live 49 - quickstart guide - v1 - alto professional - … 49 - quickstart guide... ·...
TRANSCRIPT

LIVE 49
QUICKSTART GUIDE ENGLISH ( 3 – 9 )
MANUAL DE INICIO RÁPIDO
ESPAÑOL ( 10 – 16 )
GUIDE D’UTILISATION RAPIDE FRANÇAIS ( 17 – 23 )
GUIDA RAPIDA
ITALIANO ( 24 – 30 )
KURZANLEITUNG DEUTSCH ( 31 – 37 )
SNELSTARTGIDS
NEDERLANDS ( 38 – 44 )


3
QUICKSTART GUIDE (ENGLISH)
BOX CONTENTS LIVE 49 keyboard USB cable Quickstart Guide Safety Instructions & Warranty Information booklet
CONNECTION DIAGRAM
Power-On Sequence
When connecting your LIVE keyboard to a sound system, set all the volumes to minimum then follow the correct sequence to turn all the devices on: (1) Computer or/and other MIDI device which receives MIDI data (2) LIVE keyboard, which sends out MIDI data (3) Audio devices (mixer, amplifier, speakers) When you turn off the system, follow the reverse order.
After you have connected LIVE to your computer via USB, turn the LIVE on; the computer will
find it and install the drivers automatically. You can plug and play this product on Windows XP / Vista, Windows 7 and Mac OSX systems. This product will be recognized as a ”USB Audio Device”, ”USB Sound Device” or ”LIVE”.
Before you make these connections, ensure that the keyboard is powered off and turn off
all other devices to avoid possible damage.
* Items not mentioned in BOX CONTENTS (including cables) are not included

4
TOP PANEL FEATURES
2 3
4 5
6
7 8 9
1
1110
12 1. Velocity Sensitive keys – When you play the keys on the keyboard, they will respond based on the
force you produce when striking the keys.
2. Pitch Bend wheel- Transmits MIDI Pitch Bend information to raise or lower the pitch of a note temporarily.
3. Modulation wheel- This wheel can be used to transmit continuous controller data (CC #1 or Modulation Depth).
4. Standby button- This switches and indicates the power status between Standby and Active modes.
5. Octave + - buttons- Press one of these buttons to shift the keyboard's octave range up or down.
6. Control Dial- This is used to send MIDI data.
7. Prog- This mode allows the data dial to send Program Change messages
8. Bank- This mode allows the data dial to send Bank Change messages 9. Volume- This mode allows the data dial to send MIDI volume change messages.
Note: Press the BANK and VOLUME buttons simultaneously to select velocity curve. 10. Channel- This allows the numerical keys to change the sending MIDI channel.
Note: Press the CHANNEL and SPLIT buttons simultaneously to select After-Touch curve using numerical keys on the keyboard.
11. Split- This button is used to split the keyboard into two ranges. 12. Numeric keys- These keys are used to let you select specific MIDI channels or curves.
REAR PANEL FEATURES
23 1
1. USB PORT – This is used to USB bus power the keyboard and allows you to send MIDI data.
2. MIDI Out- Connect a standard 5 pin DIN MIDI cable to send data to a MIDI module or another keyboard’s MIDI input. If you are only using the MIDI output port, you will need to use an AC adapter (not included) to the POWER IN jack in order for this to be activated.
3. Pedal jack- This switch type 1/8” TRS input is used to add sustain.

5
ADVANCED FEATURES
STANDBY
Press the STANDBY button for 2 seconds until the light turns red, the keyboard will enter Standby mode: No MIDI data will be sent when the keyboard is in Standby mode. Hold the STANDBY button again to restore normal operational status. The light will return to blue and
MIDI data can then be sent again after about 5 seconds.
OCTAVE SHIFT
You can shift the keyboard pitch in octaves by pressing the OCTAVE +/- buttons. When the octave is shifted, the relevant octave button indicator will be lit. The octave shift range is -3 to +3 in the LIVE 49. Press the two octave buttons at the same time to
reset the octave shift to 00, and the indicator will turn off. This feature is also available in Split mode. When you re-enter the octave shift mode, the further change will be based on the previous setting but it
will be reset after power off. The keyboard ranges of LIVE series are shown below:
LIVE49
LIVE88
LIVE61
PITCH BEND AND MODULATION WHEELS
Use the pitch wheel to send pitch bend messages. Move this up to raise the pitch; move this down to lower the pitch. It will return to center position automatically when you release the wheel to have no pitch bend. Use the modulation wheel to send modulation messages. The bottom position of the wheel
corresponds to no-modulation effect and the top position corresponds to Max. Modulation effect.
CONTROL DIAL
Use the dial to change and send MIDI control data. Rotate the dial clockwise to increase data and rotate counter clockwise to decrease data. The default control is set to send program change messages. It can also change other data such as Bank LSB, Bank MSB etc. Control range of the dial is 0-127 The dial cannot be used to change the MIDI channel or to select curves.
PROGRAM CHANGE
Press the PROG button and its indicator will light up. Rotate the CONTROL dial to change the program. When you re-enter the program change mode, the further change will be based on the previous
setting. This will be reset after power off.

6
BANK SELECT
Press the BANK button and its indicator will light up. Rotate the CONTROL dial to change the LSB (Least Significant Bit) of the bank.
Press the BANK button twice and its indicator will flash. Rotate the CONTROL dial to change the MSB (Most Significant Bit) of the bank.
When you re-enter the bank change mode, the further change will be based on the previous setting, including the LSB or MSB status; e.g, if you operated on MSB setting last time, press the BANK button once to enter the MSB setting automatically. This will be reset after power off.
VOLUME CONTROL
Press the VOLUME button and its indicator will light up. Rotate the CONTROL dial to change the MIDI volume. When you re-enter the volume control mode, the further change will be based on the previous setting.
This will be reset after power off.
CHANNEL CHANGE
Press the CHANNEL button and its indicator will light up. Press a numerical key on the keyboard to select a MIDI channel from 1-16. The data dial cannot be used to select the MIDI channel. The MIDI channel number in transmitted message will appear as 0-15 which is the key number (1-16)
minus 1.
SPLIT KEYBOARD
Hold down the SPLIT button and then press a key on the keyboard to set the split point. The SPLIT indicator will light up.
You can change the MIDI channel, octave, program and volume for the section of the keyboard lower than the split point (including the split point) in the same way described above. All settings higher than the split point will remain unchanged.
Press the SPLIT button again to exit the split mode. The indicator will turn off. When you re-enter the split mode, settings for the lower section will be recalled but they will be reset
after power off.
SUSTAIN PEDAL
Connect a standard momentary on/off nonlatching footswitch here. The keyboard will transmit sustain control messages when the pedal is pressed and send sustain off message when the pedal is released.
To identify polarity of the pedal simply press down the pedal and then power on the keyboard. If the pedal is the Normal-Open type, this procedure is not necessary.
7
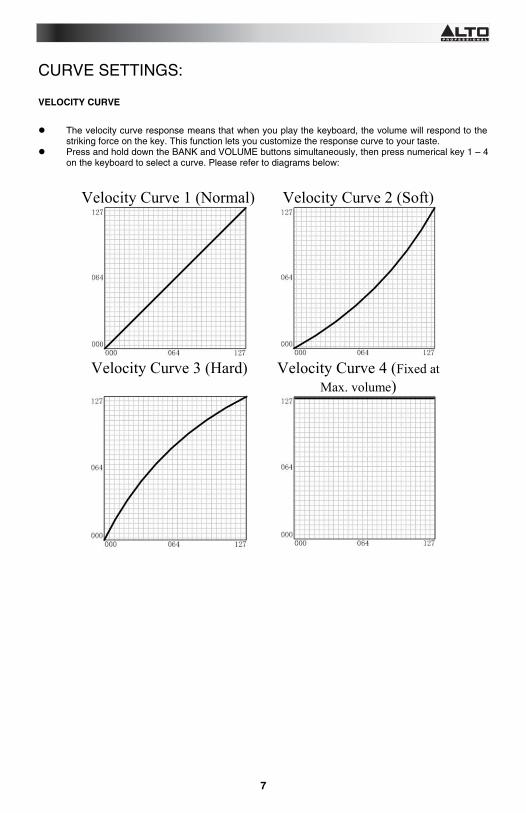
CURVE SETTINGS:
VELOCITY CURVE
The velocity curve response means that when you play the keyboard, the volume will respond to the striking force on the key. This function lets you customize the response curve to your taste.
Press and hold down the BANK and VOLUME buttons simultaneously, then press numerical key 1 – 4 on the keyboard to select a curve. Please refer to diagrams below:
Velocity Curve 1 (Normal) Velocity Curve 2 (Soft)
Velocity Curve 3 (Hard) Velocity Curve 4 (Fixed at
Max. volume)
8
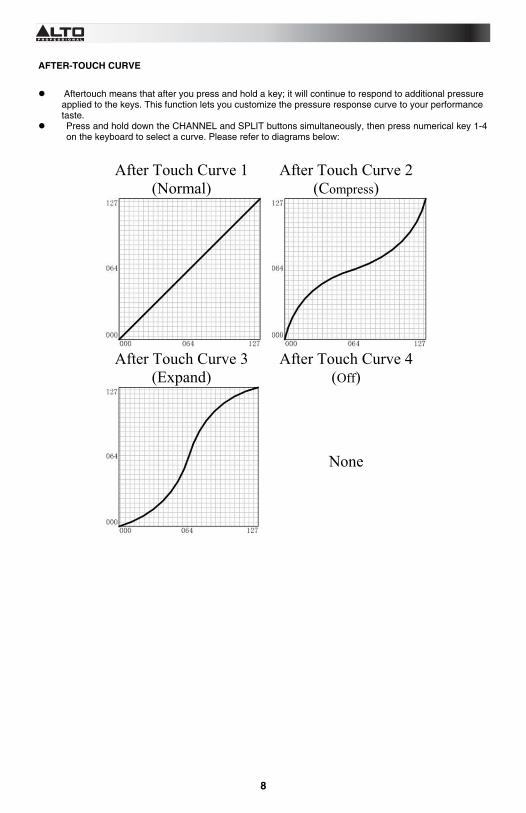
AFTER-TOUCH CURVE
Aftertouch means that after you press and hold a key; it will continue to respond to additional pressure applied to the keys. This function lets you customize the pressure response curve to your performance taste.
Press and hold down the CHANNEL and SPLIT buttons simultaneously, then press numerical key 1-4 on the keyboard to select a curve. Please refer to diagrams below:
After Touch Curve 1
(Normal) After Touch Curve 2
(Compress)
After Touch Curve 3
(Expand) After Touch Curve 4
(Off)
None

9
TROUBLESHOOTING
Common symptoms with possible causes and solutions
After turning on the power switch, the LIVE is not powered on:
1. Make sure the USB connection is made and the computer
is on.
2. Make sure the power connector is firmly connected to the
power outlet.
3. Faulty USB cable. Try another USB cable or different USB
port (rear port on the computer if possible)
No sound when playing LIVE:
1. Check the volume settings of your sound module and
speaker system. Move the Assignable Slider on LIVE to
the right most postion.
2. Check the MIDI connection and the audio cables on your
sound module/ computer soundcard.
3. Make sure you have the right settings in your music
software.
Continuous long sound:
1. Check Sustain Pedal and polarity.
Incorrect voice:
1. Your sound module or software is not set properly.
Initialize or restart recording software.
Wrong pitch:
1. Adjust the Octave function of the keyboard.
2. MIDI pitch is tuned in your software/sound module. Adjust
fine tuning or coarse tuning.
3. Pitch bend message not returned to default, please reset.
Some functions do not work:
1. Check to make sure your split point is assigned correctly.
2. Make sure your software lets you play on multiple
channels. Also, make sure both the keyboard’s and
software’s channels are assigned correctly.

10
GUÍA DE INICIO RÁPIDO (ESPAÑOL)
CONTENIDO DE LA CAJA Teclado Live Cable USB Guía de inicio rápido Folleto de instrucciones de seguridad e información sobre la garantía
DIAGRAMA DE CONEXIÓN
Secuencia de encendido
Cuando conecte su teclado LIVE a un sistema de sonido, ajuste todos los volúmenes al mínimo y siga la secuencia correcta para encender todos los dispositivos: (1) Computadora y/u otro dispositivo MIDI que recibe datos MIDI (2) Teclado LIVE que envía datos MIDI (3) Dispositivos de audio (mezclador, amplificador y altavoces) Cuando apague el sistema, realice la secuencia en orden inverso.
Después de colectar el LIVE a su computadora por USB, encienda el teclado LIVE; la
computadora lo encontrará e instalará automáticamente los drivers. Puede enchufar y utilizar este producto en sistemas Windows XP / Vista, Windows 7 y Mac
OSX. Este producto será reconocido como ”USB Audio Device” (Dispositivo de audio USB), ”USB
Sound Device” (Dispositivo de sonido USB) o ”LIVE”.
Antes de realizar estas conexiones, asegúrese de que el teclado esté apagado y apague
todos los demás dispositivos para evitar posibles daños.
* Los elementos que no se mencionan en CONTENIDO DE LA CAJA (incluso los cables)
no están incluidos

11
CARACTERÍSTICAS DEL PANEL SUPERIOR DE LIVE49
2 3
4 5
6
7 8 9
1
1110
12
1. Teclas sensibles a la velocidad – Cuando usted toca las teclas del teclado, las mismas responden en función de la fuerza que aplica al tocarlas.
2. Rueda de inflexión de pitch- Transmite la información de inflexión de pitch MIDI para elevar o bajar temporalmente el pitch de una nota.
3. Rueda de modulación- Esta rueda se puede usar para transmitir datos continuos del controlador (CC #1 o profundidad de modulación).
4. Botón de modo de espera- Este botón se usa para conmutar e indicar el estado de activación entre los modos Standby (Espera) y Active (Activo).
5. Botones de + - octava- Pulse uno de estos botones para desplazar la gama de octavas del teclado hacia arriba o abajo.
6. Cuadrante de control- Se utiliza para enviar datos MIDI.
7. Programa- Este modo permite al cuadrante de datos enviar mensajes de cambio de programa.
8. Banco- Este modo permite al cuadrante de datos enviar mensajes de cambio de banco. 9. Volumen- Este modo permite al cuadrante de datos enviar mensajes MIDI de cambio de volumen.
Nota: Pulse simultáneamente los botones BANK (Banco) y VOLUME (Volumen) para seleccionar la curva de velocidad.
10. Canal- Este botón permite cambiar el canal MIDI de envío usando las teclas numéricas. Nota: Pulse simultáneamente los botones CHANNEL (Canal) y SPLIT (División) para seleccionar la curva de post-pulsación usando las teclas numéricas del teclado.
11. División- Este botón se usa para dividir el teclado en dos gamas. 12. Teclas numéricas- Estas teclas se usan para permitirle seleccionar canales MIDI o curvas
específicas.

12
CARACTERÍSTICAS DEL PANEL TRASERO
23 1
1. PUERTO USB – Se usa para alimentar el teclado por el bus USB y le permite enviar datos MIDI.
2. Salida MIDI- Conecte aquí un cable MIDI estándar de 5 pines para enviar datos a un módulo MIDI o a la entrada MIDI de otro teclado. Si va a utilizar sólo el puerto de salida MIDI, debe usar un adaptador de CA (no incluido) en el conector POWER IN (Entrada de alimentación) a fin de activarlo.
3. Conector para pedal- Esta entrada TRS de 1/8” tipo interruptor se utiliza para agregar sostenido.
CARACTERÍSTICAS AVANZADAS DE LIVE49
MODO DE ESPERA
Pulse el botón STANDBY (Modo de espera) durante 2 segundos hasta que la luz se ponga roja indicando que el teclado entra al modo de espera: Cuando el teclado está en modo de espera, no se envía ningún dato MIDI. Mantenga pulsado el botón STANDBY otra vez para restablecer el estado operacional. La luz vuelve
al color azul y se pueden enviar nuevamente datos MIDI después de unos 5 segundos.
DESPLAZAMIENTO DE OCTAVA
Es posible desplazar el pitch del teclado en octavas pulsando los botones OCTAVE +/-. Cuando se desplaza la octava, se enciende el indicador del botón de la octava relacionada. La gama de desplazamiento de octava es -3 a +3 en el LIVE 49. Pulse los dos botones de octava a la
vez para reiniciar el desplazamiento de octava a 00. El indicador se apaga. Esta característica está disponible también en modo Split (División). Cuando reingrese al modo de desplazamiento de octava, el cambio subsiguiente se basa en el valor
anterior del parámetro pero se reinicia después del apagado. Se muestran a continuación las gamas de teclado de la serie LIVE:
LIVE49
LIVE88
LIVE61
RUEDAS DE INFLEXIÓN DE PITCH Y MODULACIÓN Use la rueda de pitch para enviar mensajes de inflexión de pitch. Muévala hacia arriba para elevar el
pitch y hacia abajo para disminuirlo. Vuelve automáticamente a la posición central cuando libera la rueda para no tener inflexión de pitch. Use la rueda de modulación para enviar mensajes de modulación. La posición inferior de la rueda
corresponde al efecto de modulación cero y el superior al efecto de modulación máxima.

13
CUADRANTE DE CONTROL Use el cuadrante para cambiar y enviar datos de control MIDI. Gire el cuadrante en sentido horario
para aumentar los datos y en sentido antihorario para disminuirlos. El control predeterminado está ajustado para enviar mensajes de cambio de programa. También pueden cambiarse datos como LSB del banco, MSB del banco, etc. El rango de control del cuadrante es 0-127 El cuadrante no se puede usar para cambiar el canal MIDI o para seleccionar curvas.
CAMBIO DE PROGRAMA
Pulse el botón PROG. Se enciende su indicador. Gire el cuadrante de CONTROL para cambiar el programa. Cuando reingrese al modo de cambio de programa, el cambio subsiguiente se basa en el valor
anterior del parámetro. Se reinicia después del apagado. SELECCIÓN DE BANCO
Pulse el botón BANK. Se enciende su indicador. Gire el cuadrante de CONTROL para cambiar el LSB (bit menos significativo) del banco.
Pulse el botón BANK dos veces. Destella su indicador. Gire el cuadrante de CONTROL para cambiar el MSB (bit más significativo) del banco.
Cuando reingrese al modo de cambio de banco, el cambio subsiguiente se basa en el valor anterior del parámetro, incluido el estado del LSB o MSB, por ejemplo, si operó sobre el MSB la última vez, pulse el botón BANK una vez para ingresar automáticamente el valor del MSB. Se reinicia después del apagado.
CONTROL DE VOLUMEN
Pulse el botón VOLUME. Se enciende su indicador. Gire el cuadrante de CONTROL para cambiar el volumen MIDI. Cuando reingrese al modo de control de volumen, el cambio subsiguiente se basa en el valor anterior
del parámetro. Se reinicia después del apagado. CAMBIO DE CANAL
Pulse el botón CHANNEL. Se enciende su indicador. Pulse una tecla numérica del teclado para seleccionar un canal MIDI de 1 a 16. El cuadrante de datos no se puede usar para seleccionar el canal MIDI. El número del canal MIDI del mensaje transmitido aparece como 0-15 que es el número de tecla (1-
16) menos 1. DIVISIÓN DEL TECLADO
Mantenga pulsado el botón SPLIT (División) y pulse una tecla del teclado para fijar el punto de división. Se enciende el indicador SPLIT.
Puede cambiar el canal MIDI, la octava, el canal, el programa y el volumen de la sección del teclado inferior al punto de división (incluido este punto de división) de la misma manera indicada precedentemente. Todos los ajustes de la parte superior al punto de división permanecen inalterados.
Pulse el botón SPLIT otra vez para salir del modo de división. El indicador se apaga. Cuando reingrese al modo de división, se recuperan los ajustes de la sección inferior pero se reinician
después del apagado. PEDAL DE SOSTENIDO
Conecte aquí un interruptor de pedal sí/no momentáneo sin enganche estándar. El teclado transmite los mensajes de control de sostenido cuando se presiona el pedal y envía el mensaje de desactivación del sostenido cuando se suelta el pedal.
Para identificar la polaridad del pedal, simplemente presiónelo y luego encienda el teclado. Si el pedal es de tipo normalmente abierto, este procedimiento no es necesario.
14
VALORES DE PARÁMETROS DE LAS CURVAS DE LIVE49:
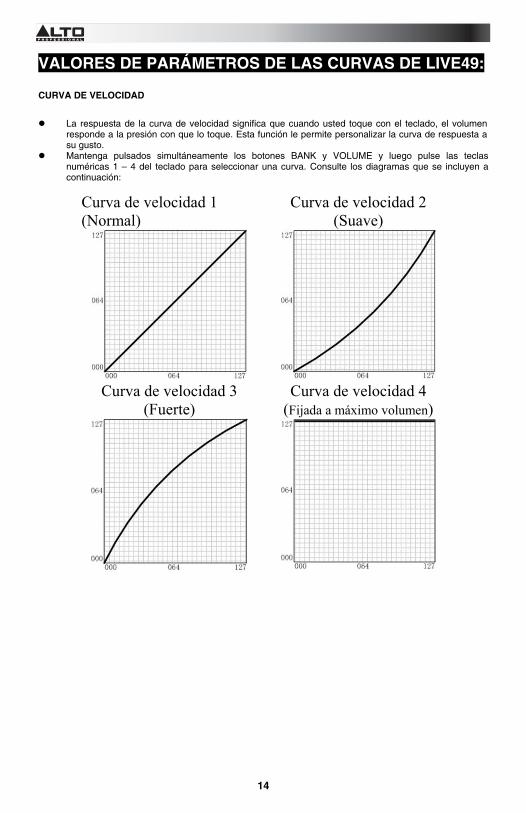
CURVA DE VELOCIDAD
La respuesta de la curva de velocidad significa que cuando usted toque con el teclado, el volumen responde a la presión con que lo toque. Esta función le permite personalizar la curva de respuesta a su gusto.
Mantenga pulsados simultáneamente los botones BANK y VOLUME y luego pulse las teclas numéricas 1 – 4 del teclado para seleccionar una curva. Consulte los diagramas que se incluyen a continuación:
Curva de velocidad 1 (Normal)
Curva de velocidad 2 (Suave)
Curva de velocidad 3
(Fuerte) Curva de velocidad 4
(Fijada a máximo volumen)
15
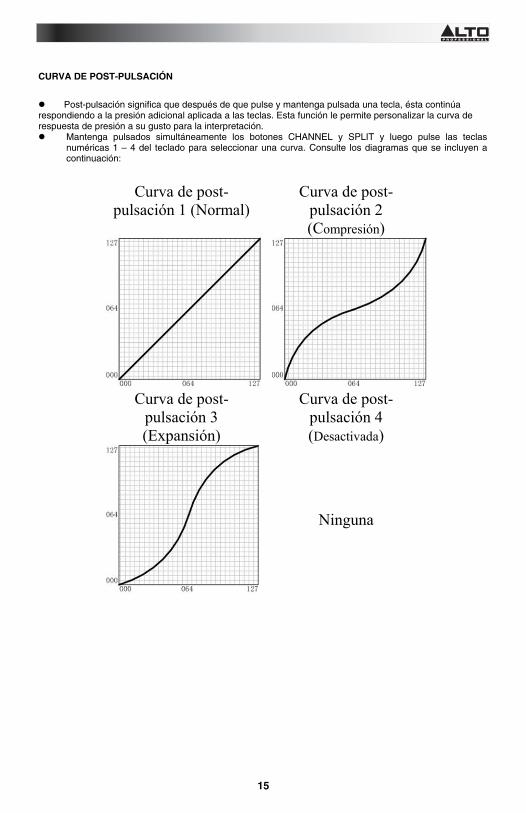
CURVA DE POST-PULSACIÓN
Post-pulsación significa que después de que pulse y mantenga pulsada una tecla, ésta continúa respondiendo a la presión adicional aplicada a las teclas. Esta función le permite personalizar la curva de respuesta de presión a su gusto para la interpretación.
Mantenga pulsados simultáneamente los botones CHANNEL y SPLIT y luego pulse las teclas numéricas 1 – 4 del teclado para seleccionar una curva. Consulte los diagramas que se incluyen a continuación:
Curva de post-
pulsación 1 (Normal) Curva de post-
pulsación 2 (Compresión)
Curva de post-
pulsación 3 (Expansión)
Curva de post-pulsación 4 (Desactivada)
Ninguna

16
SOLUCIÓN DE PROBLEMAS
Síntomas comunes con causas posibles y soluciones
Después de conectar el interruptor de encendido, el LIVE no se enciende:
1. Asegúrese de que esté realizada la conexión USB y que la
computadora esté encendida.
2. Asegúrese de que el conector de alimentación esté conectado
firmemente al tomacorriente.
3. Cable USB defectuoso. Pruebe con otro cable USB defectuoso o
un puerto USB diferente (el puerto trasero de la computadora, si
es posible).
No hay sonido cuando se toca LIVE:
1. Compruebe los ajustes de volumen de su módulo de sonido y su
sistema de altavoces. Mueva el cursor asignable de LIVE a la
posición del extremo derecho.
2. Compruebe la conexión MIDI y los cables de audio de su módulo
de sonido / tarjeta de sonido de la computadora.
3. Asegúrese de que tenga ajustados los valores de parámetros
correctos en su software musical.
Sonido largo continuo:
1. Compruebe el pedal de sostenido y la polaridad.
Voz incorrecta:
1. Su módulo o software de sonido no están ajustados
correctamente. Inicialice o reinicie el software de grabación.
Pitch incorrecto:
1. Ajuste la función de octavas del teclado.
2. El pitch MIDI está afinado para su software/módulo de sonido.
Ajuste el afinado fino o grueso.
3. El mensaje de inflexión de pitch no vuelve al valor
predeterminado. Reinícielo.
Algunas funciones no funcionan:
1. Compruebe que el punto de división esté asignado
correctamente.
2. Asegúrese de que su software le permita tocar por varios
canales. Asimismo, asegúrese de que tanto los canales del
teclado como los del software estén asignados correctamente.

17
GUIDE D’UTILISATION SIMPLIFIÉ (FRANÇAIS)
CONTENU DE LA BOÎTE Clavier LIVE Câble USB Guide d’utilisation simplifié Consignes de sécurité et informations concernant la garantie
SCHÉMA DE CONNEXION
Mise en marche
Lorsque vous connectez votre clavier LIVE à un système de sonorisation, réglez tous les volumes au minimum, puis suivez l’ordre de mise en marche ci-dessous de tous les périphériques : (1) Ordinateur et/ou autre périphérique qui reçoit des données MIDI (2) Clavier LIVE, qui envoie des données MIDI (3) Les périphériques audio (table de mixage, amplificateur, haut-parleurs) Pour éteindre, toujours inversez l'opération.
Une fois LIVE branché à votre ordinateur via USB, allumez le clavier LIVE; l'ordinateur le
reconnaîtra et installera automatiquement les pilotes. Ce produit est prêt à utiliser sous Windows XP / Vista, Windows 7 et Mac OSX.
Ce produit sera reconnu comme « Périphérique audio USB » ou « LIVE ».»
Avant d'effectuer ces connexions, assurez-vous que le clavier est hors tension et
éteignez tous les autres appareils pour éviter d'éventuels dommages.
* Les items non mentionnés dans la section CONTENU DE LA BOÎTE (incluant les câbles) ne sont pas inclus.

18
CARACTÉRISTIQUES DU PANNEAU SUPÉRIEUR DU LIVE49
2 3
4 5
6
7 8 9
1
1110
12 1. Touches sensibles à la dynamique - Lorsque vous jouez sur les touches du clavier, ils vont répondre
en fonction de la force de la frappe.
2. Molette de modulation de la hauteur tonale – Cette molette permet d’envoyer des données MIDI concernant l’augmentation ou la réduction temporaire de la vitesse de lecture.
3. Molette de modulation – Cette molette peut être utilisée pour transmettre des données de contrôleur en continu (CC no. 1 ou Modulation Depth).
4. Touche de veille – Ce commutateur permet de basculer entre les modes veille et actif et d’indique le statut.
5. Touches OCTAVE -/+ – Ces touches vous permettent d'augmenter ou de diminuer la plage d'octaves du clavier.
6. Molette de commande – Cette molette permet d’envoyer des données MIDI.
7. Prog – Ce mode permet à la molette de commande d'envoyer des messages de changement de programme.
8. Bank – Ce mode permet à la molette des données d'envoyer des messages de changement de mémoire (Bank).
9. Volume – Ce mode permet à la molette des données d'envoyer des messages de changement de volume. Remarque : Enfoncez simultanément les touches BANK et VOLUME afin de sélectionner la réponse à la dynamique.
10. Channel – Ceci permet les touches numériques de changer le canal sur lequel les données MIDI sont envoyées. Remarque : Appuyez sur les touches CHANNEL et SPLIT simultanément pour sélectionner la courbe d’Aprèstouch en utilisant les touches numériques du clavier.
11. Split – Cette touche est utilisée pour diviser le clavier en deux gammes. 12. Touches numériques – Ces touches sont utilisées afin de sélectionner des canaux MIDI ou courbes
spécifiques.

19
CARACTÉRISTIQUES DU PANNEAU ARRIÈRE
23 1
1. Port USB – Ce port est utilisé pour l'alimentation du bus USB du clavier et vous permet d’envoyer des
données MIDI.
2. Sortie MIDI – Branchez un câble DIN MIDI standard à 5 broches pour envoyer des données à un module MIDI ou une autre entrée MIDI du clavier. Si vous utilisez uniquement le port de sortie MIDI, vous devrez brancher un adaptateur CA (non inclus) à l’entrée d’alimentation pour que ce soit activée.
3. Entrée pédale – Cette entrée TRS 1/8 po de type commutateur permet d’ajouter une pédale de maintien (sustain).
CARACTÉRISTIQUES DES FONCTIONS ÉVOLUÉES DU LIVE49
TOUCHE STANDBY
Appuyez sur la touche STANDBY pendant 2 secondes jusqu’à`ce que la lumière devienne rouge et le clavier entrera en mode veille. mode : Aucune donnée MIDI ne sera envoyée lorsque le clavier est en mode veille (Standby). Enfonce de nouveau la touche STANDBY pour rétablir l'état de fonctionnement normal. La lumière
sera de nouveau bleu et les données MIDI pourront être envoyées après environs 5 secondes. DÉCALAGE D’OCTAVE Vous pouvez décaler la hauteur tonale du clavier par octaves en appuyant sur les touches OCTAVE
+/- . Lorsque l'octave est décalée, l'indicateur de la touche correspondante sera allumé. Les gammes d’octaves sont de -3 à +3 octaves pour le LIVE49. Appuyez sur les deux touches OCTAVE simultanément afin de remettre le clavier à l’octave du milieu par défaut et d’éteindre l’indicateur. Cette fonction est également disponible en mode Split. Lorsque vous retournez dans en mode de modification de l'octave, la modification sera fondée sur le
réglage précédent, mais il sera remis à zéro après la mise hors tension. Les gammes du clavier de la série LIVE sont indiquées ci-dessous :
LIVE49
LIVE88
LIVE61
MOLETTE DE TONALITÉ ET DE MODULATION • Utilisez la molette de tonalité (PITCH) afin d’envoyer des messages de changement de tonalité (pitch
bend). Déplacez-la vers le haut pour élever la tonalité, déplacez-la vers le bas pour baisser la tonalité. • Lorsque vous la relâchez, elle revient automatiquement à la position centrale, sans modification de la
tonalité. • Utilisez la molette pour envoyer des messages de modulation. La position du bas de la molette ne
correspond à aucune modulation d'effet et la position du haut correspond à l'effet de modulation maximale.

20
.
MOLETTE DE COMMANDE
Utilisez la molette pour changer et envoyer des données de contrôle MIDI. Tournez la molette dans le sens horaire pour augmenter les données et faire tourner dans le sens antihoraire pour diminuer de données. La commande par défaut est réglée pour envoyer les messages de modification de programme. Il peut également modifier d'autres données telles que Bank LSB, Bank MSB, etc. Plage de contrôle de la molette est 0 à 127. La molette ne peut pas être utilisée pour changer le canal MIDI ou pour sélectionner les courbes.
CHANGEMENT DE PROGRAMME
Appuyez sur le bouton PROG et son indicateur s'allumera. Tournez la molette de commande afin de changer le programme. Lorsque vous retournez en mode de changement de programme, la modification sera fondée sur le
réglage précédent, mais il sera remis à zéro après la mise hors tension.
SÉLECTION DE LA BANQUE DE MÉMOIRE
Appuyez sur le bouton BANK et son indicateur s'allumera. Tournez la molette de commande afin de modifier le LSB (Least Significant Bit - Bit le moins significatif) de la banque mémoire.
Appuyez sur le bouton BANK à deux reprises et son indicateur clignotera. Tournez la molette de commande afin de modifier le MSB (Most Significant Bit - Bit le plus significatif) de la banque mémoire.
Lorsque vous retournez en mode de changement de banque de mémoire, la modification sera fondée sur le réglage précédent, incluant l’état LSB ou MSB, p. ex., si vous avez utilisé le réglage MSB la dernière fois, appuyez une fois sur la touche BANK afin d’utiliser ce réglage automatiquement. Il sera réinitialisé après la mise hors tension.
COMMANDE DU VOLUME
Appuyez sur le bouton VOLUME et son indicateur s'allumera. Tournez la molette de commande afin de modifier le volume MIDI. Lorsque vous retournez dans en mode de commande du volume, la modification sera fondée sur le
réglage précédent. Il sera réinitialisé après la mise hors tension.
CHANGEMENT DE CANAL
Appuyez sur le bouton CHANNEL et son indicateur s'allumera. Utilisez les touches numériques du clavier afin d'entrer le numéro de canal MIDI désiré (1 à 16). La molette ne peut pas être utilisée pour changer le canal MIDI. Le numéro de canal MIDI dans un message transmis apparaîtra comme 0-15, qui représente le
numéro de touche (1 à 16) moins 1.
DIVISION DU CLAVIER
Appuyez sur la touche SPLIT et sur une touche qui deviendra le point de séparation du clavier. L’indicateur SPLIT devrait s’allumer.
Vous pouvez changer le canal MIDI, l'octave, le programme et le volume de la section du clavier inférieur au point de division (y compris le point de division) de la même manière décrite ci-dessus. Tous les réglages plus élevés que le point de division resteront inchangés.
Quittez le mode division en appuyant à nouveau sur la touche SPLIT. L’indicateur devrait s’éteindre. Lorsque vous retournez en mode de clavier divisé, les paramètres de la partie inférieure seront
rappelés, mais ils seront remis à zéro après la mise hors tension.
PÉDALE DE MAINTIEN (SUSTAIN)
Branchez un commutateur pied (pédale momentanée) ici. Le clavier transmettra des messages de commande de maintien activé lorsque la pédale est enfoncée et enverra un message de maintien désactivé lorsque la pédale est relâchée.
Pour identifier la polarité de la pédale, il suffit d'appuyer sur la pédale puis d’allumer le clavier. Si la pédale est le type normalement ouvert, cette procédure n'est pas nécessaire.
21
PARAMÈTRES DE COURBE DU LIVE49
RÉPONSE À LA DYNAMIQUE
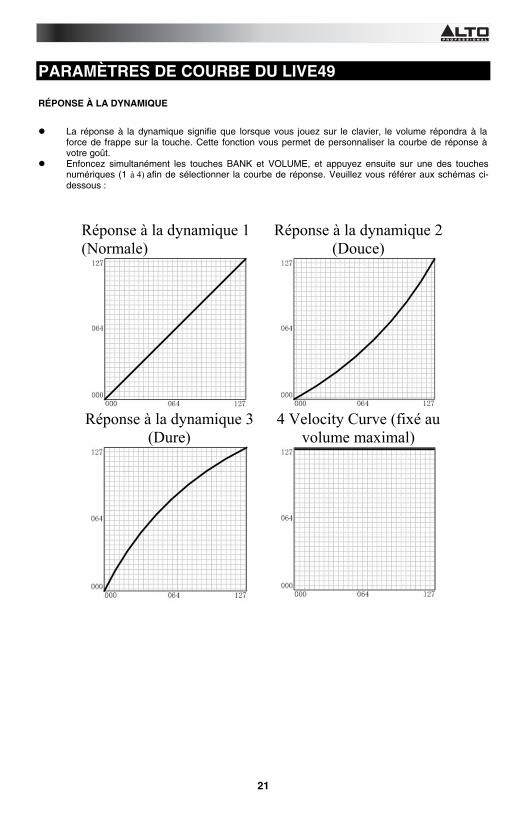
La réponse à la dynamique signifie que lorsque vous jouez sur le clavier, le volume répondra à la force de frappe sur la touche. Cette fonction vous permet de personnaliser la courbe de réponse à votre goût.
Enfoncez simultanément les touches BANK et VOLUME, et appuyez ensuite sur une des touches numériques (1 à 4) afin de sélectionner la courbe de réponse. Veuillez vous référer aux schémas ci-dessous :
Réponse à la dynamique 1 (Normale)
Réponse à la dynamique 2 (Douce)
Réponse à la dynamique 3
(Dure) 4 Velocity Curve (fixé au
volume maximal)

22
COURBE AFTER-TOUCH
Aftertouch signifie que lorsque vous appuyez et maintenez une touche, il continuera de répondre à une pression supplémentaire sur les touches. Cette fonction vous permet de personnaliser la courbe de réponse à la pression selon votre goût.
Enfoncez simultanément les touches CHANNEL et SPLIT, et appuyez ensuite sur une des touches numériques (1 à 4) afin de sélectionner la courbe de réponse. Veuillez vous référer aux schémas ci-dessous :
Courbe After-touch 1
(Normale) Courbe after-touch 2
(Comprimée)
Courbe after-touch 3
(Étendue) Courbe after-touch 4
(Désactivée)
Aucune

23
GUIDE DE DÉPANNAGE
Les symptômes communs avec les causes et solutions possibles
Après avoir l'avoir mis sous tension, le LIVE ne fonctionne pas :
1. Veuillez vous assurer que la connexion USB est correctement
effectuée et que l’ordinateur est en marche.
2. Veuillez vous assurer que le câble d’alimentation est
correctement branché à une prise secteur.
3. Câble USB défectueux. Essayez un autre câble USB ou un autre
port USB (port arrière sur l'ordinateur, si possible)
Le LIVE ne produit pas de son :
1. Vérifiez les paramètres du volume de votre module audio et de
système de sonorisation. Déplacez le curseur programmable sur
le LIVE à l'extrême droite.
2. Vérifiez la connexion MIDI et les câbles audio sur votre module
audio ou la carte son de votre ordinateur.
3. Assurez-vous d'avoir les bons réglages dans votre logiciel de
musique.
Son long en continu :
1. Vérifiez la pédale de maintien et la polarité.
Voix incorrecte :
1. Votre module audio ou logiciel n'est pas configuré correctement.
Initialisez ou redémarrez le logiciel d'enregistrement.
Mauvaise tonalité :
1. Régler la fonction Octave du clavier.
2. La tonalité MIDI doit être configurée dans votre logiciel/module
audio. Procédez au réglage d'accord fin ou au réglage d'accord
approximatif.
3. Message de variation tonale (pitch bend) n’est pas retourné au
paramètre par défaut, s'il vous plaît réinitialiser.
Certaines fonctions ne fonctionnent pas :
1. Assurez-vous que votre point de division est affecté correctement.
2. Assurez-vous que votre logiciel vous permet de jouer sur
plusieurs canaux. Assurez-vous également que les canaux du
clavier et du logiciel sont correctement affectés.
24
GUIDA RAPIDA (ITALIANO)
CONTENUTI DELLA CONFEZIONE Tastiera live Cavo USB Guida rapida Istruzioni di sicurezza e garanzia
SCHEMA DEI COLLEGAMENTI
Sequenza di accensione
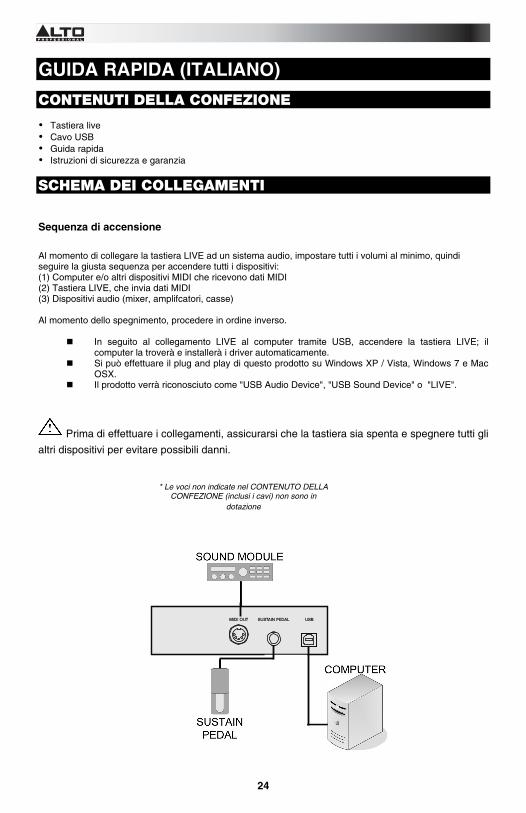
Al momento di collegare la tastiera LIVE ad un sistema audio, impostare tutti i volumi al minimo, quindi seguire la giusta sequenza per accendere tutti i dispositivi: (1) Computer e/o altri dispositivi MIDI che ricevono dati MIDI (2) Tastiera LIVE, che invia dati MIDI (3) Dispositivi audio (mixer, amplifcatori, casse) Al momento dello spegnimento, procedere in ordine inverso.
In seguito al collegamento LIVE al computer tramite USB, accendere la tastiera LIVE; il
computer la troverà e installerà i driver automaticamente. Si può effettuare il plug and play di questo prodotto su Windows XP / Vista, Windows 7 e Mac
OSX. Il prodotto verrà riconosciuto come "USB Audio Device", "USB Sound Device" o "LIVE".
Prima di effettuare i collegamenti, assicurarsi che la tastiera sia spenta e spegnere tutti gli
altri dispositivi per evitare possibili danni.
* Le voci non indicate nel CONTENUTO DELLA CONFEZIONE (inclusi i cavi) non sono in
dotazione

25
CARATTERISTICHE DEL PANNELLO SUPERIORE DI LIVE49
2 3
4 5
6
7 8 9
1
1110
12 1. Tasti sensibili alla velocità - Quando si premono i tasti sulla tastiera, questi rispondono in base alla
forza con la quale vengono battuti i tasti stessi.
2. Rotella di bend del pitch - Trasmette informazioni di bend del pitch MIDI per alzare o abbassare temporaneamente il pitch di una nota.
3. MODULATION WHEEL (rotella di modulazione) - Questa rotella può essere utilizzata per trasmettere dati continui del controller (CC #1 o Modulation Depth).
4. Tasto Standby - Questo commuta e indica lo stato di alimentazione tra le modalità Standby e Active.
5. Tasti ottave + - - Premere uno di questi pulsanti per spostare la gamma di ottave della tastiera verso l'alto o verso il basso.
6. manopola di controllo - Viene utilizzata per inviare dati MIDI.
7. Prog - Questa modalità consente alla manopola dati di inviare messaggi Program Change
8. Bank - Questa modalità consente alla manopola dati di inviare messaggi Bank Change 9. Volume - Questa modalità consente alla manopola dati di inviare messaggi di cambiamento del
volume MIDI Nota bene: premere contemporaneamente i tasti BANK e VOLUME per selezionare la curva di velocità.
10. Canale - Questo comando consente ai tasti numerici di cambiare il canale di invio MIDI. Nota bene: premere contemporaneamente i tasti CHANNEL e SPLIT per selezionare la curva After-Touch servendosi dei tasti numerici della tastiera.
11. Split - Questo tasto serve a dividere la tastiera in due gamme. 12. Tasti numerici - Questi tasti servono per selezionare canali o curve MIDI specifici.
26
CARATTERISTICHE PANNELLO POSTERIORE
23 1
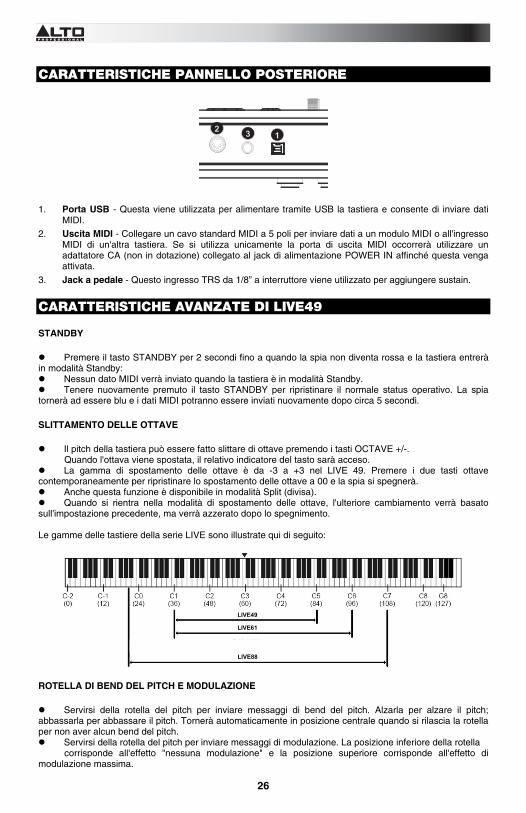
1. Porta USB - Questa viene utilizzata per alimentare tramite USB la tastiera e consente di inviare dati
MIDI.
2. Uscita MIDI - Collegare un cavo standard MIDI a 5 poli per inviare dati a un modulo MIDI o all'ingresso MIDI di un'altra tastiera. Se si utilizza unicamente la porta di uscita MIDI occorrerà utilizzare un adattatore CA (non in dotazione) collegato al jack di alimentazione POWER IN affinché questa venga attivata.
3. Jack a pedale - Questo ingresso TRS da 1/8” a interruttore viene utilizzato per aggiungere sustain.
CARATTERISTICHE AVANZATE DI LIVE49
STANDBY
Premere il tasto STANDBY per 2 secondi fino a quando la spia non diventa rossa e la tastiera entrerà in modalità Standby: Nessun dato MIDI verrà inviato quando la tastiera è in modalità Standby. Tenere nuovamente premuto il tasto STANDBY per ripristinare il normale status operativo. La spia
tornerà ad essere blu e i dati MIDI potranno essere inviati nuovamente dopo circa 5 secondi.
SLITTAMENTO DELLE OTTAVE
Il pitch della tastiera può essere fatto slittare di ottave premendo i tasti OCTAVE +/-. Quando l'ottava viene spostata, il relativo indicatore del tasto sarà acceso. La gamma di spostamento delle ottave è da -3 a +3 nel LIVE 49. Premere i due tasti ottave
contemporaneamente per ripristinare lo spostamento delle ottave a 00 e la spia si spegnerà. Anche questa funzione è disponibile in modalità Split (divisa). Quando si rientra nella modalità di spostamento delle ottave, l'ulteriore cambiamento verrà basato
sull'impostazione precedente, ma verrà azzerato dopo lo spegnimento. Le gamme delle tastiere della serie LIVE sono illustrate qui di seguito:
LIVE49
LIVE88
LIVE61
ROTELLA DI BEND DEL PITCH E MODULAZIONE
Servirsi della rotella del pitch per inviare messaggi di bend del pitch. Alzarla per alzare il pitch; abbassarla per abbassare il pitch. Tornerà automaticamente in posizione centrale quando si rilascia la rotella per non aver alcun bend del pitch. Servirsi della rotella del pitch per inviare messaggi di modulazione. La posizione inferiore della rotella
corrisponde all'effetto "nessuna modulazione" e la posizione superiore corrisponde all'effetto di modulazione massima.

27
MANOPOLA DI CONTROLLO
Servirsi della manopola per cambiare e inviare i dati di controllo MIDI. Ruotare la manopola in senso orario per aumentare i dati e in senso antiorario per farli diminuire. Il programma predefinito è impostato per imviare messaggi di cambiamento di programma. Può anche cambiare altri dati quali LSB, MSB del banco ecc. La gamma di controllo della manopola è 0-127 La manopola non può essere utilizzata per cambiare canale MIDI o per selezionare curve.
MODIFICA PROGRAMMA
Premere il tasto PROG: la spia si accende. Ruotare la manopola CONTROL per cambiare il programma. Quando si entra nuovamente in modalità di cambiamento di programma, l'ulteriore cambiamento sarà
basato sull'impostazione precedente. Verrà azzerato dopo lo spegnimento.
SELEZIONE BANCO
Premere il tasto BANK: la spia si accende. Ruotare la manopola CONTROL per cambiare l'LSB (byte meno significativo) del banco.
Premere due volte il tasto BANK: la spia lampeggia. Ruotare la manopola CONTROL per cambiare l'MSB (byte più significativo) del banco.
Quando si entra nuovamente in modalità di cambiamento di banco, l'ulteriore cambiamento sarà basato sull'impostazione precedente, incluso lo status di LSB o MSB; ad es., se l'ultima volta si è lavorato sull'MSB, premere il tasto BANK una volta per inserire automaticamente l'impostazione dell'MSB. Verrà azzerato dopo lo spegnimento.
COMANDO DI REGOLAZIONE DEL VOLUME
Premere il tasto VOLUME: la spia si accende. Ruotare la manopola CONTROL per cambiare il volume MIDI. Quando si entra nuovamente in modalità di regolazione del volumea, l'ulteriore cambiamento sarà
basato sull'impostazione precedente. Verrà azzerato dopo lo spegnimento.
CAMBIAMENTO DI CANALE
Premere il tasto CHANNEL: la spia si accende. Premere un tasto numerico della tastiera per selezionare un canale MIDI da 1 a 16. La manopola dati non può essere utilizzata per selezionare il canale MIDI. Il numero del canale MIDI nel messaggio trasmesso compare come 0-15, che è il numero del tasto (1-
16) meno 1.
TASTIERA SUDDIVISA
Tenere premuto il tasto SPLIT e premere un tasto sulla tastiera per impostare il punto di divisione. La spia SPLIT si accende.
Si possono cambiare canale MIDI, ottava, programma e volumeper la sezione della tastiera più in basso del punto di suddivisione (incluso il punto di suddivisione stesso) nello stesso modo descritto in precedenza. Tutte le configurazioni superiori al punto di divisione rimarranno invariate.
Premere nuovamente il tasto SPLIT per uscire dalla modalità di divisione. La spia si spegne Quando si entra nuovamente in modalità di divisione, le configurazioni della sezione inferiore saranno
richiamate, ma saranno azzerate dopo lo spegnimento.
PEDALE SUSTAIN
Collegare a questo livello un interruttore a pedali standard di on/off momentaneo (non di blocco). La tastiera trasmetterà messaggi di controllo del sustain quando il pedale viene premuto e invierà messaggi sustain off quando il pedale viene rilasciato.
Per identificare la polarità del pedale, premere il pedale e accendere la tastiera. Se il pedale è di tipo Normal-Open, questa procedura non è necessaria.

28
CONFIGURAZIONI DI CURVA DI LIVE49
CURVA DI VELOCITÀ
La risposta della curva di velocità significa che quando si suona la tastiera, il volume risponderà alla forza di pressione dei tasti. Questa funzione consente di personalizzare la curva di risposta a piacere.
Tenere premuti contemporaneamente i tasti BANK e VOLUME, quindi premere i tasti numerici da 1 a 4 sulla tastiera per selezionare una curva. Fare riferimento agli schemi seguenti:
Curva di velocità 1 (Normale)
Curva di velocità 2 (Soft)
Curva di velocità 3 (Hard) Curva di velocità 4 (fissa al
volume massimo)

29
CURVA AFTER-TOUCH
Aftertouch significa che dopo che premi e mantieni premuto un tasto questo continua a rispondere ad una pressione aggiuntiva applicata ai tasti. Questa funzione consente di personalizzare la curva di risposta alla pressione in base ai propri gusti in concerto.
Tenere premuti contemporaneamente i tasti CHANNEL e SPLIT, quindi premere i tasti numerici da 1 a 4 sulla tastiera per selezionare una curva. Fare riferimento agli schemi seguenti:
Curva After Touch 1 (Normale)
Curva After Touch 2 (Compressa)
Curva After Touch 3
(Espansa) Curva After Touch 4
(Off)
Nessuna

30
RISOLUZIONE DI PROBLEMI
Sintomi comuni con possibili cause e soluzioni
Dopo aver acceso l'interruttore di alimentazione, il LIVE non si accende:
1. Assicurarsi di aver effettuato il collegamento USB e che il
computer sia acceso.
2. Assicurarsi che il connettore di alimentazione sia ben inserito
nella presa.
3. Cavo USB guasto. Provare un altro cavo USB o una porta USB
diversa (se possibile, porta posteriore del computer)
Nessun suono quando si suona il LIVE:
1. Verificare le impostazioni del volume del modulo audio e del
sistema di altoparlanti/casse. Spostare il cursore assegnabile del
LIVE all'estrema destra.
2. Verificare il collegamento MIDI e i cavi audio del modulo audio / la
scheda audio del computer.
3. Assicurarsi che il software musicale presenti le giuste
configurazioni.
Suono lungo continuo:
1. Verificare il pedale Sustain e la polarità.
Voce errata:
1. Il modulo audio o il software non sono configurati adeguatamente.
Inizializzare o riavviare il software di registrazione.
Pitch errato:
1. Regolare la funzione Ottava sulla tastiera.
2. Il pitch MIDI è sintonizzato nel software/modulo audio. Sistemare
la regolazione fine o quella grossolana.
3. Il messaggio di bend del pitch non è tornato al valore predefinito,
resettare.
Alcune funzioni non funzionano:
1. Assicurarsi che il punto di divisione (split) sia stato assegnato
correttamente.
2. Assicurarsi che il software consenta di suonare su più canali.
Inoltre, assicurarsi che sia i canali della tastiera che quelli del
software siano assegnati correttamente.

31
KURZANLEITUNG (DEUTSCH)
LIEFERUMFANG Live-Keyboard USB-Kabel Schnellstart-Anleitung Sicherheitshinweise und Garantieinformationen
ANSCHLUSSÜBERSICHT
Einschaltsequenz
Wenn Sie Ihr LIVE-Keyboard mit einem Audio-System verbinden, stellen Sie alle Lautstärken auf das Minimum und befolgen dann beim Einschalten der Geräte die richtige Reihenfolge: (1) Computer oder/und ein anderes MIDI-Gerät, das MIDI-Daten empfängt (2) LIVE-Keyboard, das MIDI-Daten aussendet (3) Audio-Geräte (Mixer, Verstärker, Lautsprecher) Beim Ausschalten des Systems gehen Sie in umgekehrter Reihenfolge vor.
Nachdem Sie LIVE über USB an Ihren Computer angeschlossen haben, schalten Sie das
LIVE-Keyboard ein; der Computer wird es erkennen und automatisch die Treiber installieren. Sie können dieses Produkt unter Windows XP / Vista, Windows 7 und Mac OS X-Systemen im
Plug-and-Play-Betrieb verwenden. Dieses Produkt wird als "USB-Audio-Gerät", "USB-Sound-Gerät" oder "LIVE" erkannt.
Bevor Sie diese Verbindungen herstellen: Vergewissern Sie sich, dass das Keyboard
ausgeschaltet ist und schalten Sie alle anderen Geräte aus, um mögliche Schäden zu
vermeiden.
* Produkte, die nicht im LIEFERUMGANG erwähnt werden (inklusive Kabel), sind nicht im
Lieferumfang enthalten
32
ELEMENTE AN DER OBERSEITE DES LIVE49
2 3
4 5
6
7 8 9
1
1110
12
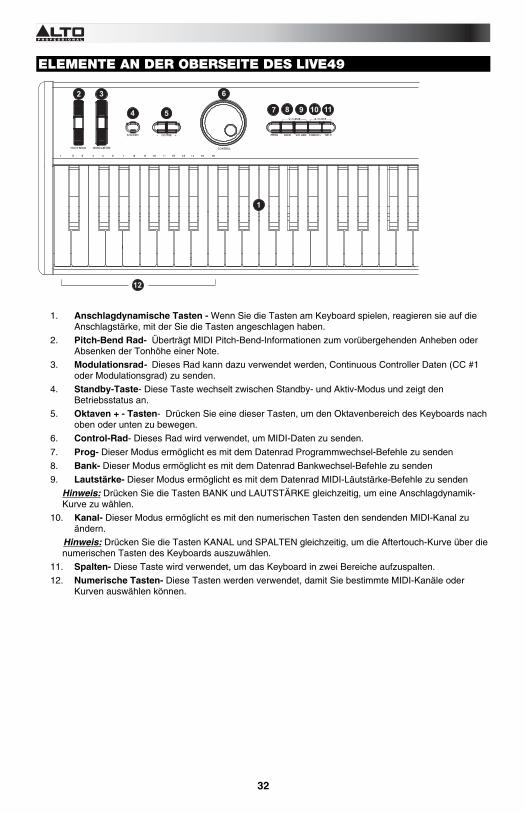
1. Anschlagdynamische Tasten - Wenn Sie die Tasten am Keyboard spielen, reagieren sie auf die Anschlagstärke, mit der Sie die Tasten angeschlagen haben.
2. Pitch-Bend Rad- Überträgt MIDI Pitch-Bend-Informationen zum vorübergehenden Anheben oder Absenken der Tonhöhe einer Note.
3. Modulationsrad- Dieses Rad kann dazu verwendet werden, Continuous Controller Daten (CC #1 oder Modulationsgrad) zu senden.
4. Standby-Taste- Diese Taste wechselt zwischen Standby- und Aktiv-Modus und zeigt den Betriebsstatus an.
5. Oktaven + - Tasten- Drücken Sie eine dieser Tasten, um den Oktavenbereich des Keyboards nach oben oder unten zu bewegen.
6. Control-Rad- Dieses Rad wird verwendet, um MIDI-Daten zu senden.
7. Prog- Dieser Modus ermöglicht es mit dem Datenrad Programmwechsel-Befehle zu senden
8. Bank- Dieser Modus ermöglicht es mit dem Datenrad Bankwechsel-Befehle zu senden 9. Lautstärke- Dieser Modus ermöglicht es mit dem Datenrad MIDI-Läutstärke-Befehle zu senden
Hinweis: Drücken Sie die Tasten BANK und LAUTSTÄRKE gleichzeitig, um eine Anschlagdynamik-Kurve zu wählen.
10. Kanal- Dieser Modus ermöglicht es mit den numerischen Tasten den sendenden MIDI-Kanal zu ändern.
Hinweis: Drücken Sie die Tasten KANAL und SPALTEN gleichzeitig, um die Aftertouch-Kurve über die numerischen Tasten des Keyboards auszuwählen.
11. Spalten- Diese Taste wird verwendet, um das Keyboard in zwei Bereiche aufzuspalten. 12. Numerische Tasten- Diese Tasten werden verwendet, damit Sie bestimmte MIDI-Kanäle oder
Kurven auswählen können.

33
ELEMENTE DER RÜCKSEITE
23 1
1. USB-PORT - Dies ermöglicht dem Keyboard über den USB-Bus mit Strom versorgt zu werden oder
MIDI-Daten zu übertragen.
2. MIDI Out- Schließen Sie ein handelsübliches 5-poliges DIN MIDI-Kabel an, um Daten an ein MIDI-Modul oder an den MIDI-Eingang eines anderen Keyboards zu senden. Wenn Sie nur den MIDI-Ausgang verwenden, müssen Sie ein Netzteil (nicht im Lieferumfang enthalten) an den NETZEINGANG anschließen, um diese Funktion zu aktivieren.
3. Pedal-Buchse- Dieser schalterähnliche 1/8"-TRS-Eingang wird verwendet, um Sustain hinzuzufügen.
ERWEITERTE FUNKTIONEN DES LIVE49
STANDBY
Halten Sie die STANDBY-Taste 2 Sekunden lang gedrückt, bis die Anzeige rot aufleuchtet. Das Keyboard schaltet nun in den Standby-Modus. Modus:
Befindet sich das Keyboard im Standby-Modus werden keine MIDI-Daten gesendet. Halten Sie die STANDBY-Taste gedrückt, um den normalen Betriebszustand wiederherzustellen. Das
Licht wechselt wieder auf blau und MIDI-Daten können nach ca. 5 Sekunden wieder gesendet werden.
OKTAVENVERSCHIEBUNG
Sie können die Tonhöhe des Keyboards in Oktaven verschieben, indem Sie die Tasten OKTAVE +/- drücken. Wenn die Oktave verschoben wird, leuchtet die entsprechende Oktaventaste auf.
Der Bereich der Oktavenverschiebung am LIVE 49 erstreckt sich von -3 bis zu +3. Drücken Sie die zwei Oktaventasten gleichzeitig, um die Verschiebung auf den Wert 00 zu bringen. Die Anzeige erlischt.
Diese Funktion ist auch im Modus Spalten verfügbar. Wenn Sie wieder in den Modus Oktavenverschiebung gehen, wird jede weitere Änderung auf Basis
der vorigen Einstellung durchgeführt, es sei denn, Sie schalten das Gerät ab.
Im Folgenden werden die Keyboard-Bereiche der LIVE-Serie dargestellt:
LIVE49
LIVE88
LIVE61

34
PITCH-BEND UND MODULATIONSRÄDER
Verwenden Sie das Pitch-Rad, um Pitch-Bend-Befehle zu senden. Bewegen Sie das Rad nach oben, um die Tonhöhe anzuheben; bewegen Sie es nach unten, um die Tonhöhe abzusenken. Das Rad bewegt sich automatisch zur Mitte zurück, wenn Sie das Rad loslassen, um keinen
Pitch-Bend-Effekt zu erzeugen. Verwenden Sie das Modulations-Rad, um Modulations-Befehle zu senden. Die untere Position des
Rads erzeugt keinen Modulations-Effekt und die oberste Position erzeugt einen maximalen Modulations-Effekt.
CONTROL-RAD
Verwenden Sie das Rad, um MIDI-Control-Daten zu ändern und zu senden. Drehen Sie das Rad im Uhrzeigersinn, um Werte zu erhöhen und drehen Sie es gegen den Uhrzeigersinn, um Werte zu verringern. Standardmäßig ist das Senden von Programmwechsel-Befehlen eingestellt. Auch andere Daten wie Bank-LSB, Bank-MSB usw. können geändert werden.
Der Regelbereich des Rads ist 0-127 Das Rad kann nicht verwendet werden, um den MIDI-Kanal zu ändern oder um Kurven auszuwählen.
PROGRAMMWECHSEL
Drücken Sie die PROG-Taste und die Kontrollleuchte leuchtet auf. Drehen Sie das CONTROL-Rad, um das Programm zu wechseln. Wenn Sie wieder in den Programmwechsel-Modus gehen, wird jede weitere Änderung auf Basis der
vorigen Einstellung durchgeführt, es sei denn, Sie schalten das Gerät ab.
AUSWAHL DER BANK
Drücken Sie die BANK-Taste und die Kontrollleuchte leuchtet auf. Drehen Sie das CONTROL-Rad, um das LSB (Least Significant Bit) der Bank zu ändern.
Drücken Sie zweimal auf die BANK-Taste und die Kontrollleuchte leuchtet auf. Drehen Sie das CONTROL-Rad, um das MSB (Most Significant Bit) der Bank zu ändern.
Wenn Sie wieder in den Bankwechsel-Modus gehen, wird jede weitere Änderung auf Basis der vorigen Einstellung durchgeführt, inklusive LSB- oder MSB-Status; Das bedeutet, dass Sie - wenn Sie zuletzt im MSB-Modus gearbeitet haben - automatisch in den MSB-Modus gelangen, wenn Sie die BANK-Taste ein einziges Mal drücken. Die Einstellung wird zurückgesetzt, nachdem Sie das Gerät ausgeschaltet haben.
LAUTSTÄRKEREGELUNG
Drücken Sie die LAUTSTÄRKE-Taste und die Kontrollleuchte leuchtet auf. Drehen Sie das CONTROL-Rad, um die MIDI-Lautstärke zu ändern. Wenn Sie wieder in den Lautstärkeregelungs-Modus gehen, wird jede weitere Änderung auf Basis der
vorigen Einstellung durchgeführt, es sei denn, Sie schalten das Gerät aus.
KANALWECHSEL
Drücken Sie die KANAL-Taste und die Kontrollleuchte leuchtet auf. Drücken Sie eine numerische Taste am Keyboard, um einen MIDI-Kanal von 1 bis 16 zu wählen. Das Datenrad kann nicht dazu verwendet werden, den MIDI-Kanal auszuwählen. Die MIDI-Kanalnummer im gesendeten Befehl erscheint als Zahl von 0-15, welche der Tastennummer
(1-16) minus 1 entspricht.
KEYBOARD SPALTEN
Halten Sie die SPALTEN-Taste gedrückt und drücken Sie dann eine Taste am Keyboard, um den Spalt-Punkt zu setzen. Der Kontrollleuchte SPALTEN leuchtet auf.
Sie können den MIDI-Kanal, die Oktave, das Programm und die Lautstärke für den Tastaturbereich unterhalb des Spalt-Punkts (einschließlich des Spalt-Punkts) so wie oben beschrieben ändern. Alle Einstellungen oberhalb des Spalt-Punkts bleiben unverändert.
Drücken Sie die SPALT-Taste erneut, um den Spalt-Modus zu beenden. Die Kontrollleuchte erlischt. Wenn Sie erneut in den Spalt-Modus gehen, werden die Einstellungen für den unteren Bereich
aufgerufen, es sei denn, Sie schalten das Gerät aus.
SUSTAIN-PEDAL
Schließen Sie hier ein handelsübliches Fußpedal ohne Umschaltfunktion an. Das Keyboard sendet Sustain-Befehle, wenn das Pedal aktiviert wird und sendet Sustain-Aus-Befehle, wenn das Pedal losgelassen wird.
Um die Polarität des Pedals festzustellen, drücken Sie das Pedal einfach herunter und schalten dann das Keyboard ein. Wenn das Pedal ein offenes Pedal ist, ist dieser Vorgang nicht notwendig.

35
KURVENEINSTELLUNGEN DES LIVE49:
ANSCHLAGDYNAMIK-KURVE
Anschlagdynamik-Kurvenreaktion heisst, dass die Lautstärke auf die Tastenanschlagstärke reagiert, wenn Sie am Keyboard spielen. Mit dieser Funktion können Sie diese Reaktionskurve nach Ihrem Geschmack anpassen.
Halten Sie die BANK- und LAUTSTÄRKE-Tasten gleichzeitig gedrückt, und drücken Sie die numerischen Tasten 1 - 4 am Keyboard, um eine Kurve zu wählen. Bitte beachten Sie folgende Diagramme:
Anschlagstärke-Kurve 1 (Normal)
Anschlagstärke-Kurve 2 (Weich)
Anschlagstärke-Kurve 3
(Hart) Anschlagstärke-Kurve 4
(auf maximale Lautstärke fixiert)

36
AFTERTOUCH-KURVE
Aftertouch bedeutet, dass Sie eine Taste halten können und sie auch dann noch auf zusätzlichen Druck reagiert, der auf die Taste ausgeübt wird. Mit dieser Funktion können Sie die Reaktion auf den Druck nach Ihrem Geschmack anpassen.
Halten Sie die KANAL- und SPALTEN-Tasten gleichzeitig gedrückt, und drücken Sie die numerischen Tasten 1 - 4 am Keyboard, um eine Kurve zu wählen. Bitte beachten Sie folgende Diagramme:
Aftertouch-Kurve 1
(Normal) Aftertouch-Kurve 2
(Komprimieren)
Aftertouch-Kurve 3
(Expandieren) Aftertouch-Kurve 4
(Aus)
Ohne

37
FEHLERBEHEBUNG
Häufige Fehlersymptome mit möglichen Ursachen und Lösungen
Nach dem Einschalten des Netzschalters schaltet sich LIVE nicht ein:
1. Vergewissern Sie sich, dass die USB-Verbindung hergestellt
wurde und Ihr Computer eingeschaltet ist.
2. Achten Sie darauf, dass das Netzteil ordnungsgemäß mit der
Steckdose verbunden ist.
3. Fehlerhaftes USB-Kabel. Versuchen Sie ein anderes USB-Kabel
oder einen anderen USB-Anschluss zu verwenden (idealerweise
an der Rückseite des Computers)
Kein Ton beim Spielen am LIVE:
1. Überprüfen Sie die Lautstärke-Einstellungen Ihres Sound-Moduls
und am Lautsprecher-System. Bewegen Sie den zuweisbaren
Schieberegler am LIVE auf die Position ganz rechts.
2. Überprüfen Sie die MIDI-Verbindung und die Audio-Kabel an
Ihrem Sound-Modul / Ihrer Computer-Soundkarte.
3. Stellen Sie sicher, dass Sie die richtigen Einstellungen in Ihrer
Musiksoftware vorgenommen haben.
Anhaltender, langer Ton:
1. Überprüfen Sie das Sustain-Pedal und die Polarität.
Falsche Stimme:
1. Ihr Sound-Modul oder Ihre Software ist nicht richtig eingestellt.
Initialisieren oder starten Sie Ihre Aufnahme-Software neu.
Falsche Tonhöhe:
1. Passen Sie die Oktaven-Funktion des Keyboards an.
2. MIDI-Tonhöhe ist in Ihrer Software / Ihrem Sound-Modul
verstimmt. Passen Sie die Feinabstimmung oder
Grobabstimmung an.
3. Der Pitch-Bend-Befehl ist nicht auf die Ausgangsposition
zurückgesprungen, bitte setzen Sie das Gerät zurück.
Einige Funktionen funktionieren nicht:
1. Überprüfen Sie, ob Ihr Spalt-Punkt korrekt zugeordnet ist.
2. Achten Sie darauf, dass Sie in Ihrer Software auf mehreren
Kanälen spielen können. Stellen Sie außerdem sicher, dass
sowohl die Tastatur- als auch die Software-Kanäle richtig
zugeordnet sind.

38
QUICKSTART HANDLEIDING (NEDERLANDS)
DOOS INHOUD Live keyboard USB kabel Quickstart Handleiding Veiligheidsinstructies & Garantie Informatie boekje
AANSLUITSCHEMA
Power-On Sequentie
Bij het sluiten van uw LIVE keyboard aan een geluidsinstallatie, zet alle volumes op het minimum dan volg de juiste sequentie om alle apparaten aan te zetten: (1) Computer en / of andere MIDI-apparaat dat ontvangt MIDI data (2) LIVE keyboard, dat het volgende uit zet: MIDI data (3) Audio-apparaten (mixer, versterker, luidsprekers) Als u het systeem uitschakelt, volgt u de omgekeerde volgorde.
Nadat u LIVE aan uw computer via USB heeft gesloten, schakelt u de LIVE keyboard aan; de
computer zal het vinden en installeert het drivers automatisch. U kunt dit product automatisch aansluiten en afspelen op Windows XP / Vista, Windows 7 en
Mac OSX systemen. Dit product zal worden herkend als een 'USB Audio Device "," USB Sound Device "of" LIVE ".
Voordat u de verbindingen maakt, zorg ervoor dat het keyboard uitgeschakeld is en
schakel alle andere apparaten om mogelijke schade te voorkomen.
* Stukken die niet in DOOS INHOUD (inclusief kabels) zijn niet inbegrepen

39
LIVE49 OVENPANEEL KENMERKEN
2 3
4 5
6
7 8 9
1
1110
12 1. Aanslaggevoelige toetsen – Wanneer u de toetsen op het keyboard speelt, zal ze reageren op basis
van de kracht dat u uit oefent bij het raken van het toetsen.
2. Pitch Regeling wiel - Zendt MIDI Pitch Regeling informatie om de toonhoogte van een noot tijdelijk te verhogen of verlagen.
3. Modulatie wiel- Dit wiel kan gebruikt worden om continu controllergegevens (CC # 1 of Modulatie Diepte) uit te zenden.
4. Stand-by knop- Deze schakelaars geeft de kracht status tussen Stand-by en een actieve stand.
5. Octaven + - knoppen- Druk op een van deze knoppen om het octaaf van het keyboard omhoog of omlaag te schakelen.
6. Control Dial- Dit wordt gebruikt om MIDI data te verzenden.
7. Prog- Deze stand maakt het mogelijk de data dial Program Change berichten te verzenden
8. Bank- Deze stand maakt het mogelijk de data dial Bank Change berichten te verzenden 9. Volume- Deze stand maakt het mogelijk de data dial MIDI volume wisseling berichten te verzenden.
Opmerking: Druk gelijktijdig op de BANK en VOLUME knoppen om snelheid curve te selecteren. 10. Channel- Hierdoor kan de numerieke toetsen van de MIDI kanaal worden veranderd.
Opmerking: Druk op de CHANNEL en SPLIT knoppen tegelijkertijd in om After-Touch curve met behulp van numerieke toetsen op het keyboard te selecteren.
11. Split- Deze knop wordt gebruikt om het keyboard in twee reeksen te splitsen. 12. Numeriek Keys- Deze toetsen worden gebruikt om u specifieke MIDI kanalen of curven te laten
selecteren.

40
ACHTERPANEEL KENMERKEN
23 1
1. USB PORT – Dit wordt gebruikt om het toetsenbord aan te drijven en geeft u de mogelijkheid in om
MIDI data te verzenden.
2. MIDI Out- Sluit een standaard 5 pins MIDI-kabel aan om gegevens te verzenden naar een MIDI-module of een andere MIDI input van het keyboard. Als u uitsluitend gebruik maakt van de MIDI output poort, moet u een AC-adapter (niet inclusief) gebruiken om de POWER IN aansluiting te activeren.
3. Pedaal jack- Deze switch type 1/8" TRS-input wordt gebruikt voor het toevoegen van ondersteuning.
LIVE49 GEAVANCEERDE KENMERKEN
STAND-BY
Druk voor 2 seconden op de STAND-BY knop, totdat het lampje rood wordt dan zal het keyboard op Stand-by in gaan. Geen MIDI data worden verzonden als het keyboard in de stand-by stand. Opnieuw, houdt de STAND-BY knop om de normale operationele status te herstellen. Het licht zal naar
blauw terugkeren en MIDI data kunnen vervolgens weer worden verzonden na ongeveer 5 seconden.
OCTAAF SHIFT
U kunt toonhoogte van het toetsenbord verschuiven in octaven door op de OCTAAF + / - toetsen te drukken. Wanneer het octaaf verschoven is, zullen het betrokken octaaf knop branden. De octaafverschuiving bereik is -3 tot 3 in de LIVE 49. Druk tegelijkertijd op het twee octaaf knoppen
om octaaf verschuiving tot de 00 waarde te herstellen en dan zal de indicator uitgeschakeld worden. Deze functie is ook beschikbaar in Split modus. Wanneer u het octaaf shift modus opnieuw invoert, zal de verdere verandering worden gebaseerd op
de vorige instelling, maar het zal na uitschakeling hersteld worden. Het keyboard reeksen van LIVE serie zijn hieronder weergegeven:
LIVE49
LIVE88
LIVE61
PITCH BEND AND MODULATIE WIELEN
Gebruik het pitch wiel om pitch bend berichten te verzenden. Verplaats deze naar het veld te verhogen; verplaatst deze om De toonhoogte te verlagen. Het zal terugkeren naar midden positie automatisch bij het loslaten van het wiel, Het zal dan geen pitch bend hebben. Gebruik de modulatie wiel om de modulatie berichten te verzenden. De onderste positie van het wiel
komt overeen met no-modulatie-effect en de hoogste positie komt overeen met Max. Modulatie effect.

41
CONTROL DIAL
Gebruik de draaiknop om MIDI control data te veranderen en te verzenden. Draai de knop met de klok mee om gegevens te verhogen en draai het tegen de klok in om gegevens te verminderen. De standaard wordt ingesteld om programma wijziging berichten te sturen. Het kan ook andere gegevens veranderen, zoals Bank LSB, Bank MSB etc. Regelbereik aan de draaiknop is 0-127 De draaiknop kan niet worden gebruikt om het MIDI kanaal te wijzigen of om curves te selecteren.
PROGRAM CHANGE
Druk op de PROG knop en de bijbehorende indicator licht op. Draai de CONTROL knop om het programma te wijzigen. Wanneer u het programma wijziging (change) modus opnieuw invoert, zal de verdere wijziging
gebaseerd worden op de vorige instelling. Dit zal na uitschakeling hersteld worden.
BANK SELECT
Druk op de BANK knop en de bijbehorende indicator licht op. Draai de CONTROL knop om de LSB (Least Significant Bit) van de bank te veranderen.
Druk tweemaal op de BANK knop en de indicator zal knipperen. Draai de CONTROL knop om de MSB (Most Significant Bit) van de bank te veranderen.
Wanneer u in de bank wijziging (change) stand terugkeert, zal de verdere verandering worden gebaseerd op de vorige instelling, met inbegrip van de LSB of MSB-status, bijvoorbeeld, als u laatst op MSB instelling geopereerd had, druk dan eenmaal op de BANK knop om de MSB instelling automatisch in te voeren. Dit zal na uitschakeling hersteld worden.
VOLUMEREGELING
Druk op de VOLUME knop en de bijbehorende indicator licht op. Draai de CONTROL dial om the MIDI-volume te wijzigen. Wanneer u in de volumeregeling stand terugkeert, zal de verdere verandering worden gebaseerd op
de vorige instelling. Dit zal na uitschakeling hersteld worden.
CHANNEL CHANGE
Druk op de CHANNEL knop en de bijbehorende indicator licht op. Druk op een numerieke toets op het keyboard om binnen MIDI kanaal bereik 1-16 te selecteren. De data draaiknop kan niet worden gebruikt om het MIDI kanaal te selecteren. Het MIDI-kanaal nummer in verzonden bericht verschijnt als 0-15, dat is de sleutel nummer is (1-16)
minus 1.
SPLIT KEYBOARD
Houdt de SPLIT knop en vervolgens op een toets op het keyboard om het splitpunt in te stellen. De SPLIT indicator zal verlichten.
U kunt het MIDI kanaal, octaaf, program en volume voor het gedeelte van het keyboard lager is dan het splitpunt veranderen (inclusief de splitsing punt) op dezelfde manier hierboven beschreven. Alle instellingen hoger dan het splitpunt, zal ongewijzigd blijven.
Druk nogmaals op de SPLIT toets om de splitmodus te verlaten. De indicator zal uitgeschakeld worden.
Wanneer u in de splitmodus stand terugkeert, zullen de instellingen voor het onderste gedeelte worden herinnerd, maar ze zullen worden hersteld na het uitschakelen.
ONDERSTEUNEND (SUSTAIN) PEDAAL
Sluit een standaard kortstondige aan / uit nonlatching voetschakelaar hier. Het keyboard zendt sustain control berichten uit wanneer het pedaal wordt ingedrukt en zendt sustain off bericht wanneer het pedaal losgelaten wordt.
Het identificeren van polariteit van het pedaal drukt u simpelweg op het pedaal en vervolgens kracht op het keyboard. Als het pedaal de Normal-Open type is, is deze procedure niet nodig.
42
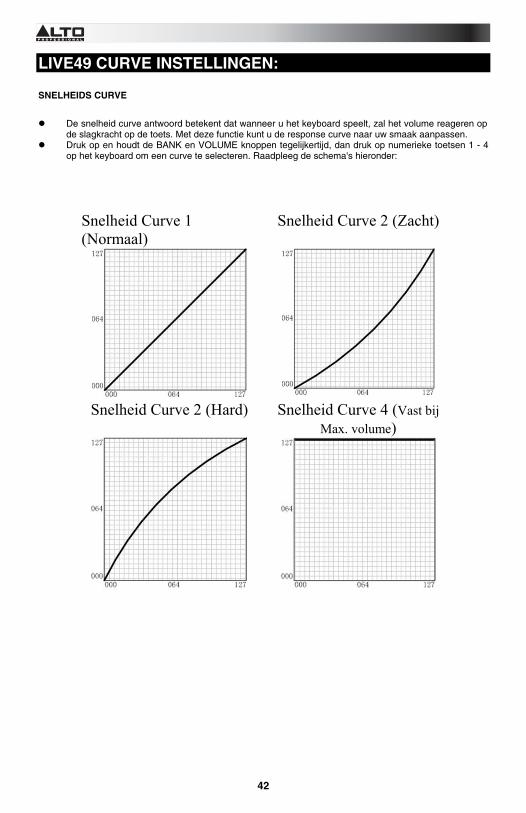
LIVE49 CURVE INSTELLINGEN:
SNELHEIDS CURVE
De snelheid curve antwoord betekent dat wanneer u het keyboard speelt, zal het volume reageren op de slagkracht op de toets. Met deze functie kunt u de response curve naar uw smaak aanpassen.
Druk op en houdt de BANK en VOLUME knoppen tegelijkertijd, dan druk op numerieke toetsen 1 - 4 op het keyboard om een curve te selecteren. Raadpleeg de schema's hieronder:
Snelheid Curve 1 (Normaal)
Snelheid Curve 2 (Zacht)
Snelheid Curve 2 (Hard) Snelheid Curve 4 (Vast bij
Max. volume)

43
AFTER-TOUCH CURVE
After-touch betekent dat na het indrukken van een toets, het zal blijven reageren op extra druk dat op de toetsen uitgeoefend wordt. Met deze functie kunt u de druk response curve aanpassen aan uw prestatie smaak.
Druk op en houd de CHANNEL en SPLIT knoppen tegelijkertijd, druk dan op numerieke toetsen 1 - 4 op het keyboard om een curve te selecteren. Raadpleeg de schema's hieronder:
After Touch Curve 1
(Normaal) After Touch Curve 2
(Kompres)
After Touch Curve 3
(Uitbreiden) After Touch Curve 4
(Uit)
Geen

44
PROBLEEMOPLOSSING
Veel voorkomende symptomen met mogelijke oorzaken en oplossingen
Na het inschakelen van de schakelaar, staat de LIVE niet aan:
1. Zorg ervoor dat de USB-aansluiting gemaakt is en dat de
computer aan staat.
2. Zorg ervoor dat de stekker goed aangesloten is in het
stopcontact.
3. Defecte USB-kabel. Probeer een andere USB-kabel of andere
USB-poort (poort aan de achterzijde van de computer indien
mogelijk)
Geen geluid bij het afspelen van LIVE:
1. Controleer de volume-instellingen van je geluid module en
luidsprekersysteem. Verplaats de Aanwijsbare Slider op Live tot
de meest rechtse positie.
2. Controleer de MIDI aansluiting en de audio kabels op uw
klankmodule / computer geluidskaart.
3. Zorg ervoor dat u de juiste instellingen in uw muziek software
heeft.
Continu lang geluid:
1. Controleer Sustain Pedaal en polariteit.
Onjuiste stem:
1. Uw geluidsmodule of software is niet goed ingesteld. Initialiseren
of herstart de opname software.
Verkeerde toonhoogte:
1. Pas de Octaaf functie van het keyboard.
2. MIDI toonhoogte is afgestemd op uw software / geluidsmodule.
Stel het fijn draaien of grof tuning.
3. Pitch bend bericht niet naar standaard teruggekeerd, dan kunt u
het resetten.
Sommige functies werken niet:
1. Controleer of uw splitpunt correct aangewezen is.
2. Zorg ervoor dat uw software op meerdere kanalen kunt spelen.
Zorg er ook voor zowel het toetsenbord en de softwarezenders
correct aangewezen is.

45
TECHNICAL SPECIFICATIONS
Keyboard: 49 keys (C1 – C5), (velocity sensitive, semi-weighted).
Functions:
Basic: USB, Pitch Bend and Modulation Wheel, Sustain Pedal, MIDI Out
Controls: Key on/off with velocity, Octave shift, Pitch Bend and Modulation, After-touch, Channel, Program, Bank, Volume, Split keyboard settings
Velocity Curve, After-touch Curve selection
Panel Control and Indicator: Standby Button with Indicator Octave Buttons with Indicator Program, Bank, Volume, Split button with indicator Data Dial
Input/Output Terminal:
USB port Sustain Pedal port MIDI Out
Power:
USB powered.
Dimension (W × D× H,) and Weight: 719 × 266 × 83 mm, 5.9 Kg 28.3” x 10.5” x 3.2”, 13 lbs
★Specifications and appearance are subject to change without notice.

46
MIDI IMPLEMENTATION CHART
Function Transmitted Recognized
Basic Channel
Default Changed
1 1~16
×
Mode
Default Messages Altered
× ***********
×
Note Number:
True voice
0~127 ***********
×
Velocity
Note ON Note OFF
○ v=0~127 ○ v=0~127
× ×
Aftertouch
Key’s Ch’s
× ×
× ×
Pitch Bend
○ ×
Control Change 0~127 × Prog Change:
True #
○ ***********
×
System Exclusive ○ ○ System Real Time
Clock Commands
× ○
× ×
System command
Song position
× ×
Aux Messages
Active Sense × ×
○: Yes ×: No


www.altoprofessional.com
MANUAL VERSION 1.3