look! listen! - primaryconnections
TRANSCRIPT
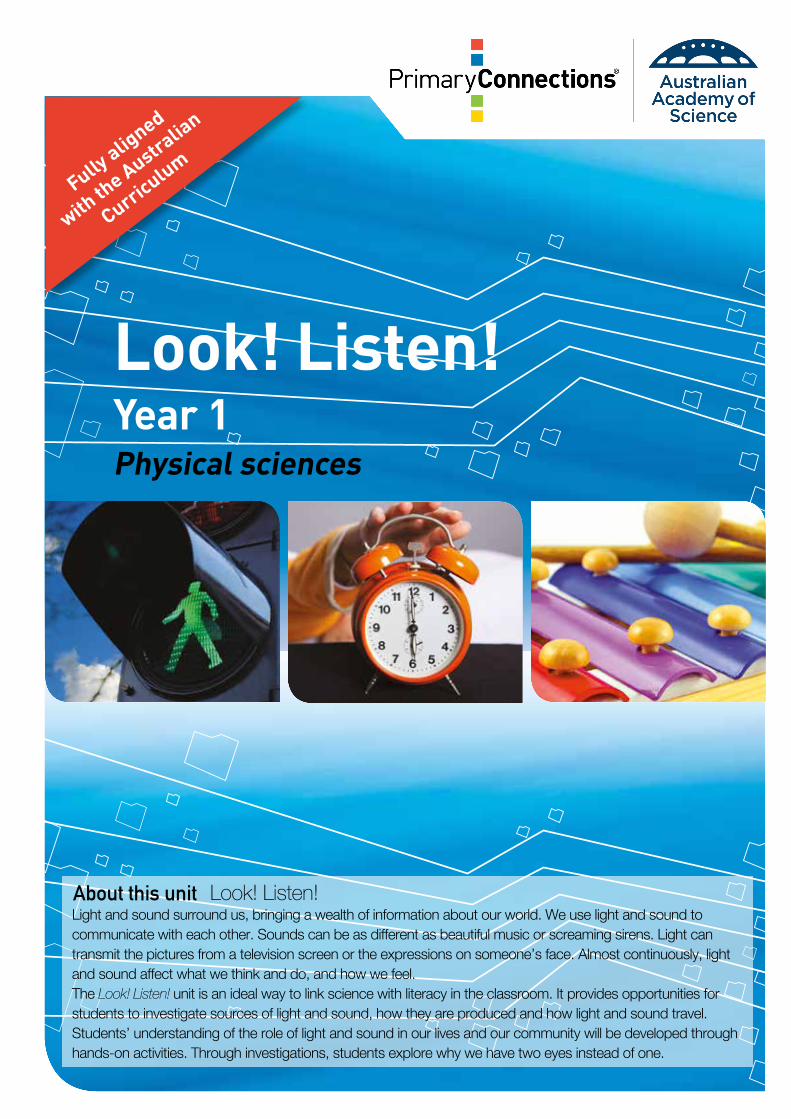
Look! Listen!
Fully alig
ned
with th
e Australian
Curriculum
Year 1 Physical sciences
About this unit Look! Listen!Light and sound surround us, bringing a wealth of information about our world. We use light and sound to communicate with each other. Sounds can be as different as beautiful music or screaming sirens. Light can transmit the pictures from a television screen or the expressions on someone’s face. Almost continuously, light and sound affect what we think and do, and how we feel.The Look! Listen! unit is an ideal way to link science with literacy in the classroom. It provides opportunities for students to investigate sources of light and sound, how they are produced and how light and sound travel. Students’ understanding of the role of light and sound in our lives and our community will be developed through hands-on activities. Through investigations, students explore why we have two eyes instead of one.
Contents
ii
© Australian Academy of Science, December 2012. Revised and reprinted March 2015. Revised June 2020.
Except as set out below or as allowed under relevant copyright law, you may not reproduce, communicate or otherwise use any of this publication in any of the ways reserved to the copyright owner without the written permission of the Australian Academy of Science.
For permissions, contact PrimaryConnections.
Educational purposes
If you work in an Australian educational institution, you may be able to rely on the provisions in Part VB of the Copyright Act 1968 (Cth) to photocopy and scan pages of this publication for educational purposes. These provisions permit a “reasonable portion” of a publication to be copied (usually, 10% or 1 chapter, but more if this publication is not commercially available in a reasonable time at an ordinary commercial price).
Notwithstanding the above, the individual teacher or organisation that purchased this publication new may photocopy or print out those pages that are marked “Resource sheet” to give hardcopy copies to his, her or its own students to use.
Australian education users may freely use this material for non-commercial educational purposes.
Published by the Australian Academy of Science.
GPO Box 783 Canberra ACT 2601 Telephone: (02)6201 9400Email: [email protected] www.primaryconnections.org.au
Illustrator: Shiloh Gordon Typesetter: Sharyn Raggett Font: Helvetica Neue, DIN Print house: Daniels Printing Craftsmen Cover images: iStockphoto.com
ISBN 978 0 85847 689 9
AcknowledgmentsThe PrimaryConnections – Linking Science with Literacy project is supported by the Australian Government.
Thanks to the trial teachers and students of the trial schools Australia-wide and Fellows of the Australian Academy of Science who contributed to this unit.
All material identified by is material subject to copyright under the Copyright Act 1968 (Cth) and is owned by the Australian Curriculum, Assessment and Reporting Authority 2020.
For all Australian Curriculum material except elaborations: This is an extract from the Australian Curriculum.
Elaborations: This may be a modified extract from the Australian Curriculum and may include the work of other authors.
Disclaimer: ACARA neither endorses nor verifies the accuracy of the information provided and accepts no responsibility for incomplete or inaccurate information. In particular, ACARA does not endorse or verify that:
• The content descriptions are solely for a particular year and subject;
• All the content descriptions for that year and subject have been used; and
• The author’s material aligns with the Australian Curriculum content descriptions for the relevant year and subject.
You can find the unaltered and most up-to-date version of this material at http://www.australiancurriculum.edu.au This material is reproduced with the permission of ACARA.
DisclaimersThe views expressed herein do not necessarily represent the views of the Australian Government.
These materials are intended for education and training only. Every effort is made to ensure the accuracy of the information presented in these materials. We do not assume any liability for the accuracy or completeness of the information contained within. The Australian Academy of Science accepts no liability or responsibility for any loss or damage whatsoever suffered as a result of direct or indirect use or application of any of these training materials.
Contents
iii
The PrimaryConnections teaching and learning approach v
Unit at a glance viii
Look! Listen—Alignment with the Australian Curriculum ix
Teacher background information xv
Lesson 1 Scary sounds 1
Lesson 2 Sound and light search 7
Lesson 3 Good vibrations 17
Lesson 4 Sounds on the move 21
Lesson 5 Sensing light 27
Lesson 6 Travelling tales 31
Lesson 7 Two versus one 35
Lesson 8 All together 39
Appendix 1 How to organise collaborative learning teams (F—Year 2) 44
Appendix 2 How to use a science journal 48
Appendix 3 How to use a word wall 50
Appendix 4 Look! Listen! equipment list 52
Appendix 5 Look! Listen! unit overview 54
Foreword
Never has there been a more important time for science in Australia. More than ever, we need a scientifically-literate community to engage in debates about issues that affect us all. We also need imaginative thinkers to discover the opportunities in our exponentially expanding knowledge base. Teachers play a vital role in nurturing the minds of our future citizens and scientists.
The Australian Academy of Science has a long, proud history of supporting science education. Our primary education program, PrimaryConnections: linking science with literacy, now has over 15 years’ experience in supporting teachers to facilitate quality learning experiences in their classrooms. Regular evaluations demonstrate the significant impact the program can have on both teacher confidence and student outcomes.
PrimaryConnections has been developed with the financial support of the Australian Government and endorsed by education authorities across the country. It has been guided by its Steering Committee, with members from the Australian Government and the Australian Academy of Science, and benefitted from input by its Reference Group, with representatives from all states and territories.
Key achievements of the program include engaging over 24,000 Australian teachers in professional learning workshops, producing multi award-winning curriculum resources, and developing an Indigenous perspective framework that acknowledges the diversity of perspectives in Australian classrooms.
The PrimaryConnections teaching and learning approach combines guided inquiry, using the 5Es model, with hands-on investigations. It encourages students to explore and test their own, and others’, ideas and to use evidence to support their claims. It focuses on developing the literacies of science and fosters lasting conceptual change by encouraging students to represent and re-represent their developing understandings. Students are not only engaged in science, they feel that they can do science.
This is one of 40 curriculum units developed to provide practical advice on implementing the teaching and learning approach while meeting the requirements of the Australian Curriculum: Science. Trialled in classrooms across the country and revised based on teacher feedback, and with the accuracy of the teacher background information verified by Fellows of the Academy, the experience of many brings this unit to you today.
I commend PrimaryConnections to you and wish you well in your teaching.
Professor John Shine, AC Pres AA President (2018–2022) Australian Academy of Science
v
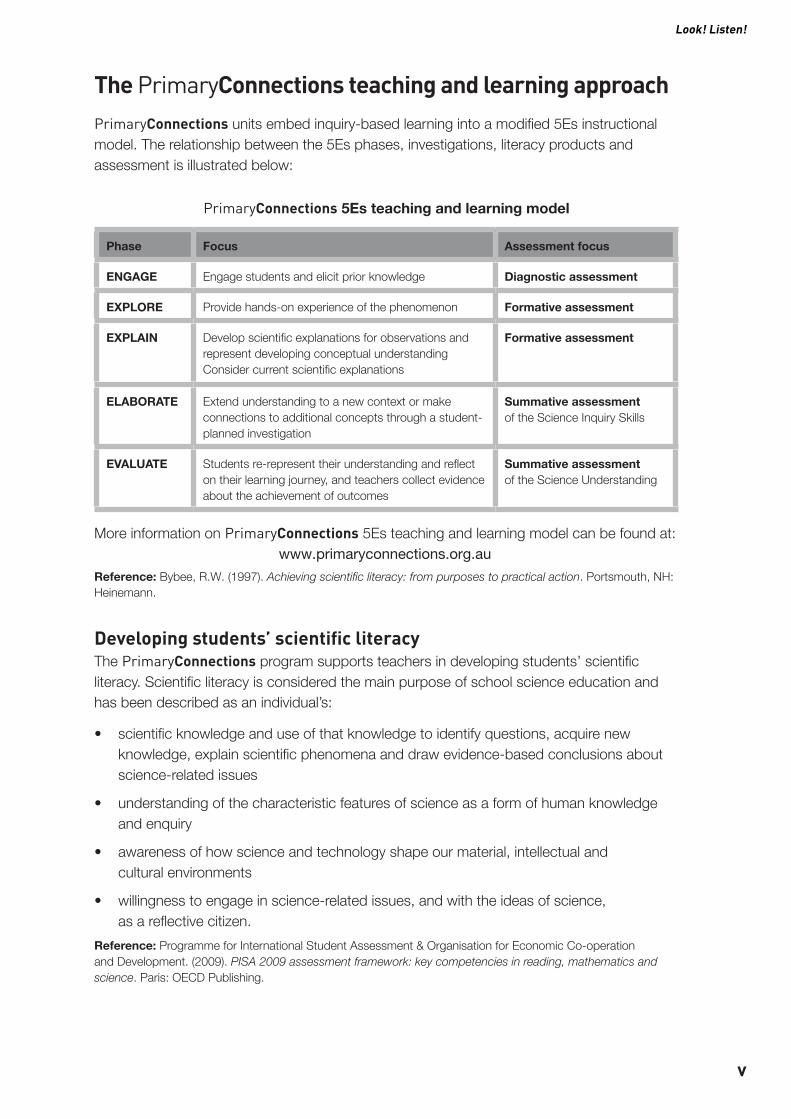
The PrimaryConnections teaching and learning approachPrimaryConnections units embed inquiry-based learning into a modified 5Es instructional model. The relationship between the 5Es phases, investigations, literacy products and assessment is illustrated below:
PrimaryConnections 5Es teaching and learning model
Phase Focus Assessment focus
ENGAGE Engage students and elicit prior knowledge Diagnostic assessment
EXPLORE Provide hands-on experience of the phenomenon Formative assessment
EXPLAIN Develop scientific explanations for observations and represent developing conceptual understandingConsider current scientific explanations
Formative assessment
ELABORATE Extend understanding to a new context or make connections to additional concepts through a student-planned investigation
Summative assessment of the Science Inquiry Skills
EVALUATE Students re-represent their understanding and reflect on their learning journey, and teachers collect evidence about the achievement of outcomes
Summative assessment of the Science Understanding
More information on PrimaryConnections 5Es teaching and learning model can be found at: www.primaryconnections.org.au
Reference: Bybee, R.W. (1997). Achieving scientific literacy: from purposes to practical action. Portsmouth, NH: Heinemann.
Developing students’ scientific literacyThe PrimaryConnections program supports teachers in developing students’ scientific literacy. Scientific literacy is considered the main purpose of school science education and has been described as an individual’s:
• scientific knowledge and use of that knowledge to identify questions, acquire newknowledge, explain scientific phenomena and draw evidence-based conclusions aboutscience-related issues
• understanding of the characteristic features of science as a form of human knowledgeand enquiry
• awareness of how science and technology shape our material, intellectual andcultural environments
• willingness to engage in science-related issues, and with the ideas of science,as a reflective citizen.
Reference: Programme for International Student Assessment & Organisation for Economic Co-operation and Development. (2009). PISA 2009 assessment framework: key competencies in reading, mathematics and science. Paris: OECD Publishing.
Look! Listen!

PrimaryConnections
vi
Linking science with literacyPrimaryConnections has an explicit focus on developing students’ knowledge, skills, understanding and capacities in science and literacy. Units employ a range of strategies to encourage students to think about and to represent science.
PrimaryConnections develops the literacies of science that students need to learn and to represent their understanding of science concepts, processes and skills. Representations in PrimaryConnections are multi-modal and include text, tables, graphs, models, drawings and embodied forms, such as gesture and role-play. Students use their everyday literacies to learn the new literacies of science. Science provides authentic contexts and meaningful purposes for literacy learning, and also provides opportunities to develop a wider range of literacies. Teaching science with literacy improves learning outcomes in both areas.
AssessmentScience is ongoing and embedded in PrimaryConnections units. Assessment is linked to the development of literacy practices and products. Relevant understandings and skills are highlighted at the beginning of each lesson. Different types of assessment are emphasised in different phases:
Diagnostic assessment occurs in the Engage phase. This assessment is to elicit students’ prior knowledge so that the teacher can take account of this when planning how the Explore and Explain lessons will be implemented.
Formative assessment occurs in the Explore and Explain phases. This enables the teacher to monitor students’ developing understanding and provide feedback that can extend and deepen students’ learning.
Summative assessment of the students’ achievement developed throughout the unit occurs in the Elaborate phase for the Science Inquiry Skills, and in the Evaluate phase for the Science Understanding.
Rubrics to help you make judgments against the relevant achievement standards of the Australian Curriculum are available on our website: www.primaryconnections.org.au
SafetyLearning to use materials and equipment safely is central to working scientifically. It is important, however, for teachers to review each lesson before teaching, to identify and manage safety issues specific to a group of students. A safety icon is included in lessons where there is a need to pay particular attention to potential safety hazards. The following guidelines will help minimise risks:
• Be aware of the school’s policy on safety in the classroom and for excursions.
• Check students’ health records for allergies or other health issues.
• Be aware of potential dangers by trying out activities before students do them.
• Caution students about potential dangers before they begin an activity.
• Clean up spills immediately as slippery floors are dangerous.
• Instruct students never to smell, taste or eat anything unless they are given permission.
• Discuss and display a list of safe practices for science activities.
vii
PrimaryConnections
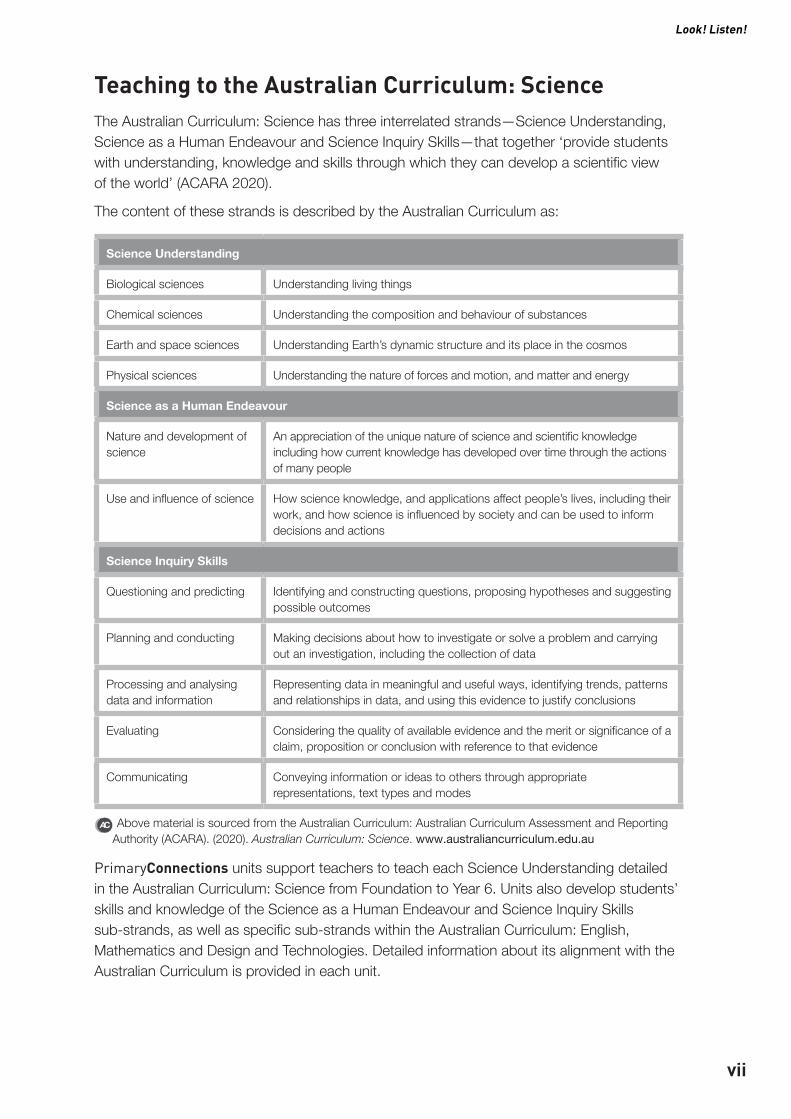
Teaching to the Australian Curriculum: ScienceThe Australian Curriculum: Science has three interrelated strands—Science Understanding, Science as a Human Endeavour and Science Inquiry Skills—that together ‘provide students with understanding, knowledge and skills through which they can develop a scientific view of the world’ (ACARA 2020).
The content of these strands is described by the Australian Curriculum as:
Science Understanding
Biological sciences Understanding living things
Chemical sciences Understanding the composition and behaviour of substances
Earth and space sciences Understanding Earth’s dynamic structure and its place in the cosmos
Physical sciences Understanding the nature of forces and motion, and matter and energy
Science as a Human Endeavour
Nature and development of science
An appreciation of the unique nature of science and scientific knowledge including how current knowledge has developed over time through the actions of many people
Use and influence of science How science knowledge, and applications affect people’s lives, including their work, and how science is influenced by society and can be used to inform decisions and actions
Science Inquiry Skills
Questioning and predicting Identifying and constructing questions, proposing hypotheses and suggesting possible outcomes
Planning and conducting Making decisions about how to investigate or solve a problem and carrying out an investigation, including the collection of data
Processing and analysing data and information
Representing data in meaningful and useful ways, identifying trends, patterns and relationships in data, and using this evidence to justify conclusions
Evaluating Considering the quality of available evidence and the merit or significance of a claim, proposition or conclusion with reference to that evidence
Communicating Conveying information or ideas to others through appropriate representations, text types and modes
Above material is sourced from the Australian Curriculum: Australian Curriculum Assessment and Reporting Authority (ACARA). (2020). Australian Curriculum: Science. www.australiancurriculum.edu.au
PrimaryConnections units support teachers to teach each Science Understanding detailed in the Australian Curriculum: Science from Foundation to Year 6. Units also develop students’ skills and knowledge of the Science as a Human Endeavour and Science Inquiry Skills sub-strands, as well as specific sub-strands within the Australian Curriculum: English, Mathematics and Design and Technologies. Detailed information about its alignment with the Australian Curriculum is provided in each unit.
Look! Listen!
PrimaryConnections
viii
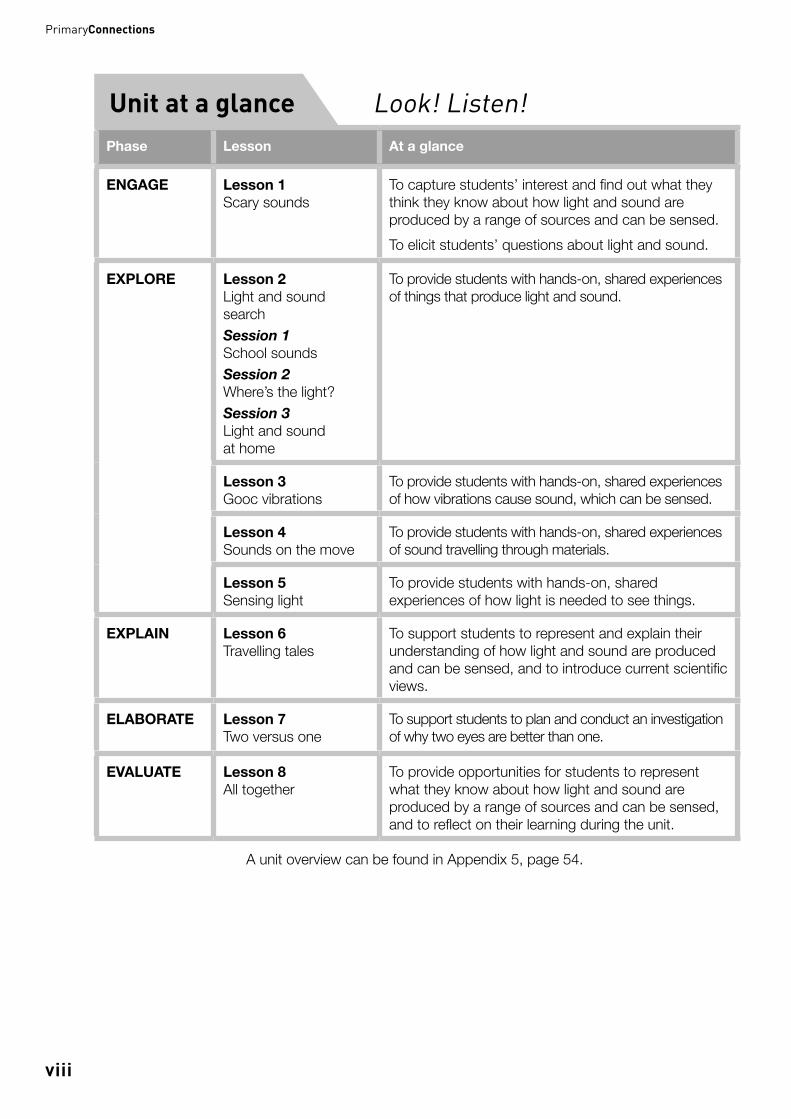
Unit at a glance Look! Listen!Phase Lesson At a glance
ENGAGE Lesson 1Scary sounds
To capture students’ interest and find out what they think they know about how light and sound are produced by a range of sources and can be sensed.To elicit students’ questions about light and sound.
EXPLORE Lesson 2Light and sound searchSession 1School soundsSession 2Where’s the light?Session 3Light and sound at home
To provide students with hands-on, shared experiences of things that produce light and sound.
Lesson 3Gooc vibrations
To provide students with hands-on, shared experiences of how vibrations cause sound, which can be sensed.
Lesson 4Sounds on the move
To provide students with hands-on, shared experiences of sound travelling through materials.
Lesson 5Sensing light
To provide students with hands-on, shared experiences of how light is needed to see things.
EXPLAIN Lesson 6Travelling tales
To support students to represent and explain their understanding of how light and sound are produced and can be sensed, and to introduce current scientific views.
ELABORATE Lesson 7Two versus one
To support students to plan and conduct an investigation of why two eyes are better than one.
EVALUATE Lesson 8All together
To provide opportunities for students to represent what they know about how light and sound are produced by a range of sources and can be sensed, and to reflect on their learning during the unit.
A unit overview can be found in Appendix 5, page 54.
ix
PrimaryConnections Look! Listen!
Students use their senses to make direct observations of the classroom, school grounds and home to gather information, describe and make comparisons of the sources of light and sound and how they are sensed.
Look! Listen! —Alignment with the Australian Curriculum
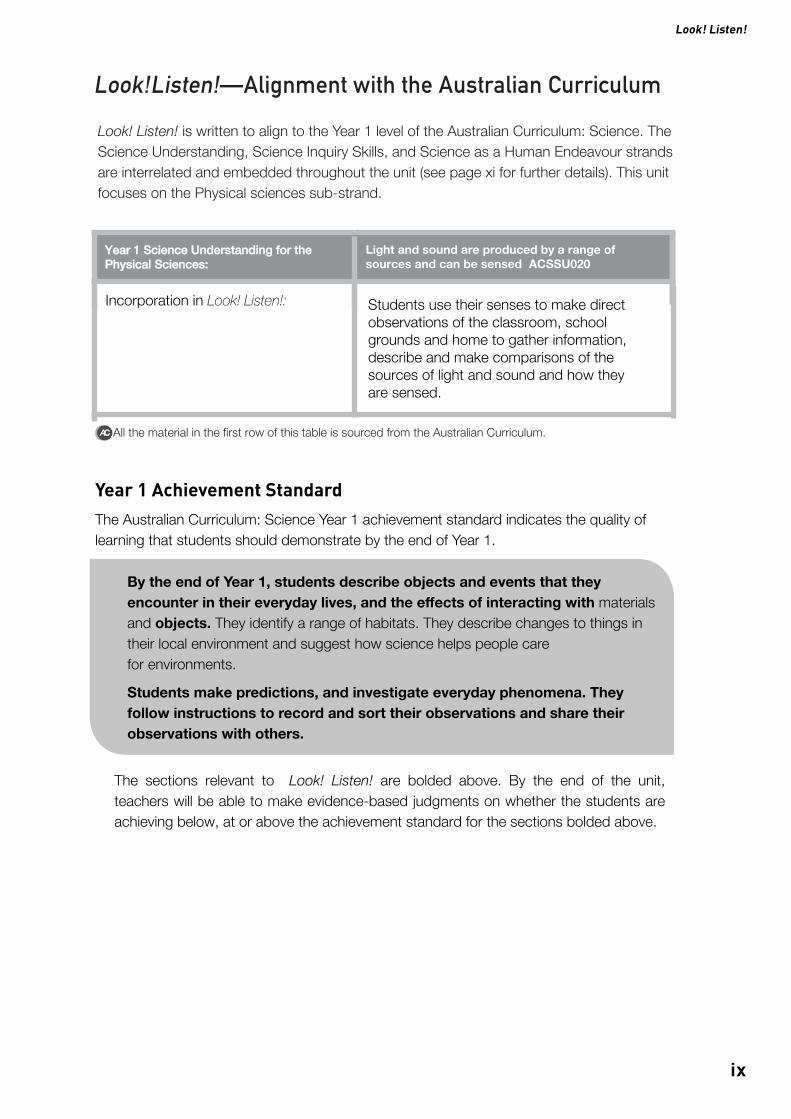
Look! Listen! is written to align to the Year 1 level of the Australian Curriculum: Science. The Science Understanding, Science Inquiry Skills, and Science as a Human Endeavour strands are interrelated and embedded throughout the unit (see page xi for further details). This unit focuses on the Physical sciences sub-strand.
Year 1 Science Understanding for the Physical Sciences:
Light and sound are produced by a range of sources and can be sensed (ACSSU020)
Incorporation in Look! Listen!:
Year 1 Achievement StandardThe Australian Curriculum: Science Year 1 achievement standard indicates the quality of learning that students should demonstrate by the end of Year 1.
The sections relevant to Look! Listen! are bolded above. By the end of the unit, teachers will be able to make evidence-based judgments on whether the students are achieving below, at or above the achievement standard for the sections bolded above.
All the material in the first row of this table is sourced from the Australian Curriculum.
By the end of Year 1, students describe objects and events that they encounter in their everyday lives, and the effects of interacting with materials and objects. They identify a range of habitats. They describe changes to things in their local environment and suggest how science helps people care for environments.
Students make predictions, and investigate everyday phenomena. They follow instructions to record and sort their observations and share their observations with others.
PrimaryConnections
x
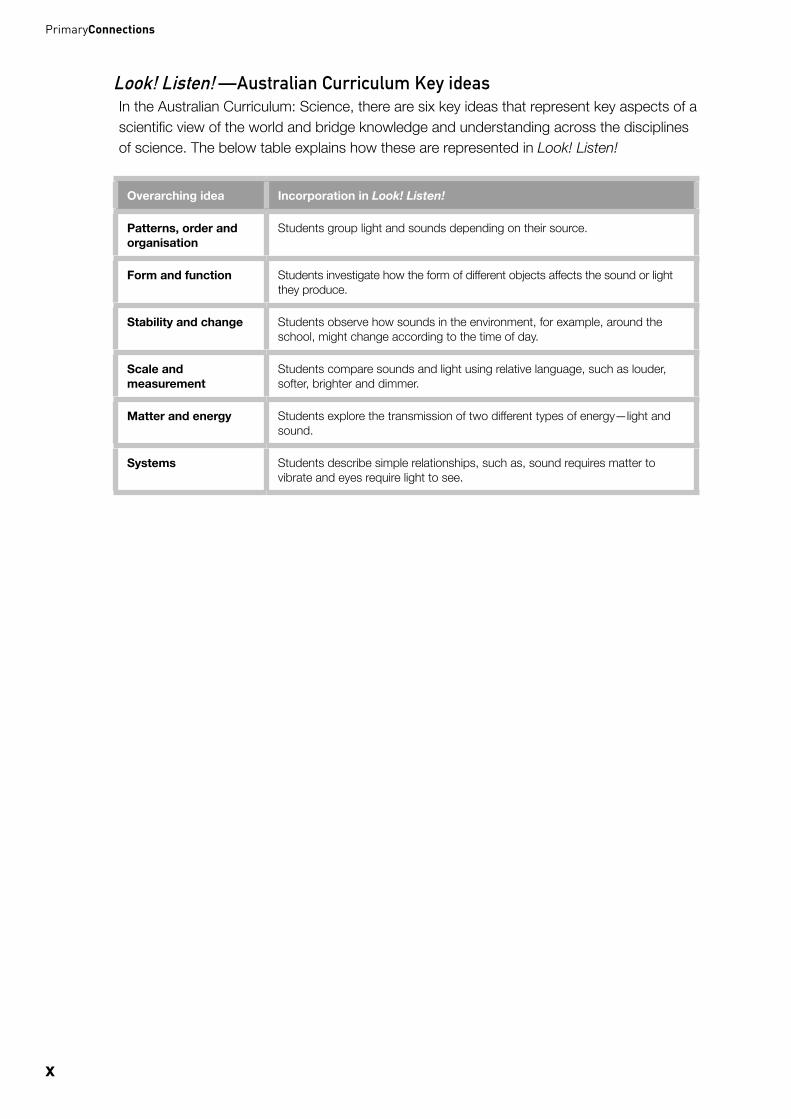
Overarching idea Incorporation in Look! Listen!
Patterns, order and organisation
Students group light and sounds depending on their source.
Form and function Students investigate how the form of different objects affects the sound or light they produce.
Stability and change Students observe how sounds in the environment, for example, around the school, might change according to the time of day.
Scale and measurement
Students compare sounds and light using relative language, such as louder, softer, brighter and dimmer.
Matter and energy Students explore the transmission of two different types of energy—light and sound.
Systems Students describe simple relationships, such as, sound requires matter to vibrate and eyes require light to see.
Look! Listen! —Australian Curriculum Key ideasIn the Australian Curriculum: Science, there are six key ideas that represent key aspects of a scientific view of the world and bridge knowledge and understanding across the disciplines of science. The below table explains how these are represented in Look! Listen!
xi
PrimaryConnections Look! Listen!
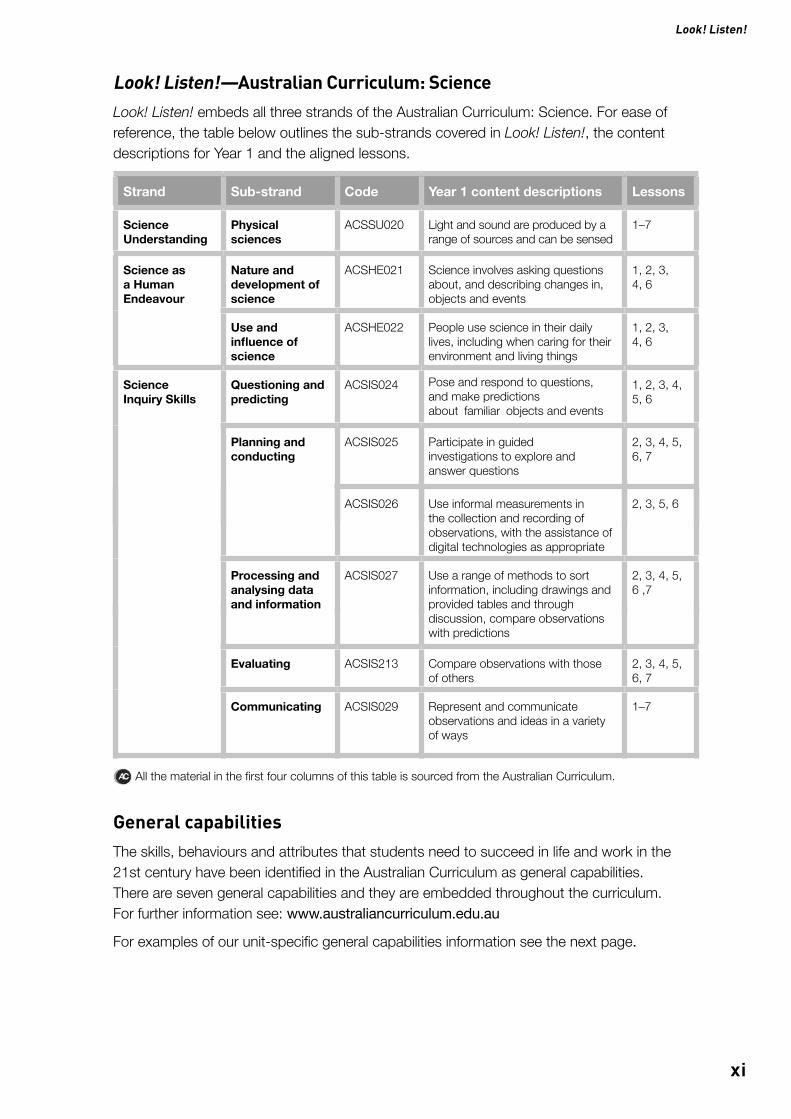
Look! Listen!—Australian Curriculum: ScienceLook! Listen! embeds all three strands of the Australian Curriculum: Science. For ease of reference, the table below outlines the sub-strands covered in Look! Listen!, the content descriptions for Year 1 and the aligned lessons.
Strand Sub-strand Code Year 1 content descriptions Lessons
Science Understanding
Physical sciences
ACSSU020 Light and sound are produced by a range of sources and can be sensed
1–7
Science as a Human Endeavour
Nature and development of science
ACSHE021 Science involves asking questions about, and describing changes in, objects and events
1, 2, 3, 4, 6
Use and influence of science
ACSHE022 People use science in their daily lives, including when caring for their environment and living things
1, 2, 3, 4, 6
Science Inquiry Skills
Questioning and predicting
ACSIS024 Pose and respond to questions, and make predictions about familiar objects and events
1, 2, 3, 4, 5, 6
Planning and conducting
ACSIS025 Participate in guided investigations to explore and answer questions
2, 3, 4, 5, 6, 7
ACSIS026 Use informal measurements in the collection and recording of observations, with the assistance of digital technologies as appropriate
2, 3, 5, 6
Processing and analysing data and information
ACSIS027 Use a range of methods to sort information, including drawings and provided tables and through discussion, compare observations with predictions
2, 3, 4, 5, 6 ,7
Evaluating ACSIS213 Compare observations with those of others
2, 3, 4, 5, 6, 7
Communicating ACSIS029 Represent and communicate observations and ideas in a variety of ways
1–7
All the material in the first four columns of this table is sourced from the Australian Curriculum.
General capabilitiesThe skills, behaviours and attributes that students need to succeed in life and work in the 21st century have been identified in the Australian Curriculum as general capabilities. There are seven general capabilities and they are embedded throughout the curriculum. For further information see: www.australiancurriculum.edu.au
For examples of our unit-specific general capabilities information see the next page.
PrimaryConnections
xii
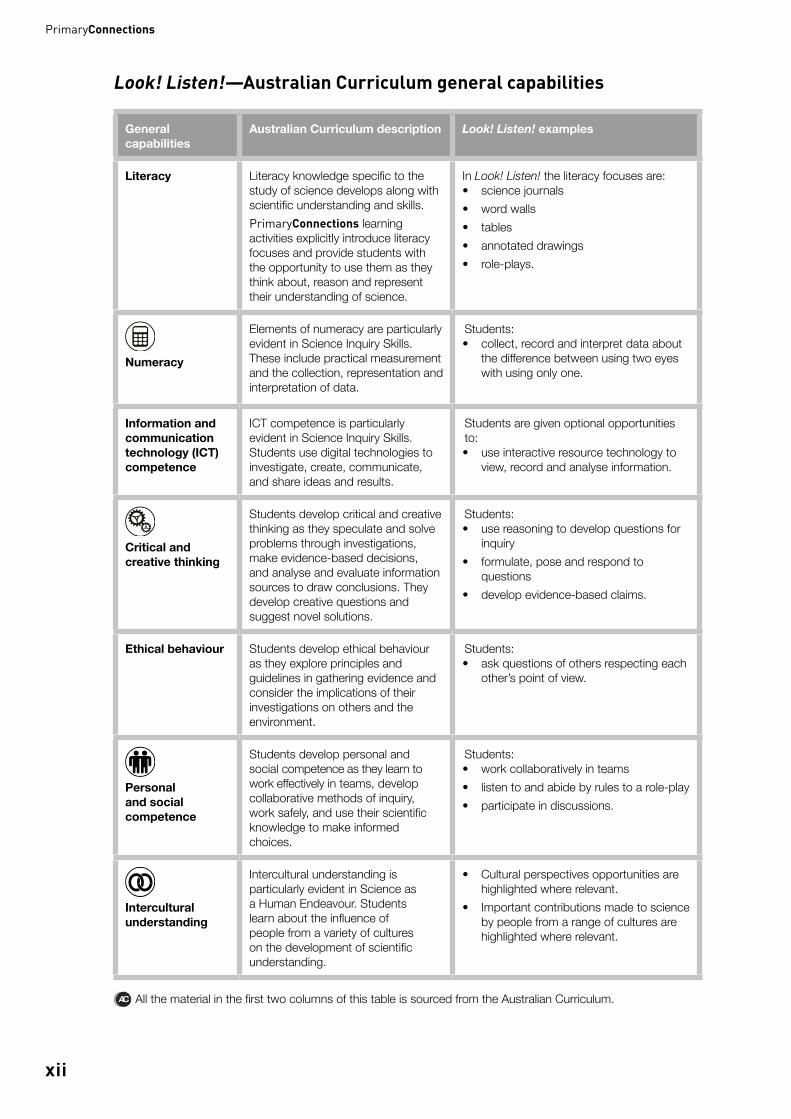
Look! Listen!—Australian Curriculum general capabilities
General capabilities
Australian Curriculum description Look! Listen! examples
Literacy Literacy knowledge specific to the study of science develops along with scientific understanding and skills.PrimaryConnections learning activities explicitly introduce literacy focuses and provide students with the opportunity to use them as they think about, reason and represent their understanding of science.
In Look! Listen! the literacy focuses are:• science journals• word walls• tables• annotated drawings• role-plays.
Numeracy
Elements of numeracy are particularly evident in Science Inquiry Skills. These include practical measurement and the collection, representation and interpretation of data.
Students:• collect, record and interpret data about
the difference between using two eyes with using only one.
Information and communication technology (ICT) competence
ICT competence is particularly evident in Science Inquiry Skills. Students use digital technologies to investigate, create, communicate, and share ideas and results.
Students are given optional opportunities to:• use interactive resource technology to
view, record and analyse information.
Critical and creative thinking
Students develop critical and creative thinking as they speculate and solve problems through investigations, make evidence-based decisions, and analyse and evaluate information sources to draw conclusions. They develop creative questions and suggest novel solutions.
Students:• use reasoning to develop questions for
inquiry• formulate, pose and respond to
questions• develop evidence-based claims.
Ethical behaviour Students develop ethical behaviour as they explore principles and guidelines in gathering evidence and consider the implications of their investigations on others and the environment.
Students:• ask questions of others respecting each
other’s point of view.
Personal and social competence
Students develop personal and social competence as they learn to work effectively in teams, develop collaborative methods of inquiry, work safely, and use their scientific knowledge to make informed choices.
Students:• work collaboratively in teams• listen to and abide by rules to a role-play• participate in discussions.
Intercultural understanding
Intercultural understanding is particularly evident in Science as a Human Endeavour. Students learn about the influence of people from a variety of cultures on the development of scientific understanding.
• Cultural perspectives opportunities arehighlighted where relevant.
• Important contributions made to scienceby people from a range of cultures arehighlighted where relevant.
All the material in the first two columns of this table is sourced from the Australian Curriculum.
xiii
PrimaryConnections Look! Listen!
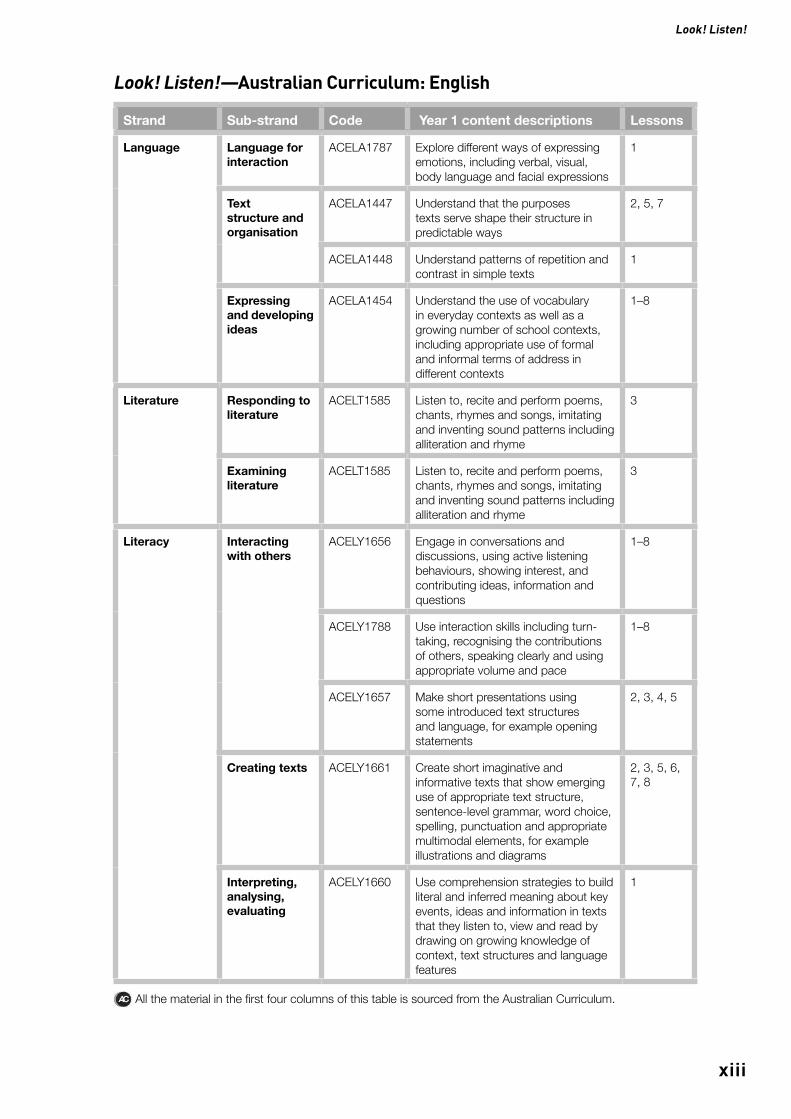
Look! Listen!—Australian Curriculum: English
Strand Sub-strand Code Year 1 content descriptions Lessons
Language Language for interaction
ACELA1787 Explore different ways of expressing emotions, including verbal, visual, body language and facial expressions
1
Text structure and organisation
ACELA1447 Understand that the purposes texts serve shape their structure in predictable ways
2, 5, 7
ACELA1448 Understand patterns of repetition and contrast in simple texts
1
Expressing and developing ideas
ACELA1454 Understand the use of vocabulary in everyday contexts as well as a growing number of school contexts, including appropriate use of formal and informal terms of address in different contexts
1–8
Literature Responding to literature
ACELT1585 Listen to, recite and perform poems, chants, rhymes and songs, imitating and inventing sound patterns including alliteration and rhyme
3
Examining literature
ACELT1585 Listen to, recite and perform poems, chants, rhymes and songs, imitating and inventing sound patterns including alliteration and rhyme
3
Literacy Interacting with others
ACELY1656 Engage in conversations and discussions, using active listening behaviours, showing interest, and contributing ideas, information and questions
1–8
ACELY1788 Use interaction skills including turn-taking, recognising the contributions of others, speaking clearly and using appropriate volume and pace
1–8
ACELY1657 Make short presentations using some introduced text structures and language, for example opening statements
2, 3, 4, 5
Creating texts ACELY1661 Create short imaginative and informative texts that show emerging use of appropriate text structure, sentence-level grammar, word choice, spelling, punctuation and appropriate multimodal elements, for example illustrations and diagrams
2, 3, 5, 6, 7, 8
Interpreting, analysing, evaluating
ACELY1660 Use comprehension strategies to build literal and inferred meaning about key events, ideas and information in texts that they listen to, view and read by drawing on growing knowledge of context, text structures and language features
1
All the material in the first four columns of this table is sourced from the Australian Curriculum.
PrimaryConnections
xiv
Cross-curriculum prioritiesThere are three cross-curriculum priorities identified by the Australian Curriculum:
• Aboriginal and Torres Strait Islander histories and cultures
• Asia and Australia’s engagement with Asia
• Sustainability.
For further information see: www.australiancurriculum.edu.au
Aboriginal and Torres Strait Islander histories and culturesThe PrimaryConnections Indigenous perspectives framework supports teachers’ implementation of Aboriginal and Torres Strait Islander histories and cultures in science. The framework can be accessed at: www.primaryconnections.org.au
Look! Listen! focuses on the Western science way of making evidence-based claims about how light and sound are produced, how they travel and are understood.
Aboriginal and Torres Strait Islander Peoples might have different explanations for the observed phenomenon of sounds travelling through different materials and the sources of light.
PrimaryConnections recommends working with Aboriginal and Torres Strait Islander community members to access local and relevant cultural perspectives. Protocols for engaging with Aboriginal and Torres Strait Islander community members are provided in state and territory education guidelines. Links to these are provided on the PrimaryConnections website.
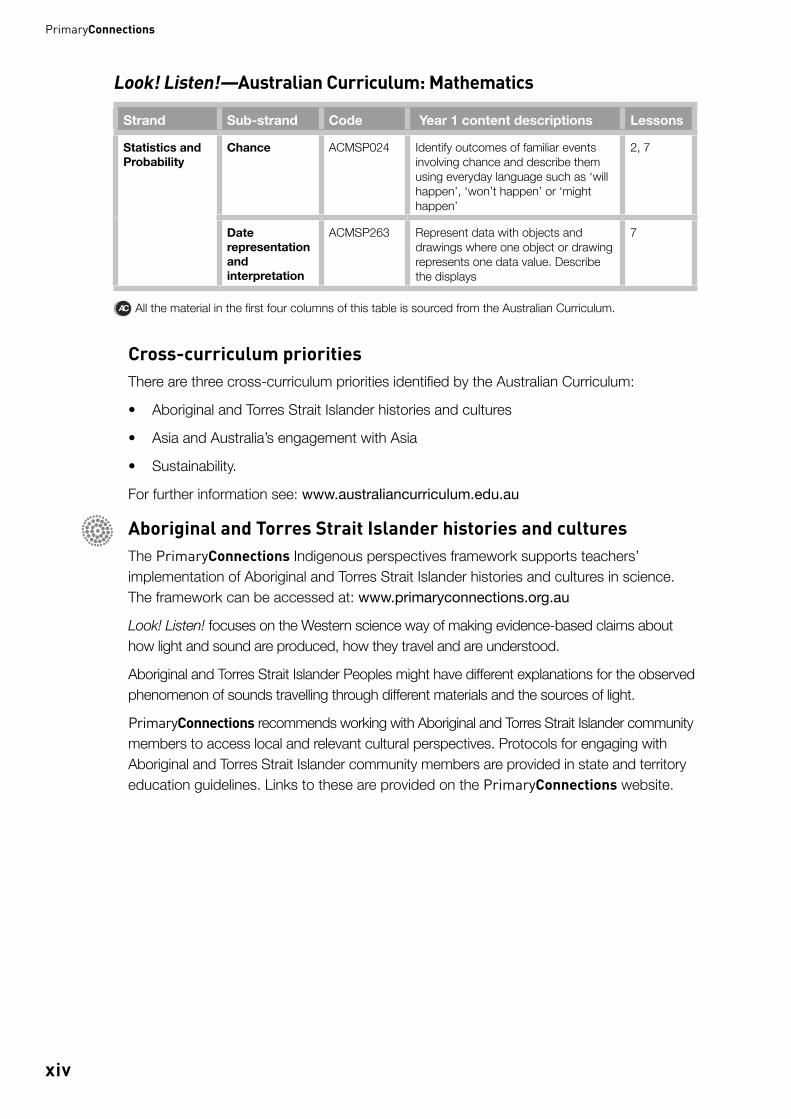
Look! Listen!—Australian Curriculum: Mathematics
Strand Sub-strand Code Year 1 content descriptions Lessons
Statistics and Probability
Chance ACMSP024 Identify outcomes of familiar events involving chance and describe them using everyday language such as ‘will happen’, ‘won’t happen’ or ‘might happen’
2, 7
Date representation and interpretation
ACMSP263 Represent data with objects and drawings where one object or drawing represents one data value. Describe the displays
7
All the material in the first four columns of this table is sourced from the Australian Curriculum.
xv
PrimaryConnections Look! Listen!
Teacher background information
This information is intended as teacher information only. It provides teachers with information relevant to the science concept so they can feel more confident and competent to teach each lesson. The content and vocabulary of this information is at a more detailed and advanced level than what is required for students.
Introduction to light and sound
What is sound?
Sound is produced by tiny, rapid vibrations in the particles that make up materials. This can be air, liquids or solids but not in a vacuum or outer space, which have no particles. When the vibrations reach our ear, our brain translates the signal into what we call sound.
We define sound by what we can hear. Generally, human ears interpret sounds caused by an object vibrating between 20 and 20,000 hertz abbreviated as Hz. (1 Hz means one vibration per second.) Anything vibrating faster is called an ultrasonic vibration and is a higher pitch. Dogs have ears that can hear vibrations that are ultrasonic; this is why they can hear a ‘silent’ dog whistle and humans cannot. Elephants communicate using subsonic vibrations which are vibrations below 20 hertz and, therefore, humans are unable to hear them.
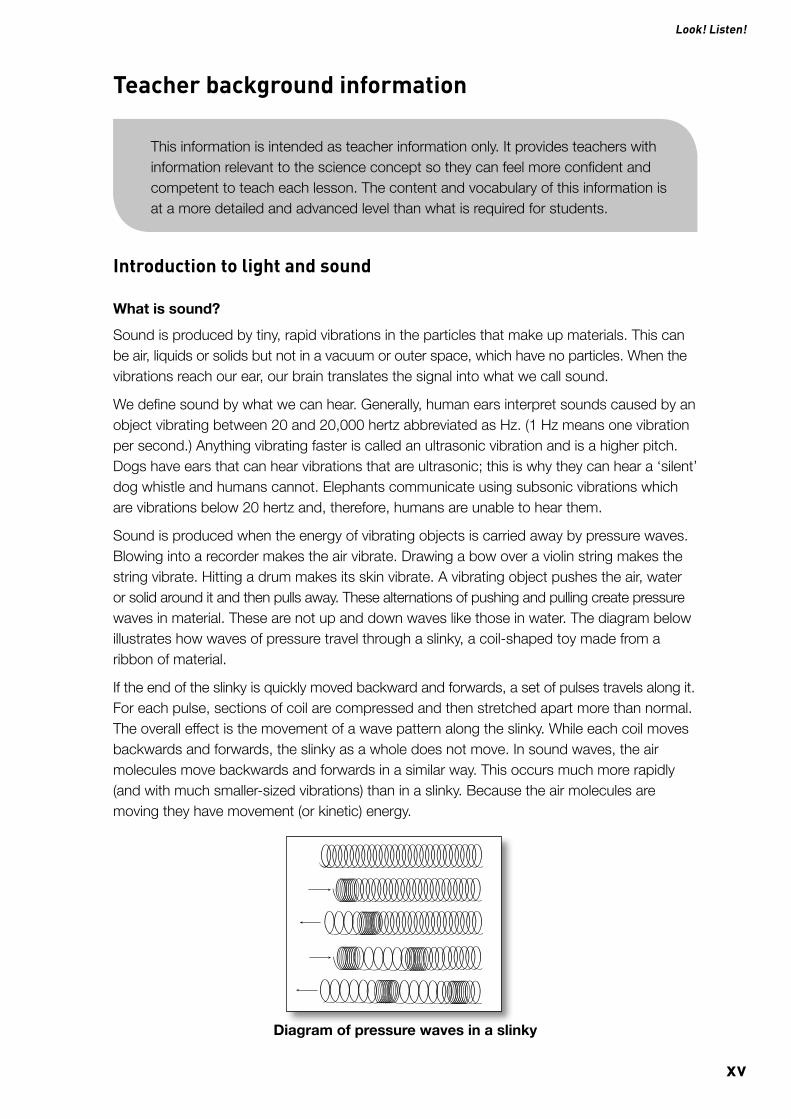
Sound is produced when the energy of vibrating objects is carried away by pressure waves. Blowing into a recorder makes the air vibrate. Drawing a bow over a violin string makes the string vibrate. Hitting a drum makes its skin vibrate. A vibrating object pushes the air, water or solid around it and then pulls away. These alternations of pushing and pulling create pressure waves in material. These are not up and down waves like those in water. The diagram below illustrates how waves of pressure travel through a slinky, a coil-shaped toy made from a ribbon of material.
If the end of the slinky is quickly moved backward and forwards, a set of pulses travels along it. For each pulse, sections of coil are compressed and then stretched apart more than normal. The overall effect is the movement of a wave pattern along the slinky. While each coil moves backwards and forwards, the slinky as a whole does not move. In sound waves, the air molecules move backwards and forwards in a similar way. This occurs much more rapidly (and with much smaller-sized vibrations) than in a slinky. Because the air molecules are moving they have movement (or kinetic) energy.
Diagram of pressure waves in a slinky
PrimaryConnections
xvi
What is light?
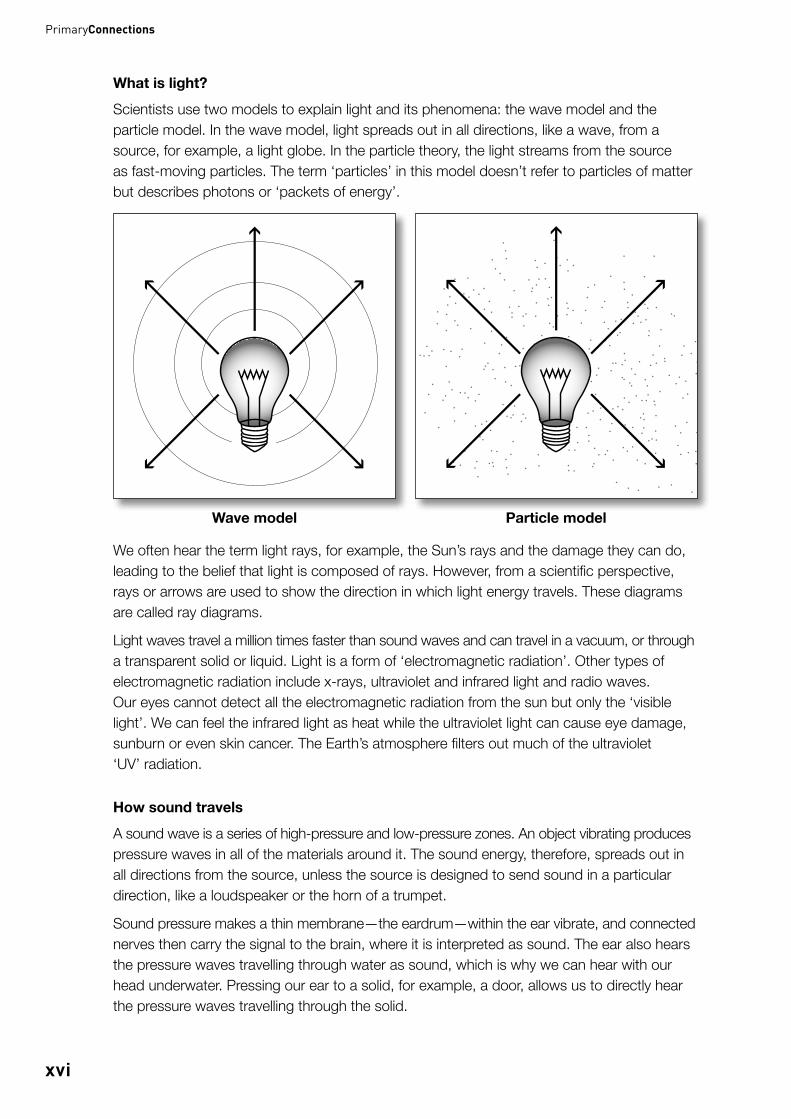
Scientists use two models to explain light and its phenomena: the wave model and the particle model. In the wave model, light spreads out in all directions, like a wave, from a source, for example, a light globe. In the particle theory, the light streams from the source as fast-moving particles. The term ‘particles’ in this model doesn’t refer to particles of matter but describes photons or ‘packets of energy’.
Wave model Particle model
We often hear the term light rays, for example, the Sun’s rays and the damage they can do, leading to the belief that light is composed of rays. However, from a scientific perspective, rays or arrows are used to show the direction in which light energy travels. These diagrams are called ray diagrams.
Light waves travel a million times faster than sound waves and can travel in a vacuum, or through a transparent solid or liquid. Light is a form of ‘electromagnetic radiation’. Other types of electromagnetic radiation include x-rays, ultraviolet and infrared light and radio waves. Our eyes cannot detect all the electromagnetic radiation from the sun but only the ‘visible light’. We can feel the infrared light as heat while the ultraviolet light can cause eye damage, sunburn or even skin cancer. The Earth’s atmosphere filters out much of the ultraviolet ‘UV’ radiation.
How sound travels
A sound wave is a series of high-pressure and low-pressure zones. An object vibrating produces pressure waves in all of the materials around it. The sound energy, therefore, spreads out in all directions from the source, unless the source is designed to send sound in a particular direction, like a loudspeaker or the horn of a trumpet.
Sound pressure makes a thin membrane—the eardrum—within the ear vibrate, and connected nerves then carry the signal to the brain, where it is interpreted as sound. The ear also hears the pressure waves travelling through water as sound, which is why we can hear with our head underwater. Pressing our ear to a solid, for example, a door, allows us to directly hear the pressure waves travelling through the solid.
xvii
PrimaryConnections Look! Listen!
The pressure waves that we call sound are a form of energy. All sound comes from another form of energy. For example, when we hit a drum the movement energy of our arm is transferred to the drum, which starts vibrating. The vibrations transfer some of the drum’s movement energy into sound energy in the air. Sound can be absorbed by materials if the energy contained in the pressure waves is transformed into different forms of energy. For example, sound energy could be transformed into heat energy when it hits sound-absorbing curtains.
Sound cannot exist without something to travel through. If you put an alarm clock in a vacuum the pieces will still be vibrating, but since there is nothing around them to transmit the vibrations no sound waves can be produced.
Sound bounces off objects and therefore can produce echoes. In the mountains, the waves of pressure travelling through the air, generated by a shout, can travel to a cliff face opposite, bounce off and travel back through the air to the shouter’s ears. The further away the object that reflects the sound, the longer it takes to get back to the ears. Sound travels slowly compared with light, which is why we see a flash of lightning before hearing the thunder.
How light travels
Light travels as electromagnetic waves; it does not need material to travel through, unlike sound. In a vacuum, for example, in interstellar space, all forms of electromagnetic radiation travel at the same speed regardless of their wavelengths. This speed is universally referred to as the speed of light. Scientific analysis (Einstein’s Theory of Relativity) shows that nothing in the universe can travel faster than light. It races towards us through the vacuum of space at about 300,000 km per second.
Theoretically, light waves from a source could travel forever. Light sources appear dimmer the further we are from them because the light spreads out. Also, light on Earth travels through the atmosphere, which has materials with which it might interact. For example, if light meets dust in the air it can be reflected, scattered or absorbed and thus the light might not be seen over a large distance.
As light is a form of energy, it has its origins in other forms of energy. Primary light sources are things that change another form of energy into light energy. For example:
• The Sun changes nuclear energy into light energy.
• A fire, glow-worms and glow sticks (cyalume sticks) change chemical energy intolight energy.
• Light bulbs, lightning and computer screens change electrical energy into light energy.
Secondary light sources are things that reflect energy from a primary light source. For example, the Moon is a secondary light source that reflects light from the Sun.
Students’ conceptionsTaking account of students’ existing ideas is important in planning effective teaching approaches which help students learn science. Students develop their own ideas during their experiences in everyday life and might hold more than one idea about an event or phenomenon.
Some students might believe that sound can be produced without using any material objects. However, a sound is always caused by something vibrating. Sound is a transmission of energy,
PrimaryConnections
xviii
To access more in-depth science information in the form of text, diagrams and animations, refer to the PrimaryConnections Science Background Resource available on the PrimaryConnections website (www.primaryconnections.org.au).
not a separate, physical object. There are ‘air guitar’ instruments that allow players to simulate playing a guitar. Sensors pick up their hand movements and send the information to a computer which directs speakers to vibrate at the appropriate frequencies.
Whether sound produces vibrations or vibrations produce sound might confuse students, especially depending on the context. Some students might erroneously believe that sound and vibration are the same. Young students might confuse vibrate and echo, and might use both terms to mean repeat. Therefore, exploring language use and its meaning will assist students to clarify their conceptual understanding.
Some students might believe that sound cannot travel through liquids and solids. Sound travels in air, solids and liquids. In fact, sound travels faster in liquids and faster again in solids since the particles are closer together. Such differences can be experienced when sitting on a metal rail when it is tapped some distance away. The vibration in the rail will be felt and heard before the vibration travelling through the air is heard. Air transmits sound at approximately 340 metres per second and water at about 1400 metres per second.
Year 1 students might think they hear a sound simply because of its loudness or their closeness to the sound source, and not intuitively hold ideas about sound travelling.
Some students might think that light doesn’t travel; rather it is thought to just exist in space. They also might think that light from weak sources doesn’t travel as far as light from strong sources. In fact, all light travels from its source in all directions, regardless of its intensity, unless interrupted by matter, such as air, water or an object where it is reflected, transmitted or absorbed.
Students might think that hearing is an active choice and depends on paying attention rather than a physical vibration of the ear drum. This is perhaps a difference between the use of the terms hearing and listening. Exploring the everyday use of words and using words in a scientific way will help students clarify their understanding.
To help them develop more scientific ideas about light and sound students need a broad range of experiences and the use of language accompanied by good teacher questioning.
ReferencesSkamp, K. (Ed.). (2012). Teaching Primary Science Constructively (4th Edn). South Melbourne: Cengage Learning Australia.
1
EN
GA
GE
Lesson 1 Scary sounds
Lesson 1 Scary sounds
PrimaryConnections
AT A GLANCE
To capture students’ interest and find out what they think they know about how light and sound are produced by a range of sources and can be sensed.
To elicit students’ questions about light and sound.
Students:
• listen to a story
• identify objects from the story that produce light and sound
• describe how sounds are sensed.
Lesson focusThe focus of the Engage phase is to spark students’ interest, stimulate their curiosity, raise questions for inquiry and elicit their existing beliefs about the topic. These existing ideas can then be taken account of in future lessons.
Assessment focusDiagnostic assessment is an important aspect of the Engage phase. In this lesson you will elicit what students already know and understand about how:• light and sound are produced by a range of sources and can be sensed.
You will also monitor their developing science inquiry skills (see page xi).
Key lesson outcomesScience
Students will be able to represent their current understanding as they:
• identify the source of sounds made ina story
• describe sources of light and sound
• describe how light and sound are sensed.
Literacy
Students will be able to:
• listen to and participate in a story
• contribute to discussions about lightand sound
• identify the purpose and features of ascience journal
• identify the purpose and features of aword wall.
Lesson 1 Scary sounds2
PrimaryConnections E
NG
AG
E
Lesson focusThe focus of the Engage phase is to spark students’ interest, stimulate their curiosity, raise questions for inquiry and elicit their existing beliefs about the topic. These existing ideas can then be taken account of in future lessons.
Assessment focusDiagnostic assessment is an important aspect of the Engage phase. In this lesson you will elicit what students already know and understand about how:
• light and sound are produced by a range of sources and can be sensed.
You will also monitor their developing science inquiry skills (see page ix).
Key lesson outcomesScience
Students will be able to represent their current understanding as they:
• identify the source of sounds made ina story
• describe sources of light and sound
• describe how light and sound are sensed.
Literacy
Students will be able to:
• listen to and participate in a story
• contribute to discussions about lightand sound
• identify the purpose and features of ascience journal
• identify the purpose and features of aword wall.
This lesson also provides opportunities to monitor the development of students’ general capabilities (highlighted through icons, see page xii).
Equipment
FOR THE CLASS FOR EACH STUDENT
• class science journal• word wall• 1 enlarged copy of ‘Sound makers’
(Resource sheet 2)
• science journal• 1 copy of ‘Sound makers’
(Resource sheet 2 )
Preparation• Read ‘How to write a science journal’ (Appendix 2).
• Read ‘How to use a word wall’ (Appendix 3).
3Lesson 1 Scary sounds
PrimaryConnections Look! Listen!
EN
GA
GE
• Read ‘Sounds in the dark’ (Resource sheet 1) to become familiar with the sound effects.
• Prepare an enlarged copy of ‘Sounds in the dark’ (Resource sheet 1).
• Prepare an enlarged copy of ‘Sound makers’ (Resource sheet 2).• Optional: Display ‘Sounds in the dark’ (Resource sheet 1) and ‘Sound makers’
(Resource sheet 2) in a digital format.
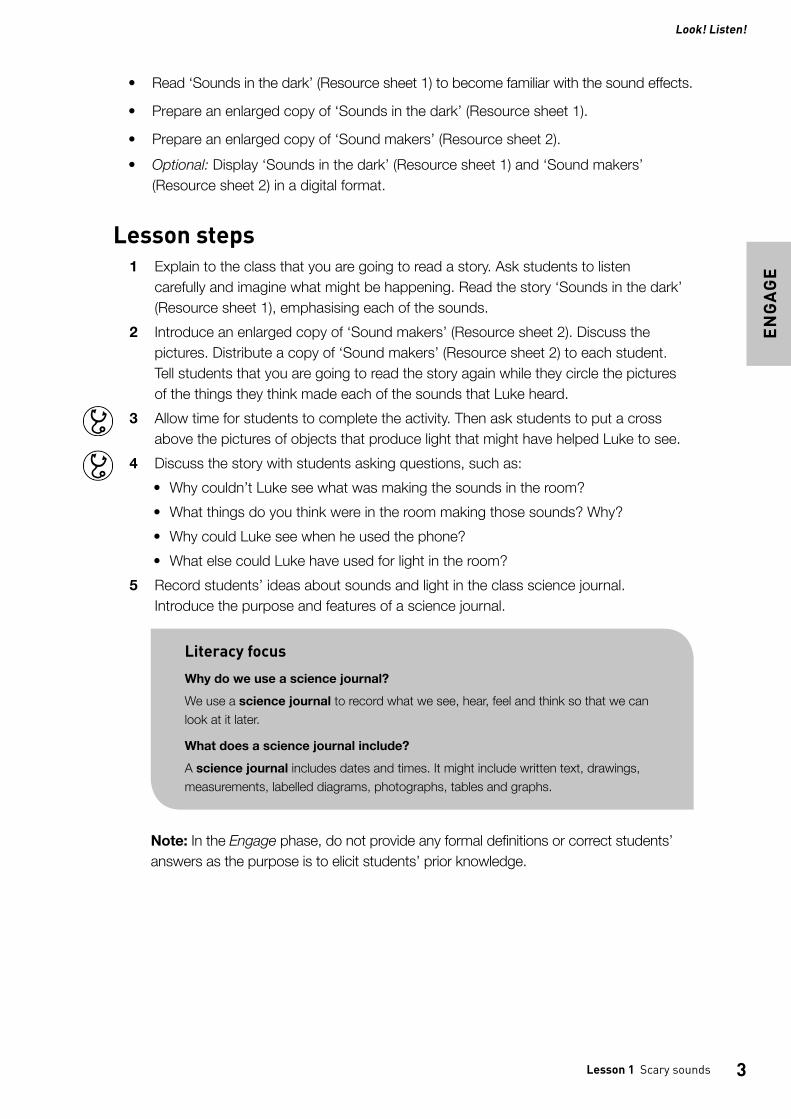
Lesson steps 1 Explain to the class that you are going to read a story. Ask students to listen
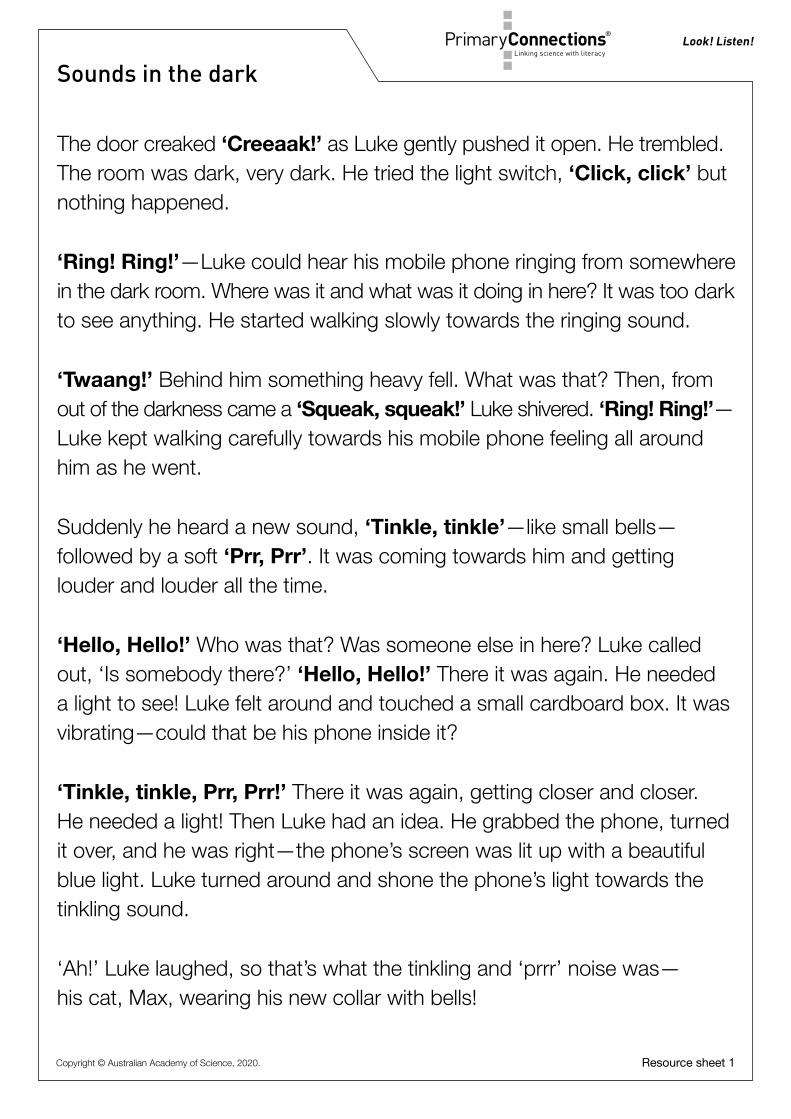
carefully and imagine what might be happening. Read the story ‘Sounds in the dark’ (Resource sheet 1), emphasising each of the sounds.
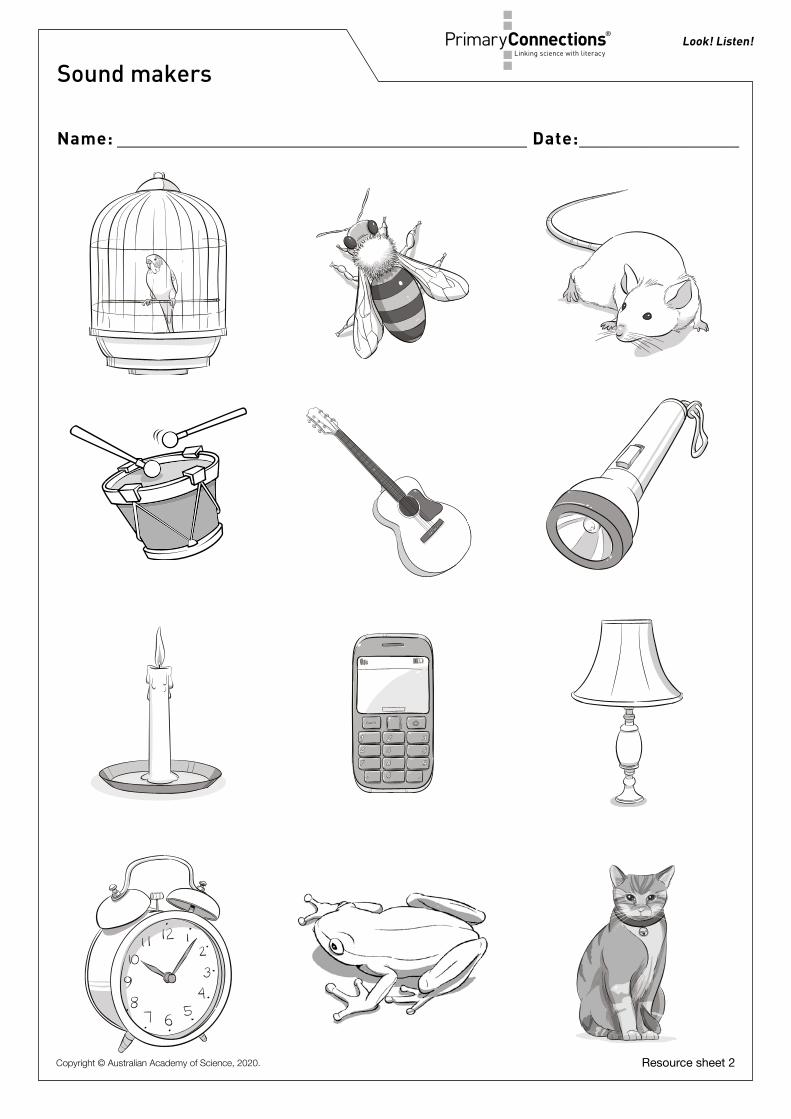
2 Introduce an enlarged copy of ‘Sound makers’ (Resource sheet 2). Discuss the pictures. Distribute a copy of ‘Sound makers’ (Resource sheet 2) to each student. Tell students that you are going to read the story again while they circle the pictures of the things they think made each of the sounds that Luke heard.
3 Allow time for students to complete the activity. Then ask students to put a cross above the pictures of objects that produce light that might have helped Luke to see.
4 Discuss the story with students asking questions, such as:• Why couldn’t Luke see what was making the sounds in the room?• What things do you think were in the room making those sounds? Why?• Why could Luke see when he used the phone?• What else could Luke have used for light in the room?
5 Record students’ ideas about sounds and light in the class science journal. Introduce the purpose and features of a science journal.
Literacy focus
Why do we use a science journal?We use a science journal to record what we see, hear, feel and think so that we can look at it later.
What does a science journal include?A science journal includes dates and times. It might include written text, drawings, measurements, labelled diagrams, photographs, tables and graphs.
Note: In the Engage phase, do not provide any formal definitions or correct students’ answers as the purpose is to elicit students’ prior knowledge.
Lesson 1 Scary sounds4
PrimaryConnections E
NG
AG
E
6 Ask students to think about how we see and hear. Ask questions, such as:• Where does sound come from?• How do we hear sounds?• How does sound get to our ears?• How do we see things? What do we need to see?• Where does light come from?Add students’ ideas to the class science journal.
7 Draw students’ attention to the word wall and discuss its purpose and features.
Literacy focus
Why do we use a word wall?We use a word wall to record words we know or learn about a topic. We display the word wall in the classroom so that we can look up words we are learning about and see how they are spelt.
What does a word wall include?A word wall includes a topic title or picture and words that we have seen or heard about the topic.
Ask students what words from today’s lesson would be useful to place on the word wall. Use words and images.
Curriculum linksScience
• Use pre-recorded sounds for students to listen to and identify.
The Arts• Sing songs about sounds, for example, The Marvellous Toy.
Look! Listen!
Copyright © Australian Academy of Science, 2020.
PrimaryConnections
Resource sheet 1
Sounds in the dark
The door creaked ‘Creeaak!’ as Luke gently pushed it open. He trembled. The room was dark, very dark. He tried the light switch, ‘Click, click’ but nothing happened.
‘Ring! Ring!’—Luke could hear his mobile phone ringing from somewhere in the dark room. Where was it and what was it doing in here? It was too dark to see anything. He started walking slowly towards the ringing sound.
‘Twaang!’ Behind him something heavy fell. What was that? Then, from out of the darkness came a ‘Squeak, squeak!’ Luke shivered. ‘Ring! Ring!’—Luke kept walking carefully towards his mobile phone feeling all around him as he went.
Suddenly he heard a new sound, ‘Tinkle, tinkle’—like small bells—followed by a soft ‘Prr, Prr’. It was coming towards him and getting louder and louder all the time.
‘Hello, Hello!’ Who was that? Was someone else in here? Luke called out, ‘Is somebody there?’ ‘Hello, Hello!’ There it was again. He needed a light to see! Luke felt around and touched a small cardboard box. It was vibrating—could that be his phone inside it?
‘Tinkle, tinkle, Prr, Prr!’ There it was again, getting closer and closer. He needed a light! Then Luke had an idea. He grabbed the phone, turned it over, and he was right—the phone’s screen was lit up with a beautiful blue light. Luke turned around and shone the phone’s light towards the tinkling sound.
‘Ah!’ Luke laughed, so that’s what the tinkling and ‘prrr’ noise was— his cat, Max, wearing his new collar with bells!
Resource sheet 2
Look! Listen!
Name: _________________________________________ Date:________________
Sound makers
Copyright © Australian Academy of Science, 2020.
Lesson 2 Light and sound search 7
EX
PLO
RE
Lesson 2 Light and sound searchName: _________________________________________ Date:________________
AT A GLANCE
To provide students with hands-on, shared experiences of things that produce light and sound.
Session 1 School sounds
Students:
• identify and describe things that produce sounds inside and outside the classroom• contribute to a class book on sounds.
Session 2 Where’s the light?
Students:
• identify and describe things that produce light inside and outside the classroom.
Session 3 Light and sound at home
Students:
• observe how light and sound are used at home.
Lesson focusThe Explore phase is designed to provide students with hands-on experiences of the science phenomenon. Students explore ideas, collect evidence, discuss their observations and keep records, such as science journal entries. The Explore phase ensures all students have a shared experience that can be discussed and explained in the Explain phase.
Assessment focusFormative assessment is an ongoing aspect of the Explore phase. It involves monitoring students’ developing understanding and giving feedback that extends their learning. In this lesson you will monitor students’ developing understanding of how: • light and sound are produced by a range of sources and can be sensed.
You will also monitor their developing science inquiry skills (see page xi).
Lesson 2 Light and sound search8
PrimaryConnections E
XP
LOR
E
Key lesson outcomesScience
Students will be able to:
• identify sources of sounds intheir environment
• identify sources of light intheir environment
• locate light and dark places
• contribute to discussions about lightand sound and how they are producedand sensed.
Literacy
Students will be able to:
• identify the purpose and features ofa table
• identify the purpose and features of anannotated drawing
• create an annotated drawing torepresent ideas about producersof sounds
• create a drawing to represent ideasabout light and dark places
• identify questions about lightand sound.
This lesson also provides opportunities to monitor the development of students’ general capabilities (highlighted through icons, see page xii).
Session 1 School sounds
Equipment
FOR THE CLASS FOR EACH STUDENT
• class science journal• word wall• optional: digital camera
• student science journal• 1 x A5 sheet of paper
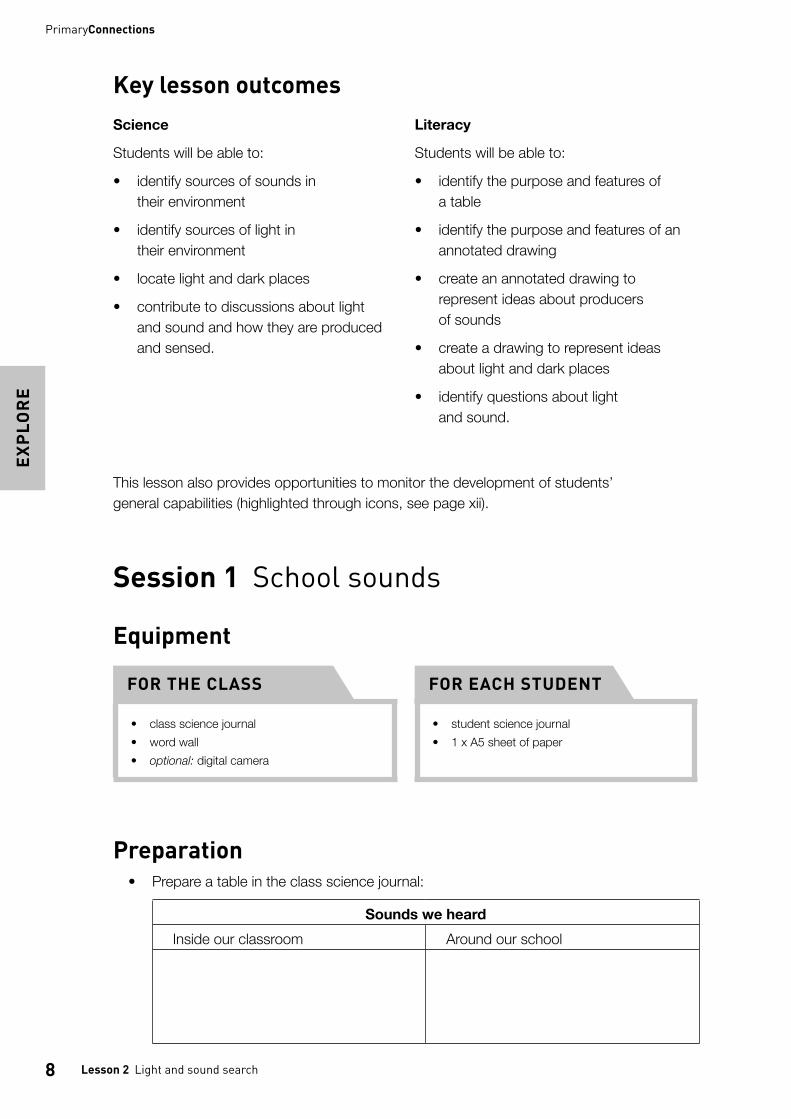
Preparation• Prepare a table in the class science journal:
Sounds we heardInside our classroom Around our school

9Lesson 2 Light and sound search
PrimaryConnections Look! Listen!
EX
PLO
RE
Lesson steps 1 Review the previous lesson focusing on the sounds that were produced by different
objects. 2 Explain to students that they are going to listen to the sounds that are being made
around them. Introduce the table in the class science journal ‘Sounds we heard’ (see ‘Preparation’). Discuss the purpose and features of a table.
Literacy focus
Why do we use a table?We use a table to organise information so that we can understand it more easily.
What does a table include?A table includes a title, columns with headings and information organised under each heading.
3 Ask students to close their eyes and sit quietly for approximately thirty seconds and to put their hands up when they hear a sound. Ask students to open their eyes and share what they heard. List students’ responses under the ‘Inside our classroom’ section of the table.
4 Ask students questions, such as:• What was the sound like? (Loud or soft, high or low.)• What do you think made that sound?• How do you think that sound was made?
5 Explain to students that they will be going for a walk around the school to listen for more sounds. Ask students to predict what sounds they might hear in different places around the school. (Office—telephone ringing, computer keyboard tapping; basketball courts—balls bouncing; oval—sprinklers swishing, birds twittering.)
6 Take students for a walk around the school to listen for sounds. Optional: Take photos of the sources of sounds to use in the class science journal,
word wall or to create a class ‘Sounds’ book. 7 List students’ responses of sounds they heard around the school in the table in the
class science journal. Discuss the sounds asking questions, such as:• Which sounds did you predict that you would hear?• Which sounds did you hear that you didn’t expect to hear?• How were those sounds made?
8 Ask students to choose one of the listed sounds in the table to draw. Ensure each of the sounds is represented. Ask students to print the words to describe the sound next to the drawing. Discuss the purpose and features of an annotated drawing.
Lesson 2 Light and sound search10
PrimaryConnections E
XP
LOR
E
Literacy focus
Why do we use an annotated drawing?We use an annotated drawing to show an idea or object.
What does an annotated drawing include?An annotated drawing includes a picture and words or descriptions about the idea or object.
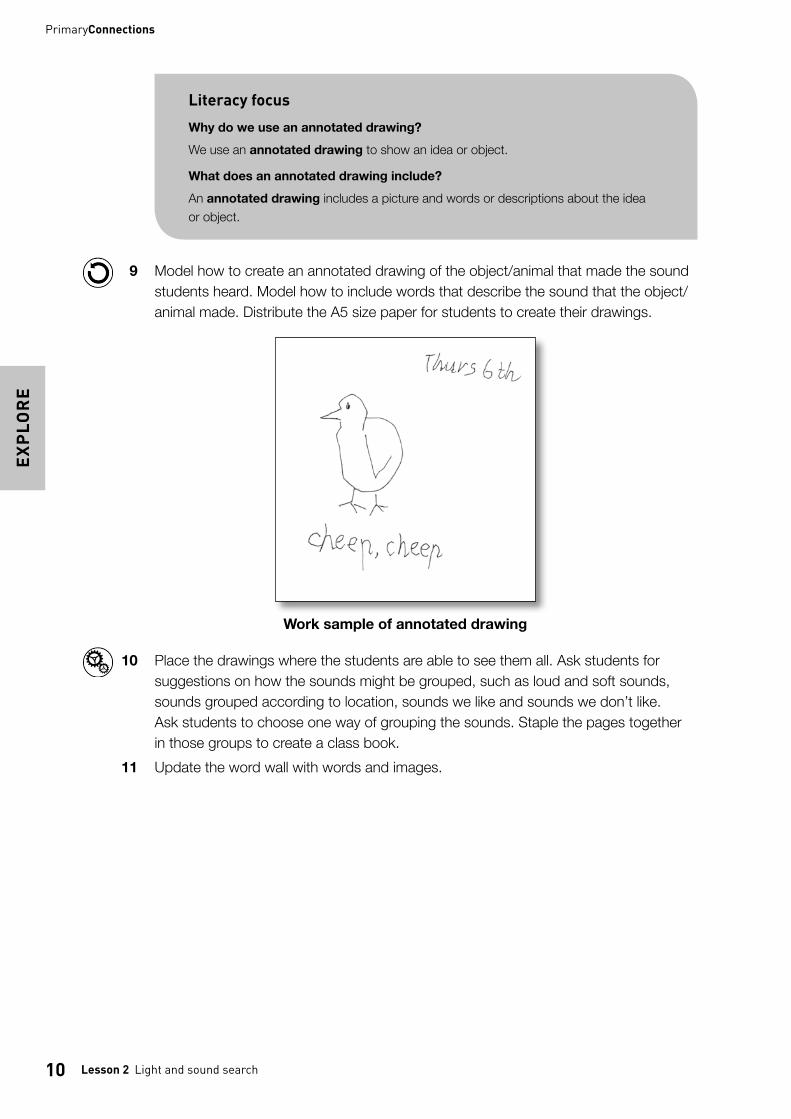
9 Model how to create an annotated drawing of the object/animal that made the sound students heard. Model how to include words that describe the sound that the object/animal made. Distribute the A5 size paper for students to create their drawings.
Work sample of annotated drawing
10 Place the drawings where the students are able to see them all. Ask students for suggestions on how the sounds might be grouped, such as loud and soft sounds, sounds grouped according to location, sounds we like and sounds we don’t like. Ask students to choose one way of grouping the sounds. Staple the pages together in those groups to create a class book.
11 Update the word wall with words and images.
11Lesson 2 Light and sound search
PrimaryConnections Look! Listen!
EX
PLO
RE
Session 2 Where’s the light?
Equipment
FOR THE CLASS FOR EACH STUDENT
• class science journal• word wall• 1 enlarged copy of ‘Light and dark’
(Resource sheet 3)• optional: digital camera
• student science journal• 1 copy of ‘Light and dark’
(Resource sheet 3)
Preparation• Locate places around the school that are very dark or very light.
• Optional: Display ‘Light and dark’ (Resource sheet 3) in a digital format.
Lesson steps 1 Turn off the classroom lights and ask students questions, such as:
• What has happened to the light in the room? (It is a bit/a lot darker.)• Can we still see without the lights on? Why or why not?• Where else is light coming from?
2 Ask students if there are places in the classroom that are very dark, such as inside the cupboard or inside the storeroom. List responses in the class science journal. Discuss why those places are dark.
3 Tell students that they will be going for a walk around the school to look for places that are very light and for places that are very dark. Ask students to predict what places around the school are light and those that are dark. Ask students why they think that. (I think it is very light in the art room because there are lots of windows where the sunlight comes in. I think it is very dark in the sports shed because there are no windows.)
4 Take students for a walk around the school to look for light and dark places. At each location discuss why there is a lot of light (sunlight streaming in, plenty of lights) or why it is very dark (no windows to let sunlight in, no lights turned on, sunlight blocked by a wall).
Optional: Take photos of the sources of light to use in the class science journal, word wall or to create a class ‘Light and dark’ book.
Lesson 2 Light and sound search12
PrimaryConnections E
XP
LOR
E
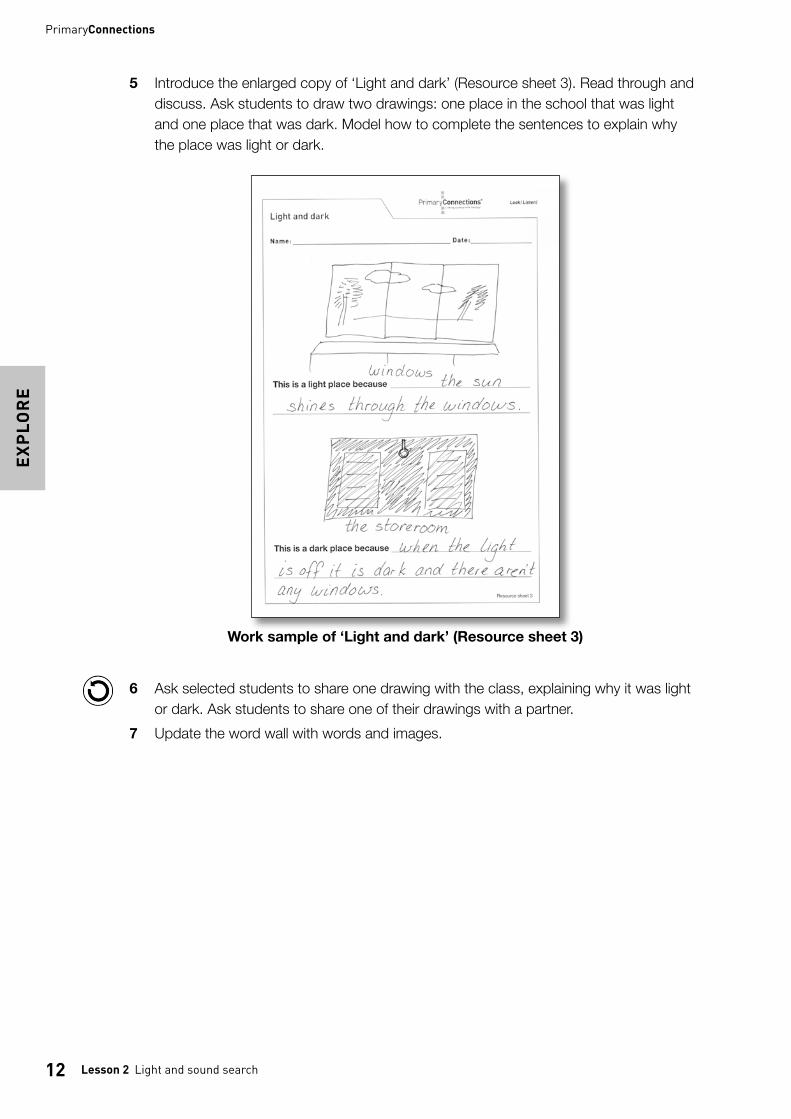
5 Introduce the enlarged copy of ‘Light and dark’ (Resource sheet 3). Read through and discuss. Ask students to draw two drawings: one place in the school that was light and one place that was dark. Model how to complete the sentences to explain why the place was light or dark.
6 Ask selected students to share one drawing with the class, explaining why it was light or dark. Ask students to share one of their drawings with a partner.
7 Update the word wall with words and images.
Work sample of ‘Light and dark’ (Resource sheet 3)
Look! Listen!
Name: _________________________________________ Date:________________
PrimaryConnections
Resource sheet 3
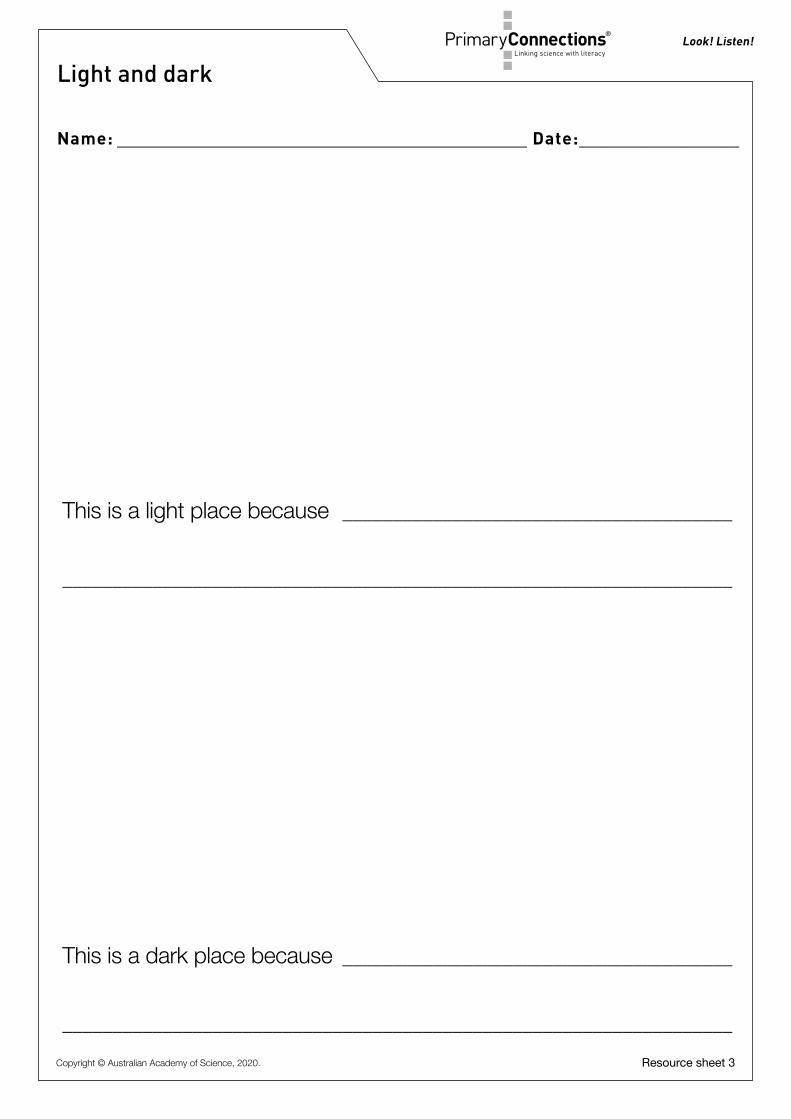
Light and dark
This is a light place because _______________________________________
___________________________________________________________________
This is a dark place because _______________________________________
___________________________________________________________________
Copyright © Australian Academy of Science, 2020.
Lesson 2 Light and sound search14
PrimaryConnections E
XP
LOR
E
Session 3 Light and sound at home
Equipment
FOR THE CLASS FOR EACH STUDENT
• class science journal• ‘Light and sound’ collection’ table
(see ‘Preparation’)• word wall• 1 enlarged copy of ‘Information note for
families’ (Resource sheet 4)
• student science journal• 1 copy of ‘Information note for families’
(Resource sheet 4)
Preparation• Set up a ‘Light and sound collection’ table for students to place objects brought from
home.
• Optional: To minimise repeated items on the table, ask groups of students to bring indifferent objects according to the rooms in the house or the type of sound, such asloud or soft, helpful or for playing games.
• Optional: Display ‘Information note for families’ (Resource sheet 4) in a digital format.
Lesson steps 1 Ask students to think of things at home that produce light and sound, such as car
horns, smoke alarms and television sets. Record students’ responses in the class science journal.
2 Invite students to bring in items from home that produce sound and/or light. This could be an object, a photo or a drawing. Discuss examples of what they might bring. Examples include a bicycle bell, a baby monitor, a torch, a magnifying glass with light, a clock, a small radio, wind up and battery toys, a tuning fork or a whistle.
3 Introduce the enlarged copy of ‘Information note for parents’ (Resource sheet 4) and discuss the types of things that students might do in the ‘Tasks to do’ section.
4 Show students the ‘Light and sound collection’ table where their items, drawings and photos will be placed.
5 Distribute ‘Information note for parents’ (Resource sheet 4) to students. 6 Update the word wall with words and images.
15Lesson 2 Light and sound search
PrimaryConnections Look! Listen!
EX
PLO
RE
Curriculum linksScience
• List the sounds that different animals make. For example, find out how bees buzz or make a mobile for each animal and attach information about its sound.
English• Read stories about sounds, for example, Too much noise! by Ann McGovern.
• Discuss how signals, signs and pictures are used instead of sound, for example, raisingyour hand at the start of a race before blowing a whistle to indicate ‘go’.
Mathematics• Sort sounds, as identified by students, into three groups based on the length of time
they last:
— sounds that start and stop quickly, for example, a party popper or doorbell
— sounds that continue for a short time, for example, a balloon deflating
— sounds that keep going for some time, for example, a fire alarm.
Studies of Society and Environment• Discuss the ways that sound is used, such as for entertainment, communication
and safety.
Health and Physical Education• Discuss how hearing impaired people use hearing aids and other devices.
Indigenous perspectives• Indigenous people have lived in Australia for thousands of years, developing a deep
knowledge of Australian flora and fauna. Indigenous names for Australian birds originatefrom the sounds and calls they make, for example, the Noongar (southwest WesternAustralia) name for the willy wagtail is djidi djidi.
• PrimaryConnections recommends working with Aboriginal and Torres Strait Islandercommunity members to access local and relevant cultural perspectives. Protocols forengaging with Aboriginal and Torres Strait Islander community members are providedin state and territory education guidelines. Links to these are provided on thePrimaryConnections website (www.primaryconnections.org.au).
Look! Listen!
Name: _________________________________________ Date:________________
Resource sheet 4
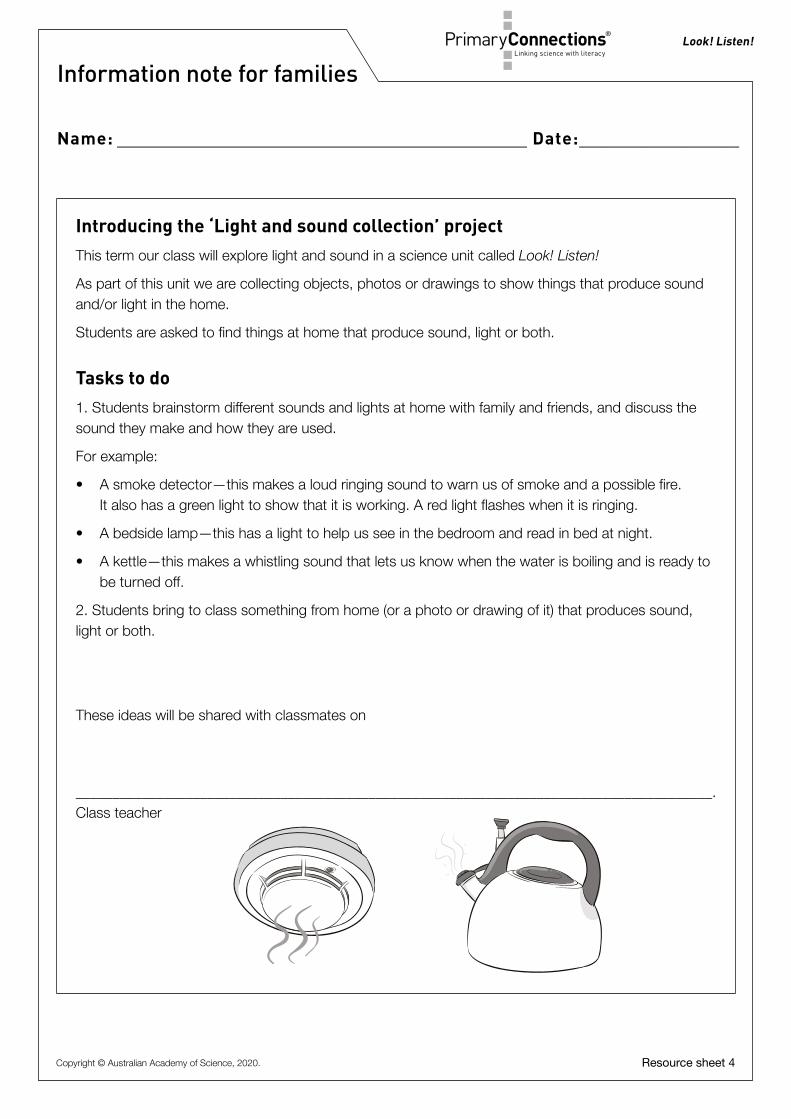
Information note for families
Introducing the ‘Light and sound collection’ projectThis term our class will explore light and sound in a science unit called Look! Listen!
As part of this unit we are collecting objects, photos or drawings to show things that produce sound and/or light in the home.
Students are asked to find things at home that produce sound, light or both.
Tasks to do1. Students brainstorm different sounds and lights at home with family and friends, and discuss thesound they make and how they are used.
For example:
• A smoke detector—this makes a loud ringing sound to warn us of smoke and a possible fire.It also has a green light to show that it is working. A red light flashes when it is ringing.
• A bedside lamp—this has a light to help us see in the bedroom and read in bed at night.
• A kettle—this makes a whistling sound that lets us know when the water is boiling and is ready tobe turned off.
2. Students bring to class something from home (or a photo or drawing of it) that produces sound,light or both.
These ideas will be shared with classmates on
_______________________________________________________________________________________.Class teacher
Copyright © Australian Academy of Science, 2020.
17
EX
PLO
RE
Lesson 3 Good vibrations
Lesson 3 Good vibrationsName: _________________________________________ Date:________________
AT A GLANCE
To provide students with hands-on, shared experiences of how vibrations cause sound, which can be sensed.
Students:
• feel vibrations made by various objects as they produce sound.
Lesson focusThe Explore phase is designed to provide students with hands-on experiences of the science phenomenon. Students explore ideas, collect evidence, discuss their observations and keep records, such as science journal entries. The Explore phase ensures all students have a shared experience that can be discussed and explained in the Explain phase.
Assessment focusFormative assessment is an ongoing aspect of the Explore phase. It involves monitoring students’ developing understanding and giving feedback that extends their learning. In this lesson you will monitor students’ developing understanding of: • objects that produce sound and how those objects vibrate for sound to occur.
You will also monitor their developing science inquiry skills (see page xi).
Key lesson outcomesScience
Students will be able to:
• describe how vibrations produce sounds
• identify objects that produce sound.
Literacy
Students will be able to:
• contribute to discussions about soundsand vibrations
• record ideas in a science journal.
This lesson also provides opportunities to monitor the development of students’ general capabilities (highlighted through icons, see page xii).
Lesson 3 Good vibrations18
PrimaryConnections E
XP
LOR
E
Teacher background informationVibrationsObjects need to vibrate for sound to occur. The action causing the vibration provides the energy for sound to be produced. Hitting a surface, plucking a string and blowing a reed are all movements that give energy to an object and cause it to vibrate. A vibrating object pushes the substance, for example, air, around it, then pulls away, then pushes again and then pulls away again in quick succession. This creates pressure waves in the surrounding substance, which can be gas, solid or liquid.
The gas, solid or liquid around a vibrating object is made of molecules. The molecules closest to the vibrating object are pushed by the object’s movement. These molecules in turn push the molecules around them, transferring their energy. When looking at a loud speaker cone, you can see the speaker move as the electric driving force pushes it and causes it to push the air.
Loudness of soundThe more movement (energy) the original sound source has, the more pressure difference there is in the waves produced and the louder the sound created will be. For example, hitting a drum harder makes the sound produced louder.
The intensity or loudness of a sound, sometimes called volume, depends on how much energy the vibrating object transfers to the sound wave. If a large amount of energy is transferred the difference between high-pressure zones and low-pressure zones is large and the sound produced is loud. This is the amplitude or size of the pressure wave.
Equipment
FOR THE CLASS FOR EACH STUDENT
• class science journal• ‘Light and sound collection’ table• word wall• 2 mobile phones• 1 small cardboard box• 1 guitar (or other string instrument)• optional: tambourine and a teaspoon of rice
• student science journal• 1 balloon per pair of students
Preparation• Find a cardboard box that can be closed. Place a mobile phone in it that has sound and
vibrate selected. Have a second phone ready to call the number of the one in the box.
• Blow up a balloon for each pair of students and some spares for the class.
19Lesson 3 Good vibrations
PrimaryConnections Look! Listen!
EX
PLO
RE
Lesson steps 1 Review the previous lessons, referring to the word wall and the class science journal,
focusing students’ attention on how sound is produced and used. 2 Ask students to think back to the story ‘Sounds in the dark’ (Resource sheet 1).
Ask students if they can remember how Luke knew that his phone was in the box. (The box was vibrating.)
3 Introduce the box with mobile phone inside. Ring the phone and ask students to hold the box and describe what they can feel.
4 Invite students to hum with their hand placed gently on the front of their own necks. Ask students to say ‘Hello, hello’ and a few lines of a song the class knows. Ask them what they can feel happening. Ask students what happens when they stop talking or singing.
5 Introduce the term vibrate to describe what they felt on their neck. Add the terms vibrate and vibrations to the word wall.
Note: Students will also feel the larynx move up and down. This can also be felt when students swallow. Explain that vibrations make only the buzzing feeling produced when talking, not the big movement felt when swallowing.
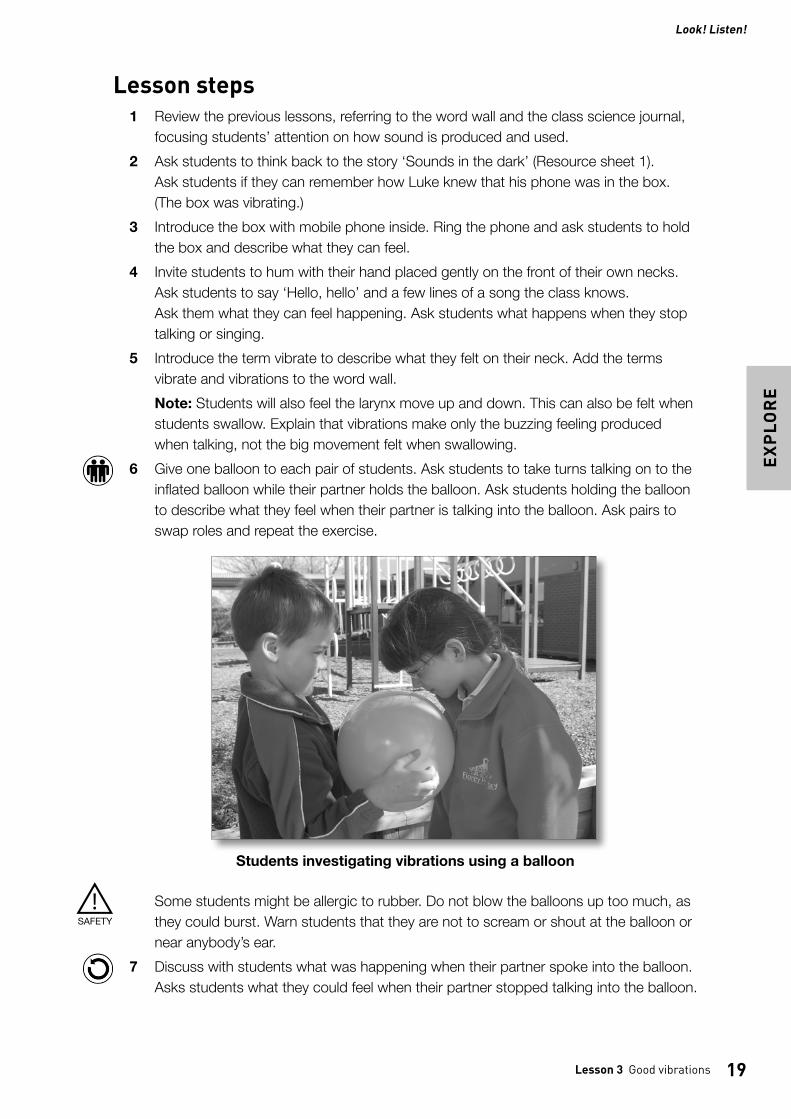
6 Give one balloon to each pair of students. Ask students to take turns talking on to the inflated balloon while their partner holds the balloon. Ask students holding the balloon to describe what they feel when their partner is talking into the balloon. Ask pairs to swap roles and repeat the exercise.
Students investigating vibrations using a balloon
Some students might be allergic to rubber. Do not blow the balloons up too much, as they could burst. Warn students that they are not to scream or shout at the balloon or near anybody’s ear.
7 Discuss with students what was happening when their partner spoke into the balloon. Asks students what they could feel when their partner stopped talking into the balloon.
Lesson 3 Good vibrations20
PrimaryConnections E
XP
LOR
E
8 Optional: Introduce the tambourine, and sprinkle rice on the surface. Ask students to observe the rice when you tap the tambourine. Ask students to describe what they see.
9 Introduce a guitar or other string instrument to the class. Ask students to remember the ‘twang’ sound made by the guitar in the story ‘Sounds in the dark’. Ask a couple of students to place their fingers over a string of the guitar while you pluck it. Ask students what they feel. Repeat, allowing others students to feel the string vibrate.
10 Ask students what they can say about sound and vibrations after completing the activities. For example, when things vibrate they make sounds. Ask students how we know that. (Because we felt our throat vibrate when we hummed, the balloon vibrated when we talked into it and the guitar string vibrated when it was plucked.)
11 Invite students to record and complete the following in their science journals using words and pictures:• Today I learned …• I know this because …• I am wondering about …
12 Discuss any objects, photographs or drawings that students have brought in for the ‘Light and sound collection’ table.
13 Update the word wall with words and images.
Curriculum linksScience
• Make string telephones using large paper cups and string. Ensure the string is really tightfor the telephone to work.
English• Explore onomatopoeia with words such as bang, sizzle and hoot.
21Lesson 4 Sounds on the move
EX
PLO
RE
Lesson 4 Sounds on the move
PrimaryConnections
AT A GLANCE
To provide students with hands-on, shared experiences of sound travelling through materials.
Students:
• explore the difference between sound transmission through air and through solids.
Lesson focusThe Explore phase is designed to provide students with hands-on experiences of the science phenomenon. Students explore ideas, collect evidence, discuss their observations and keep records, such as science journal entries. The Explore phase ensures all students have a shared experience that can be discussed and explained in the Explain phase.
Assessment focusFormative assessment is an ongoing aspect of the Explore phase. It involves monitoring students’ developing understanding and giving feedback that extends their learning. In this lesson you will monitor students’ developing understanding of how: • sound is produced by a range of sources and can be sensed. You
will also monitor their developing science inquiry skills (see page xi).
Key lesson outcomesScience
Students will be able to:
• describe the difference between soundtravelling through air and solids
• identify materials through which soundtravels, for example, air and solids
• compare the transmission of soundthrough different materials
• explain that sounds need to reach theirouter ear to be heard.
Literacy
Students will be able to:
• follow a series of oral instructions
• join in a group discussion describingtheir own ideas about how soundtravels
• make and describe a drawing thatrepresents their experiences of sound.
This lesson also provides opportunities to monitor the development of students’ general capabilities (highlighted through icons, see page xii).
Lesson 4 Sounds on the move22
PrimaryConnections E
XP
LOR
E
Teacher background informationSound cannot exist without something to travel through. When an object vibrates, it pushes the molecules around it, and these molecules push others in turn. The waves of pressure travelling through the substance are what our ear interprets as sound. Therefore, sound needs a substance to travel through. The transmission of sound depends on the properties of the materials it passes through.
How well sound travels through a given material is variable. Solids have molecules that are packed together tightly, so sound travels faster, further and more effectively through some solids, such as string, wood or wire, that transmit sound well, than through air.
Sounds travelling through solids also dissipate less than those travelling through air, so the same sound will be audible at a distance through a solid but not necessarily at the same distance through the air.
Sound travels much, much slower than light, at approximately 340 metres a second through air. We can use the time between seeing a lightning strike and hearing the thunder to tell us how far away the lightning is. A delay of three seconds indicates that lightning is approximately 1000 metres or one kilometre away.
Equipment
FOR THE CLASS FOR EACH TEAM
• class science journal• ‘Light and sound collection’ table• team roles chart• team skills chart• word wall• 1 wire coat hanger• 2 x 40 cm pieces of string
• each team member’s science journal• role wristbands or badges for Manager
and Speaker• 1 wire coat hanger• 2 x 40 cm pieces of string
Preparation• Read ‘How to organise collaborative learning teams (F–Year 2)’ (Appendix 1). Display an
enlarged copy of the team skills chart and the team roles chart in the classroom. Preparerole wristbands or badges for Managers and Speakers, and the equipment table.
• Tie two 40 cm pieces of string to each team’s coat hanger and the class coat hanger(see Lesson step 9). Test its use.
23Lesson 4 Sounds on the move
PrimaryConnections Look! Listen!
EX
PLO
RE
Lesson steps 1 Review the previous lessons, referring to the information about sound and vibrations
on the word wall. 2 Discuss with students how light can travel through some objects, for example, glass
panes, and not through others, for example, blindfolds. Discuss how to tell if light can travel through an object, for example, because you can see it.
3 Ask students whether they think sound can travel through solid objects and why they think that. Explain to students that they are going to explore ways that sound travels using their body.
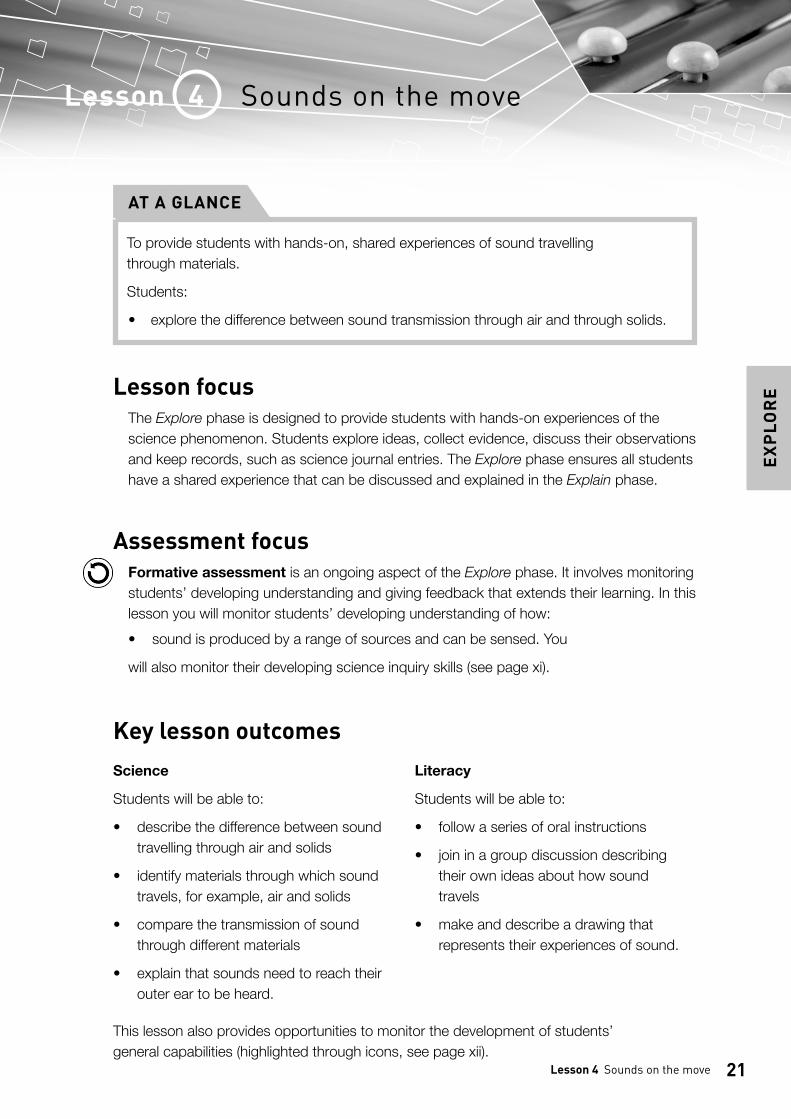
4 Model how to bend your arm so that you can touch your elbow with your other hand and point your index finger in the air. Ask students to do the same and then to tap on their elbow with a finger from their other hand, and listen carefully to the sound that they are making. Ask students:• What sound can you hear?• Where is the sound coming from?• How is the sound getting from your elbow to your ear? (Through my arm and then
the air.)
Student tapping her elbow with her finger in the air
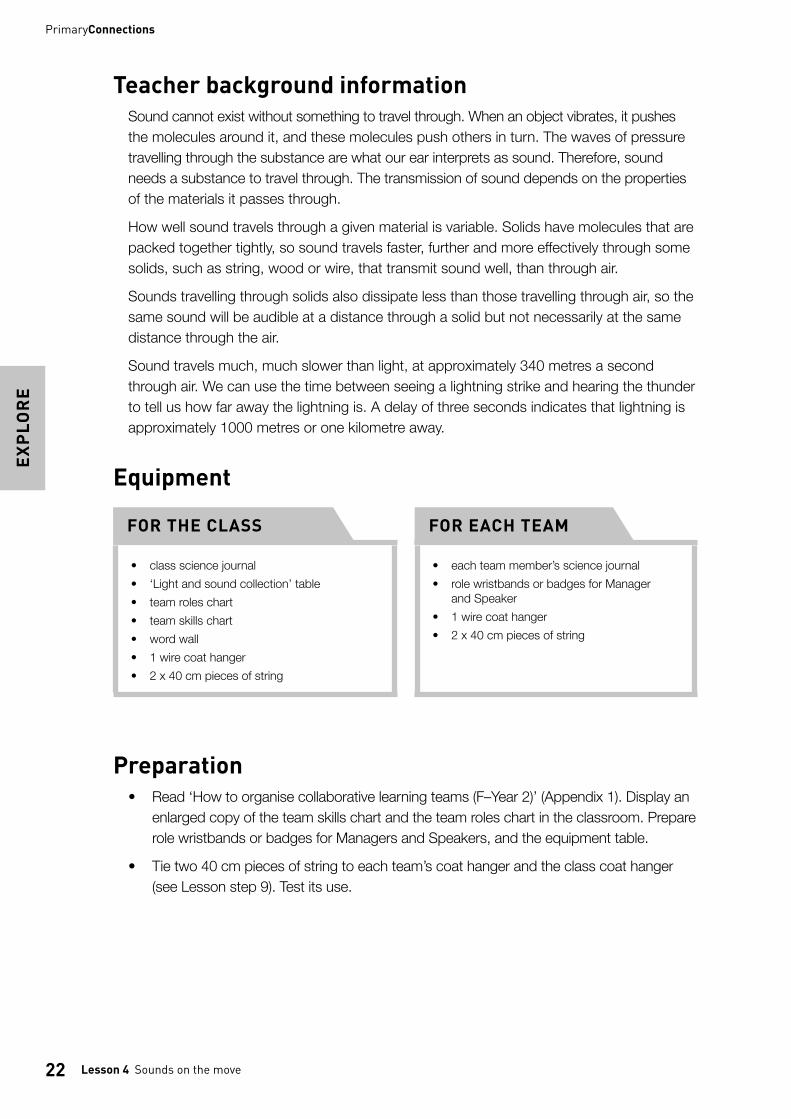
5 Model how to tap your elbow in the same way, but this time, place your finger on the fleshy part in the front of your ear (not inside the ear) and invite students to do the same. Ask students:• What sound can you hear?• Where is the sound coming from?• How is the sound getting from your elbow to your ear? (Through my arm.)
Lesson 4 Sounds on the move24
PrimaryConnections E
XP
LOR
E
During this activity, remind students to place their finger on their outer ear to hear the difference and to be careful not to put their finger inside their ears as this may cause damage.
6 Allow students the opportunity to repeat steps 3 and 4 so they can hear the difference between the sounds.
7 Lead a class discussion about students’ observations during this activity. Ask questions, such as: • Did the sound change? How did it change? (It was louder the second time.)• Why were the sounds different? (One travelled through my arm to my ear and the
other travelled through my arm and through the air to my ear.) 8 Explain that students will be working in collaborative learning teams to further explore
the way sound travels to their ears.If students are using collaborative learning teams for the first time, introduce and explain the team skills chart and team roles chart. Explain that students will wear role wristbands or badges to help them (and you) know which role each team member should be doing.Show students the equipment table and discuss its use. Explain that this table is where Managers will collect and return equipment.
9 Explain that teams will be using a wire coat hanger to make sounds. Model how to hold the coat hanger by the two pieces of string and tap it against a hard surface, or tap the coat hanger with something hard, for example, a pencil. Then model how to wrap the string over their ears and tap the coat hanger again. Explain that students will take it in turns to tap the coat hanger and describe the sound to their team member.
Student tapping his elbow with his finger on his ear
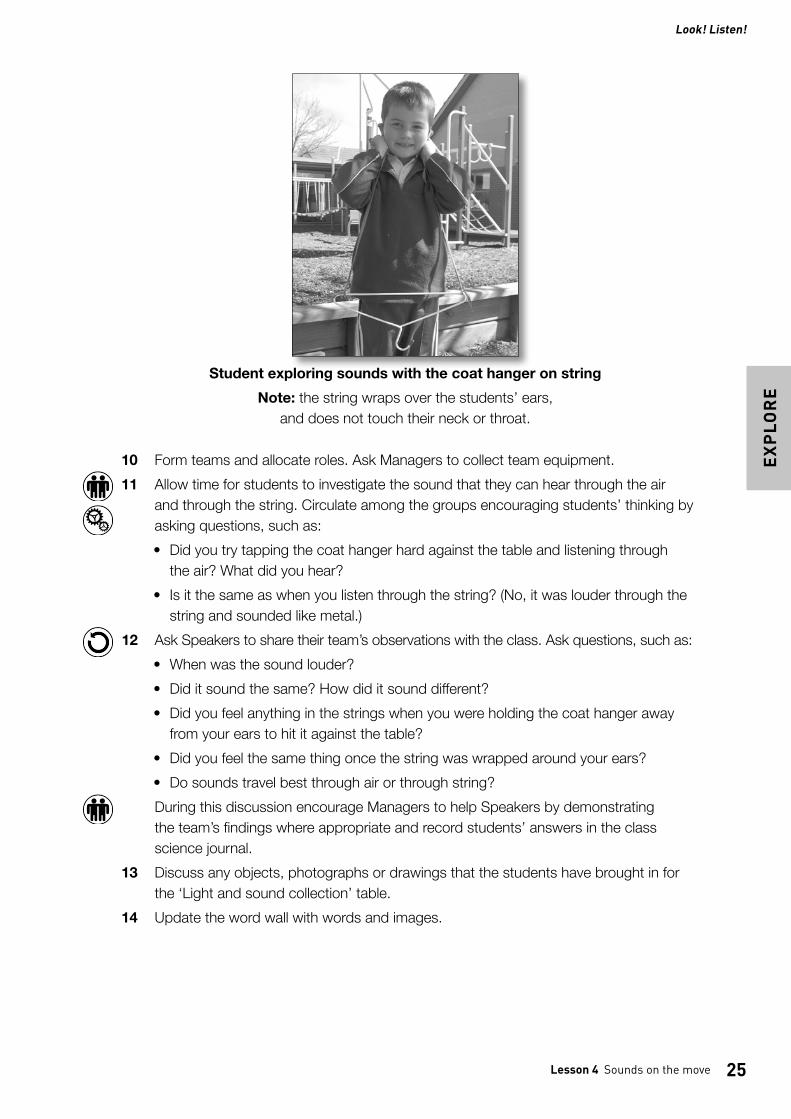
25Lesson 4 Sounds on the move
PrimaryConnections Look! Listen!
EX
PLO
RE
10 Form teams and allocate roles. Ask Managers to collect team equipment. 11 Allow time for students to investigate the sound that they can hear through the air
and through the string. Circulate among the groups encouraging students’ thinking by asking questions, such as:• Did you try tapping the coat hanger hard against the table and listening through
the air? What did you hear?• Is it the same as when you listen through the string? (No, it was louder through the
string and sounded like metal.) 12 Ask Speakers to share their team’s observations with the class. Ask questions, such as:
• When was the sound louder?• Did it sound the same? How did it sound different?• Did you feel anything in the strings when you were holding the coat hanger away
from your ears to hit it against the table?• Did you feel the same thing once the string was wrapped around your ears?• Do sounds travel best through air or through string?During this discussion encourage Managers to help Speakers by demonstratingthe team’s findings where appropriate and record students’ answers in the classscience journal.
13 Discuss any objects, photographs or drawings that the students have brought in for the ‘Light and sound collection’ table.
14 Update the word wall with words and images.
Student exploring sounds with the coat hanger on stringNote: the string wraps over the students’ ears,
and does not touch their neck or throat.
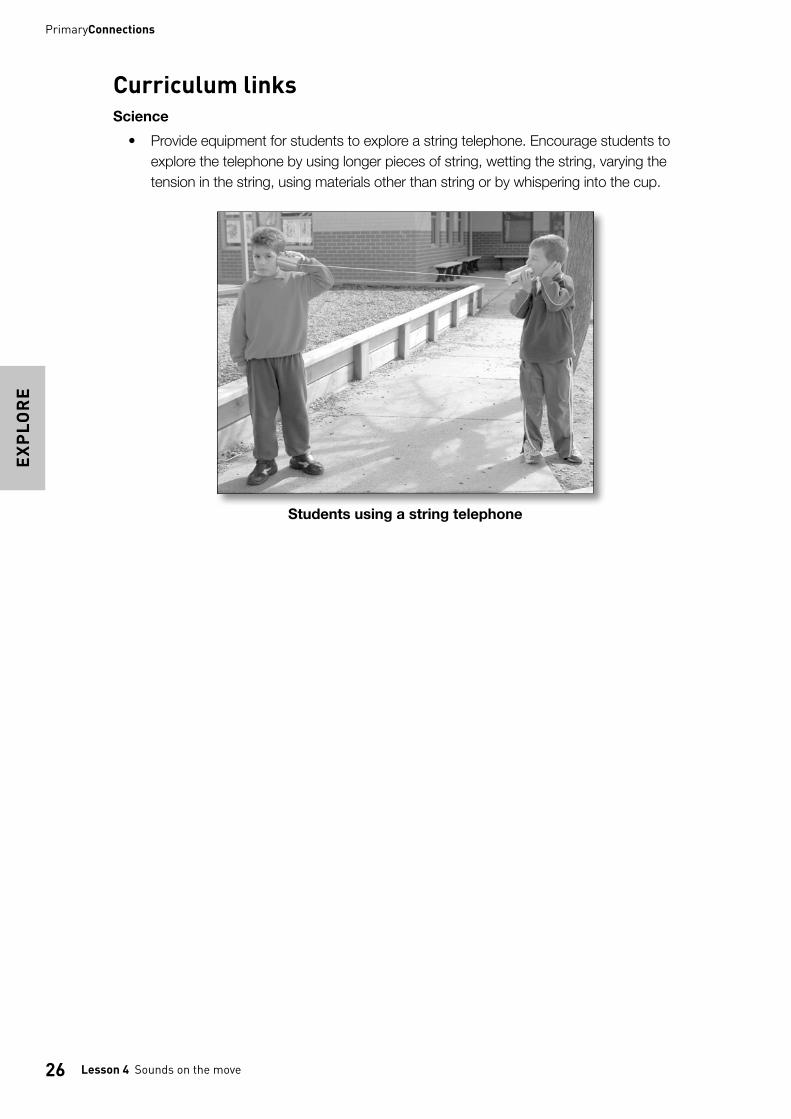
Lesson 4 Sounds on the move26
PrimaryConnections E
XP
LOR
E
Curriculum linksScience
• Provide equipment for students to explore a string telephone. Encourage students toexplore the telephone by using longer pieces of string, wetting the string, varying thetension in the string, using materials other than string or by whispering into the cup.
Students using a string telephone

27Lesson 5 Sensing light
EX
PLO
RE
EX
PLO
RE
Lesson 5 Sensing light
PrimaryConnections
AT A GLANCE
To provide students with hands-on, shared experiences of how light is needed to see things.
Students:
• explore a peek box with and without light.
Lesson focusThe Explore phase is designed to provide students with hands-on experiences of the science phenomenon. Students explore ideas, collect evidence, discuss their observations and keep records, such as science journal entries. The Explore phase ensures all students have a shared experience that can be discussed and explained in the Explain phase.
Assessment focusFormative assessment is an ongoing aspect of the Explore phase. It involves monitoring students’ developing understanding and giving feedback that extends their learning. In this lesson you will monitor students’ developing understanding of how: • light is necessary to help us see.
You will also monitor their developing science inquiry skills (see page xi).
Key lesson outcomesScience
Students will be able to:
• describe why we need light to see.
Literacy
Students will be able to:
• participate in discussions about light
• complete sentences revising what theyhave learned about light.
This lesson also provides opportunities to monitor the development of students’ general capabilities (highlighted through icons, see page xii).

Lesson 5 Sensing light28
PrimaryConnections E
XP
LOR
E
Teacher background informationSeeing the lightWe see objects when light travels from the object and enters our eyes. The object might give out light itself, such as a torch or a candle, or it might reflect light. For example, you can read this page because it is reflecting light from another source, such as sunlight through the window or an electric light. No rays leave our eyes. As light enters your eye, vision cells are activated which then create an electrical impulse that is sent to the brain.
In a dark room everything in it looks black. The appearance of black is merely a sign of the absence of light. When a room full of objects looks black, then the objects are neither generating nor reflecting light to your eyes.
Light comes from a variety of sources: primary sources, which generate or give out light directly, such as the Sun, stars, flames, light globes and computer screens; and secondary sources, such as the Moon and most objects that we see by daylight, which reflect light.
Students’ conceptionsSome students might think that light travels from their eyes to the object that they are looking at. Some students might think that bright and shiny materials create their own light and can be seen in the dark.
Equipment
FOR THE CLASS FOR EACH PAIR OF TEAMS
• class science journal• word wall• ‘Light and sound collection’ table
• each team member’s science journal• adhesive tac• collection of birthday cards or Christmas cards• 1 shoebox (see ‘Preparation’)• 1 torch
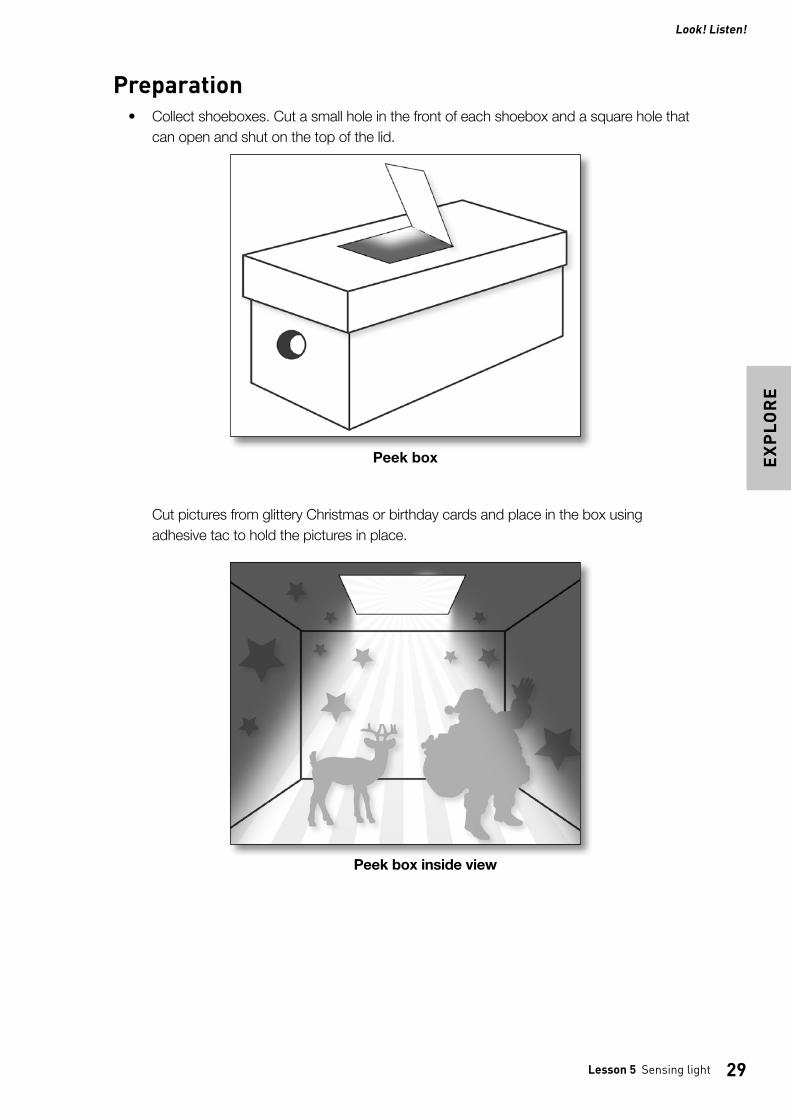
29Lesson 5 Sensing light
PrimaryConnections Look! Listen!
EX
PLO
RE
Preparation• Collect shoeboxes. Cut a small hole in the front of each shoebox and a square hole that
can open and shut on the top of the lid.
Peek box
Peek box inside view
Cut pictures from glittery Christmas or birthday cards and place in the box using adhesive tac to hold the pictures in place.
Lesson 5 Sensing light30
PrimaryConnections E
XP
LOR
E
Lesson steps 1 Revise the previous lesson, focusing on how sounds occur when things vibrate. 2 Remind students about the story ‘Sounds in the dark’ (Resource sheet 1) and what
Luke used to be able to see in the dark room when the main light wouldn’t work. Ask students what other things Luke could have used to help him see in the room.
3 Ask students if it is possible to see in a dark room. Ask students about shiny things—can we see them in a dark room?
4 Introduce the shoeboxes (see ‘Preparation’). Explain that each pair of teams will share one box. Ask students to predict what they think they will see when they look in the peephole (with top flap closed).
5 Form teams and allocate roles. Combine teams to make fours. Ask one of the Managers to collect a shoebox.
6 Ask teams to look into their shoebox and say what they can see (make sure the flap at the top is closed). Ask students why they can’t see anything. Ask what they could do to see the things in the box.
7 Ask students to open the top flap of the shoebox, look through the peephole again and describe what they can see. Ask students why they can see the pictures inside now that the flap is open. Ask students where the light is coming from that is getting in through the flap (sunlight, classroom light).
8 Ask students if there would be any difference to what they can see if they shine a torch into the box. Ask the other Manager of the combined team to collect a torch. Allow time for students to look at the pictures whilst shining a torch through the flaps.
9 Ask students what they can say about light after completing the activities. For example: ‘We need light to see.’ (Claim). Ask students how they know that. (Because we couldn’t see the pictures in the shoeboxes until we let light in through the flap.)Record students’ thoughts in the class science journal.
10 Invite students to record and complete the following in their science journal using words and pictures:• Today I learned …• I know this because …• I am wondering about …
11 Discuss any objects, photographs or drawings that students have brought in for the ‘Light and sound collection’ table.
12 Update the word wall with words and images.
Curriculum linksScience
• Students create their own peek boxes.
31Lesson 6 Travelling tales
EX
PLA
IN
Lesson 6 Travelling tales
PrimaryConnections
AT A GLANCE
To support students to represent and explain their understanding of how light and sound are produced and can be sensed, and to introduce current scientific views.
Students:
• represent their understanding of how light and sound travel using drawings
• role-play how sound travels
• role-play how light travels.
Lesson focusIn the Explain phase students develop a literacy product to represent their developing understanding. They discuss and identify patterns and relationships within their observations. Students consider the current views of scientists and deepen their own understanding.
Assessment focusFormative assessment is an ongoing aspect of the Explain phase. It involves monitoring students’ developing understanding and giving feedback that extends their learning. In this lesson you will monitor students’ developing understanding of how: • light and sound are produced by a range of sources and can be sensed.
You will also monitor their developing science inquiry skills (see page xi).
Lesson 6 Travelling tales32
PrimaryConnections E
XP
LAIN
Key lesson outcomesScience
Students will be able to:
• describe how sound travels from thesource to the ear
• describe how light travels from the sourceto the eye.
Literacy
Students will be able to:
• understand the purpose and featuresof a role-play
• use role-play to represent the journeyof light and sound
• represent their understanding ofthe journey of light and sound usingdrawings.
This lesson also provides opportunities to monitor the development of students’ general capabilities (highlighted through icons, see page xii).
Teacher background informationSoundSound is a pressure wave caused by a vibration moving through a material. Young students might have difficulty conceptualising how a sound can move through a material. Therefore, in this lesson, students will role-play the transmission of a sound wave in which shaking of body parts represents sound vibrations. The students stand in a line linking their hands to represent the particles in a material. When they feel one hand shaking, they should start shaking the other. This represents how the sound travels through materials.
An object that receives energy (from hitting, plucking or blowing) starts vibrating. These vibrations start pressure waves in all materials around the object that travel in all directions. The pressure waves travel easily through some materials, such as metals or wood, and are absorbed as they travel through other materials, for example, cottonwool. When the waves reach our ears, generally through air, we hear a sound. It is important to emphasise that air is the material through which most sound reaches our ears, as students do not see air or feel the vibrations in air. For a sound to be heard, it must reach our ears with enough energy to make the internal ear pieces vibrate.
LightWe see objects because light reflected from the object enters our eyes. To see, light must enter our eyes—light does not leave our eyes. We direct our vision to the point of interest; the light enters the eye and activates vision cells, which then create an electrical signal that is sent to the brain via nerves. Rays or arrows are used to show the direction that the light is travelling from the object to our eyes. Light from the object is either produced from it, such as a torch or candle, or reflected by the object, such as a book that is reflecting sunlight or the light from a light bulb.
33Lesson 6 Travelling tales
PrimaryConnections Look! Listen!
EX
PLA
IN
Students’ conceptionsYear 1 students’ conceptions about air might influence their understanding of how sound travels. Air is a gas made of particles and transmits sound. Sound does not travel in a vacuum or in space.
Students might believe that to see objects merely requires looking at or seeing the object and might not realise that light is needed for vision or the role that light plays. Some students might think that light goes from their eyes to the object and that is why they can see rather than the other way around.
Equipment
FOR THE CLASS FOR EACH STUDENT
• class science journal• word wall• ‘Light and sound collection’ table• 6 large cardboard arrows (see ‘Preparation’)• 1 large cardboard ear (see ‘Preparation’)• 1 large cardboard eye (see ‘Preparation’)• musical triangle• torch
• science journal
Preparation• Prepare two large cardboard cut outs of an ear and an eye and six large arrows.
Lesson steps 1 Review the class science journal, the word wall and the ‘Light and sound collection’
table asking questions, such as:• What have we learned about light?• What have we learned about sound?• How do you make a sound? (Cause a vibration.)• How do you stop something from making a sound? (Stop the vibration.)
2 Ask students to draw two pictures in their science journals.• A drawing of themselves listening to a musical triangle and showing how the sound
of the triangle gets to their ear.• A drawing of themselves looking at a torch showing how the light gets to their eyes.
3 Explain that students are going to role-play how a sound vibration travels through the air. Discuss the purpose and features of a role-play.
Lesson 6 Travelling tales34
PrimaryConnections E
XP
LAIN
Literacy focus
Why do we use a role-play?We use a role-play to show how something works by acting it out.
What does a role-play include?
A role-play might include speech, actions and props.
4 Demonstrate the role-play by asking a few students to stand in a semi-circle, holding hands. Explain that when they feel one hand shake, they should start gently shaking their other hand. When the first hand stops shaking, they stop shaking their other hand.
5 Ask all students to stand in semi-circle holding hands. Ask a student at one end of the line to hold the large ‘ear’. Ask one student to stand at the other end of the line and tap a musical triangle. Shake the free hand of the student at that end of the line. Watch the ‘vibration’ transmit itself down the line to the ‘ear’ at the other end of the line.
6 Encourage other students to choose a sound producer from the ‘Light and sound collection’ table to have a turn at creating a sound to cause the vibration to transmit down the line to the ‘ear’.
7 Discuss with students what is happening. Ask questions, such as:• Where does the vibration start?• Where does it finish?• How does it travel down the line?
8 Explain to the students that to show how light gets to our eyes we use arrows to show which way the light travels.
9 Choose a light producer from the ‘Light and sound collection’ table, for example, a torch. Ask a student to hold the torch and another student to hold the large ‘eye’. Ask three other students to hold the arrows and move from the torch to the eye.
10 Discuss with students what is happening. Ask questions, such as:• Where does the light start from?• Where does the light go to?
11 Ask students to look back at their two drawings that they did at the start of the lesson. Ask students if they want to make any changes to their pictures to show how sound gets to their ears and how light gets to their eyes.
12 Invite students to explain any changes that they made and why they made those changes.
13 Discuss any objects, photographs or drawings that the students have brought in for the ‘Light and sound collection’ table.
14 Update the word wall with words and images.
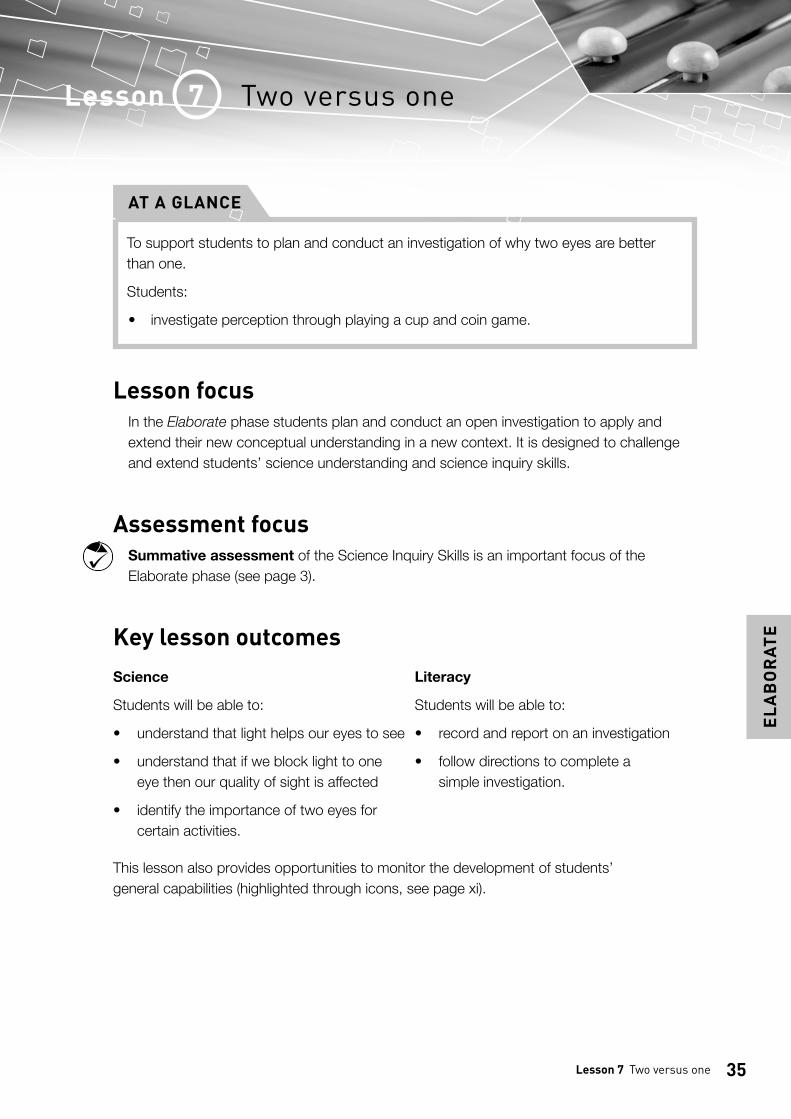
35Lesson 7 Two versus one
ELA
BO
RAT
E
Lesson 7 Two versus one
PrimaryConnections
AT A GLANCE
To support students to plan and conduct an investigation of why two eyes are better than one.
Students:
• investigate perception through playing a cup and coin game.
Lesson focusIn the Elaborate phase students plan and conduct an open investigation to apply and extend their new conceptual understanding in a new context. It is designed to challenge and extend students’ science understanding and science inquiry skills.
Assessment focusSummative assessment of the Science Inquiry Skills is an important focus of the Elaborate phase (see page 3).
Key lesson outcomesScience
Students will be able to:
• understand that light helps our eyes to see
• understand that if we block light to oneeye then our quality of sight is affected
• identify the importance of two eyes forcertain activities.
Literacy
Students will be able to:
• record and report on an investigation
• follow directions to complete asimple investigation.
This lesson also provides opportunities to monitor the development of students’ general capabilities (highlighted through icons, see page xi).
Lesson 7 Two versus one36
PrimaryConnections E
LAB
OR
ATE
Teacher background informationWhy do we have two eyes instead of only one?There are four main advantages of having two eyes: a spare eye in case one is damaged, a wider field of view, better ability to detect faint objects and improved depth perception. Having two eyes enables us to judge distance. With one eye we can make some depth judgment, but with two eyes each eye receives light from a different angle. This enhances the perception of depth and of distances in identifying where an object is positioned. Two eyes give us overlapping frontal views of the world as well as more accurate depth perception, which is crucial for hand–eye coordination.
Equipment
FOR THE CLASS FOR EACH TEAM
• class science journal• ‘Light and sound collection’ table• team roles chart• team skills chart• word wall• 1 enlarged copy of ‘Testing eyes’
(Resource sheet 5)
• each team member’s science journal• role wristbands or badges for Manager
and Speaker• 1 clear plastic cup• 1 coin• 1 copy of ‘Testing eyes’ (Resource sheet 5)
per team member
Preparation• Prepare an enlarged copy of ‘Testing eyes’ (Resource sheet 5).
• Optional: Display ‘Testing eyes’ (Resource sheet 5) in a digital format.
Lesson steps 1 Revise the previous lesson, focusing on how light and sound travel to help us hear
and see. 2 Discuss with students why they think we have two eyes instead of one. Record
students’ responses in the class science journal. 3 Explain that students are going to work in collaborative learning teams to investigate
why we have two eyes instead of one.
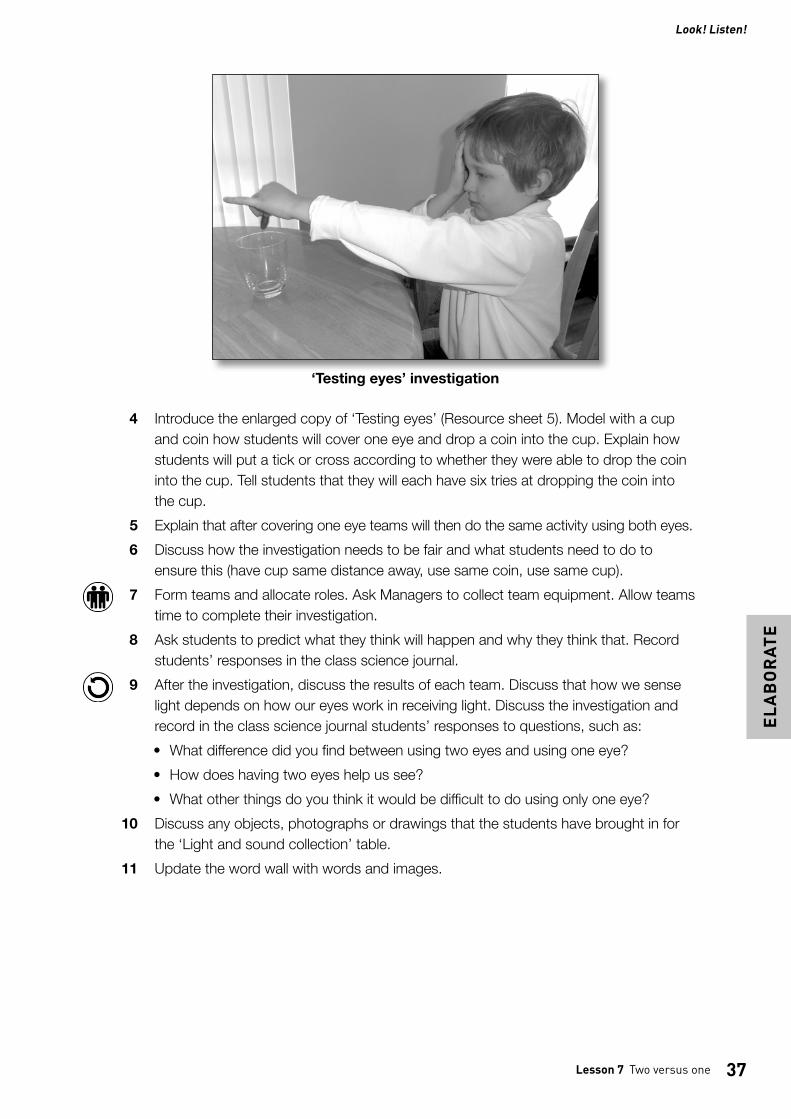
37Lesson 7 Two versus one
PrimaryConnections Look! Listen!
ELA
BO
RAT
E
4 Introduce the enlarged copy of ‘Testing eyes’ (Resource sheet 5). Model with a cup and coin how students will cover one eye and drop a coin into the cup. Explain how students will put a tick or cross according to whether they were able to drop the coin into the cup. Tell students that they will each have six tries at dropping the coin into the cup.
5 Explain that after covering one eye teams will then do the same activity using both eyes. 6 Discuss how the investigation needs to be fair and what students need to do to
ensure this (have cup same distance away, use same coin, use same cup). 7 Form teams and allocate roles. Ask Managers to collect team equipment. Allow teams
time to complete their investigation. 8 Ask students to predict what they think will happen and why they think that. Record
students’ responses in the class science journal. 9 After the investigation, discuss the results of each team. Discuss that how we sense
light depends on how our eyes work in receiving light. Discuss the investigation and record in the class science journal students’ responses to questions, such as:• What difference did you find between using two eyes and using one eye?• How does having two eyes help us see?• What other things do you think it would be difficult to do using only one eye?
10 Discuss any objects, photographs or drawings that the students have brought in for the ‘Light and sound collection’ table.
11 Update the word wall with words and images.
‘Testing eyes’ investigation
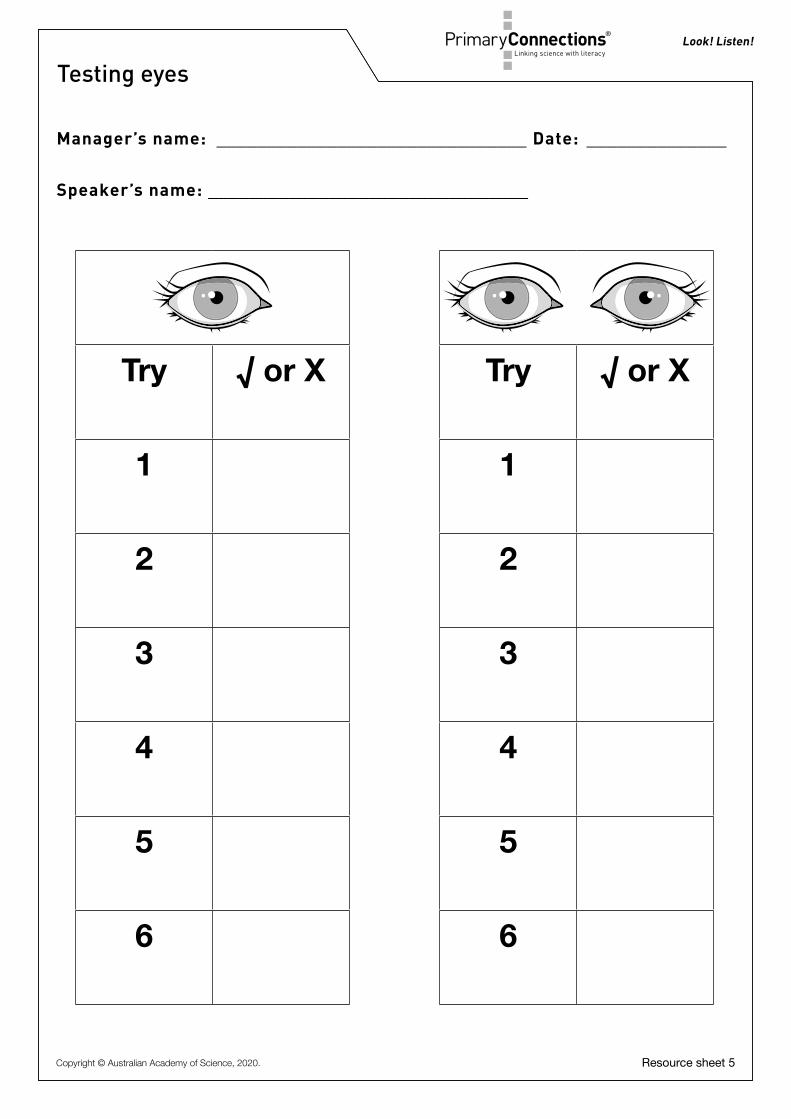
Look! Listen!
Testing eyes
Resource sheet 5
Manager’s name: _______________________________ Date: ______________
Speaker’s name: ________________________________
Try √ or X Try √ or X
1 1
2 2
3 3
4 4
5 5
6 6
Copyright © Australian Academy of Science, 2020.
39Lesson 8 All together
EVA
LUAT
E
Lesson 8 All together
AT A GLANCE
To provide opportunities for students to represent what they know about how light and sound are produced by a range of sources and can be sensed, and to reflect on their learning during the unit.
Students:
• respond to pictures showing different objects that produce sound and/or light
• draw about the journey of sound.
Lesson focusIn the Evaluate phase students reflect on their learning journey and create a literacy product to re-represent their conceptual understanding.
Assessment focusSummative assessment of the Science Understanding descriptions is an important aspect of the Evaluate phase. In this lesson you will be looking for evidence of the extent to which students understand of how:
• light and sound are produced by a range of sources and can be sensed.
Key lesson outcomesScience
Students will be able to:
• identify sources of light and sound
• explain how light and sound travel
Literacy
Students will be able to:
• participate in discussions about howlight and sound are sensed.
• represent their understanding of howlight and sound travel.
This lesson also provides opportunities to monitor the development of students’ general capabilities (highlighted through icons, see page xii).
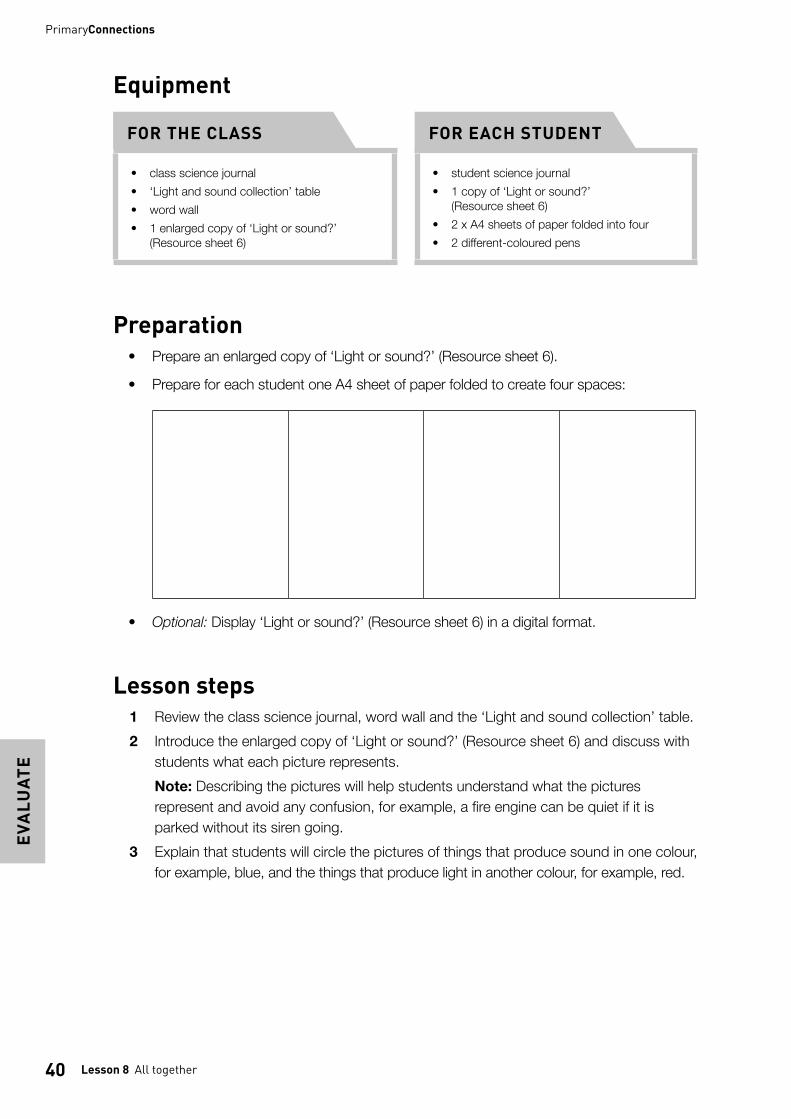
Lesson 8 All together40
PrimaryConnections E
VALU
ATE
Equipment
FOR THE CLASS FOR EACH STUDENT
• class science journal• ‘Light and sound collection’ table• word wall• 1 enlarged copy of ‘Light or sound?’
(Resource sheet 6)
• student science journal• 1 copy of ‘Light or sound?’
(Resource sheet 6)• 2 x A4 sheets of paper folded into four• 2 different-coloured pens
Preparation• Prepare an enlarged copy of ‘Light or sound?’ (Resource sheet 6).
• Prepare for each student one A4 sheet of paper folded to create four spaces:
• Optional: Display ‘Light or sound?’ (Resource sheet 6) in a digital format.
Lesson steps 1 Review the class science journal, word wall and the ‘Light and sound collection’ table. 2 Introduce the enlarged copy of ‘Light or sound?’ (Resource sheet 6) and discuss with
students what each picture represents. Note: Describing the pictures will help students understand what the pictures
represent and avoid any confusion, for example, a fire engine can be quiet if it is parked without its siren going.
3 Explain that students will circle the pictures of things that produce sound in one colour, for example, blue, and the things that produce light in another colour, for example, red.
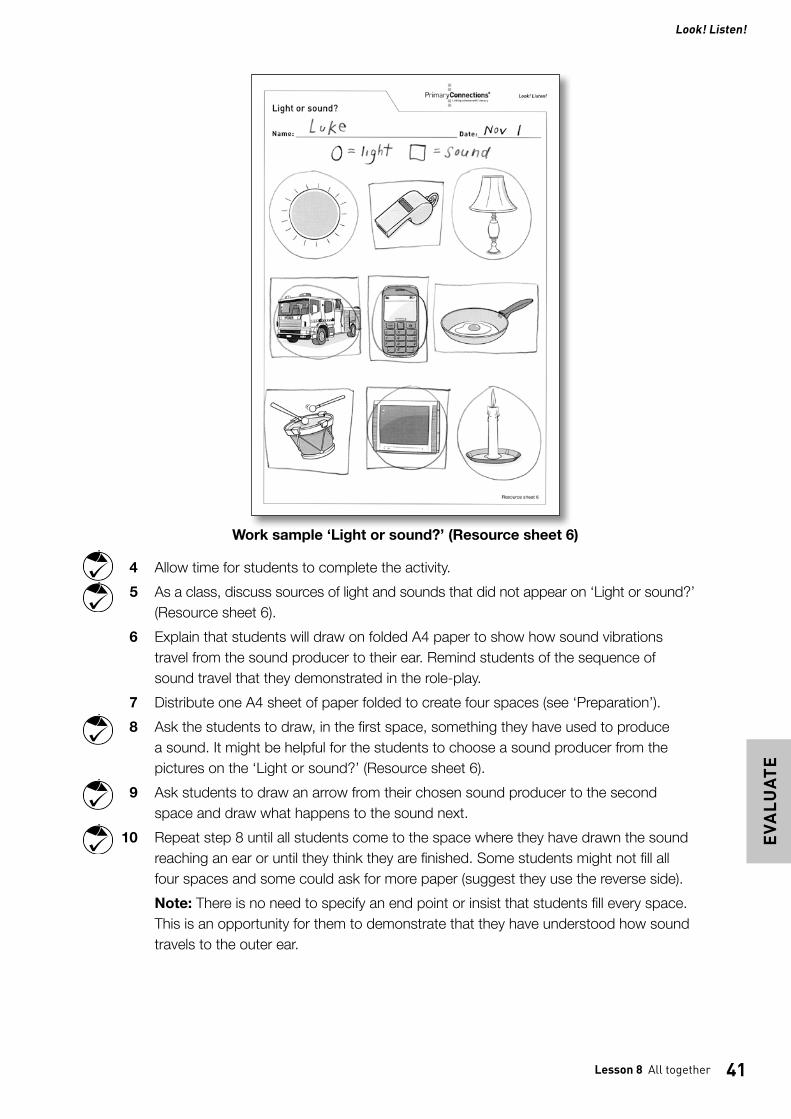
41Lesson 8 All together
PrimaryConnections Look! Listen!
EVA
LUAT
E
4 Allow time for students to complete the activity. 5 As a class, discuss sources of light and sounds that did not appear on ‘Light or sound?’
(Resource sheet 6). 6 Explain that students will draw on folded A4 paper to show how sound vibrations
travel from the sound producer to their ear. Remind students of the sequence of sound travel that they demonstrated in the role-play.
7 Distribute one A4 sheet of paper folded to create four spaces (see ‘Preparation’). 8 Ask the students to draw, in the first space, something they have used to produce
a sound. It might be helpful for the students to choose a sound producer from the pictures on the ‘Light or sound?’ (Resource sheet 6).
9 Ask students to draw an arrow from their chosen sound producer to the second space and draw what happens to the sound next.
10 Repeat step 8 until all students come to the space where they have drawn the sound reaching an ear or until they think they are finished. Some students might not fill all four spaces and some could ask for more paper (suggest they use the reverse side).
Note: There is no need to specify an end point or insist that students fill every space. This is an opportunity for them to demonstrate that they have understood how sound travels to the outer ear.
Work sample ‘Light or sound?’ (Resource sheet 6)

Lesson 8 All together42
PrimaryConnections E
VALU
ATE
14 Review the Look! Listen! unit with the class, asking questions, such as:• Which activity helped you to learn something new?• Which activity did you enjoy? Why?• What questions do you still have about light and sound?Record students’ responses in the class science journal.
11 Distribute another A4 sheet of paper folded to create four spaces (see ‘Preparation’). Explain to students that they will be drawing how light travels to their eye.
12 Ask the students to draw, in the first space, something they have used to produce light. Remind students to choose something from the ‘Light and sound collection’ table to help them choose a light source.
13 Ask students to draw the part of the body that senses light in the last box. Ask students to think about and show how light travels from the light source to the eye. Remind students that they might not need to draw in all four boxes.
Student work sample of how light travels to the eye
>>>
Student work sample of how sound travels to the ear
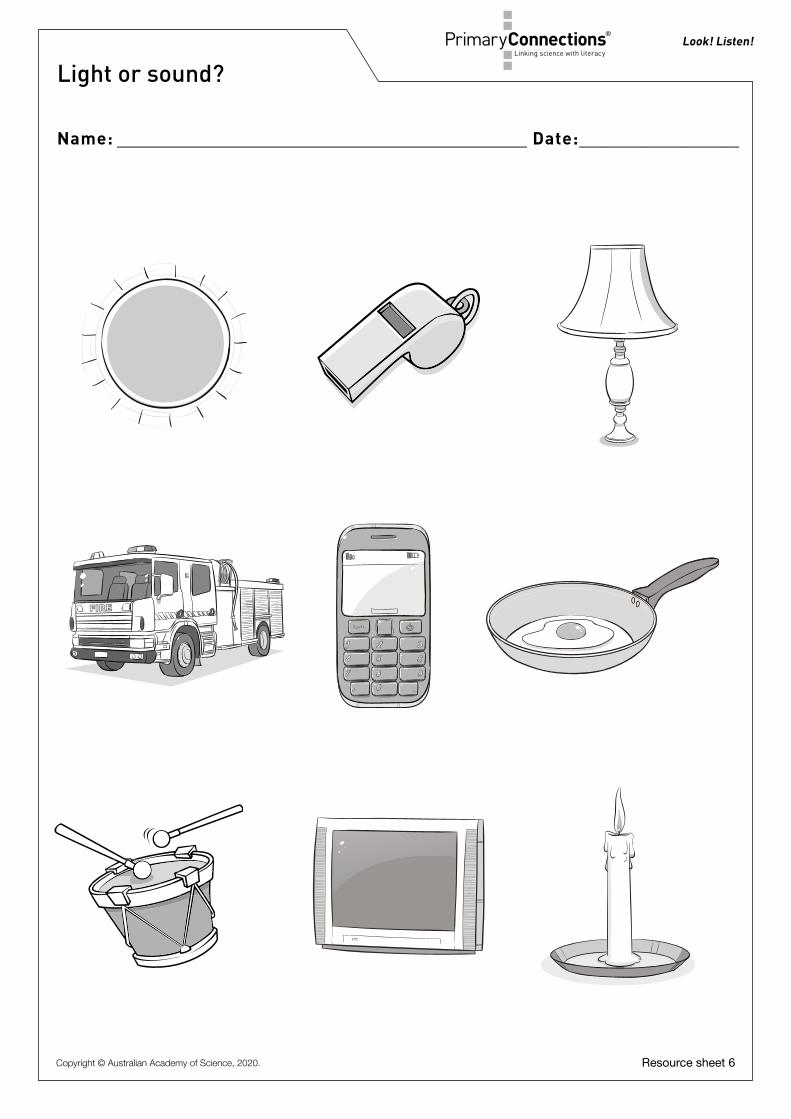
Look! Listen!
Name: _________________________________________ Date:________________
PrimaryConnections
Resource sheet 6
Light or sound?
Copyright © Australian Academy of Science, 2020.
Appendix 144
PrimaryConnections
Appendix 1 How to organise collaborative learning teams (F–Year 2)
IntroductionStudents working in collaborative teams is a key feature of the PrimaryConnections inquiry-based program. By working in collaborative teams students are able to:
• communicate and compare their ideas with one another• build on one another’s ideas• discuss and debate these ideas• revise and rethink their reasoning• present their final team understanding through multi-modal representations.
Opportunities for working in collaborative learning teams are highlighted throughout the unit.
Students need to be taught how to work collaboratively. They need to work together regularly to develop effective group learning skills.
The development of these collaborative skills aligns to descriptions in the Australian Curriculum: English. See page xiii.
Team structureThe first step towards teaching students to work collaboratively is to organise the team composition, roles and skills. Use the following ideas when planning collaborative learning with your class:
• Assign students to teams rather than allowing them to choose partners.• Vary the composition of each team. Give students opportunities to work with others
who might be of a different ability level, gender or cultural background.• Keep teams together for two or more lessons so that students have enough time to
learn to work together successfully.• If you cannot divide the students in your class into teams of three, form two teams of
two students rather than one team of four. It is difficult for students to work togethereffectively in larger groups.
• Keep a record of the students who have worked together as a team so that by the endof the year each student has worked with as many others as possible.
Team rolesStudents are assigned roles within their team (see below). Each team member has a specific role but all members share leadership responsibilities. Each member is accountable for the performance of the team and should be able to explain how the team obtained its results. Students must therefore be concerned with the performance of all team members. It is important to rotate team jobs each time a team works together so that all students have an opportunity to perform different roles.
For Foundation–Year 2, teams consist of two students—Manager and Speaker. (For Year 3–Year 6, the teams consist of three students—Director, Manager and Speaker.)
45Appendix 1
PrimaryConnections Look! Listen!
Each member of the team should wear something that identifies them as belonging to that role, such as a wristband, badge, or colour-coded peg. This makes it easier for you to identify which role each student is doing and it is easier for the students to remember what they and their team mates should be doing.
Manager The Manager is responsible for collecting and returning the team’s equipment. The Manager also tells the teacher if any equipment is damaged or broken. All team members are responsible for clearing up after an activity and getting the equipment ready to return to the equipment table.
Speaker The Speaker is responsible for asking the teacher or another team’s Speaker for help. If the team cannot resolve a question or decide how to follow a procedure, the Speaker is the only person who may leave the team and seek help. The Speaker shares any information they obtain with team members. The teacher may speak to all team members, not just to the Speaker. The Speaker is not the only person who reports to the class; each team member should be able to report on the team’s results.
Director (Year 3–Year 6) The Director is responsible for making sure that the team understands the team investigation and helps team members focus on each step. The Director is also responsible for offering encouragement and support. When the team has finished, the Director helps team members check that they have accomplished the investigation successfully. The Director provides guidance but is not the team leader.
Team skillsPrimaryConnections focuses on social skills that will help students work in collaborative teams and communicate more effectively.
Students will practise the following team skills throughout the year:
• Move into your teams quickly and quietly• Stay with your team• Take turns.To help reinforce these skills, display enlarged copies of the team skills chart (see the end of this Appendix) in a prominent place in the classroom.
Supporting equityIn science lessons, there can be a tendency for boys to manipulate materials and girls to record results. PrimaryConnections tries to avoid traditional social stereotyping by encouraging all students, irrespective of their gender, to maximise their learning potential. Collaborative learning encourages each student to participate in all aspects of team activities, including handling the equipment and taking intellectual risks.
Observe students when they are working in their collaborative teams and ensure that both girls and boys are participating in the hands-on activities.
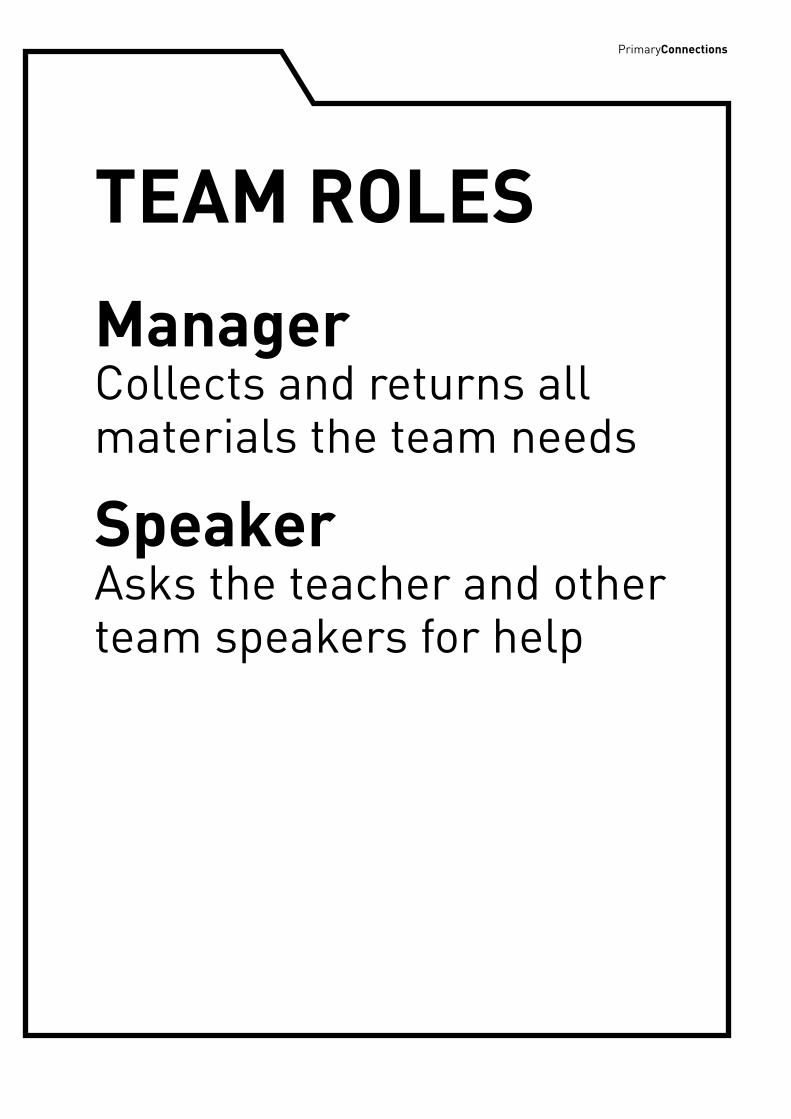
PrimaryConnections
TEAM ROLES
Manager Collects and returns all materials the team needs
Speaker Asks the teacher and other team speakers for help
PrimaryConnections
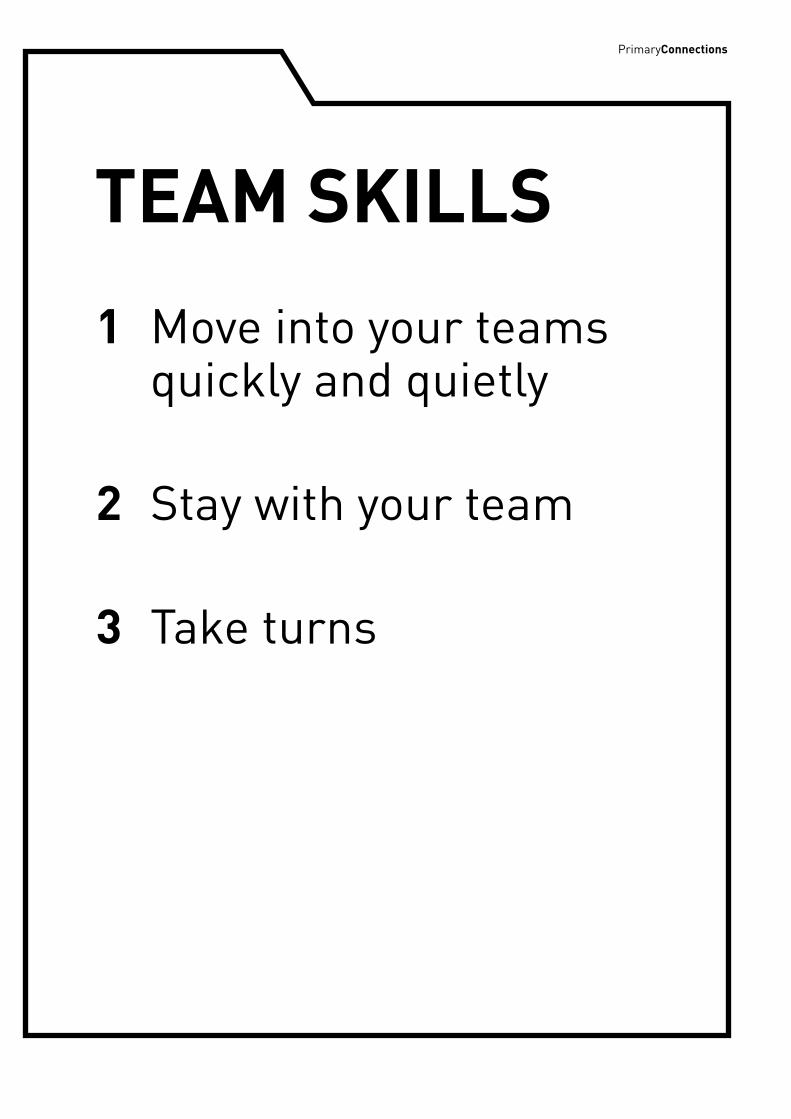
PrimaryConnections
TEAM SKILLS
1 Move into your teams quickly and quietly
2 Stay with your team
3 Take turns
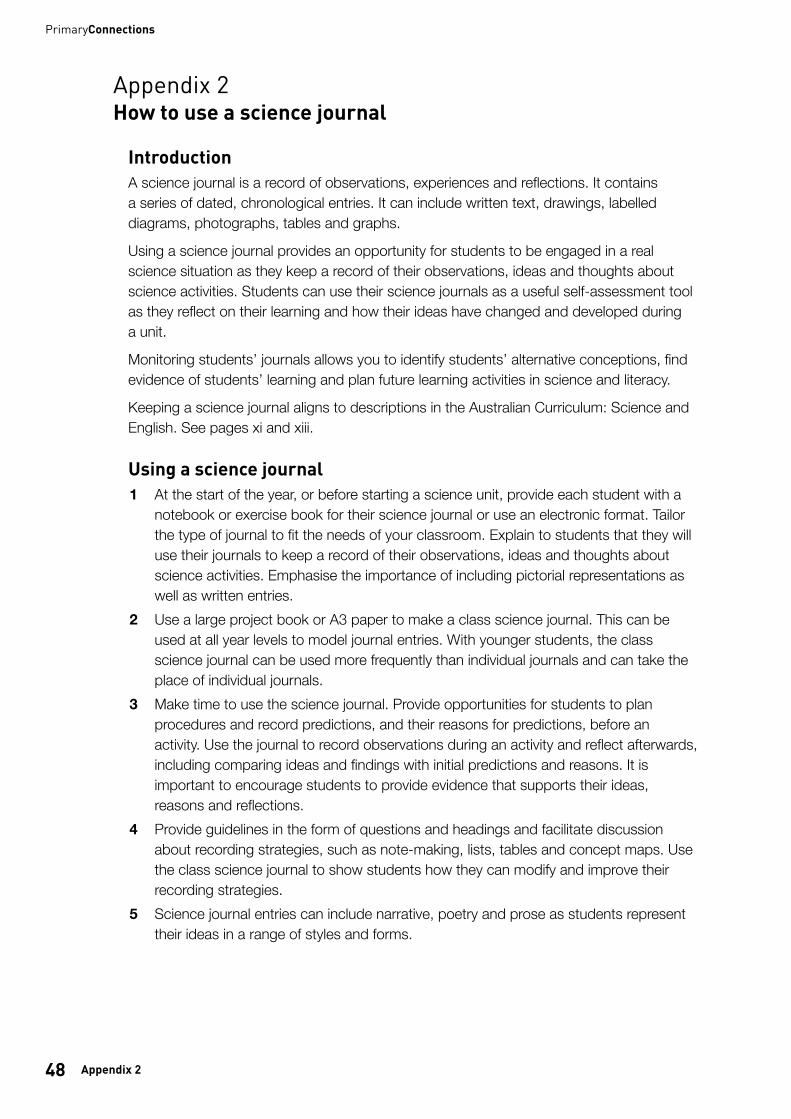
Appendix 248
PrimaryConnections
Appendix 2 How to use a science journal
IntroductionA science journal is a record of observations, experiences and reflections. It contains a series of dated, chronological entries. It can include written text, drawings, labelled diagrams, photographs, tables and graphs.
Using a science journal provides an opportunity for students to be engaged in a real science situation as they keep a record of their observations, ideas and thoughts about science activities. Students can use their science journals as a useful self-assessment tool as they reflect on their learning and how their ideas have changed and developed during a unit.
Monitoring students’ journals allows you to identify students’ alternative conceptions, find evidence of students’ learning and plan future learning activities in science and literacy.
Keeping a science journal aligns to descriptions in the Australian Curriculum: Science and English. See pages xi and xiii.
Using a science journal1 At the start of the year, or before starting a science unit, provide each student with a
notebook or exercise book for their science journal or use an electronic format. Tailor the type of journal to fit the needs of your classroom. Explain to students that they will use their journals to keep a record of their observations, ideas and thoughts about science activities. Emphasise the importance of including pictorial representations as well as written entries.
2 Use a large project book or A3 paper to make a class science journal. This can be used at all year levels to model journal entries. With younger students, the class science journal can be used more frequently than individual journals and can take the place of individual journals.
3 Make time to use the science journal. Provide opportunities for students to plan procedures and record predictions, and their reasons for predictions, before an activity. Use the journal to record observations during an activity and reflect afterwards, including comparing ideas and findings with initial predictions and reasons. It is important to encourage students to provide evidence that supports their ideas, reasons and reflections.
4 Provide guidelines in the form of questions and headings and facilitate discussion about recording strategies, such as note-making, lists, tables and concept maps. Use the class science journal to show students how they can modify and improve their recording strategies.
5 Science journal entries can include narrative, poetry and prose as students represent their ideas in a range of styles and forms.
49Appendix 2
PrimaryConnections Look! Listen!
6 In science journal work, you can refer students to display charts, pictures, diagrams, word walls and phrases about the topic displayed around the classroom. Revisit and revise this material during the unit. Explore the vocabulary, visual texts and ideas that have developed from the science unit, and encourage students to use them in their science journals.
7 Combine the use of resource sheets with journal entries. After students have pasted their completed resource sheets in their journal, they might like to add their own drawings and reflections.
8 Use the science journal to assess student learning in both science and literacy. For example, during the Engage phase, use journal entries for diagnostic assessment as you determine students’ prior knowledge.
9 Discuss the importance of entries in the science journal during the Explain and Evaluate phases. Demonstrate how the information in the journal will help students develop literacy products, such as posters, brochures, letters and oral or written presentations.
Look! Listen! science journal
Appendix 350
PrimaryConnections
Appendix 3 How to use a word wall
IntroductionA word wall is an organised collection of words and images displayed in the classroom. It supports the development of vocabulary related to a particular topic and provides a reference for students. The content of the word wall can be words that students see, hear and use in their reading, writing, speaking, listening and viewing.
The use of a word wall, including words from regional dialects and other languages, aligns to descriptions in the Australian Curriculum: English. See page xiii.
Goals in using a word wallA word wall can be used to:
• support science and literacy experiences of reading, viewing, writing and speaking
• provide support for students during literacy activities across all key learning areas
• promote independence in students as they develop their literacy skills
• provide a visual representation to help students see patterns in words anddecode them
• develop a growing bank of words that students can spell, read and/or use inwriting tasks
• provide ongoing support for the various levels of academic ability in the class
• teach the strategy of using word sources as a real-life strategy.
OrganisationPosition the word wall so that students have easy access to the words. They need to be able to see, remove and return word cards to the wall. A classroom could have one main word wall and two or three smaller ones, each with a different focus, for example, high-frequency words.
Choose robust material for the word cards. Write or type words on cardboard and perhaps laminate them. Consider covering the wall with felt-type material and backing each word card with a self-adhesive dot to make it easy for students to remove and replace word cards.
Word walls do not need to be confined to a wall. Use a portable wall, display screen, shower curtain or window curtain. Consider a cardboard shape that fits with the unit, for example, an apple for a needs unit.
The purpose is for students to be exposed to a print-rich environment that supports their science and literacy experiences.
Organise the words on the wall in a variety of ways. Place them alphabetically, or put them in word groups or groups suggested by the unit topic, for example, words for a Look! Listen! unit might be organised under headings, such as ‘Sound producers’, ‘Light producers’ and ‘Light and sound producers’.
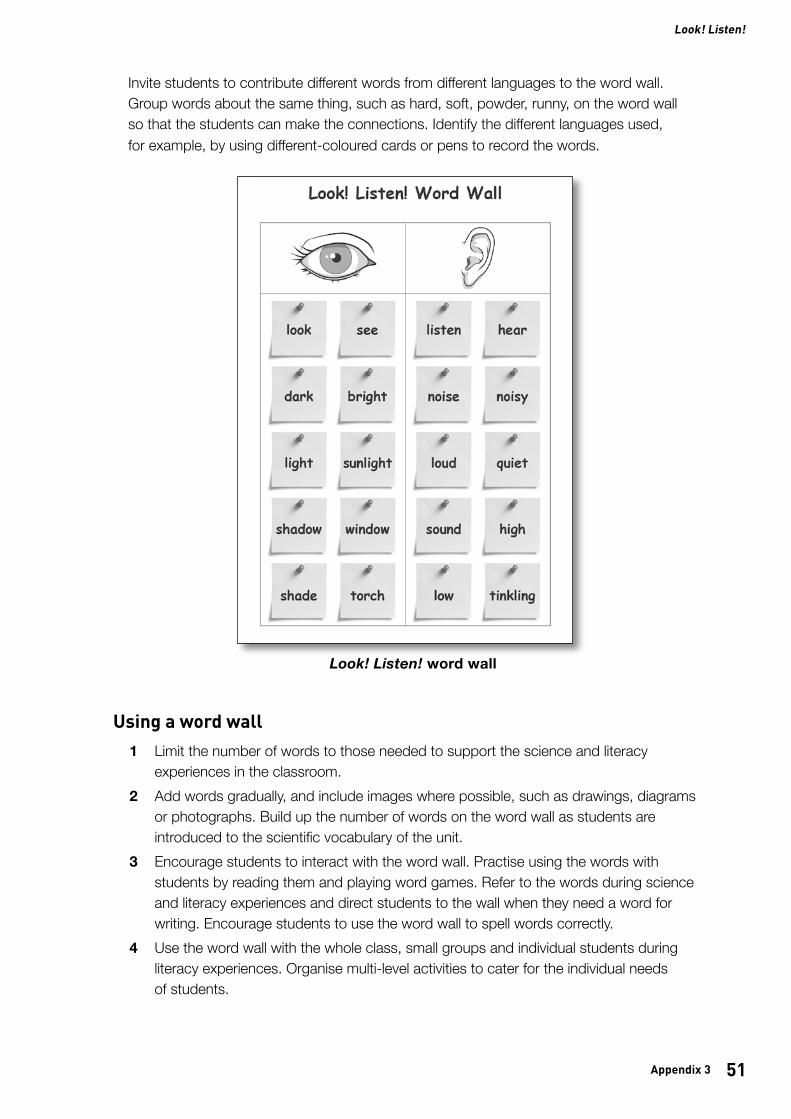
51Appendix 3
PrimaryConnections Look! Listen!
Invite students to contribute different words from different languages to the word wall. Group words about the same thing, such as hard, soft, powder, runny, on the word wall so that the students can make the connections. Identify the different languages used, for example, by using different-coloured cards or pens to record the words.
Using a word wall1 Limit the number of words to those needed to support the science and literacy
experiences in the classroom.2 Add words gradually, and include images where possible, such as drawings, diagrams
or photographs. Build up the number of words on the word wall as students are introduced to the scientific vocabulary of the unit.
3 Encourage students to interact with the word wall. Practise using the words with students by reading them and playing word games. Refer to the words during science and literacy experiences and direct students to the wall when they need a word for writing. Encourage students to use the word wall to spell words correctly.
4 Use the word wall with the whole class, small groups and individual students during literacy experiences. Organise multi-level activities to cater for the individual needs of students.
Look! Listen! word wall
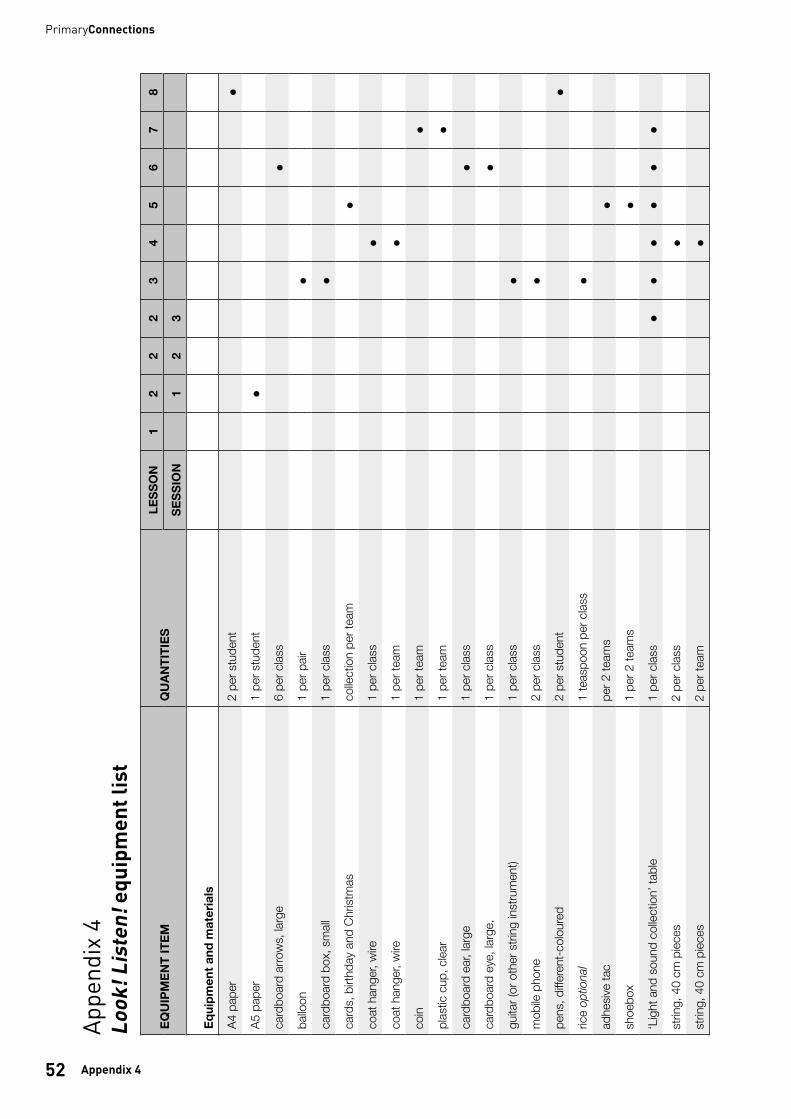
Appendix 452
PrimaryConnections
App
endi
x 4
Look
! Lis
ten!
equ
ipm
ent l
ist
EQU
IPM
ENT
ITEM
QUAN
TITIES
LESS
ON
12
22
34
56
78
SESS
ION
12
3
Equi
pmen
t and
mat
eria
ls
A4 p
aper
2 pe
r stu
dent
A5 p
aper
1 pe
r stu
dent
card
boar
d ar
row
s, la
rge
6 pe
r clas
s
ballo
on1
per p
air
card
boar
d bo
x, s
mall
1 pe
r clas
s
card
s, b
irthd
ay a
nd C
hrist
mas
colle
ctio
n pe
r tea
m
coat
han
ger,
wire
1 pe
r clas
s
coat
han
ger,
wire
1 pe
r tea
m
coin
1 pe
r tea
m
plas
tic c
up, c
lear
1 pe
r tea
m
card
boar
d ea
r, lar
ge1
per c
lass
card
boar
d ey
e, la
rge,
1 pe
r clas
s
guita
r (or
oth
er s
tring
inst
rum
ent)
1 pe
r clas
s
mob
ile p
hone
2 pe
r clas
s
pens
, diffe
rent
-col
oure
d2
per s
tude
nt
rice
optio
nal
1 te
aspo
on p
er c
lass
adhe
sive
tac
per 2
team
s
shoe
box
1 pe
r 2 te
ams
‘Lig
ht a
nd s
ound
col
lectio
n’ ta
ble
1 pe
r clas
s
strin
g, 4
0 cm
piec
es2
per c
lass
strin
g, 4
0 cm
piec
es2
per t
eam
EQU
IPM
ENT
ITEM
QUAN
TITIES
LESS
ON
12
22
34
56
78
SESS
ION
12
3
Equi
pmen
t and
mat
eria
ls (c
ontin
ued)
tam
bour
ine
optio
nal
1 pe
r clas
s
torc
h1
per c
lass
torc
h1
per 2
team
s
trian
gle,
mus
ical
1 pe
r clas
s
Resou
rce
shee
ts
‘Sou
nd m
aker
s’ (R
S2),
enlar
ged
1 pe
r clas
s
‘Sou
nd m
aker
s’ (R
S2)
1 pe
r stu
dent
‘Lig
ht a
nd d
ark’
(RS3
), en
large
d1
per c
lass
‘Lig
ht a
nd d
ark’
(RS3
)1
per s
tude
nt
‘Inf
orm
atio
n no
te fo
r fam
ilies’
(RS4
)1
per s
tude
nt
‘Info
rmat
ion
note
for f
amilie
s’ (R
S4),
enlar
ged
1 pe
r clas
s
‘Tes
ting
eyes
’ (RS
5)1
per s
tude
nt
‘Tes
ting
eyes
’ (RS
5), e
nlar
ged
1 pe
r clas
s
‘Lig
ht o
r sou
nd?’
(RS6
)1
per s
tude
nt
‘Lig
ht o
r sou
nd?’
(RS6
), en
large
d1
per c
lass
Teac
hing
tool
s
class
scie
nce
jour
nal
1 pe
r clas
s
stud
ent s
cienc
e jo
urna
l1
per s
tude
nt
wor
d w
all1
per c
lass
team
roles
cha
rt1
per c
lass
team
skil
ls ch
art
1 pe
r clas
s
role
wris
tban
ds o
r bad
ges
for M
anag
er a
nd S
peak
er1
set p
er te
am
Multim
edia
digi
tal c
amer
a op
tiona
l1
per c
lass

53Appendix 4
PrimaryConnections Look! Listen!
App
endi
x 4
Look
! Lis
ten!
equ
ipm
ent l
ist
EQU
IPM
ENT
ITEM
QUAN
TITIES
LESS
ON
12
22
34
56
78
SESS
ION
12
3
Equi
pmen
t and
mat
eria
ls
A4 p
aper
2 pe
r stu
dent
A5 p
aper
1 pe
r stu
dent
card
boar
d ar
row
s, la
rge
6 pe
r clas
s
ballo
on1
per p
air
card
boar
d bo
x, s
mall
1 pe
r clas
s
card
s, b
irthd
ay a
nd C
hrist
mas
colle
ctio
n pe
r tea
m
coat
han
ger,
wire
1 pe
r clas
s
coat
han
ger,
wire
1 pe
r tea
m
coin
1 pe
r tea
m
plas
tic c
up, c
lear
1 pe
r tea
m
card
boar
d ea
r, lar
ge1
per c
lass
card
boar
d ey
e, la
rge,
1 pe
r clas
s
guita
r (or
oth
er s
tring
inst
rum
ent)
1 pe
r clas
s
mob
ile p
hone
2 pe
r clas
s
pens
, diffe
rent
-col
oure
d2
per s
tude
nt
rice
optio
nal
1 te
aspo
on p
er c
lass
adhe
sive
tac
per 2
team
s
shoe
box
1 pe
r 2 te
ams
‘Lig
ht a
nd s
ound
col
lectio
n’ ta
ble
1 pe
r clas
s
strin
g, 4
0 cm
piec
es2
per c
lass
strin
g, 4
0 cm
piec
es2
per t
eam
EQU
IPM
ENT
ITEM
QUAN
TITIES
LESS
ON
12
22
34
56
78
SESS
ION
12
3
Equi
pmen
t and
mat
eria
ls (c
ontin
ued)
tam
bour
ine
optio
nal
1 pe
r clas
s
torc
h1
per c
lass
torc
h1
per 2
team
s
trian
gle,
mus
ical
1 pe
r clas
s
Resou
rce
shee
ts
‘Sou
nd m
aker
s’ (R
S2),
enlar
ged
1 pe
r clas
s
‘Sou
nd m
aker
s’ (R
S2)
1 pe
r stu
dent
‘Lig
ht a
nd d
ark’
(RS3
), en
large
d1
per c
lass
‘Lig
ht a
nd d
ark’
(RS3
)1
per s
tude
nt
‘Inf
orm
atio
n no
te fo
r fam
ilies’
(RS4
)1
per s
tude
nt
‘Info
rmat
ion
note
for f
amilie
s’ (R
S4),
enlar
ged
1 pe
r clas
s
‘Tes
ting
eyes
’ (RS
5)1
per s
tude
nt
‘Tes
ting
eyes
’ (RS
5), e
nlar
ged
1 pe
r clas
s
‘Lig
ht o
r sou
nd?’
(RS6
)1
per s
tude
nt
‘Lig
ht o
r sou
nd?’
(RS6
), en
large
d1
per c
lass
Teac
hing
tool
s
class
scie
nce
jour
nal
1 pe
r clas
s
stud
ent s
cienc
e jo
urna
l1
per s
tude
nt
wor
d w
all1
per c
lass
team
roles
cha
rt1
per c
lass
team
skil
ls ch
art
1 pe
r clas
s
role
wris
tban
ds o
r bad
ges
for M
anag
er a
nd S
peak
er1
set p
er te
am
Multim
edia
digi
tal c
amer
a op
tiona
l1
per c
lass
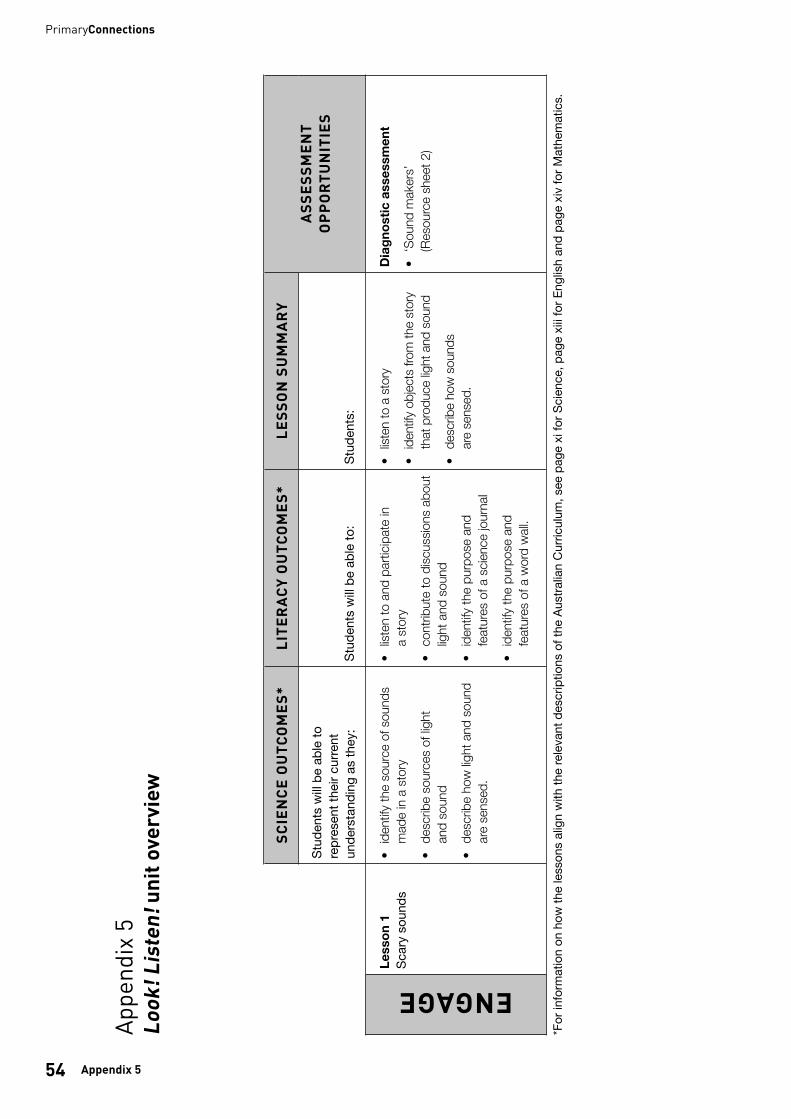
Appendix 554
PrimaryConnections
SC
IEN
CE
OU
TCO
ME
S*
LITE
RA
CY
OU
TCO
ME
S*
LES
SO
N S
UM
MA
RY
AS
SE
SS
ME
NT
OP
PO
RTU
NIT
IES
Stud
ents
will
be a
ble
to
repr
esen
t the
ir cu
rrent
un
ders
tand
ing
as th
ey:
Stud
ents
will
be a
ble
to:
Stud
ents
:
ENGAGE
Less
on 1
Sc
ary
soun
ds•
iden
tify
the
sour
ce o
f sou
nds
mad
e in
a s
tory
•de
scrib
e so
urce
s of
light
and
soun
d
•de
scrib
e ho
w lig
ht a
nd s
ound
are
sens
ed.
•lis
ten
to a
nd p
artic
ipat
e in
a st
ory
•co
ntrib
ute
to d
iscus
sions
abo
utlig
ht a
nd s
ound
•id
entif
y th
e pu
rpos
e an
dfe
atur
es o
f a s
cienc
e jo
urna
l
•id
entif
y th
e pu
rpos
e an
dfe
atur
es o
f a w
ord
wall
.
•lis
ten
to a
sto
ry
•id
entif
y ob
jects
from
the
stor
yth
at p
rodu
ce lig
ht a
nd s
ound
•de
scrib
e ho
w s
ound
sar
e se
nsed
.
Dia
gnos
tic a
sses
smen
t
•‘S
ound
mak
ers’
(Res
ourc
e sh
eet 2
)
App
endi
x 5
Look
! Lis
ten!
uni
t ove
rvie
w
*For
info
rmat
ion
on h
ow th
e le
sson
s al
ign
with
the
rele
vant
des
crip
tions
of t
he A
ustra
lian
Cur
ricul
um, s
ee p
age
xi fo
r Sci
ence
, pag
e xi
ii fo
r Eng
lish
and
page
xiv
for M
athe
mat
ics.
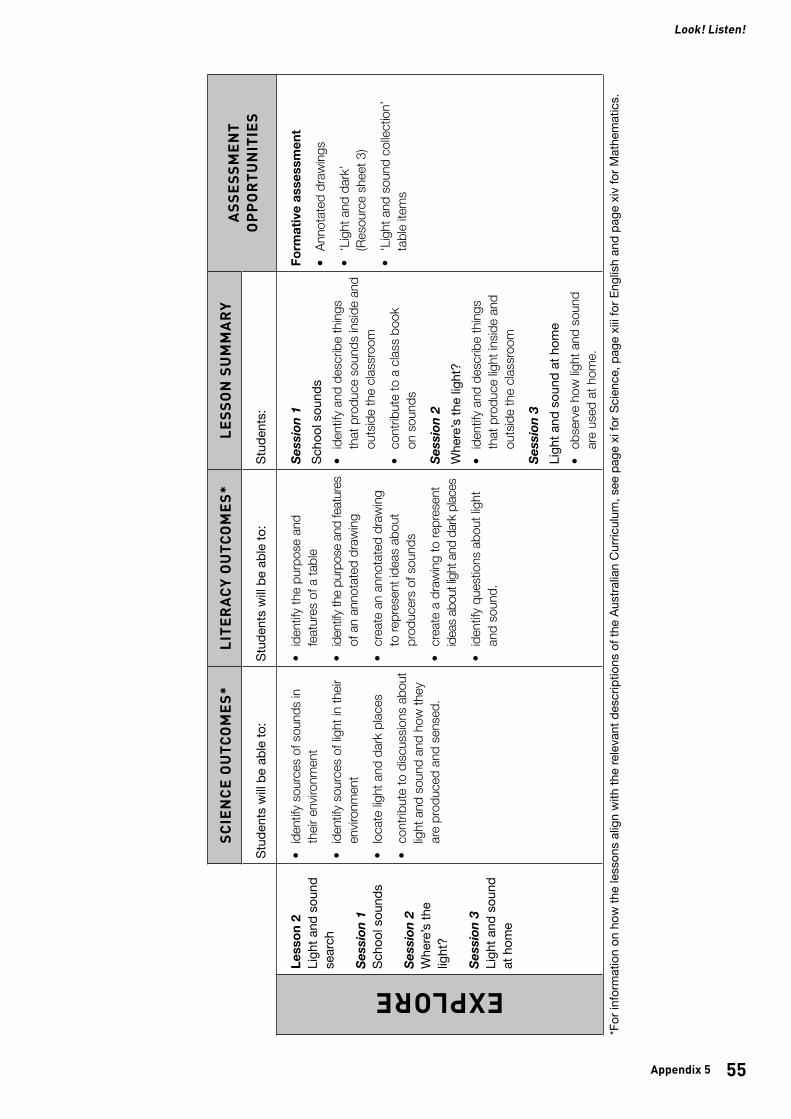
55Appendix 5
PrimaryConnections Look! Listen!
SC
IEN
CE
OU
TCO
ME
S*
LITE
RA
CY
OU
TCO
ME
S*
LES
SO
N S
UM
MA
RY
AS
SE
SS
ME
NT
OP
PO
RTU
NIT
IES
Stud
ents
will
be a
ble
to:
Stud
ents
will
be a
ble
to:
Stud
ents
:
EXPLORE
Less
on 2
Li
ght a
nd s
ound
se
arch
Sess
ion
1 Sc
hool
sou
nds
Sess
ion
2 W
here
’s th
e lig
ht?
Sess
ion
3 Li
ght a
nd s
ound
at
hom
e
• id
entif
y so
urce
s of
sou
nds
in
their
env
ironm
ent
• id
entif
y so
urce
s of
light
in th
eir
envir
onm
ent
• lo
cate
light
and
dar
k pl
aces
• co
ntrib
ute
to d
iscus
sions
abo
ut
light
and
sou
nd a
nd h
ow th
ey
are
prod
uced
and
sen
sed.
• id
entif
y th
e pu
rpos
e an
d fe
atur
es o
f a ta
ble
• id
entify
the
purp
ose
and
feat
ures
of
an
anno
tate
d dr
awin
g
• cr
eate
an
anno
tate
d dr
awin
g to
repr
esen
t ide
as a
bout
pr
oduc
ers
of s
ound
s
• cr
eate
a d
raw
ing
to re
pres
ent
ideas
abo
ut lig
ht a
nd d
ark
place
s
• id
entif
y qu
estio
ns a
bout
light
an
d so
und.
Sess
ion
1 Sc
hool
sou
nds
• id
entif
y an
d de
scrib
e th
ings
th
at p
rodu
ce s
ound
s in
side
and
outs
ide
the
class
room
• co
ntrib
ute
to a
clas
s bo
ok
on s
ound
s
Sess
ion
2 W
here
’s th
e lig
ht?
• id
entif
y an
d de
scrib
e th
ings
th
at p
rodu
ce lig
ht in
side
and
outs
ide
the
class
room
Sess
ion
3 Li
ght a
nd s
ound
at h
ome
• ob
serv
e ho
w lig
ht a
nd s
ound
ar
e us
ed a
t hom
e.
Form
ativ
e as
sess
men
t
• An
nota
ted
draw
ings
• ‘L
ight
and
dar
k’
(Res
ourc
e sh
eet 3
)
• ‘L
ight
and
sou
nd c
ollec
tion’
ta
ble
item
s
*For
info
rmat
ion
on h
ow th
e le
sson
s al
ign
with
the
rele
vant
des
crip
tions
of t
he A
ustra
lian
Cur
ricul
um, s
ee p
age
xi fo
r Sci
ence
, pag
e xi
ii fo
r Eng
lish
and
page
xiv
for M
athe
mat
ics.

Appendix 556
PrimaryConnections
SC
IEN
CE
OU
TCO
ME
S*
LITE
RA
CY
OU
TCO
ME
S*
LES
SO
N S
UM
MA
RY
AS
SE
SS
ME
NT
OP
PO
RTU
NIT
IES
Stud
ents
will
be a
ble
to:
Stud
ents
will
be a
ble
to:
Stud
ents
:
EXPLORE
Less
on 3
G
ood
vibr
atio
ns•
desc
ribe
how
vib
ratio
ns p
rodu
ceso
unds
•id
entif
y ob
jects
that
pro
duce
soun
d.
•co
ntrib
ute
to d
iscus
sions
abo
utso
unds
and
vib
ratio
ns
•re
cord
idea
s in
a s
cienc
ejo
urna
l.
•fe
el vib
ratio
ns m
ade
by v
ario
usob
jects
as
they
pro
duce
sou
nd.
Form
ativ
e as
sess
men
t
•An
nota
ted
draw
ings
•‘L
ight
and
dar
k’(R
esou
rce
shee
t 3)
•‘L
ight
and
sou
nd c
ollec
tion’
tabl
e ite
ms
Less
on 4
So
unds
on
th
e m
ove
•de
scrib
e th
e di
ffere
nce
betw
een
soun
d tra
vellin
g th
roug
h air
and
solid
s
•id
entif
y m
ater
ials
thro
ugh
whi
chso
und
trave
ls, fo
r exa
mpl
e, a
iran
d so
lids
•co
mpa
re th
e tra
nsm
issio
n of
sou
ndth
roug
h di
ffere
nt m
ater
ials
•ex
plain
that
sou
nds
need
to re
ach
their
out
er e
ar to
be
hear
d.
•fo
llow
a s
eries
of o
ral in
stru
ction
s
•jo
in in
a g
roup
disc
ussio
nde
scrib
ing
their
ow
n id
eas
abou
t how
sou
nd tr
avels
•m
ake
and
desc
ribe
adr
awin
g th
at re
pres
ents
their
expe
rienc
es o
f sou
nd.
•ex
plor
e th
e di
ffere
nce
betw
een
soun
d tra
nsm
issio
n th
roug
h air
and
thro
ugh
solid
s.
Form
ativ
e as
sess
men
t
•Sc
ience
jour
nal e
ntrie
s
•‘L
ight
and
sou
nd c
ollec
tion’
tabl
e ite
ms
*For
info
rmat
ion
on h
ow th
e le
sson
s al
ign
with
the
rele
vant
des
crip
tions
of t
he A
ustra
lian
Cur
ricul
um, s
ee p
age
xi fo
r Sci
ence
, pag
e xi
ii fo
r Eng
lish
and
page
xiv
for M
athe
mat
ics.
SC
IEN
CE
OU
TCO
ME
S*
LITE
RA
CY
OU
TCO
ME
S*
LES
SO
N S
UM
MA
RY
AS
SE
SS
ME
NT
OP
PO
RTU
NIT
IES
Stud
ents
will
be a
ble
to:
Stud
ents
will
be a
ble
to:
Stud
ents
:
EXPLORE
Less
on 5
Sens
ing
light
•de
scrib
e w
hy w
e ne
ed lig
ht to
see
.•
parti
cipat
e in
disc
ussio
ns
abou
t lig
ht
•co
mpl
ete
sent
ence
s re
visin
g w
hat t
hey
have
lear
ned
ab
out l
ight
.
•ex
plor
e a
peek
box
with
and
w
ithou
t lig
ht.
Form
ativ
e as
sess
men
t
•Sc
ience
jour
nal e
ntrie
s
•‘L
ight
and
sou
nd c
ollec
tion’
ta
ble
item
s
EXPLAIN
Less
on 6
Trav
ellin
g ta
les
•de
scrib
e ho
w s
ound
trav
els fr
om
the
sour
ce to
the
ear
•de
scrib
e ho
w lig
ht tr
avels
from
the
sour
ce to
the
eye.
•un
ders
tand
the
purp
ose
and
feat
ures
of a
role-
play
•us
e ro
le-pl
ay to
repr
esen
t the
jo
urne
y of
light
and
sou
nd
•re
pres
ent t
heir
unde
rsta
ndin
g of
the
jour
ney
of lig
ht a
nd
soun
d us
ing
draw
ings
.
•re
pres
ent t
heir
unde
rsta
ndin
g of
how
light
and
sou
nd tr
avel
usin
g dr
awin
gs
•ro
le-pl
ay h
ow s
ound
trav
els
•ro
le-pl
ay h
ow lig
ht tr
avels
.
Form
ativ
e as
sess
men
t
•Ro
le-pl
ay
•Dr
awin
gs
•‘L
ight
and
sou
nd c
ollec
tion’
ta
ble
item
s
ELABORATE
Less
on 7
Two
vers
us o
ne•
unde
rsta
nd th
at lig
ht h
elps
our
eyes
to s
ee
•un
ders
tand
that
if w
e bl
ock
light
to
one
eye
then
our
qua
lity o
f sig
ht is
aff
ecte
d
•id
entif
y th
e im
porta
nce
of tw
o ey
es
for c
erta
in a
ctivi
ties.
•re
cord
and
repo
rt on
an
inve
stig
atio
n
•fo
llow
dire
ctio
ns to
com
plet
e a
simpl
e in
vest
igat
ion.
•in
vest
igat
e pe
rcep
tion
thro
ugh
play
ing
a cu
p an
d co
in g
ame.
Sum
mat
ive
asse
ssm
ent
of S
cienc
e In
quiry
Skil
ls
•‘T
estin
g ey
es’
(Res
ourc
e sh
eet 5
)
•‘L
ight
and
sou
nd c
ollec
tion’
ta
ble
item
s
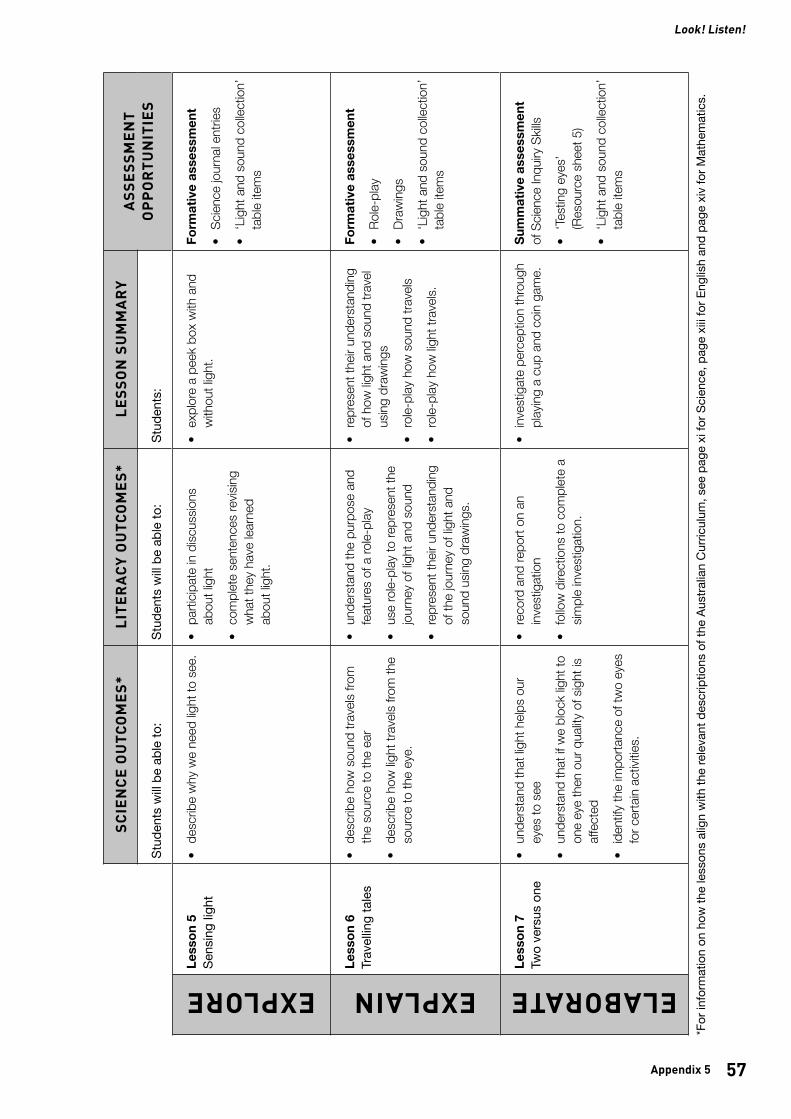
57Appendix 5
PrimaryConnections Look! Listen!
SC
IEN
CE
OU
TCO
ME
S*
LITE
RA
CY
OU
TCO
ME
S*
LES
SO
N S
UM
MA
RY
AS
SE
SS
ME
NT
OP
PO
RTU
NIT
IES
Stud
ents
will
be a
ble
to:
Stud
ents
will
be a
ble
to:
Stud
ents
:
EXPLORE
Less
on 3
G
ood
vibr
atio
ns•
desc
ribe
how
vib
ratio
ns p
rodu
ce
soun
ds
• id
entif
y ob
jects
that
pro
duce
so
und.
• co
ntrib
ute
to d
iscus
sions
abo
ut
soun
ds a
nd v
ibra
tions
• re
cord
idea
s in
a s
cienc
e jo
urna
l.
• fe
el vib
ratio
ns m
ade
by v
ario
us
objec
ts a
s th
ey p
rodu
ce s
ound
.Fo
rmat
ive
asse
ssm
ent
• An
nota
ted
draw
ings
• ‘L
ight
and
dar
k’
(Res
ourc
e sh
eet 3
)
• ‘L
ight
and
sou
nd c
ollec
tion’
ta
ble
item
s
Less
on 4
So
unds
on
th
e m
ove
• de
scrib
e th
e di
ffere
nce
betw
een
soun
d tra
vellin
g th
roug
h air
an
d so
lids
• id
entif
y m
ater
ials
thro
ugh
whi
ch
soun
d tra
vels,
for e
xam
ple,
air
an
d so
lids
• co
mpa
re th
e tra
nsm
issio
n of
sou
nd
thro
ugh
diffe
rent
mat
erial
s
• ex
plain
that
sou
nds
need
to re
ach
their
out
er e
ar to
be
hear
d.
• fo
llow
a s
eries
of o
ral in
stru
ction
s
• jo
in in
a g
roup
disc
ussio
n de
scrib
ing
their
ow
n id
eas
abou
t how
sou
nd tr
avels
• m
ake
and
desc
ribe
a dr
awin
g th
at re
pres
ents
their
ex
perie
nces
of s
ound
.
• ex
plor
e th
e di
ffere
nce
betw
een
soun
d tra
nsm
issio
n th
roug
h air
an
d th
roug
h so
lids.
Form
ativ
e as
sess
men
t
• Sc
ience
jour
nal e
ntrie
s
• ‘L
ight
and
sou
nd c
ollec
tion’
ta
ble
item
s
SC
IEN
CE
OU
TCO
ME
S*
LITE
RA
CY
OU
TCO
ME
S*
LES
SO
N S
UM
MA
RY
AS
SE
SS
ME
NT
OP
PO
RTU
NIT
IES
Stud
ents
will
be a
ble
to:
Stud
ents
will
be a
ble
to:
Stud
ents
:
EXPLORE
Less
on 5
Se
nsin
g lig
ht•
desc
ribe
why
we
need
light
to s
ee.
• pa
rticip
ate
in d
iscus
sions
ab
out l
ight
• co
mpl
ete
sent
ence
s re
visin
g w
hat t
hey
have
lear
ned
ab
out l
ight
.
• ex
plor
e a
peek
box
with
and
w
ithou
t lig
ht.
Form
ativ
e as
sess
men
t
• Sc
ience
jour
nal e
ntrie
s
• ‘L
ight
and
sou
nd c
ollec
tion’
ta
ble
item
s
EXPLAIN
Less
on 6
Tr
avel
ling
tale
s•
desc
ribe
how
sou
nd tr
avels
from
th
e so
urce
to th
e ea
r
• de
scrib
e ho
w lig
ht tr
avels
from
the
sour
ce to
the
eye.
• un
ders
tand
the
purp
ose
and
feat
ures
of a
role-
play
• us
e ro
le-pl
ay to
repr
esen
t the
jo
urne
y of
light
and
sou
nd
• re
pres
ent t
heir
unde
rsta
ndin
g of
the
jour
ney
of lig
ht a
nd
soun
d us
ing
draw
ings
.
• re
pres
ent t
heir
unde
rsta
ndin
g of
how
light
and
sou
nd tr
avel
usin
g dr
awin
gs
• ro
le-pl
ay h
ow s
ound
trav
els
• ro
le-pl
ay h
ow lig
ht tr
avels
.
Form
ativ
e as
sess
men
t
• Ro
le-pl
ay
• Dr
awin
gs
• ‘L
ight
and
sou
nd c
ollec
tion’
ta
ble
item
s
ELABORATE
Less
on 7
Tw
o ve
rsus
one
• un
ders
tand
that
light
help
s ou
r ey
es to
see
• un
ders
tand
that
if w
e bl
ock
light
to
one
eye
then
our
qua
lity o
f sig
ht is
aff
ecte
d
• id
entif
y th
e im
porta
nce
of tw
o ey
es
for c
erta
in a
ctivi
ties.
• re
cord
and
repo
rt on
an
inve
stig
atio
n
• fo
llow
dire
ctio
ns to
com
plet
e a
simpl
e in
vest
igat
ion.
• in
vest
igat
e pe
rcep
tion
thro
ugh
play
ing
a cu
p an
d co
in g
ame.
Sum
mat
ive
asse
ssm
ent
of S
cienc
e In
quiry
Skil
ls
• ‘T
estin
g ey
es’
(Res
ourc
e sh
eet 5
)
• ‘L
ight
and
sou
nd c
ollec
tion’
ta
ble
item
s
*For
info
rmat
ion
on h
ow th
e le
sson
s al
ign
with
the
rele
vant
des
crip
tions
of t
he A
ustra
lian
Cur
ricul
um, s
ee p
age
xi fo
r Sci
ence
, pag
e xi
ii fo
r Eng
lish
and
page
xiv
for M
athe
mat
ics.
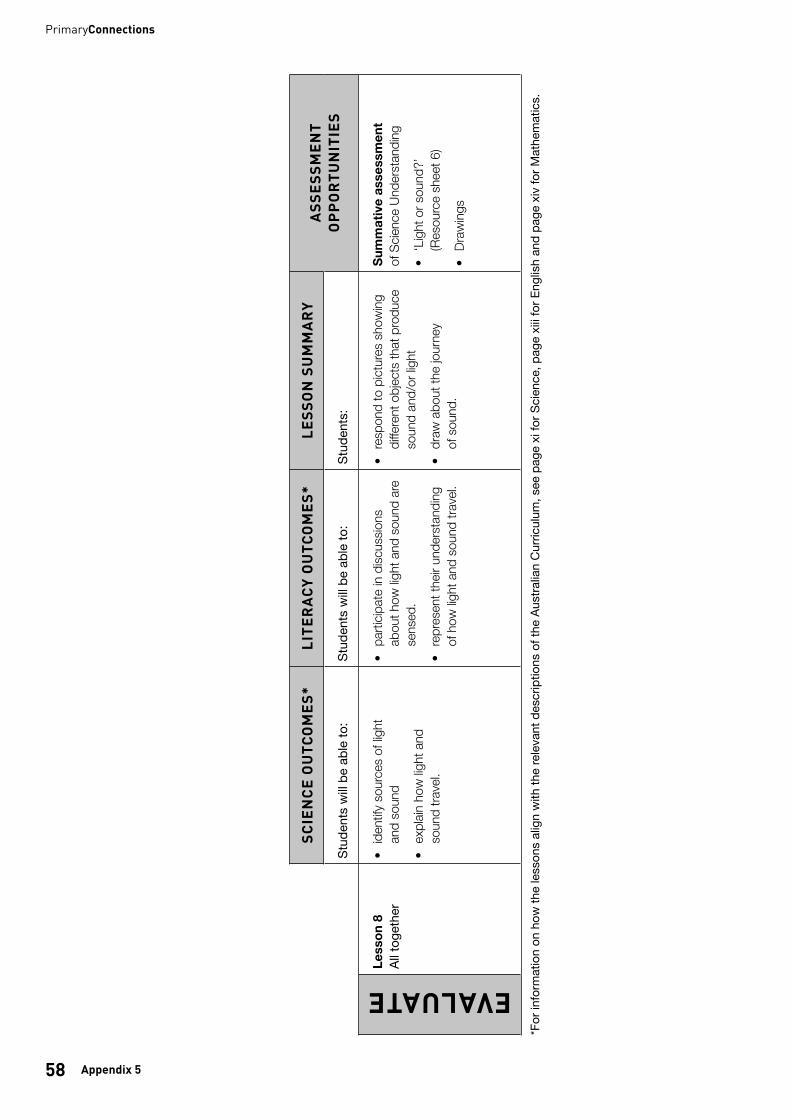
Appendix 558
PrimaryConnections
SC
IEN
CE
OU
TCO
ME
S*
LITE
RA
CY
OU
TCO
ME
S*
LES
SO
N S
UM
MA
RY
AS
SE
SS
ME
NT
OP
PO
RTU
NIT
IES
Stud
ents
will
be a
ble
to:
Stud
ents
will
be a
ble
to:
Stud
ents
:
EVALUATE
Less
on 8
Al
l tog
ethe
r•
iden
tify
sour
ces
of lig
htan
d so
und
•ex
plain
how
light
and
soun
d tra
vel.
•pa
rticip
ate
in d
iscus
sions
abou
t how
light
and
sou
nd a
rese
nsed
.
•re
pres
ent t
heir
unde
rsta
ndin
gof
how
light
and
sou
nd tr
avel.
•re
spon
d to
pict
ures
sho
win
gdi
ffere
nt o
bjec
ts th
at p
rodu
ceso
und
and/
or lig
ht
•dr
aw a
bout
the
jour
ney
of s
ound
.
Sum
mat
ive
asse
ssm
ent
of S
cienc
e Un
ders
tand
ing
•‘L
ight
or s
ound
?’(R
esou
rce
shee
t 6)
•Dr
awin
gs
*For
info
rmat
ion
on h
ow th
e le
sson
s al
ign
with
the
rele
vant
des
crip
tions
of t
he A
ustra
lian
Cur
ricul
um, s
ee p
age
xi fo
r Sci
ence
, pag
e xi
ii fo
r Eng
lish
and
page
xiv
for M
athe
mat
ics.
PrimaryConnections
SC
IEN
CE
OU
TCO
ME
S*
LITE
RA
CY
OU
TCO
ME
S*
LES
SO
N S
UM
MA
RY
AS
SE
SS
ME
NT
OP
PO
RTU
NIT
IES
Stud
ents
will
be a
ble
to:
Stud
ents
will
be a
ble
to:
Stud
ents
:
ELABORATE
Less
on 7
Rube
Gol
dber
g Se
ssio
n 1
Plan
it fi
rst
Sess
ion
2C
onst
ruct
ion
time
•ge
nera
te id
eas
and
cons
truct
a R
ube
Gol
dber
g m
achi
ne
•id
entif
y ho
w to
mak
e di
ffere
nt o
bjec
ts m
ove
thro
ugh
diffe
rent
pus
hes
and
pulls
.
•cr
eate
an
anno
tate
d dr
awin
g of
their
idea
s
•di
scus
s th
eir id
eas
abou
t how
to b
uild
and
fix
their
mac
hine
usin
g ap
prop
riate
wor
ds.
Sess
ion
1 Pl
an it
firs
t•
wor
k in
team
s to
plan
a
Rube
Gol
dber
g m
achi
ne
to m
eet d
esig
n cr
iteria
•
draw
an
anno
tate
d dr
awin
g an
d cr
eate
an
equi
pmen
t list
.Se
ssio
n 2
Con
stru
ctio
n tim
e•
follo
w th
eir p
lan to
co
nstru
ct a
Rub
e G
oldb
erg
mac
hine
•im
prov
e th
eir m
achi
ne
as n
eces
sary
to e
nsur
e it
wor
ks.
Sum
mat
ive
asse
ssm
ent
of S
cien
ce In
quiry
Ski
lls
•Sc
ience
jour
nal e
ntrie
s
•Cl
ass
disc
ussio
ns
•‘O
ur R
ube
Gol
dber
g M
achi
ne’
(Res
ourc
e sh
eet 9
)
EVALUATE
Less
on 8
Our
am
azin
g m
achi
ne
•ex
plain
how
pus
hes
and
pulls
affe
ct th
e m
ovem
ent
of o
bjec
ts in
their
m
achi
ne.
•cr
eate
an
anno
tate
d dr
awin
g•
use
oral
and
writ
ten
langu
age
to s
how
their
un
ders
tand
ing
and
refle
ct
on th
eir e
xper
ience
s.
•pr
esen
t the
ir fin
al Ru
be
Gol
dber
g m
achi
ne a
nd
expl
ain th
e pu
shes
and
pu
lls th
at m
ake
it w
ork
•re
flect
on
their
lear
ning
du
ring
the
unit.
Sum
mat
ive
asse
ssm
ent
of S
cien
ce U
nder
stan
ding
•Sc
ience
jour
nal e
ntrie
s
•Cl
ass
disc
ussio
ns
•An
nota
ted
draw
ings
(O
ptio
nal)
•O
ral p
rese
ntat
ions
YearBiological sciences
Chemical sciences
Earth and space sciences
Physical sciences
F
Staying alive That’s my hat!
Weather in my world On the move
Growing well What’s it made of?
1
Schoolyard safari Spot the difference Changes all around
Look! Listen!
Dinosaurs and more Bend it! Stretch it! Up, down and all around
2 Watch it grow! All mixed up Water works
Machine makers
Push-pull
3 Feathers, fur or leaves? Melting moments Night and day Heating up
4
Plants in action Material world
Beneath our feet
Magnetic moves
Friends or foes?
Package it better Smooth movesAmong the gum trees
5 Desert survivors What’s the matter? Earth’s place in space Light shows
6
Marvellous micro-organisms
Change detectives
Creators and destroyers Circuits and switches
Rising salt Earthquake explorers Essential energy
www.primaryconnections.org.au
PrimaryConnections Units
June 2020