mandrel fabrication guide lines - ti … · mandrel fabrication guide lines . international, ltd....
TRANSCRIPT
MANDREL FABRICATION
GUIDE LINES
International, Ltd. (formerly Templeman Industries)
2260 Commonwealth Ave. North Chicago, Il. 60064 Phone: (847) 689-0233 Fax: (847) 689-0238
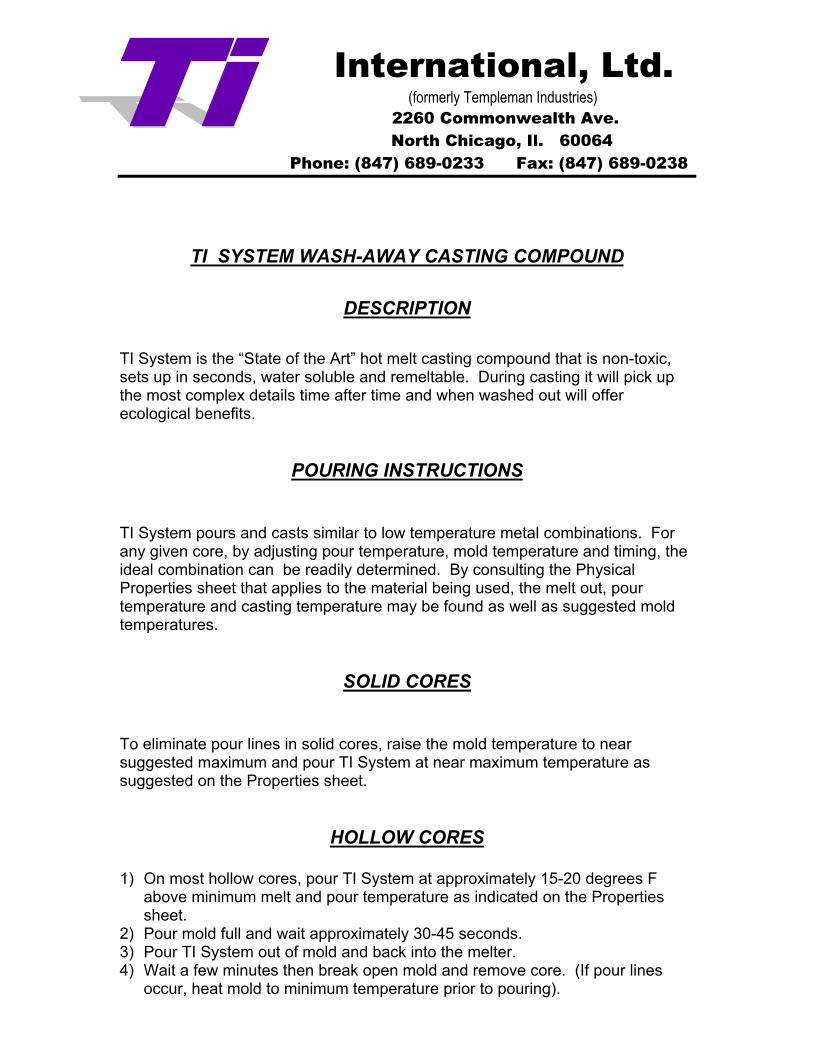
TI SYSTEM WASH-AWAY CASTING COMPOUND
DESCRIPTION
TI System is the “State of the Art” hot melt casting compound that is non-toxic, sets up in seconds, water soluble and remeltable. During casting it will pick up the most complex details time after time and when washed out will offer ecological benefits.
POURING INSTRUCTIONS
TI System pours and casts similar to low temperature metal combinations. For any given core, by adjusting pour temperature, mold temperature and timing, the ideal combination can be readily determined. By consulting the Physical Properties sheet that applies to the material being used, the melt out, pour temperature and casting temperature may be found as well as suggested mold temperatures.
SOLID CORES
To eliminate pour lines in solid cores, raise the mold temperature to near suggested maximum and pour TI System at near maximum temperature as suggested on the Properties sheet.
HOLLOW CORES
1) On most hollow cores, pour TI System at approximately 15-20 degrees F above minimum melt and pour temperature as indicated on the Properties sheet.
2) Pour mold full and wait approximately 30-45 seconds. 3) Pour TI System out of mold and back into the melter. 4) Wait a few minutes then break open mold and remove core. (If pour lines
occur, heat mold to minimum temperature prior to pouring).

FOR GREATER WALL THICKNESS ON HOLLOW CORES
1) Pour mold full of TI System and wait 30-45 seconds. 2) Pour TI System out of mold and back into melter and wait 5 minutes, leaving
core in mold. 3) With core remaining in mold, repour material back into hollow core until full
and wait 30 seconds. 4) Pour material out of mold and wait a few minutes. 5) Break open mold and remove core.
Caution: Leaving the mold full of molten material too long could result in uneven wall thickness.
EQUIPMENT REQUIREMENTS AND APPLICATION FOR ULTIMATE PERFORMANCE
I. TOOLING REQUIREMENTS: TI System Casting Compounds are used at
elevated temperatures. Tools or molds must be constructed with the ability to withstand high temperatures and initial thermal shock. Laminated high temperature epoxy system tools are normally used, however, some users are now moving to “cast to size” aluminum tools or molds as the shrink factor is the same. The advantage being that aluminum will not degradate with repeated cycling as do epoxy tools plus the surface finish of the cast mandrel is far superior. Tooling is of the split flanged type with ribbed backing in any case.
II. MELTING EQUIPMENT:
A) A good quality melting pot is very important to achieve optimum performance from TI System compounds. The melter shall be electrically heated, cylindrical with multiple circuit blanket type elements to apply uniform heat to the entire bottom and up the side walls to approximately 75% of the wall height. Heat should be evenly distributed at a low watt density (approximately 5 watts per square inch maximum), thereby eliminating the danger of “hot “ spots.
B) TANK CONTROL: Accurate variable dial thermostats to control the wall
temperature are required and temperature range should be from 200°F-550°F.
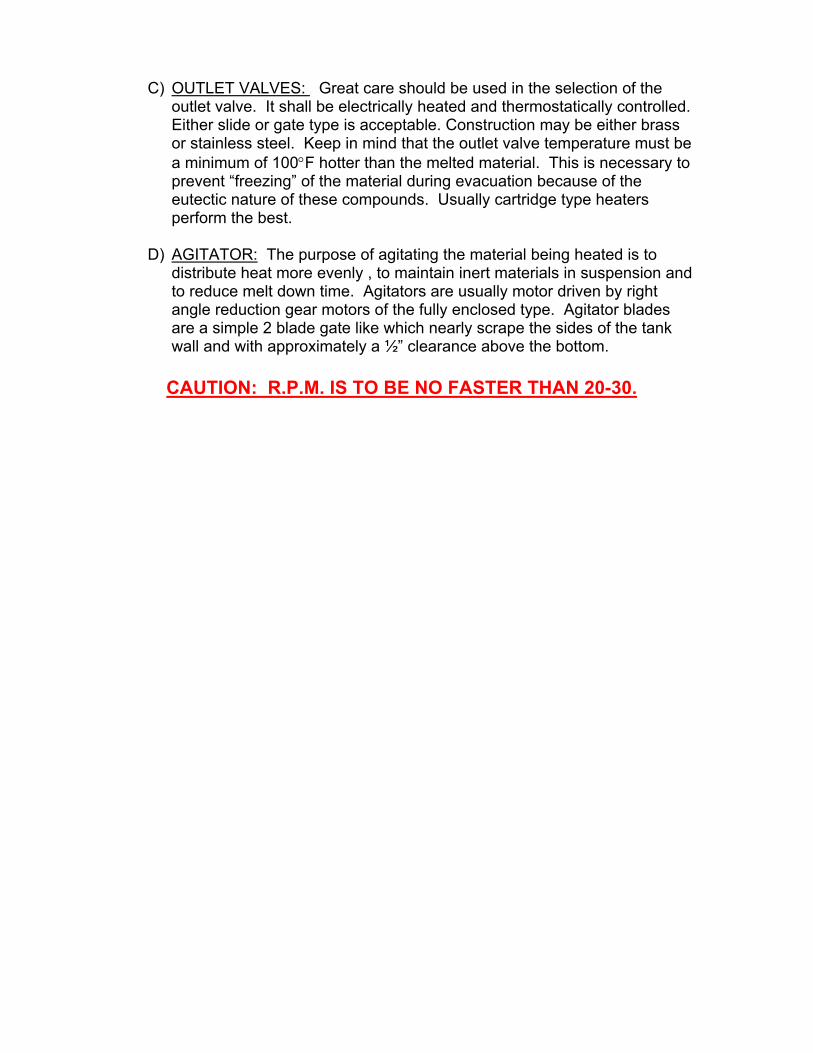
C) OUTLET VALVES: Great care should be used in the selection of the outlet valve. It shall be electrically heated and thermostatically controlled. Either slide or gate type is acceptable. Construction may be either brass or stainless steel. Keep in mind that the outlet valve temperature must be a minimum of 100°F hotter than the melted material. This is necessary to prevent “freezing” of the material during evacuation because of the eutectic nature of these compounds. Usually cartridge type heaters perform the best.
D) AGITATOR: The purpose of agitating the material being heated is to
distribute heat more evenly , to maintain inert materials in suspension and to reduce melt down time. Agitators are usually motor driven by right angle reduction gear motors of the fully enclosed type. Agitator blades are a simple 2 blade gate like which nearly scrape the sides of the tank wall and with approximately a ½” clearance above the bottom.
CAUTION: R.P.M. IS TO BE NO FASTER THAN 20-30.
International, Ltd. (formerly Templeman Industries)
2260 Commonwealth Ave. North Chicago, Il. 60064 Phone: (847) 689-0233 Fax: (847) 689-0238
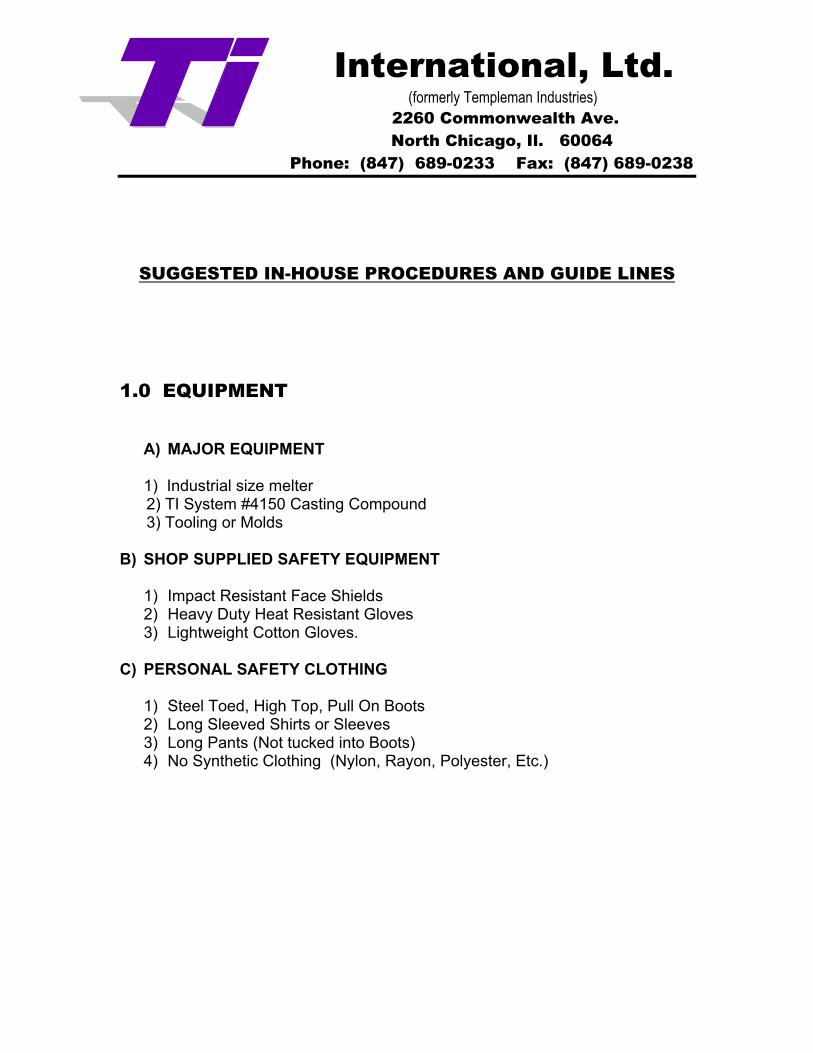
SUGGESTED IN-HOUSE PROCEDURES AND GUIDE LINES
1.0 EQUIPMENT
A) MAJOR EQUIPMENT
1) Industrial size melter 2) TI System #4150 Casting Compound 3) Tooling or Molds B) SHOP SUPPLIED SAFETY EQUIPMENT
1) Impact Resistant Face Shields 2) Heavy Duty Heat Resistant Gloves 3) Lightweight Cotton Gloves.
C) PERSONAL SAFETY CLOTHING
1) Steel Toed, High Top, Pull On Boots 2) Long Sleeved Shirts or Sleeves 3) Long Pants (Not tucked into Boots) 4) No Synthetic Clothing (Nylon, Rayon, Polyester, Etc.)
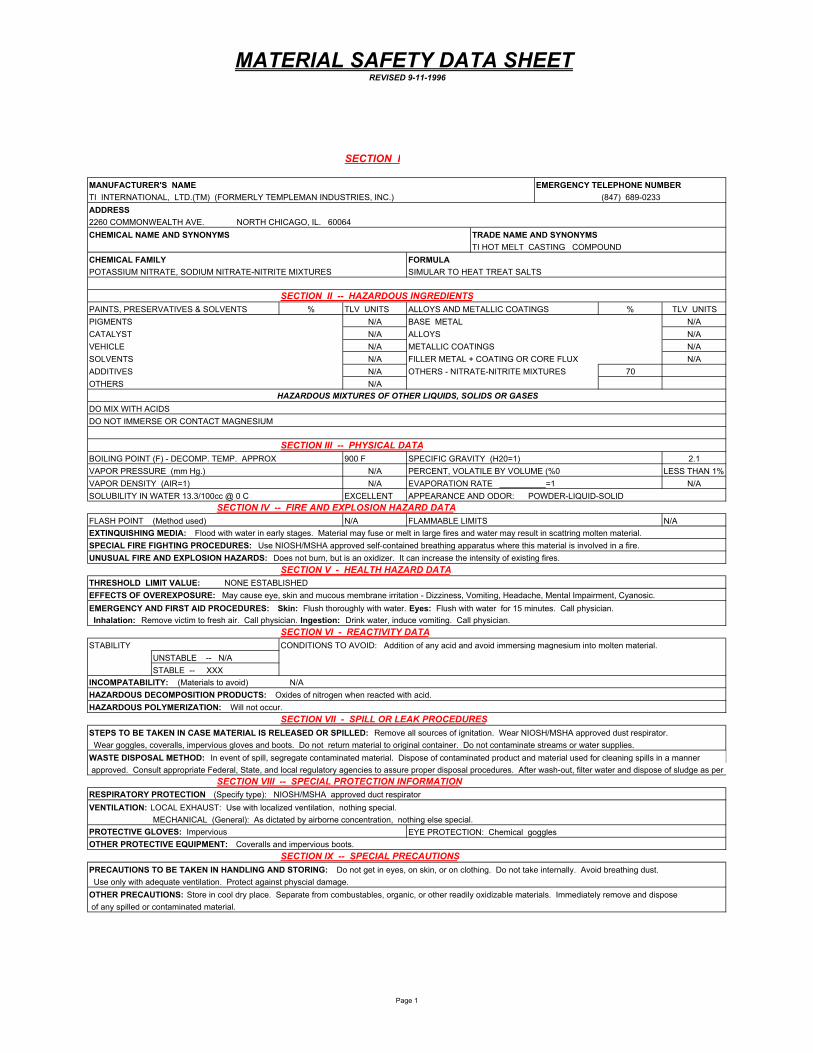
MATERIAL SAFETY DATA SHEETREVISED 9-11-1996
SECTION I
MANUFACTURER'S NAME EMERGENCY TELEPHONE NUMBERTI INTERNATIONAL, LTD.(TM) (FORMERLY TEMPLEMAN INDUSTRIES, INC.) (847) 689-0233ADDRESS2260 COMMONWEALTH AVE. NORTH CHICAGO, IL. 60064CHEMICAL NAME AND SYNONYMS TRADE NAME AND SYNONYMS
TI HOT MELT CASTING COMPOUNDCHEMICAL FAMILY FORMULAPOTASSIUM NITRATE, SODIUM NITRATE-NITRITE MIXTURES SIMULAR TO HEAT TREAT SALTS
SECTION II -- HAZARDOUS INGREDIENTSPAINTS, PRESERVATIVES & SOLVENTS % TLV UNITS ALLOYS AND METALLIC COATINGS % TLV UNITSPIGMENTS N/A BASE METAL N/ACATALYST N/A ALLOYS N/AVEHICLE N/A METALLIC COATINGS N/ASOLVENTS N/A FILLER METAL + COATING OR CORE FLUX N/AADDITIVES N/A OTHERS - NITRATE-NITRITE MIXTURES 70OTHERS N/A
HAZARDOUS MIXTURES OF OTHER LIQUIDS, SOLIDS OR GASESDO MIX WITH ACIDSDO NOT IMMERSE OR CONTACT MAGNESIUM
SECTION III -- PHYSICAL DATABOILING POINT (F) - DECOMP. TEMP. APPROX 900 F SPECIFIC GRAVITY (H20=1) 2.1VAPOR PRESSURE (mm Hg.) N/A PERCENT, VOLATILE BY VOLUME (%0 LESS THAN 1%VAPOR DENSITY (AIR=1) N/A EVAPORATION RATE __________=1 N/ASOLUBILITY IN WATER 13.3/100cc @ 0 C EXCELLENT APPEARANCE AND ODOR: POWDER-LIQUID-SOLID
SECTION IV -- FIRE AND EXPLOSION HAZARD DATAFLASH POINT (Method used) N/A FLAMMABLE LIMITS N/AEXTINQUISHING MEDIA: Flood with water in early stages. Material may fuse or melt in large fires and water may result in scattring molten material.SPECIAL FIRE FIGHTING PROCEDURES: Use NIOSH/MSHA approved self-contained breathing apparatus where this material is involved in a fire.UNUSUAL FIRE AND EXPLOSION HAZARDS: Does not burn, but is an oxidizer. It can increase the intensity of existing fires.
SECTION V - HEALTH HAZARD DATATHRESHOLD LIMIT VALUE: NONE ESTABLISHEDEFFECTS OF OVEREXPOSURE: May cause eye, skin and mucous membrane irritation - Dizziness, Vomiting, Headache, Mental Impairment, Cyanosic. EMERGENCY AND FIRST AID PROCEDURES: Skin: Flush thoroughly with water. Eyes: Flush with water for 15 minutes. Call physician. Inhalation: Remove victim to fresh air. Call physician. Ingestion: Drink water, induce vomiting. Call physician.
SECTION VI - REACTIVITY DATASTABILITY CONDITIONS TO AVOID: Addition of any acid and avoid immersing magnesium into molten material.
UNSTABLE -- N/ASTABLE -- XXX
INCOMPATABILITY: (Materials to avoid) N/AHAZARDOUS DECOMPOSITION PRODUCTS: Oxides of nitrogen when reacted with acid.HAZARDOUS POLYMERIZATION: Will not occur.
SECTION VII - SPILL OR LEAK PROCEDURESSTEPS TO BE TAKEN IN CASE MATERIAL IS RELEASED OR SPILLED: Remove all sources of ignitation. Wear NIOSH/MSHA approved dust respirator. Wear goggles, coveralls, impervious gloves and boots. Do not return material to original container. Do not contaminate streams or water supplies.WASTE DISPOSAL METHOD: In event of spill, segregate contaminated material. Dispose of contaminated product and material used for cleaning spills in a manner approved. Consult appropriate Federal, State, and local regulatory agencies to assure proper disposal procedures. After wash-out, filter water and dispose of sludge as per n
SECTION VIII -- SPECIAL PROTECTION INFORMATIONRESPIRATORY PROTECTION (Specify type): NIOSH/MSHA approved duct respiratorVENTILATION: LOCAL EXHAUST: Use with localized ventilation, nothing special.
MECHANICAL (General): As dictated by airborne concentration, nothing else special.PROTECTIVE GLOVES: Impervious EYE PROTECTION: Chemical gogglesOTHER PROTECTIVE EQUIPMENT: Coveralls and impervious boots.
SECTION IX -- SPECIAL PRECAUTIONSPRECAUTIONS TO BE TAKEN IN HANDLING AND STORING: Do not get in eyes, on skin, or on clothing. Do not take internally. Avoid breathing dust. Use only with adequate ventilation. Protect against physcial damage.OTHER PRECAUTIONS: Store in cool dry place. Separate from combustables, organic, or other readily oxidizable materials. Immediately remove and dispose of any spilled or contaminated material.
Page 1
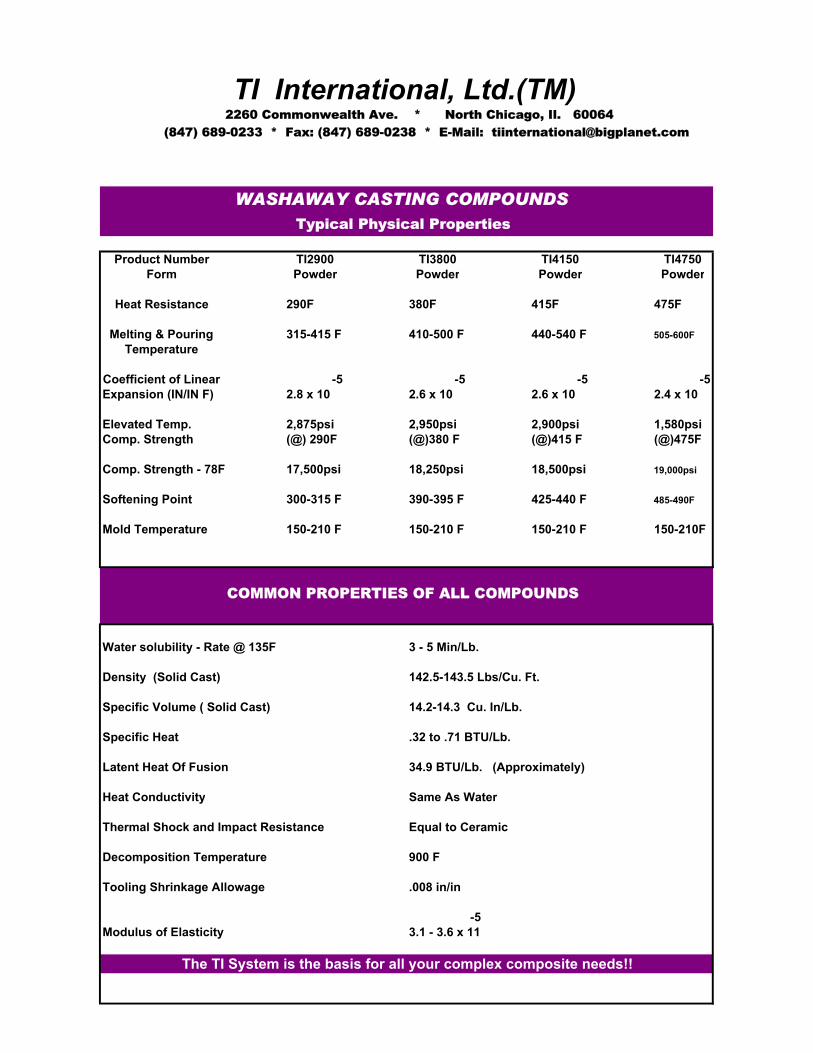
2260 Commonwealth Ave. * North Chicago, Il. 60064(847) 689-0233 * Fax: (847) 689-0238 * E-Mail: [email protected]
TI2900 TI3800 TI4150 TI4750Powder Powder Powder Powder
290F 380F 415F 475F
315-415 F 410-500 F 440-540 F 505-600F
-5 -5 -5 -5Expansion (IN/IN F) 2.8 x 10 2.6 x 10 2.6 x 10 2.4 x 10
Elevated Temp. 2,875psi 2,950psi 2,900psi 1,580psiComp. Strength (@) 290F (@)380 F (@)415 F (@)475F
Comp. Strength - 78F 17,500psi 18,250psi 18,500psi 19,000psi
Softening Point 300-315 F 390-395 F 425-440 F 485-490F
Mold Temperature 150-210 F 150-210 F 150-210 F 150-210F
Water solubility - Rate @ 135F 3 - 5 Min/Lb.
Density (Solid Cast) 142.5-143.5 Lbs/Cu. Ft.
Specific Volume ( Solid Cast) 14.2-14.3 Cu. In/Lb.
Specific Heat .32 to .71 BTU/Lb.
Latent Heat Of Fusion 34.9 BTU/Lb. (Approximately)
Heat Conductivity Same As Water
Thermal Shock and Impact Resistance Equal to Ceramic
Decomposition Temperature 900 F
Tooling Shrinkage Allowage .008 in/in
-5Modulus of Elasticity 3.1 - 3.6 x 11
Product NumberForm
TI International, Ltd.(TM)
The TI System is the basis for all your complex composite needs!!
WASHAWAY CASTING COMPOUNDS
COMMON PROPERTIES OF ALL COMPOUNDS
Heat Resistance
TemperatureMelting & Pouring
Coefficient of Linear
Typical Physical Properties
International, Ltd. ™ P.O. Box 670
2260 Commonwealth Ave. North Chicago, Il. 60064 Phone:(847)689-0233 Fax:(847)689-0238 E-Mail:[email protected]
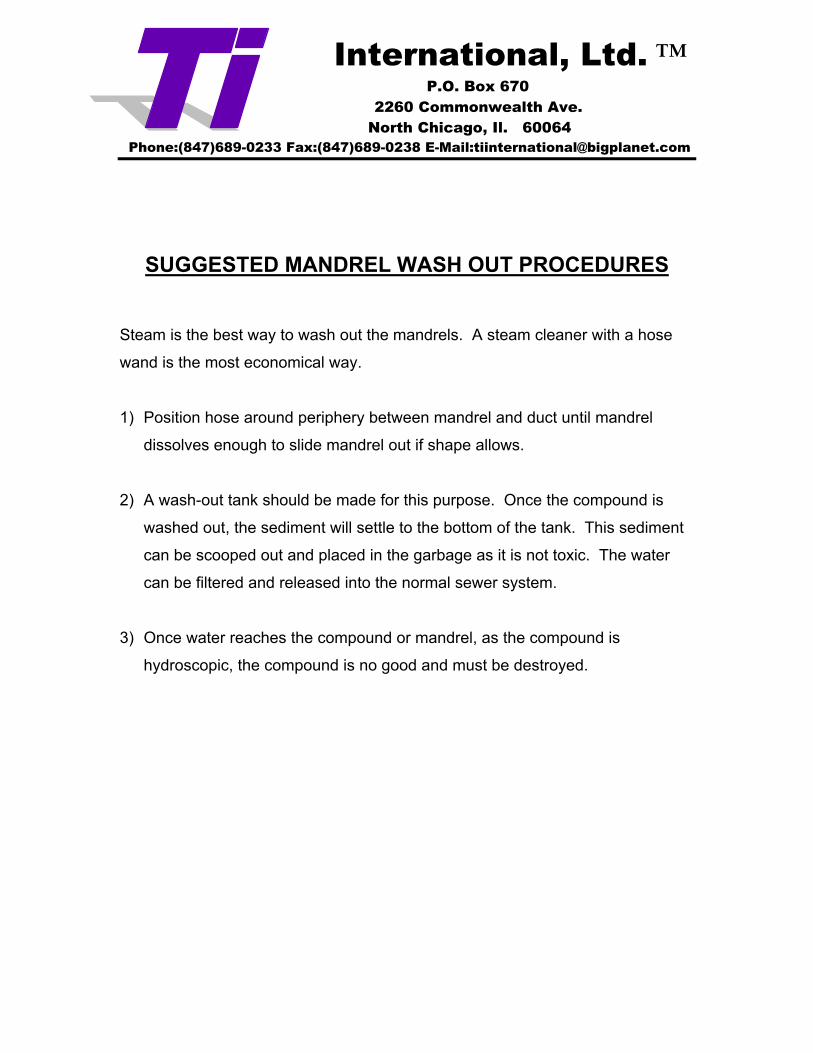
SUGGESTED MANDREL WASH OUT PROCEDURES
Steam is the best way to wash out the mandrels. A steam cleaner with a hose
wand is the most economical way.
1) Position hose around periphery between mandrel and duct until mandrel
dissolves enough to slide mandrel out if shape allows.
2) A wash-out tank should be made for this purpose. Once the compound is
washed out, the sediment will settle to the bottom of the tank. This sediment
can be scooped out and placed in the garbage as it is not toxic. The water
can be filtered and released into the normal sewer system.
3) Once water reaches the compound or mandrel, as the compound is
hydroscopic, the compound is no good and must be destroyed.
International, Ltd. (formerly Templeman Industries)
2260 Commonwealth Ave. North Chicago, Il. 60064 Phone: (847) 689-0233 Fax: (847) 689-0238
T.I. SYSTEM # 2900
SUGGESTED USE PROCEDURES
1) MELTING POT TEMPERATURE SETTING AND AGITATOR R.P.M.
Pot thermostat should be set and held constant at 350°F +- 5°F. Discharge valve should be set at least 100°F hotter (450°F +- 5°F) and
should be left on at all times to avoid it freezing up. Agitator should travel at approximately 20-25 R.P.M
The agitator should always be in operation except when charging pot with material and then when material is melted, started as quickly as possible. MELTER MAINTENANCE
a) Melter should be checked frequently against burned out heater strips,
as well as proper thermostat operation. b) Valve heaters and thermostats should be checked for proper thermostat operation. c) Melter should be cleaned at regular intervals (six months to one year) to eliminate contaminate buildup on the screen and in the sump.
3) CHARGING MELTER WITH TI SYSTEM COMPOUNDS
Remelt material is generally not recommended, however, a minimum of 50% new powder must be added to any remelt blend. If a high humidity condition is present, remelt is definitely not recommended. Conditioned use of only remelt material will always result in an overload of contaminates, causing increased melter maintenance, lowered physicals on finished mandrels, and general dissatisfaction of pour consistency and texture. CAUTION: ALWAYS WEAR HEAVY HEAT RESISTANT GLOVES, FACE MASK AND EYE PROTECTION, ALONG WITH ARM SHIELDS, HEAT RESISTANT APRON, FOOT AND LEG SHIELDS.
MOLTEN MATERIAL CAN CAUSE SEVERE BURNS!!!!
4) CASTING PROCEDURE
A) Stabilize tool or mold at “Preheat “ temperature. This may be done in oven, or using heat lamps or gun. A simple method is to fill tool with casting material and leave for a period of time and then remove. This will usually provide sufficient heat to eliminate pour lines and chill imperfections.
B) Casting material from melter discharge valve directly into mold is not
preferred, as air entrapment is almost always present. Rather, use of a steel pail or other suitable container to transfer material from melter into a pail then stirring gently to remove air bubbles that may be present prior to casting into mold.
C) SOLID CORES:
When casting T.I. System compounds in mold, always try to “slide” material down the side of the mold. This means the mold must be tilted at the start of the pour and then gradually moved back to an upright position as the mold fills. If the material is poured directly into an upright mold, the casting material will splash when it hits bottom and cause serious imperfections. Pouring technique is only accomplished by practice and by following these simple guide lines. After casting material has solidified, do no wait too long to demold, especially if the part has complicated geometry, as thermal contraction may cause difficulty in removal, as well as possible cracking. Usually 5-15 minutes is sufficient. Large parts will require an additional 5-10 minutes. In any case, demold time must be monitored for each different part.
D) HOLLOW CORES:
Producing hollow cores is easily accomplished. First the timing will be different with a metal tool than with an epoxy laminate one. Starting with the epoxy tool, fill the mold full the same way as outlined for solid cores. Make sure that the mold has sufficient preheat before casting. When mold is full, wait 60 seconds on an average size tool, and about 3-5 minutes on a larger tool, then pour material out of mold back into melter or pail and wait 5-10 minutes, leaving core in mold. This will usually produce about a .250” wall thickness. A good rule of thumb to remember is a .250” wall thickness every 30 seconds. If a greater wall thickness is desired, repeat the same procedure for an extra .250” thickness required. Timing is very important because in most every case, leaving the mold full of molten material too long will result in uneven core thickness. Now, using aluminum tooling, the tool should definitely be preheated to eliminate pour lines. With either type of tooling, the material should not be poured more than 575°F, otherwise, the dwell time will be too long to solidify and in addition, cause an uneven wall thickness.
Ideally, a log should be kept on each tool as proper dwell times are achieved, keeping in mind that constant pouring temperatures are very important and must be maintained.
E) FINISHED MANDRELS:
Completed mandrels may be placed in poly-bags of any mil thickness (preferably .006) for storage. The need for oven storage is not required. Room temperature storage is preferred, and when ready for lay-up, may be heated to facilitate faster lay-up with prepreg materials. Barrier coatings are recommended and should be applied to bare mandrels prior to lay-up. We recommend Miller Stevenson (MS143DF) as it acts as a barrier coat and a release agent combined.

International, Ltd. 2260 Commonwealth Ave.
North Chicago, Il. 60064 Phone: (847) 689-0233 Fax: (847) 689-0238
T.I. SYSTEM # 3800
SUGGESTED USE PROCEDURES
1) MELTING POT TEMPERATURE SETTING AND AGITATOR R.P.M.
Pot thermostat should be set and held constant at 440°F +- 5°F. Discharge valve should be set at least 100°F hotter (540°F +- 5°F) and
should be left on at all times to avoid it freezing up. Agitator should travel at approximately 20-25 R.P.M
The agitator should always be in operation except when charging pot with material and then when material is melted, started as quickly as possible. MELTER MAINTENANCE
a) Melter should be checked frequently against burned out heater strips,
as well as proper thermostat operation. b) Valve heaters and thermostats should be checked for proper thermostat operation. c) Melter should be cleaned at regular intervals (six months to one year) to eliminate contaminate buildup on the screen and in the sump.
3) CHARGING MELTER WITH T.I. SYSTEM COMPOUNDS
Remelt material is generally not recommended, however, a minimum of 50% new powder must be added to any remelt blend. If a high humidity condition is present, remelt is definitely not recommended. Conditioned use of only remelt material will always result in an overload of contaminates, causing increased melter maintenance, lowered physicals on finished mandrels, and general dissatisfaction of pour consistency and texture. CAUTION: ALWAYS WEAR HEAVY HEAT RESISTANT GLOVES, FACE MASK AND EYE PROTECTION, ALONG WITH ARM SHIELDS, HEAT RESISTANT APRON, FOOT AND LEG SHIELDS.
MOLTEN MATERIAL CAN CAUSE SEVERE BURNS!!!!

4) CASTING PROCEDURE
A) Stabilize tool or mold at “Preheat “ temperature. This may be done in oven, or using heat lamps or gun. A simple method is to fill tool with casting material and leave for a period of time and then remove. This will usually provide sufficient heat to eliminate pour lines and chill imperfections.
B) Casting material from melter discharge valve directly into mold is not
preferred, as air entrapment is almost always present. Rather, use of a steel pail or other suitable container to transfer material from melter into a pail then stirring gently to remove air bubbles that may be present prior to casting into mold.
C) SOLID CORES:
When casting T.I. System compounds in mold, always try to “slide” material down the side of the mold. This means the mold must be tilted at the start of the pour and then gradually moved back to an upright position as the mold fills. If the material is poured directly into an upright mold, the casting material will splash when it hits bottom and cause serious imperfections. Pouring technique is only accomplished by practice and by following these simple guide lines. After casting material has solidified, do no wait too long to demold, especially if the part has complicated geometry, as thermal contraction may cause difficulty in removal, as well as possible cracking. Usually 5-15 minutes is sufficient. Large parts will require an additional 5-10 minutes. In any case, demold time must be monitored for each different part.
D) HOLLOW CORES:
Producing hollow cores is easily accomplished. First the timing will be different with a metal tool than with an epoxy laminate one. Starting with the epoxy tool, fill the mold full the same way as outlined for solid cores. Make sure that the mold has sufficient preheat before casting. When mold is full, wait 60 seconds on an average size tool, and about 3-5 minutes on a larger tool, then pour material out of mold back into melter or pail and wait 5-10 minutes, leaving core in mold. This will usually produce about a .250” wall thickness. A good rule of thumb to remember is a .250” wall thickness every 30 seconds. If a greater wall thickness is desired, repeat the same procedure for an extra .250” thickness required. Timing is very important because in most every case, leaving the mold full of molten material too long will result in uneven core thickness. Now, using aluminum tooling, the tool should definitely be preheated to eliminate pour lines. With either type of tooling, the material should not be poured more than 575°F, otherwise, the dwell time will be too long to solidify and in addition, cause an uneven wall thickness.
Ideally, a log should be kept on each tool as proper dwell times are achieved, keeping in mind that constant pouring temperatures are very important and must be maintained.
E) FINISHED MANDRELS:
Completed mandrels may be placed in poly-bags of any mil thickness (preferably .006) for storage. The need for oven storage is not required. Room temperature storage is preferred, and when ready for lay-up, may be heated to facilitate faster lay-up with prepreg materials. Barrier coatings are recommended and should be applied to bare mandrels prior to lay-up. We recommend Miller Stevenson (MS143DF) as it acts as a barrier coat and a release agent combined.
International, Ltd. 2260 Commonwealth Ave.
North Chicago, Il. 60064 Phone: (847) 689-0233 Fax: (847) 689-0238
T.I. SYSTEM # 4150
SUGGESTED USE PROCEDURES
1) MELTING POT TEMPERATURE SETTING AND AGITATOR R.P.M.
Pot thermostat should be set and held constant at 475°F +- 5°F. Discharge valve should be set at least 100°F hotter (575°F +- 5°F) and
should be left on at all times to avoid it freezing up. Agitator should travel at approximately 20-25 R.P.M
The agitator should always be in operation except when charging pot with material and then when material is melted, started as quickly as possible. MELTER MAINTENANCE
a) Melter should be checked frequently against burned out heater strips,
as well as proper thermostat operation. b) Valve heaters and thermostats should be checked for proper thermostat operation. c) Melter should be cleaned at regular intervals (six months to one year) to eliminate contaminate buildup on the screen and in the sump.
3) CHARGING MELTER WITH T.I. SYSTEM COMPOUNDS
Remelt material is generally not recommended, however, a minimum of 50% new powder must be added to any remelt blend. If a high humidity condition is present, remelt is definitely not recommended. Conditioned use of only remelt material will always result in an overload of contaminates, causing increased melter maintenance, lowered physicals on finished mandrels, and general dissatisfaction of pour consistency and texture. CAUTION: ALWAYS WEAR HEAVY HEAT RESISTANT GLOVES, FACE MASK AND EYE PROTECTION, ALONG WITH ARM SHIELDS, HEAT RESISTANT APRON, FOOT AND LEG SHIELDS.
MOLTEN MATERIAL CAN CAUSE SEVERE BURNS!!!!
4) CASTING PROCEDURE
A) Stabilize tool or mold at “Preheat “ temperature. This may be done in oven, or using heat lamps or gun. A simple method is to fill tool with casting material and leave for a period of time and then remove. This will usually provide sufficient heat to eliminate pour lines and chill imperfections.
B) Casting material from melter discharge valve directly into mold is not
preferred, as air entrapment is almost always present. Rather, use of a steel pail or other suitable container to transfer material from melter into a pail then stirring gently to remove air bubbles that may be present prior to casting into mold.
C) SOLID CORES:
When casting T.I. System compounds in mold, always try to “slide” material down the side of the mold. This means the mold must be tilted at the start of the pour and then gradually moved back to an upright position as the mold fills. If the material is poured directly into an upright mold, the casting material will splash when it hits bottom and cause serious imperfections. Pouring technique is only accomplished by practice and by following these simple guide lines. After casting material has solidified, do no wait too long to demold, especially if the part has complicated geometry, as thermal contraction may cause difficulty in removal, as well as possible cracking. Usually 5-15 minutes is sufficient. Large parts will require an additional 5-10 minutes. In any case, demold time must be monitored for each different part.
D) HOLLOW CORES:
Producing hollow cores is easily accomplished. First the timing will be different with a metal tool than with an epoxy laminate one. Starting with the epoxy tool, fill the mold full the same way as outlined for solid cores. Make sure that the mold has sufficient preheat before casting. When mold is full, wait 60 seconds on an average size tool, and about 3-5 minutes on a larger tool, then pour material out of mold back into melter or pail and wait 5-10 minutes, leaving core in mold. This will usually produce about a .250” wall thickness. A good rule of thumb to remember is a .250” wall thickness every 30 seconds. If a greater wall thickness is desired, repeat the same procedure for an extra .250” thickness required. Timing is very important because in most every case, leaving the mold full of molten material too long will result in uneven core thickness. Now, using aluminum tooling, the tool should definitely be preheated to eliminate pour lines. With either type of tooling, the material should not be poured more than 575°F, otherwise, the dwell time will be too long to solidify and in addition, cause an uneven wall thickness.

Ideally, a log should be kept on each tool as proper dwell times are achieved, keeping in mind that constant pouring temperatures are very important and must be maintained.
E) FINISHED MANDRELS:
Completed mandrels may be placed in poly-bags of any mil thickness (preferably .006) for storage. The need for oven storage is not required. Room temperature storage is preferred, and when ready for lay-up, may be heated to facilitate faster lay-up with prepreg materials. Barrier coatings are recommended and should be applied to bare mandrels prior to lay-up. We recommend Miller Stevenson (MS143DF) as it acts as a barrier coat and a release agent combined.
Lab No. 20152Page 1 of 1
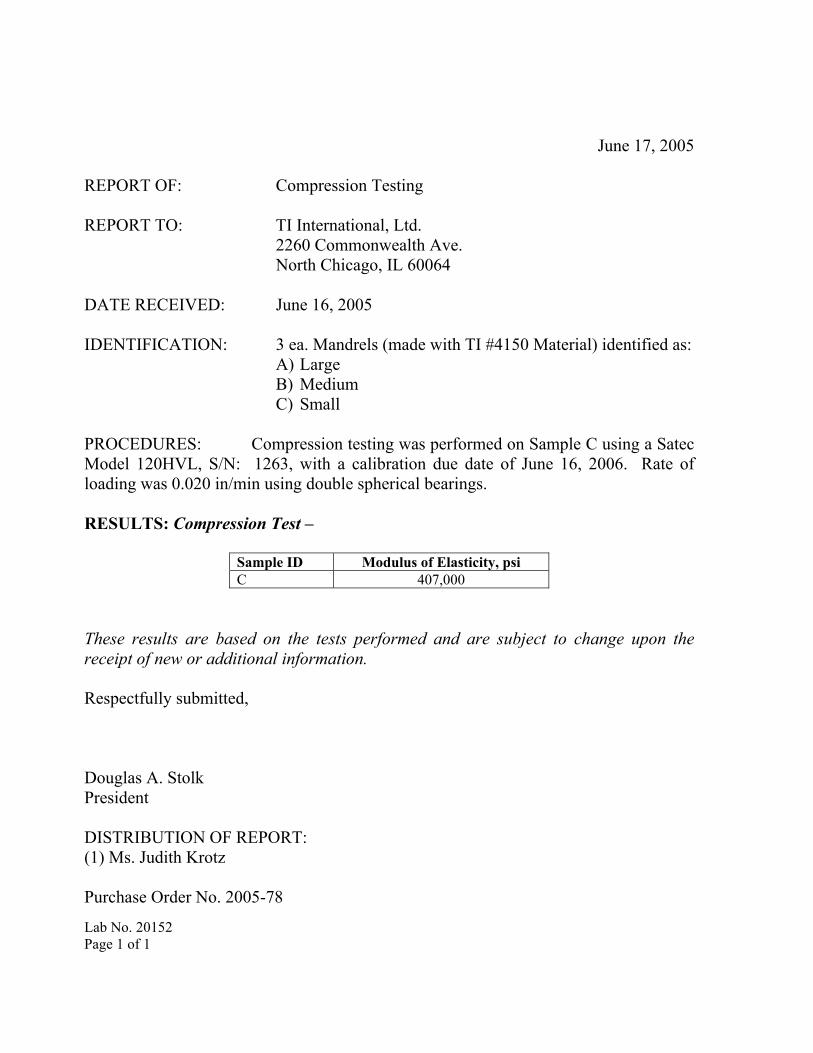
June 17, 2005
REPORT OF: Compression Testing
REPORT TO: TI International, Ltd.2260 Commonwealth Ave.North Chicago, IL 60064
DATE RECEIVED: June 16, 2005
IDENTIFICATION: 3 ea. Mandrels (made with TI #4150 Material) identified as:A) LargeB) MediumC) Small
PROCEDURES: Compression testing was performed on Sample C using a SatecModel 120HVL, S/N: 1263, with a calibration due date of June 16, 2006. Rate ofloading was 0.020 in/min using double spherical bearings. RESULTS: Compression Test –
Sample ID Modulus of Elasticity, psiC 407,000
These results are based on the tests performed and are subject to change upon thereceipt of new or additional information.
Respectfully submitted,
Douglas A. StolkPresident
DISTRIBUTION OF REPORT:(1) Ms. Judith Krotz
Purchase Order No. 2005-78