manual bintec elmeg dime manager · 2020-03-27 · chapter 1 introduction the dime manager...
TRANSCRIPT
Manual
bintec elmeg Dime Manager
Copyright© Version 1.3.8, 2013 bintec elmeg GmbH
bintec elmeg GmbH Manual
bintec elmeg Dime Manager 1
Legal Notice
Warranty
This publication is subject to change.
bintec elmeg GmbH offers no warranty whatsoever for information contained in this manu-
al.
bintec elmeg GmbH is not liable for any direct, indirect, collateral, consequential or any oth-
er damage connected to the delivery, supply or use of this manual.
Manual bintec elmeg GmbH
2 bintec elmeg Dime Manager
Table of Contents
Chapter 1 Introduction . . . . . . . . . . . . . . . . . . . . . . . . . . . 1
1.1 Possible Applications . . . . . . . . . . . . . . . . . . . . . . . . 1
1.2 Supported devices . . . . . . . . . . . . . . . . . . . . . . . . . 2
1.3 System requirements . . . . . . . . . . . . . . . . . . . . . . . . 2
1.3.1 PC . . . . . . . . . . . . . . . . . . . . . . . . . . . . . . . . 3
1.3.2 System Software . . . . . . . . . . . . . . . . . . . . . . . . . . 3
1.4 Installation . . . . . . . . . . . . . . . . . . . . . . . . . . . . . 3
Chapter 2 User interface . . . . . . . . . . . . . . . . . . . . . . . . . . 7
2.1 Elements . . . . . . . . . . . . . . . . . . . . . . . . . . . . . 7
2.1.1 Menu bar . . . . . . . . . . . . . . . . . . . . . . . . . . . . . 8
2.1.2 Device Explorer . . . . . . . . . . . . . . . . . . . . . . . . . . 8
2.1.3 Main window . . . . . . . . . . . . . . . . . . . . . . . . . . . . 9
2.1.4 Device properties . . . . . . . . . . . . . . . . . . . . . . . . . 15
2.1.5 Log and file windows . . . . . . . . . . . . . . . . . . . . . . . 19
2.2 Operation . . . . . . . . . . . . . . . . . . . . . . . . . . . . 21
2.2.1 Change window display . . . . . . . . . . . . . . . . . . . . . . 21
2.2.2 Select devices . . . . . . . . . . . . . . . . . . . . . . . . . . 23
2.2.3 Halting and resuming update . . . . . . . . . . . . . . . . . . . . 23
2.2.4 Filtering Syslog messages . . . . . . . . . . . . . . . . . . . . . 23
Chapter 3 Tasks . . . . . . . . . . . . . . . . . . . . . . . . . . . . . 24
3.1 Discover . . . . . . . . . . . . . . . . . . . . . . . . . . . . . 24
3.1.1 Search for devices . . . . . . . . . . . . . . . . . . . . . . . . 24
3.1.2 Add devices manually . . . . . . . . . . . . . . . . . . . . . . . 24
3.1.3 Display devices. . . . . . . . . . . . . . . . . . . . . . . . . . 25
3.1.4 Search for devices in the background . . . . . . . . . . . . . . . . 25
bintec elmeg GmbH Table of Contents
bintec elmeg Dime Manager i
3.1.5 Save search results . . . . . . . . . . . . . . . . . . . . . . . . 26
3.1.6 Load search results . . . . . . . . . . . . . . . . . . . . . . . . 27
3.1.7 Import devices from a file . . . . . . . . . . . . . . . . . . . . . 28
3.2 Maintenance . . . . . . . . . . . . . . . . . . . . . . . . . . . 28
3.2.1 Display configuration files . . . . . . . . . . . . . . . . . . . . . 29
3.2.2 Change the path to the configuration files . . . . . . . . . . . . . . 30
3.2.3 Display firmware files . . . . . . . . . . . . . . . . . . . . . . . 31
3.2.4 Change path to the firmware files / Update firmware files. . . . . . . . 31
3.3 Services . . . . . . . . . . . . . . . . . . . . . . . . . . . . . 32
3.3.1 Open TFTP log window . . . . . . . . . . . . . . . . . . . . . . 32
3.3.2 Define TFTP settings . . . . . . . . . . . . . . . . . . . . . . . 33
3.3.3 Start or stop TFTP service . . . . . . . . . . . . . . . . . . . . . 33
3.3.4 Open BOOTP log window . . . . . . . . . . . . . . . . . . . . . 33
3.3.5 Define parameters for a device via BOOTP . . . . . . . . . . . . . 35
3.3.6 Start or stop BOOTP service . . . . . . . . . . . . . . . . . . . . 35
3.3.7 Display BOOTP devices . . . . . . . . . . . . . . . . . . . . . . 35
3.3.8 Install Syslog service . . . . . . . . . . . . . . . . . . . . . . . 35
3.3.9 Uninstall Syslog service . . . . . . . . . . . . . . . . . . . . . . 36
3.3.10 Open Dime Syslog log window . . . . . . . . . . . . . . . . . . . 37
3.3.11 Start or end Syslog service. . . . . . . . . . . . . . . . . . . . . 38
3.3.12 Receive and display Syslog messages . . . . . . . . . . . . . . . 38
3.4 Settings . . . . . . . . . . . . . . . . . . . . . . . . . . . . . 39
3.4.1 Open log windows for devices . . . . . . . . . . . . . . . . . . . 39
3.4.2 Open log windows for Dime Manager . . . . . . . . . . . . . . . . 39
3.4.3 Change language. . . . . . . . . . . . . . . . . . . . . . . . . 39
3.4.4 Select TELNET Client . . . . . . . . . . . . . . . . . . . . . . . 40
3.5 Display information . . . . . . . . . . . . . . . . . . . . . . . . 40
3.5.1 Display copyright and version . . . . . . . . . . . . . . . . . . . 40
3.5.2 Call up help . . . . . . . . . . . . . . . . . . . . . . . . . . . 41
3.6 Perform tasks in the main window with the task bar or the shortcut menu. 41
3.6.1 Change device parameters and password . . . . . . . . . . . . . . 41
Table of Contents bintec elmeg GmbH
ii bintec elmeg Dime Manager
3.6.2 Configure device via HTTP. . . . . . . . . . . . . . . . . . . . . 42
3.6.3 Configure device securely via HTTPS . . . . . . . . . . . . . . . . 43
3.6.4 Configure device via TELNET . . . . . . . . . . . . . . . . . . . 44
3.6.5 Update firmware from a file . . . . . . . . . . . . . . . . . . . . 45
3.6.6 Update firmware from a web server . . . . . . . . . . . . . . . . . 46
3.6.7 Update firmware from Update server . . . . . . . . . . . . . . . . 47
3.6.8 Load configuration into a device . . . . . . . . . . . . . . . . . . 49
3.6.9 Save configuration . . . . . . . . . . . . . . . . . . . . . . . . 50
3.6.10 Reboot device . . . . . . . . . . . . . . . . . . . . . . . . . . 51
3.6.11 Reset default settings . . . . . . . . . . . . . . . . . . . . . . . 51
3.6.12 Define parameters for a device via BOOTP . . . . . . . . . . . . . 52
3.6.13 Log data with trace . . . . . . . . . . . . . . . . . . . . . . . . 53
3.6.14 Log data with trace CAPI . . . . . . . . . . . . . . . . . . . . . 55
3.6.15 Set company information . . . . . . . . . . . . . . . . . . . . . 56
3.6.16 Set password . . . . . . . . . . . . . . . . . . . . . . . . . . 57
3.6.17 Delete device . . . . . . . . . . . . . . . . . . . . . . . . . . 59
3.7 Accomplish tasks in the device explorer window with the shortcut menu . 59
3.7.1 Create new company . . . . . . . . . . . . . . . . . . . . . . . 60
3.7.2 Edit company . . . . . . . . . . . . . . . . . . . . . . . . . . 61
3.7.3 Delete company . . . . . . . . . . . . . . . . . . . . . . . . . 62
3.8 Perform tasks with drag and drop . . . . . . . . . . . . . . . . . 62
3.8.1 Save configuration with drag and drop . . . . . . . . . . . . . . . . 62
3.8.2 Update firmware with drag and drop. . . . . . . . . . . . . . . . . 64
3.8.3 Load configuration with drag and drop in a single device . . . . . . . . 65
3.8.4 Load configuration with drag and drop in multiple devices . . . . . . . 65
3.8.5 Assigning devices to a company with drag & drop . . . . . . . . . . . 66
Index . . . . . . . . . . . . . . . . . . . . . . . . . . . . . 67
bintec elmeg GmbH Table of Contents
bintec elmeg Dime Manager iii

Table of Contents bintec elmeg GmbH
iv bintec elmeg Dime Manager

Chapter 1 Introduction
The Dime Manager management tool can locate your bintec elmeg devices within the
network quickly and easily. The .Net-based application, which is designed for up to 50
devices, offers easy to use functions and a comprehensive overview of devices, their para-
meters and files.
By using SNMP multicast all of the devices in your local network can be located irrespect-
ive of their current IP address. A new IP address and password and other parameters can
also be assigned. A configuration can then be initiated over HTTP or TELNET. If using HT-
TP, the Dime Manager automatically logs into the devices on your behalf.
System software files and configuration files can be managed individually as required or in
logical groups for devices of the same type.
1.1 Possible Applications
With the Dime Manager you can even search for your bintec elmeg devices in a private
network. The devices are located using SNMP multicast. If multicast is enabled outside of
the network boundaries it is also possible to locate devices in adjacent networks. The loc-
ated devices are displayed in a list. A comprehensive parameter set is shown for each
device.
The software recognises Dime Manager devices irrespective of whether or not a device
• has been switched on for the first time
• is already configured or
• displays an incorrect configuration.
As soon as the devices are displayed, you can manipulate the devices individually or in
groups. In particular you can
• carry out a quick basic configuration
• call up the Graphical User Interface directly from Dime Manager and configure your
device as normal
• save and load configurations
• carry out a system software update
• boot devices directly from Dime Manager or reset devices to the factory default settings.
Comprehensive log files make your work easier. Logs are generated for the following ac-
tions:
bintec elmeg GmbH 1 Introduction
bintec elmeg Dime Manager 1
• When using the Dime Manager itself
• When manipulating the device currently displayed
• When using TFTP and BOOTP.
Tasks that are required frequently, e.g. updating the system software, can be performed by
drag and drop. This is particularly useful if you have several devices, for example, as the
devices can be updated with a single click.
1.2 Supported devices
The Dime Manager program currently supports all bintec elmeg devices that are
equipped with system software 7.8.7 or higher.
Note
A new device class is only detected after a firmware update.
(1) Select Maintenance and then Configure in the Firmware area.
Fig. 1: Maintenance -> Firmware -> Configure
(2) Select Update to update the local firmware.
1.3 System requirements
1 Introduction bintec elmeg GmbH
2 bintec elmeg Dime Manager
1.3.1 PC
For installation, your PC must meet the following system requirements:
• Operating system Microsoft Windows 7, Microsoft Windows Vista (32-bit version or 64-bit
version) or Microsoft Windows XP Service Pack 2 and above (32-bit version) with work-
ing Internet access
• Internet Explorer Version 7 and above or Mozilla Firefox Version 3.0 and above
• Installed network card (Ethernet)
• Installed TCP/IP protocol
• High colour resolution (more than 256 colours) recommended for correct representation
of the graphics
Note
You also require Microsoft .Net Framework.
If you are using Microsoft Windows 7 or Microsoft Windows Vista, .NET Framework is
included in the program setup.
If you are using Microsoft Windows XP, the program will check before installing Dime
Manager that .NET Framework is already installed on your PC. If a suitable version of
.NET Framework is available, the installation of the Dime Manager program will start
immediately. If there is no suitable version of .NET Framework available, the latest ver-
sion will be download from the Internet.
Note
If you are using Microsoft Windows 7 or Microsoft Windows Vista, TELNET is disabled
by default. If you wish to use a TELNET client, you must enable it first.
1.3.2 System Software
The Dime Manager locates all bintec elmeg devices that are equipped with system soft-
ware 7.8.7 or a new system software.
1.4 Installation
To install the Dime Manager program, proceed as follows:
bintec elmeg GmbH 1 Introduction
bintec elmeg Dime Manager 3

(1) Type www.bintec-elmeg.com in your browser.
The bintec elmeg web page will open. You will find the required Dime Manager file
in the download area, in which * contains the version number.
(2) Select the file and save it to your computer.
(3) Unpack the file.
(4) Double-click the file.
The Dime Manager Vx.x.x window opens.
(5) If a suitable version of .NET Framework cannot be found on your PC, the program will
be downloaded from the Internet. To do this you must accept the license agreement
for .NET Framework.
.NET Framework is then downloaded to your PC.
Note
Due to the large file size, downloading Microsoft .NET Framework from the Internet
may take a long time depending on the bandwidth available.
(6) The Dime Manager Vx.x.x window opens again. Follow the instructions on the
screen.
(7) We recommend making the program accessible to all users of the PC. For this, under
leave the default setting .
1 Introduction bintec elmeg GmbH
4 bintec elmeg Dime Manager
(8) Click Next.
(9) Follow the instructions on the screen.
(10) Exit the installation by clicking Close.
The Dime Manager Vx.x.x window closes.
(11) If the Windows Security Alert window opens this means that the Windows firewall
has blocked some of the functions of the Dime Manager program for security reas-
ons. You will be asked . Click
the Unblock button to stop blocking the functions.
bintec elmeg GmbH 1 Introduction
bintec elmeg Dime Manager 5
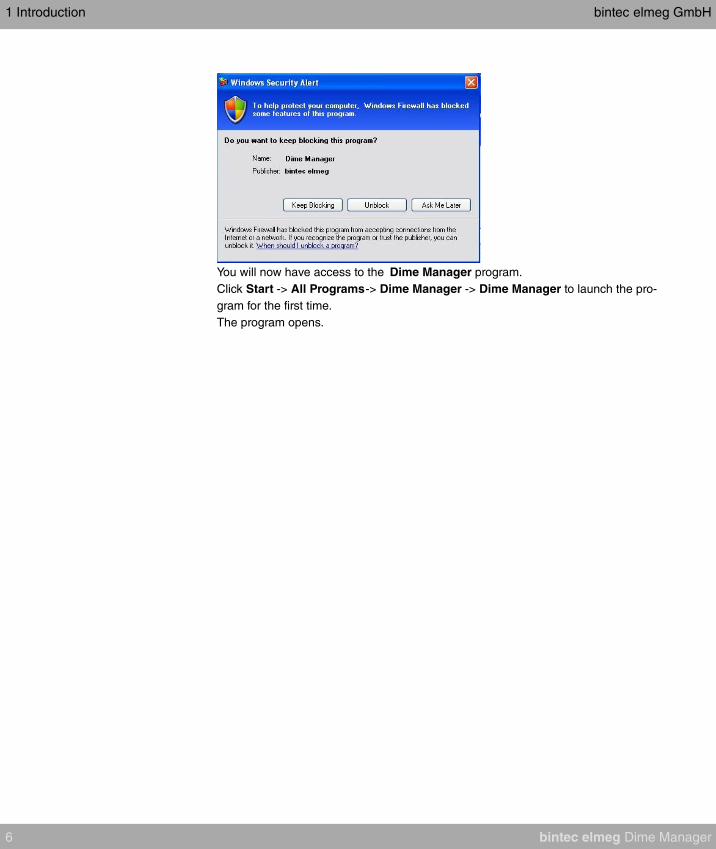
You will now have access to the Dime Manager program.
Click Start -> All Programs-> Dime Manager -> Dime Manager to launch the pro-
gram for the first time.
The program opens.
1 Introduction bintec elmeg GmbH
6 bintec elmeg Dime Manager

Chapter 2 User interface
The Dime Manager program has a graphical user interface (GUI) to operate using the
mouse.
When you launch the program for the first time you will see the default view.
The program automatically searches for and displays any bintec and elmeg devices.
Fig. 2: Dime Manager
2.1 Elements
The Dime Manager program is broken down into five areas in the default view.
• The menu bar
• The device explorer
• The main window with the Devices tab, the task bar and the display field
• The device properties
• The log and file windows.
bintec elmeg GmbH 2 User interface
bintec elmeg Dime Manager 7

The menu bar and the main window are docked and cannot be moved. The Device Ex-
plorer, Device Properties and log and file window can be undocked and moved anywhere
on the screen. You can re-dock a freely positioned window.
When you end the program, the last used window layout is saved and reloaded and display
the next time you start the program.
2.1.1 Menu bar
The menu bar shows the menu options available in Dime Manager. If you click a menu
item, you will be shown icons relating to the corresponding sub-menus. Click the same
menu item again to hide the icons.
Fig. 3: Menu bar
2.1.2 Device Explorer
The Device Explorer window shows all located devices in a tree structure.
You can display devices sorted according to location or company.
By default, they'll be sorted according to company. This sorting is useful, for example, if
you're administering devices for several companies.
You can add folders with company names via the shortcut menu. As long as no folders with
company names have been created, all devices are displayed under All devices -> Un-
known. Among these, you'll see devices of the same type grouped together in the same
folder.
As Location, entry into the GUI menu System Management-> Global Settings -> Sys-
tem is used for every device. Alternately, you can enter the Location in the Dime Manager
into the main window using the shortcut menu under Set Company Information.
Note
If the location consists of several terms separated by commas, the initial entry is used
for sorting in the folder.
2 User interface bintec elmeg GmbH
8 bintec elmeg Dime Manager
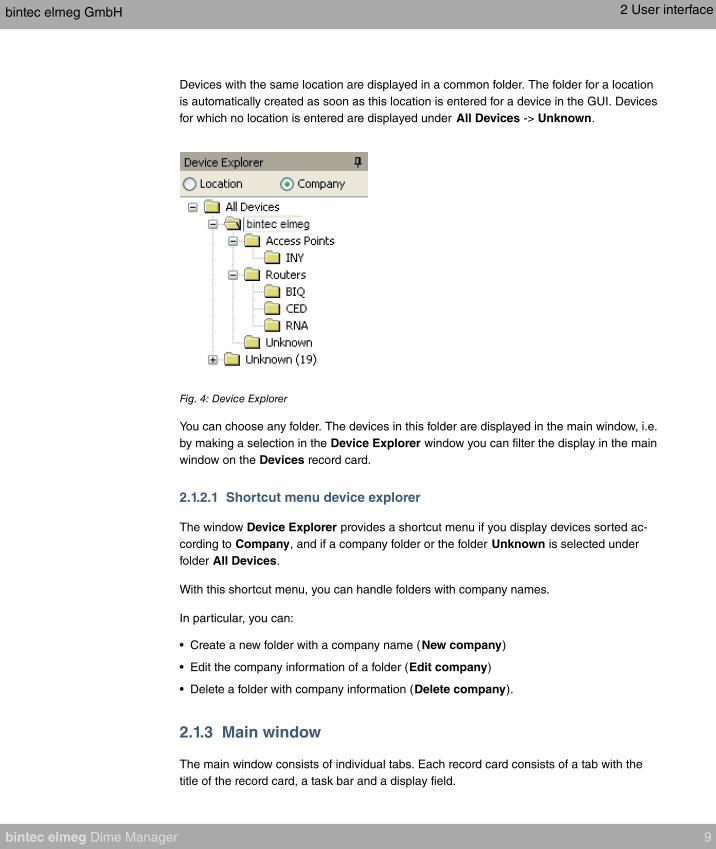
Devices with the same location are displayed in a common folder. The folder for a location
is automatically created as soon as this location is entered for a device in the GUI. Devices
for which no location is entered are displayed under All Devices -> Unknown.
Fig. 4: Device Explorer
You can choose any folder. The devices in this folder are displayed in the main window, i.e.
by making a selection in the Device Explorer window you can filter the display in the main
window on the Devices record card.
2.1.2.1 Shortcut menu device explorer
The window Device Explorer provides a shortcut menu if you display devices sorted ac-
cording to Company, and if a company folder or the folder Unknown is selected under
folder All Devices.
With this shortcut menu, you can handle folders with company names.
In particular, you can:
• Create a new folder with a company name (New company)
• Edit the company information of a folder (Edit company)
• Delete a folder with company information (Delete company).
2.1.3 Main window
The main window consists of individual tabs. Each record card consists of a tab with the
title of the record card, a task bar and a display field.
bintec elmeg GmbH 2 User interface
bintec elmeg Dime Manager 9
Fig. 5: Main window
2.1.3.1 Task bar / Shortcut menu
The task bar for each record card contains icons for frequently used tasks. Tooltips help
you when attributing tasks and icons. You can also perform these tasks via the shortcut
menu.
Task bar / Content menu on the Devices record card
Fig. 6: Task bar
In the default view the Devices record card offers the following tasks in the task bar and in
the shortcut menu:
• IP Settings
• HTTP Configuration
• HTTPS Configuration secure
• TELNET Configuration (Setup)
• Update firmware from file
• Update firmware from web server
• Update firmware from update server
• Upload configuration
• Download configuration
• Reboot device
• Reset device to factory settings
• Configure BOOTP
2 User interface bintec elmeg GmbH
10 bintec elmeg Dime Manager

• Trace interfaces
• Trace CAPI
• Set company information
• Set password.
• Delete
Fig. 7: Shortcut menu
Information on how to perform tasks using the task bar or the shortcut menu can be found
under Perform tasks in the main window with the task bar or the shortcut menu on page 41
.
2.1.3.2 Display field
The display field is organised in rows and columns.
You can sort the values displayed in each column in ascending or descending order. Click
the column header to change the sort order.
Devices record card
In the default view the display field on the Devices record card shows the devices that the
Dime Manager has located.
bintec elmeg GmbH 2 User interface
bintec elmeg Dime Manager 11
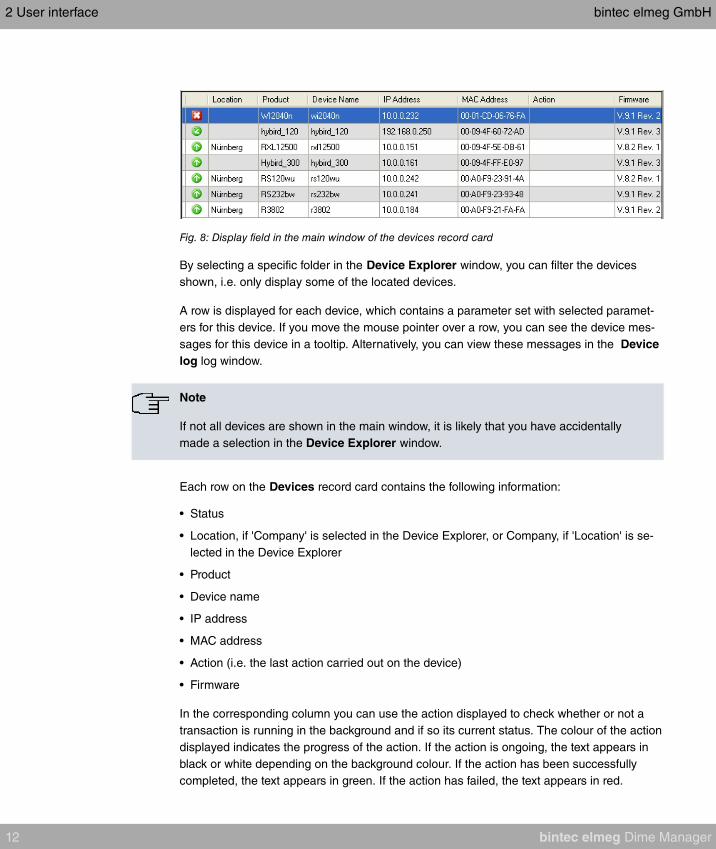
Fig. 8: Display field in the main window of the devices record card
By selecting a specific folder in the Device Explorer window, you can filter the devices
shown, i.e. only display some of the located devices.
A row is displayed for each device, which contains a parameter set with selected paramet-
ers for this device. If you move the mouse pointer over a row, you can see the device mes-
sages for this device in a tooltip. Alternatively, you can view these messages in the Device
log log window.
Note
If not all devices are shown in the main window, it is likely that you have accidentally
made a selection in the Device Explorer window.
Each row on the Devices record card contains the following information:
• Status
• Location, if 'Company' is selected in the Device Explorer, or Company, if 'Location' is se-
lected in the Device Explorer
• Product
• Device name
• IP address
• MAC address
• Action (i.e. the last action carried out on the device)
• Firmware
In the corresponding column you can use the action displayed to check whether or not a
transaction is running in the background and if so its current status. The colour of the action
displayed indicates the progress of the action. If the action is ongoing, the text appears in
black or white depending on the background colour. If the action has been successfully
completed, the text appears in green. If the action has failed, the text appears in red.
2 User interface bintec elmeg GmbH
12 bintec elmeg Dime Manager

The background colour also serves as a progress bar for the transaction.
You can also check all of the actions in the Dime Manager Log window.
The following actions can be displayed:
• Set IP via HTTPS
• Set IP via Multicast
• Reboot device
• Set ex works settings
• Update configuration
• Load configuration
• Update firmware from file
• Internet update firmware (Url)
• Internet update firmware (Vendor)
BOOTP record card
If you have assigned devices using the BOOTP parameter, these devices are displayed on
the BOOTP record card.
Each row on the BOOTP record card contains the following information:
• Status
• Device name
• IP address
• MAC address
• Ignore (i.e. ignore BOOTP queries from this device)
• BOOTP configuration file (i.e. Transfer target BOOTP configuration file to the device?
The values or can be displayed.)
Device status
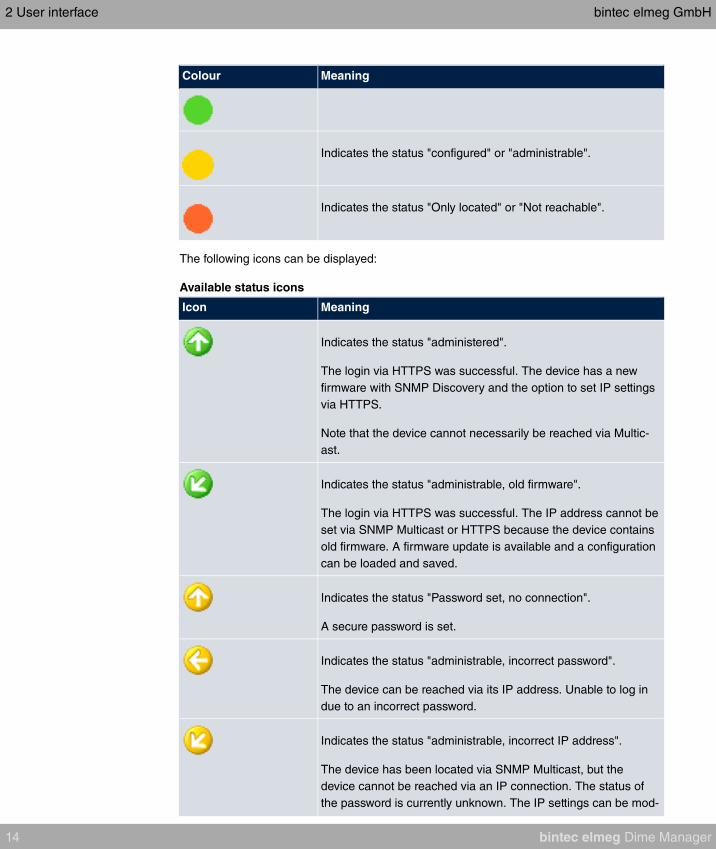
The status of the device is indicated by an icon in the left column of the record card.
The colours of the icons have the following meaning:
Available status icon colours
Colour Meaning
Indicates the status "HTTPS login successful".
bintec elmeg GmbH 2 User interface
bintec elmeg Dime Manager 13
Colour Meaning
Indicates the status "configured" or "administrable".
Indicates the status "Only located" or "Not reachable".
The following icons can be displayed:
Available status icons
Icon Meaning
Indicates the status "administered".
The login via HTTPS was successful. The device has a new
firmware with SNMP Discovery and the option to set IP settings
via HTTPS.
Note that the device cannot necessarily be reached via Multic-
ast.
Indicates the status "administrable, old firmware".
The login via HTTPS was successful. The IP address cannot be
set via SNMP Multicast or HTTPS because the device contains
old firmware. A firmware update is available and a configuration
can be loaded and saved.
Indicates the status "Password set, no connection".
A secure password is set.
Indicates the status "administrable, incorrect password".
The device can be reached via its IP address. Unable to log in
due to an incorrect password.
Indicates the status "administrable, incorrect IP address".
The device has been located via SNMP Multicast, but the
device cannot be reached via an IP connection. The status of
the password is currently unknown. The IP settings can be mod-
2 User interface bintec elmeg GmbH
14 bintec elmeg Dime Manager
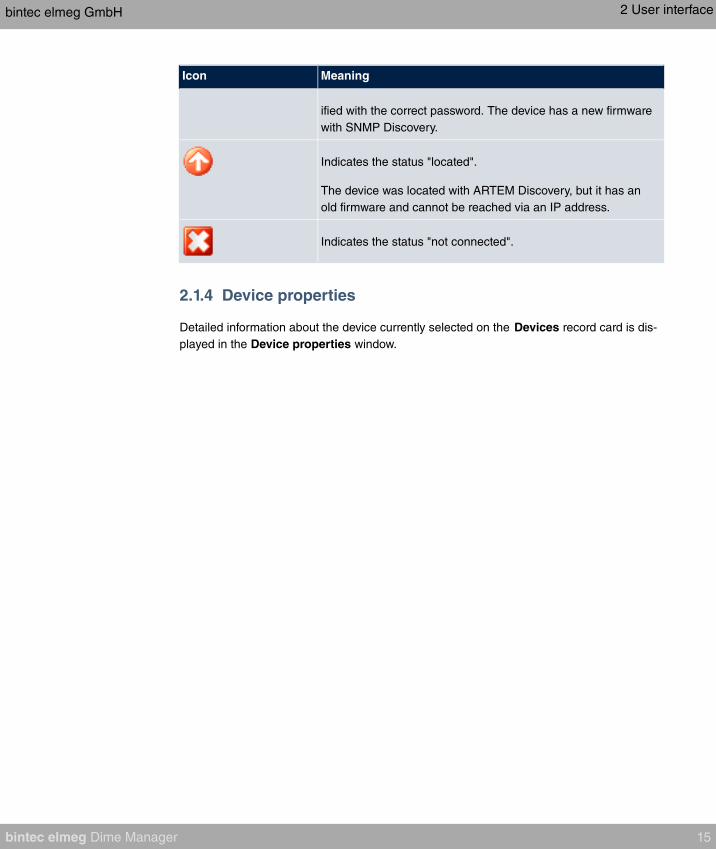
Icon Meaning
ified with the correct password. The device has a new firmware
with SNMP Discovery.
Indicates the status "located".
The device was located with ARTEM Discovery, but it has an
old firmware and cannot be reached via an IP address.
Indicates the status "not connected".
2.1.4 Device properties
Detailed information about the device currently selected on the Devices record card is dis-
played in the Device properties window.
bintec elmeg GmbH 2 User interface
bintec elmeg Dime Manager 15
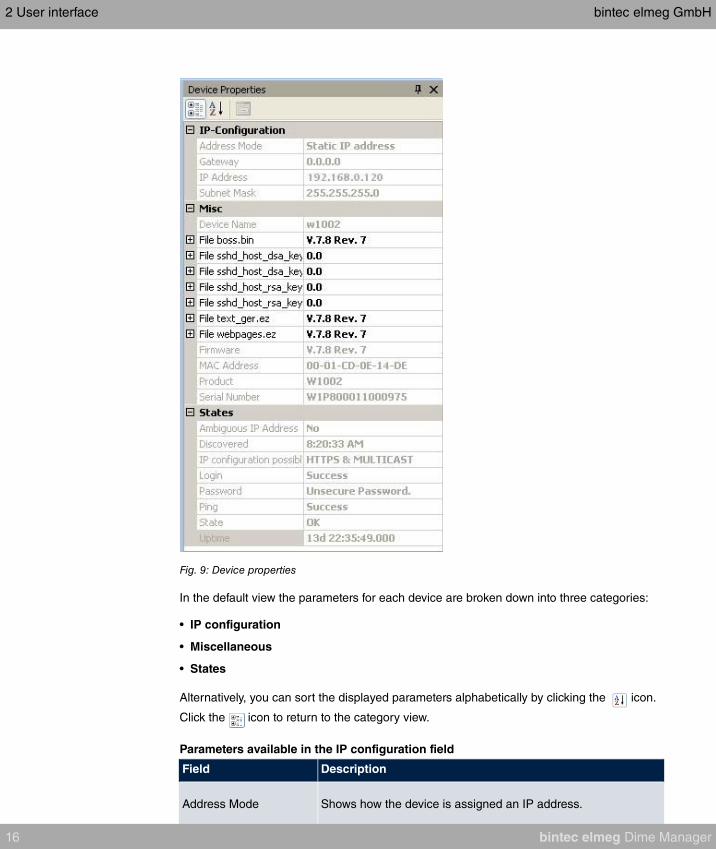
Fig. 9: Device properties
In the default view the parameters for each device are broken down into three categories:
• IP configuration
• Miscellaneous
• States
Alternatively, you can sort the displayed parameters alphabetically by clicking the icon.
Click the icon to return to the category view.
Parameters available in the IP configuration field
Field Description
Address Mode Shows how the device is assigned an IP address.
2 User interface bintec elmeg GmbH
16 bintec elmeg Dime Manager
Field Description
Possible values:
• : The device has been assigned a stat-
ic IP address.
• : An IP address is assigned to the device dynamically via
DHCP.
Gateway Shows the IP address of the gateway.
Hostname Displays the hostname of the device. A hostname may be ad-
ded under Add device.
IP Address Shows the IP address of the device.
Subnet Mask Displays the netmask of the device.
Parameters available in the Miscellaneous field
Field Description
File xxx Shows the system software files in the device flash depending
on the device. For each file you can display the file name, ver-
sion, date and time the file was created and the file size.
Company Name Displays the company name.
Device Name Displays the device name.
MAC Address Shows the MAC address of the device.
Product Shows the product names, e.g. W1200.
Serial Number Displays the serial number of the device.
Location Displays the location of the device. You may sort your devices
according to location.
Firmware Displays the version of the system software.
Monitoring Displays whether the device is monitored.
Check Connection Displays whether the connection is to be checked by a Ping or
by HTTPS.
Parameters available in the States field
Field Description
Discovered Shows the time at which the device was last located.
IP configuration possible Indicates if an IP configuration of the device can be carried out.
Possible values:
bintec elmeg GmbH 2 User interface
bintec elmeg Dime Manager 17

Field Description
• : A configuration is possible via HTTPS
and Multicast.
• : A configuration is possible via HTTPS.
• : A configuration is possible via Multicast.
• : A configuration is not possible.
<Last action on the
device>
Shows the status of the action indicated on the Devices record
card in the Action column by different colours.
Login Indicates whether or not login was successful.
Possible values:
• : Login was successful.
• : Login was not successful.
Ambiguous IP address Indicates if the same IP address is being used by several
devices.
Possible values:
• : The IP address of the device is not being used by another
located device.
• : The IP address of the device is being used by several
devices.
Password Shows the current status of the password.
Possible values:
• : The default password has not been
changed.
• : The default password has been
changed.
• : The default password for the device is not
known. This password has not been changed.
Ping Indicates whether or not the device could be reached via ping.
Possible values:
• : The device was reached via ping.
• : The device could not be reached via ping.
2 User interface bintec elmeg GmbH
18 bintec elmeg Dime Manager

Field Description
Uptime Displays the time past since the device was rebooted.
Status Shows the current status of the device.
Possible values:
• : The device is running and has been configured correctly.
• : The device could not be
reached via ping.
• : An intern-
al error occurred when checking an ID.
• : Login was not successful.
• : The device could not be
reached. It is probably switched off.
• : The HTTPS
request could not be sent to the device.
• : The HTTPS
response from the device could not be read.
• : The file format of
the data sent was incorrect.
• : The error that occurred could not be identi-
fied.
• : A device with a different seri-
al number was located under the IP address.
• : A request to the device failed.
•
: The server failed to re-
spond to an HTTPS request from the device.
2.1.5 Log and file windows
A log window displays a list with messages. A file window displays the files of a directory.
When opening the program for the first time the Dime Manager Log window is displayed.
Several log windows and several file windows can be opened at the same time for various
purposes. In the default view, you can toggle between these windows using tabs as the log
and file windows are hidden automatically.
bintec elmeg GmbH 2 User interface
bintec elmeg Dime Manager 19

Fig. 10: Log window
The following log and file windows are available:
Available windows
Window title Function of the window
Dime Manager Log Shows messages for the Dime Manager.
Devices log Shows the messages for the device currently selected in the
Devices window.
You can also see the actions currently running (see also Action
under Display field on page 11).
Alternatively you can see the messages for the device in the
tooltip in the Devices window, if you move the mouse pointer
over the corresponding row.
Firmware Shows the files in the firmware directory.
You can change the path to the firmware directory in the Firm-
ware field in the Maintenance -> Configure menu.
Configurations Shows the files in the configuration directory.
You can change the path to the configuration directory in the
Configurations field in the Maintenance -> Configure menu.
BOOTP Shows messages if BOOTP is used.
TFTP Shows messages if TFTP is used.
TRACE Displays the logged data when Trace interfaces or Trace
CAPIis launched.
Dime Syslog Shows messages if Syslog is used.
2 User interface bintec elmeg GmbH
20 bintec elmeg Dime Manager
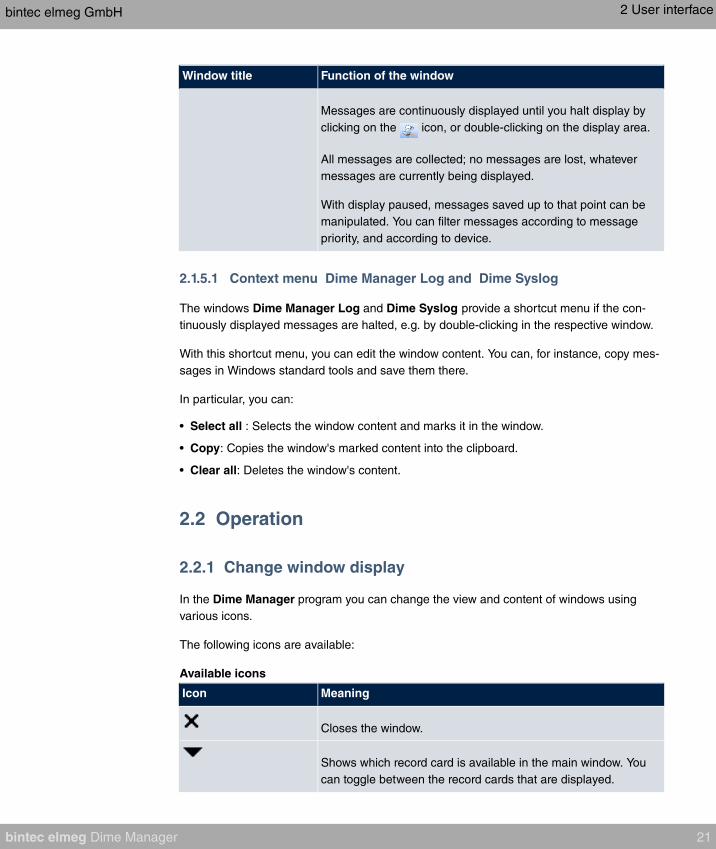
Window title Function of the window
Messages are continuously displayed until you halt display by
clicking on the icon, or double-clicking on the display area.
All messages are collected; no messages are lost, whatever
messages are currently being displayed.
With display paused, messages saved up to that point can be
manipulated. You can filter messages according to message
priority, and according to device.
2.1.5.1 Context menu Dime Manager Log and Dime Syslog
The windows Dime Manager Log and Dime Syslog provide a shortcut menu if the con-
tinuously displayed messages are halted, e.g. by double-clicking in the respective window.
With this shortcut menu, you can edit the window content. You can, for instance, copy mes-
sages in Windows standard tools and save them there.
In particular, you can:
• Select all : Selects the window content and marks it in the window.
• Copy: Copies the window's marked content into the clipboard.
• Clear all: Deletes the window's content.
2.2 Operation
2.2.1 Change window display
In the Dime Manager program you can change the view and content of windows using
various icons.
The following icons are available:
Available icons
Icon Meaning
Closes the window.
Shows which record card is available in the main window. You
can toggle between the record cards that are displayed.
bintec elmeg GmbH 2 User interface
bintec elmeg Dime Manager 21

Icon Meaning
Indicates that the automatic hide function for the window is dis-
abled. The window is displayed permanently.
If you click the icon, the display switches to the icon and the
window is hidden automatically as soon as it loses focus.
Indicates that the automatic hide function for the window is en-
abled. A tab is displayed and the window is hidden if there is no
focus.
If you drag the mouse pointer over the tab, the window is shown
and you can click the icon to switch to the icon and disable
the automatic hide function.
These icons are displayed if a window is positioned freely, you
click the window title and hold down the mouse button.
You can drag the mouse pointer over an icon to show the avail-
able docking position of the window.
When you release the mouse button, the window is docked in
the position currently displayed.
Shows the parameters in groups in the Device properties win-
dow.
Shows the parameters sorted alphabetically in the Device
properties window.
Ends the currently displayed trace in the Trace window. Con-
tinuation is not possible.
Pauses display update in the Trace window.
Alternately, you can halt display by double-clicking the display
area.
Resumes display update in the Trace window which had previ-
ously been paused by clicking the icon or double-clicking
the display area.
Deletes the displayed data in the Trace window.
2 User interface bintec elmeg GmbH
22 bintec elmeg Dime Manager

2.2.2 Select devices
You can select a row for a device and manipulate it in the main window. However, you can
also select several devices (i.e. several rows) at the same time and, for example, update
the system software for all selected devices by drag and drop with just a single click.
2.2.3 Halting and resuming update
In the Trace and Dime Syslog windows, you can halt continuous display update and re-
sume it after a pause.
(1) If you wish to halt display update, double click in the respective window or click the
icon.
Display is halted.
(2) If you wish to resume display update, click the icon.
The display is continuously updated.
2.2.4 Filtering Syslog messages
You can filter the Syslog messages in the Dime Syslog window.
(1) Double-click the Dime Syslog window or click the icon.
Continuous display update is halted. You can set priority of displayed messages and
the device from which they are to proceed. You can combine both filtering options.
(2) If you wish to display messages with a specific priority, select the value ,
or in the Log level field.
(3) If you wish to display messages from a specific device, select the desired device's IP
address in the Device field.
(4) If you wish to apply the settings selected above to the messages saved from Syslog's
start until display halt, click on the icon.
The messages are filtered. A progress bar indicates filtering process progression. At
filtering conclusion, the filtered messages are displayed.
Note
You can copy or cut the filtered data, as well as paste, edit and save these in Windows
standard tools.
bintec elmeg GmbH 2 User interface
bintec elmeg Dime Manager 23
Chapter 3 Tasks
3.1 Discover
In the Discover menu you can carry out all tasks related to searching for and locating a
device.
You can:
• Search for devices
• Add devices manually
• Display devices
• Start a search in the background
• Save the displayed list of located devices in a file
• Display a saved device list
• Load additional devices from a file to devices already displayed.
3.1.1 Search for devices
(1) Select Discover -> Discover to search for devices within a network.
The Dime Manager searches for devices using SNMP Multicast and displays the
located devices.
Note
Devices in field offices are located if SNMP Multicast is routed, i.e. via a VPN tunnel.
3.1.2 Add devices manually
You can add any devices that are not located via SNMP Multicast manually.
Tip
If a device has a system software earlier than version 7.8.7, you can add the device
manually and then carry out an update to the latest system software (see Update firm-
ware with drag and drop on page 64,Update firmware from a file on page 45,Update
firmware from a web server on page 46 orUpdate firmware from Update server on
page 47).
3 Tasks bintec elmeg GmbH
24 bintec elmeg Dime Manager
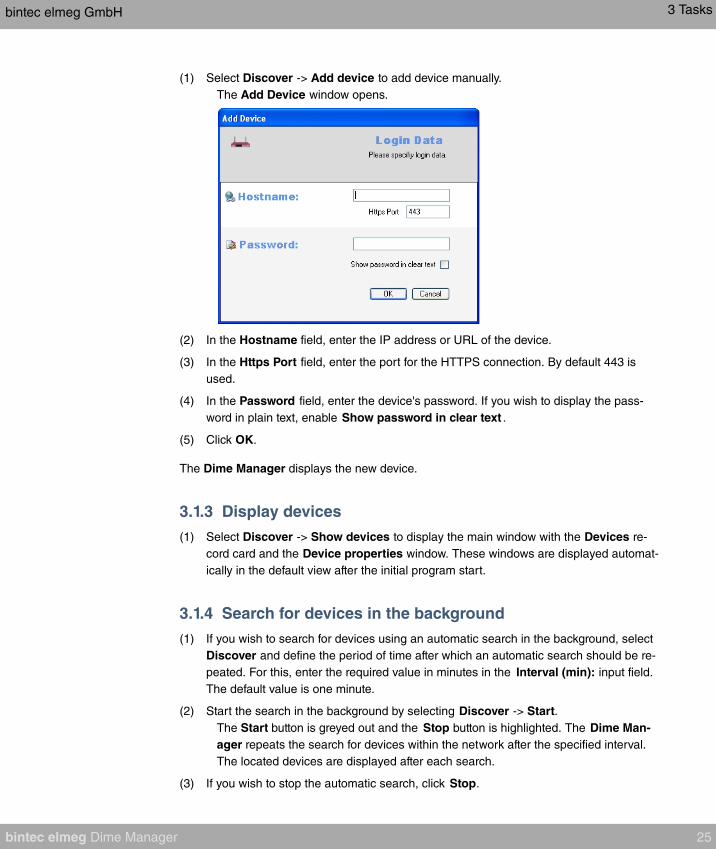
(1) Select Discover -> Add device to add device manually.
The Add Device window opens.
(2) In the Hostname field, enter the IP address or URL of the device.
(3) In the Https Port field, enter the port for the HTTPS connection. By default 443 is
used.
(4) In the Password field, enter the device's password. If you wish to display the pass-
word in plain text, enable Show password in clear text .
(5) Click OK.
The Dime Manager displays the new device.
3.1.3 Display devices
(1) Select Discover -> Show devices to display the main window with the Devices re-
cord card and the Device properties window. These windows are displayed automat-
ically in the default view after the initial program start.
3.1.4 Search for devices in the background
(1) If you wish to search for devices using an automatic search in the background, select
Discover and define the period of time after which an automatic search should be re-
peated. For this, enter the required value in minutes in the Interval (min): input field.
The default value is one minute.
(2) Start the search in the background by selecting Discover -> Start.
The Start button is greyed out and the Stop button is highlighted. The Dime Man-
ager repeats the search for devices within the network after the specified interval.
The located devices are displayed after each search.
(3) If you wish to stop the automatic search, click Stop.
bintec elmeg GmbH 3 Tasks
bintec elmeg Dime Manager 25
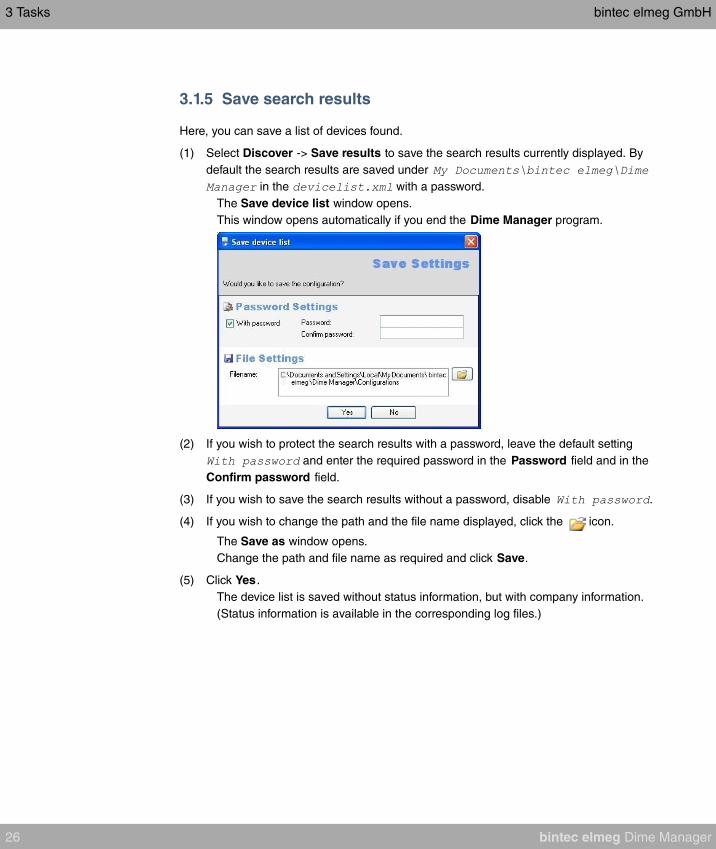
3.1.5 Save search results
Here, you can save a list of devices found.
(1) Select Discover -> Save results to save the search results currently displayed. By
default the search results are saved under
in the with a password.
The Save device list window opens.
This window opens automatically if you end the Dime Manager program.
(2) If you wish to protect the search results with a password, leave the default setting
and enter the required password in the Password field and in the
Confirm password field.
(3) If you wish to save the search results without a password, disable .
(4) If you wish to change the path and the file name displayed, click the icon.
The Save as window opens.
Change the path and file name as required and click Save.
(5) Click Yes.
The device list is saved without status information, but with company information.
(Status information is available in the corresponding log files.)
3 Tasks bintec elmeg GmbH
26 bintec elmeg Dime Manager
3.1.6 Load search results
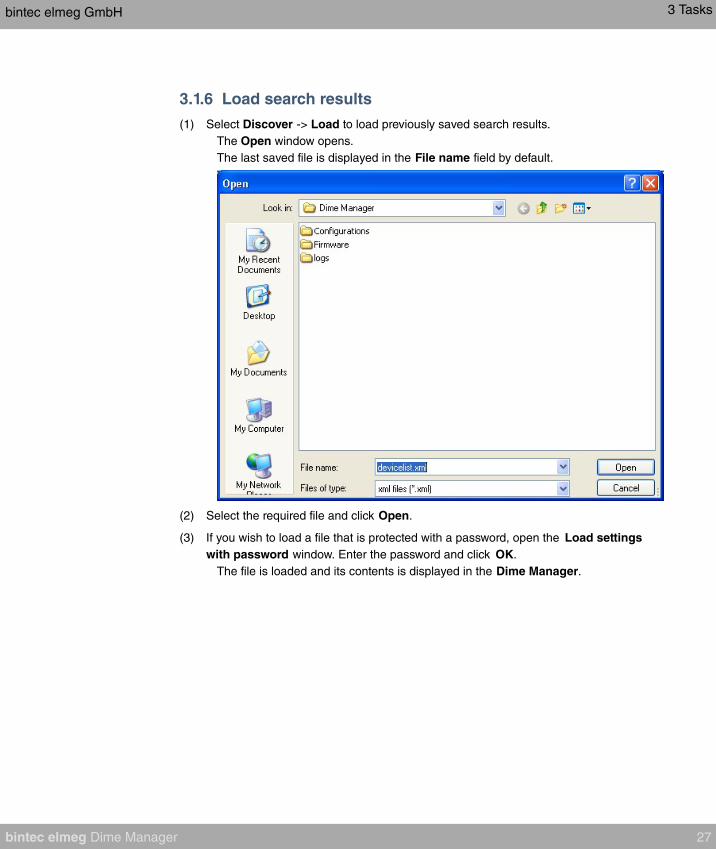
(1) Select Discover -> Load to load previously saved search results.
The Open window opens.
The last saved file is displayed in the File name field by default.
(2) Select the required file and click Open.
(3) If you wish to load a file that is protected with a password, open the Load settings
with password window. Enter the password and click OK.
The file is loaded and its contents is displayed in the Dime Manager.
bintec elmeg GmbH 3 Tasks
bintec elmeg Dime Manager 27
3.1.7 Import devices from a file
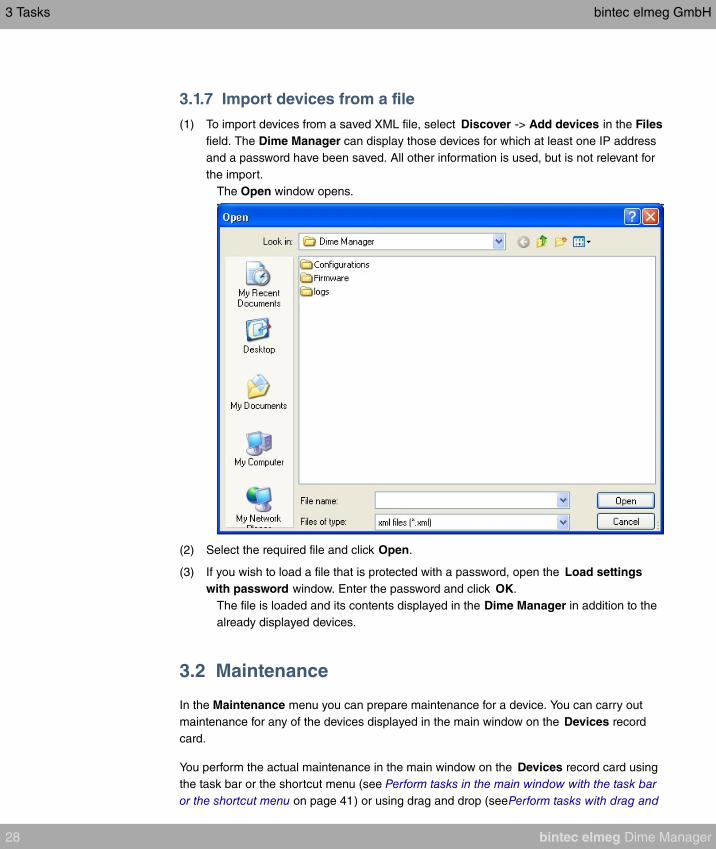
(1) To import devices from a saved XML file, select Discover -> Add devices in the Files
field. The Dime Manager can display those devices for which at least one IP address
and a password have been saved. All other information is used, but is not relevant for
the import.
The Open window opens.
(2) Select the required file and click Open.
(3) If you wish to load a file that is protected with a password, open the Load settings
with password window. Enter the password and click OK.
The file is loaded and its contents displayed in the Dime Manager in addition to the
already displayed devices.
3.2 Maintenance
In the Maintenance menu you can prepare maintenance for a device. You can carry out
maintenance for any of the devices displayed in the main window on the Devices record
card.
You perform the actual maintenance in the main window on the Devices record card using
the task bar or the shortcut menu (see Perform tasks in the main window with the task bar
or the shortcut menu on page 41) or using drag and drop (seePerform tasks with drag and
3 Tasks bintec elmeg GmbH
28 bintec elmeg Dime Manager

drop on page 62).
In the Maintenance menu you can
• Display the window for the configuration files
• Change the path to the configuration files
• Display the window for the firmware files
• Update firmware files
• Change the path to the firmware files.
3.2.1 Display configuration files
(1) Select Maintenance -> Window in the Configurations area to open the Configura-
tions window.
You can display the files that you can use for a configuration.
bintec elmeg GmbH 3 Tasks
bintec elmeg Dime Manager 29
3.2.2 Change the path to the configuration files
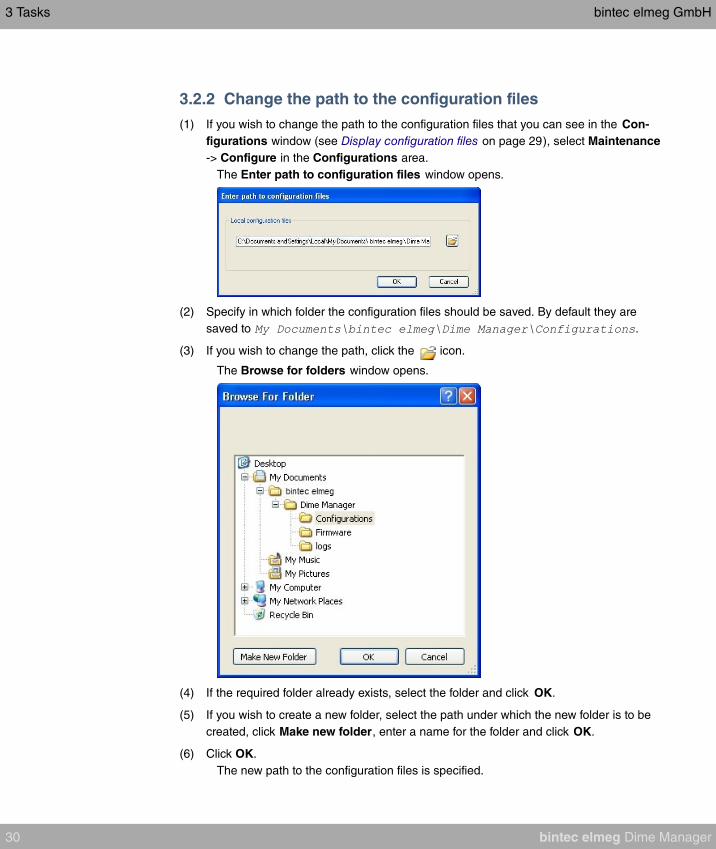
(1) If you wish to change the path to the configuration files that you can see in the Con-
figurations window (see Display configuration files on page 29), select Maintenance
-> Configure in the Configurations area.
The Enter path to configuration files window opens.
(2) Specify in which folder the configuration files should be saved. By default they are
saved to .
(3) If you wish to change the path, click the icon.
The Browse for folders window opens.
(4) If the required folder already exists, select the folder and click OK.
(5) If you wish to create a new folder, select the path under which the new folder is to be
created, click Make new folder, enter a name for the folder and click OK.
(6) Click OK.
The new path to the configuration files is specified.
3 Tasks bintec elmeg GmbH
30 bintec elmeg Dime Manager

3.2.3 Display firmware files
(1) Select Maintenance -> Window in the Firmware area to open the Firmware window.
You can display the files that you can use for a firmware update sorted according to
device.
3.2.4 Change path to the firmware files / Update firmware files
(1) If you wish to change the path to the firmware files that you can see in the Firmware
window (see Display firmware files on page 31) or wish to update the firmware files,
select Maintenance -> Configure in the Firmware area.
The Firmware information window opens.
By default the firmware files are saved to
. You can change this path Local firmware folder as re-
quired.
(2) If you wish to copy the latest firmware files to your local directory, click Update.
The firmware files are downloaded from the Internet and copied to your directory.
(3) If you wish to search for firmware updates and release notes on the bintec elmeg
home page, click the bintec elmeg logo and search for the required files.
(4) If you wish to host a proprietary firmware web server, enter the file name and the path
in the Server address field.
(5) Click OK.
bintec elmeg GmbH 3 Tasks
bintec elmeg Dime Manager 31

3.3 Services
TFTP, BOOTP and Syslog services are available from the Services menu.
TFTP is used to transfer system software or configuration files.
With BOOTP a device can be assigned an IP address and other parameters when
switched on.
Using Syslog, you can display system messages for several devices in the Dime Manager.
In the Services menu you can
• Define the settings for the TFTP service
• Start and stop the TFTP service
• Define settings for a device via BOOTP
• Start and stop the BOOTP service
• Display the BOOTP record card
• Install and uninstall the Syslog service
• Start and stop the Syslog service
• Receive and display Syslog messages
• Open a log window for the respective service.
3.3.1 Open TFTP log window
(1) Select Services -> Window in the TFTP area to open the TFTP log window.
If you use TFTP, any TFTP messages are displayed in this window.
3 Tasks bintec elmeg GmbH
32 bintec elmeg Dime Manager
3.3.2 Define TFTP settings
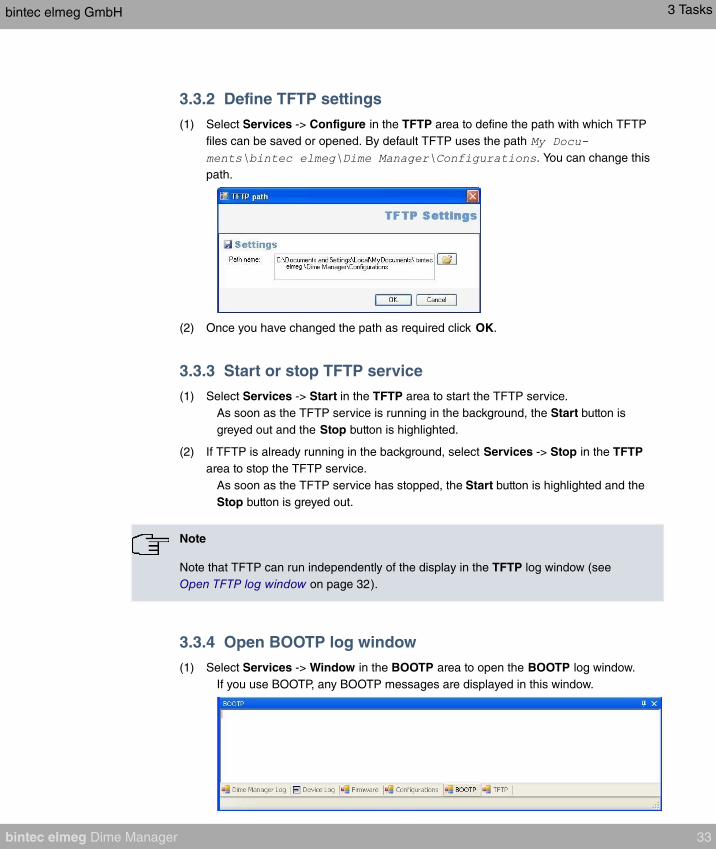
(1) Select Services -> Configure in the TFTP area to define the path with which TFTP
files can be saved or opened. By default TFTP uses the path
. You can change this
path.
(2) Once you have changed the path as required click OK.
3.3.3 Start or stop TFTP service
(1) Select Services -> Start in the TFTP area to start the TFTP service.
As soon as the TFTP service is running in the background, the Start button is
greyed out and the Stop button is highlighted.
(2) If TFTP is already running in the background, select Services -> Stop in the TFTP
area to stop the TFTP service.
As soon as the TFTP service has stopped, the Start button is highlighted and the
Stop button is greyed out.
Note
Note that TFTP can run independently of the display in the TFTP log window (see
Open TFTP log window on page 32).
3.3.4 Open BOOTP log window
(1) Select Services -> Window in the BOOTP area to open the BOOTP log window.
If you use BOOTP, any BOOTP messages are displayed in this window.
bintec elmeg GmbH 3 Tasks
bintec elmeg Dime Manager 33
3.3.5 Define parameters for a device via BOOTP
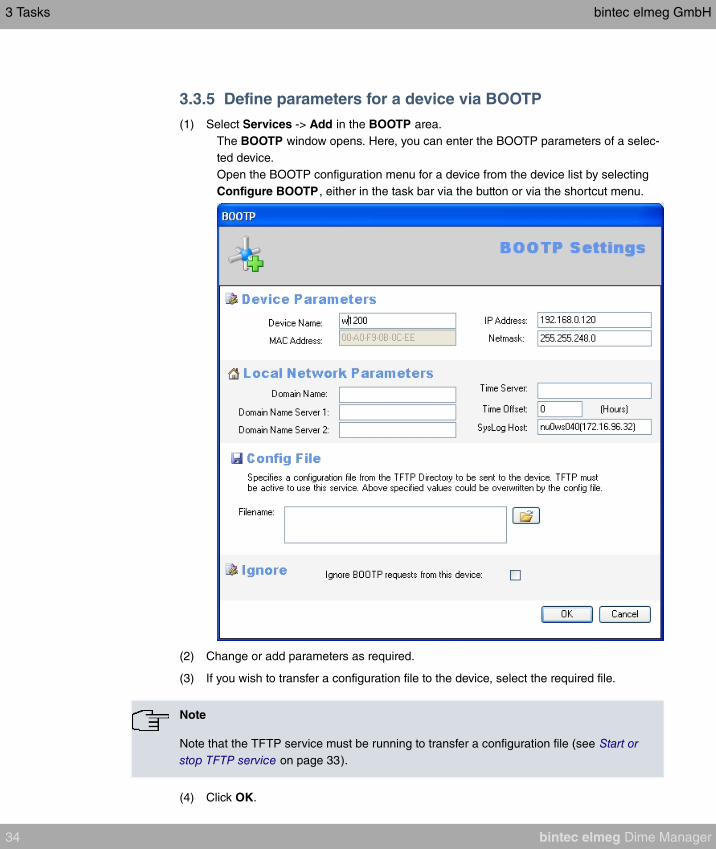
(1) Select Services -> Add in the BOOTP area.
The BOOTP window opens. Here, you can enter the BOOTP parameters of a selec-
ted device.
Open the BOOTP configuration menu for a device from the device list by selecting
Configure BOOTP , either in the task bar via the button or via the shortcut menu.
(2) Change or add parameters as required.
(3) If you wish to transfer a configuration file to the device, select the required file.
Note
Note that the TFTP service must be running to transfer a configuration file (see Start or
stop TFTP service on page 33).
(4) Click OK.
3 Tasks bintec elmeg GmbH
34 bintec elmeg Dime Manager
As soon as the device sends a BOOTP request (e.g. when booting), the parameters
are transferred to the device. The BOOTP record card is displayed in the main win-
dow with the device updated via BOOTP.
3.3.6 Start or stop BOOTP service
(1) Select Services -> Start in the BOOTP field to start the BOOTP service.
As soon as the BOOTP service is running, the Start button is greyed out and the
Stop button is highlighted.
Note
Note that BOOTP can run independently of the display in the BOOTP log window (see
Open BOOTP log window on page 33).
As soon as a device sends a BOOTP request, the BOOTP window opens with the
parameters for this device. You can change the parameters as required.
(2) Click OK to transfer the parameters to the device.
(3) Select Services -> Stop in the BOOTP area to stop the BOOTP service.
As soon as the BOOTP service has stopped, the Start button is highlighted and the
Stop button is greyed out.
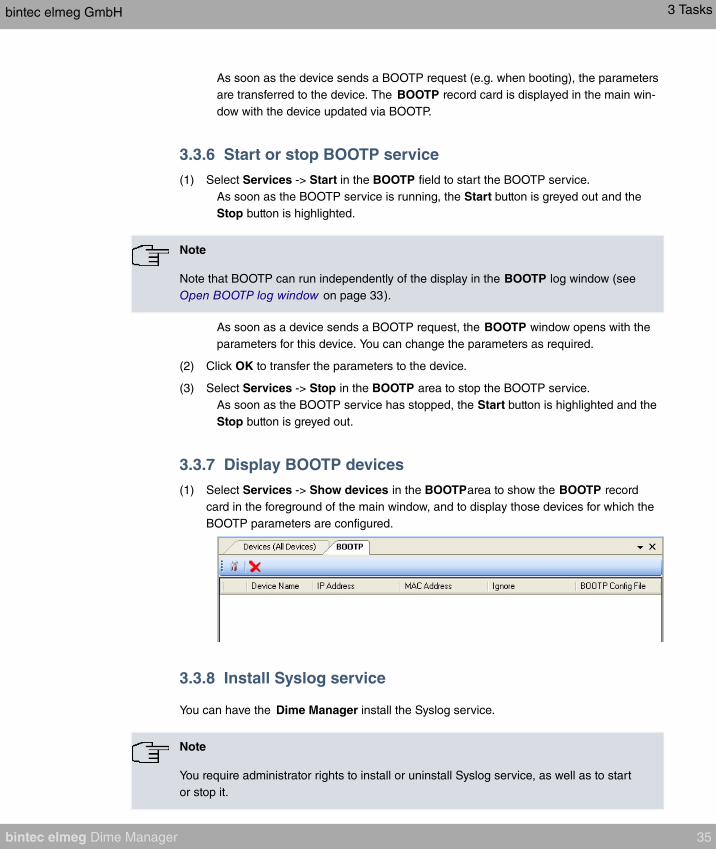
3.3.7 Display BOOTP devices
(1) Select Services -> Show devices in the BOOTParea to show the BOOTP record
card in the foreground of the main window, and to display those devices for which the
BOOTP parameters are configured.
3.3.8 Install Syslog service
You can have the Dime Manager install the Syslog service.
Note
You require administrator rights to install or uninstall Syslog service, as well as to start
or stop it.
bintec elmeg GmbH 3 Tasks
bintec elmeg Dime Manager 35

Note
If you're running Windows XP without administrator rights, the administrator must in-
stall and launch the Syslog service via Dime Manager. You can also receive Syslog
service messages as a user with restricted rights.
(1) If you wish to install the Syslog service, select Services -> Configure in the Syslog
area.
The Syslog service installation window opens.
(2) Click the Install Syslog service button.
The syslog service is installed; the button text is modified in Uninstall Syslog ser-
vice.
(3) Click OK in the Syslog service installation window.
The Syslog service installation window closes; the Syslog service becomes avail-
able in the Dime Manager
Note
At installation, the Syslog service in Windows is included in the list of authorised ap-
plications. If you use additional firewall applications on your Windows system, you
might have to add the Syslog service at the relevant location.
3.3.9 Uninstall Syslog service
Note
You require administrator rights to uninstall or install Syslog service, as well as to stop
or start it.
3 Tasks bintec elmeg GmbH
36 bintec elmeg Dime Manager

(1) Select Services -> Configure in the Syslog area to uninstall the Syslog service.
The Syslog service installation window opens.
(2) Once the service is installed, you can uninstall it. On the button, the text Uninstall
Syslog service appears. Click the Uninstall Syslog service button.
The Syslog service is uninstalled; the button text is modified in Install Syslog ser-
vice.
(3) Click OK in the Syslog service installation window.
The Syslog service installation window closes; the Syslog service is no longer
available in the Dime Manager.
3.3.10 Open Dime Syslog log window
(1) Select Services -> Window in the Syslog area to open the Syslog log window.
When you're using Syslog, i.e. when Syslog is running, any Syslog messages re-
ceived at Port 514 are displayed in this window.
Note
You see Syslog messages for those devices which have entered the IP address of the
PC on which the Dime Manager was installed in the GUI under External Reporting ->
Syslog -> New
bintec elmeg GmbH 3 Tasks
bintec elmeg Dime Manager 37
3.3.11 Start or end Syslog service
(1) Select Services -> Start in the Syslog area to start the Syslog service.
As soon as the Syslog service is running in the background, the Start button is
greyed out and the Stop button is highlighted.
(2) If Syslog is already running in the background, select Services -> Stop in the Syslog
area to stop the Syslog service.
As soon as the Syslog service has stopped, the Start button is highlighted and the
Stop button is greyed out.
3.3.12 Receive and display Syslog messages
(1) Install the Syslog service (see Install Syslog service on page 35).
(2) Enter the IP address of the PC on which the Dime Manager is installed into the GUI
of the devices whose Syslog messages you wish to receive. For this, in the GUI, go
into the menu External Reporting -> Syslog -> New.
(3) Open the Syslog log window (see Open Dime Syslog log window on page 37).
(4) Start the Syslog service (see Start or end Syslog service on page 38).
You see the Syslog messages in the Dime Syslog window. You can pause the dis-
play and manipulate the data (see Filtering Syslog messages on page 23).
Note
As soon as Syslog is started, all messages are continuously saved in the Windows
event viewer. You can administer the data with Windows standard tools.
Note
The size of the Windows events viewer is limited by default to 512 KB, i.e., about
1,000 entries. When the memory is full, the oldest messages are deleted first. If you
have administrator rights, you can modify the size of the events viewer.
Note
The number of messages received by the devices depends on which setting you have
selected for the respective device on the GUI in the menu External reporting -> Sys-
log -> New in the Level field.
3 Tasks bintec elmeg GmbH
38 bintec elmeg Dime Manager

3.4 Settings
In the Settings menu you can define basic settings.
You can
• Open the log window for the devices
• Open the log window for the Dime Manager
• Change the language for the user interface
• Change the TELNET client currently selected
3.4.1 Open log windows for devices
(1) Select Settings -> Devices Log in the Protocols area to open the Device log win-
dow for messages from all displayed devices.
The Device log log window opens and any messages are displayed.
3.4.2 Open log windows for Dime Manager
(1) Select Settings -> Dime Log in the Protocols area to open the window for Dime
Manager messages.
The Dime Manager log window opens; any messages are displayed.
3.4.3 Change language
(1) To select a different language from that currently in use, select Settings ->
Language.
(2) The languages currently available are German and English.
Select the desired language.
The message
appears.
(3) Click Yes to enable the selected language setting.
bintec elmeg GmbH 3 Tasks
bintec elmeg Dime Manager 39

3.4.4 Select TELNET Client
Note
If you are using Microsoft Windows 7 or Microsoft Windows Vista, TELNET is disabled
by default. If you wish to use a TELNET client, you must enable it first.
(1) Select Settings -> TELNET over: in the Configuration area to choose a client other
than the currently selected TELNET client.
(2) Select the desired TELNET client.
The selected TELNET client is used for configurations with the setup tool (see Con-
figure device via TELNET on page 44).
3.5 Display information
In the Info menu you can
• Display information about the Dime Manager
• Access help files on the Dime Manager
3.5.1 Display copyright and version
(1) Select About -> About.
The About Dime Manager window opens.
The copyright and version number are displayed.
(2) Click OK to close the window.
3 Tasks bintec elmeg GmbH
40 bintec elmeg Dime Manager
3.5.2 Call up help
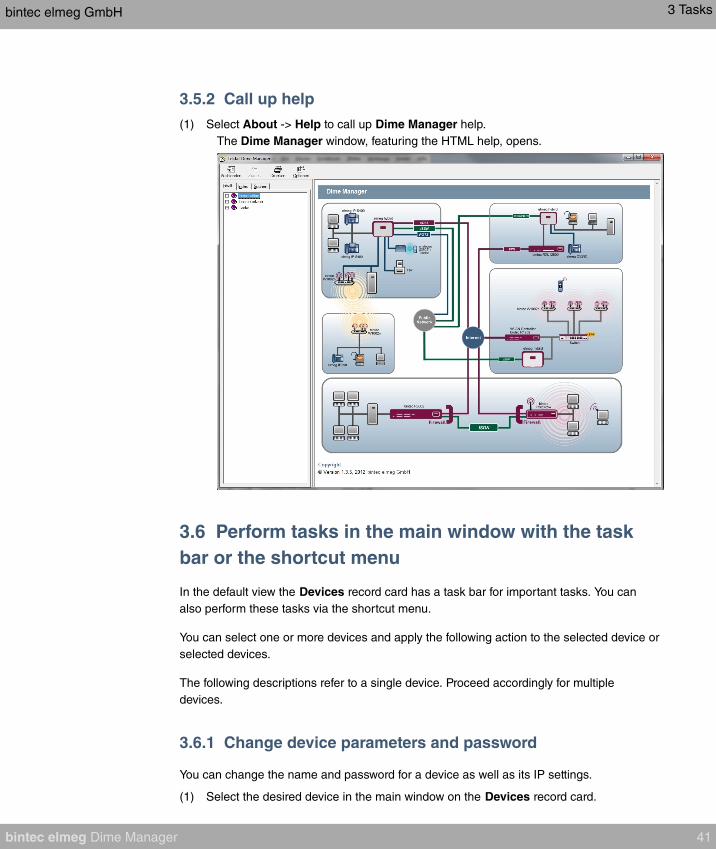
(1) Select About -> Help to call up Dime Manager help.
The Dime Manager window, featuring the HTML help, opens.
3.6 Perform tasks in the main window with the task
bar or the shortcut menu
In the default view the Devices record card has a task bar for important tasks. You can
also perform these tasks via the shortcut menu.
You can select one or more devices and apply the following action to the selected device or
selected devices.
The following descriptions refer to a single device. Proceed accordingly for multiple
devices.
3.6.1 Change device parameters and password
You can change the name and password for a device as well as its IP settings.
(1) Select the desired device in the main window on the Devices record card.
bintec elmeg GmbH 3 Tasks
bintec elmeg Dime Manager 41
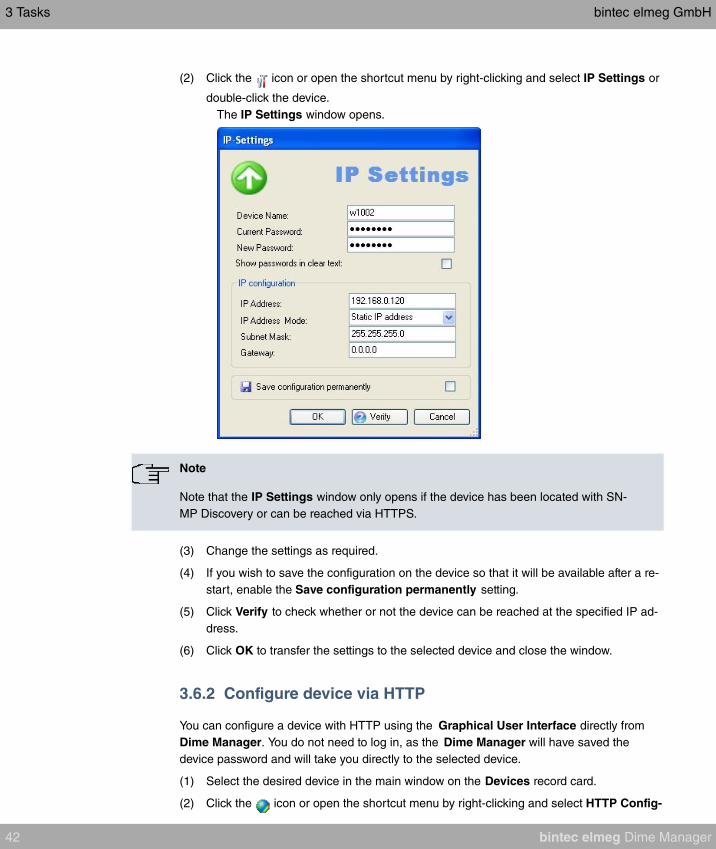
(2) Click the icon or open the shortcut menu by right-clicking and select IP Settings or
double-click the device.
The IP Settings window opens.
Note
Note that the IP Settings window only opens if the device has been located with SN-
MP Discovery or can be reached via HTTPS.
(3) Change the settings as required.
(4) If you wish to save the configuration on the device so that it will be available after a re-
start, enable the Save configuration permanently setting.
(5) Click Verify to check whether or not the device can be reached at the specified IP ad-
dress.
(6) Click OK to transfer the settings to the selected device and close the window.
3.6.2 Configure device via HTTP
You can configure a device with HTTP using the Graphical User Interface directly from
Dime Manager. You do not need to log in, as the Dime Manager will have saved the
device password and will take you directly to the selected device.
(1) Select the desired device in the main window on the Devices record card.
(2) Click the icon or open the shortcut menu by right-clicking and select HTTP Config-
3 Tasks bintec elmeg GmbH
42 bintec elmeg Dime Manager

uration.
The status page for the Graphical User Interface opens.
You can now configure the device.
(3) If you wish to save the current configuration on the device, click Save configuration
in the Graphical User Interface. Refer to Save configuration on page 50 for informa-
tion on how to save the configuration in the Dime Manager.
3.6.3 Configure device securely via HTTPS
You can configure a device securely with HTTPS using the Graphical User Interface dir-
ectly from Dime Manager. You do not need to log in, as the Dime Manager will have
saved the device password and will take you directly to the selected device.
(1) Select the desired device in the main window on the Devices record card.
(2) Click the icon or open the shortcut menu by right-clicking and select HTTPS Con-
figuration secure.
(3) In some cases a warning message may appear and the Secure Connection Failed
window may open if a security certificate is not signed.
bintec elmeg GmbH 3 Tasks
bintec elmeg Dime Manager 43
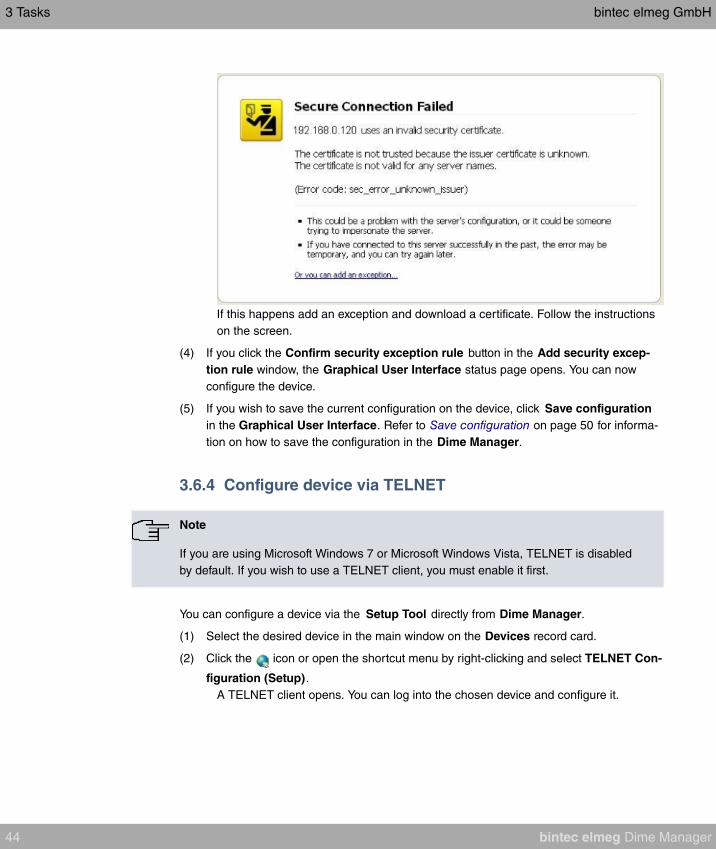
If this happens add an exception and download a certificate. Follow the instructions
on the screen.
(4) If you click the Confirm security exception rule button in the Add security excep-
tion rule window, the Graphical User Interface status page opens. You can now
configure the device.
(5) If you wish to save the current configuration on the device, click Save configuration
in the Graphical User Interface. Refer to Save configuration on page 50 for informa-
tion on how to save the configuration in the Dime Manager.
3.6.4 Configure device via TELNET
Note
If you are using Microsoft Windows 7 or Microsoft Windows Vista, TELNET is disabled
by default. If you wish to use a TELNET client, you must enable it first.
You can configure a device via the Setup Tool directly from Dime Manager.
(1) Select the desired device in the main window on the Devices record card.
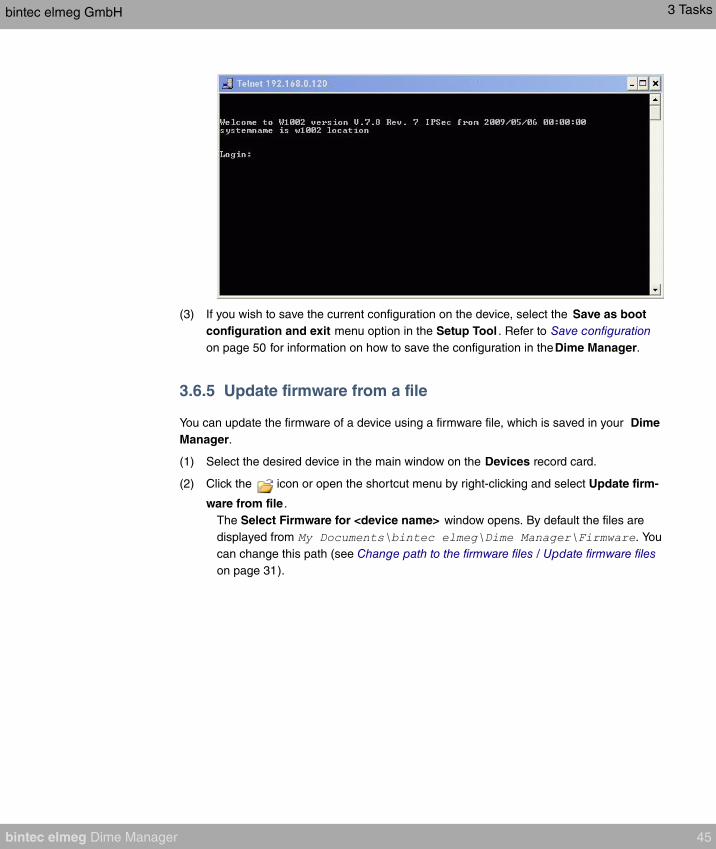
(2) Click the icon or open the shortcut menu by right-clicking and select TELNET Con-
figuration (Setup).
A TELNET client opens. You can log into the chosen device and configure it.
3 Tasks bintec elmeg GmbH
44 bintec elmeg Dime Manager
(3) If you wish to save the current configuration on the device, select the Save as boot
configuration and exit menu option in the Setup Tool . Refer to Save configuration
on page 50 for information on how to save the configuration in theDime Manager.
3.6.5 Update firmware from a file
You can update the firmware of a device using a firmware file, which is saved in your Dime
Manager.
(1) Select the desired device in the main window on the Devices record card.
(2) Click the icon or open the shortcut menu by right-clicking and select Update firm-
ware from file .
The Select Firmware for <device name> window opens. By default the files are
displayed from . You
can change this path (see Change path to the firmware files / Update firmware files
on page 31).
bintec elmeg GmbH 3 Tasks
bintec elmeg Dime Manager 45
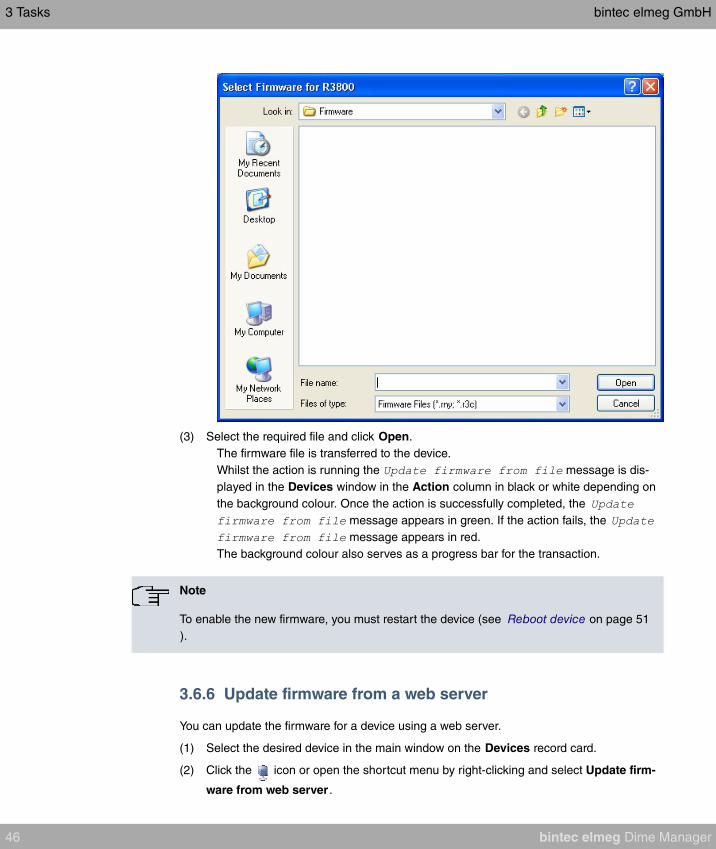
(3) Select the required file and click Open.
The firmware file is transferred to the device.
Whilst the action is running the message is dis-
played in the Devices window in the Action column in black or white depending on
the background colour. Once the action is successfully completed, the
message appears in green. If the action fails, the
message appears in red.
The background colour also serves as a progress bar for the transaction.
Note
To enable the new firmware, you must restart the device (see Reboot device on page 51
).
3.6.6 Update firmware from a web server
You can update the firmware for a device using a web server.
(1) Select the desired device in the main window on the Devices record card.
(2) Click the icon or open the shortcut menu by right-clicking and select Update firm-
ware from web server .
3 Tasks bintec elmeg GmbH
46 bintec elmeg Dime Manager
The Firmware update via Web window opens.
(3) Enter the desired web server in the Server field.
Note
Note that DNS must be enabled on the chosen devices and there must be an Internet
connection available from the chosen device to the entered web server.
(4) Click Start.
The device loads the firmware file from the specified web server.
Whilst the action is running the message is
displayed in the Devices window in the Action column in black or white depending
on the background colour. Once the action is successfully completed, the
message appears in green. If the action fails, the
message appears in red.
The background colour also serves as a progress bar for the transaction.
Note
To enable the new firmware, you must restart the device (see Reboot device on page 51
).
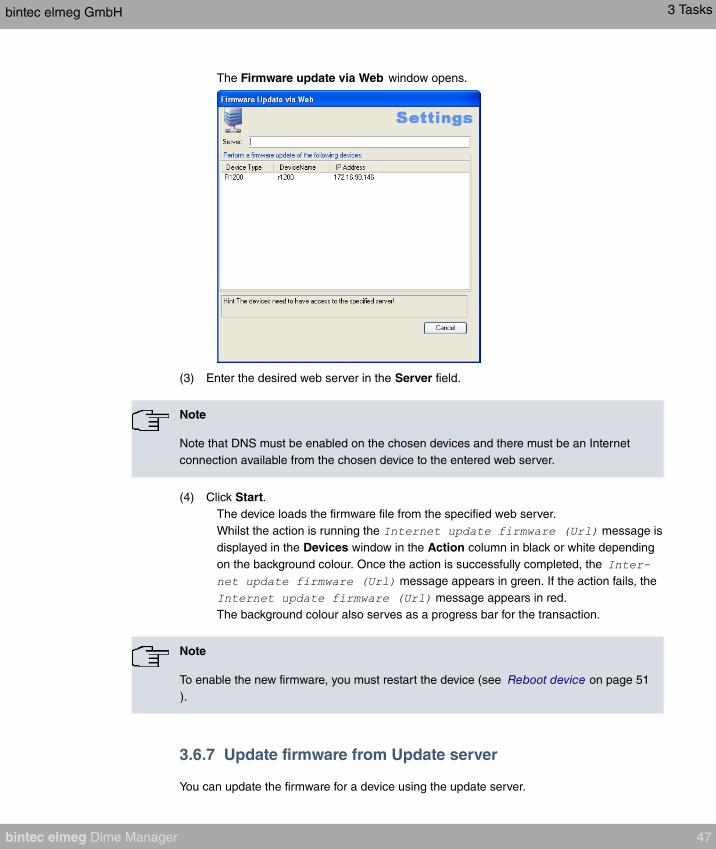
3.6.7 Update firmware from Update server
You can update the firmware for a device using the update server.
bintec elmeg GmbH 3 Tasks
bintec elmeg Dime Manager 47
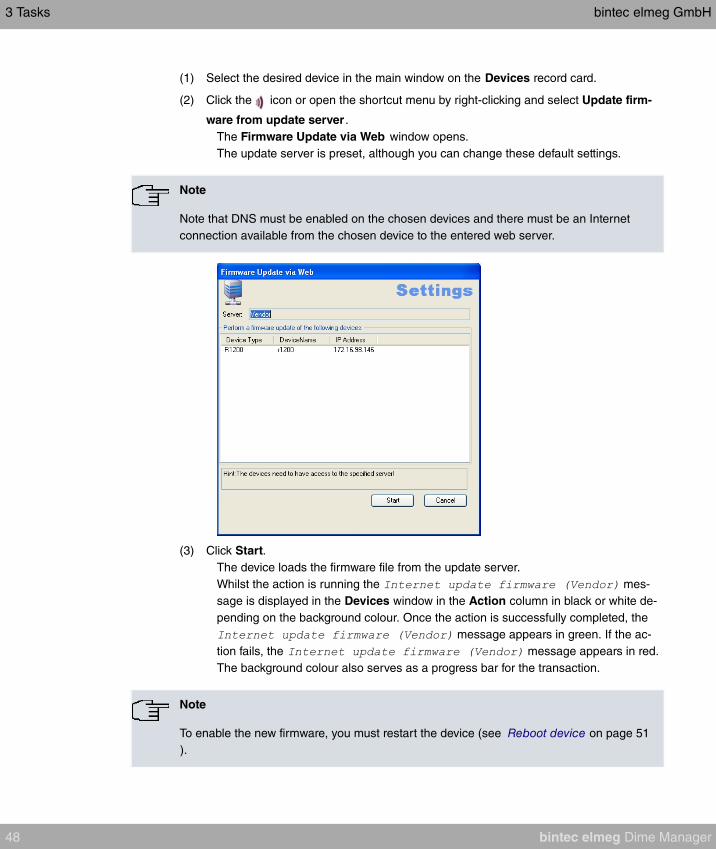
(1) Select the desired device in the main window on the Devices record card.
(2) Click the icon or open the shortcut menu by right-clicking and select Update firm-
ware from update server .
The Firmware Update via Web window opens.
The update server is preset, although you can change these default settings.
Note
Note that DNS must be enabled on the chosen devices and there must be an Internet
connection available from the chosen device to the entered web server.
(3) Click Start.
The device loads the firmware file from the update server.
Whilst the action is running the mes-
sage is displayed in the Devices window in the Action column in black or white de-
pending on the background colour. Once the action is successfully completed, the
message appears in green. If the ac-
tion fails, the message appears in red.
The background colour also serves as a progress bar for the transaction.
Note
To enable the new firmware, you must restart the device (see Reboot device on page 51
).
3 Tasks bintec elmeg GmbH
48 bintec elmeg Dime Manager
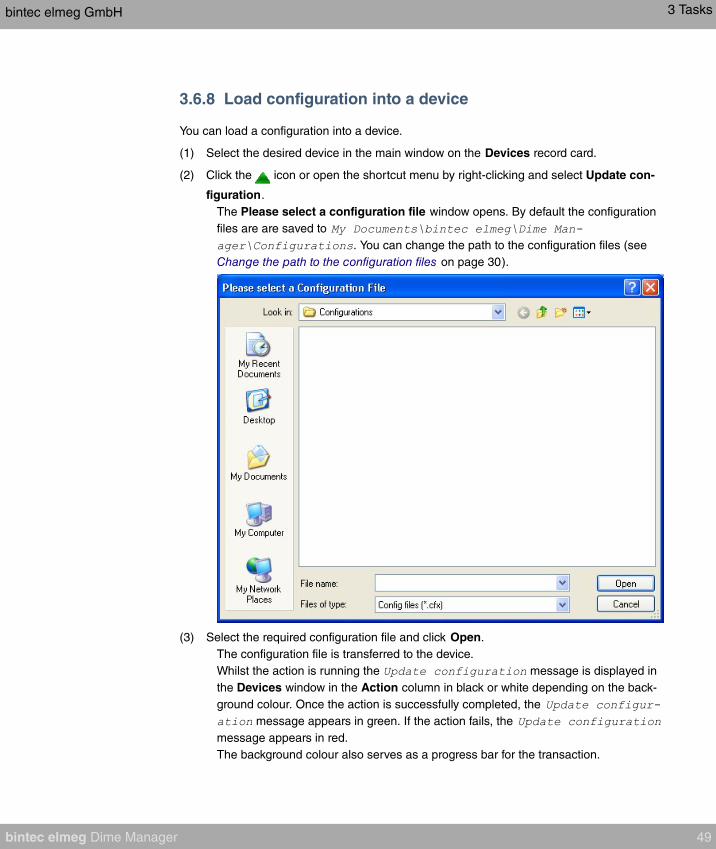
3.6.8 Load configuration into a device
You can load a configuration into a device.
(1) Select the desired device in the main window on the Devices record card.
(2) Click the icon or open the shortcut menu by right-clicking and select Update con-
figuration.
The Please select a configuration file window opens. By default the configuration
files are are saved to
. You can change the path to the configuration files (see
Change the path to the configuration files on page 30).
(3) Select the required configuration file and click Open.
The configuration file is transferred to the device.
Whilst the action is running the message is displayed in
the Devices window in the Action column in black or white depending on the back-
ground colour. Once the action is successfully completed, the
message appears in green. If the action fails, the
message appears in red.
The background colour also serves as a progress bar for the transaction.
bintec elmeg GmbH 3 Tasks
bintec elmeg Dime Manager 49

3.6.9 Save configuration
You save the current configuration for a device in a file.
(1) Select the desired device in the main window on the Devices record card.
(2) Click the icon or open the shortcut menu by right-clicking and select Download
configuration.
The Save Configurations window opens. By default the configuration files are
saved to .
You can change the path to the configuration files (see Change the path to the con-
figuration files on page 30).
(3) Select the required directory, enter a name for the configuration file and click Save.
The Download Configuration window opens.
(4) Check your entries, change them if necessary and click Start.
The configuration file is saved.
Whilst the action is running the message is displayed in the
Devices window in the Action column in black or white depending on the back-
ground colour. Once the action is successfully completed, the
message appears in green. If the action fails, the
message appears in red.
The background colour also serves as a progress bar for the transaction.
3 Tasks bintec elmeg GmbH
50 bintec elmeg Dime Manager

3.6.10 Reboot device
You can reboot a device from the Dime Manager.
(1) Select the desired device in the main window on the Devices record card.
(2) Click the icon or open the shortcut menu by right-clicking and select Reboot
device.
The Device Reboot window opens. The parameters for the selected device are dis-
played.
(3) Click Start.
The device is rebooted.
Whilst the action is running the message is displayed in the
Devices window in the Action column in black or white depending on the back-
ground colour. Once the action is successfully completed, the
message appears in green. If the action fails, the message ap-
pears in red.
The background colour also serves as a progress bar for the transaction.
3.6.11 Reset default settings
You can reset a device to its default settings. The configuration will be lost if you do not
save it first (see Save configuration on page 50).
(1) Select the desired device in the main window on the Devices record card.
(2) Click the icon or open the shortcut menu by right-clicking and select Reset device
to factory settings.
The Factory Reset window opens. The parameters for the selected device are dis-
bintec elmeg GmbH 3 Tasks
bintec elmeg Dime Manager 51

played.
(3) Click Start.
The device is reset to the default settings.
Whilst the action is running the message is dis-
played in the Devices window in the Action column in black or white depending on
the background colour. Once the action is successfully completed, the
message appears in green. If the action fails, the
message appears in red.
The background colour also serves as a progress bar for the transaction.
3.6.12 Define parameters for a device via BOOTP
You can define parameters for a device via BOOTP.
(1) Select the desired device in the main window on the Devices record card.
(2) Click the icon or open the shortcut menu by right-clicking and select Configure
BOOTP.
The BOOTP window opens.
3 Tasks bintec elmeg GmbH
52 bintec elmeg Dime Manager

(3) Change or add the displayed parameters as required.
(4) If you wish to transfer a configuration file to the device, select the required file.
Note
Note that the TFTP service must be running to transfer a configuration file (see Start or
stop TFTP service on page 33).
(5) Click OK.
The parameters are transferred to the device as soon as it sends a BOOTP request.
3.6.13 Log data with trace
With trace, you can log all data packages sent and received on a particular device inter-
face. You can display the data packets, or save them in a file.
(1) Select the desired device in the main window on the Devices record card.
(2) Click the icon or open the shortcut menu by right-clicking and select Trace Inter-
faces.
The Trace Configuration window opens.
bintec elmeg GmbH 3 Tasks
bintec elmeg Dime Manager 53
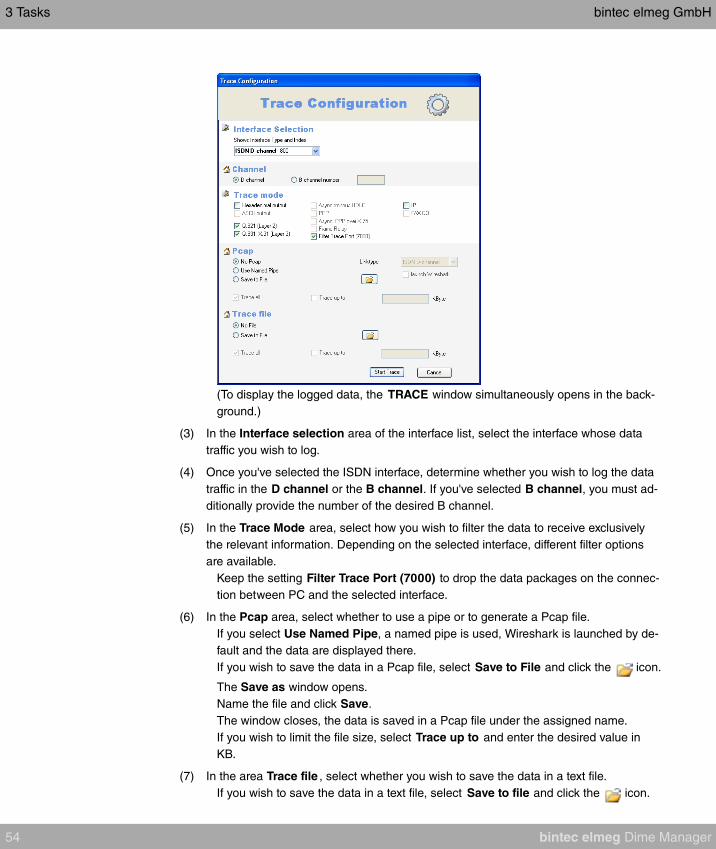
(To display the logged data, the TRACE window simultaneously opens in the back-
ground.)
(3) In the Interface selection area of the interface list, select the interface whose data
traffic you wish to log.
(4) Once you've selected the ISDN interface, determine whether you wish to log the data
traffic in the D channel or the B channel. If you've selected B channel, you must ad-
ditionally provide the number of the desired B channel.
(5) In the Trace Mode area, select how you wish to filter the data to receive exclusively
the relevant information. Depending on the selected interface, different filter options
are available.
Keep the setting Filter Trace Port (7000) to drop the data packages on the connec-
tion between PC and the selected interface.
(6) In the Pcap area, select whether to use a pipe or to generate a Pcap file.
If you select Use Named Pipe, a named pipe is used, Wireshark is launched by de-
fault and the data are displayed there.
If you wish to save the data in a Pcap file, select Save to File and click the icon.
The Save as window opens.
Name the file and click Save.
The window closes, the data is saved in a Pcap file under the assigned name.
If you wish to limit the file size, select Trace up to and enter the desired value in
KB.
(7) In the area Trace file , select whether you wish to save the data in a text file.
If you wish to save the data in a text file, select Save to file and click the icon.
3 Tasks bintec elmeg GmbH
54 bintec elmeg Dime Manager
The Save as window opens.
Name the file and click Save.
The window closes, the data is saved in a text file under the entered name.
If you wish to limit the file size, select Trace up to and enter the desired value in
KB.
(8) Click Start Trace.
Trace is launched. Received data are displayed in the Trace window and optionally
saved, depending on the configuration.
3.6.14 Log data with trace CAPI
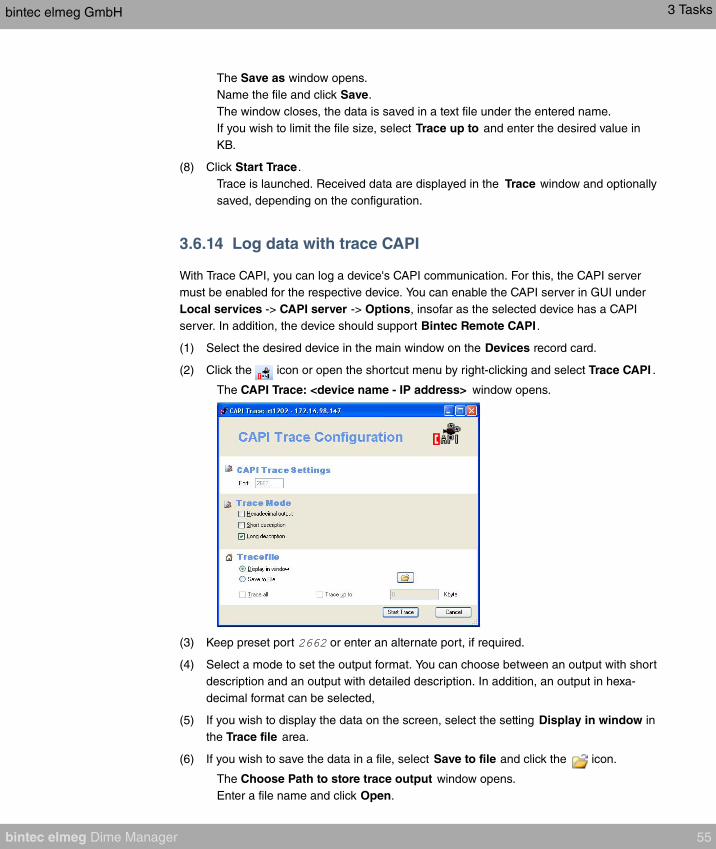
With Trace CAPI, you can log a device's CAPI communication. For this, the CAPI server
must be enabled for the respective device. You can enable the CAPI server in GUI under
Local services -> CAPI server -> Options, insofar as the selected device has a CAPI
server. In addition, the device should support Bintec Remote CAPI .
(1) Select the desired device in the main window on the Devices record card.
(2) Click the icon or open the shortcut menu by right-clicking and select Trace CAPI .
The CAPI Trace: <device name - IP address> window opens.
(3) Keep preset port or enter an alternate port, if required.
(4) Select a mode to set the output format. You can choose between an output with short
description and an output with detailed description. In addition, an output in hexa-
decimal format can be selected,
(5) If you wish to display the data on the screen, select the setting Display in window in
the Trace file area.
(6) If you wish to save the data in a file, select Save to file and click the icon.
The Choose Path to store trace output window opens.
Enter a file name and click Open.
bintec elmeg GmbH 3 Tasks
bintec elmeg Dime Manager 55

The window closes, the data is saved under the entered name.
(7) If you wish to limit the file size, enable Trace up to and enter the desired value in KB.
(8) Click Start Trace.
CAPI Trace is launched. Received data are displayed in the TRACE <IP address:
Port> window and optionally saved according to the configuration.
3.6.15 Set company information
You can either specify information for an individual device via the company in which it is
used, or you can accomplish this for several devices in a single step. You can use the loca-
tion or the company as a sorting criterion for your devices.
Sorting per company is displayed by default in the Device Explorer window.
(1) Select the desired device or devices in the main window on the Devices record card.
(2) Click the icon or open the shortcut menu by right-clicking and select Set company
information.
The Company information window opens.
(3) If you wish to sort your devices according to company, enter a company name in the
New company name field.
Note
In the New company name field, you can enter several terms separated by commas.
To sort devices in the Device Explorer window, the first term is used.
(4) If you wish to sort your devices according to location, enter a (new) location in the
3 Tasks bintec elmeg GmbH
56 bintec elmeg Dime Manager

Location field.
Note
You can enter and save a location if the corresponding devices is in the administered
status (see device status under Display field on page 11 ff).
If you wish to save this location in the configuration of the respective device, enable
Save configuration permanently .
Click OK.
The entries are used for the respective sorting. Where required, corresponding new folders
are created for Location and Company.
When saved, company information is stored in the file.
3.6.16 Set password
You can re-enter or change your devices' current administrator password.
If login with Dime Manager has failed, you can enter the current administrator password
here.
If login into a device is successful (green symbol), you can set a new password for this
device and apply it in the configuration.
Note
To be able to set a new password for several devices in a single step, these devices
must be identified with a green symbol.
In the following, you can select one or more devices. These descriptions refer to a single
device. Proceed accordingly for multiple devices.
(1) If login has been successful, and you wish to set a new password, select the desired
device identified with a green symbol in the main window on the Devices record card.
(2) Click the symbol or open the shortcut menu by right-clicking and select Set pass-
word.
The Set new password window opens.
bintec elmeg GmbH 3 Tasks
bintec elmeg Dime Manager 57
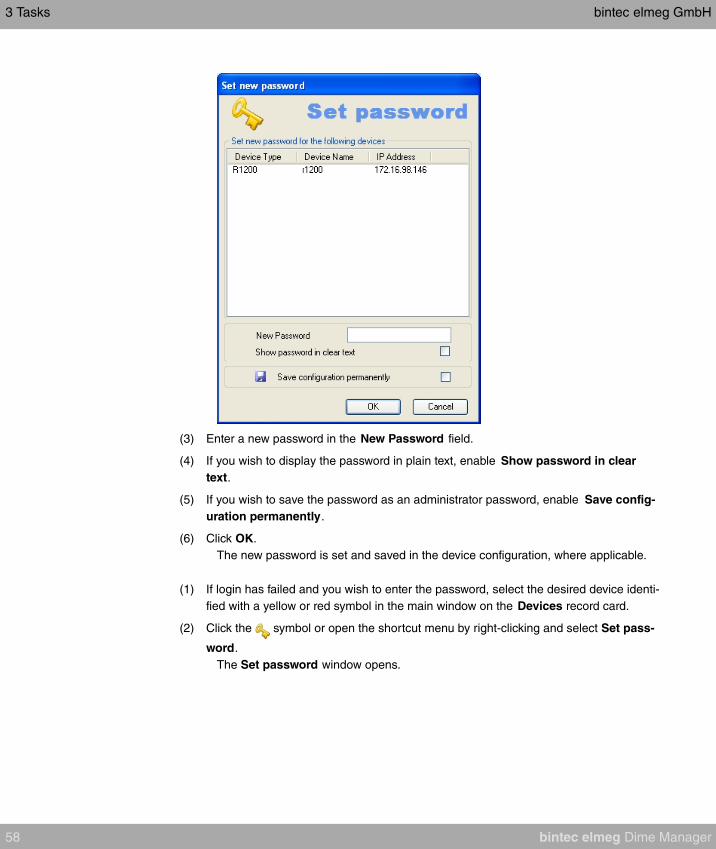
(3) Enter a new password in the New Password field.
(4) If you wish to display the password in plain text, enable Show password in clear
text.
(5) If you wish to save the password as an administrator password, enable Save config-
uration permanently.
(6) Click OK.
The new password is set and saved in the device configuration, where applicable.
(1) If login has failed and you wish to enter the password, select the desired device identi-
fied with a yellow or red symbol in the main window on the Devices record card.
(2) Click the symbol or open the shortcut menu by right-clicking and select Set pass-
word.
The Set password window opens.
3 Tasks bintec elmeg GmbH
58 bintec elmeg Dime Manager
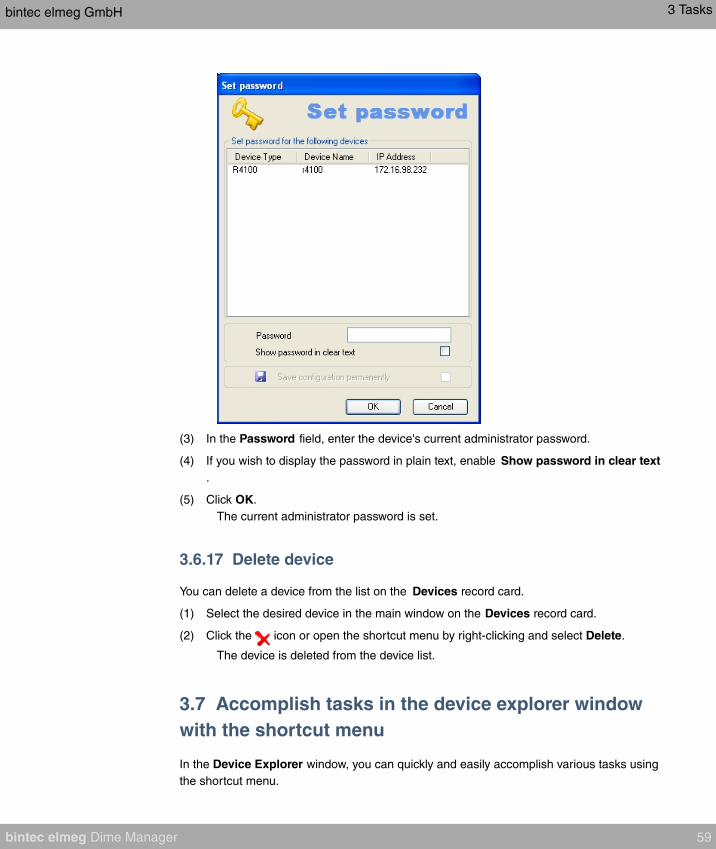
(3) In the Password field, enter the device's current administrator password.
(4) If you wish to display the password in plain text, enable Show password in clear text
.
(5) Click OK.
The current administrator password is set.
3.6.17 Delete device
You can delete a device from the list on the Devices record card.
(1) Select the desired device in the main window on the Devices record card.
(2) Click the icon or open the shortcut menu by right-clicking and select Delete.
The device is deleted from the device list.
3.7 Accomplish tasks in the device explorer window
with the shortcut menu
In the Device Explorer window, you can quickly and easily accomplish various tasks using
the shortcut menu.
bintec elmeg GmbH 3 Tasks
bintec elmeg Dime Manager 59
You can use the company name as a sorting criterium for your devices. This sorting is use-
ful, for example, if you're administering devices for several companies.
For this, create the company name as a folder in the Device Explorer window. In particu-
lar, in the Device Explorer shortcut menu, you can:
• Create a new folder with a company name (New company)
• Edit the company information in a folder (Edit company)
• Delete a folder with company information (Delete company).
You can assign devices to a folder using drag & drop (see Set company information on
page 56), or via the corresponding symbol or the shortcut menu in the main window (see
Assigning devices to a company with drag & drop on page 66).
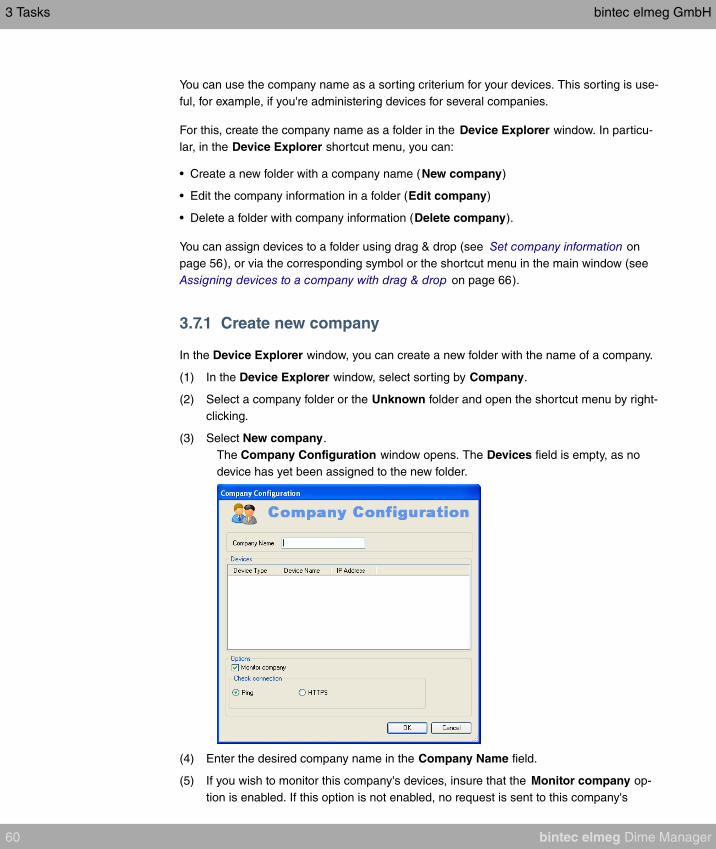
3.7.1 Create new company
In the Device Explorer window, you can create a new folder with the name of a company.
(1) In the Device Explorer window, select sorting by Company.
(2) Select a company folder or the Unknown folder and open the shortcut menu by right-
clicking.
(3) Select New company.
The Company Configuration window opens. The Devices field is empty, as no
device has yet been assigned to the new folder.
(4) Enter the desired company name in the Company Name field.
(5) If you wish to monitor this company's devices, insure that the Monitor company op-
tion is enabled. If this option is not enabled, no request is sent to this company's
3 Tasks bintec elmeg GmbH
60 bintec elmeg Dime Manager

devices.
(6) To check whether this company's devices are accessible, make sure that in the
Check connection field the option Ping is enabled.
(7) To insure that this company's devices are accessible via HTTPS requests, in the
Check connection field enable the HTTPS option.
(8) Click on OK
Parameters from this window are saved in the .xml file. A folder with
the entered company name is created in the tree structure in the Device Explorer
window under the All Devices folder.
You can assign devices to the newly created folder in the main window (see Set company
information on page 56).
3.7.2 Edit company
In a folder representing a company, you can edit company information.
(1) In the Device Explorer window, select sorting by Company.
(2) Select the desired company folder and open the shortcut menu by right-clicking.
(3) Select Edit Company.
The Company Configuration window opens. Settings for the currently selected
folder are displayed. In the Devices rea, the devices assigned to the company
name, i.e. included in the currently selected folder, are displayed.
(4) If you wish to modify the company name, enter the new company name in the Com-
pany Name field.
bintec elmeg GmbH 3 Tasks
bintec elmeg Dime Manager 61
Note
The folder name is fixed; it cannot be changed.
(5) If you wish to monitor this company's devices, insure that the Monitor company op-
tion is enabled. If this option is not enabled, no request is sent to this company's
devices, and the company's name is greyed out in the Device Explorer window. The
symbol in the Devices windows changes and is also greyed out.
(6) To check whether this company's devices are accessible, make sure that in the
Check connection area the option Ping is enabled.
(7) To insure that this company's devices are accessible via HTTPS requests, in the
Check connection area enable the HTTPS option.
(8) Click on OK
The folder with the modified name and other modified settings, as the case arises, is
displayed in tree structure in the Device Explorer window under the All Devices
folder.
3.7.3 Delete company
You can delete a folder with company information.
(1) In the Device Explorer window, select sorting by Company.
(2) Select the desired company folder, and open the shortcut menu by right-clicking.
(3) Select Delete Company.
The selected folder is deleted. Devices from this folder are moved to the Unknown
folder.
3.8 Perform tasks with drag and drop
You can perform various tasks quickly and easily using drag and drop, e.g.
• Save the configuration in the Dime Manager
• Update the firmware in devices
• Update the configuration in devices
3.8.1 Save configuration with drag and drop
You can save the configuration for a device or several devices with drag and drop in the
Dime Manager.
3 Tasks bintec elmeg GmbH
62 bintec elmeg Dime Manager

(1) Select Maintenance -> Window in the Configurations area to open the Configura-
tions window.
(2) Select a device or several devices on the Devices record card.
(3) Press and hold the mouse button to drag the device(s) to the Configurations window
and then release.
The Download Configuration window opens. You can enter a name for the group
configuration file in the Filename field. The first group configuration file that you
save is assigned the name by default. Other files are numbered:
, and so on.
You can open the cfx files with an editor and view the saved information.
(4) Click Start.
The configuration of each device is saved in a file and a configuration file is also cre-
ated for all devices, a so-called group configuration file . In the tooltip for the re-
spective file you can see for which devices the file is suitable.
Whilst the action is running the message is displayed in the
Devices menu in the Action column in the row for the respective device in black or
white depending on the background colour. Once the action is completed, the
message appears in green. If the action fails, the
message appears in red.
The background colour also serves as a progress bar for the transaction.
You can open and view configuration files using an editor.
bintec elmeg GmbH 3 Tasks
bintec elmeg Dime Manager 63

3.8.2 Update firmware with drag and drop
You can update the firmware for one device or several devices with drag and drop.
(1) Select Maintenance -> Window in the Firmware area to open the Firmware window.
(2) If you wish to update the firmware files, which are saved in the Dime Manager, select
Maintenance -> Configure in the Firmware area, carry out the desired settings in the
Firmware information window (see Change path to the firmware files / Update firm-
ware files on page 31) and click OK.
The firmware files are updated as required.
(3) If you wish to update the firmware for a single device, select the corresponding firm-
ware file in the Firmware window, press and hold the mouse button and drag it to the
desired device on the Devices record card.
The firmware for the selected device is updated.
Whilst the action is running the message is dis-
played in the Devices window in the Action column in black or white depending on
the background colour. Once the action is successfully completed, the
message appears in green. If the action fails, the
message appears in red.
(4) If you wish to update the firmware for several devices of the same type (e.g. R1200),
select the desired devices on the Devices record card and a suitable firmware file in
the Firmware window.
(5) Press and hold the mouse button to drag the selected devices to the Devices record
card and then release the mouse button.
The firmware for the selected devices is updated.
Whilst the action is running the message is dis-
played in the Devices window in the Action column in the row for the corresponding
device in black or white depending on the background colour. Once the action is
successfully completed, the message appears in
green. If the action fails, the message appears in
red.
The background colour also serves as a progress bar for the transaction.
Note
To enable the new firmware, you must restart the device (see Reboot device on page
51).
3 Tasks bintec elmeg GmbH
64 bintec elmeg Dime Manager
3.8.3 Load configuration with drag and drop in a single device
You can load a configuration file with drag and drop in a single device. To do this, you can
use one of the configuration files that you have saved previously in the configuration direct-
ory (see Save configuration on page 50 or Save configuration with drag and drop on page
62).
(1) Select Maintenance -> Window in the Configurations area to open the Configura-
tions window.
(2) Select the device into which you wish to load a configuration file in the main window
on the Devices record card.
(3) Select the configuration file you wish to load into the device in the Configurations
window.
(4) Press and hold the mouse button to drag the file to the selected device and then re-
lease the mouse button.
The configuration file is loaded into the selected device.
Whilst the action is running the message is displayed in
the Devices window in the Action column in black or white depending on the back-
ground colour. Once the action is successfully completed, the
message appears in green. If the action fails, the
message appears in red.
The background colour also serves as a progress bar for the transaction.
3.8.4 Load configuration with drag and drop in multiple
devices
You can load a configuration file with drag and drop in multiple devices in a single step. To
do this, you can use the files that you have saved previously in the configuration directory
(see Save configuration on page 50 or Save configuration with drag and drop on page 62
). For devices of the same type (e.g. R1200) you can use the same configuration file; for
devices of different types you can use a group configuration file (see Save configuration
with drag and drop on page 62).
(1) Select Maintenance -> Window in the Configurations area to open the Configura-
tions window.
You can display the available configuration and group configuration files.
(2) Select the devices into which you wish to load a configuration file in the main window
on the Devices record card.
(3) If you wish to load a configuration into devices of the same type, select the configura-
tion file you wish to load into the devices in the Configurations window.
(4) If you wish to load a configuration into devices of different types, select the group con-
bintec elmeg GmbH 3 Tasks
bintec elmeg Dime Manager 65
figuration file you wish to use for the devices in the Configurations window.
(5) Press and hold the mouse button to drag the selected file to the selected devices and
then release the mouse button.
The configuration file is loaded into the selected devices.
Whilst the action is running the message is displayed in
the Devices window in the Action column in the row for the respective device in
black or white depending on the background colour. Once the action is successfully
completed, the message appears in green. If the action
fails, the message appears in red.
The background colour also serves as a progress bar for the transaction.
3.8.5 Assigning devices to a company with drag & drop
You can assign devices to a company with drag & drop.
(1) In the the Device Explorer window, select sorting by Company.
(2) Insure that the desired company has been created as a folder.
(3) If the desired company has not already been created, create it via the shortcut menu
in the Device Explorer window (see Create new company on page 60).
(4) In the Devices window, select those devices which you wish to assign to this com-
pany, i.e. move to the company folder.
(5) With the mouse button depressed, drag the selected devices to the desired folder in
the Device Explorer window until a plus sign appears.
(6) Release the mouse button.
The devices are moved to the selected folder.
3 Tasks bintec elmeg GmbH
66 bintec elmeg Dime Manager
Index
A
Action on the device 11
Add devices manually 24
Assigning devices to a company 66
Assigning devices with drag & drop
66
B
BOOTP 32 , 52
BOOTP - set parameters 35
BOOTP - window 19
BOOTP parameters 35 , 52
BOOTP record card 11
C
CAPI 55
Change language 39
Change password 41
Change path to the firmware files 31
Change the path to the configuration
files 30
Change window display 21
Company 66
Company information 56 , 60 , 61 , 62
Configuration - GUI - secure 43
Configuration - setup tool 44
Configuration files 29 , 30
Configuration files - Change the path
30
Configurations - window 19
Configure device via HTTP 42
Configure device via HTTPS 43
Context menu - Dime Manager Log
21
Context menu - log window 21
Context window - dime Syslog 21
Copyright 40
Create company 60
Create company name as a folder 60
D
Default settings 51
Define parameters via BOOTP 35
Define TFTP settings 33
Delete 59
Delete company 62
Delete company information 62
Delete device 59
Delete folder with company
information 62
Device Explorer 8 , 59
Device Explorer - shortcut menu 9
Device explorer window 59
Device properties 15
Device status 11
Devices - record card 11
Devices log 39 , 39 , 39
Devices log - window 19
Devices record card 11
Dime Manager log 39 , 39 , 39
Dime Manager Log - window 19
Dime Syslog - window 19
Dime Syslog log window 37
Discover 24
Display BOOTP devices 35
Display configuration files 29
Display devices 25
Display field 11
Display information 40
Display Syslog messages 38
Dock window 7
Drag and drop 62 , 62 , 64 , 65 , 65 ,
66
E
Edit company 61
Edit company information 61
Edit folder with company information
61
Elements 7
End BOOTP service 35
End Syslog service 38
bintec elmeg GmbH Index
bintec elmeg Dime Manager 67

Enter company name 60
F
File window 19
Filter 21
Filter display 21
Filter Syslog messages 21
Firmware 46 , 47
Firmware - window 19
Firmware files - change the path 31
Firmware files - display 31
Firmware files - update 31
G
General settings 39
Goal and Purpose 1
GUI - configuration 42
GUI configuration 42
H
Halt update 21
Help 41
HTTP configuration - GUI 42
HTTPS configuration - GUI 43
I
Import devices 28
Import devices from a file 28
Install Syslog service 35
Installation 3
IP configuration (device properties)
15
IP settings 41
L
Launch BOOTP service 35
Load configuration 49 , 65 , 65
Load configuration with drag and drop
65 , 65
Load devices 27
Load saved devices 27 , 28
Load search results 27 , 28
Log data 53 , 55
Log window 19
Log window - devices 39
Log window - dime manager 39
M
Main window 9
Main window - shorcut window 10
Main window - task bar 10
Main window task bar 10
Maintenance 28
Menu bar 8
Miscalleneous (device properties) 15
Modify company information 61
Modify devices parameters 41
N
New company 60
New company name 60
O
Online Help 41
Open BOOTP log window 33
Open log window 32 , 33 , 37
Open Syslog log window 37
Open TFTP log window 32
Operation icons 21
Operation, general 21
P
Parameters - BOOTP 52
PC system requirements 2
Position window 7
Possible Applications 1
R
Reboot 51
Reboot device 51
Receive Syslog messages 38
Resume update 21
Index bintec elmeg GmbH
68 bintec elmeg Dime Manager
S
Save configuration 50 , 62
Save configuration with drag and drop
62
Save device list 26
Save discovered devices 26
Save search results 26
Search for devices 24
Search for devices in the background
25
Search for folders 30
Secure configuration - GUI 43
Security Alert 3
Select devices 21
Select TELNET Client 40
Services 32
Set company information 56
Set new password 57
Set password 57
Settings - general 39
Shortcut menu - Device Explorer 9
Shortcut menu - Main window 10
Shortcut menu - tasks in the devices list
window 59
Shortcut menu - tasks in the main win-
dow 41
Software system requirements 2
Start Syslog service 38
Start TFTP service 33
States (device properties) 15
Status - symbol colours 11
Status - symbols 11
Status icon colours 11
Status icons 11
Stop TFTP service 33
Supported devices 2
Syslog 32
Syslog service 35 , 35 , 36 , 36 , 38 ,
38 , 38 , 38
System Software 3
T
Task bar- tasks in the main window
41
Tasks with drag and drop 62
Tasks with the shortcut menu 41 , 59
Tasks with the task bar 41
TELNET 40
TELNET Client 2 , 39
TELNET configuration - Setup 44
TFTP 32
TFTP - window 19
Trace - log data 53
Trace - window 19
Trace CAPI - log data 55
U
Uninstall Syslog service 36
Update firmware 64
Update firmware - bintec elmeg 47
Update firmware - File 45
Update firmware - Web server 46
Update firmware with drag and drop
64
Updatet server 47
User interface 7
V
Version 40
W
Web server - Firmware 46
Window 7 , 19
Window - BOOTP 19
Window - configurations 19 , 19
Window - devices log 19
Window - Dime Manager Log 19
Window - dime Syslog 19
Window - firmware 19
Window - TFTP 19
Window - trace 19
Window display icons 21
Windows security alert 3
bintec elmeg GmbH Index
bintec elmeg Dime Manager 69