marking out and measuring chapter 2 tools and equipment marking
TRANSCRIPT

draft
Marking out and measuring is a critical part of manufacturing and is usually subject to a number of quality control checks. If components are marked out and measured wrongly before being cut out, there is no chance of them fitting together when they are assembled.
Always take marking out measurements from a datum as indicated in Figure 2.1. A datum edge is a flat face or straight edge from which all measurements are taken. This prevents cumulative errors being made.
If you are using timber, choose the face side carefully, before marking it with a small symbol for identification purposes, as shown in Figure 2.2. Then select a face edge that is at right angles to the face side. Take all your measurements from this side and/or edge.
Marking out and measuring toolsThese are the tools used for marking out and measuring that you need to know about:
rules punches squares templates gauges micrometers scribers.
RulesThere are two basic types of rule: steel rule and steel tape. Both start at zero and have millimetre graduations.
Datum A
Dat
um B
face side
face edge
Figure 2.1: Datum edges
Item Name Use Advantages Disadvantages
steel rule for measuring up to 300 mm in length
rigid form which means it will not bend and flex
ends can get worn, so the measurements are not accurate
measuring tape for making longer measurements up to 5 m
longer, so more versatile
can become twisted and break
ends can break off, making them useless
Table 2.1: The uses of rules
Chapter 2 Tools and equipmentMarking out and measuring
Datum A
Dat
um B
face side
face edge
Figure 2.2: Face edges
Marking out and measuring
34
• Recognise and be able to select the correct tools and equipment when marking out and measuring.
• Understand the tools’ uses, advantages and disadvantages.
draft
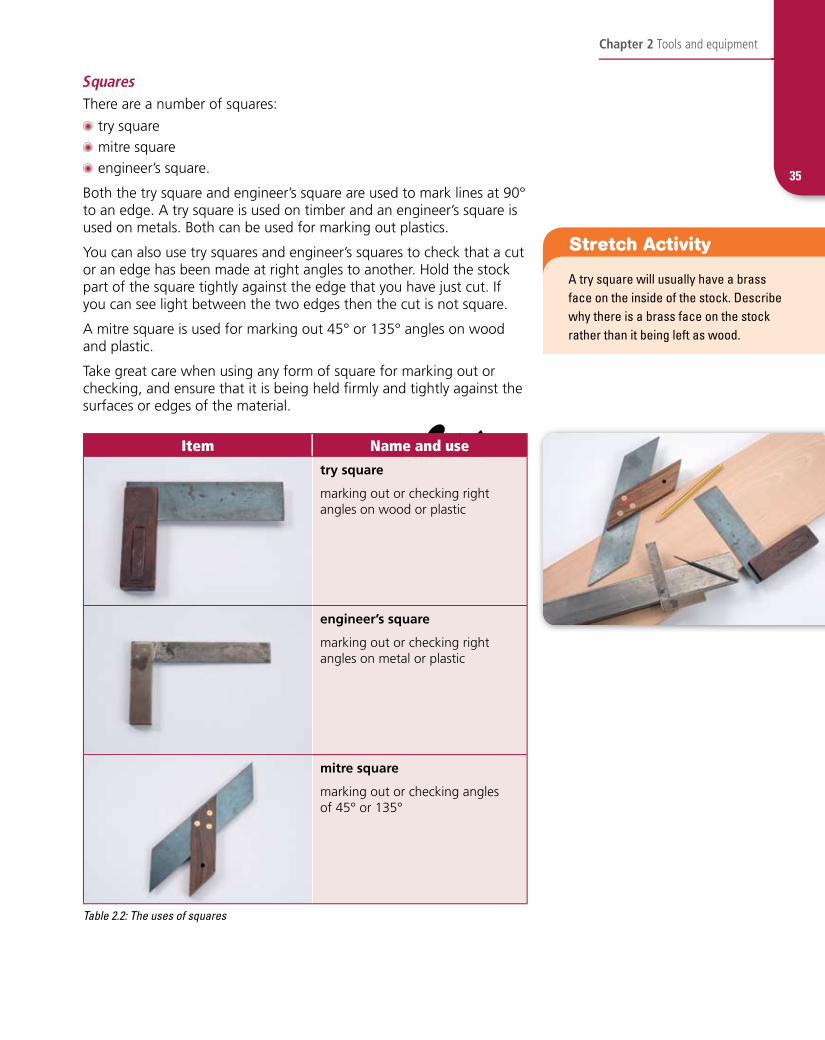
SquaresThere are a number of squares:
try square mitre square engineer’s square.
Both the try square and engineer’s square are used to mark lines at 90° to an edge. A try square is used on timber and an engineer’s square is used on metals. Both can be used for marking out plastics.
You can also use try squares and engineer’s squares to check that a cut or an edge has been made at right angles to another. Hold the stock part of the square tightly against the edge that you have just cut. If you can see light between the two edges then the cut is not square.
A mitre square is used for marking out 45° or 135° angles on wood and plastic.
Take great care when using any form of square for marking out or checking, and ensure that it is being held firmly and tightly against the surfaces or edges of the material.
Item Name and use
try square
marking out or checking right angles on wood or plastic
engineer’s square
marking out or checking right angles on metal or plastic
mitre square
marking out or checking angles of 45° or 135°
Table 2.2: The uses of squares
tStretch Activity
A try square will usually have a brass face on the inside of the stock. Describe why there is a brass face on the stock rather than it being left as wood.
Chapter 2 Tools and equipment
35
draft
tSupport Activity
Describe the difference between a marking gauge and a cutting gauge.
tApply It!
In Unit 1: Make activity you should describe the use of marking out tools. Keep a photographic record of the stages of your manufacture in the section on ‘Quality of manufacture’. Show all the relevant processes in detail, including the measuring and marking out stages.
Be careful not to confuse scribers and centre punches. You hit a centre punch with a hammer; if you do this to a scriber, you will blunt or break its tip. However, if you try to use a punch for marking out, it will not be as accurate.
Marking out and measuring
36
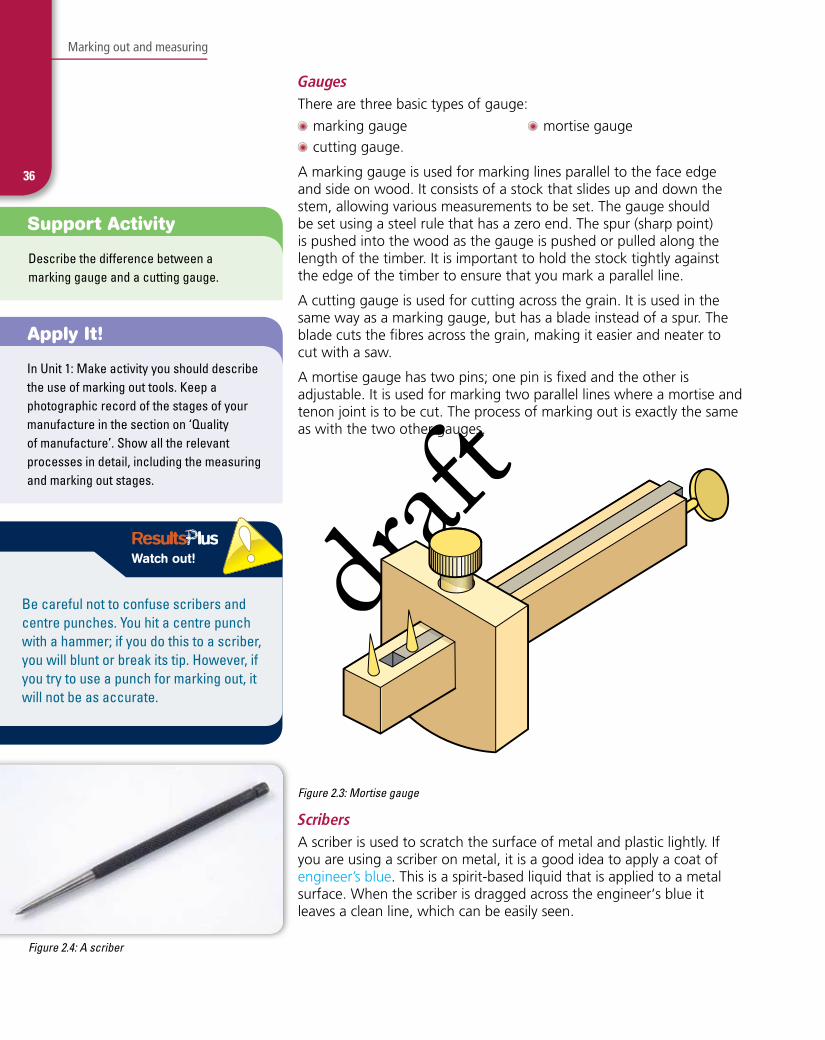
GaugesThere are three basic types of gauge:
marking gauge mortise gauge cutting gauge.
A marking gauge is used for marking lines parallel to the face edge and side on wood. It consists of a stock that slides up and down the stem, allowing various measurements to be set. The gauge should be set using a steel rule that has a zero end. The spur (sharp point) is pushed into the wood as the gauge is pushed or pulled along the length of the timber. It is important to hold the stock tightly against the edge of the timber to ensure that you mark a parallel line.
A cutting gauge is used for cutting across the grain. It is used in the same way as a marking gauge, but has a blade instead of a spur. The blade cuts the fibres across the grain, making it easier and neater to cut with a saw.
A mortise gauge has two pins; one pin is fixed and the other is adjustable. It is used for marking two parallel lines where a mortise and tenon joint is to be cut. The process of marking out is exactly the same as with the two other gauges.
spur
stock
setting
using cutting gauge
mortise gauge
setting a marking gauge
stem
Figure 2.3: Mortise gauge
ScribersA scriber is used to scratch the surface of metal and plastic lightly. If you are using a scriber on metal, it is a good idea to apply a coat of engineer’s blue. This is a spirit-based liquid that is applied to a metal surface. When the scriber is dragged across the engineer‘s blue it leaves a clean line, which can be easily seen.
Figure 2.4: A scriber
draft
tStretch Activity
Scribers and punches are made from a grade of steel known as ‘tool steel’ or high-carbon steel. Investigate why this is. Which properties of high-carbon steel make it suitable to be used in this way?
PunchesCentre punches are used to make an indent in the surface where holes are to be drilled in metal, as shown in Figure 2.5. They provide a starting point for the drill and stop it skidding over the surface. Dot punches are used for marking the centres where dividers are to be used. They are similar to a centre punch, except that the tips are ground to a 60° rather than a 90° point.
Figure 2.5: A centre punch, and the punch in use
TemplatesA template is used when a number of identical shapes or patterns need to be marked out. You can make a template from any thin material, such as plywood or aluminium, that is easy to draw around.
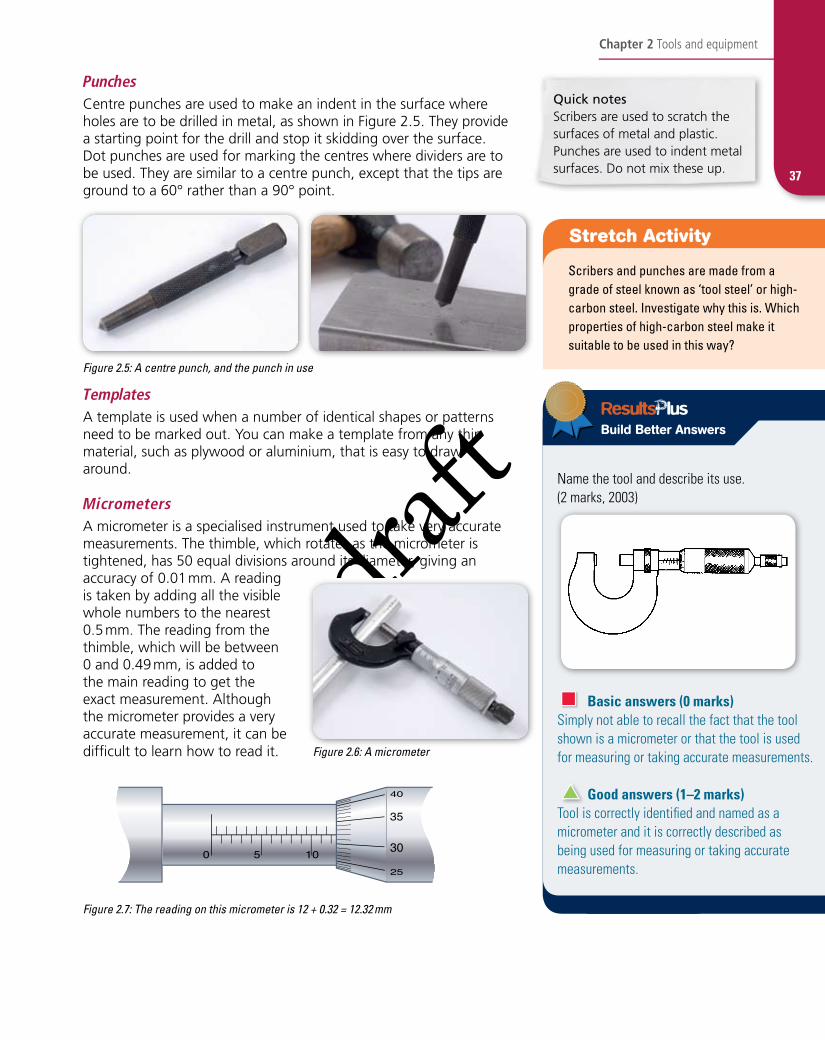
MicrometersA micrometer is a specialised instrument used to take very accurate measurements. The thimble, which rotates as the micrometer is tightened, has 50 equal divisions around its diameter, giving an accuracy of 0.01 mm. A reading is taken by adding all the visible whole numbers to the nearest 0.5 mm. The reading from the thimble, which will be between 0 and 0.49 mm, is added to the main reading to get the exact measurement. Although the micrometer provides a very accurate measurement, it can be difficult to learn how to read it.
Name the tool and describe its use. (2 marks, 2003)
Basic answers (0 marks)Simply not able to recall the fact that the tool shown is a micrometer or that the tool is used for measuring or taking accurate measurements.
Good answers (1–2 marks)Tool is correctly identified and named as a micrometer and it is correctly described as being used for measuring or taking accurate measurements.
37
Chapter 2 Tools and equipment
Figure 2.7: The reading on this micrometer is 12 + 0.32 = 12.32 mm
Quick notesScribers are used to scratch the surfaces of metal and plastic. Punches are used to indent metal surfaces. Do not mix these up.
Figure 2.6: A micrometer
draft
38
Wasting
Wasting toolsA wasting process is one that produces waste or unusable material by either cutting bits out or cutting bits off. These are the tools used for wasting that you need to know about:
saws files planes drills chisels abrading tools.
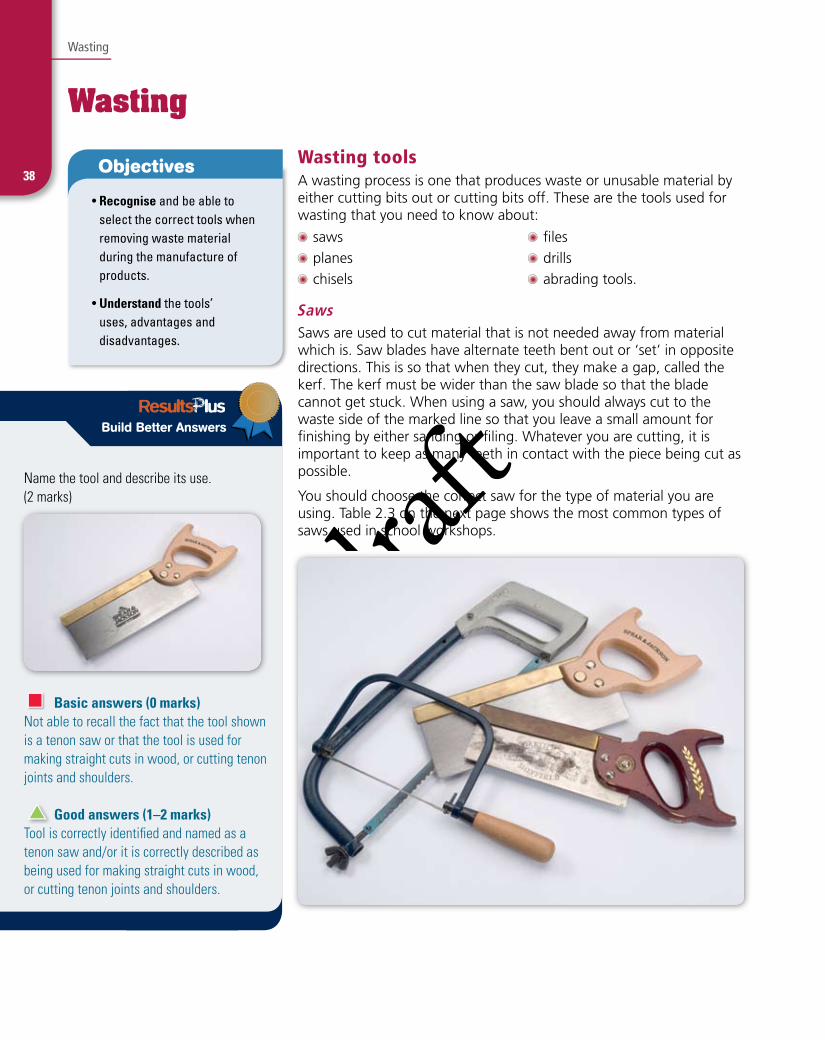
SawsSaws are used to cut material that is not needed away from material which is. Saw blades have alternate teeth bent out or ‘set’ in opposite directions. This is so that when they cut, they make a gap, called the kerf. The kerf must be wider than the saw blade so that the blade cannot get stuck. When using a saw, you should always cut to the waste side of the marked line so that you leave a small amount for finishing by either sanding or filing. Whatever you are cutting, it is important to keep as many teeth in contact with the piece being cut as possible.
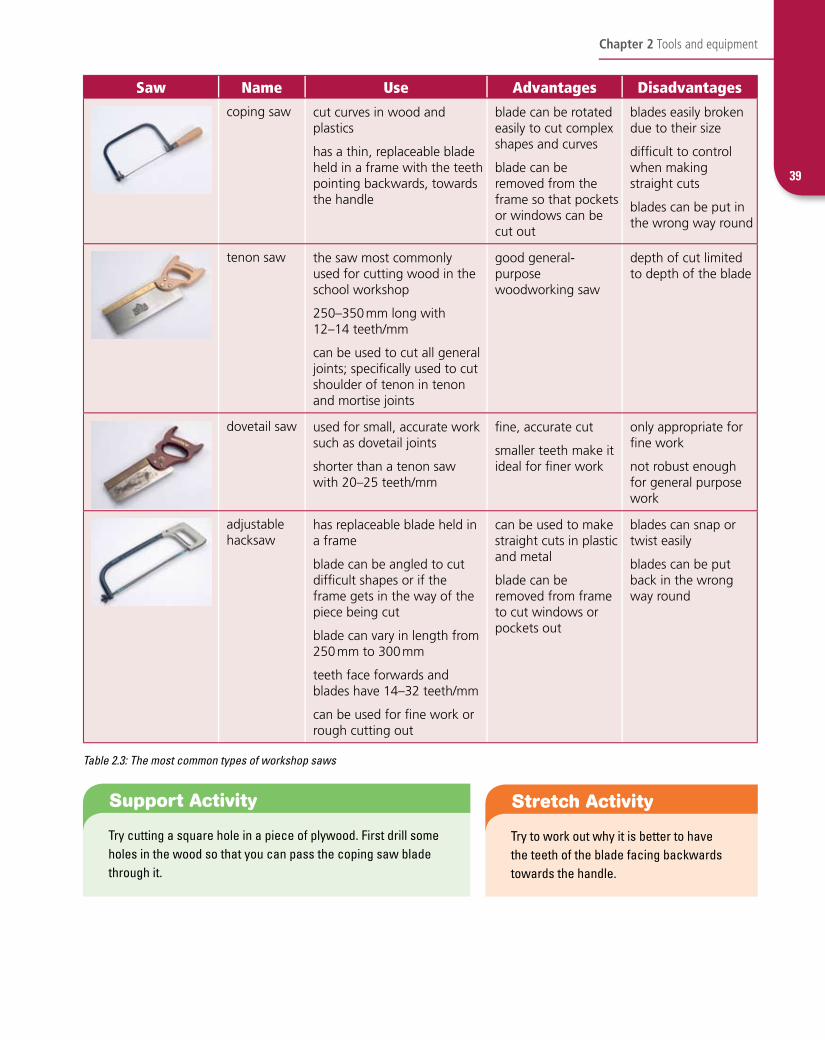
You should choose the correct saw for the type of material you are using. Table 2.3 on the next page shows the most common types of saws used in school workshops.
Build Better Answers
Name the tool and describe its use. (2 marks)
Basic answers (0 marks)Not able to recall the fact that the tool shown is a tenon saw or that the tool is used for making straight cuts in wood, or cutting tenon joints and shoulders.
Good answers (1–2 marks)Tool is correctly identified and named as a tenon saw and/or it is correctly described as being used for making straight cuts in wood, or cutting tenon joints and shoulders.
Wasting
• Recognise and be able to select the correct tools when removing waste material during the manufacture of products.
• Understand the tools’ uses, advantages and disadvantages.
draft
39
Chapter 2 Tools and equipment
Saw Name Use Advantages Disadvantages
coping saw cut curves in wood and plastics
has a thin, replaceable blade held in a frame with the teeth pointing backwards, towards the handle
blade can be rotated easily to cut complex shapes and curves
blade can be removed from the frame so that pockets or windows can be cut out
blades easily broken due to their size
difficult to control when making straight cuts
blades can be put in the wrong way round
tenon saw the saw most commonly used for cutting wood in the school workshop
250–350 mm long with 12–14 teeth/mm
can be used to cut all general joints; specifically used to cut shoulder of tenon in tenon and mortise joints
good general-purpose woodworking saw
depth of cut limited to depth of the blade
dovetail saw used for small, accurate work such as dovetail joints
shorter than a tenon saw with 20–25 teeth/mm
fine, accurate cut
smaller teeth make it ideal for finer work
only appropriate for fine work
not robust enough for general purpose work
adjustable hacksaw
has replaceable blade held in a frame
blade can be angled to cut difficult shapes or if the frame gets in the way of the piece being cut
blade can vary in length from 250 mm to 300 mm
teeth face forwards and blades have 14–32 teeth/mm
can be used for fine work or rough cutting out
can be used to make straight cuts in plastic and metal
blade can be removed from frame to cut windows or pockets out
blades can snap or twist easily
blades can be put back in the wrong way round
Table 2.3: The most common types of workshop saws
tStretch Activity
Try to work out why it is better to have the teeth of the blade facing backwards towards the handle.
tSupport Activity
Try cutting a square hole in a piece of plywood. First drill some holes in the wood so that you can pass the coping saw blade through it.
draft
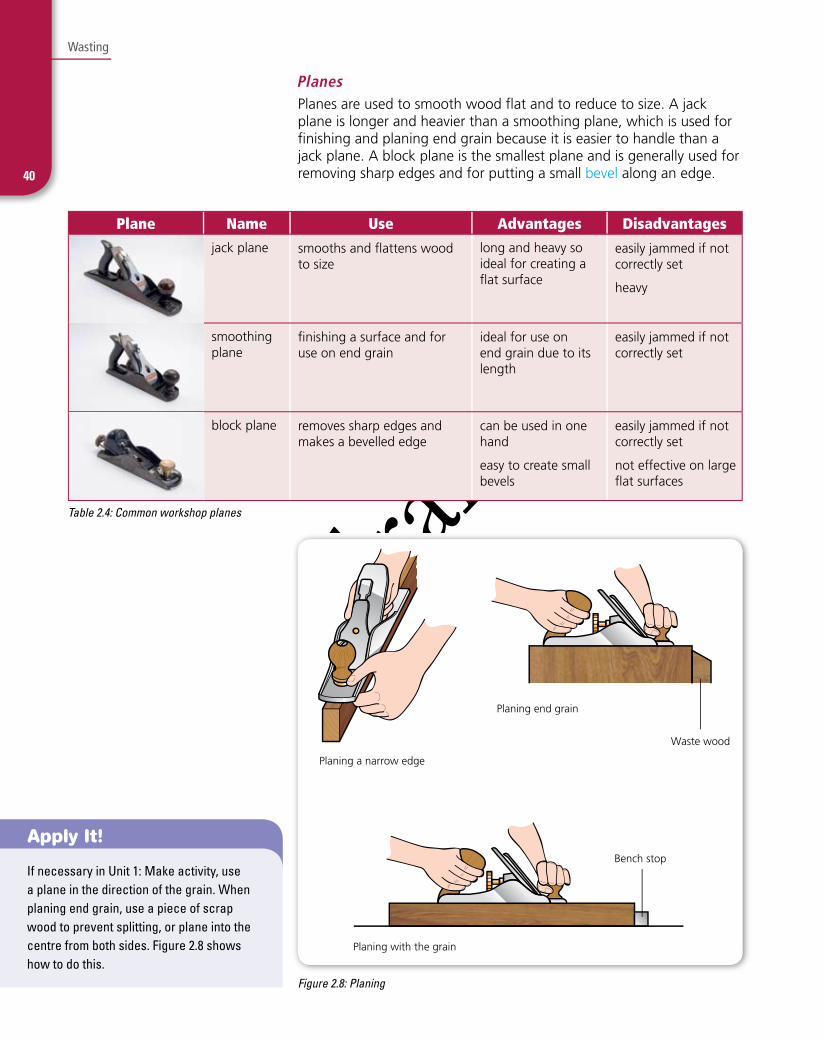
Bench stop
Waste wood
Planing with the grain
Planing end grain
Planing a narrow edge
Figure 2.8: Planing
tApply It!
If necessary in Unit 1: Make activity, use a plane in the direction of the grain. When planing end grain, use a piece of scrap wood to prevent splitting, or plane into the centre from both sides. Figure 2.8 shows how to do this.
Wasting
40
Planes Planes are used to smooth wood flat and to reduce to size. A jack plane is longer and heavier than a smoothing plane, which is used for finishing and planing end grain because it is easier to handle than a jack plane. A block plane is the smallest plane and is generally used for removing sharp edges and for putting a small bevel along an edge.
Plane Name Use Advantages Disadvantages
jack plane smooths and flattens wood to size
long and heavy so ideal for creating a flat surface
easily jammed if not correctly set
heavy
smoothing plane
finishing a surface and for use on end grain
ideal for use on end grain due to its length
easily jammed if not correctly set
block plane removes sharp edges and makes a bevelled edge
can be used in one hand
easy to create small bevels
easily jammed if not correctly set
not effective on large flat surfaces
Table 2.4: Common workshop planes
draft
tStretch Activity
Use the internet to find out how sandpaper is made.
Chisels
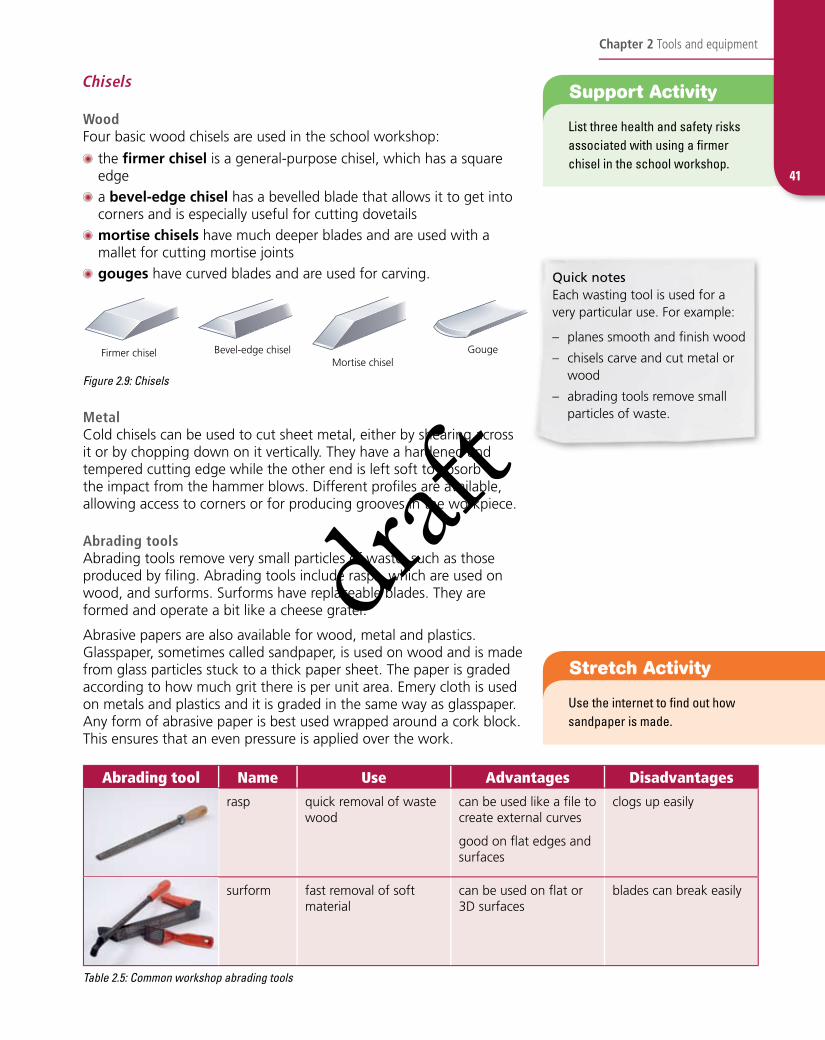
WoodFour basic wood chisels are used in the school workshop:
the firmer chisel is a general-purpose chisel, which has a square edge
a bevel-edge chisel has a bevelled blade that allows it to get into corners and is especially useful for cutting dovetails
mortise chisels have much deeper blades and are used with a mallet for cutting mortise joints
gouges have curved blades and are used for carving.
Firmer chiselMortise chisel
GougeBevel-edge chisel
Figure 2.9: Chisels
MetalCold chisels can be used to cut sheet metal, either by shearing across it or by chopping down on it vertically. They have a hardened and tempered cutting edge while the other end is left soft to absorb the impact from the hammer blows. Different profiles are available, allowing access to corners or for producing grooves in the workpiece.
Abrading toolsAbrading tools remove very small particles of waste, such as those produced by filing. Abrading tools include rasps, which are used on wood, and surforms. Surforms have replaceable blades. They are formed and operate a bit like a cheese grater.
Abrasive papers are also available for wood, metal and plastics. Glasspaper, sometimes called sandpaper, is used on wood and is made from glass particles stuck to a thick paper sheet. The paper is graded according to how much grit there is per unit area. Emery cloth is used on metals and plastics and it is graded in the same way as glasspaper. Any form of abrasive paper is best used wrapped around a cork block. This ensures that an even pressure is applied over the work.
Abrading tool Name Use Advantages Disadvantages
rasp quick removal of waste wood
can be used like a file to create external curves
good on flat edges and surfaces
clogs up easily
surform fast removal of soft material
can be used on flat or 3D surfaces
blades can break easily
Table 2.5: Common workshop abrading tools
tSupport Activity
List three health and safety risks associated with using a firmer chisel in the school workshop.
Quick notesEach wasting tool is used for a very particular use. For example:
– planes smooth and finish wood
– chisels carve and cut metal or wood
– abrading tools remove small particles of waste.
41
Chapter 2 Tools and equipment
draft
42
Wasting
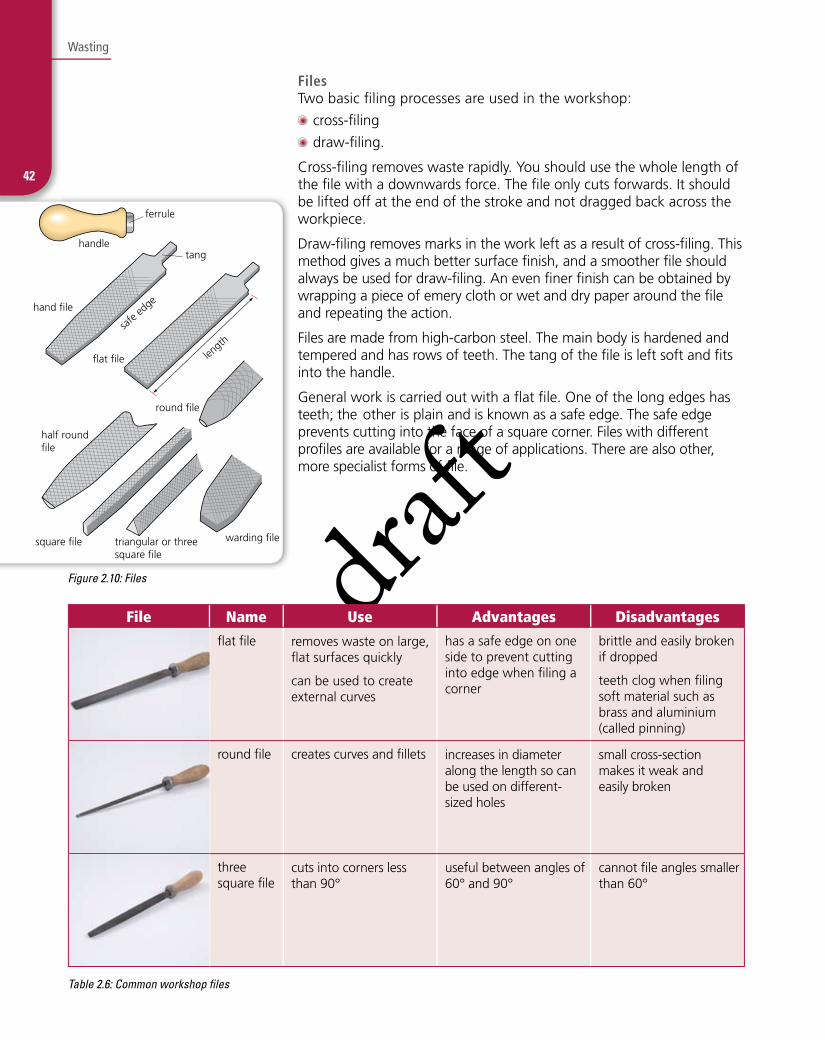
FilesTwo basic filing processes are used in the workshop:
cross-filing
draw-filing.
Cross-filing removes waste rapidly. You should use the whole length of the file with a downwards force. The file only cuts forwards. It should be lifted off at the end of the stroke and not dragged back across the workpiece.
Draw-filing removes marks in the work left as a result of cross-filing. This method gives a much better surface finish, and a smoother file should always be used for draw-filing. An even finer finish can be obtained by wrapping a piece of emery cloth or wet and dry paper around the file and repeating the action.
Files are made from high-carbon steel. The main body is hardened and tempered and has rows of teeth. The tang of the file is left soft and fits into the handle.
General work is carried out with a flat file. One of the long edges has teeth; the other is plain and is known as a safe edge. The safe edge prevents cutting into the face of a square corner. Files with different profiles are available for a range of applications. There are also other, more specialist forms of file.
File Name Use Advantages Disadvantages
flat file removes waste on large, flat surfaces quickly
can be used to create external curves
has a safe edge on one side to prevent cutting into edge when filing a corner
brittle and easily broken if dropped
teeth clog when filing soft material such as brass and aluminium (called pinning)
round file creates curves and fillets increases in diameter along the length so can be used on different-sized holes
small cross-section makes it weak and easily broken
three square file
cuts into corners less than 90°
useful between angles of 60° and 90°
cannot file angles smaller than 60°
Table 2.6: Common workshop files
Figure 2.10: Files
hand file
flat file
handle
ferrule
round file
warding filesquare file
half round file
triangular or threesquare file
tang
safe
edge
lengt
h
draft
43
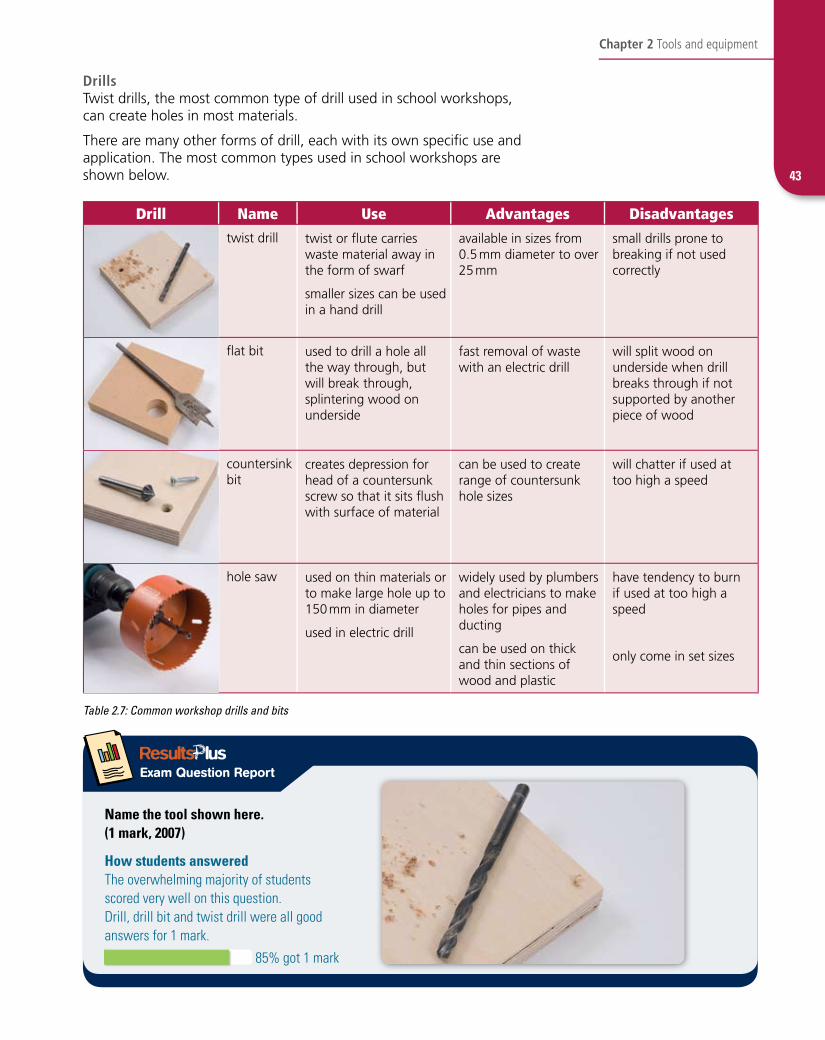
Name the tool shown here. (1 mark, 2007)
How students answeredThe overwhelming majority of students scored very well on this question. Drill, drill bit and twist drill were all good answers for 1 mark.
85% got 1 mark
Chapter 2 Tools and equipment
DrillsTwist drills, the most common type of drill used in school workshops, can create holes in most materials.
There are many other forms of drill, each with its own specific use and application. The most common types used in school workshops are shown below.
Drill Name Use Advantages Disadvantages
twist drill twist or flute carries waste material away in the form of swarf
smaller sizes can be used in a hand drill
available in sizes from 0.5 mm diameter to over 25 mm
small drills prone to breaking if not used correctly
flat bit used to drill a hole all the way through, but will break through, splintering wood on underside
fast removal of waste with an electric drill
will split wood on underside when drill breaks through if not supported by another piece of wood
countersink bit
creates depression for head of a countersunk screw so that it sits flush with surface of material
can be used to create range of countersunk hole sizes
will chatter if used at too high a speed
hole saw used on thin materials or to make large hole up to 150 mm in diameter
used in electric drill
widely used by plumbers and electricians to make holes for pipes and ducting
can be used on thick and thin sections of wood and plastic
have tendency to burn if used at too high a speed
only come in set sizes
Table 2.7: Common workshop drills and bits
draft
44
Exam
Zon
eEx
am Z
one
Know Zone
Chapter 2 Tools and equipmentexamzone
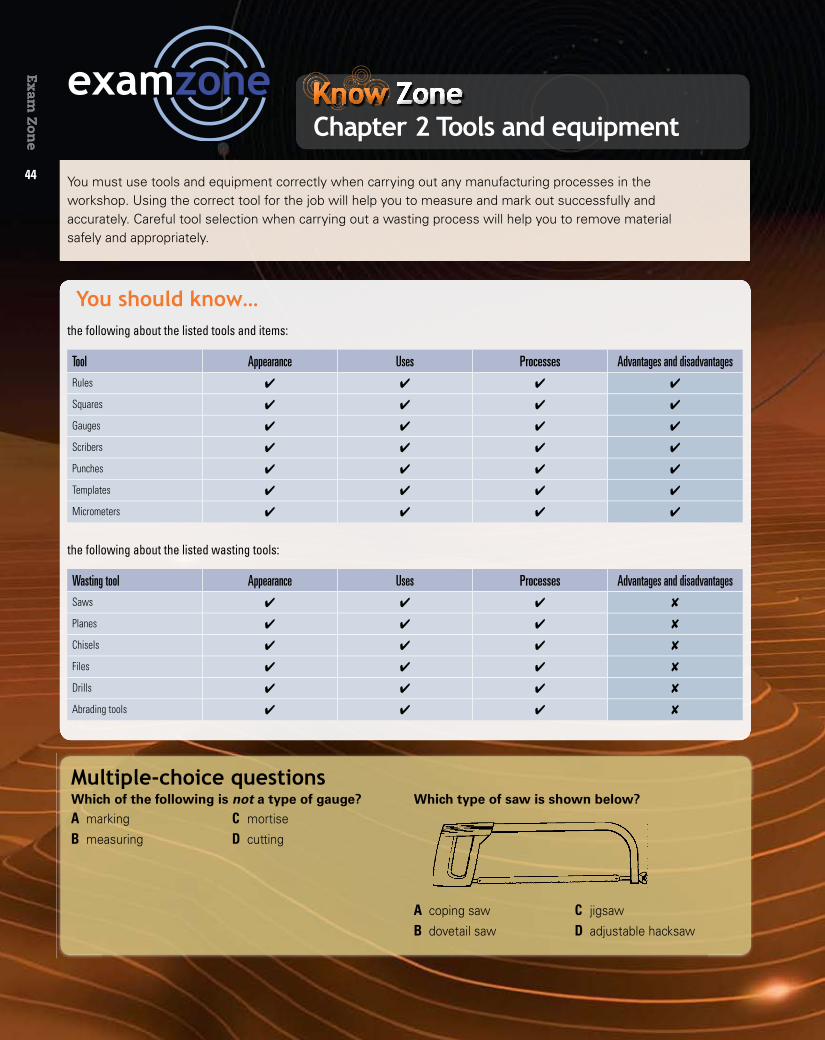
You must use tools and equipment correctly when carrying out any manufacturing processes in the workshop. Using the correct tool for the job will help you to measure and mark out successfully and accurately. Careful tool selection when carrying out a wasting process will help you to remove material safely and appropriately.
KnowKnow ZoneKnowKnowKnowKnowKnowKnowKnowKnowKnowKnowKnowKnowKnowKnowKnowKnowKnowKnowKnowKnowKnowKnowKnowKnowKnowKnowKnowKnowKnowKnowKnowKnowKnowKnowKnowKnowKnowKnowKnowKnowKnowKnowKnowKnowKnowKnowKnowKnowKnowKnowKnowKnowKnowKnowKnowKnowKnowKnowKnowKnowKnowKnowKnowKnowKnowKnowKnowKnowKnowKnowKnowKnowKnowKnowKnowKnowKnowKnowKnowKnowKnowKnowKnowKnowKnowKnowKnowKnowKnowKnowKnowKnowKnowKnowKnowKnowKnowKnowKnowKnowKnowKnowKnowKnowKnowKnowKnowKnowKnowKnowKnowKnowKnowKnowKnowKnowKnowKnowKnowKnowKnowKnowKnowKnowKnowKnowKnowKnowKnowKnowKnowKnowKnowKnowKnowKnowKnowKnowKnowKnowKnowKnowKnowKnowKnowKnowKnowKnowKnowKnowKnowKnowKnowKnowKnowKnowKnowKnowKnowKnowKnowKnowKnowKnowKnowKnowKnowKnowKnowKnowKnowKnowKnowKnowKnowKnowKnowKnowKnowKnowKnowKnowKnowKnowKnowKnowKnowKnowKnowKnowKnowKnowKnowKnowKnowKnowKnowKnowKnowKnowKnowKnowKnowKnowKnowKnowKnowKnowKnowKnowKnowKnowKnowKnowKnowKnowKnowKnowKnowKnowKnowKnowKnowKnowKnowKnowKnowKnowKnowKnowKnowKnowKnowKnowKnowKnowKnowKnowKnowKnowKnowKnowKnowKnowKnowKnowKnowKnowKnowKnowKnowKnowKnowKnowKnowKnowKnowKnowKnowKnowKnowKnowKnowKnowKnowKnowKnowKnowKnowKnowKnowKnowKnowKnowKnowKnowKnowKnowKnowKnowKnowKnowKnowKnowKnowKnowKnowKnowKnowKnowKnowKnowKnowKnowKnowKnowKnowKnowKnowKnowKnowKnowKnowKnowKnowKnowKnowKnow Zone Zone ZoneKnow ZoneKnow ZoneKnow ZoneKnow Zone Zone Zone Zone Zone Zone Zone Zone Zone ZoneKnow ZoneKnow ZoneKnow ZoneKnow Zone Zone Zone Zone Zone Zone Zone Zone Zone ZoneKnow ZoneKnow ZoneKnow ZoneKnow Zone Zone Zone Zone Zone Zone Zone Zone Zone ZoneKnow ZoneKnow ZoneKnow ZoneKnow Zone Zone Zone Zone Zone Zone Zone
the following about the listed tools and items:
Tool Appearance Uses Processes Advantages and disadvantagesRules ✔ ✔ ✔ ✔
Squares ✔ ✔ ✔ ✔
Gauges ✔ ✔ ✔ ✔
Scribers ✔ ✔ ✔ ✔
Punches ✔ ✔ ✔ ✔
Templates ✔ ✔ ✔ ✔
Micrometers ✔ ✔ ✔ ✔
the following about the listed wasting tools:
Wasting tool Appearance Uses Processes Advantages and disadvantagesSaws ✔ ✔ ✔ ✘
Planes ✔ ✔ ✔ ✘
Chisels ✔ ✔ ✔ ✘
Files ✔ ✔ ✔ ✘
Drills ✔ ✔ ✔ ✘
Abrading tools ✔ ✔ ✔ ✘
You should know…
Multiple-choice questionsWhich of the following is not a type of gauge? Which type of saw is shown below?A marking
B measuring
C mortise
D cutting
A coping saw
B dovetail saw
C jigsaw
D adjustable hacksaw
draft
Exam
Zon
eEx
am Z
one
Maximise your marks
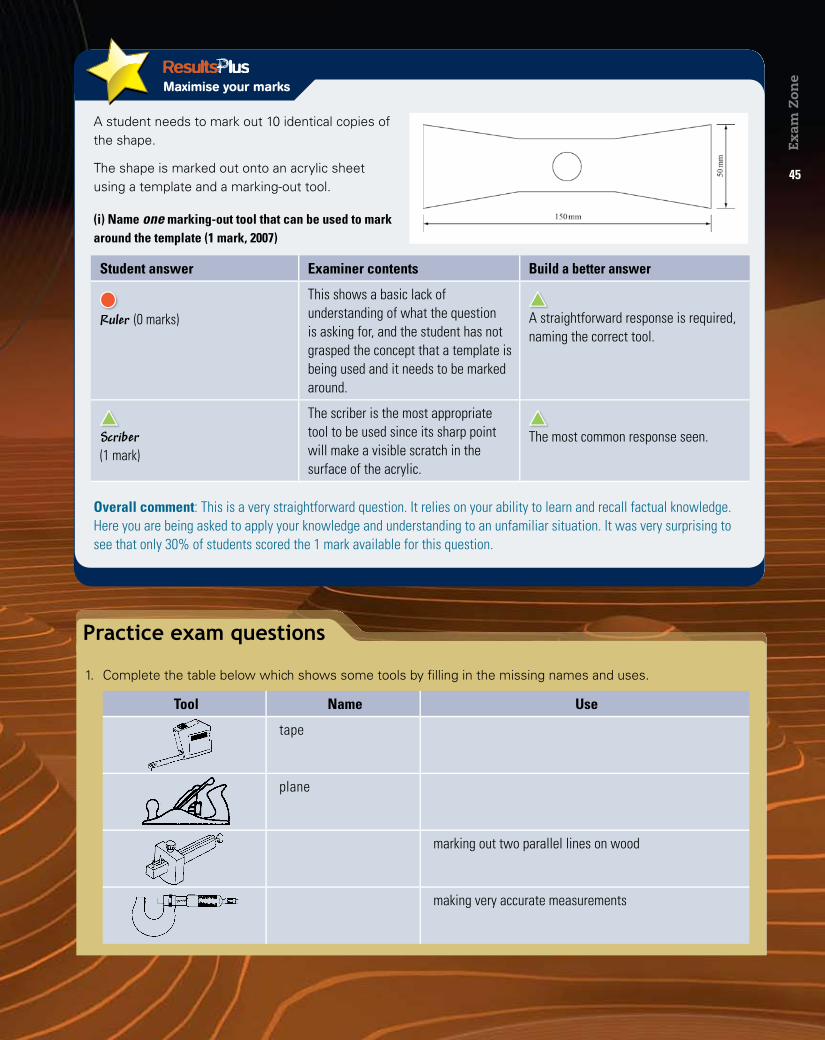
A student needs to mark out 10 identical copies of the shape.
The shape is marked out onto an acrylic sheet using a template and a marking-out tool.
(i) Name one marking-out tool that can be used to mark around the template (1 mark, 2007)
Student answer Examiner contents Build a better answer
Ruler (0 marks)
This shows a basic lack of understanding of what the question is asking for, and the student has not grasped the concept that a template is being used and it needs to be marked around.
A straightforward response is required, naming the correct tool.
Scriber(1 mark)
The scriber is the most appropriate tool to be used since its sharp point will make a visible scratch in the surface of the acrylic.
The most common response seen.
Overall comment: This is a very straightforward question. It relies on your ability to learn and recall factual knowledge. Here you are being asked to apply your knowledge and understanding to an unfamiliar situation. It was very surprising to see that only 30% of students scored the 1 mark available for this question.
1. Complete the table below which shows some tools by filling in the missing names and uses.
Tool Name Use
tape
plane
marking out two parallel lines on wood
making very accurate measurements
Practice exam questions
45