metasys® system extended ar chitecture remote...
TRANSCRIPT

Refer to the QuickLIT Web site for the most up-to-date version of this document.
Metasys® System Extended Architecture Remote AccessTechnical Bulletin
Code No. LIT-1201691Software Release 5.2
Issued May 13, 2011Supersedes October 4, 2010
Document Introduction . . . . . . . . . . . . . . . . . . . . . . . . . . . . . . . . . . . . . . . . . . . . . . . . . 3
Related Documentation. . . . . . . . . . . . . . . . . . . . . . . . . . . . . . . . . . . . . . . . . . . . . . . . . 3
Metasys System Remote Access Overview . . . . . . . . . . . . . . . . . . . . . . . . . . . . . . . . 4
Detailed Procedures . . . . . . . . . . . . . . . . . . . . . . . . . . . . . . . . . . . . . . . . . . . . . . . . . . . 4
Launching Remote Access . . . . . . . . . . . . . . . . . . . . . . . . . . . . . . . . . . . . . . . . . . . . . . . . . 4
Adding an Engine/Server . . . . . . . . . . . . . . . . . . . . . . . . . . . . . . . . . . . . . . . . . . . . . . . . . . 5
Deleting an Engine/Server . . . . . . . . . . . . . . . . . . . . . . . . . . . . . . . . . . . . . . . . . . . . . . . . . 7
Launching an Engine/Server UI . . . . . . . . . . . . . . . . . . . . . . . . . . . . . . . . . . . . . . . . . . . . . 8
Exiting Remote Access . . . . . . . . . . . . . . . . . . . . . . . . . . . . . . . . . . . . . . . . . . . . . . . . . . . 10
Adding JRE Versions to the Control Panel after Installing JRE . . . . . . . . . . . . . . . . . . 10
Troubleshooting. . . . . . . . . . . . . . . . . . . . . . . . . . . . . . . . . . . . . . . . . . . . . . . . . . . . . . 14
1Metasys® System Extended Architecture Remote Access Technical Bulletin

Metasys® System Extended Architecture Remote Access Technical Bulletin2

Metasys® System Extended Architecture Remote AccessTechnical Bulletin
Document IntroductionThis document describes how to use the Metasys® system extended architecture Remote Access application for dial-up or Local Area Network (LAN) connections. Remote Access shortens the amount of time spent downloading the Java® Archive (JAR) files and Java Runtime Environment (JRE) versions used to access the Metasys system engines or servers. This document assumes you have already commissioned the engine or server to which you want to connect: Network Automation Engine (NAE), Network Control Engine (NCE), or Network Integration Engine (NIE), or the Application and Data Server (ADS)/Extended Application and Data Server (ADX).
Related DocumentationTable 1: Metasys System Remote Access Related DocumentationFor Information On See Document LIT or Part NumberInstalling Remote Access Metasys System Extended
Architecture Remote Access Installation Instructions
LIT-12011528
General Network and Information Technology Definitions and Concepts
Network and IT Guidance for the BAS Professional Technical Bulletin
LIT-12011279
Dialing into Metasys System from a Computer
Metasys System Extended Architecture Direct Connection and Dial-Up Connection Application Note
LIT-1201639
Security Issues, Including Adding Users and Roles to the System
Security Administrator System Technical Bulletin
LIT-1201528
Overview of Metasys System Features and Functions
Metasys System Extended Architecture Overview Technical Bulletin
LIT-1201527
Daily Use of the Metasys System Extended Architecture
Metasys system Help LIT-12017931
1. This LIT number represents a print friendly version of the Help.
Installing the ADS, ADX, and System Configuration Tool (SCT)
ADS, ADX, and SCT Installation and Upgrade Instructions Wizard2
2. Use the wizard to generate instructions specific to your system.
LIT-12011521
Installing the NAE/NIE NAE55/NIE55 Installation Instructions
Part No. 24-10051-0
Configuring the NAE NAE Commissioning Guide LIT-1201519
Metasys® System Extended Architecture Remote Access Technical Bulletin 3

Metasys System Remote Access OverviewRemote Access automatically manages different versions of the Java Archive (JAR) files stored in individual cache folders on the client computer. Managing these JAR files allows faster launching of the Metasys system extended architecture engines/servers directly from the application. Remote Access is faster than using a Web browser because, when you use a Web browser, the client computer needs to download the JAR files one time for each engine/server. Web browsers do not support the management and sharing of JAR files. Remote Access shares (copies) the files among multiple engines/servers, and downloads only new files or files that have been updated since the last installation or download.
The System Configuration Tool (SCT) Manager deletes JAR files and connections used by the Remote Access application. If you are using Remote Access after using the SCT Manager, see the Missing JAR files topic in Table 5 in the Troubleshooting section of this document.
Detailed Procedures
Launching Remote AccessTo launch Remote Access, click Start > Programs > Johnson Controls > Metasys > Metasys Remote Access. Alternatively, you can use the Remote Access icon on the desktop. The Remote Access User Interface (UI) appears. Figure 1 and Table 2 show and describe the Metasys Remote Access application User Interface (UI).
Figure 1: Metasys Remote Access UI Screen
Metasys® System Extended Architecture Remote Access Technical Bulletin4

Adding an Engine/ServerThis application requires the Internet Protocol (IP) address or engine/server name and Metasys system release of the engine/server.
To add an engine/server on a LAN:
1. Launch Remote Access. The Metasys Remote Access user interface appears (Figure 1).
2. Enter the IP address, or the name of the engine/server, in the Server Address (or IP Address) field. See Table 3 for a description of the different types of connection strategies.
Note: When you use a dial-up connection, use the IP address if the site name has not been resolved on the computer. If you connect to a LAN using a dial-up Internet Service Provider (ISP), follow the steps for using a LAN.
Table 2: Metasys Remote Access UIField DescriptionNew Connection Enter criteria here to add an engine/server to the Available
Connection(s).
Server Address (or IP Address)
Enter the name or the Internet Protocol (IP) address1 of the engine/server to which you want to connect.2
Release Select the release of the Metasys system for the engine/server.
Language Select the language you wish to use: English (US) or German (DE).3
Server is NAE45, NAE35, or NCE25
Select this check box if the engine/server is NAE45, NAE35, or NCE25.
Add Connection Adds the engine/server to the Available Connection(s) list.
Available Connection(s)
Displays the details of the available connection(s).
Server Address Displays the server address (name or IP address) of the engines/servers added to the program.
Release Displays the release of the engines/servers added to the program.
Language Displays the language you wish to use: English (US) or German (DE).3
NAE45/35/25? Indicates if the engine/server is NAE45, NAE35, or NCE25.
Launch Metasys Launches the Site Management Portal UI for the selected engine/server.
Delete Connection Removes the selected engine/server from the Available Connection(s) list and deletes its associated cache folder.
EXIT Closes the Remote Access application.
1. You can enter the host name portion of the fully-qualified server address, or you can enter the IP address of the server in this field.
2. If you are using a telephone connection to a site that has never been connected to previously from this computer, use the IP address instead of the server address.
3. For the connection to appear in the selected language, the server that you want to connect to must already be internationalized. For example, you can internationalize the server by selecting the language during the ADS or SCT installation, or using the Language Installation Program. A language needs to be added using Language Installation Program (LIP). You cannot add a language during the ADS/SCT installation.
Metasys® System Extended Architecture Remote Access Technical Bulletin 5

s in the
osts file.e address is
h engine.
ccess. For
P Address
X software
you created. menu, go to the address
ontrol (MAC) and Device
To see the ontrol Panel
name in the
3. Select the release of the Metasys system for the engine/server from the Release drop-down list.
4. Select the language that was specified in the Metasys user’s security profile.
5. Select the check box if the target engine/server is an NAE45, NAE35, or NCE25.
6. Verify that you are not currently connected to the UI of the engine/server you are adding. For example, if your computer has the Site Management Portal UI open for the engine/server you are adding, close the UI before continuing.
7. Click Add Connection. The program creates a new cache folder and adds the engine/server to the Available Connection(s) list.
Table 3: Connection StrategiesConnection StepsDial-up Using the Name
Note: Only advanced users should use this procedure. Errors and incorrect entriehosts file can cause network/communication problems.
To dial-up using the name:1. On the computer you are using to connect to the engine/server, browse to the h
In the Microsoft® Windows XP® and Windows® 7 Operating Systems (OSs), thC:\WINDOWS\system32\drivers\etc
2. Create a backup copy of the hosts file.3. Open the hosts file in any text editor.4. Add an entry associating the IP address for the modem connection1 with the
engine2/server3 name. For example:169.254.77.40 nae00108D007F99If you access multiple engines using this modem connection, add a line for eac
5. Save and close the hosts file.6. Use the name of the engine/server when adding the engine/server to Remote A
example, use nae00108D007F99.
Dial-up Using the IP Address
Use the IP address of the modem connection.1
LAN Using the Name
Use the name of the engine2/server.3
LAN Using the IP Address
Use the IP address of the engine/server.If you do not know the IP address of the engine, refer to the Determining the NAE Iand Device Name for a LAN Connection section of the NAE Commissioning Guide(LIT-1201519).The IP address of the server is the IP address of the computer on which the ADS/ADis running. To see the IP address of the computer:1. Open the command prompt on the computer running the ADS/ADX.2. Type ipconfig and press Enter.3. Note the address in the IP Address field.4. Type exit and press Enter.
1. To find the IP address of the modem connection, double-click the desktop icon for the connection The Modem Status dialog box appears. (If you did not create an icon for the desktop, on the Start Settings > Control Panel and select the Network Connections folder.) Click the Details tab and notein the Server IP address field. Click OK.
2. The name for the engine defaults to naexxxxxxxxxxxx, where xxxxxxxxxxxx is the Media Access Caddress. If you do not know the name of the engine, refer to the Determining the NAE IP Address Name for a LAN Connection section of the NAE Commissioning Guide (LIT-1201519).
3. The name for the server is the name of the computer on which the ADS/ADX software is running. name of the computer, on the Start menu of the computer running the ADS/ADX, go to Settings > C> System. The System Properties dialog box appears. Click the Computer Name tab and note theFull computer name field. Click OK.
Metasys® System Extended Architecture Remote Access Technical Bulletin6
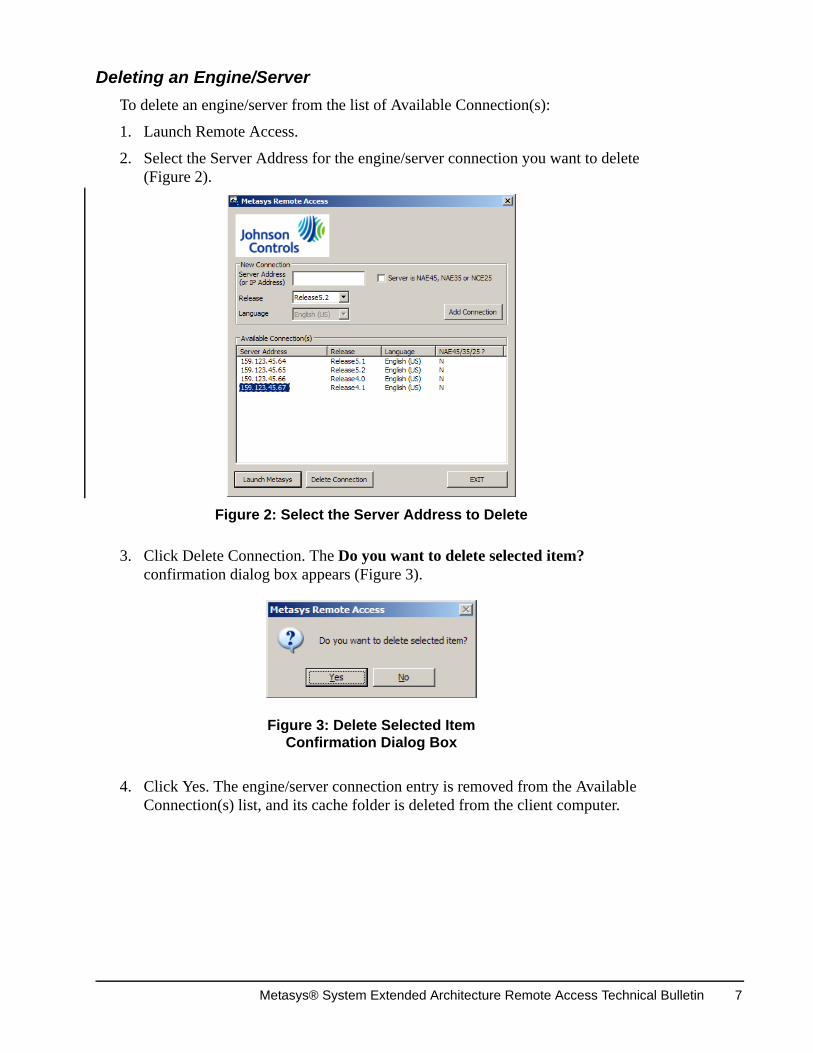
Deleting an Engine/ServerTo delete an engine/server from the list of Available Connection(s):
1. Launch Remote Access.
2. Select the Server Address for the engine/server connection you want to delete (Figure 2).
3. Click Delete Connection. The Do you want to delete selected item? confirmation dialog box appears (Figure 3).
4. Click Yes. The engine/server connection entry is removed from the Available Connection(s) list, and its cache folder is deleted from the client computer.
Figure 2: Select the Server Address to Delete
Figure 3: Delete Selected Item Confirmation Dialog Box
Metasys® System Extended Architecture Remote Access Technical Bulletin 7

Launching an Engine/Server UIIf you are using a dial-up connection to launch the UI, establish the desired dial-up connection before launching Remote Access. Double-click the Connection icon on your desktop to connect to the desired engine or server.
To launch an engine/server UI:
1. Launch Remote Access.
2. Select the engine/server you want to launch from the list of Available Connection(s). Click Launch Metasys.
The message, Accessing files in local Java cache. Please wait, appears briefly at the bottom of the Remote Access window.
3. A Security Warning dialog box may appear (Figure 5). If so, click Start.
Figure 4: Select the Server Address to Launch
Figure 5: Security Warning Dialog Box
Metasys® System Extended Architecture Remote Access Technical Bulletin8

The Metasys system Login screen appears (Figure 6).
4. Enter your Username and Password.
5. Select the domain from the Login to drop-down menu.
6. Click Login. The Site Management Portal UI Screen appears (Figure 7).
Figure 6: Metasys System Login Screen
Figure 7: Site Management Portal UI Screen
Metasys® System Extended Architecture Remote Access Technical Bulletin 9

A Metasys – Events dialog box may also appear if there are configured events that require acknowledgment (Figure 8).
For information on how to use the system, refer to the Metasys system Help (LIT-1201793).
Exiting Remote AccessTo exit Remote Access, click EXIT and disconnect from the dial-up connection.
Adding JRE Versions to the Control Panel after Installing JREThe Remote Access application requires the appropriate JRE Version listed in Table 4 to connect to the Metasys system release engines/servers.Table 4: Java Runtime Environment (JRE) DownloadsJava Runtime Environment Version Metasys System Release NumberJava 1.6.0_23 5.2
Java 1.6.0_21 5.15.0.5 (patch)4.1.9 (patch)
Java 1.6.0_16 5.04.1.5 or later (patch; uses same JRE version as 5.0)4.0.8 (patch)
Java 1.6.0_07 4.1.2 (patch; uses same JRE version as 4.1)4.1
Java 1.6.0_04 4.0
Java 1.5.0_13 3.1
Java 1.5.0_12 3.0.1 (patch; must install this JRE version)
Java 1.5.0_11 3.02.2.3 (patch; uses same JRE version as 3.0)
Java 1.5.0_10 2.22.1
Java 1.3.1_15 2.0
Figure 8: Metasys – Events Dialog Box
Metasys® System Extended Architecture Remote Access Technical Bulletin10

To add JRE versions to the Control Panel after installing JRE:
1. Click Start > Settings > Control Panel and double-click Java. The Java Control Panel appears.
2. Click the Java tab (Figure 9).
3. Click View in the Java Application Runtime Settings section (Figure 9). The Java Runtime Environment Settings screen appears. (Figure 10).
Note: In this example, we are adding JRE 1.6.0_23. Use this procedure to add the JRE version you wish to use to the Java Control Panel.
4. Verify that the desired JRE version (for example, jre1.6.0_23) is not listed in the Product column in the table (see Figure 10).
Note: It is not important which products have a check mark in this table.
Figure 9: Java Control Panel
Figure 10: Java Runtime Environment
Metasys® System Extended Architecture Remote Access Technical Bulletin 11

5. Click Add. A blank entry appears (Figure 11).
6. Select the blank entry and click Find. The JRE Finder dialog box appears (Figure 12).
7. Click Next.
Figure 11: Java Runtime Settings Screen with Blank Entry
Figure 12: JRE Finder Dialog Box
Metasys® System Extended Architecture Remote Access Technical Bulletin12

8. On the Look in drop-down list, browse to C:\Program Files\Java\ and select the folder of the desired JRE version (for example, jre1.6.0_23). See Figure 13.
Note: Your system may use a different file path. To find the desired folder, in Microsoft Windows® Explorer, right-click the C: drive and select Search from the menu. Enter the version number of the desired folder (for example, jre1.6.0_23) in the All or part of the file name field and click Search. Select the folder of the desired JRE version.
9. With the desired JRE version selected, click Next. The JRE Finder screen appears with a list of JRE versions (Figure 14).
Figure 13: JRE Finder - Locate JRE Version 1.6.0_23
Figure 14: JRE Platform Version List
Metasys® System Extended Architecture Remote Access Technical Bulletin 13

ur enu.
n, click ears.
box and
e
ious
n.
nfigured orrect Engine/
. See ent.
10. Select the desired JRE version (for example, jre1.6.0_23) from the list and click Finish. The Java Runtime Settings screen reappears, and you now see the desired JRE Version on the list (Figure 15).
11. Click OK to close the Java Runtime Environment Settings screen.
12. Click OK to close the Java Control Panel.
TroubleshootingTable 5 describes troubleshooting procedures for the Remote Access application. Table 5: Troubleshooting (Part 1 of 3)Error/Condition SolutionMicrosoft Internet Explorer® Web browser displays the following or similar error dialog:Cannot find the file “C:\Documents and Settings\ [username] \Local Settings\ Temporary Internet Files\ Content. IE6\QRSTCDX\webstart [2].jnlp” (or one of its components).Make sure the path and file name are correct and that all required libraries are available.
Delete the Temporary Internet Files:1. Close all Internet Explorer windows.2. Right-click the Internet Explorer icon on yo
desktop, and select Properties from the m3. Select the General tab.4. Under the Temporary Internet files selectio
Delete Files. A Delete Files dialog box app5. Select the Delete all offline content check
click OK.6. Click OK to close Internet Properties.7. Launch the engine/server UI using Remot
Access.
Microsoft Internet Explorer Web browser displays the following error dialog:Unable to launch the specified application.
Confirm the error message:1. Click Details and select the General tab.2. Confirm that a message similar to the prev
error appears.3. Click Abort and follow the previous solutio
Remote Access displays the following error upon launch:Could not connect to server.
An incorrect Device Name or Address was coin the Remote Access application. Enter the cDevice Name or Address. See the Adding an Server section in this document.orThe Java Web Start is not configured correctlythe Detailed Procedures section in this docum
Figure 15: Java Runtime Environment Settings
Metasys® System Extended Architecture Remote Access Technical Bulletin14

is not is
dd/Runtime n
er to the emote 528).Metasys cess
is not s
ollowing:> Java
d select
lick t.ction of e
Metasys cess
ection ful
tion that
on this . If you deletes
lier than itecture,
ion, ction of
emote ) so that can be
Java Web Start displays the following or similar JRE version/setting error:Bad installation. Error invoking Java VM (SysExec)C:\Program Files\JavaSoft\JRE\ 1.3.1_15\bin\javaw.exeNote: JRE Version 1.3.1_15 is used as an example. Your JRE version may be different.
The JRE version required for Remote Accessinstalled on your computer or Java Web Start installed incorrectly:1. Go to Start > Settings > Control Panel > A
Remove Programs and verify if the Java 2 Environment Standard Edition (SE) Versio1.3.1_15 is installed on your computer.
2. If JRE Version 1.3.1_15 is not installed, refUninstalling Remote Access section of theMetasys System Extended Architecture RAccess Installation Instructions (LIT-12011
3. Install Remote Access as described in the System Extended Architecture Remote AcInstallation Instructions (LIT-12011528).
Remote Access displays the following error:Please refer to the troubleshooting document for JRE setting.
The JRE version required for Remote Accessinstalled on your computer. Follow the previousolution.If the previous solution does not work, do the f1. Go to Start > Programs > Java Web Start
Web Start.2. Select Preferences from the File menu an
the Java tab.3. If Platform Version 1.5 appears in the Java
Runtime Versions list, select the row and cRemove. Click OK and exit Java Web Star
4. Follow the Uninstalling Remote Access sethe Metasys System Extended ArchitecturRemote Access Installation Instructions (LIT-12011528).
5. Install Remote Access as described in the System Extended Architecture Remote AcInstallation Instructions (LIT-12011528).
The Metasys System User Interface displays the following logon error:Unable to login. Unexpected error.
Follow the instructions in the previous two JREsolutions.
Remote Access displays the following error:Can not delete physical cache folder.
You may safely ignore this message.It occurs when you try to delete a device connfrom the list but have not yet made a successconnection to the specified device.
Remote Access displays the following error:Cache folder not created at this time.
You may safely ignore this message.It occurs when you try to add a device connechas not been completely removed.
Remote Access displays the following error:Dummy cache for Release x.x.x.x not found.
This error is an installation issue.The correct JAR files have not been installed computer for the device connection requestedattempt to make a connection, Remote Accessthe connection automatically.Remote Access does not support versions earRelease 2.0 of Metasys system extended archeven if they are listed in a drop-down menu.Before you upgrade your Remote Access versplease refer to Uninstalling Remote Access sethe Metasys System Extended Architecture RAccess Installation Instructions (LIT-12011528all previously specified connection informationdeleted.
Table 5: Troubleshooting (Part 2 of 3)Error/Condition Solution
Metasys® System Extended Architecture Remote Access Technical Bulletin 15

d the ,
ntrol Browser
curity is rity pen t files. rity nology
dy open s.
Explorer
were eneral CT
e/server add it edure.
nt Portal locally. y digital
ecurity e.unch ntent select each
Remote Access cannot launch the Site Management Portal UI:Webstart “target invocation” error appears.
Double-check to be sure that you have selectecorrect check box for the target engine/serverspecifying either NAE45, NAE35, or NCE25.
When you select the Typical Setup Type during the installation, the JRE may be incorrect.
This is an uninstallation issue.Open the Java software from the Windows CoPanel. Select the Advanced tab. Clear all the check boxes listed there. Click Apply.
You launch Metasys from Remote Access. The Remote Access application disappears. Nothing seems to happen, and no connection is made. You do not see any error messages.
Check to see if Internet Explorer Enhanced SeConfiguration is enabled on the computer thatrunning Remote Access. The Enhanced Secusettings do not allow external applications to oInternet Explorer windows to launch Web StarYou can turn off (disable) the Enhanced Secusettings, if approved by your Information Tech(IT) department. If not, have an Internet Explorer window alreabefore launching Metasys from Remote AccesRemote Access can use the existing Internet window to launch the Web Start files.
Missing JAR files.The Web Start attempts to download all of the JAR files, even though the release of Remote Access is the same as the release of the engine/server that is connected through Remote Access.
This may be due to the cached JAR files that deleted using the Delete Files button in the Gtab of the Java Control Panel or by using the SManager. To solve the issue, delete the enginentry from the Remote Access application andagain using the Adding an Engine/Server proc
Remote Access displays the following error:The applications digital signature has an error. Do you want to run the application?
Remote Access launches the Site ManagemeUI by using the Java JAR files that are stored These are the same JAR files that are used bMetasys software. A time limit is placed on thesignatures of these files. If the digital signatureexpires, Java Web Start displays a Warning-Smessage. You can safely click Run to continuTo avoid generating this error each time you laMetasys software, select the Always trust cofrom this publisher check box. If you do not this check box, this warning message appearstime you launch Metasys software.
Table 5: Troubleshooting (Part 3 of 3)Error/Condition Solution
Published in U.S.A. www.johnsoncontrols.com
Metasys® System Extended Architecture Remote Access Technical Bulletin16
Metasys® and Johnson Controls® are registered trademarks of Johnson Controls, Inc.All other marks herein are the marks of their respective owners. © 2011 Johnson Controls, Inc.
Building Efficiency507 E. Michigan Street, Milwaukee, WI 53202