midas link for revit structure - bentley communities · pdf filemidas civil midas link for...
TRANSCRIPT
Introduction
Getting Started
Send Model to midas Civil
Update Model from midas Civil
Applicable data for midas Link for Revit Structure
What is Updated from midas Civil to Revit Structure
Usage Note
2
3
5
9
10
11
12
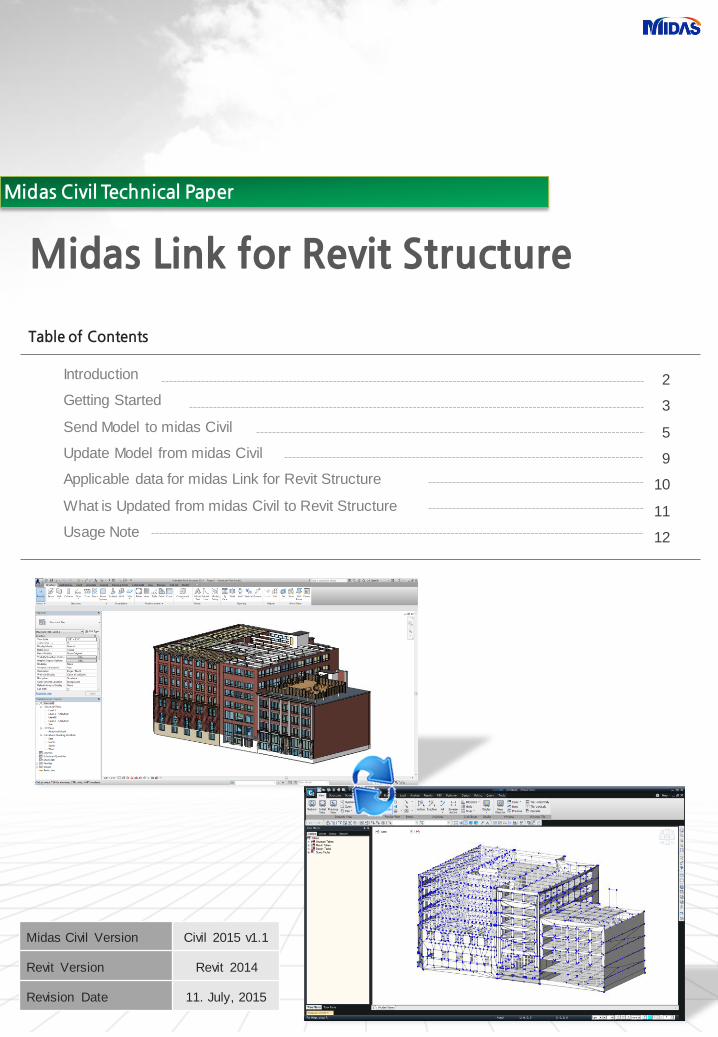
Midas Civil Technical Paper
Midas Link for Revit Structure
Table of Contents
Midas Civil Version Civil 2015 v1.1
Revit Version Revit 2014
Revision Date 11. July, 2015
midas Civil Midas Link for Revit Structure
2 / 12
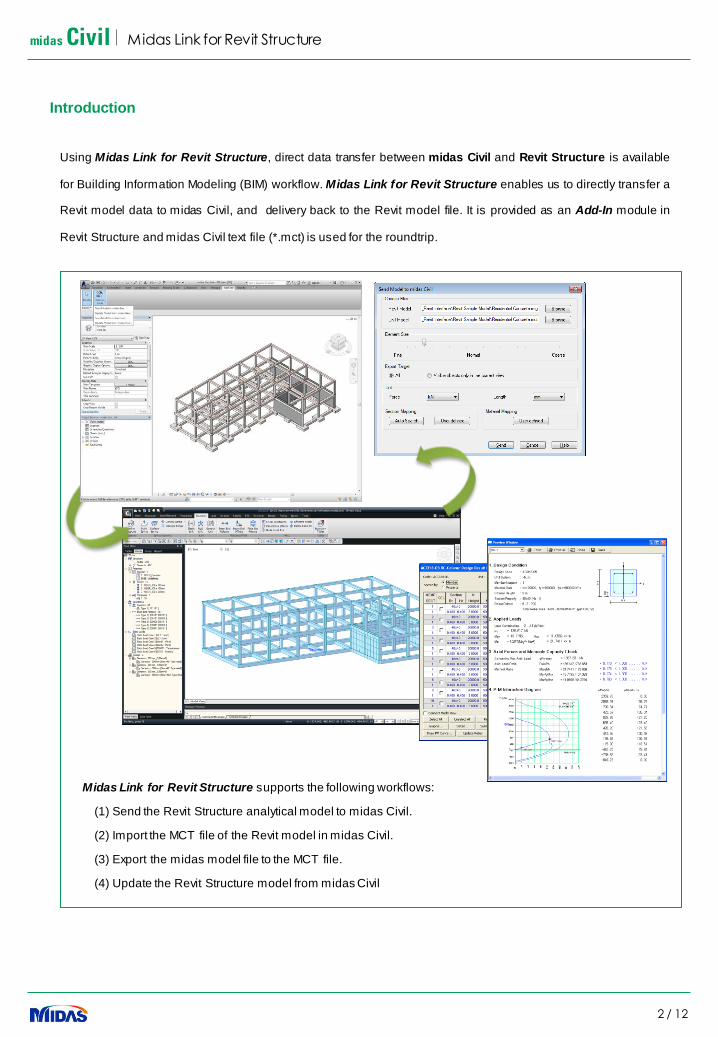
Using Midas Link for Revit Structure, direct data transfer between midas Civil and Revit Structure is available
for Building Information Modeling (BIM) workflow. Midas Link for Revit Structure enables us to directly transfer a
Revit model data to midas Civil, and delivery back to the Revit model file. It is provided as an Add-In module in
Revit Structure and midas Civil text file (*.mct) is used for the roundtrip.
Introduction
Midas Link for Revit Structure supports the following workflows:
(1) Send the Revit Structure analytical model to midas Civil.
(2) Import the MCT file of the Revit model in midas Civil.
(3) Export the midas model file to the MCT file.
(4) Update the Revit Structure model from midas Civil

midas Civil Midas Link for Revit Structure
3 / 12
Getting Started
The following exercise leads you through a sample scenario providing detailed instructions for each step in the process.
Step 2: Send Model to midas Civil
1. Click Tools menu > External Tools > Send Model to midas Civil
2. Click OK to send the project using the default.
The following table shows the Revit components that are sent to midas Civil.
Step 1: Prepare a Model
1. Using the structural template, build a simple structure that
has 4 beams, 4 columns, 4 boundary conditions, 1 HostedPoint Load,and 1 Hosted Line Load, as shown.
2. Create a load combination; create a load combination usagecalled MIDAS_STEEL; set the load combination to this usage.
3. Check for inconsistency by clicking Tools menu > Analytical
Model > Analytical / Physical Model Consistency Checks.Make any adjustments if necessary.
Revit Structure Midas Civil
Linear
Elements
Structural Column
ELEMENT (BEAM)
Beam
Brace
Curved Beam
Beam System
Truss
Planar
Elements
Foundation Slab
ELEMENT (PLATE)
Structural Floor
Structural Wall
Wall Opening & Window
Door
Vertical or Shaft Opening
Boundary
Offset OFFSET
Rigid Link ELASTICLINK
Cross-Section Rotation ELEMENT (ANGLE)
End Release FRAME-RLS
Isolated Foundation Support CONSTRAINT, SPRING
Point Boundary Condition CONSTRAINT, SPRING
Line Boundary Condition CONSTRAINT, SPRING
Wall Foundation CONSTRAINT, SPRING
Area Boundary Condition CONSTRAINT, SPRING
Load
Load Nature STLDCASE
Load Case STLDCASE
Load Combination LOADCOMB
Hosted Point Load CONLOAD
Hosted Line Load LINELOAD, PRESSURE
Hosted Area Load PRESSURE
Other
Parameters
Material MATERIAL

midas Civil Midas Link for Revit Structure
4 / 12
Step 3: Analyze and Revise Model in midas Civil
1. Start a new project in midas Civil, and import the MCT file of the Revit model. Note any warnings anderrors in the message window.
2. Import the MCT file again, it should importwithout error and displaythe structure.
3. Perform a structural analysis in order to be sure that the model is complete.
4. Add a horizontal brace to the model in section 1.
5. Reduce the size of the columns from W10x49 (section 8) to W10x33 (section 9).
6. Export the model using the same name as the imported MCT file.
Step 4: Update Model from midas Civil
1. In Revit Structure, click Tools menu > External Tools > Update Model from midas Civil
2. Verify that the paths in the dialog point to the right files, and click Update. The summary should report 1added element and 4 section changes, and the structure should now look like the following illustration.

midas Civil Midas Link for Revit Structure
5 / 12
Send Model to midas Civil
1. In order to send the Revit Structure analytical model to midas Civil, click Add Ins > External Tools >
Send Model to MIDAS/Civil.
2.Click the first Browse button to select a path for the Revit model file. The paths for the MIDAS model
and the log file will default to the same name. If necessary, modify these paths by clicking the
corresponding Browse buttons.
3.Select the units for length and force to be used in midas Civil.
►Mesh size for
slab and walls can be adjusted.
► Part of a model
can be imported to midas Civil.
(2)
(3)
(4) (5)
(6)

midas Civil Midas Link for Revit Structure
6 / 12
4. Section DB File
Section mapping is provided based on [Auto-Search] and [User-defined]mapping rule.
Auto-Search
The program automatically detects identical section name between Revit and midas Civil DB
sections. Auto-search rule can be specified in the dialog box as shown in the figure below.
Mapping Method: It is specified in Define Section Mapping dialog box between NAME and PARAMETER.
Name : Section mapping data is entered using DB section name.
Parameter : Section mapping data is entered using section parameters (ex. bf, d, tf, tw, etc.).
Revit Family Name: Family Name used in Revit Structure
Revit Type Name: Element type name used in Revit Structure
Civil Code Name: Section DB code which will be used in midas Civil
Section Shape: Section shape name which will be used in midas Civil
Civil Section Name: Section name in the specified section DB code
User-defined
Section transfer list from Revit Structure to midas Civil is displayed in the table format. Click [Add]
or [Modify] button to specify section shapes and size exported to midas Civil.
(4-1)
Shape
Code
Section Name

midas Civil Midas Link for Revit Structure
7 / 12
4-1. Add/Modify Section Mapping
DB Type Section
Section mapping data is entered using DB section name.
User Type Section
Section mapping data is entered using section parameters between Revit and midas Civil.
5. Material DB File
Material transfer list from Revit Structure to midas Civil is displayed in the table format. Click [Add] or
[Modify] button to specify section shapes and size exported to midas Civil.
Category: Material type used in Revit Structure. Steel and concrete type are applicable.
Revit Material Name: Material name used in Revit Structure
Civil Standard: Material standard which will be used in midas Civil
Civil DB Name: Material DB name which will be used in midas Civil

midas Civil Midas Link for Revit Structure
8 / 12
6. Click Send to startwriting the MIDAS model.
When the writing is complete, a summary will be presented in a dialog. If an unidentified section exists in
a Revit model, the following dialog box is displayed. Click select the row marked in the table and click
[Define Section Mapping] to specify the section shape and size imported in midas Civil. If Archive new
mapping rule option is checked on, the setting will be saved in SectionMap.smap(c:\Program
Files\MIDASIT\Midas Link for Revit Structure 2014\ CivilSectionDB \SectionMap.smap) so that the user
do not need to specify them again.

midas Civil Midas Link for Revit Structure
9 / 12
Update Model from midas Civil
1. In order to update the Revit Structure model from midas Civil, click Add Ins > External Tools >
Update Model from MIDAS/Civil.
2.A dialog will pop up. If "Send Model to MIDAS/Civil" has been used during this session, the paths
for the files are automatically set to be the same. If necessary, click Browse to change them.
3.Click Update to start updating the model.
midas Civil Midas Link for Revit Structure
10 / 12
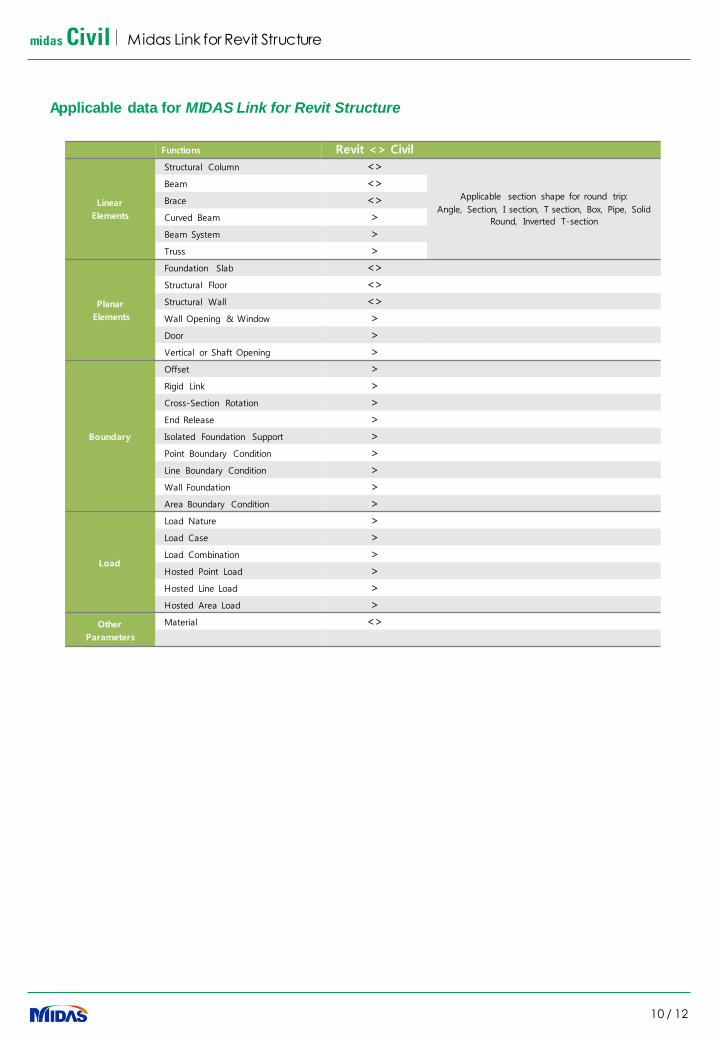
Applicable data for MIDAS Link for Revit Structure
Functions Revit <> Civil
Linear
Elements
Structural Column <>
Applicable section shape for round trip:
Angle, Section, I section, T section, Box, Pipe, Solid
Round, Inverted T-section
Beam <>
Brace <>
Curved Beam >
Beam System >
Truss >
Planar
Elements
Foundation Slab <>
Structural Floor <>
Structural Wall <>
Wall Opening & Window >
Door >
Vertical or Shaft Opening >
Boundary
Offset >
Rigid Link >
Cross-Section Rotation >
End Release >
Isolated Foundation Support >
Point Boundary Condition >
Line Boundary Condition >
Wall Foundation >
Area Boundary Condition >
Load
Load Nature >
Load Case >
Load Combination >
Hosted Point Load >
Hosted Line Load >
Hosted Area Load >
Other
Parameters
Material <>

midas Civil Midas Link for Revit Structure
11 / 12
What is Updated from midas Civil to Revit Structure
Here are the revisions thatare detected and updated in the Revit model:
Sections
If assigned section is changed to the other section pre-defined in the model, the corresponding element in
Revit will be updated accordingly.
If assigned section is changed to the other section newly added in midas Civil, the corresponding element
in Revit will be assigned to a default section (arbitrary section which has a same material type in a
model).
Delete Elements
If an element is deleted in midas Civil, the corresponding element in Revit will be deleted accordingly.
Move Elements
If an element is moved in midas Civil, the corresponding frame element or column in Revit will be moved
accordingly.
Add Elements
If a beam element is newlyadded,a corresponding element in Revit will be added accordingly.
Change Beta-Angle
If beta-angle in a beam element is changed, a corresponding element in Revit will be updated accordingly.
Materials
If material data assigned to an element is modified, a corresponding element in Revit will be assigned to a
defaultmaterial.
Thicknesses
If thickness data assigned to a planer element is modified, a corresponding element in Revit will be updated
accordingly.

midas Civil Midas Link for Revit Structure
12 / 12
Send to midas Civil
• Before sending a Revit Structure model to MIDAS, it is advisable to check and make adjustment to
the analytical model to ensure consistency. Revit Structure provides such tools under Tools menu
Analytical Model.
• Always check the export summaryto determine if any items were skipped due to problems.
Analyze and Revise in midas Civil
• Always check the message window when importing the MCT file to midas Civil.
• Though nodes and elements may be added or deleted in midas Civil, you should never renumber
them, because the update mechanism identifies them bytheir numeric IDs.
Update from midas Civil
• When section assigned in an element is modified, the family and type name of the element will not be
recognized. This means that any sections that may become necessary should be preloaded into the
Revit project before sending the model to midas Civil so that their family and type can be specified
during updating the model. Otherwise, default family (ex. MIDAS Civil User L Frame) will be
assigned.
• After the Revit model is updated, it may be worthwhile to use the Track Changes command to verify
the changes.
Usage Note