moray - aqua one...moray 2300 sponge 13s moray 3600/4900 sponge 17s aqua one spare parts 14i...
TRANSCRIPT
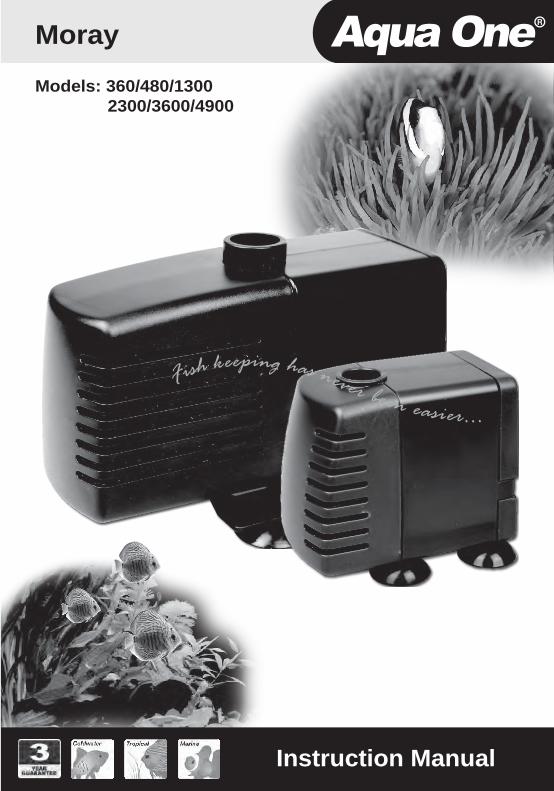
Models: 360/480/1300 2300/3600/4900
Moray
Instruction Manual
5. Do not use the pump for reasons other than the intended use. The use of attachments that are not recommended or sold by the pump manufacturer may cause the product to be unsafe. This is not recom-mended.
6. Do not install or store the pump where it will be exposed to weather or temperatures below freezing.
7. Make sure any component mounted on the aquarium is securely installed before operating it.
8. Read and observe all the important notices on the pump.
9. Ensure input voltage is the same voltage as your local power supply.
10. Ensure your hand is dry when turning the power switch on/off and when inserting/removing the power cord from the receptacle.
11. If you are in any doubt about the electrical installa-tion or safety of this product you must consult a qualified electrician.
12. This pump is for indoor use only.
a) Do not use the pump in water above 35°C.
b) Always disconnect from electrical outlet before cleaning, maintenance or handling the pump.
c) To protect against the risk of electrical shock, do not immerse the plug of the motor in water or other liquid.
For Guarantee Conditions, please refer to the Guarantee at the back of this instruc-tion booklet.
Warning: This appliance must not be disposed of together with domestic waste. It must be disposed of at an authorised centre set up
for the recycling of electrical and electronic appliances. By collecting and recycling waste, you help save our natural resources. Please Make sure this product is disposed of in an environmentally friendly and safe way.
This appliance is not intended for use by persons (including children) with reduced physical, sensory or mental capabilities, or lack of experi-ence and knowledge, unless they have been given supervision or instruction concerning use of the appliance by a person responsible for their safety.
Children should be supervised to ensure that they do not play with the appliance.
Warning: To guard against injury, basic safety precautions should be observed, including the following:
1. Read and follow all safety instructions before using this appliance.
2. Danger: To avoid possible electric shocks, special care should be taken since water is employed in the use of aquarium equipment. For each of the following situations do not attempt repairs yourself. Return the appliance to an authorised service facility for service or discard the appliance.
a) If the aquarium shows any sign of abnormal water leakage, immediately unplug all electrical appliances from the power source. b) Carefully examine the pump after installation. It should not be plugged in when there is water on parts which are not intended to be wet.
c) Do not operate any aquarium electrical appliance if they have a damaged cord or plug, or if they are malfunctioning, or dropped or damaged in any manner.
d) The power cord of the pump cannot be replaced. If the cord is damaged the motor should be scrapped.
A “drip loop” (See the diagram) should be arranged by the user for each cord connecting the electrical appliances in the aquarium to a receptacle. The drip loop is the part of the cord below the level of the receptacle. It is used to prevent water traveling along the cord and coming in contact with the receptacle.If the plug or receptacle does get wet, do not unplug the appliance. Disconnect the fuse or circuit breaker that supplies the power to the appliance, then unplug and examine for presence of water in the receptacle.
3. Close supervision is necessary when the appliance is used by or near children.
4. Always unplug all electrical appliances in the aquarium from the electrical outlet, when not in use, before putting on or taking off parts, before any type of maintenance, or cleaning. Never yank the cord to pull it from the outlet. Grasp the plug and unplug to discon-nect.
Important Safeguards
2
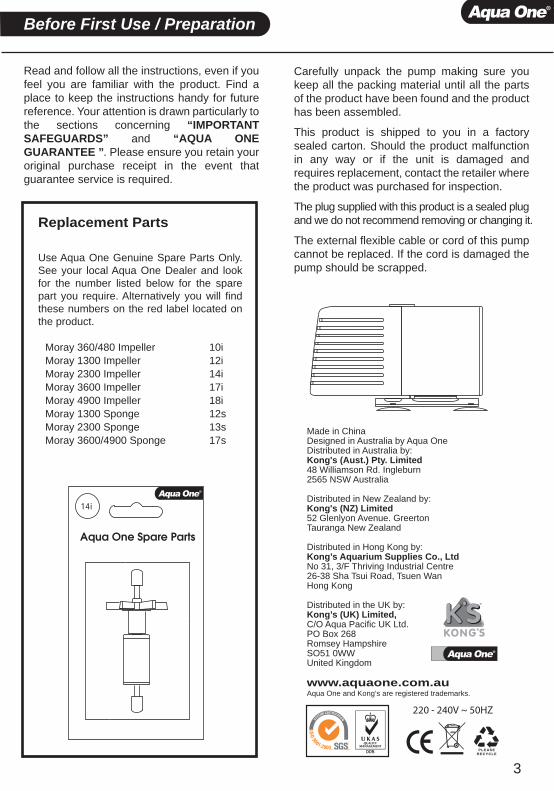
Use Aqua One Genuine Spare Parts Only. See your local Aqua One Dealer and look for the number listed below for the spare part you require. Alternatively you will find these numbers on the red label located on the product.
Replacement Parts
3
Made in ChinaDesigned in Australia by Aqua OneDistributed in Australia by: Kong's (Aust.) Pty. Limited48 Williamson Rd. Ingleburn2565 NSW Australia
Distributed in New Zealand by:Kong's (NZ) Limited 52 Glenlyon Avenue. GreertonTauranga New Zealand
Distributed in Hong Kong by:Kong’s Aquarium Supplies Co., LtdNo 31, 3/F Thriving Industrial Centre26-38 Sha Tsui Road, Tsuen WanHong Kong
Distributed in the UK by:Kong’s (UK) Limited,C/O Aqua Pacific UK Ltd.PO Box 268Romsey HampshireSO51 0WWUnited Kingdom
www.aquaone.com.auAqua One and Kong’s are registered trademarks.
220 - 240V ~ 50HZ
Moray 360/480 Impeller 10iMoray 1300 Impeller 12iMoray 2300 Impeller 14iMoray 3600 Impeller 17iMoray 4900 Impeller 18iMoray 1300 Sponge 12sMoray 2300 Sponge 13sMoray 3600/4900 Sponge 17s
Aqua One Spare Parts
14i
Carefully unpack the pump making sure you keep all the packing material until all the parts of the product have been found and the product has been assembled.
This product is shipped to you in a factory sealed carton. Should the product malfunction in any way or if the unit is damaged and requires replacement, contact the retailer where the product was purchased for inspection.
The plug supplied with this product is a sealed plug and we do not recommend removing or changing it.
The external flexible cable or cord of this pump cannot be replaced. If the cord is damaged the pump should be scrapped.
Read and follow all the instructions, even if you feel you are familiar with the product. Find a place to keep the instructions handy for future reference. Your attention is drawn particularly to the sections concerning “IMPORTANT SAFEGUARDS” and “AQUA ONE GUARANTEE ”. Please ensure you retain your original purchase receipt in the event that guarantee service is required.
Before First Use / Preparation
4
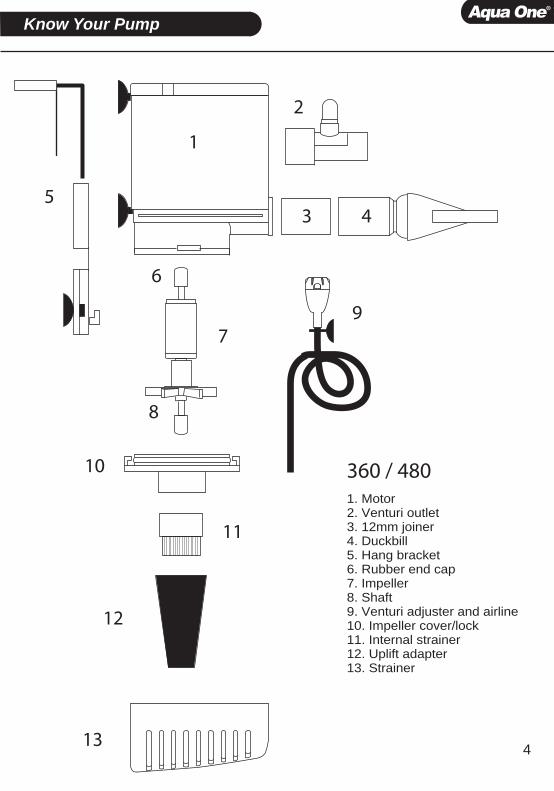
1. Motor 2. Venturi outlet3. 12mm joiner4. Duckbill5. Hang bracket6. Rubber end cap7. Impeller8. Shaft9. Venturi adjuster and airline10. Impeller cover/lock11. Internal strainer12. Uplift adapter13. Strainer
360 / 480
Know Your Pump
6
1
2
7
8
3 45
9
10
11
12
13
2 5
Know Your Pump
12
3
4
5
6
7
8
9
10
14
11
12
13
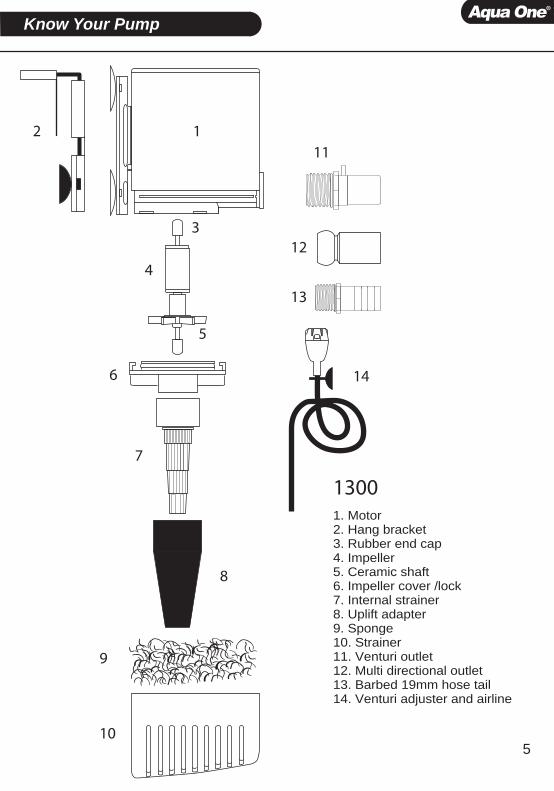
1. Motor 2. Hang bracket3. Rubber end cap4. Impeller5. Ceramic shaft6. Impeller cover /lock7. Internal strainer8. Uplift adapter9. Sponge10. Strainer11. Venturi outlet12. Multi directional outlet13. Barbed 19mm hose tail 14. Venturi adjuster and airline
1300
2 6
Know Your Pump
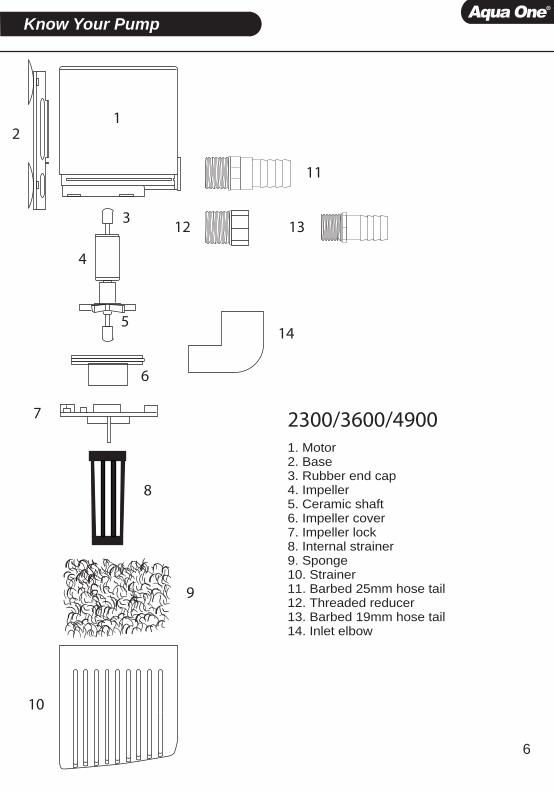
1. Motor 2. Base3. Rubber end cap4. Impeller5. Ceramic shaft6. Impeller cover7. Impeller lock8. Internal strainer9. Sponge10. Strainer11. Barbed 25mm hose tail12. Threaded reducer13. Barbed 19mm hose tail 14. Inlet elbow
2300/3600/4900
1
3
4
2
5
6
7
8
9
10
11
12 13
14

2
water level
7
They are also provided with multiple outlet options.
1. Duckbill or multi directional outlet: allows the water to be channelled a variety of different directions. Good for providing water flow to static areas of the aquarium, thus reducing waste build up.
2. Venturi: for injecting bubbles into the aquarium. The venturi adjuster allows the water to air ratio to be adjusted by the user.
3. A 19mm barbed hose tail is also provided with the 1300 series pump. This can be used for running devices such as protein skimmers.
2300, 3600 and 4900 series pumps are dedicated sump pumps. They are provided with 19mm and 25m barbed hose tails. They can be used for many other purposes such as running external filtration devices or simply circulating water.
The 360, 480 or 1300 series Morays can be mounted in 2 different ways and used for a variety of applications. All 3 models come with uplift pipe adapters enabling them to be used as an alternative to air driven systems on under gravel filters. Refer to the “know your pump” section at the front of this instruction booklet for part identification.
1. Remove the top motor cover and the strainer.2. Remove the 4 suction cups.3. Insert the hang mount into the 2 holes at the strainer end of the motor4. Place the top motor cover and the strainer (If being used) back into position.
1. Remove the strainer and slide the base plate out towards the impeller. 2. Slide the hang mount into the groves at the back of the pump.3. Replace the strainer. (If being used)
Pump Installation
Attaching the hang bracket 380/480 series
Attaching the hang bracket 1300 series
water level
8
If these pumps are being used in salt water, they must be checked regularly for buildup of calcium and other deposits.
To maximise the life of your pump, it is recommended to clean the pump casing and the impeller every 6-8 weeks or earlier if flow has decreased significantly.
Prior to cleaning, disconnect the pump from the electrical power supply.
The casing of the pump and the strainer can be cleaned with a firm brush. DO NOT USE DETERGENTS AS THE USE OF THESE WILL BE POTENTIALLY LETHAL TO AQUARIUM INHABITANTS. Any objects on or around the strainer or inlet should be removed to prevent potential blockages in the pump or damage to the impeller.
LOW WATER FLOW
1. Check strainer, impeller and impeller chamber for calcium buildup or other deposits or blockages.
2. Ensure all taps or flow control valves are fully open.
3. Clean plumbing lines to and from the pump.
NO WATER FLOW
1. Ensure all taps or flow control valves are fully open.
2. Check that maximum head height has no been exceeded. Consider all bends and horizontal plumbing when calculating head height.
3. Check impeller and shaft for damage.
PUMP IS NOISY
1. Ensure suction cups are correctly positioned.
2. Check for blockages on the pump inlet. Restriction of inlet can cause vibration.
3. Check for damage to impeller or shaft.
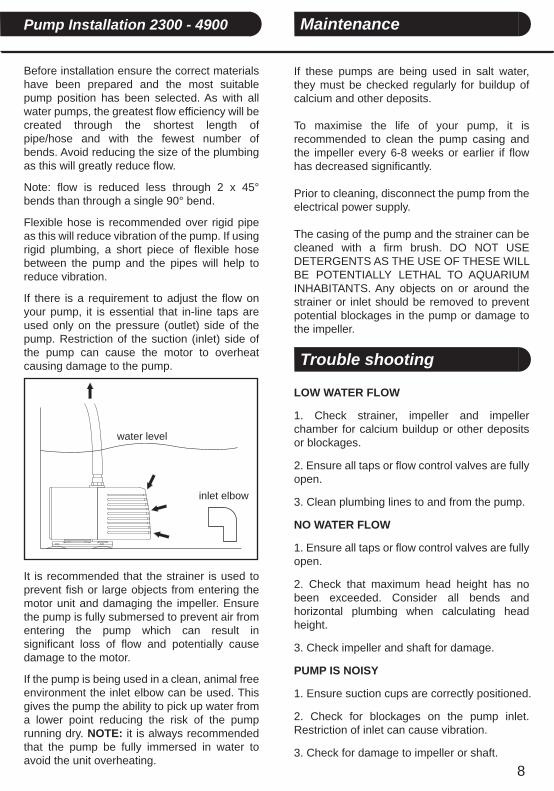
Before installation ensure the correct materials have been prepared and the most suitable pump position has been selected. As with all water pumps, the greatest flow efficiency will be created through the shortest length of pipe/hose and with the fewest number of bends. Avoid reducing the size of the plumbing as this will greatly reduce flow.
Note: flow is reduced less through 2 x 45° bends than through a single 90° bend.
Flexible hose is recommended over rigid pipe as this will reduce vibration of the pump. If using rigid plumbing, a short piece of flexible hose between the pump and the pipes will help to reduce vibration.
If there is a requirement to adjust the flow on your pump, it is essential that in-line taps are used only on the pressure (outlet) side of the pump. Restriction of the suction (inlet) side of the pump can cause the motor to overheat causing damage to the pump.
It is recommended that the strainer is used to prevent fish or large objects from entering the motor unit and damaging the impeller. Ensure the pump is fully submersed to prevent air from entering the pump which can result in significant loss of flow and potentially cause damage to the motor.
If the pump is being used in a clean, animal free environment the inlet elbow can be used. This gives the pump the ability to pick up water from a lower point reducing the risk of the pump running dry. NOTE: it is always recommended that the pump be fully immersed in water to avoid the unit overheating.
Pump Installation 2300 - 4900 Maintenance
Trouble shooting
water level
inlet elbow
9
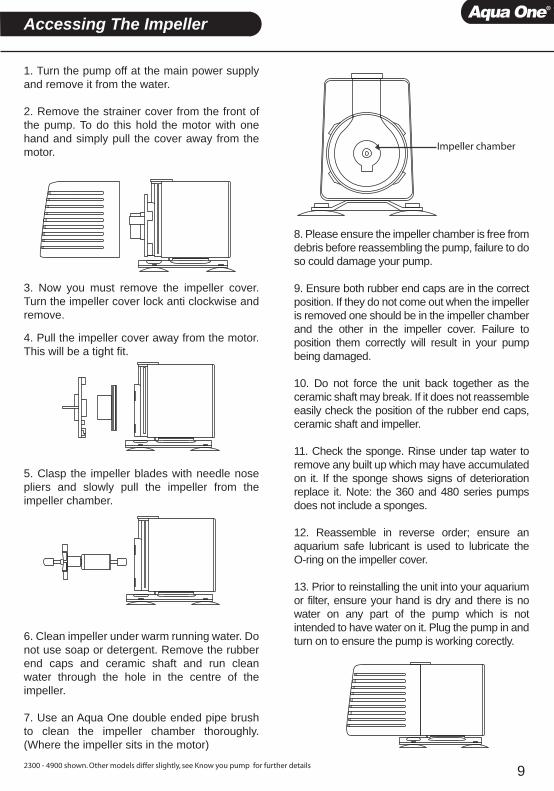
Impeller chamber
8. Please ensure the impeller chamber is free from debris before reassembling the pump, failure to do so could damage your pump.
9. Ensure both rubber end caps are in the correct position. If they do not come out when the impeller is removed one should be in the impeller chamber and the other in the impeller cover. Failure to position them correctly will result in your pump being damaged.
10. Do not force the unit back together as the ceramic shaft may break. If it does not reassemble easily check the position of the rubber end caps, ceramic shaft and impeller.
11. Check the sponge. Rinse under tap water to remove any built up which may have accumulated on it. If the sponge shows signs of deterioration replace it. Note: the 360 and 480 series pumps does not include a sponges. 12. Reassemble in reverse order; ensure an aquarium safe lubricant is used to lubricate the O-ring on the impeller cover.
13. Prior to reinstalling the unit into your aquarium or filter, ensure your hand is dry and there is no water on any part of the pump which is not intended to have water on it. Plug the pump in and turn on to ensure the pump is working corectly.
1. Turn the pump off at the main power supply and remove it from the water.
2. Remove the strainer cover from the front of the pump. To do this hold the motor with one hand and simply pull the cover away from the motor.
3. Now you must remove the impeller cover. Turn the impeller cover lock anti clockwise and remove.
4. Pull the impeller cover away from the motor. This will be a tight fit.
5. Clasp the impeller blades with needle nose pliers and slowly pull the impeller from the impeller chamber.
6. Clean impeller under warm running water. Do not use soap or detergent. Remove the rubber end caps and ceramic shaft and run clean water through the hole in the centre of the impeller.
7. Use an Aqua One double ended pipe brush to clean the impeller chamber thoroughly. (Where the impeller sits in the motor)
Accessing The Impeller
2300 - 4900 shown. Other models differ slightly, see Know you pump for further details
The additional 1 Year Extended Guarantee applies when you REGISTER with Aqua One. See enclosed for details.
ATTENTION!PLEASE RETAIN YOUR PROOF OF PURCHASE AND GUARANTEECongratulations on your purchase of a quality Aqua One product. This product will last you many years under normal usage.About this Guarantee
The Manufacturer or Distributor, of Aqua One goods, is collectively known herein as “Aqua One”. Please refer to contact details for Aqua One below or on the applicable Aqua One website. Any product that is covered by its own Guarantee (as enclosed with the product) is subject to the conditions of that Guarantee.
The benefits given to the purchaser, under Guarantee, are in addition to all other statutory rights and remedies which the purchaser has in respect of goods under legislation in the applicable country of purchase. This Guarantee shall not affect any such rights and should be read subject to such legislation.
1.0. Terms and Conditions of Guarantee.1.1. Aqua One warrants to the purchaser, for 2 Years from date of original purchase, to repair or replace goods where fault is found due to defective materials or faulty workmanship and where goods do not operate in accordance with the instructions. 1.2. All claims for repair or replacement must be made at place of purchase.1.3. The original and dated Proof of Purchase (receipt) must be supplied with all goods claims. Please also provide this Guarantee where possible.1.4. All goods subject to claim under Guarantee should be prepared for transportation in the original packaging or other comparable packaging which offers the same degree of protection.1.5. Where goods are repaired or replaced under Guarantee, these goods are Guaranteed for the remainder of either the original Guarantee or Extended Guarantee period.1.6. Where claims on inspection reveal goods are in normal working order, Aqua One will request reimbursement of all reasonable costs incurred.
2.0. Other Terms and Conditions – Extended Guarantee2.1. The Extended Guarantee period is for an additional 1 Year and commences on expiration of the standard guarantee period. 2.2. Application for Extended Guarantee is FREE of any registration cost to the purchaser on completion of the Extended Guarantee question-naire which may be found with the Aqua One goods purchased or on the applicable Aqua One website. (See below) 2.3. Upon receipt and acceptance of the questionnaire, Aqua One will forward a Certificate of Extended Guarantee to the purchaser.2.4. For more information on how we collect, hold, use and disclose personal information provided to us, please refer to our Privacy Statement on the Aqua One websites or write to our Privacy Officer, in your country of purchase.2.5. Where Aqua One determines goods are being used in a manner contrary to the instructions, specifications or this Guarantee, Aqua One reserves the right to terminate Extended Guarantee for such goods and will provide written notice to the purchaser.
3.0. Exclusions and LimitationsWhere permitted by local law, the following exclusions and limitations apply in regard to the Guarantee:3.1. Goods claims where fault is due to, but not limited by a) misuse b) neglect c) abuse d) fire or flood e) normal wear and tear f) accidental breakage g) Acts of God h) mains voltage fluctuation or supply problems i) connection to any voltage other than what is stated on the rating plate j) modification or tampering to electrical cord or plug, k) vermin, insects or foreign object l) liquid spillage or submersion of goods where goods are not designed to sustain such use or duress.3.2. Where inspections reveal goods are in normal working order including where noise or vibration is consistent with normal goods operation.3.3. Attempted repairs or modifications by unauthorised persons, including but not limited to modifications to the electrical lead or plug.3.4. Where the goods factory rating plate has been removed, altered, damaged or is rendered illegible.3.5. Where goods are not installed, operated or maintained in accordance with Aqua One’s goods instructions, specifications or this Guarantee.3.6. Replacement or repair of worn consumables or replacement of lost goods, parts or components.3.7. Costs associated with goods transportation, removal, installation, postage or cost of insurance.3.8. Any damage incurred whilst installing, transporting or moving the goods.3.9. Subject to certain local statutory rights and obligations to the contrary, and this guarantee shall not affect those rights or obligations, where, to the full extent permitted by law:1. all express and implied warranties and conditions under statute or general law, are expressly excluded and Aqua One, where permitted, will limit liability as follows and at Aqua One’s option to: in regard to goods either a) the replacement of goods or supply of equivalent goods b) the repair of goods or the cost of replacing the goods or of acquiring equivalent goods OR in regard to services either c) the re-supply of services d) the cost to re-supply services.2. Aqua One will not be liable for any loss or damage, including consequential loss or damage either directly or indirectly, or for any incidental expenses, of any kind, and in any way whatsoever.
(1) Consumables include items such as Impellers, rotors, o-rings and plastic fittings.
Aqua One - Guarantee 2 + 1 Year
Aqua One may be contacted in:
Australia
Kong's (Aust.) Pty. Limited
PO Box 863, Ingleburn
1890 NSW Australia
www.aquaone.com.au
Hong Kong
Kong’s Aquarium Supplies Co., Ltd
No 31, 3/F Thriving Industrial Centre
26-38 Sha Tsui Road, Tsuen Wan
Hong Kong
www.aquaone.co.hk
New Zealand
Kong's (NZ) Limited
PO Box 15 - 183, Tauranga
3015 New Zealand
www.aquaone.co.nz
United Kingdom
Kong’s (UK) Limited
C/O Aqua Pacific UK Ltd
PO Box 268
Romsey Hampshire, SO51 0WW
United Kingdom
www.aquaone.co.uk
(1)
11
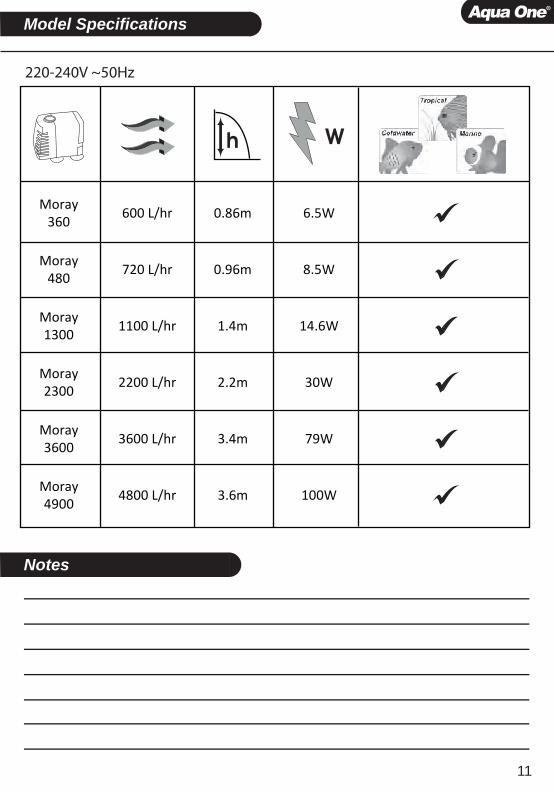
Model Specifications
Notes
W
220-240V ~50Hz
Moray360
600 L/hr 0.86m 6.5W
Moray480
720 L/hr 0.96m 8.5W
Moray1300
1100 L/hr 1.4m 14.6W
Moray2300
2200 L/hr 2.2m 30W
Moray3600
3600 L/hr 3.4m 79W
Moray4900
4800 L/hr 3.6m 100W
h

Fish keeping has never been easier...
www.aquaone.com.au
Aqua One specialises in all of your aquarium needs.
Aqua One uses state of the art technology which results in the most efficient and superior aquarium products.
The Aqua One range includes a wide range of curved glass aquariums, air pumps, filters, power heads, heaters, reflectors, under water lighting, along
with fish foods, cleaning and maintenance accessories and decorations.
Keep an eye out for these Aqua Oneproducts at your local retailer...
Instruction Version 18/04/09