more for the money when sandblasting, get more shield for your
TRANSCRIPT

More For The MoneyWhen sandblasting, get more shield for your money
by leaving the plastic protective sleeve on the lensuntil it is pecked and scratched, then peel it off thelens.
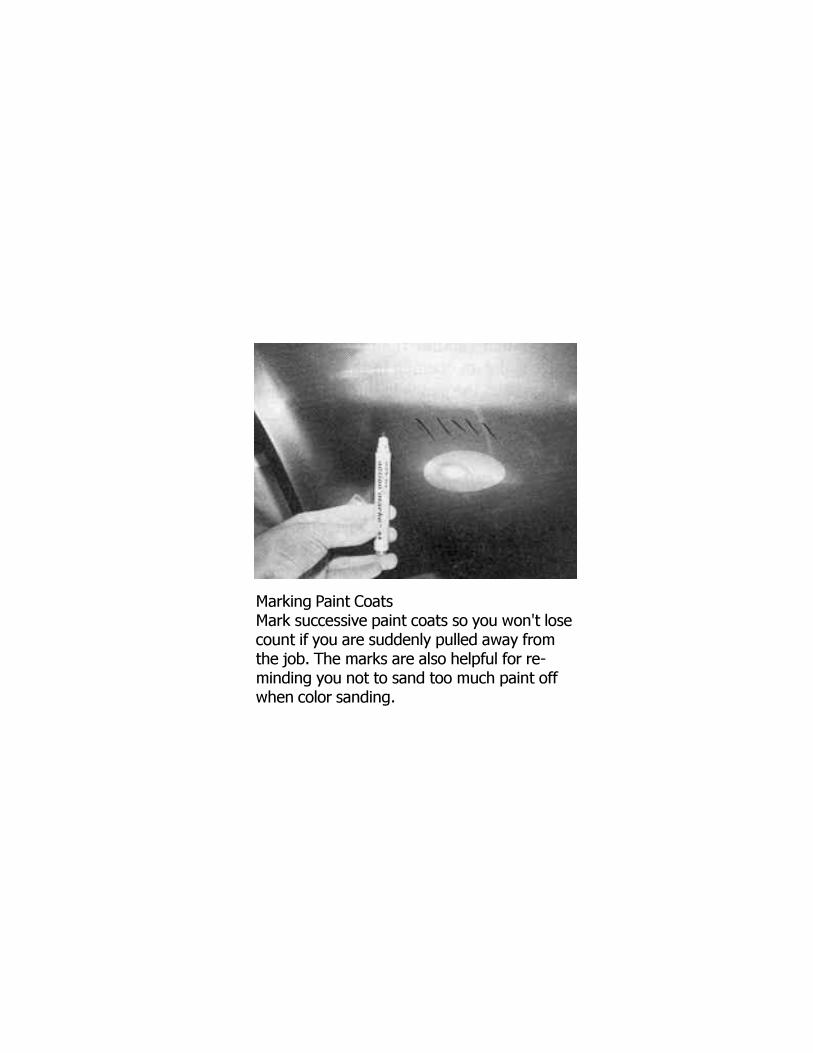
Marking Paint CoatsMark successive paint coats so you won't losecount if you are suddenly pulled away fromthe job. The marks are also helpful for re-minding you not to sand too much paint off
when color sanding.

Panel ReplacementWhen replacing sheet metal, you want a great fit.Take the replacement panel and lay it down first, thenplace the old panel over it. Trace the old with a scribemarker. When you cut, slice 1/4" outside the scribemark on the new panel. This will assure that youhave plenty of extra material when fitting the car.

Slapping A DentTo pull a dent, try holding a serrated dolly on theside of the dent that is raised. Slap with a slap-ping file on the dipped side. Although this mayseem a backwards action, the serrated teeth; in
conjunction with the serrated dolly, pulls the dentout through a kind of metal-shrinking process.

Sanding Tip
When sanding sheet
metal sections(paint or bare metal); alwayskeep the sander flat to the,surface, without placingany weight other than the -tool itself on the panel. Thisprevents warping of themetal, plus adds longevity tothe sand paper (less friction).

Wrench WrappingWhen you install newly-plated bolts to a car or component, wrap astrip of masking tape around the wrench. This will keep metalcontact from occurring and avoid discoloring

Original SheenTo obtain the original sheen of your aluminumintake, use Eagle One Aluminum Mag cleaner.Agitate it with a brush while on the intake, thenhose it off with water.

How To Restore A Mopar Ballast ResistorTo make a ballast resistor look like new again,lightly glass bead the ceramic and immerse itin bleach.

Shoot 'EmTo achieve an even, smooth look with compo-nents that have many sides or angles, build abracket to hang the pieces at eye level. Thatway, you can see around the pieces easier.

Metal PreparationTo assure a blue, clean metal after you have acidprepped any sheet metal, as well as neutralized it andwashed it with water, take a clean towel within 30seconds and use air to lightly blow the area as youwipe it dry. All the harmful residue will be removedand leave only true blue!

Not Silly Putty
Stick "Heat Sink" putty near a weld area to soak up heat that would otherwise damage thin
sheetmetal.
Two Gaskets In OneUse two, instead of one, gaskets beneath an external gas cap to protect a newly-paintedrear taillight board on a car such as the Mustang.
Good LightingFor the best lighting during stainless polishing, body work or' checking paint, use whitefiberglass panels below lights. The diffused lighting offers accurate reading for your work.

Shape Your BunsWhen re-upholstering bucket seats, there's no need to buy newseat buns. Instead, put them on an exercise program of reshaping.With a large pair of scissors, snip strips of foam from an old seatbun and glue them to the bun to build up the flattened contours.
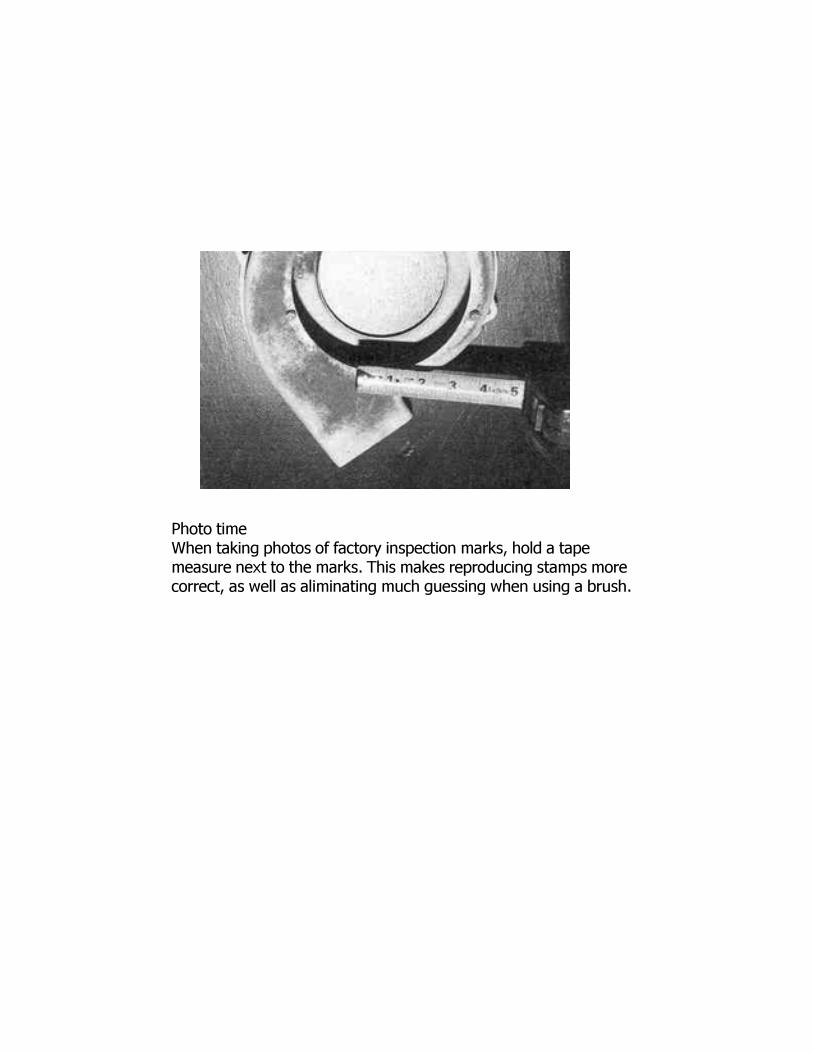
Photo timeWhen taking photos of factory inspection marks, hold a tapemeasure next to the marks. This makes reproducing stamps morecorrect, as well as aliminating much guessing when using a brush.

Keeping Rust AwayTo keep rust from occuring in seams after sandblasting the insideof your doors, spray a good quality urethane primer into and downthe seams where panels are joined. This will keep moisture frompenetrating the seams.

Card Board GuardsWhen you are ready to assemble doors to the body, place a 12" x 12"card board section between the bottom edge of the door and therocker. This will protect the the new finish from chips while providingthe proper 3/16" gap necessary for alignment.

Rubber PrepIf you are replacing the rubber splash shields in the engine compartmentand they are painted or undercoated, originally, always clean them withthinner to remove any silicone. That way, the paint or undercoating willadhere better and last longer.

Hang 'Em!To keep your aluminum parts from tarnishing, hang themwith wire and spray them with a light coat of urethane RVclear and catalyst by R-M with PPG flattener. 3 oz. clear,1.5 oz. clear, 1.5 oz. catalyst and 1.5 oz. flattener is therecipe. This mixture will flash off and the component willnot show any signs of being coated.

Plugged!
Make sure to install. the rubber drain plugs in the bottoms of quarter panels. It's not
enough to make sure the factory holes in the bottom of quarters are open. The rubber
plugs keep out dirt, but let the water pass through. It's also a good idea to pull the plugs
periodically and flush out the quarters.
Semi-gloss?
One of the most confusing terms is semi-gloss. How much gloss and how much flatten-ing agent does it mean? Generally, semi-gloss means 25% to 33% flattening compound.For example, a Camaro subframe is painted with Ditzler DAR 9000 with 33% DX 265flattener. Upper and lower A-arms on the same Camaro use about 25% flattener. DAR at100%, of course, would be 100% gloss.
Avoiding Dry SpotsEven-looking paint on your car's engine compartment, frame and other chassis compo-nents is essential. Dry spots can occur using some "fast flash" paints, such as lacqueror urethane. Try using acrylic enamel with urethane hardener and flattener. It takes upto 25 minutes to flash off and set. This way, you can spray the more difficult andsmaller areas first, then lay a smooth coat on the flat surfaces. The finishes will drytogether and flatten out in the same tone and provide smooth film.

Glue Label
Reproduction trunk labels, such as for jacking instructions, are decals with a sticky back
for easy application. However, the originals were simply sheets of paper, to which the
assembly line worker applied glue and pasted it to the underside of the decklid. There-
fore, to give your car a totally stock, unrestored look, buy the reproduction decal, then
make a good copy of it on paper, and glue it in place.
Soap & WaterSoapy water on sheetmetal makes decal stripes easy to move into position and get right.But first, remove traces of oil and wax with a wax and grease remover. Any substanceunder the stripe will hamper adhesion, even oil from your fingers. Also, the best time toapply a stripe is after color sanding and buff out, when there are no little bumps in thepaint to raise the decal.
Good GraffitiFew restorers are wise to Mark all paint sticks; which are exactly the writing instru-ments used on the assembly line on undercarriages, rear axle housings, and enginecompartments. Yellow, orange, white, blue and green, they are available from localdistributors around the country.
Finish LineRestorers often paint over stock bolts. However, you can often figure out the correctfinish by pulling it and flipping it over. A silver back side, for example, means it wasprobably originally cadmium plated. Even rusty bolts are often clean on the side that wasflush to a washer. It is better to replate the original bolt than to use reproduction bolts
that do not have the manufacturer's identification on them, which is going to become
more and more important as the hobby gets increasingly sophisticated. If the old boltscan't be replated, then original bolts from a salvage yard are the next best choice.

Shoot 'EmTo achieve an even, smooth look with compo-nents that have many sides or angles, build abracket to hang the pieces at eye level. Thatway, you can see around the pieces easier.

When welding panels it is best to cool them with anair-filtered blower or damp towel between every1.5-inch-long bead no more than 2 to 3 seconds after weld-ing.

Shape Your BunsWhen re-upholstering bucket seats, there's no need to buy newseat buns. Instead, put them on an exercise program of reshaping.
With a large pair of scissors, snip strips of foam from an old seatbun and glue them to the bun to build up the flattened contours.

Brush After Each FillingWhen your filler work is close to complete and ready to prime, takea clean hand wire brush and run it over the whole section. This willclean out any unnoticed pinholes and you can then touch them up.

For a clean job when working on doors, place 2-inch tape behindall holes including door locks and door handle holes. When youdo body work, filler will not ooze into and stick on the back side,avoiding a mess. After the body work remove the tape and use acarbide burr tool to clean out the hole. Finish off with small handfiles just barely touching the metal around the edges.

Mounting Screws In Sheetmetal
If for any reason you must make holes in a car body- maybe in the top of the door, for
example, to mount a side view mirrordo not make the mistake of drilling holes for the
mounting screws. In order for the screws to tighten, the holes must be punched. This
way, the threads will pull up and tighten against the forced metal punched below the
surface of the body. You can use a drill bitmuch smaller than the hole needed- to make an
opening in the sheet metal. Then, insert the punch in this small hole to open it a little
wider, and try the screw to see how tight it is.
GroundedBefore painting a car, ground the body with a chain from the floor to the rear axle, to preventa static charge differential.
Dippity Don'tUnless your car has major rust problems, including rocker panel erosion, do not dip it.When a body is dipped- and by dip, we mean such a process known as RediStrip- the fac-tory sealer is completely removed, and every, square inch has to be prepped to be readiedfor paint. That means the inner structure and the outer structure. Essentially, you're startingover with a bare piece of metal and no factory sealer.It is hard to remove the paint from the firewall with conventional strippers, but did youknow that oven cleaner works great? Just spray it on and let it soak in. It'll work in any hardto get area, dissolving grease as well as paint, right down to the clean, bare steel.
How To Restore Brackets, Clips And Other PartsA common mistake is to spray paint brackets and clips, but from the factory they weresimply dipped in paint. This saves time and gives better coverage of the part. Concoursjudges look for drips and runs from dipping, which is factory correct. Many large parts were
also dipped, such as Mopar torsion bars and Ford A-arms. It's easy to spot the drips andruns on original parts and determine the original finish.
Milk WashersA chronic problem with restorers is paint scratches on re-painted door jambs when re-
hanging the doors. A solution is to back up the door striker plates with plastic washers cut
from one gallon milk jugs. Once the door is adjusted to close properly, it's easy to rip outthe plastic washer, no scratches.

Metal PreparationTo assure a blue, clean metal after you have acidprepped any sheet metal, as well as neutralized it andwashed it with water, take a clean towel within 30seconds and use air to lightly blow the area as youwipe it dry. All the harmful residue will be removedand leave only true blue!