netvault backup apm for oracle users guide - dellsw.jp · netvault: backup apm for oracle. ... -...
TRANSCRIPT
Redefining Data Protection
Title Page
User’s Guide
for theNetVault: Backup
APM for Oracle
APM Version 5.5 OAG-101-5.5-EN-01 06/06/08
CopyrightsNetVault: Backup - User’s Guide for the NetVault: Backup APM for OracleSoftware Copyright © 2008 BakBone Software
Documentation Copyright © 2008 BakBone Software
This software product is copyrighted and all rights are reserved. The distribution and sale of this product are intended for the use of the original purchaser only per the terms of the License Agreement. All other product trademarks are the property of their respective owners.
The NetVault: Backup - User’s Guide for the NetVault: Backup APM for Oracle documentation is copyrighted and all rights are reserved.
This document may not, in whole or part, be copied, photocopied, reproduced, translated, reduced or transferred to any electronic medium or machine-readable form without prior consent in writing from BakBone Software.
THIS PUBLICATION IS PROVIDED “AS IS” WITHOUT WARRANTY OF ANY KIND, EITHER EXPRESS OR IMPLIED, INCLUDING, BUT NOT LIMITED TO, THE IMPLIED WARRANTIES OF MERCHANTABILITY, FITNESS FOR A PARTICULAR PURPOSE, OR NON-INFRINGEMENT.
THIS PUBLICATION COULD INCLUDE TECHNICAL INACCURACIES OR TYPOGRAPHICAL ERRORS. CHANGES ARE PERIODICALLY ADDED TO THE INFORMATION HEREIN; THESE CHANGES WILL BE INCORPORATED INTO NEW EDITIONS OF THE PUBLICATION. BAKBONE SOFTWARE MAY MAKE IMPROVEMENTS AND/OR CHANGES IN THE PRODUCT(S) AND/OR THE PROGRAM(S) DESCRIBED IN THIS PUBLICATION AT ANY TIME.
BakBone Software9540 Towne Centre Drive, Suite 100 San Diego, California 92121 866.484.2663

NetVault®: BackupUser’s Guide
3
Chapter 1: Introduction 7
• About the Oracle Application Plugin Module.................................................................. 7- Oracle at a Glance ............................................................................................................... 7- Key Benefits ........................................................................................................................ 7- Feature Summary ................................................................................................................ 9- Target Audience .................................................................................................................. 9- Recommended Additional Reading ........................................................................................ 9
Chapter 2: Strategy 11
• Defining a Backup and Recovery Strategy ................................................................... 11- Available Backup Methods .................................................................................................. 11- Supported Oracle File Types ............................................................................................... 14- Defining an RMAN Backup Strategy..................................................................................... 15
Chapter 3: Installation 25
• Installing the Oracle APM ............................................................................................... 25- Pre-installation Requirements.............................................................................................. 25- Pre-requisites for RMAN Backups........................................................................................ 26- Recommended Configuration in a Single-Instance
Non-RAC Environment ....................................................................................................... 30- Installation Procedure ......................................................................................................... 31- Removing the Oracle APM .................................................................................................. 32
Chapter 4: Configuration 35
• Configuring the Oracle APM........................................................................................... 35- Defining Default Backup Target Set for RMAN Backups ......................................................... 35- Configuring Default Attributes .............................................................................................. 36- Adding a Database to the Oracle APM ................................................................................. 41- Language Support ............................................................................................................. 53
Chapter 5: Backup 57
• Backing Up Data with the Oracle APM .......................................................................... 57• Performing User Managed Backups .............................................................................. 57
- Phase 1: Selecting Data for a Backup .................................................................................. 57
Table of Contents
NetVault®: BackupUser’s Guide
4
- Phase 2: Selecting Backup Options ..................................................................................... 59- Phase 3: Finalizing and Submitting the Job ........................................................................... 61
• Performing RMAN Backups ............................................................................................ 61- Phase 1: Selecting Data for a Backup .................................................................................. 62- Phase 2: Setting Backup Options......................................................................................... 64- Phase 3: Finalizing and Submitting the Job ........................................................................... 69
Chapter 6: Restore 71
• Restoring Data with the Oracle APM ............................................................................. 71• Restore and Recovery Overview.................................................................................... 71
- Understanding User Managed Recovery .............................................................................. 71- Understanding RMAN Recovery .......................................................................................... 74
• Performing User Managed Restores.............................................................................. 78- Phase 1: Preparing Database for Recovery .......................................................................... 78- Phase 2: Selecting Data for a Restore.................................................................................. 79- Phase 3: Finalizing and Submitting the Job ........................................................................... 80- Phase 4: Recovering Database ........................................................................................... 80- Phase 5: Opening Database for Use .................................................................................... 80
• Advanced User Managed Restore Procedures............................................................. 81- Renaming and/or Relocating Files During Restore................................................................. 81
• Available RMAN Recovery Types in a Non-RAC Environment.................................... 84- Restoring Control File from an Autobackup ........................................................................... 84- Recovering Individual Datafiles/Tablespaces to Same Server ................................................. 86- Recovering Whole Database to Same Server........................................................................ 86- Performing Disaster Recovery with RMAN ........................................................................... 87
• Performing RMAN Restores ........................................................................................... 91- Phase 1: Selecting Data for a Restore.................................................................................. 91- Phase 3: Setting Restore Options ........................................................................................ 95- Phase 4: Finalizing and Submitting the Job ......................................................................... 106
• Advanced Restore Procedures with RMAN ................................................................ 106- Renaming and/or Relocating Files During Restore............................................................... 107- Duplicating a Database in a Non-RAC Environment............................................................. 108
Chapter 7: RMAN Recovery Catalog Maintenance 121
• Resynchronizing the Recovery Catalog ...................................................................... 121- Using Crosscheck to Update RMAN Repository .................................................................. 122
Chapter 8: RMAN CLI 125
• CLI-based RMAN Backups and Restores .................................................................... 125
NetVault®: BackupUser’s Guide
5
- Pre-Requisites ................................................................................................................. 125- Performing CLI-based Backups ......................................................................................... 126- Performing CLI-based Restores......................................................................................... 133
Chapter 9: Real Application Clusters 135
• An Overview of Oracle Real Application Clusters...................................................... 135• About this Appendix...................................................................................................... 135• Recommended Additional Reading ............................................................................. 136• Deployment Overview ................................................................................................... 137• Licensing ........................................................................................................................ 138• Installation ...................................................................................................................... 139• Required RAC Configuration........................................................................................ 139
- Pre-Requisites ................................................................................................................. 141- Installation Process .......................................................................................................... 142
• Configuration ................................................................................................................. 143- Configuring Default Attributes ............................................................................................ 143- Determining the Local Oracle SID and Home Directory in a RAC Environment ....................... 144- Adding a Database to the Oracle APM ............................................................................... 145
• Backup............................................................................................................................ 145- Performing Backups after Node Failure .............................................................................. 145
• Restore ........................................................................................................................... 146- Types of RMAN Recovery Available in a RAC Environment .................................................. 147
Chapter 10: Glossary 159
• Glossary ......................................................................................................................... 159
Chapter 11: The About Window 163
• The About Window ........................................................................................................ 163
Chapter 12: Troubleshooting and Support 165
• Troubleshooting............................................................................................................. 165• Backup Fails................................................................................................................... 165• Backup Job Hangs ........................................................................................................ 166• Restore Fails .................................................................................................................. 168• Technical Support.......................................................................................................... 168• Documentation Updates................................................................................................ 168

NetVault®: BackupUser’s Guide
6

7
Chapter 1:
INTRODUCTION
1.0.0 About the Oracle Application Plugin Module
1.0.1 NetVault: Backup APM for Oracle at a GlanceThe NetVault: Backup APM for Oracle (Oracle APM) increases confidence in recoverability of Oracle databases including those in a Oracle Real Application Cluster (RAC) environment and eliminates the need for complex scripting.
Through an intuitive GUI and automated workflow process, the APM offers users a centralized console to setup, configure, and define backup and restore policies for the Oracle databases. Support for online User Managed backups, and full featured RMAN based backups provides users the flexibility to select their preferred backup method without requiring them to learning Oracle internals.
The Oracle APM offers granular control that minimizes downtime by allowing the users to reliably restore complete databases, individual tablespaces, individual datafiles or corrupted blocks.
Through automatic integration with a wide range of backup devices, you can be confident that your Oracle data is protected and safely stored offsite to meet your disaster recovery and business continuity goals.
Support for Oracle features such as Automated Storage Management (ASM), Flash Recovery Area (FRA) and Transparent Data Encryption offer users advanced backup and recovery options in case of hardware failure or data loss. The Oracle APM protects business-critical Oracle data and increases the user confidence and agility.
1.0.2 Key BenefitsIncreases Confidence and Reduces Risk While Deploying Oracle - With Oracle APM, DBAs no longer have to worry about understanding Oracle internals before being able to implement a backup policy that is flexible enough to account for a large number of recovery scenarios. DBAs have the flexibility to choose the best method for the job whether it is simple User Managed full backups for less mission critical databases, or RMAN based full, differential or cumulative incremental backups for the most mission critical databases, all without creating scripts.

Chapter 1Introduction
8
Oracle APM's flexible backup features also include:Full, differential, and cumulative incremental backups while data is online and accessibleDuplicate Database backups to create local or remote duplicate databasesProtection of backup recovery files in the Flash Recovery AreaProtection for single-instance and multi-instance RAC environments Protection down to the datafile levelBackups of Flash Recovery Area, parameter, control, and archived redo log files
By relying on Oracle APM to implement backup policies, DBAs can be freed to focus on more critical tasks without risking the ability to recover exactly what is needed in the unfortunate event of a failure. In addition, the IT managers’ confidence is increased by knowing their Oracle data is protected, no matter what.Speeds Up Restores to Reduce Downtime - With Oracle APM, you are not required to determine exactly which backup sets are needed during the process. You simply select what needs to be restored, the latest backup, and if appropriate, the time, SCN, or log sequence, and the Oracle APM automatically performs the recovery. Not only are restores faster due to the reduced involvement, the chance for a syntax error in a manual script that would require a restart is eliminated too.Additional Oracle APM restore and recovery features include:
Complete recovery, and point-in-time recovery based on time, SCN, and log sequence numberRestores of complete databases, individual tablespaces, individual datafiles or only the corrupted data blocksRestore read-only files when neededRename of datafilesDisaster recovery of databases
Ensure Business Continuity with Automatic Integration of Backup Devices - With offsite backups being an important part of the data protection plan for any mission critical application, the Oracle APM takes advantage of NetVault: Backup's fundamental integration with a wide range of backup devices which include, tape libraries, stand-alone tape devices, virtual tape (disk) libraries, and shared virtual tape libraries. NetVault: Backup allows you the flexibility to select which backup device to store the backup on. You can store the backup online in a virtual tape library and duplicate the job to physical tape libraries shared by multiple Oracle databases, other proprietary databases, or used for general backup purposes.

9
Oracle APM gives you the confidence that your Oracle environment is being protected and stored offsite for disaster recovery purposes. At the same time, it frees administrators from being present 24x7 because even less experienced Oracle personnel can initiate restores with confidence that they will be performed correctly and as quickly as possible, thereby reducing downtime and improving business continuity.
1.0.3 Feature SummaryUser Managed full database backups while data is online and accessible RMAN based full, differential or cumulative incremental backups while data is online and accessibleDuplicate Database backups to create local or remote duplicate databasesProtection for single-instance and multi-instance RAC environmentsProtection down to the datafile levelProtect datafiles stored in Oracle’s Automated Storage Management (ASM) filesystem Protection of backup recovery files in the Flash Recovery AreaParallel backup supportRestore complete databases, individual tablespaces, individual datafiles or only the corrupted data blocks.Restore read-only files when neededRename of datafilesPoint-and-click complete recovery and point-in-time recovery based on time, SCN, and log sequence numberDisaster recovery of databasesAutomatic integration with a wide range of backup devices
1.0.4 Target AudienceWhile advanced Oracle DBA skills are generally not required to create and execute routine backup operations, they are required for defining the Oracle Database Backup and Recovery Strategy.
1.0.5 Recommended Additional ReadingIt is recommended that the following documentation be readily available for reference when setting up, and while using this APM.
Oracle® Database Backup and Recovery User’s GuideOracle® Database Backup and Recovery BasicsOracle® Database Backup and Recovery ReferenceOracle® Database Backup and Recovery Advanced User's Guide

Chapter 1Introduction
10
The NetVault: Backup Administrator's Guide - Offers descriptions on the use of functionality available in NetVault: Backup that can be used in conjunction with this APM. http://www.bakbone.com/support/product_documentation/
The Oracle Documentation Libraries can be found at the following links:
Oracle 11.1xhttp://www.oracle.com/pls/db111/homepageOracle 10.2x http://www.oracle.com/pls/db102/homepage Oracle 10.1x http://www.oracle.com/pls/db10g/portal.portal_demo3?selected=1Oracle 9.2 http://www.oracle.com/pls/db92/db92.docindex?remark=homepage

11
Chapter 2:
STRATEGY
2.0.0 Defining a Backup and Recovery StrategyThe primary objective of backing up data is to recover from the damage caused by a failure and resume normal operations as quickly as possible. This can be accomplished only if you have a well-designed backup and recovery strategy that maximizes data protection and minimizes data loss.
To formulate an efficient strategy, begin with your recovery strategy, which will define your recovery requirements, and the recovery techniques you will use to recover from various failure modes, such as media failure, user error, data corruption, and complete loss of the Oracle Database Server.
Each restore and recovery requirement will impose requirements on your backup strategy. Once you have decided on your recovery strategy, you can plan your backup strategy, which will define your backup requirements, including:
Oracle features you will use to take, store and manage your backupsBackup types you will implementIntervals at which you will schedule these backupsSituations in which you will backup the data outside the regular schedule
Typically, when defining a backup strategy, you will face a trade-off between MTTR (Mean Time To Recover) and backup space usage.
The sections that follow provide information and guidelines that can help you formulate a backup strategy for use with the Oracle APM.
2.0.1 Available Backup MethodsThe Oracle APM offers two backup methods: User Managed and Recovery Manager (RMAN). The Oracle APM supports implementing a pure User Managed or a pure RMAN based backup strategy, i.e., your backup strategy should include either User Managed backups or RMAN backups, not a combination of the two.
2.0.1.a User Managed Backup MethodOracle continues to support the ability to perform traditional User Managed backup and recovery. With this backup method, the files that make up the database are basically backed up and restored using a combination of host operating system commands, and SQL*Plus backup and recovery related capabilities.
Chapter 2Strategy
12
While the Oracle APM’s User Managed backups offer the simplest form of backups with complete point-and-click functionality for full backups, recovering the Oracle database involves more human interaction and DBA expertise. User Managed restores begin with point-and-click restoration of the various datafiles from the backup media to the original or new destination. Restoration of the datafiles is followed by the recovery of the entire or parts of the database. With User Managed recovery, the DBA must determine what needs to be recovered and perform the actual recovery process manually outside the Oracle APM by executing a series of SQL*Plus commands.
The User Managed backup method offers the simplest backup strategy at the expense of longer and more complex restores, making it more suitable for less mission critical databases.
The backup and restore strategies available with the User Managed method are thoroughly discussed in the Oracle® Database Backup and Recovery Advanced User’s Guide or the Oracle® Database Backup and Recovery User's Guide for 11g.
While User Managed backups are available for all supported Oracle versions, they are not supported in environments where Oracle's Automated Storage Management (ASM) or Flash Recovery Area (FRA) is deployed.
2.0.1.b Recovery Manager (RMAN) Backup MethodRMAN is a tool provided by Oracle that automatically integrates with sessions running on the Oracle Database Server to perform a range of backup and recovery activities. RMAN also reduces the administration work associated with your backup strategy by maintaining an extensive record of metadata about backups, archive logs, and its own activities, known as the RMAN repository. In restore operations, RMAN uses this information to eliminate the need for you to identify backup files for use in restores.
RMAN backups provide maximum reliability and flexibility when defining a backup strategy. The Oracle APM supports the full range of backup types and options available with Oracle’s RMAN tool together with the ability to handle a number of recovery scenarios with less reliance on human interaction and DBA expertise. Users simply select what needs to be restored, the latest backup, and if appropriate, the time, SCN, or log sequence number for point-in-time recovery, and the Oracle APM automatically performs the recovery without further interaction.
RMAN is Oracle’s preferred solution for backup and recovery, and is the best choice for mission critical databases. It provides maximum flexibility during the recovery process, allowing you to recover the database up to the point of failure no matter what caused the failure, whether it is a disaster, media failure, user error, or database corruption.

13
For a feature comparison between User Managed and RMAN backups refer to the Feature Comparison of Backup Methods section of the Oracle Database Backup and Recovery Basics Guide. The same guide also provides a thorough discussion on the backup and restore strategies available with the RMAN method.
RMAN backups are available for all supported Oracle versions but are the only supported backup method for multi-instance RAC databases.
RMAN Based Backup ProcessThe following figure illustrates the RMAN based backup process:
1. User defines backup job in NetVault: Backup Console. 2. The Oracle APM converts job definition into corresponding RMAN backup
commands.3. RMAN executes backup commands which reads data from Oracle database
datafiles.4. RMAN uses Oracle Media Management API to store backup on backup
device managed by NetVault: Backup server.5. RMAN stores backup metadata in recovery catalog repository.
Backup Media
Recovery Catalog Database
Recovery Catalog Server
NetVault: Backup Console
NetVault: Backup Server
NetVault: Backup APM for Oracle
Oracle Database
NetVault: Backup Administrator Workstation
NetVault: Backup Server
Oracle Server
Oracle Recovery Manager
Oracle Media Management API
1 2
3
5
4
4

Chapter 2Strategy
14
RMAN Based Restore and Recovery ProcessThe following figure illustrates the RMAN based restore and recovery process:
1. User defines restore job in NetVault: Backup Console. 2. The Oracle APM converts job definition into corresponding RMAN restore
and recovery commands.3. RMAN reads backup metadata from recovery catalog repository.4. RMAN uses Oracle Media Management API to read backup from backup
device managed by NetVault: Backup Server.5. RMAN restores datafiles to Oracle server and recovers database.
2.0.2 Supported Oracle File TypesThe Oracle APM allows you to backup the following types of Oracle database files, which are critical to the successful operation of the Oracle instance:
DatafilesDatafiles are a physical file on disk that was created by Oracle Database and contains data structures such as tables and indexes. A datafile can belong to only one database, and is located either in an operating system file system or in an Automatic Storage Management disk group.
Backup Media
Recovery Catalog Database
Recovery Catalog Server
NetVault: Backup Console
NetVault: Backup Server
NetVault: Backup APM for Oracle
Oracle Database
NetVault: Backup Administrator Workstation
NetVault: Backup Server
Oracle Server
Oracle Recovery Manager
Oracle Media Management API
1 2
54
3 4

15
Control FileControl Files are binary files that record the physical structure of the database. Information in the Control File includes, the database name, names and locations of associated datafiles and online redo log files, timestamps for database creation, current log sequence number, and checkpoint information. Protecting the Control File is extremely important for many recovery scenarios.
Parameter FileThe PFILE, client side initialization parameter file or the SPFILE, server side initialization parameter file for the Oracle database.
Archived Redo LogsThe Oracle database allows you to copy online redo log groups that are not currently in use to one or more archive locations on disk, where they are collectively called the archived redo log. Individual files are referred to as archived redo log files. After a redo log file is archived, it can be backed up to other locations on disk or on tape, for long term storage and use in future recovery operations. Without archived redo logs, your database backup and recovery options are severely limited. Your database must be taken offline before it can be backed up, and if you must restore your database from backup, the database contents are only available as of the time of the backup. Reconstructing the state of the database to a point in time is not possible without archive logs.
It is critical that your backup strategy include all these file types to ensure recoverability from any type of failure, including media failure, data corruption, or a disaster.
2.0.3 Defining an RMAN Backup StrategyThe first step in defining an RMAN backup strategy is determining the location for the RMAN repository. The second step involves determining the types and frequency of backups that are needed to meet your recovery requirements. These steps are discussed in the following sections.
Important: The database also depends on few other files for operation such as network configuration files (tnsnames.ora and listener.ora), password files, and the contents of Oracle home. Currently the Oracle APM does not support backing up these files. It is recommended that you use the NetVault: Backup Filesystem Plugin to backup these files. Future versions of the Oracle APM will allow Oracle Configuration Files and software binaries to be included in a backup.

Chapter 2Strategy
16
2.0.3.a Choosing the Location for the RMAN RepositoryThe RMAN repository is the collection of metadata about backup and recovery operations on the target database. The authoritative copy of the RMAN repository is always stored in the Control File of the target database. A Recovery Catalog, i.e., an external database can also be used to store this information.
Control File RMAN can conduct all necessary backup and recovery operations using just the Control File to store the RMAN repository information. This increases the importance of protecting the Control File as part of your backup strategy.
Storing the RMAN repository in the Control File is especially appropriate for small databases where installation and administration of a separate Recovery Catalog database will be burdensome. The only RMAN feature that is not supported in this mode is stored scripts which are not utilized by the Oracle APM.
When using the Control File to store the RMAN repository, Oracle highly recommends the following:
Enable Oracle’s control file autobackup feature. This causes RMAN to automatically back up the Control File, and also lets RMAN restore the Control File autobackup without access to a repository.Keep a record of your DBID, which may be required to recover the database when the Control File is lost.Use a minimum of two multiplexed or mirrored Control Files on separate disks.
Recovery CatalogAn external Oracle database can also be used to store the RMAN repository. This external database is known as the Recovery Catalog. While the Control File has finite space for records of backup activities, a Recovery Catalog can store a much longer history. The added complexity of administering a Recovery Catalog database can be offset by the convenience of having the extended backup history available if you have to do a recovery that goes further back in time than the history in the Control File.
The Recovery Catalog's version of the RMAN repository is maintained solely by RMAN. The database targeted for backup never accesses it directly because RMAN propagates the information about the database structure, archived redo logs, backup sets, and datafile copies into the Recovery Catalog from the target database's Control File after any operation such as backup and restore.
Oracle recommends that you store the Recovery Catalog in a dedicated database. If you store the Recovery Catalog alongside other data in a

17
database, then if you lose that other database you will lose your Recovery Catalog as well. This will make recovery more difficult. Moreover, if you store the Recovery Catalog in a database that is targeted for back up, you will not be able to perform whole database restores for that database because the database must be in a mounted state for restores, and the Oracle APM will not have access to the Catalog to perform the recovery in that state.
2.0.3.b RMAN Tablespace/Datafile Backup TypesThe Oracle APM supports following types of RMAN backups:
Full BackupIncremental Backup
The Incremental Backups are further classified as follows:
Level 0 Incremental BackupLevel 1 Incremental Backup
Differential Incremental BackupCumulative Incremental Backup
Full BackupAn RMAN Full Backup is a backup of a datafile that includes every allocated block in the file being backed up. A full backup of a datafile can be an image copy, in which case every data block is backed up. It can also be stored in a backup set, in which case datafile blocks not in use may be skipped. An RMAN Full Backup cannot be part of an incremental backup strategy, i.e., it cannot be the parent or base of a subsequent incremental backup.
Incremental BackupAn incremental backup of a datafile captures images of blocks in the datafile that have changed since a specific point in time, usually the time of a previous incremental backup. Incremental backups are generally smaller than full datafile backups, unless every block in the datafile is changed. RMAN Incremental backups are only available for datafiles.
During media recovery, RMAN uses the block images from incremental backups, to update changed blocks to their contents at the SCN where the block was created in a single step. Without incremental backups, all changes must be applied one at a time from the archived redo logs. To reduce downtime, RMAN will always choose an incremental backup over reapplying individual changes stored in archived redo logs.
Multilevel Incremental BackupsRMAN’s incremental backups are multilevel. Each incremental level is denoted by a value of 0 or 1.

Chapter 2Strategy
18
Level 0 Incremental BackupA level 0 incremental backup, which is the base for subsequent incremental backups, copies all blocks containing data, backing up the datafile into a backup set just as a full backup would.
The only difference between a level 0 incremental backup and a full backup is that a full backup cannot be included in an incremental strategy.
Level 1 Incremental Backup A level 1 incremental backup can be either of the following types:
Cumulative Incremental BackupDifferential Incremental Backup
Cumulative Incremental Backups
In a cumulative incremental backup, RMAN backs up all the blocks used since the most recent level 0 incremental backup. Cumulative incremental backups speed up restores by reducing the number of incremental backups that need to be included in the recovery process. Cumulative backups require more space and time than differential backups because they duplicate the work done by previous backups at the same level.
Cumulative backups are preferred over differential backups when recovery time is more important than disk space, because fewer incremental backups need to be applied during recovery.
Differential Incremental Backups
In a differential incremental backup, RMAN backs up all blocks that have changed since the most recent cumulative or differential incremental backup, whether at level 1 or level 0.
RMAN determines which level 1 backup occurred most recently and backs up all blocks modified since that backup. If no level 1 is available, RMAN copies all blocks changed since the level 0 backup.
Differential incremental backups lead to longer restores because multiple incremental backups must be applied during recovery.
Archive Log BackupArchived Redo Logs are important for point-in-time recovery and must be backed up regularly. You can backup the archive logs separately or together with the datafiles, and other supported files. The Oracle APM also provides the option to force an additional log switch before backing up the archive logs and the option to delete the archive logs from the disk after backing them up to the backup sets.

19
2.0.3.c Control File Backup TypesProtecting the Control File is extremely important in many recovery situations. The Oracle APM provides two methods for protecting the Control File: Manual backups and Autobackups. However, when using the RMAN method, you can perform either Control File Autobackups or manual Control File backups but not both. When the Control File Autobackups are enabled for a database, manual Control File backups are not available.
Manual Backups of Control FileThe manual backup of Control File is supported by both the User Managed and RMAN backup methods.
Manual Backup of Control File with User Managed Backup Method
With the User Managed backup method, the Oracle APM does not use the active Control File for backup and restore. During backup, the Oracle APM first saves a snapshot of the Control File to the user-specified Control File Save Location, and then backs up this copy of the Control File. This ensures that a consistent copy of the Control File is protected. During restoration, the Oracle APM restores the Control File to the Control File Save Location to ensure that the active Control File is not inadvertently overwritten. You must manually copy this file to the original location as required. To make sure that a recent copy of Control File is always available, include it with each User Managed backup.Manual Backup of Control File with RMAN Backup Method
When Control File Autobackups are disabled and the Control File node is explicitly selected in the Backup Selections window, the Oracle APM uses RMAN’s BACKUP CURRENT CONTROLFILE to backup the Control Files. To make sure that a recent copy of the Control File is always available, include it with each RMAN backup.
Autobackups of Control File An autobackup of Control File also includes the Server Parameter File (SPFILE). The autobackups are made after every RMAN based backup or after making structural changes to the database such as adding a new tablespace, altering the state of a tablespace or datafile, adding a new online redo log, renaming a file, adding a new redo thread, etc.Manual vs. Autobackups
A Manual Control File backup allows you to restore a specific copy of a Control File and is ideal when data corruption has occurred and you need to restore the most recently saved version of a Control File prior to data corruption. The user is responsible for ensuring that the Control File is backed up with every RMAN based backup and after every database structural change. While Manual Control

Chapter 2Strategy
20
File backups do offer the ability to restore specific Control File backups, they can not be used during Disaster Recovery or in multi-instance RAC environments.
Control File Autobackups provide the most reliability to ensure that there is always a recent backup of the Control File. In addition, they are required for Disaster Recovery and in multi-instance RAC environments.
2.0.3.d Other Backup TypesDuplicate Database BackupThe Duplicate Database backup is designed to allow the DBA to create a duplicate or clone of a source database for special purposes that must not affect the overall backup and restore procedures for the source database. RMAN supports duplicating databases to increase a DBA's flexibility when performing the following tasks:
Testing backup and recovery proceduresTesting an upgrade to a new release of Oracle DatabaseTesting the effect of applications on database performanceGenerating reports
For example, you can duplicate the production database on hostA to hostB, and then use the duplicate database on hostB to practice restoring and recovering this database while the production database on hostA operates as usual.
The Oracle APM’s support for Oracle’s Database Duplication is backup-based duplication. For additional information on Oracle's Duplicate Database functionality refer to Duplicating a Database section in Oracle Database Backup and Recovery User's Guide.
Flash Recovery Area BackupsOracle introduced the Flash Recovery Area (FRA) in Oracle 10g. FRA is a disk location used to store recovery-related files such as Control Files, archived redo logs, and RMAN backups. Oracle and RMAN manage the files in the Flash Recovery Area automatically.
A Flash Recovery Area minimizes the need to manually manage disk space for backup-related files and balance the use of space among the different types of files store in the FRA. In this way, A Flash Recovery Area simplifies the ongoing administration of your database. Oracle recommends that you enable a recovery area to simplify backup management.
Enabling the FRA can speed up restores by enabling RMAN to restore the needed datafiles from the FRA versus restoring the files from backup media managed by NetVault: Backup. However, storing backups in the FRA does not provide the user with offsite protection for disaster recovery protection. Therefore, the Oracle APM

21
provides the user the following backup destination options when the FRA is enabled for the database:
Backup to FRA onlyBackup to backup media managed by NetVault: BackupBackup to FRA then backup FRA to NetVault: Backup backup media
Additionally, the Oracle APM provides the ability to perform a separate backup of the backup recovery files stored in the FRA to backup media managed by NetVault: Backup. Backup recovery files include: full and incremental backup sets, Control File Autobackups, datafile copies, and archived redo logs. If an archived redo log file is missing or corrupted, then RMAN looks outside of the recovery area for a good copy of the log that it can use for the backup. Flashback logs, the current control file, and online redo logs are not backed up.
2.0.3.e Recovery Catalog Backup StrategyThe Recovery Catalog database is similar to any other database, and must be a key part of your backup and recovery strategy.
Oracle recommends that you back up the Recovery Catalog with the same frequency that you back up the target database. For example, if you make a weekly whole database backup of the target database, then back up the Recovery Catalog immediately after all target database backups, in order to protect the record of the whole database backup. This backup can also help you in a disaster recovery scenario. Even if you have to restore the Recovery Catalog database using a Control File autobackup, you can then use the full record of backups in your restored Recovery Catalog database to restore the target database without using a Control File autobackup for the target database.
Oracle recommends the following guidelines for an RMAN backup strategy for the Recovery Catalog database:
Run the Recovery Catalog database in ARCHIVELOG mode so that point-in-time recovery is possible.Back up the database onto two separate media (for example, disk and tape).Include Archivelogs in your backups.Do not use another Recovery Catalog as the repository for the backups.Configure the control file autobackup feature to ON.
2.0.3.f Example Backup SequencesFollowing are few example backup sequences that can be implemented to meet the data protection requirements of your Oracle Database Server.

Chapter 2Strategy
22
Full Backups OnlyWhen business requirements guarantee data protection up to the previous day, performing full backups on a daily basis should be sufficient. DBAs are only guaranteed to be able to recover the database up to the point of the last full backup.
Full Backup + Archived Log BackupsWhen business requirements mandate point-in-time data protection but recovery time is not important, Full Backups coupled with Archived Log backups will provide you the necessary protection.
For example, Full Backups are performed every Sunday night at 11:00 p.m., while Archived Log backups are performed Monday through Saturday at 11:00 p.m.
This strategy will require RMAN to restore and apply each Archived Log backup between the last Full Backup and the point-of-failure in succession. This can lead to longer recovery as the week progresses. To speed up restores, you can include Incremental backups which will reduce the number of Archived Log backups that must be restored.
Incremental Level 0 + Differential Incremental Level 1 + Archived Log Backups
When business requirements mandate point-in-time data protection and backups have to be as fast as possible, Incremental level 0 + Differential Incremental Backup + Archived Redo Log backups is an ideal strategy.
For example, Incremental Level 0 backups are performed every Sunday night at 11:00 p.m., while Differential Incremental Level 1 backups are performed Monday through Saturday at 11:00 p.m., and Archived Log backups are performed every 5-6 hours. Each Differential Incremental Level 1 backup will include all the changes since the last Level 0 or Level 1 backup and the Archived Log backups will include the transaction logs since the last Differential Incremental Level 1 backup.
This strategy can lead to longer recovery because RMAN must restore the Incremental Level 0 backup, each Differential Incremental Level 1 backup since the Incremental Level 0 backup and the Archived Log backups between the last Differential Incremental backup and the point-of-failure.
Incremental Level 0 + Cumulative Incremental Level 1 + Archived Log Backups
When business requirements mandate point-in-time data protection and recovery time should be as fast as possible, Incremental Level 0 + Cumulative Incremental Level 1 + Archived Log backups are the best combination.

23
For example, Incremental Level 0 backups are performed every Sunday night at 11:00 p.m., while Cumulative Incremental Level 1 backups are performed Monday through Saturday at 11:00 p.m. and Archived Log backups are performed every 5-6 hours. Each Cumulative Incremental Level 1 backup will include all the changes since the last Incremental Level 0 backup and the Archived Log backups will include the Redo Logs since the last Cumulative Incremental Level 1 backup.
This strategy leads to quick recovery because RMAN only has to restore the Incremental Level 0 backup, the last Cumulative backup, and the Archived Log backups between the last Cumulative backup and the point-of-failure.
2.0.3.g Defining a Backup Destination StrategyWhen the Flash Recovery Area is enabled, Destination Backup Options will be enabled in the Backup Options tab. These options allow the user to select the destination for the backup and include the following options:
Tape (Backup to NetVault: Backup Media)Disk (Backup to FRA)Both Tape and Disk (Backup to FRA then Backup FRA to NetVault: Backup Media)
These options allow the user to define a media destination strategy that best meets their needs.
Tape (Backup to NetVault: Backup Media)When selected, RMAN will open an “SBT_TAPE” channel and write the backup files to the backup media that is managed by NetVault: Backup and specified in the Device Options section of the Source tab. NetVault: Backup can manage a wide range of backup devices including Virtual Tape Libraries and tape drives allowing the user to implement a Disk to Disk to Tape backup strategy. Even though the Flash Recovery Area has been enabled for the database, it will not be used to store backup recovery files. This is an ideal option for users who wish to maintain a dedicated FRA for permanent files such as copies of the current Control File and online redo logs or Flashback logs. This is the default option.
Disk (Backup to FRA)When selected, RMAN will open a DISK channel and only write the backup files to the Flash Recovery Area. Storing the backup recovery files in the FRA provides for the fastest restore possible with RMAN because RMAN can simply restore the files directly from the FRA without having to read files from backup media. Since the FRA is typically disk storage residing on the same local or shared storage as the datafiles, it does not provide complete protection against complete media failure, corruption, or disaster recovery. To ensure that the backup recovery files are stored in offsite storage, the user can use the Both Tape and Disk or perform

Chapter 2Strategy
24
periodic Flash Recovery Area Backups to backup the backup recovery files stored in the FRA to backup media managed by NetVault: Backup.
Both Tape and Disk (Backup to FRA then Backup FRA to NetVault: Backup Media) Implementing a Tape and Disk backup strategy provides the user the most protection with the fastest restores. When selected, RMAN will open a DISK channel and write the backup files to the Flash Recovery Area followed by a backup of the backup recovery files stored in the FRA to backup media managed by NetVault: Backup in the same backup job. This provides the user the ability to perform the fastest recovery possible from isolated media failure and data corruption while providing offsite protection for complete media failure or disaster recovery. Selecting the Both Tape and Disk option will lengthen the duration of the backup job because RMAN will be perform two types of backups in the same backup job.
For users who want to store backup recovery files in the FRA for faster restores and require offsite protection for disaster recovery but do not want to lengthen the duration of the daily backup jobs, users have an additional option to perform daily backups to the FRA while performing Flash Recovery Area Backups on a different independent schedule. For example, when Full Backups are performed every Sunday at 11:00pm, they are performed to Disk. When Incremental Backups are performed Monday through Saturday at 11:00pm, they are also performed to Disk. However, a Flash Recovery Area Backup to backup media is performed on a weekly basis every Sunday at 10:00pm before the Full Backup is performed. Additionally, the user has the option to perform the Flash Recovery Area Backup at any desired interval which meets business requirements.

25
Chapter 3:
INSTALLATION
3.0.0 Installing the Oracle APM
3.0.1 Pre-installation RequirementsBefore installing the Oracle APM, make sure that the following pre-requisites are met on the machine designated as the Oracle Database Server:
3.0.1.a NetVault: Backup Server/Client SoftwareAt least the Client version of NetVault: Backup must be installed on the machine where the Oracle APM will be installed. In a single-instance non-RAC environment, the Oracle APM will be installed on the server where the Oracle database will reside. In a multi-instance RAC environment, the Oracle APM will be installed on one of the nodes which hosts one of the instances for the RAC enabled database.
3.0.1.b Database in ARCHIVELOG Mode Make sure that the database is running in ARCHIVELOG mode. For instructions on enabling the archiving of filled groups of redo log files, refer the Oracle Administrator’s Guide. The steps below can be followed to verify that the database is properly set in this mode.
1. Start SQL*Plus and then connect with administrator privileges to the database. sqlplus SYS/<password>@<connect_identifier> AS SYSDBA
2. From the SQL> prompt, enter: ARCHIVE LOG LISTThe output will show the current mode. If the “Automatic Archival” property displays the “Enabled” status, then the database is properly configured.
Figure 3-1:Example
output of the“ARCHIVELOG LIST”command
showing theDatabase Log
Mode in“Archive
Mode”

Chapter 3Installation
26
3.0.2 Pre-requisites for RMAN Backups
3.0.2.a Determining the Oracle SID and Home Directory in a Non-RAC EnvironmentTo find out the Oracle SID and home directory, follow one of the procedures below
(based on the O/S running on the Oracle Database Server):
Windows-based O/SOn Windows, the SID and Oracle Home can be determined from the Registry.
1. Launch the Registry Editor on the Oracle Database Server (e.g., by selecting Start>Run, followed by typing “regedit” in the Run window).
2. Navigate to the following directory: My Computer\HKEY_LOCAL_MACHINE\SOFTWARE\ORACLEVarious directories will be displayed. Each folder prefaced with “KEY_” represents an installation of Oracle on the target machine (i.e., in the event that multiple installations of Oracle exist on the machine).
3. Open the folder entitled “KEY_<Oracle_Home>” that represents the target installation of Oracle to list the registry items in the right-hand frame. Locate the following items beneath the Name column and make note of the associated entry in the Data column:
ORACLE_HOMEORACLE_SID
Linux/UNIX-based O/SOn Linux/UNIX-based operating systems, the SID and Oracle Home can be determined from the “oratab” file.
1. Open the “oratab” file (e.g., by issuing the command # more /etc/oratab in a terminal window)
2. The “oratab” file will contain entries for each Oracle database running on the server in the following format:<ORACLE_SID>:<ORACLE_HOME>:<Additional Information>Example: If the command was run and the following was the result:PROD:/u03/app/oracle/product/10.2.0/db_1:N
“PROD” is the ORACLE_SID“/u03/app/oracle/product/10.2.0/db_1” is the ORACLE_HOME
3.0.2.b Creating the RMAN Repository As discussed in Choosing the Location for the RMAN Repository of Chapter 2 on page 16, for an RMAN backup strategy you must first choose a location for the

27
RMAN repository. By default, this repository is maintained in the Control File. However for larger or more mission critical databases, create a Recovery Catalog database which can store a much longer history than the Control File.
Creating a Recovery Catalog is a three-step process: you must configure the database that will contain the Recovery Catalog, create the Recovery Catalog owner, and then create the Recovery Catalog itself.
Configuring the Recovery Catalog DatabaseWhen you use a Recovery Catalog, RMAN requires that you maintain a Recovery Catalog schema. The Recovery Catalog is stored in the default tablespace of the schema. Note that SYS cannot be the owner of the Recovery Catalog. Decide which database you will use to install the Recovery Catalog schema. It is recommended that you create a separate database for the Recovery Catalog and run the catalog database in ARCHIVELOG mode.
Next, you must allocate space to be used by the catalog schema. The size of the Recovery Catalog schema depends upon the number of databases managed by the catalog. The schema also grows as the number of archived redo log files and backups for each database increases. For more information on sizing the Recovery Catalog schema, refer to the Planning the Size of the Recovery Catalog Schema section in the Oracle® Database Backup and Recovery Advanced User’s Guide.
Creating the Recovery Catalog Owner After choosing the Recovery Catalog database and creating necessary space, follow the steps given below to create the owner of the Recovery Catalog and grant this user necessary privileges:
1. Start SQL*Plus and then connect with administrator privileges to the database that will contain the Recovery Catalog.sqlplus SYS/<password>@<connect_identifier> AS SYSDBA
2. Create a user and schema for the Recovery Catalog. For example, enter:CREATE USER rman IDENTIFIED BY <password>TEMPORARY TABLESPACE temp DEFAULT TABLESPACE tools QUOTA UNLIMITED ON tools;
3. Grant the RECOVERY_CATALOG_OWNER role to the schema owner. This role provides the user with all privileges required to maintain and query the Recovery Catalog.GRANT RECOVERY_CATALOG_OWNER TO rman;
4. Grant the CONNECT role to the rman user.GRANT CONNECT TO rman;

Chapter 3Installation
28
Creating the Recovery Catalog After creating the catalog owner, create the catalog tables with the RMAN CREATE CATALOG command. This command creates the catalog in the default tablespace of the catalog owner.
1. Connect to the database that will contain the catalog as the catalog owner. For example:> rmanCONNECT CATALOG rman/<password>@<connect_identifier_for_catalog>
2. Run the CREATE CATALOG command to create the catalog. The creation of the catalog can take several minutes. If the catalog tablespace is this user's default tablespace, then you can run this command:CREATE CATALOG;You can also specify the tablespace name for the catalog in the CREATE CATALOG command. For example:CREATE CATALOG TABLESPACE <tablespace_name>;
3.0.2.c Registering the Target DatabaseThe first step in using a Recovery Catalog with a target database is registering the database in the Recovery Catalog. Follow the steps given below to register a target database:
1. After making sure the Recovery Catalog database is open, connect RMAN to the target database and Recovery Catalog database. For example, issue the following command to connect to the catalog database.> rman TARGET / CATALOG rman/<password>@<connect_identifier_for_catalog>
2. If the target database is not mounted, then mount or open it:STARTUP MOUNT;
3. Register the target database in the connected Recovery Catalog:REGISTER DATABASE;
4. RMAN creates rows in the catalog tables to contain information about the target database, then copies all pertinent data about the target database from the Control File into the catalog, synchronizing the Catalog with the Control File.
5. Verify that the registration was successful.REPORT SCHEMA

29
Registering Multiple Databases in a Recovery CatalogYou can register multiple target databases in a single Recovery Catalog, if they do not have duplicate database IDs (DBIDs). RMAN uses the DBID to distinguish one database from another.
3.0.2.d Enabling Control File Autobackups Control File Autobackups are required for disaster recovery with the Oracle APM. Refer to Control File Backup Types of Chapter 2 on page 19 for more information on Control File Autobackups.
You can turn the autobackup feature on by executing the following commands from the RMAN command line utility:
1. After making sure the Recovery Catalog database is open, connect RMAN to the target database and Recovery Catalog database. For example, issue the following commands to connect to the catalog database:> rman TARGET / CATALOG / rman/<password>@<connect_identifier for catalog>
2. Configure the default device type to “SBT_TAPE”.CONFIGURE DEFAULT DEVICE TYPE TO ‘SBT_TAPE’;
3. Enable Control File Autobackups.CONFIGURE CONTROLFILE AUTOBACKUP ON;
4. Confirm Control File Autobackups are enabled by reviewing the RMAN configuration settings.SHOW ALL;
3.0.2.e Enabling Block Change Tracking When this feature is enabled, RMAN uses a change tracking file to record changed blocks in each data file. This eliminates the need to scan every block in the data file for an incremental backup, thereby improving performance of the incremental backup jobs.
Important: For multi-instance RAC databases, refer to Enabling Control File Autobackups in a RAC Environment of Appendix A on page 142 for more information.
Important: Block Change Tracking is disabled by default on an Oracle 10g installation. This is because it introduces minimal performance overhead on the database during normal operations. However, the benefits of avoiding full data file scans during incremental backups are considerable, especially if only a small percentage of data blocks are changed between backups. For additional information refer to Improving Incremental Backup Performance: Change Tracking section of Oracle® Database Backup and Recovery Basics.

Chapter 3Installation
30
You can enable change tracking when the database is either open or mounted. To alter the change tracking setting, follow the steps below:
1. Start SQL*Plus and then connect with administrator privileges to the target database.sqlplus SYS/<password>@<connect_identifier> AS SYSDBA
2. The Block Change Tracking file can either be stored in the default location, or in a user-defined location:
To Store it in the Default Location: Set the DB_CREATE_FILE_DEST parameter for the target database.Issue the following SQL statement to enable block change tracking:ALTER DATABASE ENABLE BLOCK CHANGE TRACKING;
To Store it in a User-defined Location - Issue the following SQL statement:ALTER DATABASE ENABLE BLOCK CHANGE TRACKING USING FILE ‘/<path to desired destination>/rman_change_track.dat’ REUSE;The REUSE option tells Oracle to overwrite any existing file with thespecified name.
The following example stores the Block Change Tracking File in a file located in an Automated Storage Management (ASM) filesystem which is used for shared storage in a RAC environment.ALTER DATABASE ENABLE BLOCK CHANGE TRACKING USING FILE '+DATA/o10grac/block_change_tracking.dat' REUSE;
3.0.3 Recommended Configuration in a Single-InstanceNon-RAC EnvironmentWhile it is possible to set up a single machine as both the NetVault: Backup Server and the Oracle Database Server (i.e., all software installation and configuration requirements are performed on a single machine), it is recommended that these two entities exist on separate machines.
Important: In a Real Applications Clusters (RAC) environment, the change tracking file must be located on shared storage accessible from all nodes in the cluster.

31
3.0.4 Installation ProcedureFollow the steps outlined below to successfully install the Oracle APM.
Backup Media
Recovery Catalog Database
Recovery Catalog Server
NetVault: Backup Server
NetVault: Backup APM for Oracle
Oracle Database
NetVault: Backup Server
Oracle Database Server
Oracle Recovery Manager
Oracle Media Management API
Important: 1. Refer to Pre-Requisites of Appendix A on page 141 for more information on the
configuration of the Oracle APM in a RAC environment.2. The NetVault: Backup client software must be installed on the Oracle Database Server
and the Oracle Database Server must be added as a NetVault: Backup Client. Refer to NetVault: Backup Administrators Guide for more information.
3. Regardless of configuration environment in place (i.e., separate NetVault: Backup Sever and Oracle Database Server, vs. a single machine configured as both), the Oracle APM must be installed on the host on which Oracle Database Server resides.
4. Example images and procedures throughout this guide assume that this two machine environment is in place and all configuration requirements have been met.

Chapter 3Installation
32
Figure 3-2:The InstallSoftwareoption menuthat appears
when theOracle
DatabaseServer is right-
clicked.
1. Start the GUI on the NetVault: Backup Server, and open the Client Management window (via either of the Client Management buttons on the command toolbar, or by selecting the Client Management command from the Administration pull-down menu).
2. Locate the machine configured as the Oracle Database Server in the Clients frame and right-click on it. Select the Install Software command from the pop-up menu.
3. In the additional window that appears, navigate to the location of the “.npk” installation file for the Oracle APM (e.g., the NetVault: Backup APM Installation CD or the directory to which the file was downloaded from BakBone Software’s web site). Based on the operating system, the directory path for this software may vary on the installation CD.Select the file entitled “ora-xxxx.npk” (where “xxxx” represents various software platforms and version numbers) and click on the Open button.
4. The installation will start and once it has completed, a successful installation message will appear in the Install Software dialog box. The Oracle APM is now successfully installed.
3.0.5 Removing the Oracle APMFollow the steps given below to remove the Oracle APM:
1. In the Client Management window, locate the Client configured as the Oracle Database Server.
2. Right-click on this machine and select the Remove Software from the pop-up menu. The Remove Software window will be displayed.
3. In the list of installed plugins that is displayed, select the Oracle APM.
Important: When installing the Oracle APM on Windows, the Oracle APM copies a dynamic link library file entitled ORASBT.DLL to the “…\system32” directory. This DLL is the link between Oracle and the media management utilities used by NetVault: Backup, and is required for the proper functioning of the APM. Ensure that the ORASBT.DLL exists in this directory.

33
Figure 3-3:The Remove
Softwarewindow with
the OracleAPM selected
for removal
4. Click the Remove button to begin the software removal process. 5. A confirmation window will be displayed. Click OK to remove the Oracle
APM. Click OK to return to the Client Management window.

Chapter 3Installation
34

35
Chapter 4:
CONFIGURATION
4.0.0 Configuring the Oracle APMThe configuration information for the Oracle APM is organized into the following sections:
Defining Default Backup Target Set for RMAN BackupsConfiguring Default AttributesAdding a Database to the Oracle APM
4.0.1 Defining Default Backup Target Set for RMAN BackupsSince Control File Autobackups are enabled for disaster recovery and RAC environments, the Oracle APM will spawn a “child job” in RMAN itself for the autobackup of the Control File and SPFILE. A Default Backup Target Set needs to be defined to designate the target device for these backups. While it is possible to specify any device for these backups it is ideal to store the Control File Autobackups on the same device as all the other backups performed by this specific installation of the Oracle APM. The Default Backup Target Set will be specified in the configuration of the Oracle APM default attributes
Follow the steps given below to define a Default Backup Target Set for the Oracle APM:
1. From NetVault: Backup GUI, open the Backup window (via either of the buttons offered in the command toolbars, or by using the Backup command in the Operations pull-down menu).
2. Click the Target tab. 3. Click the Specific Device option.4. Select the desired device where Control File Autobackups will be stored.5. Set other Backup Target Options as desired6. Click the Save As button.7. In the Save Backup Target Set window, specify a user defined name.

Chapter 4Configuration
36
Figure 4-1:Specify a userdefined name
for the BackupTarget Set
after selectingthe desired
device whereControl File
Autobackupswill be stored.
For complete details on the creation of NetVault Sets, please see the Appendix of the NetVault: Backup Administrator's Guide entitled Working with NetVault Sets.
4.0.2 Configuring Default AttributesThe Oracle APM provides the ability to set default attributes for the backup and restore jobs that can be overridden on a per-job basis. In addition, the APM also allows you to configure certain instance parameters.
Follow the steps given below to configure the default attributes for the Oracle APM:
1. From NetVault: Backup GUI, open the Backup window (via either of the buttons offered in the command toolbars, or by using the Backup command in the Operations pull-down menu). You will see a list of machines added as NetVault: Backup Clients in the Selections tab.
2. Locate the Client configured as the Oracle Database Server, and open it. To open any node in the Selections tab, you can do either of the following:
Double-click on the nodeRight-click and select Open command from the pop-up menu
A list of APMs/plugins installed on the machine will be displayed when you open the Oracle Database Server node.
3. Locate the Oracle APM in the list. Right-click on it and select the Configure command from the pop-up menu. This will launch the Configure window.
4. Set the default options as described below:Use Oracle Password File Authentication- Oracle supports two methods to authenticate database administrators or SYSDBA users: Operating System (OS) authentication and password file authentication. Select this option to enable the password file as the authentication method. Oracle's operating system authentication takes precedence over

37
password file authentication, i.e., if the requirements for operating system authentication are met, then even if you use a password file, the user will be authenticated by operating system authentication.When this option is selected, the Oracle APM will use the SYSDBA authentication details from the Oracle password file to connect to the Oracle target instance with RMAN, i.e., connect target <SYSDBA User>/<password>@<connect identifier>. When this option is de-selected, the Oracle APM will use OS authentication when connecting to the Oracle target instance, i.e., connect target /.
Figure 4-2:Oracle APM
ConfigurationOptions
Flash Recovery Area Enabled - Select this option when the Flash Recovery Area (FRA) has been enabled for all the databases that reside on the Oracle Database Server where the Oracle APM has been installed. When this option is selected, Flash Recovery Area Backups and Backup Destination Options will be available. Refer to Other Backup Types of Chapter 2 on page 20 and Defining a Backup Destination Strategy of Chapter 2 on page 23 for more information on available Flash Recovery Area features.

Chapter 4Configuration
38
Oracle SYSDBA User Name - Specify the default Oracle user with SYSDBA privileges that will be used by the Oracle APM to connect to the database. NLS_LANG - Select the character set that matches the National Language Support (NLS) Language or NLS_LANGUAGE parameter for the databases residing on this Oracle Database Server. The NLS_LANGUAGE specifies the default language of the database. This language is used for messages, day and month names, symbols for AD, BC, a.m., and p.m., and the default sorting mechanism. To determine the current NLS_LANGUAGE parameter for database, issue the following command from SQL*Plus as a SYSDBA user: select * from v$NLS_PARAMETERS where PARAMETER = 'NLS_LANGUAGE' or PARAMETER = 'NLS_TERRITORY' or PARAMETER = 'NLS_CHARACTERSET';The results will be combined in the following format to match the available selections in the drop down box:<NLS_LANGUAGE>_<NLS_TERRITORY>.<NLS_CHARACTERSET>For a list of languages supported by the Oracle APM and their corresponding NLS_Lang value see Language Support on page 53. Note that if you are not able to find an NLS_LANG in this list that exactly matches your current settings from the SQL*Plus query, then it is possible to enter (or copy and paste) the exact value in the drop-down list. Moreover, you do not require a “perfect match”, a “compatible match” is sufficient. For example, any charset 1252 will be compatible with the charset WE8MSWIN1252.Parameter File Input Field Length - This field can be used to increase the length of the Parameter File(s) Path field in the Add/Edit Database window. By default, the length of the Parameter File(s) Path field is 2048, which can be increased to a maximum of 32766 characters.Incomplete Backup of ALL Items Selected - When multiple items are included in a backup, and the APM is unable to successfully backup all the items selected even if RMAN has successfully cataloged some of the selected items, the Oracle APM lets you specify what action the backup should take. For example, if a job includes multiple tablespaces and archived redo logs, and the backup of archive logs is unsuccessful while the tablespaces are backed up successfully, then you specify what action the backup job should take in this situation.The default action for the Oracle APM can be set by selecting one of the following four settings from the drop-down list:
Complete with Warnings - Saveset Retained - The job will return a status of “Backup Completed With Warnings” and a backup saveset

39
will be created comprising of the items that were successfully backed up.Complete without Warnings - Saveset Retained - The job will complete and return a status of “Backup Completed”, i.e., while errors are logged in the NetVault: Backup binary logs, the errors will essentially be ignored in the Job Management window and a backup saveset will be created comprising of the items that were backed up successfully. Fail - Saveset Retained - The backup job will return a status of “Backup Failed”. However, a backup saveset will be generated comprising of the items that were successfully backed up.Fail - No Saveset Retained - The backup job will return a status of “Backup Failed” and no saveset of backed up objects will be kept (i.e., even if some of the selected objects were actually successfully backed up, it will be discarded).
Use Catalog for RMAN Based Backups - Select this option to specify that a Recovery Catalog database will be used for maintaining a record of all RMAN backup operations performed with this APM. Catalog Net Service Name - Enter the Oracle Net Service name for the default Recovery Catalog database. This service name must be defined in the “TNSNAMES.ORA” file on the Oracle Database Server so that the Oracle APM can connect to the Recovery Catalog database. Catalog Owner - Specify the user that was defined as the owner of the Catalog and was granted the RECOVERY_CATALOG_OWNER role.User Managed Raw Devices Blocking Factor (KB) - This field can be used to set the Block Read units for quicker User Managed backups of Raw devices. The value can be between 1kb and 64kb, e.g., if you enter 8kb in this field, the Oracle APM would read 8kb chunks of data at a time while taking backups. NetVault Server (Required for RMAN Backups) - Specify the name of the NetVault: Backup Server where the Oracle Database Server was added as a NetVault: Backup Client. Do Restore from NetVault Server (Required for RMAN Backups) - Specify the name of the NetVault: Backup Server where the Oracle Database Server was added as a NetVault: Backup Client. Restore Backup Taken from NetVault Client - When a restore is performed by the Oracle APM from a terminal session, this field indicates the NetVault Client from which the original backup was performed. If no client name is entered, then the restore command will default to the local NetVault machine performing the restore. A complete description of the use of this functionality can be found in CLI-based RMAN Backups and Restores of Chapter 8 on page 125.

Chapter 4Configuration
40
CLI Backup/Autobackup Advanced Options Set - This option requires that you first create a Set of desired options in the Advanced Options tab, and then save it with a specific name. Enter the name of this Set in the CLI Backup Advanced Options Set field to have all CLI-based RMAN backups automatically use the Advanced Options specified in this Set. If no set name is specified in this field, all CLI-based RMAN backups will use the default Advanced Options.When defining the CLI Backup Advanced Options Set, the Discard after Days/Weeks/Years option must be specified instead of the Discard after Full Backups in the Backup Life section of the Advanced Options tab. CLI-based RMAN backups do not support backup life generation for Full Backups and backups may expire unexpectedly if the Discard after Full Backups option is specified.CLI Backup/Autobackup Target Set (Required for RMAN Backups) - Specify the name of the Backup Target Set that was specified in Defining Default Backup Target Set for RMAN Backups on page 35.
Slave Connection Timeout (0 = Never) - Use this option to set an amount of time (in minutes) that will serve as an inoperability timeout between the Oracle APM and the Oracle database. If the Oracle APM senses no activity for this length of time during a backup, it will timeout and disconnect from the backup. The default entry of zero (“0”) indicates that no timeout exists.
5. Click OK to save the default settings.
4.2.0.a Setting the Default Attributes via the NetVault: Backup ConfiguratorThe default options for the backup and restore jobs can also be set via the NetVault: Backup Configurator. Follow the steps given below to access these options via the Configurator:
Important:
1. For complete details on the creation of NetVault Sets, please see the Appendix of the NetVault: Backup Administrator’s Guide entitled Working with NetVault Sets.
2. If a Backup Target Set or Advanced Options Set is named in their appropriate field, they can be overridden from the command line by specifying the name of another desired Set as a variable in the syntax. Refer to Chapter 8: CLI-based RMAN Backups and Restores on page 125 for more details on naming Sets in the CLI syntax.

41
Figure 4-3:Select theConfigure
option for theOracle
DatabaseServer
1. From the NetVault: Backup GUI, open the Client Management window (via either for the buttons on the command toolbars, or by using the Client Management command in the Administration pull-down menu).
2. In the Clients frame, locate the machine configured as the Oracle Database Server and right-click on it. In the pop-up menu that appears, select the Configure command.
3. The Remote Configurator window will appear. Click on the Plugin Options tab, and then click on the Oracle APM tab.
4. Continue from step 4 of the previous section Configuring Default Attributes on page 36.
4.2.1 Adding a Database to the Oracle APMTo begin using the APM for backup and restore, you must first add the target Oracle database to the Oracle APM. The steps for adding a database are given below. This procedure must be followed for each database running on the Oracle server that will be protected with the Oracle APM.
1. From the GUI running on the NetVault: Backup Server, open the Backup window (via either of the buttons provided in the command toolbars, or by using the Backup command in the Operations pull-down menu). A list of NetVault: Backup Clients will be displayed in the Selections tab.
Figure 4-4:The Add
Databaseoption
selected fromthe pop-upmenu that
appears whenthe Oracle
APM node isright-clicked
2. Locate the Client configured as the Oracle Database Server, and open it for a list of APMs/plugins installed on the machine. Next, locate the Oracle APM in the list and open it.To open a node in the Selections tab, you can do either of the following:
Double-click on the nodeRight-click and select Open command from the pop-up menu
The Add Oracle Database window will appear when you open the Oracle APM node. If one or more database(s) have already been added to the Oracle APM, then opening this node will list the added database(s). To launch the Add Oracle Database window, right-click on the Oracle APM node and select the Add Database command from the right-click menu.
3. Set the various parameters as described in the points below:

Chapter 4Configuration
42
a. Oracle Instance Details TabAll the parameters pertaining to the Oracle Instance are mandatory for both RMAN and User Managed backup methods.
Figure 4-5:The Oracle
Instancespecific
parameters
Oracle SID - Enter the SID for the target Oracle database. For help on determining the Oracle SID, see Determining the Oracle SID and Home Directory in a Non-RAC Environment of Chapter 3 on page 26.Oracle Home - Enter the complete path to the installation directory of the target database. For help on determining the Oracle Home, see Determining the Oracle SID and Home Directory in a Non-RAC Environment of Chapter 3 on page 26.Oracle SYSDBA User Name - Specify an Oracle user with SYSDBA privileges that will be used by the Oracle APM to connect to the database.Oracle SYSDBA Password - Enter the password associated with the user name specified in the field above.
Important:
1. The authentication details for Oracle APM can also be configured at a later time by accessing the Set Database Password functionality. For more information, see Setting the Database Password on page 49.
2. If the Oracle APM’s authentication details are not configured in the Add Oracle Database window or via Set Database Password, then a login prompt will appear each time a connection to the database is required.

43
For Linux/UNIX-based Systems ONLY - On Linux/UNIX-based systems, two additional parameters are available - Oracle Software Owner and Oracle Software Group. Configure these parameters as described in the points below:
Oracle Software Owner - Specify the name of the Linux/UNIX operating system user that owns all the Oracle software. This user must have the Oracle Inventory group as its primary group and the OSDBA and OSOPER groups as secondary groups. The usual name chosen for this user is oracle.Oracle Software Group - Specify the name of the Linux/UNIX group that owns the Oracle inventory, which is a catalog of all Oracle software installed on the system. The usual name chosen for this group is oinstall.
Figure 4-6:The additional
OracleInstance
Parameters tobe configured
on Linux/UNIX-based
systems
NLS_LANG - Select the character set that matches the National Language Support (NLS) Language or NLS_LANGUAGE parameter for the databases residing on this Oracle Database Server. The NLS_LANGUAGE specifies the default language of the database. This language is used for messages, day and month names, symbols for AD, BC, a.m., and p.m., and the default sorting mechanism. To determine the current NLS_LANGUAGE parameter for database, issue the following command from SQL*Plus as a SYSDBA user: select * from v$NLS_PARAMETERS where PARAMETER = 'NLS_LANGUAGE' or PARAMETER = 'NLS_TERRITORY' or PARAMETER = 'NLS_CHARACTERSET';

Chapter 4Configuration
44
The results will be combined in the following format to match the available selections in the drop down box:<NLS_LANGUAGE>_<NLS_TERRITORY>.<NLS_CHARACTERSET>For a list of languages supported by the Oracle APM and their corresponding NLS_Lang value see Language Support on page 53.Note that if you are not able to find an NLS_LANG in this list that exactly matches your current settings from the SQL*Plus query, then it is possible to enter (or copy and paste) the exact value in the drop-down list. Moreover, you do not require a “perfect match”, a “compatible match” is sufficient. For example, any charset 1252 will be compatible with the charset WE8MSWIN1252.Parameter File(s) Path - When an Oracle Instance is started, the characteristics of the Instance are established by parameters specified within the initialization parameter file. These initialization parameters are either stored in a client-side initialization file called PFILE, or a server-side initialization file called SPFILE. Specifying the Parameter File(s) Path is required when using the User Managed backup method. When using the RMAN backup method, the user has three options to backup the SPFILE which include:
Enabling Control File Autobackups which include autobackups of the SPFILE by selecting the Control File Autobackup Enabled option in the RMAN Details tab is selectedDisabling Control File Autobackups and using RMAN commands to backup the SPFILE when the Use RMAN Commands to Backup SPFILE option in the RMAN Details tab is selected Disabling Control File Autobackups and using FileSystem based commands to backup the SPFILE by entering the path for the SPFILE in the Parameter File(s) Path field
When using the User Managed backup method or using the RMAN backup method but want to use Filesystem based backups for the SPFILE, specify the complete path including the directory and file name of the PFILE or SPFILE, depending upon whichever is in use. Provide the details for both if you are using SPFILE as well as a PFILE. The default paths are provided in the table below:

45
Multiple parameter file paths can be entered using comma as a delimiter. The default length of this field is 2048 characters. You can increase the length of this field to accommodate longer entries by editing the Parameter File Input Field Length in the Configure window. See Configuring Default Attributes on page 36 for changing the field length.
b. RMAN Details TabIf the RMAN backup method is going to be implemented the following options must be configured. Refer to Pre-requisites for RMAN Backups of Chapter 3 on page 26 for more information on Recovery Catalog.
Figure 4-7:The RMAN
Details framein the AddDatabase
window
Control File Autobackup Enabled (Disables Manual Control File and SPFile Backups) - Select this option if the Control File Autobackups have been enabled for this database. Control File Autobackups are required for disaster recovery and multi-instance RAC environments. When this option is selected manual Control File
Init. File Platform Default Name Default Location
PFILE
Windows initSID.ora %ORACLE_HOME%\dbs\Linux/UNIX
initSID.orawhere the SID represents the ORACLE_SID
$ORACLE_HOME/dbs
SPFILE
Windows spfileSID.ora where SID represents the ORACLE_SID
%ORACLE_HOME%\dbs\
Linux/UNIX
spfileSID.ora where SID represents the ORACLE_SID
$ORACLE_HOME/dbs

Chapter 4Configuration
46
backups are disabled and the Control File node in the Backup Selection tree will not be available. Refer to Enabling Control File Autobackups in a RAC Environment of Appendix A on page 142 for more information on Control File Autobackups in a multi-instance RAC environment.Use RMAN Commands to Backup SPFILE - Available only when Control File Autobackup Enabled is not selected. When this option is selected the RMAN commands will be used to backup the SPFILE. When this option is not selected, a FileSystem based backup of the SPFILE will be performed of the SPFILE that is specified in the Parameter File(s) Path field in the Instance Details tab.Use Catalog for RMAN Based Backups - Select this option if the RMAN repository for this database will be stored in a Recovery Catalog database.The following fields will be enabled when you select this option.
Catalog Net Service Name - Enter the Oracle Net Service name for the Recovery Catalog database. This service name must be defined in the “TNSNAMES.ORA” file on the Oracle Database Server so that the Oracle APM can connect to the Recovery Catalog database. Catalog Owner - Specify the user that was specified as the owner of the Catalog and was granted the RECOVERY_CATALOG_OWNER role.Catalog Password - Provide the password associated with the Catalog owner name specified in the field above.
c. User Managed Details TabFor User Managed backup method Only (not supported in multi-instance RAC environments). Provide the following information for making User Managed backups of Control Files and archived redo logs. These fields can be left blank if your backup and recovery strategy includes the RMAN method.
Important: If the Recovery Catalog is not enabled, then Oracle APM will automatically store the RMAN Repository information in the database's Control File.

47
Figure 4-8:The UserManaged
Details framein the AddDatabase
window
Control File Save Location - When the Oracle APM uses the User Managed backup method, backups and restores of the Control File are not performed using the active Control File. A snapshot of the Control File is saved to the Control File Save Location and the snapshot or copy of the Control File is backed up. This ensures that a consistent copy of the Control File is protected.During a User Managed restore sequence that includes restoring Control Files, the Control Files are restored to the Control File Save Location to ensure that the active Control Files are not inadvertently overwritten. During the User Managed recovery processes, the user will have to manually copy the Control Files from the Control File Save Location to the original location as required.Specify a directory on the Oracle Database Server that will be used as the Control File Save Location and ensure that the Oracle APM has read/write privileges.Archive Log Destination Directory(s) - Enter the complete path to the archive log directory as set in the LOG_ARCHIVE_DEST or LOG_ARCHIVE_DEST_n parameters in the parameter file. If you archive the redo logs to multiple locations, then specify only the primary destination directory in this field.
Archive Log Format - Specify the extension of the archive log files. The archive file pattern will depend on what is established for the LOG_ARCHIVE_FORMAT setting in the parameter file. Some examples are shown below:
If LOG_ARCHIVE_FORMAT = “%t_%s_%r.dbf”, then the archive file pattern will be “*.dbf”.If LOG_ARCHIVE_FORMAT = “%t_%s.arc”, then the archive file pattern will be “*.arc”.
Important: The User Managed Backup Method does not support dynamic path names such as a daily created sub-folders in the Archive Log Destination Directory.

Chapter 4Configuration
48
If LOG_ARCHIVE_FORMAT = “arc%s.%t”, then the archive file pattern will be “arc*.*”.
d. Optional OS Authentication Details Tab (Windows-based O/S Only)The fields below can be used to specify a Windows Administrator user name that will allow the Windows installation to “impersonate” an Oracle SYSDBA user. This login is only necessary if backups fail due to “ORA-01031 insufficient” errors.
Figure 4-9:The OS
AuthenticationDetails frame
that isdisplayed in
the Windowsversion of the
Oracle APM
Windows Administrator User Name - Enter the Windows Administrator user name under which account the Oracle APM should run. The user name specified in this field must have been already created in the Windows operating system. Password - Enter the password associated with the user name specified in the field above.Windows Domain - Specify the Domain to which the user belongs. Leave blank if the domain is the Local domain.
4. Once all of the entries have been completed in the Add Oracle Database window, click on OK to save all the settings.
4.2.0.a Editing Database InformationTo re-configure the database details, follow the steps given below:
1. With the Backup window open, locate the Oracle Database Server in the Selections tab and open it.
2. Locate the Oracle APM in the list and open it. This will list all the previously configured databases.
3. Right-click on the database for which you want to re-configure the parameters, and select the Edit Database command from the pop-up menu. In the Edit Oracle Database window that appears, you can see configured values for the database instance.

49
4. Re-configure the parameters as required. For information on various fields in this window, see Adding a Database to the Oracle APM on page 41.
5. Click on OK to save the changes and close the window.
4.2.0.b Setting the Database PasswordThe Oracle APM allows you to save the Oracle authentication details that are used to automatically connect to the database. Saving the authentication information eliminates the need to enter the details each time a connection to the database is required. You can save these details either at the time of adding a database or any time later using the Set Database Password option.
To set the authentication details for an added database, follow the steps outlined below:
1. With the Backup window open, locate the Oracle Database Server in the Client list and open it. This will list all the APMs/plugins installed on the Client.
2. Locate the Oracle APM in the list and open it. This will list all the previously configured databases.
3. Right-click on the database node for which you want to set the authentication details. Select Set Database Password from the pop-up menu.
4. In the Set Database Password window, enter the following informationAccount Name - Enter an Oracle user name with SYSDBA privileges.Password - Enter the password associated with the user name specified in the field above.
5. Click OK to save the authentication details.
4.2.0.c Removing a Saved PasswordTo remove the saved password for a database, follow the steps outlined below:
Important: 1. The password fields in the Edit Database window will be blank. You must set the
passwords again (even if there are no changes). It this is not done, the existing values will be reset to blank when you save the updated information.
2. To update only the authentication details for the Oracle APM, select the Set Database Password option instead of Edit Database.
Important: 1. If the password for the configured SYSDBA user is changed in the Oracle database, then
it is necessary to update the password in the Oracle APM.2. Additionally, in a multi-instance RAC environment, it is necessary to re-execute Step 4
Assign the channel for Control File Autobackups in Enabling Control File Autobackups in a RAC Environment of Appendix A on page 142.

Chapter 4Configuration
50
1. With the Backup window open, locate the Oracle Database Server in the Client list and open it. This will list all the APMs/plugins installed on the Client.
2. Locate the Oracle APM in the list and open it. This will list all the previously configured databases.
3. Right-click on the database node for which you want to set the authentication details. Select Remove Saved Password from the pop-up menu.
4. The Reset Login dialog box will appear asking for confirmation. Click Yes to clear the authentication details.
4.2.0.d Removing a DatabaseIf a previously configured database is no longer in use, you can remove it from the Oracle APM. The steps for removing a database are given below:
1. With the Backup window open, locate the Oracle Database Server in the Selections tab and open it. This will list all the APMs/plugins installed on the Client.
2. Locate the Oracle APM in the list and open it. This will list all the previously configured databases.
3. Right-click on the database not required any longer and select the Remove Database command from the pop-up menu.
4. The Remove Oracle Database dialog box will appear asking for confirmation. Click Yes to remove the database.
4.2.0.e View Database DetailsTo quickly view database details about a previously configured database including enabled database options and whether pre-requisites for the Oracle APM have been met follow the steps below:
Figure 4-10:The Detailspage for an
OracleDatabase

51
1. With the Backup window open, locate the Oracle Database Server in the Client list and open it. This will list all the APMs/plugins installed on the Client.
2. Locate the Oracle APM in the list and open it. This will list all the previously configured databases.
3. Right-click on the database node for which you want to view database configuration details. Select View Details from the pop-up menu. The following details will be displayed:
Database Name - Database name for the selected database as detailed in the NAME column of the sys.v$database v$ table. DBID - Oracle Database ID (DBID) for the selected database. DBID is the internal, uniquely generated number that differentiates databases and is required during the Disaster Recovery process. Oracle Version - Oracle version or release of the selected database. When the selected database is the Oracle Enterprise Edition, this information will also be displayed. If the selected database is any other edition of Oracle, only the Oracle version will be displayed.Flash Recovery Area Destination - When the Flash Recovery Area is enabled, the destination of the FRAReal Application Clusters - TRUE if instance is part of multi-instance RAC environment or FALSE if instance is single instance environmentBlock Media Recovery - TRUE if block media recovery is available for the selected database and is based upon the Oracle Edition of the databaseBlock Change Tracking - ENABLED if Block Change Tracking has been enabled for the database or DISABLED if Block Change Tracking has not been enabledControl File Autobackup - ON if Control File Autobackups have been enabled for the database or OFF if Control File Autobackups have not been enabledLog Mode - ARCHIVELOG mode if the database has automatic archiving of the redo logs enabled or NOARCHIVELOG mode if the database does not have automatic archiving of the redo logs enabled
4. Click OK to close the window.
4.2.0.f Using RMAN Post-backup ScriptsThe Oracle APM provides a feature to run a script containing RMAN commands on completion of a backup job. For example, you can use this feature to duplicate the database to a standby server by running a post-backup script that contains the appropriate RMAN commands. This functionality is designed for Oracle DBAs with advanced RMAN and scripting experience. The procedure for creating an RMAN post-backup script is outlined below:
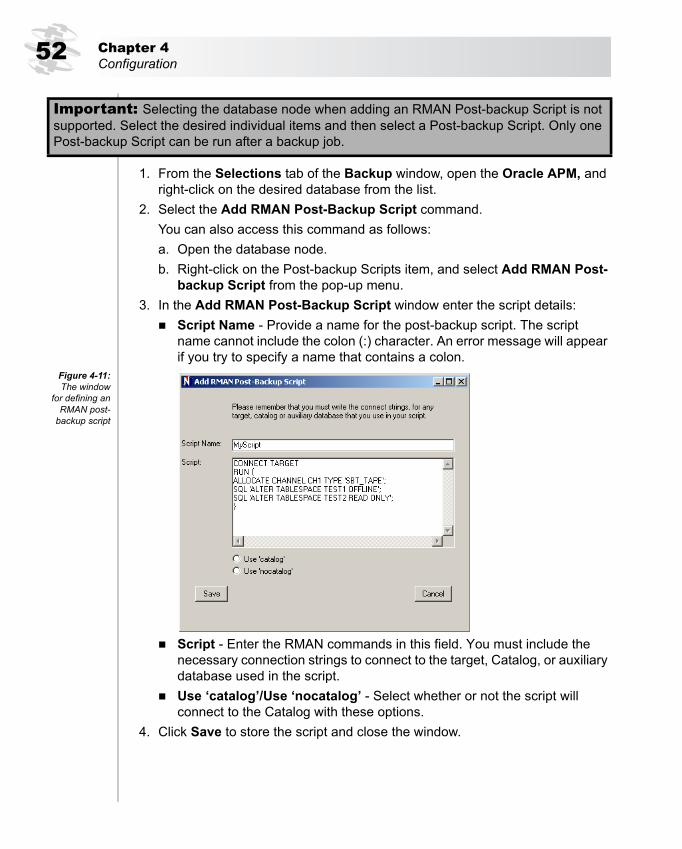
Chapter 4Configuration
52
1. From the Selections tab of the Backup window, open the Oracle APM, and right-click on the desired database from the list.
2. Select the Add RMAN Post-Backup Script command.You can also access this command as follows:a. Open the database node.b. Right-click on the Post-backup Scripts item, and select Add RMAN Post-
backup Script from the pop-up menu. 3. In the Add RMAN Post-Backup Script window enter the script details:
Script Name - Provide a name for the post-backup script. The script name cannot include the colon (:) character. An error message will appear if you try to specify a name that contains a colon.
Figure 4-11:The window
for defining anRMAN post-
backup script
Script - Enter the RMAN commands in this field. You must include the necessary connection strings to connect to the target, Catalog, or auxiliary database used in the script. Use ‘catalog’/Use ‘nocatalog’ - Select whether or not the script will connect to the Catalog with these options.
4. Click Save to store the script and close the window.
Important: Selecting the database node when adding an RMAN Post-backup Script is not supported. Select the desired individual items and then select a Post-backup Script. Only one Post-backup Script can be run after a backup job.

53
Editing a Post-backup ScriptOpen the database node, and double-click on the Script listed beneath the Post-backup Scripts node (or right-click and select Edit Post-backup Script). Make the required changes and click on Save.
Removing a Post-backup ScriptOpen the database node, right-click on the Script listed beneath the Post-backup Scripts node, and select Delete Post-backup Script. Click Yes in the confirmation window.
4.2.1 Language SupportThe following table lists the default languages available for the Oracle APM, and their corresponding NLS_LANG values.
Language NLS_Lang ValueArabic ARABIC_UNITED ARAB EMIRATES.AR8MSWIN1256
Brazilian Portuguese BRAZILIAN PORTUGUESE_BRAZIL.WE8MSWIN1252BRAZILIAN PORTUGUESE_BRAZIL.UTF8BRAZILIAN PORTUGUESE_BRAZIL.WE8ISO8859P1BRAZILIAN PORTUGUESE_BRAZIL.WE8ISO8859P15
Catalan CATALAN_CATALONIA.WE8ISO8859P1CATALAN_CATALONIA.WE8MSWIN1252CATALAN_CATALONIA.WE8ISO8859P15
Chinese Simplified SIMPLIFIED CHINESE_CHINA.ZHS16CGB231280SIMPLIFIED CHINESE_CHINA.UTF8SIMPLIFIED CHINESE_CHINA.ZHS16GBK
Chinese Traditional TRADITIONAL CHINESE_TAIWAN.ZHT16BIG5
Croatian CROATIAN_CROATIA.EE8MSWIN1250
Czech CZECH_CZECH REPUBLIC.EE8MSWIN1250
Danish DANISH_DENMARK.WE8ISO8859P1DANISH_DENMARK.WE8MSWIN1252DANISH_DENMARK.WE8ISO8859P15
Dutch DUTCH_THE NETHERLANDS.WE8ISO8859P1DUTCH_THE NETHERLANDS.WE8MSWIN1252DUTCH_THE NETHERLANDS.WE8ISO8859P15

Chapter 4Configuration
54
English AMERICAN_AMERICA.AL32UTF8AMERICAN_AMERICA.US7ASCIIAMERICAN_AMERICA.UTF8AMERICAN_AMERICA.WE8ISO8859P1AMERICAN_AMERICA.WE8ISO8859P15AMERICAN_AMERICA.WE8MSWIN1252ENGLISH_UNITED KINGDOM.WE8ISO8859P1ENGLISH_UNITED KINGDOM.WE8ISO8859P15ENGLISH_UNITED KINGDOM.WE8MSWIN1252
Finnish FINNISH_FINLAND.WE8ISO8859P1FINNISH_FINLAND.WE8MSWIN1252FINNISH_FINLAND.WE8ISO8859P15
FrenchFRENCH_FRANCE.UTF8FRENCH_FRANCE.WE8ISO8859P1FRENCH_FRANCE.WE8ISO8859P15FRENCH_FRANCE.WE8MSWIN1252
German GERMAN_GERMANY.UTF8GERMAN_GERMANY.WE8ISO8859P1GERMAN_GERMANY.WE8ISO8859P15GERMAN_GERMANY.WE8MSWIN1252
Greek GREEK_GREECE.EL8MSWIN1253
HebrewHEBREW_ISRAEL.IW8MSWIN1255HEBREW_ISRAEL.UTF8
Hungarian HUNGARIAN_HUNGARY.EE8MSWIN1250
Italian ITALIAN_ITALY.UTF8ITALIAN_ITALY.WE8ISO8859P1ITALIAN_ITALY.WE8ISO8859P15ITALIAN_ITALY.WE8MSWIN1252
JapaneseJAPANESE_JAPAN.JA16EUCJAPANESE_JAPAN.JA16SJISJAPANESE_JAPAN.UTF8
KoreanKOREAN_KOREA.KO16KSC5601KOREAN_KOREA.KO1616KSCCSKOREAN_KOREA.UTF8
Norwegian NORWEGIAN_NORWAY.WE8ISO8859P1NORWEGIAN_NORWAY.WE8ISO8859P15NORWEGIAN_NORWAY.WE8MSWIN1252
Language NLS_Lang Value

55
Polish POLISH_POLAND.EE8MSWIN1250
Portuguese PORTUGUESE_PORTUGAL.WE8ISO8859P1PORTUGUESE_PORTUGAL.WE8ISO8859P15PORTUGUESE_PORTUGAL.WE8MSWIN1252
Romanian ROMANIAN_ROMANIA.EE8MSWIN1250
Russian RUSSIAN_CIS.CL8MSWIN1251
Slovak SLOVAK_SLOVAKIA.EE8MSWIN1250
Spanish SPANISH_SPAIN.UTF8SPANISH_SPAIN.WE8ISO8859P1SPANISH_SPAIN.WE8ISO8859P15SPANISH_SPAIN.WE8MSWIN1252
Spanish Latin American
LATIN AMERICAN SPANISH_AMERICA.WE8ISO8859P1LATIN AMERICAN SPANISH_AMERICA.WE8ISO8859P15LATIN AMERICAN SPANISH_AMERICA.WE8MSWIN1252
Swedish SWEDISH_SWEDEN.WE8ISO8859P1SWEDISH_SWEDEN.WE8ISO8859P15SWEDISH_SWEDEN.WE8MSWIN1252
Turkish TURKISH_TURKEY.WE8ISO8859P9
Language NLS_Lang Value

Chapter 4Configuration
56

57
Chapter 5:
BACKUP
5.0.0 Backing Up Data with the Oracle APMThis chapter offers basic instructions on the use of the Oracle APM to perform backups of Oracle databases. The information in this chapter is organized into the following sections:
Performing User Managed Backups Performing RMAN Backups
5.1.0 Performing User Managed BackupsThe User Managed backup procedure can be divided into following phases:
Phase 1: Selecting Data for a BackupPhase 2: Setting Backup OptionsPhase 3: Finalizing and Submitting the Job
5.1.1 Phase 1: Selecting Data for a Backup1. From the GUI running on the NetVault: Backup Server open the Backup
window (via either of the buttons provided in the command toolbars, or by using the Backup command in the Operations pull-down menu). You will see a list of machines added as NetVault: Backup Clients in the Selections tab.
2. Locate the Client serving as the Oracle Database Server in the list, and open it. To open any node in the Selections tab, you can do either of the following:
Double-click on the nodeRight-click and select Open command from the pop-up menu
A list of APMs/plugins installed on the machine will be displayed when you open the Oracle Database Server node.
3. Next, locate the Oracle APM in the list and open it. The database(s) added to the Oracle APM will be displayed.
4. Open the database that is to be backed up. The APM will connect to the database with the configured SYSDBA user and list the supported file types for selection. A login prompt will appear if you have not configured the Oracle APM’s authentication details. Provide the required information in the login window:
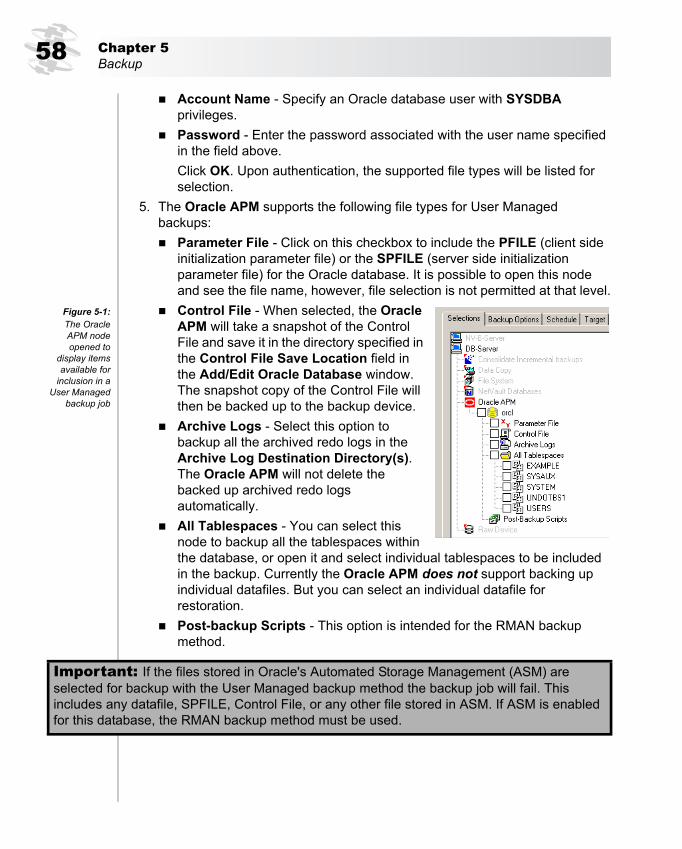
Chapter 5Backup
58
Account Name - Specify an Oracle database user with SYSDBA privileges.Password - Enter the password associated with the user name specified in the field above. Click OK. Upon authentication, the supported file types will be listed for selection.
5. The Oracle APM supports the following file types for User Managed backups:
Parameter File - Click on this checkbox to include the PFILE (client side initialization parameter file) or the SPFILE (server side initialization parameter file) for the Oracle database. It is possible to open this node and see the file name, however, file selection is not permitted at that level.
Figure 5-1:The OracleAPM nodeopened to
display itemsavailable for
inclusion in aUser Managed
backup job
Control File - When selected, the Oracle APM will take a snapshot of the Control File and save it in the directory specified in the Control File Save Location field in the Add/Edit Oracle Database window. The snapshot copy of the Control File will then be backed up to the backup device. Archive Logs - Select this option to backup all the archived redo logs in the Archive Log Destination Directory(s). The Oracle APM will not delete the backed up archived redo logs automatically.All Tablespaces - You can select this node to backup all the tablespaces within the database, or open it and select individual tablespaces to be included in the backup. Currently the Oracle APM does not support backing up individual datafiles. But you can select an individual datafile for restoration. Post-backup Scripts - This option is intended for the RMAN backup method.
Important: If the files stored in Oracle's Automated Storage Management (ASM) are selected for backup with the User Managed backup method the backup job will fail. This includes any datafile, SPFILE, Control File, or any other file stored in ASM. If ASM is enabled for this database, the RMAN backup method must be used.

59
5.1.1.a Using Selection SetsA Selection Set allows you to save the frequently selected data items in a composite set, which can be easily accessed for future backup jobs. This eliminates the need to manually select these items each time a backup is required.
Creating a Selection SetTo create a Selection Set, do the following:
1. With the desired items selected, click on the Save As button in the Backup Selection Set frame at the bottom of the Selections window.
2. In the Save Backup Selection Set widow that appears, enter a unique name for the Selection Set.
3. Click OK.
Loading a Selection SetTo use a Selection Set, follow the steps below:
1. Click on the Load button in the Backup Selection Set frame at the bottom of the Selections window.
2. In the Load Backup Selection Set window that appears, select the required set.
3. Click on OK.Selection Sets are not unique to the Oracle APM. For details on their creation and use, please see the NetVault: Backup Administrator’s Guide.
5.1.2 Phase 2: Selecting Backup OptionsThe next phase in the backup procedure involves the following tasks:
Selecting the Backup MethodSetting the User Managed Backup OptionsSpecifying the Action for an Error Condition
Click on the Backup Options tab to perform these tasks.

Chapter 5Backup
60
Figure 5-2:The optionsavailable for aUser Managed
backup
5.1.2.a Selecting the Backup MethodThe following option allows you to select the User Managed backup method.
Backup Method - Click on the User Managed option to perform a User Managed backup.
5.1.2.b Setting the User Managed Backup OptionsThe following option can be set for the User Managed backups:
Include Read-only and Offline Tablespaces - By default, the Oracle APM will not back up read-only and offline tablespaces even if you have selected them explicitly in the Backup Selections window. Read-only and offline tablespaces typically do not require backing up unless the read-only data has been updated or the offline tablespaces have been brought online. Eliminating these tablespaces from the Full User Managed backups will reduce the backup window. To include read-only and offline tablespace in the backup you must select this option. Future versions of the APM will split this option and allow you to select read-only and offline tablespaces independently.
5.1.2.c Specifying the Action for an Error ConditionWhen multiple items are included in a backup, and the APM is unable to successfully backup ALL the items selected, the Oracle APM lets you specify what action the backup should take. For example, if a job includes multiple tablespaces and archive logs, and the backup of archive logs is unsuccessful while the tablespaces are backed up successfully, then you specify what action the backup job should take in this situation.
Incomplete Backup of ALL Items Selected - The default action for the Oracle APM can be set by selecting one of the following four settings from the drop-down list:

61
Complete with Warnings - Saveset Retained - The job will return a status of “Backup Completed With Warnings” and a backup saveset will be created comprising of the items that were successfully backed up.Complete without Warnings - Saveset Retained - The job will complete and return a status of “Backup Completed”, i.e., while errors are logged in the NetVault: Backup binary logs, the errors will essentially be ignored in the Job Management window and a backup saveset will be created comprising of the items that were backed up successfully. Fail - Saveset Retained - The backup job will return a status of “Backup Failed”. However, a backup saveset will be generated comprising of the items that were successfully backed up.Fail - No Saveset Retained - The backup job will return a status of “Backup Failed” and no saveset of backed up objects will be kept (i.e., even if some of the selected objects were actually successfully backed up, it will be discarded).
5.1.3 Phase 3: Finalizing and Submitting the JobWith the desired data items selected and the necessary Backup Options set, follow the steps below to finalize the backup job and submit it.
1. Set the additional options available in the Schedule, Target and Advanced Options, if required. These options are not unique to the Oracle APM. For information on these options, please refer to the chapter dedicated to the Backup functionality in the NetVault: Backup Administrator’s Guide.
2. Enter a suitable name for the job in the Job Title field. Specify a detailed name that allows you to easily identify the job for monitoring its progress or restoring data.
3. Click on the Submit button.4. You can monitor the backup job progress and log entries via the Job
Management, Status, and NetVault Logs windows. Please see the NetVault: Backup Administrator’s Guide for details on accessing these windows and their use.
5.2.0 Performing RMAN BackupsThe RMAN backup procedure can be divided into the following phases:
Phase 1: Selecting Data for a BackupPhase 2: Setting Backup OptionsPhase 3: Finalizing and Submitting the Job

Chapter 5Backup
62
5.2.1 Phase 1: Selecting Data for a Backup1. From the GUI on the NetVault: Backup Server open the Backup window (via
either of the buttons provided in the command toolbars, or by using the Backup command in the Operations pull-down menu). You will see a list of machines added as NetVault: Backup Clients in the Selections tab.
2. Locate the Client serving as the Oracle Database Server in the list, and open it. To open any node in the Selections tab, you can do either of the following:
Double-click on the nodeRight-click and select Open command from the pop-up menu
A list of APMs/plugins installed on the machine will be displayed when you open the Oracle Database Server node.
3. Next, locate the Oracle APM in the list and open it. The database(s) added to the Oracle APM will be displayed.
4. Open the database that is to be backed up. The APM will connect to the database with the configured SYSDBA user and list the supported file types for selection. A login prompt will appear if you have not configured the Oracle APM’s authentication details. Provide the required information in the login window:
Account Name - Specify an Oracle database user with SYSDBA privileges.Password - Enter the password associated with the user name specified in the field above. Click OK. Upon authentication, the supported file types will be listed for selection.
5. The Oracle APM supports the following selections for RMAN backups: Database Node - When this node is selected and no individual sub-nodes have been deselected, the whole Oracle database will be backed up with the equivalent RMAN BACKUP DATABASE PLUS ARCHIVE LOG command. Unless performing specialized individualized backups that only include Parameter File, Control Files, or Archive Logs, it is recommended that this node be selected when performing Full and Incremental Backups.Parameter File - Only available for selection if Control File Autobackup Enabled in the RMAN Details tab of the Add/Edit Database window is not selected. Select this node to include the PFILE (client side initialization parameter file) or the SPFILE (server side initialization parameter file) for the Oracle database in the backup. If the Control File Autobackup Enabled or the Use RMAN Commands to Backup SPFILE option in the Add/Edit Database window is enabled, the Parameter File node will not expand
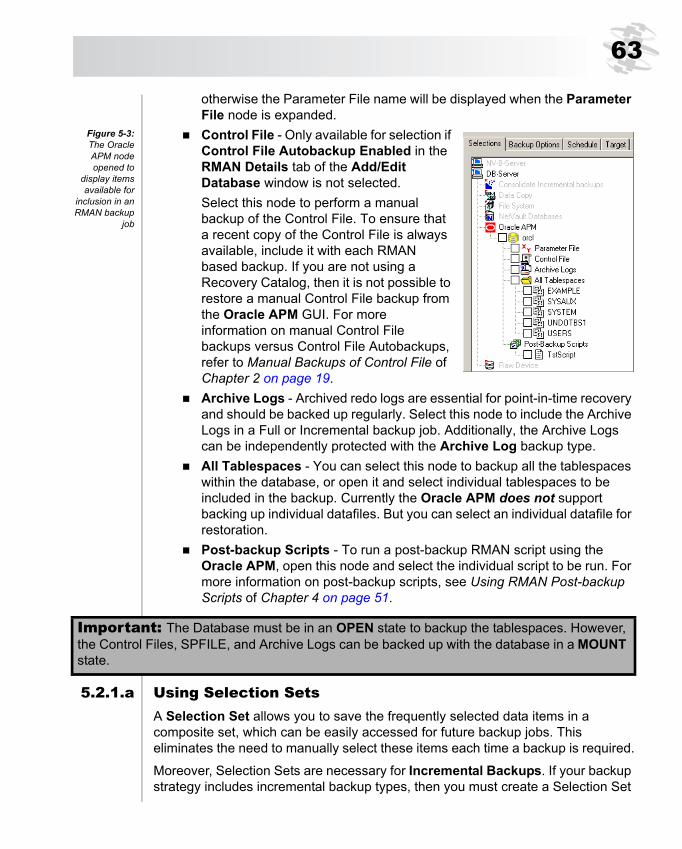
63
otherwise the Parameter File name will be displayed when the Parameter File node is expanded.
Figure 5-3:The OracleAPM nodeopened to
display itemsavailable for
inclusion in anRMAN backup
job
Control File - Only available for selection if Control File Autobackup Enabled in the RMAN Details tab of the Add/Edit Database window is not selected. Select this node to perform a manual backup of the Control File. To ensure that a recent copy of the Control File is always available, include it with each RMAN based backup. If you are not using a Recovery Catalog, then it is not possible to restore a manual Control File backup from the Oracle APM GUI. For more information on manual Control File backups versus Control File Autobackups, refer to Manual Backups of Control File of Chapter 2 on page 19.Archive Logs - Archived redo logs are essential for point-in-time recovery and should be backed up regularly. Select this node to include the Archive Logs in a Full or Incremental backup job. Additionally, the Archive Logs can be independently protected with the Archive Log backup type.All Tablespaces - You can select this node to backup all the tablespaces within the database, or open it and select individual tablespaces to be included in the backup. Currently the Oracle APM does not support backing up individual datafiles. But you can select an individual datafile for restoration. Post-backup Scripts - To run a post-backup RMAN script using the Oracle APM, open this node and select the individual script to be run. For more information on post-backup scripts, see Using RMAN Post-backup Scripts of Chapter 4 on page 51.
5.2.1.a Using Selection SetsA Selection Set allows you to save the frequently selected data items in a composite set, which can be easily accessed for future backup jobs. This eliminates the need to manually select these items each time a backup is required.
Moreover, Selection Sets are necessary for Incremental Backups. If your backup strategy includes incremental backup types, then you must create a Selection Set
Important: The Database must be in an OPEN state to backup the tablespaces. However, the Control Files, SPFILE, and Archive Logs can be backed up with the database in a MOUNT state.

Chapter 5Backup
64
when making an Incremental Level 0 backup, and use this Selection Set for the Incremental Level 0, and Differential Incremental and Cumulative Incremental backups. The backup job will report an error if a Selection Set is not used for the Incremental Level 1/Level n backups.
Creating a Selection SetTo create a Selection Set, do the following:
1. With the desired items selected, click on the Save As button in the Backup Selection Set frame at the bottom of the Selections window.
2. In the Save Backup Selection Set widow that appears, enter a unique name for the Selection Set.
3. Click OK.
Loading a Selection SetTo use a Selection Set, follow the steps below:
1. Click on the Load button in the Backup Selection Set frame at the bottom of the Selections window.
2. In the Load Backup Selection Set window that appears, select the required set.
3. Click on OK.Selection Sets are not unique to the Oracle APM. For details on their creation and use, please see the NetVault: Backup Administrator’s Guide.
5.2.2 Phase 2: Setting Backup OptionsThe next phase of the backup procedure involves the following tasks:
Selecting the Backup MethodSpecifying the Backup TypeSetting the RMAN Backup OptionsSpecifying the Action for an Error Condition
Click on the Backup Options tab to perform these tasks.
5.2.2.a Selecting the Backup MethodThe following option allows you to select the RMAN backup method.
Backup Method - Click on the RMAN option for performing RMAN backups with the Oracle APM.

65
Figure 5-4:The Backup
Method,Backup
Destination,and Backup
Type Selectionin the Backup
Options tab.
5.2.2.b Selecting the Backup DestinationThe following options are available when the Flash Recovery Area is enabled in the Add/Edit Database window and all you to select the select the destination for the backup. The following options are available:
Tape (Backup to NetVault: Backup Media)Disk (Backup to FRA)Both Tape and Disk (Backup to FRA then Backup FRA to NetVault: Backup Media)
Delete File Copies from Disk After Successful Backup to Tape - Available only when the Flash Recovery Area backup type is selected. When selected, RMAN will delete the recovery files from the FRA after a successful backup. Selecting this option is equivalent to the RMAN commandBACKUP RECOVERY AREA DELETE INPUT
These options allow the user to implement a media destination strategy that best balances business requirements while speeding up restores. Refer to Defining a Backup Destination Strategy of Chapter 2 on page 23 for more information on these options.
Important: Selecting the Delete File Copies After Successful Backup To Tape option will cause RMAN to delete the recovery files in the FRA even if the backup job fails. Therefore, you should ensure that the option selected for Incomplete backup of ALL items selected includes retaining a backup saveset to ensure that the backup to disk can still be restored.

Chapter 5Backup
66
5.2.2.c Specifying the Backup TypeThe Oracle APM supports the following type of RMAN backups:
FullIncremental Level 0Level 1 DifferentialLevel 1 Cumulative Archive LogDuplicate DatabaseFlash Recovery Area (Only Available for Oracle 10g and Later)
Delete Recovery Files from Flash Recovery Area After Successful Backup - Available only when the Flash Recovery Area backup type is selected. When selected, RMAN will delete the recovery files from the FRA after a successful backup. Selecting this option is equivalent to the RMAN commandBACKUP RECOVERY AREA DELETE INPUT
Refer to Defining an RMAN Backup Strategy of Chapter 2 on page 15 for information on these backup types.
5.2.2.d Setting the RMAN Backup OptionsThe following options can be set for the RMAN backups:
Figure 5-5:The options
that can be setfor an RMAN
backup
Important: Flash Recovery Area backups will fail if previous backups have not been performed with a Backup Destination of Disk or Both Tape and Disk. You must use the FRA as a Backup Destination before you can perform a backup of the FRA with the Flash Recovery Area backup type.

67
Delete Archive Logs After Successful Backup - This option deletes the archive logs automatically after they are backed up, eliminating the need to manually delete them. It is useful when backing up the archive logs on the disk to tape. This option is equivalent to the RMAN command:BACKUP ARCHIVELOG ALL DELETE ALL INPUT;The Oracle APM will backup each log sequence number and then delete the file that it has backed up. If you have multiple redo log archiving destinations, then the other copies of the same log sequence number are not deleted.
Force Additional Log Switch Before Archive Logs Backup - Selecting this option will ensure that an additional log switch is performed before the backup of the Archived Redo Logs is started by issuing the SQL statementALTER SYSTEM ARCHIVE LOG CURRENTSkip Offline Tablespaces - Select this option, if you want the Oracle APM to ignore the offline tablespaces and omit them from the backup.Skip Read-only Tablespaces - Read-only tablespaces should be backed up after an update has been performed and can be skipped in subsequent backups to reduce the size of the backup. Select this option, if you want the Oracle APM to ignore the read-only tablespaces and omit them from the backup.Skip Inaccessible Tablespaces - Operations within Oracle might render a tablespace inaccessible. For example, if a datafile has been removed at the O/S level, but not dropped inside the Oracle database; or if a raw device mount point link is dismounted. Enabling this option allows the Oracle APM to skip inaccessible databases that were selected in the Backup Selections window without causing the backup job to fail.User-defined Backup Tag - This option creates a tag name for the backup set. If you do not specify a tag, then RMAN creates a default tag for backups (except for Control File Autobackups) in the format TAGYYYYMMDDTHHMMSS. You can specify the tag rather than the filename when executing the RESTORE command. Tags are stored in uppercase, regardless of the case used when entering them. The maximum length of a tag is 30 bytes. The characters used in a tag must be limited to the characters that are legal in filenames on the target filesystem. For example, ASM does not support the use of the hyphen (-) character in the filenames it uses internally, so a tag
Important: Selecting the Delete Archive Logs After Successful Backup option will cause RMAN to delete the archive logs even if the backup job fails. Therefore, you should ensure that the option selected for Incomplete backup of ALL items selected includes retaining a backup saveset to ensure that the archive logs can still be restored.

Chapter 5Backup
68
including a - (such as, weekly-incremental) is not a legal tag name if you are storing backups in ASM disk groups.Files Per Backup Set - Backup information is stored in a logical structure called backup set. A backup set contains the data from one or more datafiles, archived redo logs, control files, or SPFILE. Note that datafiles and archive logs cannot be combined together in the same backup set. By default, each backup set contains 4 or fewer datafiles, or 16 or fewer archive logs. This field allows you to specify the maximum number of files to include in each backup set created by the Oracle APM. The number of files per backup set can be set independently for tablespaces/datafiles and archive logs by setting this value for the following fields:
For Tablespaces/DatafilesFor Archive Logs
With the default value of zero (“0”), the Oracle APM divides files among backup sets in order to make optimal use of available channels. The total number of files to be backed up is divided by the number of channels. If the result is less than (<) 64, then that value is the number of files placed in each backup set. Otherwise, 64 files will be placed in each backup set. Number of Channels - You can control the degree of parallelism within a backup job by allocating the desired number of channels. Allocating multiple channels simultaneously allows a single job to read or write multiple backup sets in parallel. The number of channels should be less than or equal (<=) to the number of drives for the backup devices specified in the Target window. For example, if you are targeting a Virtual Library configured with 2 drives, then the number of channels should be 2 or less. The number of channels can be set independently for tablespaces/datafiles and archive logs by setting this value for the following fields:
For Tablespaces/DatafilesFor Archive Logs
5.2.2.e Specifying the Action for an Error ConditionWhen multiple items are included in a backup, and the APM is unable to successfully backup all the items selected even if RMAN has successfully cataloged some of the selected items, the Oracle APM lets you specify what action the backup should take. For example, if a job includes multiple tablespaces and archive logs, and the backup of the archive logs is unsuccessful while the tablespaces are backed up successfully, then you specify what action the backup job should take in this situation:
Incomplete Backup of ALL Items Selected - The Oracle APM can take one of following possible courses of action when such an error condition occurs:

69
Figure 5-6:The possible
courses ofaction when an
error occurs
Complete with Warnings - Saveset Retained - The job will return a status of “Backup Completed With Warnings” and a backup saveset will be created comprising of the items that were successfully backed up.Complete without Warnings - Saveset Retained - The job will complete and return a status of “Backup Completed”, i.e., while errors are logged in the NetVault: Backup binary logs, the errors will essentially be ignored in the Job Management window and a backup saveset will be created comprising of the items that were backed up successfully.Fail - Saveset Retained - The backup job will return a status of “Backup Failed”. However, a backup saveset will be generated comprising of the items that were successfully backed up.Fail - No Saveset Retained - The backup job will return a status of “Backup Failed” and no saveset of backed up objects will be kept (i.e., even if some of the selected objects were actually successfully backed up, it will be discarded).
5.2.3 Phase 3: Finalizing and Submitting the JobWith the desired data items selected and the necessary Backup Options set, follow the steps below to finalize the backup job and submit it.
1. Set the additional options available in the Schedule, Target and Advanced Options, if required. These options are not unique to the Oracle APM. For information on these options, please refer to the chapter dedicated to the Backup functionality in the NetVault: Backup Administrator’s Guide.
2. Enter a suitable name for the job in the Job Title field. Specify a detailed name that allows you to easily identify the job for monitoring its progress or restoring data.
3. Click on the Submit button.4. You can monitor the backup job progress and log entries via the Job
Management, Status, and NetVault Logs windows. Please see the
Important: To ensure that the backup of the objects selected in the Backup Selections tab are stored on the save device as the Control File Autobackups, use the Load button in the Target tab to load the Default Backup Target Set that was specified in the Oracle APM default attributes. For more information on defining the Default Backup Target Set, see Defining Default Backup Target Set for RMAN Backups of Chapter 4 on page 35.

Chapter 5Backup
70
NetVault: Backup Administrator’s Guide for details on accessing these windows and their use.

71
Chapter 6:
RESTORE
6.0.0 Restoring Data with the Oracle APMThis chapter offers basic instructions on the use of the Oracle APM to restore and recover Oracle databases. The information in this chapter is organized into the following sections:
Restore and Recovery Overview Performing User Managed RestoresAdvanced User Managed Restore ProceduresAvailable RMAN Recovery Types in a Non-RAC EnvironmentPerforming RMAN RestoresAdvanced Restore Procedures with RMAN
Based on your backup method, follow the instructions in the relevant section for successfully performing data restoration using the Oracle APM.
6.1.0 Restore and Recovery OverviewReconstructing the contents of all or part of a database from a backup typically involves two phases: Restore and Recovery. Restoring is the process of retrieving a copy of the datafile from a backup. Recovery is the process of reapplying changes to the file since the backup from the archived and online redo logs, to bring the database to a desired SCN (typically the present, or the point-of failure).
6.1.1 Understanding User Managed RecoveryWhen a User Managed backup strategy has been implemented, the recovery process must be managed by the DBA. This includes the following tasks:
Determining what needs to be recoveredRestoring the needed files with the Oracle APMAnd performing the actual recovery process manually outside the Oracle APM by issuing a series of SQL*Plus commands.
The following sections provide an overview of the User Managed recovery process. Refer to the About User-Managed Restore Operations section in the Oracle Database Backup and Recovery Advanced User’s Guide or Performing User-Managed Backup and Recovery in the Oracle Database Backup and Recovery User's Guide for more details.

Chapter 6Restore
72
6.1.1.a Determining Which Datafiles Require RecoveryWhen a media failure or data corruption has occurred, you can use the following SQL*Plus query to determine which datafiles need recovery. This command will work only when the database is in an Open state:
SELECT FILE#, ERROR, ONLINE_STATUS, CHANGE#, TIME FROM V$RECOVER_FILE;
6.1.1.b Recovering Datafiles and Archive LogsOnce the damaged datafiles have been determined, restore the last Full Backup of the datafiles, and the backup of all the archive logs generated since the last backup till the target recovery time. When you restore the datafiles, the existing files will be replaced with the backed up copy. On the other hand, when you restore the archive logs, these files will be copied to the original location so that they are available to the database during the recovery process.
The recovery of the damaged datafiles and the archive logs will include the following steps:
1. Connect to the database with SYSDBA privileges via the SQL*PLUS utility.SQLPLUS SYS AS SYSDBA
2. If the database is open, then alter all the tablespace(s) which will be recovered offline with the following command:ALTER TABLESPACE <TABLESPACE NAME> OFFLINE;
3. Use the Oracle APM to restore the damaged datafile(s) from the latest User Managed Full Backup saveset. To restore the datafile to a different location, specify the new path during restore.
4. Use the Oracle APM to restore all the archive logs backups that have been completed since the User Managed Full Backup. Restore the archive logs to the primary destination directory. If space constraints do not permit restoration to the primary destination directory, then use the Rename option to restore the archived redo logs to a different directory. See Renaming and/or Relocating Files During Restore on page 81 for details.
5. After the restoration is complete, use SQL*Plus to perform the recovery manually by issuing the following command for every tablespace that needs recovering:RECOVER TABLESPACE <TABLESPACE NAME>
6. Alter the recovered tablespace(s) online with the following SQL*Plus command: ALTER TABLESPACE <TABLESPACE NAME> ONLINE;
6.1.1.c Restoring Control FilesA Control File can be recovered using one of the following two options:
73
Restoring a Lost Copy of a Multiplexed Control File - This procedure is used to recover a database if a permanent media failure has damaged one or more Control Files of a database, and at least one Control File has not been damaged by the media failure. Refer to the Restore Lost Copy of a Multiplexed Control File section of the Oracle Database Backup and Recovery Advanced User’s Guide or Responding to the Loss of a Subset of the Current Control Files in the Oracle Database Backup and Recovery User's Guide for Oracle 11g for more information. Restoring a Control File from Backup After Loss of All Current Control Files - This procedure is used to restore a backup Control File if a permanent media failure has damaged all Control Files of a database and you have a backup of the Control File.
Restoring a Control File from Backup After Loss of All Current Control Files
When a Control File is inaccessible, you can start the instance, but not mount the database. If you attempt to mount the database when the Control File is unavailable, then you will get the following error message:
ORA-00205: error in identifying Control File, check alert log for more info
You cannot mount and open the database until the Control File is accessible again.
The Oracle APM saves a copy of the snapshot of Control File to the Control File Save Location specified in the Add/Edit Oracle Database window. You can copy the Control File from this location if you loose all current Control Files. If the snapshot is not available in the Control File Save Location, then you can restore it from the backup by following the steps given below:
1. Use the Oracle APM to restore the Control File from the latest Control File backup.The Oracle APM will restore it to the Control File Save Location. The restored file will have “.SAV” extension.
2. Connect to the database with SYSDBA privileges via the SQL*PLUS utility.SQLPLUS SYS AS SYSDBA
3. Shutdown the database.4. Rename and copy this restored file to the Control File name and location
specified in the Oracle parameter file.5. Mount the database.
STARTUP MOUNT;6. Additional recovery will be needed to recover the database to the point that
equals the current SCN stored in the datafiles. Refer to Restoring a Backup
Chapter 6Restore
74
Control File to the Default Location section of the Oracle Database Backup and Recovery Advanced User’s Guide for detailed steps.
7. Open the database with the RESETLOGS option after finishing recovery ALTER DATABASE OPEN RESETLOGS;
6.1.2 Understanding RMAN Recovery
6.1.2.a How RMAN Backups are Selected for Use in Recovery OperationsWhen the Oracle APM performs RMAN based restores, RMAN itself is actually performing the restores and recovery operations. RMAN uses the record of available backups in the RMAN repository to select the best available backups for use in the restore operation. This simplifies the entire recovery process by eliminating the need for less experienced personnel to determine the order in which backups should be restored.
6.1.2.b Choosing Between Incremental Backups and Redo LogsIf RMAN has a choice between applying an incremental backup or applying redo logs to the restored datafiles to meet a recovery objective, then it will always choose an incremental backup. If overlapping levels of incremental backup are available, then RMAN automatically chooses the one covering the longest period of time.
RMAN automatically restores the datafiles that it needs from available backups, applies incremental backups to the datafiles if they are available, and then applies archive logs.
6.1.2.c Choosing the Restore SourceWhen the Flash Recovery Area is enabled, the Oracle APM provides the user with the ability to define a media destination strategy that best balances business requirements while speeding up restores by specifying the Destination Backup Options in the Backup Options tab. These options allow the user to select the destination for the backup and include the following options:
Tape (Backup to NetVault: Backup Media)Disk (Backup to FRA)Both Tape and Disk (Backup to FRA then Backup FRA to NetVault: Backup Media)
The Oracle APM provides the user the option during the restore process to define the Restore Source or location that RMAN should use as the source for the restore. This provides the user the flexibility to speed up restores by ensuring that RMAN restores from the FRA even if the backup is also available on NetVault: Backup media such as VTL or Tape or ensuring that RMAN restores from the

75
NetVault: Backup media when the FRA is suspected to have a media failure or data corruption and the user does not want to risk restarting the restore and recovery process due to RMAN's inability to restore from the FRA.
Additionally these same Restore Source options can be used when the user has performed CLI-based backups to Disk by allocating a channel to Disk but wants to perform the restore from the Oracle APM GUI.
The following Restore Source options are available:
Tape (Restore from NetVault: Backup Media)Disk (Restore from FRA)Both Tape and Disk (Restore from both NetVault: Backup Media and (FRA or Disk))
Tape (Restore from NetVault: Backup MediaWhen selected, RMAN will open a “SBT_TAPE” channel and read the backup files from the backup media that is managed by NetVault: Backup and specified in the Device Options section of the Source tab. Select this option if an FRA backup destination strategy has not been implemented or the Tape backup destination was selected for all backups.
Disk (Restore from FRA or Disk)When selected, RMAN will only open a DISK device type and restore the backup files from the Flash Recovery Area or the operating system specific directory specified when configuring RMAN's DISK device type. This is the default option.
Both Tape and Disk (Restore from both NetVault: Backup Media and (FRA or Disk)When selected, RMAN will open a “SBT_TAPE” channel and a DISK channel allowing RMAN the flexibility to choose the best source for the recovery files. Select this option if your backup destination strategy includes the Both Tape and Disk option or you have chosen to store backup recovery files in the FRA while performing Flash Recovery Area Backups on a different independent schedule.
6.1.2.d Datafile Media RecoveryDatafile media recovery is the application of online logs, archived redo logs, or incremental backups to a restored datafile in order to update it to the current time or some other specified time. Datafile media recovery (often referred to as Recovery) is either Complete Recovery or Point-in-Time (PIT) Recovery (also called Incomplete Recovery). Point-in-Time Recovery is one of the possible responses to a data loss caused by, for instance, a user error such as dropping a table or logical corruption that goes unnoticed for some time.

Chapter 6Restore
76
Complete Recovery vs. Point-in-Time (PIT) RecoveryComplete Recovery recovers the database to the most recent time without the loss of any committed transactions. With Point-in-Time recovery, it is possible to recover the database to a specific point. The Oracle APM supports point-in-time recovery based on time, log sequence number, or system change number. Currently, the Oracle APM supports only Database Point-in-Time Recovery (DBPITR). (The Tablespace Point-in-Time Recovery (TSPITR), which enables PIT recovery on one or more tablespaces is planned for a future release of the Oracle APM.)
System Change Number (SCN) Based Point-in-Time Recovery
When an SCN is specified during point-in-time recovery, RMAN will recover up to but not including the specified SCN. For example, if SCN 1000 is specified, then recovery up to SCN 999 will be performed.
Log Sequence Number (LSN) Based Point-in-Time Recovery
When the exact time of the data corruption or failure is not known, specifying a Log Sequence Number that contains the target SCN is a viable option. RMAN will recover through the specified log. V$LOG_HISTORY can be queried to view the logs that have been archived to identify the appropriate log sequence number and thread.
Time Based Point-in-Time Recovery
Time based PIT recovery is useful when the time that the data corruption occurred is known. For example, if a developer dropped a table at 6:00am, PIT recovery can be performed with a stop time of 5:55 a.m. The Oracle APM will recover up to but not including the specified time.
Refer to the Performing Database Point-In-Time Recovery section in Oracle Database Backup and Recovery Basics for more information on Point-in-Time Recovery and database incarnations.
6.1.2.e Block Media RecoveryBlock media recovery is only available in the Oracle Enterprise Edition as a feature that reduces downtime by allowing users to recover only the blocks that were corrupted instead of restoring and recovering the entire datafile. Block media recovery is most useful for physical corruption problems that involve a small, well-known number of blocks. Block-level data loss usually results from intermittent, random I/O errors that do not cause widespread data loss, and memory corruptions that get written to disk. Block media recovery is not intended for cases where the extent of data loss or corruption is unknown and the entire datafile requires recovery. In such cases, datafile media recovery is the best solution.

77
You can use block media recovery to recover one or more corrupt data blocks within a datafile. Block media recovery provides the following advantages over datafile media recovery:
Lowers the Mean Time To Recover (MTTR) because only blocks needing recovery are restored and recoveredEnables affected datafiles to remain online during recovery
Without block media recovery, if even a single block is corrupt, then you must take the datafile offline and restore a backup of the datafile. You must apply all redo logs generated for the datafile after the backup was created. The entire file is unavailable until media recovery completes. With block media recovery, only the blocks actually being recovered are unavailable during the recovery.
Pre-RequisitesIn addition to running the Oracle Enterprise Edition, Oracle requires the following pre-requisites for Block Media Recovery to be met as defined in the Performing Block Media Recovery of Oracle Database Backup and Recovery User's Guide.
The target database must run in ARCHIVELOG mode and be open or mounted with a current control file.The target database must not be a standby database.The backups of the datafiles containing the corrupt blocks must be Full or Incremental Level 0 backups and not proxy copies.RMAN can use only archived redo logs for the recovery. RMAN cannot use Incremental Level 1 incremental backups. Block media recovery cannot survive a missing or inaccessible archived redo log, although it can sometimes survive missing redo records.Flashback Database must be enabled on the target database for RMAN to search the flashback logs for good copies of corrupt blocks. If flashback logging is enabled and contains older, uncorrupted versions of the corrupt blocks, then RMAN can use these blocks, possibly speeding up the recovery.
Identifying Corrupted BlocksThe V$DATABASE_BLOCK_CORRUPTION view displays blocks marked corrupt by database components such as RMAN commands, ANALYZE, dbv, SQL queries, and so on. Physical corruption, sometimes called media corruption, results in rows being added to this view. For example, the database does not recognize the block: the checksum is invalid, the block contains all zeros, or the block header is fractured.
In addition to being reported in V$DATABASE_BLOCK_CORRUPTION, block corruption is also reported in the following locations:

Chapter 6Restore
78
Results of the LIST FAILURE, VALIDATE, or BACKUP ... VALIDATE commandError messages in standard outputThe alert logUser trace filesResults of the SQL commands ANALYZE TABLE and ANALYZE INDEXResults of the DBVERIFY utilityThird-party media management output such as NetVault: Backup.For example, you may discover the following messages in a user trace file:ORA-01578: ORACLE data block corrupted (file # 7, block # 3)ORA-01110: data file 7: '/oracle/oradata/trgt/tools01.dbf'ORA-01578: ORACLE data block corrupted (file # 2, block # 235)ORA-01110: data file 2: '/oracle/oradata/trgt/undotbs01.dbf'
6.2.0 Performing User Managed RestoresA standard User Managed restore with the Oracle APM can be divided into the following phases:
Phase 1: Preparing Database for RecoveryPhase 2: Selecting Data for a RestorePhase 3: Finalizing and Submitting the JobPhase 4: Recovering the DatabasePhase 5: Opening the Database for Use
This section outlines the various steps to be performed in these phases in order to complete data restoration successfully
6.2.1 Phase 1: Preparing Database for RecoveryWhile it is not necessary to take a complete Oracle Database offline to restore selected tablespaces, each individual tablespace that is to be restored must be taken offline prior to performing the restore.
1. Connect to the database with SYSDBA privileges via the SQL*PLUS utility.SQLPLUS SYS AS SYSDBA
2. If the database is open, take all tablespaces containing damaged datafiles offline by executing the following command:ALTER TABLESPACE <Tablespace name> OFFLINE IMMEDIATE;

79
6.2.2 Phase 2: Selecting Data for a Restore1. From the NetVault: Backup GUI, open the Restore window (via either of the
Restore buttons available in the command toolbars or by choosing the Restore command from the Operations pull-down menu). You will see a list of NetVault: Backup Clients that have been the target of backup jobs in the Selections tab.
2. Locate the Client configured as the Oracle Database Server in the list, and open it. To open any node in the Selections tab, you can do either of the following:
Double-click on the nodeRight-click and select Open command from the pop-up menu
A list of APMs/plugins which have been used to backup data will be displayed when you open the Oracle Database Server node.
Figure 6-1:A User
Managedbackupsaveset
opened forrestore
3. Next, locate the Oracle APM in the list and open it. You will see the list of backup savesets created with the APM. Each saveset will be labeled with it’s given “Job Title” followed by its backup type and the time that the backup was performed. For User Managed backups, the type will be always UM FULL DB.
4. Open the desired backup saveset. This will display the database that was the target of the backup. Open it further to list the items contained in the saveset. From this level, double-click on a node to open it (the right-click + Open method is not available).
5. Depending upon the items selected for the backup, the saveset will include the following items:
Parameter File All Tablespaces Backup Control FileArchive Logs
You can open each of these items and select the items for inclusion in the restore procedure.

Chapter 6Restore
80
6.2.3 Phase 3: Finalizing and Submitting the JobFigure 6-2:
The RestoreOptions tab forUser Managed
restores
For the User Managed restores, you do not have to set any other options (the Restore Options tab does not contain any fields).
1. Set the additional options available in the Schedule, Target Client and Advanced Options tabs of the Restore window, as required. These options are not unique to the Oracle APM. For information on these options, please refer to the chapter dedicated to the Restore functionality in the NetVault: Backup Administrator’s Guide.
2. Enter a suitable name for the job in the Job Title field. Specify a detailed name that allows you to easily identify the job for monitoring its progress.
3. Click on the Submit button.4. You can monitor the restore job progress and log entries via the Job
Management, Status, and NetVault Logs windows. Please see the NetVault: Backup Administrator’s Guide for details on accessing these windows and their use.
6.2.4 Phase 4: Recovering DatabaseAfter restoring the datafiles, you can choose to recover the database, tablespace, or the datafile.
1. Connect to the database with SYSDBA privileges via the SQL*PLUS utility.SQLPLUS SYS AS SYSDBA
2. Execute one of following commands based on the required result:Recover Whole DatabaseRECOVER DATABASERecover Specific TablespaceRECOVER TABLESPACE <tablespace name>Recover Specific DatafileRECOVER DATAFILE '<datafile name with the complete path>';
3. The database notifies you when media recovery is complete:Media recovery complete.
6.2.5 Phase 5: Opening Database for UseAfter recovery terminates, you must open the database for use by issuing the following command at the SQL*PLUS prompt:
ALTER DATABASE OPEN;

81
6.3.0 Advanced User Managed Restore ProceduresThis section comprises of sections that describe other User Managed restore operations that can be performed with the Oracle APM.
6.3.1 Renaming and/or Relocating Files During RestoreWith the User Managed backup method, the Oracle APM allows you to rename the Control File, Datafiles, and Archive Log Directory or Individual Archived Log files during restore. Renaming of files can be useful if you do not want to overwrite the existing version and want to create a copy of the file. You can also relocate the files to a different directory while restoring it with the APM.
The steps to rename and/or relocate a database during restore are given below:
6.3.1.a Renaming/Relocating Control File, Datafile, or Individual Archived Log Files
1. Complete the steps outlined in Phase 1: Preparing Database for Recovery on page 78.
2. Select the Datafile, Control File, or the individual Archived Log file to be restored from the backup saveset by following the instructions outlined in Phase 2: Selecting Data for a Restore on page 79.
3. Right-click on the item and select the Rename command from the pop-up menu
4. In the Restore Rename - <File name> window that appears, set the following values:
Figure 6-3:The Restore
Rename -<File name>
window
Rename To - Click on this checkbox. This will activate the associated textbox. Enter the new name/new destination folder for the selected file as described below:Specify a New Name - The file will be restored to the NETVAULT_HOME directory with the name specified in this field.Specify Existing Name With a New Path - If you specify a new path and the current name, then the file will be relocated to the new folder, and maintain its existing file name.Specify a New Name and a New Path - If you specify a new name and a new path, the file will be relocated to new location with the specified name.

Chapter 6Restore
82
5. Click OK to apply changes. The file will be accompanied by rename/relocate information in the parenthesis.
Figure 6-4:A datafile
marked with itsRename/
Relocationinformation in
the Selectionstab 6. Continue with the restore procedure as explained in Phase 3: Finalizing and
Submitting the Job on page 80.
6.3.1.b Renaming/Relocating Archive Log Directory During RestoreWhen renaming an Archive Log Directory for User Managed backups, enter the new destination directory in the Rename To field selecting the Archive Log Directory in the Restore Selections window and selecting Rename form the Right-click menu. All of the Archive Logs will be restored to the directory specified.
1. Complete the steps outlined in Phase 1: Preparing Database for Recovery on page 78.
2. Select the Archive Log Directory to be restored from the backup saveset by following the instructions outlined in Phase 2: Selecting Data for a Restore on page 79.
3. Right-click on the item and select the Rename command from the pop-up menu
4. In the Restore Rename - <File name> window that appears, set the following values:
Rename To - Click on this checkbox. This will activate the associated textbox. Specify the complete path and name of the new destination directory for the Archive Log Directory in this field. All the Archived Log files in the Archived Log Directory will be restored to the directory specified in this field.
5. Click OK to apply changes. The file will be accompanied by rename/relocate information in the parenthesis.
6. Continue with the restore procedure as explained in Phase 3: Finalizing and Submitting the Job on page 80.
Important: When renaming individual archive log files during a restore job, you must perform media recovery with SET AUTORECOVERY OFF, and enter the archive log filenames manually indicating the renamed file names.
Important: When restoring some or all of the required archived redo log files to an alternate location, specify the location before media recovery using the LOGSOURCE parameter of the SET statement in SQL*Plus.

83
6.3.1.c Additional Functionality Available in the Restore Selections TabIn addition to direct data selection, the Selections tab offers several other functionality that can be used to perform tasks from locating specific data to managing entries in the NetVault: Backup Database. This functionality is not unique to the Oracle APM (it is available for use with all NetVault: Backup APMs/Plugins), and descriptions on their use can be found in the NetVault: Backup Administrator’s Guide. The points below offer a brief description of this functionality as well as a reference to where information can be found in the NetVault: Backup Administrator’s Guide.
Figure 6-5:The Selection
Methodoptions, which
allow you tochoose how
items aredisplayed in
the Selectionstab
Selection Method Pull-down Menu - This menu allows you to select a method for the organization of data items displayed in the Selections tab, based on three basic selections:
APM/Plugin Used in the Backup (Default)Backup Selection Set UsedJob Title
Information on this functionality can be found in the section The Selection Method Pull-down Menu located in the chapter of the NetVault: Backup Administrator’s Guide dedicated to the Restore functionality.
Figure 6-6:The Filter
Options, whichallow you to
filter how itemsare displayed
in theSelections tab
Filter Options - Filter Options can be set to customize how data is displayed in the Restore Selections window. The following options are available:
By Date Range - To list the savesets generated during a given period, select this option and set the dates in the fields provided.Show On-line Status - Select this option to list only the currently available media.
Click on the Apply Filter button. Details on this functionality are covered in the section The Filter Options Frame located in the chapter of the NetVault: Backup Administrator’s Guide dedicated to the Restore functionality.

Chapter 6Restore
84
Figure 6-7:The Searchfunctionalityallows you tolocate and
displayselecatbale
data based onits title
Search Functionality - At various levels of the selection tree, you can access the “Search...” command by right-clicking a node. This allows you to search for specific data items based on an item’s name. Information on this functionality can be found in the section The Search Facility located in the chapter of the NetVault: Backup Administrator’s Guide dedicated to the Restore functionality.
Figure 6-8:The Media Listcommand that
is used todisplay media-
relatedinformation for
the selectedbackupsaveset
Media List - This command provides information pertaining to the media used for the backup saveset. Complete information on this functionality can be found in the section “The Media List Tool” located in the chapter of the NetVault: Backup Administrator’s Guide dedicated to the Restore functionality.Index Compression Functionality (Compress/Uncompress Commands) - Each job generates an index entry in the NetVault: Backup Database (NVDB), and this entry is required by NetVault: Backup to restore the job. However, as job numbers increase, so do the number of index entries, and as an end result, the NVDB will continue to grow and occupy increasing amount of hard disk space.
Figure 6-9:The Index
Compressionfunctionality
that is used tocompressNetVault
Databaseindex size, to
conserve harddisk space on
the NetVaultServer
This functionality allows you to compress these entries and reduce the overall size of the NVDB. In turn, these entries can be decompressed as required, to allow for a restore. Complete information on this functionality can be found in the section NetVault: Backup Database Management and the Restore Window located in the chapter of the NetVault: Backup Administrator’s Guide dedicated to the Restore functionality.
6.4.0 Available RMAN Recovery Types in a Non-RAC EnvironmentFor information on the types of RMAN Recovery Available in a RAC Environment, see Types of RMAN Recovery Available in a RAC Environment of Appendix A on page 147.
6.4.1 Restoring Control File from an AutobackupRestoring the Control File should only be performed in the following cases:

85
All current copies of the control file have been lost due to a media failure, accidental user deletion or have become corrupted and are not usableOracle Customer Support has advised that a Control File restore is required
As the autobackup uses a default format, RMAN can restore it even if it does not have a repository available that lists the available backups. RMAN replicates the Control File to all CONTROL_FILES locations automatically.
1. Start RMAN and connect to the target database:>rman connect TARGET /
2. Start the target instance without mounting the database:STARTUP FORCE NOMOUNT;
3. Set the database identifier for the target database with SET DBID. RMAN displays the DBID whenever you connect to the target. You can also obtain it by inspecting saved RMAN log files, querying the Catalog, or looking at the filenames of Control File autobackup. For example, run: SET DBID <Source_DBID>;
4. Restore the Control File Autobackup:RUN {ALLOCATE CHANNEL CH1 TYPE 'SBT_TAPE';RESTORE CONTROLFILE FROM AUTOBACKUP;ALTER DATABASE MOUNT;RESTORE DATABASE;RECOVER DATABASE;}
5. Open the database and reset the online logs:ALTER DATABASE OPEN RESETLOGS;
Running the ALTER DATABASE OPEN RESETLOGS from RMAN versus SQL*Plus resets the target database automatically so that you do not have to run a RESET DATABASE. By resetting the database, RMAN considers the new incarnation as the current incarnation of the database. If you ALTER DATABASE OPEN RESETLOGS from SQL*Plus and do not follow it with a RESET DATABASE at the RMAN prompt, then RMAN refuses to access the Recovery Catalog because it cannot distinguish between a RESETLOGS operation and an accidental restore of an old control file.
Important: After restoring a Control File from an autobackup, it is highly recommended that a Full or Incremental Level 0 backup with the entire database selected in the Backup Selections tab be performed.

Chapter 6Restore
86
6.4.2 Recovering Individual Datafiles/Tablespaces to Same ServerThis type of recovery is performed when the database is open, but some of the datafiles are damaged. This is useful when you want to recover the damaged tablespace, while leaving the database open so that the rest of the database remains available. You will only be able to perform Complete Recovery when restoring and recovering individual datafiles/tablespaces. Point-in-Time recovery is not available for individual datafiles/tablespaces. Enabling Point-in-Time recovery will cause the restore job to fail. Following is an overview of the process to recover individual datafiles/tablespaces:
1. In the Oracle APM Restore Selections window, select the damaged datafile(s)/tablespace(s) from the latest available backup of the tablespace.
2. In the Restore Options tab of the Restore Options window, select the Alter Tablespaces Offline Before Restore and the Alter Tablespaces Online After Restore options.
3. To recover the tablespace to the current time, i.e., last committed transaction available in the archive and online redo logs, select the Perform Complete Recovery option in the Perform Recovery tab. If you do not want to perform any recovery, select the Do Not Perform Recovery option in this tab. Note that, if you select Perform Database Point in Time Recovery option in this tab, the restore job will fail.
4. In the Perform Recovery tab, select the Delete Restored Archive Logs No Longer Needed option to delete the restored archive logs that Oracle itself deems are no longer necessary.
5. Complete the Schedule, Target Client and Advanced Options, and submit the job.
6. RMAN will automatically choose the best available full, incremental, or archived log backups and restore and recover the tablespace.
6.4.3 Recovering Whole Database to Same ServerThis type of recovery is performed when the current Control File and SPFILE are intact but all the datafiles are damaged or lost. You will be able to perform complete recovery or recover the database to a specific point-in-time. Following is an overview of the process to recover the whole database which must be performed when the database is a MOUNT state:
1. In the Oracle APM Restore Selections window, find the latest available backup that included ALL the tablespaces and select the Whole Database node.
2. In the Restore Options window:
87
a. In the Restore Options tab, select the Mount Database Before Restore to automatically mount the database before the performing the restore. Select Shutdown Abort Database First to automatically shutdown the database before mounting the database. Select Check Read-Only Datafiles and Restore if Necessary to include read-only datafiles in the restore.
b. To perform recovery on the database, i.e., reconstruct the database up to the current or specified point-in-time, select one of the following options in the Perform Recovery tab:
Perform Complete Recovery – Recovers the database to the current time, i.e., last committed transaction available in the archived and online redo logs.Perform Point-in-Time Recovery – Recovers the database to a specific point-in-time whether it be a specific time, log sequence number, or SCN.
Select Check Read-Only Datafiles and Recover if Not Current to include read-only datafiles in the recovery process. The read-only files will be included only if they are needed to complete recovery. If they are not damaged, RMAN will omit them. Select Delete Archive Logs No Longer Needed to delete the restored archive logs that Oracle itself deems are no longer necessary.
c. In the Post Recovery tab, select the Open Database after Recovery and Read Write and Reset Logs to automatically open the database in read-write mode and reset the online logs.
3. Complete the Schedule, Target Client and Advanced Options, and submit the job.
4. RMAN will automatically choose the best available full, incremental, or archived log backups and restore and recover the database.
6.4.4 Performing Disaster Recovery with RMAN Disaster recovery includes the restore and recovery of a database after the loss of the entire target database, all current control files, all online redo log files, and all parameter files. It is also assumed that the Flash Recovery Area has been lost.To perform a disaster recovery, the minimum required set of backups is backups of all the datafiles, some archived redo logs generated after the time of the backup, and at least one autobackup of the control file.
Important: After completing a restore of the Whole Database, it is highly recommended that a Full or Incremental Level 0 backup with the entire database selected in the Backup Selections tab be performed.

Chapter 6Restore
88
If your goal is to create a new copy of your target database for ongoing use on a new host, these procedures should not be used. The Duplicate Database backup type is designed specifically for this purpose. Refer to Duplicate Database Backup of Chapter 2 on page 20 for more information.
6.4.4.a Disaster Recovery to Same Server The following procedure details the steps to perform disaster recovery to the same server where the source database resided. This procedure would be utilized in the scenario in which a complete media failure occurred and either the damaged host was rebuilt using the same configuration or a new server was configured imitating the original host's configuration including host name.
The same procedure should be used whether a Recovery Catalog was being used as part of the backup strategy for the RMAN Repository or not. RMAN always stores information concerning the backups in records in the control file. The version of this information in the control file is the authoritative record of RMAN's backups of your database. RMAN can conduct all necessary backup and recovery operations using just the repository information in the control file.
For variations to the Disaster Recovery procedure below, refer to Performing Disaster Recovery section in Oracle Database Backup and Recovery Advanced User's Guide for more information.
Pre-RequisitesTo perform a disaster recovery without a Recovery Catalog, the following requirements must be met:
Oracle Database Software Installed - Install the same version of the Oracle database software on the system as existed on the damaged server. The ORACLE_HOME should be identical on both the source and destination Oracle server. You do not have to create the database.Oracle Service On Windows Created and Started - Create the Oracle Service on Windows with Oracle's oradim utility. The Oracle SID should be identical to the original or source database. This will result in identical Oracle Service name. For example from a OS prompt execute:oradim -new -sid <sid_name>
Important: When performing a test recovery ensure that you do not connect to the Recovery Catalog during datafile restoration. Otherwise, RMAN will record information about the restored datafiles to the recovery catalog. This interferes with future attempts to restore and recover the primary database. If you must use a recovery catalog because the control file is not large enough to contain the RMAN repository data on all of the backups that you need to restore, then export the catalog and import it into a different schema or database and use the copied recovery catalog for the test restore. Otherwise, the catalog considers the restored database as the current target database.

89
After the Windows service is created, start the service with the following command from an OS prompt: net start oracleservice<sid_name>NetVault: Backup Software and the Oracle APM Installed - The same version of NetVault: Backup software and the Oracle APM must be installed and configured as it originally existed on the damaged server. Ensure the Oracle APM default attributes are defined as specified in Configuring Default Attributes of Chapter 4 on page 36. DBID of the Source Database Identified - Identify the DBID of the damaged database. If the DBID was not recorded as part of the initial Oracle APM installation, the DBID can be obtained by examining the NetVault: Backup binary logs for RMAN based backups of the source database. The DBID is also available in the View Database Details window or the Backup Contents tab of the Restore Options window.Default Location for SPFILE must Exist - Default location for the SPFILE must exist before beginning the steps below. Failure to ensure that the default location will result in an ORA-17502 Failed to create file error during the SPFILE restore.Backups of All Tablespaces Made Available - Make sure that you have the latest backups of all the tablespaces.
Disaster Recovery Procedure1. Restore the Oracle Net Services Configuration Files. If the Filesystem
Plugin was utilized to backup the Oracle Net Services configuration files such as LISTENER.ORA, SQLNET.ORA, and TNSNAMES.ORA, restore the files to the destination Oracle Database Server. Otherwise, configure the Oracle Net Services on the destination Oracle server.
2. Start the Oracle listener. For example from an OS command prompt run:lsnrctl start
3. Start RMAN with no catalog and connect to the target database:RMAN TARGET / NOCATALOG
4. Set the DBID to the damaged database DBID. SET DBID <Source_DBID>;
5. Start the target instance without mounting the database.STARTUP NOMOUNT;
6. Restore the SPFILE from autobackup.RUN {ALLOCATE CHANNEL C1 TYPE 'SBT_TAPE';RESTORE SPFILE FROM AUTOBACKUP;}
Chapter 6Restore
90
7. Restart the database with the restored SPFILE. STARTUP FORCE NOMOUNT;
8. Restore the Control File from Autobackup. If restoring the Control File from the last autobackup execute: RUN {ALLOCATE CHANNEL CH1 TYPE 'SBT_TAPE';RESTORE CONTROLFILE FROM AUTOBACKUP;}
9. In the Oracle APM Restore Selections tab, navigate to the source NetVault: Backup Client and database, and find the latest available backup that included ALL the tablespaces and select the Whole Database node.
10.In the Restore Options window:a. In the Restore Options tab, select Mount Database Before Restore to
automatically mount the database before the performing the restore. Select Check Read-Only Datafiles and Restore if Necessary to include read-only datafiles in the restore.
b. Recovery must be performed in a disaster recovery scenario. In the Perform Recovery tab, select Perform Database Point-in-Time Recovery. Point-in-time recovery recovers the database to a specific time, log sequence number or SCN. If the specific time or log sequence of the failure is not known, it is recommended that the SCN option be utilized. Select Check Read-Only Datafiles and Recover if Not Current to include read-only datafiles in the recovery process. The read-only files will be included only if they are needed to complete recovery. If they are not damaged, RMAN will omit them.
c. In the Post Recovery tab, select Open Database after Recovery and Read Write and Reset Logs to automatically open the database in read-write mode and reset the online logs.
d. In the Recovery Catalog tab, deselect the Use Catalog option to ensure the Recovery Catalog is not used for this restore.
11.Complete the Schedule, Target Client and Advanced Options and submit the job.
12.RMAN will automatically choose the best available full, incremental, or archived log backups and restore and recover the database.
13.In RMAN, update the RMAN metadata.CROSSCHECK ARCHIVELOG ALL;
14.Exit RMAN.

91
6.5.0 Performing RMAN RestoresA standard RMAN restore with the Oracle APM can be divided into the following phases:
Phase 1: Selecting Data Items for a RestorePhase 2: Setting Restore OptionsPhase 3: Finalizing and Submitting the Job
This section outlines the various steps to be performed in these phases in order to complete data restoration successfully.
6.5.1 Phase 1: Selecting Data for a Restore1. From the NetVault: Backup GUI, open the Restore window (via either of the
Restore buttons available in the command toolbars or by choosing the Restore command from the Operations pull-down menu). You will see a list of NetVault: Backup Clients that have been the target of backup jobs in the Selections tab.
2. Locate the Client configured as the Oracle Database Server in the list, and open it. To open any node in the Selections tab, you can do either of the following:
Double-click on the nodeRight-click and select Open command from the pop-up menu
A list of APMs/plugins which have been used to backup data will be displayed when you open the Oracle Database Server node.
Important: After completing a disaster recovery, it is highly recommended that a Full or Incremental Level 0 backup with the entire database selected in the Backup Selections tab be performed.

Chapter 6Restore
92
Figure 6-10:An RMANbackupsaveset
opened forrestore
3. Next, locate the Oracle APM in the list and open it. You will see the list of backup savesets created with the APM. Each saveset will be labeled with it’s given “Job Title” followed by its backup type and the time that the backup was performed. The backup type identifiers are outlined in the table below:
4. Open the desired backup saveset. This will display the database that was the target of the backup. Open it further to list the items contained in the saveset. From this level, double-click on a node to open it (the right-click + Open method is not available).
5. The Whole Database node and the other nodes based on the items selected for the backup will be displayed:
Whole Database - Select this node if you want to Restore and/or Recover the entire database. With this option selected, you can perform the Database Point-in-Time Recovery based on SCN, LSN, or time to re-construct the database up to the required point. Note that, selecting the All Tablespaces node or all the datafiles/tablespaces nodes is not equivalent to selecting this node.Parameter File - Available only if the Control File Autobackup Enabled option is deselected in the Add/Edit Database window.
Backup Type Backup Type IdentifierRMAN Archive Log RMAN ARCHIVE LOG
RMAN Control File and Parameter File RMAN CTRL PARM
RMAN Cumulative Incremental RMAN CUML INCRMTAL
RMAN Differential Incremental RMAN DIFF INCRMTAL
RMAN Duplicate Database RMAN DUPL DB
RMAN Flash Recovery Area RMAN FRA
RMAN Full Database RMAN FULL DB
RMAN Incremental Level 0 RMAN INCRMTAL LVL 0

93
When restoring a parameter file, select the backup that contains the specific version of the Parameter File you want to restore. For example, the Parameter File is backed up weekly on Sunday night at 11 p.m. Assuming today is Thursday and you need to restore the Parameter File to the state it was on Tuesday at 6 p.m., select the Parameter File from the last backup that occurred before Tuesday at 6 p.m. which would be Sunday night's backup at 11 p.m.Control File - This node cannot be opened further. Secondly, if a Recovery Catalog is not in use, then the Control File cannot be restored from the GUI. The restore will fail if you try to include Control File in a restore job, unless the Use Catalog is enabled in the Recovery Catalog tab.When restoring the Control File from Manual Backup, select the backup that contains the specific version of the Control File you want to restore. For example, manual backups of the Control File are performed nightly at 11 p.m. Assuming today is Thursday and you need to restore the Control File to the state it was on Tuesday at 6 p.m., select the Control File from the last backup that occurred before Tuesday at 6 p.m. which would be Monday night's backup at 11 p.m.All Tablespaces - Select this node to perform an All Tablespace restore where all the tablespaces are restored consecutively with the RMAN RESTORE DATAFILE command. Performing an All Tablespace restore requires the database to be in a MOUNT state. The Oracle APM can automatically put the database in the MOUNT state with the Mount Database Before Restore and Shutdown Abort Database First restore options.Individual Tablespaces/Datafiles - Open the All Tablespaces node to reveal the tablespaces available for restoration. You can select individual or multiple tablespaces or open the tablespace node and select the individual datafiles to be restored. Restoring individual tablespaces or datafiles requires the tablespace to be OFFLINE during the restore and recovery process. The Oracle APM can automatically take the tablespace offline before the restore and put the tablespace back online after the restore with the Alter Tablespaces Offline Before Restore and Alter Tablespaces Online After Restore options.
6.5.1.a Additional Functionality Available in the Restore Selections TabIn addition to direct data selection, the Selections tab offers a variety of other functionality that can be used to perform tasks from locating specific data to managing entries in the NetVault: Backup Database. This functionality is not unique to the Oracle APM (it is available for use with all NetVault: Backup APMs/Plugins), and descriptions on their use can be found in the NetVault: Backup

Chapter 6Restore
94
Administrator’s Guide. The points below offer a brief description of this functionality as well as a reference to where information can be found in the NetVault: Backup Administrator’s Guide.
Figure 6-11:The Selection
Methodoptions, which
allow you tochoose how
items aredisplayed in
the Selectionstab
Selection Method Pull-down Menu - This menu allows you to select a method for the organization of data items displayed in the Selections tab, based on three basic selections:
APM/Plugin Used in the Backup (Default)Backup Selection Set UsedJob Title
Information on this functionality can be found in the section The Selection Method Pull-down Menu located in the chapter of the NetVault: Backup Administrator’s Guide dedicated to the Restore functionality.
Figure 6-12:The Filter
Options, whichallow you to
filter how itemsare displayed
in theSelections tab
Filter Options Frame - Filter Options can be set to customize how data is displayed in the Restore Selections window. The following options are available.
By Date Range - To list the savesets generated during a given period, select this option and set the dates in the fields provided.Show On-line Status - Select this option to list only the currently available media.
Click on the Apply Filter button. Details on this functionality are covered in the section The Filter Options Frame located in the chapter of the NetVault: Backup Administrator’s Guide dedicated to the Restore functionality.
Figure 6-13:The Searchfunctionality
allows you tolocate and
display databased on its
title
Search Functionality - At various levels of the selection tree, you can access the “Search...” by right-clicking a node. This allows you to search for specific data items based on an item’s name. Information on this functionality can be found in the section The Search Facility located in the chapter of the NetVault: Backup Administrator’s Guide dedicated to the Restore functionality.

95
Figure 6-14:The Media Listcommand that
is used todisplay media-
relatedinformation for
the selectedbackupsaveset
Media List - This command provides information pertaining to the media used for this backup saveset. Complete information on this functionality can be found in the section The Media List Tool located in the chapter of the NetVault: Backup Administrator’s Guide dedicated to the Restore functionality.
Figure 6-15:The Index
Compressionfunctionality
that is used tocompressNetVault
Databaseindex size, to
conserve harddisk space on
the NetVaultServer
Index Compression Functionality (Compress/Uncompress Commands) - Each job generates an index entry in the NetVault: Backup Database (NVDB), and this entry is required by NetVault: Backup to restore the job. However, as job numbers increase, so do the number of index entries, and as an end result, the NVDB will continue to grow and occupy increasing amount of hard disk space. This functionality allows you to compress these entries and reduce the overall size of the NVDB. In turn, these entries can be decompressed as required, to allow for a restore. Complete information on this functionality can be found in the section NetVault: Backup Database Management and the Restore Window located in the chapter of the NetVault: Backup Administrator’s Guide dedicated to the Restore functionality.
6.5.2 Phase 3: Setting Restore OptionsIn this phase, you will specify whether you want to perform complete or point-in-time recovery, and set the other restore options. Click on the Restore Options tab to proceed with the restore procedure.
6.5.2.a Viewing the Contents of Backup Pieces Before proceeding with the restore, you can view the contents of the various backup pieces in the selected backup set and see what each piece contains, the backup start and end time, datafile name(s), SCN range, including the low and high SCN, and the log sequence number of the archived redo logs. To view these details, click on the Backup Contents tab.

Chapter 6Restore
96
Figure 6-16:The BackupContents tab
6.5.2.b Setting the Pre-Restore and General Restore OptionsPre-Restore Options - These options provide the user the flexibility to automatically prepare the database or tablespaces for the restore process during the Oracle APM restore job.
Figure 6-17:The RestoreOptions tab

97
Mount Database Before Restore - When performing Whole Database or All Tablespace restores, the database must be in a MOUNT state. Select this option if you want the Oracle APM to automatically mount the database before performing the restore and recovery. If this option is not selected, the database must be manually put into a MOUNT state before submitting the restore job or the restore job will fail.Shutdown Abort Database First - Available only when Mount Database Before Restore is selected. If the database is currently in an OPEN state, the database must be shutdown before it can be opened in a MOUNT state. Select this option if you want the Oracle APM to automatically execute a SHUTDOWN ABORT before starting up the database in a MOUNT state. If the option is not selected and the Mount Database Before Restore option is selected, the restore job will fail if the user does not manually shutdown the database before submitting the restore job.Alter Tablespaces Offline Before Restore - When restoring individual tablespace/datafiles, the tablespace must be offline before the restore is performed. Select this option if you want the Oracle APM to automatically execute the ALTER TABLESPACE OFFLINE command for each tablespace that is being restored.
Restore Options - These options pertain to the restore phase of Oracle's restore and recovery process.
Alter Tablespaces Online After Restore - When restoring individual tablespace/datafiles, the tablespace must be returned to an online state after the restore/recovery is completed. Select this option if you want the Oracle APM to automatically execute the ALTER TABLESPACE ONLINE command after the selected tablespaces are restored/recovered.Check Read-only Datafiles and Restore if Necessary - Select this option to include read-only datafiles in the restore. The read-only files will be included only if they are needed for the complete recovery. If they are not damaged, RMAN will omit them.Number of Channels - You can control the degree of parallelism within a restore job by allocating the desired number of channels. Allocating multiple channels simultaneously allows a single restore job to restore multiple backup sets in parallel. The number of channels should be less than or equal to (<) the number of channels that was specified for the backup job.Restore Source - Select the location that RMAN should use as the source for the restore. This option provides the flexibility to speed up restores by ensuring that RMAN restores from the FRA even if the backup is also available on NetVault: Backup media (i.e., VTL or Tape). Alternately, the Restore Source option can ensure that RMAN restores from the NetVault: Backup media when the FRA is suspected to have a

Chapter 6Restore
98
media failure or data corruption. This is useful when the user does not want to risk restarting the restore and recovery process due to RMAN's inability to restore from the FRA. Additionally, these same options can be used from the Oracle APM GUI even if the user originally performed CLI-based backups to Disk by allocating a channel to Disk.The following Restore Source options are available:
Tape (Restore from NetVault: Backup Media)Disk (Restore from FRA or Disk)Both Tape and Disk (Restore from both NetVault: Backup Media and (FRA or Disk)
Refer to Choosing the Restore Source on page 74 for more information on selecting the best restore source option.
6.5.2.c Setting Recovery OptionsThis release of the Oracle APM supports the following types of Datafile Media Recovery. (See Datafile Media Recovery on page 75 for more information on complete and in-complete database recovery.)
Complete Recovery of Individual Datafile(s)/Tablespace(s)Complete Recovery of Whole DatabasePoint-in-Time Recovery of Database (DBPITR)
The Tablespace Point-in-Time Recovery (TSPITR), which enables PIT recovery on one or more tablespaces is not supported with this release of the Oracle APM.
Use the Perform Recovery tab to select the type of recovery and the recovery options that pertain the recovery phase of the restore and recovery process:
Recovery Type - Use these options to select the type of recovery to be performed.
Do Not Perform Recovery - Select this option if you just want to restore the files and do not want to perform recovery at all.
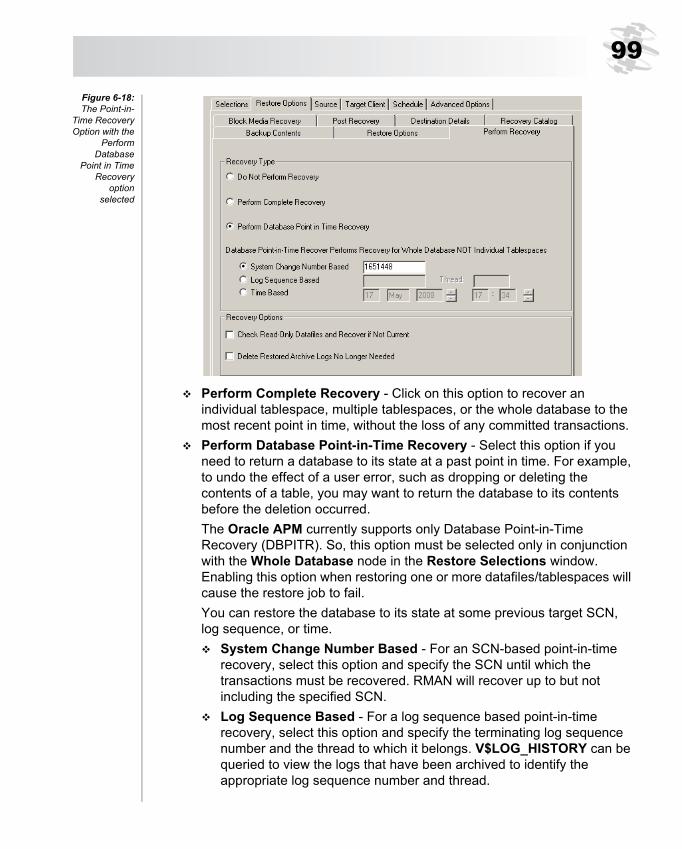
99
Figure 6-18:The Point-in-
Time RecoveryOption with the
PerformDatabase
Point in TimeRecovery
optionselected
Perform Complete Recovery - Click on this option to recover an individual tablespace, multiple tablespaces, or the whole database to the most recent point in time, without the loss of any committed transactions.Perform Database Point-in-Time Recovery - Select this option if you need to return a database to its state at a past point in time. For example, to undo the effect of a user error, such as dropping or deleting the contents of a table, you may want to return the database to its contents before the deletion occurred. The Oracle APM currently supports only Database Point-in-Time Recovery (DBPITR). So, this option must be selected only in conjunction with the Whole Database node in the Restore Selections window. Enabling this option when restoring one or more datafiles/tablespaces will cause the restore job to fail.You can restore the database to its state at some previous target SCN, log sequence, or time.
System Change Number Based - For an SCN-based point-in-time recovery, select this option and specify the SCN until which the transactions must be recovered. RMAN will recover up to but not including the specified SCN.Log Sequence Based - For a log sequence based point-in-time recovery, select this option and specify the terminating log sequence number and the thread to which it belongs. V$LOG_HISTORY can be queried to view the logs that have been archived to identify the appropriate log sequence number and thread.

Chapter 6Restore
100
Time Based - For a time-based point-in-time recovery, select this option, and set the date and time in the fields provided. The Oracle APM will recover up to but not including the specified time.
Recovery Options - These options pertain to the recovery phase of the restore and recovery process.
Check Read-Only Datafiles and Recover if Not Current - Used in conjunction with the Check Read-Only Datafiles and Restore if Necessary Restore Option. Select this option to include read-only datafiles in the recovery process. The read-only files will be included only if they are needed for the complete recovery. If they are not damaged, RMAN will omit them.Delete Restored Archive Logs No Longer Needed - The Oracle APM copies the archived redo logs to the directory from which they were backed up. Select this option to delete the restored archive logs that Oracle deems as no longer necessary.
6.5.2.d Setting Block Media Recovery OptionsBlock media recovery is only available in the Oracle Enterprise Edition as a feature to reduce downtime by allowing users to recover only the blocks that were corrupted instead of restoring and recovering the entire datafile. Block media recovery is most useful for physical corruption problems that involve a small, well-known number of blocks. Refer to the Block Media Recovery on page 76 for more information on Block Media Recovery, its pre-requisites and the process of identifying corrupted blocks.
Figure 6-19:Block Media
Recovery tab

101
Use the options in the Block Media Recovery tab to specify that you want to perform Block Media Recovery. When Block Media Recovery is performed, the following should be noted:
Objects selected in the Restore Selection tree are ignoredMount Database Before Restore and Shutdown Abort Database First options in the Restore Options tab are honoredOptions selected in the Post Recovery Options tab are honoredAll other Restore and Recovery Options are ignored
The options in the Block Media Recovery tab are listed below:
Perform Block Media Recovery - Select this option to perform Block Media Recovery and recover only the corrupted blocks versus recovering the entire datafile(s). Recover All Corrupted Blocks - Select this option to recover all the corrupted blocks that are reported in V$DATABASE_BLOCK_CORRUPTION. The RMAN BLOCKRECOVERY command is used to recovery the entire corruption list.Specify Corrupted Blocks to Recover - When it is determined that is desired to only recover a certain subset of the corrupted blocks, select this option to activate the Specify Corrupted Blocks Edit Box.Specify Corrupted Blocks Edit Box - Use this multi-line edit box to enter the datafile number and block number of each of the corrupted blocks that you want to recover. Datafile-block entries should be entered one entry per line in the following format.DATAFILE <num> BLOCK <num>DATAFILE <num> BLOCK <num>...DATAFILE <num> BLOCK <num>DATAFILE <num> BLOCK <num>In this example, <num> represents the datafile and block number that is to be recovered.The Corrupted Blocks Edit Box allows up to 4096 characters which results in approximately 200 datafile-block entries. It should be noted that no syntax validation is performed on the entries.
6.5.2.e Setting Post Recovery OptionsWhen performing the Whole Database, All Tablespace, or Disaster Recovery, the database is in a MOUNT state during the restore and recovery process and

Chapter 6Restore
102
must be returned to the OPEN state upon its completion. The Oracle APM provides the user the flexibility to automatically open the database after the recovery process during the Oracle APM restore job.
Figure 6-20:The Post
Recovery tab
The Post Recovery tab Includes the following options:
Open Database after Recovery - Select this option to automatically open the database and make it available for normal use after the recovery process during the restore job. This is equivalent to the ALTER DATABASE OPEN command.The following options are only available when the Open Database after Recovery option is selected.
Read Write - Opens the database in read/write mode, allowing users to generate redo logs. This is the default if you are opening a primary database.Read Write and Reset Logs - Opens the database in read/write mode and resets the current log sequence number to one (1), archives any un-archived logs (including the current log), and discards any redo information that was not applied during recovery so that it will never be applied. This option must be selected in the following situations:
After performing incomplete media recovery or media recovery using a backup control fileAfter a previous OPEN RESETLOGS operation that did not completeAfter a FLASHBACK DATABASE operation
Read Only - Select this option to restrict users to read-only transactions, preventing them from generating redo logs. This is the default setting when you are opening a physical standby database, so that the physical standby database is available for queries even while archive logs are being copied from the primary database site. Oracle has the following restrictions on opening a database with the READ ONLY option:
You cannot open a database in READ ONLY mode if it is currently opened in READ WRITE mode by another instance.

103
You cannot open a database in READ ONLY mode if it requires recovery.You cannot take tablespaces offline while the database is open in READ ONLY mode. However, you can take datafiles offline and online, and you can recover offline datafiles and tablespaces while the database is open in READ ONLY mode.
6.5.2.f Setting Destination DetailsIf the SYSDBA user name/password, or the Oracle SID for the database has been changed since the time of backup, the set these options for the restore job in the Destination Details tab as described below:
Figure 6-21:The
DestinationDetails tab
Target Service - This option is required only if the current SID for the Oracle Database ID (DBID) has been changed since the time the backup was taken. Oracle SYSDBA User Name - Specify the new SYSDBA user name if changed.Oracle SYSDBA Password - Specify the password associated with the user name specified in the field above.
6.5.2.g Setting the Recovery Catalog DetailsWhile the Recovery Catalog information is provided for backups in the Configure or Add/Edit Database window, set the Recovery Catalog configuration for a particular restore job by configuring the Recovery Catalog information in the Recovery Catalog tab of the Restore Options window.
Important: The Destination Details requires that the Database ID (DBID) of the backed up or source database equal the DBID of the destination database. When the goal of the restore is to create a duplicate of the source database to a database with a different DBID, using a Duplicate Database Backup is required. Refer to the Duplicate Database Backup Type section in Chapter 2 for more information.

Chapter 6Restore
104
Figure 6-22:The RecoveryCatalog tab
Use Catalog - Select this option to use the RMAN repository in the Recovery Catalog and store information about this restore operation in a Recovery Catalog. De-select Use Catalog when performing a test recovery. The following fields will be enabled when you select this option:Catalog Net Service Name - Enter the Oracle Net Service name for the Recovery Catalog database. This service name must be defined in the “TNSNAMES.ORA” file on the Oracle Database Server so that the Oracle APM can connect to the Recovery Catalog database. If the Recovery Catalog was used during the backup, the Service Name field will default to the Oracle Net Service name used during.Catalog Owner - Specify the user that was specified as the owner of the Recovery Catalog and was granted the RECOVERY_CATALOG_OWNER role.Catalog Password - Provide the password associated with the Catalog owner name specified in the field above.
6.5.2.h Setting the Clone Database OptionsAvailable only when an RMAN DUPL DB backup is selected in the Restore Selections tab, the Clone Database tab is used to specify the options for restoring a Duplicate Database backup to a destination database. Refer to Duplicating a Database in a Non-RAC Environment on page 108 or Duplicating a Database in a RAC Environment of Appendix A on page 157 for more information on the pre-requisites for restoring Duplicate Database backups.

105
Figure 6-23:Clone
DatabaseOptions tab
only availablewhen RMAN
DUPL DBbackup is
selected inRestore
Selectionstree.
Duplicate Database - Select this option to restore the selected Duplicate Database backup to a alternate destination database.Destination Database Details
Target Service - Specify the Oracle Net Service name of the auxiliary instance. This field defaults to auxdb.Oracle Home - Specify the Oracle Home for the auxiliary instance. This field defaults to the Oracle Home of the source database.Oracle SYSDBA User Name - Specify the SYSDBA user name that will be used to connect to the auxiliary instance. This field defaults to the SYSDBA user name specified in the configuration of the source database.Use nofilenamecheck Option - Select this option to prevent RMAN from checking whether the datafiles and online redo logs files of the source database are in use when the source database files share the same names as the duplicate database files. You are responsible for determining that the duplicate operation will not overwrite useful data. This option is required when you are restoring a duplicate database to an alternate server. Do not select this option if restoring a duplicate database to the same server; otherwise the restore job will fail with the following errors:

Chapter 6Restore
106
RMAN-10035: exception raised in RPC: ORA-19504: failed to create file ORA-27086: skgfglk: unable to lock file - already in use SVR4 Error: 11: Resource temporarily unavailable RMAN-10031: ORA-19624 occurred during call to DBMS_BACKUP_RESTORE. RESTOREBACKUPPIECE
Duplicate From Database DetailsOracle SID - Specify the Oracle SID of the source database. This field defaults to the Oracle SID of the database including in the backup.Oracle Home - Specify the Oracle Home for the source database. This field defaults to the Oracle Home of the source database.Oracle SYSDBA User Name - Specify the SYSDBA user name that will be used to connect to the source database. This field defaults to the SYSDBA user name specified in the configuration of the source database.Oracle SYSDBA Password - Specify the password for the SYSDBA user name specified in the field above.
6.5.3 Phase 4: Finalizing and Submitting the JobWith all data items selected and the desired Restore Options set, follow the steps outlined below to finish set up of the job and submit it to run.
1. Set the additional options available in the Schedule, Target Client and Advanced Options tabs of the Restore window, as required. These options are not unique to the Oracle APM. For information on these options, please refer to the chapter dedicated to the Restore functionality in the NetVault: Backup Administrator’s Guide.
2. Enter a suitable name for the job in the Job Title field. Specify a detailed name that allows you to easily identify the job for monitoring its progress.
3. Click on the Submit button.4. You can monitor the restore job progress and log entries via the Job
Management, Status, and NetVault Logs windows. Please see the NetVault: Backup Administrator’s Guide for details on accessing these windows and their use.
6.6.0 Advanced Restore Procedures with RMANThis section comprises of sections that describe other restore operations that can be performed with the Oracle APM.

107
6.6.1 Renaming and/or Relocating Files During RestoreWith the RMAN backup method, the Oracle APM allows you to rename Control File and datafiles during restore. Renaming of files can be useful if you do not want to overwrite the existing version and want to create a copy of the file. You can also relocate the files to a different directory while restoring it with the APM.
The steps to rename and/or relocate a database during restore are given below:
1. Complete the steps outlined in Phase 1: Preparing Database for Recovery on page 78.
2. Select the Datafile, or Control File to be restored from the backup saveset by following the instructions outlined in Phase 1: Selecting Data for a Restore on page 91.
3. Right-click on the item and select the Rename command from the pop-up menu
4. In the Restore Rename - <File name> window that appears, set the following values:
Figure 6-24:The Restore
Rename -<File name>
window
Rename To - Click on this checkbox. This will activate the associated textbox. Enter the new name for the selected file in this field. The file will be restored to the directory identified by the DB_CREATE_FILE_DEST parameter in the Oracle Parameter File with the name specified in this field. Note that when renaming Control File during restore, the resulting filename should exist in the CONTROL_FILES list in the Oracle Parameter File.
5. Click OK to apply changes. The file will be accompanied by rename/relocate information in the parenthesis.

Chapter 6Restore
108
Figure 6-25:A datafilemarked with its
Rename/Relocation
information inthe Selections
tab
6. Continue with the restore procedure as explained in Phase 3: Setting Restore Options on page 95 (Performing RMAN Restores).
6.6.2 Duplicating a Database in a Non-RAC EnvironmentThe Duplicate Database Backup is designed to allow the DBA to create a duplicate or clone of a source database for special purposes which will not affect the overall backup and restore procedures for the source database. RMAN supports duplicating databases to increase a DBA's flexibility when performing the following tasks:
Testing backup and recovery proceduresTesting an upgrade to a new release of Oracle DatabaseTesting the effect of applications on database performanceGenerating reports
Refer to Duplicating a Database in a RAC Environment of Appendix A on page 157 for more information on duplicating a multi-instance RAC database. For additional information on Oracle's Duplicate Database functionality refer to Duplicating a Database section in Oracle Database Backup and Recovery User's Guide.
The Oracle APM provides the following restore scenarios for the Duplicate Database Backup:
Restore to Same Server Restore to Alternate Server with Same Directory StructureRestore to Alternate Server with Alternate Directory Structure
6.6.2.a Restoring Duplicate Database to Same Server The following procedure details the steps to restore a Duplicate Database Backup to the local or same server where the source database resides. Since the duplicated database or destination database will reside on the same physical server as the source database, the destination database must utilize a different directory structure.

109
Pre-RequisitesTo restore a Duplicate Database backup to the same server, the following pre-requisites must be met:
Same Version of Oracle Database Software - The version and edition of Oracle for the destination database must be identical as the version and edition of Oracle being used for the source database. This includes identical patch levels.Duplicate Database Backup Available - A Duplicate Database backup must be completed successfully and made available.Source Database in Open State - The source database must remain in an OPEN READ WRITE state during the entire duplicate database restore process.Auxiliary Instance Prepared - RMAN's backup-based duplicate database process requires the preparation of an auxiliary instance as defined below:1. Oracle Password File for Auxiliary Instance Created - Required if you
want to use a password file versus operating system authentication for the auxiliary connection when duplicating to the same host as the source database. Refer to Creating and Maintaining a Password File in Oracle Database Administrator's Guide for more information on creating a password file.
2. Oracle Net Connectivity Established to Auxiliary Instance - The auxiliary instance must be available through Oracle Net by adding the instance to the TNSNAMES.ORA file.
3. Auxiliary Instance Destination Directories Exist - The following destination directories for the auxiliary instance must be created on the server where the destination database will reside. If the destination database will store its datafiles in ASM, the ASM instance name for the destination database must already exist.
Control_FilesDB_Create_File_DestAudit_File_DestBackground_Dump_DestUser_Dump_Dest
4. PFILE Created for Auxiliary Instance - A client side parameter file (PFILE) for the Auxiliary Database must be created from the SPFILE of the source database.
Start SQL*Plus and then connect with administrator privileges to the source database.sqlplus sys/<password.@<source_connect_identifier> AS SYSDBA

Chapter 6Restore
110
Create a PFILE from the SPFILE.create pfile = '<PFILE_destination_directory>/init<auxiliary_sid>.ora' from spfile;
5. PFILE Updated with Auxiliary Values - The PFILE created for the auxiliary instance must be edited and updated with the parameter values specific to the auxiliary instance.The following values in the PFILE must be updated with the appropriate values for the auxiliary instance.
Remove all entries that begin with <source_sid>.__Update the *.db_name= entry to reflect the name of the destination databaseUpdate the following entries to reflect the destination directory for the auxiliary instance. This directory must already exist; however, if the source database stores the datafiles in ASM, the ASM instance name for the destination database should be specified for each of the control_files and db_create_file_dest parameters below. *.audit_file_dest=*.background_dump_dest=*.control_files=*.user_dump_dest=*.db_create_file_dest=*.db_recovery_file_dest=Comment out the following entry by inserting a '#' pound or hash sign at the beginning of the entry*.dispatchers='(PROTOCOL=TCP) (SERVICE=<source_sid>XDB)'Add the following line to specify the pairs of strings for converting the names of datafiles and tempfiles. *.db_file_name_convert='<source_db_create_file_dest>/<source_sid>', '<destination_db_create_file_dest>/<destination_sid>'For example: *.db_file_name_convert=' C:\oracle\oradata\prod', 'c:\oracle\oradata\test'Add the following line to specify the pairs of strings for naming online redo log files: *.log_file_name_convert='<source_db_create_file_dest>/<source_sid>’, ‘<destination_db_create_file_dest>/<destination_sid>’For example:

111
*.log_file_name_convert=’ C:\oracle\oradata\prod’, ‘c:\oracle\oradata\test’
6. Auxiliary Instance Started in NOMOUNT state - The auxiliary instance must be started in NOMOUNT state with the PFILE that has been updated with the parameter values specific to the auxiliary instance.
Start SQL*Plus and then connect with administrator privileges to the auxiliary instance.sqlplus sys/<password.@<auxiliary_connect_identifier> AS SYSDBAStart the instance in NOMOUNT state.startup nomount pfile = '<PFILE_destination_directory>/init<auxiliary_sid>.ora'
7. Auxiliary Instance Created from SPFILE from the PFILEcreate spfile from pfile='<PFILE_destination_directory>/init<auxiliary_sid>.ora';Exit SQL*Plus. You must exit SQLPLUS for the duplicate database restore to complete successfully.
Restore Duplicate Database Procedure1. In the Oracle APM Restore Selections tab, navigate to the source NetVault:
Backup Client and database, and find the desired Duplicate Database backup and select the Whole Database node.
2. In the Clone Database tab, select the Duplicate Database option.In the Destination Database frame:
Specify the Oracle Net Service name of the auxiliary instance in the Target Service field.Specify the Oracle Home for the auxiliary instance.Specify the Oracle SYSDBA User Name that will be used by the Oracle APM to connect to the auxiliary instance. Specify the Oracle SYSDBA Password.
In the Duplicate From Database frame:Specify the Oracle SID for the source database. Specify the Oracle Home for the source database. Specify the Oracle SYSDBA User Name that will be used by the Oracle APM to connect to the source database. Specify the Oracle SYSDBA Password.
3. Complete the Schedule, Target Client and Advanced Options and submit the job.

Chapter 6Restore
112
6.6.2.b Restoring Duplicate Database to Alternate Server with Same Directory Structure The following procedure details the steps to restore a Duplicate Database Backup to an alternate or remote server than where the source database resides but uses the same directory structure as the source database.
Pre-RequisitesTo restore a Duplicate Database backup to an alternate or remote server, the following pre-requisites must be met:
Same Version of Oracle Database Software - The version and edition of Oracle for the destination database must be identical as the version and edition of Oracle being used for the source database. This includes identical patch levels.Duplicate Database Backup Available - A Duplicate Database backup must be completed successfully and made available.Source Database in Open State - The source database must remain in an OPEN READ WRITE state during the entire duplicate database restore process.Auxiliary Instance Prepared - RMAN's backup-based duplicate database process requires the preparation of an auxiliary instance as defined below:1. Oracle Password File for Auxiliary Instance Created - Required if you
want to use a password file versus operating system authentication for the auxiliary connection when duplicating to the same host as the source database. Refer to Creating and Maintaining a Password File in Oracle Database Administrator's Guide for more information on creating a password file.
2. Oracle Net Connectivity Established to Auxiliary Instance - The auxiliary instance must be available through Oracle Net by adding the instance to the TNSNAMES.ORA file of BOTH the source server and the alternate server.
3. Auxiliary Instance Destination Directories Exist - The following destination directories for the auxiliary instance must be created on the server where the destination database will reside. If the destination database will store its datafiles in ASM, the ASM instance name for the destination database must already exist.
Control_FilesDB_Create_File_DestAudit_File_DestBackground_Dump_DestUser_Dump_Dest

113
4. PFILE Created for Auxiliary Instance - A client side parameter file (PFILE) for the Auxiliary Database must be created from the SPFILE of the source database.
Start SQL*Plus and then connect with administrator privileges to the source database.sqlplus sys/<password.@<source_connect_identifier> AS SYSDBACreate a PFILE from the SPFILE.create pfile = '<PFILE_destination_directory>/init<auxiliary_sid>.ora' from spfile;
5. PFILE Updated with Auxiliary Values - The PFILE created for the auxiliary instance must be edited and updated with the parameter values specific to the auxiliary instance.The following values in the PFILE must be updated with the appropriate values for the auxiliary instance.
Remove all entries that begin with <source_sid>.__Update the *.db_name= entry to reflect the name of the destination databaseUpdate the following entries to reflect the destination directory for the auxiliary instance. This directory must already exist; however, if the source database stores the datafiles in ASM, the ASM instance name for the destination database should be specified for each of the control_files and db_create_file_dest parameters below. *.audit_file_dest=*.background_dump_dest=*.control_files=*.user_dump_dest=*.db_create_file_dest=*.db_recovery_file_dest=Comment out the following entry by inserting a '#' pound or hash sign at the beginning of the entry*.dispatchers='(PROTOCOL=TCP) (SERVICE=<source_sid>XDB)'
6. Auxiliary Instance Started in NOMOUNT state - The auxiliary instance must be started in NOMOUNT state with the PFILE that has been updated with the parameter values specific to the auxiliary instance.
Start SQL*Plus and then connect with administrator privileges to the auxiliary instance.sqlplus sys/<password.@<auxiliary_connect_identifier> AS SYSDBA

Chapter 6Restore
114
Start the instance in NOMOUNT state.startup nomount pfile = '<PFILE_destination_directory>/init<auxiliary_sid>.ora'
7. Auxiliary Instance Created from SPFILE from the PFILEcreate spfile from pfile='<PFILE_destination_directory>/init<auxiliary_sid>.ora';Exit SQL*Plus. You must exit SQLPLUS for the duplicate database restore to complete successfully.
NetVault: Backup Software and the Oracle APM Installed - The same version of NetVault: Backup software and the Oracle APM must be installed and configured on the alternate server where the destination database will reside. When configuring the Oracle APM on the alternate server ensure the following Default Attributes are defined:
NetVault Server - Specify the name of the NetVault: Backup Server where the source database server was added as a NetVault: Backup Client. Do Restore From NetVault Server - Specify the name of the NetVault: Backup Server where the source database server was added as a NetVault: Backup Client. Restore Backup Taken from NetVault Client - Specify the NetVault: Backup machine name for the source database server
Refer to Configuring Default Attributes of Chapter 4 on page 36 for more information.Source Database Added to Oracle APM Installed on Alternate Server - The source database must be added to the Oracle APM that is installed on the alternate server where the destination database will reside as defined in Adding a Database to the Oracle APM of Chapter 4 on page 41.
Restore Duplicate Database Procedure1. In the Oracle APM Restore Selections tab, navigate to the source NetVault:
Backup Client and database, and find the desired Duplicate Database backup and select the Whole Database node.
2. In the Clone Database tab, select the Duplicate Database option.In the Destination Database frame:
Specify the Oracle Net Service name of the auxiliary instance in the Target Service field.Specify the Oracle Home for the auxiliary instance.Specify the Oracle SYSDBA User Name that will be used by the Oracle APM to connect to the auxiliary instance.

115
Specify the Oracle SYSDBA Password.Select the Use nofilenamecheck option.
In the Duplicate From Database frame:Specify the Oracle SID for the source database. Specify the Oracle Home for the source database. Specify the Oracle SYSDBA User Name that will be used by the Oracle APM to connect to the source database. Specify the Oracle SYSDBA Password.
3. In the Target Client tab, select the NetVault: Backup machine name of the alternate server where the destination database will reside.
4. Complete the Schedule and Advanced Options and submit the job.
6.6.2.c Restoring Duplicate Database to Alternate Server with Alternate Directory Structure The following procedure details the steps to restore a Duplicate Database Backup to an alternate or remote server than where the source database resides and the directory structure will be different than the source database directory structure.
Pre-RequisitesTo restore a Duplicate Database backup to an alternate or remote server with an alternate directory structure, the following pre-requisites must be met:
Same Version of Oracle Database Software - The version and edition of Oracle for the destination database must be identical as the version and edition of Oracle being used for the source database. This includes identical patch levels.Duplicate Database Backup Available - A Duplicate Database backup must be completed successfully and made available.Source Database in Open State - The source database must remain in an OPEN READ WRITE state during the entire duplicate database restore process.Auxiliary Instance Prepared - RMAN's backup-based duplicate database process requires the preparation of an auxiliary instance as defined below:1. Oracle Password File for Auxiliary Instance Created - Required if you
want to use a password file versus operating system authentication for the auxiliary connection when duplicating to the same host as the source database. Refer to Creating and Maintaining a Password File in Oracle Database Administrator's Guide for more information on creating a password file.
2. Oracle Net Connectivity Established to Auxiliary Instance - The auxiliary instance must be available through Oracle Net by adding the

Chapter 6Restore
116
instance to the TNSNAMES.ORA file of BOTH the source server and the alternate server.
3. Auxiliary Instance Destination Directories Exist - The following destination directories for the auxiliary instance must be created on the server where the destination database will reside. If the destination database will store its datafiles in ASM, the ASM instance name for the destination database must already exist.
Control_FilesDB_Create_File_DestAudit_File_DestBackground_Dump_DestUser_Dump_Dest
4. PFILE Created for Auxiliary Instance - A client side parameter file (PFILE) for the Auxiliary Database must be created from the SPFILE of the source database.
Start SQL*Plus and then connect with administrator privileges to the source database.sqlplus sys/<password.@<source_connect_identifier> AS SYSDBACreate a PFILE from the SPFILE.create pfile = '<PFILE_destination_directory>/init<auxiliary_sid>.ora' from spfile;
5. PFILE Updated with Auxiliary Values - The PFILE created for the auxiliary instance must be edited and updated with the parameter values specific to the auxiliary instance.The following values in the PFILE must be updated with the appropriate values for the auxiliary instance.
Remove all entries that begin with <source_sid>.__Update the *.db_name= entry to reflect the name of the destination databaseUpdate the following entries to reflect the destination directory for the auxiliary instance. This directory must already exist; however, if the source database stores the datafiles in ASM, the ASM instance name for the destination database should be specified for each of the control_files and db_create_file_dest parameters below. *.audit_file_dest=*.background_dump_dest=*.control_files=*.user_dump_dest=

117
*.db_create_file_dest=*.db_recovery_file_dest=Comment out the following entry by inserting a '#' pound or hash sign at the beginning of the entry*.dispatchers='(PROTOCOL=TCP) (SERVICE=<source_sid>XDB)'Add the following line to specify the pairs of strings for converting the names of datafiles and tempfiles. *.db_file_name_convert='<source_db_create_file_dest>/<source_sid>', '<destination_db_create_file_dest>/<destination_sid>'For example: *.db_file_name_convert=' C:\oracle\oradata\prod', 'c:\oracle\oradata\test'Add the following line to specify the pairs of strings for naming online redo log files: *.log_file_name_convert='<source_db_create_file_dest>/<source_sid>’, ‘<destination_db_create_file_dest>/<destination_sid>’For example: *.log_file_name_convert=’ C:\oracle\oradata\prod’, ‘c:\oracle\oradata\test’
6. Auxiliary Instance Started in NOMOUNT state - The auxiliary instance must be started in NOMOUNT state with the PFILE that has been updated with the parameter values specific to the auxiliary instance.
Start SQL*Plus and then connect with administrator privileges to the auxiliary instance.sqlplus sys/<password.@<auxiliary_connect_identifier> AS SYSDBAStart the instance in NOMOUNT state.startup nomount pfile = '<PFILE_destination_directory>/init<auxiliary_sid>.ora'
7. Auxiliary Instance Created from SPFILE from the PFILEcreate spfile from pfile='<PFILE_destination_directory>/init<auxiliary_sid>.ora';Exit SQL*Plus. You must exit SQLPLUS for the duplicate database restore to complete successfully.
NetVault: Backup Software and the Oracle APM Installed - The same version of NetVault: Backup software and the Oracle APM must be installed

Chapter 6Restore
118
and configured on the alternate server where the destination database will reside. When configuring the Oracle APM on the alternate server ensure the following Default Attributes are defined:
NetVault Server - Specify the name of the NetVault: Backup Server where the source database server was added as a NetVault: Backup Client. Do Restore From NetVault Server - Specify the name of the NetVault: Backup Server where the source database server was added as a NetVault: Backup Client. Restore Backup Taken from NetVault Client - Specify the NetVault: Backup machine name for the source database server
Refer to Configuring Default Attributes of Chapter 4 on page 36 for more information.Source Database Added to Oracle APM Installed on Alternate Server - The source database must be added to the Oracle APM that is installed on the alternate server where the destination database will reside as defined in Adding a Database to the Oracle APM of Chapter 4 on page 41.
Restore Duplicate Database Procedure1. In the Oracle APM Restore Selections tab, navigate to the source NetVault:
Backup Client and database, and find the desired Duplicate Database backup and select the Whole Database node.
2. In the Clone Database tab, select the Duplicate Database option.In the Destination Database frame:
Specify the Oracle Net Service name of the auxiliary instance in the Target Service field.Specify the Oracle Home for the auxiliary instance.Specify the Oracle SYSDBA User Name that will be used by the Oracle APM to connect to the auxiliary instance. Specify the Oracle SYSDBA Password.Select the Use nofilenamecheck option.
In the Duplicate From Database frame:Specify the Oracle SID for the source database. Specify the Oracle Home for the source database. Specify the Oracle SYSDBA User Name that will be used by the Oracle APM to connect to the source database. Specify the Oracle SYSDBA Password.

119
3. In the Target Client tab, select the NetVault: Backup machine name of the alternate server where the destination database will reside.
4. Complete the Schedule and Advanced Options and submit the job.

Chapter 6Restore
120

121
Chapter 7:
RMAN RECOVERY CATALOGMAINTENANCE
7.1.0 Resynchronizing the Recovery CatalogThe Oracle APM automatically executes a full or partial resynchronization of the recovery catalog when performing RMAN backups as long the control file is mounted and the recovery catalog database is available at command execution.
You can use RMAN’s RESYNC CATALOG command to perform manual full resynchronizations when:
The recovery catalog is unavailable when you issue any of the commands that automatically perform a resynchronization.The database is backed up infrequently (for example, hundreds of archive logs are archived between database backups) and generates a high number of log switches every day (for example, 1000 switches between catalog resynchronizations)You have made changes to the physical structure of the target database such as adding or dropping a tablespace. As with archive operations, the recovery catalog is not updated automatically when the physical schema changes.
You should not need to manually run RESYNC CATALOG very often. Refer to Resynchronizing the Recovery Catalog in Oracle Database Backup and Recovery Advanced User's Guide for more information.
Force a Full Resynchronization of the Recovery Catalog, with the detailed steps below:
1. Start RMAN and connect to the target database and Recovery Catalog.> rman TARGET / CATALOG rman/<password>@<connect_identifier for catalog>
2. Mount the target database.STARTUP MOUNT;
3. Resync the recovery catalog.RESYNC CATALOG;
4. Exit RMAN.

Chapter 7RMAN Recovery Catalog Maintenance
122
7.1.1 Using Crosscheck to Update RMAN RepositoryTo ensure that data about backups in the RMAN Repository is synchronized with corresponding data in the NetVault: Backup Database, perform a crosscheck. The CROSSCHECK command updates outdated RMAN repository information about backups whose repository records do not match their physical status. For example, if a user removes archive logs from disk with an operating system command, the repository still indicates that the logs are on disk, when in fact they are not.
Refer to Using CROSSCHECK to Update the RMAN Repository in Oracle® Database Backup and Recovery Basics for more information.
Crosscheck the archive logs, with the detailed steps below:
1. Start RMAN and connect to the target database and Recovery Catalog.> rman TARGET / CATALOG rman/<password>@<connect_identifier for catalog>
2. Crosscheck the archive logs.CROSSCHECK ARCHIVELOG ALL;
3. Exit RMAN.

123

Chapter 7RMAN Recovery Catalog Maintenance
124

125
Chapter 8:
RMAN CLI
8.0.0 CLI-based RMAN Backups and RestoresThe users who want to take advantage of advanced RMAN features that are not supported via the Oracle APM GUI can perform CLI-based RMAN backup and restores instead of or in conjunction with the Oracle APM. During CLI-based RMAN backup and restores, the Oracle APM is simply providing media management functionality for RMAN.
8.0.1 Pre-RequisitesThe following steps must be performed before initiating backups/restores from the command line:
Verifying the Proper RMAN Executable is in Use (Linux-based O/S ONLY)Ensuring an “SBT_TAPE” Channel is Established
These steps are covered in the sub-sections below:
8.0.1.a Verifying the Proper RMAN Executable is in Use(Linux-based O/S ONLY)Various installations of Linux include more than one executable named as rman. So, it is necessary to verify that the Oracle RMAN application is started when you issue the rman command at the prompt. This can be done by making the path to the Oracle RMAN executable ($ORACLE_HOME/bin) as the first search path in the PATH environmental variable.
8.0.1.b Ensuring an “SBT_TAPE” Channel is EstablishedThe Oracle APM uses an Oracle “SBT_TAPE” channel to conduct backups of an Oracle database. System Backup to Tape (or “SBT”) is most commonly used to specify a destination for RMAN commands used to back up to tape media. Please consult the section, Configuring and Allocating Channels for Use in Backups in the Oracle® Database Backup and Recovery Advanced User’s Guide for complete information on establishing this type of channel for use.
Important: Prior to using this functionality, it is strongly recommended that you thoroughly review the Oracle® Database Backup and Recovery Advanced User’s Guide to familiarize yourself with the internals of the Recovery Manager.

Chapter 8RMAN CLI
126
8.0.2 Performing CLI-based Backups
8.0.2.a Example of a Basic CLI BackupThis section shows how to take a full backup of “USERS” tablespace using RMAN commands:
1. Log on to the Oracle Database Server and initiate a terminal session.2. From the prompt, generate a “Run Block” as follows:
run {allocate channel c1 device type ‘SBT_TAPE’;backup tablespace USERS;release channel c1;}
The commands shown above are the minimum required to perform a CLI-based backup. The Oracle APM provides several additional parameters that can be used to set different options for a CLI backup job. The sections that follow provide a description of these parameters.
8.0.2.b Additional Parameters: The “format” ClauseThe format clause specifies the pattern to use in creating a filename for the backup pieces or image copies it creates. The Oracle APM provides additional parameters that can be used as variables along with the format clause. These three variables allow you to specify three parameters for a backup job:
Server NameTarget SetAdvanced Options Set
Important: Jobs that are generated using the RMAN CLI cannot be re-run using the NetVault GUI. The RMAN CLI command (i.e. the RMAN script) is not sent from the RMAN CLI application back to NetVault: Backup. Consequently, if you right-click the CLI-based job and select Run Now in the NetVault: Backup Job Management window the job will fail.

127
Figure 8-1:The correct
placement ofthe “format”command in
the syntax of arun block
The “format” clause is used within a run block and is specified immediately after the “backup” command in the syntax (the order of the remaining commands within the Run Block remains the same). Specific variables are included with this clause, each following a designated sequence (e.g., “<Variable_1>”, “<Variable_2>” and “<Variable_3>”). Each corresponds to specific NetVault and RMAN values, and all are outlined in the following table. Ensure that each variable in the command is separated by a colon (“:”).
Variable Description<Variable_1> NetVault Server Name - The NetVault name of the machine
from which you will run the backup job. This is a required value.
<Variable_2> The Target Set Name - Specify a Target Set created for use with Oracle RMAN backups, in order to target a specific device during backup. Leave this option if you want to use NetVault’s default setting of “Any Device”. This option will override the Target Set specified in the Configure window. When defining the CLI Backup Advanced Options Set, the Discard after Days/Weeks/Years option must be specified instead of the Discard after Full Backups in the Backup Life section of the Advanced Options tab. CLI-based RMAN backups do not support backup life generation for Full Backups and backups may expire unexpectedly if the Discard after Full Backups option is specified.
<Variable_3> The Advanced Options Set Name - Specify an Advanced Options Set created for use with Oracle RMAN backups. Leave this option if you want to use NetVault’s default Advanced Options settings. This option will override the Advanced Options Set specified in the Configure window.

Chapter 8RMAN CLI
128
8.0.2.c Additional Parameters: The “send” and “PARMS” ClausesThe parameters described in this section can be used either with the SEND or the PARMS commands to set up the NetVault: Backup options for a backup job run from the command line. This section describes how the send and the PARMS clauses work.
The “send” Clause - The parameters specified with the “send” clause are applied to a specific job. send ‘<Variable>=<Value>';An example is shown below:run { allocate channel ch1 type ‘SBT_TAPE’ send 'NV_TARGET_MEDIA=Mid' }run { allocate channel ch2 }In this example, the command “NV_TARGET_MEDIA” will affect only to the “SBT_TAPE” Channel “ch1”The “PARMS” Clause - The parameters specified with the “PARMS” clause are applied to all the jobs run from the Oracle instance.PARMS=“ENV=(<Variable>=<Value>)”An example is shown below:run { allocate channel ch1 type ‘SBT_TAPE’ PARMS=“ENV=(NV_TARGET_MEDIA=Mid)” }run { allocate channel ch2 }In this example, the command “NV_TARGET_MEDIA” will affect the “SBT_TAPE” Channel “ch1”and any other channels set in the other Run Blocks.
“%d_%s_%t” These values pertain to unique RMAN identifiers (i.e., they are Oracle environmental variables).
%d - Specifies the name of the database%s - Specifies the backup set number. This number is a counter in the Control File that is incremented for each backup set. The counter value starts at one and is unique for the life time of the Control File. If you restore a backup Control File, then duplicate values can result. Also, the command, “CREATE CONTROLFILE” initializes the counter back to one.%t - Specifies the backup set time stamp, which is a 4-byte value derived as the number of seconds elapsed since a fixed reference time. The combination of this vari-able and the “%t” variable can be used to form a unique name for the backup set.
Variable Description

129
Figure 8-2:Proper
placement ofthe “send”
clause in thesyntax of aRun Block.
Figure 8-3:Proper
placement ofthe “PARMS”clause in the
syntax of aRun Block.
Variables Available with the “send”/”PARMS” ClausesA description of the variables available for use with the “send” and “PARMS” clauses is given in the table below:
Variable DescriptionNV_AUTO_LABEL_MEDIA
This variable can be used to automatically label and use any blank media when no other media is available for the job. The permissible values are:
TrueFalse
Example:send ‘NV_AUTO_LABEL_MEDIA=TRUE’;PARMS=“ENV=(NV_AUTO_LABEL_MEDIA=TRUE)”;
NV_BACKUP_SERVER This variable is intended for use with the PARMS clause in order to establish the default NetVault Server for an entire Oracle instance. Example:PARMS=“ENV=(NV_BACKUP_SERVER=NVSERVER)”

Chapter 8RMAN CLI
130
NV_BACKUP_LIFE This variable can be used to control exactly how long a backup will exist or “live” on its target media. The permissible values are:
count {full | days | weeks | years}The parameters within curly braces are optional. Count followed by full determines the number of generations the backup will be kept. This is the default parameter (i.e., if nothing is specified with count, the number of backup generations is considered for the backup life). Days, weeks, or years represents the number of days, weeks or years that the backup will be kept before it is discarded.Example:send ‘NV_BACKUP_LIFE=2’;PARMS=“ENV=(NV_BACKUP_LIFE=2)”;
NV_GROUP_LABEL This variable can be used to select a specific group of media based on its group label. This variable must be used in conjunction with the “NV_TARGET_MEDIA” variable, otherwise it will have no effect.Example:send ‘NV_TARGET_MEDIA=Group Label, NV_GROUP_LABEL=Group_2’;PARMS=“ENV=(NV_TARGET_MEDIA=Group Label,NV_GROUP_LABEL=Group_2)”;
NV_JOB_TITLE This variable can be used to assign a title to the job. It is recommended that this variable only be used with the “send” command on a per job basis (i.e., to avoid the chance of all future jobs being labeled with this Job Title, when applied with the PARMS clause).Example:send ‘NV_JOB_TITLE=Backup_1’;
NV_MID_LABEL This variable can be used to select a specific piece of media based on its media label. This variable must be used in conjunction with the “NV_TARGET_MEDIA” variable, otherwise it will have no effect.Example:send ‘NV_TARGET_MEDIA=Mid, NV_MID_LABEL=Media_1’;PARMS=“ENV=(NV_TARGET_MEDIA=Mid,NV_MID_LABEL=Media_1)”
Variable Description

131
NV_NETWORK_COMPRESSION
This variable can be used to compress the backup data before it is transferred over the network (i.e., in the same manner as the Advanced Options tab’s “Network Compression” option. The permissible values are:
TrueFalse
Example:send ‘NV_NETWORK_COMPRESSION=True’;PARMS=“ENV=(NV_NETWORK_COMPRESSION=False)”;
NV_ORIGINAL_NV_CLIENT
This variable is intended for use with the PARMS clause in order to establish the machine name of the original NetVault Client Machine Name where the backup was performed from.Example:PARMS=“ENV=(NV_ORIGINAL_NV_CLIENT=<nv_client_machine_name>)”
NV_POSTSCRIPT This variable can be used to run a script after completion of a backup job. The script to be run must be saved in the “...\netvault\scripts” sub-directory on the Oracle Database Server (i.e., where “...” refers to the complete path to the installation of NetVault).Example:send ‘NV_POSTSCRIPT=C:\NetVault\scripts\p2.txt’;PARMS=“ENV=(NV_POSTSCRIPT=p2.txt)”;
NV_PRESCRIPT This variable can be used to run a script before a backup job. The script to be run must be saved in the “...\netvault\scripts” sub-directory on the Oracle Database Server (i.e., where “...” refers to the complete path to the installation of NetVault).Example: send ‘NV_PRESCRIPT=C:\NetVault\scripts\p1.txt’;PARMS=“ENV=(NV_PRESCRIPT=p1.txt)”;
NV_RESET_ENV_PARMS
This variable is used to reset the Oracle environment after the PARMS clause has been used in the Run Block.Example: send ‘NV_RESET_ENV_PARMS=TRUE’PARMS=“ENV=(NV_RESET_ENV_PARMS=TRUE)”
Variable Description

Chapter 8RMAN CLI
132
NV_VERIFICATION This variable can be used for verification of the completion of a backup job. The permissible values are:
TrueFalse
If set to True, the data transfer will be checked and a job message will be added to the NetVault Job log stating “Backup job has verified successfully.”Example: send ‘NV_VERIFICATION=TRUE’;PARMS=“ENV=(NV_VERIFICATION=TRUE)”;
NV_REUSE_MEDIA This variable can be used in order to set a specific media as reusable. The permissible values are:
NeverAnyWith same group label as target media
If the value for this parameter is set as Never, no media marked for re-use will be used for the backup. With the parameter set as Any, any media previously marked for re-use will be considered for the backup. And if it is set as With same group label as the target media, any media containing the group label specified, that has been previously marked for re-use will be considered for the backup.Example:send ‘NV_REUSE_MEDIA=Any’;PARMS=“ENV=(NV_REUSE_MEDIA=Any)”;
Variable Description

133
Resetting the RMAN EnvironmentOnce the “PARMS” clause has been used, either of the following lines of syntax can be used in order to reset the RMAN environment:
send ‘NV_RESET_ENV_PARMS=TRUE’PARMS=“ENV=(NV_RESET_ENV_PARMS=TRUE)”
8.0.3 Performing CLI-based RestoresThis form of restore is performed using the RMAN CLI Utility. Through this utility, you can perform restores of backups, regardless of how they were created (i.e., either through the Oracle APM GUI, or from the command line). Refer to the Oracle® Database Backup and Recovery Backup and Recovery Reference Guide for more information on the RMAN commands.
NV_TARGET_MEDIA This variable can be used to set the media in the targeted device. The permissible values are:
Any not in a group - To target any media that does not have a Group Label assigned to itAny - To target any available mediaMid - To target a specific piece of media based on its media label (in which case the NV_MID_LABEL vari-able will have to accompany this variable, and the desired piece of media must be named)Group Label - To target the media within a specific group based on its Group Label (in which case the NV_GROUP_LABEL variable will have to accompany this variable, and the desired Group Label must be named)
Example:send ‘NV_TARGET_MEDIA=Any’;PARMS=“ENV=(NV_TARGET_MEDIA=Mid, NV_MID_LABEL=Media_1)”;
Variable Description
Important: Even though this form of restore is initiated locally from a terminal session on the Oracle Database Server, job progress can be monitored from the Job Management or Status windows on the NetVault: Backup GUI. However, this applies only to data restores from the media contained in devices controlled by the NetVault: Backup Server.

Chapter 8RMAN CLI
134

135
Appendix A:REAL APPLICATION CLUSTERS
A.0.0 An Overview of Oracle Real Application ClustersOracle Corporation defines Oracle's Real Application Clusters (RAC) option as "support for the transparent deployment of a single database across a cluster of servers, providing fault tolerance from hardware failures or planned outages. Oracle RAC running on clusters provides Oracle's highest level of capability in terms of availability, scalability, and low-cost computing. Oracle RAC supports mainstream business applications of all kinds. This includes OLTP, DSS, and Oracle's unique ability to effectively support mixed OLTP/DSS environments. This also includes popular packaged products such as SAP, PeopleSoft, Siebel, and Oracle E*Business Suite, as well as custom applications."
The Oracle APM v5.5 provides support for a limited number of Oracle versions and platforms in a RAC environment. The installation, configuration, backup and restore procedures differ in a multi-instance RAC environment. This section of the documentation is intended to offer specifics on how the Oracle APM operates in an Oracle RAC environment.
For a complete list of supported Oracle versions and platforms in a RAC environment refer to the NetVault: Backup Supported APM and Plugin matrix available at:
http://www.bakbone.com/support/product_documentation/
A.1.0 About this AppendixThis section of the guide is designed to point out any differences between the setup and usage of the Oracle APM in a multi-instance RAC environment vs. a single instance or traditional non-RAC environment. It is broken down in sections to mirror the sections found in the standard instructions, as follows:
Deployment OverviewLicensingInstallationConfigurationBackupRestore

Real Application Clusters
136
A.2.0 Recommended Additional ReadingIt is recommended that the following Oracle RAC documentation be readily available for reference when setting up, and while using the Oracle APM in a RAC environment.
Oracle® Clusterware and Oracle Real Application Clusters Administration and Deployment Guide
Overview of Oracle Real Application Clusters Management ToolsStarting and Stopping Instances and Oracle Real Application Clusters DatabasesOracle Clusterware Command-Line ReferenceOracle 11.1http://download.oracle.com/docs/cd/B28359_01/rac.111/b28254/toc.htmOracle 10.2http://download.oracle.com/docs/cd/B19306_01/rac.102/b14197/toc.htmOracle 10.1 http://download.oracle.com/docs/cd/B14117_01/server.101/b10825/toc.htm
Oracle® Database Administrator's GuideUsing Automatic Storage ManagementOracle 11.1http://download.oracle.com/docs/cd/B28359_01/server.111/b28310/toc.htmOracle 10.2http://download.oracle.com/docs/cd/B19306_01/server.102/b14231/storeman.htm#g1040709 Oracle 10.1http://download.oracle.com/docs/cd/B14117_01/server.101/b10739/toc.htm
Oracle® Database Utilities ASM Command Line UtilityOracle 11.1http://download.oracle.com/docs/cd/B28359_01/server.111/b28319/toc.htm
Important: Unless outlined in the sections that follow, backups and restores performed with the Oracle APM for multi-instance RAC databases are the same as those performed with single instance databases.

137
Oracle 10.2http://download.oracle.com/docs/cd/B19306_01/server.102/b14215/asm_util.htm#SUTIL016 Oracle 10.1 http://download.oracle.com/docs/cd/B14117_01/server.101/b10825/toc.htm
A.3.0 Deployment OverviewDeploying the Oracle APM in a multi-instance database environment is almost identical to a single-instance database environment except that RMAN based backups are the only available backup method for RAC databases. The Oracle APM is installed on one of the nodes which hosts one of the instances for the RAC enabled database. All RMAN based backups and restores are performed from this single installation of the Oracle APM. The following section details how the Oracle APM performs RMAN backups and restores in a RAC environment.
Oracle APM RMAN Backup Process for RAC Environment
1. User defines backup job in NetVault: Backup Console2. NetVault: Backup APM for Oracle converts job definition into corresponding
RMAN backup commands
NetVault: Backup Console
NetVault: Backup Server
NetVault: Backup APM for Oracle
NetVault: Backup Administrator Workstation
NetVault: Backup Server
Oracle RAC Node 2
Recovery Manager
Oracle Media Management API
1
Recovery Catalog Database
Recovery Catalog Server
4
Backup Media
Oracle RAC Node 1 Oracle RAC Node 3
54
ASMShared Storage
PROD Instance 1
PROD Instance 2
PROD Instance 3
2
SPFILEControl Files
Datafi lesLog Files
Archive Log Files
3
PRODDatabase

Real Application Clusters
138
3. RMAN executes backup commands which read data from Oracle database datafiles
4. RMAN uses Oracle Media Management API to store backup on backup device managed by NetVault: Backup Server
5. RMAN stores backup metadata in recovery catalog repository
Oracle APM RMAN Restore Process for RAC Environment
1. User defines restore job in NetVault: Backup Console2. NetVault: Backup APM for Oracle converts job definition into corresponding
RMAN restore and recovery commands3. RMAN reads backup metadata from recovery catalog repository4. RMAN uses Oracle Media Management API to read backup from backup
device managed by NetVault: Backup Server5. RMAN restores datafiles to Oracle server and recovers database
A.4.0 LicensingLicensing of the Oracle APM in a single-instance, or non-RAC environment, differs from the licensing of the Oracle APM in a multi-instance or RAC environment.
NetVault: Backup Console
NetVault: Backup Server
NetVault: Backup APM for Oracle
NetVault: Backup Administrator Workstation
NetVault: Backup ServerOracle RAC Node 2
Recovery Manager
Oracle Media Management API
1
Recovery Catalog Database
Recovery Catalog Server
Backup Media
Oracle RAC Node 1 Oracle RAC Node 3
ASMShared Storage
PROD Instance 1
PROD Instance 2
PROD Instance 3
2
SPFILEControl Files
Datafi lesLog Files
Archive Log Files
45
3
4
PRODDatabase

139
In a single-instance environment, one (1) Edition Based Oracle APM license provides the ability to backup and recover an unlimited number of Oracle databases that reside on a single Database Server.
In a multi-instance or RAC environment, one (1) RAC Database Based Oracle APM license allows the customer to backup and recover a single database within the single RAC environment no matter the number of instances or nodes that reside in the RAC environment. If the customer has five (5) databases residing in the single RAC environment, they will be required to purchase five (5) RAC Database Based Oracle APM licenses, etc.
Each RAC environment will need its own licensing. For example, if the production RAC environment has five (5) databases and the test RAC environment has one (1) database, five (5) RAC Database Based Oracle APM licenses would be required for the production RAC environment and one (1) RAC Database Based Oracle APM license would be required for the test RAC environment.
To request permanent RAC Database Based Oracle APM license keys visit:
http://www.bakbone.com/productlicensing
A.5.0 Installation
A.5.1 Required RAC ConfigurationThe Oracle APM's support for multi-instance RAC databases is limited to environments that meet the following criteria:
Version of Oracle and Platform is listed a Supporting RAC environment in the NetVault: Backup Supported APM and Plugin Products matrix available at:http://www.bakbone.com/support/product_documentation/Oracle Clusterware is used as the Cluster SoftwareDatafiles, Control Files, SPFILE, Log Files, and Archive Log Files are stored on Shared StorageAutomated Storage Management (ASM) Filesystem is used for Shared StorageControl File Autobackups are enabledRecovery Catalog Database is the highly recommended location for the RMAN RepositorySingle or Multiple RAC databases within the same RAC environment is supported
Figure A-1 and Figure A-2 provide an overview of supported single and multiple RAC database deployments.

Real Application Clusters
140
Figure A-1:SupportedSingle
DatabaseDeployments
Oracle RAC Node 2
Recovery Catalog Database
Recovery Catalog Server
Oracle RAC Node 1 Oracle RAC Node 3
ASMShared Storage
Clusterware Clusterware Clusterware
SPFILEControl Files
Datafi lesLog Files
Archive Log Files
CRMDatabase
CRM Instance 3CRM Instance 2CRM Instance 1

141
Figure A-2:Supported
MultipleDatabase
Deployments
A.5.2 Pre-RequisitesThe following pre-requisites must be met before it is possible to install the Oracle APM in a RAC environment:
Oracle RAC Environment in Place - You must have a properly configured Oracle RAC environment that matches the configuration as specified in Required RAC Configuration on page 139.Separate NetVault: Backup Server Machine - The machine that is to serve as the NetVault: Backup Server must be properly configured and it must exist outside the Oracle RAC environment, but have network connectivity to the nodes/hosts within the RAC environment.Separate Recovery Catalog Server - It is highly recommended that the RMAN repository be stored in a Recovery Catalog database on a server outside the Oracle RAC environment. Refer to Creating the RMAN Repository of Chapter 3 on page 26 for more information.Other Pre-Installation Requirements - In addition to the above RAC specific requirements, you must meet the non-RAC specific pre-installation requirements that are specified Pre-installation Requirements of Chapter 3 on page 25.
Oracle RAC Node 2
Recovery Catalog Database
Recovery Catalog Server
Oracle RAC Node 1 Oracle RAC Node 3
ASMShared Storage
SPFILEControl Files
Datafi lesLog Files
Archive Log Files
CRMDatabase
CRM Instance 3
HR Instance 3
CRM Instance 2
HR Instance 2
CRM Instance 1
HR Instance 1
HRDatabase
Clusterware ClusterwareClusterware

Real Application Clusters
142
A.5.2.a Enabling Control File Autobackups in a RAC EnvironmentControl File Autobackups are required in a RAC environment. Refer to Control File Backup Types of Chapter 2 on page 19 for more information on Control File Autobackups. For single-instance RAC databases, refer to Enabling Control File Autobackups of Chapter 3 on page 29 for more information.
You can turn the autobackup feature on for multi-instance RAC databases by executing the following commands from the RMAN command line utility on the node where the Oracle APM will be installed:
1. After making sure the Recovery Catalog database is open, connect RMAN to the target database and Recovery Catalog database. For example, issue the following commands to connect to the catalog database:> rman TARGET / CATALOG rman/<password>@<connect_identifier for catalog>
2. Configure the default device type to “SBT_TAPE”.CONFIGURE DEFAULT DEVICE TYPE TO ‘SBT_TAPE’;
3. Configure parallelism for the default device type.CONFIGURE DEVICE TYPE 'SBT_TAPE' PARALLELISM 1;
4. Assign the channel for Control File Autobackups.CONFIGURE CHANNEL 1 DEVICE TYPE ‘SBT_TAPE’ CONNECT ‘SYS/<password>@<connect_identifier for local instance>’;
5. Enable Control File Autobackups.CONFIGURE CONTROLFILE AUTOBACKUP ON;
6. Confirm Control File Autobackups are enabled by reviewing the RMAN configuration settings:SHOW ALL;
A.5.3 Installation ProcessInstalling the Oracle APM in a multi-instance database environment is almost identical to a single-instance database environment. The Oracle APM is installed on one of the nodes which hosts one of the instances for the RAC enabled database. All RMAN based backups and restores are performed from this single installation of the Oracle APM. Installing the Oracle APM is a two step process:
1. Install the NetVault: Backup Client Software
Important: If the Oracle APM is relocated to a different node or the SYS password is altered, this process must be re-executed from node where the Oracle APM is installed to ensure that the Control File Autobackups are successfully completed.

143
During the Installation of the NetVault: Backup Client Software on the selected node of the RAC environment, a name that represents the entire RAC environment should be specified as the NetVault Machine Name versus the machine name of the selected node. For example, if the machine name for the node where the NetVault: Backup Client Software is being installed is called RAC_NODE_1, RAC_NODE_1 should NOT be specified as the NetVault Machine Name; it should be a generic or virtual name that represents the entire RAC environment such as PROD_RAC.
Figure A-3:Right-click to
install theOracle APM
on the node ofthe RAC
environment.
2. Install the Oracle APM - Once the NetVault: Backup Client Software has been installed on the selected node of the RAC environment, the Oracle APM will need to be installed. The process is identical to installing the Oracle APM for a single instance database environment except that Oracle APM shall be installed on the NetVault: Backup Client that corresponds with the generic or virtual name provided as the NetVault Machine Name during the NetVault: Backup Client Software installation.
A.6.0 ConfigurationConfiguring the Oracle APM in a multi-instance RAC environment is almost identical as configuring the Oracle APM in a single-instance non-RAC environment except for the following fields must be filled in correctly:
A.6.1 Configuring Default AttributesNetVault Server - (Required for RMAN Backups in a RAC Environment) - Specify the name of the NetVault: Backup Server where the Oracle Database Server was added as a NetVault: Backup Client.Do Restores from NetVault Server (Required for RMAN Backups in a RAC Environment) - Specify the name of the NetVault: Backup Server where the Oracle Database Server was added as a NetVault: Backup Client.CLI Backup/Autobackup Target Set - (Required for RMAN Backups in a RAC Environment) - Specify the name of the Backup Target Set that was specified in the Defining Default Backup Target Set for RMAN Backups of Chapter 4 on page 35

Real Application Clusters
144
Figure A-4:DefaultAttributes for
the OracleAPM in a RAC
Environment
A.6.2 Determining the Local Oracle SID and Home Directory in a RAC EnvironmentIn a multi-instance RAC environment, the local SID and Oracle Home can be determined with the srvctl config database commands as detailed in the following the steps below:
1. From a terminal window connect as the Oracle Software Owner to the node where Oracle APM is installed.
2. Execute the following command: srvctl config database
3. A list of the all the databases in the RAC environment will be displayed.4. Execute the following command where <database_name> represents the
database that is currently being added to the Oracle APM:srvctl config database -d <database_name>
5. The name of the node, local Oracle SID, and local Oracle Home will be displayed for each node in the RAC environment in the format: <node> <local Oracle SID> <local Oracle Home>

145
In Figure A-5, if the Oracle APM is being installed on the faro node, the local Oracle SID is o10rac3 and the local Oracle Home is /home/o10g/db.
Figure A-5:Run srvctl from
the commandline
A.6.3 Adding a Database to the Oracle APMAdding a multi-instance database in the Oracle APM is almost identical to adding a single-instance non-RAC database except for the following differences:
Oracle SID - Enter the local SID for the target RAC database. The local SID is the instance name for the target RAC database on the node where the Oracle APM is installed.Parameter File(s) Path - In a multi-instance RAC environment, the Oracle APM requires the usage of a server parameter file (SPFILE) as dynamic means of maintaining initialization parameters. The SPFILE must be stored on the shared storage in ASM. The SPFILE is included in the Control File Autobackups, therefore, this field should be left blank in a RAC environment.Control File Autobackup Enabled - Select this option since Control File Autobackups are required in a RAC environment.
Refer to Configuring the Oracle APM of Chapter 4 on page 35 for more information.
A.7.0 BackupRMAN based backups are the only supported backup method for multi-instance RAC databases. RMAN is RAC aware in that it automatically identifies that a database is multi-instance RAD database and backups up the selected data accordingly.
With the Oracle APM installed on one of the nodes that hosts one of the instances for the RAC enabled database, all RMAN based backups and restores are performed from this single installation of the Oracle APM.
The Parameter File node will not be selectable in the Backup Selection tab.
Refer to Performing RMAN Backups of Chapter 5 on page 61 for more information on Selecting Data for Backup, Setting Backup Options, and Finalizing and Submitting the Job.
A.7.1 Performing Backups after Node FailureIf the node where the Oracle APM is installed in the RAC environment experiences a node failure and the node is or will be unavailable at the time of the

Real Application Clusters
146
next scheduled backup, the Oracle APM needs to be relocated to an alternate node in the RAC environment. Relocating the Oracle APM is a two step process:
1. Install the NetVault: Backup Client Software on Alternate NodeInstall the NetVault: Backup Client Software on an alternate node in the RAC environment. During the installation process, be sure to use the same NetVault Machine Name that was used during the installation of the NetVault: Backup Client Software on the original node. For example, if PROD_RAC was the NetVault Machine Name specified during the installation of the original node, PROD_RAC should be used as the NetVault Machine Name on the alternate node.
2. Install the Oracle APMOnce the NetVault: Backup Client Software has been installed on the selected node of the RAC environment, the Oracle APM will need to be installed. The process is identical to installing the Oracle APM for a single instance non RAC environment except that Oracle APM will be installed on the NetVault: Backup Client that corresponds with the generic or virtual name provided as the NetVault Machine Name during the NetVault: Backup Client Software installation.
With the Oracle APM installed on the alternate node, update the following fields in the Database Configuration window. Refer to Editing Database Information of Chapter 4 on page 48 for more information.
Oracle SID - Enter the local SID for the target RAC database. The local SID is the instance name for the target RAC database on the node where the Oracle APM has been relocated.
Refer to Performing RMAN Backups of Chapter 5 on page 61 for more information on Selecting Data for Backup, Setting Backup Options, and Finalizing and Submitting the Job.
A.8.0 RestoreRMAN is RAC aware in that it automatically identifies that a database is multi-instance RAC database and restores the selected data accordingly.
With the Oracle APM installed on one of the nodes that hosts one of the instances for the RAC enabled database, all RMAN based restores are performed from this single installation of the Oracle APM. Refer to Performing RMAN Restores of Chapter 6 on page 91 for more information on Preparing Database for Recovery,
Important: If the relocation of the Oracle APM is expected to be permanent or last longer than 45 days, email [email protected] to request a relocation of the RAC Database Based Oracle APM license keys.

147
Selecting Data Items for a Restore, Setting Restore Options, Finalizing and Submitting the Job, and Opening Database for Use.
A.8.1 Types of RMAN Recovery Available in a RAC Environment
A.8.1.a Recovering Whole Database to Same RAC Environment This type of recovery is performed when the current Control File and SPFILE are intact but all the datafiles are damaged or lost. You will be able to perform complete recovery or recover the database to a specific point-in-time. Following is an overview of the process to recover the whole database in a RAC environment.
1. From a terminal window connect as the Oracle Software Owner to the node where Oracle APM is installed.
2. Set ORACLE_SID environment variable to local instance.export ORACLE_SID = <local_SID>
3. Start SQL*Plus and connect with administrator privileges to the local instance. SQLPLUS SYS AS SYSDBA
4. Shutdown the local instance.SHUTDOWN ABORT;
5. Startup the local instance with the nomount option.STARTUP FORCE NOMOUNT;
6. Disable cluster_database initialization parameter for the local instance.ALTER SYSTEM SET CLUSTER_DATABASE=FALSE SCOPE=SPFILE SID='<local_SID>';
7. Shutdown the local instance.SHUTDOWN ABORT;
8. Exit SQL*Plus.9. Shutdown all RAC instances.
> srvctl STOP DATABASE -d <database_name> -o abort10.Ensure all RAC instances are shutdown.
>srvctl STATUS DATABASE -d <database_name>11.Start SQL*Plus and connect with administrator privileges to the local
instance.
Important: If the Oracle APM was relocated to an alternate node and backups were performed from multiple instances, use the current Oracle SID when selecting data in the Restore Selections Tab.

Real Application Clusters
148
SQLPLUS SYS AS SYSDBA12.In SQL*Plus, start the local instance with the MOUNT option.
STARTUP MOUNT;13.In the Oracle APM Restore Selections window, find the latest available
backup that included ALL the tablespaces and select the Whole Database node.
14.In the Restore Options window: a. Select the Check Read-Only Datafiles and Restore if Necessary and
the Check Read-Only Datafiles and Recover if Not Current to include read-only datafiles in the restore and recovery process. The read-only files will be included only if they are needed for the complete recovery. If they are not damaged, RMAN will omit them.
b. Select the Delete Archive Logs No Longer Needed option to delete the restored archive logs that Oracle itself deems are no longer necessary.
c. To perform recovery on the database, i.e., reconstruct the database up to the current or specified point-in-time; select one of the following options in the Perform Recovery window:
Perform Complete Recovery - Recovers the database to the current time, i.e., last committed transaction available in the archived and online redo logs.Perform Database Point-in-Time Recovery - Recovers the database to a specific point-in- time whether it is a specific time, log sequence number, or SCN.
d. Select the Use Catalog option in the Recovery Catalog tab and specify the Recovery Catalog connection details.
15.Complete the Schedule, Target Client and Advanced Options, and submit the job. RMAN will automatically choose the best available full, incremental, or archived log backups and restore and recover the database.
16.From a terminal window connect as the Oracle Software Owner to the node where Oracle APM is installed.
17.Start SQL*Plus and connect with administrator privileges to the local instance. SQLPLUS SYS AS SYSDBA
18.Enable cluster_database initialization parameter for the local instance.ALTER SYSTEM SET CLUSTER_DATABASE=TRUE SCOPE=SPFILE SID='<local_SID>';
19.Shutdown the local instance.SHUTDOWN ABORT;
20.Exit SQL*Plus

149
21.Startup all RAC instances.>srvctl START DATABASE -d <database_name>
22.Start up all RAC Services.>srvctl START SERVICE -d <database_name>
23.Ensure all RAC instances are running.>srvctl STATUS DATABASE -d <database_name>
A.8.1.b Restoring SPFILE in a RAC EnvironmentSince Control File Autobackups are a pre-requisite in a multi-instance RAC environment, the SPFILE is backed up with the Control File whenever an autobackup is performed. The SPFILE is restored from the autobackup to the default location with the detailed steps below. If the instance is already started with the server parameter file, you cannot overwrite the existing server parameter file. Refer to Restoring the Server Parameter File (SPFILE) from Backup section in Oracle Database Backup and Recovery Basics for details on restoring a SPFILE to a non-default location.
1. From a terminal window connect as the Oracle Software Owner to the node where Oracle APM is installed.
2. Set ORACLE_SID environment variable to local instance.export ORACLE_SID = <local_SID>
3. Start SQL*Plus and connect with administrator privileges to the local instance. SQLPLUS SYS AS SYSDBA
4. Shutdown the local instance.SHUTDOWN ABORT;
5. Startup the local instance with the nomount option.STARTUP FORCE NOMOUNT;
6. Disable cluster_database initialization parameter for the local instance.ALTER SYSTEM SET CLUSTER_DATABASE=FALSE SCOPE=SPFILE SID='<local_SID>';
7. Shutdown the local instance.SHUTDOWN ABORT;
8. Exit SQL*Plus.9. Shutdown all RAC instances.
Important: After completing a restore of the Whole Database, it is highly recommended that a Full or Incremental Level 0 backup with the entire database selected in the Backup Selections tab be performed.
Real Application Clusters
150
>srvctl STOP DATABASE -d <database_name> -o abort10.Ensure all RAC instances are shutdown.
>srvctl STATUS DATABASE -d <database_name>11.Start RMAN and connect to the target database and Recovery Catalog.
>rman TARGET / CATALOG rman/<password>@<connect_identifier for catalog>
12.Startup the local instance with the FORCE NOMOUNT option.STARTUP FORCE NOMOUNT;
13.Set the database identifier for the target database with SET DBID. RMAN displays the DBID whenever you connect to the target. You can also obtain it by inspecting saved RMAN log files, querying the Catalog, or looking at the filenames of Control File autobackup. The DBID is also available in the View Database Details window or the Backup Contents tab of the Restore Options window.SET DBID <DBID>;
14.Restore the SPFILE Autobackup. If restoring the SPFILE to the default location execute: RUN {ALLOCATE CHANNEL CH1 TYPE 'SBT_TAPE';RESTORE SPFILE FROM AUTOBACKUP;}
15.Startup the instance with the FORCE option.STARTUP FORCE;
16.Exit RMAN.17.Start SQL*Plus and connect with administrator privileges to the local
instance. SQLPLUS SYS AS SYSDBA
18.Enable cluster_database initialization parameter for the local instance.ALTER SYSTEM SET CLUSTER_DATABASE=TRUE SCOPE=SPFILE SID='<local_SID>';
19.Shutdown the local instance.SHUTDOWN ABORT;
20.Exit SQL*Plus21.Startup all RAC instances.
>srvctl START DATABASE -d <database_name>22.Start up all RAC Services.
>srvctl START SERVICE -d <database_name>

151
23.Ensure all RAC instances are running.>srvctl STATUS DATABASE -d <database_name>
A.8.1.c Restoring Control Files in a RAC EnvironmentRestoring the Control File should only be performed in the following cases:
All current copies of the control file have been lost due to a media failure, accidental user deletion or have become corrupted and are not usable Oracle Customer Support has advised that a Control File restore is required
Since Control File Autobackups are a pre-requisite in a multi-instance RAC environment, the Control Files are restored from the Autobackup with the detailed steps below.
1. From a terminal window connect as the Oracle Software Owner to the node where Oracle APM is installed.
2. Set ORACLE_SID environment variable to local instance.export ORACLE_SID = <local_SID>
3. Start SQL*Plus and connect with administrator privileges to the local instance. SQLPLUS SYS AS SYSDBA
4. Shutdown the local instance.SHUTDOWN ABORT;
5. Startup the local instance with the nomount option.STARTUP FORCE NOMOUNT;
6. Disable cluster_database initialization parameter for the local instance.ALTER SYSTEM SET CLUSTER_DATABASE=FALSE SCOPE=SPFILE SID='<local_SID>';
7. Shutdown the local instance.SHUTDOWN ABORT;
8. Exit SQL*Plus.9. Shutdown all RAC instances.
>srvctl STOP DATABASE -d <database_name> -o abort10.Ensure all RAC instances are shutdown.
>srvctl STATUS DATABASE -d <database_name>11.Start RMAN and connect to the target database.
>rman TARGET /12.Startup the local instance with the FORCE NOMOUNT option.
STARTUP FORCE NOMOUNT;

Real Application Clusters
152
13.Set the database identifier for the target database with SET DBID. RMAN displays the DBID whenever you connect to the target. You can also obtain it by inspecting saved RMAN log files, querying the Catalog, or looking at the filenames of Control File autobackup. The DBID is also available in the View Database Details window or the Backup Contents tab of the Restore Options window.SET DBID <DBID>;
14.Restore the Control File Autobackup. If restoring the Control File from the last autobackup execute: RUN {ALLOCATE CHANNEL CH1 TYPE 'SBT_TAPE';RESTORE CONTROLFILE FROM AUTOBACKUP;ALTER DATABASE MOUNT;RESTORE DATABASE;RECOVER DATABASE;}
15.Open the database with the RESETLOGS option.ALTER DATABASE OPEN RESETLOGS;
16.Exit RMAN.17.Start SQL*Plus and connect with administrator privileges to the local
instance.SQLPLUS SYS AS SYSDBA
18.Enable cluster_database initialization parameter for the local instance.ALTER SYSTEM SET CLUSTER_DATABASE=TRUE SCOPE=SPFILE SID='<local_SID>';
19.Shutdown the local instance.SHUTDOWN ABORT;
20.Exit SQL*Plus21.Startup all RAC instances.
>srvctl START DATABASE -d <database_name>22.Start up all RAC Services.
>srvctl START SERVICE -d <database_name>23.Ensure all RAC instances are running.
>srvctl STATUS DATABASE -d <database_name>

153
A.8.1.d Performing Disaster Recovery in a RAC EnvironmentDisaster recovery includes the restore and recovery of a multi-instance RAC database after a complete media failure of all the shared storage including the current control files, all online redo log files, and all parameter files and the Recovery Catalog. To perform a disaster recovery, the minimum required set of backups including the backups of all the datafiles, some archived redo logs generated after the time of the backup, and at least one autobackup of the control file.
If your goal is to create a new copy of your target database for ongoing use on a standby RAC environment or independent RAC environment these procedures should not be used. The Duplicate Database backup type is designed specifically for this purpose. Refer to Duplicating a Database in a RAC Environment on page 157 for more information on duplicating a multi-instance RAC database.
The following procedure details the steps to perform a disaster recovery to the same RAC environment where the source database previously resided. This procedure would be utilized in the scenario in which a complete media failure of the shared storage occurred and the damaged shared storage was rebuilt using the same configuration or a new shared storage was configured imitating the original shared storage's configuration.
For variations to the Disaster Recovery procedure below, refer to Performing Disaster Recovery section in Oracle Database Backup and Recovery Advanced User's Guide for more information.
Pre-RequisitesTo perform a disaster recovery without a Recovery Catalog, the following requirements must be met:
Important: After restoring a Control File from an autobackup, it is highly recommended that a Full or Incremental Level 0 backup with the entire database selected in the Backup Selections tab be performed.
Important: When performing a test recovery ensure that you do not connect to the Recovery Catalog during datafile restoration. Otherwise, RMAN will record information about the restored datafiles to the recovery catalog. This interferes with future attempts to restore and recover the primary database. If you must use a recovery catalog because the control file is not large enough to contain the RMAN repository data on all of the backups that you need to restore, then export the catalog and import it into a different schema or database and use the copied recovery catalog for the test restore. Otherwise, the catalog considers the restored database as the current target database.

Real Application Clusters
154
Oracle RAC Environment in Place - You must have a properly configured Oracle RAC environment that matches the configuration as specified Performing User Managed Backups of Chapter 5 on page 57. In addition, the same version of the Oracle database software must be installed in the RAC environment as it existed on the damaged RAC environment. The ORACLE_HOME should be identical on both the original and new node. You do not have to create the database but you do need to configure Oracle Net Services and Automated Storage Management for shared storage.NetVault: Backup Software and the Oracle APM Installed - The same version of NetVault: Backup software and the Oracle APM must be installed on one of the nodes in the RAC using the same NetVault Machine Name as previously defined for the RAC environment. Ensure the Oracle APM default attributes are defined as specified in Configuring Default Attributes on page 143.DBID of the Source Database Identified - Identify the DBID of the damaged database. If the DBID was not recorded as part of the initial Oracle APM installation, the DBID can be obtained by examining the NetVault: Backup binary logs for RMAN based backups of the source database. The DBID is also available in the View Database Details window or the Backup Contents tab of the Restore Options window.Default Location for SPFILE must Exist - Default location in the ASM Shared Storage must exist before executing the steps below. Failure to ensure that the default location already exists will result in an ORA-17502 Failed to create file error during the SPFILE restore. Additionally, the SPFILE location should be detailed in the PFILE with the SPFILE parameter.Backups of All Tablespaces Made Available - Make sure that you have the latest backups of all the tablespaces.
Disaster Recovery Procedure1. Start RMAN and connect to the target database.
> rman TARGET /2. Set the database identifier for the target database with SET DBID. RMAN
displays the DBID whenever you connect to the target. You can also obtain it by inspecting saved RMAN log files, querying the Catalog, or looking at the filenames of Control File autobackup. The DBID is also available in the View Database Details window or the Backup Contents tab of the Restore Options window.SET DBID <DBID>;
3. Startup the local instance with the FORCE NOMOUNT option.STARTUP FORCE NOMOUNT;
4. Restore the SPFILE autobackup.

155
If restoring the SPFILE to the default location, execute: RUN {ALLOCATE CHANNEL CH1 TYPE 'SBT_TAPE';RESTORE SPFILE FROM AUTOBACKUP;}
5. Startup the local instance with the FORCE NOMOUNT option.STARTUP FORCE NOMOUNT;
6. Restore the Control File Autobackup. If restoring the Control File from the last autobackup execute: RUN {ALLOCATE CHANNEL CH1 TYPE 'SBT_TAPE';RESTORE CONTROLFILE FROM AUTOBACKUP;}
7. Mount the database:ALTER DATABASE MOUNT;
8. Disable Block Change Tracking.SQL "ALTER DATABASE DISABLE BLOCK CHANGE TRACKING";
9. In the Oracle APM Restore Selections window, navigate to the source NetVault: Backup Client and database, and find the latest available backup that included ALL the tablespaces and select the Whole Database node.
10.In the Restore Options window:a. Select the Check Read-Only Datafiles and Restore if Necessary and the
Check Read-Only Datafiles and Recover if Not Current to include read-only datafiles in the restore and recovery process.
b. Recovery must be performed in a disaster recovery scenario. In the Perform Recovery tab, select the Perform Database Point-in-Time Recovery option. Point-in-time recovery recovers the database to a specific time, log sequence number or SCN. If the specific time or log sequence of the failure is not known, it is recommended that the SCN option be utilized.
c. Disable the Use Catalog in the Recovery Catalog window. 11.Complete the Schedule, Target Client and Advanced Options and submit the
job. 12.RMAN will automatically choose the best available full, incremental, or
archived log backups and restore and recover the database.13.In RMAN, Enable Block Change Tracking.
SQL "ALTER DATABASE ENABLE BLOCK CHANGE TRACKING";14.Update the RMAN metadata.

Real Application Clusters
156
CROSSCHECK ARCHIVELOG ALL;15.Exit RMAN.16.Startup all RAC instances.
>srvctl START DATABASE -d <database_name>17.Start up all RAC Services.
>srvctl START SERVICE -d <database_name>18.Ensure all RAC instances are running.
>srvctl STATUS DATABASE -d <database_name>
A.8.1.e Performing Restores after Node FailureIf the multi-instance RAC database experiences a media failure or data corruption simultaneously with a node failure of the node where the Oracle APM is installed, the Oracle APM must be relocated to an alternate node in the RAC environment in order to perform an RMAN based restore and recovery. Relocating the Oracle APM is a two step process:
1. Install the NetVault: Backup Client Software on Alternate NodeInstall the NetVault: Backup Client Software on an alternate node in the RAC environment. During the installation process, be sure to use the same NetVault Machine Name that was used during the installation of the NetVault: Backup Client Software on the original node. For example, if PROD_RAC was the NetVault Machine Name specified during the installation of the original node, PROD_RAC should be used as the NetVault Machine Name on the alternate node.
2. Install the Oracle APMOnce the NetVault: Backup Client Software has been installed on the selected node of the RAC environment, the Oracle APM will need to be installed. The process is identical to installing the Oracle APM for a single instance database environment except that Oracle APM shall be installed on the NetVault: Backup Client that corresponds with the generic or virtual name provided as the NetVault Machine Name during the NetVault: Backup Client Software installation.
Important: After completing a disaster recovery, it is highly recommended that a Full or Incremental Level 0 backup with the entire database selected in the Backup Selections tab be performed.
Important: If the relocation of the Oracle APM is expected to be permanent or last longer than 45 days, email [email protected] to request a relocation of the RAC Database Based Oracle APM license keys.

157
With the Oracle APM installed on the alternate node, the restore process will be similar to performing restores in a single-instance non-RAC environment except for the following two differences:
During the Selecting Data Items for a Restore phase of performing RMAN restores, select the backup set from the node in the Restore Selections tab where the Oracle SID equals the Oracle SID of the instance where the Oracle APM was originally installed immediately before the relocation.During the Setting Restore Options phase, set the Target Database Authentication Details to the appropriate values for the local instance on the alternate node where the Oracle APM now resides. Refer to the Setting Destination Details of Chapter 6 on page 103 for more information.
Refer to Performing RMAN Restores of Chapter 6 on page 91 for complete details on Preparing Database for Recovery, Selecting Data Items for a Restore, Setting Restore Options, Finalizing and Submitting the Job, and Opening Database for Use.
A.8.1.f Duplicating a Database in a RAC EnvironmentThe Duplicate Database Backup is designed to allow the DBA to create a duplicate or clone of a source database for special purposes which will not affect the overall backup and restore procedures for the source database. In a RAC environment, Oracle does not support duplicating a multi-instance database to another multi-instance database. However, Oracle does support duplicating a multi-instance database to a single-instance database followed by converting the single instance database to a multi-instance database using one of the procedures detailed in Converting to Oracle Real Application Clusters from Single-Instance Oracle Databases chapter of Oracle Real Application Clusters Installation Guide.
Restoring a Duplicate Database Backup to the same RAC Environment is almost identical to restoring a Duplicate Database Backup in a single-instance environment except for the following differences:
Pre-RequisitesPFILE Updated with Auxiliary Values - In addition to the updates to the PFILE as specified in the Non-RAC Duplicate procedures, the following additional updates must be made when the source database is a multi-instance database:
1. Comment out the RAC related parameters by inserting a '#' pound or hash sign at the beginning of the entry. Example RAC related parameters include:
.cluster_database_instances = N
.cluster_database=TRUE<database/instance_name>.cluster_database=TRUE<instance_name>.instance_number=N

Real Application Clusters
158
<instance_name>.thread = N<instance_name>.undo_tablespace = '<tablespace_name>'
2. Add the following parameters:<auxiliary_instance_name>.undo_tablespace='<undo_tablespace>'<auxiliary_instance_name>.thread = 1
Post-Restore ProcedureUpon completion of the Restore Duplicate Database Procedure as defined in the Duplicating a Database in a Non-RAC Environment of Chapter 6 on page 108, the resulting single-instance database may be converted to a multi-instance database using the one of the procedures detailed in Converting to Oracle Real Application Clusters from Single-Instance Oracle Databases chapter of Oracle Real Application Clusters Installation Guide.

159
Appendix B:Glossary
B.0.0 GlossaryAutomated Storage Management (ASM)Integrated file system and volume manager expressly built for Oracle database files.
backup pieceA backup file generated by RMAN. Backup pieces are written in a proprietary format that can only be created or restored by RMAN and are stored in a logical container called a backup set.
backup setA backup of one or more datafiles, control files, SPFILE and archived redo log files. Each backup set consists of one or more binary files called backup pieces. By default, a backup set consists of only one backup piece.
block media recoveryBlock Media Recovery recovers only the damaged or corrupted blocks within a datafile using RMAN and leaves the affected datafiles online.
complete recoveryComplete Recovery recovers the database to the most recent time without the loss of any committed transactions. Typically, you perform complete recovery when media failure damages one or more datafiles or control files.
cumulative incremental backupAn incremental backup that backs up all the blocks changed since the most recent backup at level 0. When recovering with cumulative incremental backups, only the most recent cumulative incremental backup needs to be applied.
database point-in-time recovery (DBPITR)The recovery of an entire database to a specified past target time, SCN, or log sequence number.
DBIDAn internal, uniquely generated number that differentiates databases. Oracle creates this number automatically when you create the database. The DBID is needed during disaster recovery scenarios.
differential incremental backup
Glossary
160
A type of incremental backup that backs up all blocks that have changed since the most recent backup at level 1 or level 0. Differential backups are the default type of incremental backup. When recovering using differential incremental backups, the Oracle APM must apply all differential incremental level 1 backups since the restored tablespace backup.
duplicate databaseA database created from target database backups using the RMAN duplicate command.
flash recovery areaAn optional disk location that you can use to store recovery-related files such as control file and online redo log copies, archived redo log files, flashback logs, and RMAN backups. Oracle and RMAN manage the files in the flash recovery area automatically.
instanceA combination of background processes and memory buffers.
log sequence number (LSN)A number that uniquely identifies a set of redo records in a redo log file. When Oracle fills one online redo log file and switches to a different one, Oracle automatically assigns the new file a log sequence number.
Oracle ClusterwareA portable cluster management solution that is integrated with the Oracle database.
parallelismAllocating multiple channels for simultaneous RMAN backup and recovery operations. Allows a single job to read or write multiple backup sets in parallel. The number of channels should be less than or equal (<=) to the number of drives for the backup devices.
Real Application Clusters (RAC)Support for the transparent deployment of a single database across a cluster of servers, providing fault tolerance from hardware failures or planned outages.
recoveryTo recover a datafile (also called performing recovery on a datafile), is to take a restored copy of the datafile and apply to it changes recorded in the database's archived and online redo logs. Often the term Recovery is used to encompass both the Restore and Recovery processes.
Recovery Manager (RMAN)

161
RMAN is the preferred utility for backup and recovery of Oracle databases. RMAN backups provide maximum reliability while providing the most flexibility when defining a backup strategy. Support for the full range of backup types and options available with Oracle's RMAN tool are provided along with the ability to perform a number of recovery scenarios with less reliance on human interaction and DBA expertise.
RMAN also reduces the administration work associated with your backup strategy by maintaining an extensive record of metadata about backups, archive logs, and its own activities, known as the RMAN repository. In restore operations, RMAN will use this information to eliminate the need to identify backup files for use in restores in most situations.
resetlogsA method for opening a database, which is required after incomplete recovery or recovery with a backup control file. OPEN RESETLOGS resets the log sequence number to 1, and clears the online redo logs.
Backups from before the OPEN RESETLOGS operation remain valid and can be used along with backups taken after the OPEN RESETLOGS operation to repair any damage to the database.
restoreTo restore a datafile or control file from backup is to retrieve the file onto disk from a backup location on tape, disk or other media, and make it available to the database server.
system change number (SCN)A stamp that defines a committed version of a database at a point in time. Oracle assigns every committed transaction a unique SCN.
System Global Area (SGA)A memory region within main memory used to store data for fast access.
user managed backup methodWith this backup method, the files that make up the database are fundamentally backed up and restored with a mixture of host operating system commands and SQL*Plus backup and recovery-related capabilities.

Glossary
162

163
Appendix C:The About Window
C.0.0 The About WindowThe About window shows you the software version and the license serial number. You can access this window from the Backup Selections tab. The steps are given below:
Figure C-1:The OracleAPM About
window
1. From the GUI on the NetVault: Backup Server, open the Backup window (via either of the buttons offered in the command toolbars, or by using the Backup command in the Operations pull-down menu). A list of machines added as NetVault: Backup Clients will be displayed in the Selections tab.
2. Locate the Client configured as the Oracle Database Server, and open it to display a list of APMs/plugins installed on the machine.
3. Locate the Oracle APM in the list and right-click on it. 4. Select About from the pop-up menu.5. To close this window, click on OK.

The About Window
164
165
Appendix D:Troubleshooting and Support
D.0.0 TroubleshootingThe following table describes commonly encountered problems and possible solutions. In cases where an error occurs and it is not described in this table, view the job log to extract the Oracle Database error number and then refer to the relevant Oracle documentation for the resolution.
D.0.1 Backup Fails
Error ExplanationFailed to Connect to Database or ORA-01034: Oracle in not available
Oracle instance specified in the Oracle SID field in the Database Configuration window must be in an open state. The instance must be in an open state in order to perform backup.
ORA-01031: insufficient privileges on Oracle Backup error
User name specified in the Oracle SYSDBA User Name in the Database Configuration window must have SYSDBA privileges or be included in the Oracle Password File, or be a member of the ORA_DBA operating system group. Additionally, if the SYSDBA user is specified in the Oracle Password File, the Use Oracle Password File Authentication option should be selected in the Oracle APM Configuration window. Additionally, if the SYSDBA user is specified in the Oracle Password File, the Use Oracle Password File Authentication option should be selected in the Oracle APM Configuration window.
ORA-01123: Cannot start online backup; media recovery not enabled
Oracle instance is not running in ARCHIVELOG mode as specified in Pre-installation Requirements of Chapter 3 on page 25

Troubleshooting and Support
166
D.0.2 Backup Job HangsProblem:
There is a lock on the control file and a backup job hangs at log output: "Log Message: Starting Control File and SPFILE Autobackup at <date>". Or this job is aborted and a subsequent backup job completes with an error message in the log of the job: "ORA-00230: operation disallowed: snapshot control file enqueue unavailable".
Possible Causes:
1. The Oracle APM has not been properly configured, i.e. the "NetVault Server" field has not been set in the Oracle APM Configure window; (Backup window > Right Click "Oracle APM").
2. Control File Autobackup has been enabled without proper configuration of the Oracle APM.
Resolution:
1. Abort the hung backup job.2. Remove the lock on the Control File.
RMAN-06062 - can not backup SPFILE because the instance was not started with SPFILE
If either the Control File Autobackup Enabled or the Use RMAN Commands to backup SPFILE are selected in the Add/Edit Database window, the database must be started with an SPFILE. Create an SPFILE and re-start the instance using the SPFILE or use the Edit Database option to deselect these two option and insert the path for the PFILE in the Parameter File Path field.
Failed to backup all data If the SYSDBA password has been changed on the Oracle server, it must be updated in the Oracle APM Database Configuration. Refer to Removing a Saved Password of Chapter 4 on page 49
Flash Recovery Area Backup Fails with 'specification does not match any datafile copy in the repository' or 'specification does not match any backup set in the repository' errors.
A Flash Recovery Area Backup was performed however, the FRA does not contain any recovery files for previous backups that were performed with a Backup Destination of Disk or Both Tape and Disk. You must use the FRA as a Backup Destination before you can perform a backup of the FRA with the Flash Recovery Area backup type.
Error Explanation
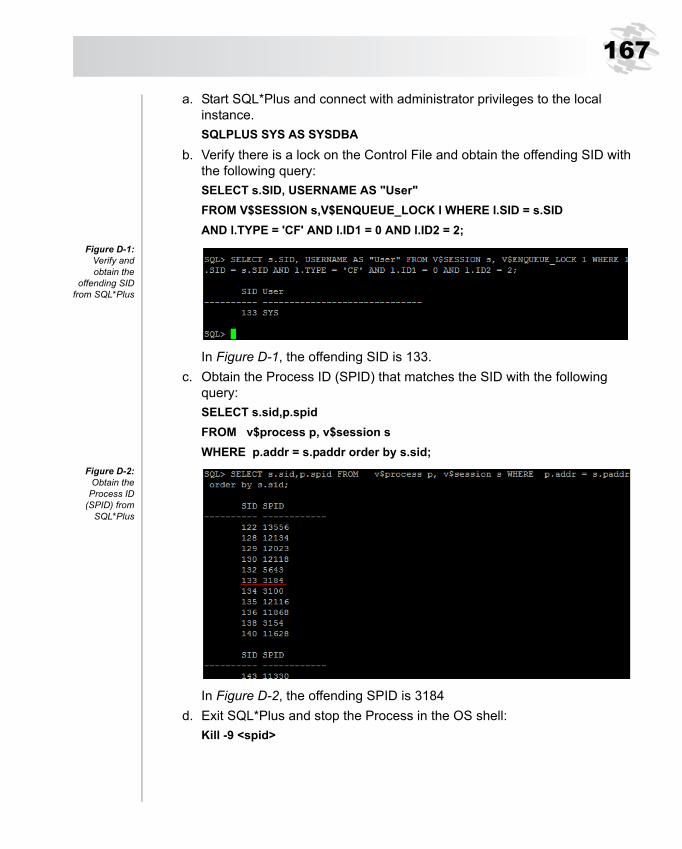
167
a. Start SQL*Plus and connect with administrator privileges to the local instance. SQLPLUS SYS AS SYSDBA
b. Verify there is a lock on the Control File and obtain the offending SID with the following query:SELECT s.SID, USERNAME AS "User" FROM V$SESSION s,V$ENQUEUE_LOCK l WHERE l.SID = s.SID AND l.TYPE = 'CF' AND l.ID1 = 0 AND l.ID2 = 2;
Figure D-1:Verify andobtain the
offending SIDfrom SQL*Plus
In Figure D-1, the offending SID is 133.c. Obtain the Process ID (SPID) that matches the SID with the following
query:SELECT s.sid,p.spid FROM v$process p, v$session s WHERE p.addr = s.paddr order by s.sid;
Figure D-2:Obtain the
Process ID(SPID) from
SQL*Plus
In Figure D-2, the offending SPID is 3184d. Exit SQL*Plus and stop the Process in the OS shell:
Kill -9 <spid>

Troubleshooting and Support
168
Figure D-3:Stop theoffending
process in theOS shell.
3. Ensure that the NetVault: Server and Do Restore from NetVault Server are defined in the Default Attributes as detailed in Configuring Default Attributes of Chapter 4 on page 36.
D.0.3 Restore Fails
D.1.0 Technical SupportBakBone Software is dedicated to providing friendly, expert advice to our customers. Our highly trained professionals are available to answer questions, offer solutions to problems and generally help make the most of any BakBone software purchase. Log on to our web site for more information.
http://www.bakbone.com/supportportal
D.1.1 Documentation UpdatesFor late-breaking documentation updates, refer to the BakBone Software Knowledge Base. BakBone’s Knowledge Base article for [product_name product_version] can be found at the following link:
http://kb.bakbone.com/3686
Error ExplanationORA-27007: failed to open file Ensure that NetVault: Server and Do
Restore from NetVault Server settings are defined as detailed in Configuring Default Attributes of Chapter 4 on page 36.
ORA-19511: Error received from media manager, error text: SBT error=7011, errno=1, sbtopen: system error
ORA-27012: Read from file failed
ORA-19511: Error received from media manager layer, error text: SBT error= 7063, errno = 0, sbtread: i/o error