operating manual of dromas 2 (version 2.0: draft) 2 operating manual v02… · use qgis to create a...
TRANSCRIPT

District Road Maintenance System (DROMAS)
Operating Manual of DROMAS 2
(Version 2.0: DRAFT)
February, 2016

Dromas 2: Operating Manual
Table of Content
1 DISTRICT ROAD MAINTEANNCE SYSTEM (DROMAS)..................................................................... 1
1.1 System Architecture........................................................................................................................................1
1.2 Presentation Layer..........................................................................................................................................1
1.3 Data Layer ......................................................................................................................................................1
1.4 System Installation and Operation ..................................................................................................................2
2 DESCRIPTION OF SYSTEM.................................................................................................................. 3
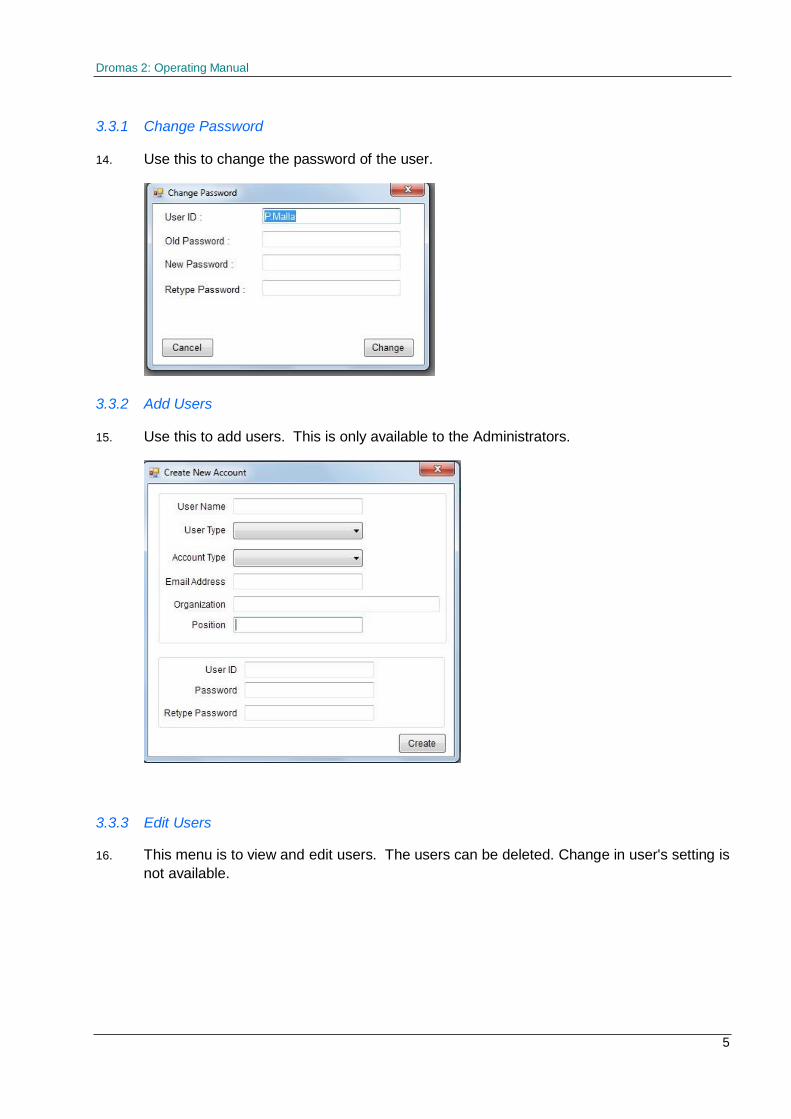
3 ADMIN MENU......................................................................................................................................... 4
3.1 Login ...............................................................................................................................................................4
3.2 Select District & Year ......................................................................................................................................4
3.3 Manage Users ................................................................................................................................................4
3.3.1 Change Password ...............................................................................................................................5 3.3.2 Add Users............................................................................................................................................5 3.3.3 Edit Users............................................................................................................................................5
3.4 Logout.............................................................................................................................................................6
3.5 Exit..................................................................................................................................................................6
4 ROAD NETWORK .................................................................................................................................. 7
4.1 Road Network .................................................................................................................................................7
4.1.1 Road Network......................................................................................................................................7 4.1.2 Road Links ..........................................................................................................................................9 4.1.3 Road Nodes ......................................................................................................................................10 4.1.4 Download Data ..................................................................................................................................10 4.1.5 Calibrate Chainage with GPS............................................................................................................11
4.2 Road Inventory .............................................................................................................................................12
4.2.1 Construction Status ...........................................................................................................................12 4.2.2 Pavement Types ...............................................................................................................................13 4.2.3 Road Formation.................................................................................................................................14 4.2.4 Retaining Wall ...................................................................................................................................15 4.2.5 Side Drain..........................................................................................................................................16 4.2.6 Culverts and Causeway.....................................................................................................................17 4.2.7 Bridges ..............................................................................................................................................18 4.2.8 Inventory of New Crossing ................................................................................................................19 4.2.9 Road Furniture ..................................................................................................................................20 4.2.10 Utilities...............................................................................................................................................21 4.2.11 Import from Mobile ............................................................................................................................21
4.3 Road Condition .............................................................................................................................................22
4.4 Traffic............................................................................................................................................................23
4.4.1 Traffic Stations ..................................................................................................................................23 4.4.2 Traffic Counts ....................................................................................................................................24 4.4.3 Traffic Assignments ...........................................................................................................................25
5 ANNUAL MAINTENANCE ................................................................................................................... 26
5.1 Rates ............................................................................................................................................................26
5.1.1 ARMP Budgetary Items .....................................................................................................................27 5.1.2 ARMP Budgetary Rates ....................................................................................................................27
5.2 Routine .........................................................................................................................................................28
5.2.1 Select Roads .....................................................................................................................................28 5.2.2 Prepare Details..................................................................................................................................29 5.2.3 View Summary ..................................................................................................................................30
5.3 Recurrent ......................................................................................................................................................31
5.3.1 Select Roads .....................................................................................................................................31 5.3.2 Prepare Details..................................................................................................................................32 5.3.3 View Summary ..................................................................................................................................33
5.4 Periodic.........................................................................................................................................................34
5.5 Specific (Spot & Bottlenecks)........................................................................................................................34
5.6 Upgrading .....................................................................................................................................................34
5.7 Rehabilitation/Reconstruction .......................................................................................................................34
i

Dromas 2: Operating Manual
5.8 Miscellaneous ...............................................................................................................................................34
5.9 View Summary..............................................................................................................................................35
6 CONTRACT MANAGEMENT............................................................................................................... 36
6.1 Create/Select Contract..................................................................................................................................36
6.2 Bill of Quantities ............................................................................................................................................37
6.3 Progress Milestone .......................................................................................................................................37
6.4 Physical Progress .........................................................................................................................................38
6.5 Variation Orders............................................................................................................................................38
6.5.1 VO Summary .....................................................................................................................................38 6.5.2 VO New Items and Rates ..................................................................................................................39 6.5.3 VO Details .........................................................................................................................................39
6.6 Interim Payment Certificates .........................................................................................................................40
6.6.1 IPC Summary ....................................................................................................................................40 6.6.2 IPC Details ........................................................................................................................................41
6.7 Document management................................................................................................................................42
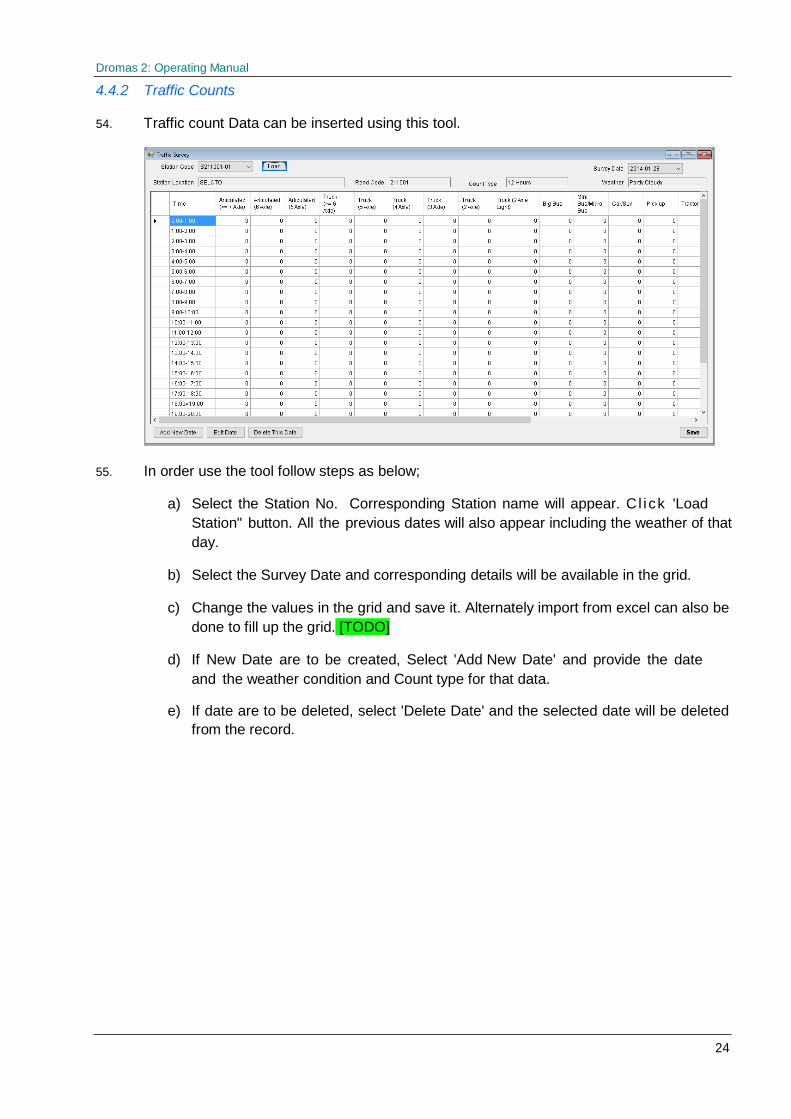
6.7.1 Upload Documents ............................................................................................................................42 6.7.2 Download Documents .......................................................................................................................42
6.8 Generate Reports .........................................................................................................................................43
7 SOCIO-ECONOMY............................................................................................................................. .. 44
8 PRIORITIZATION ................................................................................................................................. 45
9 MAP ...................................................................................................................................................... 46
9.1 View Map in Internal Browser .......................................................................................................................46
9.2 View Map in External Browser ......................................................................................................................46
ii

Dromas 2: Operating Manual
1 DISTRICT ROAD MAINTEANNCE SYSTEM (DROMAS)
1.1 System Architecture
1. The DROMAS is developed based on following approaches;
• Complete Open Source System Design requiring no proprietary software
• Centralized Database using PostgreSQL/PostGIS which is a enterprise grade open
source database widely used.
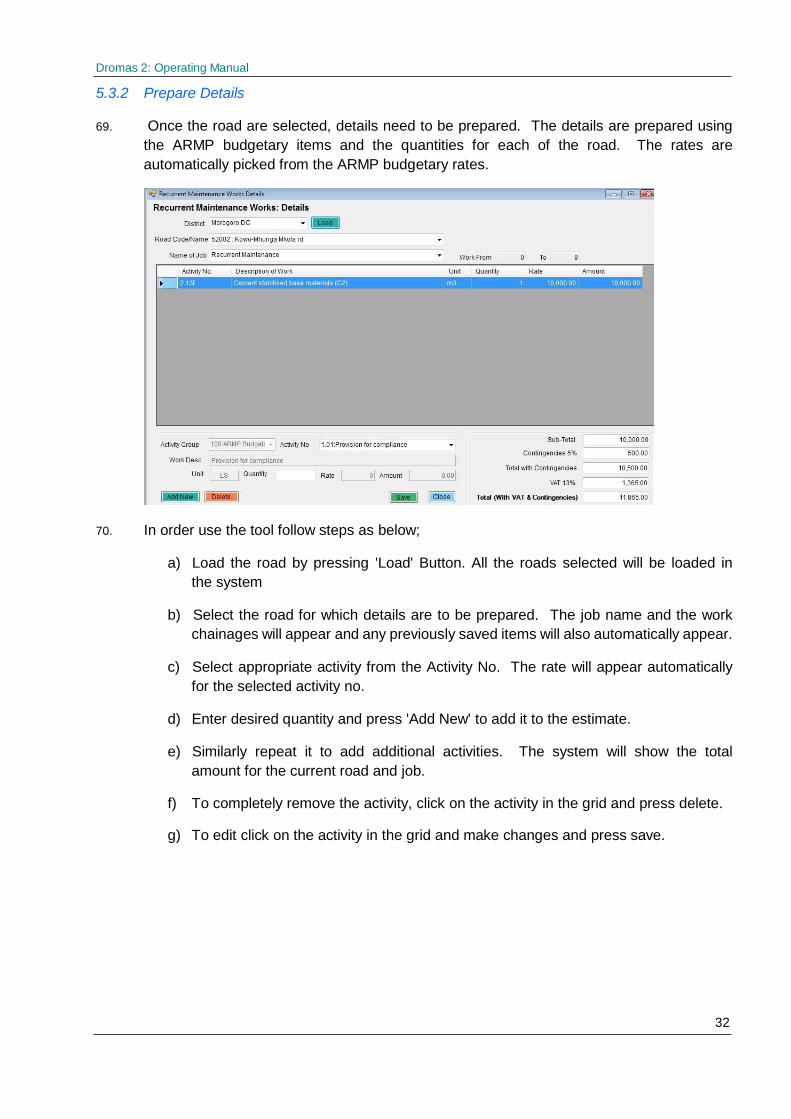
• Open Source Quantum GIS for Desktop GIS to manipulate the GIS data and
processing of GPS data.
• Geo-Server Based Web Mapping system using PostgreSQL data of road layers
and other static background layers.
• Automatic Updating Desktop Software using "Click Once" technology
• Android based mobile system for mapping and inventory
2. The architecture of DROMAS has been designed using the layered architectural pattern. A
two dimensional layering approach has been used to structure the software firstly by
responsibility and secondly for reuse.
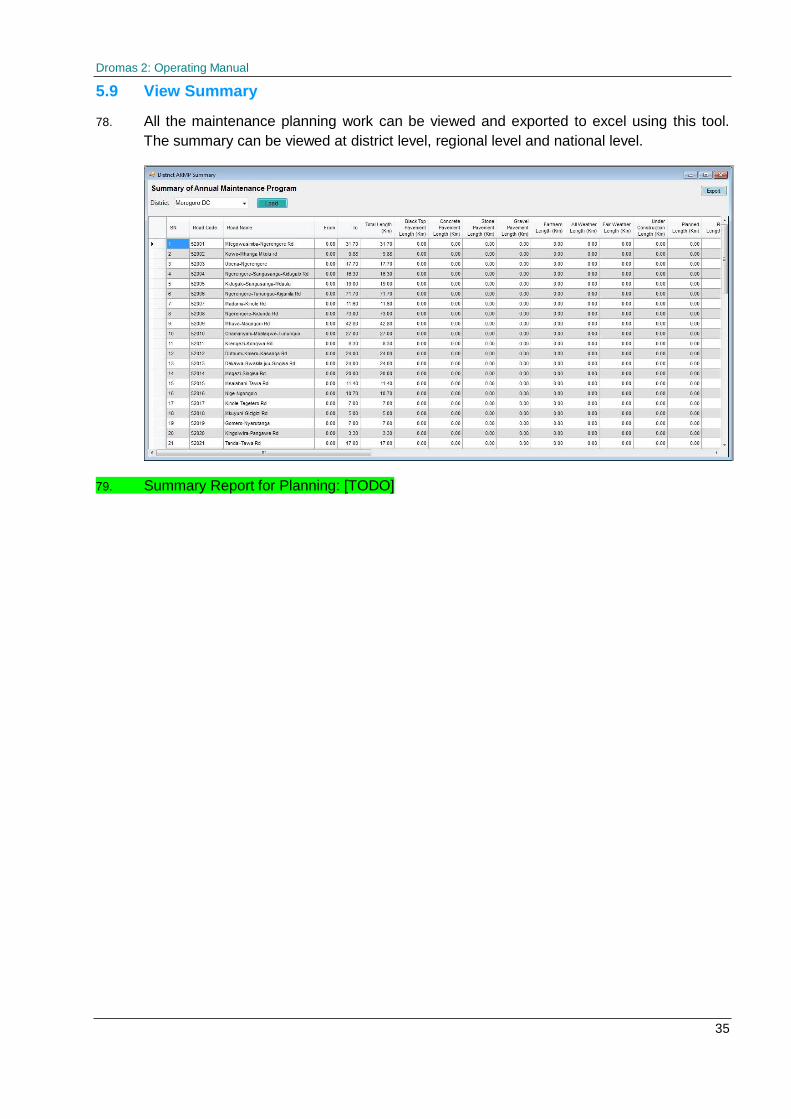
1.2 Presentation Layer
3. Presentation layers consist of four components ;
a) DROMAS Desktop
b) DROMAS Web Interface
c) DROMAS Web Mapping
d) DROMAS Mobile
4. The DROMAS Desktop is a windows based desktop application delivered to end users via
Web based "clickOnce Installation" for windows based system. The web page is a
standard web system written with css and java script for project status display. The web
mapping is provided through the "Geo-Server".
5. Web based system for dissemination of the data through internet is required for
addressing the public data demand as well as for notifying the work progress to the higher
authorities.
1.3 Data Layer
6. The Data Layer persists DROMAS data into a PostgreSQL with PostGIS database. The
structure of the DROMAS Database is based on the data storage requirements implied in
various requirements of the system including road information system, road planning etc.
The database contains multiple schemas with the data in each schema. The PostGIS
Database provides support for storage and manipulation of spatial data including road
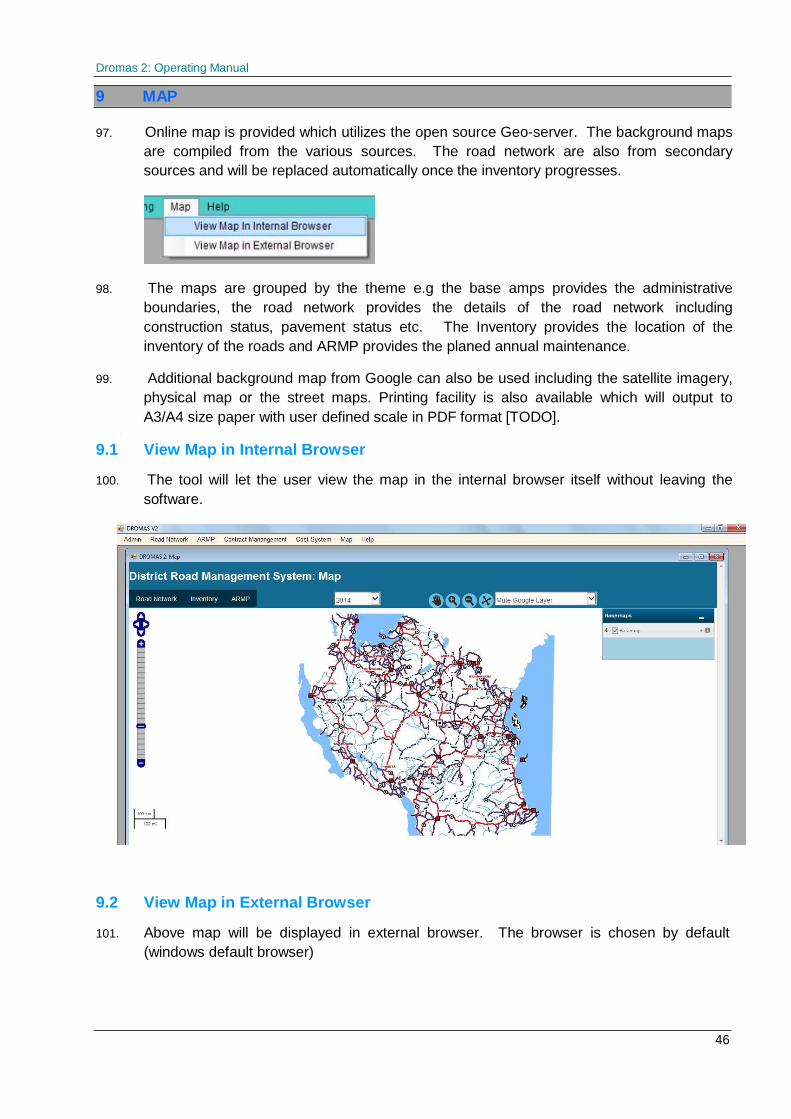
network, background maps, accessibility analysis etc.
1

Dromas 2: Operating Manual
1.4 System Installation and Operation
7. The proposed system is based on server based installation. use following link to access
the setup file.
http://dromas.aviyaan.com/download/setup.exe
8. This will download a setup.exe file. Save this file in the computer and run it. Follow the
screen procedures and the program will be installed automatically will be available from start
panel in DROMAS2/DROMAS2.EXE.
9. In order to operate the system, a valid user name and password is required. This can be
obtained from the PMORLG.
2

Dromas 2: Operating Manual
2 DESCRIPTION OF SYSTEM
10. The entire system is grouped in to menus based on their similarity of functions. The
following table provides the summary of the menus and the sub-sequent section provides
details of each of the menus and the sub-menus
.Menus Descriptions
Admin Allows users to login, select province and year, create new user, change password, view users, login and logout/quit.
Road Network Manages the Road Network, Inventory, Condition and Traffic
ARMP Annual Road Maintenance Planning Tool
Contract Management Management of Contracts
Cost System Cost Estimation Tool using First Principle
Map Online Mapping system
Help About the system.
3

Dromas 2: Operating Manual
3 ADMIN MENU
3.1 Login
11. The login is required for all the operation. Provide the user name and password in the
dialog box which is shown after pressing the login menu.
3.2 Select District & Financial Year
12. Before proceeding to the any other aspect of the system, a selection of work area is
required. This is accessed through this menu. Select the work area (District). depending
on the user rights, the District list might show the districts with are allocated to the users.
3.3 Manage Users
13. This menu is used to change the passwords and also create users (only used by
Administrators).
4
Dromas 2: Operating Manual
3.3.1 Change Password
14. Use this to change the password of the user.
3.3.2 Add Users
15. Use this to add users. This is only available to the Administrators.
3.3.3 Edit Users
16. This menu is to view and edit users. The users can be deleted. Change in user's setting is
not available.
5

Dromas 2: Operating Manual
3.4 Logout
17. This menu will log out the user from the system. After this a login will be required to use
the system.
3.5 Exit
18. Will Exit from the program.
6

Dromas 2: Operating Manual
4 ROAD NETWORK
19. The Inventory system provide the access to all the information related to inventory of the
road network.
4.1 Road Network 4.1.1 Road Network
20. The road network provides provisions for creating road network and refining the mobile
data. Loading of geometry is also provided in this tool.
21. In order use the tool follow steps as below;
a) Select the District and press 'Load'
b) Right click on the grid to Edit, Delete or Add new road
c) For new roads provide the From Chainage (0+000 format), length (Km), Road
Code, Road Name etc.
7

Dromas 2: Operating Manual
d) Click on 'Load Geometry' to load geometry for the selected road. In case of new
road entry first save the road without geometry and later edit it to include the
geometry. The geometry should be clean shapefile in single part. Significant
editing is required to prepare clean shapefile from the gps track. Use QGIS to
create a clean shape file and also add a column for the road code and enter the
proper road code.
e) Provide 'Last Update', 'Inventory year', 'update notes' and select program under which
this inventory was carried out and the year of construction if applicable.
f) To edit the previously defined data, select it in the and the data related to the selected
road be shown in the input boxes below. Make necessary changes and press 'Save'.
g) A instruction to use QGIS for GPS track editing is given in Appendix.
8

Dromas 2: Operating Manual
4.1.2 Road Links
22. Road Links are defined using road nodes. These could be homogenous sections or
sections for maintenance etc. In order to define links, the road nodes should be defined
first.
23. In order use the tool follow steps as below;
a) Select the Road using the road codes. Corresponding road name will appear.
b) Use 'Load Road' button to select the road for this tool
c) If new sections are to be created, Click 'New' to create Sections.
d) Provide a link code. It could be road code with suffix 01, 02 etc e.g 52001-01.
Provide link name.
e) Provide the from node and to node. The node should already be defined using
'Road Nodes'.
f) Provide the purpose of the link by selecting one of the options.
g) Provide 'Last Update', 'Inventory year', 'update notes' and select program under
which this inventory was carried out and the year of construction if applicable.
h) To edit the previously defined data, select it in the grid and the data related to the
selected road be shown in the input boxes below. Make necessary changes and
press 'Save'.
9

Dromas 2: Operating Manual
4.1.3 Road Nodes
24. Road Nodes are the specific location in a road indicating various functions.
25. In order use the tool follow steps as below;
a) Select the Road using the road codes. Corresponding road name will appear.
b) Use 'Load Road' button to select the road for this tool
c) If new nodes are to be created, Click 'New' to create nodes.
d) Provide a node code. It could be road code with suffix 01, 02 etc e.g 52001-01.
Provide node name.
e) Provide the chainage, known mark (if available), latitude/longitude etc
f) Provide the purpose of the node by selecting one of the options.
g) Provide 'Last Update', 'Inventory year', 'update notes' and select program under which
this inventory was carried out and the year of construction if applicable.
h) To edit the previously defined data, select it in the grid and the data related to the
selected road be shown in the input boxes below. Make necessary changes and
press 'Save'.
4.1.4 Download Data
26. This tool can be used to download the data from server as shape file. [To be Implemented]
10

Dromas 2: Operating Manual
4.1.5 Calibrate Chainage with GPS
27. This tool is useful for calibrating the chainages with GPS coordinate. In general this is not
required if all portion a road are properly surveyed with GPS and are in plain regions. In
case of planned roads, the alignment is not well defined and can be extension of existing
road. In such situation, the GPS calibration can be used to properly defined the existing
portions.
28. In order use the tool follow steps as below;
a) Use 'Load Road' button to select the road for this tool
b) use 'New' to create new position of calibration. No calibration is required if only using
start and end points (it is done automatically)
c) Provide the GPS coordinate and corresponding chainage. The format for chainage
is 0+000.00
d) Press 'Calc' to check the accuracy of the point. The accuracy is the distance of the
GPS coordinate from the road line. Do not use point that are more than 100m
accuracy.
e) Provide update date, notes, established year and program as appropriate and save
it.
f) to edit the previously defined data, select it in the grid and the data related to the
selected node will be shown in the input boxes below. Make necessary changes
and press 'Save'.
11

Dromas 2: Operating Manual
4.2 Road Inventory
29. The Inventory system provide the access to all the information related to inventory of the
road network.
4.2.1 Construction Status
30. Construction Status is indication of the road status at present with respect to its access
(All Weather, Fair Weather, Under Construction or planned new construction).
31. In order use the tool follow steps as below;
a) Select the Road using the road codes. Corresponding road name will appear.
b) Use 'Load Road' button to select the road for this tool
c) If new section are to be created, Select 'New' to create new positions of road
construction status.
d) Provide 'From Chainage' and 'To Chainage' for this section of the road.
e) Optionally From Latitude/Longitude and To Latitude/Longitude can also be
provided if chainage are not known and the points are obtained using GPS.
f) Select appropriate construction status.
g) Provide 'Last Update', 'Inventory year', 'update notes' and select program under
which this inventory was carried out and the year of construction if applicable.
12
Dromas 2: Operating Manual
h) To edit the previously defined data, select it in the grid and the data related to the
selected road be shown in the input boxes below. Make necessary changes and
press 'Save'.
4.2.2 Pavement Types
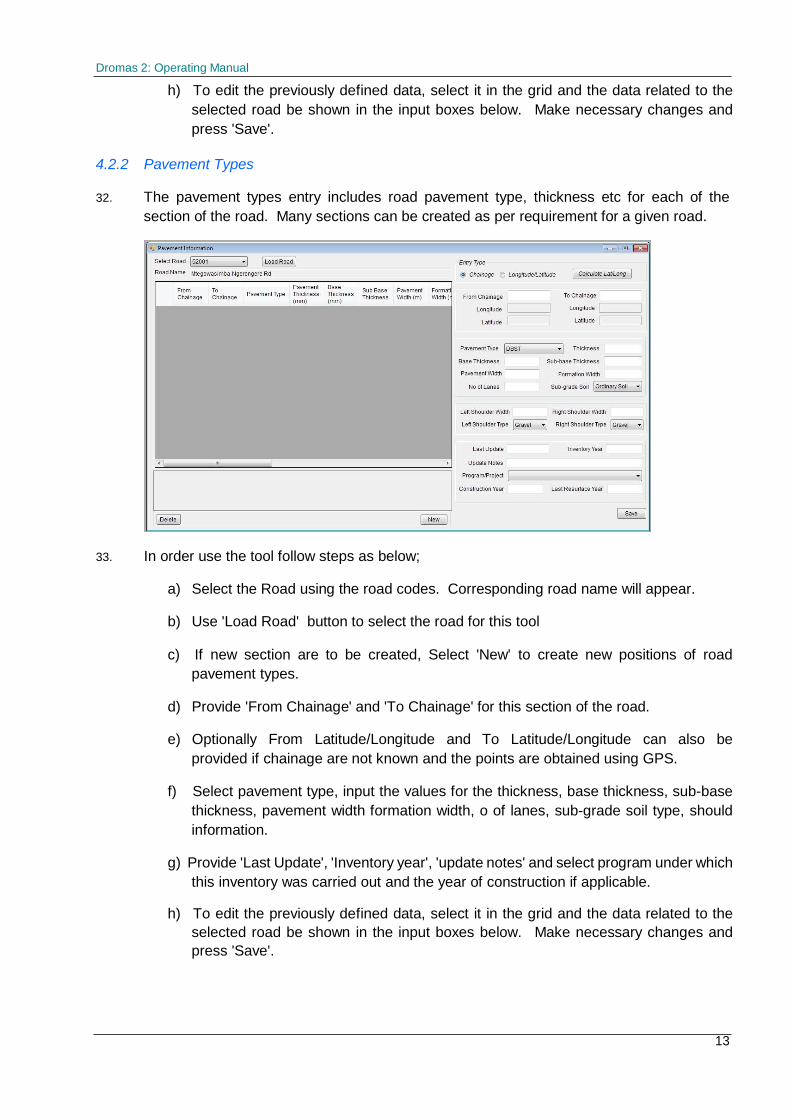
32. The pavement types entry includes road pavement type, thickness etc for each of the
section of the road. Many sections can be created as per requirement for a given road.
33. In order use the tool follow steps as below;
a) Select the Road using the road codes. Corresponding road name will appear.
b) Use 'Load Road' button to select the road for this tool
c) If new section are to be created, Select 'New' to create new positions of road
pavement types.
d) Provide 'From Chainage' and 'To Chainage' for this section of the road.
e) Optionally From Latitude/Longitude and To Latitude/Longitude can also be
provided if chainage are not known and the points are obtained using GPS.
f) Select pavement type, input the values for the thickness, base thickness, sub-base
thickness, pavement width formation width, o of lanes, sub-grade soil type, should
information.
g) Provide 'Last Update', 'Inventory year', 'update notes' and select program under which
this inventory was carried out and the year of construction if applicable.
h) To edit the previously defined data, select it in the grid and the data related to the
selected road be shown in the input boxes below. Make necessary changes and
press 'Save'.
13
Dromas 2: Operating Manual
4.2.3 Road Formation
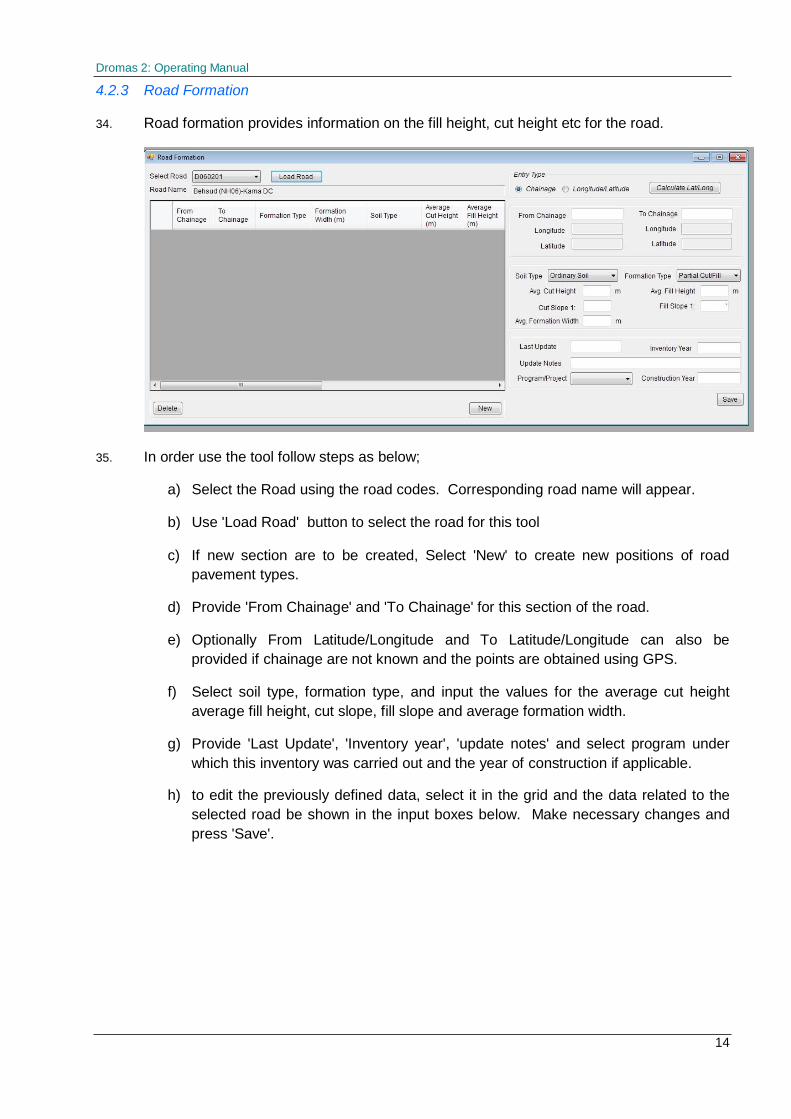
34. Road formation provides information on the fill height, cut height etc for the road.
35. In order use the tool follow steps as below;
a) Select the Road using the road codes. Corresponding road name will appear.
b) Use 'Load Road' button to select the road for this tool
c) If new section are to be created, Select 'New' to create new positions of road
pavement types.
d) Provide 'From Chainage' and 'To Chainage' for this section of the road.
e) Optionally From Latitude/Longitude and To Latitude/Longitude can also be
provided if chainage are not known and the points are obtained using GPS.
f) Select soil type, formation type, and input the values for the average cut height
average fill height, cut slope, fill slope and average formation width.
g) Provide 'Last Update', 'Inventory year', 'update notes' and select program under
which this inventory was carried out and the year of construction if applicable.
h) to edit the previously defined data, select it in the grid and the data related to the
selected road be shown in the input boxes below. Make necessary changes and
press 'Save'.
14
Dromas 2: Operating Manual
4.2.4 Retaining Wall
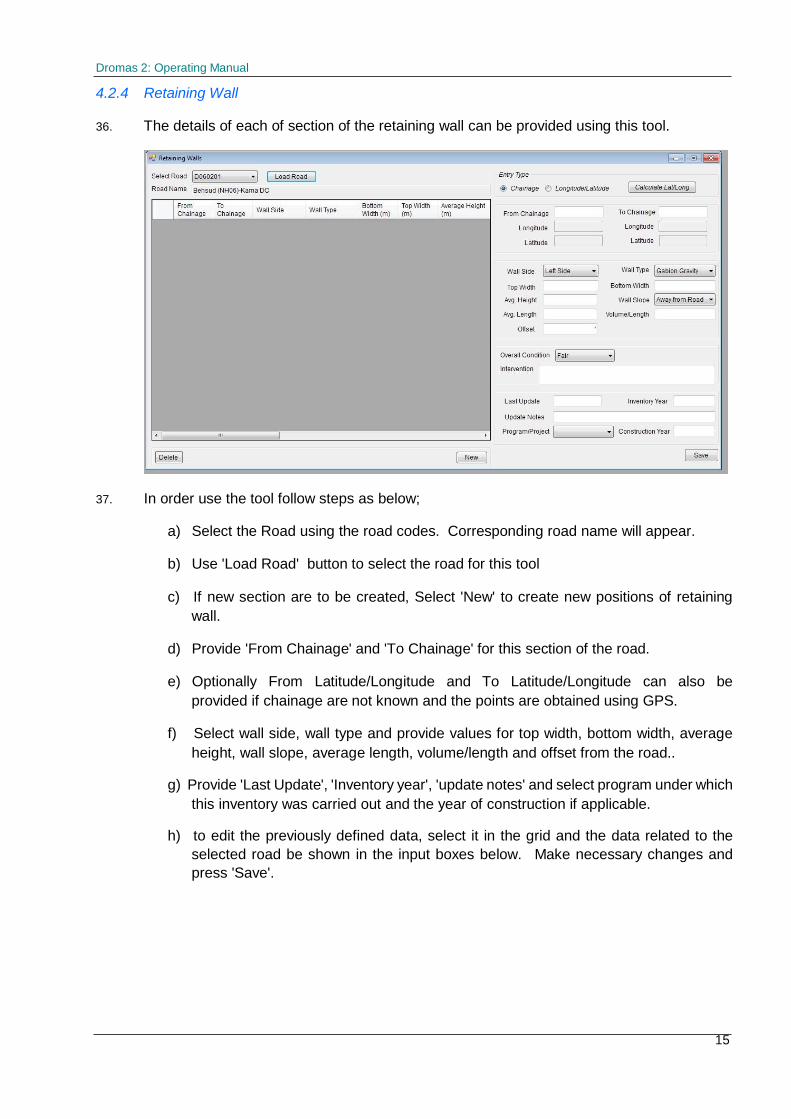
36. The details of each of section of the retaining wall can be provided using this tool.
37. In order use the tool follow steps as below;
a) Select the Road using the road codes. Corresponding road name will appear.
b) Use 'Load Road' button to select the road for this tool
c) If new section are to be created, Select 'New' to create new positions of retaining
wall.
d) Provide 'From Chainage' and 'To Chainage' for this section of the road.
e) Optionally From Latitude/Longitude and To Latitude/Longitude can also be
provided if chainage are not known and the points are obtained using GPS.
f) Select wall side, wall type and provide values for top width, bottom width, average
height, wall slope, average length, volume/length and offset from the road..
g) Provide 'Last Update', 'Inventory year', 'update notes' and select program under which
this inventory was carried out and the year of construction if applicable.
h) to edit the previously defined data, select it in the grid and the data related to the
selected road be shown in the input boxes below. Make necessary changes and
press 'Save'.
15

Dromas 2: Operating Manual
4.2.5 Side Drain
38. The road side drain information can be created or edited using this tool
39. In order use the tool follow steps as below;
a) Select the Road using the road codes. Corresponding road name will appear.
b) Use 'Load Road' button to select the road for this tool
c) If new section are to be created, Select 'New' to create new positions of retaining
wall.
d) Provide 'From Chainage' and 'To Chainage' for this section of the road.
e) Optionally From Latitude/Longitude and To Latitude/Longitude can also be
provided if chainage are not known and the points are obtained using GPS.
f) Select drain side, drain type and provide values for top width, bottom width,
average height, average wall thickness, drain shape, drain cover type and
intervention required based on the field observation.
g) Provide 'Last Update', 'Inventory year', 'update notes' and select program under which
this inventory was carried out and the year of construction if applicable.
h) to edit the previously defined data, select it in the grid and the data related to the
selected road be shown in the input boxes below. Make necessary changes and
press 'Save'.
16

Dromas 2: Operating Manual
4.2.6 Culverts and Causeway
40. The inventory of culverts and condition assessment is grouped into this menu.
41. In order use the tool follow steps as below;
a) Select the Road using the road codes. Corresponding road name will appear.
b) Use 'Load Road' button to select the road for this tool
c) If new section are to be created, Select 'New' to create new positions of culvert.
d) Provide 'Chainage' for the culvert
e) Optionally Latitude/Longitude can also be provided if chainage are not known and
the points are obtained using GPS.
f) Select culvert type and provide values for no of barrels, diameters etc and also
provide the condition assessment and intervention required based on the field
observation.
g) Provide 'Last Update', 'Inventory year', 'update notes' and select program under which
this inventory was carried out and the year of construction if applicable.
h) to edit the previously defined data, select it in the grid and the data related to the
selected road be shown in the input boxes below. Make necessary changes and
press 'Save'.
17

Dromas 2: Operating Manual
4.2.7 Bridges
42. The inventory of existing bridges can be accessed from this tool.
43. In order use the tool follow steps as below;
a) Select the Road using the road codes. Corresponding road name will appear.
b) Use 'Load Road' button to select the road for this tool
c) If bridge are to be created, Select 'New' by right clicking on the grid to create new
positions of culvert.
d) Provide details of the bridge. The bridge code is very essential and should be
provided according to the road code. It could be e.g B55100-001 etc
e) Provide 'Last Update', 'Inventory year', 'update notes' and select program under which
this inventory was carried out and the year of construction if applicable.
f) to edit the previously defined data, select it in the grid and the data related to the
selected road be shown in the input boxes below. Make necessary changes and
press 'Save'.
g) Photographs are also shown. Right click on the photo section to edit, view and
add new photographs.
18

Dromas 2: Operating Manual
4.2.8 Inventory of New Crossing
44. The inventory of new crossings can be accessed from this tool.
45. In order use the tool follow steps as below;
a) Select the Road using the road codes. Corresponding road name will appear.
b) Use 'Load Road' button to select the road for this tool
c) If new crossing are to be created, Select 'New' by right clicking on the grid to
create new positions of culvert.
d) Provide details of the crossing. The crossing code is very essential and should be
provided according to the road code. It could be e.g V080210-001 etc
e) Provide 'Last Update', 'Inventory year', 'update notes' and select program under which
this inventory was carried out and the year of construction if applicable.
f) to edit the previously defined data, select it in the grid and the data related to the
selected road be shown in the input boxes below. Make necessary changes and
press 'Save'.
g) Photographs are also shown. Right click on the photo section to edit, view and
add new photographs.
19

Dromas 2: Operating Manual
4.2.9 Road Furniture 4.2.9.1 Traffic Signs
46. In order use the tool follow steps as below;
a) Select the Road using the road codes. Corresponding road name will appear.
b) Use 'Load Road' button to select the road for this tool
c) If signs are to be created, Select 'New' to create new positions of sign.
d) Provide 'Chainage' for the sign
e) Optionally Latitude/Longitude can also be provided if chainage are not known and
the points are obtained using GPS.
f) Select sign group, sing type etc and also provide the sign condition based on the
field observation.
g) Provide 'Last Update', 'Inventory year', 'update notes' and select program under which
this inventory was carried out and the year of construction if applicable.
h) To edit the previously defined data, select it in the grid and the data related to the
selected road be shown in the input boxes below. Make necessary changes and
press 'Save'.
20

Dromas 2: Operating Manual
4.2.10 Utilities 4.2.10.1 Copy Inventory
47. The utilities include the copy inventory tool which can be used to copy inventory from one
year to another. The entire system is based on 'year-wise' basis for planning purpose but
the inventory may not be available year wise due to extensive network of the country. Hence
in order to comply with the yearly data requirement, this tool is created. Copy the inventory
from one year to another and edit the only the changed parts in the desired year.
4.2.11 Import from Mobile
48. This tool will import the Mobile data to the DROMAS database. Progress will be shown as
the data are copied from the mobile database to the DROMAS database including the
photographs. The photographs are resized to 1024 pixel width automatically. [TODO]
21

Dromas 2: Operating Manual
4.3 Road Condition
49. Road Condition Data can be entered using this tool.
50. In order use the tool follow steps as below;
a) Select the Road using the road codes. Corresponding road name will appear.
b) Use 'Load Road' button to select the road for this tool
c) If new sections are to be created, Select 'New' to create.
d) Provide 'From Chainage' and 'To Chainage'
e) Optionally Latitude/Longitude can also be provided if chainage are not known and
the points are obtained using GPS.
f) Select observation on Surface and Drainage Conditions.
g) Provide 'Last Update', 'Inventory year', 'update notes' and select program under
which this inventory was carried out and the year of construction if applicable.
h) To edit the previously defined data, select it in the grid and the data related to the
selected road be shown in the input boxes below. Make necessary changes and
press 'Save'.
22

Dromas 2: Operating Manual
4.4 Traffic
51. Traffic data can be managed through this interface.
4.4.1 Traffic Stations
52. Traffic Stations are maintained through this tool.
53. In order use the tool follow steps as below;
a) Select the Road using the road codes. Corresponding road name will appear.
b) Use 'Load Road' button to select the road for this tool
c) If new Station are to be created, Select 'New' to create new data and provide the
necessary data in the left panel..
d) To edit the previously defined data, select it in the grid and the data related will be
shown in left boxes. Make necessary changes and press 'Save'.
23
Dromas 2: Operating Manual
4.4.2 Traffic Counts
54. Traffic count Data can be inserted using this tool.
55. In order use the tool follow steps as below;
a) Select the Station No. Corresponding Station name will appear. C l i ck 'Load
Station" button. All the previous dates will also appear including the weather of that
day.
b) Select the Survey Date and corresponding details will be available in the grid.
c) Change the values in the grid and save it. Alternately import from excel can also be
done to fill up the grid. [TODO]
d) If New Date are to be created, Select 'Add New Date' and provide the date
and the weather condition and Count type for that data.
e) If date are to be deleted, select 'Delete Date' and the selected date will be deleted
from the record.
24

Dromas 2: Operating Manual
4.4.3 Traffic Assignments
56. Traffic Assignment by road can be created using this tool.
25

Dromas 2: Operating Manual
5 ANNUAL MAINTENANCE
57. The annual maintenance planning is included in this menu. It includes the rates, system
for routine, recurrent, periodic, specific, miscellaneous maintenance and reporting tool for
viewing summary of the annual maintenance works.
5.1 Rates
58. Budgetary items and rates are provided for estimation of the maintenance needs. These
rates should be provided.
26

Dromas 2: Operating Manual
5.1.1 ARMP Budgetary Items 59. The items required for the annual maintenance works are grouped into this. The editing of
the items are allowed only to the administrators. Other user can only edit the rates. It is
important the Administrator of the system setups all the required items in the beginning of
the planning year.
5.1.2 ARMP Budgetary Rates
The rates for the maintenance works are to be provided. This is valid for a selected work
areas (e.g province or all highways) and for the selected year.
27

Dromas 2: Operating Manual
5.2 Routine
60. Routine maintenance works can be planned for each of the roads. The planning includes
selection of roads for routine maintenance, preparation of the details and viewing of the
summary of the maintenance works.
5.2.1 Select Roads
61. Roads for the routine maintained can be selected using this tool. Roads under the
construction etc are not selected for routine maintenance works.
62. In order use the tool follow steps as below;
a) Select the required road for the road list on the left side by clicking in the grid.
b) Provide the description of the routine works and the work chainages
c) Press "Add New" to include this road in the selection and it will appear the list in
the right side.
d) If editing is required (mainly on the work description and work chainages), click the
selected road (in right side) and the details will appear in the boxes below
e) Edit the changes and save it.
f) To completely remove the road from the selected list, click on the road and press
'Delete'.
28

Dromas 2: Operating Manual
5.2.2 Prepare Details
63. Once the road are selected, details need to be prepared. The details are prepared using
the ARMP budgetary items and the quantities for each of the road. The rates are
automatically picked from the ARMP budgetary rates.
64. In order use the tool follow steps as below;
a) Load the road by pressing 'Load' Button. All the roads selected will be loaded in
the system
b) Select the road for which details are to be prepared. The job name and the work
chainages will appear and any previously saved items will also automatically appear.
c) Select appropriate activity from the Activity No. The rate will appear automatically
for the selected activity no.
d) Enter desired quantity and press 'Add New' to add it to the estimate.
e) Similarly repeat it to add additional activities. The system will show the total
amount for the current road and job.
f) To completely remove the activity, click on the activity in the grid and press delete.
g) To edit click on the activity in the grid and make changes and press save.
29

Dromas 2: Operating Manual
5.2.3 View Summary
65. Once the details of the maintenance needs are prepared, summary can be viewed using
this tool.
30

Dromas 2: Operating Manual
5.3 Recurrent
66. Similar to the routine maintenance, the recurrent maintenance cost can also be calculated.
5.3.1 Select Roads
67. Roads for the recurrent maintenance can be selected using this tool. Roads under the
construction etc are not selected for recurrent maintenance works.
68. In order use the tool follow steps as below;
a) Select the required road for the road list on the left side by clicking in the grid.
b) Provide the description of the routine works and the work chainages
c) Press "Add New" to include this road in the selection and it will appear the list in
the right side.
d) If editing is required (mainly on the work description and work chainages), click the
selected road (in right side) and the details will appear in the boxes below
e) Edit the changes and save it.
f) To completely remove the road from the selected list, click on the road and press
'Delete'.
31
Dromas 2: Operating Manual
5.3.2 Prepare Details
69. Once the road are selected, details need to be prepared. The details are prepared using
the ARMP budgetary items and the quantities for each of the road. The rates are
automatically picked from the ARMP budgetary rates.
70. In order use the tool follow steps as below;
a) Load the road by pressing 'Load' Button. All the roads selected will be loaded in
the system
b) Select the road for which details are to be prepared. The job name and the work
chainages will appear and any previously saved items will also automatically appear.
c) Select appropriate activity from the Activity No. The rate will appear automatically
for the selected activity no.
d) Enter desired quantity and press 'Add New' to add it to the estimate.
e) Similarly repeat it to add additional activities. The system will show the total
amount for the current road and job.
f) To completely remove the activity, click on the activity in the grid and press delete.
g) To edit click on the activity in the grid and make changes and press save.
32

Dromas 2: Operating Manual
5.3.3 View Summary
71. Once the details of the maintenance needs are prepared, summary can be viewed using
this tool.
33

Dromas 2: Operating Manual
5.4 Periodic
72. The periodic planning can also be done similar to Routine or Recurrent. In case of the
paved road and gavel road the frequency of the maintenance need to be determined using
the maintenance matrix which is related to year of last resurfacing, traffic load, surface
distress etc.
5.5 Specific (Spot & Bottlenecks)
73. Similar to the recurrent maintenance, the specific maintenance cost can also be
calculated. The specific maintenance refers to a certain works in a selected road which
are specific of nature e.g. bottlenecks, wall repairs, construction of new protection works etc.
Minor items are generally dealt in the recurrent maintenance and should not be part of
specific maintenance.
5.6 Upgrading
74. The Planning of the upgrading work can also be carried out similar to above other
planning. Road should be selected and upgrading details to be prepared for each of the
road.
5.7 Rehabilitation/Reconstruction
75. The Planning of the upgrading work can also be carried out similar to above other
planning. Road should be selected and upgrading details to be prepared for each of the
road.
5.8 Miscellaneous
76. Miscellaneous maintenance works includes road safety, bio engineering, and emergency
maintenance.
77. The work plan sequence is similar to Specific Maintenance. First the road for which these
activities are to be planned should be selected. After that the details should be prepared.
The summary can be loaded for each of the category.
34
Dromas 2: Operating Manual
5.9 View Summary
78. All the maintenance planning work can be viewed and exported to excel using this tool.
The summary can be viewed at district level, regional level and national level.
79. Summary Report for Planning: [TODO]
35

Dromas 2: Operating Manual
6 CONTRACT MANAGEMENT
80. The construction management menu provides access to tools for management of the
contract, reporting of progress and generating Quarterly Progress Reports.
6.1 Create/Select Contract
81. This tool lets to create new contract (work package) or select existing contract for editing
purpose.
82. a) To create a new contract, Select 'Add New' by right clicking on the grid and fill up the
data and save it. To edit existing contracts click on the contract ID in the grid and edit the
corresponding data in the left side and save it.
36

Dromas 2: Operating Manual
b) To input roads which are in the package select contract ID in the grid and click edit. After that
click ‘input road’ button. Then right click on the grid then click ‘Add new’ choose the road you
want to add and then select work type and save.
To edit the previously defined data, select it in the grid and the data related to the selected road
be shown in the input boxes below. Make necessary changes and press 'Save'.
c) To add project length of the road select road on the grid, select ‘edit road section’ by right click
on the selected road. To add new section click ‘Add new’ by right click on the grid Provide 'From
Chainage' and 'To Chainage' for this section of the road.
To edit the previously defined data, select it in the grid and the data related to the selected
road be shown in the input boxes below. Make necessary changes and press 'Save'.
83. The contract planning is also done using the same tool. Initially only engineer's estimate
is provided and after the contract the bid price is provided. [TODO THIS PART]
6.2 Bill of Quantities
84. The BoQ can be created using this tool. Standard Items as in the ARMP can be used
[TODO]. Rate can be engineer's estimate (Approved rate) or the contract rates. The BoQ has three part General, Road works &Drainage and Structures. Each part is entered on the respective part. That means Preliminary will be entered on the general part, Also Road work and Drainage & Structures.

6.3 Progress Milestone
85. The progress milestone is the work plan for every month staring from the contract month
to the contract end month. A percentage of work planned in each month should be entered.
This will be used to create the 'S curve' along with the physical progress of the work.
37

Dromas 2: Operating Manual
6.4 Physical Progress
86. Physical progress is a record of the work done per month for each of the items in the BoQ.
A monthly entry is required. Select the month and year to report and fill up the quantities
for each of the items that is achieved.
6.5 Variation Orders
87. Variation order has three parts a) Summary b) New Items and Rate and c) Variation
Details.
6.5.1 VO Summary
88. This tool will only create the variation number and reason for it and the date of variation.
Other columns are read-only and will get data from the variation order details
automatically once the details are provided.
38

Dromas 2: Operating Manual
6.5.2 VO New Items and Rates
89. New Items and Rates can be provided for the contract considered. New rates are like new
items that is Items which were not in the original BoQ. It is advised to use a different item
numbers for the variation items.
6.5.3 VO Details
90. Select the variation order number, it will highlight the quantity change column for the
selected variation number. Provide the changes in the selected variation and save it. Click
on 'Calculate' to see the results. Only the change in quantity is to be recorded e.g + or - in
quantity.
9

Dromas 2: Operating Manual
6.6 Interim Payment Certificates 6.6.1 IPC Summary
91. This tool will only create IPC number, submission and approval dates. Other columns are
read-only and will get data from the IPC details automatically once the details are
provided.
40

Dromas 2: Operating Manual
6.6.2 IPC Details
92. Select the IPC number, it will highlight the quantity column for the selected IPC number.
Provide the quantities for selected IPC and save it. Click on 'Calculate' to see the results.
41

Dromas 2: Operating Manual
6.7 Document management 6.7.1 Upload Documents
93. Documents related to the contract can be stored in the server and later retrieved for
viewing. It will work as a online storage of the documents.
6.7.2 Download Documents
42

Dromas 2: Operating Manual
6.8 Generate Reports
94. Progress report can be generated using this tool for all the contracts. Option for creating
Quarterly Report is available which will create a pre-defined report for reporting.
43

Dromas 2: Operating Manual
7 SOCIO-ECONOMY
95. [TO DO].
44

Dromas 2: Operating Manual
8 PRIORITIZATION
96. [TODO]
45
Dromas 2: Operating Manual
9 MAP
97. Online map is provided which utilizes the open source Geo-server. The background maps
are compiled from the various sources. The road network are also from secondary
sources and will be replaced automatically once the inventory progresses.
98. The maps are grouped by the theme e.g the base amps provides the administrative
boundaries, the road network provides the details of the road network including
construction status, pavement status etc. The Inventory provides the location of the
inventory of the roads and ARMP provides the planed annual maintenance.
99. Additional background map from Google can also be used including the satellite imagery,
physical map or the street maps. Printing facility is also available which will output to
A3/A4 size paper with user defined scale in PDF format [TODO].
9.1 View Map in Internal Browser
100. The tool will let the user view the map in the internal browser itself without leaving the
software.
9.2 View Map in External Browser
101. Above map will be displayed in external browser. The browser is chosen by default
(windows default browser)
46
Appendix A Notes

Cleaning Road Shapefile in QGIS
The GPS tracks needs to cleaned before loading to DROMAS. The cleaning is
required due to;
a) To join the existing roads at the ends and at intersections.
b) To remove 'dangles' due to stopping of the tracks.
Step 1: Setting up of GPS Equipment
a) Set the coordinate system to WGS 84 in GPS (Settling, Units)
b) Set Recording at most often or 1 Second Interval
c) Clear all the previous memory track (Track, Clear)
d) Start Recording and Save the Track at the end with a road code or recognizable
name
e) Find the GPX file in GPS and Copy this track to computer.
1

Step 2: Importing GPX file in QGIS and Cleaning
a) In QGIS ''Layers'-> 'Add Vector Layer'
b) Chose file type as 'GPX'
2

c) Navigate to Directory to get the GPX file
d) Open it and select 'Track'. It is also better to import track points.
e) The QGIS will show these as layers.
f) Immediately export (In Menu with right click on layer) 'Save As' the track to
'Shapefile format' with recognizable name and location in the local hard disk.
3

g) Remove the 'GPX layers' from the QGIS as these are no longer needed
h) Load the saved shapefile.
i) Do 'Toggle Editing' for the track shapefile and use grips to move it and remove
unwanted sections.
j) Save the Editing
4

k) Go to attribute table and add a field called 'roadcode'. Edit the layer and input the
road code
5

Step 3: Importing Shapefile in DROMAS
a) Select Proper District where the road belongs
b) Go to Road Network->Upload Data
6

c) Chose the shapefile
d) Carryout the attribute mapping. The minimum field is the roadcode
e) Chose Upload.
f) Check in the Road Network->Road Network and see if the road was loaded. Input
other data for the imported road.
7

g) Check the map and verify if the road was loaded properly or not.
8