operations center troubleshooting guide
TRANSCRIPT

Operations CenterTroubleshooting Guide
October 2016

Legal Notice
For information about NetIQ legal notices, disclaimers, warranties, export and other use restrictions, U.S. Government restricted rights, patent policy, and FIPS compliance, see https://www.netiq.com/company/legal/.
Copyright (C) 2016 NetIQ Corporation. All rights reserved.

Contents
About This Guide 5
1 Overview of Product Support 7
1.1 Contacting NetIQ Support . . . . . . . . . . . . . . . . . . . . . . . . . . . . . . . . . . . . . . . . . . . . . . . . . . . . . . . . . . 71.2 Third-Party Support . . . . . . . . . . . . . . . . . . . . . . . . . . . . . . . . . . . . . . . . . . . . . . . . . . . . . . . . . . . . . . . 71.3 Gathering Information for Support . . . . . . . . . . . . . . . . . . . . . . . . . . . . . . . . . . . . . . . . . . . . . . . . . . . . 7
1.3.1 Running probe to Retrieve Configuration and Environment Information . . . . . . . . . . . . . . . . 81.3.2 Running probe to Retrieve Dashboard Configuration Information. . . . . . . . . . . . . . . . . . . . . 81.3.3 Gathering Information about the Operations Center Console . . . . . . . . . . . . . . . . . . . . . . . . 91.3.4 Diagnosing the Operations Center Server . . . . . . . . . . . . . . . . . . . . . . . . . . . . . . . . . . . . . . . 91.3.5 Using the SIGQUIT Command to troubleshoot the Operations Center server for
UNIX . . . . . . . . . . . . . . . . . . . . . . . . . . . . . . . . . . . . . . . . . . . . . . . . . . . . . . . . . . . . . . . . . . 11
2 Tips, Troubleshooting, and Common Issues 13
2.1 Problems Starting Operations Center as a Service . . . . . . . . . . . . . . . . . . . . . . . . . . . . . . . . . . . . . . 132.2 Troubleshooting the Console . . . . . . . . . . . . . . . . . . . . . . . . . . . . . . . . . . . . . . . . . . . . . . . . . . . . . . . 13
2.2.1 Login Problems . . . . . . . . . . . . . . . . . . . . . . . . . . . . . . . . . . . . . . . . . . . . . . . . . . . . . . . . . . 142.2.2 Enabling Debug Logging . . . . . . . . . . . . . . . . . . . . . . . . . . . . . . . . . . . . . . . . . . . . . . . . . . . 14
2.3 Validating Configurations and Troubleshooting Common Issues with Start Up Self Tests . . . . . . . . 142.3.1 Understanding the Test Definition Repository and Test Script Directories. . . . . . . . . . . . . . 152.3.2 Setting Tests to Halt Component Startup on Test Failure . . . . . . . . . . . . . . . . . . . . . . . . . . 152.3.3 Updating Retry Settings. . . . . . . . . . . . . . . . . . . . . . . . . . . . . . . . . . . . . . . . . . . . . . . . . . . . 162.3.4 Understanding Self Test Message Logs and Errors. . . . . . . . . . . . . . . . . . . . . . . . . . . . . . . 16
2.4 Operations Center Server . . . . . . . . . . . . . . . . . . . . . . . . . . . . . . . . . . . . . . . . . . . . . . . . . . . . . . . . . 172.4.1 CORBA Timeout Properties. . . . . . . . . . . . . . . . . . . . . . . . . . . . . . . . . . . . . . . . . . . . . . . . . 172.4.2 Custom Java Class Loading Notes . . . . . . . . . . . . . . . . . . . . . . . . . . . . . . . . . . . . . . . . . . . 182.4.3 Setting Up the Temp Directory for Operations Server . . . . . . . . . . . . . . . . . . . . . . . . . . . . . 182.4.4 Verifying Space on the Web Server . . . . . . . . . . . . . . . . . . . . . . . . . . . . . . . . . . . . . . . . . . . 18
2.5 Diagnosing ConfigStore Settings . . . . . . . . . . . . . . . . . . . . . . . . . . . . . . . . . . . . . . . . . . . . . . . . . . . . 192.6 Data Warehouse and Database . . . . . . . . . . . . . . . . . . . . . . . . . . . . . . . . . . . . . . . . . . . . . . . . . . . . . 19
2.6.1 Database Warehouse Repository Log Messages . . . . . . . . . . . . . . . . . . . . . . . . . . . . . . . . 192.6.2 Overriding the Database URL . . . . . . . . . . . . . . . . . . . . . . . . . . . . . . . . . . . . . . . . . . . . . . . 20
2.7 Customization Tips. . . . . . . . . . . . . . . . . . . . . . . . . . . . . . . . . . . . . . . . . . . . . . . . . . . . . . . . . . . . . . . 212.7.1 Creating Custom Element Classes and Specifying Custom Icons . . . . . . . . . . . . . . . . . . . 212.7.2 Date/Time Skewing . . . . . . . . . . . . . . . . . . . . . . . . . . . . . . . . . . . . . . . . . . . . . . . . . . . . . . . 21
2.8 Internal LDAP Server Guidelines and Settings . . . . . . . . . . . . . . . . . . . . . . . . . . . . . . . . . . . . . . . . . 222.8.1 General Guidelines . . . . . . . . . . . . . . . . . . . . . . . . . . . . . . . . . . . . . . . . . . . . . . . . . . . . . . . 222.8.2 Non-SSL Settings . . . . . . . . . . . . . . . . . . . . . . . . . . . . . . . . . . . . . . . . . . . . . . . . . . . . . . . . 222.8.3 SSL Settings . . . . . . . . . . . . . . . . . . . . . . . . . . . . . . . . . . . . . . . . . . . . . . . . . . . . . . . . . . . . 22
2.9 Adapters. . . . . . . . . . . . . . . . . . . . . . . . . . . . . . . . . . . . . . . . . . . . . . . . . . . . . . . . . . . . . . . . . . . . . . . 232.9.1 Suppressing Alarms in IBM Tivoli T/EC . . . . . . . . . . . . . . . . . . . . . . . . . . . . . . . . . . . . . . . . 23
2.10 Diagnosing Memory Errors . . . . . . . . . . . . . . . . . . . . . . . . . . . . . . . . . . . . . . . . . . . . . . . . . . . . . . . . 24
Contents 3

4 Operations Center Troubleshooting Guide

About This Guide
The Troubleshooting Guide helps Operations Center administrators in diagnosing and troubleshooting issues with Operations Center software.
Chapter 1, “Overview of Product Support,” on page 7
Chapter 2, “Tips, Troubleshooting, and Common Issues,” on page 13
Audience
This guide is intended for Operations Center system administrators.
Feedback
We want to hear your comments and suggestions about this manual and the other documentation included with this product. Please use the User Comments feature at the bottom of each page of the online documentation.
Additional Documentation & Documentation Updates
This guide is part of the Operations Center documentation set. For the most recent version of the Troubleshooting Guide and a complete list of publications supporting Operations Center, visit our Online Documentation Web Site at Operations Center online documentation.
The Operations Center documentation set is also available as PDF files on the installation CD or ISO; and is delivered as part of the online help accessible from multiple locations in Operations Center depending on the product component.
Additional Resources
We encourage you to use the following additional resources on the Web:
NetIQ User Community (https://www.netiq.com/communities/): A Web-based community with a variety of discussion topics.
NetIQ Support Knowledgebase (https://www.netiq.com/support/kb/?product%5B%5D=Operations_Center): A collection of in-depth technical articles.
NetIQ Support Forums (https://forums.netiq.com/forumdisplay.php?26-Operations-Center): A Web location where product users can discuss NetIQ product functionality and advice with other product users.
Technical Support
You can learn more about the policies and procedures of NetIQ Technical Support by accessing its Technical Support Guide (https://www.netiq.com/Support/process.asp#_Maintenance_Programs_and).
Use these resources for support specific to Operations Center:
Telephone in Canada and the United States: 1-800-858-4000
Telephone outside the United States: 1-801-861-4000
About This Guide 5

E-mail: [email protected] ([email protected])
Submit a Service Request: http://support.novell.com/contact/ (http://support.novell.com/contact/)
Documentation Conventions
In NetIQ documentation, a greater-than symbol (>) is used to separate actions within a step and items in a cross-reference path. The > symbol is also used to connect consecutive links in an element tree structure where you can either click a plus symbol (+) or double-click the elements to expand them.
When a single pathname can be written with a backslash for some platforms or a forward slash for other platforms, the pathname is presented with a forward slash to preserve case considerations in the UNIX* or Linux* operating systems.
A trademark symbol (®, ™, etc.) denotes a NetIQ trademark. An asterisk (*) denotes a third-party trademark.
6 Operations Center Troubleshooting Guide

1 1Overview of Product Support
The following topics provide information about contacting Technical Support and useful ways to gather information necessary for Technical Support to assist you:
Section 1.1, “Contacting NetIQ Support,” on page 7
Section 1.2, “Third-Party Support,” on page 7
Section 1.3, “Gathering Information for Support,” on page 7
1.1 Contacting NetIQ SupportYou can access our award-winning Technical Support Web site for a number of self-help resources and to register and check on service requests. For critical issues, we recommend that you call Technial Support directly. Visit the Service Request Web site to find the phone numbers for your region.
1.2 Third-Party SupportBecause of the nature of the environments where Operations Center operates, it is naturally dependent on, and interacts with, a wide variety of third-party systems, such as:
Operating Systems
Management Systems
Databases
Third-party Applications
Technical Support cannot provide direct support for issues that are specifically related to any software component that is not a NetIQ product.
1.3 Gathering Information for SupportFor some reported incidents, Support needs information from you about your Operations Center configuration, console, or server to assist in troubleshooting the potential cause of the problem.
Section 1.3.1, “Running probe to Retrieve Configuration and Environment Information,” on page 8
Section 1.3.2, “Running probe to Retrieve Dashboard Configuration Information,” on page 8
Section 1.3.3, “Gathering Information about the Operations Center Console,” on page 9
Section 1.3.4, “Diagnosing the Operations Center Server,” on page 9
Section 1.3.5, “Using the SIGQUIT Command to troubleshoot the Operations Center server for UNIX,” on page 11
Overview of Product Support 7

1.3.1 Running probe to Retrieve Configuration and Environment Information
The probe script gathers information on your patch level, platform, Java* environment, memory and GC usage, configurations, adapters, and logs for a specified number of days. This tool can safely be run while the Operations Center server is up.
The configprobe.xml configuration file is used to specify the files and log files that are captured in the output file.
To generate a probe output file to attach to your service request:
1 If necessary, update the /OperationsCenter_install_path/config/configprobe.xml file to change any default probe configuration values.
By default, probe retrieves all log files available in the log directories, but is not recursive. Modify the number of days of log files to retrieve by editing any log element daystogather attribute values.
If log files are in different directories, uncomment the Logs section and specify the directories where logs are located.
2 At a command prompt, issue the following command from the /OperationsCenter_install_path/bin directory:
./probe
where OperationsCenter_install_path is the Operations Center installation directory.
3 Attach the output ZIP file to your open service request.
The output file is saved to the /OperationsCenter_install_path/bin directory, in the format of probe.Version_Number.zip.
1.3.2 Running probe to Retrieve Dashboard Configuration Information
The /OperationsCenter_Dashboard_install_path/bin/probe script gathers information on your dashboard configuration. This tool can safely be run while the dashboard is running.
To generate a probe output file to attach to your service request:
1 At a command prompt in the /OperationsCenter_Dashboard_install_path/bin directory, issue the following command:
./probe
where OperationsCenter_Dashboard_install_path is the Operations Center Dashboard installation directory.
2 Attach the output ZIP file to your open service request.
The output file is saved to the /OperationsCenter_Dashboard_install_path directory, in the format of dashboardprobe.Version_Number.zip.
8 Operations Center Troubleshooting Guide

1.3.3 Gathering Information about the Operations Center Console
The context of each thread in the client application is written to the Java console. You can cut and paste this information into an e-mail and send it to support.
To obtain information about the Operations Center console on Windows* and UNIX:
1 From the desktop, click Start > Run to open the Run dialog box.
2 Open the Java Web Start Application Manager by doing one of the following:
Windows: Enter javaws -viewer in the Open field (use lowercase), then click OK.
UNIX: At a command line in the directory where Java is installed, enter javaws (use all lowercase).
The Java Web Start Application Manager dialog box opens.
3 Click File > Preferences to open the Java Web Start Preferences dialog box.
4 Click the Advanced tab.
5 Select the Show JAVA Console check box.
6 Click OK.
7 Click (Close) to close the Java Web Start Application Manager dialog box.
8 Close all Operations Center consoles.
9 Restart the Operations Center console.
The JavaConsole dialog box opens each time the Operations Center console starts.
10 Cut and paste the information in the Java Console dialog box into your open service request.
1.3.4 Diagnosing the Operations Center Server
Operations Center provides the ability to execute a dump of Operations Center system information to a file that can assist Technical Support with troubleshooting the problem. The information is obtained by identifying the process ID (PID) for Operations Center, which is found in the daemon.trc file in the stdout directory.
“Windows” on page 10
“UNIX” on page 11
Overview of Product Support 9
Windows
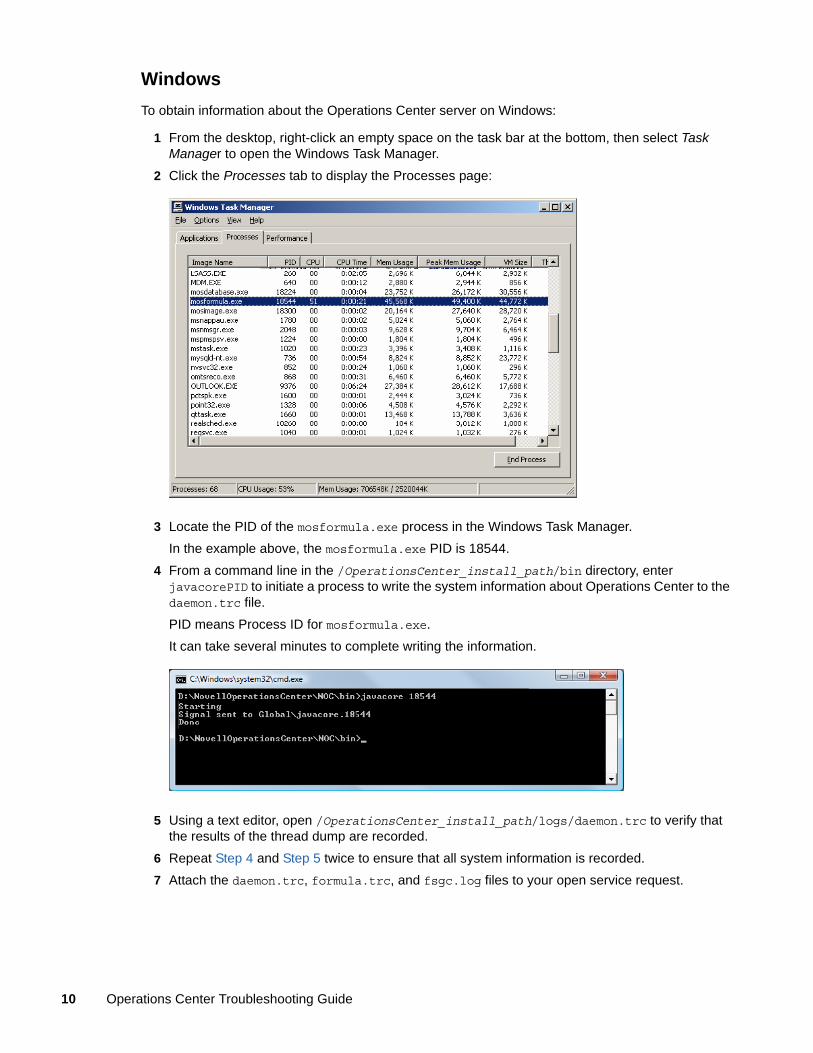
To obtain information about the Operations Center server on Windows:
1 From the desktop, right-click an empty space on the task bar at the bottom, then select Task Manager to open the Windows Task Manager.
2 Click the Processes tab to display the Processes page:
3 Locate the PID of the mosformula.exe process in the Windows Task Manager.
In the example above, the mosformula.exe PID is 18544.
4 From a command line in the /OperationsCenter_install_path/bin directory, enter javacorePID to initiate a process to write the system information about Operations Center to the daemon.trc file.
PID means Process ID for mosformula.exe.
It can take several minutes to complete writing the information.
5 Using a text editor, open /OperationsCenter_install_path/logs/daemon.trc to verify that the results of the thread dump are recorded.
6 Repeat Step 4 and Step 5 twice to ensure that all system information is recorded.
7 Attach the daemon.trc, formula.trc, and fsgc.log files to your open service request.
10 Operations Center Troubleshooting Guide

UNIX
To obtain system information about Operations Center on UNIX, a signal is sent to the application to generate a core file. Before a signal can be sent, determine the type of signal required. The core file is written to the standard Operations Center trace file (daemon.trc).
1 To display the Operations Center PID, go to a command line and enter the following command:
$ ps ef|grep Formula.properties
The Formula process properties display, as shown:
The formula 35442 38448 0 10:56:43 pts/0 117:04 /usr/java130/jre/bin/java –classpath /apps/formula/html/classes/common.jar:/apps/formula/html/classes:/apps/formula/html/classes/swingall.jar:/apps/formula/classes/server.j ar:/apps/formula/classes:/apps/formula/classes/rsa.jar -Xmx256m com.mo sol.Formula.Server.ServerImpl /apps/formula/config/Formula.properties -CORBA.Port 2000
2 Identify the Formula PID number, which is located following formula in the properties. In the example above, the Formula PID is 35442.
3 Send a SIGQUIT signal by issuing the following command:
kill –s -QUIT formula_PID_number
The operating system dumps the thread information into the daemon.trc file.
4 Verify that the daemon.trc file contains the system information.
5 Attach the /OperationsCenter_install_path/logo/daemon.trc file to your open support ticket.
1.3.5 Using the SIGQUIT Command to troubleshoot the Operations Center server for UNIX
Issue the SIGQUIT command to troubleshoot the Operations Center server for UNIX systems. The SIGQUIT command captures system information when the Operations Center server is running and is in the locked state. It is often useful to have several consecutive SIGQUIT signals issued to be able to see if the server is processing information or if it has locked up in a certain segment of code.
The SIGQUIT command is indicated when:
The mosstatus command does not return any output and hangs
The server appears to be running with a mosstatus command, but users cannot log in
A ps –ef | grep jre or a ps –ef | grep java on UNIX indicates that your server processes are running, but the mosstatus command doesn’t return a running server
The Operations Center console displays the message Locating server..., and your server processes are running
The Operations Center console displays the message Initializing user interface..., but the Operations Center console does not display properly and your Operations Center processes are running
A grep for the Web server port on 8080 is not established and the Operations Center console cannot locate the Operations Center server for connection, but your Operations Center server processes are running
Overview of Product Support 11

12 Operations Center Troubleshooting Guide

2 2Tips, Troubleshooting, and Common Issues
This section summarizes tips and common issues that our customers have found useful. This information is organized by product or product area.
Section 2.1, “Problems Starting Operations Center as a Service,” on page 13
Section 2.2, “Troubleshooting the Console,” on page 13
Section 2.3, “Validating Configurations and Troubleshooting Common Issues with Start Up Self Tests,” on page 14
Section 2.4, “Operations Center Server,” on page 17
Section 2.5, “Diagnosing ConfigStore Settings,” on page 19
Section 2.6, “Data Warehouse and Database,” on page 19
Section 2.7, “Customization Tips,” on page 21
Section 2.8, “Internal LDAP Server Guidelines and Settings,” on page 22
Section 2.9, “Adapters,” on page 23
Section 2.10, “Diagnosing Memory Errors,” on page 24
2.1 Problems Starting Operations Center as a ServiceIf running Java 7 on a Windows server and you are having difficulties starting the Operations Center service, you might need to install the Microsoft Visual C++ 2010 Redistributable Package to obtain the msvcr100.dll file.
See Java Runtime Environment in the Operations Center Getting Started Guide for more information.
2.2 Troubleshooting the ConsoleThe following topics pertain to troubleshooting console issues:
Section 2.2.1, “Login Problems,” on page 14
Section 2.2.2, “Enabling Debug Logging,” on page 14
Tips, Troubleshooting, and Common Issues 13

2.2.1 Login Problems
Problems with logging into Operations Center using Java Web Start might require clearing the Web Start cache. For instructions, see Java’s Web page on clearing the Java cache (http://www.java.com/en/download/help/plugin_cache.xml)
2.2.2 Enabling Debug Logging
Console debug logging is available for client UI categories.
To enable console debug logging:
1 In a text editor, open the /OperationsCenter_install_path/html/client/launch.jnlp file.
2 In the Logging Options section, add the following property:
<property name="verboseCategories" value="categories" />
Where categories is a comma separated list of log categories. For example, "Formula.Client.Browser, Formula.Client.MainFrame"
2.3 Validating Configurations and Troubleshooting Common Issues with Start Up Self Tests Operations Center self tests run automatically at start up to test configurations and verify the server is healthy before starting the application. These self tests check for common configuration problems and issue warnings or stop the server from starting if applicable. If problems are found, information is written to the server logs.
The following tests are run at start up:
AvailablePort (formula.web.server.port, formula.web.server.ssl.port, and rmi.port)
IsLocalHost/IP (formula.web.server.host and MOAddress)
VMMemory
DiskFreeSpace (formula.home)
HttpURLCheck (ImageServer.ExternalServer and ImageServer.InternalServer)
FilePermissions (formula.home)
JavaVersion
NOTE: Default test scripts are not editable and any changes to these scripts, except configurable test settings, are ignored. All test files are signed and if modified, a warning message is logged.
Configurable test settings include the critical flag and retry settings. See Section 2.3.2, “Setting Tests to Halt Component Startup on Test Failure,” on page 15 and Section 2.3.3, “Updating Retry Settings,” on page 16 for more information about these configurable settings.
The following sections address how to set various parameters on the self tests and the location of log files:
Section 2.3.1, “Understanding the Test Definition Repository and Test Script Directories,” on page 15
Section 2.3.2, “Setting Tests to Halt Component Startup on Test Failure,” on page 15
14 Operations Center Troubleshooting Guide

Section 2.3.3, “Updating Retry Settings,” on page 16
Section 2.3.4, “Understanding Self Test Message Logs and Errors,” on page 16
2.3.1 Understanding the Test Definition Repository and Test Script Directories
Self test scripts are located in the product component root directories under the Operations Center installation directory:
/OperationsCenter_install_path/SelfTestScripts
/OperationsCenter_CMS_install_path/SelfTestScripts
/OperationsCenter_Dashboard_install_path/SelfTestScripts
Under each of the SelfTestScripts directories, new directories are created for each test during the first run, such as:
/OperationsCenter_install_path/SelfTestScripts\NOC
/OperationsCenter_install_path/SelfTestScripts\NOC Daemon
Each of these test script directories contain the following two files:
definition.xml: defines the configuration of the test; where to retrieve values.
unit.xml: defines the hierarchical ordered set of tests to be run and the inputs required.
2.3.2 Setting Tests to Halt Component Startup on Test Failure
When a critical test fails, it log errors and halt the product component at startup. It is possible to set the critical flag on any test so that the component does not start on test failure. Setting a group of test to critical will halt product component start up if any of the tests in the group fails.
WARNING: Self tests ensure that your environment is properly configured and that disabling the criticality of tests could result in your components starting in an unusable state.
To change the critical flag for a test:
1 Open the /OperationsCenter_ProductComponent_install_path/SelfTestScripts/script_name/unit.xml file in any text or XML editor.
Where OperationsCenter_ProductComponent_install_path is the installation path for the Operations Center server, CMS or Dashboard.
2 To log errors and halt the component from starting up, add or set the critical property in the test’s XML attributes as:
critical="true"
For example, the JavaVersion test would be.
<test classname="com.mosol.selftest.tests.JavaVersion" critical="true" mandatory="true" name="java version">
3 To continue to log errors but not halt component startup on test failure, set the critical attribute to false.
4 Save the file.
Tips, Troubleshooting, and Common Issues 15

2.3.3 Updating Retry Settings
When a test fails, it is possible to retry the execution of the test before calling the test a failure.
There are 2 XML attributes that can be set in the test’s declaration to configure retry settings:
retries: the number of times to retry the test after the first exeuction fails
retryDelay: the number of seconds to wait before attempting to retry the test
To update retry settings for a test:
1 Open the /OperationsCenter_ProductComponent_install_path/SelfTestScripts/script_name\unit.xml file in any text or XML editor.
Where OperationsCenter_ProductComponent_install_path is the installation path for the Operations Center server, CMS or Dashboard.
2 To set the number or retries to perform, set the retries attribute. To set the number of seconds to wait before each attempt, set the retryDelay attribute.
For example, the following test will retry twice if there is a problem and wait 3 seconds before each try:
<test classname="com.mosol.selftest.tests.HttpURLCheck" critical="true" mandatory="true" name="internal image server" retries="2" retryDelay="3">
3 Save the file.
2.3.4 Understanding Self Test Message Logs and Errors
During normal operations, self tests provide informational logging to describe the tests run and the actions performed by the tests. Logs can be found in the standard log file of the product component for which the tests are being run. For example:
/OperationsCenter_install_path/logs
/OperationsCenter_CMS_install_path/logs
The following is an example of an informational log message for a self test:
2010-07-28 10:34:30,655 INFO Self Tests/NOC Daemon/java version - Minimum Supported Java version is :1.6.0
Where the log level is INFO. The level of logging is customizable for a group of tests or a single test by adding or setting logLevel="loglevel" to the XML attributes of the test, with acceptable loglevel values of DEBUG, INFO, WARN or ERROR.
And, where the log category is Self Tests/NOC Daemon/java version. The log category of the log entry is the fully pathed name of the test outputting the log.
Error logs can indicate problems in your configuration. Use the Operations Center Customizer to edit the configuration as appropriate. Table 2-1 lists the possible cause and action for various error messages.
16 Operations Center Troubleshooting Guide

Table 2-1 Sample Error Message in Self Test Logs
2.4 Operations Center Server Section 2.4.1, “CORBA Timeout Properties,” on page 17
Section 2.4.2, “Custom Java Class Loading Notes,” on page 18
Section 2.4.3, “Setting Up the Temp Directory for Operations Server,” on page 18
Section 2.4.4, “Verifying Space on the Web Server,” on page 18
2.4.1 CORBA Timeout Properties
The CORBA timeout properties allows you to set the number of seconds for client requests to the server before the operation or connection is terminated.
To set the CORBA Timeout property:
1 Open the /OperationsCenter_install_path/html/applet_params.xml and /OperationsCenter_install_path/Formula.custom.properties files in a text editor.
2 Add or edit the following properties:Edit the property, where seconds is the number of seconds before failing if an unconnected remote reference fails to connect.
CORBA.connectionTimeout: Set to the number of seconds before failing if an unconnected remote reference fails to connect.
Error Message Possible Cause and Action
An IOException occurred binding socket. The port noted in previous messages might already be in use by another application. Free the port or change the relevant port value in the Operations Center Customizer.
permissions_level access is denied on 'filename'
The current user (running Operations Center) does not have the required permissions. Verify that the user has the appropriate permissions and reset file permissions if necessary.
Exception attempting to reach URL The server might not be running or might not have completed its initialization. Check that the server is running and initialized, and retry the connection. Adjust the retries settings if necessary.
host_address is not a local address. The IP address to which this host address resolves is not assigned to this machine. Verify that the host specified in the Customizer is the correct host name of the machine.
Unknown host "host_address" The IP address for the host cannot be found. Verify that the host specified in the Customizer is the correct host name of the machine.
Critical test "test_name" failed. Stopping execution
A test marked critical has failed, and the server has stopped. Review the above errors to correct possible configuration issues.
Execution of test "test_name" failed in duration ms. (number_of_attempts attempts)
A test failed, possibly after multiple attempts, but server startup has not been halted. Review the above error logs to correct possible configuration issue.
Tips, Troubleshooting, and Common Issues 17

If the customer is using LDAP, set this value to 60 or higher to allow authentication of users.
CORBA.operationTimeout: Set to the number of seconds before failing if the remote reference fails to service a request.
CORBA.transactionTimeout: Set to the number of seconds before failing if the remote reference fails to service a transaction.
3 Save the files.
2.4.2 Custom Java Class Loading Notes
This section lists information related to custom Java classes:
Load custom archive files that should be available to all the Operations Servers servers in the /OperationsCenter_install_path/classes/ext directory.
Load a single class or set of classes that are not in an archive file in the /OperationsCenter_install_path/classes directory.
Use the full path name. For example, if the myclass.class file is in the com.acme.somepackage package directory, the class file must be in the /OperationsCenter_install_path/classes/com/acme/somepackage directory.
Load server patches in the /OperationsCenter_install_path/patches directory.
Load client patches in the /OperationsCenter_install_path/html/client/patches directory.
Some third-party integrations require additional .jar files. Read the third-party documentation for special instructions. For example, Spectrum Version 7 expects all additional .jar files to be loaded in the /OperationsCenter_install_path/integrations/ext/spectrumV71 directory.
2.4.3 Setting Up the Temp Directory for Operations Server
The tmp directory is controlled by the java.io.tmpdir Java parameter and defaults to /var/tmp. The tmp directory can be specified as a Java arg in the Operations Center Configuration Manager:
-Djava.io.tmpdir=/formula/tmp
2.4.4 Verifying Space on the Web Server
If the Web server won’t start and the /var/tmp file is filling up, there might not be enough space in /var.
To verify the space in the /var/tmp file:
1 For UNIX, enter df -k at a command prompt.
2 If necessary, modify the tmp directory for Operations Center.
For more information, see Section 2.4.3, “Setting Up the Temp Directory for Operations Server,” on page 18.
18 Operations Center Troubleshooting Guide

2.5 Diagnosing ConfigStore SettingsIf you are experiencing data consistency issues (non-clustered environment) or two servers that are functioning like they are the cluster coordinator, you might have issues with Configuration Storage (ConfigStore) settings.
Query the ConfigStore database to diagnose server connection issues. Using a SQL client against the ConfigStore database (non-OBD databases only), view the CFG_CLIENT_DATA table which contains information about client connections and details.
The connection information in the CFG_CLIENT_DATA table can help to:
In a Non-Clustered Environment: Verify that there isn’t more than one server using the ConfigStore.
If you find more than one server connecting to the ConfigStore database, reconfigure your servers so that only one connects to each ConfigStore.
Clustered Environment: Verify that all servers are connecting the same ConfigStore.
In a clustered environment, all servers must point to the same ConfigStore database. If you find a clustered server not connecting to the correct ConfigStore, change the Configuration Storage settings using the server’s Configuration Manager.
For information about configuring Configuration Storage, see “Configuring the Database for Configuration Storage” in the Operations Center Server Configuration Guide.
2.6 Data Warehouse and Database Section 2.6.1, “Database Warehouse Repository Log Messages,” on page 19
Section 2.6.2, “Overriding the Database URL,” on page 20
2.6.1 Database Warehouse Repository Log Messages
The following message in the formula.trc log indicates that the Data Warehouse is in backup mode:
INFO Backup Repository - Data Warehouse Backup repository started.INFO Backup Repository - Backup operation mode changed to: STORE
The following message in the formula.trc log indicates that Operations Center is writing to the Data Warehouse:
INFO Backup Repository - Backup operation mode changed to: TRANSFERINFO Performance.Engine - moving from backup to warehouse repository
Tips, Troubleshooting, and Common Issues 19

2.6.2 Overriding the Database URL
Many Operations Center components (such as TEC+ and BEM adapters) require a database connection. You can use the Database Type property to override the use of the sourceforge driver or other native driver.
The following sections include examples of how to use the INET driver embedded in the Operations Center product:
“Setting Up the INET Driver for a Microsoft* SQL Server” on page 20
“Setting Up the INET Driver for Oracle*” on page 20
“Setting Up the INET Driver for Sybase*” on page 20
Setting Up the INET Driver for a Microsoft* SQL Server
At the command prompt, enter:
com.inet.tds.TdsDriver|jdbc:inetdaemssql_protocol:database_server_ name:database_server_port:database_name|select getDate()
where:
database_server_ name is the server where the database is installed
database_server_port is the port used to communicate with Operations Center
database_name is the database name
For example:
com.inet.tds.TdsDriver|jdbc:inetdae7:mssqldbsvr:1433:formula|select getDate()
Setting Up the INET Driver for Oracle*
At the command prompt, enter:
com.inet.ora.OraDriver|jdbc:inetora:database_server_name:database_server_ port:database_name|select sysdate from dual
where:
database_server_ name is the server where the database is installed
database_server_port is the port used to communicate with Operations Center
database_name is the database name
For example:
com.inet.ora.OraDriver|jdbc:inetora:oracledbsvr:1521:formula|select sysdate from dual
Setting Up the INET Driver for Sybase*
At the command prompt, enter:
com.inet.syb.SybDriver|jdbc:inetsyb:databaseServer:databaseServerPort|select getDate()
20 Operations Center Troubleshooting Guide

where:
database_server_ name is the server where the database is installed
databaseServerPort is the port used to communicate with Operations Center
For example:
com.inet.syb.SybDriver|jdbc:inetsyb:sybasedbsvr:4100|select getDate()
2.7 Customization Tips Section 2.7.1, “Creating Custom Element Classes and Specifying Custom Icons,” on page 21
Section 2.7.2, “Date/Time Skewing,” on page 21
2.7.1 Creating Custom Element Classes and Specifying Custom Icons
“Viewing the Operations Center Icon Library” on page 21
“Implementing Custom Icons” on page 21
Viewing the Operations Center Icon Library
To view the Operations Center icon library, go to http://operations_center_server:port/icons/list.
Implementing Custom Icons
1 Copy the /OperationsCenter_install_path/database/examples/IconAliases.properties file to the /OperationsCenter_install_path/database directory and create an entry for each icon substitution.
For example:
MyRouterBrand=device_router
2 To add custom icons (.gif files named to match the entries created in Step 1) to the images directories:
2a Save a 16x16 version of the icon in the ManagedObjects/html/images/small directory.
2b Save a 32x32 version of the icon in the ManagedObjects/html/images/large directory.
This icon is used specifically for the Layout view.
2.7.2 Date/Time Skewing
Date/time skewing is used to align database information for reporting.
To turn off the Date/Time skew:
1 In a text editor, open the /OperationsCenter_install_path/html/applet_params.xml file.
2 Add the following entry to the <params><common> element:
<param name="Connection.correctTimeSkew" value="false" />
Tips, Troubleshooting, and Common Issues 21

3 Force all users off Operations Center.
When users log in again, Operations Center no longer performs date/time skewing.
2.8 Internal LDAP Server Guidelines and Settings Section 2.8.1, “General Guidelines,” on page 22
Section 2.8.2, “Non-SSL Settings,” on page 22
Section 2.8.3, “SSL Settings,” on page 22
2.8.1 General Guidelines
Make sure that you don’t have trailing spaces after any of the values. For example,
Host URL: ldap://managed1.mosol.com:389
Base DN: ou=users,ou=acme corporation,dc=acme,dc=com
Filter: (objectclass=*)
Username Attribute: sAMAccountName
Principal: Change it to your network user name and password; for example:
acme/jpeters, "password"
2.8.2 Non-SSL Settings
Make sure that you don’t have trailing spaces after any of the values. For example,
Host URL: ldap://acme1.acme.com:389
Authentication: simple
Security Protocol: none
2.8.3 SSL Settings
Make sure that you do not have trailing spaces after any of the values. For example,
Host URL: ldaps://acmecorp1.acme.com:636
Authentication: EXTERNAL
Ensure that the remote LDAP server to which you want to connect supports this external method.
Security Protocol: ssl
Currently, we do not have an SSL-enabled LDAP server. You must get a signed certificate from the Active Directory* where you want to connect.
Use the following command to add the certificate to the JRE* under the Operations Center installation:
keytool -import -v -alias formula_ldap -file AD_cert -keypass changeit -keystore [location to 1.7 JRE cacerts, usually under OperationsCenter/bin] -storepass changeit
where AD_cert is the Active Directory certificate.
22 Operations Center Troubleshooting Guide

Use the following command to verify that the certificate has been installed:
keytool -list -keystore [location to 1.7 JRE cacerts, usually under OperationsCenter/bin]
2.9 Adapters Section 2.9.1, “Suppressing Alarms in IBM Tivoli T/EC,” on page 23
2.9.1 Suppressing Alarms in IBM Tivoli T/EC
1 Update the enumeration in the rulebase:
1a Open the root.baroc file in TEC_CLASSES for the specific ruleset.
1b Go to the ENUMERATIONS section and find ENUMERATION STATUS.
1c Add "100 SUPPRESSED" after the "30 CLOSED" entry.
2 Enter wcomprules rulebaseName at a command prompt to compile the rulebase.
Replace rulebaseName with the file name of Rules database.
3 Enter wstopesvr at a command prompt to stop the T/EC event server.
4 Enter wstartesvr at a command prompt to start the T/EC event server.
The tec_t_status_event table updates with the Suppressed option.
5 To verify that the tec_t_status_event table has the data from the database, execute the following SQL query:
select * from tec_t_status_event
6 Verify and insert as need the following values in the tec_t_status_event table:
(100, 'STATUS_EVENT', 0, 'SUPPRESSED')
Tips, Troubleshooting, and Common Issues 23

2.10 Diagnosing Memory ErrorsBy default, the Operations Center server saves data related to various garbage collection and memory activities that can help when diagnosing memory errors. The actual properties can vary, depending on the virtual machine running.
To chart server memory statistics:
1 In the Explorer pane, expand the Administration root element > Server.
2 Click the Performance tab to display the Performance view.
3 Adjust the timeline to select the desired time range.
4 Select the memory properties in the Properties pane.
5 Select all four Old Generation properties.
6 Click Create Chart.
7 Select all four Perm Generation properties.
8 Click Create Chart.
This creates a single view of the two most important memory charts related to the Operations Center virtual machine. Take a screen shot of these charts and include it with the memorysamples.dat and fsgc.log files from the Operations Center log directories when working with Technical Support on memory issues.
24 Operations Center Troubleshooting Guide