oracle® communications converged application server · oracle® communications converged...
TRANSCRIPT

Oracle® Communications Converged Application ServerDeveloper’s Guide
Release 5.1
E27707-01
December 2012

Oracle Communications Converged Application Server Developer's Guide, Release 5.1
E27707-01
Copyright © 2005, 2012, Oracle and/or its affiliates. All rights reserved.
This software and related documentation are provided under a license agreement containing restrictions on use and disclosure and are protected by intellectual property laws. Except as expressly permitted in your license agreement or allowed by law, you may not use, copy, reproduce, translate, broadcast, modify, license, transmit, distribute, exhibit, perform, publish, or display any part, in any form, or by any means. Reverse engineering, disassembly, or decompilation of this software, unless required by law for interoperability, is prohibited.
The information contained herein is subject to change without notice and is not warranted to be error-free. If you find any errors, please report them to us in writing.
If this is software or related documentation that is delivered to the U.S. Government or anyone licensing it on behalf of the U.S. Government, the following notice is applicable:
U.S. GOVERNMENT END USERS: Oracle programs, including any operating system, integrated software, any programs installed on the hardware, and/or documentation, delivered to U.S. Government end users are "commercial computer software" pursuant to the applicable Federal Acquisition Regulation and agency-specific supplemental regulations. As such, use, duplication, disclosure, modification, and adaptation of the programs, including any operating system, integrated software, any programs installed on the hardware, and/or documentation, shall be subject to license terms and license restrictions applicable to the programs. No other rights are granted to the U.S. Government.
This software or hardware is developed for general use in a variety of information management applications. It is not developed or intended for use in any inherently dangerous applications, including applications that may create a risk of personal injury. If you use this software or hardware in dangerous applications, then you shall be responsible to take all appropriate fail-safe, backup, redundancy, and other measures to ensure its safe use. Oracle Corporation and its affiliates disclaim any liability for any damages caused by use of this software or hardware in dangerous applications.
Oracle and Java are registered trademarks of Oracle and/or its affiliates. Other names may be trademarks of their respective owners.
Intel and Intel Xeon are trademarks or registered trademarks of Intel Corporation. All SPARC trademarks are used under license and are trademarks or registered trademarks of SPARC International, Inc. AMD, Opteron, the AMD logo, and the AMD Opteron logo are trademarks or registered trademarks of Advanced Micro Devices. UNIX is a registered trademark of The Open Group.
This software or hardware and documentation may provide access to or information on content, products, and services from third parties. Oracle Corporation and its affiliates are not responsible for and expressly disclaim all warranties of any kind with respect to third-party content, products, and services. Oracle Corporation and its affiliates will not be responsible for any loss, costs, or damages incurred due to your access to or use of third-party content, products, or services.

iii
Contents
Preface ................................................................................................................................................................. xi
Audience....................................................................................................................................................... xiRelated Documents ..................................................................................................................................... xiDocumentation Accessibility ..................................................................................................................... xi
Part I Introduction to Developing Applications for Converged Application Server
1 About Developing Applications for the Converged Application Server
About Converged Application Server APIs ........................................................................................ 1-1About this Book ........................................................................................................................................ 1-2
Part II Developing Applications with the Service Creation Environment
2 Getting Started
About the Service Creation Environment ........................................................................................... 2-1SCE Workflow Overview.................................................................................................................. 2-2
About Converged Application Projects ............................................................................................... 2-2Converged Application Project Configuration.............................................................................. 2-3Converged SIP Diameter Project Configuration ........................................................................... 2-3
Before Starting .......................................................................................................................................... 2-4Enabling Converged Application Server Debug Option ................................................................. 2-4Installing the Converged Application Service Creation Environment ......................................... 2-5Creating a Converged Application Project.......................................................................................... 2-6Adding Converged Application Project Facets to an Existing Project........................................... 2-7Creating an Ant Build File...................................................................................................................... 2-8Deploying SIP Applications from Eclipse .......................................................................................... 2-9
3 Creating Applications with the Converged Application SCE Wizards
About SCE Wizards ................................................................................................................................. 3-1About SIP Servlet Templates ............................................................................................................ 3-1
Using the SIP Servlet Wizard................................................................................................................. 3-2Creating a SIP Servlet ........................................................................................................................ 3-2Creating a SIP Servlet Based on a Template................................................................................... 3-3

iv
Using the SIP Listener Wizard............................................................................................................... 3-5Using the SFT Communication Bean Wizard ..................................................................................... 3-6
4 Using Simulators and Other Testing Tools
About the SCE Tools................................................................................................................................ 4-1Using the XDMS Simulator.................................................................................................................... 4-2
Deploying and Starting the XDMS Simulator................................................................................ 4-3Using the XCAP Interface to Populate and Query the XDMS..................................................... 4-3
Configuring the Media Server Driver .................................................................................................. 4-4Configuring the Diameter Simulator Settings ................................................................................... 4-5Extending Domains with Diameter Capabilities............................................................................... 4-5Using the SIPp Plug-in ............................................................................................................................ 4-8
Part III Developing SIP Applications
5 Overview of SIP Servlet Application Development
About the SIP Protocol ............................................................................................................................ 5-1SIP Requests ........................................................................................................................................ 5-1SIP Responses ..................................................................................................................................... 5-2
What are SIP Servlets?............................................................................................................................. 5-2Differences Between HTTP Servlets and SIP Servlets ..................................................................... 5-3Differences from HTTP Servlets ........................................................................................................... 5-4
Multiple Responses............................................................................................................................ 5-4Receiving Responses.......................................................................................................................... 5-5Proxy Functions.................................................................................................................................. 5-6Message Body ..................................................................................................................................... 5-6
Servlet Request ............................................................................................................................ 5-7Servlet Response ......................................................................................................................... 5-7SipServletMessage ...................................................................................................................... 5-7
Role of a Servlet Container ............................................................................................................... 5-8Application Management .......................................................................................................... 5-8SIP Messaging.............................................................................................................................. 5-9Utility Functions....................................................................................................................... 5-11
SIP Session, Application Session .................................................................................... 5-12SIP Factory ......................................................................................................................... 5-12Proxy................................................................................................................................... 5-12
6 Porting Existing Applications to Oracle Communications Converged Application Server
Application Router and Legacy Application Composition.............................................................. 6-1SipSession and SipApplicationSession Not Serializable ................................................................ 6-1SipServletResponse.setCharacterEncoding() API Change .............................................................. 6-2Transactional Restrictions for SipServletRequest and SipServletResponse ............................... 6-2Immutable Parameters for New Parameterable Interface ................................................................ 6-2Stateless Transaction Proxies Deprecated ........................................................................................... 6-3Backward-Compatibility Mode for v1.0 Deployments..................................................................... 6-3

v
Validation Warnings for v1.0 Servlet Deployments ..................................................................... 6-3Modifying Committed Messages..................................................................................................... 6-3Path Header as System Header........................................................................................................ 6-3SipServletResponse.createPrack() Exception ................................................................................. 6-4Proxy.proxyTo() Exceptions ............................................................................................................. 6-4Changes to Proxy Branch Timers..................................................................................................... 6-4
Deprecated APIs ....................................................................................................................................... 6-4SNMP MIB Changes................................................................................................................................ 6-5Renamed Diagnostic Monitors and Actions ....................................................................................... 6-5
7 Requirements and Best Practices for SIP Applications
Overview of Developing Distributed Applications for Converged Application Server........... 7-1Applications Must Not Create Threads ............................................................................................... 7-2Servlets Must Be Non-Blocking ............................................................................................................ 7-2Store all Application Data in the Session............................................................................................ 7-2All Session Data Must Be Serializable ................................................................................................ 7-3Use setAttribute() to Modify Session Data in “No-Call” Scope ..................................................... 7-3send() Calls Are Buffered ....................................................................................................................... 7-4Mark SIP Servlets as Distributable ...................................................................................................... 7-5Use SipApplicationSessionActivationListener Sparingly ............................................................... 7-5Session Expiration Best Practices .......................................................................................................... 7-5Observe Best Practices for Java EE Applications ............................................................................... 7-5Optimizing Memory Utilization and Performance with Serialization ......................................... 7-5
8 Using Compact and Long Header Formats for SIP Messages
Overview of Header Format APIs and Configuration ...................................................................... 8-1Summary of Compact Headers .............................................................................................................. 8-1Assigning Header Formats with WlssSipServletMessage ............................................................... 8-2Summary of API and Configuration Behavior ................................................................................... 8-2
9 Composing SIP Applications
Using the Application Router ................................................................................................................ 9-1Using the Default Application Router ............................................................................................ 9-2Configuring a Custom Application Router.................................................................................... 9-3Using the Built-in Custom Application Router ............................................................................. 9-4
Configuring the Custom Application Router ......................................................................... 9-5Working with SIP and HTTP Sessions ................................................................................................ 9-8
Modifying the SipApplicationSession.......................................................................................... 9-10Synchronous Access ................................................................................................................ 9-10Asynchronous Access.............................................................................................................. 9-11
Session Key-Based Request Targeting.............................................................................................. 9-11Join and Replaces Header Support .................................................................................................... 9-12
About the Join Header.................................................................................................................... 9-12About the Replaces Header ........................................................................................................... 9-12Enabling Support for Join and Replaces Headers ...................................................................... 9-13
API to Set Transport Parameter on Record-Route Header ............................................................ 9-13

vi
Setting Content in SIP Responses...................................................................................................... 9-13
10 Developing Converged Applications
Overview of Converged Applications............................................................................................... 10-1Assembling and Packaging a Converged Application .................................................................. 10-1Converged Application Samples........................................................................................................ 10-2
11 Developing Custom Profile Service Providers
Overview of the Profile Service API ................................................................................................. 11-1Implementing Profile Service API Methods.................................................................................... 11-2Configuring and Packaging Profile Providers ................................................................................ 11-3
Mapping Profile Requests to Profile Providers .......................................................................... 11-4Configuring Profile Providers Using the Administration Console ............................................ 11-4
12 Using Content Indirection in SIP Servlets
Overview of Content Indirection ....................................................................................................... 12-1Using the Content Indirection API .................................................................................................... 12-1Additional Information........................................................................................................................ 12-1
13 Securing SIP Servlet Resources
Overview of SIP Servlet Security....................................................................................................... 13-1Triggering SIP Response Codes ......................................................................................................... 13-2Specifying the Security Realm ........................................................................................................... 13-2Converged Application Server Role Mapping Features................................................................ 13-2Using Implicit Role Assignment ........................................................................................................ 13-3Assigning Roles Using security-role-assignment ........................................................................... 13-3
Important Requirements ................................................................................................................ 13-3Assigning Roles at Deployment Time.......................................................................................... 13-5Dynamically Assigning Roles Using the Administration Console.......................................... 13-5
Assigning run-as Roles ........................................................................................................................ 13-6Role Assignment Precedence for SIP Servlet Roles ....................................................................... 13-6Debugging Security Features.............................................................................................................. 13-7weblogic.xml Deployment Descriptor Reference ........................................................................... 13-7
14 Enabling Message Logging
Overview ................................................................................................................................................. 14-1Enabling Message Logging ................................................................................................................. 14-1
Specifying a Predefined Logging Level ....................................................................................... 14-2Customizing Log Records.............................................................................................................. 14-2
Specifying Content Types for Unencrypted Logging .................................................................... 14-3Example Message Log Configuration and Output ......................................................................... 14-4Configuring Log File Rotation............................................................................................................ 14-5
15 Generating SNMP Traps from Application Code
Overview ................................................................................................................................................. 15-1

vii
Requirement for Accessing SipServletSnmpTrapRuntimeMBean............................................. 15-2Obtaining a Reference to SipServletSnmpTrapRuntimeMBean ................................................ 15-2Generating an SNMP Trap .................................................................................................................. 15-3
16 Using the Location Service RESTful Interface
About the Location Service RESTful Interface ............................................................................... 16-1About REST ............................................................................................................................................ 16-1About JSON Body Parameters ............................................................................................................ 16-1About the Context Root........................................................................................................................ 16-2Using Authentication and Authorization......................................................................................... 16-2 RESTful APIs for the Location Service ............................................................................................ 16-3
Store Registrations for Address-of-Record.................................................................................. 16-4Lookup an Address-of-Record...................................................................................................... 16-6Clear All Address of Record Bindings ......................................................................................... 16-8
Part IV Developing Applications With the Service Foundation Toolkit
17 Introduction to the Service Foundation Toolkit
The Service Foundation Toolkit Programming Model.................................................................. 17-1About the Communication Interface ................................................................................................. 17-1About Communication Beans ............................................................................................................. 17-3About Participants................................................................................................................................. 17-4About SIP Messages and SFT ............................................................................................................. 17-5About Communication Context Types ............................................................................................. 17-6About Agents ......................................................................................................................................... 17-7About Media Control............................................................................................................................ 17-7Searching Communications ................................................................................................................ 17-7Packaging and Deploying SFT Applications................................................................................... 17-8SFT Annotations .................................................................................................................................... 17-8
Using the @CommunicationBean Annotation ............................................................................ 17-8About Event Handling ......................................................................................................................... 17-9
Understanding Event Flow............................................................................................................ 17-9Event Walkthrough....................................................................................................................... 17-11Using the @CommunicationEvent Annotation ........................................................................ 17-11About Communication and Participant Events........................................................................ 17-12
CommunicationEvent Enumeration Types........................................................................ 17-13Using the @ParticipantEvent Annotation.................................................................................. 17-14
ParticipantEvent Enumeration Types................................................................................. 17-14SFT Sample Application .................................................................................................................... 17-15
18 Packaging and Deploying SFT Applications
Structure of a SFT Application ........................................................................................................... 18-1Packaging SFT Applications.......................................................................................................... 18-1Integrating SFT with SIP Servlets ................................................................................................. 18-1SFT.XML Deployment Descriptor ................................................................................................ 18-2

viii
19 SFT Deployment Descriptor and Schema Reference
Application-Based Deployment ......................................................................................................... 19-1XML Schema Definitions and Namespace Declarations............................................................... 19-1Annotation-based Configuration ....................................................................................................... 19-1
Using the @ServiceAttributes Annotation................................................................................... 19-1About the sft.xml Deployment Descriptor Elements ..................................................................... 19-2
About the communication-bean Element.................................................................................... 19-2The service-attributes Element...................................................................................................... 19-4Annotation Scanning ...................................................................................................................... 19-7Overriding Annotations with the SFT.XML Deployment Descriptor .................................... 19-7
SFT.XML Schema .................................................................................................................................. 19-9
20 Event Orchestration in the Service Foundation Toolkit
About Event Orchestration.................................................................................................................. 20-1Using Annotations to Define the Invocation Order ....................................................................... 20-1Using XML to Define the Invocation Order .................................................................................... 20-2Filtering and Overriding Communication Beans ........................................................................... 20-3
Filtering Communication Beans ................................................................................................... 20-3Filtering Specific Communication Bean Annotations................................................................ 20-4Overriding CommunicationBean Annotations........................................................................... 20-4
21 Implementing Call Control Services
About Converged Application Framework and VoLTE ................................................................ 21-1Call Forwarding ..................................................................................................................................... 21-1
Accessing Call Forwarding History ............................................................................................. 21-2Discovering Call Reject Reasons ................................................................................................... 21-4Call Forwarding Example .............................................................................................................. 21-5
Call Barring............................................................................................................................................. 21-6Communication Hold ........................................................................................................................... 21-8
Setting the Communication Hold Bandwidth ............................................................................ 21-9Identity Presentation and Restriction ............................................................................................. 21-10
Identity Presentation and Restriction Interfaces ...................................................................... 21-11Privacy Service Behavior.............................................................................................................. 21-12Enabling User-Level Privacy ....................................................................................................... 21-13Providing Privacy for the History-Info Header........................................................................ 21-14
Communication Waiting.................................................................................................................... 21-14Supporting Network- and Terminal-based Communication Waiting.................................. 21-14
About Network-based Communication Waiting.............................................................. 21-14About Terminal-based Communication Waiting.............................................................. 21-15
About the Communication Waiting Interfaces......................................................................... 21-15Creating a Communication Waiting Application .................................................................... 21-15CallWaitingBean Example Code................................................................................................. 21-17
Message Waiting Indication.............................................................................................................. 21-18Configuring Message Waiting Indication ................................................................................. 21-19About the Message Waiting Indication Interfaces ................................................................... 21-19Creating a Message Waiting Indication Application............................................................... 21-20

ix
Sending MWI Notifications to Subscribers ........................................................................ 21-22Removing a Subscription...................................................................................................... 21-23
Message Waiting Indication Example........................................................................................ 21-23
22 Using Announcements
About Announcements ........................................................................................................................ 22-1APIs for Announcement Support....................................................................................................... 22-1
MediaPartner ................................................................................................................................... 22-3CommunicationEvent Enumeration Types................................................................................. 22-3ParticipantEvent Enumeration Types .......................................................................................... 22-4
About the MediaPartner and UserPartner Interfaces..................................................................... 22-4Callout Announcement ........................................................................................................................ 22-5Call Barring Announcement ............................................................................................................... 22-6
Call Barring Announcement Using Error-Info ........................................................................... 22-6Call Barring Announcement Using Early Media ....................................................................... 22-7Playing a Call Barring Announcement With Established Sessions ......................................... 22-8
Playing a Colorful Ring Tone ........................................................................................................... 22-10Playing Colorful Ring Back Tone .................................................................................................... 22-10
Colorful Ring Back Tone by Alert-Info ...................................................................................... 22-11Colorful Ring Back Tone Without Early Media Exchange...................................................... 22-11CRBT After Early Media Exchange ............................................................................................ 22-12
Playing a Call Rejection Announcement........................................................................................ 22-13Call Rejection Using Error-Info................................................................................................... 22-13Call Rejection Announcements Using Early Media................................................................. 22-13
Call Forwarding Announcements .................................................................................................... 22-14Un-Conditional Call Forwarding Announcement ................................................................... 22-14Conditional Call Forwarding ...................................................................................................... 22-15
Call Waiting Announcement ............................................................................................................ 22-17Call Waiting Announcement Using ALERT-INFO.................................................................. 22-17Call Waiting Announcement Using Early Media..................................................................... 22-17
Pickup Announcement....................................................................................................................... 22-18
23 Conferencing With Media Control
Conferencing with Media Control..................................................................................................... 23-1About the Conferencing and Media Control Interfaces ............................................................ 23-1Creating a Conference With the Focus Interface ....................................................................... 23-2Creating Conferences Using Resource-Contained Lists............................................................ 23-3
Ad-Hoc Conferencing........................................................................................................................... 23-8Configuring the Conference Event Package ............................................................................... 23-8Handling Subscription and Notification Events ........................................................................ 23-9
Handling Conference Subscription Events .......................................................................... 23-9Handling Conference Notification Events ......................................................................... 23-10
24 Using the XCAP Interfaces
About XCAP and VoLTE ..................................................................................................................... 24-2Creating and Accessing an XCAP Client .......................................................................................... 24-2

x
Fetching, Creating, and Deleting Resources With XCAP ............................................................. 24-3Fetching Documents from the XDMS .......................................................................................... 24-3Creating or Replacing Documents in the XDMS........................................................................ 24-4Deleting a Document from the XDMS ......................................................................................... 24-5
Using XCAP for IR.92 Supplementary Services .............................................................................. 24-5XCAP Supplementary Service APIs ............................................................................................. 24-6Creating Supplementary Service Rules ....................................................................................... 24-7
Adding and Editing Elements............................................................................................................. 24-8Validating Data ..................................................................................................................................... 24-9XCAP Authentication and Authorization....................................................................................... 24-10
Using Digest Authentication ....................................................................................................... 24-10Using Transport Layer Security .................................................................................................. 24-11Using X-3GPP-Asserted-Identity Header Authentication ...................................................... 24-11
25 Creating Instant Messaging and Rich Media Services
About Rich Communication Services ............................................................................................... 25-1Discovering Device Capability........................................................................................................... 25-1
About the Capability Discovery Interfaces ................................................................................. 25-2Using the Capability Discovery Interfaces .................................................................................. 25-3
Using In-dialog, SIP Options-based Capability Discovery .......................................................... 25-5Using End User Confirmation Request ............................................................................................ 25-6
About the EUCR Interfaces............................................................................................................ 25-7Using EUCR in Response to a File Transfer ................................................................................ 25-8
Conferencing Using MSRP ................................................................................................................. 25-9Using Instant Message Disposition Notification............................................................................ 25-9
About the IMDN Interfaces ......................................................................................................... 25-11Creating an Instant Message with IMDN Request................................................................... 25-11Creating an IMDN With CommunicationBean ........................................................................ 25-12

xi
Preface
This document provides an overview of SIP Servlets and developing SIP applications for Oracle Communications Converged Application Server.
AudienceThis document is intended for developers who build SIP applications for use with Converged Application Server.
Related DocumentsFor more information, see the following documents in the Oracle Communications Converged Application Server Release 5.1 documentation set:
■ Converged Application Server Release Notes
■ Converged Application Server Installation Guide
■ Converged Application Server Concepts
■ Converged Application Security Guide
■ Converged Application Server Administrator’s Guide
■ Converged Application Server Diameter Application Development Guide
Documentation AccessibilityFor information about Oracle's commitment to accessibility, visit the Oracle Accessibility Program website at http://www.oracle.com/pls/topic/lookup?ctx=acc&id=docacc.
Access to Oracle SupportOracle customers have access to electronic support through My Oracle Support. For information, visit http://www.oracle.com/pls/topic/lookup?ctx=acc&id=info or visit http://www.oracle.com/pls/topic/lookup?ctx=acc&id=trs if you are hearing impaired.

xii

Part IPart I Introduction to Developing Applications for
Converged Application Server
This part provides an overview of this guide, and describes the contents of each chapter.
It contains the following chapter:
■ Chapter 1, "About Developing Applications for the Converged Application Server"


1
About Developing Applications for the Converged Application Server 1-1
1About Developing Applications for the Converged Application Server
This chapter introduces application development for the Oracle Communications Converged Application Server.
About Converged Application Server APIsConverged Application Server supports a set of different APIs:
■ SIP Servlet API
■ Service Foundation Toolkit API
■ Media server API
■ Diameter API
■ Converged Load Balancer API
Communications-oriented applications can also use the JEE APIs exposed by Oracle WebLogic Server, and thus making them converged applications.
The SIP Servlet container exposes a JSR 289 compliant API for developing SIP applications.
The Service Foundation Toolkit API adds higher level of abstraction over SIP Servlets and provides abstracted programming model for creating Rich Communication Services (RCS) including Voice over LTE (VoLTE), support for SIP OPTIONS, Presence, Instant Messaging, MSRP, XDMS, and media servers.
The media server API is a JSR 389 compliant and provides an object model for controlling media server resources and the topology of media streams independently of the underlying media server control protocols. Media server specifics are handled by a JSR 309 Driver, similar to how JDBC are abstracting away database specifics. This allows an application to interact with different media servers regardless of vendor.
The Diameter API provides programmatic access to Diameter nodes. This books does not cover this topic, see Oracle Communications Converged Application Server Diameter Application Development Guide for further information.
The Converged Load Balancer API allows for creating data centric rules to customize load distribution selection in the Converged Load Balancer. This books does not cover this topic, see Oracle Communications Converged Application Server System Administrator’s Guide for further information.

About this Book
1-2 Oracle Communications Converged Application Server Developer's Guide
About this BookThis book is structured into the following parts:
■ Part II, "Developing Applications with the Service Creation Environment" describes the Service Creation Environment (SCE), an Eclipse based integrated application development environment. It introduces the use of SCE for developing, packaging, and deploying SIP applications that run in Converged Application Server.
■ Part III, "Developing SIP Applications" provides the programming guide for developing SIP based converged applications. It introduces the key elements of the SIP Servlet API and describes considerations for developing SIP Servlets to be deployed in Converged Application Server.
■ Part IV, "Developing Applications With the Service Foundation Toolkit"provides the programming guide for developing applications using the Service Foundation Toolkit (SFT).

Part IIPart II Developing Applications with the Service
Creation Environment
This part contains the following chapters:
■ Chapter 2, "Getting Started"
■ Chapter 3, "Creating Applications with the Converged Application SCE Wizards"
■ Chapter 4, "Using Simulators and Other Testing Tools"


2
Getting Started 2-1
2Getting Started
This chapter describes the Oracle Communications Converged Application Server Service Creation Environment (SCE), an Eclipse-based development environment that eases the task of developing SIP and converged applications.
About the Service Creation EnvironmentThe SCE is a separately installed software component that supplements the Oracle Enterprise Pack for Eclipse (OEPE). The Converged Application SCE works with OEPE version 7.1 and later.
The OEPE supplements the underlying Eclipse software with features specifically intended to facilitate application development for WebLogic. The features are available for converged application development as well, and include:
■ Tools for editing deployment descriptors and deployment plans graphically.
■ Remote application deployment capabilities
■ Oracle WebLogic Server Extension Facets
For more information about OEPE, see the Oracle Enterprise Pack for Eclipse overview page on Oracle Technology Network:
http://www.oracle.com/technetwork
In addition, the Converged Application SCE supplements the OEPE with features specifically intended for converged application development. The features enable you to:
■ Create SIP and converged applications using rapid development tools, such as wizards and templates. SCE provides wizards for creating SIP listeners, SIP servlets and other SIP components.
■ Use simulators to perform the functions of IMS components in your development environment, such as an XML Document Management Server (XDMS), media servers, and charging servers.
■ Use SIPp directly from the Eclipse development environment.
■ Reduce the time required to build, deploy, and debug your application due to the integration between the SCE and the Converged Application Server runtime environment.
The SCE supplements Eclipse using the mechanism of the Eclipse faceted project framework. Each facet in Eclipse is made up of a bundled set of features in the form of libraries, tools, and resources. The capabilities are typically targeted to a specific type

About Converged Application Projects
2-2 Oracle Communications Converged Application Server Developer's Guide
of application or for creating applications for a target domain, such as communication services.
When you create a converged application project, the appropriate SCE facets are included in the project. In addition, you can add the SCE facets to existing projects. See "Converged Application Project Configuration" for more information about SCE project facets.
SCE Workflow OverviewThe high-level steps for getting started developing converged applications with the SCE are:
1. Ensure that your system meets the requirements for installing and using the Service Creation Environment.
See "Before Starting" for more information.
2. Install the Converged Application SCE software to OEPE.
See "Installing the Converged Application Service Creation Environment" for more information.
3. Create a Converged Application Project, using the Converged Application Server as the runtime target environment for the project.
See "Creating a Converged Application Project" for more information.
4. Use wizards and templates to create the initial source code for your converged application classes.
See "Creating Applications with the Converged Application SCE Wizards" for more information.
5. Deploy, test, and debug the application using the SCE simulators and other testing tools.
See "Creating Applications with the Converged Application SCE Wizards" for more information.
The followings sections provide more information on the steps specific for the SCE. For more information on using OEPE for Eclipse, see the Eclipse documentation.
About Converged Application ProjectsEclipse organizes the resources and artifacts associated with a particular application development effort into projects. There are various types of projects, each of which is intended for a particular type of application.
To develop SIP and converged applications with the SCE, you use the project type Converged Application Project. The Converged Application Project contains the resources for developing applications for the Converged Application Server.
The Converged Application Project offers two types of configuration types. The configuration types are the base Converged Application Project configuration and the Converged SIP Diameter Project configuration, which are described in the following sections.

About Converged Application Projects
Getting Started 2-3
Converged Application Project ConfigurationA Converged Application Project is similar to a Dynamic Web Project, but it adds components intended for SIP and converged application development, such as SIP and SFT libraries, IMS simulators, and more.
The base Converged Application Project includes the following facets:
■ Dynamic Web Module
■ Java
■ JavaScript
■ Oracle Communication Converged Application Extensions, including:
– SIP Servlet
– SFT Communication Bean
■ Oracle WebLogic Web Application Extensions
In addition to standard JRE resources, the facets contain Converged Application Server system library files, such as sft-communication-api.jar and sipservlet.jar, as well as sft.xml, sip.xml, and web.xml deployment descriptor files.
The Converged Application Projects enables you to create SFT Communication Beans and SIP Servlets along with standard HTTP Servlets, JPSs, static files, and EJB-based classes.
Notice that an additional Converged Application Project facet, the Diameter extension facet, is not enabled by default. To create Diameter applications with the SCE, either use the Converged SIP Diameter Project type configuration with the Converged Application Project, or enable the facet.
Converged SIP Diameter Project ConfigurationYou use the Converged SIP Diameter Project configuration for converged applications that need to interact with Diameter nodes.
The Converged SIP Diameter Project incorporates these facets:
■ Dynamic Web Module
■ Java
■ JavaScript
■ Oracle Communication Converged Application Extensions, including:
– Diameter Extension
– SIP Servlet
■ Oracle WebLogic Web Application Extensions
The target domain server to which you deploy a Diameter-enabled application must be capable of operating as a Diameter node. Therefore, before deploying a Diameter application, you should ensure that the target domain has been extended for Diameter operability. The SCE provides an interface for extending target domains with Diameter capabilities. See "Extending Domains with Diameter Capabilities" for more information.
Notice that the SFT Communication Bean facet is not enabled by default. To create SFT applications, you need to enable the facet.

Before Starting
2-4 Oracle Communications Converged Application Server Developer's Guide
Before StartingThe SCE relies on external components that must be present before you can install or use SCE.
Before you can start working with the SCE, confirm the following prerequisites:
■ A Converged Application Server installation with an administrative domain that you can configure and restart as necessary.
See information on creating a domain in the Oracle Communications Converged Application Server Installation Guide.
■ Oracle Enterprise Pack for Eclipse 11g R1 (11.1.1.7.1) or later.
To get OEPE, download the latest installer suitable for your operating system from the Oracle Enterprise Pack for Eclipse download page on Oracle Technology Network:
http://www.oracle.com/technetwork/developer-tools/eclipse
Follow the instructions provided for downloading and installing the OEPE software.
Enabling Converged Application Server Debug OptionWhen developing and testing converged applications, you may find it useful to enable debug options on the Converged Application Server.
Follow these steps to add debugging options to the startup script and to attach the debugger from within Eclipse.
1. Use a text editor to open the StartWebLogic.cmd script for your development domain.
2. Beneath the line that reads:
set JAVA_OPTIONS=Enter the following line:set DEBUG_OPTS=-Xdebug -Xrunjdwp:transport=dt_socket,address=9000,server=y,suspend=n
3. In the last line of the file, add the %DEBUG_OPTS% variable in the place indicated below:
"%JAVA_HOME%\bin\java" %JAVA_VM% %MEM_ARGS% %JAVA_OPTIONS% %DEBUG_OPTS% -Dweblogic.Name=%SERVER_NAME% -Dweblogic.management.username=%WLS_USER% -Dweblogic.management.password=%WLS_PW%-Dweblogic.management.server=%ADMIN_URL%-Djava.security.policy="%WL_HOME%\server\lib\weblogic.policy" weblogic.Server
4. Save the file and use the script to restart Converged Application Server.
5. To attach the debugger from within Eclipse select Run, and then select the Open debug dialog box.
6. Create a new Remote Java Application.
7. Enter the host and port corresponding to the DEBUG_OPTS.
Note: On Linux, debug is enabled by default if you install in developer mode. However, the port is set to 8453.

Installing the Converged Application Service Creation Environment
Getting Started 2-5
Installing the Converged Application Service Creation EnvironmentThe SCE software is distributed as a JAR file that is located in your Converged Application Server installation directory.
The JAR file is named:
com.oracle.occas.sce.updatesite_5.1.0.jar
The JAR file is located in the following directory:
MW_HOME/occas_5.1/sce
Where MW_HOME is the Oracle Middleware home directory as defined during installation.
You install the Converged Application SCE software to the OEPE using the Update Manager feature in the Eclipse environment.
Before starting, make sure that you have installed the correct version of OEPE and that you can access the JAR file from the computer on which you are using the OEPE. If necessary, copy the JAR file from the Converged Application Server computer to the computer on which you intend to install the SCE software.
The following steps describe how to use the update manager to install the SCE. As a final step in the installation, you will need to restart the OEPE. You should start the installation procedure only if it is convenient to restart Eclipse.
To install Converged Application Server SCE in OEPE:
1. From the main menu in the Eclipse window, click Help and then Install New Software.
2. Click the Add button next to the Work with field.
3. In the Add Repository dialog, click Archive.
4. In the Repository archive dialog, navigate to the directory that contains the SCE distribution archive. By default, the name and location of the file is:
OCCAS_HOME/sce/com.oracle.occas.sce.updatesite_5.1.0.jar
5. Select the file and click OK.
6. In the Add Repository dialog, click OK.
The available software list in the Available Software dialog refreshes, showing an item for OCCAS Service Creation Environment.
7. Select OCCAS Service Creation Environment check box.
8. If the option is enabled, clear the Contact all update sites during install to find required software check box.
9. Select OCCAS Service Creation Environment check box and click Next.
The Install Details page appears in the Install dialog. The page lists the OCCAS Service Creation Environment as the item to install.
10. Make sure that the OCCAS Service Creation Environment appears as an item to be installed in the Install Details screen and click Next.
The Review license page appears.
11. Review the license agreement and click I accept the terms of the license agreement and then Finish to complete the installation. Alternatively, click Cancel to terminate the installation.

Creating a Converged Application Project
2-6 Oracle Communications Converged Application Server Developer's Guide
If you accepted the license agreement, the Installing Software dialog appears.
12. If a security warning appears that indicates that the software contains unsigned content, click OK to continue.
The Installing Software dialog shows the progress of the installation. When it is finished, you are prompted to restart the Eclipse platform to complete the installation.
13. Click Restart Now to have the installation changes take effect.
The SCE software is now installed in OEPE. Notice that the OCCAS menu appears on the top menu bar of the Eclipse interface. You can now use the SCE to create Converged Application Server projects or add Converged Application Server facets to existing projects.
You can uninstall the SCE software at any time from the Install New Software dialog by clicking the What is already installed? link. When the list of installed software appears, select the OCCAS Service Creation Environment from the list and click the Uninstall button. Follow the on-screen instructions to complete the software removal.
Creating a Converged Application ProjectEclipse organizes the resources of a particular application or set of applications into projects. There are various types of projects, each associated with a particular type or class of application.
To develop converged applications with the SCE, you can use the Converged Application Project or the Converged SIP Diameter Project.
The Converged Application Project type is similar to the Dynamic Web Project, but adds support for SIP and converged application development. Thus, for example, you can use it to develop SIP servlets, HTTP servlets, JPSs, static files, EJBs, and so on.
The SIP Diameter Project type adds tools for developing SIP applications that can interact with Diameter nodes.
To create a new converged application project, follow these steps:
1. From the File menu, select New and Other.
2. In the Select a wizard screen, expand the Oracle node and then the OCCAS Application node.
3. Choose Converged Application Project and click Next.
4. Type a name for the project in the Project name field.
5. From the Target Runtime menu, choose the target server environment to which to deploy the converged application.
If you have not already defined a Converged Application Server installation as a target server, do the following:
a. Click New Runtime.
b. Under the Oracle node in the target environment list, choose Oracle WebLogic Server 11gR1 (10.3.6) and click Next.
c. Specify the WebLogic home directory by clicking the browse icon and selecting the wlserver_10.3 directory in your Oracle Middleware home.
d. Specify the Java home, if it is not already populated based on your WebLogic home selection.

Adding Converged Application Project Facets to an Existing Project
Getting Started 2-7
e. Click Finish to save the target runtime configuration.
6. From the Dynamic web module version menu choose 2.5.
7. Verify that the Dynamic web module version value is 2.5.
8. From the Configuration menu, choose:
■ Converged Application Project to create converged and SIP applications, including SFT applications.
■ Converged SIP Diameter Project to create converged and SIP applications that can act as Diameter nodes.
9. If needed, select the option to have the project output added to an EAR file or to working sets.
In most cases, converged applications are deployed as SAR or WAR files. However, you can choose to output to an EAR file if your project contains both SIP and enterprise JavaBean components.
10. Click Next and optionally specify the source file location. By default, source files are stored in the src directory.
11. If you want to modify the default context root or content directory, click Next and specify the new values for the project.
12. Click Finish
The wizard creates the project components and configuration settings. You can now add source files to the project by creating them manually or by using the SCE code generation wizards. SCE provides wizards and templates for creating a variety of SIP and converged application types.
Adding Converged Application Project Facets to an Existing ProjectAs an alternative to creating a new Converged Application Project, you can add the Converged Application Project facets to an existing project of a different type, such as a Dynamic Web Project or Enterprise Application Project.
Adding Converged Application facets to the projects makes the SCE wizards, tools, and project resources available in the existing project.
To add the Converged Application Project facets to an existing project:
1. In the Project Explorer, right click on the name of the project and choose Properties from the menu.
2. In the Properties dialog, choose Project Facets.
3. Select the following facets:
■ Oracle Communications Converged Applications Server SIP adds SIP API support to the project.
■ SIP Deployment Descriptor adds the SIP Deployment Descriptor file (sip.xml) to the project.
4. Click OK.
You can now use the Converged Application tools and wizards in your project.

Creating an Ant Build File
2-8 Oracle Communications Converged Application Server Developer's Guide
Creating an Ant Build FileThe OEPE includes project-build features that allow you to build your applications automatically. However, for complex projects, you may choose to use the Ant build tool. Ant provides fine-grained control over project building and deploying logic.
To create an Ant build file:
1. Right-click on the name of your project in Eclipse, and select New, and then select File.
2. Enter the name build.xml and click Finish. Eclipse opens the empty file in a new window.
3. Copy the sample text from Example 2–1, substituting your domain name and application name for myDomain and myApplication.
Example 2–1 Ant Build File Contents
<?xml version="1.0" encoding="ISO-8859-1"?><project default="all"> <property environment="env"/> <property name="beahome" value="${env.BEA_HOME}"/> <target name="all" depends="compile,install"/> <target name="compile"> <mkdir dir="WEB-INF/classes"/> <javac destdir="WEB-INF/classes" srcdir="src" debug="true" debuglevel="lines,vars,source"> <classpath> <pathelement path="${weblogic.jar}"/> </classpath> </javac> </target> <target name="install"> <jar destfile="${beahome}/user_projects/domains/myDomain/applications/myApplication.war"> <zipfileset dir="WEB-INF" prefix="WEB-INF"/> <zipfileset dir="WEB-INF" includes="*.html"/> <zipfileset dir="WEB-INF" includes="*.jsp"/> </jar> </target></project>
4. Close the build.xml file and save your changes.
5. Verify that the build.xml file is valid by selecting the Window menu, then select Show View, and then select Ant and dragging the build.xml file into the Ant view. Correct any problems before proceeding.
6. Right-click on the project name and select Properties.
7. Select the Builders property in the left column, and click New.
8. Select the Ant Build tool type and click OK to add an Ant builder.
9. In the Buildfile field, click Browse Workspace and select the build.xml file you created.
10. In the Base Directory field, click Browse Workspace and select the top-level directory for your project.
11. Click the JRE tab and choose Separate JRE in the Runtime JRE field. Use the drop-down list or the Installed JREs... button to select an installed version 1.6 JRE.
Deploying SIP Applications from Eclipse
Getting Started 2-9
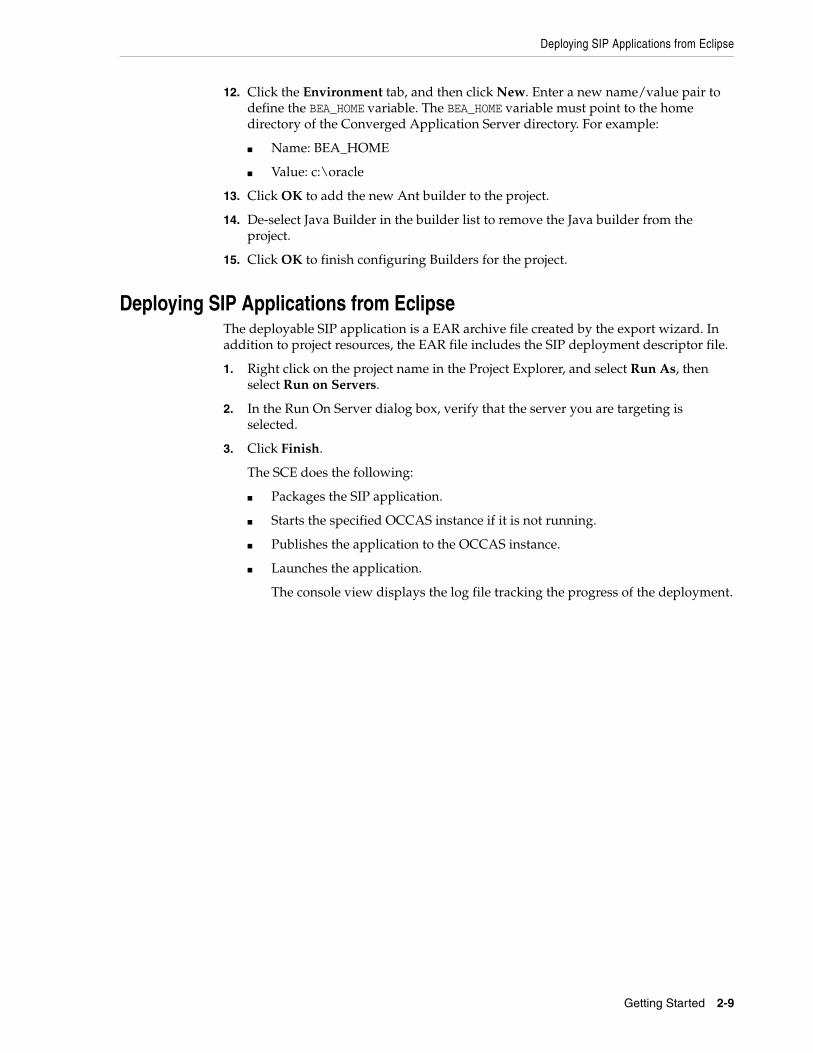
12. Click the Environment tab, and then click New. Enter a new name/value pair to define the BEA_HOME variable. The BEA_HOME variable must point to the home directory of the Converged Application Server directory. For example:
■ Name: BEA_HOME
■ Value: c:\oracle
13. Click OK to add the new Ant builder to the project.
14. De-select Java Builder in the builder list to remove the Java builder from the project.
15. Click OK to finish configuring Builders for the project.
Deploying SIP Applications from EclipseThe deployable SIP application is a EAR archive file created by the export wizard. In addition to project resources, the EAR file includes the SIP deployment descriptor file.
1. Right click on the project name in the Project Explorer, and select Run As, then select Run on Servers.
2. In the Run On Server dialog box, verify that the server you are targeting is selected.
3. Click Finish.
The SCE does the following:
■ Packages the SIP application.
■ Starts the specified OCCAS instance if it is not running.
■ Publishes the application to the OCCAS instance.
■ Launches the application.
The console view displays the log file tracking the progress of the deployment.

Deploying SIP Applications from Eclipse
2-10 Oracle Communications Converged Application Server Developer's Guide

3
Creating Applications with the Converged Application SCE Wizards 3-1
3Creating Applications with the Converged Application SCE Wizards
This chapter describes how to use the SCE wizards to create the starter code for your converged web and telecommunication applications. The classes generated by the wizards can serve as the starting point for your development.
About SCE WizardsThe SCE wizards eases the task of developing converged applications. Using the wizards, you can generate the initial code for various types of SIP services.
The SCE includes the following types of wizards:
■ SIP Servlet
■ SIP Listener
■ CommunicationBean
Using the wizards, you can rapidly develop converged applications that provide services such as call control, conferencing, and other advanced communication services.
After running a wizard, you have compilable code that serves as the starting point for your development. In addition to source files for your application, the wizards produce project resources are artifacts, such as pre-populated deployment descriptor files.
About SIP Servlet TemplatesWhen using the SIP servlet wizard, you can choose to a template on which to base your new SIP servlet. The templates correspond to the standards-defined roles for SIP servlets.
Templates are available for the following types of SIP servlet classes:
■ SIP Proxy creates a class that performs the SIP proxy functions, including providing routing capabilities and performing user authentication, accounting, registration, and security. Note that, by default, the record route flag in the generated SIP proxy class is enabled, so that the application is included in the message path for the requests sent within a dialog.
■ B2BUA creates a class that acts as a back-to-back user agent. A back-to-back user agent can act as both a user agent client and server. The class uses the helper class, javax.servlet.sip.B2buaHelper, which provides methods required by back to back user agents.

Using the SIP Servlet Wizard
3-2 Oracle Communications Converged Application Server Developer's Guide
■ Subscribe UAS creates a class that subscribes to a User Agent Server (UAS).
■ Invite UAS creates a class that initiates communication sessions between UA peers.
When you choose to create the servlet based on a template, the wizard populates the new class with the stub methods appropriate for the type of SIP servlet you chose. For example, a class created with the Invite UAS template contains an empty doInvite method. After using a template, you only need to supplement the stub methods with the custom code required for your specific application requirements.
Alternatively, you can create a new SIP servlet with the wizard and choose which method stubs to include from a list of methods defined by the SIP specification.
For servlets based on any of the template types, you can add these common methods:
■ Session Key: adds the session key annotation and getKey method to the class. The session key mechanism allows incoming SIP requests of various dialogs to be correlated to an existing application session instance, so that multiple user interactions can be linked together more easily, such as for a conference call.
■ WlssAction: adds a method that implements the WlssAction API. WlssAction defines a transaction boundary to execute a series of updates in a synchronous manner.
■ WlssAsynchronousAction: represents the work to be done on a SIP application session object in an asynchronous manner. This API is useful for accessing the SIP application session from Web or EJB modules in a converged application.
The code comments included with the common methods provide more information on how to implement and use the methods. features.
Using the SIP Servlet WizardThe Create SIP Servlet Wizard generates starter code for SIP servlets based on the options you specify in the wizard. When using the wizard, you can specify the methods in the class yourself or have the wizard populate the class with the methods based on a particular template type.
The following sections provide information about each method for creating SIP servlets with the wizard. See "About SCE Wizards" for more general information about the SIP Servlet templates.
Creating a SIP ServletThe SIP servlet wizard can populate the methods in the starter class based on the template you choose, or by allowing you to manually select the methods to be used to populate the generated class.
This section describes how to manually select the constituent methods in the generated class. See "Creating a SIP Servlet Based on a Template" for information on creating a SIP servlet based on a template.
To create a SIP servlet:
1. From the Eclipse main menu, choose File, New, and then Other.
The Select a wizard dialog opens.
2. From the list of available wizards, expand the Oracle node and then the OCCAS Application node.

Using the SIP Servlet Wizard
Creating Applications with the Converged Application SCE Wizards 3-3
3. From the OCCAS application wizards, choose SIP Servlet and click Next.
The first screen of the Create SIP Servlet wizard appears.
4. In the Create SIP Servlet dialog, provide the following values:
■ Project: Choose the name of the project to which you want to add the new SIP Servlet class.
■ Source folder: The folder where the new class source file will be located. By default, this is default source code folder for the project selected.
■ Java Package: The optional name of the package to which the new class belongs.
■ Class name: The name of the new SIP servlet class.
■ Superclass name: The name of the class the new SIP servlet is extending. By default, this is javax.servlet.sip.SipServlet. You do not need to modify this value in most cases.
The other options in the dialog can remain disabled, as they are by default.
5. Click Next.
6. Optionally, enter deployment descriptor parameters for the class.
The deployment descriptor mechanism controls application selection and initialization properties. The values you add in this screen will appear in the sip.xml file for the project.
7. Click Next.
8. Optionally, add an interface to be implemented by the new class by clicking the Add button and choosing the interface.
9. Choose the method stubs to be included in the class by selecting the check boxes next to the desired methods.
10. Click Finish.
The SIP Servlet wizard generates the Java source file based and sip.xml content based on your configuration.
You can now add your custom logic to the generated SIP servlet class. The generated source file includes TODO markers that indicate places in the code that require further development or customization.
To view a combined view of the TODO markers, open the Marker view tab and expand the Java Task node. The lists of TODO marker comments in the current file appear under the node.
Creating a SIP Servlet Based on a TemplateAs an alternative to selecting methods in the generated class manually, you can use templates to automatically populate the SIP servlet with the methods appropriate for the role of the SIP servlet.
To create a SIP servlet based on a template:
1. From the Eclipse main menu, choose File, New, and then Other.
The Select a wizard dialog opens.
2. From the list of available wizards, expand the Oracle node and then the OCCAS Application node.

Using the SIP Servlet Wizard
3-4 Oracle Communications Converged Application Server Developer's Guide
3. From the OCCAS application wizards, choose SIP Servlet and click Next.
The first screen of the Create SIP Servlet wizard appears.
4. In the Create SIP Servlet dialog, specify values for the following fields:
■ Project: Choose the name of the project to which you want to add the new SIP Servlet class.
■ Source folder: The folder where the new class source file will be located. By default, this is source code folder specified for the selected project.
■ Java Package: The optional name of the package to which the new class belongs.
■ Class name: The name of the new SIP servlet class.
■ Superclass name: The name of the class the new SIP servlet is extending. By default, this is javax.servlet.sip.SipServlet. You do not need to modify this value in most cases.
5. To have the servlet pre-configured for a specific SIP servlet role (SIP proxy, back-to-back user agent, subscribe UAS, or invite UAS) enable the Use Servlet templates option and click Next.
6. If you chose to use a template for the new servlet, select the type of template to apply from these options:
■ Proxy, for a SIP proxy class.
■ B2BUA, for a back-to-back user agent class.
■ SUBSCRIBE UAS, for a user agent server that subscribes to INVITE events.
■ INVITE UAS, for a user agent server that generates INVITE events.
Optionally choose the common methods to be added to the class from Session Key, WlssAction, or WlssAsynchronousAction. Note that these methods supplement those that are added based on the template type you chose. See "About SCE Wizards" for more information about the template types and common methods.
7. Click Next.
8. Optionally, enter a description and deployment descriptor parameters for the class.
The deployment descriptor mechanism controls application selection and initialization parameters. The values you add in this screen will appear in the sip.xml file for the project.
9. Click Finish.
The SIP Servlet wizard generates the Java source file based and sip.xml content based on your configuration.
You can now customize the generated SIP servlet class with your own business logic.
The generated class includes TODO markers that indicate places in the code that require customization. The Marker view tab presents these markers as a task list. To view the list, open the Marker view tab and expand the Java Task node. The TODO markers in the current source code file appear below the node.

Using the SIP Listener Wizard
Creating Applications with the Converged Application SCE Wizards 3-5
Using the SIP Listener WizardThe SCE SIP listener wizard makes it easy to create SIP listener applications. A SIP listener application listens for certain types of SIP-specific events, and typically performs some processing action in response to the event.
To create a SIP listener:
1. From the Eclipse main menu, choose File, New, and then Other.
The Select a wizard dialog opens.
2. From the list of available wizards, expand the Oracle node and then the OCCAS Application node.
3. From the OCCAS application wizards, choose SIP Listener and click Next.
The first screen of the Create SIP Listener wizard appears.
4. In the Create SIP Listener dialog, specify values for the following fields:
■ Project: Choose the name of the project to which you want to add the new SIP Servlet class.
■ Source folder: The folder where the new class source file will be located. By default, this is default source code folder for the project selected.
■ Java Package: The optional name of the package to which the new class belongs.
■ Class name: The name of the new SIP servlet class.
■ Superclass name: Optionally, the name of the class the new SIP listener is extending.
5. Click Next.
6. Select at least one application event to listen for. Optionally, click the Select All button to choose all events, or Deselect All to reset your event selection.
The available events are standard SIP-specified events, and include application events, session events, errors, timer events, and initialization events.
7. Click Next.
8. Optionally, specify additional interfaces to be implemented by the class. By default, the listener implements the interfaces appropriate for your event selection. You can add other interfaces in the modifier page.
If you add an interface, specify whether it should be a public, abstract, or final interface. Also, the last panel in the wizard defines the interfaces and methods to use with the SIP Listener. Stubs are automatically created in the servlet class. You implement the servlet by developing the code for the stubs.
9. Click Finish to create the SIP Listener.
The SIP Servlet wizard generates the Java source file based and updates sip.xml based on your configuration.
You can now customize the generated SIP listener class with your own business logic.
The generated class includes TODO markers that indicate places in the code that require customization. The Marker view tab presents these markers as a task list. To view the list, open the Marker view tab and expand the Java Task node. The TODO markers in the current source code file appear below the node.

Using the SFT Communication Bean Wizard
3-6 Oracle Communications Converged Application Server Developer's Guide
Using the SFT Communication Bean WizardA CommunicationBean is a Java class that performs the functions of a SIP or HTTP servlet while hiding the complexities of SIP and communication protocol programming.
CommunicationBeans use annotations to encapsulate common functions or roles fulfilled by communication applications. Instead of specifying the code that performs the function, you simply add the annotation to the source file. The SFT framework expands the annotation to the appropriate code.
Annotations take the form of @annotation_name, where annotation_name identifies the annotation. Some annotations take arguments, which you specify alongside the annotation. For example:
@EventOrchestration(priority = 100)
See Chapter 17, "Introduction to the Service Foundation Toolkit," for more information on CommunicationBean classes and annotations.
You can use the SCE wizard to generate CommunicationBean classes.
To create a Communication Bean with the SCE wizard:
1. From the Eclipse main menu, choose File, New, and then Other.
The Select a wizard dialog opens.
2. From the list of available wizards, expand the Oracle node and then the OCCAS Application node.
3. From the OCCAS application wizards, choose SFT CommunicationBean and click Next.
The first screen of the Communication Bean wizard appears.
4. In the Create SFT CommunicationBean page, specify general attributes of the CommunicationBean class, from these attributes:
■ Project: The Converged Application project in which to create the CommunicationBean class.
■ Source Folder: The project folder in which to create the source file for the class.
■ Package: The Java package to which the class will belong.
■ Class Name: The name for the new CommunicationBean class.
5. Click Next.
The SFT CommunicationBean Information Page appears.
6. From the Communication Type menu, choose the SFT interface the class will extend.
This interface determines the type of communication the new class implements, such as conferencing, conversation, IM conferencing, and so on. See Chapter 17, "Introduction to the Service Foundation Toolkit," for complete information on SFT interfaces and communication types.
7. From the Service Attribute list, choose the annotations that you want to add to the CommunicationBean class.

Using the SFT Communication Bean Wizard
Creating Applications with the Converged Application SCE Wizards 3-7
In SFT, annotations encapsulate features and characteristics provided by the communication bean. See "SFT Annotations" in Chapter 17, "Introduction to the Service Foundation Toolkit,"for information about the SFT service attributes.
8. From the Context Member options, choose the type of communication context in which this bean will participate. Options include communication sessions, communication context, and communication service.
See "About Communication Context Types" in Chapter 17, "Introduction to the Service Foundation Toolkit," for complete information on SFT communication context types.
9. Click Next.
The SFT Event Selection Wizard Page appears.
10. Add methods to your communication bean that listen for specific events as follows:
a. From the Event Type list, choose the event category from these options: CommunicationEvent, ParticipantEvent, or ProtocolEvent.
b. From the Event menu, choose the specific event on which you want the method to listen. The options vary depending on the event type. For instance, for ProtocolEvent, you can choose from these specific events: REQUESTRECEIVED, REQUESTSENT, RESPONSERECEIVED, or RESPONSESENT.
c. Optionally, modify the default priority for the method, 100.
d. In the Method Name field, enter a name for the new method.
e. Click Add.
The method appears in the Event Type list.
f. Repeat steps a through e for each method you want to add. Note that you can only create one method per event type or communication type.
11. Click Finish to create the SIP Listener.
The SIP Servlet wizard generates the Java source file based and updates sip.xml based on your configuration.
You can now supplement the initial code with your own custom business logic. In addition, you can use the SCE simulators and testing tools to develop and refine your application.

Using the SFT Communication Bean Wizard
3-8 Oracle Communications Converged Application Server Developer's Guide

4
Using Simulators and Other Testing Tools 4-1
4Using Simulators and Other Testing Tools
This chapter describes the testing tools included with the SCE. The tools include simulators, SIPp, and Diameter domain extension tools.
About the SCE ToolsThe SCE includes simulators and other network service tools that you can use to develop and test applications. The simulators provide the functions of common IMS network components. The simulators allow you to test your applications against network components without having to access a live or production network.
The SCE includes simulators or simulator integration features for the following types of network components:
■ XDMS server
■ Diameter Ro server
■ Diameter Rf server
■ Diameter HSS server
■ Media server
In addition to simulator-related features, the SCE provides a graphical user interface for using SIPp directly from the SCE. It also enables you to extend and configure a Converged Application Server domain with Diameter capabilities.
You access the converged application tools from the OCCAS menu in the OEPE. Figure 4–1 shows the general components of the graphical user interface for configuring the SCE simulators:

Using the XDMS Simulator
4-2 Oracle Communications Converged Application Server Developer's Guide
Figure 4–1 Service Creation Environment Simulator Interface
As shown, the simulator list provides access to the various configuration page for each type of simulator. After setting the configuration, you can deploy the simulator to the selected target servers by clicking the start icon. The stop icon terminates the simulator process, and also removes the simulator as a deployed application from the target server.
Any target server you have added to the SCE project appears in the target server list. You can click the refresh icon to update the list of servers that appear in the list. Refreshing the server list adds newly created servers and removes deleted servers from the list.
The following sections provide more information on how to use each type of simulator, as well as the SIPp and Diameter domain configuration tools.
Using the XDMS SimulatorIn an IMS network, the XML Document Management Server (XDMS) makes user-specific service information available to client applications. The type of information hosted by the XDMS presence authorization policies, contact and group lists, and presence status. The SCE provides an XDMS simulator that allows you to test applications that interact with XDMS servers.
The XDMS simulator is suitable for testing purposes only. It supports only those document management capabilities applicable to call functions that are available through the SFT APIs, including call barring, call forwarding, and OIP.
The XDMS simulator does not support data persistence, high availability, or other requirements of a production XDMS system. Since it lacks data persistence, when you shut down the XDMS simulator, its hosted data is lost. Also, the simulator supports basic operations only, such as GET and SET.
In addition, shared XDMS is not supported; the SCE supports single XDMS simulator instances only.

Using the XDMS Simulator
Using Simulators and Other Testing Tools 4-3
The XDMS runs on the Converged Application Server. To use it, you deploy it from the Converged Application SCE to the Converged Application Server. It can be deployed to any server you have added as a target server environment in the SCE.
Using an XDMS system involves both loading and querying information. The XDMS simulator exposes get and set operations through a REST-based XCAP interface. See "Using the XCAP Interface to Populate and Query the XDMS" for more information about the RESTful interface.
Deploying and Starting the XDMS SimulatorThe XDMS simulator software is distributed as a WAR file that you deploy to the Converged Application Server. Although it is possible to deploy the XDMS file to the Converged Application Server manually, the SCE enables you to deploy and control the XDMS simulator directly from the development interface.
The following steps describe how to deploy and start the simulator. Before starting, configure the target server environment to which you want to deploy the simulator in the SCE.
To deploy and start the XDMS in the Converged Application SCE, follow these steps:
1. From the OCCAS menu, click Simulators.
2. If is not already selected, select the XDMS Simulator node from the SCE Simulators list.
The XDMS Simulator settings appear in the right pane. Notice that the target servers appear at the bottom of the pane.
3. To have the XDMS simulator enforce digest authentication requirements, select the Enable digest filter.
4. Select the check box of the server to which you want to deploy the XDMS software.
You should deploy the simulator to a Converged Application Server administration server only; it does not operate on engine tier servers. XDMS simulators on different servers cannot share information. For most development testing scenarios, deploying the XDMS simulator to a single server is sufficient.
5. Click the start icon.
The SCE deploys the XDMS bundle to the selected server and starts the XDMS application. You can now populate the XDMS simulator with data and test it from SFT applications.
After starting the XDMS simulator, you can remove the XDMS simulator from the server by clicking the stop icon. Stopping the XDMS simulator removes the XDMS simulator package from the Converged Application Server to which it was deployed.
While the XDMS simulator is running, you can populate it with data using its XCAP interface. See "Using the XCAP Interface to Populate and Query the XDMS" for more information.
Using the XCAP Interface to Populate and Query the XDMSAfter deploying the XDMS to the Converged Application Server, you can use the XCAP interface to add or get documents in the XDMS.
By default, the XDMS simulator exposes its XCAP root address at the following location:

Configuring the Media Server Driver
4-4 Oracle Communications Converged Application Server Developer's Guide
http://hostname:7001/xdms_simulator
An XCAP client application can establish a connection to the simulator as it does to the any XDMS system.
For example, given an XCAP client instantiated on the communication service, the following code fragment creates the connection to the XDMS simulator on the local host:
XCAPClient client = getClient(); XcapRoot root = client.createXcapRoot("http://127.0.0.1:7001/xdms"); XcapConnection connection = client.createConnection(root); See Chapter 24, "Using the XCAP Interfaces,"to learn about XCAP and XDMS from a programming perspective.
You can shut down and undeploy the XDMS simulator from the server by clicking the stop icon in the XDMS Simulator tab. Because the XDMS simulator stores its contents in memory only, stopping the simulator application clears its contents and returns it to its initial state.
Configuring the Media Server DriverConverged applications rely on media servers to enable rich media services, such as conferencing, audio prompting, and speech detection. The SCE provides a JSR 309 adapter that allows you to test interactions between converged applications and an external media server.
The SCE includes a media server simulator that you can use to test applications that rely on a media server.
To configure the media server connectivity in the SCE, follow these steps:
1. From the OCCAS menu, click Simulators.
2. In the simulators list, choose Media Server Simulator.
The media server configuration settings appear in the right pane.
3. Configure the following settings:
■ Media Server Address: Enter the host name or IP address of the media server in your environment.
■ Media Server Port: Enter the port number on which the media server listens for client requests. By default, this is 6666.
■ JNDI Name: The name of the media server resource in Java Naming and Directory Interface (JNDI) format. By default, this is mscontrol/jvb/default.
4. Select the Converged Application Server on which to deploy the media server driver. The page shows the servers that have been configured as target servers for the project. Choose the server on which to deploy the media server driver.
5. Click the start icon to deploy and start the simulator.
The media server starts. You can now test the applications that rely on the media server.
6. When finished, click the stop icon to terminate the media server process and remove the deployment from the Converged Application Server.
You can now test your converged applications that use the media server simulator.

Extending Domains with Diameter Capabilities
Using Simulators and Other Testing Tools 4-5
Configuring the Diameter Simulator SettingsThe Diameter charging and HSS simulators enable you to test operations related to charging and authentication in your converged applications.
The Diameter and HSS simulators can operate as standalone servers only. For additional information about deploying and running the simulator, see the information about the Sh and Rf simulator in the Oracle Communications Converged Application Server Administrator’s Guide.
To configure connectivity to the Diameter server from the SCE:
1. From the OCCAS menu, click Simulators.
2. In the simulators list, choose one of the following nodes:
■ Diameter Ro Simulator to have the simulator perform online charging functions.
■ Diameter Rf Simulator if the simulator performs offline charging server functions.
■ Diameter HSS Simulator if the simulator performs Home Subscriber Server (HSS) functions, such as serving subscriber information.
The configurations settings for the simulator integration appear in the right pane.
3. Configure the following settings:
■ realm name: Enter the realm name for which the Diameter node simulator has responsibility.
■ host name: Enter the identity of the Diameter simulator.
■ listen address: Enter the listen address on which the Diameter simulator listens for Diameter traffic.
■ listen port: Enter the listen port on which this node listens for Diameter traffic with the simulator.
■ Enable debug output: Select to have debug output printed to the SCE log screen.
■ Enable message tracing: Select to have log output printed to the SCE log screen.
4. Click the start icon to start the simulator.
You can now test run the applications that rely on charging functions of the simulator.
5. When finished, click the stop icon to terminate the simulator process.
You can now test the Diameter interactions of your converged applications with the Diameter simulator.
Extending Domains with Diameter CapabilitiesDiameter-enabled converged applications can run only on domains that have been extended with the Diameter domain template. The template provides the container framework for enabling Diameter capabilities. You can use the Diameter configuration tool in the SCE to extend an existing Converged Application Server domain for Diameter.

Extending Domains with Diameter Capabilities
4-6 Oracle Communications Converged Application Server Developer's Guide
The SCE Diameter configuration interface provides an alternative to extending the domain with the Converged Application Server Configuration Wizard, as described in the Converged Application Server Installation Guide. The interface also enables you to specify the initial configuration for the domain from the SCE.
The Diameter domain extension configuration page has settings that populate the diameter.xml configuration file for the Converged Application Server. See the Converged Application Server Administrator’s Guide for more information on the diameter.xml file.
The configuration page has several types of settings, including:
■ Application settings apply to Diameter applications that run on the node.
■ Peer configuration settings define the other Diameter nodes with which this node operates. You can define peer connection information for each Diameter node.
Alternatively, you can use the allow-dynamic-peers functionality in combination with TLS transport to allow peers to be recognized automatically. See the Oracle Communications Converged Application Server Administrator’s Guide for more information.
■ Routes configuration settings define realm-based routes that the node can use when resolving messages.
■ The target servers for the domains to be extended. Any target server configured in the SCE appears in the list.
To extend a domain with Diameter capabilities from the SCE, follow these steps:
1. From the OCCAS menu, click Extending Diameter.
The Diameter domain extension configuration page appears.
2. Click the Add button next to the Diameter application settings list.
3. In the Diameter Application dialog, specify the following settings:
■ Application Name: Enter a name for the application configuration.
■ Class Name: Enter the class name of the application to deploy to this node, from the following options:
– com.bea.wcp.diameter.sh.WlssShApplication for the HSS application
– com.bea.wcp.diameter.charging.RoApplication for the Diameter Ro (online charging) application
– com.bea.wcp.diameter.charging.RfApplication for the Diameter Rf (offline charging) application.
■ Application ID: The Diameter application ID for this application. If one of the predefined Diameter classes is selected, this field is populated automatically.
– 16777217 for Diameter HSS
– 3 for Diameter Rf
– 4 for Diameter Ro
■ Parameters: Enter optional parameters to pass to the application upon startup.
Note: The SCE can extend domains on a local server only; it cannot extend domains on remote servers.

Extending Domains with Diameter Capabilities
Using Simulators and Other Testing Tools 4-7
For example, the Rf application accepts the parameters cdf.host and cdf.realm, which are used to identify the host name and realm of the Charging Data Function (CDF), respectively. See information about configuring Diameter applications in the Oracle Communications Converged Application Server Administrator’s Guide for more information on parameters accepted by the applications.
4. Click Add to save the settings.
5. Configure peer nodes by clicking the Add button next to the peer node configuration list.
6. In the Diameter Peer dialog, specify the peer Diameter node using the following settings:
■ Import configuration from: Select this option to import Charging or HSS simulator parameters from the simulator view.
■ Host: Enter the peer node's host identity.
■ Realm: Enter the peer node’s Diameter realm.
■ Address: Enter the peer node's address (DNS name or IP address).
■ Port: Enter the listen port number of the peer node.
■ Protocol: Select the protocol used to communicate with the peer (TCP or SCTP).
■ Enable WatchDog: Select this check box to specify that the peer supports the Diameter Tw watchdog timer interval.
7. Click Add to save the settings.
8. Optionally, configure settings the Converged Application Server container will use to resolve routes to the peer nodes by clicking the Add button next to the realm-based routes configuration list.
9. In the Diameter Route dialog, specify the following settings:
■ Name: A unique, identifying name for this route configuration.
■ Servers: The peer for which this route applies. The peer nodes you have configured appear as menu options for this item.
■ realm: The target Diameter realm associated with this route.
■ Application ID: The Diameter application ID for this application. If one of the predefined Diameter classes is selected, this field is populated automatically.
– 16777217 for Diameter HSS
– 3 for Diameter Rf
– 4 for Diameter Ro
■ Action: Select an action that this node performs when using the configured route. The action type may be one of: local, relay, proxy, or redirect.
10. For a given route, choose the route in the route list and choose Default Route to make this route the default route used when resolving messages.
The Converged Application Server uses the selected route as the default message exchange route. In the view, a blue icon indicates the currently selected default route.
11. Click Add to save the settings.

Using the SIPp Plug-in
4-8 Oracle Communications Converged Application Server Developer's Guide
12. Select the target server from the list of configured servers, and click the extend icon to extend the domain and deploy the configuration to the selected server.
You can now deploy Diameter-capable applications to the target server.
Using the SIPp Plug-inWith the SCE, you can run SIPp directly from Eclipse. SIPp is a freely available SIP traffic generator and testing tool. To use SIPp with the SCE, you must have the SIPp program installed on your computer.
The SIPp software is available for download from:
http://sipp.sourceforge.net/
The SCE SIPp interface exposes existing SIPp features. Therefore, for detailed information on any of the SIPp interface settings, including SIPp embedded scenarios, XML scenario files, CSV files, and other features, see the SIPp documentation page at:
http://sipp.sourceforge.net/doc/reference.html
The SIPp integration page appears as a simulator resource in the SCE user interface, as shown in Figure 4–2:
Figure 4–2 SIPp Configuration Setup Tab
As shown in the figure, you compose the SIPp command in the SIPp Setup tab. When you click the run icon at the top right corner of the page, a new tab is created for the command. You can create additional commands by returning to the SIPp Setup tab and repeating the command configuration. The output of the execution appears in the Console log viewer at the bottom of the screen.
There are several ways to compose SIPp commands in the tab. They include:
■ Choosing a SIPp embedded scenario from the list.
■ Specifying a standard SIPp scenario file.
Note: The SCE SIPp interface does not support SIPp short cut keys.

Using the SIPp Plug-in
Using Simulators and Other Testing Tools 4-9
■ Entering the command manually in the SIPp command line field.
In the SCE SIPp interface, the command you create in the interface appears in the SIPp command line field. When you use the SIPp interface controls to configure the command, changes to the command are automatically reflected in the command that appears in the field.
For example, if you choose the uac embedded scenario and added an address to the Remote IP address field, the SIPp command line field is populated with this command:
sipp -sn uac 10.1.3.11:5060 You can further modify the command by editing the command in the field directly.
Embedded scenarios are simple, predefined scenarios for SIPp. You can create complex or custom scenarios using scenario XML files. Further, SIPp provides a mechanism for injecting values from a CSV file into scenarios. In the command line invocation, the CSV file name is specified as a value for the -inf option. In the SCE SIPp interface, you can specify the equivalent file name in the CSV file field.
After installing SIPp and creating the scenarios and CSV files, you can run SIPp from the SCE as follows:
1. From the OCCAS menu, click Simulators.
2. From the SCE Simulators list in the Service Creation Environment pane, click the SIPp Testing Tool node.
3. In the SIPp Setup tab, specify the full path to the SIPp program file in the Set SIPp installation directory, such as /opt/sipp/sipp-3.1.
4. Use the configuration fields in the setup tab to compose the SIPp command. The fields are:
■ SIPp embedded scenarios: choose from one of the common, predefined SIPp scenarios.
■ Remote IP address: The IP address and port on which a client agent runs.
■ CSV file: A comma-separated values file that contains injection values for this scenario. The values in the file are matched to placeholders in the scenario XML file.
5. Manually modify or extend, if desired, the SIPp command as it appears in the SIPp command line field.
6. When the command is ready, click the Start button at the top right corner of the interface.
A new tab appears that contains that command instance. The console tab appears with a printout of the execution log for the command. You can simultaneously issue additional command executions.
Note: The SCE SIPp interface exposes only existing SIPp features. Therefore, for detailed information on any of the SIPp interface settings, including SIPp embedded scenarios, XML scenario files, CSV files, and other features, see the SIPp documentation page at:
http://sipp.sourceforge.net/doc/reference.html

Using the SIPp Plug-in
4-10 Oracle Communications Converged Application Server Developer's Guide
7. Optionally, click the SIPp Setup tab to return to the command configuration page and create a new command. You can run any number of commands simultaneously.
8. While the command is running, you can click the Stop icon at any time to terminate the command.

Part IIIPart III Developing SIP Applications
This part contains the following chapters:
■ Chapter 5, "Overview of SIP Servlet Application Development"
■ Chapter 6, "Porting Existing Applications to Oracle Communications Converged Application Server"
■ Chapter 7, "Requirements and Best Practices for SIP Applications"
■ Chapter 8, "Using Compact and Long Header Formats for SIP Messages"
■ Chapter 9, "Composing SIP Applications"
■ Chapter 10, "Developing Converged Applications"
■ Chapter 11, "Developing Custom Profile Service Providers"
■ Chapter 12, "Using Content Indirection in SIP Servlets"
■ Chapter 13, "Securing SIP Servlet Resources"
■ Chapter 14, "Enabling Message Logging"
■ Chapter 15, "Generating SNMP Traps from Application Code"
■ Chapter 16, "Using the Location Service RESTful Interface"


5
Overview of SIP Servlet Application Development 5-1
5 Overview of SIP Servlet Application Development
This chapter describes the SIP protocol, and provides a background on SIP application development using the Java programming language.
■ About the SIP Protocol
■ What are SIP Servlets?
■ Differences Between HTTP Servlets and SIP Servlets
■ Differences from HTTP Servlets
About the SIP ProtocolThe session initiation protocol (SIP) is a simple network signalling protocol for creating and terminating sessions with one or more participant. The SIP protocol is designed to be independent of the underlying transport protocol, so SIP applications can run on TCP,UDP, or other lower-layer networking protocols.
Typically, the SIP protocol is used for internet telephony and multimedia distribution between two or more endpoints. For example, one person can initiate a telephone call to another person using SIP, or someone may create a conference call with many participants.
The SIP protocol was designed to be very simple, with a limited set of commands. It is also text-based, so humans can read the SIP messages passed between endpoints in a SIP session.
SIP RequestsThe SIP protocol defines the following common request types:
Table 5–1 File Structure Example of Application
SIP Request Description
INVITE Initiates a session between two participants.
ACK The client acknowledges receiving the final message from an INVITE request.
BYE Terminates a connection.
CANCEL Cancels any pending actions, but does not terminate any accepted connections.
OPTIONS Queries the server for a list of capabilities.

What are SIP Servlets?
5-2 Oracle Communications Converged Application Server Developer's Guide
SIP requests are codes used to indicate the various stages in a connection between SIP-enabled entities.
SIP ResponsesThe SIP Protocol uses response codes similar to the HTTP protocol. Some of the common response codes are:
■ 100 (Trying)
■ 200 (OK)
■ 404 (Not found)
■ 500 (Server error)
■ 600 (Global failure)
What are SIP Servlets?A servlet is a Java programming language class used to extend the capabilities of servers that host applications accessed via a request-response programming model. A Servlet is a Java class in Java EE that conforms to the Java Servlet API, a protocol by which a Java class may respond to requests. They are not tied to a specific client-server protocol, but are most often used with the HTTP protocol. Therefore, the word “Servlet” is often used in the meaning of “HTTP Servlet”.
A SIP servlet is a Java programming language server-side component that performs SIP signalling. SIP servlets are managed by a SIP servlet container, which typically are part of a SIP-enabled application server. SIP servlets interact with clients by responding to incoming SIP requests and returning corresponding SIP responses.
SIP servlets are built off the generic servlet API provided by the Java Servlet Specification. The SIP Servlet API is standardized as JSR289 of JCP (Java Community Process).
Figure 5–1 Servlet API and SIP Servlet API
REGISTER Registers the address in the To header with the server.
Note: In this document, the term "SIP Servlet" is used to represent the API, and "SIP servlet" is used to represent an application created with the API.
Table 5–1 (Cont.) File Structure Example of Application
SIP Request Description

Differences Between HTTP Servlets and SIP Servlets
Overview of SIP Servlet Application Development 5-3
SIP Servlets are similar to HTTP Servlets, and HTTP servlet developers can easily adapt to the programming model. The service level defined by both HTTP and SIP Servlets is very similar, allowing fro the design of applications that support both HTTP and SIP. Example 5–1 shows an example of a simple SIP servlet.
Example 5–1 SimpleSIPServlet.java
package oracle.example.simple;import java.io.IOException;import javax.servlet.*;import javax.servlet.sip.*;
public class SimpleSIPServlet extends SipServlet { protected void doMessage(SipServletRequest req) throws ServletException, IOException { SipServletResponse res = req.createResponse(200); res.send(); }}
Example 5–1 shows a simple SIP servlet that sends back a 200 OK response to the SIP MESSAGE request. As you can see from the list, SIP Servlet and HTTP Servlet have many things in common:
1. Servlets must inherit the base class provided by the API. HTTP servlets must inherit HttpServlet, and SIP servlets must inherit SipServlet.
2. Methods doXxx must be overridden and implemented. HTTP servlets have doGet/doPost methods corresponding to GET/POST methods. Similarly, SIP servlets have doXxx methods corresponding to the method name (in Example 5–1, the MESSAGE method). Application developers override and implement necessary methods.
3. The life cycle and management methods (init, destroy) of SIP Servlet are exactly the same as HTTP Servlet. Manipulation of sessions and attributes is also the same.
4. Although not shown in the example above, there is a deployment descriptor called sip.xml for a SIP servlet, which corresponds to web.xml. Application developers and service managers can edit this file to configure applications using multiple SIP servlets.
However, there are several differences between SIP and HTTP servlets. A major difference comes from protocols. The next section describes these differences as well as features of SIP servlets.
Differences Between HTTP Servlets and SIP ServletsSIP servlets differ from typical HTTP servlets used in web applications in the following ways:
■ HTTP servlets have a particular context (called the context-root) in which they run, while SIP servlets have no context.
■ HTTP servlets typically return HTML pages to the requesting client, while SIP servlets typically connect SIP-enabled clients to enable telecommunications between the client and server.

Differences from HTTP Servlets
5-4 Oracle Communications Converged Application Server Developer's Guide
■ SIP is a peer-to-peer protocol, unlike HTTP, and SIP servlets can originate SIP requests, unlike HTTP servlets which only send responses to the originating client.
■ SIP servlets often act as proxies to other SIP endpoints, while HTTP servlets are typically the final endpoint for incoming HTTP requests.
■ SIP servlets can generate multiple responses for a particular request.
■ SIP servlets can communicate asynchronously, and are not obligated to respond to incoming requests.
■ SIP servlets often work in concert with other SIP servlets to respond to particular SIP requests, unlike HTTP servlets which typically are solely responsible for responding to HTTP requests.
Differences from HTTP ServletsThis section describes differences between SIP Servlets and HTTP Servlets.
Multiple ResponsesYou might notice in Example 5–1 that the doMessage method has only one argument. In HTTP, a transaction consists of a pair of request and response messages, so arguments of a doXxx method specify a request (HttpServletRequest) and its response (HttpServletResponse). An application takes information such as parameters from the request to execute it, and returns its result in the body of the response.
protected void doGet(HttpServletRequest req, HttpServletResponse res) throws ServletException, IOException
For SIP, more than one response may be returned to a single request.
Figure 5–2 Example of Request and Response in SIP
The above figure shows an example of a response to the INVITE request. In this example, the server sends back three responses 100, 180, and 200 to the single INVITE request. To implement such sequence, in SIP Servlet, only a request is specified in a doXxx method, and an application generates and returns necessary responses in an overridden method.
Currently, SIP Servlet defines the following doXxx methods:
protected void doInvite(SipServletRequest req);protected void doAck(SipServletRequest req);protected void doOptions(SipServletRequest req);protected void doBye(SipServletRequest req);protected void doCancel(SipServletRequest req);

Differences from HTTP Servlets
Overview of SIP Servlet Application Development 5-5
protected void doSubscribe(SipServletRequest req);protected void doNotify(SipServletRequest req);protected void doMessage(SipServletRequest req);protected void doInfo(SipServletRequest req);protected void doPrack(SipServletRequest req);
Receiving ResponsesOne of the major features of SIP is that roles of a client and server are not fixed. In HTTP, Web browsers always send HTTP requests and receive HTTP responses: They never receive HTTP requests and send HTTP responses. In SIP, however, each terminal needs to have functions of both a client and server.
For example, both of two SIP phones must call to the other and disconnect the call.
Figure 5–3 Relationship between Client and Server in SIP
Figure 5–3 indicates that a calling or disconnecting terminal acts as a client. In SIP, roles of a client and server can be changed in one dialog. This client function is called UAC (User Agent Client) and server function is called UAS (User Agent Server), and the terminal is called UA (User Agent). SIP Servlet defines methods to receive responses as well as requests.
protected void doProvisionalResponse(SipServletResponse res);protected void doSuccessResponse(SipServletResponse res);protected void doRedirectResponse(SipServletResponse res);protected void doErrorResponse(SipServletResponse res);
These doXxx response methods are not the method name of the request. They are named by the type of the response as follows:
■ doProvisionalResponse: A method invoked on the receipt of a provisional response (or 1xx response).
■ doSuccessResponse: A method invoked on the receipt of a success response.
■ doRedirectResponse: A method invoked on the receipt of a redirect response.
■ doErrorResponse: A method invoked on the receipt of an error response (or 4xx, 5xx, 6xx responses).

Differences from HTTP Servlets
5-6 Oracle Communications Converged Application Server Developer's Guide
The use of methods to receive responses indicates that the SIP Servlet requests and responses are independently transmitted by the application using different threads. Applications must explicitly manage the association of SIP messages. The use of independent requests and responses makes the process more complicated, but enables you to write more flexible processes.
Also, SIP Servlet allows applications to explicitly create requests. Using these functions, SIP servlets not only wait for requests as a server (UAS), but also send requests as a client (UAC).
Proxy FunctionsAnother function that is different from the HTTP protocol is forking. Forking is a process of proxying one request to multiple servers simultaneously (or sequentially) and used when multiple terminals (operators) are associated with one telephone number (such as in a call center).
Figure 5–4 Proxy Forking
SIP Servlet provides a utility to proxy SIP requests for applications that have proxy functions.
Message BodyAs Figure 5–5 illustrates, the contents of SIP messages is the same as the contents of HTTP messages. Both SIP and HTTP messages include:
■ Starting line: Identifies the message as a request or a response. The starting line is also referred to as the initial request line or the initial response line.
■ Header field: Provides information about the request or response.
■ Separator: A blank line separating the header field from the message body.
■ Message body: A message may have a body of data sent after the header lines. In a response, this is where the requested resource is returned to the client (the most common use of the message body).

Differences from HTTP Servlets
Overview of SIP Servlet Application Development 5-7
Figure 5–5 SIP Message Example
HTTP is a protocol that transfers HTML files, images, and multimedia data. Contents to be transferred are stored in the message body. HTTP Servlet defines a stream manipulation-based API that enables the sending and receiving of these large-file content types.
Servlet RequestServletInputStream getInputStream()BufferedReader getReader()
Servlet ResponseServletOutputStream getOutputStream()PrintWriter getWriter()int getBufferSize()void setBufferSize(int size)void resetBuffer()void flushBuffer()
In SIP, however, only low-volume contents are stored in the message body since SIP is intended for real-time communication. Therefore, above methods are provided only for compatibility, and their functions are disabled.
In SIP, contents stored in the body include:
■ SDP (Session Description Protocol): A protocol to define multimedia sessions used between terminals. This protocol is defined in RFC2373.
■ Presence Information: A message that describes presence information defined in CPIM.
■ IM Messages: IM (instant message) body. User-input messages are stored in the message body.
Since the message body is in a small size, processing it in a streaming way increases overhead. SIP Servlet re-defines API to manipulate the message body on memory as follows:
SipServletMessagevoid setContent(Object content, String contentType)Object getContent()byte[] getRawContent()

Differences from HTTP Servlets
5-8 Oracle Communications Converged Application Server Developer's Guide
Role of a Servlet ContainerThe following sections describe major functions provided by Converged Application Server as a SIP servlet container:
■ Application Management: Describes functions such as application management by servlet context, life cycle management of servlets, application initialization by deployment descriptors.
■ SIP Messaging: Describes functions of parsing incoming SIP messages and delivering to appropriate SIP servlets, sending messages created by SIP servlets to appropriate UAS, and automatically setting SIP header fields.
■ Utility Functions: Describes functions such as sessions, factories, and proxying that are available in SIP servlets.
Application ManagementLike HTTP servlet containers, SIP servlet containers manage applications by servlet context (see Figure 5–6). Servlet contexts (applications) are normally archived in a WAR format and deployed in each application server.
Figure 5–6 Servlet Container and Servlet Context
A servlet context for a converged SIP and Web application can include multiple SIP servlets, HTTP servlets, and JSPs.
Converged application Server can deploy applications using the same method as the application server you use as the platform. However, if you deploy applications including SIP servlets, you need a SIP specific deployment descriptor (sip.xml) defined by SIP servlets. The table below shows the file structure of a general converged SIP and Web application.
Note: The method of deploying in application servers varies depending on your product. Refer to the documentation of your application server.
Table 5–2 File Structure Example of Application
File Description
WEB-INF/ Place your configuration and executable files of your converged SIP and Web application in the directory. You cannot directly refer to files in this directory on Web (servlets can do this).
WEB-INF/web.xml The Java EE standard configuration file for the Web application.
WEB-INF/sip.xml The SIP Servlet-defined configuration files for the SIP application.
WEB-INF/classes/ Store compiled class files in the directory. You can store both HTTP and SIP servlets in this directory.

Differences from HTTP Servlets
Overview of SIP Servlet Application Development 5-9
Information specified in the sip.xml file is similar to that in the web.xml except servlet-mapping setting that is different from HTTP servlets. In HTTP you specify a servlet associated with the file name portion of URL. But SIP has no concept of the file name. You set filter conditions using URI or the header field of a SIP request. The following example shows that a SIP servlet called registrar is assigned all REGISTER methods.
Example 5–2 Filter Condition Example of sip.xml
<servlet-mapping> <servlet-name>registrar</servlet-name> <pattern> <equal> <var>request.method</var> <value>REGISTER</value> </equal> </pattern> </servlet-mapping>
Once deployed, life cycle of the servlet context is maintained by the servlet container. Although the servlet context is normally started and shutdown when the server is started and shutdown, the system administrator can explicitly start, stop, and reload the servlet context.
SIP MessagingSIP messaging functions provided by a SIP servlet container are classified under the following types:
■ Parsing received SIP messages.
■ Delivering parsed messages to the appropriate SIP servlet.
■ Sending SIP servlet-generated messages to the appropriate UA
■ Automatically generating a response (such as “100 Trying”).
■ Automatically managing the SIP header field.
All SIP messages that a SIP servlet handles are represented as a SipServletRequest or SipServletResponse object. A received message is first parsed by the parser and then translated to one of these objects and sent to the SIP servlet container.
A SIP servlet container receives the following three types of SIP messages, for each of which you determine a target servlet.
■ First SIP Request: When the SIP servlet container received a request that does not belong to any SIP session, it uses filter conditions in the sip.xml file (described in the previous section) to determine the target SIP servlet. Since the container creates a new SIP session when the initial request is delivered, any SIP requests received after that point are considered as subsequent requests.
WEB-INF/lib/ Store class files archived as Jar files in the directory. You can store both HTTP and SIP servlets in this directory.
*.jsp, *.jpg Files comprising the Web application (for example JSP) can be deployed in the same way as Java EE.
Table 5–2 (Cont.) File Structure Example of Application
File Description

Differences from HTTP Servlets
5-10 Oracle Communications Converged Application Server Developer's Guide
■ Subsequent SIP Request: When the SIP Servlet container receives a request that belongs to any SIP session, it delivers the request to a SIP Servlet associated with that session. Whether the request belongs to a session or not is determined using dialog ID.
Each time a SIP Servlet processes messages, a lock is established by the container on the call ID. If a SIP Servlet is currently processing earlier requests for the same call ID when subsequent requests are received, the SIP Servlet container queues the subsequent requests. The queued messages are processed only after the Servlet has finished processing the initial message and has returned control to the SIP Servlet container.
This concurrency control is guaranteed both in a single containers and in clustered environments. Application developers can code applications with the understanding that only one message for any particular call ID gets processed at a given time.
■ SIP Response: When the received response is to a request that a SIP servlet proxied, the response is automatically delivered to the same servlet since its SIP session had been determined. When a SIP servlet sends its own request, you must first specify a servlet that receives a response in the SIP session. For example, if the SIP servlet sending a request also receives the response, the following handler setting must be specified in the SIP session.
SipServletRequest req = getSipFactory().createRequest(appSession, ...);req.getSession().setHandler(getServletName());
Normally, in SIP a session means a real-time session by RTP/RTSP. On the other hand, in HTTP Servlet a session refers to a way of relating multiple HTTP transactions. In this document, session-related terms are defined as follows:
Converged Application Server automatically execute the following response and retransmission processes:
Note: Filtering should be done carefully. In Oracle Communications Converged Application Server, when the received SIP message matches multiple SIP servlets, it is delivered only to any one SIP servlet.
The use of additional criteria such as request parameters can be used to direct a request to a servlet.
Table 5–3 Session-Related Terminology
Session Name Description
Realtime Session A realtime session established by RTP/RTSP.
HTTP Session A session defined by HTTP Servlet. A means of relating multiple HTTP transactions.
SIP Session A means of implementing the same concept as in HTTP session in SIP. SIP (RFC3261) has a similar concept of "dialog," but in this document this is treated as a different term since its lifecycle and generation conditions are different.
Application Session A means for applications using multiple protocols and dialogs to associate multiple HTTP sessions and SIP sessions. Also called "AP session."

Differences from HTTP Servlets
Overview of SIP Servlet Application Development 5-11
■ Sending “100 Trying”: When Converged Application Server receives an INVITE request, it automatically creates and sends “100 Trying.”
■ Response to CANCEL: When WebLogic Communications Server receives a CANCEL request, it executes the following processes if the request is valid.
1. Sends a 200 response to the CANCEL request.
2. Sends a 487 response to the INVITE request to be cancelled.
3. Invokes a doCancel method on the SIP servlet. This allows the application to abort the process within the doCancel method, eliminating the need for explicitly sending back a response.
■ Sends ACK to an error response to INVITE: When a 4xx, 5xx, or 6xx response is returned for INVITE that were sent by a SIP servlet, WebLogic Communications Server automatically creates and sends ACK. This is because ACK is required only for a SIP sequence, and the SIP servlet does not require it.
When the SIP servlet sends a 4xx, 5xx, or 6xx response to INVITE, it never receives ACK for the response.
■ Retransmission process when using UDP: SIP defines that sent messages are retransmitted when low-trust transport including UDP is used. WebLogic Communications Server automatically do the retransmission process according to the specification.
Applications typically do not need to explicitly set and see header fields in HTTP Servlet, as HTTP Servlet containers automatically manage fields such as Content-Length and Content-Type. SIP Servlet provides the same header management functions.
In SIP, however, since important information about message delivery exists in some fields, these headers are not allowed to change by applications. Headers that can not be changed by SIP Servlets are called system headers. Table 5–4 below lists system headers:
Utility FunctionsSIP Servlet defines the following utilities, which are available to SIP servlets:
1. SIP Session, Application Session
Table 5–4 System Headers
Header Name Description
Call-ID Contains ID information to associate multiple SIP messages as Call.
From, To Contains Information on the sender and receiver of the SIP request (SIP, URI, etc.). tag parameters are given by the servlet container.
CSeq Contains sequence numbers and method names.
Via Contains a list of servers the SIP message passed through. This is used when you want to keep track of the path to send a response to the request.
Record-Route, Route Used when the proxy server mediates subsequent requests.
Contact Contains network information (such as IP address and port number) that is used for direct communication between terminals. For a REGISTER message, 3xx, or 485 response, this is not considered as the system header and SIP servlets can directly edit the information.

Differences from HTTP Servlets
5-12 Oracle Communications Converged Application Server Developer's Guide
2. SIP Factory
3. Proxy
SIP Session, Application Session As stated before, SIP Servlet provides a “SIP session” whose concept is the same as a HTTP session. In HTTP, multiple transactions are associated using information like Cookie. In SIP, this association is done with header information (Call-ID and tag parameters in From and To). Servlet containers maintain and manage SIP sessions. Messages within the same dialog can refer to the same SIP session. Also, For a method that does not create a dialog (such as MESSAGE), messages can be managed as a session if they have the same header information.
SIP Servlet has a concept of an “application session,” which does not exist in HTTP Servlet. An application session is an object to associate and manage multiple SIP sessions and HTTP sessions. It is suitable for applications such as B2BUA.
SIP Factory A SIP factory (SipFactory) is a factory class to create SIP Servlet-specific objects necessary for application execution. You can generate the following objects:
SipFactory is located in the servlet context attribute under the default name. You can take this with the following code.
ServletContext context = getServletContext();SipFactory factory = (SipFactory) context.getAttribute("javax.servlet.sip.SipFactory");
Proxy Proxy is a utility used by a SIP servlet to proxy a request. In SIP, proxying has its own sequences including forking. You can specify the following settings in proxying with Proxy:
■ Recursive routing (recursive): When the destination of proxying returns a 3xx response, the request is proxied to the specified target.
■ Record-Route setting: Sets a Record-Route header in the specified request.
■ Parallel/Sequential (parallel): Determines whether forking is executed in parallel or sequentially.
■ stateful: Determines whether proxying is transaction stateful. This parameter is not relevant because stateless proxy mode is deprecated in JSR289.
■ Supervising mode: In the event of the state change of proxying (response receipts), an application reports this.
Table 5–5 Objects Generated with SipFactory
Class Name Description
URI, SipURI, Address Can generate address information including SIP URI from String.
SipApplicationSession Creates a new application session. It is invoked when a SIP servlet starts a new SIP signal process.
SipServletRequest Used when a SIP servlet acts as UAC to create a request. Such requests can not be sent with Proxy.proxyTo. They must be sent with SipServletRequest.send.

6
Porting Existing Applications to Oracle Communications Converged Application Server 6-1
6Porting Existing Applications to Oracle Communications Converged Application
Server
This chapter describes guidelines and issues related to porting existing applications based on the SIP Servlet v1.0 specification to Oracle Communications Converged Application Server and the SIP Servlet v1.1 specification.
■ Application Router and Legacy Application Composition
■ SipSession and SipApplicationSession Not Serializable
■ SipServletResponse.setCharacterEncoding() API Change
■ Transactional Restrictions for SipServletRequest and SipServletResponse
■ Immutable Parameters for New Parameterable Interface
■ Stateless Transaction Proxies Deprecated
■ Backward-Compatibility Mode for v1.0 Deployments
■ Deprecated APIs
■ SNMP MIB Changes
■ Renamed Diagnostic Monitors and Actions
Application Router and Legacy Application CompositionThe SIP Servlet v1.1 specification describes a formal application selection and composition process, which is fully implemented in Converged Application Server. Use the SIP Servlet v1.1 techniques for all new development. Application composition techniques described in earlier versions of WebLogic SIP Server are now deprecated.
Converged Application Server provides backwards compatibility for applications using version SIP Servlet 1.0 composition techniques, provided that:
■ You do not configure a custom Application Router, and
■ You do not configure Default Application Router properties.
SipSession and SipApplicationSession Not SerializableThe SipSession and SipApplicationSession interfaces are no longer serializable in the SIP Servlet v1.1 specification. Converged Application Server maintains binary compatibility for the earlier v1.0 specification to allow any compiled applications that treat these interfaces as serializable objects to work. However, you must modify the

SipServletResponse.setCharacterEncoding() API Change
6-2 Oracle Communications Converged Application Server Developer's Guide
source code of such applications before you can recompile them with Converged Application Server.
Version 1.0 Servlets that stored the SipSession as a serializable info object using the TimerService.createTimer API can achieve similar functionality by storing the SipSession ID as the serializable info object. On receiving the timer expiration callback, applications must use the SipApplicationSession and the serialized ID object returned by the ServletTimer to find the SipSession within the SipApplicationSession using the retrieved ID. See the SIP Servlet v1.1 API JavaDoc at the Java Community Process web site (JSR 289: SIP Servlet v1.1 at jcp.org) for more information.
SipServletResponse.setCharacterEncoding() API ChangeSipServletResponse.setCharacterEncoding() no longer throws UnsupportedEncodingException. If you have an application that explicitly catches UnsupportedEncodingException with this method, the existing, compiled application can be deployed to Converged Application Server unchanged. However, the source code must be modified to not catch the exception before you can recompile.
Transactional Restrictions for SipServletRequest and SipServletResponseSIP Servlet v1.1 acknowledges that SipServletRequest and SipServletResponse objects always belong to a SIP transaction. The specification further defines the conditions for committing a message, after which no application can modify or re-send the message. See 5.2 Implicit Transaction State in the SIP Servlet Specification v1.1 (http://jcp.org/en/jsr/detail?id=289) for a list of conditions that commit SIP messages.
As a result of this change, any attempt to modify (set, add, or remove a header) or send a committed message now results in an IllegalStateException. Ensure that any existing code checks for the committed status of a message using SipServletMessage.isCommitted() before modifying or sending a message.
Immutable Parameters for New Parameterable InterfaceSIP Servlet v1.1 introduces a new javax.servlet.sip.Parameterable interface for accessing, creating, and modifying parameters in various SIP headers. Note that the system header parameters described in Table 6–1 are immutable and cannot be modified using this new interface.
Table 6–1 Immutable System Header Parameters
Parameter Description
Header Immutable Parameters
Contact
From tag
To tag
Via branch, received, rport, wlsslport, wlssladdr, maddr, ttl
Record-Route All parameters are immutable.
Route For initial requests, the application that pushes the Route header can modify any of the header's parameters. In all other cases, the parameters of the Route header are immutable.

Backward-Compatibility Mode for v1.0 Deployments
Porting Existing Applications to Oracle Communications Converged Application Server 6-3
Stateless Transaction Proxies DeprecatedFor applications in Converged Application Server, the Proxy function is always transactionally stateful, and setting the Proxy object to stateless has no effect.
The Proxy.setStateful() and Proxy.getStateful() methods are redundant: Proxy.getStateful() always returns true, and Proxy.setStateful() performs no operation.
Backward-Compatibility Mode for v1.0 DeploymentsConverged Application Server automatically detects precompiled, v1.0 deployments and alters the SIP container behavior to maintain backward compatibility. The sections that follow describe differences in behavior that occur when deploying v1.0 SIP Servlets to Converged Application Server.
Validation Warnings for v1.0 Servlet DeploymentsThe SIP Servlet v1.1 specification requires more strict validation of Servlet deployments than the previous specification. In the following cases, v1.0 SIP Servlets can be successfully deployed to Converged Application Server, but a warning message is displayed at deployment:
■ If a listener is declared in the listener-class element of a v1.0 deployment descriptor but the corresponding class does not implement the EventListener interface, a warning is displayed during deployment. (Version 1.1 SIP Servlets that declare a listener must implement EventListener, or the application cannot be deployed).
■ If a SIP Servlet is declared in the servlet-class element of a v1.0 deployment descriptor, but the corresponding class does extend the SipServlet abstract class, a warning is displayed. (Version 1.1 SIP Servlets must extend SipServlet, or the application cannot be deployed).
Modifying Committed MessagesThe SIP Servlet v1.1 specification now recommends that the SIP container throw an IllegalStateException if an application attempts to modify a committed message. To maintain backward compatibility, Converged Application Server throws the IllegalStateException only when a version 1.1 SIP Servlet deployment modifies a committed message.
Path Header as System HeaderThe SIP Servlet v1.1 specification now defines the Path header as a system header, which cannot be modified by an application. Version 1.0 SIP Servlets can still modify the Path header, but a warning message is generated. Version 1.1 SIP Servlets that attempt to modify the Path header fail with an IllegalArgumentException.
Path For Register requests, the application that pushes the Path header can modify any of the header's parameters. In all other cases, the parameters of the Path header are immutable.
Table 6–1 (Cont.) Immutable System Header Parameters
Parameter Description

Deprecated APIs
6-4 Oracle Communications Converged Application Server Developer's Guide
SipServletResponse.createPrack() ExceptionIn Converged Application Server, SipServletResponse.createPrack() can throw Rel100Exception only for version 1.1 SIP Servlets. createPrack() does not throw the exception for version 1.0 SIP Servlets to maintain backward compatibility.
Proxy.proxyTo() ExceptionsFor version 1.1 SIP Servlets, Converged Application Server throws an IllegalStateException if a version 1.1 SIP Servlet specifies a duplicate branch URI with Proxy.proxyTo(uri) or Proxy.proxyTo(uris). To maintain backward compatibility, Converged Application Server ignores the duplicate URIs (and throws no exception) if a version 1.0 SIP Servlet specifies duplicate URIs with these methods.
Changes to Proxy Branch TimersSIP Servlet v1.1 makes several protocol changes that effect the behavior of proxy branching for both sequential and parallel proxying.
For sequential proxying, the v1.1 specification requires that Converged Application Server start a branch timer using the maximum of the sequential-search-timeout value, which is configured in sip.xml, or SIP protocol Timer C (> 3 minutes). Prior versions of Converged Application Server always set sequential branch proxy time-outs using the value of sequential-search-timeout; this behavior is maintained for v1.0 deployments.
For parallel proxying, the v1.1 specification provides a new proxyTimeout value that controls proxying. The specification requires that Converged Application Server reset a branch timer using the configured proxyTimeout value, rather than using the Timer C value as required in the SIP Servlet v1.0 specification. The Timer C value is still used for v1.0 deployments.
Deprecated APIsEarlier versions of WebLogic SIP Server provided proprietary APIs to support functionality and RFCs that were not supported in the SIP Servlet v1.0 specification. The SIP Servlet v1.1 specification adds new RFC support and functionality, making the proprietary APIs redundant. Table 6–2 shows newly-available SIP Servlet v1.1 methods that must be used in place of now-deprecated WebLogic SIP Server methods. The deprecated methods are still available in this release to provide backward compatibility for v1.0 applications.
Table 6–2 Deprecated APIs
Deprecated Methods (WebLogic SIP Server Proprietary) Replacement Method (SIP Servlet v1.1)
WlssSipServlet.doRefer(), WlssSipServlet.doUpdate(), WlssSipServlet.doPrack()
SipServlet.doRefer(), SipServlet.doUpdate(), SipServlet.doPrack()
WlssSipServletResponse.createPrack() SipServletResponse.createPrack()
WlssProxy.getAddToPath(), WlssProxy.setAddToPath()
Proxy.getAddToPath(), Proxy.setAddToPath()
WlssSipServletMessage.setHeaderForm(), WlssSipServletMessage.getHeaderForm()
SipServletMessage.setHeaderForm(), SipServletMessage.getHeaderForm()
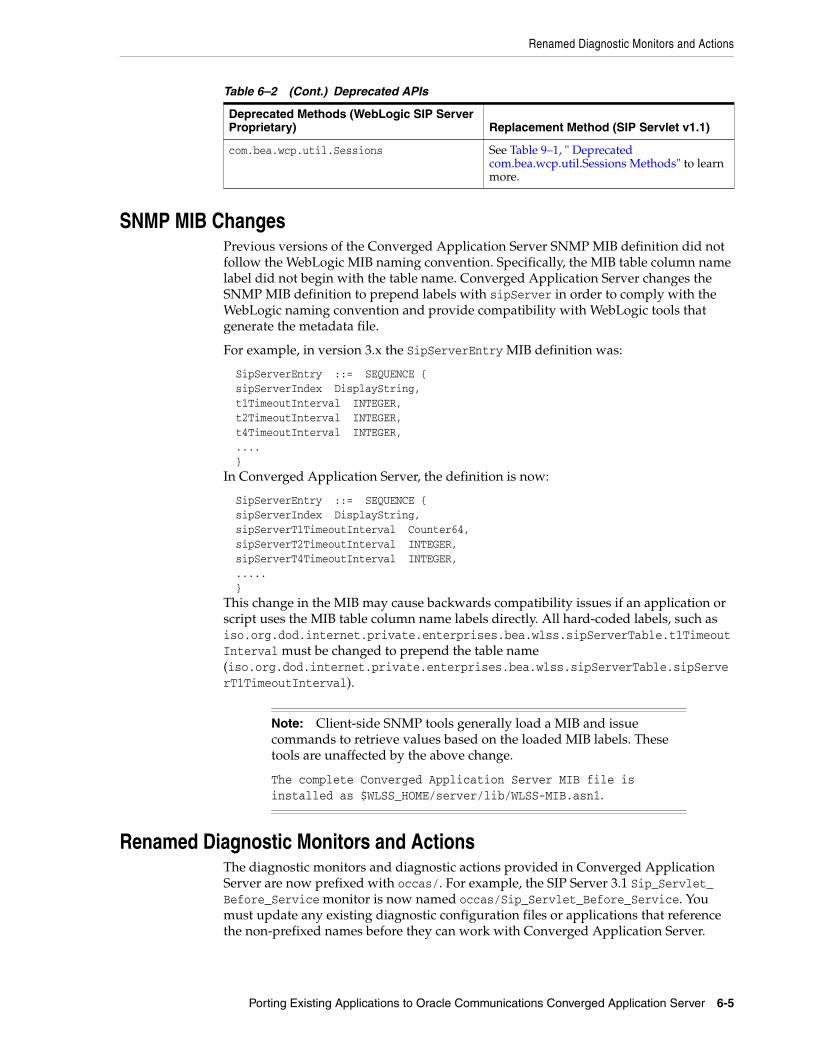
Renamed Diagnostic Monitors and Actions
Porting Existing Applications to Oracle Communications Converged Application Server 6-5
SNMP MIB ChangesPrevious versions of the Converged Application Server SNMP MIB definition did not follow the WebLogic MIB naming convention. Specifically, the MIB table column name label did not begin with the table name. Converged Application Server changes the SNMP MIB definition to prepend labels with sipServer in order to comply with the WebLogic naming convention and provide compatibility with WebLogic tools that generate the metadata file.
For example, in version 3.x the SipServerEntry MIB definition was:
SipServerEntry ::= SEQUENCE { sipServerIndex DisplayString, t1TimeoutInterval INTEGER, t2TimeoutInterval INTEGER, t4TimeoutInterval INTEGER, .... }In Converged Application Server, the definition is now:
SipServerEntry ::= SEQUENCE { sipServerIndex DisplayString, sipServerT1TimeoutInterval Counter64, sipServerT2TimeoutInterval INTEGER, sipServerT4TimeoutInterval INTEGER, ..... }This change in the MIB may cause backwards compatibility issues if an application or script uses the MIB table column name labels directly. All hard-coded labels, such as iso.org.dod.internet.private.enterprises.bea.wlss.sipServerTable.t1TimeoutInterval must be changed to prepend the table name (iso.org.dod.internet.private.enterprises.bea.wlss.sipServerTable.sipServerT1TimeoutInterval).
Renamed Diagnostic Monitors and ActionsThe diagnostic monitors and diagnostic actions provided in Converged Application Server are now prefixed with occas/. For example, the SIP Server 3.1 Sip_Servlet_Before_Service monitor is now named occas/Sip_Servlet_Before_Service. You must update any existing diagnostic configuration files or applications that reference the non-prefixed names before they can work with Converged Application Server.
com.bea.wcp.util.Sessions See Table 9–1, " Deprecated com.bea.wcp.util.Sessions Methods" to learn more.
Note: Client-side SNMP tools generally load a MIB and issue commands to retrieve values based on the loaded MIB labels. These tools are unaffected by the above change.
The complete Converged Application Server MIB file is installed as $WLSS_HOME/server/lib/WLSS-MIB.asn1.
Table 6–2 (Cont.) Deprecated APIs
Deprecated Methods (WebLogic SIP Server Proprietary) Replacement Method (SIP Servlet v1.1)

Renamed Diagnostic Monitors and Actions
6-6 Oracle Communications Converged Application Server Developer's Guide
See the discussion on using the WebLogic Server Diagnostic Framework (WLDF) in the Converged Application Server Administrator’s Guide for more information.

7
Requirements and Best Practices for SIP Applications 7-1
7Requirements and Best Practices for SIP Applications
This chapter describes requirements and best practices for developing applications for deployment to Oracle Communications Converged Application Server:
■ Overview of Developing Distributed Applications for Converged Application Server
■ Applications Must Not Create Threads
■ Servlets Must Be Non-Blocking
■ Store all Application Data in the Session
■ All Session Data Must Be Serializable
■ Use setAttribute() to Modify Session Data in “No-Call” Scope
■ send() Calls Are Buffered
■ Mark SIP Servlets as Distributable
■ Use SipApplicationSessionActivationListener Sparingly
■ Observe Best Practices for Java EE Applications
■ Optimizing Memory Utilization and Performance with Serialization
Overview of Developing Distributed Applications for Converged Application Server
In a typical production environment, SIP applications are deployed to a cluster of Converged Application Server instances that form the engine tier cluster. A separate cluster of servers in the SIP data tier provides a replicated, in-memory database of the call states for active calls. In order for applications to function reliably in this environment, you must observe the programming practices and conventions described in the sections that follow to ensure that multiple deployed copies of your application perform as expected in the clustered environment.
If you are porting an application from a previous version of Converged Application Server, the conventions and restrictions described below may be new to you, because the 2.0 and 2.1 versions of WebLogic SIP Server implementations did not support clustering. Thoroughly test and profile your ported applications to discover problems and ensure adequate performance in the new environment.

Applications Must Not Create Threads
7-2 Oracle Communications Converged Application Server Developer's Guide
Applications Must Not Create ThreadsConverged Application Server is a multi-threaded application server that carefully manages resource allocation, concurrency, and thread synchronization for the modules it hosts. To obtain the greatest advantage from the Converged Application Server architecture, construct your application modules according to the SIP Servlet and Java EE API specifications.
Avoid application designs that require creating new threads in server-side modules such as SIP Servlets:
■ The SIP Servlet container automatically locks the associated call state when invoking the doxxx method of a SIP Servlet. If the doxxx method spawns additional threads or accesses a different call state before returning control, deadlock scenarios and lost updates to session data can occur.
■ Applications that create their own threads do not scale well. Threads in the JVM are a limited resource that must be allocated thoughtfully. Your applications may break or cause poor Converged Application Server performance when the server load increases. Problems such as deadlocks and thread starvation may not appear until the application is under a heavy load.
■ Multi threaded modules are complex and difficult to debug. Interactions between application-generated threads and WebLogic Server threads are especially difficult to anticipate and analyze.
■ The WlssSipApplicationSession.doAction() method, described in "Use setAttribute() to Modify Session Data in “No-Call” Scope", does not provide synchronization for spawned Java threads. Any threads created within doAction() can execute another doAction() on the same WlssSipApplicationSession. Similarly, main threads that use doAction() to access a different wlssSipApplicationSession can lead to deadlocks, because the container automatically locks main threads when processing incoming SIP messages. "Use setAttribute() to Modify Session Data in “No-Call” Scope" describes a potential deadlock situation.
Servlets Must Be Non-BlockingSIP and HTTP Servlets must not block threads in the body of a SIP method because the call state remains locked while the method is invoked. For example, no Servlet method must actively wait for data to be retrieved or written before returning control to the SIP Servlet container.
Store all Application Data in the SessionIf you deploy your application to more than one engine tier server (in a replicated Converged Application Server configuration) you must store all application data in the session as session attributes. In a replicated configuration, engine tier servers maintain no cached information; all application data must be de-serialized from the session attribute available in SIP data tier servers.
Caution: If your application must spawn threads, you must guard against deadlocks and carefully manage concurrent access to session data. At a minimum, never spawn threads inside the service method of a SIP Servlet. Instead, maintain a separate thread pool outside of the service method, and be careful to synchronize access to all session data.

Use setAttribute() to Modify Session Data in “No-Call” Scope
Requirements and Best Practices for SIP Applications 7-3
All Session Data Must Be SerializableTo support in-memory replication of SIP application call states, you must ensure that all objects stored in the SIP Servlet session are serializable. Every field in an object must be serializable or transient in order for the object to be considered serializable. If the Servlet uses a combination of serializable and non-serializable objects, Converged Application Server cannot replicate the session state of the non-serializable objects.
Use setAttribute() to Modify Session Data in “No-Call” ScopeThe SIP Servlet container automatically locks the associated call state when invoking the doxxx method of a SIP Servlet. However, applications may also attempt to modify session data in “no-call” scope. No-call scope refers to the context where call state data is modified outside the scope of a normal doxxx method. For example, data is modified in no-call scope when an HTTP Servlet attempts to modify SIP session data, or when a SIP Servlet attempts to modify a call state other than the one that the container locked before invoking the Servlet.
Applications must always use the SIP Session's setAttribute method to change attributes in no-call scope. Likewise, use removeAttribute to remove an attribute from a session object. Each time setAttribute/removeAttribute is used to update session data, the SIP Servlet container obtains and releases a lock on the associated call state. (The methods enqueue the object for updating, and return control immediately.) This ensures that only one application modifies the data at a time, and also ensures that your changes are replicated across SIP data tier nodes in a cluster.
If you use other set methods to change objects within a session, Converged Application Server cannot replicate those changes.
Note that the Converged Application Server container does not persist changes to a call state attribute that are made after calling setAttribute. For example, in the following code sample the setAttribute call immediately modifies the call state, but the subsequent call to modifyState() does not:
Foo foo = new Foo(..); appSession.setAttribute("name", foo); // This persists the call state. foo.modifyState(); // This change is not persisted.
Instead, ensure that your Servlet code modifies the call state attribute value before calling setAttribute, as in:
Foo foo = new Foo(..); foo.modifyState(); appSession.setAttribute("name", foo);
Also, keep in mind that the SIP Servlet container obtains a lock to the call state for each individual setAttribute call. For example, when executing the following code in an HTTP Servlet, the SIP Servlet container obtains and releases a lock on the call state lock twice:
appSess.setAttribute("foo1", "bar2");appSess.setAttribute("foo2", "bar2");
This locking behavior ensures that only one thread modifies a call state at any given time. However, another process could potentially modify the call state between sequential updates. The following code is not considered thread safe when done no-call state:
Integer oldValue = appSession.getAttribute("counter");Integer newValue = incrementCounter(oldValue);

send() Calls Are Buffered
7-4 Oracle Communications Converged Application Server Developer's Guide
appSession.setAttribute("counter", newValue);
To make the above code thread safe, you must enclose it using the wlssAppSession.doAction method, which ensures that all modifications made to the call state are performed within a single transaction lock, as in:
wlssAppSession.doAction(new WlssAction() { public Object run() throws Exception { Integer oldValue = appSession.getAttribute("counter"); Integer newValue = incrementCounter(oldValue); appSession.setAttribute("counter", newValue); return null; } });
Finally, be careful to avoid deadlock situations when locking call states in a doSipMethod call, such as doInvite(). Keep in mind that the Converged Application Server container has already locked the call state when the instructions of a doSipMethod are executed. If your application code attempts to access the current call state from within such a method (for example, by accessing a session that is stored within a data structure or attribute), the lock ordering results in a deadlock.
Example 7–1 shows an example that can result in a deadlock. If the code is executed by the container for a call associated with callAppSession, the locking order is reversed and the attempt to obtain the session with getApplicationSession(callId) causes a deadlock.
Example 7–1 Session Access Resulting in a Deadlock
WlssSipApplicationSession confAppSession = (WlssSipApplicationSession) appSession;confAppSession.doAction(new WlssAction() { // confAppSession is locked public Object run() throws Exception { String callIds = confAppSession.getAttribute("callIds"); for (each callId in callIds) { callAppSess = Session.getApplicationSession(callId); // callAppSession is locked attributeStr += callAppSess.getAttribute("someattrib"); } confAppSession.setAttribute("attrib", attributeStr); }}
See "Modifying the SipApplicationSession" for more information about using the com.bea.wcp.sip.WlssAction interface.
send() Calls Are BufferedIf your SIP Servlet calls the send() method within a SIP request method such as doInvite(), doAck(), doNotify(), and so forth, keep in mind that the Converged Application Server container buffers all send() calls and transmits them in order after the SIP method returns. Applications cannot rely on send() calls to be transmitted immediately as they are called.
Caution: Applications must not wait or sleep after a call to send(), because the request or response is not transmitted until control returns to the SIP Servlet container.

Optimizing Memory Utilization and Performance with Serialization
Requirements and Best Practices for SIP Applications 7-5
Mark SIP Servlets as DistributableIf you have designed and programmed your SIP Servlet to be deployed to a cluster environment, you must include the distributable marker element in the Servlet's deployment descriptor when deploying the application to a cluster of engine tier servers. If you omit the distributable element, Converged Application Server does not deploy the Servlet to a cluster of engine tier servers. If you mark distributable in sip.xml it must also be marked in the web.xml for a WAR file.
The distributable element is not required, and is ignored if you deploy to a single, combined-tier (non-replicated) Converged Application Server instance.
Use SipApplicationSessionActivationListener SparinglyThe SIP Servlet 1.1 specification introduces SipApplicationSessionActivationListener, which can provide callbacks to an application when SIP Sessions are passivated or activated. Keep in mind that callbacks occur only in a replicated Converged Application Server deployment. Single-server deployments use no SIP data tier, so SIP Sessions are never passivated.
Also, keep in mind that in a replicated deployment Converged Application Server activates and passivates a SIP Session many times, before and after SIP messages are processed for the session. (This occurs normally in any replicated deployment, even when RDBMS-based persistence is not configured.) Because this constant cycle of activation and passivation results in frequent callbacks, use SipApplicationSessionActivationListener sparingly in your applications.
Session Expiration Best PracticesFor a JSR289 application, the container is more “intelligent” in removing sessions. For example, there is no need to explicitly call invalidate() on a SIP session or SIP application session.
However, if setExpirs() is used on a session and the application is of a JSR289 type then that call has no effect unless setInvalidateWhenRead(false) is called on the session.
Observe Best Practices for Java EE ApplicationsIf you are deploying applications that use other Java EE APIs, observe the basic clustering guidelines associated with those APIs. For example, if you are deploying EJBs, you must design all methods to be idempotent and make EJB homes clusterable in the deployment descriptor. See the discussion on clustering best practices in the Oracle WebLogic Server Documentation for more information.
Optimizing Memory Utilization and Performance with SerializationConverged Application Server provides a local serialization command that enables you to optimize a standalone domain for memory utilization or performance, as required by a SIP application. The local serialization command is a system property called wlss.local.serialization which must be provided to the Java Virtual Machine (JVM) that starts Converged Application Server.
To enable or disable serialization, edit the system property wlss.local.serialization in the startWebLogic.sh script, and set its value to true or false. The

Optimizing Memory Utilization and Performance with Serialization
7-6 Oracle Communications Converged Application Server Developer's Guide
startWebLogic.sh script is located in the DOMAIN_HOME/bin directory, where DOMAIN_HOME is the domain’s home directory.
This command can be set to one of the following values:
■ True: This is the default setting. When you set the local serialization flag to true, Converged Application Server will optimize a standalone domain for efficient memory utilization. Maintain this setting if memory utilization is of concern in your environment, especially in scenarios where the application session time-out values are large. When set to true, Converged Application Server will serialize the call state once a dialog is established and will de-serialize that call state as it becomes necessary to do so. Note that performance may be impacted by the serialization and de-serialization of call states.
■ False: When set to false, Converged Application Server optimizes a standalone domain for performance. Set to false when performance is critical in your environment and calls have fewer hold times or lower application session time-out values. Converged Application Server will not serialize or de-serialize call states. Note that, since the call state will be held in memory for the life of each call, an increase in the hold times for the calls will have an impact on memory utilization.

8
Using Compact and Long Header Formats for SIP Messages 8-1
8Using Compact and Long Header Formats for SIP Messages
This chapter describes how to use the Oracle Communications Converged Application Server SipServletMessage interface and configuration parameters to control SIP message header formats:
■ Overview of Header Format APIs and Configuration
■ Summary of Compact Headers
■ Assigning Header Formats with WlssSipServletMessage
■ Summary of API and Configuration Behavior
Overview of Header Format APIs and ConfigurationApplications that operate on wireless networks may want to limit the size of SIP headers to reduce the size of messages and conserve bandwidth. JSR 289 provides the SipServletMessage.setHeaderForm() method, which enables application developers to set a long or compact format for the value of a given header.
One feature of the SipServletMessage API provided in JSR 289 is the ability to set long or compact header formats for the entire SIP message using the setHeaderForm method.
In addition to SipServletMessage, Converged Application Server provides a container-wide configuration parameter that can control SIP header formats for all system-generated headers. This system-wide parameter can be used along with SipServletMessage.setHeaderForm and SipServletMessage.setHeader to further customize header formats.
Summary of Compact HeadersTable 8–1 defines the compact header abbreviations described in the SIP specification (http://www.ietf.org/rfc/rfc3261.txt). Specifications that introduce additional headers may also include compact header abbreviations.
Table 8–1 Compact Header Abbreviations
Header Name (Long Format)
Compact Format
Call-ID i
Contact m
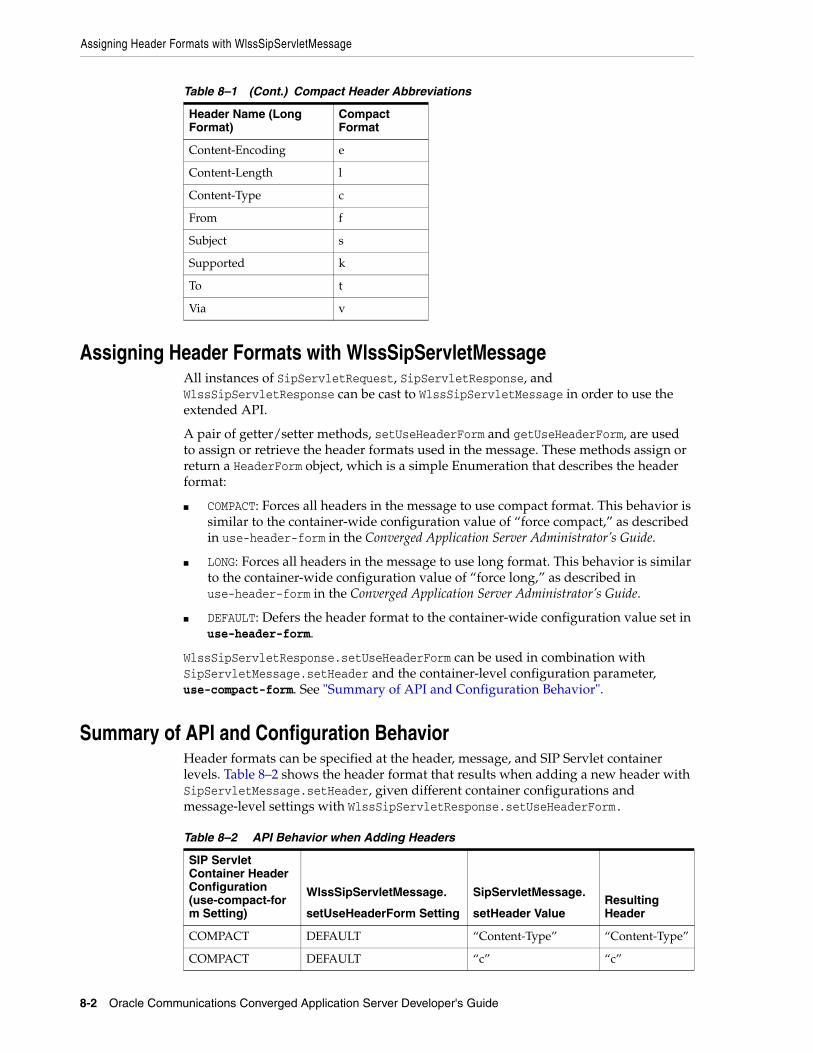
Assigning Header Formats with WlssSipServletMessage
8-2 Oracle Communications Converged Application Server Developer's Guide
Assigning Header Formats with WlssSipServletMessageAll instances of SipServletRequest, SipServletResponse, and WlssSipServletResponse can be cast to WlssSipServletMessage in order to use the extended API.
A pair of getter/setter methods, setUseHeaderForm and getUseHeaderForm, are used to assign or retrieve the header formats used in the message. These methods assign or return a HeaderForm object, which is a simple Enumeration that describes the header format:
■ COMPACT: Forces all headers in the message to use compact format. This behavior is similar to the container-wide configuration value of “force compact,” as described in use-header-form in the Converged Application Server Administrator’s Guide.
■ LONG: Forces all headers in the message to use long format. This behavior is similar to the container-wide configuration value of “force long,” as described in use-header-form in the Converged Application Server Administrator’s Guide.
■ DEFAULT: Defers the header format to the container-wide configuration value set in use-header-form.
WlssSipServletResponse.setUseHeaderForm can be used in combination with SipServletMessage.setHeader and the container-level configuration parameter, use-compact-form. See "Summary of API and Configuration Behavior".
Summary of API and Configuration BehaviorHeader formats can be specified at the header, message, and SIP Servlet container levels. Table 8–2 shows the header format that results when adding a new header with SipServletMessage.setHeader, given different container configurations and message-level settings with WlssSipServletResponse.setUseHeaderForm.
Content-Encoding e
Content-Length l
Content-Type c
From f
Subject s
Supported k
To t
Via v
Table 8–2 API Behavior when Adding Headers
SIP Servlet Container Header Configuration (use-compact-form Setting)
WlssSipServletMessage.
setUseHeaderForm Setting
SipServletMessage.
setHeader ValueResulting Header
COMPACT DEFAULT “Content-Type” “Content-Type”
COMPACT DEFAULT “c” “c”
Table 8–1 (Cont.) Compact Header Abbreviations
Header Name (Long Format)
Compact Format

Summary of API and Configuration Behavior
Using Compact and Long Header Formats for SIP Messages 8-3
Table 8–3 shows the system header format that results when setting the header format with WlssSipServletResponse.setUseHeaderForm given different container configuration values.
COMPACT COMPACT “Content-Type” “c”
COMPACT COMPACT “c” “c”
COMPACT LONG “Content-Type” “Content-Type”
COMPACT LONG “c” “Content-Type”
LONG DEFAULT “Content-Type” “Content-Type”
LONG DEFAULT “c” “c”
LONG COMPACT “Content-Type” “c”
LONG COMPACT “c” “c”
LONG LONG “Content-Type” “Content-Type”
LONG LONG “c” “Content-Type”
FORCE_COMPACT DEFAULT “Content-Type” “c”
FORCE_COMPACT DEFAULT “c” “c”
FORCE_COMPACT COMPACT “Content-Type” “c”
FORCE_COMPACT COMPACT “c” “c”
FORCE_COMPACT LONG “Content-Type” “Content-Type”
FORCE_COMPACT LONG “c” “Content-Type”
FORCE_LONG DEFAULT “Content-Type” “Content-Type”
FORCE_LONG DEFAULT “c” “Content-Type”
FORCE_LONG COMPACT “Content-Type” “c”
FORCE_LONG COMPACT “c” “c”
FORCE_LONG LONG “Content-Type” “Content-Type”
FORCE_LONG LONG “c” “Content-Type”
Table 8–3 API Behavior for System Headers
SIP Servlet Container Header Configuration (use-compact-form Setting)
WlssSipServletMessage.
setUseHeaderForm Setting Resulting Contact Header
COMPACT DEFAULT “m”
COMPACT COMPACT “m”
COMPACT LONG “Contact”
LONG DEFAULT “Contact”
LONG COMPACT “m”
Table 8–2 (Cont.) API Behavior when Adding Headers
SIP Servlet Container Header Configuration (use-compact-form Setting)
WlssSipServletMessage.
setUseHeaderForm Setting
SipServletMessage.
setHeader ValueResulting Header

Summary of API and Configuration Behavior
8-4 Oracle Communications Converged Application Server Developer's Guide
LONG LONG “Contact”
FORCE_COMPACT DEFAULT “m”
FORCE_COMPACT COMPACT “m”
FORCE_COMPACT LONG “Contact”
FORCE_LONG DEFAULT “Contact”
FORCE_LONG COMPACT “m”
FORCE_LONG LONG “Contact”
Table 8–3 (Cont.) API Behavior for System Headers
SIP Servlet Container Header Configuration (use-compact-form Setting)
WlssSipServletMessage.
setUseHeaderForm Setting Resulting Contact Header

9
Composing SIP Applications 9-1
9Composing SIP Applications
This chapter describes how to use Oracle Communications Converged Application Server application composition features.
Using the Application RouterApplication composition is the process of “chaining” multiple SIP applications into a logical path to apply services to a SIP request. The SIP Servlet v1.1 specification introduces an Application Router (AR) deployment, which performs a key role in composing SIP applications. The Application Router examines an initial SIP request and uses custom logic to determine which SIP application must process the request. In Converged Application Server, all initial requests are first delivered to the AR, which determines the application used to process the request.
Converged Application Server supports the Default Application Router, which can be configured using a text file. Custom Application Routers are also supported. You create a Custom Application Router by implementing the SipApplicationRouter interface. A Custom Application Router can use complex processing to make routing decisions.
In contrast to the Application Router, which requires knowledge of which SIP applications are available for processing a message, individual SIP applications remain independent from one another. An individual application performs a very specific service for a SIP request, without requiring any knowledge of other applications deployed on the system. (The Application Router does require knowledge of deployed applications, and the SipApplicationRouter interface provides for automatic notification of application deployment and undeployment.)
Individual SIP applications may complete their processing of an initial request by proxying or relaying the request, or by terminating the request as a User Agent Server
Note: The SIP Servlet v1.1 specification (http://jcp.org/en/jsr/detail?id=289) describes a formal application selection and composition process, which is fully implemented in Converged Application Server. Use the SIP Servlet v1.1 techniques, as described in this document, for all new development. Application composition techniques described in earlier versions of Converged Application Server are now deprecated.
Converged Application Server provides backwards compatibility for applications using version 1.0 composition techniques, provided that:
■ You do not configure a custom Application Router.
■ You do not configure the Default Application Router properties.

Using the Application Router
9-2 Oracle Communications Converged Application Server Developer's Guide
(UAS). If an initial request is proxied or relayed, the SIP container again forwards the request to the Application Router, which selects the next SIP application to provide a service for the request. In this way, the AR can chain multiple SIP applications as needed to process a request. The chaining process is terminated when:
■ A selected SIP application acts as a UAS to terminate the chain, or
■ There are no more applications to select for that request. (In this case, the request is sent out.)
When the chain is terminated and the request sent, the SIP container maintains the established path of applications for processing subsequent requests, and the AR is no longer consulted.
Figure 9–1 shows the use of an Application Router for applying multiple service to a SIP request.
Figure 9–1 Composed Application Model
Note that the AR may select remote as well as local applications. The chain of services need not reside within the same Converged Application Server container.
Using the Default Application RouterConverged Application Server includes a Default Application Router (DAR), which provides the basic functionality described in the SIP Servlet Specification v1.1 (http://jcp.org/en/jsr/detail?id=289), Appendix C: Default Application Router.
In summary, the Converged Application Server DAR implements all methods of the SipApplicationRouter interface, and is configured using the simple Java properties file described in the v1.1 specification.
Each line of the DAR properties file specifies one or more SIP methods, and is followed by SIP routing information in comma-delimited format. The DAR initially reads the properties file on startup, and then reads it each time a SIP application is deployed or undeployed from the container.

Using the Application Router
Composing SIP Applications 9-3
To specify the location of the configuration file used by the DAR, configure the properties using the Administration Console, as described in "Configuring a Custom Application Router", or include the following parameter when starting the Converged Application Server instance:
-Djavax.servlet.sip.ar.dar.configuration
(To specify a property file, rather than a URI, include the prefix file:///) This Java parameter is specified at the command line, or it can be included in your server startup script.
See Appendix C in the SIP Servlet Specification v1.1 (http://jcp.org/en/jsr/detail?id=289) for detailed information about the format of routing information used by the Default Application Router.
Note that the Converged Application Server DAR accepts route region strings in addition to “originating,” “terminating,” and “neutral.” Each new string value is treated as an extended route region. Also, the Converged Application Server DAR uses the order of properties in the configuration file to determine the route entry sequence; the state_info value has no effect when specified in the DAR configuration.
Configuring a Custom Application RouterIn contrast to DAR, which is property-file driven, a Custom Application Router is implemented as a Java class, which allows for complex decision-making processes.
If you develop a custom Application Router, you must store the implementation for the AR in the /approuter subdirectory of the domain home directory. Supporting libraries for the AR can be stored in a /lib subdirectory within /approuter. (If you have multiple implementations of SipApplicationRouter, use the -Djavax.servlet.sip.ar.spi.SipApplicationRouterProvider option at startup to specify which one to use.)
Converged Application Server provides several configuration parameters to specify the AR class and to pass initialization properties to the AR or AR. To configure these parameters using the Administration Console:
1. Log in to the Administration Console for your domain.
2. Select the SipServer node in the left pane.
3. Click the Configuration tab and then the Application Router tab.
4. Use the options on the Application Router pane to configure the custom AR:
■ Use Custom AR: Select this option to use a custom AR instead of the Default AR. Note that you must restart the server after selecting or clearing this option, to switch between using the DAR and a custom AR.
■ Custom AR filename: Specify only the filename of the custom AR (packaged as a JAR) to use. The custom AR implementation must reside in the $DOMAIN_HOME/approuter subdirectory.
■ AR configuration data: Enter properties to pass to the AR in the init method. The options are passed either to the DAR or custom AR, depending on whether the Use Custom AR option is selected.
Note: In a clustered environment, the custom AR is deployed to all engine tier instances of the domain; you cannot deploy different AR implementations within the same domain.

Using the Application Router
9-4 Oracle Communications Converged Application Server Developer's Guide
All configuration properties must conform to the Java Properties format. DAR properties must further adhere to the detailed property format described in Appendix C of the SIP Servlet Specification v1.1 (http://jcp.org/en/jsr/detail?id=289). Each property must be listed on a separate, single line without line breaks or spaces, as in:
INVITE:("OriginatingCallWaiting","DAR:From","ORIGINATING","","NO_ROUTE","0"),("CallForwarding","DAR:To","TERMINATING","","NO_ROUTE","1")SUBSCRIBE:("CallForwarding","DAR:To","TERMINATING","","NO_ROUTE","1")You can optionally specify AR initialization properties when starting the Converged Application Server instance by including the -Djavax.servlet.sip.ar.dar.configuration Java option. (To specify a property file, rather than a URI, include the prefix file:///) If you specify the Java startup option, the container ignores any configuration properties defined in AR configuration data (stored in sipserver.xml). You can modify the properties in AR configuration data at any time, but the properties are not passed to the AR until the server is restarted with the -Djavax.servlet.sip.ar.dar.configuration option omitted.
■ Default application name: Enter the name of a default application that the container should call when the custom AR cannot find an application to process an initial request. If no default application is specified, the container returns a 500 error if the AR cannot select an application.
5. Select Save.
See Section 15 in the SIP Servlet Specification v1.1 (http://jcp.org/en/jsr/detail?id=289) for more information about the function of the AR. See also the SIP Servlet v1.1 API for information about how to implement a custom AR.
Using the Built-in Custom Application RouterThe Converged Application Server provides a built-in CAR that you can use. To use the CAR implementation, you supply configuration parameters to the CAR in the form of an XML file. The file specifies the applications in the chain, and the rules for targeting them.
The rules can impose conditions on application targeting based on factors such as the user identity or the request URI.
To use the prebuilt CAR, first create the configuration file that controls the behavior of the CAR.
After creating the configuration file, follow the steps listed in "Configuring a Custom Application Router" to apply the built-in CAR. In the configuration fields, provide the following values:
Note: You must first deploy an application before specifying its name as the value of Default application name.
Note: These configuration options are persisted as XML elements in the sipserver.xml file. See the chapter “Engine Tier Configuration Reference (sipserver.xml)” in the Converged Application Server Administrator’s Guide for more information.

Using the Application Router
Composing SIP Applications 9-5
■ For the custom AR filename, use approuter-SDP.jar
■ In the AR configuration data field, specify the name of the configuration file you created as the value of the configFileName variable. For example:
configFileName=./app.xml
■ As the second line of the AR configuration data, enter the following:
byPassIfAppIsNotWorking=true
The following section provides more information on the prebuilt CAR configuration file format.
Configuring the Custom Application RouterYou control the prebuilt custom application router using an XML-based configuration file. The file lets you specify the application chain and the conditions for invoking the applications.
The configuration file is specified by configFileName property in the AR Configuration Data field of the UI.
You place the file in the following location:
domain_home/approuter/lib
The schema definition for the configuration file is located in the same location. It is named app-easydef.xsd.
Figure 9–1 shows a sample configuration for the prebuilt CAR implementation:
Example 9–1 Example Prebuilt CAR Configuration File
<app-router-conf xmlns:xsi="http://www.w3.org/2001/XMLSchema-instance" xsi:schemaLocation="http://www.oracle.com/sdp/easyapp-def easyapp-def.xsd" xmlns="http://www.oracle.com/sdp/easyapp-def" > <external-resource> <file> <file-path>./approuter/lib/user.properties</file-path> </file> </external-resource> <user-identity-header>From</user-identity-header> <terminating> <app> <app-name>basic-call-app</app-name> <index>0</index> <mapping-rule> <protocol>SIP</protocol> <pattern> <and> <equal><var>request.method</var><value>INVITE</value></equal><not><contains><var>request.uri</var><value>voicemail</value></contains></not> </and> </pattern> <subscriber-identity>.*</subscriber-identity> <request-uri>.*</request-uri> </mapping-rule> </app> <app> <app-name>presence-app</app-name> <index>1</index> <mapping-rule> <protocol>SIP</protocol>

Using the Application Router
9-6 Oracle Communications Converged Application Server Developer's Guide
<pattern> <and> <equal><var>request.method</var><value>SUBSCRIBE</value></equal> <equal><var>request.method</var><value>PUBLISH</value></equal> </and> </pattern> <subscriber-identity>.*</subscriber-identity> <request-uri>.*</request-uri> </mapping-rule> </app> <app> <app-name>RouteToExternalURI</app-name> <index>2</index> <externalURI>sip:[email protected]</externalURI> <mapping-rule> <protocol>SIP</protocol> <pattern> <and> <equal><var>request.method</var><value>INVITE</value></equal> <contains><var>request.uri</var><value>voicemail</value></contains> </and> </pattern> <subscriber-identity>.*</subscriber-identity> <request-uri>.*</request-uri> </mapping-rule> </app> </terminating> </app-router-conf> Notice the application named RouteToExternalURI, in the final app-name element. This is a symbolic application name that enables routing to an external URI. The CAR implementation adds the external URI to SipApplicationRouterInfo, which directs the container to route the request to the external URI. You can configure more than one special application, each with its own name, pattern, and index.
The pattern element syntax is the same as the pattern syntax used in sip.xml
The Application Router must provide the user identity of a subscriber to retrieve subscriber information from external sources. For the IMS environment, the P-Asserted-Identify header identifies the user by default. For non-IMS environments, the From header identifies the user. You can specify which header should be used to extract the user identity using the user-identity-header element.
For example:
<app-router-conf xmlns:xsi="http://www.w3.org/2001/XMLSchema-instance" xsi:schemaLocation="http://www.oracle.com/sdp/app-def app-def.xsd" xmlns="http://www.oracle.com/sdp/app-def" > <external-resource> <file> <file-path>./approuter/lib/user.properties</file-path> </file> </external-resource> <user-identity-header>From</user-identity-header> To access a database, you must specify the JNDI name for the JDBC connection the SQL statement that selects the subscriber information.
For example:
<external-resource> <rdbms>

Using the Application Router
Composing SIP Applications 9-7
<jdbc-jndi-name>jdbc/OwlcsLs</jdbc-jndi-name> <sql>select appname from userapp where aor=?</sql> </rdbms> </external-resource> In this example, appname identifies the column name in the table that contains the applications for the subscriber. The aor variable is the column name that represents the subscriber. The parameter for this SQL will be the P-Asserted-Identity header or From header of the initial request, as defined by the user-identity-header element.
If an HSS system is used as the external source, the diameter channel must be set up for each server, as specified in the Oracle Communications Converged Application Server Administrator’s Guide.
Additional information you need to specify in the configuration file includes:
■ file-path: The diameter configuration file path
■ service-indication: The Service-Indication AVP value which is defined in the 3GPP 29.328 section 7.4
■ app-element: The customer AVP name. Its value is the applications subscribed to by the subscriber. In the context of the HSS, the app-element is the value of the ServiceData AVP.
The configuration file may be like:
<external-resource> <hss> <file-path>./approuter/lib/hssconfig.xml</file-path> <service-indication>ARTest</service-indication> <app-element>apps</app-element> </hss> </external-resource> The diameter configuration file, hssconfig.xml in the example, must comply with the OCCAS diameter.xml format, and be located in the following directory:
domain_home/approuter/lib
An example of the hssconfig.xml file is as follows:
<?xml version="1.0" encoding="utf-8"?> <diameter xmlns="http://www.bea.com/ns/wlcp/diameter/300" xmlns:xsi= "http://www.w3.org/2001/XMLSchema-instance"> <configuration> <name>hssclient</name> <target>engine1</target> <target>engine2</target> <host>hssclient</host> <realm>bea.com</realm> <message-debug-enabled>true</message-debug-enabled> <application> <name>WlssShApplication</name> <class-name>com.bea.wcp.diameter.sh.WlssShApplication</class-name> <param> <name>destination.host</name> <value>hss</value> </param> </application>

Working with SIP and HTTP Sessions
9-8 Oracle Communications Converged Application Server Developer's Guide
<peer> <host>hss</host> <address>10.182.101.206</address> <port>3900</port> </peer> </configuration></diameter> Properties can also reside externally. This may be useful in testing or evaluation scenarios. In this case, you only need to configure the file path.
<external-resource> <file> <file-path>./approuter/lib/user.properties</file-path> </file> </external-resource> The file, user.properties in the example, should contain configuration information consisting of name-value pairs, and should be parsable by a Java Properties class. It should be located in the following directory:
domain_home/approuter/lib
The format of each line in the user properties file should be subscriber name followed by the applications available to the subscriber.
For example:
[email protected]=proxyregistrar,app2,[email protected]=proxyregistrar,app1 The index element specifies the order of invocation for the applications. The lower number has higher priority. The index must start at 0.
The mapping-rule element is used to determine if the application should be invoked by a special initial request. The value of subscriber-identity and request-uri must be Java regular expression. Only if the initial request matches all conditions, including protocol, pattern, subscriber-identity and request-uri, can the request be targeted to the application.
Working with SIP and HTTP SessionsAs shown in Figure 9–2, each converged application deployed to the Converged Application Server container has a unique SipApplicationSession, which can contain one or more SipSession and HttpSession objects.

Working with SIP and HTTP Sessions
Composing SIP Applications 9-9
Figure 9–2 Sessions in a Converged Application
The API provided by javax.servlet.SipApplicationSession enables you to iterate through all available sessions in a given SipApplicationSession. It also provides methods to encode a URL with the unique application session when developing converged applications.
In prior releases, Converged Application Server extended the basic SIP Servlet API to provide methods for:
■ Creating new HTTP sessions from a SIP Servlet
■ Adding and removing HTTP sessions from SipApplicationSession
■ Obtaining SipApplicationSession objects using either the call ID or session ID
■ Encoding HTTP URLs with session IDs from within a SIP Servlet
This functionality is now provided directly as part of the SIP Servlet API version 1.1, and the proprietary API (com.bea.wcp.util.Sessions) is now deprecated. Table 9–1 lists the SIP Servlet APIs to use in place of now deprecated methods. See the SIP Servlet v1.1 API JavaDoc at the Java Community Process web site (JSR 289: SIP Servlet v1.1 at jcp.org) for more information.
Table 9–1 Deprecated com.bea.wcp.util.Sessions Methods
Deprecated Method (in com.bea.wcp.util.Sessions) Replacement Method Description
getApplicationSession javax.servlet.sip.SipSessionsUtil.
getApplicationSession
Obtains the SipApplicationSession object with a specified session ID.
getApplicationSessionsByCallId
None. Obtains an Iterator of SipApplicationSession objects associated with the specified call ID.
createHttpSession None. Applications can instead cast an HttpSession into ConvergedHttpSession.

Working with SIP and HTTP Sessions
9-10 Oracle Communications Converged Application Server Developer's Guide
Modifying the SipApplicationSessionWhen using a replicated domain, Converged Application Server automatically provides concurrency control when a SIP Servlet modifies a SipApplicationSession object. In other words, when a SIP Servlet modifies the SipApplicationSession object, the SIP container automatically locks other applications from modifying the object at the same time.
Non-SIP applications, such as HTTP Servlets, must themselves ensure that the application call state is locked before modifying it in a replicated environment. This is also required if a single SIP Servlet needs to modify other call state objects, such as when a conferencing Servlet joins multiple calls.
To help application developers manage concurrent access to the application session object, Converged Application Server extends the standard SipApplicationSession object with com.bea.wcp.sip.WlssSipApplicationSession, and adds a two new interfaces, com.bea.wcp.sip.WlssAction and com.bea.wcp.sip.WlssAsynchronousAction, to encapsulate tasks performed to modify the session. When these APIs are used, the SIP container ensures that all business logic contained within the WlssAction and WlssAsynchronousAction objects is executed on a locked copy of the associated SipApplicationSession instance. The sections that follow describe each interface.
Synchronous AccessApplications that need to read and update a session attribute in a transactional and synchronous manner must use the WlssAction API. WlssAction obtains an explicit
setApplicationSession javax.servlet.sip.ConvergedHttpSession.
getApplicationSession
Associates an HTTP session with an existing SipApplicationSession.
removeApplicationSession None. Removes an HTTP session from an existing SipApplicationSession.
getEncodeURL javax.servlet.sip.ConvergedHttpSession.
encodeURL
Encodes an HTTP URL with the jsessionid of an existing HTTP session object.
Note: The com.bea.wcp.util.Sessions API is provided only for backward compatibility. Use the SIP Servlet APIs for all new development. Converged Application Server does not support converged applications that mix the com.bea.wcp.util.Sessions API and JSR 289 convergence APIs.
Specifically, the deprecated Sessions.getApplicationSessionsByCallId(String callId method cannot be used with v1.1 SIP Servlets that use the session key-based targeting method for associating an initial request with an existing SipApplicationSession object. See Section 15.11.2 in the SIP Servlet Specification v1.1 (http://jcp.org/en/jsr/detail?id=289) for more information about this targeting mechanism.
Table 9–1 (Cont.) Deprecated com.bea.wcp.util.Sessions Methods
Deprecated Method (in com.bea.wcp.util.Sessions) Replacement Method Description

Session Key-Based Request Targeting
Composing SIP Applications 9-11
lock on the session for the duration of the action. Example 9–2 shows an example of using this API.
Example 9–2 Example Code using WlssAction API
final SipApplicationSession appSession = ...;WlssSipApplicationSession wlssAppSession = (WlssSipApplicationSession) appSession;wlssAppSession.doAction(new WlssAction() { public Object run() throws Exception { // Add all business logic here. appSession.setAttribute("counter", latestCounterValue); sipSession.setAttribute("currentState", latestAppState); // The SIP container ensures that the run method is invoked // while the application session is locked. return null; }});
Because the WlssAction API obtains an exclusive lock on the associated session, deadlocks can occur if you attempt to modify other application session attributes within the action.
Asynchronous AccessApplications that need to update a different SipApplicationSession while in the context of a locked SipApplicationSession can perform asynchronous updates using the WlssAsynchronousAction API. This API reduces contention when multiple applications might need to update attributes in the same SipApplicationSession at the same time. Example 9–3 shows an example of using this API.
To compile applications using this API, you need to include wlssapi.jar, and sipservlet.jar to your class path. Both JARs are located in the directory MW_HOME/wlserver_10.3/sip/server/lib.
Example 9–3 Example Code using WlssAsynchronousAction API
SipApplicationSession sas1 = req.getSipApplicationSession(); // SipApplicationSession1 is already locked by the container // Obtain another SipApplicationSession to schedule work on it WlssSipApplicationSession wlssSipAppSession = SipSessionsUtil.getApplicationSessionById(conferenceAppSessionId); // The work is done on the application session asynchronously appSession.doAsynchronousAction(new WlssAsynchronousAction() { Serializable run(SipApplicationSession appSession) { // Add all business logic here. int counter = appSession.getAttribute("counter"); ++ counter; appSession.setAttribute("counter", counter); return null; }});
Performing the work on appSession in an asynchronous manner prevents nested locking and associated deadlock scenarios.
Session Key-Based Request TargetingThe SIP Servlet v1.1 specification also provides a mechanism for associating an initial request with an existing SipApplicationSession object. This mechanism is called

Join and Replaces Header Support
9-12 Oracle Communications Converged Application Server Developer's Guide
session key-based targeting. Session key-based targeting is used to direct initial requests having a particular subscriber (request URI) or region, or other feature to an already-existing SipApplicationSession, rather than generating a new session. To use this targeting mechanism with an application, you create a method that generates a unique key and annotate that method with @SipApplicationKey. When the SIP container selects that application (for example, as a result of the AR choosing it for an initial request), it obtains a key using the annotated method, and uses the key and application name to determine if the SipApplicationSession exists. If one exists, the container associates the new request with the existing session, rather than generating a new session.
See section 15 in the SIP Servlet Specification v1.1 (http://jcp.org/en/jsr/detail?id=289) for more information about using session key-based targeting.
Join and Replaces Header SupportConverged Application Server provides support for the use of both the Join and Replaces headers. To learn how to create SIP applications that use the functionality provided by the Join and Replaces headers, refer to the JSR 289 documentation and APIs.
About the Join HeaderThe Join header, defined in RFC 3911, is for use with SIP Call Control and Multi-Party applications. The Join header logically joins an existing SIP dialog with a new SIP dialog. You can use this to enable features such as Call Forwarding, Message Screening, and Call Center Monitoring.
The Join header contains information an application can use to match an existing SIP dialog to a new dialog. You can use the Join header to add a new dialog or SIP application session to an existing SIP application session in the same way that an encoded URI is used. This is achieved by setting the call-id, to-tag, and from-tag in the Join header of the SIP INVITE to match that of the existing dialog.
About the Replaces HeaderThe Replaces header, defined in RFC 3891, logically replaces an existing SIP dialog with a new SIP dialog. You can use this functionality to enable features such as Attended Call Transfer and Call Pickup.
The Replaces header contains information used to match and replace an existing SIP dialog (using the call-id, to-tag, and from-tag) to the newly created dialog. The Join header can be used to replace an existing SIP session associated with a SIP application session with a new dialog/session. This is achieved by setting the call-id, to-tag, and from-tag in the Replaces header of the INVITE to match that of an existing dialog.
Note: If you develop a spiral proxy application using this targeting mechanism, and the application modifies the record-route more than once, it must generate different keys for the initial request, if necessary, when processing record-route hops. If it does not, then the application cannot discriminate record-route hops for subsequent requests.

Setting Content in SIP Responses
Composing SIP Applications 9-13
Enabling Support for Join and Replaces HeadersSupport for the Join and Replaces headers is disabled by default. If you have applications that need to use the Join and Replaces headers, you must enable Converged Application Server to handle these types of headers.
To enable support for Join and Replaces headers, edit the entry for the –Dwlss.dialog.index.enabled=false command in the startWebLogic.sh script, and set its value to true. The startWebLogic.sh script is located in the DOMAIN_HOME/bin directory, where DOMAIN_HOME is the domain’s home directory. When support for Join and Replace headers is enabled, the entry in the startWebLogic.sh script appears as shown below:
–Dwlss.dialog.index.enabled=true
See the Converged Application Server Administrator’s Guide learn more about the startWebLogic.sh script and the start-up options it controls.
API to Set Transport Parameter on Record-Route HeaderConverged Application Server provides a setRecordRouteUriTransport API on the WlssProxy interface which will allow proxy applications to set the transport parameter of the Record-Route header, in scenarios where the proxy is aware of the transport supported by the next downstream element.
RFC 3261 (Section 16.6, Item4) states that “The URI SHOULD NOT contain the transport parameter unless the proxy has knowledge (such as in a private network) that the next downstream element that will be in the path of subsequent requests supports that transport.”
The API consists of the method setRecordRouteUriTransport on the WlssProxy interface. This method takes a string value for the required transport. Use the API to set the transport parameter of a Record-Route header as shown in the following code sample:
...WlssProxy p = (WlssProxy)req.getProxy();p.setRecordRouteUriTransport("tcp");...
Setting Content in SIP ResponsesConverged Application Server provides you with a System property to specify whether SIP Proxy applications that are acting in supervised Proxy mode should be able to modify the content of SIP responses before forwarding such messages
Note: The SIP application must determine to send a BYE message using the original dialog. Converged Application Server does not automatically send a BYE message to terminate the original dialog.
Note: Enabling support for the Join and Replaces header may affect the performance of Converged Application Server. When enabling this feature ensure that your deployment of Converged Application Server has enough memory, computing power, and network bandwidth to function properly using Join- and Replaces-enabled applications.

Setting Content in SIP Responses
9-14 Oracle Communications Converged Application Server Developer's Guide
upstream. By default, a SIP application will be able to modify the content of a SIP response when that application acts in a supervised Proxy mode.
Converged Application Server reconciles the different approaches specified in JSR289 (Section 10.2.4) and RFC 3261 (Section 16.7, Item 9) by implementing a flag to control the behavior of message content modification by a Proxy application that is functioning in a supervised mode.
The system property is wlss.proxy.setcontent and the default value for the property is true. Maintain this default setting to allow proxy applications in supervised mode to set the content of the responses that such applications forward upstream. To prevent such proxy applications from modifying the content in SIP responses, set the system property wlss.proxy.setcontent to false in the startWebLogic.sh script. The startWebLogic.sh script is located in the DOMAIN_HOME/bin directory, where DOMAIN_HOME is the domain’s home directory.

10
Developing Converged Applications 10-1
10Developing Converged Applications
This chapter describes how to develop converged HTTP and SIP applications with Oracle Communications Converged Application Server:
■ Overview of Converged Applications
■ Assembling and Packaging a Converged Application
■ Converged Application Samples
Overview of Converged ApplicationsIn a converged application, SIP protocol functionality is combined with HTTP or Java EE components to provide a unified communication service. For example, an online push-to-talk application might enable a customer to initiate a voice call to ask questions about products in their shopping cart. The SIP session initiated for the call is associated with the customer's HTTP session, which enables the employee answering the call to view customer's shopping cart contents or purchasing history.
You must package converged applications that utilize Java EE components (such as EJBs) into an Enterprise Archive (EAR) file. EAR is a file format used by Java EE for packaging one or more modules into a single archive so that the deployment of the various modules onto an application server happens simultaneously and coherently. It also contains XML files called deployment descriptors which describe how to deploy the modules. Converged applications that use SIP and HTTP protocols must be packaged in a single SAR or WAR file containing both a sip.xml and a web.xml deployment descriptor file.You can optionally package the SIP and HTTP Servlets of a converged application into separate SAR and WAR components within a single EAR file.
The HTTP and SIP sessions used in a converged application can be accessed programmatically through a common application session object. The SIP Servlet API also helps you associate HTTP sessions with an application session.
Assembling and Packaging a Converged ApplicationThe SIP Servlet specification fully describes the requirements and restrictions for assembling converged applications. The following statements summarize the information in the SIP Servlet specification:
■ Use the standard SIP Servlet directory structure for converged applications.
■ Store all SIP Servlet files under the WEB-INF subdirectory; this ensures that the files are not served up as static files by an HTTP Servlet.

Converged Application Samples
10-2 Oracle Communications Converged Application Server Developer's Guide
■ Include deployment descriptors for both the HTTP and SIP components of your application. This means that both sip.xml and web.xml descriptors are required. A weblogic.xml deployment descriptor may also be included to configure Servlet functionality in the Converged Application Server container.
■ Observe the following restrictions on deployment descriptor elements:
■ The distributable tag must be present in both sip.xml and web.xml, or it must be omitted entirely.
■ context-param elements are shared for a given converged application. If you define the same context-param element in sip.xml and in web.xml, the parameter must have the same value in each definition.
■ If either the display-name or icons element is required, the element must be defined in both sip.xml and web.xml, and it must be configured with the same value in each location.
Converged Application SamplesConverged Application Server includes sample converged applications. All source code, deployment descriptors, and build files for the examples are found in
MiddleWare_Home\wlserver_Version\samples\sipserver\examples
See index.html in the src sub-directory for descriptions of the examples, source code, and build files.

11
Developing Custom Profile Service Providers 11-1
11Developing Custom Profile Service Providers
This chapter describes how to use the Profile Service API to develop custom profile providers.
■ Overview of the Profile Service API
■ Implementing Profile Service API Methods
■ Configuring and Packaging Profile Providers
■ Configuring Profile Providers Using the Administration Console
Overview of the Profile Service APIOracle Communications Converged Application Server includes a profile service API, com.bea.wcp.profile.API, that may have multiple profile service provider implementations can be used to create profile provider implementations. A profile provider performs the work of accessing XML documents from a data repository using a defined protocol. Deployed SIP Servlets and other applications need not understand the underlying protocol or the data repository in which the document is stored; they simply reference profile data using a custom URL, and Converged Application Server delegates the request processing to the correct profile provider.
The provider performs the necessary protocol operations for manipulating the document. All providers work with documents in XML DOM format, so client code can work with many different types of profile data in a common way.
You can also use the profile service API to create a custom provider for retrieving document schemas using another protocol. For example, a profile provider could be created to retrieve subscription data from an LDAP store or RDBMS.
Note: The Diameter Sh application also accesses profile data from a Home Subscriber Server using the Sh protocol. Profile. Although applications access this profile data using a simple URL, the Diameter applications are implemented using the Diameter base protocol implementation rather than the profile provider API.

Implementing Profile Service API Methods
11-2 Oracle Communications Converged Application Server Developer's Guide
Figure 11–1 Profile Service API and Provider Implementation
Each profile provider implemented using the API may enable the following operations against profile data:
■ Creating new documents.
■ Querying and updating existing documents.
■ Deleting documents.
■ Managing subscriptions for receiving notifications of profile document changes.
Clients that want to use a profile provider obtain a profile service instance through a Servlet context attribute. They then construct an appropriate URL and use that URL with one of the available Profile Service API methods to work with profile data. The contents of the URL, combined with the configuration of profile providers, determines the provider implementation that Converged Application Server to process the client's requests.
The sections that follow describe how to implement the profile service API interfaces in a custom profile provider.
Implementing Profile Service API MethodsA custom profile providers is implemented as a shared Java EE library (typically a simple JAR file) deployed to the engine tier cluster. The provider JAR file must include, at minimum, a class that implements com.bea.wcp.profile.ProfileServiceSpi. This interface inherits methods from com.bea.wcp.profile.ProfileService and defines new methods that are called during provider registration and unregistration.
In addition to the provider implementation, you must implement the com.bea.wcp.profile.ProfileSubscription interface if your provider supports subscription-based notification of profile data updates. A ProfileSubscription is returned to the client subscriber when the profile document is modified.
The Converged Application Server Java API Reference describes each method of the profile service API in detail. Also keep in mind the following notes and best practices when implementing the profile service interfaces:

Configuring and Packaging Profile Providers
Developing Custom Profile Service Providers 11-3
■ The putDocument, getDocument, and deleteDocument methods each have two distinct method signatures. The basic version of a method passes only the document selector on which to operate. The alternate method signature also passes the address of the sender of the request for protocols that require explicit information about the requestor.
■ The subscribe method has multiple method signatures to allow passing the sender's address, as well as for supporting time-based subscriptions.
■ If you do not want to implement a method in com.bea.wcp.profile.ProfileServiceSpi, include a “no-op” method implementation that throws the OperationNotSupportedException.
com.bea.wcp.profile.ProfileServiceSpi defines provider methods that are called during registration and unregistration. Providers can create connections to data stores or perform any required initializing in the register method. The register method also supplies a ProviderBean instance, which includes any context parameters configured in the provider's configuration elements in profile.xml.
Providers must release any backing store connections, and clean up any state that they maintain, in the unregister method.
Configuring and Packaging Profile ProvidersProviders must be deployed as a shared Java EE library, because all other deployed applications must be able to access the implementation.
See the documentation on creating shared Java EE libraries and optional packages in Developing Applications for Oracle WebLogic Server in the WebLogic Server 11g documentation for information on how to assemble Java EE libraries. For most profile providers, you can simply package the implementation classes in a JAR file and then register the library with Converged Application Server.
After installing the provider as a library, you must also identify the provider class as a provider in a profile.xml file. The name element uniquely identifies a provider configuration, and the class element identifies the Java class that implements the profile service API interfaces. One or more context parameters can also be defined for the provider, which are delivered to the implementation class in the register method. For example, context parameters might be used to identify backing stores to use for retrieving profile data.
Example 11–1 shows a sample configuration for a provider that accesses data using XCAP.
Example 11–1 Provider Mapping in profile.xml
<profile-service xmlns="http://www.bea.com/ns/wlcp/wlss/profile/300" xmlns:sec="http://www.bea.com/ns/weblogic/90/security" xmlns:xsi="http://www.w3.org/2001/XMLSchema=instance" xmlns:wls="http;//www.bea.com/ns/weblogic/90/security/wls"> <mapping> <map-by>provider-name</map-by> </mapping> <provider> <name>xcap</name> <provider-class>com.mycompany.profile.XcapProfileProvider</provider-class> <param> <name>server</name> <value>example.com</name> </param>

Configuring Profile Providers Using the Administration Console
11-4 Oracle Communications Converged Application Server Developer's Guide
... </provider></profile-service>
Mapping Profile Requests to Profile ProvidersWhen an application makes a request using the Profile Service API, Converged Application Server must find a corresponding provider to process the request. By default, Converged Application Server maps the prefix of the requested URL to a provider name element defined in profile.xml. For example, with the basic configuration shown in Example 11–1, Converged Application Server would map Profile Service API requests beginning with xcap:// to the provider class com.mycompany.profile.XcapProfileProvider.
Alternately, you can define a mapping entry in profile.xml that lists the prefixes corresponding to each named provider. Example 11–2 shows a mapping with two alternate prefixes.
Example 11–2 Mapping a Provider to Multiple Prefixes
...<mapping> <map-by>prefix</map-by> <provider> <provider-name>xcap</provider-name> <doc-prefix>sip</doc-prefix> <doc-prefix>subscribe</doc-prefix> </provider> <by-prefix><mapping>...
If the explicit mapping capabilities of profile.xml are insufficient, you can create a custom mapping class that implements the com.bea.wcp.profile.ProfileRouter interface, and then identify that class in the map-by-router element. Example 11–3 shows an example configuration.
Example 11–3 Using a Custom Mapping Class
...<mapping> <map-by-router> <class>com.bea.wcp.profile.ExampleRouter</class> </map-by-router></mapping>...
Configuring Profile Providers Using the Administration ConsoleYou can optionally use the Administration Console to create or modify a profile.xml file. To do so, you must enable the profile provider console extension in the config.xml file for your domain.
Example 11–4 Enabling the Profile Service Resource in config.xml
...<custom-resource> <name>ProfileService</name> <target>AdminServer</target>
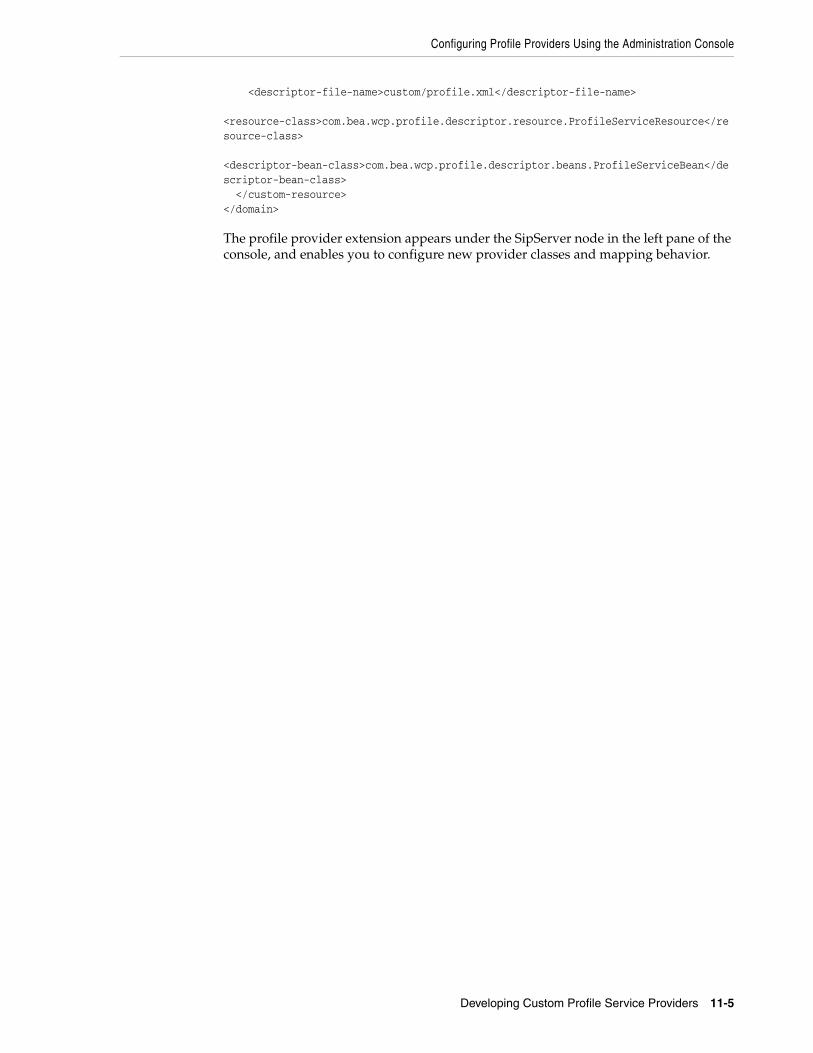
Configuring Profile Providers Using the Administration Console
Developing Custom Profile Service Providers 11-5
<descriptor-file-name>custom/profile.xml</descriptor-file-name> <resource-class>com.bea.wcp.profile.descriptor.resource.ProfileServiceResource</resource-class> <descriptor-bean-class>com.bea.wcp.profile.descriptor.beans.ProfileServiceBean</descriptor-bean-class> </custom-resource></domain>
The profile provider extension appears under the SipServer node in the left pane of the console, and enables you to configure new provider classes and mapping behavior.

Configuring Profile Providers Using the Administration Console
11-6 Oracle Communications Converged Application Server Developer's Guide

12
Using Content Indirection in SIP Servlets 12-1
12Using Content Indirection in SIP Servlets
This chapter describes how to develop SIP Servlets that work with indirect content specified in the SIP message body, and how to use the Oracle Communications Converged Application Server content indirection API.
■ Overview of Content Indirection
■ Using the Content Indirection API
Overview of Content IndirectionData provided by the body of a SIP message can be included either directly in the SIP message body, or indirectly by specifying an HTTP URL and metadata that describes the URL content. Indirectly specifying the content of the message body is used primarily in the following scenarios:
■ When the message bodies include large volumes of data. In this case, content indirection can be used to transfer the data outside of the SIP network (using a separate connection or protocol).
■ For bandwidth-limited applications. In this case, content indirection provides enough metadata for the application to determine whether or not it must retrieve the message body (potentially degrading performance or response time).
Converged Application Server provides a simple API that you can use to work with indirect content specified in SIP messages.
Using the Content Indirection APIThe content indirection API provided by Converged Application Server helps you quickly determine if a SIP message uses content indirection, and to easily retrieve all metadata associated with the indirect content. The basic API consists of a utility class, com.bea.wcp.sip.util.ContentIndirectionUtil, and an interface for accessing content metadata, com.bea.wcp.sip.util.ICParsedData.
SIP Servlets can use the utility class to identify SIP messages having indirect content, and to retrieve an ICParsedData object representing the content metadata. The ICParsedData object has simple “getter” methods that return metadata attributes.
Additional InformationComplete details about content indirection are available in RFC 4483:
http://www.ietf.org/rfc/rfc4483.txt

Additional Information
12-2 Oracle Communications Converged Application Server Developer's Guide
See also the Converged Application Server Java API Reference for additional documentation about the content indirection API.

13
Securing SIP Servlet Resources 13-1
13Securing SIP Servlet Resources
This chapter describes how to apply security constraints to SIP Servlet resources when deploying to Oracle Communications Converged Application Server:
■ Overview of SIP Servlet Security
■ Converged Application Server Role Mapping Features
■ Using Implicit Role Assignment
■ Assigning Roles Using security-role-assignment
■ Assigning run-as Roles
■ Role Assignment Precedence for SIP Servlet Roles
■ Debugging Security Features
■ weblogic.xml Deployment Descriptor Reference
Overview of SIP Servlet SecurityThe SIP Servlet API specification defines a set of deployment descriptor elements that can be used for providing declarative and programmatic security for SIP Servlets. The primary method for declaring security constraints is to define one or more security-constraint elements in the sip.xml deployment descriptor. The security-constraint element defines the actual resources in the SIP Servlet, defined in resource-collection elements, that are to be protected. security-constraint also identifies the role names that are authorized to access the resources. All role names used in the security-constraint are defined elsewhere in sip.xml in a security-role element.
SIP Servlets can also programmatically refer to a role name within the Servlet code, and then map the hard-coded role name to an alternate role in the sip.xml security-role-ref element during deployment. Roles must be defined elsewhere in a security-role element before they can be mapped to a hard-coded name in the security-role-ref element.
The SIP Servlet specification also enables Servlets to propagate a security role to a called Enterprise JavaBean (EJB) using the run-as element. Once again, roles used in the run-as element must be defined in a separate security-role element in sip.xml.
Chapter 14 in the SIP Servlet API specification provides more details about the types of security available to SIP Servlets. SIP Servlet security features are similar to security features available with HTTP Servlets; you can find additional information about HTTP Servlet security by referring to these sections in the Oracle WebLogic Server 11g documentation:

Triggering SIP Response Codes
13-2 Oracle Communications Converged Application Server Developer's Guide
■ The discussion on securing web applications in Programming WebLogic Security provides an overview of declarative and programmatic security models for Servlets.
■ The discussion on EJB security-related deployment descriptors in “Securing Enterprise JavaBeans (EJBs)” in Programming WebLogic Security describes all security-related deployment descriptor elements for EJBs, including the run-as element used for propagating roles to called EJBs.
See also the example sip.xml excerpt in Example 13–1, "Declarative Security Constraints in sip.xml".
Triggering SIP Response CodesYou can distinguish whether you are a proxy application, or a UAS application, by configuring the container to trigger the appropriate SIP response code, either a 401 SIP response code, or a 407 SIP response code. If your application needs to proxy an invitation, the 407 code is appropriate to use. If your application is a registrar application, you must use the 401 code.
To configure the container to respond with a 407 SIP response code instead of a 401 SIP response code, you must add the <proxy-authentication> element to the security constraint.
Specifying the Security RealmYou must specify the name of the current security realm in the sip.xml file as follows:
<login-config><auth-method>DIGEST</auth-method> <realm-name>myrealm</realm-name></login-config>
Converged Application Server Role Mapping FeaturesWhen you deploy a SIP Servlet, security-role definitions that were created for declarative and programmatic security must be assigned to actual principals and/or roles available in the Servlet container. Converged Application Server uses the security-role-assignment element in weblogic.xml to help you map security-role definitions to actual principals and roles. security-role-assignment provides two different ways to map security roles, depending on how much flexibility you require for changing role assignment at a later time:
■ The security-role-assignment element can define the complete list of principal names and roles that map to roles defined in. This method defines the role assignment at deployment time, but at the cost of flexibility; to add or remove principals from the role, you must edit the sip.xml and weblogic.xml deployment descriptors, and redeploy the SIP Servlet.
■ The externally-defined element in security-role-assignment enables you to assign principal names and roles to a sip.xml role at any time using the Administration Console. When using the externally-defined element, you can add or remove principals and roles to a sip.xml role without having to redeploy the SIP Servlet.
Two additional XML elements can be used for assigning roles to the sip.xml deployment descriptor’s run-as element: run-as-principal-name and run-as-role-assignment. These role assignment elements take precedence over

Assigning Roles Using security-role-assignment
Securing SIP Servlet Resources 13-3
security-role-assignment elements if they are used, as described in "Assigning run-as Roles".
Optionally, you can choose to specify no role mapping elements in weblogic.xml to use implicit role mapping, as described in "Using Implicit Role Assignment".
The sections that follow describe Converged Application Server role assignment in more detail.
Using Implicit Role AssignmentWith implicit role assignment, Converged Application Server assigns a security-role name in sip.xml to a role of the exact same name, which must be configured in the Converged Application Server security realm. To use implicit role mapping, you omit the security-role-assignment element in weblogic.xml, as well as any run-as-principal-name, and run-as-role-assignment elements use for mapping run-as roles.
When no role mapping elements are available in weblogic.xml, Converged Application Server implicitly maps the sip.xml deployment descriptor’s security-role elements to roles having the same name. Note that implicit role mapping takes place regardless of whether the role name defined in sip.xml is actually available in the security realm. Converged Application Server displays a warning message anytime it uses implicit role assignment. For example, if you use the “everyone” role in sip.xml but you do not explicitly assign the role in weblogic.xml, the server displays the warning:
<Webapp: ServletContext(id=id,name=application,context-path=/context),the role: everyone defined in web.xml has not been mapped to principalsin security-role-assignment in weblogic.xml.Will use the rolename itself as the principal-name.>
You can ignore the warning message if the corresponding role has been defined in the Converged Application Server security realm. The message can be disabled by defining an explicit role mapping in weblogic.xml.
Use implicit role assignment if you want to hard-code your role mapping at deployment time to a known principal name.
Assigning Roles Using security-role-assignmentThe security-role-assignment element in weblogic.xml enables you to assign roles either at deployment time or at any time using the Administration Console. The sections that follow describe each approach.
Important RequirementsIf you specify a security-role-assignment element in the weblogic.xml deployment descriptor, Converged Application Server requires that you also define a duplicate security-role element in a web.xml deployment descriptor. This requirement applies even if you are deploying a pure SIP Servlet, which would not normally require a web.xml deployment descriptor (generally reserved for HTTP Web Applications).

Assigning Roles Using security-role-assignment
13-4 Oracle Communications Converged Application Server Developer's Guide
For example, Example 13–1 shows a portion of a sip.xml deployment descriptor that defines a security constraint with the role, roleadmin. Example 13–2 shows that a security-role-assignment element has been defined in weblogic.xml to assign principals and roles to roleadmin. In Converged Application Server, this Servlet must be deployed with a web.xml deployment descriptor that also defines the roleadmin role, as shown in Example 13–3.
If the web.xml contents were not available, Converged Application Server would use implicit role assignment and assume that the roleadmin role was defined in the security realm; the principals and roles assigned in weblogic.xml would be ignored.
Example 13–1 Declarative Security Constraints in sip.xml
... <security-constraint> <resource-collection> <resource-name>RegisterRequests</resource-name> <servlet-name>registrar</servlet-name> </resource-collection> <auth-constraint> <javaee:role-name>roleadmin</javaee:role-name> </auth-constraint> </security-constraint>
<security-role> <javaee:role-name>roleadmin</javaee:role-name> </security-role>...
Example 13–2 Example security-role-assignment in weblogic.xml
<weblogic-web-app> <security-role-assignment> <role-name>roleadmin</role-name> <principal-name>Tanya</principal-name> <principal-name>Fred</principal-name> <principal-name>system</principal-name> </security-role-assignment></weblogic-web-app>
Example 13–3 Required security-role Element in web.xml
<!DOCTYPE web-app PUBLIC "-//Sun Microsystems, Inc.//DTD Web Application 2.3//EN" "http://java.sun.com/dtd/web-app_2_3.dtd"><web-app> <security-role> <role-name>roleadmin</role-name>
Note: If you specify a security-role-assignment in weblogic.xml, but there is no corresponding security-role element in web.xml, Converged Application Server generates the error message:
The security-role-assignment references an invlaid security-role: rolename
The server then implicitly maps the security-role defined in sip.xml to a role of the same name, as described in "Using Implicit Role Assignment".

Assigning Roles Using security-role-assignment
Securing SIP Servlet Resources 13-5
</security-role></web-app>
Assigning Roles at Deployment TimeA basic security-role-assignment element definition in weblogic.xml declares a mapping between a security-role defined in sip.xml and one or more principals or roles available in the Converged Application Server security realm. If the security-role is used in combination with the run-as element in sip.xml, Converged Application Server assigns the first principal or role name specified in the security-role-assignment to the run-as role.
Example 13–2, "Example security-role-assignment in weblogic.xml" shows an example security-role-assignment element. This example assigns three users to the roleadmin role defined in Example 13–1, "Declarative Security Constraints in sip.xml". To change the role assignment, you must edit the weblogic.xml descriptor and redeploy the SIP Servlet.
Dynamically Assigning Roles Using the Administration ConsoleThe externally-defined element can be used in place of the <principal-name> element to indicate that you want the security roles defined in the role-name element of sip.xml to use mappings that you assign in the Administration Console. The externally-defined element gives you the flexibility of not having to specify a specific security role mapping for each security role at deployment time. Instead, you can use the Administration Console to specify and modify role assignments at anytime.
Additionally, because you may elect to use this element for some SIP Servlets and not others, it is not necessary to select the ignore roles and polices from DD option for the security realm. (You select this option in the On Future Redeploys: field on the General tab on the Security control panel in the Administration Console.) Therefore, within the same security realm, deployment descriptors can be used to specify and modify security for some applications while the Administration Console can be used to specify and modify security for others.
Example 13–4 shows an example of using the externally-defined element with the roleadmin role defined in Example 13–1, "Declarative Security Constraints in sip.xml". To assign existing principals and roles to the roleadmin role, the Administrator would use the Converged Application Server Administration Console.
Note: When specifying security role names, observe the following conventions and restrictions:
■ The proper syntax for a security role name is as defined for an Nmtoken in the Extensible Markup Language (XML) recommendation available on the Web at: http://www.w3.org/TR/REC-xml#NT-Nmtoken.
■ Do not use blank spaces, commas, hyphens, or any characters in this comma-separated list: \t, < >, #, |, &, ~, ?, ( ), { }.
■ Security role names are case sensitive.
■ The Oracle-suggested convention for security role names is that they be singular.
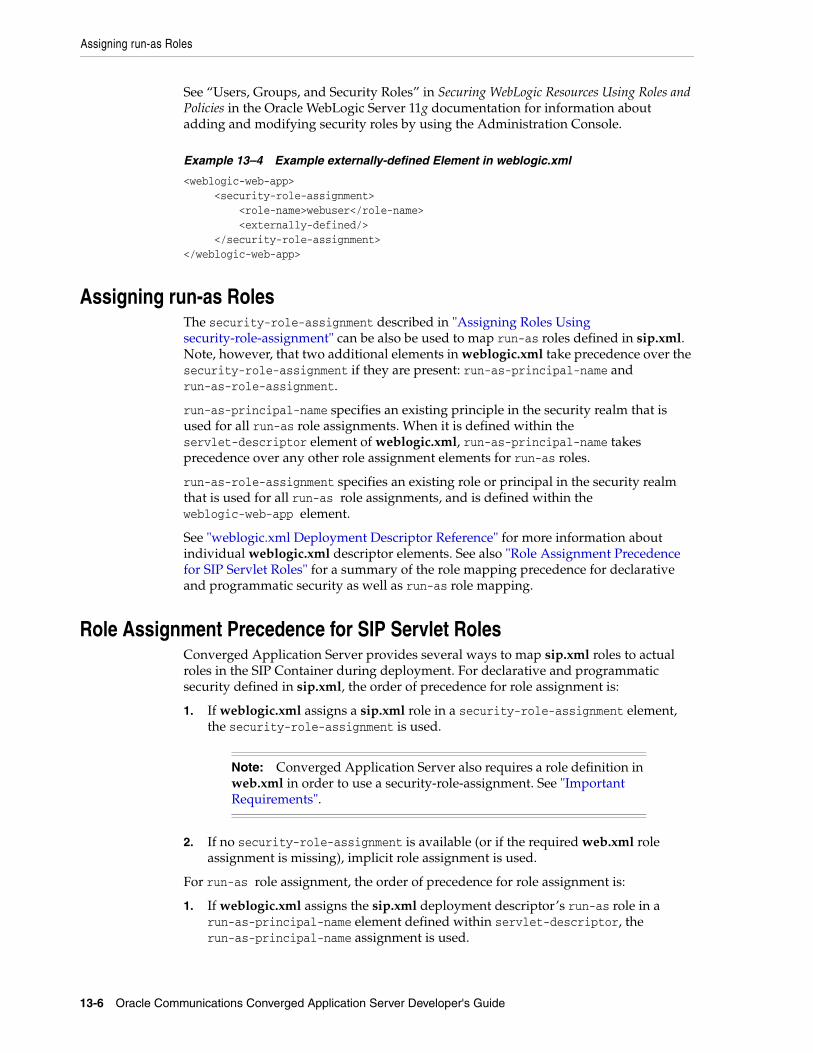
Assigning run-as Roles
13-6 Oracle Communications Converged Application Server Developer's Guide
See “Users, Groups, and Security Roles” in Securing WebLogic Resources Using Roles and Policies in the Oracle WebLogic Server 11g documentation for information about adding and modifying security roles by using the Administration Console.
Example 13–4 Example externally-defined Element in weblogic.xml
<weblogic-web-app> <security-role-assignment> <role-name>webuser</role-name> <externally-defined/> </security-role-assignment></weblogic-web-app>
Assigning run-as RolesThe security-role-assignment described in "Assigning Roles Using security-role-assignment" can be also be used to map run-as roles defined in sip.xml. Note, however, that two additional elements in weblogic.xml take precedence over the security-role-assignment if they are present: run-as-principal-name and run-as-role-assignment.
run-as-principal-name specifies an existing principle in the security realm that is used for all run-as role assignments. When it is defined within the servlet-descriptor element of weblogic.xml, run-as-principal-name takes precedence over any other role assignment elements for run-as roles.
run-as-role-assignment specifies an existing role or principal in the security realm that is used for all run-as role assignments, and is defined within the weblogic-web-app element.
See "weblogic.xml Deployment Descriptor Reference" for more information about individual weblogic.xml descriptor elements. See also "Role Assignment Precedence for SIP Servlet Roles" for a summary of the role mapping precedence for declarative and programmatic security as well as run-as role mapping.
Role Assignment Precedence for SIP Servlet RolesConverged Application Server provides several ways to map sip.xml roles to actual roles in the SIP Container during deployment. For declarative and programmatic security defined in sip.xml, the order of precedence for role assignment is:
1. If weblogic.xml assigns a sip.xml role in a security-role-assignment element, the security-role-assignment is used.
2. If no security-role-assignment is available (or if the required web.xml role assignment is missing), implicit role assignment is used.
For run-as role assignment, the order of precedence for role assignment is:
1. If weblogic.xml assigns the sip.xml deployment descriptor’s run-as role in a run-as-principal-name element defined within servlet-descriptor, the run-as-principal-name assignment is used.
Note: Converged Application Server also requires a role definition in web.xml in order to use a security-role-assignment. See "Important Requirements".

weblogic.xml Deployment Descriptor Reference
Securing SIP Servlet Resources 13-7
2. If weblogic.xml assigns the sip.xml deployment descriptor’s run-as role in a run-as-role-assignment element, the run-as-role-assignment element is used.
3. If weblogic.xml assigns the sip.xml deployment descriptor’s run-as role in a security-role-assignment element, the security-role-assignment is used.
4. If no security-role-assignment is available (or if the required web.xml role assignment is missing), implicit role assignment is used.
Debugging Security FeaturesIf you want to debug security features in SIP Servlets that you develop, specify the -Dweblogic.Debug=wlss.Security startup option when you start Converged Application Server. Using this debug option causes Converged Application Server to display additional security-related messages in the standard output.
weblogic.xml Deployment Descriptor ReferenceThe weblogic.xml DTD contains detailed information about each of the role mapping elements discussed in this section. See “weblogic.xml Deployment Descriptor Elements” in Developing Web Applications, Servlets, and JSPs for Oracle WebLogic Server in the Oracle WebLogic Server 11g documentation.
Note: Converged Application Server also requires a role definition in web.xml in order to assign roles with run-as-principal-name. See "Important Requirements".
Note: Converged Application Server also requires a role definition in web.xml in order to assign roles with run-as-role-assignment. See "Important Requirements".
Note: Converged Application Server also requires a role definition in web.xml in order to use a security-role-assignment. See "Important Requirements".

weblogic.xml Deployment Descriptor Reference
13-8 Oracle Communications Converged Application Server Developer's Guide

14
Enabling Message Logging 14-1
14Enabling Message Logging
This chapter describes how to use Oracle Communications Converged Application Server message logging features on a development system:
■ Overview
■ Enabling Message Logging
■ Specifying Content Types for Unencrypted Logging
■ Example Message Log Configuration and Output
■ Configuring Log File Rotation
OverviewMessage logging records SIP and Diameter messages (both requests and responses) received by Converged Application Server. This requires that the logging level be set to at least the INFO level. You can use the message log in a development environment to check how external SIP requests and SIP responses are received. By outputting the distinguishable information of SIP dialogs such as Call-IDs from the application log, and extracting relevant SIP messages from the message log, you can also check SIP invocations from HTTP servlets and so forth.
When you enable message logging, Converged Application Server records log records in the Managed Server log file associated with each engine tier server instance by default. You can optionally log the messages in a separate, dedicated log file, as described in "Configuring Log File Rotation".
Enabling Message LoggingYou enable and configure message logging by adding a message-debug element to the sipserver.xml configuration file. Converged Application Server provides two different methods of configuring the information that is logged:
■ Specify a predefined logging level (terse, basic, or full), or
Note: The message logging functionality logs all SIP requests and responses; do not enable this feature in a production system. In a production system, you can instead configure one or more logging Servlets, which enable you to specify additional criteria for determining which messages to log. See “Logging SIP Requests and Responses” in Converged Application Server Administrator’s Guide.

Enabling Message Logging
14-2 Oracle Communications Converged Application Server Developer's Guide
■ Identify the exact portions of the SIP message that you want to include in a log record, in a specified order
The sections that follow describe each method of configuring message logging functionality using elements in the sipserver.xml file. Note that you can also set these elements using the Administration Console. In the left pane of the Administration Console, select Configuration, then select the Message Debug tab of the SipServer console extension node.
Specifying a Predefined Logging LevelThe optional level element in message-debug specifies a predefined collection of information to log for each SIP request and response. The following levels are supported:
■ terse: Logs only the domain setting, logging Servlet name, logging level, and whether or not the message is an incoming message.
■ basic: Logs the terse items plus the SIP message status, reason phrase, the type of response or request, the SIP method, the From header, and the To header.
■ full: Logs the basic items plus all SIP message headers plus the timestamp, protocol, request URI, request type, response type, content type, and raw content.
Example 14–1 shows a configuration entry that specifies the full logging level.
Example 14–1 Sample Message Logging Level Configuration in sipserver.xml
<message-debug> <level>full</level></message-debug>
Customizing Log RecordsConverged Application Server also enables you to customize the exact content and order of each message log record. To configure a custom log record, you provide a format element that defines a log record pattern and one or more tokens to log in each record.
Table 14–1 describes the nested elements used in the format element.
Table 14–2 describes the string token values used to specify information in a message log record:
Note: When level is set to full, format is overridden.
Table 14–1 Nested format Elements
param-name param-value Description
pattern Specifies the pattern used to format a message log entry. The format is defined by specifying one or more integers, bracketed by “{“ and “}”. Each integer represents a token defined later in the format definition.
token A string token that identifies a portion of the SIP message to include in a log record. Table 14–2 provides a list of available string tokens. You can define multiple token elements as needed to customize your log records.

Specifying Content Types for Unencrypted Logging
Enabling Message Logging 14-3
See "Example Message Log Configuration and Output" for an example sipserver.xml file that defines a custom log record using two tokens.
Specifying Content Types for Unencrypted LoggingBy default Converged Application Server uses String format (UTF-8 encoding) to log the content of SIP messages having a text or application/sdp Content-Type value. For
Table 14–2 Available Tokens for Message Log Records
Token Description Example or Type
%call_id The Call-ID header. It is blank when forwarding. 43543543
%content The raw content. Byte array
%content_length The content length. String value
%content_type The content type. String value
%cseq The CSeq header. It is blank when forwarding. INVITE 1
%date The date when the message was received. (“yyyy/MM/dd” format)
2004/05/16
%from The From header (all). It is blank when forwarding. sip:[email protected];tag=438943
%from_addr The address portion of the From header. [email protected]
%from_port The port number portion of the From header. 7002
%from_tag The tag parameter of the From header. It is blank when forwarding.
12345
%from_uri The SIP URI part of the From header. It is blank when forwarding. sip:[email protected]
%headers A List of message headers stored in a 2-element array. The first element is the name of the header, while the second is a list of all values for the header.
List of headers
%io Whether the message is incoming or not. TRUE
%method The name of the SIP method. It records the method name to invoke when forwarding.
INVITE
%msg Summary Call ID String value
%mtype The type of receiving. SIPREQ
%protocol The protocol used. UDP
%reason The response reason. OK
%req_uri The request URI. This token is only available for the SIP request. sip:[email protected]
%status The response status. 200
%time The time when the message was received. (“HH:mm:ss” format) 18:05:27
%timestampmillis Time stamp in milliseconds. 9295968296
%to The To header (all). It is blank when forwarding. sip:[email protected];tag=438943
%to_addr The address portion of the To header. [email protected]
%to_port The port number portion of the To header. 7002
%to_tag The tag parameter of the To header. It is blank when forwarding. 12345
%to_uri The SIP URI part of the To header. It is blank when forwarding. sip:[email protected]

Example Message Log Configuration and Output
14-4 Oracle Communications Converged Application Server Developer's Guide
all other Content-Type values, Converged Application Server attempts to log the message content using the character set specified in the charset parameter of the message, if one is specified. If no charset parameter is specified, or if the charset value is invalid or unsupported, Converged Application Server uses Base-64 encoding to encrypt the message content before logging the message.
If you want to avoid encrypting the content of messages under these circumstances, specify a list of String-representable Content-Type values using the string-rep element in sipserver.xml. The string-rep element can contain one or more content-type elements to match. If a logged message matches one of the configured content-type elements, Converged Application Server logs the content in String format using UTF-8 encoding, regardless of whether or not a charset parameter is included.
Example 14–2 shows a sample message-debug configuration that logs String content for three additional Content-Type values, in addition to text/* and application/sdp content.
Example 14–2 Logging String Content for Additional Content Types
<message-debug> <level>full</level> <string-rep> <content-type>application/msml+xml</content-type> <content-type>application/media_control+xml</content-type> <content-type>application/media_control</content-type> </string-rep> </message-debug>
Example Message Log Configuration and OutputExample 14–3 shows a sample message log configuration in sipserver.xml. Example 14–4, "Sample Message Log Output" shows sample output from the Managed Server log file.
Example 14–3 Sample Message Log Configuration in sipserver.xml
<message-debug> <format> <pattern>{0} {1}</pattern> <token>%headers</token> <token>%content</token> </format></message-debug>
Example 14–4 Sample Message Log Output
####<Aug 10, 2005 7:12:08 PM PDT> <Info> <WLSS.Trace> <jiri.bea.com> <myserver> <ExecuteThread: '11' for queue: 'sip.transport.Default'> <<WLS Kernel>> <> <BEA- 331802> <SIP Tracer: logger Message: To: sut <sip:[email protected]:5060> <mailto:sip:[email protected]:5060> Content-Length: 136Contact: user:[email protected]:5061CSeq: 1 INVITE
Note: You do not need to specify text/* or application/sdp content types as these are logged in String format by default.

Configuring Log File Rotation
Enabling Message Logging 14-5
Call-ID: [email protected]: user <sip:[email protected]:5061> <mailto:sip:[email protected]:5061>;tag=59Via: SIP/2.0/UDP 10.32.5.230:5061Content-Type: application/sdpSubject: Performance TestMax-Forwards: 70 v=0o=user1 53655765 2353687637 IN IP4 127.0.0.1s=-c=IN IP4 127.0.0.1t=0 0m=audio 10000 RTP/AVP 0a=rtpmap:0 PCMU/8000>####<Aug 10, 2005 7:12:08 PM PDT> <Info> <WLSS.Trace> <jiri.bea.com> <myserver> <ExecuteThread: '11' for queue: 'sip.transport.Default'> <<WLS Kernel>> <> <BEA- 331802> <SIP Tracer: logger Message: To: sut <sip:[email protected]:5060> <mailto:sip:[email protected]:5060> Content-Length: 0CSeq: 1 INVITECall-ID: [email protected]: SIP/2.0/UDP 10.32.5.230:5061From: user <sip:[email protected]:5061> <mailto:sip:[email protected]:5061> ;tag=59Server: Oracle WebLogic Communications Server 10.3.1.0 >
Configuring Log File RotationMessage log entries for SIP and Diameter messages are stored in the main Converged Application Server log file by default. You can optionally store the messages in a dedicated log file. Using a separate file makes it easier to locate message logs, and also enables you to use Converged Application Server's log rotation features to better manage logged data.
Log rotation is configured using several elements nested within the main message-debug element in sipserver.xml. As with the other XML elements described in this section, you can also configure values using the Configuration->Message Debug tab of the SIP Server Administration Console extension.
Table 14–3 describes each element. Note that a server restart is necessary in order to initiate independent logging and log rotation.
Table 14–3 XML Elements for Configuring Log Rotation
Element Description
logging-enabled Determines whether a separate log file is used to store message debug log messages. By default, this element is set to false and messages are logged in the general log file.
file-min-size Configures the minimum size, in kilobytes, after which the server automatically rotate log messages into another file. This value is used when the rotation-type element is set to bySize.
log-filename Defines the name of the log file for storing messages. By default, the log files are stored under domain_home/servers/server_name/logs.

Configuring Log File Rotation
14-6 Oracle Communications Converged Application Server Developer's Guide
Example 14–5 shows a sample message-debug configuration using log rotation.
Example 14–5 Sample Log Rotation Configuration
<?xml version='1.0' encoding='UTF-8'?><sip-server xmlns="http://www.bea.com/ns/wlcp/wlss/300" xmlns:sec="http://www.bea.com/ns/weblogic/90/security" xmlns:xsi="http://www.w3.org/2001/XMLSchema-instance" xmlns:wls="http://www.bea.com/ns/weblogic/90/security/wls"> <message-debug> <logging-enabled>true</logging-enabled> <file-min-size>500</file-min-size> <log-filename>sip-messages.log</log-filename> <rotation-type>byTime</rotation-type> <number-of-files-limited>true</number-of-files-limited> <file-count>5</file-count> <rotate-log-on-startup>false</rotate-log-on-startup> <log-file-rotation-dir>old_logs</log-file-rotation-dir> <rotation-time>00:00</rotation-time> <file-time-span>20</file-time-span> <date-format-pattern>MMM d, yyyy h:mm a z</date-format-pattern> </message-debug></sip-server>
rotation-type Configures the criterion for moving older log messages to a different file. This element may have one of the following values:
■ bySize: This default setting rotates log messages based on the specified file-min-size.
■ byTime: This setting rotates log messages based on the specified rotation-time.
■ none: Disables log rotation.
number-of-files-limited Specifies whether or not the server places a limit on the total number of log files stored after a log rotation. By default, this element is set to false.
file-count Configures the maximum number of log files to keep when number-of-files-limited is set to true.
rotate-log-on-startup Determines whether the server must rotate the log file at server startup time.
log-file-rotation-dir Configures a directory in which to store rotated log files. By default, rotated log files are stored in the same directory as the active log file.
rotation-time Configures a start time for log rotation when using the byTime log rotation criterion.
file-time-span Specifies the interval, in hours, after which the log file is rotated. This value is used when the rotation-type element is set to byTime.
date-format-pattern Specifies the pattern to use for rending dates in log file entries. The value of this element must conform to the java.text.SimpleDateFormat class.
Table 14–3 (Cont.) XML Elements for Configuring Log Rotation
Element Description

15
Generating SNMP Traps from Application Code 15-1
15Generating SNMP Traps from Application Code
This chapter describes how to use the Oracle Communications Converged Application Server SipServletSnmpTrapRuntimeMBean to generate SNMP traps from within a SIP Servlet:
■ Overview
■ Requirement for Accessing SipServletSnmpTrapRuntimeMBean
■ Obtaining a Reference to SipServletSnmpTrapRuntimeMBean
■ Generating an SNMP Trap
See “Configuring SNMP” in the Converged Application Server Administrator’s Guide for information about configuring SNMP in a Converged Application Server domain.
OverviewConverged Application Server includes a runtime MBean, SipServletSnmpTrapRuntimeMBean,that enables applications to easily generate SNMP traps. The Converged Application Server MIB contains seven new OIDs that are reserved for traps generated by an application. Each OID corresponds to a severity level that the application can assign to a trap, in order from the least severe to the most severe:
■ Info
■ Notice
■ Warning
■ Error
■ Critical
■ Alert
■ Emergency
To generate a trap, an application simply obtains an instance of the SipServletSnmpTrapRuntimeMBean and then executes a method that corresponds to the desired trap severity level (sendInfoTrap(), sendWarningTrap(), sendErrorTrap(), sendNoticeTrap(), sendCriticalTrap(), sendAlertTrap(), and sendEmergencyTrap()). Each method takes, as a single parameter, the String value of the trap message to generate.
For each SNMP trap generated in this manner, Converged Application Server also automatically transmits the Servlet name, application name, and Converged Application Server instance name associated with the calling Servlet.

Requirement for Accessing SipServletSnmpTrapRuntimeMBean
15-2 Oracle Communications Converged Application Server Developer's Guide
Requirement for Accessing SipServletSnmpTrapRuntimeMBeanIn order to obtain a SipServletSnmpTrapRuntimeMBean, the calling SIP Servlet must be able to perform MBean lookups from the Servlet context. To enable this functionality, you must assign a Converged Application Server administrator role-name entry to the security-role and run-as role elements in the sip.xml deployment descriptor. Example 15–1 shows a sample sip.xml file with the required role elements highlighted.
Example 15–1 Sample Role Requirement in sip.xml
<?xml version="1.0" encoding="UTF-8"?><!DOCTYPE sip-app PUBLIC "-//Java Community Process//DTD SIP Application 1.0//EN" "http://www.jcp.org/dtd/sip-app_1_0.dtd"><sip-app> <display-name>My SIP Servlet</display-name> <distributable/> <servlet> <servlet-name>myservlet</servlet-name> <servlet-class>com.mycompany.MyServlet</servlet-class> <run-as> <role-name>weblogic</role-name> </run-as> </servlet> <servlet-mapping> <servlet-name>myservlet</servlet-name> <pattern> <equal><var>request.method</var><value>INVITE</value> </equal> </pattern> </servlet-mapping> <security-role> <role-name>weblogic</role-name> </security-role></sip-app>
Obtaining a Reference to SipServletSnmpTrapRuntimeMBeanAny SIP Servlet that generates SNMP traps must first obtain a reference to the SipServletSnmpTrapRuntimeMBean. Example 15–2 shows the sample code for a method to obtain the MBean.
Example 15–2 Sample Method for Accessing SipServletSnmpTrapRuntimeMBean
public SipServletSnmpTrapRuntimeMBean getServletSnmpTrapRuntimeMBean() { MBeanHome localHomeB = null; SipServletSnmpTrapRuntimeMBean ssTrapMB = null;
try { Context ctx = new InitialContext(); localHomeB = (MBeanHome)ctx.lookup(MBeanHome.LOCAL_JNDI_NAME); ctx.close(); } catch (NamingException ne){ ne.printStackTrace(); }

Generating an SNMP Trap
Generating SNMP Traps from Application Code 15-3
Set set = localHomeB.getMBeansByType("SipServletSnmpTrapRuntime"); if (set == null || set.isEmpty()) { try { throw new ServletException("Unable to lookup type 'SipServletSnmpTrapRuntime'"); } catch (ServletException e) { e.printStackTrace(); } } ssTrapMB = (SipServletSnmpTrapRuntimeMBean) set.iterator().next(); return ssTrapMB;}
Generating an SNMP TrapIn combination with the method shown in Example 15–2, Example 15–3 demonstrates how a SIP Servlet would use the MBean instance to generate an SNMP trap in response to a SIP INVITE.
Example 15–3 Generating a SNMP Trap
public class MyServlet extends SipServlet { private SipServletSnmpTrapRuntimeMBean sipServletSnmpTrapMb = null;
public MyServlet () { }
public void init (ServletConfig sc) throws ServletException { super.init (sc); sipServletSnmpTrapMb = getServletSnmpTrapRuntimeMBean(); }
protected void doInvite(SipServletRequest req) throws IOException { sipServletSnmpTrapMb.sendInfoTrap("Rx Invite from " + req.getRemoteAddr() + "with call id" + req.getCallId()); }}

Generating an SNMP Trap
15-4 Oracle Communications Converged Application Server Developer's Guide

16
Using the Location Service RESTful Interface 16-1
16Using the Location Service RESTful Interface
This chapter describes the Oracle Communications Converged Application Server RESTful API, a RESTful interface that creates, modifies, and deletes address-of-record (AOR) entries in the Location Service.
About the Location Service RESTful InterfaceThis chapter lists RESTful operations for the Location Service, including the parameters accepted and returned by each operation and examples of HTTP requests and responses.
These operations store, lookup, and clear address-of-record registrations in the Location Service. An AOR is a SIP or SIPS URI that points to a domain with a location service that can map the URI to another URI where the user might be available. Typically, the location service is populated through registrations. An AOR is frequently thought of as the “public address” of the user.
For example, to create objects that represent the AOR, the client application sends the following request to the API:
POST / context-root/locationservice/registration/sip:[email protected]
About RESTThe Location Service API follows the style of a REpresentational State Transfer (REST) interface.
In a RESTful API, functions are distinguished by the combination of a particular URI and the HTTP method used to access it. In general, the URI identifies the resource on which to act, and the HTTP method identifies the type of action to perform.
The methods in the HTTP protocol used in the Location Service RESTful API - POST, GET, PUT, and DELETE - correspond to the programming operations commonly known as CRUD operations. CRUD, which stands for create, read, update, and delete, represent the common operations applicable in data-oriented APIs. The equivalent function calls in a traditional API may be similar to createUser(), getUser(), setUser(), and deleteUser(). In this case, the instance on which the function operates is typically identified through an input parameter.
About JSON Body ParametersOperations that are performed by using the GET or DELETE HTTP methods do not require input values other than what is provided in the URL and headers of the client

About the Context Root
16-2 Oracle Communications Converged Application Server Developer's Guide
request. That is, they do not require HTTP body content to be supplied in the invocation request.
However, Location Service RESTful API operations are performed by using the POST methods require additional input data. The API takes input parameters in the form of JSON (JavaScript Object Notation) data in the body of the request.
JSON is a data exchange format based on JavaScript that is commonly used to pass information between web clients and servers over HTTP. In the body of the request, JSON data appears as one or more name-value pairs.
About the Context RootThe context root is set when the application is deployed. By default Converged Application Server uses proxyregistrarssr as context root. You can change the context root by editing the application.xml in the file
MW_home/occas_5.1/applications/proxyregistrarear-5.1.0.0.0.ear.
To learn more, see the chapter on configuring the Proxy Registrar in Converged Application Server Administrator’s Guide.
Using Authentication and AuthorizationThe Location Service RESTful interface’s security consists of authentication and authorization. Authentication supports HTTP Digest and X-3GPP-Asserted-Identity header. Authorization allows only the AOR owner to access and update their registration information.
To use HTTP Digest and X-3GPP-Asserted-Identity authentication you must configure Converged Application Server to handle these header types for authentication. To learn more, see the chapters on configuring Digest authentication and 3GPP HTTP authentication assertion providers in Converged Application Server Security Guide.

RESTful APIs for the Location Service
Using the Location Service RESTful Interface 16-3
RESTful APIs for the Location Service
The RESTful Location Service APIs are:
■ Store Registrations for Address-of-Record
■ Lookup an Address-of-Record
■ Clear All Address of Record Bindings

Store Registrations for Address-of-Record
16-4 Oracle Communications Converged Application Server Developer's Guide
Store Registrations for Address-of-Record
Stores registrations for the AOR.
An HTTP response 200 message is returned on success.
16HTTP MethodPOST
16URIproxyregistrarssr/locationservice/registration/uri
Where the URI is of the form: sip:[email protected]
16Request HeaderAccept application/json, Content-Type application/json
16Request BodyThe cseq, contactAddress, and callId parameters are required and case-sensitive.
[{"cseq":7,"callId":"a97d0d177949304c@enpoYWkwMS5hcGFjLmJlYS5jb20.","contactAddress":"<sip:[email protected]:5060>;expires=3600","methodsParam":"INVITE,BYE,CANCEL,ACK"}]
16Response Body [{"aor":"sip:[email protected]","contactUri":"sip:[email protected]:5060","contactAddress":"<sip:[email protected]:5060>;expires=3600","callId":"a97d0d177949304c@enpoYWkwMS5hcGFjLmJlYS5jb20.","cseq":7,"qvalue":1.0,"methodsParam":"INVITE,BYE,CANCEL,ACK","expiresParam":3600,"expires":1335173253469,"path":null,"sipInstanceId":null,"regId":null,"remoteIP":"localhost","remotePort":2169,"created":1335169653469,"updated":1335169653469}]
16ExampleExample 16–1 stores an AOR registration in the Proxy Registrar using the following parameters:

RESTful APIs for the Location Service
Using the Location Service RESTful Interface 16-5
final String DEST_URL = "/proxyregistrarssr/locationservice/registration/sip:[email protected]"; private String account_name = "alice";private String account_pass = "welcome1";
Example 16–1 Storing AOR Registrations
public void StoreRegistration() throws Exception {String restUrl = "http://127.0.0.1:7001" + DEST_URL;URL url = new URL(restUrl);HttpURLConnection httpConn = (HttpURLConnection)url.openConnection();setHttpConnReqProperty(httpConn);httpConn.setRequestMethod("POST");httpConn.connect();OutputStreamWriter outWriter = new OutputStreamWriter(httpConn.getOutputStream(), "UTF-8");String requestRegistration = "[{\"cseq\":2," +"\"callId\":\"[email protected]:5071\"," +"\"contactAddress\":\"<sip:[email protected]:5071>;expires=300\"," +"\"methodsParam\":\"INVITE,BYE,CANCEL,ACK\"}]";outWriter.write(requestRegistration);outWriter.flush();outWriter.close();int responseCode = httpConn.getResponseCode();assertEquals(HttpURLConnection.HTTP_UNAUTHORIZED, responseCode);String digestValue = httpConn.getHeaderField(HttpAuthenticationUtils.HEADER_WWW_AUTHENTICATE);// Calculate the authorization header value from the authenticate headerString authorizeValue = caculateAuthorizationFromDigest(digestValue, DEST_URL, account_name, account_pass, "POST");httpConn = (HttpURLConnection)url.openConnection();setHttpConnReqProperty(httpConn);httpConn.setRequestMethod("POST");httpConn.setRequestProperty(HttpAuthenticationUtils.HEADER_AUTHORIZATION, authorizeValue);httpConn.connect();outWriter = new OutputStreamWriter(httpConn.getOutputStream(), "UTF-8");outWriter.write(requestRegistration);outWriter.flush();outWriter.close();responseCode = httpConn.getResponseCode(); assertEquals(HttpURLConnection.HTTP_OK, responseCode);InputStream input = httpConn.getInputStream();BufferedReader reader = new BufferedReader(new InputStreamReader(input, "UTF-8"));String responseContent = "";String line = null;while ((line = reader.readLine()) != null) {responseContent += line;} reader.close(); httpConn.disconnect(); } void setHttpConnReqProperty(HttpURLConnection httpConn) throws ProtocolException { httpConn.setRequestProperty("Accept", "application/json"); httpConn.setRequestProperty("Content-Type", "application/json"); httpConn.setDoInput(true); httpConn.setDoOutput(true); }
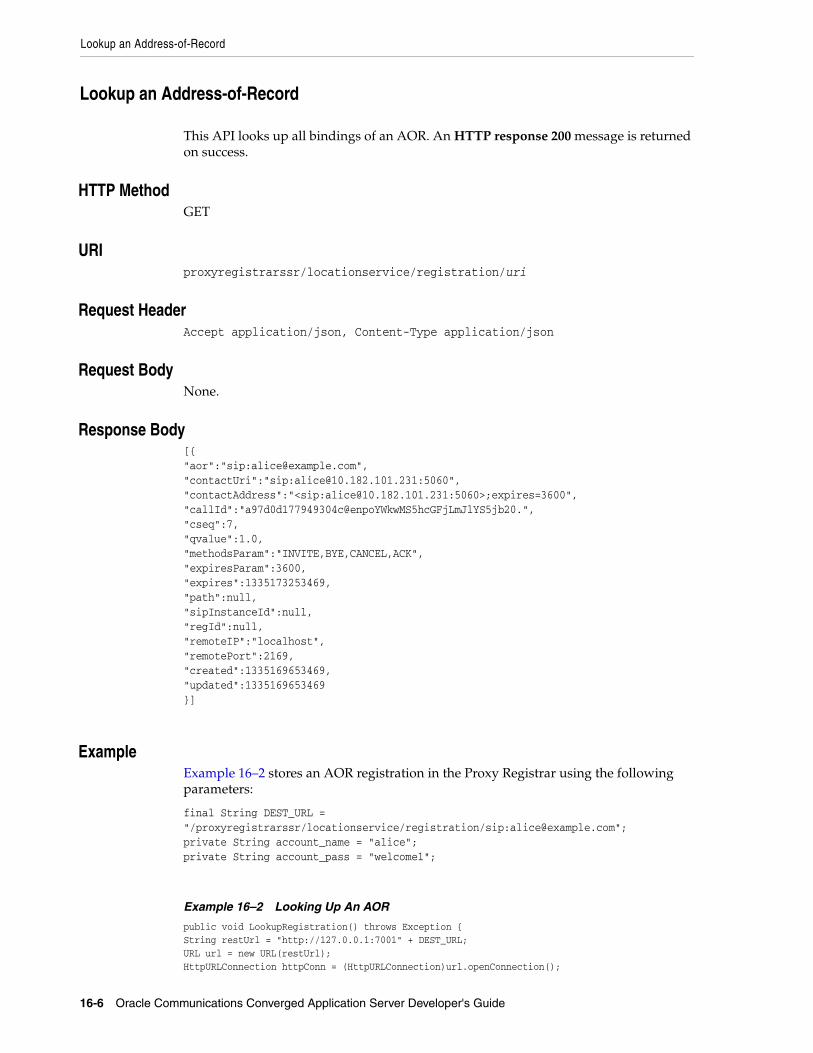
Lookup an Address-of-Record
16-6 Oracle Communications Converged Application Server Developer's Guide
Lookup an Address-of-Record
This API looks up all bindings of an AOR. An HTTP response 200 message is returned on success.
16HTTP MethodGET
16URIproxyregistrarssr/locationservice/registration/uri
16Request HeaderAccept application/json, Content-Type application/json
16Request BodyNone.
16Response Body[{"aor":"sip:[email protected]","contactUri":"sip:[email protected]:5060","contactAddress":"<sip:[email protected]:5060>;expires=3600","callId":"a97d0d177949304c@enpoYWkwMS5hcGFjLmJlYS5jb20.","cseq":7,"qvalue":1.0,"methodsParam":"INVITE,BYE,CANCEL,ACK","expiresParam":3600,"expires":1335173253469,"path":null,"sipInstanceId":null,"regId":null,"remoteIP":"localhost","remotePort":2169,"created":1335169653469,"updated":1335169653469}]
16ExampleExample 16–2 stores an AOR registration in the Proxy Registrar using the following parameters:
final String DEST_URL = "/proxyregistrarssr/locationservice/registration/sip:[email protected]"; private String account_name = "alice";private String account_pass = "welcome1";
Example 16–2 Looking Up An AOR
public void LookupRegistration() throws Exception {String restUrl = "http://127.0.0.1:7001" + DEST_URL;URL url = new URL(restUrl);HttpURLConnection httpConn = (HttpURLConnection)url.openConnection();

RESTful APIs for the Location Service
Using the Location Service RESTful Interface 16-7
setHttpConnReqProperty(httpConn);httpConn.setRequestMethod("GET");httpConn.connect();String digestValue = httpConn.getHeaderField(HttpAuthenticationUtils.HEADER_WWW_AUTHENTICATE); String authorizeValue = caculateAuthorizationFromDigest(digestValue, DEST_URL, account_name, account_pass, "GET");httpConn = (HttpURLConnection)url.openConnection();setHttpConnReqProperty(httpConn);httpConn.setRequestMethod("GET");httpConn.setRequestProperty(HttpAuthenticationUtils.HEADER_AUTHORIZATION, authorizeValue); httpConn.connect();responseCode = httpConn.getResponseCode();assertEquals(HttpURLConnection.HTTP_OK, responseCode);InputStream input = httpConn.getInputStream();BufferedReader reader = new BufferedReader(new InputStreamReader(input, "UTF-8"));String responseContent = "";String line = null;while ((line = reader.readLine()) != null) {responseContent += line;}reader.close();httpConn.disconnect(); }

Clear All Address of Record Bindings
16-8 Oracle Communications Converged Application Server Developer's Guide
Clear All Address of Record Bindings
An HTTP response 204 message is returned on success.
16HTTP MethodDELETE
16URIproxyregistrarssr/locationservice/registration/uri
Where the URI is of the form: sip:[email protected]
16ParametersNone.
16Request HeaderNone.
16Request BodyNone.
16Response BodyNone.
16ExamplesExample 16–3 clears an AOR registration in the Proxy Registrar using the following parameters:
final String DEST_URL = "/proxyregistrarssr/locationservice/registration/sip:[email protected]"; private String account_name = "alice";private String account_pass = "welcome1";
Example 16–3 Clearing AOR Binding
public void testClearAllBindings() throws Exception {String restUrl = "http://127.0.0.1:7001" + DEST_URL;URL url = new URL(restUrl);HttpURLConnection httpConn = (HttpURLConnection)url.openConnection();setHttpConnReqProperty(httpConn);httpConn.setRequestMethod("DELETE"); httpConn.connect();String digestValue = httpConn.getHeaderField(HttpAuthenticationUtils.HEADER_WWW_AUTHENTICATE);String authorizeValue = caculateAuthorizationFromDigest(digestValue, DEST_URL, account_name, account_pass, "DELETE");httpConn = (HttpURLConnection)url.openConnection();setHttpConnReqProperty(httpConn);httpConn.setRequestMethod("DELETE"); httpConn.setRequestProperty(HttpAuthenticationUtils.HEADER_AUTHORIZATION,

RESTful APIs for the Location Service
Using the Location Service RESTful Interface 16-9
authorizeValue);httpConn.connect();respCode = httpConn.getResponseCode(); assertEquals(HttpURLConnection.HTTP_NO_CONTENT, respCode); httpConn.disconnect();
}

Clear All Address of Record Bindings
16-10 Oracle Communications Converged Application Server Developer's Guide

Part IVPart IV Developing Applications With the Service
Foundation Toolkit
This part contains the following chapters:
■ Chapter 17, "Introduction to the Service Foundation Toolkit"
■ Chapter 18, "Packaging and Deploying SFT Applications"
■ Chapter 19, "SFT Deployment Descriptor and Schema Reference"
■ Chapter 20, "Event Orchestration in the Service Foundation Toolkit"
■ Chapter 21, "Implementing Call Control Services"
■ Chapter 22, "Using Announcements"
■ Chapter 24, "Using the XCAP Interfaces"
■ Chapter 25, "Creating Instant Messaging and Rich Media Services"


17
Introduction to the Service Foundation Toolkit 17-1
17Introduction to the Service Foundation Toolkit
Service Foundation Toolkit (SFT) is a server-side Java framework built on top of Oracle Communication Converged Application Server’s SIP Servlet programming model (SIP Servlet 1.1 as defined by JSR 289). SFT allows for the rapid development of converged communication services using the Java EE programming model, and provides Java APIs that you can use to implement services such as call control, media control, and instant messaging.
This chapter provides an overview of SFT, and how to create SFT applications.
The Service Foundation Toolkit Programming ModelSFT was developed with the understanding that SIP and converged applications are highly asynchronous, and that an event driven programming model is the preferred application development environment. SFT also supports the Java EE component model, and the ease-of-development and ease-of-configuration features introduced by Java EE—improving developer productivity by simplifying application development. Since the Java EE programming model and development concepts are widely recognized within the enterprise application development profession, these concepts are leveraged by SFT. In addition, SFT simplifies the usage of Communication artifacts from the Java EE components.
Normally, an application developer creates a CommunicationBean containing the necessary application logic in their event handling methods. In this way they can control the state of the communication session. Using dependency injection with the CommunicationService and CommunicationSession objects, a developer creates a communication session from Java EE components, or from the CommunicationBean itself. To do this, the developer uses the search API to locate the correct Communication object and modify it as necessary using the Java EE components.
The business logic common to both Java EE components and CommunicationBeans can be coded into Agents. Agents act as bridge between Java EE and Communication.
About the Communication InterfaceThe parent interface of all communication types within SFT is com.oracle.sft.api.Communication. There are two categories of communication:
■ UserActivity represent a single Participant within a communication.
■ Interaction represents multiple Participants within a communication.
Interaction provides the following sub-interfaces that represent different types of communications between multiple Participants.
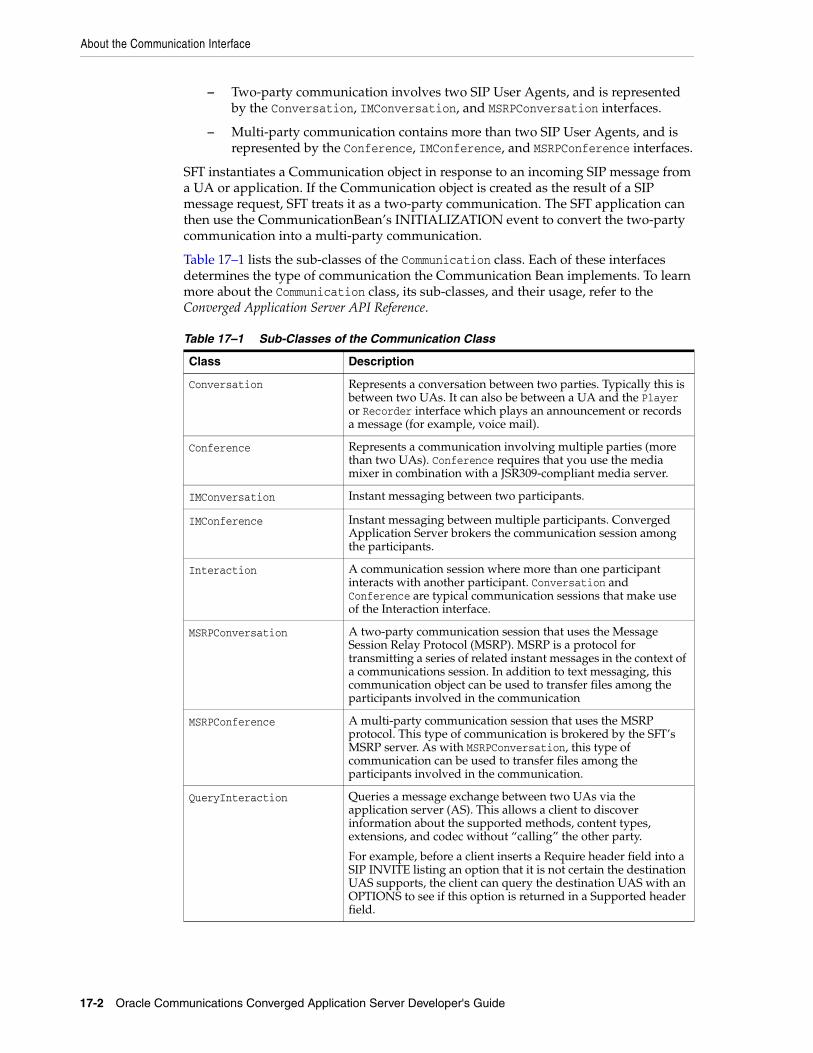
About the Communication Interface
17-2 Oracle Communications Converged Application Server Developer's Guide
– Two-party communication involves two SIP User Agents, and is represented by the Conversation, IMConversation, and MSRPConversation interfaces.
– Multi-party communication contains more than two SIP User Agents, and is represented by the Conference, IMConference, and MSRPConference interfaces.
SFT instantiates a Communication object in response to an incoming SIP message from a UA or application. If the Communication object is created as the result of a SIP message request, SFT treats it as a two-party communication. The SFT application can then use the CommunicationBean’s INITIALIZATION event to convert the two-party communication into a multi-party communication.
Table 17–1 lists the sub-classes of the Communication class. Each of these interfaces determines the type of communication the Communication Bean implements. To learn more about the Communication class, its sub-classes, and their usage, refer to the Converged Application Server API Reference.
Table 17–1 Sub-Classes of the Communication Class
Class Description
Conversation Represents a conversation between two parties. Typically this is between two UAs. It can also be between a UA and the Player or Recorder interface which plays an announcement or records a message (for example, voice mail).
Conference Represents a communication involving multiple parties (more than two UAs). Conference requires that you use the media mixer in combination with a JSR309-compliant media server.
IMConversation Instant messaging between two participants.
IMConference Instant messaging between multiple participants. Converged Application Server brokers the communication session among the participants.
Interaction A communication session where more than one participant interacts with another participant. Conversation and Conference are typical communication sessions that make use of the Interaction interface.
MSRPConversation A two-party communication session that uses the Message Session Relay Protocol (MSRP). MSRP is a protocol for transmitting a series of related instant messages in the context of a communications session. In addition to text messaging, this communication object can be used to transfer files among the participants involved in the communication
MSRPConference A multi-party communication session that uses the MSRP protocol. This type of communication is brokered by the SFT’s MSRP server. As with MSRPConversation, this type of communication can be used to transfer files among the participants involved in the communication.
QueryInteraction Queries a message exchange between two UAs via the application server (AS). This allows a client to discover information about the supported methods, content types, extensions, and codec without “calling” the other party.
For example, before a client inserts a Require header field into a SIP INVITE listing an option that it is not certain the destination UAS supports, the client can query the destination UAS with an OPTIONS to see if this option is returned in a Supported header field.

About Communication Beans
Introduction to the Service Foundation Toolkit 17-3
About Communication BeansThe SFT APIs use Java ease-of-development features such as Plain Old Java Objects (POJO), annotations, and dependency injection. At the core of SFT is CommunicationBean, a stateless POJO. CommunicationBean functions as an intermediary between the SIP Servlet and incoming SIP messages, simplifying the development of SIP-based applications.
Developers can create applications that contain one or more CommunicationBeans whose logic modifies the default behavior of SFT. This is done by invoking methods on the contextual objects (such as Communications and CommunicationSession) injected into the CommunicationBean rather than the SIP protocol itself. This is done by modifying the behavior of the communication session the bean is handling rather than the SIP protocol itself.
By default CommunicationBean acts as a Back-to-Back User Agent (B2BUA).When an event is generated, the related communication artifact is made available to CommunicationBean. CommunicationBean is a high level Java bean that encapsulates the logic for handling SIP-based communications. It exposes the call flow of a communication by generating events at logical stages of the communication session. CommunicationBean provides the capabilities of regular Java EE components—looking up JDBC data sources, J2EE Connector Architecture (JCA) resources, and Enterprise JavaBeans (EJBs). It also provides the ability to initiate transactions using the Java Transaction API (JTA), and propagates security related context information from SFT to the application server.
You implement CommunicationBeans using the @CommunicationBean annotation, which identifies a Java class as a CommunicationBean. CommunicationBeans act as event listeners for communication events initiated within the network. Methods in CommunicationBean—when annotated with a particular event annotation using the appropriate attributes—act as event listeners for the communication. For example, if SFT receives a SIP INVITE it results in an INITIALIZATION event within the CommunicationBean, which is handled using the method level @CommunicationEvent annotation. Once communication is established, a method annotated with the ESTABLISHED event type is triggered.
Example 17–1 illustrates the use of the INITIALIZATION and ESTABLISHED event types applied using the @CommunicationEvent annotations.
Example 17–1
@CommunicationBeanpublic class MyCommunicationBean { @Context CommunicationSession sess; @Context CommunicationContext ctx; @CommunicationEvent(type=CommunicationEvent.Type.INITIALIZATION) void handleInit() { Conversation call = (Conversation) ctx.getCommunication(); String confName = call.getCallee().getUserName();
UserActivity Encapsulates user activity. You can use this to retrieve information about a participant’s activity, and either allow or reject a communication between participants to be established based on the user’s activity.
Table 17–1 (Cont.) Sub-Classes of the Communication Class
Class Description

About Participants
17-4 Oracle Communications Converged Application Server Developer's Guide
if (confName.equalsIgnoreCase("[email protected]")) { sess.createConference(confName, call); } @CommunicationEvent(type=CommunicationEvent.Type.ESTABLISHED) void handleESTABLISH() {...
About ParticipantsSIP applications invite participants to scheduled or existing communication sessions. A participant can be a person, an automated service (such as voice mail or an announcement), or a physical device such as a mobile phone (the user equipment, or UE). A participant can also add or remove media to or from a communication. Within SFT, a participant in a communication is represented by the Participant interface. A communication session can have different types of participants.
For example, UserParticipant represents a SIP UA, and a MediaParticipant represents a party involved in media operations such as audio playback and recording. The Player and Recorder classes are sub-classes of MediaParticipant, and represent the ability to play an audio announcement or record a conversation.
Participants are added to a communication session either by SFT at runtime, or by an application. For example, when a SIP INVITE for a two-party call reaches Converged Application Server, SFT instantiates a Conversation object, and adds the caller and callee as participants. In cases where an application within Converged Application Server initiates the call, the application instantiates a Conversation object, and adds
Table 17–2 Sub-Classes of the Participant Class
Class Description
ActiviyParticipant Represents the activity of a Participant. For example, a SIP participant listening to waiting messages (voice mail) is an ActivityParticipant. That is, they are an active participant in a communication.
Focus Represents the Participant class in a Conference. Applications use the Focus interface to initialize JSR 309-compliant media server via the JSR 309 APIs.
MediaParticipant Represents a media participant such as the Player or Recorder interfaces (see below) which you use to add or remove media streams.
MediaPartner Represents a MediaPartner, which functions as both a Player and Recorder. The MediaPartner can also attach to a Participant in an established Conversation to play an announcement.
MSRPPlayer Represents a participant that is used to send files (such a JPEG images or documents) from the AS to the other participants in a MSRP communication.
MSRPRecorder A participant that is used to save files sent with MSRPPlayer and/or record the message history of a MSRP communication.
Player Represents a Player object that you can add to a Communication object for the playback of audio files.
Recorder Represents a Recorder object that you can add to a Communication object for the recording of audio files.
UserParticipant Represents a participant—a User Agent—using the communication session.

About SIP Messages and SFT
Introduction to the Service Foundation Toolkit 17-5
participants to the object to initiate the conversation. For example, a Third Party Call Control (3PCC) application in which the operator creates a call that connects two participants. Similarly, a conferencing application adds a participant in the form of the Recorder class to the Communication object, and then records the conversation.
Example 17–2 The UserParticipant Interface Getting Caller Information
...@Context CommunicationContext<Conversation,UserParticipant> ctx... Conversation call = ctx.getCommunication(); UserParticipant callee = (UserParticipant) ctx.getCallee(); UserParticipant caller = (UserParticipant) ctx.getCaller(); IdentityInformation ii = ctx.getContextElement(IdentityInformation.class); if (isRoaming(ii)) { caller.reject(Reason.DECLINE); } PhoneNumber ph = callee.getPhoneNumber(); if (isInternationalCall(ph, caller)) { caller.reject(Reason.DECLINE); }...
About SIP Messages and SFTSIP signaling—the setting up, modification, and termination of communication sessions—occurs through the exchange of SIP messages. There are two types of SIP messages: requests and responses. Requests are sent to initiate an action; responses are sent as replies to requests, acknowledging receipt of the requests and indicating their status.
Requests and responses share a common message format which consist of a start-line, one or more header fields, an empty line indicating the end of the header fields, and an optional message-body.
SIP messages often carry a lot of information. For example, the SIP MESSAGE body may include a text message, and the SIP INFO method communicates additional information about an active session using dual-tone multi-frequency (DTMF) signaling (DTMF). SIP Servlets read the SIP message contents, interpret them, and respond accordingly.
SFT converts SIP request and response messages into Java objects, which are defined by the Java interface Message. When an event is generated, SFT provides these Message objects to the application. Examples of Message objects include TextMessage, DtmfSignal, and MessageIndication.
Example 17–3 illustrates a CommunicationBean using the MessageIndication class within the @CommunicationEvent annotation. Depending on the type of message, applications may modify the message content. For example, an application can alter the text message sent in the SIP message body by adding a warning, or translating the content. Similarly, some messages may be consumed by the application to facilitate communication between the server and user agents. For example, a web-to-SIP phone IM session.
Example 17–3 The MessageIndication Communication Event
@CommunicationBeanpublic class MyCommunicationBean {

About Communication Context Types
17-6 Oracle Communications Converged Application Server Developer's Guide
@Context CommunicationContext ctx; @CommunicationEvent(type=CommunicationEvent.Type.MESSAGEINDICATION) void handleMessageIndication() { IMConversation conv = (IMConversation) ctx.getCommunication(); MessageIndication msg = (MessageIndication) ctx.getMessage(); System.out.println("Message State : " + msg.getState()); System.out.println("Next Message Type : " + msg.getNextMessageType()); }
About Communication Context TypesSFT provides three objects that can be injected into the CommunicationBean and other Java application components: CommunicationSession, CommunicationContext, and CommunicationService.
You inject these objects using the @Context annotation, as shown in Example 17–4. As shown below, dependency injection allows one component to reference another by having the container “inject” the component into a method or instance variable.
Example 17–4
@CommunicationBeanpublic class CallBean { @Context CommunicationSession session; @Context CommunicationContext<Conversation,UserParticipant,Message> ctx; @Context CommunicationService service;...
CommunicationSessionA communication or participant is always associated with CommunicationSession. For every event generated that pertains to a Communication or Participant object, CommunicationSession is injected into the application. This association is made at the time of creation of the object (by the application or by the SFT runtime). Multiple objects can be created using the same CommunicationSession object.
CommunicationServiceCommunicationService configures the underlying communication service. Persistent information—such as groups—are created using CommunicationService.
CommunicationContextCommunicationContext represents the context in which the current event is generated. SFT injects CommunicationContext into the CommunicationBean for each event. Applications obtain artifacts relevant to the event such as Communication, Participant, and Message from the CommunicationContext object.
CommunicationContext is only injected into CommunicationBean, and is not injected into other Java EE artifacts.
Note: CommunicationContext is only injected into CommunicationBean, and is not into other Java EE artifacts.

Searching Communications
Introduction to the Service Foundation Toolkit 17-7
To learn more about CommunicationSession, CommunicationContext, and CommunicationService and their usage, refer to the Converged Application Server API Reference.
About AgentsThe CommunicationSession object is injected into HTTP Servlets and the CommunicationBean. Applications can use CommunicationSession to create any kind of communication. Different entities in a communication, such as Communication or Participant objects, have different life cycles, and there may be different events associated with these entities. A converged application may need to execute logic based on such events. For example, in a conferencing application, when the host of the communication joins the conference, audio recording is automatically activated. Events such as this are invoked in the CommunicationBean.
SFT provides the ability to attach agents to different communication session artifacts. An agent is an object defined by the application that contains data and logic specific to the application. Agents can be attached to a Communication object, a Participant object, or to both the Communication and Participant objects. The application invokes the agent to perform application specific logic whenever an event occurs. Given communication session artifacts are accessible both from web applications and CommunicationBean, the agent enables you to develop converged applications in an organized manner.
About Media ControlSFT provides APIs to control media object composition. Media objects are composed together for media processing and functions. Media objects are MediaParticipants, such as a Recorder and Player, that can be added to a Communication object.
A composable media object is referred to as Joinable in the Java Media Control API (JSR 309). When a joiner joins a Communication with a joinee, the media streams are connected between them. You can specify the direction of the joining media streams. Each MediaParticipant encapsulates a Joinable defined by the Media Control API. It is also possible to create a MediaParticipant using a pre-created Joinable. This allows the application to specify advanced Media Control API parameters using SFT. The Media Control API allows you to register an event listener to listen for media events. For example, the media event “Playing Finished,” signaling the end of a media stream’s playback. SFT has its own event annotations for common media events. SFT also allows you to annotate a CommunicationBean as a MediaEventListener. This enables all JSR 309 media events to be received by the Communication bean. Since these events occur like any other SFT defined event, the CommunicationContext—and hence the relevant Communication—are also available to the MediaEvent.
Media server configuration can be performed using the JNDI name of the MediaSessionFactory in use by the CommunicationBean interface.
Searching CommunicationsThe SFT API exposes the ability to search Communication interfaces, allowing converged applications to locate the correct Communication object. Communication objects can be searched based on the name of the participant(s) or the name of communication itself. For example, an application might want to find a communication session that is already underway.

Packaging and Deploying SFT Applications
17-8 Oracle Communications Converged Application Server Developer's Guide
Packaging and Deploying SFT ApplicationsSFT applications are packaged in the standard WAR file format. When a @CommunicationBean annotation and sft.xml deployment descriptor is present in the WAR file, SFT provisions an internal SIP Servlet to handle SIP requests. For composing multiple applications, a standard JSR 289 application router is used, which treats the SFT application as a SIP application.
See Chapter 18, "Packaging and Deploying SFT Applications," to learn more about packaging and deploying SFT applications.
SFT AnnotationsAnnotations are a type of metadata that enable a declarative style of programming. The CommunicationBean uses annotations to encapsulate common functions or roles fulfilled by communication applications. Instead of specifying the code that performs the function, you simply add the annotation to the source file. The SFT framework expands the annotation to the appropriate code.
Annotations take the form of @annotation_name, where annotation_name identifies the annotation. Some annotations take arguments, which you specify alongside the annotation.
Table 17–3 lists the annotations available within SFT.
Using the @CommunicationBean AnnotationExample 17–5 illustrates the use of the com.oracle.sft.api.bean.CommunicationBean class-level annotation. The type = Conversation.class argument specifies that this CommunicationBean be applied to the Conversation class, which represents a two-party communication. This example creates the Java class MyConversationBean. The @Context annotation injects instances of the CommunicationContext and CommunicationSession objects.
CommunicationContext provides information related to the current communication to the application, and is linked to the event currently being handled by the CommunicationBean. The CommunicationSession object creates Communication related objects from the communication session. When an event—either a CommunicationEvent or ParticipantEvent—is executed, the same CommunicationSession object is injected into the CommunicationBean.
Table 17–3 SFT Annotations
Annotation Description
@Context Injects a CommunicationSession, CommunicationContext or CommunicationService object into the CommunicationBean.
@CommunicationBean SFT scans Java classes for this annotation, and, when found, instantiates the Java class and uses them as event listeners. Methods using this annotation are invoked by SFT to listen for the specified event types.
@CommunicationEvent Specifies events pertaining to a communication. Any method using this annotation is invoked when a CommunicationEvent of the specified type occurs.
@ParticipantEvent Specifies events pertaining to a participant. Any method using this annotation is invoked when a ParticipantEvent of the specified type occurs.

About Event Handling
Introduction to the Service Foundation Toolkit 17-9
Also shown is this example are two methods declared using the @CommunicationEvent annotation: handleInit() and handleEstablish(). The handleInit() method listens for communication events of Type.INITIALIZATION, which identifies the method as the initializing event in a communication session. The handleEstablish() method listens for communication events of Type.ESTABLISH, signifying events where a media session is established. See "Using the @CommunicationEvent Annotation" to learn more about event types.
Example 17–5 Using The @CommunicationBean Annotation
@CommunicationBean(type = Conversation.class)public class MyConversationBean { @Context CommunicationContext ctx; @Context CommunicationSession session; @CommunicationEvent(type=CommunicationEvent.Type.INITIALIZATION) public void handleInit() { } @CommunicationEvent(type=CommunicationEvent.Type.ESTABLISHED) public void handleEstablish() { }}...
About Event HandlingAs described earlier, SFT provides two method-level annotations by which you can declare and instantiate methods that respond to events:
■ @ParticipantEvent specifies events pertaining to a participant in the communication.
■ @CommunicationEvent specifies events pertaining to a communication session.
The @CommunicationEvent and @ParticipantEvent annotations define a number of read-only constants that provide important information about an event. These constants provide an easy way to refer to specific event types. The example below illustrates the CommunicationEvent.Type.INITIALIZATION event, which initializes a communication session.
@CommunicationEvent(type=CommunicationEvent.Type.INITIALIZATION)
Understanding Event FlowThe following example illustrates the event handling that occurs in a simple Conversation (a two-party call). Figure 17–1 shows the flow of events as they are triggered by the application.

About Event Handling
17-10 Oracle Communications Converged Application Server Developer's Guide
Figure 17–1 Event Handling Within A Two-Party Conversation
1. The caller initiates a call which invokes an INITIALIZATION event in the CommunicationBean. All communication within an SFT application begins with an INITIALIZATION event type—which as the name implies—initializes the communication.
2. The CommunicationBean responds with SIP ACK messages, acknowledging receipt of a SIP INVITE from the caller. The sending of ACKs is handled by the STARTED communication event. If the application rejects the call, the communication ends.
If the application redirects the call (for example, to voice mail) the Conversation ends, and a ParticipantEvent event type is called by the application to create a communication between the caller and the Recorder interface, which allows the caller to record a voice message.
3. If ACKs are sent and received by both the caller and callee (the person being called has answered the phone), the CommunicationBean invokes the ESTABLISHED event, indicating that communication is established between the two parties.
4. If the callee chooses to reject the call (the person being called does not answer the phone) the CommunicationBean invokes the FAILED event, indicating that the communication has been rejected by the callee.
5. In cases where the CommunicationBean invokes the ESTABLISHED event, the communication continues until one of the parties ends the call by hanging up the phone. This invokes the FINISHED event, signifying that the communication has ended.

About Event Handling
Introduction to the Service Foundation Toolkit 17-11
Event WalkthroughThe following examples step you through a simple CommunicationBean that handles Conversation events.
All communication begins with an INITIALIZATION event. The handleInit() method processes an incoming SIP INVITE, using the Conversation interface, which represents a two-party call.
@CommunicationEvent(type = CommunicationEvent.Type.INITIALIZATION) void handleInit() { Conversation call = (Conversation) ctx.getCommunication();//Remaining code omitted for brevity
The CommunicationBean acknowledges receipt of the SIP INVITE from the caller, sending an ACK message. The sending of ACKs is handled by the STARTED communication event.
@CommunicationEvent(type = CommunicationEvent.Type.STARTED) void handleStart() {//Remaining code omitted for brevity
When the callee (the person being called) answers the phones, ACKs are sent and received by both the caller and callee, and the CommunicationBean invokes the ESTABLISHED event, establishing communication between the two parties.
@CommunicationEvent(type = CommunicationEvent.Type.ESTABLISHED) void handleEstablish() {//Remaining code omitted for brevity
The FINISHED event signifies that the communication has ended, and is only invoked in cases where communication was established via the ESTABLISHED event, and the communication continues until one of the parties ends the call by hanging up the phone.
@CommunicationEvent(type = CommunicationEvent.Type.FINISHED) void handleFinish() { System.out.println("Call Finished :" + ctx.getCommunication()); }
Using the @CommunicationEvent AnnotationThe @ComunicationEvent method-level annotation identifies events pertaining to a communication. Methods declared with @ComunicationEvent are invoked when a communication event of the specified type occurs.
Example 17–6 illustrates the use of the @CommunicationEvent annotation specifying an Type.INITIALIZATION event type, which declares the handleInit() method as the initializing event in a communication session. The initialization event occurs when a Communication object is created as a result of SFT receiving a SIP message. For example, when a SIP INVITE message reaches SFT, by default it creates a Conversation object, and invokes the method associated with the Type.INITIALIZATION event type so that the application can respond appropriately to the communication session being established. In this example, the createConference() method converts the Conversation object into a Conference object via a method call using the sess object reference variable.
Example 17–6 The @CommunicationEvent Annotation
@CommunicationBean

About Event Handling
17-12 Oracle Communications Converged Application Server Developer's Guide
public class MyCommunicationBean { @Context CommunicationSession sess; @Context CommunicationContext ctx; @CommunicationEvent(type=CommunicationEvent.Type.INITIALIZATION) void handleInit() { Conversation call = (Conversation) ctx.getCommunication(); String confName = call.getCallee().getUserName(); if (confName.equalsIgnoreCase("[email protected]")) { sess.createConference(confName, call); } }}...
About Communication and Participant EventsSFT applications listen for events that occur in response to SIP messages from the network or a media server. Events mark a logical stage in a communication session. For example, an initial SIP INVITE generates an INITIALIZATION event in the CommunicationBean. From that initial event, the CommunicationBean generates an event at each logical stage of the communication session. An INITIALIZATION event might be followed by STARTED, ESTABLISHED, and FINISHED events.
Events pertaining to a communication are declared using the @CommunicationEvent method level annotation, and those pertaining to a participant are declared using the @ParticipantEvent method level annotation.
Example 17–7 The @CommunicationEvent Annotation
@CommunicationBeanpublic class MyCommunicationBean { @Context CommunicationSession sess; @Context CommunicationContext ctx; @CommunicationEvent(type=CommunicationEvent.Type.INITIALIZATION) void handleInit() { Conversation call = (Conversation) ctx.getCommunication(); String confName = call.getCallee().getUserName(); if (confName.equalsIgnoreCase("[email protected]")) { sess.createConference(confName, call); } }}
Since events are optional, you don't need to include each event type in your application. Instead, you only need to include events relevant to the type of communication session being established. When a particular event type is not implemented in the application, SFT proceeds with the default behavior of that communication session.
For example, in a two-party call, if a callee rejects an INVITE with the 486 Busy Here SIP response code, SFT generates a REJECTED event, allowing the application to remove the rejected callee participant, and add another participant as the callee. In such an instance, SFT adds that party to the call (for example, using INVITE or REINVITE). If the application does not override the default behavior of the REJECTED

About Event Handling
Introduction to the Service Foundation Toolkit 17-13
event, the 486 SIP response code is sent to the caller, and the communication session is terminated.
Since events are optional, the simplest CommunicationBean does not need to have any methods. Such a CommunicationBean acts as a back-to-back user agent (B2BUA) facilitating a two-party call.
CommunicationEvent Enumeration TypesTable 17–4 lists the @CommunicationEvent enumeration types. To learn more about @CommunicationEvent, its usage, and the event types it provides, refer to the Converged Application Server API Reference.
Table 17–4 CommunicationEvent Enumeration Types
Enumeration Description
ABORTED Indicates that the Communication has been aborted by the initiator.
CONFIRMATION_FINISHED
Indicates that the End User Confirmation message has finished.
CONFIRMATION_MESSAGEARRIVED
Indicates that an End User Confirmation message arrived during an IMConversation.
CONFIRMATION_RESPONDED
Indicates that an End User Confirmation response message arrived during an IMConversation.
ERROR Indicates that an error occurred in the Communication.
ESTABLISHED Indicates that the Communication is established.
FAILED Indicates that the Communication has failed.
FINISHED Indicates that the Communication is finished.
FINISHING Indicates that the Participant is requesting to finish (or end) an established Communication.
FORWARDING Indicates that a call is being forwarded.
HELD Indicates that a call is in a held state.
HOLDING Indicates that a call is being held.
INITIALIZATION Indicates that a Communication is being initialized.
MEDIA Generic event that act as a capture all for any media event in the media server.
MEDIA_INFO_EARLY_EXCHANGED
Indicates that end-to-end media information is to be exchanged before the called party answers the call (picks-up the phone). End-to-end refers to information being exchanged between the calling party (the caller) to the called party (the callee).
MEDIA_RESOURCE_RESERVED
Indicates that a media resource has been reserved. This event is triggered after a media exchange between the calling and called party when the media server finishes streaming content.
You can trigger this event by adding a MediaParticipant.
MEDIAENDED Indicates that media being streamed from the media server has ended.
MESSAGE_FAILURE_RESPONDED
A 4xx, 5xx, or 6xx response that an IM message has arrived.
MESSAGE_SUCCESS_RESPONDED
A 2xx response of IM message arrived.

About Event Handling
17-14 Oracle Communications Converged Application Server Developer's Guide
Using the @ParticipantEvent AnnotationThe @ParticipantEvent method-level annotation identifies events pertaining to a participant in the communication. Methods declared with @ParticipantEvent are invoked when a participant event of the specified type occurs.
Example 17–8 The @ParticipantEvent Annotation
@CommunicationBeanpublic class MyCommunicationBean { @Context CommunicationContext<Conversation,UserParticipant> ctx; @ParticipantEvent(type= ParticipantEvent.Type.JOINING, communicationType = Conversation.class) public void hanldeStatedEvent() { Conversation call = (Conversation) ctx.getCommunication();
ParticipantEvent Enumeration TypesTable 17–8 lists the @ParticipantEvent enumeration types. To learn more about @ParticipantEvent, its usage, and the event types it provides, refer to the Converged Application Server API Reference.
MESSAGEARRIVED Indicates that a message arrived. The message could be an IM sent during an IMConversation, or a DTMF Signal message during a Conversation or Conference.
MESSAGEINDICATION A Message Indication arrived during an IMConversation.
NOTIFICATION Indicates that a new notification has been created.
PICKUP Indicates that the called party has picked-up the phone (answered the call).
QUERIED Indicates that the a query has responded.
QUERYING Indicates that the process of querying (such as for device capability) has been initiated.
REFER Indicates a REFER event.
RESUMED Indicates that a call is already resumed.
RESUMING Indicates that a call is being resumed.
STARTED Indicates that a Communication has started.
SUBSCRIPTION Indicates that a new subscription is to be created.
WAITING Indicates that call is waiting.
Table 17–5 ParticipantEvent Enumeration Types
Enumeration Description
BEING_BANNED The participant is about to be rejected by the application server (call barring).
ERROR An unexpected error happened pertaining to the Participant.
Table 17–4 (Cont.) CommunicationEvent Enumeration Types
Enumeration Description

SFT Sample Application
Introduction to the Service Foundation Toolkit 17-15
SFT Sample ApplicationThe SFT sample application demonstrates the use the SFT APIs to create a telecommunication service application. The example application allows you to build and deploy a simple 411 directory assistance service that demonstrates the following:
■ Establish an audio conversation with another user.
■ Establish an audio conference with multiple users.
■ Play a call announcement and transfer the call to another callee.
■ Create a Message Session Relay Protocol (MSRP) conversation and conference in which users can exchange Instant Messages (IMs) and share pictures or other files.
All source code, deployment descriptors, and build files for the examples are found in
MiddleWare_Home\occas_Version\samples\s4e
See Readme.htm for descriptions of the example, source code, and build files.
INITIALIZATION The first participant event during the entire Participant life-cycle.
JOINED The Participant has joined the communication.
JOINING Participant is about to join the communication.
LEFT The Participant has left the communication.
REJECTED The Participant has refused to join the communication.
Table 17–5 (Cont.) ParticipantEvent Enumeration Types
Enumeration Description

SFT Sample Application
17-16 Oracle Communications Converged Application Server Developer's Guide

18
Packaging and Deploying SFT Applications 18-1
18Packaging and Deploying SFT Applications
In order to develop and deploy Converged Application Framework Essentials (SFT) applications, you must package the applications using the configurations described in this chapter.
Structure of a SFT ApplicationSFT applications consist of the following programming artifacts:
■ One or more Communication Beans
■ metadata and configuration files
Packaging SFT ApplicationsSFT applications are packaged in WAR (web archive) files. When deployed with the SFT domain template, the .war extension is recognized and the application is scanned to find SFT annotations. If a SFT specific annotation is found, the SFT framework is enabled.
SFT applications may be packaged in WAR files, or the WAR file may itself be packaged within an Enterprise archive (EAR), similar to a typical Java EE application. This means a SFT application that has been packaged in a WAR may be packaged with Enterprise Bean components, Java Persistence API JARs, and any other Java EE component that is allowed to be packaged in EAR files.
Integrating SFT with SIP ServletsSFT uses ServletContextListener as the trigger for annotation scanning. This event class handles notifications about changes to the servlet context of the Web application that it is part of. There is one ServletContextListener for each WAR application you deploy. When ServletContextListener intercepts an event, the SFT annotations will be scanned. For each SFT-enabled WAR file, a SIP Servlet is used by the SFT framework. SIP messages from different SIP entities will be received by this SIP Servlet. Example 18–1 illustrates the implementation the ServletContextListener class in a SFT application by declaring it in the sip.xml deployment descriptor.
Example 18–1 Integrating SFT With OCCAS Using SIP.XML
<?xml version="1.0" encoding="UTF-8"?><sip-app xmlns:ee="http://java.sun.com/xml/ns/javaee" xmlns="http://www.jcp.org/xml/ns/sipservlet" version="1.1"> <app-name>com.oracle.example.test</app-name> <servlet>

Structure of a SFT Application
18-2 Oracle Communications Converged Application Server Developer's Guide
<ee:servlet-name>ExampleServlet</ee:servlet-name> <ee:servlet-class>com.oracle.SFT.core.Servlet<</ee:servlet-class> <ee:load-on-startup>0</ee:load-on-startup> </servlet> <listener> <ee:listener-class> com.oracle.sft.deployment.SFTContextListener </ee:listener-class> </listener></sip-app>
SFT.XML Deployment DescriptorYou use the sft.xml deployment descriptor to configure SFT applications. Much of the information can be specified programmatically using the @ServiceAttributes annotation. However, this information can also be overridden using the sft.xml deployment descriptor. You can also specify which Java packages the SFT application should scan for annotations, which may improve performance.
Example 18–2 illustrates the use of the annotation-scanning XML elements of the sft.xml deployment descriptor. In this example, the configuration information contained in the service-attributes element overrides the configuration information in the ServiceAttributes annotation. If the annotation-scanning element is present in sft.xml deployment descriptor, it will scan only the listed JAR files and Java packages for SFT annotations.
Example 18–2 Annotation Scanning Using SFT.XML
<SFT-app> <service-attributes> <domain-proxy>sip:example.proxy.oracle.com:5060</domain-proxy> <domain-name>example.com</domain-name> <xcap-root>http://example.xdms.oracle.com:8080/xdmserver</xcap-root> <mediacontrol-jndi-name>mscontrol/dialogic1</mediacontrol-jndi-name> <allowed-javaee-modules>*</allowed-javaee-modules> </service-attributes> <annotation-scanning> <jars> <jar>example1.jar</jar> <jar>example2.jar</jar> </jars> <packages> <package>com.oracle.SFT.api</package> <package>com.oracle.SFT.api.bean</package> </packages> </annotation-scanning></SFT-app>

19
SFT Deployment Descriptor and Schema Reference 19-1
19SFT Deployment Descriptor and Schema Reference
Deployment descriptors are XML Schema Definition-based (XSD). The following sections describe XSD-based deployment descriptors and namespace declarations for the Service Foundation Toolkit (SFT) for Converged Application Server.
Application-Based DeploymentAn application is a logical collection of one or more modules joined by application annotations or deployment descriptors. You assemble components into WAR or SAR files which are then deployed within a Converged Application Server installation using the SFT domain template.
XML Schema Definitions and Namespace DeclarationsThe contents and arrangement of elements in the sft.xml deployment descriptor file must conform to the appropriate XSD. An XSD deployment descriptor file requires a namespace declaration in the root element of the file. Namespace declarations in the root element of a deployment descriptor file apply to all elements in the descriptor unless a specific element includes another namespace declaration that overrides the root namespace declaration.
Oracle recommends that you always include the schema location URL along with the namespace declaration in your XML deployment descriptor files; if you do not include the schema location in your XML deployment descriptor files, you may not be able to edit the descriptor files with a third-party tool.
Annotation-based ConfigurationAn alternative to XML-based deployment descriptors is provided by annotation-based configuration, which injects metadata for configuring components into the Java class byte code instead of using XML-based deployment descriptors. Instead of using XML to describe a Java bean, the configuration information is contained within the Java class itself by using annotations on the relevant class, method, or field declaration.
This annotation indicates that the affected bean property be populated at runtime time through an explicit property value in the bean definition.
Using the @ServiceAttributes AnnotationThe @ServiceAttributes annotation is placed at top of a @CommunicationBean annotation. There can only one @ServiceAttribute annotation in an application.

About the sft.xml Deployment Descriptor Elements
19-2 Oracle Communications Converged Application Server Developer's Guide
@ServiceAttributes defines the attributes of the application. Example 19–1 illustrates the use of the @ServiceAttributes annotation to specify bandwidth usage supplementary service. To lean about the @ServiceAttributes annotation, refer to the Converged Application Server API Reference
Example 19–1 Specifying Bandwidth With The @ServiceAttributes Annotation
@ServiceAttributes(enableChangeBandwidth = true, sdpBandwidthAttributes = {0, 800, 1600})
About the sft.xml Deployment Descriptor ElementsThe following sections describe the elements in the Converged Application Server-specific deployment descriptor sft.xml.
About the communication-bean ElementThe communication-bean element describes the CommunicationBean and other resources used by the SFT application. If a CommunicationBean using the class name specified with the class-name element exists, then the name and type values override the values specified using the annotations in the CommunicationBean’s Java class file.
If the event element specified in the communication-bean element matches the CommunicationBean's annotated method (it uses the same communication-type and event-type), then the orchestration priority value specified with the orchestration element overrides the value specified in the CommunicationBean Java class file.
Table 19–1 describes the elements you can define within the communication-bean element.
Table 19–1 Sub-Elements of the communication-bean Element
Element Description
name Name of the CommunicationBean. If a name is not specified, the SFT container uses the fully-qualified class name as the CommunicationBean name. This procedure is typically used to enable configuration of Java beans within the application server.
class-name The fully-qualified name of the Java class. For example:
<class-name>com.oracle.sft.CommunicationBean</class-name>

About the sft.xml Deployment Descriptor Elements
SFT Deployment Descriptor and Schema Reference 19-3
type Identifies the type of CommunicationBean. If the type is specified, the CommunicationBean is invoked only for the specified event types. If the application does not specify an event type, then the CommunicationBean is invoked for any type of communication session. The type values are:
■ Conversation
■ Conference
■ IMConversation
■ IMConference
■ MSRPConversation
■ MSRPConference
■ MessageObservation
■ QueryInteraction
For example:
<type>Conversation</type>
event Identifies events pertaining to the type of communication. The possible values are those defined using the following method-level event annotations:
■ CommunicationEvent
■ ParticipantEvent
■ ProtocolEvent
Refer to the Converged Application Server API Reference for information on the event types.
For example:
<event communication-type="Conversation" event-type="ParticipantEvent.Type.JOINING"></event>
communication-type Identifies the type of communication to which to apply the communication event. The communication-type values are:
■ Conversation
■ Conference
■ IMConversation
■ IMConference
■ MSRPConversation
■ MSRPConference
■ MessageObservation
■ QueryInteraction
Table 19–1 (Cont.) Sub-Elements of the communication-bean Element
Element Description

About the sft.xml Deployment Descriptor Elements
19-4 Oracle Communications Converged Application Server Developer's Guide
Example 19–2 Example communication-bean Element
<communication-bean> <name>ConversationBean</name> <class-name>com.oracle.sft.ConversationBean</class-name> <type>Conversation</type> <event communication-type="Conversation" event-type="ParticipantEvent.Type.JOINING"> <orchestration priority="10" /> </event> </communication-bean>
The service-attributes ElementService attributes define various configuration parameters for use by SFT applications. You can specify these parameters using either the service-attributes element in the sft.xml deployment descriptor, or using the @ServiceAttributes annotation placed in the CommunicationBean’s Java class file. If you specify service parameters using the service-attributes element in the sft.xml deployment descriptor, the values you specify will override the values specified using the @ServiceAttributes annotation.
Table 19–2 describes the elements you can define within the service-attributes element.
event-type Identifies events pertaining to the type of communication. The possible values are those defined using the ParticipantEvent.Type and CommunicationEvent.Type:
■ CommunicationEvent
■ ParticipantEvent
■ ProtocolEvent
Refer to the Converged Application Server API Reference for information on the event types.
For example:
<event communication-type="Conversation" event-type="ParticipantEvent.Type.JOINING"></event>
Table 19–2 Sub-Elements of the service-attributes Element
Element Description
registrar The IP address or DNS name of the Registrar to use in conjunction with SFT.
domain-proxy The IP address or DNS name of the Domain Proxy to use in conjunction with SFT.
domain-name Specifies the default domain name, which is appended to all user names.
xcap-root Specifies the HTTP URI representing the XCAP root. Although a syntactically valid URI, the XCAP Root URI does not correspond to an actual resource on an XCAP server. Actual resources are created by appending additional path information to the XCAP Root URI.
mscontrol-jndi-name Java Naming and Directory Interface (JNDI) name with which to look up the MsControlFactory object configured for use with the application server. This allows you to use different Media Servers or configurations for the default MsControlFactory object.
Table 19–1 (Cont.) Sub-Elements of the communication-bean Element
Element Description

About the sft.xml Deployment Descriptor Elements
SFT Deployment Descriptor and Schema Reference 19-5
enableChangeBandwidth Specifies whether or not to enable the alternate bandwidth settings specified by the sdpBandwidthAttributes element (see below). By default, enableChangeBandwidth is set to “true”:
<enableChangeBandwidth>true</enableChangeBandwidth>
The 3GPP TS 24.610 specification requires that the application server (AS) of the User Equipment (UE) invoking a media stream whose SDP session attribute is “recvonly” use a lower bandwidth. The 3GPP TS 24.610 specification recommends these values to preserve network bandwidth when a communication is placed on hold, however, you may need to adjust the bandwidth to better suit the requirements of the Communication Hold application.
See "Setting the Communication Hold Bandwidth" for more information.
sdpBandwidthAttributes The 3GPP 24.610 Communication HOLD specification specifies that, as a network option, the AS of the UE that invokes Communication HOLD shall, for each media stream marked “recvonly,” lower the bandwidth by setting the “b=AS:” parameter to a lower value. For example, the “b=AS:0”. The “b=RR:” and “b=RS:” parameters are set to values large enough to enable the continuation of the RTCP flow. For example, “b=RR:800” and “b=RS:800”.
Elements you can define within the sdpBandwidthAttributes element are:
■ totalBandwidth
■ bandwidthForActiveDataSenders
■ bandwidthForOtherParticipants
For example:
<sdpBandwidthAttributes> <totalBandwidth>0</totalBandwidth> <bandwidthForActiveDataSenders>800</bandwidthForActiveDataSenders> <bandwidthForActiveDataSenders>800</bandwidthForActiveDataSenders></sdpBandwidthAttributes>
See "Setting the Communication Hold Bandwidth" for more information.
conferenceEventConfig Specifies the configuration parameters for a conference event. Elements you can define within the conferenceEventConfig element are:
■ minExpirationTime
■ defaultExpirationTime
■ maxExpirationTime
■ maxNumOfSubscriptions
For example:
<conferenceEventConfig> <minExpirationTime>100</minExpirationTime> <defaultExpirationTime>1800</defaultExpirationTime> <maxExpirationTime>3600</maxExpirationTime> <maxNumOfSubscriptions>100</maxNumOfSubscriptions></conferenceEventConfig>
See "Configuring the Conference Event Package" for more information.
Table 19–2 (Cont.) Sub-Elements of the service-attributes Element
Element Description

About the sft.xml Deployment Descriptor Elements
19-6 Oracle Communications Converged Application Server Developer's Guide
messageObservationEventConfig
Specifies the configuration parameters for a message waiting event. Elements you can define within the messageObservationEventConfig element are:
■ minExpirationTime
■ defaultExpirationTime
■ maxExpirationTime
■ maxNumOfSubscriptions
For example:
<messageObservationEventConfig> <minExpirationTime>100</minExpirationTime> <defaultExpirationTime>1800</defaultExpirationTime> <maxExpirationTime>3600</maxExpirationTime> <maxNumOfSubscriptions>100</maxNumOfSubscriptions></messageObservationEventConfig>
See "Configuring the Conference Event Package" for more information.
referEventConfig Specifies the configuration parameter for a refer event. Note that unlike SUBSCRIBE, REFER does not contain a duration for the subscription in either the request or the response. The application can specify the default expiration time for a refer event. For example:
<referEventConfig>1800</referEventConfig>
terminatingOperator Represents the term-ioi parameter in P-Charging-Vector header.
The P-Charging-Vector header allows IMS signaling elements to generate and/or query IMS Charging IDs (icid) and originating and terminating Inter Operator Identifiers (ioi). For more information refer to the 3GPP TS 24.229 and RFC 3455 specifications.
Table 19–2 (Cont.) Sub-Elements of the service-attributes Element
Element Description

About the sft.xml Deployment Descriptor Elements
SFT Deployment Descriptor and Schema Reference 19-7
Annotation ScanningAnnotation scanning can only be specified using the sft.xml deployment descriptor.
Example 19–3 The Annotation-Scanning Element
<annotation-scanning> <jars> <jar>Sample.jar</jar> </jars> <packages> <package>com.oracle.sft.samples</package> </packages> <beanclasses-from-descriptor>true</beanclasses-from-descriptor></annotation-scanning>
Overriding Annotations with the SFT.XML Deployment Descriptor The following examples show the same configuration parameters specified using both the sip.xml deployment descriptor and using annotations within the Java class file SampleBean. The configuration parameters in the sft.xml deployment descriptor always override the parameters specified using the @ServiceAttributes annotation in a bean’s Java class file.
chargingCollectionFunction Represents the Charging Collection Function (CCF) charging functional entity in P-Charging-Function-Addresses header. CCF is used for off-line charging (for example, postpaid account charging). Elements you can define within the chargingCollectionFunction element are
■ ccf
For example:
<chargingCollectionFunction> <ccf>10.182.99.71</ccf> <ccf>10.182.99.72</ccf> </chargingCollectionFunction>
eventChargingFunction Represents the Event Charging Function (ECF) charging functional entity in P-Charging-Function-Addresses header. ECF is used for on-line charging (for example, pre-paid account charging). Elements you can define within the eventChargingFunction element are:
■ ecf
For example:
<eventChargingFunction> <ecf>10.182.99.71</ecf> </eventChargingFunction>
statusCode4InitiateEarlyMedia
Specifies the status code of the response through which the AS initiates early media for certain instances of the UserParticipant as the caller. Converged Application Server support two values: 183 (Session Progress) and 180 (Ringing). If a value is not specified, or the value is something other than either 183 or 180, 183 will be used by default.
<statusCode4InitiateEarlyMedia>183</statusCode4InitiateEarlyMedia>
Table 19–2 (Cont.) Sub-Elements of the service-attributes Element
Element Description
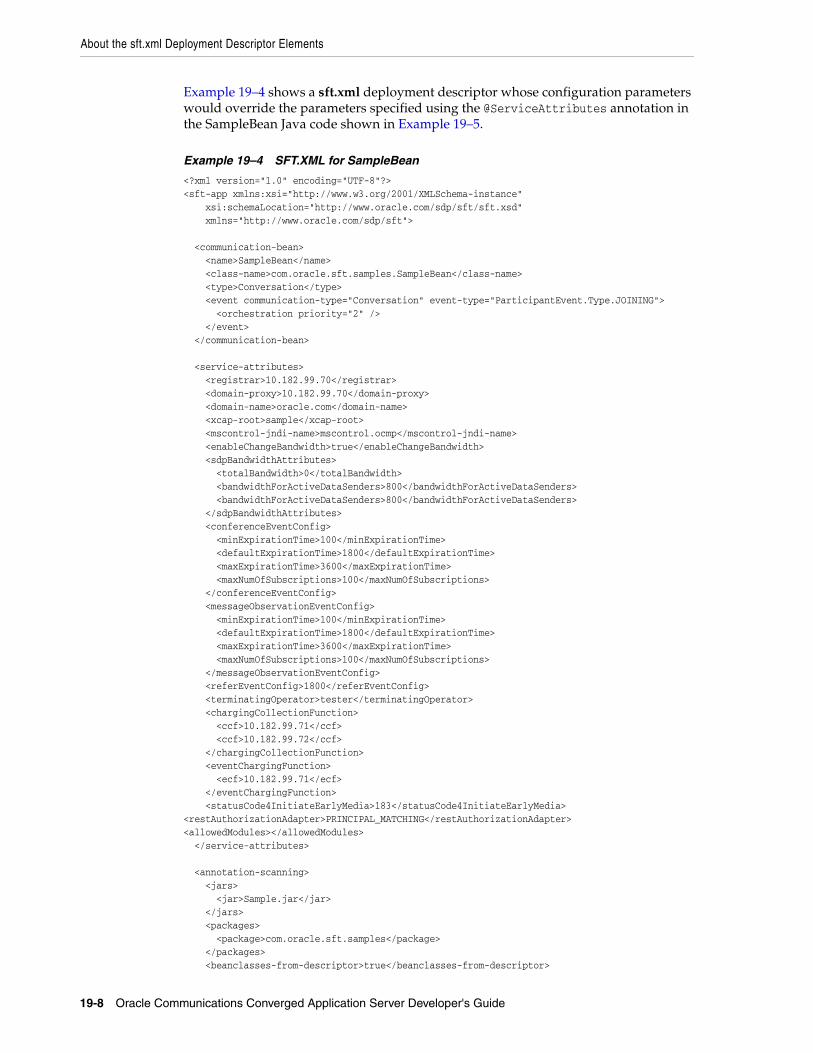
About the sft.xml Deployment Descriptor Elements
19-8 Oracle Communications Converged Application Server Developer's Guide
Example 19–4 shows a sft.xml deployment descriptor whose configuration parameters would override the parameters specified using the @ServiceAttributes annotation in the SampleBean Java code shown in Example 19–5.
Example 19–4 SFT.XML for SampleBean
<?xml version="1.0" encoding="UTF-8"?><sft-app xmlns:xsi="http://www.w3.org/2001/XMLSchema-instance" xsi:schemaLocation="http://www.oracle.com/sdp/sft/sft.xsd" xmlns="http://www.oracle.com/sdp/sft"> <communication-bean> <name>SampleBean</name> <class-name>com.oracle.sft.samples.SampleBean</class-name> <type>Conversation</type> <event communication-type="Conversation" event-type="ParticipantEvent.Type.JOINING"> <orchestration priority="2" /> </event> </communication-bean> <service-attributes> <registrar>10.182.99.70</registrar> <domain-proxy>10.182.99.70</domain-proxy> <domain-name>oracle.com</domain-name> <xcap-root>sample</xcap-root> <mscontrol-jndi-name>mscontrol.ocmp</mscontrol-jndi-name> <enableChangeBandwidth>true</enableChangeBandwidth> <sdpBandwidthAttributes> <totalBandwidth>0</totalBandwidth> <bandwidthForActiveDataSenders>800</bandwidthForActiveDataSenders> <bandwidthForActiveDataSenders>800</bandwidthForActiveDataSenders> </sdpBandwidthAttributes> <conferenceEventConfig> <minExpirationTime>100</minExpirationTime> <defaultExpirationTime>1800</defaultExpirationTime> <maxExpirationTime>3600</maxExpirationTime> <maxNumOfSubscriptions>100</maxNumOfSubscriptions> </conferenceEventConfig> <messageObservationEventConfig> <minExpirationTime>100</minExpirationTime> <defaultExpirationTime>1800</defaultExpirationTime> <maxExpirationTime>3600</maxExpirationTime> <maxNumOfSubscriptions>100</maxNumOfSubscriptions> </messageObservationEventConfig> <referEventConfig>1800</referEventConfig> <terminatingOperator>tester</terminatingOperator> <chargingCollectionFunction> <ccf>10.182.99.71</ccf> <ccf>10.182.99.72</ccf> </chargingCollectionFunction> <eventChargingFunction> <ecf>10.182.99.71</ecf> </eventChargingFunction> <statusCode4InitiateEarlyMedia>183</statusCode4InitiateEarlyMedia><restAuthorizationAdapter>PRINCIPAL_MATCHING</restAuthorizationAdapter><allowedModules></allowedModules> </service-attributes> <annotation-scanning> <jars> <jar>Sample.jar</jar> </jars> <packages> <package>com.oracle.sft.samples</package> </packages> <beanclasses-from-descriptor>true</beanclasses-from-descriptor>

SFT.XML Schema
SFT Deployment Descriptor and Schema Reference 19-9
</annotation-scanning></sft-app>
Example 19–5 illustrate the use of the @ServiceAttributes annotation in the SampleBean Java class.
Example 19–5 Code for SampleBean with @ServiceAttributes Annotation
package com.oracle.sft.samples; import com.oracle.sft.api.bean.ParticipantEvent;import com.oracle.sft.api.bean.ServiceAttributes;import com.oracle.sft.api.bean.CommunicationBean;import com.oracle.sft.api.Context;import com.oracle.sft.api.CommunicationSession;import com.oracle.sft.api.CommunicationContext;import com.oracle.sft.api.Communication;import com.oracle.sft.api.Conversation;import com.oracle.sft.api.Participant;import com.oracle.sft.api.Message;import com.oracle.sft.api.CommunicationService; @ServiceAttributes( registrar = "10.182.99.70", domainProxy = "10.182.99.70", domainName = "oracle.com", xcapRoot = "sample", mscontrolJndiName = "mscontrol.ocmp", enableChangeBandwidth = true, sdpBandwidthAttributes = { 0, 800, 800 }, conferenceEventConfig = { 100, 1800, 3600, 100 }, messageObservationEventConfig = { 100, 1800, 3600, 100 }, referEventConfig = 1800, terminatingOperator = "tester", chargingCollectionFunction = {"10.182.99.71", "10.182.99.72" }, eventChargingFunction = { "10.182.99.73" }, statusCode4InitiateEarlyMedia = 183, restAuthorizationAdapter = "PRINCIPAL_MATCHING", allowedModules = "" )@CommunicationBean(name = "SampleBean")public class SampleBean { @Context CommunicationSession session; @Context CommunicationContext<Communication, Participant, Message> context; @Context CommunicationService service; @ParticipantEvent(type = ParticipantEvent.Type.JOINING, communicationType=Conversation.class) public void handleJoining() { System.out.println(context.getParticipant().getName() + " joining"); }}
SFT.XML SchemaExample 19–6 shows the sft.xml deployment descriptor schema.
Example 19–6 SFT.XML Deployment Descriptor Schema
<?xml version="1.0" encoding="UTF-8"?><xs:schema xmlns:xs="http://www.w3.org/2001/XMLSchema" targetNamespace="http://www.oracle.com/sdp/sft"

SFT.XML Schema
19-10 Oracle Communications Converged Application Server Developer's Guide
xmlns="http://www.oracle.com/sdp/sft" elementFormDefault="qualified"> <xs:element name="orchestrator-class-name" type="xs:token" /> <xs:simpleType name="event-type-def"> <xs:restriction base="xs:token"> </xs:restriction> </xs:simpleType><xs:simpleType name="bandwidth"> <xs:restriction base="xs:int"> <xs:minInclusive value="0"/> </xs:restriction> </xs:simpleType>
<xs:complexType name="sdpBandwidthAttributes-type-def"> <xs:sequence><xs:element name="totalBandwidth" type="bandwidth" minOccurs="0" maxOccurs="1" /><xs:element name="bandwidthForActiveDataSenders" type="bandwidth" minOccurs="0" maxOccurs="1" /><xs:element name="bandwidthForOtherParticipants" type="bandwidth" minOccurs="0" maxOccurs="1" /> </xs:sequence></xs:complexType> <xs:complexType name="eventConfig-type-def"> <xs:sequence><xs:element name="minExpirationTime" type="xs:nonNegativeInteger" minOccurs="0" maxOccurs="1" /><xs:element name="defaultExpirationTime" type="xs:nonNegativeInteger" minOccurs="0" maxOccurs="1" /><xs:element name="maxExpirationTime" type="xs:nonNegativeInteger" minOccurs="0" maxOccurs="1" /><xs:element name="maxNumOfSubscriptions" type="xs:nonNegativeInteger" minOccurs="0" maxOccurs="1" /> </xs:sequence></xs:complexType> <xs:complexType name="ccfs-type-def"> <xs:sequence><xs:element name="ccf" type="xs:token" minOccurs="0" maxOccurs="unbounded" /> </xs:sequence></xs:complexType> <xs:complexType name="ecfs-type-def"> <xs:sequence><xs:element name="ecf" type="xs:token" minOccurs="0" maxOccurs="unbounded" /> </xs:sequence></xs:complexType> <xs:element name="orchestration"> <xs:complexType> <xs:attribute name="priority" type="xs:nonNegativeInteger" default="100"/> </xs:complexType> </xs:element> <xs:element name="event"> <xs:complexType> <xs:sequence> <xs:element ref="orchestration" /> </xs:sequence> <xs:attribute name="communication-type" type="xs:token" /> <xs:attribute name="event-type" type="event-type-def" /> </xs:complexType> </xs:element> <xs:element name="communication-bean">

SFT.XML Schema
SFT Deployment Descriptor and Schema Reference 19-11
<xs:complexType> <xs:sequence> <xs:element name="name" type="xs:token" minOccurs="0" /> <xs:element name="class-name" type="xs:token" /> <xs:element name="type" type="xs:token" minOccurs="0" /> <xs:element ref="event" maxOccurs="unbounded" /> </xs:sequence> </xs:complexType> </xs:element> <xs:element name="service-attributes"> <xs:complexType> <xs:sequence> <xs:element name="registrar" type="xs:token" minOccurs="0" /> <xs:element name="domain-proxy" type="xs:token" minOccurs="0" /> <xs:element name="domain-name" type="xs:token" minOccurs="0" /> <xs:element name="xcap-root" type="xs:token" minOccurs="0" /> <xs:element name="mscontrol-jndi-name" type="xs:token" minOccurs="0" /> <xs:element name="enableChangeBandwidth" type="xs:boolean" default="true" minOccurs="0" maxOccurs="1" /> <xs:element name="sdpBandwidthAttributes" type="sdpBandwidthAttributes-type-def" minOccurs="0" maxOccurs="1" /> <xs:element name="conferenceEventConfig" type="eventConfig-type-def" minOccurs="0" maxOccurs="1" /> <xs:element name="messageObservationEventConfig" type="eventConfig-type-def" minOccurs="0" maxOccurs="1" /> <xs:element name="referEventConfig" type="xs:nonNegativeInteger" minOccurs="0" maxOccurs="1" /> <xs:element name="terminatingOperator" type="xs:token" minOccurs="0" maxOccurs="1" /> <xs:element name="chargingCollectionFunction" type="ccfs-type-def" minOccurs="0" maxOccurs="1" /> <xs:element name="eventChargingFunction" type="ecfs-type-def" minOccurs="0" maxOccurs="1" /> <xs:element name="statusCode4InitiateEarlyMedia" type="xs:int" default="183" minOccurs="0" maxOccurs="1" /> <xs:element name="restAuthorizationAdapter" type="xs:token" minOccurs="0" /> <xs:element name="allowedModules" type="xs:token" minOccurs="0" /> </xs:sequence> </xs:complexType> </xs:element> <xs:element name="packages"> <xs:complexType> <xs:sequence> <xs:element name="package" type="xs:token" minOccurs="0" maxOccurs="unbounded" /> </xs:sequence> </xs:complexType> </xs:element> <xs:element name="jars"> <xs:complexType> <xs:sequence> <xs:element name="jar" type="xs:token" minOccurs="0" maxOccurs="unbounded" /> </xs:sequence> </xs:complexType> </xs:element> <xs:element name="annotation-scanning"> <xs:complexType> <xs:sequence> <xs:element ref="jars" minOccurs="0" /> <xs:element ref="packages" minOccurs="0" /> </xs:sequence>

SFT.XML Schema
19-12 Oracle Communications Converged Application Server Developer's Guide
<xs:attribute name="beanclasses-from-descriptor" type="xs:boolean"> <xs:annotation> <xs:documentation> Only communication beans listed in sft.xml will be processed for further annotation scanning if this attribute is set to "true". </xs:documentation> </xs:annotation> </xs:attribute> </xs:complexType> </xs:element> <xs:element name="sft-app"> <xs:complexType> <xs:sequence> <xs:element ref="service-attributes" minOccurs="0" /> <xs:element ref="communication-bean" minOccurs="0" maxOccurs="unbounded" /> <xs:element ref="annotation-scanning" minOccurs="0" /> </xs:sequence> </xs:complexType> </xs:element> </xs:schema>

20
Event Orchestration in the Service Foundation Toolkit 20-1
20Event Orchestration in the Service Foundation Toolkit
Service Foundation Toolkit (SFT) defines the CommunicationBean as the programming unit through which to implement communication logic. There may be many CommunicationBeans in a single SFT application. A primary function of SFT is routing events among CommunicationBeans, using an event routing module called the orchestration module.
About Event OrchestrationBy default, CommunicationBeans receive SFT events. If multiple CommunicationBeans are interested in the same event, SFT sequentially forwards the event to the individual CommunicationBeans. This default behavior does not allow you to customize the invocation sequence.
The orchestration module lets you use one of two ways of defining the orchestration order: an XML-based, or an annotation-based. Both of the orchestration mechanisms allow you to customize the Communication bean’s invocation sequence.
When SFT is instantiated, the it performs the following checks to determine which way the invocation order is defined:
1. SFT searches the WEB-INF directory for the application's deployment descriptor file (sft.xml).
The sft.xml deployment descriptor is a standard XML file and contains markup describing the attributes of all SFT-based applications. Converged Application Server reads the sft.xml file during initialization of the application.
2. If Converged Application Server discovers the sft.xml deployment descriptor, this one is used.
3. If there is no sft.xml file, the annotations are used.
Using Annotations to Define the Invocation OrderUse the @EventOrchestration annotation. This annotation must be used in conjunction with the @CommunicationEvent and @ParticipantEvent annotations to identify which events to prioritize.
To assign an event orchestration priority, specify a value using the priority attribute. The orchestrator routes the SFT event according to the priority you specify.

Using XML to Define the Invocation Order
20-2 Oracle Communications Converged Application Server Developer's Guide
Example 20–1 The @EventOrchestration Annotation
@CommunicationBean()public class MyExampleApplication { @Context CommunicationContext<?, UserParticipant,?> ctx; @EventOrchestration( priority=50 ) @ParticipantEvent(type= ParticipantEvent.Type.JOINING, communicationType = Conversation.class) public void hanldeStatedEvent() { } }
Using XML to Define the Invocation OrderTo specify event orchestration using XML, you must deploy a SFT application with the sft.xml deployment descriptor within the application’s WAR or SAR file.
Example 20–2 illustrates two instances of the communication-bean element with orchestration priority set to “2” and “1” respectively. Both instances of the CommunicationBean are defined with the ParticipantEvent.Type.JOINING event type. Since the orchestration priority for Bean1 is set to 1, all ParticipantEvent.Type.JOINING events will be directed to Bean1 first, and then to Bean2, whose orchestration priority is set to 2.
Example 20–2 Specifying Orchestration Priority in the SFT.XML Deployment Descriptor
<?xml version="1.0" encoding="UTF-8"?><sft-app xmlns:xsi="http://www.w3.org/2001/XMLSchema-instance" xsi:schemaLocation="http://www.oracle.com/sdp/sft sft.xsd" xmlns="http://www.oracle.com/sdp/sft"> <communication-bean> <class-name>com.oracle.sft.test.Bean1</class-name> <event communication-type="Conversation" event-type="ParticipantEvent.Type.JOINING"> <orchestration priority="2" /> </event> </communication-bean> <communication-bean>
Table 20–1 Attributes of the @EventOrchestration Annotation
Name Description Data Type Required?
priority Assigns an event orchestration priority. The default value is 100, and the lower the numerical value the higher the event orchestration priority. You can not assign a negative value.
Integer Yes
Note: The event type you want the Communication bean to listen for must be specified in both the bean’s Java source file using the appropriate annotation, and the sft.xml deployment descriptor. In this example, the ParticipantEvent.Type.JOINING event type must be specified in sft.xml as shown in Example 20–2, and in the bean’s Java code using the @ParticipantEvent annotation as shown in Example 20–3.

Filtering and Overriding Communication Beans
Event Orchestration in the Service Foundation Toolkit 20-3
<class-name>com.oracle.sft.test.Bean2</class-name> <event communication-type="Conversation" event-type="ParticipantEvent.Type.JOINING"> <orchestration priority="1" /> </event> </communication-bean> </sft-app>
Example 20–3 shows the @CommunicationBean annotation with the @ParticipantEvent event type JOINING specified. This must match the configuration specified in the sft.xml deployment descriptor as illustrated in Example 20–2.
Example 20–3 @ParticipantEvent Whose Orchestration Priority
@CommunicationBean()public class Bean1 { @Context CommunicationContext<?, UserParticipant,?> ctx; @ParticipantEvent(type= ParticipantEvent.Type.JOINING, communicationType = Conversation.class, priority = 1) public void hanldeStatedEvent() { } }
Filtering and Overriding Communication BeansCommunicationBeans are defined using the @CommunicationBean annotation, however, SFT provides a mechanism to override or filter the annotation specified in the bean’s Java code.
Filtering Communication BeansSFT provides Communication beans suitable for most types of applications, however, certain deployments may require a greater amount of flexibility in creating and assigning beans for different event types. To accommodate this, you can filter beans such that only beans with event types that you specify are given event orchestration priority via the orchestration module, and beans with other event types sequentially receive event notifications using the default event orchestration behavior.
To filter beans use the annotation-scanning element in the sft.xml deployment descriptor’s to specify which JAR files and Java packages to load. Beans that are not explicitly specified are discarded, even if they are present and in the class path.
Example 20–4 filters beans whose class files are contained in the sft-sample.jar file, and whose package name is com.oracle.sft.MyCommunicationBean. Using these parameters, the following filtering is performed:
■ If a bean's Java class file is not contained in the sft-sample.jar file, it will be discarded.
■ If a bean's Java class file is contained in the sft-sample.jar file, and its package name starts with com.oracle.sft.MyCommunicationBean, it will be retained and initialized.
■ If a bean's Java class file is located in the /WEB-INF/classes directory of the application folder structure, and its package name begins with com.oracle.sft.MyCommunicationBean, it will be retained and initialized.

Filtering and Overriding Communication Beans
20-4 Oracle Communications Converged Application Server Developer's Guide
■ If no JAR files or packages are specified using the annotation-scanning element, then all Communication beans contained in /WEB-INF/lib/*.jar or /WEB-INF/classes/ are retained and initialized (e.g. no filtering using annotation scanning is performed).
When a bean passes the filtering check performed by the annotation-scanning element, it is initialized by SFT.
Example 20–4 The annotation-scanning element
<annotation-scanning> <jars> <jar>sft-sample.jar</jar> </jars> <packages> <package>com.oracle.sft.MyCommunicationBean</package> </packages></annotation-scanning>
Filtering Specific Communication Bean AnnotationsYou can further limit annotation scanning to CommunicationBeans specified in the sft.xml deployment descriptor. SFT will only perform annotation scanning on the beans specified in the sft.xml deployment descriptor. To enable annotation scanning, set the beanclasses-from-descriptor attribute of the annotation-scanning element to true, as shown in Example 20–5.
Example 20–5 Specifying annotation scanning for a Communication bean
<?xml version="1.0" encoding="UTF-8"?><sft-app xmlns="http://www.oracle.com/sdp/sft"> <communication-bean> <name>MyCommunicationBean</name> <class-name>com.oracle.example.web.ExampleBean</class-name> <event communication-type="Conversation" event-type="CommunicationEvent.Type.STARTED"> <orchestration priority="0"/> </event> </communication-bean> <annotation-scanning beanclasses-from-descriptor="true"/> </sft-app>
Overriding CommunicationBean AnnotationsSFT uses the communication-bean element of the sft.xml deployment descriptor to filter using the annotation specified for a given CommunicationBean. SFT can also override a bean’s annotation as defined by the communication-bean element of the sft.xml deployment descriptor. This allows you to override certain attributes of a bean’s annotation using the definition of the communication-bean element.
The annotation override includes four bean-related attributes, which are overridden by corresponding sub-elements (or the attribute of a sub-element) of the communication-bean element.

Filtering and Overriding Communication Beans
Event Orchestration in the Service Foundation Toolkit 20-5
Using the sequence shown in Table 20–2, if both annotation-scanning and communication-bean are explicitly defined in the sft.xml deployment descriptor, the override sequence is as follows:
1. Filtering is performed as specified by the annotation-scanning element. If a bean’s class name is discovered by the annotation-scanning element it overrides sequence rules 2, 3, and 4.
2. If a bean’s class name is discovered by the communication-bean element, it overrides sequence rule 1.
Table 20–2 Overriding CommunicationBean Annotations
Sequence Attribute defined by annotation Attribute defined in sft.xml Override condition
1 Priority of @EventOrchstration orchestration priority Explicitly defined in sft.xml
2 Name of @CommunicationBean name Explicitly defined in sft.xml
3 Type of @CommunicationBean communication-type Explicitly defined in sft.xml
4 Event type for each bean (e.g. CommunicationEvent or ParticipantEvent)
event-type Explicitly defined in sft.xml

Filtering and Overriding Communication Beans
20-6 Oracle Communications Converged Application Server Developer's Guide
21
Implementing Call Control Services 21-1
21Implementing Call Control Services
A key benefit of the Service Foundation Toolkit (SFT) is support for GSM Association's (GSMA) IR.92 specifications for delivering Voice over LTE (VoLTE).
About Converged Application Framework and VoLTESFT provides enhanced APIs that you can use to quickly and easily implement applications for delivering IR.92-compliant supplementary services over VoLTE. The APIs provide support for supplementary services such as Call Forwarding, Incoming and Outgoing Call Barring, ID Presentation and Restriction, Multi-Party Conferencing, and Message Waiting Indication (MWI).
GSM Association's (GSMA) IR.92 specifications defines the IP Multimedia Subsystem (IMS) profile for delivering Voice over LTE (VoLTE). The GSMA VoLTE initiative has defined IMS as the common way to deliver voice and messaging services over mobile broadband all-IP networks.
In September 2010, GSMA published the IREG Permanent Reference Document IR.92, which outlines the specifications for migrating 2G and 3G mobile voice, video and messaging services to 4G mobile broadband networks, such as LTE.
This chapter describes the following call control services:
■ Call Forwarding
■ Call Barring
■ Communication Hold
■ Identity Presentation and Restriction
■ Communication Waiting
■ Message Waiting Indication
Call ForwardingCall Forwarding (also referred to as Call Diversion) lets users of the service (the called party, or callee) forward incoming calls to another phone number (the third party). The third party may be a mobile telephone, voice-mail box, or other telephone number where the desired called party is situated.
With Call Forwarding activated:
■ Users can continue to make outgoing calls from their telephone while incoming calls are forwarded.

Call Forwarding
21-2 Oracle Communications Converged Application Server Developer's Guide
■ When the telephone number the user’s calls are being forwarded to is busy, callers to the forwarded number will receive a busy signal.
Converged Application Server supports the following IR.92 defined Call Forwarding modes for VoLTE:
■ Communication Forwarding Unconditional 3GPP TS 24.604
■ Communication Forwarding on No Reply 3GPP TS 24.604
■ Communication Forwarding on not Logged in 3GPP TS 24.604
■ Communication Forwarding on Busy 3GPP TS 24.604
■ Communication Forwarding on not Reachable 3GPP TS 24.604
Call Forwarding applications forward calls by removing the callee (the person to whom the call is being made), and adding a new participant (the third party) in the calle’s place. How the SFT handles the call signaling depends on what stage the conversation is at. For example, if the Call Forwarding application replaces the callee during the STARTED event, SFT changes the callee to the new participant. However, if the application replaces the callee during the JOINING event, SFT sends a CANCEL event to the original callee before sending a SIP INVITE request to the new participant.
Example 21–1 illustrates the removal of a the callee during the INITILIZATION event, who is then with the participant: [email protected].
Example 21–1 Replacing the Callee With A New Participant
...
@CommunicationEvent(type = CommunicationEvent.Type.INITIALIZATION) void handleInit() { Conversation call = ctx.getCommunication(); call.removeParticipant(call.getCallee()); call.addParticipant("[email protected]"); }...
This example creates the handleInit() method which is annotated with @CommunicationEvent, indicating that a communication session is being initialized (as indicated by the Type.INITIALIZATION constant). The method declares the instance variable call, which it initializes using the Conversation class. The Conversation class represents a two-party call, and extends the Communication object which represents the communication session. The call variable retrieves the context of the communication via the @CommunicationContext object (stored in the previously initialized ctx variable) using the getCommunication() method.
After instantiating call, the code calls the variable’s removeParticipant() method, which in turn calls the getCallee() method to retrieve the identity of the callee from the Conversation class and remove them. Once the callee is removed from the conversation, the call variable can call the addParticpant() method (which the Conversation class inherits from the Interaction class) and adds the new participant (in this example, [email protected]) to the communication.
Accessing Call Forwarding HistoryYou can access a user's call forwarding (also referred to a call diversion) history and use it to create a call forwarding policy. For example, you may want to limit the total number of call forwarding diversions by looking at the caller's history.

Call Forwarding
Implementing Call Control Services 21-3
The SIP History-Info header (defined in RFC 4244) provides a way of capturing any redirection information that may have occurred on a particular call. The SIP History-Info header is generated when a SIP request is re-directed, and can appear in any SIP request not associated with a dialog. The SIP History-Info header is generated by a User Agent (UA) or proxy, and is passed from one entity to another through requests and responses.
Example 21–1 illustrates how to retrieve call history information using the HistoryInformation class. HistoryInformation encapsulates the call forwarding (call diversion) history. In this example:
■ HistoryInformation accesses the call forwarding history. If the number of call diversions is greater than 50, the call is rejected.
■ HistoryElement retrieves the call diversion history from the History-Info header, which is maintained as a TreeSet representing the chronological order of the call diversions (see Table 21–1 for more information). If the number of call diversions is greater than 10, the call is rejected.
■ If the call is rejected due to too many call diversions, the initial participant (the callee) is replaced with the participant: [email protected]
Example 21–2 Accessing Call Forwarding History
@Context CommunicationContext<Conversation, UserParticipant, ?> ctx;HistoryInformation hi = ctx.getContextElement(HistoryInformation.class);TreeSet<HistoryElement> elements = hi.getElements();int totalDiversions = elements.size(); if (totalDiversions > 50) {//Reject the caller if the number of diversions is greater than 50.Conversation call = ctx.getCommunication();call.removeParticipant(call.getCaller());} //Get the history via elements.TreeSet<HistoryElement> lastLegElements = (TreeSet) elements.tailSet(elements);if (lastLegElements.size() > 10) {//Reject the caller if the number of diversions is greater than 10. } //Forward the caller if their call is rejected too many times.Conversation call = ctx.getCommunication();call.removeParticipant(call.getCallee());call.addParticipant("[email protected]");
Table 21–1 lists the methods defined by the HistoryInformation interface to access a user’s call forwarding history.

Call Forwarding
21-4 Oracle Communications Converged Application Server Developer's Guide
Table 21–2 lists the methods defined by the HistoryElement interface to access a user’s call forwarding history. The HistoryElement class represents an element of call diversion history, and provides all the information about previous call diversions. SFT injects an instance of this class each time a call is diverted.
Discovering Call Reject ReasonsYou can discover the reason a callee rejects a call using the EventReason class to retrieve information about reject events. EventReason implements the getReasonData() method, which returns call reject information stored in the SIP request’s Reason header. You can implement Call Forwarding in response to call rejection, and forward the call to a voice mail box or other specified end point. See RFC 3326 to learn more about the Reason header field.
Example 21–3 shows how to discover call reject reasons using the EventReason class.
Example 21–3 Discovering Call Reject Reasons
@ParticipantEvent(type = ParticipantEvent.Type.REJECTED) void handleReject() { EventReason er = ctx.getContextElement(EventReason.class); ReasonData data = er.getReasonData(); if (data.getReasonType() == Reason.BUSY) { //Followed by logic to forward the call if getREasonType() returns BUSY. } }...
Table 21–1 Methods Defined by the HistoryElement interface
Method Description
getElements() Returns the HistoryElement as a TreeSet. The TreeSet is an index (in chronological order) of the call diversion. An empty TreeSet is returned if there is no prior history.
TreeSet provides an implementation of the Set interface that uses a tree for storage. Objects are stored in sorted, ascending order. Access and retrieval times are very fast, which makes TreeSet an excellent choice when storing large amounts of sorted information that must be found quickly.
Table 21–2 Methods Defined by the HistoryInformation Interface
Methods Description
getAlternateReasonData() A History element can have an alternate reason, which is embedded in the message. Returns an instance of ReasonData.
getIndexAsArray() An index of the call history. The History is in the Augmented BNF (ABNF) format. ABNF is a plain-text (non-XML) representation that is similar to traditional BNF grammar. 1*DIGIT *(DOT 1*DIGIT).
getIndexString() Get the index of this call diversion history element.
getParameters() Retrieves all parameters as a Set of name-value pairs.
getReasonData() The reason associated with this call diversion history element. Returns an instance of ReasonData.
getTargetHost() The host involved in the call diversion.
getTargetUser() The specific user involved in the call diversion.

Call Forwarding
Implementing Call Control Services 21-5
This example creates the method handleReject(), which uses the @ParticipantEvent annotation to initialize it using the type.REJECTED constant. This method is called if a participant refuses to join the communication.
The er reference variable points to the EventReason class, and is assigned the context of the communication via the @CommunicationContext object (which is stored in the ctx class variable) using the getContextElement(EventReason.class) method. The er variable stores the context of the type.REJECTED communication event.
The data reference variable points to the ReasonData class, and is assigned the call reject information from the SIP Reason header via the er variable’s to call the getReasonData() method, which returns the reason for call rejection. If the returned reason code is BUSY, you can implement call forwarding.
Call Forwarding ExampleExample 21–4 shows the code for the Java class CallForwardBean.
■ All calls to Bob are unconditionally forwarded to Amy.
■ Calls to Amy are forwarded to Carol when Amy’s phone is busy.
■ Calls to Carol are forwarded to Tom when Carol is not available.
Additionally, this example implements the HistoryInformation and HistoryElement interfaces to retrieve the call forwarding history.
Example 21–4 Call Forwarding
package com.oracle.sft.demo; import java.util.Iterator;import java.util.TreeSet; import com.oracle.sft.api.CommunicationContext;import com.oracle.sft.api.CommunicationSession;import com.oracle.sft.api.Context;import com.oracle.sft.api.Conversation;import com.oracle.sft.api.Reason;import com.oracle.sft.api.UserParticipant;import com.oracle.sft.api.bean.CommunicationBean;import com.oracle.sft.api.bean.CommunicationEvent;import com.oracle.sft.api.bean.ParticipantEvent;import com.oracle.sft.api.context.EventReason;import com.oracle.sft.api.context.HistoryElement;import com.oracle.sft.api.context.HistoryInformation;import com.oracle.sft.api.context.ReasonData; @CommunicationBeanpublic class CallForwardBean { @Context CommunicationSession session; @Context CommunicationContext<Conversation,UserParticipant,?> ctx; //Forward all incoming calls for Bob to Amy. @CommunicationEvent(type = CommunicationEvent.Type.INITIALIZATION) void handleInit() { Conversation call = (Conversation) ctx.getCommunication(); if (call.getCallee().getName().equals("[email protected]")) { call.removeParticipant(call.getCallee()); call.addParticipant("[email protected]");

Call Barring
21-6 Oracle Communications Converged Application Server Developer's Guide
} } //Forward Amy’s calls to Carol when Amy’s phone is busy. //If Carol is not availalbe, forward calls to Tom @ParticipantEvent(type= ParticipantEvent.Type.REJECTED) void handleRejected() { Conversation call = (Conversation) ctx.getCommunication(); EventReason er = ctx.getContextElement(EventReason.class); HistoryInformation hi = null; hi = ctx.getContextElement(HistoryInformation.class); printHistoryInformation(hi); if (er!=null){ ReasonData rd = er.getReasonData(); if (rd.getReasonType()==Reason.BUSY){ if (call.getCallee().getName().equals("[email protected]")) { call.removeParticipant(call.getCallee()); call.addParticipant("[email protected]"); } } else if(rd.getReasonType()==Reason.NOT_FOUND){ if (call.getCallee().getName().equals("[email protected]")) { call.removeParticipant(call.getCallee()); call.addParticipant("[email protected]"); } } else if(rd.getReasonType()==Reason.NO_RESPONSE){ if (call.getCallee().getName().equals("[email protected]")) { call.removeParticipant(call.getCallee()); call.addParticipant("[email protected]"); } } } }}
Call BarringCall Barring lets users bar (or restrict) certain or all types of calls to and from their phone. For example, a user can restrict outgoing calls, outgoing international calls, or incoming calls from undesirable callers.
Converged Application Server supports the following IR.92 defined Call Barring modes for VoLTE:
■ Barring of All Incoming Calls 3GPP TS 24.611
■ Barring of All Outgoing Calls 3GPP TS 24.611
■ Barring of Outgoing International Calls 3GPP TS 24.611
■ Barring of Outgoing International Calls—ex Home Country 3GPP TS 24.611
■ Barring of Incoming Calls When Roaming 3GPP TS 24.611
To implement international call barring, the Call Barring application must have access to the phone number of the participant. To obtain the phone number, use the

Call Barring
Implementing Call Control Services 21-7
PhoneNumber class, which you can access via the UserParticipant interface. Similarly, to decide the roaming status of the user, the Call Barring application must access the private identity information available in the message. The IdentityInformation class provides this information. Note that IdentityInformation only represents information contained in the SIP Request that causes the current event. The application can also access this information from other sources, such as the Registrar, to determine roaming status. Similarly, the profile of the user—such as country of origin—can be obtained by the application using other interfaces (for example, the Diameter interface).
Table 21–3 lists the methods defined in the PhoneNumber interface to access a user’s telephone number information.
Table 21–4 lists the methods defined in the IdentityInformation interface to access the identity information available in the context of the Event. The identity information is stored in the P headers of the SIP message.
Example 21–5 illustrates the use of the PhoneNumber and IdentityInformation classes to bar international calls when roaming.
Example 21–5 Using The PhoneNumber And IdentityInformation Interfaces
@ Context CommunicationContext<Conversation,UserParticipant> ctx = ... Conversation call = ctx.getCommunication(); UserParticipant callee = (UserParticipant) ctx.getCallee(); UserParticipant caller = (UserParticipant) ctx.getCaller(); ... IdentityInformation ii = ctx.getContextElement(IdentityInformation.class); if (isRoaming(ii)) { caller.reject(Reason.DECLINE); } ... PhoneNumber ph = callee.getPhoneNumber(); if (isInternationalCall(ph, caller)) { caller.reject(Reason.DECLINE); }
Table 21–3 Methods Defined In The PhoneNumber Interface
Method Description
getContext() Returns any phone-context present in the number as a string value.
getNumber() Returns the phone number as a string value.
isGlobal() Returns if the number is a global number or local number. If the number is global, it returns true; if the phone number is local it returns false.
Table 21–4 Methods defined in the IdentityInformation interface
Method Description
getAssertedIdentity Represents P-Asserted-Id header value.
getServedUserIdentity Represents P-Served-User header value.
getVisitedNetworkIdentity Represents P-Visited-Network-Id header value.
getAccessNetworkInformation Represents P-AccessNetwork-Info header value.

Communication Hold
21-8 Oracle Communications Converged Application Server Developer's Guide
...
Example 21–6 shows code for the Java class CallBarBean, which creates rules for barring incoming, outgoing, and roaming calls.
■ All outgoing calls made by [email protected] are barred
■ All incoming calls to [email protected] are barred
■ All incoming calls to [email protected] are barred when Tom is roaming
Example 21–6 Call Barring For Outgoing, Incoming, And Roaming Calls
package com.oracle.sft.demo;import com.oracle.sft.api.CommunicationContext;import com.oracle.sft.api.Context;import com.oracle.sft.api.Conversation;import com.oracle.sft.api.Reason;import com.oracle.sft.api.UserParticipant;import com.oracle.sft.api.bean.CommunicationBean;import com.oracle.sft.api.bean.ParticipantEvent;import com.oracle.sft.api.context.IdentityInformation; @CommunicationBeanpublic class CallBarBean { @Context CommunicationContext<Conversation,UserParticipant> ctx; @ParticipantEvent(type= ParticipantEvent.Type.JOINING, communicationType = Conversation.class) public void hanldeStatedEvent() { Conversation call = (Conversation) ctx.getCommunication(); UserParticipant callee = (UserParticipant) call.getCallee(); UserParticipant caller = (UserParticipant) call.getCaller(); if (caller.getName().equals("[email protected]")) { caller.reject(Reason.DECLINE); } else if (callee.getName().equals("[email protected]")) { caller.reject(Reason.DECLINE); } else if (callee.getName().equals("[email protected]")) { IdentityInformation ii = ctx.getContextElement(IdentityInformation.class); if (isRoaming(ii)) { caller.reject(Reason.DECLINE); } } } boolean isRoaming(IdentityInformation pi) { boolean roaming = false; if (pi.getVisitedNetworkIdentity()!=null) roaming = true; return roaming; }}
Communication HoldCommunication Hold (also referred to Call Hold) allows a user to suspend a communication session—the reception of media stream(s) from an established IP

Communication Hold
Implementing Call Control Services 21-9
multimedia session—and resume the media stream(s) at a later time. Placing a Communication Hold on an ongoing session is achieved by sending a Session Description Protocol (SDP) offer where each of the communications (media streams) to be held are marked with the sendonly attribute if they were previously bidirectional media streams. To resume the session, a new SDP offer is issued in which each of the held media streams is marked with the default sendrecv attribute.
Communication Hold also allows an AS to play music or an announcement to the held party. This is achieved using an AS that acts as a third-party call controller (3PCC), and replaces the existing session of one of the users with a session originating from an application server that plays the announcement or music until the user’s session is resumed. See the 3GPP TS 24.628 specification for more information on the playing of announcements during Communication Hold.
Setting the Communication Hold BandwidthThe 3GPP TS 24.610 specification requires that the AS of the User Equipment (UE) invoking a media stream whose SDP session attribute is recvonly use a lower bandwidth. The SDP specifies a lower bandwidth by setting the bandwidth (the b= line in the SDP) to a lower value. The b= line contains two elements:
■ The bandwidth value expressed in kilo bits per second (kbps).
■ An alphanumeric modifier that indicates the communication session or media stream to which to apply the specified bandwidth value.
The modifiers whose bandwidth values are specified by SFT are:
■ AS—Application Specific Maximum, which specifies the total bandwidth for a single media stream from one source.
■ RS—RTCP bandwidth allocated to active data senders.
■ RR—RTCP bandwidth allocated to other participants (receivers) in the RTP session.
When the bandwidth setting is enabled, SFT sets the default value for the AS bandwidth to zero (b=AS:0). The b=RR: and b=RS: parameters are set to a value of 800 kbps, which is high enough to allow the continuation of the RTCP flow: b=RR:800 and b=RS:800
Example 21–7 Bandwidth Line in the Session Description Protocol
v=0o=alice 2890844526 2890842807 IN IP4 126.16.64.4s=SDP Seminarc=IN IP4 224.2.17.12/127t=2873397496 2873404696m=audio 49170 RTP/AVP 0b=AS:0b=RR:800b=RS:800
Note: The 3GPP TS 24.610 specification recommends that the AS modify the bandwidth for media streams whose SDP session attribute is recvonly. Media streams whose SDP session attribute are inactive, sendonly, and sendrecv are not affected.

Identity Presentation and Restriction
21-10 Oracle Communications Converged Application Server Developer's Guide
While the 3GPP TS 24.610 specification recommends these values to preserve network bandwidth when a communication is placed on hold, you may need to adjust the bandwidth to better suit the requirements of the Communication Hold application. You can specify a network bandwidth for use with Communication Hold using:
■ The enableChangeBandwidth and sdpBandwidthAttributes elements of the sft.xml deployment descriptor.
■ The @ServiceAttributes annotation.
■ The conversation.setBandWidth() method.
Example 21–8 specifies alternate bandwidth settings using the enableChangeBandwidth and sdpBandwidthAttributes elements of the sft.xml deployment descriptor.
Example 21–8 Specifying Bandwidth Using the SFT.XML Deployment Descriptor
<service-attributes> <enableChangeBandwidth>true</enableChangeBandwidth> <sdpBandwidthAttributes> <totalBandwidth>0</totalBandwidth> <bandwidthForActiveDataSenders>800</bandwidthForActiveDataSenders> <bandwidthForOtherParticipants>1600</bandwidthForOtherParticipants> </sdpBandwidthAttributes> </service-attributes>
The enableChangeBandwidth element is set to true, which enables the alternate bandwidth settings specified by the sdpBandwidthAttributes element. In this example the bandwidthForActiveDataSenders sub-element specifies a bandwidth of 800 for users sending active media streams, while the bandwidthForOtherParticipants sub-element specifies a bandwidth of 1600 for all other participants.
Example 21–9 specifies alternate bandwidth settings using the @ServiceAttributes annotation. Use this annotation in the CommunicationBean Java class you create to implement the Communication Hold application.
Example 21–9 Specifying Bandwidth Using the @ServiceAttributes Annotation
@ServiceAttributes(enableChangeBandwidth = true, sdpBandwidthAttributes = {0, 800, 1600})
Identity Presentation and RestrictionConverged Application Server supports the following Identity Presentation and Restriction services:
■ Originating Identification Presentation (OIP): Enables the called party to receive a network generated and trusted identity of the calling user on the screen of the mobile device. The originating user may also present a custom identity to be seen at the called party. The user generated identity is usually screened by the network of the originating user.
■ Originating Identification Restriction (OIR): Invoked when the calling user does not want their identity to be shown to the called party. In such cases, the network of the originating user signals to the network of the called user, to withhold the identity of the calling user.
■ Terminating Identification Presentation (TIP): Enables the calling party to receive the identification information of the remote party from the network. This information is provided to the originating party once the IMS communication has
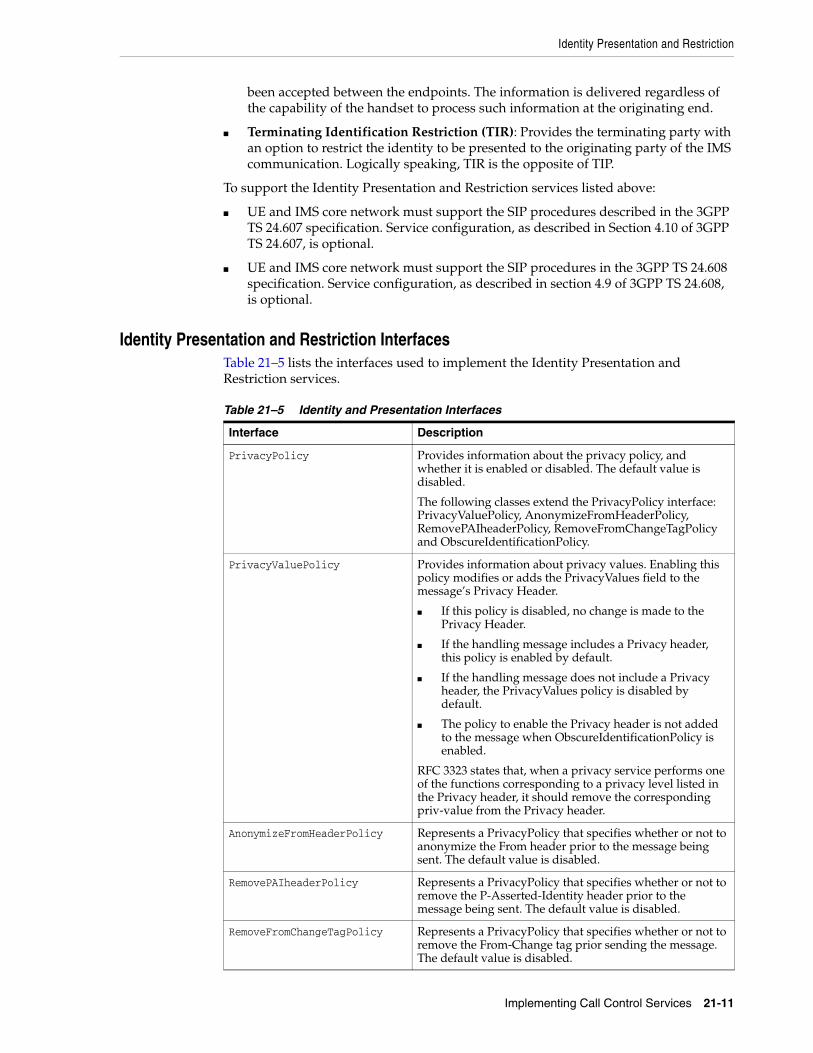
Identity Presentation and Restriction
Implementing Call Control Services 21-11
been accepted between the endpoints. The information is delivered regardless of the capability of the handset to process such information at the originating end.
■ Terminating Identification Restriction (TIR): Provides the terminating party with an option to restrict the identity to be presented to the originating party of the IMS communication. Logically speaking, TIR is the opposite of TIP.
To support the Identity Presentation and Restriction services listed above:
■ UE and IMS core network must support the SIP procedures described in the 3GPP TS 24.607 specification. Service configuration, as described in Section 4.10 of 3GPP TS 24.607, is optional.
■ UE and IMS core network must support the SIP procedures in the 3GPP TS 24.608 specification. Service configuration, as described in section 4.9 of 3GPP TS 24.608, is optional.
Identity Presentation and Restriction InterfacesTable 21–5 lists the interfaces used to implement the Identity Presentation and Restriction services.
Table 21–5 Identity and Presentation Interfaces
Interface Description
PrivacyPolicy Provides information about the privacy policy, and whether it is enabled or disabled. The default value is disabled.
The following classes extend the PrivacyPolicy interface: PrivacyValuePolicy, AnonymizeFromHeaderPolicy, RemovePAIheaderPolicy, RemoveFromChangeTagPolicy and ObscureIdentificationPolicy.
PrivacyValuePolicy Provides information about privacy values. Enabling this policy modifies or adds the PrivacyValues field to the message’s Privacy Header.
■ If this policy is disabled, no change is made to the Privacy Header.
■ If the handling message includes a Privacy header, this policy is enabled by default.
■ If the handling message does not include a Privacy header, the PrivacyValues policy is disabled by default.
■ The policy to enable the Privacy header is not added to the message when ObscureIdentificationPolicy is enabled.
RFC 3323 states that, when a privacy service performs one of the functions corresponding to a privacy level listed in the Privacy header, it should remove the corresponding priv-value from the Privacy header.
AnonymizeFromHeaderPolicy Represents a PrivacyPolicy that specifies whether or not to anonymize the From header prior to the message being sent. The default value is disabled.
RemovePAIheaderPolicy Represents a PrivacyPolicy that specifies whether or not to remove the P-Asserted-Identity header prior to the message being sent. The default value is disabled.
RemoveFromChangeTagPolicy Represents a PrivacyPolicy that specifies whether or not to remove the From-Change tag prior sending the message. The default value is disabled.

Identity Presentation and Restriction
21-12 Oracle Communications Converged Application Server Developer's Guide
Privacy Service BehaviorThe privacy service role is instantiated by a network intermediary. Typically this function is performed by entities that act as SIP proxy servers. The privacy service is designed to provide privacy functions for SIP messages that cannot otherwise be provided by the UAs themselves. Table 21–6 lists the semantics of each priv-value, and the RFC that defines them.
RFC 5379 describes privacy considerations and the recommended treatment of each SIP header that may reveal user-privacy information. Section 5, “Recommended Treatment of User-Privacy-Sensitive Information” of RFC 5379 describes how each
ObscureIdentificationPolicy Represents a PrivacyPolicy that specifies whether or not to obscure identification according to the privacy header. Disabling this policy does not obscure identification contained in the Privacy header prior to the message being sent. The default value is disabled.
RFC 3323, RFC 3325, and RFC 4244 define specific behaviors for each privacy value. RFC 5379 provides guidelines that are specified in RFC 3323, and subsequently extended in RFC 3325 and RFC 4244.
PrivacyInformation Encapsulates Privacy information. You can use PrivacyInformation methods to return information about the privacy policy.
Table 21–6 Types of Privacy Service Behaviors
Privacy Type Description
user Request that privacy services provide a user-level privacy function.
See RFC 3323, “A Privacy Mechanism for the Session Initiation Protocol (SIP)” for more information.
header Request that privacy services modify headers that cannot be set arbitrarily by the user. For example, the Contact and Via headers.
See RFC 3323, “A Privacy Mechanism for the Session Initiation Protocol (SIP)” for more information.
session Request that privacy services provide privacy for session media.
See RFC 3323, “A Privacy Mechanism for the Session Initiation Protocol (SIP)” for more information.
none Privacy services must not perform any privacy function.
See RFC 3323, “A Privacy Mechanism for the Session Initiation Protocol (SIP)” for more information.
critical Privacy service must perform the specified services or fail the request.
See RFC 3323, “A Privacy Mechanism for the Session Initiation Protocol (SIP)” for more information.
id Privacy requested for Third-Party Asserted Identity.
See RFC 3325, “Private Extensions to the Session Initiation Protocol (SIP) for Asserted Identity within Trusted Networks” for more information.
history Privacy requested for History-Info headers.
See RFC 4244, “An Extension to the Session Initiation Protocol (SIP) for Request History Information” for more information.
Table 21–5 (Cont.) Identity and Presentation Interfaces
Interface Description
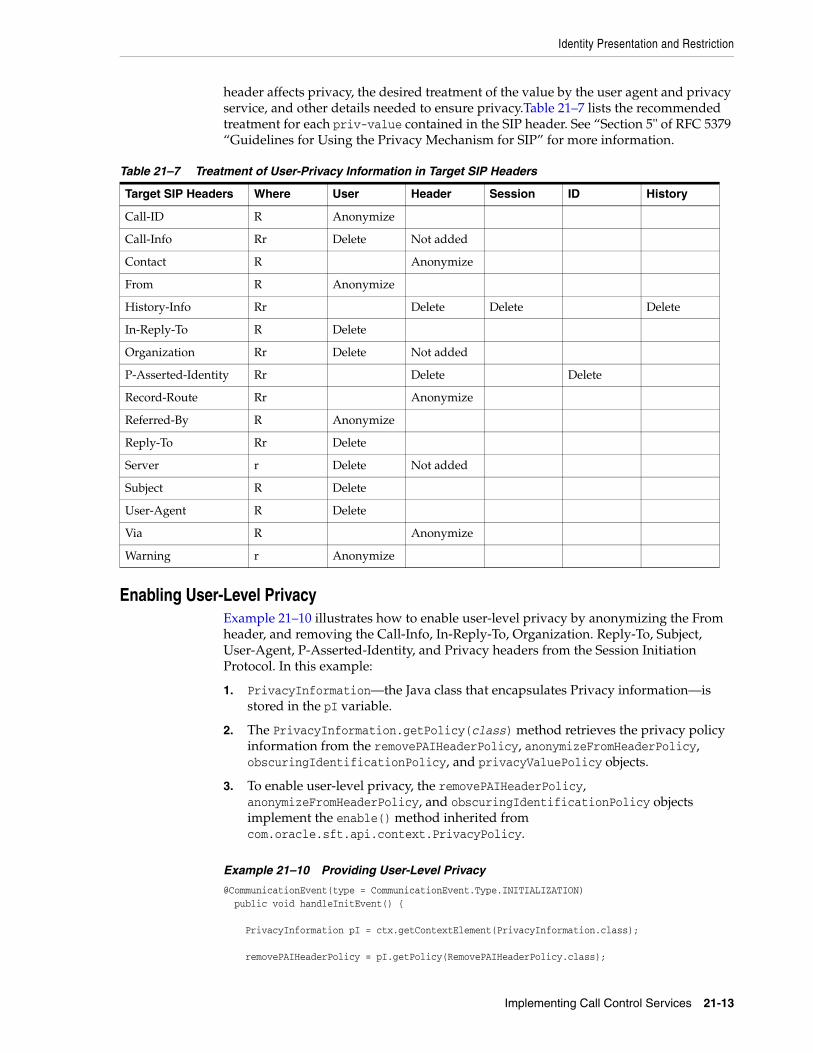
Identity Presentation and Restriction
Implementing Call Control Services 21-13
header affects privacy, the desired treatment of the value by the user agent and privacy service, and other details needed to ensure privacy.Table 21–7 lists the recommended treatment for each priv-value contained in the SIP header. See “Section 5" of RFC 5379 “Guidelines for Using the Privacy Mechanism for SIP” for more information.
Enabling User-Level PrivacyExample 21–10 illustrates how to enable user-level privacy by anonymizing the From header, and removing the Call-Info, In-Reply-To, Organization. Reply-To, Subject, User-Agent, P-Asserted-Identity, and Privacy headers from the Session Initiation Protocol. In this example:
1. PrivacyInformation—the Java class that encapsulates Privacy information—is stored in the pI variable.
2. The PrivacyInformation.getPolicy(class) method retrieves the privacy policy information from the removePAIHeaderPolicy, anonymizeFromHeaderPolicy, obscuringIdentificationPolicy, and privacyValuePolicy objects.
3. To enable user-level privacy, the removePAIHeaderPolicy, anonymizeFromHeaderPolicy, and obscuringIdentificationPolicy objects implement the enable() method inherited from com.oracle.sft.api.context.PrivacyPolicy.
Example 21–10 Providing User-Level Privacy
@CommunicationEvent(type = CommunicationEvent.Type.INITIALIZATION) public void handleInitEvent() {
PrivacyInformation pI = ctx.getContextElement(PrivacyInformation.class); removePAIHeaderPolicy = pI.getPolicy(RemovePAIHeaderPolicy.class);
Table 21–7 Treatment of User-Privacy Information in Target SIP Headers
Target SIP Headers Where User Header Session ID History
Call-ID R Anonymize
Call-Info Rr Delete Not added
Contact R Anonymize
From R Anonymize
History-Info Rr Delete Delete Delete
In-Reply-To R Delete
Organization Rr Delete Not added
P-Asserted-Identity Rr Delete Delete
Record-Route Rr Anonymize
Referred-By R Anonymize
Reply-To Rr Delete
Server r Delete Not added
Subject R Delete
User-Agent R Delete
Via R Anonymize
Warning r Anonymize

Communication Waiting
21-14 Oracle Communications Converged Application Server Developer's Guide
anonymizeFromHeaderPolicy = pI.getPolicy(AnonymizeFromHeaderPolicy.class); obscuringIdentificationPolicy = pI.getPolicy(ObscureIdentificationPolicy.class); privacyValuePolicy = pI.getPolicy(PrivacyValuePolicy.class); removePAIHeaderPolicy.enable(); anonymizeFromHeaderPolicy.enable(); obscuringIdentificationPolicy.enable(); printPrivacyInformation(); }
Providing Privacy for the History-Info HeaderThe History-Info header (defined in RFC 4244) provides a way of capturing any redirection information that may have occurred during a particular call. Without the History-Info header the redirecting information would be lost. The History-Info header is generated when a SIP request is re-directed, and can appear in any SIP request not associated with a dialog. The History-Info header is generated by a User Agent or proxy and is passed from one entity to another through requests and responses.
Example 21–11 adds history to the privacy policy, and then modifies the contents of the PRIVACY header by calling the PrivacyValuePolicy.enable() method. The PrivacyValuePolicy.enable() method adds a Privacy header with PrivacyValues to the message.
Example 21–11 Removing the History-Info Header
privacyValuePolicy.addPrivacyValue(ValueType.HISTORY);privacyValuePolicy.enable();
Communication WaitingCommunication Waiting (also referred to as Call Waiting) informs a user (or the user equipment) that limited resources are available for incoming calls. Typically this means that the callee is involved in a communication session with another caller, and is not able to answer the incoming call from the second caller. Communication Waiting provides a mechanism by which you can create an application to inform a user that there is a second incoming call. The user then has the choice of accepting, rejecting, or ignoring the waiting call. Converged Application Server supports the 3GPP TS 24.615 and the GSMA IR.92 specifications.
Supporting Network- and Terminal-based Communication WaitingWhen using SFT to develop Communication Waiting services, Converged Application Server supports both network- and terminal-based Communication Waiting.
About Network-based Communication WaitingNetwork-based Communication Waiting occurs when the AS determines that one of the following conditions has occurred:
■ The SIP INVITE request fulfills the Network Determined User Busy (NDUB) condition for the callee.
■ The caller receives a SIP message 486 Busy Here (indicating that the callee is busy) with a 370 Warning in the SIP header field indicating that there is insufficient bandwidth for the call to complete.

Communication Waiting
Implementing Call Control Services 21-15
To support network-based Communication Waiting, the AS performs the following functions in response to receiving an appropriate Communication Waiting condition:
1. Modifies the SIP INVITE request and forwards or re-sends it to User B.
2. Provides an announcement to User C upon receipt of a 180 Ringing response from User B.
3. Inserts an Alert-Info header field set to urn:alert:service:call-waiting in the 180 Ringing response and forwards it to User C
4. Rejects the communication by sending a 486 Busy Here response to User C upon receipt of a 415 Unsupported Media Type response.
About Terminal-based Communication WaitingTerminal-based Communication Waiting occurs when the AS receives the SIP message 180 Ringing with the Alert-Info header URN Indication Values set to urn:alert:service:call-waiting.
To support terminal-based Communication Waiting, the application server performs the following functions in response to receiving an appropriate Communication Waiting condition:
1. Sends an announcement to the calling user (the caller).
2. Sends a 180 Ringing response to the caller.
3. Initiates the Telephony Application Server-Communication Waiting (TAS-CW) timer. This optional timer specifies the amount of time the network will wait for a response from User B, in response to the communication from User C. The value of the timer is between 0.5 and 2 minutes.
If the TAS-CW timer expires, the AS sends a CANCEL request to User B with a Reason header field set to “SIP,” and the cause set to 408 Request Time-out, indicating that the user could not be found in the allotted time. A 480 Temporarily Unavailable response is sent to User C, including a Reason header field set to ISUP Cause Code 19, indicating that these was no answer from the callee.
About the Communication Waiting InterfacesCommunication Waiting makes use of the following classes in the com.oracle.sft.api package. For more information on these interfaces and their usage, refer to the Converged Application Server API Reference.
Creating a Communication Waiting ApplicationThe following examples decompose the CallWaitingBean Java class. See "CallWaitingBean Example Code" to view the code in its entirety.
Example 21–12 creates CallWaitingBean, a Java class that responds to Communication Waiting events.
Example 21–12 Creating the CallWaitingBean Java Class
@CommunicationBeanpublic class CallWaitingBean {
@Context CommunicationContext<Conversation,UserParticipant> ctx;...
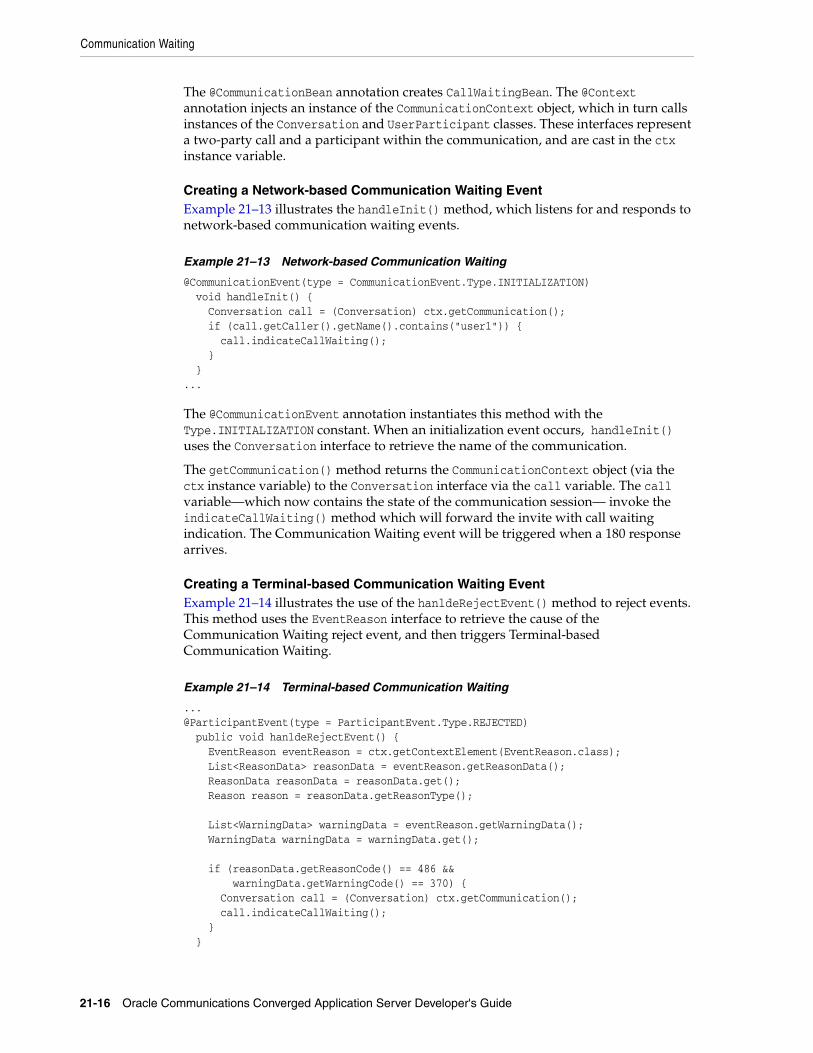
Communication Waiting
21-16 Oracle Communications Converged Application Server Developer's Guide
The @CommunicationBean annotation creates CallWaitingBean. The @Context annotation injects an instance of the CommunicationContext object, which in turn calls instances of the Conversation and UserParticipant classes. These interfaces represent a two-party call and a participant within the communication, and are cast in the ctx instance variable.
Creating a Network-based Communication Waiting EventExample 21–13 illustrates the handleInit() method, which listens for and responds to network-based communication waiting events.
Example 21–13 Network-based Communication Waiting
@CommunicationEvent(type = CommunicationEvent.Type.INITIALIZATION) void handleInit() { Conversation call = (Conversation) ctx.getCommunication(); if (call.getCaller().getName().contains("user1")) { call.indicateCallWaiting(); } }...
The @CommunicationEvent annotation instantiates this method with the Type.INITIALIZATION constant. When an initialization event occurs, handleInit() uses the Conversation interface to retrieve the name of the communication.
The getCommunication() method returns the CommunicationContext object (via the ctx instance variable) to the Conversation interface via the call variable. The call variable—which now contains the state of the communication session— invoke the indicateCallWaiting() method which will forward the invite with call waiting indication. The Communication Waiting event will be triggered when a 180 response arrives.
Creating a Terminal-based Communication Waiting EventExample 21–14 illustrates the use of the hanldeRejectEvent() method to reject events. This method uses the EventReason interface to retrieve the cause of the Communication Waiting reject event, and then triggers Terminal-based Communication Waiting.
Example 21–14 Terminal-based Communication Waiting
...@ParticipantEvent(type = ParticipantEvent.Type.REJECTED) public void hanldeRejectEvent() { EventReason eventReason = ctx.getContextElement(EventReason.class); List<ReasonData> reasonData = eventReason.getReasonData(); ReasonData reasonData = reasonData.get(); Reason reason = reasonData.getReasonType();
List<WarningData> warningData = eventReason.getWarningData(); WarningData warningData = warningData.get(); if (reasonData.getReasonCode() == 486 && warningData.getWarningCode() == 370) { Conversation call = (Conversation) ctx.getCommunication(); call.indicateCallWaiting(); } }

Communication Waiting
Implementing Call Control Services 21-17
The @ParticipantEvent annotation—which specifies events pertaining to a participant within a given communication session—listens for an event type of REJECTED, indicating that the participant has refused to join the communication. The hanldeRejectEvent()method calls the EventReason interface to get the cause of the REJECTED event. List<WarningData> returns the list of WarningData for the event, and the getWarningCode() method returns the warning codes.
If the status code of the response is 486 Busy Here and the warning code is 370 Insufficient Bandwidth, the getCommunication() method returns the CommunicationContext object (via the ctx instance variable) to the Conversation interface via the call variable. The call variable invoke the indicateCallWaiting() method, which re-sends the INVITE. The Communication Waiting event will be triggered when 180 response arrives.
Handling the Communication Waiting EventExample 21–15 creates the method handleCallWaiting(), which uses the @CommunicationEvent annotation’s type.WAITING constant to indicate that a call is waiting. The application receives a notification that an incoming call is waiting, and can play announcements to the caller.
Example 21–15 Handling the Call Waiting Event
@CommunicationEvent(type = CommunicationEvent.Type.WAITING) void handleCallWaiting() {
CallWaitingBean Example CodeExample 21–16 shows the code for the previously described CallWaitingBean in its entirety.
Example 21–16 CallWaitingBean Example Java Code
package com.oracle.sft.demo;import java.util.List; import com.oracle.sft.api.CommunicationContext;import com.oracle.sft.api.Context;import com.oracle.sft.api.Conversation;import com.oracle.sft.api.Reason;import com.oracle.sft.api.UserParticipant;import com.oracle.sft.api.bean.CommunicationBean;import com.oracle.sft.api.bean.CommunicationEvent;import com.oracle.sft.api.bean.ParticipantEvent;import com.oracle.sft.api.context.EventReason;import com.oracle.sft.api.context.ReasonData;import com.oracle.sft.api.context.WarningData; //Create the CallWaitingBean Java class using the @CommunicationBean annotation.@CommunicationBeanpublic class CallWaitingBean { // @Context injects an instance of CommunicationContext, // which retrives instances of Conversation and UserParticipant. @Context CommunicationContext<Conversation,UserParticipant> ctx; //Annotate handleInit() with @CommunicationEvent. @CommunicationEvent(type = CommunicationEvent.Type.INITIALIZATION) void handleInit() { Conversation call = (Conversation) ctx.getCommunication(); if (call.getCaller().getName().contains("user1")) { call.indicateCallWaiting(); }

Message Waiting Indication
21-18 Oracle Communications Converged Application Server Developer's Guide
} //Annotate hanldeRejectEvent() with @ParticipantEvent. @ParticipantEvent(type = ParticipantEvent.Type.REJECTED) public void hanldeRejectEvent() { EventReason eventReason = ctx.getContextElement(EventReason.class); List<ReasonData> reasonDatas = eventReason.getReasonData(); ReasonData reasonData = reasonDatas.get(0); Reason reason = reasonData.getReasonType(); //Get the warning data and codes from the EventReason interface. List<WarningData> warningDatas = eventReason.getWarningData(); WarningData warningData = warningDatas.get(0); // If the warning code is 486 Busy Here and 370 Insufficient Bandwidth, // resend the INVITE using the indicateCallWaiting() method. if (reasonData.getReasonCode() == 486 && warningData.getWarningCode() == 370) { Conversation call = (Conversation) ctx.getCommunication(); call.indicateCallWaiting(); } } // @CommunicationEvent(type = CommunicationEvent.Type.WAITING) void handleCallWaiting() { }
Message Waiting IndicationMessage Waiting Indication (MWI) is a service that informs a user about the status of recorded messages. To use the notification feature, the user must subscribe to a notification service that makes use of the Message Waiting Indication status messages. With the Message Waiting Indication feature you can:
■ Send notification when a new subscription arrives.
■ Specify when notifications are sent in response to subscriptions.
■ Reject subscriptions.
■ Terminate subscriptions.
Message Waiting Indication lets the AS notify a subscriber that there is a message waiting for them. The indication is delivered to the subscriber's UE after they have successfully subscribed to the Message Waiting Indication service as defined in the 3GPP TS 24.606 specification.
When Converged Application Server receives a SUBSCRIBE message, SFT notifies the MWI application via a SUBSCRIPTION event. Once notification is received the MWI application calls instances of the MessageObservation and ActivityParticipant interfaces—which identify the current subscriber—using the CommunicationContext interface.
Note: Typically a voice-mail server manages Message Waiting Indication accounts. When a new message arrives, the voice-mail server typically provides a listener or API that you can resister with to receive notification of new messages. How the application manages the message account is beyond the scope of the SFT Message Waiting Indication APIs.

Message Waiting Indication
Implementing Call Control Services 21-19
RFC 3842 specifies that a NOTIFY message must be sent when accepting new subscriptions, the subscription has expired, or an unsubscribe event occurs. Converged Application Server’s Event Notification Service sends these NOTIFY messages automatically, and application updates the MessageSummary object during the initial SUBSCRIPTION event to ensure that the correct NOTIFY message is sent.
Configuring Message Waiting IndicationTo configure Message Waiting Indication, use either the sft.xml deployment descriptor, or the CommunicationBean’s @ServiceAttributes annotation. The parameters you specify corollate to the incoming SUBSCRIBE request's Subscription-State Expires header parameter, which contains an expiration time.
■ If the expiration time is less than zero (> 0) but greater than the minimum expiration time, Converged Application Server rejects the SUBSCRIBE request with the 423 Interval Too Brief response code.
■ If the expiration time is greater than zero (< 0), Converged Application Server uses the default expiration time.
■ If the specified expiration time in greater (>) than the maximum expiration time, Converged Application Server uses the maximum expiration time.
■ If the maximum number of subscriptions is reached, the next SUBSCIRBE request is rejected with the 503 Service Unavailable response code.
Example 21–17 illustrates the use of the @ServiceAttributes annotation to configure Message Waiting Indication events. The configuration parameters are listed in the order in which you specify them:
■ Minimum expiration time allowed for subscriptions. The default value is 100.
■ Default expiration time for subscriptions. The default value is 1800.
■ Maximum expiration time allowed for subscriptions. The default value is 3600.
■ Maximum number of subscriptions per resource allowed for the service. The default value is 100.
Example 21–17 Using @ServiceAttribute to Configure MWI Events
...@ServiceAttributes(messageObservationEventConfig = {100, 1800, 3600, 100})@CommunicationBeanpublic class MWIBean...
About the Message Waiting Indication InterfacesMessage Waiting Indication makes use of the following classes in the com.oracle.sft.api package. For more information on these interfaces and their usage, refer to the Converged Application Server API Reference.
Table 21–8 Message Waiting Indication classes
Class Description
UserActivity UserActivity extends the Communication class, and encapsulates the participant’s activity. UserActivity provides several ActivityParticipant() methods.

Message Waiting Indication
21-20 Oracle Communications Converged Application Server Developer's Guide
Creating a Message Waiting Indication ApplicationThe following examples decompose the MWIBean Java class, which responds to Message Waiting Indication events. See "Message Waiting Indication Example" to view the application’s Java code in its entirety.
Example 21–19 creates MWIBean, a Java class whose methods handle and respond to Message Waiting Indication events.
Example 21–18 Creating the MWIBean Java Class
@CommunicationBean@ServiceAttributes(messageObservationEventConfig = {100, 1800, 3600, 100})public class MWIBean {
@Context CommunicationContext<MessageObservation,ActivityParticipant> ctx; @Context CommunicationService service; private String subscriberName; private String resourceId;
...
MWIBean uses the @SerivceAttributes annotation to configure the Message Waiting Indication event expiration times. This example configures the service using the default values. The @Context annotation injects an instance of the CommunicationContext, which in turn calls instances of MessageObservation and ActivityParticipant. These interfaces identify the user initiating the subscription request, and are stored in the ctx instance variable.
The @Context annotation injects an instance of CommunicationService, which is referred to with the service instance variable. CommunicationService lets you create objects that are not related to a CommunicationSession, such as groups.
MessageObservation MessageObservation extends the UserActivity class, and encapsulates the resource and subscribers. Using MessageObservation applications can get and notify subscribers (ActivityParticipants), and terminate subscriptions. The getMessageSummary() method returns a MessageSummary, which contains message information that is sent in NOTIFY messages. The application must update MessageSummary before sending a NOTIFY message to subscribers.
MessageSummary Before sending a notification, the MWI application must update the MessageSummary object, which encapsulates the NOTIFY body according to RFC 3842. MessageSummary is obtained via the MessageObservation class.
MessageSummaryLine MessageSummaryLine encapsulates the message summary line as defined in RFC 3842. MessageSummaryLine is obtained via MessageSummary.
MessageSummaryExtensionHeader
MessageSummaryExtensionHeader encapsulates a message summary extension header as defined by RFC 3842. MessageSummaryExtensionHeader is obtained via MessageSummary.
ActivityParticipant ActivityParticipant extends Participant. In the context of the MessageObservation class, ActivityParticipant represents a subscriber. Applications can obtain an instance of ActivityParticipant via MessageObservation.
Table 21–8 (Cont.) Message Waiting Indication classes
Class Description

Message Waiting Indication
Implementing Call Control Services 21-21
Finally, two private instance variables are created: subscriberName and resourceId.
Updating MessageSummary Before Sending NotificationsExample 21–19 illustrates the hanldeSubscriptionEvent() method. This method is annotated with the @CommunicationEvent annotation’s Type.SUBSCRIPTION constant. When Converged Application Server receives a SIP SUBSCRIBE message, the MWI application receives notification via the SUBSCRIPTION event.
A NOTIFY message is sent when accepting new subscriptions. Converged Application Server’s Event Notification Service sends these NOTIFY messages automatically, and the MWI application updates the MessageSummary object during the initial SUBSCRIPTION event to ensure that the correct NOTIFY message is sent. Before sending a notification, the MWI application updates the MessageSummary object. MessageSummary is obtained via the MessageObservation interface.
Example 21–19 Updating the MessageSummary Class
...@CommunicationEvent(type = CommunicationEvent.Type.SUBSCRIPTION)public void hanldeSubscriptionEvent() {
MessageObservation messageObservation = (MessageObservation)ctx.getCommunication(); ActivityParticipant currentSubscriber = (ActivityParticipant)ctx.getParticipant(); MessageSummary messageSummary = messageObservation.getMessageSummary(); messageSummary.setMessageAccount(URI.create("sip:[email protected]")); messageSummary.setStatusLine(true); messageSummary.setMessageSummaryLine(MessageContextClass.VOICEMESSAGE, 1, 2, 3, 4); }...
The hanldeSubscriptionEvent() method declares and initializes the following object reference variables:
■ The getCommunication() method returns the CommunicationContext object (via the ctx instance variable) to the MessageObservation interface using the messageObservation variable.
■ The getParticiapnt() method returns subscriber information from the CommunicationContext object (via the messageObservation instance variable). MessageSummary is to the ActivityParticipant interface using the currentSubscriber variable.
■ The getMessageSummary() method returns message summary information from MessageObservation (via the messageObservation object reference variable).
MessageObservation acts as a resource which receives notifications from the server managing the message account (for example, a voice-mail server). Users (ActivityParticipants) subscribe to the message account. When new messages arrive the state of the MessageSummary object is updated, and notifications are sent to all ActivityParticipants subscribed to the account, alerting them that new messages are waiting.
The messageSummary object variable, which serves as a reference to the MessageSummary object, makes a series of method calls which updates the NOTIFY body with the following information:

Message Waiting Indication
21-22 Oracle Communications Converged Application Server Developer's Guide
■ The account to which the message-summary body corresponds. This is specified by the Message Waiting Indication application to indicate the resource. For example, the user’s voice-mail account: [email protected]
■ The setStatusLine(true) method specifies that messages are waiting.
■ The setMessageSummaryLine() method indicates that the waiting message types are voice messages.
As defined in RFC 3458 and RFC 3938, the following message types can provide notifications: voice-message, video-message, fax-message, pager-message, multimedia-message, text-message, or none (no message).
Sending MWI Notifications to SubscribersTo send MWI notifications to subscribers, first locate the resource (for example, the voice-mail account), and then update MessageSummary with the status of the message account. To do this you use the MessageObservation interface to look up accounts, and the MessageSummary class to send the notifications. Once MessageSummary references the status of the message account, invoke resource.process() to send NOTIFY messages to the subscribers.
Example 21–20 creates the updateResourceInfo(String resourceId) method. This method is invoked when the status of a mail account changes. (How to get this change is beyond the scope of the SFT Message Waiting Indication APIs). This customer defined method updates messageSummary, and sends a NOFITY message to all subscribers.
Example 21–20 Sending Notification to all Subscribers
...void updateResourceInfo(String resourceId) { MessageObservation resource = service.findByName(MessageObservation.class, resourceId); MessageSummary messageSummary = resource.getMessageSummary(); MessageSummaryLine messageSummaryLine = messageSummary.getMessageSummaryLine(MessageContextClass.VOICEMESSAGE); messageSummaryLine.setNewMessageCount(1); messageSummaryLine.setOldMessageCount(2); resource.process(); }...
To begin the method declares and initializes the following object reference variables:
■ The resource variable serves as a container for the list of subscribers (or resources) obtained via the MessageObservation.class.
MessageObservation resource =service.findByName(MessageObservation.class, resourceId);
■ The getMessagesummary() method returns the message summary information to the messsageSummary variable via a method call to the MessageObservation class.
MessageSummary messageSummary = resource.getMessageSummary();
Note: This method may be a callback method to the server managing the message account, or another application’s APIs that notify MWI application that a message has arrived and is waiting. These parameters are defined by your message server’s APIs.

Message Waiting Indication
Implementing Call Control Services 21-23
■ The getMessageSummaryLine() method returns a reference to a MessageSummaryLine which ContextClass is specified. In this example, the type is VOICEMESSAGE
MessageSummaryLine messageSummaryLine =messageSummary.getMessageSummaryLine(MessageContextClass.VOICEMESSAGE);
■ The messageSummaryLine variable, which stores message summary line information from the MessageSummaryLine object, makes method calls to set the old and new message counts using the setNewMessageCount(int count) and setOldMessageCount(int count) methods.
Finally, the resource variable storing the subscriber list calls MessageObservation.process(), which sends NOTIFY messages containing the updated message summary information to all of the subscribers.
messageSummaryLine.setNewMessageCount(1);messageSummaryLine.setOldMessageCount(2);resource.process();
Removing a SubscriptionExample 21–21 illustrates the use of the UserActivity interface in removing a subscription (which is a type of UserActivity). UserActivity extends the Communication, and provides the removeActivityParticipant() method, which lets you remove the ActivityParticipant from the UserActivity.
This example declares and initializes the variable resource, which serves as a source for the list of subscribers (or resources) obtained via the MessageObservation class. The service session attribute—which was declared earlier in the program—lets you call an instance of CommunicationSession. When responding to an event, the service session attribute injects an instance of CommunicationSession into the CommunicationBean.
Example 21–21 Removing a Subscriber
...void removeSubscriber(String resourceId, String subscriberName) { MessageObservation resource = service.findByName(MessageObservation.class, resourceId); resource.removeActivityParticipant(subscriberName); }}
Message Waiting Indication ExampleExample 21–22 shows the code for the previously described MWIBean in its entirety.
Example 21–22 Message Waiting Indication Scenarios
package com.oracle.sft.MWIBean; import com.oracle.sft.api.ActivityParticipant;import com.oracle.sft.api.CommunicationContext;import com.oracle.sft.api.CommunicationService;import com.oracle.sft.api.Context;import com.oracle.sft.api.MessageObservation;import com.oracle.sft.api.ProtocolMessage;import com.oracle.sft.api.MessageContextClass;import com.oracle.sft.api.bean.CommunicationBean;import com.oracle.sft.api.bean.CommunicationEvent;

Message Waiting Indication
21-24 Oracle Communications Converged Application Server Developer's Guide
import com.oracle.sft.api.bean.ProtocolEvent;import com.oracle.sft.api.bean.ServiceAttributes;import com.oracle.sft.api.context.MessageObservationResource;import com.oracle.sft.api.MessageSummary;import com.oracle.sft.api.MessageSummaryLine; @CommunicationBean@ServiceAttributes(messageObservationEventConfig = {31, 61, 91, 2})public class MWIBean {
@Context CommunicationContext<MessageObservation,ActivityParticipant,?> ctx; @Context CommunicationService service; private String subscriberName; private String resourceId; //Receiving the SUBSCRIPTION Event @CommunicationEvent(type = CommunicationEvent.Type.SUBSCRIPTION) public void hanldeSubscriptionEvent() { MessageObservation messageObservation = (MessageObservation)ctx.getCommunication(); ActivityParticipant currentSubscriber = (ActivityParticipant)ctx.getParticipant(); subscriberName = currentSubscriber.getName(); resourceId = messageObservation.getName(); if (currentSubscriber.getName().contains("subscriberA")) { MessageSummary messageSummary = messageObservation.getMessageSummary(); messageSummary.setMessageAccount(URI.create("sip:[email protected]")); messageSummary.setStatusLine(true); messageSummary.setMessageSummaryLine(MessageContextClass.VOICEMESSAGE, 1, 2, 3, 4); messageSummary.setMessageSummaryLine(MessageContextClass.FAX, 10, 20, 30, 40); messageSummary.setExtensionHeader("messageID", "to", "from", "subject", "date", "priority"); } else { //System.out.println("###### Reject the subscription. ######"); currentSubscriber.reject(); } }
@CommunicationEvent(type = CommunicationEvent.Type.NOTIFICATION) public void hanldeNotificationEvent() { System.out.println("###### Receive NOTIFICATION Event ######"); System.out.println(""); } /** * Update resource info and send NOTIFY message to all subscribers. */
void updateResourceInfo(String resourceId) { MessageObservation resource = service.findByName (MessageObservation.class, resourceId); MessageSummary messageSummary = resource.getMessageSummary(); messageSummary.setStatusLine(false); MessageSummaryLine messageSummaryLine = messageSummary.getMessageSummaryLine(MessageContextClass.VOICEMESSAGE); if (messageSummaryLine != null) { messageSummaryLine.setNewMessageCount(messageSummaryLine.getNewMessageCount() + 1); messageSummaryLine.setOldMessageCount(messageSummaryLine.getOldMessageCount() + 1); } resource.process(); }
/** * Send NOTIFY message to a specified subscriber to end the Subscription. */ void removeSubscriber(String resourceId, String subscriberName) {

Message Waiting Indication
Implementing Call Control Services 21-25
MessageObservation resource = service.findByName(MessageObservation.class, resourceId); System.out.println("###### remove Subscriber " + subscriberName); resource.removeActivityParticipant(subscriberName); } }

Message Waiting Indication
21-26 Oracle Communications Converged Application Server Developer's Guide

22
Using Announcements 22-1
22Using Announcements
This chapter describes how to implement announcement support as defined in IR.92 Supplementary Services using the Service Foundation Toolkit (SFT).
About AnnouncementsAnnouncements are service-related messages played to a recipient to inform them about the state of a call. Announcements can be provided using either audio or video content.
SFT supports the following approaches to playing announcements:
■ Send the media stream to the recipient of the announcement for playback.
This approach uses a media server and Media Resource Function Processor (MRFP). The media is streamed to the recipient using the Real-time Transport Protocol (RTP) after establishing a media session with the media server. Based on the point-in-time at which the media session is initiated, an early- or non-early media session can be used.
SFT reserves a media resource using the JSR 309 API (the JSR 309 driver used by the media server). The underlying mechanism between the JSR309 driver and MRFP is protocol agnostic.
■ Send information about the media content that lets the recipient retrieve and playback the announcement.
This approach sends a URI identifying the media to the recipient, allowing them to determine whether or not to play the announcement.
APIs for Announcement SupportAnnouncement support makes use of the following classes in the com.oracle.sft.api package. For more information on these interfaces and their usage, refer to the Converged Application Server API Reference.
Table 22–1 lists the methods defined by the Interaction interface to replace a participant in a communication with another participant. In the context of announcement support, the other participant you add to the communication is the media server.

APIs for Announcement Support
22-2 Oracle Communications Converged Application Server Developer's Guide
Table 22–2 lists the methods defined by the Conversation interface.
Table 22–3 lists the methods defined by the Participant interface.
Table 22–4 lists the methods defined by the ConversationParticipantExtension interface
Table 22–1 Methods Defined by the Interaction Interface
Method Description
addParticipant(Class<P> type, String name)
addParticipant(Class<P> type, String name, javax.media.mscontrol.join.Joinable j)
addParticipant(Participant p)
addParticipant(String name)
Adds a participant to the interaction.
removeParticipant(Participant p)
removeParticipant(String name)
Removes a participant from the interaction.
replaceParticipant(Participant replaced, Participant replacing
replaceParticipant(Participant replaced, Participant replacing, boolean purge)
Enhanced function for participant replacement. If purge is set to false, the two methods provides the same are functionality.
IMConversation, IMConference and QueryInteration do not support this function
Table 22–2 Methods Defined by the Conversation Interface
Method Description
getOtherParty() Gets the other party of the specified participant in the Conversation.
getMediaPartner() Returns the MediaPartner joined in the Conversation instance if such a MediaPartner exists.
Table 22–3 Methods Defined by the Participant Interface
Method Description
getExtension(ConversationParticipantExtension.class)
Gets a ConversationParticipantExtension.
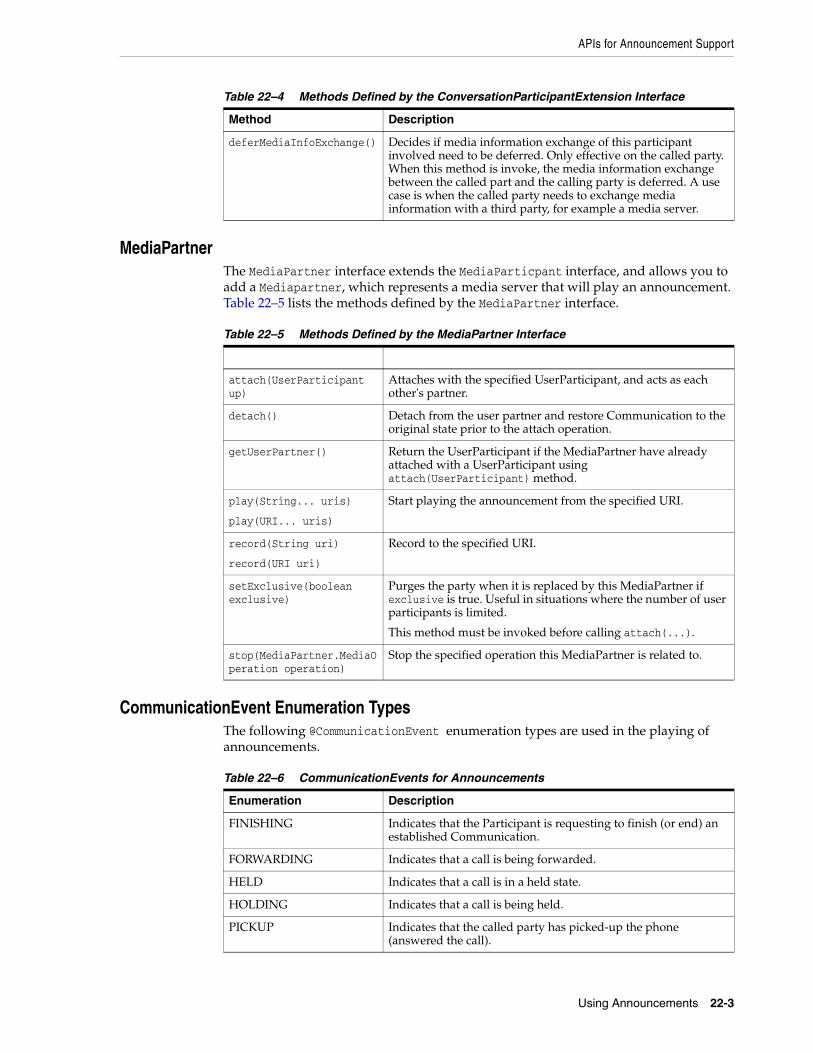
APIs for Announcement Support
Using Announcements 22-3
MediaPartnerThe MediaPartner interface extends the MediaParticpant interface, and allows you to add a Mediapartner, which represents a media server that will play an announcement. Table 22–5 lists the methods defined by the MediaPartner interface.
CommunicationEvent Enumeration TypesThe following @CommunicationEvent enumeration types are used in the playing of announcements.
Table 22–4 Methods Defined by the ConversationParticipantExtension Interface
Method Description
deferMediaInfoExchange() Decides if media information exchange of this participant involved need to be deferred. Only effective on the called party. When this method is invoke, the media information exchange between the called part and the calling party is deferred. A use case is when the called party needs to exchange media information with a third party, for example a media server.
Table 22–5 Methods Defined by the MediaPartner Interface
attach(UserParticipant up)
Attaches with the specified UserParticipant, and acts as each other's partner.
detach() Detach from the user partner and restore Communication to the original state prior to the attach operation.
getUserPartner() Return the UserParticipant if the MediaPartner have already attached with a UserParticipant using attach(UserParticipant) method.
play(String... uris)
play(URI... uris)
Start playing the announcement from the specified URI.
record(String uri)
record(URI uri)
Record to the specified URI.
setExclusive(boolean exclusive)
Purges the party when it is replaced by this MediaPartner if exclusive is true. Useful in situations where the number of user participants is limited.
This method must be invoked before calling attach(...).
stop(MediaPartner.MediaOperation operation)
Stop the specified operation this MediaPartner is related to.
Table 22–6 CommunicationEvents for Announcements
Enumeration Description
FINISHING Indicates that the Participant is requesting to finish (or end) an established Communication.
FORWARDING Indicates that a call is being forwarded.
HELD Indicates that a call is in a held state.
HOLDING Indicates that a call is being held.
PICKUP Indicates that the called party has picked-up the phone (answered the call).

About the MediaPartner and UserPartner Interfaces
22-4 Oracle Communications Converged Application Server Developer's Guide
ParticipantEvent Enumeration TypesThe following @ParticipantEvent enumeration types are used in the playing of announcements.
About the MediaPartner and UserPartner InterfacesThe MediaPartner allows the UserPartner to access media-related functions such as the playing or recording of announcements. A Conversation can have one MediaPartner in addition to the maximum two UserParticipant objects. Each MediaPartner interacts with one UserParticipant. MediaPartner.attach(UserParticipant) establishes a relationship between the MediaPartner and the UserParticipant. Before it attaches to the UserParticpant, the MediaPartner must first be added to the Conversation.
Assume that a MediaPartner has been added to a Conversation, and that User A represents a member of the Conversation. If the MediaPartner attaches to User A via MediaPartner.attach(UserA), it starts the process of reserving the media resource. During the set-up process there is an SDP exchange between User A and the media server that will play the announcement. If in addition to User A, the Conversation has another member identified as User B, then the MediaPartner replaces User B. If the MediaPartner is exclusive, then User B will be purged (using a BYE/CANCEL/REJECTED message) from the Conversation.
If User B is not purged, the called party (callee) or calling party (caller) is temporarily replaced by another participant. In the case of playing an announcement the other
MEDIA_INFO_EARLY_EXCHANGED
Indicates that end-to-end media information is to be exchanged before the called party answers the call (picks-up the phone). End-to-end refers to information being exchanged between the calling party (the caller) to the called party (the callee).
MEDIA_RESOURCE_RESERVED
Indicates that a media resource has been reserved. This event is triggered after a media exchange between the calling and called party when the media server finishes streaming content.
You can trigger this event by adding a MediaParticipant.
RESUMED Indicates that a call is already resumed.
RESUMING Indicates that a call is being resumed.
Table 22–7 ParticipantEvents for Announcements
Enumeration Description
INITIALIZATION This is the first Participant event during the Participant's life-cycle. This event allows the CommunicationBean to set the Participant's attributes and properties, altering it's subsequent behaviors. Operations that lead to the state transition of the Communication or Participant are not permitted to use this event.
Although this event occurs prior to any other disposal on this participant, however it occurs later than the INITIALIZATION event used by the CommunicationEvent. A typical use case is to invoke deferMediaInfoExchange() on a called party during this event.
BEING_BANNED Indicates that the Participant is to be rejected by the AS (call barring).
Table 22–6 (Cont.) CommunicationEvents for Announcements
Enumeration Description

Callout Announcement
Using Announcements 22-5
participant is represented by the MediaPartner. When the announcement is finished and the MediaPartner terminates, the participant that was temporarily replaced is restored as the callee or caller, and participates in any subsequent stages of the conversation.
MediaPartner.play(uri) invokes the play operation of the underlying JSR309 API. Once a media resource is reserved, SFT throws a corresponding event in which MediaPartner.play(uri) is invoked to play an announcement. Note that MediaPartner.play(url) must co-operate with MediaPartner.attach(UserParticipant).
When MediaPartner.detach() is invoked, the MediaPartner is removed from the Conversation and purged, the temporarily replaced participant is restored, and both UserPartner attached to the MediaPartner and the MediaPartner of User A are purged.
Callout AnnouncementCallout announcements play an announcement to the calling party when initiating a call, but prior to the call being forwarded to the called party. For example, a Change of Service announcement that informs the caller that the phone number they are calling has been changed, recites the new phone number, and then forwards the call to the new number.
Callout announcement is defined in section of A.1.1 of TS 24.628.
Example 22–1 shows the example code for a Communication Bean that plays a call out announcement. The trigger to play the announcement is defined in the method using CommunicationEvent.Type.MEDIA_RESOURCE_RESERVED.
Example 22–1 Callout Announcement
@ServiceAttributes(mscontrolJndiName = "mscontrol/dlg309")@CommunicationBean(type = Conversation.class)public class CalloutAnnouncementBean { @Context CommunicationContext<Conversation, UserParticipant> ctx; @Context CommunicationSession session;
String userSubsCalloutPrompt = "[email protected]"; String uriStr = "file://prompts/generic/en_US/num_dialed.wav"; @CommunicationEvent(type = CommunicationEvent.Type.INITIALIZATION) public void handleInit() { Conversation conv = (Conversation)ctx.getCommunication(); if(conv.getCaller().getName().equals(userSubsCalloutPrompt)) { UserParticipant caller = (UserParticipant)conv.getCaller(); conv.addParticipant(MediaPartner.class, "theMP"); MediaPartner mediaPartner = conv.getMediaPartner(); mediaPartner.attach(caller); }
@CommunicationEvent(type = CommunicationEvent.Type.MEDIA_RESOURCE_RESERVED) public void handleEarlyEstablished() { Conversation conv = (Conversation)ctx.getCommunication(); conv.getMediaPartner().play(media_file_uri); }
//Handle end of the announcement playback @CommunicationEvent(type = CommunicationEvent.Type.MEDIAENDED) void handleMediaEnded(){

Call Barring Announcement
22-6 Oracle Communications Converged Application Server Developer's Guide
Conversation conv = ctx.getCommunication(); //Media partner quit the call, restore former call process. conv.getMediaPartner().detach(); }
@ParticipantEvent(type = ParticipantEvent.Type.INITIALIZATION) public void handlePartInit(){ Participant currPart = ctx.getParticipant(); Conversation conv = (Conversation)ctx.getCommunication(); Participant callee = conv.getCallee(); if (currPart.equals(callee)){ if(conv.getCaller().getName().equals(userSubsCalloutPrompt)) { callee.getExtension(ConversationParticipantExtension.class). deferMediaInfoExchange(); } } }}
Call Barring AnnouncementSFT supports the following call barring announcements, which are defined in Section 4.2.4 of the 3GPP TS 24.628 specification:
■ Call Barring Announcement by Error-Info
■ Call Barring Announcement by Early Media
■ Call Barring Announcement by Established Session
Call Barring Announcement Using Error-InfoWhen rejecting the calling party, this scenario inserts an Error-Info header in the error response field (3xx, 4xx, 5xx, or 6xx). This header can also carry a media URI, allowing the calling party to play an announcement, or carry an indication about the call barring.
You can populate the Error-Info header with a response code using the EventReason.createReasonData(Reason reason) method. Each of the reason types is translated into a corresponding SIP response code by SFT. See the Converged Application Server API Reference for more information.
Example 22–2 illustrates how to initiate a call barring announcement using the Error-Info event when a call barring event is identified, but before invoking the UserParticipant.reject event.
Example 22–2 Call Barring Announcement by Error-Info
@ParticipantEvent(type = ParticipantEvent.Type.JOINING) void handleJoining() { Conversation conv = (Conversation) ctx.getCommunication(); Participant currPart = ctx.getParticipant(); if(conv.getCaller().equals(currPart)){//Application initiates call barring. UserParticipant caller = (UserParticipant)conv.getCaller(); String promptTone = "http://localhost/media/nopermission.wav"; AnnouncementIndication ai = ctx.getContextElement(AnnouncementIndication.class); ai.createErrorIndication(promptTone);

Call Barring Announcement
Using Announcements 22-7
caller.reject(Reason.DECLINE); } }
In Example 22–3 the ParticipantEvent.Type.BEING_BANNED event occurs after the UserParticipant.reject(Reason.DECLINE) method is invoked by the application, but prior to the call barring service being activated. This scenario also lets you play an announcement using the Error-Info header.
Example 22–3
@ParticipantEvent(type = ParticipantEvent.Type.JOINING) void handleJoining() { Conversation conv = (Conversation) ctx.getCommunication(); Participant currPart = ctx.getParticipant();
//Application initiates call barring via the Reason.DECLINE reject event. if(conv.getCaller().equals(currPart)){ UserParticipant caller = (UserParticipant)conv.getCaller(); caller.reject(Reason.DECLINE); } } @ParticipantEvent(type = ParticipantEvent.Type.BEING_BANNED) void handleBarring() { String promptTone = "http://localhost/media/wav/nopermission.wav"; AnnouncementIndication ai = ctx.getContextElement(AnnouncementIndication.class); ai.createErrorIndication(promptTone); }
Call Barring Announcement Using Early MediaEarly media is the ability to play an announcement prior to establishing a SIP session (before sending a 2xx response code). In conjunction with call barring, the early media announcement plays, and when it finishes playback the incoming call is barred
Audible announcements can be also provided when an Application Server is rejecting the establishment of a session (before sending a 2xx response code). In this scenario a caller sends an INVITE request that is received by the AS, which determines to reject the call. Before barring the call, the AS can provide an audible announcement to the caller, potentially indicating the reasons for the call rejection.
Example 22–4 shows how to initiate playback of the announcement prior to rejecting the call using the ParticipantEvent.Type.BEING_BANNED event.
■ During the ParticipantEvent.Type.JOINING method, the application invokes caller.reject(Reason.DECLINE), initiating call barring.
■ When the ParticipantEvent.Type.BEING_BANNED event is subsequently thrown, the MediaParticipant.getMediaPartner() method plays the announcement.
■ After the announcement plays, the CommunicationEvent.Type.MEDIAENDED event signifies that the media playback from the media server is over, releasing the media resource. Call barring can then be completed.
Example 22–4 Call Barring Announcement Using Early Media
@ParticipantEvent(type = ParticipantEvent.Type.JOINING) void handleJoining() {

Call Barring Announcement
22-8 Oracle Communications Converged Application Server Developer's Guide
Conversation conv = (Conversation) ctx.getCommunication(); Participant currPart = ctx.getParticipant(); if(conv.getCaller().equals(currPart)){ //Initiate call barring using Reason.DECLINE UserParticipant caller = (UserParticipant)conv.getCaller(); caller.reject(Reason.DECLINE); } } @ParticipantEvent(type = ParticipantEvent.Type.BEING_BANNED) void handleBarring() { Conversation conv = (Conversation) ctx.getCommunication(); UserParticipant caller = (UserParticipant)conv.getCaller(); caller.getMediaPartner().play(uri); } @CommunicationEvent(type = CommunicationEvent.Type.MEDIAENDED) void handleMediaEnded(){ MediaParticipant mp = (MediaParticipant)ctx.getParticipant(); //MediaParticipant is released from the communication mp.unjoin(); }//Call reject process can now resume.
Another possibility is to play the announcement upon determining that the calling party is to be barred, and then invoking the caller reject event after removing the media resource.
Example 22–5 invokes the getMediaPartner() method during the ParticipantEvent.Type.JOINING event. Once the announcement is finished playing, the caller.reject() method performs the call barring.
Example 22–5 Call Barring Announcement Using Early Media
@ParticipantEvent(type = ParticipantEvent.Type.JOINING) void handleJoining() { Conversation conv = (Conversation) ctx.getCommunication(); Participant currPart = ctx.getParticipant(); if(conv.getCaller().equals(currPart)){ //Application determines to bar the caller... UserParticipant caller = (UserParticipant)conv.getCaller(); caller.getMediaPartner().play(uri); } } @CommunicationEvent(type = CommunicationEvent.Type.MEDIAENDED) void handleMediaEnded(){ Conversation conv = ctx.getCommunication(); //Release media resource. MediaParticipant mp = (MediaParticipant)ctx.getParticipant(); conv.removeParticipant(mp); UserParticipant caller = (UserParticipant)conv.getCaller(); caller.reject(Reason.DECLINE); }
Playing a Call Barring Announcement With Established SessionsIn this scenario the call is barred not by an error response, but with a BYE request in the Reason header. When the application determines the call is to be barred, a media

Call Barring Announcement
Using Announcements 22-9
session to play the announcement is established for the calling party. When the announcement finishes playing, the application releases the communication and includes an appropriate Reason header as the reject code in the BYE request.
Example 22–6 calls the EventReason.createReasonData(Reason reason) method, which inserts a BYE request in the Reason header. The communication is then terminated with a method call to Communication.end().
Example 22–6 Playing an Announcement Before Rejecting the Call
@ParticipantEvent(type = ParticipantEvent.Type.JOINING) void handleJoining() { Conversation conv = (Conversation) ctx.getCommunication(); Participant currPart = ctx.getParticipant(); if(conv.getCaller().equals(currPart)){ //Application determines to bar the caller. UserParticipant caller = (UserParticipant)conv.getCaller(); //Create a media partner to play the announcement. caller.getMediaPartner(true).play(uri); } } @CommunicationEvent(type = CommunicationEvent.Type.MEDIAENDED) void handleMediaEnded(){ Conversation conv = ctx.getCommunication(); //Insert a BYE request in the Reason header. EventReason er = ctx.getContextElement(EventReason.class); er.createReasonData(Reason.DECLINE); //End the call. conv.end(); }
Example 22–7 shows how an application can terminate an established communication using caller.reject(Reason), and play an announcement. The application bars the calling party, and in the subsequent ParticipantEvent.Type.BEING_BANNED event, plays an announcement with an exclusive media partner. After the announcement plays, the communication ends.
Example 22–7 Terminating a Communication and playing an Announcement
@ParticipantEvent(type = ParticipantEvent.Type.JOINING)void handleJoining() { Conversation conv = (Conversation) ctx.getCommunication(); Participant currPart = ctx.getParticipant(); if(conv.getCaller().equals(currPart)){ //Application determines to bar the caller. UserParticipant caller = (UserParticipant)conv.getCaller(); //The caller is rejected. caller.reject(Reason.DECLINE); } }//The participant will be rejected by the AS (call barring).@ParticipantEvent(type = ParticipantEvent.Type.BEING_BANNED)
Note: Unlike the early media scenario described earlier in this chapter, playing an announcement in an established session requires that you create an exclusive media partner for the caller to play the announcement.

Playing a Colorful Ring Tone
22-10 Oracle Communications Converged Application Server Developer's Guide
void handleBarring() { Conversation conv = (Conversation) ctx.getCommunication(); UserParticipant caller = (UserParticipant)conv.getCaller(); //Create a media partner to play the announcement. caller.getMediaPartner(true).play(uri); }//When the announcement ends, unjoin the MediaParticipant.player.@CommunicationEvent(type = CommunicationEvent.Type.MEDIAENDED)void handleMediaEnded(){ MediaParticipant player = (MediaParticipant)ctx.getParticipant(); player.unjoin(); }
Playing a Colorful Ring ToneColorful Ring Tone (CRT) (defined in RFC 3959) allows an application to play a distinctive audio or video announcement to the called party to replace the default ring tone. SFT supports CRT by adding an Alert-Info header to the SIP INVITE sent to the callee. The Alert-Info header value is a media URI that the UE of the callee can play as an announcement. SFT adds the media URI to the Alert-Info header using the AnnouncementIndication.createDRIndication(uri) method.
To specify an announcement as a CRT, use the ParticipantEvent.Type.INITIALIZATION event to identify the callee. In this way the callee is subscribed to the CRT announcement.
Example 22–8 creates a method to handle the INITIALIZATION event, in which the callee ([email protected]) will receive the URI identifying the audio file ringtone.wav to be played as an announcement indication.
Example 22–8
@ParticipantEvent(type= ParticipantEvent.Type.INITIALIZATION)void handleInit() { Participant currPart = ctx.getParticipant(); Conversation conv = (Conversation) ctx.getCommunication(); UserParticipant callee = (UserParticipant)conv.getCallee(); if(currPart.equals(callee)){ //Alice subscribes to the CRT service, which plays the specifed ringtone. if(conv.getCaller().getName().equals("[email protected]")){ String url = "http://localhost/media/ringtone.wav"; //Add the media URI to the Alert-Info header. AnnouncementIndication ai = ctx.getContextElement(AnnouncementIndication.class); ai.createDRIndication(url); } } }
Playing Colorful Ring Back ToneColorful Ring Back Tone, (also referred to as Caller Ring Back Tone), allows an application to play a distinctive audio or video announcement to the calling party to replace the default ring tone. SFT supports the following methods to create a Colorful Ring Back Tone (CRBT):
■ CRBT by Alert-Info

Playing Colorful Ring Back Tone
Using Announcements 22-11
■ CRBT using early media, however, there is no early media exchange between the original calling and called parties
■ CRBT using early media after the early media is exchanged between original calling and called parties
The above approaches for creating a CRBT application are defined in Section 4.2.2 of the 3GPP TS 24.628 specification. CRBT is also described in RFC 5009.
Colorful Ring Back Tone by Alert-InfoIn this scenario, an Alert-Info header containing a media URI is inserted into the SIP message in response to the 180 Ringing response code. The Alert-Info header value can be a media URI that the UE of the calling party plays as announcement, or a conventional indication by which the UE of the calling party determines what media to play. SFT adds the media URI to the Alert-Info header using the AnnouncementIndication.createDRIndication(uri) method.
To specify an announcement as a CRBT, use the ParticipantEvent.Type.JOINING event to identify the callee. In this way the callee is subscribed to the CRBT announcement.
Example 22–9 creates a method to handle the JOINING event, in which the callee ([email protected]) receives the URI identifying the audio file ringtone.wav to be played as an announcement indication.
Example 22–9 CRBT Using a Media URI in the Alert-Info Header
@ParticipantEvent(type= ParticipantEvent.Type.JOINING) void handleJoining() { Conversation conv = (Conversation) ctx.getCommunication(); Participant callee = conv.getCallee(); Participant currPart = ctx.getParticipant(); if(currPart.equals(callee)){ //Bob subscribes to the CRBT service, which plays the specifed ringtone. if(callee.getName().equals("[email protected]")){ String url = "http://localhost/media/ringtone.wav"; AnnouncementIndication ai = ctx.getContextElement(AnnouncementIndication.class); ai.createDRIndication(url); } } }
Colorful Ring Back Tone Without Early Media ExchangeTo specify an announcement as a CRBT without early media exchange, use the ParticipantEvent.Type.JOINING event to identify the callee. In this way the callee is subscribed to the CRBT announcement.
Example 22–10 CRBT Without Early Media Exchange
@ServiceAttributes(mscontrolJndiName = "mscontrol/dlg309")@CommunicationBean(type = Conversation.class)public class ColorRingBackToneBean { @Context CommunicationContext<Conversation, UserParticipant> ctx; @Context CommunicationSession session; @ParticipantEvent(type = ParticipantEvent.Type.INITIALIZATION)

Playing Colorful Ring Back Tone
22-12 Oracle Communications Converged Application Server Developer's Guide
public void handlePartInit(){ Conversation conv = ctx.getCommunication(); Participant currPart = ctx.getParticipant(); Participant callee = conv.getCallee(); //Bob subscribes to the CRBT service. if (callee.equals(currPart)&& callee.getName().equals("[email protected]")) { callee.deferMediaInfoExchange(); } } @ParticipantEvent(type = ParticipantEvent.Type.JOINING) public void handleJoining() { Conversation conv = (Conversation)ctx.getCommunication(); Participant callee = conv.getCallee(); Participant currPart = ctx.getParticipant(); if (callee.equals(currPart)&& callee.getName().equals("[email protected]")) { String uriStr = "file://prompts/generic/en_US/numDialed.wav"; UserParticipant caller = (UserParticipant)conv.getCaller(); caller.getMediaPartner().play(uriStr); } } //End announcement and release the media resource. @CommunicationEvent(type = CommunicationEvent.Type.MEDIAENDED) void handleMediaEnded(){ MediaParticipant mp = (MediaParticipant)ctx.getParticipant(); mp.unjoin(); }
CRBT After Early Media ExchangeTo specify an announcement as a CRBT after early media exchange, use the ParticipantEvent.Type.MEDIA_INFO_EARLY_EXCHANGED event to identify the callee. In this way the callee is subscribed to the CRBT announcement.
Example 22–11 CRBT After Early Media Exchange
@ServiceAttributes(mscontrolJndiName = "mscontrol/dlg309")@CommunicationBean(type = Conversation.class)public class ColorRingBackToneBean02 { @Context CommunicationContext<Conversation, UserParticipant> ctx; @Context CommunicationSession session; @CommunicationEvent(type = CommunicationEvent.Type.MEDIA_INFO_EARLY_EXCHANGED) public void handleMediaEarlyExchange() { Conversation conv = (Conversation)ctx.getCommunication(); Participant callee = conv.getCallee(); //Bob subscribes to the CRBT service. if(callee.getName().equals("[email protected]")){ String uriStr = "file://prompts/generic/en_US/numDialed.wav"; UserParticipant caller = (UserParticipant)conv.getCaller(); caller.getMediaPartner().play(uriStr); } } //End announcement and release the media resource. @CommunicationEvent(type = CommunicationEvent.Type.MEDIAENDED) void handleMediaEnded(){ MediaParticipant mp = (MediaParticipant)ctx.getParticipant();
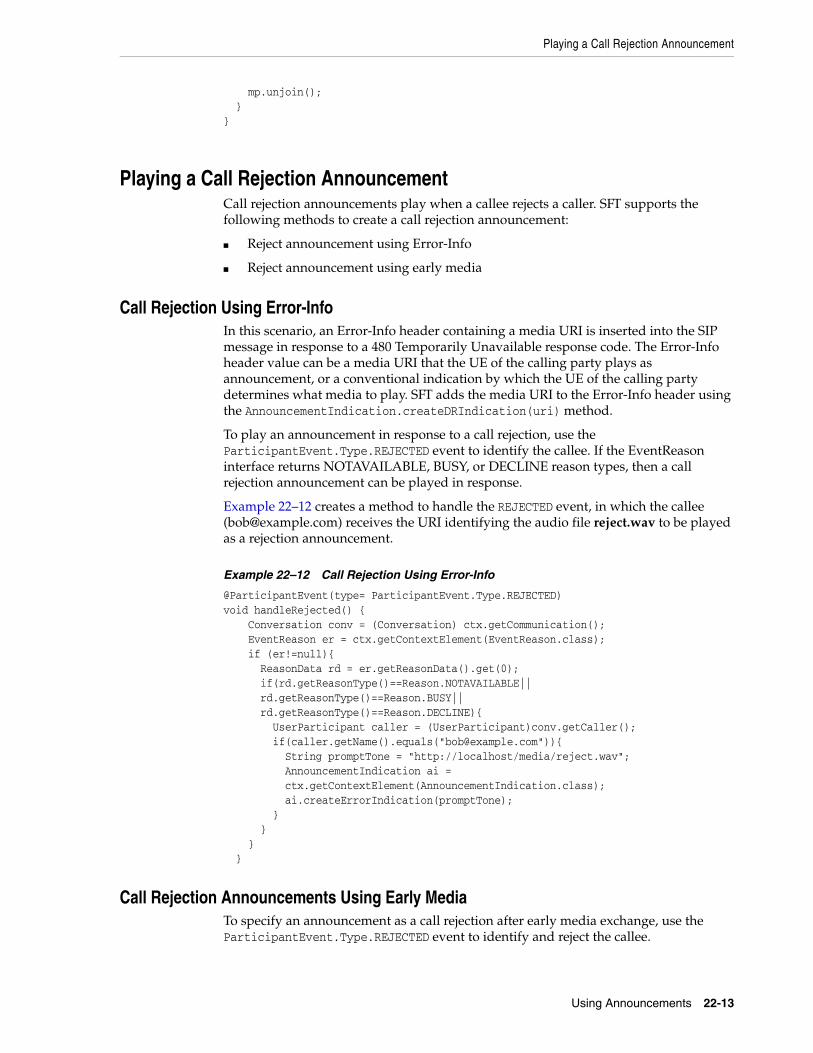
Playing a Call Rejection Announcement
Using Announcements 22-13
mp.unjoin(); }}
Playing a Call Rejection AnnouncementCall rejection announcements play when a callee rejects a caller. SFT supports the following methods to create a call rejection announcement:
■ Reject announcement using Error-Info
■ Reject announcement using early media
Call Rejection Using Error-InfoIn this scenario, an Error-Info header containing a media URI is inserted into the SIP message in response to a 480 Temporarily Unavailable response code. The Error-Info header value can be a media URI that the UE of the calling party plays as announcement, or a conventional indication by which the UE of the calling party determines what media to play. SFT adds the media URI to the Error-Info header using the AnnouncementIndication.createDRIndication(uri) method.
To play an announcement in response to a call rejection, use the ParticipantEvent.Type.REJECTED event to identify the callee. If the EventReason interface returns NOTAVAILABLE, BUSY, or DECLINE reason types, then a call rejection announcement can be played in response.
Example 22–12 creates a method to handle the REJECTED event, in which the callee ([email protected]) receives the URI identifying the audio file reject.wav to be played as a rejection announcement.
Example 22–12 Call Rejection Using Error-Info
@ParticipantEvent(type= ParticipantEvent.Type.REJECTED)void handleRejected() { Conversation conv = (Conversation) ctx.getCommunication(); EventReason er = ctx.getContextElement(EventReason.class); if (er!=null){ ReasonData rd = er.getReasonData().get(0); if(rd.getReasonType()==Reason.NOTAVAILABLE|| rd.getReasonType()==Reason.BUSY|| rd.getReasonType()==Reason.DECLINE){ UserParticipant caller = (UserParticipant)conv.getCaller(); if(caller.getName().equals("[email protected]")){ String promptTone = "http://localhost/media/reject.wav"; AnnouncementIndication ai = ctx.getContextElement(AnnouncementIndication.class); ai.createErrorIndication(promptTone); } } } }
Call Rejection Announcements Using Early MediaTo specify an announcement as a call rejection after early media exchange, use the ParticipantEvent.Type.REJECTED event to identify and reject the callee.

Call Forwarding Announcements
22-14 Oracle Communications Converged Application Server Developer's Guide
Example 22–13 Call Rejection Announcement Using Early Media
@ParticipantEvent(type= ParticipantEvent.Type.REJECTED) void handleRejected() { Conversation conv = (Conversation) ctx.getCommunication(); EventReason er = ctx.getContextElement(EventReason.class); if (er!=null){ ReasonData rd = er.getReasonData().get(0); if(rd.getReasonType()==Reason.NOT_AVAILABLE|| rd.getReasonType()==Reason.BUSY|| rd.getReasonType()==Reason.DECLINE){ if(conv.getCaller().getName().equals("[email protected]")){ UserParticipant caller = (UserParticipant)conv.getCaller(); conv.addParticipant(MediaPartner.class, "theMP"); conv.getMediaPartner().attach(caller); } } } } @CommunicationEvent(type = CommunicationEvent.Type.MEDIA_RESOURCE_RESERVED) public void handleEarlyEstablished() { Conversation conv = (Conversation)ctx.getCommunication(); String uri = "file:///prompts/en_US/rejected.wav"; conv.getMediaPartner().play(uri); } @CommunicationEvent(type = CommunicationEvent.Type.MEDIAENDED) void handleMediaEnded(){ MediaPartner player = ctx.getParticipant(); player.detach(); }
Call Forwarding AnnouncementsFor all supported call forwarding modes, SFT supports announcements to the calling party using early media prior to forwarding the call. Call Forwarding announcements are referenced in RFC 5009.
Un-Conditional Call Forwarding AnnouncementUnconditional forwarding routes all incoming calls to a second phone number specified by the user of the service. The second number can be a work phone, voice-mail account, or other end-point in the network where the user would like their incoming calls to be received. In contrast, conditional call forwarding occurs when the user’s phone is out of the service area, on another call, or the phone is turned off, and the call is forwarded to a secondary number.
SFT supports Unconditional Call Forwarding announcements using the following event types:
■ ParticipantEvent.Type.JOINING (Caller side)
■ CommunicationEvent.Type.STARTED
■ CommunicationEvent.Type.INITIALIZATION
Example 22–14 shows how to implement a Direct Call Forwarding Announcement by initiating the announcement without first triggering the Call Forwarding event. In this

Call Forwarding Announcements
Using Announcements 22-15
example Call Forwarding is triggered using the CommunicationEvent.Type.MEDIAENDED event.
Example 22–14 Direct Call Forwarding Announcement Without A Call Forwarding Event
@CommunicationEvent(type = CommunicationEvent.Type.INITIALIZATION) public void handleInit() { Conversation conv = (Conversation)ctx.getCommunication(); UserParticipant caller = (UserParticipant)conv.getCaller(); // Bob subscribes to call forwarding service. // Opensp subscribes to call forwarding announcement service. if(caller.getName().equals("[email protected]") && conv.getCallee().getName().equals("[email protected]")) { conv.addParticipant(MediaPartner.class, "theMP"); conv.getMediaPartner().attach(caller); } } @CommunicationEvent(type = CommunicationEvent.Type.MEDIA_RESOURCE_RESERVED) public void handleMediaResourceReserved() { Conversation conv = (Conversation)ctx.getCommunication(); String uri = "file://prompts/generic/en_US/num_changed.wav"; conv.getMediaPartner().play(uri); } @CommunicationEvent(type = CommunicationEvent.Type.MEDIAENDED) void handleMediaEnded(){ Conversation conv = ctx.getCommunication(); UserParticipant p = session.createParticipant(UserParticipant.class, "[email protected]"); MediaParticipant mp = conv.getMediaPartner(); conv.replaceParticipant(mp, p); } @ParticipantEvent(type = ParticipantEvent.Type.INITIALIZATION) public void handlePartInit(){ Participant currPart = ctx.getParticipant(); Conversation conv = (Conversation)ctx.getCommunication(); Participant callee = conv.getCallee(); if (currPart.equals(callee)){ if(conv.getCaller().getName().equals("[email protected]") &&callee.getName().equals("[email protected]")) callee.getExtension(ConversationParticipantExtension.class).deferMediaInfoExchange(); } } }
Conditional Call ForwardingConditional call forwarding (also referred to as call diversion) routes all incoming calls to the specified phone number when a corresponding condition is met. Common call forwarding conditions include:
■ No answer after specified period of time
■ Unreachable due to no signal or phone powered off
■ Busy on another call

Call Forwarding Announcements
22-16 Oracle Communications Converged Application Server Developer's Guide
Example 22–15 shows how to initiate the call forwarding announcement in the CommunicationEvent.Type.FORWARDING event.
Example 22–15 Call Forwarding Announcement During CommunicationEvent.Type.FORWARDING
@ParticipantEvent(type= ParticipantEvent.Type.REJECTED) void handleIncomingResponse() { Conversation call = (Conversation) ctx.getCommunication(); EventReason er = ctx.getContextElement(EventReason.class); if (er!=null){ ReasonData rd = er.getReasonData().get(0); if(rd.getReasonType()==Reason.NOTAVAILABLE|| rd.getReasonType()==Reason.BUSY|| rd.getReasonType()==Reason.DECLINE){ if(call.getCallee().getName().equals("[email protected]")){ Participant newCallee = session.createParticipant (UserParticipant.class, "[email protected]"); //Use not removeParticipant+addParticipant but //replaceParticipant to assure both CF and announcement work fine. call.replaceParticipant(call.getCallee(), newCallee, true); } } } } @CommunicationEvent(type = CommunicationEvent.Type.FORWARDING) void handleForwarding(){ Conversation conv = (Conversation) ctx.getCommunication(); if(conv.getCaller().getName().equals("[email protected]")){ UserParticipant caller = (UserParticipant)conv.getCaller(); conv.addParticipant(MediaPartner.class, "theMP"); conv.getMediaPartner().attach(caller); } } @CommunicationEvent(type = CommunicationEvent.Type.MEDIA_RESOURCE_RESERVED) public void handleEarlyEstablished() { Conversation conv = (Conversation)ctx.getCommunication(); String uri = "file:////opt/snowshore/prompts/generic/en_US/num_changed.wav"; conv.getMediaPartner().play(uri); } @CommunicationEvent(type = CommunicationEvent.Type.MEDIAENDED) void handleMediaEnded() { MediaPartner player = (MediaPartner)ctx.getParticipant(); player.detach(); } @ParticipantEvent(type = ParticipantEvent.Type.INITIALIZATION) public void handlePartInit(){ Participant currPart = ctx.getParticipant(); Conversation conv = (Conversation)ctx.getCommunication(); Participant callee = conv.getCallee(); if (currPart.equals(callee)){ if(conv.getCaller().getName().equals("[email protected]")&&callee.getName().equals("[email protected]")) { callee.getExtension(ConversationParticipantExtension.class).deferMediaInfoExchange

Call Waiting Announcement
Using Announcements 22-17
(); } } }
Call Waiting AnnouncementCall waiting announcement plays an announcement to the calling parties in a communication waiting state. SFT supports call waiting announcement for all call waiting scenarios (including NDUB and UDUB). SFT provides two methods by which to implement communication waiting announcement:
■ Call waiting announcement by Alert-Info
■ Call waiting announcement by early media
When implementing either of these approaches, the announcement logic should be in the CommunicationEvent.Type.WAITING event.
Call Waiting Announcement Using ALERT-INFOSFT’s implementation of call waiting announcement using the Alert-Info header complies with RFC 3261, TS 24.628, TS 24.615, and the Alert-Info URNs for the Session Initiation Protocol (SIP).
Example 22–16 plays a Distinctive Ringing announcement (Alert-Info) to the calling party held in the call waiting state. The Alert-Info header is carried in the 180 response which forwards the calling party. The code example shown below is common for different call waiting scenarios.
Example 22–16
//Communication waiting logic appears pior to this.
@CommunicationEvent(type = CommunicationEvent.Type.WAITING)void handleCallWaiting() { String uri = "http://localhost/myapp/media/wav/busy.wav"; AnnouncementIndication ai = ctx.getContextElement(AnnouncementIndication.class); ai.createDRIndication(uri); }
Call Waiting Announcement Using Early MediaExample 22–17 shows how to initiate playback of an announcement to a calling party in a call waiting state using early media. The code example shown below is common to different call waiting scenarios using early media to play announcements.
Example 22–17 Call Waiting Announcement Using Early Media
@ParticipantEvent(type = ParticipantEvent.Type.INITIALIZATION)public void handlePartInit(){ Conversation conv = (Conversation)ctx.getCommunication(); Participant currPart = ctx.getParticipant(); Participant callee = conv.getCallee(); if (currPart.equals(callee)&& callee.getName().equals(userSubsCWPrompt)) { callee.getExtension(ConversationParticipantExtension.class)
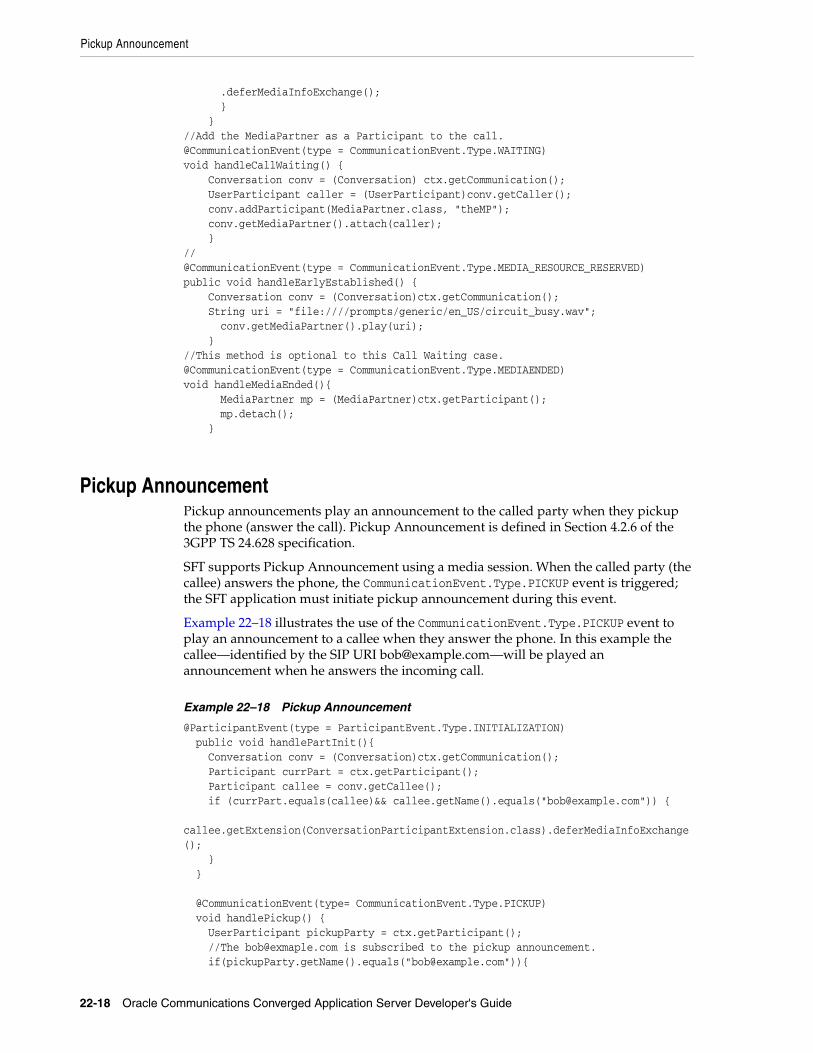
Pickup Announcement
22-18 Oracle Communications Converged Application Server Developer's Guide
.deferMediaInfoExchange(); } }//Add the MediaPartner as a Participant to the call.@CommunicationEvent(type = CommunicationEvent.Type.WAITING)void handleCallWaiting() { Conversation conv = (Conversation) ctx.getCommunication(); UserParticipant caller = (UserParticipant)conv.getCaller(); conv.addParticipant(MediaPartner.class, "theMP"); conv.getMediaPartner().attach(caller); }//@CommunicationEvent(type = CommunicationEvent.Type.MEDIA_RESOURCE_RESERVED)public void handleEarlyEstablished() { Conversation conv = (Conversation)ctx.getCommunication(); String uri = "file:////prompts/generic/en_US/circuit_busy.wav"; conv.getMediaPartner().play(uri); } //This method is optional to this Call Waiting case.@CommunicationEvent(type = CommunicationEvent.Type.MEDIAENDED)void handleMediaEnded(){ MediaPartner mp = (MediaPartner)ctx.getParticipant(); mp.detach(); }
Pickup AnnouncementPickup announcements play an announcement to the called party when they pickup the phone (answer the call). Pickup Announcement is defined in Section 4.2.6 of the 3GPP TS 24.628 specification.
SFT supports Pickup Announcement using a media session. When the called party (the callee) answers the phone, the CommunicationEvent.Type.PICKUP event is triggered; the SFT application must initiate pickup announcement during this event.
Example 22–18 illustrates the use of the CommunicationEvent.Type.PICKUP event to play an announcement to a callee when they answer the phone. In this example the callee—identified by the SIP URI [email protected]—will be played an announcement when he answers the incoming call.
Example 22–18 Pickup Announcement
@ParticipantEvent(type = ParticipantEvent.Type.INITIALIZATION) public void handlePartInit(){ Conversation conv = (Conversation)ctx.getCommunication(); Participant currPart = ctx.getParticipant(); Participant callee = conv.getCallee(); if (currPart.equals(callee)&& callee.getName().equals("[email protected]")) { callee.getExtension(ConversationParticipantExtension.class).deferMediaInfoExchange(); } } @CommunicationEvent(type= CommunicationEvent.Type.PICKUP) void handlePickup() { UserParticipant pickupParty = ctx.getParticipant(); //The [email protected] is subscribed to the pickup announcement. if(pickupParty.getName().equals("[email protected]")){

Pickup Announcement
Using Announcements 22-19
Conversation conv = ctx.getCommunication(); conv.addParticipant(MediaPartner.class, "theMP"); conv.getMediaPartner().attach(pickupParty); } } @CommunicationEvent(type = CommunicationEvent.Type.MEDIA_RESOURCE_RESERVED) public void handleEarlyEstablished() { Conversation conv = ctx.getCommunication(); String uri = "file:////opt/snowshore/prompts/generic/en_US/pickup_who.wav"; conv.getMediaPartner().play(uri); } @CommunicationEvent(type = CommunicationEvent.Type.MEDIAENDED) void handleMediaEnded(){ MediaPartner player = (MediaPartner)ctx.getParticipant(); player.detach(); }

Pickup Announcement
22-20 Oracle Communications Converged Application Server Developer's Guide

23
Conferencing With Media Control 23-1
23Conferencing With Media Control
This chapter describes how to implement conferencing applications with media server interactions using Service Foundation Toolkit (SFT).
Conferencing with Media ControlA common use of a media server is to provide multi-user conferences that incorporate audio and video conferencing features. A conference is a unique instance of a multi-party conversation, and consists of a Focus and a Mixer.
The Focus identifies a conference. It acts as a SIP UA and is addressed by SIP URI. The Focus maintains a SIP signaling relationship with each participant in the conference, and is responsible for ensuring that each participant receives the media that makes up the conference. The Focus implements conference policies, such as determining who can join a conference, and is responsible for interpreting the media policies.
The Mixer is responsible for mixing all members’ data streams and sending them back to all conference members via an RTP channel. Data streams may be text, audio, and video. A Mixer is always under the control of the Focus. The Mixer enforces the appropriate media policies. The Mixer represents a JSR 309 compliant media server.
About the Conferencing and Media Control InterfacesThe Focus interface let’s you create a voice conference with a Mixer, such that you can use the JSR 309 APIs to create a Mixer, and encapsulate the Mixer within the Focus interface to create a conference.
Conferencing and Media Control makes use of the following classes in the com.oracle.sft.api package. For more information on these interfaces and their usage, refer to the Converged Application Server API Reference.
Table 23–2 lists methods accessed from the CommunicationSession interface that you can use to create a conference.
Table 23–1 Focus Interfaces
Class Description
Focus Focus extends the Participant class, and represents a participant in a conference. Applications use the Focus interface to initialize the media server using JSR309 API, and create a Mixer.

Conferencing with Media Control
23-2 Oracle Communications Converged Application Server Developer's Guide
Creating a Conference With the Focus Interface Example 23–1 creates a JSR 309-compliant Mixer which is encapsulated by the Focus interface. The Mixer is created using the javax.media.mscontrol.mixer.MediaMixer class, which serves as the base for a conferencing service. When a conference is instantiated, JSR 309 objects are created using MsControlFactory. The Focus interface encapsulates the Mixer, and connects and mixes multiple participants in a conference.
Example 23–1 Creating a Mixer And Encapsulating It Within A Focus
...String msJndiName = "mediaServerJNDIName";MsControlFactory msFactory = (MsControlFactory)(new InitialContext()).lookup(msJndiName);MediaSession mSession = msFactory.createMediaSession();MediaMixer mixer = (MediaMixer) mSession.createMediaMixer(MediaMixer.AUDIO_VIDEO);Focus focus = sess.createParticipant(Focus.class, "FOCUS_AUDIO_VIDEO", mixer);Conference conf = sess.createConference(null, call, focus);...
Example 23–2 creates the Java class ConfFocusBean, which is a JSR 309 conference application. ConfFocusBean encapsulates the Mixer within the Focus interface, and illustrates the use of the @CommunicationEvent annotation in creating and establishing communication within the conference, and @ParticpantEvent annotation in joining SIP dialogs within the conference.
Example 23–2 Creating A JSR 309 Conference Using The Focus Interface
package com.oracle.sft.testapp; import javax.media.mscontrol.MediaSession;import javax.media.mscontrol.MsControlException;import javax.media.mscontrol.MsControlFactory;import javax.media.mscontrol.join.Joinable;import javax.media.mscontrol.mixer.MediaMixer;import javax.naming.InitialContext;import javax.naming.NamingException; import com.oracle.sft.api.Communication;import com.oracle.sft.api.CommunicationContext;import com.oracle.sft.api.CommunicationService;import com.oracle.sft.api.CommunicationSession;import com.oracle.sft.api.Conference;import com.oracle.sft.api.Context;import com.oracle.sft.api.Conversation;import com.oracle.sft.api.Focus;import com.oracle.sft.api.bean.CommunicationBean;import com.oracle.sft.api.bean.CommunicationEvent;import com.oracle.sft.api.bean.ParticipantEvent; @ServiceAttributes(mscontrolJndiName = "mscontrol.OCMP")@ServiceAttributes(mscontrolJndiName = "mscontrol.dlg309")
Table 23–2 Methods Defined by the CommunicationSession Interface
Method Description
createConference(Focus f) Creates a conference without a specified name.
createConference(String name, Focus f)
Creates a conference with a specified name and focus instance.
createConference(String name, Conversation c, Focus f)
Create a conference from a Conversation instance using the focus instance. If no name is specified (null), the conference name will use the name assigned to the focus.

Conferencing with Media Control
Conferencing With Media Control 23-3
@CommunicationBeanpublic class ConfFocusBean { @Context CommunicationSession sess; @Context CommunicationContext ctx; @Context CommunicationService service; @CommunicationEvent(type = CommunicationEvent.Type.INITIALIZATION) void handleInit() { Conversation call = (Conversation) ctx.getCommunication(); String calleeName = call.getCallee().getName(); if(calleeName.equals("[email protected]")) { MediaMixer mixer = this.createMixer(); Focus focus = sess.createParticipant(Focus.class, "FOCUS_AUDIO_VIDEO", mixer); // The Conference name is set to null, and uses the Focus's name. Conference conf = sess.createConference(null, call, focus); } } @CommunicationEvent(type = CommunicationEvent.Type.STARTED) void handleStarted() { Joinable j = ctx.getParticipant().getJoinable(); Communication c = ctx.getCommunication(); } @CommunicationEvent(type = CommunicationEvent.Type.ESTABLISHED) void handleEstablised() { Joinable j = ctx.getParticipant().getJoinable(); Communication c = ctx.getCommunication(); } @ParticipantEvent(type = ParticipantEvent.Type.JOINED) void handleJoin() { Communication c = ctx.getCommunication(); } private MediaMixer createMixer() { String msJndiName = "__SYSTEM.resource.jvb-ra#javax.media.mscontrol.MsControlFactory"; MsControlFactory msFactory; try { msFactory = (MsControlFactory)(new InitialContext()).lookup(msJndiName); MediaSession mSession = msFactory.createMediaSession(); MediaMixer mixer = (MediaMixer) mSession.createMediaMixer(MediaMixer.AUDIO_VIDEO); return mixer; } catch (NamingException e) { e.printStackTrace(); } catch (MsControlException e) { e.printStackTrace(); } return null; }}
Creating Conferences Using Resource-Contained ListsIn certain types of multimedia communications, a SIP request is distributed to a group of SIP User Agents (UAs). The sender sends a single SIP request to a server which further distributes the request to the group. This SIP request contains a list of Uniform Resource Identifiers (URIs). The URI list is expressed as an XML document that allows the sender of the request to qualify a recipient using a copy control level similar to the copy control level of existing e-mail systems.

Conferencing with Media Control
23-4 Oracle Communications Converged Application Server Developer's Guide
The XML resource list (defined in RFC 4826) provides a mechanism for describing a list of resources, however, there is a need for a copy control attribute to determine whether a resource is receiving a SIP request as a primary recipient, a carbon copy, or a blind carbon copy. This is similar to e-mail systems where the sender can categorize each recipient as “to”, “cc”, or “bcc.” RFC 5366 defines the copy control XML extension to the XML resource list format. Example 23–3 shows a list that follows the XML resource list document extended with format extension for representing copy control attributes in resource lists.
Example 23–3 URI List for Conference Establishment Contained in the SIP Header
<?xml version="1.0" encoding="UTF-8"?><resource-lists xmlns="urn:ietf:params:xml:ns:resource-lists" xmlns:cp="urn:ietf:params:xml:ns:copycontrol"> <list> <entry uri="sip:[email protected]" cp:copyControl="to"/> <entry uri="sip:[email protected]" cp:copyControl="cc" /> <entry uri="sip:[email protected]" cp:copyControl="bcc"/> </list></resource-lists>
A conference server supporting RFC 5366, in which a received INVITE triggers the conference focus UAS to initiate multiple INVITEs as a UAC, operates as a media termination B2BUA when performing that function.
When an incoming INVITE request with the SIP Content-Type header containing either of:
■ Content-Type: application/resource-lists+xml
■ Content-Type: multipart/mixed;boundary="boundary1" with sub Content-Type: application/resource-lists+xml
is received the com.oracle.sft.api.ResourceListsMessage interface creates the message, and sets it to the current CommunicationContext.
The ResourceListsMessage interface represents the ProtocolMessage (the actual SIP Message) interface. Like other types of Message interfaces, ProtocolMessage is available to the application from the CommunicationContext.getMessage() method. Note that ProtocolMessage is expected to be used only by advanced users. Also, changes made to the actual protocol objects may impact the behavior of the SFT runtime. Typically an SFT application adds or removes custom headers or parameters needed by a specific application.
com.oracle.sft.api.UserParticipant contains recipient list history information.
The interface defines the methods setRecipientListHistory(ResourceLists recipientLists) and getRecipientListHistory() that you can use to set and retrieve recipient list history information contained by the URI list in the INVITE to the user participant.
When an INVITE is sent to the user participant, the SIP Content-Type is multipart/mixed.
Table 23–3 lists the interfaces defined in the com.oracle.sft.api.rls package to handle the XML resource list carried in the INVITE request. For more information on these interfaces and their usage, refer to the Converged Application Server API Reference.

Conferencing with Media Control
Conferencing With Media Control 23-5
Example 23–4 illustrates how to create a conference using a resource list provided in the SIP message from the conference initiator.
Example 23–4 Using the ResourceLists Interface
...Message msg = ctx.getMessage(); if (msg instanceof ResourceListsMessage) { ResourceLists rlss = ((ResourceListsMessage) msg).getResourceLists();}...
ResourceListsFactory rlssFactory = service.createResourceListsFactory();ResourceLists recipientLists = rlssFactory.createRecipientLists(rlss);ResourceLists recipientHistoryLists = rlssFactory.createRecipientHistoryLists(rlss); List<ResourceList> dataList = recipientLists.getResourceList(); for (ResourceList rls : dataList) { List<Entry> entryList = rls.getResourceListData(); for (Entry entry: entryList) { String userName = entry.getName(); UserParticipant up = sess.createParticipant(UserParticipant.class, userName); up.setRecipientHistoryList(recipientHistLists); comm.addParticipant(up); } }
Example 23–5 creates a conference using a resource-contained list. A CommunicationBean named ConfRLSBean is created, which creates a conference and distributes the request to a group using a resource-contained list to specify copy control to the individual UAS receiving the INVITE. This SIP request contains a list of Uniform Resource Identifier (URI) requests— expressed as an XML document—that allows the sender of the request to qualify a recipient using a copy control level similar to the copy control level of existing e-mail systems.
Example 23–5 Creating a Conference using a Resource-Contained List
package com.oracle.sft.testapp; import java.util.List;import java.util.logging.Logger;
Table 23–3 Interfaces for Handling XML Resource Lists
Interfaces Description
DisplayName Represents the display-nameType complex type.
Entry Represents the entryType complex type
EntryRef Represents the entry-refType complex type.
External Represents the externalType complex type.
ResourceList Represents the resource-list contained in a resource-lists.
ResourceListData Represents the data carried in the ResourceList.
ResourceLists Represents the resource-lists defined in RFC 4826 and RFC 5364.
ResourceListsFactory Factory interface for creating resource lists elements.

Conferencing with Media Control
23-6 Oracle Communications Converged Application Server Developer's Guide
import com.oracle.sft.api.Agent;import com.oracle.sft.api.Communication;import com.oracle.sft.api.CommunicationContext;import com.oracle.sft.api.CommunicationService;import com.oracle.sft.api.CommunicationSession;import com.oracle.sft.api.Conference;import com.oracle.sft.api.Context;import com.oracle.sft.api.Conversation;import com.oracle.sft.api.Message;import com.oracle.sft.api.ResourceListsMessage;import com.oracle.sft.api.UserParticipant;import com.oracle.sft.api.bean.CommunicationBean;import com.oracle.sft.api.bean.CommunicationEvent;import com.oracle.sft.api.bean.ParticipantEvent;import com.oracle.sft.api.rls.Entry;import com.oracle.sft.api.rls.ResourceList;import com.oracle.sft.api.rls.ResourceLists;import com.oracle.sft.api.rls.ResourceListsFactory; // @ServiceAttributes(mscontrolJndiName = "mscontrol.OCMP")// @ServiceAttributes(mscontrolJndiName = "mscontrol.dlg309") @CommunicationBeanpublic class ConfRLSBean { @Context CommunicationSession sess; @Context CommunicationContext<> ctx; @Context CommunicationService service; private Logger logger = Logger.getLogger("sft.test"); @CommunicationEvent(type = CommunicationEvent.Type.INITIALIZATION) void handleInit() { Conversation call = (Conversation) ctx.getCommunication(); String calleeName = call.getCallee().getName(); logger.info(call.getCaller().getName() + " call " + calleeName); if(calleeName.equals("[email protected]")) { Conference conf = sess.createConference(calleeName, call); Message msg = ctx.getMessage(); ResourceLists rlss = handleMsg(msg); if (conf.getAgent("test") == null) { conf.addAgent("test", new TestAgent(rlss)); } } } @CommunicationEvent(type = CommunicationEvent.Type.STARTED) void handleStart() { String confName = ctx.getCommunication().getName(); logger.info(confName + " is started."); } @CommunicationEvent(type = CommunicationEvent.Type.ESTABLISHED) void handleEstablished() { Communication comm = ctx.getCommunication(); logger.info(comm.getName() + " established"); Agent<ResourceLists> testAgent = comm.getAgent("test"); ResourceLists incomingRlss = testAgent.get(); System.out.println("incomingRlss size : "); List<ResourceList> resourceList = incomingRlss.getResourceList(); for (ResourceList rls: resourceList) { System.out.println(rls.getResourceListData().size()); } System.out.println(incomingRlss.toString());

Conferencing with Media Control
Conferencing With Media Control 23-7
ResourceListsFactory rlssFactory = service.createResourceListsFactory(); ResourceLists recipientLists = rlssFactory.createRecipientLists(incomingRlss); resourceList = recipientLists.getResourceList(); System.out.println("recipientLists size : "); for (ResourceList rls: resourceList) { System.out.println(rls.getResourceListData().size()); } System.out.println(recipientLists.toString()); ResourceLists recipientHistLists = rlssFactory.createRecipientHistoryLists(incomingRlss); System.out.println("recipientHistLists size : "); resourceList = recipientHistLists.getResourceList(); for (ResourceList rls: resourceList) { System.out.println(rls.getResourceListData().size()); } System.out.println(recipientHistLists.toString()); List<ResourceList> dataList = recipientLists.getResourceList(); for (ResourceList rls : dataList) { List<Entry> entryList = rls.getResourceListData(); for (Entry entry: entryList) { String userName = entry.getName(); UserParticipant up = sess.createParticipant(UserParticipant.class, userName);// up.setRecipientHistoryList(recipientHistLists); comm.addParticipant(up); } } } @CommunicationEvent(type = CommunicationEvent.Type.FINISHED) void handleEnd() { String confName = ctx.getCommunication().getName(); logger.info(confName + " is finished."); } // Handle ParticipantEvent @ParticipantEvent(type = ParticipantEvent.Type.JOINED) void handleJoin() { logger.info(ctx.getParticipant().getName() + " joined"); } private ResourceLists handleMsg(Message msg) { if (msg instanceof ResourceListsMessage) { ResourceLists rlss = ((ResourceListsMessage) msg).getResourceLists(); return rlss; } return null; }} class TestAgent extends Agent<ResourceLists> { private static final long serialVersionUID = 1L; TestAgent(ResourceLists rls) { super(false); super.set(rls); }}

Ad-Hoc Conferencing
23-8 Oracle Communications Converged Application Server Developer's Guide
Ad-Hoc ConferencingRFC 4575 defines an event package for conferencing. The conference event package allows a user to subscribe to information relating to a conference.
The conference event package allows a user to subscribe to information relating to a conference. Within the SIP protocol, conferences are represented by URIs. These URIs identify the Focus, a SIP user agent (UA), that is responsible for ensuring that all users in the conference can communicate with each other. The Focus has sufficient information about the state of the conference to inform subscribers about it.
The following is supported for event notifications via the conference event package:
■ Converged Application Server only supports a SUBSCRIPTION event without body, which is the default subscription filtering policy. See RFC 4575, Section 3.2.
■ The default expiration time for a subscription to a conference is one hour. Once the conference ends, all subscriptions to that conference are terminated, with a reason of “no resource” as defined in RFC 3265.
■ The body of the conference event package notification contains a conference information document that describes the state of a conference. All subscribers and notifiers must support the application/conference-info+xml data format. See RFC 4575, Section 3.4.
■ The conference information contains sensitive information. Therefore, all subscriptions should be authenticated and authorized before approval. Authorization policy is at the discretion of the administrator, as always. See RFC 4575, Section 3.5.
Configuring the Conference Event PackageYou can configure a conference with:
■ Miminum expiration time
■ Maximum expiration time
■ Default expiration time
■ Maximum number of participants
The configuration is done using:
■ The minExpirationTime, defaultExpirationTime, maxExpirationTime, and maxNumOfSubscriptions elements of the sft.xml deployment descriptor.
■ The @ServiceAttributes annotation.
The times are given in seconds.
Example 23–6 illustrates event notification expiration times and the maximum number of subscribers to a conference using the conferenceEventConfig element of the sft.xml deployment descriptor.
Example 23–6 Conference Event Expiration in SFT.XML Deployment Descriptor
<service-attributes> <conferenceEventConfig> <minExpirationTime>100</minExpirationTime> <defaultExpirationTime>1800</defaultExpirationTime> <maxExpirationTime>3600</maxExpirationTime> <maxNumOfSubscriptions>100</maxNumOfSubscriptions> </conferenceEventConfig>

Ad-Hoc Conferencing
Conferencing With Media Control 23-9
</service-attributes>
Example 23–7 specifies event notification expiration times and the maximum number of subscribers using the @ServiceAttributes annotation. Use this annotation in the CommunicationBean Java class you create to implement the conferencing application.
Example 23–7 Specifying Bandwidth Using the @ServiceAttributes Annotation
@ServiceAttributes (conferenceEventConfig = {100, 3600, 3600, 100})@CommunicationBeanpublic class ConferenceBean...
To learn more about configuring event notification for conferences with the @ServiceAttributes annotation, see the Converged Application Server API Reference.
Handling Subscription and Notification EventsThe conference notification service allows conference-aware participants to subscribe to it, and receive notifications that contain a list of participants. Subscribers are notified when a participant joins or leaves a conference. The conference notification service also allows a user to obtain a list of current subscribers.
The conference notification service uses the @CommunicationEvent annotation’s SUBSCRIPTION and NOTIFICATION event types.
Handling Conference Subscription EventsExample 23–8 illustrates the use of the SUBSCRIPTION event type in conjunction with the SubscriptionPolicy interface to perform authorization. SubscriptionPolicy gets the subscription information from @CommunicationContext using the ContextElement interface.
■ If the application sets the Policy to SubscriptionPolicy.ACCEPTED, the subscription will be created successfully, and a SIP 200 OK response sent to the subscriber.
■ If the application sets the Policy to SubscriptionPolicy.FORBIDDEN, a SIP 403 - Forbidden response is sent to the subscriber.
■ If the application does not change the Policy, the default value is set to SubscriptionPolicy.NONE. In this case, if the subscriber is authenticated by Converged Application Server, the SFT application accepts the request.
Example 23–8 Handling SUBSCRIPTION Type
... @CommunicationEvent(type = CommunicationEvent.Type.SUBSCRIPTION) void handleSub() { // The communication name is the same as the resourceId String confName = ctx.getCommunication().getName(); //Get Subscription information from CommunicationContext. ContextElement SubsElement = ctx.getContextElement(SubscriptionPolicy.class); if (SubsElement != null) { SubscriptionPolicy subsPolicy = (SubscriptionPolicy)SubsElement; // Get information about the subscription for authorization. List<String> accepList = subsPolicy.getAccept(); String contentType = subsPolicy.getContentType();

Ad-Hoc Conferencing
23-10 Oracle Communications Converged Application Server Developer's Guide
Map<String, String> parameters = subsPolicy.getEventHeaderParameters(); String resourceId = subsPolicy.getResourceId(); String subscriber = subsPolicy.getSubscriber(); String eventName = subsPolicy.getEventName(); /* Perform authorization and reject [email protected] * subscription to [email protected] */ if (subscriber.equals("[email protected]")) { if (resourceId.equals("[email protected]")) { subsPolicy.reject(); } } } }...
Handling Conference Notification EventsIndicates a new notification has been created. The conference application can change the notification content in this event.
Example 23–9 illustrates the use of the NOTIFICATION event type. The subscriber Alice is removed from the list of subscribers that get notifications about the conference. Alice’s info is explicitly removed from the notification details sent to Bob.
Example 23–9 Handling the NOTIFICATION Type
... @CommunicationEvent(type = CommunicationEvent.Type.NOTIFICATION) void handleNotify() { // The communication name is the same as the resourceId String confName = ctx.getCommunication().getName(); // Get ConferenceResource from CommunicationContext. ContextElement element = ctx.getContextElement(ConferenceResource.class); if (element != null) { ConferenceResource confrenceRes = (ConferenceResource) element; // Get all the information about the Resource. Application can // use them to do the authorization for notifications. ConferenceInfo defaultConferenceInfo = confrenceRes.getDefaultConferenceInfo(); Collection<String> subscribers = confrenceRes.getSubscribers(); String resourceId = confrenceRes.getResourceId(); // ******************************* // An example of authorization * // ******************************* if (resourceId.equals("[email protected]")) { // Alice can not get notification. if (subscribers.contains("[email protected]")) { confrenceRes.removeSubscriber("[email protected]"); } // Bob can not get Alice's state from conference. if (subscribers.contains("[email protected]")) { ConferenceInfo confInfoToBob = defaultConferenceInfo.clone(); Users users = confInfoToBob.getUsers(); if (users != null) { List<User> userList = users.getUserList(); ListIterator<User> it = userList.listIterator(); while (it.hasNext()) { User user = it.next();

Ad-Hoc Conferencing
Conferencing With Media Control 23-11
if (user.getEntity().contains("[email protected]")) { it.remove(); confrenceRes.setDistinctConferenceInfo( "[email protected]", confInfoToBob); } } } } } } }...

Ad-Hoc Conferencing
23-12 Oracle Communications Converged Application Server Developer's Guide

24
Using the XCAP Interfaces 24-1
24Using the XCAP Interfaces
Oracle Communications Converged Application Server provides APIs that let you access an XML Document Management Server (XDMS). The XDMS handles the management of user-generated XML documents stored on the network, such as authorization rules and contact and group lists (also referred to as resource lists).
The XML Configuration Access Protocol Server (XCAP server), provides an interface that allows for the manipulation of service-related data stored as XML documents within the XDMS. The XCAP specification defines how an HTTP address (or URI) can identify the way XML documents are stored on an XCAP server. It also defines how the URI can be used to identify entire XML documents, individual elements, or XML attributes that can be retrieved, updated, or deleted.
Each XCAP resource on a XCAP server has an associated application. For the associated application to use the XCAP resources, the application must have the following information:
■ An Application Unique ID (AUID), which uniquely identifies the application usage, must be created.
■ The XML schema must be defined.
■ The default namespace binding, which maps the namespace prefixes to the namespace URIs, must be set.
■ The MIME type of the document must be defined.
■ The XCAP server must be able to validate the content of each XCAP document that is being modified.
■ The data in the XML document must have a well defined semantic.
■ Naming conventions for XCAP client URIs must be set.
■ Resource interdependencies, how changes to one resource will effect other resources, has to be determined.
The following operations are supported using XCAP:
■ Retrieve an item
■ Delete an item
■ Modify an item
■ Add an item
The XCAP addressing mechanism is based on XML Path Language (XPath), a query language for selecting nodes in XML documents. The operations above can be executed on XML documents and elements. Operations to XML attributes are not

About XCAP and VoLTE
24-2 Oracle Communications Converged Application Server Developer's Guide
supported, however, attributes can be handled indirectly by modifying the elements that contain them.
About XCAP and VoLTEConverged Application Server provides two levels of XCAP support: Access to the XDMS using a base XCAP API that is not specific to any schema, and a high level API providing support for GSMA IR.92 supplementary services using VoLTE as supported by the Service Foundation Toolkit (SFT). The VoLTE version of the XCAP API supports the following supplementary services:
■ 3GPP TS 24.611 Communications Diversion
■ 3GPP TS 24.604 Communication Barring
■ 3GPP TS 24.607 Originating Identification Presentation and Originating Identification Restriction
■ 3GPP TS 24.608 Terminating Identification Presentation and Terminating Identification Restriction
■ 3GPP TS 24.615 Communication Waiting
The supported RFC 4825 functions are:
■ Partial operations (adding and removing XML elements)
■ Data validation
■ Support for 409 XCAP error responses as defined in Section 11 of RFC 4825
Creating and Accessing an XCAP ClientXCAPClient is the main Java class for accessing an XDMS with XCAP. The XCAPClient class functions as a gateway to create XCAP connections, documents, and the XCAP root of the requesting URI. Any Java class that has access to the CommunicationService can obtain an instance of XCAPClient and establish a connection to an XDMS.
Example 24–1 illustrates the usage of XCAPClient.
Example 24–1 Creating an XCAP Connection Using XCAPClient
@CommunicationBeanpublic class MyCommunicationBean { @Context CommunicationService service; @CommunicationEvent(type = CommunicationEvent.Type.INITIALIZATION, communicationType = Conversation.class) public void init() throws NamingException { XCAPClient client = service.getXcapClient(); XcapRoot root = client.createXcapRoot("http://example.com/xcap"); XcapConnection connection = client.createConnection(root); }
In this example the CommunicationService calls getXcapClient(), which returns a reference via the client object variable. XCAPClient is the starting point from which to create XCAP connections.
XCAPClient client = service.getXcapClient();
The createXcapRoot() method creates the XCAP root of the requesting URI.

Fetching, Creating, and Deleting Resources With XCAP
Using the XCAP Interfaces 24-3
XcapRoot root = client.createXcapRoot("http://example.com/xcap");
To create an HTTP connection to an XDMS, use an instance of XCAPConnection. You can use XCAPConnection to send a request to the XDMS, and perform the following functions:
■ Authenticate the request with the XDMS.
■ Send the request to the XDMS.
■ Receive the response from the XDMS.
To create the connection, use the createConnection(root) method. The example below returns the XCAP root to XCapConnection via the connection object reference variable.
XcapConnection connection = client.createConnection(root);
Fetching, Creating, and Deleting Resources With XCAP The following examples fetch, remove, and modify the simservs XML document, which contains data associated with one or more supplementary services (SimservTypes). You can also perform these actions on the simserv XML document’s elements.
XCAP resources are analogous to HTTP resources, and can be XML documents, an element in an XML document, or an attribute of an element. You use the HTTP GET, PUT, and DELETE methods to fetch, create, or replace and remove XCAP resources. The following sections describe the steps required to create, fetch, or delete a resource from an XDMS using XCAP:
■ Fetching Documents from the XDMS
■ Creating or Replacing Documents in the XDMS
■ Deleting a Document from the XDMS
Fetching Documents from the XDMSTo fetch (or retrieve) an XCAP resource:
1. Create the XCAP URI of the resource.
The URI must identify the XCAP resource.
2. Authenticate the XCAP request against the XDMS.
3. Create the HTTP GET request.
4. Send the XCAP request to the XDMS.
5. Process the HTTP response from the XDMS.
The request is successfully processed when it returns a HTTP status code of 200.
Example 24–2 shows the code to fetch a document from an XDMS.
Example 24–2 Fetching XDMS Document
... @CommunicationEvent(type = CommunicationEvent.Type.INITIALIZATION, communicationType = Conversation.class) public void init() throws NamingException { XCAPClient client = service.getXcapClient();

Fetching, Creating, and Deleting Resources With XCAP
24-4 Oracle Communications Converged Application Server Developer's Guide
XcapDocumentSelector selector = client.createDocumentSelector(AUID, XUI, documentName); SimServsDocument document = client.createDocument(selector, contentType); XcapRequest request = client.createRequest(document, XcapRequest.Operation.FETCH); XcapConnection conn = client.createConnection(client.createXcapRoot(XCAP_ROOT)); XcapResponse resp = conn.send(request); if (resp.getStatus() == 200) { } }...
The method in this example performs the following actions:
The client object reference variable—which refers to the XCapClient class—makes a series of method calls to createDocumentSelector(), createDocument(), createRequest(), and createConnection(), and returns arguments as shown. Of these statements, the following fetches the XDMS document via the XcapRequest object’s Operation.FETCH, which fetches the resource.
XcapRequest request = client.createRequest(document, XcapRequest.Operation.FETCH);
If the request is successful, the response data populates XCAPDocument, and the FETCH operation retrieves the specified XML document.
Creating or Replacing Documents in the XDMSThe process to create an XDMS document is similar to the fetch operation shown in Example 24–2. The difference is that you use the Operation.SYNC argument to create or replace the simserv document in the XDMS.
To create or replace a document:
1. Create a local representation of the XCAP resource, including a representation of the XML content, an XCAP URI, and the content type.
2. Authenticate the XCAP request against the XDMS.
3. Create the HTTP PUT request.
4. Send the XCAP request to the XDMS.
5. Process the HTTP response from the XDMS.
Example 24–3 creates a document in the XDMS by converting an XML input stream.
Example 24–3 Creating or Replacing XCAP Documents
...@CommunicationEvent(type = CommunicationEvent.Type.INITIALIZATION, communicationType = Conversation.class)public void createDocument() throws XcapException, IOException { XCAPClient client = service.getXcapClient(); XcapDocumentSelector selector = client.createDocumentSelector(AUID, XUI, documentName); SimServsDocument document = client.createDocument(selector, contentType); XcapRequest request = client.createRequest(document, XcapRequest.Operation.SYNC); XcapConnection conn = client.createConnection(client.createXcapRoot(XCAP_ROOT)); XcapResponse resp = conn.send(request); if (resp.getStatus() == 201) { } }
Example 24–4 creates a simserv document of the specified MIME type (Internet media type).

Using XCAP for IR.92 Supplementary Services
Using the XCAP Interfaces 24-5
Example 24–4 Creating XCAP Documents Using the XCAP API
public void createByApi() throws XcapException, IOException { String XUI = "sip:[email protected]"; XCAPClient client = service.getXcapClient(); XcapDocumentSelector selector = client.createDocumentSelector( SimServsDocument.AUID, XUI, SimServsDocument.FILENAME); SimServsDocument document = xcapClient.createDocument(Selector, SimServsDocument.MIMETYPE);...
Deleting a Document from the XDMSTo delete a simserv document you construct an XCAP URI identifying its location in the XDMS. To delete a simserv document from the XDMS:
1. Create the XCAP URI of the resource.
The URI must identify the XCAP resource.
2. Authenticate the XCAP request against the XDMS.
3. Create the HTTP DELETE request.
4. Send the XCAP request to the XDMS.
5. Process the HTTP response from the XDMS.
The request is successfully processed when it returns a HTTP status code of 2xx or 4xx.
Example 24–5 removes the element from the XML document stored in the XDMS using the XcapRequest class’s Operation.DELETE argument.
Example 24–5 Deleting Documents From the XDMS
...XcapRequest request = client.createRequest(rule, XcapRequest.Operation.DELETE);XcapConnection conn = client.createConnection(client.createXcapRoot(XCAP_ROOT));XcapResponse resp = conn.send(request);...
Using XCAP for IR.92 Supplementary ServicesThe 3GPP TS 24.623 specification defines usage of the XCAP protocol for the manipulation of XML data related to the following IR.92 supplementary services:
■ 3GPP TS 24.604: Communication Diversion
3GPP TS 24.607: Originating Identification Presentation and Originating Identification Restriction
■ 3GPP TS 24.608: Terminating Identification Presentation and Terminating Identification Restriction
■ 3GPP TS 24.611: Anonymous Communication Rejection and Communication Barring.
■ 3GPP TS 24.615: Communication Waiting
The 3GPP TS 24.623 specification defines the above supplementary services are as sub-trees of the simservs XML document. XCAP maps XML document sub-trees and element attributes to HTTP URIs so that these components can be directly accessed by clients using the HTTP protocol. In order to maintain synchronization with the network elements and other terminals that the user might be using, the UE subscribes to changes in the XCAP simserv documents.

Using XCAP for IR.92 Supplementary Services
24-6 Oracle Communications Converged Application Server Developer's Guide
The following examples illustrate the sub-trees defining the supplementary services in the simserv XML document schema.
3GPP TS 24.607 Originating IdentityExample 24–6 illustrates the Originating Identity sub-tree of the simservs XML document defined by the 3GPP TS 24.623 specification.
Example 24–6 Originating Identity Sub-Tree
<?xml version="1.0" encoding="UTF-8"?><simservs xmlns="http://uri.etsi.org/ngn/params/xml/simservs/xcap" xmlns:xsi="http://www.w3.org/2001/XMLSchema-instance" > <originating-identity-presentation active="true"/> <originating-identity-presentation-restriction active="true"> <default-behaviour>presentation-restricted</default-behaviour> </originating-identity-presentation-restriction> </simservs>
3GPP TS 24.608: Terminating Identification Presentation and RestrictionExample 24–7 illustrates the Terminating Identification Presentation and Restriction sub-tree of the simservs XML document defined by the 3GPP TS 24.623 specification.
Example 24–7 Terminating Identification Presentation and Restriction Sub-Tree
<?xml version="1.0" encoding="UTF-8"?><simservs xmlns="http://uri.etsi.org/ngn/params/xml/simservs/xcap" xmlns:xsi="http://www.w3.org/2001/XMLSchema-instance" > <terminating-identity-presentation active="true"/> <terminating-identity-presentation-restriction active="true"> <default-behaviour>presentation-restricted</default-behaviour> </terminating-identity-presentation-restriction> </simservs>
3GPP TS 24.615 Communication WaitingExample 24–8 illustrates the Communication Waiting sub-tree of the simservs XML document defined by the 3GPP TS 24.623 specification.
Example 24–8 Communication Waiting Sub-Tree
<?xml version="1.0" encoding="UTF-8"?><simservs xmlns="http://uri.etsi.org/ngn/params/xml/simservs/xcap" xmlns:xsi="http://www.w3.org/2001/XMLSchema-instance"> <communication-waiting active="true"/></simservs>
XCAP Supplementary Service APIsTable 24–1 lists the supplementary service Java classes available in the com.oracle.sft.xcap.client.simservs package. Refer to the Converged Application Server API Reference to learn more about these Java classes and their usage.

Using XCAP for IR.92 Supplementary Services
Using the XCAP Interfaces 24-7
Creating Supplementary Service RulesTo create or modify a supplementary service’s sub-tree in the simserv XML, use the appropriate supplementary service Java class in combination with the SimServs class’s createAbsService() method.
Example 24–9 disables the Communication Waiting service. In this example the simServs.createAbsService() returns a CommunicationWaiting instance object. The object is assigned to the cw variable. The SimServ object’s setActive(false) method disables the service.
Example 24–9 Creating a CommunicationWaiting Service
CommunicationWaiting cw = simServs.createAbsService(CommunicationWaiting.class);cw.setActive(false);
Example 24–10 implements the following services:
■ Communication Waiting is set to false, disabling the service.
■ Originating Identification Presentation is enabled.
■ Originating Identification Restriction uses its default behavior, which does not restrict the presentation of the caller’s identity.
■ Terminating Identity Presentation allows the callee (the terminating identity) to receive the caller’s (the originating identity) identification.
Example 24–10 Implementing Supplementary Service Rules with XCAP
...//Disable the Communication Waiting serviceCommunicationWaiting cw = simServs.createAbsService(CommunicationWaiting.class);cw.setActive(false);
//Enable Originating Identity PresentationOriginatingIdentityPresentation oip = simServs.createAbsService(OriginatingIdentityPresentation.class);oip.setActive(true);
//The caller’s ID is not restrictedOriginatingIdentityPresentationRestriction oipr = simServs.createAbsService(OriginatingIdentityPresentationRestriction.class);oipr.setDefaultBehaviour(DefaultBehaviour.PRESENTATION_NOT_RESTRICTED);
Table 24–1 Java Classes To Create Supplementary Service Rules
Class Description
CommunicationDiversion Describes a ruleset and no-reply timer for communication diversion.
CommunicationWaiting Describes a ruleset for the communication waiting service.
IncomingCommunicationBarring Describes a ruleset for barring of incoming communication.
OriginatingIdentityPresentation Describes a ruleset for barring of originating requests.
OriginatingIdentityPresentationRestriction Describes a ruleset for restriction of originating identity presentation.
OutgoingCommunicationBarring Describes a ruleset for barring of outgoing communication.
TerminatingIdentityPresentation Describes a ruleset for terminating identity presentation.
TerminatingIdentityPresentationRestriction Describes a ruleset for restriction of terminating identity presentation.

Adding and Editing Elements
24-8 Oracle Communications Converged Application Server Developer's Guide
//Enable the calling party to receive identification informationTerminatingIdentityPresentation tip = simServs.createAbsService(TerminatingIdentityPresentation.class);TerminatingIdentityPresentationRestriction tipr = simServs.createAbsService(TerminatingIdentityPresentationRestriction.class);...
Adding and Editing ElementsXCAP maps XML document sub-trees and elements to HTTP URIs so that these components can be directly accessed by clients using the HTTP protocol. You can perform get, fetch, and delete operations on XML elements containing the specified attributes. The com.oracle.sft.xcap.client.Attributable interface identifies an element as having attributes.
Example 24–11 illustrates the use of the setByAttrName() method to set the name of an XML attribute’s predicate. A predicate is similar to an If/Then statement. If the predicate is TRUE, the element is selected. If the predicate is FALSE, it is excluded. The result of the predicate is only valid if the result is unique, and the uniqueness must be enforced. Element selection without predicates returns a list.
In this example two Communication Diversion rules are stored in the XDMS, and are identified using the IDs rule66 and rule88. The code shown in Example 24–11 creates a Communication Diversion rule using the rule66 identifier, which it stores in the r1 variable. The r1 variable is then used to call the setByAttrName() method, to set the attribute using the rule66 identifier. The example code then performs a FETCH operation using the XcapRequest interface to retrieve the element whose ID is labelled rule66 from the XDMS.
Example 24–11 Fetching a Specific Element From the XDMS
XcapDocumentSelector ds = client.createDocumentSelector(SimServsDocument.AUID,XUI, SimServsDocument.FILENAME);SimServsDocument d = client.createDocument(ds, SimServsDocument.MIMETYPE);SimServs ss = d.getSimservs();CommunicationDiversion cd1 = ss.createAbsService(CommunicationDiversion.class);RuleSet rs1 = cd1.createRuleset();Rule r1 = rs1.createRule("rule66");
// Set attribute testerr1.setByAttrName("id");XcapRequest req1 = client.createRequest(r1, XcapRequest.Operation.FETCH);XcapConnection conn1 = client.createConnection(client.createXcapRoot(XCAP_ROOT));XcapResponse resp1 = null; try { resp1 = conn1.send(req1);} catch (XcapException e) { e.printStackTrace(); fail("Exception when send FETCH request: " + req1.getResource().getUrl());}assertThat(resp1, notNullValue());assertThat(resp1.getStatus(), is(200));assertThat(r1.getId(), is("rule66"));assertThat(r1.getConditions(), notNullValue());assertThat(r1.getConditions().getConditions(Identity.class).size(), is(1));Condition cccc = r1.getConditions().getConditions(Identity.class).iterator().next();

Validating Data
Using the XCAP Interfaces 24-9
assertThat(cccc, instanceOf(Identity.class));List<One> theOnesss = ((Identity) cccc).getOnes();assertThat(theOnesss.get(0).getId(), is("sip:[email protected]"));assertThat(rs1.getRules().size(), is(1));assertThat(rs1.getRule("rule88"), nullValue());
// Fetch from Busyrs1 = cd1.createRuleset();r1 = rs1.createRule("rule66");r1.setByAttrName("id");Busy b = null;try { b = r1.createConditions().createCondition(Busy.class); } catch (XcapException e) { e.printStackTrace(); fail("Exception"); } req1 = client.createRequest(b, FETCH); try { resp1 = conn1.send(req1); } catch (XcapException e) { e.printStackTrace(); fail("Exception when send FETCH request: " + req1.getResource().getUrl()); } assertThat(resp1.getStatus(), is(200)); }
Validating Data Proper URI generation and XML data validation are key to working with XCAP documents. When a client performs an XCAP operation, it must use the proper HTTP request. In the case of document/node creation or updates, the client should ensure that the resulting document remains consistent with the data constraints imposed by the application. An XCAP server must not allow any modification that breaks any data constraint, and an XCAP client must not make any modification that will lead to issues with the application-defined schema. While data validation sent and received using XCAP is optional, it is strongly recommended that you use data validation to ensure that the resulting XCAP documents retain their integrity.
Example 24–12 creates the AllMedia, NoMedia and Media elements, however, only one of them can legally exist in the XCAP document. The code below illustrates the use of an exception which, when validation fails, prevents the creation or modification of the XML file in the XDMS. Example 24–13 illustrates the XML document containing the AllMedia, NoMedia and Media sub-elements.
Example 24–12 Create and Validate the AllMedia, NoMedia, and Media Elements
. . .SupportedMediaType smt = mc.getMediaType(); smt.setAllMedia(); smt.setNoMedia();
Note: The XCAP API does not cache any data fetched from the XCAP server. Validation is only performed using related schemas. When validating data, the entire XML document is validated even if only a single element is being fetched or updated.

XCAP Authentication and Authorization
24-10 Oracle Communications Converged Application Server Developer's Guide
smt.createMedia().setValue("audio"); smt.createMedia().setValue("video"); XcapRequest reqCC = client.createRequest(cc, XcapRequest.Operation.SYNC); XcapConnection connCC = client.createConnection(client.createXcapRoot(XCAP_ROOT)); /** * Set to validate. If there are no validation errors, the XCAP connection* requestis made, and a new document is created.*/connCC.setValidation(true); XcapResponse respCC = null; try { respCC = connCC.send(reqCC); fail("Exception when send SYNC request: " + reqCC.getResource().getUrl());} catch (XcapException e) { e.printStackTrace(); }. . .
Example 24–13 Simserv Supported-Media-Type Element
. . .<xs:complexType name="supported-media-type"> <xs:choice> <xs:element name="all-media" type="ss:empty-element-type" /> <xs:element name="no-media" type="ss:empty-element-type" /> <xs:sequence maxOccurs="unbounded"> <xs:element name="media" type="ss:media-type" /> </xs:sequence><xs:any namespace="##other" processContents="lax" /> </xs:choice></xs:complexType>. . .
XCAP Authentication and AuthorizationAuthentication consists of determining whether a user wishing to perform certain operations is who he or she claims to be. Authorization consists of determining whether an authenticated user is allowed to perform the requested operation. User authorization is performed by the relevant XDMS the processes requests coming from authenticated users. XCAP user authentication uses XCAP User Identity (XUI) to perform authentication. The XUI typically takes the form of a TEL URI or SIP URI.
Using Digest AuthenticationThe XCAP APIs provide support for both Basic and Digest authentication (as defined in RFC 2617). Digest authentication uses a simple challenge-response mechanism to verify the identity of a user over SIP or HTTP, and requires a user name and password. Clients must implement digest authentication, assuring interoperability with servers that challenge the client.
Table 24–2 lists the method to create a an XCAP connection using Basic/Digest authentication available via com.oracle.sft.xcap.client.XcapConnection.

XCAP Authentication and Authorization
Using the XCAP Interfaces 24-11
Example 24–14 illustrates the use of the Basic/Digest authentication APIs.
Example 24–14 Basic/Digest Authentication
...XCAPClient xcapClient = new XcapClientImpl();XcapRequest request = xcapClient.createRequest(document, XcapRequest.Operation.SYNC);XcapConnection conn = xcapClient.createConnection(xcapClientString userName = "alice";String password = "myPassword";conn.setCredentials(userName, password);XcapResponse resp = conn.send(request);...
Using Transport Layer SecuritySection 14 of RFC 4825 specifies that XCAP clients must implement Transport Layer Security (TLS), ensuring interoperability with servers that challenge the client. TLS is a cryptographic protocol that provides communication security over the Internet. TLS encrypts segments of network connections at the Application Layer for the Transport Layer, using asymmetric cryptography for key exchange, symmetric encryption for privacy, and message authentication codes for message integrity.
To implement TLS, refer to the chapter on configuring Secure Sockets Layer (SSL) in Oracle Fusion Middleware Securing Oracle WebLogic Server for more information.
Using X-3GPP-Asserted-Identity Header AuthenticationThe X-3GPP-Asserted-Identity header functions for HTTP requests in the same manner that the P-Asserted-Identity header functions for SIP requests. When the XCAP server receives an incoming HTTP request having a X-3GPP-Asserted-Identity header, it first verifies that the request was received from a trusted host. If the host was trusted, the server asserts the user's identity using the information in the header, authenticates the user, and logs the user in if that user is authorized to access the requested resource.
To insert X-3GPP-Asserted-Identity headers into the HTTP request, use the addHeader() or addHeaders() methods. X-3GPP-Asserted-Identity headers are sent to the XCAP server, and, if authenticated, are put into effect. If the X-3GPP-Asserted-Identity header fails to authenticate the request, the XCAP request may revert to Digest authentication if the XCAP server is configured to do so.
To use X-3GPP-Asserted-Identity authentication you must configure Converged Application Server to handle this header type for authentication. To learn more, see the chapter on configuring 3GPP HTTP authentication assertion providers in Converged Application Server Security Guide.
Table 24–2 XCAP Basic/Digest Authentication in XcapConnection Interface
Method Description
setCredentials(String userName, String password)
Sets the user name and password for Basic/Digest authentication.

XCAP Authentication and Authorization
24-12 Oracle Communications Converged Application Server Developer's Guide
Table 24–3 lists the methods to insert X-3GPP-Asserted-Identity headers into an HTTP via com.oracle.sft.xcap.client.XcapRequest. The value used is the XCAP User Identifier (XUI), such as sip:[email protected]. Refer to the Converged Application Server API Reference to learn more about these methods and their usage.
Note: In order to use X-3GPP-Asserted-Identity header authentication, the XCAP server must also support the use of this header type. If you enable X-3GPP-Asserted-Identity header authentication, and the XCAP server is unable to use it, the header is ignored.
Table 24–3 Methods to Insert 3GPP-Asserted-Identity Authentication Headers
Method Description
addHeader(String name, String value)
Inserts a single header containing a single value into the HTTP request.
addHeader(String name, <List>String values)
Inserts a single header containing a list of values into the HTTP request.
addHeaders(Map<String, List<String> aHeaders)
Inserts a series of headers containing a list of values into the HTTP request.
Map<String, List<String>> getHeaders()
Returns an unmodifiable map of the headers for the request. The map keys are strings that represent the request-header field names. Each map value is a unmodifiable list of strings that represents the corresponding header field values.
removeHeader(String aHeaderName)
Removes the header whose name you supply using the string argument.
25
Creating Instant Messaging and Rich Media Services 25-1
25Creating Instant Messaging and Rich Media Services
Converged Application Server provides APIs that allow you to create rich messaging and media services for subscribers. This chapter describes the APIs provided by the Service Foundation Toolkit (SFT) that can be used to create Instant Message (IM) servers. The high level APIs abstract the protocol level details of SIP, IMS, and MSRP (and their inherent complexity), simplifying development of IM services.
About Rich Communication ServicesRich Communication Suite (RCS) provides rich messaging and media services for subscribers. The specification includes support for RCS-e (“e” for enhanced), which introduces IMS voice sessions (VoIP/VoLTE) that can be enriched for IM and chat, file transfer, and image sharing. RCS-e is designed to lower the entry barrier for RCS by providing operators and developers with a framework in which to deploy RCS functionality without needing to implement the full RCS profiles.
Converged Application Server provides APIs that can be used to create RCS-e compliant Instant Message (IM) servers. The high level APIs abstract the protocol level details of SIP, IMS, and MSRP (and their inherent complexity), simplifying development of RCS-e services.
Discovering Device CapabilityThe capability discovery process in RCS-e is handled using SIP OPTIONS and is the process by which a user is able to understand what RCS-e services are available on another user’s equipment. In comparison to RCS, which only has feature tags for Image and Video Share, there are several more feature tags that are possible with RCS-e. The feature tags are sent in the Accept-Contact header of the SIP OPTIONS message by the requesting user equipment. The responding user equipment sends the response in the Contact header of the 200 OK message.
Figure 25–1 shows the RCS-e capabilities exchange signalling process.

Discovering Device Capability
25-2 Oracle Communications Converged Application Server Developer's Guide
Figure 25–1 Capability Discovery Call Flow
1. End-user A, using device A, sends a SIP REGISTER request to the IMS core network.
2. The IMS core responds with a SIP 200 OK to the SIP REGISTER request. At this point, User A restarts its registration timer.
3. User A sends a SIP PUBLISH message with its capabilities to the IMS core.
4. The IMS core responds with a SIP 200 OK.
5. When User A decides that they wish to exchange device capabilities with User B, their device (user equipment) sends a SIP OPTIONS request to the IMS core.
6. The IMS core routes the SIP OPTIONS request to User B.
7. User B responds to User A with an SIP 200 OK message, containing the capabilities of User B’s device.
If the terminating user has multiple devices, the terminating network applies a SIP-AS that sends multiple OPTIONS AS to each device, and aggregates the capabilities into a single OPTIONS response back to the user that sent the OPTIONS request.
About the Capability Discovery InterfacesCapability discovery uses the following event types in the @CommunicationEvent annotation in the com.oracle.sft.api.bean package. For more information on these interfaces and their usage, refer to the Converged Application Server API Reference.
Capability discovery uses of the following interfaces in the com.oracle.sft.api package. For more information on these interfaces and their usage, refer to the Converged Application Server API Reference.
Table 25–1 @CommunicationEvent Event Types for Capability Discovery
Event Type Description
QUERIED Specifies that the query process has returned a response, and can be appropriately handled.
QUERYING Specifies that the process of querying (such as querying for device capabilities) is started.
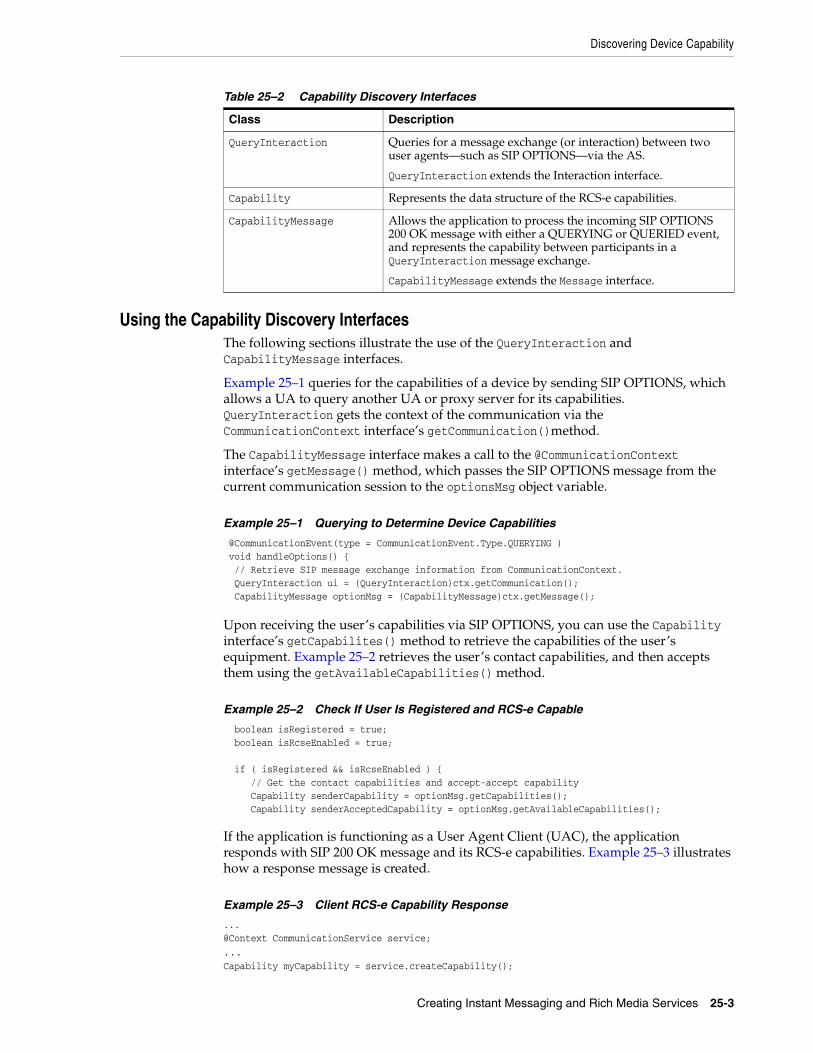
Discovering Device Capability
Creating Instant Messaging and Rich Media Services 25-3
Using the Capability Discovery InterfacesThe following sections illustrate the use of the QueryInteraction and CapabilityMessage interfaces.
Example 25–1 queries for the capabilities of a device by sending SIP OPTIONS, which allows a UA to query another UA or proxy server for its capabilities. QueryInteraction gets the context of the communication via the CommunicationContext interface’s getCommunication()method.
The CapabilityMessage interface makes a call to the @CommunicationContext interface’s getMessage() method, which passes the SIP OPTIONS message from the current communication session to the optionsMsg object variable.
Example 25–1 Querying to Determine Device Capabilities
@CommunicationEvent(type = CommunicationEvent.Type.QUERYING ) void handleOptions() { // Retrieve SIP message exchange information from CommunicationContext. QueryInteraction ui = (QueryInteraction)ctx.getCommunication(); CapabilityMessage optionMsg = (CapabilityMessage)ctx.getMessage();
Upon receiving the user’s capabilities via SIP OPTIONS, you can use the Capability interface’s getCapabilites() method to retrieve the capabilities of the user’s equipment. Example 25–2 retrieves the user’s contact capabilities, and then accepts them using the getAvailableCapabilities() method.
Example 25–2 Check If User Is Registered and RCS-e Capable
boolean isRegistered = true; boolean isRcseEnabled = true; if ( isRegistered && isRcseEnabled ) { // Get the contact capabilities and accept-accept capability Capability senderCapability = optionMsg.getCapabilities(); Capability senderAcceptedCapability = optionMsg.getAvailableCapabilities();
If the application is functioning as a User Agent Client (UAC), the application responds with SIP 200 OK message and its RCS-e capabilities. Example 25–3 illustrates how a response message is created.
Example 25–3 Client RCS-e Capability Response
...@Context CommunicationService service;
...Capability myCapability = service.createCapability();
Table 25–2 Capability Discovery Interfaces
Class Description
QueryInteraction Queries for a message exchange (or interaction) between two user agents—such as SIP OPTIONS—via the AS.
QueryInteraction extends the Interaction interface.
Capability Represents the data structure of the RCS-e capabilities.
CapabilityMessage Allows the application to process the incoming SIP OPTIONS 200 OK message with either a QUERYING or QUERIED event, and represents the capability between participants in a QueryInteraction message exchange.
CapabilityMessage extends the Message interface.

Discovering Device Capability
25-4 Oracle Communications Converged Application Server Developer's Guide
List<Feature> myRcse = new ArrayList<RcseFeature> ();myRcse.add(Feature.RCSE_CHAT);myRcse.add(Feature.RCSE_FT);myRcse.add(Feature.VIDEO_SHARE_3GPP);myRcse.add(Feature.RCSE_IMAGE_SHARE);myCapability.setFeatures(myRcse);
optionMsg.consume(myCapability);
...
Example 25–4 shows a CommunicationBean in which Converged Application Server acts as both a User Agent Client (UAC) and User Agent Server (UAS). The CommunicationBean in this example performs the following functions:
■ The SIP OPTIONS message from the requesting user (User A) carries the capability tags in both the Contact and Accept-Contact header.
■ The SIP 200 OK response from a receiving user carries the capability tags in the Contact header.
■ If a receiving user is not registered, User A receives a SIP 480 TEMPORARILY UNAVAILABLE or SIP 408 REQUEST TIMEOUT response.
■ If a receiving user is not provisioned to use RCS-e, User A receives a 404 NOT FOUND response.
Example 25–4 Capability Discovery Using a UAC and UAS
@CommunicationBeanpublic class MyCommunicationBean { @Context CommunicationSession session; @Context CommunicationContext ctx; @Context CommunicationService service; @CommunicationEvent(type = CommunicationEvent.Type.QUERYING ) void handleOptions() { // Retrieve option information from CommunicationContext. QueryInteraction ui = (QueryInteraction)ctx.getCommunication(); CapabilityMessage optionMsg = (CapabilityMessage)ctx.getMessage(); /** The application checks whether the receiver is registered, and if * they are RCS-e enabled.
boolean isRegistered = true; boolean isRcseEnabled = true; if ( isRegistered && isRcseEnabled ) { // Get the contact capabilities and accept the capability Capability senderCapability = optionMsg.getCapabilities(); Capability senderAcceptedCapability = optionMsg.getAvailableCapabilities(); /** The application acts as a UAS, forwarding the SIP OPTIONS message by default * When acting as a UAC, the application responds with SIP 200 OK with its RCS-e features.*/ Capability myCapability = service.createCapability(); List<Feature> myRcse = new ArrayList<RcseFeature> (); myRcse.add(Feature.RCSE_CHAT); myRcse.add(Feature.RCSE_FT); myRcse.add(Feature.VIDEO_SHARE_3GPP); myRcse.add(Feature.RCSE_IMAGE_SHARE); myCapability.setFeatures(myRcse);
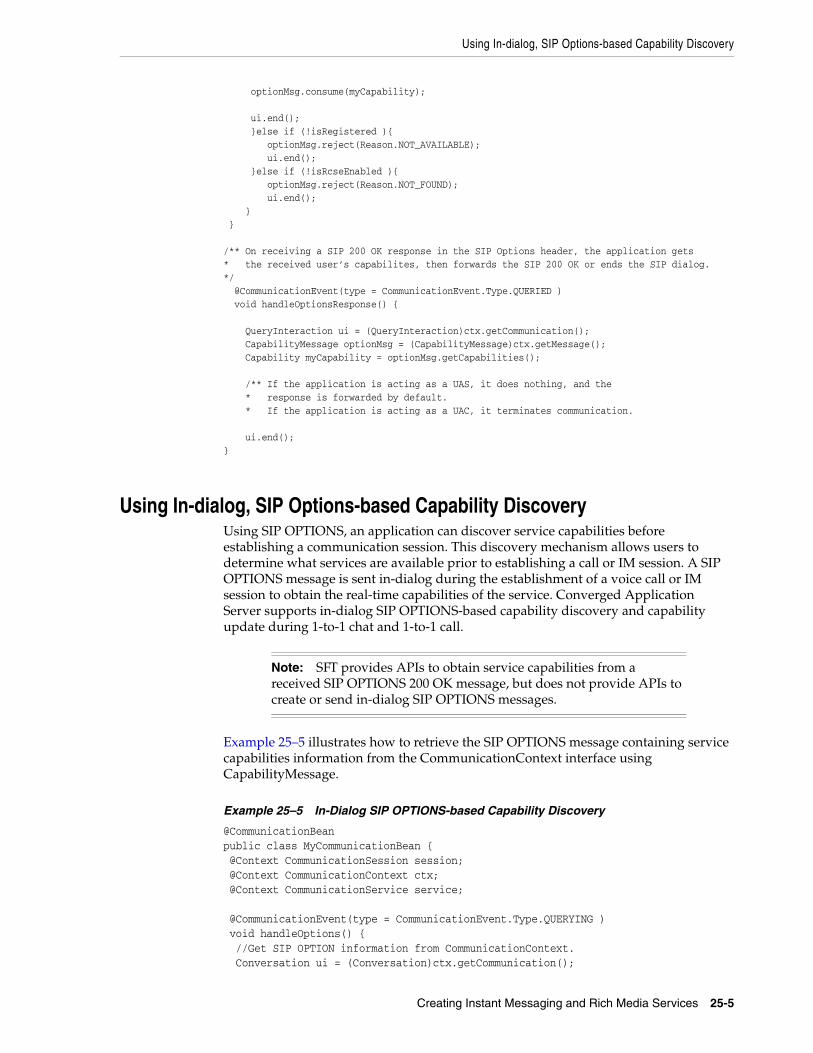
Using In-dialog, SIP Options-based Capability Discovery
Creating Instant Messaging and Rich Media Services 25-5
optionMsg.consume(myCapability); ui.end(); }else if (!isRegistered ){ optionMsg.reject(Reason.NOT_AVAILABLE); ui.end(); }else if (!isRcseEnabled ){ optionMsg.reject(Reason.NOT_FOUND); ui.end(); } } /** On receiving a SIP 200 OK response in the SIP Options header, the application gets * the received user’s capabilites, then forwards the SIP 200 OK or ends the SIP dialog.*/ @CommunicationEvent(type = CommunicationEvent.Type.QUERIED ) void handleOptionsResponse() { QueryInteraction ui = (QueryInteraction)ctx.getCommunication(); CapabilityMessage optionMsg = (CapabilityMessage)ctx.getMessage(); Capability myCapability = optionMsg.getCapabilities(); /** If the application is acting as a UAS, it does nothing, and the * response is forwarded by default. * If the application is acting as a UAC, it terminates communication. ui.end();}
Using In-dialog, SIP Options-based Capability DiscoveryUsing SIP OPTIONS, an application can discover service capabilities before establishing a communication session. This discovery mechanism allows users to determine what services are available prior to establishing a call or IM session. A SIP OPTIONS message is sent in-dialog during the establishment of a voice call or IM session to obtain the real-time capabilities of the service. Converged Application Server supports in-dialog SIP OPTIONS-based capability discovery and capability update during 1-to-1 chat and 1-to-1 call.
Example 25–5 illustrates how to retrieve the SIP OPTIONS message containing service capabilities information from the CommunicationContext interface using CapabilityMessage.
Example 25–5 In-Dialog SIP OPTIONS-based Capability Discovery
@CommunicationBeanpublic class MyCommunicationBean { @Context CommunicationSession session; @Context CommunicationContext ctx; @Context CommunicationService service; @CommunicationEvent(type = CommunicationEvent.Type.QUERYING ) void handleOptions() { //Get SIP OPTION information from CommunicationContext. Conversation ui = (Conversation)ctx.getCommunication();
Note: SFT provides APIs to obtain service capabilities from a received SIP OPTIONS 200 OK message, but does not provide APIs to create or send in-dialog SIP OPTIONS messages.

Using End User Confirmation Request
25-6 Oracle Communications Converged Application Server Developer's Guide
CapabilityMessage optionMsg = (CapabilityMessage)ctx.getMessage(); //Receive the contact and accept-accept capabilities Capability senderCapability = optionMsg.getCapabilities(); Capability senderAcceptedCapability = optionMsg.getAcceptCapabilities(); } //Receive 200 OK response via SIP OPTIONS. //The application gets the receiving user’s capability, then forwards this 200 OK //or terminates this SIP dialog. @CommunicationEvent(type = CommunicationEvent.Type.QUERIED ) void handleOptionsResponse() { Conversation ui = (Conversation )ctx.getCommunication(); CapabilityMessage optionMsg = (CapabilityMessage)ctx.getMessage(); Capability myCapability = optionMsg.getCapabilities(); }...
Using End User Confirmation RequestEnd User Confirmation Request (EUCR) is a mechanism by which an application server communicates with a user about a service, and queries for confirmation as to what actions to take. In the client device’s user interface (UI) this might equate to a pop-up menu or similar UI element that the user can interact with to confirm or deny a specific service request.
The sequence of steps to perform a EUCR is as follows:
1. The end user confirmation request is implemented using a SIP MESSAGE method containing an XML payload of type application/end-user-confirmation-request+xml that is sent by the application server to the end user’s RCS-e client (for example, a mobile phone).
2. Upon receipt of the SIP MESSAGE, the end user’s device checks the P-Asserted-Identity of the incoming message, and matches it against the configured URI for the service, and extracts the request information from the XML payload body. A dialog or notification is displayed on the end user’s device (UX dependant) displaying the confirmation request and any related information.
3. The end user’s confirmation response is encapsulated in an XML body with a payload of type application/end-user-confirmation-response+xml, and returned either in the SIP MESSAGE response back to the MNO, or in a new SIP MESSAGE.
The information contained in the end user confirmation request is:
■ id: Unique identifier of the request.
■ type: Determines the behavior of the receiving device. The type can take one of the following two values:
– volatile—the answer is returned in the SIP 200 OK response. If the SIP INFO message times out without end user input, the request is discarded.
– persistent—the answer is returned in a new SIP MESSAGE request. The confirmation request does not time out.
■ pin: Determines whether a pin number is requested of the end user. It can take one of the following two values: true or false. If the attribute is not present it is

Using End User Confirmation Request
Creating Instant Messaging and Rich Media Services 25-7
considered false. Pin requests can be used to add a higher degree of confirmation authentication, and can be used to allow operations such as parental control or other security features.
■ Subject: Text to display within the notification, or as a dialog box title.
■ Text: Text to display within the body of the dialog box.
4. (Optional) If the type of the confirmation request is persistent, the MNO can send an optional acknowledgement message of the transaction back to the user with a welcome message, an error message, or additional instructions. The acknowledgement message is encapsulated in an XML body with a payload of type application/end-user-confirmationack+ xml and returned in the SIP 200 OK body of the confirmation SIP MESSAGE.
The end user confirmation response is:
■ id: Unique identifier of the request.
■ value: Specifies if the end user accepts or declines the request. It takes one of the following two values: accept or decline
The information contained in the end user acknowledgement response is:
■ id: Unique identifier of the request.
■ status: with the end user confirmation. It can take one of the following two values: ok or error
■ Subject: Text to display within the notification, or as a dialog box title.
■ Text: Text to display within the body of the dialog box.
About the EUCR InterfacesEUCR makes use of the following classes in the com.oracle.sft.api package. For more information on these interfaces and their usage, refer to the Converged Application Server API Reference.
Table 25–3 Interfaces for EUCR
Class Description
EndUserConfirmationData Represents the data structure for the End User Confirmation Request, End User Confirmation Response, and End User Confirmation Acknowledgement messages.
EndUserConfirmationDisplay Represents the Subject and Text message displayed on the end user client during EUCR exchange.
EndUserConfirmationMessage The extended Message for EUCR exchange.
IMConversation Represents a two party IM conversation. The application uses this communication type to send and receive messages. For EUCR, IMConversation provides the following methods:
■ createEndUserConfirmRequestMessage()
■ createEndUserConfirmResponseMessage()

Using End User Confirmation Request
25-8 Oracle Communications Converged Application Server Developer's Guide
Using EUCR in Response to a File TransferExample 25–6 shows the code to sends a EUCR in response to initiating a file transfer. If the user chooses to confirm the request, they will be charged an additional amount on their bill.
Example 25–6 EUCR In Response to a File Transfer
@CommunicationBeanpublic class MyCommunicationBean { @Context CommunicationSession session; @Context CommunicationContext ctx; @Context CommunicationService service; private boolean authorization = false; private Message origMsg; @CommunicationEvent(type=CommunicationEvent.Type.INITIALIZATION ) void handleInit() { origMsg = ctx.getMessage(); Interaction ii = (Interaction ) ctx.getCommunication(); if ( ii instanceof MSRPConversation){ MSRPConversation MSRPConv = (MSRPConversation) ii; Participant receiver = MSRPConv.getParticipant(); Participant sender = MSRPConv.getInitiator (); IMConversation newIM = session.createIMConversation("[email protected]"); newIM.addParticipant(sender.getName()); /** * EndUserConfirmationData request = service.createEndUserConfirmationData(); request.setId("EucrTest1"); request.setPinRequired(true); request.setBehaviour(Behaviour.Persistent ); // Constructor to create a new IMConversation, and send the EUCR. newIM.createEndUserConfirmationRequestMessage(request).send(); EndUserConfirmationDisplay display; display = request.createDisplayText("Extra Charge","Charing Conditions", "en"); request.setCondition(display); display = request.createDisplayText("????,"0?1?/M", "ch"); request.setCondition(display); try { } catch (InterruptedException e) {
CommunicationEvent Specifies events pertaining to a Communication. Any method using this annotation is invoked when the CommunicationEvent of the specified type occurs. For EUCR, CommunicationEvent provides the following events:
■ CONFIRMATION_MESSAGEARRIVED
■ CONFIRMATION_RESPONDED
■ CONFIRMATION_FINISHED
CommunicationService A utility class to create objects that are not related to a CommunicationSession, for example groups. For EUCR, CommunicationService provides the method: createEndUserConfirmationData()
Table 25–3 (Cont.) Interfaces for EUCR
Class Description

Using Instant Message Disposition Notification
Creating Instant Messaging and Rich Media Services 25-9
e.printStackTrace(); } if( !authorization){ origMsg.reject(Reason.DECLINE); MSRPConv.end(); } } } //** * Handles SIP MESSAGE 200 OK containing the EUCR response is received by IMConversation * @CommunicationEvent(type=CommunicationEvent.Type.CONFIRMATION_RESPONDED) void handleEUCResponseMessage() { IMConversation IMConv = (IMConversation) ctx.getCommunication(); byte[] content = ctx.getMessage().getContent().toString().getBytes(); EndUserConfirmationMessage msg = (EndUserConfirmationMessage) ctx.getMessage(); EndUserConfirmationData resp = msg.getData(); EndUserConfirmationData ack = resp.createAcknowledgement(); if ( resp.getAction().equalsIgnoreCase("accept")){ resp.setAcknowledgement( resp.createDisplayText("Welcome", "Hello", "en")); msg.consume(); this.authorization = true; IMConv.end(); }else { resp.setAcknowledgement( resp.createDisplayText("Sorry", "Can Not Access", "en")); msg.consume() this.authorization = false; IMConv.end(); } }}
Conferencing Using MSRPMessage Session Relay Protocol (MSRP) is a protocol for transmitting a series of related instant messages in the context of a session. Message sessions are treated like any other media stream when set up via a rendezvous or session creation protocol such as the Session Initiation Protocol (SIP). MSRP Sessions are defined in RFC 4975.
Using Instant Message Disposition NotificationTo support store and forward status reporting and message disposition, RCS-e uses Instant Message Disposition Notification (IMDN) to request and forward dispositions of all exchanged messages. Converged Application Server supports Page Mode instant messaging, which uses the SIP method MESSAGE as defined in RFC 3428. Page Mode instant messaging establishes no sessions. Instant Message Disposition Notification (IMDN) is defined in RFC 5438.
Instant messages are constructed using the Common Presence and Instant Messaging (CPIM) message format defined in RFC 3862. Converged Application Server supports the following aspects of RFC 5438 when constructing Instant Messages in the CPIM message format:
■ Adding a Message-ID header field

Using Instant Message Disposition Notification
25-10 Oracle Communications Converged Application Server Developer's Guide
If the IM Sender requests the reception of IMDNs, the IM Sender must include a Message-ID header field. The Message-ID header field enables the IM Sender to match any IMDNs with their corresponding IMs. See Section 7.1.1.1 for more information.
■ Automatically adding a DataTime header field
Some devices are not able to retain state over long periods of time. For example, mobile devices may have memory limitations. These limitations mean that these devices may not be able to, or may choose not to, keep sent messages for the purposes of correlating IMDNs with sent IMs. To make some use of IMDN in this case, a time stamp is added to the IM to indicate when the user sent the message. The IMDN returns the time stamp to enable the user to correlate the IM with the IMDN. The DateTime CPIM header field for this purpose. Thus, if the IM Sender wants an IMDN, the IM Sender must include the DateTime CPIM header field. See Section 7.1.1.2 for more information.
■ Adding a Disposition-Notification header field
The Disposition-Notification header field conveys the type of disposition notification requested by the IM Sender. There are three types of disposition notification: delivery, processing, and display. The delivery notification is further subdivided into failure and success delivery notifications. An IM Sender requests failure delivery notification by including a Disposition-Notification header field with a value of negative-delivery. A success notification is requested by including a Disposition-Notification header field with the value positive-delivery. The IM Sender can request both types of delivery notifications for the same IM.
The IM Sender can request a processing notification by including a Disposition-Notification header field with value processing.
The IM Sender can also request a display notification. The IM Sender MUST include a Disposition-Notification header field with the value display to request a display IMDN.
The absence of this header field, or the presence of the header field with an empty value, indicates that the IM Sender is not requesting any IMDNs. Disposition-Notification header field values are comma-separated. The IM Sender may request more than one type of IMDN for a single IM.
See Section 7.1.1.2 for more information.
■ Parsing aggregated IMDNS
An IM Sender may send an IM to multiple recipients in one Transport Protocol Message (typically using a URI-List server) and request IMDNs. An IM Sender that requests IMDNs must be able to receive multiple aggregated or non-aggregated IMDNs. See Section 8.3 for more information.
Converged Application Server supports following aspects of RFC 5438 when constructing the IMDN:
■ Constructing Delivery notifications
■ Constructing Display notifications
■ Constructing Processing notifications
■ Constructing Aggregated IMDNs
Refer to RFC 5438 for more information on these aspects of creating IMDNs.

Using Instant Message Disposition Notification
Creating Instant Messaging and Rich Media Services 25-11
About the IMDN InterfacesIMDN makes use of the following classes in the com.oracle.sft.api package. For more information on these interfaces and their usage, refer to the Converged Application Server API Reference.
Creating an Instant Message with IMDN RequestExample 25–7 creates an instant message with an IMDN in the message header for a two-party IM conversation.
Example 25–7 Creating an Instant Message With an IMDN Request
public class CpimServlet extends HttpServlet{/**CommunicationSession session =(CommunicationSession)request.getSession().getAttribute(CommunicationSession.NAME);
CommunicationService service = (CommunicationService)request.getSession().getAttribute(CommunicationService.NAME); java.io.PrintWriter out = response.getWriter(); String party1 = request.getParameter("Party1"); String party2 = request.getParameter("Party2"); try { out.println("<html>"); IMConversation conv = session.createIMConversation(party1); conv.addParticipant(party2);
Table 25–4 IMDN Interfaces
Class Description
CommonPresenceInstantMessage The extension to TextMessage for message/CPIM format, you can use CommonPresenceInstantMessage to construct common IM messages using the CPIM format, IM message requesting disposition notifications, and IMDN messages.
DispositionContext Represents the data carried in the Disposition message.
DispositionNotification The data structure for disposition notification. You use this interface to construct and parse IMDN payloads.
CommunicationEvent Specifies events pertaining to a Communication. Any method using this annotation is invoked when the CommunicationEvent of the specified type occurs. For IMDN, CommunicationEvent provides the following events:
■ MESSAGE_SUCCESS_RESONDED
■ MESSAGE_FAILUER_RESONDED
■ DISPOSITION_REQUEST_SUCCESS_RESPONDED
■ DISPOSITION_REQUEST_FAILURE_RESPONDED
IMConversation Represents a two party IM conversation. The application uses this communication type to send and receive messages. For IMDN, IMConversation provides the createCommonPresenceInstantMessage() method to create CPIM messages.
IMConference Represents a multi-party, Page Mode instant message session. For IMDN, IMConference provides the createCommonPresenceInstantMessage() method to create CPIM messages.

Using Instant Message Disposition Notification
25-12 Oracle Communications Converged Application Server Developer's Guide
CommonPresenceInstantMessage cpimReq = conv.createCommonPresenceInstantMessage (); cpimReq.setHeader(Header.Subject.toString(), "imdn test"); DispositionContext disposCxt = cpimReq.buildDispositionContext("hello world!", "text/plain"); disposCxt.setDispositionRequest(RequestType.negative_delivery); disposCxt.setDispositionRequest(RequestType.processing); cpimReq.setDispositionContext(disposCxt); cpimReq.send(); }
Creating an IMDN With CommunicationBeanExample 25–8 creates a CommunicationBean that acts as an intermediary server (a store-and-forward server) for a two-party conversation using the IMConversation interface. The actual IMDN message is not stored, but content disposition is performed so that Store/Forward information status reporting can be done according to RFC 5438.
Example 25–8 Creating an IMDN with CommunicationBean
@ServiceAttributes(domainName = "example.com")@CommunicationBean public class CpimBean { @Context CommunicationSession session; @Context CommunicationContext ctx; @Context CommunicationService service; private DispositionContext aggregationContext; @CommunicationEvent(type=CommunicationEvent.Type.MESSAGEARRIVED) void handleMessage ( ){ //** If the message contains a disposition request, the server forwards the message * to the recipient. If the message is sent to multiple recipients, the server * behaves as specifed RFC 5365. /* IMConversation conv = (IMConversation) ctx.getCommunication(); CommonPresenceInstantMessage msg = (CommonPresenceInstantMessage)conv.getMessage(); DispositionContext getImdns = msg.getDispositionContext(); if (getImdns == null ){ System.out.println("Received CPIM message "); } if (getImdns != null && getImdns.getDispositionNotifications()== null){ System.out.println("Received Disposition Request "); msg.consume(); CommonPresenceInstantMessage imdnMsg = conv .createCommonPresenceInstantMessage(); imdnMsg.setDispositionContext( getImdns()); imdnMsg.send(); } } @CommunicationEvent(type=CommunicationEvent.Type.DISPOSITION_REQUEST_SUCCESS_RESPONDED) void handleImdnSuccessResponse ( ){ IMConversation conv = (IMConversation) ctx.getCommunication(); CommonPresenceInstantMessage msg = (CommonPresenceInstantMessage )conv.getMessage( );

Using Instant Message Disposition Notification
Creating Instant Messaging and Rich Media Services 25-13
DispositionContext origCxt = msg.getDispositionContext(); CommonPresenceInstantMessage newMsg = conv.createCommonPresenceInstantMessage (); if ( origCxt.isDispositionRequest( RequestType.positive_delivery ){ newMsg.buildDispositionContext(msg,Type.delivery ,Status.delivered); } if(imdnMsg.getDispositionContext()!= null && imdnMsg.getDispositionContext().getDispositionNotifications() != null ) newMsg.send( conv.getParticipant() ); } @CommunicationEvent(type=CommunicationEvent.Type.DISPOSITION_REQUEST_FAILURE_RESONDED) void handleImdnFailureResponse( ){ IMConversation conv = (IMConversation) ctx.getCommunication(); CommonPresenceInstantMessage msg = (CommonPresenceInstantMessage )conv.getMessage( ); DispositionContext origCxt = msg.getDispositionContext(); CommonPresenceInstantMessage newMsg = conv.createCommonPresenceInstantMessage (); if ( origCxt.isDispositionRequest( RequestType.negative_delivery ){ newMsg.buildDispositionContext(msg, Type.delivery ,Status.failed); } // If the message is stored, if ( origCxt.isDispositionRequest( RequestType.processing ){ newMsg.buildDispositionContext(nsg,Type.processing ,Status.stored); } if(imdnMsg.getDispositionContext()!= null && imdnMsg.getDispositionContext().getDispositionNotifications() != null ) newMsg.send( conv.getParticipant() ); } @CommunicationEvent(type=CommunicationEvent.Type.MESSAGE_SUCCESS_RESPONDED) void handleResponse() { System.out.println(" Enter MESSAGE_SUCCESS_RESONDED event "); IMConversation conv = (IMConversation) ctx.getCommunication(); CommonPresenceInstantMessage msg = (CommonPresenceInstantMessage)ctx.getMessage(); if (msg!= null && msg.getDispositionContext()!= null && msg.getDispositionContext().getDispositionNotifications()!=null ){ System.out.println(" Disposition Notification Message is Responed "); conv.end(); } } @CommunicationEvent(type=CommunicationEvent.Type.MESSAGE_FAILURE_RESPONDED) void handleErrorResponse() { System.out.println(" Enter MMESSAGE_FAILUER_RESPONDED event "); }

Using Instant Message Disposition Notification
25-14 Oracle Communications Converged Application Server Developer's Guide