os ug 2013-03-12rev - ortho clinical diagnostics 4 or via email at orthoplus@ its.jnj.com. you may...
TRANSCRIPT
User Guide
ORTHO PLUSSM Solutions
Pub. No. J400172018-04-13

ORTHO PLUSSM Solutions User Guide
Proprietary notice
This document discloses subject matter in which Ortho Clinical Diagnostics has proprietary rights. Neither receipt nor possession of the document confers or transfers any rights to copy or reproduce any information contained therein without the express written consent of a duly authorized representative of Ortho Clinical Diagnostics.
© Ortho Clinical Diagnostics 2011-2018. All Rights Reserved.

ORTHO PLUSSM Solutions User Guide
Date Page
2011-04-27 All
2013-03-12 1-2
1-2
1-2
1-2
2-1
2-1
2-2
3-1
3-3
3-6
3-9
3-12
4-1
2013-10-09 2-1
2-113-9,
2-11
3-3
3-10
2013-11-22 3-1
thro
Revision History
Description
Initial release
to 4-2
1st paragraph, 2nd bullet: “Ship To and there” changed to “Ship To. There”
2nd paragraph, 2nd sentence: DELETED
2nd paragraph, 1st bullet: DELETED
3rd paragraph: “Features are also known as applications. The following features are” changed to “Features, also known as applications, are”
Step 1: “Logon Name and” inserted before “Password”
Step 2, 2nd sentence: “OrthoConnect applications that do not require a contract” changed to “OrthoConnect/ORTHO PLUSSM by clicking Register Now”
Step 3: “using the provided Forgot Password utility” changed to “by clicking Forgot Password”
Step 1: “Logon Name and” inserted before “Password”
Step 6, 3rd sentence: “OCD recommends that you select” changed to “Select”
Step 1: “Logon Name and” inserted before “Password”
Step 1: “Logon Name and” inserted before “Password”
Step 1: “Logon Name and” inserted before “Password”
New Chapter 4 “Managing Automatic Alerts” added
to 2-10
, 3-1, 3-6, 3-13
and 3-11
New Sections “Registering for New Users” and “Registering for Current Users” added
Step 1: changed to read “enter your User Name and Password, and click Log In” with new screen capture
Step 2: Revised instructions for Forgot Password
Step 6: “Logon Name” changed to “User Name”
Steps 4-7: Revised instructions for managing alerts
to 3-12
ughout
New Chapter 3 “e-Communications” added
All screen captures have been updated as needed

ORTHO PLUSSM Solutions User Guide
2018-04-13 All
Date Page
Removed Johnson & Johnson references and updated screenshots.
Description

ORTHO PLUSSM Solutions User Guide
Contents
Chapter 1 About This Guide Purpose ..................................................................................... 1-1Audience .......................................................................................... 1-1Key Terms/Glossary ..................................................................... 1-1ORTHO PLUSSM Solutions Structure ..................................... 1-2Where to Get Help ........................................................................ 1-3
Chapter 2 Getting Started Registering for New Users ......................................................... 2-1
Registering for Current Users .................................................... 2-7
Logging In ....................................................................................... 2-13The Home Page ............................................................................. 2-14
Chapter 3 e-Communications How to Register for e-Communications ................................. 3-1How to Manage e-Communications Access .......................... 3-5How to Manage Messages .......................................................... 3-8
Chapter 4 Customer Admin. and User Functions How to Add a New User ........................................................ 4-1How to Manage Account Settings ............................................ 4-6How to Manage Alerts ................................................................. 4-9How to View Metrics ................................................................... 4-13
Chapter 5 Managing Automatic Alerts ORTHO PLUSSM Solutions Alerts ........................................... 5-1Order Receipt Alert ...................................................................... 5-1Shipping Status Alert ................................................................... 5-2Shipping Status Update ............................................................... 5-2

ORTHO PLUSSM Solutions User Guide

1 About This Guide
Purpose
The purpose of this guide is to provide Users and Customer Administrators information on ORTHO PLUSSM Solutions. It explains how to use it as a Web Portal for access to ORTHO PLUSSM applications and services.
Audience
This guide was written for users of ORTHO PLUSSM.
Key Terms/Glossary
TERM DEFINITIONApplication The various programs within ORTHO PLUSSM.
Customer Administrator
Customer representative given administrative authority and access for all Users within their Organization.
Feature A term used interchangeably with Application.
Location A term used interchangeably with Ship To.
Ortho Administrator
Ortho representative with authority to manage all aspects of organization, site and user setup and support.
OrganizationThe highest level of customer within the ORTHO PLUSSM Solutions application. May include one or more Ship To’s
Ship ToIndividual customer site (laboratory) within a customer organization. It is the actual location of the analyzer(s).
Site A term used interchangeably with Ship To.
UCNUniversal Customer Number: A term used interchangeably with Ship To.
UserCustomer / individual account user with limited access to ORTHO PLUSSM features.
2018-04-13 1-1
1 About This GuideORTHO PLUSsm Solutions Structure
ORTHO PLUSSM Solutions Structure
Organization
The highest level within the ORTHO PLUSSM Solutions application.
Each organization must have 1 and only one customer administrator.
An organization must have at least 1 affiliated Ship To. There is no limit to the number of affiliated Ship To’s each organization can have.
Ship To’s within the same organization can share data and users.
Preferences set at the Organization level affect the Features and Properties available at the Ship To and User Levels.
Ship To’s are also known as UCN (Universal Customer Number), Site or Location.
Each Ship To can be affiliated with one and only one organization
Feature access is also controlled at the Ship To level with each Ship To being assigned a subset of those made available at the organization level.
Features, also known as applications, are available within ORTHO PLUSSM Solutions.
ORTHO PLUSSM Services – Access the specific ORTHO PLUSSM features.
(For a complete list of ORTHO PLUSSM Services, see https://www.orthoclinicaldiagnostics.com/en-us/home/services.)
Each organization must have one and only one Customer Administrator, who is granted access to manage all aspects of account setup and management including:
Create/edit/delete users
Grant/edit/remove the access rights of a user to a specific feature
Grant/edit/remove the access rights of a user to access a specific Ship To
Reset user passwords
The Customer Administrator maintains access for all authorized ORTHO PLUSSM users at the customer site(s) and updates security permissions to align with every change in personnel or roles and responsibilities.
1-2 2018-04-13 1 About This Guide

Where to Get Help
Users are granted access rights to use specific features at specific Ship To’s within an organization.
Each user can be granted access to one and only one organization
Users are granted access to one or more Ship To’s within the organization.
Users are granted access to specific Features at the Ship To level.
Users may be granted no access, read-only access or read-write access at the by-Feature by-Ship To level.
Where to Get Help
This guide should answer all the questions you may have about the ORTHO PLUSSM Solutions.
For further information please contact us:
800-421-3311 option 4 Monday - Friday, 8 AM - 5 PM (Eastern Time)
1 About This Guide 2018-04-13 1-3

1 About This GuideWhere to Get Help
1-4 2018-04-13 1 About This Guide

2 Getting Started
Registering for New Users
1 Go to https://orthoplus.orthoclinicaldiagnostics.com and click
Register Now.
2018-04-13 2-1
2 Getting StartedRegistering for New Users
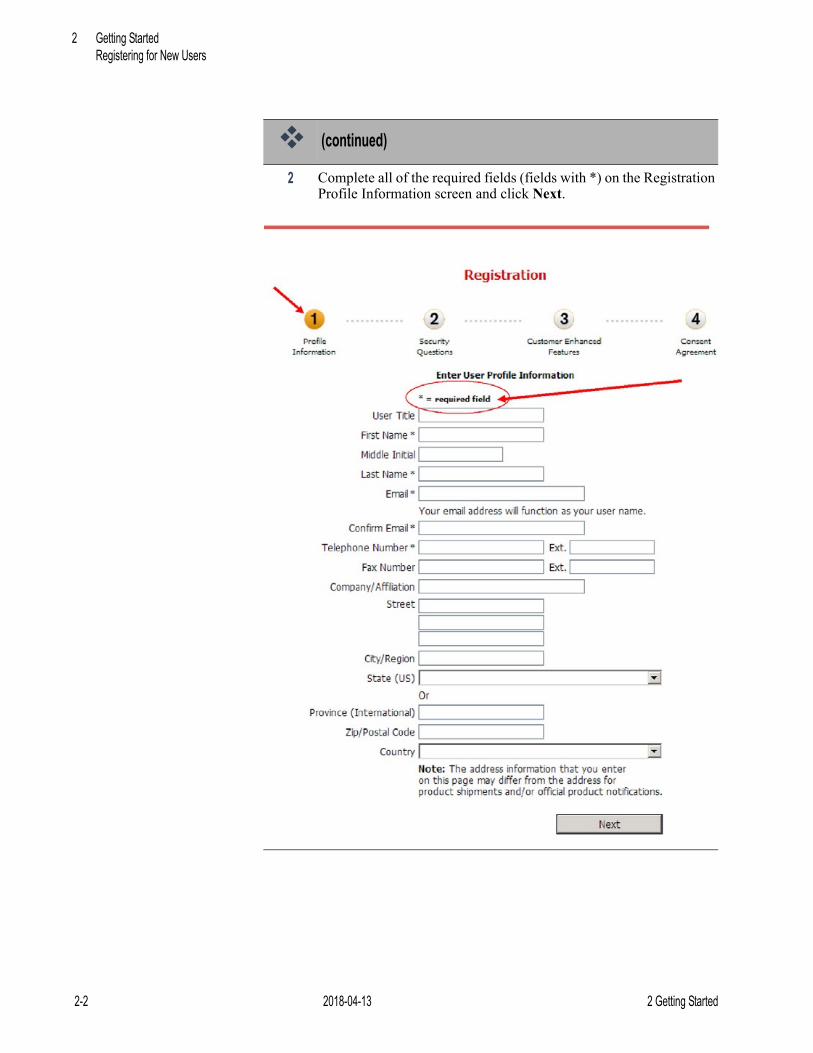
2 Complete all of the required fields (fields with *) on the Registration Profile Information screen and click Next.
(continued)
2-2 2018-04-13 2 Getting Started

Registering for New Users
3 On the Registration Security Questions screen, select and answer three security questions, then click Next.
4 On the Customer Enhanced Features screen Click in the checkbox next to "Yes, associate this account with my customer number(s)" and the screen will change.
(continued)
2 Getting Started 2018-04-13 2-3

2 Getting StartedRegistering for New Users
5 Click Yes option next to "I have been provided an Access Code" and the screen will change again.
Note: If you have not been provided an Access Code, click No and proceed to step 7.
6 Fill in your Access Code and Customer Number (UCN) and click Next.
Proceed to step 8.
(continued)
2-4 2018-04-13 2 Getting Started
Registering for New Users
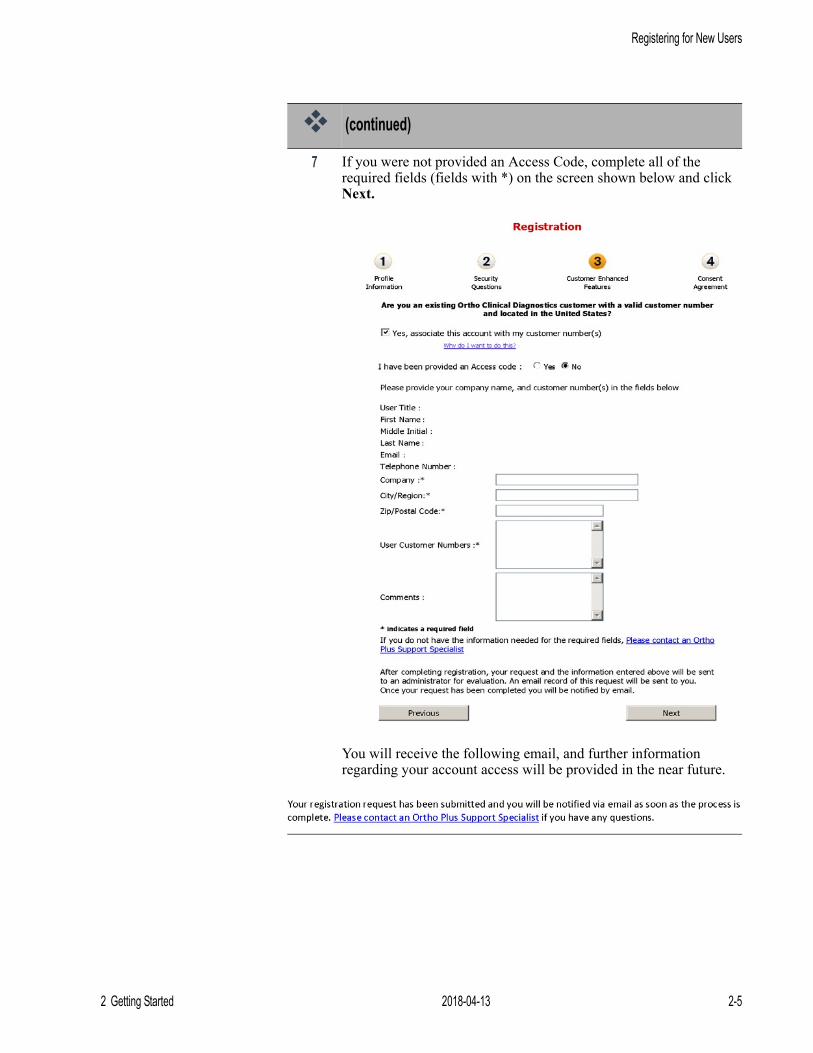
7 If you were not provided an Access Code, complete all of the required fields (fields with *) on the screen shown below and click Next.
You will receive the following email, and further information regarding your account access will be provided in the near future.
(continued)
2 Getting Started 2018-04-13 2-5

2 Getting StartedRegistering for New Users
8 On the Consent Agreement screen, click in the checkbox next to "I consent to the information …" The screen will change so that the Submit button is no longer greyed out. Click Submit when the button becomes available.
9 Click OK on the screen that thanks you for registering.
10 After you receive your temporary password via email, follow the link provided in the email message and you will see the Change your password screen. Create a new password following the boxed guidelines and click Save.
(continued)
2-6 2018-04-13 2 Getting Started
Registering for Current Users
Registering for Current Users
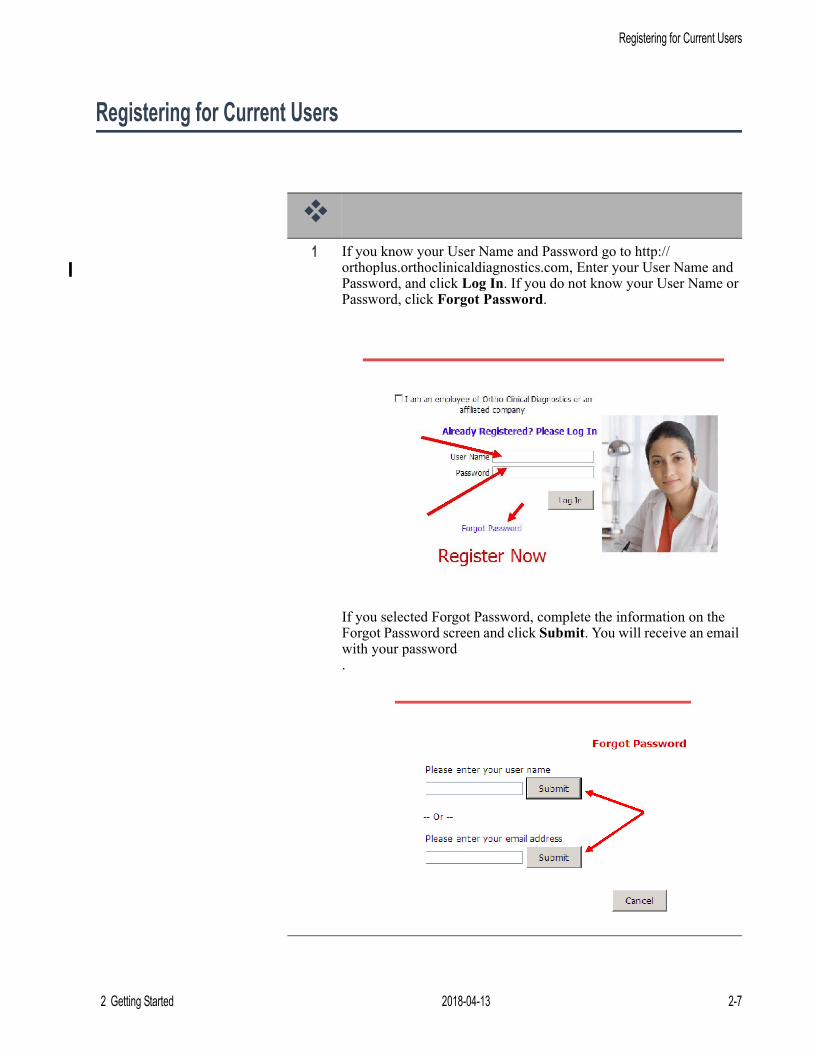
1 If you know your User Name and Password go to http://
orthoplus.orthoclinicaldiagnostics.com, Enter your User Name and Password, and click Log In. If you do not know your User Name or Password, click Forgot Password.
If you selected Forgot Password, complete the information on the Forgot Password screen and click Submit. You will receive an email with your password.
2 Getting Started 2018-04-13 2-7
2 Getting StartedRegistering for Current Users
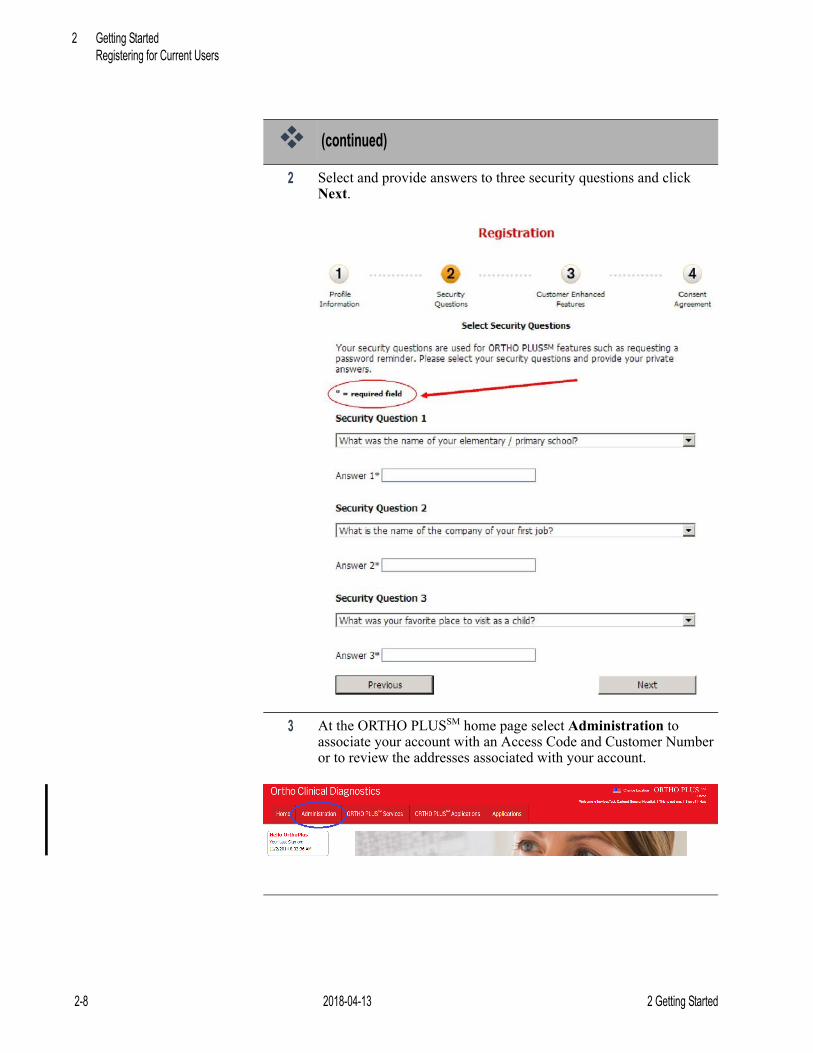
2 Select and provide answers to three security questions and click Next.
3 At the ORTHO PLUSSM home page select Administration to associate your account with an Access Code and Customer Number or to review the addresses associated with your account.
(continued)
2-8 2018-04-13 2 Getting Started

Registering for Current Users
4 Locate your cursor over My Profile and select Profile Maintenance from the drop down menu.
5 Click the Locations tab.
(continued)
2 Getting Started 2018-04-13 2-9

2 Getting StartedRegistering for Current Users
6 If you do not have any addresses associated with your account but you have been provided an Access Code, click Yes button next to "I have been provided an Access Code" on the Locations screen.
Note: If you do not have any addresses associated with your account and you have not been provided an Access Code, click No and proceed to step 8.
The screen will change.
Note: If you already have address(es) associated with your account, you will see the screen below. If you want to associate your account with another address, click Associate another Location.
The screen will change to the one below Step 6 that asks you if you have been provided an Access Code. Complete Step 6 and proceed to Step 7.
(continued)
2-10 2018-04-13 2 Getting Started
Registering for Current Users
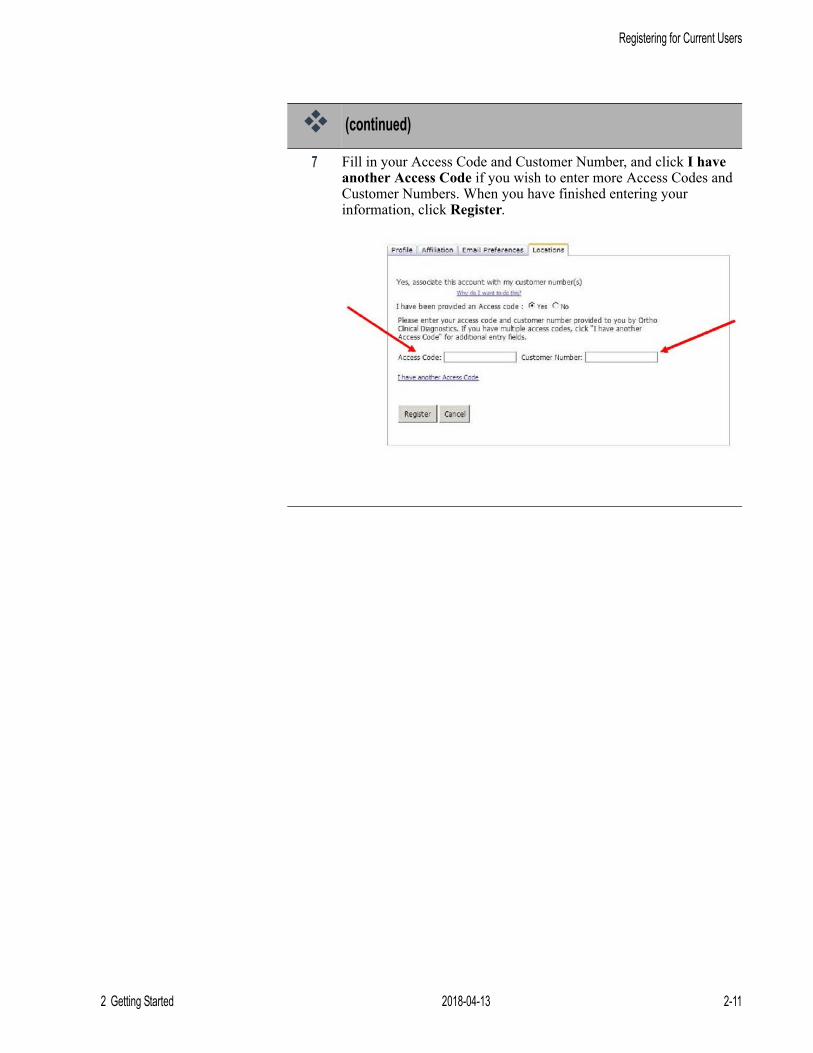
7 Fill in your Access Code and Customer Number, and click I have another Access Code if you wish to enter more Access Codes and Customer Numbers. When you have finished entering your information, click Register.
(continued)
2 Getting Started 2018-04-13 2-11

2 Getting StartedRegistering for Current Users
8 If you were not provided an Access Code, complete all of the required fields (fields with *) on the screen shown below and click Register.
You will receive a confirmation email, and further information regarding your account access will be provided in the near future.
(continued)
2-12 2018-04-13 2 Getting Started
Logging In
Logging In
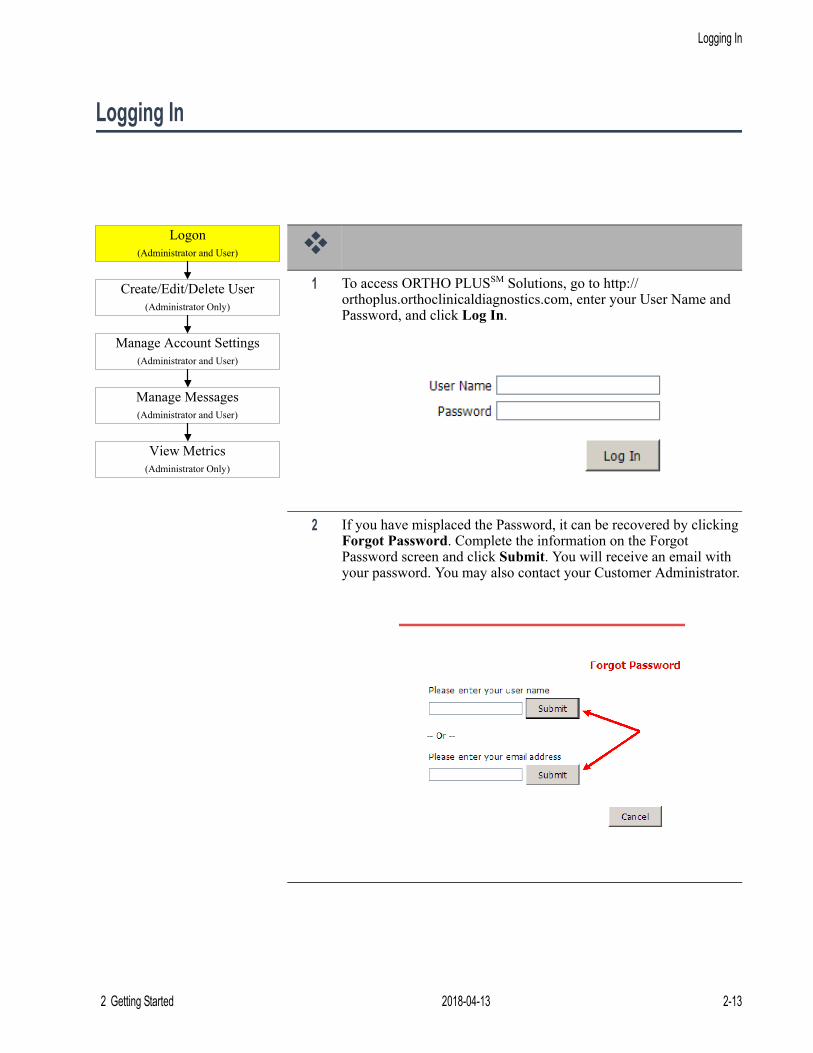
1 To access ORTHO PLUSSM Solutions, go to http://
orthoplus.orthoclinicaldiagnostics.com, enter your User Name and Password, and click Log In.
2 If you have misplaced the Password, it can be recovered by clicking Forgot Password. Complete the information on the Forgot Password screen and click Submit. You will receive an email with your password. You may also contact your Customer Administrator.
Manage Messages(Administrator and User)
View Metrics(Administrator Only)
Manage Account Settings(Administrator and User)
Create/Edit/Delete User(Administrator Only)
Logon(Administrator and User)
2 Getting Started 2018-04-13 2-13

2 Getting StartedThe Home Page
The Home Page
Options on the main page include:
Home – Return to this screen
Administration – move to ORTHO PLUSSM Solutions security and account management center
ORTHO PLUSSM Services – access the specific ORTHO PLUSSM features.
ORTHO PLUSSM Applications – access features that share the same login, navigation and security features of ORTHO PLUSSM Solutions.
2-14 2018-04-13 2 Getting Started

3 e-Communications
e-Communications delivers Ortho communications directly to your preferred email address. This service provides a more effective and manageable means of receiving and accessing important Ortho product information.
In order to access e-Communications, you must use one of the following browsers:
Internet Explorer® version 8 or later; Google Chrome™ version 16 or later; Safari® version 5 or later; Mozilla® / Firefox® version 8 or later.
How to Register for e-Communications
1 To register for e-Communications, log on to ORTHO PLUSSM
Solutions, enter your User Name and Password, and click Log In.
2 Click on Sign Up NOW for e-Communications under Communications in the left sidebar.
2018-04-13 3-1
3 e-CommunicationsHow to Register for e-Communications
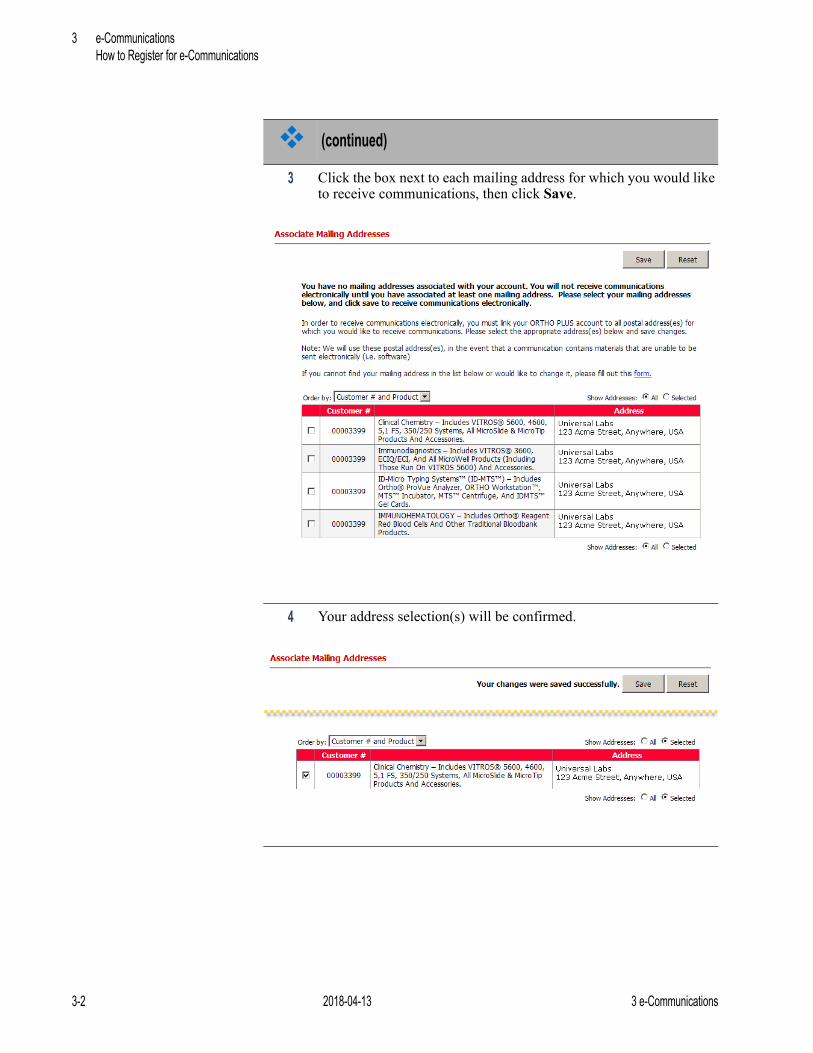
3 Click the box next to each mailing address for which you would like to receive communications, then click Save.
4 Your address selection(s) will be confirmed.
(continued)
3-2 2018-04-13 3 e-Communications

How to Register for e-Communications
5 If you did not find your mailing address in the list provided, click the word form in message shown below.
6 Click Open to access the Mailing Information Change Request form.
(continued)
3 e-Communications 2018-04-13 3-3

3 e-CommunicationsHow to Register for e-Communications
7 Complete the Mailing Information Change Request form and click Submit.
You will receive an email confirming your new address selection.
(continued)
3-4 2018-04-13 3 e-Communications

How to Manage e-Communications Access
How to Manage e-Communications Access
1 To manage your access to e-Communications, log on to ORTHO
PLUSSM Solutions, enter your User Name and Password, and click Log In.
2 From the top menu select Administration.
3 From the My Profile drop down menu, select Profile Maintenance.
3 e-Communications 2018-04-13 3-5

3 e-CommunicationsHow to Manage e-Communications Access
4 Click the Mailing Addresses tab, then click on the link Manage your Electronic Communications (e-Communications) Mailing address association.
5 To deselect a current mailing address, click in the checked box next to the address to remove the check mark.
(continued)
3-6 2018-04-13 3 e-Communications

How to Manage e-Communications Access
6 To change the mailing addresses selected, click the All button next to Show Addresses.
7 Click the box next to each mailing address for which you would like to receive communications and click Save.
8 If you want to create a new mailing address, click on the word form, then Open and complete the Mailing Information Change Request form and click Submit.
(continued)
3 e-Communications 2018-04-13 3-7

3 e-CommunicationsHow to Manage Messages
How to Manage Messages
1 To manage your messages, log on to ORTHO PLUSSM Solutions,
enter your User Name and Password, and click Log In.
2 Click on View Messages under Communications in the left sidebar.
3 You can view the list of messages in your mailbox and click on any message to open it.
3-8 2018-04-13 3 e-Communications

4 Customer Administrator and User Functions
How to Add a New User
1 To create a new user for your organization, log on to ORTHO
PLUSSM Solutions, enter your User Name and Password, and click Log In.
2 From the top menu select Administration.
Manage Messages(Administrator and User)
View Metrics(Administrator Only)
Manage Account Settings(Administrator and User)
Create/Edit/Delete User(Administrator Only)
Logon(Administrator and User)
2018-04-13 4-1

4 Customer Administrator and User FunctionsHow to Add a New User
3 From the Security Center drop down menu, select Add/Change Users.
4 Or click on Add/Change Users in the Security Center box.
5 To create a new user, click on the Add button.
(continued)
4-2 2018-04-13 4 Customer Administrator and User Functions

How to Add a New User
6 On the Profile tab enter a unique User Name and password. Reconfirm the password and enter all required information (denoted by *). Select a User Name that is easy for the user to remember, such as a network logon or email address.
7 Enter your organization’s name and address on the Affiliation tab.
(continued)
4 Customer Administrator and User Functions 2018-04-13 4-3

4 Customer Administrator and User FunctionsHow to Add a New User
8 Enter the Email Preferences for the new user on the next tab.
9 If multiple sites exist for your organization, assign the appropriate site(s) on the Locations tab.
(continued)
4-4 2018-04-13 4 Customer Administrator and User Functions

How to Add a New User
10 On the Features tab, you can allow the new user access to one or multiple ORTHO PLUSSM features.
11 Click on the Save button to create the new User and to update Features and Locations.
12 On the Access Levels tab, you can specify the User access to Features by Ship To location. The user will automatically have Read/Write access unless the box for Read Only is selected.
13 Click on the Save button to create the new Access Levels.
14 When logging on for the first time, the new user will be prompted to change his/her password.
(continued)
4 Customer Administrator and User Functions 2018-04-13 4-5
4 Customer Administrator and User FunctionsHow to Manage Account Settings
How to Manage Account Settings
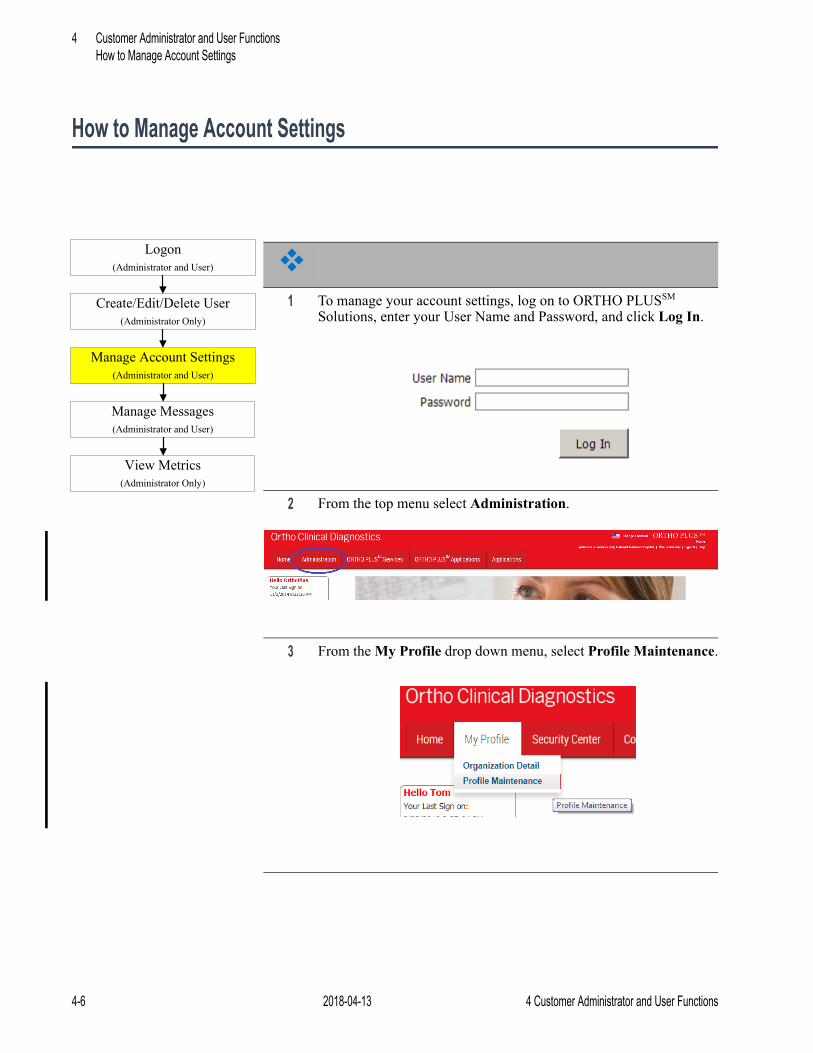
1 To manage your account settings, log on to ORTHO PLUSSM
Solutions, enter your User Name and Password, and click Log In.
2 From the top menu select Administration.
3 From the My Profile drop down menu, select Profile Maintenance.
Manage Messages(Administrator and User)
View Metrics(Administrator Only)
Manage Account Settings(Administrator and User)
Create/Edit/Delete User(Administrator Only)
Logon(Administrator and User)
4-6 2018-04-13 4 Customer Administrator and User Functions

How to Manage Account Settings
4 Click the Affiliation tab to update your company and address information.
Note: This information is not used by any ORTHO PLUSSM services.
5 Update your Email Preferences including your email address and selection of Ortho News and announcements.
6 Click on the Save button to update your information.
(continued)
4 Customer Administrator and User Functions 2018-04-13 4-7

4 Customer Administrator and User FunctionsHow to Manage Alerts
How to Manage Alerts
1 To setup and manage your messages, log on to ORTHO PLUSSM
Solutions, enter your User Name and Password, and click Log In.
2 From the top menu select Administration.
3 From the Communications menu, select Subscribe to Alerts.
Manage Messages(Administrator and User)
View Metrics(Administrator Only)
Manage Account Settings(Administrator and User)
Create/Edit/Delete User(Administrator Only)
Logon(Administrator and User)
4-8 2018-04-13 4 Customer Administrator and User Functions
How to Manage Alerts
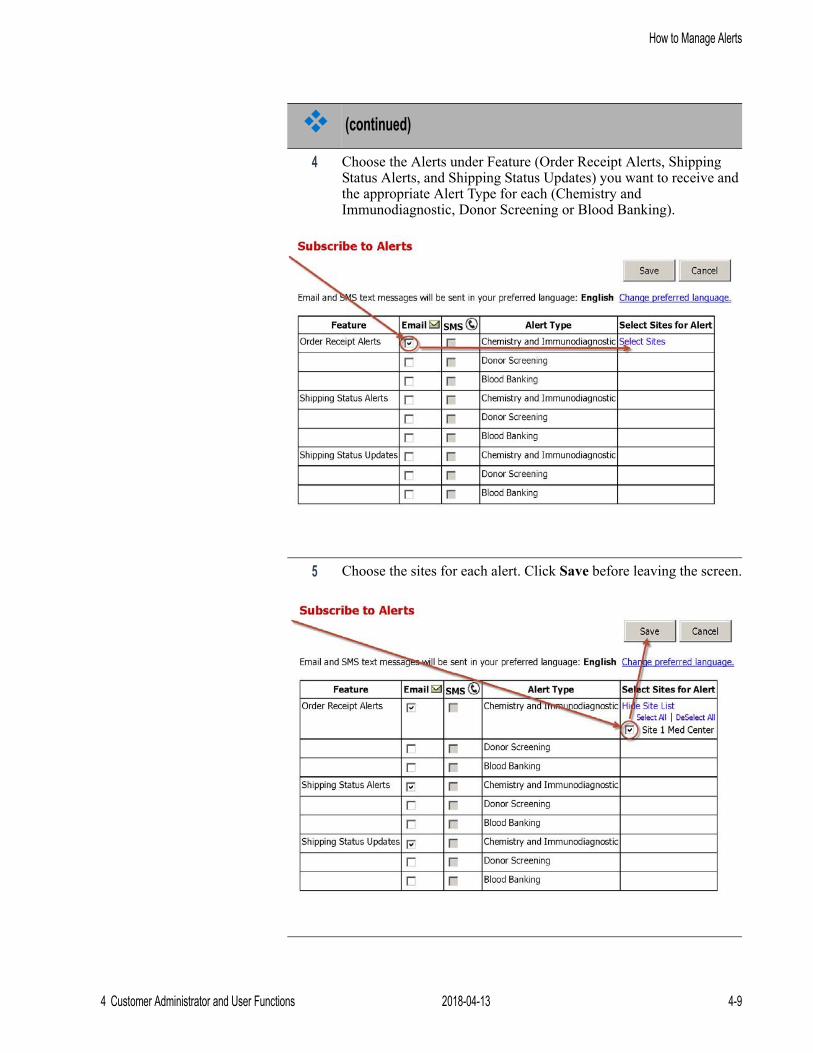
4 Choose the Alerts under Feature (Order Receipt Alerts, Shipping Status Alerts, and Shipping Status Updates) you want to receive and the appropriate Alert Type for each (Chemistry and Immunodiagnostic, Donor Screening or Blood Banking).
5 Choose the sites for each alert. Click Save before leaving the screen.
(continued)
4 Customer Administrator and User Functions 2018-04-13 4-9

4 Customer Administrator and User FunctionsHow to Manage Alerts
6 Click OK.
7 Click OK.
8 From the Communications menu, select Email Settings.
(continued)
4-10 2018-04-13 4 Customer Administrator and User Functions

How to Manage Alerts
9 Email Settings – allows you to edit your email address and update your preferences for email notifications from Ortho. This is an identical screen to that seen in the Profile Maintenance and Add/Change Users screens.
10 Click on the Save button to update your preferences.
11 Click on View Alerts under Communications in the left sidebar.
View Alerts is a “mailbox” where you can view system generated messages that have been sent to you through the embedded mailbox or email.
12 Mobile Settings are not currently available, but are being developed as a future enhancement to ORTHO PLUSSM Solutions.
(continued)
4 Customer Administrator and User Functions 2018-04-13 4-11
4 Customer Administrator and User FunctionsHow to View Metrics
How to View Metrics
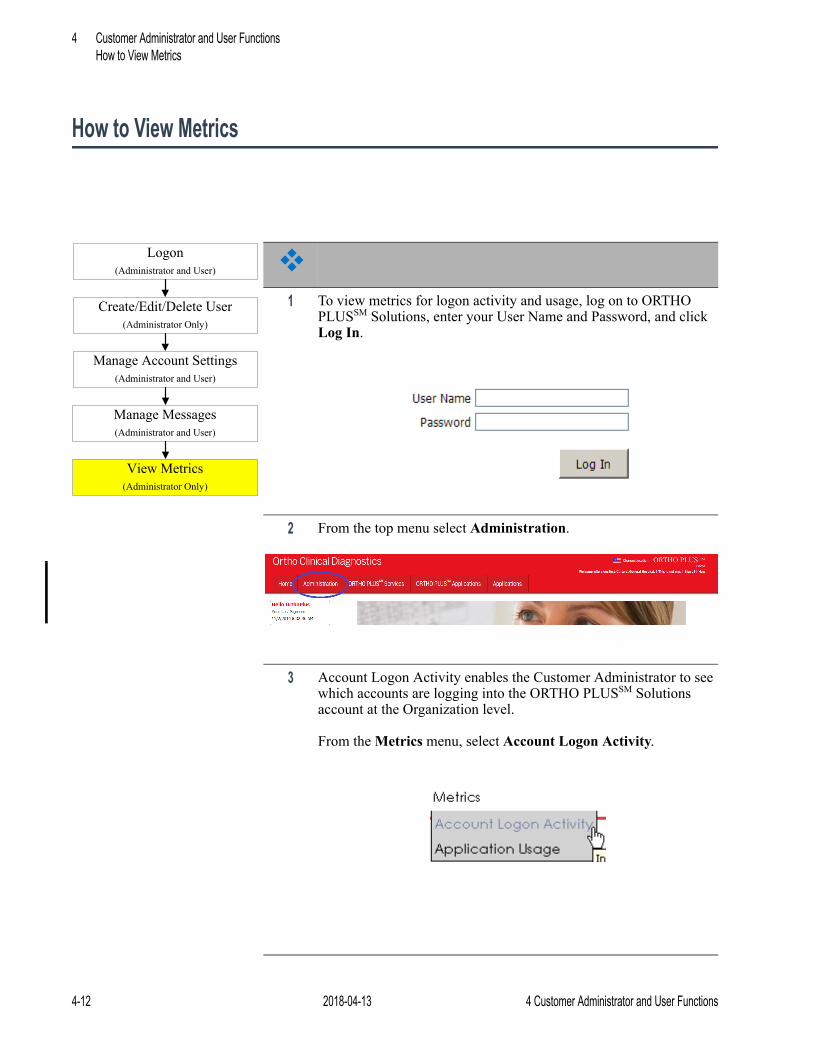
1 To view metrics for logon activity and usage, log on to ORTHO
PLUSSM Solutions, enter your User Name and Password, and click Log In.
2 From the top menu select Administration.
3 Account Logon Activity enables the Customer Administrator to see which accounts are logging into the ORTHO PLUSSM Solutions account at the Organization level.
From the Metrics menu, select Account Logon Activity.
Manage Messages(Administrator and User)
View Metrics(Administrator Only)
Manage Account Settings(Administrator and User)
Create/Edit/Delete User(Administrator Only)
Logon(Administrator and User)
4-12 2018-04-13 4 Customer Administrator and User Functions

How to View Metrics
4 The Customer Administrator will see a bar chart showing each user’s number of logons for the time period selected.
5 To view detailed logon activity for a specific user, click on the bar chart to create a table with logon details for the user.
(continued)
4 Customer Administrator and User Functions 2018-04-13 4-13
4 Customer Administrator and User FunctionsHow to View Metrics
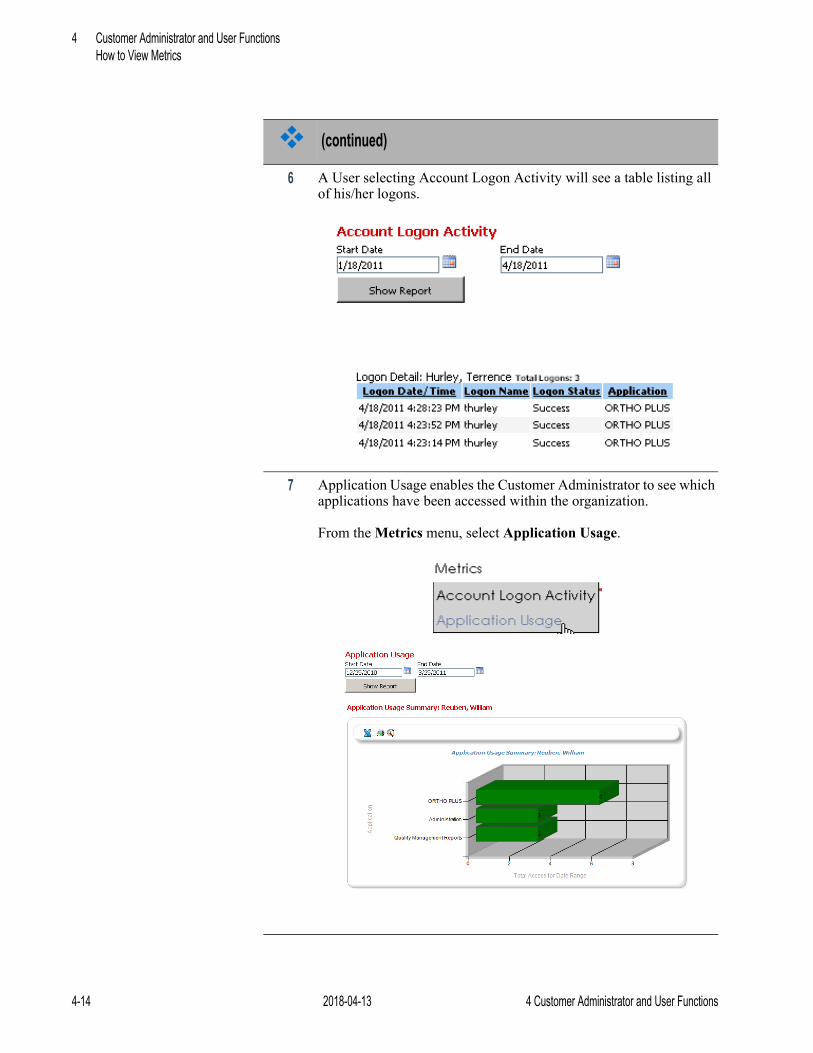
6 A User selecting Account Logon Activity will see a table listing all of his/her logons.
7 Application Usage enables the Customer Administrator to see which applications have been accessed within the organization.
From the Metrics menu, select Application Usage.
(continued)
4-14 2018-04-13 4 Customer Administrator and User Functions

5 Managing Automatic Alerts
ORTHO PLUSSM Solutions Alerts
One of the features of ORTHO PLUSSM Solutions is that it provides automated alerts.
In order to protect confidential customer information, all proactive notifications are stored within your password protected ORTHO PLUSSM Solutions account, and new alerts are accompanied by a notification email that will be sent to your email address based on the alerts you have selected to receive (see How to Manage Alerts).
Each individual with an account receives selected alerts and manages their own mailbox. You will receive an email notification to the address on file upon receipt of one or more new alerts.
The list of alerts includes:
Order Receipt Alert
Shipping Status Alert
Shipping Status Update
Order Receipt Alert
The Order Receipt Alert will be sent when a new order is found in the system, which looks for new orders throughout the business day. The alert includes information about your order such as order number, items and quantities.
Note: Any discrepancies between the information in the Order Receipt Alert and the order you placed should be reported to Customer Service immediately.
2018-04-13 5-1
5 Managing Automatic AlertsShipping Status Alert
Shipping Status Alert
The Shipping Status Alert will be sent when an order that Ortho receives is placed on hold due to inventory availability. This alert will only be sent if an item on your order is not being filled. The Shipping Status Alert will include only information about the specific item such as original quantity, shipped quantity and expected inventory availability date.
Shipping Status Update
The Shipping Status Update will be sent when specific items listed in a previous Shipping Status Alert have been released from insufficient inventory hold and will be made ready for shipment.
5-2 2018-04-13 5 Managing Automatic Alerts


Ortho-Clinical Diagnostics