peakdv/fcp tutorial - bias
TRANSCRIPT

This tutorial illustrates how to set up and use BIAS Peak DV 3, BIASDeck 3.5, and Apple’s Final Cut Pro 3 software together... From withinthe Final Cut Pro environment, you’ll learn how to use Peak DV as a ded-icated external sample editor, as well as using Peak DV for complexbatch file processing operations. In the section on BIAS Deck 3.5, youwill learn how to use an advanced digital audio workstation to easilyimport a rough mix from Final Cut Pro, and then use Deck’s highly intu-itive mixing environment to quickly and accurately mix multiple tracksof audio.
Why use Peak DV and Deck? Peak DV and Deck are dedicated audiotools which can add significantly to what you can do with Final Cut Proalone. Peak DV is a sample editor at heart, and can edit audio at thesample level, which is the smallest increment available. Final Cut Prooffers editing at the sub-frame level, down to 1/100th of a frame, whichis very precise for video, but Peak DV allows much higher precision. Thestandard DV sample rate for audio is 48kHz, and the standard framerate is approximately 30 frames per second, this gives Peak DV the abil-ity to edit to within 1/1600th of a frame. Deck is a sophisticated digitalaudio workstation, capable of recording and playing back multiple tracksof audio, without the need to render until the mix is finalized. Deck’sintuitive user interface, modeled after an analog tape deck, is very fastand simple to use - you’ll soon be mixing complex multi-track sessionsin no time.
By using dedicated audio tools in conjunction with Final Cut Pro, you canfree Final Cut Pro up for what it’s best at - video editing. This tutorialillustrates some of the main reasons Peak DV and Deck are bundled withFCP, but don’t be limited by these. Creative editing techniques cangreatly expand what you can do with Peak DV, Deck, and FCP.
You may want to verify that you are using the most current versions ofPeak DV 3.01 and Deck 3.5. Some features highlighted in this tutori-al require at least the most current versions available at the time of writ-ing. The most current versions of each application are Peak DV 3.01r1,and Deck 3.50 - free, downloadable updates are available online, at:
http://www.bias-inc.com/downloads/updates/
This tutorial assumes the user to be familiar with basic Macintosh con-cepts such as opening files, dragging, selecting, etc. as well as beingfamiliar with Apple’s Final Cut Pro software. If you are not already famil-iar with either, please spend some time with your Macintosh and FCPdocumentation, so as to get the most out of both...
Using Peak DV 3 and Deck 3.5 with Final Cut Pro 3

Table of Contents
1. Introduction 1
2. Peak DV Basics The Peak DV User Interface 3 Making the Connection 4
3. Editing with Peak DVUsing Real-Time VST Effects 6Using Markers & Regions 10 Repairing Digital Clicks & Pops 18Change Duration - Audio Only 21Change Duration - Audio & Video 26 Batch File Processing 36
4. Deck Basics The Deck User Interface 43 Deck Preferences 44Working with OMF Files from Final Cut Pro 45 Controls 51
5. Mixing Audio Tracks with DeckBreakpoint Automation 61 Recording Automation 67Spotting Audio Clips to QuickTime Movies 76Using Real-Time Effects 79
6. Output of Files Mixing to Disk 86Bringing Master Files in to Final Cut Pro 89

Peak DV Basics - The Peak DV User Interface
1
2
3
4
5
6
7
8
9
10
11
12
13
14
15
16
1
23
45
6
7810 1112
13
14
15 16
17
18
19
20
Toolbar
Audio Document Window
Cursor Palette
File Overview
Detail Area
Left Channel
Right Channel
dB Scale
Precision VU Meters
Reference Marker
Region Marker
Selected Waveform
File Information
Change Duration Window
Counter
Transport Controls
Contents Window
VST Plug-In (BIAS Freq EQ)
QuickTime Movie Window
Batch File Processor
9
1718
19
20

Assigning Peak DV as a waveform editor
Final Cut’s preferences allow for various external editors to be used -
one for audio, one for video, and another for still images. To be able
to launch either audio-only clips, or DV clips containing audio into
Peak DV, set Peak DV as the external editor for both audio and video.
Once you set Peak DV as the dedicated external audio editor for Final
Cut Pro, Peak DV behaves almost as if it were a plug-in. Since Peak
DV is a stand-alone application rather than a plug-in you can also use
it independently, outside of the FCP environment.
Most of the steps in this tutorial can be used directly from within a
Final Cut Pro session. However, the batch processing section illus-
trates a use for Peak DV that would take place outside of the FCP
environment... Using Peak DV enhances your ability to sweeten audio clips, as it addsseveral powerful features directly accessible from Final Cut Pro...
Peak DV Basics - Making the Connection
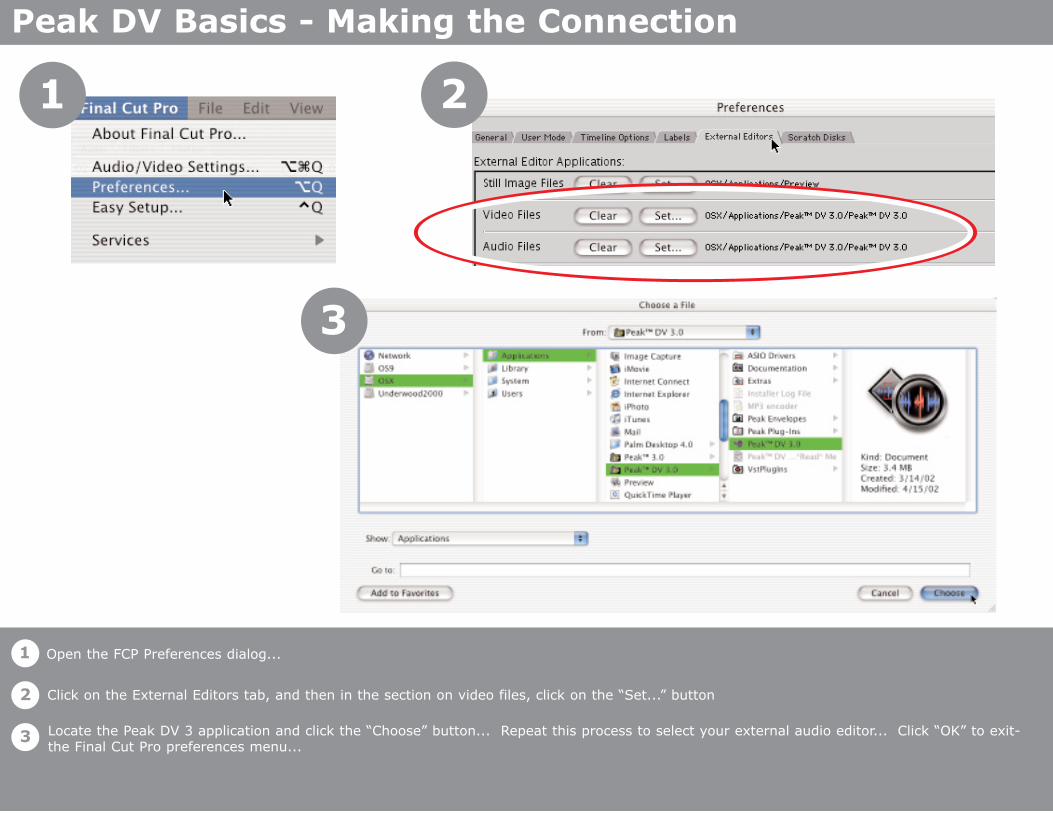
Open the FCP Preferences dialog...
Click on the External Editors tab, and then in the section on video files, click on the “Set...” button
3Locate the Peak DV 3 application and click the “Choose” button... Repeat this process to select your external audio editor... Click “OK” to exit-the Final Cut Pro preferences menu...
Peak DV Basics - Making the Connection
1
2
3
2
3
1

Peak DV supports the real-time VST plug-in standard. VST is a common native(CPU powered) plug-in format, and many manufacturers make VST plug-insthat can be used in Peak DV. Included are a number of useful effects, such asthe BIAS Freq EQ (equalization) and reverb.
With a real-time plug-in such as BIAS Freq, there is no rendering requireduntil you’ve found a setting that works. You can adjust all parameters withinstant response, and when a setting is made that works for the file you’reprocessing, then you render the effect, or as it is known in the audio world,“bounce” the effect to the file. When bounced, VST effects will process theselected portion of the waveform. If nothing is selected, or if the entire file isselected, then the effect will be applied to the entire file.
The steps above will write/render the effect to the file. It is important to dis-able the plug-in once it has been bounced, or else you will hear a processedfile being played through the active plug-in in real time, giving the impressionof the file having twice the desired level of a particular effect. If you havemore than one file to process, then the plug-in may be left active so other filesmay be quickly and easily processed.
More information about VST format effects is available online at:
http://www.steinberg.net/infocenter/discoveries/pluginzone/index.phtml?sid=04511119&id=040303
BIAS Freq is an example of a real time VST formatplug-in - Freq is a 4 band paragraphic equalizer...
Editing with Peak DV - Using Real-Time VST Effects

Editing with Peak DV - Using Real-Time VST Effects
Copy the Tutorial Media folder from the Deck 3.5 installer CD-ROM to your hard drive... From the Tutorial Media folder on your hard drive,open the Final Cut Pro document called “BIAS OMF Demo”. (Tutorial Media/BIAS OMF Demo/Final Cut Pro Documents/BIAS OMF Demo)
In the Final Cut Pro Timeline window, click the video track to select it, as well as the movie’s soundtrack (audio tracks 1 and 2)
From the View Menu, choose “Clip in Editor”...
As the audio is linked to a video clip, what you’re actually doing in this step is launching into your external “video” editor - Peak DV... As far asFinal Cut Pro is concerned, Peak DV is in this case treated as a “video” editor, as it is compatible with QuickTime movie files... When the videoclip opens in Peak DV, you will see a QuickTime movie window, and the movie’s soundtrack as a standard Peak DV audio document window...
4
1
2
3
4
1 2
3

Editing with Peak DV - Using Real-Time VST Effects
To use a VST plug-in, go to Peak DV’s VST Plug-Ins Menu>Insert 1 and select BIAS Freq... (If you don’t already have BIAS Freq, you candownload a copy for free by registering your copy of Peak DV with BIAS... To do so, you will need your Peak DV serial number from thepaper sleeve of your Peak DV installer CD-ROM - When you have this, go online, to: http://www.bias-inc.com/sales/registration.html )
Audition the file by clicking the Play button on the transport and experiment with different settings... For the best results, consult the docu-mentation of the specific plug-in you are using for more information...
To apply, or render effects to a file, select “VST Plug-Ins>Bounce VST Plug-Ins”
You will be prompted to “Disable all VST plug-ins after bounce?”... Click the “Yes” button...
5 6
7 8
5
6
7
8

Editing with Peak DV - Using Real-Time VST Effects
Audition file by clicking the “Play” button on the transport...
That’s all there is to it... Since we’ll need this file intact for the Deck 3.5/Final Cut Pro demo - close the file, but don’t save any changes to it...
9
10
9 10

Editing with Peak DV - Using Markers and Regions
Peak DV allows markers and regions to be usedfor reference, to easily locate specific audioevents in a file, or a range of audio. Markersare inserted one at a time, and are intendedmainly for reference. Regions are used to des-ignate a range of audio, and have a regionbeginning marker, and an end marker. Regionmarkers are similar to in/out points in a DVclip.
The next few steps will show how to use mark-ers and regions for reference, navigation, aswell as using them as a guide for replacingunwanted sounds such as coughs, profanity,etc.

Editing with Peak DV - Using Markers and Regions
To Add a reference marker to an audio file, open the file called “VOwithCough” from the Tutorial Media folder you copied to your hard drive... (Tutorial Media/Audio Files/VOwithCough)
Position the cursor in the waveform display where you would like a marker
Click the “New Marker” button in the toolbar, or go to the Action Menu>New Marker, or use the keyboard shortcut: (Cmd+M) Markers may also be dropped into place during audio playback using the menu command, the toolbar button or the keyboard shortcut (Cmd+M)
To edit the position of a marker, just click on the triangular “flag” at the bottom of a marker and drag left or right. If you have a specific loca-tion in time, SMPTE units, etc. then double-click the triangular “flag”, and enter the specific location. You can also enter a name for the markerin the Edit Marker dialog box.
2
3
1
4
1
2
3
4

Editing with Peak DV - Using Markers and Regions
To Add a Region to an audio file, open the audio file called “VOwithCough” from the Tutorial Media folder you copied to your hard drive...(Tutorial Media/Audio Files/VOwithCough)
As regions designate a range of audio, you must first make a selection... To select a range of audio, click into the waveform and drag left orright...
With a selection made, click the “New Region” button in the toolbar, or go to the Action Menu>New Region, or use the keyboard shortcut: (Cmd+R)
To edit the position of a region marker, just click on the triangular “flag” at the bottom of the marker and drag left or right. If you have a spe-cific length of time, SMPTE units, etc. that you would like the region to span, then double-click the triangular “flag”, and enter the specific dura-tion. You can also enter a name for the region in the Edit Region dialog box.
6
7
5
8
5
6
7
8

Editing with Peak DV - Using Markers and Regions
When audio documents contain markers, (reference markers or region markers) they become much easier to navigate... You can simply starttyping the name of a marker, and Peak DV will “snap” to that location automatically...
Using the Tab key allows selection of the space between markers, regardless of what type of marker... Press the Tab key on your keyboard to trythis...
Command + Click between markers to quickly select the area between two markers, or Command + Shift + Click for multiple areas betweenmarkers... Try this...
Using the Shift key + command + clicking allows selection of multiple areas between markers, or you can Shift + Tab to select multiple areasbetween markers... Try this technique as well...
910
11 12
9
10
11
12

Editing with Peak DV - Using Markers and Regions
Open the file called “VOwithCough” from the Tutorial Media folder you copied to your hard drive and locate the cough in it.. (Tutorial Media/AudioFiles/VOwithCough)
Select/highlight the area of the cough in the waveform display...
Use the new Region button in the toolbar to turn the selected area into a region...
Double-click one of the “flags” at the bottom of one of the region markers - either one will work... Name the region “Noise”...
Locate the undesired sound...
13 14
15 16
13
14
15
16

Editing with Peak DV - Using Markers and Regions
With a newly created region in place, be sure the space between the two region markers is still selected...
Create a second set of region markers right on top of the first... Call it “Noise Replacement”...
Holding the Option Key down, click and hold the mouse button on the triangular marker “flag” and drag one set of region markers to an area ofthe file with ambient noise - Holding the Option Key while dragging moves both region markers at the same time... It doesn’t matter which setof region markers you move, provided one set stays on the selected area...
Drag the region markers together to a part of the file where there is only ambient noise, and drop them over this part of the waveform...
Edi t ing
1718
19 20
17
18
19
20

Editing with Peak DV - Using Markers and Regions
When the region markers are in an area of ambient sound, command + click between them to quickly select the area betwen them...
Go to the Edit Menu and choose “Copy”...
Go back to the original set of region markers, and command click between them to select the space between them...
Go to the Edit Menu and choose “Replace” - This should replace the undesired sound with ambient sound from the same file. If this type of editis being performed on a very short section of audio, you may need to turn off Peak DV’s automatic blending function under the “PreferencesMenu”...
2122
23 24
21
22
23
24

Now you’re left with ambient noise from the same file, that replaces the unwanted sound - since you used regions of equal length to calculatethe amount of ambient noise to replace the cough with, there’s no difference in length of this audio clip. If this clip had video associated with it,there would be no loss of sync, since the duration of the file was never changed...
Editing with Peak DV - Using Markers and Regions
25
25

If you’ve been working with audio in the digital domain for even a shortwhile, you may have experienced “clicks” or “pops” in the audio. Usuallythis is from making edits at a point in the audio waveform other than a zerocrossing.
A zero crossing is a point in the waveform where the wave crosses the zeroaxis, and has no amplitude. Editing at a zero crossing is a preference inPeak DV that is on by default, and it’s usually best to leave this turned on.
When you make cuts anywhere else in a file, it is very likely that you willwind up with abrupt amplitude transitions, and these are heard as “clicks”or “pops”.
Without a sample editor like Peak DV, FCP editors might do a very quickfade out/fade in to lower the level where the pop occurs, or they would justcut out the affected section.
While either of these methods can be somewhat effective, they can createloss of sync with video, or dropout of audio. Using Peak DV allows you tocorrect the problem, rather than work around it.
At some point, you’ll probably run into a file that does have a digital clickor pop in it - and you’ll want to repair it - the next section of this tutorialteaches you how to do it...
Example of a waveform with the selection made at zero crossing...
Example of a bad selection - notice the selection is madeat non-zero crossing... Cutting the waveform here would
most likely result in a click or pop...
Good!
Bad!
Editing with Peak DV - Repairing Digital Clicks & Pops

In Final Cut Pro, open the “BIAS OMF Demo” Final Cut Pro project, from the Tutorial Media folder that was copied to your hard drive... Click/selectaudio tracks 3 and 4 (JeffLorberClip) - the music bed for this project...
From the View Menu, choose “Clip in Editor” to launch the music tracks into Peak DV for editing...
The music tracks will open in Peak DV for sample editing - this music clip is perfect for the video, except there’s a mysterious click right in themiddle of the file, that kind of ruins the mood...
Editing with Peak DV - Repairing Digital Clicks & Pops
1
2
3
21
3

Locate the reference marker called “Click”, and position the mouse cursor directly over this marker... Click to place Peak DV’s playheaddirectly over the click...
Use the “Zoom In” button on the toolbar to zoom in to the sample level.. Wherever the playhead is located becomes the center point/axis forzooming - as you get close to sample level, you may need to reposition the playhead closer to the click...
Editing with Peak DV - Repairing Digital Clicks & Pops
As you continue zooming, the audio waveform will begin to look like a series of blocks, or steps... Each “step” is actually an individual sample...
Digital clicks and pops generally stand out as “spikes” in the waveform - to repair these, the idea is to use the pencil tool to draw across the areaof the spike, and try to approximate the shape of the waveform on either side of the click... If working with a stereo file, repeat the process forthe other channel... When you’ve drawn out the click, audition the file to see if the click is gone... Save this change and close the file...
Draw across click to eliminate it...
4
5
6
7
Place cursor over marker...
Zoomed in halfway...
4 5
6 7
Zoomed in to sample level...

Among many powerful DSP (Digital Signal Processing) tools in Peak DV’s arse-nal, is the Change Duration feature. This unique tool allows you to modify thelength of an audio clip without affecting its pitch. When used in small incre-ments, Change Duration is invaluable for altering vocal tracks, and maintainingthe character of a voice. When used more drastically, Change Duration makesan excellent sound design tool...
Peak DV allows you to change the duration of a piece of audio without affectingits pitch. In an application like Final Cut Pro, while you can change duration of aclip, this raises or lowers the pitch of the audio, creating an unwanted effect. Byoutsourcing this audio processing task to Peak DV, you can adjust the durationand retain the pitch characteristics of the original material.
A good example of this feature would be a 30 second commercial spot. Say youhave edited out all the content that can be removed without compromising yourmessage, however, you’re now left with a commerical that runs 35 seconds long.You could change the duration of the clip in FCP, but by shortening it you wouldalso raise the pitch, and wind up with a narrative or music that sounds like theChipmunks. By processing the audio in Peak DV, you can compress all the con-tent to fit into the 30 second spot, and retain the original pitch.
There are essetially two situations in which you may want to change the durationof an audio clip - One is with stand-alone audio clips, and the other is audio clipsassociated with a QT movie or DV clip. The process differs slightly for each, andthe next two sections will teach you how to do both.
In the Change Duration window, you can select a new duration either by typingin a new time value, or percentage, or if you are working with music, and knowthe time signature of your material you can enter the existing time signature anda new time signature. To maintain high quality, it’s recommended to change +/-10-15%. There is a preference that can be set, depending on the type of audiomaterial you’re working on. Simpler monophonic sounds like speech or a drum-loop work best with a lower setting, and more complex sounds are best with ahigher setting. There is no rule to this, the best thing is to experiment andbecome familiar with how different settings affect different types of audio.
Editing with Peak DV - Change Duration (Audio Only)

If you don’t still have the FCP project called “BIAS OMF Demo” open, open it now...
Editing with Peak DV - Change Duration (Audio Only)
Click on audio tracks 3 and 4 to select them...
From the View Menu, choose “Clip in Editor”
The music tracks should now be open in Peak DV...
2
3
1
1
2
3
4
4

From Peak DV’s Edit Menu, choose “Select All”... As with most of Peak DV’s DSP tools, the selected area becomes the target for the processyou choose - when changing duration, selecting the entire file generally works best...
Editing with Peak DV - Change Duration (Audio Only)
Since the time units used in Final Cut Pro are in SMPTE, it’s best to change Peak DV to use SMPTE units as well - this is done in thePreference Menu>Time Units... Select the SMPTE time units that match your Final Cut Pro session... In this case, use 29.97 fps...
When you make a selection in an audio clip, you can check to see how long it is in Peak DV’s cursor palette... The duration of a selectionappears in whatever time units you have chosen in the Preferences Menu>Time Units...
Duration of selectedarea of waveform
With your “target” area of the audio clip selected, choose “Change Duration” from the DSP Menu...
6
7
5
8
5
6
7
8

Editing with Peak DV - Change Duration (Audio Only)
In the Change Duration window, you can choose several ways to change the length of your file, for this example, we will only use “seconds”.The original file in this example has a length of 20.9039 seconds, or in SMPTE - 20 seconds, 27 frames...
The example file is changed to 18 seconds, or in SMPTE - 17 seconds, 29 frames...
Duration of selectedarea of waveform Duration of selected
area of waveform
If the audio clip you are modifying was launched directly from FCP into Peak DV, saving the file will alter your original media. If you wish tokeep your original media intact, this is a good time to learn a couple of handy features in Peak DV... Select All in the audio clip, and from thefile menu choose “New>Document from Selection”...
This command takes any selection, copies it, opens a new audio document, and pastes in the copied selection... Now, from the Window Menu,choose “Tile Windows”...
9 10
11
9
10
11
12
12

Editing with Peak DV - Change Duration (Audio Only)
The Edit history for the active/foreground document will appear... As only one edit was made so far, there is only one level of undo... As more edits are made in a file,more edits are added to the edit history... You can go back as many edits as you need to up until saving the file - when you save, the edit history is lost... Click on thefirst item in the edit history list, and then click the “Revert to Item” button... Click the “Done” button to exit the Edits window...
From the Edit Menu, choose “Edits...”
When you Tile Windows in Peak DV, it will resize all windows to neatly fit on your monitor... Click on the orginal audio clip’s window to make itactive/bring it to the foreground...
Having undone any edits that were made, you can now close your original audio document with no fear of losing your original media file... Be sure to choose“Don’t Save”... This way, we’re editing a copy of the original media, and won’t affect the original file...
14
15 16
13
14
15
16
13

Editing with Peak DV - Change Duration (Audio & Video)
The last step showed how to alter the duration of a simple audio
clip... Now that you’ve mastered that process, we’ll try a similar
task - modifying the length of a piece of audio associated with a
video clip. In this situation, Final Cut Pro will take care of alter-
ing the length of the video clip, and Peak DV will alter the audio
that’s linked to that clip, without affecting its pitch...
If you have not yet attempted the previous lesson, please go
back and try that first. The first few steps of this lesson are very
similar, but you will need to know both techniques to get the most
out of Peak DV...

Editing with Peak DV - Change Duration (Audio & Video)
In the Final Cut Pro timeline, select the video track (Interview_short.dv), and it’s linked soundtrack...
Launch into Peak DV by selecting the clip, and from the the View Menu, choose “Clip in Editor”...
From the Edit Menu, choose “Select All”... As with most of Peak DV’s DSP tools, the selected area becomes the target for the process youchoose - when changing duration, selecting the entire file generally works best...
The video clip will open into Peak DV in a QuickTime movie window, and the audio will open as any other audio document - with awaveform waiting to be edited...
2
3
1
4
1
2
3
4

Editing with Peak DV - Change Duration (Audio & Video)
Since the time units used in Final Cut Pro are in SMPTE, it’s best to change Peak DV to use SMPTE units as well - this is done in thePreference Menu>Time Units... Select the SMPTE time units that match your Final Cut Pro session... In this case, use 29.97 fps...
When you make a selection in an audio clip, you can check to see how long it is in Peak DV’s cursor palette... The duration of a selectionappears in the same time unit you have chosen in the Preferences Menu>Time Units...
With your “target” area of the audio clip selected, choose “Change Duration” from the DSP Menu...
Duration of selectedarea of waveform
In the Change Duration window, you can choose several ways to change the length of your file, for this example, we will only use “seconds”.The original file in this example has a length of 16.950 seconds, or in SMPTE - 16 seconds, 28 frames...
6
7
5
8
5
6
7
8

Editing with Peak DV - Change Duration (Audio & Video)
When you Tile Windows in Peak DV, it will resize all windows to neatly fit on your monitor... Click on the orginal audio clip’s window to make itactive/bring it to the foreground...
Type in 15 seconds as a new duration, (in SMPTE this would equal - 14 seconds, 29 frames)... Make a note of this new SMPTE value!
Duration of selectedarea of waveform
If the audio clip you are modifying was launched directly from FCP into Peak DV, saving the file will alter your original media. If you wish tokeep your original media intact, this is a good time to learn a couple of handy features in Peak DV... Select All in the audio clip, and from thefile menu choose “New>Document from Selection”...
This command takes any selection, copies it, opens a new audio document, and pastes in the copied selection... Now, to undo the durationchange in the original clip, choose “Tile Windows” from the Window Menu...
9 10
1112
9
10
11
12

Editing with Peak DV - Change Duration (Audio & Video)
As only one edit was made so far, there is only one level of undo... As more edits are made in a file, more edits are added to the edit histo-ry... You can go back as many edits as you need to up until saving the file - when you save, the edit history is lost... Click on the first itemin the edit history list, and then click the “Revert to Item” button... Click the “Done” button to exit the Edits window...
From the Edit Menu, choose “Edits...” The Edit history for the active/foreground document will appear...
Having undone any edits that were made, you can now close your original audio document with no fear of losing your original media file...
Now you should be left with an audio only file (no movie window)... This file will be saved with the duration changes intact, and will be import-ed back into Final Cut Pro in the next step... For now, save and close the modified audio file in a location where you can easily locate it forimport into FCP - also, choose a filename that’s easy to remember, such as “InterviewCompressed.aif”... Close and Save this file...
13 14
15
13
14
15
16
16

Editing with Peak DV - Change Duration (Audio & Video)
Hide Peak DV...
Go back to Final Cut Pro...
The DV clip that was launched into Peak DV should still be selected - if not, select it again
From the Modify Menu, choose “Link” - you want to “unlink” the audio and video, so that the audio can be deleted and replaced with the time com-pressed audio file “InterviewCompressed.aif” (When you first go into this menu, link should be checked, after this step, it should be unchecked...)
17 18
1920
17
18
19
20

Editing with Peak DV - Change Duration (Audio & Video)
Click into an empty part of the timeline, so that nothing is selected...
Now, click on just the soundtrack portion of the movie...
Press the Delete key on your keyboard - this does not delete the file, just the reference to it in the timeline... Should you need to access theoriginal file, just drag it from the browser window into the timeline, and it will be restored....
Now, click on just the video portion of the movie...
21 22
23 24
21
22
23
24

Editing with Peak DV - Change Duration (Audio & Video)
Go the the Modify Menu>Speed...
Remember the new SMPTE value from the audio clip that was time compressed in Peak DV?
Enter that same value in SMPTE units in the “Duration” field of the “Speed” Menu...
You will need to render the time compressed video...
New duration of time compressedaudio from Peak DV...
Copy value so video is the sameduration as the audio...
2526
27 28
25
26
27
28

Editing with Peak DV - Change Duration (Audio & Video)
From FCP’s File Menu, choose Import>Files...
Locate the time-compressed audio clip called “InterviewCompressed.aif” - Select the file, and click the “Choose” button...
Locate “InterviewCompressed.aif” in FCP’s browser window, and drag onto the tracks where the original audio portion of the movie was... Align theaudio tracks with the existing video tracks... As both audio and video were altered the same amount, they now both have the exact same shortenedduration...
Shift-click on the video portion of the movie to select both audio and video...
Audio and video now altered by sameamount, and have the same duration...
29 30
31 32
29
30
31
32

Editing with Peak DV - Change Duration (Audio & Video)
Audition the movie - audio and video should be in sync, should be shorter than the original movie, and the pitch of the audio should also be retained...
From the Modify Menu, choose “Link” - When you’re finished with this step, “Link” should have a checkmark next to it in the menu...
3334
33
34

Editing with Peak DV - Batch File Processing
Since Peak DV is a stand-alone application, not a plug-in, it can be usedindependently, outside of the FCP environment. In addition to high-endediting features, it also features a sophisticated Batch File Processor,which can be used to automate repetitive tasks, such as sample rateconversion, file format conversion, or any other operation you find your-self applying to multiple files.
To proceed with this step, you will want to have a few audio files on yourhard drive, that are at a sample rate other than 48kHz. If you do notwant to use any of your important files as you practice this step, youmay want to import a few CD tracks.
Audio CDs and CD-ROM sound libraries typically include files as AIFF,.WAV, Audio, and various types of sampler formats. The typical samplerate is 44.1 kHz, the standard for CD audio. While these 44.1kHz filescould be imported into FCP directly, it’s best to convert them to thenative sample rate of an FCP session, which is 48kHz. This allows FCPto play back these files without applying its real-time sample rate con-verter. The benefit is higher quality audio, and also not taxing theprocessor with real-time sample rate conversion.
*Peak DV creates copies of the original files when batch processing. Ifyou have subdirectories inside the folder you drop on the Peak DV icon,Peak DV will create the same directory structure in the output location.
**An easy way to keep track of files being batch processed is to createan input folder called “BatchIn”, where you place files to be batchprocessed. Also create another folder called “BatchOut”, which is thedestination for processed files.

Editing with Peak DV - Batch File Processing
To batch process files, follow these steps - if you don’t already have an alias for Peak DV in the dock, create one now... To place an alias inthe Dock, just find the Peak DV application icon in the finder, and drag it into the Dock...
Open Peak DV, and open any audio file - Peak DV needs a file open to configure the batch processor... (This file does not necessarily have tobe one of the files you plan to batch process)
From Peak DV’s File Menu, choose “Batch Processor”...
In the Batch Processor window, select “Convert Sample Rate” from the list of available processes...
2
3
1
4
1
2
3
4

Editing with Peak DV - Batch File Processing
Click the “Add” button to add this process to your batch “script”.
The batch script consists of all the processes you add to the window titled: Selected Processes for Batch
When you add a process to the batch script, if it needs to be configured, a dialog box will open with available settings - for Sample RateConversion, select 48,000Hz (the same as 48kHz).
In the lower section of the Batch Processor window, be sure the “Save Changes” checkbox is checked...
6
7
5
8
5
6
7
8

Editing with Peak DV - Batch File Processing
Click the “Set...” button - this allows you to choose a specific folder location to output processed files (If processing many files, it’s best not tooutput to the Desktop as it can quickly become cluttered with icons. Peak DV can process hundreds or even thousands of files, and having all ofthese icons on the Desktop can be frustrating! Creating and saving to a folder called “Batch Out” is an easy way to locate processed files...)
When you’ve selected the output location, click the “Save” button...
You’re almost ready to begin - in the top section of the Batch Processor window, click the “On” button
Click the “OK” button...
9 10
11 12
9
10
11
12

Editing with Peak DV - Batch File Processing
Hide Peak DV...
In the Finder, locate the audio files/folder of audio files you wish to batch process - In this case, we’ve dragged a number of CD Audio tracks intoa folder called “Batch In”...
Drag the selected files/folder over the Peak DV icon in the dock - Peak DV will now process and output files according to your batch script.(Commonly used batch scripts can be saved for later use)
At this point, you can put Peak DV into the background and work in another application, or just take a break for lunch, etc. When you return,the files will be processed and waiting ....
13 14
1516
13
14
15
16
Contents of “Batch In” folder

Editing with Peak DV - Batch File Processing
IMPORTANT! As soon as you are finished batch processing, open the Batch Processor window and turn it off. Otherwise, any files opened in PeakDV will be processed according to the active batch script.
When you’ve finished batch processing, you can find the processed files in the output directory you selected. For the purposes of this tutorial,we’re using an output directory called “BatchOut”.
1718
17
18

Deck Basics - Introduction
This tutorial covers the basics of using BIAS Deck 3.5 to mix aQuickTime movie soundtrack with various music and SFX clips. Bythe end of this tutorial, you’ll see why Deck is the most intuitive mul-titrack digital audio workstation available for the Mac.
The workflow approach will quickly get you into Deck, but does notattempt to replace the Deck User’s Guide, which goes into much moredetail about controls, features, etc. For more information, consult theDeck User’s Guide, which is available in .pdf format in theDocumentation folder on your Deck installer CD-ROM.
This tutorial is intended to help you get up to speed with the Deckinterface and basic controls. As with any other tool, your results willvary depending on how much time you invest in learning how theywork. To get the most out of Deck, you may want to pick up somebooks on recording, mixing, effects, etc. The appendix at the end ofthe Deck User’s Guide lists a number of publications that may be ofinterest...

Deck Basics - The Deck 3.5 User Interface
1
2
3
4
5
6
7
8
9
10
11
12
13
14
15
16
12
34
5
6
7
8
9
10
11
12 13
14
15
16
Tracks window
Tracks window controls
Track Control Area
Selected waveform
Automation Breakpoints
QuickTime Movie Window
Mixer Window
Pan Fader
Volume Fader
Effects Inserts
Transport Controls
Auto-Locate Controls
Mixer State Controls
CPU Meter
Automation Pop-up Menu
Timeline

Deck Basics - Preferences
Deck’s general preferences menu allows you to change colors, turn on/off the desktop curtain, etc.
Launch Deck...
To optimize Deck’s performance, it’s best to set the maximum number of play tracks to the same number you anticipate using in your session.If more tracks are needed, they can always be added later...
For this tutorial, set the maximum number of play tracks to 8, and click “OK”...
2
3
1
4
1
2
3
4
Deck Basics - Working with OMF Files from Final Cut Pro
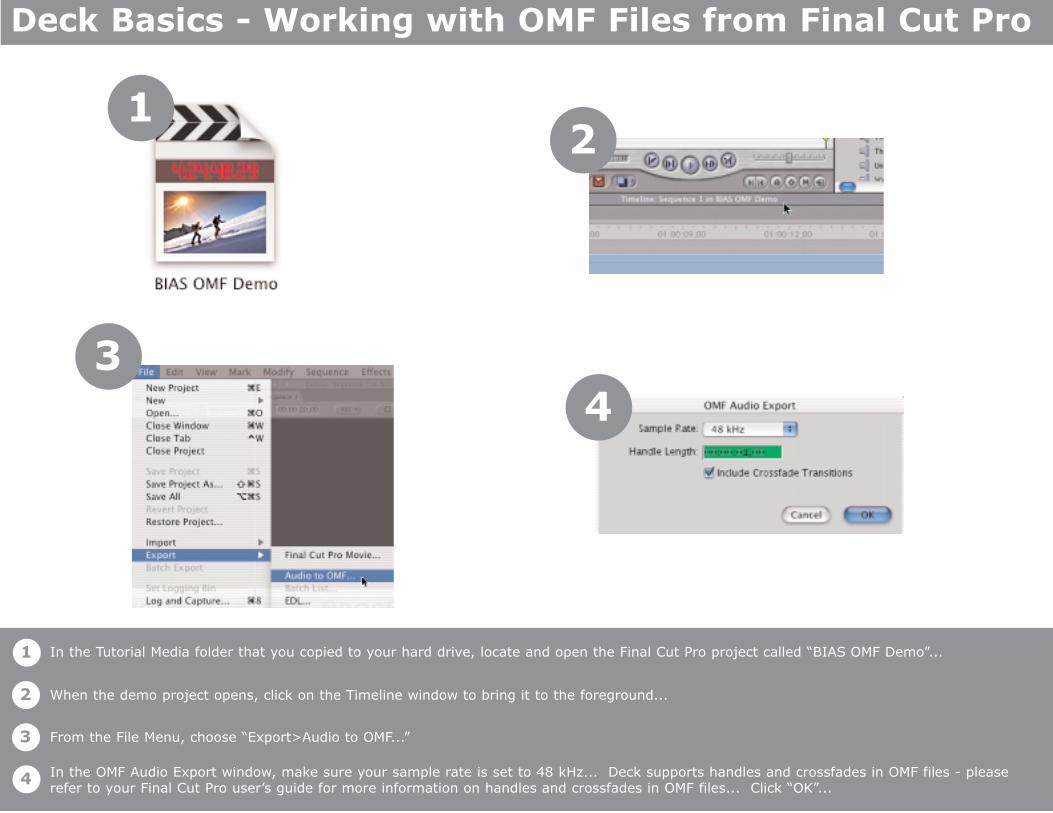
In the Tutorial Media folder that you copied to your hard drive, locate and open the Final Cut Pro project called “BIAS OMF Demo”...
When the demo project opens, click on the Timeline window to bring it to the foreground...
From the File Menu, choose “Export>Audio to OMF...”
In the OMF Audio Export window, make sure your sample rate is set to 48 kHz... Deck supports handles and crossfades in OMF files - pleaserefer to your Final Cut Pro user’s guide for more information on handles and crossfades in OMF files... Click “OK”...
2
3
1
4
1
2
3
4

Deck Basics - Working with OMF Files from Final Cut Pro
You will also want to export a silent QuickTime movie that will be used in Deck for reference...
7
5
6
7
8
5 6
8
Name your OMF file “BIAS Demo.omf”, and save to a location where you will easily be able to find it...
Final Cut Pro will export all the audio data contained in any audio tracks in the project... OMF files contain all audio files, track number, and tim-ing information... This allows DAWs (Digital Audio Workstation) to correctly recreate the project for audio post production...
Set the movie settings as shown... The size that works best for you depends on the size of your monitor, the speed of your computer, etc. Thistutorial was created on a G3/500mHz PowerBook - using a movie size of 300 x 200 pixels was the best combination for this machine’s speed andmonitor size...

Deck Basics - Working with OMF Files from Final Cut Pro
Quit Final Cut Pro... Launch Deck 3.5...
You may see the following warning about MIDI devices when you launch Deck - this is normal if you have no MIDI devices connected, click anykey to proceed...
11 12
9
10
11
12
109
Set the movie compression options as shown... This is another area where you may want to experiment with settings for your particular system...
Save to a location where you will easily be able to find the movie for import into Deck...

Deck Basics - Working with OMF Files from Final Cut Pro
In Deck’s preferences, the default setting will prompt you to open a session whenever you launch... Since we’ll be importing an OMF file, click“Cancel” in this window... This preference can be turned off in Deck’s General Preferences window...
From the File Menu, choose “Import OMF...”
Locate the OMF file called “BIAS Demo.omf” that was just exported from Final Cut Pro... Select it in the menu and click “Open”...
Deck will prompt you to name the new session - name it “BIAS OMF Mix”, and save to a location where you will be able to easily locate it...Set the session sample rate to 48kHz, and mixing mode to “Stereo”... Click the “Save” button...
13 14
15 16
13
14
15
16

Deck Basics - Working with OMF Files from Final Cut Pro
Deck will now import the media from the OMF file...
When the import is finished, you should see all 8 audio tracks arranged like this...
It’s important to have a visual reference when mixing audio for picture - Click on the QuickTime Menu in Deck, and choose “Import Movie...”While Deck can dispose any audio contained in a QuickTime movie, it’s faster to just leave the audio out when you export a reference moviefrom Final Cut Pro...
17 18
19
17
18
19

Deck Basics - Working with OMF Files from Final Cut Pro
Locate the file called “Silent Reference Movie” that was just exported from Final Cut Pro... Click the “Choose” button...
QuickTime movies are imported at their standard size - If you need to resize the movie window, go to the QuickTime Menu>Size, and you canselect from various movie window sizes...
Depending on your monitor, you may need to resize some windows to see them all - the windows that need to be visible are the Tracks window(though not all 8 tracks need to be visible at the same time), the Mixer Window, the Transport window, and the QuickTime movie window... Ifyou ever lose track of windows, or accidentally close one, you can bring them back by selecting the window under the Window Menu...
20 21
22
23
21
22
23

Deck Basics - Controls
If you ever have a project that needs a SMPTE start time other than zero, this can be set under the Options Menu>SMPTE Start Time... (Bydefault, Deck will automatically set the SMPTE start time to the start time of an imported OMF file)
Just enter the value in timecode which will actually be the beginning of the timeline in Deck...
Deck’s transport window with a SMPTE start time of 1:00:00:00...
2
3
1
1
2
3

Deck Basics - Controls
Deck has two ways of selecting audio - Range Mode and Object Mode... This picture shows Deck in Object Mode... Object Mode allows regionsto be treated as discrete objects...
This picture shows Deck in Range Mode.... Range Mode allows selecting a range of audio within an audio region...
Audio selected in Object Mode appears with a bold black border around it, with small squares in each corner - these small squares are “handles” - If youexported your OMF file from Final Cut Pro with handles, you can use the handles in Deck to stretch out any audio that does not appear within a region...
5
6
4
7
4
5
6
7 Audio selected in Range Mode appears with a different highlight color in the waveform and allows more precise selections than Object Mode...

Deck Basics - Controls
Click the “Object Mode” button in Deck’s toolbar section of the Tracks window for the next step... In this step, we’ll zoom in to see more detailin the audio tracks... Re-size the Tracks Window so you can see all the tracks...
The music bed in this session (tracks 3 and 4) is the longest - click on either track 3 or track 4...
Click the “Fit Selection” button... Since the longest section of audio was “fit” to the width of the tracks window, all regions can be seen in theirentirety...
8
10
9
8
9
10

Deck Basics - Controls
You may want to set Auto Locate points for various parts of your session, which allow you to instantly jump to that section... Click into anempty auto locate slot in the “Location Times” section of the Transport Window...
By default, Deck will place the SMPTE timecode (or other selected time units) of the position of the playhead in the timeline in this auto locateslot
To name an auto locate setting something other than the timecode, you can command-click in the auto locate slot, and a window will pop upwhere you can enter a name for that location time... Here, we’ve named the first auto locate time “Beginning of Session”, as it is at time 0
To name other points of interest in your session, just repeat the steps above...
11 12
13 14
11
12
13
14

Deck Basics - Controls
Auto locate times also are represented by small red flag markers in the tracks window timeline...
Marker positions may be edited by clicking and dragging the marker left or right (forward or backward in time), or, by command - clicking on themarker/flag in the timeline...
To alternate which auto locates are shown in the transport window, click in any auto locate slot and select the location you want to be active...While there are only 6 slots for auto locate points in the transport, the number of auto locates you can have is unlimited.
Clicking an auto locate preset will jump to the desired location in the timeline and the QuickTime movie will jump to the corresponding frame ...
15 16
1718
15
16
17
18
Deck Basics - Controls
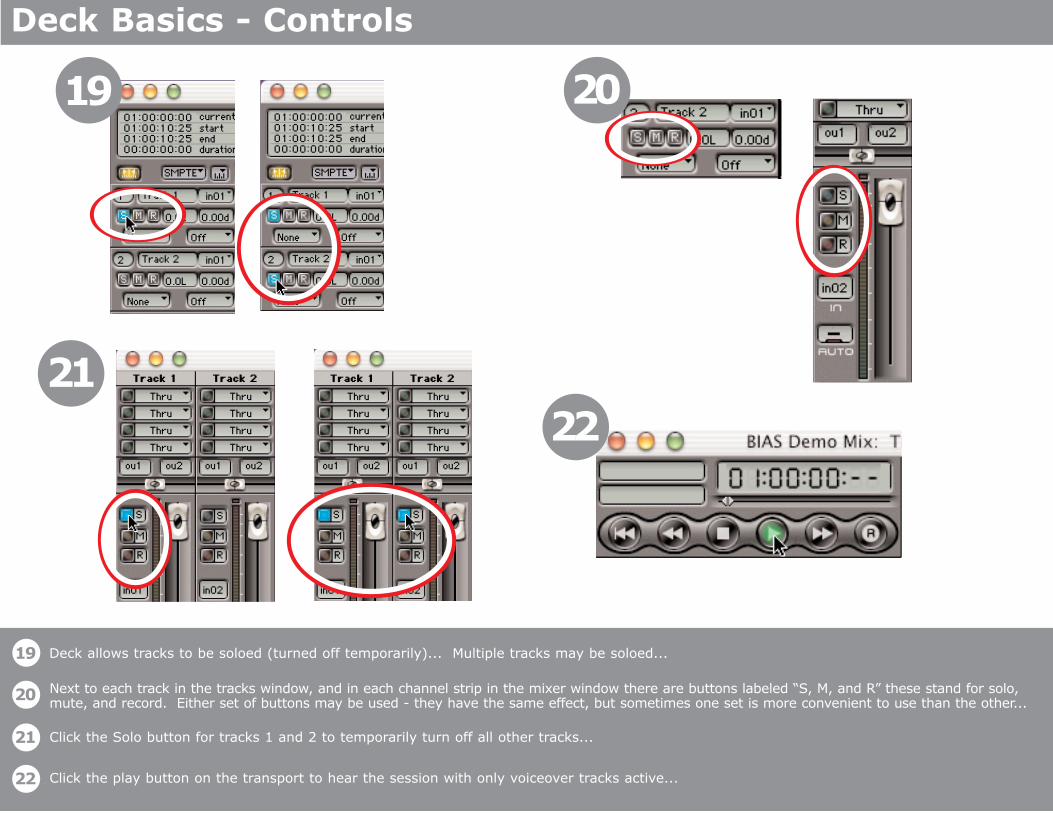
Deck allows tracks to be soloed (turned off temporarily)... Multiple tracks may be soloed...
Next to each track in the tracks window, and in each channel strip in the mixer window there are buttons labeled “S, M, and R” these stand for solo,mute, and record. Either set of buttons may be used - they have the same effect, but sometimes one set is more convenient to use than the other...
Click the Solo button for tracks 1 and 2 to temporarily turn off all other tracks...
Click the play button on the transport to hear the session with only voiceover tracks active...
19
21
19
20
21
22
20
22

Deck Basics - Controls
Deck also allows tracks to be muted... Multiple tracks may be muted...
Next to each track in the tracks window, and in each channel strip in the mixer window there are buttons labeled “S, M, and R” these stand for solo,mute, and record. Either set of buttons may be used - they have the same effect, but sometimes one set is more convenient to use than the other...
Click the Mute button for tracks 1 and 2 to temporarily turn them off...
Click the play button on the transport to hear the session without the voiceover tracks...
23
25
23
24
25
26
26
24

Deck Basics - Controls
Deck allows you to record as many simultaneous audio tracks as you have inputs available... To arm a track for recording, click the buttonlabeled “R” next to each track in the tracks window, or in the corresponding channel strip in the Mixer Window...
Each track must have a unique input assigned to it - if not, you will see an error message... If you see this error message, you must select a differentinput for that track - In this example, Input 1 (Left Channel) is routed to track 1, and Input 2 (Right Channel) is selected as an input for track 2...
Just like with Deck’s Solo and Mute buttons, you can use the Record buttons either in the track control area to the left of each track, or you canuse the Record buttons in the track’s channel strip in the Mixer Window...
The same rule applies to assigning inputs to tracks when using the Record buttons in the Mixer Window - you must have a unique input for eachtrack, or you will see an error message...
27 28
29 30
27
28
29
30

Deck Basics - Controls
Working on your session can be much easier if tracks are properly labeled...
To name a track in Deck, just command-click in the Track Name field in either the tracks window, or the mixer window...
Type in the track’s name, and click “OK”... You can re-arrange where tracks are located by clicking into the Track Name field and selecting atrack name...
31 32
33
31
32
33
Mixing with Deck
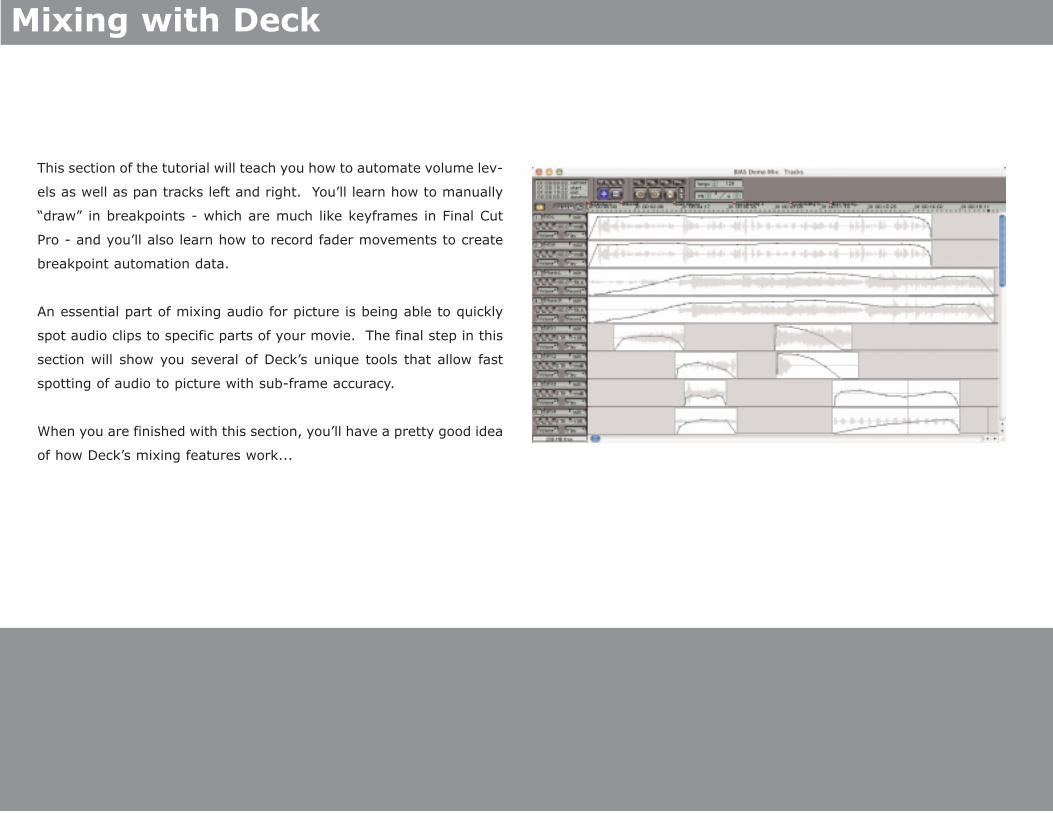
This section of the tutorial will teach you how to automate volume lev-
els as well as pan tracks left and right. You’ll learn how to manually
“draw” in breakpoints - which are much like keyframes in Final Cut
Pro - and you’ll also learn how to record fader movements to create
breakpoint automation data.
An essential part of mixing audio for picture is being able to quickly
spot audio clips to specific parts of your movie. The final step in this
section will show you several of Deck’s unique tools that allow fast
spotting of audio to picture with sub-frame accuracy.
When you are finished with this section, you’ll have a pretty good idea
of how Deck’s mixing features work...
Mixing with Deck - Breakpoint Automation
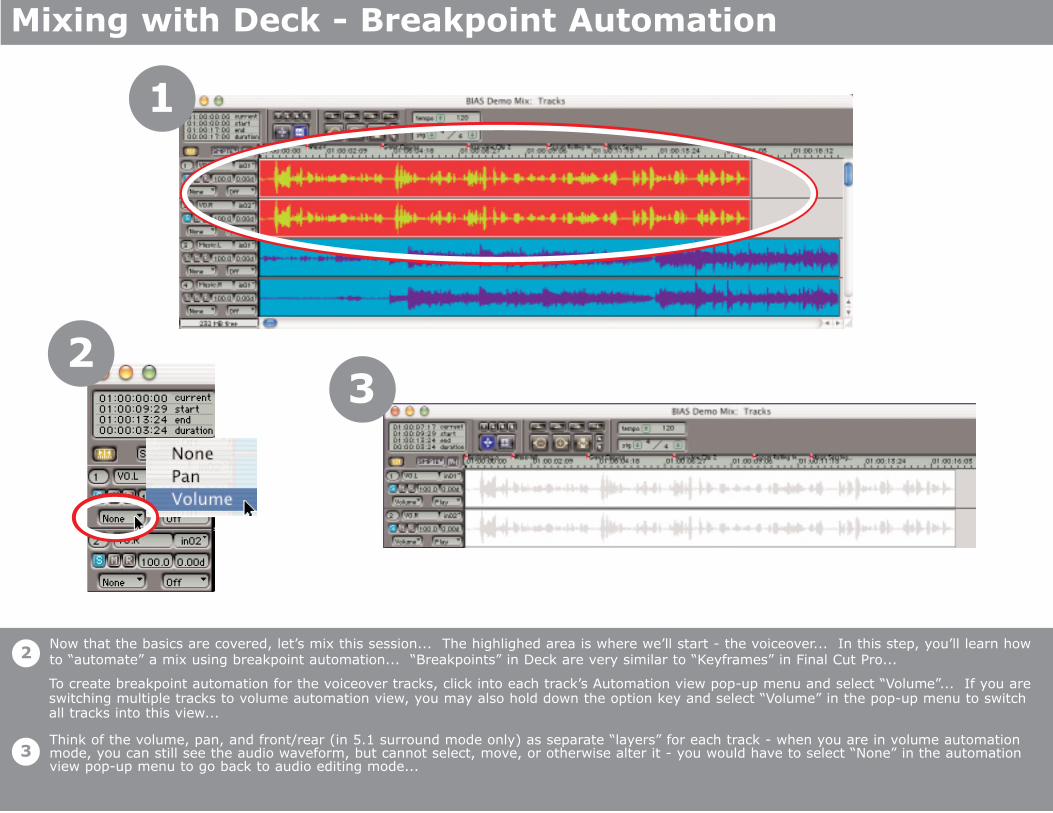
Now that the basics are covered, let’s mix this session... The highlighed area is where we’ll start - the voiceover... In this step, you’ll learn howto “automate” a mix using breakpoint automation... “Breakpoints” in Deck are very similar to “Keyframes” in Final Cut Pro...2
3
To create breakpoint automation for the voiceover tracks, click into each track’s Automation view pop-up menu and select “Volume”... If you areswitching multiple tracks to volume automation view, you may also hold down the option key and select “Volume” in the pop-up menu to switchall tracks into this view...
Think of the volume, pan, and front/rear (in 5.1 surround mode only) as separate “layers” for each track - when you are in volume automationmode, you can still see the audio waveform, but cannot select, move, or otherwise alter it - you would have to select “None” in the automationview pop-up menu to go back to audio editing mode...
23
1
Mixing with Deck - Breakpoint Automation
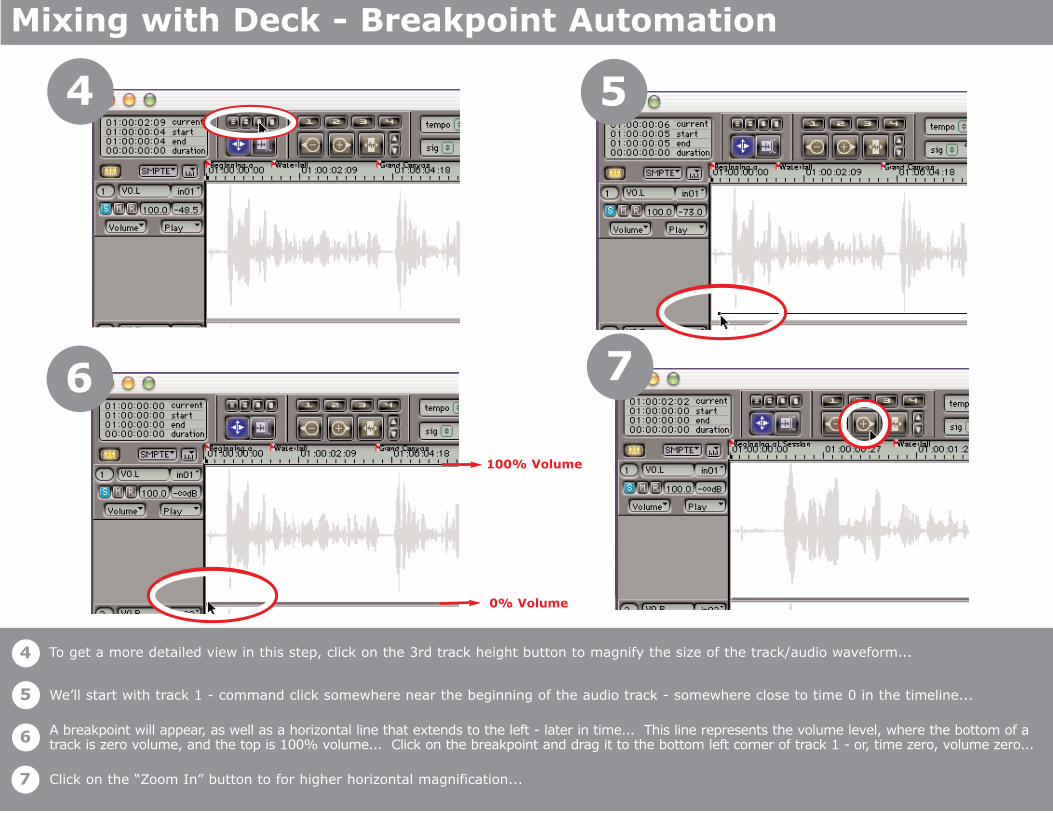
To get a more detailed view in this step, click on the 3rd track height button to magnify the size of the track/audio waveform...
We’ll start with track 1 - command click somewhere near the beginning of the audio track - somewhere close to time 0 in the timeline...
A breakpoint will appear, as well as a horizontal line that extends to the left - later in time... This line represents the volume level, where the bottom of atrack is zero volume, and the top is 100% volume... Click on the breakpoint and drag it to the bottom left corner of track 1 - or, time zero, volume zero...
Click on the “Zoom In” button to for higher horizontal magnification...
6 7
54
4
5
6
7
100% Volume
0% Volume

Mixing with Deck - Breakpoint Automation
Command-click in the waveform a little further to the right of the first breakpoint... Have this second breakpoint reach its maximum volumebefore the first significant event in the audio waveform...
Click and drag the second breakpoint almost to the top of the track... At this point, the volume level for track one would start at zero, and riseto the volume level of the second breakpoint, and it would happen over the period of time between the two...
Continue to add breakpoints until the end of the audio region...
98
10
8
9
10

Mixing with Deck - Breakpoint Automation
Once you have added a series of breakpoints that raise the volume, vary its level according to each scene, and then smoothly fade out, choose“Select All” from the Edit Menu...
All breakpoints on that track will be highlighted...
From the Edit Menu, choose “Copy”...
Click into track 2 at time zero - shown in red...
11 12
13
14
11
12
13
14
Mixing with Deck - Breakpoint Automation
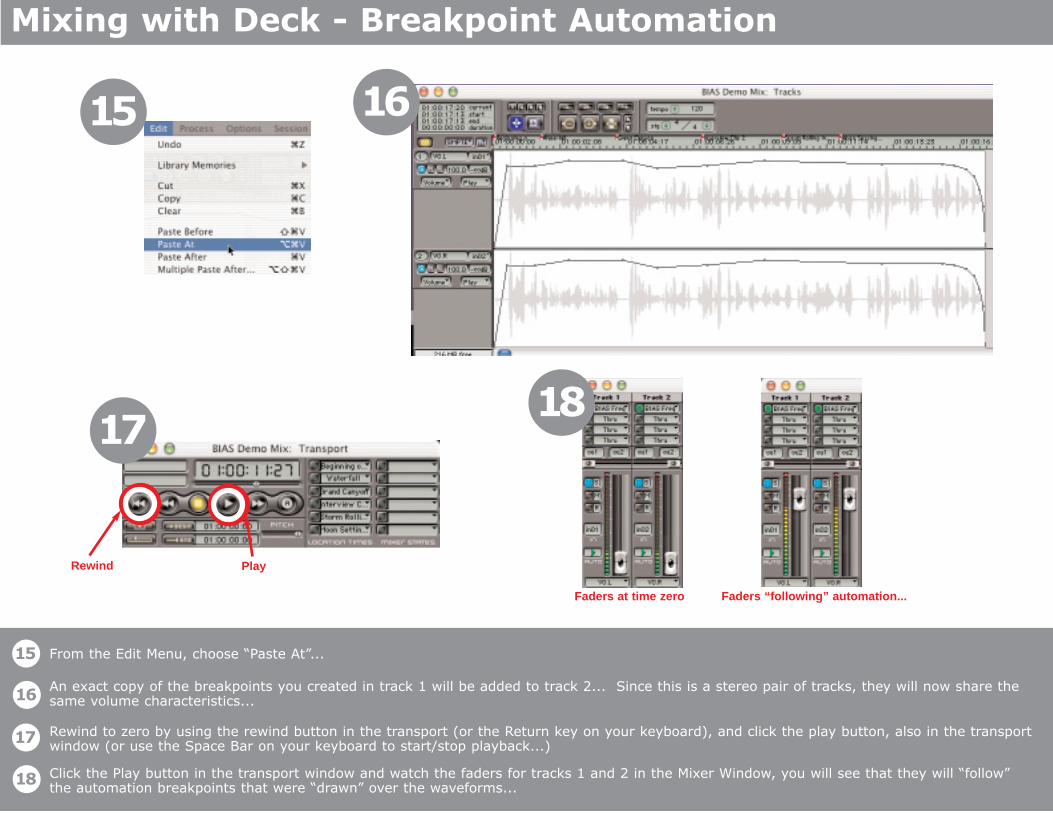
From the Edit Menu, choose “Paste At”...
An exact copy of the breakpoints you created in track 1 will be added to track 2... Since this is a stereo pair of tracks, they will now share thesame volume characteristics...
Rewind to zero by using the rewind button in the transport (or the Return key on your keyboard), and click the play button, also in the transportwindow (or use the Space Bar on your keyboard to start/stop playback...)
Click the Play button in the transport window and watch the faders for tracks 1 and 2 in the Mixer Window, you will see that they will “follow”the automation breakpoints that were “drawn” over the waveforms...
Faders at time zero Faders “following” automation...
15 16
1718
15
16
17
18
Rewind Play

Mixing with Deck - Breakpoint Automation
Any automation breakpoint may be edited or deleted... To edit the location of a breakpoint, just click on it and drag to the desired location...If you want a specific volume for a breakpoint, you can control - click on the breakpoint and a window will appear for you to enter a value...
Using more breakpoints to create a smooth curve, tends to create smoother fades...
19 20
19
20

Mixing with Deck - Recording Automation
You’ve learned how to create volume automation using breakpoints... Now we’ll move to tracks 3 and 4, which contain the music bed in thissession, and we’ll create breakpoints by recording fader movements in the Mixer Window...
Click into the automation pop-up menu for track 3 in the Mixer Window...
Select “Record Volume”... Repeat this process for track 4...
Since we want the same automation on both tracks that make up this stereo pair, but can only control one fader at a time with the mouse, we’lllink these two faders together and record volume automation for both at the same time... Shift-click on the volume fader in track 3...
2
3
1
4
1
2
3
4

Mixing with Deck - Recording Automation
Now, shift-click on the volume fader for track 4 - the center of each fader will turn blue, indicating that they are linked... Now, moving onefader will move any linked faders at the same time...
Move the volume faders for tracks 3 and 4 to zero volume - Since we’re recording a fade-in from the beginning of the session, the faders needto be at the zero volume position...
In the transport window, click the “Record” button to arm for recording - Recording automation is independent from recording audio. You willnot overwrite any audio data on these tracks...
This is a good time to get used to using the Space Bar to start and stop playback - Since you’ll need to use your mouse to slowly move thefaders upward just after starting playback, it’s best to have your mouse cursor positioned on one of the linked faders for tracks 3 and 4. Thatway, as soon as you press the Space Bar, the session will start playing and you can immediately start recording automation...
6
7
5
8
5
6
7
8
Mixing with Deck - Recording Automation
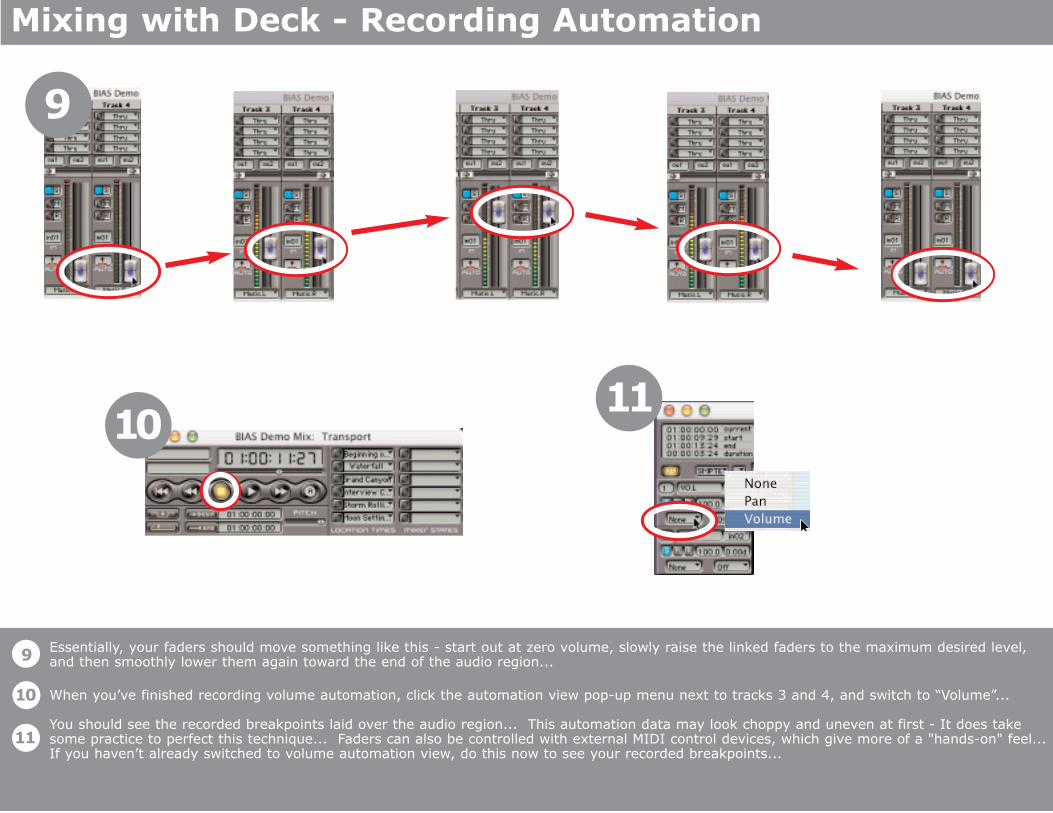
Essentially, your faders should move something like this - start out at zero volume, slowly raise the linked faders to the maximum desired level,and then smoothly lower them again toward the end of the audio region...
When you’ve finished recording volume automation, click the automation view pop-up menu next to tracks 3 and 4, and switch to “Volume”...
You should see the recorded breakpoints laid over the audio region... This automation data may look choppy and uneven at first - It does takesome practice to perfect this technique... Faders can also be controlled with external MIDI control devices, which give more of a "hands-on" feel...If you haven’t already switched to volume automation view, do this now to see your recorded breakpoints...
9
1011
9
11
10

Mixing with Deck - Recording Automation
Your first 4 tracks should now look something like this...
If the recorded automation didn’t come out quite right on the first try, you can click into a track (track 3 or 4), then choose “Select All” from theEdit Menu, then press the Delete Key on your keyboard and the automation will be erased, and you can repeat the previous steps to attemptanother recording pass...
12
12

Mixing with Deck - Recording Automation
Now that the first 4 tracks - the VO and music tracks - are done, it’s time to automate the levels for the remaining SFX tracks...
1
1

Mixing with Deck - Recording Automation
If necessary, resize your tracks window, zoom, or scroll until you can see the sound effects clips in tracks 5-8...
Switch tracks 5-8 into volume automation mode...
Since the SFX clips used are very short, it’s more practical to “draw” in the breakpoints... When you’re finished, tracks 5-8 should look some-thing like this...
23
4
2
3
4

Mixing with Deck - Recording Automation
And the whole session should now look something like this... When you play the session, all the faders in the Mixer Window should now moveautomatically, “following” the breakpoint data you either drew in, or recorded with the volume faders...
5
5

Mixing with Deck - Recording Automation
Much in the same way as you can record volume changes in Deck, you can also record stereo panning and surround panning movements... Thissession is stereo, so we’ll record a panning movement from left to right on the last SFX clip on track 8 (crickets).
In the mixer window, click into the Automation pop-up menu for track 8, and switch to “Record Pan”...
If you’re not recording panning automation for the entire track, make sure the playhead is located at the point where you want to start recordingyour panning movements from left to right... To locate to a particular point, use one of your auto locate points, or just click into the timelineitself, a few seconds before the point where you want to begin panning - this “pre-roll” will give you a bit of time to prepare for recording...
Click the “Record” button in the transport to arm for recording...
2
3
1
4
2
3
4
1

Mixing with Deck - Recording Automation
Press the Space Bar on the transport to begin playback... You’ll want to have your mouse cursor on the pan fader for track 8, so you’re ready tomove as soon as playback starts...
Once you initiate playback, and hear the crickets SFX clip begin, slowly move the fader from left to right...
Once you record this mixer movement, stop playback, and switch into Pan Automation view, and you should see automation that looks some-thing like the diagram above...
As with volume automation breakpoints, if you didn’t get it quite right on the first try, you can always select all the breakpoints, delete them,and try again... If this SFX clip seems too short to record panning movements on, you can also “draw” them in, one breakpoint at a time...
6
7
5
8
5
6
7
8
Panned to left
Panned to right

Mixing with Deck - Spotting Audio Clips to a QT Movie
So you’ve now got a pretty good first mix, except the SFX clips of thunder in the scene where the clouds are rolling in seems to happen a bit toosoon...
In this step, you’ll learn how to spot audio clips to specific parts of a movie, and also how to “lock” automation to an audio clip, so if it’s moved,the automation will move with it...
Go to the Options Menu, and choose “Automation>Conform to Audio Edits”... This is the command that locks automation to an audio clip/region...Be sure that any automation breakpoints lie within the boundaries of a region before moving the region...
Then, go to the QuickTime Menu, and choose “Chase Positioning”... This command lets you move an audio clip through the timeline, and themovie will “chase”... This makes it very easy to spot the audio to a particular scene or even a frame...
2
3
1
4
2
3
4
1

Mixing with Deck - Spotting Audio Clips to a QT Movie
With your windows arranged so you can easily see both the Tracks window and the QuickTime movie window, select the thunder SFX clip ontrack 5... Switch back to audio editing mode - so the Automation View menu reads “None”...
Now, drag the selected SFX clip slowly to the right, until you reach the first frame of the scene with a storm rolling in... Release the clip, and itshould be right in sync with the correct scene in the movie, and the automation breakpoints should also have moved with the clip...
If you find that you cannot locate exactly to the first frame of the storm scene, change your time unit resolution in the Axis Resolution pop-up menu to “Frame”,which will also zoom in horizontally, so that each tick in the timeline grid is one frame long... You may also want to disable the Auto snap to grid feature...
To pinpoint an audio clip on a particular frame at this zoom level, you can also nudge the audio clip by using the command key and left or rightarrow keys to move one frame at a time... (Or one subframe, second, etc. - whatever type of time units you have chosen)
6
7
5
8
5
6
7
8
GridOn/OffButton
Mixing with Deck - Spotting Audio Clips to a QT Movie
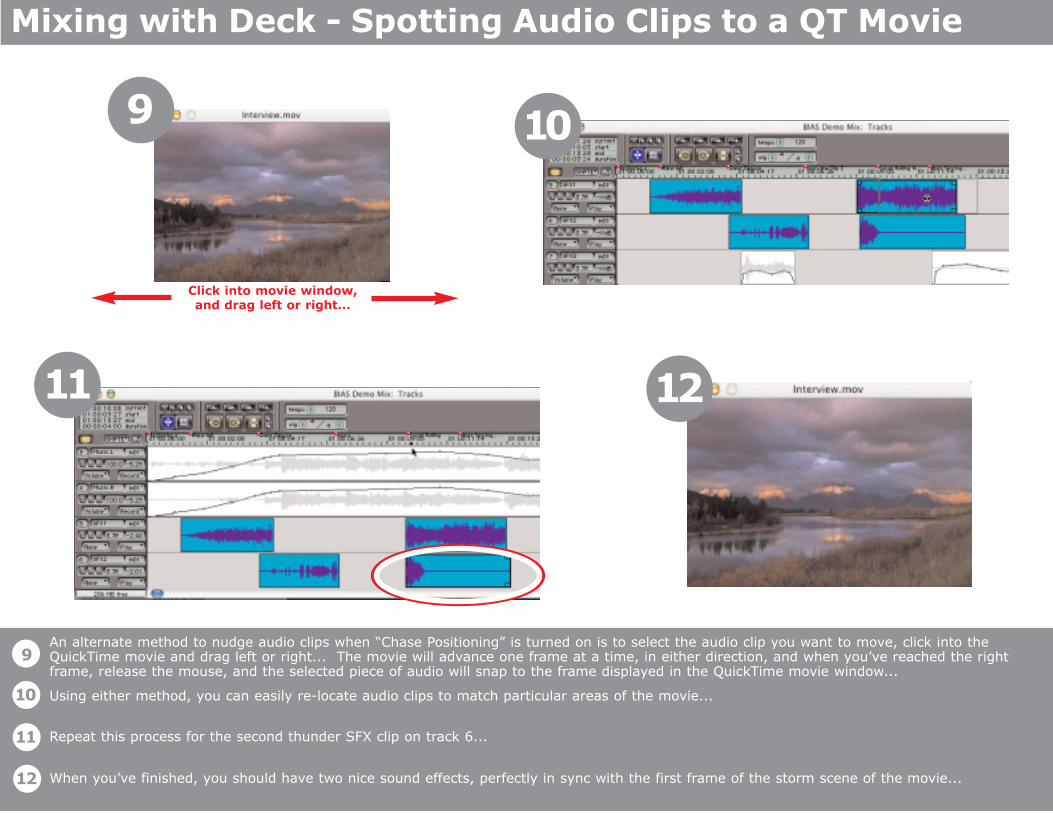
An alternate method to nudge audio clips when “Chase Positioning” is turned on is to select the audio clip you want to move, click into theQuickTime movie and drag left or right... The movie will advance one frame at a time, in either direction, and when you’ve reached the rightframe, release the mouse, and the selected piece of audio will snap to the frame displayed in the QuickTime movie window...
Using either method, you can easily re-locate audio clips to match particular areas of the movie...
Repeat this process for the second thunder SFX clip on track 6...
When you’ve finished, you should have two nice sound effects, perfectly in sync with the first frame of the storm scene of the movie...
Click into movie window,and drag left or right...
9 10
11 12
9
11
12
10

Mixing with Deck - Using Real-Time Effects
One of the key features that makes Deck such a good companion to digi-
tal video editing applications is that it offers far more in the area of audio
effects, such as equalization, reverb, compression, delay, and many other
types of effects.
Since Deck is a dedicated digital audio workstation, it offers far more real-
time audio tracks, and more real-time effects for each of those tracks.
Deck has several built-in effects, and can also host third-party VST format
effects. Aside from the built-in effects, Deck ships with over 20 Mac OS X
compatible VST audio effects.
This section will teach you the basics about how to use VST effects within
the Deck environment. To get the most out of Deck’s effects, you may
want to consult a good book about the theory behind using effects - see
the “Recommended Reading” section of the Deck User’s Guide.
For more information about available VST effects, please visit:
http://www.steinberg.net/infocenter/discoveries/pluginzone/index.phtml?sid=04511119&id=040303

Mixing with Deck - Using Real-Time Effects
Deck allows use of up to 4 independent, real-time VST effects plug-in per track - these are assigned in the Mixer Window...
Real-time master effects may also be assigned in the Master Outputs window (stereo sessions only)... Effects in the mixer affect only one track,and master effects affect all tracks equally... For example, if you wanted to assign the same level of EQ to all the tracks, assigning a separateEQ plug-in for each track would waste CPU power, assigning one master EQ plug-in would be a better way to apply the effect to all tracks equally...
Any active built-in effects show up in the Effects window, which can be accessed from the Windows Menu...
Assigning effects is as easy as clicking into an empty effect selection box (shown in step 1 of this page) and choosing an effect from the pop-upmenu... Both VST and built-in effects are selected here...
2
3 4
2
3
4
1
1

Mixing with Deck - Using Real-Time Effects
BIAS Freq and mda Delay from Maxim Digital Audio are examples of a real-time VST plug-ins... It is common for plug-ins from different manu-facturers to have different types of interfaces and controls...
Real-time effects all show up in the same window, which grows to accomodate each new effect added to a track... Each effect shows up withdifferently colored labels for each track and each effect...
For this step, we’ll solo tracks 1 and 2, and instantiate the BIAS Freq equalizer plug-in in each track, and give the voiceover a bit more low fre-quency boost to “thicken” the speaker’s voice... Click into the first effect selector box (labelled “Thru”) for track 1...
From the pop-up menu, choose BIAS Freq...
65
8
5
6
7
8
7

Mixing with Deck - Using Real-Time Effects
Do the same for track 2...
Initially, the only difference you will see in the mixer window is the first effect box will now read: “BIAS Freq”...
To open up the plug-in’s interface, to access any knobs, dials, button, or sliders, click into the active effect box in the mixer window, and choose“Open Editor”...
The control interface, known as a plug-in editor, will appear... Repeat the process for track 2...
9
1112
9
11
12
10
10

Mixing with Deck - Using Real-Time Effects
Copy the settings from the picture in step 3 to the Freq plug-in on track 1 in your session... These settings mildly boost the low, or bass frequen-cies, and mildly cut (or lower) the high or treble frequencies... Don’t make these settings to the plug-in on track 2 yet...
On the plug-in on track 1, click the “S” button (save user preset)...
Save the preset as “VO Preset”... You can save the VO preset in the same folder as the session, which makes the session portable, as allfiles/presets can be moved to another system - or, you can save all presets you make in a single presets folder and always have all presets avail-able in any session you work on...
In the plug-in editor for the Freq plug-in on track 2, click the “L” button (Load User Preset)...
1314
1516
13
14
15
16

Mixing with Deck - Using Real-Time Effects
Locate the “VO Preset” and click the “Open” button...
You should now have the exact same settings in the Freq plug-ins on both tracks 1 and 2...
Rewind to the beginning of the session, and audition the voiceover tracks, now with real-time equalization applied to them... If you need tomake changes to the EQ settings, this can be done in real-time, while audio is playing... Real-time effects are rendered to the master files whenyou mix to disk...
17 18
19
17
18
19

Output of Files from Deck 3.5
Congratulations - you’ve learned all the basic skills required to mix asession in Deck, but now what? Deck has several options for file out-put, including mixing to a master mono file, stereo file, or if you areworking in a 5.1 surround session, you can output 6 audio files forthat represent left, right, center, left surround, right surround, andLFE (low frequency effects - otherwise known as a subwoofer chan-nel)...
A “master” file output from Deck will sound exactly the same as theentire collection of tracks within the Deck session. Any effects, level,pan, or surround automation is reflected in the final mix.
If you plan to output your Final Cut Pro project to video tape, you canimport the mixed-down mono or stereo file back into the Final Cut Proproject, remove any audio files in the timeline, and replace with themaster stereo file created in Deck, and print to video.
If you plan to author a DVD using DVD Studio Pro, use the A.Pack AC3encoder that’s included in DVD Studio Pro to encode your master filesinto the appropriate audio format. DVD Studio Pro/A.Pack supportsvarious audio formats including stereo, and various surround formats.
The following step covers mixing a session to a stereo master file, andthen importing that master file back into FCP, for output to video. Aseparate tutorial on 5.1 surround mixing, DVD Studio Pro, and A.Packwill soon be available for download from the BIAS website, at:
http://www.bias-inc.com/downloads/tutorials/
Output of Files from Deck 3.5 - Mixing to Disk
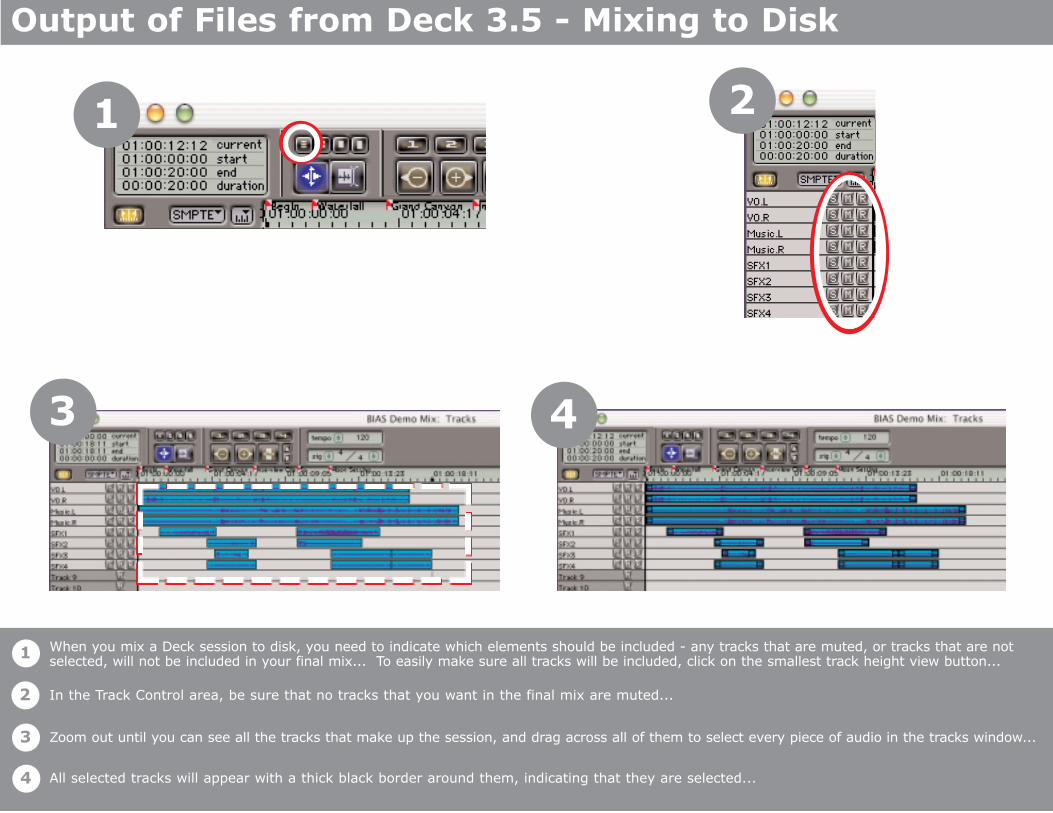
When you mix a Deck session to disk, you need to indicate which elements should be included - any tracks that are muted, or tracks that are notselected, will not be included in your final mix... To easily make sure all tracks will be included, click on the smallest track height view button...
In the Track Control area, be sure that no tracks that you want in the final mix are muted...
Zoom out until you can see all the tracks that make up the session, and drag across all of them to select every piece of audio in the tracks window...
All selected tracks will appear with a thick black border around them, indicating that they are selected...
2
3
1
4
2
3
4
1

Output of Files from Deck 3.5 - Mixing to Disk
From the Process Menu, choose “Mix to Disk...”
In the Mix to File window, choose a save location you will be able to easily find when importing the stereo master file back into FCP...
Your output file format should be AIFF/48kHz/16-bit/Stereo...
Deck will now mix all your tracks, automation, and effects into a master file...
6
7
5
8
5
6
7
8
Output of Files from Deck 3.5 - Mixing to Disk
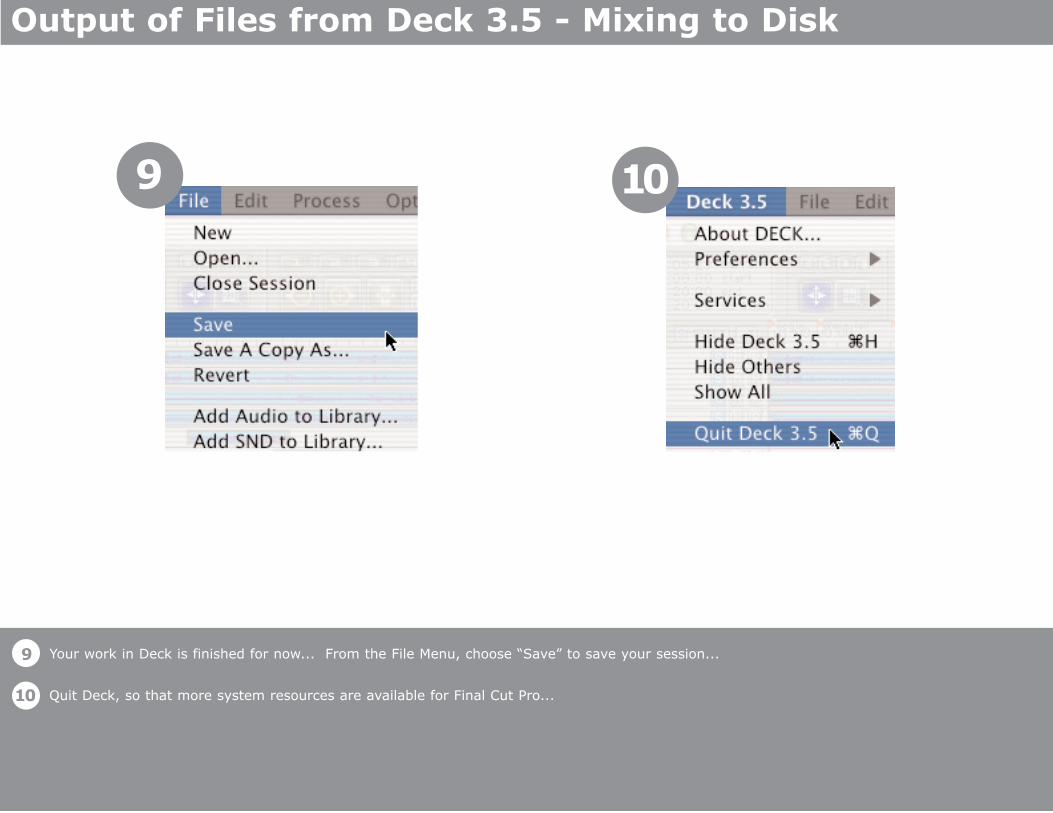
Your work in Deck is finished for now... From the File Menu, choose “Save” to save your session...
9 10
9
10 Quit Deck, so that more system resources are available for Final Cut Pro...

Output of Files from Deck 3.5 - Master Files
Launch Final Cut Pro 3....
From the File Menu, choose “Import>Files...”
Navigate to the directory where you saved the stereo master file that was mixed from Deck...
This file is imported into FCP’s Browser window...
11 12
13
11
12
13
14
14

Output of Files from Deck 3.5 - Master Files
You can select all audio tracks and delete them - You may need to “unlink” the video clip from its soundtrack first...
Drag the stereo master file from the Browser window into the timeline window, onto audio tracks 1 and 2, and align with the beginning of thevideo track (time zero - or, the same start time as the corresponding video clip)...
Since you’ve consolidated the rough mix that was composed of 8 real-time audio tracks down to just 2 tracks, you can now use more CPU powerfor what Final Cut Pro is best at - video... If you need to create titles, etc. on additional video tracks, you’ll now have more CPU power availablefor this task...
15
16 17
15
16
17

Output of Files from Deck 3.5 - Master Files
You’re now ready to output your project to video... Please see Final Cut Pro’s documentation for more information...
18
18