peripheral intravenous cannulation policy - · pdf filean intravenous cannula should be...
TRANSCRIPT
HOSPITAL INFECTION CONTROL POLICY
Policy no:ICU03Pol2011v01.0
Insertion and maintenance of peripheral intravenous cannulae
TITLE Policy for Insertion and Maintenance of
Peripheral Intravenous Cannulae
This document provides instruction and guidance to hospital personnel how to insert and maintain peripheral intravenous Cannulae.
SUMMARY
All Clinical Directors, Departmental Managers, Heads of Sections and Nursing Officers in charge of wards are required to instigate action to ensure the successful implementation of the policy within their area(s) of control.
DATE OF REVIEW June 2014
APPROVED VIA Infection Control Committee
DISTRIBUTION For distribution to all wards and sections
RELATED DOCUMENTS Hand Hygiene Policy
AUTHOR(S) / FURTHER INFORMATION
Infection Control Team Ext: 4540
THIS DOCUMENT REPLACES None
ISSUED BY: CEO, Mater Dei Hospital
ISSUE DATE: September 2011
1
INDEX Executive summary 2 1. Introduction 3 2. Objectives 3 3. Indications for Intravenous Cannulation 3
4. Insertion
4.1 Site Selection 4 4.2 Gauge size 4 4.3 Equipment 5 4.4 Procedure for cannulation 5
6. Care and management of IV cannula 7
7. Documentation 8 8. IV cannula Dressing 9 9. Removal of IV cannulae 10
2
Executive summary
The need for I.V. access must be assessed prior to insertion
An intravenous cannula should be retained in situ only if intravenous therapy is documented to be required within the next 24 hours and then reviewed daily for as long as the cannula is in-situ.
Hand hygiene must be performed prior to insertion.
If hair removal is necessary, scissors or hair clippers should be used.
The patient’s skin must be cleaned prior to cannula insertion using chlorhexidine
gluconate in 70% alcohol and allowed to dry. If this is not available, 70% alcohol is an acceptable alternative.
If a procedure is not successful and the cannula needs to be withdrawn, DO NOT
use the same cannula for another insertion. A new sterile cannula must be used for each attempt at cannulation and every time the skin should be disinfected again as above.
No more than two attempts at IV peripheral cannulation may be made on any one patient by the same clinician within a 15 minute, unless in an emergency situation. If unsuccessful, the patient should be given a period of rest of 20-30 minutes. Access should then be reassessed and if problems again anticipated, the assistance of another member of staff should be sought.
The date of insertion must be written clearly on the dressing by the doctor
inserting the line.
If the dressing becomes loose, damp or soiled, it should be changed using an aseptic technique.
In adults, the cannula should not stay in situ longer than 3 days after the date of
insertion. It must be removed routinely after this period of time unless written clinical instructions to the contrary have been made.
The cannula must be reviewed on a daily basis and the condition of the site
documented using the VIP score system. If evidence of inflammation at more than VIP 1 is noted, the cannula should be replaced immediately.
3
1. Introduction Venous cannulae provide relatively easy and comfortable access for intravenous therapy for hospitalised patients. However, cannulae present a high risk for healthcare associated infection. Almost two-thirds of bacteraemias in which the source is identified originate from an intravascular device.
Nevertheless, intravenous (IV) cannulation is an invasive procedure which predisposes the patient to an increased risk of local and systemic infection either at the time of insertion or when in-situ. IV cannula related infections are associated with increased morbidity, prolonged hospitalisation and increased costs. These infections are most commonly caused by Staphylococci and originate predominantly from either the flora of the patient’s own skin or from the hands of the health care practitioner. 2. Objectives This policy aims to standardise the insertion technique and subsequent management of peripheral I.V. cannulae. It provides guidance on: a. the appropriate assessment and selection of peripheral IV cannulation sites b. the procedure of cannulation c. care of the cannula site so as to reduce the risk of infection, discomfort, trauma and complications to the patient. The recommended clinical procedure is based on evidence recognised to reduce the incidence of cannula related complications, with particular emphasis on associated infection risks.
3. Indications for Intravenous Cannulation Inappropriate IV cannulation may lead to infection and should be avoided where possible. The need for intravenous cannulation will be determined by the need for intravenous therapy. In all cases first consideration should be for the administration of therapy by alternative routes. An intravenous cannula should retained in situ if intravenous therapy is documented to be required within the next 24 hours. The practice of routine insertion of an intravenous cannula on admission to hospital should be discouraged and cannulae inserted only when genuine clinical benefit is ascertained. Furthermore, every patient admitted to hospital should have his/her IV cannula assessed after 24 hours by a senior doctor in the patient’s firm to establish whether it needs to be retained.
4
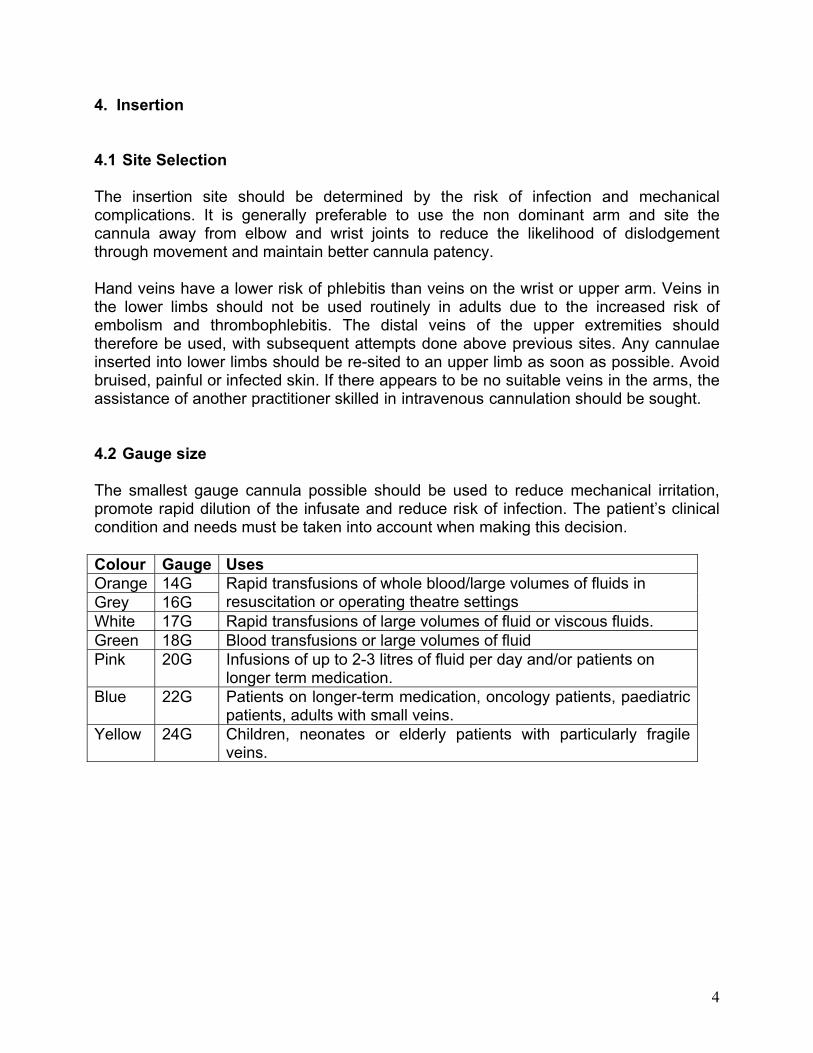
4. Insertion 4.1 Site Selection The insertion site should be determined by the risk of infection and mechanical complications. It is generally preferable to use the non dominant arm and site the cannula away from elbow and wrist joints to reduce the likelihood of dislodgement through movement and maintain better cannula patency. Hand veins have a lower risk of phlebitis than veins on the wrist or upper arm. Veins in the lower limbs should not be used routinely in adults due to the increased risk of embolism and thrombophlebitis. The distal veins of the upper extremities should therefore be used, with subsequent attempts done above previous sites. Any cannulae inserted into lower limbs should be re-sited to an upper limb as soon as possible. Avoid bruised, painful or infected skin. If there appears to be no suitable veins in the arms, the assistance of another practitioner skilled in intravenous cannulation should be sought. 4.2 Gauge size The smallest gauge cannula possible should be used to reduce mechanical irritation, promote rapid dilution of the infusate and reduce risk of infection. The patient’s clinical condition and needs must be taken into account when making this decision. Colour Gauge Uses Orange 14G Grey 16G
Rapid transfusions of whole blood/large volumes of fluids in resuscitation or operating theatre settings
White 17G Rapid transfusions of large volumes of fluid or viscous fluids. Green 18G Blood transfusions or large volumes of fluid Pink 20G Infusions of up to 2-3 litres of fluid per day and/or patients on
longer term medication. Blue 22G Patients on longer-term medication, oncology patients, paediatric
patients, adults with small veins. Yellow 24G Children, neonates or elderly patients with particularly fragile
veins.
5
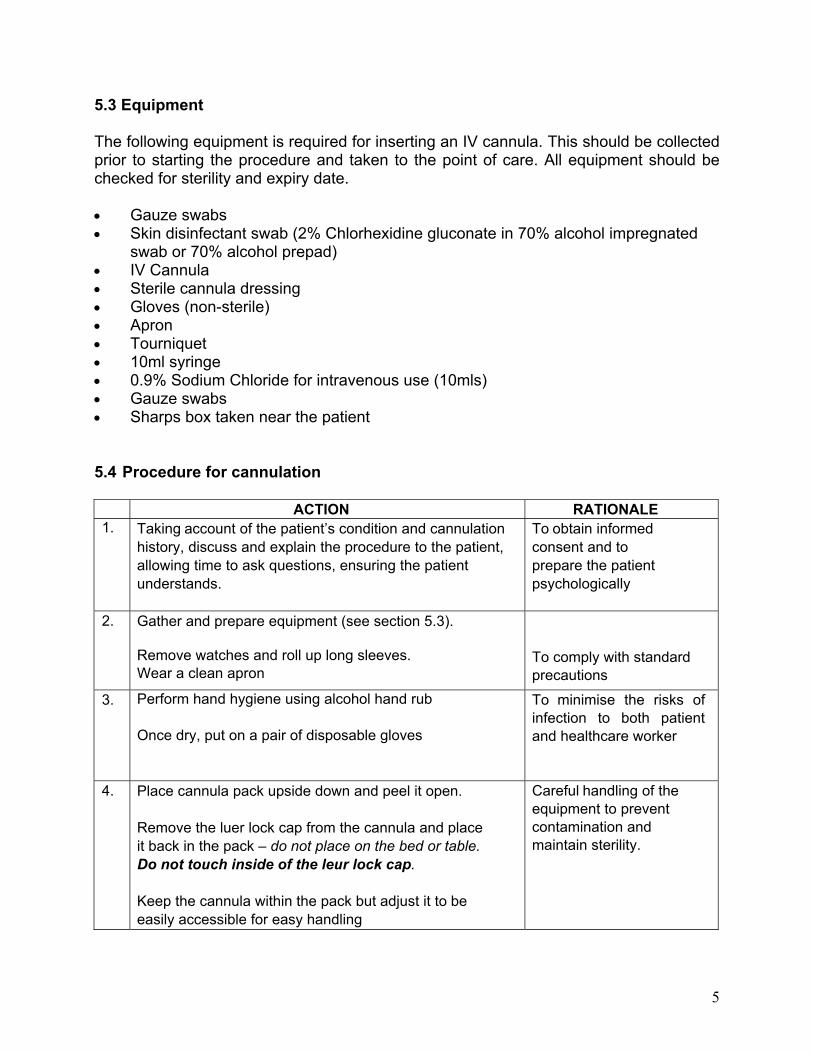
5.3 Equipment The following equipment is required for inserting an IV cannula. This should be collected prior to starting the procedure and taken to the point of care. All equipment should be checked for sterility and expiry date. Gauze swabs Skin disinfectant swab (2% Chlorhexidine gluconate in 70% alcohol impregnated
swab or 70% alcohol prepad) IV Cannula Sterile cannula dressing Gloves (non-sterile) Apron Tourniquet 10ml syringe 0.9% Sodium Chloride for intravenous use (10mls) Gauze swabs Sharps box taken near the patient 5.4 Procedure for cannulation
ACTION RATIONALE 1. Taking account of the patient’s condition and cannulation
history, discuss and explain the procedure to the patient, allowing time to ask questions, ensuring the patient understands.
To obtain informed consent and to prepare the patient psychologically
2. Gather and prepare equipment (see section 5.3). Remove watches and roll up long sleeves. Wear a clean apron
To comply with standard precautions
3. Perform hand hygiene using alcohol hand rub Once dry, put on a pair of disposable gloves
To minimise the risks of infection to both patient and healthcare worker
4. Place cannula pack upside down and peel it open. Remove the luer lock cap from the cannula and place it back in the pack – do not place on the bed or table. Do not touch inside of the leur lock cap. Keep the cannula within the pack but adjust it to be easily accessible for easy handling
Careful handling of the equipment to prevent contamination and maintain sterility.
6
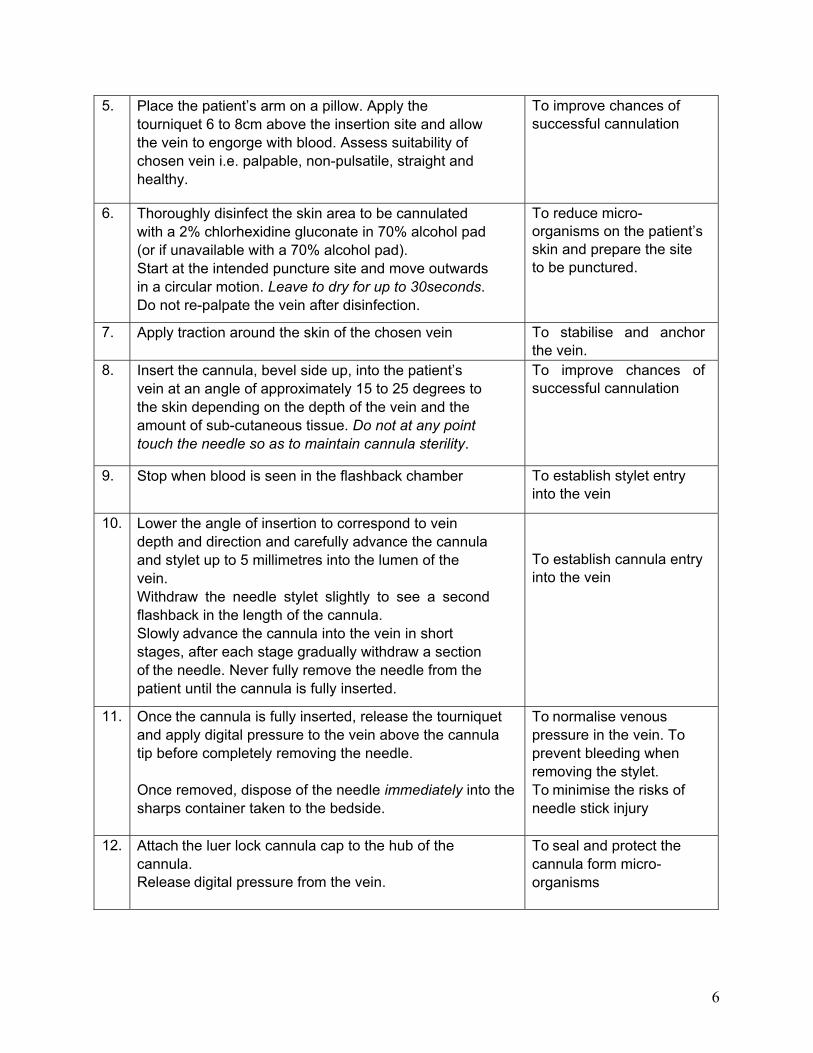
5. Place the patient’s arm on a pillow. Apply the tourniquet 6 to 8cm above the insertion site and allow the vein to engorge with blood. Assess suitability of chosen vein i.e. palpable, non-pulsatile, straight and healthy.
To improve chances of successful cannulation
6. Thoroughly disinfect the skin area to be cannulated with a 2% chlorhexidine gluconate in 70% alcohol pad (or if unavailable with a 70% alcohol pad). Start at the intended puncture site and move outwards in a circular motion. Leave to dry for up to 30seconds. Do not re-palpate the vein after disinfection.
To reduce micro-organisms on the patient’s skin and prepare the site to be punctured.
7. Apply traction around the skin of the chosen vein To stabilise and anchor the vein.
8. Insert the cannula, bevel side up, into the patient’s vein at an angle of approximately 15 to 25 degrees to the skin depending on the depth of the vein and the amount of sub-cutaneous tissue. Do not at any point touch the needle so as to maintain cannula sterility.
To improve chances of successful cannulation
9. Stop when blood is seen in the flashback chamber To establish stylet entry into the vein
10. Lower the angle of insertion to correspond to vein depth and direction and carefully advance the cannula and stylet up to 5 millimetres into the lumen of the vein. Withdraw the needle stylet slightly to see a second flashback in the length of the cannula. Slowly advance the cannula into the vein in short stages, after each stage gradually withdraw a section of the needle. Never fully remove the needle from the patient until the cannula is fully inserted.
To establish cannula entry into the vein
11. Once the cannula is fully inserted, release the tourniquet and apply digital pressure to the vein above the cannula tip before completely removing the needle. Once removed, dispose of the needle immediately into the sharps container taken to the bedside.
To normalise venous pressure in the vein. To prevent bleeding when removing the stylet. To minimise the risks of needle stick injury
12. Attach the luer lock cannula cap to the hub of the cannula. Release digital pressure from the vein.
To seal and protect the cannula form micro- organisms
7
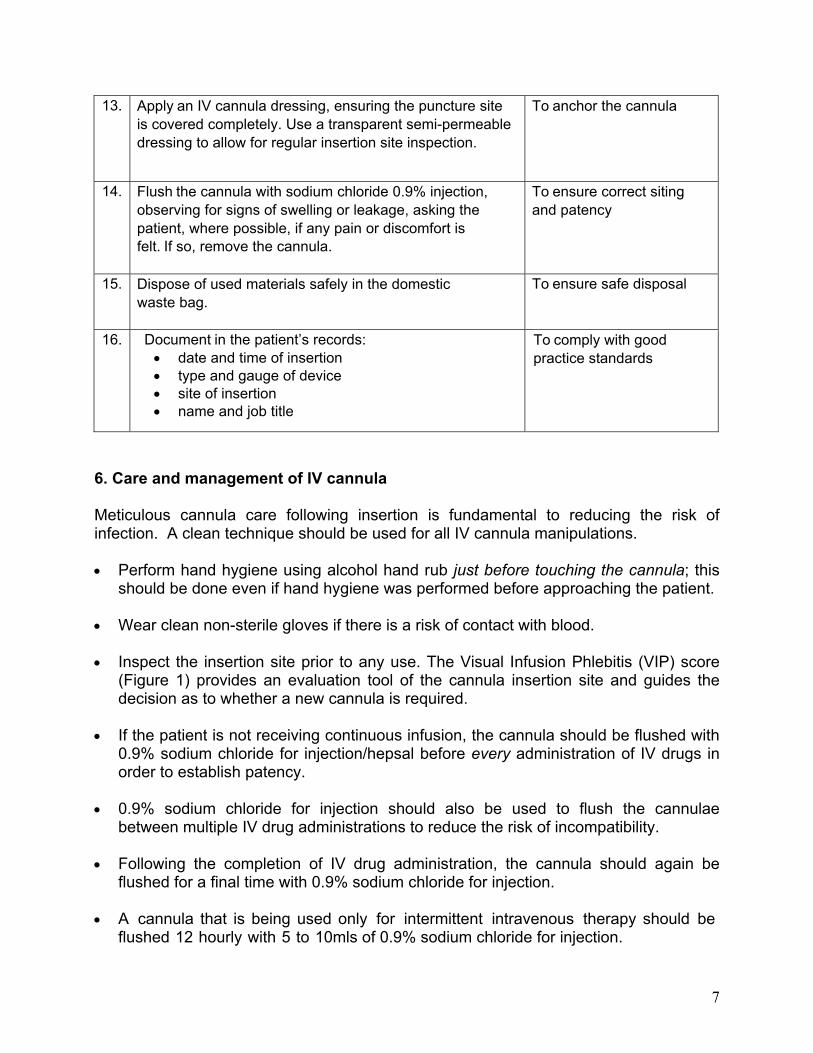
13. Apply an IV cannula dressing, ensuring the puncture site is covered completely. Use a transparent semi-permeable dressing to allow for regular insertion site inspection.
To anchor the cannula
14. Flush the cannula with sodium chloride 0.9% injection, observing for signs of swelling or leakage, asking the patient, where possible, if any pain or discomfort is felt. If so, remove the cannula.
To ensure correct siting and patency
15. Dispose of used materials safely in the domestic waste bag.
To ensure safe disposal
16. Document in the patient’s records: date and time of insertion type and gauge of device site of insertion name and job title
To comply with good practice standards
6. Care and management of IV cannula Meticulous cannula care following insertion is fundamental to reducing the risk of infection. A clean technique should be used for all IV cannula manipulations. Perform hand hygiene using alcohol hand rub just before touching the cannula; this
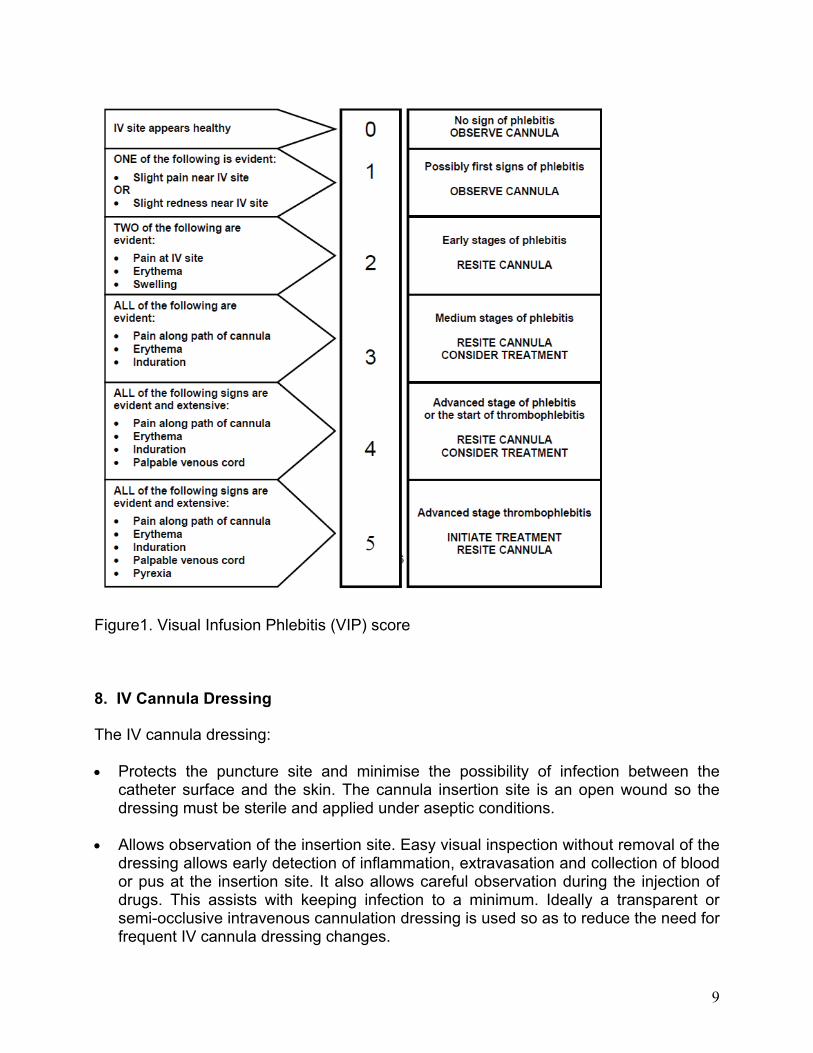
should be done even if hand hygiene was performed before approaching the patient. Wear clean non-sterile gloves if there is a risk of contact with blood. Inspect the insertion site prior to any use. The Visual Infusion Phlebitis (VIP) score
(Figure 1) provides an evaluation tool of the cannula insertion site and guides the decision as to whether a new cannula is required.
If the patient is not receiving continuous infusion, the cannula should be flushed with
0.9% sodium chloride for injection/hepsal before every administration of IV drugs in order to establish patency.
0.9% sodium chloride for injection should also be used to flush the cannulae between multiple IV drug administrations to reduce the risk of incompatibility.
Following the completion of IV drug administration, the cannula should again be flushed for a final time with 0.9% sodium chloride for injection.
A cannula that is being used only for intermittent intravenous therapy should be
flushed 12 hourly with 5 to 10mls of 0.9% sodium chloride for injection.
8
The cannula should be assessed daily to establish whether it needs to be retained
and if not deemed to be required it should be removed as soon as possible. In adults, IV cannulas should be changed after a maximum of 3 days after the date
of insertion even if no evidence of phlebitis is present. This duration can be exceeded if clear and exceptional attenuating circumstances exist. In such cases, the clinical reason must be clearly documented by a senior member of the patient’s firm.
If the cannula does not have a clear date written on the dressing, then it should be
assumed to have been in place for more than 3 days and replaced immediately. If the cap is removed from the circuit for whatever reason, it must be replaced with a
new sterile luer-lock cap following each use. Never handle the leur lock with bare hands or touch the inner side of the cannula cap (even if wearing gloves) since this will introduce micro-organisms directly into the cannula hub and bloodstream.
Where feasible, patients should be encouraged to participate in observation and care of their own cannulae. 7. Documentation: Every IV cannula inserted should be documented, except where the cannula is anticipated to be in situ for less than 6 hours. The healthcare professional who inserts the cannula should fill in the first part of the IV Cannula form appended to this policy. The IV site should then be assessed on a daily basis, as part of patient care activities, according to the Visual Infusion Phlebitis (VIP) score in Figure 1. The appropriate action should be taken according to VIP score. If the cannula is resited, a doctor in the patient’s firm should be informed. All daily reviews, any action taken as well as removal information should be filled in within the form.
9
Figure1. Visual Infusion Phlebitis (VIP) score 8. IV Cannula Dressing
The IV cannula dressing: Protects the puncture site and minimise the possibility of infection between the
catheter surface and the skin. The cannula insertion site is an open wound so the dressing must be sterile and applied under aseptic conditions.
Allows observation of the insertion site. Easy visual inspection without removal of the
dressing allows early detection of inflammation, extravasation and collection of blood or pus at the insertion site. It also allows careful observation during the injection of drugs. This assists with keeping infection to a minimum. Ideally a transparent or semi-occlusive intravenous cannulation dressing is used so as to reduce the need for frequent IV cannula dressing changes.
10
Secure the device in place and prevent movement of the device which damages the vessel.
When a dressing is changed, an aseptic non-touch technique is to be used so as not to introduce micro-organisms from the operator’s hands to the IV cannulation site: Perform hand hygiene using alcohol hand rub. Disinfect the IV cannula entry site with 2% chlorhexidine gluconate in 70% alcohol
(or 70% alcohol if not available) and allow to dry Apply new dressing. 9. Removal of IV Cannula Perform hand hygiene before any contact with patient and put on non-sterile gloves. Release cannula dressing and remove cannula slowly. Apply sterile swab
immediately on exit site. Prevent haematoma formation by applying digital pressure to the puncture site for at
least 3 minutes. Application of dressings does not replace digital pressure. Throw away the cannula in domestic waste bin. • Cover the site with a sterile dressing. • If the cannula was removed due to signs of phlebitis, continue to observe the site
and document treatment and actions taken in the nursing report. Bibliography Department of Health (2007) High impact intervention No. 2: Peripheral intravenous cannula care bundle. Saving Lives: reducing infection, delivering clean and safe care. O’Grady, N.P., Alexander, M., Dellinger, E.P., Gerberding, J.L. et al. (2002) Guidelines for the prevention of intravascular catheter-related infections. Morbidity and Mortality Weekly Report. 51 (RR10):1–26. Zingg W., & Pittet, D. (2009). Peripheral venous catheters – an under evaluated problem International Journal of Antimicrobial Agents. 34S, S38-S42.
ICU1003v01.0 Page 1
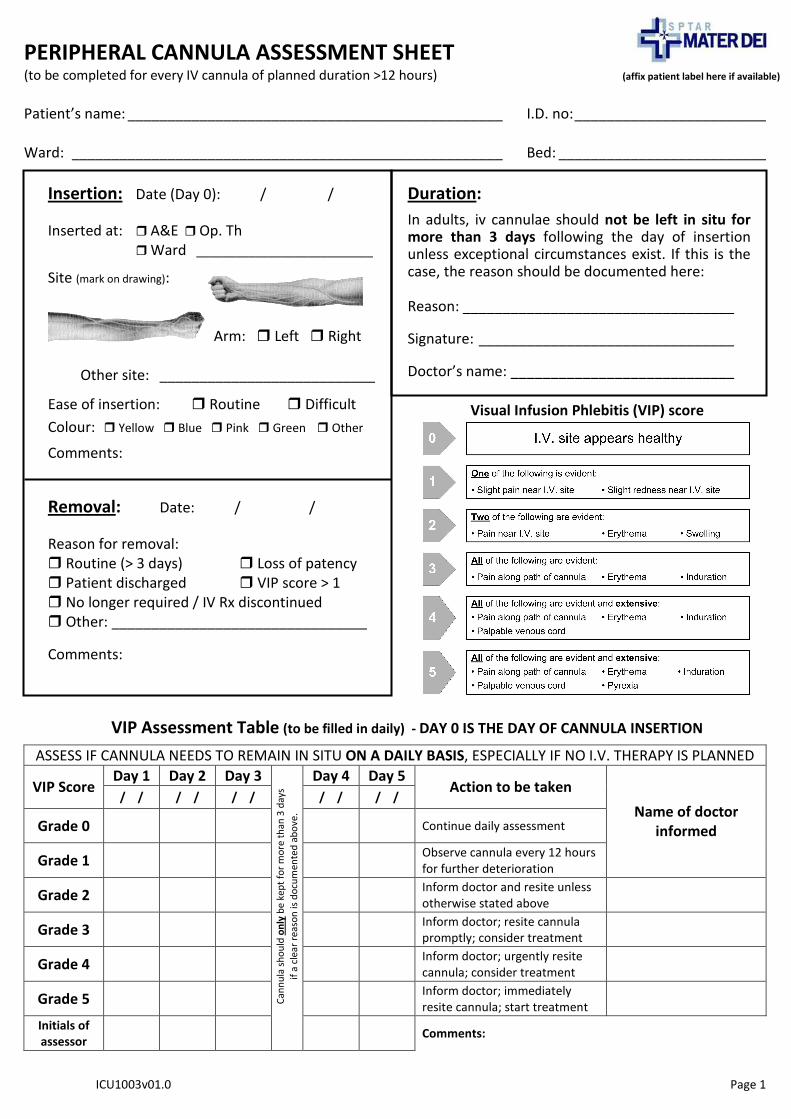
PERIPHERAL CANNULA ASSESSMENT SHEET (to be completed for every IV cannula of planned duration >12 hours) (affix patient label here if available)
Patient’s name: _______________________________________________ I.D. no:________________________
Ward: ______________________________________________________ Bed: __________________________
Insertion: Date (Day 0): / /
Inserted at: � A&E � Op. Th
� Ward ___________________________
Site (mark on drawing):
Arm: � Left � Right
Other site: ___________________________
Ease of insertion: � Routine � Difficult
Colour: � Yellow � Blue � Pink � Green � Other
Comments:
Removal: Date: / /
Reason for removal:
� Routine (> 3 days) � Loss of patency
� Patient discharged � VIP score > 1
� No longer required / IV Rx discontinued
� Other: ________________________________
Comments:
Duration:
In adults, iv cannulae should not be left in situ for more than 3 days following the day of insertion unless exceptional circumstances exist. If this is the case, the reason should be documented here:
Reason: __________________________________
Signature: ________________________________
Doctor’s name: ____________________________
Visual Infusion Phlebitis (VIP) score
VIP Assessment Table (to be filled in daily) - DAY 0 IS THE DAY OF CANNULA INSERTION
ASSESS IF CANNULA NEEDS TO REMAIN IN SITU ON A DAILY BASIS, ESPECIALLY IF NO I.V. THERAPY IS PLANNED
Day 1 Day 2 Day 3 Day 4 Day 5 VIP Score
/ / / / / / / / / / Action to be taken
Grade 0 Continue daily assessment
Grade 1 Observe cannula every 12 hours
for further deterioration
Name of doctor
informed
Grade 2 Inform doctor and resite unless
otherwise stated above
Grade 3 Inform doctor; resite cannula
promptly; consider treatment
Grade 4 Inform doctor; urgently resite
cannula; consider treatment
Grade 5 Inform doctor; immediately
resite cannula; start treatment
Initials of
assessor
Ca
nn
ula
sh
ou
ld o
nly
be
ke
pt
for
mo
re t
ha
n 3
da
ys
if a
cle
ar
rea
son
is
do
cum
en
ted
ab
ov
e.
Comments:

Use only for a second / third cannula inserted on the patient after page 1 has been completed Page 2
ICU1003v01.1
Insertion: Date (day 0): / /
Inserted at: � A&E � Op. Th � Ward ____________
Site (mark on drawing):
Arm: � Left � Right
Other site: ___________________________________
Ease of insertion: � Routine � Difficult
Colour: � Yellow � Blue � Pink � Green � Other
Comments:
Removal: Date: / /
Reason for removal:
� Routine (> 3 days) � Loss of patency
� Patient discharged � VIP score > 1
� No longer required / IV Rx discontinued
� Other: ________________________________________
Comments: ________________________________________
__________________________________________________
VIP Assessment Table (to be filled in daily) - DAY 0 IS THE DAY OF CANNULA INSERTION
ASSESS IF CANNULA NEEDS TO REMAIN IN SITU ON A DAILY BASIS, ESPECIALLY IF NO I.V. THERAPY IS PLANNED
Day 1 Day 2 Day 3 Day 4 Day 5 VIP Score
/ / / / / / / / / / Action to be taken
Grade 0 Continue daily assessment
Grade 1 Observe cannula every 12 hours for
further deterioration
Name of doctor
informed
Grade 2 Inform doctor and resite unless
otherwise stated on Page 1
Grade 3 Inform doctor; resite cannula
promptly; consider treatment
Grade 4 Inform doctor; urgently resite
cannula; consider treatment
Grade 5 Inform doctor; immediately resite
cannula; start treatment
Initials of
assessor
Ca
nn
ula
sh
ou
ld o
nly
be
ke
pt
for
mo
re t
ha
n 3
da
ys
if a
cle
ar
rea
son
is
do
cum
en
ted
ab
ov
e.
Comments:
Insertion: Date (day 0): / /
Inserted at: � A&E � Op. Th � Ward ____________
Site (mark on drawing):
Arm: � Left � Right
Other site: ___________________________________
Ease of insertion: � Routine � Difficult
Colour: � Yellow � Blue � Pink � Green � Other
Comments:
Removal: Date: / /
Reason for removal:
� Routine (> 3 days) � Loss of patency
� Patient discharged � VIP score > 1
� No longer required / IV Rx discontinued
� Other: ________________________________________
Comments: ______________________________________
________________________________________________
VIP Assessment Table (to be filled in daily) - DAY 0 IS THE DAY OF CANNULA INSERTION
ASSESS IF CANNULA NEEDS TO REMAIN IN SITU ON A DAILY BASIS, ESPECIALLY IF NO I.V. THERAPY IS PLANNED
Day 1 Day 2 Day 3 Day 4 Day 5 VIP Score
/ / / / / / / / / / Action to be taken
Grade 0 Continue daily assessment
Grade 1 Observe cannula every 12 hours for
further deterioration
Name of doctor
informed
Grade 2 Inform doctor and resite unless
otherwise stated on Page 1
Grade 3 Inform doctor; resite cannula
promptly; consider treatment
Grade 4 Inform doctor; urgently resite
cannula; consider treatment
Grade 5 Inform doctor; immediately resite
cannula; start treatment
Initials of
assessor
Ca
nn
ula
sh
ou
ld o
nly
be
ke
pt
for
mo
re t
ha
n 3
da
ys
if a
cle
ar
rea
son
is
do
cum
en
ted
ab
ov
e.
Comments: