processing weblogs with hdinsight · processing weblogs with hdinsight 3 estimated time to complete...
TRANSCRIPT

Processing
Weblogs with
HDInsight

Processing Weblogs with HDInsight
Contents
Azure account required for lab ..................................... 3
Setting up your HDInsight cluster ............................... 4
Machine Learning with Mahout .................................. 17
Visualizing data in Excel ................................................ 27
Roll back Azure changes ............................................... 58
Terms of use ...................................................................... 59

Processing Weblogs with HDInsight 3
Estimated time to complete lab is 40-45 minutes.
This lab is the first in a three-part series. Throughout the course of all
three labs, we will be creating a web service that takes web data,
processes it and tries to detect whether or not each IP address belongs
to a bot. There are three main steps:
First we need to process the data and extract features for our
machine learning algorithm to ingest using HDInsight and
HIVE.
Next we need to set up and train the machine learning
algorithm using MLStudio.
Finally, we need to output the results to HBase so we can
quickly analyze them.
In Lab 1, we’ll accomplish the following:
We will learn to set up an HDInsight cluster and run HIVE
scripts.
We will use the HIVE scripts to process raw web data.
Meaningful features will be extracted from the data that we can
then pass to a Machine Learning Algorithm.
While carrying all of the exercises within this hands on lab you will
either be making use of the Azure portal at
https://manage.windowsazure.com/ or the Preview portal at
https://portal.azure.com/.
To perform this lab, you will require a Microsoft Azure account.
If you do not have an Azure account, you can request a free trial
version by going to http://azure.microsoft.com/en-us/pricing/free-
trial/.
Within the one-month trial version, you can perform other SQL Server
2014 hands on labs along with other tutorials available on Azure.
Note, to sign up for a free trial, you will need a mobile device that can
receive text messages and a valid credit card.
Be sure to follow the Roll back Azure changes section at the end of
this exercise after creating the Azure database so that you can make
the most use of your $200 free Azure credit.
Azure account required for lab

Processing Weblogs with HDInsight 4
Connect to SQLONE computer
1. Click on SQL2014DEMO-SQLO… button on right side of the
screen to connect to the SQLONE computer.
Note, if you have a monitor that supports a larger screen
resolution than 1024 x 768, you can change the screen resolution
for the lab to go as high as 1920 x 1080. By going to a higher
screen resolution, it will be easier to use SQL Server
Management Studio.
2. Right click on the desktop and click on Screen resolution.
3. Select 1366 x 786 (a good minimum screen size for using
SSMS) and click OK.
4. Click Keep Changes.
5. Resize the client holLaunchPad Online window for the lab to
fit your screen resolution.
6. During the setup you will need to record credentials and server
locations. Open notepad.exe to keep track of information
Overview of the setup process
We are given raw data to start with. This is the data we will be
processing using HDInsight and HIVE.
The raw data has two columns. The first column holds an IP address
while the second column holds a time stamp. Each of these rows
represents an event on a website such as a click, or loading an
advertisement. We have stripped out the extra columns so that we can
focus on data relevant to this problem. We are also given some labeled
data, which is similar to the raw data except it has another boolean
Setting up your HDInsight cluster

Processing Weblogs with HDInsight 5
column which tells us whether or not this event was a bot. This is what
we will use to train our algorithm in future labs.
1. Open up Internet Exploere and navigate to
https://manage.windowsazure.com, log in with Azure ID
you’re provided. In the lab environment, this is the home page
for the browser.
2. Click on Storage on the left navigation.
3. Click New in the bottom left corner.
4. Click Quick Create.
5. Enter in your assigned Azure User ID in the URL field
If your username already exists, choose a unique user
name with only lowercase letters and/or numbers.

Processing Weblogs with HDInsight 6
Remember this because it is going to be a parameter
later.
Please ensure your location is South Central US.
Replication should be Geo-Redundant.
6. Click Create Storage Account.
7. Once your storage account is created, check its properties to
see if everything looks fine.
8. Go back to the Management Portal and click on the
Elephant/HDInsight icon on the left navigation.
9. Click on “Create an HDInsight Cluster”.
10. Ensure Hadoop is selected.
11. Under cluster name, type your user name (the same name you
used for the earlier step).
12. Select 1 data node for cluster size.
13. Type in a password and confirm it.
14. Select your name for the storage account.
15. Click Create HDInsight Cluster.
Uploading sample data
While this gets created (it may take a while) let’s upload the data from
the master storage account into your containers, but first you need to
get your storage account key:
1. From Azure home screen click Storage.
2. Select your storage account from the list on the right.
3. Click Manage Access Keys.

Processing Weblogs with HDInsight 7
4. Copy the Primary Access Key from the dialog and keep this
handy.
5. Next, open a command window by pressing Windows key and
typing in CMD.
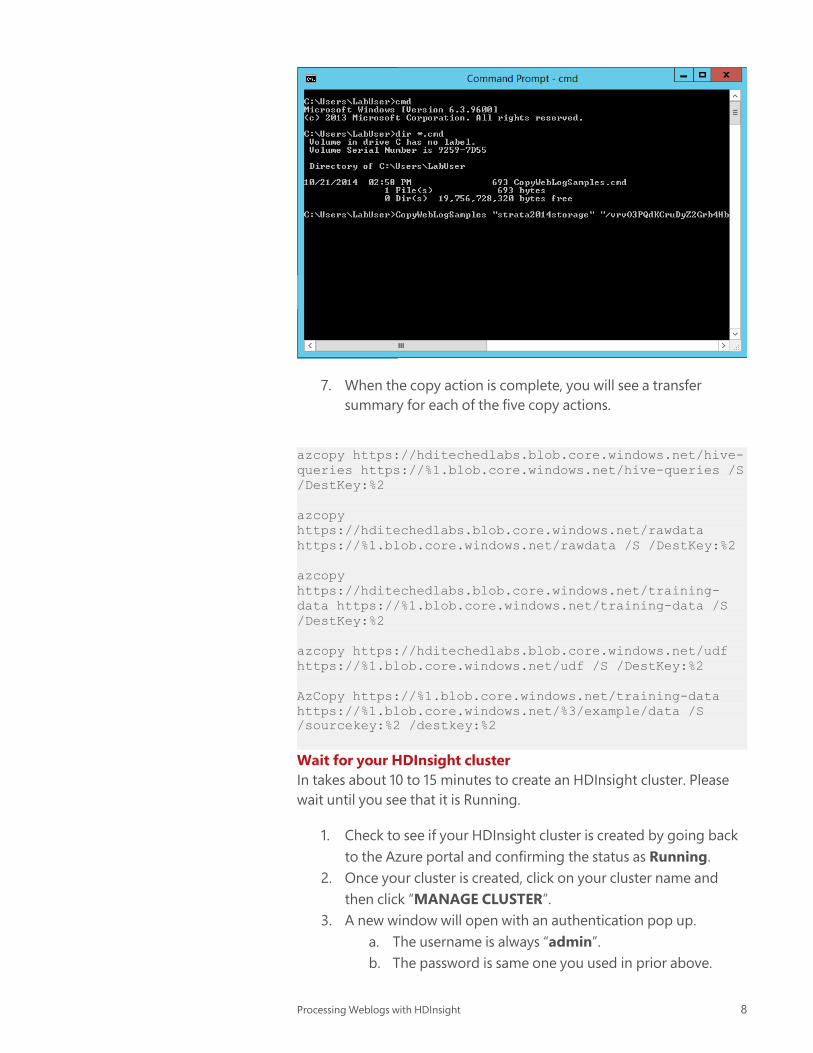
6. In the C:\Users\LabUser directory, there is a batch file called
CopyWebLogSamples.cmd with three parameters that uses the
AZCopy program from the Azure SDK to copy blobs from the
sample storage account to your local storage account for your
HDInsight cluster. At the command prompt type in the
command as follows:
CopyWebLogSamples "<storage name>" "<paste your storage
key here>" "<cluster name>"
Processing Weblogs with HDInsight 8
7. When the copy action is complete, you will see a transfer
summary for each of the five copy actions.
Wait for your HDInsight cluster
In takes about 10 to 15 minutes to create an HDInsight cluster. Please
wait until you see that it is Running.
1. Check to see if your HDInsight cluster is created by going back
to the Azure portal and confirming the status as Running.
2. Once your cluster is created, click on your cluster name and
then click “MANAGE CLUSTER”.
3. A new window will open with an authentication pop up.
a. The username is always “admin”.
b. The password is same one you used in prior above.
azcopy https://hditechedlabs.blob.core.windows.net/hive-
queries https://%1.blob.core.windows.net/hive-queries /S
/DestKey:%2
azcopy
https://hditechedlabs.blob.core.windows.net/rawdata
https://%1.blob.core.windows.net/rawdata /S /DestKey:%2
azcopy
https://hditechedlabs.blob.core.windows.net/training-
data https://%1.blob.core.windows.net/training-data /S
/DestKey:%2
azcopy https://hditechedlabs.blob.core.windows.net/udf
https://%1.blob.core.windows.net/udf /S /DestKey:%2
AzCopy https://%1.blob.core.windows.net/training-data
https://%1.blob.core.windows.net/%3/example/data /S
/sourcekey:%2 /destkey:%2

Processing Weblogs with HDInsight 9
c. Then click OK to log in.
d. If you enter in the wrong password, it will automatically
try and log you in with that password every time. To
make this stop, clear your cookies.
Using the Hive Editor
The HDInsight Query Console allows you to test functionality with
the Getting Started Gallery, execute Hive queries using the Hive
Editor, review jobs with Job History, or view files on your cluster with
File Browser.
1. Click on the Hive Editor link to get started.

Processing Weblogs with HDInsight 10
2. Open a new Notepad window and press Ctrl+O to open the
file C:\SQLSCRIPTS\HDIWeblogHOL\process_sql.txt
3. Press Ctrl+A to select all of the text and Ctrl+C to copy the text
to the clipboard.
4. Go back to the Hive editor, delete the existing text in the editor
and paste the code into the window.
5. Paste the text from process_data.hql into the Hive editor.

Processing Weblogs with HDInsight 11
6. In the Hive editor, there are two URIs with the prefix “wasb://”
– one points to the raw data file and one points to the udf. Find
the two instances on lines 4 and 22 where is says <Your
Storage Account Name> with brackets on both sides, and
paste in your storage account name. It should look something
like this: wasb://[email protected]/
7. To run the Hive query, click Submit and wait for the status to
say “Completed”. While you are waiting, skip ahead to review
the Hive query statements in process_data.hql.
About the code
The following boxed scripts are part of process_data.hql, and
additional context around what they do and why we’re using them.
DROP TABLE data;
CREATE EXTERNAL TABLE data (client_ip STRING, server_utc_datetime STRING)
ROW FORMAT DELIMITED FIELDS TERMINATED BY '09' STORED AS TEXTFILE
LOCATION 'wasb://[email protected]/';
Here we are create a new table called data with two columns,
“client_ip” which is a string and “server_utc_datetime” which is also a
string. The EXTERNAL keyword indicates that this data is stored
externally from the HDInsight cluster, namely in
‘wasb://[email protected]/’. This is the URI
we use to locate the raw data, which says check under the account

Processing Weblogs with HDInsight 12
name LabUsername in the container rawdata. Finally the ROW
FORMAT DELIMITED FIELDS TERMINATED BY '09' just means that, the
fields in the raw data are delimited by tabs, where 09 is ASCII code for a
tab.
DROP TABLE cooked;
CREATE TABLE cooked (client_ip STRING, unix_timestamp BIGINT) ROW FORMAT
DELIMITED FIELDS TERMINATED BY '09' STORED AS TEXTFILE;
INSERT OVERWRITE TABLE cooked SELECT client_ip,
unix_timestamp(server_utc_datetime) FROM data;
Now we are converting the server_utc_datetimes to Unix Times by
passing those values through a function called unix_timestamp, which
converts datetime strings to Unix timestamps.
DROP TABLE events;
CREATE TABLE events (client_ip STRING, datetimes array<BIGINT>) ROW FORMAT
DELIMITED FIELDS TERMINATED BY '09' STORED AS TEXTFILE;
INSERT OVERWRITE TABLE events SELECT client_ip,
collect_list(unix_timestamp) FROM cooked GROUP BY client_ip;
INSERT OVERWRITE TABLE events SELECT * FROM EVENTS WHERE size(datetimes) >
50;
Here we are grouping the table by client_ip and using the function
collect_list to list out the unix_timestamps associated with each
client_ip. Then we filter this down to client_ip’s that contain more than
50 unix_timestamps.
DROP TABLE event_counts;
CREATE TABLE event_counts (client_ip STRING, event_count INT) ROW FORMAT
DELIMITED FIELDS TERMINATED BY '09' STORED AS TEXTFILE;
INSERT OVERWRITE TABLE event_counts SELECT client_ip, size(datetimes) FROM
events;
Finally we get to calculate our first feature, the number of events per
client_ip. We use the size function to get the size of the
unix_timestamps from the previous events table. The next step will be
to calculate the standard deviation. This part is trickier and involves
using a custom python function, which we import into HIVE.

Processing Weblogs with HDInsight 13
DROP TABLE stds;
CREATE TABLE stds (client_ip STRING, std FLOAT) ROW FORMAT DELIMITED FIELDS
TERMINATED BY '09' STORED AS TEXTFILE;
ADD FILE wasb://[email protected]/standard_dev.py;
INSERT OVERWRITE TABLE stds SELECT TRANSFORM (client_ip, datetimes)
USING 'D:\Python27\python.exe standard_dev.py' AS
(client_ip STRING, std FLOAT)
FROM events;
Our custom function is called standard_dev.py and can be found in the
supplementary material. All it does is take an array of unix_timestamps
and calculates the standard deviation of the differences as described in
the section Features. We use ADD FILE to add the python file to our
HIVE environment and then use the keyword TRANSFORM to apply the
command 'D:\Python27\python.exe standard_dev.py' which runs the
python script.
DROP TABLE features;
CREATE EXTERNAL TABLE features (client_ip STRING, event_counts INT, std
FLOAT)
ROW FORMAT DELIMITED FIELDS TERMINATED BY '09' LINES TERMINATED BY '\n'
STORED AS TEXTFILE
LOCATION 'wasb://[email protected]/';
INSERT INTO TABLE features SELECT event_counts.client_ip,
event_counts.event_count, stds.std FROM event_counts JOIN stds ON
(event_counts.client_ip = stds.client_ip);
Lastly we combine the counts of the timestamps, labeled event_counts
and the standard deviations into one table and dump it back into
Azure Blob so that our MLStudio algorithm can read it. This is done by
creating a new external table called features, which is located in the
input container and then inserting the event_counts and standard
deviations into the table. Notice we also use the key word JOIN which
allows us to match rows of event_counts and std only where the
client_ip’s match.
Reviewing the job results
1. Click on “View Details” under Query Name in order to view the
output and the logging.
2. Check Job Output and Job Log to ensure everything executed
correctly. If it didn’t, go back and ensure all inputs are correct
and then click Submit again.

Processing Weblogs with HDInsight 14
Show the results of the features table
1. To see the some of the rows in the features table, go back to
the Hive Editor table and delete the existing query statements
in the window using Ctrl+A and Del.
2. Type in the following select statement and press Submit to run
the query. Wait for the Job Session to show that the Status is
Competed.
3. Click on the View Details link for the query.
SELECT * from features LIMIT 30;

Processing Weblogs with HDInsight 15
4. Go to the IE tab that displays the Job Details and you can see
the first 30 rows in the Job Output section that displays the
client_ip, event_counts, and std column values with TAB
delimiters.
The feature table results will later be used as input to determine which
of the ClientIP addresses may be from a bot.
5. To get a count of the results, run the following query using the
Hive Editor.
The result should be 633 rows.
Summary
You’ve accomplished the following:
Learned how to set up an HDInsight cluster
Basics of HIVE
How to use basic HIVE functionality
Run user defined functions for more advanced processing
Using HIVE to interact with HDInsight and Azure Blob Storage
Outcomes
SELECT COUNT(*) FROM features;

Processing Weblogs with HDInsight 16
At this point, your HDInsight cluster is setup as follows:
A processed dataset that contains features extracted from the
raw data
An HDInsight cluster set up and connected to your Azure Blob
Storage Account

Processing Weblogs with HDInsight 17
Overview
This lab is the second in a three-part series. Throughout the course of
all three labs, we will be creating a web service that takes web data,
processes it and tries to detect whether or not each IP address belongs
to a bot. There are three main steps:
First we need to process the data and extract features for our
machine learning algorithm to ingest using HDInsight and
HIVE.
Next we need to set up and train the machine learning
algorithm using Mahout.
In Part 2, we’ll accomplish the following:
Here we will use Mahout on HDInsight to train a bot detection
algorithm
We will also use that algorithm to detect bots in real data and
push the results to HDInsight
Setting up the Hive features_csv table
1. Click on the Notepad icon on the task bar and then press
Ctrl+O to open the file at
C:\SQLSCRIPTS\HDIWeblogHOL\HiveMahout.txt
This query will convert the tab delimited features table into a comma
delimited file as the features_csv table.
2. Select the first three Hive commands as highlighted above and
copy them to the clipboard. Keep this file open.
3. Switch back to Internet Explorer and go to the tab with the Hive
editor.
4. Select all the text from the prior query and delete it
5. Paste the text that creates the Hive features_csv table into the
Hive editor.
Machine Learning with Mahout

Processing Weblogs with HDInsight 18
6. Click Submit to run the query. While you are waiting for the
query to complete, skip ahead to the next section of this lab.
Enabling Remote Desktop for HDInsight
1. Click on the IE browser tab for the Azure Management portal
and click HDINSIGHT on the left pane.
2. Click on the CONFIGURATION link on the HDInsight getting
started page.
3. Click on ENABLE REMOTE at the bottom of the
page.
4. For the Configure Remote Desktop dialog, you need to enter
in the credentials used for the remote desktop session. The user
name must be different from ADMIN. Use the following values:
USER NAME: AzureAdmin
PASSWORD and CONFIRM PASSWORD: Pass@word12
EXPIRES ON: choose the date for tomorrow.

Processing Weblogs with HDInsight 19
5. Click the check to start the process.
Opening the remote desktop session to the cluster
1. Wait until Azure enables the CONNECT link at the bottom of
the page, then click on it. The CONNECT link downloads an
RDP file used to open the remote desktop session.
2. While you are waiting, go back to the tab with the Hive editor
and make sure the job session completed.

Processing Weblogs with HDInsight 20
3. Go back to the Azure portal to wait for the CONNECT
button is ready to select and click it.
4. Open up the file click Connect to open up a remote desktop
connection.
5. Enter in your password and click OK to connect.
6. Click OK for the certificate dialog.
7. On the remote desktop you should see a file labeled Hadoop
Command Line, open up the shortcut.

Processing Weblogs with HDInsight 21
Running the Mahout job
1. Minimize the HDInsight remote desktop window.
2. Click on the Notepad icon on the task bar. Then, press Ctrl+O
and open the following file at
C:\SQLSCRIPTS\HDIWeblogHOL\MahoutCMDs.txt
3. Copy the first hadoop command in the file as shown below to
the clipboard.
This command copies the data.csv file from Azure storage used as the
HDFS for the cluster to the cluster head node’s local file system.
hadoop fs -get /example/data/example/data/data.csv
C:\apps\dist\examples\data\data.csv

Processing Weblogs with HDInsight 22
4. Go back to your remote desktop session and then right click at
the end of the command prompt and paste the command.
5. Press enter to run the command.
6. To view the contents of the data.csv file, use the File Explorer to
open the file using Notepad.
This is a 633 row file that has either a 0 or 1 in the bot column followed
by the count of events for the period and the standard deviation of the
time stamps for the sample bot.
7. Minimize the remote desktop window and then copy the
second hadoop command in the MahoutCMDs.txt file to the
clipboard that looks as follows:

Processing Weblogs with HDInsight 23
8. Go back to the remote desktop window, right click at the end
of the command prompt and paste the command.
9. Press enter to run the map reduce job. When the job
completes, your output should look as follows:
The line above takes the input file data.csv and stores an output file
bots.model that holds the model parameters. The Target argument
specifies the column name to train on, in this case bots. The categories
argument indicates there are two classes for bot, 0 or 1. The Predictors
argument specifies which columns are used to determine the bot
column. The Types argument indicates the type of data is numerical.
Passes specifies the number of times to pass over the data. Lambda is
our regularization factor, which helps control against over fitting to the

Processing Weblogs with HDInsight 24
training data. Rate is our learning rate and Features is used to indicate
the dimension of the feature space we are hashing into. Now to run the
model on testing data we must also grab the real data from HDFS
using the same command as above.
Convert the features_csv Hive table into a csv file that Mahout
understands
1. Copy the echo statement from the MahoutCMDs.txt window,
paste it into the command window and run it. This builds the
header line for the features.csv file.
2. Run the next Hadoop file system command to copy the
features_csv file from the Hive table you created at the
beginning of this section. Then, paste the command into the
Hadoop command line window.
Run the Mahout job using the features.csv file as input using the
bot.model training file
1. Run the next Hadoop statement to run the Mahout job to
create the output scoring model for potential bots by copying
the text from the MahoutCMDs.txt file, pasting it into the
Hadoop command line and executing the command.
The output is streamed into the scores.csv file.

Processing Weblogs with HDInsight 25
Load the results into a Hive table
1. Run the fs –mkdir and –put commands to copy the scores.csv
file into the ml-results directory on the cluster for loading into a
Hive table.
2. Go to open HiveMahout.txt file and then highlight the lines
shown below and copy them to the clipboard.

Processing Weblogs with HDInsight 26
These commands will create an Hive table to use over the scores.csv file
located in the /example/data/ml-results directory and then output the
first 30 rows.
3. Go to the Hive Editor tab in IE and delete the existing lines in
the editor and then paste in the new lines. Click Submit to run
the query.
4. Click on the View Details link when the Status shows as
Completed to view the results.
The NULL values at the top represent the column names in the CSV file.
Each row represents the row in the row in the features.csv file. In the
cases like the sixth row down where the first column value matches the
second column value, that represents the row in the features.csv file
that represents a traffic from a bot.
Processing Weblogs with HDInsight 27
Summary
You’ve accomplished the following:
Basic knowledge of Mahout logistic regression algorithm.
Know how to move data to and from HDInsight cluster to head
node.
Outcomes
A trained Mahout bot detection algorithm.
A real dataset of predicted bots on your HDInsight cluster.
Overview
This lab is the third in a three-part series. Throughout the course of all
three labs, we will be creating a web service that takes web data,
processes it and tries to detect whether or not each IP address belongs
to a bot. There are three main steps:
First we need to process the data and extract features for our
machine learning algorithm to ingest using HDInsight and
HIVE.
Next we need to set up and train the machine learning
algorithm using MLStudio.
Finally, we need to output the results to HBase so we can
quickly analyze them using Excel.
In Lab 3, we’ll accomplish the following:
Import Hive data into Microsoft Excel from a running instance
of HDInsight using an ODBC driver.
Import a text file into Microsoft Excel from an Azure storage
account (blob). The text file is a sample outcome from an
HDInsight process.
Introduction
We’ll be using two methods: ODBC Driver and Power Query. Here is a
comparison of the two approaches.
ODBC Driver
Requires running instance of HDInsight cluster to connect to
hive tables.
Data must be in internal hive tables. Driver won’t show external
hive table files.
No need to hunt for hive data tables. The driver displays a list.
Visualizing data in Excel

Processing Weblogs with HDInsight 28
Power Query
No need for a running instance of an HDInsight cluster.
Can pull data from any text file on Azure blob
User must hunt around for the data files
Getting started with the ODBC driver
On the SQLONE lab computer, the Hive ODBC driver is already
installed after downloading it from http://www.microsoft.com/en-
us/download/details.aspx?id=40886.
1. Click start then type Data Sources.
2. Choose ODBC Data Sources (64-bit) from the list.
3. In the User Data Source tab click the button Add…
4. In the Create New Data Source dialog select Microsoft Hive
ODBC Driver.

Processing Weblogs with HDInsight 29
5. Click Finish.
6. Fill in the resulting dialog appropriately. In the following
example my HDInsight cluster in named botdetection. For Host
type the name of your cluster + .azurehdinsight.net

Processing Weblogs with HDInsight 30
7. Click Test. You should see a dialog like the following:

Processing Weblogs with HDInsight 31
8. Advanced Options don’t need to be modified for this sample.
9. Click OK to create the connection
Use the connection in Excel
1. Open a new Excel workbook
2. Click the DATA tab, then select From Other Sources / From
Data Connection Wizard in Get External Data tools group.

Processing Weblogs with HDInsight 32
3. In the connection wizard select ODBC DSN then click Next >
4. From the ODBC data sources list select the source you created
in step 1 then click Next >
5. Enter your password again in the following dialog and click
Test again to make sure the connection works. Then click OK.
6. Select scored from the list of available tables when prompted
then click Next >.

Processing Weblogs with HDInsight 33
7. Use the defaults on the last page of the wizard or optionally
name the data connection file and give a description, friendly
name, and search keywords. Check on Save password in file,
then click Finish.
8. In the Import Data dialog select Table and cell where you want
to place the data. Then click OK. Optionally filter the query
before clicking OK.

Processing Weblogs with HDInsight 34
9. Note when the query runs the status bar will state that it’s
waiting.
10. When the query finishes the data will be loaded into the
workbook. Note, the blank row on row 2 represents the
embedded column names in the scored.csv table.

Processing Weblogs with HDInsight 35
Modifying the query when loading into Excel
The key advantage to using the Hive ODBC driver is the ability to alter
the query. Let’s add a WHERE clause to the query to remove the blank
line.
1. Click on the DATA ribbon and click Connections.

Processing Weblogs with HDInsight 36
2. Click on the Properties button for the HIVE scored connection
in the Workbook Connections dialog. Then, click on the
Definition tab in the Connection Properties dialog.

Processing Weblogs with HDInsight 37
3. In the Command text region, add the following WHERE clause
as shown below.
WHERE bot_target IS NOT NULL

Processing Weblogs with HDInsight 38
4. Click OK and the Yes to the message box that asks you to
proceed with changes to the connection.
5. Click OK to close the Connection dialog. Then click Close to
close the Work Book Connections dialog.
6. Click the Refresh All command in the ribbon.
7. When Excel displays the ODBC Driver Connection Dialog, enter
in your password for the HDInsight cluster and click OK.

Processing Weblogs with HDInsight 39
8. Once the query execution completes, you should see the
following result in the workbook.

Processing Weblogs with HDInsight 40
Loading data from Azure storage using Power Query
The following lists the details of pulling data from a hive table, or files,
located in an Azure Storage Container. These instructions do not cover
running a Hive query, but rather pull sample data provided by
Azure/HDInsight. In this exercise, you will load the data from the Hive
features_csv file that aligns with the rows of data in the Hive scored
table from the previous exercise.
1. Click the POWER QUERY tab, then select From Other Sources
/ From Windows Azure HDInsight in Get External Data tools
group.

Processing Weblogs with HDInsight 41
2. Enter the Account Name in the resulting dialog then click OK.
3. Enter the Account Key associated with the storage account
then click Save. You will need to go back to the Azure portal,
select your storage account and then click MANAGE ACCESS
KEYS from the storage account DASHBOARD. Then click the
copy button for the PRIMARY ACCESS KEY.
Then, paste the value into the Power Query dialog.

Processing Weblogs with HDInsight 42
4. From the Navigator on the right select the container that is the
same as the name for your HDInsight cluster where the data is
stored then click Edit.

Processing Weblogs with HDInsight 43
5. Scroll the display in the Query Editor to the right until you see
Folder Path. Then, click on the down button to display the
column actions pane. In the Search box, type in features_csv/
to display the blobs in the hive/warehouse directory where Hive
stores data for the cluster by default.

Processing Weblogs with HDInsight 44
6. Press enter to see the results. Click on the Binary link for the row
displayed to show the data in the features_csv table.
7. You will see that the column names are Column1, Column2 and
Column3.
8. Rename the columns using the following steps.

Processing Weblogs with HDInsight 45
9. Double Click on the column heading for Column1 to select the
column name.
10. Then type in the name client_ip and press enter to save the
change.
11. Change the name of Column2 to event_counts and Column3
to std.
Setting up a join column
You are going to join this result to the scored table that you loaded
using the Hiver ODBC driver. To do this, you need to add a row number
to the query.

Processing Weblogs with HDInsight 46
1. Click on the Add Column ribbon the Query Editor and click the
Add Index Column command. The result is an Index column
that starts with a value of 0.
2. Click File and the Close & Load command.
3. After the rows are loaded into Sheet2, click on Sheet1 to display
the Hive query results.
Processing Weblogs with HDInsight 47
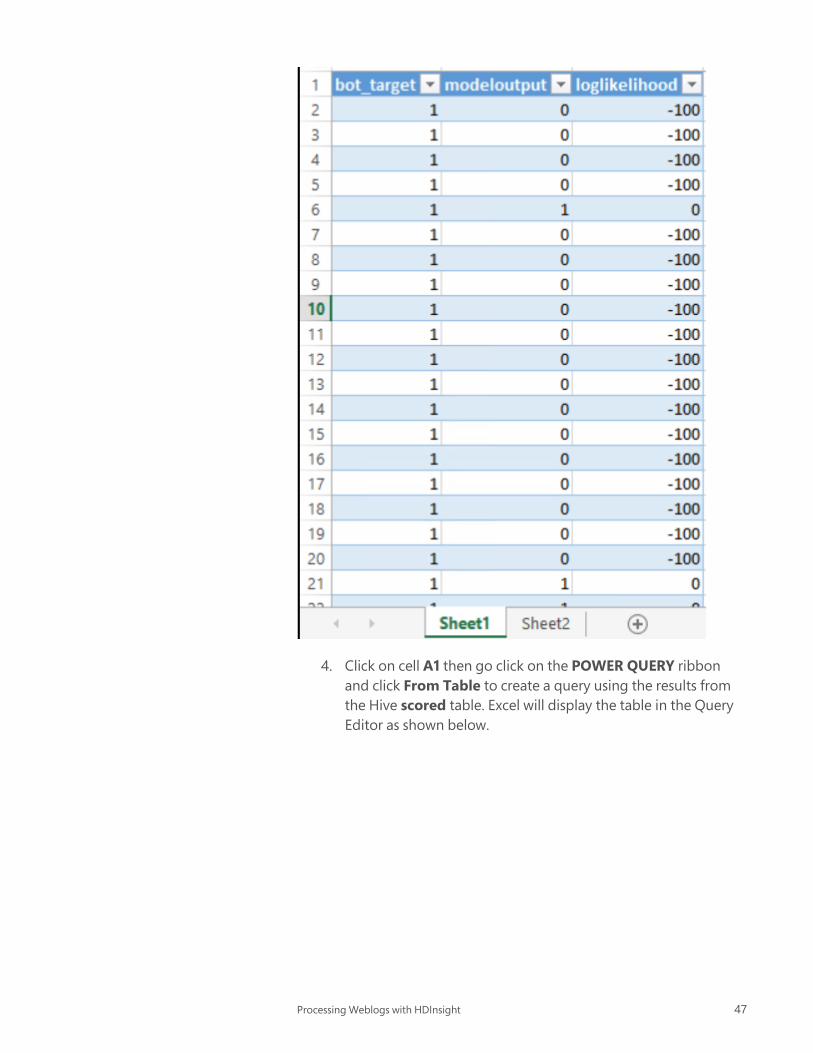
4. Click on cell A1 then go click on the POWER QUERY ribbon
and click From Table to create a query using the results from
the Hive scored table. Excel will display the table in the Query
Editor as shown below.

Processing Weblogs with HDInsight 48
5. Click on Add Column and then Add Index Column to add the
Index column to the Query Editor.

Processing Weblogs with HDInsight 49
Merging the two query results
1. Click on the Home ribbon for the Table_HIVE_scored Query
Editor. Then click Merge Queries over on the right side of the
ribbon.
2. Click on the drop down in the Merge dialog and click on the
table representing your cluster name.

Processing Weblogs with HDInsight 50
3. Click on the Index column for the top table and the Index
column for the bottom table to enable the OK button. Excel will
display a Privacy levels.
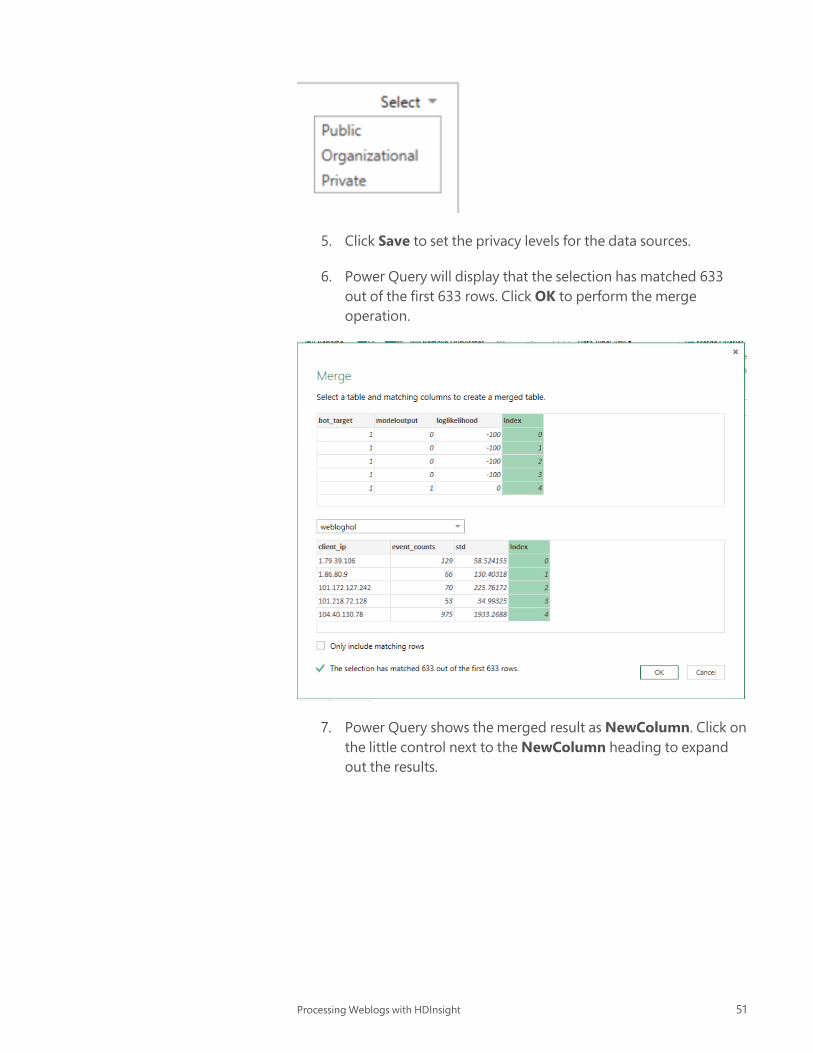
4. Click on each of the Select and then click on Public
Processing Weblogs with HDInsight 51
5. Click Save to set the privacy levels for the data sources.
6. Power Query will display that the selection has matched 633
out of the first 633 rows. Click OK to perform the merge
operation.
7. Power Query shows the merged result as NewColumn. Click on
the little control next to the NewColumn heading to expand
out the results.

Processing Weblogs with HDInsight 52
8. Deselect Index and click OK.
9. Click Close & Load to load the results into your workbook.
10. To correlate the client_ip addresses with the Mahout scored
results, click the drop down for the modeloutput column and
select the value of 1 and click OK.

Processing Weblogs with HDInsight 53
11. The modeloutput value of 1 means that the Mahout model
calculated that the bot_target value of 1 – meaning it was a bot
– as a bot.
Displaying the bot results using Power View
1. With focus still on Sheet3, click the INSERT ribbon – Power
View command.

Processing Weblogs with HDInsight 54
2. This will load up Power View with the ACTIVE Power View Fields
based on the data in the table.
3. In the Power View Fields pane, select only the modeloutput
and NewColumn.event_counts columns.

Processing Weblogs with HDInsight 55
4. For the modeloutput FIELD drop down, select Do not
summarize.
5. Click on Bar Chart -> Stacked bar to display a chart of the
results. Click the lower right corner of the chart and drag to fill
the top portion of the canvas.

Processing Weblogs with HDInsight 56
You can see that the majority of the page hits were due to bot activity.
Adding a Pie chart to show occurrences
1. Click in the blank area under the chart to deselect the chart.
2. In the Power View Fields list, expand the
Table_HIVE_scored_2 table and select the modeloutput and
bot_target columns.
3. Click on the drop down for modeloutput in the FIELDS list and
click Do not summarize. The table data should look like this:

Processing Weblogs with HDInsight 57
4. Click on Other Chart and then Pie to display a Pie chart of the
data. Go ahead and resize the chart to look like this:
5. You can see that more unique client_ip addresses hit your site
that web than bots, but bots resulted in more traffic. From here,
you could go back into Sheet 3 and change your web site
firewall to block the client_ip addresses.
Outcomes
An Excel workbook with query results using HIVE ODBC and
HDInsight storage data using Power Query.
A Power Query result that combined the features_csv table data
with the Mahout scored table data.
A Power View chart that shows the count of bot and non-bot
hits from the web log data.
You can now close the workbook without saving changes.

Processing Weblogs with HDInsight 58
Let’s clean up the assets we have used during this hands on lab. Here
are the items which should be deleted from your subscription:
Delete the HDInsight cluster
1. Go to your Azure Management Portal.
2. Select the HDINSIGHT tab on the left hand side.
3. Click anywhere in the row of the cluster for the cluster you
created, except within the name cell as this will navigate into
the cluster
4. Click Delete
5. Confirm the delete action by clicking Yes.
Delete the storage account for the cluster
1. Once the HDInsight cluster is deleted, click on the STORAGE
tab on the left hand side.
Roll back Azure changes

Processing Weblogs with HDInsight 59
2. Click on the STATUS column for the storage account you used
for your HDInsight cluster and then click the DELETE command
at the bottom of the page.
3. Click YES to confirm the deletion of the account.
© 2014 Microsoft Corporation. All rights reserved.
By using this Hands-on Lab, you agree to the following terms:
The technology/functionality described in this Hands-on Lab is
provided by Microsoft Corporation in a “sandbox” testing environment
for purposes of obtaining your feedback and to provide you with a
learning experience. You may only use the Hands-on Lab to evaluate
such technology features and functionality and provide feedback to
Microsoft. You may not use it for any other purpose. You may not
modify, copy, distribute, transmit, display, perform, reproduce, publish,
license, create derivative works from, transfer, or sell this Hands-on Lab
or any portion thereof.
COPYING OR REPRODUCTION OF THE HANDS-ON LAB (OR ANY
PORTION OF IT) TO ANY OTHER SERVER OR LOCATION FOR FURTHER
REPRODUCTION OR REDISTRIBUTION IS EXPRESSLY PROHIBITED.
THIS HANDS-ONLAB PROVIDES CERTAIN SOFTWARE
TECHNOLOGY/PRODUCT FEATURES AND FUNCTIONALITY,
INCLUDING POTENTIAL NEW FEATURES AND CONCEPTS, IN A
SIMULATED ENVIRONMENT WITHOUT COMPLEX SET-UP OR
INSTALLATION FOR THE PURPOSE DESCRIBED ABOVE. THE
TECHNOLOGY/CONCEPTS REPRESENTED IN THIS HANDS-ON LAB
MAY NOT REPRESENT FULL FEATURE FUNCTIONALITY AND MAY NOT
WORK THE WAY A FINAL VERSION MAY WORK. WE ALSO MAY NOT
RELEASE A FINAL VERSION OF SUCH FEATURES OR CONCEPTS. YOUR
EXPERIENCE WITH USING SUCH FEATURES AND FUNCITONALITY IN A
PHYSICAL ENVIRONMENT MAY ALSO BE DIFFERENT.
Terms of use

Processing Weblogs with HDInsight 60
FEEDBACK. If you give feedback about the technology features,
functionality and/or concepts described in this Hands-on Lab to
Microsoft, you give to Microsoft, without charge, the right to use, share
and commercialize your feedback in any way and for any purpose. You
also give to third parties, without charge, any patent rights needed for
their products, technologies and services to use or interface with any
specific parts of a Microsoft software or service that includes the
feedback. You will not give feedback that is subject to a license that
requires Microsoft to license its software or documentation to third
parties because we include your feedback in them. These rights survive
this agreement.
MICROSOFT CORPORATION HEREBY DISCLAIMS ALL WARRANTIES
AND CONDITIONS WITH REGARD TO THE HANDS-ON LAB ,
INCLUDING ALL WARRANTIES AND CONDITIONS OF
MERCHANTABILITY, WHETHER EXPRESS, IMPLIED OR STATUTORY,
FITNESS FOR A PARTICULAR PURPOSE, TITLE AND NON-
INFRINGEMENT. MICROSOFT DOES NOT MAKE ANY ASSURANCES OR
REPRESENTATIONS WITH REGARD TO THE ACCURACY OF THE
RESULTS, OUTPUT THAT DERIVES FROM USE OF THE VIRTUAL LAB, OR
SUITABILITY OF THE INFORMATION CONTAINED IN THE VIRTUAL LAB
FOR ANY PURPOSE.
DISCLAIMER
This lab contains only a portion of new features and enhancements in
Microsoft SQL Server 2014. Some of the features might change in
future releases of the product. In this lab, you will learn about some,
but not all, new features.