product documentationdocs.embarcadero.com/products/appwave/appwave_4.2_en/appwav… ·...
TRANSCRIPT
Embarcadero® AppWave™ StudioQuick Start
Ve
Pu
Product Documentation
rsion 4.2
blished August, 2013
© 2013 Embarcadero Technologies, Inc. Embarcadero, the Embarcadero Technologies logos, and all other Embarcadero Technologies product or service names are trademarks or registered trademarks of Embarcadero Technologies, Inc. All other trademarks are property of their respective owners.
Embarcadero Technologies, Inc. is a leading provider of award-winning tools for application developers and database professionals so they can design systems right, build them faster and run them better, regardless of their platform or programming language. Ninety of the Fortune 100 and an active community of more than three million users worldwide rely on Embarcadero products to increase productivity, reduce costs, simplify change management and compliance and accelerate innovation. The company's flagship tools include: Embarcadero® Change Manager™, RAD Studio, DBArtisan®, Delphi®, ER/Studio®, JBuilder® and Rapid SQL®. Founded in 1993, Embarcadero is headquartered in San Francisco, with offices located around the world. Embarcadero is online at www.embarcadero.com.
July, 2013
Introduction . . . . . . . . . . . . . . . . . . . . . . . . . . . . . . . . . . . . . . . . . . . . . . . . . . . . . . . . . . . . . . . . . . . . . . . . . . . . . . 1
Getting Started. . . . . . . . . . . . . . . . . . . . . . . . . . . . . . . . . . . . . . . . . . . . . . . . . . . . . . . . . . . . . . . . . . . . . . . . . . . . . . . . . . .1
Creating an App . . . . . . . . . . . . . . . . . . . . . . . . . . . . . . . . . . . . . . . . . . . . . . . . . . . . . . . . . . . . . . . . . . . . . . . . . . . . . . . . . .2
Create an App with One Click . . . . . . . . . . . . . . . . . . . . . . . . . . . . . . . . . . . . . . . . . . . . . . . . . . . . . . . . . 3
Start the Mastering Process . . . . . . . . . . . . . . . . . . . . . . . . . . . . . . . . . . . . . . . . . . . . . . . . . . . . . . . . . 4
Recording. . . . . . . . . . . . . . . . . . . . . . . . . . . . . . . . . . . . . . . . . . . . . . . . . . . . . . . . . . . . . . . . . . . . . . . . 7
Create AppWave Supported or Custom App from Install . . . . . . . . . . . . . . . . . . . . . . . . . . . . . . . . . 13
Start . . . . . . . . . . . . . . . . . . . . . . . . . . . . . . . . . . . . . . . . . . . . . . . . . . . . . . . . . . . . . . . . . . . . . . . . . . . 14
Launch & Brand . . . . . . . . . . . . . . . . . . . . . . . . . . . . . . . . . . . . . . . . . . . . . . . . . . . . . . . . . . . . . . . . . . 17
App. . . . . . . . . . . . . . . . . . . . . . . . . . . . . . . . . . . . . . . . . . . . . . . . . . . . . . . . . . . . . . . . . . . . . . . . . . . . 17
Test . . . . . . . . . . . . . . . . . . . . . . . . . . . . . . . . . . . . . . . . . . . . . . . . . . . . . . . . . . . . . . . . . . . . . . . . . . . . 18
Broadcast . . . . . . . . . . . . . . . . . . . . . . . . . . . . . . . . . . . . . . . . . . . . . . . . . . . . . . . . . . . . . . . . . . . . . . . 18
Using the App . . . . . . . . . . . . . . . . . . . . . . . . . . . . . . . . . . . . . . . . . . . . . . . . . . . . . . . . . . . . . . . . . . . 21
Create AppWave Supported or Custom App from Scratch . . . . . . . . . . . . . . . . . . . . . . . . . . . . . . . . 22
Start . . . . . . . . . . . . . . . . . . . . . . . . . . . . . . . . . . . . . . . . . . . . . . . . . . . . . . . . . . . . . . . . . . . . . . . . . . . 23
Launch& Brand . . . . . . . . . . . . . . . . . . . . . . . . . . . . . . . . . . . . . . . . . . . . . . . . . . . . . . . . . . . . . . . . . . 24
App. . . . . . . . . . . . . . . . . . . . . . . . . . . . . . . . . . . . . . . . . . . . . . . . . . . . . . . . . . . . . . . . . . . . . . . . . . . . 25
Test . . . . . . . . . . . . . . . . . . . . . . . . . . . . . . . . . . . . . . . . . . . . . . . . . . . . . . . . . . . . . . . . . . . . . . . . . . . . 25
Broadcast . . . . . . . . . . . . . . . . . . . . . . . . . . . . . . . . . . . . . . . . . . . . . . . . . . . . . . . . . . . . . . . . . . . . . . . 26
Using the App . . . . . . . . . . . . . . . . . . . . . . . . . . . . . . . . . . . . . . . . . . . . . . . . . . . . . . . . . . . . . . . . . . . 29
Create AppWave Supported WebApp. . . . . . . . . . . . . . . . . . . . . . . . . . . . . . . . . . . . . . . . . . . . . . . . . 31
Launch & Brand . . . . . . . . . . . . . . . . . . . . . . . . . . . . . . . . . . . . . . . . . . . . . . . . . . . . . . . . . . . . . . . . . . 33
App. . . . . . . . . . . . . . . . . . . . . . . . . . . . . . . . . . . . . . . . . . . . . . . . . . . . . . . . . . . . . . . . . . . . . . . . . . . . 34
Test . . . . . . . . . . . . . . . . . . . . . . . . . . . . . . . . . . . . . . . . . . . . . . . . . . . . . . . . . . . . . . . . . . . . . . . . . . . . 34
Broadcast . . . . . . . . . . . . . . . . . . . . . . . . . . . . . . . . . . . . . . . . . . . . . . . . . . . . . . . . . . . . . . . . . . . . . . . 34
Using the App . . . . . . . . . . . . . . . . . . . . . . . . . . . . . . . . . . . . . . . . . . . . . . . . . . . . . . . . . . . . . . . . . . . 35
Add Native Installer to AppWave Catalog . . . . . . . . . . . . . . . . . . . . . . . . . . . . . . . . . . . . . . . . . . . . . . 36
EMBARCADERO® APPWAVE™ STUDIO 4.2 QUICK START GUIDE 1

2 EMBARCADERO® APPWAVE™ STUDIO 4.2 QUICK START GUIDE
INTRODUCTION
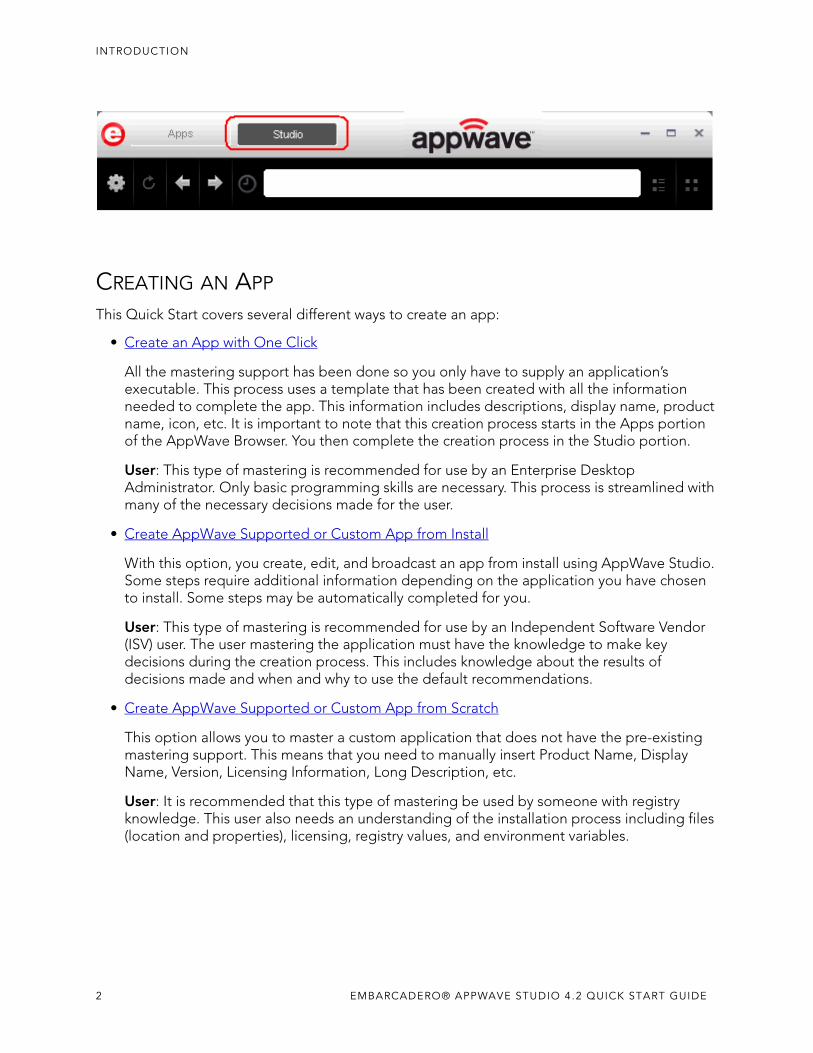
The AppWave Studio is an application within the AppWave Browser where you can master app versions of existing applications or create app versions from scratch. The mastering process creates an application that can be streamed from AppWave and then run locally on your desktop without installation. This option allows most applications to be run on a locked-down desktop. There are no conflicts with other applications, no writing to the system areas of their registry, or modifying shared DLLs.
Independent Software Vendors must master the apps they plan to sell in the AppWave Store. During the mastering process they set application types and licensing. For more information please see: The Independent Software Vendor Portal User Guide.
The AppWave Browser is hosted outside of your site and is managed by Embarcadero. This quick start walks you through the basic steps of mastering applications five different ways:
• Create an App with One Click
• Create AppWave Supported or Custom App from Install
• Create AppWave Supported or Custom App from Scratch
• Create AppWave Supported WebApp
• Add Native Installer to AppWave Catalog
For additional information on AppWave Studio please refer to the online help AppWave Studio User Guide.
GETTING STARTED
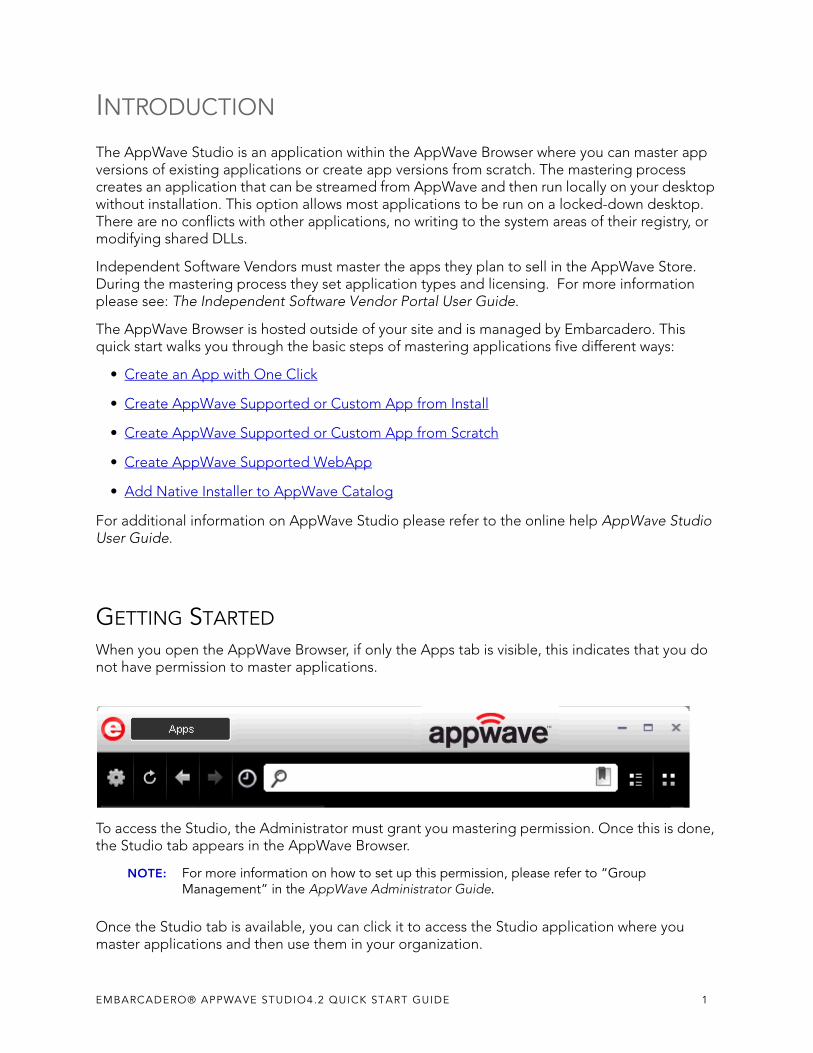
When you open the AppWave Browser, if only the Apps tab is visible, this indicates that you do not have permission to master applications.
To access the Studio, the Administrator must grant you mastering permission. Once this is done, the Studio tab appears in the AppWave Browser.
NOTE: For more information on how to set up this permission, please refer to “Group Management” in the AppWave Administrator Guide.
Once the Studio tab is available, you can click it to access the Studio application where you master applications and then use them in your organization.
EMBARCADERO® APPWAVE STUDIO4.2 QUICK START GUIDE 1
INTRODUCTION
CREATING AN APP
This Quick Start covers several different ways to create an app:
• Create an App with One Click
All the mastering support has been done so you only have to supply an application’s executable. This process uses a template that has been created with all the information needed to complete the app. This information includes descriptions, display name, product name, icon, etc. It is important to note that this creation process starts in the Apps portion of the AppWave Browser. You then complete the creation process in the Studio portion.
User: This type of mastering is recommended for use by an Enterprise Desktop Administrator. Only basic programming skills are necessary. This process is streamlined with many of the necessary decisions made for the user.
• Create AppWave Supported or Custom App from Install
With this option, you create, edit, and broadcast an app from install using AppWave Studio. Some steps require additional information depending on the application you have chosen to install. Some steps may be automatically completed for you.
User: This type of mastering is recommended for use by an Independent Software Vendor (ISV) user. The user mastering the application must have the knowledge to make key decisions during the creation process. This includes knowledge about the results of decisions made and when and why to use the default recommendations.
• Create AppWave Supported or Custom App from Scratch
This option allows you to master a custom application that does not have the pre-existing mastering support. This means that you need to manually insert Product Name, Display Name, Version, Licensing Information, Long Description, etc.
User: It is recommended that this type of mastering be used by someone with registry knowledge. This user also needs an understanding of the installation process including files (location and properties), licensing, registry values, and environment variables.
2 EMBARCADERO® APPWAVE STUDIO 4.2 QUICK START GUIDE
INTRODUCTION
• Create AppWave Supported WebApp
You can create an application that is accessible via an Internet Browser typically executed on an application server. This app is hosted either by an Enterprise customer directly or is hosted externally accessed as a "cloud" service. An external app would be anything you can access on the public internet as well as purpose built on company intranets.
User: Once an WebApp is mastered, the AppWave Admin has an ideal platform for distributing, monitoring, and controlling access to WebApps for IT departments. Also, it can be cataloged, including both internally available WebApps and controlled-access external WebApps. The AppWave Browser user can catalog, discover, and rate/review WebApps for end-users. The AppWave Studio Author can master apps for the display and execution of WebApps from within the AppWave Browser.
• Add Native Installer to AppWave Catalog
With this feature you can distribute software that cannot be easily mastered into stream apps. Some examples would be native 64-bit software, printer drivers, and software establishing Windows services. You can also distribute data and media content packaged as installers. Some examples would be data models, training materials and manuals, and data sets.
User: It is recommended that this type of mastering be used by someone with registry knowledge. This user also needs an understanding of the installation process including files (location and properties), licensing, registry values, and environment variables.
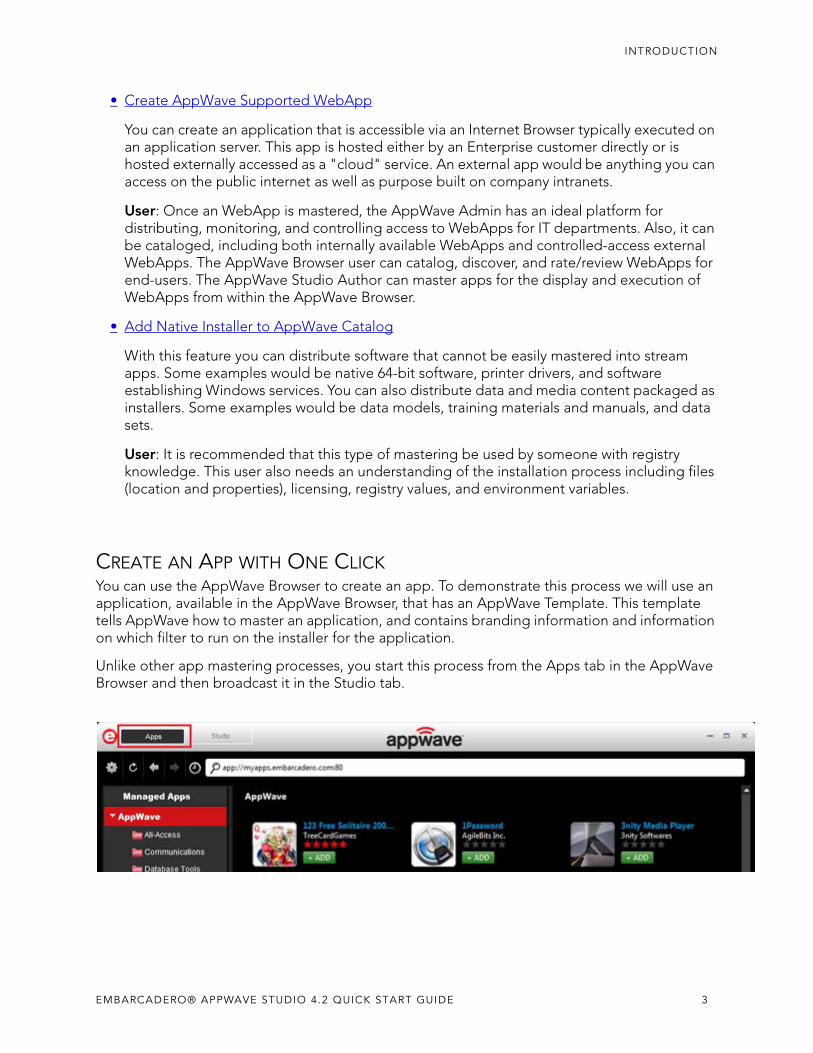
CREATE AN APP WITH ONE CLICKYou can use the AppWave Browser to create an app. To demonstrate this process we will use an application, available in the AppWave Browser, that has an AppWave Template. This template tells AppWave how to master an application, and contains branding information and information on which filter to run on the installer for the application.
Unlike other app mastering processes, you start this process from the Apps tab in the AppWave Browser and then broadcast it in the Studio tab.
EMBARCADERO® APPWAVE STUDIO 4.2 QUICK START GUIDE 3
INTRODUCTION
START THE MASTERING PROCESS1 We are going to use the !Quick Screen Capture application for this process. This app is an
image grabber and image editing tool. So first we need to download the executable for a free trial from http://www.mediachance.com/free/multimon.htm.
2 Save this executable in the root directory.
3 In Apps, search ( ) for “AppWave Template” and all the applications
with that designation are listed. This template is indicated by an icon ( ) located to the right of the application icon.
NOTE: Click View All to see a complete list of the apps found in your search.
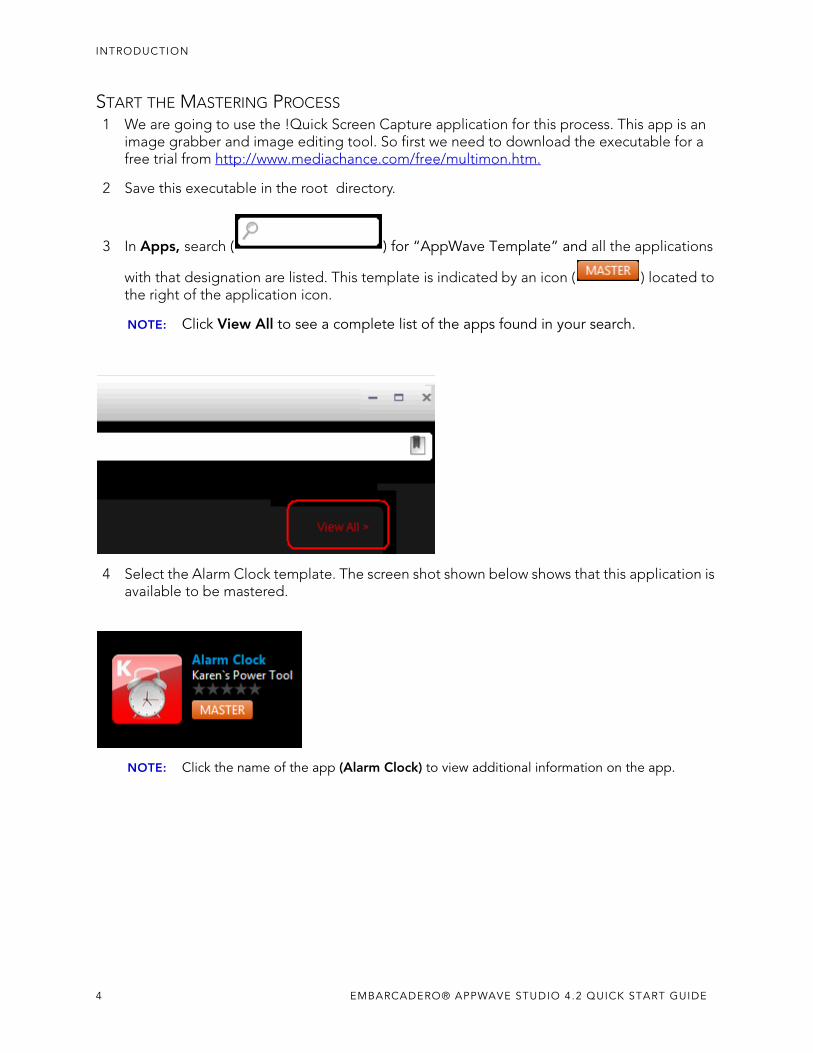
4 Select the Alarm Clock template. The screen shot shown below shows that this application is available to be mastered.
NOTE: Click the name of the app (Alarm Clock) to view additional information on the app.
4 EMBARCADERO® APPWAVE STUDIO 4.2 QUICK START GUIDE
INTRODUCTION
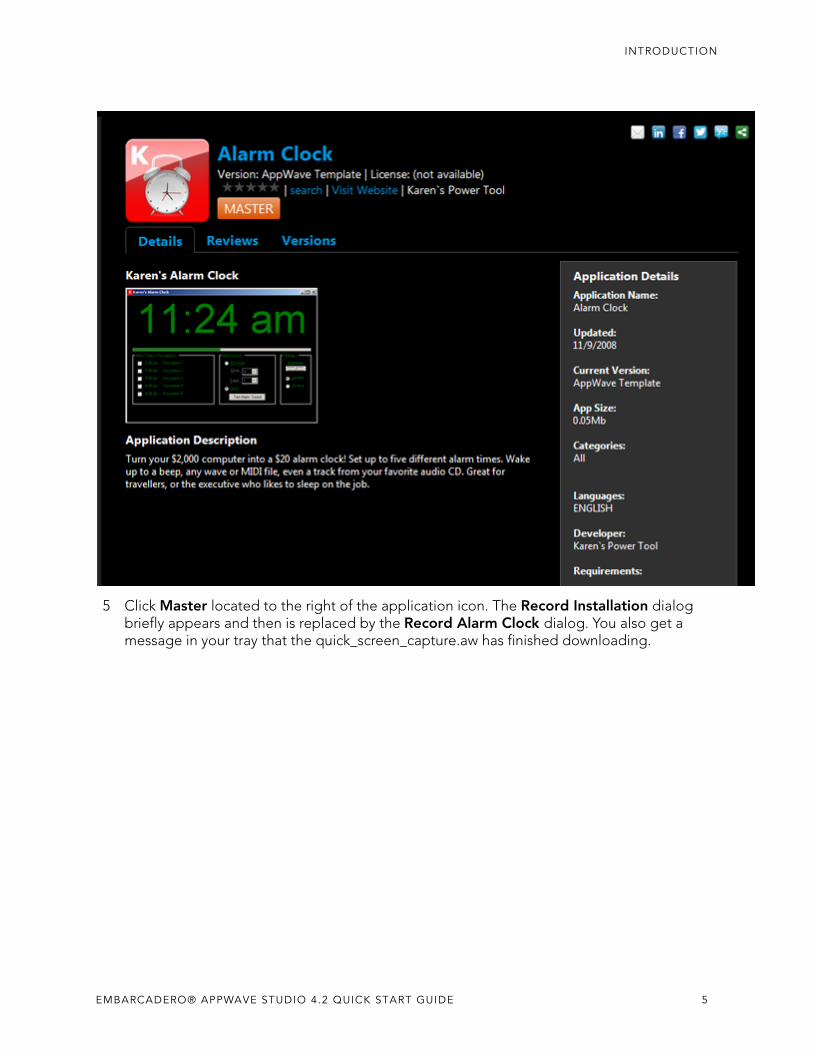
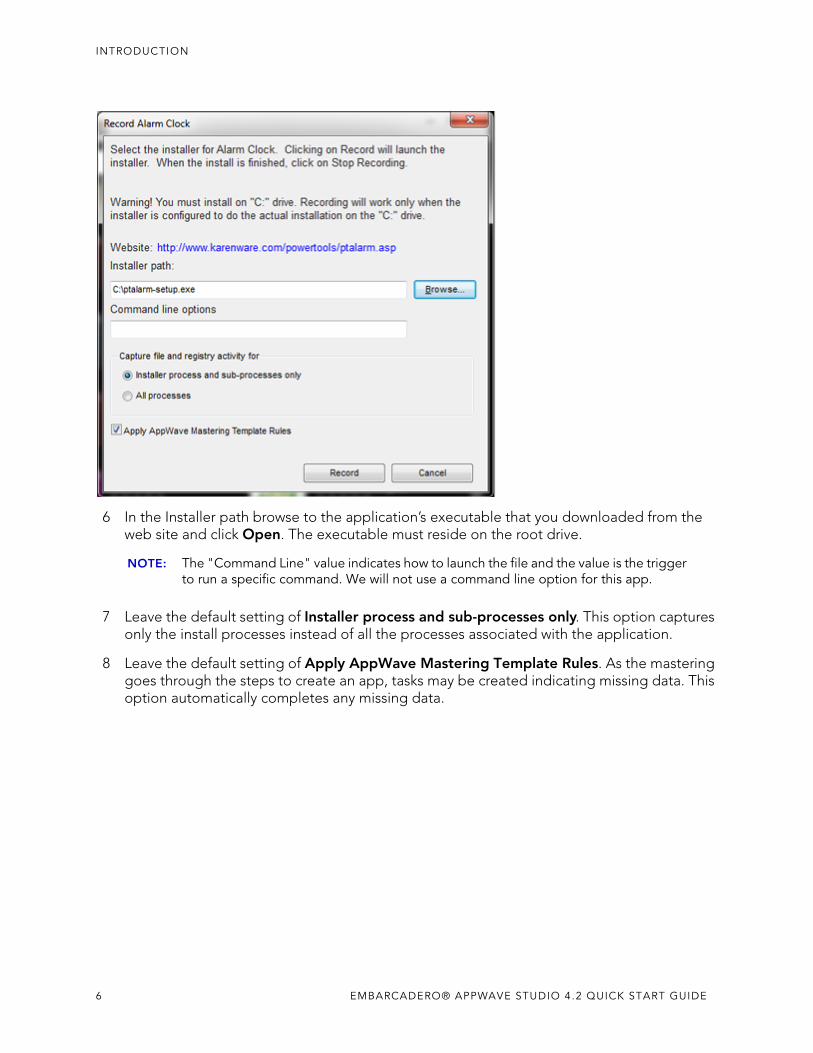
5 Click Master located to the right of the application icon. The Record Installation dialog briefly appears and then is replaced by the Record Alarm Clock dialog. You also get a message in your tray that the quick_screen_capture.aw has finished downloading.
EMBARCADERO® APPWAVE STUDIO 4.2 QUICK START GUIDE 5
INTRODUCTION
6 In the Installer path browse to the application’s executable that you downloaded from the web site and click Open. The executable must reside on the root drive.
NOTE: The "Command Line" value indicates how to launch the file and the value is the trigger to run a specific command. We will not use a command line option for this app.
7 Leave the default setting of Installer process and sub-processes only. This option captures only the install processes instead of all the processes associated with the application.
8 Leave the default setting of Apply AppWave Mastering Template Rules. As the mastering goes through the steps to create an app, tasks may be created indicating missing data. This option automatically completes any missing data.
6 EMBARCADERO® APPWAVE STUDIO 4.2 QUICK START GUIDE
INTRODUCTION
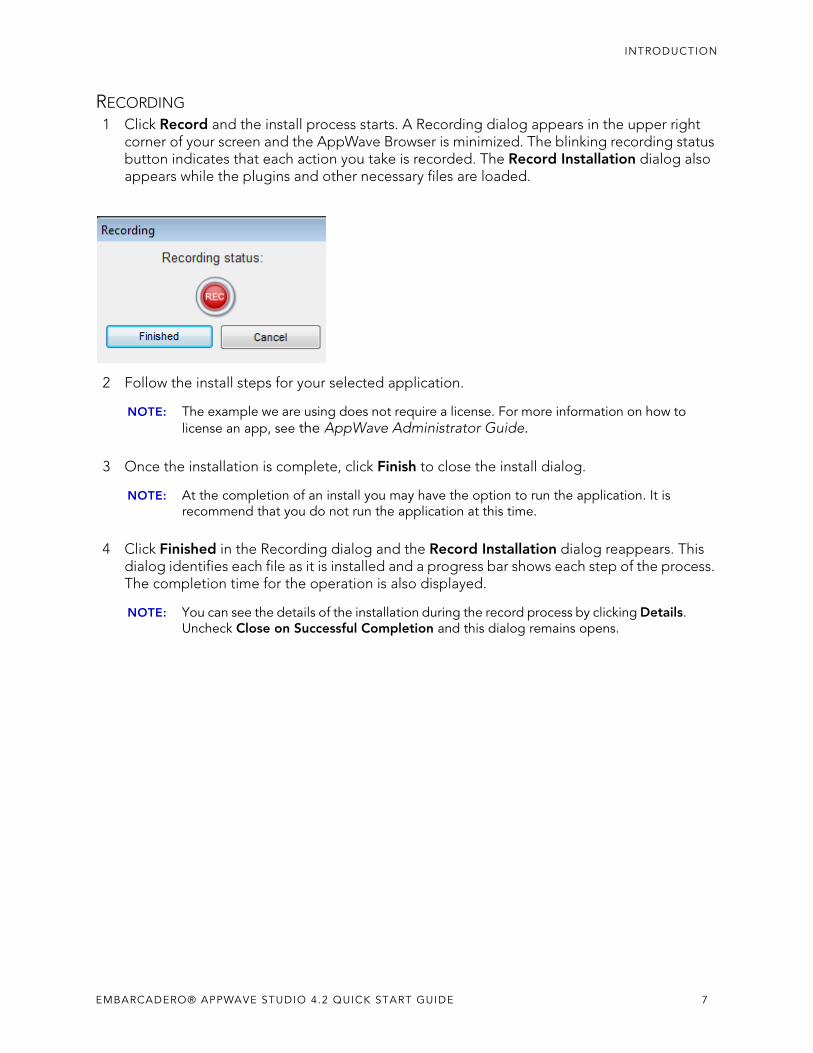
RECORDING1 Click Record and the install process starts. A Recording dialog appears in the upper right
corner of your screen and the AppWave Browser is minimized. The blinking recording status button indicates that each action you take is recorded. The Record Installation dialog also appears while the plugins and other necessary files are loaded.
2 Follow the install steps for your selected application.
NOTE: The example we are using does not require a license. For more information on how to license an app, see the AppWave Administrator Guide.
3 Once the installation is complete, click Finish to close the install dialog.
NOTE: At the completion of an install you may have the option to run the application. It is recommend that you do not run the application at this time.
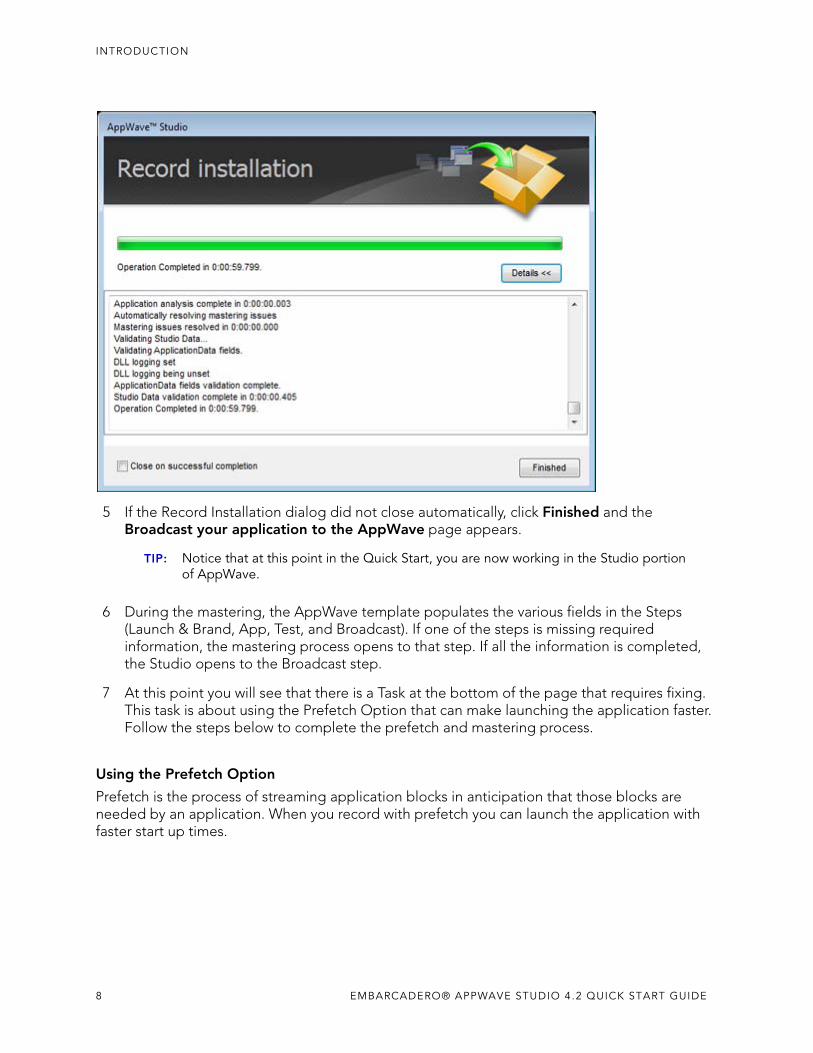
4 Click Finished in the Recording dialog and the Record Installation dialog reappears. This dialog identifies each file as it is installed and a progress bar shows each step of the process. The completion time for the operation is also displayed.
NOTE: You can see the details of the installation during the record process by clicking Details. Uncheck Close on Successful Completion and this dialog remains opens.
EMBARCADERO® APPWAVE STUDIO 4.2 QUICK START GUIDE 7
INTRODUCTION
5 If the Record Installation dialog did not close automatically, click Finished and the Broadcast your application to the AppWave page appears.
TIP: Notice that at this point in the Quick Start, you are now working in the Studio portion of AppWave.
6 During the mastering, the AppWave template populates the various fields in the Steps (Launch & Brand, App, Test, and Broadcast). If one of the steps is missing required information, the mastering process opens to that step. If all the information is completed, the Studio opens to the Broadcast step.
7 At this point you will see that there is a Task at the bottom of the page that requires fixing. This task is about using the Prefetch Option that can make launching the application faster. Follow the steps below to complete the prefetch and mastering process.
Using the Prefetch Option
Prefetch is the process of streaming application blocks in anticipation that those blocks are needed by an application. When you record with prefetch you can launch the application with faster start up times.
8 EMBARCADERO® APPWAVE STUDIO 4.2 QUICK START GUIDE
INTRODUCTION
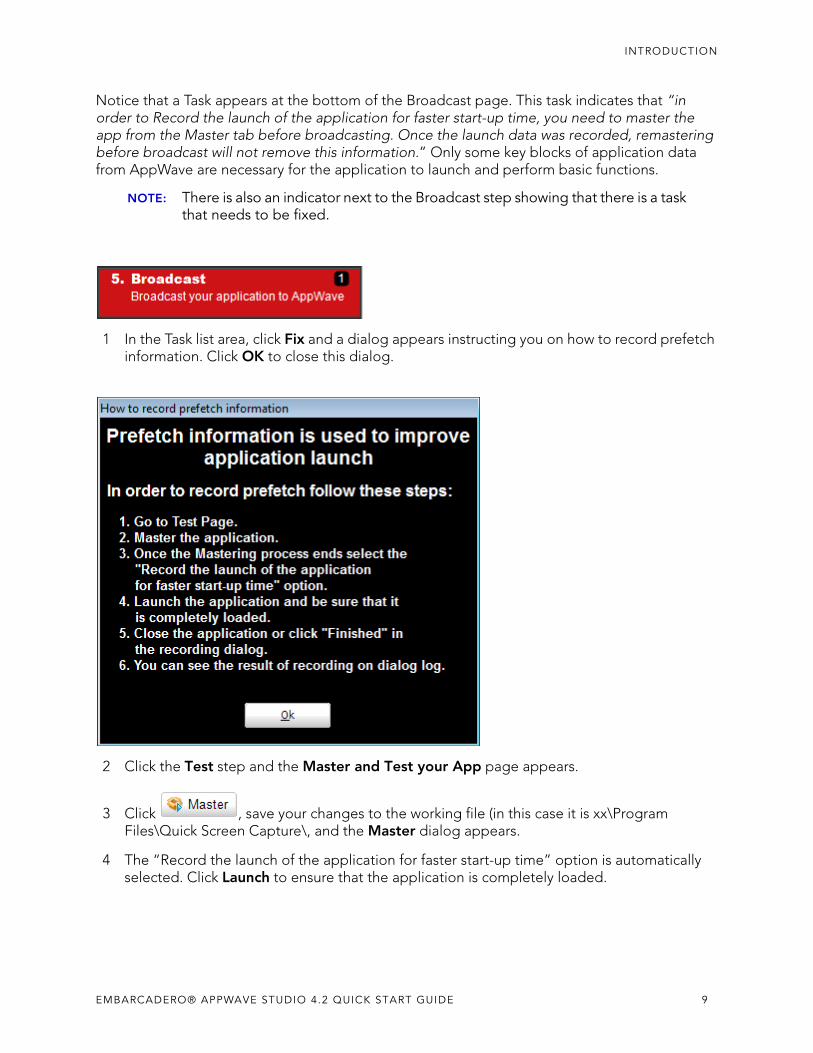
Notice that a Task appears at the bottom of the Broadcast page. This task indicates that “in order to Record the launch of the application for faster start-up time, you need to master the app from the Master tab before broadcasting. Once the launch data was recorded, remastering before broadcast will not remove this information.” Only some key blocks of application data from AppWave are necessary for the application to launch and perform basic functions.
NOTE: There is also an indicator next to the Broadcast step showing that there is a task that needs to be fixed.
1 In the Task list area, click Fix and a dialog appears instructing you on how to record prefetch information. Click OK to close this dialog.
2 Click the Test step and the Master and Test your App page appears.
3 Click , save your changes to the working file (in this case it is xx\Program Files\Quick Screen Capture\, and the Master dialog appears.
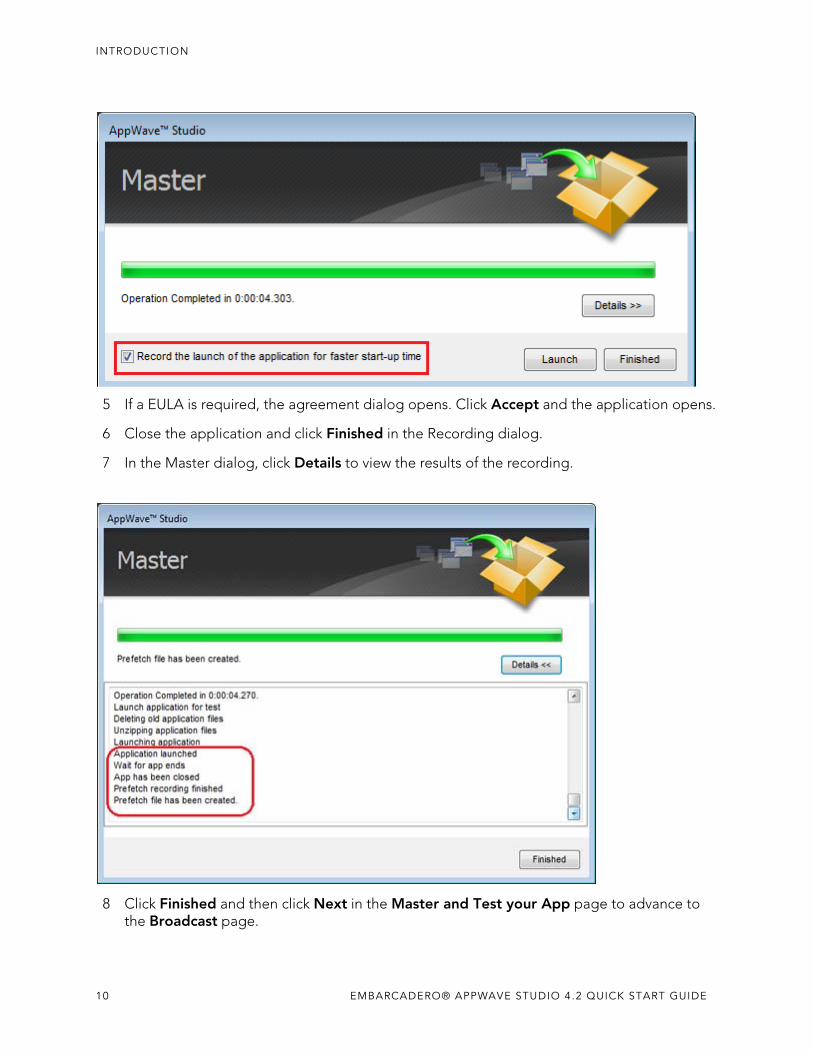
4 The “Record the launch of the application for faster start-up time” option is automatically selected. Click Launch to ensure that the application is completely loaded.
EMBARCADERO® APPWAVE STUDIO 4.2 QUICK START GUIDE 9
INTRODUCTION
5 If a EULA is required, the agreement dialog opens. Click Accept and the application opens.
6 Close the application and click Finished in the Recording dialog.
7 In the Master dialog, click Details to view the results of the recording.
8 Click Finished and then click Next in the Master and Test your App page to advance to the Broadcast page.
10 EMBARCADERO® APPWAVE STUDIO 4.2 QUICK START GUIDE
INTRODUCTION
9 Click Broadcast and you are asked to save your current working file before broadcasting. Save your files once again in the same location.
10 Click Yes and save the file. Note that the app file has a .tca file extension. The Broadcast dialog opens and shows the mastering processes. It also displays the completion time.
NOTE: You can click Details to view the steps taken during the deploy process.
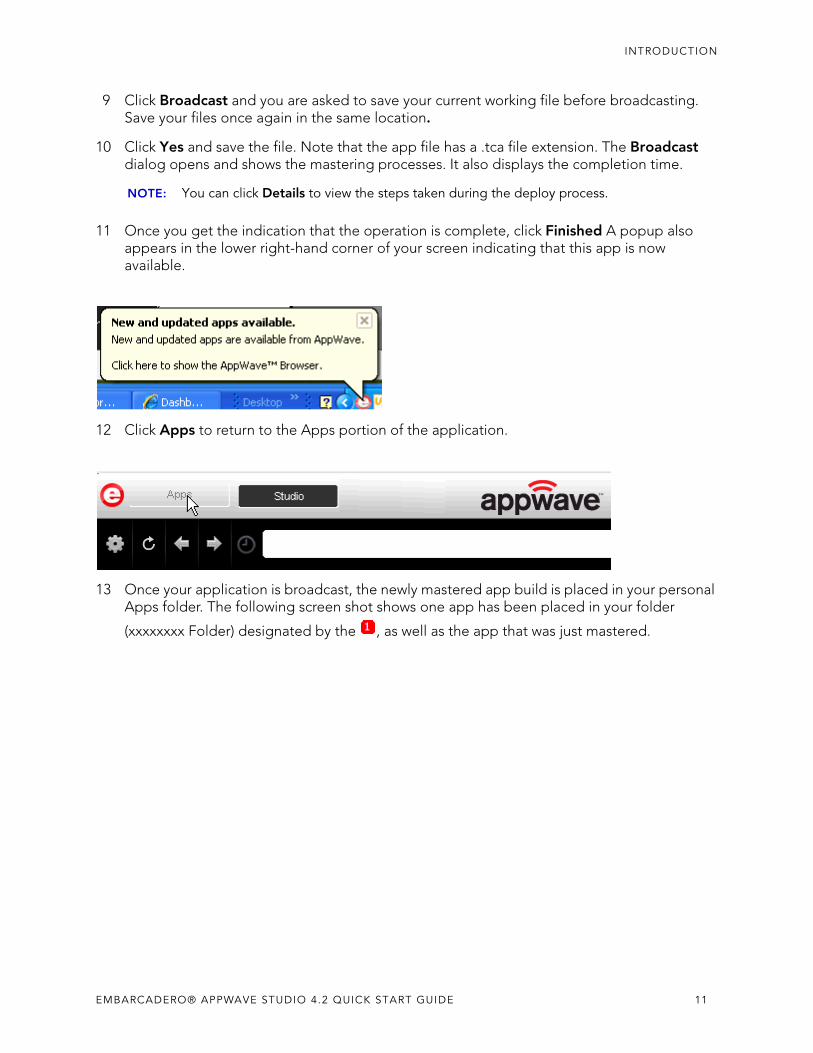
11 Once you get the indication that the operation is complete, click Finished A popup also appears in the lower right-hand corner of your screen indicating that this app is now available.
12 Click Apps to return to the Apps portion of the application.
13 Once your application is broadcast, the newly mastered app build is placed in your personal Apps folder. The following screen shot shows one app has been placed in your folder
(xxxxxxxx Folder) designated by the , as well as the app that was just mastered.
EMBARCADERO® APPWAVE STUDIO 4.2 QUICK START GUIDE 11
INTRODUCTION
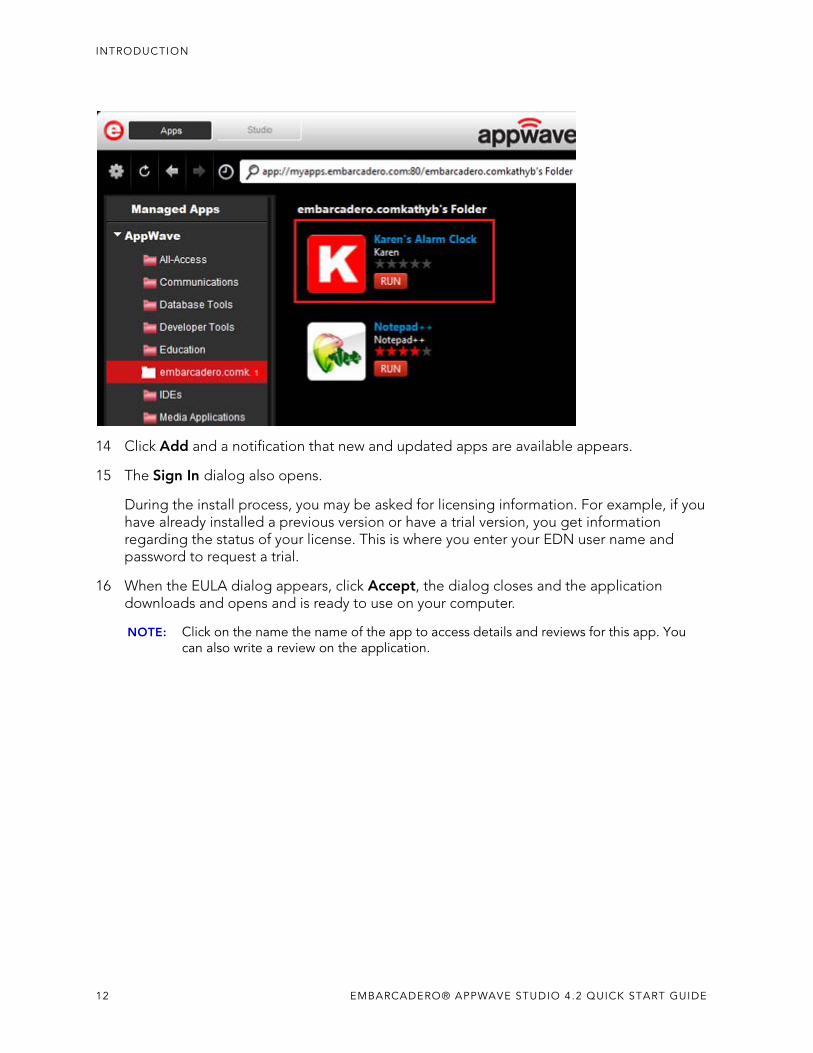
14 Click Add and a notification that new and updated apps are available appears.
15 The Sign In dialog also opens.
During the install process, you may be asked for licensing information. For example, if you have already installed a previous version or have a trial version, you get information regarding the status of your license. This is where you enter your EDN user name and password to request a trial.
16 When the EULA dialog appears, click Accept, the dialog closes and the application downloads and opens and is ready to use on your computer.
NOTE: Click on the name the name of the app to access details and reviews for this app. You can also write a review on the application.
12 EMBARCADERO® APPWAVE STUDIO 4.2 QUICK START GUIDE
INTRODUCTION
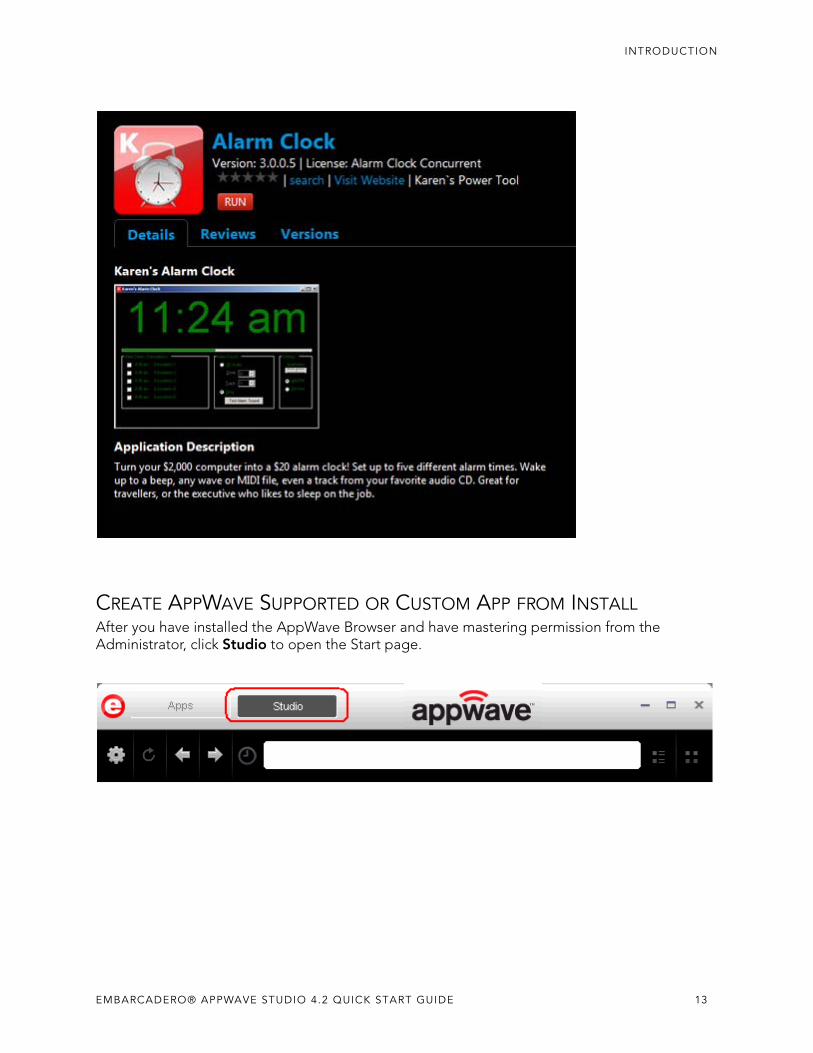
CREATE APPWAVE SUPPORTED OR CUSTOM APP FROM INSTALLAfter you have installed the AppWave Browser and have mastering permission from the Administrator, click Studio to open the Start page.
EMBARCADERO® APPWAVE STUDIO 4.2 QUICK START GUIDE 13
INTRODUCTION
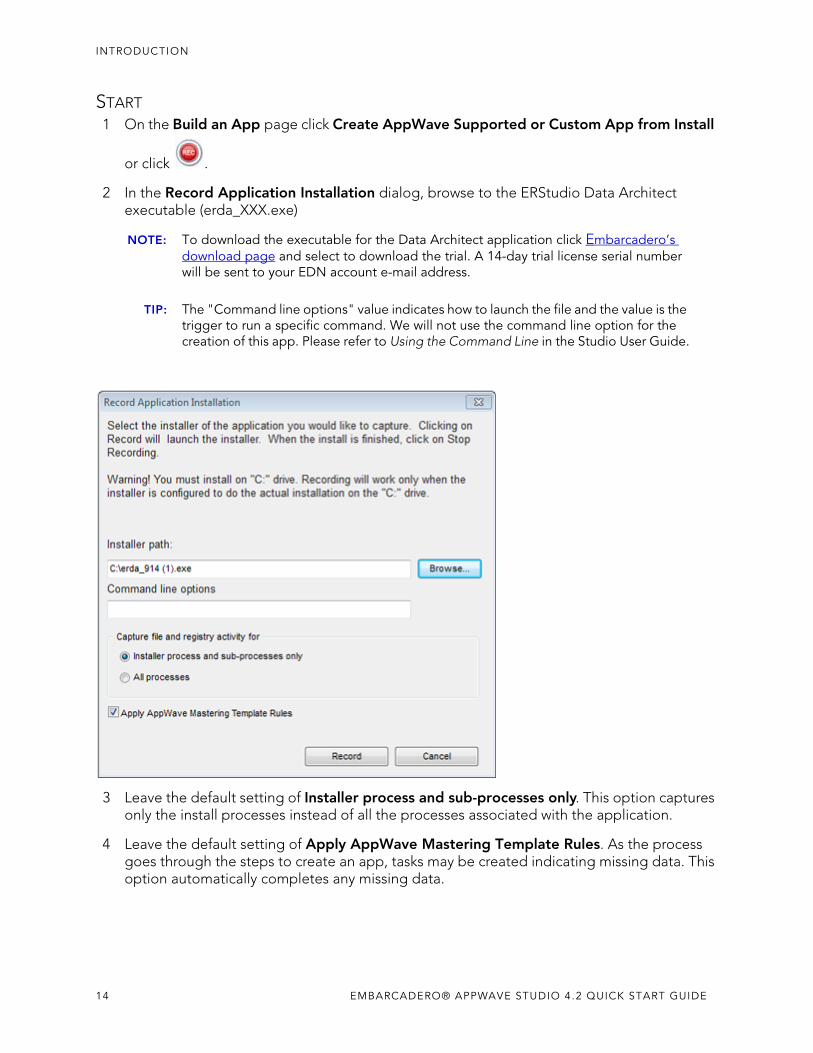
START1 On the Build an App page click Create AppWave Supported or Custom App from Install
or click .
2 In the Record Application Installation dialog, browse to the ERStudio Data Architect executable (erda_XXX.exe)
NOTE: To download the executable for the Data Architect application click Embarcadero’s download page and select to download the trial. A 14-day trial license serial number will be sent to your EDN account e-mail address.
TIP: The "Command line options" value indicates how to launch the file and the value is the trigger to run a specific command. We will not use the command line option for the creation of this app. Please refer to Using the Command Line in the Studio User Guide.
3 Leave the default setting of Installer process and sub-processes only. This option captures only the install processes instead of all the processes associated with the application.
4 Leave the default setting of Apply AppWave Mastering Template Rules. As the process goes through the steps to create an app, tasks may be created indicating missing data. This option automatically completes any missing data.
14 EMBARCADERO® APPWAVE STUDIO 4.2 QUICK START GUIDE
INTRODUCTION
5 Click Record and the install process starts. A Recording dialog appears in the upper right corner of your screen. The blinking recording status button indicates that recording is in progress.
NOTE: The AppWave Browser application is minimized.
6 Follow the install steps for your selected application.
During the install process, you may be asked for licensing information. For example, if you have already installed a previous version or have a trial version, you get information regarding the status of your license. If you are installing a trial version for the first time the Register Trial Owner dialog box opens. Enter your EDN user name and password to request a trial.
NOTE: If you do not have an EDN account, click “Create new EDN account”.
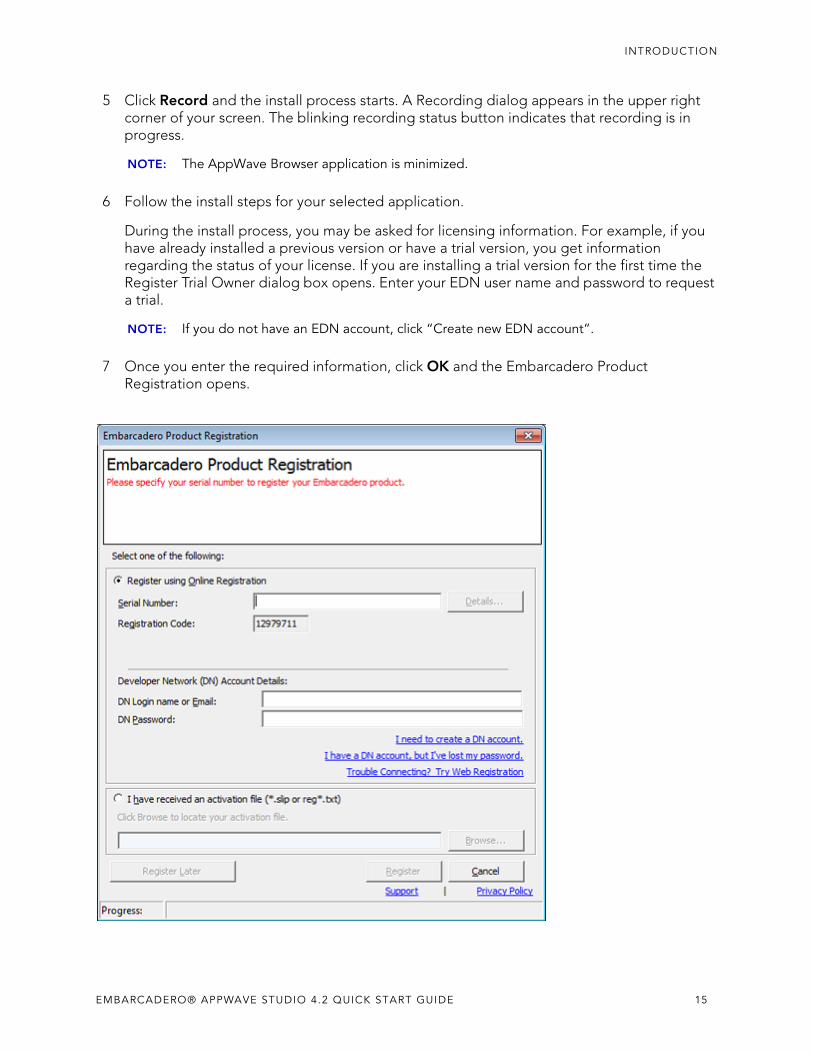
7 Once you enter the required information, click OK and the Embarcadero Product Registration opens.
EMBARCADERO® APPWAVE STUDIO 4.2 QUICK START GUIDE 15
INTRODUCTION
8 Insert the serial number that was sent to your e-mail address. You also need to enter your Developer Network (DN) Login Name and DN Password.
NOTE: The DN Login Name and Password are what you created in your EDN account.
9 Click Register and the EULA for the Data Architect application appears.
10 Click Accept and the dialog closes.
11 Complete all steps and click Finish in the Embarcadero ERStudio Data Architect dialog.
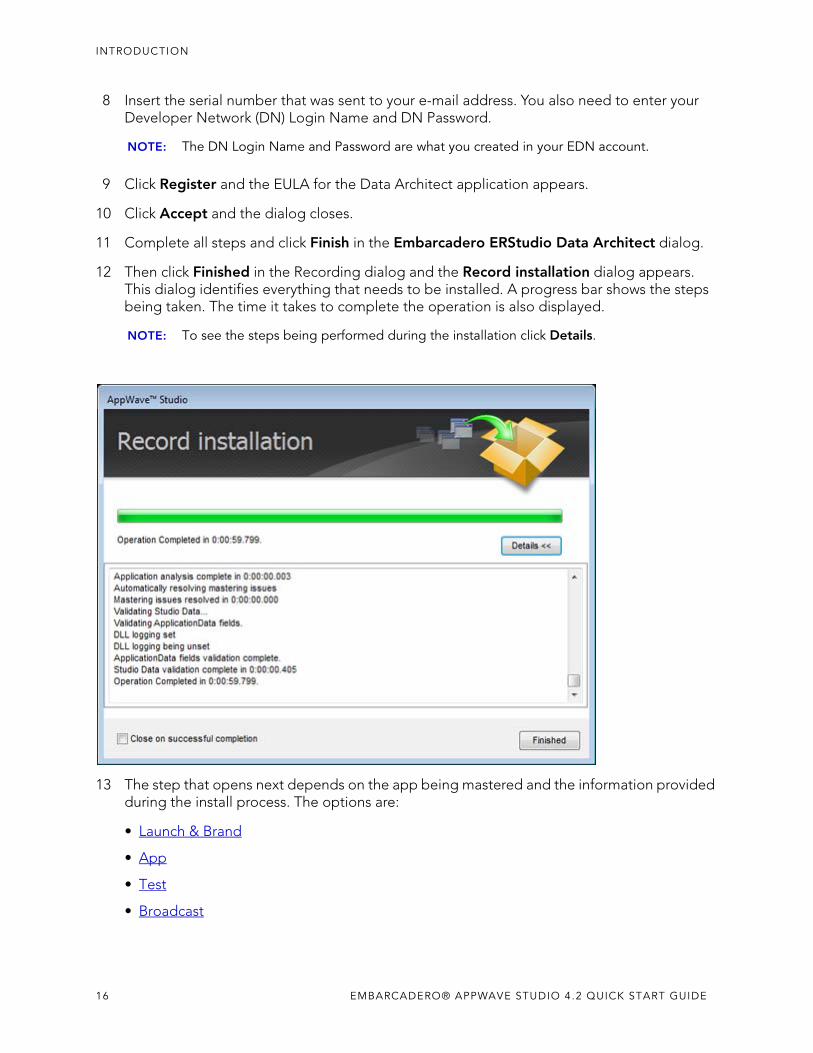
12 Then click Finished in the Recording dialog and the Record installation dialog appears. This dialog identifies everything that needs to be installed. A progress bar shows the steps being taken. The time it takes to complete the operation is also displayed.
NOTE: To see the steps being performed during the installation click Details.
13 The step that opens next depends on the app being mastered and the information provided during the install process. The options are:
• Launch & Brand
• App
• Test
• Broadcast
16 EMBARCADERO® APPWAVE STUDIO 4.2 QUICK START GUIDE
INTRODUCTION
LAUNCH & BRAND1 If the Record Installation dialog does not close automatically, click Finished and the Launch
& Brand page appears. This is where you select the launch executable and critical information.
2 Select Embarcadero\ERStudio Data Architect x,x\ERSTUDIO.exe from the drop-down menu.
NOTE: The Working Folder and Icon information fields are then automatically populated.
3 Next you will select a Product name. Click the drop-down arrow in the Product Name field and select ER/Studio Data Architect from the list.
4 If it isn’t automatically populated, enter the version in the Product Version field.
5 In the Publisher field enter Embarcadero. You can leave the default settings in the remainder of the fields.
NOTE: Any empty fields that are required are listed in the lower Tasks panel. An alert
icon ( ) also appears next to the field. Click Fix on an issue and your cursor is placed in the field requiring information. Once the information is supplied the item listed in the Tasks panel disappears.
APP1 Click Next and the Configure your App page opens. This is where you can view the
changes and/or additions made to your files, registry settings, environment variables, and required runtimes. You can also edit custom scripts to run when certain app events happen.
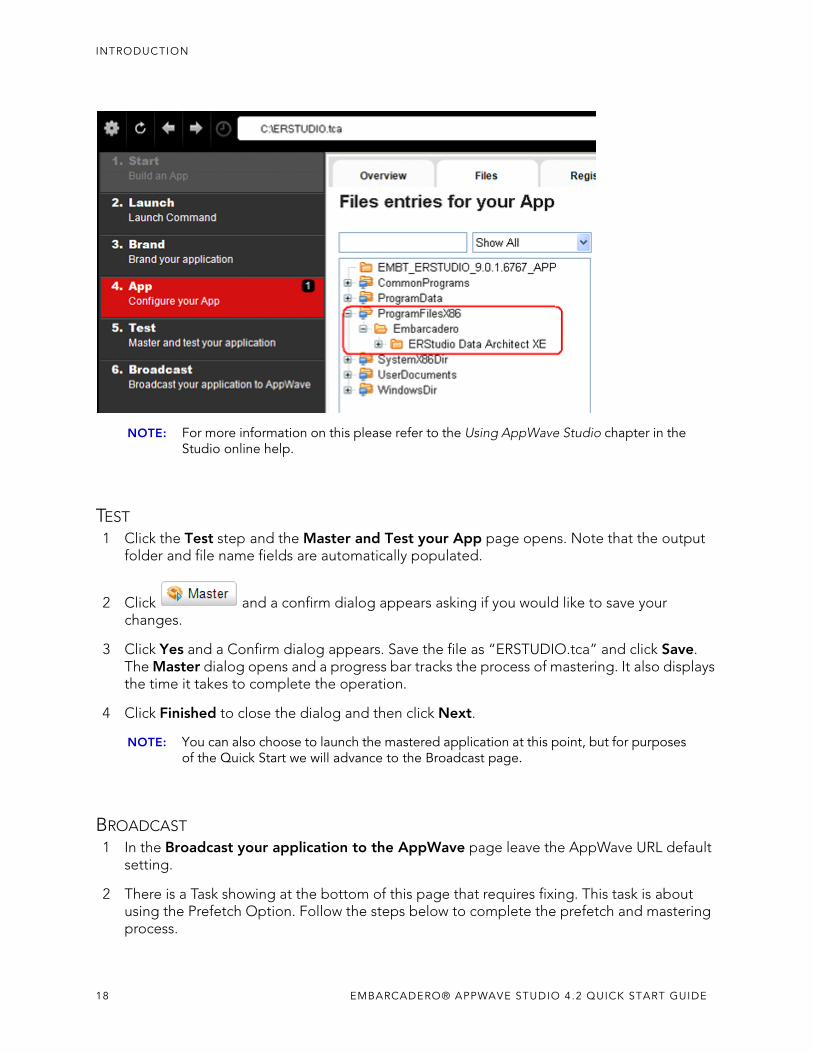
2 Click Files to view the files that were created and placed in the working folder.
EMBARCADERO® APPWAVE STUDIO 4.2 QUICK START GUIDE 17
INTRODUCTION
NOTE: For more information on this please refer to the Using AppWave Studio chapter in the Studio online help.
TEST1 Click the Test step and the Master and Test your App page opens. Note that the output
folder and file name fields are automatically populated.
2 Click and a confirm dialog appears asking if you would like to save your changes.
3 Click Yes and a Confirm dialog appears. Save the file as “ERSTUDIO.tca” and click Save. The Master dialog opens and a progress bar tracks the process of mastering. It also displays the time it takes to complete the operation.
4 Click Finished to close the dialog and then click Next.
NOTE: You can also choose to launch the mastered application at this point, but for purposes of the Quick Start we will advance to the Broadcast page.
BROADCAST1 In the Broadcast your application to the AppWave page leave the AppWave URL default
setting.
2 There is a Task showing at the bottom of this page that requires fixing. This task is about using the Prefetch Option. Follow the steps below to complete the prefetch and mastering process.
18 EMBARCADERO® APPWAVE STUDIO 4.2 QUICK START GUIDE
INTRODUCTION
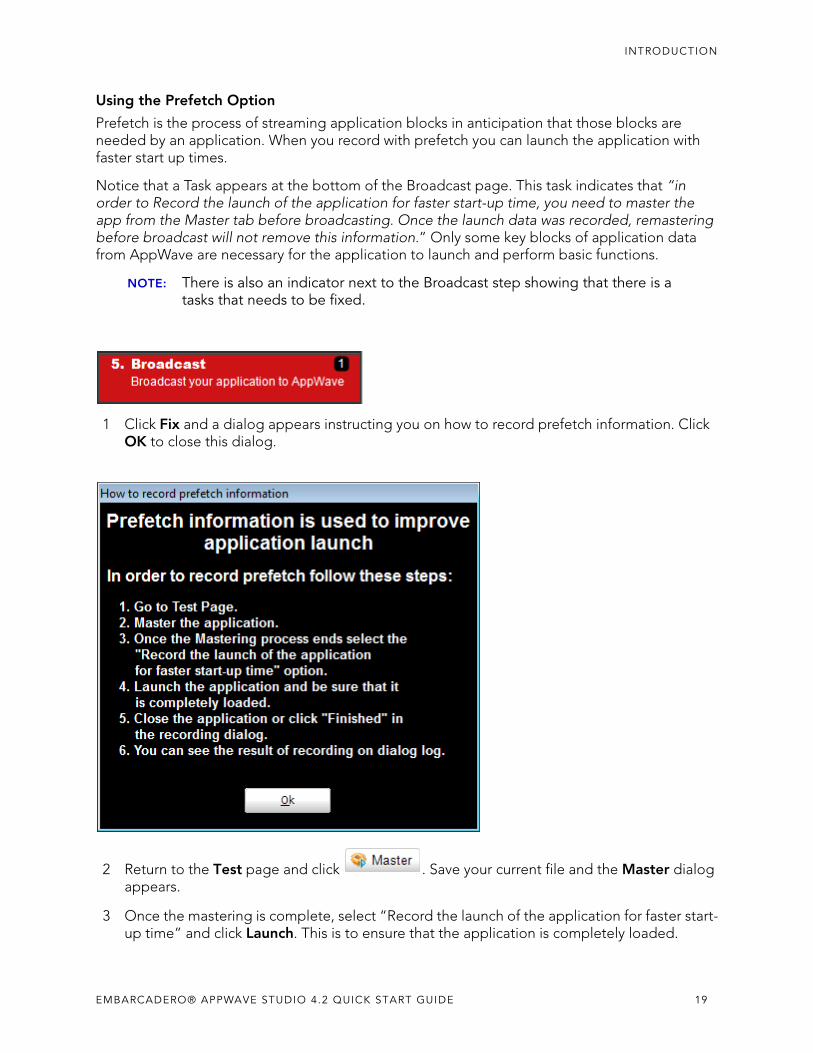
Using the Prefetch Option
Prefetch is the process of streaming application blocks in anticipation that those blocks are needed by an application. When you record with prefetch you can launch the application with faster start up times.
Notice that a Task appears at the bottom of the Broadcast page. This task indicates that “in order to Record the launch of the application for faster start-up time, you need to master the app from the Master tab before broadcasting. Once the launch data was recorded, remastering before broadcast will not remove this information.” Only some key blocks of application data from AppWave are necessary for the application to launch and perform basic functions.
NOTE: There is also an indicator next to the Broadcast step showing that there is a tasks that needs to be fixed.
1 Click Fix and a dialog appears instructing you on how to record prefetch information. Click OK to close this dialog.
2 Return to the Test page and click . Save your current file and the Master dialog appears.
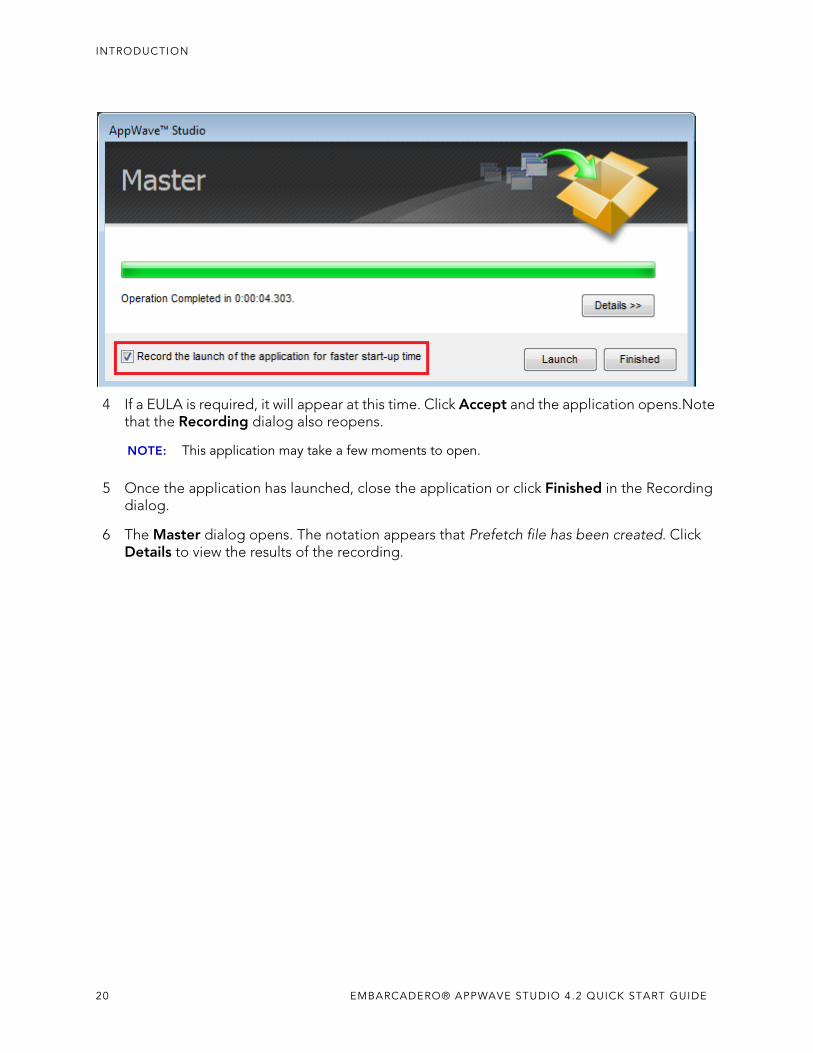
3 Once the mastering is complete, select “Record the launch of the application for faster start-up time” and click Launch. This is to ensure that the application is completely loaded.
EMBARCADERO® APPWAVE STUDIO 4.2 QUICK START GUIDE 19
INTRODUCTION
4 If a EULA is required, it will appear at this time. Click Accept and the application opens.Note that the Recording dialog also reopens.
NOTE: This application may take a few moments to open.
5 Once the application has launched, close the application or click Finished in the Recording dialog.
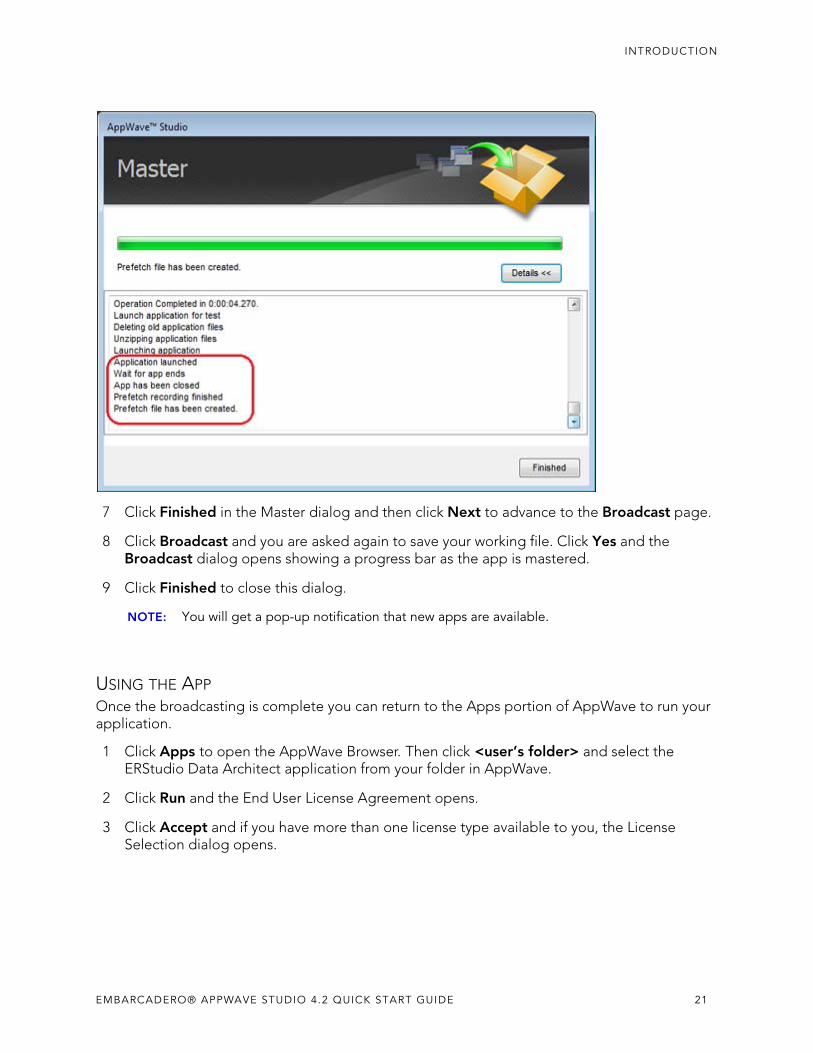
6 The Master dialog opens. The notation appears that Prefetch file has been created. Click Details to view the results of the recording.
20 EMBARCADERO® APPWAVE STUDIO 4.2 QUICK START GUIDE
INTRODUCTION
7 Click Finished in the Master dialog and then click Next to advance to the Broadcast page.
8 Click Broadcast and you are asked again to save your working file. Click Yes and the Broadcast dialog opens showing a progress bar as the app is mastered.
9 Click Finished to close this dialog.
NOTE: You will get a pop-up notification that new apps are available.
USING THE APPOnce the broadcasting is complete you can return to the Apps portion of AppWave to run your application.
1 Click Apps to open the AppWave Browser. Then click <user’s folder> and select the ERStudio Data Architect application from your folder in AppWave.
2 Click Run and the End User License Agreement opens.
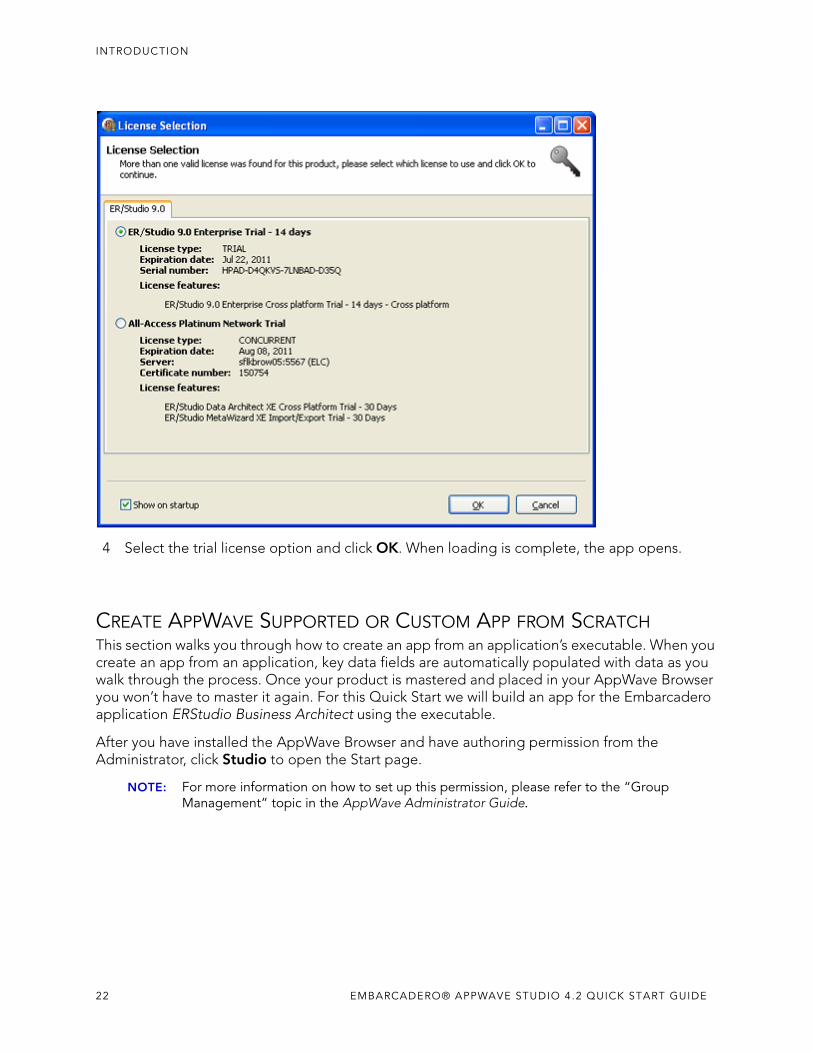
3 Click Accept and if you have more than one license type available to you, the License Selection dialog opens.
EMBARCADERO® APPWAVE STUDIO 4.2 QUICK START GUIDE 21
INTRODUCTION
4 Select the trial license option and click OK. When loading is complete, the app opens.
CREATE APPWAVE SUPPORTED OR CUSTOM APP FROM SCRATCHThis section walks you through how to create an app from an application’s executable. When you create an app from an application, key data fields are automatically populated with data as you walk through the process. Once your product is mastered and placed in your AppWave Browser you won’t have to master it again. For this Quick Start we will build an app for the Embarcadero application ERStudio Business Architect using the executable.
After you have installed the AppWave Browser and have authoring permission from the Administrator, click Studio to open the Start page.
NOTE: For more information on how to set up this permission, please refer to the “Group Management” topic in the AppWave Administrator Guide.
22 EMBARCADERO® APPWAVE STUDIO 4.2 QUICK START GUIDE
INTRODUCTION
STARTOn the Build an App page, click or the Create AppWave Supported or Custom App from Scratch link.
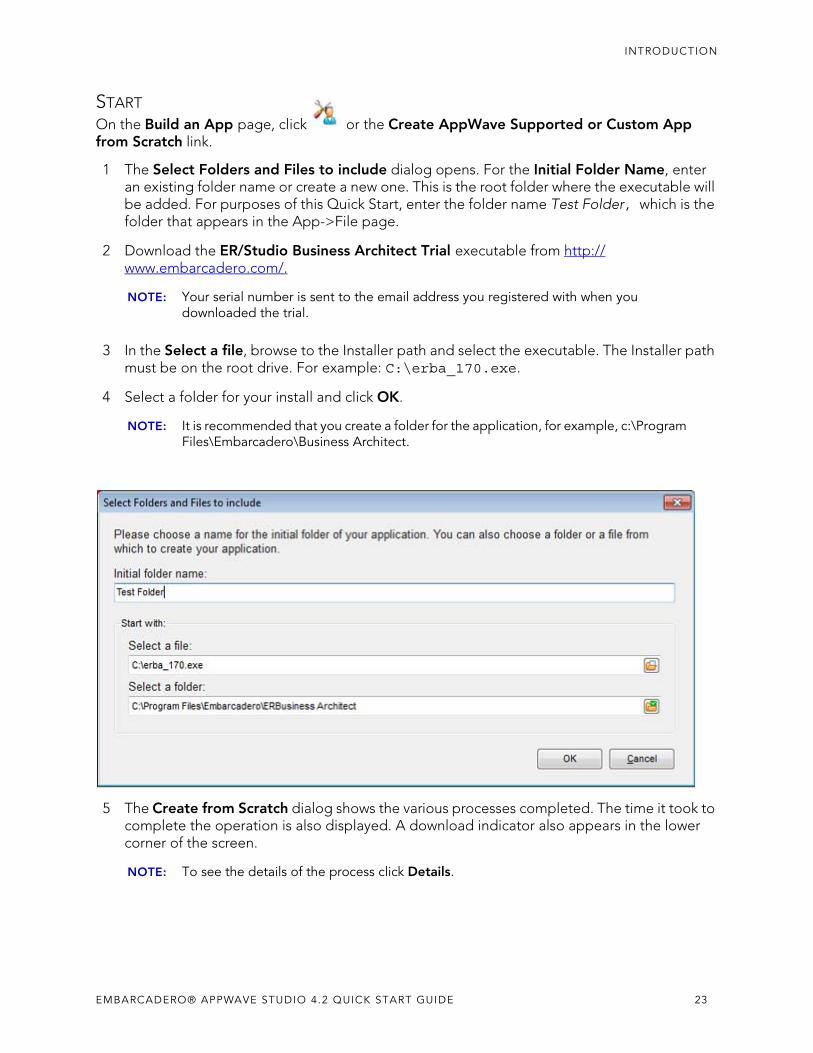
1 The Select Folders and Files to include dialog opens. For the Initial Folder Name, enter an existing folder name or create a new one. This is the root folder where the executable will be added. For purposes of this Quick Start, enter the folder name Test Folder, which is the folder that appears in the App->File page.
2 Download the ER/Studio Business Architect Trial executable from http://www.embarcadero.com/.
NOTE: Your serial number is sent to the email address you registered with when you downloaded the trial.
3 In the Select a file, browse to the Installer path and select the executable. The Installer path must be on the root drive. For example: C:\erba_170.exe.
4 Select a folder for your install and click OK.
NOTE: It is recommended that you create a folder for the application, for example, c:\Program Files\Embarcadero\Business Architect.
5 The Create from Scratch dialog shows the various processes completed. The time it took to complete the operation is also displayed. A download indicator also appears in the lower corner of the screen.
NOTE: To see the details of the process click Details.
EMBARCADERO® APPWAVE STUDIO 4.2 QUICK START GUIDE 23
INTRODUCTION
6 The step that opens next depends on the app being mastered and the information provided during the install process. The options are:
• Launch& Brand
• App
• Test
• Broadcast
LAUNCH& BRANDIf the Launch & Brand page opens:
NOTE: When you first open this page, any empty fields that are required are listed in
the lower Tasks panel. An alert icon ( ) also appears next to the field. Click Fix on an issue and your cursor is placed in the field requiring information. Once the information is supplied the item listed in the Tasks panel disappears.
1 The Launch Executable field is automatically populated.
2 The Working Folder is the initial folder name you created in the first dialog. This is a required field.
3 Click the drop-down in Product Name and select ER/Studio Business Architect.
4 Click the drop-down in Product Version and select the version from the list.
5 The Publisher is a required field, so enter Embarcadero Technologies.
6 The remainder of the fields on this page are not necessary since this is a trial application.
NOTE: The Tasks pane located at the bottom of the page lists fields that require information. You need to select the product name and version number of the installed application. Click the drop-down and select ER/Studio Business Architect. Once that is selected the Display Name field is also populated.
24 EMBARCADERO® APPWAVE STUDIO 4.2 QUICK START GUIDE

INTRODUCTION
APPClick Next to advance to the App page: This is where you can view your files, registry settings and environment variables created during the mastering task. Files created by an application installer are placed in their appropriate folders. You also can select runtimes required by your app.
1 Click Next to advance to the Files page and review the additions made to folder. Note that the working folder, “Test Folder”, appears here.
2 Click Next again to advance to view any registry entries for your app.
3 Click Next again to open the Environment Variables page. You can add variables here.
4 Click Next to advance to the Runtime page. All available runtimes that may be required by your app are listed.
TEST1 Click Next to open the Master and Test your App page. Notice that the Output Folder
and File Name fields are automatically populated.
2 Click to master and then test your application before deploying it. You are prompted to save your working file. Select the default name of the file of EMBARCADERO_EASTUDIO.tca.
3 The Master dialog opens and a progress bar tracks the process of mastering. It also displays the time it took to complete the operation.
4 Click Finished to close the dialog. We are not going to launch the application at this time because we will do it when we perform the Prefetch function in the next step.
EMBARCADERO® APPWAVE STUDIO 4.2 QUICK START GUIDE 25
INTRODUCTION
BROADCAST1 Click Next and the Broadcast your application to the AppWave page appears.
2 Leave the AppWave URL default setting, as well as the Always remaster option.
3 There is a Task showing at the bottom of this page that requires fixing. This task is about using the Prefetch Option. Follow the steps below to complete the prefetch and mastering process.
Using the Prefetch Option
Prefetch is the process of streaming application blocks in anticipation that those blocks are needed by an application. When you record with prefetch you can launch the application with faster start up times.
Notice that a Task appears at the bottom of the Broadcast page. This task indicates that “in order to Record the launch of the application for faster start-up time, you need to master the app from the Master tab before broadcasting. Once the launch data was recorded, remastering before broadcast will not remove this information.” Only some key blocks of application data from AppWave are necessary for the application to launch and perform basic functions.
NOTE: There is also an indicator next to the Broadcast step showing that there is a task that needs to be fixed.
26 EMBARCADERO® APPWAVE STUDIO 4.2 QUICK START GUIDE
INTRODUCTION
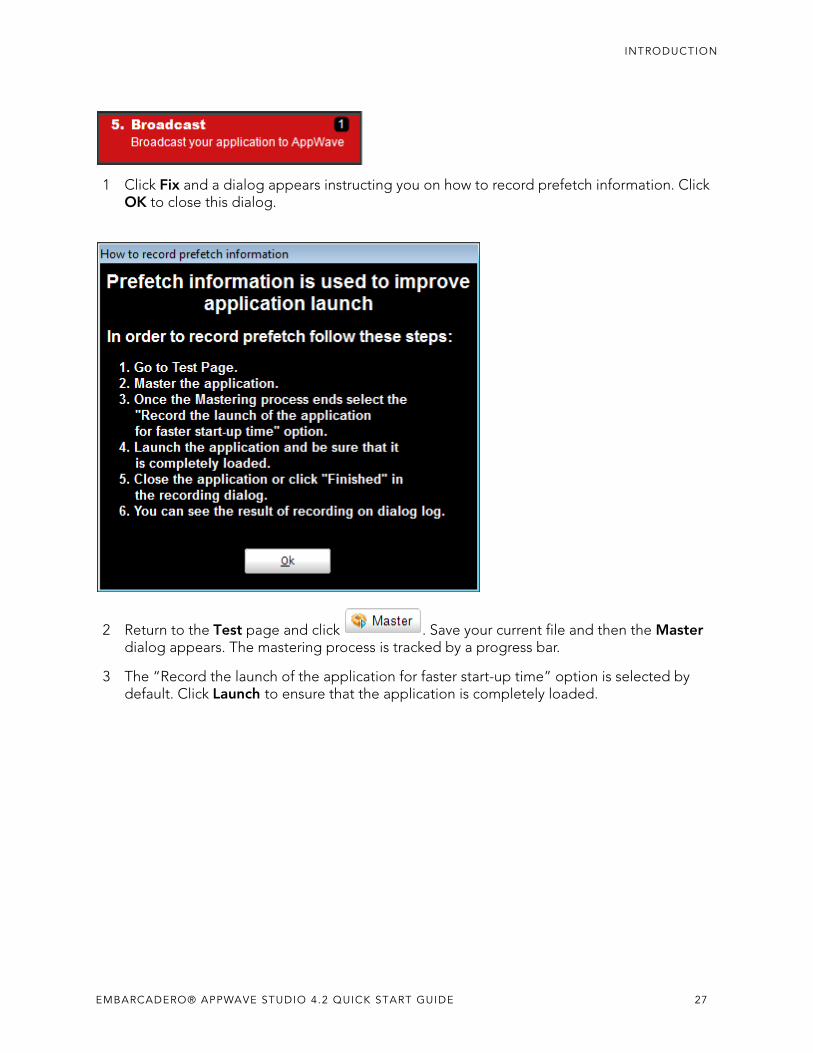
1 Click Fix and a dialog appears instructing you on how to record prefetch information. Click OK to close this dialog.
2 Return to the Test page and click . Save your current file and then the Master dialog appears. The mastering process is tracked by a progress bar.
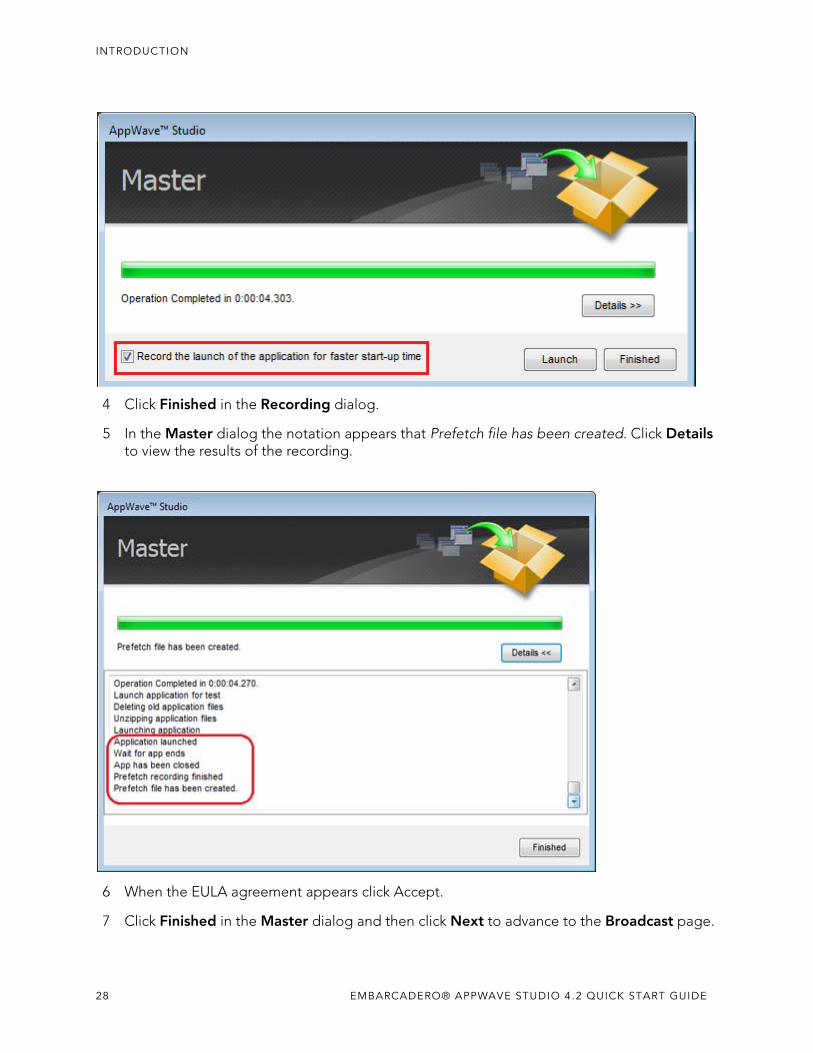
3 The “Record the launch of the application for faster start-up time” option is selected by default. Click Launch to ensure that the application is completely loaded.
EMBARCADERO® APPWAVE STUDIO 4.2 QUICK START GUIDE 27
INTRODUCTION
4 Click Finished in the Recording dialog.
5 In the Master dialog the notation appears that Prefetch file has been created. Click Details to view the results of the recording.
6 When the EULA agreement appears click Accept.
7 Click Finished in the Master dialog and then click Next to advance to the Broadcast page.
28 EMBARCADERO® APPWAVE STUDIO 4.2 QUICK START GUIDE
INTRODUCTION
8 Click Broadcast and you are asked again to save your working file. Once you have saved the file, the Broadcast dialog opens and shows a progress bar as the app is mastered.
9 Click Finished to close this dialog.
NOTE: You will get a pop-up notification that new apps are now available as well.
USING THE APP1 Once you have mastered the app using AppWave Studio, it is available on AppWave
Browser.
2 Once the broadcasting is complete you can return to the Apps portion of AppWave to run your application.
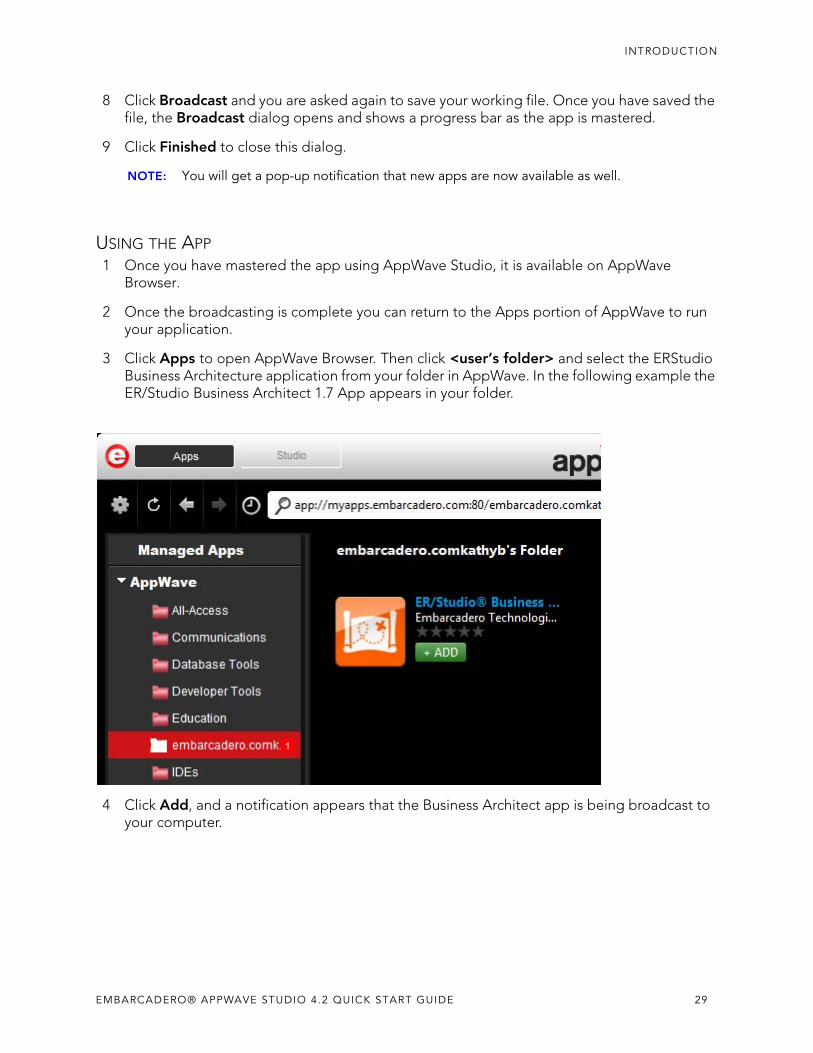
3 Click Apps to open AppWave Browser. Then click <user’s folder> and select the ERStudio Business Architecture application from your folder in AppWave. In the following example the ER/Studio Business Architect 1.7 App appears in your folder.
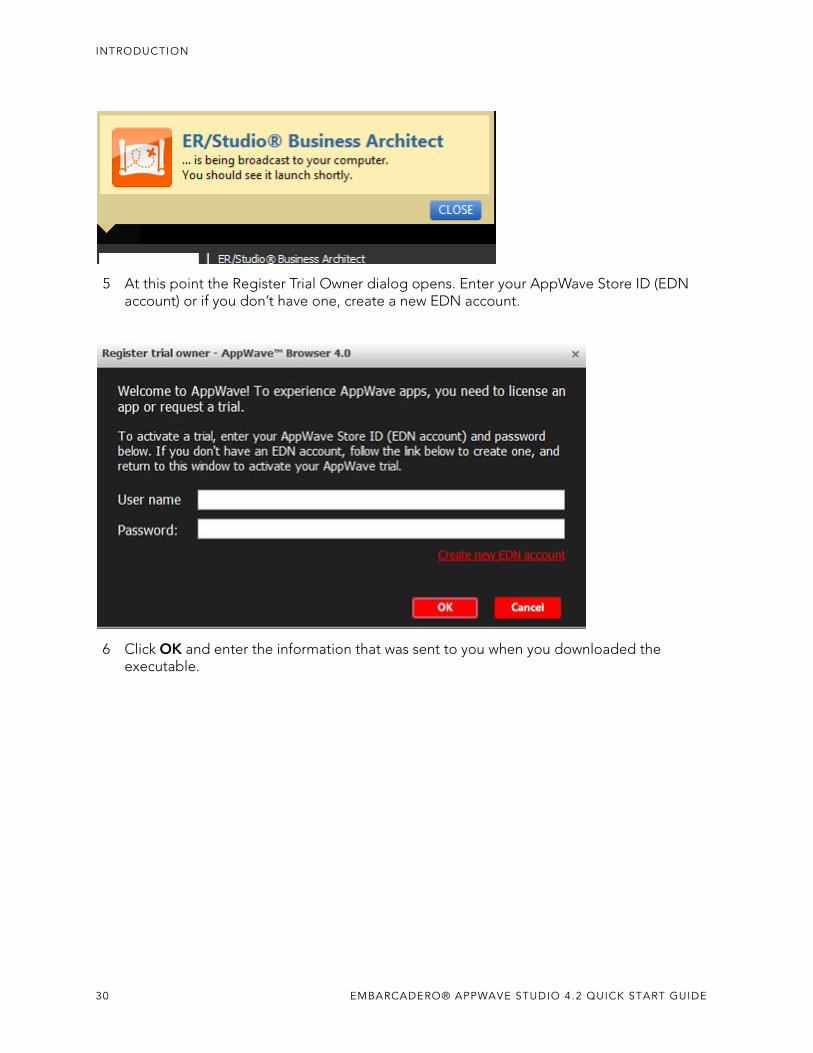
4 Click Add, and a notification appears that the Business Architect app is being broadcast to your computer.
EMBARCADERO® APPWAVE STUDIO 4.2 QUICK START GUIDE 29
INTRODUCTION
5 At this point the Register Trial Owner dialog opens. Enter your AppWave Store ID (EDN account) or if you don’t have one, create a new EDN account.
6 Click OK and enter the information that was sent to you when you downloaded the executable.
30 EMBARCADERO® APPWAVE STUDIO 4.2 QUICK START GUIDE

INTRODUCTION
NOTE: For more information on the Apps tab, please see the AppWave Browser Apps User Guide.
7 The End User License Agreement dialog appears. Click Accept and the ER/Studio Business Architect application loads and runs.
CREATE APPWAVE SUPPORTED WEBAPPThis option allows you to create an app that is accessible via an internet browser. Mastering a WebApp does not require recording as for other apps, but requires a simple configuration where the required parameters are defined.
1 After you have installed the AppWave Browser and have mastering permission from the Administrator, click Studio to open the Start page.
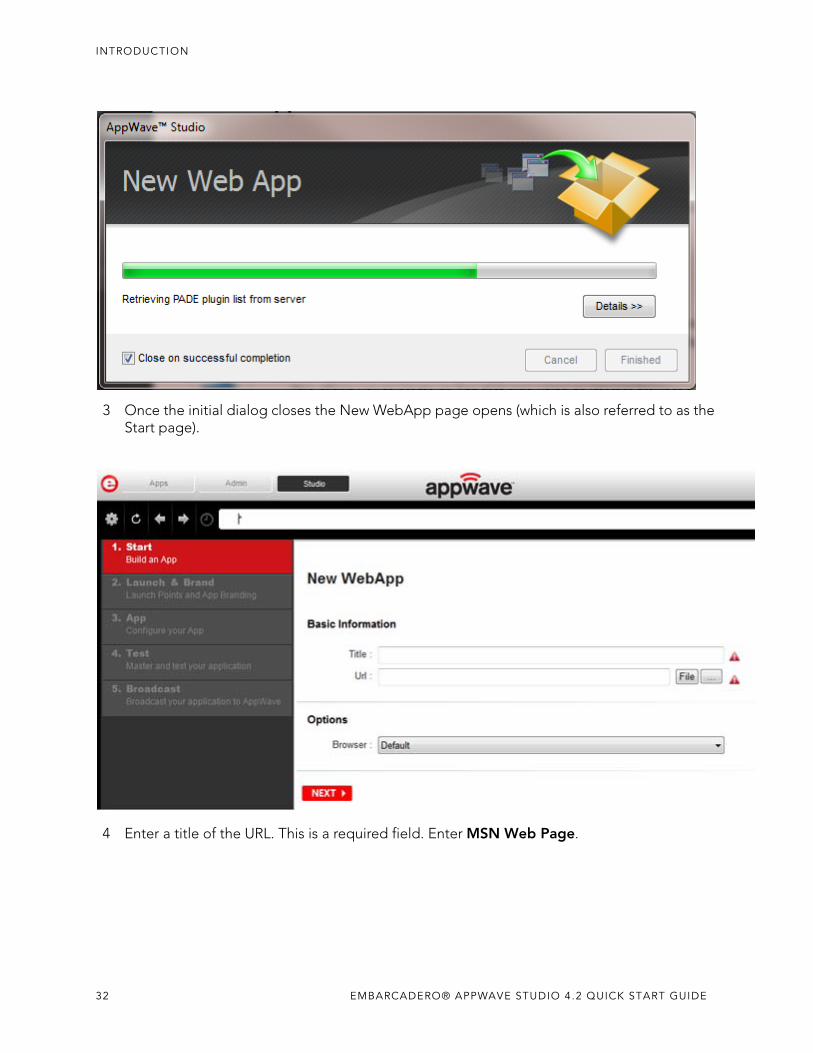
2 Click Create AppWave Supported WebApp or click . The New Web App dialog briefly appears. This retrieves the PADE plugin information from the server. This plugin helps users master an app by automatically manipulating the file and registry entries.
EMBARCADERO® APPWAVE STUDIO 4.2 QUICK START GUIDE 31
INTRODUCTION
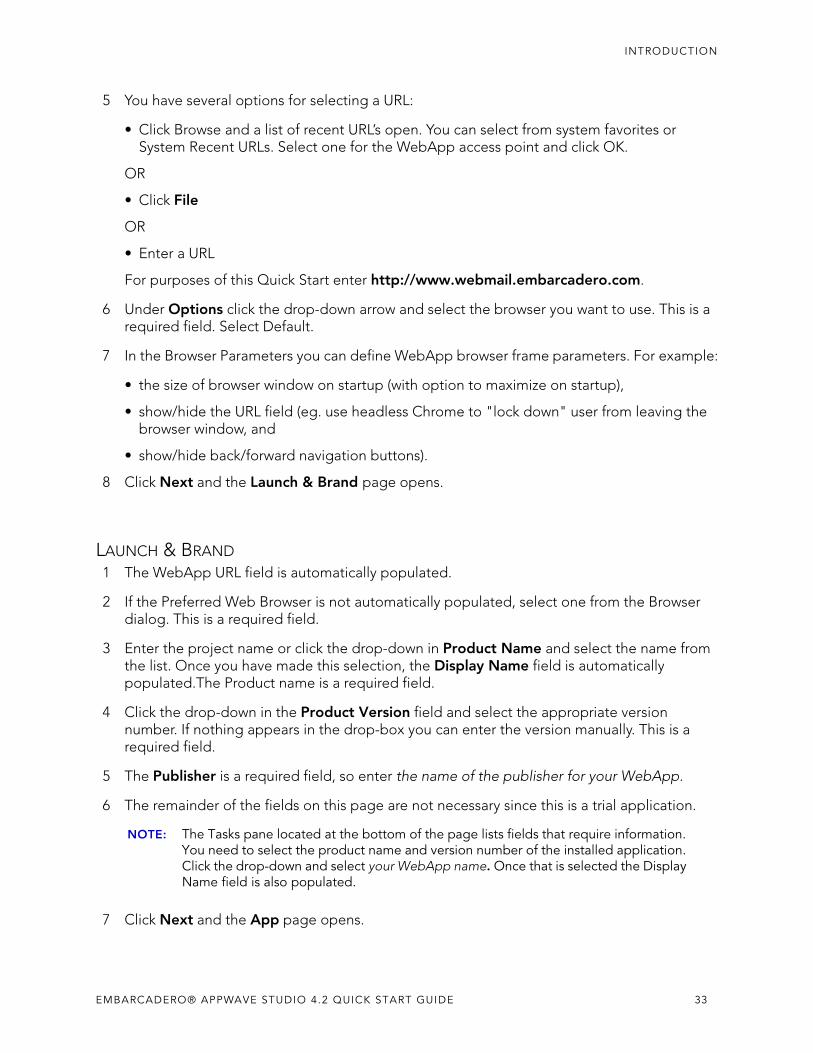
3 Once the initial dialog closes the New WebApp page opens (which is also referred to as the Start page).
4 Enter a title of the URL. This is a required field. Enter MSN Web Page.
32 EMBARCADERO® APPWAVE STUDIO 4.2 QUICK START GUIDE
INTRODUCTION
5 You have several options for selecting a URL:
• Click Browse and a list of recent URL’s open. You can select from system favorites or System Recent URLs. Select one for the WebApp access point and click OK.
OR
• Click File
OR
• Enter a URL
For purposes of this Quick Start enter http://www.webmail.embarcadero.com.
6 Under Options click the drop-down arrow and select the browser you want to use. This is a required field. Select Default.
7 In the Browser Parameters you can define WebApp browser frame parameters. For example:
• the size of browser window on startup (with option to maximize on startup),
• show/hide the URL field (eg. use headless Chrome to "lock down" user from leaving the browser window, and
• show/hide back/forward navigation buttons).
8 Click Next and the Launch & Brand page opens.
LAUNCH & BRAND1 The WebApp URL field is automatically populated.
2 If the Preferred Web Browser is not automatically populated, select one from the Browser dialog. This is a required field.
3 Enter the project name or click the drop-down in Product Name and select the name from the list. Once you have made this selection, the Display Name field is automatically populated.The Product name is a required field.
4 Click the drop-down in the Product Version field and select the appropriate version number. If nothing appears in the drop-box you can enter the version manually. This is a required field.
5 The Publisher is a required field, so enter the name of the publisher for your WebApp.
6 The remainder of the fields on this page are not necessary since this is a trial application.
NOTE: The Tasks pane located at the bottom of the page lists fields that require information. You need to select the product name and version number of the installed application. Click the drop-down and select your WebApp name. Once that is selected the Display Name field is also populated.
7 Click Next and the App page opens.
EMBARCADERO® APPWAVE STUDIO 4.2 QUICK START GUIDE 33
INTRODUCTION
APP The App page is where you configure your Web App.
1 Click WebApps or and the WebApp tab opens. The information that appears here is what you entered on the New WebApps page.
NOTE: Once you have clicked Next on the New WebApps page, you cannot go back and make changes. Any changes must be made here on the WebApps tab
2 Make any necessary changes and click Next to advance to the Master and Test your App page.
TEST1 When the Master and Test your App page opens notice that the output folder and file name
fields are automatically populated.
2 Click and a confirm dialog appears asking if you would like to save your changes.
3 Click Yes and a Save As dialog appears. Save the file. The Master dialog opens and a progress bar tracks the process of mastering. It also displays the time it takes to complete the operation.
NOTE: The file extension is .tca.
4 Click Finished to close the dialog and then click Next.
NOTE: You can also choose to launch the mastered application at this point, but for purposes of the Quick Start we will advance to the Broadcast page.
BROADCAST1 In the Broadcast your application to the AppWave page leave the AppWave URL default
setting.
2 Leave the default setting of “Always remaster projects before broadcasting to the AppWave” and click Broadcast.
3 The Broadcast dialog appears with a progress bar tracking the steps.
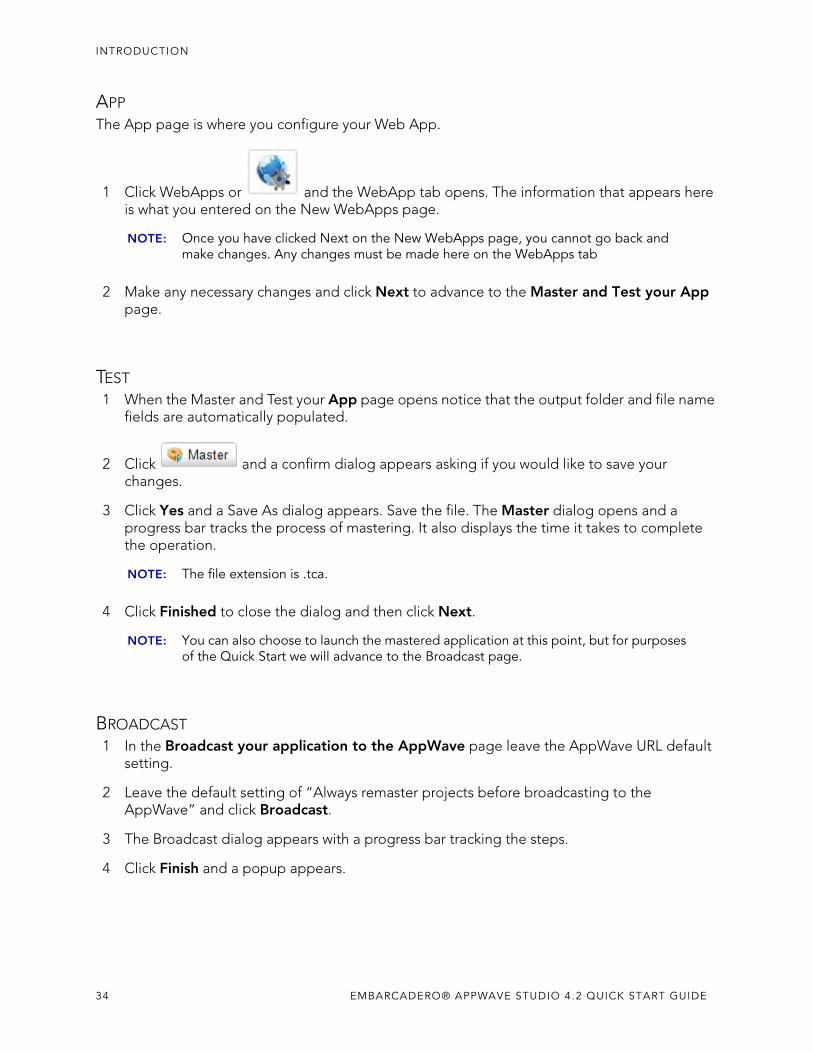
4 Click Finish and a popup appears.
34 EMBARCADERO® APPWAVE STUDIO 4.2 QUICK START GUIDE
INTRODUCTION
USING THE APP1 Once you have mastered the app using AppWave Studio, it is available on AppWave
Browser.
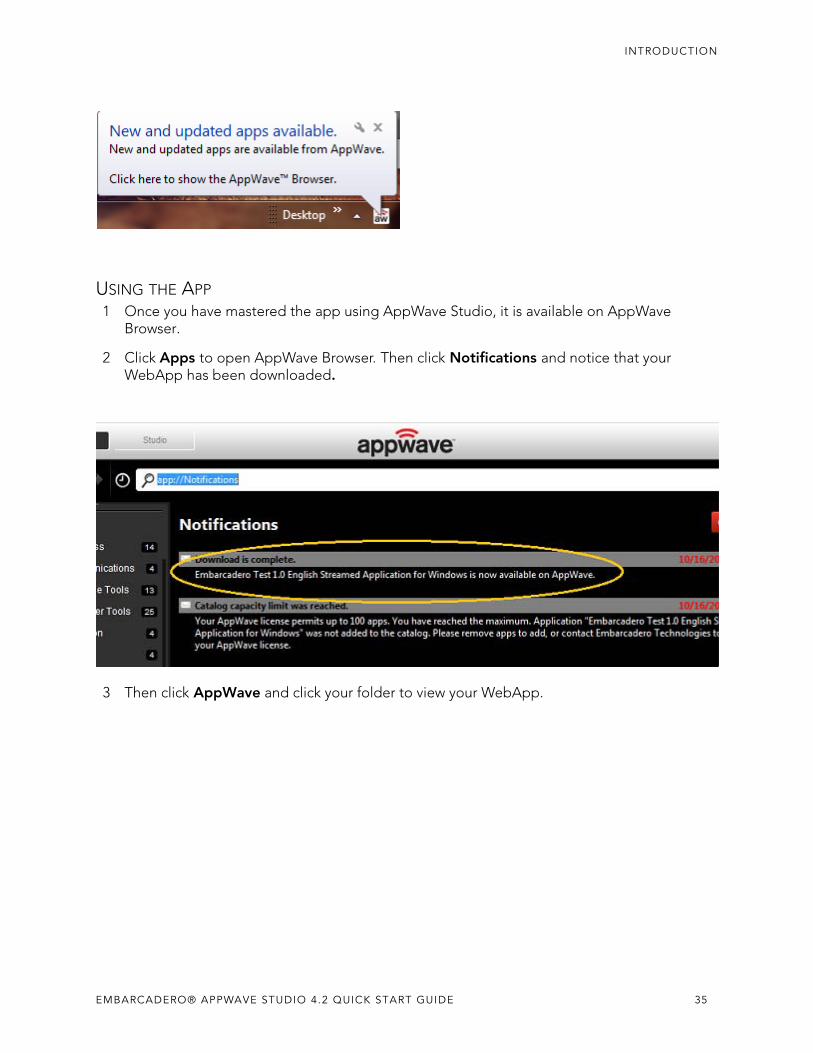
2 Click Apps to open AppWave Browser. Then click Notifications and notice that your WebApp has been downloaded.
3 Then click AppWave and click your folder to view your WebApp.
EMBARCADERO® APPWAVE STUDIO 4.2 QUICK START GUIDE 35
INTRODUCTION
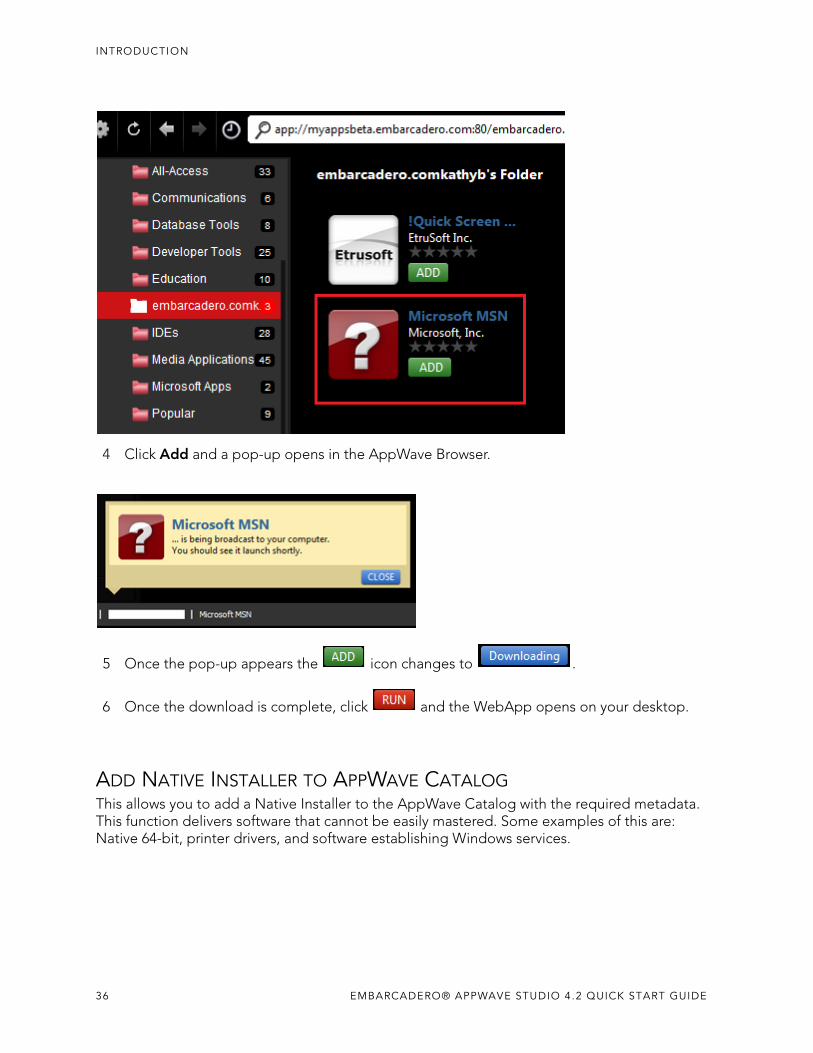
4 Click Add and a pop-up opens in the AppWave Browser.
5 Once the pop-up appears the icon changes to .
6 Once the download is complete, click and the WebApp opens on your desktop.
ADD NATIVE INSTALLER TO APPWAVE CATALOGThis allows you to add a Native Installer to the AppWave Catalog with the required metadata. This function delivers software that cannot be easily mastered. Some examples of this are: Native 64-bit, printer drivers, and software establishing Windows services.
36 EMBARCADERO® APPWAVE STUDIO 4.2 QUICK START GUIDE
INTRODUCTION
It can also distribute data and media content packaged up as installers. Examples of this type of content would be: data models, training materials and manuals, and data sets.
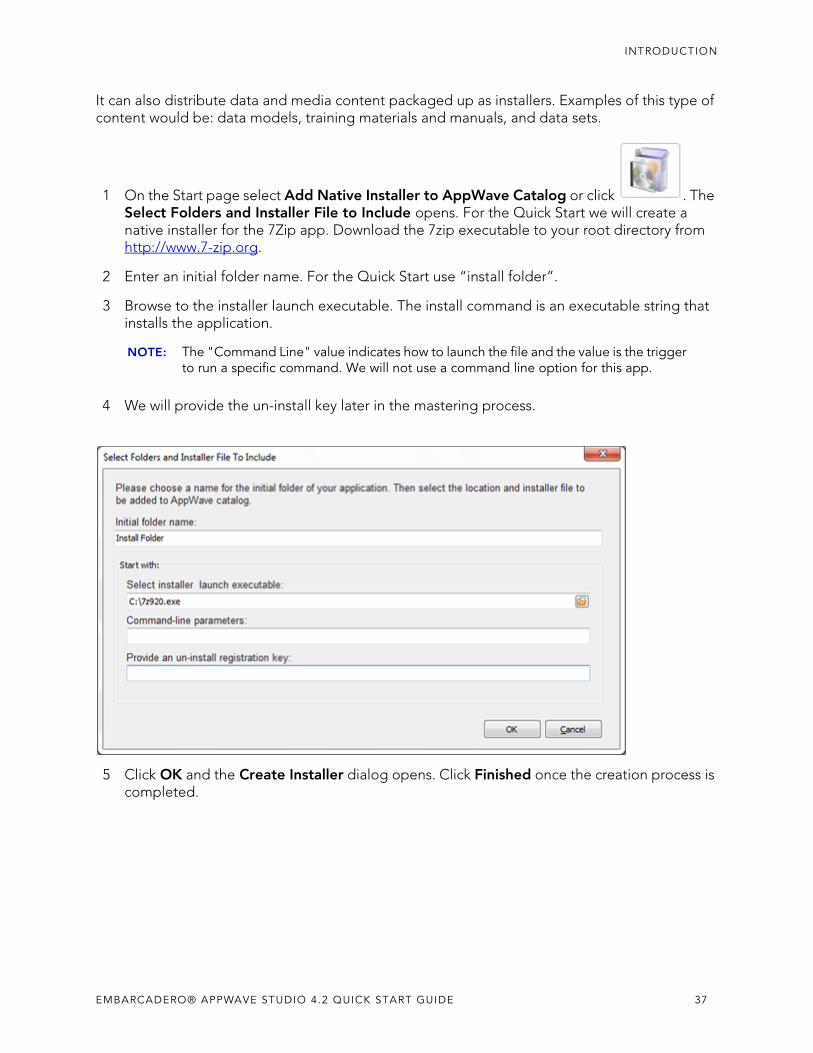
1 On the Start page select Add Native Installer to AppWave Catalog or click . The Select Folders and Installer File to Include opens. For the Quick Start we will create a native installer for the 7Zip app. Download the 7zip executable to your root directory from http://www.7-zip.org.
2 Enter an initial folder name. For the Quick Start use “install folder”.
3 Browse to the installer launch executable. The install command is an executable string that installs the application.
NOTE: The "Command Line" value indicates how to launch the file and the value is the trigger to run a specific command. We will not use a command line option for this app.
4 We will provide the un-install key later in the mastering process.
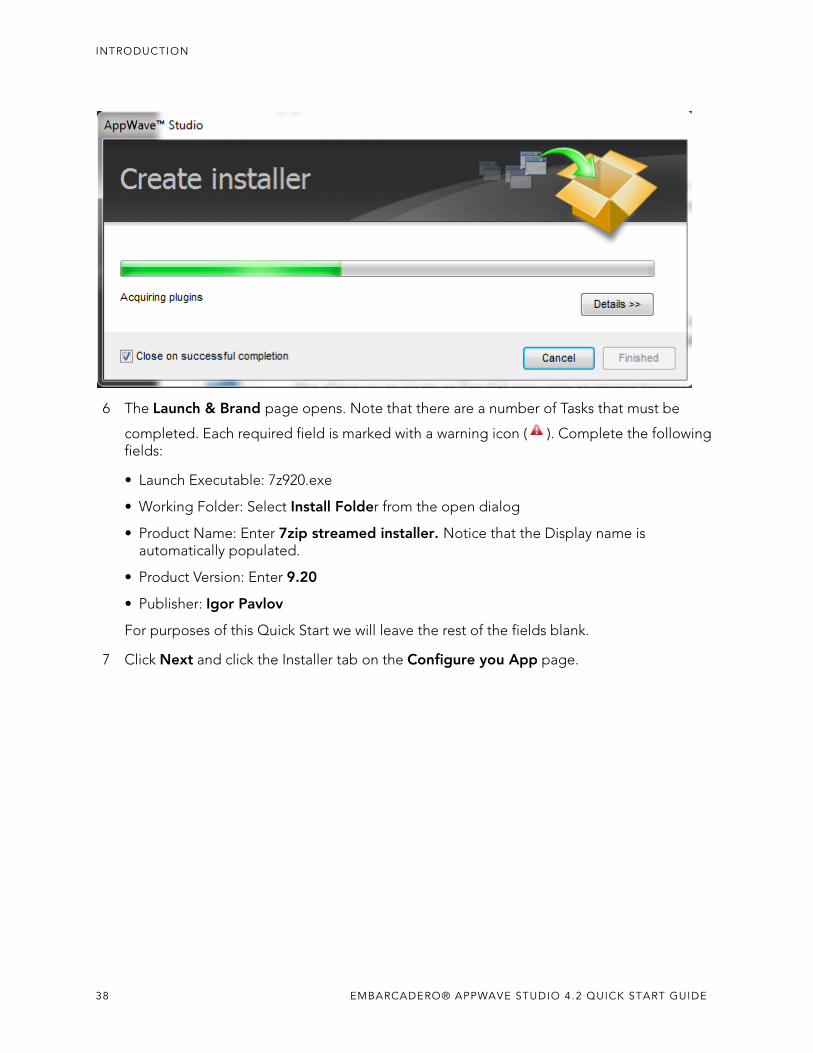
5 Click OK and the Create Installer dialog opens. Click Finished once the creation process is completed.
EMBARCADERO® APPWAVE STUDIO 4.2 QUICK START GUIDE 37
INTRODUCTION
6 The Launch & Brand page opens. Note that there are a number of Tasks that must be
completed. Each required field is marked with a warning icon ( ). Complete the following fields:
• Launch Executable: 7z920.exe
• Working Folder: Select Install Folder from the open dialog
• Product Name: Enter 7zip streamed installer. Notice that the Display name is automatically populated.
• Product Version: Enter 9.20
• Publisher: Igor Pavlov
For purposes of this Quick Start we will leave the rest of the fields blank.
7 Click Next and click the Installer tab on the Configure you App page.
38 EMBARCADERO® APPWAVE STUDIO 4.2 QUICK START GUIDE
INTRODUCTION
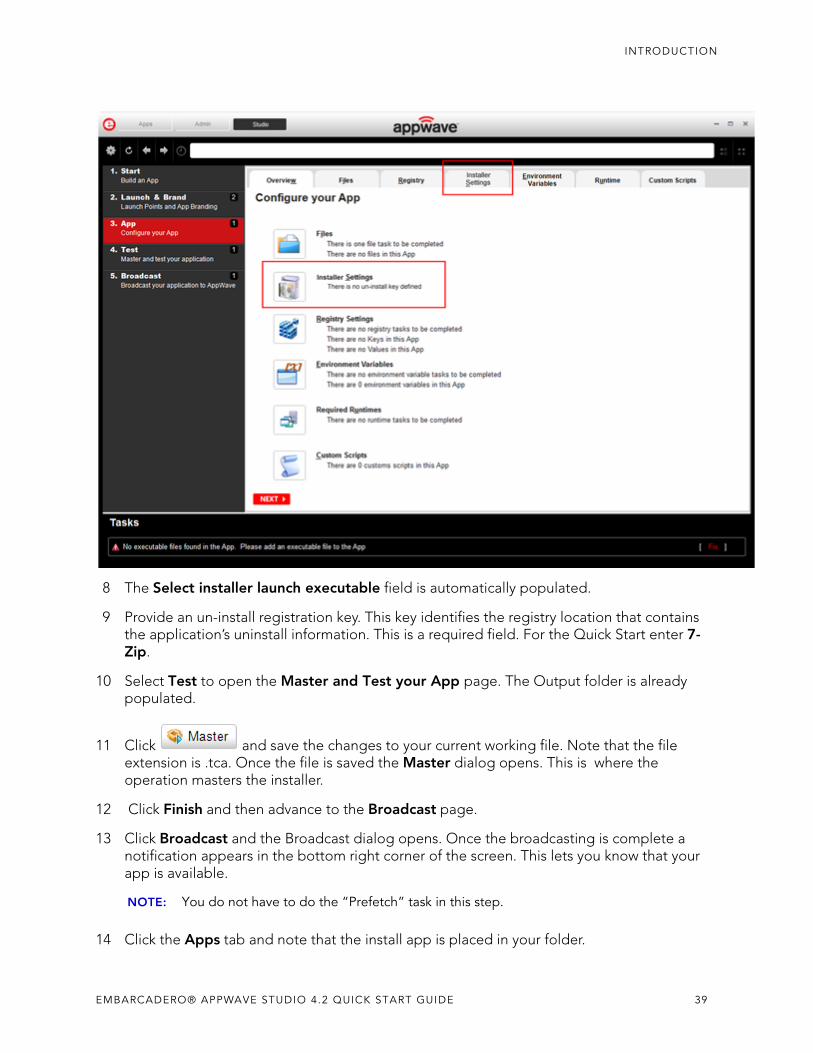
8 The Select installer launch executable field is automatically populated.
9 Provide an un-install registration key. This key identifies the registry location that contains the application’s uninstall information. This is a required field. For the Quick Start enter 7-Zip.
10 Select Test to open the Master and Test your App page. The Output folder is already populated.
11 Click and save the changes to your current working file. Note that the file extension is .tca. Once the file is saved the Master dialog opens. This is where the operation masters the installer.
12 Click Finish and then advance to the Broadcast page.
13 Click Broadcast and the Broadcast dialog opens. Once the broadcasting is complete a notification appears in the bottom right corner of the screen. This lets you know that your app is available.
NOTE: You do not have to do the “Prefetch” task in this step.
14 Click the Apps tab and note that the install app is placed in your folder.
EMBARCADERO® APPWAVE STUDIO 4.2 QUICK START GUIDE 39
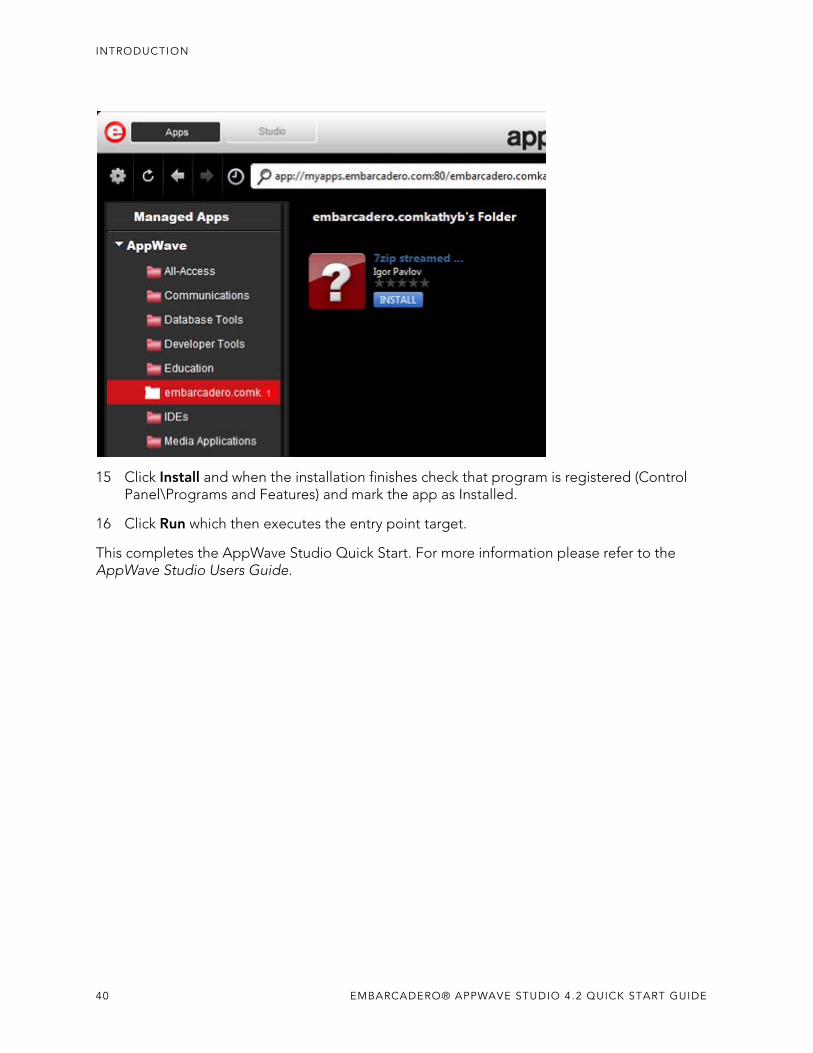
INTRODUCTION
15 Click Install and when the installation finishes check that program is registered (Control Panel\Programs and Features) and mark the app as Installed.
16 Click Run which then executes the entry point target.
This completes the AppWave Studio Quick Start. For more information please refer to the AppWave Studio Users Guide.
40 EMBARCADERO® APPWAVE STUDIO 4.2 QUICK START GUIDE
>
EMBARCADERO® APPWAVE™ STUDIO 4.2 QUICK START GUIDE 1
AAdministrator 1AppWave Template 4
BBroadcast 11Build an App 14
CCommand Line 6, 37
EEDN 12Embarcadero Product Registration 15Enterprise Desktop Administrator 2executable 4
IIndependent Software Vendor 2
LLaunch 9Launch & Brand 17licensing 12
MMaster 9
PPrefetch 8prefetch 9, 19, 27
QQuick Start 2
RRecording 7Register 16
Sstreamed 1
TTask 9Test 9