proficy plant applications 7.0 quick install guide (and
TRANSCRIPT

Proficy Plant Applications v7.0 Quick Install Guide
1
Proficy Plant Applications 7.0
Quick Install Guide
(And Best Practices) Installation Instructions Based on:
Windows Server 2016 x64 Operating System
SQL Server 2016 Standard (where applicable)
Microsoft Office / Excel 2016 (where applicable)

Proficy Plant Applications v7.0 Quick Install Guide
2
Contents Installation Pre-Requisites ........................................................................................................................................ 3
General Pre-Requisites ......................................................................................................................................... 3
Proficy Plant Applications Application Server ...................................................................................................... 3
Proficy Plant Applications Report (Web Server) ................................................................................................... 3
Proficy Plant Application Clients ........................................................................................................................... 4
Plant Applications Universal Client ........................................................................................................................ 4
Installing Proficy Plant Applications 7.0 ..................................................................................................................... 6
Proficy Application Server ...................................................................................................................................... 6
Plant Applications Server ..................................................................................................................................... 11
Plant Applications Report Server ......................................................................................................................... 14
Plant Applications Client ...................................................................................................................................... 19
Plant Applications Universal Client ...................................................................................................................... 22
Plant Applications .NET SDK ................................................................................................................................. 25
Appendices .............................................................................................................................................................. 27
Installing Proficy Advantage Licensing and Activating License ....................................................................... 28
Installing the Proficy Advantage Client .......................................................................................................... 28
Installing the Proficy Advantage License (Activation Code) .......................................................................... 30
Installing IIS Roles & Service Pre-Requisites ........................................................................................................ 31
IIS Roles & Services for the Plant Applications Application Server .................................................................. 31
IIS Roles & Services for the Plant Applications Report Server ......................................................................... 31
Proficy Plant Applications v7.0 Quick Install Guide
3
Installation Pre-Requisites
General Pre-Requisites 1) Microsoft SQL Server 2012, 2014, 2016
2) Microsoft Server 2012 R2, 2014, 2016 Standard
3) Windows 7 or Windows 10 (Clients only)
4) Internet Explorer 11 (in non-compatibility mode)
5) New Installation (This document does not cover upgrades)
6) Proficy Advantage Licensing Plan (Cloud Licensing, Local License Server, Offline option)
Proficy Plant Applications Application Server 1) Proficy Advantage Licensing Client – Current Version (17.4.1162 at time of printing)
2) Plant Applications 7.0 License - Installing Proficy Advantage Licensing and Activating License
3) Install Required Roles & Features
a. Microsoft IIS Version 8.0 or higher (depending on Operating System) – Installing IIS Roles &
Service Pre-Requisites
b. IIS DefaultAppPool needs to be set to enable 32-Bit applications
c. Post Installation, the SOAWebService Application Pool needs to be set to enable 32-Bit
applications
4) Microsoft SQL 2016 Feature Pack
i. SQLSysClrTypes.msi (ENU\x64\SQLSysClrTypes.msi from the above link)
5) A SQL authenticated account with SQL “sysadmin” group membership (permissions). In the past the
SA account was required, this requirement has been removed. However, the account must have SA
“sysadmin” privileges.
6) Validate at least 8Gb of RAM on the Host machine (Note: Testing on a Virtual Machine, many VMs
default to a 4Gb RAM environment, this will need to be increased prior to installation)
Proficy Plant Applications Report (Web Server) 1) Install Required Roles & Features
a. Microsoft IIS Version 8.0 or higher (depending on Operating System) – Installing IIS Roles &
Service Pre-Requisites
b. IIS DefaultAppPool needs to be set to enable 32-Bit applications
c. Post Installation, the PlantApplications Application Pool needs to be set to enable 32-Bit
applications
2) Microsoft Excel 2013 /2016, 32-Bit with VBA options installed (64-bit is NOT supported (if Excel
Reporting will be leveraged)
3) A domain or local computer service account that has local computer administrator permissions (if
Excel Reporting will be leveraged)
4) A SQL authenticated account with SQL “sysadmin” group membership (permissions) in the past the
SA account was required, this requirement has been removed. However, the account must have SA
“sysadmin” privileges.
5) Install the Plant Applications Client(s) first and validate can connect. (Resolve connection issues if
cannot be connected before installing the Report Server)
6) A Default Printer – This printer should leverage a real printer driver (not a printer “class” driver). A
“dummy printer” can be installed and set offline. A PDF or XPS printer is should not be configured as
the default printer.

Proficy Plant Applications v7.0 Quick Install Guide
4
7) A local or domain service account with local administrator group membership and the ability to log
on as a service. Note: An account without local administrator privileges can be leveraged, however,
additional configuration will be required for DCOM services (see GE Knowledge Base for configuring
DCOM). Log on as a service permissions are still required.
8) Post installation, it is required to logon to the report server at least one time, leveraging the same
account created for Step 6. Run Excel, and configure the Excel options appropriately. (see Ge
Knowledge Base for Configuring Excel for the Report Server)
Proficy Plant Application Clients 1) Microsoft Windows 7 or Windows 10
2) Microsoft .NET Framework 2.0 – On the server - Control Panel -> Programs -> Turn Windows Features
On or Off -> Server Manager -> Add roles and features -> Before You Begin -> Next -> Installation
Type -> Next -> Select Server -> Next -> Server Roles -> Web Server -> Application Development ->
Check .NET Extensibility 3.5 and ASP.NET 3.5 (this will add the required roles that include .NET 2.0 and
3.0) -> Features -> .NET Framework 3.5 Features -> Check HTTP Activation (and required features) ->
Next -> Confirm Installation Selections – You will almost certainly be required to specify an alternate
source path -> Specify an alternate source path -> Select path to your Windows installation media
drive and the \sources\sxs folder -> Ok -> Install
3) Microsoft .NET Framework 2.0 – On Windows 7 or 10 – Control Panel -> Programs -> Turn Windows
Features On or Off -> Windows Features -> Check .NET Framework 3.5 (includes .NET 2.0 and 3.0) ->
OK -> Download file from Windows Update
4) Microsoft Internet Explorer 11 in non-compatibility mode.
Note: By default, Microsoft IE will default intranet sites to being in compatibility mode. This will need
to be unchecked. See IE Internet Options, Compatibility View Settings.
5) Proficy Plant Applications Excel Add-In
a. Microsoft Excel 2010 – 2016, 32-Bit with VBA options installed (64-bit is NOT supported, Excel
is required if exporting/importing of various plant components will be leveraged from the
Plant Applications Administrator or for Reports created with the Excel Add-In
Plant Applications Universal Client 1. Proficy Historian 7
*Note: This application is installed on the Proficy Historian 7 Server. It is not installed on the Plant
Applications Application or Report Servers, nor is it installed on the Plant Applications Client systems.
2. Microsoft ODBC and SQL Command Line Utilities which are available from Microsoft. Note that this
step will not be needed if SQL and Historian are on the same server and the two utilities from the SQL
2016 Feature Pack should also work with SQL 2012 and SQL 2014
a. Microsoft SQL 2016 Feature Pack
i. msodbcsql.msi (ENU\x64\msodbcsql.msi from the above link)
ii. MsSqlCmdLnUtils.msi (ENU\x64\MsSqlCmdLnUtils.msi from the above link)
b. Microsoft SQL 2014 Feature Pack
i. Microsoft SQL ODBC Utility
1. ENU\x64\msodbcsql.msi
2. ENU\x86\msodbcsql.msi
ii. Microsoft SQL Command Line Utility
1. 1033\x64\MsSqlCmdLnUtils.msi

Proficy Plant Applications v7.0 Quick Install Guide
5
2. 1033\x86\MsSqlCmdLnUtils.msi
c. Microsoft SQL 2012 Feature Pack
i. Microsoft SQL ODBC Utility
1. 64-bit (x64)
2. 32-bit (x86)
ii. Microsoft SQL Command Line Utility
1. 64-bit (x64)
2. 32-bit (x86)
3. 32-bit (x86)
Proficy Plant Applications v7.0 Quick Install Guide
6
Installing Proficy Plant Applications 7.0 When installing Plant Applications, the installation order is important, while this document does not cover SIM
or Service Pack installations, the order is noted for reference purposes. This order applies to all Plant
Applications Versions
1) Proficy Application Server 2) Plant Applications Server 3) Plant Applications Client (Application Server) 4) Plant Applications Client (Report Server) 5) Plant Applications Report Server 6) Workflow Service Packs/SIMs (App Server) 7) Workflow Service Packs/SIMs (Extension
Server(s))
8) Plant Applications Service Packs/SIMs (App Server)
9) Plant Applications Service Packs/SIMs (Web Server)
10) Workflow Service Packs/SIMs (Clients) 11) Plant Applications Service Packs/SIMs
(Clients)
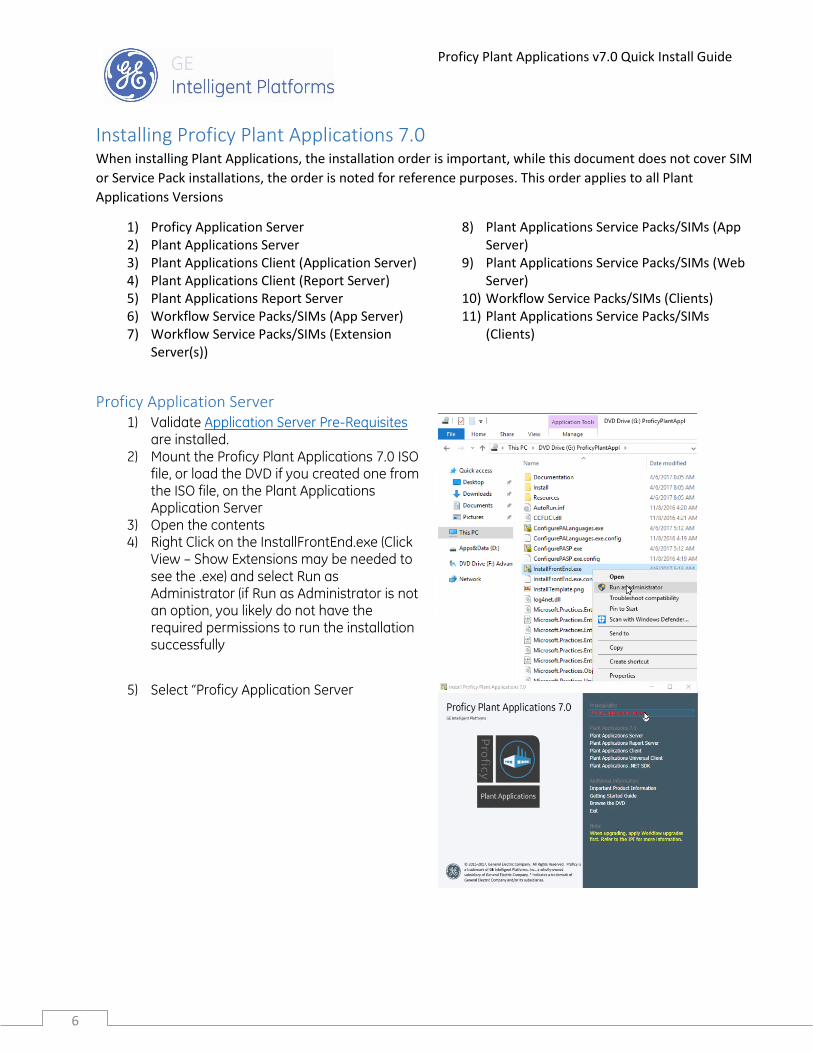
Proficy Application Server 1) Validate Application Server Pre-Requisites
are installed. 2) Mount the Proficy Plant Applications 7.0 ISO
file, or load the DVD if you created one from the ISO file, on the Plant Applications Application Server
3) Open the contents 4) Right Click on the InstallFrontEnd.exe (Click
View – Show Extensions may be needed to see the .exe) and select Run as Administrator (if Run as Administrator is not an option, you likely do not have the required permissions to run the installation successfully
5) Select “Proficy Application Server
Proficy Plant Applications v7.0 Quick Install Guide
7
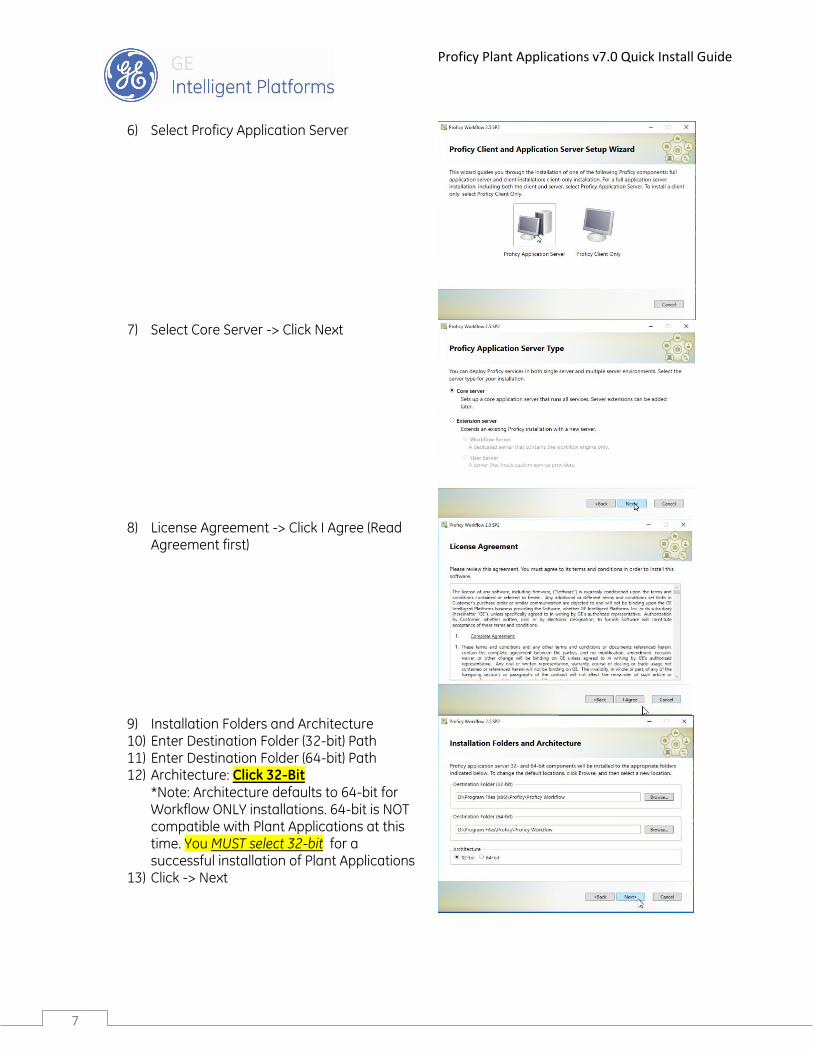
6) Select Proficy Application Server
7) Select Core Server -> Click Next
8) License Agreement -> Click I Agree (Read
Agreement first)
9) Installation Folders and Architecture 10) Enter Destination Folder (32-bit) Path 11) Enter Destination Folder (64-bit) Path 12) Architecture: Click 32-Bit
*Note: Architecture defaults to 64-bit for Workflow ONLY installations. 64-bit is NOT compatible with Plant Applications at this time. You MUST select 32-bit for a successful installation of Plant Applications
13) Click -> Next

Proficy Plant Applications v7.0 Quick Install Guide
8
14) AD LDS Integration *Note: If AD LDS services have not been installed on the server, this is an informational message only. If AD LDS services have been installed on the server, a configuration screen appears. Click -> Do Not Use AD LDS Service option
15) Click -> Next
16) Database Configuration 17) Uncheck Back up your existing database 18) Uncheck Use a local database with
Windows Authentication *Note: This option is for Workflow only installations and installs SQL Express. SQL Express is NOT compatible with Plant Applications
19) Server: SQL-ServerName\Instance (Instances may not be leveraged in which just the SQL Server name should be entered)
20) Database: Database Name (Customize the database name or leave default “SOADB” – If upgrading from PA 6.3, this will be your existing database name)
21) Authentication: Select SQL Server Authentication
22) Username: SA (Alternate SQL user may be used, the user must be a member of the SQL sysadmin’s group)
23) Password: ******** (per user name) 24) Click -> Next
*After clicking Next, the installer will validate the SQL server can be accessed and logged into leveraging the user name and passoword provided. If a connection cannot be made, validate firewall rules. SQL Server port 1433 inbound on the SQL server and outbound on the applications server must be open.
25) Security 26) Name: Admin 27) Password: ****** 28) Confirm Password: ****** 29) Optional Additional Security
*Note: This options can be enabled at a later date. To keep the installation as simple as possible, uncheck all the options at this time.
30) Click -> Next

Proficy Plant Applications v7.0 Quick Install Guide
9
31) Server Certificates 32) Select Generate new and unique certificates 33) Click -> Next
34) Web Service 35) IIS Server Information 36) Host Name: Application Server NetBios
(short name) 37) Website: Default Web Site 38) KSP User Account 39) Password: ***** 40) Confirm Password: ***** 41) Click -> Next
The KSP User account information is maintained for compatibility with PA v6.3. If upgrading, this password needs to match your existing KSP User account if the KSP databases where backed up and restored database was also restored.
42) Firewall Settings Note: Informational message/reminder to open the required firewall ports
43) Click -> Next

Proficy Plant Applications v7.0 Quick Install Guide
10
44) Installation Confirmation 45) Click -> Install
Approximate Run Time: 7 Minutes (clean install) *Note: When the installation gets to the stage of “Deploying DACPACs” this stage can take a significant amount of time (when upgrading) and is relevant to database size (160Gb db took 30+ minutes)
46) If errors are encountered, View Log file and
consult GE Digital Knowledge base, search on keywords found in the error messages. Resolve issues and retry. If issues persist, contact GE Support.
47) Installation Successful, Click -> Exit

Proficy Plant Applications v7.0 Quick Install Guide
11
Plant Applications Server 1) Mount the Proficy Plant Applications 7.0 ISO
file, or load the DVD if you created one from the ISO file, on the Plant Applications Application Server
2) Open the contents 3) Right Click on the InstallFrontEnd.exe (Click
View – Show Extensions may be needed to see the .exe) and select Run as Administrator (if Run as Administrator is not an option, you likely do not have the required permissions to run the installation successfully
4) Select Plant Applications Server
5) License Agreement -> Click I Agree

Proficy Plant Applications v7.0 Quick Install Guide
12
6) Configure Security 7) Administrator Name: Admin (same name as
entered when installing the Proficy Application Server)
8) Administrator Password: ***** (same password as entered when installing the Proficy Application Server)
9) Click -> Next
10) Install PASP
The Plant Applications Service Provider is maintained for backwards compatibility. This technology has been replaced with MESCore functionality. It can be enabled after the install is completed if it is needed. For now, best practice is to skip this step and do not select to Install Plant Apps Service Provider
11) Leave unchecked, Click -> Next
12) Ready To install The installation package will pick up many of the details such as server names from the Proficy Application Server installation.
13) Click -> Install 14) If the Proficy Application Server services are
running, a warning will be displayed that these services need to be shutdown
15) Click -> Ok

Proficy Plant Applications v7.0 Quick Install Guide
13
16) Configure Site 17) Ensure the MESCoreService is checked
(enabled) 18) Click -> Enable 19) Click -> Save
20) Configure Site 21) Validate Save Complete 22) Click -> Exit
23) If errors are encountered, View Log file and
consult GE Digital Knowledge base, search on keywords found in the error messages. Resolve issues and retry. If issues persist, contact GE Support.
24) Installation Successful, Click -> Exit 25) Other Installation Options 26) Plant Applications Clients
Both the Administrator and Client are recommended to be installed on the Application Server.
27) Plant Applications Universal Client
Is NOT installed on the Application Server. This is installed on your Proficy Historian 7.0 server
28) Plant Applications .NET SDK Is NOT installed on the Application Server. This is installed on the Client workstations and possibly on the Report Server
Proficy Plant Applications v7.0 Quick Install Guide
14
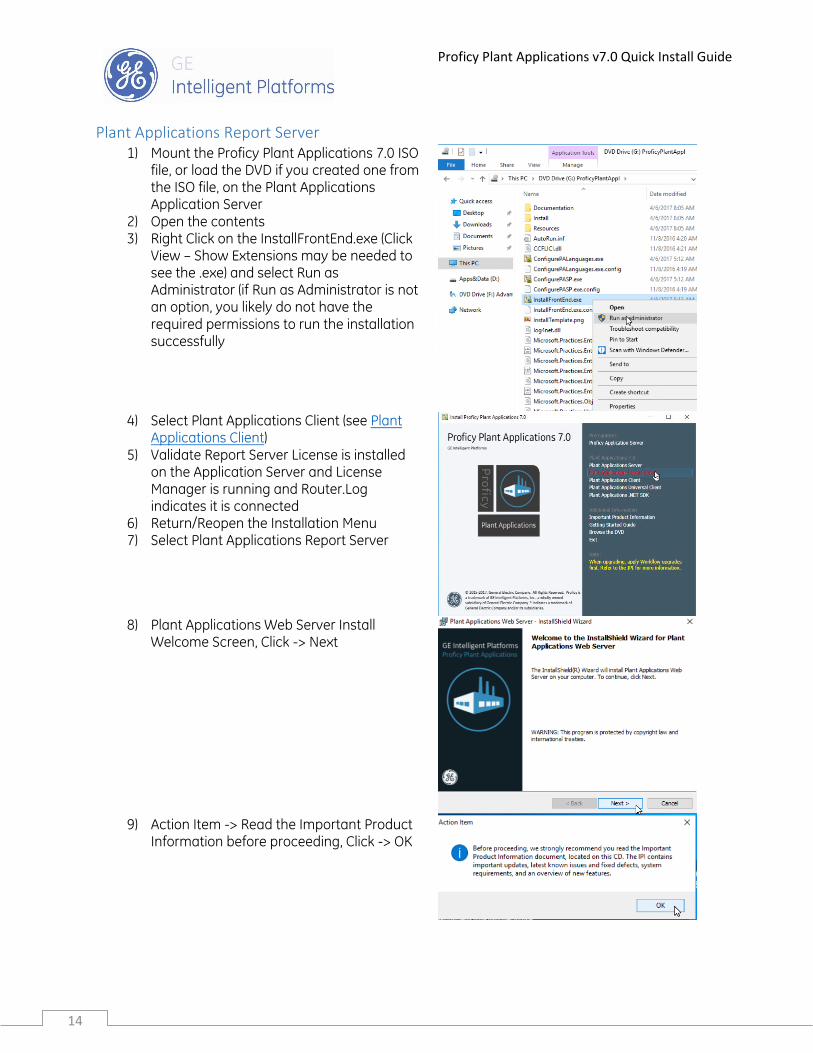
Plant Applications Report Server 1) Mount the Proficy Plant Applications 7.0 ISO
file, or load the DVD if you created one from the ISO file, on the Plant Applications Application Server
2) Open the contents 3) Right Click on the InstallFrontEnd.exe (Click
View – Show Extensions may be needed to see the .exe) and select Run as Administrator (if Run as Administrator is not an option, you likely do not have the required permissions to run the installation successfully
4) Select Plant Applications Client (see Plant
Applications Client) 5) Validate Report Server License is installed
on the Application Server and License Manager is running and Router.Log indicates it is connected
6) Return/Reopen the Installation Menu 7) Select Plant Applications Report Server
8) Plant Applications Web Server Install
Welcome Screen, Click -> Next
9) Action Item -> Read the Important Product
Information before proceeding, Click -> OK

Proficy Plant Applications v7.0 Quick Install Guide
15
10) Question: Update Firewall Settings? Click -> Yes or No (Yes Recommended) If you click No, you will need to update the firewall rules after installation (not covered in this document, see Knowledge Support Center and search for Firewall Port Requirements)
11) Select components to install, Change Installation path if desired, Click -> Next *Note: WebParts are an optionally licensed component, installation is recommended regardless of licensing obtained. If a license for WebParts is not available, they will install, they just will not be functional until a license is added. This is easier than installing at a later date and then having to re-apply Service Packs and/or SIMs The Plant Applications Web Report Engines require Microsoft Excel 2010 – 2016 32-bit (x86). 64-bit (x64) Excel is not supported. A Report Engine Service Account is required and the username and password will be prompted for during the install.
12) If you see this, and will be leveraging the Plant Applications Report Engines (Excel reports) you will need to quit the installation, install Microsoft Office and/or Excel 32-bit and start again.
13) Click -> OK (and Cancel and then Finish if Excel is needed)
14) If you see this, the pre-requisites for IIS have not been completed. See Installing IIS Roles & Service Pre-Requisites
15) Click -> OK (and Cancel and then Finish), then install IIS Pre-Requisites

Proficy Plant Applications v7.0 Quick Install Guide
16
16) Report Server Port Settings *Note: These do NOT typically need to be changed. This would apply to a custom IIS installation where alternate ports are leveraged.
17) Http Port: 80 18) Https Port: 443 19) Click -> Next
20) Database Server Information 21) Database server: NetBios (short name) of
the SQL server\Instance *Note: \Instance = SQL Instance name if instances are being leveraged. This is a less common installation and typically only the SQL server name is needed. Check with IT/dBA if unsure.
22) Click -> Next
23) Report Server Pre and Post Installation task
reminder (see Pre-Requisites) 24) Click -> Next
25) Report Engine Service Account Information 26) Windows Account
a. If a Local Account precede the account name with a .\ or server’s NetBios (short) name and a \ (backslash)
b. If a domain account precede the account name with the domain and a \ (backslash)
27) Account leveraged must have Log On As A Service ability and should be a member of the local computer’s administrator group or DCOM has been configured appropriately
28) Click -> Next

Proficy Plant Applications v7.0 Quick Install Guide
17
29) Installation path, Modify if desired, Click -> Next
30) Sharepoint Portal Services detection 31) Click -> OK
32) Confirmation 33) Click -> Install
Approximate Installation Time: 8 minutes
34) If this error is encountered, the Plant
Applications Client was not installed first, the license manager is not running correctly on the Application server (check router.log for license manager connection), or another factor prevented connection with the SQL Server

Proficy Plant Applications v7.0 Quick Install Guide
18
35) Re-Install Plant Applications Report Server *Note: When clicking on the Plant Applications Report Server to reinstall, a prompt to Repair Or Remove is presented. Click -> Remove
36) Run Plant Applications Report Server
installation again starting from above 37) Installation Successful, Click -> Finish

Proficy Plant Applications v7.0 Quick Install Guide
19
Plant Applications Client 1) Validate Pre-Requisites are installed. 2) Mount the Proficy Plant Applications 7.0 ISO
file, or load the DVD if you created one from the ISO file, on the Plant Applications Application Server
3) Open the contents 4) Right Click on the InstallFrontEnd.exe (Click
View – Show Extensions may be needed to see the .exe) and select Run as Administrator (if Run as Administrator is not an option, you likely do not have the required permissions to run the installation successfully
5) Select Plant Applications Client
6) Plant Applications Client Welcome 7) Click -> Next
8) Action Item -> Read the Important Product
Information before proceeding, Click -> OK

Proficy Plant Applications v7.0 Quick Install Guide
20
9) Select components to be installed *Note: If the Plant Applications Excel Add-In is installed, Microsoft Office/Excel 2010 – 2016 32-bit (x86) must be installed first. Microsoft Office/Excel 64-bit (x64) is NOT supported.
10) Developer Tools and Remote Services are not needed unless this is being installed on a Historian or other server where Remote Services are desired or installing an OPC Server on another system.
11) Click -> Next
12) Database server: NetBios (short name) of the SQL server\Instance *Note: \Instance = SQL Instance name if instances are being leveraged. This is a less common installation and typically only the SQL server NetBios (short) name is needed. Check with IT/dBA if unsure.
13) Click -> Next
14) Installation Path, Modify path if desired,
Click -> Next
15) Question: Create Desktop Shortcuts? 16) Select Yes Or No

Proficy Plant Applications v7.0 Quick Install Guide
21
17) Confirmation, Click -> Install Approximate Installation Time: 2 Minutes
18) If errors are encountered, View Log file and
consult GE Digital Knowledge base, search on keywords found in the error messages. Resolve issues and retry. If issues persist, contact GE Support.
19) Installation Successful, Click -> Finish 20) Open the Plant Applications Administrator
and log in 21) Open the Plant Applications Client and log in 22) If login successful – Done 23) If login not successful – troubleshoot
connections first a. Validate Licenses are appropriate
on the Application server b. Ping SQL Server c. Check Firewalls d. If SQL Instance, Configure port if
non-standard port 1433 is being leveraged
e. Search GE Knowledge Base on any errors presented
f. Contact GE Support
Proficy Plant Applications v7.0 Quick Install Guide
22
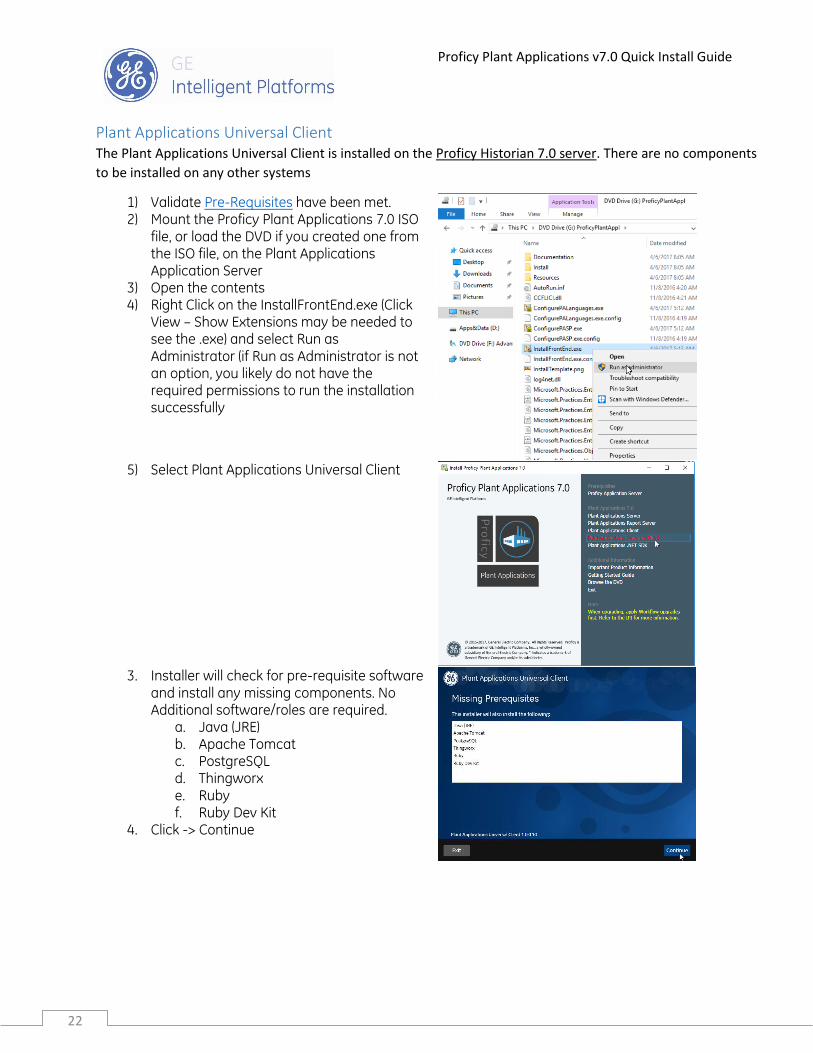
Plant Applications Universal Client The Plant Applications Universal Client is installed on the Proficy Historian 7.0 server. There are no components
to be installed on any other systems
1) Validate Pre-Requisites have been met. 2) Mount the Proficy Plant Applications 7.0 ISO
file, or load the DVD if you created one from the ISO file, on the Plant Applications Application Server
3) Open the contents 4) Right Click on the InstallFrontEnd.exe (Click
View – Show Extensions may be needed to see the .exe) and select Run as Administrator (if Run as Administrator is not an option, you likely do not have the required permissions to run the installation successfully
5) Select Plant Applications Universal Client
3. Installer will check for pre-requisite software
and install any missing components. No Additional software/roles are required.
a. Java (JRE) b. Apache Tomcat c. PostgreSQL d. Thingworx e. Ruby f. Ruby Dev Kit
4. Click -> Continue

Proficy Plant Applications v7.0 Quick Install Guide
23
6) Trusted Root Certificates a. Microsoft Details b. Trusted Root Installer Updater
7) Check the Check Here To Proceed… box, Click -> Next *Note: You may or may not see this screen depending on the Operating System and the version of the Trusted Client installer on the system. The links copy the URLs to the clipboard. Paste into a browser or follow the links in above step.
8) Plant Applications Universal Client Welcome, Click -> Next
9) Plant Applications Universal Client EULA,
Click -> Accept, Click -> Next
10) Plant Applications Universal Client
Connection Information (Screen 1) a. SQL Hostname: SQLServer b. SQL Instance: Instance or blank c. SQL DB: SOA/PA Database Name d. SQL Port: 1433 or Custom # e. SQL User: SQL Authenticated
account of user with SQL sysadmin group membership
f. SQL Password: ****** g. Historian Admin Password: ****** h. Install Location: Modify if desired
11) Click Validate Connection 12) Click -> Next

Proficy Plant Applications v7.0 Quick Install Guide
24
13) Plant Applications Universal Client Connection Information (Screen 2)
a. PostgreSQL Port: 5434 b. Tomcat Port: 8081 c. Tomcat Username: admin d. Tomcat Password: ******* (this sets
the Tomcat admin password) e. Tomcat Roles: manager-gui,admin-
gui (don’t change) 14) Click -> Next
15) Ready to install, Click -> Install
16) Installation Successful, Click -> Exit
Note: Default accounts: UC Config: Administrator Password: admin UC Client: bm_operator_1 Password: test

Proficy Plant Applications v7.0 Quick Install Guide
25
Plant Applications .NET SDK The Plant Applications .NET SDK is only needed if site is leveraging the SDK. This will NOT be installed on the
Application Server. It MAY be needed on the Plant Applications Report Server, it WILL be needed on the Plant
Applications Clients or wherever else the SDK is being leveraged.
1) Mount the Proficy Plant Applications 7.0 ISO file, or load the DVD if you created one from the ISO file, on the Plant Applications Application Server
2) Open the contents 3) Right Click on the InstallFrontEnd.exe (Click
View – Show Extensions may be needed to see the .exe) and select Run as Administrator (if Run as Administrator is not an option, you likely do not have the required permissions to run the installation successfully
4) Select Plant Applications .NET SDK
5) Plant Applications SDK Client Welcome,
Click -> Next

Proficy Plant Applications v7.0 Quick Install Guide
26
6) Select Typical or Custom installation type 7) Custom Recommended 8) Click -> Next
9) Select Components to be installed
*Note: Typical does not install the Help or Sample SDK Test Applications
10) Modify Installation To path if desired 11) Click -> Next
12) Click -> Install
Approximate Installation Time: Under a minute
13) Click -> Finish

Proficy Plant Applications v7.0 Quick Install Guide
27
Appendices Appendix L - Installing Proficy Advantage Licensing and Activating License
Appendix IIS - Installing IIS Roles & Service Pre-Requisites

Proficy Plant Applications v7.0 Quick Install Guide
28
Installing Proficy Advantage Licensing and Activating License
Installing the Proficy Advantage Client 1) Obtain the latest version of Proficy Advantage Licensing
(Download) Version 17.4.1162 at time of printing
2) Disable User Access Control (UAC) a. Right Click Start Icon b. Select Search c. Enter User Ac d. Select Change User Account Control Settings e. Slide the slider control to the bottom f. Click Ok g. Click Yes if prompted to confirm the change
3) Run the Common Licensing Installer as Administrator (Right
Click -> Run as Administrator)
4) From the Common Licensing Install Front End Menu 5) Select Install Licensing Client
6) Welcome Screen -> Click Next

Proficy Plant Applications v7.0 Quick Install Guide
29
7) EULA -> Click I Accept -> Click Next
8) Ready to Install -> Click Install
9) Install Complete -> Click Finish 10) Reboot system if prompted

Proficy Plant Applications v7.0 Quick Install Guide
30
Installing the Proficy Advantage License (Activation Code) 1) Navigate to Programs menu -> Proficy
Common -> License Client This installation method is most frequently used.
2) Select Activate Licenses Tab 3) Select Yes, for this computer from a local
license server
4) In the Local Server connection URL -> Enter
http://<LicenseServerName FQDN and NetBios names are supported> or http://<LicenseServerIPAddress>
5) Change Local Server Port if needed. By default this will be 3333 and the License Server is by default configured with 3333
6) Click Display Available Licenses 7) Check the box that matches your activation
code for this application / license 8) Click Activate 9) Review the license activated and validate
Licensed Version is Plant Applications 7.0 10) Review the license options enabled against the
expected values 11) Close License Client

Proficy Plant Applications v7.0 Quick Install Guide
31
Installing IIS Roles & Service Pre-Requisites
IIS Roles & Services for the Plant Applications Application Server
IIS Roles & Services for the Plant Applications Report Server
The following Roles & Services are required on the Proficy Plant Applications Application and Report Servers.
The Report Server requires additional roles and services than the application server. These additional roles &
services are denoted with a ** after them and can be skipped on the Application Server
• Web Server (IIS)
• Common HTTP Features
• Default Document
• Directory Browsing
• HTTP Errors
• Static Content
• HTTP Redirection
• Health and Diagnostics
• HTTP Logging
• Performance
• Static Content Compression
• Security
• Request Filtering
• Basic Authentication
• Windows Authentication
• Application Development
• .NET Extensibility 3.5**
• .NET Extensibility 4.6 (4.5 minimum)
• ASP
• ASP.NET 3.5**
• ASP.NET 4.6 (4.5 minimum)
• CGI**
• ISAPI Extensions
• ISAPI Filters
• Server Side Includes**
• FTP Server**
• FTP Service**
• FTP Extensibility**
• Management Tools
• IIS Management Console
• IIS 6 Management Compatibility
• IIS 6 Metabase Compatibility**
• IIS 6 Scripting Tools**
• IIS 6 WMI Compatibility**
Step by Step IIS Configuration 1) Open Server Manager 2) Click Add Roles and Features 3) Before You Begin -> Click Next (this may
not be displayed if skip this page was previously selected)

Proficy Plant Applications v7.0 Quick Install Guide
32
4) Installation Type -> Select Role-based or feature-based installation -> Click Next
5) Select destination server -> Highlight the
application server’s name -> Click Next
6) Leave any pre-select options checked 7) Select Web Server (IIS) -> If prompted for
required features -> Click Add Features

Proficy Plant Applications v7.0 Quick Install Guide
33
8) Click Next
9) Select .NET Framework 3.5**
a. .NET Framework 3.5** b. HTTP Activation**
10) Select ASP.NET 4.6 a. .NET Framework 4.6 b. ASP.NET 4.6 c. WCF Services
i. HTTP Activation ii. TCP Activation** iii. TCP Port Sharing
If prompted to add required role features, click -> Add Features
11) OPTIONAL: Select Telnet Client (the telnet client will come in handy if troubleshooting ports or email services are needed at a later date)
12) Click Next
13) Web Server Role (IIS) -> Click Next
14) Leave the select options checked 15) Check additional options:

Proficy Plant Applications v7.0 Quick Install Guide
34
a. Common HTTP Features: HTTP Redirection
b. Security: Basic Authentication c. Security: URL Authorization d. Security: Windows Authentication e. Application Development: .NET
Extensibility 4.6 f. Application Development: ASP g. Application Development: ASP.NET
4.6 If prompted for required features, click -> Add Features

Proficy Plant Applications v7.0 Quick Install Guide
35
Review Screen Shots to confirm correct selections have been made
Proficy Plant Applications v7.0 Quick Install Guide
36
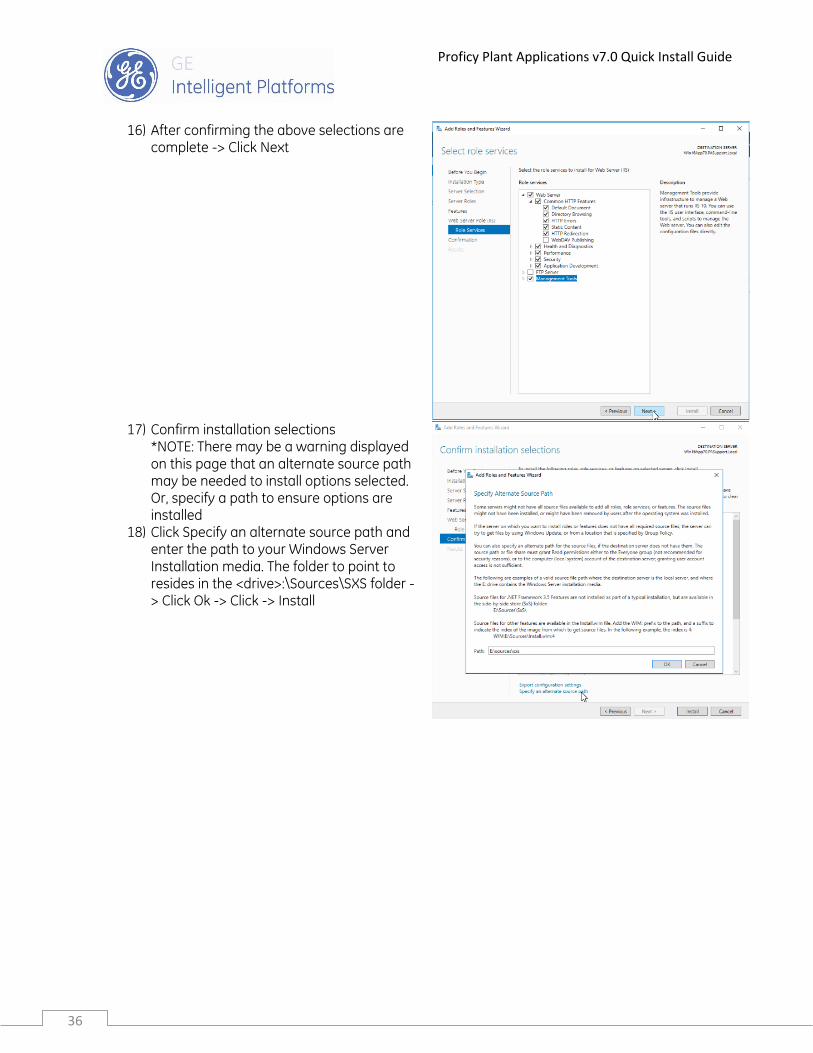
16) After confirming the above selections are complete -> Click Next
17) Confirm installation selections
*NOTE: There may be a warning displayed on this page that an alternate source path may be needed to install options selected. Or, specify a path to ensure options are installed
18) Click Specify an alternate source path and enter the path to your Windows Server Installation media. The folder to point to resides in the <drive>:\Sources\SXS folder -> Click Ok -> Click -> Install
Proficy Plant Applications v7.0 Quick Install Guide
37
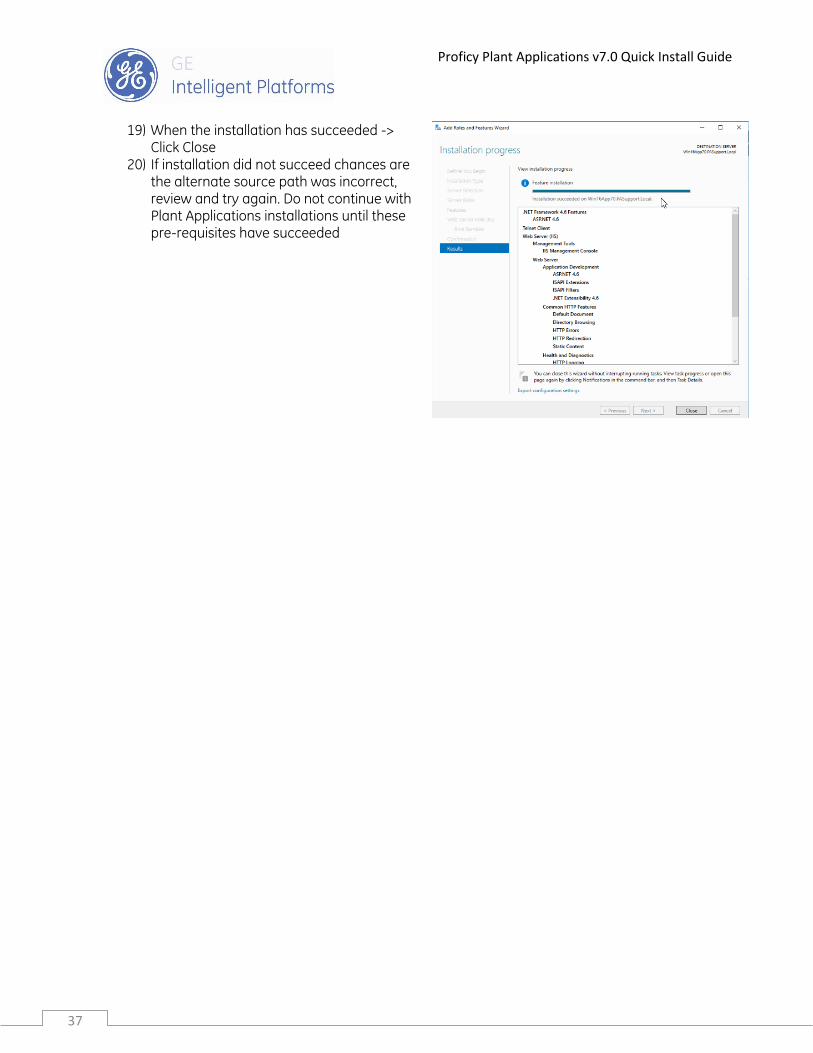
19) When the installation has succeeded -> Click Close
20) If installation did not succeed chances are the alternate source path was incorrect, review and try again. Do not continue with Plant Applications installations until these pre-requisites have succeeded