proform finishing products construction guide
TRANSCRIPT

Exclusive service provider of ProForm Finishing Products, LLC.
ProForm Finishing Products
Construction Guide
09 29 00/NGC

2 | ProForm Finishing Products
Enhanced Moisture ProtectionProForm Finishing Products offers the only full line of mold and mildew resistant products for ready mix, setting compounds and textures.
Versatile Product Range for any ProjectWe offer products specific to your project needs and preferences. Products range from having superior bonding characteristics to excellent sanding performance. From heavyweight products ideal for taping to patented lightweight products for an easy finish. Plus, specialty products to fit specific application needs such as low dust, and products designed to flow through automated tools more easily.
Wide Packaging SelectionFrom one quart and one gallon pails for home improvement and repair projects, to standard-sized pails, cartons and bags, ProForm Finishing Products offers a wide arrangement of packaging so you have exactly what you need for your project.
GREENGUARD CertifiedProForm Finishing Products achieve GREENGUARD Certification. GREENGUARD certified products are certified to GREENGUARD standards for low chemical emissions into indoor air during product usage. For more information, visit: ul.com/gg.
Select ProForm products achieve GREENGUARD Gold Certification. Products that achieve GREENGUARD Gold Certification qualify as low-emitting per California Specification Section 01350 in accordance with CDPH Standard Method, v1.2. For more information, visit: calrecycle.ca.gov.
Experience the ProForm DifferenceProForm offers a wide range of finishing products with packaging options to meet all of your finishing needs and preferences.
Our variety of products allow you to achieve top-level performance on your projects. Benefits found in our specialty products include:
• Reducing airborne dust up to 60%
• Resistant to mold and mildew growth
• Patented lightweight formulas
• Consistent set times
All of these product benefits combined with our best-in-class customer service help you minimize project costs and maximize jobsite performance.
ConsistencyYou can expect the same product, performance and feel every time.
Diversified Plant NetworkWhile ProForm® products are preferred worldwide, they are developed to fit regional preferences. We understand each region and market has different needs. Our team members are committed to delivering best-in-class quality, all driven by feedback and formula development from the professional finishers in markets each plant serves. The team at ProForm Finishing Products doesn’t assume what the user wants, we work with you to create products that reduce your jobsite issues.

Construction Guide | 3
Choose the Best Products for Your Project Meet our ProForm Product Family . . . . . . . . . . . . . . . . 4
Ready Mix Joint Compounds . . . . . . . . . . . . . . . . . . . . . . 6
Ultra Lightweight Ready Mix. . . . . . . . . . . . . . . . . . . . . 6
Lightweight Ready Mix. . . . . . . . . . . . . . . . . . . . . . . . . . 6
Mid-Weight Ready Mix . . . . . . . . . . . . . . . . . . . . . . . . . . 9
Standard Weight Ready Mix . . . . . . . . . . . . . . . . . . . . . 9
Setting Compounds . . . . . . . . . . . . . . . . . . . . . . . . . . . . . .13
Joint Tapes . . . . . . . . . . . . . . . . . . . . . . . . . . . . . . . . . . . . . .14
Texture Products. . . . . . . . . . . . . . . . . . . . . . . . . . . . . . . . .15
Installation Guide How and Where . . . . . . . . . . . . . . .16
Ready Mix Compounds . . . . . . . . . . . . . . . . . . . . . . . . . . .16
Setting Compounds. . . . . . . . . . . . . . . . . . . . . . . . . . . . . . .17
Spray Texture Products. . . . . . . . . . . . . . . . . . . . . . . . . . .18
Materials Estimating and Coverage . . . . . . . . . . . . . .18
Five Levels of Finish . . . . . . . . . . . . . . . . . . . . . . . . . . . . .19
Problems and Solutions. . . . . . . . . . . . . . . . . . . . . . . . . .21
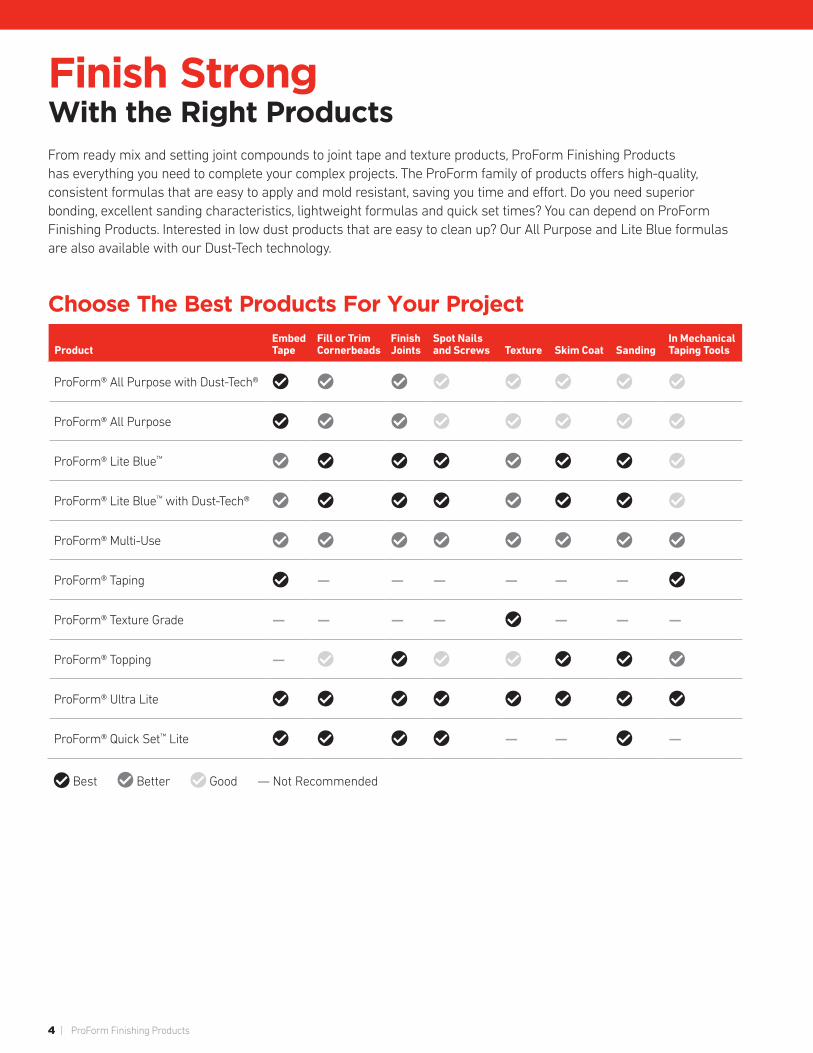
Choose The Best Products For Your Project
ProductEmbed Tape
Fill or Trim Cornerbeads
Finish Joints
Spot Nails and Screws Texture Skim Coat Sanding
In Mechanical Taping Tools
ProForm® All Purpose with Dust-Tech®
ProForm® All Purpose
ProForm® Lite Blue™
ProForm® Lite Blue™ with Dust-Tech®
ProForm® Multi-Use
ProForm® Taping — — — — — —
ProForm® Texture Grade — — — — — — —
ProForm® Topping —
ProForm® Ultra Lite
ProForm® Quick Set™ Lite — — —
Best Better Good — Not Recommended
4 | ProForm Finishing Products
From ready mix and setting joint compounds to joint tape and texture products, ProForm Finishing Products has everything you need to complete your complex projects. The ProForm family of products offers high-quality, consistent formulas that are easy to apply and mold resistant, saving you time and effort. Do you need superior bonding, excellent sanding characteristics, lightweight formulas and quick set times? You can depend on ProForm Finishing Products. Interested in low dust products that are easy to clean up? Our All Purpose and Lite Blue formulas are also available with our Dust-Tech technology.
Finish StrongWith the Right Products

Construction Guide | 5
Open, Mix and ApplyReady Mix Joint Compound: Ultra Lightweight, Lightweight, Mid-Weight or Standard WeightSo fast and easy, you’ll save hours with ProForm Ready Mix Joint Compound. These premixed formulas are mold resistant and have all achieved GREENGUARD Certification. They are ready to use right out of the container, wherever your job takes you.
Ultra Lightweight Ready MixWeighs up to 40% less than standard weight ready mix, sands easily and is an excellent choice for use in all taping and finishing tools and for all phases of finishing.
Lightweight Ready Mix Weighs up to 30% less than standard weight ready mix, shrinks less, provides a superior finish and sands easily.
Mid-Weight Ready MixWeighs up to 20% less than standard weight ready mix, shrinks less, works well for all phases of finishing and sands easily.
Standard Weight Ready Mix Provides excellent bond, works great for texturing and for first phases of finishing.
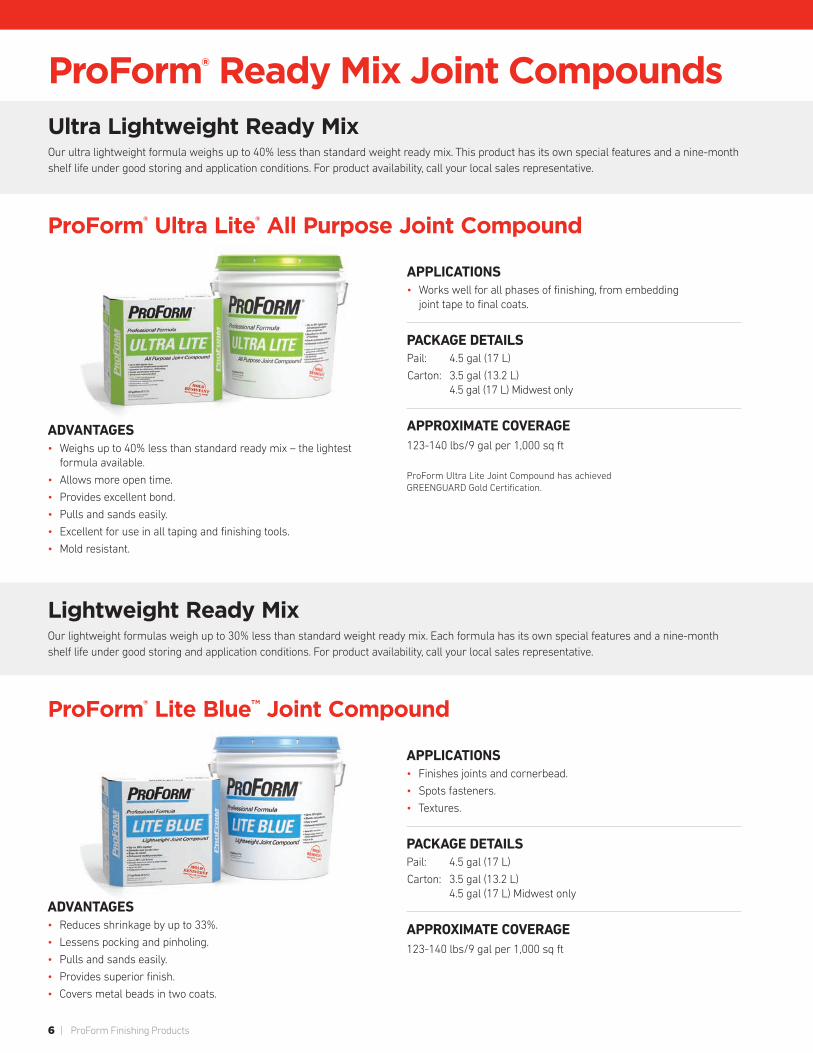
6 | ProForm Finishing Products
Ultra Lightweight Ready MixOur ultra lightweight formula weighs up to 40% less than standard weight ready mix. This product has its own special features and a nine-month shelf life under good storing and application conditions. For product availability, call your local sales representative.
ProForm® Ultra Lite® All Purpose Joint Compound
APPLICATIONS• Works well for all phases of finishing, from embedding
joint tape to final coats.
PACKAGE DETAILS Pail: 4.5 gal (17 L)
Carton: 3.5 gal (13.2 L) 4.5 gal (17 L) Midwest only
APPROXIMATE COVERAGE 123-140 lbs/9 gal per 1,000 sq ft
ProForm Ultra Lite Joint Compound has achieved GREENGUARD Gold Certification.
ProForm® Lite Blue™ Joint Compound
ADVANTAGES• Reduces shrinkage by up to 33%.
• Lessens pocking and pinholing.
• Pulls and sands easily.
• Provides superior finish.
• Covers metal beads in two coats.
Lightweight Ready MixOur lightweight formulas weigh up to 30% less than standard weight ready mix. Each formula has its own special features and a nine-month shelf life under good storing and application conditions. For product availability, call your local sales representative.
APPLICATIONS• Finishes joints and cornerbead.
• Spots fasteners.
• Textures.
PACKAGE DETAILS Pail: 4.5 gal (17 L)
Carton: 3.5 gal (13.2 L) 4.5 gal (17 L) Midwest only
APPROXIMATE COVERAGE 123-140 lbs/9 gal per 1,000 sq ft
ProForm® Ready Mix Joint Compounds
ADVANTAGES• Weighs up to 40% less than standard ready mix – the lightest
formula available.
• Allows more open time.
• Provides excellent bond.
• Pulls and sands easily.
• Excellent for use in all taping and finishing tools.
• Mold resistant.

ProForm® Lite Blue™ with Dust-Tech® Joint Compound
ADVANTAGES• Reduces airborne dust by 60% – quick and easy clean-up.
• Reduces shrinkage by up to 33%.
• Mold resistant.
• Provides superior finish.
• Sands without clogging sanding tool.
• Same formula as ProForm Lite Blue.
APPLICATIONS• Finishes joints and cornerbead.
• Spots fasteners.
• Skims and textures.
• Repairs cracks in plaster walls.
PACKAGE DETAILS Pail: 4.5 gal (17 L)
Carton: 3.5 gal (13.2 L)
APPROXIMATE COVERAGE 123-140 lbs/9 gal per 1,000 sq ft
ProForm Lite Blue with Dust-Tech Joint Compound has achieved GREENGUARD Gold Certification.
ProForm® Lite Joint Compound
ADVANTAGES• Reduces shrinkage by up to 33%.
• Lessens pocking and pinholing.
• Pulls and sands easily.
• Provides superior finish.
• Covers metal beads in two coats.
• Mold resistant.
APPLICATIONS• Finishes joints and cornerbead.
• Spots fasteners.
• Textures.
PACKAGE DETAILS Carton: 3.5 gal (13.2 L) Southwest only
APPROXIMATE COVERAGE123-140 lbs/9 gal per 1,000 sq ft

ProForm® Ready Mix Joint Compounds
ADVANTAGES• Excellent adhesion/bond.
• 40% lighter than standard taping compound.
• Mold and moisture resistant.
• Great for use in taping tools.
• Low VOC content – less than 2 grams/liter.
APPLICATIONS• Taping.
• Adheres cornerbead.
• Laminates gypsum board.
PACKAGE DETAILSCarton: 4.5 gal (17 L)
APPROXIMATE COVERAGE123-140 lbs/9 gal per 1,000 sq ft
ProForm® Taping Lite Joint Compound
ProForm® Tinted Lite™ Joint Compound
ADVANTAGES• Reduces shrinkage by up to 33%.
• Weighs up to 30% less than standard ready mix.
• Provides a finish with less pocking and pinholing.
• Mold resistant.
APPLICATIONS• Use for taping, filling, spotting fasteners and finishing.
• Ideal to repair cracks in plastered walls, texture surfaces and laminate gypsum board to other surfaces.
PACKAGE DETAILS Carton: 4.5 gal (17 L) Central and Midwest only
APPROXIMATE COVERAGE123-140 lbs/9 gal per 1,000 sq ft

Construction Guide | 9
Mid-Weight Ready MixA happy medium, ProForm Multi-Use weighs up to 20% less than standard weight ready mix. This formula has its own special features and a nine-month shelf life under good storage and application conditions. For product availability, call your local sales representative.
ProForm® Multi-Use Joint Compound
ADVANTAGES• Weighs up to 20% less than standard ready mix.
• Shrinks less than all purpose formula.
• Provides excellent bond.
• Lessens pocking and pinholing.
• Mold resistant.
APPLICATIONS• Works well for all phases of finishing, from embedding joint tape
to final coats.
PACKAGE DETAILS.Pail: 4.5 gal (17 L)
Carton: 3.5 gal (13.2 L) 4.5 gal (17 L)
APPROXIMATE COVERAGE 123-140 lbs/9 gal per 1,000 sq ft
ProForm® All Purpose Joint Compound
ADVANTAGES• Applies easily and provides excellent bond.
• Stays strong – highly durable surface.
• Lessens pocking and pinholing.
• Works great for first phases of finishing.
• Mold resistant.
APPLICATIONS• Taping.
• Finishes joints and cornerbead.
• Spots fasteners.
• Skims and textures.
• Repairs cracks in plaster walls.
PACKAGE DETAILSPail: 61.7 lbs (28 kg) 12 lbs/1 gal (5.4 kg)
Carton: 48 lbs (21.8 kg) 50 lbs (22.7 kg) 61.7 lbs (28 kg)
APPROXIMATE COVERAGE 123-140 lbs/9 gal per 1,000 sq ft
Standard Weight Ready Mix All standard formulas are consistent and easy to apply, with many excellent qualities built in. Each formula has its own special features and a nine-month shelf life under good storage and application conditions. For product availability, call your local sales representative.

10 | ProForm Finishing Products
ProForm® All Purpose Machine Grade Joint Compound
ADVANTAGES• Applies easily and provides excellent bond.
• Stays strong – highly durable surface.
• Lessens pocking and pinholing.
• Works great for first phases of finishing as well as for automatic taping and finishing tools.
• Mold resistant.
APPLICATIONS• Taping.
• Finishes joints.
• Spots fasteners.
• Skims and textures.
• Repairs cracks in plaster walls
PACKAGE DETAILSPail: 61.7 lbs (28 kg)
APPROXIMATE COVERAGE 123-140 lbs/9 gal per 1,000 sq ft
ProForm® Taping Joint Compound
ADVANTAGES• Enhances bond when embedding tape – first coating cornerbead
and laminating gypsum board.
• Works well with automatic taping tools.
• Mold resistant.
APPLICATIONS• Taping.
• Adheres cornerbead.
• Laminates gypsum board.
PACKAGE DETAILSPail: 61.7 lbs (28 kg) Carton: 46 lbs (20.8 kg)
APPROXIMATE COVERAGE 123-140 lbs/9 gal per 1,000 sq ft
ProForm® All Purpose with Dust-Tech® Joint Compound
ADVANTAGES• Reduces airborne dust by 60% – quick and easy clean-up.
• Mold resistant.
• Applies easily and provides excellent bond.
• Same formula as ProForm All Purpose.
• Lessens pocking and pinholing.
• Great for first phases of finishing.
APPLICATIONS• Taping.
• Finishes joints and cornerbead.
• Spots fasteners.
• Skims and textures.
• Repairs cracks in plaster walls.
PACKAGE DETAILSPail: 61.7 lbs (28 kg)
Carton: 50 lbs (22.7 kg)
APPROXIMATE COVERAGE 123-140 lbs/9 gal per 1,000 sq ft
ProForm All Purpose with Dust-Tech Joint Compound has achieved GREENGUARD Gold Certification.

ProForm® Heavy Viscosity Joint Compound
ADVANTAGES• Excellent adhesion/bond.
• Designed for use in mechanical taping and finishing tools.
• Mold resistant.
• Ready to use right from the container.
APPLICATIONS• Taping.
• Finishes joints.
• Spots fasteners.
• Texturing.
• Repairs cracks in plaster walls.
PACKAGE DETAILSPail: 61.7 lbs (28 kg)
APPROXIMATE COVERAGE 123-140 lbs/9 gal per 1,000 sq ft
ProForm® Topping Joint Compound
ADVANTAGES• Spreads easily.
• Lessens pocking and pinholing.
• Sands easily.
• Mold resistant.
APPLICATIONS• Finishes joints and cornerbead.
• Spots fasteners.
• Textures.
PACKAGE DETAILSPail: 61.7 lbs (28 kg) Carton: 50 lbs (22.7 kg)
APPROXIMATE COVERAGE 123-140 lbs/9 gal per 1,000 sq ft

ProForm® Texture Grade Joint Compound
ADVANTAGES• Allows great pattern versatility.
• Conceals minor cracks and other imperfections.
• Applies easily and provides excellent bond.
• Mold resistant.
APPLICATIONS• Works well for any non-aggregated texture.
• Works for a variety of textures, including stipple, knockdown, skip trowel and orange peel.
PACKAGE DETAILS Carton: 50 lbs (22.7 kg)
APPROXIMATE COVERAGE 123-140 lbs/9 gal per 1,000 sq ft
ProForm® Concrete Cover Compound
ADVANTAGES• Enhances bond when skimming to interior above-grade
monolithic concrete walls, ceilings and columns.
• Stays strong – highly durable surface.
• Creates a variety of textures.
• Dries white.
• Mold resistant.
APPLICATIONS• Smooths and textures monolithic concrete ceilings or columns.
• Sprays, brushes, rolls and applies by trowel, drywall finishing boxes or taping tools.
• Laminates.
• Provides first-fill coat on fastener beads or trim.
PACKAGE DETAILS Pail: 61.7 lbs (28 kg)
APPROXIMATE COVERAGE 123-140 lbs/9 gal per 1,000 sq ft
ProForm Concrete Cover Joint Compound has achieved GREENGUARD Gold Certification.

Construction Guide | 13
ProForm® Quick Set™ Fire and Smoke Stop 90 Setting Compound
ADVANTAGES• 30% lighter than Quick
Set Compound.
• Streamlines scheduling – recoat immediately once previous coat sets.
• Provides excellent bond.
• Stays strong/highly durable surface.
• Shrinks less and dries white.
• Allows easy mixing and sanding.
• Added protection against mold.
• Available in 5, 20, 45, 90 and 210 minute set times for flexibility.
ADVANTAGES• Blocks fire and smoke – dries red
for easy identification.
• Saves money – more economical and less waste than caulking tube products.
• Reduces waste – mix only what you need for the job.
APPLICATIONS• Works well for heavy fills,
beads, trims, joint finishing and laminating gypsum panels.
PACKAGE DETAILS Bag: 18 lbs (8.2 kg)
APPLICATIONSMeets multiple standards to qualify as UL Listed for:
• Use in fire and smoke-stop.
• Use for through-wall and floor penetrations.
• Use for head of wall.
PACKAGE DETAILS Bag: 25 lbs (11.3 kg)
Setting CompoundEasy to mix and apply, ProForm setting compound sets fast, allowing for same-day finishing and next-day decorating. Once the compound has set, even humidity will not slow down your tight schedule. When minutes count, you can set your clock by our consistent setting and working times. Available nationwide.
Sets Fast for Same-Day Finishing
ProForm® Quick Set Lite™ Setting Compound
ProForm® Quick Set™ Setting CompoundADVANTAGES• Streamlines scheduling –
recoat immediately once previous coat sets.
• Provides excellent bond.
• Stays strong/highly durable surface.
• Shrinks less and dries white.
• Allows easy mixing.
• Added protection against mold.
• Available in 90 and 210 minute set times for flexibility.
APPLICATIONS• Works well for heavy fills,
beads, trims, joint finishing and laminating gypsum panels.
PACKAGE DETAILSBag: 25 lbs (11.3 kg)
APPROXIMATE COVERAGE 45-55 lbs/1,000 sq ft (22-27 kg/100 sq m)
MIXINGMix 11-12 pts (5.2-5.7 L) clean, room temperature, drinkable water per bag.
APPROXIMATE COVERAGE 45-55 lbs/1,000 sq ft
(22-29 kg/1,000 sq m)
MIXINGMix 13-14 pts (6.2-6.6 L) clean, room temperature, drinkable water per bag.
APPROXIMATE COVERAGE25 lbs bag/850 cu in
MIXING Mix 12-13 pts (5.7-6.2 L) clean, room temperature, drinkable water per bag. If less than a full bag will be needed, then plan on a ratio of 2 parts dry powder to 1 part water.
ProForm Quick Set Lite Setting Compound has achieved GREENGUARD Gold Certification.
ProForm Quick Set Setting Compound has achieved GREENGUARD Gold Certification.

ProForm™ Paper Joint Tape
ProForm™ Paper Joint TapeADVANTAGES• Creates added strength
in joints.
• Provides superior bond – buffed on both sides.
• Folds at corners easily due to center crease.
• Resists distortions, such as stretching, wrinkling and tearing.
APPLICATIONS• Use on gypsum panel joints and
interior angles – apply crease side in.
• Use with ready mix joint compounds.
• Embed in ProForm joint compound, removing excess compound.
PACKAGE DETAILSAvailable in:
75’ rolls (22.9 m), 20 rolls/carton
250’ rolls (76.2 m), 20 rolls/carton
500’ rolls (152.4 m), 10 rolls/carton
APPROXIMATE COVERAGE375 ft/1,000 sq ft of gypsum board
(114 m/93 sq m)
Stick to QualityReinforce and conceal your interior wall and ceiling joints with high-quality ProForm joint tape. Available in 3 different sizes to fit your needs. For product availability, contact your local sales representative.

Construction Guide | 15
ProForm™ Perfect Spray® Medium Aggregated Texture Spray
ADVANTAGES• Mixes easily and provides
low fallout.
• Achieves bright white appearance providing bold accent and hiding minor surface defects.
• Contains shredded polystyrene aggregate – sprays quickly.
APPROXIMATE COVERAGE300-400 sq ft
(27-37 sq m)/bag
MIXING3-4 gal (11.3-15.1 L)
water/bag
ProForm™ Texture Products
APPLICATIONS• Use on interior ceilings with new,
primed or previously painted gypsum board or monolithic concrete/plaster.
• Works with standard spray equipment.
PACKAGE DETAILSBag: 40 lbs (18.2 kg)
ProForm™ Wall & Ceiling Spray Non-Aggregated Texture Spray
ADVANTAGES• Mixes and pumps easily.
• Creates a variety of textures, including spray spatter, spatter knockdown and orange peel.
• Offers textures in several light-reflecting finishes.
APPROXIMATE COVERAGE500-1,500 sq ft (46-139 sq m)/bag
MIXING4-5 gal (15-19 L) water/bag
APPLICATIONS• Use on walls and ceilings.
• Applies without overspray impacting ceiling.
• Use on wall surface finished with a coat of paint or concrete coated with an alkali-resistant primer/sealer.
PACKAGE DETAILSBag: 50 lbs (22.7 kg)
Create Textured SurfacesWhether you want to cover, conceal, or create interesting design effects, texture products from ProForm offer a complete line of interior ceiling and wall textures. These work on well-primed surfaces, including drywall, concrete, plaster, wood and metal. Saves time and money over conventional painting. Each texture product has its own special features. For product availability, contact your local sales representative.
ProForm™ Perfect Spray® EM Non-Aggregated Texture Spray
ADVANTAGES• Provides an innovative time and
money-saving option to ordinary painting.
• Decorative texturing product for fast spray applications to interior surfaces.
• Bright white finish.
• Mold resistant.
APPROXIMATE COVERAGE500-1,500 sq ft (46-139m 2)/bag
MIXING4-5 gal (15-19 L) water/bag
APPLICATIONS• Use on walls and ceilings.
• Works with standard spray equipment.
PACKAGE DETAILSBag: 50 lbs (22.7 kg)

16 | ProForm Finishing Products
Installation Guide
ENVIRONMENTAL CONDITIONSVarying weather conditions can impact both the quality and appearance of taped drywall joints. Relative humidity, plus temperature, will affect the working characteristics of all joint compounds.
The potential for finishing and decorating problems are minimized when temperature, humidity and airflow remain constant and as close to occupancy environmental conditions as possible. A minimum temperature of 50˚F (10˚C) should be maintained continuously for 48 hours prior to and throughout the finishing process until applied materials are thoroughly dry.
For example, cool wet weather will slow down the drying process while hot, dry weather hastens the drying process. Exposure to winds, breezes or drafts while drying can also affect the performance of joint compounds. Typical problems from improper drying can be cracking, excessive shrinkage, ridging and beading, banding or bond failure. A further explanation of these conditions is outlined in the “Problems and Solutions” section of this guide.
Proper precautions at the job site should always be taken to minimize the adverse effects of weather on drying. These precautions will ultimately reduce the application time and expense from call backs and rework.
STORAGEShelf-life up to 9 months under good storage conditions. See production date code on product packaging. To prevent spoilage and freezing, maintain temperature at a minimum 50˚F (10˚C) and protect container from exposure to extreme heat and sunlight.
FROZEN READY MIX Allow material to thaw at room temperature for at least 24 hours. When thawed, turn the container upside-down for at least 15 minutes. Turn pail right side up, remove lid and immediately remix with an electric drill. Ready Mix should be lump-free and ready to use within 1 minute. Discard all Ready Mix that does not remix to a lump-free consistency.
STACKINGReady Mix pails or cartons should not be stacked more than two pallets in height.
MOLD AND MILDEW GROWTH PROTECTIONProForm® All Purpose with Dust-Tech® Joint Compound and ProForm® Lite Blue™ with Dust-Tech® Joint CompoundAll ProForm products are mold and mildew resistant but the ProForm Dust-Tech products meet achieve the highest test score. ProForm All Purpose with Dust-Tech and Lite Blue with Dust-Tech were designed to provide extra protection against mold and mildew compared to standard ready mix compound. When tested by an independent lab per ASTM D3273 (Standard Test Method for Resistance to Growth of Mold on the Surface of Interior Coatings in an Environmental Chamber), ProForm Ready Mix with Dust-Tech achieved a score of 10, the best possible score for this test.
These products also resist the growth of mold per ASTM G21 (Standard Practice for Determining Resistance of Synthetic Polymeric Materials to Fungi) with a score of 0, the best possible score.
When tested in a system with ProForm™ Paper Joint Tape, Gold Bond® XP® Gypsum Board or Gold Bond® eXP® Interior Extreme® Gyspum Panels, this system achieves a score of “10” for ASTM D3273 and a score of “0” for ASTM G21. These are the best possible mold-resistant scores for these tests.
MOLD AND MILDEW RESISTANCEPlanning and PreventionPlanning and prevention is the most effective way to avert the growth of mold or mildew. Gypsum wallboard and finishing products should be delivered to projects as near to the time it will be used as possible. Wallboard delivered to a job site must be placed under cover immediately, properly protected and not exposed to outside elements such as rain, snow or other high moisture conditions.
If building materials get wet from any moisture source, that source must first be identified and corrected. If mold or mildew growth occurs, or if you suspect it might occur due to environmental conditions and moisture, a determination must be made to either attempt to dry and clean the affected areas or to replace the affected materials. Care must be taken in this evaluation, and if you do not have the training or experience to recognize and to make proper decisions about repair or removal, you should consult a professional.
No material can be considered “mold proof,” nor is it certain that any material will resist mold or mildew indefinitely. When used in conjunction with good design, handling and construction practices, Ready Mix with Dust-Tech can provide increased mold resistance versus standard ready-mixed compounds. As with any building material, avoiding water exposure during handling, storage and installation and after installation is complete is the best way to avoid the formation of mold or mildew.
Ready Mix Compounds
JOINT COMPOUND DRYING TIMESApproximate Drying Times for Ready Mix Joint Compound
Temperature
Relative Humidity 32° 40° 50° 60° 70° 80° 100°
0% 38/H 28/H 19/H 13/H 9/H 6/H 3/H
20% 2/D 34/H 23/H 16/H 11/H 8/H 4/H
40% 2.5/D 44/H 29/H 20/H 14/H 10/H 5/H
50% 3/D 2/D 36/H 24/H 17/H 12/H 6/H
60% 3.5/D 2.5/D 42/H 29/H 20/H 13.5/H 8/H
70% 4.5/D 3.5/D 2.25/D 38/H 26/H 19.5/H 10/H
80% 7/D 4.5/D 3.25/D 2.25/D 38/H 27/H 14/H
90% 13/D 9/D 6/D 4.5/D 3/D 49/H 26/H
98% 53/D 37/D 26/D 18/D 12/D 9/D 5/D
Note: D = Days (24 hour period) H = Hours
The chart above is a helpful guide in determining approximate drying times for joint compounds under a variety of humidity/temperature conditions. Shaded area is below the minimum application temperature requirement of 50°F and is not recommended for the application of joint compound.
Note: To ensure best results, all ProForm Joint Compounds should be used together in construction systems.
All ProForm Joint Compounds are formulated without asbestos and therefore comply with Consumer Product Safety Standards.

Construction Guide | 17
MIXINGMix no more compound than can be applied in the designated set time. Place the amount of water recommended, (see mixing ratio) on compound packaging in a clean mixing container. Add the compound gradually to clean, drinkable water while stirring. Mix the compound free of lumps with a mechanical mixer or by hand. Allow standing (soak) for 1 minute, and then remix until consistency is smooth and creamy. If a thinner or thicker mix is desired, add water or powder sparingly. Careful not to overmix as it could lead to shortened working times. DO NOT mix with any other joint compounds (wet or dry) and not recommended for use in automatic tools. Prior to application, surface areas should be clean and free of dust and debris.
ESTIMATED WORKING AND SETTING TIMESOne of the most crucial things for selecting the proper ProForm® Quick Set™ Setting Compound is matching its working time and setting time ranges to the project.
It should be noted that working time and setting time are not the same.
WORKING TIME Working time refers to the period during which the ProForm Quick Set is usable for application. At the end of this time, the material begins to stiffen and can no longer be spread easily. Working time should correspond to the required time for actual application.
SETTING TIME Setting time refers to the time after which the applied ProForm Quick Set will become adequately hardened so that another layer can be applied. For manufactured or modular builders, the setting time should match your timetable for moving a floor along the line.
APPROXIMATE WORKING TIME VERSUS SET/HARDENING TIME
Quick Set/ Quick Set Lite
Working Time (Minutes)
Set/Hardening Time (Minutes)
5 3–5 10–20
20 15–20 20–40
45 35–45 45–70
90 70–90 90–125
210 180–210 210–280
LIMITATIONS• Do not apply over moist surfaces or surfaces subject to direct moisture.• Do not mix with any other material. Use only clean, room
temperature, drinkable water.• Mixing equipment and tools must be thoroughly cleaned
between batches.• Each fresh batch of compound must be kept free of previous
batches; otherwise the working time will be shortened.• High-speed mixing or excessive mixing will shorten the working
time of the ProForm Quick Set setting compounds.• Do not add water or remix after compound begins to thicken
and harden.• Not recommended for use in automatic taping tools.• Close opened bag as tight as possible for storage or setting time
may be affected.• Shelf life up to 6 months in high humidity areas and 12 months under
good storage conditions. See production date code. To prevent spoilage and freezing, maintain temperature at a minimum 50˚F (10˚C) and protect container from exposure to extreme heat, sunlight and water.
• The potential for finishing and decorating problems are minimized when temperature, humidity and airflow remain constant and as close to occupancy environmental conditions as possible. A minimum temperature of 50˚F (10˚C) should be maintained continuously for 48 hours prior to and throughout the finishing process until applied materials are thoroughly dry.
FREQUENTLY ASKED QUESTIONS1. Why is the product lumpy after mixing?
• Water was added to the ProForm Quick Set, rather than the compound being added to the water.
• ProForm Quick Set was not allowed to soak (for approximately 1 minute) after initial mix before remixing was initiated.
2. Why is the product setting much faster than the advertised range?
• Dirty mixing water and/or application tools.• Excessive mixing of the compound.• Foreign material (accidentally or deliberately) added to the mixture.• Mixing water too hot.
3. Why is the product setting much slower than the advertised range?
• Too much water was used.• Impure water source (dissolved organics in the water generally
retard the set time).• Foreign material (accidentally or deliberately) added to the mixture.• Water too cold.• Product was remixed after initial stiffening began.
4. Why does the product display weak strength?• Too much water was used.• Foreign material (accidentally or deliberately) added to the mixture.
JOINT AND CORNER FINISHING APPLICATION1. ProForm Quick Set setting compounds should be mixed in accordance with the printed instructions on the package.
2. A uniformly thin layer of joint compound should be applied over the joint approximately 4" wide. Tape should be centered over the joint and embedded into the compound leaving sufficient joint compound under the tape for proper bond. Ceiling and wall angles plus all inside corner angles should be reinforced with tape folded to conform to angles and embedded into the compound.
3. After compound is thoroughly dry or hard (approximately 24 hours for Regular compound or 2 hours for Quick Set), joint tape should be covered with a coat of joint or topping compound. The compound should be spread over the tape approximately 3" on each side and feathered out at edges. After thoroughly dry, another coat of joint or topping compound should be applied with a slight uniform crown over the joint. This coat should be smoothed and feathered approximately 3" beyond the preceding coat.
4. All inside corners should be coated with at least one coat of joint or topping compound and the edges feathered out.
5. All nail or screw head dimples should receive three coats. This may be applied along with each joint coat.
6. Flanges of wallboard cornerbead should be concealed by at least two coats of compound. The second coat should be feathered out approximately 9" on both sides of the exposed metal nose.
7. For joint and corner treatment with Quick Set, fill joint and bed tape simultaneously. After Quick Set has hardened, apply any ProForm joint compound.
8. For wet sanding, allow each application of compound to dry or harden. If dry sanding is performed, ventilate work area and/or use a NIOSH/MSHA-approved respirator. Safety glasses are also recommended. Caution should be used to avoid roughing the wallboard paper. All wallboard and treated areas should be smooth and ready for decoration.
Setting Compounds

18 | ProForm Finishing Products
Recommended Application PracticesGYPSUM WALLBOARDSurfaces, including joint-treated areas, must be smooth, clean and dry. First apply a coat of sealing primer. Allow primer to dry thoroughly, and maintain adequate drying conditions after application. Primer is to minimize sagging of gypsum wallboard and discoloration or difference in sheen on ceiling surface. Add dry texture to water. Use a piston pump or Mono-type pump with a texture gun. Minimum 3/4" I.D. material hose. A hopper-type gun with adequate air supply is also suitable. Typical coverage is 8-10 sq. ft. per lb. for aggregated and 10-30 sq. ft. per lb. for nonaggregated textures. Mask appropriate areas before spraying and promptly remove overspray from unprotected surfaces afterward. Follow the instructions of the spray equipment manufacturer for adjusting controls and cleaning. If a second coat is desired, allow the first coat to dry thoroughly.
Note: For ceilings to receive water-based texture, apply minimum 1/2” gypsum board perpendicular to framing members spaced 16” o.c. Apply minimum 1/2” sag-resistant or 5/8” gypsum board to framing members spaced 16” o.c.
CONCRETEAllow concrete to cure for at least 28 days. Clip protruding wire ends and spot with rust-inhibitive primer. Remove all form oil, grease and dirt, or any loose or water-soluble material. Grind down any form ridges, and level any remaining unevenness with ProForm® Quick Set. Apply a coat of alkali-resistant sealing primer over the entire surface to be textured.
Spray Textures
Materials Estimating and CoverageINSTALLATION MATERIALS
Sq Ft of Wall/Ceiling
Gypsum Board SizeAll Purpose/ Lite Blue Joint Tape/ft Quick Set/lb Nails/ct Screws/ct4'x8' 4'x10' 4'x12
100 4 3 3 12-14 lbs/1.0 gal 35 6 168 90
200 7 5 5 25-28 lbs/1.8 gal 70 11 294 150
300 10 8 7 37-42 lbs/2.7 gal 105 17 420 240
400 13 10 9 49-56 lbs/3.6 gal 140 22 546 300
500 16 13 11 62-70 lbs/4.5 gal 175 28 672 390
600 19 15 13 73-84 lbs/5.4 gal 210 33 798 456
700 22 18 15 86-98 lbs/6.3 gal 245 39 924 528
800 25 20 17 98-112 lbs/7.2 gal 280 44 1050 600
900 29 23 19 110-126 lbs/8.1 gal 315 50 1218 696
1000 32 25 21 123-140 lbs/9.0 gal 350 55 1344 768
1100 35 28 23 135-154 lbs/9.9 gal 385 61 1470 840
1200 38 30 25 148-168 lbs/10.8 gal 420 66 1596 912
1300 41 33 28 160-182 lbs/11.7 gal 455 72 1722 984
1400 44 35 30 172-196 lbs/12.6 gal 490 77 1848 1056
1500 47 38 32 184-210 lbs/13.5 gal 525 83 1974 1128
FINISHING MATERIALS
All Purpose/Lite Blue Quick Set Perfect SprayWall and Ceiling Spray Joint Tape
Quantity per 1,000 sq ft of Gypsum Board
123-140 lbs/9.0 gal 55 lbs 120 lbs 50-100 lbs 350 ft

Construction Guide | 19
LEVEL 0• Typically specified in temporary construction or whenever the final
decoration has not been determined.• No taping, finishing, or accessories required.
LEVEL 1• Typically specified joint treatment in smoke barrier applications and
areas not normally open to public view such as plenum areas above ceilings, attics, and other areas where the assembly would generally be concealed.
• All joints and interior angles shall have tape embedded in joint compound. Excess joint compound, tool marks and ridges are acceptable.
• Accessories are optional unless specified in the project documents.
LEVEL 2• Typically specified where gypsum panel products are used as a
substrate for tile; may be used in garages, warehouse storage or other similar areas where surface appearance is not a concern.
• All joints and interior angles shall have tape embedded in joint compound and wiped with a joint knife leaving a thin coating of joint compound over all joints and interior angles. Joint compound applied over the body of the tape at the time of tape embedment shall be considered a separate coat of joint compound and shall satisfy the conditions of this level.
• Fastener heads and accessories shall be covered with one (1) coat of joint compound. Surface shall be free of excess joint compound. Tool marks and ridges are acceptable.
LEVEL 3• Typically specified in appearance areas which are to receive heavy- or
medium-texture finishes (spray or hand applied) before final painting, or where heavy-duty/commercial grade wallcoverings are to be applied as the final decoration. The design professional shall specify the mock-up procedure and mock-up construction details within the project documents. This level of finish is not recommended for smooth wall designs or applications where light textures, non-continuous textures, or lightweight wallcoverings are applied.
• All joints and interior angles shall have tape embedded in joint compound and shall be immediately wiped with a joint knife leaving a thin coating of joint compound over all joints and interior angles. One (1) separate coat of joint compound shall be applied over all joints and interior angles. Fastener heads and accessories shall be covered with two (2) separate coats of joint compound. The surface shall be smooth and free of tool marks and ridges.
• Jobsite mock-up(s) shall be used to determine acceptance of the finish within the building.
Note: It is recommended that the final decoration specification (e.g., painting specification) include the application of a priming material prior to the decoration.
LEVEL 4• Typically specified in appearance areas where smooth wall designs are
decorated with flat paints, light textures, non-continuous textures, or wallcoverings are to be applied. The design professional shall specify the mock-up procedure and mock-up construction details within the project documents. This level of finish is not recommended where non-flat or dark/deep tone paints are applied.
• In critical lighting areas, flat paints applied over light continuous textures tend to reduce joint photographing.
(Continued)
Five Levels of Finish for Gypsum Board
0No taping, finishing or accessories required.
1All joints and interior angles have tape set in compound.
2Thin coating of compound over all joints and interior angles.
3Additional coating of compound over joints and interior angles. Smooth and free of tool marks and ridges.
4Another coating of compound over flat joints, smooth and free of tool marks or ridges.
5Skim coat applied over entire surface. Surface smooth and free of tool marks or ridges.

20 | ProForm Finishing Products
Five Levels of Finish for Gypsum Board• The weight, texture, and sheen level of wallcoverings applied over this
level of finish should be carefully evaluated. Joints and fasteners must be adequately concealed if the wallcovering used is of lightweight construction, contains limited pattern, has a sheen level other than flat, or any combination thereof. Unbacked vinyl wallcoverings are not recommended over this level of finish.
• All joints and interior angles shall have tape embedded in joint compound and shall be immediately wiped with a joint knife leaving a thin coating of joint compound over all joints and interior angles. Two (2) separate coats of joint compound shall be applied over all flat joints and one (1) separate coat of joint compound shall be applied over interior angles. Fastener heads and accessories shall be covered with three (3) separate coats of joint compound. The surface shall be smooth and free of tool marks and ridges.
• Where glass mat and/or fiber reinforced gypsum panels are installed, refer to the gypsum panel manufacturer for specific finishing recommendations.
• Jobsite mock-up(s) shall be used to determine acceptance of the finish within the building.
Note: It is recommended that the final decoration specification (e.g., painting specification) include the application of a priming material prior to the decoration.
LEVEL 5• Typically specified in appearance areas where smooth wall
designs are decorated with non-flat paints (i.e., sheen/gloss) or other glossy decorative finishes, dark/deep tone paints are applied, or critical lighting conditions occur. The design professional shall specify the mock-up procedure and mock-up construction details within the project documents. This level of finish is the most effective method to provide a uniform surface and minimize the possibility of joint photographing and/or fasteners showing through the final decoration.
Notes
• All joints and interior angles shall have tape embedded in joint compound and shall be immediately wiped with a joint knife leaving a thin consistent coating of joint compound over all joints and interior angles. Two (2) separate coats of joint compound shall be applied over all flat joints and one (1) separate coat of joint compound shall be applied over interior angles. Fastener heads and accessories shall be covered with three (3) separate coats of joint compound. A thin skim coat of joint compound (see “Skim Coat” in Comments) or a material manufactured especially for this purpose shall be applied to the entire surface. The surface shall be smooth and free of tool marks and ridges.
• Where glass mat and/or fiber reinforced gypsum panels are installed, refer to the gypsum panel manufacturer for specific finishing recommendations.
• Jobsite mock-up(s) shall be used to determine acceptance of the finish within the building.
Note: It is recommended that the final decoration specification (e.g., painting specification) include the application of a priming material prior to the decoration.
For more information, refer to the Gypsum Association document GA-214.

Construction Guide | 21
Problems and SolutionsJOINT PROBLEMS
Conditions Probable Cause Preventive Action Corrective Action
Tape Photographing
Slow drying of finishing coats. Too much compound under tape. Joint compound too thin.
Correct drying conditions. Embed tape properly. Use joint compound thicker. Use ProForm Paper Joint Tape
Sand down the tape outline and seal. Refloat if necessary before decoration. Prevent finish coat moisture from re-wetting the tape by applying a thinner coat for fast drying.
Starved Joint Compound applied too thin in viscosity and thickness. Too little compound over joint. Excessive sanding.
Use finishing compound at heavier viscosity and proper thickness of coats. Do not over-sand.
Allow to thoroughly dry, then apply an additional coat of topping or joint compound.
High Joint Excess joint compound under the tape. Excess joint compound over the tape and improper feathering. Poor framing. Improper gypsum board application. Improper sanding. Use of compound too heavy.
Proper thickness of compounds for taping and finishing. Feather finishing coats wider than previous coats. Correct poor framing and improper wallboard application to ensure proper alignment. Sand properly.
Sand joint to near flush without sanding into tape. Apply a wider finishing coat properly feathered, if necessary. Apply a second finishing coat or skim coat.
Beading/Ridging Lumber expansion and contraction. Improper heating and ventilation. Cold weather with high humidity. Improper application of gypsum board. Excess compound over joints and needless wide joints. Rough or poorly cut butt joint.
Use Quick Set™ or Quick Set Lite™ setting compounds to minimize beading or ridging. Alternatives include: double-layer lamination system.
Allow one full heating cycle — 6 months to 1 year — before repairing, then sand ridge flush and apply one or more finishing coats of joint or topping compound. Use critical lighting to determine if bead is eliminated prior to decoration.
NAIL PROBLEMS
Conditions Probable Cause Preventive Action Corrective Action
Nail Pops Framing out of alignment. Lumber shrinkage. Improper gypsum board application. Improper heating and ventilation.
Provide heat and ventilation to dry framing lumber. Align framing lumber. Nail center of wallboard first. Hold gypsum board firm to nailing member when nailing. Use proper nails. Check all nails before nail spotting. Systems recommended to reduce or eliminate nail pops include: double-layer lamination, double nailing system, floating angle system, adhesive nail-on system and screw application.
When nail pops occur before decoration, repair immediately. If problem occurs after decoration, repair after framing lumber is dry (usually one heating cycle). To repair, drive a GWB-54 nail 1-1/2” from each side of popped nail while holding gypsum board firm to the nailing member. Countersink popped nail, remove loose joint compound, then apply finishing coats of joint or topping compound.
Depressed Nails Framing out of alignment. Lumber expansion due to moisture absorption. Improper gypsum board application. Too few nails, improper furring, structural movement. Nails dimpled too deeply.
Align framing lumber. Allow dry lumber to become acclimated. Correct gypsum board application as described for nail pops. Use proper nail spacing. When furring, use no less than 2" x 2". Use systems recommended to reduce or eliminate nail pops. Avoid fracturing paper when driving nails.
Repair as described for nail pops, unless most nails are depressed and wallboard is loose (usually ceilings). Re-nail entire surface using proper spacing. Dimple depressed nails and apply finishing coats of joint or topping compound.

22 | ProForm Finishing Products
Problems and SolutionsTEXTURING PROBLEMS
Conditions Probable Cause Preventive Action Corrective Action
Lumping Too much water added to initial mix. Adding water to powder.
Add powder to water using less water than initially specified. After mix is smooth and lump-free, add remaining water to adjust mix to a workable viscosity.
Add powder until mix thickens. Continue mixing until lumps disappear.
Mix Too Thin Too much water added in initial mix or inadequate soaking time in cold water.
Use recommended water requirements in initial mix. Allow mixed ingredients to soak for several minutes, when necessary, if using cold water.
Add powder until mix thickens.
Aggregate Fallout (During Spraying)
Spray gun too close to surface and/or excessive air pressure at nozzle.
Hold spray gun at proper distance and angle from surface to prevent aggregate fallout.
Lower air pressure. Hold spray gun at proper distance and angle from surface to prevent excessive fallout.
Aggregate Floatout Too much water added during initial mix and/or inadequate mixing after initial water is added.
Use recommended water requirements and make sure water is properly blended into mix.
Add powder until mix thickens.
Poor Coverage Mix too thick for proper spray viscosity and/or improper application such as spraying too slow, overloading surface with spray material and using incorrect spray pressures.
Use recommended water volume for mixing to ensure sprayable viscosity. Use proper spray application to ensure uniform dispersion of aggregate and proper coverage.
Carefully add water to mix. Use proper spray techniques. Adjust spray pressure.
Poor Hide Over-thinned mix causing a reduction in both wet and dry hide. Mix too thick causing poor atomization resulting in surface show-through. Improper application/over-extending spray. Selecting improper spray pressures. No primer used prior to texturing.
Use recommended water volume for mixing to ensure sprayable viscosity. Use proper spray application to ensure uniform dispersion of aggregate and proper coverage. Use a good quality drywall primer.
Add powder or water depending on mix consistency. Adjust spray pressure. Use proper spray technique. Apply finished paint over textured surface.
Poor Bond or Hardness
Over-thinned mix results in over-dilution of latex binder in spray texture. Improper surface preparation. Contamination with other materials.
Use recommended water volume for mixing. Remove all loose material, dust, grease, oil and prime surface with a quality drywall primer. Do not intermix with other products. Always use a clean mixing container and clean water.
Scrape down surface and repeat application following recommendations under “Prevention.”
Clogged Spray Equipment
Contamination of mix with oversized particles can sometimes clog spray nozzle orifice.
Prevent contamination during mixing and spraying. Use correct nozzle size for aggregate being sprayed.
Check mix for contamination and/or oversized particles. If contaminated, screen out contaminants or discard and remix new batch.
Material Pumping Problems
Mixed spray material too heavy. Pump equipment old and worn. Equipment improper size for spray product.
Use recommended water volume for mixing. Make sure proper equipment is being used and that spray machine is in good repair.
Thin mix if too heavy for pumping.
Material Pumping Problems
Worn spray equipment (either fluid or spray nozzle) and/or improper air pressure. Improper spray technique and/or poor spray mix consistency.
Inspect spray nozzles to ensure good working condition. Replace any worn parts.
Improve spraying technique. Add recommended water volume to ensure proper spraying consistency.

Construction Guide | 23
TEXTURING PROBLEMS (CONT.)
Conditions Probable Cause Preventive Action Corrective Action
Texture Buildup Spraying or texturing over surfaces with major differences in surface porosity or suction (improperly primed). Thin texture will tend to build up over high suction surfaces.
Prime entire surface with a good quality drywall primer. Follow mixing instructions.
Remove all texture from sprayed surface and re-apply following instructions under Preventative Action.
Joint Show-Through Over-extended and over-thinned primer won’t adequately hide the contrast between finished joints and gypsum board paper.
Use recommended water volume when mixing texture and apply at recommended coverage rates. Prime surface with a good quality drywall primer prior to application of spray texture.
Allow spray to thoroughly dry, then prime with a quality drywall primer and re-spray or paint textured surface.
Joint Shows Through as White Band
Spraying over unprimed surfaces during cool, humid, slow drying conditions. Joint stays white, water solubles in gypsum board paper bleed through.
Prime surface with a good quality drywall primer before applying texture.
Allow spray to thoroughly dry, then paint textured surface.
SHRINKAGE PROBLEMS
Conditions Probable Cause Preventive Action Corrective Action
Shrinkage Compound used too thin or watery. Applied too soon after mixing. Improper drying between coats. Painting before joints are thoroughly dry. Too deep fills in one coat. Slow drying.
Use compound at heaviest workable consistency. Allow to stand before using. Allow thorough drying of compound between coats and prior to painting. Apply additional coats on deep fills. Provide proper drying.
Allow to thoroughly dry and re-coat. Provide proper drying.
Delayed Shrinkage Improper drying conditions. Painting before compound and wallboard are thoroughly dry. Under high humidity, slow drying conditions, joints and wallboard may hold moisture for weeks.
Provide proper drying conditions. Allow complete drying before each coat of joint treatment and before repainting.
Allow to thoroughly dry and re-coat affected joints.
Misinterpreted Shrinkage
Improper wallboard application including: nails dimpled too deep, fractured core of wallboard, fractured face paper, corner bead applied improperly, tape photographing.
Less dimple of nails. Press wallboard snug to nailing member before dimpling nail. Re-nail where necessary. Use ProForm Quick Set compound for at least the first coat on nails and corner bead. (See Tape Photographing.)
Nails: re-nail where necessary. Cut out any loose areas and fill with two or more coats of Quick Set or regular joint compound. Re-coat corner bead.
MISCELLANEOUS PROBLEMS
Conditions Probable Cause Preventive Action Corrective Action
Pock Marking Entrapment of air in the mixed compound and in application. Over-mixing of compound. Compound mixed too thin. Heavy fills. Improper application technique. Compound applied too loosely.
Mix compound as quickly as possible and let stand until binder is in solution before remixing. Mechanical mixers should have 500 RPM maximum. Use heavier mix. Make additional passes over joints and bead with hand or mechanical tools. File trowel edges square regularly to avoid entrapment in application. Apply compound thinly and use more pressure on finish coat.
Remove sanding dust that may collect in “pocks” prior to painting and refloat joint as necessary. When condition exists after painting, float with compound and repaint.

LIMITED WARRANTY
ProForm Family of Products(United States, U.S. Territories, and Canada Only)
LIMITED WARRANTYProducts manufactured by ProForm Finishing Products, LLC (“Seller”) are warranted by Seller to its customers to be free from defects in materials and workmanship at the time of shipment. Additional or different express limited warranties, limitations and exclusions may apply to specific Seller products. Current warranty information on such products is available at proformfinishing.com. THIS EXPRESS WARRANTY IS THE ONLY WARRANTY APPLICABLE TO SUCH PRODUCTS, AND IS IN LIEU OF AND EXCLUDES ALL OTHER EXPRESS ORAL OR WRITTEN WARRANTIES AND ALL IMPLIED WARRANTIES, INCLUDING BUT NOT LIMITED TO THE IMPLIED WARRANTIES OF MERCHANTABILITY AND FITNESS FOR A PARTICULAR PURPOSE.
Seller will not be liable for any incidental, indirect or consequential losses, damages or expenses. The customer’s exclusive remedy for any type of claim or action for defective products will be limited to the replacement of the products (in the form originally shipped) or, at Seller’s option, to a payment or credit not greater than the original purchase price of the products.
Seller will not be liable for products claimed to be defective where the defect resulted from causes not within Sellers control, or which arose or occurred after shipment, including but not limited to accidents, misuse, mishandling, improper installation, contamination or adulteration by other materials or goods, or abnormal conditions of temperature, moisture, dirt or corrosive matter.
Any claim that products sold by Seller were defective or otherwise did not conform to the contract of sale is waived unless the customer submits it in writing to National Gypsum Services Company d/b/a National Gypsum Company, authorized sales agent and service provider to Seller, within thirty (30) days from the date the customer discovered or should have discovered the defect or nonconformance. No legal action or proceeding complaining of goods sold by Seller may be brought by the customer more than one year after the date the customer discovered or should have discovered the defect or problem of which it complains.
MAKING CLAIMSWithin thirty (30) days from the time you discover a problem with your ProForm product, write to National Gypsum Services Company d/b/a National Gypsum Company, authorized sales agent and service provider to Seller (or to the manufacturer of the home) and include a brief description of the problem and photographs. Also, furnish us with the date of purchase of the home and name of the selling dealer. Mail this information to:
National Gypsum Company 5901 Carnegie Boulevard Charlotte, NC 28209 Attn: Director, Quality Services R&D
This warranty gives you specific legal rights and you may also have other rights which will vary depending upon the state.
Issued January 2021
24 | ProForm Finishing Products

National Gypsum CompanyNational Gypsum Company is the exclusive service provider of reliable, high-performance building products manufactured by its affiliate companies and marketed under the Gold Bond®, ProForm®, and PermaBASE® brands. The strategic network of Gold Bond, ProForm, and PermaBASE manufacturing facilities located throughout major metropolitan hubs in North America allows us to provide the best in customer service so we can keep your fast-paced projects moving forward.
SustainabilityOur brands create products that contribute to sustainable design by providing healthy indoor air quality; moisture, mold and mildew management; durability; optimal acoustics; life safety and increased space functionality. No matter how you define sustainability, we offer the most comprehensive set of value-added solutions in the industry.
Trusted PartnerThe National Gypsum name has been synonymous with high-quality, innovative products and exceptional customer service since 1925. Our technical experts at 1-800-NATIONAL® are always a phone call away to answer any type of product or specification question.
We are Building Products for a Better Future® — one project at a time.
Construction Guide | 25
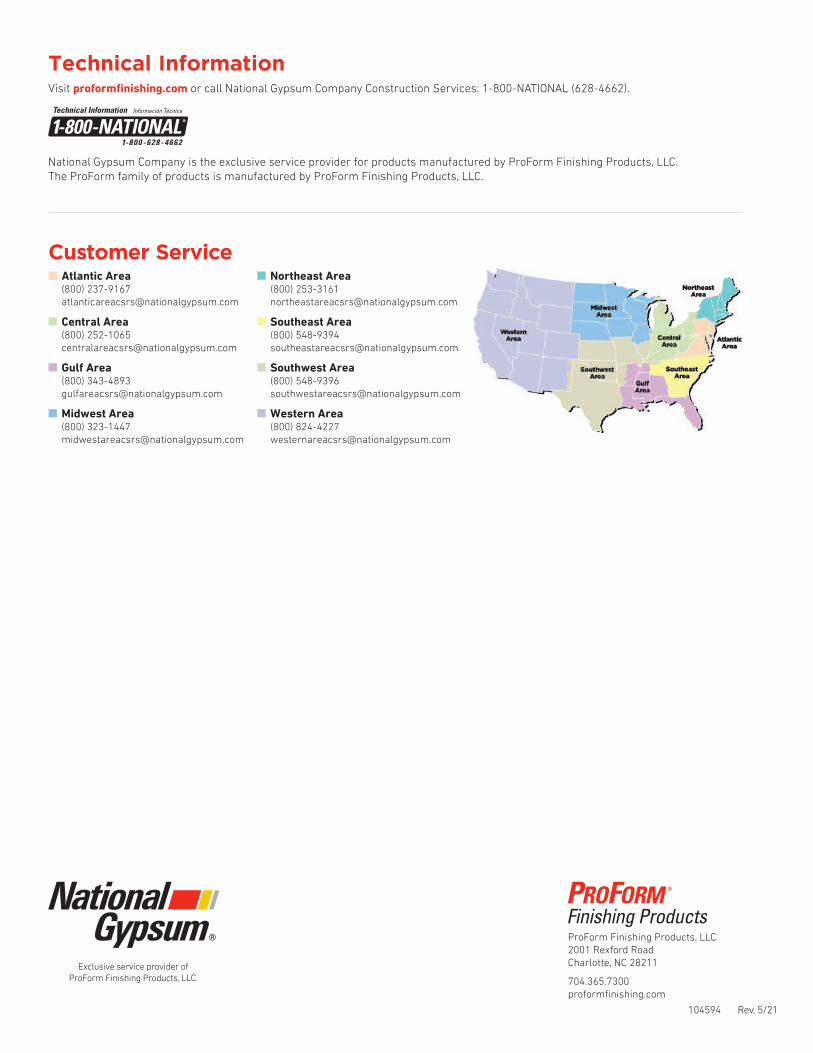
Technical Information
ProForm Finishing Products, LLC 2001 Rexford Road Charlotte, NC 28211
704.365.7300 proformfinishing.com
104594 Rev. 5/21
Visit proformfinishing.com or call National Gypsum Company Construction Services: 1-800-NATIONAL (628-4662).
National Gypsum Company is the exclusive service provider for products manufactured by ProForm Finishing Products, LLC. The ProForm family of products is manufactured by ProForm Finishing Products, LLC.
Exclusive service provider of ProForm Finishing Products, LLC.
Customer Service■ Atlantic Area
(800) 237-9167 [email protected]
■ Central Area (800) 252-1065 [email protected]
■ Gulf Area (800) 343-4893 [email protected]
■ Midwest Area (800) 323-1447 [email protected]
■ Northeast Area (800) 253-3161 [email protected]
■ Southeast Area (800) 548-9394 [email protected]
■ Southwest Area (800) 548-9396 [email protected]
■ Western Area (800) 824-4227 [email protected]