quilt diagram - benartex batting and backing. bind as usual. note: if this benartex pattern is...
TRANSCRIPT
FINISHINGCut batting and backing 3” larger than top on all
sides. Layer backing, batting and top together and baste or pin. When quilting is completed, trim
excess batting and backing. Bind as usual.
Note: If this Benartex pattern is included in a kit, any questions about
the kit should be addressed to the vendor from whom you bought it.
benartex, llc. • 132 West 36th street, 4th floor neW York, nY 10018 • t: 212-840-3250 • WWW.benartex.comthe quilt shown is a digital representation. actual fabric repeats will vary from design shown.
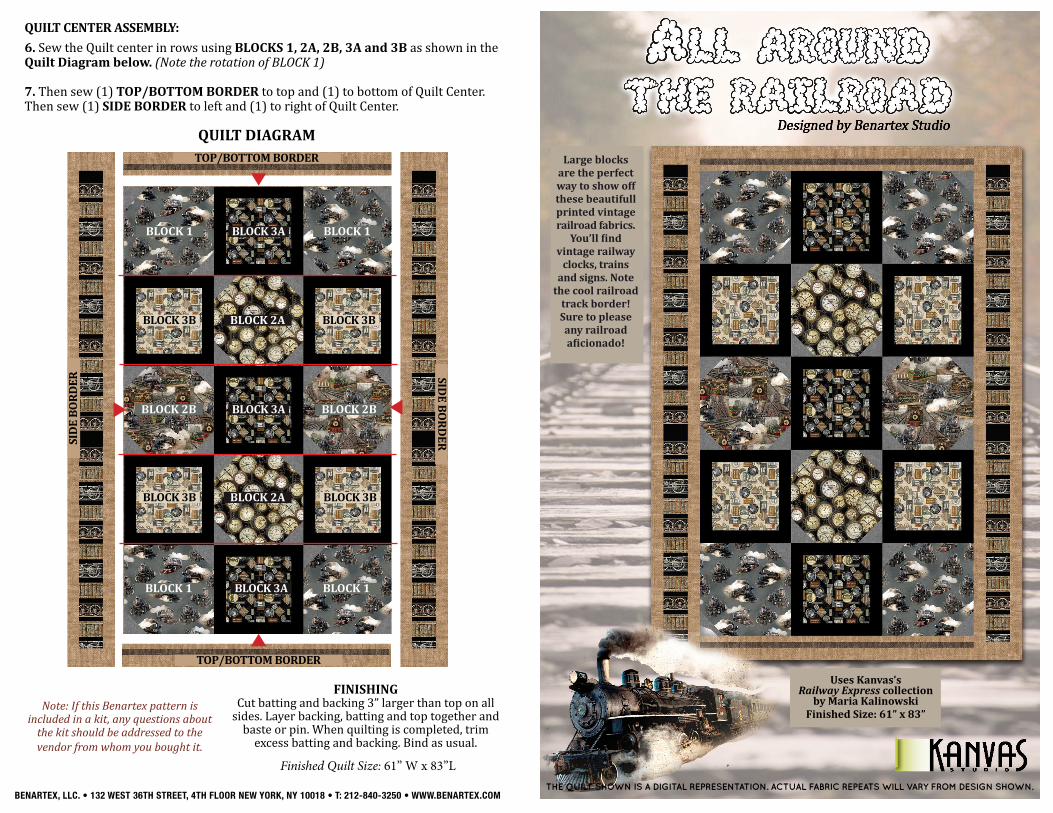
QUILT CENTER ASSEMBLY:
6. Sew the Quilt center in rows using BLOCKS 1, 2A, 2B, 3A and 3B as shown in the Quilt Diagram below. (Note the rotation of BLOCK 1)
7. Then sew (1) TOP/BOTTOM BORDER to top and (1) to bottom of Quilt Center. Then sew (1) SIDE BORDER to left and (1) to right of Quilt Center.
QUILT DIAGRAM
Large blocks are the perfect way to show off these beautifull printed vintage railroad fabrics.
You’ll find vintage railway
clocks, trains and signs. Note
the cool railroad track border! Sure to please any railroad aficionado!
Uses Kanvas’s Railway Express collection
by Maria KalinowskiFinished Size: 61” x 83”
BLOCK 1 BLOCK 1
BLOCK 1 BLOCK 1
BLOCK 2B BLOCK 2B
BLOCK 2A
BLOCK 2A
BLOCK 3A
BLOCK 3A
BLOCK 3B BLOCK 3B
BLOCK 3B BLOCK 3B
TOP/BOTTOM BORDER
TOP/BOTTOM BORDER
SID
E B
OR
DER
SIDE B
OR
DER
BLOCK 3A
Finished Quilt Size: 61” W x 83”L

BLOCK ASSEMBLY: 1. BLOCK 1: Take (1) G 4-1/2” square and fold diagonally. Press with iron or draw diagonal line on the wrong side. Place G square on top left side of A square, right sides together and sew on diagonal line. Then press towards top left corner and trim excess fabric on reverse side to 1/4”. Repeat step for bottom right corner to create BLOCK 1. Make 4.
A
SAMPLE KEY/SKU QTY CUT
B
(4) 15-1/2” squares
WOF = WidTh OF FaBRiC | *SeW STRiPS via ShORT endS | QST = QUaRTeR SQUaRe TRiangLeS
Steam engines8504-11 Steel 1 yd
(2) 15-1/2” squaresRailway Collage8507-99 Multi 1/2 yd
C (2) 15-1/2” squaresStation Clocks8505-12 Antique
1/2 yd
D (4) 11-1/2” squaresStation Stamps8506-07 Cream 2/3 yd
E (3) 11-1/2” squaresStation Stamps8506-12 Black
2/3 yd
F Quilt Block Solids3000h-12 Black 7/8 yd
GBurlap Solids757-11 Heather Gray
1/2 yd
BLOCK 1(Make 4)
HRailway Stripe8508-12 Black
2/3 yd
IBurlap Solids757-88 Clay
1-1/2 yds
JBurlap Solids757-77 Espresso
1/4 yd
(3) 4-1/2” x WOF strips, subcut (24) 4-1/2” squares
(4) 4-1/2” x WOF strips*, subcut (2) 4-1/2” x 77-1/2” strips
(3) 1-1/2” x WOF strips*, subcut (2) 1-1/2” x 45-1/2” strips
(10) 2-1/2” x WOF strips*, subcut (2) 2-1/2” x 45-1/2” strips (4) 2-1/2” x 77-1/2” strips(3) 1-1/2” x WOF strips*, subcut (2) 1-1/2” x 45-1/2” strips(4) 3-1/2” x 8-1/2” rectangles
(12) 2-1/2” x WOF strips, subcut (14) 2-1/2” x 15-1/2” strips (14) 2-1/2” x 11-1/2” strips
G G
G
AA
G
2. BLOCK 2: Using the instructions for G fabric in Step 1, repeat steps for all 4 corners of C and B 15-1/2” squares. This will create BLOCK 2A and BLOCK 2B. Make 2 of each Block.
3. BLOCK 3: Take (1) F 2-1/2” x 11-1/2” strip and sew to left and (1) to right side of E 11-1/2” square. Then take (1) F 2-1/2” x 15-1/2” strip and sew to top and (1) to bottom of E 11-1/2” square to create BLOCK 3A. Make 3. Repeat step 3 using d square to make BLOCK 3B. Make 4.
BLOCK 2A(Make 2)
BLOCK 2B(Make 2)
I
IJ
I
I
II H
4. TOP/BOTTOM BORDER: Take (1) J 1-1/2” x 45-1/2” strip and sew (1) I 2-1/2” x 45-1/2” on top of J strip. Then sew (1) I 1-1/2” x 45-1/2” strip on bottom of J strip. Make 2 TOP/BOTTOM BORDER.
5. SIDE BORDERS: Sew (1) I 2-1/2” x 77-1/2” strips to top and 1 to bottom of (1) H 4-1/2” x 77-1/2” strip. Then sew (1) I 3-1/2” x 8-1/2” rectangles to left and (1) to right side of IHI UNIT to make SIDE BORDER. Make 2 SIDE BORDERS.
SIDE BORDER(Make 2)
TOP/BOTTOM BORDER(Make 2)
F
F
F
F F
F
F
F
G
G
G
G
G G
G G
C B
E D
BLOCK 3A(Make 3)
BLOCK 3B(Make 4)