rescuenet 12-lead user guide
TRANSCRIPT

RescueNet12-Lead User GuideSoftware version 2.4Issue 1

© 2013 by ZOLL. All rights reserved.
RescueNet® is a registered trademark of ZOLL. RescueNet CommCAD, RescueNet Dispatch, RescueNet DispatchPro, RescueNet Billing, RescueNet TabletPCR, RescueNet Nomad, RescueNet Crew Scheduler, RescueNet Resource Planner, RescueNet NetTransit.com, RescueNet Web Viewer, RescueNet WebPCR, RescueNet ePCR Suite, RescueNet Navigator, RescueNet Insight, RescueNet @Work, RescueNet 12-Lead, and RescueNet Code Review are trademarks of ZOLL.
ZOLL is a registered trademark of ZOLL Medical Corporation. X Series, M Series, E Series, AED Plus, and AED Pro are trademarks of ZOLL Medical Corporation.
Other product and company names may be the trademarks of their respective owners.

Welcome to RescueNet 12-Lead, a web-based 12-Lead ECG management system. With RescueNet 12-Lead, you can manage the 12-Lead records sent from ZOLL defibrillators anywhere in your system.
Let Us Know What You Think
Your opinions are very important to us! Please let us know what you think of this guide. Sending comments is easy - just email to [email protected].
Please include the document title and release number so we can easily identify the book you are referring to.
Thanks!


RescueNet 12-Lead User Guide
Table of Contents
Chapter 1: Getting Started 1-1Overview......................................................................................................................... 1-1Safety Considerations ..................................................................................................... 1-3
Cautions.................................................................................................................. 1-3ZOLL Online .................................................................................................................. 1-4
ZOLL Online Supported Browsers .......................................................................... 1-4Sign Up..................................................................................................................... 1-4
Join Multiple Companies................................................................................... 1-5My Account.............................................................................................................. 1-5
Change My Password ........................................................................................ 1-5Create a Company ............................................................................................. 1-6
Forgot Your Password.............................................................................................. 1-6
Chapter 2: Inbox 2-1Acute MI......................................................................................................................... 2-212-Lead Details page ...................................................................................................... 2-3
Edit ........................................................................................................................... 2-3Edit Patient ........................................................................................................ 2-3Edit EMS to Balloon Time (E2B) ..................................................................... 2-4Add Notes .......................................................................................................... 2-5
Distribute.................................................................................................................. 2-6Print or Save the 12-Lead......................................................................................... 2-7Close......................................................................................................................... 2-8
Manual close:..................................................................................................... 2-8Automatic close: ................................................................................................ 2-8
Audit Log ................................................................................................................. 2-8
Chapter 3: Search 3-1
Chapter 4: Reports 4-1Exporting Reports.............................................................................................. 4-1View 12-Lead Details Page ............................................................................... 4-4
12-Lead Activity Report ................................................................................................. 4-5EMS to Balloon Report .................................................................................................. 4-7
Report Examples................................................................................................ 4-9
1

2 Table of Contents

1 1
Chapter 1:GettingStarted
OverviewRescueNet® 12-Lead is a web-based management system that uses a web browser to provide quick, easy access to critical 12-Lead records sent from ZOLL defibrillators. With RescueNet 12-Lead, users can view, distribute, close, add notes, and print 12-Lead records; search for Inbox and/or closed 12-Lead records, and run reports.
How it works. When your administrator signs up with ZOLL Online, the system creates a company and automatically assigns a Company ID. This ID is configured on every transmitting monitor or electrocardiogram (ECG) system used by your service and is part of the data when the monitor/defibrillator transmits the 12-Lead record. The RescueNet 12-Lead system receives the 12-Lead, identifies that the Customer ID belongs to your company, and displays the 12-Lead in your Inbox.
Before you can access RescueNet 12-Lead, your administrator must log onto ZOLL Online and configure the system. Step-by-step information is available for administrators in the RescueNet 12-Lead Administration Guide. After the system is configured, the administrator sends you an email invitation to register with ZOLL Online. For complete information on how to sign up and access RescueNet 12-Lead, see ZOLL Online on page 1-4.
View 12-Leads - your Inbox. The Inbox is the repository of all 12-Leads received by RescueNet 12-Lead. The Inbox displays basic 12-Lead information such as the received and acquired date and time, the agency, unit, ETA, status, and interpretation.
The 12-Lead Details page. Click a 12-Lead record to view the 12-Lead Details page. Use this page to view, add a note, edit the record’s patient information, distribute, print, and close the 12-Lead.
Edit 12-Leads. You can edit the patient information, the E2B (EMS to Balloon time), and add notes to the 12-Lead record.
Note: Estimated time of arrival (ETA) will be populated if the information is available from the sending monitor/defibrillator.
1-1

Distribute 12-Leads:
Distribution Methods: In most cases, the system uses either a fax number or an email address to distribute 12-Lead records. The system also has the ability to distribute 12-Lead records to the Inbox of another RescueNet 12-Lead customer. To distribute a report to another customer’s Inbox, your administrator must configure the customer as a Cooperating RescueNet 12-Lead Customer.
Distribution Lists: To aid in the distribution of 12-Lead records, your administrator can create one or more lists of contacts and/or customers. These lists are called distribution lists and can be used for automatic or manual distribution.
Automatic distribution: You may have one or more contacts/customers who need to see every 12-Lead record. In this case, your administrator can place these members in a distribution list and set the list for automatic distribution. Once set, the system automatically sends every new 12-Lead to members of the list.
Manual: For customers and/or contacts who want to receive only certain types of 12-Lead records, select the 12-Lead record and manually enter an email address and/or fax number. If the contact or company exists in the system, type the first letter and select the name from the drop-down menu. To speed up the manual distribution process, you can choose a distribution list if available.
Close 12-Leads. 12-Lead records can be closed manually or automatically. You can view closed 12-Lead records using Search and Reports.
Manual: You can manually close an opened 12-Lead record by clicking the Close button. Clicking Close removes the 12-Lead from the Inbox.
Automatic Incident Closure: To reduce clutter, RescueNet 12-Lead automatically closes 12-Lead records and removes them from the Inbox after an pre-configured number of days. You can access closed 12-Lead records using Search or Reports.
Print 12-Leads or save to your PC. When you send a print request, the system takes an image of the 12-Lead record as it appeared when it was received by RescueNet 12-Lead and displays it in a PDF document on your screen. Since this is the original 12-Lead record that was acquired by the defibrillator, it will not show modifications users make with RescueNet 12-Lead. To view the PDF you must have a PDF reader installed on your computer. In addition to printing the 12-Lead, you can save a copy to your computer’s disk.
Note: 12-Lead patient reports contains sensitive patient information and should be treated according to your organizations policies for accessing Protected Health Information (PHI).
1-2 Chapter 1: Getting Started

RescueNet 12-Lead User Guide
Reports. RescueNet 12-Lead provides a 12-Lead Activity Report and an EMS to Balloon Report. You can filter the 12-Lead data by sent, received, or both sent and received. You can export report results to a PDF, Microsoft Word® or Microsoft Excel® format. For more information, see Chapter 4: Reports.
Search. You can search the database for all 12-Lead records (Inbox and closed), all reports that match a specific criteria such as reports received on a given day or time, and individual reports. To retrieve all the reports with data in a specific field, use the special character %. In the results page, click a 12-Lead record to see the 12-Lead details. Once selected, you can edit the E2B and/or patient information, print, distribute, or close the 12-Lead record. For information, see Chapter 3: Search.
Safety ConsiderationsRead the following cautions before using RescueNet 12-Lead.
Cautions
Always read the electrocardiogram (ECG) signals to determine the presence or absence of an acute myocardial infraction (AMI). Do not rely solely on the acuity highlighting provided by the system to identify AMI victims.
Do not delay patient care while attempting to correct 12 Lead ECG communications problems. Deliver care according to accepted standards and local protocols before addressing data communications issues.
Always obtain a confirmatory 12 Lead ECG prior to performing any invasive or irreversible procedure on a patient.
Do not make treatment or triage decisions based solely on the highlighting of received 12-Leads or the highlighting of ST segment measurements. Always make these decisions based on a clinical interpretation of the ECG signals themselves.
Always verify patient identity on the 12-Lead ECG report before prescribing treatment.
Safety Considerations 1-3

ZOLL OnlineZOLL Online is a central site that provides access to RescueNet 12-Lead and other ZOLL EMS and fire products.
ZOLL Online Supported BrowsersBefore you access ZOLL Online, verify that you are using one of the following supported browsers:
Sign UpYou will receive an email invitation from your administrator asking you to sign up with ZOLL Online. The email contains a link to ZOLL Online and an invitation code.
Use the following steps to register:
1. In your email invitation, click the ZOLL Online link. The ZOLL Sign Up page opens with your email address and invitation code pre-populated.
2. The Sign Up page contains the following fields:
a) Email address: Contains your email address. In ZOLL Online, your email address is the username that you will use to log onto the system.
b) Password/Reenter Password: Enter a password for this account.c) First/Last Name: Enter your first and last name.d) Company: Enter the name of the company you are joining.e) Invitation code: Contains your invitation code. The system uses the invitation code to
link you to the administrator’s company. f) Terms of service: Click ZOLL Online terms of service to read the terms of service. If
you agree with the terms, check the box. You cannot sign up without agreeing to the terms of service.
3. Click Sign up.
The ZOLL Online home page opens. You can now access the application by clicking RescueNet 12-Lead.
Name Version
Microsoft Internet Explorer® 8 and 9
Mozilla Firefox® Web browser 12.x or later
Google Chrome® 14.0.x or later
Mobile Safari® 5.x or later
1-4 Chapter 1: Getting Started

RescueNet 12-Lead User Guide
Join Multiple CompaniesMultiple administrators can send you an invitation to join their companies. If you are not logged onto ZOLL Online, you can join the company by clicking the link in the email. The Online Sign Up page displays with your username and invitation code pre-populated. If you are already logged on, see Join a Company on page 1-6 for instructions.
When you are a member of multiple companies, you can select which company you want to log onto from the Company drop-down menu on the ZOLL Online home page. After you select the company, select the product. The company name that you are working under appears next to the home icon so you can easily identify which company you are currently logged onto. If you log off and back onto ZOLL Online, the system logs you onto the first company on the list which is sorted in alphabetical order.
My AccountFrom any ZOLL Online page, click your username to access your account information. In the My Account page you can change your password, update your security questions, or join a company.
Change My Password
1. In the My Account page, click Change my password.
2. Current password: Enter your current password.
3. New password/Confirm new password: Enter your new password.
4. Click Change Password.
ZOLL Online 1-5

Create a Company
1. In the My Account page, click Create a company.
2. Company name: Enter the new company’s name.
3. Click Create Company. The company name will now appear in the Company drop-down menu on the home page.
Forgot Your PasswordForgot your password? No problem! Use the following steps to acquire a new one:
1. Access http://www.zollonline.com from any supported browser.
2. On the ZOLL Online Login page, click Forgot password?.
3. The system prompts you to enter the email address that you used when you signed up with ZOLL Online. Enter the email address and click Next. The system sends a temporary password to the email address you entered. The ZOLL Online Login Page displays. Leave this window open and go to your email.
4. In the email that you receive, copy the temporary password and paste it in the password field on the ZOLL Online Login Page. Click Log in.
5. You will be prompted to enter a your temporary password again and then a new password.
1-6 Chapter 1: Getting Started

2 2
Chapter 2: InboxThe Inbox defaults to the first page that displays when you log onto RescueNet 12-Lead. To minimize redundancy, the system provides only one Inbox per customer account. An action of a single user in a customer account impacts the Inbox of all users for that same account. For example, when a user clicks a new 12-Lead record, all users see the status for that record change from new to open. Likewise, when a user closes a 12-Lead record, the system removes the record from the view of all Inbox users.
The Inbox:
Displays the most recently received 12-Lead record first. The order in which the 12-Lead records display on the page is based on received time, not acquired time.
Displays a red background for new 12-Lead records; once opened the status changes to open and the background changes to blue.
Allows you to view, print, and distribute a 12-Lead record without closing it. In this case, the 12-Lead record remains in the Inbox until it is automatically or manually closed.
Provides an audible alert and an alert banner with the arrival of each new 12-Lead record. The alert banner appears above the navigation bar to the right of the page and provides links to the Inbox and to the 12-Lead Details page. The audible alert interval is configured by your administrator. If no interval is set, the alert sounds once. If an interval is set, the alerts sounds until the alert banner is acknowledged by closing the banner.
Displays the acquired time as the exact time the device reports the acquisition regardless of the time zone the record is being viewed in.
2-1

Acute MIIf the defibrillator sends Acute MI information, a yellow alert symbol displays in the Acute MI column to indicate that patient may be experiencing a STEMI.
For more information click the record to view the 12-Lead Details page.
The leads showing ST segment elevation or depression exceeding +1 or -1 highlight in yellow. The next section describes the 12-Lead Details page in more detail.
Caution: Do not make treatment or triage decisions based solely on the highlighting of received 12-Lead records or the highlighting of ST segment measurements. Always make these decisions based on a clinical interpretation of the ECG signals themselves.
2-2 Chapter 2: Inbox

RescueNet 12-Lead User Guide
12-Lead Details pageYou access the12-Lead Details page by clicking a 12-Lead record in the Inbox, Search Results page, or Reports Results page. The 12-Lead Details page displays the actual record and allows you to:
Add a note and/or edit the 12-Lead’s patient information, EMS Time, and Balloon Time - see Edit - page 2-3.
Distribute a 12-Lead to an email address, a fax number, and a distribution list - see Distribute - page 2-6.
Print the 12-Lead or save the 12-Lead - see Print or Save the 12-Lead - page 2-7.
Close a 12-Lead - see Close - page 2-8.
View the audit log for the 12-Lead - see Audit Log - page 2-8.
Edit
Edit Patient
1. Roll your mouse over the upper section of the 12-Lead to highlight.
2. Click the highlighted section. The Edit 12-Lead Record dialog box opens.
3. Edit the fields as needed. Click the Patient date of birth (DOB) field to manually enter a patient’s DOB or select a date from the pop-up calendar. When using the pop-up calendar, always select the day last before you click Done. For example: select the month, the year, and then the day.
4. Click Save.
Caution: Do not delay patient care while attempting to correct 12 Lead ECG communications problems. Deliver care according to accepted standards and local protocols before addressing data communications issues.
Caution: Always obtain a confirmatory 12 Lead ECG prior to performing any invasive or irreversible procedure on a patient.
12-Lead Details page 2-3

Edit EMS to Balloon Time (E2B)
1. Roll your mouse over E2B to highlight.
2. Click the highlighted section. The Edit 12-Lead Record dialog box opens.
3. The E2B value is derived from the time difference between Balloon Time and Emergency Medical Services (EMS) Time. In this figure, the E2B value would be 00:11:00. You can enter the EMS and Balloon day and time manually or you can select a date from the pop-up calendar and a time from the slide bar.
EMS Time: The EMS Time field defaults to the time the 12-Lead record was acquired. If RescueNet 12-Lead receives multiple 12-Lead records for a single incident, the field displays the EMS time of the earliest acquired 12-Lead record.
Balloon Time: Enter the balloon time.
4. Click Save. The E2B displays in red.
2-4 Chapter 2: Inbox

RescueNet 12-Lead User Guide
Add Notes
To add a note:
1. Click Add under the Notes heading.
The Add Note page opens.
2. Type the note and click Save.
3. The system displays the date and time the note was added, the user who added the note, and the note under the Notes heading. Notes are visible to all Inbox users on your customer account.
12-Lead Details page 2-5

DistributeManually distribute a 12-Lead record to a contact, a distribution list, a Cooperating RescueNet 12-Lead Customer, or any valid email address or fax number. Enter the fax number as a long distance number such as 1 + area code + number.
1. In the right hand corner of the 12-Lead Details page, click Distribute.
The Distribute 12-Lead page opens.
2. In the To box: Enter an email address, fax number, Cooperating Customer, or distribution list name. If the contact, company, or distribution list exists in the system, type the first letter and select the name from the drop-down list.
3. Click Send to distribute the 12-Lead record or Cancel to stop the operation.
If you distribute to the Inbox of a Cooperating RescueNet 12-Lead Customer, the 12-Lead record reflects all patient information modifications performed with RescueNet 12-Lead. If you distribute using email or fax, the 12-Lead reflects the image of the original 12-Lead sent by the transmitting monitor/defibrillator and will not show the patient information modifications made with RescueNet 12-Lead. Also, notes that you added to a record are not distributed with the 12-Lead.
Note: Enter the fax number as a long distant number (1+ area code+ number).
2-6 Chapter 2: Inbox

RescueNet 12-Lead User Guide
Print or Save the 12-LeadSelect Print to take an image of the 12-Lead record that the transmitting monitor/defibrillator sent to RescueNet 12-Lead and display it in a PDF document on your computer screen. The system creates the image from the original transmitted record, so the image will not reflect any patient information changes performed with RescueNet 12-Lead.
1. In the Inbox, click the 12-Lead record to open the 12-Lead Details page.
2. In the right-hand corner of the 12-Lead Details page, click Print.
3. The system generates a PDF document and displays it on your computer screen.
4. Use the menu bar at the top of the page to print and/or save the PDF to your PC.
Note: You must install Adobe Reader on your computer to print a 12-Lead. You can download a free copy of Adobe Reader at http://get.adobe.com/reader.
12-Lead Details page 2-7

Close
Manual close:
1. In the Inbox, click the 12-Lead record to open the 12-Lead Details page.
2. Click Close. The system closes the record, removes it from the Inbox, and sets the balloon time (if it has not previously been set). Use Search or Reports to view closed records.
Automatic close: Your system administrator configures the number of days the system waits to automatically close 12-Lead records. When an opened 12-Lead record reaches that configured number of days (from 1 to 365), the system closes the record and removes it from the Inbox.
Audit LogThe Audit Log provides a list of actions performed on a 12-Lead record. The system displays a timestamp for each action along with a description of the area within the 12-Lead Details page where the action took place. The most recent events display first, the oldest last.
1. In the upper right hand corner of the 12-Lead Details page, click Audit Log.
2-8 Chapter 2: Inbox

RescueNet 12-Lead User Guide
2. The Audit Log page displays.
The patient information displays on the top line:
Each line in the log contains the following information:
Distributed 12-Lead records contain a view details link. Click the link to see who sent the 12-Lead, the distribution method they used, and the intended recipient.
3. Click Back to 12-Lead to view the 12-Lead Details page.
: Date and time of the event
: Description of area within the 12-Lead page
: Displays the action taken. Possible actions include; viewed, saved, searched, exported, and distributed. If a user edited the patient data, the audit log displays a ‘PatientEncounter was saved by’ entry. Currently, there is no entry for adding notes to the record.
: Name performing the action
12-Lead Details page 2-9

2-10 Chapter 2: Inbox

3 3
Chapter 3: SearchUse Search to find and view 12-Lead records (Inbox and closed) that match a specific criteria such as records received on a given day or time, and individual records. Except for age and date of birth (DOB), you can search using any combination of fields at one time and optionally include either an age or DOB. You can also use the wildcard % to do a generic search on all the fields with the exception of the date fields.
1. To view all the 12-Lead records, leave the fields blank and click Search.
2. To search for a specific record, enter data in one or more of the following fields. The more detail you provide the more exact the search results become.
Acquired Date Range and Received Date Range: The acquired date range is the date and time the 12-Lead was acquired as it was recorded on the monitor/defibrillator. The received date range is the date RescueNet 12-Lead received the 12-Lead record.
3-1

Enter dates and times in the To and From fields. You can select the date and time from the pop-up calendar or manually enter the information in the following format: mm/dd/yyyy hh:mm.
UnitAcute MI: Select Either, Yes, or NoPatient NameDOB and Age: Select either date of birth (DOB) or the age. When you select DOB,
a pop-up calendar appears. Select the month and the year before you select the day. If you select the day first, the system selects the current year.
Patient IDMedical Record IDVisit IDPhysicianCardiologistAgency
3. Click Search. A results page displays. If the number of matches exceeds the amount that can display on the page, page numbers appear on the top and bottom of the page. You can page forward or backward using the page numbers or the arrows to the right or the left of the numbers.
4. Click a record to view the 12-Lead Details page. From the 12-Lead Details page, you can add a note, distribute, print, or view the Audit Log. Click Back to Search to enter a new search.
Note: The Close button does not appear if the 12-Lead record is already closed.
3-2 Chapter 3: Search

4 4
Chapter 4: ReportsThrough the Reports menu, you have quick and easy access to all the 12-Lead records that were received or sent by RescueNet 12-Lead.
You can choose to run the 12-Lead Activity or EMS to Balloon report and export the report results to a Microsoft Word®, Microsoft Excel®, or PDF document. The report data can be filtered by date and time or transaction type (sent, received, or transaction log).
Exporting ReportsThe Report Results screens displays a utility bar that appears at the top of the page. Use the bar to view additional report pages and export the report.
4-1

Once exported, you can print, email, or save the report.
4-2 Chapter 4: Reports

RescueNet 12-Lead User Guide
Important Exporting Notes
You must install Adobe Reader on your computer to export a report to a PDF. You can download a free copy of Adobe Reader at http://get.adobe.com/reader.
When exporting a report to Excel format, the date/time columns are sized in such a way that only the date appears. You must re-size the column to expose the time portion of the column and view the data.
Because the ZOLL E Series does not deal with time zones, it is possible to have an Acquired Date/Time that appears to occur after other timestamps in the system.
4-3
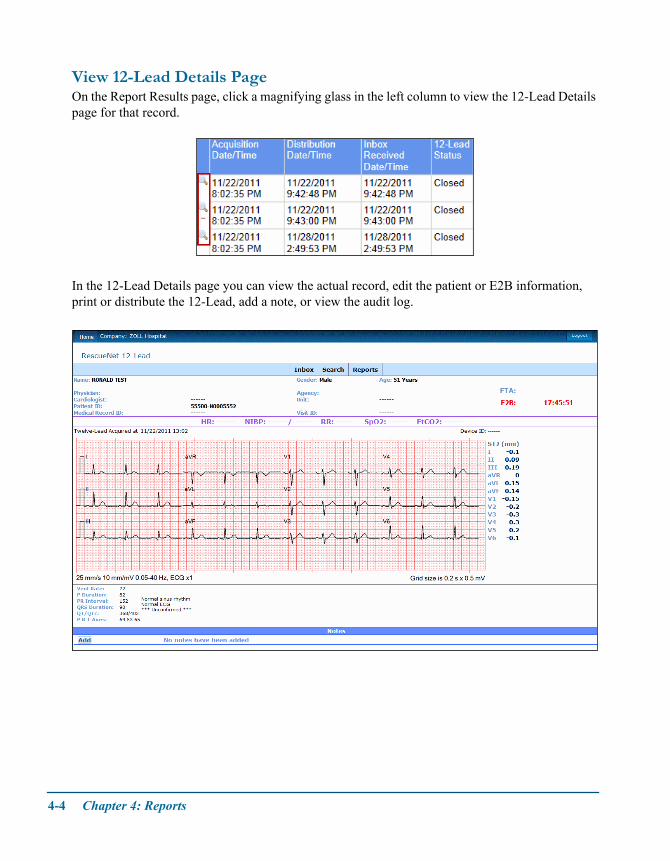
View 12-Lead Details PageOn the Report Results page, click a magnifying glass in the left column to view the 12-Lead Details page for that record.
In the 12-Lead Details page you can view the actual record, edit the patient or E2B information, print or distribute the 12-Lead, add a note, or view the audit log.
4-4 Chapter 4: Reports

RescueNet 12-Lead User Guide
12-Lead Activity ReportUse the 12-Lead Activity Report to view all the 12-Lead records in the system or specify an acquired date and time range to view specific 12-Lead records.
1. Acquired Date Range:
a) See 12-Leads for a specific date and time: Click From and To in the Acquired Date Range field to manually enter the date and time or to select a day and time from the pop-up calendar.
Manually enter a date and time: Use the mm/dd/yyyy hh:mm format.Pop-up calendar: Select the month and the year before you select the day. If you
select the day first, the system selects the current year.
b) See all the 12-Leads in the system: Enter today’s date in the To field.
2. Transaction Type: Select one of the following from the drop-down list:
a) 12-Leads Sent: View sent 12-Lead records only.b) 12-Leads Received: View received 12-Lead records only.c) Transaction Log: View both the sent and received 12-Lead records.
3. Click Display to start the search or Reset to clear the search fields. The transaction type you select impacts which columns of information display.
Note: The system will deliver 1000 records for a single request. If your request is larger than 1000 records, only the first 1000 records display.
12-Lead Activity Report 4-5

The columns of information include:
Acquisition Date/Time: The date and time the 12-Lead record was acquired.
Distribution Date/Time: The date and time RescueNet 12-Lead distributed the 12-Lead record.
Inbox Received Date/Time: The date and time the 12-Lead record arrived in the RescueNet 12-Lead Inbox.
12-Lead Status: New, opened, or closed.
Unit Name: The unit name that obtained the 12-Lead record.
Sending Agency Name: Name of the agency that performed the distribution.
Distribution List: The name of the distribution list the system used to distribute the 12-Lead. For more information on distribution lists, see Distribute on page 2-6.
Destination Type: Destination types include email, fax, and RescueNet 12-Lead Cooperating Customer.
Destination: Contains the destination type details such as the email address, fax number or Cooperating Customer name.
Transaction Type: Received or sent.
4-6 Chapter 4: Reports

RescueNet 12-Lead User Guide
EMS to Balloon ReportMove your mouse over Reports and select EMS to Balloon. There are two sections in this report; the EMS to Balloon Time vs. Goal graph and the report grid.
1. Acquired Date Range:
a) To view 12-Leads for a specific date and time: Click From and To in the Acquired Date Range field to manually enter the date and time or to select a day and time from the pop-up calendar.
Manually enter a date and time: Use the mm/dd/yyyy hh:mm format.
Pop-up calendar: Select the month and the year before you select the day. If you select the day first, the system selects the current year.
b) To view all the 12-Leads in the system: Enter today’s date in the To field.
2. Transaction Type: Select one of the following from the drop-down list:
a) 12-Leads Sent: View sent 12-Lead records only.b) 12-Leads Received: View received 12-Lead records only.
Note: The system will deliver 1000 records for a single request. If your request is larger than 1000 records, only the first 1000 records display.
EMS to Balloon Report 4-7

c) Transaction Log: View both the sent and received 12-Lead records.
3. Include New 12-Leads: Check this box to include new 12-Lead data in the report.
4. EMS To Balloon Goal: If your company has an EMS to balloon goal, enter the goal in minutes. When you enter a goal, the system plots the time on the graph in red so you can easily see the records that fall in and out of goal range.
5. Click Display to view the report.
The columns of information include:Acquisition Date/Time: The date and time the 12-Lead record was acquired.Distribution Date/Time: The date and time RescueNet 12-Lead distributed the 12-Lead
record.Inbox Received Date/Time: The date and time the 12-Lead record arrived in the
RescueNet 12-Lead Inbox. 12-Lead Status: New, opened, or closed.Unit Name: The name of the unit that obtained the 12-Lead record.Sending Agency Name: The agency name that sent the 12-Lead record.Destination:
Email address if destination type is email.Fax number if destination type is fax.Cooperating Customer name if destination type is Cooperating Customer.
Destination Type: The destination type such as email, cooperating customer, and fax.
Distribution List: The distribution list name.
6. E2B:Displays the E2B for this record. The E2B value is derived from the time difference between balloon time and EMS time. The EMS time and balloon time is set in the 12-Lead Details page. For information on how to set the E2B, see Edit EMS to Balloon Time (E2B) on page 2-4.
4-8 Chapter 4: Reports

RescueNet 12-Lead User Guide
Report Examples
In the following example, a user generated a report using a transaction type of 12-Leads Sent and an EMS to Balloon Goal of 30 minutes. The goal displays in red on the graph. Since this is a sent report, the Distribution List, Destination type, and Destination columns display.
EMS to Balloon Report 4-9

The next example shows a report generated with the transaction type of 12-Leads Received with no EMS to Balloon Goal specified.
4-10 Chapter 4: Reports

Setting Up the D
atabase
Index
Numerics12-Lead
Close 1-2Distribute 1-2, 2-6, 4-7
Automatic Distribution 1-2Lists 1-2Manual 1-2Methods 1-2
Edit 1-1, 2-3Print 1-2, 2-7Save to disk 2-7View 1-1
AAcquired Time 2-1Alert Banner 2-1Audible Alert 2-1Audit Log 2-8
BBalloon Time 2-4
CClose 2-8
Automatic 2-8Manual 2-8
Cooperating Customer 2-6
DDistribute 12-Lead 2-6Distribution List 2-6Distribution Lists 1-2
EE2B 2-4Edit 12-Lead 1-1Edit 12-Lead Record 2-4Edit Patient Information 2-3Edit Records 2-4Email Address 2-6Emergency Medical Services 2-4, 4-8EMS Time 2-4, 4-8
HHow it works 1-1
IInbox 1-1, 2-1
PPrint 2-7
SSafety Considerations 1-3Save to Disk 2-7Search 1-3
Index-1

Index-2