rescuenet tabletpcr and webpcr - contracostazolltablet pcr: allows you to capture, access and...
TRANSCRIPT
RescueNetTabletPCR and WebPCRUser’s GuideSoftware version 5.2Manual 5.2.2

Tablet PCR and Web PCR User’s Guide
Table of Contents
Chapter 1: Introduction 1-1Overview.......................................................................................................................... 1-1
Intended Use.............................................................................................................. 1-1Hints for Using This Book............................................................................................... 1-2
Notes ........................................................................................................................ 1-2Getting the Latest Revision of this Book......................................................................... 1-2Commenting on this Book ............................................................................................... 1-3
Chapter 2: TabletPCR - Overview 2-1Starting TabletPCR for the First Time............................................................................. 2-1Logging in and Adding Crew Members .......................................................................... 2-2Viewing the Inbox ........................................................................................................... 2-5Adding a Patient Care Report (PCR)............................................................................... 2-6
Changing default Time, Input, and Sync modes ....................................................... 2-7Capturing Information for PCRs............................................................................... 2-9
Receiving Automatic Updates from Dispatch ............................................................... 2-16Merge............................................................................................................................. 2-17
How Merge Works.................................................................................................. 2-17Merging a New PCR to a PCR from Dispatch .............................................................. 2-23Completing PCRs .......................................................................................................... 2-25Synchronizing with RescueNet Field Data.................................................................... 2-25Using the Spell Check Feature ...................................................................................... 2-26Dataflow in PCR............................................................................................................ 2-27
Complete Call.......................................................................................................... 2-27Incomplete Call ....................................................................................................... 2-27
Chapter 3: TabletPCR - Capturing Trip Information 3-1The Dispatch Section....................................................................................................... 3-2The Times Section ........................................................................................................... 3-4The Mileages Section ...................................................................................................... 3-6The Scene Section............................................................................................................ 3-7Importing from RescueNet Dispatch ............................................................................... 3-7
Chapter 4: TabletPCR - Capturing Patient Information 4-1The Patient Section .......................................................................................................... 4-2
Importing Recent or Common Patient Information .................................................. 4-2Importing Patient Information From RescueNet Dispatch ....................................... 4-3
1

Date of Birth (DOB) ................................................................................................. 4-4Capturing Information That Is Not on a List ............................................................ 4-5Copying an Address.................................................................................................. 4-6
The Next-of-Kin (NOK) Section..................................................................................... 4-7The Billing Section.......................................................................................................... 4-7The Payors Section (Multiple-capture Wizard) .............................................................. 4-8The Cert. of Medical Necessity (Cert - CMS) Section ................................................. 4-11The Immunization Hx Section ...................................................................................... 4-11
Chapter 5: TabletPCR - Capturing Subjective Information 5-1The Chief Complaint Section.......................................................................................... 5-2The Cause of Injury Section............................................................................................ 5-5The Past History Section ................................................................................................. 5-5The Medications Section................................................................................................. 5-6
Adding Unlisted Medications Using the “Other” Feature........................................ 5-6The Allergies Section .................................................................................................... 5-10The NEMSIS Mechanism of Injury Section ................................................................. 5-11
Clearing a Selected Item From a List ..................................................................... 5-11The Other Section.......................................................................................................... 5-12
Chapter 6: Tablet PCR - Capturing Objective Information 6-1The Assessment Section.................................................................................................. 6-1
Performing a Body Survey ....................................................................................... 6-5Copying an Assessment to Start Another One ......................................................... 6-8Starting a New Blank Assessment............................................................................ 6-8
The Impressions Section ................................................................................................. 6-9The Trauma Section ...................................................................................................... 6-10The Cardiac Arrest Section ........................................................................................... 6-10
Chapter 7: TabletPCR - Capturing Vital Signs 7-1The Vital Signs Section................................................................................................... 7-1The Scores Section .......................................................................................................... 7-5The Medical Devices Section.......................................................................................... 7-6
Upload Resuscitation Data From Medical Device ................................................... 7-6Philips HeartStart MRx............................................................................................. 7-8Upload Settings....................................................................................................... 7-10Linking Data to Patient’s PCR ............................................................................... 7-12Unlinking Resuscitation Data from Patient’s PCR................................................. 7-13Deleting Uploaded Resuscitation Data................................................................... 7-14Viewing ECG.......................................................................................................... 7-14
2 Table of Contents
Tablet PCR and Web PCR User’s Guide
Chapter 8: TabletPCR - Capturing Interventions 8-1Quick Log ........................................................................................................................ 8-2The Interventions Section ................................................................................................ 8-3
Adding or Reviewing an Intervention....................................................................... 8-4
Chapter 9: TabletPCR - Capturing the Outcome 9-1The Outcome Section ...................................................................................................... 9-2The Times Section ........................................................................................................... 9-2The Signatures Section .................................................................................................... 9-3The NPP Section.............................................................................................................. 9-4The Exposures Section .................................................................................................... 9-5
Chapter 10: TabletPCR - Reviewing the PCR 10-1The Crew Section .......................................................................................................... 10-2The Time Summary Section .......................................................................................... 10-3
Changing the View.................................................................................................. 10-3Changing a Time Stamp.......................................................................................... 10-4Changing Multiple Time Stamps Simultaneously .................................................. 10-5Editing or Deleting Items ........................................................................................ 10-6
The Print Preview Section ............................................................................................. 10-8The Narrative Section .................................................................................................... 10-8The Addenda Section..................................................................................................... 10-8The View ECG Section ............................................................................................... 10-10The Research Survey Section ...................................................................................... 10-10The QA Comments Section ......................................................................................... 10-10
Chapter 11: TabletPCR - Additional Options 11-1Adding Patients.............................................................................................................. 11-1Moving PCRs................................................................................................................. 11-3Printing Reports ............................................................................................................. 11-3Deleting PCRs ............................................................................................................... 11-4Viewing Help Documents.............................................................................................. 11-4
Hint › Minimizing TabletPCR................................................................................. 11-5
Chapter 12: TabletPCR - Capturing Attachments 12-1Adding Files and Drawings ........................................................................................... 12-1
Scratch Pad.............................................................................................................. 12-2Opening or Printing an Attachment............................................................................... 12-3
Chapter 13: TabletPCR - Synchronizing 13-1
3

Using the Save to Server Feature .................................................................................. 13-1Using the Request from Server and Save to Server Features........................................ 13-2Receiving Administrative Updates from eDistribution................................................. 13-7
Chapter 14: TabletPCR - Completing the PCR 14-1Finishing the PCR ......................................................................................................... 14-1
Deleted PCRs.......................................................................................................... 14-3
Chapter 15: WebPCR - Capturing Trip Information 15-1The Dispatch Section .................................................................................................... 15-2The Times Section......................................................................................................... 15-3The Mileages Section .................................................................................................... 15-4The Scene Section ......................................................................................................... 15-5Importing from RescueNet Dispatch ............................................................................ 15-5
Chapter 16: WebPCR - Capturing Patient Information 16-1The Patient Section........................................................................................................ 16-2
Import Patient Information from RescueNet Dispatch........................................... 16-3Date of Birth (DOB) ............................................................................................... 16-4Copy an Address..................................................................................................... 16-4
The NOK Section .......................................................................................................... 16-4The Billing Section........................................................................................................ 16-5The Payors Section (Multiple-capture) ......................................................................... 16-6The Cert-CMS Section .................................................................................................. 16-7The Immunization Hx Section ...................................................................................... 16-8
Chapter 17: Web PCR - Quick Look 17-1Overview ....................................................................................................................... 17-1Features ......................................................................................................................... 17-1
Spell Check............................................................................................................. 17-1The Inbox ...................................................................................................................... 17-3Starting WebPCR for the First Time............................................................................. 17-4Logging in ..................................................................................................................... 17-4Configuring the Crew.................................................................................................... 17-4Adding a Patient Care Report (PCR) ............................................................................ 17-6Deleting or Editing Items from a PCR........................................................................ 17-12
Adding Notes ........................................................................................................ 17-13Requesting a PCR from the Server ............................................................................. 17-14Completing PCRs........................................................................................................ 17-14Saving the PCR ........................................................................................................... 17-15
4 Table of Contents
Tablet PCR and Web PCR User’s Guide
Chapter 18: WebPCR - Capturing Objective Information 18-1The Assessment Section ................................................................................................ 18-1
Perform a Body Survey........................................................................................... 18-3To Finish a Body Survey......................................................................................... 18-4Auto Mark ............................................................................................................... 18-4Add a Note to an Assessment.................................................................................. 18-5Start Another New Blank Assessment .................................................................... 18-5
The Impressions Section................................................................................................ 18-5The Trauma Section....................................................................................................... 18-7The Other Section .......................................................................................................... 18-7The Cardiac Arrest Section............................................................................................ 18-8
Chapter 19: WebPCR - Capturing Subjective Information 19-1The Chief Complaint Section ........................................................................................ 19-1
Mark as Pertinent Negative (Not Presented As) ..................................................... 19-2The Mechanism of Injury Section ................................................................................. 19-3
Add a Mechanism of Injury From a List................................................................. 19-3The Past History Section ............................................................................................... 19-3The Medications Section ............................................................................................... 19-4
Add Unlisted Medications Using the “Other” Button............................................. 19-6The Allergies Section .................................................................................................... 19-7The Other Section .......................................................................................................... 19-8The NEMSIS Mechanism of Injury Section.................................................................. 19-8
Chapter 20: WebPCR - Capturing Interventions 20-1The Interventions Section .............................................................................................. 20-1
Adding or Reviewing an Intervention..................................................................... 20-2
Chapter 21: WebPCR - Capturing Vital Signs 21-1The Vital Signs Section ................................................................................................. 21-1The Scores Section ........................................................................................................ 21-3The Medical Devices Section ........................................................................................ 21-4
Chapter 22: WebPCR - Capturing the Outcome 22-1The Outcome Section .................................................................................................... 22-1The Times Section ......................................................................................................... 22-2The Signatures Section .................................................................................................. 22-2The NPP Section............................................................................................................ 22-3The Exposures Section .................................................................................................. 22-3
5
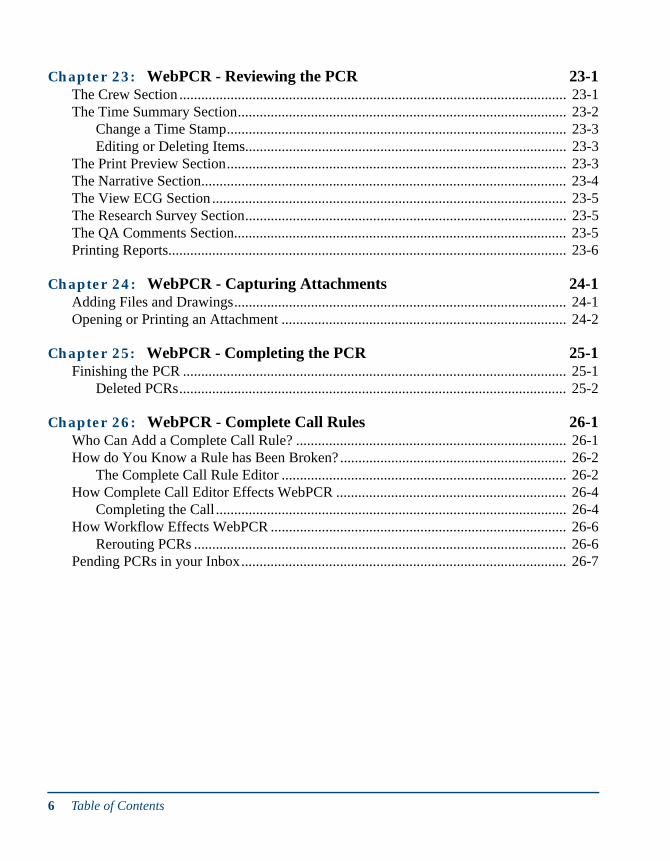
Chapter 23: WebPCR - Reviewing the PCR 23-1The Crew Section .......................................................................................................... 23-1The Time Summary Section.......................................................................................... 23-2
Change a Time Stamp............................................................................................. 23-3Editing or Deleting Items........................................................................................ 23-3
The Print Preview Section............................................................................................. 23-3The Narrative Section.................................................................................................... 23-4The View ECG Section ................................................................................................. 23-5The Research Survey Section........................................................................................ 23-5The QA Comments Section........................................................................................... 23-5Printing Reports............................................................................................................. 23-6
Chapter 24: WebPCR - Capturing Attachments 24-1Adding Files and Drawings........................................................................................... 24-1Opening or Printing an Attachment .............................................................................. 24-2
Chapter 25: WebPCR - Completing the PCR 25-1Finishing the PCR ......................................................................................................... 25-1
Deleted PCRs.......................................................................................................... 25-2
Chapter 26: WebPCR - Complete Call Rules 26-1Who Can Add a Complete Call Rule? .......................................................................... 26-1How do You Know a Rule has Been Broken? .............................................................. 26-2
The Complete Call Rule Editor .............................................................................. 26-2How Complete Call Editor Effects WebPCR ............................................................... 26-4
Completing the Call ................................................................................................ 26-4How Workflow Effects WebPCR ................................................................................. 26-6
Rerouting PCRs ...................................................................................................... 26-6Pending PCRs in your Inbox......................................................................................... 26-7
6 Table of Contents

Tablet PCR and Web PCR User’s Guide
7

8 Table of Contents

1 1
Chapter 1:Introduction
Topics in this chapter include:
OverviewWelcome to ZOLL RescueNet™ TabletPCR and WebPCR. These powerful tools can help you streamline data collection and reporting, increase the accuracy of the data that is collected, and ensure that each PCR contains the information that your company requires.
TabletPCR and WebPCR 5.1 simplify and enhance your data collection tasks:
Tablet PCR: Allows you to capture, access and automate pre-hospital patient data, clinical QA and system information and improves the overall access to information. Tablet PCR has configurable screens, an easy-to-use touchscreen-friendly user interface and an open architecture interface to allow integration with other billing and CAD systems.
WebPCR: Provides a web-based version of TabletPCR that allows you to access incomplete calls from any computer that has access to a Web browser and your WebPCR Server. You can easily add or edit data, generate reports, and close calls without having to use a tablet computer.
Intended UseThe RescueNet ePCR 5.2 is intended for use by trained medical personnel who are familiar with basic monitoring, vital sign assessment, emergency cardiac care, and the use of RescueNet ePCR5.2. RescueNet ePCR 5.2 is also intended for use by (or on the order of) physicians at the
Overview page 1-1
Hints for using this book page 1-2
Getting the latest revision of this book page 1-2
Commenting on this Book page 1-2
1-1
scene of an emergency or in a hospital emergency room, intensive care unit, cardiac care unit, or other similar area of a hospital. The usage may be in an ambulance or at the scene of an emergency. It is also intended to be used during the transport of patients.
Hints for Using This BookRescueNet ePCR 5.2 User’s Guide provides information that operators need for the safe and effective use and care of the RescueNet ePCR 5.2 product. It is important that all persons using this device read and understand all the information contained in this book. All information concerning the safety considerations and the warning section should be thoroughly understood.
Interface elements, command names, and menu names are shown in bold.
When you should press a combination of keys at the same time, they are shown joined with a PLUS (+) symbol, for example, Alt+n.
If you should type something, it is displayed in a monospaced font.
All procedures are numbered:
1. Even a one-step procedure.
Notes
Getting the Latest Revision of this BookThe latest revision of the PDF version of this book is automatically transferred to your system whenever you perform an upgrade.
You can also download the latest PDF version of this book at any time by visiting the ZOLL Res-cueNet Documentation webpage: www.myzolldata.com/documentation.
Note: These notes present additional information related to the current topic.
Speed Hint: These speed hints can help you do things faster!
Warning/Important: These notes are essential to the successful use of your system.
1-2 Chapter 1: Introduction

Tablet PCR and Web PCR User’s Guide
Commenting on this BookZOLL welcomes your feedback. You can comment on this document by sending e-mail to [email protected].
You must state the document title and release number.
Your comments are of great value, and will help us improve our documentation.
Commenting on this Book 1-3

1-4 Chapter 1: Introduction

2 2
Chapter 2:TabletPCR - Overview
Topics described in this chapter include:
Starting TabletPCR for the First Time1. On the Windows desktop, tap the TabletPCR icon.
The very first time you start TabletPCR on a field data device or workstation, a message appears stating that some information is required before the Login screen can be displayed. Tap Yes to synchronize and download it from the server. The next time you start TabletPCR, this step is skipped.
Starting TabletPCR for the First Time page 2-1
Logging in and Adding Crew Members page 2-2
Viewing the Inbox page 2-5
Adding a Patient Care Report (PCR) page 2-6
Receiving Automatic Updates from Dispatch page 2-16
Linking a New PCR to a PCR from Dispatch page 2-17
Completing PCRs page 2-25
Synchronizing with RescueNet Field Data page 2-25
Using the Spell Check Feature page 2-26
2-1

Logging in and Adding Crew Members1. Once the initial synchronization is completed, the Login screen is displayed.
Tap your name (a), type your password (b), and then tap Log In (c).
TabletPCR can be used on touch screen or pen-based PCs, or regular workstations. If your TabletPCR was set up for pen-based PCs, you see a pop-up soft keyboard that allows you to write on it.
For touch screen PCs, you see a pop-up soft ink pad; for workstations, you use a regular keyboard.
To change these settings, see Changing default Time, Input, and Sync modes on page 7.
Note: Your organization can customize the TabletPCR screens, so you might see different captions and choices than those shown in this book’s examples.
2-2 Chapter 2: TabletPCR - Overview

Tablet PCR and Web PCR User’s Guide
2. Use the Add Crew wizard to describe your crew and shift.
a) The Add Crew wizard’s data-entry fields are listed on the left side. You can tap to select one, or you can go through them in sequence using the Next button.
b) The selected data-entry field’s long caption.c) The selected data-entry field’s number in the sequence of fields.d) There are a couple of ways to capture information.
In this example, you can tap Now to select the current date and time as the shift start date or you can tap a time in the list. The selected time is displayed bold with a check mark.
e) The data-entry area shows your choices for the selected data-entry field. You can scroll a list by tapping the Page Up, Up, Down, or Page Down buttons.
f) If the current data-entry field is designed to accept a single value, when you select or add a value for it, the focus automatically advances to the next field. Otherwise, you can move to the next field by tapping the Next button.
The Add Crew wizard is only displayed on startup if you are not already a member of a shift stored on the current TabletPCR device. Note that shifts are stored on TabletPCR as long as it has any associated Patient Care Reports (PCRs) that have not been completed and uploaded. If all PCRs have been uploaded, the shift is cleared off the device after 28 hours, except for the last active shift, which is stored on the device until a new shift is started.
Logging in and Adding Crew Members 2-3

Alternative ways to capture information
For many data-entry fields, if you cannot easily find the value that you are looking for in the list, you can tap Can’t Find to access an alternative
method to capture the information. For example, for the Shift Start Date, a keypad for add-ing the time and date is displayed.
To return to the main list, tap Pick from List
3. Continue to go through the Add Crew wizard by selecting your region, station, shift, unit type, and vehicle number.
4. When you get to Crew 1 Name, tap your name, and then a signature box opens.
Important! Make sure you sign your actual signature. It is printed on the Patient Care Report and could be used for legal reasons.
Note: You must also collect a signature for each crew member that you add to the shift.
5. When you finish adding the shift information in the Add Crew wizard, tap OK.
2-4 Chapter 2: TabletPCR - Overview

Tablet PCR and Web PCR User’s Guide
6. The Configure Crew wizard lists the crew that you added. Select the crew you want to use for the shift, and then tap to Set as Current Crew.
Depending on your TabletPCR setup, you might also view the following information:
All crews you have been a member of within the last 28 hours that have used the current TabletPCR device.
Or, all crews that you or any other member of the current crew has been a member of during the last 28 hours that have used the current TabletPCR device.
You can also edit the selected crew’s shift information. When you use the same TabletPCR for each shift, you can elect your crew from the previous shift and all your shift information gets populated in the fields. If your new crew or shift information is slightly different, you need to capture those differences.
Viewing the InboxThere are four sections to the Inbox: the navigational bar, Messages, PCRs checked out to your Inbox, and Pending PCRs.
The navigational bar includes icons for opening PCRs, creating new PCRs, copying PCRs, print-ing, deleting PCRs, saving PCRs to the server, and requesting PCRs from the server.
Viewing the Inbox 2-5
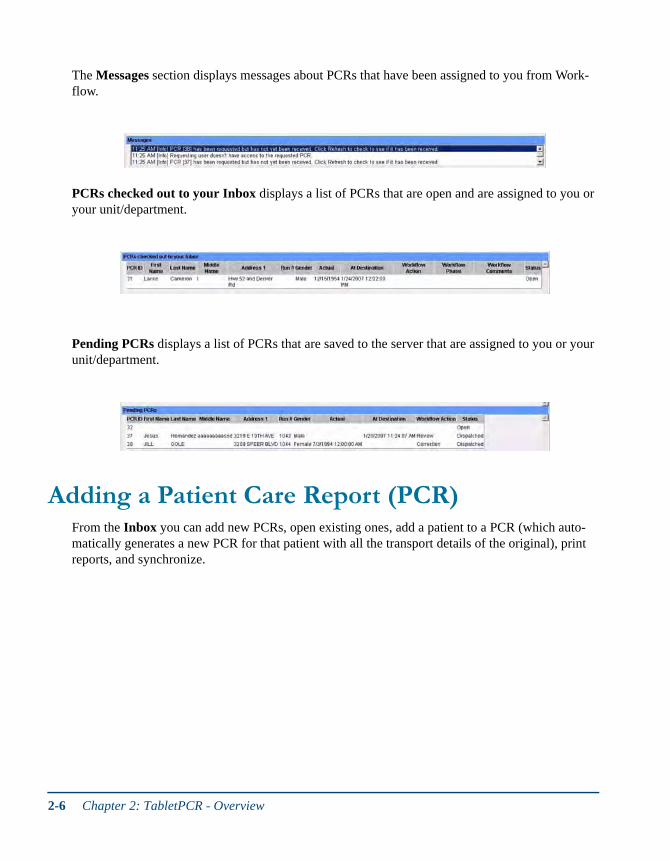
The Messages section displays messages about PCRs that have been assigned to you from Work-flow.
PCRs checked out to your Inbox displays a list of PCRs that are open and are assigned to you or your unit/department.
Pending PCRs displays a list of PCRs that are saved to the server that are assigned to you or your unit/department.
Adding a Patient Care Report (PCR)From the Inbox you can add new PCRs, open existing ones, add a patient to a PCR (which auto-matically generates a new PCR for that patient with all the transport details of the original), print reports, and synchronize.
2-6 Chapter 2: TabletPCR - Overview
Tablet PCR and Web PCR User’s Guide
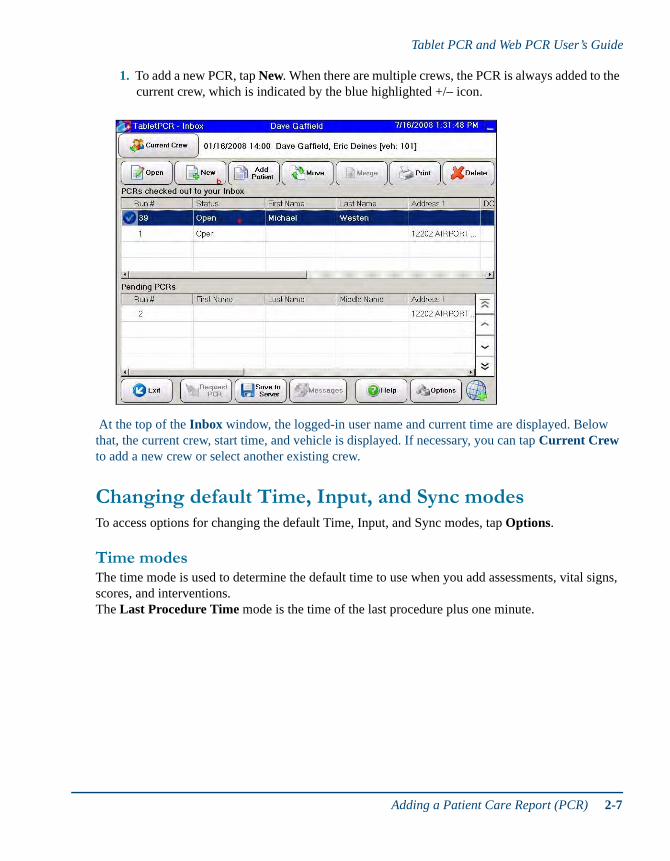
1. To add a new PCR, tap New. When there are multiple crews, the PCR is always added to the current crew, which is indicated by the blue highlighted +/– icon.
At the top of the Inbox window, the logged-in user name and current time are displayed. Below that, the current crew, start time, and vehicle is displayed. If necessary, you can tap Current Crew to add a new crew or select another existing crew.
Changing default Time, Input, and Sync modes To access options for changing the default Time, Input, and Sync modes, tap Options.
Time modesThe time mode is used to determine the default time to use when you add assessments, vital signs, scores, and interventions. The Last Procedure Time mode is the time of the last procedure plus one minute.
Adding a Patient Care Report (PCR) 2-7
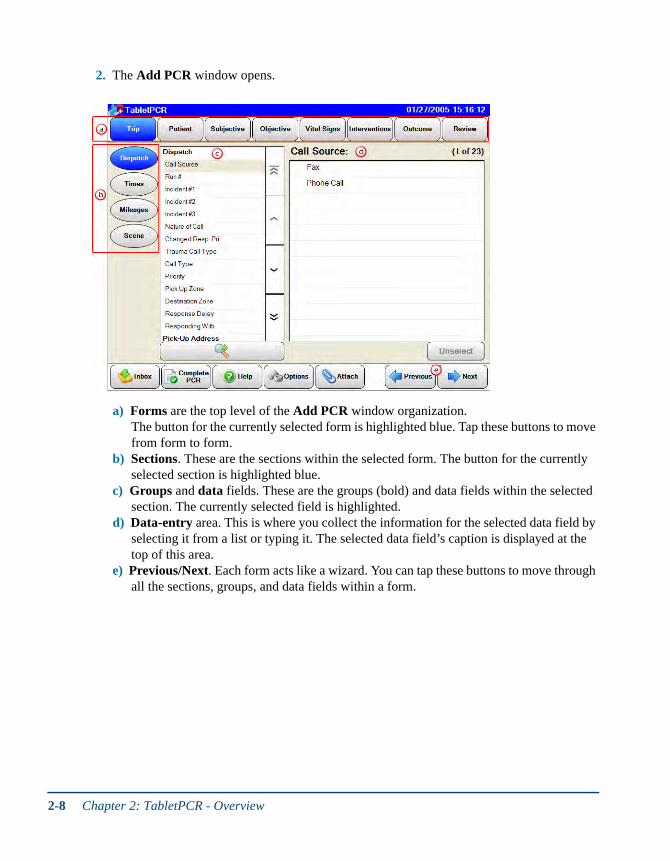
2. The Add PCR window opens.
a) Forms are the top level of the Add PCR window organization. The button for the currently selected form is highlighted blue. Tap these buttons to move from form to form.
b) Sections. These are the sections within the selected form. The button for the currently selected section is highlighted blue.
c) Groups and data fields. These are the groups (bold) and data fields within the selected section. The currently selected field is highlighted.
d) Data-entry area. This is where you collect the information for the selected data field by selecting it from a list or typing it. The selected data field’s caption is displayed at the top of this area.
e) Previous/Next. Each form acts like a wizard. You can tap these buttons to move through all the sections, groups, and data fields within a form.
2-8 Chapter 2: TabletPCR - Overview

Tablet PCR and Web PCR User’s Guide
Capturing Information for PCRsThis section shows examples of some of the methods you can use to collect and review infor-mation in TabletPCR:
Simple lists. On simple lists, you can tap either a single or multiple choices.
Lists with search. Some simple lists and tree lists include a search capability. Tap a letter or a couple of letters to jump directly to the choice you want.
In a tree list, the search works on the current level. You can tap a branch (+) to open another level of related choices. A path displays your current level and you can jump to higher levels by tapping that level in the path.
Adding a Patient Care Report (PCR) 2-9
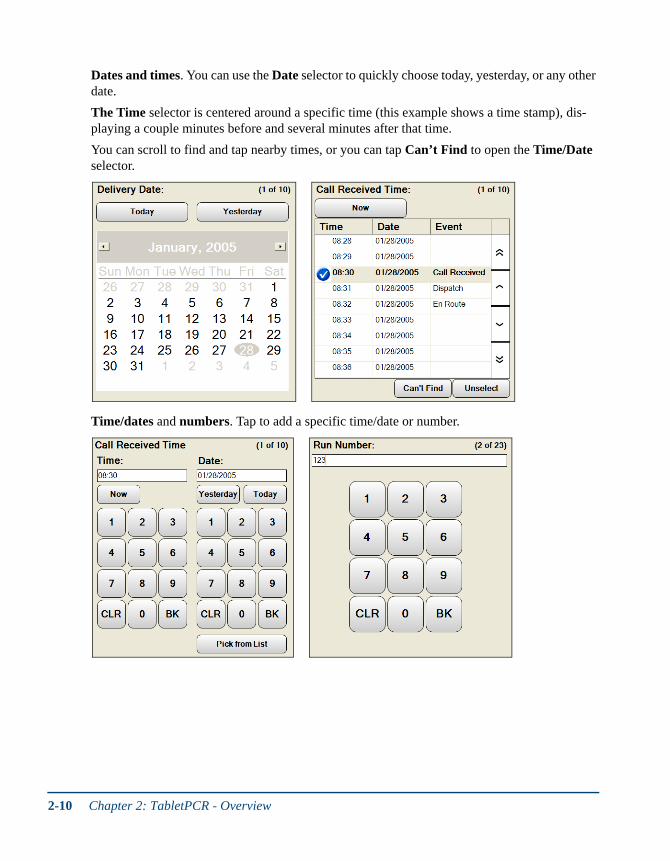
Dates and times. You can use the Date selector to quickly choose today, yesterday, or any other date.
The Time selector is centered around a specific time (this example shows a time stamp), dis-playing a couple minutes before and several minutes after that time.
You can scroll to find and tap nearby times, or you can tap Can’t Find to open the Time/Date selector.
Time/dates and numbers. Tap to add a specific time/date or number.
2-10 Chapter 2: TabletPCR - Overview

Tablet PCR and Web PCR User’s Guide
Quick log. Use this tab to view the interventions performed, along with the time stamps
Body survey. Use this tab to note visual assessments.
Body images: Copyright © 2004 Nucleus Medical Art, All rights reserved. www.nucleusinc.com
Adding a Patient Care Report (PCR) 2-11
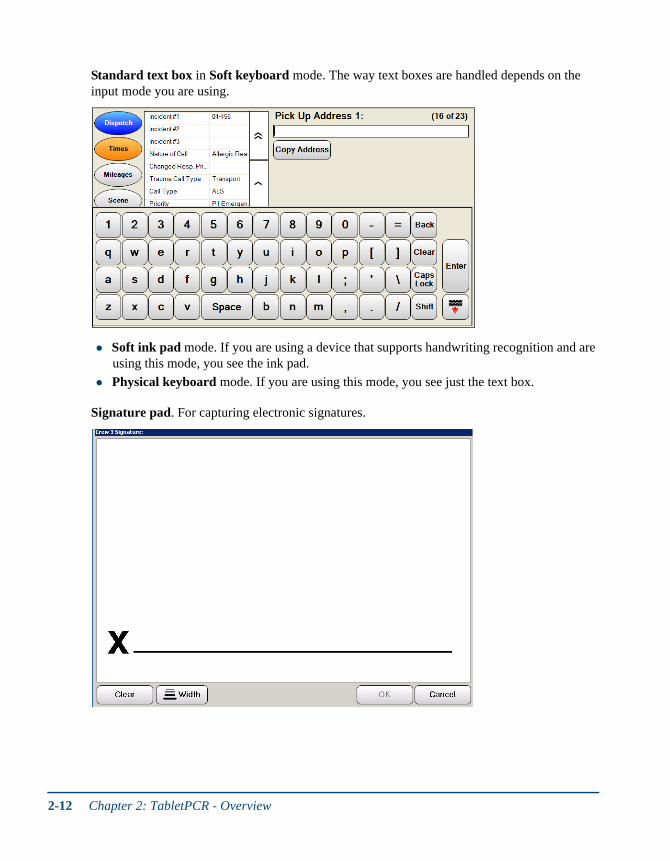
Standard text box in Soft keyboard mode. The way text boxes are handled depends on the input mode you are using.
Soft ink pad mode. If you are using a device that supports handwriting recognition and are using this mode, you see the ink pad.
Physical keyboard mode. If you are using this mode, you see just the text box.
Signature pad. For capturing electronic signatures.
2-12 Chapter 2: TabletPCR - Overview
Tablet PCR and Web PCR User’s Guide
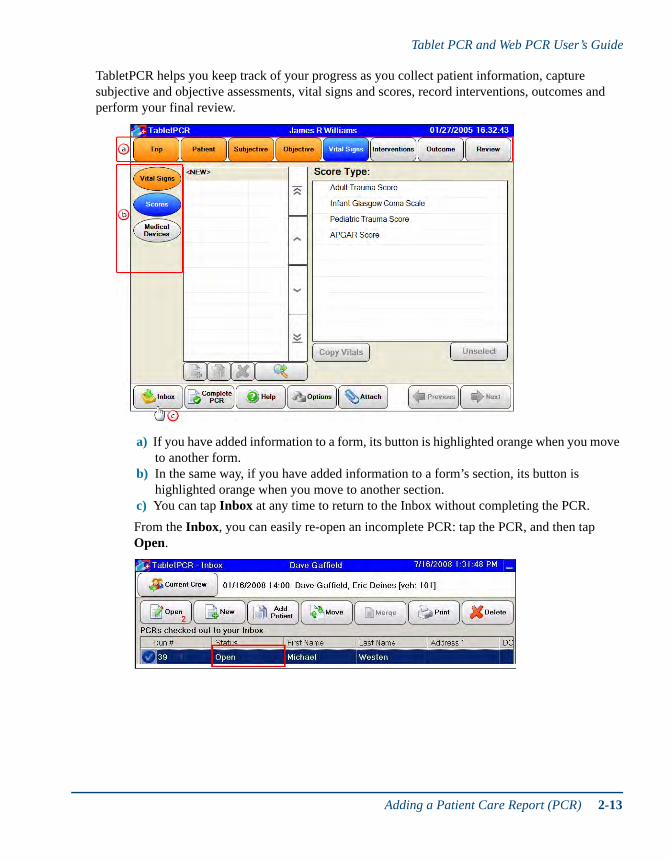
TabletPCR helps you keep track of your progress as you collect patient information, capture subjective and objective assessments, vital signs and scores, record interventions, outcomes and perform your final review.
a) If you have added information to a form, its button is highlighted orange when you move to another form.
b) In the same way, if you have added information to a form’s section, its button is highlighted orange when you move to another section.
c) You can tap Inbox at any time to return to the Inbox without completing the PCR.
From the Inbox, you can easily re-open an incomplete PCR: tap the PCR, and then tap Open.
Adding a Patient Care Report (PCR) 2-13

The final step after collecting all the PCR information is to review it.
a) On the Review form, you can review the following in the Time Summary section:
b) Change from one view to another by tapping View, and selecting another view.c) Print preview the PCR reportd) Add narrative to the PCR.e) Even after you have completed a PCR, you can still add supplemental information
(addenda) to it.f) If you have uploaded and attached a resuscitation record from a medical device, you can
view the ECG.g) For any summary items with a time stamp, you can correct the time and date. (To change
several time stamps simultaneously, tap Select Multiple Items, tap the items, and then change the time and/or date.)
h) For items that have data-entry information, you can go to the original data-entry field and, if necessary, change the information. Or you can delete the item.
All time events Signatures
Assessments Trip times
Interventions Vitals
Scores
2-14 Chapter 2: TabletPCR - Overview
Tablet PCR and Web PCR User’s Guide
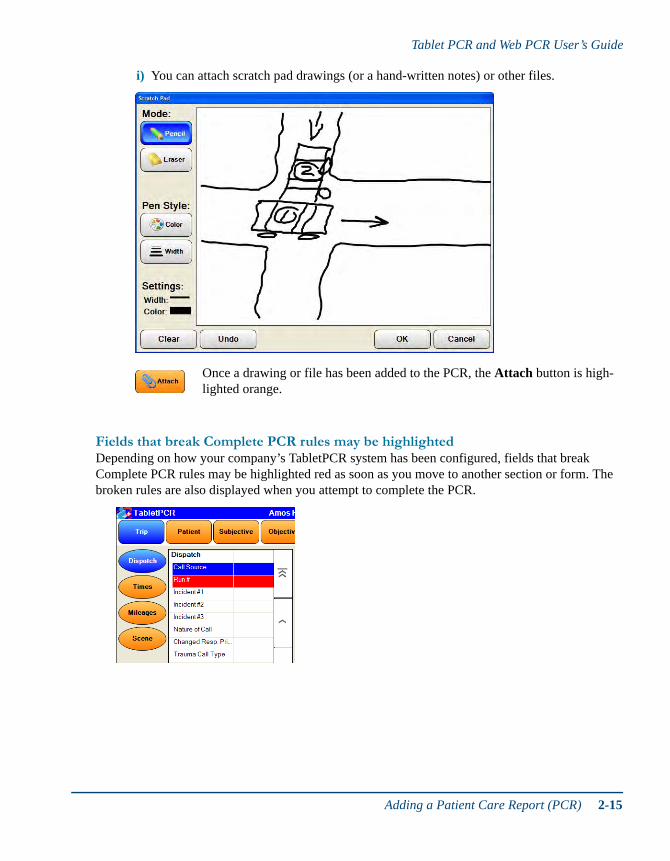
i) You can attach scratch pad drawings (or a hand-written notes) or other files.
Once a drawing or file has been added to the PCR, the Attach button is high-lighted orange.
Fields that break Complete PCR rules may be highlightedDepending on how your company’s TabletPCR system has been configured, fields that break Complete PCR rules may be highlighted red as soon as you move to another section or form. The broken rules are also displayed when you attempt to complete the PCR.
Adding a Patient Care Report (PCR) 2-15

Receiving Automatic Updates from Dispatch ePCR allows you to automatically merge dispatch updates into a PCR that exists in Tablet PCR and is not complete, and is not being edited at the time.
Note that this feature applies to updates received from RescueNet Dispatch and other similar CAD APIs. To configure automatic updates from Dispatch:
1. Once RescueNet Dispatch or the CAD API is configured appropriately, the Messages button on your Inbox turns orange when an update is received from Dispatch for a PCR that is not currently being edited.
2. Click on the Messages tab to read the messages. You can scroll to read the message, or double click on it to read the dialog box with text about the message.Click on Clear Messages to reset the Messages button.
3. If the update is received while you are editing a PCR, the updates are not automatically added to the PCR.
2-16 Chapter 2: TabletPCR - Overview

Tablet PCR and Web PCR User’s Guide
4. When you exit the PCR and return to the Inbox, the system asks if you want to merge PCR data received from Dispatch.
If you choose Yes, automatic updates are merged to PCR that you were working on. The automatic updates does not overwrite any information that you entered, it updates the items that were left blank.
If you choose No, automatic updates from Dispatch are not added to the PCR and you are not prompted to apply the updates again unless you receive other subsequent updates from Dispatch. Subsequent updates pertaining to a PCR includes the data included in earlier iterations.
Merge
How Merge WorksThere are two "merges" relating to ePCR.
Dispatched merge - A dispatched merge occurs before a PCR is first checked out to a user. It will always overwrite existing values with new values from Dispatch.
Working merge - A working merge occurs after a PCR has been checked out the first time. It will only fill in missing/empty existing values with values from Dispatch.
NOTE: Once they've been filled in, either by user or PCR Merge, they won't be overwritten.
Dispatched MergeA Dispatched merge happens any time updates come from Dispatch before a PCR has been checked out by a user. This merge happens automatically behind the scenes, and occurs when a dispatched PCR enters the system and a dispatch update comes in. The two PCRs are essentially for the same incident/patient but contain different data (e.g., the original PCR may have been opened for editing by the user and the update may contain data for a new timestamp). Either the PCRServer or PCREditor, depending on of the original PCR is checked out, merges the two PCRs based on a pre-defined set of rules.
Below are categories and the list of items that are merged in a Dispatched Merge:
Merge 2-17
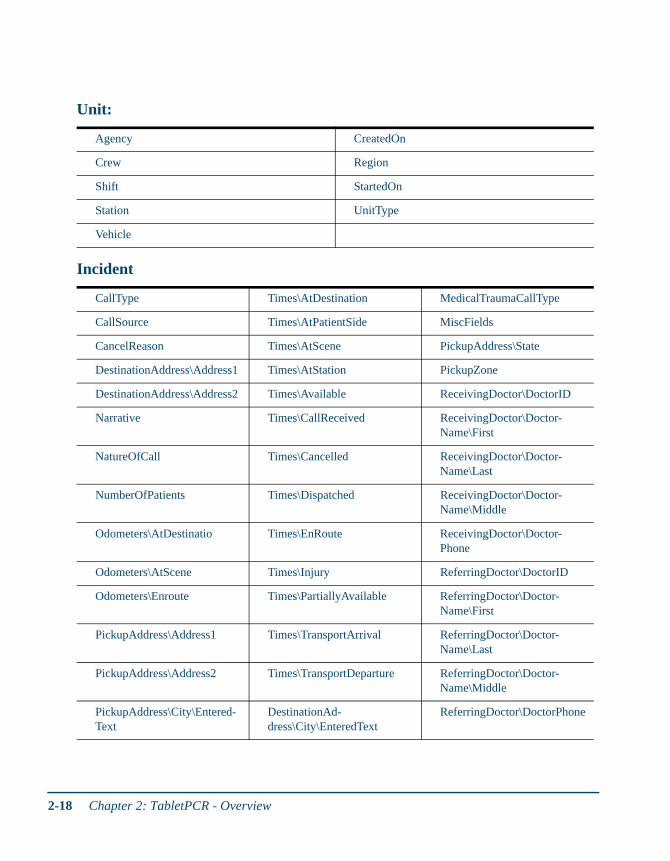
Unit:
Agency CreatedOn
Crew Region
Shift StartedOn
Station UnitType
Vehicle
Incident
CallType Times\AtDestination MedicalTraumaCallType
CallSource Times\AtPatientSide MiscFields
CancelReason Times\AtScene PickupAddress\State
DestinationAddress\Address1 Times\AtStation PickupZone
DestinationAddress\Address2 Times\Available ReceivingDoctor\DoctorID
Narrative Times\CallReceived ReceivingDoctor\Doctor-Name\First
NatureOfCall Times\Cancelled ReceivingDoctor\Doctor-Name\Last
NumberOfPatients Times\Dispatched ReceivingDoctor\Doctor-Name\Middle
Odometers\AtDestinatio Times\EnRoute ReceivingDoctor\Doctor-Phone
Odometers\AtScene Times\Injury ReferringDoctor\DoctorID
Odometers\Enroute Times\PartiallyAvailable ReferringDoctor\Doctor-Name\First
PickupAddress\Address1 Times\TransportArrival ReferringDoctor\Doctor-Name\Last
PickupAddress\Address2 Times\TransportDeparture ReferringDoctor\Doctor-Name\Middle
PickupAddress\City\Entered-Text
DestinationAd-dress\City\EnteredText
ReferringDoctor\DoctorPhone
2-18 Chapter 2: TabletPCR - Overview

Tablet PCR and Web PCR User’s Guide
PickupAd-dress\County\EnteredText
DestinationAd-dress\County\EnteredText
ResponsePriorityChanged
PickupAddress\Facil-ity\Department\ID
DestinationAddress\Facil-ity\Department\ID
MedicalTraumaCallType
PickupAddress\Facility\ID DestinationAddress\Facil-ity\ID
MiscFields
PickupAddress\Phone1 DestinationAddress\Phone1 PickupAddress\State
PickupAddress\PostalCode DestinationAddress\Phone2 PickupZone
RunNumber DestinationAddress\Postal-Code
ReceivingDoctor\DoctorID
ResponsePriorityOriginal DestinationAddress\State ReceivingDoctor\Doctor-Name\First
Times\Transporting DestinationZone ReceivingDoctor\Doctor-Name\Last
Times\TraumaAlert IncidentNumbers
TransportPriorityChanged LevelOfCareID
TransportPriorityOriginal MassCasualty
Patient
FamilyDoctor\DoctorID BillingAddress\City\EnteredText
FamilyDoctor\DoctorPhone BillingAddress\County\EnteredText
FamilyDoctor\First DOB\AgeScalar
FamilyDoctor\Last DOB\AgeScalarUnits
FamilyDoctor\Middle DOB\Approximate
Gender DOB\Date
HomeAddress\Address1 DriversLicenseLocale
HomeAddress\Address2 HomeAddress\Phone1
HomeAddress\City\EnteredText HomeAddress\PostalCode
HomeAddress\County\EnteredText HomeAddress\State
HomeAddress\Facility\Department\ID MaritalStatus
HomeAddress\Facility\FaxNumber Name\First
Incident
Merge 2-19

Working MergeThis merge is invoked by a user by clicking the Merge button in a PCR editor and is used when a user manually creates a PCR. For example, if they use Dispatch but are disconnected and need to merge it with a dispatched PCR later.
1. To merge, first select two PCRs in the inbox - one with a server PCR key, one with a negative key and then click the Merge button.
2. By clicking Merge, the server and checkout information from the dispatched PCR with a server PCR key is copied to the manually created PCR. The dispatched PCR is deleted, and the data entered by the user in the manually created PCR is merged to the dispatched PCR, except for the PCR key, dispatch ID, server and checkout information.
HomeAddress\Facility\ID Name\Last
NextOfKin\HomeAddress\PostalCode Name\Middle
NextOfKin\HomeAddress\State NextOfKin\DOB\Date
NextOfKin\Name\First NextOfKin\EmailAddress
NextOfKin\Name\Last NextOfKin\HomeAddress\Address1
NextOfKin\Name\Middle NextOfKin\HomeAddress\Address2
FamilyDoctor\DoctorID NextOfKin\HomeAddress\City\EnteredText
FamilyDoctor\DoctorPhone NextOfKin\HomeAddress\County\EnteredText
FamilyDoctor\First NextOfKin\HomeAddress\Phone1
FamilyDoctor\Last NPPExists
FamilyDoctor\Middle Race
Gender UniqueIdentifier
Other
SystemInformation\DispatchID TabletRCSQLIntegration\ReadyToComplete
Patient
2-20 Chapter 2: TabletPCR - Overview

Tablet PCR and Web PCR User’s Guide
Below are categories and the list of items that are merged in a Working Merge:
Incident
CallSource CallType CallType
CancelReason DestinationAddress\Address1 DestinationAddress\Address2
DestinationAd-dress\City\EnteredText
DestinationAd-dress\County\EnteredText
DestinationAddress\Facil-ity\Department\ID
DestinationAddress\Facil-ity\ID
DestinationAddress\Phone1 DestinationAddress\Phone2
DestinationAddress\Postal-Code
DestinationAddress\State DestinationZone
IncidentNumbers IncidentNumbers LevelOfCareID
MassCasualty MedicalTraumaCallType MiscFields
Narrative NatureOfCall NumberOfPatients
Odometers\AtDestination Odometers\AtScene Odometers\Enroute
PickupAddress\Address1 PickupAddress\Address2 PickupAddress\City\Entered-Text
PickupAd-dress\County\EnteredText
PickupAddress\Facil-ity\Department\ID
PickupAddress\Facility\ID
PickupAddress\Phone1 PickupAddress\PostalCode PickupAddress\State
PickupZone ReceivingDoctor\DoctorID ReceivingDoctor\Doctor-Name\First
ReceivingDoctor\Doctor-Name\Last
ReceivingDoctor\Doctor-Name\Middle
ReceivingDoctor\Doctor-Phone
ReferringDoctor\DoctorID ReferringDoctor\Doctor-Name\First
ReferringDoctor\Doctor-Name\Last
ReferringDoctor\Doctor-Name\Middle
ReferringDoctor\DoctorPhone ResponsePriorityChanged
ResponsePriorityOriginal RunNumber Times\AtDestination
Times\AtPatientSide Times\AtScene Times\AtStation
Times\Available Times\CallReceived Times\Cancelled
Times\Dispatched Times\EnRoute Times\Injury
Times\PartiallyAvailable Times\TransportArrival Times\TransportDeparture
Merge 2-21
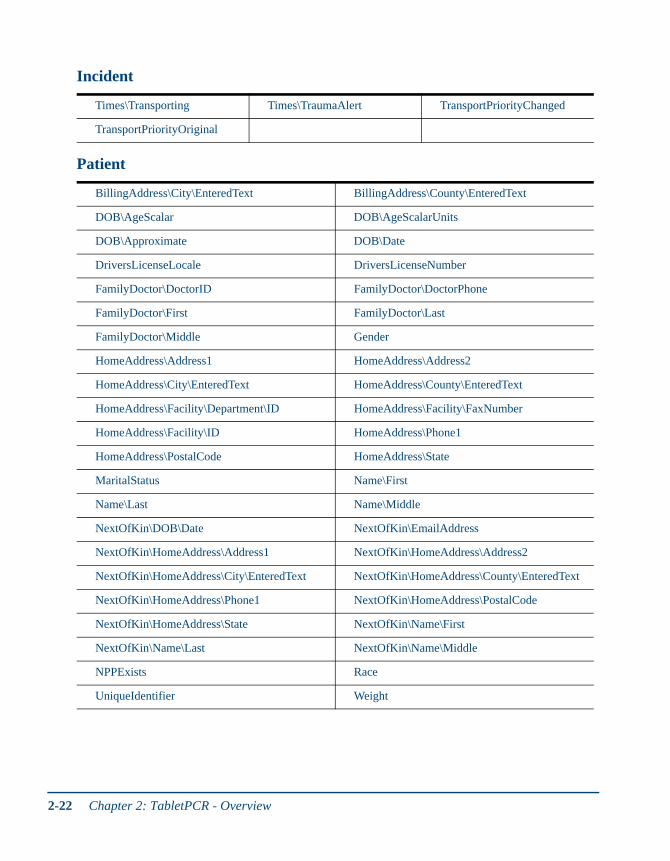
Times\Transporting Times\TraumaAlert TransportPriorityChanged
TransportPriorityOriginal
Patient
BillingAddress\City\EnteredText BillingAddress\County\EnteredText
DOB\AgeScalar DOB\AgeScalarUnits
DOB\Approximate DOB\Date
DriversLicenseLocale DriversLicenseNumber
FamilyDoctor\DoctorID FamilyDoctor\DoctorPhone
FamilyDoctor\First FamilyDoctor\Last
FamilyDoctor\Middle Gender
HomeAddress\Address1 HomeAddress\Address2
HomeAddress\City\EnteredText HomeAddress\County\EnteredText
HomeAddress\Facility\Department\ID HomeAddress\Facility\FaxNumber
HomeAddress\Facility\ID HomeAddress\Phone1
HomeAddress\PostalCode HomeAddress\State
MaritalStatus Name\First
Name\Last Name\Middle
NextOfKin\DOB\Date NextOfKin\EmailAddress
NextOfKin\HomeAddress\Address1 NextOfKin\HomeAddress\Address2
NextOfKin\HomeAddress\City\EnteredText NextOfKin\HomeAddress\County\EnteredText
NextOfKin\HomeAddress\Phone1 NextOfKin\HomeAddress\PostalCode
NextOfKin\HomeAddress\State NextOfKin\Name\First
NextOfKin\Name\Last NextOfKin\Name\Middle
NPPExists Race
UniqueIdentifier Weight
Incident
2-22 Chapter 2: TabletPCR - Overview

Tablet PCR and Web PCR User’s Guide
Merging a New PCR to a PCR from Dispatch
You can use the Merge button on your Inbox to connect to the server and retrieve a “new” PCR from Dispatch that you might have started working on, but could not complete.
1. Request the PCR from Dispatch for check out.
Other
SystemInformation\DispatchID TabletPCSQLIntegration\ReadyToComplete
Merging a New PCR to a PCR from Dispatch 2-23

2. Make sure that you select both the PCR that you created and the PCR from Dispatch and click the Merge button.
3. Once the merging process is complete, only one PCR remains in your Inbox with the combined information from both PCRs as shown in the screenshot.
2-24 Chapter 2: TabletPCR - Overview

Tablet PCR and Web PCR User’s Guide
Completing PCRs1. Once you have completed the PCR review and you know you are finished documenting it,
tap Complete PCR.
2. Identify yourself as the crew member completing the call and enter your password.
3. The PCR is checked to see whether it satisfies all of the complete call rules:
If all the rules are met, you are returned to the Inbox, and the PCR status is Complete.
If a rule is broken, the Complete Call Rules screen opens showing the rules that are broken. If any required rules are broken, you must fix them before you can complete the PCR.
4. Whether you can reopen and edit a trip that is in “Complete” status depends on how your organization has set up TabletPCR.
Allowed. The user who completed the PCR can re-open and edit it (password required). The status changes to Open (or Ready to Complete, if you are required to download dispatch times).
Not allowed. The user who completed the PCR can still add supplemental information (addenda) to it after it is in Complete status via the Review form. In that case, you can also print preview the PCR and view any linked ECGs, but everything else is disabled.
Synchronizing with RescueNet Field DataSynchronizing is the process of connecting to your RescueNet Field Data server using wireless or via your network and uploading your completed PCRs. You can also download any updates that are available, such as revised data-entry lists.
Each TabletPCR field device and workstation has its own database. PCRs are automatically stored when TabletPCR is not connected to the PCR Server. When connectivity is restored, PCRs are automatically uploaded. The icon below shows when the device is connected.
Note: If you are required to download dispatch times before completing a PCR (see The Dispatch Section on page 2), you must do so (by synchronizing) in order to change the status of the PCR to Ready to Complete. In that case, you can only complete a PCR once it is in Ready to Complete status.
Completing PCRs 2-25

Using the Spell Check Feature
TabletPCR and WebPCR Release 5.1 or later offers spell checking on the following fields:
Narrative
Addenda
Notes:
Subjective section
Objective Assessment
Objective Impression
Objective Trauma
Vital Statistics comments
Interventions Complication Narrative
Interventions Comments
Personal Effects
Assessment comments
Assessment notes
Clicking on the Spell Check button launches the Spell Check form. When the spelling checker encounters a word it does not recognize, it determines which words in its dictionary are similarly spelled and displays a list of those words, with the most likely match highlighted.
Several options are available from this screen.
Ignore - Ignore this instance of the word.
Ignore All - Ignore all instances of this word.
Change - Accept the selected word and make the appropriate change to the text.
Change All - Change all instances of the misspelled word to the selected word.
Undo - If the change was incorrect, clicking Undo will revert the text to its original form.
Unselect - If the incorrect word is selected, clicking Unselect will allow a new word to be chosen.
Close - Closes the spell checking form.
Note: If you are using the RescueNet Dispatch Interface, the complete PCRs will only upload if they have a valid matching crew, vehicle, and run number.
2-26 Chapter 2: TabletPCR - Overview

Tablet PCR and Web PCR User’s Guide
Dataflow in PCR This section explains how data flows from the patient care reports (PCRs) to the system and how the PCRs are processed.
Complete Call
You create the PCRs in TabletPCR. If they match the complete call rules feature of the ePCR Suite, they are then sent through the database where Workflow process passes the PCR to the next step defined in the Workflow, such as Billing or to the archive.
Incomplete Call
When the PCRs are synchronized to the server as an incomplete call, you have the option of com-pleting them using WebPCR. Once the user completes the PCR, WebPCR processes the complete call rules for the report and ensures that all the required data is collected. Upon passing the com-pleted call rules, the PCR is routed via the workflow process to its appropriate next stop, such as Billing, or to the archive.
Dataflow in PCR 2-27

2-28 Chapter 2: TabletPCR - Overview
3 3
Chapter 3:TabletPCR - Capturing Trip Information
Topics described in this chapter include:
The Trip tab has four main sections:
Dispatch
Times
Mileages
Scene
The Dispatch Section page 3-2
The Times Section page 3-4
The Mileages Section page 3-6
The Scene Section page 3-7
Importing from RescueNet Dispatch page 3-7
3-1

The Dispatch SectionThe Trip form opens with the first section and data-entry field selected. Use this section to record all Dispatch information and supporting details such as run number, incident number, call type and so on.
1. The list of the selected section’s data fields, organized into groups (bold).
2. The data-entry area displays the caption of the selected data field.
3. The selected data field’s number indicates where you are in the current section.
4. The data-entry area contains the field’s choices or methods for adding information.
5. You can move rapidly through the fields. For simple data-entry lists, tap your choice and the wizard automatically advances you to the next field. For other data-entry methods, select or add you information, and then tap Next. To skip a field, tap Next.
3-2 Chapter 3: TabletPCR - Capturing Trip Information

Tablet PCR and Web PCR User’s Guide
Tap the Expand button to see more of a section’s fields and data. Tap the button again to return to the regular view.
Speed hint: In an address, add the ZIP Code, and TabletPCR adds the city, state, and county.
The Dispatch Section 3-3

The Times SectionUse this section to record information on dispatched, en-route and on scene time and other support-ing details. The Times section opens with the first time stamp field selected, and the Time/Date selector showing in the date-entry area.
For the first time stamp, tap the correct time and date (the default is set to today’s date)
Hint: Times and dates, as well as several other types of fields, are masked. Tap the numbers to add the colons and slashes.
3-4 Chapter 3: TabletPCR - Capturing Trip Information

Tablet PCR and Web PCR User’s Guide
The next time stamp opens with the Time selector focused on the previous field’s time stamp, displaying a couple minutes before and several minutes after that time.
You can scroll to find and tap nearby times, or you can tap Can’t Find to open the Time/Date selector, so that you can manually add a time and date.
If a dispatched trip is cancelled, you can note this information in the cancel date/time fields
Hint: If you have mistakenly added information to a field, tap the field, and then tap Unselect.
The Times Section 3-5
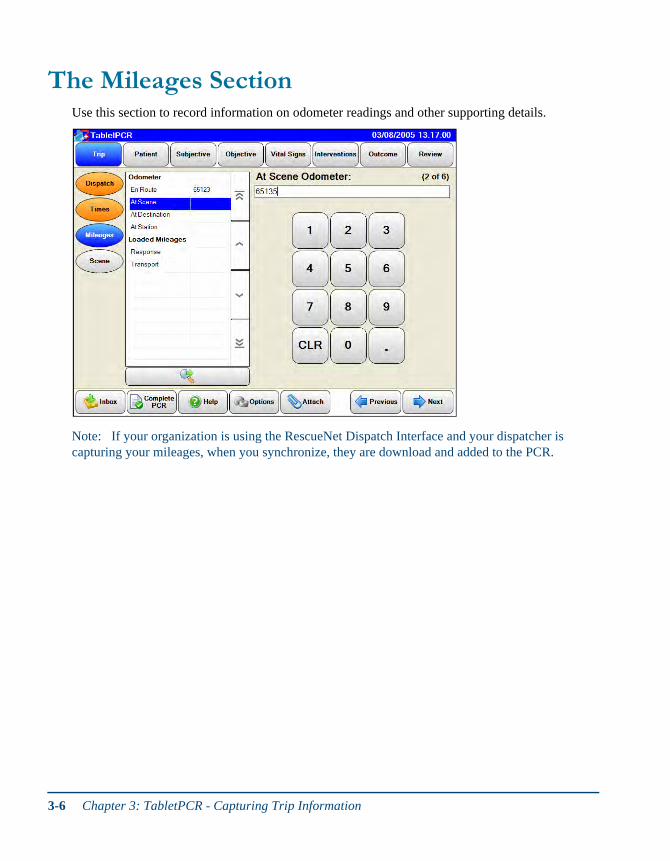
The Mileages SectionUse this section to record information on odometer readings and other supporting details.
Note: If your organization is using the RescueNet Dispatch Interface and your dispatcher is capturing your mileages, when you synchronize, they are download and added to the PCR.
3-6 Chapter 3: TabletPCR - Capturing Trip Information

Tablet PCR and Web PCR User’s Guide
The Scene SectionUse this section to capture information about the scene and add supporting details.
Importing from RescueNet Dispatch If your organization is also using RescueNet Dispatch and has enabled TabletPCR’s RescueNet Dispatch Interface feature, you can import patient and transport-related information from Res-cueNet Dispatch.
For this to happen, the transport must have been added in RescueNet Dispatch, assigned to your crew, and marked to you en route. Then you can synchronize to download the information.
The transport-related information includes the following:
• Run number • Odometer readings
• Call type and priority • Response and transport delay reasons
• Pick-up and drop-off addresses • Cancel reasons
• Dispatch time stamps
The Scene Section 3-7

3-8 Chapter 3: TabletPCR - Capturing Trip Information

4 4
Chapter 4:TabletPCR - Capturing Patient Information
Topics described in this chapter include:
The Patient tab has six main sections:
Patient
NOK
Billing
Payors
Cert-CMS
Immunization-HX
The Patient Section page 4-2
The Next-of-Kin (NOK) Section page 4-7
The Billing Section page 4-7
The Payors Section (Multiple-capture Wizard) page 4-8
The Cert. of Medical Necessity (Cert - CMS) Section page 4-11
The Immunization Hx Section page 4-11
4-1
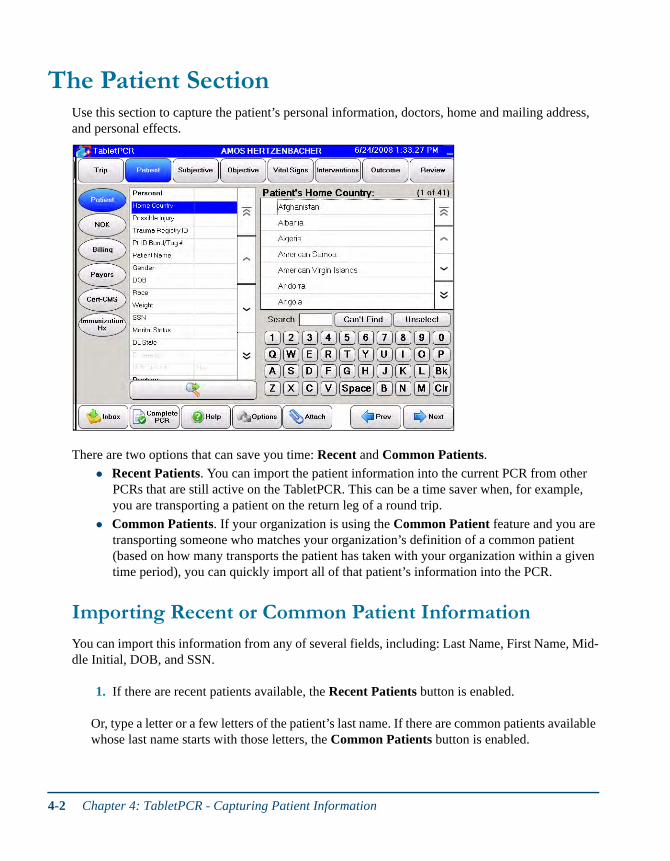
The Patient SectionUse this section to capture the patient’s personal information, doctors, home and mailing address, and personal effects.
There are two options that can save you time: Recent and Common Patients.
Recent Patients. You can import the patient information into the current PCR from other PCRs that are still active on the TabletPCR. This can be a time saver when, for example, you are transporting a patient on the return leg of a round trip.
Common Patients. If your organization is using the Common Patient feature and you are transporting someone who matches your organization’s definition of a common patient (based on how many transports the patient has taken with your organization within a given time period), you can quickly import all of that patient’s information into the PCR.
Importing Recent or Common Patient Information
You can import this information from any of several fields, including: Last Name, First Name, Mid-dle Initial, DOB, and SSN.
1. If there are recent patients available, the Recent Patients button is enabled.
Or, type a letter or a few letters of the patient’s last name. If there are common patients available whose last name starts with those letters, the Common Patients button is enabled.
4-2 Chapter 4: TabletPCR - Capturing Patient Information
Tablet PCR and Web PCR User’s Guide
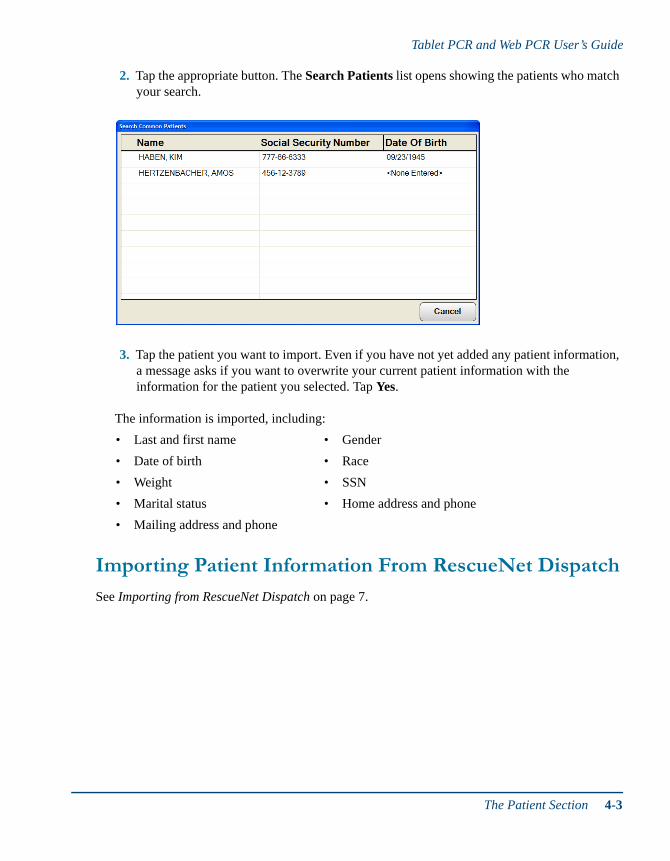
2. Tap the appropriate button. The Search Patients list opens showing the patients who match your search.
3. Tap the patient you want to import. Even if you have not yet added any patient information, a message asks if you want to overwrite your current patient information with the information for the patient you selected. Tap Yes.
The information is imported, including:
Importing Patient Information From RescueNet Dispatch
See Importing from RescueNet Dispatch on page 7.
• Last and first name • Gender
• Date of birth • Race
• Weight • SSN
• Marital status • Home address and phone
• Mailing address and phone
The Patient Section 4-3
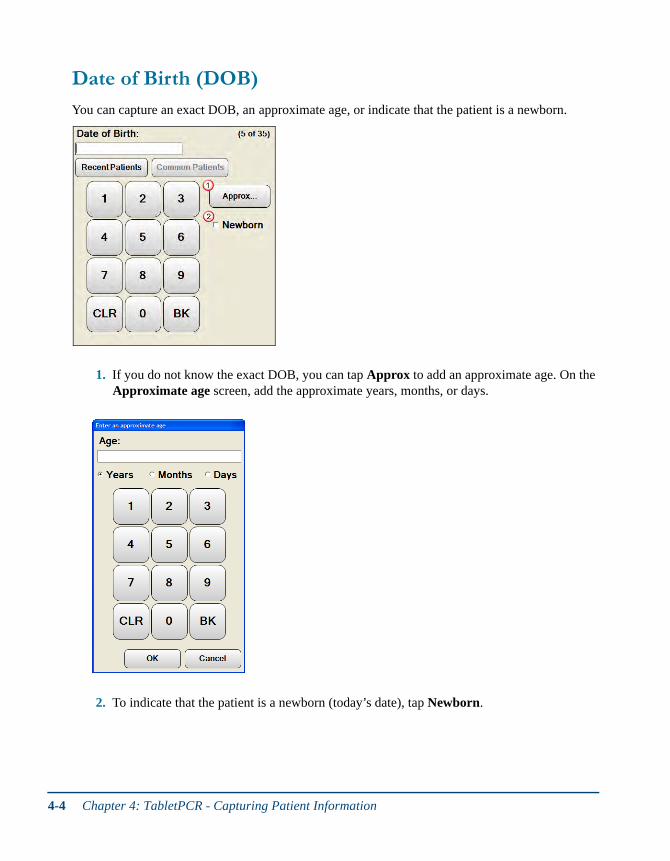
Date of Birth (DOB)
You can capture an exact DOB, an approximate age, or indicate that the patient is a newborn.
1. If you do not know the exact DOB, you can tap Approx to add an approximate age. On the Approximate age screen, add the approximate years, months, or days.
2. To indicate that the patient is a newborn (today’s date), tap Newborn.
4-4 Chapter 4: TabletPCR - Capturing Patient Information

Tablet PCR and Web PCR User’s Guide
Capturing Information That Is Not on a List
For some data-entry fields, you can capture information that is not on the list for that field, for example, a family doctor who is not listed.
1. If the doctor is not on the list, tap Can’t Find.
2. A text box opens, and you can type the name (in the following example, by using the soft keyboard).
If you need to return to the list, tap Pick from List.
The Patient Section 4-5
Hint › To hide/show the soft keyboard, tap the Hide/Show Keyboard buttons
Copying an Address
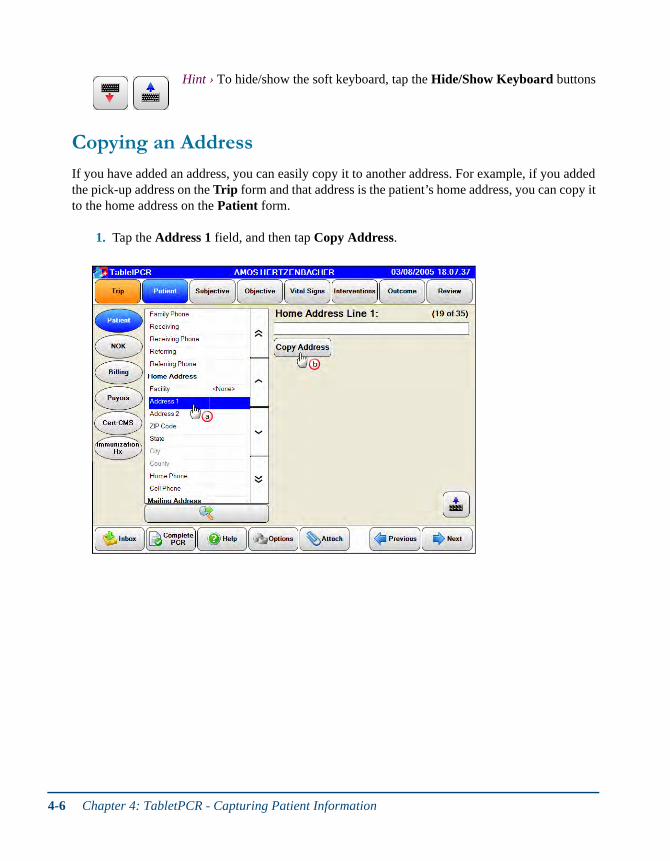
If you have added an address, you can easily copy it to another address. For example, if you added the pick-up address on the Trip form and that address is the patient’s home address, you can copy it to the home address on the Patient form.
1. Tap the Address 1 field, and then tap Copy Address.
4-6 Chapter 4: TabletPCR - Capturing Patient Information
Tablet PCR and Web PCR User’s Guide
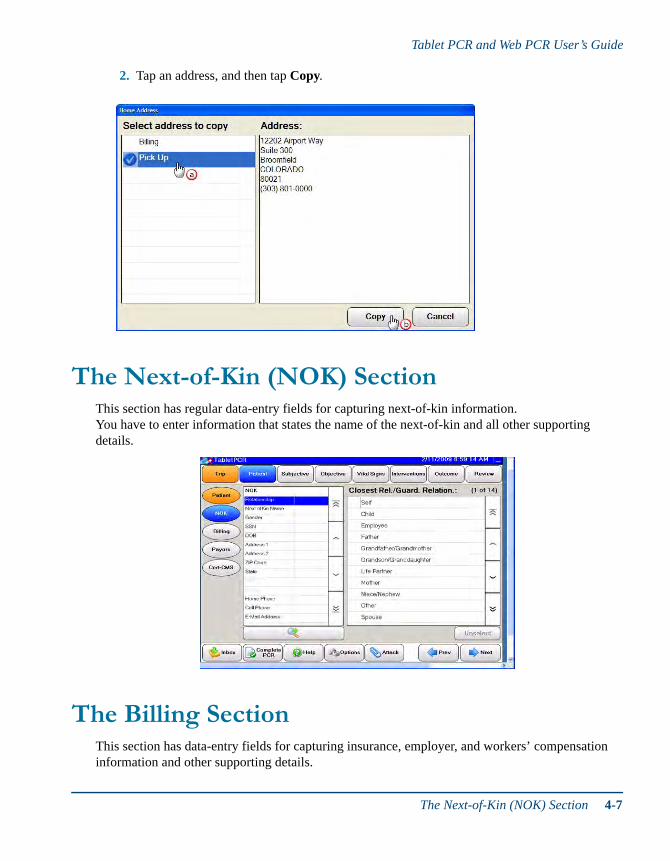
2. Tap an address, and then tap Copy.
The Next-of-Kin (NOK) SectionThis section has regular data-entry fields for capturing next-of-kin information. You have to enter information that states the name of the next-of-kin and all other supporting details.
The Billing SectionThis section has data-entry fields for capturing insurance, employer, and workers’ compensation information and other supporting details.
The Next-of-Kin (NOK) Section 4-7
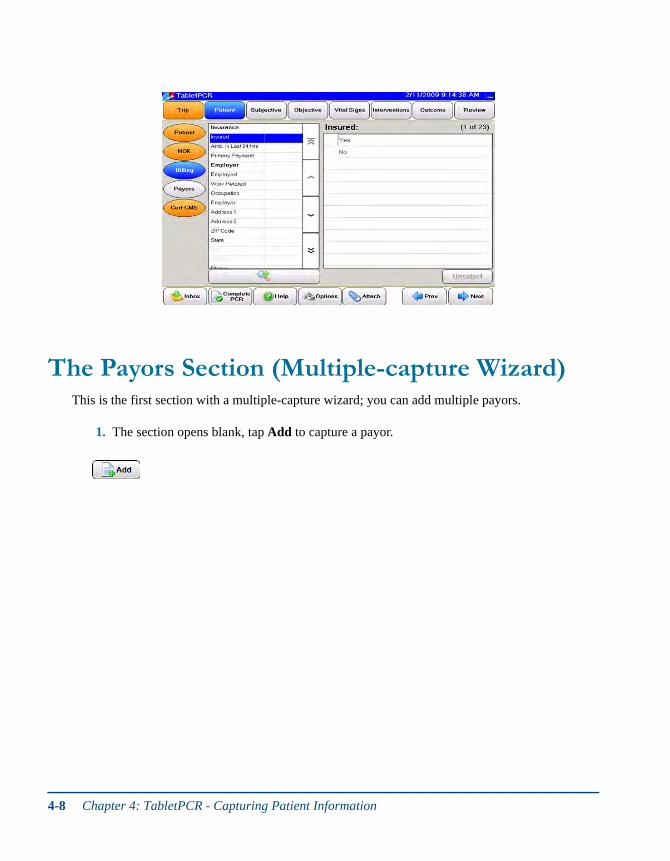
The Payors Section (Multiple-capture Wizard)This is the first section with a multiple-capture wizard; you can add multiple payors.
1. The section opens blank, tap Add to capture a payor.
4-8 Chapter 4: TabletPCR - Capturing Patient Information

Tablet PCR and Web PCR User’s Guide
2. Next, select an insurance provider.
3. Finally, you need to capture the information specific to that provider.
Note: In multiple-capture wizards, once you begin to capture the information, a Delete (×) button is enabled. You can tap it to delete the information (in this case, the selected payor).
The Payors Section (Multiple-capture Wizard) 4-9
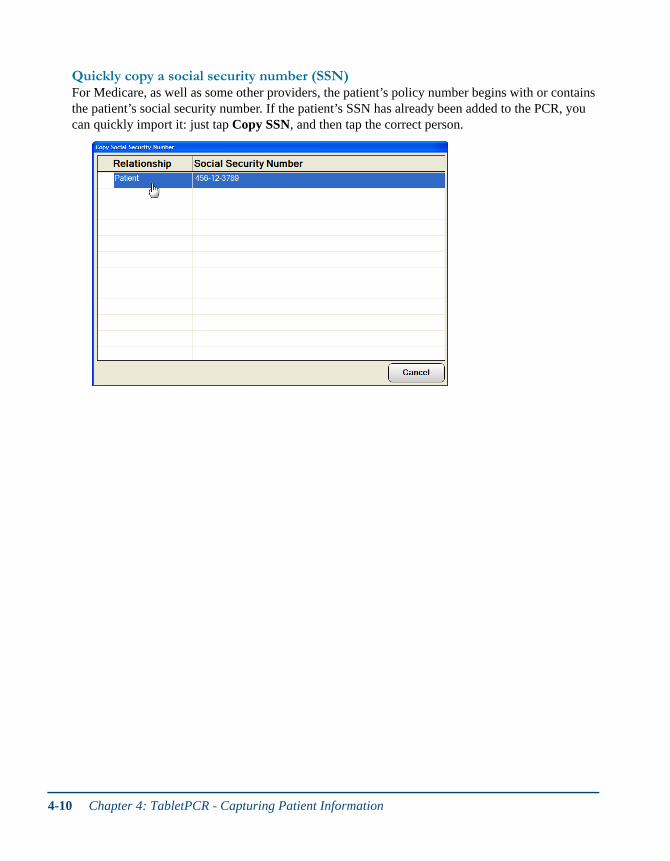
Quickly copy a social security number (SSN)For Medicare, as well as some other providers, the patient’s policy number begins with or contains the patient’s social security number. If the patient’s SSN has already been added to the PCR, you can quickly import it: just tap Copy SSN, and then tap the correct person.
4-10 Chapter 4: TabletPCR - Capturing Patient Information
Tablet PCR and Web PCR User’s Guide
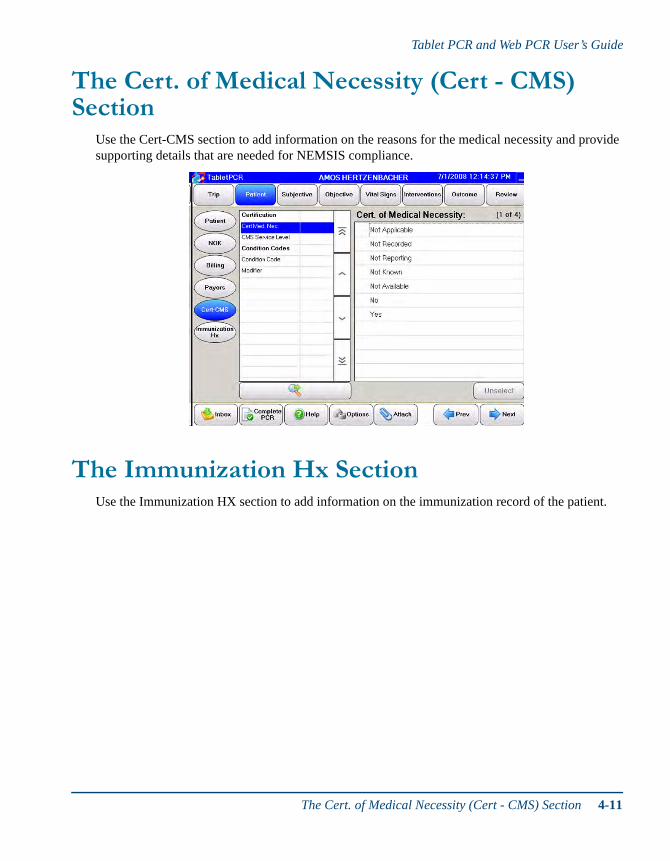
The Cert. of Medical Necessity (Cert - CMS) Section
Use the Cert-CMS section to add information on the reasons for the medical necessity and provide supporting details that are needed for NEMSIS compliance.
The Immunization Hx SectionUse the Immunization HX section to add information on the immunization record of the patient.
The Cert. of Medical Necessity (Cert - CMS) Section 4-11

4-12 Chapter 4: TabletPCR - Capturing Patient Information

5 5
Chapter 5:TabletPCR - Capturing Subjective Information
Topics described in this chapter include:
Each Subjective form presents a searchable, multiple-select list of options and has seven main sec-tions:
Chief Complaint
Cause of Injury
Past History
Medications
Allergies
Other
Nemsis Mech. of Inj.
The Chief Complaint Section page 5-2
The Cause of Injury Section page 5-11
The Past History Section page 5-5
The Medications Section page 5-6
The Allergies Section page 5-10
The NEMSIS Mechanism of Injury Section page 5-11
The Other Section page 5-12
5-1
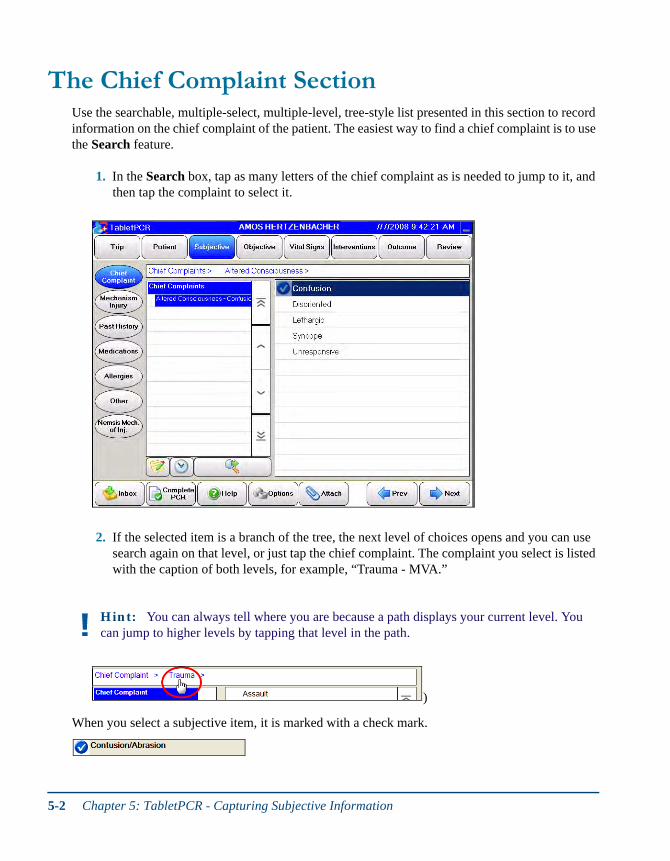
The Chief Complaint SectionUse the searchable, multiple-select, multiple-level, tree-style list presented in this section to record information on the chief complaint of the patient. The easiest way to find a chief complaint is to use the Search feature.
1. In the Search box, tap as many letters of the chief complaint as is needed to jump to it, and then tap the complaint to select it.
2. If the selected item is a branch of the tree, the next level of choices opens and you can use search again on that level, or just tap the chief complaint. The complaint you select is listed with the caption of both levels, for example, “Trauma - MVA.”
)
When you select a subjective item, it is marked with a check mark.
Hint: You can always tell where you are because a path displays your current level. You can jump to higher levels by tapping that level in the path.
5-2 Chapter 5: TabletPCR - Capturing Subjective Information
Tablet PCR and Web PCR User’s Guide
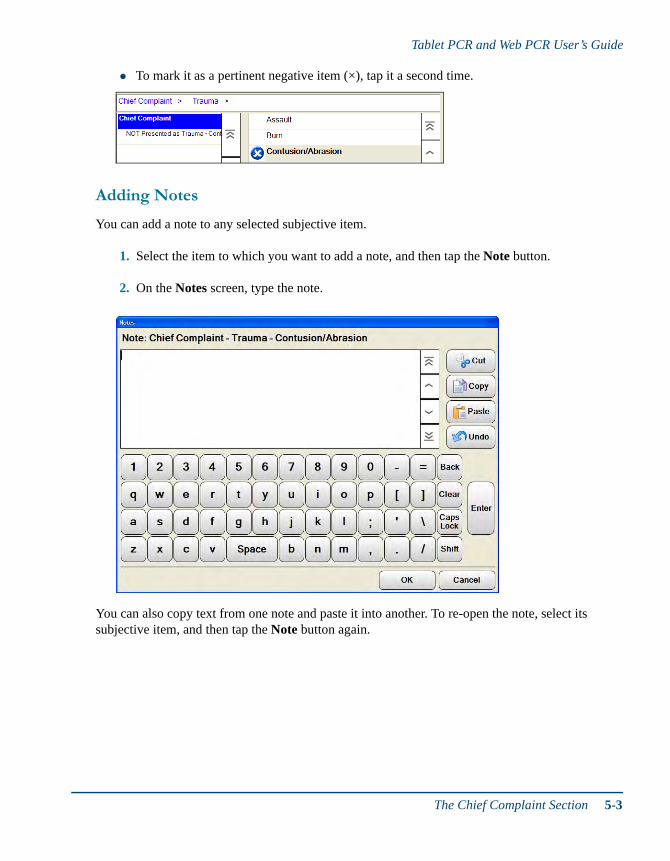
To mark it as a pertinent negative item (×), tap it a second time.
Adding Notes
You can add a note to any selected subjective item.
1. Select the item to which you want to add a note, and then tap the Note button.
2. On the Notes screen, type the note.
You can also copy text from one note and paste it into another. To re-open the note, select its subjective item, and then tap the Note button again.
The Chief Complaint Section 5-3
Using Wizard Items
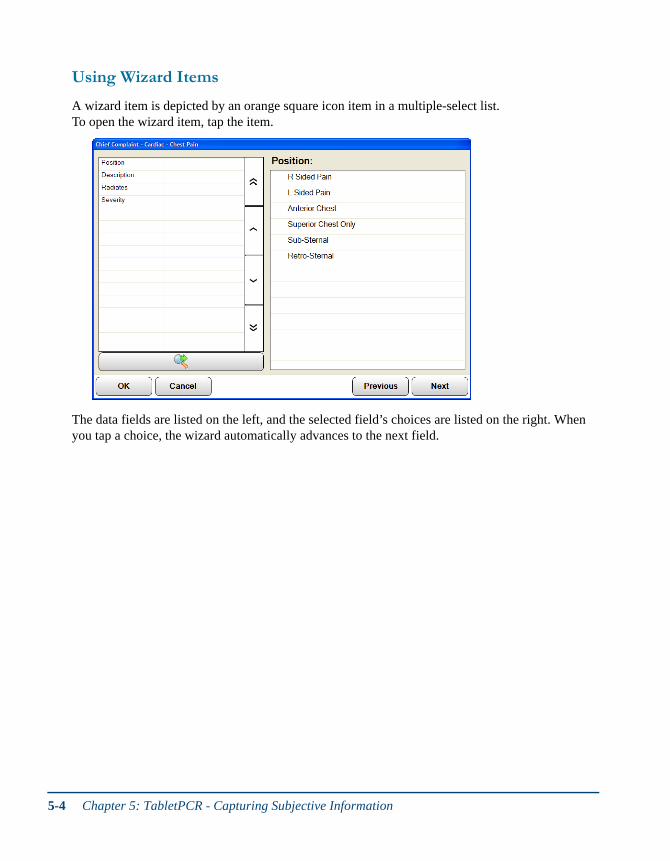
A wizard item is depicted by an orange square icon item in a multiple-select list.To open the wizard item, tap the item.
The data fields are listed on the left, and the selected field’s choices are listed on the right. When you tap a choice, the wizard automatically advances to the next field.
5-4 Chapter 5: TabletPCR - Capturing Subjective Information
Tablet PCR and Web PCR User’s Guide
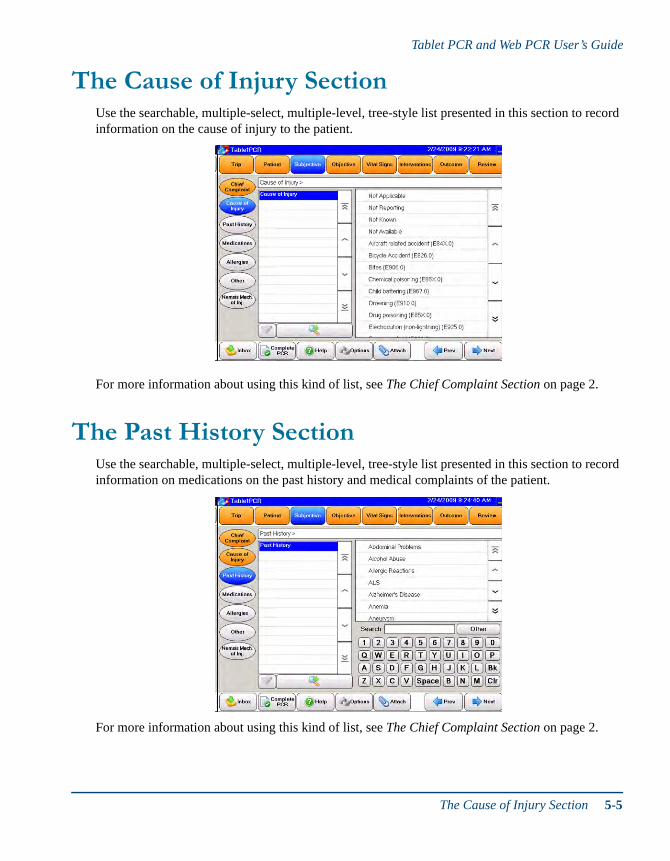
The Cause of Injury SectionUse the searchable, multiple-select, multiple-level, tree-style list presented in this section to record information on the cause of injury to the patient.
For more information about using this kind of list, see The Chief Complaint Section on page 2.
The Past History SectionUse the searchable, multiple-select, multiple-level, tree-style list presented in this section to record information on medications on the past history and medical complaints of the patient.
For more information about using this kind of list, see The Chief Complaint Section on page 2.
The Cause of Injury Section 5-5
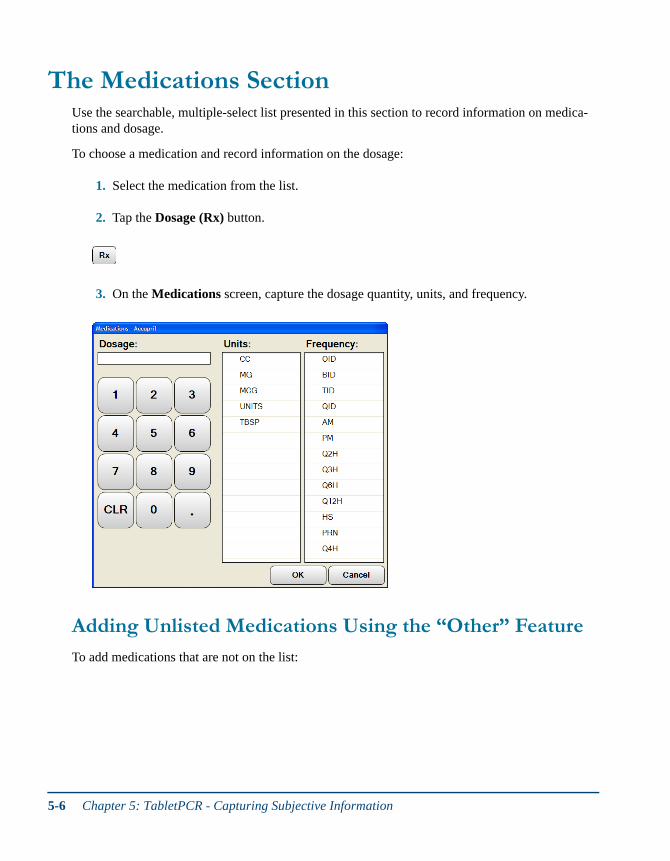
The Medications SectionUse the searchable, multiple-select list presented in this section to record information on medica-tions and dosage.
To choose a medication and record information on the dosage:
1. Select the medication from the list.
2. Tap the Dosage (Rx) button.
3. On the Medications screen, capture the dosage quantity, units, and frequency.
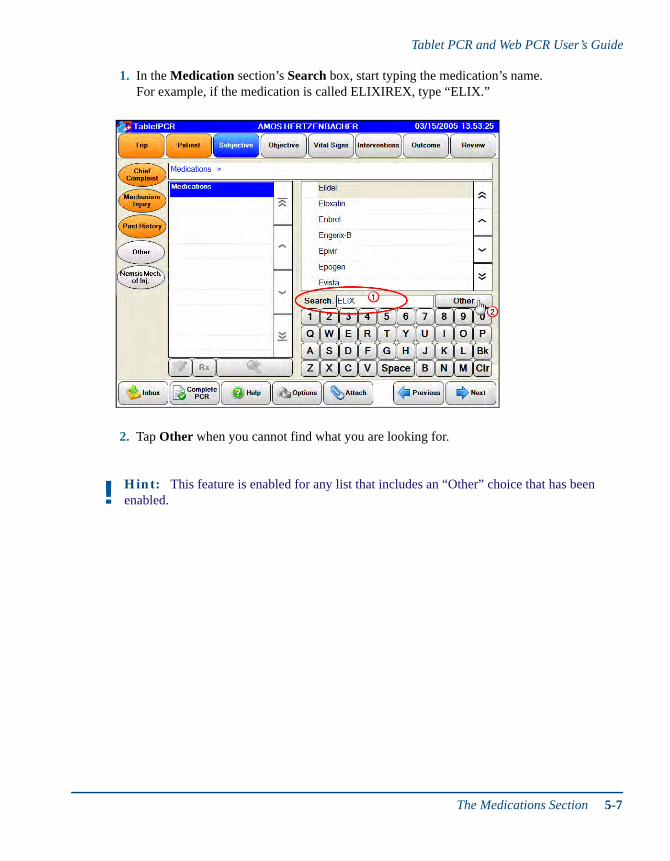
Adding Unlisted Medications Using the “Other” Feature
To add medications that are not on the list:
5-6 Chapter 5: TabletPCR - Capturing Subjective Information
Tablet PCR and Web PCR User’s Guide
1. In the Medication section’s Search box, start typing the medication’s name. For example, if the medication is called ELIXIREX, type “ELIX.”
2. Tap Other when you cannot find what you are looking for.
Hint: This feature is enabled for any list that includes an “Other” choice that has been enabled.
The Medications Section 5-7

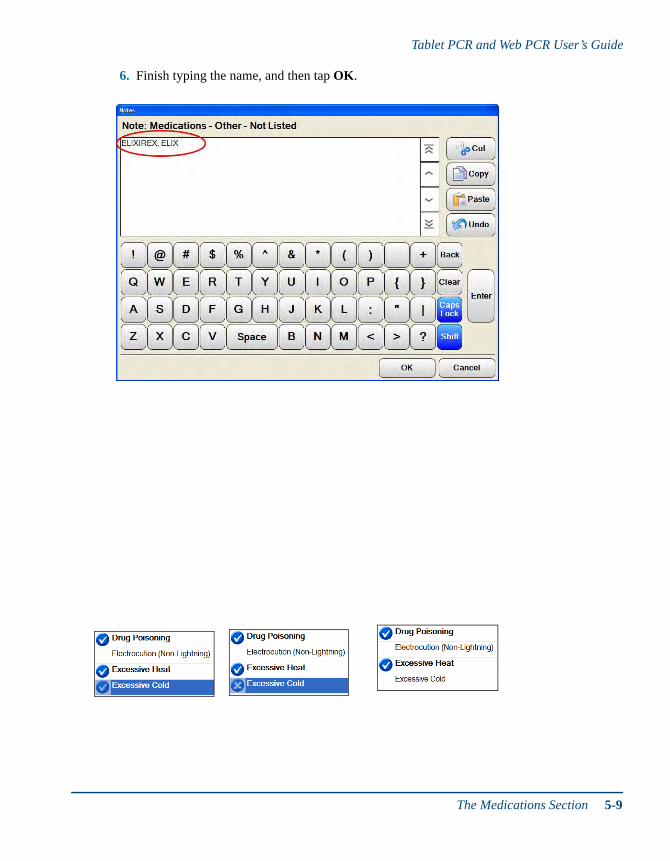
3. The Notes screen opens displaying what you have typed. Finish typing the name, and then tap OK.
4. Back in the Medication section, “Other - Not Listed” is selected, and in its associated notes, “ELIXIREX” is displayed.
5. The Notes screen opens displaying the previously added “Other” medication
5-8 Chapter 5: TabletPCR - Capturing Subjective Information
Tablet PCR and Web PCR User’s Guide
6. Finish typing the name, and then tap OK.
The Medications Section 5-9

The Allergies SectionUse this section to record information on allergies. This section presents a standard, searchable, multiple-select list. For more information about using this kind of list, see The Chief Complaint Section on page 2.
5-10 Chapter 5: TabletPCR - Capturing Subjective Information

Tablet PCR and Web PCR User’s Guide
The NEMSIS Mechanism of Injury SectionUse the searchable, multiple-select list presented in this section to record information on mecha-nism of injury for reporting to NEMSIS.
Clearing a Selected Item From a List
1. If you select an item by mistake, you can clear it by tapping it twice more.
2. The second tap changes it to a pertinent negative, and the third tap clears it.
The NEMSIS Mechanism of Injury Section 5-11
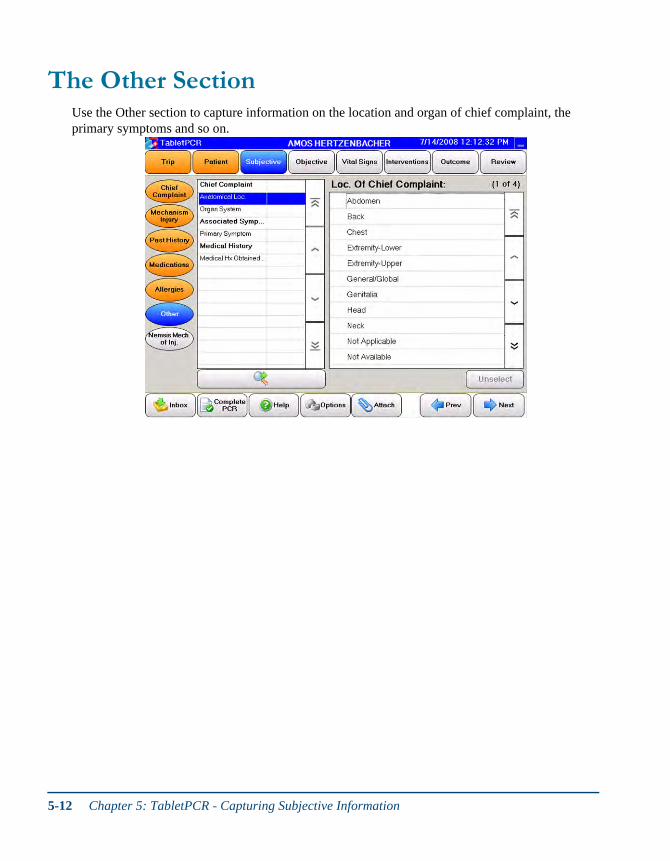
The Other SectionUse the Other section to capture information on the location and organ of chief complaint, the primary symptoms and so on.
5-12 Chapter 5: TabletPCR - Capturing Subjective Information

6 6
Chapter 6:Tablet PCR - Capturing Objective Information
Topics described in this chapter include:
The Objective tab contains five main sections to capture assessments, impressions, and trauma information, and perform a body survey.
Assessment
Impressions
Trauma
Other
Cardiac Arrest
The Assessment SectionThis multiple-capture wizard enables you to record multiple assessments. Assessments includes information such as assessment time, details pertaining to the medic who performed the assessment, and airway, breathing, circulation information for the patient and so on.
1. The section opens blank. You can tap Add to capture an assessment.
The Assessment Section page 6-1
The Impressions Section page 6-9
The Trauma Section page 6-10
The Cardiac Arrest Section page 6-10
6-1
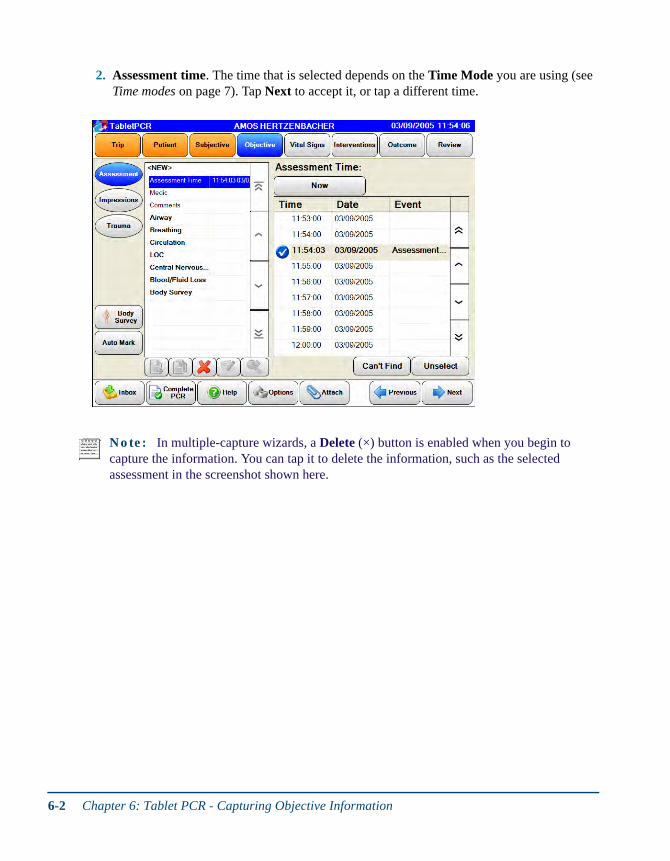
2. Assessment time. The time that is selected depends on the Time Mode you are using (see Time modes on page 7). Tap Next to accept it, or tap a different time.
Note: In multiple-capture wizards, a Delete (×) button is enabled when you begin to capture the information. You can tap it to delete the information, such as the selected assessment in the screenshot shown here.
6-2 Chapter 6: Tablet PCR - Capturing Objective Information
Tablet PCR and Web PCR User’s Guide
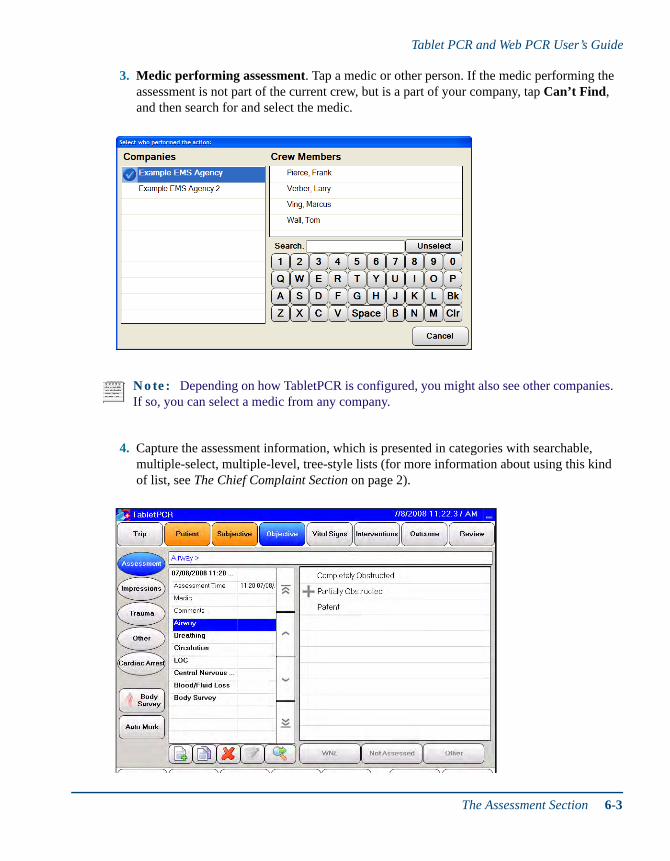
3. Medic performing assessment. Tap a medic or other person. If the medic performing the assessment is not part of the current crew, but is a part of your company, tap Can’t Find, and then search for and select the medic.
4. Capture the assessment information, which is presented in categories with searchable, multiple-select, multiple-level, tree-style lists (for more information about using this kind of list, see The Chief Complaint Section on page 2).
Note: Depending on how TabletPCR is configured, you might also see other companies. If so, you can select a medic from any company.
The Assessment Section 6-3

Hint: If available for the selected category, you can tap Not Assessed or WNL (within normal limits). If available, you can also tap Other and capture a related note.
6-4 Chapter 6: Tablet PCR - Capturing Objective Information

Tablet PCR and Web PCR User’s Guide
Performing a Body Survey
1. To perform a body survey, tap the Body Survey category or button. If the patient’s sex and age has already been captured, the appropriate body type opens directly (infant: DOB < 1 year; Child: DOB < 8 years). Otherwise, you are prompted to select the correct body type.
Body images: Copyright © 2004 Nucleus Medical Art, All rights reserved. www.nucleusinc.com
2. Perform the assessment from the body to the injury.
Body images: Copyright © 2004 Nucleus Medical Art, All rights reserved. www.nucleusinc.com
a) Tap the body part.b) Tap the area within the body part.c) Tap the assessment items.
The Assessment Section 6-5

d) Tap the Rotate button to rotate the body.e) Tap List to switch to a text-based body part list.
f) To add a graphic annotation, tap Annotate. For example, you might want to show the area of a burn.
Body images: Copyright © 2004 Nucleus Medical Art, All rights reserved. www.nucleusinc.com
Note: Once a body survey has an annotation, the Annotate button is highlighted orange.
6-6 Chapter 6: Tablet PCR - Capturing Objective Information
Tablet PCR and Web PCR User’s Guide
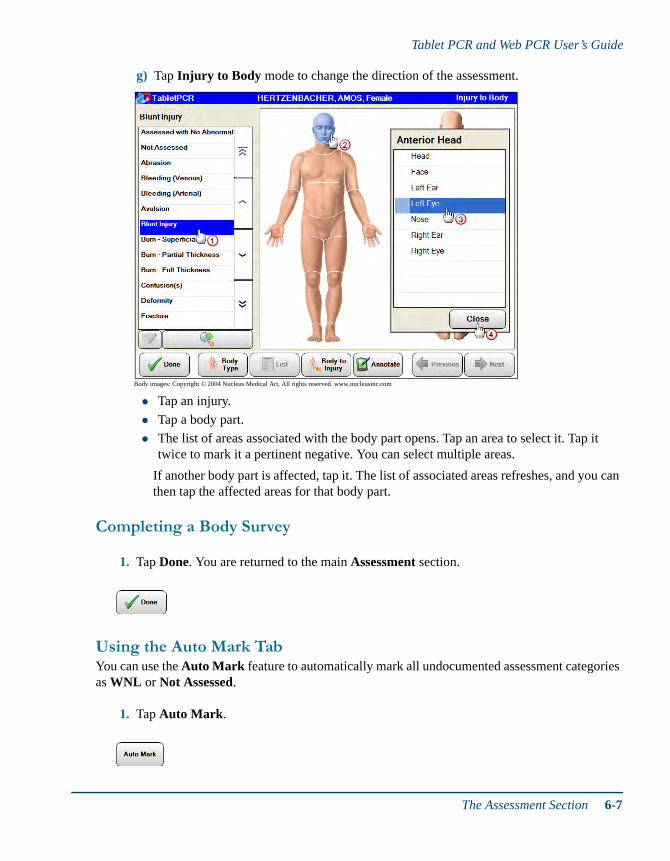
g) Tap Injury to Body mode to change the direction of the assessment.
Body images: Copyright © 2004 Nucleus Medical Art, All rights reserved. www.nucleusinc.com
Tap an injury.
Tap a body part.
The list of areas associated with the body part opens. Tap an area to select it. Tap it twice to mark it a pertinent negative. You can select multiple areas.
If another body part is affected, tap it. The list of associated areas refreshes, and you can then tap the affected areas for that body part.
Completing a Body Survey
1. Tap Done. You are returned to the main Assessment section.
Using the Auto Mark TabYou can use the Auto Mark feature to automatically mark all undocumented assessment categories as WNL or Not Assessed.
1. Tap Auto Mark.
The Assessment Section 6-7

2. Tap WNL or Not Assessed.
Adding a Note to an Assessment
1. To add a note to the selected assessment item, tap this button.
2. The Notes screen for the selected assessment opens.
Copying an Assessment to Start Another One
1. To quickly copy an assessment and begin a new one based on it, tap this button.
2. You must capture the time for the new assessment and who performed it. All other information is over copied to it.
Starting a New Blank Assessment
1. Once you have added an assessment, you can tap this button to begin a new, blank assessment.
Note: Only those categories for which the WNL and Not Assessed options are enabled are marked.
6-8 Chapter 6: Tablet PCR - Capturing Objective Information
Tablet PCR and Web PCR User’s Guide
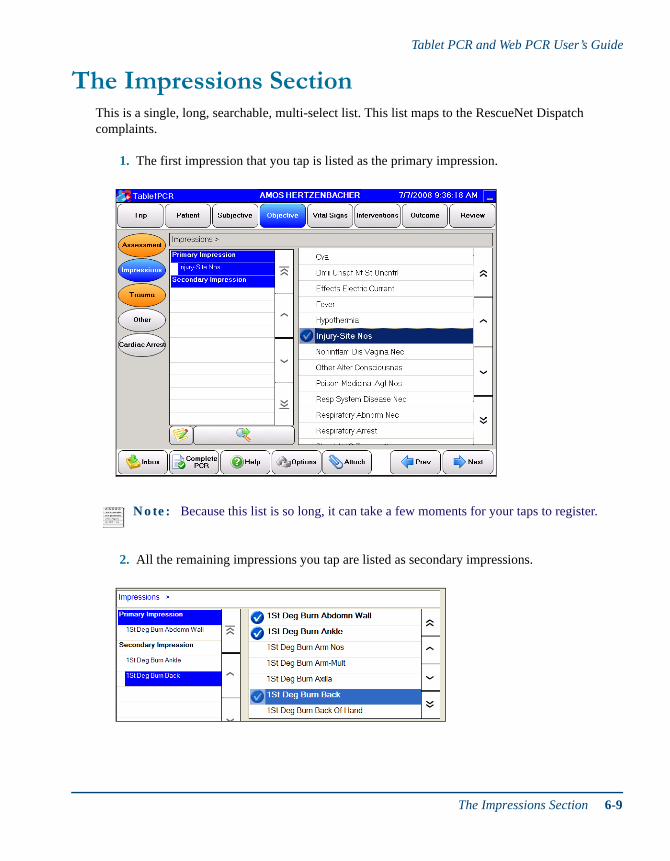
The Impressions SectionThis is a single, long, searchable, multi-select list. This list maps to the RescueNet Dispatch complaints.
1. The first impression that you tap is listed as the primary impression.
2. All the remaining impressions you tap are listed as secondary impressions.
Note: Because this list is so long, it can take a few moments for your taps to register.
The Impressions Section 6-9
3. To clear an impression, tap it again. If you clear the primary impression, all of the secondary impressions are also cleared. (To help prevent this from happening accidentally, a message asks if you really want to clear all selections.)
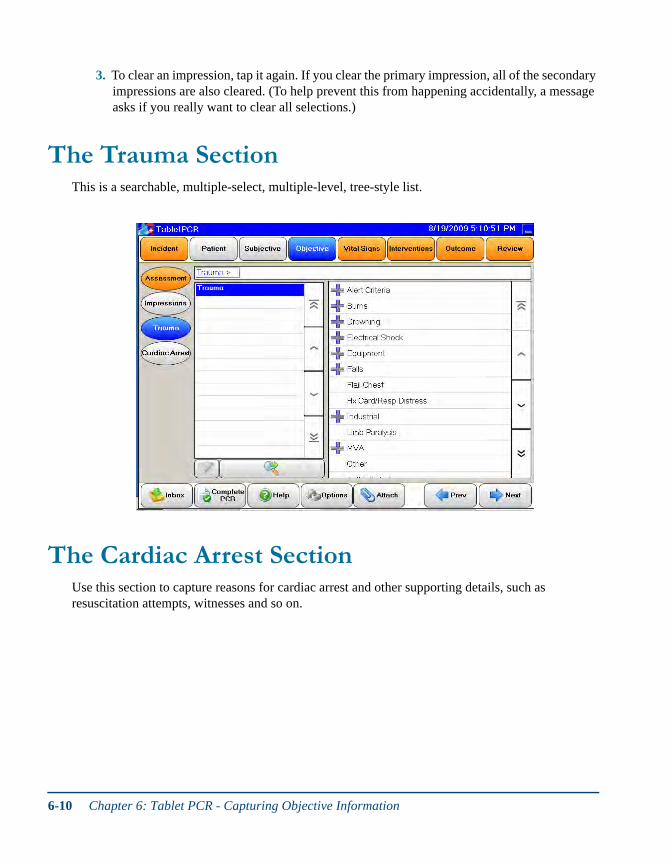
The Trauma SectionThis is a searchable, multiple-select, multiple-level, tree-style list.
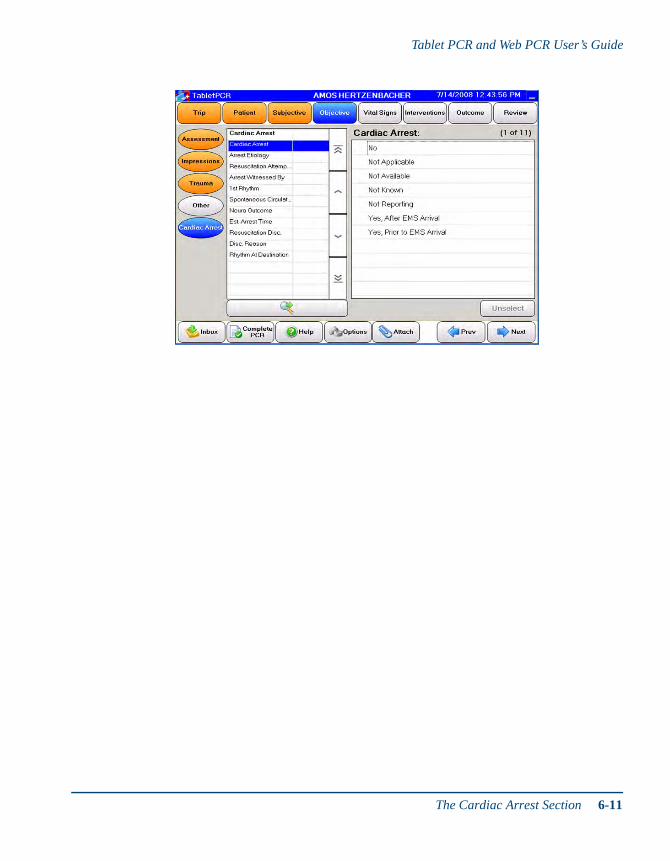
The Cardiac Arrest SectionUse this section to capture reasons for cardiac arrest and other supporting details, such as resuscitation attempts, witnesses and so on.
6-10 Chapter 6: Tablet PCR - Capturing Objective Information
Tablet PCR and Web PCR User’s Guide
The Cardiac Arrest Section 6-11

6-12 Chapter 6: Tablet PCR - Capturing Objective Information
7 7
Chapter 7:TabletPCR - Capturing Vital Signs
Topics described in this chapter include:
The Vital Signs tab has three major sections for you to record vital signs and scores. You can also upload data from medical devices.
Vital Signs
Scores
Medical Devices
The Vital Signs SectionThis is a multiple-capture wizard; you can capture multiple vital sign readings on items such as blood pressure, pulse, respiratory rate, skin color, body temperature and so on.
1. Initially, the section opens blank, tap Add to capture a vital signs reading.
2. Taken time. The time that is selected depends on the Time Mode you are using (see Time modes on page 7). Tap Next to accept it, or tap a different time.
The Vital Signs Section page 7-1
The Scores Section page 7-5
The Medical Devices Section page 7-6
7-1

Alternatively, you can mark a reading PTA (prior to arrival).
3. Capture who performed the reading, and then record the readings. For each, you need to add one or more values, or pick from one or more lists.
Additional details are provided on a few items in the section below.
Note: In multiple-capture wizards, once you begin to capture the information, a Delete (×) button is enabled. You can tap it to delete the information (in this case, the selected assessment)
7-2 Chapter 7: TabletPCR - Capturing Vital Signs
Tablet PCR and Web PCR User’s Guide
Blood pressure
Add both systolic and diastolic readings for blood pressure. Alternatively, you can tap Palp (by palpation) for diastolic rather than adding a value.
Glasgow Coma Scale (GCS)
For GCS, tap values for Eyes, Verbal, and motor. Each value is scored, and the three scores are added up to arrive at the overall GCS score.
The Vital Signs Section 7-3
Pain scale
You can tap a numeric value, or you can tap FACES Pain Scale to open and use the Wong-Baker FACES Pain Rating Scale.
When you are finished capturing the readings, the summary is displayed. You can add a new reading, or copy and delete existing readings.
7-4 Chapter 7: TabletPCR - Capturing Vital Signs
Tablet PCR and Web PCR User’s Guide
The Scores SectionThis is a multiple-capture wizard; you can use this to record multiple scores on items such as Adult Trauma, Pediatric Trauma, APGAR and so on.
1. Initially, the section opens blank, tap Add to capture a score.
2. To import the values from an existing vital signs reading:
a) Tap Copy Vitals.b) On the Copy Vital Signs screen, tap the vital signs reading from which you want to
copy values. c) The values are copied, and the selected vital sign is displayed below the button.
The Scores Section 7-5

3. Finally, tap a type of score. That type’s data-entry items are displayed, and all mapped values are pre-filled from the vital signs reading (which values are mapped depends on how your organization has set up TabletPCR).
The time that is selected depends on the Time Mode you are using (see Time modes on page 7).
The Medical Devices SectionTabletPCR can upload information from a variety of medical devices, including ZOLL, Philips HeartStart MRx, and Medtronic Physio-Control defibrillators.
Defibrillators use a variety of connectivity methods to transfer information, including Bluetooth, infrared, card reader, and serial cable. Some devices, such as the ZOLL M Series, support multi-ple connectivity methods; other devices support only one method. To perform an upload, your TabletPCR field device must support a connectivity method that is used by the defibrillator.
Once you have finished recording information on the defibrillator, you can upload it to TabletPCR and link it to a patient. You can also view the ECG, as well as print related reports.
Upload Resuscitation Data From Medical Device
Physio Control LIFEPAK 12/15The following instructions describe how to upload a LIFEPAK device data into the TabletPCR.
1. A PCR is documented/created in TabletPCR.
7-6 Chapter 7: TabletPCR - Capturing Vital Signs
Tablet PCR and Web PCR User’s Guide
2. On the Vital Sign form, select Medical Devices.
3. Tap Upload.
4. Select the LIFEPAK defibrillator from the list of enabled devices and then tap Next.
5. Start the upload process on the LIFEPAK defibrillator. A progress bar displays during the data upload onto the Tablet PCR mobile computer.
6. Once the upload completes, a second status bar displays while the LIFEPAK device data is added to the LIFENET SDK interface software and imported into the TabletPCR patient
The Medical Devices Section 7-7
care report. The LIFEPAK device data is stored in both the LIFENET SDK interface software and the TabletPCR databases on the mobile computer.
Note: If the TabletPCR patient care report already has a LIFEPAK device data file associated with it, a prompt appears asking if you wish to merge the two LIFEPAK device data files. If you respond yes, the two LIFEPAK device data files will be merged into one. If you respond no, a second LIFEPAK data file is associated to the patient care report in TabletPCR.
Philips HeartStart MRx
Adding a Bluetooth DeviceThe Philips HeartStart MRx can have up to 20 Bluetooth devices configured at one time. After 20, anytime you configure an additional device, it replaces the device that is least used on the list. The following instructions describe how to add a Bluetooth Device:
1. In 12-Lead mode, press the Menu Select button.
2. Using the navigation buttons, select Bluetooth Devices and press the Menu Select button. A list of previously discovered Bluetooth devices displays.
3. Select Add Device and press the Menu Select button. The message Searching for Bluetooth Devices displays. The search lasts approximately 30 seconds.
4. From the Add Device menu, select the desired device and press Menu Select.
5. The selected device must now go through the pairing process described in the following section.
Pairing a Bluetooth Device with the Philips HeartStart MRxOnce a Bluetooth device is selected from the Add Devices menu, a passkey sequence is performed to communicate or pair the wireless device with the Philips HeartStart MRx. This passkey is a user-defined character sequence, such as 000 or 1234. Some Bluetooth devices allow pairing for 30 seconds only, so have your passkey ready.
The following instructions describe how to pair a Bluetooth Device with the MRx:1. Use the navigation buttons to enter the passkey on the MRx and select Done.
2. The Mobile Unit/Bluetooth device prompts you for a passkey. Enter the same passkey on your Mobile Unit/Bluetooth device.
3. A prompt appears asking you to select a Bluetooth Service. Highlight File Transfer and press Menu Select.
7-8 Chapter 7: TabletPCR - Capturing Vital Signs

Tablet PCR and Web PCR User’s Guide
4. The Mobile Unit/Bluetooth device prompts you to confirm the file transfer location. Select OK to acknowledge.
5. Once the Mobile Unit/Bluetooth device is paired with the Philips HeartStart MRx and the profile is selected, the Philips HeartStart MRx performs a transmission test. After successfully connecting, the message Transmission Test Pass displays. Press Menu Select to acknowledge the message.
6. Should the transmission test fail, the message Transmission Test Failed displays along with additional failure information.
Upload Philips Device data to TabletPCRThe following instructions describe how to upload Philips device data into TabletPCR.
1. A PCR is documented/created in TabletPCR.
2. After you have finished monitoring the patient and removed them from the Philips HeartStart MRx, place the device into Data Management Mode. Data Management - Internal Memory displays across the top.
3. Press Menu.
4. Select Other.
5. Select Data Management.
6. In TabletPCR go to the Vital Sign form. Select Medical Devices and tap Upload.
7. Select the Philips MRx then Next.
8. Select the Philips MRx in the list of enabled devices and tap Next.
9. Select the Philips HeartStart MRx use the [Prev Item] and the [Next Item] softkeys. Highlight the Event Summary you want to transmit and press Menu Select. Highlight Send and press Menu Select.
10. Select All Events Data as the type of data you want to transmit and press Menu Select.
11. Select your Mobile Unit ID.
12. On the Mobile Unit, select OK to the Connect Request from the Philips HeartStart MRx.
13. During the import into the TabletPCR, the appropriate Philips device events and the vital signs are added to the patient care report.
The Medical Devices Section 7-9

Upload SettingsIf you are uploading from a ZOLL defibrillator and your TabletPCR setup allows changing the upload settings, you can tap Options to access the settings.
Settings for Philips HeartStart MRxPhilips uses FTP file transfer over Bluetooth to transmit the case data from the monitor to the destination mobile device. The following instructions provide details on how to setup your Tablet PCR mobile computers to accept the FTP file transfer from the Philips Device.
1. Open the Bluetooth Configuration application from your mobile device.
For the Toshiba Bluetooth stack:1. From the Bluetooth Configuration application menu, select the Bluetooth > Options >
Bluetooth Information Exchanger tab.
2. Click Advanced.
3. Select the File Transfer tab.
4. Enter the FTP Bluetooth download path as defined in the administrative setup on the server. The Bluetooth FTP folder will be created.
5. Click OK twice and exit.
For the Widcomm (Broadcom) Bluetooth stack:1. On the Bluetooth configuration screen, select the Local Services tab.
7-10 Chapter 7: TabletPCR - Capturing Vital Signs
Tablet PCR and Web PCR User’s Guide
2. Select File Transfer and click Properties.
3. Enter the FTP Bluetooth download path in the Bluetooth exchange folder location as defined in the administrative setup on the server.
4. Click OK twice.
Infrared Settings for ZOLL DevicesUSB or internal infrared readers are recommended for Windows 2000 and later. Serial port infrared readers are recommended for systems running a Windows operating system earlier than Windows 2000.
Card reader settings for ZOLL devices:The Internal option works for most internal card readers in notebook PCs. If the default memory window doesn't work, click Detect to find the first free memory window. You can also try manually selecting the memory window to find one that works. Click Test to determine whether the selected memory window is a valid choice for use with a card reader.
You can optionally choose to have cards be erased automatically after they have been successfully read. This makes it possible to use the card next in an M Series.
Serial and Bluetooth settings for ZOLL devices:The COM port must match that used on the PC by the serial or Bluetooth device. The defibrillator baud setting in TabletPCR must match what is configured in the defibrillator (see your defibrillator manual for details).
For the E/M Series, the default setting is 115,200 If you enable the time synchronization option (M Series only), the defibrillator event times are automatically synchronized to the field device’s clock.
Serial transfer technical note for ZOLL devices:For the M Series, you must use a ZOLL M Series RS-232 Data Transfer Cable (ZOLL part #8000-0605-01), which terminates in a female DB9 connector.
Settings for Physio-Control LIFEPAK 12/15:Your Physio-Control LIFEPAK monitor/defibrillators needs to be appropriately equipped to handle data uploads via either serial cable or Bluetooth.
Performing uploads via serial cable requires the LIFEPAK 12/15 Defibrillator-to-PC Serial Port Interface Cable, Physio-Control ERS Catalog Number 11230-000005.
Performing uploads via Bluetooth requires either the Microsoft or Widcomm Bluetooth stack and a corresponding radio to be installed on each mobile computer.
The Medical Devices Section 7-11
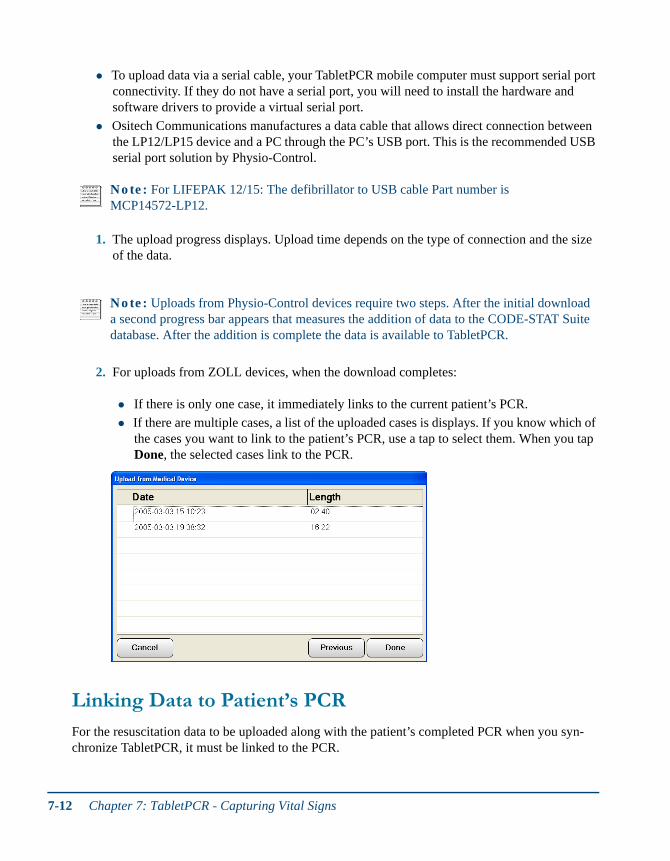
To upload data via a serial cable, your TabletPCR mobile computer must support serial port connectivity. If they do not have a serial port, you will need to install the hardware and software drivers to provide a virtual serial port.
Ositech Communications manufactures a data cable that allows direct connection between the LP12/LP15 device and a PC through the PC’s USB port. This is the recommended USB serial port solution by Physio-Control.
1. The upload progress displays. Upload time depends on the type of connection and the size of the data.
2. For uploads from ZOLL devices, when the download completes:
If there is only one case, it immediately links to the current patient’s PCR.
If there are multiple cases, a list of the uploaded cases is displays. If you know which of the cases you want to link to the patient’s PCR, use a tap to select them. When you tap Done, the selected cases link to the PCR.
Linking Data to Patient’s PCR
For the resuscitation data to be uploaded along with the patient’s completed PCR when you syn-chronize TabletPCR, it must be linked to the PCR.
Note: For LIFEPAK 12/15: The defibrillator to USB cable Part number is MCP14572-LP12.
Note: Uploads from Physio-Control devices require two steps. After the initial download a second progress bar appears that measures the addition of data to the CODE-STAT Suite database. After the addition is complete the data is available to TabletPCR.
7-12 Chapter 7: TabletPCR - Capturing Vital Signs

Tablet PCR and Web PCR User’s Guide
Additionally, when resuscitation data is linked to a PCR, all recorded vital signs readings and inter-ventions are automatically added to the patient’s PCR.
1. If you need to manually link the resuscitation data, tap a case, and then tap Link.
2. A link icon is displayed next to cases that have been linked to the current PCR.
Unlinking Resuscitation Data from Patient’s PCR
It might be necessary to unlink resuscitation data from a patient’s PCR, for example, if it was linked to the wrong patient.
1. To unlink resuscitation data from a patient’s PCR, tap it, and the tap Unlink.
2. Any vital signs and interventions that were created in TabletPCR when the resuscitation data was linked are deleted from the PCR.
Note: Cases recorded on ZOLL defibrillators can span multiple flash memory cards. If they do, the segments are displayed as separate cases and you’ll need to link all of them to the PCR
The Medical Devices Section 7-13
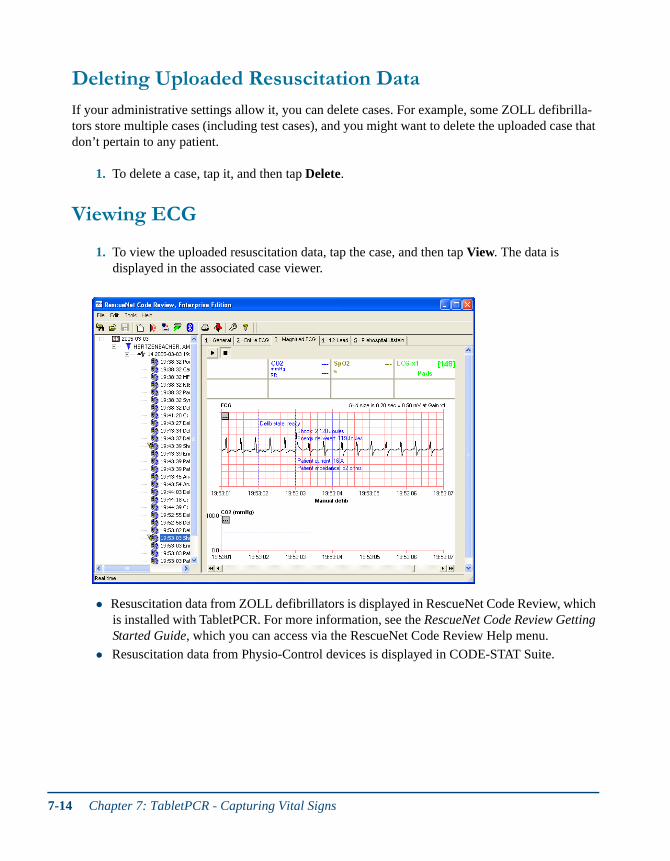
Deleting Uploaded Resuscitation Data
If your administrative settings allow it, you can delete cases. For example, some ZOLL defibrilla-tors store multiple cases (including test cases), and you might want to delete the uploaded case that don’t pertain to any patient.
1. To delete a case, tap it, and then tap Delete.
Viewing ECG
1. To view the uploaded resuscitation data, tap the case, and then tap View. The data is displayed in the associated case viewer.
Resuscitation data from ZOLL defibrillators is displayed in RescueNet Code Review, which is installed with TabletPCR. For more information, see the RescueNet Code Review Getting Started Guide, which you can access via the RescueNet Code Review Help menu.
Resuscitation data from Physio-Control devices is displayed in CODE-STAT Suite.
7-14 Chapter 7: TabletPCR - Capturing Vital Signs

8 8
Chapter 8:TabletPCR - Capturing Interventions
Topics described in this chapter include:
The Interventions tab contains two sections that you can use at patient side to capture intervention information with a single button tap. The Tablet PCR Quick Log also displays the time stamp and, for some interventions, some default qualifier values.
Quick Log
Interventions
Quick Log page 8-2
The Interventions Section page 8-3
8-1
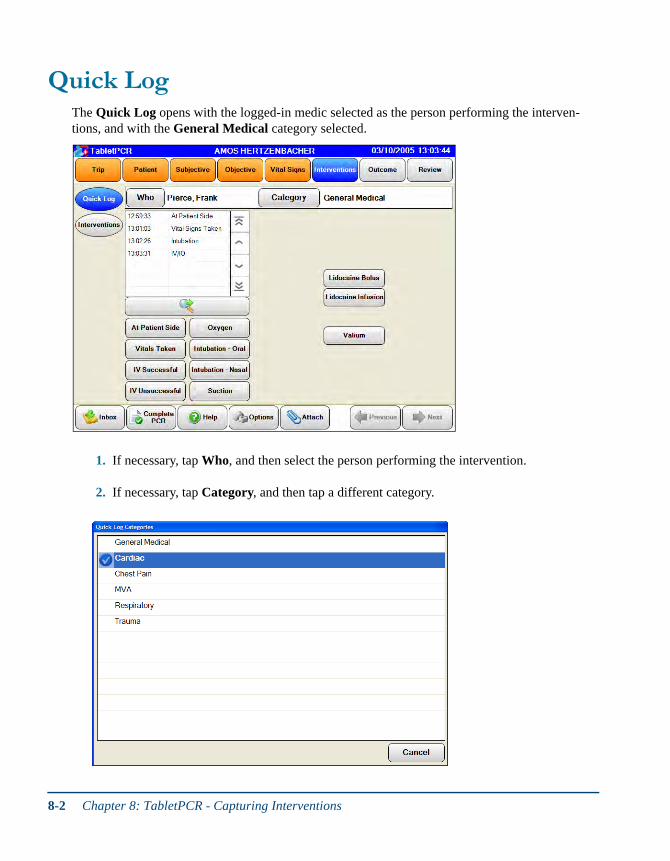
Quick LogThe Quick Log opens with the logged-in medic selected as the person performing the interven-tions, and with the General Medical category selected.
1. If necessary, tap Who, and then select the person performing the intervention.
2. If necessary, tap Category, and then tap a different category.
8-2 Chapter 8: TabletPCR - Capturing Interventions
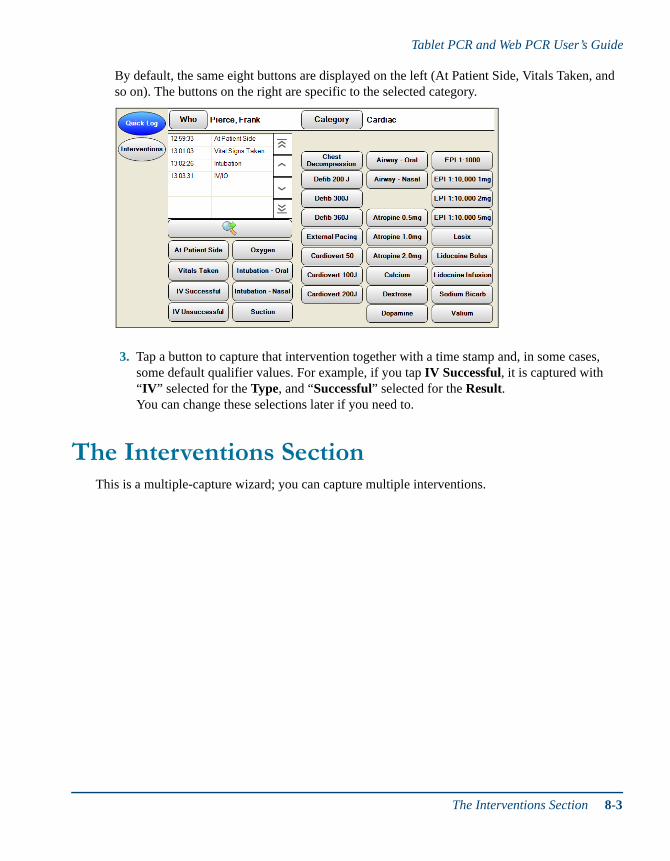
Tablet PCR and Web PCR User’s Guide
By default, the same eight buttons are displayed on the left (At Patient Side, Vitals Taken, and so on). The buttons on the right are specific to the selected category.
3. Tap a button to capture that intervention together with a time stamp and, in some cases, some default qualifier values. For example, if you tap IV Successful, it is captured with “IV” selected for the Type, and “Successful” selected for the Result. You can change these selections later if you need to.
The Interventions SectionThis is a multiple-capture wizard; you can capture multiple interventions.
The Interventions Section 8-3
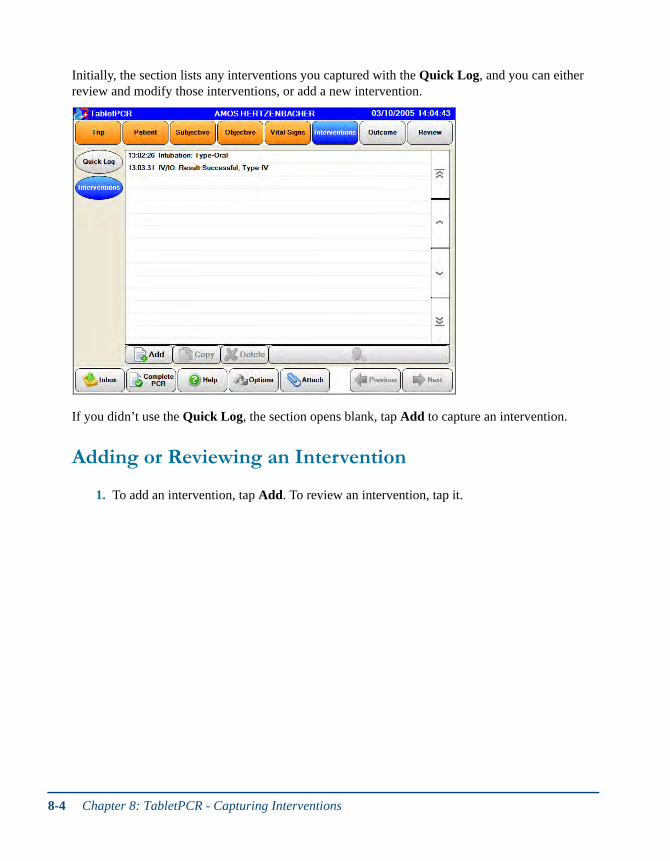
Initially, the section lists any interventions you captured with the Quick Log, and you can either review and modify those interventions, or add a new intervention.
If you didn’t use the Quick Log, the section opens blank, tap Add to capture an intervention.
Adding or Reviewing an Intervention
1. To add an intervention, tap Add. To review an intervention, tap it.
8-4 Chapter 8: TabletPCR - Capturing Interventions

Tablet PCR and Web PCR User’s Guide
2. If you are adding an intervention, select the intervention category and treatment.
3. Intervention time. The time that is selected depends on the Time Mode you are using (see Time modes on page 8). Tap Next to accept it, or tap a different time.
4. Who. Captures who performed the intervention.
5. Qualifiers. Captures the qualifier values. For each qualifier, you can either type a value or pick one from a list.
Note: In multiple-capture wizards, once you begin to capture the information, a Delete (×) button is enabled. You can tap it to delete the information (in this case, the selected assessment)
Note: For interventions that were added via the Quick Log, the time it was performed and who performed it are pre-filled. In addition, some qualifiers might have default values selected. If necessary, you can change any of this information.
The Interventions Section 8-5

8-6 Chapter 8: TabletPCR - Capturing Interventions
9 9
Chapter 9:TabletPCR - Capturing the Outcome
Topics described in this chapter include:
The Outcome tab has five main sections that you can use to capture outcome, times, signatures and so on.
Outcome
Times
Signatures
NPP
Exposures
The Outcome Section page 9-2
The Times Section page 9-2
The Signatures Section page 9-3
The NPP Section page 9-4
The Exposures Section page 9-5
9-1
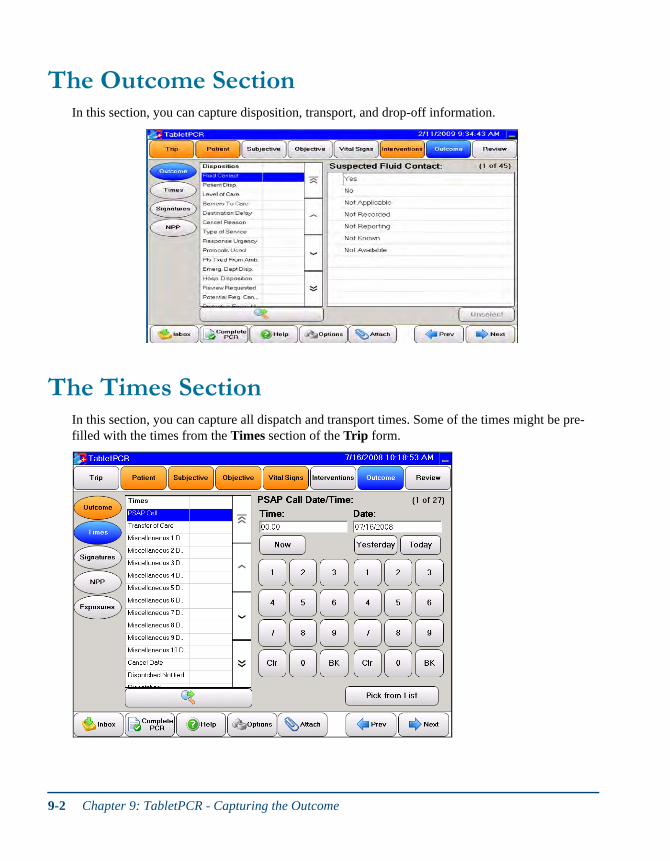
The Outcome SectionIn this section, you can capture disposition, transport, and drop-off information.
The Times SectionIn this section, you can capture all dispatch and transport times. Some of the times might be pre-filled with the times from the Times section of the Trip form.
9-2 Chapter 9: TabletPCR - Capturing the Outcome

Tablet PCR and Web PCR User’s Guide
The Signatures SectionIn this section, you can capture the standard authorization signatures that are displayed in the Sig-natures section of the Patient Care Report. This is a multiple-capture wizard; you can capture mul-tiple signatures.
1. Initially, the section opens blank, tap Add to capture a signature.
2. Signature type. Tap a type.
3. Person signing. The next step depends on who you select as the person signing:
Crew member for patient. The wizard jumps to the Reason unable to sign field. When you select the reason, the disclaimer is displayed.
Self. If you identified the patient on the Patient form, the disclaimer is displayed. Otherwise, the wizard jumps to the Name of signer field. Once you capture the name, the disclaimer is displayed.
Other (child, employee, father, and so on). The wizard jumps to the Name of signer field. After you capture the name, the wizard jumps to the Reason unable to sign field. Once you select the reason, the disclaimer is displayed.
4. Disclaimer. The disclaimer includes the patient and crew member names.
a) Language. If your organization has supplied translations, you can tap to select a translation of the disclaimer from a list of supported languages.
b) Magnify. You can tap the magnifying glasses to increase/decrease the text size.
5. Once the signer taps Accept, the Signature screen opens, and you can capture the electronic signature.
The Signatures Section 9-3
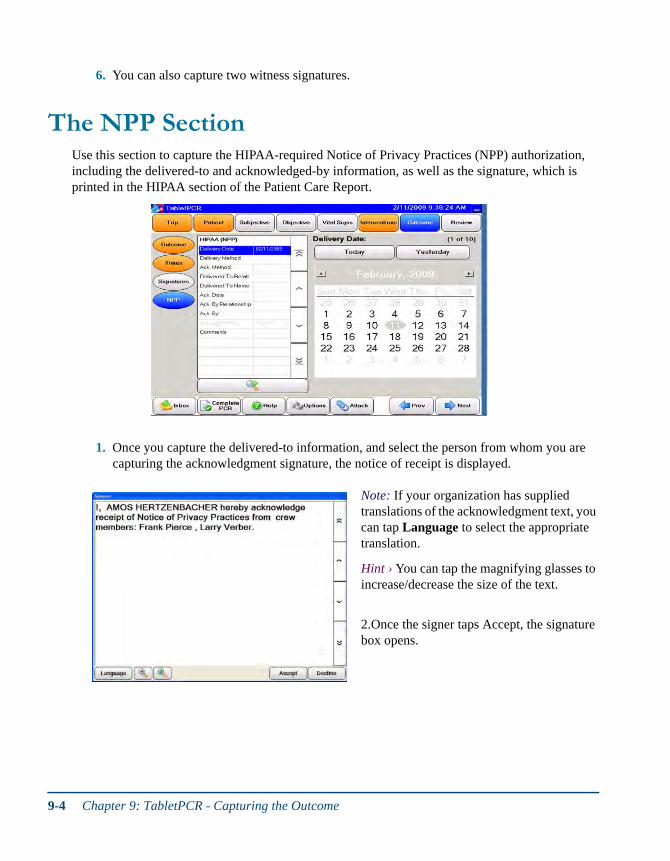
6. You can also capture two witness signatures.
The NPP SectionUse this section to capture the HIPAA-required Notice of Privacy Practices (NPP) authorization, including the delivered-to and acknowledged-by information, as well as the signature, which is printed in the HIPAA section of the Patient Care Report.
1. Once you capture the delivered-to information, and select the person from whom you are capturing the acknowledgment signature, the notice of receipt is displayed.
Note: If your organization has supplied translations of the acknowledgment text, you can tap Language to select the appropriate translation.
Hint › You can tap the magnifying glasses to increase/decrease the size of the text.
2.Once the signer taps Accept, the signature box opens.
9-4 Chapter 9: TabletPCR - Capturing the Outcome

Tablet PCR and Web PCR User’s Guide
The Exposures SectionUse this section to record information on exposures for the patient and the medic with date and time stamps.
The Exposures Section 9-5

9-6 Chapter 9: TabletPCR - Capturing the Outcome
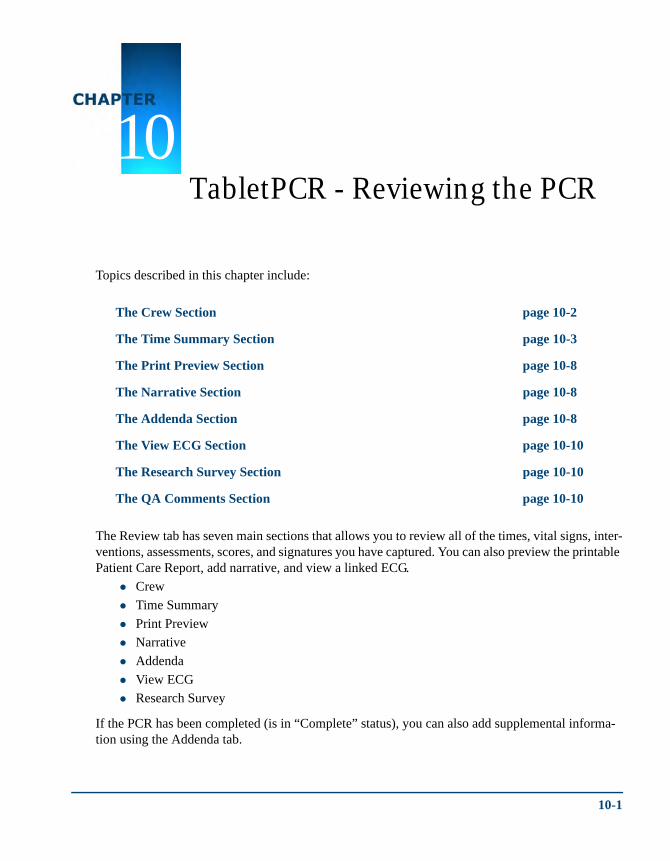
10 10
Chapter 10:TabletPCR - Reviewing the PCR
Topics described in this chapter include:
The Review tab has seven main sections that allows you to review all of the times, vital signs, inter-ventions, assessments, scores, and signatures you have captured. You can also preview the printable Patient Care Report, add narrative, and view a linked ECG.
Crew
Time Summary
Print Preview
Narrative
Addenda
View ECG
Research Survey
If the PCR has been completed (is in “Complete” status), you can also add supplemental informa-tion using the Addenda tab.
The Crew Section page 10-2
The Time Summary Section page 10-3
The Print Preview Section page 10-8
The Narrative Section page 10-8
The Addenda Section page 10-8
The View ECG Section page 10-10
The Research Survey Section page 10-10
The QA Comments Section page 10-10
10-1

The Crew SectionThe Crew section summarizes crew, vehicle and shift information pertaining to a PCR. You can navigate through this section to ensure that all information is accurate and complete.
10-2 Chapter 10: TabletPCR - Reviewing the PCR
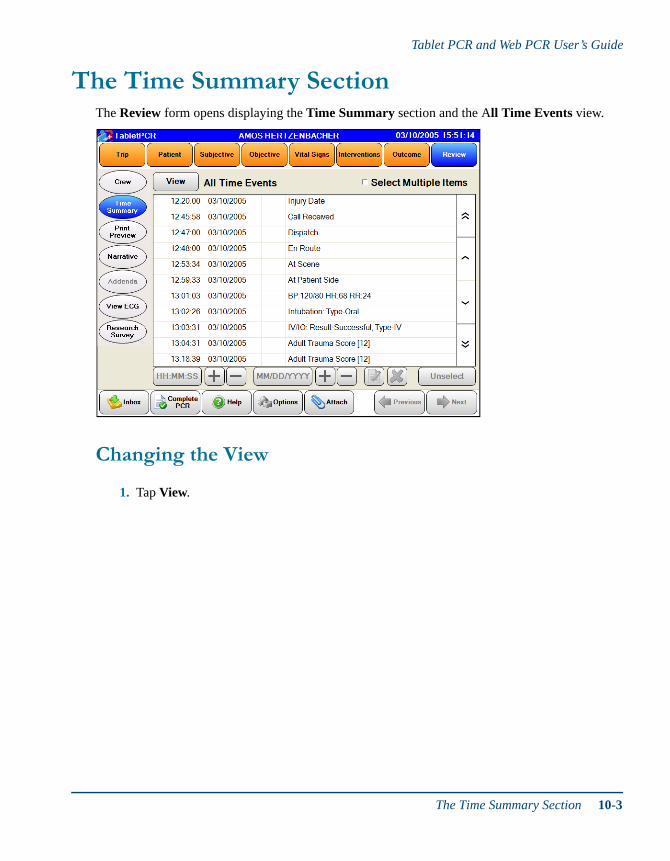
Tablet PCR and Web PCR User’s Guide
The Time Summary SectionThe Review form opens displaying the Time Summary section and the All Time Events view.
Changing the View
1. Tap View.
The Time Summary Section 10-3

2. On the View Types screen, tap the type you want to review.
Changing a Time Stamp
1. Tap the item you want to change.
2. To add or subtract one minute, tap the + or – (time) button.
10-4 Chapter 10: TabletPCR - Reviewing the PCR

Tablet PCR and Web PCR User’s Guide
3. To add or subtract one day from the date, tap the + or – (date) button.
4. To open the Edit Date and Time or Edit Date Only screen, tap the Time or Date button.
5. To unselect the item, tap it again, or tap Unselect.
Changing Multiple Time Stamps Simultaneously
1. Tap Select Multiple Items.
Note: When you tap the Time button, you change both the time and date. When you tap the Date button, you can only change the date.
The Time Summary Section 10-5

2. Tap the items you want to change.
3. Make your changes as described in the previous section. All of the selected items are changed simultaneously. Typically, this is used to change the date, and can be needed for transports that span midnight.
4. To unselect all of the selected items, tap Unselect.
Editing or Deleting Items
You can edit or delete vital signs, interventions, assessments, scores, and signatures.
Important: The +/– (time) buttons are disabled when multiple items are selected. If you want to use this feature to change the time for multiple items, you must tap the Edit Date and Time button. The new time is applied to all selected items.
10-6 Chapter 10: TabletPCR - Reviewing the PCR

Tablet PCR and Web PCR User’s Guide
1. Tap the item you want to change or delete.
2. To change the item, tap the Edit button.
3. To delete the item, tap the Delete button.
A message asks you to confirm that you want to delete the selected item.
Note: These options are not available for time-only time stamps (Call Received, Dispatch, En Route, and so on). They are not available when multiple items are selected.
The Time Summary Section 10-7
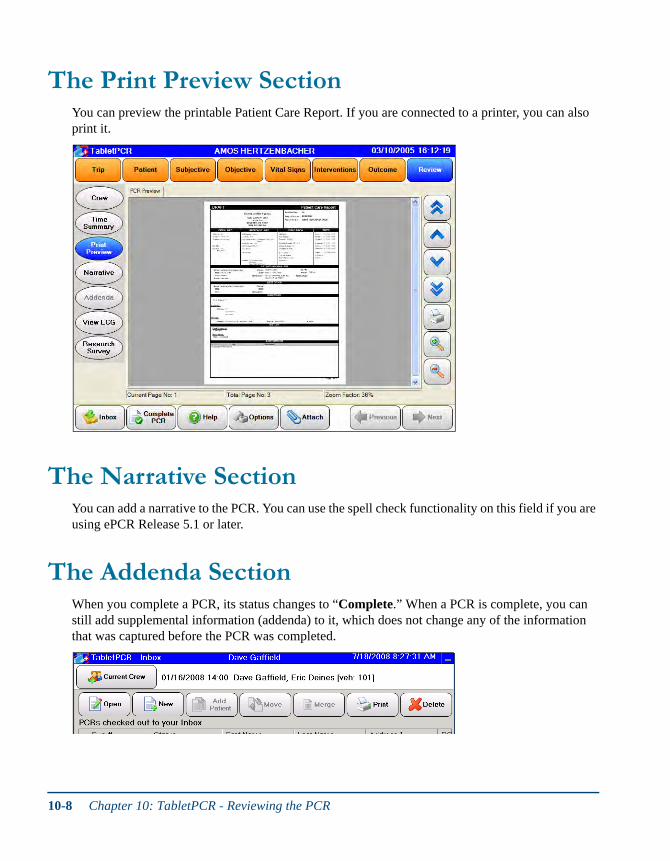
The Print Preview SectionYou can preview the printable Patient Care Report. If you are connected to a printer, you can also print it.
The Narrative SectionYou can add a narrative to the PCR. You can use the spell check functionality on this field if you are using ePCR Release 5.1 or later.
The Addenda SectionWhen you complete a PCR, its status changes to “Complete.” When a PCR is complete, you can still add supplemental information (addenda) to it, which does not change any of the information that was captured before the PCR was completed.
10-8 Chapter 10: TabletPCR - Reviewing the PCR

Tablet PCR and Web PCR User’s Guide
Whether you may re-open and edit a trip that is in “Complete” status depends on how your organi-zation has set up TabletPCR.
Not allowed. The user who completed the PCR can still tap Open to add addenda to the PCR via the Review form. The PCR opens directly to the Review form. In that case, you can also print preview the PCR and view ECGs, but everything else is disabled.
Allowed. The user who completed the PCR can tap Open to re-open and edit it. A message asks if you want to re-open the trip for editing. Tap Yes. You must also enter your password. The PCR status changes to “Ready to Complete,” the PCR opens to the Trip form, and you can add and change information as usual.
Allowed: add addenda. Alternatively, the user who completed the PCR can also re-open the PCR without using the editing mode in order to add addenda. When the message asks if you want to re-open the trip for editing, tap No. The PCR opens directly to the Review form. In that case, you can also print preview the PCR and view ECGs, but everything else is disabled.
1. To add supplemental information, tap Addenda.
2. Type the supplemental information.
The Addenda Section 10-9
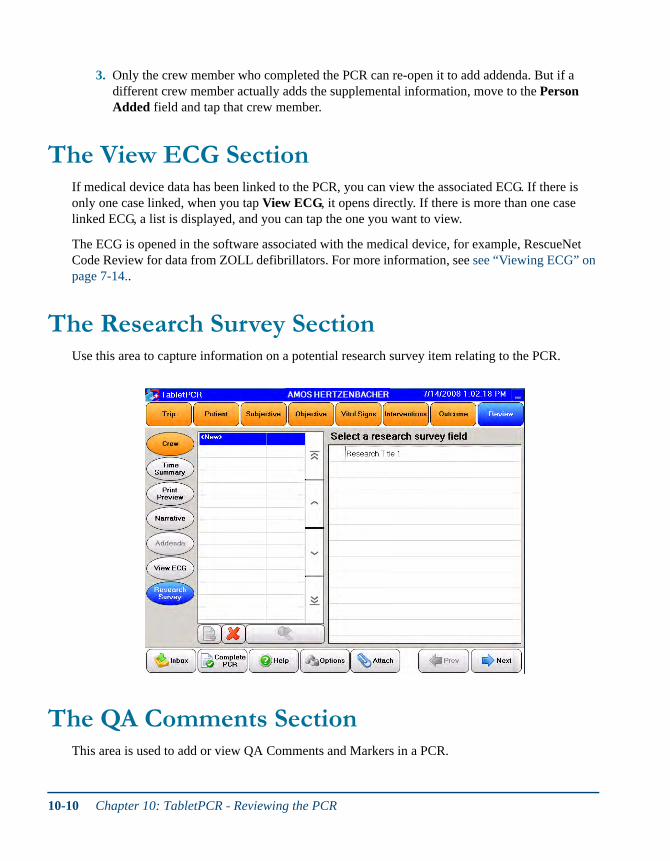
3. Only the crew member who completed the PCR can re-open it to add addenda. But if a different crew member actually adds the supplemental information, move to the Person Added field and tap that crew member.
The View ECG SectionIf medical device data has been linked to the PCR, you can view the associated ECG. If there is only one case linked, when you tap View ECG, it opens directly. If there is more than one case linked ECG, a list is displayed, and you can tap the one you want to view.
The ECG is opened in the software associated with the medical device, for example, RescueNet Code Review for data from ZOLL defibrillators. For more information, see see “Viewing ECG” on page 7-14..
The Research Survey SectionUse this area to capture information on a potential research survey item relating to the PCR.
The QA Comments SectionThis area is used to add or view QA Comments and Markers in a PCR.
10-10 Chapter 10: TabletPCR - Reviewing the PCR

Tablet PCR and Web PCR User’s Guide
1. Click the QA Comments tab of the Review section to view the comments.
The QA Comments Section 10-11

10-12 Chapter 10: TabletPCR - Reviewing the PCR
11 11
Chapter 11:TabletPCR - Additional Options
Topics described in this chapter include:
From the Inbox, there are a few more things you can do with PCRs:
Adding PatientsIf you have two patients with the same trip information, for example, at a multiple casualty MVA, you can create a copy of the first patient’s PCR. In the Inbox, tap the first patient’s PCR (before it
Adding Patients page 11-1
Moving PCRs page 11-3
Printing Reports page 11-3
Deleting PCRs page 11-4
Viewing Help Documents page 11-4
11-1
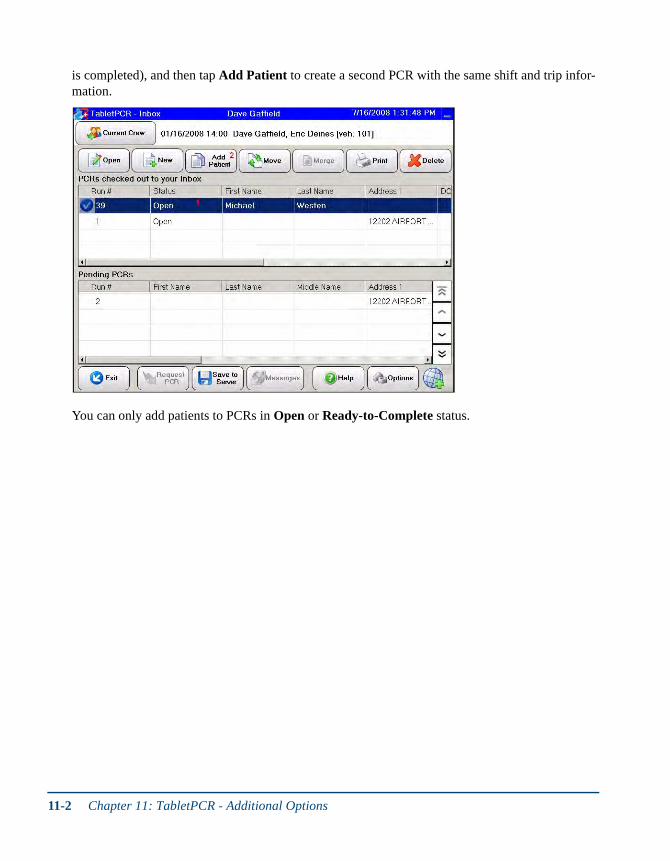
is completed), and then tap Add Patient to create a second PCR with the same shift and trip infor-mation.
You can only add patients to PCRs in Open or Ready-to-Complete status.
11-2 Chapter 11: TabletPCR - Additional Options
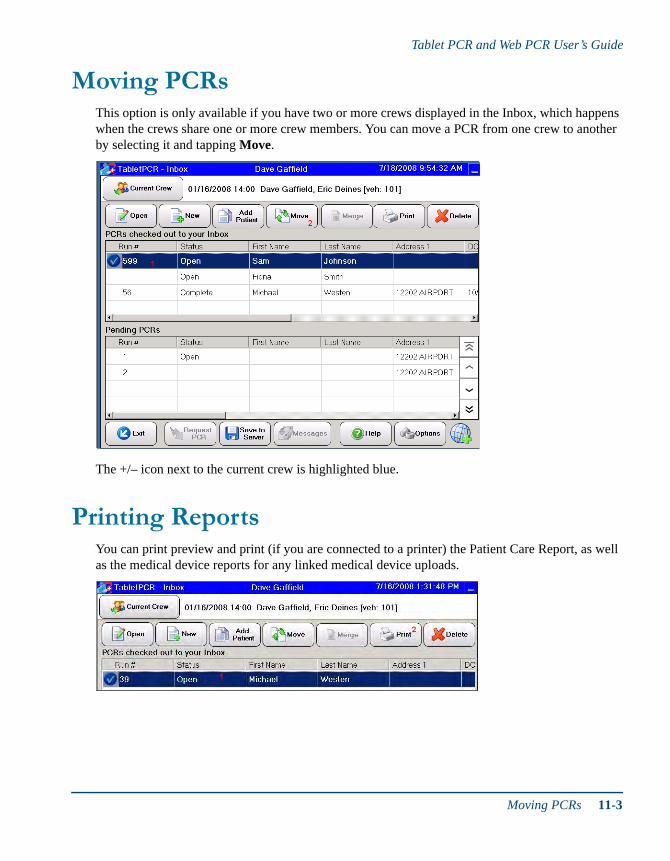
Tablet PCR and Web PCR User’s Guide
Moving PCRsThis option is only available if you have two or more crews displayed in the Inbox, which happens when the crews share one or more crew members. You can move a PCR from one crew to another by selecting it and tapping Move.
The +/– icon next to the current crew is highlighted blue.
Printing ReportsYou can print preview and print (if you are connected to a printer) the Patient Care Report, as well as the medical device reports for any linked medical device uploads.
Moving PCRs 11-3

On the Print Reports screen, you can preview the Patient Care Report. You can also select a printer, set the number of copies you want to print, and select a medical device report if you want it to be printed together with the Patient Care Report.
Deleting PCRsIf necessary, you can delete the PCR that is selected in the Inbox.
Viewing Help DocumentsThere are two types of Help documents available: manuals and the TabletPCR bulletin board. To open them, tap the Help button. The Help Documents screen displays a list of available documents
11-4 Chapter 11: TabletPCR - Additional Options

Tablet PCR and Web PCR User’s Guide
and provides a link to the bulletin board. The guides open in Adobe Reader. The bulletin board opens in a Web browser.
Hint › Minimizing TabletPCR
You can minimize TabletPCR, for example, if you want to see the Windows desktop, but don’t want to exit TabletPCR. Tap Options, and then tap Minimize Application.
Viewing Help Documents 11-5

11-6 Chapter 11: TabletPCR - Additional Options
12 12
Chapter 12:TabletPCR - Capturing Attachments
You can attach files (such as digital photos) and even your own drawings (or hand-written notes) to a PCR.
Topics described in this chapter include:
Adding Files and Drawings1. Tap Attach.
Adding Files and Drawings page 12-1
Opening or Printing an Attachment page 12-3
12-1

2. On the File Attachments screen, tap Add.
To create and attach a drawing or hand-written note, tap Scratch Pad.
To attach a file, tap Other File. A standard Windows Select File dialog box opens. Find and select the file.
3. Once you have attached a drawing or file to a PCR, the button is highlighted orange.
Scratch Pad
You can use the Scratch Pad to create a drawing or scribble a hand-written note. You can use the pencil or eraser, and can select the pencil’s color and line width.
12-2 Chapter 12: TabletPCR - Capturing Attachments
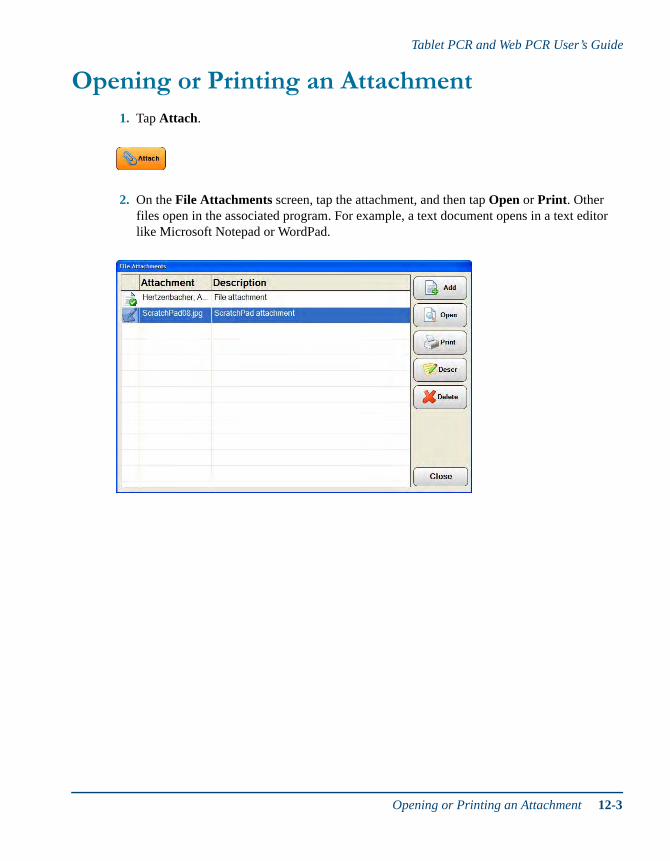
Tablet PCR and Web PCR User’s Guide
Opening or Printing an Attachment1. Tap Attach.
2. On the File Attachments screen, tap the attachment, and then tap Open or Print. Other files open in the associated program. For example, a text document opens in a text editor like Microsoft Notepad or WordPad.
Opening or Printing an Attachment 12-3

12-4 Chapter 12: TabletPCR - Capturing Attachments
13 13
Chapter 13:TabletPCR - Synchronizing
Beginning with ePCR 5.1 or later, there is a new procedure for synchronizing PCRs with the Field Data Server. The Sync button in TabletPCR has been replaced by two new buttons called Request PCR and Save to Server.
Note that if the mobile device does not have access to a license, the Request from Server and Save to Server buttons are not enabled for use. The user may attempt to request a license if there have green plus sign in their Mercury icon by exiting TabletPCR and logging back in. Contact your sys-tem administrator if the system does not display a green connection sign, or if logging back in resolve the issue. The globe icon on Tablet PCR Inbox screen indicates connectivity status with the server.
The green plus sign on the globe indicates that services are enabled and there is connectivity.
A red exclamation mark indicates no connectivity.
A blue exclamation mark indicates loss of connectivity with the server even though services are enabled on the mobile unit. One common cause for this status is a user who is logged into more than one machine. Logging out of the other machines can enable a resolution of this status.
Using the Save to Server FeatureTo save a completed or pending PCR to the server:
1. Select the completed PCR that you want to save to the server.
2. Click on the Save to Server button to save a completed PCR.
13-1

3. If you have any pending PCRs that show up on the Pending PCR window, select the pending PCR and click on the Save to Server button.
Using the Request from Server and Save to Server Features
To request a PCR from the server and save to the server:
13-2 Chapter 13: TabletPCR - Synchronizing

Tablet PCR and Web PCR User’s Guide
1. In TabletPCR, PCRs arriving through Dispatch, or other pending PCRs that are not complete appear in the Pending PCRs area as shown in the screenshot.
Using the Request from Server and Save to Server Features 13-3

2. You can select one or multiple PCRs from the Pending PCR area and click on the Request PCR button to check them out to your Inbox to make changes, or to complete the PCR.
The following screenshot shows the two PCRs checked out to the Inbox.
13-4 Chapter 13: TabletPCR - Synchronizing
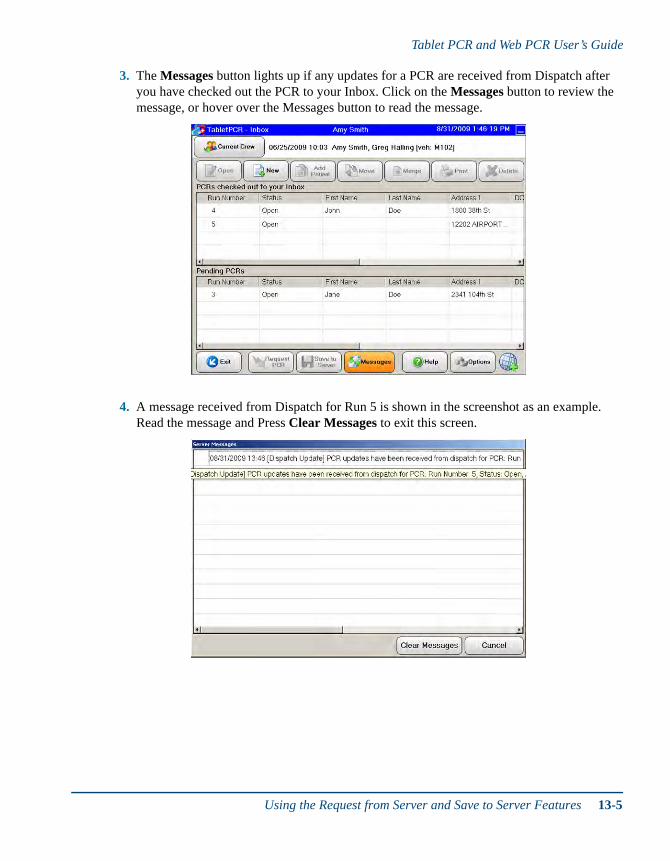
Tablet PCR and Web PCR User’s Guide
3. The Messages button lights up if any updates for a PCR are received from Dispatch after you have checked out the PCR to your Inbox. Click on the Messages button to review the message, or hover over the Messages button to read the message.
4. A message received from Dispatch for Run 5 is shown in the screenshot as an example. Read the message and Press Clear Messages to exit this screen.
Using the Request from Server and Save to Server Features 13-5
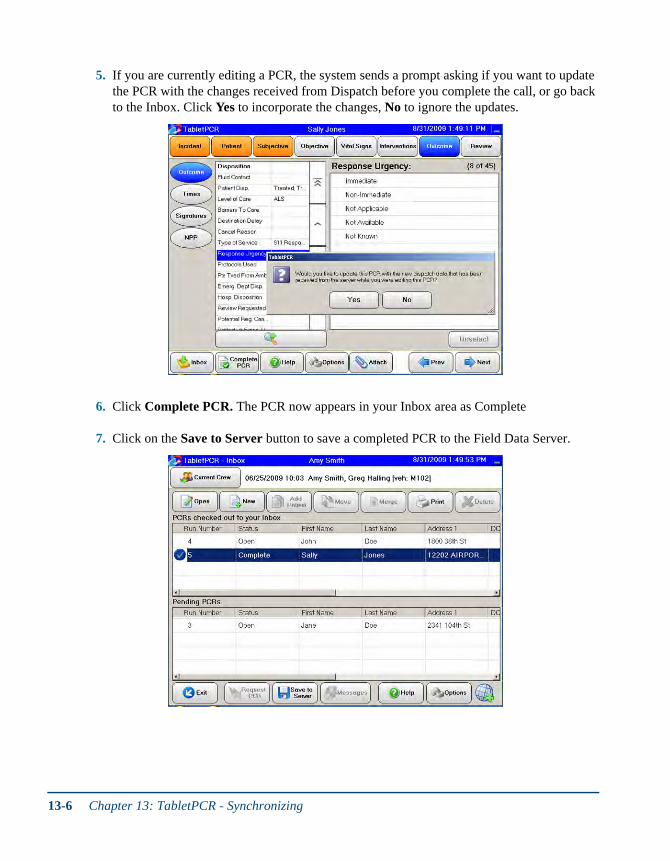
5. If you are currently editing a PCR, the system sends a prompt asking if you want to update the PCR with the changes received from Dispatch before you complete the call, or go back to the Inbox. Click Yes to incorporate the changes, No to ignore the updates.
6. Click Complete PCR. The PCR now appears in your Inbox area as Complete
7. Click on the Save to Server button to save a completed PCR to the Field Data Server.
13-6 Chapter 13: TabletPCR - Synchronizing
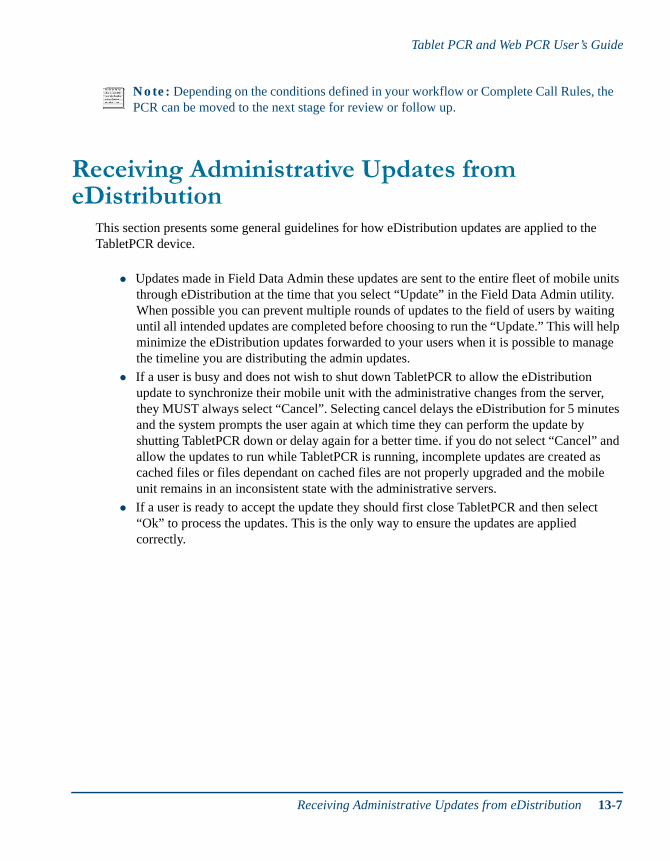
Tablet PCR and Web PCR User’s Guide
Receiving Administrative Updates from eDistribution
This section presents some general guidelines for how eDistribution updates are applied to the TabletPCR device.
Updates made in Field Data Admin these updates are sent to the entire fleet of mobile units through eDistribution at the time that you select “Update” in the Field Data Admin utility. When possible you can prevent multiple rounds of updates to the field of users by waiting until all intended updates are completed before choosing to run the “Update.” This will help minimize the eDistribution updates forwarded to your users when it is possible to manage the timeline you are distributing the admin updates.
If a user is busy and does not wish to shut down TabletPCR to allow the eDistribution update to synchronize their mobile unit with the administrative changes from the server, they MUST always select “Cancel”. Selecting cancel delays the eDistribution for 5 minutes and the system prompts the user again at which time they can perform the update by shutting TabletPCR down or delay again for a better time. if you do not select “Cancel” and allow the updates to run while TabletPCR is running, incomplete updates are created as cached files or files dependant on cached files are not properly upgraded and the mobile unit remains in an inconsistent state with the administrative servers.
If a user is ready to accept the update they should first close TabletPCR and then select “Ok” to process the updates. This is the only way to ensure the updates are applied correctly.
Note: Depending on the conditions defined in your workflow or Complete Call Rules, the PCR can be moved to the next stage for review or follow up.
Receiving Administrative Updates from eDistribution 13-7

13-8 Chapter 13: TabletPCR - Synchronizing
14 14
Chapter 14:TabletPCR - Completing the PCR
Topics described in this chapter include:
When you have finished capturing all of the necessary information, you can complete the PCR. The process of completing it prepares it to be uploaded the next time you synchronize.
Finishing the PCR1. Once you have completed the PCR review and know you are finished documenting it, tap
Complete PCR.
Finishing the PCR page 14-1
Deleted PCRs page 14-3
Note: If you are required to download dispatch times before completing a PCR, you must do so in order to change the status of the PCR to Ready to Complete. In that case, you can only complete a PCR once it is in Ready to Complete status.
14-1

2. If the PCR fails to satisfy any required or optional Complete PCR Rules, they are displayed.
If a required rule fails, it is preceded by a red × icon. You aren’t allowed to complete the PCR until you satisfy all required rules.
If an optional rule fails, it is preceded by a yellow × icon. If all required rules have been satisfied, you can optionally bypass the rule by tapping Next.
3. In many cases, you can tap a failed rule to be taken to the item that needs to be completed. For example, if it is a required rule that an NPP be collected when the At Patient Side time is recorded and it hasn’t been, you can tap the rule to be taken to the NPP section of the
14-2 Chapter 14: TabletPCR - Completing the PCR

Tablet PCR and Web PCR User’s Guide
Patient form, where you can collect the required information. Depending on how your TabletPCR is set up, the field that needs to be completed might also be highlighted red.
4. Once you have satisfied all required rules and satisfied or bypassed all optional rules, you must select yourself as the Completed by User and enter your password.
5. You are returned to the Inbox, and the PCR status is changed to “Complete.”
6. When you synchronize, all completed PCRs are uploaded.
Deleted PCRsDispatched PCRs which have not been updated after a period of time set by your administrator are automatically deleted from the PCR server. Users assigned to the PCR will receive a revoke message alerting them to the deletion. Only PCR’s that are in a Dispatch status (have never been checked out from the server) will be marked for deletion.
Finishing the PCR 14-3

14-4 Chapter 14: TabletPCR - Completing the PCR
15 15
Chapter 15:WebPCR - Capturing Trip Information
Topics described in this chapter include:
These chapters about capturing PCR information follow the default order of the forms and sections in WebPCR, but you do not have to follow the same order when you are using WebPCR. You can move around in any way that works best for you.
The Dispatch Section page 15-2
The Times Section page 15-3
The Mileages Section page 15-4
The Scene Section page 15-5
Importing from RescueNet Dispatch page 15-5
15-1

The Dispatch SectionThe Trip form opens with the first section and data-entry field selected.
1. The list of the selected section’s data fields, organized into groups.
2. The data-entry area displays the forms for the selected data field.
3. The data-entry area contains the field’s choices or methods for adding information; i.e.: text boxes, dropdown lists, etc.
4. You can move rapidly through the fields by clicking or tabbing.
15-2 Chapter 15: WebPCR - Capturing Trip Information
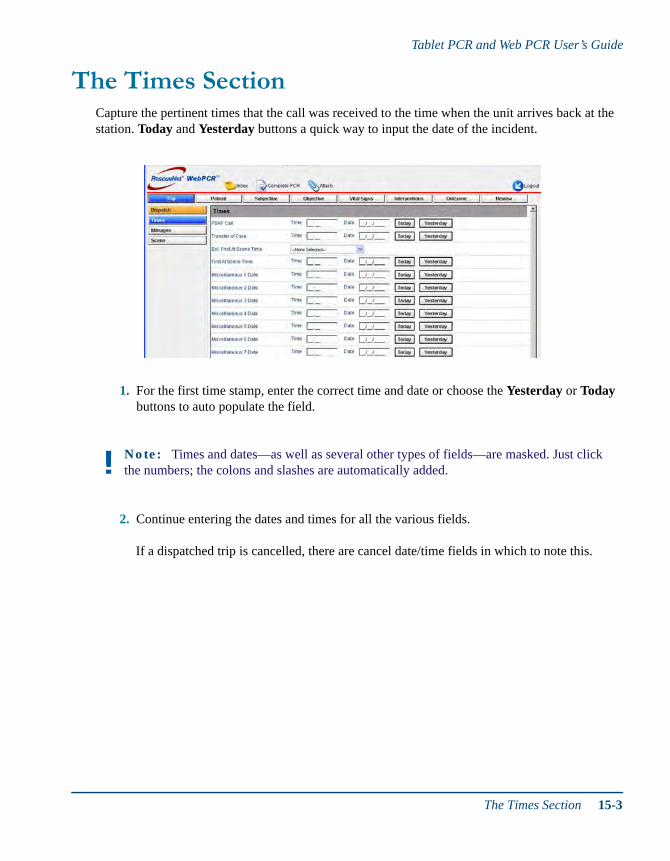
Tablet PCR and Web PCR User’s Guide
The Times SectionCapture the pertinent times that the call was received to the time when the unit arrives back at the station. Today and Yesterday buttons a quick way to input the date of the incident.
1. For the first time stamp, enter the correct time and date or choose the Yesterday or Today buttons to auto populate the field.
2. Continue entering the dates and times for all the various fields.
If a dispatched trip is cancelled, there are cancel date/time fields in which to note this.
Note: Times and dates—as well as several other types of fields—are masked. Just click the numbers; the colons and slashes are automatically added.
The Times Section 15-3
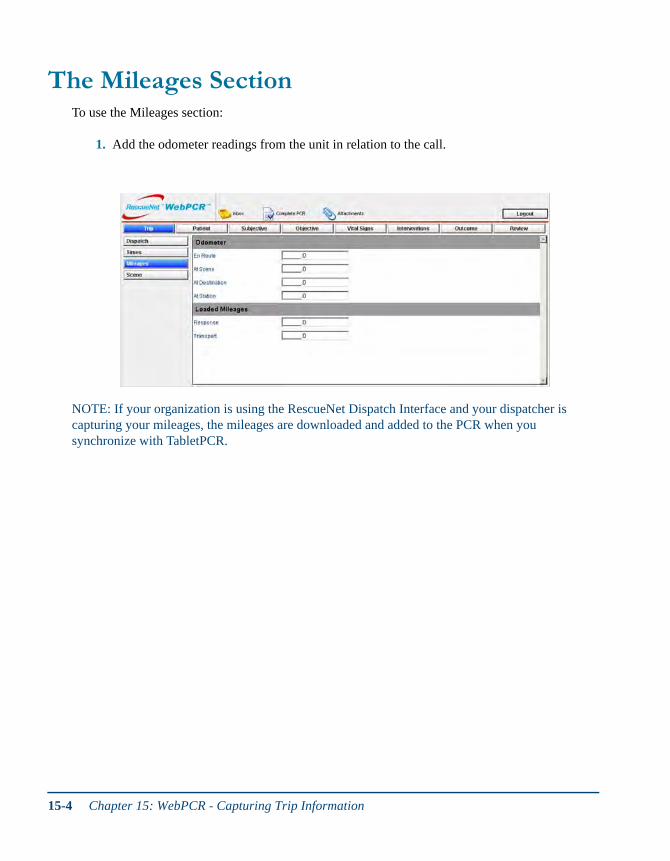
The Mileages SectionTo use the Mileages section:
1. Add the odometer readings from the unit in relation to the call.
NOTE: If your organization is using the RescueNet Dispatch Interface and your dispatcher is capturing your mileages, the mileages are downloaded and added to the PCR when you synchronize with TabletPCR.
15-4 Chapter 15: WebPCR - Capturing Trip Information

Tablet PCR and Web PCR User’s Guide
The Scene SectionA short section for capturing information about the scene. The Delay @ Scene and Assisted By fields can have up to three entries.
Importing from RescueNet Dispatch If your organization is also using RescueNet Dispatch and has enabled WebPCR’s RescueNet Dis-patch Interface feature, you can import patient and transport-related information from RescueNet Dispatch.
For this to happen, the transport must have been added in RescueNet Dispatch, assigned to your crew, and marked you en route. Then you can synchronize to download the information.
The transport-related information includes:
Run number Odometer readings
Call type and priority Response and transport delay reasons
Pick-up and drop-off addresses Cancel reasons
Dispatch time stamps
The Scene Section 15-5

Note that PCRs can be transferred from TabletPCR to WebPCR, but they can not be transferred back to TabletPCR.
Note: Unlike TabletPCR, there is no synchronizing. WebPCR automatically pulls the PCRs from the server. PCRs can be accessed by any member of the assigned crew.
15-6 Chapter 15: WebPCR - Capturing Trip Information

16 16
Chapter 16:WebPCR - Capturing Patient Information
Topics described in this chapter include:
The Patient Section page 16-2
The NOK Section page 16-4
The Billing Section page 16-5
The Payors Section (Multiple-capture) page 16-6
The Cert-CMS Section page 16-7
The Immunization Hx Section page 16-8
16-1

The Patient SectionYou can capture the patient’s personal information, doctors, home and mailing address, and per-sonal effects.
1. When a patient’s information already exists in the system in the common customer table, you can do a quick lookup of all their information by clicking Lookup.
2. You can import this information from any of several fields. Click Lookup.
Note: The lookup option is available in several areas, including the multiple Doctor sections.
16-2 Chapter 16: WebPCR - Capturing Patient Information
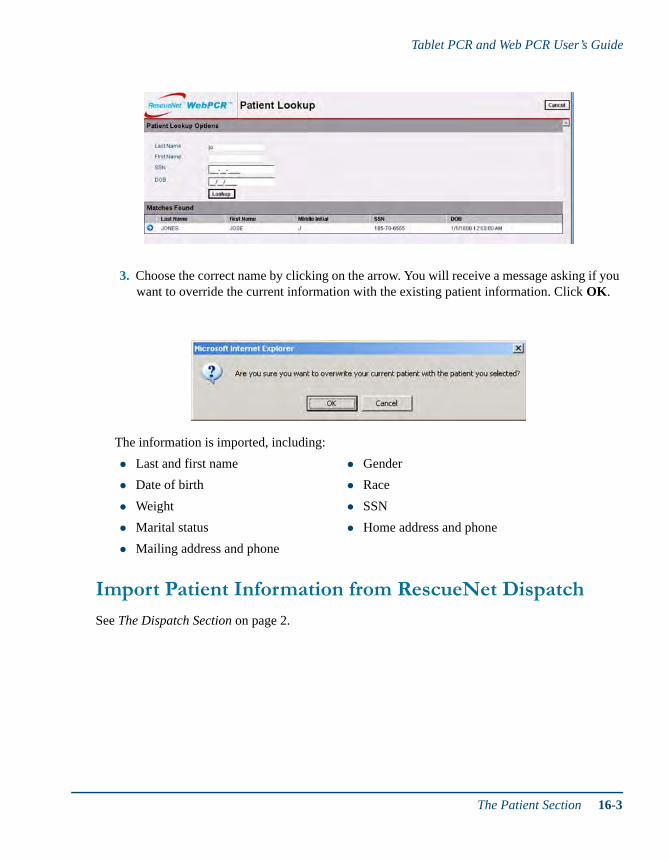
Tablet PCR and Web PCR User’s Guide
3. Choose the correct name by clicking on the arrow. You will receive a message asking if you want to override the current information with the existing patient information. Click OK.
The information is imported, including:
Import Patient Information from RescueNet Dispatch
See The Dispatch Section on page 2.
Last and first name Gender
Date of birth Race
Weight SSN
Marital status Home address and phone
Mailing address and phone
The Patient Section 16-3
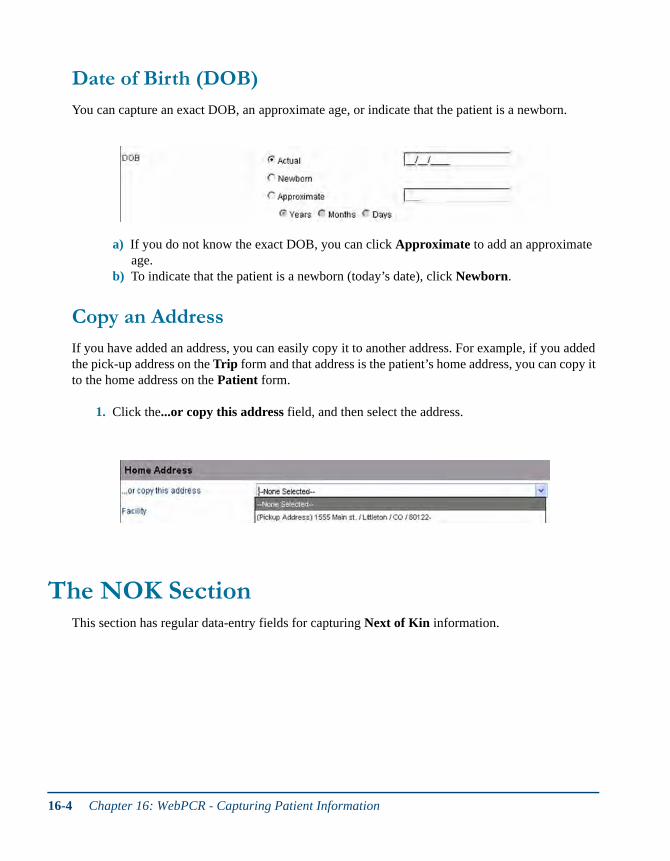
Date of Birth (DOB)
You can capture an exact DOB, an approximate age, or indicate that the patient is a newborn.
a) If you do not know the exact DOB, you can click Approximate to add an approximate age.
b) To indicate that the patient is a newborn (today’s date), click Newborn.
Copy an Address
If you have added an address, you can easily copy it to another address. For example, if you added the pick-up address on the Trip form and that address is the patient’s home address, you can copy it to the home address on the Patient form.
1. Click the...or copy this address field, and then select the address.
The NOK SectionThis section has regular data-entry fields for capturing Next of Kin information.
16-4 Chapter 16: WebPCR - Capturing Patient Information
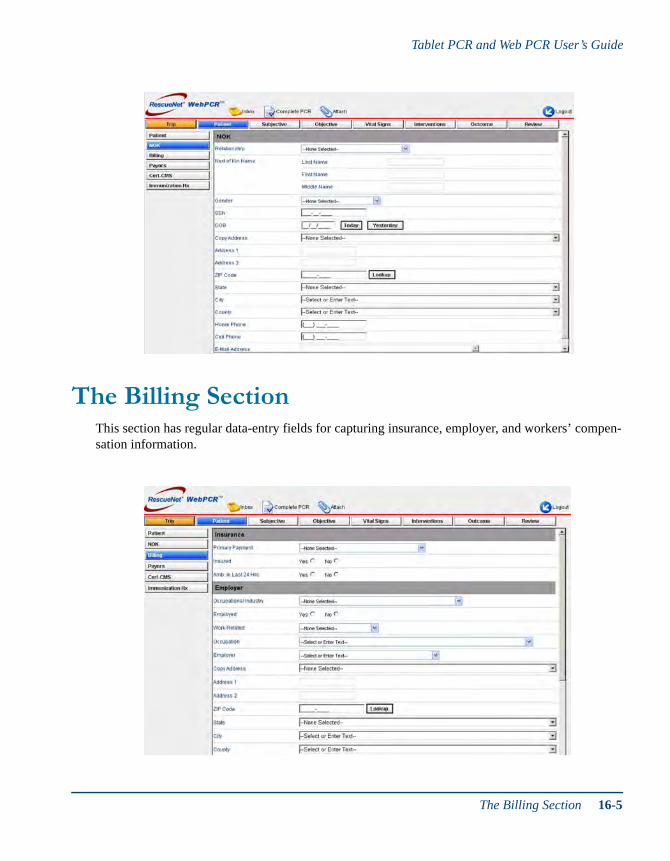
Tablet PCR and Web PCR User’s Guide
The Billing SectionThis section has regular data-entry fields for capturing insurance, employer, and workers’ compen-sation information.
The Billing Section 16-5

The Payors Section (Multiple-capture)This is the first section of the Payors section. WebPCR has the ability to handle multiple payors.
1. The section opens blank, click Add New to capture a payor.
2. Next, select an insurance provider and click Continue.
3. Finally, you must capture the information specific to that provider.
16-6 Chapter 16: WebPCR - Capturing Patient Information
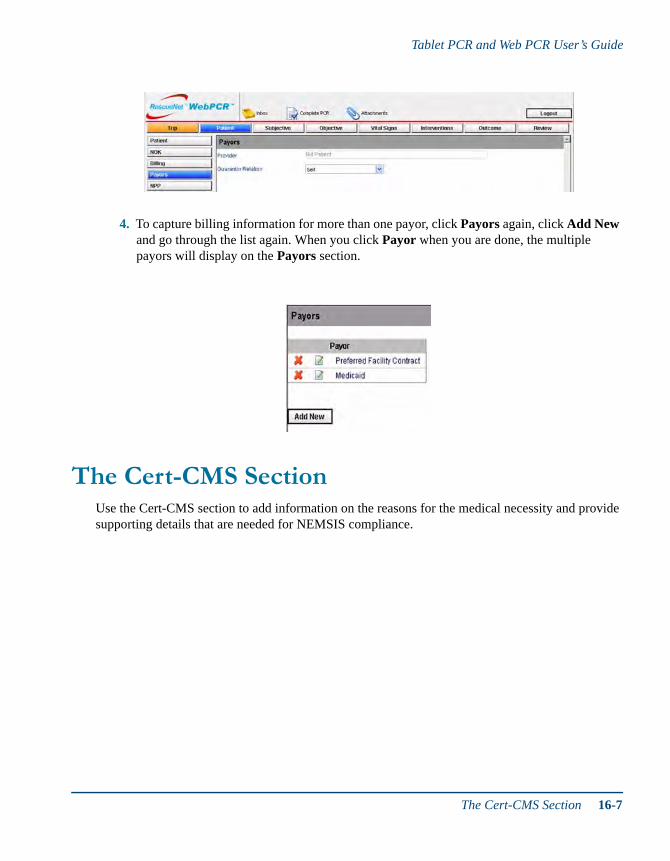
Tablet PCR and Web PCR User’s Guide
4. To capture billing information for more than one payor, click Payors again, click Add New and go through the list again. When you click Payor when you are done, the multiple payors will display on the Payors section.
The Cert-CMS SectionUse the Cert-CMS section to add information on the reasons for the medical necessity and provide supporting details that are needed for NEMSIS compliance.
The Cert-CMS Section 16-7
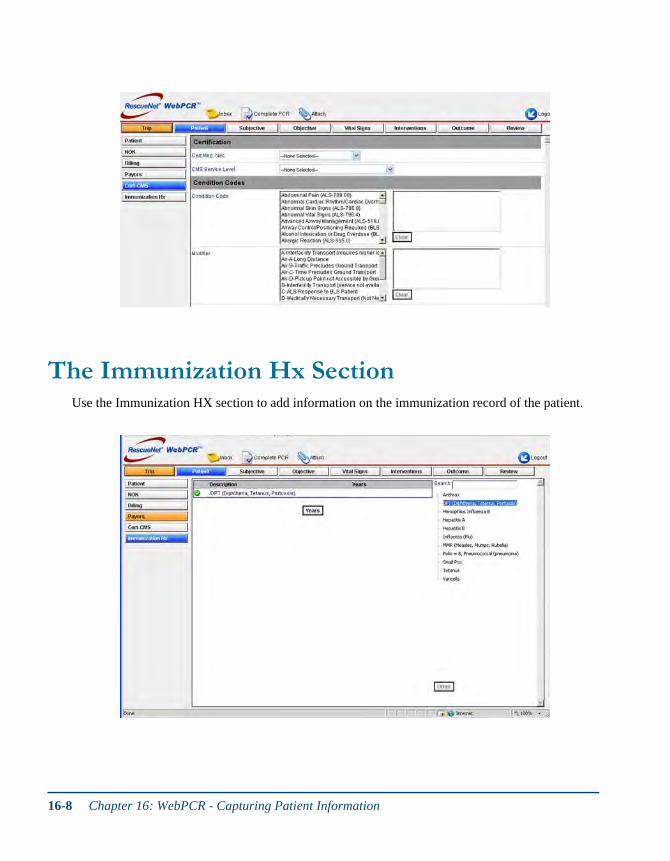
The Immunization Hx SectionUse the Immunization HX section to add information on the immunization record of the patient.
16-8 Chapter 16: WebPCR - Capturing Patient Information

17 17
Chapter 17:Web PCR - Quick Look
OverviewTopics described in this chapter include:
Features
Spell Check
TabletPCR/WebPCR offers spell checking on the following fields:
Narrative
Addenda
Notes
Features page 17-1
The Inbox page 17-3
Starting WebPCR for the First Time page 17-4
Logging in page 17-4
Configuring the Crew page 17-4
Adding a Patient Care Report (PCR) page 17-6
Deleting or Editing Items from a PCR page 17-12
Requesting a PCR from the Server page 17-14
Completing PCRs page 17-14
Saving the PCR page 17-15
17-1
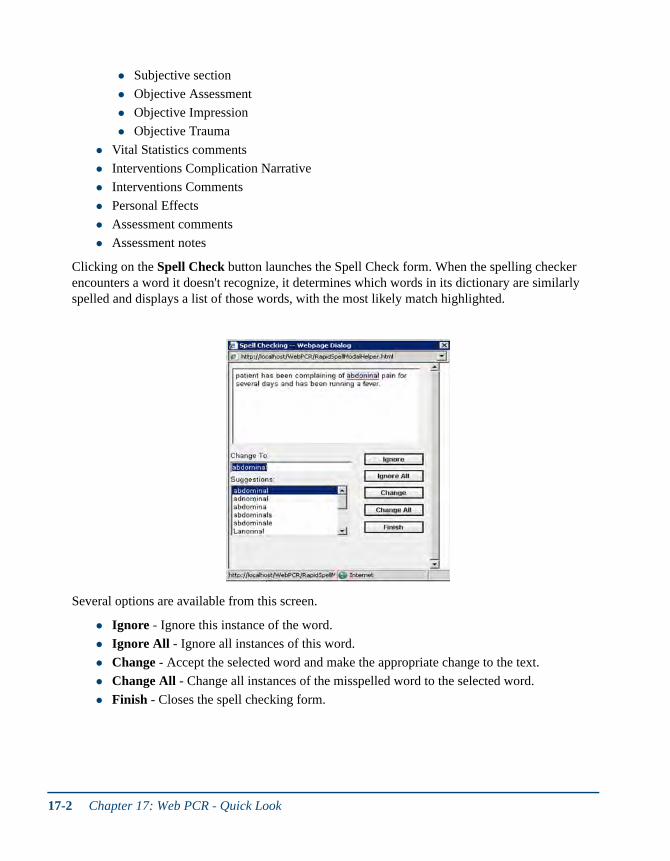
Subjective section
Objective Assessment
Objective Impression
Objective Trauma
Vital Statistics comments
Interventions Complication Narrative
Interventions Comments
Personal Effects
Assessment comments
Assessment notes
Clicking on the Spell Check button launches the Spell Check form. When the spelling checker encounters a word it doesn't recognize, it determines which words in its dictionary are similarly spelled and displays a list of those words, with the most likely match highlighted.
Several options are available from this screen.
Ignore - Ignore this instance of the word.
Ignore All - Ignore all instances of this word.
Change - Accept the selected word and make the appropriate change to the text.
Change All - Change all instances of the misspelled word to the selected word.
Finish - Closes the spell checking form.
17-2 Chapter 17: Web PCR - Quick Look
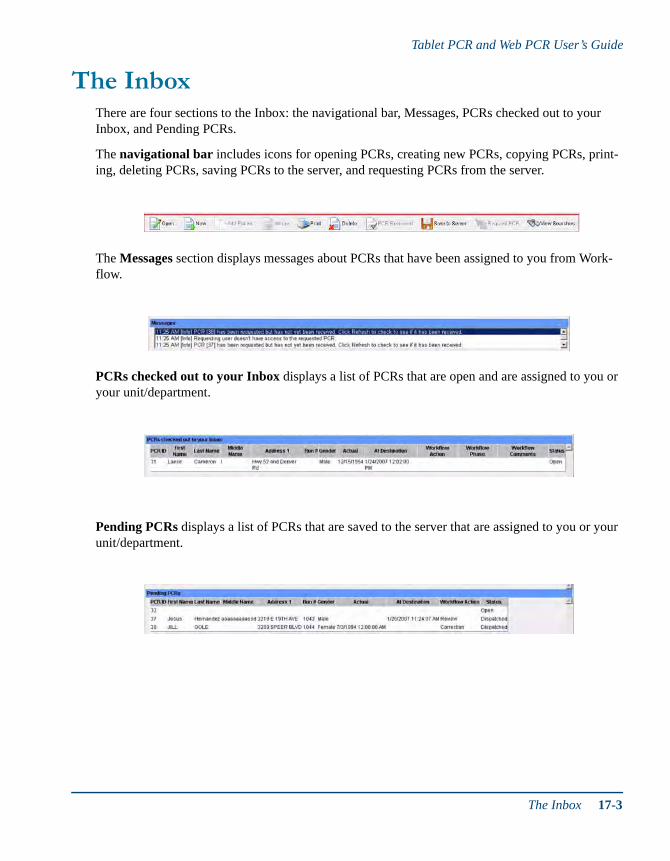
Tablet PCR and Web PCR User’s Guide
The InboxThere are four sections to the Inbox: the navigational bar, Messages, PCRs checked out to your Inbox, and Pending PCRs.
The navigational bar includes icons for opening PCRs, creating new PCRs, copying PCRs, print-ing, deleting PCRs, saving PCRs to the server, and requesting PCRs from the server.
The Messages section displays messages about PCRs that have been assigned to you from Work-flow.
PCRs checked out to your Inbox displays a list of PCRs that are open and are assigned to you or your unit/department.
Pending PCRs displays a list of PCRs that are saved to the server that are assigned to you or your unit/department.
The Inbox 17-3
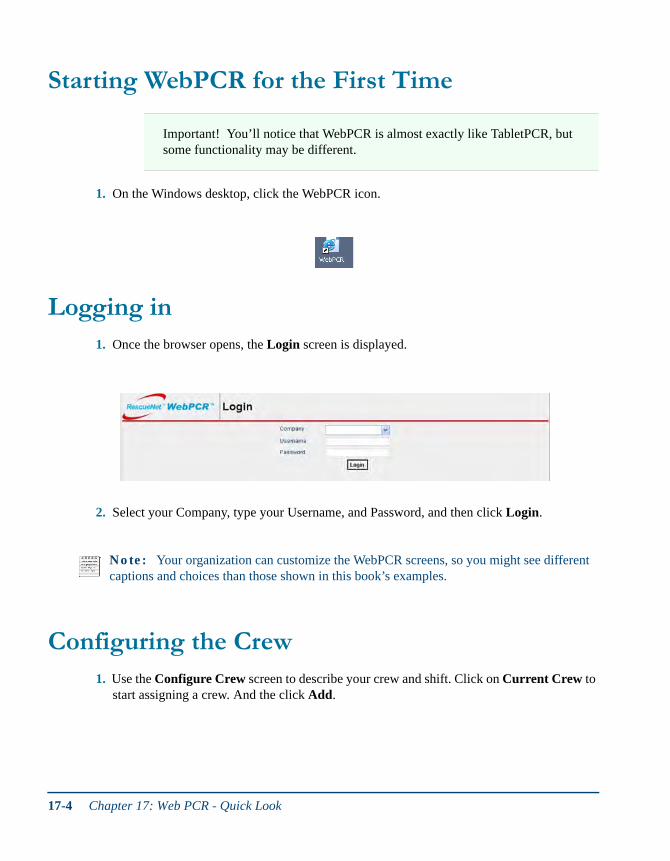
Starting WebPCR for the First Time
1. On the Windows desktop, click the WebPCR icon.
Logging in1. Once the browser opens, the Login screen is displayed.
2. Select your Company, type your Username, and Password, and then click Login.
Configuring the Crew1. Use the Configure Crew screen to describe your crew and shift. Click on Current Crew to
start assigning a crew. And the click Add.
Important! You’ll notice that WebPCR is almost exactly like TabletPCR, but some functionality may be different.
Note: Your organization can customize the WebPCR screens, so you might see different captions and choices than those shown in this book’s examples.
17-4 Chapter 17: Web PCR - Quick Look

Tablet PCR and Web PCR User’s Guide
a) The Configure Crew screen data-entry fields are listed with dropdown pick lists. You can click to select one, or you can go through them in sequence by tabbing.
b) There are often a couple of ways to capture information. For example, you can click Today to select the current date as the shift start date, you can click Yesterday to autofill the date field with yesterday’s date, or you can manually add dates and time,
Note: If you are logging in to complete an existing call, then no crew needs to be defined, as that information is already captured by the PCR.
Note: Returning to the InboxYou may return to the Inbox at anytime during the process as long as the Inbox button is shown on the screen.
Configuring the Crew 17-5
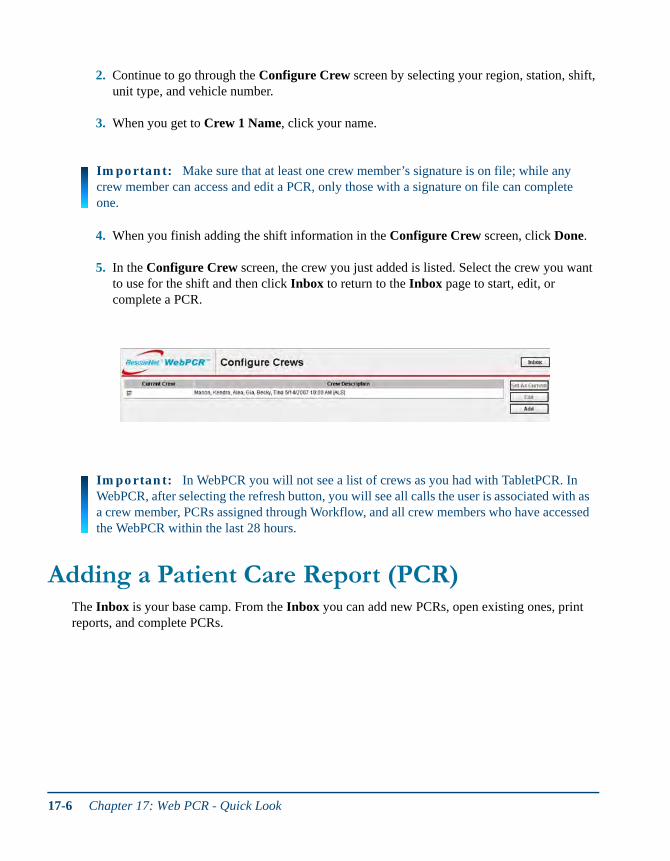
2. Continue to go through the Configure Crew screen by selecting your region, station, shift, unit type, and vehicle number.
3. When you get to Crew 1 Name, click your name.
4. When you finish adding the shift information in the Configure Crew screen, click Done.
5. In the Configure Crew screen, the crew you just added is listed. Select the crew you want to use for the shift and then click Inbox to return to the Inbox page to start, edit, or complete a PCR.
Adding a Patient Care Report (PCR)The Inbox is your base camp. From the Inbox you can add new PCRs, open existing ones, print reports, and complete PCRs.
Important: Make sure that at least one crew member’s signature is on file; while any crew member can access and edit a PCR, only those with a signature on file can complete one.
Important: In WebPCR you will not see a list of crews as you had with TabletPCR. In WebPCR, after selecting the refresh button, you will see all calls the user is associated with as a crew member, PCRs assigned through Workflow, and all crew members who have accessed the WebPCR within the last 28 hours.
17-6 Chapter 17: Web PCR - Quick Look
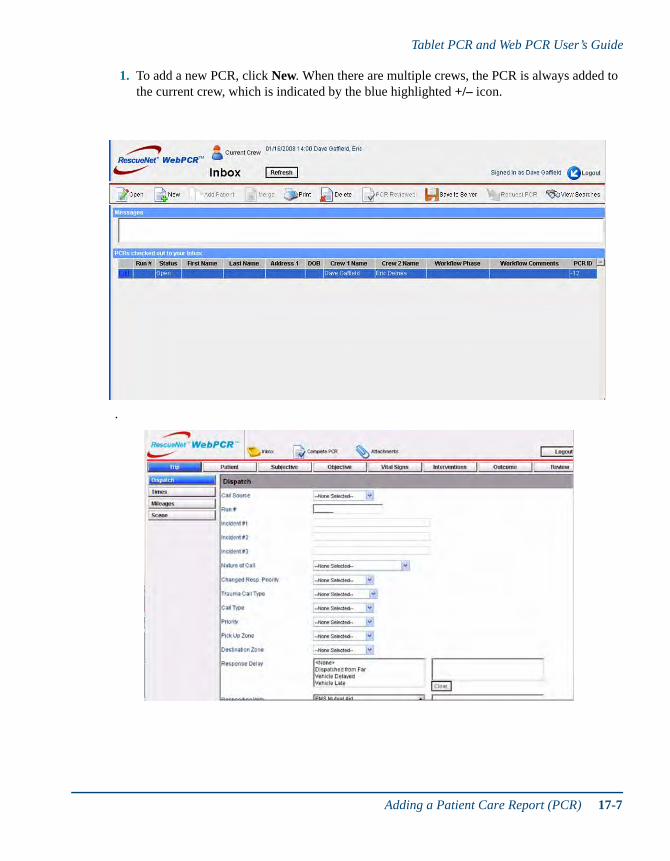
Tablet PCR and Web PCR User’s Guide
1. To add a new PCR, click New. When there are multiple crews, the PCR is always added to the current crew, which is indicated by the blue highlighted +/– icon.
.
Adding a Patient Care Report (PCR) 17-7
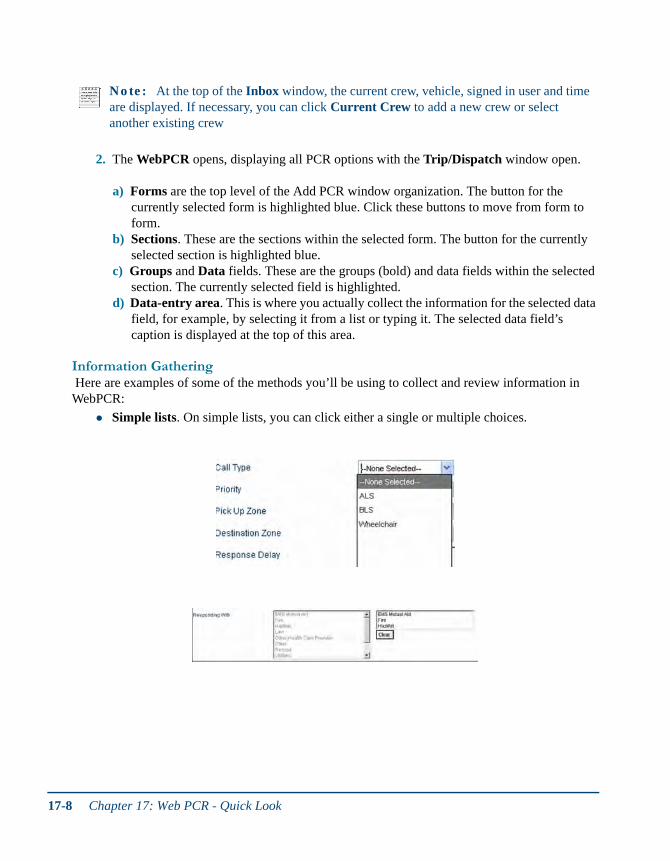
2. The WebPCR opens, displaying all PCR options with the Trip/Dispatch window open.
a) Forms are the top level of the Add PCR window organization. The button for the currently selected form is highlighted blue. Click these buttons to move from form to form.
b) Sections. These are the sections within the selected form. The button for the currently selected section is highlighted blue.
c) Groups and Data fields. These are the groups (bold) and data fields within the selected section. The currently selected field is highlighted.
d) Data-entry area. This is where you actually collect the information for the selected data field, for example, by selecting it from a list or typing it. The selected data field’s caption is displayed at the top of this area.
Information Gathering Here are examples of some of the methods you’ll be using to collect and review information in WebPCR:
Simple lists. On simple lists, you can click either a single or multiple choices.
Note: At the top of the Inbox window, the current crew, vehicle, signed in user and time are displayed. If necessary, you can click Current Crew to add a new crew or select another existing crew
17-8 Chapter 17: Web PCR - Quick Look
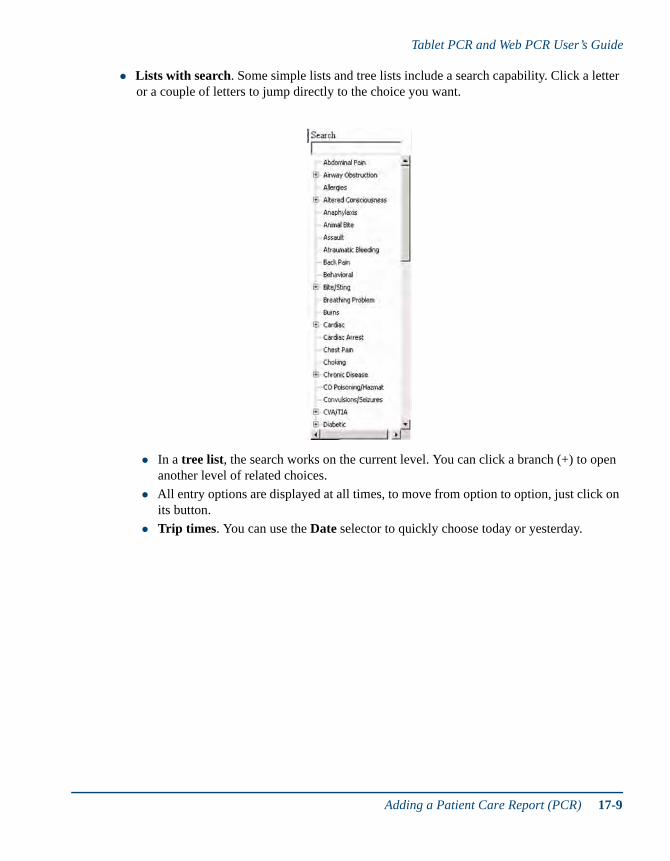
Tablet PCR and Web PCR User’s Guide
Lists with search. Some simple lists and tree lists include a search capability. Click a letter or a couple of letters to jump directly to the choice you want.
In a tree list, the search works on the current level. You can click a branch (+) to open another level of related choices.
All entry options are displayed at all times, to move from option to option, just click on its button.
Trip times. You can use the Date selector to quickly choose today or yesterday.
Adding a Patient Care Report (PCR) 17-9
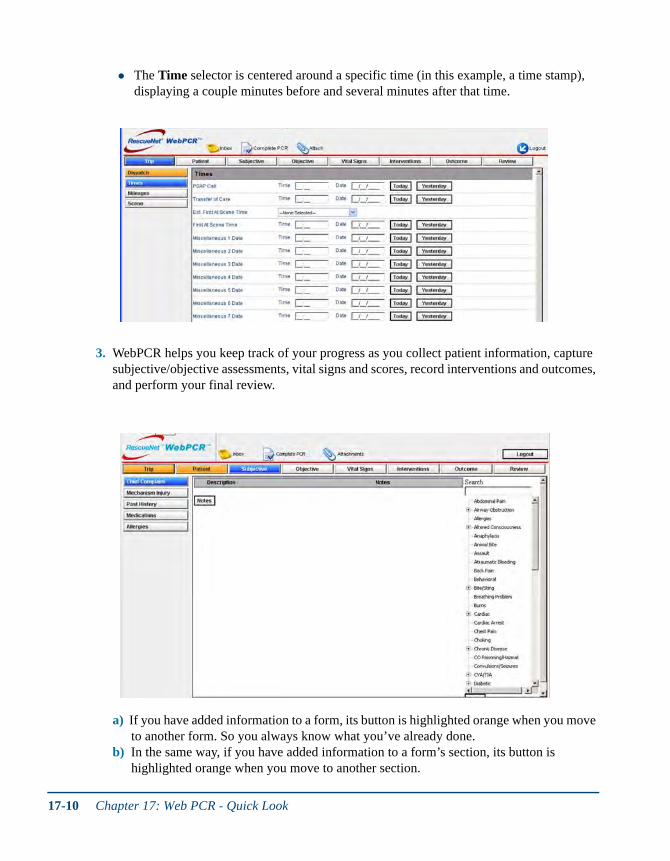
The Time selector is centered around a specific time (in this example, a time stamp), displaying a couple minutes before and several minutes after that time.
3. WebPCR helps you keep track of your progress as you collect patient information, capture subjective/objective assessments, vital signs and scores, record interventions and outcomes, and perform your final review.
a) If you have added information to a form, its button is highlighted orange when you move to another form. So you always know what you’ve already done.
b) In the same way, if you have added information to a form’s section, its button is highlighted orange when you move to another section.
17-10 Chapter 17: Web PCR - Quick Look
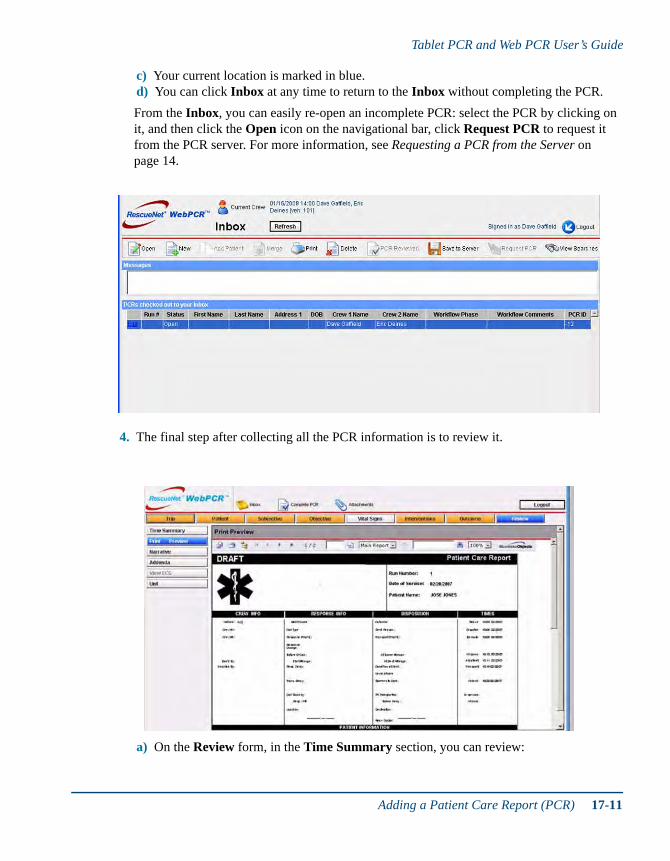
Tablet PCR and Web PCR User’s Guide
c) Your current location is marked in blue.d) You can click Inbox at any time to return to the Inbox without completing the PCR.
From the Inbox, you can easily re-open an incomplete PCR: select the PCR by clicking on it, and then click the Open icon on the navigational bar, click Request PCR to request it from the PCR server. For more information, see Requesting a PCR from the Server on page 14.
4. The final step after collecting all the PCR information is to review it.
a) On the Review form, in the Time Summary section, you can review:
Adding a Patient Care Report (PCR) 17-11

b) Change from one view to another by clicking the selections on the left.c) Print preview the PCR reportd) Add narrative to the PCR.e) Even after you have completed a PCR, you can still add information to it.f) If you have uploaded and attached a resuscitation record from a medical device, you can
view the ECG.g) For items that have data-entry information, you can go to the original data-entry field
and, if necessary, change the information. Or you can delete the item.h) You can attach other files.
Once a file has been added to the PCR, the Attach button is highlighted orange.
Fields that break Complete PCR rulesUnlike TabletPCR, WebPCR does not highlight fields that break complete PCR rules. This functionality may be added in a later release.
However, the broken rules are displayed when you attempt to complete the PCR (see next section). For more information, see The Complete Call Rule Editor on page 2.
Deleting or Editing Items from a PCRIn sections where you have the option to have more than one item listed, you may want to remove or edit them.
When viewing the list, you will see a red X, which deletes the item, or an edit icon that looked like a pencil and paper.
When you click X to delete an item, a warning box appears asking you to confirm the deletion.
All time events Signatures
Assessments Trip times
Interventions Vitals
Scores
17-12 Chapter 17: Web PCR - Quick Look

Tablet PCR and Web PCR User’s Guide
Clicking the Edit icon, takes you back to that items information screen, at which time you can make any necessary changes.
Adding Notes
You can add a note to many selected items by clicking the Edit icon.
1. Select the item to which you want to add a note, and then click the Note button.
2. On the Notes screen, type the note.
Hint: You can also copy text from one note and paste it into another. To re-open the note, select its item, and then click the Note button again.
Deleting or Editing Items from a PCR 17-13

Requesting a PCR from the ServerPCRs that appear in the Pending PCRs list can be downloaded to the local machine by clicking on the Request PCR button.
1. Click on the PCR in the Pending PCR list to highlight it, then click the Request PCR button.
2. The PCR is then moved from the server to your local machine and it is listed in the PCRs checked out to your Inbox section.
3. Work on the PCR as needed.
Completing PCRs1. Once you have completed the PCR review and you know you are finished, click the Save
PCR to Server button.
2. Identify yourself as the crew member completing the call and enter your password.
3. The PCR is checked to see whether it satisfies all of the complete call rules:
If it does, you are returned to the Inbox, and the PCR status is Complete.
If it doesn’t, the Complete Call Rules screen opens showing the rules that are broken. If any required rules are broken, you must fix them before you can complete the PCR.
Note: For more information, see The Complete Call Rule Editor on page 2.
17-14 Chapter 17: Web PCR - Quick Look

Tablet PCR and Web PCR User’s Guide
Saving the PCRUnlike TabletPCR, where synchronizing is the process of connecting to your RescueNet Field Data server, uploading your completed PCRs, and downloading any updates that are available, all you need to do with WebPCR is Save PCR to Server.
1. Click Save PCR to Server.
Once it has been saved to the server and is complete, it is the processed by the Workflow engine.
For more information, see How Workflow Effects WebPCR on page 6.
Saving the PCR 17-15

17-16 Chapter 17: Web PCR - Quick Look

18 18
Chapter 18:WebPCR - Capturing Objective Information
Topics described in this chapter include:
On this form, you can capture assessments, impressions, and trauma information.
The Assessment SectionThis is a multiple-capture wizard; you can capture multiple assessments.
1. Initially, the section opens blank, click Add New to capture an assessment.
The Assessment Section page 18-1
The Impressions Section page 18-5
The Trauma Section page 18-7
The Other Section page 18-7
The Cardiac Arrest Section page 18-8
18-1
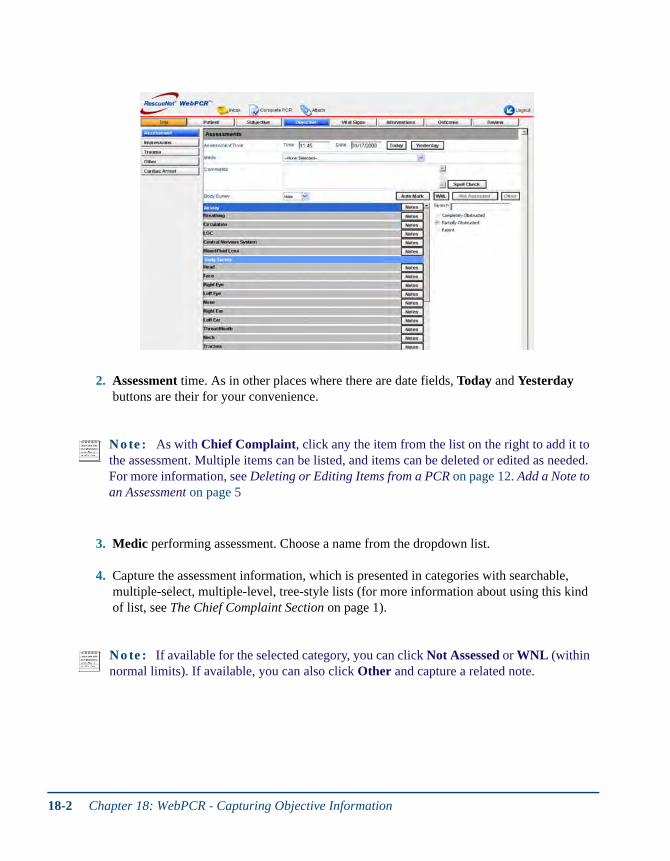
2. Assessment time. As in other places where there are date fields, Today and Yesterday buttons are their for your convenience.
3. Medic performing assessment. Choose a name from the dropdown list.
4. Capture the assessment information, which is presented in categories with searchable, multiple-select, multiple-level, tree-style lists (for more information about using this kind of list, see The Chief Complaint Section on page 1).
Note: As with Chief Complaint, click any the item from the list on the right to add it to the assessment. Multiple items can be listed, and items can be deleted or edited as needed. For more information, see Deleting or Editing Items from a PCR on page 12. Add a Note to an Assessment on page 5
Note: If available for the selected category, you can click Not Assessed or WNL (within normal limits). If available, you can also click Other and capture a related note.
18-2 Chapter 18: WebPCR - Capturing Objective Information
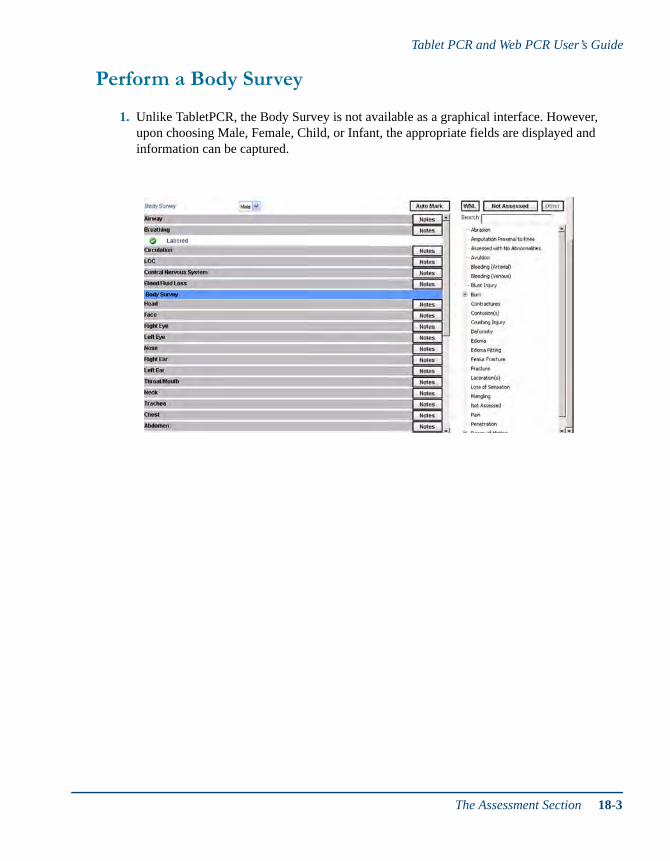
Tablet PCR and Web PCR User’s Guide
Perform a Body Survey
1. Unlike TabletPCR, the Body Survey is not available as a graphical interface. However, upon choosing Male, Female, Child, or Infant, the appropriate fields are displayed and information can be captured.
The Assessment Section 18-3

2. Perform the assessment from the body to the injury, clicking each body part as needed and choosing the pertinent information from the tree menu at the right. Notes can be added, as usual.
To Finish a Body Survey1. Click into any other frame. When you return to Assessment, it will show as a time stamped
instance. Click X to delete, the edit icon (pencil and paper) to edit the information, or review the assessment by clicking the review icon (two pieces of paper).
Auto Mark
You can use the Auto Mark feature to automatically mark all undocumented assessment categories as WNL (within normal limits) or Not Assessed.
1. Click Auto Mark.
18-4 Chapter 18: WebPCR - Capturing Objective Information
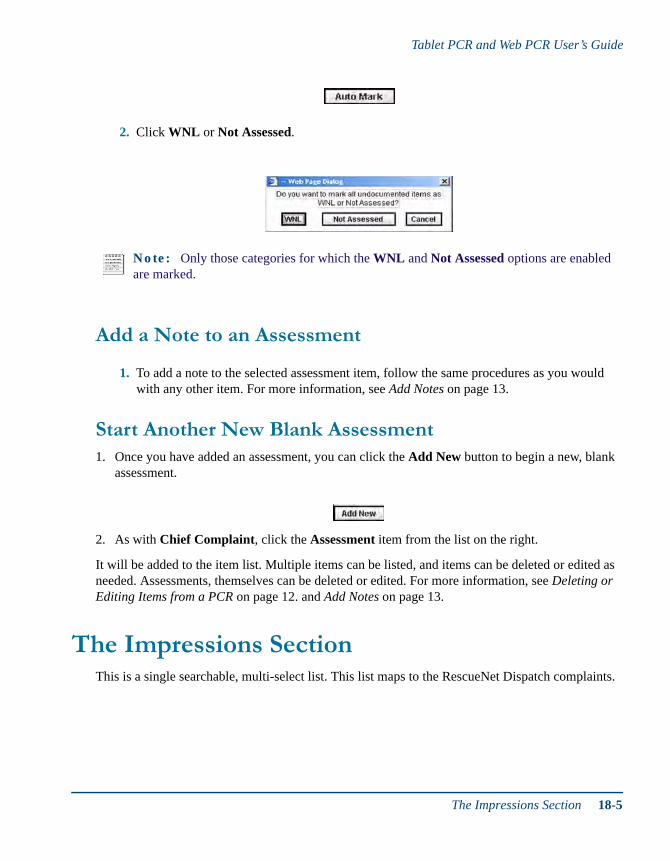
Tablet PCR and Web PCR User’s Guide
2. Click WNL or Not Assessed.
Add a Note to an Assessment
1. To add a note to the selected assessment item, follow the same procedures as you would with any other item. For more information, see Add Notes on page 13.
Start Another New Blank Assessment1. Once you have added an assessment, you can click the Add New button to begin a new, blank
assessment.
2. As with Chief Complaint, click the Assessment item from the list on the right.
It will be added to the item list. Multiple items can be listed, and items can be deleted or edited as needed. Assessments, themselves can be deleted or edited. For more information, see Deleting or Editing Items from a PCR on page 12. and Add Notes on page 13.
The Impressions SectionThis is a single searchable, multi-select list. This list maps to the RescueNet Dispatch complaints.
Note: Only those categories for which the WNL and Not Assessed options are enabled are marked.
The Impressions Section 18-5
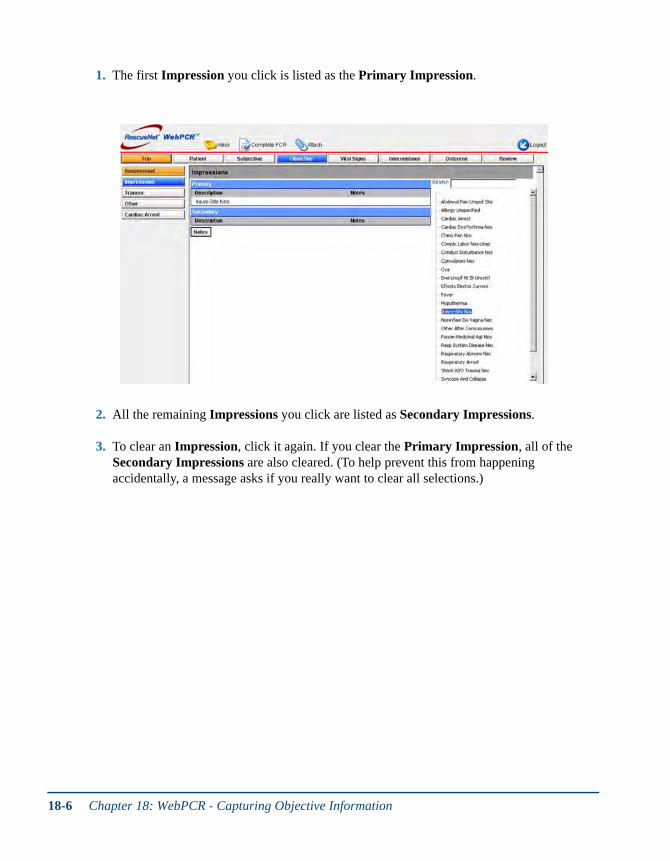
1. The first Impression you click is listed as the Primary Impression.
2. All the remaining Impressions you click are listed as Secondary Impressions.
3. To clear an Impression, click it again. If you clear the Primary Impression, all of the Secondary Impressions are also cleared. (To help prevent this from happening accidentally, a message asks if you really want to clear all selections.)
18-6 Chapter 18: WebPCR - Capturing Objective Information
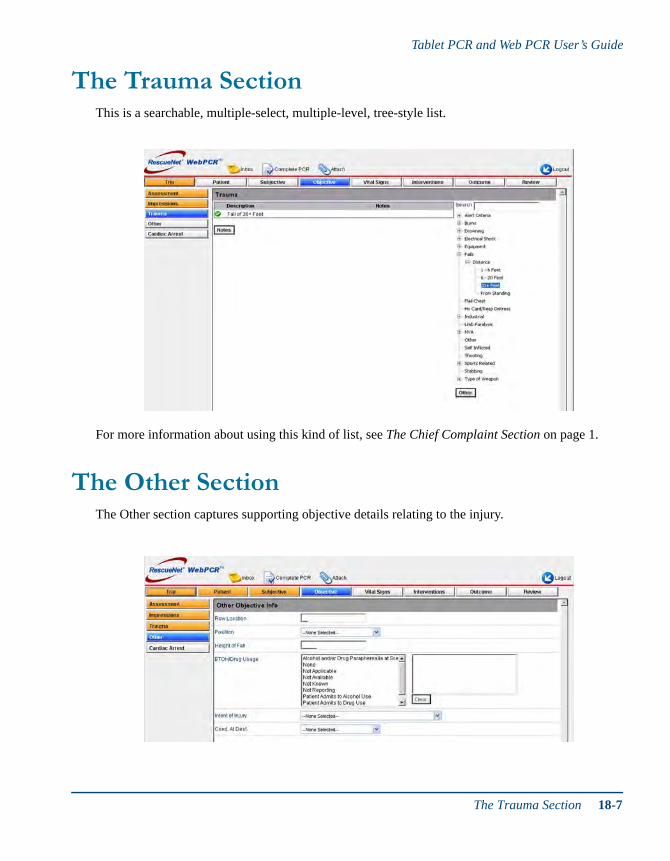
Tablet PCR and Web PCR User’s Guide
The Trauma SectionThis is a searchable, multiple-select, multiple-level, tree-style list.
For more information about using this kind of list, see The Chief Complaint Section on page 1.
The Other SectionThe Other section captures supporting objective details relating to the injury.
The Trauma Section 18-7

The Cardiac Arrest SectionUse this section to capture details on a patient who has suffered a cardiac arrest.You can choose the options available on the drop-down lists for the different fields. Fields include information such as resuscitation attempts, rhythm at destination, witnesses and so on.
18-8 Chapter 18: WebPCR - Capturing Objective Information

19 19
Chapter 19:WebPCR - Capturing Subjective Information
Topics described in this chapter include:
Each Subjective form section presents a searchable, multiple-select list of options.
The Chief Complaint SectionThis section presents a searchable, multiple-select, multiple-level, tree-style list. Often, the easiest way to find a chief complaint is to use the Search feature.
1. In the Search box, click as many letters of the chief complaint as needed to jump to it, and then click the complaint to select it, or you can scroll through the list.
The Chief Complaint Section page 19-1
The Mechanism of Injury Section page 19-3
The Past History Section page 19-3
The Medications Section page 19-4
The Allergies Section page 19-7
The Other Section page 19-8
The NEMSIS Mechanism of Injury Section page 19-8
19-1

2. If the selected item is a branch of the tree (+), the next level of choices expands and you can use search again on that level, or just click the chief complaint.
Mark as Pertinent Negative (Not Presented As)
When you select a subjective item, it is marked with a check mark.
1. To mark it as a pertinent negative item (×), click the item from the tree list on the left. The item will be shown with a red X and listed as NOT Presented.
Click once for true and present
Click twice for a pertinent negative
Click three times to clear the item entirely.
19-2 Chapter 19: WebPCR - Capturing Subjective Information

Tablet PCR and Web PCR User’s Guide
2. Notes can be added to any subjective item. For more information, see Add Notes on page 13.
The Mechanism of Injury SectionThis section presents a standard, searchable, multiple-select list. For more information about using this kind of list, see The Chief Complaint Section on page 1.
The mechanism of injury differs from the chief complaint as it is the cause of the complaint. The chief complaint are the effects of the mechanism of injury.
Add a Mechanism of Injury From a List
As with Chief Complaint, click the Mechanism of Injury from the list on the right. It will be added to the item list. Multiple items can be listed, and items can be deleted or edited as needed. For more information, see Deleting or Editing Items from a PCR on page 12. and Add Notes on page 13.
The Past History SectionThis section presents a searchable, multiple-select, multiple-level, tree-style list. For more informa-tion about using this kind of list, see The Chief Complaint Section on page 1.
The Mechanism of Injury Section 19-3

As with Chief Complaint, click the Past History item from the list on the right. It will be added to the item list. Multiple items can be listed, and items can be deleted or edited as needed. For more information, see Deleting or Editing Items from a PCR on page 12. and Add Notes on page 13.
The Medications SectionThis section presents a searchable, multiple-select list. For more information about using this kind of list, see The Chief Complaint Section on page 1.
19-4 Chapter 19: WebPCR - Capturing Subjective Information

Tablet PCR and Web PCR User’s Guide
1. You can also capture the dosage for any selected medication. Select the medication, and then click the Notes (Rx) button.
2. On the Medications screen, capture the dosage quantity, units, frequency and add notes.
As with Chief Complaint, click the Medications item from the list on the right. It will be added to the item list. Multiple items can be listed, and items can be deleted or edited as needed. For more information, see Deleting or Editing Items from a PCR on page 12. and Deleting or Editing Items from a PCR on page 12.
The Medications Section 19-5

Add Unlisted Medications Using the “Other” Button
You can quickly add medications that aren’t on the list.
1. Under the Medication section’s Search box, click the Other button.
2. A line item reading “Other - Not Listed” appears on the list. Click on the Notes / Rx button to add dosage, units, frequency and notes.
3. The Medications screen opens, wherein you may add the dosage, units, frequency and notes as usual.
Note: This feature is enabled for any list that includes an “Other” choice that has been enabled.
19-6 Chapter 19: WebPCR - Capturing Subjective Information
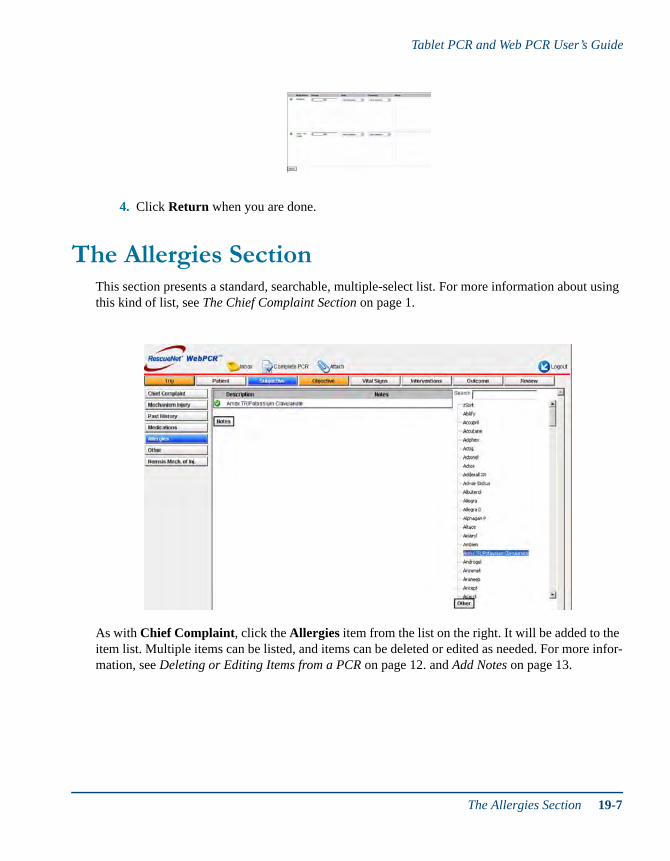
Tablet PCR and Web PCR User’s Guide
4. Click Return when you are done.
The Allergies SectionThis section presents a standard, searchable, multiple-select list. For more information about using this kind of list, see The Chief Complaint Section on page 1.
As with Chief Complaint, click the Allergies item from the list on the right. It will be added to the item list. Multiple items can be listed, and items can be deleted or edited as needed. For more infor-mation, see Deleting or Editing Items from a PCR on page 12. and Add Notes on page 13.
The Allergies Section 19-7

The Other SectionUse the Other section to capture information on the location and organ of chief complaint, the pri-mary symptoms and so on
The NEMSIS Mechanism of Injury SectionUse the searchable, multiple-select list presented in this section to record information on mecha-nism of injury for reporting to NEMSIS.
19-8 Chapter 19: WebPCR - Capturing Subjective Information
20 20
Chapter 20:WebPCR - Capturing Interventions
Topics described in this chapter include:
TabletPCR offers Quick Log functionality, which is meant to be used at the patient’s side. It enables you to capture the intervention given with a single button click, along with the time stamp. For some interventions, the system provides default qualifier values.
Later, when you have time, you can review the interventions and fill in additional details.
However, Quick Log is not available in WebPCR, therefore, interventions must be added manually.
Interventions can be added, deleted, edited, or annotated as needed. For more information, see Deleting or Editing Items from a PCR on page 12 or Adding Notes on page 13.
The Interventions SectionThis is a multiple-capture wizard; you can capture multiple interventions.
The Interventions Section page 20-1
20-1
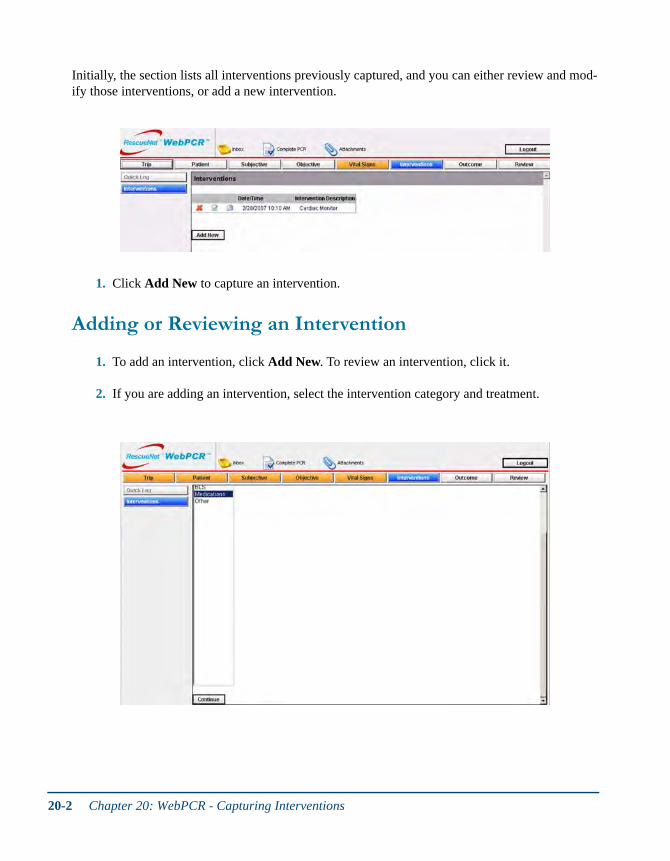
Initially, the section lists all interventions previously captured, and you can either review and mod-ify those interventions, or add a new intervention.
1. Click Add New to capture an intervention.
Adding or Reviewing an Intervention
1. To add an intervention, click Add New. To review an intervention, click it.
2. If you are adding an intervention, select the intervention category and treatment.
20-2 Chapter 20: WebPCR - Capturing Interventions
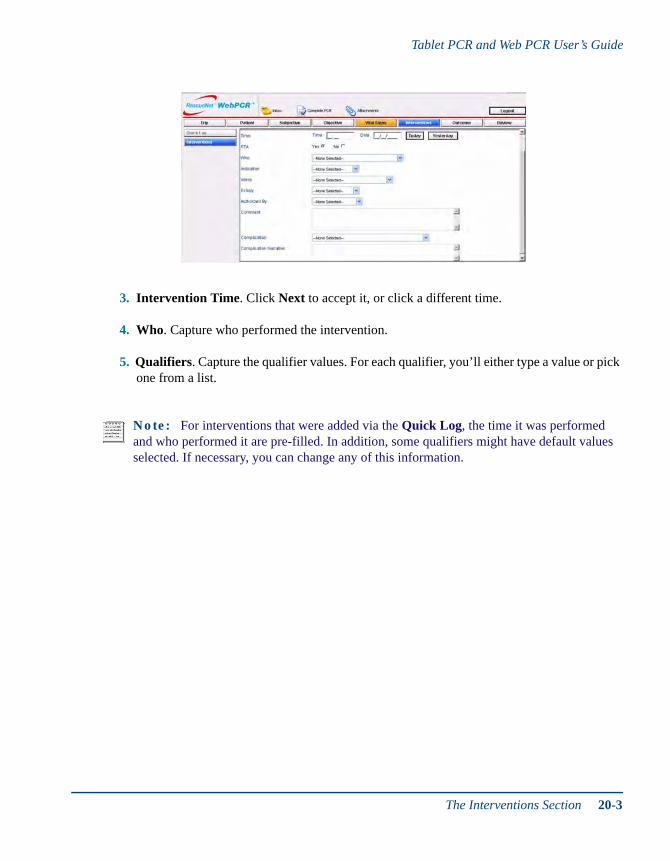
Tablet PCR and Web PCR User’s Guide
3. Intervention Time. Click Next to accept it, or click a different time.
4. Who. Capture who performed the intervention.
5. Qualifiers. Capture the qualifier values. For each qualifier, you’ll either type a value or pick one from a list.
Note: For interventions that were added via the Quick Log, the time it was performed and who performed it are pre-filled. In addition, some qualifiers might have default values selected. If necessary, you can change any of this information.
The Interventions Section 20-3

20-4 Chapter 20: WebPCR - Capturing Interventions

21 21
Chapter 21:WebPCR - Capturing Vital Signs
Topics described in this chapter include:
On this form, you can view vital signs and scores. You can only upload data from medical devices with TabletPCR. Note that the uploading functionality is not available in WebPCR.
The Vital Signs SectionThis is a multiple-capture wizard; you can capture multiple vital sign readings.
The Vital Signs Section page 21-1
The Scores Section page 21-3
The Medical Devices Section page 21-4
21-1

1. Initially, the section opens blank, click Add New to capture a vital signs reading.
2. Taken time. Today and Tomorrow buttons are their for your convenience.
3. Alternatively, you can mark a reading PTA (Prior to Arrival).
4. Capture who performed the reading, and then capture the readings. For each, you need to add one or more values, or pick from one or more lists.
Blood pressureFor example, for blood pressure, add both systolic and diastolic. Alternatively, you can click Palp (by palpation) for diastolic rather than adding a value.GCS (Glasgow Coma Scale)
For GCS, click values for Eyes, Verbal, and Motor. Each value is scored, and the three scores are totaled to arrive at the overall GCS score.
5. When you are finished capturing the readings, the system displays the summary. You can add a new reading, or copy and delete existing readings.
21-2 Chapter 21: WebPCR - Capturing Vital Signs

Tablet PCR and Web PCR User’s Guide
The Scores SectionThis is a multiple-capture wizard; you can capture multiple scores.
1. Initially, the section opens blank, click Continue to capture a score.
The following screen appears:
The Scores Section 21-3

2. Or to import the values from an existing vital signs reading:
a) There is a line of text that says Copy from Vital Signs (Optional). Existing vital sign information displays on the list. Highlight the one you need to edit and click Continue.
3. Finally, click a type of score. That type’s data-entry items are displayed, and all mapped values are pre-filled from the vital signs reading (which values are mapped depends on how your organization has set up WebPCR). For example, in the GCS section:
The Medical Devices SectionWebPCR allows you to only view records from medical devices that were imported into Tablet PCR. For more information on the medical devices supported by Tablet PCR, see “The Medical Devices Section” on page 6-6.
21-4 Chapter 21: WebPCR - Capturing Vital Signs
22 22
Chapter 22:WebPCR - Capturing the Outcome
Topics described in this chapter include:
On this form, you can capture the outcome, times, and signatures.
The Outcome SectionIn this section, you can capture disposition, transport, and drop-off information. You can add up to three Barriers to Care and Destination Delay items.
The Outcome Section page 22-1
The Times Section page 22-2
The Signatures Section page 22-2
The NPP Section page 22-3
The Exposures Section page 22-3
22-1

The Times SectionIn this section, you can capture all dispatch and transport times. Some of the times might be pre-filled with the times from the Times section of the Trip form.
The Signatures SectionThis section is disabled in WebPCR. Make sure you gather all necessary signatures with TabletPCR prior to synching an incomplete call.
22-2 Chapter 22: WebPCR - Capturing the Outcome

Tablet PCR and Web PCR User’s Guide
The NPP SectionThis section is disabled in WebPCR. Make sure you capture all the NPP data in WebPCR prior to closing the call.
The Exposures SectionUse this section to record information on exposures for the patient and the medic with date and time stamps.
The NPP Section 22-3

22-4 Chapter 22: WebPCR - Capturing the Outcome
23 23
Chapter 23:WebPCR - Reviewing the PCR
Topics described in this chapter include:
On this form, you can review all of the times, vital signs, interventions, assessments, scores, and signatures you have captured. You can also preview the printable Patient Care Report and add narrative.
Unlike TabletPCR, WebPCR allows changes even after the PCR is in Complete status. Edits can be made to the PCR without the need for an addenda section. All additions, deletions, and modifica-tions to the PCR are recorded and stored in the PCR history for future audit.
The Crew SectionThe Crew section summarizes crew, vehicle and shift information pertaining to a PCR. You can navigate through this section to ensure that all information is accurate and complete.
The Crew Section page 23-2
The Time Summary Section page 23-2
The Print Preview Section page 23-3
The Narrative Section page 23-4
The View ECG Section page 23-5
The Research Survey Section page 23-5
The QA Comments Section page 23-5
Printing Reports page 23-6
23-1
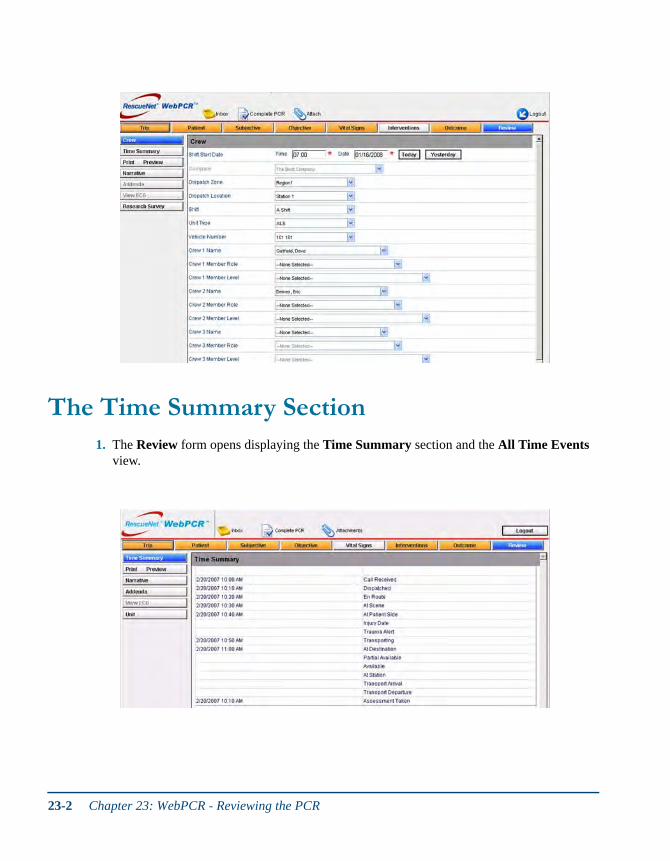
The Time Summary Section1. The Review form opens displaying the Time Summary section and the All Time Events
view.
23-2 Chapter 23: WebPCR - Reviewing the PCR
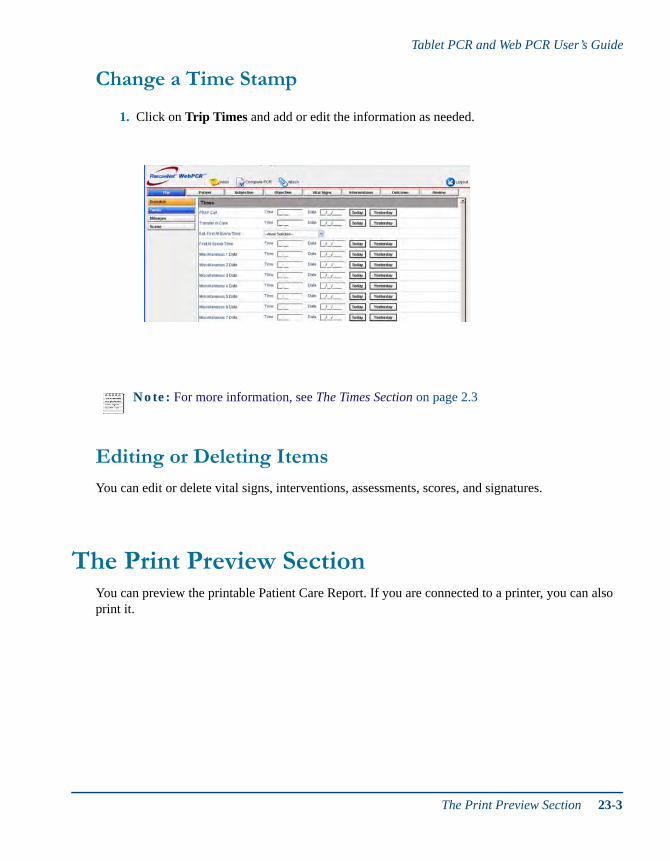
Tablet PCR and Web PCR User’s Guide
Change a Time Stamp
1. Click on Trip Times and add or edit the information as needed.
Editing or Deleting Items
You can edit or delete vital signs, interventions, assessments, scores, and signatures.
The Print Preview SectionYou can preview the printable Patient Care Report. If you are connected to a printer, you can also print it.
Note: For more information, see The Times Section on page 2.3
The Print Preview Section 23-3

1. Click Print Preview.
The Narrative SectionYou can add a narrative of up to 40,000 characters to the PCR.
1. Click Narrative.
23-4 Chapter 23: WebPCR - Reviewing the PCR

Tablet PCR and Web PCR User’s Guide
The View ECG SectionIf medical device data has been linked to the PCR, you can view the associated ECG. If there is only one case linked, when you tap View ECG, it opens directly. If there is more than one case linked ECG, a list is displayed, and you can tap the one you want to view.
The ECG is opened in the software associated with the medical device, for example, RescueNet Code Review for data from ZOLL defibrillators. For more information, see “Viewing ECG” on page 7-14..
The Research Survey SectionUse this area to capture information on a potential research survey item relating to the PCR.
The QA Comments SectionThis area is used to add or view QA Comments and Markers in a PCR.
The View ECG Section 23-5

1. Click the QA Comments tab of the Review section to view the comments.
Printing ReportsYou can print preview and print (if you are connected to a printer) the Patient Care Report, as well as the medical device reports for any linked medical device uploads.
1. Just click the Print icon.
On the Print Reports screen, you can preview the Patient Care Report. You can also select a printer, set the number of copies you want to print, and select a medical device report if you want it to be printed together with the Patient Care Report.
23-6 Chapter 23: WebPCR - Reviewing the PCR
24 24
Chapter 24:WebPCR - Capturing Attachments
Topics described in this chapter include:
You can attach files (such as digital photos) and even your own drawings (or hand-written notes) to a PCR.
Adding Files and Drawings1. Click Attachments.
2. On the File Attachments screen, click Add.
To attach a file, click Other File. A standard Windows Select File dialog box opens. Find and select the file. Add a description if needed.
Adding Files and Drawings page 24-1
Opening or Printing an Attachment page 24-2
24-1
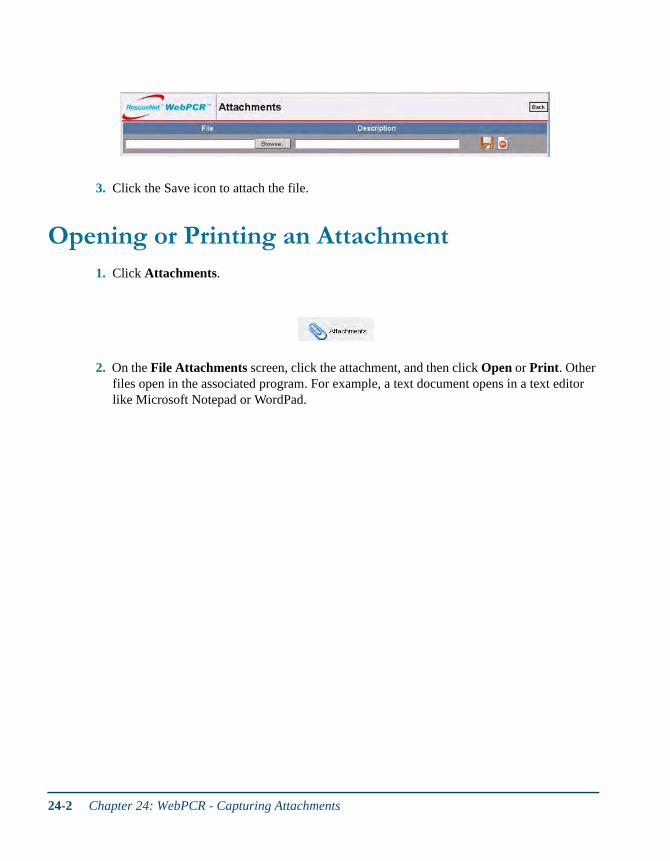
3. Click the Save icon to attach the file.
Opening or Printing an Attachment1. Click Attachments.
2. On the File Attachments screen, click the attachment, and then click Open or Print. Other files open in the associated program. For example, a text document opens in a text editor like Microsoft Notepad or WordPad.
24-2 Chapter 24: WebPCR - Capturing Attachments

25 25
Chapter 25:WebPCR - Completing the PCR
Topics described in this chapter include:
When you have finished capturing all of the necessary information, you can complete the PCR. Once complete, the PCR will be automatically sent to the server.
Finishing the PCR
1. Once you have completed the PCR review and know you are finished documenting it, click Complete PCR.
2. If the PCR fails to satisfy any required or optional Complete PCR Rules, they are displayed.
Finishing the PCR page 25-1
Deleted PCRs page 25-2
Note: If you are required to download dispatch times before completing a PCR, you must do so in order to change the status of the PCR to Ready to Complete. In that case, you can only complete a PCR once it is in Ready to Complete status.
25-1
3. Click on the + sign under Fields to get further information on the item.
4. You can click a failed rule to be taken to the item that needs to be completed. For example, if Call Received Time is required, you will be taken directly to the Times screen.
5. Once you have satisfied all required rules and satisfied or bypassed all optional rules, you must select yourself as the Completed by user and enter your password and click Complete.
6. You are returned to the Inbox, and the PCR status is changed to “Complete.”
Deleted PCRsDispatched PCRs which have not been updated after a period of time set by your administrator are automatically deleted from the PCR server. Users assigned to the PCR will receive a revoke message alerting them to the deletion. Only PCR’s that are in a Dispatch status (have never been checked out from the server) will be marked for deletion.
25-2 Chapter 25: WebPCR - Completing the PCR

26 26
Chapter 26:WebPCR - Complete Call Rules
Topics described in this chapter include:
Complete call rules are a tool that can help you reduce errors related to data entry and omissions.
A set of default pre-made rules is a part of normal installation, but your organization can create cus-tom complete call rules that exactly match your company’s specific needs.
You can set up complete call rules for each user type that needs them, and the rules themselves can range from simple single-item rules to more complex, multiple-item rules, depending on what you need.
For example, a complete call rule for a medic could be as simple as there must be an incident num-ber before the call can be closed. Or, you might require that if there is a departure from scene time, there must be an arrival at destination time.
Your organization can control whether a rule is optional, required, or disabled. Optional rules will let the user know that a rule has been broken, but still allow the call to be closed, while required rules do not allow the call to be closed until the piece of information that broke the rule is fixed.
Who Can Add a Complete Call Rule?You can control access to the Complete Call Rule Editor through the Data Management Console. In the Security Configuration branch, you can create Roles, assign Commands to those Roles (this is
Who can add a Complete Call Rule? page 26-1
How do you know when the rule has been broken? page 26-2
How Complete Call Editor effects WebPCR page 26-2
How Workflow Editor effects WebPCR page 26-6
Pending PCRs in your Inbox page 26-7
26-1

where you will grant access to the Complete Call Rules Editor), and assign Operators to each Group.
How do You Know a Rule has Been Broken?In WebPCR, there are multiple ways to know if a PCR has not passed the complete call rule phase. The first is when you initially try to close a call. If the PCR fails to meet the complete call rules, the Complete Call Rule Editor screen appears
Under Type, the error will be listed as Optional or Required. Calls can be closed with broken Optional rules; however, if the rule is Required, the item must be fixed before the call can be closed.
Message displays the general rule set name.
Fields give further detail into what rules have been broken. Rules with multiple items will display a (+) which, when clicked, will expand to give further information.
Most items can be accessed directly with a click on the link. Clicking “Incident/Times/Call Received” will open up the Time section. This greatly reduces the time spent searching for the missing item.
The Complete Call Rule Editor
The information contained in this section is for further information only. Unless you have rights and permissions to access the Complete Call Rule Editor, this information is given merely so you have an understanding of what is happening “behind the scenes”.
Please see the Complete Call Rule Editor Guide for full details.
26-2 Chapter 26: WebPCR - Complete Call Rules
Tablet PCR and Web PCR User’s Guide
The top section of the screen lists all the rules that apply to your organization. The gears at the left signify that there are rules embedded in rules. For example “Treatment Excepted” had a child rule “Accept Treatment at Patient Side.”
Descriptions give further information to clarify the rule title.
Category describes what sort of rule it is.
Status shows if a rule is required, optional, or disabled.
Display Message is the message that displays on your screen, letting you know of the error.
The bottom section advises if created rules are incomplete, illogical, or invalid. Red (X) denotes an error, the yellow (!) denotes a warning only.
How do You Know a Rule has Been Broken? 26-3

The call is flagged with an exception symbol in the Inbox
Finally, if a user chooses to exit the call (without closing it) and return to the Inbox, the call is flagged with the exception symbol representing the highest level of exception currently active in the call, which is shown to the left of the call.
In a multiple-patient call, each patient is listed separately with the exception symbol that relates specifically to the status of their portion of the call.
How Complete Call Editor Effects WebPCR
Completing the Call
1. Once you have completed the PCR review and know you are finished documenting it, click Complete PCR.
Note: If you are required to download dispatch times before completing a PCR, you must do so in order to change the status of the PCR to Ready to Complete. In that case, you can only complete a PCR once it is in Ready to Complete status.
26-4 Chapter 26: WebPCR - Complete Call Rules

Tablet PCR and Web PCR User’s Guide
2. If the PCR fails to satisfy any required or optional Complete PCR Rules, they are displayed.
3. Click on the + sign under Fields to get further information on the item.
4. You can click a failed rule to be taken to the item that needs to be completed. For example, if Call Received Time is required, you will be taken directly to the Times screen.
5. Once you have satisfied all required rules and satisfied or bypassed all optional rules, you must select yourself as the Completed by user and enter your password and click Complete.
6. You are returned to the Inbox, and the PCR status is changed to “Complete.”
Note: If you are required to download dispatch times before completing a PCR, you must do so in order to change the status of the PCR to Ready to Complete. In that case, you can only complete a PCR once it is in Ready to Complete status.
How Complete Call Editor Effects WebPCR 26-5

How Workflow Effects WebPCRThe information contained in this section is for further information only. Unless you have rights and permissions to access the Workflow Editor, this information is given merely so you have an understanding of what is happening “behind the scenes”.
Please see the Workflow Editor Guide for full details.
PCRs that have been assigned to you or your group from Workflow Editor, or those that have been rerouted appear in the Server PCR List of the Inbox.
Rerouting PCRs
You may reroute a PCR to another individual or group to request that further action be taken. Reroute works in combination with the server and Workflow to insure that the PCRs are worked according to your organization’s policies and procedures.
1. Click on Reroute PCR.
The Reroute PCR screen opens.
2. Fill out the appropriate fields and comments to let the recipient know what they need to do.
3. Click Reroute.
26-6 Chapter 26: WebPCR - Complete Call Rules

Tablet PCR and Web PCR User’s Guide
Rerouted PCRs appear in the Pending PCRs portion of that group or individual’s Inbox.
Pending PCRs in your InboxPCRs that have gone through the Workflow process and are destined by the Workflow Editor rules to your Inbox appear in the Pending PCRs section.
1. Click on the PCR to highlight it.
2. Click on Request PCR to open it.
3. Work these in accordance with set processes and procedures or the comments in Workflow Comments.
Pending PCRs in your Inbox 26-7

26-8 Chapter 26: WebPCR - Complete Call Rules