reveal… - grŵp llandrillo menai · web viewdisplay the other basic tabs, one at a time,...
TRANSCRIPT

Open Learning PowerPoint 2007 Introductory
Open Learning GuideOpen Learning Guide
Microsoft®
PowerPoint® 2007Introductory
Note: Microsoft is a registered trademark and Windows is a trademark of the Microsoft Corporation. Sound and video data files are copyright of NASA.
Release OL321v1
© CIA Training Ltd 2008 1

Open Learning PowerPoint 2007 Introductory
Published by:
CiA Training LtdBusiness & Innovation CentreSunderland Enterprise ParkSunderland SR5 2THUnited Kingdom
Tel: +44 (0)191 549 5002Fax: +44 (0)191 549 9005
E-mail: [email protected]: www.ciatraining.co.uk
ISBN 13: 978-1-86005-540-9
Important NoteThis guide was written using Windows Vista. If using Windows XP some dialog boxes will look different, although the content is the same.
A screen resolution of 1024 x 768 was used. Working in a different screen resolution, or with an application window which is not maximised, will change the look of the Office 2007 Ribbon.
The ribbon appearance is dynamic, it changes to fit the space available. The full ribbon may show a group containing several options, but if space is restricted it may show a single button that you need to click to see the same options, e.g. the
Editing group may be replaced by the Editing button .
First published 2008
Copyright © 2008 CiA Training Ltd
All rights reserved. No part of this publication may be reproduced, stored in a retrieval system, or transmitted in any form or by any means (electronic, mechanical, photocopying, recording or otherwise) without the prior written permission of CiA Training Limited.
Microsoft is a registered trademark and Windows is a trademark of the Microsoft Corporation. Screen images reproduced by permission of the Microsoft Corporation. All other trademarks in this book are acknowledged as the property of their respective owners.
2 © CIA Training Ltd 2008

Open Learning PowerPoint 2007 Introductory
CiA Training's Open Learning guides are a collection of structured exercises building into a complete open learning package to teach how to use a particular software application. They are designed to take the user through the features to enhance, fulfil and instil confidence in the product.
POWERPOINT INTRODUCTORY - The first guide in the PowerPoint 2007 series contains exercises covering the following topics:
Creating Presentations Clip Art
Help Animation Schemes
Views Organisation Charts
Saving Presentations Tables and Charts
Slide Formats Printing and Colour Options
Slide Layout Bullets and Numbering
Find and Replace Data Drawing and AutoShapes
This Open Learning guide is suitable for:
Any individual wishing to learn this version of PowerPoint. The user works through the guide from start to finish.
Tutor led groups as reinforcement material. It can be used as and when necessary.
Aims and Objectives
To provide the knowledge and techniques necessary for the successful creation and manipulation of presentations using PowerPoint 2007.
After completing the guide the user will be able to:
create and add slides of various kinds to a presentation
use preset animation schemes
add graphics and charts
change slide design and layout
produce a slide show on a screen
© CIA Training Ltd 2008 3

Open Learning PowerPoint 2007 Introductory
Downloading the Data FilesThe data associated with these exercises must be downloaded from our website. Go to: www.ciatraining.co.uk/data. Follow the on screen instructions to download the appropriate data files.
By default, the data files will be downloaded to Documents\CIA DATA FILES\Open Learning\PowerPoint 2007 Introductory Data.
If you prefer, the data can be supplied on CD at an additional cost. Contact the Sales team at [email protected].
IntroductionThis guide assumes that the program has been correctly and fully installed on your personal computer, that the computer is already switched on, and that a printer and mouse are attached. The guide was created using version 2007 of PowerPoint.
Some prepared presentations for the exercises are contained on disk. This avoids unnecessary typing and speeds up the learning process.
Important Notes For All UsersThe accompanying data contains files, enabling the user to practise new techniques without the need for data entry.
Notation Used Throughout This Guide Key presses are included within < > e.g. <Enter>
The guide is split into individual exercises. Each exercise consists of a written explanation of the feature, followed by a stepped exercise. Read the Guidelines and then follow the Actions with reference to the Guidelines, if necessary.
Recommendations Read the whole of each exercise before starting to work through it. This
ensures understanding of the topic and prevents any unnecessary mistakes.
Measurements used throughout this guide are metric, substitute similar distances if Imperial measurements are used.
It is assumed that the language selected is English (UK).
4 © CIA Training Ltd 2008

Open Learning PowerPoint 2007 Introductory
Section 1 Fundamentals....................................................................................................................... 71 - STARTING POWERPOINT...............................................................................................................................82 - THE POWERPOINT SCREEN...........................................................................................................................93 - PRESENTATIONS..........................................................................................................................................104 - THE RIBBON................................................................................................................................................115 - QUICK ACCESS TOOLBAR...........................................................................................................................136 - THE TASKBAR.............................................................................................................................................147 - HELP............................................................................................................................................................158 - PREFERENCES..............................................................................................................................................179 - CLOSING POWERPOINT...............................................................................................................................1910 - REVISION: FUNDAMENTALS......................................................................................................................20
SECTION 2 SLIDES..........................................................................................................................................2111 - VIEWS........................................................................................................................................................2212 - SLIDE VIEW...............................................................................................................................................2413 - SLIDES AND OUTLINE VIEW......................................................................................................................2514 - SLIDE SORTER VIEW.................................................................................................................................2715 - NOTES PAGE VIEW....................................................................................................................................2816 - SLIDE SHOW BASICS.................................................................................................................................2917 - SAVING A PRESENTATION.........................................................................................................................3018 - CLOSING A PRESENTATION.......................................................................................................................3219 - OPENING PRESENTATIONS.........................................................................................................................3320 - REVISION: SLIDES.....................................................................................................................................34
SECTION 3 PRESENTATIONS......................................................................................................................3521 - CREATING A BLANK PRESENTATION........................................................................................................3622 - PRE-DEFINED PRESENTATIONS.................................................................................................................3723 - THEMES.....................................................................................................................................................3924 - ADDING HEADERS AND FOOTERS.............................................................................................................4125 - ADDING A NEW SLIDE..............................................................................................................................4326 - CHANGING SLIDE LAYOUT........................................................................................................................4427 - INSERTING SLIDES.....................................................................................................................................4528 - SPLITTING SLIDES.....................................................................................................................................4629 - CREATING A SUMMARY SLIDE..................................................................................................................4830 - REVISION: PRESENTATIONS.......................................................................................................................49
SECTION 4 FORMATTING............................................................................................................................5031 - TEXT FORMATTING...................................................................................................................................5132 - APPLYING TEXT EFFECTS.........................................................................................................................5233 - ALIGNMENT AND SPACING........................................................................................................................5334 - FORMATTING BULLETS.............................................................................................................................5435 - INDENTS....................................................................................................................................................5536 - PICTURE BULLETS.....................................................................................................................................5637 - AUTOMATIC NUMBERING..........................................................................................................................5738 - USING UNDO AND REDO...........................................................................................................................5839 - FIND AND REPLACE DATA........................................................................................................................5940 - USING CUT AND PASTE.............................................................................................................................6041 - USING COPY AND PASTE...........................................................................................................................6242 - REVISION: FORMATTING...........................................................................................................................63
© CIA Training Ltd 2008 5
Open Learning PowerPoint 2007 Introductory
SECTION 5 POWERPOINT OBJECTS.........................................................................................................6443 - INSERTING AN ORGANISATION CHART.....................................................................................................6544 - MOVING AND RESIZING OBJECTS.............................................................................................................6745 - INSERTING CLIP ART.................................................................................................................................6846 - INSERTING A PICTURE FROM A FILE.........................................................................................................7047 - INSERTING A TABLE..................................................................................................................................7148 - INSERTING A CHART.................................................................................................................................7249 - DRAWING ON SLIDES................................................................................................................................7450 - USING OTHER SHAPES..............................................................................................................................7551 - FORMATTING SHAPES...............................................................................................................................7652 - USING THE FORMAT PAINTER...................................................................................................................7853 - INSERTING WORDART...............................................................................................................................7954 - REVISION: POWERPOINT OBJECTS............................................................................................................81
SECTION 6 SLIDE FORMATTING...............................................................................................................8255 - SLIDE DESIGN AND SETUP........................................................................................................................8356 - APPLYING COLOUR SCHEMES...................................................................................................................8457 - SPELL CHECKING THE PRESENTATION......................................................................................................8558 - REVISION: SLIDE FORMATTING.................................................................................................................86
SECTION 7 SLIDE SHOWS.............................................................................................................................8759 - SETTING UP A SLIDE SHOW.......................................................................................................................8860 - APPLYING SLIDE TRANSITIONS.................................................................................................................8961 - RUNNING THE PRESENTATION..................................................................................................................9062 - PRINTING SLIDES AND PRESENTATIONS....................................................................................................9163 - HANDOUTS................................................................................................................................................9264 - COLOUR OPTIONS.....................................................................................................................................9365 - PRESENTATION FORMATS.........................................................................................................................9466 - REVISION: SLIDE SHOWS...........................................................................................................................95
ANSWERS...........................................................................................................................................................96
GLOSSARY.........................................................................................................................................................99
INDEX................................................................................................................................................................101
OTHER PRODUCTS FROM CIA TRAINING.............................................................................................103
6 © CIA Training Ltd 2008
Open Learning PowerPoint 2007 Introductory
Section 1
Fundamentals
By the end of this Section you should be able to:
Understand PowerPoint PrinciplesStart PowerPoint
Recognise the Screen LayoutUnderstand the Ribbon and Quick Access Toolbar
Use the TaskbarUse Help
Change PreferencesExit PowerPoint
© CIA Training Ltd 2008 7
Open Learning PowerPoint 2007 Introductory
Exercise 1 - Starting PowerPointGuidelines:
PowerPoint is a powerful presentation graphics application, which allows impressive presentations to be produced with ease. Presentations can be viewed on screen, on an overhead projector, on 35mm slides, or as web pages.
A presentation can include text in any format, pictures, graphs, tables, organisation charts, sound and video. A finished slide show can incorporate animation and special effects.
Presentation notes, handouts, slide printouts and text outlines can also be produced.
Although there are numerous ways to start the program, the following method is recommended for beginners.
Actions:
1. Starting the computer will automatically show the Windows Desktop.
2. Click once on to show the Start menu. All Windows applications can be started here.
3. Move the mouse pointer over All Programs. Click the folder and then .
Note: If PowerPoint has been used recently there may be an entry for it in the Start menu and it can be started from there.
4. If the Tip of the Day dialog box appears, click on Close.
5. The opening PowerPoint screen is displayed.
8 © CIA Training Ltd 2008
Open Learning PowerPoint 2007 Introductory
Exercise 2 - The PowerPoint ScreenGuidelines:
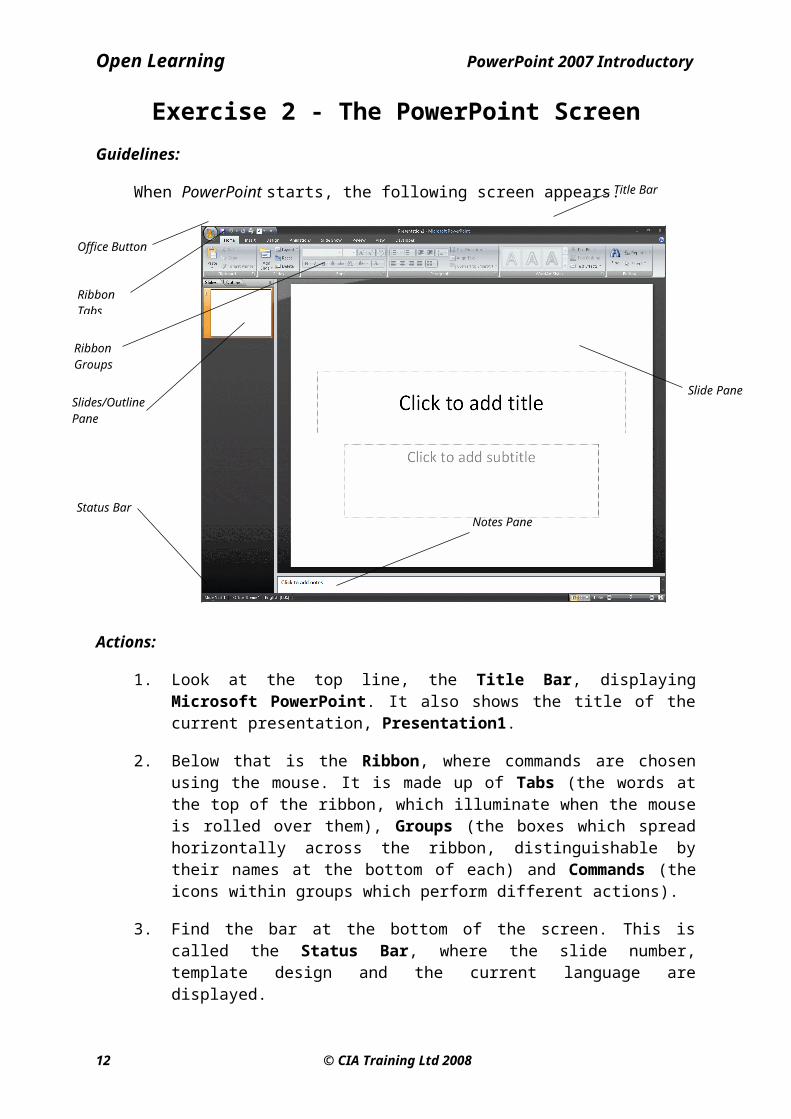
When PowerPoint starts, the following screen appears.
Actions:
1. Look at the top line, the Title Bar, displaying Microsoft PowerPoint. It also shows the title of the current presentation, Presentation1.
2. Below that is the Ribbon, where commands are chosen using the mouse. It is made up of Tabs (the words at the top of the ribbon, which illuminate when the mouse is rolled over them), Groups (the boxes which spread horizontally across the ribbon, distinguishable by their names at the bottom of each) and Commands (the icons within groups which perform different actions).
3. Find the bar at the bottom of the screen. This is called the Status Bar, where the slide number, template design and the current language are displayed.
4. The main part of the screen shows various views of the current presentation. The default view, shown here is Normal view.
5. To the left of the Slide pane is the Slides/Outline pane with two tabs, Slides and Outline. The default view shows Slides. This view shows the slides as thumbnails. This presentation has only one slide with no content.
© CIA Training Ltd 2008 9
RibbonGroups
Status Bar
Office Button
RibbonTabs
Notes Pane
Slides/Outline Pane
Slide Pane
Title Bar

Open Learning PowerPoint 2007 Introductory
Exercise 3 - PresentationsGuidelines:
The PowerPoint New Presentation dialog box offers various ways to start a new presentation.
Templates allows the basic background design to be chosen from any previously saved templates. Individual slides and content can then be created with this background already applied.
Microsoft Office Online allows users to choose from hundreds of online templates. An internet connection is required to access these files.
Blank and recent presentation provides no preset options. The user defines the layout, content and background for all slides. Themes can be applied later.
Recently Used Templates allows the basic background design to be chosen from any templates which have been used or modified recently (none may be shown when the application is started for the first time). This can allow quicker access for users who have paused whilst planning or designing a presentation.
Actions:
1. In the top left corner of the screen, click the Office Button, , and select New. This dialog box deals with opening and creating a new presentation.
2. Click Installed Templates, and from the gallery click Introducing PowerPoint 2007 to select it.
3. Click Create to open it.
4. Notice the three distinct areas of the screen. At the left is a slim panel which displays either Slides or Outline. Make sure the Slides tab is selected.
5. This template is complete with a number of slides designed to demonstrate the benefits of Microsoft PowerPoint 2007. However, you can now add and remove slides as well as modify the contents as required.
6. Each slide is numbered. To display a slide in the main part of the screen, click on it in the pane on the left. Click Slide 2 to display it.
7. Leave this presentation on screen for the next exercise.
10 © CIA Training Ltd 2008
Open Learning PowerPoint 2007 Introductory
Exercise 4 - The RibbonGuidelines:
In previous versions of Microsoft Office applications, commands were controlled by a series of menus and toolbars. PowerPoint 2007 has replaced these with a Ribbon which is displayed at the top of the application window. The Ribbon contains buttons and drop down lists to control the operation of PowerPoint. The Ribbon is divided into a series of Tabs, each one of which has a set of controls specific to a certain function or process. On each tab, the controls are further divided into separate Groups of connected functions.
Some tabs can be selected manually, some only appear when certain operations are active, for example only when a Chart is active, will Chart Tools tabs be displayed on the Ribbon.
Actions:
1. On the Ribbon, the Home tab should be selected. Other basic tabs are available.
Part of the Ribbon displaying the Home tab
Note: Any buttons or commands displayed in pale grey are called ghosted and are not available to be selected at present.
2. Notice how the buttons on the Ribbon are divided into Groups (Clipboard, Slides, Font, etc.).
Note: The display of buttons on the Ribbon is dynamic. That is it will change according to how much space there is available. If the window is not maximised or the screen resolution is anything other than 1024 by 768, the Ribbon will not always appear as shown in this guide.
3. Leave the cursor over of any the buttons. A ToolTip appears which gives more information and an alternative key press for the function, if available.
4. Some buttons produce immediate effects, like the Bold, Italic and Underline buttons in the Font group.
© CIA Training Ltd 2008 11
Open Learning PowerPoint 2007 Introductory
Exercise 4 - Continued5. Buttons with a drop down arrow lead to further options. Click the Shapes
button, which is found in the Drawing group. A list of further options is displayed. Click the button again to remove the options.
6. Some options will display a dialog box which needs data to be entered. Click the Replace button, the Replace dialog box is displayed, where text can be found or replaced. Click the Close button in the dialog box to remove it.
7. Some groups have a dialog box launcher to the right of the group name, e.g. the Font group,
8. In the Slides/Outline pane click on Slide1 to display it in the slide pane. Click on the word Introducing in the main slide, click the Font dialog box launcher to display the Font dialog box.
9. This is a tabbed dialog box, showing the current format of the selected word. Click Cancel to close the Font dialog box.
10. Display the other basic tabs, one at a time, Insert, Design, Animations, Slide Show, Review and View to see which other commands are available. The Drawing Tools, Format tab will also be displayed, if the insertion point is still within the word Introducing.
11. Select the Home tab again.
12 © CIA Training Ltd 2008

Open Learning PowerPoint 2007 Introductory
Exercise 5 - Quick Access ToolbarGuidelines:
Above the Ribbon on the left of the Title Bar is the Quick Access Toolbar which contains a few popular command buttons. By default this toolbar has three buttons, Save, Undo and Repeat. This toolbar can be customised by adding further buttons.
Actions:
1. The Quick Access Toolbar is located next to the Office Button.
2. Point at each button on the Quick Access Toolbar and read its ToolTip.
3. The third button is the Repeat/Redo button. This button has a dual function, it changes to a Redo button after the Undo button has been used.
4. To the right of the Repeat/Redo button is the Customize Quick Access Toolbar button, . Click the button to display the menu.
5. To add commands not shown, click More Commands. This displays the PowerPoint Options window with the Customize option selected. This window is covered later in the Preferences exercise.
6. Click Cancel to close the window.
© CIA Training Ltd 2008 13

Open Learning PowerPoint 2007 Introductory
Exercise 6 - The TaskbarGuidelines:
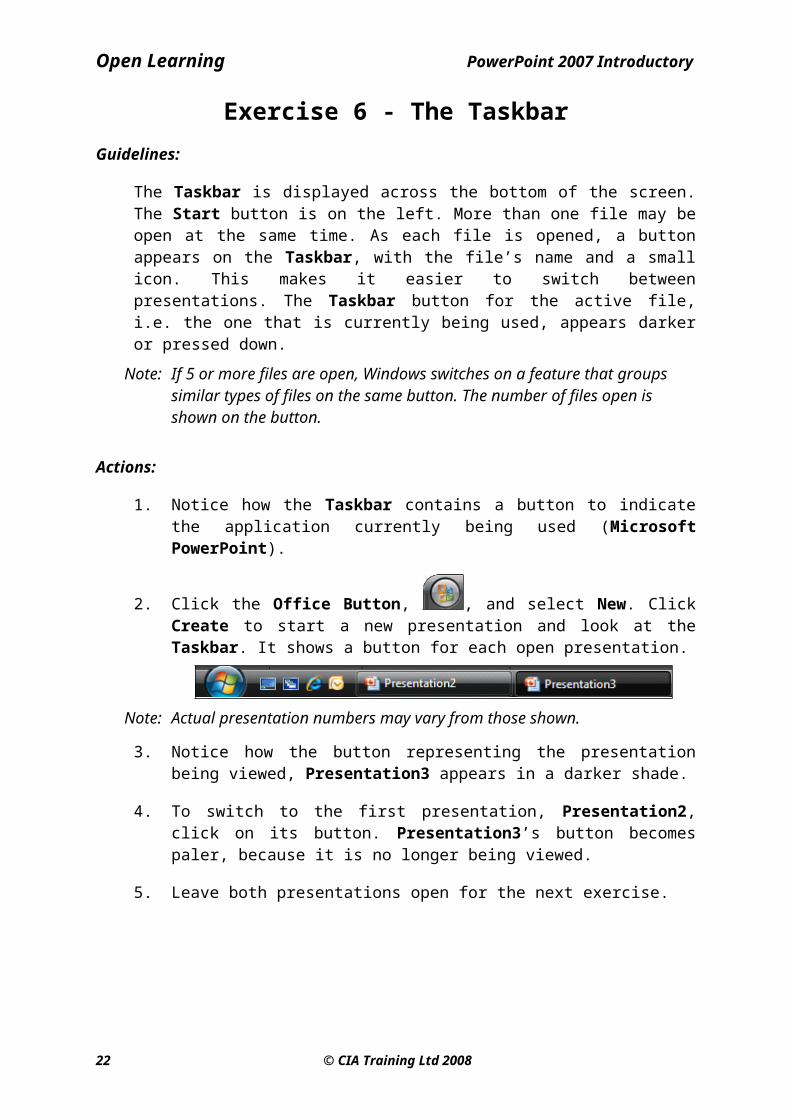
The Taskbar is displayed across the bottom of the screen. The Start button is on the left. More than one file may be open at the same time. As each file is opened, a button appears on the Taskbar, with the file’s name and a small icon. This makes it easier to switch between presentations. The Taskbar button for the active file, i.e. the one that is currently being used, appears darker or pressed down.
Note: If 5 or more files are open, Windows switches on a feature that groups similar types of files on the same button. The number of files open is shown on the button.
Actions:
1. Notice how the Taskbar contains a button to indicate the application currently being used (Microsoft PowerPoint).
2. Click the Office Button, , and select New. Click Create to start a new presentation and look at the Taskbar. It shows a button for each open presentation.
Note: Actual presentation numbers may vary from those shown.
3. Notice how the button representing the presentation being viewed, Presentation3 appears in a darker shade.
4. To switch to the first presentation, Presentation2, click on its button. Presentation3’s button becomes paler, because it is no longer being viewed.
5. Leave both presentations open for the next exercise.
14 © CIA Training Ltd 2008

Open Learning PowerPoint 2007 Introductory
Exercise 7 - HelpGuidelines:
PowerPoint has a comprehensive Help facility. This means that full advantage can be taken of the features incorporated in the program. Using Help can usually solve the majority of problems encountered.
Help topics are available either from Microsoft Office Online via the internet, or from the content installed on your computer (Offline). The method of using Help is the same in either case but the content may vary slightly and there will be some extra options when online. This guide assumes the Online option is selected.
Actions:
1. Click the Help button, in the upper right corner of the PowerPoint window to display the PowerPoint Help window.
Note: Pressing the <F1> key will display the same Help window. The window can be moved, resized or maximised if required.
© CIA Training Ltd 2008 15

Open Learning PowerPoint 2007 Introductory
Exercise 7 - Continued2. Help can be used in two ways: either type keywords into the Search box
or browse through the listed topics.
3. Type printer into the Search box and click, . There will be many topics found for your search and it will be necessary to locate the most appropriate.
4. Click the topic Set the default printer. Help text for this topic is displayed.
5. Read the text then click the Back button, , on the dialog box toolbar to return to the previous screen. Click Back again to return to the main help screen.
6. Type “delete slide” into the Search box and click, . The quotation marks force the whole phrase to be used and may help to narrow down the search.
7. Click the first topic in the list. Help text for this topic is displayed.
8. Read the text then click the Home button, , on the dialog box toolbar to return directly to the main help screen.
9. Type xyz into the Search box and click, . Because the text is not found, some suggestions are made to help you find the required information. There are more options when connected online.
10. Click the Home button, , to return directly to the main help screen.
11. On the main screen the help topics are grouped into categories. Click on the Creating a presentation category. A list of topics is displayed. There are also two further subcategories which could be expanded.
12. Click Fonts and formatting. A list of Topics is displayed.
13. Click on a topic to display the help. Scroll down, there may be links to other related topics.
14. Click the Home button, .
15. The button at the bottom right of the window indicates whether you are connected to Office Online or not (Offline). Click on the button to see the alternative options, if available. Click in the Help window to remove the options.
16. Close the Help window, by clicking its Close button, .
16 © CIA Training Ltd 2008

Open Learning PowerPoint 2007 Introductory
Exercise 8 - PreferencesGuidelines:
Basic options (preferences) can be changed in PowerPoint; for example, the default directory for saves. By default, documents are opened from and saved to the Documents folder. This location can be changed. It is also possible to change the user name; by default, the person who installed the application is named as the user. It can be changed to show a different name, which will then appear on presentations created from templates.
Actions:
1. Click the Office Button, , then select Open and notice that the save location box in the Open dialog box shows Documents (My Documents in Windows XP).
2. Click Cancel to close the dialog box and click the Save button , on the Quick Access Toolbar. The Save As dialog box is shown, and again the default location is Documents. Click Cancel to close the dialog box.
3. To change this file location, click on the Office Button and then click
.
4. Click Save at the left of the PowerPoint Options dialog box.
5. In the Default file location box, click at the end of the existing text and add CIA DATA FILES\Open Learning\PowerPoint 2007 Introductory Data. Click OK.
6. Click the Save button, , on the Quick Access Toolbar and notice that the new location is shown.
© CIA Training Ltd 2008 17

Open Learning PowerPoint 2007 Introductory
Exercise 8 - Continued7. Cancel the dialog box. To change the settings back, display the
PowerPoint Options dialog box and the Save options. In the Default file location box, amend the entry by deleting CIA DATA FILES\Open Learning\PowerPoint 2007 Introductory Data, so that the location ends with Documents and click OK.
8. Display PowerPoint Options again and select the Popular button from the dialog box.
9. Under the heading Personalize your copy of Microsoft Office, delete any existing information and enter your own details. This changes the User Information associated with the presentation.
10. Click OK to apply the new settings.
11. The changed settings will only be used for new presentations.
12. Start a new presentation. To check the user name click the Office Button, place the cursor over Prepare and click Properties at the top right of the menu.
13. The Document Properties window is displayed. Check your name as Author and then close the window by clicking the Close button at the right of the Document Properties window.
14. Leave the presentations open for the next exercise.
18 © CIA Training Ltd 2008

Open Learning PowerPoint 2007 Introductory
Exercise 9 - Closing PowerPointGuidelines:
PowerPoint can be closed in a number of different ways, all of which are accessible from within the PowerPoint screen. Choose one of the following ways to close the program.
Actions:
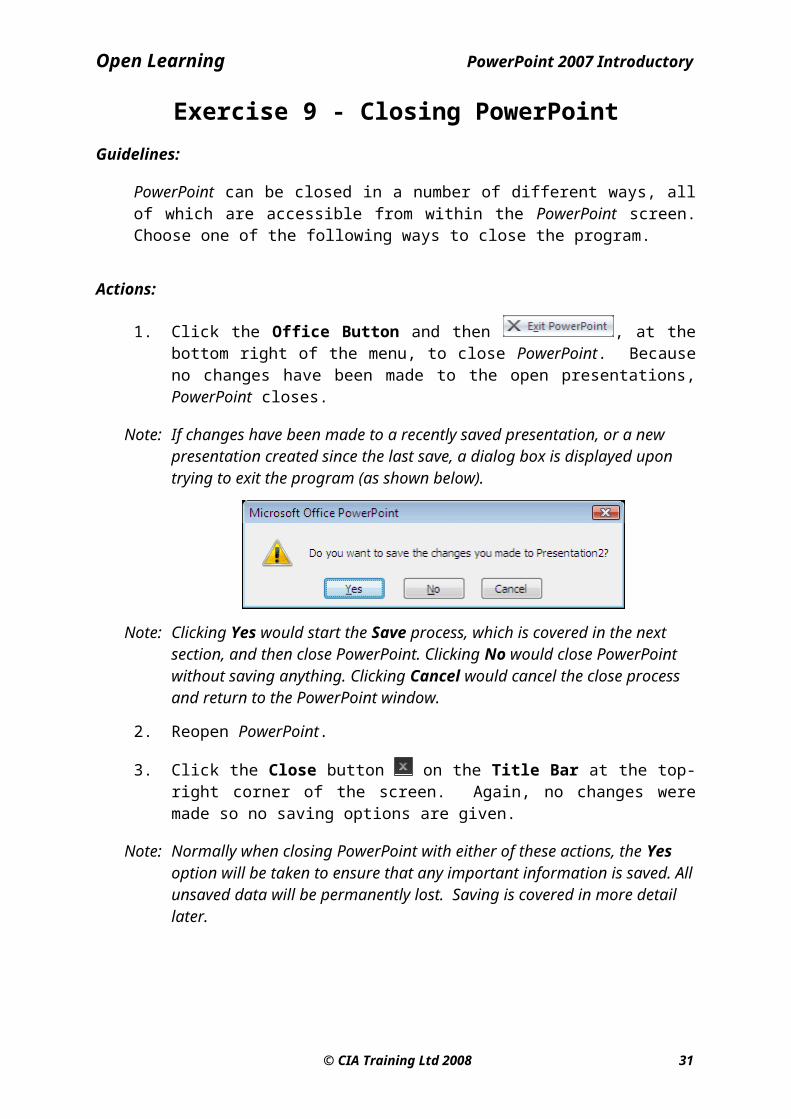
1. Click the Office Button and then , at the bottom right of the menu, to close PowerPoint. Because no changes have been made to the open presentations, PowerPoint closes.
Note: If changes have been made to a recently saved presentation, or a new presentation created since the last save, a dialog box is displayed upon trying to exit the program (as shown below).
Note: Clicking Yes would start the Save process, which is covered in the next section, and then close PowerPoint. Clicking No would close PowerPoint without saving anything. Clicking Cancel would cancel the close process and return to the PowerPoint window.
2. Reopen PowerPoint.
3. Click the Close button on the Title Bar at the top-right corner of the screen. Again, no changes were made so no saving options are given.
Note: Normally when closing PowerPoint with either of these actions, the Yes option will be taken to ensure that any important information is saved. All unsaved data will be permanently lost. Saving is covered in more detail later.
© CIA Training Ltd 2008 19

Open Learning PowerPoint 2007 Introductory
Exercise 10 - Revision: Fundamentals1. Start PowerPoint.
2. How many buttons are displayed on the Quick Access Toolbar?
3. Use the ToolTips on the buttons to find what they are?
4. What does it mean if a button is ghosted?
5. When creating a new presentation what are the options available from the New Presentation dialog box?
6. What is the Ribbon?
7. Some of the default Ribbon tabs are Home, View, Animations, Slide Show, and Design. Name another 2 tabs.
8. List the presentations available from the Installed Templates category.
9. Use the Installed Templates to create a Contemporary Photo Album presentation.
10. Use ToolTips to discover the functions of the following buttons, which can be found on the Home tab or elsewhere in the PowerPoint window:
a) b) c) d) e) f)
11. What are preferences?
12. Using Help to search for information on previewing animations.
13. Find information on Creating a presentation.
14. Select Create a basic presentation in PowerPoint 2007 and read the instructions.
15. Close the PowerPoint Help window.
16. Close PowerPoint without saving.
Note: The answers to this exercise can be found in the Answers Section at the end of the guide.
20 © CIA Training Ltd 2008

Open Learning PowerPoint 2007 Introductory
Section 2
Slides
By the end of this Section you should be able to:
Understand and Use Different ViewsUnderstand Slide Show Basics
Save, Close and Open Presentations
© CIA Training Ltd 2008 21
Open Learning PowerPoint 2007 Introductory
Exercise 11 - ViewsGuidelines:
The PowerPoint View tab lists four different ways to view a presentation on screen. (Master Views are covered in the Advanced Guide). Each view shows a different aspect of the presentation. The views are (with the View menu icons):
Normal Combines the main Slide View with an Outline View, a multiple Slides view and an area for Notes. Each area of the screen can be resized individually.
Slide Sorter A miniature of each slide is shown. Used to change the order, effects and timings of the slide show.
Slide Show Used to view presentations.
Notes Page Used to create speaker's notes for the slides (only available from the View tab).
Buttons for the first three of these views can be found at the bottom right of most PowerPoint screens.
Views within the Normal View are:
Slide View Used to change the text, graphics and layout of a slide and to add graphics and artwork from other applications. This is the main view for editing slides.
Outline View The text content of the slides is listed in the left panel of the screen. Used to add or edit the presentation page titles and text.
Slides View A vertical list of miniature slide images with the same functions as Slide Sorter View. Occupies the same panel as Outline View. Tabs are used to toggle between them.
Actions:
1. Start PowerPoint. Click the Office Button and select New.
2. From the New Presentation dialog box, select Installed Templates. Select Introducing PowerPoint 2007 and click Create.
3. Click on the View tab. Normal view is displayed by default. Click the
Slide Sorter button, . Several slides of the presentation are shown on the screen at once.
22 © CIA Training Ltd 2008

Open Learning PowerPoint 2007 Introductory
Exercise 11 - Continued
4. Click on the Notes Page button . The slide is shown in the top of the screen, with an area for notes at the bottom.
5. Click the Slide Show button, , at the bottom right of the screen. The presentation slide show starts, beginning with the slide currently being viewed.
6. Click the mouse button to go from one slide to the next. Each slide is shown in turn on the screen. Continue to the end or press <Esc> to finish.
7. Make sure Normal view, , is selected and click on the Slides tab, . A list of slide miniatures is displayed with the
current slide (as shown in the Slide pane) highlighted.
8. Each pane works independently of the others, although they are also linked. Click slide 4 in the Slides list and slide 4 will be shown in the Slide pane. Click in the Slide pane.
9. Display the View tab, click Zoom and choose 100% from the Zoom dialog box. Click OK.
10. Use the scroll bar at the bottom of the Slide pane to see more of the slide.
11. Now click Zoom again and select Fit from the list. Click OK. The slide returns to its dimensions when PowerPoint was originally opened.
12. Select the Outline tab, to show the contents of the slides in the left pane. Each slide is represented by a small icon and the slide number, .
13. Use the scroll bar at the right of the pane to display slide 10. Move the
mouse over the icon until it becomes . Click once to display slide 10 in the Slide pane. The associated Smart Art icon is highlighted in the Outline pane.
14. Move the mouse over the border at the right of the Outline pane until it becomes . Click and drag to change the size of the pane until it fills about half the screen. Drag to the left to decrease the size of the pane or to the right to increase it. Drag the border back to its original position.
15. View slide 15, Quick Styles. Click in the Notes pane (Click to add notes) and type in Mention the huge number available.
Note: If graphics are required in notes, they must be inserted in Notes Page view.
16. Leave the presentation on screen for the next exercise.
© CIA Training Ltd 2008 23

Open Learning PowerPoint 2007 Introductory
Exercise 12 - Slide ViewGuidelines:
Slide View is the pane on the right within Normal View - it shows the presentation slides, one at a time, with all text properly formatted and with a background template. This is the main area used to create, edit and format most slide content.
The scroll bar at the right of the screen is used to move from one slide to another.
In all the views except Slide Show, pressing <Ctrl Home> or <Ctrl End> moves directly to the first or last slide in a presentation respectively.
Actions:
1. The presentation started earlier should still be on screen, if not start a new presentation from Installed Templates called Introducing PowerPoint 2007.
2. Click on the Next Slide button, , to move to the next slide.
Note: The sequence number of the current slide is always displayed on the Status Bar, e.g. Slide 2 of 18.
3. Click on the Previous Slide button, , to move back one slide.
4. Click and drag the scroll button up or down the scroll bar, as appropriate. Release the mouse button when the marker for slide 14, Mix It Up, appears.
5. Press <Ctrl End> to move to the last slide in the presentation.
6. Press <Ctrl Home> to move to the first slide in the presentation.
7. Practise navigating through the slides in Normal view, then return to Slide 1.
8. Leave the presentation on screen for the next exercise.
24 © CIA Training Ltd 2008

Open Learning PowerPoint 2007 Introductory
Exercise 13 - Slides and Outline ViewGuidelines:
Slides and Outline views are optional within Normal view. Either can be used to move to different slides or rearrange slides in the context of the presentation.
Slides does this using thumbnail pictures, while Outline uses only text. Text can be entered in Outline and it will appear on the slide. Text can also be hidden in Outline so that only the slide titles appear. This is useful if there are a number of slides which need to be reordered.
If the pane using these options is narrowed, then the tab titles, are replaced with pictures, .
Actions:
1. With the Introducing PowerPoint presentation still on screen, from within the Slides tab, click on slide 3 Text, Graphics & Pictures.
2. The slide is shown in the main part of the window.
3. Move the scroll button in the Slides tab down so that slide 9 is in view.
4. Click on it. It is now on view in the Slide pane.
5. Click on the Outline tab. The pane expands to better accommodate the text. Note that no graphics appear in Outline view.
6. The current slide is shown as . There is no text in the view for this slide because the text on the slide is actually part of the graphic.
7. Click on slide 12. The slide title and text become highlighted in Outline.
© CIA Training Ltd 2008 25
Open Learning PowerPoint 2007 Introductory
Exercise 13 - Continued8. In the Outline pane, click at the end of the text for slide 12, beyond the
highlighted text. The flashing insertion point cursor should be shown.
9. Press <Enter> and type the text: Text can be added in Outline View. The text appears on the slide.
10. Double click on the slide icon for slide 12. The slide text is hidden; only the title is shown, underlined, to denote the hidden words.
11. Right click anywhere in the Outline pane and select Collapse and then Collapse All. All text is hidden, apart from the slide headings.
12. Right click anywhere in the Outline pane and select Expand then Expand All. All text is now shown again.
13. Click on the Slides tab.
14. Close the Slides/Outline pane by clicking on , this gives more space to the slide.
15. Click the View tab and then Normal button , to replace the Slides pane on screen.
26 © CIA Training Ltd 2008

Open Learning PowerPoint 2007 Introductory
Exercise 14 - Slide Sorter ViewGuidelines:
Slide Sorter view shows a thumbnail of slides in a presentation on-screen at the same time. This makes it easy to move, add or delete slides and to decide on animated transitions (special effects, e.g. fade or dissolve) for moving from slide to slide. Transitions and effects are covered in later exercises.
Actions:
1. With the presentation still on screen, switch to Slide Sorter view. The screen will appear similar to below. Use the Zoom Control slider on the Status bar, , to display more or fewer slides (fewer slides will be shown if the screen resolution is below 1024x768).
2. Click on the middle of slide number 3, hold down the left mouse button and move it about the screen. Notice that as the mouse pointer moves about the screen, an orange line appears, moving between slides. When the mouse button is released, the line is replaced by the slide.
3. Release the mouse button when the line is to the left of slide 6. The Text, Graphics & Pictures slide has now become slide 5.
© CIA Training Ltd 2008 27

Open Learning PowerPoint 2007 Introductory
Exercise 15 - Notes Page ViewGuidelines:
Notes Page view allows speaker’s notes to be added to slides. The top of the screen shows the slide and lower part is reserved for speaker's notes. These can be used to prompt the person delivering the presentation.
Note: Notes can also be added via the Notes pane in Normal view. This can be resized by dragging the border between the panes.
Actions:
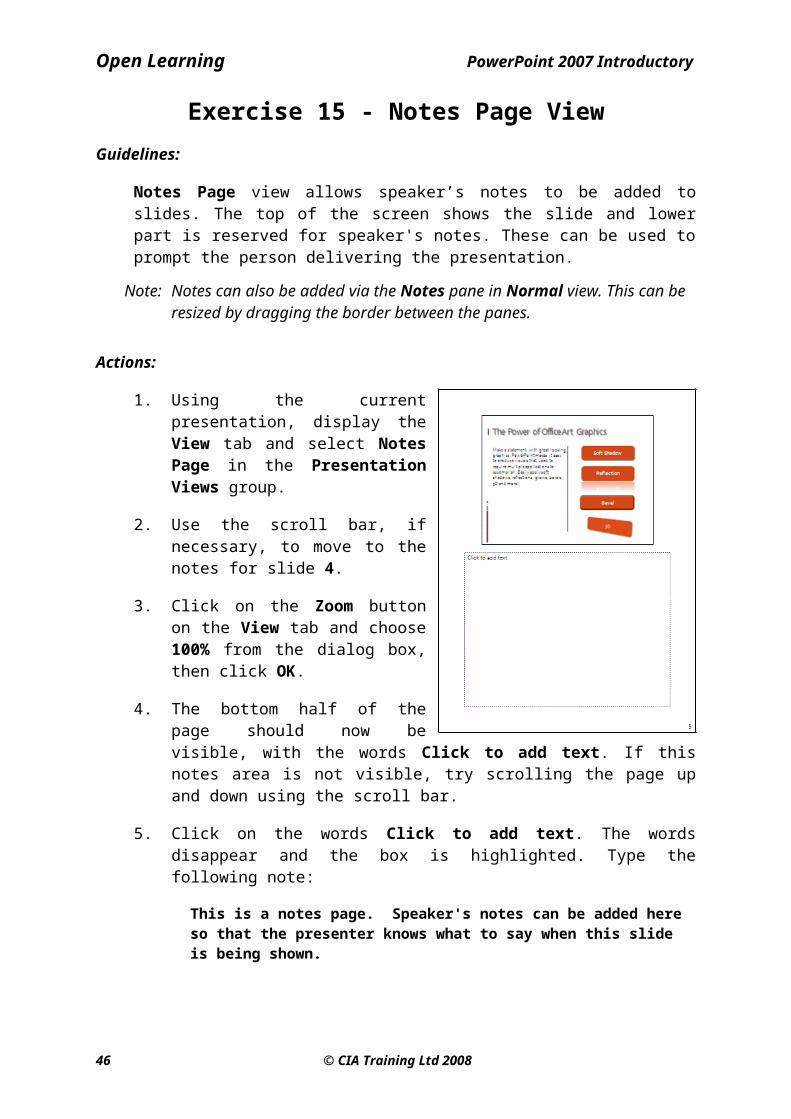
1. Using the current presentation, display the View tab and select Notes Page in the Presentation Views group.
2. Use the scroll bar, if necessary, to move to the notes for slide 4.
3. Click on the Zoom button on the View tab and choose 100% from the dialog box, then click OK.
4. The bottom half of the page should now be visible, with the words Click to add text. If this notes area is not visible, try scrolling the page up and down using the scroll bar.
5. Click on the words Click to add text. The words disappear and the box is highlighted. Type the following note:
This is a notes page. Speaker's notes can be added here so that the presenter knows what to say when this slide is being shown.
6. Click on the white space outside the notes area to finish entering the text. Zoom to 50% to see the whole page.
7. Switch to Normal view and move to slide 1.
8. Click in the Notes pane and add the following note, zooming in if necessary:
This is the first slide.
9. Switch to Notes Page view to confirm that the note is there.
28 © CIA Training Ltd 2008

Open Learning PowerPoint 2007 Introductory
Exercise 16 - Slide Show BasicsGuidelines:
Slide Show is used to preview the presentation. The slides are displayed in full screen view one at a time, with all transitions and effects applied. While the show is in progress, the mouse can be used to draw on the slide using the pen options, to highlight key points.
Actions:
1. Using the presentation from the previous exercise, click the Slide Show button on the View tab. The slide show starts, with the first slide filling the screen.
2. Click the mouse button or press <Page Down> to move to the next slide.
3. To move back to the first slide, press <Page Up> or click the right mouse button and select Previous from the shortcut menu.
4. To move to a non-adjacent slide, click the right mouse button and select Go to Slide from the shortcut menu. Select 8 Visualise It and that slide will be displayed.
Note: The shortcut menu can also be displayed by clicking the popup menu
button, , that appears at the lower left corner of each slide.
5. Display the shortcut menu (using the method shown in the note above)
and click the pointer button. This displays the Pointer Menu. Select Ballpoint Pen from the menu. The mouse pointer changes into a small dot.
6. Move the pen on to the slide and click and drag. The pointer draws a line on the slide. All lines drawn with any pen are saved to the presentation. Select Erase All Ink on Slide from the Pointer options menu to delete the lines drawn.
7. Display the Pointer Menu again this time select Arrow to return the mouse pointer to normal. View the rest of the presentation. When the end of the show is reached, a black screen appears, with the words
.
Note: If this black screen does not appear, view PowerPoint Options and click the Advanced button. Select the End with black slide option, click OK and view the show again.
8. Click once to return to the last view used.
9. Leave the presentation open for the next exercise.
© CIA Training Ltd 2008 29

Open Learning PowerPoint 2007 Introductory
Exercise 17 - Saving a PresentationGuidelines:
A presentation must be saved if it is to be used again. There are two main ways to save; Save to save a new presentation or to update changes made to an existing one; Save As to save a presentation under a new name, to a different location, or in a different format.
Actions:
1. The presentation opened earlier is now going to be saved. Click the Office Button and select Save (the Save button, , can also be used).
2. From the dialog box, choose Documents from the Favorite Links Bar (if not already there by default).
3. Double click on CIA DATA FILES then Open Learning, then on PowerPoint 2007 Introductory Data.
4. In the File name box, edit the suggestion to PowerPoint 2007.
5. The files are shown above as List, your View may be different. To view the files as a List, click the Views button and select List.
30 © CIA Training Ltd 2008
Favorite Links Bar
Folders
Open Learning PowerPoint 2007 Introductory
Exercise 17 - Continued6. Click on the drop down arrow at the right of the Save as type box to see
the different formats available, including: text format Outline/RTF (*.rtf), Template (*.potx), earlier versions of PowerPoint, e.g. PowerPoint 97-2003 (*.ppt), graphics formats including JPEG File (*.jpg) and Windows Metafile (*wmf).
7. Choose the default format PowerPoint Presentation (*.pptx).
8. Click the Save button, .
Note: To save the presentation in a different format, or another name, select the Office Button and then Save As.
9. The presentation can also be saved as an Outline file. This means that a presentation saved as an rtf (Rich Text Format) outline can be opened in various programs such as Word, although any graphic content will be lost.
10. Open the Save As dialog box. Change the File name to My Outline and from Save as type select Outline/RTF(*.rtf), then click Save.
11. To make sure that the file has been saved correctly, click the Office Button and select Open, make sure the location where your files are saved is selected and change to All Files (*.*), (to the right of the File name box).
12. The Outline file should appear as . This icon indicates that only the text has been saved.
13. Click the Cancel button to close the Open dialog box.
Note: Remember that files can be saved to any folder or to a particular folder that you have been instructed to use.
Note: To be able to post a presentation to the World Wide Web, select Save As and select Web Page to save the presentation in the correct format.
14. Leave the PowerPoint 2007 presentation open for the next exercise.
© CIA Training Ltd 2008 31

Open Learning PowerPoint 2007 Introductory
Exercise 18 - Closing a PresentationGuidelines:
To clear the screen and begin working on a new presentation, the current one can be closed. If the presentation has not been previously saved, or if it has been modified in any way since the last save, a prompt to save it will appear.
Actions:
1. The PowerPoint 2007 presentation should still be on the screen.
2. In Slide Sorter view, move slide 1 to a position after slide 4. The presentation has now been modified since it was last saved.
3. Click the Office Button and select Close. If no changes to the presentation have been made since it was saved the presentation would have closed immediately.
4. The following message appears asking if the new version of the presentation is to be saved:
Note: In the prompt to save box, clicking Yes would start the Save process. Clicking No would close the presentation without saving anything. Clicking Cancel will cancel the close process and return to the presentation.
5. The change carried out in step 2 does not need to be saved. Click No. The presentation now closes without saving.
6. A blank PowerPoint screen is now shown, ready to start a new presentation, open an existing one or close PowerPoint.
32 © CIA Training Ltd 2008

Open Learning PowerPoint 2007 Introductory
Exercise 19 - Opening PresentationsGuidelines:
Once created and saved, a presentation can be opened at any time.
Actions:
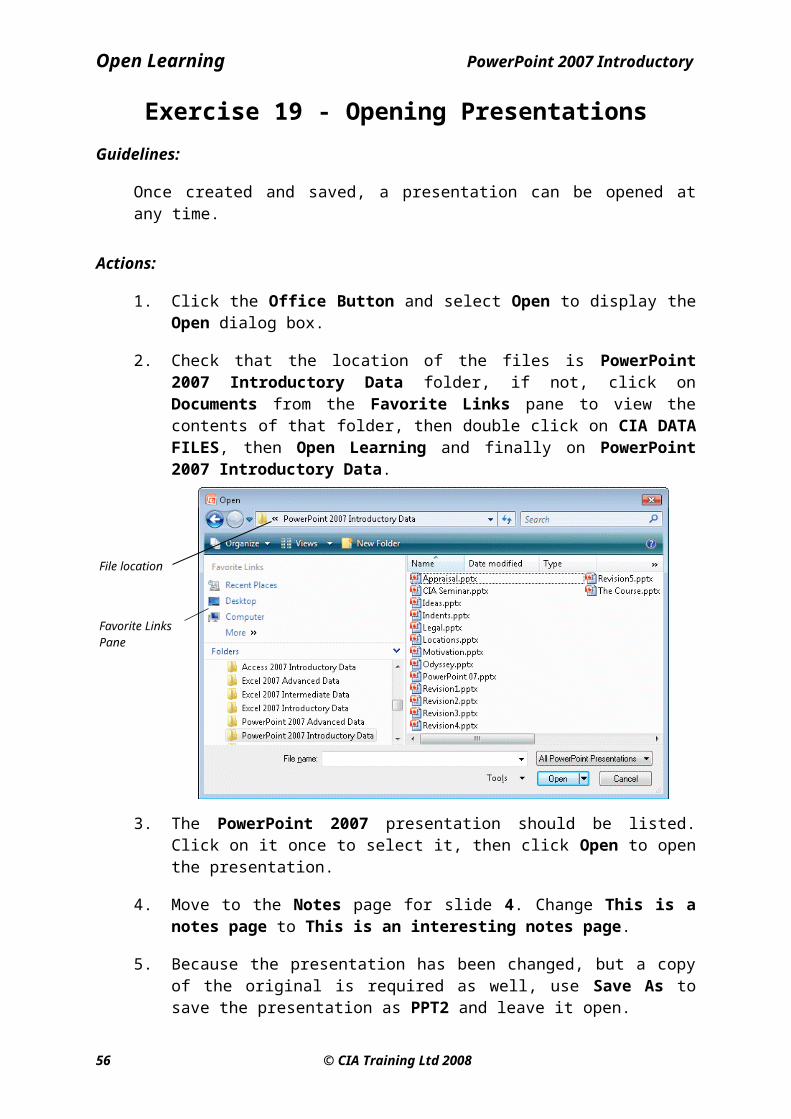
1. Click the Office Button and select Open to display the Open dialog box.
2. Check that the location of the files is PowerPoint 2007 Introductory Data folder, if not, click on Documents from the Favorite Links pane to view the contents of that folder, then double click on CIA DATA FILES, then Open Learning and finally on PowerPoint 2007 Introductory Data.
3. The PowerPoint 2007 presentation should be listed. Click on it once to select it, then click Open to open the presentation.
4. Move to the Notes page for slide 4. Change This is a notes page to This is an interesting notes page.
5. Because the presentation has been changed, but a copy of the original is required as well, use Save As to save the presentation as PPT2 and leave it open.
6. Now open the presentation called Locations, which should also be in this folder.
7. Practise switching between the presentations, by clicking on the buttons in the Taskbar.
8. Close the presentations without saving.
© CIA Training Ltd 2008 33
Favorite Links Pane
File location
Open Learning PowerPoint 2007 Introductory
Exercise 20 - Revision: Slides1. Open the presentation CIA Seminar.
2. View the notes page for the first slide.
3. Use the Zoom control to change the magnification of the page to 75%.
4. Insert the following text into the notes page area.
Good morning ladies and gentlemen, welcome to Sunderland.
I am (your name) and I will be your speaker for this presentation.
First of all I would like to give you a brief introduction to CiA Training.
5. Change to Slide Sorter view and select slide 2.
6. Display the slide in Notes Page view and insert the following text:
Since 1985 CiA Training have been successfully providing training materials to customers throughout the world.
Materials can be uniquely customised to our clients’ requirements. Our aim is to ensure each student who uses a CiA product receives the highest quality training materials, written by our dedicated products team.
7. Make sure the option is set to end the presentation with a black end slide. Switch to Slide Show view.
8. View the whole show.
9. Save the presentation as CIA Training.
10. Close the presentation.
34 © CIA Training Ltd 2008

Open Learning PowerPoint 2007 Introductory
Section 3
Presentations
By the end of this Section you should be able to:
Create a Blank PresentationUse Pre-Defined Presentations
Use Design ThemesAdd Headers and Footers
Add New SlidesChange Slide Layout
Insert SlidesSplit a Slide
Create a Summary Slide
© CIA Training Ltd 2008 35
Open Learning PowerPoint 2007 Introductory
Exercise 21 - Creating a Blank PresentationGuidelines:
You may not always wish to use an existing PowerPoint format for your presentation. A completely blank presentation without colours, background or graphics can be used as a starting point. The type of slide to be used is specified, i.e. Title slide, bulleted text, etc. and then the content can be designed from scratch.
Actions:
1. Click the Office Button and then New to display the New Presentation dialog box.
2. Click on Blank Presentation under Blank and recent. Click Create to start a new, blank presentation.
3. The default layout for the first slide is Title Slide. Click on the Layout button, , which is found on the Slides group of the Home tab.
4. Alternative layouts for the slide are shown. Select a different layout to see how the view in the Slide pane changes. Click on the Layout button and select Title Slide layout again.
5. A completely blank presentation slide has been created. Text can be added to the boxes as indicated.
6. Close the presentation without saving.
Note: Usually, a presentation starts with a Title Slide to introduce it.
36 © CIA Training Ltd 2008
Open Learning PowerPoint 2007 Introductory
Exercise 22 - Pre-Defined PresentationsGuidelines:
A variety of ways to create and view a presentation have now been examined. PowerPoint can also access numerous pre-defined presentations from Microsoft Office Online, although this does require that an active internet connection is available. These presentations contain a number of suggested slides relevant to each topic which can be then be altered to fit the specific requirements of the user.
Actions:
1. Click the Office Button and then New to display the New Presentation dialog box.
2. Under Microsoft Office Online, select Presentations to see the range of presentations available.
3. On the right select Business from the list. Scroll down the list and select Recommending a strategy. A preview appears at the right of the dialog box.
4. Click Download.
© CIA Training Ltd 2008 37

Open Learning PowerPoint 2007 Introductory
Exercise 22 - Continued5. A Microsoft Office Genuine Advantage dialog box is displayed.
6. If in agreement with the statement, click Continue to download the template or click Cancel to abort the process.
7. When the presentation is downloaded, it will be opened and displayed
automatically. Use the Previous and Next buttons, , in Normal view to move through the slides. Each slide is formatted and gives suggestions for text entries.
8. Try different views, then run the Slide Show.
9. Close the presentation without saving.
Note: This template is available after downloading from the Recently Used Templates section in the New Presentation dialog box.
10. Repeat from step 1, viewing different presentation templates from the list, without downloading any.
11. Click Cancel to close the dialog box.
38 © CIA Training Ltd 2008

Open Learning PowerPoint 2007 Introductory
Exercise 23 - ThemesGuidelines:
A Theme is a template with no slide content, but which has predefined backgrounds and text styles for all slides that are created. They provide a quick and easy way to create an impressive presentation with little effort.
Actions:
1. Click the Office Button and then New to display the New Presentation dialog box.
2. Select Installed Themes under Templates. A list is displayed on the right.
3. Scroll down the list and select Flow.
4. Click Create. A new presentation is created. The first slide is a Title Slide with the Flow background.
5. A miniature of the first slide is shown on the left. No other slides have yet been created.
6. Notice how the Status Bar shows Slide 1 of 1.
© CIA Training Ltd 2008 39

Open Learning PowerPoint 2007 Introductory
Exercise 23 - Continued7. Your task is to start to create a presentation for a new company,
specialising in wine tasting excursions to France. Click in the top text box and enter Bacchus Tours.
8. In the lower box, enter An Introduction.
9. Use the different views to observe the slide.
10. Save the presentation as Promotion.
11. Leave the Promotion presentation open for the next exercise.
40 © CIA Training Ltd 2008

Open Learning PowerPoint 2007 Introductory
Exercise 24 - Adding Headers and FootersGuidelines:
Headers and Footers are items of information that appear at the top and/or bottom of every slide. This information usually consists of the date, the page or slide number and text such as the company name. The date can be fixed or inserted as an updating field in a number of different formats.
Actions:
1. Using the Promotion presentation, with the Title Slide in Normal view, display the Insert tab and click the Header & Footer button.
2. Click the Slide tab if not already selected, ensure the Date and time checkbox is checked and select the Update automatically option.
3. In the Language box, select English (United Kingdom).
4. Click the drop down arrow next to the Date text box and choose a format for the date. The date will always be updated in this format.
5. Place a tick in the Slide number checkbox so that all the slides in the presentation will be numbered correctly.
6. Make sure that the Footer is checked and in the text box type Bacchus Tours.
7. Note the Preview, the three items are placed across the slide.
© CIA Training Ltd 2008 41

Open Learning PowerPoint 2007 Introductory
Exercise 24 - ContinuedNote: The default footer format is date on the left, footer text in the centre and
slide number on the right. These components can be formatted completely differently depending on which theme is applied.
8. Switch to the Notes and Handouts tab.
9. Select to have: Date and time Updated automatically, date format and Language the same as on the slide, Page numbers and a Footer of Bacchus Tours.
10. Note the Preview the date is placed top right and the other items in the bottom corners.
11. Click Apply to All to apply this information to all slides, notes and handouts; any new slides will also contain the same information.
12. View the slide in Notes Page view to observe the effects. The Footer on the slide takes on the font of the Flow design applied earlier.
13. Change to Normal view.
14. Save the changes to the presentation and leave it open.
42 © CIA Training Ltd 2008

Open Learning PowerPoint 2007 Introductory
Exercise 25 - Adding a New SlideGuidelines:
A new slide can be added to the presentation at any time and in any place. New slides are placed directly after the slide that is currently selected. If necessary, their position can easily be changed later using the Slides pane or Slide Sorter view.
Actions:
1. Use the Promotion presentation in Normal view. Display the Home tab and click the drop down arrow on the New Slide button, in the Slides group.
2. From the list select a Title and Content slide. The new slide, number 2, has now been created. Note that the Status Bar now shows Slide 2 of 2.
3. You decide to have two columns of bulleted data. Click the Delete button in the Slides group. The slide is removed.
4. Click the drop down arrow on the New Slide button, in the Slides group and from the list select Two Content slide.
5. Click to add the title Welcome. Notice the handles around the text box. These can be used to resize the text area.
6. Click at the top of the first column of text and type Founded Spring 2004.
7. Press <Enter> and type Background of Directors. On the next line down, type How the idea grew.
8. In the second column of text, enter Expertise on the first line, Research on the second and Mission Statement on the third line.
Note: To insert a new slide in a particular place, click on the previous slide in Slides view or Slide Sorter view and click the New Slide button.
9. Save the presentation and close it.
© CIA Training Ltd 2008 43

Open Learning PowerPoint 2007 Introductory
Exercise 26 - Changing Slide LayoutGuidelines:
The layout of a slide can be changed after it has been added to a presentation, avoiding the need to delete a slide and insert one with the required layout.
Actions:
1. Open the presentation Legal.
2. Select slide 5, Company Ethic. The firm has decided that they should list a few more ethics.
3. To change the type of slide, click the Layout button in the Slides group.
4. From the list select the Two Content layout.
5. In the column to the right type the following list:
To support staff development
To embrace innovation
To look to the future
6. Leave the presentation open.
44 © CIA Training Ltd 2008

Open Learning PowerPoint 2007 Introductory
Exercise 27 - Inserting SlidesGuidelines:
Existing slides from other presentations can easily be inserted into a new presentation. During the process their colours and backgrounds are changed to match the presentation into which they are being imported.
Actions:
1. Make sure the Legal presentation is open in Normal view and select slide 7, Health and Safety.
2. Click the drop down arrow on the New Slide button and select Reuse Slides. The Reuse Slide Task Pane is displayed on the right.
3. Click the Browse button and then Browse File. Select the location of the data files in the Browse dialog box.
4. Select the Appraisal presentation and click Open.
5. All slides in the selected presentation are shown in the Slides area. There is only a single slide in this presentation. Place the cursor over the slide. It increases in size to enable the contents to be read.
6. Click on it to place the slide into the Legal presentation. The Staff Appraisal slide is inserted after slide 7, Health & Safety. Notice that the inserted slide changes to the design background of the existing presentation.
7. Close the Reuse Slide task pane. Notice that the Status Bar has been updated to Slide 8 of 8.
8. Save the presentation as Legal2 and leave it open for the next exercise.
© CIA Training Ltd 2008 45
Open Learning PowerPoint 2007 Introductory
Exercise 28 - Splitting SlidesGuidelines:
A slide containing bullets can be split, so that a new slide containing some of the original bullets is created.
Actions:
1. Make sure that slide 7, Health and Safety is being viewed in Normal view.
2. Click the Outline tab, to display the Outline pane.
3. In the Outline pane, position the cursor in front of Work station safety.
4. Right click and select Promote. The text is promoted from a bullet point to a slide heading and a new slide icon appears beneath slide 7. The new slide is also shown in the Slide pane.
5. In the same way, create a new slide for Electrical Safety. Place the cursor before the appropriate bullet. Right click and select Promote to create slide 9.
6. Create a new slide for the last bullet point If you have an accident.
7. Add extra bullets to slide 7 as follows:
Government guidelinesStaff responsibilities
8. Click on slide 8 and edit the title to title case, i.e. Work Station Safety and add the bullets:
Ensure you have an adjustable chairA monitor free from glareSufficient desk space
46 © CIA Training Ltd 2008

Open Learning PowerPoint 2007 Introductory
Exercise 28 - Continued9. Click on slide 9, capitalise Safety and add the bullets:
No trailing or loose cablesNo overloaded power pointsNo worn or frayed cables
10. Click on slide 10, capitalise Accident and add the bullets:
Seek medical/first aid help if necessaryComplete the accident bookInform the designated member of staff
11. Click the Slides tab and move to the first slide.
12. Run the Slide Show.
13. Save the presentation.
14. Leave the presentation open for the next exercise.
© CIA Training Ltd 2008 47

Open Learning PowerPoint 2007 Introductory
Exercise 29 - Creating a Summary SlideGuidelines:
At certain points of your presentation you may want to summarise some main points on a Summary Slide. The Summary Slide is created by inserting a slide and copying the titles to it, which then become bulleted items.
Note: The Summary Slide command which was included in previous versions, has been omitted from PowerPoint 2007. This exercise shows how to create it manually.
Actions:
1. In Normal view, select slide 1 and add a new Title and Content slide.
2. Add the title Summary Slide.
3. Display the slides in Outline view. Highlight the title on slide 3. Click the Copy button and then place the cursor in the Summary Slide and click Paste.
Note: The Copy and Paste buttons are on the Home tab in the Clipboard group.
4. Repeat this process for the slides 4 to 8 and 12.
5. This slide could be used by the presenter to briefly outline the course of the presentation.
6. Click the Slides tab to return to Slides view.
7. Save the changes to the current presentation and then close it.
48 © CIA Training Ltd 2008

Open Learning PowerPoint 2007 Introductory
Exercise 30 - Revision: PresentationsNote: The presentation created in this exercise will be developed throughout the
guide, within the Revision exercises at the end of each section.
1. Create a new presentation based on Trek, an Installed Theme.
2. Add the title Egyptian Odyssey Tours and the subtitle Luxury Holidays.
3. Add the footer Egyptian Odyssey Ltd and include slide numbers, but not the date and time. Make sure that Don’t show on title slide is checked when applying the footer.
4. Save the presentation as Revision.
5. Insert all the 12 slides from the Odyssey presentation, supplied with the data files in the order that they appear in the task pane.
6. Insert a Title and Content slide as slide 3.
7. Add the title Summary Slide.
8. Add the title from the slides 4-9, 11 and 14 to the Summary Slide.
9. Change the layout of the summary slide to Two Content (some text will be moved into the empty area in a later revision).
10. Save the changes to the presentation and close it.
Note: An example of how the presentation created in this exercise should look can be found in the Answers Section at the end of the guide.
© CIA Training Ltd 2008 49

Open Learning PowerPoint 2007 Introductory
Section 4
Formatting
By the end of this Section you should be able to:
Apply Formatting and Text EffectsChange Alignment and Spacing
Format BulletsUse Indents
Create Picture BulletsNumber Automatically
Use Undo and RedoFind and Replace Data
Use Cut, Copy and Paste
50 © CIA Training Ltd 2008

Open Learning PowerPoint 2007 Introductory
Exercise 31 - Text FormattingGuidelines:
The text on any slide can be formatted in a number of ways, including changing the font, size, appearance, colour, alignment, spacing, case, bullets, etc.
Actions:
1. Open the presentation The Course and view the first slide in Normal view.
2. Text must be selected before formatting can be applied. In the Slide pane, select the title text, Introductory PowerPoint 2007, by clicking and dragging the mouse across it.
Note: Alternatively, clicking once on text will select its text box and clicking once on the dashed box border will select everything within the text box.
3. Click the Font drop down button, , on the Home tab in the Font group and choose the Book Antiqua font from the list given.
Note: If this font is not available, select an alternative.
4. With the same text selected, use the Font Size drop down list, , to change the size to 48.
5. Another way to change font size is to use the Font Size buttons. Click the Increase Font Size button, , to increase the size of the font.
6. Click the Decrease Font Size button, twice, to reduce the text size to 44.
7. The Font dialog box can also be used to change font and size. With the text still highlighted, click the Font dialog box launcher (located to the right of the Font group name).
8. Select Tahoma from the Font area and 48 from the Size area, then click OK.
9. Move to slide 2, The Format.
10. Reduce the size of all the bulleted text to 28pt using any of the methods described above.
11. Leave the presentation open for the next exercise.
© CIA Training Ltd 2008 51
Dialog box Launcher

Open Learning PowerPoint 2007 Introductory
Exercise 32 - Applying Text EffectsGuidelines:
Various effects, such as bold, italic, underline and shadow can be applied to selected text on a presentation slide. Text colour can also be changed.
Actions:
1. Using the presentation The Course, view slide 3, Revision Exercises and select the title text.
2. This text has Shadow applied from the initial template. Click the Shadow button, , to remove it. The difference may be hard to see.
3. With the text still selected, click the Bold button, , to see the effect. Try the Italic, , Underline, and Shadow, , buttons in turn, leaving only the Shadow effect on when finished.
Note: The formatting buttons are on the Home tab in the Font group.
4. Select all the text in the bulleted list and click the drop down arrow on the Font Color button, , on the Home tab, in the Font group. The colour box appears.
5. The available colours are from the colour scheme for this theme. Click on any available pale colour (or click on More Colors to choose a new colour from the honeycomb), then click OK.
6. With the text still selected, display the Font dialog box by clicking the launcher.
7. Select the italic effect and a new colour if desired. Click OK to see the effect.
8. Leave the presentation open for the next exercise.
52 © CIA Training Ltd 2008

Open Learning PowerPoint 2007 Introductory
Exercise 33 - Alignment and SpacingGuidelines:
Text is normally aligned to the left, but this can be changed to centre or right, or the text can be justified (straight left and right margins). It is also possible to change the spacing between lines in a paragraph.
Actions:
1. On slide 3 of The Course presentation from the previous exercise, select all the text in the bulleted list.
2. On the Home tab, click the Centre button, and then the Align Text Left button, , to see the difference.
3. The Paragraph dialog box can also be used to change alignment. With the text still highlighted, click the Paragraph group dialog box launcher. From the Alignment drop down, select Right. Click OK.
4. Change the alignment of the bulleted text back to left using the Align Text Left button.
5. With the text still highlighted, click the Line Spacing button, .
Note: Selecting Line Spacing Options displays the Paragraph dialog box, which has a full range of spacing options.
6. Select 2.0 to change the Line Spacing to 2 lines. The lines of text are now double spaced.
7. Change the line spacing back to 1.
8. Leave the slide on screen for the next exercise.
© CIA Training Ltd 2008 53

Open Learning PowerPoint 2007 Introductory
Exercise 34 - Formatting BulletsGuidelines:
Text in a list is usually bulleted; the type, colour and size of the bullet can be changed. Bullets can also be selected from a grid containing hundreds of options. These are known as Character Bullets.
Actions:
1. With the text in the list selected, click the Bullets button, , to remove the bullets. Click on the button again to reapply them.
2. Click the drop down arrow on the Bullets button.
3. The list shows a basic choice of bullets. Click the Bullets and Numbering option to display the Bullets and Numbering dialog box.
4. Click the Customize button to display a grid of symbols available. From the drop down Font list, select the Wingdings font. Any of these symbols may be used as bullets.
5. Click on a different symbol from the grid and click OK. Select a different colour and size in the dialog box, then click OK.
6. The bullets will have changed. Try changing bullet types, using symbols from different fonts.
7. Close the presentation without saving.
54 © CIA Training Ltd 2008

Open Learning PowerPoint 2007 Introductory
Exercise 35 - IndentsGuidelines:
Indents represent the distance of the text and/or bullet from the edge of the text box. This distance can be changed for visual effect.
Actions:
1. Open the presentation Indents.
2. Click inside the lower text box and ensure the ruler is displayed (check Ruler in the Show/Hide group on the View tab).
3. Notice the grey triangular indent markers. The upper one moves the bullet and the lower triangle moves the text. Highlight all the text in the box. Click and drag the lower triangle to 4cm.
4. Notice that the text moves in line with the new setting.
5. Now drag the upper triangle to 2cm to move the bullet nearer to the text.
6. Move the bullets to approximately 1cm and the text to about 2½cm.
7. Leave the presentation open for the next exercise.
© CIA Training Ltd 2008 55
Open Learning PowerPoint 2007 Introductory
Exercise 36 - Picture BulletsGuidelines:
Picture bullets can be added to lists or paragraphs to make them a little more original. A set of picture bullets is supplied by default, although any ClipArt or scanned image can be used.
Actions:
1. Select all of the bulleted text on the slide, then click the Bullets button drop down arrow and select Bullets and Numbering. Click the Picture button, the Picture Bullet dialog box then appears.
2. Select an image and click OK. The bullets are applied to the list (remove any surplus bullets).
3. Move the bullet indent as near to the edge of the text box as possible.
4. Replace the picture bullet with a different picture bullet.
5. Leave the presentation open.
56 © CIA Training Ltd 2008

Open Learning PowerPoint 2007 Introductory
Exercise 37 - Automatic NumberingGuidelines:
Lists can be numbered automatically in PowerPoint. Each new item added to a list will be given the next number or letter in the chosen series.
Actions:
1. Using the Indents presentation from the previous exercise, highlight all the bulleted text on slide 1.
2. Click the Bullets button drop down and select Bullets and Numbering. Select the Numbered tab in the dialog box.
3. Select the a) b) c) option and click OK. Notice how the bullets have been replaced.
4. Click at the end of line c) and press <Enter>.
5. Notice that the next letter in the sequence - d) - has appeared (it may appear feint until the bullet text is entered).
6. Enter the final line It can improve the appearance of lists.
7. The graphic is now covering some of the text. This will be addressed later. Save the presentation as Indents1.
8. Leave the presentation open for the next exercise.
© CIA Training Ltd 2008 57
Open Learning PowerPoint 2007 Introductory
Exercise 38 - Using Undo and RedoGuidelines:
Undo and Redo are very useful features, which help correct errors. Undo allows the reversal of incorrect actions, while Redo repeats the undone action. It is also possible to undo/redo multiple actions at the same time.
Actions:
1. Using the Indents1 presentation saved in the previous exercise, select the title text box (click on the edge, the selected box is shown with a solid border) and press <Delete>.
2. To undo this action, click the Undo button, .
3. Change the colour of the bulleted list to Indigo (dark blue).
4. Change the font of the title to Arial with a Shadow effect.
5. More than one action can be undone at a time. Click the drop down arrow on the Undo button, .
6. A list of actions that can be undone should appear. If necessary, scroll to view all the actions.
Note: If there are no actions that can be undone, the Undo button will be unavailable.
7. Click on Replace Fonts to undo the Arial formatting and notice that the action which followed this (Text Shadow) is also undone. This is because undoing the Replace Font action also undoes anything that followed it, i.e. higher in the list.
8. Click the Redo button, and redo the last action Replace Fonts. The text is Arial again, but the shadow is not reapplied.
9. Close the presentation without saving.
58 © CIA Training Ltd 2008

Open Learning PowerPoint 2007 Introductory
Exercise 39 - Find and Replace DataGuidelines:
Rather than finding and editing text manually, PowerPoint, like many other applications has a replace option, making the process much quicker. This allows specified text to be replaced. Replace has an option to find and replace each occurrence individually or to replace all occurrences.
Actions:
1. Open the presentation The Course.
2. In Normal view, view slide 1. CiA has decided to change the name of the book to Open Learning Manual.
3. On the Home tab, click the Replace button in the Editing group.
4. In the Find what box enter guide. In the Replace with box enter manual.
5. Select Find Next. The first occurrence of the word Guide is highlighted.
6. Choose to Replace this occurrence. The highlight goes immediately to the next occurrence of the word.
7. Select Replace to replace this occurrence. The final occurrence is found. Replace it.
8. At the prompt click OK.
9. Close the Replace dialog box.
10. View slide 1. Notice the word manual is in lowercase, capitalise the first letter.
11. Close the presentation without saving.
© CIA Training Ltd 2008 59

Open Learning PowerPoint 2007 Introductory
Exercise 40 - Using Cut and PasteGuidelines:
The Cut and Paste commands allow text and other items, such as graphics, to be moved around a presentation from one place to another, quickly and easily. When an item is cut, it is removed from its original location.
When copied or cut, text is placed in a temporary storage area known as the Clipboard. Up to 24 cut or copied items can be held on the Clipboard, which is common to all Windows applications.
Actions:
1. Open the presentation Ideas. Display the Clipboard task pane by clicking the Clipboard launcher. The Clipboard task pane is shown on the left.
2. If it contains any items, click to remove them.
3. View slide 3, Overview, place the cursor over the first bullet point (it changes to a four headed arrow) and click to select the first bullet point text, Quick overview….
4. Click the Cut button, . The text is removed from the slide and an entry appears in the Clipboard. If a blank line is left where the text has been removed, click on it and press <Delete> to move the other lines up.
5. View slide 5 Rules. The order is to be changed, so that point 1 becomes point 4.
6. Select the text No idea is a bad idea and cut it. Be creative is now point 1. Click at the end of the third bullet and press <Enter>.
7. Click the drop down arrow at the right of the Clipboard entry for No idea…. There are options to Paste or Delete.
8. Click Paste. Use <Backspace> to remove any extra bullet points.
Note: To paste quickly, just click an item on the Clipboard.
60 © CIA Training Ltd 2008

Open Learning PowerPoint 2007 Introductory
Exercise 40 - ContinuedNote: If pasted text has a different format to the existing text, a Paste Smart
Tag, , is displayed next to it. Click the Smart Tag to see the options. Make sure the option Use Destination Theme is selected to ensure that the pasted text takes on the format of the existing text. The Keep Source Formatting option would retain the format of the pasted text as it was when it was Cut or Copied, if it were different.
9. Images can also be manipulated using cut and paste. Move to slide 9.
10. Click once on the top left image to select it.
11. Click Cut to add it to the Clipboard.
12. Navigate to slide 1 and click the graphic on the Clipboard. It is then pasted onto the middle of the slide.
13. Entire slides can be Cut and Pasted. Select Slide Sorter view.
14. Select slide 9 and click Cut. The slide is removed from the presentation.
15. Click between slide 5 and 6 and click the top half of the Paste button,
. The Paste button can be used to paste the last item cut or copied without using the Clipboard.
Note: The Paste drop down (the bottom half of the button) displays a menu of paste options to select from.
16. The graphics slide is now pasted in the middle of the presentation.
17. Use Cut and Paste to make it the last slide again.
18. Leave the presentation open for the next exercise.
© CIA Training Ltd 2008 61
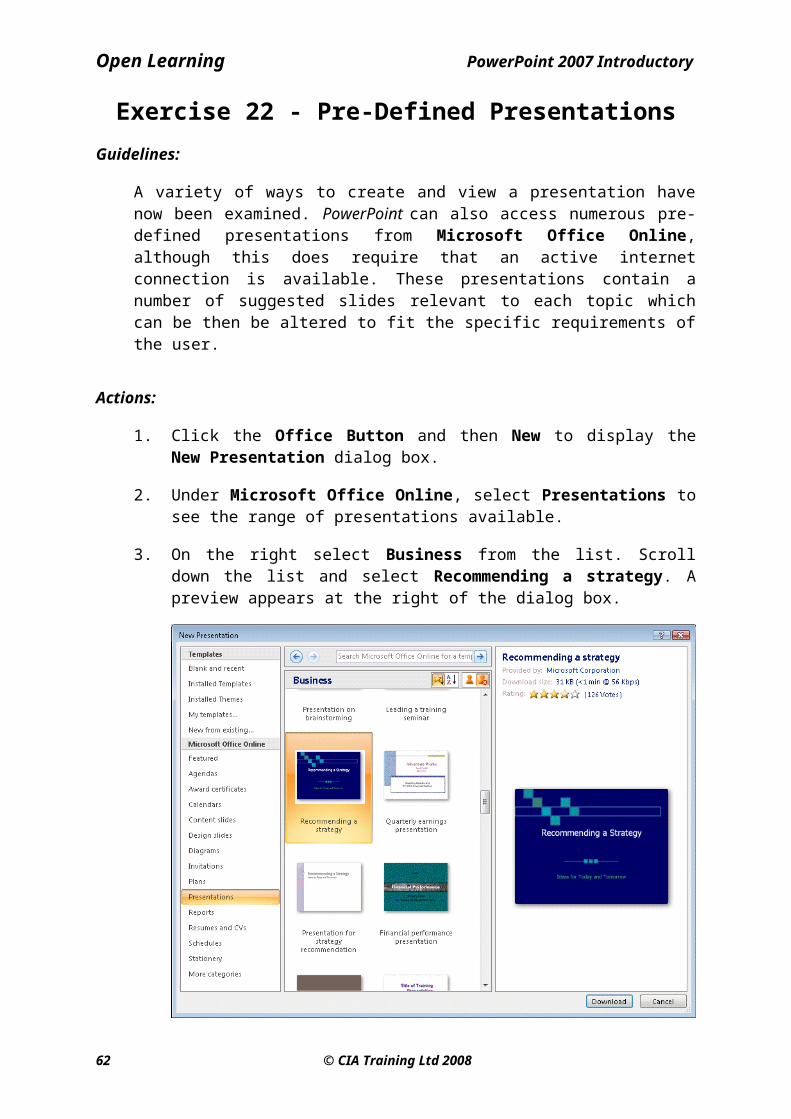
Open Learning PowerPoint 2007 Introductory
Exercise 41 - Using Copy and PasteGuidelines:
Text or other items may also be copied to the Clipboard; when copied, the original is untouched. Other features of Cut and Paste such as Smart Tags, still apply.
Actions:
1. View slide 1 in Normal view and select the graphic.
2. In the Clipboard, click to remove all previously stored items.
3. Click the Copy button, . It may seem as if nothing has happened, but notice that a copy of the graphic has been placed in the Clipboard whilst the original has stayed in place.
4. Select slide 9 from the Slides pane.
5. Click the Paste button, . The copied image is pasted into the slide in the same location as it was on slide 1.
6. Click Paste again. The image is pasted again, PowerPoint “cascades” the image so that it is not directly on top of the first.
7. On slide 5, copy the text No idea….
8. Paste it on slide 7, to become point 2.
Note: Slides can also be copied and pasted.
9. Click the Close button, , top right of the Clipboard Task Pane.
10. Save the presentation as Ideas2 and close it.
62 © CIA Training Ltd 2008

Open Learning PowerPoint 2007 Introductory
Exercise 42 - Revision: Formatting1. Open the presentation Revision (or if you did not complete the revision in
the previous Section open the supplied presentation Revision1 and save as Revision).
2. View slide 1 in Normal view.
3. Change the font of the title ‘Egyptian Odyssey Tours’ to Papyrus 32pt, bold and the subtitle ‘Luxury Holidays’ to Papyrus 36pt, bold and orange.
4. Change the line spacing on slide 2, Introduction to 1.5 lines.
5. On slide 3, Summary Slide, cut the last 4 bullet points.
6. Paste them into the empty text box at the right.
7. Remove any surplus bullets using <Backspace>.
8. Centre align the text in each box.
9. Change the bullet symbols on slide 3 to Hollow Round Bullet.
10. On slides 10, Aswan and 11, Valley of the Kings indent the text to 2cm and the bullet to 1cm.
11. The company is thinking of re-branding. Replace all occurrences of Odyssey with Journey.
12. After a change of heart, the company has decided to stick with Odyssey. Either undo the replacement, or perform a second find and replace to change Journey to Odyssey.
13. Cut the Karnak slide (8) and reposition it in front of Luxor (7).
14. View the slide show.
15. Save the changes to the presentation.
16. Close the presentation.
Note: An example of how the presentation created in this exercise should look can be found in the Answers Section at the end of the guide.
© CIA Training Ltd 2008 63

Open Learning PowerPoint 2007 Introductory
Section 5
PowerPoint Objects
By the end of this Section you should be able to:
Insert an Organisation ChartMove and Resize Objects
Insert Clip ArtInsert a Picture from a FileInsert and Format a Table
Insert ChartsUse Drawing Tools and AutoShapes on Slides
Change Colours and LinesUse the Format Painter
Insert WordArt
64 © CIA Training Ltd 2008

Open Learning PowerPoint 2007 Introductory
Exercise 43 - Inserting an Organisation ChartGuidelines:
Slides in a presentation are composed of various objects which, although easy to insert, can result in an impressive show. When creating a company presentation, it is a good idea to insert an organisation chart to demonstrate the company’s structure. A slide containing a chart can easily be created.
Actions:
1. Open the file Ideas.
2. View the first slide in Normal view.
3. Insert a Title and Content slide, which is placed after slide 1.
4. Add the slide title Think Tank Training are:.
5. Click the Insert SmartArt Graphic in the centre of the screen.
6. The Choose a SmartArt Graphic dialog box is displayed. Click Hierarchy on the left then Organization Chart from the centre. Click OK.
7. A Text Box can be used to add text but for the purposes of this exercise, if displayed, use the Close button to close it.
© CIA Training Ltd 2008 65

Open Learning PowerPoint 2007 Introductory
Exercise 43 - Continued8. Click in the top box, type Alice Brown, press <Enter> and type Director.
Note: If the colour scheme being used makes text difficult to read, select all the boxes by clicking and dragging a rectangle around them. The boxes should display handles as they are selected. Use the Font Color button to choose a more suitable colour for the text from the options.
9. Click on the edge of the box on the second line an Assistant to Alice and press <Delete> to remove it.
10. Click on the left box on the second line and enter Joanne Malone on the first line and Training Manager on the second line.
11. Add the text Katharine Deacon, Marketing Manager in the middle box and Jean Barker, Office Manager in the last box.
12. Click on the box for Joanne Malone and click the Add Shape drop down arrow from Design tab. Select Add Shape Below from the drop down list. A new box is created linked to Joanne’s. Click in the new box and enter Bob Khan, Trainer.
13. Add another shape below Joanne Malone named Michael Jones, Trainer. Add a subordinate to Jean Barker named Lindsay Lightfoot, Clerk.
14. Jean Barker also has an assistant, use Insert Shape and Add Assistant to add the box then enter the details Neera Singh, Accounts.
15. Display the Slide Show tab and click the From Current Slide button, to view the Slide Show for this slide only to see the following chart:
16. Press <Esc> to return to Normal view, then save the presentation as Ideas3 and leave it open.
66 © CIA Training Ltd 2008
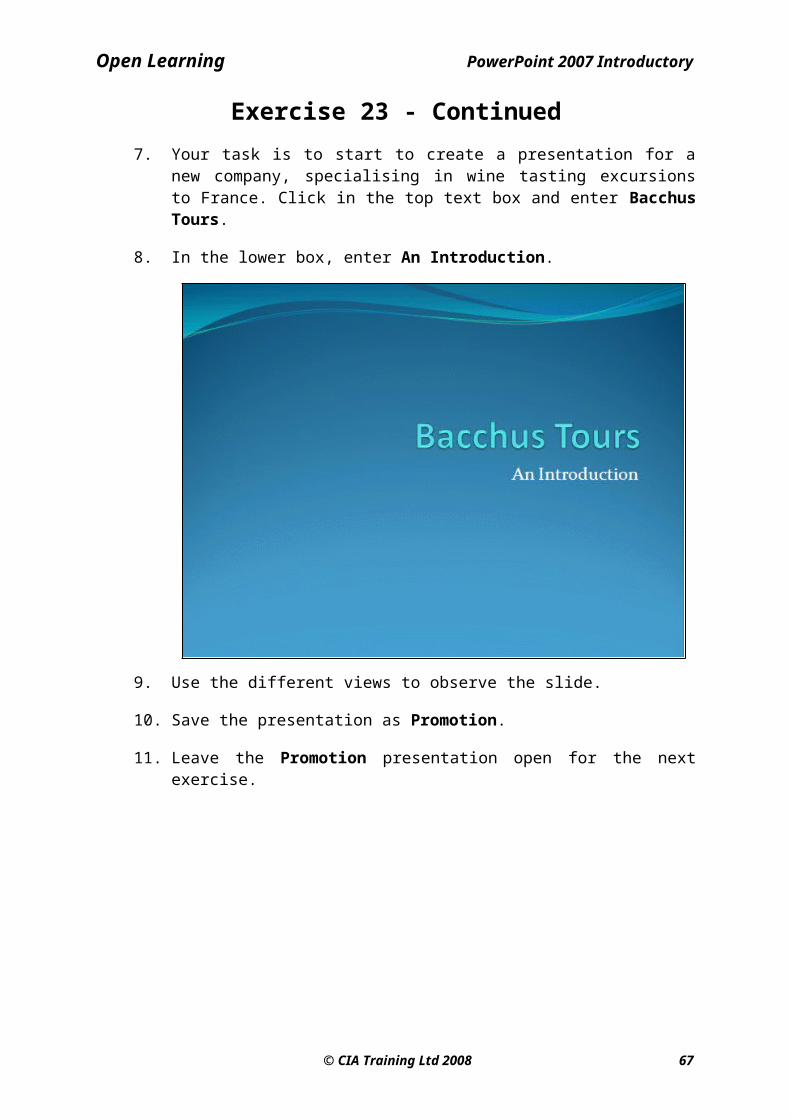
Open Learning PowerPoint 2007 Introductory
Exercise 44 - Moving and Resizing ObjectsGuidelines:
It may be necessary to move or resize an object on a slide. All objects can be resized or repositioned so that they occupy the correct amount of space and position. In the previous section click and drag was used to move some objects.
Actions:
1. Open the presentation Indents. Select the wizard image by clicking on it once. Round and square white handles should appear around it.
2. Move the mouse pointer to the middle of the image, the cursor changes to
a four-headed arrow, . Click and hold the mouse button down. Drag the image around the slide. Release the mouse button when the image is in a central position clear of any text.
3. Hold down the <Shift> key, then click and drag again. Notice how only vertical or horizontal movement is possible. Position the image in a different location, then place it back where it was originally.
4. With the image selected, use the keyboard arrow keys to nudge it around the slide.
5. Resize the image by clicking and dragging any of the corner white
handles (the mouse pointer changes to a double headed arrow, , when over a handle). Clicking and dragging any of the mid point square handles will distort the shape of the image.
6. Click the green Rotate handle, and keep the mouse button held down. Drag the handle from side to side to rotate the image. With the <Shift> key held down the image will only rotate to certain preset angles.
7. Organisation charts can also be manipulated. Use the Taskbar to view the Ideas3 presentation and select slide 2 in Normal view. Click once in the chart area to select it.
8. To resize the whole chart, click and drag one of the handles (displayed as a group of dots). The boxes are automatically rescaled.
9. To move the whole chart, position the mouse pointer over the chart border (the pointer will change to a four headed arrow), click and drag the chart around the slide. Release the mouse button.
Note: Organisation charts cannot be rotated.
10. Save the Ideas3 presentation and leave it open for the next exercise. Close the Indents presentation without saving.
© CIA Training Ltd 2008 67

Open Learning PowerPoint 2007 Introductory
Exercise 45 - Inserting Clip ArtGuidelines:
Clip Art images can be added to slides to create more interest. Office 2007 allows Clip Art to be downloaded from Microsoft Online directly into PowerPoint. Alternatively, if there is no live Internet connection or you have the option switched off, a small number of graphics is provided with the PowerPoint installation. This exercise assumes you have a live connection.
Note: To download clips using a dial up Internet connection 56k or lower may take a long time.
Actions:
1. Select slide 6, Rules in the Ideas3 presentation.
2. Display the Insert tab and click Clip Art button, , in the Illustrations group to display the Clip Art task pane.
Note: Clip Art can be inserted on a new slide. Choose a layout including Content layout and double click the Clip Art icon, to display the Clip Art task pane.
3. Type idea in Search for.
4. To control the search there are two other boxes; Search in and Results should be. Click the Search in drop down.
5. To prevent looking for online content, uncheck Web Collections.
6. Click the Go button. Now only the Clip Art images stored within your computer as part of the PowerPoint installation are searched, and a very limited set is returned.
7. Click the Search in drop down and check Everywhere to search online as well.
8. Click the Go button.
68 © CIA Training Ltd 2008
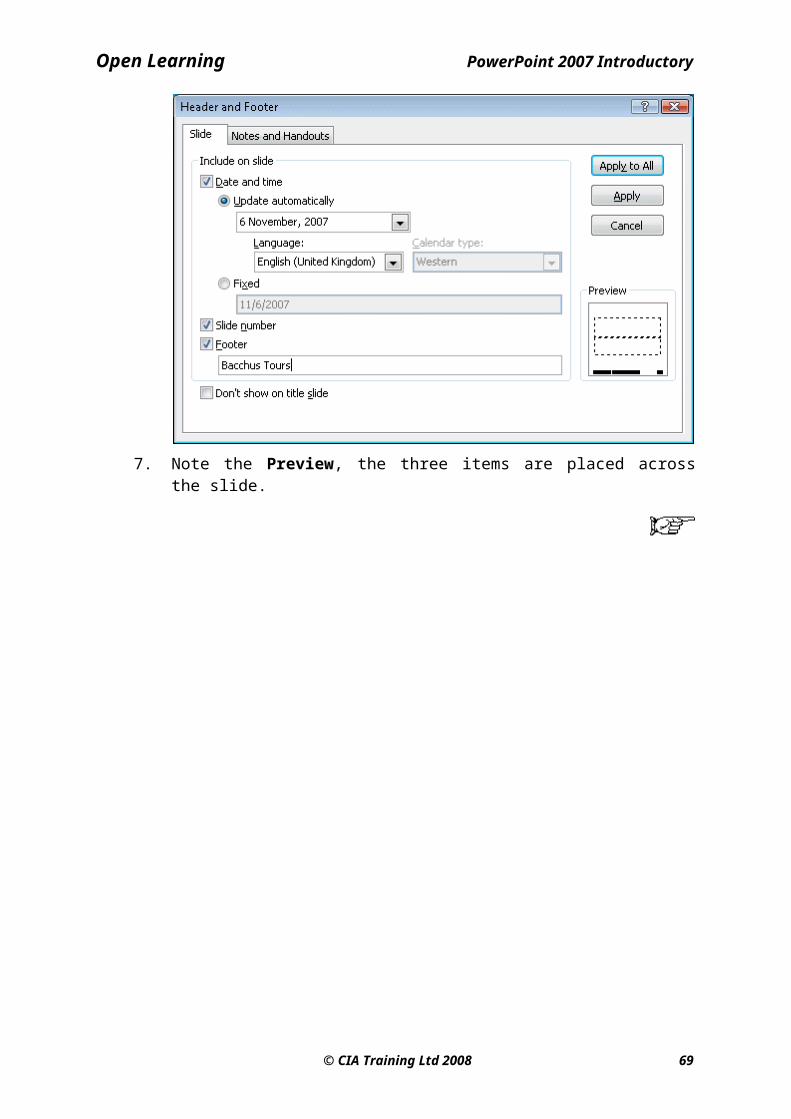
Open Learning PowerPoint 2007 Introductory
Exercise 45 - Continued
Note: If graphics used in the following exercises are unavailable, replace the specified graphic with an alternative.
Note: Clips showing a World symbol in the bottom left corner are downloaded and are not stored on your computer.
9. Click on an image. The picture will appear on the slide.
10. Move the picture to the right of the text, just above the first item.
11. View slide 3, and delete the graphic at the bottom right by clicking on it and pressing <Delete>.
12. Enter brainstorm in Search for and click Go. If you are linked to Microsoft Office Online this will produce a list of images. Click on a suitable image to insert it on to the slide.
Note: If you don’t have an Internet connection there may be no suitable clips. Try other words and choose an alternative.
13. Move the image to the bottom right of the slide, ensuring the slide number is not hidden.
14. Close the Clip Art task pane and leave the presentation open for the next exercise.
© CIA Training Ltd 2008 69

Open Learning PowerPoint 2007 Introductory
Exercise 46 - Inserting a Picture from a FileGuidelines:
Many photographic images from existing files can be inserted into a slide. This means that many more graphics can be used in a presentation than are available from Clip Art.
Actions:
1. Ideas3 should be open from the previous exercise. View slide 4, Overview in Normal view.
2. On the Insert tab click the Picture button. The Insert Picture dialog box is displayed. The picture to be used in this exercise has been supplied with the data files.
3. Look in the data folder for this guide.
4. Select the file meeting, then click Insert (the open button changes to Insert when an image file is selected).
5. Adjust the size and position of the picture to be suitable for the slide - move it to the bottom left and double its size. Do not overlap any of the text.
6. Save the changes to the presentation and close it.
70 © CIA Training Ltd 2008

Open Learning PowerPoint 2007 Introductory
Exercise 47 - Inserting a TableGuidelines:
Tables can be used to present data in a clear way in a columnar format. A simple table can be inserted on to a slide and more complex formatting can be applied later if required.
Actions:
1. Open the presentation Legal.
2. In Normal view, insert a new slide after slide 2, based on the Title and Content slide layout and enter the slide title Cases Won.
3. Click the Insert Table icon in the centre of the slide.
Note: Alternatively, display the Insert tab and click the Insert Table button.
4. From the dialog box, select 4 columns by 3 rows.
5. Click OK. A table appears on the slide.
6. Enter the following data into the table, using the <Tab> key to move from cell to cell:
Year 2002 2003 2004Corporate 2340 3450 2430Non Corporate 1976 2014 978
7. Change the cell widths where necessary by clicking and dragging the cell margins so that all the text fits neatly into the cells but Non Corporate fits on two lines. This will involve some trial and error.
8. Select all the text in the whole table.
9. On the Layout tab, click the Center Vertically button, in the Alignment group. All text in the table is re-aligned.
10. Click and drag to select the three cells in the first column of the table.
11. On the Design tab, click the arrow on the Shading button, , and select a colour from the those available.
12. Practise changing the appearance of the table by selecting cells and using commands from the Design and Layout tabs.
13. When you are happy with the table, save the presentation as Legal3 and leave it open for the next exercise.
© CIA Training Ltd 2008 71

Open Learning PowerPoint 2007 Introductory
Exercise 48 - Inserting a ChartGuidelines:
A chart can be inserted on to a slide to display data in a more attractive way. The relevant information is entered into a datasheet and is then displayed in a chart. Various types and subtypes of chart are available.
Actions:
1. View the Cases Won slide, which is slide 3 and insert a new slide, based on the Title Only slide layout. Give it the title Our Success.
2. Display the Insert tab then click the Chart button to add a chart and its associated datasheet.
Note: This is an alternative method to inserting a Title and Content slide and then clicking the Insert Chart icon.
3. Scroll down the list of available chart types to see the range of charts that are available.
4. Select Column then Clustered Column, the first sub-type of Column charts. Click OK.
5. In the datasheet, to reflect the table on slide 2, click on the word Category 1 and type Corporate. Underneath, replace Category 2 with Non Corporate.
72 © CIA Training Ltd 2008

Open Learning PowerPoint 2007 Introductory
Exercise 48 - Continued6. To delete the extra rows, select rows 4 and 5, by clicking and dragging on
the row numbers, then right click on the row 4 header and select Delete.
7. Replace Series 1 with 2002, Series 2 with 2003 and Series 3 with 2004.
8. Replace the data so it matches the data in the table.
9. Close the Datasheet.
10. Click on the slide away from the chart, to see how the chart will appear.
11. On the Design tab, click the Edit Data button in the Data group to redisplay the datasheet and allow editing of the data.
12. Change the Corporate figures for 2004 from 2430 to 2530.
13. Change the Non Corporate figures for 2004 from 978 to 1525 to observe the change reflected in the chart.
14. Close the datasheet.
15. Any part of a chart can be formatted. Click on the Plot Area. Display the Format tab and click the Format Selection button in the Current Selection group.
Note: Use ToolTips to identify areas of the chart for editing, if required.
16. In the Format Plot Area dialog box, with the Fill section displayed, change the colour by selecting the Solid fill option and from the drop down Color button select a pale blue colour. Move the dialog box to one side so that the effect of the change can be seen.
17. Single click on one of the dark blue columns (representing 2003). The dialog box changes to reflect the selection. Change the colour of the 2003 columns to red.
18. Click Close.
19. An alternative method of editing is to right click on the object, then select Format... from the shortcut menu. Right click on the Vertical Axis and select Format Axis.
20. With Axis Options selected, to change the Minimum level (the smallest column is 1500) to 1000, select the Fixed option and enter 1000 in the box. The scale now starts at 1000.
21. Change the Maximum level to 3500. Click Close to remove the dialog box.
22. Save the presentation and then close it.
© CIA Training Ltd 2008 73

Open Learning PowerPoint 2007 Introductory
Exercise 49 - Drawing on SlidesGuidelines:
Drawings can be made directly on to a slide using the tools from the Shapes button. The Shapes button is located on the Home tab in the Drawing group and the Insert tab in the Illustrations group. All objects drawn have handles, so that they can be moved, reshaped and resized.
Actions:
1. Start a new blank presentation.
2. Use the Layout button to change the slide to Title Only. Enter Drawings as the Title.
3. Click the Shapes button and select a basic line, the first item under Lines. Click and drag a horizontal line on the slide, under the title.
4. In a similar way, draw a basic Rectangle, anywhere on the slide.
5. Hold down <Shift> while dragging a second Rectangle shape, release the mouse button before releasing <Shift>. A perfect square is drawn.
6. Use <Shift> and Oval found under Basic Shapes, to draw a circle. All these shapes are filled with blue.
7. With the circle selected, click on the Shape Fill button, . Choose a different colour from the options.
8. With the circle still selected, change its outline colour by clicking Shape Outline button, choose a different colour as a contrast to the first colour.
9. Select the line and change its thickness by clicking the Shape Outline button, , then choosing Weight and select the 4½ pt option.
Note: An alternative method to format a shape is to right click on it and select Format Shape. Changes are then made in the Format Shape dialog box. Click Close when finished.
10. Click and drag the circle to move it. Click and drag any of the corner handles of the circle to change its size.
11. Click and drag around the objects. All of the objects completely within the selection are then selected and have handles.
12. Press <Delete> to delete them and leave the presentation open.
74 © CIA Training Ltd 2008

Open Learning PowerPoint 2007 Introductory
Exercise 50 - Using Other ShapesGuidelines:
As well as standard shapes the Shapes list also contains a variety of other non standard shapes that can be drawn and manipulated to create diagrams and pictures.
Actions:
1. Still viewing the Drawings slide, click the Shapes button. A list of options is shown as seen previously.
2. Choose Oval Callout the third shape under Callouts.
3. Click and drag on the slide to draw the shape, then move it to the top half of the screen.
4. With the Callout shape selected, type Shapes make drawing easier. If necessary, use the handles to enlarge the shape so that the text fits inside.
5. Change the fill and outline colour.
6. The callout stem is controlled with the yellow diamond. Drag the diamond down and to the left to make the stem longer.
7. With the callout still selected, click the Shape Effects button. Select each group in turn to see the available options. Select Reflection and Full Reflection, touching (top row, 3rd item).
Note: This exercise used a Callout as an example, all other shapes work in a similar way.
8. Experiment with drawing different shapes, adding different colours and effects.
9. Leave the presentation open for the next exercise.
© CIA Training Ltd 2008 75

Open Learning PowerPoint 2007 Introductory
Exercise 51 - Formatting ShapesGuidelines:
Shapes can be formatted in a variety of ways. The fill colour, outline colour and weight of lines have been covered already. This exercise introduces more shape effects.
Actions:
1. Using the slide from the previous exercise, draw a rectangle to the right of the callout.
2. Right click on the rectangle and select Format Shape.
3. The Format Shape dialog box is displayed.
4. Move the dialog box so the rectangle can be seen. Set the Transparency value to 50% by dragging the slider or using spinner box. This option is used to prevent text being hidden behind objects. Move the object over the title, Drawings - it should be visible underneath.
76 © CIA Training Ltd 2008
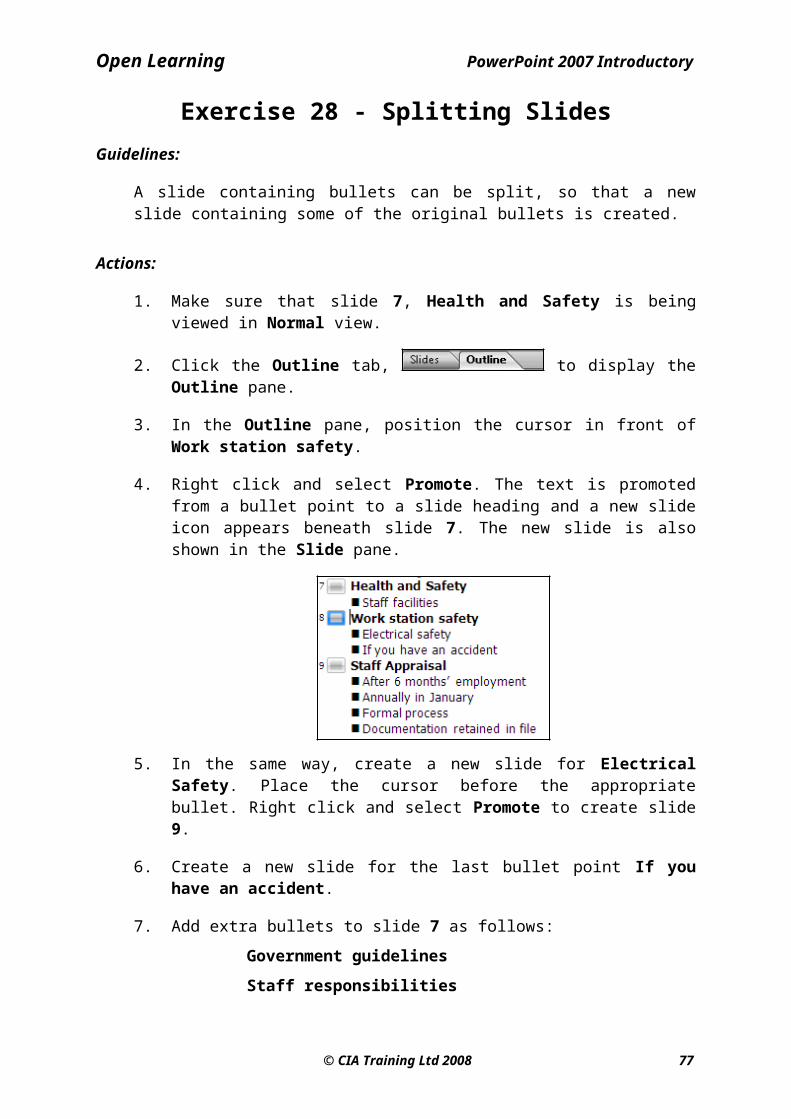
Open Learning PowerPoint 2007 Introductory
Exercise 51 - Continued5. Move the rectangle away from the title.
6. Select the Picture or texture fill option. The dialog box changes to Format Picture and adds more options.
7. Click the Texture button. View the available textures before choosing Parchment from the list.
8. Click the File button under Insert from. Navigate to the data files folder, PowerPoint 2007 Introductory Data.
9. Select the deathmask image and click the Insert button. The image fits the shape. The shape of the rectangle can still be adjusted if required.
Note: Using Insert from a variety of fills can be achieved using the File, Clipboard or Clip Art buttons.
10. Select the Picture section on the left of the dialog box. The picture can have the Brightness and Contrast changed. Experiment and then click the Reset Picture button. Close the Format Picture dialog box.
11. Leave the presentation open for the next exercise.
© CIA Training Ltd 2008 77

Open Learning PowerPoint 2007 Introductory
Exercise 52 - Using the Format PainterGuidelines:
If an object has a style that is to be applied to another object, the Format Painter can be used. The original formatting is copied and then applied in its entirety to the desired object, or to multiple objects. The Format Painter can also be used to copy text formatting.
Actions:
1. Draw a Heart (found under Basic Shapes) at the bottom right of the slide.
2. Select the callout formatted previously then click the Format Painter button, , on the Home tab in the Clipboard group. A paintbrush
appears beside the mouse pointer, .
3. Click on the heart object. The formatting of the first object is applied to the second.
4. Draw a third object, this time a sun from Basic Shapes and colour it yellow.
5. With the sun still selected, apply the formatting to more than one object, by double clicking the Format Painter button, then clicking on the heart and then the callout.
6. Deactivate the Format Painter by clicking the button again or by pressing the <Esc> key.
7. Select the callout (click on the edge), it is shown with a solid border, then press <Delete> to remove it from the slide.
8. Save the presentation as Drawings and leave it open.
78 © CIA Training Ltd 2008
Open Learning PowerPoint 2007 Introductory
Exercise 53 - Inserting WordArtGuidelines:
WordArt, special graphical text, can be inserted into a slide. Various styles are available and can be manipulated and edited in several ways.
Actions:
1. Insert a new Title Only slide. Add the title WordArt.
2. Display the Insert tab and click the WordArt button, , in the Text group to display the WordArt Gallery.
3. Select the second item on the first row, Fill - None, Outline - Accent 2.
4. In the text box type Eye catching.
5. The WordArt is placed on the slide. Notice that the object has white sizing handles and a green rotate handle.
6. Enlarge the WordArt slightly using the Font group on the Home tab and reposition it at the top of the slide, under the title.
7. Click away from the WordArt.
© CIA Training Ltd 2008 79
Open Learning PowerPoint 2007 Introductory
Exercise 53 - Continued
8. Click the WordArt button again and choose the third style on the fifth row, Fill - Accent 2, Warm Matte Bevel.
9. Insert the text Colourful and position the WordArt underneath the other text, but at the centre of the slide, resizing if necessary.
10. WordArt text, is edited in the same way as any text box, click in the box, place the cursor and make the changes. Add Very in front of Colourful.
11. WordArt is formatted using the buttons in the WordArt Styles group on the Format tab. Text is either highlighted, or the cursor is placed in the required word or the entire box is selected.
12. With the second WordArt box selected (solid border), click the Text Effects button, the bottom of the three. Click on each item in turn, starting with Shadow to view the available options.
13. The most interesting is the Transform options. Select Transform and select Chevron Up.
14. When a different shape is added to the text, a new diamond handle is added to control the extent of the shape. Click the diamond handle and drag downwards for the maximum effect (dragging it upwards reduces the effect).
15. Save the changes to the Drawings presentation.
16. Experiment with WordArt effects and colours.
17. Close the presentation without saving.
80 © CIA Training Ltd 2008

Open Learning PowerPoint 2007 Introductory
Exercise 54 - Revision: PowerPoint Objects1. Open the Revision presentation (or Revision2 from the data files if you
did not complete the revision for the previous Section).
2. Insert the following pictures on the slides indicated, moving and resizing as you think necessary for the best effect.
Slide 4 Cairo deathmaskSlide 5 Great Pyramid greatpyramidSlide 6 Sphinx sphinxSlide 7 Karnak karnak3Slide 8 Luxor avenue_of_sphinxes2Slide 9 Nile Cruise nile1Slide 10 Aswan abu_simbel1Slide 11 Valley of the Kings valley2Slide 12 Valley of the Queens hieroglyphs1Slide 14 Balloon Trip balloon
3. For slide 13 Hatshepsut, insert any Clip Art graphic using the search Egypt (you may need an Internet connection to locate clips).
4. On slide 3, Summary Slide, insert WordArt, the first style on the third row, to read Highlights.
5. Double the size of the WordArt and move to the bottom centre of the slide.
6. Insert a new Title and Content slide after slide 14 Balloon Trip. Add the title Average Cairo Temperatures.
7. Create a Clustered Column chart and enter the information on the right into the datasheet:
8. Add the label Temp in cell B2 and delete columns C and D.
9. Close the Datasheet. Click on the Legend and delete it. Remove the title Temp also.
10. View the slide show.
11. Save as Revision and close the presentation.
Note: An example of how the presentation created in this exercise should look can be found in the Answers Section at the end of the guide.
© CIA Training Ltd 2008 81
Open Learning PowerPoint 2007 Introductory
Section 6
Slide Formatting
By the end of this Section you should be able to:
Change Slide Design and SetupApply Colour Schemes
Spell Check the Presentation
82 © CIA Training Ltd 2008
Open Learning PowerPoint 2007 Introductory
Exercise 55 - Slide Design and SetupGuidelines:
The design chosen when the presentation was first created can be changed at any time. The new design can be applied to all the slides in the presentation or just one. The slide setup, e.g. the slide size and orientation may be changed, as well as the orientation of the Notes Pages, Handouts and Outlines.
Actions:
1. Open the Ideas presentation and view any slide.
2. Display the Design tab and click the More button in the Themes group.
Note: There are more Themes available from Microsoft Office Online.
3. From the Built-In section, select Opulent (second row, 4th style).
4. View the slides in the Slides pane at the left to check that all the slide designs have been changed.
5. With the Design tab displayed, click the Page Setup button.
6. To see the slides with different orientation applied, select Portrait from the Slides area, then click OK.
7. Return the slide to Landscape.
8. Leave the presentation open for the next exercise.
© CIA Training Ltd 2008 83
More button
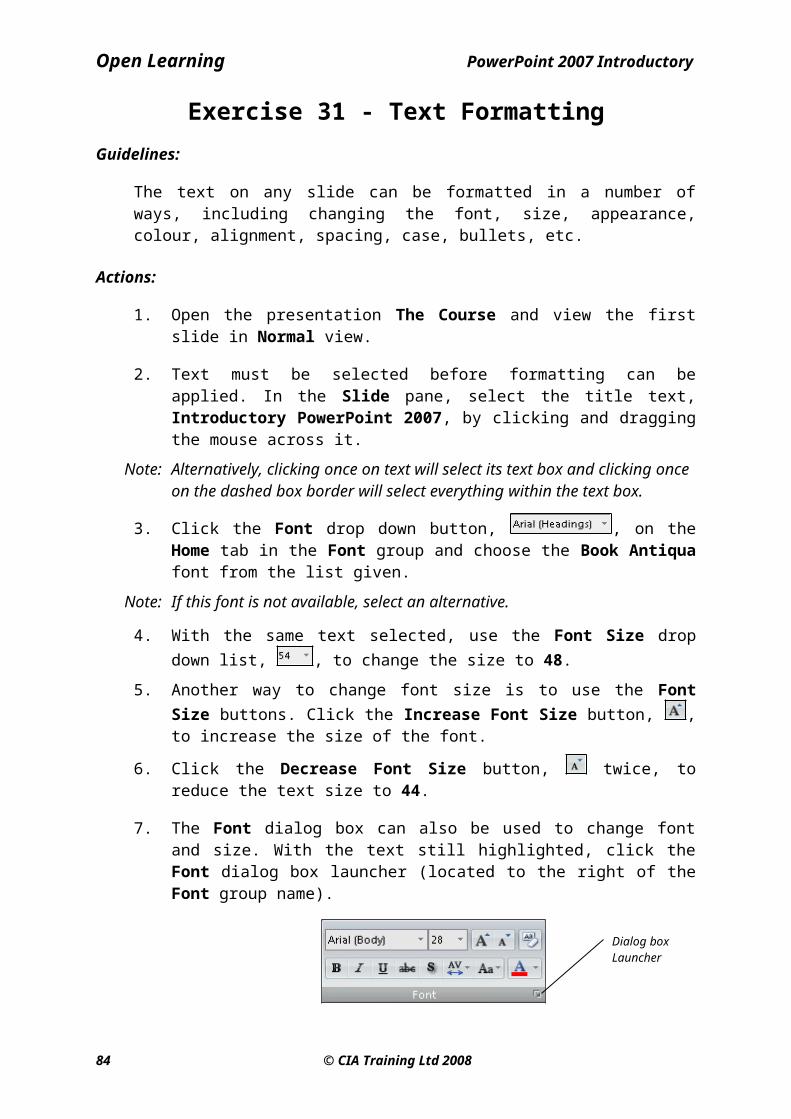
Open Learning PowerPoint 2007 Introductory
Exercise 56 - Colour SchemesGuidelines:
A colour scheme is a set of colours that compliment the design template applied to the presentation. When a presentation is first created, a particular colour scheme is applied by default, but this scheme can be changed or a new one selected.
Actions:
1. From the Design tab, click the Colors button in the Themes group. The Built-In colours for the themes are listed. A different group of colours can be applied to the chosen theme.
2. To edit the colour scheme by changing individual colours, click Create New Theme Colors at the bottom of the list.
3. The various parts of the scheme are shown and can be changed. Click the drop down of the Text/Background - Dark2 and select Orange. Click Save. The theme is saved as Custom 1.
4. The colour does not go with the graphic, click Undo to revert back to the original colours.
5. Close the presentation without saving.
84 © CIA Training Ltd 2008

Open Learning PowerPoint 2007 Introductory
Exercise 57 - Spell Checking the PresentationGuidelines:
A presentation can be checked at any time for spelling errors. The spell checker will suggest alternatives for words it does not recognise; these can be accepted or ignored. Words can be added to the dictionary if desired.
Actions:
1. Open the presentation Motivation.
2. Display the Review tab and with slide 1 displayed, click the Spelling
button, , in the Proofing group, to start the spell checker.
3. When the Spelling dialog box appears, either Ignore to leave the word unchanged or Change the incorrect words, by selecting a word from the Suggestions list or by typing a new word in the Change to box.
Note: On the slide words spelled incorrectly will be underlined with a red wavy line. An alternative way of correcting errors is to right click such a word to display a shortcut menu showing possible alternative words for selection.
4. When spell checking is finished, the following dialog box is displayed.
5. Click OK.
6. Save the presentation as Checked and close it.
Note: Double clicking on the Spell Checker icon, , on the Status Bar will also display a shortcut menu with possible alternatives for misspelled words.
© CIA Training Ltd 2008 85

Open Learning PowerPoint 2007 Introductory
Exercise 58 - Revision: Slide Formatting1. Open the Revision presentation (or the Revision3 presentation from the
data files if you did not complete the revision from the previous Section and save the presentation as Revision).
2. Change the colour of the sand using the Text/Background - Light 2 box to make the sand a slightly darker yellow.
3. Has the slide design changed?
4. Spell check the presentation. All names of places or people can be ignored.
5. Ensure the page setup is Landscape and sized for an On-screen show (4:3).
6. Save the presentation as Revision.
7. Close it.
86 © CIA Training Ltd 2008

Open Learning PowerPoint 2007 Introductory
Section 7
Slide Shows
By the end of this Section you should be able to:
Set up a Slide ShowApply Slide Transitions
Run the PresentationPrint Slides, Presentations, Outlines and Handouts
© CIA Training Ltd 2008 87
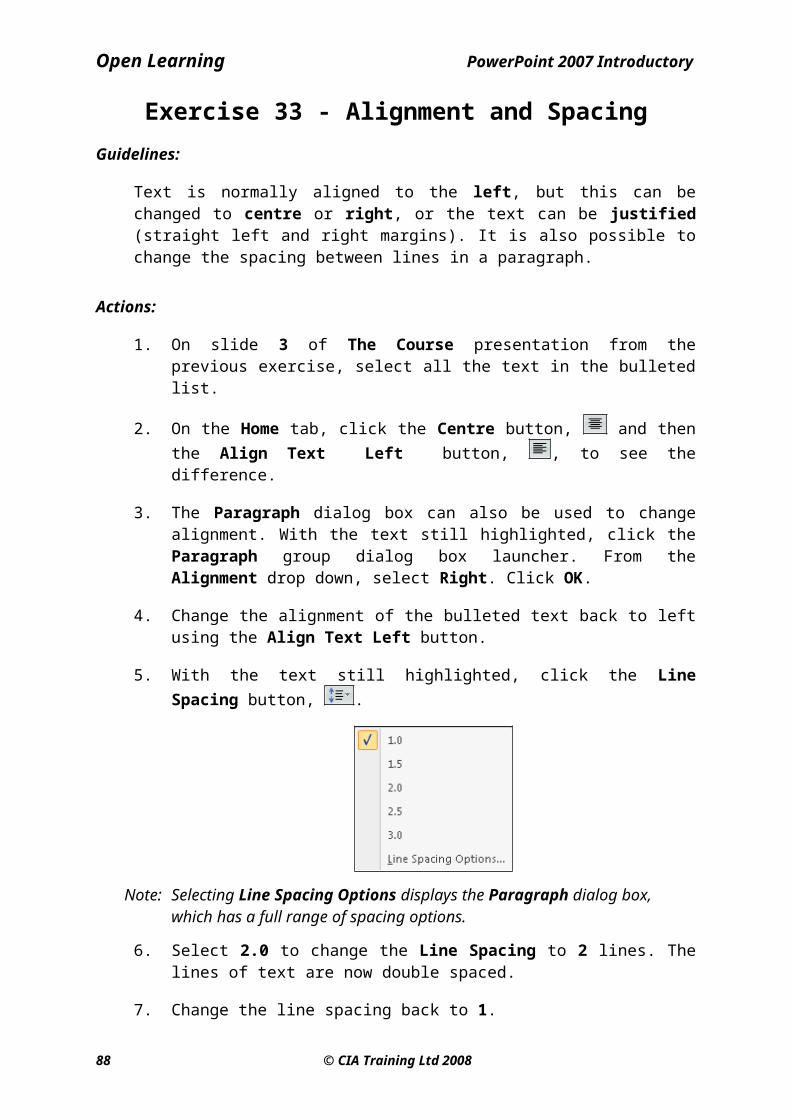
Open Learning PowerPoint 2007 Introductory
Exercise 59 - Setting up a Slide ShowGuidelines:
A slide show can be set up to run in a few different ways. It can be run manually, by clicking the mouse, or automatically using timings (timings are covered in the Advanced PowerPoint guide). It can also be set up to loop, running continuously.
Actions:
1. Open the presentation Legal and switch to Slide Sorter view.
2. Click on the first slide. Display the Slide Show tab and click the Set Up Slide Show button in the Set Up group. Selections made here control how the presentation runs.
3. From Show options select Loop continuously until ‘Esc’ and click OK.
4. Click the From Beginning button, in the Start Slide Show group to run the presentation.
5. Click to advance the slides and notice how the show starts again when the end is reached. Press <Esc> to end it.
6. Click the Set Up Slide Show button again and remove the check from Loop continuously… and click OK.
7. View the show again. At the end of the show PowerPoint returns to Slide Sorter view.
8. Leave the presentation open.
88 © CIA Training Ltd 2008

Open Learning PowerPoint 2007 Introductory
Exercise 60 - Applying Slide TransitionsGuidelines:
To add interest to a slide show, a transition can be applied to slides. This is a special effect, which controls how one slide changes to the next. Timings can be applied to the effects, so that they appear after a specified interval, or they can be displayed manually by clicking the mouse. In this guide, the mouse will be used.
Actions:
1. In Slide Sorter view, click on the Title slide of the presentation.
2. Display the Animations tab. Click the More button in the Transition to This Slide group.
3. Select an effect from the drop down list and watch the preview.
4. The transition is too fast to see. Change the Transition Speed to Medium. Try a few more.
5. From under Fades and Dissolves, select the effect Dissolve.
6. From Transition Sound select a sound if required, and ensure Advance slide is set to On Mouse Click.
7. Click Apply to All to make all transitions the same.
Note: Alternatively, define different effects for other slides and don’t click Apply to All.
8. Select the first slide, then run the slide show. Click the mouse button to move through. Notice the effect/s as the slides change.
9. Save the presentation as Legal4.
Note: A slide that has a transition applied has the symbol, , underneath it in Slide Sorter view.
10. Leave the presentation open for the next exercise.
© CIA Training Ltd 2008 89
More button

Open Learning PowerPoint 2007 Introductory
Exercise 61 - Running the PresentationGuidelines:
After transitions have been applied and the slide show has been set up, you can run it to check that it flows properly.
Actions:
1. The slide show is to be advanced without using timings. From the Slide Show tab, click the Set Up Slide Show button and change the Advance slides setting to Manually. Click OK. There are no timings.
2. To start the presentation with slide 3, (missing out slides 1 and 2), select the third slide and click the From Current Slide button.
Note: Clicking the From Beginning button or pressing <F5> will all start the presentation at the first slide, regardless of which is the currently selected slide.
3. Advance the show with a mouse click.
4. Press <Esc> to end the show.
5. Run the show from slide 1.
6. When the mouse pointer is moved on the screen, a number of ghosted icons appear in the bottom left corner. Move the pointer over the icons to
see them more clearly. Click and select Go to Slide. A menu will open, displaying a list of the slides in the presentation.
7. Select slide 4. The show jumps to slide 4 and the presentation will continue from this point.
Note: Initially, the presentation should run in slide order. Navigation tools are mainly used for answering questions put to the presenter that require the displaying of non-adjacent slides.
8. Display the popup icons again, and explore the other options.
9. Exit the show by pressing <Esc> and leave the presentation open.
Note: Narration can be recorded and edited one slide at a time, giving greater flexibility. A microphone is needed for this process. Click the Record Narration and record narration for each slide.
90 © CIA Training Ltd 2008

Open Learning PowerPoint 2007 Introductory
Exercise 62 - Printing Slides and PresentationsGuidelines:
Slides, notes pages, outlines and handouts can be printed in various formats.
Actions:
1. In Slide Sorter view, select the second slide.
2. Click the Office Button and then select Print. The Print dialog box appears.
3. Check that the printer is ready to print. If the printer shown at the top of the dialog box is incorrect, click on the Printer Name box and select the correct one.
4. From Print what, select Slides. From Copies and Print range respectively, opt to print 1 copy of the Current slide, then click OK.
Note: The Preview button can be used instead, to check the results without having to use paper by printing.
5. Click the Office Button and then select Print. Select All from Print range and from Print what select Outline view.
6. Click OK to produce a printout of slide headings and bullet points.
7. Complete presentations can be printed, one slide per page. To see a preview of how the printouts would look, click the Office Button, click Print and change Print what back to Slides. Click the Preview button.
8. Use the Next Slide button to view how each one would be printed and when you have seen them all, click Close Print Preview.
9. Leave the presentation open for the next exercise.
© CIA Training Ltd 2008 91

Open Learning PowerPoint 2007 Introductory
Exercise 63 - HandoutsGuidelines:
Handouts can be printed for an audience to follow as the presentation is running. They will then have something to refer to, which will remind them of the presentation.
Actions:
1. Still in Slide Sorter view, click the Office Button and then Print.
2. From the Print what drop down list, select Handouts.
Note: Any speaker’s notes can be printed as a prompt for the presenter by selecting Notes Pages from Print what.
3. Different numbers of handouts can be printed on a page. 3 handouts per page is a popular choice because a blank area for notes is printed alongside each slide image. Set the Slides per page to 3.
Note: The Color/grayscale option will default to Grayscale if a colour printer is not attached.
4. Select the Print range as All.
5. Click OK to print the handouts or Preview to see the results without printing.
6. Leave the presentation open.
92 © CIA Training Ltd 2008
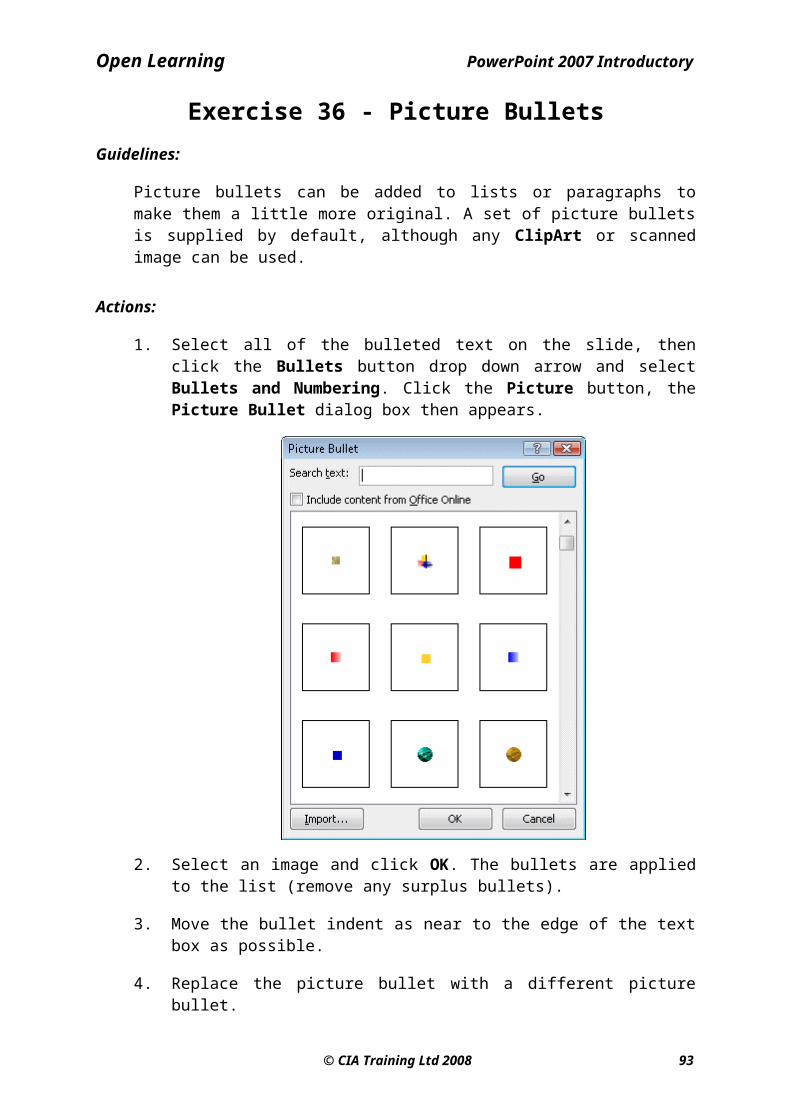
Open Learning PowerPoint 2007 Introductory
Exercise 64 - Colour OptionsGuidelines:
If a colour printer is used, colour presentations can be printed in black and white or shades of grey (a monochrome printer prints like this anyway). This can reduce printing costs and save colour ink.
Actions:
1. Click the Office Button and then Print.
2. From Print what select Slides and from Print range select Current slide.
3. Click the Color/grayscale drop down arrow and select Grayscale.
4. Click OK. Background graphics are not shown with this option, although any inserted graphics will be displayed.
Note: If you don’t want to print at this stage, click the Preview button instead.
5. Display the Print dialog box again.
6. From the Color/grayscale list, select Color.
7. Click OK (or Preview). Background graphics are now shown, even if not printing to a colour printer.
8. Compare the two printouts.
9. Leave the presentation open.
© CIA Training Ltd 2008 93

Open Learning PowerPoint 2007 Introductory
Exercise 65 - Presentation FormatsGuidelines:
A presentation can be given using different methods, such as on an overhead projector, an on-screen show, on 35mm slides, or just as handouts for the audience. The output format should be selected before the presentation is run.
Actions:
1. The Legal4 presentation is to be shown on an overhead projector. Display the Design tab and click Page Setup.
2. The presentation is currently set up as an On-screen Show. Click on the drop down list for Slides sized for.
3. Select Overhead (this setting is usually used for printing onto transparent overhead projector sheets).
4. Click OK.
Note: The 35mm Slides option converts the slides to the correct size before sending the presentation to have the 35mm slides produced commercially.
5. Click the Page Setup and change the size setting to A4 Paper and click OK. This could also be used to print handouts of the slide show.
6. From the Page Setup dialog box, change the size to Letter Paper. Click OK. The slide image changes slightly to indicate how it would look when printed on letter size paper.
7. Open the Page Setup dialog box again. Select the Custom option from Slides sized for. The size of the slide can now be defined using the Height and Width boxes. Set a height of 20cm and a width of 10cm and click OK to see the effect.
8. Now change the format back to On-screen show and Slide Orientation to Landscape.
9. Save the changes to the presentation and close it.
94 © CIA Training Ltd 2008

Open Learning PowerPoint 2007 Introductory
Exercise 66 - Revision: Slide Shows1. Open the Revision presentation (or Revision4 if you have not completed
the revision in the previous Section and save the presentation as Revision).
2. Set up the presentation to run manually and loop continuously.
3. Apply the transition effect Wedge (slow speed) to all slides.
4. Run the show.
5. When the show starts again use a key press to stop it.
6. Change the page setup to size slides for A4 paper.
7. Print the speaker’s notes.
8. Print an outline of the presentation.
9. Print slide 3, Summary Slide in pure black and white.
10. Save the presentation as Revision.
11. Close the presentation.
Note: An example of how the finished presentation should look can be found in the Answers Section at the end of the guide.
© CIA Training Ltd 2008 95

Open Learning PowerPoint 2007 Introductory
Answers
Exercise 10 - Revision
Step 2 Three buttons
Step 3 Save, Undo and Repeat/Redo
Step 4 Not available to be used at the present time
Step 5 A Blank Presentation or a selection from: Recently Used Templates, Installed Templates, Installed Themes, My Templates, New from existing or Microsoft Office Online templates
Step 6 The Ribbon is a bar that contains tabs. Each tab contains groups that include buttons to carry out most of the required commands
Step 7 Insert, Review, or Developer (the Developer tab is optional and may not be selected on your installation).
Step 8 Classic Photo Album, Contemporary Photo Album, Quiz Show, Introducing PowerPoint 2007, Pitchbook and Widescreen Presentation
Step 10 a) New Slide b) Format Painter c) Text Shadow d) Savee) Bullets f) Microsoft Office PowerPoint Help
Step 11 Preferences are controls that can be set to personalise the program
Exercise 30 - Revision
96 © CIA Training Ltd 2008

Open Learning PowerPoint 2007 Introductory
Exercise 42 - Revision
Exercise 54 - Revision
© CIA Training Ltd 2008 97

Open Learning PowerPoint 2007 Introductory
Exercise 58 - Revision
Step 3 No, just the colour changes.
Exercise 66 - Revision
The completed presentation is included in the data folder as Revision 5.
98 © CIA Training Ltd 2008

Open Learning PowerPoint 2007 Introductory
Glossary
Clip Art A collection of graphic images included with Office 2007.
Colour Scheme A set of pre-defined colours applied to areas of a slide.
Design Template A pre-set design that can be applied to slides, including colours and fonts.
Drawing Objects Objects that can be created directly on the slide using tools from the Drawing group on the Home tab.
Format Painter A tool that allows a combination of formats to be copied from one location and applied to another.
Handouts Hardcopies of slides that may be printed in a variety of layouts and sizes.
Header/Footer Information that is displayed at the top/ bottom of every slide.
Notes Page A view that allows speaker's notes to be added to slides. The notes may be printed out as well as viewed on screen.
Organisation Chart A pictorial representation of the personnel structure of a company.
Presentation A collection of slides used by a speaker as a visual aid.
Presentation Template A pre-defined presentation, including formatting and graphic design, together with generic content that can be adapted.
Shapes Ready-made shapes in a variety of categories, available from the Drawing group on the Home tab.
Slide Layout Type of slide specified; e.g. Bulleted List, Title Only, etc.
Slide Show A presentation being run on screen, with all effects, transitions, sounds, etc.
© CIA Training Ltd 2008 99
Open Learning PowerPoint 2007 Introductory
Summary Slide A slide displaying bulleted points that is created from the titles of existing slides.
Template A presentation framework containing formatting, which can be saved for use as the basis for future presentations.
Transitions Special effects that occur as one slide changes to the next during a Slide Show. Timings and sound effects may be specified as well as visual effects.
Views Different ways of looking at the slides within a presentation.
WordArt Special graphical text that can be inserted into a slide.
100 © CIA Training Ltd 2008

Open Learning PowerPoint 2007 Introductory
IndexAlignment
Text 53
Automatic Numbering 57
Basic Shapes 74
Blank Presentation 36
Bullets 54Formatting 54Picture 56
Charts 72Organisation 65
Clip Art 68
Clipboard 60
ClosingPowerPoint 19Presentations 32
Colour 84Bullet 54Options 94Schemes 84Text 51
Copy 62
Cut 60
Drawing on Slides 74
EffectsText 52
Exit PowerPoint 19
Find Data 59
Font 51
Footers 41
Format Painter 78
Formatting 50Alignment 53Bullets 54Effects 52Font 51Format Painter 78Size 51Spacing 53Text 51
Fundamentals 7
Handouts 92
Headers 41
Help 15
Indents 55
InsertingChart 72Clip Art 68Organisation Charts 65Picture from File 70Slides 45Table 71Word Art 79
LinesChanging 74
Moving Objects 67
New Slide Adding 43
Normal View 22
Notes Page View 28
Objects 64Moving 67Resizing 67Rotating 67
Opening Presentations 33
Organisation Charts 65
Outline View 25
Paste 60-62
PictureBullets 56Insert from File 70
PowerPointClosing 19Starting 8
Preferences 17
Presentations 35Blank 36Creating 36-37Closing 32Formats 94Opening 33Pre-Defined 37Printing 91Running 90Saving 30Templates 37Themes 39
© CIA Training Ltd 2008 101

Open Learning PowerPoint 2007 Introductory
PrintingHandouts 92Outlines 91Presentations 91Slides 91
Quick Access Toolbar 13
Redo 58
Replacing Data 59
Resizing Objects 67
Reuse Slide 45
RevisionFormatting 63Fundamentals 20PowerPoint Objects 81Presentations 49Slide Formatting 86Slides 34Slide Shows 95
Rotate Objects 67
Saving Presentations 30
Screen 9
ShapesFormatting 76Other 75Basic 74
SizeText 51
Slides 21Changing Layout 44Design and Setup 83Drawing on 74Inserting 45New 43Printing 91Splitting 46Summary 48Transitions 89
Slide ShowBasics 29Setting Up 88
Slide Sorter View 27
Slide View 24
SpacingText 53
Spell Checker 85
Splitting Slides 46
Starting PowerPoint 8
Summary Slide 48
TableInserting 71
Taskbar 14
Task PaneReuse Slide 45Clipboard 60
Templates 36-37
Text Formatting 51
ToolTips 11, 13
Transitions 89
Undo 58
Views 22Normal 22Notes Page 28Outline 25Slide 24Slides 25Slide Sorter 27Slide Show 29
Word Art 79
Zoom Control 27
102 © CIA Training Ltd 2008

Other Products from CiA TrainingCiA Training is a leading publishing company, which has consistently delivered the highest quality products since 1985. A wide range of flexible and easy to use self teach resources has been developed by CiA's experienced publishing team to aid the learning process. These include the following materials at the time of publication of this product:
Open Learning Guides
ECDL/ICDL & ECDL/ICDL Advanced (ECDL Foundation Qualification)
New CLAIT, CLAIT Plus & CLAIT Advanced (OCR Qualification)
CiA Revision Series
ITQs (Industry Standard Qualification)
e-Citizen (ECDL Foundation Qualification)
Trainer’s Packs with iCourse
Start IT (City & Guilds Qualification)
Skill for Life in ICT (Industry Standard Qualification)
iCourse - Course customising software
We hope you have enjoyed using our materials and would love to hear your opinions about them. If you’d like to give us some feedback, please go to:
www.ciatraining.co.uk/feedback.php
and let us know what you think.
New products are constantly being developed. For up to the minute information on our products, to view our full range, to find out more, or to be added to our mailing list, visit:
www.ciatraining.co.uk

Open Learning PowerPoint 2007 Introductory
Notes