revel ipad point of sale - amazon s3 · revel has also added a functionality for hosts/hostesses to...
TRANSCRIPT

Revel iPad Point of SaleTable Reservations User GuideMay 2016

6/2/16 Table Reservations User Guide 4
Introduction
In order to accommodate the needs of our Table Service users, Revel has released additionaltable service features. These additional features now include: Table Reservations, Waitlist, andMessaging (SMS).
This guide is designed to help users create a table reservation; add a party to the waitlist; tag/assign a table to a party/guest; and, send an SMS message to a wait-listed or table reservationcustomer.
NOTE: The Management Console must be configured before using the iPad POS. For assis-tance setting up the Management Console contact Revel Systems Onboarding team at415.744.1433 ext 4 or send an email to [email protected].

6/2/16 Table Reservations User Guide 5
Table Reservations
Revel has released the Table Reservation feature. This new option allows hosts/hostesses to create reservations for new or returning customers. In order to configure this feature in the Management Console, the “Enable table reservations” (staff only) option needs to be enabled. Once enabled, the “Reservations” tab will appear on the POS menu, as shown in Figure 1.
1. Log in to the Revel POS.
2. Tapping the “Reservations” tab will bring up the Reservations calendar, allowing the host/hostess to create a reservation by selecting a specified date and time.
Figure 1. Reservations Tab
3. Tapping the date range arrows “<” -“>” allows the host/hostess to adjust the date, as shown in Figure 2 below.
Figure 2. Reservations Date Range
4. Tapping the “+” icon on a desired date and time brings up the “Add Reservation” screen, allowing the host/hostess to create a reservation for the date and time specified. The host/hostess can create a reservation for either a new or returning customer. They can do this by entering the name, contact number, details (notes), party size, and table preference(s) in the corresponding fields, as shown in Figure 3.
5. Tapping the icon allows the host/hostess to assign an available table to the reservation.
NOTE: If a customer requires a table preference, such as a booth, wheelchair, outside seating,
highchair, bar, etc., the host/hostess can include a table preference to the party using table tag

6/2/16 Table Reservations User Guide 6
selection. This table tag can later be used as a filter for available tables that match that crite-
rion. Table Tags is a staff only setting, which can be enabled in the Management Console.
Table Tags can be enabled on the Settings > Table Service Settings page in the ManagementConsole. Once enabled, the option to add table tags will appear below the “Use table tags”setting. Table tags can be added by clicking “+Add New Tag” located below the “Use Tabletags” setting, as shown in Figure 3. Users can then tag a table with a table tag on the Establish-ment > Tables page in the Management Console, as shown in the Figure 4.
Figure 3. Table Tags Setup
Figure 4. Assigning a Table Tag
In addition, table tags can be assigned to a new party when adding them to the Waitlist or theReservations calendar. Table tags can be found below the “Table Preferences” section on theleft hand side of the screen, as shown in Figure 5.

6/2/16 Table Reservations User Guide 7
Figure 5. Applying Table Tags
6. Tapping “Add” located near the upper right corner of the screen will then create the reser-vation and take the host/hostess back to the Reservations calendar, allowing the host/host-ess to track and edit the reservation, as needed.
7. Tapping the pencil icon will bring up a popup window, allowing the host/hostess to make specific changes to the reservation, as shown in Figure 6 below.
Figure 6. Edit Reservation

6/2/16 Table Reservations User Guide 8
Waitlist
In addition to the Table Reservations feature, Revel has also released a Waitlist feature. This new option allows hosts/hostesses to waitlist new or returning customers. In order to configure this feature in the Management Console, the “Enable table reservations” (staff only) option needs to be enabled. Once enabled, the “Waitlist” tab will then appear on the POS menu.
1. Tapping the “Waitlist” tab on the left hand side of the “Reservations” tab will bring up the waitlist. Tapping “View” will allow the host/hostess to view the waitlist by “Present” or “His-tory”, as shown in Figure 7 below.
Figure 7. Waitlist Tab
NOTE: Reservations made for a future date will appear on the waitlist on the day/time thereservation was made for. “History” view will display customers that were once removed fromeither the waitlist or the reservations calendar, or it will display customers that were onceseated with pending or closed orders. The host/hostess can move customers from “History”back to the waitlist and/or calendar, if they have not been seated yet, as shown in Figure 8below.
Figure 8. History View
6/2/16 Table Reservations User Guide 9
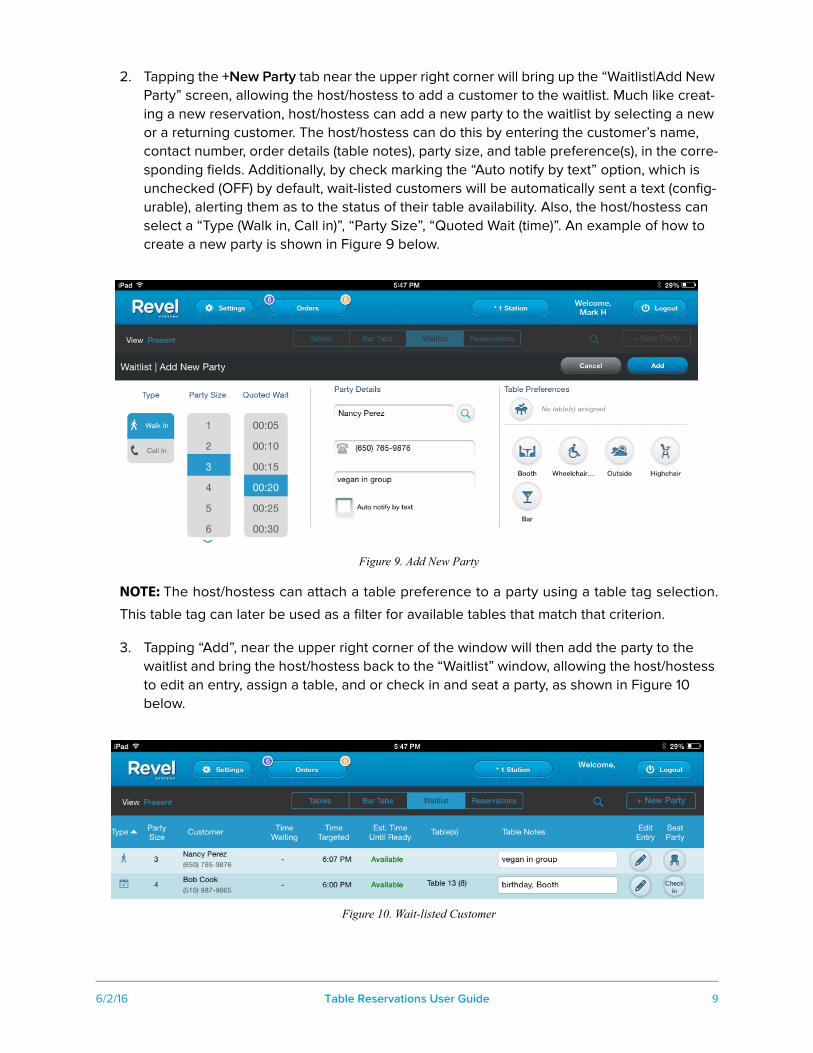
2. Tapping the +New Party tab near the upper right corner will bring up the “Waitlist|Add New Party” screen, allowing the host/hostess to add a customer to the waitlist. Much like creat-ing a new reservation, host/hostess can add a new party to the waitlist by selecting a new or a returning customer. The host/hostess can do this by entering the customer’s name, contact number, order details (table notes), party size, and table preference(s), in the corre-sponding fields. Additionally, by check marking the “Auto notify by text” option, which is unchecked (OFF) by default, wait-listed customers will be automatically sent a text (config-urable), alerting them as to the status of their table availability. Also, the host/hostess can select a “Type (Walk in, Call in)”, “Party Size”, “Quoted Wait (time)”. An example of how to create a new party is shown in Figure 9 below.
Figure 9. Add New Party
NOTE: The host/hostess can attach a table preference to a party using a table tag selection.
This table tag can later be used as a filter for available tables that match that criterion.
3. Tapping “Add”, near the upper right corner of the window will then add the party to the waitlist and bring the host/hostess back to the “Waitlist” window, allowing the host/hostess to edit an entry, assign a table, and or check in and seat a party, as shown in Figure 10 below.
Figure 10. Wait-listed Customer

6/2/16 Table Reservations User Guide 10
The iconography below “Type” indicates the type of reservation. The icon indicates a “Walk in”. The icon indicates a “Call in”. The icon indicates a “Reservation”. The iconography below “Seat Party” allows the host/hostess to check in or seat a party. The icon checks in the party, indicating they have arrived at the restaurant and are ready to be seated. And then the icon seats the customer.
“Time Targeted” is based on the “Quoted Wait time” estimated and attached to the party by the host/hostess. The “Est. Time Until Ready” is based on available tables and estimated turn times for occupied tables. Estimated turn times are set up in the Management Console and are configurable based on the seating capacity (i.e. number of covers) of the table.
4. Once a party has been added to the “Waitlist” from the Reservations calendar, tapping the “Check in” icon will allow the host/hostess to check in the customer.
5. Once a host/hostess has checked in a customer, tapping the icon will bring up the “All Tables” screen, allowing the host/hostess to check the status of all tables at the establish-ment. Here, the host/hostess can filter by table preference(s) by tapping the “Filter By Pref-erences” box at the lower left corner of the screen. Using the table tabs near the top-center of the screen, the host/hostess can filter by the tables “In Use” and tables “Avail-able”, as shown in Figure 11 below. By tapping a box corresponding to an available table, the host/hostess can assign a table to the party/guest.
Figure 11. Table Tabs
6. Tapping “Done” will begin the seating process, as shown in Figure 12.
Figure 12. Seating Process

6/2/16 Table Reservations User Guide 11
7. Tapping the “Tables” tab on the left hand side of the “Waitlist” tab will then display the POS table layout screen with the assigned table, as shown in Figure 13.
Figure 13. Tables Layout Screen
• When a party has been seated and has ordered any item, they are not eligible to be put back on the waitlist from the "History View," screen. However, the party will still be listed on this screen, with the arrow icon INACTIVE.
• When a party has been seated, but not ordered an item, they will be allowed to be put back on the waitlist from the waitlist history screen. However, in this case, they are removed from the table and are no longer "seated" at any table. Their targeted table is still there, but they are not "seated" anymore. The host/hostess can then change the targeted table manually.
• When a party is seated, the record of their reservation on the calendar will be updated and indicated they were seated, with the word "Seated" (to the right of notes). Also, the Edit icon will be deactivated. This ensures that the host/hostess has a record of the reservation in the calendar, but that reservation can no longer be edited from the calendar.
• If a party is moved back to the waitlist from the Waitlist History screen, the “edit” icon in the calendar becomes active again, and the “seated” text is removed.
Revel has introduced the “Key - table status” pop-up window that graphically explains themeaning of each status color for tables in the Table Layout screens, shown in Figure 14 below.The window can be accessed by tapping the “Key” icon found in the lower-right corner of thescreen.
Figure 14. Table Status Key

6/2/16 Table Reservations User Guide 12
Messaging
Revel has also added a functionality for hosts/hostesses to send SMS messages to customerson the waitlist (auto or manual) or the reservation calendar (manual). In order to configure thisenhancement in the Management Console, the “Enable table reservations” (staff only) optionneeds to be enabled. Once enabled, hosts/hostesses will see the new Messaging settingspage nested under Table Reservations on the Settings page.
1. To send SMS messages, users must provide their Account SID, Auth Token, and the phone number associated to their Twilio account. Twilio settings can be found on the Settings > Social Networks/Marketing > Twilio page in the Management Console, as shown in Fig-ure 15 below.
Figure 15. Twilio Settings
2. On the Messaging settings page, the host/hostess can create personalized preset mes-sages by clicking +Add SMS Preset. Then, the host/hostess may determine how and when those messages are to be sent. Preset messages can be sent to wait-listed customers automatically at a defined time, either after the customer has been added to the waitlist or before the quoted wait time that the customer’s table will be ready. Only one of each respective “TRIGGER” can be used (Quoted Wait Time & After Added to waitlist). If multiple automatic preset messages are assigned the same trigger, the automatic preset message created first will inherit the trigger.
Figure 16. Creating Preset Messages

6/2/16 Table Reservations User Guide 13
Additionally, preset messages can be sent manually at ANY TIME; regardless of the fact that the “AUTOMATIC” box of a message preset is checked or left unchecked, a host/hostess can send a preset message manually to waitlisted or table reservation customers at any time.
NOTE: Guests who text back "STOP" will be removed from the waitlist and will no longer
receive automated text messages. Include this tip in message presets to help guests take advantage of this functionality. Note that "STOP" is not case sensitive.
3. Once saved, using the POS, a host/hostess can send manual message presets to eithercustomers with table reservations or wait-listed customers by tapping the icon next to their name, followed by “Send Message”, as shown in Figure 17 below.
Figure 17. Send an SMS Message using Table Reservation
Figure 18. Send an SMS Message using Waitlist
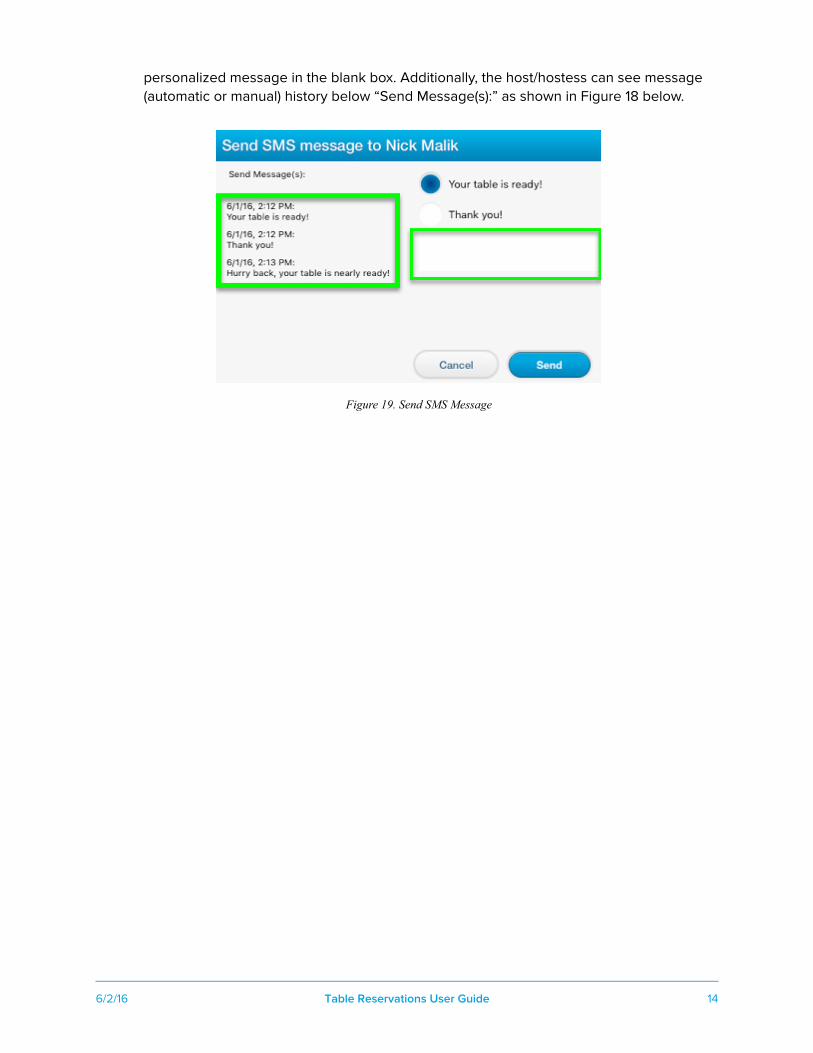
4. Tapping “Send Message” will bring up the “Send SMS message to…” window, allowing thehost/hostess to send a message to the selected customer. The host/hostess can eitherchoose from one of the preset messages created in the Management Console, or input a
6/2/16 Table Reservations User Guide 14
personalized message in the blank box. Additionally, the host/hostess can see message (automatic or manual) history below “Send Message(s):” as shown in Figure 18 below.
Figure 19. Send SMS Message

6/2/16 Table Reservations User Guide 15
Table Reservation Report
Once Table Reservation/Waitlist data is generated, the user can access the data using theTable Reservations report. The Table Reservation report can be found on the Reports > OtherReports > Table Reservations page in the Management Console. The Table Reservationsreport displays customer/order related data, including reservation and waitlist history.
1. Log in to the Management Console.
2. Click the Reports page icon from the menu near the top of the screen.
3. Click on Other Reports and additional report options will appear.
4. Click on Table Reservations, and the table reservations report screen opens.
• Res. Status – Drop-down menu filters the report by Reservation status (Reserved, Check In, Seated, or No Show).
• Date – Drop-down menu filters the report by date range (Today, Yesterday, This Week, This Month, Last Week, Last Month, or a Custom Range).
• Filter by Reserved On – Check box filters the report by reservations made on a specified date, using the date drop-down menu. This includes any past/future reservations.

6/2/16 Table Reservations User Guide 16
• Print Report – Prints the report.
• Reserved On – Displays the date the reservation was placed on.
• Reserved For – Displays the date the reservation was placed for. The time below the date indicates the time of day the reservation was placed for.
• Order ID – Displays the order number associated with the order. Order IDs can be selected; if selected, the order history report opens, displaying all related details corre-sponding to the selected order.
• The Order History report displays all orders taken in a given time frame. This report allows users to see a brief overview of each order taken, including when the order was created, when it was closed, the employee that processed the transaction, and the sales generated along with the payments collected for those sales. If more in-depth information for a particular order is required, user can either click on the line item con-taining the order in question, or look up a particular order in the search field, to popu-late the Order Details.
• Status – Displays the status of the reservation/waitlist.
• Party Size – Displays the party size of the reservation/waitlist.
• Wait time – Displays the wait time associated with the reservation/waitlist.
• Customer – Displays the name associated with the reservation/waitlist.
• Phone – Displays the phone number associated with the reservation/waitlist.
• Notes & Preferences – Displays any additional notes associated with the reservation/wait-list.
SYSTEM CONFIGURATION SUPPORTPhone: 415.744.1433 extension 2
Website: http://support.revelsystems.com
Revel Systems, the Revel Systems logo, and other trademarks associated with Revel Systemsproducts referred to in this publication are trademarks of the Revel Systems.
©Copyright 2016, Revel Systems. All rights reserved.