right on replicas, llc step-by-step review 20150902* f-100
TRANSCRIPT

Right On Replicas, LLC ©2015 All rights reserved. *All registered trademarks are the property of their respective brands. Follow the manufacturer’s safety recommendations for any product mentioned here.
Right On Replicas, LLC Step-by-Step Review 20150902* F-100 Super Sabre 1:48 Scale Revell Model Kit #85-5317 Review
The North American F-100 Super Sabre was the world’s first jet fighter capable of supersonic speed in level flight. The F-100 was initially designed for interceptor and nuclear strike roles. It served with the United States Air Force from 1954 to 1971 and with the Air National Guard until 1979. When war broke out in Southeast Asia, the F-100Ds were deployed to provide air superiority over the skies of Vietnam much like the F-86s did over Korea. Unfortunately, the lack of radar rendered the F-100s ineffective for air-to-air combat and the F-100 was relegated to air-to-ground duties in the skies over Laos, Cambodia and Vietnam as a fighter bomber. It flew extensively over South Vietnam as the air force's primary close air support jet in this capacity and excelled for a while, but its age began to show against the newer aircraft entering the war, eventually being replaced by the more efficient subsonic the LTV A-7 Corsair II. In the end, F-100s also served in other NATO air forces and with other U.S. allies. The F-100D would serve in numerous air forces around the world and many ended their careers as target drones for missile testing and/or training. The aircraft was often referred to as the “Hun”, a shortened version of one hundred. For the Modeler: This review covers the reissued North American F-100D Super Sabre 1:48 Scale Revell model Kit #85-5317. It is a skill level 2 plastic kit molded in light gray with a clear canopy containing 91 parts. The kit does have a positionable Canopy, Stabilizers, Ammo and Gun bay doors, Speed brakes, and if the modeler chooses, the front wing slats can be shown in the closed position by removing the tabs on the front of the wing and gluing the slats in the closed position. The kit also provides under wing ordinance

Right On Replicas, LLC ©2015 All rights reserved. *All registered trademarks are the property of their respective brands. Follow the manufacturer’s safety recommendations for any product mentioned here.
consisting of two Mk 82 500 lb. bombs with extended fuses, 2 Bullpup AGM-12Bs and under wing fuel drop tanks. This kit also features a detailed cockpit with a pilot figure and a ground crewman. The kit has been released previously in other versions. Decals provided are for two different Aircraft: 1.) F-100D-30-NA, 55- 3712, Pahokee Tiger, 308th TFS,31st TFW Bien Hoa, Vietnam, December 1965 (although the box and the instruction sheet states 1955) 2.) F-100D-90-NA, 56-3321 494th FBS, 48th TFW, Weapons Team, Chaumont Air Base, France 1958. Completed dimensions are: Length 13-11/16” Wing Span 9¾”.
(Pic1) (Pic2) This is the kit’s Box Art and the general layout of the sprue trees.
(Pic3) These are the decals and clear canopy pieces
(Pic 4) The cockpit pieces before painting.

Right On Replicas, LLC ©2015 All rights reserved. *All registered trademarks are the property of their respective brands. Follow the manufacturer’s safety recommendations for any product mentioned here.
(Pic 5) The overall parts were spray painted camouflage gray then detail painted. There were many variations of the cockpit side panels and it appears that Revell did a compilation of them since I found no reference depicting the exact layout as molded. I picked out the various panels in flat black and then dry brushed with silver and grays, then went back and picked out various switched and knobs painted them red and yellow as seen in various reference pics I found on Google and books that I have on hand. The seat was assembled and again there are various color combos of the cushion and back board. I chose Red for
the back board and OD for the seat cushion although not much of either will be seen when pilot is added. The seat belts were painted with a mix of Khaki and white, but again, it will be covered by the pilot. (Pic 6) Cockpit tub assembled

Right On Replicas, LLC ©2015 All rights reserved. *All registered trademarks are the property of their respective brands. Follow the manufacturer’s safety recommendations for any product mentioned here.
(Pic 7) (Pic 8) Instrument panel gauges in the center section are a decal that was put on using the Micro Scale two-part Set and Sol decal solutions. The panel itself has raised gauges so they can be painted
Right On Replicas, LLC ©2015 All rights reserved. *All registered trademarks are the property of their respective brands. Follow the manufacturer’s safety recommendations for any product mentioned here.
leaving off the decal if desired. The cockpit tub is shown inserted and glued in place. The outer cockpit equipment (molded in placed) was rough painted flat black with silver and gray dry brushing, following colors from reference pictures and instructions. While this was set aside to dry I went on to the Crew figure.
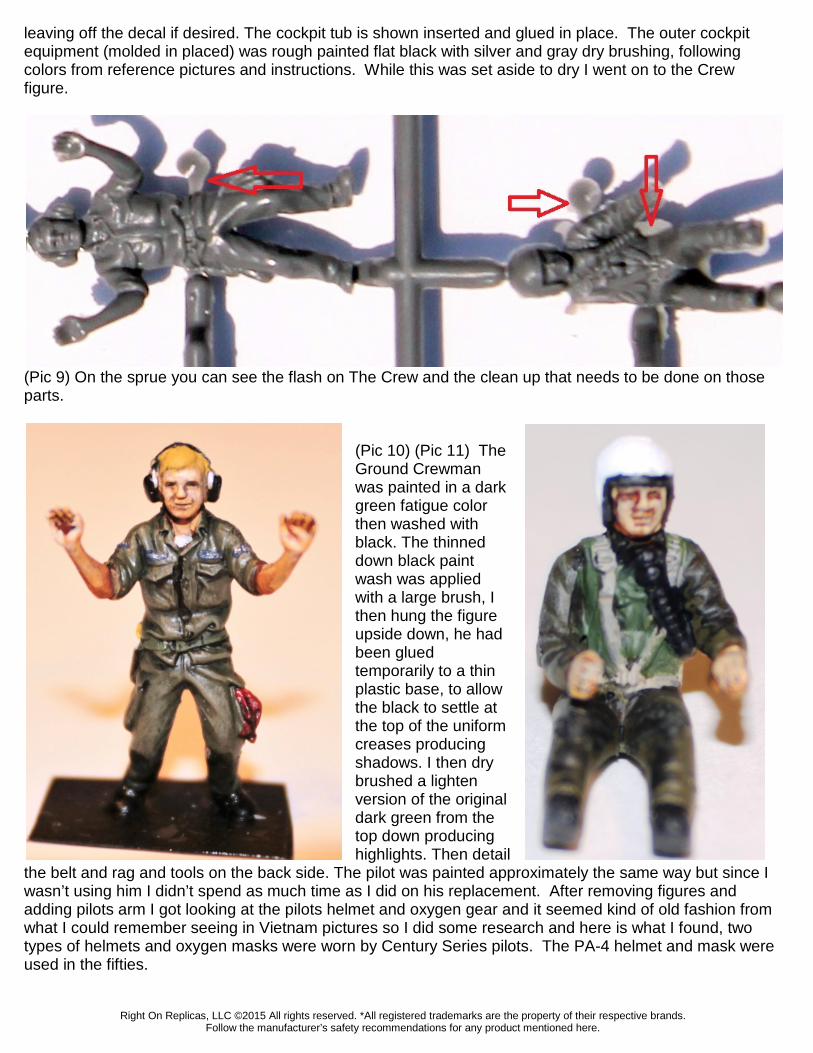
(Pic 9) On the sprue you can see the flash on The Crew and the clean up that needs to be done on those parts.
(Pic 10) (Pic 11) The Ground Crewman was painted in a dark green fatigue color then washed with black. The thinned down black paint wash was applied with a large brush, I then hung the figure upside down, he had been glued temporarily to a thin plastic base, to allow the black to settle at the top of the uniform creases producing shadows. I then dry brushed a lighten version of the original dark green from the top down producing highlights. Then detail
the belt and rag and tools on the back side. The pilot was painted approximately the same way but since I wasn’t using him I didn’t spend as much time as I did on his replacement. After removing figures and adding pilots arm I got looking at the pilots helmet and oxygen gear and it seemed kind of old fashion from what I could remember seeing in Vietnam pictures so I did some research and here is what I found, two types of helmets and oxygen masks were worn by Century Series pilots. The PA-4 helmet and mask were used in the fifties.

Right On Replicas, LLC ©2015 All rights reserved. *All registered trademarks are the property of their respective brands. Follow the manufacturer’s safety recommendations for any product mentioned here.
(Pic 12) (Pic 13) . The helmet used at the time that the F-100 was deployed to Vietnam the mask used by crews was the MBU-5/P in conjunction with an individually form-fitted helmet with clear and tinted visors. So rather than use the pilot that came with the kit I used a left over pilot from another kit. A period correct pilot is found in the F-4C 1/48th Monogram Kit # 85-5859. They are parts #75 (pilot) and 76 (pilot’s arm). Any kit supplied pilot with this helmet style will do in scale. I painted him using a medium green trying to match the color of the flight suit of that time. Again the same process was used as described above. I painted the helmet green for contrast and the fact that the 308th TFS was called the “Emerald Knights.”
(Pic 14) (Pic 15) Main wing sprue and Copyright of 1980. Still, it’s the best 48th scale kit in my opinion, even though it’s a little older. These were removed from sprue cleaned up and glued together.

Right On Replicas, LLC ©2015 All rights reserved. *All registered trademarks are the property of their respective brands. Follow the manufacturer’s safety recommendations for any product mentioned here.
(Pic 16) Use some clothes pins to keep the wing clamped together until dry.
(Pic 17) (Pic 18) The tail parts again used clothes pins to clamp parts together
(Pic 19) The kit is unique in that the fuselage is in to halves but rather then Right and Left it is done as the top and bottom. Shown here is the bottom half. There are few alignment pins in fact only 2 pins at the front and the main wing assembly locks the center in place but the rear needs a little help to keep the fuselage straight so I glued tabs about ¾” to 1” plastic in place at the rear where there we no pins to help out. I remember reading this tip years ago and it came back to mind when I was test fitting the halves.
Right On Replicas, LLC ©2015 All rights reserved. *All registered trademarks are the property of their respective brands. Follow the manufacturer’s safety recommendations for any product mentioned here.
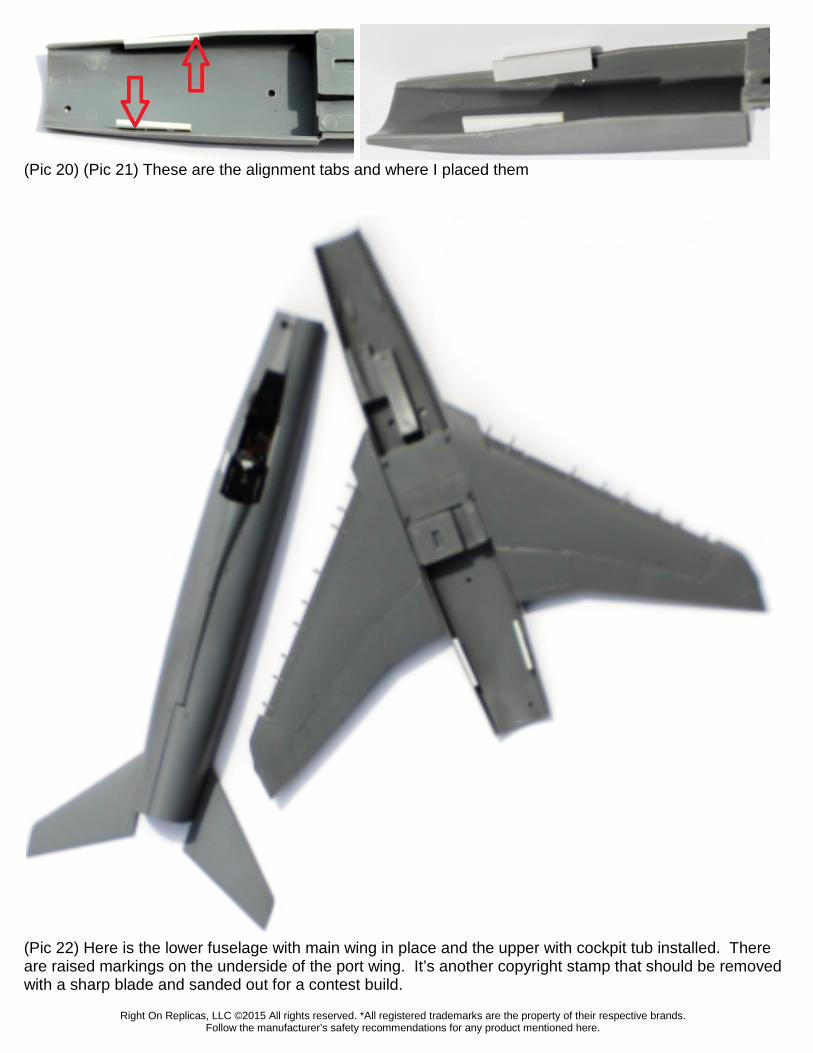
(Pic 20) (Pic 21) These are the alignment tabs and where I placed them
(Pic 22) Here is the lower fuselage with main wing in place and the upper with cockpit tub installed. There are raised markings on the underside of the port wing. It’s another copyright stamp that should be removed with a sharp blade and sanded out for a contest build.
Right On Replicas, LLC ©2015 All rights reserved. *All registered trademarks are the property of their respective brands. Follow the manufacturer’s safety recommendations for any product mentioned here.
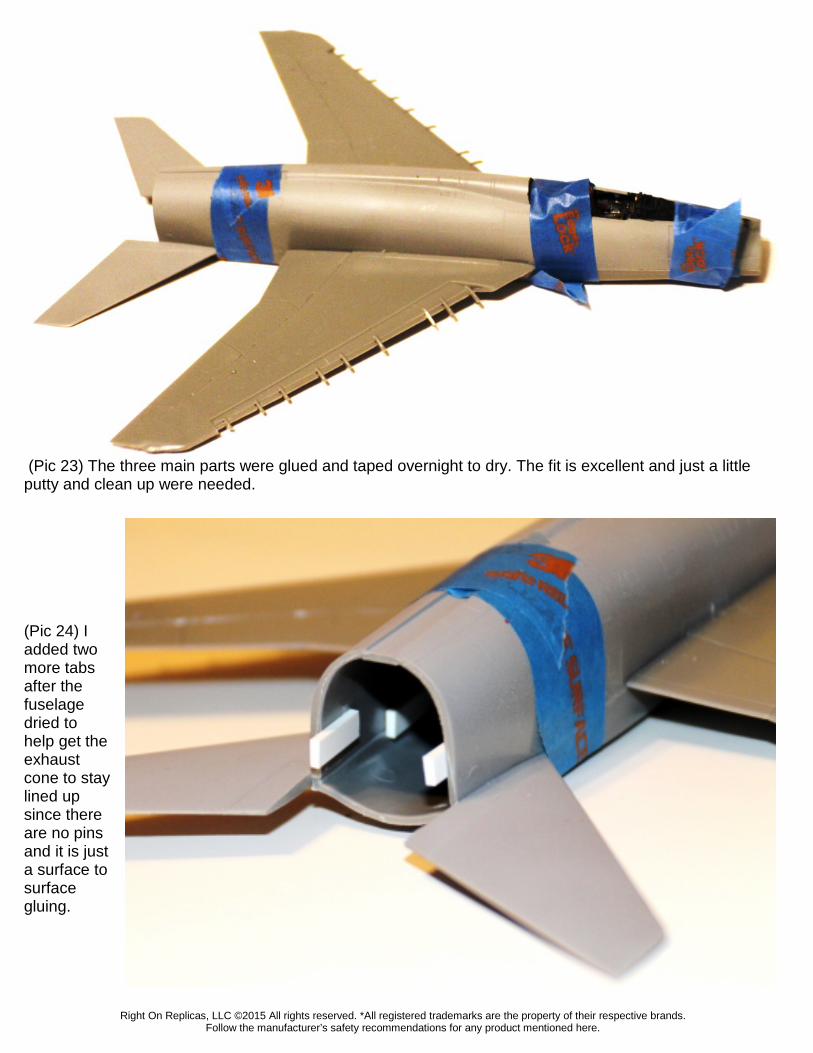
(Pic 23) The three main parts were glued and taped overnight to dry. The fit is excellent and just a little putty and clean up were needed. (Pic 24) I added two more tabs after the fuselage dried to help get the exhaust cone to stay lined up since there are no pins and it is just a surface to surface gluing.

Right On Replicas, LLC ©2015 All rights reserved. *All registered trademarks are the property of their respective brands. Follow the manufacturer’s safety recommendations for any product mentioned here.
(Pic 25) With the tail and nose pieces installed and the cockpit area masked off I primed the Aircraft with Tamiya light gray primer then sprayed Krylon gloss black and allowed it to dry overnight. A gloss black base gives the silver a more pronounced color.
(Pic 26) (Pic 27) Part #6, the F-102 afterburner. This can ONLY be used on ANG aircraft as no Regular AF units got to use this A/B (much to their chagrin, as this 'burner was more reliable and maintenance free). The one I used is the correct one for the USAF version.

Right On Replicas, LLC ©2015 All rights reserved. *All registered trademarks are the property of their respective brands. Follow the manufacturer’s safety recommendations for any product mentioned here.
(Pic 28 ) The aircraft was sprayed with Matte aluminum. All compartments will be painted interior green and the detail with dry brushing, washes and some individual detail painting. While this dries overnight I will paint and build/components the rest of the parts for final assembly.
(Pic 30) (Pic 31) While the Aircraft dried overnight I assembled 1 of each ordinance, painted and took a picture showing the parts un-built and built. They are very easy with only 2 halves to be glued and held together with clothes pin clamps. There is no information except to paint the bombs olive drab and the bullpup missile white. I used Testors spray can Olive Drab FS34087and the Bullpup was sprayed with Krylon Semi-gloss white. I used the Hasegawa weapons kits painting instructions info and painted the
Right On Replicas, LLC ©2015 All rights reserved. *All registered trademarks are the property of their respective brands. Follow the manufacturer’s safety recommendations for any product mentioned here.
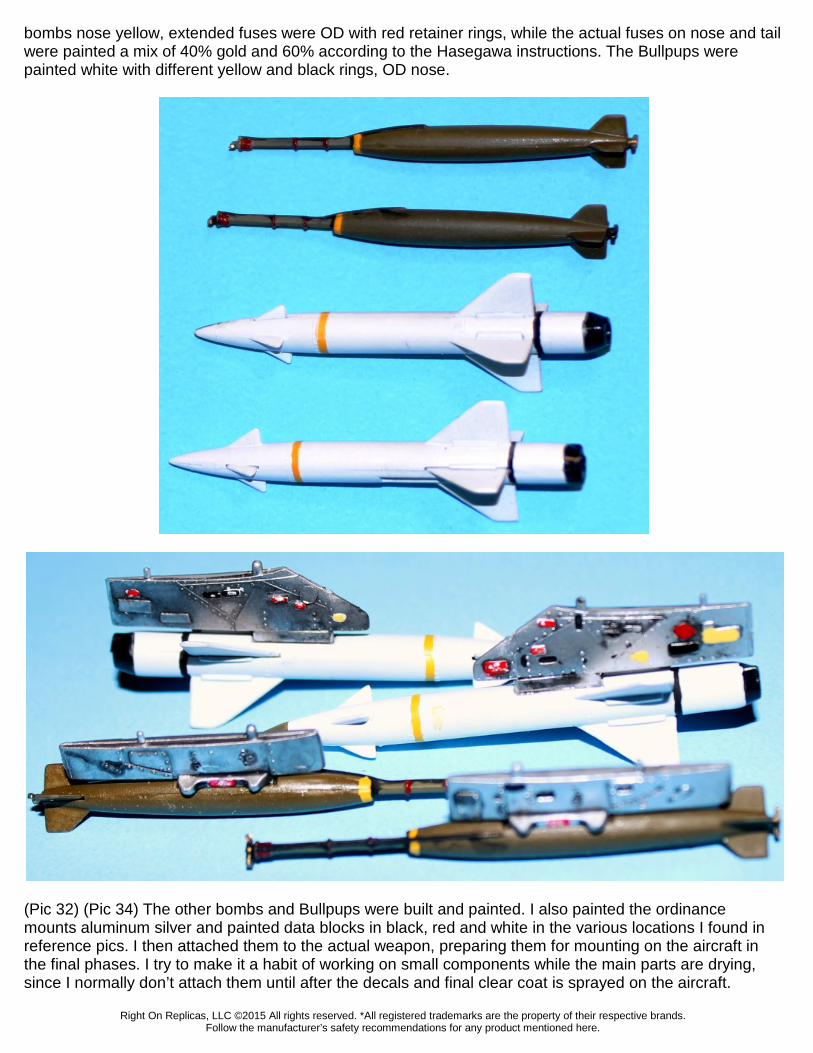
bombs nose yellow, extended fuses were OD with red retainer rings, while the actual fuses on nose and tail were painted a mix of 40% gold and 60% according to the Hasegawa instructions. The Bullpups were painted white with different yellow and black rings, OD nose.
(Pic 32) (Pic 34) The other bombs and Bullpups were built and painted. I also painted the ordinance mounts aluminum silver and painted data blocks in black, red and white in the various locations I found in reference pics. I then attached them to the actual weapon, preparing them for mounting on the aircraft in the final phases. I try to make it a habit of working on small components while the main parts are drying, since I normally don’t attach them until after the decals and final clear coat is sprayed on the aircraft.

Right On Replicas, LLC ©2015 All rights reserved. *All registered trademarks are the property of their respective brands. Follow the manufacturer’s safety recommendations for any product mentioned here.
(Pic 35) The fuel tanks consist of two halves which I glued together and clamped again with Clothes pins until dry then spray painted using a can of Color Place aluminum.
(Pic 36) When it dried it was a different shade of silver than I was looking for. Remember to test your finishes on a plastic spoon prior to use to make sure you get what you want!
(Pic 37) (Pic 38) The hydraulic dive brake actuators were painted flat white with light blue hydraulic hoses and silver extension arms (from a detailed picture found in reference) and dive brake itself is painted aluminum interior/exterior.

Right On Replicas, LLC ©2015 All rights reserved. *All registered trademarks are the property of their respective brands. Follow the manufacturer’s safety recommendations for any product mentioned here.
(Pic 40 ) The wheel wells, gun bay, and dive brake compartments were painted interior green and then picked out the various lines in silver and used Tamiya clear blue for the AN Connectors and various shades of gray and black then did a black wash to make them stand out.

Right On Replicas, LLC ©2015 All rights reserved. *All registered trademarks are the property of their respective brands. Follow the manufacturer’s safety recommendations for any product mentioned here.
(Pic 41 ) (Pic 42 ) The Nose gear parts and main gear parts painted aluminum and washed with black to bring out the detail. Needing some detail painting before assembly, mainly a few black hydraulic hoses. The tires were hand painted with MM flat black, as were the hydraulic hoses. (Pic 44 ) I sprayed the Fuselage with clear gloss to apply the decals and realized I should airbrush the rear fuselage exhaust burns first. I went to Google and pulled up some F-100 pictures and found one I could enlarge and get a good idea how the burned area should look, in doing this I realized each and every F-200 actually burn like that (on the camouflage version it actually burned the paint off) and no two aircraft burned the same so however you paint it will be fine. I taped off the fuselage area where the fuselage got so hot in after burner flight that the metal changed color due to the heat after the clear gloss dried. I then masked off the area in front of the exhaust cone and airbrushed a steel color I made up by mixing approximately 40% black with 60% aluminum.

Right On Replicas, LLC ©2015 All rights reserved. *All registered trademarks are the property of their respective brands. Follow the manufacturer’s safety recommendations for any product mentioned here.
(Pic 45) (Pic 46 ) After the steel paint on the exhaust cone area dried I masked over it and airbrushed the burn area with MM acrylic aluminum. The next color I went with was Tamiya clear blue and painted the vertical burn lines, I actually just added it to the remnants of the silver in the airbrush paint cup.
(Pic 47 ) (Pic 48 ) Added some black to the blue and airbrushed them again. Next I used some Vallejo Model color flat brown and red leather over the blue,
(Pic 49) I followed that with a light overspray of aluminum to bring it all together, and I like the results I got.

Right On Replicas, LLC ©2015 All rights reserved. *All registered trademarks are the property of their respective brands. Follow the manufacturer’s safety recommendations for any product mentioned here.
(Pic 50 ) (Pic 51) Decal application finished following instruction sheet for the 308th TFS Bien Hoa, Vietnam 1966. I used the Microscale two-part set/solvent on these leaving great results.
(Pic 52) The decals on the underside. The decal sheet is a very nice one providing not only colorful ones but all the little stencils that would be on the real aircraft and some are quite small, so one really needs to take their time with these as they tend to disappear sometimes, getting stuck to the fingers or applicator used to position them.
Right On Replicas, LLC ©2015 All rights reserved. *All registered trademarks are the property of their respective brands. Follow the manufacturer’s safety recommendations for any product mentioned here.
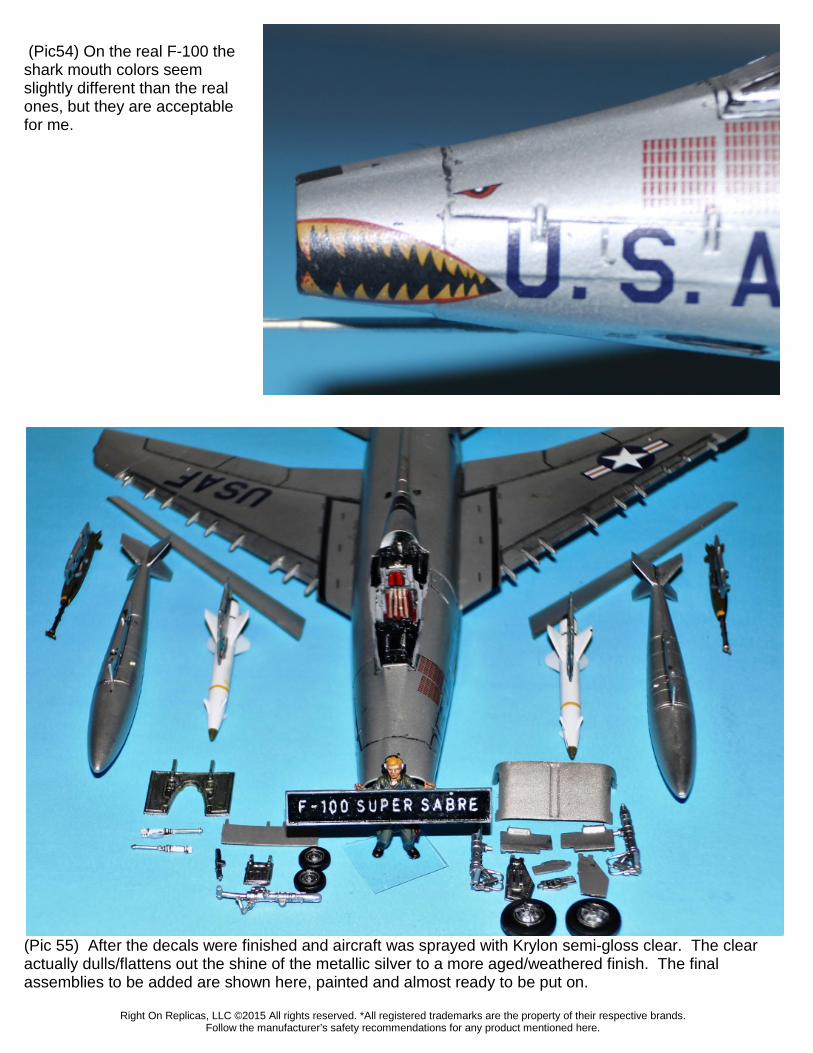
(Pic54) On the real F-100 the shark mouth colors seem slightly different than the real ones, but they are acceptable for me.
(Pic 55) After the decals were finished and aircraft was sprayed with Krylon semi-gloss clear. The clear actually dulls/flattens out the shine of the metallic silver to a more aged/weathered finish. The final assemblies to be added are shown here, painted and almost ready to be put on.

Right On Replicas, LLC ©2015 All rights reserved. *All registered trademarks are the property of their respective brands. Follow the manufacturer’s safety recommendations for any product mentioned here.
(Pic56) The first parts added after the clear dried were the wing slats. These were not cleared as well as some of the other pieces to give different shade of silver as most aircraft have.

Right On Replicas, LLC ©2015 All rights reserved. *All registered trademarks are the property of their respective brands. Follow the manufacturer’s safety recommendations for any product mentioned here.
(Pic 57) (Pic 58) The nose gear consists of the two tires/wheels, gear strut and support and the doors. The wheels were glue in place on the strut which was then glue in the locating hole (which is a D-shaped opening matching the end of the strut so you can't get it in wrong) after that I added the support strut and doors.
(Pic 59) (Pic 60) The main landing gear are a little more complex than the nose gear. On the main gear you have the tire/wheel, strut and two strut doors. One goes on the strut and one on an actuator arm next to the strut for both sides. The main doors are molded as one piece and the two large curved ones are molded to the middle support but are able to be bent to the open “V” position then glued into place, there are two little ones you see at the top in the picture that you glue in place (a nice option if you are doing a wheels up build in flight model display) I used the regular Testors orange tube glue almost exclusively on this build where I normally only use it on the landing gear on aircraft. The gears were then allowed dry over night and are good and stable when the tube glue dries to a good bond.
Right On Replicas, LLC ©2015 All rights reserved. *All registered trademarks are the property of their respective brands. Follow the manufacturer’s safety recommendations for any product mentioned here.
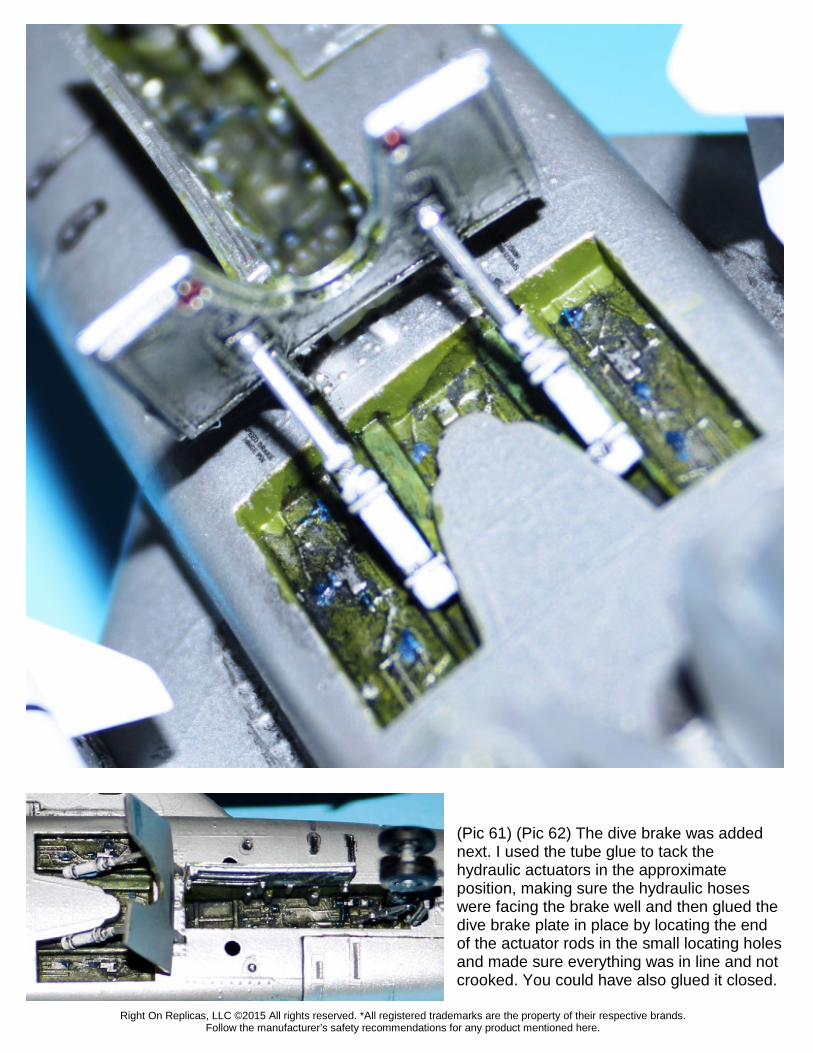
(Pic 61) (Pic 62) The dive brake was added next. I used the tube glue to tack the hydraulic actuators in the approximate position, making sure the hydraulic hoses were facing the brake well and then glued the dive brake plate in place by locating the end of the actuator rods in the small locating holes and made sure everything was in line and not crooked. You could have also glued it closed.

Right On Replicas, LLC ©2015 All rights reserved. *All registered trademarks are the property of their respective brands. Follow the manufacturer’s safety recommendations for any product mentioned here.
(Pic 63) The Bullpup missiles were the first to be mounted under the wings since they were closest to the fuselage.
(Pic 64) Next, the fuel tanks with stabilizing arms were mounted and finally the 500lb bombs. Now the under wing ordinance assemblies, the refueling probe and nose probe is added. You can see where some of the ordinance is positioned over the decals so it’s a good idea to do them before final assembly.
Right On Replicas, LLC ©2015 All rights reserved. *All registered trademarks are the property of their respective brands. Follow the manufacturer’s safety recommendations for any product mentioned here.
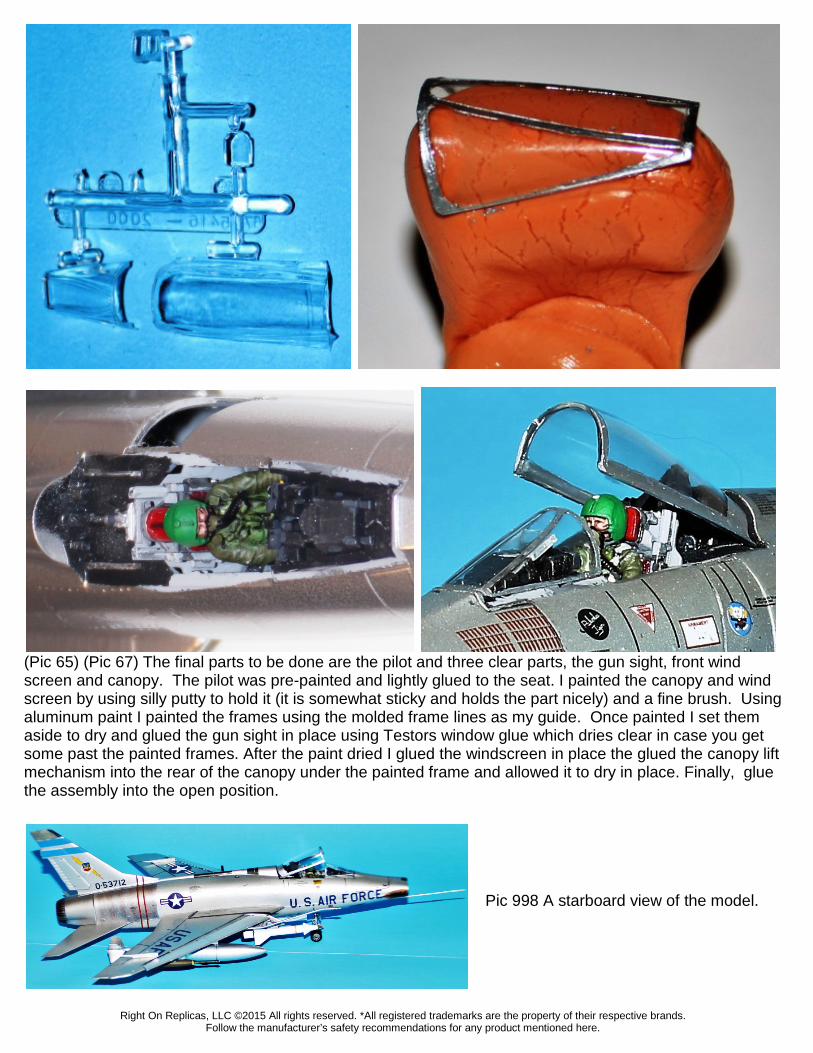
(Pic 65) (Pic 67) The final parts to be done are the pilot and three clear parts, the gun sight, front wind screen and canopy. The pilot was pre-painted and lightly glued to the seat. I painted the canopy and wind screen by using silly putty to hold it (it is somewhat sticky and holds the part nicely) and a fine brush. Using aluminum paint I painted the frames using the molded frame lines as my guide. Once painted I set them aside to dry and glued the gun sight in place using Testors window glue which dries clear in case you get some past the painted frames. After the paint dried I glued the windscreen in place the glued the canopy lift mechanism into the rear of the canopy under the painted frame and allowed it to dry in place. Finally, glue the assembly into the open position.
Pic 998 A starboard view of the model.

Right On Replicas, LLC ©2015 All rights reserved. *All registered trademarks are the property of their respective brands. Follow the manufacturer’s safety recommendations for any product mentioned here.
Overall: For a 1980s original release this kit was a joy to build. The setbacks for me were the flash, mold lines and ejector pin marks which were abundant and time consuming throughout. The wing tanks were a little short, although they don’t detract from the overall look of the finished kit. I also wish the kit had a better weapons selection since the Bullpup proved to be of little value in Vietnam and a 750lb M117 bomb or napalm bomb would be better choices. The instructions were simply line drawings that were a little vague on part placement locations. On the bright side, I loved the upper and lower half fuselage assemblies sandwiching the main wing in between. Also notable was the leading edge wing slat option to remove the actuators and glue the slats in the closed position. Surprisingly, no nose weight was needed for this build and there was no problem with its stance. The decals were excellent and released from the film quickly and stuck to the model, accepting the two-step Microscale decal setting system quite well. I only used a small amount of filler putty in a few locations. The fit of all the parts was great although I had to add alignment tabs on the rear fuselage and tail cone area to ensure placement there.