right on replicas, llc step-by-step review 20160128* foose … · 2016-01-28 · modern and so is...
TRANSCRIPT

Right On Replicas, LLC ©2016 All rights reserved. *All registered trademarks are the property of their respective brands. Follow the manufacturer’s safety recommendations for any product mentioned here.
Right On Replicas, LLC Step-by-Step Review 20160128* Foose 2013 Challenger SRT8 1:25 Scale Revell Model Kit #85-4398 Review
The Challenger is the name of three different generations of American automobiles produced by Dodge. From 1969 to 1974, the first generation Dodge Challenger pony car was built using the Chrysler E platform, sharing major components with the Plymouth Barracuda. The second generation, from 1978 to 1983, was a badge engineered Mitsubishi Galant Lambda. The third, and current generation, was introduced in early 2008 as a rival to the evolved fifth generation Ford Mustang and the fifth generation Chevrolet Camaro. The new version was a 2-door coupe which shared common design elements with the first generation Challenger, despite being significantly longer and taller. As with Chevrolet's new Camaro, the Challenger concept car's pillar-less hardtop body was replaced with a fixed "B" pillar, hidden behind the side glass to give an illusion of the hardtop. The LC chassis is a modified (shortened wheelbase) version of the LX platform that underpins the Dodge Charger. The original Dodge Challenger was Chrysler's entry into the "Pony Car" muscle car wars of the 1960s. The Dodge Challenger of today, while having very familiar styling, is a very different car. Its technology is very modern and so is its performance at 0 to 60 mph in 4 seconds. Now Chip Foose, the famous car designer, has made the Challenger even better. For the Modeler: This review covers the first release of the new 1/25 Scale Foose 2013 Dodge Challenger by Revell. This is kit #85-4398 in the current catalog and is rated as a Skill Level 3 kit for intermediate builders. The kit is a NEW RELEASE with no previous versions available. The build itself is just above a SNAP kit and more of an entry level Glue kit. You get 45 parts molded in Gray and Black with Chrome. The tires are vinyl and it has Metal axles. The glass is Clear and Clear Red with the Black window outlines already printed on the glass. The body comes molded in a Lime Green Metallic with Black and has Waterslide decals. The instruction sheet is a fold-out one-page design unlike the typical book format Revell usually has. Overall dimensions are: Length: 7-7/8", Width: 3-1/4", Height: 2-5/16".

Right On Replicas, LLC ©2016 All rights reserved. *All registered trademarks are the property of their respective brands. Follow the manufacturer’s safety recommendations for any product mentioned here.
BUILDING CAVIATS: Having organization and a proper work area is important if you want to build a model properly. But even without dedicated space a place to leave your build while you work is necessary. Being able to lay out your parts organized helps the build as you are not digging for parts in the box possibly losing or damaging them. Also you really should have a place to let painted parts cure. Throughout the review you will find OPTIONAL IDEAS that I suggest. These are completely your choice. Not doing these steps will in no way affect the build, they are just ways to offer some personal and custom touches to your builds. OPTIONS will be noted. One of the best parts of model building is using your imagination to create the build YOU want! Unless you are building a “Factory Stock” or a “Replica” your choices of color and build options are completely up to you. The instruction give recommendations but you are free to substitute whatever options you want. There is no “Wrong way” to build your kit! Have fun and enjoy your hobby. Review the instruction sheet thoroughly to get familiar with the assembly sequence. Decide your color scheme in advance and your custom options so you can build accordingly.
PIC 1 This is the box art for this kit as released in the Revell 2016 release version. Unless otherwise stated I use Testors Tube Glue (Orange Tube) for assembly of the parts. Other adhesives used in the construction are Superglue and Elmer’s White Glue. Paints consist of Testors Enamel or Tamiya Acrylic bottle paints and different brands of “Rattle can” spray paints. Many parts are finished using 1:1 automotive use paint products shot with an airbrush. One of the major benefits of using automotive paint is a very fast drying time. You can get just as good results using Spray can products but they require a longer drying time. Automotive paint is FULLY cured in less than a half an hour and clear about 6 hours. Use a good quality airbrush to paint automotive products because Lacquer Thinner will destroy the cheaper ones quickly. Assembly paint colors may vary from instructions as I use simplified colors that most model builders should have on hand. Before beginning your build soak and wash your parts with a mild detergent like DAWN to remove any mold release agents and help with paint adhesion.

Right On Replicas, LLC ©2016 All rights reserved. *All registered trademarks are the property of their respective brands. Follow the manufacturer’s safety recommendations for any product mentioned here.
Note to remember: Always follow the Manufacturer’s Safety and Use Guidelines when using any of the products mentioned in the review for your own protection.
PIC 2 PIC 3 Here are the decals for this build. The quality is very high and color registry is good. There is a small carrier around each decal. These decals float easily and will set quickly. Normally it is preferable to use a setting solution to help move the decals in place on your build and to allow extra time to place them. I personally have found Microscale Industries products to be the most compatible with all the different manufacturers of decals.
PIC 4 The motor can be assembled prior to paint. Assemble the block halves, bottom, front and top. Paint the transmission and oil pan Aluminum, the block is Steel and the top is Black with a Steel intake plenum. The oil filter is Orange and the starter is Black. Highlight with different colors of metal and steel shades. The exhaust are steel and the belt is Flat Black.

Right On Replicas, LLC ©2016 All rights reserved. *All registered trademarks are the property of their respective brands. Follow the manufacturer’s safety recommendations for any product mentioned here.
PIC 5 PIC 6 Add the belt and exhaust in place.
PIC 7 PIC 8 The chassis is painted next. Note the copyright script that should be removed. Paint the chassis pan Primer and tape off the frame parts, paint those Flat Black. Highlight the wires and lines with Black and Silver markers. The suspension is Flat Black. Paint the exhaust steel with Copper catalytic converters, Aluminum muffler and Gun Metal resonators.
PIC 9 Install the front suspension and exhaust.

Right On Replicas, LLC ©2016 All rights reserved. *All registered trademarks are the property of their respective brands. Follow the manufacturer’s safety recommendations for any product mentioned here.
PIC 10 The interior will be started next. Assemble the seats. Paint the wires on the firewall Black and silver with a Steel master cylinder and White reservoirs. Normally I would paint the seats and door panels but this car is molded with a nice textured interior in the Black color I was going to use anyway. PIC 11 OPTIONAL: I decided I wanted to have carpet in this car. I will FLOCK the floor pan with CRAFT FLOCKING. It is simple to do and makes a nice add on detail. Paint the floor the color of the carpet. Using Elmer’s White Glue paint a thin layer of glue on the area you want flocked ONLY. I use a fine strainer and dump the flocking into it and then shake the strainer over the glue area. Do this in a box so you can re-use the unused flocking. Cover the area densely with flocking and lightly pat it on. Shake off the loose stuff and it will be carpeted. Look online for CRAFT FLOCKING, it is very inexpensive and makes a really nice addition for that extra reality.

Right On Replicas, LLC ©2016 All rights reserved. *All registered trademarks are the property of their respective brands. Follow the manufacturer’s safety recommendations for any product mentioned here.
PIC 12 The flocking gives your model a more finished look.
PIC 13 PIC 14 OPTIONAL: As people buy custom floor mats for their real cars why not have ones for their models? This idea is FREE to do and easy. Search the internet for car floor mats; use the pictures of the flat mat display and save it. In a photo program resize the front mat to a height of an average ¾ to 1 inch tall. Print them at 300 DPI on plain paper. Glue the paper to some Black card stock and cut out the mat. A dab of White Glue on the floor will hold them in place. I did a search and found tons of usable images from all kind of sites.

Right On Replicas, LLC ©2016 All rights reserved. *All registered trademarks are the property of their respective brands. Follow the manufacturer’s safety recommendations for any product mentioned here.
PIC 15 Install the door panels, seats and firewall.
PIC 16 The dash needs to be painted Satin Black. There are no decals for interior instruments.
PIC 17 I found some pre-made sets online that I purchased and cut those out to fit. Using white glue I attached the instruments and radio screen in place. Look online for aftermarket details and you can find a ton of neat things to detail your interiors!

Right On Replicas, LLC ©2016 All rights reserved. *All registered trademarks are the property of their respective brands. Follow the manufacturer’s safety recommendations for any product mentioned here.
PIC 18 Install the dash. That completes the interior tub for this build.
PIC 19 Install the motor.
Right On Replicas, LLC ©2016 All rights reserved. *All registered trademarks are the property of their respective brands. Follow the manufacturer’s safety recommendations for any product mentioned here.
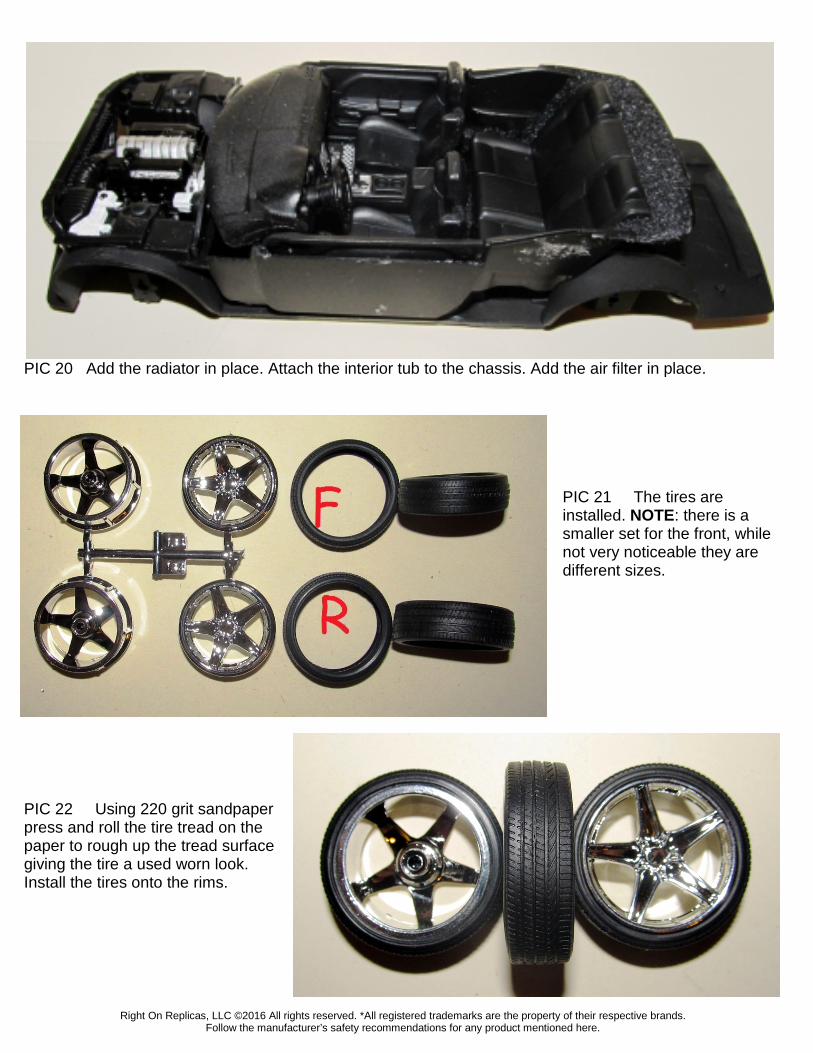
PIC 20 Add the radiator in place. Attach the interior tub to the chassis. Add the air filter in place.
PIC 21 The tires are installed. NOTE: there is a smaller set for the front, while not very noticeable they are different sizes.
PIC 22 Using 220 grit sandpaper press and roll the tire tread on the paper to rough up the tread surface giving the tire a used worn look. Install the tires onto the rims.

Right On Replicas, LLC ©2016 All rights reserved. *All registered trademarks are the property of their respective brands. Follow the manufacturer’s safety recommendations for any product mentioned here.
PIC 23 Paint the brakes Aluminum leaving the calipers unpainted.
PIC 24 Install the brakes in place making sure each caliper faces IN. Insert the metal axle into the rim and install the tires smaller set in front.
PIC 25 PIC 26 Note on both the front and rear suspensions, the metal axles will show.

Right On Replicas, LLC ©2016 All rights reserved. *All registered trademarks are the property of their respective brands. Follow the manufacturer’s safety recommendations for any product mentioned here.
PIC 27 PIC 28 The chassis is finished and here is a bottom view and a rolling chassis view.
PIC 29 Body Decaling and Finishing: After you have your base coat on you are ready to decal it. Remember decals lay better on a GLOSS surface and will not adhere properly on a FLAT surface. If you decal a flat surface you get what is called SILVERING of the decals, or the look that they are not adhered, as air is trapped under the decal. Clean your work area good so no dust or grunge from building and sanding gets under your decals. Pick the decals you want to work with and plan out how the best way to lay them out without handling previously laid decals will be. I try either a Front to Back or Top to Bottom approach doing one side at a time then the front and rear of the car in steps giving the decals time to set and dry in place before handling it again. Once you have a plan of action cut your first decal as close to the edge of the outermost color as possible. Once trimmed place the decal into warm water and let it get soft until it “Floats” loosely on the carrier paper. Microscale Industries has a product set called Micro-Set and Micro-Sol. The purpose is to soften the decals to help them conform to the contours of the body and lay smooth. To apply Micro Set, use a soft brush and apply Micro Set to the part where you are going to apply the decal. Next apply the decal as normal. Use a small pointed tip synthetic bristle brush and carefully position the decal. Blot the decal carefully with a Q-tip or paper towel so as not to move it and allow it to dry. For a tougher decals apply Micro-Sol with a small flat brush on to the decal. Apply with as few strokes as possible so as not to disturb the decal. As the decal dries slowly work any creases or blemishes in the decal out with a Q-tip or damp paper towel. Work slowly as not to damage the decal. A second coat of Micro-Sol can be added if needed. Now continue this process until all the decals for that area are done, wait for them to set and continue the rest of the car. Let the decals cure at least overnight before applying your clear coat.

Right On Replicas, LLC ©2016 All rights reserved. *All registered trademarks are the property of their respective brands. Follow the manufacturer’s safety recommendations for any product mentioned here.
PIC 30 On the body paint the under hood area Flat Black as well as all of the window moldings.

Right On Replicas, LLC ©2016 All rights reserved. *All registered trademarks are the property of their respective brands. Follow the manufacturer’s safety recommendations for any product mentioned here.
PIC 31 PIC 32 OPTIONAL: Prior to assembly I want to give the glass a thinner, crisper look. I will dip the parts into Pledge Floor Care. When applied to both side of a piece of clear polystyrene, it will make glass appear thinner and clearer. It will help to hide minor scratches also. Simply pour some Pledge into a small container and dip your clear glass into it. It will self-level and make the part look clearer. Place the parts on a sheet of paper towel to cure, the paper towel will draw out the excess Pledge and “Wick” it off the parts so it does not accumulate at the edges leaving an unwanted build up. After you dip the part, be sure to place a cover over it to prevent dust from collecting on it.
PIC 33 Install the headlight lenses and bezels. Using white glue, install the glass and then paint the interior area Flat Black after the glass dries in place.

Right On Replicas, LLC ©2016 All rights reserved. *All registered trademarks are the property of their respective brands. Follow the manufacturer’s safety recommendations for any product mentioned here.
PIC 34 OPTIONAL: License Plates: I decided to do custom license plates and personalize this kit a little. You can go to http://www.acme.com/licensemaker/ and create any custom plate you want for any State. Also, you can search photos online for designer license plates. You can save the photo and resize it to fit a model. Just print it on photo paper and you have a plate of your own. To print your plate for 1/25 or 1/24 scale kit, open your photo program and crop the plate so you just have the plate only. Re-size the image size to make the Width .5 inches and make sure CONSTRAIN PROPORTIONS is on. Use 300 DPI for a crisp print. Save that and Print it on White Photo paper printing on High Quality Print Setting. You now have a proper sized plate to glue on your car.
PIC 35 PIC 36 Install the rear tail light and license plate.

Right On Replicas, LLC ©2016 All rights reserved. *All registered trademarks are the property of their respective brands. Follow the manufacturer’s safety recommendations for any product mentioned here.
PIC 37 PIC 38 Starting at the back install the chassis into the body at a 45 degree angle and shoehorn the body over the chassis. It will fit snug and tight once in place without any glue.
PIC 39 The under hood area is completed.

Right On Replicas, LLC ©2016 All rights reserved. *All registered trademarks are the property of their respective brands. Follow the manufacturer’s safety recommendations for any product mentioned here.
PIC 40 The final parts are the hood and mirrors. Paint the mirror faces silver and glue in place. Set the hood in place without glue.
PIC 41 PIC 42 A front and rear shot of the completed kit. There were no parts left over except a decal for the kit supplied license tag that I did not use.

Right On Replicas, LLC ©2016 All rights reserved. *All registered trademarks are the property of their respective brands. Follow the manufacturer’s safety recommendations for any product mentioned here.
OVERALL IMPRESSIONS: I loved this kit! Although it is just barely over a Snap Tite kit and quite simplistic for the builder with experience, given the audience this is intended for it is great! This kit is perfect for the “NEW TO GLUE” builder that is stepping out of Snap kits but is not ready for a full blown builder. You get a fairly detailed motor, it is low on parts count but the details are crisp and nice. Aldo for the fact almost none of the motor shows once built it looks good finished. A builder that details motors can easily add extras making this motor even better. The chassis is very basis with the rear suspension molded in. While the details are crisp and the overall chassis is highly detailed the beginner is best to just spray the chassis Flat Black or the basic details as I did. It can be made into a nicely detailed chassis with some good painting and weathering. The interior is also simple but well detailed. The dash has crisp nice details that can be easily painted or as I did it with decals. With simple carpet and some interior detail stuff you have a very nice interior. The body is where this kit really gets the look. This is molded in a Sublime Green Metallic styrene and then painted Black. The overall body is shiny and ready to use without work. There is some minor imperfections and swirling in the molding but not too distracting. Adding the waterslide decals that fit perfectly finished off the look and gave the body a very nice finished appearance as is without any clear coat or polishing. All you need to do is highlight the molding on the windows and under the hood with Flat Black and it is done. I do recommend a clear coat over the decals to protect them though but it is not required. Final assembly is tight and fit and finish is great. Overall the car looks good and can be built without any issues or problems. As an experienced builder and even with detailing the interior and paintwork I built this kit in a day. So a new builder would have a weekend project, which is perfect. So, in this kit you get a great subject, the new Challenger, an easy build that fits great with a custom pre-painted body, a popular tie in with Chip Foose for the hot rod lovers. What is not to love? With all this being said Revell hit this one out of the park. On a scale of 1 to 10 rating this kit for what it is marketed to be I give this a 10!

Right On Replicas, LLC ©2016 All rights reserved. *All registered trademarks are the property of their respective brands. Follow the manufacturer’s safety recommendations for any product mentioned here.
More About Chip Foose: In a relatively short career, Chip Foose has created a legacy of designs and accomplishments that are well beyond his years. Chip's first job was working for his father's company, Project Design. By age twelve, Chip already had five years’ experience under his belt. 1990 brought about the beginning of a relationship with Boyd Coddington and Hot Rods by Boyd, becoming a full time position in 1993, where Chip eventually became the President. Chip's venture with Boyd however, ended in 1998. The split was not pretty as many of Boyd’s best builders left with Chip. At this time Chip and his wife Lynne started their Huntington Beach, California based company Foose Design, an automotive and product design Development Company still in operation. ELK GROVE VILLAGE, IL (May 19, 2015) – The world’s largest scale plastic model kit manufacturer, Revell Inc. today announced an exclusive three-year licensing agreement with acclaimed custom car designer Chip Foose that will add six new model car kits to its existing Foose collection. Two will replicate Foose’s real-world car designs, complete with original tooling, for the first time ever in the scale plastic model marketplace. The other four will be re-issues of earlier Revell model kits that will be Foose-ified with Chip’s personal design modifications.