rn42221muk rev4 ib - morphy richards · please read and keep these instructions for future use...
TRANSCRIPT
RN42221MUK Rev4
* Register online for your 2 year guarantee. See back of this instruction book for details. (UK and Ireland customers only)
www.morphyrichards.co.uk/blog
For competitions, product hints and tipsand more join us at
www.facebook.com/morphyrichardsuk
@loveyourmorphy
Please read and keep these instructions for future use
Steam Generator
RN42221MUK Rev4_IB 02/07/2013 15:22 Page 1
2
Important safety instructions
• This appliance can be used by children aged from8 years and above and persons with reducedphysical, sensory or mental capabilities or lack ofexperience or knowledge if they have been givensupervision or instruction concerning use of theappliance in a safe way and understand thehazards involved. Children shall not play with theappliance. Cleaning and user maintenance shallnot be made by children without supervision.
• Keep the steam generator and its cord out of reachof children less than 8 years of age at all times.
• The steam generator must not be left unattendedwhile it is connected to the supply mains.
• The steam generator must be used and rested ona stable surface.
• When placing the iron on the steam generator baseor on its heel, ensure that the surface on which theheel or base is placed is stable.
• The steam generator is not to be used if it has beendropped, if there are visible signs of damage or itis leaking.
• The filling aperture may be opened during use, dueto the design of the system.
• CAUTION - HOT: Burns can occur fromtouching hot parts, hot water or steam,or the iron rest plate.
• WARNING: To avoid electric shock, do notimmerse appliance in water / liquid.
• Check that the voltage on the rating plate of yourappliance corresponds with your house electricity supplywhich must be A.C. (Alternating current).
• Do not operate with a damaged steam/supply cord orgrommet, it must be replaced by the manufacturer, itsservice agent or similarly qualified person in order toavoid a hazard.
• Do not let the mains lead come into contact with the hotsoleplate of the iron.
• Should the fuse in the mains plug require changing, a 13amp BS1362 fuse must be fitted.
• WARNING: This appliance must be earthed.
RN42221MUK Rev4_IB 02/07/2013 15:22 Page 2
3
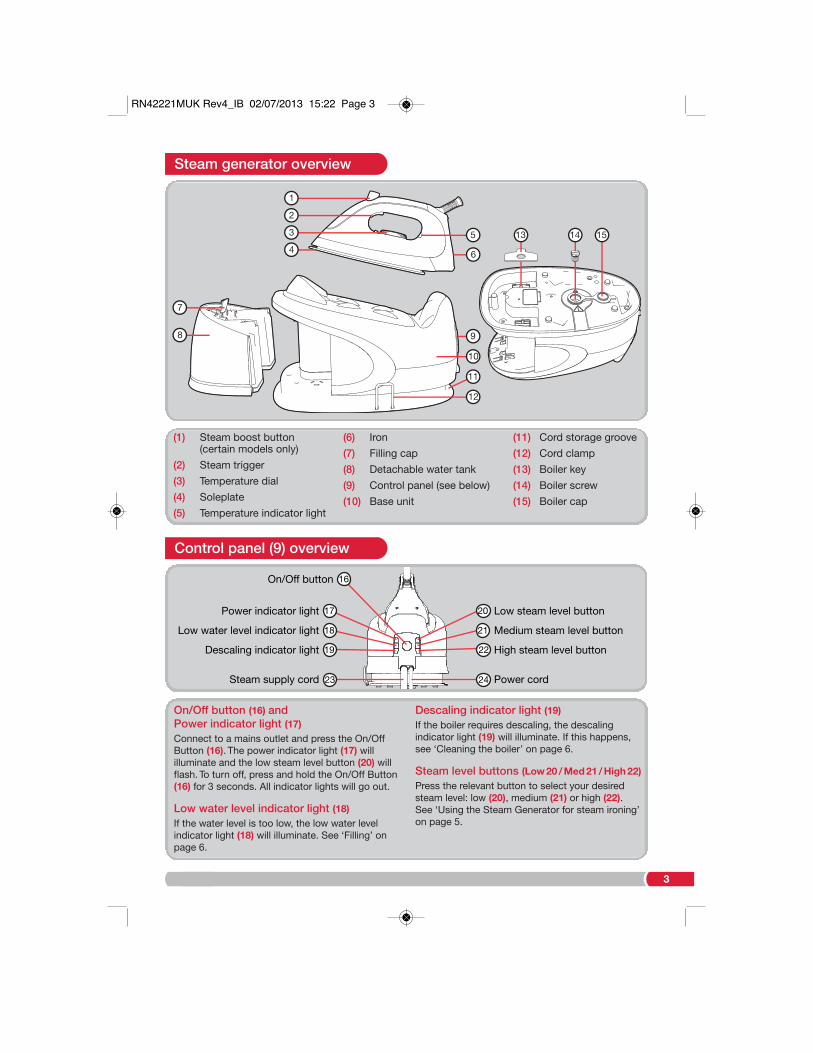
(1) Steam boost button(certain models only)
(2) Steam trigger(3) Temperature dial(4) Soleplate(5) Temperature indicator light
(6) Iron(7) Filling cap(8) Detachable water tank(9) Control panel (see below)(10) Base unit
(11) Cord storage groove(12) Cord clamp(13) Boiler key(14) Boiler screw(15) Boiler cap
Steam generator overview
Control panel (9) overview
On/Off button (16) andPower indicator light (17)
Connect to a mains outlet and press the On/OffButton (16). The power indicator light (17) willilluminate and the low steam level button (20) willflash. To turn off, press and hold the On/Off Button(16) for 3 seconds. All indicator lights will go out.
Low water level indicator light (18)
If the water level is too low, the low water levelindicator light (18) will illuminate. See ‘Filling’ onpage 6.
Descaling indicator light (19)
If the boiler requires descaling, the descalingindicator light (19) will illuminate. If this happens,see ‘Cleaning the boiler’ on page 6.
Steam level buttons (Low 20 / Med 21 / High 22)
Press the relevant button to select your desiredsteam level: low (20), medium (21) or high (22).See ‘Using the Steam Generator for steam ironing’on page 5.
2
3
4
5
6
7
8 9
10
11
12
1513 14
1
17
18
19
20
21
22
16
Low steam level button
Medium steam level button
High steam level button
On/Off button
Power indicator light
Low water level indicator light
Descaling indicator light
24 Power cord23Steam supply cord
RN42221MUK Rev4_IB 02/07/2013 15:22 Page 3
4
Locate the steam generator horizontally on theiron rest plate of your ironing board (if largeenough) or on a heat resistant stand at the sameheight as your ironing board or below it. Alwaysensure the steam generator is on a firm surfacewhen ironing.
WARNING: Do not use the product on asurface which could be damaged by heat orsteam such as a worktop or a polished woodsurface.
If in doubt, contact Morphy Richards.
Remove any protective cover from the soleplate(4) and the base unit, if any.
Unwind and straighten the power cord (24) andsteam supply cord (23).
Textiles and clothes should carry ironinginstructions. If not, follow the temperature guideabove, but test the temperature by ironing thehem of the garment or similar discreet area first.
It is advised to begin with ‘cool’ fabrics and workup to higher settings. An iron heats up quickerthan it cools down so you’ll save time andelectricity.
If you turn the temperature dial down from a hotsetting to a cooler setting, wait until the irontemperature has stabilised before you continueironing.
NOTE: Hold the base with both hands whenhandling and moving the unit, as the water tank isdetachable.
Location Before use
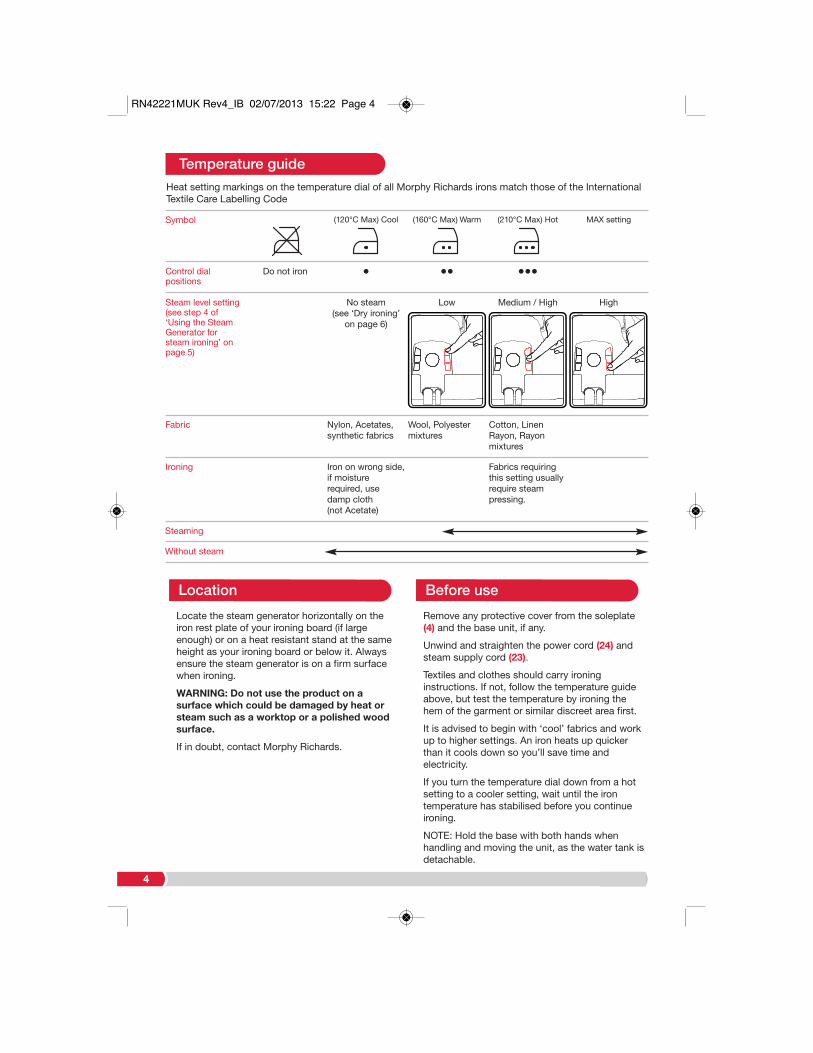
Heat setting markings on the temperature dial of all Morphy Richards irons match those of the InternationalTextile Care Labelling Code
Temperature guide
Symbol (120°C Max) Cool (160°C Max) Warm (210°C Max) Hot MAX setting
Control dialpositions
Do not iron • •• •••
Fabric Nylon, Acetates,synthetic fabrics
Wool, Polyestermixtures
Cotton, LinenRayon, Rayonmixtures
Ironing Iron on wrong side,if moisturerequired, usedamp cloth(not Acetate)
Fabrics requiringthis setting usuallyrequire steampressing.
Steaming
Without steam
Steam level setting(see step 4 of‘Using the SteamGenerator forsteam ironing’ onpage 5)
No steam(see ‘Dry ironing’
on page 6)
Low Medium / High High
RN42221MUK Rev4_IB 02/07/2013 15:22 Page 4
5
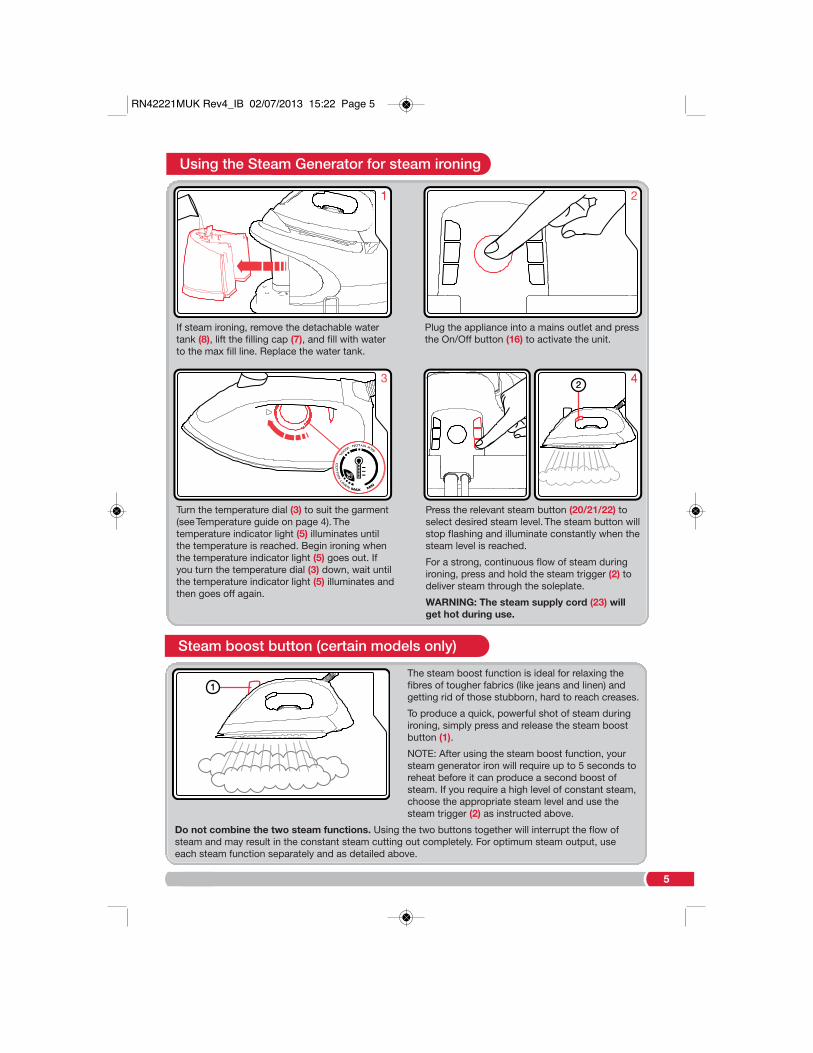
Turn the temperature dial (3) to suit the garment(see Temperature guide on page 4). Thetemperature indicator light (5) illuminates untilthe temperature is reached. Begin ironing whenthe temperature indicator light (5) goes out. Ifyou turn the temperature dial (3) down, wait untilthe temperature indicator light (5) illuminates andthen goes off again.
422
4
Press the relevant steam button (20/21/22) toselect desired steam level. The steam button willstop flashing and illuminate constantly when thesteam level is reached.
For a strong, continuous flow of steam duringironing, press and hold the steam trigger (2) todeliver steam through the soleplate.
WARNING: The steam supply cord (23) willget hot during use.
Plug the appliance into a mains outlet and pressthe On/Off button (16) to activate the unit.
2
If steam ironing, remove the detachable watertank (8), lift the filling cap (7), and fill with waterto the max fill line. Replace the water tank.
11
3
Using the Steam Generator for steam ironing
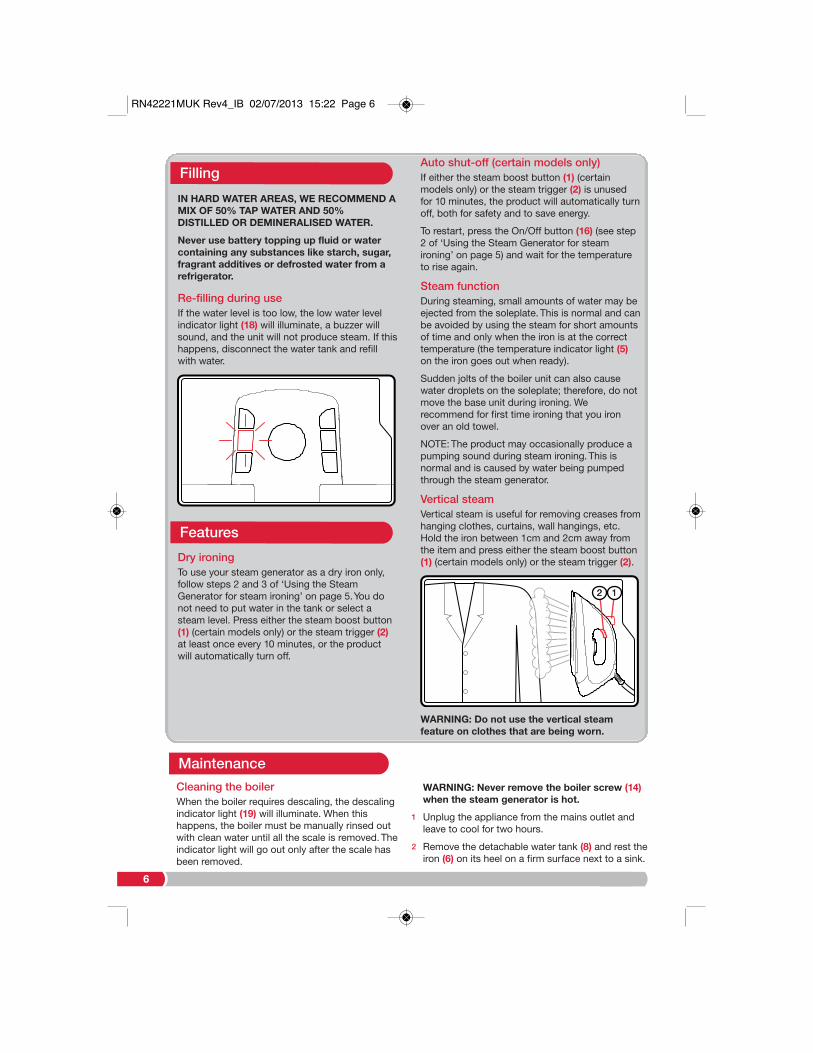
Steam boost button (certain models only)
The steam boost function is ideal for relaxing thefibres of tougher fabrics (like jeans and linen) andgetting rid of those stubborn, hard to reach creases.
To produce a quick, powerful shot of steam duringironing, simply press and release the steam boostbutton (1).
NOTE: After using the steam boost function, yoursteam generator iron will require up to 5 seconds toreheat before it can produce a second boost ofsteam. If you require a high level of constant steam,choose the appropriate steam level and use thesteam trigger (2) as instructed above.
Do not combine the two steam functions. Using the two buttons together will interrupt the flow ofsteam and may result in the constant steam cutting out completely. For optimum steam output, useeach steam function separately and as detailed above.
11
RN42221MUK Rev4_IB 02/07/2013 15:22 Page 5
6
Cleaning the boilerWhen the boiler requires descaling, the descalingindicator light (19) will illuminate. When thishappens, the boiler must be manually rinsed outwith clean water until all the scale is removed. Theindicator light will go out only after the scale hasbeen removed.
WARNING: Never remove the boiler screw (14)
when the steam generator is hot.
1 Unplug the appliance from the mains outlet andleave to cool for two hours.
2 Remove the detachable water tank (8) and rest theiron (6) on its heel on a firm surface next to a sink.
Maintenance
IN HARD WATER AREAS, WE RECOMMEND AMIX OF 50% TAP WATER AND 50%DISTILLED OR DEMINERALISED WATER.
Never use battery topping up fluid or watercontaining any substances like starch, sugar,fragrant additives or defrosted water from arefrigerator.
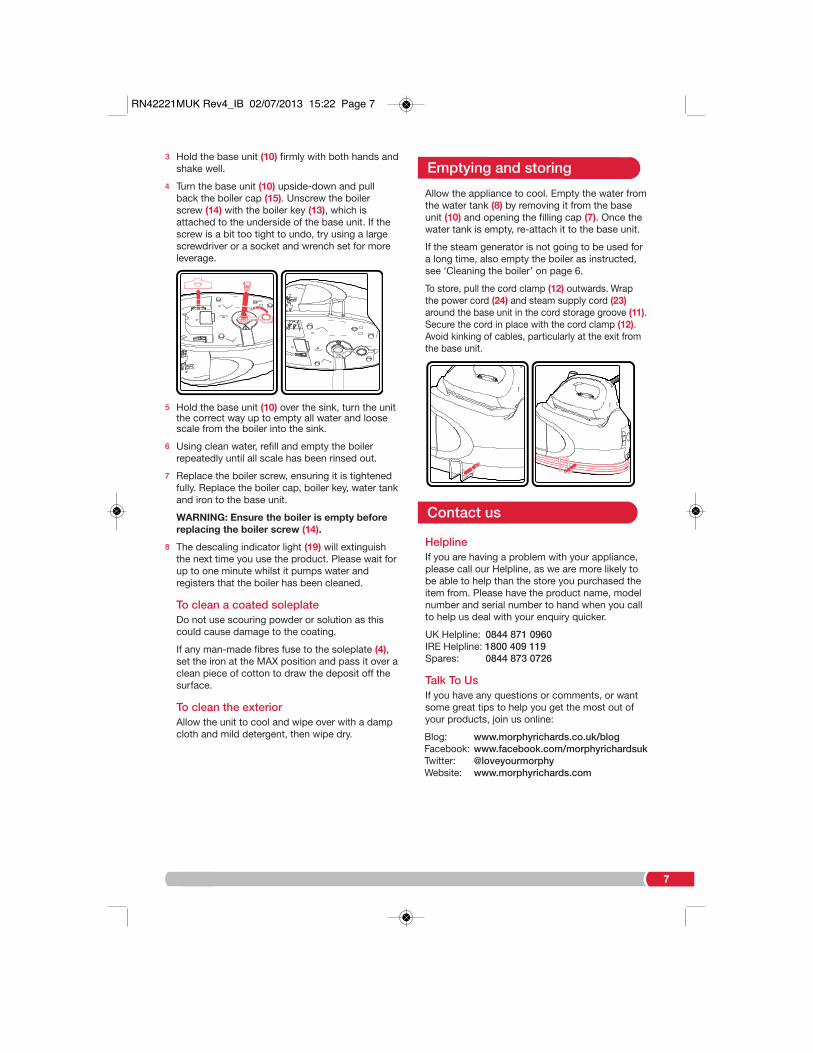
Re-filling during useIf the water level is too low, the low water levelindicator light (18) will illuminate, a buzzer willsound, and the unit will not produce steam. If thishappens, disconnect the water tank and refillwith water.
Dry ironingTo use your steam generator as a dry iron only,follow steps 2 and 3 of ‘Using the SteamGenerator for steam ironing’ on page 5. You donot need to put water in the tank or select asteam level. Press either the steam boost button(1) (certain models only) or the steam trigger (2)
at least once every 10 minutes, or the productwill automatically turn off.
Auto shut-off (certain models only)If either the steam boost button (1) (certainmodels only) or the steam trigger (2) is unusedfor 10 minutes, the product will automatically turnoff, both for safety and to save energy.
To restart, press the On/Off button (16) (see step2 of ‘Using the Steam Generator for steamironing’ on page 5) and wait for the temperatureto rise again.
Steam functionDuring steaming, small amounts of water may beejected from the soleplate. This is normal and canbe avoided by using the steam for short amountsof time and only when the iron is at the correcttemperature (the temperature indicator light (5)
on the iron goes out when ready).
Sudden jolts of the boiler unit can also causewater droplets on the soleplate; therefore, do notmove the base unit during ironing. Werecommend for first time ironing that you ironover an old towel.
NOTE: The product may occasionally produce apumping sound during steam ironing. This isnormal and is caused by water being pumpedthrough the steam generator.
Vertical steamVertical steam is useful for removing creases fromhanging clothes, curtains, wall hangings, etc.Hold the iron between 1cm and 2cm away fromthe item and press either the steam boost button(1) (certain models only) or the steam trigger (2).
WARNING: Do not use the vertical steamfeature on clothes that are being worn.
Features
Filling
2 12 1
RN42221MUK Rev4_IB 02/07/2013 15:22 Page 6
7
3 Hold the base unit (10) firmly with both hands andshake well.
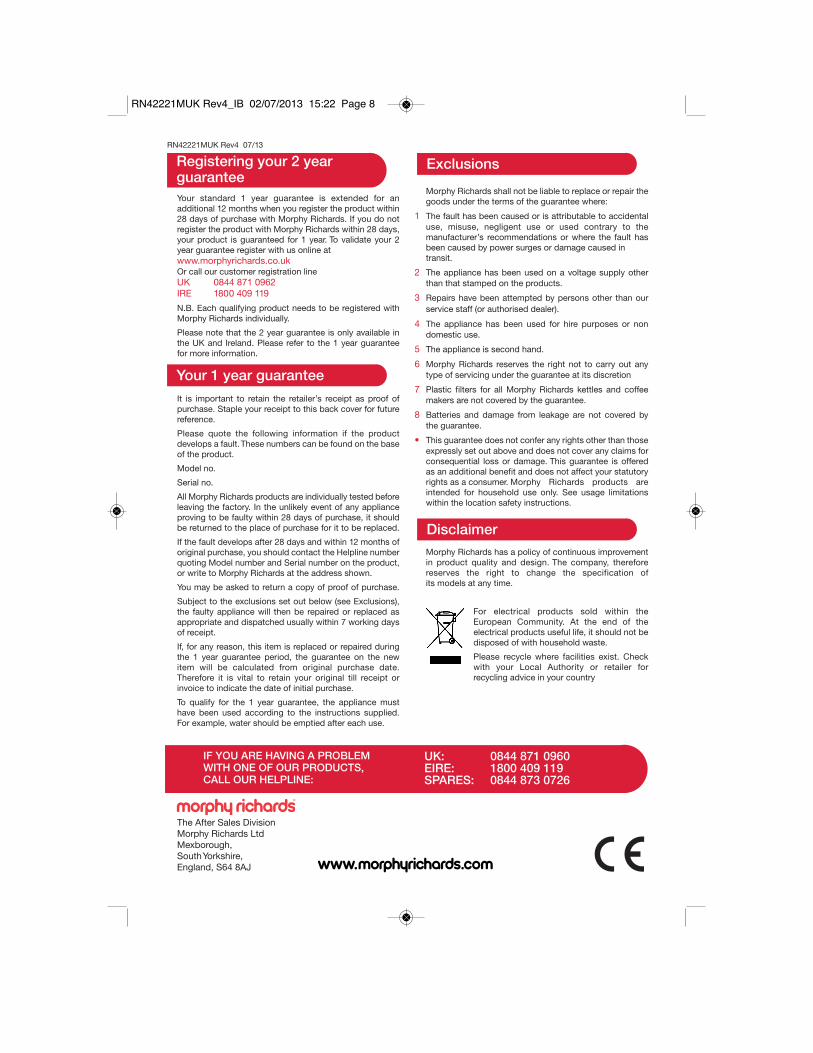
4 Turn the base unit (10) upside-down and pullback the boiler cap (15). Unscrew the boilerscrew (14) with the boiler key (13), which isattached to the underside of the base unit. If thescrew is a bit too tight to undo, try using a largescrewdriver or a socket and wrench set for moreleverage.
5 Hold the base unit (10) over the sink, turn the unitthe correct way up to empty all water and loosescale from the boiler into the sink.
6 Using clean water, refill and empty the boilerrepeatedly until all scale has been rinsed out.
7 Replace the boiler screw, ensuring it is tightenedfully. Replace the boiler cap, boiler key, water tankand iron to the base unit.
WARNING: Ensure the boiler is empty beforereplacing the boiler screw (14).
8 The descaling indicator light (19) will extinguishthe next time you use the product. Please wait forup to one minute whilst it pumps water andregisters that the boiler has been cleaned.
To clean a coated soleplateDo not use scouring powder or solution as thiscould cause damage to the coating.
If any man-made fibres fuse to the soleplate (4),set the iron at the MAX position and pass it over aclean piece of cotton to draw the deposit off thesurface.
To clean the exteriorAllow the unit to cool and wipe over with a dampcloth and mild detergent, then wipe dry.
Allow the appliance to cool. Empty the water fromthe water tank (8) by removing it from the baseunit (10) and opening the filling cap (7). Once thewater tank is empty, re-attach it to the base unit.
If the steam generator is not going to be used fora long time, also empty the boiler as instructed,see ‘Cleaning the boiler’ on page 6.
To store, pull the cord clamp (12) outwards. Wrapthe power cord (24) and steam supply cord (23)
around the base unit in the cord storage groove (11).Secure the cord in place with the cord clamp (12).Avoid kinking of cables, particularly at the exit fromthe base unit.
HelplineIf you are having a problem with your appliance,please call our Helpline, as we are more likely tobe able to help than the store you purchased theitem from. Please have the product name, modelnumber and serial number to hand when you callto help us deal with your enquiry quicker.
UK Helpline: 0844 871 0960IRE Helpline: 1800 409 119 Spares: 0844 873 0726
Talk To UsIf you have any questions or comments, or wantsome great tips to help you get the most out ofyour products, join us online:
Blog: www.morphyrichards.co.uk/blogFacebook: www.facebook.com/morphyrichardsukTwitter: @loveyourmorphyWebsite: www.morphyrichards.com
Emptying and storing
Contact us
RN42221MUK Rev4_IB 02/07/2013 15:22 Page 7
RN42221MUK Rev4 07/13
Your standard 1 year guarantee is extended for an additional 12 months when you register the product within28 days of purchase with Morphy Richards. If you do notregister the product with Morphy Richards within 28 days,your product is guaranteed for 1 year. To validate your 2year guarantee register with us online atwww.morphyrichards.co.ukOr call our customer registration line UK 0844 871 0962IRE 1800 409 119
N.B. Each qualifying product needs to be registered withMorphy Richards individually.
Please note that the 2 year guarantee is only available inthe UK and Ireland. Please refer to the 1 year guaranteefor more information.
It is important to retain the retailer’s receipt as proof ofpurchase. Staple your receipt to this back cover for futurereference.
Please quote the following information if the product develops a fault. These numbers can be found on the baseof the product.
Model no.
Serial no.
All Morphy Richards products are individually tested beforeleaving the factory. In the unlikely event of any applianceproving to be faulty within 28 days of purchase, it shouldbe returned to the place of purchase for it to be replaced.
If the fault develops after 28 days and within 12 months oforiginal purchase, you should contact the Helpline numberquoting Model number and Serial number on the product,or write to Morphy Richards at the address shown.
You may be asked to return a copy of proof of purchase.
Subject to the exclusions set out below (see Exclusions),the faulty appliance will then be repaired or replaced asappropriate and dispatched usually within 7 working daysof receipt.
If, for any reason, this item is replaced or repaired duringthe 1 year guarantee period, the guarantee on the newitem will be calculated from original purchase date. Therefore it is vital to retain your original till receipt orinvoice to indicate the date of initial purchase.
To qualify for the 1 year guarantee, the appliance musthave been used according to the instructions supplied.For example, water should be emptied after each use.
Morphy Richards shall not be liable to replace or repair thegoods under the terms of the guarantee where:
1 The fault has been caused or is attributable to accidentaluse, misuse, negligent use or used contrary to the manufacturer’s recommendations or where the fault hasbeen caused by power surges or damage caused in transit.
2 The appliance has been used on a voltage supply otherthan that stamped on the products.
3 Repairs have been attempted by persons other than ourservice staff (or authorised dealer).
4 The appliance has been used for hire purposes or non domestic use.
5 The appliance is second hand.
6 Morphy Richards reserves the right not to carry out anytype of servicing under the guarantee at its discretion
7 Plastic filters for all Morphy Richards kettles and coffeemakers are not covered by the guarantee.
8 Batteries and damage from leakage are not covered bythe guarantee.
• This guarantee does not confer any rights other than thoseexpressly set out above and does not cover any claims forconsequential loss or damage. This guarantee is offeredas an additional benefit and does not affect your statutoryrights as a consumer. Morphy Richards products are intended for household use only. See usage limitationswithin the location safety instructions.
Morphy Richards has a policy of continuous improvementin product quality and design. The company, therefore reserves the right to change the specification ofits models at any time.
For electrical products sold within the European Community. At the end of the electrical products useful life, it should not bedisposed of with household waste.
Please recycle where facilities exist. Checkwith your Local Authority or retailer for recycling advice in your country
ExclusionsRegistering your 2 year guarantee
Your 1 year guarantee
Disclaimer
The After Sales DivisionMorphy Richards LtdMexborough,South Yorkshire, England, S64 8AJ
IF YOU ARE HAVING A PROBLEMWITH ONE OF OUR PRODUCTS,CALL OUR HELPLINE:
UK: 0844 871 0960EIRE: 1800 409 119 SPARES: 0844 873 0726
RN42221MUK Rev4_IB 02/07/2013 15:22 Page 8