rt software tog gv sports and k2 dyno s - grass valley€¦ · rt software tog gv sports and k2...
TRANSCRIPT

RT Software tOG GV Sports and K2 Dyno S Olaf Bahr, Product Manager Grass Valley, a Belden Brand.
July 2015

APPLICATION NOTE RT SOFTWARE TOG GV SPORTS AND K2 DYNO S
2www.grassvalley.com
WHY tOG ON K2 DYNO S?
The speed of live events and the need to efficiently tell the story of “what just happened” is increasingly in demand to be faster, more dynamic, paint a clearer picture and even be more entertaining to enhance the viewing experience. The integration of tOG and K2 Dyno brings an affordable A-level analysis tool to every level of live event production.
This Application Note covers:
• Software installation and setup on K2 Dyno S
• Software installation and setup on the tOG PC
• Preparing the K2 Summit 3G for interaction with tOG
• Using the K2 Dyno S/tOG interface
• Building stacked overlay graphics
Prior to using this Application Note, verify with the K2 Dyno S, K2 Summit 3G and tOG release notes that the appropriately compati-ble versions of software on all systems is being used. Visit the Grass Valley K2 Dyno website for updated information regarding software releases, required software and documentation: www.grassvalley.com/products/k2_dyno and click on the Documentation tab in the Resources area.
Required software for K2 Dyno installation in the RTDyno_Install.zip file:
ChromeStandaloneSetup.exe
GoogleUpdate.adm
tOGGVDynoClient.crx
tOGGVDynoClient.pem
Required software for tOG Server installation:
togpre-4.6_14565-windows-installer
tog-4.6_r15288-windows-installer
mysql-5.5.35-winx64
dvsdriver-4.3.5.4_1-windows-installer
gvsports-4.6_r15288-windows-installer
Have the IP address, subnet mask and any other IP configuration information readily available for the K2 Dyno S, K2 Summit 3G and tOG server. In either a standalone or SAN configuration, the K2 Dyno S, K2 Summit 3G and tOG server need to be connected via a Gigabit Ethernet switch or router.
For this Application Note example, the IP addresses are:
K2 Summit 3G: 10.16.41.70
K2 Dyno S: 10.16.41.71
tOG server PC: 10.16.41.79

APPLICATION NOTE RT SOFTWARE TOG GV SPORTS AND K2 DYNO S
3www.grassvalley.com
Installation on K2 Dyno S
1) If the K2 Dyno application is running, exit the application to the K2 Dyno S Mainte-nance level in order to see the Windows desktop.
2) Verify that McAfee Embedded Security Manager is set to UPDATE.
3) If not connected, connect the K2 Dyno S Controller to the Internet via the Media Port on the back.
4) Insert a USB device with the RTDyno_Install files.
5) Run the ChromeStandaloneSetup.exe
6) With an Internet connection Chrome will install on the K2 Dyno S controller. Close the Chrome Browser application. From this point, Internet connection is no lon-ger required.
7) To prevent Chrome from automatically downloading and installing updates that have not been tested in this environment, it is advised the following adjustments to Chrome are made. Use Windows Start menu and type in Edit group policy.

APPLICATION NOTE RT SOFTWARE TOG GV SPORTS AND K2 DYNO S
4www.grassvalley.com
Installation on K2 Dyno S (cont.)
8) From the selection, click on Edit group policy. When the window opens, under User Configuration, right-click on Administrative Templates then Add/Remove Templates.
9) Click Add… and browse to the RTDyno_Install folder that contains the file GoogleUpdate.adm and select it and click Open.
10) If it is listed in the window of tem-plates, close the window.
11) Under Computer Configuration, select Administrative Templates/Clas-sic Administrative Templates/Google/Google Update/Applications Google Chrome.
12) In this folder, right-click on Update policy override and select Edit.

APPLICATION NOTE RT SOFTWARE TOG GV SPORTS AND K2 DYNO S
5www.grassvalley.com
Installation on K2 Dyno S (cont.)
13) Change Update policy override to Enabled and Policy to Updates disabled.
14) Then click Apply and then OK, close all windows.
15) Open a Chrome browser window and type in the URL search field chrome://extensions. This will open the Chrome extensions setup section.

APPLICATION NOTE RT SOFTWARE TOG GV SPORTS AND K2 DYNO S
6www.grassvalley.com
Installation on K2 Dyno S (cont.)
16) With Windows Explorer, open the RTDyno_Install folder and drag the tOGGVDynoClient.crx file onto the Chrome Browser window.
17) In the Chrome Browser Apps tab is the RT Software Client app. Right-click and select Create shortcuts…
…and only check the Desktop box. Then click Create. Now close the Chrome browser. The RT Software Client shortcut will be created on the desktop. (NOTE: Do Not check add to Start Menu or Pin to Taskbar this will create an incorrect shortcut.)

APPLICATION NOTE RT SOFTWARE TOG GV SPORTS AND K2 DYNO S
7www.grassvalley.com
Installation on K2 Dyno S (cont.)
18) On the K2 Dyno S desktop, right-click and create a new text file.
19) Name the file the IP address of the tOG server PC and include the .txt suf-fix. (For this example the IP address is: 10.16.41.79 therefore, the file name would be 10.16.41.79.txt. Please remember to substitute your IP address for the example given.)
20) Right-click on the RT Software Client short-cut and select Properties.
21) In the Target field there should be a sim-ilar line to this: “C:\Program Files (x86)\Google\Chrome\Application\chrome.exe” --profile-directory=Default --app-id=hdin-gebnoinafgkhbbdfdfobnanfopjo
22) At the end of this string add a single space and then “c:\Users\Administrator\Desk-top\10.16.41.79.txt” Then click Apply and OK. (Note: Do not forget the quotation marks and to substitute your IP address for the example given above.)
23) If the IP address of the tOG server PC changes in the future, the .txt file name and the target line above both need to be changed as well.
24) After these settings are complete, it is acceptable to add the shortcut to the Win-dows Taskbar.
25) Once installation is complete, ENABLE McAfee Embedded Security by selecting Leave Update Mode.
26) Restart the K2 Dyno S controller.

APPLICATION NOTE RT SOFTWARE TOG GV SPORTS AND K2 DYNO S
8www.grassvalley.com
Installation on K2 Summit 3G
1) Launch AppCenter on the on the K2 Summit 3G.
2) Do not have a session in use. Select the channel to be used and set it as Player/Recorder.
3) At the top of AppCenter, select the Control tab and then Options…
4) In the side tabs, select Control and button check Remote and Local and AMP.
5) Click OK.
6) Do this for each channel to be con-trolled.

APPLICATION NOTE RT SOFTWARE TOG GV SPORTS AND K2 DYNO S
9www.grassvalley.com
Installation on tOG Server
MySQL Installation
1) Installation of the DVS driver is required after installing the DVS I/O hardware. It can be performed after the tOG software installation. See the end of this document for those procedures.
2) Prior to installation, the operating system has to be installed. Current versions supported are:
RedHat EL 5.5 Workstation 64-bit.
Windows 7 Pro 64-bit SP1.
3) Once the OS has been installed, the NVIDIA driver has to be installed. These must be obtained from the NVIDIA website: www.nvidia.com. Current versions are:
Linux – 331.20
Windows – 331.82
4) Refer to the documentation associated with the selected driver for install instructions.
Installation of tOG Sports for Windows, and Windows Projects require MySQL. If not included in the GV Sports download zip, download the MySQL install from the MySQL website. This is located at:
www.mysql.com/downloads/mysql/
This is the community edition and is available for free under the Open Source GPL license.
1) Double click on the installer.
2) Click Next.
3) Accept the EULA and click Next.

APPLICATION NOTE RT SOFTWARE TOG GV SPORTS AND K2 DYNO S
10www.grassvalley.com
MySQL Installation (cont.)
4) Typical is the setup type to be installed. Click Next.
5) Click Install.
7) Click Next.
6) MySQL will now install.

APPLICATION NOTE RT SOFTWARE TOG GV SPORTS AND K2 DYNO S
11www.grassvalley.com
MySQL Installation (cont.)
8) Click Next.
11) Click Next.
9) Click Finish.
10) MySQL will now launch the MySQL Instance configurator.

APPLICATION NOTE RT SOFTWARE TOG GV SPORTS AND K2 DYNO S
12www.grassvalley.com
MySQL Installation (cont.)
12) Select Standard Configuration, then Click Next.
15) IMPORTANT: Deselect the Modify Secu-rity Settings.
16) Click Next.
13) Check both boxes for Install As Windows Service and Include Bin Directory in Win-dows PATH.
14) Click Next.

APPLICATION NOTE RT SOFTWARE TOG GV SPORTS AND K2 DYNO S
13www.grassvalley.com
MySQL Installation (cont.)
17) MySQL service is ready to execute the con-figuration.
18) Click Execute to finalize the installation and configuration of MySQL.
19) Click Finish when the service is complete, then close all open windows.
20) Run the tOG Pre install application.

APPLICATION NOTE RT SOFTWARE TOG GV SPORTS AND K2 DYNO S
14www.grassvalley.com
MySQL Installation (cont.)
23) Click Finish to complete the installation.
24) Run the tOG install application.
25) Accept the EULA and click Next.
26) Use the default installation directory loca-tion and click Next.
27) Click Finish to complete the installation.
28) Run the GV Sports Install application.
29) Accept the EULA and click Next.
30) Use the default Installation Directory loca-tion and click Next.
31) DO NOT enter a password for Root pass-word for mysql. It needs to remain blank. Click Next.
32) Click Next again to start the install.
33) Click Finish to complete the installation.
34) On the desktop is a folder with the tOG ver-sion name.
22) Use the default Installation Directory loca-tion and click Next.
21) Accept the EULA and click Next.

APPLICATION NOTE RT SOFTWARE TOG GV SPORTS AND K2 DYNO S
15www.grassvalley.com
MySQL Installation (cont.)
36) The GV Sports shortcut can be copied to the desktop.
37) Once installation of tOG Pre, tOG and GV Sports is complete, restart the tOG server.
38) After Windows OS starts, insert the USB License Dongle into a USB port on the tOG server.
39) Launch GV Sports with the desktop shortcut.
35) Within this folder should be two directory folders: GV Sports and tOGGVDynoClient, and these Shortcuts: GV Sports, tOG Edit, tOG Sports, tOG Playout, tOG Live and Uninstall.
40) In the bottom left corner of the tOG GV Sports interface panel, select the Clip tab.
41) Under Clip Control Plugin, select K2DirClipStore.
42) In the Address field, enter the IP address of the K2 Summit Con-trol Connection. (In this example, 10.16.41.70 is used.)
43) In the Directory Root field either leave blank or enter a specific root folder, for example Dyno (case sensitive.)
44) For Input Channel 1 and 2, uncheck the box to state false for those chan-nels.
45) For Input Channel 3 and 4 check the box to state true for those channels. This allows for control of the K2 Sum-mit output channels.
46) Set Automatic Updates to true as well, so that the clip information updates when clips are created or renamed on the K2 Dyno S panel. (See above pic-ture for example of correct settings.)

APPLICATION NOTE RT SOFTWARE TOG GV SPORTS AND K2 DYNO S
16www.grassvalley.com
MySQL Installation (cont.)
48) From the right hand panel of tabs, select tOG Preferences.
49) Under the Protocol tab, None should be the Protocol setting.
50) In the Video Streaming Bitrate field the values of 6000,6000,6000 are the default. (These determine the minimum, starting, and maximum bit rates for the video maintained in the K2 Dyno GV Sports Interface.) Values may be altered to a maximum setting of 10000,10000,10000 and press the Enter key on the keyboard to accept changes.
47) Press F6 to launch the Refresh Clip List window. Click Refresh Clip List.
51) Under the Video tab, choose the input and output device settings.
52) If using the split screen tool, the Number of Channels on the input side should be set to 2.
53) By having the Flicker Filter option checked, video may appear “soft.” If this is the case, uncheck Flicker Filter.
54) Click Save to save any changes.
55) Exit the tOG application and relaunch with the GV Sports shortcut.

APPLICATION NOTE RT SOFTWARE TOG GV SPORTS AND K2 DYNO S
17www.grassvalley.com
MySQL Installation (cont.)
56) IMPORTANT: Xitami Web Server service must be stopped on the tOG server.
Windows Start / Control Panel/ Administrative Tools / Services – locate Xitami Web Server
57) Right-click Properties and under Gen-eral tab, Startup type set to Disable.
APPLICATION NOTE RT SOFTWARE TOG GV SPORTS AND K2 DYNO S
18www.grassvalley.com
MySQL Installation (cont.)
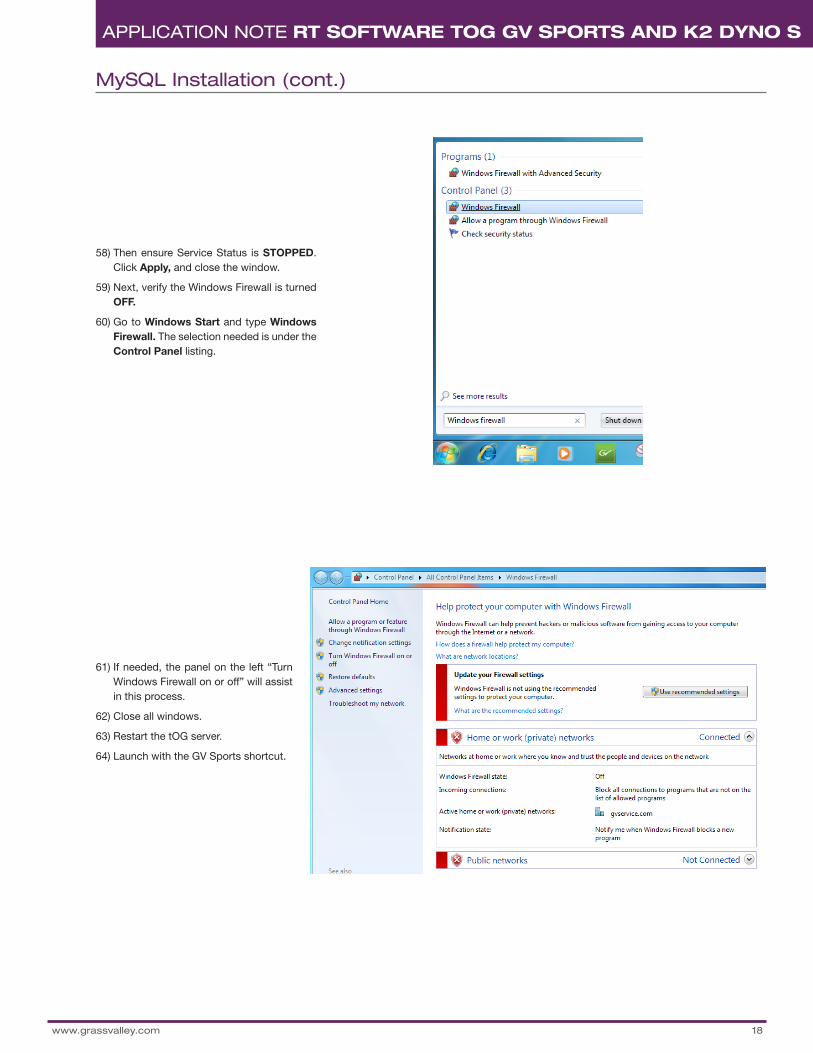
58) Then ensure Service Status is STOPPED. Click Apply, and close the window.
59) Next, verify the Windows Firewall is turned OFF.
60) Go to Windows Start and type Windows Firewall. The selection needed is under the Control Panel listing.
61) If needed, the panel on the left “Turn Windows Firewall on or off” will assist in this process.
62) Close all windows.
63) Restart the tOG server.
64) Launch with the GV Sports shortcut.

APPLICATION NOTE RT SOFTWARE TOG GV SPORTS AND K2 DYNO S
19www.grassvalley.com
Using the tOG Application on K2 Dyno S Controller
1) Start a replay session with the K2 Dyno S and start recording.
2) Launch the tOG application on the tOG server.
3) On the K2 Dyno S, use either the Home screen tOG launch tab or Windows Start GV Sports. The GV Sports window opens on the K2 Dyno S and reveals the interface.
4) Click Show Tools in the bottom-left corner to expose the tools.
6) Click Clips in the upper-right to access clips on the K2 Summit.
5) Apply any of the tools to the video on the screen. Split Screen may not be used at the same time with any of the “draw” tools.

APPLICATION NOTE RT SOFTWARE TOG GV SPORTS AND K2 DYNO S
20www.grassvalley.com
Using the tOG Application on K2 Dyno S Controller (cont.)
7) Double tap a clip to load it to the K2 Summit output channel.
8) Use the Jog knob to locate a specific frame and apply any of the tools to the clip. This adds a keyframe to the Stack catalogue viewable at the tOG server interface screen.
9) Use the Restart button, at the top, to recue the clip and the overlay graphic clears.
10) Click Replay, at the top, to play the clip. It will add the overlay graphic at the selected keyframe.
11) Pause and Animation Off points can be added to the Stack. Split Screen cannot be part of the stack.
12) Spot Shadow, Spot Zoom and Blur follow keyframe paths. Apply any of these tools and jog to the next key-frame, and reposition the focus point.
13) Use the Switch button, top-left to switch back to the K2 Dyno S inter-face screen.
14) Use the Exit button to exit the GV Sports application on K2 Dyno. The tOG server will continue to operate and waits for a new K2 Dyno connec-tion via GV Sports.

WWW.GRASSVALLEY.COMJoin the Conversation at GrassValleyLive on Facebook, Twitter, YouTube and Grass Valley - A Belden Brand on LinkedIn.
21
APPLICATION NOTE RT SOFTWARE TOG GV SPORTS AND K2 DYNO S
GVB-1-0105B-EN-AN
Belden, Belden Sending All The Right Signals and the Belden logo are trademarks or registered trademarks of Belden Inc. or its affiliated companies in the United States and other jurisdictions. Grass Valley, K2 Dyno and K2 Summit are trademarks or registered trademarks of Grass Valley. Belden Inc., Grass Valley and other parties may also have trademark rights in other terms used herein.Copyright © 2015 Grass Valley. All rights reserved. Specifications subject to change without notice.
Appendix
1) Double click on the DVS driver installer.
2) Click Next.
3) Accept the EULA and click Next.
4) Use the default Installation Directory loca-tion and click Next.
5) The driver will now install. Once completed, a confirmation window opens. Click Finish. Then close all open windows.
6) Windows Power Save Mode
If configuring a tOG server for the first time, this is a reminder to change the Power Sav-ing mode (in Windows Control Panel) to NEVER.
Service Help
Contact your regional Grass Valley technical service representative for support. Online service support can be found at www.grassvalley.com/support/customer_care