sap list viewer in web dynpro abap
TRANSCRIPT
SAP COMMUNITY NETWORK SDN - sdn.sap.com | BPX - bpx.sap.com | BOC - boc.sap.com | UAC - uac.sap.com
© 2010 SAP AG 1
SAP List Viewer in Web Dynpro
ABAP
Applies to:
SAP NetWeaver 7.0 Enhancement package 2
Summary
If you want to use the famous ALV in your Web Dynpro ABAP application, maybe you sometimes want to have a look into the documentation. This article provides a printable version of the latest version of the SAP List Viewer in Web Dynpro ABAP (ALV) documentation you can find also on SAP Help Portal
Author: Stefanie Bacher
Company: SAP AG
Created on: 23 April 2010
Author Bio
Stefanie Bacher works as a product specialist within the SAP NetWeaver Knowledge Management team. She focuses on UI technology.

SAP List Viewer in Web Dynpro ABAP
SAP COMMUNITY NETWORK SDN - sdn.sap.com | BPX - bpx.sap.com | BOC - boc.sap.com | UAC - uac.sap.com
© 2010 SAP AG 2
Table of Contents
SAP List Viewer in Web Dynpro ABAP .............................................................................................................. 4
Integrating ALV into your Web Dynpro Application ............................................................................................ 6
Defining ALV Component Usage .................................................................................................................... 6
Providing Data for ALV Display ....................................................................................................................... 7
Embedding ALV Views.................................................................................................................................... 9
Configuring Dynamically with ALV Configuration Model .................................................................................. 10
Objects of the ALV Configuration Model ....................................................................................................... 11
Getting the ALV Configuration Model ........................................................................................................... 12
Configuring Standard ALV Functions ............................................................................................................... 14
Standard Functions of ALV and Presettings ................................................................................................. 14
Sorting ........................................................................................................................................................... 16
Filters............................................................................................................................................................. 19
Calculating (Aggregation).............................................................................................................................. 22 Presettings for Calculations ....................................................................................................................................... 22
Settings for Aggregation ............................................................................................................................................ 23
Intermediate Results .................................................................................................................................................. 25
Specifying the Initial View of Applications ..................................................................................................... 27 Configuring Views ...................................................................................................................................................... 28
Saving Configuration Data Records ........................................................................................................................... 29
Exporting ....................................................................................................................................................... 30 Exporting to Microsoft Excel....................................................................................................................................... 31
Print Version .................................................................................................................................................. 32 Pre-Settings for Print Versions ................................................................................................................................... 36
Managing ALV Display Areas ........................................................................................................................... 39
Header of ALV Display .................................................................................................................................. 39
Fields ............................................................................................................................................................. 40
Columns ........................................................................................................................................................ 41 Column Headers ........................................................................................................................................................ 43
Position of Columns ................................................................................................................................................... 46
Configuring Scroll Bars ................................................................................................................................. 48
Header and Footer Areas.............................................................................................................................. 49 Creating Modeling Objects and Elements .................................................................................................................. 51
Design Object Settings .............................................................................................................................................. 52
Creating Modeling Area ............................................................................................................................................. 54
Defining the Positioning of the Settings Dialog Box ...................................................................................... 55
Defining the Appearance of the ALV Display ................................................................................................... 56
Assigning Properties to Columns and Cells .................................................................................................. 56
Size of ALV Display, Columns, and Cells ..................................................................................................... 57
Visibility of Individual Areas .......................................................................................................................... 59
Color of ALV Output, Columns, and Cells..................................................................................................... 60
Text Properties .............................................................................................................................................. 61
Lines Between Columns and Rows .............................................................................................................. 62
Table as Hierarchy ........................................................................................................................................ 62

SAP List Viewer in Web Dynpro ABAP
SAP COMMUNITY NETWORK SDN - sdn.sap.com | BPX - bpx.sap.com | BOC - boc.sap.com | UAC - uac.sap.com
© 2010 SAP AG 3
Table Data as Business Graphic .................................................................................................................. 64
Display with Crystal Reports ......................................................................................................................... 67
Substitute Text for Empty Output .................................................................................................................. 67
Providing Application-Specific Functions .......................................................................................................... 68
Generating, Getting, and Deleting Functions ................................................................................................ 68
Preparing the Context ................................................................................................................................... 70
Defining User Interface Elements ................................................................................................................. 71
Specifying the Position in the Toolbar ........................................................................................................... 71
Controlling Visibility and Activation Status .................................................................................................... 72
Events for Handling Functions ...................................................................................................................... 73
Providing ALV Standard Functions Using Application-Specific UI Elements ............................................... 73
Handling Interaction .......................................................................................................................................... 74
Handling Interaction Without Data Change................................................................................................... 75 Defining the Selection of Rows and Columns ............................................................................................................ 75
Using Hyperlinks and Buttons as Cell Editors ............................................................................................................ 78
Activating and Deactivating the ALV Output .............................................................................................................. 79
Handling Interaction with Editable ALV ......................................................................................................... 79 Controlling Write-Protection for the ALV Output ......................................................................................................... 80
Changing Cell Editors ................................................................................................................................................ 81
Enabling Addition and Deletion of Rows .................................................................................................................... 82
Adding Entire Pages with Input Ready Rows ............................................................................................................. 82
Specifying Check Times ............................................................................................................................................ 83
Refreshing the Display ............................................................................................................................................... 84
Drag and Drop ............................................................................................................................................... 86
Providing Help for Users ................................................................................................................................... 89
Copyright........................................................................................................................................................... 92

SAP List Viewer in Web Dynpro ABAP
SAP COMMUNITY NETWORK SDN - sdn.sap.com | BPX - bpx.sap.com | BOC - boc.sap.com | UAC - uac.sap.com
© 2010 SAP AG 4
SAP List Viewer in Web Dynpro ABAP
SAP List Viewer (ALV) is a flexible tool used to display lists and tabular structures. It provides common list operations as standard functions and can be enhanced by user-specific functions.
The SAP List Viewer is already available to you as a Web Dynpro component that you can integrate into your application.
The ALV component SALV_WD_TABLE is a configurable Web Dynpro component used to display data in the form of tables. It contains a configuration model (ALV configuration model), which you can use to determine the appearance, functions, and runtime behavior of the ALV display, as well as the display of the standard ALV display.
For the end user, the standard output consists of a toolbar, a title, and the output table.
Features
A variety of personalization options are available to the user and these can be saved in personalized views.
For example, the following functions are available depending on the ALV configuration:
Filters
Sorting across multiple columns
Displaying calculations and subtotals
Display in Crystal Reports with predefined Crystal Report layouts
Configurable print version in PDF format
Export of data to Excel
Hierarchical display of table
As application developer you can include the ALV in your Web Dynpro application and can either use it with the specified presettings or also use the ALV Configuration Model. With the ALV Confiuration Model you can decided which of the stndard functions are available to the user and how these are intially configured. You can find a detailed overview of this here: Standard Functions of the ALV and Presettings [Page 14]

SAP List Viewer in Web Dynpro ABAP
SAP COMMUNITY NETWORK SDN - sdn.sap.com | BPX - bpx.sap.com | BOC - boc.sap.com | UAC - uac.sap.com
© 2010 SAP AG 5
You also have a variety of options with the ALV Configuration, for example you can:
Design the appearance and behavior of the ALV display. Amongst other things you can use diferent cell editors and define background colors and size settings
Implement drag and drop
Allow user to enter and change data and configure it
Design special areas above and below the table. These can be exported in different file formats for printing or table calculations.
Provide the user with application-specific functions using UI elements in the toolbar
Procedure
Integrate the ALV into your application
You must execute the following procedures to be able to use the ALV with its standard settings and functions in your Web Dynpro application.
1. In your Web Dynpro component you define a use for ALV Component (SALV_WD_TABLE).
For more information: Defining ALV Component Usage [Page 6]
2. You map the data of your Web Dynpro component with the context node DATA of the ALV
Component.
For more information: Providing Data for ALV Display [Page 7]
3. A TABLE view is contained in the ALV Component which you can include in your application where
you want to display the table.
More information: Using ALV Views [Page 8]
Configuring Dynamically with ALV Configuration Model
If you want to changes the standard settings or implement further functions then you also have to include the ALV Configuration Model along with the procedure just described.
1. You get the ALV Configuration Model in a method in the Component Controller. For more information: Getting the ALV Configuration Model [Page 12]
The following sections contain the different procedures for designing the ALV:
Configuring Standard ALV Functions
Managing ALV Display Areas [Page 39]
Defining the Appearance of the ALV Display [Page 55]
Providing Application-Specific Functions [Page 68]
Handling Interaction [Page 74]
Providing Help for Users [Page 89]
You can find the basic sample component WDT_ALV in your system in package SWDP_DEMO, subpackage SWDP_DEMO_TUTORIALS.

SAP List Viewer in Web Dynpro ABAP
SAP COMMUNITY NETWORK SDN - sdn.sap.com | BPX - bpx.sap.com | BOC - boc.sap.com | UAC - uac.sap.com
© 2010 SAP AG 6
Integrating ALV into your Web Dynpro Application
SAP List Viewer (ALV) is available to you as a Web Dynpro component which you can integrate into a Web Dynpro component of your application.
You can embed the ALV into your Web Dynpro component like any other Web Dynpro component however there are a few things to take into consideration.
Prerequisites
You must have exeucted the following (ALV-independent) steps:
You have created a Web Dynpro component for your application and saved it actively
You have created a context node with the cardinality 0..n. The structure of the attributes in this
context node (name and data type) matches those in the internal data table that you connect to this context node.
Process
1. Define a component usage so that the ALV component (SALV_WD_TABLE) is available to you.
For more information: Defining ALV Component Usage [Page 6]
2. You map the data of your Web Dynpro component with the context node DATA of the ALV component.
For more information: Providing Data [Page 7]
3. You embed the TABLE view of ALV component into an appropriate position in one of your views.
For more information: Embedding ALV Views [Page 8]
You can use the ALV now with its standard settings but you do not have any further configuration options.
1. To be able to configure the ALV, use the ALV Configuration Model.
For more information: Getting the ALV Configuration Model [Page 12]
Defining ALV Component Usage
To use an ALV output in your application, use the component SALV_WD_TABLE. You can include this ALV component in your Web Dynpro component. You define a Component Usage for this.
The ALV Component Usage provides you with the Interface Controller SALV_WD_TABLE of the ALV component. You can use this to:
map the data of your context with the context node DATA of the ALV component.
use the methods and events of the Interface Controller.
For more information, read the Interface Controller documentation on SALV_WD_TABLE in your
system.

SAP List Viewer in Web Dynpro ABAP
SAP COMMUNITY NETWORK SDN - sdn.sap.com | BPX - bpx.sap.com | BOC - boc.sap.com | UAC - uac.sap.com
© 2010 SAP AG 7
Accessing the ALV configuration model.
If you want to display multiple different ALV outputs, distinguish between these outputs by using unique names for the respective usage variants of the component.
Procedure
1. Select your Web Dynpro component and switch to the Used Components tab page.
2. Create a new component usage - for example with the name MY_ALV_COMP_USAGE - select
SALV_WD_TABLE as the component and save. 3. Now switch to the COMPONENTCONTROLLER of your Web Dynpro component and the Properties
tab page and create a new Component Usage (Creating Controller Usage). 4. A further entry for the INTERFACECONTROLLER is provided for the Component Usage
(MY_ALV_COMP_USAGE). Select this and confirm. The Component Usage is now created automatically.
You can also create the INTERFACECONTROLLER usage directly in the View Controller of the view where you want to display the ALV.
Result
Your Component Usage now looks like this:
(Defining the Result of the ALV Component Usage Procedure)
Providing Data for ALV Display
To provide the data that you want to display in the ALV display, you must connect the context node of your application (the one that contains the data for the table output) with the DATA context node of the ALV component. This takes place using External Context Mapping.
In the context of the ALV component, context node DATA only contains a reference to the corresponding context node of your application. This in turn is a reference to the internal data table.
By default, the ALV component works with your reference to the data. Filters, calculations, and other standard ALV functions are executed on the data by various mechanisms, and the changed ALV display is then shown on the screen.
Important Exception: Sorting
Here ALV has to use the entire dataset so that the data records can be arranged in the new order. For this purpose, the ALV component temporarily takes control of the internal data table and invalidates the corresponding context node of your application during this time. This ensures that the application cannot access the context node while the ALV component is editing the internal data table.
Once the internal data table has been resorted, ALV rebuilds the context node, releases it again for the application, and displays the data accordingly.
SAP List Viewer in Web Dynpro ABAP
SAP COMMUNITY NETWORK SDN - sdn.sap.com | BPX - bpx.sap.com | BOC - boc.sap.com | UAC - uac.sap.com
© 2010 SAP AG 8
This ensures that the internal data table is never copied. This is important because large volumes of data would considerably impact performance and memory space.
When you are planning your application, note the following side-effects of this mechanism:
When the context node is invalidated, information about current selections, and in particular the lead selection, is lost.
If your application has created subnodes for the context node (master-detail scenario), these subnodes are lost as soon as the ALV component invalidates the context node. If the application then tries to access the subnodes, a runtime error occurs.
Prerequisites
The context node that contains the data for the ALV must be constructed as follows:
It has the cardinality 0..n.
It only contains attributes and no subnodes: For each column of your internal data table, you create exactly one attribute of the same name and data type.
All the attributes are static, not dynamic.
The data of the internal data table (which is connected to this context node) must also exist in flat structures. The easiest way to do this is to use an existing DDIC structure.
Procedure
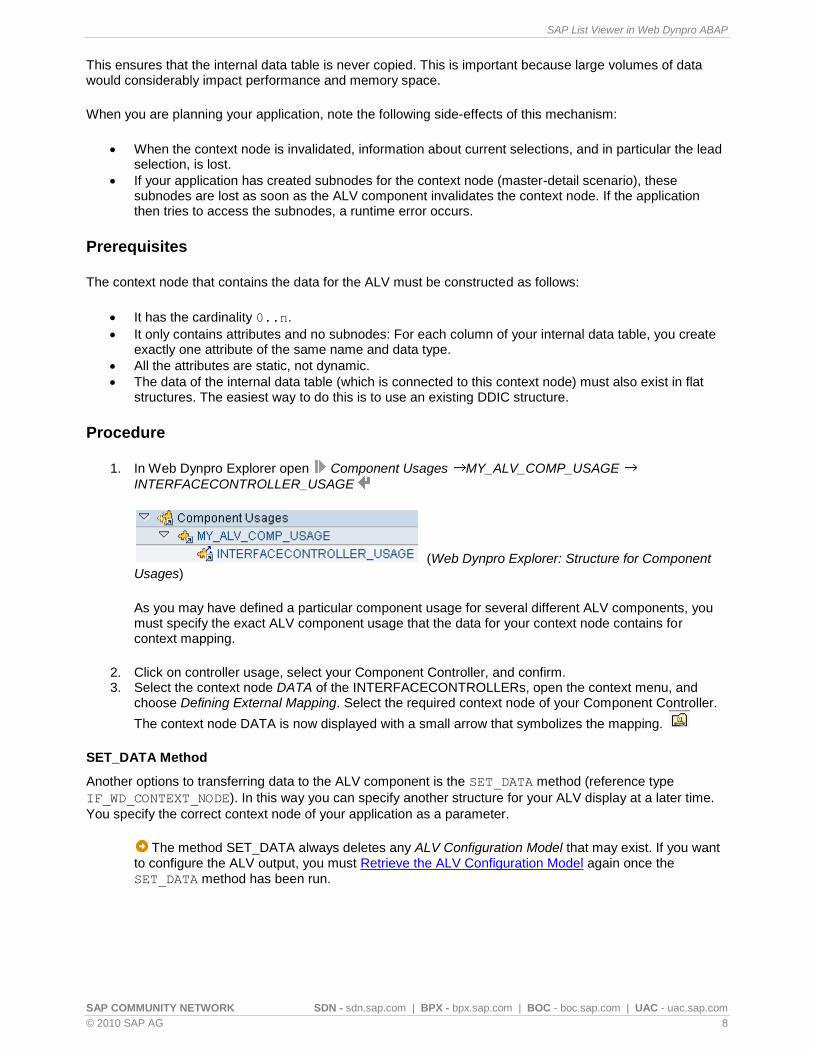
1. In Web Dynpro Explorer open Component Usages MY_ALV_COMP_USAGE
INTERFACECONTROLLER_USAGE
(Web Dynpro Explorer: Structure for Component Usages)
As you may have defined a particular component usage for several different ALV components, you must specify the exact ALV component usage that the data for your context node contains for context mapping.
2. Click on controller usage, select your Component Controller, and confirm. 3. Select the context node DATA of the INTERFACECONTROLLERs, open the context menu, and
choose Defining External Mapping. Select the required context node of your Component Controller.
The context node DATA is now displayed with a small arrow that symbolizes the mapping.
SET_DATA Method
Another options to transferring data to the ALV component is the SET_DATA method (reference type
IF_WD_CONTEXT_NODE). In this way you can specify another structure for your ALV display at a later time.
You specify the correct context node of your application as a parameter.
The method SET_DATA always deletes any ALV Configuration Model that may exist. If you want to configure the ALV output, you must Retrieve the ALV Configuration Model again once the
SET_DATA method has been run.

SAP List Viewer in Web Dynpro ABAP
SAP COMMUNITY NETWORK SDN - sdn.sap.com | BPX - bpx.sap.com | BOC - boc.sap.com | UAC - uac.sap.com
© 2010 SAP AG 9
Embedding ALV Views
The ALV component contains the following views:
TABLE
This is the central ALV view. To display the ALV display, you require this view.
The TABLE view is the container in which the ALV display is shown. It is a fundamental part of the ALV component. You cannot, therefore, change the layout.
SERVICE
This view contains the Settings dialog box with which the user can make changes to the settings for column display, sorting, filtering, and so on.
By default, the view is displayed above the ALV display when the user chooses the Settings hyperlink in the toolbar. You use this view when you want to display the dialog box in another position on the same window.
If you want to display the settings dialog in a window of your own then you can configure it using the ALV Configuration Model without having to include the SERVICE view specially.
For more information: Defining the Positioning of the Settings Dialog Box [Page 54]
CONTROL_VIEW
You cannot use this view, it is only for internal SAP use for implicit personalization.
Procedure
Include an ALV view in the TABLE example
You require the TABLE view if you want to display an ALV display in your application.
1. Add a UI element of type ViewContainerUIElement in the required position on one of your views. 2. Navigate to the window where this view is embedded and open the structure as far as the
ViewContainerUIElement that was just created. 3. Select this element, open the context menu, and select Embed View. 4. Choose TABLE from the SALV_WD_TABLE component and confirm. The embedded view is now
displayed in your window.
SAP List Viewer in Web Dynpro ABAP
SAP COMMUNITY NETWORK SDN - sdn.sap.com | BPX - bpx.sap.com | BOC - boc.sap.com | UAC - uac.sap.com
© 2010 SAP AG 10
Configuring Dynamically with ALV Configuration Model
If you have included the ALV component in your Web Dynpro component you can now make use of the full functionality of the SAP List Viewer with the ALV Configuration Model.
Prerequisites
To be also to use the ALV Configuration Model you must have included the ALV component in your Web Dynpro component.
You must implement the coding in a relevant method depending on whether you want to call the model in the View Controller or the Component Controller.
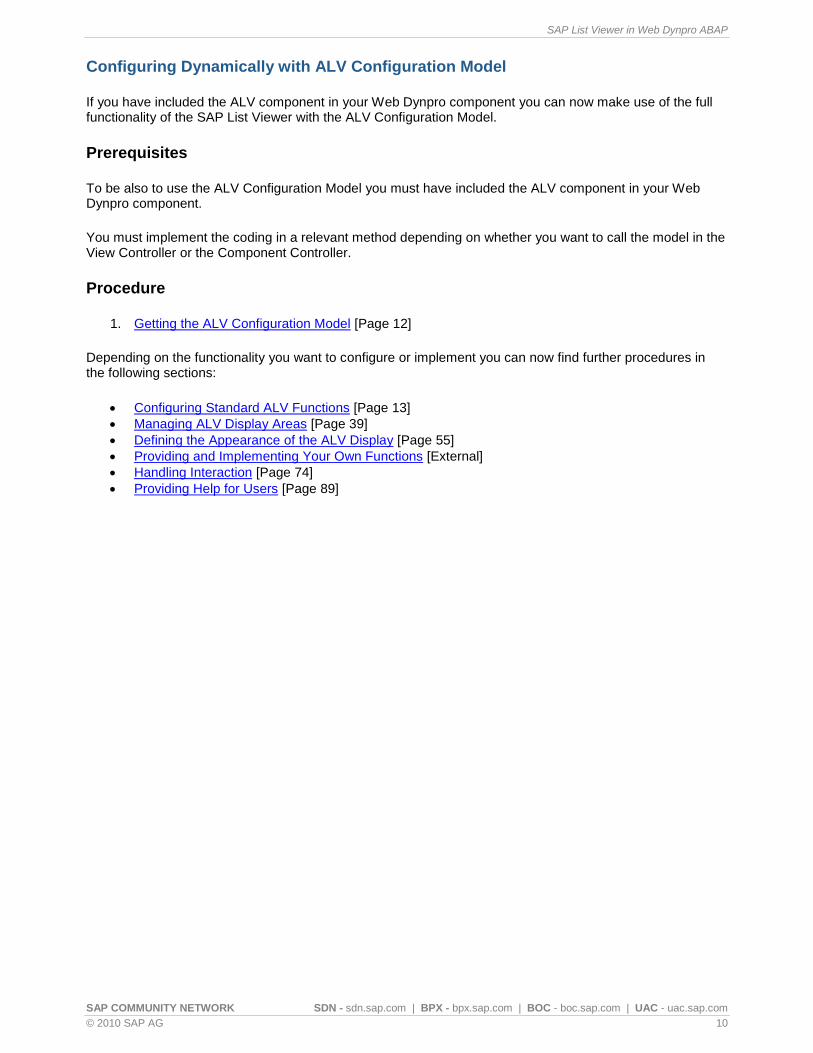
Procedure
1. Getting the ALV Configuration Model [Page 12]
Depending on the functionality you want to configure or implement you can now find further procedures in the following sections:
Configuring Standard ALV Functions [Page 13]
Managing ALV Display Areas [Page 39]
Defining the Appearance of the ALV Display [Page 55]
Providing and Implementing Your Own Functions [External]
Handling Interaction [Page 74]
Providing Help for Users [Page 89]

SAP List Viewer in Web Dynpro ABAP
SAP COMMUNITY NETWORK SDN - sdn.sap.com | BPX - bpx.sap.com | BOC - boc.sap.com | UAC - uac.sap.com
© 2010 SAP AG 11
Objects of the ALV Configuration Model
The object model for the ALV configuration model consists of the following classes and interfaces:
This class diagram has been simplified. You can find the exact structures in the system in
package SALV_WD_CONFIG.
The following main areas are available for configuring your ALV display:
Table Settings (IF_SALV_WD_TABLE_SETTINGS)
The data for the Table UI element includes the structure of the application data as well as the technical fields that determine the appearance or function of the ALV display. You can define, for example, whether the ALV display is to be displayed with a simple, two-dimensional table or as a hierarchy with a leading hierarchy column.
Column Settings (IF_SALV_WD_COLUMNS_SETTINGS)
The column objects are visible elements that define the ALV display. The columns have the same names as the corresponding field objects and attributes in the context node. The column object contains settings as to whether and how the data for the field of the same name is displayed in the ALV display. If you do not want to display the values of the field, you can delete the corresponding column object.
You use the column settings to manage a list of all the column objects (the columns for the Table UI elements).
Field Settings (IF_SALV_WD_FIELD_SETTINGS)

SAP List Viewer in Web Dynpro ABAP
SAP COMMUNITY NETWORK SDN - sdn.sap.com | BPX - bpx.sap.com | BOC - boc.sap.com | UAC - uac.sap.com
© 2010 SAP AG 12
The fields describe the data that is used in the ALV display. The name of a field matches the name of an attribute in the context node: All fields objects are automatically created from the specifications you made for the attributes in the context node. As a result, every attribute in the context node has a representative with the same name in the ALV Configuration Model.
By connecting the internal data table to the context node you fulfill all the prerequisites to start your application with ALV. You can sort the data with statements from your application, filter it, or perform applications. All these functions (ALV services) are essentially field object methods. You cannot, however, display the data yet. To do this, you need columns.
ALV Standard Functions Settings (IF_SALV_WD_STD_FUNCTIONS)
ALV provides a number of functions. The following list shows the most important of these standard ALV functions:
o ALV services: Sorting, filtering, aggregating (calculations), as well as the option to make all the necessary settings for these services.
o Settings you can provide for editable ALV display, such as inserting and deleting rows. o Exporting the ALV display to Microsoft Excel or generating a print version in PDF format.
All these standard functions are accessible using the relevant UI elements. You can hide or show these UI elements by using the standard function settings.
Settings for Application-Specific Functions (IF_SALV_WD_FUNCTION_SETTINGS)
You can define as many functions as you want in your application and provide suitable UI elements to the user with which he or she can then run these functions.
Getting the ALV Configuration Model
To make the ALV configuration model available, you use, for example, a method from class IWCI_SALV_WD_TABLE in WDDOINIT. You choose one of the following methods:
GET_MODEL
You get a complete ALV Configuration Model with all column objects and all field objects. This is the default variant. The method does not have any parameters.
GET_MODEL_EXTENDED
The system returns all field objects (as above), but only returns column objects when required. If, for example, you want to manage a large number of field objects but you only want to display a few columns, create the field objects first and later generate the column objects you require to display the content.
Parameter S_PARAM of method GET_MODEL_EXTENDED consists of the field DEFAULT_COLUMNS.
This enables you to specify whether the column objects are to be generated or not.

SAP List Viewer in Web Dynpro ABAP
SAP COMMUNITY NETWORK SDN - sdn.sap.com | BPX - bpx.sap.com | BOC - boc.sap.com | UAC - uac.sap.com
© 2010 SAP AG 13
You can specify a new internal data table for the ALV display at a later stage. Use method
SET_DATA of the Interface Controller for this. However, by using this method you also automatically
delete the entire ALV configuration model with all fields and column objects. To make the
configuration model available again to the new data table, use method GET_MODEL or method
GET_MODEL_EXTENDED.
Procedure
To be able to user the ALV Configuration Model you must initiate the ALV Component explicitly.
1. At a suitable point in your coding (for example in method WDDOINIT of your Component Controller)
open the Web Dynpro Code Wizard and choose Instantiate Used Component on the General tab.
2. Select the required component usage of SALV_WD_TABLE (for example: MY_ALV_COMP_USAGE)
and confirm.
The following coding is added to your method:
data lo_cmp_usage type ref to if_wd_component_usage.
lo_cmp_usage = wd_this->wd_cpuse_my_alv_comp_usage( ).
if lo_cmp_usage->has_active_component( ) is initial.
lo_cmp_usage->create_component( ).
endif.
3. Open the Web Dynpro Code Wizard again and select Method Call in Used Controller. 4. Select the INTERFACECONTROLLER of your ALV Component Usage and choose the rrequired
method, for example, GET_MODEL.
The following coding is added to your method:
DATA lo_INTERFACECONTROLLER TYPE REF TO IWCI_SALV_WD_TABLE.
lo_INTERFACECONTROLLER = wd_this->wd_cpifc_my_alv_comp_usage( ).
DATA lv_value TYPE ref to cl_salv_wd_config_table.
lv_value = lo_interfacecontroller->get_model( ).
5. Now you can access the different interfaces of the ALV Configuration Model.
To be able to activate the standard function for displaying the table as a hierarchy, call:
lv_value->IF_SALV_WD_STD_FUNCTIONS~SET_HIERARCHY_ALLOWED( ).

SAP List Viewer in Web Dynpro ABAP
SAP COMMUNITY NETWORK SDN - sdn.sap.com | BPX - bpx.sap.com | BOC - boc.sap.com | UAC - uac.sap.com
© 2010 SAP AG 14
Configuring Standard ALV Functions
You can use your application to predefine how the ALV display is displayed on the screen when the user calls the application up. This relates to the data itself, as well as to design aspects, so you can affect the manner in which the data is arranged in the table. The functions are:
Procedure
Sorting
Filters
Calculating (Aggregation)
Specifying the Initial View of Applications [Page 27]
Exporting
Print Version in PDF Format [Page 32]
For information on the design possibilities available to you in the ALV display, see Defining Appearance of ALV Display.
Standard Functions of ALV and Presettings
The ALV offers a wide-range of standard functions. Some of the functions are initially activated and you can
activate or deactivate some in Customizing (transaction code SIMGH) for SAP Web Application Server under
SAP List Viewer (ALV) Maintain Web Dynpro ABAP-Specific Settings .
You need the ALV Configuration Model to preset standard functions and for all other configuration options.
Standard Functions Initially Activated
Function Configuration + Customizing
Interface Methods IF_SALV_WD_STD_FUNCTIONS
Visualization for User
Sorting
The ALV display is initially not sorted, the user can sort both using the column title and in the settings dialog box.
SET_SORT_COMPLEX_ALLOWED
SET_SORT_HEADERCLICK_ALLOWED
Sorting tab page in settings dialog box
Sorting using the symbol in the column title
Filters
SET_FILTER_COMPLEX_ALLOWED
SET_FILTER_FILTERLINE_ALLOWED
Filters tab page in settings dialog box
Displaying filter sequence using a button
Print with PDF
Printing is only possible when there is a Java server. Can be deactivated in Customizing.
SET_PDF_ALLOWED
Print Version tab page in settings dialog box
Print Version button in the toolbar
Export to Excel
Preferred format for table calculation can be set in Customizing
SET_EXPORT_ALLOWED Entry Export to Excel in button menu Export

SAP List Viewer in Web Dynpro ABAP
SAP COMMUNITY NETWORK SDN - sdn.sap.com | BPX - bpx.sap.com | BOC - boc.sap.com | UAC - uac.sap.com
© 2010 SAP AG 15
Function Configuration + Customizing
Interface Methods IF_SALV_WD_STD_FUNCTIONS
Visualization for User
List Display with Crystal Reports
Can be activated and deactivated in Customizing. If it is activated there then it cannot be deactivated in the program.
Methods for permitting the display inplace:
SET_CR_INPLACE_ALLOWED
Crystal Reports entry in the Display tab.
Configuring Personalization Options
Visibility of the Settings Dialog Box
If the settings dialog box is blocked for the user, then the other personalization options are not visible for the user, even if you have activated it.
SET_DIALOG_SETTINGS_ALLOWED
Visibility of the button that makes it possible to display the settings dialog box.
Personalization of the Column Display
SET_COLUMN_SELECTION_ALLOWED Column Selection tab page
Personalization of View SET_DISPLAY_SETTINGS_ALLOWED Display tab page
Save and Select View by User
SET_VIEW_LIST_ALLOWED
Dropdown list box for selecting a View
Save as... button in the settings dialog box
Standard Functions Initially Deactivated
The following functions are not available in the standard setting: They can either be activated in Customizing or using ALV Configuration Model.
Function Configuration + Customizing Methods/Interfaces in ALV
Configuration Model Visualization for
User
Editability Handling Interaction in Editable ALV [Page 79]
Methods for canceling read-only protection:
IF_SALV_WD_TABLE_SETTI
NGS~SET_READ_ONLY
Calculation
Calculating (Aggregation) [Page 22]
IF_SALV_WD_STD_FUNCTIO
NS~SET_AGGREGATION_ALL
OWED Calculation tab page
Modeling Areas
The modeling areas above and below the table are initially visible but are not defined. You can implement these areas.
Header and Footer Areas [Page 49]
IF_SALV_WD_TABLE_SETTI
NGS~SET_TOP_OF_LIST_VI
SIBLE
IF_SALV_WD_TABLE_SETTI
NGS~SET_END_OF_LIST_VI
No settings options

SAP List Viewer in Web Dynpro ABAP
SAP COMMUNITY NETWORK SDN - sdn.sap.com | BPX - bpx.sap.com | BOC - boc.sap.com | UAC - uac.sap.com
© 2010 SAP AG 16
Function Configuration + Customizing Methods/Interfaces in ALV
Configuration Model Visualization for
User
SIBLE
Display as Business Graphic
Prerequisites: Java server must be available: Can be deactivated in Customizing
Table Data as Business Graphic [Page 64]
IF_SALV_WD_STD_FUNCTIO
NS~SET_GRAPHIC_ALLOWED Graphic settings on Display tab
Export to BEx Analyzer
Can be activated in Customizing and then needs to be permitted in the program.
IF_SALV_WD_STD_FUNCTIO
NS~BEX_ANALYZER_ALLOWE
D
Entry BEx Analyzer in dropdown listbox Export
BI Broadcasting
IF_SALV_WD_STD_FUNCTIO
NS~BI_BROADCASTING_ALL
OWED
Send button in the toolbar
Display Table as Hierarchy
IF_SALV_WD_STD_FUNCTIO
NS~SET_HIERARCHY_ALLOW
ED
Hierarchy check box and dialog box for defining the hierarchy columns on the Display tab.
Row Number Display
IF_SALV_WD_STD_FUNCTIO
NS~SET_COUNT_RECORDS_A
LLOWED
Count Table Entries check box on Calculation tab.
Configuring Personalization Options
Selecting the table view as a graphic or Crystal Report.
The dropdown list box is not visible for the user if either graphic and/or Crystal Reports are activated, even when you activate this function.
IF_SALV_WD_STD_FUNCT
IONS~SET_DISPLAY_AS_
ALLOWED
Dropdown List Box for Selecting Display
Fixing Columns to Right and Left Table Side
SET_FIXED_COLS_LEFT_
ALLOWESET_FIXED_COLS
_RIGHT_ALLOWED
Defining number of fixed columns on Column Selection tab.
Sorting
You can change the sequence of data records according to specific rules by sorting the ALV output. You specify which fields contain the values that are to be sorted alphabetically or numerically, and that therefore determine the sequence of all rows.
You can make the following settings for sorting:
Create, get, and delete sort settings (sort conditions)
Specify sort direction and sort order
Group values that are the same
Disallow sorting for a field
Enable sorting by clicking a column header
Sort a field using the values of another field
Hiding and showing tabs for sorting
SAP List Viewer in Web Dynpro ABAP
SAP COMMUNITY NETWORK SDN - sdn.sap.com | BPX - bpx.sap.com | BOC - boc.sap.com | UAC - uac.sap.com
© 2010 SAP AG 17
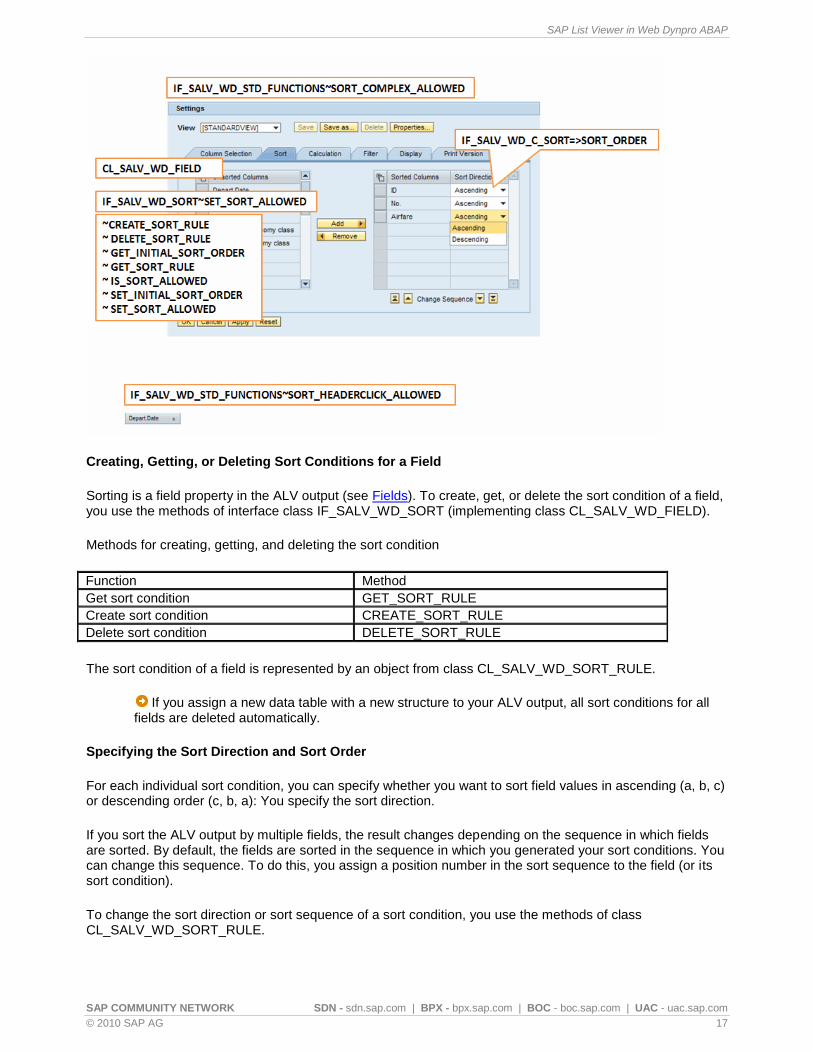
Creating, Getting, or Deleting Sort Conditions for a Field
Sorting is a field property in the ALV output (see Fields). To create, get, or delete the sort condition of a field, you use the methods of interface class IF_SALV_WD_SORT (implementing class CL_SALV_WD_FIELD).
Methods for creating, getting, and deleting the sort condition
Function Method
Get sort condition GET_SORT_RULE
Create sort condition CREATE_SORT_RULE
Delete sort condition DELETE_SORT_RULE
The sort condition of a field is represented by an object from class CL_SALV_WD_SORT_RULE.
If you assign a new data table with a new structure to your ALV output, all sort conditions for all fields are deleted automatically.
Specifying the Sort Direction and Sort Order
For each individual sort condition, you can specify whether you want to sort field values in ascending (a, b, c) or descending order (c, b, a): You specify the sort direction.
If you sort the ALV output by multiple fields, the result changes depending on the sequence in which fields are sorted. By default, the fields are sorted in the sequence in which you generated your sort conditions. You can change this sequence. To do this, you assign a position number in the sort sequence to the field (or its sort condition).
To change the sort direction or sort sequence of a sort condition, you use the methods of class CL_SALV_WD_SORT_RULE.

SAP List Viewer in Web Dynpro ABAP
SAP COMMUNITY NETWORK SDN - sdn.sap.com | BPX - bpx.sap.com | BOC - boc.sap.com | UAC - uac.sap.com
© 2010 SAP AG 18
Methods for the sort direction and sort sequence
Function Method
Specify sort direction SET_SORT_ORDER
Get sort direction GET_SORT_ORDER
Specify position of field within sort order SET_SORT_POSITION
Get position of field within sort order GET_SORT_POSITION
You can also specify the preferred sort direction for the field when the user sorts the corresponding column.
To define the desired sort direction for a field, you use the methods of interface class IF_SALV_WD_SORT (implementing class CL_SALV_WD_FIELD).
Method for the preferred sort direction
Function Method
Specifying Preferred Sort Direction SET_INITIAL_SORT_ORDER
Getting the Sort Direction GET_INITIAL_SORT_ORDER
Group values that are the same
By default, values that are the same are combined in a sorted field in a sorted ALV output. The values are grouped. You can specify that a value is to appear in each row, even if this value does not change. To do this, you use the methods of interface class IF_SALV_WD_SORT (implementing class CL_SALV_WD_FIELD).
Methods for Grouping Sorted Values
Function Method
Group values/remove grouping SET_GROUPING_ALLOWED
Check whether values are grouped IS_GROUPING_ALLOWED
Disallow sorting for a field
You can explicitly disallow sorting for a field. This has the following effects:
The relevant field is no longer displayed on the Sorting tab page of the Settings dialog box.
If you allow users to sort columns by clicking column headers (see below), the function is not available for the column for which you have disallowed sorting; the arrow icons are hidden.
If you defined a sort condition for this field in your application, this sort condition has no effect on the ALV output.
To disallow sorting for a field, you use the methods of interface class IF_SALV_WD_SORT (implementing class CL_SALV_WD_FIELD).
Methods for Forbidding Sorting
Function Method
Disallow sorting SET_SORT_ALLOWED
Check whether sorting is allowed IS_SORT_ALLOWED

SAP List Viewer in Web Dynpro ABAP
SAP COMMUNITY NETWORK SDN - sdn.sap.com | BPX - bpx.sap.com | BOC - boc.sap.com | UAC - uac.sap.com
© 2010 SAP AG 19
Enable sorting by clicking a column header
You can display small arrow icons in the column headers of the ALV output. Users can use these arrow icons to sort the columns in ascending or descending order.
You can also specify whether users can sort by just one column, or whether they can sort by multiple columns by using the CRTL key.
To enable users to sort by clicking a column header, you use the methods of interface class IF_SALV_WD_STD_FUNCTIONS (implementing class CL_SALV_WD_CONFIG_TABLE).
Methods for Sorting by Clicking a Column Header
Function Method
Show arrow icons in column headers SET_SORT_HEADERCLICK_ALLOWED
Check whether arrow icons are shown in column headers
IS_SORT_HEADERCLICK_ALLOWED
To enable users to sort multiple columns by clicking column headers, you use the methods of interface class F_SALV_WD_TABLE_SETTINGS (implementing class CL_SALV_WD_CONFIG_TABLE).
Methods for Sorting Multiple Columns by Clicking Column Headers
Function Method
Enable sorting for multiple columns SET_MULTI_COLUMN_SORT
Check whether sorting by multiple columns is allowed GET_MULTI_COLUMN_SORT
Sort a field using the values of another field
You can specify a field using which the current field is to be sorted if the field itself does not return the required result. To do this, you use the methods of interface class IF_SALV_WD_COLUMN_SERVICE_REF (implementing class CL_SALV_WD_COLUMN).
Methods for Sorting Using the Values of Another Field
Function Method
Specify field name of another field SET_SORT_FIELDNAME
Get field name of another field GET_SORT_FIELDNAME
Filters
Using filters, you restrict the display of data records in the ALV output. To do this, you specify conditions that a record in a specific field has to fulfill to be displayed or filtered out.
You can make the following settings for filter objects:
Create, get, or delete filter conditions for a field
Make settings for a filter condition
Ignore capitalization
Disallow filters for a column
Filter by the values of another field

SAP List Viewer in Web Dynpro ABAP
SAP COMMUNITY NETWORK SDN - sdn.sap.com | BPX - bpx.sap.com | BOC - boc.sap.com | UAC - uac.sap.com
© 2010 SAP AG 20
Hiding and showing the tab page for filtering or Filter oushbutton in the toolbar
Creatting, Getting, or Deleting Filter Conditions for a Field
Unlike a sort condition, you can create any number of filter conditions for each field.
You can create a filter condition only for columns for which you have not explicitly disallowed this (see below).
Filtering is a property of a field in the ALV output (see Fields [Page 40]). To create, get, or delete the filter condition of a field, use the methods of interface class IF_SALV_WD_FILTER (implementing class CL_SALV_WD_FIELD).
Methods for creating, getting, and deleting filter conditions
Function Method
Get a specific filter condition GET_FILTER_RULE
Get all filter conditions of a field GET_FILTER_RULES
Create filter conditions CREATE_FILTER_RULE
Delete a specific filter condition DELETE_FILTER_RULE
Delete all filter conditions of a field DELETE_FILTER_RULES
The filter condition of a field is represented by an object of class CL_SALV_WD_FILTER_RULE.
If you assign a new data table with a new structure to your ALV output, all filter conditions for all fields are deleted automatically.
Make Settings for a Filter Condition
A filter condition consists of the following specifications:
Comparison value for which the rows are checked
This can be an individual value or a range for the given value. You always enter the lower value (LOW_VALUE), and for a range, you also enter an upper value (HIGH_VALUE).
Operator for comparing the field value and the comparison value
Using this specification (OPERATOR), you specify the relationship between the cell value and the comparison value (for example, greater than, less than, or equal to)
Inclusion or exclusion
Using this specification, you specify whether rows that match the condition are displayed, or whether they are not to be displayed at the moment.
To change settings for a filter condition, use the methods of class CL_SALV_WD_FILTER_RULE.
Methods for settings for a filter condition
Function Method
Specify comparison value (lower value) SET_LOW_VALUE
Get comparison value (lower value) GET_LOW_VALUE

SAP List Viewer in Web Dynpro ABAP
SAP COMMUNITY NETWORK SDN - sdn.sap.com | BPX - bpx.sap.com | BOC - boc.sap.com | UAC - uac.sap.com
© 2010 SAP AG 21
Specify upper value of comparison range SET_HIGH_VALUE
Get upper value of comparison range GET_HIGH_VALUE
Specify operator SET_OPERATOR
Get operator GET_OPERATOR
Specify inclusion or exclusion SET_INCLUDED
Get inclusion or exclusion GET_INCLUDED
Ignoring the Capitalization
By default, the filter takes capitalization into account when searching for data records that fulfill the filter conditions. When you enter the comparison value, you must therefore enter the value with exactly the right capitalization to obtain the required results.
You can make a setting so that the filter ignores the capitalization. To do this, you use the methods of interface class IF_SALV_WD_FIELD_SETTINGS (implementing class CL_SALV_WD_CONFIG_TABLE).
Methods for capitalization
Function Method
Ignore capitalization SET_FILTER_IGNORING_CASE
Check whether capitalization is ignored IS_FILTER_IGNORING_CASE
Disallowing Filters for a Column
You can explicitly disallow filters for a field. This has the following effects:
If an ALV output is filtered, a filter row is automatically displayed in which you can see the filters currently set for each column. The user can quickly enter a filter here.
If you disallow filtering for a field, the corresponding cell in the filter row is empty and cannot be filled.
In the Settings dialog box, on the Filters tab page, the corresponding column is not longer available.
If you defined a filter condition for this field in your application, the filter in the ALV output has no effect.
To disallow filtering for a field, use the methods of interface class IF_SALV_WD_FILTER (implementing class CL_SALV_WD_FIELD).
Methods for disallowing filtering
Function Method
Disallow filtering for a field SET_FILTER_ALLOWED
Check whether filtering is allowed IS_FILTER_ALLOWED
Filtering by the Values of Another Field
You can specify a field according to which the current field is to be filtered if the field does not return the required result or requires overly complicated input. To do this, you use the methods of interface class IF_SALV_WD_COLUMN_SERVICE_REF (implementing class CL_SALV_WD_COLUMN).
Methods for filtering using the values of another field
Function Method
Specify field name of another field SET_FILTER_FIELDNAME
Get field name of another field GET_FILTER_FIELDNAME

SAP List Viewer in Web Dynpro ABAP
SAP COMMUNITY NETWORK SDN - sdn.sap.com | BPX - bpx.sap.com | BOC - boc.sap.com | UAC - uac.sap.com
© 2010 SAP AG 22
Calculating (Aggregation)
You can perform calculations in fields that have a numeric data type. You generate an aggregation condition. The result of the calculation is then displayed in a separate results row.
Intermediate Results
Usually all values in a field are used in the calculation when you perform aggregation. You can also obtain intermediate results. To do this you have to sort the ALV output and group the rows that you want to use for the interim result (see Sorting).
You can make the following settings for aggregations:
Create, get, and delete functions
Make settings for aggregation (see Settings for Aggregation)
Generate intermediate results (see Intermediate Results)
Hiding and showing interface elements for calculations or subtotals
Creating, Getting, and Deleting Functions
You are able to create a maximum of one aggregation rule for a field. Aggregation is a property of a field in the ALV output. To create, get, or delete the aggregation rule of a field, use the methods of interface class IF_SALV_WD_AGGR (implementing class CL_SALV_WD_FIELD).
Methods for creating, getting, and deleting the aggregation rule
Function Method
Get aggregation rule GET_AGGR_RULE
Create aggregation condition CREATE_AGGR_RULE
Delete aggregation rule DELETE_AGGR_RULE
The aggregation rule of a field is represented by an object of class CL_SALV_WD_AGGR_RULE.
If you assign a new data table with a new structure to your ALV output, all aggregation rules for all fields are deleted automatically.
Presettings for Calculations
The ALV standard function calculations displayed to the user using a tab page in the settings dialog is initially
deactivated. You can activate it using IF_SALV_WD_STD_FUNCTIONS~SET_AGGREGATION_ALLOWED.
There is also the options to show subtotals and to define the calculation type.
The display of the number of table rows can also be controlled here.

SAP List Viewer in Web Dynpro ABAP
SAP COMMUNITY NETWORK SDN - sdn.sap.com | BPX - bpx.sap.com | BOC - boc.sap.com | UAC - uac.sap.com
© 2010 SAP AG 23
Calculation
Read the system documentation for IF_SALV_WD_STD_FUNCTIONS and
IF_SALV_WD_FIELD_SETTINGS in package SALV_WD_CONFIG.
Settings for Aggregation
You are able to make the following settings for the calculation of field values:
Specify aggregation types
Specify the position of the results row
Disallow aggregation for a field
Specifying Aggregation Types
The following calculation (aggregation) types are available:
Total Adds together all values of the field
Minimum Determines the lowest value of the field
Maximum Determines the highest value of the field

SAP List Viewer in Web Dynpro ABAP
SAP COMMUNITY NETWORK SDN - sdn.sap.com | BPX - bpx.sap.com | BOC - boc.sap.com | UAC - uac.sap.com
© 2010 SAP AG 24
Mean value Determines the geometric average of all values of the field
To define the calculation type, use methods of class CL_SALV_WD_AGGR_RULE.
Methods for changing the calculation type
Function Method
Specify calculation type SET_AGGREGATION_TYPE
Get calculation type GET_AGGREGATION_TYPE
In addition to the calculation types listed above, you can also determine the total number of data records. The result is displayed in the results row in the first available column. Because this setting affects the entire ALV output, you use methods of interface class IF_SALV_WD_FIELD_SETTINGS (implementing class CL_SALV_WD_CONFIG_TABLE).
Methods for displaying the data records of a result
Function Method
Display the number of data records SET_COUNT_RECORDS_ENABLED
Check whether the number of data records is displayed IS_COUNT_RECORDS_ENABLED
Specifying the Position of Results Rows
You are able to define whether you wish to display the results row for the calculations in an ALV output above or below the rows that are included in the calculation. To do this, you use the methods of interface class IF_SALV_WD_FIELD_SETTINGS (implementing class CL_SALV_WD_CONFIG_TABLE).
Methods relating to the position of the results row
Function Method
Place results row before data records SET_AGGR_BEFORE_ITEMS
Check whether the results row is placed before the data records
IS_AGGR_BEFORE_ITEMS
Disallowing Aggregation for a Field
By default, all fields with a numeric data type can be aggregated. You can disallow the aggregation of a field, if required. This has the following effects:
The column in question is no longer available on the Calculation tab of the Settings dialog box.
If you have defined an aggregation rule for this field in your application, the calculation is not carried out.
To forbid the aggregation of a field, use the methods of interface class IF_SALV_WD_AGGR (implementing class CL_SALV_WD_FIELD).
Methods for forbidding aggregation
Function Method
Forbid aggregation SET_AGGREGATION_ALLOWED
Check whether aggregation is allowed IS_AGGREGATION_ALLOWED

SAP List Viewer in Web Dynpro ABAP
SAP COMMUNITY NETWORK SDN - sdn.sap.com | BPX - bpx.sap.com | BOC - boc.sap.com | UAC - uac.sap.com
© 2010 SAP AG 25
Intermediate Results
By default, all values in a field are used in the calculation during aggregation. However, you can also generate intermediate results. When you do this, you group together data records containing the values for an intermediate result and display the intermediate result in a separate results row.
To generate intermediate results, you have to make certain settings:
To specify which field contains the values that you want to use to calculate the intermediate results, you create an aggregation condition for the relevant field. The overall result is displayed in the results row.
To specify which data records are to be included in an intermediate result, you group together the data records: You sort the ALV output by the field that contains the criterion for the intermediate result.
To generate the intermediate results, you use the field that contains the criterion to calculate the intermediate results.
To display the intermediate results, you switch on the display for the intermediate results.
If internediate results need more than one row, for example, because they are displayed for different currencies, and you have defined the table to be displayed hierarchically then the intermediate results cannot be displayed.
With intermediate results, you can:
Generate intermediate results
Display intermediate results
Specifying Levels for Drilling Down Intermediate Results
Set the position of the results rows (see Settings for Aggregation)
Disallow generation of intermediate results
Prerequisites
You have created an aggregation condition for at least one field that can be aggregated.
The field with the criterion for intermediate results cannot be aggregated and has an alphanumeric data type.
Generating Intermediate Results
To generate intermediate results in a field that already has an aggregation condition, you generate a sort condition for the field of a column (another column) (see Sorting).
In this sort condition, you specify whether intermediate results are to be generated. To do this, you use the methods of class CL_SALV_WD_SORT_RULE.
Methods for generating intermediate results
Function Method
Generate intermediate results SET_GROUP_AGGREGATION
Check whether intermediate results are displayed GET_GROUP_AGGREGATION

SAP List Viewer in Web Dynpro ABAP
SAP COMMUNITY NETWORK SDN - sdn.sap.com | BPX - bpx.sap.com | BOC - boc.sap.com | UAC - uac.sap.com
© 2010 SAP AG 26
Displaying Intermediate Results
Once you have made all settings, to generate intermediate results you have to activate the display of these intermediate results. To do this, you use the methods of interface class IF_SALV_WD_FIELD_SETTINGS (implementing class CL_SALV_WD_CONFIG_TABLE).
Methods for displaying intermediate results
Function Method
Display intermediate results SET_GROUP_AGGR_DISPLAYED
Check whether intermediate results are displayed GET_GROUP_AGGR_DISPLAYED
Specifying Levels for Drilling Down Intermediate Results
If you have defined intermediate results for multiple alphanumeric fields, this results in multiple levels of subtotals: The intermediate results are displayed hierarchically and are marked with a specific number of points according to their levels. The user can use these points to show and hide the entries for each of the intermediate results. In your application, you can show or hide entries for one or more subtotal levels.
You can also collapse to intermediate results: In doing this, you hide all data records and any corresponding lower subtotal levels. Only the results rows of the highest subtotal level and the results row with the overall result remain visible.
For these functions, you use the methods of interface class IF_SALV_WD_FIELD_SETTINGS (implementing class CL_SALV_WD_CONFIG_TABLE).
Methods for levels in drilldown of subtotals
Function Method
Specify highest subtotal level displayed SET_EXPAND_LEVEL
Get current subtotal level displayed GET_EXPAND_LEVEL
Collapse to intermediate result SET_GROUP_AGGR_COLLAPSED
Check whether data is collapsed to intermediate results GET_GROUP_AGGR_COLLAPSED
Disallow generation of intermediate results
By default, intermediate results are automatically displayed in the ALV output as soon as a calculation is made in at least one field. All sorted fields with alphanumeric data types are interpreted as possible criteria for intermediate results and are therefore provided with intermediate results.
You can disallow the generation of intermediate results for specific fields. This has the following effects:
If you generate intermediate results for this field in your application, these settings have no effect in the ALV output.
The user can later specify for which columns he or she wants to display intermediate results. If you disallow the generation of intermediate results for a field, the particular column is not displayed for the user.
To disallow the generation of intermediate results for a field, you use the methods of interface class IF_SALV_WD_SORT (implementing class CL_SALV_WD_FIELD).
Methods for disallowing intermediate results

SAP List Viewer in Web Dynpro ABAP
SAP COMMUNITY NETWORK SDN - sdn.sap.com | BPX - bpx.sap.com | BOC - boc.sap.com | UAC - uac.sap.com
© 2010 SAP AG 27
Function Method
Disallow generation of intermediate results SET_GROUP_AGGREGATION_ALLOWED
Check whether generation of intermediate results is permitted
IS_GROUP_AGGREGATION_ALLOWED
Specifying the Initial View of Applications
Different people can influence the properties with which the ALV output starts:
The application developer who uses the ALV configuration model to create the ALV output through programming and therefore specifies the [Default View].
If no further configurations are made, the system always starts the ALV output exactly as specified in the coding. In the View dropdown list, this view is displayed to all users as the [Default View] when the application starts.
The application developer who specifies a configuration data record of the ALV output as the start configuration in the application configurator.
In the View dropdown list, this view is displayed to all users when the application starts. Users can still select the unchanged [Default View] from the list.
The administrator who modifies the properties of the [Default View] by means of customization.
In the View dropdown list, this view is displayed to all users as the [Default View] when the application starts.
The administrator who specifies one of the available views as the initial view by means of customization.
In the View dropdown list, this view is displayed to all users when the application starts.
The user who specifies one of the available views as the initial view by means of personalization.
In the View dropdown list, this view is offered to the user when the application starts.
The following section describes how you as the application developer specify a configuration data record of the ALV output as the start configuration.
Prerequisites
You are authorized to save configuration data records and to change application configurations.
You have saved at least one configuration data record for the ALV output (see Saving Configuration Data Records).
If the application contains more than one ALV output, you must know the name of the component usage that contains the current ALV output (see also Defining the Component Usage).

SAP List Viewer in Web Dynpro ABAP
SAP COMMUNITY NETWORK SDN - sdn.sap.com | BPX - bpx.sap.com | BOC - boc.sap.com | UAC - uac.sap.com
© 2010 SAP AG 28
Procedure
1. Determining the Configuration ID of the Current View
The description that you enter when you save a view does not have to be unique. You cannot therefore use the description if you subsequently choose the view for the start configuration. Instead, you require the unique configuration ID. The system automatically creates this ID.
To be able to determine the correct configuration data record in a later step, you require the configuration ID of the respective view.
1. Start the application in configuration mode (see Saving Configuration Data Records). 2. Open the Settings dialog box of the ALV output for which you want to specify the start configuration
and load the required view. 3. Choose Properties.
The configuration ID of the view is displayed in the Properties dialog box.
4. Copy the configuration ID of the view, for example into a text editor, so that you can use the ID as a comparison in a later step.
2. Specifying the Configuration Data Record as the Start Configuration
You can save different configurations to each application. One property of such a configuration is the view of an ALV output that is specified as the start configuration.
1. Start the application configurator as described in Application Configuration under The Application Configurator, and create an application configuration or choose an existing one.
In the Assignment of the Component Configurations list, all component usages that are defined for the application are displayed.
2. Select the entry with the component usage of the ALV output for which you want to specify the start configuration.
3. In this row, click in the Configuration column and open the F4 help for this cell.
All views of the system are listed here, sorted according to their configuration ID.
4. Scroll to the configuration ID that you determined as described above, and find the required view on the basis of the configuration ID. Apply this view to the list.
Configuring Views
You can configure Web Dynpro applications and therefore specify at design time which details are presented to users during their work and which are not. In addition, administrators and users can make and save their own settings at runtime and therefore adjust the application by means of customization and personalization.
In the ALV component there are also various options for modifying a standard set of properties and providing users with suitable variants depending on their business needs. Unlike in the rest of the Web Dynpro environment, however, you cannot make this configuration at design time. At design time, it is possible that the structure to which the configuration relates has not yet been specified. For this reason you cannot, as is usual, use the application configurator to configure your ALV output.

SAP List Viewer in Web Dynpro ABAP
SAP COMMUNITY NETWORK SDN - sdn.sap.com | BPX - bpx.sap.com | BOC - boc.sap.com | UAC - uac.sap.com
© 2010 SAP AG 29
Personalization, Configuration, and Customizing of an ALV Output
Depending on who is modifying the ALV output, a differentiation is made between the following strategies:
Personalization: One of the functions of the ALV output that is available to users is the saving of views. Users can save information about column structure, sort criteria, filter conditions, various display options, and so on, in an unlimited number of views. In this way, users can always display the ALV output with the properties they choose. However, these views are only available to the user who created them. Other users cannot see these views. This form of modification of the ALV output is referred to as 'personalization'.
Configuration: Application developers can neither create nor delete views using the classes and methods of the ALV configuration model. They can, however, start their ALV component in a special mode, create an unlimited number of views for it, and deliver these views with the product. Views that application developers save in this way are stored as configuration data records and are transported and delivered together with their ALV programming. This form of modification of the ALV output is referred to as 'configuration'. The following sections describe the options available when saving configuration data records:
o Saving Configuration Data Records [Page 29] o Specifying the Initial View of Applications
Customizing: At customer sites, administrators can change the views they provided or insert their own views. These views are then available to all users client-wide. This form of modification of the ALV output is referred to as 'customizing' (see User-Independent, Client-Wide Modifications in Personalization).
For configuration and for Customizing, you must start the application in the respectively required mode and make the necessary settings at runtime.
Views and Data Structure of ALV Configuration Model
All settings that the user saves in a view for an ALV output relate to the fields of a specific data structure of the ALV configuration model. If, for example, you load another structure, the settings for the view may not work.
You must therefore ensure that the system can uniquely assign a view to both the current application and the data structure that is currently loaded. You flag the data structure with a unique key (KEY). All views that the user saves from now on are given this identifying key.
You can find an example of this in the documentation for the Interface Controller
SALV_WD_TABLE.
You can get all settings for a view using the method GET_CONFIG_DATA in the interface controller of the
ALV component.
More Information
You can find more detailed information on the methods of the Interface Controller in the system in the controller documentation for the SALV_WD_TABLE.
Saving Configuration Data Records
In the ALV output, a configuration data record corresponds to a global view. Unlike the client-wide global view provided by the administrator, the configuration data record is an integral part of the application and is provided by the application programmer.

SAP List Viewer in Web Dynpro ABAP
SAP COMMUNITY NETWORK SDN - sdn.sap.com | BPX - bpx.sap.com | BOC - boc.sap.com | UAC - uac.sap.com
© 2010 SAP AG 30
You can subsequently specify one of the configuration data records that you save for an ALV output as the start configuration of this ALV output (for more information, see Specifying the Initial View of Applications).
Prerequisites
Since you can only save a configuration data record at runtime, the ALV output must be part of an executable application.
You have a transport request in which you can save transportable objects.
You have access to a transportable development package in which you can store the data of the configuration data record.
Procedure
1. Starting the Application in Configuration Mode
1. In the object list of the ABAP Workbench, double-click the name of the application.
2. In the menu, choose Web Dynpro Applications Test Execute in Admin Mode .
3. In the URL in the browser window, change URL parameter &sap-config-mode=X to &sap-
config-mode=config and choose Enter.
The application starts in configuration mode, in which you can save configuration data records.
2. Creating Configuration Data Records
1. In the toolbar of the ALV output to which you want to save a configuration data record, choose Settings.
2. In the Settings dialog box, make all the settings that you want to save with the configuration data record.
3. In the Settings dialog box, choose Save As. 4. In the Save View As dialog box, make all necessary specifications for the configuration data record. 5. Enter the required transport request or select it using the F4 Help, and choose OK.
If you now release the transport request with the new configuration data record, the transport can take place. A new view with the settings of the configuration data record is then offered in the ALV output.
Exporting
The user can export the ALV output that is currently being displayed in different file formats:
Microsoft Excel The user can trigger the export of the current data to Microsoft Excel using the Export button.
For more information: Microsoft Excel
Adobe Acrobat
A PDF version that is optimized for printing is created when the user selects the Print Version
button.
For more information: Print version
Crystal Reports Display in Crystal Reports is made possible to the user using the Display as dropdown list box. Display in Crystal Reports replaces the table display.
SAP List Viewer in Web Dynpro ABAP
SAP COMMUNITY NETWORK SDN - sdn.sap.com | BPX - bpx.sap.com | BOC - boc.sap.com | UAC - uac.sap.com
© 2010 SAP AG 31
For more information: Display with Crystal Reports [Page 67]
BEx Analyzer
In addition, you can make it possible for the user to export the ALV output to the BEx Analyzer. You cannot however make any further specifications about the result.
The following requirements must be met:
o Ensure that a SAP NetWeaver Application Server is installed with usage type BI Java. This means that the BEx Analyzer is also available.
o In Customizing execute the IMG activity Maintain Web Dynpro ABAP-Specific Settings under
SAP Web Application Server SAP List Viewer (ALV) .
Set the Allow Export Function BEx Analyzer flag.
Exporting to Microsoft Excel
To generate an Excel list from the ALV output, the user simply chooses the corresponding pushbutton from the toolbar. The user cannot affect the result in advance.
At this time, the following Excel formats are supported:
Excel for Office 2007
Excel (MHTML format)
Excel (MHTML format for 2000/97)
To specify the required standard format, execute the activity Maintaining Web Dynpro ABAP-Specific
Settings in Customizing (transaction code SIMGH) for SAP Web Application Server under SAP List Viewer
(ALV) and select the required format.
However, in your application, you can define whether information other than the ALV output is also copied to the Excel file when the user triggers the export. This applies to:
Design objects for header and footer areas
Result rows for calculations
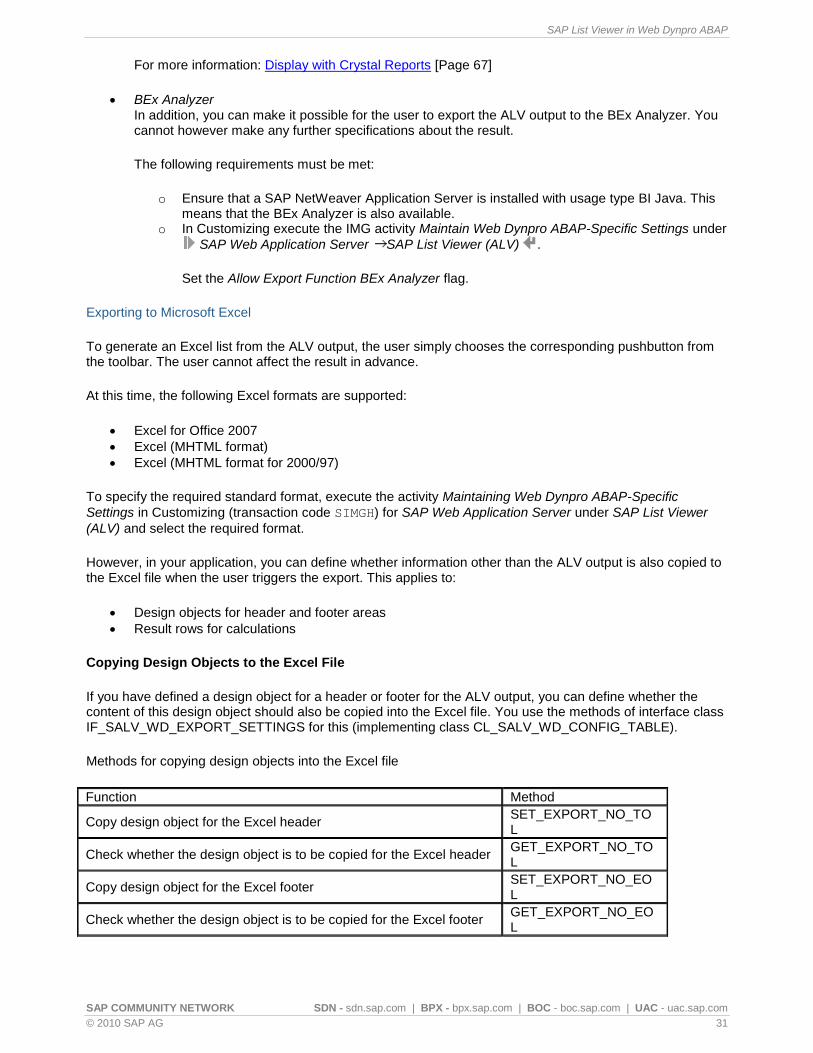
Copying Design Objects to the Excel File
If you have defined a design object for a header or footer for the ALV output, you can define whether the content of this design object should also be copied into the Excel file. You use the methods of interface class IF_SALV_WD_EXPORT_SETTINGS for this (implementing class CL_SALV_WD_CONFIG_TABLE).
Methods for copying design objects into the Excel file
Function Method
Copy design object for the Excel header SET_EXPORT_NO_TOL
Check whether the design object is to be copied for the Excel header GET_EXPORT_NO_TOL
Copy design object for the Excel footer SET_EXPORT_NO_EOL
Check whether the design object is to be copied for the Excel footer GET_EXPORT_NO_EOL

SAP List Viewer in Web Dynpro ABAP
SAP COMMUNITY NETWORK SDN - sdn.sap.com | BPX - bpx.sap.com | BOC - boc.sap.com | UAC - uac.sap.com
© 2010 SAP AG 32
Copying Result Rows for Calculations into the Excel File
You can define whether result rows containing the results or interim results of aggregations should be copied to Microsoft Excel when the export takes place. You use the methods of interface class IF_SALV_WD_EXPORT_SETTINGS for this (implementing class CL_SALV_WD_CONFIG_TABLE).
Methods for copying result rows into the Excel file
Function Method
Copy result rows to Excel SET_EXPORT_NO_SUMS
Check whether result rows are copied to Excel GET_EXPORT_NO_SUMS
Print Version
The user can print out the ALV output that is currently displayed. To do this, the user chooses Print Version in the toolbar. ALV then generates a standard PDF file from the ALV output data, starts Adobe Acrobat, and displays the generated PDF file.
There are two different ways to generate a PDF document.
Adobe Document Services (ADS)
SAP BI Export Library (SAP)
In Customizing (transaction code SIMGH) for SAP Web Application Server you can maintain this setting under SAP List Viewer (ALV). For more details see the documentation located there.
Using the Settings dialog box, the user can make various settings that determine how the PDF file is to be displayed. The same options are available in your application. Define the default settings for the PDF document as follows:
Specify the paper format and orientation
Specify the size of the print area
Scale columns and rows
Send output directly to the printer
Set up headers and footers
Copy design objects to PDF file
You can also define whether a design object that you defined for the header or footer should also appear in the PDF file.
Specifying the Paper Format and Orientation
You can specify the paper format to be used in the PDF document. You can choose from the following paper formats:
DIN A4
Letter
You can also specify whether the PDF document is to be created in Portrait or Landscape format.
You use the methods of interface class IF_SALV_WD_PDF_SETTINGS for this (implementing class
CL_SALV_WD_CONFIG_TABLE).
Methods for paper format and orientation

SAP List Viewer in Web Dynpro ABAP
SAP COMMUNITY NETWORK SDN - sdn.sap.com | BPX - bpx.sap.com | BOC - boc.sap.com | UAC - uac.sap.com
© 2010 SAP AG 33
Function Method
Define paper format SET_PAGE_SIZE
Get paper format GET_PAGE_SIZE
Set paper orientation SET_ORIENTATION
Get paper orientation GET_ORIENTATION
Specifying the Size of the Print Area
You can define the size of the print area for pages of your PDF document by specifying the width of the page margins. You also specify the unit of measurement for your settings. You use the methods of interface class IF_SALV_WD_PDF_SETTINGS for this (implementing class CL_SALV_WD_CONFIG_TABLE).
Methods relating to the printable area of a page
Function Method
Define unit of measurement for margins SET_MARGINS_UNIT
Get unit of measurement for margins GET_MARGINS_UNIT
Define width of bottom, top, right, and left margins
SET_MARGIN_BOTTOM
SET_MARGIN_TOP
SET_MARGIN_RIGHT
SET_MARGIN_LEFT
Get width of bottom, top, right, and left margins
GET_MARGIN_BOTTOM
GET_MARGIN_TOP
GET_MARGIN_RIGHT
GET_MARGIN_LEFT
Scaling Columns and Rows
By default, the columns in the PDF document have the same width as the width in the ALV output. If the page does not provide sufficient space for all columns, the table is split across two or more pages. In the same way, the rows are also distributed across the number of pages required to display them. You can modify the size of the columns and rows in line with the page size of your PDF document in the following ways:
Reduce the width of columns so that they fit onto one page.
The height of the table remains unchanged.
Reduce the width and the height of the table so that the entire table fits onto one page.
Leave both width and height unchanged.
If the columns are distributed across multiple pages, you can specify whether specific information is to appear on the first page only or whether it is also to be repeated on subsequent pages. You can choose from the following variants:
For unchanged column width (wallpaper): The column header is displayed on every page.
For adjusted column width: Column headers are repeated on subsequent pages
Regardless of scaling: Fixed columns are repeated on all subsequent pages.

SAP List Viewer in Web Dynpro ABAP
SAP COMMUNITY NETWORK SDN - sdn.sap.com | BPX - bpx.sap.com | BOC - boc.sap.com | UAC - uac.sap.com
© 2010 SAP AG 34
You use the methods of interface class IF_SALV_WD_PDF_SETTINGS for this (implementing class CL_SALV_WD_CONFIG_TABLE).
Methods for scaling columns and rows
Function Method
Define table scaling in PDF document SET_PAGE_LAYOUT
Get table scaling in PDF document GET_PAGE_LAYOUT
Repeat column titles if page width is adjusted SET_REPEAT_HEADERS_FIT_H
Check whether column titles are repeated if page width is adjusted
GET_REPEAT_HEADERS_FIT_H
Repeat column titles for adjacent pages SET_REPEAT_HEADERS_WALLPAPER
Check whether column titles are repeated for adjacent pages
GET_REPEAT_HEADERS_WALLPAPER
Repeat fixed columns on every page SET_REPEAT_KEY_COLUMNS
Check whether fixed columns are repeated on every page
GET_REPEAT_KEY_COLUMNS
Sending the output directly to the printer
You can choose for the print version to be created as a PostScript file instead of a PDF document. The PostScript file is then sent directly to a printer of your choice.
If you do not specify an output device here, a PDF file is generated and displayed on the screen.
You use the methods of interface class IF_SALV_WD_PDF_SETTINGS for this (implementing class CL_SALV_WD_CONFIG_TABLE).
Methods for printing directly
Function Method
Set ALV output to be printed immediately SET_PRINT_IMMEDIATE
Check whether the ALV output is to be printed immediately GET_PRINT_IMMEDIATE
Set printer SET_PRINTER
Get printer GET_PRINTER
Setting up Headers and Footers
Using text modules, you can create headers or footers for your PDF document. These are displayed on every page of your document. When you create the header and footer, you specify the position of the text module (centered, left-justified, or right-justified).
You can place one of the following text modules at the required position:
No text The current position remains empty.
Free text The free text that you specified for the position is inserted at the current position.
Current date Current date and time
Current page
Page 1 of ? The number of the current page and the total number of pages are inserted at the current position.

SAP List Viewer in Web Dynpro ABAP
SAP COMMUNITY NETWORK SDN - sdn.sap.com | BPX - bpx.sap.com | BOC - boc.sap.com | UAC - uac.sap.com
© 2010 SAP AG 35
You use the methods of interface class IF_SALV_WD_PDF_SETTINGS for this (implementing class CL_SALV_WD_CONFIG_TABLE).
Methods for placing text modules in headers and footers
Function Method
Set Free Text text module for the different positions
SET_FOOTER_CENTER_FREETEXT
GET_FOOTER_LEFT_FREETEXT
SET_FOOTER_RIGHT_FREETEXT
SET_HEADER_CENTER_FREETEXT
SET_HEADER_LEFT_FREETEXT
SET_HEADER_RIGHT_FREETEXT
Get Free Text text module for the different positions
GET_FOOTER_CENTER_FREETEXT
GET_FOOTER_LEFT_FREETEXT
GET_FOOTER_RIGHT_FREETEXT
GET_HEADER_CENTER_FREETEXT
GET_HEADER_LEFT_FREETEXT
GET_HEADER_RIGHT_FREETEXT
Set text module for the different positions
SET_FOOTER_CENTER
SET_FOOTER_LEFT
SET_FOOTER_RIGHT
SET_HEADER_CENTER
SET_HEADER_LEFT
SET_HEADER_RIGHT
Get text module for the different positions
GET_FOOTER_CENTER
GET_FOOTER_LEFT
GET_FOOTER_RIGHT
GET_HEADER_CENTER
GET_HEADER_LEFT
GET_HEADER_RIGHT

SAP List Viewer in Web Dynpro ABAP
SAP COMMUNITY NETWORK SDN - sdn.sap.com | BPX - bpx.sap.com | BOC - boc.sap.com | UAC - uac.sap.com
© 2010 SAP AG 36
Copying Design Objects to the PDF File
If you have defined a design object for a header or footer for the ALV output, you can define whether the content of this design object should also be copied into the PDF file. You use the methods of interface class IF_SALV_WD_PDF_SETTINGS for this (implementing class CL_SALV_WD_CONFIG_TABLE).
Methods for copying design objects into the PDF file
Function Method
Copy design object for the PDF header SET_EXPORT_NO_TOL
Check whether the design object is to be copied for the PDF header GET_EXPORT_NO_TOL
Copy design object for the PDF footer SET_EXPORT_NO_EOL
Check whether the design object is to be copied for the PDF footer GET_EXPORT_NO_EOL
Pre-Settings for Print Versions
The ALV standard function Print Version is activated initially. You can usually activate and deactivate it using
IF_SALV_WD_STD_FUNCTIONS~SET_PDF_ALLOWED.
To maintain the settings for the print verson, you need the interface IF_SALV_WD_PDF_SETTINGS.
Read the system documentation for IF_SALV_WD_PDF_SETTINGS in package
SALV_WD_CONFIG to do this.
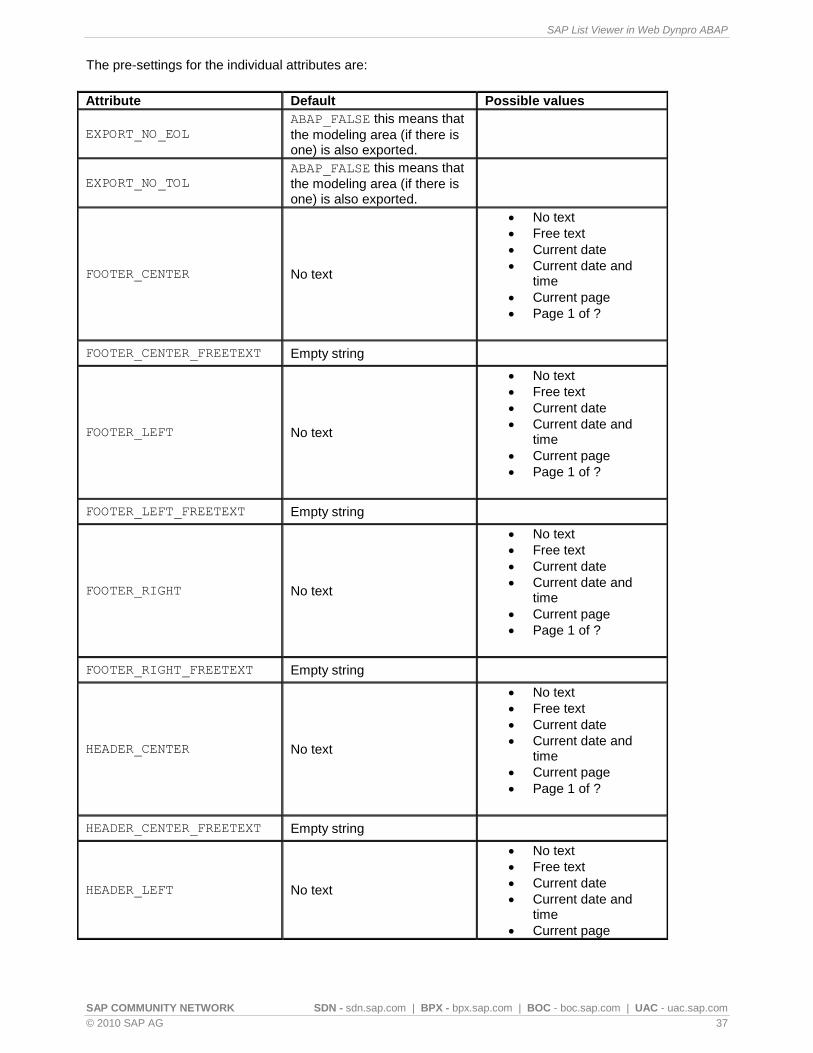
SAP List Viewer in Web Dynpro ABAP
SAP COMMUNITY NETWORK SDN - sdn.sap.com | BPX - bpx.sap.com | BOC - boc.sap.com | UAC - uac.sap.com
© 2010 SAP AG 37
The pre-settings for the individual attributes are:
Attribute Default Possible values
EXPORT_NO_EOL ABAP_FALSE this means that
the modeling area (if there is one) is also exported.
EXPORT_NO_TOL ABAP_FALSE this means that
the modeling area (if there is one) is also exported.
FOOTER_CENTER No text
No text
Free text
Current date
Current date and time
Current page
Page 1 of ?
FOOTER_CENTER_FREETEXT Empty string
FOOTER_LEFT No text
No text
Free text
Current date
Current date and time
Current page
Page 1 of ?
FOOTER_LEFT_FREETEXT Empty string
FOOTER_RIGHT No text
No text
Free text
Current date
Current date and time
Current page
Page 1 of ?
FOOTER_RIGHT_FREETEXT Empty string
HEADER_CENTER No text
No text
Free text
Current date
Current date and time
Current page
Page 1 of ?
HEADER_CENTER_FREETEXT Empty string
HEADER_LEFT No text
No text
Free text
Current date
Current date and time
Current page

SAP List Viewer in Web Dynpro ABAP
SAP COMMUNITY NETWORK SDN - sdn.sap.com | BPX - bpx.sap.com | BOC - boc.sap.com | UAC - uac.sap.com
© 2010 SAP AG 38
Page 1 of ?
HEADER_LEFT_FREETEXT Empty string
HEADER_RIGHT No text
No text
Free text
Current date
Current date and time
Current page
Page 1 of ?
HEADER_RIGHT_FREETEXT Empty string
MARGINS_UNIT cc
mm (Millimeter)
inch
pt (?)
MARGIN_BOTTOM 20 mm
MARGIN_LEFT 20 mm
MARGIN_RIGHT 20 mm
MARGIN_TOP 20 mm
ORIENTATION Landscape
Landscape
Portrait
PAGE_LAYOUT Fit to page width
(LAYOUT_FIT_HORIZONTAL)
Fit to page width
(LAYOUT_FIT_HORIZONTAL
)
Fit to page (LAYOUT_FIT_TO_PAGE)
Poster
(LAYOUT_WALLPAPER)
PAGE_SIZE DINA 4
DINA 4
Letter
PRINTER Empty string
PRINT_IMMEDIATE ABAP_FALSE means the
output is not sent directly to the printer.
REPEAT_HEADERS_FIT_H ABAP_TRUE the column
header is repeated on every page
REPEAT_HEADERS_WALLPAPE
R
ABAP_TRUE the column
header is repeated on every page
REPEAT_KEY_COLUMNS ABAP_TRUE the fixed column
is repeated on every page
SAP List Viewer in Web Dynpro ABAP
SAP COMMUNITY NETWORK SDN - sdn.sap.com | BPX - bpx.sap.com | BOC - boc.sap.com | UAC - uac.sap.com
© 2010 SAP AG 39
Managing ALV Display Areas
The ALV display consists of the following different areas which, to a certain extent, you can generate, change, and remove independently of each other.
You can include a title and a graphic in the ALV display
For more information: Header of ALV Display [Page 39]
You can choose which fields are assigned visible columns. You can also set out the columns and their assignment and define the column title.
For more information: Fields and Columns
You can influence the horizontal and vertical scroll bar.
For more information: Configuring Scroll Bars [Page 47]
You can define an area of your own above and/or below the actual ALV display that can be displayed during export or in the print version.
For more information: Header and Footer Areas
You can decide whether the settings dialog box is displayed and where.
For more information: Definig the Positioning of the Settings Dialog Box [Page 54]
Header of ALV Display
By default, the ALV display has no header. You can generate a header and display it above the ALV display. The header can have the following parts:
Text
Graphic
Tooltip
You can make the following settings for the header of the ALV display:
Generating, Getting, and Deleting a Header Object
Specify wording for header
Specifying the Path of the Graphic in the Header
Specify the position of the graphic in the header
Specify the wording for the tooltip
Generating, Getting, and Deleting a Header Object
The header of the ALV display is an instance of the class CL_SALV_WD_HEADER. To generate or delete the object, use the methods of the interface class IF_SALV_WD_TABLE_SETTINGS (implementing class CL_SALV_WD_CONFIG_TABLE).
Methods for creating, getting, and deleting header objects
Function Method

SAP List Viewer in Web Dynpro ABAP
SAP COMMUNITY NETWORK SDN - sdn.sap.com | BPX - bpx.sap.com | BOC - boc.sap.com | UAC - uac.sap.com
© 2010 SAP AG 40
Generate header object CREATE_HEADER
Get header object GET_HEADER
Delete header object DELETE_HEADER
Specify wording for header
The header of the ALV display has the type STRING. To define the header, use methods of the class CL_SALV_WD_HEADER.
Methods for wording of headers
Function Method
Specify wording for header SET_TEXT
Get wording for header GET_TEXT
Specifying the Path of the Graphic in the Header
You can display any graphic in the header of your ALV display as long as it is suitable for the Web Dynpro environment (see Handling Web Icons). To define the path or ID of the graphic file, use the methods of the class CL_SALV_WD_HEADER.
Methods for graphic file path
Function Method
Set path or ID for graphic SET_IMAGE_SOURCE
Get path or ID for graphic GET_IMAGE_SOURCE
Specifying the Position of the Graphic in the Header
You can choose whether the graphic displayed in the header is placed before or after the header text. To do this, use the methods of the class CL_SALV_WD_HEADER.
Methods for placing graphics in headers
Function Method
Set position within header SET_IMAGE_FIRST
Get position within header GET_IMAGE_FIRST
Specify the wording for the tooltip
The tooltip of the header becomes visible when the user places the cursor over the header of a ALV display. To specify the wording of the tooltip, use the methods of the class CL_SALV_WD_HEADER.
Methods for header tooltip
Function Method
Specify the wording for the tooltip SET_TOOLTIP
Get wording for tooltip GET_TOOLTIP
Fields
If you use the ALV configuration model, all the field objects are generated automatically from the specifications you made for the attributes in the context node. As a result, every attribute in the context node
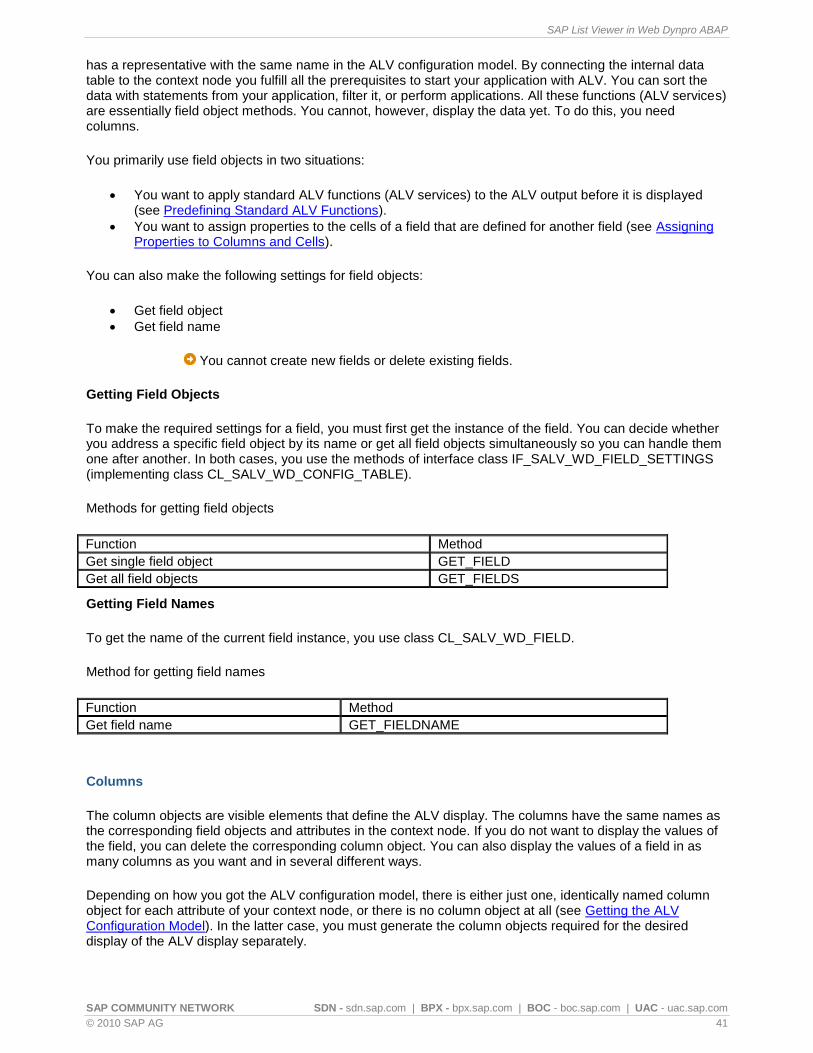
SAP List Viewer in Web Dynpro ABAP
SAP COMMUNITY NETWORK SDN - sdn.sap.com | BPX - bpx.sap.com | BOC - boc.sap.com | UAC - uac.sap.com
© 2010 SAP AG 41
has a representative with the same name in the ALV configuration model. By connecting the internal data table to the context node you fulfill all the prerequisites to start your application with ALV. You can sort the data with statements from your application, filter it, or perform applications. All these functions (ALV services) are essentially field object methods. You cannot, however, display the data yet. To do this, you need columns.
You primarily use field objects in two situations:
You want to apply standard ALV functions (ALV services) to the ALV output before it is displayed (see Predefining Standard ALV Functions).
You want to assign properties to the cells of a field that are defined for another field (see Assigning Properties to Columns and Cells).
You can also make the following settings for field objects:
Get field object
Get field name
You cannot create new fields or delete existing fields.
Getting Field Objects
To make the required settings for a field, you must first get the instance of the field. You can decide whether you address a specific field object by its name or get all field objects simultaneously so you can handle them one after another. In both cases, you use the methods of interface class IF_SALV_WD_FIELD_SETTINGS (implementing class CL_SALV_WD_CONFIG_TABLE).
Methods for getting field objects
Function Method
Get single field object GET_FIELD
Get all field objects GET_FIELDS
Getting Field Names
To get the name of the current field instance, you use class CL_SALV_WD_FIELD.
Method for getting field names
Function Method
Get field name GET_FIELDNAME
Columns
The column objects are visible elements that define the ALV display. The columns have the same names as the corresponding field objects and attributes in the context node. If you do not want to display the values of the field, you can delete the corresponding column object. You can also display the values of a field in as many columns as you want and in several different ways.
Depending on how you got the ALV configuration model, there is either just one, identically named column object for each attribute of your context node, or there is no column object at all (see Getting the ALV Configuration Model). In the latter case, you must generate the column objects required for the desired display of the ALV display separately.

SAP List Viewer in Web Dynpro ABAP
SAP COMMUNITY NETWORK SDN - sdn.sap.com | BPX - bpx.sap.com | BOC - boc.sap.com | UAC - uac.sap.com
© 2010 SAP AG 42
You can make the following settings for column objects:
Get column object
Get the technical name of a column
Create and delete column objects
Set up a column header (see Column Headers [Page 43])
Change the position of a column (see Position of Columns [Page 46])
More Information
For information on designing the appearance of a column, see the sections below Appearance of ALV Display.
For information on filtering, sorting, and aggregating columns, see Predefining Standard ALV Functions.
Getting a Column Object
In order to make the required settings for a column, you first have to get the instance of the column. You can decide whether you address a specific column object by its name or get all column objects at once in order to handle them one after another. In both cases you use the methods of the interface class IF_SALV_WD_COLUMN_SETTINGS for this (implementing class CL_SALV_WD_CONFIG_TABLE).
Methods for getting column objects
Function Method
Get individual column object GET_COLUMN
Get all column objects GET_COLUMNS
Getting the Technical Name of a Column
Use class CL_SALV_WD_COLUMN to get the name of the current column instance.
Method for getting the technical name of a column
Function Method
Get technical column name GET_ID
Creating and Deleting Column Objects
If, when getting the ALV configuration model, you defined that the system should not generate column objects, you need to generate the column objects required for displaying the ALV data yourself in your application.
All columns for which a column object exists are displayed to the user in a column set. If you do not want a column to be displayed to a user, you have to delete the corresponding column object.
When creating a column object, you enter its technical name. This name must match the name of an attribute in the context node of your application.
To generate or delete a column object, use the methods of the interface class IF_SALV_WD_COLUMN_SETTINGS (implementing class CL_SALV_WD_CONFIG_TABLE).
Methods for generating and deleting column objects

SAP List Viewer in Web Dynpro ABAP
SAP COMMUNITY NETWORK SDN - sdn.sap.com | BPX - bpx.sap.com | BOC - boc.sap.com | UAC - uac.sap.com
© 2010 SAP AG 43
Function Method
Create column object CREATE_COLUMN
Delete column object DELETE_COLUMN
Delete all column objects DELETE_COLUMNS
Column Headers
By default, each column in the ALV output has a column header. You do not have to generate the objects in question first.
You can change a column header. To do this, you can set up the following component parts:
Text
Graphic
Tooltip
You can make the following settings for the column header:
Generate, get, and delete object for column header
Specify the wording of the column header
Determine whether line breaks are possible in the column header
Specify the path to the graphic in the column header
Specify the position of the graphic in the column header
Specify the wording for the tooltip
Information on Standard Column Headers
Standard column headers only contain text. The wording depends on the context node attribute:
If the attribute has no DDIC reference:
By default, the system uses the technical name of the attribute for the column header.
If the attribute has a DDIC reference:
The system assigns column headers as follows:
o If field labels have been defined for the DDIC data element, the system uses the short text of the DDIC data element as the column header.
o If no field labels have been defined, the system uses the technical name of the DDIC data element.
Generating, Getting, and Deleting Objects for Column Headers
The column header of a column in your ALV output is an instance of the class CL_SALV_WD_COLUMN_HEADER. A column header object can exist for every column object.
To get, generate, or delete a column header object, use the methods of the class CL_SALV_WD_COLUMN.
Methods for getting, generating, and deleting column headers

SAP List Viewer in Web Dynpro ABAP
SAP COMMUNITY NETWORK SDN - sdn.sap.com | BPX - bpx.sap.com | BOC - boc.sap.com | UAC - uac.sap.com
© 2010 SAP AG 44
Function Method
Get column header object GET_HEADER
Generate column header object CREATE_HEADER
Delete column header object DELETE_HEADER
Specifying the Wording of the Column Header
You can define the text to be displayed as a column header. You have the following options:
You can enter free text.
You can enter a separate DDIC data element whose field label is to be used as the column header.
For a DDIC relationship, you first of all enter the DDIC data element that returns the wording of the column header. You do this using method SET_PROP_DDIC_BINDING_ELEMENT. Make the following entries:
Column header or tooltip
The text from the DDIC is to be used here as the column header.
Name of the DDIC data element
If you do not make any further entries, the short text of the DDIC data element is used. You can also use the heading, medium text, or long text of the DDIC data element. You do this using method SET_PROP_DDIC_BINDING_FIELD.
If you enter user-defined text as the column header, you must use this method to explicitly deactivate the DDIC relationship.
To specify the wording of the column header, use the methods of the class CL_SALV_WD_COLUMN_HEADER.
Methods for the wording of column headers
Function Method
Define free text as column header
Explicitly deactivate DDIC relationship
SET_TEXT
SET_PROP_DDIC_BINDING_FIELD
Get wording for column header GET_TEXT
Specify DDIC data element whose field label is to be used as the column header
SET_PROP_DDIC_BINDING_ELEMENT
Get name of the DDIC data element GET_ PROP_DDIC_BINDING_ELEMENT
Specify type of field label to be used as column header
SET_ PROP_DDIC_BINDING_FIELD
Get type of field label to be used as column header GET_ PROP_DDIC_BINDING_FIELD
Line Breaks in Column Headers
The system does not generally add line breaks in the column header. By default, the width of the column is determined by the text length in the column header. You can specify that line breaks are to be permitted in the column header.
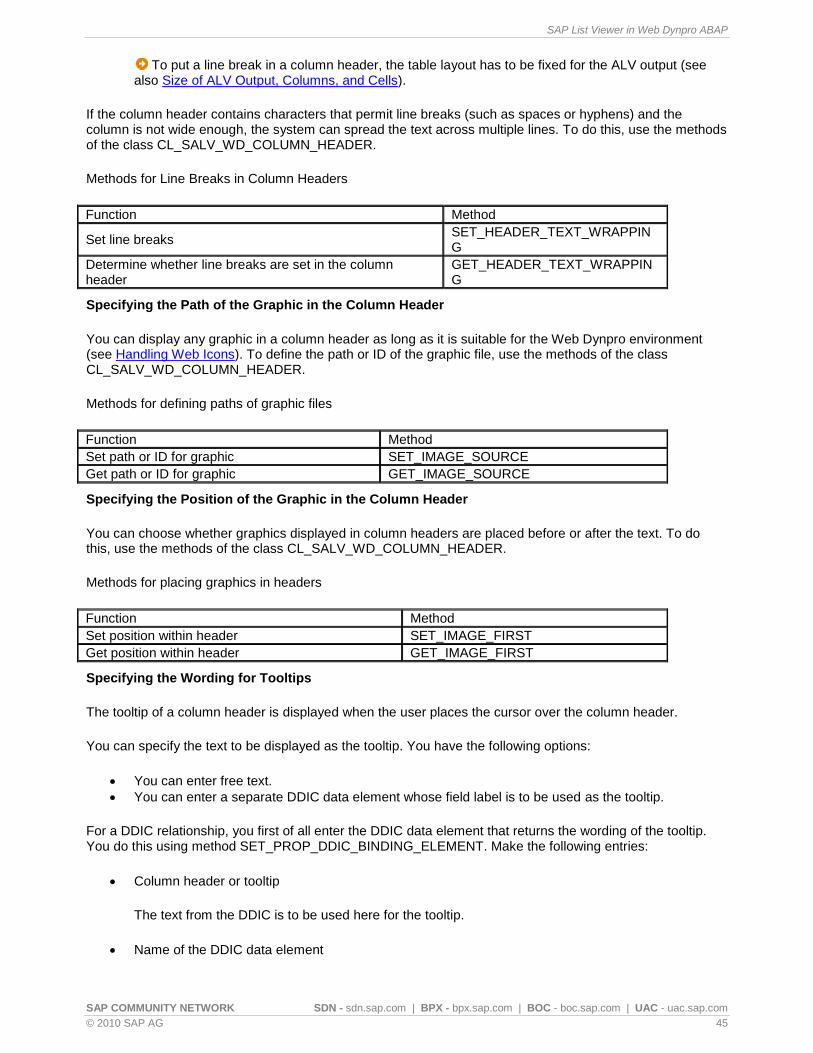
SAP List Viewer in Web Dynpro ABAP
SAP COMMUNITY NETWORK SDN - sdn.sap.com | BPX - bpx.sap.com | BOC - boc.sap.com | UAC - uac.sap.com
© 2010 SAP AG 45
To put a line break in a column header, the table layout has to be fixed for the ALV output (see also Size of ALV Output, Columns, and Cells).
If the column header contains characters that permit line breaks (such as spaces or hyphens) and the column is not wide enough, the system can spread the text across multiple lines. To do this, use the methods of the class CL_SALV_WD_COLUMN_HEADER.
Methods for Line Breaks in Column Headers
Function Method
Set line breaks SET_HEADER_TEXT_WRAPPING
Determine whether line breaks are set in the column header
GET_HEADER_TEXT_WRAPPING
Specifying the Path of the Graphic in the Column Header
You can display any graphic in a column header as long as it is suitable for the Web Dynpro environment (see Handling Web Icons). To define the path or ID of the graphic file, use the methods of the class CL_SALV_WD_COLUMN_HEADER.
Methods for defining paths of graphic files
Function Method
Set path or ID for graphic SET_IMAGE_SOURCE
Get path or ID for graphic GET_IMAGE_SOURCE
Specifying the Position of the Graphic in the Column Header
You can choose whether graphics displayed in column headers are placed before or after the text. To do this, use the methods of the class CL_SALV_WD_COLUMN_HEADER.
Methods for placing graphics in headers
Function Method
Set position within header SET_IMAGE_FIRST
Get position within header GET_IMAGE_FIRST
Specifying the Wording for Tooltips
The tooltip of a column header is displayed when the user places the cursor over the column header.
You can specify the text to be displayed as the tooltip. You have the following options:
You can enter free text.
You can enter a separate DDIC data element whose field label is to be used as the tooltip.
For a DDIC relationship, you first of all enter the DDIC data element that returns the wording of the tooltip. You do this using method SET_PROP_DDIC_BINDING_ELEMENT. Make the following entries:
Column header or tooltip
The text from the DDIC is to be used here for the tooltip.
Name of the DDIC data element

SAP List Viewer in Web Dynpro ABAP
SAP COMMUNITY NETWORK SDN - sdn.sap.com | BPX - bpx.sap.com | BOC - boc.sap.com | UAC - uac.sap.com
© 2010 SAP AG 46
If you do not make any further entries, the short text of the DDIC data element is used. You can also use the heading, medium text, or long text of the DDIC data element. You do this using method SET_PROP_DDIC_BINDING_FIELD.
If you enter user-defined text as the tooltip, you must explicitly deactivate the DDIC relationship using this method.
To specify the wording of tooltips, use the methods of the class CL_SALV_WD_COLUMN_HEADER.
Methods for the wording of tooltips
Function Method
Specify any text as the tooltip
Explicitly deactivate DDIC relationship
SET_TOOLTIP
SET_PROP_DDIC_BINDING_FIELD
Get wording for tooltip GET_TOOLTIP
Specify the DDIC data element whose field label is to be used as the tooltip
SET_PROP_DDIC_BINDING_ELEMENT
Get name of the DDIC data element GET_ PROP_DDIC_BINDING_ELEMENT
Specify the type of field label to be used as the tooltip
SET_ PROP_DDIC_BINDING_FIELD
Get the type of field label to be used as the tooltip GET_ PROP_DDIC_BINDING_FIELD
Position of Columns
By default, all columns are arranged in the same order as the attributes in the context node of your application. You can change the order of columns. You can do this in the following ways:
By changing the position number
By fixing the column
You can also specify whether the user is allowed to fix columns.
For information on the sequence of hierarchy columns, see Table as Hierarchy.
Changing the Position Number
Every column is automatically assigned the position number 0 initially. You can change the position of a column by changing this position number. The position number does not have to be unique.
Columns with the position number 0 are always left-justified. This means that if you want to align a column to the left, you must give all other columns a higher position number the column in question.
You can also use negative numbers as position numbers. This means that you can give a single column an appropriate position number without changing the 0 of all the other columns.
To change the position number of a column, use the methods of the class CL_SALV_WD_COLUMN.
Methods for changing the position number

SAP List Viewer in Web Dynpro ABAP
SAP COMMUNITY NETWORK SDN - sdn.sap.com | BPX - bpx.sap.com | BOC - boc.sap.com | UAC - uac.sap.com
© 2010 SAP AG 47
Function Method
Set position number SET_POSITION
Get position number GET_POSITION
Fixing the Column
You can fix columns. This has the following effects:
You move the column in question to the edge of the ALV output.
The column can then no longer be moved when scrolling sideways with the horizontal paginators.
When fixing a column, you specify whether the column is to be fixed to the left-hand side or the right-hand side. In this way, you can create up to three blocks of columns: The columns fixed to left, the columns that are not fixed, and the columns fixed to right.
You can also change the position number of a column to fix its position (see above) This allows you to arrange all columns in a block according to their position numbers.
To fix columns, use the methods of the class CL_SALV_WD_COLUMN.
Methods for fixing columns
Function Method
Fix column SET_FIXED_POSITION
Check whether a column is fixed and where it is fixed GET_FIXED_POSITION
Allowing the Fixing of Columns
You can specify whether the user is allowed to fix individual columns. You specify this separately for fixing to the right edge or to the left edge. In the Settings dialog box, a UI element is displayed by means of which the user can specify the number of fixed columns.
To allow the fixing of columns, you use the methods of interface class IF_SALV_WD_STD_FUNCTIONS (implementing class CL_SALV_WD_TABLE):
Methods for allowing the fixing of columns
Function Method
Allow the fixing of columns to the left edge of the ALV output
SET_FIXED_COLS_LEFT_ALLOWED
Check whether the user is allowed to fix columns to the left edge of the ALV output
IS_FIXED_COLS_LEFT_ALLOWED
Allow the fixing of columns to the right edge of the ALV output
SET_FIXED_COLS_RIGHT_ALLOWED
Check whether the user is allowed to fix columns to the right edge of the ALV output
IS_FIXED_COLS_RIGHT_ALLOWED
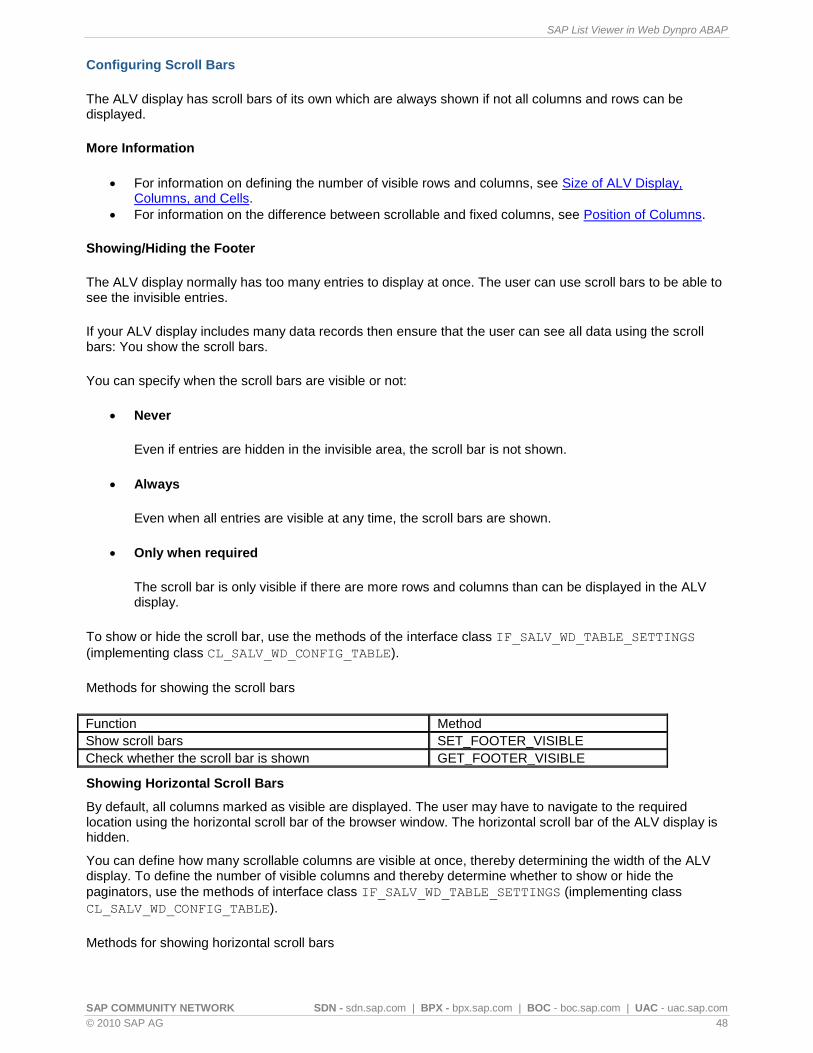
SAP List Viewer in Web Dynpro ABAP
SAP COMMUNITY NETWORK SDN - sdn.sap.com | BPX - bpx.sap.com | BOC - boc.sap.com | UAC - uac.sap.com
© 2010 SAP AG 48
Configuring Scroll Bars
The ALV display has scroll bars of its own which are always shown if not all columns and rows can be displayed.
More Information
For information on defining the number of visible rows and columns, see Size of ALV Display, Columns, and Cells.
For information on the difference between scrollable and fixed columns, see Position of Columns.
Showing/Hiding the Footer
The ALV display normally has too many entries to display at once. The user can use scroll bars to be able to see the invisible entries.
If your ALV display includes many data records then ensure that the user can see all data using the scroll bars: You show the scroll bars.
You can specify when the scroll bars are visible or not:
Never
Even if entries are hidden in the invisible area, the scroll bar is not shown.
Always
Even when all entries are visible at any time, the scroll bars are shown.
Only when required
The scroll bar is only visible if there are more rows and columns than can be displayed in the ALV display.
To show or hide the scroll bar, use the methods of the interface class IF_SALV_WD_TABLE_SETTINGS
(implementing class CL_SALV_WD_CONFIG_TABLE).
Methods for showing the scroll bars
Function Method
Show scroll bars SET_FOOTER_VISIBLE
Check whether the scroll bar is shown GET_FOOTER_VISIBLE
Showing Horizontal Scroll Bars
By default, all columns marked as visible are displayed. The user may have to navigate to the required location using the horizontal scroll bar of the browser window. The horizontal scroll bar of the ALV display is hidden.
You can define how many scrollable columns are visible at once, thereby determining the width of the ALV display. To define the number of visible columns and thereby determine whether to show or hide the
paginators, use the methods of interface class IF_SALV_WD_TABLE_SETTINGS (implementing class
CL_SALV_WD_CONFIG_TABLE).
Methods for showing horizontal scroll bars
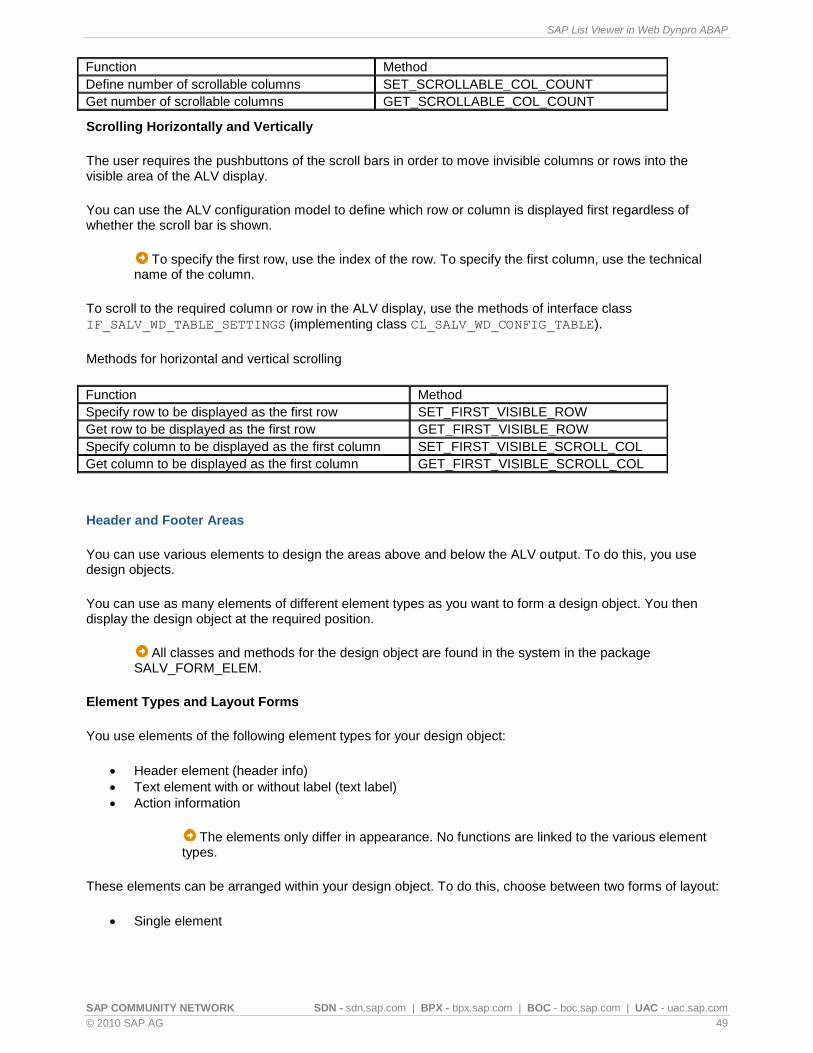
SAP List Viewer in Web Dynpro ABAP
SAP COMMUNITY NETWORK SDN - sdn.sap.com | BPX - bpx.sap.com | BOC - boc.sap.com | UAC - uac.sap.com
© 2010 SAP AG 49
Function Method
Define number of scrollable columns SET_SCROLLABLE_COL_COUNT
Get number of scrollable columns GET_SCROLLABLE_COL_COUNT
Scrolling Horizontally and Vertically
The user requires the pushbuttons of the scroll bars in order to move invisible columns or rows into the visible area of the ALV display.
You can use the ALV configuration model to define which row or column is displayed first regardless of whether the scroll bar is shown.
To specify the first row, use the index of the row. To specify the first column, use the technical name of the column.
To scroll to the required column or row in the ALV display, use the methods of interface class
IF_SALV_WD_TABLE_SETTINGS (implementing class CL_SALV_WD_CONFIG_TABLE).
Methods for horizontal and vertical scrolling
Function Method
Specify row to be displayed as the first row SET_FIRST_VISIBLE_ROW
Get row to be displayed as the first row GET_FIRST_VISIBLE_ROW
Specify column to be displayed as the first column SET_FIRST_VISIBLE_SCROLL_COL
Get column to be displayed as the first column GET_FIRST_VISIBLE_SCROLL_COL
Header and Footer Areas
You can use various elements to design the areas above and below the ALV output. To do this, you use design objects.
You can use as many elements of different element types as you want to form a design object. You then display the design object at the required position.
All classes and methods for the design object are found in the system in the package SALV_FORM_ELEM.
Element Types and Layout Forms
You use elements of the following element types for your design object:
Header element (header info)
Text element with or without label (text label)
Action information
The elements only differ in appearance. No functions are linked to the various element types.
These elements can be arranged within your design object. To do this, choose between two forms of layout:
Single element
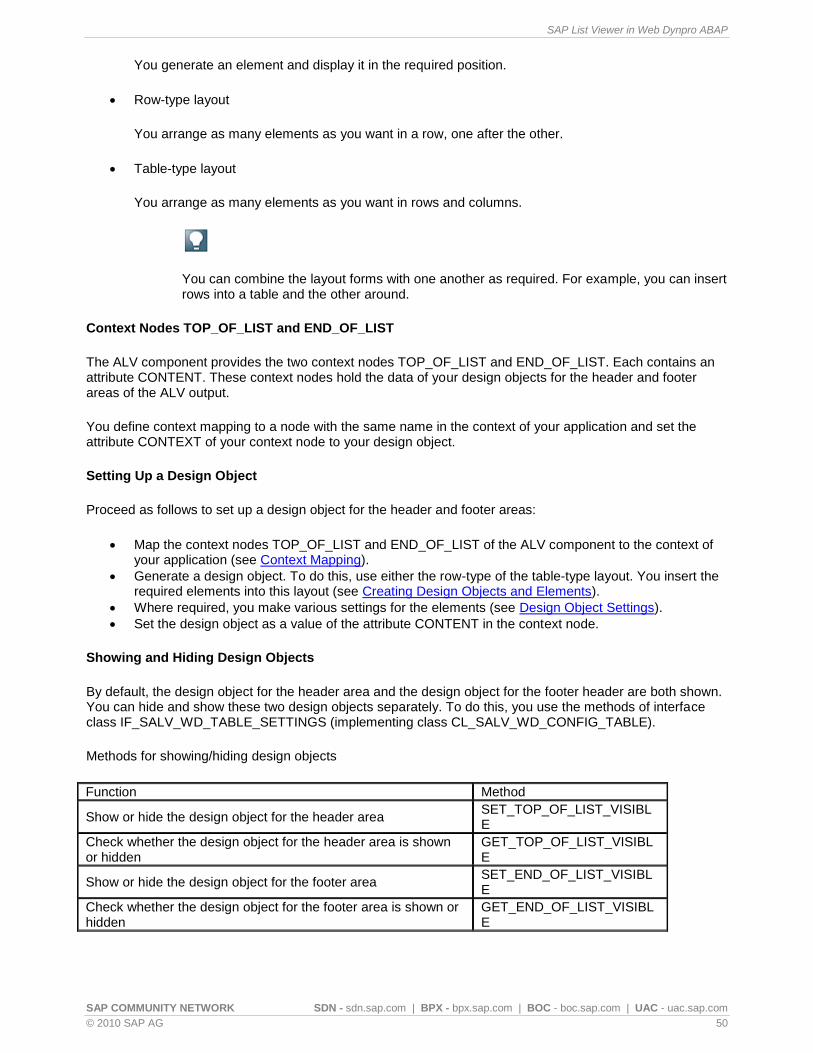
SAP List Viewer in Web Dynpro ABAP
SAP COMMUNITY NETWORK SDN - sdn.sap.com | BPX - bpx.sap.com | BOC - boc.sap.com | UAC - uac.sap.com
© 2010 SAP AG 50
You generate an element and display it in the required position.
Row-type layout
You arrange as many elements as you want in a row, one after the other.
Table-type layout
You arrange as many elements as you want in rows and columns.
You can combine the layout forms with one another as required. For example, you can insert rows into a table and the other around.
Context Nodes TOP_OF_LIST and END_OF_LIST
The ALV component provides the two context nodes TOP_OF_LIST and END_OF_LIST. Each contains an attribute CONTENT. These context nodes hold the data of your design objects for the header and footer areas of the ALV output.
You define context mapping to a node with the same name in the context of your application and set the attribute CONTEXT of your context node to your design object.
Setting Up a Design Object
Proceed as follows to set up a design object for the header and footer areas:
Map the context nodes TOP_OF_LIST and END_OF_LIST of the ALV component to the context of your application (see Context Mapping).
Generate a design object. To do this, use either the row-type of the table-type layout. You insert the required elements into this layout (see Creating Design Objects and Elements).
Where required, you make various settings for the elements (see Design Object Settings).
Set the design object as a value of the attribute CONTENT in the context node.
Showing and Hiding Design Objects
By default, the design object for the header area and the design object for the footer header are both shown. You can hide and show these two design objects separately. To do this, you use the methods of interface class IF_SALV_WD_TABLE_SETTINGS (implementing class CL_SALV_WD_CONFIG_TABLE).
Methods for showing/hiding design objects
Function Method
Show or hide the design object for the header area SET_TOP_OF_LIST_VISIBLE
Check whether the design object for the header area is shown or hidden
GET_TOP_OF_LIST_VISIBLE
Show or hide the design object for the footer area SET_END_OF_LIST_VISIBLE
Check whether the design object for the footer area is shown or hidden
GET_END_OF_LIST_VISIBLE
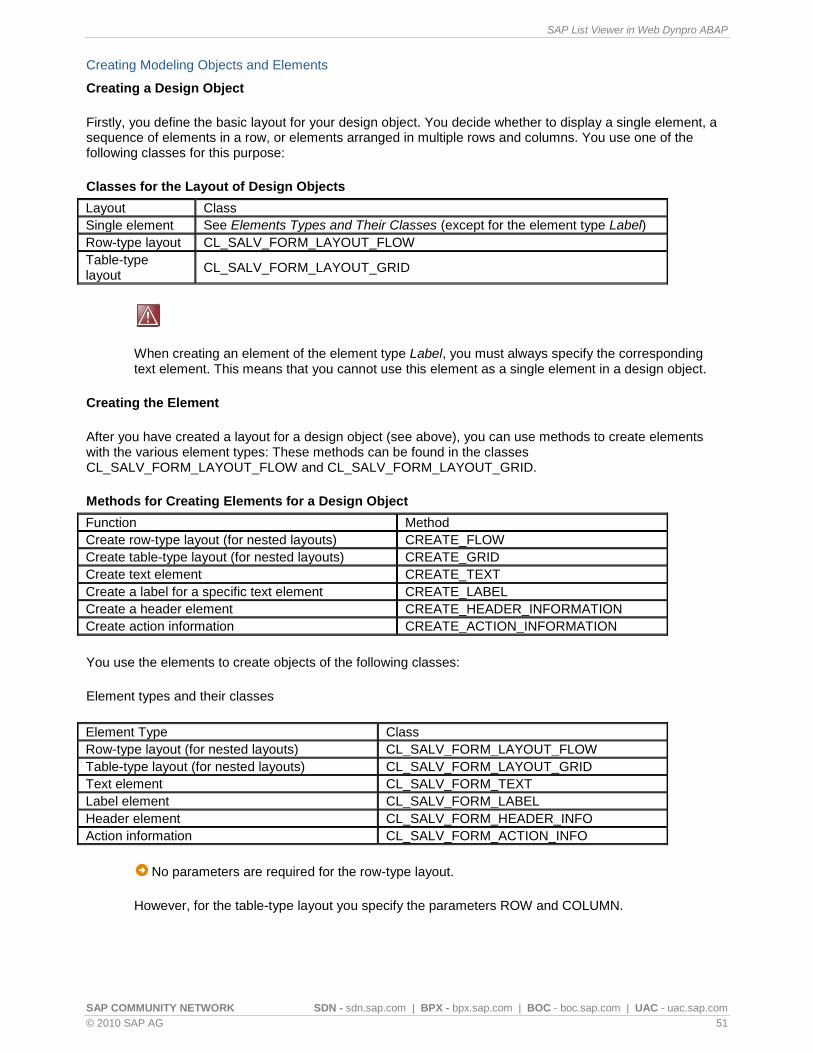
SAP List Viewer in Web Dynpro ABAP
SAP COMMUNITY NETWORK SDN - sdn.sap.com | BPX - bpx.sap.com | BOC - boc.sap.com | UAC - uac.sap.com
© 2010 SAP AG 51
Creating Modeling Objects and Elements
Creating a Design Object
Firstly, you define the basic layout for your design object. You decide whether to display a single element, a sequence of elements in a row, or elements arranged in multiple rows and columns. You use one of the following classes for this purpose:
Classes for the Layout of Design Objects
Layout Class
Single element See Elements Types and Their Classes (except for the element type Label)
Row-type layout CL_SALV_FORM_LAYOUT_FLOW
Table-type layout
CL_SALV_FORM_LAYOUT_GRID
When creating an element of the element type Label, you must always specify the corresponding text element. This means that you cannot use this element as a single element in a design object.
Creating the Element
After you have created a layout for a design object (see above), you can use methods to create elements with the various element types: These methods can be found in the classes CL_SALV_FORM_LAYOUT_FLOW and CL_SALV_FORM_LAYOUT_GRID.
Methods for Creating Elements for a Design Object
Function Method
Create row-type layout (for nested layouts) CREATE_FLOW
Create table-type layout (for nested layouts) CREATE_GRID
Create text element CREATE_TEXT
Create a label for a specific text element CREATE_LABEL
Create a header element CREATE_HEADER_INFORMATION
Create action information CREATE_ACTION_INFORMATION
You use the elements to create objects of the following classes:
Element types and their classes
Element Type Class
Row-type layout (for nested layouts) CL_SALV_FORM_LAYOUT_FLOW
Table-type layout (for nested layouts) CL_SALV_FORM_LAYOUT_GRID
Text element CL_SALV_FORM_TEXT
Label element CL_SALV_FORM_LABEL
Header element CL_SALV_FORM_HEADER_INFO
Action information CL_SALV_FORM_ACTION_INFO
No parameters are required for the row-type layout.
However, for the table-type layout you specify the parameters ROW and COLUMN.

SAP List Viewer in Web Dynpro ABAP
SAP COMMUNITY NETWORK SDN - sdn.sap.com | BPX - bpx.sap.com | BOC - boc.sap.com | UAC - uac.sap.com
© 2010 SAP AG 52
Exception: When creating an element of the element type Label, you must always specify the corresponding text element (R_LABEL_FOR) as well, regardless of the layout type.
Design Object Settings
You can make settings for a design object, each contained element, and, in the case of a table-type layout, for the individual columns.
Design Object Settings
You can make the following settings for a design object and for design object elements:
Settings for row-type layout (CL_SALV_FORM_LAYOUT_FLOW)
Function Method
Move element within the layout SET_ELEMENT
Get number of elements in row-type layout GET_ELEMENT_COUNT
Set tooltip for design object SET_TOOLTIP
Get tooltip for design object GET_TOOLTIP
Settings for table-type layout (CL_SALV_FORM_LAYOUT_GRID)
Function Method
Move element within the layout SET_ELEMENT
Append empty row (FLOW object) ADD_ROW
Get number of rows GET_ROW_COUNT
Show lines between columns and rows SET_GRID_LINES
Set tooltip for design object SET_TOOLTIP
Get tooltip for design object GET_TOOLTIP
Settings for Elements
You have quite similar functions available for the different element types:
Settings for element types
Function Method Class
Set wording for element SET_TEXT
CL_SALV_FORM_TEXT
CL_SALV_FORM_LABEL
CL_SALV_FORM_HEADER_INFO
CL_SALV_FORM_ACTION_INFO
Get wording for element GET_TEXT
Set tooltip for element SET_TOOLTIP
Get tooltip for element GET_TOOLTIP
Set corresponding text element SET_LABEL_FOR CL_SALV_FORM_LABEL
Get corresponding text element GET_LABEL_FOR

SAP List Viewer in Web Dynpro ABAP
SAP COMMUNITY NETWORK SDN - sdn.sap.com | BPX - bpx.sap.com | BOC - boc.sap.com | UAC - uac.sap.com
© 2010 SAP AG 53
Width and Alignment in a Column
A column in the table-type layout of your design object is an object of the class CL_SALV_FORM_GRID_COLUMN. Whenever you create an element in your layout and enter a column that
does not yet exist (for example, COLUMN = 2), one or more objects of this class are generated as
appropriate. You can use the class CL_SALV_FORM_LAYOUT_GRID to create several column objects in one go.
Methods for a column in a table-type layout
Function Method
Get column GET_COLUMN
Create columns in table layout SET_COLUMN_COUNT
Get number of columns in table layout GET_COLUMN_COUNT
You can use the column object to define the width of the column and the alignment of elements in the column.
Methods for width and alignment
Function Method
Specify width of column SET_WIDTH
Get width of column GET_WIDTH
Set horizontal alignment of elements SET_H_ALIGN
Get horizontal alignment of elements GET_H_ALIGN
Width and Alignment of a Single Element
You can define the width and alignment of elements individually. For technical reasons, you must determine whether the element is in a row-type or table-type layout:
For a row-type layout, use the class CL_SALV_FORM_LAYOUT_DATA_FLOW
For a table-type layout, use the class CL_SALV_FORM_LAYOUT_DATA_GRID
To change the layout data, first cast the element to one of these classes.
Methods for layout data of an element
Function Method
Get layout data on the alignment and width of the element GET_LAYOUT_DATA
To define the width and alignment of the element, now use the methods of the casted classes:
Methods for the Width and Alignment of an Element
Function Method
Set width SET_WIDTH
Get width GET_WIDTH
Specify horizontal alignment SET_H_ALIGN
Get horizontal alignment GET_H_ALIGN

SAP List Viewer in Web Dynpro ABAP
SAP COMMUNITY NETWORK SDN - sdn.sap.com | BPX - bpx.sap.com | BOC - boc.sap.com | UAC - uac.sap.com
© 2010 SAP AG 54
Creating Modeling Area
Procedure
Table-Type Layout at the Beginning of the ALV Display
The following example shows how you insert a design object with a table-type layout at the beginning of the ALV display:
1. Map the content node TOP_OF_LIST to the Component Controller context and then the context of the view where you display the ALV.
2. Insert the following coding into the method WDDOMODIFYVIEW of this view:
*Example for TOP_OF_LIST
DATA:
lr_node type REF TO if_wd_context_node,
lr_grid type REF TO cl_salv_form_layout_grid,
lr_text type REF TO cl_salv_form_text,
lr_label type REF TO cl_salv_form_label.
CREATE OBJECT lr_grid.
lr_text = lr_grid->create_text( text = '1.2 TEXT' row = 1 column =
2 ).
lr_label = lr_grid->create_label(text = '1.1 LABEL' row = 1 column
= 1 r_label_for = lr_text ).
lr_text = lr_grid->create_text( text = '2.2 TEXT' row = 2 column =
2 ).
lr_label = lr_grid->create_label( text = '2.1 LABEL' row = 2
column = 1 r_label_for = lr_text ).
lr_node = wd_context->get_child_node( name = 'TOP_OF_LIST' ).
CALL METHOD lr_node->set_attribute EXPORTING
value = lr_grid
name = 'CONTENT'.
Then save and activate is displayed to you in the ALV display of the following header:

SAP List Viewer in Web Dynpro ABAP
SAP COMMUNITY NETWORK SDN - sdn.sap.com | BPX - bpx.sap.com | BOC - boc.sap.com | UAC - uac.sap.com
© 2010 SAP AG 55
Defining the Positioning of the Settings Dialog Box
Some UI elements for standard ALV functions are located in a special area - the Settings dialog box.
The Settings dialog box is displayed above the ALV display by default when the user clicks on Settings in the toolbar.
The figure shows a settings dialog box in the standard configuration.
You have different options for adapting the positioning of this dialog box for your application:
You can place the interface view SERVICE in the required position in your application.
For more information: Embedding ALV Views [Page 8]
You can specify whether the dialog box is to be displayed as a modal window, that is, as a popup window in front of your ALV display:
Procedure
Display the dialog box as a popup
1. Use the method SET_DIALOG_SETTINGS_AS_POPUP of the interface class
IF_SALV_WD_STD_FUNCTIONS with parameter ABAP_TRUE. No further steps are required.
Check whether the dialog box is displayed as a popup
1. Use the method IS_DIALOG_SETTINGS_AS_POPUP of the interface class
IF_SALV_WD_STD_FUNCTIONS.

SAP List Viewer in Web Dynpro ABAP
SAP COMMUNITY NETWORK SDN - sdn.sap.com | BPX - bpx.sap.com | BOC - boc.sap.com | UAC - uac.sap.com
© 2010 SAP AG 56
Defining the Appearance of the ALV Display
You can change the appearance of ALV display in various ways. You can determine settings for:
Size of ALV Display, Columns, and Cells
Visibility of Individual Areas
Color of ALV Display, Columns, and Cells
Text Properties
Lines Between Columns and Rows
Table as Hierarchy
Display with Crystal Reports [Page 67]
Table Data as Business Graphic
Assigning Properties to Columns and Cells
You can assign most of the properties that affect the appearance of columns in the ALV output in the following ways:
You assign the property to the whole column and then every cells of the column gets this property.
In separate field in each cell, you specify how each cell is to appear in the current column. You then assign this field to the current column. This allows you to assign the required properties to cells individually.
You can assign the following properties like this:
Background color of a column (SET_CELL_DESIGN or SET_CELL_DESIGN_FIELDNAME)
Cell variant (SET_SELECTED_CELL_VARIANT or SET_SEL_CELL_VARIANT_FIELDNAME)
Cell Editor Properties
However, some properties for the appearances of a cell are connected with the cell editor that is used in the cell. This means the properties of the cell editor determine how a column is shown. The following applies to these properties too: They can be valid for all instances of the editor, or they can be overridden by information in another field.
Procedure
The following example shows how you can define the visibility of a button differently for individual rows of a column.
In a column, you are using the BUTTON cell editor. Each cell is displayed as a button. You want to hide some of the cells in this column. Since the visibility property is based on the button, and not the column, you have to use a workaround to hide the cell. This means that the BUTTON_VIS field determines in which cells
of the column lr_column the button is visible.
1. Create an object of class CL_SALV_WD_UIE_BUTTON (for example, lr_button).
2. A different field (for example, BUTTON_VIS) contains information for the visibility of each cell. You
assign this field to the button lr_button:
lr_button->set_visible_fieldname( ' BUTTON_VIS ' ).
3. Assign this button to the column (for example, lr_column) as a cell editor:
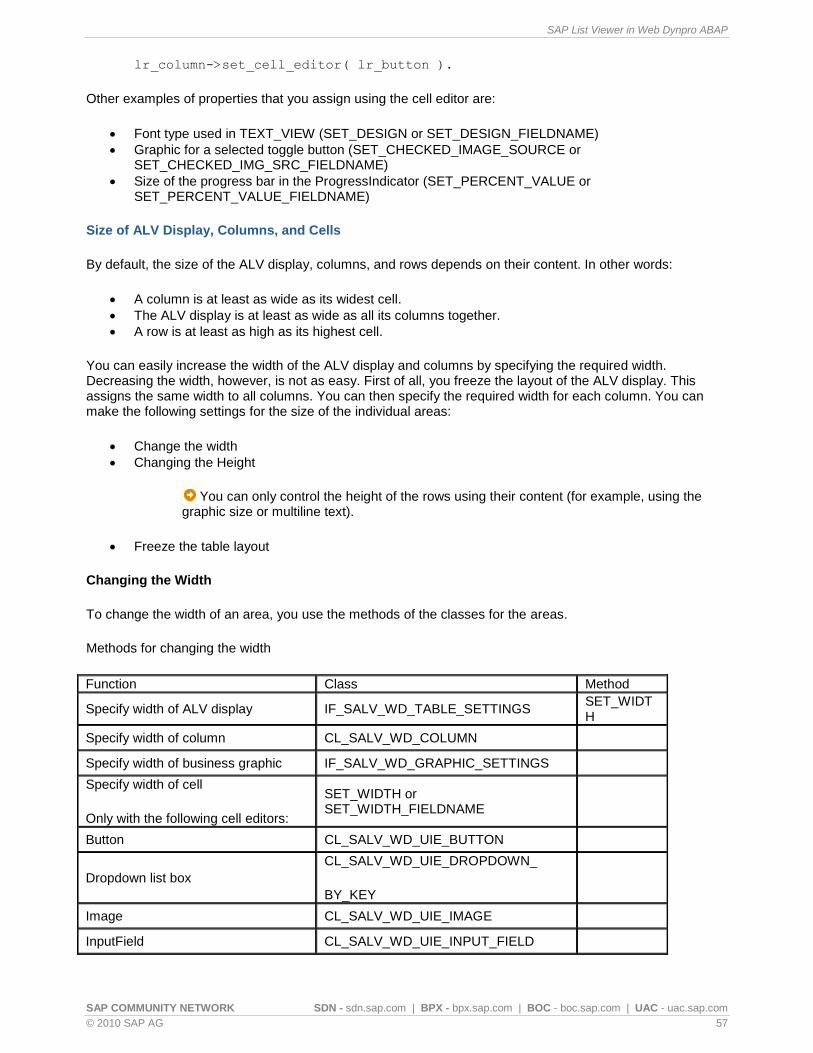
SAP List Viewer in Web Dynpro ABAP
SAP COMMUNITY NETWORK SDN - sdn.sap.com | BPX - bpx.sap.com | BOC - boc.sap.com | UAC - uac.sap.com
© 2010 SAP AG 57
lr_column->set_cell_editor( lr_button ).
Other examples of properties that you assign using the cell editor are:
Font type used in TEXT_VIEW (SET_DESIGN or SET_DESIGN_FIELDNAME)
Graphic for a selected toggle button (SET_CHECKED_IMAGE_SOURCE or SET_CHECKED_IMG_SRC_FIELDNAME)
Size of the progress bar in the ProgressIndicator (SET_PERCENT_VALUE or SET_PERCENT_VALUE_FIELDNAME)
Size of ALV Display, Columns, and Cells
By default, the size of the ALV display, columns, and rows depends on their content. In other words:
A column is at least as wide as its widest cell.
The ALV display is at least as wide as all its columns together.
A row is at least as high as its highest cell.
You can easily increase the width of the ALV display and columns by specifying the required width. Decreasing the width, however, is not as easy. First of all, you freeze the layout of the ALV display. This assigns the same width to all columns. You can then specify the required width for each column. You can make the following settings for the size of the individual areas:
Change the width
Changing the Height
You can only control the height of the rows using their content (for example, using the graphic size or multiline text).
Freeze the table layout
Changing the Width
To change the width of an area, you use the methods of the classes for the areas.
Methods for changing the width
Function Class Method
Specify width of ALV display IF_SALV_WD_TABLE_SETTINGS SET_WIDTH
Specify width of column CL_SALV_WD_COLUMN
Specify width of business graphic IF_SALV_WD_GRAPHIC_SETTINGS
Specify width of cell
Only with the following cell editors:
SET_WIDTH or SET_WIDTH_FIELDNAME
Button CL_SALV_WD_UIE_BUTTON
Dropdown list box
CL_SALV_WD_UIE_DROPDOWN_
BY_KEY
Image CL_SALV_WD_UIE_IMAGE
InputField CL_SALV_WD_UIE_INPUT_FIELD

SAP List Viewer in Web Dynpro ABAP
SAP COMMUNITY NETWORK SDN - sdn.sap.com | BPX - bpx.sap.com | BOC - boc.sap.com | UAC - uac.sap.com
© 2010 SAP AG 58
ProgressIndicator
CL_SALV_WD_UIE_PROGR_
INDICATOR
ToggleButton
CL_SALV_WD_UIE_TOGGLE_
BUTTON
ValueComparison CL_SALV_WD_UIE_VALUE_CMP
Get width of ALV display IF_SALV_WD_TABLE_SETTINGS GET_WIDTH
Get width of column CL_SALV_WD_COLUMN
Get width of business graphic IF_SALV_WD_GRAPHIC_SETTINGS
Get width of cell (only with cell editors listed above)
GET_WIDTH or GET_WIDTH_FIELDNAME
Changing the Height
You specify the height of the ALV display using the number of rows that are to be displayed at a time.
If the number of data records is less than the number of visible rows, empty rows are automatically appended to the end of the ALV display. You can specify that no empty rows are to be appended and that the height of the ALV display therefore adjusts itself according to the number of data records.
To do this, you use the methods of interface class IF_SALV_WD_TABLE_SETTINGS (implementing class CL_SALV_WD_CONFIG_TABLE).
Methods for changing the height
Function Method
Specify number of visible rows SET_VISIBLE_ROW_COUNT
Get number of visible rows GET_VISIBLE_ROW_COUNT
Append empty rows SET_DISPLAY_EMPTY_ROWS
Check whether empty rows are appended GET_DISPLAY_EMPTY_ROWS
To display all data records of the internal data table, set the number of visible rows to -1.
Freezing the Table Layout
Freezing the layout of the ALV display can be used to make columns narrower than their content dictates.
To do this, you use the methods of interface class IF_SALV_WD_TABLE_SETTINGS (implementing class CL_SALV_WD_CONFIG_TABLE).
Methods for freezing the table layout
Function Method
Freeze the table layout SET_FIXED_TABLE_LAYOUT
Check whether table layout is frozen GET_FIXED_TABLE_LAYOUT

SAP List Viewer in Web Dynpro ABAP
SAP COMMUNITY NETWORK SDN - sdn.sap.com | BPX - bpx.sap.com | BOC - boc.sap.com | UAC - uac.sap.com
© 2010 SAP AG 59
Visibility of Individual Areas
You can show or hide the different areas of the ALV output.
If an area is in an invisible area, the area is also invisible.
You can show and hide the following areas individually:
Entire ALV output
Individual column
Every UI element used as a cell editor or cell variant
Entire toolbar with all functions
Individual UI elements of standard ALV functions in the toolbar
Design object for the header area of the ALV output
Design object for the footer area of the ALV output
To hide another object, such as the header of the ALV output or a column header, you have to delete the relevant object.
Classes and methods for hiding areas
Area Class Method
Entire ALV output IF_SALV_WD_ TABLE_SETTINGS
SET_VISIBLE
GET_VISIBLE
Individual column CL_SALV_WD_ COLUMN
Every UI element used as a cell editor or cell variant
CL_SALV_WD_UIE (base class of all UI elements)
Entire toolbar with all functions
IF_SALV_WD_ FUNCTION_SETTINGS
Design object for the header area of the ALV output
IF_SALV_WD_ TABLE_SETTINGS
SET_TOP_OF_LIST_
VISIBLE
Design object for the footer area of the ALV output
IF_SALV_WD_ TABLE_SETTINGS
SET_END_OF_LIST_
VISIBLE
Individual UI elements of standard ALV functions in the toolbar
IF_SALV_WD_ STD_FUNCTIONS
SET_<standard_function>_ ALLOWED
IS_<standard_function>_ ALLOWED
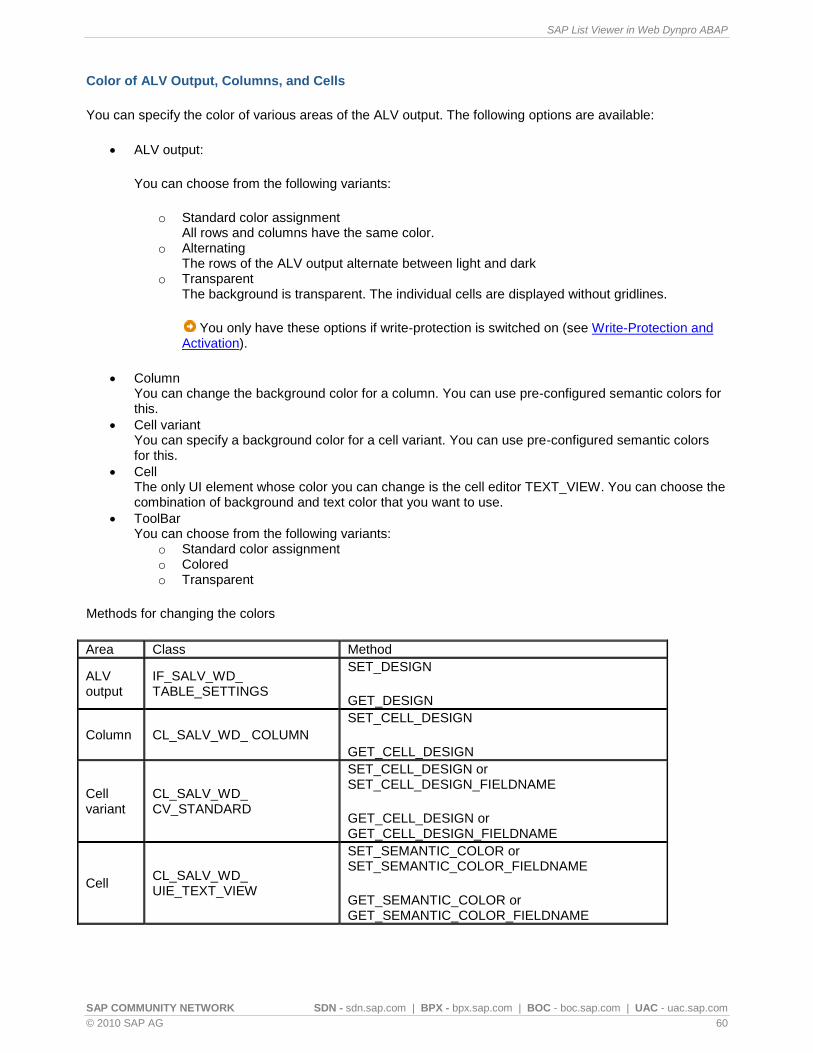
SAP List Viewer in Web Dynpro ABAP
SAP COMMUNITY NETWORK SDN - sdn.sap.com | BPX - bpx.sap.com | BOC - boc.sap.com | UAC - uac.sap.com
© 2010 SAP AG 60
Color of ALV Output, Columns, and Cells
You can specify the color of various areas of the ALV output. The following options are available:
ALV output:
You can choose from the following variants:
o Standard color assignment All rows and columns have the same color.
o Alternating The rows of the ALV output alternate between light and dark
o Transparent The background is transparent. The individual cells are displayed without gridlines.
You only have these options if write-protection is switched on (see Write-Protection and Activation).
Column You can change the background color for a column. You can use pre-configured semantic colors for this.
Cell variant You can specify a background color for a cell variant. You can use pre-configured semantic colors for this.
Cell The only UI element whose color you can change is the cell editor TEXT_VIEW. You can choose the combination of background and text color that you want to use.
ToolBar You can choose from the following variants:
o Standard color assignment o Colored o Transparent
Methods for changing the colors
Area Class Method
ALV output
IF_SALV_WD_ TABLE_SETTINGS
SET_DESIGN
GET_DESIGN
Column CL_SALV_WD_ COLUMN
SET_CELL_DESIGN
GET_CELL_DESIGN
Cell variant
CL_SALV_WD_ CV_STANDARD
SET_CELL_DESIGN or SET_CELL_DESIGN_FIELDNAME
GET_CELL_DESIGN or GET_CELL_DESIGN_FIELDNAME
Cell CL_SALV_WD_ UIE_TEXT_VIEW
SET_SEMANTIC_COLOR or SET_SEMANTIC_COLOR_FIELDNAME
GET_SEMANTIC_COLOR or GET_SEMANTIC_COLOR_FIELDNAME

SAP List Viewer in Web Dynpro ABAP
SAP COMMUNITY NETWORK SDN - sdn.sap.com | BPX - bpx.sap.com | BOC - boc.sap.com | UAC - uac.sap.com
© 2010 SAP AG 61
ToolBar IF_SALV_WD_ FUNCTION_SETTINGS
SET_DESIGN
GET_DESIGN
Text Properties
You can influence how text is displayed in individual areas of the ALV output as follows:
Horizontal alignment within a column
Horizontal alignment within a cell variant
Font size and style in a cell
This function is only available in the cell editor TEXT_VIEW. Here, you can choose the pre-configured formatting that you want to use (see Design in TextView Properties).
You can also set the reading direction here.
Line break in a cell
This function is only available in the cell editors TEXT_VIEW, LINK_TO_ACTION and LINK_TO_URL. If the text contains characters that permit a line break (such as spaces and hyphens), the text can be distributed across multiple lines.
For more information about how to permit line breaks in column headers, see Column Header.
Font color in a cell (see Color of ALV Output, Columns, and Cells)
Alignment, font size, and font style in a design object for the header or footer area (see Design Object Settings)
Methods for text properties
Function Class Method
Horizontal alignment within a column
CL_SALV_WD_ COLUMN
SET_H_ALIGN
GET_H_ALIGN
Horizontal alignment within a cell variant
CL_SALV_WD_ CV_STANDARD
SET_H_ALIGN
GET_H_ALIGN
Font size and style in a cell
CL_SALV_WD_ UIE_TEXT_VIEW
SET_DESIGN or SET_DESIGN_FIELDNAME
GET_DESIGN or GET_DESIGN_FIELDNAME
Line break in a cell
CL_SALV_WD_ UIE_TEXT_VIEW
CL_SALV_WD_ UIE_LINK_TO_ACTION
CL_SALV_WD_ UIE_LINK_TO_URL
SET_WRAPPING or SET_WRAPPING_FIELDNAME
GET_WRAPPING or GET_WRAPPING_FIELDNAME

SAP List Viewer in Web Dynpro ABAP
SAP COMMUNITY NETWORK SDN - sdn.sap.com | BPX - bpx.sap.com | BOC - boc.sap.com | UAC - uac.sap.com
© 2010 SAP AG 62
Lines Between Columns and Rows
You can define whether lines between columns and rows are to be shown or hidden in the ALV output. You can choose from the following variants:
Lines only between columns
Lines only between rows
Lines between columns and rows
No lines
To do this, you use the methods of interface class IF_SALV_WD_TABLE_SETTINGS (implementing class CL_SALV_WD_CONFIG_TABLE).
Methods for showing grid lines
Function Method
Show or hide lines SET_GRID_MODE
Check which lines are shown GET_GRID_MODE
Table as Hierarchy
You can display the ALV output as a hierarchy. To do this, you proceed as follows:
Specify the hierarchy column
You specify one or more columns as hierarchy columns.
Specify display type
You define the ALV output as a hierarchy.
You can also specify that all hierarchy levels are to be expanded. By default, only the rows for the upper hierarchy are visible when the ALV output is displayed.
Hierarchy
Displaying the ALV output as a hierarchy has the following effects on the columns:
The ALV output is automatically sorted according to all hierarchy columns.
By default, the sort sequence (and therefore the sequence of the hierarchy levels) is determined by the sequence of the column objects. You can change the sequence of the hierarchy levels in various ways:
o You change the position of the (hierarchy) columns o You change the sequence used to sort the fields of the hierarchy columns
The columns that you defined as hierarchy columns are not displayed in the usual form. Instead, all values of all hierarchy columns are displayed together in the first column. The value is indented according to the hierarchy level to which it belongs.
The values in the first column of a hierarchy have a small arrow icon. The user can use this arrow icon to show or hide all lower-level data records.
You can specify that the data for the last hierarchy column is not to be displayed as a node with an arrow icon, but as a leaf with a point.

SAP List Viewer in Web Dynpro ABAP
SAP COMMUNITY NETWORK SDN - sdn.sap.com | BPX - bpx.sap.com | BOC - boc.sap.com | UAC - uac.sap.com
© 2010 SAP AG 63
By default, only the rows of the upper hierarchy levels are displayed. The lower hierarchy levels are not expanded and are therefore not displayed.
The first column of a hierarchy is not an object instance of class CL_SALV_WD_COLUMN.
In the column header for this column, the column headers for each of the hierarchy columns are listed together.
Hierarchy columns or their values (since the columns themselves are not displayed) cannot be hidden.
The Settings dialog box displays hierarchy columns in green on the Column Selection tab page. The user cannot transfer them to the list of hidden columns.
Specifying the Hierarchy Column
To define a column as a hierarchy column, you use the methods of interface class IF_SALV_WD_COLUMN_HIERARCHY (implementing class CL_SALV_WD_COLUMN).
Methods for defining hierarchy columns
Function Method
Specify hierarchy column SET_HIERARCHY_COLUMN
Check whether a column is a hierarchy column IS_HIERARCHIY_COLUMN
Specifying the Display Type
To define your ALV output as a hierarchy and thereby define the type of display, you use the methods of interface class IF_SALV_WD_TABLE_SETTINGS (implementing class CL_SALV_WD_CONFIG_TABLE).
Methods for specifying the display type
Function Method
Specify display type SET_DISPLAY_TYPE
Get display type GET_DISPLAY_TYPE
Expanding Lower Hierarchy Levels
For the hierarchy display, ALV has to load all data when output is first displayed. Large amounts of data can result in long load times. By default, only the rows of the upper hierarchy levels are displayed. The lower hierarchy levels are not expanded and are therefore not displayed.
You can also specify that all hierarchy levels are to be expanded. To do this, you use the methods of interface class IF_SALV_WD_TABLE_HIERARCHY (implementing class CL_SALV_WD_CONFIG_TABLE).
Methods for initial display of all hierarchy levels
Function Method
Expand all hierarchy levels SET_EXPANDED
Check whether all hierarchy levels are to be expanded IS_EXPANDED
Displaying Data for the Last Hierarchy Column as a Sheet
To display the data in the last hierarchy column of the first column in the hierarchy as a sheet, you use the methods of interface class IF_SALV_WD_TABLE_HIERARCHY (implementing class CL_SALV_WD_CONFIG_TABLE).
Methods for displaying data as a sheet

SAP List Viewer in Web Dynpro ABAP
SAP COMMUNITY NETWORK SDN - sdn.sap.com | BPX - bpx.sap.com | BOC - boc.sap.com | UAC - uac.sap.com
© 2010 SAP AG 64
Function Method
Display data for the last hierarchy column as a sheet SET_LAST_HIER_COLUMN_AS_LEAF
Check whether the data for the last hierarchy column is displayed as a sheet
IS_LAST_HIER_COLUMN_AS_LEAF
Table Data as Business Graphic
You can display the data from ALV output as a business graphic. You can make the following settings for business graphics:
Display business graphics
Specify data use
Change the appearance of business graphics
Allow or disallow display as business graphic
If you allow users to display data as business graphics, they can select from a range of chart types. Most users select the vertical bar chart or bar chart to display the data from the ALV output.
Displaying Business Graphics
You can specify whether a business graphic is to be displayed when the ALV output is first displayed. You can choose from the following variants:
Display as table only
Display as table and business graphic
Display as business graphic only
To do this, you use the methods of interface class IF_SALV_WD_TABLE_SETTINGS (implementing class CL_SALV_WD_CONFIG_TABLE):
Methods for displaying data as business graphic
Function Method
Specify type of display SET_DISPLAY_AS
Get type of display GET_DISPLAY_AS
Specifying the Data Use
The data displayed in the business graphic depends primarily on whether and in which columns you make calculations:
If you do not make any calculations:
The first column with an alphanumeric data type is used for the axis that contains the characteristics of the chart.
In vertical bar charts, this is usually the X axis; in bar charts, this is usually the Y axis.
The first column with a numeric data type is used for the axis that contains the key figures of the chart.
In vertical bar charts, this is usually the Y axis; in bar charts, this is usually the X axis.
The first column with an alphanumeric data type is the Airlines column, which contains the names of the airlines. The first column with a numeric data type is the Occupied column, which contains the number of occupied seats for each flight. The business graphic is a vertical bar chart. A bar

SAP List Viewer in Web Dynpro ABAP
SAP COMMUNITY NETWORK SDN - sdn.sap.com | BPX - bpx.sap.com | BOC - boc.sap.com | UAC - uac.sap.com
© 2010 SAP AG 65
containing the name of the airline is displayed for each data record. The value in the Occupied column determines the height of each bar in the chart.
The user may not want to display each data record as a separate bar. In the above example, the user may want the business graphic to display one bar for each airline. You can achieve this, for example, by generating intermediate results in the Occupied column using the Airlines column. This produces a figure that is displayed in a single bar in the chart.
If you make calculations:
The first column with an alphanumeric data type is used for the axis that contains the characteristics of the chart.
Each column that involves a calculation is displayed in the axis that contains the key figures for the chart.
If you generate intermediate results:
Each column that is a criterion for intermediate results is displayed in the axis that contains the characteristics for the chart. If you specified more than one criterion, the combination of the criteria is displayed.
Each column that involves a calculation is displayed in the axis that contains the key figures for the chart.
You specify which data is to be displayed in the business graphic by moving the relevant column in the ALV output to the left, or by making calculations in the column. You cannot influence the content of the business graphic.
More information:
Position of Columns
Calculating (Aggregation)
Intermediate Results
Changing the Appearance of Business Graphics
You can influence the appearance of a business graphic by:
Specify dimensions of business graphic
Specify chart type
Specifying the size of the business graphic
Dimensions
You can set the following dimensions for your business graphic:
2D
The display is two-dimensional.
In vertical bar charts, the bars are displayed next to one another; in bar charts, they are displayed above one another.

SAP List Viewer in Web Dynpro ABAP
SAP COMMUNITY NETWORK SDN - sdn.sap.com | BPX - bpx.sap.com | BOC - boc.sap.com | UAC - uac.sap.com
© 2010 SAP AG 66
Pseudo 3D
The display is three-dimensional.
In vertical bar charts, the bars are displayed next to one another; in bar charts, they are displayed above one another.
3D
The display is three-dimensional.
In vertical bar charts and bar charts, the bars for each of the characteristics are displayed behind one another.
Chart Type
You can choose from the following chart types:
Area chart
Bar Chart
Vertical bar chart
Doughnut chart
Line chart
Pie chart
Split pie chart
Stacked area chart
Stacked bar chart
Stacked vertical bar chart

SAP List Viewer in Web Dynpro ABAP
SAP COMMUNITY NETWORK SDN - sdn.sap.com | BPX - bpx.sap.com | BOC - boc.sap.com | UAC - uac.sap.com
© 2010 SAP AG 67
Stacked line chart
To change the appearance of a business graphic, use the methods of interface class IF_SALV_WD_GRAPHIC_SETTINGS (implementing class CL_SALV_WD_COLUMN).
Methods for the appearance of the business graphic
Function Method
Specify dimensions of business graphic SET_DIMENSION
Get dimensions of business graphic GET_DIMENSION
Specify height of business graphic SET_HEIGHT
Get height of business graphic GET_HEIGHT
Specify chart type SET_TYPE
Get chart type GET_TYPE
Specify width of business graphic SET_WIDTH
Get width of business graphic GET_WIDTH
Allowing or Disallowing Display as Business Graphic
By default, users are permitted to display data from ALV output as business graphic. Using a dropdown list box in the toolbar, users can select from the following options:
Display as table only
Display as table and business graphic
Display as business graphic only
You can disallow users to display data as business graphic. To do this, you use the methods of interface class IF_SALV_WD_STD_FUNCTIONS (implementing class CL_SALV_WD_CONFIG_TABLE).
Methods for allowing the display of the business graphic
Function Method
Allow display as business graphic SET_DISPLAY_AS_ALLOWED
Check whether display as business graphic is allowed IS_DISPLAY_AS_ALLOWED
Display with Crystal Reports
To display data in Crystal Reports, the user needs a local installation of the Crystal Reports Viewer. For this reason the option to display data in Crystal Reports is initially deactivated.
You can activate Crystal Reports in Customizing for SAP List Viewer (ALV) under SAP Web Application
Server Customizing (transaction SIMGH). Here you can also maintain the generic Crystal Reports layout
under Managing Generic Crystal Reports.
You can control the option of the display with Crystal Reports with the following method for your Web Dynpro application: IF_SALV_WD_STD_FUNCTIONS~SET_CR_INPLACE_ALLOWED
Substitute Text for Empty Output
If no data is available, you can specify a text that is displayed in the area of the ALV output.

SAP List Viewer in Web Dynpro ABAP
SAP COMMUNITY NETWORK SDN - sdn.sap.com | BPX - bpx.sap.com | BOC - boc.sap.com | UAC - uac.sap.com
© 2010 SAP AG 68
To display the substitute text, the number of visible rows has to be set to -1 (see Size of ALV Output, Columns, and Cells, under Changing the Height).
To display the substitute text for empty ALV output, use the methods of interface class IF_SALV_WD_TABLE_SETTINGS (implementing class CL_SALV_WD_CONFIG_TABLE):
Methods for displaying substitute text for empty ALV output
Function Method
Specify substitute text SET_EMPTY_TABLE_TEXT
Get substitute text GET_EMPTY_TABLE_TEXT
Providing Application-Specific Functions
You can provide functions so that users can work with the ALV output. The functions that the system provides for ALV are called standard ALV functions. Standard ALV functions include sorting, filtering, and making calculations.
For more information: Configuring ALV Standard Functions [Page 13].
In addition to the standard ALV functions, you can display UI elements that users can use to execute user-defined, application-specific functions.
You can make the following settings for these functions:
Creating, Getting, and Deleting Functions
Specifying User Interface Elements
Specifying the Position in the Toolbar
Controlling Visibility and Activation Status
Events for Handling Functions
Generating, Getting, and Deleting Functions
If you use the ALV configuration model, the objects for all standard ALV functions are generated automatically. The objects are from class CL_SALV_WD_FUNCTION_STD.
With self-defined functions, you generate a function object of class CL_SALV_WD_FUNCTION with each function. You can create as many function objects as you want and arrange them in the toolbar.
You can make settings for:
Creating an object for a user-defined function
Getting object for a function
Setting and getting information about a function
Deleting an object for a user-defined function

SAP List Viewer in Web Dynpro ABAP
SAP COMMUNITY NETWORK SDN - sdn.sap.com | BPX - bpx.sap.com | BOC - boc.sap.com | UAC - uac.sap.com
© 2010 SAP AG 69
Creating an object for a user-defined function
When you generate a self-defined function, you specify a unique ID (type STRING), with which you later address the function.
To generate a function object, you use the methods of interface class IF_SALV_WD_FUNCTION_SETTINGS (implementing class CL_SALV_WD_CONFIG_TABLE).
Methods for generating function objects
Function Method
Generate user-defined function CREATE_FUNCTION
Getting an Object for a Function
To make settings for a function object, you must first call a suitable GET method. You can choose which function you want to get from the toolbar:
All standard ALV functions or a specific function
All self-defined functions or a specific function
Only the standard ALV functions on one side of the toolbar
All self-defined functions on one side of the toolbar or a specific function
Various methods are available for this purpose in interface class IF_SALV_WD_FUNCTION_SETTINGS (implementing class CL_SALV_WD_CONFIG_TABLE):
Methods for getting function objects
Function Method
Get all standard ALV functions GET_FUNCTIONS_STD
Get specific standard ALV function GET_FUNCTION_STD
Get all user-defined functions GET_FUNCTIONS
Get specific user-defined function GET_FUNCTION
Get all left-aligned standard ALV functions GET_FUNCTIONS_LEFT_STD
Get all left-aligned self-defined functions GET_FUNCTIONS_LEFT
Get specific left-aligned user-defined function GET_FUNCTION_LEFT
Get all right-aligned standard ALV functions GET_FUNCTIONS_RIGHT_STD
Get all right-aligned self-defined functions GET_FUNCTIONS_RIGHT
Get specific right-aligned user-defined function GET_FUNCTION_RIGHT
Setting and Getting Information About a Function
You can examine a function in the toolbar to determine whether it is a standard ALV function or a self-defined function.
You also specify the following properties:
ID
The ID of a standard ALV function is created automatically. It contains information about the standard ALV function.
The ID of a user-defined function is the ID you assigned the object when you created it.

SAP List Viewer in Web Dynpro ABAP
SAP COMMUNITY NETWORK SDN - sdn.sap.com | BPX - bpx.sap.com | BOC - boc.sap.com | UAC - uac.sap.com
© 2010 SAP AG 70
Group
You can use the group name to group functions according to any criteria.
Position in the toolbar (see Specifying the Position in the Toolbar)
Visibility and activation (see Controlling Visibility and Activation Status)
For the information, you use methods from class CL_SALV_WD_FUNCTION or class CL_SALV_WD_FUNCTION_STD.
Methods for information about function objects
Function Method
Get function type GET_TYPE
Get function ID GET_ID
Assign function to a group SET_GROUP
Get name of group to which function is assigned GET_GROUP
Deleting a Function
You can only delete objects from user-defined functions; you cannot delete objects from standard ALV functions.
To delete a user-defined function, specify the function ID. To do this, you use the methods of interface class IF_SALV_WD_FUNCTION_SETTINGS (implementing class CL_SALV_WD_CONFIG_TABLE).
Methods for deleting function objects
Function Method
Delete user-defined function DELETE_FUNCTION
Preparing the Context
Some of the self-defined functions that you can insert into the toolbar cause data to change when the user triggers them. You therefore link these functions to a context node of your application. To do this, you have to define an external context mapping to context node FUNCTION_ELEMENTS of the ALV interface controller. You generate a suitable attribute or subnode for each function beneath this context node.

SAP List Viewer in Web Dynpro ABAP
SAP COMMUNITY NETWORK SDN - sdn.sap.com | BPX - bpx.sap.com | BOC - boc.sap.com | UAC - uac.sap.com
© 2010 SAP AG 71
Defining User Interface Elements
You can use the following UI elements for user-defined functions:
Button (CL_SALV_WD_FE_BUTTON)
ButtonChoice (CL_SALV_WD_FE_BUTTON_CHOICE)
DropDownByIndex (CL_SALV_WD_FE_DROPDOWN_BY_IDX)
DropDownByKey (CL_SALV_WD_FE_DROPDOWN_BY_KEY)
InputField (CL_SALV_WD_FE_INPUT_FIELD)
LinkToAction (CL_SALV_WD_FE_LINK_TO_ACTION)
LinkToURL (CL_SALV_WD_FE_LINK_TO_URL)
ToggleButton (CL_SALV_WD_FE_TOGGLE_BUTTON)
For optical separation between the individual UI elements:
Separator (CL_SALV_WD_FE_SEPARATOR)
You can find the classes in the system in package SALV_WD_CONFIG.
To specify the UI element for a self-defined function, proceed as follows:
Generate a function object (see Creating, Getting, and Deleting Functions).
Generate one of the toolbar elements listed above.
Specify the properties of the toolbar element, as required.
Assign the toolbar element to the function.
To assign a suitable UI element to a function object, you use the methods of class CL_SALV_WD_FUNCTION.
Methods for assigning a UI element
Function Method
Set UI element SET_EDITOR
Get UI element GET_EDITOR
Specifying the Position in the Toolbar
You can specify the position of a function in various ways:
Specify alignment in toolbar
You specify whether the function is to be aligned from the left or right margin of the toolbar.
Specifying the position
You specify at which position the function is to be displayed.
To specify the position of a standard ALV function, you use the methods of class CL_SALV_WD_FUNCTION_STD.
To specify the position of a user-defined function, you use the methods of class CL_SALV_WD_FUNCTION.

SAP List Viewer in Web Dynpro ABAP
SAP COMMUNITY NETWORK SDN - sdn.sap.com | BPX - bpx.sap.com | BOC - boc.sap.com | UAC - uac.sap.com
© 2010 SAP AG 72
Methods for specifying the position of function objects
Function Method
Specify alignment in toolbar SET_ALIGNMENT
Get alignment in toolbar GET_ALIGNMENT
Set position number SET_POSITION
Get position number GET_POSITION
Controlling Visibility and Activation Status
You can control whether user-defined functions are used in various ways:
You can deactivate an individual UI element for a function.
You can hide an individual UI element for a function.
You can deactivate the entire toolbar.
You can hide the entire toolbar.
Activating and Deactivating Functions
If you do not want to hide a UI element, but want to prevent the user from executing its function, you can deactivate the UI element.
To activate or deactivate the UI element for a standard ALV function, you use methods from class CL_SALV_WD_FUNCTION_STD.
To activate or deactivate the UI element for a user-defined function, you use methods from the class of your UI element (see Specifying User Interface Elements).
Methods for the activation status of function objects
Function Method
Enable/disable function object SET_ENABLED
Get activation status GET_ENABLED
Showing and Hiding Functions
The following two constants are available for showing and hiding functions:
VISIBILITY-VISIBLE
The system displays the function.
VISIBILITY-NONE
The system hides the function.
To show or hide a UI element for a standard ALV function, you use the methods of class CL_SALV_WD_FUNCTION_STD.
To show or hide a UI element for a user-defined function, you use the methods of class CL_SALV_WD_FUNCTION.
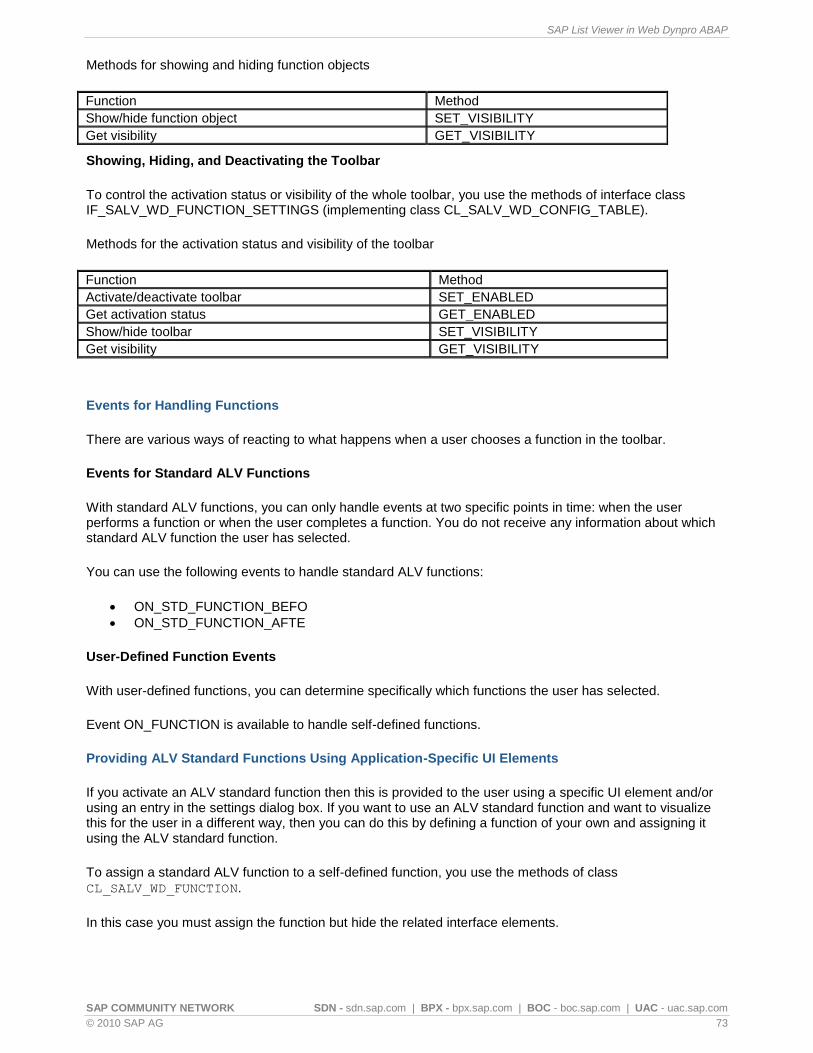
SAP List Viewer in Web Dynpro ABAP
SAP COMMUNITY NETWORK SDN - sdn.sap.com | BPX - bpx.sap.com | BOC - boc.sap.com | UAC - uac.sap.com
© 2010 SAP AG 73
Methods for showing and hiding function objects
Function Method
Show/hide function object SET_VISIBILITY
Get visibility GET_VISIBILITY
Showing, Hiding, and Deactivating the Toolbar
To control the activation status or visibility of the whole toolbar, you use the methods of interface class IF_SALV_WD_FUNCTION_SETTINGS (implementing class CL_SALV_WD_CONFIG_TABLE).
Methods for the activation status and visibility of the toolbar
Function Method
Activate/deactivate toolbar SET_ENABLED
Get activation status GET_ENABLED
Show/hide toolbar SET_VISIBILITY
Get visibility GET_VISIBILITY
Events for Handling Functions
There are various ways of reacting to what happens when a user chooses a function in the toolbar.
Events for Standard ALV Functions
With standard ALV functions, you can only handle events at two specific points in time: when the user performs a function or when the user completes a function. You do not receive any information about which standard ALV function the user has selected.
You can use the following events to handle standard ALV functions:
ON_STD_FUNCTION_BEFO
ON_STD_FUNCTION_AFTE
User-Defined Function Events
With user-defined functions, you can determine specifically which functions the user has selected.
Event ON_FUNCTION is available to handle self-defined functions.
Providing ALV Standard Functions Using Application-Specific UI Elements
If you activate an ALV standard function then this is provided to the user using a specific UI element and/or using an entry in the settings dialog box. If you want to use an ALV standard function and want to visualize this for the user in a different way, then you can do this by defining a function of your own and assigning it using the ALV standard function.
To assign a standard ALV function to a self-defined function, you use the methods of class
CL_SALV_WD_FUNCTION.
In this case you must assign the function but hide the related interface elements.

SAP List Viewer in Web Dynpro ABAP
SAP COMMUNITY NETWORK SDN - sdn.sap.com | BPX - bpx.sap.com | BOC - boc.sap.com | UAC - uac.sap.com
© 2010 SAP AG 74
You can replace the following UI elements for standard ALV functions in this way:
Send dropdown list box and individual entries in the dropdown list box
Display As dropdown list box and individual entries in the dropdown list box
Insert Row, Append Row, and Delete Row pushbuttons
Check pushbutton
Undo pushbutton
Excel and Print Version pushbuttons
Filter pushbutton and the Define Filter and Delete Filter functions
Settings pushbutton and the Open Settings Dialog Box and Close Settings Dialog Box functions
Views dropdown list box
Methods for Assigning a Standard ALV Function
Function Method
Assign standard ALV function to a self-defined function SET_FUNCTION_STD
Get standard ALV function that is assigned to a self-defined function GET_FUNCTION_STD
See also:
Creating, Getting, and Deleting Functions
Controlling Visibility and Activation Status
Handling Interaction
ALV output is not just used to display data structures as tables to users. Users can also use ALV output interactively in various ways. You can provide the following options:
Standard ALV Functions
In the Settings dialog box or the toolbar, you can show or hide various UI elements with which the user can access the ALV output services.
ALV supports the selection of standard functions: If, for example, your ALV output does not contain any columns with values that can be calculated, the UI elements for calculation are not displayed in the columns.
More information: Configuring Standard ALV Functions [Page 13]
User-defined, application-specific functions
You create UI elements in the toolbar with which the user can run the functions you programmed or standard ALV functions, and thus use your application effectively.
More information: Providing Application-Specific Functions [Page 68]
Interactive UI elements within the ALV output table
You can use interactive UI elements in the ALV output table (for example, as cell editors in the columns and cells of your ALV output). There are two types of interaction:

SAP List Viewer in Web Dynpro ABAP
SAP COMMUNITY NETWORK SDN - sdn.sap.com | BPX - bpx.sap.com | BOC - boc.sap.com | UAC - uac.sap.com
© 2010 SAP AG 75
o Interaction Without Data Change
More information: Handling Interaction Without Data Change [Page 75])
o Interaction with Data Change
More information: Handling Interaction with Editable ALV [Page 79]
Various events are available to handle users' actions for these UI elements.
Handling Interaction Without Data Change
Not all actions carried out by the user in the ALV output lead to a change in the data. Examples of actions that do not cause changes to the data are:
The user can select individual or multiple rows and can then execute different actions on these rows - depending on the settings you have made as a developer.
More information: Defining the Selection of Rows and Columns [Page 75]
If you use hyperlinks or buttons as interface elements then you can implement relevant actions for the user.
More information: Using Hyperlinks and Buttons as Cell Editors [Page 78]
You can make various settings to control or handle this kind of interaction.
Defining the Selection of Rows and Columns
You can determine whether and how many rows or columns the user can select at a time.
Enabling selection of columns
Using the selection status, you specify whether and how many columns the user can select at a time.
Enable selection of rows
Using the selection type, you specify whether and how many rows the user can select at a time and whether a lead selection exists (see Context Node: Properties, under Lead Selection).
The user can also change the selection of rows in a write-protected ALV output if the selection type allows this. However, if you deactivate the ALV output, the user cannot select any rows, regardless of the selection type.
More information: Controlling Write-Protection of the ALV Output [Page 80]
You can also prevent the user from selecting specific cells or all cells.

SAP List Viewer in Web Dynpro ABAP
SAP COMMUNITY NETWORK SDN - sdn.sap.com | BPX - bpx.sap.com | BOC - boc.sap.com | UAC - uac.sap.com
© 2010 SAP AG 76
Setting the Selection Status
You can specify the selection status separately for each column. You can use the following selection statuses:
Not selected
Any existing selections are removed.
Selected
The column is selected.
Not selectable
The user cannot select the column.
To fix columns, use the methods of the class CL_SALV_WD_COLUMN.
Methods for Selection Status
Function Method
Specify selection status SET_SELECTION_STATE
Get selection status GET_SELECTION_STATE
Setting the Selection Type
You can use the following selection types:
Automatic
The settings from the context node are applied.
No selection possible (NONE)
No pushbuttons for selecting rows are displayed at the start of the rows.
Single rows (SINGLE)
Pushbuttons are displayed at the start of the rows. The user can only select one row at a time. This row is displayed as the lead selection. If a user selects another row, the lead selection is also changed.
Single rows without lead selection (SINGLE_NO_LEAD)
Pushbuttons are displayed at the start of the rows. The user can only select one row at a time. If a user selects another row, the selection is also changed. The ALV output has no lead selection.
Multiple rows (MULTI)
Pushbuttons are displayed at the start of the rows. The user can select multiple rows by pressing the CTRL key. The first row selected is the lead selection.

SAP List Viewer in Web Dynpro ABAP
SAP COMMUNITY NETWORK SDN - sdn.sap.com | BPX - bpx.sap.com | BOC - boc.sap.com | UAC - uac.sap.com
© 2010 SAP AG 77
Multiple rows without lead selection (MULTI_NO_LEAD)
Pushbuttons are displayed at the start of the rows. The user can select multiple rows by pressing the CTRL key. The ALV output has no lead selection.
You use the SELECTION property of your context node to specify how many data records can be selected.
Example: If you select the value 1..1 for SELECTION, one entry must always be selected. If the value is 0..n, it is possible to select no entries at all, or as many as required.
Using the selection type, you cannot allow the selection of more entries than the number defined in the context node. If you try to do this, a runtime error occurs and the application terminates.
Example: If you specified 1..1 for SELECTION in the context node, you cannot use the selection types MULTI and MULTI_NO_LEAD.
To define the selection type, you use the methods of interface class IF_SALV_WD_TABLE_SETTINGS (implementing class CL_SALV_WD_CONFIG_TABLE).
Methods for Selection Type
Function Method
Specify selection type SET_SELECTION_MODE
Get selection type GET_SELECTION_MODE
Event Handling
There are two different events available to react to a selection of the user:
ON_LEAD_SELECT
The application reacts to a lead selection change of the end user.
For more information, see the documentation on the interface controller WD_SALV_TABLE in the system.
ON_SELECT
The application reacts to a lead selection or a selection change of the end user.
The system can raise only one of the above mentioned events. With the method IF_SALV_WD_TABLE_SETTINGS~SET_ON_SELECT_ENABLED you enable the event handler of the event ON_SELECT and deactivate the event handler of the event ON_LEAD_SELECT.
Note that, if the ON_SELECT event is enabled, a roundtrip is executed for each selection the end user is making. This event should only be enabled if it is necessary to get notified on selections, not only lead selections.

SAP List Viewer in Web Dynpro ABAP
SAP COMMUNITY NETWORK SDN - sdn.sap.com | BPX - bpx.sap.com | BOC - boc.sap.com | UAC - uac.sap.com
© 2010 SAP AG 78
Preventing Selection
You can prevent users from selecting ALV output rows.
In contrast to the NONE selection type, the pushbuttons are not hidden; they are only deactivated. This enables you to prevent the user from selecting rows.
You can decide whether you want to prevent selection for all ALV output rows, or just for specific rows.
To do this, you use the methods of interface class IF_SALV_WD_TABLE_SETTINGS (implementing class CL_SALV_WD_CONFIG_TABLE).
Methods for Preventing Selection
Function Method
Disallow selection for all rows in ALV output SET_ROW_SELECTABLE
Check whether selection is disallowed for all rows GET_ROW_SELECTABLE
Disallow selection for specific rows in ALV output SET_ROW_SELECTABLE_FIELDNAME
Get name of field that controls whether individual rows can be selected
GET_ROW_SELECTABLE_FIELDNAME
For more information on using individual fields to control the behavior of rows or cells: Assigning Properties to Columns and Cells [Page 56].
Using Hyperlinks and Buttons as Cell Editors
You can use UI elements in the cells of the ALV output that allow the user to trigger certain actions. The following UI elements do not automatically lead to data changes:
Hyperlink LINK_TO_ACTION
Hyperlink LINK_TO_URL
Button
ToggleButton
Classes for Interactive UI Elements
UI Element Class
Hyperlink LINK_TO_ACTION CL_SALV_WD_UIE_LINK_TO_ACTION
Hyperlink LINK_TO_URL CL_SALV_WD_UIE_LINK_TO_URL
Button CL_SALV_WD_UIE_BUTTON
ToggleButton CL_SALV_WD_UIE_TOGGLE_BUTTON
You can find these classes in the system in package SALV_WD_CONFIG.
For information about displaying one of the UI elements in a cell, see Assigning Properties to Columns and Cells [Page 56].
Users can also use the UI elements listed here in a write-protected ALV output. However, if you deactivate the ALV output then the interface elements are also deactivated.

SAP List Viewer in Web Dynpro ABAP
SAP COMMUNITY NETWORK SDN - sdn.sap.com | BPX - bpx.sap.com | BOC - boc.sap.com | UAC - uac.sap.com
© 2010 SAP AG 79
More information: Activating and Deactivating the ALV Output [Page 79].
Event Handling
You can use the event ON_CLICK to handle user actions for the following UI elements:
Hyperlink LINK_TO_ACTION
Button
ToggleButton
However, the UI element LINK_TO_URL is only for displaying a URL in an Internet browser. You cannot catch any events.
Activating and Deactivating the ALV Output
Procedure
The ALV output is activated by default. All interactive UI elements of the ALV output, both in the toolbar and in the table section, are operable if the ALV output is activated.
To activate or deactivate the ALV output, use the methods of the interface class IF_SALV_WD_TABLE_SETTINGS (implementing class CL_SALV_WD_CONFIG_TABLE).
Methods for activating the ALV output
Function Method
Activate or deactivate ALV output SET_ENABLED
Check whether ALV output is activated GET_ENABLED
You can also deactivate individual interface elements.
More information: Assigning Properties to Columns and Cells [Page 56]
Handling Interaction with Editable ALV
The ALV output is read-only by default. To allow users to change or enter new data then you have to make some changes to the standard settings.
Procedure
1. The write-protection for the ALV output must be deactivated before these actions can be executed.
More information: Controlling Write-Protection of the ALV Output [Page 80]
2. The ALV output uses TextView as the cell editor for displaying data by default. To make it possible for users to enter or change existing data, replace this interface element with an interactive interface element, such as InputField.
More information: Changing Cell Editors [Page 81]

SAP List Viewer in Web Dynpro ABAP
SAP COMMUNITY NETWORK SDN - sdn.sap.com | BPX - bpx.sap.com | BOC - boc.sap.com | UAC - uac.sap.com
© 2010 SAP AG 80
3. The user can add rows at a specific position, attach them to the end of the ALV output, and delete them.
More information: Adding and Deleting Individual Rows [Page 81]
4. It is also possible to attach a whole page of empty rows, not only individual rows, to make it possible to enter mass data.
More information: Append Entire Page with Input Ready Rows [Page 82]
5. You must also define the time at which the system checks whether changed data is correct.
More information: Specifying Check Times [Page 83]
6. If the user changes or creates new data then it might be necessary to refresh the data manually or you might only want to refresh that data and not the whole ALV output.
More information: Refreshing the Display [Page 84]
Controlling Write-Protection for the ALV Output
You can depict the data in the ALV output using UI elements that allow the data to be changed. However, the ALV output is write-protected by default. To allow the user to change data, you must first remove this write-protection. If you remove the write-protection then it has the following effects:
UI elements (in cells, not in the toolbar) that permit data to be changed can be used.
The buttons for adding, attaching, and deleting rows as well as for checking data changes are visible in the toolbar.
If you remove the write protection of the ALV output, the system uses a specified color for the ALV output. You cannot then influence which colors are used for the ALV output. Specifications that you have made for the color of the ALV output are overwritten (see Color of ALV Output, Columns, and Cells).
To switch write-protection on or off, use the methods of the interface class IF_SALV_WD_TABLE_SETTINGS (implementing class CL_SALV_WD_CONFIG_TABLE).
Methods for the write-protection of the ALV output
Function Method
Switch write-protection on/off SET_READ_ONLY
Check whether write-protection is switched on/off GET_READ_ONLY
Procedure
Remove write-protection
1. You get the ALV Configuration Model, as described in Getting ALV Configuration Model [Page 12]. 2. To remove the write-protection, add the following code:
lv_value->IF_SALV_WD_TABLE_SETTINGS~SET_READ_ONLY( ABAP_FALSE ).

SAP List Viewer in Web Dynpro ABAP
SAP COMMUNITY NETWORK SDN - sdn.sap.com | BPX - bpx.sap.com | BOC - boc.sap.com | UAC - uac.sap.com
© 2010 SAP AG 81
Changing Cell Editors
As standard, the cells of the ALV display are displayed with cell editors, for example the TextView, which are not ready for input. If you want to make the ALV editable then you have the option to replace these cell editors with the following interactive interface elements:
InputField
Checkbox
ToggleButton
TriStateCheckBox
DropDownByKey
Classes for interactive UI elements
UI Element Class
InputField CL_SALV_WD_UIE_INPUT_FIELD
Checkbox CL_SALV_WD_UIE_CHECKBOX
ToggleButton CL_SALV_WD_UIE_TOGGLE_BUTTON
TriStateCheckBox CL_SALV_WD_UIE_CHECKBOX_TRI
DropDownByKey CL_SALV_WD_UIE_DROPDOWN_BY_KEY
You can find these classes in the system in package SALV_WD_CONFIG.
For information about displaying one of the UI elements in a cell, see Assigning Properties to Columns and Cells [Page 56].
Procedure
Proceed as follows to set an InputField as the cell editor for a column:
1. Instantiate the ALV Configuration Model, as described in Getting ALV Configuration Model [Page 12].
2. Add the following code where lv_value is the variable for the configuration model:
DATA: lr_column_settings TYPE REF TO if_salv_wd_column_settings,
lr_input_field TYPE REF TO cl_salv_wd_uie_input_field.
lr_column_settings ?= lv_value.
lr_column = lr_column_settings->get_column( 'MY_COLUMN' ).
CREATE OBJECT lr_input_field EXPORTING value_fieldname = 'MY_COLUMN'.
lr_column->set_cell_editor( lr_input_field ).

SAP List Viewer in Web Dynpro ABAP
SAP COMMUNITY NETWORK SDN - sdn.sap.com | BPX - bpx.sap.com | BOC - boc.sap.com | UAC - uac.sap.com
© 2010 SAP AG 82
Enabling Addition and Deletion of Rows
You can provide the user with pushbuttons in the toolbar for adding or deleting data records in various places in the ALV output. These functions are activated when you remove the write-protection for the ALV output.
More information: Controlling Write-Protection of the ALV Output [Page 80]
You can provide the following functions:
(Buttons for Editing Data)
Insert Row
If the user has not selected a row, the new row is created as the first row. Otherwise, it is created before the selected row or rows.
Append Row
A new row is appended to the end of the ALV output, regardless of which row is selected.
Delete Row
The selected rows are deleted.
The number of rows that the user can insert or delete at a time depends on how many rows he or she has selected. You use the selection type to define how many rows the user can select at a time.
More information: Defining the Selection of Rows and Columns [Page 75]
If the selection type No Selection Possible is specified, the user cannot select any rows. The pushbuttons for inserting and deleting rows are therefore hidden.
Event Handling
The event ON_DATA_CHECK contains parameters for getting the indexes of inserted or deleted rows.
Adding Entire Pages with Input Ready Rows
You can switch the SAP List Viewer (ALV) to the mode for mass data. You thereby automatically create a page of empty, input ready rows at the end of the ALV output. The user does not have to individually insert every new row but can fill any number of rows at the end of the ALV output.
To switch the ALV output to the mode for mass data, use the methods of the interface class IF_SALV_WD_TABLE_SETTINGS (implementing class CL_SALV_WD_CONFIG_TABLE).
Methods for Switching on the Mode for Mass Data
Function Method
Activating and deactivating the mode for mass data SET_EDIT_MODE
Check whether the mode for mass data is switched on GET_EDIT_MODE

SAP List Viewer in Web Dynpro ABAP
SAP COMMUNITY NETWORK SDN - sdn.sap.com | BPX - bpx.sap.com | BOC - boc.sap.com | UAC - uac.sap.com
© 2010 SAP AG 83
Procedure
1. Instantiate the ALV Configuration Model, as described in Getting ALV Configuration Model [Page 12].
2. Activate the mass data mode:
lv_value->IF_SALV_WD_TABLE_SETTINGS~SET_EDIT_MODE (
IF_SALV_WD_C_TABLE_SETTINGS=>EDIT_MODE_MASS ).
3. If you want to display initial values for the new rows, then you can set it up using this method:
lv_value->IF_SALV_WD_MASS_EDIT_SETTINGS~SET_DEFAULT_VALUES_VISIBLE(
ABAP_TRUE ).
Specifying Check Times
In the editable ALV, the user can change data and add or delete rows. These changes are initially only stored in the context of the ALV component. At predefined times, the system transfers the data from the ALV context to the context of your application and checks the data for correct data types, and so on. This ensures that subsequent actions are applied to the most current data.
When the user chooses the Settings pushbutton in the toolbar in order to use ALV services, the system automatically checks the data.
You can specify additional times at which the current data in the ALV output is to be synchronized with that of the application:
When the user presses the ENTER key or triggers a system action (DATA_CHECK_ON_CELL_EVENT). Use this setting when you anticipate minimal data change that does not have a negative impact on system performance due to frequent checks.
The user chooses Check (DATA_CHECK_ON_CHECK_EVENT).
This pushbutton is displayed by default as soon as you switch off the write-protection for the ALV output.
This setting is useful if the user is to process multiple data records one after the other; it does not have a negative impact on system performance due to frequent checks. You also use this setting if you only want checks to be made if the user triggers the check himself or herself.
When you trigger the check in your application (DATA_CHECK).
Specifying Check Times by User
To specify which user action triggers the data check, use the methods of the interface class IF_SALV_WD_TABLE_SETTINGS (implementing class CL_SALV_WD_CONFIG_TABLE).
Methods for Setting Check Times
Function Method
Set time SET_DATA_CHECK

SAP List Viewer in Web Dynpro ABAP
SAP COMMUNITY NETWORK SDN - sdn.sap.com | BPX - bpx.sap.com | BOC - boc.sap.com | UAC - uac.sap.com
© 2010 SAP AG 84
Get time GET_DATA_CHECK
Event Handling
When the data is checked, the event ON_DATA_CHECK is triggered.
Refreshing the Display
By default, the ALV output display is refreshed as soon as changes to the data are checked. The data in the list is updated and the settings in the Settings dialog box are applied to the data. This can result in undesired effects.
The ALV output shows filtered data: only data records that contain a value beginning with the letter A in the Airline column are displayed. The user changes one of the values in the Airline column from AA to BA. As soon as the user presses the ENTER key, the data record just edited disappears from the ALV output.
Automatic Refresh
The system automatically updates the display and applies the settings in the Settings dialog box under the following circumstances. You cannot change these mechanisms:
The user inserts rows, appends them to the end of the list, or deletes them.
The application applies changes to the data.
The user applies the settings in the Settings dialog box to the data by choosing Transfer or OK.
The user sorts or filters the ALV output.
Manual Refresh
In cases where the user changes existing data records, you can influence when a refresh of the ALV output is only to affect the data, and when the services that are currently set are to be applied to the changed data. There are two methods for this, each of which has two possible settings:
SET_REFRESH_ON_DATA_CHANGE
Controls refresh when the user changes the data and confirms this by pressing the ENTER key.
SET_REFRESH_ON_DATA_CHECK
Controls refresh when the user changes the data and chooses Check.
The following values are possible:
REFRESH_AND_APPLY_SERVICES
The data in the list is updated; the settings in the Settings dialog box are applied to the data.
REFRESH_DATA_ONLY
The data in the list is updated. The settings in the Settings dialog box are not applied to the data.
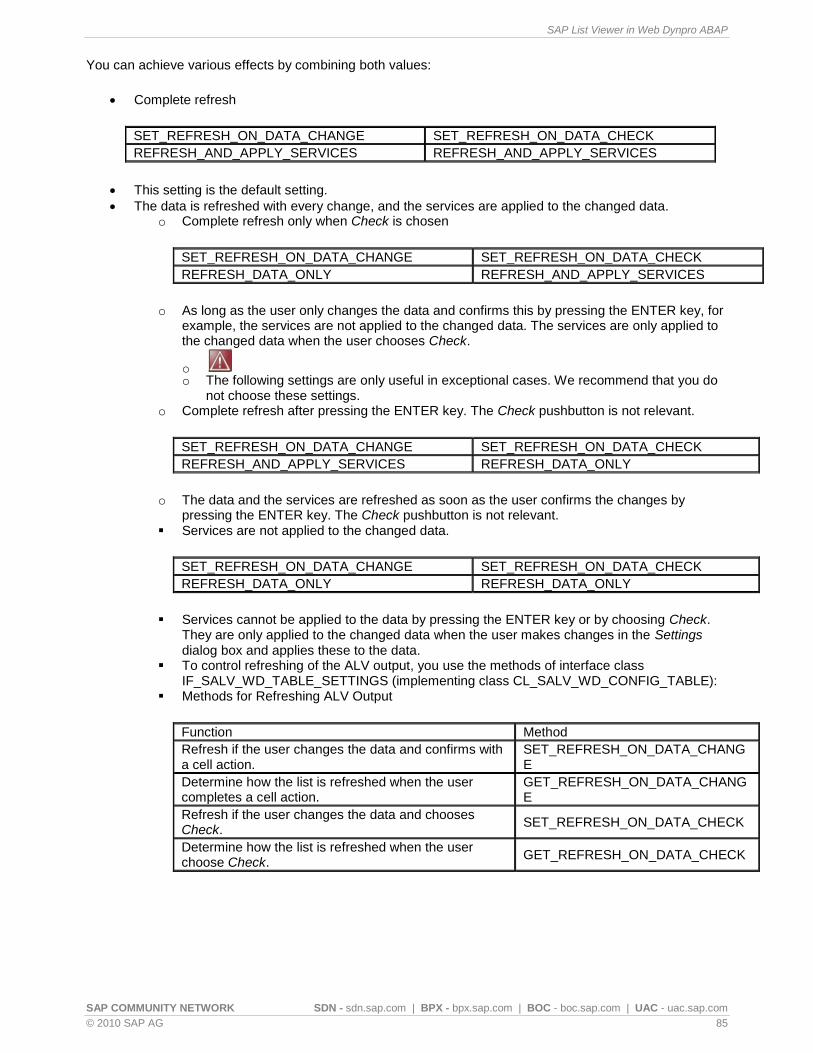
SAP List Viewer in Web Dynpro ABAP
SAP COMMUNITY NETWORK SDN - sdn.sap.com | BPX - bpx.sap.com | BOC - boc.sap.com | UAC - uac.sap.com
© 2010 SAP AG 85
You can achieve various effects by combining both values:
Complete refresh
SET_REFRESH_ON_DATA_CHANGE SET_REFRESH_ON_DATA_CHECK
REFRESH_AND_APPLY_SERVICES REFRESH_AND_APPLY_SERVICES
This setting is the default setting.
The data is refreshed with every change, and the services are applied to the changed data. o Complete refresh only when Check is chosen
SET_REFRESH_ON_DATA_CHANGE SET_REFRESH_ON_DATA_CHECK
REFRESH_DATA_ONLY REFRESH_AND_APPLY_SERVICES
o As long as the user only changes the data and confirms this by pressing the ENTER key, for example, the services are not applied to the changed data. The services are only applied to the changed data when the user chooses Check.
o o The following settings are only useful in exceptional cases. We recommend that you do
not choose these settings. o Complete refresh after pressing the ENTER key. The Check pushbutton is not relevant.
SET_REFRESH_ON_DATA_CHANGE SET_REFRESH_ON_DATA_CHECK
REFRESH_AND_APPLY_SERVICES REFRESH_DATA_ONLY
o The data and the services are refreshed as soon as the user confirms the changes by pressing the ENTER key. The Check pushbutton is not relevant.
Services are not applied to the changed data.
SET_REFRESH_ON_DATA_CHANGE SET_REFRESH_ON_DATA_CHECK
REFRESH_DATA_ONLY REFRESH_DATA_ONLY
Services cannot be applied to the data by pressing the ENTER key or by choosing Check. They are only applied to the changed data when the user makes changes in the Settings dialog box and applies these to the data.
To control refreshing of the ALV output, you use the methods of interface class IF_SALV_WD_TABLE_SETTINGS (implementing class CL_SALV_WD_CONFIG_TABLE):
Methods for Refreshing ALV Output
Function Method
Refresh if the user changes the data and confirms with a cell action.
SET_REFRESH_ON_DATA_CHANGE
Determine how the list is refreshed when the user completes a cell action.
GET_REFRESH_ON_DATA_CHANGE
Refresh if the user changes the data and chooses Check.
SET_REFRESH_ON_DATA_CHECK
Determine how the list is refreshed when the user choose Check.
GET_REFRESH_ON_DATA_CHECK
SAP List Viewer in Web Dynpro ABAP
SAP COMMUNITY NETWORK SDN - sdn.sap.com | BPX - bpx.sap.com | BOC - boc.sap.com | UAC - uac.sap.com
© 2010 SAP AG 86
Drag and Drop
With drag and drop a user can select UI elements from a UI area (source), drag them from the source, and drop them into another UI element area (target). Source and target can be either the same UI element or two different UI elements. The ALV can be used as the source and the target of a drag and drop operation.
Note that, in ALV, you cannot drop objects between rows, only onto an existing row.
To ensure the accessibility of your application, you should also enable a task to be executed without drag and drop.
See also the system documentation for CL_SALV_WD_CONFIG_TABLE and IF_SALV_DRAG_AND_DROP.
ALV as a DragSource
You can enable the ALV as DragSource by adding a DragSourceInfo to the ALV. The enduser is then able to drag the selected rows to a drop target. Note that every row selected is dragged.
You can make the following settings:
Create a DragSourceInfo
Get the DragSourceInfo
Set and get information about a DragSourceInfo
Delete the DragSourceInfo
Create a DragSourceInfo
To generate a DragSourceInfo, you use the methods of interface class IF_SALV_WD_DRAG_AND_DROP (implementing class CL_SALV_WD_CONFIG_TABLE).
Methods for Creating a DragsourceInfo
Function Method
Create DragSourceInfo CREATE_DRAG_SOURCE_INFO
Get the DragSourceInfo
To be able to modify properties of the DragSourceInfo, you must first call the GET_DRAG_SOURCE_INFO method of interface class IF_SALV_WD_DRAG_AND_DROP (implementing class CL_SALV_WD_CONFIG_TABLE).
Methods for Getting the DragSourceInfo
Function Method
Get the DragSourceInfo GET_DRAG_SOURCE_INFO
Set and get information about a DragSourceInfo
A DragSourceInfo has the following properties:
DATA
When an object is dropped, an event is triggered and DragSourceInfo.data is passed as the
event parameter DATA. In the case of ALV for Web Dynpro ABAP, the application must specify at this point the ALV from which the object was dropped. The application can then ask the ALV context

SAP List Viewer in Web Dynpro ABAP
SAP COMMUNITY NETWORK SDN - sdn.sap.com | BPX - bpx.sap.com | BOC - boc.sap.com | UAC - uac.sap.com
© 2010 SAP AG 87
of that ALV for the current selections in the implementation of the ON_DROP event in the DropTarget.
ENABLED
The enabled flag enables or disables the DragSourceInfo. That way you can specify whether the ALV can be used for a drag operation.
TAGS
To define which drag source can be moved to which drag target, specify the corresponding string
(same name) in the tag property of the relevant DragSourceInfo and DropTargetInfo. You can also
use multiple tags. You separate the tags with blank spaces. The system does not differentiate between uppercase and lowercase letters in tags. You can use an asterisk (*) as a wild card at the end of the tags for example, grid*. You may not use the following characters: Colon (:) Comma (,) Semicolon (;) Backslash (\) Slash (/) Point (.)
For retrieving and setting properties of the DragSourceInfo, you use methods from interface class IF_SALV_WD_DRAG_SOURCE_INFO.
Methods for Information About Function Objects
Function Method
Returns the value for data transport GET_DATA
Returns if the DragSourceInfo is enabled GET_ENABLED
Returns the tags of the DragSourceInfo GET_TAGS
Sets the value for data transport SET_DATA
Sets the enabled flag of the DragSourceInfo SET_ENABLED
Sets the tags of the DragSourceInfo SET_TAGS
Delete the DragSourceInfo
To delete the DragSourceInfo you previously defined, you use the method of interface class IF_SALV_WD_DRAG_AND_DROP (implementing class CL_SALV_WD_CONFIG_TABLE).
Methods for Deleting the DragSourceInfo
Function Method
Delete the DragSourceInfo DELETE_DRAG_SOURCE_INFO
ALV as a DropTarget
You can enable the ALV as Drop Target by adding one or more DropTargetInfos to the ALV.
The ALV supports only dropping items on a table row.
The enduser is then able to drop an item onto a row of an ALV.
You can make the following settings:
Create a Row-DropTargetInfo
Get Row-DropTargetInfos
Set and get information about a Row-DropTargetInfo
Delete Row-DropTargetInfo

SAP List Viewer in Web Dynpro ABAP
SAP COMMUNITY NETWORK SDN - sdn.sap.com | BPX - bpx.sap.com | BOC - boc.sap.com | UAC - uac.sap.com
© 2010 SAP AG 88
Create a Row-DropTargetInfo
To generate a RowDropTargetInfo, you use the methods of interface class IF_SALV_WD_DRAG_AND_DROP (implementing class CL_SALV_WD_CONFIG_TABLE).
Methods for Creating Function Objects
Function Method
Create a Row-DropTargetInfo CREATE_DROP_ROW_TARGET_INFO
Get Row-DropTargetInfos
To be able to modify properties of a Row-DropTargetInfo, you must first call the get method of interface class IF_SALV_WD_DRAG_AND_DROP (implementing class CL_SALV_WD_CONFIG_TABLE).
Method for Getting the DragSourceInfo
Function Method
Get Row-DropTargetInfos GET_DROP_ROW_TARGET_INFO
Get all Row-DropTargetInfos GET_DROP_ROW_TARGET_INFOS
Set and get information about a Row-DropTargetInfo
A DropTargetInfo has the following properties:
ENABLED The enabled flag enables or disables the Row-DropTargetInfo. That way you can specify whether the ALV can make use of this Row-DropTargetInfo for a drop operation.
NAME Name of a Row-DropTargetInfo.
TAGS To define which drag source can be moved to which drag target, specify the corresponding string
(same name) in the tag property of the relevant DragSourceInfo and DropTargetInfo. You can also
use multiple tags. You separate the tags with blank spaces. The system does not differentiate between uppercase and lowercase letters in tags. You can use an asterisk (*) as a wild card at the end of the tags for example, grid*. You may not use the following characters: Colon (:) Comma (,) Semicolon (;) Backslash (\) Slash (/) Point (.)
For retrieving and setting properties of the DragSourceInfo, you use methods from interface class IF_SALV_WD_DRAG_SOURCE_INFO.
Methods for Information About DropTargetInfo Objects
Function Method
Returns if the DropTargetInfo is enabled GET_ENABLED
Returns the name of a DropTargetInfo GET_NAME
Returns the tags of the DropTargetInfo GET_TAGS
Sets the enabled flag of a DropTargetIfno SET_ENABLED
Sets the name of a DropTargetInfo SET_NAME
Sets the tags of the DropTargetInfo SET_TAGS
Specifying which Row-DropTargetInfos can be used for dropping onto rows
You specify which DropTargetInfo can be used for which row in the ALV as follows: You either define exactly one DropTargetInfo in the method SET_DROP_ROW_NAME; or you tell the ALV the fieldname, in which the name of each DropTargetInfo for each row in the ALV is stored.
SAP List Viewer in Web Dynpro ABAP
SAP COMMUNITY NETWORK SDN - sdn.sap.com | BPX - bpx.sap.com | BOC - boc.sap.com | UAC - uac.sap.com
© 2010 SAP AG 89
Methods for managing Row-DropTargetInfos
Function Method
Returns the name of the Row-DropTargetInfo for dropping on a row
GET_DROP_ROW_NAME
Returns the name of the field that manages the name of the Row-DropTargetInfo
GET_DROP_ROW_NAME_FIELDNAME
Specifies the name of the Row-DropTargetInfo to be used
SET_DROP_ROW_NAME
Specifies the field that manages the name of the Row-DropTargetInfo
SET_DROP_ROW_NAME_FIELDNAME
Deleting Row-DropTargetInfos
To delete the Row-DropTargetInfos you previously defined, you use the methods of interface class IF_SALV_WD_DRAG_AND_DROP (implementing class CL_SALV_WD_CONFIG_TABLE).
Methods for deleting function objects
Function Method
Delete Row-DropTargetInfo DELETE_DRAG_SOURCE_INFO
Delete all Row-DropTargetInfos DELETE_DRAG_SOURCE_INFOS
Providing Help for Users
You have various options of providing help to users of your application. You can use the following types of help for your ALV output:
accessibilityDescription
If the user has activated accessibility, the text assigned here is added to the quick info. This description is to provide more information about the ALV output or column. The description is only read by the screen reader when the user moves the focus to the ALV output.
Tooltip
Quick info text that appears when the user passes the mouse pointer over the UI element in the toolbar or over a cell. If screen readers are supported, accessibilityDescription is added automatically as additional text for the quick info, to support accessibility.
Explanation
Various UI elements in the toolbar or list have the explanation property. If the user has switched on the help mode, the text for this property is displayed in a box when the user moves the cursor over the UI element.
The text for the explanation property is displayed independently of the tooltip.
Web Dynpro input help
You can use the following input help in the ALV output:
o ABAP Dictionary Search Help
SAP List Viewer in Web Dynpro ABAP
SAP COMMUNITY NETWORK SDN - sdn.sap.com | BPX - bpx.sap.com | BOC - boc.sap.com | UAC - uac.sap.com
© 2010 SAP AG 90
o OVS Value Help o Freely Programmed Input Help
accessibilityDescription
accessibilityDescription is a property of the following areas:
Entire ALV output
The accessibilityDescription is displayed with the tooltip for the header of the ALV output. To enter it, you use the methods of interface class IF_SALV_WD_TABLE_SETTINGS (implementing class CL_SALV_WD_CONFIG_TABLE):
accessibilityDescription of the ALV Output
Function Method
Specify accessibilityDescription SET_ACC_DESCRIPTION
Get accessibilityDescription GET_ACC_DESCRIPTION
Column
The accessibilityDescription is displayed with the tooltip of the column header. To enter it, you use the methods of class CL_SALV_WD_COLUMN:
Methods for entering accessibilityDescription
Function Method
Specify accessibilityDescription SET_ACCESSIBILITY_DESCR
Get accessibilityDescription GET_ACCESSIBILITY_DESCR
Tooltip
You can specify tooltips for the following elements of your ALV output:
Header of ALV output
Column Headers
User-defined functions (using the UI element used)
Cell editors (using the UI element used)
Classes and methods for tooltips
Tooltip Class Method
For the header of the ALV output
IF_SALV_WD_TABLE_SETTINGS
SET_TOOLTIP and GET_TOOLTIP
For user-defined functions CL_SALV_WD_FE_<UI element>
For cell editors CL_SALV_WD_UIE_<UI element>
Explanation
You can specify an explanation for the following elements of your ALV output:
Column

SAP List Viewer in Web Dynpro ABAP
SAP COMMUNITY NETWORK SDN - sdn.sap.com | BPX - bpx.sap.com | BOC - boc.sap.com | UAC - uac.sap.com
© 2010 SAP AG 91
User-defined functions (using the UI element used) o Button o Dropdown list box (index and key) o Input field
Cell editors (using the UI element used) o Button o Checkbox and TriState checkbox o Dropdown list box (index and key) o Input Field o FileUpload
Classes and methods for the explanation
Tooltip Class Method
For the column CL_SALV_WD_COLUMN SET_EXPLANATION and GET_EXPLANATION
For user-defined functions
CL_SALV_WD_FE_BUTTON
CL_SALV_WD_FE_DROPDOWN_BY_IDX
CL_SALV_WD_FE_DROPDOWN_BY_KEY
CL_SALV_WD_FE_INPUT_FIELD
For cell editors
CL_SALV_WD_UIE_BUTTON
CL_SALV_WD_UIE_CHECKBOX
CL_SALV_WD_UIE_CHECKBOX_TRI
CL_SALV_WD_UIE_DROPDOWN_BY_IDX
CL_SALV_WD_UIE_DROPDOWN_BY_KEY
CL_SALV_WD_UIE_FILE_UPLOAD
CL_SALV_WD_UIE_INPUT_FIELD
SAP List Viewer in Web Dynpro ABAP
SAP COMMUNITY NETWORK SDN - sdn.sap.com | BPX - bpx.sap.com | BOC - boc.sap.com | UAC - uac.sap.com
© 2010 SAP AG 92
Copyright
© 2010 SAP AG. All rights reserved.
No part of this publication may be reproduced or transmitted in any form or for any purpose without the express permission of SAP AG. The information contained herein may be changed without prior notice.
Some software products marketed by SAP AG and its distributors contain proprietary software components of other software vendors.
Microsoft, Windows, Outlook, and PowerPoint are registered trademarks of Microsoft Corporation.
IBM, DB2, DB2 Universal Database, OS/2, Parallel Sysplex, MVS/ESA, AIX, S/390, AS/400, OS/390, OS/400, iSeries, pSeries, xSeries, zSeries, System i, System i5, System p, System p5, System x, System z, System z9, z/OS, AFP, Intelligent Miner, WebSphere, Netfinity, Tivoli, Informix, i5/OS, POWER, POWER5, POWER5+, OpenPower and PowerPC are trademarks or registered trademarks of IBM Corporation.
Adobe, the Adobe logo, Acrobat, PostScript, and Reader are either trademarks or registered trademarks of Adobe Systems Incorporated in the United States and/or other countries.
Oracle is a registered trademark of Oracle Corporation.
UNIX, X/Open, OSF/1, and Motif are registered trademarks of the Open Group.
Citrix, ICA, Program Neighborhood, MetaFrame, WinFrame, VideoFrame, and MultiWin are trademarks or registered trademarks of Citrix Systems, Inc.
HTML, XML, XHTML and W3C are trademarks or registered trademarks of W3C®, World Wide Web Consortium, Massachusetts Institute of Technology.
Java is a registered trademark of Sun Microsystems, Inc.
JavaScript is a registered trademark of Sun Microsystems, Inc., used under license for technology invented and implemented by Netscape.
MaxDB is a trademark of MySQL AB, Sweden.
SAP, R/3, mySAP, mySAP.com, xApps, xApp, SAP NetWeaver, and other SAP products and services mentioned herein as well as their respective logos are trademarks or registered trademarks of SAP AG in Germany and in several other countries all over the world. All other product and service names mentioned are the trademarks of their respective companies. Data contained in this document serves informational purposes only. National product specifications may vary.
These materials are subject to change without notice. These materials are provided by SAP AG and its affiliated companies ("SAP Group") for informational purposes only, without representation or warranty of any kind, and SAP Group shall not be liable for errors or omissions with respect to the materials. The only warranties for SAP Group products and services are those that are set forth in the express warranty statements accompanying such products and services, if any. Nothing herein should be construed as constituting an additional warranty.
These materials are provided “as is” without a warranty of any kind, either express or implied, including but not limited to, the implied warranties of merchantability, fitness for a particular purpose, or non-infringement.
SAP shall not be liable for damages of any kind including without limitation direct, special, indirect, or consequential damages that may result from the use of these materials.
SAP does not warrant the accuracy or completeness of the information, text, graphics, links or other items contained within these materials. SAP has no control over the information that you may access through the use of hot links contained in these materials and does not endorse your use of third party web pages nor provide any warranty whatsoever relating to third party web pages.
Any software coding and/or code lines/strings (“Code”) included in this documentation are only examples and are not intended to be used in a productive system environment. The Code is only intended better explain and visualize the syntax and phrasing rules of certain coding. SAP does not warrant the correctness and completeness of the Code given herein, and SAP shall not be liable for errors or damages caused by the usage of the Code, except if such damages were caused by SAP intentionally or grossly negligent.