series 5 systems management - user help
TRANSCRIPT
© 2007 - 2014 by Sentinel Hill Software, all rights reserved
Accounting Systems
SHSI Series V
SystemsManagementVersion 1.0
Sentinel HillSoftware Inc.
www.sentinel-hill.com800-663-8354
October-21-14

Series 5 Systems Management - User Help2
© 2007 - 2014 by Sentinel Hill Software, all rights reserved
Table of Contents
Part I Welcome to Series 5 Systems Management 5
Part II Introduction 8
................................................................................................................................... 81 Product Overview
................................................................................................................................... 92 Series 5 Features
................................................................................................................................... 113 History of Enhancements
................................................................................................................................... 284 Getting Help
Part III The Basic User Interface 32
................................................................................................................................... 321 Grid Processing Screens
................................................................................................................................... 442 Code "Lookup" Window
................................................................................................................................... 493 Date "Lookup" Window
................................................................................................................................... 504 Date Range "Lookup" Window
Part IV Quick Start Tutorials 54
................................................................................................................................... 541 Adding a New Printer
................................................................................................................................... 552 Adding a New Company System
................................................................................................................................... 573 Adding a New User on a WorkStation
................................................................................................................................... 584 Setting up a New Logon User
Part V Accessing the Series 5 System ManagementFunctions 62
................................................................................................................................... 621 User Logon
................................................................................................................................... 652 Series 5 Main Menu
Part VI Basic Processing Procedures 67
................................................................................................................................... 671 Background or Night Processing
.......................................................................................................................................................... 68Selecting Jobs for Background Processing
.......................................................................................................................................................... 71Batch Job Management
.......................................................................................................................................................... 77The Batch Job Processor
................................................................................................................................... 812 Report Generation and Printing
.......................................................................................................................................................... 82Report Options Screen
.......................................................................................................................................................... 87Report Browser
.......................................................................................................................................................... 89Archived Reports Management
................................................................................................................................... 953 Monitor System Usage
Part VII Systems Management Menu Functions 98
................................................................................................................................... 981 Printer Queues and Captured Printers
.......................................................................................................................................................... 99Printer Queue Maintenance
.......................................................................................................................................................... 104Captured Network Windows Printers Maintenance

3Contents
© 2007 - 2014 by Sentinel Hill Software, all rights reserved
................................................................................................................................... 1072 Company Systems
.......................................................................................................................................................... 108Company Systems Maintenance
......................................................................................................................................................... 109Company Name Tab Screen
......................................................................................................................................................... 111Data Folders Tab Screen
......................................................................................................................................................... 114Printers Tab Screen
......................................................................................................................................................... 116G/L Account Format Tab Screen
................................................................................................................................... 1183 System and User Logon Properties
.......................................................................................................................................................... 119System Control Options
.......................................................................................................................................................... 122Define System User's Menu Functions
.......................................................................................................................................................... 125User Logon Profiles Maintenance
................................................................................................................................... 1294 Signon Access Audit Inquiry
.......................................................................................................................................................... 129User Signon Audit Inquiry
................................................................................................................................... 1325 Logon Control and Message Broadcasting
.......................................................................................................................................................... 133Define Broadcast Messages
.......................................................................................................................................................... 135Disable Users from Logging On to Series 5
.......................................................................................................................................................... 135Force Users Out of Series 5
................................................................................................................................... 1366 Initialization and Setup
.......................................................................................................................................................... 137Customize the Main Menu
.......................................................................................................................................................... 140Re-Initialize Access Monitor Files
.......................................................................................................................................................... 141Re-Initialize Use Profile Files
.......................................................................................................................................................... 142Re-Initialize Series 5 Licenses
Part VIII Appendix 147
................................................................................................................................... 1471 Series 5 System Control Files
................................................................................................................................... 1482 System Operational Variables
.......................................................................................................................................................... 149Environment Variables
.......................................................................................................................................................... 149Configuration Variables
................................................................................................................................... 1603 Runtime Error Codes
.......................................................................................................................................................... 161Application Error Codes
.......................................................................................................................................................... 163Microsoft Utility Errors
................................................................................................................................... 1634 Frequently Asked Questions
................................................................................................................................... 1635 Setting Up a New Users PC WorkStation
Index 174

Part
I

Welcome to Series 5 Systems Management 5
© 2007 - 2014 by Sentinel Hill Software, all rights reserved
1 Welcome to Series 5 Systems Management
The Series 5 Systems Management functions providesthe basic management of all the Financial Applicationsavailable from Sentinel Hill Software Inc. It provides forsetting up the data structure for companies for whichaccounting is being kept, defines User Logon rights,defines Printer Queues, and activates the Series 5system as a whole.
The Systems Management functions are accessed fromthe the Series 5 main menu screen. Initially, however,there is one function that must be be launched directly onit's own. Also, only selected users will be permittedaccess to these menu items.
This help is designed both as a course in using theSeries 5 Systems Management and as an ongoingreference while you are working with the program.
Getting started – new users
Study the Introduction and Quick Start Tutorials sections to familiarize yourselfwith the basics of the application.
Check out all the links in the Help tab – plenty of help is available!
Getting started – users upgrading from prior revisions
See the History of Enhancements for a quick summary of the major changes andwhere to find the functions you are looking for.
Even if you are an experienced Systems Management user, please run through theIntroduction and Quick Start Tutorials sections quickly to get up to speed withwhat has changed in the latest version of the program.
Copyright Notice
Sentinel Hill Software Inc. has made every effort to ensure that the material published inthis Help file and/or manual is correct and accurate, but reserves the right to makechanges without notice at it's sole discretion at any time.
PROPRIETARY RIGHTS NOTICE: All rights reserved. This material contains thevaluable properties and trade secrets of Sentinel Hill Software Inc. of West Vancouver,BC, Canada, (Sentinel Hill), embodying substantial creative efforts and confidentialinformation, ideas and expressions, no part of which may be reproduced or transmittedin any form or by any means, electronic, mechanical, or otherwise, includingphotocopying and recording or in connection with any information storage retrievalsystem without the permission in writing from Sentinel Hill Software Inc.
8 54
11
8 54

Series 5 Systems Management - User Help6
© 2007 - 2014 by Sentinel Hill Software, all rights reserved
Copyright 2008-2014. -- An Unpublished Work by Sentinel Hill Software Inc. -- Printedin Canada

Part
II

Series 5 Systems Management - User Help8
© 2007 - 2014 by Sentinel Hill Software, all rights reserved
2 Introduction
The topics in this section provide some basic information about the Systems Managementsystem, what it is for and what you can do with it.
How to get started
See Getting help for details on using this helpand getting more information.
Study this Introduction chapter and The BasicUser Interface sections to familiarize yourselfwith the basic screen operating controls.
Then work through the Quick Start Tutorials tofamiliarize yourself with some basic operationsyou will need to perform.
Learning more
See the Basic Processing Proceduressection for detailed instructions on the optionsavailable for generating reports, importing/exporting data, background processing, buildingWizards and User Access rights.
See the <%APP%> Menu Functions , youguessed it, for the the detailed instructions oneach of the Systems Management Menu items!
If you really want to, see the Appendix sectionfor a list of error codes, the data files used andsystem variables that are needed for the system.
2.1 Product Overview
The Systems Management routines represent the heart and soul of the Series 5 applications. The associated functions define the directory structure for storing your company's data files;any Printer Queues to be used; and the list of Logon Users that will be allowed to sign in tothe the Series 5 applications. Specifically, the following features and controls are managed:
Entry of the Series 5 Activation Key
Customization of the Series 5 Main Menu
28
32
54
67
98
147

Introduction 9
© 2007 - 2014 by Sentinel Hill Software, all rights reserved
Define Printer Queues
Define "Captured" Windows Network Printers
Define Company Systems for Companies or Branch Offices thatwill be reported for
Setting up User Logon Profiles
Access to the User Logon Audit Inquiry Function
Setting Up system wide Access Properties
Sending Broadcasting Messages to Users
Disabling or Forcing Users Off the System
The Systems Management routines are prerequisite to use of any of the the Series 5applications.
2.2 Series 5 Features
A brief summary of some of the major features of the Series 5 systems!
Accumulate data for Multiple Companies or Divisions
The Series 5 applications provides support for multiple companies. Separate set ofdata files are maintained, totally independent from one another. (Within the G/Lsystem, though, multiple companies may be combined for purpose ofconsolidation). When users sign onto the system, they select which CompanySystem is to be worked with.
Full User Access Security
All users of the system will require a system Logon Profile record to be definedbefore they can log into the system using a password. Passwords may be definedto timeout and be updated within a specified period of time. Users must also havean User Access record defined for each of the Series 5 applications being run. These User Access records provide access rights down to the menu level of theapplications' menu. There is also the concept of a "Gatekeeper". When configured, this user is the only Logon User that is permitted to update User Access rights, butwho cannot execute any accounting functions.
Batch or Background Execution
A number of the Series 5 applications have functions that may be executed as abackground or delayed night jobs. These also can be set up to be re-occurring atdifferent time frames. Jobs are executed using a Job Processor that can be

Series 5 Systems Management - User Help10
© 2007 - 2014 by Sentinel Hill Software, all rights reserved
configured to service different Job Queues and run as multiple instances on differentclient computers.
User Defined G/L Account # ie., 9999-99-9999999 - 999
The G/L Account number is divided into two parts. The Main Account #, and theProfit Center. The Main Account can have up to 18 digits and can be segmentedinto up to four segments. The Profit Center may be 3, 4 or 5 digits in size. You getto define the size as required.
Extensive Import/Export from/to Spreadsheet capabilities
The Series 5 provides for the loading or dumping of data from or to your favoritespreadsheet. Data can be read or written directly to Microsoft's Excel, or tab-delimitedtext files. You can build your Chart-of-Accounts, or maintain Budgets in yourspreadsheet and load them into the system very easily. Data Import/Export is offeredfor a variety of different transactions and master records or analysis.
Transaction Entry
All transactions are entered as sets of batches. Once a batch of transactions areentered, they are posted to their respective data systems. With every posting, a registeris generated.
Support for Multiple Printer Queues
The system allows you to define an unlimited number of Print Queues. Each PrintQueue has it's own set of properties like network printer, font, forms and margins. When any reports or forms are generated and printed, the operator can select whichPrinter Queue the job is to be sent to.
Grid Based Operator Interface
In all Codes Maintenance, Transaction Entry and Record Inquiry functions, the basicscreen presented to the operator is that of a grid. The grid is similar to a table, (likea spreadsheet), that displays anywhere from 10 - 25 rows of the data being updated,entered or displayed. The operator can navigate through the particular data set,perform a variety of different functions, execute sorts and choose different displaysorts all from these grid based screens.
Using the Series 5 Systems Management can be fun

Introduction 11
© 2007 - 2014 by Sentinel Hill Software, all rights reserved
Don't believe it? Give it a try.
2.3 History of Enhancements
Over the lifespan of the Systems Management system a number of major enhancementsand minor fixes have been applied. Following is a brief summary.
New and Different – Enhancements and Fixes to the Systems Management Functions
For 2012
Using Windows' Logon Usernames
A new option has been introduced to the General System Settings properties screen. You may now define to have the Series 5 system use the client's Windows LogonCode as the User Code for signing in to Series 5. If set, when Series 5 is launched,the Windows Signon Code will be used. The User-Logon screen will be presented, butonly the Password field may be displayed for keyboard entry. (If the given Series 5User Logon profile had a blank password entered, then the User-Logon screenwill not be presented at all. Control will be transferred directly to the Main Menuscreen.)
For systems that are set to use the Windows User Logon code, user's would ONLY beable to log in to Series 5 using the Windows Logon Code. The function to "RepeatUser's Logon", found under the Main Menu's File drop-down menu will be disabled. Note however, if a user has their System Management Access set to Full, theywill still be able to "Repeat User's Logon", and sign on as a different user. (Feb-28-2012)
For 2011
Systems Maintenance Functions
When any of the Series 5 applications are executed, one of the steps involvesidentifying whether it is being executed as a thin-client on a Unix system or as a normalWindows "Fat" client application. The routines that are used to provide "SystemManager" Utilities was not performing this step, as it was assumed they would alwaysbe executing as a Windows FAT client. This test is now performed, and relatedprinting routines that take different steps depending on whether the user is executingas a Thin-client or a FAT-client now will work correctly. (Jan-25-2011)

Series 5 Systems Management - User Help12
© 2007 - 2014 by Sentinel Hill Software, all rights reserved
For 2010
Company Systems Maintenance
The system provides for accounting data files to be kept for each Company separately. The Company Systems Maintenance function offers a field used to specify the fullpathname to the folder where the data files are stored. Up until now, this path could notcontain any spaces in the folder names. The system has been enhanced to allowspaces in the directory pathname. (Although with AcuGT 8.1 on Windows 7 spaces inthe directory path folder names does not work). (Feb-08-2010)
For 2009
Each Applications' User Access Maintenance
The function to export User access summary rights to Excel spreadsheets, has beenenhanced (Dec-15-2009) :
When titles are output, they will be formatted as bold in 14-point
When legends are output, they will be formatted as bold in 12-point
When headers are output, they will be formatted as bold and italic
Automatic Disabling of User who Fail to Correctly Logon
As a new security feature, as an option, you may select to have users that fail tocorrectly log in to Series 5 after a specified number of times, automatically disabledfrom logging in again. Before they can use the Series 5 system again, the System'sManager, or Series 5 Gatekeeper must modify their Logon Properties record. Thisoption may be selected with a new field found on System Control Options screen. (Oct-22-2009)
User Logon Profiles - Disable Logon Access
As new property has been introduced to the User Logon Profile screen. "User isDisabled from Logon Access" offers a check-box, which when set, disables that userfrom logging into the Systems Management system. This option is set by the systemwhen a user fails to enter the correct password a given number of times, (seepreceding enhancement entry). (Oct-22-2009)
For 2008
On-Line Help
The Systems Management functions now have On-Line Help. You can access thesehelp files from the assorted functions' screens or menu bars. (Aug/2008)
Logon User Temporary Access Rights

Introduction 13
© 2007 - 2014 by Sentinel Hill Software, all rights reserved
A new property has been introduced to the Logon User Profile screen, that provides fortemporary logon rights. If set, the user will only be able to log in to the system up to aspecified date. (July/2008)
User Signon Audit Inquiry
A new function has been introduced that provides inquiry to the User Access Auditrecords. Records may be listed and displayed on a grid screen, by Application, or byUser or by date. A report may also be generated. The inquiry shows the Date, Time,User, Company Code and Function that was executed. (July/2008)
New and Different – Enhancements and Fixes in all Series 5 Systems
For 2014
Support for Office 365
The printing routines, and the import/export routines have been enhanced to providesupport for MS Word and MS Excel in Office 365. (Oct-01-2014)
Series 5 User Logon Profile Maintenance
A new property has been introduced to the Series 5 Logon User's profile. You maynow specify the Default Import/Export File type for each user. When Importing orExporting data the selected default will now be automatically set. The Import/Exportroutines has been revised to use the specified default. (Mar-26-2014)
For 2013
Generating Documents and Reports as MS Word Documents
When output is generated as an MS Word Document, an entry in the runtimeconfiguration file is used to define the output orientation, font name, font size, andwhere applicable, a Template. The system has been enhanced to now provide for 40character font names and template filenames. (Increased from 25 characters) (July-03-2013)
Attach Supporting Documents function
The ability to attach documents to different Series 5 Transactions Master Code recordshas been enhanced. You may now attach an HTML file or a link to a Web Page. Also,when displaying JPEG or Bit-Map files, the Microsoft Office Picture Viewer Utility will beemployed.
Also, when adding a new attachment, the system will default the path to a folder thatshould exist in the directory designated to be the "Temporary" directory associated toeach Company System. You should create a directory named "Attachments" in thatdirectory, (if it's not already there). (Jun-27-2013)

Series 5 Systems Management - User Help14
© 2007 - 2014 by Sentinel Hill Software, all rights reserved
Series 5 Outlook Email Reading
Series 5 applications may now make use of a new routine that provides the ability toread email from MS Outlook. Currently used by the A/P and O/P Manager Approvalfunctions, emails are read that were sent from designated approval managers. Theinternal driver used to read emails using calls to Microsoft Office Outlook. Thefollowing capabilities associated to reading emails are now possible:
Emails are read from program selected in-boxes
Filters may be set to read only emails from selected Senders or emails with aspecified character string within the Subject lineUp to 3 attachments may be read and passed to the S5 application
Sub-folders withing a designated In-Box may be created by the system
Emails may be deleted or moved to different sub-folders (May-26-2013)
For 2012
Series 5 Import/Export Functions
When importing or exporting data fields from/to MS Excel, after the process has beencompleted, the EXCEL.EXE process was not being terminated, (due to a problem withWindows, or there is some secret function to do so). The problem has been fixed. Now, when Excel is launched from Series 5, it's Process Id is detected, and once theimport/export is completed, the process is "Killed" using a system call using theTASKKILL DOS command. (Nov-12-2012)
Series 5 Import/Export Functions
When importing or exporting data fields from MS Excel, tab-delimited, or CSV datafiles, the system will now handle text fields up to 200 characters in length. (Sept-18-2012)
Series 5 Launching Microsoft Calendar
The Series 5 Applications make calls to the Microsoft Calendar routine to display acalendar, and accept the operator's selection of a date. In order to make use of thisfeature, the Microsoft Calendar must be registered on all client computers executingSeries 5. MSCAL.OCX may be found in \ms\ocx on the AcuGT, (Extend 9.xx), installation CD for Windows. If you cannot locate it on the release CD, a copy isincluded in the Series 5 release directory in S5\UTIL . (June 25-2012)
This is accomplished by executing the following command from the designated DOSCommand Prompt:
REGSVR32.EXE S5\UTIL\MSCAL.OCX
where:
For System From Directory Comments
Windows Server 2003 & C:\Windows Right click on the Command

Introduction 15
© 2007 - 2014 by Sentinel Hill Software, all rights reserved
2008 - 64 bit \SysWOW64 Prompt and select "Run asAdministrator"
Windows XP and 7 C:\Windows\System32
Right click on the CommandPrompt and select "Run asAdministrator"
earlier Windows C:\Windows\System
Reports and Forms generated as MS Word Documents
All reports and forms that are generated as MS Word Documents may now have anassorted formatting properties applied to the text that is generated. The followingformatting capabilities may be applied:
"Formatting Regions", defined as ranges of lines, for a page may be formattedwith a particular font type and size and be set as Bold, Italic, Underlined, Shaded,or as Reverse Video. Up to 5 different regions may be defined and activatedunder program control as the page is being populated with text."Tab Sets" may be defined consisting of up to 10 tab settings per line. The typesof tabs include Left-Tab, Right-Tab, Center-Tab, and Decimal-Aligned-Tab. Up to20 different Tab Sets may be defined and activated under program control as thepage is being populated with text. As the line of reporting text is output, the tabsare inserted and any preceding spaces are removed. (This basically now allowsthe use of variable pitch fonts, when outputting columns of data, ensuring properalignment).Individual words or sub-strings, within a print line, may now be output as Bold,Italic, Underlined, Shaded, or as Reverse Video. On a given page, up to 50 sub-strings may be formatted in this manner. On a given line, up to 6 sub-stringsmay be formatted in this manner.Single, (thick or thin), and Double Lines may now be inserted at any positionwithin a page. As the page is being populated with text, the lines are defined tothe printing routines with position and sizing set under program control. Up to 40line may be output per page.
These types of formatting controls could be implemented for Invoices, PurchaseOrders, Customer Statements, A/P Checks or Customer Quotes. In order to takeadvantage of these features, the appropriate applications' program must be pro-grammatically customized. Contact Sentinel Hill Software Inc., for more information.further details. (Apr-24-2012) HS5_Enhancements_to_ALL_Systems-2011-2013.xml
All Series 5 Applications offering Export Functions
When entering export selection options, if the operator was to click on the "AboutExporting" information tab, an error was being reported that the "File did not exits". This problem has been fixed. Now you may freely select any filtering or output optionstab when they are presented without any problems. (March-09-2012)
Using Windows' Logon Usernames
New functionality has been introduced to the Series 5 Main menu Signon process. You may now define to have the Series 5 system use the client's Windows LogonCode as the User Code for signing in to Series 5. If set, when Series 5 is launched,

Series 5 Systems Management - User Help16
© 2007 - 2014 by Sentinel Hill Software, all rights reserved
the Windows Signon Code will be used. The User-Logon screen will be presented, butonly the Password field may be displayed for keyboard entry. (If the given Series 5User Logon profile had a blank password entered, then the User-Logon screenwill not be presented at all. Control will be transferred directly to the Main Menuscreen.)
For systems that are set to use the Windows User Logon code, user's will ONLY beable to log in to Series 5 using the Windows Logon Code. The function to "RepeatUser's Logon", found under the Main Menu's File drop-down menu will be disabled. Note however, if a user has their System Management Access set to Full, theywill still be able to "Repeat User's Logon", and sign on as a different user.
For systems that do not wish to use the Windows logon, the default will still be set tothat defined by the PC Client user's SHSI_USER_NAME environment variable. (Feb-28-2012)
Bitmapped Images in Series 5
All Series 5 applications that load bitmapped images have been revised to expect theimage filenames to be in upper case. (Feb-28-2012)
Upper Case Bitmap Files
On UNIX systems, please make sure that all bitmap files in the bin/imagesfolder have uppercase file names.
Series 5 File Error Handling Routine
The logic used to report serious file I/O errors has been enhanced to correctly identifythe full folder path for any sequential text files that might be generated. Previously insome cases, the error message displayed incorrectly showed the path that wasassigned as the Data Files Directory assigned to the Company System. This problemhas been fixed. (Jan-30-2012)
Series 5 Directory/Folder Selection "Browse" Feature
For any application that requires entry or selection of a directory path, a "Browse" pushbutton is presented. The operator could click this button, and the Windows Folderbrowse dialogue window would be presented. Previously, only descendants of theuser's default working folder are shown. The system has been revised to now displayonly those folders which are descendants of the root directory of the Directory Pathfield associated to the "Browse" button. So now, if you were to enter C:\ in theDirectory Path, when the "Browse" button is clicked, you would be able to browse anydirectory on your computer's "C" drive. Setting the Directory Path blank, or tosomething other that a drive letter designation, would result in only being able tobrowse descendants of the user's default working directory. (Jan-18-2012)
"Series 5 File Error Handling Routine
The logic used to report serious file I/O errors has been enhanced to identify errorsassociated to the use of AcuServer. Previously, 9D-104 errors were reported as an"AcuServer Connection Failure". Now, all 9D-XX errors are identified, and the

Introduction 17
© 2007 - 2014 by Sentinel Hill Software, all rights reserved
applicable message displayed. (Jan-10-2012)
Reports and Forms generated as MS Word Documents
All reports and forms that are generated as MS Word Documents are now createdprotected as "Read-Only" documents. A password may be used to un-lock them. Refer to the applicable documentation for further details. (Jan-10-2012)
For 2011
Series 5 Import/Export Routine
The generic routine to handle importing and exporting of data, (to spreadsheet orcharacter delimited files), has been enhanced to provide for CSV files that do not have/allow quotes around character strings. (Dec-12-2011)
"CALLEREQ" Program
The CALLEREQ program has been revised to call either the W/M's E-Request Serviceroutine or the new P/I's On-Demand Billing Service routine. It no longer resides as aprogram belonging to the W/M system, rather, it has been moved into the S/M,(System's Management) directory and library. Please ensure the correct compilescript files are installed. (Nov-11-2011)
Interfacing with MS Office Excel and Word
The logic provided to launch MS Excel or MS Word has been expanded to handle thecase where MS Office was installed in C:\Program Files (x86)\Microsoft Office\Office. (Previously the system only looked in in C:\Program Files\Microsoft Office\Office . (Oct-03-2011)
Series 5 Email Generation
A number of different application functions offer the ability to automatically generate andsend emails. This includes the emailing of invoices, purchase orders, statements,customer quotes, reports and other messages.The internal driver used to send emails has been enhanced to generated and sendemails using calls to Microsoft Office Outlook, (rather than to the MAPI library). As aresult, the following capabilities associated to sending emails are now possible:
Emails may be sent as Plain Text, Rich Text, or as HTML
Emails may be generated when executing as either a thin-client of FAT client
Emails may now be sent with copies going to Cc users and Bcc
The text message associated to emails are now loaded from user created/maintained data files, rather than being coded from within the applicationsoftware. These text files may be either plain ASCII text, or HTML files andcontain up to 8192 characters. Except for specific types of emails, these filesMUST BE LOCATED in the directory named Email-Templates located in eachCompany System's designated reports directory.Provides support for 120 character email addresses, and 140 character subjectline

Series 5 Systems Management - User Help18
© 2007 - 2014 by Sentinel Hill Software, all rights reserved
(Sept-20-2011)
Importing $ Numeric Cells from Spreadsheet
A problem has been identified and fixed when importing $ formatted columns of datafrom spreadsheet. If any headings were specified, and they exceeded 22 characters inlength, the number being input and recorded was ZERO. The problem has been fixed. (July-25-2011)
Generating Reports as MS Word Documents
The Series 5 printing routines had the ability to generate output as an MS Worddocument. This function has been enhanced to provide support for Office 2010 Wordutility. Now, when presented with the print options screen, and the operator chooses to"Save To Disk", they may choose to output as an Office 2007/2010 or Office 2003Word document. The system will automatically append either the .DOCX or the .DOCextension, and generate the document using the correct file format. (June-14-2011)
Import/Export Functions
The import and export function has been enhanced to provide support for Office 2010EXCEL utility. Now, when presented with the import/export options screen, theoperator may select to load from, or output to, either an Excel 2007/2010 Workbook, oran Excel 97-2003 Workbook. The system will automatically append either the .XLSX orthe .XLS extension, and read or write the spreadsheet using the correct file format. (June-14-2011)
Generic Search Function
In all Series Series 5 applications where a grid screen is presented for the entry oftransactions, or the maintenance of master codes, a "Search" function is provided. This function has been enhanced in the cases where the operator has chosen tosearch for a given record where a Date is chosen as the search criteria. Now thefollowing literal label is displayed, "mm/dd/yy", indicating the desired format that thedate should be entered as. As well, the date entered may now be as "mmddyy","mmddyyyy", "mm/dd/yy", or "mm/dd/yyyy", depending on the mood of the operator. (May-02-2011)
New Feature to Attach Supporting Documents to assorted Master CodeRecords and Transactions
You may now attach a variety of different documents to assorted Master Code records,and Transactions. Up to 15 separate documents may be selected, and attached andviewed from the applicable functions in assorted Series 5 systems. These documentsmay also be viewed where applicable. The different types of documents supported are as follows:
Bitmap ( *.BMP files)
JPEG
TIFF
ASCII Text ( *.TXT files)
MS Word 2003 documents
MS Word 2007 documents
MS Excel 2003 documents
MS Excel 2007 documents
ASCII Text ( *.txt files)

Introduction 19
© 2007 - 2014 by Sentinel Hill Software, all rights reserved
(Apr-14-2011)
Printing to Windows Spooler
The Series 5 provides for the definition of Printer Queues. As a property to eachSeries 5 Printer Queue, you may define a "Captured Printer". When a report isgenerated and a given Series 5 Printer Queue is chosen that has a "Captured Printer",the report prints directly to the associated network printer. If the Printer Queue doesnot have a "Captured Printer" defined, then a Windows "Printer Select" dialogue boxwindow is displayed. Previously, the the Series 5 system made a call to have the"Printer Select" window displayed which was an older style, compatible with olderversions of Windows. Now a new call is made displaying a modern Windows XP/7"Printer Select" Window. (Feb-09-2011)
System Captured Windows Maintenance
The Series 5 provides for the definition of Printer Queues. As a property to eachSeries 5 Printer Queue, you may define a "Captured Printer". When a report isgenerated and a given Series 5 Printer Queue is chosen that has a "Captured Printer",the report prints directly to the associated network printer. The routine used to capturea Windows printer was not working correctly under Windows 7. This problem hasbeen fixed. (Feb-09-2011)
For 2010
Default Reporting Output Destination
In all Series 5 applications that generate reports that might normally be printed, a PrintOptions screen is presented. From this screen, the operator may choose to have theoutput directed to a printer; to be "Archived", to be just displayed to the screen to"Browse"; or output as an MS Word or PDF file. The default output has been changedto be just displayed to the screen to be "Browsed". (Previously it was defaulted to beoutput to a printer).
Additionally, should you desire to set the default output, you may do so by inserting avariable in the runtime Configuration file. The variable SHSI_RPT_DESTINATION witha single numeric argument, will provide the default target for generated reports, whereyou would set the argument as follows:
1 - To the Printer2 - Archived3 - Both the Printerand Archived4 - To be justBrowsed
17 - To Disk as an MS Word 2003 document26 - To Disk as an MS Word 2007 document35 - To Disk as a PDF document
Note that if the applicable application already determined the target output, thesedefaults will NOT be used. (Oct-13-2010)
Data File "Properties" function

Series 5 Systems Management - User Help20
© 2007 - 2014 by Sentinel Hill Software, all rights reserved
In all Series 5 applications that maintain master codes records, or provide for the entryor inquiry of transaction or history records, under File on the menu bar, the Propertiesfunction will display information about the related files. This function has beenenhanced to now display 12 numeric digits for both the files size, and the number ofrecords in the file. Also, now the version of the Vision file is displayed, along with thenumber of volumes that are used to hold the data and the index keys for the associatedfile(s). (Sept-01-2010)
Using the Mouse Wheel to navigate Series 5 Grid Screens
In all Series 5 applications that use a paged grid screen, (those showing rows ofmaster codes and/or transaction records similar to a spreadsheet), the operator maynow navigate forwards and backwards through the records using the Mouse Wheel. Ifthe Ctrl-Key is also pressed while twirling the mouse, 4 rows of data are skippedinstead of just 1. (If when you spin the mouse too fast, and a "Stack Overflow" erroroccurs, in the runtimes Configuration file, add the variable PERFORM_STACK 384 and it should work OK ) Note that this new feature is only available for systems with atleast AcuGT Rev 8.1.3 (July 27-2010)
MS Excel System Error Recovery
The Series 5 family of applications offers the ability to import to, and export from, anMS Excel Workbook document. System error that could be generated while outputtingto and/or inputting from, MS Excel documents were causing Series 5 applications toterminate with a not too friendly error message. The errors that were particularlyannoying were as follows:
When importing from an Excel document with a filename, selected from theapplication, that did not actually exist, (and the operator had forgotten to "Browse"to choose the particular file).
When a user attempted to generate output as an MS Excel document, but theydid not have MS Excel installed, or it was installed in a location other than thedefault, a fatal error occurred.
The import/export routines have been enhanced to now capture any system errors thatwere being generated from MS Excel. A reasonably friendly error message will now bedisplayed, and the particular application will continue processing. (In most cases, theimport/export will just be abandoned). (May-31-2010)
Compiling with INTEL Native mode
A problem has been discovered when compiling with the Intel native mode. This optionmust be removed from the S5_GCBL.BAT compiler macro that can be found in the S5\util directory. (Basically replace the set NATIVE=--intel command with set NATIVE=command. (May-21-2010)
Generating Standard Forms as MS Word Documents
The Series 5 generates a number of different forms. For example, A/P Checks,Invoices, Picking Tickets, Statements and Purchase Orders. Variables within theruntime configuration file may be set up that are used to indicate how the forms are to

Introduction 21
© 2007 - 2014 by Sentinel Hill Software, all rights reserved
be generated and/or printed. Arguments to these variables indicated whether the formwas printed, archived, and/or saved as MS Word documents. The 2nd argument,used to define the output, may now have the following values:
WORD2003
PRINT&WORD2003
ARCHIVE&WORD2003
WORD2007
PRINT&WORD2007
ARCHIVE&WORD2007
Existing arguments associated to WORD will be interpreted as WORD2003.
The applications that generated these forms have been enhanced to now recognizearguments that indicate the forms are to be generated as Office 2007 Word or Office2003 Word documents. (May-21-2010)
MS Word System Error Recovery
The Series 5 printing routines had the ability to generate output as an MS Worddocument. System error that could be generated while outputting to and/or automaticprinting of MS Word documents were causing Series 5 applications to terminate with anot too friendly error message. The errors that were particularly annoying were asfollows:
When outputting to an MS Word document that had a template defined, and thegiven template file was not set up for that user, a fatal error occurred.
When outputting to an MS Word document that was supposed to beautomatically printed, but the given network printer was either offline, or thatsegment of the network was not active, a fatal error occurred.
When a user attempted to generate output as an MS Word document, but theydid not have MS Word installed, or it was installed in a location other than thedefault, a fatal error occurred.
The printing routines have been enhanced to now capture any system errors that werebeing generated from MS Word. A reasonably friendly error message will now bedisplayed, and the particular application will continue processing. (In most cases, thegeneration of the report will just be abandoned). (May-21-2010)
Generating Reports as MS Word Documents
The Series 5 printing routines had the ability to generate output as an MS Worddocument. This function has been enhanced to provide support for Office 2007 Wordutility. Now, when presented with the print options screen, and the operator chooses to"Save To Disk", they may choose to output as an Office 2007 or Office 2003 Worddocument. The system will automatically append either the .DOCX or the .DOCextension, and generate the document using the correct file format. For users thathave Office 2007 installed, the default File Type will be the Office 2007 Word, but theymay choose either Office formats. For users that do not have Office 2007 installed,the default File Type will be the Office 2003 Word, and they will not be able to chooseWord 2007 or the PDF formats. (May-20-2010)
Automatic Sending of Emails

Series 5 Systems Management - User Help22
© 2007 - 2014 by Sentinel Hill Software, all rights reserved
The Series 5 system has the capability of automatically sending emails. Emails aresent by making a call to a MAPI.Library, which in turn sends the email using MicrosoftOutlook. If the receiver's email address is prefixed with "LN:" or "Ln:", (indicating thatthey are Lotus Notes users), then instead of using MAPI, a DOS command call ismade using the command line defined by the runtime configuration variable"DOS_MAIL_CMD", to actually send the email. Within this command line, there arepseudo variables, that would be replaced with the Subject, Receivers Name andAddress and the path to an Attachment. This capability has been enhanced to nowprovide for sending the email with 2 attachments. The new pseudo variable %ATTACHMENT2% will be replaced with the full path to a 2nd attachment, if applicable. (May-03-2010)
Import/Export Functions
The import and export function has been enhanced to provide support for Office 2007EXCEL utility. Now, when presented with the import/export options screen, theoperator may select to load from, or output to, either an Excel 2007 Workbook, or anExcel 97-2003 Workbook. The system will automatically append either the .XLSX orthe .XLS extension, and read or write the spreadsheet using the correct file format. For users that have Office 2007 installed, the default File Type will be the Excel 2007Workbook, but they may choose either Excel format. For users that do not have Office2007 installed, the default File Type will be the Excel 97-2003 Workbook, and they willnot be able to choose Excel 2007. (May-03-2010)
Import/Export Functions
When the import/export screen is presented and a particular directory and file isselected for processing, if the operator clicks on the Back push-button, (to go back andchange an option of prior screens), upon re-displaying the import/export screen, theoriginally selected file/directory was being reset to the program's default. This problemhas been fixed. (Mar-24-2010)
Generating Sub-Documents as MS Word or PDF Files
The Series 5 printing routines had the ability to generate a sub-document as an MSWord document. (A sub-document might be a single Invoice or Customer Statement,generated with a unique filename). This functionality has been enhanced to have thesub-document generated as either an MS Word document, or a PDF document. These sub-documents may be generated at the same time, totally independent from,their normal "printed" versions. When generated as Word documents or PDFdocuments, MS Word Templates may be used to define the properties of the resultingdocument with watermarks and headers and footers. (Mar-15-2010)
Import functions from Excel Spreadsheets
The Series 5 import function offers the option to input from an Excel spreadsheet. Inany application that loaded data in this manner, it was difficult to determine when allvalid rows of data had been loaded. The Excel import function has been enhanced sothat it will correctly stop once valid rows of data have been loaded. (Previously, thesystem would attempt to load up to 65,436 rows of data and when executing any givenImport function it would appear as if the system has hanging). (Mar-03-2010)

Introduction 23
© 2007 - 2014 by Sentinel Hill Software, all rights reserved
Printing of Report as PDF Documents
All reports and forms that are generated from the Series 5 applications may now besaved as PDF documents. This option is available only to users that have Microsoft'sOffice 2007 installed on their systems. When the Print Options screen is presented,click the Save To check box, and select PDF Document from the associated SaveAs drop list. (Feb-23-2010)
Browsing to Select Files and/or Directories Functions
All routines that offer the functionality to click a "Browse" button to present the operatorwith a window from which a directory, or a file, can be selected have been revised. Under Windows 7, the clicking of the "Browse" caused a "nested input of events"syndrome to occur. In effect, repeatedly displaying the browse window. The logic forthese routines have been revised to avoid this problem. (Jan-28-2010)
Encryption/Decryption Function
The subroutine has been revised to now handle 8 digit numeric seeds. This was doneto accommodate the A/R system that now has 8 digit documents numbers. All existingencrypted fields will still be able to be decrypted. (Jan-24-2010)
For 2009
Printing of Reports in Series 5
The Series 5 printing function has been enhanced to offer the option of printing multiplecopies of reports, forms, invoices, orders, etc. A new entry field has been added to theprint options sub-screen labeled # of Copies. You may select to have up to 9 copiesprinted. These copies printed will be automatically collated.
Multiple Copies
The ability to have the system print multiple copies is a a feature that is provided as afunction of the Windows operating system, and the driver for your printer. If either does notsupport multiple copies, then setting a value other than 1, will have no effect. This feature is available only to users executing on Windows system, either directly, or asthin clients.
As well, fields on the Print Options sub-screen have been reorganized slightly toaccommodate the new field. (Fields and display prompts associated to outputtingreports to a Print Queue are now enclosed within a frame.
Where applicable, in all Series 5 applications, the size of display windows and/or tabsub-screens have been adjusted accordingly. (Dec-22-2009)
Export functions to Office 2007 Excel Spreadsheets
The Series 5 import/export function offers the option to output/input to an Excelspreadsheet. Office 2003 Excel had allowed for 65,500 rows, and Office 2007 Excelallows for 1,000,000 rows. When exporting data, the Series 5 system would

Series 5 Systems Management - User Help24
© 2007 - 2014 by Sentinel Hill Software, all rights reserved
automatically start outputting to a 2nd worksheet when 65,500 rows were reached. The system will now switch to a 2nd worksheet depending on which version is beingused.
As well, the Spreadsheet I/O routines have been enhanced to support up to 999,999rows of data. (Dec-16-2009)
Exporting to Excel Spreadsheets functions
The logic used to export to Excel spreadsheets has been enhanced. In the assortedSeries 5 applications, those functions that offer functions to export to an Excelspreadsheet have the ability to perform the following:
Create multiple worksheets
Select a specific worksheet to be populated
Format titles, legends and headers in larger fonts, as bold, and/or as italic
Have data columns justified left, center or right
Have a data column formatted for "Currency", (where $ signs will be displayedwith 2 decimal places)
For Office 2003 Excel negative numbers are displayed with parenthesisaround them For Office 2007 Excel negative numbers are displayed in red withparenthesis around them
Where applicable, in most of the Series 5 applications, these new capabilities havebeen introduced. (Dec-10-2009)
Import and Export functions to Excel Spreadsheets
The Series 5 import/export function offers the option to output/input to an Excelspreadsheet. If the user selected to launch Excel after exporting data, the systemincorrectly assumed Office 2003 was installed, and it's Excel utility was beingexecuted. If you only have Office 2003, then this would not have been a problem. Thesystem now correctly detects the version of Excel to launch. (Nov-11-2009)
Selecting Dates from Lookup Calendars
When executing under Windows VISTA, dates were not properly being returned. Theyear was loaded incorrectly as year ZERO which resolved to a date falling in the year2000. The problem has been fixed. (Oct-28-2009)
Automatic Disabling of User who Fail to Correctly Logon
As a new security feature, as an option, you may select to have users that fail tocorrectly log in to Series 5 after a specified number of times, automatically disabledfrom logging in again. Before they can use the Series 5 system again, the System'sManager, or Series 5 Gatekeeper must modify their Logon Properties record. Thisoption may be selected with a new field found on System Control Options screen. (Oct-22-2009)
User Logon Passwords
Passwords now must contain at least one numeric digit, and one alpha character, and

Introduction 25
© 2007 - 2014 by Sentinel Hill Software, all rights reserved
be at least 8 characters in length. (Oct-22-2009)
Import and Export functions to Excel Spreadsheets
The Series 5 import/export function offers the option to output/input to an Excelspreadsheet. If that output/input option is selected, and Excel is not installed on theuser's workstation, a message will now be displayed. Previously, the systemassumed it was installed, and when it attempted to call Excel to build/read thespreadsheet, the program would bomb out with an error. This will no longer happen. (June-02-2009)
Outputting Reports and Invoices as MS Word Documents
Any Series 5 generated reports, invoices, statements, etc, may be output as an MSWord document. For any MS Word documents that are generated, a Template mayalso be specified, (as defined in a Series 5 Configuration file variable). Thesetemplates must be installed on each users workstation in the C:\Documents andSettings\<PC UserName>\Application Data\Microsoft\Templates folder. For userswith Office 2007 these templates need an extension of .DOTX. For earlier versions ofMS Office, the templates need an extension of .DOT. The system has been enhancedso that if from the Series 5 Print Options screen, MS Word output is chosen, it will testfor the occurrence of the designated template file for the particular type of output beinggenerated. If the template cannot be located, an error message is displayed. Previously, if when generating the output, the MS Word utility could not find thetemplate, the system displayed an evil looking message, and would abort. (June-02-2009)
Main Menu User Logon
When a user fails to logon after 5 attempts of entering their User Code and Password,the system exits. Now, as well, an entry will be recorded in the User Access Log file. (April-04-2009)
Encryption/Decryption Function
A new subroutine has been developed that provides the functionality to encrypt anddecrypt data fields. The algorithm used is based on a Vigenere Cipher. This would beconsidered a "strong" encryption. The subroutine is made available to any Series 5application that requires encryption of any given data record field. (March-11-2009)
Series 5 Grid Management Screens
In any of the Maintenance or Transaction Inquiry routines that listed items in a gridwhereby a given item, such as a Customer Code or a G/L Account, could be selected. If there were no item on file to be listed, sometimes transactions for the next item onfile were being displayed, but the entry field was not being updated. This problem hasbeen fixed. Also, now a message will be displayed indicating that no records werefound for the item entered, but the next highest item's items were being displayed. (Feb-03-2009)

Series 5 Systems Management - User Help26
© 2007 - 2014 by Sentinel Hill Software, all rights reserved
For 2008
Using AcuGT Rev 8.1
With the recent release of Rev 8.1 of AcuGT, we have discovered that the INTEL nativemode, on certain occasions cause Memory Access errors. The batch file used tocompile programs S5\util\s5_gcbl.bat must be edited to have the variable NATIVE setto nothing. (Nov-15-2008)
User Logon Passwords
The Series 5 system now requires all passwords to be made up of at least 8 non-space characters, at lease one of which must be a numeric digit. Also, if a userspassword has expired, they will be offered the opportunity to assign a new password,after entering the old password. The rules for password entry will apply. (Oct-7-2008)
Import and Export and User Interface Applications
An error occurred when exporting to an Excel spreadsheet if the 1st character theoutput string was a "+", "=", or "-" character. In this case, Excel expected a validformula. If this was not the case, a terminating error was displayed. The problem hasbeen fixed. Now the Series 5 software will automatically insert a single quote"'"character in front of the string before inserting to the cell. (Oct-7-2008)
User Access Maintenance
The Series 5 User Access maintenance routine has been enhanced to simplify thesteps to establish new users and give/deny access rights. (Sept-24-2008)
The Enable and Enable-Like functions have been simplified. In each case, younow just highlight the "Red" head that is to be given access rights, and click theEnable or Enable-Like push button, (or right click, and select the desired functionfrom the pop-up menu.
For the Enable-Like function, a drop-down list will be presented, from which youcan select the user that already has access rights, whose rights are assigned tothe new user.
The Copy function has been simplified. If you highlight a "Green" head user thatis already enabled, and select Copy from the Edit menu's drop-down menu, youwill be able to select one of the users that has no access rights in drop-down listthat is presented. (The Copy is basically the reverse of the Enable-Likefunction)
For "Green" head users that are already enabled, when right-clicked, the pop-upmenu has 2 new functions - "Set All Items to Full Access" - "Set All Items to NoAccess". These will make it easier to set up and maintain the users' accessrights.
A pop-up window will now be displayed, when any given menu-item in the tree isright-clicked. You will be able to set the access to either "No Access", or to "Full

Introduction 27
© 2007 - 2014 by Sentinel Hill Software, all rights reserved
Access" directly, without having to edit the properties sub-screen.
User Access Maintenance
The Series 5 User Access has been enhanced to support up to 250 Logon Users. Formerly was limited to 100 users. (Sept-10-2008)
Print Manager and Browser
The Series 5 reporting and printing routines have been enhanced to handle filenamesof up to 30 characters long. The UPGRADSM utility must be executed to have theReport-Manager file's records rebuilt to accommodate the larger field. (Aug-25-2008)
Import and Export and User Interface Applications
In all applications that offer the opportunity to load from or read a text based interfacefile where a BROWSE button had been provided, you will now be able to select files thathave a "—" or a SPACE in the filename or the directory path. (Aug-25-2008)
Import/Export Functions
The import and export function has been enhanced to provide support for Office 2007EXCEL utility. The system will identify Office 2007 utilities by seeing if Excel.EXE canbe found in the clients's C:\Program Files\Microsoft Office\Office12 folder. Forexporting, the files will be created with the *.XLSX extension; and if selected to belaunched, Office 2007 Excel will now correctly be executed. (Aug-25-2008)
On-Line Help
The Series 5 systems now have On-Line Help. You can access these help files fromthe application. In all functions that offer a menu bar, clicking Help will display a drop-down menu offering General Help, Help on the particular function, and Help aboutGrids. For menu items that don't have a menu bar, if help is available, a help icon maybe clicked to display Help about the particular screen. (Note that help may not actuallybe available in all cases where offered in the drop down menus) (Aug-10-2008)
Broadcast Messages
The Series 5 Broadcast messages have been increased in size. You may now specify3 lines of 80 character lines of message text to be displayed. The files used to holdthese messages have been renamed to be EMERGENCY.DAT andBROADCASTS.DAT. (Aug-10-2008)
Application User Access Analysis Export
A new function has been introduced to each applications' User Access Maintenancefunction. You may now Export to a spreadsheet an analysis table of users accessrights. Each row of the table is a menu item, and each column is a Logon User. Itprovides a quick snapshot of which users have access to any particular function. (July-15-2008)
User Access Logging

Series 5 Systems Management - User Help28
© 2007 - 2014 by Sentinel Hill Software, all rights reserved
As an option, your systems manager can turn on the option to log user access to allthe systems' menu items. (June-15-2008)
Major Systems Management Features not Found in Series 4
New Storage of "Archived" reports
When a report is generated and "Archived", it is stored as an ISAM file rather than asan ASCII text file. You will only be able to access and reprint the report using theReports Manager. The plus for this is that when browsed, after the fact, it is easier tonavigate through the file, and make use of a search function.
User Access "Gate Keeper"
The system now supports the idea of a "Gate Keeper". If turned on, this user will be theonly person that can access each of the Series 5 systems' User Access Maintenancefunction. However, this use will not have any access to any of the applications'functions. The reasoning is to be able to provide extra control as to who will bepermitted into the accounting software.
User Logon Profiles
New properties include the option to allow temporary access through to a specifieddate; the location of the user's home directory referred to as their "My Documents"folder; and for "thin-client" users, the location of the users' temporary home directory.
"Thin Client" aware
The Series 5 has been implemented to offer the functionality of running under a "thinclient" environment. In particular, the the thin-client server may be a UNIX or LINUXserver, with the clients executing on MS Windows platforms.
Grid Screen Processing
All master Code Maintenance, and most operations are now executed making use of aWindow's grid screen. A grid is basically a table of rows that display anywhere from 10to 25 records of data on the screen at a time. The operator can easily navigate throughthe data files using a number of graphic buttons. For these grid based functions, thereare searching capabilities, editing functions, menu bars, and in most cases the abilityto display records sorted in different ways. (The use of grids is just one of the manygraphical Windows controls that are used).
2.4 Getting Help
There are a number of different sources of help in Series 5. In addition to this help file you canalso access the Power Point tutorials and Sentinel Hill Software support.

Introduction 29
© 2007 - 2014 by Sentinel Hill Software, all rights reserved
To get started, your main source of information should be this help file. We have designed itto provide all the information you will need for using and learning the Systems Management.
Before contacting support, please make sure that you really can't find the information youneed here. Thanks!
Displaying the help
The quickest way to display the help is to press shift-F1. If context-sensitive help isavailable it will be displayed automatically.
Most screens will have a Help button that displays relevant information when clicked.
On the Series 5 main menu screen, and each application menu screen on the menu-bar click Help then On-Line Help .
Contacting Sentinel Hill Software support
Direct email support is available from the Sentinel Hill Software team at [email protected]. You can send an email to this address automatically byclicking on the [email protected] graphic on the Licensing tab screendisplayed after clicking Help / About on each systems' menu.
If you have a Support Contract, you may contact Sentinel Hill support center directly at1-800-663-8354.
Summary of Fixes and Enhancements
For each application, a detailed history of the changes that have been made is availablefrom our website at Series 5 Fixes and Enhancements.
Getting a printed user manual
You can download formatted PDF versions of the documentation for each applicationfrom our website with the following links:
Accounts Payable Miscellaneous Invoicing
Accounts Receivable Fixed Assets

Series 5 Systems Management - User Help30
© 2007 - 2014 by Sentinel Hill Software, all rights reserved
Customer Order Processing Web Access Management
Inventory Management Series 5 Systems Manager
Purchase Order Processing Professional Invoicing

Part
III

Series 5 Systems Management - User Help32
© 2007 - 2014 by Sentinel Hill Software, all rights reserved
3 The Basic User Interface
Throughout the Series 5 system applications, there are a number of basic common types ofscreens to provide a consistent operation. These are discussed in this chapter and it'srelated sub-topics.
Basic User Interface
Grid Processing Screens
Code Lookup Screens
Date Lookup Screen
Date Range Lookup Screen
3.1 Grid Processing Screens
The Series 5 applications have been developed around the concept that the operator shouldbe able to navigate easily through the master codes data sets or batches of transactions thatare being worked with. To accomplish this, the assorted accounting systems have made useof a graphical control known as a grid.
The grid control is basically a table that provides the operator with a list of the data recordsbeing worked with, and controls to navigate through the associated file. Individual fields maybe edited, pop-up menus may be displayed for related functions, and the cursor up/down andPage up/down keys may be used to move around rows and columns of data.
The screens that display these grids also offer a number of functions that the operator canmanage or manipulate the particular records' information. These are fairly consistentthroughout the Series 5 accounting systems.
Grid screens are typically developed for the following types of menu functions:
Master Code Maintenance routines Transaction Entry routines Data Inquiry routines Operations that require the operator to perform some type of function to easily set oredit properties of a specific type of data record
Here is an example of a grid based screen that offers most of the controls typical of aTransaction Entry function. (In this case there are 2 rows in information for each data itembeing displayed).
32
44
49
50

The Basic User Interface 33
© 2007 - 2014 by Sentinel Hill Software, all rights reserved
List-By or View Options Menu
In those grid applications where the items may be displayed using different sort criteria, clickon View in the menu-bar for a drop-down menu of selections; or make the selection from theList-By drop-down list.

Series 5 Systems Management - User Help34
© 2007 - 2014 by Sentinel Hill Software, all rights reserved
or
A description of the sort order is displayed in the status bar at the bottom of the screen.
"Fast Button" Frame Tasks Push Buttons
In all the grid based screen functions, the major operations that could be performed aredisplayed as Push Buttons in a brightly colored frame. This is referred to as the "Fast Button"Frame.

The Basic User Interface 35
© 2007 - 2014 by Sentinel Hill Software, all rights reserved
Or for another example:
Note that different types of functions have different frame background colors.
- Blue Active data Inquiry or Analysis
- Burgundy Codes Maintenance
- Olive Green Archived transaction Inquiry
- Aqua-Marine Green Transaction Entry
Selecting to Display Items Associated to a Particular Code
In certain grid based applications, you will be able to display only those items associated to aparticular master code. There is a field in which you can enter the desired code.
In the example, the screen displays all Open Items for a selected Customer.

Series 5 Systems Management - User Help36
© 2007 - 2014 by Sentinel Hill Software, all rights reserved
In this example there are three ways that a given Customer may be selected:
1. Enter the Customer Code whose items are to be displayed in the grid.
2. Click on the icon to have the Customer "Lookup" window displayed and select thedesired customer.
3. Click on the "Find Prior" or "Find Next" icons for the prior or next Customer Code on filewith items to be displayed
Processing Tip
When a grid application that offers a code to be selected is initially displayed, that field is is normally blank. Ifyou wish to just display items for the 1st code on file, click on the "Find Next" icon push button and the systemwill do the rest.
Search Function
In all the grid based screen functions, a Search function is provided.
1. Click on the Search icon.

The Basic User Interface 37
© 2007 - 2014 by Sentinel Hill Software, all rights reserved
2. The Search window will be displayed. Enter the string or number to be searched inthe Find field and select the particular field of the given record to be tested.
3. Set the searching options as desired and click on the Find push button. (If you ratherjust get a count of the # of records that satisfy the search, click on the Count push-button
4. If a record is found, then the grid will be refreshed with that item displayed. Also, theSearch Backward/Forward icons will be enabled, and you could then search back orforward by clicking on the appropriate buttons.

Series 5 Systems Management - User Help38
© 2007 - 2014 by Sentinel Hill Software, all rights reserved
5. The current search string, and name of the field tested is displayed in the status bar atthe bottom of the screen.
Grid Navigation Buttons
To move through a file of records that are accessed or displayed using the grid, use theNavigation Buttons found at the right side of the screen.
Navigation To Keyboard Key or MouseClick
Graphic
The next grid row Cursor-Down Key or
rotate the mouse wheeltowards you

The Basic User Interface 39
© 2007 - 2014 by Sentinel Hill Software, all rights reserved
Down 4 grid rows Hold the Ctrl-key androtate the mouse wheeltowards you
The prior grid row Cursor-Up Key or rotatethe mouse wheel away
Up 4 grid rows Hold the Ctrl-key androtate the mouse wheel away
The 1st row of thenext screen
Click bottom down button
The 1st row of thecurrent screen, or therow just before the1st row of the currentscreen
Click top up button
The last row of thenext screen
Page-Down key, or clickthe lower dbl-down button
The 1st row of theprior screen
Page-Up key, or click thetop upper dbl-down button
The 1st record on file Hold the shift key andclick the top up button
The last record on file Hold the shift key andclick the bottom downbutton

Series 5 Systems Management - User Help40
© 2007 - 2014 by Sentinel Hill Software, all rights reserved
Grid Row Pop-Up Menus
For most of the grid based menu item screens, you can right-click a given row to have a pop-up menu of the functions that would be applicable to the record represented in the row.
Editing Cell Contents Directly on the Grid
In a number of code maintenance applications, descriptive fields may be edited directly on thegrid. If this is allowed, when those particular cells are double clicked, the contents of the cellwill be highlighted. the operator may then key in the new value.

The Basic User Interface 41
© 2007 - 2014 by Sentinel Hill Software, all rights reserved
Standard Record Editing Functions
Most of the grids in the Series 5 system's applications provide an Edit drop-down menu fromthe menu bar. This offers functions to Cut, Copy and Paste the associated records belongingto the grid. For codes maintenance applications, there are also functions to Undo the lastdeleted item; and to Undo the last edited item. From the drop down menu under Edit in themenu-bar, click the desired function. (In most cases, these functions are also availablefrom the pop-up menu displayed when a row in the grid is right-clicked).
Warning
The Undo Delete, Undo Modify, Cut, Copy and Paste functions are onlyoperable while working in the particular function. If you exit the functionassociated to the grid, when you return, any Cut, Modified or Deletedrecord may not be Pasted or Undone.

Series 5 Systems Management - User Help42
© 2007 - 2014 by Sentinel Hill Software, all rights reserved
Most Recently Accessed Items Menu
In the drop down menu under File in the menu-bar, most grid screens will provide a list of thelast 6 items that were added or edited . You can click on any one these to position to it.
Grid File Properties Menu Function
In almost all applications using a grid screen, the rows of data displayed represent a datarecord in a file. The Properties function found In the drop down menu under File in the menu-bar, when clicked will display some properties about the displayed file.

The Basic User Interface 43
© 2007 - 2014 by Sentinel Hill Software, all rights reserved
The Properties Screen displayed shows the names of the files, the # of records, and the size.
Grid Slide Bar and Full Screen Expand Push Button
In most cases, the columns of data displayed in the grid can be displayed in the screen'swindow. There are a few functions that have too many columns of data to fit.
If there are more columns defined that can't all fit on the screen at once, there will be a slidebar displayed at the bottom of the grid. The operator may slide it over with the mouse to view

Series 5 Systems Management - User Help44
© 2007 - 2014 by Sentinel Hill Software, all rights reserved
the hidden columns of data.
If there is an icon in the lower right corner of the screen, clicking on this will expand thescreen laterally to it's full size. (You will need to have a wide screen for this to be effective).
3.2 Code "Lookup" Window
Throughout each of the Series 5 applications there may be master codes that must be
entered into a field on a screen. In most cases there will be an icon of a pair ofbinoculars located to the right of the field. If you click on the binoculars, a "Codes Lookup"window will be displayed, from which you can browse for and select a code.
Here is an example of fields with the binoculars icon for entering master codes in theProfessional Invoicing system.

The Basic User Interface 45
© 2007 - 2014 by Sentinel Hill Software, all rights reserved
Code "Lookup" Window
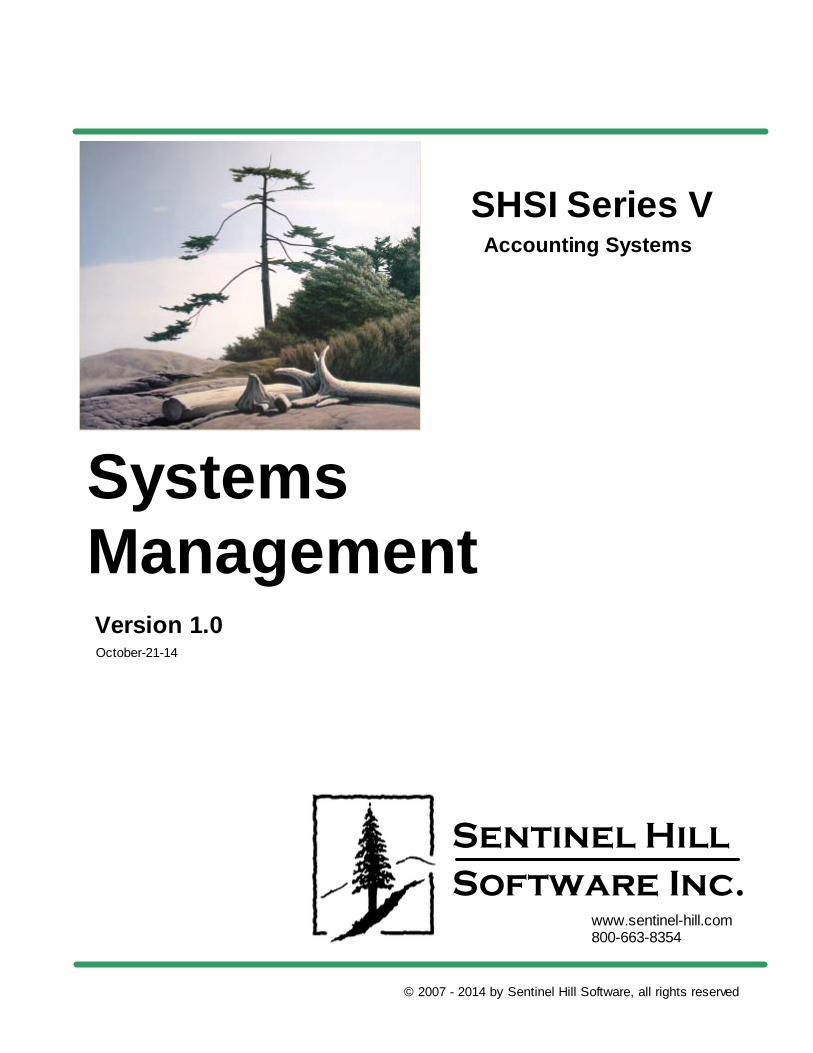
All "Lookup" windows basically have the same characteristics and controls.

Series 5 Systems Management - User Help46
© 2007 - 2014 by Sentinel Hill Software, all rights reserved
Select a particular code by navigating to it in the window and double clicking therow, or clicking the Select push button
To exit the Lookup window without selecting an item, click on the Cancel pushbutton
A Search window may be activated by clicking on the binoculars icon
Move through the codes in the window by clicking on the grid navigate bar icons(on the right), or the cursor up/down keys, or the Page Up/Down keys.
If you know the 1st few letters of the code you are wanting, you can type these,and the grid will redisplay showing the item closest to the Goto Key that you havetyped. (To reset the Goto Key string, strike the ESC key, of click the Resetpushbutton).

The Basic User Interface 47
© 2007 - 2014 by Sentinel Hill Software, all rights reserved
G/L Account "Lookup" Window
For "Lookup" windows offering a G/L Account to be selected, a similar window with thesame characteristics and controls is displayed.
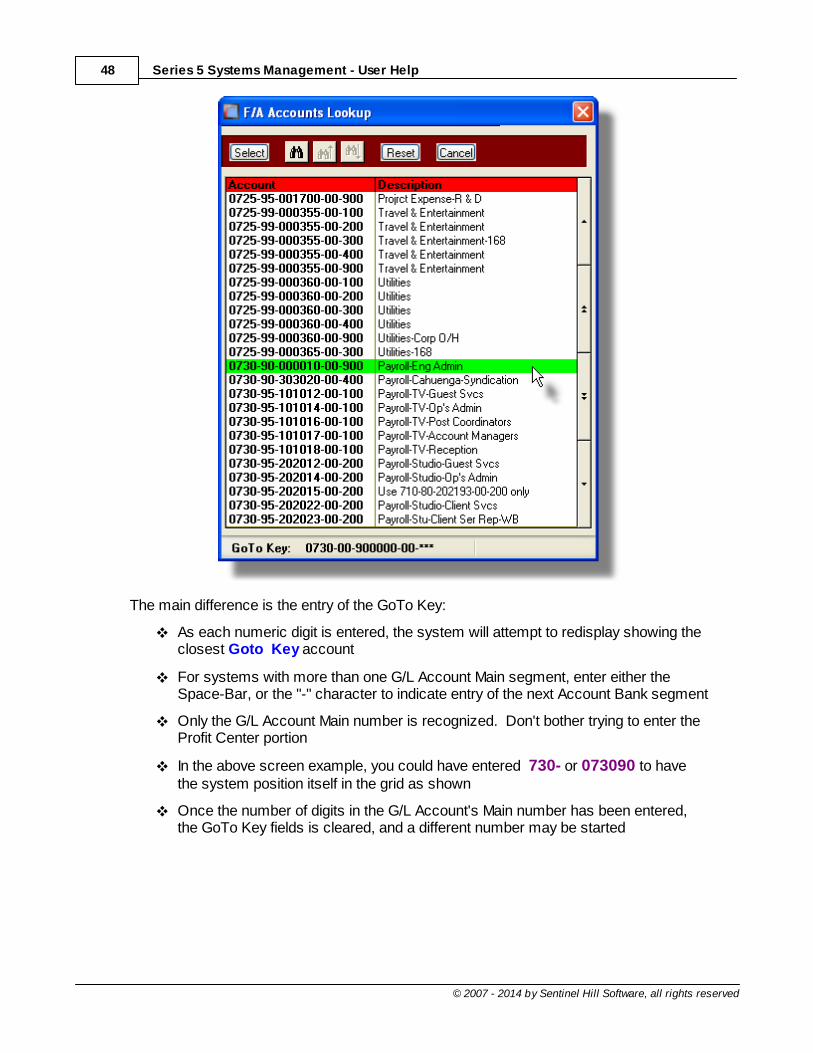
Series 5 Systems Management - User Help48
© 2007 - 2014 by Sentinel Hill Software, all rights reserved
The main difference is the entry of the GoTo Key:
As each numeric digit is entered, the system will attempt to redisplay showing theclosest Goto Key account
For systems with more than one G/L Account Main segment, enter either theSpace-Bar, or the "-" character to indicate entry of the next Account Bank segment
Only the G/L Account Main number is recognized. Don't bother trying to enter theProfit Center portion
In the above screen example, you could have entered 730- or 073090 to havethe system position itself in the grid as shown
Once the number of digits in the G/L Account's Main number has been entered,the GoTo Key fields is cleared, and a different number may be started

The Basic User Interface 49
© 2007 - 2014 by Sentinel Hill Software, all rights reserved
3.3 Date "Lookup" Window
Throughout the Series 5 applications there is the need to enter dates. With each date entry
field there will be an icon of a calendar located to the right of the field.
If you click on the calendar, a "Date Lookup" window will be displayed, from which you canchoose a date.
Date entry "Lookup" Window
Here is the "Date Lookup" window.
Select a particular date by double-clicking it on the calendar
Select a particular Month or Year by selecting it from the given drop down listfields
Move to the next or previous Years and Months by clicking on the navigate buttonsat the bottom

Series 5 Systems Management - User Help50
© 2007 - 2014 by Sentinel Hill Software, all rights reserved
Exit without selecting a date by clicking on the Cancel push button
3.4 Date Range "Lookup" Window
Throughout each of the Series 5 applications there may be a need to enter a range of dates.
In most cases there will be an icon of a small calendar located to the right of the fields.
Here is an example of selecting a range of Ledger dates in one of the G/L system's functions.
If you click on the calendar, a "Date Range Lookup" window will be displayed, from whichyou can enter the starting/ending dates, or choose from a variety of different date rangepossibilities from a drop down select field.
Date Range "Lookup" Window
The window for entering a range of dates, (or selecting one form a drop down list).

The Basic User Interface 51
© 2007 - 2014 by Sentinel Hill Software, all rights reserved
You may choose, or set, a given date range using a variety of methods:
Enter the dates in the From and To fields
Click on the little calendar icons to have a calendar displayed from which a datacan be chosen
Click on the Prior .... or Next .... push buttons to adjust the dates accordingly
Choose a particular date range from the drop down list

Series 5 Systems Management - User Help52
© 2007 - 2014 by Sentinel Hill Software, all rights reserved

Part
IV
Series 5 Systems Management - User Help54
© 2007 - 2014 by Sentinel Hill Software, all rights reserved
4 Quick Start Tutorials
The tutorials in this section provide a quick introduction to using and setting up your Series 5system. They are intentionally kept brief so that you can actually start using the accountingapplications as quickly as possible. The objective is not to teach you every single detail, butto familiarize you with the basic principles and the way the program works.
For full details on the procedures and screens described in the tutorials, please refer to theapplicable sub-topics in the Systems Management Menu Functions section.
Tutorials
Adding a New Printer
Adding a New Company System
Setting up a new PC Workstation
Setting up a New Logon User
4.1 Adding a New Printer
The Series 5 systems provides for the capability to define an unlimited number of PrinterQueues that can be accessed from the various applications. Each Print Queue has it's ownset of properties. You can associate a Print Queue to a specific network printer, or set it upso the operator can select the printer. You can also have more than one Print Queue thatprints to a single printer, each having their own margins and fonts, etc.
The following steps are needed to establish a printer:
1. Have your Systems Manager, or Network Manager, define the printer on yournetwork. Then on each client PC that will need to access it, add it as a new printer.
2. Dream up a name for your new printer, that's less than 20 alphanumericcharacters, and define it as a variable in the Series 5 Configuration file .
3. If it's a Windows printer, and you wish to access it at runtime without having toselect from the list of all your other printers, you need to define it as a CapturedWindows Printer .
4. Define the new printer as a Series 5 Printer Queue , with it's applicableproperties, and assigning it to your Captured Windows Printer.
5. If in your Company System(s) , you have limited access to selected printers,then assign your new Printer Queue to those companies that will utilize it.
98
54
55
57
58
149
104
99
114
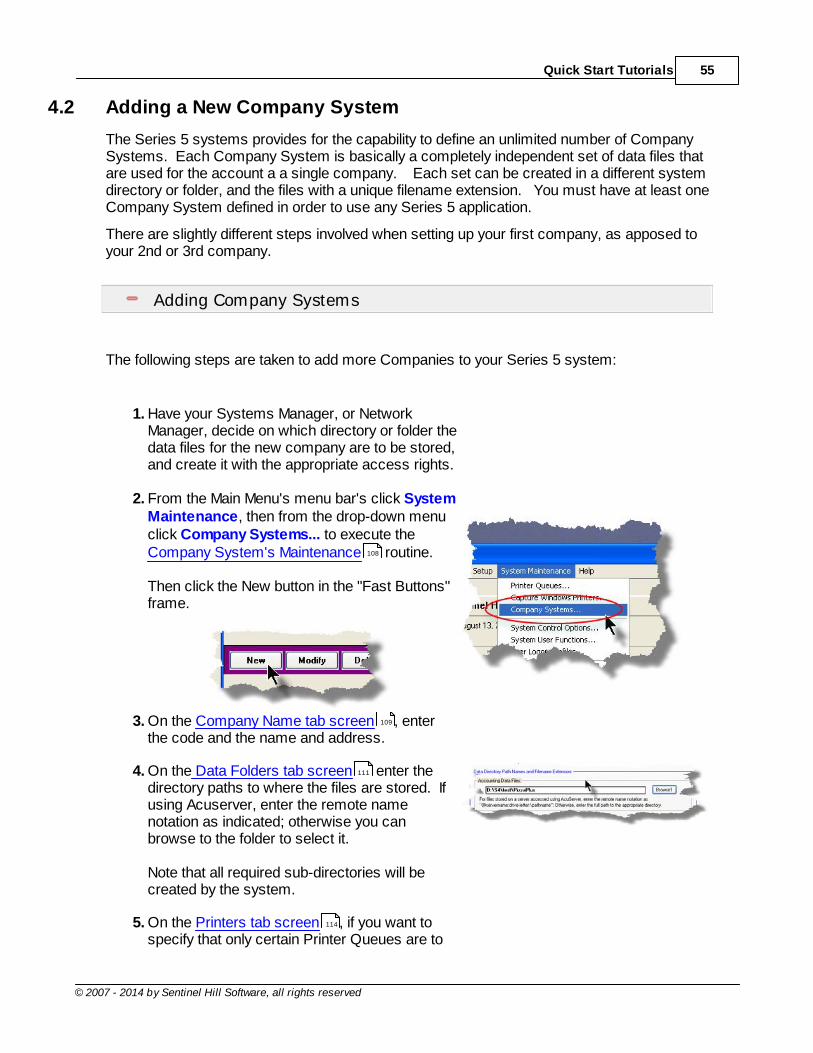
Quick Start Tutorials 55
© 2007 - 2014 by Sentinel Hill Software, all rights reserved
4.2 Adding a New Company System
The Series 5 systems provides for the capability to define an unlimited number of CompanySystems. Each Company System is basically a completely independent set of data files thatare used for the account a a single company. Each set can be created in a different systemdirectory or folder, and the files with a unique filename extension. You must have at least oneCompany System defined in order to use any Series 5 application.
There are slightly different steps involved when setting up your first company, as apposed toyour 2nd or 3rd company.
Adding Company Systems
The following steps are taken to add more Companies to your Series 5 system:
1. Have your Systems Manager, or NetworkManager, decide on which directory or folder thedata files for the new company are to be stored,and create it with the appropriate access rights.
2. From the Main Menu's menu bar's click SystemMaintenance, then from the drop-down menuclick Company Systems... to execute theCompany System's Maintenance routine.
Then click the New button in the "Fast Buttons"frame.
3. On the Company Name tab screen , enter
the code and the name and address.
4. On the Data Folders tab screen enter thedirectory paths to where the files are stored. Ifusing Acuserver, enter the remote namenotation as indicated; otherwise you canbrowse to the folder to select it.
Note that all required sub-directories will becreated by the system.
5. On the Printers tab screen , if you want tospecify that only certain Printer Queues are to
108
109
111
114

Series 5 Systems Management - User Help56
© 2007 - 2014 by Sentinel Hill Software, all rights reserved
be used, select them; otherwise just leave it asis and click the Next button.
6. On the G/L Account Format tab screenenter, or select, the definition of the G/L Accountnumber. After clicking the Finish button, thisCompany may then be selected when logging into Series 5.
7. At this point, you have only created theCompany System.
The files for each Series 5 application mustnow be established. To accomplish this youmust start the Series 5 main menu for the newCompany System.
Then for each accounting application to be usedperform the following steps:
Click on the application's icon
A message will be displayed advising thatthe given Control File is not available andasking if the Control File Maintenanceshould be executed. Click on the Yespush-button.
Another message will be displayedindicating an error 35. Click the Yespush-button to proceed.
The Control Preferences function for theselected application will automaticallystart. Enter the applicable properties foryour accounting environment.
When finished, execute that application'smenu to return back to the Series 5 mainmenu.
Repeat this process for each application to beset up for the new company.
Processing Tip
116

Quick Start Tutorials 57
© 2007 - 2014 by Sentinel Hill Software, all rights reserved
You can create a "Test Environment" by adding a company system called TEST. Then copy all the files from one of your "live" companies to the test directory. This way you can test new releases of software without affecting your day to dayaccounting files.
4.3 Adding a New User on a WorkStation
The Series 5 systems provides support for multiple simultaneous users. Users may either beconnected as a "FAT" Client, or as a "Thin" Client. In either case, they will be sitting at aWindows based personal computer.
The following steps are needed to establish a PC for use with the Series 5 applications:
1. Have your Systems Manager, or Network Manager, define the network printers thatneed to be accessed from the PC.
2. For "FAT" Clients, if the <%COMPILERNAME%> runtimes are to be kept on eachPC, load the <%COMPILERNAME%> product from the Acucorp's release CD.
3. For "thin' Clients, load the <%COMPILERNAME%> thin client program,("atcinst.exe") from the Acucorp's release CD or from the Acucorp's web site.
4. Establish any mapped drives that point to directories where the data files, the <%COMPILERNAME%> executables, or the Series 5 runtimes live.
5. Create the user's personal Series 5 working sub-directories , in their designated"My Documents" folder. There needs to be a directory named SHSI, andunderneath that, a separate sub-directory for each Series 5 Company System thatwill be accessed by the user.
6. Create the Windows screen shortcuts that will be used to launch the Series 5applications. You would have either one for execution as a "thin" client, or one forexecution as a "FAT" client ; or maybe both.
7. Define any of the required environment variables used for assorted defaultswhen the Series 5 applications are executed. In particular, the variable SHSI_USER_NAME is used to default the Signon User Code.
8. Modify the Windows Register for the PC to specify the location of the HTML Helpfiles on your network. This is needed to bypass a Microsoft security feature found inWindows XP and Vista.
9. If the user of this PC is going to be generating emails from the Series 5applications, you must install a 3rd party utility that deals with an emailing security
163
163
149

Series 5 Systems Management - User Help58
© 2007 - 2014 by Sentinel Hill Software, all rights reserved
feature found in Windows XP and Vista. Basically, unless the application is aMicrosoft product, when an email is submitted to Outlook, a screen will be displayedwarning the operator, and asking them if it's OK to send the email. There are anumber of 3rd party products that can be installed, with which you can disable thismessage from appearing. (One such product is called "ClickYes Pro", that can bepurchased by visiting www.ContextMagic.com).
10. If the user of this PC is going to be generating reports or forms that are saved asMS Word documents, then the MS Word Templates, (files with a .DOT or .DOTXextension), must be copied to their system. For users with Office 2003, thetemplate is named as whatever.dot and for Office 2007 is saved aswhatever.dotx . On Windows XP clients, these must be put on their PC in their C:\Documents and Settings\<PC UserName>\Application Data\Microsoft\Templates" directory. On Windows 7 clients, these must be put on their PC intheir C:\Users\<PC UserName>\AppData\Roaming\Microsoft\Templates"directory. (See the discussion on Setting up Word Templates in the chapter onExecuting as Windows Clients on NT Networks ).
4.4 Setting up a New Logon User
In order to access any of the Series 5 systems, a given user must have a User Logon Profileestablished. Every user that needs to access any of the applications must first sign on tothe system with a User Code and Password. The Logon Users' properties include theirname, password, email address and assorted options associated to use of the system.
Setup Warning
You must have at least one user with Full System Management Access rights. The1st user you define in your system should have Full System Management rights. Should you fail to set up such a user you will be in deep do-do.
Adding Logon Users
The following steps are taken to set up new users access rights to your Series 5 system:
1. Have your Systems Manager or AccountingManager, decide on a 15 character user codeto be assigned to the employee using Series 5.
163

Quick Start Tutorials 59
© 2007 - 2014 by Sentinel Hill Software, all rights reserved
2. From the Main Menu's menu bar's click SystemMaintenance, then from the drop-down menuclick User Logon Profiles... to execute theLogon User Maintenance routine.
Then click the New button in the "Fast Buttons"frame.
3. On the User's properties screen, enter the UserCode, Password, Email Address, and otherrequired fields.
4. At this point, you have only created the user'sLogon profile.
The user must be given access rights to eachSeries 5 application. To accomplish this youmust execute each Series 5 system.
From the application's menu bar's click Control Options, then from the drop-downmenu click User Access Privileges... toexecute the User Access Maintenance routine.
5. From the User Access Maintenance screenperform the following steps:
A tree structure listing all the User LogonProfiles that have been defined will bedisplayed. Red heads have not beenenabled yet. The green heads alreadyhave access. Highlight the red head thatis to be set up for access. Click the Enable button in the "Fast Buttons"frame; then click the Select User push-button.
If this user should have full access to AllMenu items, set the applicable check-box.
Then click the Add It push-button in theright hand side of the screen.
In the tree structure, each menu-bar titlewill be shown under the users now green
125

Series 5 Systems Management - User Help60
© 2007 - 2014 by Sentinel Hill Software, all rights reserved
head.
Expand the tree under the item(s), thatyou wish to assign access rights to.Double click any of the items, and theAccess Properties screen will bedisplayed in the right hand side of thescreen. Assign the desired access rightsand click the OK push-button.
6.
Processing Warning
When Enabling users access to each applicationmake sure that the 1st user added to a givenapplication has either "Full Access to All MenuSelections", or has "Full" Access Rights to the UserAccess privileges menu item, (found under the ControlOptions menu set).
7. Repeat this process for each application to beset up for the new company. (For the GeneralLedger Systems that have multiple G/LCompanies, you must set up a given user ineach G/L Company that they are allowedaccess.)

Part
V

Series 5 Systems Management - User Help62
© 2007 - 2014 by Sentinel Hill Software, all rights reserved
5 Accessing the Series 5 System Management Functions
In order to use any of the Series 5 system applications, each user must go through a sign-onprocess.
The following steps are required.
1. Signon using the users assigned User Code and Password.
2. Select the Company System that is to be processed. (If only one Company systemis defined, then this step is not required).
3. From the Main Menu screen, click the appropriate icon of the system to be executed.
Using the Series 5 System
User Logon Screens
Series 5 Main Menu
5.1 User Logon
Each user must first log in to use any of the Series 5 applications.
Key Information
Your Systems Manager, or designated "Gate Keeper"must first create a User Profile before any user cansign on to the system.
User Logon Screens
1. Click on the Series 5 application icon that has been set up on your desktop.
62
65

Accessing the Series 5 System Management Functions 63
© 2007 - 2014 by Sentinel Hill Software, all rights reserved
2. Enter your User Code and Password. If setup by your Systems manager, theUsername Code will default to that defined by the SHSI_USER_NAME DOSEnvironment Variable.
You must enter the correct password to get into the system.
You will have five attempts at entering the correct Username andPassword combination
Your Systems Manager may have established the rule that passwordsmust be renewed at some interval of time. (ie., every 3 months). If this isthe case, the system will warn you 21 days ahead of time, that you willneed to change the password. If it has expired, you will have to contact

Series 5 Systems Management - User Help64
© 2007 - 2014 by Sentinel Hill Software, all rights reserved
your System Administrator, or your Gatekeeper to set up a new passwordfor you.
3. If you have defined more that one Company System, select the company to be workedwith:
Defining a New Password
On occasion, you may be required to define a new password. You can have your SystemsManager, or the designated Gate Keeper assign you a new password, or you can do thatyourself.
1. From the Main Menu's menu bar, click on My Own Setup, and from the drop downmenu, click on Change My Password. The following screen will be displayed:
2. Enter your old password
3. Enter your new password in both fields presented. There are a few rules about thepassword you are allowed to use:
The password must contain at least 8 non-space characters
The password must contain at least 1 numeric digit and 1 alpha character

Accessing the Series 5 System Management Functions 65
© 2007 - 2014 by Sentinel Hill Software, all rights reserved
You cannot use the same password that you have used for the last 3 times
The password will time-out after a pre-determined period of time. (As setup byyour Systems Manager)
If you fail to enter the password correctly after a number of tries, (as setup byyour Systems Manger), you will be disabled from logging in. You will have tocontact your System Manager to have your profile re-enabled.
4. Click OK to proceed.
5.2 Series 5 Main Menu
The Series 5 Main Menu screen provides each of the bitmap buttons for each application thathas been defined on your system. The System Management functions are accessed fromthe System Maintenance menu bar item.
Series 5 Main Menu
Select the desired S/M application by clicking it's associated graphic, or choose aSystems Management function from the drop down menu.

Part
VI

Basic Processing Procedures 67
© 2007 - 2014 by Sentinel Hill Software, all rights reserved
6 Basic Processing Procedures
Throughout the Series 5 system applications, a variety of functions provide standardprocessing options screens. Those that apply directly to the management of the systemsare are documented in this chapter and it's related sub-topics. (A description of otherBasic Procedures are found in the Help provided for specific Series 5 systems).
Basic Processing Options
Background Processing
Report Generation and Printing
6.1 Background or Night Processing
Many of the Series 5 applications provide the ability to execute a number of their reporting andprocessing functions in the background as a batch job. You might choose to execute anapplication as a Batch Job so that your terminal may be free to be used for other activity, orso that a report could be delayed to be executed in the evening when the demands on yourcomputer system are less. In order to process jobs in the background a PC terminal, runningWindows, must be dedicated to executing the Batch Job Processor utility.
Some of the features of Batch processing:
Jobs may be queued to one of 5 different Job Queues
Jobs may be queued with different Priorities
Jobs may be queued to execute after a specified time of day (for NightProcessing)
Jobs may be defined as "Re-Occurring" at a variety of time intervals
A Batch Job Manager can control and/or change individual jobs waitingto be executed
Each Job has a Parameter Control file that can be edited
Each completed Job has an Execute Audit Log file that may be viewed
Multiple Batch Job Processor may execute simultaneously
The ability to submit jobs to execute in the Background Job Processor is a privilege granted to
67
81

Series 5 Systems Management - User Help68
© 2007 - 2014 by Sentinel Hill Software, all rights reserved
individual users for each application's menu functions. It is also possible to define the option that a given operation MUST be executed by the Job Processor; and alternatively, that the jobmust execute after 6:00 PM in the evening.
Batch Job Processing
Selecting Jobs for Batch Processing
Managing Batch Jobs
The Batch Job Processor
6.1.1 Selecting Jobs for Background Processing
Only certain jobs have been set up to optionally execute using the Batch Job Processor. These are mainly functions that generate reports, or functions that need to be executed everynight, or those functions requiring extensive CPU processing.
Processing Note
Batch Processing is a feature that carried over from the days when processors wererelatively slow compared to today. As such, only a limited number of functions have beenset up to execute in this manner. If there are any functions that you feel should be revisedto execute in the Batch, please make your request to the development team at SentinelHill Software Inc.
If an application has been set up for Batch Processing, then typically on the last screen usedto enter processing options, there will be a prompt at the bottom. Set the check box if youwish to execute the job in Batch. If the user's access for the given menu item is set such thatthe job must be executed as a batch job, the check-box will be set, and disabled.
68
71
77
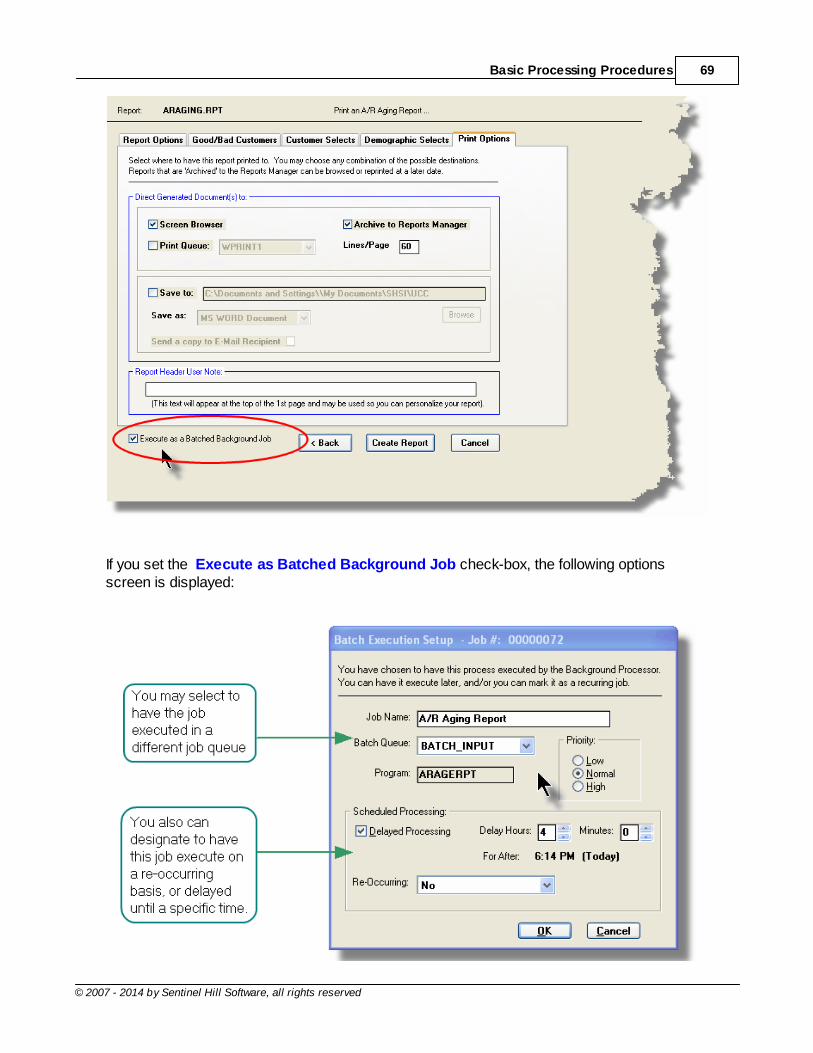
Basic Processing Procedures 69
© 2007 - 2014 by Sentinel Hill Software, all rights reserved
If you set the Execute as Batched Background Job check-box, the following optionsscreen is displayed:

Series 5 Systems Management - User Help70
© 2007 - 2014 by Sentinel Hill Software, all rights reserved
Once the OK push button is clicked, then the job will be submitted to the Job Batch Queue towait for it's time to be executed. In the meantime, you may continue with other functions, orexit the Series 5 application totally. Notice that every job is assigned a unique number. Thismay be used to track the job using the Batch Job Manager.
Batch Execute Setup Field Definitions
Job Name X(30)
By default, is the name of the Report or Operation. The job may easily be tracked by theBatch Job Manager using this name.
Batch Queue drop-list
The system provides pre-defined BatchQueue names. Each job may be dispatchedto a particular queue to be processed. YourSystem's Manager may have defined multiplequeues, each with different execute priorities,or on different processors.
ProgramThis field defines the name of the Series 5 program this is executed. It may not bechanged.
Priority radio-buttons
The priority will determine how quickly thebatch request is executed. The default settingis determined from the User's accessproperties for the given application.
Low
Normal
High
Delayed Processing check-box
Should you wish to have this job execute at some designated time of the day, set thischeck-box. You will then be able to set the Delay Hours and Minutes. The delay willdefault such that the job would executed after 6:00 pm today.
Re-Occurring drop-list
When a job is initially queued, you may set thisoption to have it automatically re-occur at oneof the defined intervals. After it eventuallyexecutes, it will automatically re-queue itself toexecute. Note that any date parameters orfilters associated to the application, willautomatically be updated based on the giveninterval chosen.

Basic Processing Procedures 71
© 2007 - 2014 by Sentinel Hill Software, all rights reserved
6.1.2 Batch Job Management
The Batch Job Manager is available to each of the Series 5 applications. Whenever anapplication's function is queued to be executed by the Batch processor, an entry is recordedin the Batch Job file. The Batch Manager allows you to view the status of the job, put it onHold, have it re-queued, or even delete it.
Accessing the S/M Batch Job Manager
From either the S/M Main menu, or any application, select Batch Job Processingfrom the File drop-down menu.

Series 5 Systems Management - User Help72
© 2007 - 2014 by Sentinel Hill Software, all rights reserved
Batch Job Queue Manager Grid Screen
Maintenance and monitoring of the Batch Jobs is done with a Series 5 grid screen.
"Fast Buttons"
Hold Put a Hold on thethe selected Job
Modify Modify theproperties of theselected job
Delete Delete the selectedJob
JobParams
Display and edit theJob's executionparameters withNotepad
OutputLog
View the output loggenerated whenthe selected jobwas executed.
Purge Have those jobssatisfying a numberof filters deletedfrom the system
Select Set filters for theitems that aredisplayed in thegrid
Modifying a Job in the Batch Queue
1. In the grid, navigate to the row listing the job that is to be modified.
2. Double-click the row, or right-click the row to have a drop-down menu displayed, thenclick Modify, .... or just click on the Modify button in the "Fast Button" frame. The Job'sproperties screen will be displayed.

Basic Processing Procedures 73
© 2007 - 2014 by Sentinel Hill Software, all rights reserved
3. Edit any given field as required. Note in particular, that if a job has been placed on
"Hold", or if it has completed, you can click on the Reset Status to "WAITING" checkbox, and the job will be executed at the next opportunity after the specified executiontime.
4. You can also view and edit the system command line that is used to launch theparticular job. This is the shell or Command Prompt command that is issued. YOUSHOULD NOT NORMALLY EVER NEED TO EDIT THIS COMMAND LINE.
5. Click the Update push button at the bottom of the screen.
Batch Job Properties Screen Field Definitions
Batch Queue drop-list

Series 5 Systems Management - User Help74
© 2007 - 2014 by Sentinel Hill Software, all rights reserved
The system provides pre-defined BatchQueue names. Each job may be dispatchedto a particular queue to be processed. YourSystem's Manager may have defined multiplequeues, each with different execute priorities,or on different processors.
Re-Occurring drop-list
A job that has already completed, may be setup to have it automatically re-occur at one ofthe defined intervals. After it eventuallyexecutes, it will automatically re-queue itself toexecute. Note that any date parameters orfilters associated to the application, willautomatically be updated based on the giveninterval chosen.
Priority radio-buttons
The priority will determine how quickly thebatch request is executed. The default settingis determined from the User's accessproperties for the given application.
Low
Normal
High
Queued for Execution - Date and Time (mm/dd/yy)
You can set to have this job execute at some designated time of a particular date.
Reset Status to "WAITING" check-box
If a job has completed, or if it has been placed"On-Hold", then you can reactivate it and haveit execute again. (Depending on the function,you may have to re-edit the Job Parametersto set up correct dates of report options).
Grid Display Search options
You may search for specific records displayed in the grid using a number of relevant fields.
Click on the Search icon.A search string may be entered for the following fields:
Job Name Job Number

Basic Processing Procedures 75
© 2007 - 2014 by Sentinel Hill Software, all rights reserved
Grid Display and Purge Filters Screen
If your company makes use of Batched Jobs, over a period of time you may have a greatnumber of Job History records. You can limit the number of items that are displayed in thegrid. The same filter fields are also available to the Purge function.
1. Click on Selections in the "Fast Button" frame. The Archive Report selection filtersscreen will be displayed.
2. Set the applicable filters
3. Click the OK push-button. The grid will be redisplayed showing only those reportssatisfying the selected filters.
Filters Screen Field Definitions
Systems radio-buttons & drop down list
Click the All button, or the Selected button with a specific application from the drop downlist. Only those jobs generated from the selected system will be listed.

Series 5 Systems Management - User Help76
© 2007 - 2014 by Sentinel Hill Software, all rights reserved
Company System radio-buttons & drop down list
Click the All button, or the Selected button with a specific Company for which jobrecords are to displayed or processed.
Batch Execute Queue radio-buttons & drop down list
Click the All button, or the Selected button with a specific Batch Queue. Only those jobsgenerated and processed by by the selected queue will be listed.
Execute Date radio-buttons & (mm/dd/yy) entry fields
Click the All button, or the Selected button with a date range. Only those jobs thatexecuted within the range of dates entered will be listed.
Putting a Job "On-Hold"
If a job has not yet executed, and for whatever reason, you want to put it on hold, you can doso. (Perhaps to change a parameter or priority).
1. In the grid, navigate to the row listing the Job to be put on-hold.
2. Right-click the row to have a drop-down menu displayed, then click Hold, .... or justclick on the Hold button in the "Fast Button" frame.
3. A hold verification screen will be displayed. Click the Put On Hold button to proceed.
4. The Job's status will be set accordingly.
5. To re-activate the Job, you will have Modify it, and click the Rest Status to "WAITING"check-box.
Purging old "Completed" Job Control Records
Over a period of time, your users may have generated a great number of Job records. If youwish, you may delete them to reduce the overhead, make available more disk space, or justto get rid of them.
1. Click on the Purge button in the "Fast Button" frame.
2. The Purge options screen will be displayed. (This is the same screen as used for theGrid Display filters).
3. Click the OK push-button. The system will remove all those jobs satisfying theselected filters.

Basic Processing Procedures 77
© 2007 - 2014 by Sentinel Hill Software, all rights reserved
6.1.3 The Batch Job Processor
In order to process any Systems Management function jobs that might have been queued tobe run in the background, or at night, a PC terminal running Windows must be dedicated toexecuting the Batch Job Processor utility. This is basically another Series 5 program thatgets launched from the Batch Job Management function.
Some of the features of Batch Processor Utility:
The Processor Utility is launched from the File drop-down menu fromthe Batch Job Manager
Multiple instances of the Processor Utility may execute at the same timeon different client terminals
Each Processor Utility may be set up to service jobs sent to a particularBatch Execute Queue
Each Processor Utility may be set up to service jobs generated for aparticular Company Systems
Each Processor Utility may be set up to service jobs generated for aparticular application
An Execution Log screen is available that displays the last 10 jobs thathave executed
The window within which the Job Processor executes can be toggledbetween two sizes. In Expanded mode it shows the details and log ofexecuting jobs; In Brief mode, it just shows a small general statusscreen
Launching the Series 5 Batch Job Processor Utility
From the Batch Job Manager screen:
1. Click on Start Batch Processor from the File drop-down menu. A prompt will bedisplayed confirming the launch of the Job Processor.

Series 5 Systems Management - User Help78
© 2007 - 2014 by Sentinel Hill Software, all rights reserved
2. Click the Yes button, then the Job Service Handler screen will be displayed andyou will be able to set a number of filters that are used to select particular jobs thatare to be accepted. (By default All jobs will be processed).
3. Click OK and the Job Processor will trundle off and wait for a job that it canexecute.
Processing Note

Basic Processing Procedures 79
© 2007 - 2014 by Sentinel Hill Software, all rights reserved
The Batch Job Processor, when launched, is executed as an entirely new task in it's ownwindow. You can switch back to the Batch Job Manager window, exit that, and dowhatever you please without disturbing the Job Processor.
Processing Status Tab Screen
As jobs are executing, you can view their status on the Processing Status tab screen. Itdisplays the jobs that is currently executing, or the last job that was executed.
Execution Log Tab Screen
A table is kept displaying the last ten jobs that have executed since the Job Processor hasstarted.

Series 5 Systems Management - User Help80
© 2007 - 2014 by Sentinel Hill Software, all rights reserved
Job Processor "Brief" Window
If you are not interested in view the progress of the batched jobs, you can switch thewindow to a "Brief" display. From which you can switch back to an "Expanded" display.
Job Select Filters Screen Field Definitions
Systems radio-buttons & drop down list
Basic Processing Procedures 81
© 2007 - 2014 by Sentinel Hill Software, all rights reserved
Click the All button, or the Selected button with a specific application from the drop downlist. Only those jobs generated from the selected system will be executed.
Company System radio-buttons & drop down list
Click the All button, or the Selected button with a specific Company for which jobrecords are to be executed.
Batch Execute Queue radio-buttons & drop down list
Click the All button, or the Selected button with a specific Batch Queue. Only those jobssubmitted to the selected queue will be executed.
6.2 Report Generation and Printing
Most of the Series 5 applications generate reports or forms that need to be printed. Thesystem offers a variety of options for selecting the format in which reports are generated andhow they are actually to be printed. Reports may be generated as follows:
Viewed by the Series 5 Report Browser
Printed to a selected printer
"Archived" for later reference
Saved as an ASCII text file or MS Word file
Emailed to specified recipients
Any combination of the above
When a report is to be actually printed, any of the Series 5 defined Print Queues may beselected. An unlimited number of Printer Queues may be set up by your SystemAdministrator. Each Queue has a variety of properties associated that means you can prettywell print to any of your network defined printers using different fonts or margin settings. (Refer to the chapter on Defining Series 5 Print Queues in the Systems ManagementHelp or manuals).

Series 5 Systems Management - User Help82
© 2007 - 2014 by Sentinel Hill Software, all rights reserved
Report Generation
Report Options Screen
Report Browser
Archived Reports Management
6.2.1 Report Options Screen
When any kind of report or form output is to be generated, the following window screen isdisplayed:
82
87
89

Basic Processing Procedures 83
© 2007 - 2014 by Sentinel Hill Software, all rights reserved
Selecting Report Generation Options
Normally, the Print Options screen will be presented with all fields defaulted for typical reporthandling. However, you may want to revise how and where the report is to be generated. The following steps may be taken:
1. Determine where the generated report is to be directed. Click the appropriate check-box. You may choose one or more from the following:
Output To Comments
Screen BrowserOutput is displayed to the screen using theSeries 5 Report Browser .
Archived to Report Manager
Output is saved as an "Archived" report. Itmay be viewed and reprinted using theSeries 5 Report Manager . It will remainon the system until purged.
Print Queue
Output will be directed to the selectedSeries 5 Printer Queue. This may be anyprinter that has been defined on yournetwork. When selecting to output to aPrinter Queue, you may select to have upto 9 copies printed, (as long as that featureis supported by your operating system,and printer).
Saved to Disk as an MS WordDocument
The output is written to an MS WordDocument in the specified folder.
Saved to Disk as an MS WordDocument and printed
The output is written to an MS WordDocument in the specified folder. It is alsoprinted to the designated Captured Printerfrom within Word.
Saved to Disk as an ASCII Textfile
The output is written as a text file to thespecified folder. This would be useful onlyif you needed to parse the file with some3rd party utility.
Saved to Disk as a PDFDocument
The output is written to a PDF Documentin the specified folder.
2. When selected to direct the report output to a Printer Queue, you may select a Series5 Printer Queue from the drop down list. (The list will contain each of the printersthat has been assigned to the particular Company System that you are workingin). When the Print Queue has been selected, the system will echo the Description,the Font, and if applicable, the network assigned printer name of the Captured printer.
87
89

Series 5 Systems Management - User Help84
© 2007 - 2014 by Sentinel Hill Software, all rights reserved
3. When selected to direct the report Saved To Disk you must select to save it as an MSWord Document, an MS Word Document Printed, a PDF Document, or an ASCII TextFile. In either case you need to have specified the folder to which the file is saved. Thedefault is the directory that is defined in the Series 5 User's Logon Profile field labeled
as the User's "My Documents" folder Pathname. You can click the pushbutton to locate or change the folder where the file is to be stored.
4. If saving to an MS Word Document Printed, then after generated, the document willbe printed from within Word. You will need to select a specific Captured Printer. Captured Printers are defined by your Systems Manager using the Captured WindowsPrinters maintenance function available from the Series 5 main menu under theSystem Maintenance drop down sub-menu. (Refer to the chapter on Defining Series5 Captured Windows Printers in the Systems Management Help or manuals).
Setup Tip
If you wish to be able to generate your reports as Word or PDF documents, your Systems Manager must havedefined pertinent variables in the AcuGT runtime configuration file. For simple reports you specifically need to
have set up the variable MSWORD-DEFAULT-SPECS. This defines whether the document isgenerated as Portrait or Landscape, the Font Name and Font Size and an optional Template that might be
applied to the document when it is created. (Refer to the chapter Setting up for MS Word in theSystems Management Help or manuals.)
If templates are used to format the output to MS Word or PDF documents, they must be installed on eachuser's individual client PC. On Windows XP clients, these must be saved to the C:\Documents and Settings

Basic Processing Procedures 85
© 2007 - 2014 by Sentinel Hill Software, all rights reserved
\<PC UserName>\Application Data\Microsoft\Templates folder. On Windows VISTA and Windows 7 clients,these must be saved to the C:\Users\<PC UserName>\AppData\Roaming\Microsoft\Templates folder.
For users of Office 2003 the file must be named with a xxxx.dot extension. For users of Office 2007 orlater, the file must be named with a xxxx.dotx extension.
5. When a report is saved to disk, you may also select to have the generated disk fileemail to a given recipient. Set the check-box accordingly. After the report is generated,the window to send an email will be displayed. You can select the recipient(s), and editthe text of the message and click the Send button to send the email.
Protected MS Word Documents
When reports of forms are output as MS Word Documents, they are generated in protected "Read-Only"mode. If you really need to un-protect it, the password is SENTINELHILL.

Series 5 Systems Management - User Help86
© 2007 - 2014 by Sentinel Hill Software, all rights reserved
Field Definitions
Screen Browser: check-box
Set the check mark to have the report displayed to the screen using the Screen Browserutility.
Archive to Reports Manager: check-box
Set the check mark to have the report output as an "Archived Report". This may later beviewed and/or reprinted from the Reports Manager.
Print Queue: check-box
Set the check mark to have the report output to a printer.
Print Queue: drop-down list
Select the the Series 5 Printer Queue to which the report is to be output to.
# of Copies: 9
When outputting to a Printer Queue, you may specify how many copies are to be printed.You can print up to 9 copies. This is a feature that is offered only on WIndows XP, VIstaand Windows 7, and is dependant on the type of printer and it's drivers. When multiplecopies are chosen, they are printed collated.
Save To: check-box
Set the check mark to have the report output to a disk file, or folder, on your system aseither an MS Word Document, a PDF Document, or a simple ASCII text file.
Save To: X(90)
Enter the name of the directory folder to which the saved-to-disk report is to be written. This will default to the directory path defined in the Users Logon Profile established byyour Systems Manager.
You may click on the Browse button to locate the desired directory. Only those folderswhich are descendants of the root directory, of that which is defined by the Save-To field,can be displayed. So if you wish to choose a folder on your "C" drive, enter C:\ in theSave-To field before clicking the "Browse" button. Setting the Folder field blank, or to apath that does not have a drive letter designation, would result in only being able to

Basic Processing Procedures 87
© 2007 - 2014 by Sentinel Hill Software, all rights reserved
browse descendants of the user's default working directory.
Save As: drop-down list
Select to have the output saved as an Office Word document, an Office Word documentthat is printed from Word, as a PDF document, or as an ASCII text file. If chosen to Saveto "MS Word Printed", then you must select the Captured Printer to which the report is tobe printed.
To Captured Printer: X(12)
If chosen to Save to "MS Word Printed", then you must select the Captured Printer towhich the report is to be printed. This must be a valid network printer that was capturedusing the Captured Windows Printers maintenance function available from the Series 5main menu under the System Maintenance drop down sub-menu. (Refer to the SystemsManagement Help if required).
Send a copy to E-Mail Recipient: check-box
If chosen to save the report to a disk file, you may also select to have an email sent withthe generated disk file as an attachment. Set the check mark to have the report emailed.
Report Header User Note: X(100)
If you need to personalize the report, the text you enter here will be printed at the top of the1st page.
6.2.2 Report Browser
When selected to direct a report output to the Screen Browser, or from the Reports Manageryou have selected a particular report, the Series 5 Report Browser screen window will beshown.
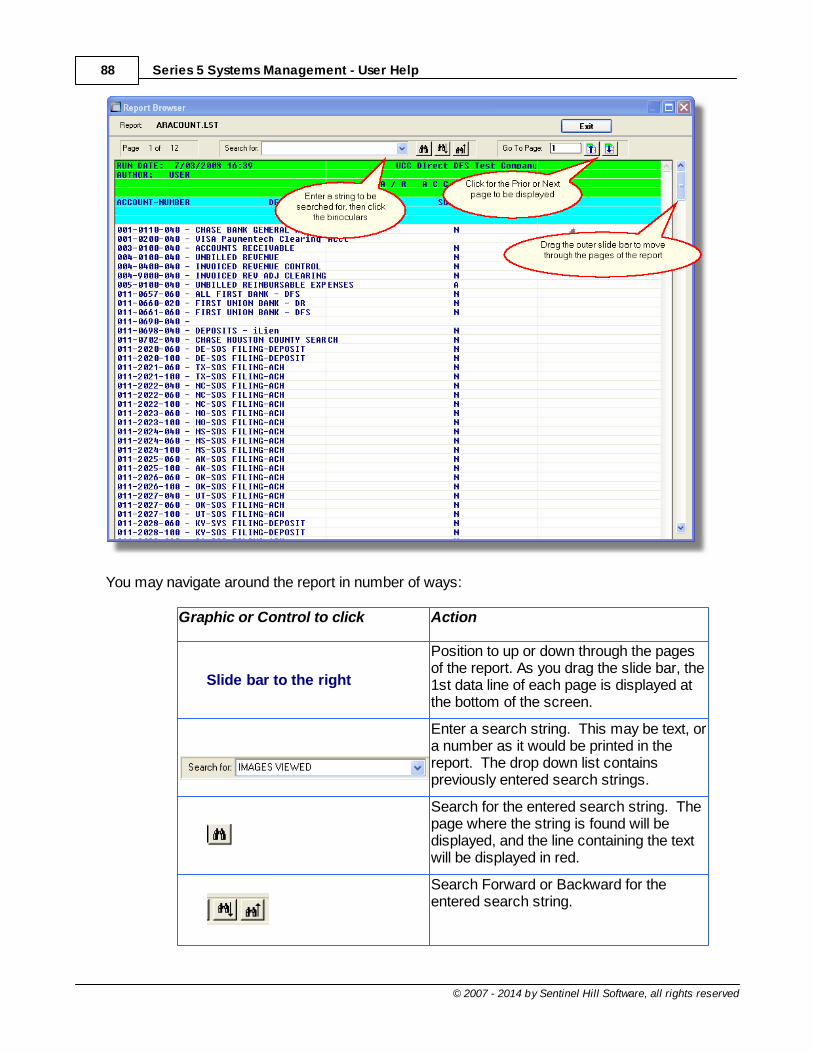
Series 5 Systems Management - User Help88
© 2007 - 2014 by Sentinel Hill Software, all rights reserved
You may navigate around the report in number of ways:
Graphic or Control to click Action
Slide bar to the right
Position to up or down through the pagesof the report. As you drag the slide bar, the1st data line of each page is displayed atthe bottom of the screen.
Enter a search string. This may be text, ora number as it would be printed in thereport. The drop down list containspreviously entered search strings.
Search for the entered search string. Thepage where the string is found will bedisplayed, and the line containing the textwill be displayed in red.
Search Forward or Backward for theentered search string.

Basic Processing Procedures 89
© 2007 - 2014 by Sentinel Hill Software, all rights reserved
Display the select Page.
Display the Prior or Next page of thereport.
6.2.3 Archived Reports Management
The Reports Manager is available to each of the Series 5 applications. Whenever a report isgenerated, the operator may have chosen to direct the output to be "Archived". Thesearchived reports may be viewed and printed using the Reports Manager.
Accessing the S/M Reports Manager
From either the S/M Main menu, or any application, select Reports Manager fromthe File drop-down menu.

Series 5 Systems Management - User Help90
© 2007 - 2014 by Sentinel Hill Software, all rights reserved
Reports Manager Grid Screen
Maintenance of the Archived reports is done with a Series 5 grid screen.
"Fast Buttons"
Re-Print Print the selectedreport
Browse Browse the selectedreport
Delete Delete the selectedArchived report
Purge Have reportssatisfying a numberof filters deleted fromthe system
Selections
Set filters for theitems that aredisplayed in the grid
Viewing an Archived Report
1. In the grid, navigate to the row listing the report that is to be viewed.
2. Double-click the row.
3. The Report Browser window will be displayed.
Process Warning
The "archive" report files are stored in a sub-directory under the folder specified to be used for the company'sdata files. These files are not in any type of format that can be used, other than directly from the ReportsManager utility.
89

Basic Processing Procedures 91
© 2007 - 2014 by Sentinel Hill Software, all rights reserved
Re-Printing an "Archived" Report
1. In the grid, Navigate to the row listing the report that is to be printed.
2. Right-click the row to have a drop-down menu displayed, then click Re-Print, .... orjust click on the Re-Print button in the "Fast Button" frame. The Re-Print optionsscreen will be displayed.
3. Enter the reprint options. Basically you can either print the report, or save it to disk asan MS Word or ASCII text file. Notice that you can also specify a range of pages thatare to be printed.
4. Click the Reprint Report push button at the bottom of the screen.

Series 5 Systems Management - User Help92
© 2007 - 2014 by Sentinel Hill Software, all rights reserved
Grid Display Search options
You may search for specific records displayed in the grid using a number of relevant fields.
Click on the Search icon.A search string may be entered for the following fields:
Sequence # Report Name
Grid Display Sort options
You may choose to have the items in the grid displayed using a number of sorts. Theseinclude:
By Sequence # By System then Report Name By Report Name Extension, then System, then most recent date By the date created (with the most recent ones listed first)
To change the displayed sort order:
1. Click on the heading of the column of data which is to be used for the sort. Only thosecolumns with a [.] can be used. The column that is currently used for the sort has [*] displayed.
Grid Display and Purge Filters Screen
Over a period of time, your users will probably be generating a great number of "Archived"reports. You can limit the number of items that are displayed in the grid. The same filterfields are also available to the Purge function.
1. Click on Selections in the "Fast Button" frame. The Archive Report selection filtersscreen will be displayed.

Basic Processing Procedures 93
© 2007 - 2014 by Sentinel Hill Software, all rights reserved
2. Set the applicable filters
3. Click the OK push-button. The grid will be redisplayed showing only those reportssatisfying the selected filters.
Filters Screen Field Definitions
Systems radio-buttons & drop down list
Click the All button, or the Selected button with a specific application from the drop downlist. Only those reports generated from the selected system will be listed.
Report Types radio-buttons & drop down list
Click the All button, or the Selected button with a specific report name extension fromthe drop down list. Only those reports with their report name extension matching thatwhich was selected will be listed.

Series 5 Systems Management - User Help94
© 2007 - 2014 by Sentinel Hill Software, all rights reserved
Users radio-buttons & drop down list
Click the All button, or the Selected button with a specific user from the drop down list. Only those reports generated by the selected user will be listed.
Date Generated radio-buttons & (mm/dd/yy) entry fields
Click the All button, or the Selected button with a date range. Only those reportsgenerated within the range of dates entered will be listed.
Report Name Template X(20)
Enter a template to be used to match the report names to be listed. The "$" will matchany single character. Use the "*" character immediately before or after the ".", or as the1st character, to match a string of characters.
Delete an "Archived" Report
1. In the grid, navigate to the row listing the report that is to be deleted.
2. Right-click the row to have a drop-down menu displayed, then click Delete, .... or justclick on the Delete button in the "Fast Button" frame.
3. A delete verification screen will be displayed. Click the Remove-It button to proceed.
4. Both the entry in the tables, and it's corresponding "Archive" file will be deleted.
Purging old "Archived" Reports
Over a period of time, your users will probably be generating a great number of "Archived"reports. If you wish, you may delete them to reduce the overhead, make available more diskspace, or just to get rid of them.
1. Click on the Purge button in the "Fast Button" frame.
2. The Purge options screen will be displayed. (This is the same screen as used for theGrid Display filters).
3. Click the OK push-button. The system will remove all reports satisfying the selectedfilters.
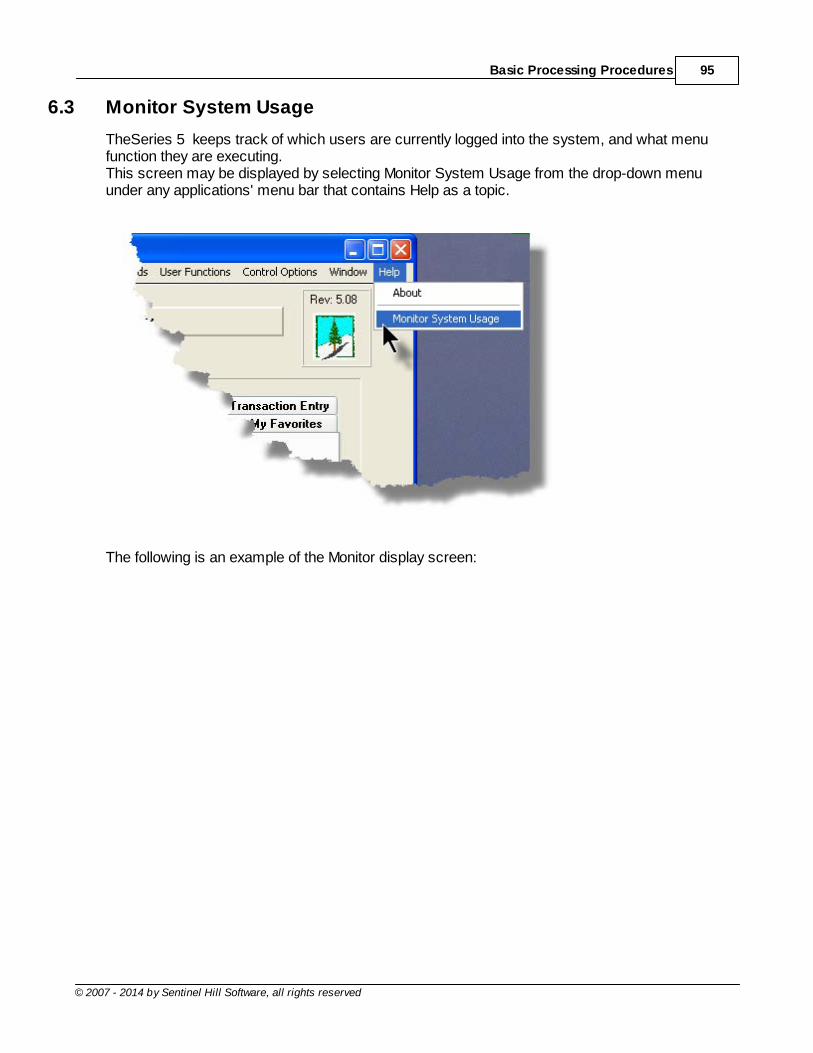
Basic Processing Procedures 95
© 2007 - 2014 by Sentinel Hill Software, all rights reserved
6.3 Monitor System Usage
TheSeries 5 keeps track of which users are currently logged into the system, and what menufunction they are executing.This screen may be displayed by selecting Monitor System Usage from the drop-down menuunder any applications' menu bar that contains Help as a topic.
The following is an example of the Monitor display screen:

Series 5 Systems Management - User Help96
© 2007 - 2014 by Sentinel Hill Software, all rights reserved
Processing Tip
Should you discover that there are items listed, but you knowthat there are no users in the system, ask your SystemsManager to purges these records. (There is a SystemMaintenance function that will delete all the records used indisplaying the items on this screen).

Part
VII

Series 5 Systems Management - User Help98
© 2007 - 2014 by Sentinel Hill Software, all rights reserved
7 Systems Management Menu Functions
All Systems Management functions are accessed from the Series 5 Main Menu. At the top ofthe screen on the menu bar, click System Maintenance for the drop-down sub-menu.
They are divided into types of functions. Each section following describes each set ofcommon types of functions.
Systems Management Functions
Printers and Printer Queues
Company Systems Maintenance
System and User Logon Profile Properties
Signon Audit Inquiry Function
Logon Broadcasting Messages and Control
Initialization and Setup Functions
7.1 Printer Queues and Captured Printers
The topics in this chapter describe functions to manage the Series 5 Printer Queues andestablish links to any Windows based network printers. The Printer Management functionsare available to users that have Full or Restricted Systems Management access.
These functions are available from the Series 5 Main Menu as indicated:
Systems Management sub-menu items
Printer Queue Maintenance
Captured Windows Printers
98
107
118
129
132
136
99
104

Systems Management Menu Functions 99
© 2007 - 2014 by Sentinel Hill Software, all rights reserved
7.1.1 Printer Queue Maintenance
The Series 5 systems provides for the capability to define an unlimited number of PrinterQueues that can be accessed from the various applications. Each Print Queue has it's ownset of properties. You can associate a Print Queue to a specific network printer, or set it upso the operator can select the printer. You can also have more than one Print Queue thatprints to a single printer, each having their own margins and fonts, etc.
This menu function lets you define these Printer Queues. Some of the properties you can setinclude the following:
Assignment to a Windows or network printer
Margins
Lines per Inch and Lines per Page
Fonts
Embedded Graphics
Embedded printer controls
Processing Note
The Printer Queue Code that is assigned to each Printer Queue must have been defined in the Series 5system's Configuration file. See the topic "Configuration Variables" under System Operational Variablesin the Appendix for an example of a Printer Queue.
149

Series 5 Systems Management - User Help100
© 2007 - 2014 by Sentinel Hill Software, all rights reserved
The Printer Queue Maintenance Grid Screen
The Printer Queues are managed with the following grid based screen.
"Fast Buttons"
New Add a new Printer Queue
Modify Modify the Printer Queuehighlighted in the grid
Delete Delete the Printer Queuehighlighted inthe grid
Print Generate a report listing thePrinter Queues that arealready defined
Test Page Print a couple of test pageswith text and markings onevery line of each columnfor the Print Queue that youcan select. This function isuseful for testing alignmentwhen designing orprogramming for specialforms.
Once a Print Queue is defined, it will be available in the drop-down list presented in the PrinterOptions Screen in any application's reporting functions.
Printer Queue Properties Screen
The properties for each Printer Queue are defined with the following screen:
82
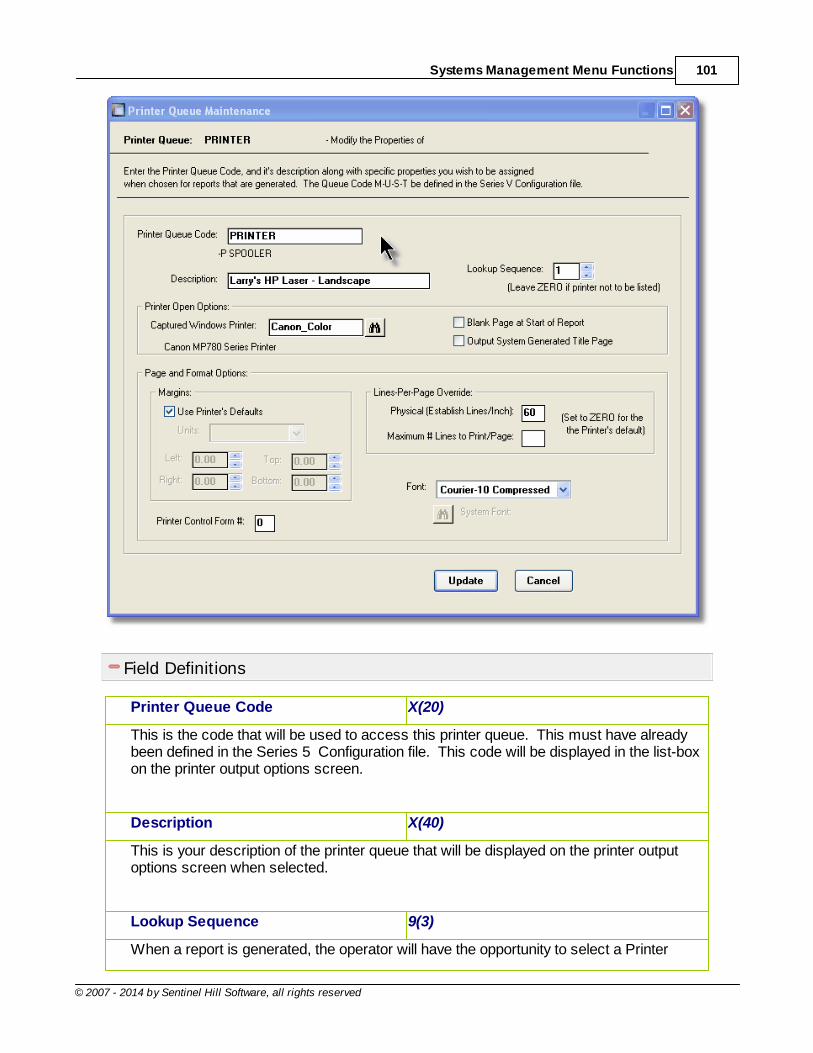
Systems Management Menu Functions 101
© 2007 - 2014 by Sentinel Hill Software, all rights reserved
Field Definitions
Printer Queue Code X(20)
This is the code that will be used to access this printer queue. This must have alreadybeen defined in the Series 5 Configuration file. This code will be displayed in the list-boxon the printer output options screen.
Description X(40)
This is your description of the printer queue that will be displayed on the printer outputoptions screen when selected.
Lookup Sequence 9(3)
When a report is generated, the operator will have the opportunity to select a Printer

Series 5 Systems Management - User Help102
© 2007 - 2014 by Sentinel Hill Software, all rights reserved
Queue from a list-box that is displayed on the Printer Options Screen . The sequencenumber entered defines the ascending sort order by which each Printer Queue isdisplayed. If you do not wish to show this Printer Queue in the list, then leave this fieldblank, or set it to ZERO.
Captured Windows Printer X(12)
When generating a report to a Printer Queue that outputs to a Windows, or Windows NTnetworked printer, every time selected, the operator will be presented with the WindowsPrint Select dialogue. If you wish to set up a Printer Queue dedicated to each one of yournetwork printers, or you do not wish to allow the operator to choose which Windowsprinter the report needs to be queued to you can assign a printer. The Series 5 systemlets you Capture a Windows Spooled Printer , assign a code to it. Once you have thename of your pre-captured printer, you must enter into this field.
Processing Note
If you want to have any reporting functionsexecute as a Batch Job or in theBackground, and are using the Windowsspooler, you must specify a Print Queuethat has a Captured Windows Printerassigned to it.
Blank Page at Start of Report check-box
When a report is printed to this Printer Queue, if this check-box is set, then a form feed ora blank page will be issued at the beginning of the report. (This option is onlyapplicable for older drum type tractor feed printers).
Output System Generated Title Page check-box
You may have defined the Printer Queue Code in the Series 5 systems Configuration fileto designate a Command Prompt command or utility to be used to print a report. If thatcommand provides an argument that causes a banner page to be generated, setting thischeck-box will turn on that switch to have it printed. (If using the -P SPOOLER or -PSPOOLER-DIRECT designation, this option does not apply).
Margins - User Printer's Defaults check-box
Lines-Per-Page - Physical 9(2)
Setting a value to this field will define the number of lines that physically will be able toprint on the page. The system uses this number to adjust the height of the printed font ofa given line. Note that the font is not scaled, but it is simply printed in the specified verticalspace. The value entered basically establishes the number of lines that will print per
82
104

Systems Management Menu Functions 103
© 2007 - 2014 by Sentinel Hill Software, all rights reserved
inch. The printable area is based on the page height minus the physical margins of thepage. For an 11 inch page with 1/2 inch margins at to the top and bottom entering 60lines per page yields 6 lines per inch. (If using the -P SPOOLER-DIRECTdesignation, this option does not apply).
Lines-Per-Page - Max # of Lines perPage (logical)
9(3)
When generating reports or forms, the Series 5 system generally determine the numberof lines that will fit on a page based on the size of the page and margins before issuing anew page. Should you wish to have the computed count overridden, you can specify thenumber of lines to be printed on a page in this field. Normally, this field should be leftblank.
Font drop down list
Select the font to be used when this Printer Queue is selected by the operator.
If Default is selected, thenwhatever font was lastassigned to the printer will beused
The predefined Courier fontsare True-Type fonts
Choosing the Select aSystem Font will have theWindows Font selectionWindow displayed from whichyou can select a font, styleand size.
If Select on Printer Open ischosen, then every time thisPrinter Queue is selected, theoperator will be able to selecta font
Printer Control Form # 9(2)
The Series 5 printing system provide the ability to automatically have printer controlcommands merged in to any report or form type of output. A set of printer controlcommands may be grouped together to be called a Printer Control Form. To have a setof form Control commands output, enter the form # in this field, and select this PrinterQueue when the related application's function is executed.
The set of Form commands must be defined in the Series 5 Configuration file with the

Series 5 Systems Management - User Help104
© 2007 - 2014 by Sentinel Hill Software, all rights reserved
following command:
FMnnn-ccccc [ Lii ] <Printer Control text>
where: nnn is the Form #
ccccc is a Series 5 assigned command name
Lii is an optional argument that indicates the string is to be inserted atline ii (if applicable)<Printer Control Command Text> is the actual text of the printercommand enclosed in double quotes
See Printer Control Variables in the topic "Configuration Variables" under System OperationalVariables in the Appendix for a list of the form commands available.
Processing Note
Most of the form command will be automaticallyinserted when specified. However to use theSELECT-TRAY and USER-CODE commands thesoftware will have to be specially customized tohave the applicable print string inserted. ContactSentinel Hill Software Inc. for further information.
7.1.2 Captured Network Windows Printers Maintenance
The Series 5 systems provides for the capability to print directly to an MS Windows systemnetwork printer, using the Windows spooler. Typically, when a Windows Spool Queue isselected, the Windows Print Select dialogue window is presented to the operator. A printermay then be selected. If you wish to have the system bypass this step, or you do not wishthe operator the burden of making this decision, you may Pre-Capture a Windows printer andassociate it to a particular Series 5 Printer Queue.
The Series 5 systems can also output reports or forms as MS Word documents that will beprinted directly to a specified captured printer.
Capturing a Windows printer involves the following steps:
1) Define your network printer to each client PC that may have cause togenerate and print a report or set of forms to that printer using any of theSeries 5 systems. (The name given to each printer on each PC must beidentical).
149

Systems Management Menu Functions 105
© 2007 - 2014 by Sentinel Hill Software, all rights reserved
2) On any of the PC that the printer has been installed, execute the Series 5system
3) On the menu bar, click System Maintenance, then Capture WindowsPrinters
4) The Windows Printer Maintenance screen is displayed. Click the Newpush-button so you can capture a new printer.
5) Give it a code, and the Windows printer Page Setup screen will bedisplayed. Click on the Printer ... push button at the bottom of the screenand locate the printer that you have defined from the drop down list, (or if it'sa printer on your network, click the Network push-button, and locate theappropriate printer).
6) You may also select any other properties such as Orientation, Source,Margins, etc., that may be displayed.
7) Click OK, and finally, click the Finish push button.
You may now assign this Captured Printer Code to one or more of the Series 5 PrinterQueues , or select it when generating and printing an MS Word document.
Setup Warning
When defining a network printers on different servers, or to each of the clientPCs, you must assign exactly the same name in each case.
The Captured Windows Printers Maintenance Grid Screen
The Captured Printers are managed with the following grid based screen.
"Fast Buttons"
New Add a new Captured PrinterCode
Modify Modify the Captured Printerhighlighted in the grid
Delete Delete the Captured Printerhighlighted in the grid
Print Generate a report listing the
99

Series 5 Systems Management - User Help106
© 2007 - 2014 by Sentinel Hill Software, all rights reserved
Captured Printers alreadydefined
Re-Capture
Have the printer re-captured.
Once a captured Windows Printer has been defined, it will be available to be assigned to aPrinter Queue in the Printer Queue Maintenance function.
Captured Windows Printerer Properties Screen
The properties for each captured Printer are defined with the following screen:
Field Definitions
Series 5 Capture Code X(12)
This is the code that will be used to access this captured Windows Printer. It can be anyname you wish to dream up. It should be a unique code that is associated in some wayto the printer being selected. This code will be used in the definition of a Series 5 Printer
99

Systems Management Menu Functions 107
© 2007 - 2014 by Sentinel Hill Software, all rights reserved
Queue to associate this “Captured” printer with it.
Description X(40)
This field is returned from the Windows System. It will hold the description of the printerthat has been captured, as defined by your network administrator.
7.2 Company Systems
The topics in this chapter describe functions to set up and manage the Series 5 CompanySystems for the Companies of which the accounting is to be set up for. Company SystemsMaintenance may only be accessed by users that have Full Systems Management access.
These functions are available from the Series 5 Main Menu as indicated:
Systems Management sub-menu items
Company Systems Maintenance 108

Series 5 Systems Management - User Help108
© 2007 - 2014 by Sentinel Hill Software, all rights reserved
7.2.1 Company Systems Maintenance
The Series 5 systems provides for the capability to define an unlimited number of CompanySystems. Each Company System is basically a completely independent set of data files thatare used for the account a a single company. Each set can be created in a different systemdirectory or folder, and the files with a unique filename extension. You must have at least oneCompany System defined in order to use any Series 5 application.
When users sign on to the Series 5 main menu, they will select the Company System withwhich to work with. (If you only have one system defined, then it will automatically be selectedfor them).
When defining a Company System you will be supplying the following information:
Company name and address
Data directory folders where data, temporary files and archived reports areto be stored
Filename extension to be used for the data files
The Series 5 Printer Queues that may be used for this Company System
The definition of the G/L Account # that is to be used
Processing Note
If you intend or managing the accounting for more than one company, then be sure to assign a CompanyCode that will make it easy to identify the particular company. These codes will be presented in a drop-downlist when users start up the Series 5 system.
The Company Systems Maintenance Grid Screen
The Company Systems are managed with the following grid based screen.
"Fast Buttons"
New Add a new Company
Modify Modify the Companyhighlighted in the grid
Delete Delete the Companyhighlighted in the grid

Systems Management Menu Functions 109
© 2007 - 2014 by Sentinel Hill Software, all rights reserved
Print Generate a report listing theCompany Systems that arealready defined
Once a Company System is defined, it will be available in the drop-down list presented in the Main Menu Logon Screen .
Company Properties Screens
Company Name tab Screen
Data Folders tab Screen
Printers tab Screen
G/L Account Format tab Screen
7.2.1.1 Company Name Tab Screen
Company Systems - Name Properties Screen
Define the Company Code, name and address with the following screen:
62
109
111
114
116

Series 5 Systems Management - User Help110
© 2007 - 2014 by Sentinel Hill Software, all rights reserved
Field Definitions
Access Code X(8)
This is the code that will be used to access this Company System. This code will bedisplayed in the list-box when the Series 5 main menu is launched.
Company Name X(50)
This is the name of the company. It will be displayed in a frame at the top of the theSeries 5 main menu, and each application's menu screen. It is also printed at the top ofall reports that are generated.
Address 4 lines of X(30)

Systems Management Menu Functions 111
© 2007 - 2014 by Sentinel Hill Software, all rights reserved
This is the company's address. When an address is printed, this will be it.
7.2.1.2 Data Folders Tab Screen
Company Systems - Data Folders Properties Screen
Define the locations of the accounting data files that are used for the company.

Series 5 Systems Management - User Help112
© 2007 - 2014 by Sentinel Hill Software, all rights reserved
Field Definitions
Accounting Data Files Folder Name X(70)
Enter the full path to the directory where the data files for this Company System are to bekept. This can be a directory on any disk, either on the system you are processing, or onyour network. You may define many Company Data Systems, and have their respectivefiles all live in the same directory. If you do this, you need to make sure each Company is

Systems Management Menu Functions 113
© 2007 - 2014 by Sentinel Hill Software, all rights reserved
assigned a unique File Extension. It is probably wiser to set up separate directories foreach of your company systems though. Enter the full pathname to the directory. Thedirectory MUST exist before you define the Company System.
You may click on the Browse button to locate the desired directory. Only those folderswhich are descendants of the root directory, of that which is defined by the entry field, canbe displayed. So if you wish to choose a folder on your "C" drive, enter C:\ in the entryfield before clicking the "Browse" button. Setting the entry field blank, or to a path thatdoes not have a drive letter designation, would result in only being able to browsedescendants of the user's default working directory.
If you are using ACUSERVER on your system, then you will need to enter the name of theserver and the actual server path to the drive where the files are stored. For example, ifyour server was called HAL, and the data was in D:\SHSIDATA, you would specify thefollowing Data File Path:
@HAL:D:\SHSIDATA
Temporary Data Files Folder Name X(70)
The Temporary Files Folder Name is used to specify the pathname to the directory whereall temporary work data files for this Company Data System are to be created. Subfolders named import, private, spio and temp will automatically be created withinthe directory that is specified. It is provided so you can separate the temporary files fromyour permanent ones. The directory MUST exist before you define it here. You can clickon the Browse push button to navigate to the desired folder to have it selected.
You may click on the Browse button to locate the desired directory. Only those folderswhich are descendants of the root directory, of that which is defined by the entry field, canbe displayed. So if you wish to choose a folder on your "C" drive, enter C:\ in the entryfield before clicking the "Browse" button. Setting the entry field blank, or to a path thatdoes not have a drive letter designation, would result in only being able to browsedescendants of the user's default working directory.
Archived and Saved-As Reports Folder Name X(70)
The Report Path is used to specify the pathname to the directory where all report files forthis Company Data System are to be created. Subfolders named arch, docs and textwill automatically be created within the directory that is specified. It is provided so youcan separate your archived and saved report files from your permanent ones. Thedirectory MUST exist before you define the Company System. You can click on the Browse push button to navigate to the desired folder to have it selected.
You may click on the Browse button to locate the desired directory. Only those folderswhich are descendants of the root directory, of that which is defined by the entry field, canbe displayed. So if you wish to choose a folder on your "C" drive, enter C:\ in the entryfield before clicking the "Browse" button. Setting the entry field blank, or to a path thatdoes not have a drive letter designation, would result in only being able to browsedescendants of the user's default working directory.
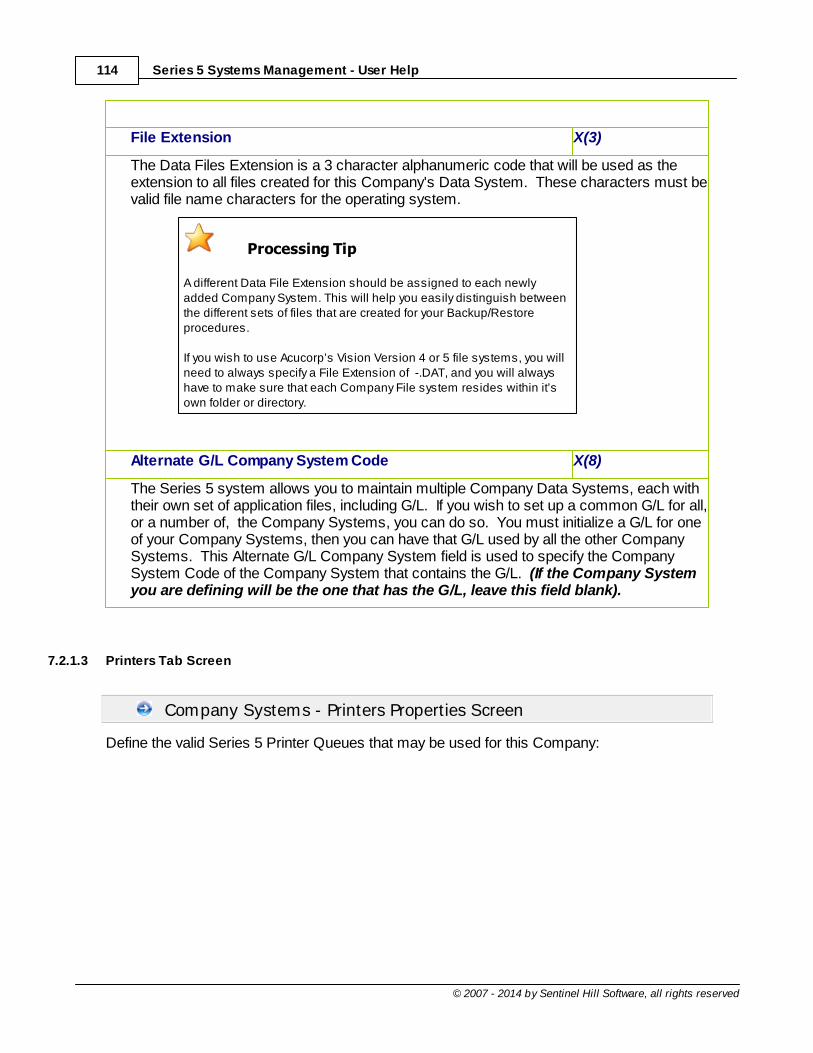
Series 5 Systems Management - User Help114
© 2007 - 2014 by Sentinel Hill Software, all rights reserved
File Extension X(3)
The Data Files Extension is a 3 character alphanumeric code that will be used as theextension to all files created for this Company's Data System. These characters must bevalid file name characters for the operating system.
Processing Tip
A different Data File Extension should be assigned to each newlyadded Company System. This will help you easily distinguish betweenthe different sets of files that are created for your Backup/Restoreprocedures.
If you wish to use Acucorp’s Vision Version 4 or 5 file systems, you willneed to always specify a File Extension of -.DAT, and you will alwayshave to make sure that each Company File system resides within it’sown folder or directory.
Alternate G/L Company System Code X(8)
The Series 5 system allows you to maintain multiple Company Data Systems, each withtheir own set of application files, including G/L. If you wish to set up a common G/L for all,or a number of, the Company Systems, you can do so. You must initialize a G/L for oneof your Company Systems, then you can have that G/L used by all the other CompanySystems. This Alternate G/L Company System field is used to specify the CompanySystem Code of the Company System that contains the G/L. (If the Company Systemyou are defining will be the one that has the G/L, leave this field blank).
7.2.1.3 Printers Tab Screen
Company Systems - Printers Properties Screen
Define the valid Series 5 Printer Queues that may be used for this Company:

Systems Management Menu Functions 115
© 2007 - 2014 by Sentinel Hill Software, all rights reserved
If you wish to restrict specific printers to this Company System, select those that may beused. Only these Printers Queue will be displayed in the Print Options Screen. (If you donot wish to restrict which printers can be used with this Company System, do notselect anything from the screen).
1. Double click an item in the left pane to have it included.
2. The codes of those Items that have been chosen are displayed in the right pane.
3. Search for a particular code by clicking on the binoculars icon.
4. Click on the push button icons to shift the selected item higher or lower in the list. Those pricing codes at the top of the list will be test for first when attempting to assign theprice.
Series 5 Systems Management - User Help116
© 2007 - 2014 by Sentinel Hill Software, all rights reserved
5. Click to have "ALL" items selected or unselected.
6. When a particular previously selected item is highlighted in the right pane, click the
button to have it unselected.
7. Use the grid navigate buttons to move through the list of possible items.
7.2.1.4 G/L Account Format Tab Screen
Company System - G/L Account # Format Screen
Define the format of the G/L Account #s that are to be used with the Company:

Systems Management Menu Functions 117
© 2007 - 2014 by Sentinel Hill Software, all rights reserved
Each of the ISeries 5 Financial Applications generate transactions that eventually areassigned to General Ledger Accounts. In all system, these accounts are referenced usingAccount Numbers. General Ledger Accounts may be structured to facilitate various levels ofaccounting detail. This might include multiple corporate entities, departmental breakdowns byprofit or cost center components, or even financial statement classification.
For example, you might have an account defined where sets of digits have significantmeaning in the General Ledger. Let's for discussion, consider an account defined with thefollowing format:
999 - 9 -9999 -999
where: 999
99999999
Represents the code for specific geographical regions Indicates the type of account classification - asset, liability, owner equity, revenue or expense, etc Further classifies the account by description Represent the Profit Center. The Profit Center isdefined as an entity within a company for which separate

Series 5 Systems Management - User Help118
© 2007 - 2014 by Sentinel Hill Software, all rights reserved
accounting records are maintained. This includes profitcenters, cost centers or even divisions. It is generallyregarded as an internal component of a company whichhas income and expenses.
In the Series 5 applications, the account number is made up of two parts - the Main Accountnumber and the Profit Center. In the example, 999-9-9999 is the Main Account number, andthe last three digits is the Profit Center. The Main Account number can have from 4 to 18digits, and the Profit Center from 3 to 5 digits. The Main Account number can be furtherdivided into four segments. In the example, 999-9-9999 is made of three segments.
Processing Tip
In all Series 5 data records, where G/L Account Number fields are kept, 23 digits ofnumeric data storage is assigned. Regardless of the defined format, the Main Numberand the Profit Center are each stored right justified in 18 and 5 digit numeric fieldsrespectively.
Field Definitions
Main Account Number drop-down list
This is the main segment of the G/L account number. You canenter the definition of the code you wish to use with the numericcharacter "9" and the dash "-" character. You can also select one ofthe pre-defined codes from the drop-down list.
Profit/Cost Center drop-down list
This is the Profit Center segment of the G/L account number. Select the desired # ofdigits from the drop down list.
7.3 System and User Logon Properties
The topics in this chapter describe functions to manage the Series 5 Control Options, defineLogon Users, and set up links to custom developed routines and/or other Windows utilities.

Systems Management Menu Functions 119
© 2007 - 2014 by Sentinel Hill Software, all rights reserved
These functions are available from the Series 5 Main Menu as indicated:
Systems Management sub-menu items
System Control Options
Define System User Functions
User Logon Profiles Maintenance
7.3.1 System Control Options
The Series 5 system provides for a number security issues that enables it to meet certainlevels of certification. It is the intent of these feature to provide tight controls with respect tothe access of the different applications and to provide a logging mechanism.
The following options are provided:
Specify that Users' passwords must be updated after a specified number ofdays
Specify that a User's Access rights will be disabled if they fail to correctlylogon after a given number of attempts
As an option, User Menu Access Logging be activated
As an option, automatically log-on using the Username used to log-on toWindows
Designate a specific user as a "Gate Keeper". This user will be the ONLYperson that can issue access rights to users of the Series 5 applications. Although, this user will not have access to any other menu items in any ofthe Series 5 applications.
119
122
125

Series 5 Systems Management - User Help120
© 2007 - 2014 by Sentinel Hill Software, all rights reserved
Important Security Note
If you intend on specifying a Gate Keeper, keep in mind that you must have in place at least one user thathas full System Management Access. The Gate Keeper cannot add or modify Logon Users to the system. They can only provide access rights to each application to Logon Users that are already established. Thus you still need a "Super User" Logon User that can add or update Logon Users. Keep in mind that this"Super User" will have access to any of the Series 5 systems only if the Gate Keeper issues it.
Series 5 General System Settings - Properties Screen
Define the Security control properties with the following screen:

Systems Management Menu Functions 121
© 2007 - 2014 by Sentinel Hill Software, all rights reserved
Field Definitions
Use the Window's client Logon Username checkbox
You may choose to have the Series 5 system use the client's Windows Logon Code asthe User Code for signing in to Series 5. If set, when Series 5 is launched, the WindowsSignon Code will be used. The User-Logon screen will be presented, but only thePassword field may be displayed for keyboard entry. (If the given Series 5 User Logonprofile has a blank password entered, then the User-Logon screen will not be presentedat all. Control will be transferred directly to the Main Menu screen.)
If this option to use the Windows User Logon code is set, user's would ONLY be able tolog in to Series 5 using the client PC's Windows Logon Code. The function to "RepeatUser's Logon", found under the Main Menu's File drop-down menu will be disabled. Note however, if a user has their System Management Access set to Full, they wouldbe able to "Repeat User's Logon", and sign on as a different user.
If this option is not set, the User-Logon screen will always be presented. In this case, theUsername field will default to the string value assigned to the Windows' user's SHSI_USER_NAME environment variable.
New Passwords After Days 9(3)
Enter the number of days, after which users must change their passwords. If you don'twish to enforce this option, enter ZERO. Once the number of days has elapsed, theuser will have to ask the designated System Manger to issue a new password. The userwill be warned every time they sign on for a period of 21 days before it expires.
Disable User's Access after Logon Failures checkbox
The system has the ability to disable users from logging in to the system if they fail tocorrectly enter their password a specified number of times. If checked, a field isdisplayed offering you to enter the # of failures before the user is disabled. (Their LogonProperties will have to be edited by the Systems' Manager or Gatekeeper to allowthem to log in again).
# of Failed Logon Attempts 9(1)
If a user attempts to Logon, but fails to enter their User Code / Password correctly, thisnumber of times, then they will be disabled from logging in.
Enable User Menu Access Logging checkbox
The system has the ability to log every time a user selects any the Series 5 application'smenu functions. It records the date, time, User Code, Company, application, and menuItem. There is a User Signon Audit Inquiry function that displays these records. (Ifyou turn this option on, be aware that after a period of time the access log file will
129
Series 5 Systems Management - User Help122
© 2007 - 2014 by Sentinel Hill Software, all rights reserved
grow quite large. Make sure that it is purged at least once a year).
Next Access Log ID # 9(12)
This is a number assigned to each log entry, so as to provide each with a unique key.
Designated "Gate Keeper" X(15)
The Gate Keeper, if specified, is one of your Logon Users that has been chosen to be theperson who manages the access rights to all of the Series 5 application's menus. If setup, they are the ONLY user that will be able to access the User Access Maintenancefunctions of each of the applications. The Gate Keeper will be the only user that will beable to modify any of the System Control Options' screen fields, as described in thistopic. However, they will not be able to select any of the other functions provided by theSeries 5 applications. Note that the Gate Keeper will not be able to add or edit anyLogon Users, other than their own profiles, even if they have Full SystemManagement Access rights.
7.3.2 Define System User's Menu Functions
The Series 5 systems provides for other programs, shell macros, or Windows utilities to belaunched directly from Series 5. These will appear as menu items in the drop-down menupresented when User Functions is clicked on the menu bar of the Main Menu, or anyapplication menu. There are two types of User Menu Functions that may be established.
The first is a set of up to 15 items that can be defined that will appear on all user's Main andApplications menus. These are managed by selecting System User Functions from theSystem Maintenance drop-down menu offered on the Main Menu's menu bar.
The second is a set of up to 15 items that each user can create, that will appear only on thatuser's Main and Applications menus. These are managed by selecting My User Functionsfrom the My Own Setup drop-down menu offered on the Main Menu's menu bar.
These "User Functions" items will be presented in the drop-down menu by clicking UserFunctions on either the Main Menu or Applications Menus' screen menu bar. You may wish,or need, to set up menu items to launch the following types programs:

Systems Management Menu Functions 123
© 2007 - 2014 by Sentinel Hill Software, all rights reserved
Windowsutilities
DOS scriptsfor launchingsome type ofdatatransmission
Specialcustomizedreportingprogram tocomplimentthoseprovidedwithin theSeries 5applications.
Upgradeprogramssupplied bySentinel HillSoftware Inc.
The Define Users Functions Grid Screen
The User Functions are managed with the following grid based screen. Items are storedand displayed in the grid in the order that they will be shown in the User Functions dropdown menu.
"Fast Buttons"
New/Modify
Add a new, or Modifythe Functionhighlighted in the grid
ClearItem
Clear, or delete, theFunction highlighted inthe grid
MoveUp
Shift the highlightedFunction up one rowin the grid

Series 5 Systems Management - User Help124
© 2007 - 2014 by Sentinel Hill Software, all rights reserved
MoveDown
Shift the highlightedFunction down onerow in the grid
Once a User Function is defined, it will be displayed in the drop-down menu of the MainMenu.
User Function Properties Screen
The properties for each User Function are defined with the following screen:
Field Definitions
Menu Description X(30)
This is the description that appears in the drop-down menu.
Program or BAT File X(20)
Enter the name of the Acu-GT program that is to be called, or enter the name of the scriptor system program that is to be executed.

Systems Management Menu Functions 125
© 2007 - 2014 by Sentinel Hill Software, all rights reserved
Call Type radio-buttons
Specify the type of function, or the manner in which the program is to be executed.
Program Call For a compiled Acu-GT program
DOS prompt Call If it's DOS *.BAT file that is to beexecuted
Windows Application Utility For a Windows utility program to belaunched in it's own window
7.3.3 User Logon Profiles Maintenance
In order to access any of the Series 5 systems, a given user must have a User Logon Profileestablished. Every user that needs to access any of the applications must first sign on tothe system with a User Code and Password. The Logon Users' properties include theirname, password, email address and assorted options associated to use of the system.
Only users with full System Management Access rights will be able to maintain the UserLogon Profile records.
This properties that are associated to each User Logon include the following: the following:
Logon User Code and Password
Temporary Access
Disabled Access to the System
System Management Access Rights flag
Email Address and Full Email Name
The path to the user's "My Documents" folder
Thin-Client user's UNIX home directory
Processing Note
Having a Logon Access record only guarantees access to the Series 5 Main Menu. To select any particularapplication, a User Access record must also be defined for that application. In each application's Help, seethe topic Defining User Access Rights under User Access Management in the chapter titled BasicProcessing Procedures.

Series 5 Systems Management - User Help126
© 2007 - 2014 by Sentinel Hill Software, all rights reserved
The Logon User Maintenance Grid Screen
The Logon User records are managed with the following grid based screen.
"Fast Buttons"
New Add a new Logon User
Modify Modify the Logon Userhighlighted in the grid
Delete Delete the Logon Userhighlighted inthe grid
Print Generate a report listing theLogon Users that arealready defined
Once a Logon User is defined, it may be used for logging in to the Series 5 Main Menu.
Logon User Properties Screen
The properties for each Logon User are defined with the following screen:

Systems Management Menu Functions 127
© 2007 - 2014 by Sentinel Hill Software, all rights reserved
Field Definitions
Logon User Code X(15)
This is the user's Logon Code. Each time they wish to access the Series 5 system, itmust be entered.
Password / Confirm New Password X(15)
This is the user's password. Each time they wish to access the Series 5 system, it mustbe entered. When edited, you will need to enter the identical code in the ConfirmPassword field. Passwords must contain at least 8 non-space characters, one of whichmust be a numeric, one of which must be an alpha character, and it must be differentfrom the password that the user had the last three times.
Allow ONLY Temporary Access check-box with (mmddyy) date
Set this check-box if you wish to limit the time that this Logon User Code will be allowedto be used. If set, you can set the date, up to and including, with which it may be used.
User is Disabled from Logon Access check-box
Set this check-box if you wish to disable this user from logging in to the Series 5 system. If the system is configured with the option to disable users that fail to correctly enter theirpasswords, and this occurs, the system will set this check-box field.
System Management Access radio-buttons
There are are number of functions that deal with the management of the Series 5 system. These are functions that can be accessed only by those Logon Users that have SystemManagement Access. The following table indicates which functions are allowed to eachtype of access rights, or user:
SystemManagementFunction
NoAccess
RestrictedAccess
FullAccess
GateKeeperAccess
Setup Warning
You must have at least one userwith Full System ManagementAccess rights. Should you fail
Printer QueueMaintenance
x p p x

Series 5 Systems Management - User Help128
© 2007 - 2014 by Sentinel Hill Software, all rights reserved
to set up such a user you willbe in deep do-do.
Captured WindowsMaintenance
x p p x
Company SystemsMaintenance
x x p x
System ControlOptions
x x p p
System UserFunctions
x p p x
User Logon ProfileMaintenance
x x p p
User Signon AuditInquiry
x x p p
Define BroadcastMessage
x p p p
Disable Users fromLogging In
x x p p
Force Users to LogOff
x x p p
Customize the MainMenu
x x p x
Re-initialize UserFiles
x x p x
Re-initialize LicenseFiles
x x p x
Email Address / Email Full Name X(50) / X(30)
When a user selects to send an email from any of the Series 5 applications, theirreturning email address and their full name is required.
"My Documents" Folder Pathname X(90)
When the user executes a function and they choose to export or import data, or to save areport as an ASCII text file or MS Word Document, the pathname specified here will bepresented as the default directory to/from which the data will be written/read.
Default Import/Export File Type drop down list
"Thin-Client" UNIX Home DirectoryPathname
X(90)
If you are executing in a Thin-Client environment, with the server being UNIX system youmust enter the directory path, (based from the UNIX root directory), to the user'sdesignated home directory. Should the user execute a function that reads or writes a filethat is read from or written to the clients PC, this directory will be where the applicabletemporary file is copied to. Leave this field blank if not running thin-client.

Systems Management Menu Functions 129
© 2007 - 2014 by Sentinel Hill Software, all rights reserved
7.4 Signon Access Audit Inquiry
The topics in this chapter describe functions to view the Series 5 Logon Audit records. Thesystem maintains a history of when a Logon User accesses any of the Series 5 applicationsmenu items. This function is available only to users that have Full Systems Managementaccess.
These functions are available from the Series 5 Main Menu as indicated:
Systems Management sub-menu items
User Signon Audit Inquiry
7.4.1 User Signon Audit Inquiry
If you had selected to enable the Menu Access Logging feature in the Series 5 SystemControl Option screen, you will be able to view the audit records using this menu selection. Agrid based screen is provided for a variety of display options, and lets you navigate through
129

Series 5 Systems Management - User Help130
© 2007 - 2014 by Sentinel Hill Software, all rights reserved
the audit records.
Only users with full System Management Access rights, or the designated "Gate Keeper" willbe able to view the audit records.
Some of the features of the Inquiry function are as follows:
Select either to display for selected Logon User, or Series 5 application, orjust by Date
A Filters screen may be selected to limit the number of records displayed
A report may be generated
A Purge function is also provided
The User Access Audit Inquiry Grid Screen
The Access Audit records are displayed with the following grid based screen.
"Fast Buttons"
Set Filters Set Filters for the records tobe displayed
Print Generate a report listing theAudit records
PurgeHistory
Purge Audit records for aspecified date range
Access Audit Filter Screen
The filters screen will be displayed for limiting the records displayed, printer or purged:

Systems Management Menu Functions 131
© 2007 - 2014 by Sentinel Hill Software, all rights reserved
Field Definitions
Audit Items Dated radio-buttons& (mmddyy)entry fields
Click the Not Considered button, or the Inclusive button with a date range. Only thoseitems within the date range specified will be processed, printed, or displayed.
For Company System X(8)
Select only those audit records that were generated for users that selected functionswhile working in the selected Company System. Leave the field blank if it is NOT to beconsidered as a filter.
For Logon User X(15)
Select only those audit records that were generated for the selected Logon User. Leavethe field blank if it is NOT to be considered as a filter.

Series 5 Systems Management - User Help132
© 2007 - 2014 by Sentinel Hill Software, all rights reserved
Application drop-downlist
Select the application for which it's audit recordsare to be viewed or processed. Select the {{AllApplications }} entry if not considered as a filter.
7.5 Logon Control and Message Broadcasting
The topics in this chapter describe functions to have the system Broadcast messages tousers; to Disable Users from logging on to the Series 5 system; and to actually Force a Useroff the system. Users with Restricted Systems Management access can set BroadcastMessages, but will not be able to control logging on/off functions.
These functions are available from the Series 5 Main Menu as indicated:
Systems Management sub-menu items
Define Broadcast Messages
Disable Users from Logging In
Force Users to Log Off
133
135
135

Systems Management Menu Functions 133
© 2007 - 2014 by Sentinel Hill Software, all rights reserved
7.5.1 Define Broadcast Messages
The Series 5 system provides for messages to broadcast to all users. Three messages canbe set up.
1) A message is displayed when users sign on to the system
2) A message is displayed when users log out of the system
3) A message can be sent advising all users of some sort of emergency.
Series 5 Broadcast Messages - Properties Screen
Define the messages that will be shown with the following screen:

Series 5 Systems Management - User Help134
© 2007 - 2014 by Sentinel Hill Software, all rights reserved
Field Definitions
When Logging In 3 lines X(80)
This message is displayed after a user has logged on to the system. Leave the fieldblank if no message is to be displayed.
When Logging Out 3 lines X(80)
This message is displayed when users exit the Main Menu. Leave the field blank if nomessage is to be displayed.
System Emergency 3 lines X(80)
This message is displayed at the earliest opportunity, when users select a function froman application's menu. Leave the field blank if no message is to be displayed.

Systems Management Menu Functions 135
© 2007 - 2014 by Sentinel Hill Software, all rights reserved
7.5.2 Disable Users from Logging On to Series 5
The Series 5 system provides for the ability to restrict any new users from signing in to thesystem. You might wish to implement this function if you have a planned shutdown and don'twant any users to get into the accounting system.
There are no screens associated to this function. From Main Menu's System Maintenancedrop down menu, just click the Disable Users from Loggin item. A check-mark will appearnext to this menu item. Re-click the same menu item to re-allow users to log in.
Normal users will be presented with the followingmessage when attempting to sign in:
Users with Full Systems Management access will bepresented with the following message when signing in:
7.5.3 Force Users Out of Series 5
The Series 5 system provides for the ability to force users out of the system. You might wishto implement this function if you have to shut down for some unplanned emergency.
There are no screens associated to this function. From Main Menu's System Maintenancedrop down menu, just click the Force Users to Log Off item. A check-mark will appear next

Series 5 Systems Management - User Help136
© 2007 - 2014 by Sentinel Hill Software, all rights reserved
to this menu item. Re-click the same menu item to reset the function.
Whenever a transaction or master code is enteredor edited, the system will test to see if this conditionhas been set. After 8 tests, the following messageis displayed. After this message has beendisplayed 5 times, the system will automaticallyback out the user from whatever menu screen theyare working in.
7.6 Initialization and Setup
The topics in this chapter describe functions to Customize the Series 5 Main Menu, and tohave the System's Licence established. Users must have Full Systems Managementaccess to execute these functions.
Processing Note
When the Series 5 system is first installed, you will have to enter a Licence Activation Key. This is a codethat will be provided to you from Sentinel Hill Software Inc. If you purchase additional Series 5 applications,a new Activation Key will have to be entered.
These functions are available from the Series 5 Main Menu as indicated:

Systems Management Menu Functions 137
© 2007 - 2014 by Sentinel Hill Software, all rights reserved
Systems Management sub-menu items
Customize the Main Menu
Re-Initialize Access Monitor Files
Re-Initialize User Files
Re-Initialize Series 5 License
7.6.1 Customize the Main Menu
Once a user has signed on the the Series 5 system, the Main Menu is the first major screenpresented. It provides a menu bar and up to 15 larger icons that may be used to launch agiven application. The icons presented, the accompanying descriptions, and their placementare defined by a set of properties that your systems manager can manipulate.
The Main Menu Properties Grid Screen
The Applications presented on the Main Menu are managed with the following grid basedscreen. Items are displayed in each of 3 rows corresponding to the order that they aredisplayed in the grid screen.
137
140
141
142

Series 5 Systems Management - User Help138
© 2007 - 2014 by Sentinel Hill Software, all rights reserved
"Fast Buttons"
New/Modify
Add a new, or Modifythe Menu Itemhighlighted in the grid
ClearItem
Clear, or delete, theMenu Item highlightedin the grid
MoveUp
Shift the highlightedMenu Item up one rowin the grid
MoveDown
Shift the highlightedMenu Item down onerow in the grid
Main Menu Item Properties Screen
The properties for each standard Series 5 application menu item is defined with the followingscreen:

Systems Management Menu Functions 139
© 2007 - 2014 by Sentinel Hill Software, all rights reserved
The properties for each User Developed application menu item are defined with the followingscreen:
Field Definitions
Menu Description X(30)
This is the description that appears in the Financial Systems drop-down menu, andunderneath the large icon that is displayed. If you wish to be able to activate the icon byusing an Alt-character key, place the "&" character immediately in front of the characterthat you wish to assign.
System Type radio-buttons
Specify the type of menu item, whether it is a standard Series 5 application, or one thatwas specially developed and integrated into <%PRODFAMILY%.
Series VSystem
For a standard Series 5 application provided by Sentinel HillSoftware Inc.
UserDeveloped
For a user's application that was integrated into, anddeveloped with the Sentinel Hill Software's GUI Developer'sLibraries. If selected, the User Menu Program Prefix field willbe displayed, in which you must enter the 1st two charactersthat has been assigned to the menu. (In the screen above,the name of the menu program is PDMENU, so you

Series 5 Systems Management - User Help140
© 2007 - 2014 by Sentinel Hill Software, all rights reserved
must enter PD in the field).
Series 5 System drop-down list
Select the application which this menu item will be used to launch.
User Menu Program Prefix X(2)
This 2 character prefix is used to determine the name of the application's menu program. For a prefix of XX, the menu program called is XXMENU. (When selecting any of thestandard Series 5 applications, the 2 character prefix is automatically assigned).
You can use any 2 character combination except for the following, as they are used bythe standard Series 5 applications:
AP, AR, GL, PI, IM, OP, PI, PR, FA, QI and WM
Processing Tip (Secret)
This icon that is displayed for each defined XXMENU application on the MainMenu is loaded from a file named XXMENU.BMP and resides in the designatedS5\bin\images folder.
7.6.2 Re-Initialize Access Monitor Files
The system attempts to keep track of all Logon Users that are currently accessing any of theSeries 5 system applications, and what menu function they are working with. There is aMonitoring Utility that can be executed showing the users activity. This information is kept in afile. On occasion when there is a system failure of some kind, widowed records will be left inthis Monitor Access file and they will be displayed whenever the Monitor Utility is evoked. Ifyou would like to have these items removed there is a System Management function that will

Systems Management Menu Functions 141
© 2007 - 2014 by Sentinel Hill Software, all rights reserved
do this for you. From the Main Menu's System Maintenance drop down menu, just click theRe-Init Access Montior Files item. You will first be prompted to verify that you really wantto proceed. Click the Yes push button if you want to proceed.
(Note that all users should be off the system when you execute this menu item.).
The prompt to re-initialize the Access Monitor files:
7.6.3 Re-Initialize Use Profile Files
In the unlikely event that your User Logon file needs to be recreated, there is a SystemManagement function that will do this for you. From the Main Menu's System Maintenancedrop down menu, just click the Re-Init User Logon Files item. You will first be prompted toverify that you really want to proceed. Click the Yes push button if you want to proceed.
The main reason you may want to execute this function is to delete the User Logon filesbecause you have defined a number of users, but you do not have any Logon User that wasdesignated with full Systems Managers access rights. If you had reached such a state youbasically would not be able to manage the Series 5 system. The only way out would be todelete the User Logon file and start again to add your users. (Not forgetting to set up the1st user with full System Management rights).
The prompt to re-initialize the User Logon files:

Series 5 Systems Management - User Help142
© 2007 - 2014 by Sentinel Hill Software, all rights reserved
7.6.4 Re-Initialize Series 5 Licenses
The system is controlled by a License Activation Key that defines the number of users andthe Series 5 systems that have been purchased. This key is provided by Sentinel HillSoftware Inc. at the time of installation, or when additional licenses are purchased.
Initially, when launching the Series 5 system for the first time, you will automatically beprompted to enter the Activation Key. If you purchase more licenses at a later date, you mustselect this function to enter your new key. From the Main Menu's System Maintenance dropdown menu, click the Re-Initialize License item. You will first be prompted to verify thatyou really want to proceed. Click the Yes push button if you want to proceed. You will thenbe required to enter a password.
The prompt to re-initialize the Access Monitor files:
Enter the appropriate password to proceed:
The SHSI Activation Key Entry Screen
An Activation key must be entered in order to initialize the Series 5 system. This key willbe supplied to you by Sentinel Hill Software Inc. when you wish to install the software. It iscase sensitive and must be entered exactly as supplied.

Systems Management Menu Functions 143
© 2007 - 2014 by Sentinel Hill Software, all rights reserved
Processing Tip(Secret)
This Activation Key is encoded with thedate issued. From the date received, itwill be valid only for a period of 2 days. After that, it will no longer be valid. Youmust request the key only when you areactually ready to proceed with theinstallation.
Should you receive an error when the Activation Code is entered, you can identify theproblem by looking up the error codes from the following table:
Error Code Description1 The 1st character of the key was incorrectly entered2 The 2nd character of the key was incorrectly entered4 The 4th character of the key was incorrectly entered5 The last 5 characters of the key was incorrectly entered
6 or 7 Other characters of the key was incorrectly entered8 The key entered as expired. It's too old
The Series 5 About Screens
Following the entry of the Activation Key, the Licensing "About" screen will be displayed. Itdisplays the following bits of information:
Accounting Applications
License # and # of Users
Installation Date
Revision of Acu-GT that is being executed (along with it's serial #)
The date and time the executable runtimes were last compiled
Email address graphic, (which when clicked will setup for an email to be sent)

Series 5 Systems Management - User Help144
© 2007 - 2014 by Sentinel Hill Software, all rights reserved
The File Folder Definitions tab screen displays a number of the different data folderdirectory paths that hold the Series 5 control files and the current Company System's datafiles.

Systems Management Menu Functions 145
© 2007 - 2014 by Sentinel Hill Software, all rights reserved

Part
VIII

Appendix 147
© 2007 - 2014 by Sentinel Hill Software, all rights reserved
8 Appendix
Appendix
Series 5 Control Data Files
System Operational Variables
Runtime Error Codes
Frequently Asked Questions
Setting Up a new Users PC Workstation
8.1 Series 5 System Control Files
These files are used to hold the control information to manage the Series 5 systems. The arefound in the directory specified for by the Configuration variable SHSI_CTRL_PATH.
Series 5 System Control files
Filename Description ACCESAUDIT.DAT Holds the Users Signon Audit Log records.
BROADCASTS.DAT Holds the Broadcast messages that are displayedwhen users sign in or out of the system.
COMPANY.DAT Holds the Company Systems master controlrecords. There is one record for each companydefined in Series 5.
EMERGENCY.DAT Holds the Emergency message that may have beendefined.
JOBQUEUE.DAT Holds information about each Job that has beenqueued to be executed using the Batch/BackgroundProcessor.
CODSELCT.XXX Used by those applications that offer record filteringscreens. If a set of random codes are selected asfilters, they are stored temporarily in this file.
147
148
160
163
163

Series 5 Systems Management - User Help148
© 2007 - 2014 by Sentinel Hill Software, all rights reserved
FLEXCTRL.XXX Holds the definition of the G/L Account Number.
LINUSEAG.XXX Created when the Series 5 system is first installedand created. Records in this file are allocated tousers to guarantee they receive a uniqueprocessing ID number. This number is used intemporary files and/or keys that might be created forthis user.
PRGUSEAG.XXX When users sign on to the Series 5 system, arecord is written into this file to indicate the programapplication being executed, the time started, andother information pertinent to successful operation.
PRINTQDF.XXX This file holds the definitions of the Series 5 PrinterQueues.
RECENTS.XXX A number of maintenance and processing functionsremembers the most recently accessed codes. These are stored in this file.
RPTSMNGR.DAT For every report that is generated and "Archived", arecord is recorded in this file. It holds informationsuch as the name, date and time created, theauthor and a pointer to the file that holds the report.
SYSCNTRL.DAT Holds the record that keeps the Series 5 SystemControl properties.
USERACC5.XXX Holds the access rights of all users to all Series 5systems.
USERNAME.XXX Holds the master Logon User Code records.
WINPRNTD.DAT Holds the Captured WIndows Network printerinformation.
WIZARDS.DAT Hold the properties of any Wizards that weredefined to any of the applications
8.2 System Operational Variables
Some aspects of the Series 5 S/M system can be controlled through runtime configurationvariables. This mechanism provides a great deal of flexibility, because these variables can bemodified by each site as well as directly by an AcuGT program.

Appendix 149
© 2007 - 2014 by Sentinel Hill Software, all rights reserved
Configuration variables are maintained in a runtime configuration file. This standard text filecan be modified by the host system's text editor. Each entry in the runtime configuration fileconsists of a single line. All entries start with a keyword, followed by one or more spaces ortabs, and then one or more values.
These variables may also be defined in each operators' execution environment. On bothUNIX and Windows systems, these would be defined as environment variables.
8.2.1 Environment Variables
The following variables may be defined for the operator's environment. Under UNIX, thesemay be seen by entering the shell env command. Under Windows, these may be seen byentering the DOS set command.
Variable Description DescriptionAPPDATA C:\Documents and Settings
\xxxxxx\Application DataThe 1st 2 characters are used to determinethe users' Home Drive on their PC. (Is setup by Windows)
SHSI_USER_NAME
SHSI5.LARRY The default Signon User code used whensigning onto the system from a client PC.
USERNAME SHSI The Windows client signon name. Used todetermine the operators actual "/MyDocuments" folder pathname. (Is set up byWindows)
S5_DIR D:\S5 Required ONLY by the user building theSeries 5 executables
8.2.2 Configuration Variables
The following variables may be defined in the runtime configuration file. These variables canonly be defined or updated by your Systems Manager, or support staff from Sentinel HillSoftware Inc.
Processing Tip
If you need to maintain different sets of operating environments on your system, you may do so by setting updifferent runtime configuration files. In this case, the different environments would execute totallyindependent of one another. In particular, the two variables that would provide total independence are SHSI_CTRL_PATH and CODE-PREFIX.

Series 5 Systems Management - User Help150
© 2007 - 2014 by Sentinel Hill Software, all rights reserved
Control and File Management Variables
The following variables are used to define the location of different sets of files used by theSeries 5 applications. (Those in red are critical to proper execution)
Variable Default orSampleArgument
Description
ACURUN_NAME wrun32 The name of the AcuGT runtime. Used to buildthe command line for Background JobExecution
ccc_SPIO_PATH d:\acctg\comp\spiodir
The default directory used for import/export forSeries 5 Company System ccc. This is alsoused as the directory where the form letters forA/R Dunning Letters are stored.
ccc_ORTXT_PATH d:\acctg\comp\txtorders
The default directory used for importing O/PText Orders for Series 5 Company System ccc
ccc_TRXTXT_PATH d:\acctg\comp\trxinput
The default directory used for importing A/R andA/P transactions for Series 5 Company Systemccc
ccc_IMAUDIT_PATH d:\acctg\comp\imaudit
The default directory used for maintaining O/PInventory Audit files for Series 5 CompanySystem ccc
ccc_DUNLETTER_PATH
d:\S5\dun-templates
The default directory used for maintaining A/RDunning Letter template files for Series 5Company System ccc
CODE_PREFIX d:\S5\bin\runs The directory path in which the executableprograms reside.
IAMESS_x1 "OK to Sell Textline 1"
Lines of text displayed in O/P when an item isout of stock, and operator is prompted. Theseare the 3 lines used in the prompt. The x isused to allow for different sets of texts fordifferent Inventory Activity Codes that may havebeen set up for the Inventory Item in question.
A -ActiveF -Forecasted
O -ObsoleteF -Planned
D -DiscontinuedC -Canceled
I -NeedsInformationS -Suppressed
IAMESS_x2 "OK to Sell Textline 2"
see above
IAMESS_x3 "OK to Sell Text see above

Appendix 151
© 2007 - 2014 by Sentinel Hill Software, all rights reserved
line 3"
HELP_PREFIX d:\S5\bin\help The directory path in which the Help files reside.
IMAGE_PREFIX d:\S5\bin\images
The directory path in which all bitmappedimages are stored.
LAUNCH_BCKGRND_CMD
wrun32 -d -c d:\s5\etc\cblcfgui
This is the shell command that is used toexecute jobs submitted for execution in theBackground Job Processor
m-THIN-DRIVE-MAP /user/larry/data On thin client systems, when attempting to printto, or save text export to a file on mapped driveM, (which is mapped to a directory on the UNIXserver), then the file will actually be written tothe directory path specified as the argument
MANIFEST_IN_PATH
d:\acct\comp\manif-dir
PI-INV-DESCN B SoftwareDevelopment
Defines the Invoice Layout Generation Type andDescriptive text printed on P/I Invoices forcharges that are sub-totalled by their WIPConsolidation Flag when set to N, (where N = 1,.... 9)
SHSI_ACUCON-EREQUEST-MODE
1, 2, 3, or 4 Used to determine how E-Requests arehandled by the Web Management system:
1 - Use AcuConnect on a remoteserver 2 - Use AcuConnect initiated fromthe E-Request Server programrunning on the PC 3 - Don't use AcuConnect at all. Process requests directly from the E-Request Server program on the PC 4 - Use AcuConnect only forrequests that don't generate MS Wordor Excel documents
SHSI_CTRL_PATH The Series 5 applications are controlled using anumber of system files. These files are storedin the directory path defined here.
SHSI_JOBQ_PATH When functions are set up to be executed in theBackground or Night Job Processor, informationabout the job is stored in a file that is written inthe directory path defined here.
SHSI_REMOTE BRANCH10 If entering A/P Transactions in a remote branchwhere the Batch file is to be transmitted to headoffice, this is the 8 character branch codeembedded in the A/P Batch's created by field.
SORT_DIR c:\windows\temp
The directory path in which temporary sort filesare created used by the system. On FATsystems, this path should be on the users PC.
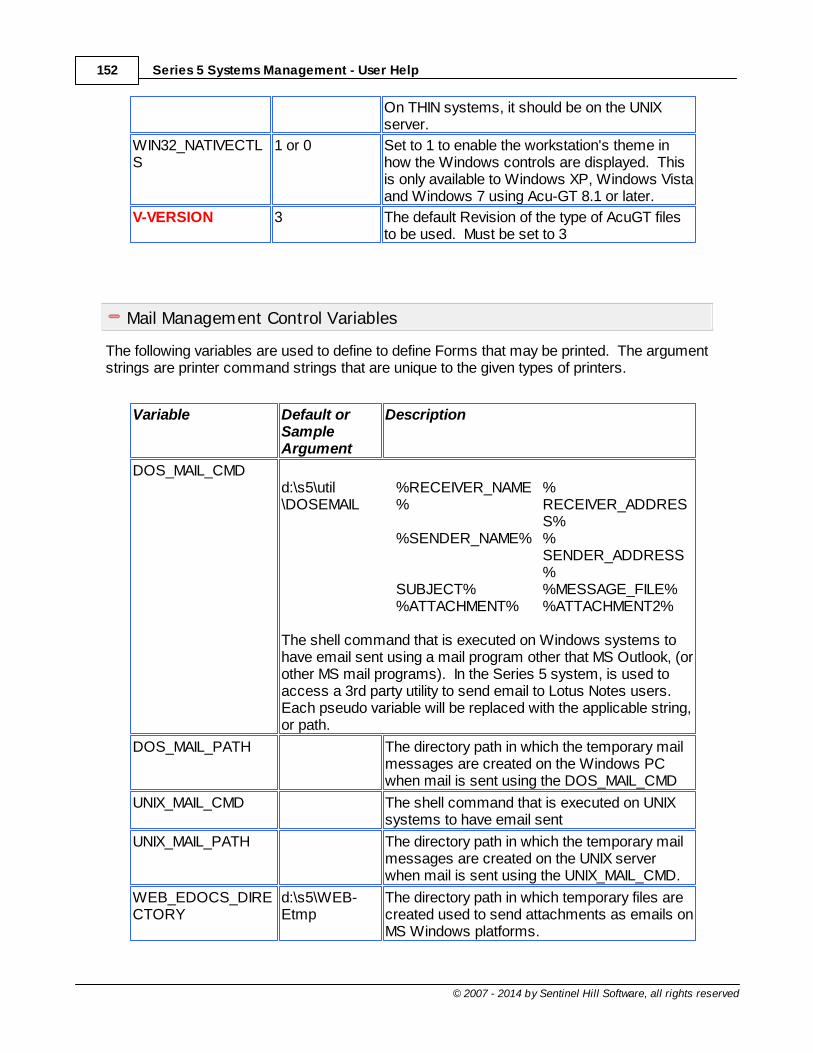
Series 5 Systems Management - User Help152
© 2007 - 2014 by Sentinel Hill Software, all rights reserved
On THIN systems, it should be on the UNIXserver.
WIN32_NATIVECTLS
1 or 0 Set to 1 to enable the workstation's theme inhow the Windows controls are displayed. Thisis only available to Windows XP, Windows Vistaand Windows 7 using Acu-GT 8.1 or later.
V-VERSION 3 The default Revision of the type of AcuGT filesto be used. Must be set to 3
Mail Management Control Variables
The following variables are used to define to define Forms that may be printed. The argumentstrings are printer command strings that are unique to the given types of printers.
Variable Default orSampleArgument
Description
DOS_MAIL_CMDd:\s5\util\DOSEMAIL
%RECEIVER_NAME%
%RECEIVER_ADDRESS%
%SENDER_NAME% %SENDER_ADDRESS%
SUBJECT% %MESSAGE_FILE%%ATTACHMENT% %ATTACHMENT2%
The shell command that is executed on Windows systems tohave email sent using a mail program other that MS Outlook, (orother MS mail programs). In the Series 5 system, is used toaccess a 3rd party utility to send email to Lotus Notes users. Each pseudo variable will be replaced with the applicable string,or path.
DOS_MAIL_PATH The directory path in which the temporary mailmessages are created on the Windows PCwhen mail is sent using the DOS_MAIL_CMD
UNIX_MAIL_CMD The shell command that is executed on UNIXsystems to have email sent
UNIX_MAIL_PATH The directory path in which the temporary mailmessages are created on the UNIX serverwhen mail is sent using the UNIX_MAIL_CMD.
WEB_EDOCS_DIRECTORY
d:\s5\WEB-Etmp
The directory path in which temporary files arecreated used to send attachments as emails onMS Windows platforms.

Appendix 153
© 2007 - 2014 by Sentinel Hill Software, all rights reserved
Printer Control Variables
The following variables are used to define to define Forms that may be printed. The argumentstrings are printer command strings that are unique to the given types of printers.
Variable Default orSampleArgument
Description
<my queue name 1> PRINTER1 -PSPOOLER
Defines a Series 5 Print Queue named PRINTER1that is designated as a Windows printer. When theruntime opens a file assigned to "-P SPOOLER, itautomatically initiates a job with the Windowsspooler and constructs print pages in accordancewith the program. The runtime uses the defaultprinter and font. If the user looks for the job in thespooler, it is named with the current title of theAcuGT-GT window.
Note that you must also set up a Printer Queuenamed PRINTER1 using the Printer QueueMaintenance function found on the Main Menuunder System Maintenance on the menu bar.
<my queue name 2> LARRYPRINTER2 -PSPOOLER-DIRECT
Defines a Series 5 Print Queue named LARRYPRINTER2. You would define the queuewith -P SPOOLER-DIRECT if a Series 5 form wasto be assigned to this printer output, or if theapplication formatted the printout with embeddedcontrol codes. In this case, the print job to be sentto the printer via the Windows spooler, but theprogram does not use the spooler to format thepages. You must use embedded control codes tohandle formatting (much as you would under UNIX ifyou used the UNIX spooler).
<my queue name 3>
The following variables are used to identify the default settings forthe different types of special forms that may be printed. Eachvariable must have 3 arguments, as follows, providing theQueue Name, the Create Option, and the Target output:
<ccccc>-FORM-Q <Queue-Name> <Create-Option> <Output-Target>where:

Series 5 Systems Management - User Help154
© 2007 - 2014 by Sentinel Hill Software, all rights reserved
<ccccc> is the Series 5 Company System code to whichthe variable is to be applied to
<Queue-Name> is one of the Series 5 Queues that hasbeen defined
<Create-Option> is either RECREATE, APPEND orDISTINCT
<Output-Target> is one of the following:
PRINTER - Output to the selected Printer QueuePRINT - Output to the selected Printer QueueARCHIVE - Output only as ArchivedDISK - Output only as ArchivedPRINT&ARCHIVE
- Output to the selected Printer Queue andhave Archived
BOTH - Output to the selected Printer Queue andhave Archived
BROWSE - Output to the Series 5 BrowserASCIIDISK - Output to disk as an ASCII Text document
WORDDISK - Output to disk as an MS Word documentPRINT&WORD
- Output to disk as an MS Word document andto selected Printer
ARCHIVE&WORD
- Output to disk as an MS Word document andhave Archived
WORD2003 - Output to disk as an MS Word 2003document
PRINT&WORD2003
- Output to disk as an MS Word 2003document and to the selected Printer
ARCHIVE&WORD2003
- Output to disk as an MS Word 2003document and have Archived
WORD2007 - Output to disk as an MS Word 2003document
PRINT&WORD2007
- Output to disk as an MS Word 2003document and to the selected Printer
ARCHIVE&WORD2007
- Output to disk as an MS Word 2003document and have Archived
PDFDISK - Output to disk as a PDF documentPRINT&PDF - Output to disk as a PDF document and to
the selected Printer QueueARCHIVE&PDF
- Output to disk as a PDF document and haveArchived

Appendix 155
© 2007 - 2014 by Sentinel Hill Software, all rights reserved
ccc-OP-INVOICE-Q <my queuename> RECREATE BOTH
Print Queue used for O/P Invoices
ccc-OP-INV-REPRINT-Q
<my queuename> RECREATE PRINT
Print Queue used for O/P Reprinted Invoices
ccc-OP-POS-INVOICE-Q
<my queuename> RECREATE BOTH
Print Queue used for O/P Point-of-Sales Invoices
ccc-OP-QUOTE-PRINT-Q
<my queuename> RECREATE ARCHIVE&PDF
Print Queue used for O/P Customer Quotes
ccc-xxx-PACKSLIPS-Q
<my queuename> RECREATE BOTH
Print Queue used for O/P Packing Slips forLocation xxx
ccc-xxx-PICKS-Q <my queuename> RECREATE BOTH
Print Queue used for O/P Pick Tickets for Locationxxx
ccc-xxx-QPICKS-Q <my queuename> RECREATE BOTH
Print Queue used for O/P QuickPick Ticket forLocation xxx for
ccc-AP-CHECK-Q <my queuename> RECREATE BOTH
Print Queue used for A/P Checks
ccc-AP-QUICK-CHECK-Q
<my queuename> RECREATE BOTH
Print Queue used for A/P Quick Checks
ccc-AR-STATEMENT-Q
<my queuename> RECREATE DISK
Print Queue used for A/R Statements
ccc-PI-INVOICE-Q <my queuename> RECREATE PRINT&WORD
Print Queue used for PI Invoices
ccc-PI-INV-REPRINT-Q
<my queuename>
Print Queue used for PI Reprinted Invoices

Series 5 Systems Management - User Help156
© 2007 - 2014 by Sentinel Hill Software, all rights reserved
RECREATE ARCHIVE&WORD
ccc-PURCHASE-ORDER-Q
<my queuename> RECREATE ARCHIVE&WORD2007
Print Queue used for PO Purchase Orders
ccc-PO-REQUISITION-Q
<my queuename> RECREATE ARCHIVE&WORD
Print Queue used for PO Requisitions
ccc-QI-INVOICE-Q <my queuename> RECREATE PDFDISK
Print Queue used for QI Invoices
ccc-QI-INV-REPRINT-Q
<my queuename> RECREATE ARCHIVE&WORD
Print Queue used for QI Reprinted Invoices
FMnnn-DESC For DualPageDunningLetters
Report Print Form # nnn - The description of theform displayed on the print options screen
FMnnn-INIT <text string> Report Print Form # nnn - Printer command stringto Initialize print job
FMnnn-RESET <text string> Report Print Form # nnn - Printer command toreset printer
FMnnn-SELECT-TRAY-1
<text string> Report Print Form # nnn - Printer command stringto select paper from tray 1
FMnnn-SELECT-TRAY-2
<text string> Report Print Form # nnn - Printer command stringto select paper from tray 2
FMnnn-SELECT-TRAY-3
<text string> Report Print Form # nnn - Printer command stringto select paper from tray 3
FMnnn-ODD-PAGE-HEAD
<text string> Report Print Form # nnn - Printer command stringfor odd page headers
FMnnn-ODD-PAGE-FOOT
<text string> Report Print Form # nnn - Printer command stringfor odd page footers
FMnnn-EVEN-PAGE-HEAD
<text string> Report Print Form # nnn - Printer command stringfor even page headers
FMnnn-EVEN-PAGE-FOOT
<text string> Report Print Form # nnn - Printer command stringfor even page footers
FMnnn-RPT-DATE-LINE
<text string> Report Print Form # nnn - Printer command stringfor report date line

Appendix 157
© 2007 - 2014 by Sentinel Hill Software, all rights reserved
FMnnn-RPT-TITLE <text string> Report Print Form # nnn - Printer command stringfor report title line
FMnnn-RPT-LEGENDS
<text string> Report Print Form # nnn - Printer command stringfor report legends lines
FMnnn-RPT-HEADERS
<text string> Report Print Form # nnn - Printer command stringfor report headers lines
FMnnn-USER-CODE-1
Lii <textstring>
Report Print Form # nnn - Printer command stringfor User defined action at Line ii
FMnnn-USER-CODE-2
Lii <textstring>
Report Print Form # nnn - Printer command stringfor User defined action at Line ii
FMnnn-USER-CODE-3
Lii <textstring>
Report Print Form # nnn - Printer command stringfor User defined action at Line ii
FMnnn-USER-CODE-4
Lii <textstring>
Report Print Form # nnn - Printer command stringfor User defined action at Line ii
FMnnn-USER-CODE-5
Lii <textstring>
Report Print Form # nnn - Printer command stringfor User defined action at Line ii
FMnnn-USER-CODE-6
Lii <textstring>
Report Print Form # nnn - Printer command stringfor User defined action at Line ii
FMnnn-USER-CODE-7
Lii <textstring>
Report Print Form # nnn - Printer command stringfor User defined action at Line ii
FMnnn-USER-CODE-8
Lii <textstring>
Report Print Form # nnn - Printer command stringfor User defined action at Line ii
FMnnn-USER-CODE-9
Lii <textstring>
Report Print Form # nnn - Printer command stringfor User defined action at Line ii
FMnnn-USER-CODE-10
Lii <textstring>
Report Print Form # nnn - Printer command stringfor User defined action at Line ii
MSWORD-DEFAULT-SPECS
"LANDSCAPE" "CourierNew" 8
Defined specifications for outputting Series 5reports to an MS Word DocumentArguments are: <Orientation> <Font> <Fontsize> <Template-Name>
The font must be defined on the clients PC
Orientation must be LANDSCAPE or PORTRAITThe Template is an MS Word definedtemplate and must be stored in MS Word'sTemplate directory
MSWORD-AR-STMT-SPECS
LANDSCAPE "CourierNew" 8
Defined specifications for outputting A/RStatements to an MS Word Document
MSWORD-CS-INV-SPECS
PORTRAIT "CourierNew" 8 Invoice-
Defined specifications for outputting CementShipment Invoices to an MS Word Document

Series 5 Systems Management - User Help158
© 2007 - 2014 by Sentinel Hill Software, all rights reserved
Template
MSWORD-DUNSTMT-SPECS
LANDSCAPE "Arial" 10 Letter-Template
Defined specifications for outputting A/R DunningLetters to an MS Word Document
MSWORD-GL-FINS-SPECS
LANDSCAPE "CourierNew" 8
Defined specifications for outputting G/L FinancialStatements to an MS Word Document
MSWORD-OP-FINS-SPECS
PORTRAIT "CourierNew" 8 Invoice-Template
Defined specifications for outputting O/P Invoices toan MS Word Document
MSWORD-OP-QUOTE-SPECS
PORTRAIT "CourierNew" 10Quotes-Template
Defined specifications for outputting O/P Quotes toan MS Word Document
MSWORD-PAKSLIP-SPECS
LANDSCAPE "CourierNew" 8 Pack-Template
Defined specifications for outputting O/P PackingSlips to an MS Word Document
MSWORD-PI-INV-SPECS
PORTRAIT "CourierNew" 8 Invoice-Template
Defined specifications for outputting P/I Invoices toan MS Word Document
MSWORD-PO-FORMS-SPECS
PORTRAIT "CourierNew" 10 purchase_order.dot
Defined specifications for outputting P/O PurchaseOrders to an MS Word Document
MSWORD-PO-REQS-SPECS
PORTRAIT "CourierNew" 10 requisition.dot
Defined specifications for outputting P/ORequisitions to an MS Word Document
MSWORD-QI-INV-SPECS
PORTRAIT "CourierNew" 8 Misc-Invoice-Template
Defined specifications for outputting Q/IMiscellaneous Invoices to an MS Word Document
MSWORD-WEB-RPT-SPECS
LANDSCAPE "CourierNew" 7
Defined specifications for outputting E-Requestserver reports to an MS Word Document

Appendix 159
© 2007 - 2014 by Sentinel Hill Software, all rights reserved
XXX-BITMAP Row Column Pixel-Height Pixel-Width Filename
For Series 5 Printer Queue XXX Outputs thespeciifed bitmap file to the given row/column of thepage at the specifed pixel Height/Width on everypage of the report.
SHSI-RPT-DESTINATION
4 Sets the default output target selection for allreports generated in Series 5 that are notprogramatically targeted. The argument is aninteger digit representing the desired target asfollows:
1 - To the printer2 - Archived3 - Both the printer & Archived4 - to be Browsed Only8 - to disk as an ASCII file17 - To disk as an MS Word 2003 document19 - To disk as an MS Word 2003 document &
Archived26 - To disk as an MS Word 2007 document30 - To disk as an MS Word 2007 document &
Archived35 - To disk as an MS Word 2007 saved as a
PDF file
You would typically have the argument set toeither 1, 2 or 4.
Web Server Control and File Management Variables
The following variables are used to define the location of different sets of files used by the Series 5 CGI service routines executing on a Web Server.
Variable Default or SampleArgument
Description
CODE-PREFIX /web/..../shweb/acubin
The directory path in which the executableCGI programs reside.
SHSI-WEB-LOG-FILE
/web/..../shweb/acutemp
The full path and filename which is used tolog messages, generated by the system, byCGI service routines executing on a Webserver.
SHSI-WEB-TRACE-MODE
0 or 1 If = 1, then messages are output to theexecution error log file. Should be set tozero unless specifically need to debug the

Series 5 Systems Management - User Help160
© 2007 - 2014 by Sentinel Hill Software, all rights reserved
execution of CGI service routines.
WEB-COMPANY-1 40 The Series 5 Company code assigned toWeb Company 1 (Code embedded in WebPage ID codes)
WEB-COMPANY-2 50 The Series 5 Company code assigned toWeb Company 2
WEB-COMPANY-3 SHSI The Series 5 Company code assigned toWeb Company 3
WEB-COMPANY-4 PCA The Series 5 Company code assigned toWeb Company 4
WEB-COMPANY-5 AUSI The Series 5 Company code assigned toWeb Company 4
WEB-OP-LOCATION-1
10 The Inventory Warehouse Location code fororders submitted over the Web forCompany 1
WEB-OP-LOCATION-2
20 The Inventory Warehouse Location code fororders submitted over the Web forCompany 2
WEB-OP-LOCATION-3
30 The Inventory Warehouse Location code fororders submitted over the Web forCompany 3
WEB-OP-LOCATION-4
40 The Inventory Warehouse Location code fororders submitted over the Web forCompany 4
WEB-OP-LOCATION-5
EAST The Inventory Warehouse Location code fororders submitted over the Web forCompany 5
WEB-EDOCS-DIRECTORY
/web/..../shweb/acutemp
The directory path in which temporary filesare created used to send attachments asemails on UNIX web servers.
WEB-MGMT-CTRL-PATH
@accserver:/acctg/shsi_ctrl
For CGI service routines on a Web server,defines the directory path of the locationwhere the Series 5 control files reside.
8.3 Runtime Error Codes
These Unfortunately things don't always operate the way they should. For a variety ofreasons, the application will on occasion generate some nasty looking error codes andmessages.
These can be divided up into three categories of errors:
Application generated Errors
Microsoft Word or Excel generated Errors
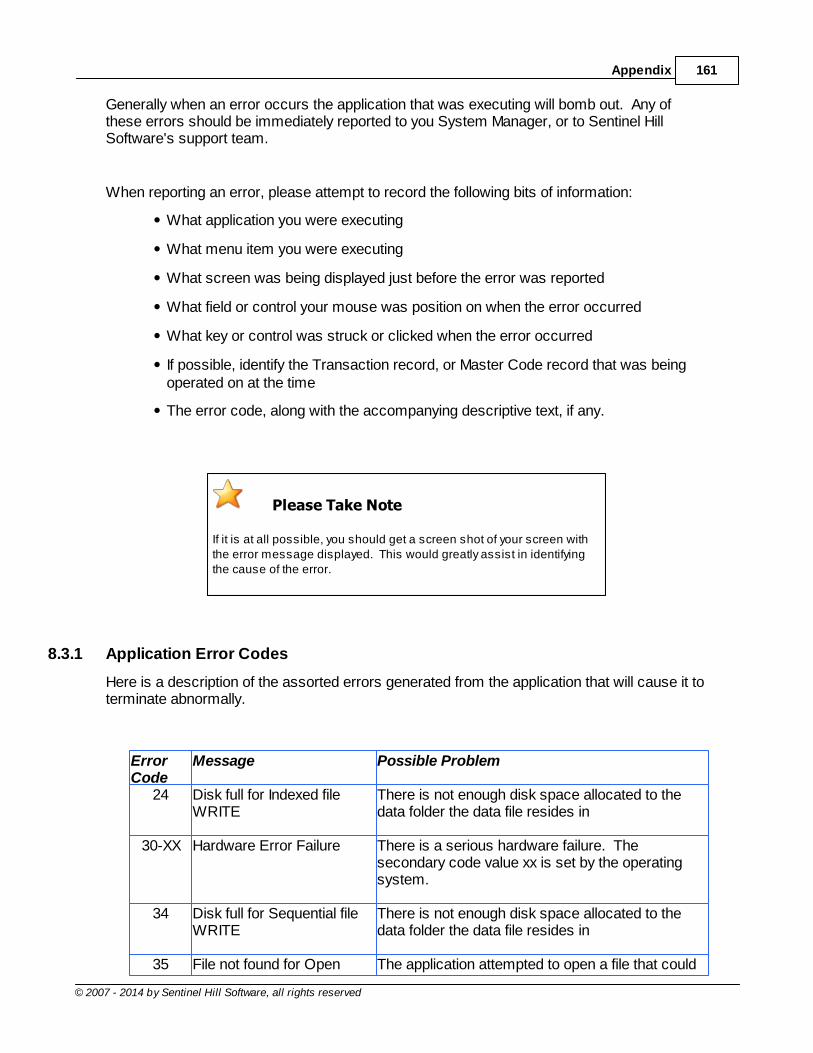
Appendix 161
© 2007 - 2014 by Sentinel Hill Software, all rights reserved
Generally when an error occurs the application that was executing will bomb out. Any ofthese errors should be immediately reported to you System Manager, or to Sentinel HillSoftware's support team.
When reporting an error, please attempt to record the following bits of information:
What application you were executing
What menu item you were executing
What screen was being displayed just before the error was reported
What field or control your mouse was position on when the error occurred
What key or control was struck or clicked when the error occurred
If possible, identify the Transaction record, or Master Code record that was beingoperated on at the time
The error code, along with the accompanying descriptive text, if any.
Please Take Note
If it is at all possible, you should get a screen shot of your screen withthe error message displayed. This would greatly assist in identifyingthe cause of the error.
8.3.1 Application Error Codes
Here is a description of the assorted errors generated from the application that will cause it toterminate abnormally.
ErrorCode
Message Possible Problem
24 Disk full for Indexed fileWRITE
There is not enough disk space allocated to thedata folder the data file resides in
30-XX Hardware Error Failure There is a serious hardware failure. Thesecondary code value xx is set by the operatingsystem.
34 Disk full for Sequential fileWRITE
There is not enough disk space allocated to thedata folder the data file resides in
35 File not found for Open The application attempted to open a file that could

Series 5 Systems Management - User Help162
© 2007 - 2014 by Sentinel Hill Software, all rights reserved
not be found. Contact your Systems Manager orSentinel Hill Software support for assistance.
37-07 User does not havepermission to access file
The user does not appropriate access rights toopen the file
37-XX System failure on opening afile
The application attempted to open the file in thewrong mode
37-99 Windows runtime notnetwork enabled
Non-Networked runtime attempted to open a file ona remote system
39-XX File Mismatch on OPEN An older version of the file was being accessed, orapplication programming error.The secondary codevalue xx indicates the type of mismatch.
41 File Already Open An application programming error. ContactSentinel Hill Software support.
42 File Not Open An application programming error. ContactSentinel Hill Software support.
47-XX File not opened in thecorrect mode
An application programming error. ContactSentinel Hill Software support.
48-XX File not opened in thecorrect mode
An application programming error. ContactSentinel Hill Software support.
49-XX File not opened in thecorrect mode
An application programming error. ContactSentinel Hill Software support.
94-10 Too many files opened byprocess
The max number of files has been reached. Theconfiguration variable MAX-FILES should beincreased.
98 The file has become corrupt The file has become corrupt for some reason. Youmust use the AcuGT's vutil utility to rebuild the file. Contact your Systems Manager or Sentinel HillSoftware support for assistance. ( From a DOS orUNIX prompt you will need to issue the command vutil32 -rebuild filename ).
9C Max number of locksspecified.
The max number of files that can be locked hasbeen reached. Either the configuration variableMAX-LOCKS should be increased, or anapplication programming error has caused theproblem. (By default MAX-LOCKS is the same asMAX-FILES)
9D-XX Internal error from host filesystem
An internal error has occurred when attempting toaccess a file over the network using AcuGT's

Appendix 163
© 2007 - 2014 by Sentinel Hill Software, all rights reserved
Acuserver running on the primary server. Themost likely problem is that the host server networkis down, or the host server file server process hasfailed. Contact your Systems Manager. The xx isthe host system's error code.
8.3.2 Microsoft Utility Errors
TheSeries 5 systems internally makes calls to Microsoft's Word and Excel utilities. Onoccasion, these utilities will report an error which causes the application to abort. Here arethe documented errors that have been encountered to date.
From Message Possible ProblemWord Unable to satisfy the
requested call When attempting to print a document directly fromWord, and a problem exists on the network, or theremote printer is probably not turned on.
Excel Class is not licensed for use(error 800A03EC)
When outputting a string to a spreadsheet therewas a "=", "+", or "-" character in the 1st characterof the string. Excel thinks this is the start of anequation that does not make sense. If possibleinsert the "'" , (single quote), character as the 1stcharacter of the string being output.
8.4 Frequently Asked Questions
No questions are currently on record.
8.5 Setting Up a New Users PC WorkStation
The Series 5 systems provides support for multiple simultaneous users. Users may either beconnected as a "FAT" Client, or as a "Thin" Client. In either case, they will be sitting at aWindows based personal computer.
This topic discusses the steps to set up a "FAT" client executing from a Microsoft NT Serverbased system.
Installing FAT Client on a Windows PC
In the <%COMPILERNAME%> FAT client environment, the application is executed on theWindows PC. The data, is located on one of the servers on the network and is accessed onthat server using AcuServer.
Building the "FAT" Client Shortcut ICON
The user will be executing as a "FAT" client if the <%COMPILERNAME%> runtimes are to beexecuted on their PC, (and you do not have the thin client service software). You must create

Series 5 Systems Management - User Help164
© 2007 - 2014 by Sentinel Hill Software, all rights reserved
a shortcut on the users desktop.
1. Copy the shortcut that is provided with the Series 5 release. It can be found in E:\s5\util named Series 5 Accounting or copy one from another user's desktop.
2. Right-click the icon, and on the pop-up menu, click Properties.
3. You must edit the Target field and make sure the command has the followingformat:
e:\Acucorp\AcuGT\bin\wrun32.exe -c e:\shsi_etc\cblcfgui -y SM.LIB -yAR.LIB -y AP.LIB -y GL.LIB -y FA.LIB
CommandArgument:
Example: Description:
<%COMPILERNAME%> Runtime
e:\Acucorp\AcuGT\bin\wrun32.exe
Is the program that executes the Series 5 applications.
Configuration File -c e:\shsi_etc\cblconfigui Is the location of the Series 5Configuration file. Thisshould be a path to a mappeddirectory on your server, thatis accessed by all users.
System ManagementLibrary
-y SM.LIB This defines the Series 5management and coreroutines library. It ismandatory.
Application Libraries -y GL.LIB -y AP.LIB -yAR.LIB-y FA.LIB
These are the Series 5applications' libraries. Foreach application you intend toexecute, it's associatedlibrary must be present as an-y argument.

Appendix 165
© 2007 - 2014 by Sentinel Hill Software, all rights reserved
Establish a Series 5 User on the Windows XP Client PC
Once the PC is connected to the network, the following steps are needed to provide the userwith the ability to execute Series 5 applications.
All Client Users
These steps are required for both Thin and "FAT" Clients.
Creating the User's Personal Series 5 Working Directories
The user on this PC may have occasion to import or export data to/from any of the Series 5applications; or they may wish to generate a report as an MS Word document. The system isdesigned to default the directory path for these functions to a particular directory in the users' My Documents folder. You need to create the applicable folders.
1. Using Windows Explorer, position to the users' designated My Documents folder
2. Create a new directory named SHSI
3. For each Company System that is being managed by the accounting system,create a directory named with the same code used for the Company System.
For example, this user has to 2 systems, named PCA and UCC.

Series 5 Systems Management - User Help166
© 2007 - 2014 by Sentinel Hill Software, all rights reserved
Setting Up Environment Variables
There is only one environment variable that may need to be established. This is used todefine the user's logon code so the Series 5 logon screen will have the users code alreadydisplayed.
1. Click on the Windows system Start button; then right-click My Computer. Fromthe pop-up menu, click Properties.
2. Click the Advanced tab. Then click on the Environment Variables push-button at thebottom of the window.
3. At the top of the displayed window, click the New button and add the followingvariable:

Appendix 167
© 2007 - 2014 by Sentinel Hill Software, all rights reserved
Variable Name: SHSI_USER_NAME
Example Values: SHSI5.LARRY, ... or KLENKDO
Allowing for Series 5 to Access HTML Help over the Network
The Series 5 applications provide on-line Help capability. There are a number of HTML helpfiles, that are provided, and in assorted functions Help can be invoked. These help files willtypically reside on your server in the XX\s5\bin\help directory.
Thin Client Users
For "thin" client users, the Help files must reside on either the client PC, or a designatedWindows server. The Help files cannot be accessed if stored on the UNIX server.
There is however a minor problem. It turns out that due to a potential security problem, recentupdates to Windows XP and VISTA has disallowed users from accessing help files that arestored on network PCs.
There are 2 methods to fix this issue.
1. There is a registry entry that you must set to specify the location of “safe” help files.There is a *.reg script that you can execute on each client's PC the makes a change tothe Windows Registry. The script currently is assuming every client PC has Q:\mapped to the servers D:\s5\bin directory. (You can find the script and a little READMEfile in D:\s5\util). Edit the file to accommodate your configuration and run the script.
RegistryVariable:
HKEY_LOCAL_MACHINE\SOFTWARE\Microsoft\HTMLHelp\1.x\ItssRestrictions
VariableValue:
p:\s5\bin\help or \\xxx-server\\s5\bin\help\;file:/
2. For Windows Visa, 7 and 8 clients, you can create a symbolic link that makes the linkedfolder appear as a local one. This allows the PC to view the Help files without hackingthe registry. From the command prompt, (with administrator privilege), issue thefollowing command to create a "Directory Junction" linking a local directory, to the oneon your network where the Series 5 Help files are stored:
mklink /D C:\Users\Larry\Documents\SHSI\HelpFiles \\server-name\D:\s5\bin\help

Series 5 Systems Management - User Help168
© 2007 - 2014 by Sentinel Hill Software, all rights reserved
Setting up Microsoft Word Templates
The Series 5 applications offer the option to generate reports and forms as Microsoft Worddocuments. For specific types of forms, such as P/I and O/P Invoices, or A/R Statements,when output, each file can have an MS Word Template applied. These templates can provideheaders and footers with graphics, and can set up other formatting properties. For any userthat might be generating these Word documents, they must have the *.dot template fileinstalled on their PC in their C:\Documents and Settings\<PC UserName>\ApplicationData\Microsoft\Templates" directory.
Word Template *.dot files
For users that generate Word document forms, if templates are used, they must beinstalled on each users PC. If using Office 2003, these files have an .dot extension. Ifusing Office 2007, the have a .dotx extension.
You may wish to define templates for the following output forms. The Configuration Variableis used to define the properties to assign to the MS Word document generated. Theseinclude orientation, font, fontsize and the actual name of the template file to be used. See thesection on Configuration Variables in the Appendix.
System
Application or Form Configuration Variable
All Any report saved as an MS Word documentMSWORD-DEFAULT-SPECS
P/IInvoices generated and from the E-RequestServer
MSWORD-PI-INV-SPECS
P/I E-Request Server generated Recap ReportsMSWORD-WEB-RPT-SPECS
A/P Checks MSWORD-AP-CHECKS-SPECS
A/R Statements generated for Dunning Letters MSWORD-DUNSTM-SPECS
A/R Customer StatementsMSWORD-AR-STMT-SPECS
A/R Customer PCA Canadian CustomerStatements
MSWORD-AR-CD-STMT-SPECS
A/R Custom PCA US Customer Statements MSWORD-AR-US-STMT-SPECS
G/L Financial Statements MSWORD-GL-FINS-SPECS
O/P Customer Order Packing Slips MSWORD-PAKSLIP-SPECS
O/P Customer Order Invoices MSWORD-OP-INV-SPECS
149

Appendix 169
© 2007 - 2014 by Sentinel Hill Software, all rights reserved
O/P Order Entry Picking Tickets MSWORD-PICKTIK-SPECS
C/S Cement Shipments System Invoices MSWORD-CS-INV-SPECS
R/G Class Registrations System Invoices MSWORD-REG-INV-SPECS
Q/I Miscellaneous Invoice System Invoices MSWORD-QI-INV-SPECS
Installing 3rd Party Utility to Allow Emails to be Sent from Series 5
A number of the Series 5 applications offer the ability to automatically send emails. Emailsare sent using calls to Microsoft's MAPI.DLL library. A Microsoft security feature exists withWindows 2000, XP and Vista that warns users that non-Microsoft products are attempting toautomatically send emails. When the following screen is displayed, you would have to wait10 seconds, then click the Yes button to have the email delivered:
To bypass this annoying security feature, their are a number of 3rd party products that can bepurchased and installed on the user's PC. One such product is called ClickYes Pro, thatcan be purchased by visiting www.ContextMagic.com. If you purchase this utility, you mustdefine each of the applications that will be allowed to automatically submit emails withouthaving the warning screen displayed. The following screens show the ClickYes Pro displayscreen, and the setup screen for the <%COMPILERNAME%> system.

Series 5 Systems Management - User Help170
© 2007 - 2014 by Sentinel Hill Software, all rights reserved
Establish a Series 5 User on a VISTA or Windows 7 Client PC
Once the PC is connected to the network, the following steps are needed to provide the userwith the ability to execute Series 5 applications.
All Client Users
These steps are required for both Thin and "FAT" Clients.

Appendix 171
© 2007 - 2014 by Sentinel Hill Software, all rights reserved
Creating the User's Personal Series 5 Working Directories
The user on this PC may have occasion to import or export data to/from any of the Series 5applications; or they may wish to generate a report as an MS Word document. The system isdesigned to default the directory path for these functions to a particular directory in the users'designated Documents folder. You need to create the applicable folders.
1. Using Windows Explorer, position to the users' Documents folder in their FavoriteLinks
2. Create a new folder named SHSI
3. For each Company System that is being managed by the accounting system,create a folder named with the same code used for the Company System.
For example, this user has to 2 systems, named PCA and UCC.

Series 5 Systems Management - User Help172
© 2007 - 2014 by Sentinel Hill Software, all rights reserved
Setting Up Environment Variables on Windows 7 or VISTA
There is only one environment variable that may need to be established. This is used todefine the user's logon code so the Series 5 logon screen will have the users code alreadydisplayed.
1. Click on the Windows system Start button; then right-click Computer. From thepop-up menu, click Properties.
2. Click the Advanced system settings in the left side Task list. Then click on theEnvironment Variables push-button at the bottom of the window.
3. Click the New button and add the following variable:
Variable Name:
SHSI_USER_NAME
Example Values: SHSI5.LARRY, ... or KLENKDO
Setting up Microsoft Word Templates on Windows 7 or VISTA
The Series 5 applications offer the option to generate reports and forms as Microsoft Worddocuments. For specific types of forms, such as P/I and O/P Invoices, or A/R Statements,when output, each file can have an MS Word Template applied. These templates can provideheaders and footers with graphics, and can set up other formatting properties. For any userthat might be generating these Word documents, they must have the *.dotx template fileinstalled on their PC in their C:\Users\<PC UserName>\AppData\Roaming\Microsoft\Templates" directory.
Word Template *.dotx files
For users that generate Word document forms, if templates are used, they must beinstalled on each users PC. If using Office 2003, these files have an .dot extension. Ifusing Office 2007 or Office 2010, the have a .dotx extension.
You may wish to define templates for the following output forms. The Configuration Variableis used to define the properties to assign to the MS Word document generated. Theseinclude orientation, font, fontsize and the actual name of the template file to be used. See thesection on Configuration Variables in the Appendix.
Syste Application or Form Configuration Variable
149

Appendix 173
© 2007 - 2014 by Sentinel Hill Software, all rights reserved
m
All Any report saved as an MS Word documentMSWORD-DEFAULT-SPECS
P/IInvoices generated and from the E-RequestServer
MSWORD-PI-INV-SPECS
P/I E-Request Server generated Recap ReportsMSWORD-WEB-RPT-SPECS
A/P Checks MSWORD-AP-CHECKS-SPECS
A/R Statements generated for Dunning Letters MSWORD-DUNSTM-SPECS
A/R Customer StatementsMSWORD-AR-STMT-SPECS
A/R Customer PCA Canadian CustomerStatements
MSWORD-AR-CD-STMT-SPECS
A/R Custom PCA US Customer Statements MSWORD-AR-US-STMT-SPECS
G/L Financial Statements MSWORD-GL-FINS-SPECS
O/P Customer Order Packing Slips MSWORD-PAKSLIP-SPECS
O/P Customer Order Invoices MSWORD-OP-INV-SPECS
O/P Order Entry Picking Tickets MSWORD-PICKTIK-SPECS
C/S Cement Shipments System Invoices MSWORD-CS-INV-SPECS
R/G Class Registrations System Invoices MSWORD-REG-INV-SPECS
Q/I Miscellaneous Invoice System Invoices MSWORD-QI-INV-SPECS

Series 5 Systems Management - User Help174
© 2007 - 2014 by Sentinel Hill Software, all rights reserved
Index- A -about Series 5 menu screens
acknowledgements 143
copyright notice 143
file folder definitions 143
licensing screen 143
access monitoring utility
clearing widow records 140
who is using the system right now ? 95
application data files
determining file sizes 42
how many records in a file ? 42
Series 5 control data filenames 147
- B -basic processing screens
about 67
background job processor 67
browsing reports 87
dispatching a job to batch 68
generating reports 81
monitoring who is on the system 95
report options screen 82
viewing archived reports 89
batch execution
delayed processing 68
enabling users to access 44
job management 71
launching the Batch Job Processor 77
modifying job execution parameters 71
night processing 68
putting jobs On-Hold 71
submitting jobs to batch 68
- C -ClickYes Pro 77
company systems
about 108
assigning printer queues to be used 114
data files name extension 111
defining the G/L Account # format 116
defining the name and address 109
defining the use of AcuServer 111
initializing a company's data files 108
location of data fles 111
tutorial "Adding a New Company" 55
configuration variables 149
- D -date Lookup window 49
date range Lookup window 50
define user's environment variables 57, 77
disable all users from loggin in 135
- E -email
Series 5 reports 85
emergency broadcast message 133
entering a range of dates 50
entering dates from a calendar 49
environment variables 149
executing jobs in the background
about 67
batch job execute screen 68
the Batch Job Processor 77
- F -force all users off the system 135
- G -G/L Account numbers
defining the layout 116
Gate Keeper 119
generating emails 77
- H -help
getting help 28
HTML Help access 57, 77
- L -login message 133

Index 175
© 2007 - 2014 by Sentinel Hill Software, all rights reserved
logout message 133
- M -main menu icons 137
master code Lookup window 44
MS Word Templates
on VISTA and Windows 7 172
on Windows XP 168
- P -printer queues
<- P SPOOLER> or <-P SPOOLER-DIRECT> 99
about 99
adding 99
assigning to a network printer 99
captured Windows printers 99
embededed print control commands 99
lines-per-page settings 99
setting fonts 99
setting page margins 99
tutorial "Adding a New Printer" 54
- R -report generation
about 81
archived reports 82
displaying to the screen 82
having reports emailed 82, 85
outputting to a printer 82
report options screen 82
saving as a PDF document 82
saving as an ASCII text file 82
saving as an MS Word document 82, 84
runtime errors
about 160
Microsoft utility errors 163
system error codes 161
- S -S/M Menu
"Help" menu functions 28
Sentinel Hill Software
contacting 29
Series 5 activation key
adding new licenses 142
re-initializing 142
Series 5 Main Menu
about 65
accessing System Management functions 65
entering a new password 62
expired passwords 62
loging in to the system 62
selecting a Company 62
Series 5 Systems Maintenance sub-menu
building broadcast messages 132
capturing network printers 98
company systems maintenance 107
customizing the main menu 136
define Users' functions 118
disable users from logging on 132
force users out of Series 5 132
logon access audit inquiry 129
printer queues maintenance 98
re-initializing the Access Monitor File 136
re-initializing the Series 5 License 136
re-initializing the User Access File 136
system security controls 118
user logon profiles 118
Setting Up a User's PC
allowing access to HTML Help 57, 77
allowing emails to be sent 77
build the Series 5 shortcut icon 57, 77
define user's environment variables 57, 77
defining user's working directories 57, 77
SHSI_USER_NAME 57, 77
SHSI_USER_NAME variable 57
SHSI-USER-NAME variable 77
system management functions
accessing 65
capturing Windows printers 104
customizing the main menu 137
defining network Windows printers 104
defining printer queues 99
defining the Gate Keeper 119
defining user functions 122
defining user logon profiles 125
disable all users from logging in 135
emergency message 133
force all users off the system 135
initializing a company's data files 108
login message 133
logon access audit inquiry 129

Series 5 Systems Management - User Help176
© 2007 - 2014 by Sentinel Hill Software, all rights reserved
system management functions
logout message 133
password expirey days 119
re-initializing access monitor file 140
re-initializing the Series 5 Licenses 142
re-initializing the User Logon file 141
system access control options 119
user access logging 119
- T -tutorials
"Adding a New Company" 55
"Adding a New Printer" 54
"Adding a New User" 58
- U -user access logging
defining 119
inquiry 129
user access management
user menu access logging 119
who is using the system right now ? 95
user functions
defining 122
executing 122
user logon
entering a new passwords 62
expired passwords 62
logging user menu access 119
passwords 62
user logon profiles
about 125
defining new users 125
I forgot to set up a user with System Managementaccess 141
passwords 125
purging all users 141
setting temporary access 125
tutorial "Adding a New User" 58
- W -Windows printers
about 104
capturing 104
network printer 104
Windows shortcuts 57, 77
Windows VISTA
environment variables 172
MS Word templates 172
user's default working folders 171
Windows XP
environment variables 166
MS Word templates 168
user's default working folders 165
working with grids
"Fast Button" frames 34
copy, cut and paste 41
display items with different sorts 33
editing grid row fields 40
file properties 42
most recently accessed items 42
navigating through the data files 38
pop-up menus 40
searching for particular items 36
selecting items for display 35
Undo deleted records 41
Undo modified records 41