shower cubicle/toilet - chiltern · pdf file100mk2 shower cubicle/toilet warranty ... 3 core...
TRANSCRIPT

Shower Cubicle/Toilet
Model 100MK2
user and installation guide

User Guide
1
Contents
Installation ........................................................ 2
Cleaning & Maintenance .................................. 18
Troubleshooting ............................................... 19
Operation Guide .............................................. 20
Accessories .................................................... 21
Spare parts ...................................................... 22
Warranty ......................................................... 20
100
MK2
Sho
wer
Cub
icle
/Toi
let
These products have been designed to thehighest standards with safety, strength andquality in mind.
Follow the recommendations in this guide toensure maximum benefit from your ChilternInvadex Shower Cubicle / Shower Toilet Cubicle.

Chiltern Invadex Front Entry 100MK2 Shower Cubicle / Toilet
2
InstallationGeneral GuideFor your safety installation should be carried out by qualifiedpersonnel complying with all relevant regulations and byelaws.Chiltern Invadex Shower cubicles are manufactured to many differentspecifications and sizes. It is therefore important that all servicesrelevant to your model are complete and tested before you attempt toassemble your shower cubicle. All building work and decorating should befinished i.e. a suitable floor in place, skirting boards painted and fixed, wallsand ceilings plastered and decorated.
Check all the items in the carton against the parts list on theenclosed leaflet
Should you require any technical assistance or have any queries regardinginstallation procedures contact your nearest Chiltern Invadex Divisionaloffice. For an efficient response it will help if you have the model type andserial number to hand when you call (the serial number can be found onthe label on the back panel).
Services - Incoming WaterThe installation must be in accordance with local water companybyelaws.
Mixer showersBoth hot and cold supplies must come from the water storage tanks with atleast 4.6 metres (15’) head of water above the shower.BOOSTER PUMP If the required head of water is not available a TwinImpeller Booster Pump can be employed. Do not use flow switches.All supplies should terminate close to the relevant controls with a 3/4" B. S.Male outlet. We strongly recommend that accessible isolating valves arefitted near to our units to facilitate future servicing, or isolation, in the eventof an emergency.
Instantantaneous Shower15mm pipe with mains cold water supply.Minimum operating pressure 1 bar (14.5 p.s.i.).Permissible pressure variations 1 bar - 10 bar (14.5 p.s.i. - 145 p.s.i.).
Waste Water (Fig 1)The Chiltern Invadex Shower has a 12 volt pump positioned in the rear lefthand corner of the cabinet. It pumps the waste water out of the base to awaste stack similar to that used by a washing machine.The waste stack need only be in 1 1/4" (32mm) plastic but it is necessaryto fit a trap to prevent odours.

User Guide
3
The height of the waste stack should be 508mm maximum above the floorlevel and fitted to the left hand rear of the proposed shower position (seediagram). This diagram is only one example of an installation. The position ofthe pipework will vary according to individual situations. NOTE: The lowerthe waste stack pipe the less water will be left in the trough once the pump isturned off.
Wire SizesIncoming Mains-220/240V 50/60Hz (UK and Europe only) Cable size tosuit application.Electrical shower-(Please refer to manufacturers instructions - suppliedseparately)Pumped waste-Cable supplied (do not replace cable if faulty. Please callyour nearest Chiltern Invadex Divisional office for replacement)
Waste pump technical specification
Operating voltage 12 volts DC (via transformer)Current rating 3.0 amps maximum Rating- 315mADelivery output 20ltrs/min maximumClass IIInsulation class- Type B equipment
All electrical installations must be carried out by qualifiedpersonnel, complying with all relevant byelaws and IEE regulations.
Prior to installing the shower cubicle, find out whether the unit is to beinstalled with an electric shower unit, or thermostatic mixer unit.Then refer to the relevant figure for correct installation.
508 max
Waste Detail
Waste
Fig 1

Chiltern Invadex Front Entry 100MK2 Shower Cubicle / Toilet
4
N E
AR
TH LS
UP
PLY
L E
AR
TH N
LOA
DL
NA
UX
Electrical InstallationShower & pumped wasteThe correct wiring installation for the electric shower and pumped waste isshown below. Please pay particular consideration to the wire sizes.
Blue
Red
230v ACsupply
Black(Neutral)
Yellow/Green(Earth)
Red(Live)
Black(Neutral)
Yellow/Green(Earth)
Red(Live)
Fuse315ma
Fuse2 amp
*230v AC loadoutput cable
3 core flex(supplied) towaste pumplow voltage
Auxiliary outputfor eg. 230v fanvia 2 amp fuse
Green
12 Volt 75VA wiring block layout (without roof light)
Fig 2
*Note: For mixer showers load output cable is not required.
Fitting (Optional) Roof Lights
Standard LightThis plugs into the wire already fitted into the wiring block from the 12vtransformer (upgraded to 75Va).
Light/FanIf optional light/fan is ordered a hole 4” O will be drilled in the roof and thelight will have to be fitted into this and secured with 1/2” 8’s flange headscrews supplied.
The light/fan is wired into the auxilliary output. One feed to the fan andone feed to the transformer for the halogen light (see manufacturersinstructions for wiring). The “Aux” socket on the wiring block can beused for this.

User Guide
5
Electrical SupplyWARNING! GENERAL ADVICE FOR INSTALLERS
All installations must comply with I.E.E. regulations, Local Authority bylawsand electricity board regulations and must be carried out only by a qualifiedelectrician.
Follow manufacturers instructions for installation of the shower heater unitfor all electrical units.
RECOMMENDED WIRING METHODRefer to the manufacturers fitting instructions enclosed.
Note: The double pole ceiling pull switch is used to isolate the shower aswell as turning the shower waste pump on and off and must be accessi-ble to a wheelchair user where applicable.
The wiring block is positioned at a maximum of 4m from the pump unit andcomplies with all mentioned regulations. Follow connection instructionsincluded with wiring block to complete electrical supply.

Chiltern Invadex Front Entry 100MK2 Shower Cubicle / Toilet
6
Preparing the floorThis section covers the installation of the shower cubicle base to providelevel access. If the shower cubicle base is to be fitted above floor pleaserefer to page 11 of this guide.
2. Ensure the floor is flat before fitting the shower cubicle base into it(use leveling compound or a dry mix).
Provision should be made for the waste pipe, electrical supply and coldwater before proceeding.
Concrete floors
1. Remove a section of concrete to the dimensions shown in Fig 1:
960mm
1035mm
minimumdepth35mm
Fig 1

User Guide
7
Wooden floors
There are 2 alternative options for installing a Chiltern Invadex ShowerCubicle on a wooden floor:
Method 1
1. Remove floorboards where cubicle is to be installed, as Fig 2.
2. Using battens and timber create a sub floor that is level with the top ofthe joists, as Fig 3.
Preparing the floor
TimberBatten
Joist Floorboard
Fig 2
Fig 3
Chiltern Invadex Front Entry 100MK2 Shower Cubicle / Toilet
8
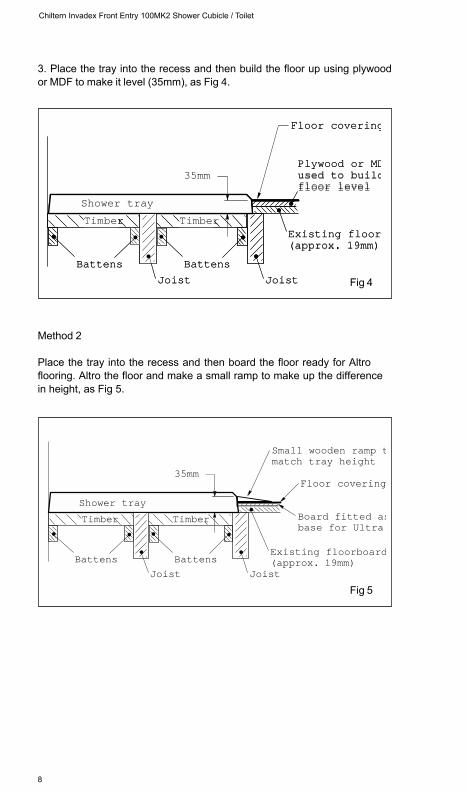
Method 2
Place the tray into the recess and then board the floor ready for Altroflooring. Altro the floor and make a small ramp to make up the differencein height, as Fig 5.
Existing floorboard(approx. 19mm)
Timber Timber
Shower tray
Battens Battens
Joist Joist
Board fitted asbase for Ultra
Floor covering
Small wooden ramp tmatch tray height
35mm
Existing floor(approx. 19mm)
Timber
Shower tray
Battens Battens
Joist Joist
Plywood or MDused to buildfloor level
Floor covering
Existing floor(approx. 19mm)
Timber Timber
Shower tray
Battens Battens
Joist Joist
Plywood or MDused to buildfloor level
Floor covering
35mm
3. Place the tray into the recess and then build the floor up using plywoodor MDF to make it level (35mm), as Fig 4.
Fig 4
Fig 5

User Guide
9
Side Elevation
415
overflowwater in
Fitting Instructions for100MK2 Shower ToiletThe flexipipe in Chiltern Invadex 100MK2 Shower Toilets should beconnected through the side panel.The toilet waste pipe must also beconnected when the side panel is fitted.
The position of the pan on the base unit must relate to the individualrequirements of the user and we recommend that this operation is leftuntil later. Flush pipe and multikwik pan connector are supplied forstandard installation. These can be extended on site. Additional parts arenot included.
Locating the toilet pan and cistern
Side elevation170
110mm soil pipeconnection to flexipipe
212
40mm connectionto flexible pipe fromflush tank
minimum clearancefrom wall
Front Elevation

Chiltern Invadex Front Entry 100MK2 Shower Cubicle / Toilet
10
Installation Details (use Fig 3 with instructions)
Fig 3
9
2
3
4
7
8
6
5
10
1

User Guide
11
Note:Assembling the unit insitu is usually easierthan moving theassembled unit.
1. Fig 4.0-Ensure thatthe shower tray isplaced on the floor andis level along its lengthand width.
Also ensure that the4 x 30mm blocks areinserted in the bottomof all 4 corner sectionsbefore assembly, asFig 4.1.
2. Fig 4.1-Locate thecorner post withlarge hole at thebottom onto thefactory fitted footsection, adjacent tothe waste pumpposition. Secure withthe grub screw inblock previously fitted(see inset).
corner sec
corner pos
30mm block
Fig 4.0
Fig 4.1

Chiltern Invadex Front Entry 100MK2 Shower Cubicle / Toilet
12
3. Fig 4.2-Locate theback panel (3) into thechannel in the cornerpost.
4. Fig 4.3 Slide in thesecond corner post.This is blank i.ewithout any dooradjusting slots. Tightenthe section with theallen key supplied.
Fig 4.2
Fig 4.3

User Guide
13
5. Fig 4.4 Locate theside panel (5) into thechannel in the cornerpost.
6. Fig 4.5 Position thecorner post makingsure the dooradjustment slots areat the bottom. Tightenup grub screw.
Fig 4.5
Fig 4.4
Chiltern Invadex Front Entry 100MK2 Shower Cubicle / Toilet
14
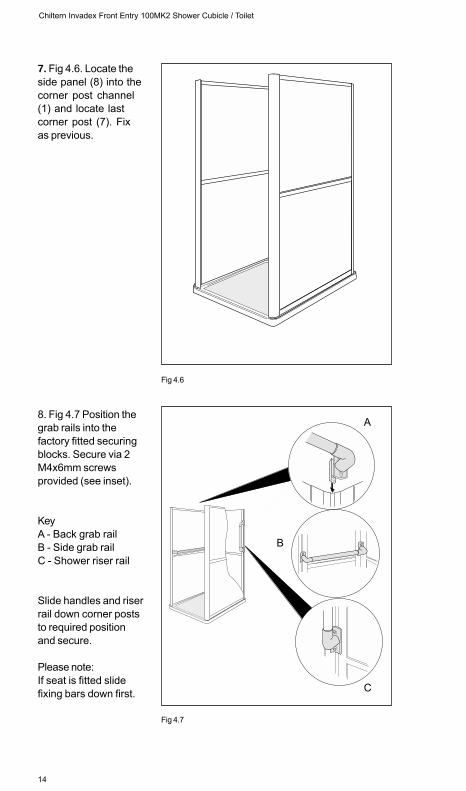
7. Fig 4.6. Locate theside panel (8) into thecorner post channel(1) and locate lastcorner post (7). Fixas previous.
8. Fig 4.7 Position thegrab rails into thefactory fitted securingblocks. Secure via 2M4x6mm screwsprovided (see inset).
KeyA - Back grab railB - Side grab railC - Shower riser rail
Slide handles and riserrail down corner poststo required positionand secure.
Please note:If seat is fitted slidefixing bars down first.
Fig 4.6
Fig 4.7
A
B
C

User Guide
15
9. Fig 4.8. Prior tofitting the roof panelensure that the cubicleis square and upright.
Once handles etc arein position load 4 x30mm blocks into topof corner sections withgrub screws.
Locate the roof panel(9) into the top of thecorner posts one at atime.
Slackening the roofscrews will be helpful ifthe roof is difficult toalign. Secure with grubscrews.
If an (optional) seat isto be fittedThe sliders must bepositioned first. Feedthem into the channelfrom the top and pushthem all the way downto the bottom of theside panel.
The seat can then befitted using the fixingsprovided.
Please contact yourChiltern InvadexDivisional Office if aseat is required, buthas not been ordered.
Slide curtain slidersinto curtain rail andload. Finally put endstops on and hangthe curtain.
Fig 4.8

Chiltern Invadex Front Entry 100MK2 Shower Cubicle / Toilet
16
Door assembly -Swinging doors(standard)
10.Fig 4.9 Slide thedoors into the cornerposts (6,7) ensuringthat the doors openoutwards. Secure withthe screws and slotcovers and shakeproofwashers (see inset).Check that the doorsopen and closecorrectly and thebottom seal is incontact with theshower tray base. Thedoor must nearly betouching when closedso as not to leak.
Tri-fold/bi-fold doorsSlide the door into thecorner section andtighten screws,shakeproof washersand slot covers loosely.Place the door receiverinto the opposingcorner section andtighten with twowashers, slot coversand 1/2” screws.Before locking in thedoor tight ensure thatthe door is straight andthat the sliding handlelocks correctly. Alsocheck that themagnetic strip mateswith the one in thereceiver.
Fig 4.9
shakeproof was
slot cover
screw

User Guide
17
Pumped wasteassembly
11.Fig 4.10 Push outlet(waste) hose throughthe hole in the cornerpost (1) and secure itto the outlet pipe inthe base. Do notstretch the wastepipe, allow forpossible adjustment.Connect the pump unitto the electricalconnector, ensuring afirm fit. Push themotor housing into thebase socket until theface of the pump andsocket meet. Prior tofitting the pump cover(10) ensure that theelectrical cable andwaste pipe are clear ofobstructions.
12. Final assembly4.11 Once doors arefitted place cappingsinto corner posts and“U” channel abovedoors, cutting whereappropriate with ajunior hacksaw. Pushblack screw coverson to grab rails.
Securing the cubicleOnce the cubicle is inposition, wired andplumbed in, ‘L’shaped brackets canbe fitted to blocks onthe roof and thensecured to the wall,using the nuts andscrews provided, asFig 4.12.
Outletwastehose
Stackpipe
Electricalconnector
Basesocket
Pump unit
Pump cover
Fig 4.10
Fig 4.11
Fig 4.12

Chiltern Invadex Front Entry 100MK2 Shower Cubicle / Toilet
18
Cleaning & MaintenanceRegularShower Cubicles do not require any major maintenance, but you shouldfollow these simple instructions:
Tray and EnclosureTo retain the surface quality of your shower cubicle, weeklycleaning using bathroom cleaning mousse or washing-up liquid,warm water and a soft cloth is recommended. For the slip resistantshower tray area you may need to use a stiff brush. Stubborn stainsmay require a non-scratch liquid cleaner.
Do not use oven cleaner or a scouring powder on any of thesurfaces. Use of scourers will dull the finish of the surfaces andspoil the appearance of your tray and enclosure.
Shower Head (Handset)If you live in a ‘hard-water’ area, the holes in the shower head willblock more quickly. This will result in a poor spray and a reductionin the heating ability of some instant water heaters.Vigorously rub shower head to remove scale build up.
MonthlyPump Maintenance (for trays with pumped waste). NOTE: Disconnect theelectrical lead before removing the pump.Regularly (monthly) lift pump from the socket in the base and removeforeign matter from the blades. Scrub the area around the pump with along handled stiff brush. This will reduce the build up of scum and odours.Check that the small bore hole adjacent to the pump blades is clean.Replace pump cover making sure that the pump cover touches the showerbase.
To ensure good performance regularlyclean pump and shower head.
AnnualWe recommend that the unit is servicedby a qualified Chiltern Invadex engineer.This will ensure that the unit complieswith current health and safety regulations.
Cross InfectionWarning: If this unit is to be utilized by many different bathers, then wewould strongly recommend that this unit be cleaned with a medicaldisinfectant. Please contact your local infection control nurse for furtheradvice.

User Guide
19
Rub clean head ofhandset to clear anyscale build up.
See note 1 below.
Check unit is onmaximum heat setting/reduce flow.
Turn down thetemperature and tryagain, Pump needscleaning.Clean shower head.
Unblock waste hose.Run pump aftershowering for 1 minute toclear excess water.
This is normal. The waterleft in the waste hosewhen the pump stops willrun back when the pumpstops.
The shower should be runfor a couple of minutesafter useto ensure that theresidual water is clean.
Mixer ShowersReduced flow of waterfrom the shower head.
Electric ShowersReduced flow of waterfrom the shower head.
Temperature of showeringwater is too cool.
Shower cuts out.
Pumped shower wasteWater level higher thannormal.
Unpleasant odourfrom cubicle
Troubleshootingsymptom suggested cause solution
Note 1: *Water supply presssures may be affected by simultaneous use ofwater at another point in the house, a fault in the house plumbing or aproblem with the water supply to the house.
For further assistance please telephone your nearest Chiltern InvadexDivisional Office. Remember that the service calls made after the expiryof the guarantee will be chargeable. If maintenance of the equipment isthe responsibility of a third party, for example the Social Services, pleasecontact them in the first instance.
Spray rings in the showerhead have a build up oflimescale and needcleaning.
Water supply* pressureis lower than normal.
Water supply is colderthan normal, possibly dueto weather conditons.
Water supply* pressure islower than normal.Temperature is set higherthan safety cut-out.Spray rings in the showerhead have a buid up oflime-scale and needcleaning.
Water supply* pressure islower than normal.
Waste hose is blocked.
Water left in gully at backof shower after use.
Stagnant soapy water inthe back gully.

Chiltern Invadex Front Entry 100MK2 Shower Cubicle / Toilet
20
Operation GuideIf a seat is fittedFold down the seat, ensuring the feet are firmly placed on the shower tray,then transfer to the seat.
All cubiclesPull the mains cord to provide power to the pump/shower.
Operate the shower noting the hot and cold position.
To minimise spray always ensure the doors and shower curtain areclosed.
Cross infection
Warning: If this unit is to be utilised by many different bathers, then we wouldstrongly recommend that this unit be cleaned with a medical disinfectant.Please contact your local infection control nurse for further advice.

User Guide
21
OptionalAccessories
Folding Shower seat(height to be specified).
Flat padded
Large horseshoe
Medium horseshoe
Small horseshoe
Large aperture
Medium aperture
Small aperture
Vinyl seat
Please contact yournearest ChilternInvadex RegionalOffice to discuss seatoptions.

Chiltern Invadex Front Entry 100MK2 Shower Cubicle / Toilet
22
Spare Parts
no description qty part no
1 Shower Base (pumped waste) 1 IDI100011 Shower Base (gravity waste) 1 IDI100032 Grab rail (State model & horizontal or vertical) 1 SHSU0233 Back panel 1 SHPA0031004 Roof light assembly 1 SHRLIGHT5 Standard door (alcove) 1 SHPA0081006 Bi-fold door (left hand) 1 SHPA028L1006 Bi-fold door (Right hand) 1 SHPA028R1007 Tri-fold Doors (left hand) 1 SHPA009L1007 Tri-fold Doors (right hand) 1 SHPA009R1008 Side panel (left hand) 1 SHPA001L1008 Side panel (right hand) 1 SHPA001R1009 Roof 1 SHPA00610010 Pump Cover 1 SH0690W11 12v Waste Pump 1 SHPU03012 Ramp (not pictured) 1 IDI10005

User Guide
23
Outletwastehose
Stackpipe
Electricalconnector
Basesocket
Pump unit
Pump cover
99
4
3
8
1
2
2
11
10
5
7
6

Chiltern Invadex Front Entry 100MK2 Shower Cubicle / Toilet
24
WarrantyYour Chiltern Invadex Shower Cubicle carries a 12 month warranty from thedate of purchase (for guarantee on shower unit see manufacturers details),subject to the following:-
1. Should you experience any problems with our workmanship ormaterials within the first 12 months period, please contact your pointof purchase.
2. Repairs made during the warranty period will be carried out free ofcharge, provided the product has been used strictly in accordancewith the guidelines set out in this user guide.
3. Our warranty does not cover replacements, adjustments or repairswhich may be required as result of normal wear and tear, wilful oraccidental damage, misuse, neglect or any other cause which isbeyond the control of Chiltern Invadex.
4. Modifications and repairs made to this product by unauthorisedpersons will render the warranty void.
5. Only parts manufactured or approved by Chiltern Invadex shall beused to repair this product. Use of unauthorised parts will invalidateall warranties and remove all liability from Chiltern Invadex for thesafety of this product.
6. Chiltern Invadex shall in no event be liable for any damages, costs orexpenses arising from any claim made under this warranty (save forany legal liability of Chiltern Invadex for death or personal injuryresulting from the company’s negligence in respect of its products).
7. Faults due to inadequate cleaning, limescale or other water impuritiesincluding debris not flushed from the supply pipe work prior toconnection are excluded from this warranty.
8. This warranty does not affect your statutory consumer rights.

Dealers Name
..........................................................................
Address
..........................................................................
..........................................................................
....................... Post Code.................................
Telephone ........................................................
Your Serial Number is
..................................
Date of purchase
...........................
Please fill in the information below for future reference
Modelscovered
100MK2

100M
K2
Sho
wer
Cub
icle
/Toi
let
Copyright Chiltern Invadex Ltd The design of the product shown on this user guide is vested in Chiltern Invadex Ltd and should not becopied or reproduced in any way whatsoever without the express permission in writing of Chiltern Invadex Ltd.As part of our commitment to new product development we reserve the right to alter specifications without prior notice.This is an original design of Chiltern Invadex Ltd in which Design Right Subsists.Published by : Chiltern Invadex Ltd, 6 Wedgwood Road, Bicester, Oxon, OX26 4UL Registered in England No: 1182024In Northern Ireland : Chiltern Invadex (NI) Ltd, 5 Balloo Way, Balloo Industrial Estate, Bangor, County Down, BT19 7QZ Registered No: NI 19958.
Chiltern Invadex (UK) Ltd 126 Churchill Road Bicester Oxfordshire
OX26 4XD
Tel: 01869 365500 Fax: 01869 365588
Web: www.chilterninvadex.co.ukE-mail: [email protected]
CINV 307.02 06/03