shower pan extension installation guide - sierra glass block · hydro-blok installation guides for...
TRANSCRIPT

Install your HYDRO-BLOK shower pan as per the instructions included with the shower pan. Pre-measure the area where the extension piece(s) will fit to ensure any required cuts will be accurate.
Cut and dry fit the shower extension(s) to ensure they fit the install location.
TIP: We recommend marking the edges of each section on the subfloor at this point to assist in applying thinset in later steps.
If your shower extension includes the HYDRO-BLOK corner extension (HBSPCE3636CU12) it should be installed before any other sections (see reverse ).
Installation Hints
We recommend reading the installation guides for all relavent HYDRO-BLOK products before starting your shower. HYDRO-BLOK installation guides for shower niches, pans, and more can be found online at www.HYDROBLOK.com
Before Installing your HYDRO-BLOK Shower System
Perform a final floor and wall measurement check to ensure all walls are square and make any adjustments required BEFORE installing your HYDRO-BLOK shower system.
If installing a Corner Shower Pan Extension, see reverse
Installation Tools and Materials Required
• Pu�y Knife (included with all HYDRO-BLOK shower pans)• Tape Measure• Fine Point Marker• Sharp Utility Knife• Professional Notch Trowel (minimum ⅜" x ⅜" square notch)• 5 gallon plastic bucket and drill with mixing paddle for thinset • Cleaning supplies (we recommend paper towels, citrus wipes,
rags, dust pan and brush)
IMPORTANT: Please read all related installation guides before installing your HYDRO-BLOK Shower System! Contact your local dealer if you have any questions regarding the installation process.
The BETTER Shower System
Shower Pan Extension Installation Guide
step
1
step
2
step
3
Apply a ½" continuous bead of HYDRO-BLOK joint sealant along the shower pan notch as well as along the exposed foam edge of the shower pan where the extension will fit.
Using the same thinset material used in the shower installation (you may have to re-mix or make a new batch if the thinset is too hard from using it for the shower pan installation), apply thinset on the subfloor where your extension will fit. Ensure the trowel lines travel away from the shower pan. DO NOT cross-channel trowel lines or air cannot escape. Apply thinset to the back side of your extension using the flat side of a trowel.
Perform a final check to ensure the thinset has not come in contact with any joint sealant as this will contaminate the joint. Fix any areas where this may have happened by removing the excess thinset from any foam areas and re-applying the joint sealant.
step
4
step
5
step
6

Apply a ½" continuous bead of HYDRO-BLOK joint sealant along the shower pan notch as well as along the exposed foam edge of the shower pan where the corner section will fit. Continue the bead of sealant 1 inch beyond the edge of the corner extension on each side.
Apply thinset and install the corner extension as per steps 5-8
To install the straight extension piece(s) apply a ½" continuous bead of HYDRO-BLOK joint sealant along the shower pan notch, along the exposed foam edge of the shower pan, and along the corner extension notch. Apply a generous amount of joint sealant to the wallboard where the ends of the extenstion(s) will be located.
The HYDRO-BLOK HBSPE2448 and HBSPE1272 extensions require a ½" overhanging notch to be cut in order to fit with the corner extension. Use a sharp utility knife and to remove the existing notch and then cut the new notch with a utility knife and a straight edge as shown. Dry-fit the extension and corner extension to ensure the notches fit together snugly.
The BETTER Shower System
Shower Pan Extension Installation Guide
HYDROBLOK INTERNATIONAL LTD.www.hydroblok.com [email protected]
Toll Free: 1 844 588 9559Fax: 1 778 278 2731
To contact any of our worldwidedistributors, please visit our websiteor contact us via our toll-free number.
© 2014 HYDROBLOK International Ltd. All Rights Reserved.
step
C1
step
C2
step
C3
step
C4
Apply thinset and install the straight extensions as per steps 5-8. Apply and finish all seams with joint sealant as per step 9.
step
C5
Once in place use a straight edge pu�y knife to smooth out the excess joint sealant along the joint between the extension and the shower pan. We recommend placing weight on the extension for about 30 minutes
Apply an additional ½" continu-ous bead of HYDRO-BLOK joint sealant over the seam between the shower pan and the extension and use a pu�y knife to smooth out the sealant. Ensure there is at least 1" of joint sealant on either side of the seam.
A�er approximately one hour (at room temperature of at least 18° C or 65° F) the HYDRO-BLOK joint sealant will skin over and thinset can safely be applied.
See the HYDRO-BLOK Shower Pan Installation Guide for full instructions on installing HYDRO-BLOK Shower Curbs.
Place the extension into position by slowly angling it into the joint sealant and then lowering it into the thinset. This will ensure good adhesion of the joint sealant with the foam without forcing the thinset up into the joint.
step
7
step
8
step
9
step
10
Installing a Corner Shower Pan Extension

Ensure your HYDRO-BLOK wallboard is properly installed and ready for your HYDRO-BLOK niche.
Locate and mark the locations of your wall studs so that the niche can be installed in the proper location. All HYDRO-BLOK niches must be installed so that they are supported by a stud on each vertical side.
Place the niche with its face against the wall where it will be installed. Use a level to ensure the niche is properly positioned and then outline/trace the edges of the niche onto the wallboard with a marker.
Before Installing your HYDRO-BLOK Shower System
Perform a final floor and wall measurement check to ensure all walls are square and make any adjustments required BEFORE installing your HYDRO-BLOK shower system.
Installation Tools and Materials Required
• #2 Robertson or #2 Philips screwdriver drill bit• Tape Measure• Fine Point Marker• Level• Utility Knife and Metal Ruler/Straight Edge • Cleaning supplies (we recommend paper towels, citrus wipes,
rags, dust pan and brush)
IMPORTANT: Please read all related installation guides beforeinstalling your HYDRO-BLOK Shower System! Contact your local dealer if you have any questions regarding the installation process.
The BETTER Shower System
Shower Niche Installation Guide
step
1
step
2
step
3
Using a utility knife, cut the horizontal lines first, using those cuts to ensure that the vertical cuts will be located in the middle of a wall stud on each side.
Once the location of the studs has been confirmed, the vertical cuts can be made.
Place the niche in the openingand dry fit to ensure it fits in the opening.
step
4
step
5
step
6

Press fit the niche right side up into the opening. Smooth out the excess sealant with a HYDRO-BLOK standard pu�y knife
Install HYDRO-BLOK washers and screws at the corners and along the vertical seams every 12" so that the washer covers half of the niche and half of the wallboard. For double wide niches, place washers and screws at the top and bo�om of the centre stud as well along the horizontal seam.
Apply a final ½" continuous bead of joint sealant on all 4 seams and smooth out with the straight pu�y knife ensuring that all washers are covered. Ensure there is at least 1" of joint sealant on either side of the seam.
Installation Hints
We recommend reading the installation guides for all the relavent HYDRO-BLOK products before starting your shower. HYDRO-BLOK installation guides for shower niches, pan extensions and more can be found online at www.HYDROBLOK.com.
Apply a ½" continuous bead of HYDRO-BLOK joint sealant on all 4 inner edges of the wallboard in the opening.
The BETTER Shower System
Shower Niche Installation Guide
HYDROBLOK INTERNATIONAL LTD.www.hydroblok.com [email protected]
Toll Free: 1 844 588 9559Fax: 1 778 278 2731
To contact any of our worldwidedistributors, please visit our websiteor contact us via our toll-free number.
© 2014 HYDROBLOK International Ltd. All Rights Reserved.
step
7
step
8
step
9
step
10
A�er approximately one hour (at room temperature of at least 18° C or 65° F) the HYDRO-BLOK joint sealant will skin over and thinset can safely be applied.
step
11

Decide on a suitable corner in your shower for your shower bench to be installed, ensuring it will not interfere with a proper standing position based on your shower head placement. Mark the positions of the two studs which are closest to the corner on both walls (e.g. a corner stud and another stud 16" OC from the corner stud).
Hold the corner bench in place at an appropriate height (between 16" to 18" for suspended benches or 20" for diamond benches) from the shower base. For HYDRO-BLOK Suspended Benches, use a level to slightly slope the bench towards the front to allow water drainage.
Mark a line from one edge to the corner and then from the other edge to the corner.
Place one of the support pieces below the line from step 2 and mark a new line underneath the support from the edge to the corner. Repeat for the other wall.
Before Installing your HYDRO-BLOK Shower System
Perform a final floor and wall measurement check to ensure all walls are square and make any adjustments required BEFORE installing your HYDRO-BLOK shower system.
Installation Tools and Materials Required
• #2 Robertson (square) screwdriver drill bit• Corner Pu�y Knife (supplied with HYDRO-BLOK Shower Pans)• Fine Point Marker• Level• Tape Measure • 12" to 16" Level• Cleaning supplies (we recommend paper towels, citrus wipes,
rags, dust pan and brush)
IMPORTANT: Please read all related installation guides before installing your HYDRO-BLOK Shower System! Contact your local dealer if you have any questions regarding the installation process.
The BETTER Shower System
Shower Bench Installation Guide
step
1
step
2
step
3
Install the support pieces by first laying out the le� and right supports on the correct sides. Starting with one side support, apply a continuous ½" bead of joint sealant in an “S” pa�ern directly onto the foam along the wall side (opposite to the cement coated side).
Place the support in position, aligning the top edge of the support piece with the lower of the two marked lines.
A�ach the support to the wall using a HYDRO-BLOK washer and included 3 ½" screw at each stud location. Repeat steps 4 to 6 for the other side support, applying additional joint sealant to the face where the supports will meet in the corner.
step
4
step
5
step
6
Installing HYDRO-BLOK Shower BenchesThis installation guide can be used for both HYDRO-BLOK Suspended Benches and HYDRO-BLOK Diamond Benches. Differences in installation will be noted where required.
Each side support must to a�ached to the stud wall or similar support using HYDRO-BLOK screws & washers at two locations at least 8" apart. The innermost location must be at least 3" from the shower corner. Add additional wood support if required before installing HYDRO-BLOK wallboard.

HYDRO-BLOK Suspended Bench (shown)Apply a continuous ½" bead of joint sealant to the top and front faces of both bench supports in an “S” pa�ern. Also apply a ½" continuous bead of joint sealant in an “S” pa�ern on the foam faces of the bench that will contact the wallboard.
HYDRO-BLOK Diamond BenchApply a continuous ½" bead of joint sealant to the top and front faces of both bench supports. Also apply a ½" continuous bead of joint sealant in an “S” pa�ern covering the faces of the bench that will contact the wallboard.
HYDRO-BLOK Suspended BenchPosition the bench and firmly press it into placeon the two supports and against the wallboard. Smooth out any excess joint sealant with a corner pu�y knife.
HYDRO-BLOK Diamond BenchSlide the bench evenly into place on the supports, ensuring it is positioned firmly in the corner so that both inner faces are in contact with the wallboard.
Apply a final ½" continuous bead of joint sealant along all joints and smooth out with the corner pu�y knife. Ensure there is at least 1" of joint sealant on either side of all seams.
Installation Hints
We recommend reading the installation guides for all the relevant HYDRO-BLOK products before starting your shower. HYDRO-BLOK installation guides for shower niches, pan extensions and more can be found online at www.HYDROBLOK.com.
Smooth out any excess joint sealant on the underside of the supports with a corner pu�y knife. Dry-fit the bench in position to ensure it sits evenly and level on the supports.
The BETTER Shower System
Shower Bench Installation Guide
HYDROBLOK INTERNATIONAL LTD.www.hydroblok.com [email protected]
Toll Free: 1 844 588 9559Fax: 1 778 278 2731
To contact any of our worldwidedistributors, please visit our websiteor contact us via our toll-free number.
© 2014 HYDROBLOK International Ltd. All Rights Reserved.
step
7
step
8
step
9
step
10
A�er approximately one hour (at room temperature of at least 18° C or 65° F)the HYDRO-BLOK joint sealant will skin over and thinset can safely be applied.
step
11

Using a straight edge, mark a line 7/8" from the edge of your recessed shower area to represent the linear drain slot. Mark the center of the shower opening.
Please note: The linear drain may also be located against a back or side wall if not installing a barrier free/flush entry shower. A HYDRO-BLOK shower curb should be used in these cases. When installing the drain against a side or rear shower wall, the 7/8" offset may need to be increased appropriately if your combined wallboard/tile thickness exceeds 7/8".
Locate the 3 drain templates included in the linear drain kit. These templates assist in locating the recesses required for the drain end caps and the center drain opening.
Tape the templates to the floor using the line marked in step 1 as a guide. Ensure the center template is properly centered in your shower opening*. Using a punch or similar tool, transfer/mark the rectangular cut-outs on each template onto the subfloor. Additionally, mark the drain center on the center template.
Drill a 2 ½" hole for the drain pipe using the transferred marks and have a qualified plumber install a 2" ABS drain pipe. The drain pipe should be installed so that the top of the pipe is 1 ⅜" below the top of the shower area sub-floor.
The drain pipe should be installed so that it is properly supported with no vertical movement.
If you have access to the shower area from below, you may continue to step 4 and install your drain pipe at a later time.
Before Installing your HYDRO-BLOK Shower System
If the edge of the shower pan is higher than the floor plate 2" x 4" on any side, another 2” x 4” must be installed on top of the existing floor plate between each wall stud. This provides the wallboard with the necessary support needed at the shower pan joint.
The shower and drain area subfloor must be recessed 1" below the adjacent tileable surface to allow for the height of the Ebbe linear drain.
The subfloor must be solid, level and properly constructed to meet deflection standards. For wood floors, joists must be 16" OC with ¾"T & G plywood or equivalent glued and screwed.
The drain pipe must be securely fastened below the subfloor so that it will not move under load. Cut the 2" ABS or PVC drain pipe 1 ⅜" below the top of the subfloor. Clean off any burrs on the 2" pipe a%er cu&ing.
Perform a final floor and wall measurement check to ensure all walls are square and make any adjustments required BEFORE installing your HYDRO-BLOK shower system. Clean the shower pan install area of any dirt, dust or debris.
Installation Tools and Materials Required
• #2 Robertson or #2 Philips screwdriver drill bit• Professional notch trowel (maximum ¼" notch size)• Electric drill with 2 ½" hole saw
• ABS glue• Electric tile saw• Tape measure / Level / Fine point marker• 4' to 6' Straight edge or similar square• Cleaning supplies (we recommend paper towels, citrus wipes,
rags, dust pan and brush)
IMPORTANT: Please read all related installation guides before installing your HYDRO-BLOK Shower System! Contact your local dealer if you have any questions regarding the installation process.
This installation guide is to be used exclusively for the installation of HYDRO-BLOK Single Slope Shower Pans with an Ebbe America INNI® Linear Drain system.
The BETTER Shower System
Ebbe INNI® Linear Drain Installation Guide
step
1
step
2
step
3
Included in the Ebbe Linear Drain Kit
Before beginning your installation, ensure all parts of the linear drain kit are present.
1. Main drain body
2. Left and right end caps with covers
3. Ramp inserts, 4 pairs lettered A, B, C, D
4. Two aluminum rails, one labeled as “slot-side rail”
5. Drain cover kit
6. Drain cover puller
7. Applicator bottle for ABS glue
8. Paper template kit
9. Four corrugated plastic gap sticks
10. Hole drilling guide/jig
11. Drill bit with integrated countersink
12. Flat head screw kit
13. Cotton swabs
* Please Note: The drain opening may be placed off-center if your shower width does not exceed the overall length of the linear drain and end caps (72"). The difference between the shower width and the full length of the drain body will determine the distance the center drain opening may be shi%ed.

Using appropriate tools (e.g. router), cut the end cap recesses a minimum of 3/16" deep. Cut out the 4" x 6" center drain opening completely.
If the linear drain body is wider than the shower opening, it must be rough cut to fit so that it can be placed inside the shower opening.
Use a tile saw to rough cut each end of the drain body so that it will fit inside the shower opening, leaving 1" of clearance at each end.
Ensure each drain end cap is located on the appropriate side of the drain body by placing the drain end cap covers in place temporarily and ensuring the drain slot aligns with the slot on the main drain body.
Double check the location of the final cut marks and use an electric tile saw to cut each end of the drain body (DO NOT use hand tools as the cut MUST be straight and accurate).
Use a sharp utility knife to clean and deburr all edges of the drain body.
Dry fit the drain with the end caps loosely in place to ensure the entire assembly fits in place.
On the underside of the main drain body, note which zone (A, B, C or D) that your final cut was made in. Select the two ramp inserts with the matching le&ers.
On each drain end cap, apply a continuous bead of ABS cement as shown using the applicator bo&le supplied with the linear drain kit. Firmly press the matching ramp insert into place ensuring the rib on the ramp insert aligns with the rib on the drain cap.
Dry fit the drain end caps onto the linear drain body. If the rib on the end caps interferes with the drain body, use a utility knife to score and snap off the overhanging portion of the rib.
Use the supplied drill bit to drill 3 holes through the drain body and rail along each side (one at each end and center, ¼" in from the outside edge). Countersink each hole so that the screw heads will sit flush with the top of the drain body.
Measure the length of the underside channels on the front and rear of the assembled drain body. Mark and cut the two aluminum rails to the measured channel length.
Dry fit each rail into place, ensuring the labeled slot-side rail is placed on the labeled slot side of the drain body.
CAUTION: the two aluminum rails are different heights and must be placed on the correct side of the drain body.
Remove the peel and stick backing from the adhesive on each rail, and press each rail into place firmly.
Once the ABS cement is applied to the drain pipe and connector, immediately install the line drain and press firmly into position.
Use a level to ensure the linear drain body is straight and level. Shims may be used if necessary.
Secure the drain body to the subfloor using the supplied screws at the 6 locations drilled in step 15. Install a additional screws into the pre-drilled holes at each end of the drain body.
Using the supplied applicator bo&le, apply a continuous bead of ABS cement as shown to one of the drain end caps and immediately fit the end cap onto the main drain body.
Install two of the supplied screws to secure the end cap to the drain body. Ensure any excess ABS cement is removed using the included co&on swabs and/or rags.
Flip the drain over and apply an additional heavy bead of ABS cement along the entire seam between the end cap and the main drain body.
Repeat this step for the second end cap.
Dry fit the drain body assembly in place and mark a line along the entire back edge of the drain body.
Using the mark as a guide, apply HYDRO-BLOK joint sealant generously to the sub floor where the drain will be positioned. Trowel out the sealant using a maximum ¼" notched trowel.
Apply ABS cement to the outside surface of the drainpipe and inside surface of the drain connector on the line drain body.
To cut the tile that installs into the triangular drain access cover, peel the backing off the double-sided adhesive on the supplied tile pa&ern and adhere it to a tile.
Using the tile pa&ern as a guide, use a tile saw to trim your tile to size.
The BETTER Shower System
Ebbe Inni Linear Drain Installation Guide
step
4
step
5
step
7
step
8
step
9
step
10
step
11
step
12
step
13
step
14
step
15
step
16
step
17
step
18
Using the supplied drill jig and drill bit as shown, drill two holes at each end of the linear drain body.
Countersink each of the 4 holes using the supplied bit so that the included screws will sit flush with the top of the drain body.
Install the end cap covers by applying a small amount of ABS cement as shown and firmly pressing the covers into place.
At this stage it is recommended to perform a simple watertight test by plugging the drain connection and filling the linear drain body with water to the top of the drain channel. Ensure there are no leaks at either of the end caps.
To mark the final cuts, lay the linear drain end caps next to each end of the drain. Carefully mark a line on the top of the drain body at the location of the upper ledge of the drain cap (as shown).
step
6

Install your HYDRO-BLOK Single Slope Shower Pan as per the instructions included with the pan.
Place the provided gap sticks in place in the drain slot, cu&ing them to size as required. Place the drain access cover assembly (drain cover with frame) into position against the gap sticks.
Tile the shower floor, tiling tight to the gap stick and drain access cover assembly. Leave the drain cover and gap sticks in place to grout the shower floor.
Once your tile has set, remove the drain access cover assembly, leaving the gap sticks in place.
Apply epoxy or HYDRO-BLOK Joint Sealant to the areas shown in yellow and position the drain access cover assembly into place.
CAUTION: Only the V-shaped drain cover frame should be cemented into place.
Once the drain frame is bonded in place (a minimum 1 hour of cure time is recommended for epoxy or overnight for HYDRO-BLOK Joint Sealant), the drain cover may be removed using the included cover puller tool.
When tiling the area outside of the shower place the gap sticks into the drain channel so that thinset and grout does not enter the drain channel. Tile must be installed tight to the gap sticks. The drain channel a%er tiling should not be narrower than the gap sticks in order to allow for proper drainage.
For cleaning the linear drain channels, use the cleaning tool available separately from your dealer.
Install the cut tile into the drain access cover using a small amount of thinset or joint sealant. Use the provided set screws to raise or lower the tile so that the top surface is flush with the top of the drain cover.
Allow the thinset or joint sealant to fully set before removing the set screws.
The BETTER Shower System
Ebbe Linear Drain Installation Guide
HYDROBLOK INTERNATIONAL LTD.www.hydroblok.com [email protected]
Toll Free: 1 844 588 9559
To contact any of our worldwidedistributors, please visit our websiteor contact us via our toll-free number.
© 2016-2017 HYDROBLOK International Ltd. All Rights Reserved.
step
19
step
20
step
21
step
22
step
23
Installation Note!
When installing your drain & shower pan, ensure that your installation meets all local building codes for proper slope. Either the shower pan or your tile or stone installation can be adjusted to meet any local requirements.
The Ebbe America INNI® Linear Drainis a patented system designed for use with HYDRO-BLOK Single Slope Shower Pans.
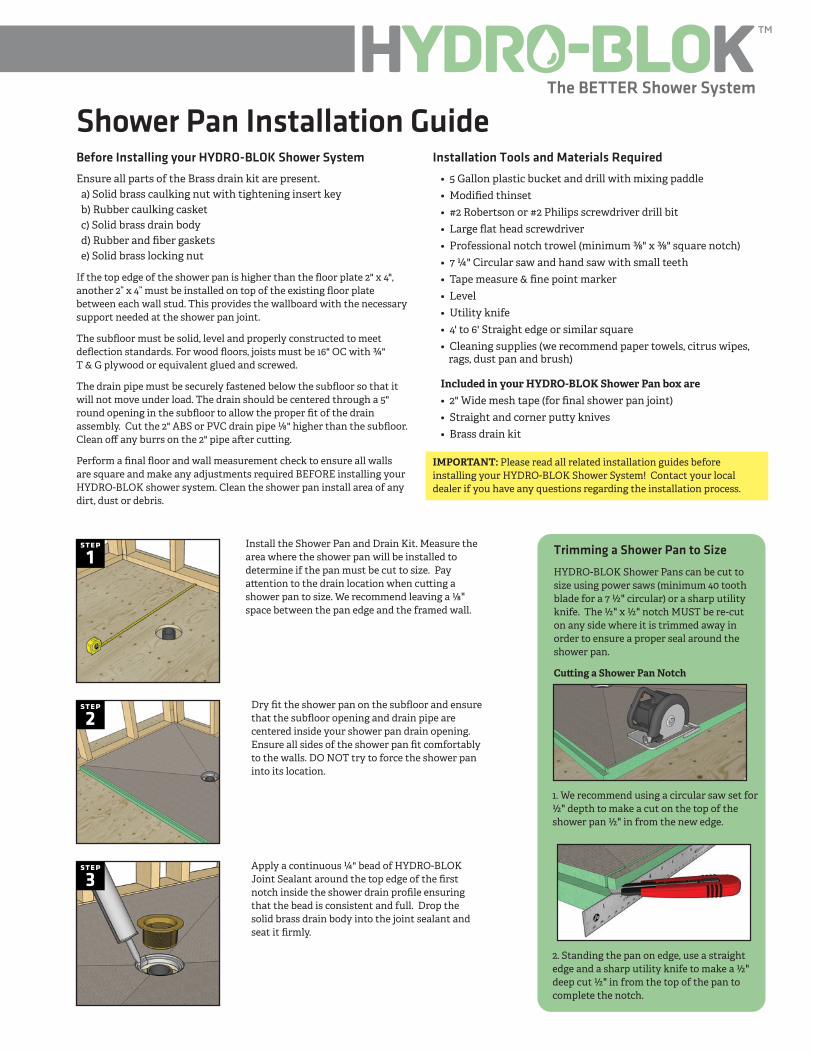
Install the Shower Pan and Drain Kit. Measure the area where the shower pan will be installed to determine if the pan must be cut to size. Pay a!ention to the drain location when cu!ing a shower pan to size. We recommend leaving a ⅛" space between the pan edge and the framed wall.
Dry fit the shower pan on the subfloor and ensure that the subfloor opening and drain pipe are centered inside your shower pan drain opening. Ensure all sides of the shower pan fit comfortably to the walls. DO NOT try to force the shower pan into its location.
1. We recommend using a circular saw set for ½" depth to make a cut on the top of the shower pan ½" in from the new edge.
Trimming a Shower Pan to Size
HYDRO-BLOK Shower Pans can be cut to size using power saws (minimum 40 tooth blade for a 7 ½" circular) or a sharp utility knife. The ½" x ½" notch MUST be re-cut on any side where it is trimmed away in order to ensure a proper seal around the shower pan.
Cu!ing a Shower Pan Notch
2. Standing the pan on edge, use a straight edge and a sharp utility knife to make a ½" deep cut ½" in from the top of the pan to complete the notch.
Apply a continuous ¼" bead of HYDRO-BLOK Joint Sealant around the top edge of the first notch inside the shower drain profile ensuring that the bead is consistent and full. Drop the solid brass drain body into the joint sealant and seat it firmly.
Before Installing your HYDRO-BLOK Shower System
Ensure all parts of the Brass drain kit are present. a) Solid brass caulking nut with tightening insert key b) Rubber caulking casket c) Solid brass drain body d) Rubber and fiber gaskets e) Solid brass locking nut
If the top edge of the shower pan is higher than the floor plate 2" x 4", another 2” x 4” must be installed on top of the existing floor plate between each wall stud. This provides the wallboard with the necessary support needed at the shower pan joint.
The subfloor must be solid, level and properly constructed to meet deflection standards. For wood floors, joists must be 16" OC with ¾"T & G plywood or equivalent glued and screwed.
The drain pipe must be securely fastened below the subfloor so that it will not move under load. The drain should be centered through a 5" round opening in the subfloor to allow the proper fit of the drain assembly. Cut the 2" ABS or PVC drain pipe ⅛" higher than the subfloor. Clean off any burrs on the 2" pipe a'er cu!ing.
Perform a final floor and wall measurement check to ensure all walls are square and make any adjustments required BEFORE installing your HYDRO-BLOK shower system. Clean the shower pan install area of any dirt, dust or debris.
Installation Tools and Materials Required
• 5 Gallon plastic bucket and drill with mixing paddle• Modified thinset• #2 Robertson or #2 Philips screwdriver drill bit• Large flat head screwdriver• Professional notch trowel (minimum ⅜" x ⅜" square notch)• 7 ¼" Circular saw and hand saw with small teeth• Tape measure & fine point marker• Level• Utility knife • 4' to 6' Straight edge or similar square• Cleaning supplies (we recommend paper towels, citrus wipes,
rags, dust pan and brush)
Included in your HYDRO-BLOK Shower Pan box are• 2" Wide mesh tape (for final shower pan joint)• Straight and corner pu!y knives• Brass drain kit
IMPORTANT: Please read all related installation guides before installing your HYDRO-BLOK Shower System! Contact your local dealer if you have any questions regarding the installation process.
The BETTER Shower System
Shower Pan Installation Guide
step
1
step
2
step
3

Apply a continuous ½" bead of joint sealant into the corner seam of the shower pan where it meets the curb or wallboard. Use the corner pu!y knife to smooth out the sealant so that there is at least 1" of sealant on either side of the seams.
Press 2" mesh tape (supplied) into the seam, pressing it into the existing joint sealant. Use a sharp utility knife to make small slits to fit the corners. Use a corner pu!y knife to smooth the mesh tape into the joint sealant. Apply a continuous ½" bead of joint sealant on top of the mesh tape and smooth out again with the corner pu!y knife to fully cover the mesh tape.
Repeat Step 20 for all seams between the wallboard and the shower curb.
Important: The mesh strips must be long enough to go from the shower pan base to the front of the curb where it meets the sub floor. Mesh tape should always be pressed into joint sealant and should not make any contact with the cement surface of the wallboard, pan, or curb. It should always be fully covered by the final application of joint sealant.
Perform a final check of all joints and screws/washers to ensure they are completely covered in joint sealant. Check the caulking nut on the drain assembly again to ensure it is tight and cannot be turned by hand with a screwdriver.
A'er approximately one hour, (at room temperature of at least 18° C or 65° F) the joint sealant will skin over and thinset can safely be applied. The drain assembly and shower pan can be water tested to confirm a leak free installation using a 2" drain plug.
Loosely fit the HYDRO-BLOK stainless steel drain and tray into the shower pan drain opening while installing tile (tile up to the edge of the tray).
DO NOT glue the tray into the opening. Should the drain cover need to be raised to accommodate thicker format tile/stone, cut the supplied plastic riser to adjust the height of the drain cover.
Installation Hints
All HYDRO-BLOK shower pans have 4 flat slopes that allow the installation of large format tileor stone. The tile or stone must be cut and grouted to follow the slope joints.
If using tile or stone which is 2" x 2" or smaller on the shower pan, epoxy grout or a similar high compression grout must be used to comply with the HYDRO-BLOK warranty.
If planning to install any HYDRO-BLOK accessories such as a shower niche, we recommend marking the exact locations of all wall studs you will need to use on the wallboard as you go.
If your shower requires curbs on two sides of the shower pan, you must cut the curb lengths to meet at a 45 degree angle at the corner. The curbs must be glued together with a ½" continuous bead of joint sealant generously applied in a zig-zag pa!ern during steps 18-19. Weight should be applied to the top and front of the curbs to ensure a constant pressure is applied to the 45 degree joint while the joint sealant is curing.
We recommend reading the installation guides for all the relavent HYDRO-BLOK products before starting your shower. HYDRO-BLOK installation guides for shower niches, pan extensions and other products can be found online at www.hydroblok.com.
Position the shower curb ensuring the curb is firmly pressed into place against the shower pan notch and the thinset on the sub floor.
We recommend placing the curb from the top down at a slight angle to avoid the thinset from contacting or mixing with the joint sealant.
TIP: We recommend placing weight on the curb while applying joint sealant in the following steps.
The BETTER Shower System
Shower Pan Installation Guide
HYDROBLOK INTERNATIONAL LTD.www.hydroblok.com [email protected]
Toll Free: 1 844 588 9559Fax: 1 778 278 2731
To contact any of our worldwidedistributors, please visit our websiteor contact us via our toll-free number.
© 2016 HYDROBLOK International Ltd. All Rights Reserved.
step
19
step
20
step
21
step
22
step
23
Installation Note!
When installing your shower pan, ensure that your installation meets all local building codes for proper slope. Either the shower pan or your tile or stone installation can be adjusted to meet any local requirements.
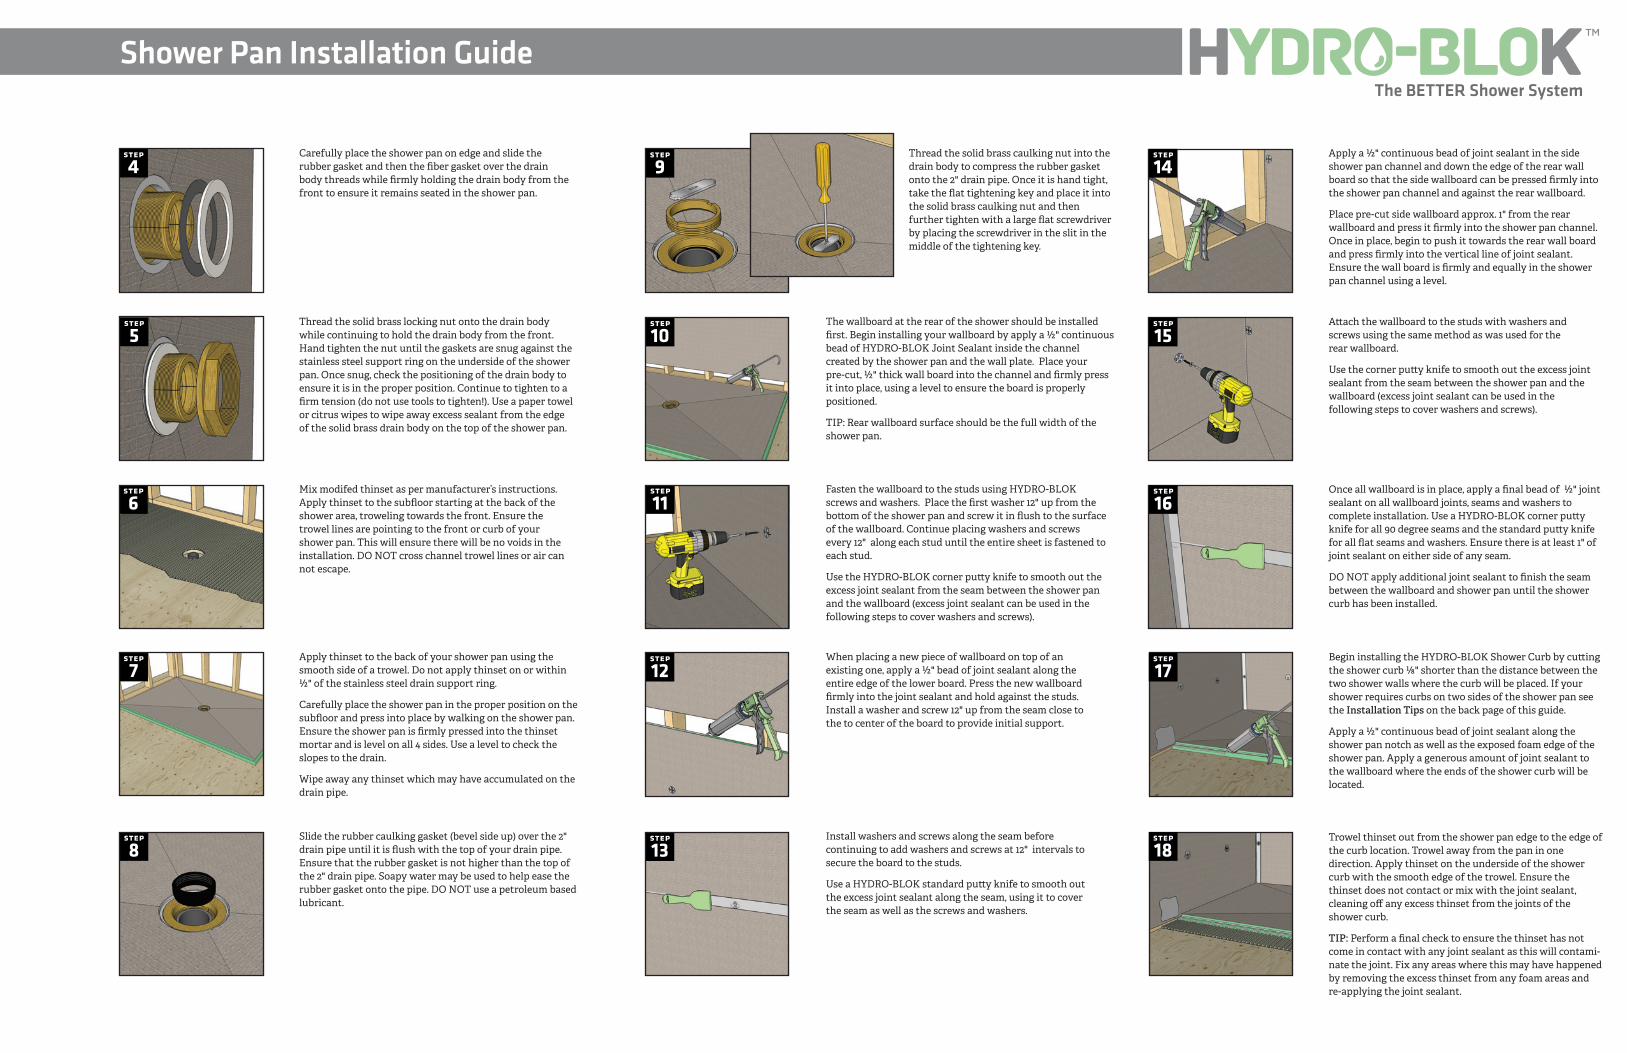
Carefully place the shower pan on edge and slide the rubber gasket and then the fiber gasket over the drain body threads while firmly holding the drain body from the front to ensure it remains seated in the shower pan.
Thread the solid brass locking nut onto the drain body while continuing to hold the drain body from the front. Hand tighten the nut until the gaskets are snug against the stainless steel support ring on the underside of the shower pan. Once snug, check the positioning of the drain body to ensure it is in the proper position. Continue to tighten to a firm tension (do not use tools to tighten!). Use a paper towel or citrus wipes to wipe away excess sealant from the edge of the solid brass drain body on the top of the shower pan.
Mix modifed thinset as per manufacturer’s instructions. Apply thinset to the subfloor starting at the back of the shower area, troweling towards the front. Ensure the trowel lines are pointing to the front or curb of your shower pan. This will ensure there will be no voids in the installation. DO NOT cross channel trowel lines or air can not escape.
Apply thinset to the back of your shower pan using the smooth side of a trowel. Do not apply thinset on or within ½" of the stainless steel drain support ring.
Carefully place the shower pan in the proper position on the subfloor and press into place by walking on the shower pan. Ensure the shower pan is firmly pressed into the thinset mortar and is level on all 4 sides. Use a level to check the slopes to the drain.
Wipe away any thinset which may have accumulated on the drain pipe.
Slide the rubber caulking gasket (bevel side up) over the 2" drain pipe until it is flush with the top of your drain pipe. Ensure that the rubber gasket is not higher than the top of the 2" drain pipe. Soapy water may be used to help ease the rubber gasket onto the pipe. DO NOT use a petroleum based lubricant.
The wallboard at the rear of the shower should be installed first. Begin installing your wallboard by apply a ½" continuous bead of HYDRO-BLOK Joint Sealant inside the channel created by the shower pan and the wall plate. Place your pre-cut, ½" thick wall board into the channel and firmly press it into place, using a level to ensure the board is properly positioned.
TIP: Rear wallboard surface should be the full width of the shower pan.
Fasten the wallboard to the studs using HYDRO-BLOK screws and washers. Place the first washer 12" up from the bo!om of the shower pan and screw it in flush to the surface of the wallboard. Continue placing washers and screws every 12" along each stud until the entire sheet is fastened to each stud.
Use the HYDRO-BLOK corner pu!y knife to smooth out the excess joint sealant from the seam between the shower pan and the wallboard (excess joint sealant can be used in the following steps to cover washers and screws).
Install washers and screws along the seam before continuing to add washers and screws at 12" intervals to secure the board to the studs.
Use a HYDRO-BLOK standard pu!y knife to smooth out the excess joint sealant along the seam, using it to cover the seam as well as the screws and washers.
Apply a ½" continuous bead of joint sealant in the side shower pan channel and down the edge of the rear wall board so that the side wallboard can be pressed firmly into the shower pan channel and against the rear wallboard.
Place pre-cut side wallboard approx. 1" from the rear wallboard and press it firmly into the shower pan channel. Once in place, begin to push it towards the rear wall board and press firmly into the vertical line of joint sealant. Ensure the wall board is firmly and equally in the shower pan channel using a level.
Begin installing the HYDRO-BLOK Shower Curb by cu!ing the shower curb ⅛" shorter than the distance between the two shower walls where the curb will be placed. If your shower requires curbs on two sides of the shower pan see the Installation Tips on the back page of this guide.
Apply a ½" continuous bead of joint sealant along the shower pan notch as well as the exposed foam edge of the shower pan. Apply a generous amount of joint sealant to the wallboard where the ends of the shower curb will be located.
When placing a new piece of wallboard on top of an existing one, apply a ½" bead of joint sealant along the entire edge of the lower board. Press the new wallboard firmly into the joint sealant and hold against the studs. Install a washer and screw 12" up from the seam close to the to center of the board to provide initial support.
A!ach the wallboard to the studs with washers and screws using the same method as was used for therear wallboard.
Use the corner pu!y knife to smooth out the excess joint sealant from the seam between the shower pan and the wallboard (excess joint sealant can be used in the following steps to cover washers and screws).
Once all wallboard is in place, apply a final bead of ½" joint sealant on all wallboard joints, seams and washers to complete installation. Use a HYDRO-BLOK corner pu!y knife for all 90 degree seams and the standard pu!y knife for all flat seams and washers. Ensure there is at least 1" of joint sealant on either side of any seam.
DO NOT apply additional joint sealant to finish the seam between the wallboard and shower pan until the shower curb has been installed.
Trowel thinset out from the shower pan edge to the edge of the curb location. Trowel away from the pan in one direction. Apply thinset on the underside of the shower curb with the smooth edge of the trowel. Ensure the thinset does not contact or mix with the joint sealant, cleaning off any excess thinset from the joints of the shower curb.
TIP: Perform a final check to ensure the thinset has not come in contact with any joint sealant as this will contami-nate the joint. Fix any areas where this may have happened by removing the excess thinset from any foam areas and re-applying the joint sealant.
Thread the solid brass caulking nut into the drain body to compress the rubber gasket onto the 2" drain pipe. Once it is hand tight, take the flat tightening key and place it into the solid brass caulking nut and then further tighten with a large flat screwdriver by placing the screwdriver in the slit in the middle of the tightening key.
The BETTER Shower System
Shower Pan Installation Guide
step
4
step
5
step
6
step
7
step
8
step
9
step
10
step
11
step
12
step
13
step
14
step
15
step
16
step
17
step
18

Measure the area where the shower pan and linear drain will be installed to determine if the pan must be cut to size. We recommend leaving a ⅛" space between the pan edge and the framed wall.
See the reverse for details on cu!ing a shower pan to size.
Dry fit the shower pan on the subfloor. Ensure all sides of the shower pan fit comfortably to the walls. DO NOT try to force the shower pan into its location.
Mark a line on your subfloor 1" from the edge of the linear drain body. Apply modified thinset to the subfloor starting at the back of the shower area, troweling towards the front and stopping at the marked line.
Ensure the trowel lines are pointing to the front of your shower pan. This will ensure there will be no air voids in the installation. DO NOT cross channel trowel lines or air can not escape.
Apply a ¾" bead of joint sealant along the entire back edge of the drain body and an additional ¾" bead on the subfloor.
Before Installing your HYDRO-BLOK Shower System
If the edge of the shower pan is higher than the floor plate 2" x 4" on any side, another 2” x 4” must be installed on top of the existing floor plate between each wall stud. This provides the wallboard with the necessary support needed at the shower pan joint.
The subfloor must be solid, level and properly constructed to meet deflection standards. For wood floors, joists must be 16" OC with ¾"T & G plywood or equivalent glued and screwed.
Perform a final floor and wall measurement check to ensure all walls are square and make any adjustments required BEFORE installing your HYDRO-BLOK shower system. Clean the shower pan install area of any dirt, dust or debris.
All HYDRO-BLOK Single Slope Shower Pans need to be installed using modified thinset.
Included in your HYDRO-BLOK Shower Pan box are• 2" Wide mesh tape (for final shower pan joint)• Straight and corner pu#y knives
Installation Tools and Materials Required
• 5 Gallon plastic bucket and drill with mixing paddle for thinset • Modified thinset • Professional notch trowel (minimum ⅜" x ⅜" square notch)• 7 ¼" Circular saw and hand saw with small teeth• Tape measure / Level / Utility Knife / Pencil or Marker • 4' to 6' Straight edge or similar square• 2" Masking tape or duct tape• Cleaning supplies (we recommend paper towels, citrus wipes, rags,
dust pan and brush)
IMPORTANT: Please read all related installation guides before installing your HYDRO-BLOK Shower System! Contact your local dealer if you have any questions regarding the installation process.
This installation guide is to be used exclusively for the installation of HYDRO-BLOK Single Slope Shower Pans with an Ebbe America INNI® Linear Drain system.
When installing your shower pan, ensure that your installation meets all local building codes for proper slope. Either the shower pan or your tile or stone installation can be adjusted to meet any local requirements.
The BETTER Shower System
Single Slope Shower Pan Installation Guide
step
1
step
2
step
3The wallboard at the rear of the shower should be installed first. Apply a ½" continuous bead of HYDRO-BLOK Joint Sealant inside the channel created by the shower pan and the wall plate. Place your pre-cut, ½" thick wall board into the channel and firmly press it into place, using a level to ensure the board is properly positioned.
TIP: Rear wallboard surface should be the full width of the shower pan.
Fasten the wallboard to the studs using HYDRO-BLOK screws and washers. Place the first washer 12" up from the bo#om of the shower pan and screw it in flush to the surface of the wallboard. Continue placing washers and screws every 12" along each stud until the entire sheet is fastened to each stud.
Use the HYDRO-BLOK corner pu#y knife to smooth out the excess joint sealant from the seam between the shower pan and the wallboard.
When placing a new piece of wallboard on top of an existing one, apply a ½" bead of joint sealant along the entire edge of the lower board. Press the new wallboard firmly into the joint sealant and hold against the studs. Install a washer and screw 12" up from the seam close to the to center of the board to provide initial support.
step
7
step
8
step
9
Apply thinset to the back of your shower pan using the smooth side of a trowel.
Place the lower front edge of the pan onto the subfloor between the joint sealant and the thinset. Then slowly lower the back of the pan into place.
Press the pan into place by walking on the shower pan. Use a level to check the slope to the drain edge.
Leave any excess joint sealant along the pan/drain seam in place.
step
4
Use masking tape or duct tape to mask off the entire drain opening 1 ½" from the rear edge of the linear drain body to ensure no sealant enters the drain.
Apply an additional ½" bead of joint sealant along the seam between the shower pan and the linear drain body.
Use a flat putty knife to smooth out the all the joint sealant so there is at least ¾"
step
5
Cut a length of the 2" mesh tape supplied with the shower pan to the length of the seam. Press the mesh tape into the seam, carefully pressing it into the joint sealant.
Apply a ½" bead of joint sealant on top of the mesh tape and smooth out with a flat putty knife to fully cover the mesh tape.
Remove the duct/masking tape mask immediately after smoothing out the joint sealant. DO NOT allow the sealant to cure with the mask in place.
step
6

Apply a ½" continuous bead of joint sealant in the side shower pan channel and down the edge of the rear wall board so that the side wallboard can be pressed firmly into the shower pan channel and against the rear wallboard.
Place pre-cut side wallboard approx. 1" from the rear wallboard and press it firmly into the shower pan channel. Once in place, begin to push it towards the rear wall board and press firmly into the vertical line of joint sealant. Ensure the wall board is firmly and equally in the shower pan channel using a level.
A#ach the wallboard to the studs with washers and screws using the same method as was used for the rear wallboard. Use the corner pu#y knife to smooth out the excess joint sealant from the seam between the shower pan and the wallboard (excess joint sealant can be used in the following steps to cover washers and screws).
Apply a continuous ½" bead of joint sealant into the corner seams of the pan where it meets the wallboard. Use the corner pu#y knife to smooth out the sealant so that there is at least 1" of sealant on either side of the seams.
Press 2" mesh tape (supplied) into the seams, pressing it into the existing joint sealant. Use a sharp utility knife to make small slits to fit the corners. Use a corner pu#y knife to smooth the mesh tape into the joint sealant. Apply a continuous ½" bead of joint sealant on top of the mesh tape and smooth out again with the corner pu#y knife to fully cover the mesh tape.
Remove the masking /duct tape mask from the linear drain ends before the joint sealant cures.
Perform a final check of all joints and screws/washers to ensure they are completely covered in joint sealant.
A(er approximately one hour, (at room temperature of at least 18° C or 65° F) the joint sealant will skin over and thinset can safely be applied.
Installation Hints
If using tile or stone which is 2" x 2" or smaller on the shower pan, epoxy grout or a similar high compression grout must be used to comply with the HYDRO-BLOK warranty.
We recommend reading the installation guides for all the relevent HYDRO-BLOK products before starting your shower. HYDRO-BLOK installation guides for shower niches, pan extensions and other products can be found online at www.hydroblok.com.
Install washers and screws along the seam before continu-ing to add washers and screws at 12" intervals to secure the board to the studs.
Use a HYDRO-BLOK standard pu#y knife to smooth out the excess joint sealant along the seam, using it to cover the seam as well as the screws and washers. Ensure all seams have a minimum of 1" of sealant on each side of the seam.
The BETTER Shower System
Single Slope Shower Pan Installation
HYDROBLOK INTERNATIONAL LTD.www.hydroblok.com [email protected]
Toll Free: 1 844 588 9559
To contact any of our worldwidedistributors, please visit our websiteor contact us via our toll-free number.
© 2016 HYDROBLOK International Ltd. All Rights Reserved.
step
10
step
12
step
13
step
15
step
16
1. Use a circular saw set for 1/8" depth to make a cut through the cement surface on the top of the shower pan ½" in from the new edge.
Trimming a Shower Pan to Size
HYDRO-BLOK Shower Pans can be cut to size using power saws (minimum 40 tooth blade for a 7 ½" circular) or a sharp utility knife. The notch MUST be re-cut on any side where it is trimmed away in order to ensure a proper seal around the shower pan.
Cu!ing a Single Slope Shower Pan Notch
2. Use a circular saw or straight edge & utility knife to make a ½" deep cut on the edge of the pan, 1" up from the bo#om of the pan.
Once all wallboard is in place, apply a final bead of ½" joint sealant on all wallboard joints, seams and washers to complete installation. Use a HYDRO-BLOK corner pu#y knife for all 90 degree seams and the standard pu#y knife for all flat seams and washers. Ensure there is at least 1" of joint sealant on either side of any seam.
step
14
3. Use a utility knife to continue cu#ing through the foam on the top of the pan to meet the cut made on the edge of the pan.
Apply strips of masking/duct tape to cover the end of the HYDRO-BLOK linear drain opening. Ensure at least 1-2" of the drain opening at each end is masked to prevent joint sealant from entering the drain.
step
11
The Ebbe America INNI® Linear Drainis a patented system designed for use with HYDRO-BLOK Single Slope Shower Pans.

Before Installing your tub & HYDRO-BLOK Wallboard
Ensure all plumbing and wall studs are in the required locations before beginning installation. Check to ensure the floor and wall studs are secure and add any additional blocking at this time if required (the tub manufacturer’s instructions will provide a detailed drawing of the recommended wall stud placement). If your tub does not come with a pre-moulded flange as shown in the instructions below, you must install a waterproof tub flange for tile as specified by the manufacturer of the tub and your local building codes.
Ensure that the tub is securely fastened in position as per the directions from the manufacturer. NOTE: ½" and ⅝" HYDRO-BLOK wallboard must be installed with a maximum stud opening of 16” OC. When fastening the tub to the wall studs, ensure the screws used to a#ach the tub flange to the wall studs are counter sunk and flush with the flange.
Installation Tools and Materials Required
• ½" to ⅝" HYDRO-BLOK Wallboard• HYDRO-BLOK Washers and Screws• HYDRO-BLOK Joint Sealant (HYDRO-BLOK Sausage gun or
Skeleton Gun are recommended)• Pu#y knife (flat and corner blades recommended)• Cordless or electric drill with a #2 Robertson or #2 Philips
screwdriver drill bit• Tape measure and marker/pencil• Sharp utility/razor knife and metal straight-edge • Cleaning supplies (we recommend paper towels, citrus
wipes, rags, dust pan and brush)
The BETTER Shower System
HYDRO-BLOK Wallboard for Tub Enclosures
IMPORTANT: Please read all related installation guides before installing your HYDRO-BLOK products! Contact your local dealer if you have any questions regarding the installation process.
1) HYDRO-BLOK Wallboard should be first installed on the back wall of the tub enclosure followed by the sides. Begin installa-tion by carefully measuring and cu#ing the required wallboard pieces. For vertical dimensions, measure from the deck of the tub to the top of the wall and then subtract one ⅛" for the required gap between the wallboard and the tub deck.
2) If your tub flange is greater than ⅛" deep, a notch will need to be cut into the wallboard in order to allow it to fit flush against the studs (see Figure A). Measure the height and depth of the tub flange and use a sharp utility knife and straight edge to cut a notch into the bo#om of the wallboard (see Figure B). The notch should allow the wallboard should to rest plumb against the wall studs and be square in the corners. Dry fit all wallboard first to ensure it fits properly.
3) Apply two, ¼" continuous beads of HYDRO-BLOK Joint Sealant to the tub flange along the entire back side of the tub. Apply one ⅜" continuous bead of joint sealant on the tub deck right next to the tub flange so the wall board can be pressed down into this bead. (see Figure C - side flange is shown) Press the lower edge of each wallboard panel into the joint sealant bead on the tub deck and then press it against the back wall and the joint sealant on the tub flange.
4) Begin a#aching the wallboard to the studs using HYDRO-BLOK screws & washers starting approximately 4" up from the tub deck on all stud locations (see Figure D). Continue to install screws/washers every 12" up each stud location. Do not install the uppermost screws/washers until the all rear wallboards have been installed.
5) If multiple boards are required, install them by first applying a ½" continuous bead of HYDRO-BLOK Joint Sealant along the
Continued on reverse
Figure A
Figure B

HYDROBLOK INTERNATIONAL LTD.www.hydroblok.com [email protected]
Toll Free: 1 844 588 9559
To contact any of our worldwidedistributors, please visit our websiteor contact us via our toll-free number.
© 2015-2017 HYDROBLOK International Ltd. All Rights Reserved.
The BETTER Shower System
HYDRO-BLOK Wallboard for Tub Enclosures
edge of previously installed wallboard (for horizontal and vertical joints). Install the next wallboard by gently lowering and pressing it into the bead of sealant. Secure the wallboard with screws & washers starting 12" up from the seam. Once the wallboard is secure, add screws and washers at each stud location along the seam. Use a HYDRO-BLOK standard pu#y knife to smooth out the excess joint sealant along the seams, using it to cover the seam as well as the screws and washers.
6) The side wallboard panels may now be installed in using the same method as the rear panels. Be sure to measure and mark the location of all plumbing fixtures carefully. Use a razor knife or utility knife to cut any required openings on the wallboard before installation.
8) Begin installing the side wallboard by applying a ½" continuous bead of joint sealant on the edge of the rear wallboard where the side panel will join. When placing the side panels in position, ensure they are firmly pressed into the joint sealant on the rear wallboard as well as the joint sealant on the tub and flange. Continue by using screws & washers to secure the wallboard at all stud locations as described previously. Use a HYDRO-BLOCK corner pu#y knife to smooth out any excess joint sealant in the corners where the sides and rear wallboard meet.
9) Once all wallboard is secured, add ½" dabs of joint sealant on all washers and use a HYDRO-BLOK standard pu#y knife to ensure each washer is covered by sealant.
10) Press 2" mesh tape into the joint sealant on all seams between wallboards, pressing it into the existing joint sealant. Use a sharp utility knife to make small slits to fit the corners. Use pu#y knives to smooth the mesh tape into the joint sealant. Apply a continuous ½" bead of joint sealant on top of the mesh tape and smooth out again with the corner pu#y knife to fully cover the mesh tape. Ensure there is at least 1" of joint sealant on either side of any seam. (see Figure E)
11) Clean any excess joint sealant from the tub surface with mineral spirits or citrus wipes. A'er approximately one hour, (at room temperature of at least 18° C or 65° F) the joint sealant will skin over and thinset can safely be applied.
Continued from front Figure C
Figure D
Figure E*
*mesh tape on seams not shown