simatic pc panel pc 670 v2/870 v2, control unit · 8.3.7 simatic som safecard on motherboard ......
TRANSCRIPT
Preface 1
Safety information and general information
2
Description 3
Usage planning 4
Installation 5
Connecting 6
Operating 7
Operating and parametrizing 8
Maintenance and Service 9
Technical specifications 10
Appendix 11
SIMATIC PC
Panel PC 670 V2/870 V2 Control unit
Operating Instructions
Edition 03/2004
Safety Guidelines This manual contains notices which you should observe to ensure your own personal safety as well as to avoid property damage. The notices referring to your personal safety are highlighted in the manual by a safety alert symbol, notices referring to property damage only have no safety alert symbol.
Danger
indicates an imminently hazardous situation which, if not avoided, will result in death or serious injury.
Warning
indicates a potentially hazardous situation which, if not avoided, could result in death or serious injury.
Caution
used with the safety alert symbol indicates a potentially hazardous situation which, if not avoided, may result in minor or moderate injury.
Caution
used without safety alert symbol indicates a potentially hazardous situation which, if not avoided, may result in property damage.
Notice
used without the safety alert symbol indicates a potential situation which, if not avoided, may result in an undesirable result or state.
Wehn several danger levels apply, the notices of the highest level (lower number) are always displayed. If a notice refers to personal damages with the safety alert symbol, then another notice may be added warning of property damage.
Qualified Personnel The device/system may only be set up and operated in conjunction with this documentation. Only qualified personnel should be allowed to install and work on the equipment. Qualified persons are defined as persons who are authorized to commission, to earth, and to tag circuits, equipment and systems in accordance with established safety practices and standards.
Intended Use Please note the following:
Warning
This device and its components may only be used for the applications described in the catalog or technical description, and only in connection with devices or components from other manufacturers approved or recommended by Siemens.
This product can only function correctly and safely if it is transported, stored, set up and installed correctly, and operated and maintained as recommended.
Trademarks All designations marked with ® are registered trademarks of Siemens AG. Other designations in this documentation might be trademarks which, if used by third parties for their purposes, might infringe upon the rights of the proprietors.
Copyright Siemens AG ,2004.All rights reserved Reproduction, transmission or use of this document or its contents is not permitted without express written authority. Offenders will be liable for damages. All rights, including rights created by patent grant or registration of a utility model or design, are reserved.
Disclaimer of Liability We have checked the contents of this manual for agreement with the hardware and software described. Since deviations cannot be precluded entirely, we cannot guarantee full agreement. However, the data in the manual are reviewed regularly, and any necessary corrections will be included in subsequent editions. Suggestions for improvement are welcomed.
Siemens AG Automation and Drives Group P.O. Box 4848, D-90327 Nuremberg (Germany)
Siemens AG 2004 Technical data subject to change
Siemens Aktiengesellschaft Order No. CD Documentation and Drivers
Panel PC 670 V2/870 V2, Control unit Operating Instructions, Edition 03/2004, CD Documentation and Drivers iii
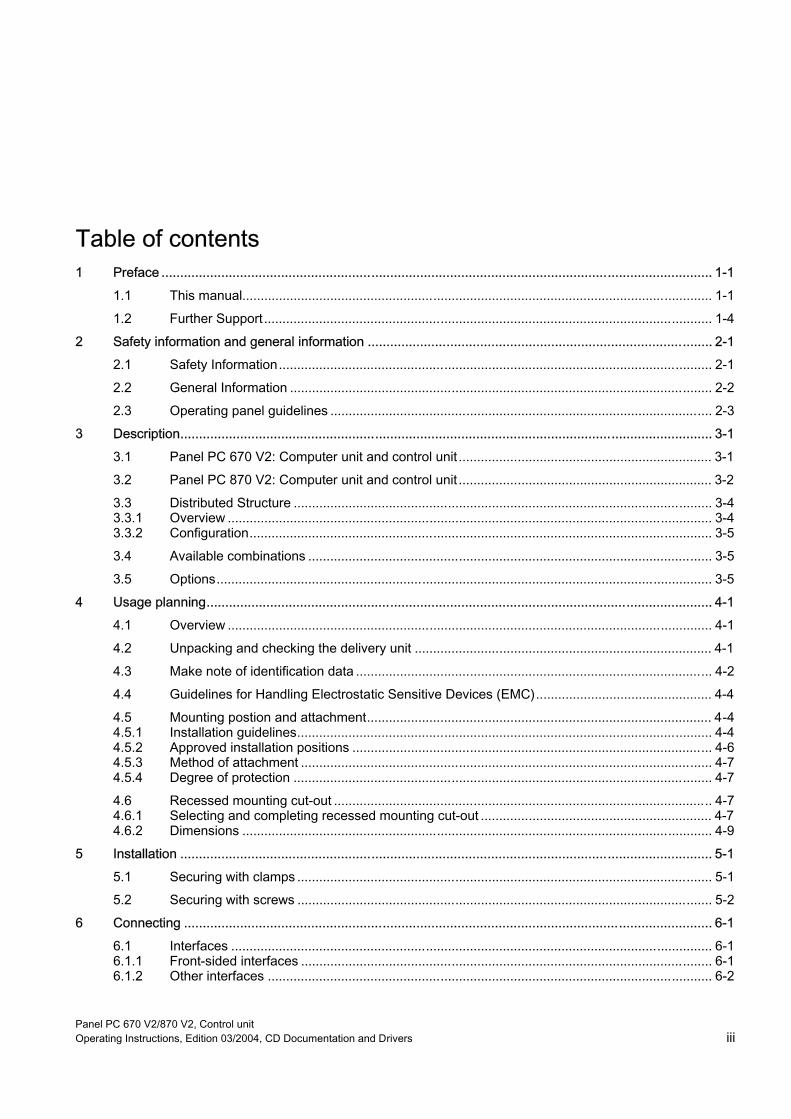
Table of contents 1 Preface ................................................................................................................................................... 1-1
1.1 This manual................................................................................................................................ 1-1 1.2 Further Support .......................................................................................................................... 1-4
2 Safety information and general information ............................................................................................ 2-1 2.1 Safety Information...................................................................................................................... 2-1 2.2 General Information ................................................................................................................... 2-2 2.3 Operating panel guidelines ........................................................................................................ 2-3
3 Description.............................................................................................................................................. 3-1 3.1 Panel PC 670 V2: Computer unit and control unit ..................................................................... 3-1 3.2 Panel PC 870 V2: Computer unit and control unit ..................................................................... 3-2 3.3 Distributed Structure .................................................................................................................. 3-4 3.3.1 Overview .................................................................................................................................... 3-4 3.3.2 Configuration.............................................................................................................................. 3-5 3.4 Available combinations .............................................................................................................. 3-5 3.5 Options....................................................................................................................................... 3-5
4 Usage planning....................................................................................................................................... 4-1 4.1 Overview .................................................................................................................................... 4-1 4.2 Unpacking and checking the delivery unit ................................................................................. 4-1 4.3 Make note of identification data ................................................................................................. 4-2 4.4 Guidelines for Handling Electrostatic Sensitive Devices (EMC)................................................ 4-4 4.5 Mounting postion and attachment.............................................................................................. 4-4 4.5.1 Installation guidelines................................................................................................................. 4-4 4.5.2 Approved installation positions .................................................................................................. 4-6 4.5.3 Method of attachment ................................................................................................................ 4-7 4.5.4 Degree of protection .................................................................................................................. 4-7 4.6 Recessed mounting cut-out ....................................................................................................... 4-7 4.6.1 Selecting and completing recessed mounting cut-out ............................................................... 4-7 4.6.2 Dimensions ................................................................................................................................ 4-9
5 Installation .............................................................................................................................................. 5-1 5.1 Securing with clamps ................................................................................................................. 5-1 5.2 Securing with screws ................................................................................................................. 5-2
6 Connecting ............................................................................................................................................. 6-1 6.1 Interfaces ................................................................................................................................... 6-1 6.1.1 Front-sided interfaces ................................................................................................................ 6-1 6.1.2 Other interfaces ......................................................................................................................... 6-2
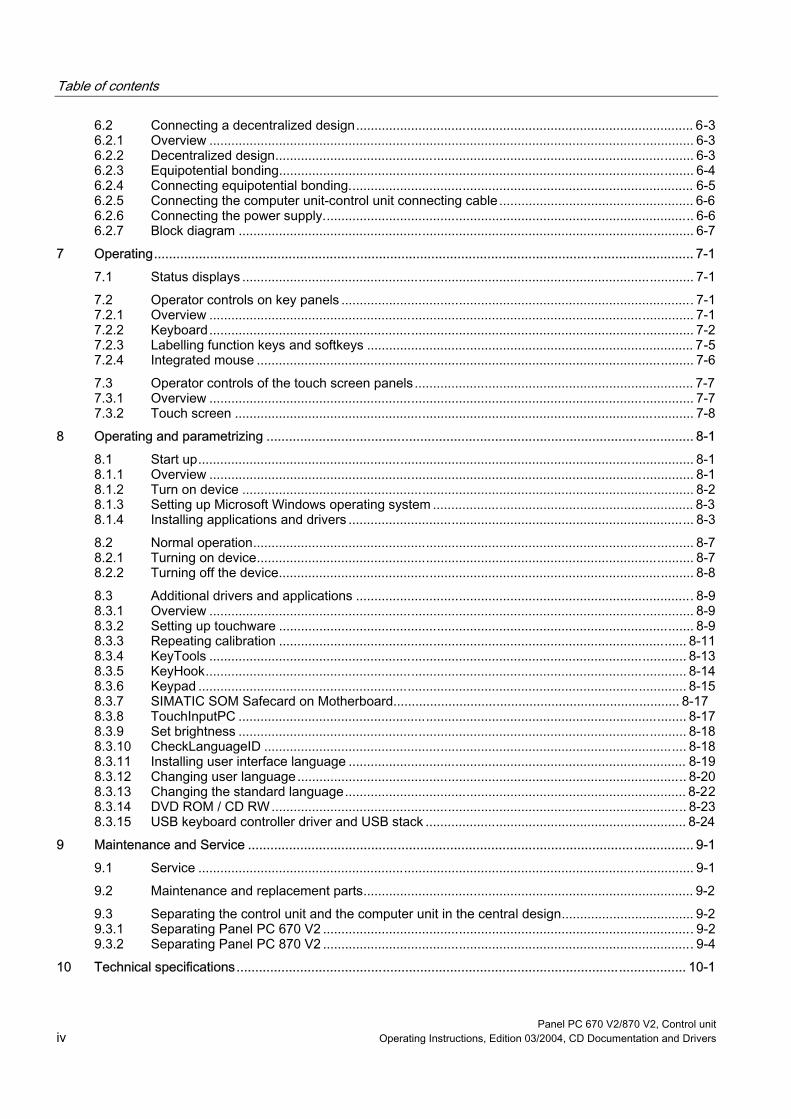
Table of contents
Panel PC 670 V2/870 V2, Control unit iv Operating Instructions, Edition 03/2004, CD Documentation and Drivers
6.2 Connecting a decentralized design............................................................................................ 6-3 6.2.1 Overview .................................................................................................................................... 6-3 6.2.2 Decentralized design.................................................................................................................. 6-3 6.2.3 Equipotential bonding................................................................................................................. 6-4 6.2.4 Connecting equipotential bonding.............................................................................................. 6-5 6.2.5 Connecting the computer unit-control unit connecting cable ..................................................... 6-6 6.2.6 Connecting the power supply..................................................................................................... 6-6 6.2.7 Block diagram ............................................................................................................................ 6-7
7 Operating................................................................................................................................................ 7-1 7.1 Status displays ........................................................................................................................... 7-1 7.2 Operator controls on key panels ................................................................................................ 7-1 7.2.1 Overview .................................................................................................................................... 7-1 7.2.2 Keyboard.................................................................................................................................... 7-2 7.2.3 Labelling function keys and softkeys ......................................................................................... 7-5 7.2.4 Integrated mouse ....................................................................................................................... 7-6 7.3 Operator controls of the touch screen panels ............................................................................ 7-7 7.3.1 Overview .................................................................................................................................... 7-7 7.3.2 Touch screen ............................................................................................................................. 7-8
8 Operating and parametrizing .................................................................................................................. 8-1 8.1 Start up....................................................................................................................................... 8-1 8.1.1 Overview .................................................................................................................................... 8-1 8.1.2 Turn on device ........................................................................................................................... 8-2 8.1.3 Setting up Microsoft Windows operating system ....................................................................... 8-3 8.1.4 Installing applications and drivers .............................................................................................. 8-3 8.2 Normal operation........................................................................................................................ 8-7 8.2.1 Turning on device....................................................................................................................... 8-7 8.2.2 Turning off the device................................................................................................................. 8-8 8.3 Additional drivers and applications ............................................................................................ 8-9 8.3.1 Overview .................................................................................................................................... 8-9 8.3.2 Setting up touchware ................................................................................................................. 8-9 8.3.3 Repeating calibration ............................................................................................................... 8-11 8.3.4 KeyTools .................................................................................................................................. 8-13 8.3.5 KeyHook................................................................................................................................... 8-14 8.3.6 Keypad ..................................................................................................................................... 8-15 8.3.7 SIMATIC SOM Safecard on Motherboard.............................................................................. 8-17 8.3.8 TouchInputPC .......................................................................................................................... 8-17 8.3.9 Set brightness .......................................................................................................................... 8-18 8.3.10 CheckLanguageID ................................................................................................................... 8-18 8.3.11 Installing user interface language ............................................................................................ 8-19 8.3.12 Changing user language.......................................................................................................... 8-20 8.3.13 Changing the standard language............................................................................................. 8-22 8.3.14 DVD ROM / CD RW................................................................................................................. 8-23 8.3.15 USB keyboard controller driver and USB stack ....................................................................... 8-24
9 Maintenance and Service ....................................................................................................................... 9-1 9.1 Service ....................................................................................................................................... 9-1 9.2 Maintenance and replacement parts.......................................................................................... 9-2 9.3 Separating the control unit and the computer unit in the central design.................................... 9-2 9.3.1 Separating Panel PC 670 V2 ..................................................................................................... 9-2 9.3.2 Separating Panel PC 870 V2 ..................................................................................................... 9-4
10 Technical specifications........................................................................................................................ 10-1
Table of contents
Panel PC 670 V2/870 V2, Control unit Operating Instructions, Edition 03/2004, CD Documentation and Drivers v
10.1 Technical data.......................................................................................................................... 10-1 10.1.1 EMC requirements ................................................................................................................... 10-1 10.1.2 Central design technical data................................................................................................... 10-2 10.1.3 Ambient and environmental conditions.................................................................................... 10-3 10.1.4 Decentralized design technical data ........................................................................................ 10-4 10.2 Dimensional drawings.............................................................................................................. 10-5 10.2.1 Overview .................................................................................................................................. 10-5 10.2.2 Panel PC 670 V2 dimensions for central design ..................................................................... 10-5 10.2.3 Panel PC 870 V2 dimensions for central design ..................................................................... 10-6 10.3 Interfaces ................................................................................................................................. 10-7 10.3.1 USB port................................................................................................................................... 10-7 10.4 Keyboard table......................................................................................................................... 10-7
11 Appendix............................................................................................................................................... 11-1 11.1 Certificates and guidelines....................................................................................................... 11-1 11.1.1 Approvals ................................................................................................................................. 11-1 11.1.2 ESD guideline .......................................................................................................................... 11-1 11.2 Abbreviations ........................................................................................................................... 11-4 11.3 Glossary ................................................................................................................................... 11-5

Panel PC 670 V2/870 V2, Control unitOperating Instructions, Edition 03/2004, CD Documentation and Drivers

Panel PC 670 V2/870 V2, Control unit Operating Instructions, Edition 03/2004, CD Documentation and Drivers 1-1
Preface 11.1 This manual
Purpose of the Manual This manual provides you with information derived from the requirements for manuals in conformity with mechanical engineering documentation according to DIN 8418. This information refers to the device, its place of use, transport, storage, installation, usage and maintenance.
This manual is aimed at the following target groups:
• Users
• Commissioners
• Service technicians
• Maintenance technicians
Please pay particular attention to the chapter "Safety Information and General Information."
Required Basic Knowledge Thorough knowledge of personal computers and Microsoft operating systems is required. General knowledge in the field of automation is recommended.
Where is this Manual valid? This manual is valid for devices with the order numbers 6AV772…, 6AV773…, 6AV774… and 6AV775….
Changes compared to the previous version 11/02 Start up instructions and device manual are combined in the control unit operating instructions. The structure of the document was standardized: Heading and numbering of the main chapter describe the main steps in their processing sequence.

Preface 1.1 This manual
Panel PC 670 V2/870 V2, Control unit 1-2 Operating Instructions, Edition 03/2004, CD Documentation and Drivers
Incorporation into the communications environment The documentation for the Panel PC comprises the following parts:
• SIMATIC Panel PC 670 V2 start up instructions, SIMATIC Panel PC 870 V2, QuickStart with the following information:
– Starting up
– Legal notes
• SIMATIC Panel PC 670 V2 control unit device manual, SIMATIC Panel PC 870 V2, control unit operating instructions with the following information:
– Operation
– Error diagnostics
– Hardware
Referred to briefly as "control unit operating instructions" hereafter.
• SIMATIC Panel PC 670 V2 computer unit device manual, SIMATIC Panel PC 870 V2, computer unit operating instructions with the following information:
– Expansion possibilities
– Configuration
– Error diagnostics
– Hardware
Referred to briefly as "computer unit operating instructions" hereafter.
The documentation is delivered with the PC panel electronically on the "Documentation & Drivers" CD in PDF format. QuickStart for the Panel PC 870 V2 is enclosed in printed form in addition. The documentation is available in German, English, French, Italian and Spanish.
For further information concerning the Windows operating system, please visit the Microsoft homepage at "www.Microsoft.com."
Online availability The following links will guide you directly to the range of technical documentation for SIMATIC products and systems in German, English, French, Italian and Spanish.
• SIMATIC Guide for Technical Documentation in German: http://www.ad.siemens.de/simatic/portal/html_00/techdoku.htm
• SIMATIC Guide for Technical Documentation in English: http://www.ad.siemens.de/simatic/portal/html_76/techdoku.htm

Preface 1.1 This manual
Panel PC 670 V2/870 V2, Control unit Operating Instructions, Edition 03/2004, CD Documentation and Drivers 1-3
Conventions The following text distinctions make it easier for you to read the manual:
Type of display Area of validity "File" • Terms which appear on the user interface, for example,
dialog names, tab controls, buttons, menu commands. • Required entries, e.g. limit values, tag values. • Path information
"File > Process" Operating sequences, e.g. menu commands, context menu commands.
<F1>, <Shift>+<F1> Keys and key combinations
In these operating instructions, the standard term "device" replaces the terms "Panel PC 670/870 V2," "control unit," and "computer unit." The concrete term is used only where necessary.
Note
A reference is important information concerning the product, the handling of the product, or it points out a certain part of the documentation to which particular attention should be paid.
Trademarks All designations bearing the ® trademark symbol are registered trademarks of Siemens AG. All other designations in this documentation are trademarks, whose use by third parties for their own purposes might infringe on the rights of the owner.
HMI ® SIMATIC ® SIMATIC HMI ® SIMATIC ProTool® SIMATIC WinCC ® Panel PC 670® Panel PC 870®
Preface 1.2 Further Support
Panel PC 670 V2/870 V2, Control unit 1-4 Operating Instructions, Edition 03/2004, CD Documentation and Drivers
1.2 Further Support
Representatives and offices Please consult your Siemens representative at the office nearest you for any other questions regarding the use of the products described in the manual.
Locate your representative at:
http://www.siemens.com/automation/partner
Training Centers Siemens offers a number of training courses to familiarize you with the automation system. Please contact your regional training center or our central training center in 90327 Nuremberg, Germany for details:
Telephone: +49 (911) 895-3200.
Internet: http://www.sitrain.com/
Service & Support on the Internet Extensive additional information concerning the SIMATIC products is available to you through online services at "http://www.siemens.com/automation/service&support."
• The newsletter with continuously updated information about your products.
• Numerous documents available through search in Service & Support.
• A bulletin board, where users and experts from all over the world exchange their experiences.
• Current product information, FAQs and downloads.
• Your local representative for Automation & Drives.
• Infomation about local service, repairs, replacement parts and much more under the heading "Services."

Preface 1.2 Further Support
Panel PC 670 V2/870 V2, Control unit Operating Instructions, Edition 03/2004, CD Documentation and Drivers 1-5
A&D Technical Support Available 24 hours a day worldwide:
Worldwide (Nuremberg) Technical Support (Free Contact) Local time: Mo - Fr 7:00 am to 5:00 pm Telephone: +49 (0) 180 5050-222 Fax: +49 (0) 180 5050-223 E-mail: [email protected] GMT: +1:00
Worldwide(Nuremberg) Technical Support (subject to fees, with SIMATIC Card only) Local time: 24 hours a day / 365 days a year: Telephone: +49 (911) 895-7777 Fax: +49 (911) 895-7001 GMT: +1:00
Europe / Africa (Nuremberg) Authorization Local time: Mo - Fr 7:00 am to 5:00 pm Telephone: +49 (911) 895-7200 Fax: +49 (911) 895-7201 E-Mail: [email protected] GMT: +1:00
United States(Johnson City) Technical Support and Authorization Local time: Mo - Fr 8:00 am to 7:00 pm Telephone: +1 423 461-2522 Fax: +1 423 461-2289 E-mail: [email protected] GMT: -5:00
Asia/Pacific(Beijing) Technical Support and Authorization Local time: Mo - Fr 8:30 am to 5:00 pm Telephone: +86 10 64 75 75 75 Fax: +86 10 64 74 74 74 E-mail: [email protected] GMT: +8:00
Information available in German and English.

Panel PC 670 V2/870 V2, Control unitOperating Instructions, Edition 03/2004, CD Documentation and Drivers

Panel PC 670 V2/870 V2, Control unit Operating Instructions, Edition 03/2004, CD Documentation and Drivers 2-1
Safety information and general information 22.1 Safety Information
Electrical Connection
Warning
Unplug the device before every intervention and after disconnecting it from the power supply.
Avoid contact with network lines and data transmission lines during thunderstorms, and do not connect any lines during this time.
High frequency radiation
Caution Unintentional operating situation
High frequency radiation, e.g. from cell phones, can cause unintentional operating situations under some circumstances. For more details, consult the technical data in the "EMC Requirements" chapter.
Handling and disposal of lithium batteries
Warning Danger of explosion and the release of harmful substances!
Do not throw lithium batteries into fire, do not solder onto the cell body, do not open, do not short circuit, do not reverse pole, do not heat above 100 °C, dispose of according to regulations, and protect from direct sunlight, moisture and condensation.
Replace lithium batteries with the same brand or a brand recommended by the manufacturer.
Dispose of used lithium batteries individually as hazardous waste in accordance with the local regulations.

Safety information and general information 2.2 General Information
Panel PC 670 V2/870 V2, Control unit 2-2 Operating Instructions, Edition 03/2004, CD Documentation and Drivers
2.2 General Information
Overview
Caution
The device is approved for operation in closed rooms only.
Notice
The guarantee is void if these stipulations are ignored.
Avoid extreme environmental operating conditions. Protect your device against dust, moisture and heat. For additional information, refer to the specifications.
Do not place the device in direct sunlight.
Transport Unpack the device at the its installation location. Transport the device only in the original packaging. Do not transport the device when it is mounted.
Notice
Adhere to these stipulations each time the device is transported, otherwise the guarantee is void.
Caution
Condensation When transporting the device in low temperatures, ensure that no moisture gets on or in the device. This also applies when the device is subjected to extreme changes in temperature.
Commissioning Allow the device to slowly adjust to room temperature before commissioning the device. Do no place the device near heat radiation. If moisture condensation occurs, wait at least about 12 hours before you switch on the device.
Vibration CD/DVD drives are sensitive to vibration. Vibrations during operation may result in loss of data or damage to the drive or data medium.
Before transporting the device, wait at least 20 seconds to allow the drive to stop completely.
Updates Regularly check if hotfixes for your device are available at the Siemens Internet site.

Safety information and general information 2.3 Operating panel guidelines
Panel PC 670 V2/870 V2, Control unit Operating Instructions, Edition 03/2004, CD Documentation and Drivers 2-3
2.3 Operating panel guidelines
Reistance to chemicals
Caution
The panel of the control unit is only partially resistant to chemicals. More information is available in the internet at "www.ad.siemens.de" under the heading "Products & Solutions." Click on "Service & Support" under "Services" and look for the article-ID "16532108" on the "Product Support" page. The desired article about chemical resistance will be displayed.
Sources of light
Notice
Position the screen so that it is not subject to direct sunlight or other strong sources of light.
Faulty pixels in the display At present, the manufacturing process of modern displays does not guarantee that all pixels of the display will be perfect. A small number of faulty pixels in the display, is therefore unavoidable. This does not present a functional problem as long as the faulty pixels are not bunched in one location.
For additional information, refer to the technical data.
TFT-LC display A permanent picture with bright images can lead to a burn-in effect on the LCD.
If a screen saver is activated, please observe the following:
• The liquid crystals in screen savers which actuate active black when the backlighting is on, e.g. flying stars "starfield simulation," renew themselves. Pay attention to the length of time the backlighting is activated.
• The following applies to screen savers which turn off the the backlighting tubes: Each time the backlighting is turned on, its life is reduced by 50 minutes.
Consider the following carefully:
• Use of a screen saver
• Turn off the backlighting regularly
• Permanent display of the customer application

Panel PC 670 V2/870 V2, Control unitOperating Instructions, Edition 03/2004, CD Documentation and Drivers

Panel PC 670 V2/870 V2, Control unit Operating Instructions, Edition 03/2004, CD Documentation and Drivers 3-1
Description 33.1 Panel PC 670 V2: Computer unit and control unit
Design The device is available in two different designs:
• Central design: Computer unit and control unit form an entity.
• Decentralized design: Computer unit and control unit are in separate locations.
Principle In the central design, the computer is screwed to the back of the control unit with two mounting rails. The computer unit is connected to the control unit by screws.
Computing unit Operating unit
Figure 3-1 Panel PC 670 V2 as a complete device with central design

Description 3.2 Panel PC 870 V2: Computer unit and control unit
Panel PC 670 V2/870 V2, Control unit 3-2 Operating Instructions, Edition 03/2004, CD Documentation and Drivers
Product brief The device is available with different control units, which distinguish themselves by the size of the display and by the membrane keyboard or touch screen.
Keyboard variants • Color display with backlighting:
– 10.4'' TFT technology with the 640 x 480 pixels resolution or
– 12.1'' TFT technology with 800 x 600 pixels resolution or
– 15.1'' TFT technology with 1024 x 768 pixels resolution
• Membrane keyboard with alphanumeric keys, numeric keys, cursor keys and control keys
• Function keys and softkeys
• Integrated mouse
• LEDs for power supply, temperature, softkeys, <Shift> and <ACK> keys.
• Front-mounted USB 1.1 port for connecting external I/O modules
Touch screen variants • Color display with backlighting
– 12.1'' TFT technology with 800 x 600 pixels resolution or
– 15.1'' TFT technology with 1024 x 768 pixels resolution
• LEDs for power supply and temperature
• Front-mounted USB 1.1 port for connecting external I/O modules, not included in order option "control unit without front-mounted USB port"
For additional information, refer to the technical data.
3.2 Panel PC 870 V2: Computer unit and control unit
Design The device is available in two different designs:
• Central design: Computer unit and control unit form an entity.
• Decentralized design: Computer unit and control unit are in separate locations.
Principle In the central design, the computer is screwed to the back of the control unit with two mounting rails.

Description 3.2 Panel PC 870 V2: Computer unit and control unit
Panel PC 670 V2/870 V2, Control unit Operating Instructions, Edition 03/2004, CD Documentation and Drivers 3-3
Operating unit Computing unit Figure 3-2 Panel PC 870 V2 as a complete device in the central design
Product brief The device is available with different control units, which distinguish themselves by the size of the display and by the membrane keyboard or touch screen.
Keyboard variants • Color display with backlighting:
– 12.1'' TFT technology with 800 x 600 pixels resolution or
– 15.1'' TFT technology with 1024 x 768 pixels resolution
• Membrane keyboard with alphanumeric keys, numeric keys, cursor keys and control keys
• Function keys and softkeys
• Integrated mouse
• LEDs for power supply, temperature, softkeys, <Shift> and <ACK> keys
• Front-mounted USB 1.1 port for connecting external I/O modules
Description 3.3 Distributed Structure
Panel PC 670 V2/870 V2, Control unit 3-4 Operating Instructions, Edition 03/2004, CD Documentation and Drivers
Touch screen variants • Color display with backlighting
– 12.1'' TFT technology; 800 x 600 pixels resolution, available only in decentralized design or
– 15.1" TFT technology; 1024 x 768 pixels resolution
• LEDs for power supply and temperature
• Front-mounted USB 1.1 port for connecting external I/O modules, not icluded in the order option "control unit without front-mounted USB port"
For additional information, refer to the technical data.
3.3 Distributed Structure
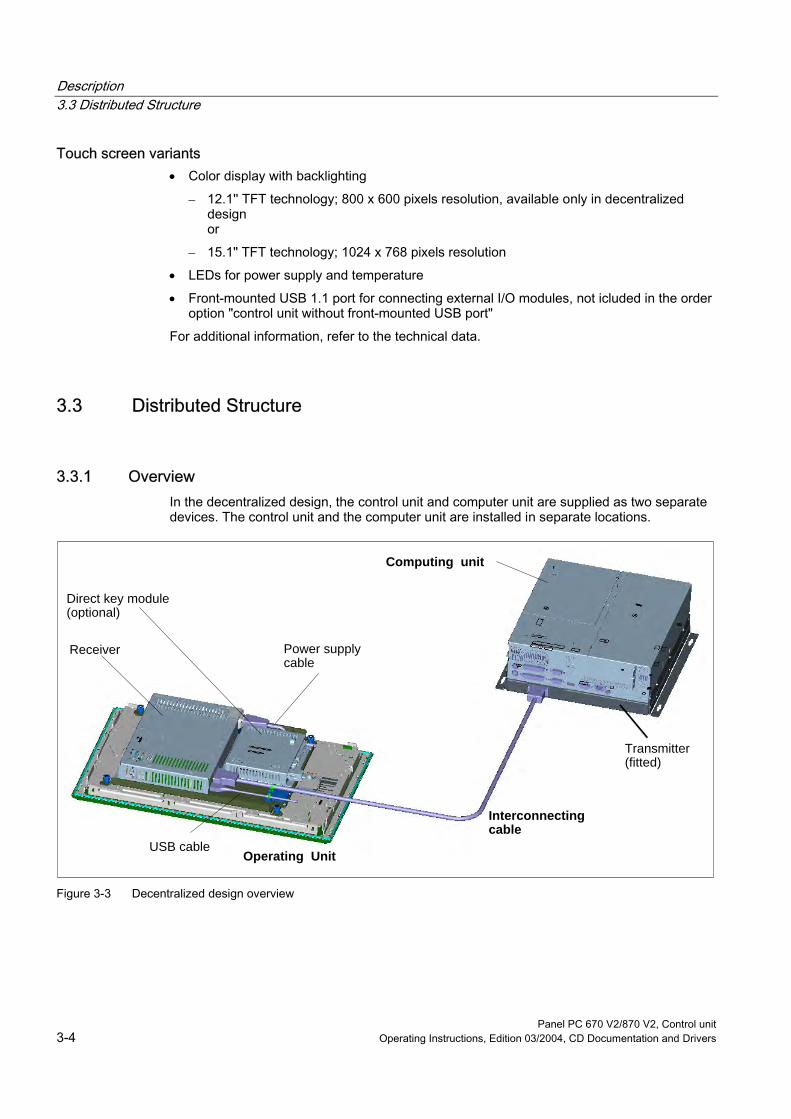
3.3.1 Overview In the decentralized design, the control unit and computer unit are supplied as two separate devices. The control unit and the computer unit are installed in separate locations.
USB cable
Interconnecting cable
Receiver
Computing unit
Direct key module (optional)
Transmitter (fitted)
Power supplycable
Operating Unit
Figure 3-3 Decentralized design overview

Description 3.4 Available combinations
Panel PC 670 V2/870 V2, Control unit Operating Instructions, Edition 03/2004, CD Documentation and Drivers 3-5
3.3.2 Configuration The illustration in the overview depicts the components of the decentralized design:
• The remote module unit, also called receiver, and an optional direct key module are attached to a mounting plate, which is screwed to the back of the control unit.
• The host module, also called sender, is installed below the computer unit between the mounting rails.
• Connect the remote module and host module with a cable from the options.
Note
Refer to the relevant order variant in the catalog for the components of the decentralized design. Before delivery from the factory, the order will beconfigured.
3.4 Available combinations The available cominations of control unit and computer unit are listed in the table.
Control unit computer unit
10.4" TFT 12.1" TFT 15.1" TFT 12.1" TFT touch screen
15.1" TFT touch screen
PC 670 V2 central design X X X X X PC 670 V2 decentralized design — X X X X PC 870 V2 central design — X X — X PC 870 V2 decentralized design — X X X X
X = available
Direct key module For more information, refer to the start up instructions included with the direct key module
3.5 Options
Components The options comprise the following components:
Options Order No. Direct key module 6AV7671-7DA00-0AA0 Film for protecting the touch screen panel against dirt and scratches for 12" touch screen varaiant for 15" touch screen variant
6AV7671-2BA00-0AA0 6AV7671-4BA00-0AA0
Labeling strips for 10" keyboard variant for 12" keyboard variant for 15" keyboard variant
6AV7671-0CA00-0AA0 6AV7671-3CA00-0AA0 6AV7671-5CA00-0AA0
The printing templates for the labelling strips can be obtained from the internet address in the preface.
Description 3.5 Options
Panel PC 670 V2/870 V2, Control unit 3-6 Operating Instructions, Edition 03/2004, CD Documentation and Drivers
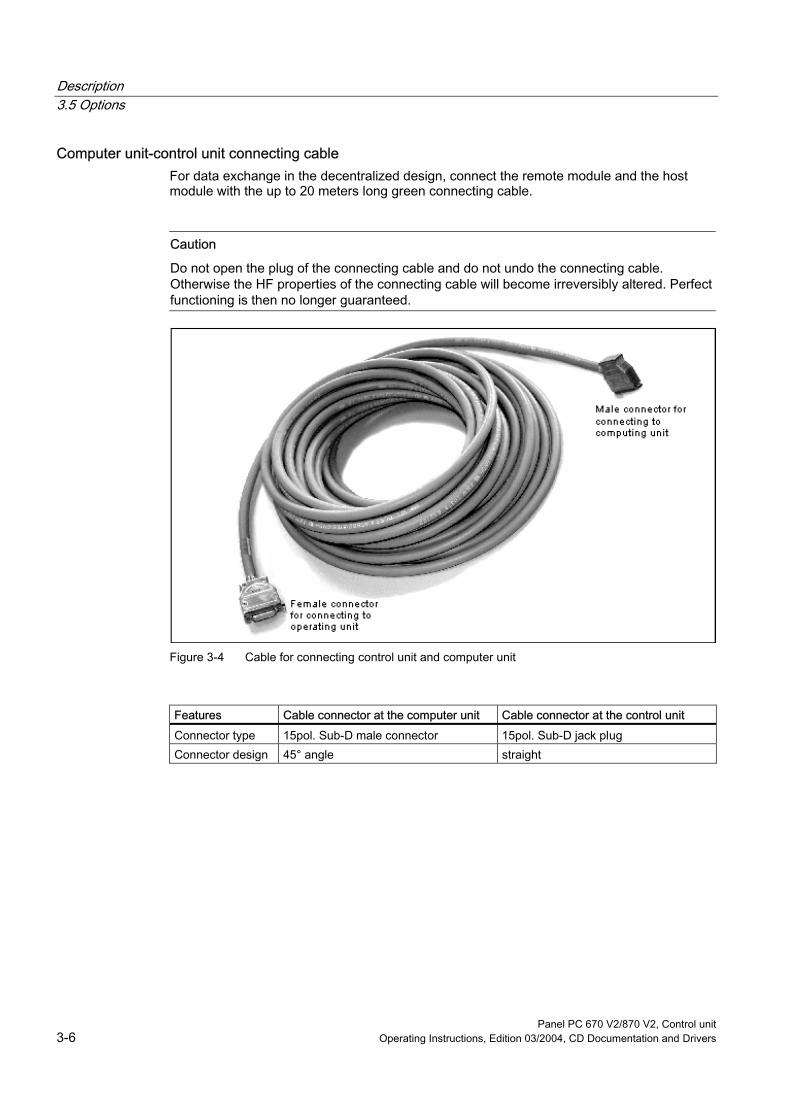
Computer unit-control unit connecting cable For data exchange in the decentralized design, connect the remote module and the host module with the up to 20 meters long green connecting cable.
Caution
Do not open the plug of the connecting cable and do not undo the connecting cable. Otherwise the HF properties of the connecting cable will become irreversibly altered. Perfect functioning is then no longer guaranteed.
Figure 3-4 Cable for connecting control unit and computer unit
Features Cable connector at the computer unit Cable connector at the control unit Connector type 15pol. Sub-D male connector 15pol. Sub-D jack plug Connector design 45° angle straight

Panel PC 670 V2/870 V2, Control unit Operating Instructions, Edition 03/2004, CD Documentation and Drivers 4-1
Usage planning 44.1 Overview
Introduction This section describes the first steps after unpackaging, the permitted mounting positions and the fixation. This section describes the necessary considerations for EMC.
Notice
Take note of the corresponding information in the operating instructions for the computer unit and the operator unit.
Field of application The SIMATIC Panel PC is an industry-standard PC platform for demanding tasks in the field of PC-based automation. The Panel PC is designed for on-site use on the machine, installed for example in:
• Control cabinets and consoles
• 19" racks
• Swivel arms (booms)
Note
In the following, the term "control cabinet" also refers to rack, mounting rack, switchboard, operator panel and console. The term "device" represents the Panel PC and its variants.
4.2 Unpacking and checking the delivery unit
Procedure 1. Upon delivery, check the packaging for damage incurred during transport.
2. If any transport damage is present at the time of delivery, lodge a complaint at the shipping company in charge. Have the shipper confirm the transport damage immediately.
3. Unpack the device.

Usage planning 4.3 Make note of identification data
Panel PC 670 V2/870 V2, Control unit 4-2 Operating Instructions, Edition 03/2004, CD Documentation and Drivers
4. Keep the packaging material in case you have to transport the unit again.
Notice
The packaging protects the device during transport and storage. Therefore, never dispose of the original packaging material!
5. Please keep the enclosed documentation in a safe place. You will need the documentation when you start up the device for the first time.
6. Check the package contents for completeness and any visible transport damage. Check for completeness using the enclosed "Contents of Delivery" list.
7. Notify the delivery service in charge immediately if the packages contents are incomplete or damaged.
Warning
Make sure that a damaged unit is not installed nor put into operation.
4.3 Make note of identification data
Procedure 1. Write down the Microsoft Windows Product Key of the Certificate of Authenticity COA in
the table at the end of this section. The product key is located on the power supply cover of the computer unit. You will need the product key during the reinstallation of the operating system.
2. Write down the manufacturer's number SVP and the order number of the computer unit, e.g. "6AV..." in the table. If repairs are necessaryr, the device can be identified by the service center on the basis of the SVP number and order number. Both numbers are located on the rating label of the computer unit at the top of the ventilator side.
Figure 4-1 Rating label of the computer unit, example
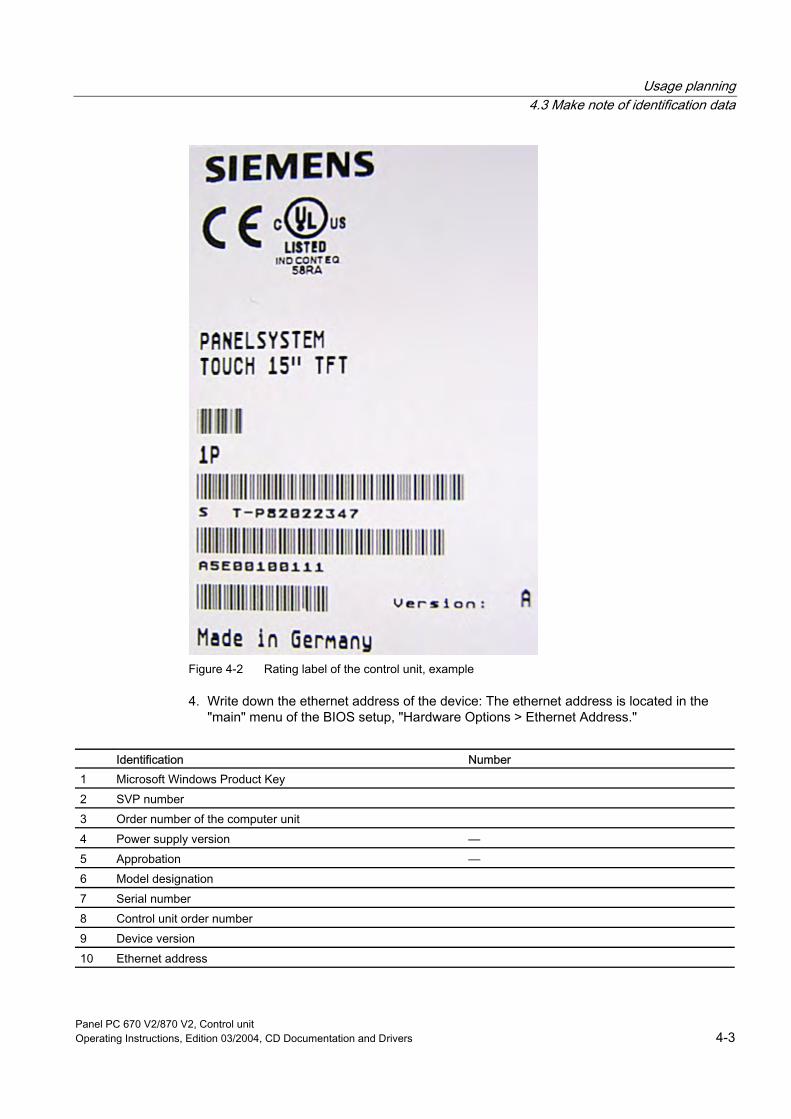
3. Write down the model designation, the serial number e.g. "ST-...," the order number of the control unit, e.g. "A5E," and the version of the device. in the table. This data is located on the rating label on the edge of the side of the control unit.
Usage planning 4.3 Make note of identification data
Panel PC 670 V2/870 V2, Control unit Operating Instructions, Edition 03/2004, CD Documentation and Drivers 4-3
Figure 4-2 Rating label of the control unit, example
4. Write down the ethernet address of the device: The ethernet address is located in the "main" menu of the BIOS setup, "Hardware Options > Ethernet Address."
Identification Number 1 Microsoft Windows Product Key 2 SVP number 3 Order number of the computer unit 4 Power supply version — 5 Approbation — 6 Model designation 7 Serial number 8 Control unit order number 9 Device version 10 Ethernet address

Usage planning 4.4 Guidelines for Handling Electrostatic Sensitive Devices (EMC)
Panel PC 670 V2/870 V2, Control unit 4-4 Operating Instructions, Edition 03/2004, CD Documentation and Drivers
4.4 Guidelines for Handling Electrostatic Sensitive Devices (EMC)
Electromagnetic Compatibility The device fulfills the requirements of the EMC law of the Federal Republic of Germany as well as the EMC Guidelines of the Single European Market.
The device is designed as a built-in model with front-sided Protection Class IP 65. Ensure compliance with the EN 61000-4-2 standard by installing the device in grounded metal cabinets, e.g. MC cabinets, Siemens catalog NV21.
Note
Please refer to the appendix for for more information concerning the EMC requirements.
Installing the device according to EMC guidelines Principles of interference-free operation:
• Installing the controls according to EMC guidelines
• Using interference immune cable
Note
The instructions "Guidelines for the assembly of interference immune programmable logic controllers" with the article ID 1064706 and the manual "PROFIBUS networks" with the article ID 1971286, which also applies to the installation of the device, is located on the "Documentation and Drivers" CD.
4.5 Mounting postion and attachment
4.5.1 Installation guidelines Before installing the device, please observe the following information which applies both to the centralized and decentralized designs.
Warning Dangerous voltage
When opening the switch cabinet, beware of exposed live parts which are dangerous upon contact.
Isolate the power supply to the switch cabinet before opening it. Make sure that the power to the switch cabinet cannot be turned on accidentally.
Caution
The device is approved for use in closed areas only.

Usage planning 4.5 Mounting postion and attachment
Panel PC 670 V2/870 V2, Control unit Operating Instructions, Edition 03/2004, CD Documentation and Drivers 4-5
• Make sure that the protective contact socket of the building installation is easily accessible, and that a central power disconnector exists in switch cabinet installations.
• Position the screen in an ergonomic position favorable to the user. Choose a suitable installation height.
• Position the screen so that it is not subject to direct sunlight or other strong sources of light.
• Shocks CD/DVD drives are susceptible to shocks. Shocks during operation can lead to the loss of data or damage to the drive or data carrier. Burners and CD/DVD are not suitable for long-term writing.
• Applies to devices which are installed in swivel arm housings: Avoid rapid or jerky movements of the swivel arm during operation. The ensuing forces could lead to possible irreversible damage of the hard disk.
• The device with DC power supply is considered an open means of operation on the part of the voltage supply. Therefore, make sure that the switch cabinet fulfills the the requirements of a fire protection housing.
Note
The computer unit with AC power supply fulfills the requirements of a fire protection housing according to EN60950. Therefore, no additional fire protection is necessary for the installation.
• Provide adequate volume in the switch cabinet for air circulation and heat transport. Keep a distance of at least 10 cm circumference between the device and switch cabinet.
• Do not allow the maximum air intake temperature to exceed 45 °C. Decisive is the temperature measured at a distance of 10 cm from an air intake. The maxiumum air intake temperature must be accounted for especially when sizing closed switch cabinets.
• The minimum distance between the device and the housing is 10 cm on the air output side at the ventilator.
• Position the device so that the air vents of the housing are not covered up following installation.
• Provide an extra 1 cm of space for air circulation for the decentralized design.
• Also provide enough free space to add on to the device.
• The connecting cable between the control unit and the computer unit is 20 meters maximum.
• Equip the switch cabinet with struts for stabilizing the recessed mounting cut-out. Install struts where necessary.
• Avoid extreme environmental conditions. Protect your device from dust, moisture and heat.
• Install the device in such a way that it poses no danger, e.g. by falling over.
• During assembly, please comply with the approved installation positions.
Notice
If the device is installed in an unapproved position, the licenses expire in accordance with UL 508 and EN 60950!
For additional information, refer to the dimension diagrams in the appendix.

Usage planning 4.5 Mounting postion and attachment
Panel PC 670 V2/870 V2, Control unit 4-6 Operating Instructions, Edition 03/2004, CD Documentation and Drivers
4.5.2 Approved installation positions
Approval Depending on the design form described in the overview, certain installation positions are approved for the device.
Central design:
Figure 4-3 Approved installation positions for central design
Vertical installation and deviations between +20° and -20° in the given directions is permitted.
Decentralized design Applies only to the control unit:
Figure 4-4 Approved installation positions for decentralized design
Vertical installation and deviations between +70° and -20° in the given directions is permissible.
Usage planning 4.6 Recessed mounting cut-out
Panel PC 670 V2/870 V2, Control unit Operating Instructions, Edition 03/2004, CD Documentation and Drivers 4-7
4.5.3 Method of attachment The control unit is secured in the recessed mounting cut-out either with clamps or screws.
Notice
Securing with screws is not possible with the 12.1" touch screen variant. For more information, please refer to the chapter "Description."
Select the method of attachment suitable to your requirements for the degree of protection.
4.5.4 Degree of protection
Principle Applies to the central and decentralized designs: The degree of protection depends on the method of attachment.
Protection Class IP65 This degree of protection is provided when the control unit is attached with clamps and the presence of an encircling seal.
IP54 degree of protection This degree of protection is provided when the control unit is attached with screws.
4.6 Recessed mounting cut-out
4.6.1 Selecting and completing recessed mounting cut-out
Area of validity No recessed mounting cut-out is necessary for the computer unit in the decentralized design.
The following applies to the complete device in the central design and the control unit in the decentralized design.
Requirement The degree of protection suitable to the field of application and thereby the method of attachment have been selected.
Usage planning 4.6 Recessed mounting cut-out
Panel PC 670 V2/870 V2, Control unit 4-8 Operating Instructions, Edition 03/2004, CD Documentation and Drivers
Procedure 1. Please comply with installation guidelines.
2. Select a location suitable for installation, taking into account the installation guidelines and the chosen installation position.
3. On the basis of the dimension diagrams, check whether the required screw and pressure points on the backside and the hatched sealing area are easily accessible after the completion of the recessed mounting cut-out. Otherwise the recessed mounting cut-out is useless.
4. Complete the recessed mounting cut-out according to the dimension diagrams. Take into account the mounting depth of the control unit in the decentralized design, which must be deeper due to the direct key module and remote module.
Usage planning 4.6 Recessed mounting cut-out
Panel PC 670 V2/870 V2, Control unit Operating Instructions, Edition 03/2004, CD Documentation and Drivers 4-9
4.6.2 Dimensions
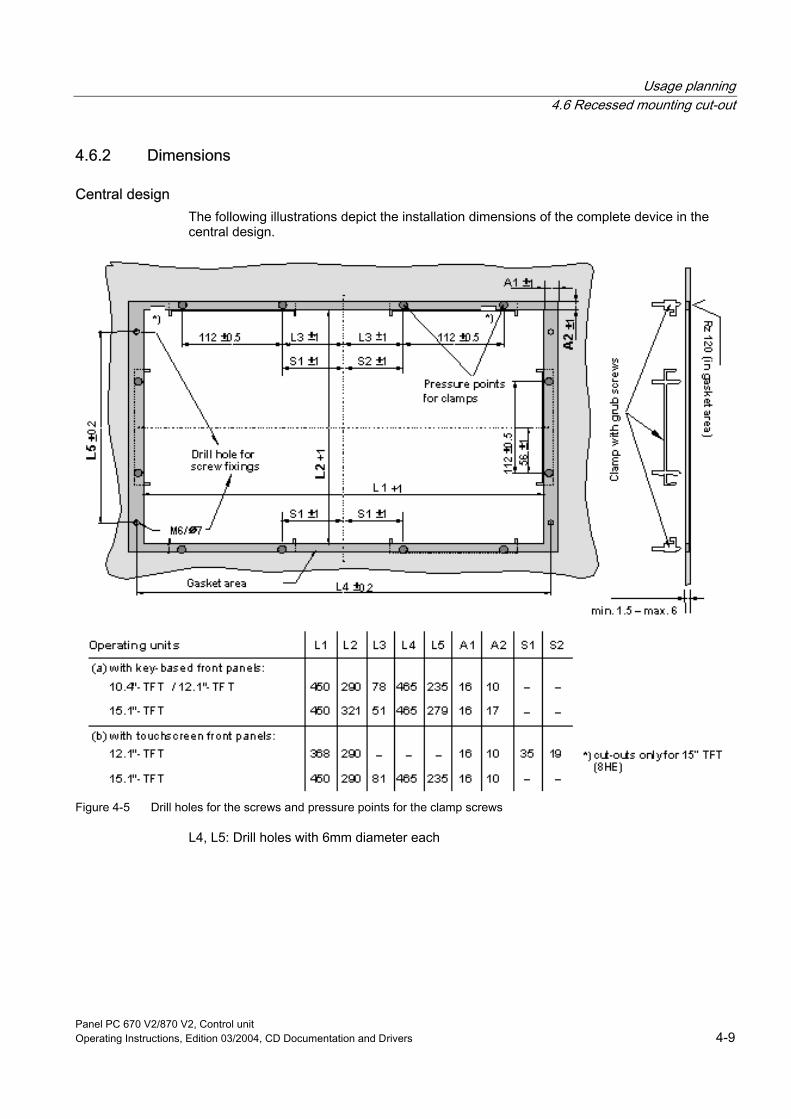
Central design The following illustrations depict the installation dimensions of the complete device in the central design.
Figure 4-5 Drill holes for the screws and pressure points for the clamp screws
L4, L5: Drill holes with 6mm diameter each
Usage planning 4.6 Recessed mounting cut-out
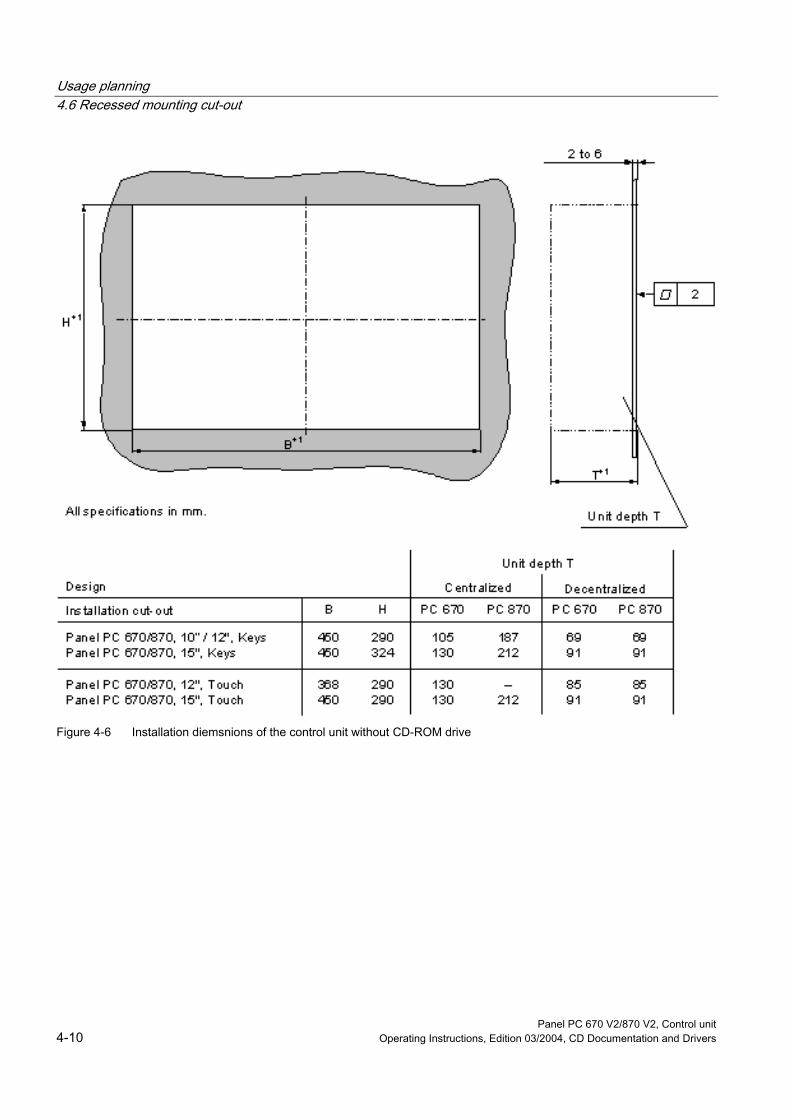
Panel PC 670 V2/870 V2, Control unit 4-10 Operating Instructions, Edition 03/2004, CD Documentation and Drivers
Figure 4-6 Installation diemsnions of the control unit without CD-ROM drive

Usage planning 4.6 Recessed mounting cut-out
Panel PC 670 V2/870 V2, Control unit Operating Instructions, Edition 03/2004, CD Documentation and Drivers 4-11
Decentralized design The following illustration shows the dimensions of the control unit in the decentralized design The respective dimensions are dependent on the control unit.
Figure 4-7 Dimensions of the control unit with attached remote module and direct key module

Panel PC 670 V2/870 V2, Control unitOperating Instructions, Edition 03/2004, CD Documentation and Drivers
Panel PC 670 V2/870 V2, Control unit Operating Instructions, Edition 03/2004, CD Documentation and Drivers 5-1
Installation 55.1 Securing with clamps
Area of validity Applies to the central and decentralized designs: Skip this step if you have selected "installing with screws."
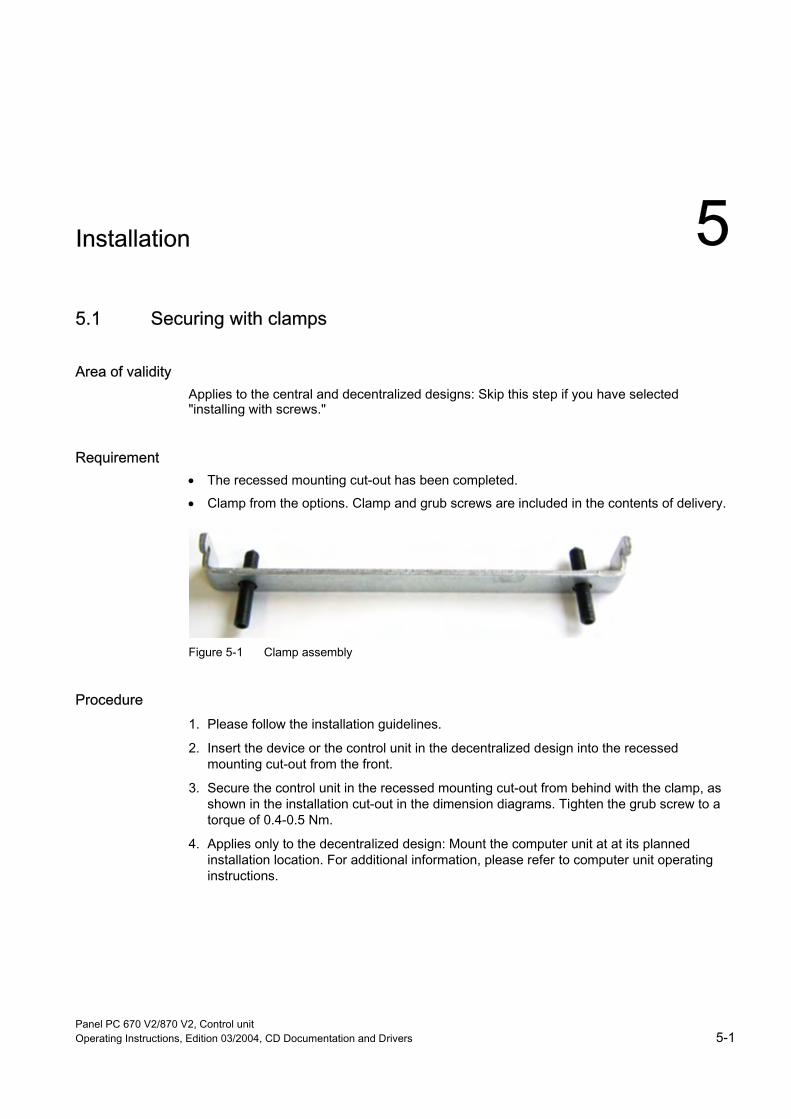
Requirement • The recessed mounting cut-out has been completed.
• Clamp from the options. Clamp and grub screws are included in the contents of delivery.
Figure 5-1 Clamp assembly
Procedure 1. Please follow the installation guidelines.
2. Insert the device or the control unit in the decentralized design into the recessed mounting cut-out from the front.
3. Secure the control unit in the recessed mounting cut-out from behind with the clamp, as shown in the installation cut-out in the dimension diagrams. Tighten the grub screw to a torque of 0.4-0.5 Nm.
4. Applies only to the decentralized design: Mount the computer unit at at its planned installation location. For additional information, please refer to computer unit operating instructions.

Installation 5.2 Securing with screws
Panel PC 670 V2/870 V2, Control unit 5-2 Operating Instructions, Edition 03/2004, CD Documentation and Drivers
Com
putin
g un
it
Ope
ratin
g un
it
Knurled screw
Knurled screw
Hinge
Hinge
Figure 5-2 Device assembly
5.2 Securing with screws
Area of validity Applies to the central and decentralized designs: Skip this step if you have selected "installing with clamps."
Requirement The recessed mounting cut-out has been completed.
Procedure 1. Please follow the installation guidelines.
2. Drill suitable holes at the prepared recessed mounting cut-out in accordance with the specifications for L4 and L5, as shown in the installation cut-out in the dimension diagrams.
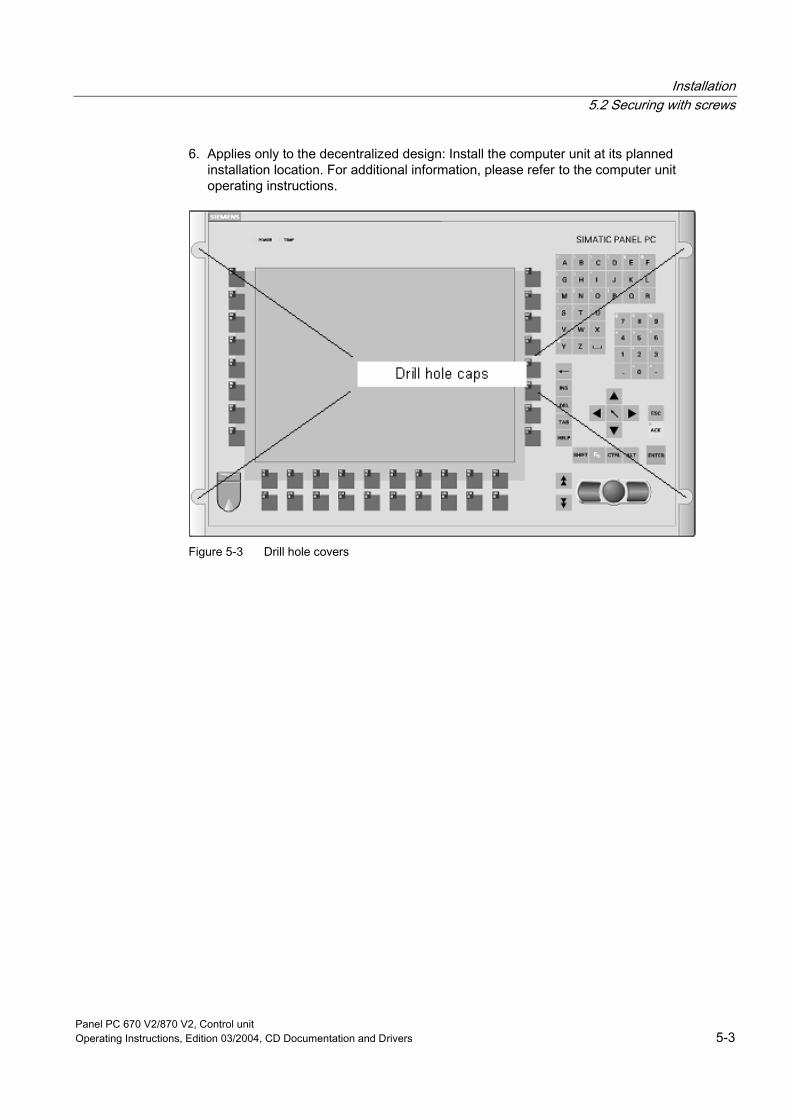
3. Carefully drill out the drill hole caps on the front of the control unit. The drill hole caps are illustrated at the end of this section.
4. Insert the device or the control unit in the decentralized design into the recessed mounting cut-out from the front.
5. Secure the control unit by inserting suitable screws through the holes and attaching nuts.
Installation 5.2 Securing with screws
Panel PC 670 V2/870 V2, Control unit Operating Instructions, Edition 03/2004, CD Documentation and Drivers 5-3
6. Applies only to the decentralized design: Install the computer unit at its planned installation location. For additional information, please refer to the computer unit operating instructions.
Figure 5-3 Drill hole covers

Panel PC 670 V2/870 V2, Control unit Operating Instructions, Edition 03/2004, CD Documentation and Drivers 6-1
Connecting 66.1 Interfaces
6.1.1 Front-sided interfaces
USB port The USB port is located under the rubber cover on the front side with the control elements and displays. Attach an external keyboard or an external mouse, for example, to the USB port. The front-sided USB port supports the standard USB 1.1.
Caution
Wait at least 10 seconds between the unplugging and replugging of USB devices. This also applie in particular to touch control in control units with touch screen panels. A short circuit of the voltage supply at the USB front plug will cause the device to reset.
Notice
When the rubber cover over the USB port is removed in order to connect an USB component, the degree of protection for the device is no longer guaranteed.
When using standard USB peripheral devices, please bear in mind that their EMC immunity level is frequently designed for office applications only.
These devices are adequate for starting up and service purposes. For use in industry, however, only devices suitable to industry are permitted.
The I/O modules are developments of the respective provider, who also markets them. The respective product supplier offers support for the I/O modules. The liability conditions of the manufacturer still apply.
The USB port is not available on the order option "control unit without front-sided USB port." For additional information, refer to the technical data. Please refer to the chapter "Starting up" in the computer unit operating instructions for more information concerning the connection of a USB device.

Connecting 6.1 Interfaces
Panel PC 670 V2/870 V2, Control unit 6-2 Operating Instructions, Edition 03/2004, CD Documentation and Drivers
6.1.2 Other interfaces
Other Connections
Caution
Please comply with the connections in the computer unit operating instructions
Back side On the back side of the computer unit are two flatband cables for connecting to the computer unit.
Figure 6-1 Other interfaces on the computer unit
• The I/O USB cable K1 at X1 comprises not only the signals of the display interface but also the signals for the connection of control units.
• The display cable K2 connects the display of the control unit with the computer unit.
Connecting 6.2 Connecting a decentralized design
Panel PC 670 V2/870 V2, Control unit Operating Instructions, Edition 03/2004, CD Documentation and Drivers 6-3
6.2 Connecting a decentralized design
6.2.1 Overview
Introduction After installing the device, connect it.
Caution Connection sequence
To avoid damage to the device, please follow the connection sequence of the device.
Other Connections
Please comply with the connections in the computer unit operating instructions.
Starting up
Before connecting the device, allow it to adjust to room temperature. Do not subject it directly to heat radiation from a heating device, however.
Requirements • The device has been installed in accordance with EMC guidelines.
• The device has been installed in accordance with the specifications of these operating instructions.
Procedure 1. Connect equipotential bonding.
2. Connect computer unit-control unit connecting cable.
3. Connect power supply.
6.2.2 Decentralized design
Principle In the decentralized design, the control unit and computer unit are in separate locations.
Components The following illustration shows as an example of a 15" control unit on which a mounting plate is attached to the back side. The remote module, also called receiver, and the optional direct key module are attached to the mounting plate. The remote module has a AC 110/230V power supply. The remote module is also available with a DC 24 V power supply.

Connecting 6.2 Connecting a decentralized design
Panel PC 670 V2/870 V2, Control unit 6-4 Operating Instructions, Edition 03/2004, CD Documentation and Drivers
Note
Make sure that the cable strain reliefs for the connection cable at the operating unit and computer unit are mounted properly, especially if the devices are installed at a slant.
Power supply120-240 V AC
Socket for interconnecting cable to transmitter
Receiver
Mounting plate for receiver and direct key module
Operating unit(rear)
Fastening screw for mounting plate
USB cable Direct key module (optional)
Figure 6-2 Back side of the control unit with attached remote module and direct key module
6.2.3 Equipotential bonding
Differences in potential Differences in potential arise between separated system parts, which in some cases leads to high equalization currents. When cable shields are applied on both sides and are grounded at different system parts, for example.
Causes of potential differences are different network feed-ins, for example.
Connecting 6.2 Connecting a decentralized design
Panel PC 670 V2/870 V2, Control unit Operating Instructions, Edition 03/2004, CD Documentation and Drivers 6-5
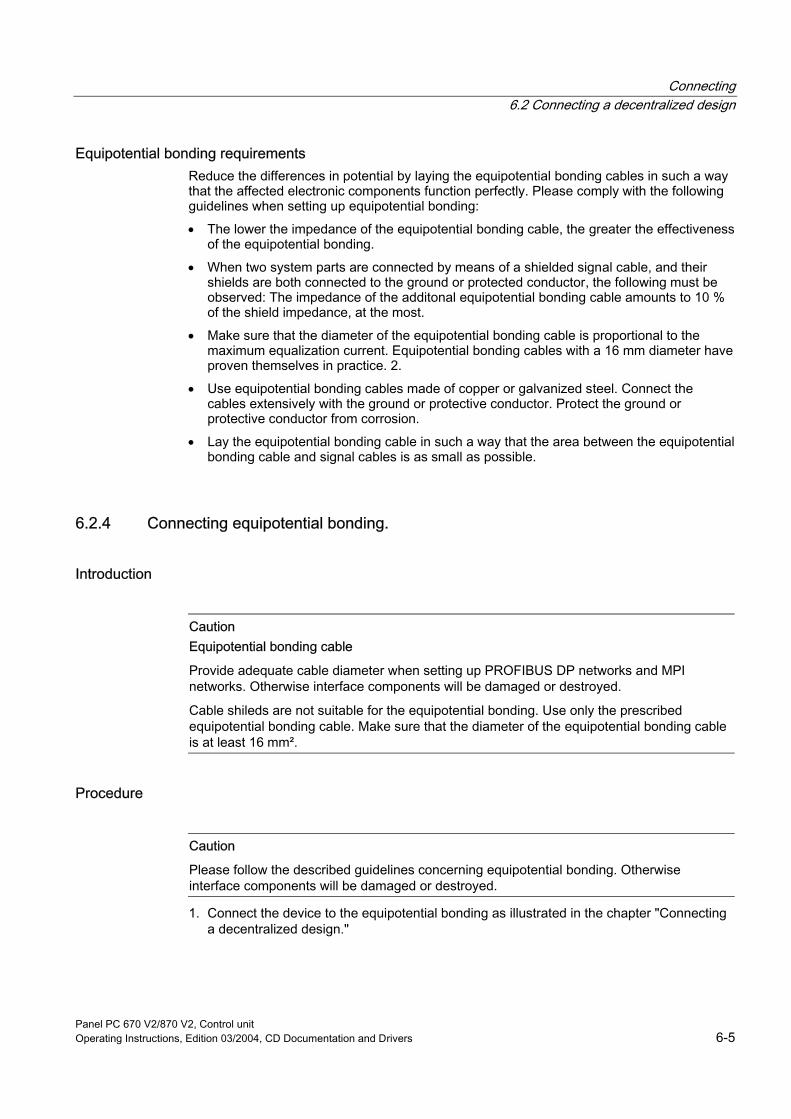
Equipotential bonding requirements Reduce the differences in potential by laying the equipotential bonding cables in such a way that the affected electronic components function perfectly. Please comply with the following guidelines when setting up equipotential bonding:
• The lower the impedance of the equipotential bonding cable, the greater the effectiveness of the equipotential bonding.
• When two system parts are connected by means of a shielded signal cable, and their shields are both connected to the ground or protected conductor, the following must be observed: The impedance of the additonal equipotential bonding cable amounts to 10 % of the shield impedance, at the most.
• Make sure that the diameter of the equipotential bonding cable is proportional to the maximum equalization current. Equipotential bonding cables with a 16 mm diameter have proven themselves in practice. 2.
• Use equipotential bonding cables made of copper or galvanized steel. Connect the cables extensively with the ground or protective conductor. Protect the ground or protective conductor from corrosion.
• Lay the equipotential bonding cable in such a way that the area between the equipotential bonding cable and signal cables is as small as possible.
6.2.4 Connecting equipotential bonding.
Introduction
Caution Equipotential bonding cable
Provide adequate cable diameter when setting up PROFIBUS DP networks and MPI networks. Otherwise interface components will be damaged or destroyed.
Cable shileds are not suitable for the equipotential bonding. Use only the prescribed equipotential bonding cable. Make sure that the diameter of the equipotential bonding cable is at least 16 mm².
Procedure
Caution
Please follow the described guidelines concerning equipotential bonding. Otherwise interface components will be damaged or destroyed.
1. Connect the device to the equipotential bonding as illustrated in the chapter "Connecting a decentralized design."
Connecting 6.2 Connecting a decentralized design
Panel PC 670 V2/870 V2, Control unit 6-6 Operating Instructions, Edition 03/2004, CD Documentation and Drivers
6.2.5 Connecting the computer unit-control unit connecting cable
Introduction For data exchange, connect the control unit and the computer unit with the connecting cable which is illustrated in the "Options" section.
Warning
Avoid contact with network lines and data transmission lines during thunderstorms and do not disconnect any lines during this time.
For complete isolation from the power supply, always pull out the power plug.
Procedure 1. Plug the jack plug of the connection cable into the connector on the remote module of the
control unit, as illustrated in the section "Connecting a decentralized design."
2. Lock the jack plug.
3. Screw on the cable strain relief.
4. Plug the male connector of the connection cable into the connector on the host module of the computer unit, as illustrated in the chapter "Description," "Connecting a decentralized design."
5. Screw on the cable strain relief.
6.2.6 Connecting the power supply.
Principle
Warning
Select an adequately large cable diameter so that the device is not damaged by the cable during a short circuit.
Power supply AC 110/230 V The device can be operated in AC 110/230 V networks. The voltage is switched automatically.
DC 24 V power supply
Caution
Connect the device with DC power supply only to 24V power supply networks which comply with the requirements of a secure low voltage SELV.
Connecting 6.2 Connecting a decentralized design
Panel PC 670 V2/870 V2, Control unit Operating Instructions, Edition 03/2004, CD Documentation and Drivers 6-7
Procedure 1. Attach the supplied power supply cable into the AC/DC power supply connector of the
control unit. Applies only to the Panel PC 670 V2: When the computer unit is supplied with electricity through the power supply connection, the device is in operation and begins to boot.
2. Lock the power plug with the supplied cable clips. This prevents accidental removal of the power plug from the control unit.
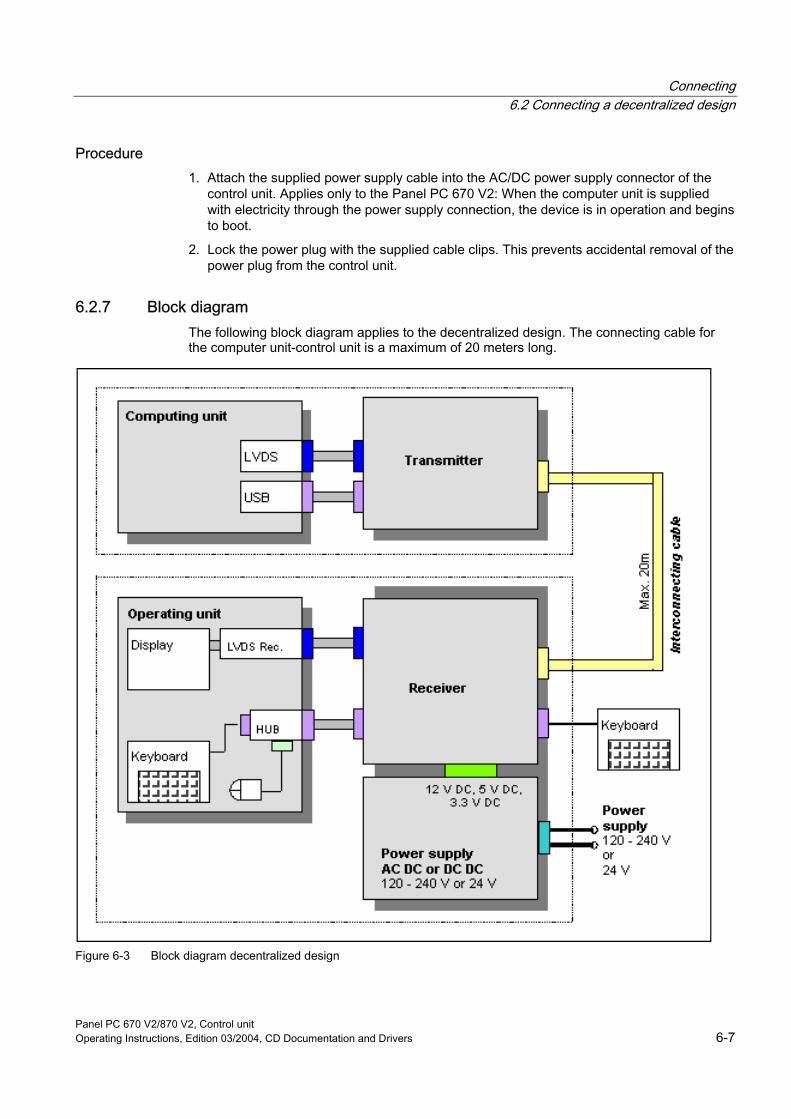
6.2.7 Block diagram The following block diagram applies to the decentralized design. The connecting cable for the computer unit-control unit is a maximum of 20 meters long.
Figure 6-3 Block diagram decentralized design

Panel PC 670 V2/870 V2, Control unit Operating Instructions, Edition 03/2004, CD Documentation and Drivers 7-1
Operating 77.1 Status displays
The two LEDs on the upper left hand side of the front panel display the operating mode:
• LED "POWER" Green: Active voltage.
• LED "TEMP" orange: Temperature threshold exceeded, will be adjusted in SIMATIC-SOM.
For more information, please refer to the chapter "Additional drivers and applications" and to the computer unit operating instructions.
7.2 Operator controls on key panels
7.2.1 Overview The device has the following keypads:
• 2 x 8 vertical keypads with softkey functions
• 2 x 10 horizontal keypads with function keys F1 -F10
• Optional 32 direct key functions
The number of keys, their labelling and function is the same on all key panels. The various panel types differ only in the arrangement of the keys, and in the size and type of the display. The following illustration shows as an example the front view of the 12" variant with the display, the operating mode display, the individual keypads, the integrated mouse and the front-sided USB 1.1 port.

Operating 7.2 Operator controls on key panels
Panel PC 670 V2/870 V2, Control unit 7-2 Operating Instructions, Edition 03/2004, CD Documentation and Drivers
Figure 7-1 Example of a 12" control unit with key panel
7.2.2 Keyboard
Principle The layout of the membrane keyboard is "English/USA international."
Warning Incorrect operation
If you activate several keys simultaneously, a malfunction on the device cannot be excluded. Activate function keys and softkeys only in sequence! Use "KeyTools" as described in the chapter "Additional Drivers and Applications."
Applies after the deactivation of the "security features" of "Key Tools" or after the deinstallation of "KeyHook":
When the additional function keys F13 and S16 are used, or when using your own key code table, serious malfunctions of the user software can occur, because the key codes behind the function keys can also be activated by activating keys other than the configured ones.
Activating a key using a hard object, e.g. a screwdriver, reduces the life of the key.

Operating 7.2 Operator controls on key panels
Panel PC 670 V2/870 V2, Control unit Operating Instructions, Edition 03/2004, CD Documentation and Drivers 7-3
Overview The keyboard is divided into different functional groups:
• Function keys and softkeys
• Control keys
• Alphanumeric keys
• Numeric keys
• Cursor keys
Function keys and softkeys The softkeys are arranged on the left and on the right, and the function keys in a double row below the display. Each key has an integrated LED.
Figure 7-2 Function keys and softkeys
Control keys The control keys activate editing functions and control functions in different applications:
Figure 7-3 Control keys
Operating 7.2 Operator controls on key panels
Panel PC 670 V2/870 V2, Control unit 7-4 Operating Instructions, Edition 03/2004, CD Documentation and Drivers
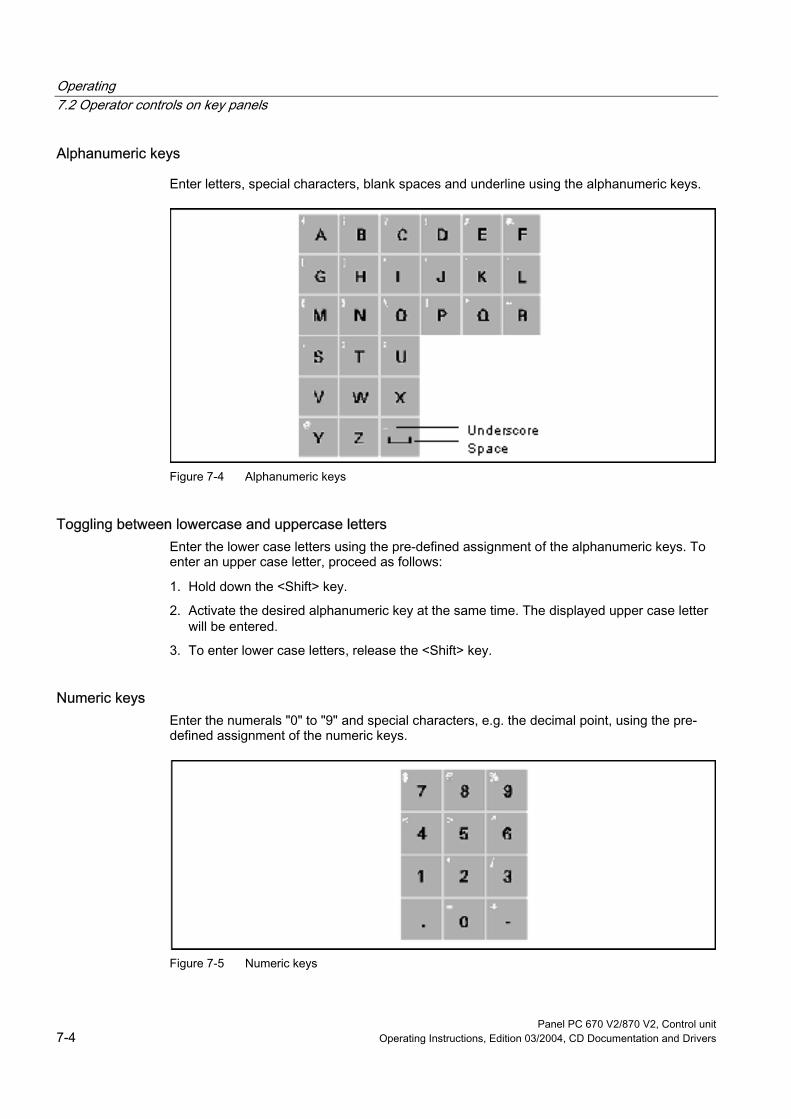
Alphanumeric keys
Enter letters, special characters, blank spaces and underline using the alphanumeric keys.
Figure 7-4 Alphanumeric keys
Toggling between lowercase and uppercase letters Enter the lower case letters using the pre-defined assignment of the alphanumeric keys. To enter an upper case letter, proceed as follows:
1. Hold down the <Shift> key.
2. Activate the desired alphanumeric key at the same time. The displayed upper case letter will be entered.
3. To enter lower case letters, release the <Shift> key.
Numeric keys Enter the numerals "0" to "9" and special characters, e.g. the decimal point, using the pre-defined assignment of the numeric keys.
Figure 7-5 Numeric keys

Operating 7.2 Operator controls on key panels
Panel PC 670 V2/870 V2, Control unit Operating Instructions, Edition 03/2004, CD Documentation and Drivers 7-5
Enter special characters, arithmetic signs and signs Special characters, arithmetic signs and signs are also assigned to most of the alphanumeric and numeric keys. These signs are indicated by white symbols on the top left of the keys. To enter such a sign, proceed as follows:
1. Hold down the <FN> key.
2. Activate the desired alphanumeric or numeric key at the same time. The displayed special character, arithmetic sign or signs will be entered.
3. To enter the signs of the pre-defined assignment again, release the <FN> key.
Cursor keys Navigate, scroll or move the writing mark using the cursor keys. The cursor keys correspond to the usual keys of the PC keyboard.
Figure 7-6 Cursor keys
External keyboards The keyboard layout has been set to "English/USA international." If you use a keyboard with a layout other than the "English/USA international" layout, the key codes of the internal and external keyboards might no longer correspond.
7.2.3 Labelling function keys and softkeys
Area of validity This section applies only to control units with key panels.
Introduction The control unit has two horizontal and two vertical keypads Assign user specific functions to the keys as needed. Label the keys with labelling strips from the options.
DIN A4 film is available for the production and insertion of the labelling strips, as described under Service and Maintenance in the options.
Warning Labeling
Label the function keys and softkeys to conform with the project. Labeling without reference to a project leads to incorrect operations on the system to be observed.

Operating 7.2 Operator controls on key panels
Panel PC 670 V2/870 V2, Control unit 7-6 Operating Instructions, Edition 03/2004, CD Documentation and Drivers
Procedure 1. Label the DIN A4 film with a laser printer with the printing templates from the options, for
example.
2. Cut the labeling strips along the pre-printed lines.
Note
Do not insert handwritten labeling strips until the ink has dried.
3. Insert the labeling strips into the slots provided on the rear side of the control unit.
Figure 7-7 Rear side of the control unit with connectors and slots for the labeling strips
7.2.4 Integrated mouse The position on which you press the middle round button determines the direction in which the cursor moves. The amount of pressure determines the speed of the cursor.
As an alternative, connect an external mouse at the USB 1.1 port.
Operating 7.3 Operator controls of the touch screen panels
Panel PC 670 V2/870 V2, Control unit Operating Instructions, Edition 03/2004, CD Documentation and Drivers 7-7
7.3 Operator controls of the touch screen panels
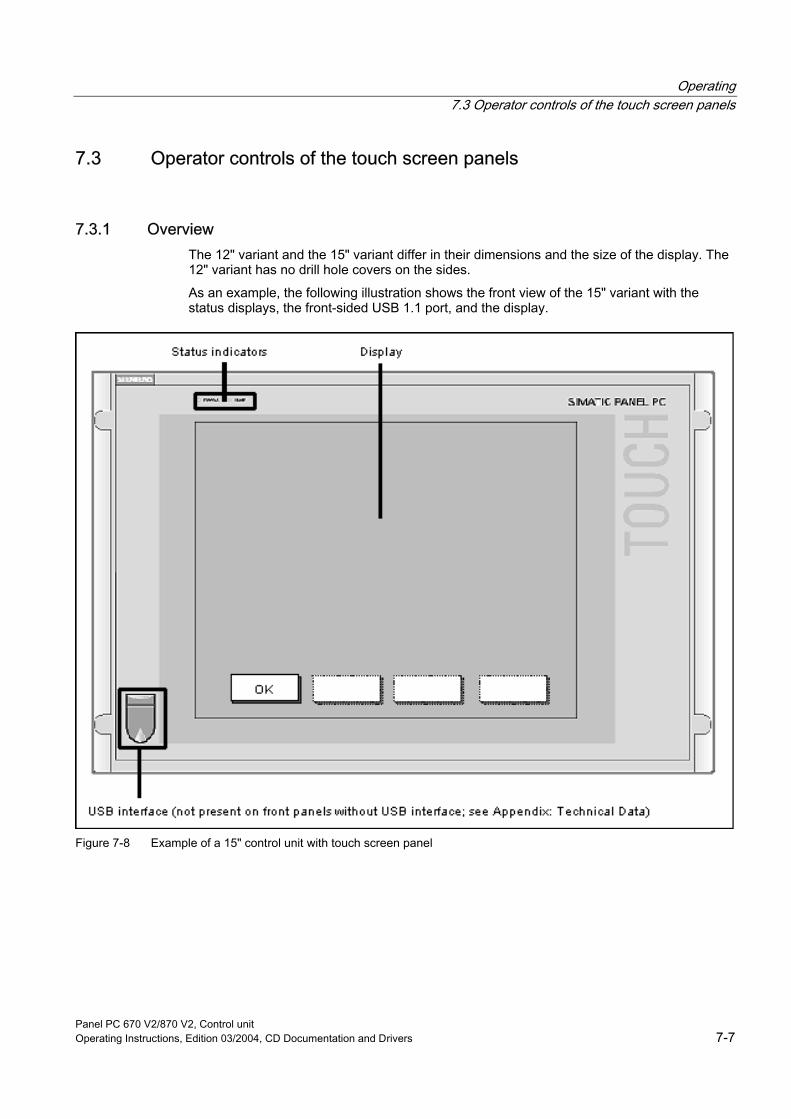
7.3.1 Overview The 12" variant and the 15" variant differ in their dimensions and the size of the display. The 12" variant has no drill hole covers on the sides.
As an example, the following illustration shows the front view of the 15" variant with the status displays, the front-sided USB 1.1 port, and the display.
Figure 7-8 Example of a 15" control unit with touch screen panel
Operating 7.3 Operator controls of the touch screen panels
Panel PC 670 V2/870 V2, Control unit 7-8 Operating Instructions, Edition 03/2004, CD Documentation and Drivers
7.3.2 Touch screen The display is sensitive to touch, and application-specific surface elements, e.g. a button, appear on the screen. By tapping the button with your finger, the function assigned to the button is activated.
Caution
Do not touch the screen in the following situations:
— During the booting of the device until the beep tone
— When plugging or unplugging USB components
— When the warning "Do not touch the screen" appears.
Wait at least 1 second after the warning extinguishes.
The following exertions of pressure are permissible:
• Using a plastic pen with a 1 mm radius at the point: 25 g.
• Using a silicone finger with a diameter of 1.6 cm: 50 g.

Panel PC 670 V2/870 V2, Control unit Operating Instructions, Edition 03/2004, CD Documentation and Drivers 8-1
Operating and parametrizing 88.1 Start up
8.1.1 Overview
Checklist Before starting up the device for the first time, go through the following checklist:
• Have you taken into account the proper ambient and environmental conditions for the device and the connected I/O modules, as described in the technical information?
• Have you found out how to connect the equipotential bonding?
• Have you found out how to connect the power supply?
• Read over this information in the respective "Connecting" chapter of the control unit and computer unit operating instructions. Please follow all guidelines.
Caution
Condensation When transporting the device at low temperatures, prevent condensation from forming on or in the device. The same applies when the device is subjected to extreme changes in temperature. Wait 12 hours before switching the device on.
Before starting up the device, allow it to adjust slowly to room temperature. Do not subject it directly to heat radiation from a heating device, however.
I/O modules Connect the I/O modules using shielded cable and metal plugs. Otherwise the operating license expires. Secure the plug of the interface cable on the housing of the device. This improves the electrical shielding.
Start up Do not switch off the device during the start up. Otherwise parts of the software will be lost which are necessary for trouble-free operation.
Use the default values in the BIOS. Otherwise the operating system will not be installed properly.
Operating and parametrizing 8.1 Start up
Panel PC 670 V2/870 V2, Control unit 8-2 Operating Instructions, Edition 03/2004, CD Documentation and Drivers
Requirements The following devices have been connected:
• Computer unit
• Control unit
• PS/2 mouse
• PS/2 keyboard
For additional information, refer to computer unit operating instructions.
Procedure 1. Turn on device
2. Install Microsoft Windows operating system.
3. Install applications and drivers.
8.1.2 Turn on device
Procedure 1. Decentralized design only: Plug the supplied power supply cable into the AC/DC power
supply connector of the decentralized control unit and lock it in place. Connect the power supply cable to the supply network. The "POWER" LED will light up.
2. Plug the power plug of the supplied power supply cable in the AC/DC power supply connector of the computer unit.
3. Lock the power plug in place. For Panel PC 670 only: clamp the supplied ferrite core onto the power supply cable. This step can also be performed later. For additional information, please refer to the chapter "Connecting" in the computer unit operating instructions.
4. Plug the power supply cable of the computer unit into a socket with a grounded protective conductor.
5. If your computer has a power switch, turn on the computer unit at the power switch. In the central design, not until now will the "POWER" LED illuminate. The device is now in operation and booting.
Note
Applies to the decentralized design: If the picture signal is missing, e.g. when the computer unit- control unit connecting cable is not plugged in, the control unit screen is white.
Self test After connection to the power supply, the device performs a self test. During the self test, the message "Press <F2> to enter SETUP" appears briefly.
When the self test is finished, the operating system will be loaded.
Operating and parametrizing 8.1 Start up
Panel PC 670 V2/870 V2, Control unit Operating Instructions, Edition 03/2004, CD Documentation and Drivers 8-3
8.1.3 Setting up Microsoft Windows operating system
Introduction Immediately following the start up of the computer unit, the setup assistant will start, which is used to setup the parameters of the operating system.
Note
The dialogs of the setup assistants differ slightly in some places in the Windows 98 SE, Windows NT 4.0, Windows 2000 and Windows XP operating systems.
In order to change to the next dialog, click on the "Continue" button. In order to change the entry in the previous dialog, click on the "return" button.
Procedure 1. For Windows 98 and Windows NT 4.0 only: If required, enter the Microsoft Windows
Product Key which you wrote down in the identification data.
2. Accept the Microsoft licensing agreement.
3. For Windows 2000 and Windows XP only: Perform the regional settings of the operating system.
4. Enter the company names and user names.
5. Enter the administrator password where necessary.
6. When connecting a computer unit to a network only: Enter the name of the computers for identification.
7. When the dialog "SetDisplay" appears only: Click on the button with the screen size and screen resolution which matches your device.
8. Restarting the operating system: – Windows 98: Exit the operating system session and restart the computer unit.
– Windows NT 4.0: Click on the "Finish" button.
– Windows 2000 and Windows XP: automatic restart.
The operating system will be restarted. The system settings will be updated and the desktop will be set up. The setup of the operating system is complete.
8.1.4 Installing applications and drivers
Introduction After the computer unit is restarted, different dialogs appear on the screen with which the drivers and applications can be installed.
Note
The dialogs overlap themselves. In order to change from one dialog to another, press the key combination <Alt>+<Tab>.
Operating and parametrizing 8.1 Start up
Panel PC 670 V2/870 V2, Control unit 8-4 Operating Instructions, Edition 03/2004, CD Documentation and Drivers
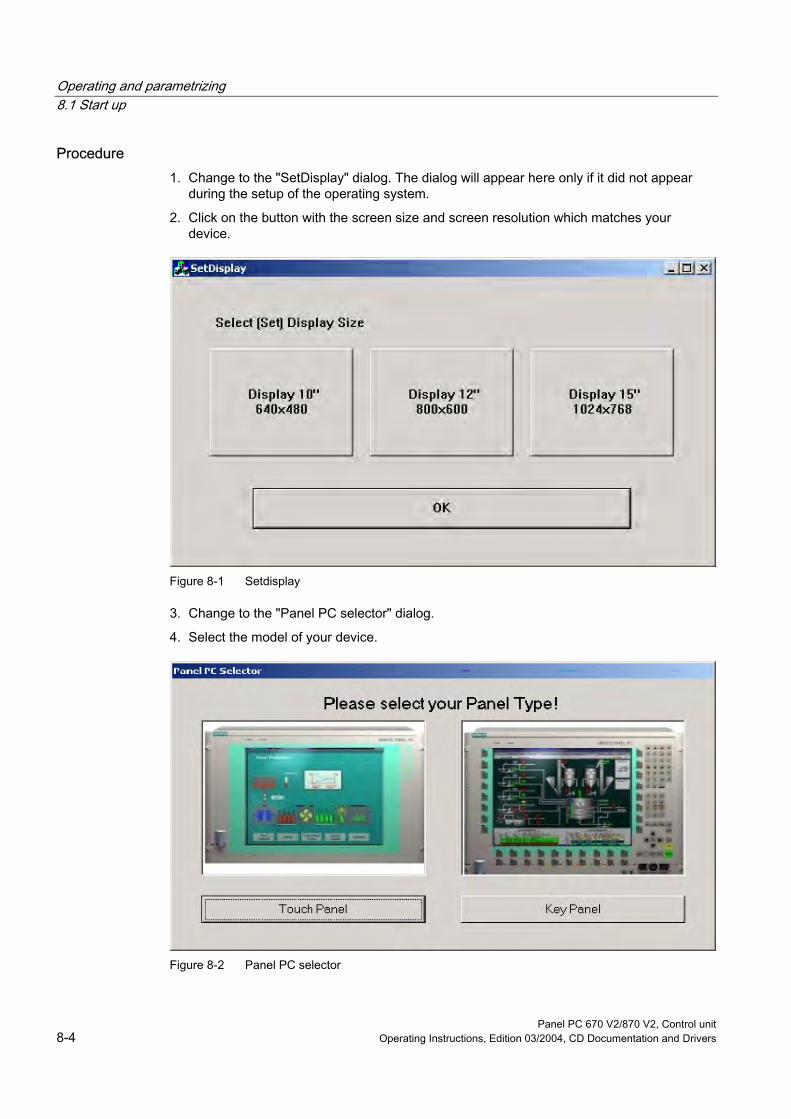
Procedure 1. Change to the "SetDisplay" dialog. The dialog will appear here only if it did not appear
during the setup of the operating system.
2. Click on the button with the screen size and screen resolution which matches your device.
Figure 8-1 Setdisplay
3. Change to the "Panel PC selector" dialog.
4. Select the model of your device.
Figure 8-2 Panel PC selector

Operating and parametrizing 8.1 Start up
Panel PC 670 V2/870 V2, Control unit Operating Instructions, Edition 03/2004, CD Documentation and Drivers 8-5
The system settings of the device will be updated.
5. Change to the "Digital signature" dialog.
6. For Windows 2000 and Windows XP only: Click on the "Yes" button for every digital signature.
Figure 8-3 Digital signature
7. Decentralized design only: Enter the path to the USB keyboard controller driver: "C:/drivers…/USB Keyboard controller" The touchware driver and USB keyboard controller driver will be installed.
8. Exit the operating system session and restart the computer unit. Otherwise the "Security features" from "KeyTools" or "KeyHook" will not be activated.
Warning
Use "KeyTools" as described in the chapter "Additional Drivers and Applications."
Applies after the deactivation of the "security features" of "Key Tools" or after the deinstallation of "KeyHook":
When the additional function keys F13 and S16 are used, or when using your own key code table, serious malfunctions of the user software can occur, because the key codes behind the function keys can also be activated by activating keys other than the configured ones.
The next two steps apply to control units with touch screen panels: After the computer unit is restarted, the "Touch screen calibration" dialog will appear. Carry out the following steps carefully:

Operating and parametrizing 8.1 Start up
Panel PC 670 V2/870 V2, Control unit 8-6 Operating Instructions, Edition 03/2004, CD Documentation and Drivers
Figure 8-4 Touch screen calibration
9. Click on the "Calibrate" button. The dialog for touch calibration will appear.
10. Touch the cross hairs on the touch screen for at least 3 seconds and no longer than 10 seconds. The "Calibration complete" dialog will appear. Exit the calibration by clicking on the "Done" button.
11. After installing the drivers and applications, exit the operating system session and restart the computer unit.
The installation of the drivers and applications is complete. For more information, please refer to the chapter "Additional drivers and applications" in the control unit operating instructions.
Notice
After starting up your device, find out more about the particulars of the operating system in the chapter "Starting up" in the computer unit operating instructions. More information about the Microsoft Windows operating system is located in the chapter "Maintenance and Service" in the computer unit operating instructions.
Raid system Applies only to the raid system option: The application "Raid promise monitor" will appear after every restart of the computer unit. For additional information, please refer to the chapter "Functions" in the computer unit operating instructions.

Operating and parametrizing 8.2 Normal operation
Panel PC 670 V2/870 V2, Control unit Operating Instructions, Edition 03/2004, CD Documentation and Drivers 8-7
Figure 8-5 Raid promise monitor
8.2 Normal operation
8.2.1 Turning on device
Requirement • The I/O modules, e.g. mouse and keyboard, have been connected.
Caution
Connect the I/O modules using shielded cable and metal plugs. Otherwise the operating license expires. Secure the plug of the interface cable on the housing of the device. This improves the electrical shielding.
Follow the guidelines in the "Interfaces" section of the chapter "Connecting."
• The operating system and the service packs have been installed and set up on the hard disk of the device. For additional information, please refer to the chapter "Starting up" in the computer unit operating instructions.
• The pre-installed drivers and applications have been set up appropriately. For more information, please refer to the chapter "Additional drivers and applications."
• The proper ambient and environmental conditions according to the technical data for the device and the connected I/O modules have been observed.
Operating and parametrizing 8.2 Normal operation
Panel PC 670 V2/870 V2, Control unit 8-8 Operating Instructions, Edition 03/2004, CD Documentation and Drivers
Procedure
Warning Danger of incorrect operations!
The following applies to external input devices or combinations of external input devices and control units with key panels: Ambiguous key codes can cause serious malfunctions of the application program.
Always activate the "Security features" of "KeyTools." Please follow the relevant safety guidelines in the chapter "Additional drivers and applications."
Caution
If condensation has formed, wait 12 hours before switching the device on.
1. Decentralized design only: Connect the decentralized control unit to the power supply. The "POWER" LED will light up.
2. Plug the power supply cable of the computer unit into a socket with a grounded protective conductor.
3. If your computer has a power switch, turn on the computer unit at the power switch. In the central design, not until now will the "POWER" LED illuminate. The device is now in operation and booting.
Caution Danger of data loss!
Do not switch off the power supply when the device is in operation. Do not disconnect the power suply until the device has shut down properly.
After switching on the power supply, the device performs a self test. During the self test, the message "Press <F2> to enter SETUP" appears briefly.
When the self test is finished, the operating system will be loaded and the desktop will be displayed.
The booting process has been completed successfully.
8.2.2 Turning off the device
Introduction To turn off the device, shut down the device and disconnect it from the power supply.
Procedure 1. Exist the operating system session of the computer unit properly.
Caution
When using the operating systems Windows 98, Windows 2000 and Windows XP, wait until the display has turned dark.
Applies to the decentralized design: When the computer unit is turned off or the operating system session has been exited, the display is always white.
Operating and parametrizing 8.3 Additional drivers and applications
Panel PC 670 V2/870 V2, Control unit Operating Instructions, Edition 03/2004, CD Documentation and Drivers 8-9
2. If your computer has a power switch, turn off the computer unit at the power switch.
3. In order to isolate the power supply completely, turn off the power at the power supply switch and pull out the computer unit plug and the control units plug.
Warning
Always pull out the power supply plug in order to isolate the power to the devices.
On the direct key module, make sure the keys of the membrane keyboard remain operable until the voltage of the entire device has been switched off.
8.3 Additional drivers and applications
8.3.1 Overview All of the necessary drivers and applications are contained in the supplied "Documentation & Drivers" CD.
Caution
Do not turn off the device during the installation of drivers and applications. Otherwise parts of the software which are necessary for trouble-free operation will be lost.
Note
The supplied drivers and applications have been tested for the system and released for this device. No warranty can be provided for other software.
The following illustrations of drivers and applications refer to the Panel PC 870 V2. The corresponding software for the Panel PC 670 V2 differs slightly from these illustrations in some places.
The 10" key panel is available only on the Panel PC 670 V2.
Press the "Help" button to obtain information concerning the buttons of a dialog.
8.3.2 Setting up touchware
Introduction The modification of touch pre-settings simplifies operation under Windows. Make user-specific settings in the touchware using the tab controls "Touch settings" and "Tools."

Operating and parametrizing 8.3 Additional drivers and applications
Panel PC 670 V2/870 V2, Control unit 8-10 Operating Instructions, Edition 03/2004, CD Documentation and Drivers
Special features
Warning Incorrect operation
If you should touch the touch screen while making settings in touchware or if the screen saver is active, the SIMATIC process visualization software, e.g. ProTool/Pro, will carry out the functions which happen to be behind it.
Caution
Do not touch the screen in the following situations:
— While the device is booting until the beep tone
— When plugging or unplugging USB components
— When the warning "Do not touch the screen" appears.
Wait at least 1 second after the warning extinguishes.
Start • "MicroTouch TouchWare" symbol on the desktop
• Start menu "Start", command "Settings > Control panel > MicroTouch Touchscreen"
Procedure 1. Start the touchware settings
2. Switch to the "Touch settings" tab control. The following dialog will appear:

Operating and parametrizing 8.3 Additional drivers and applications
Panel PC 670 V2/870 V2, Control unit Operating Instructions, Edition 03/2004, CD Documentation and Drivers 8-11
Figure 8-6 Touch settings tab control
3. Click on the "Drawing" button.
4. Click on the "Right click" button. The right click tool will be activated.
8.3.3 Repeating calibration
Introduction If the touch screen does not react as expected when touched, repeat the calibration. To do this, first activate the 2 point calibration and then calibrate the touch screen.
Procedure 1. Start the touchware settings as described in the last section.
2. Switch to the "Touch settings" tab control. The following dialog will appear:
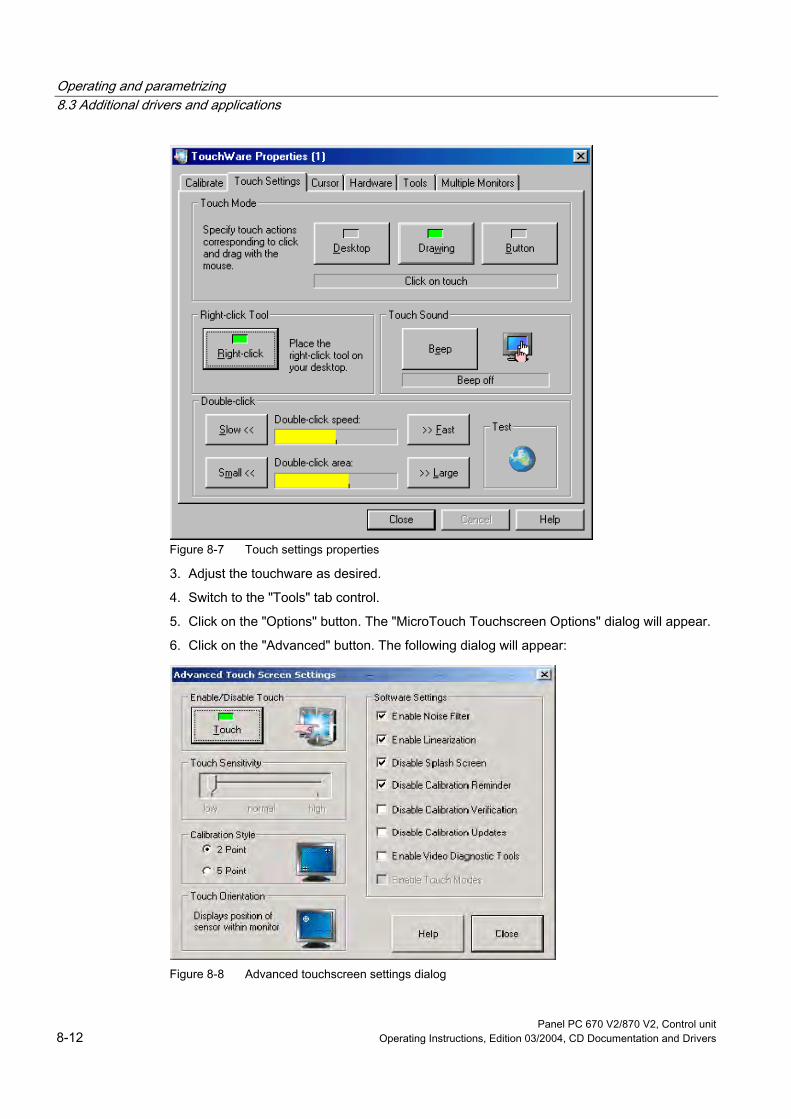
Operating and parametrizing 8.3 Additional drivers and applications
Panel PC 670 V2/870 V2, Control unit 8-12 Operating Instructions, Edition 03/2004, CD Documentation and Drivers
Figure 8-7 Touch settings properties
3. Adjust the touchware as desired.
4. Switch to the "Tools" tab control.
5. Click on the "Options" button. The "MicroTouch Touchscreen Options" dialog will appear.
6. Click on the "Advanced" button. The following dialog will appear:
Figure 8-8 Advanced touchscreen settings dialog
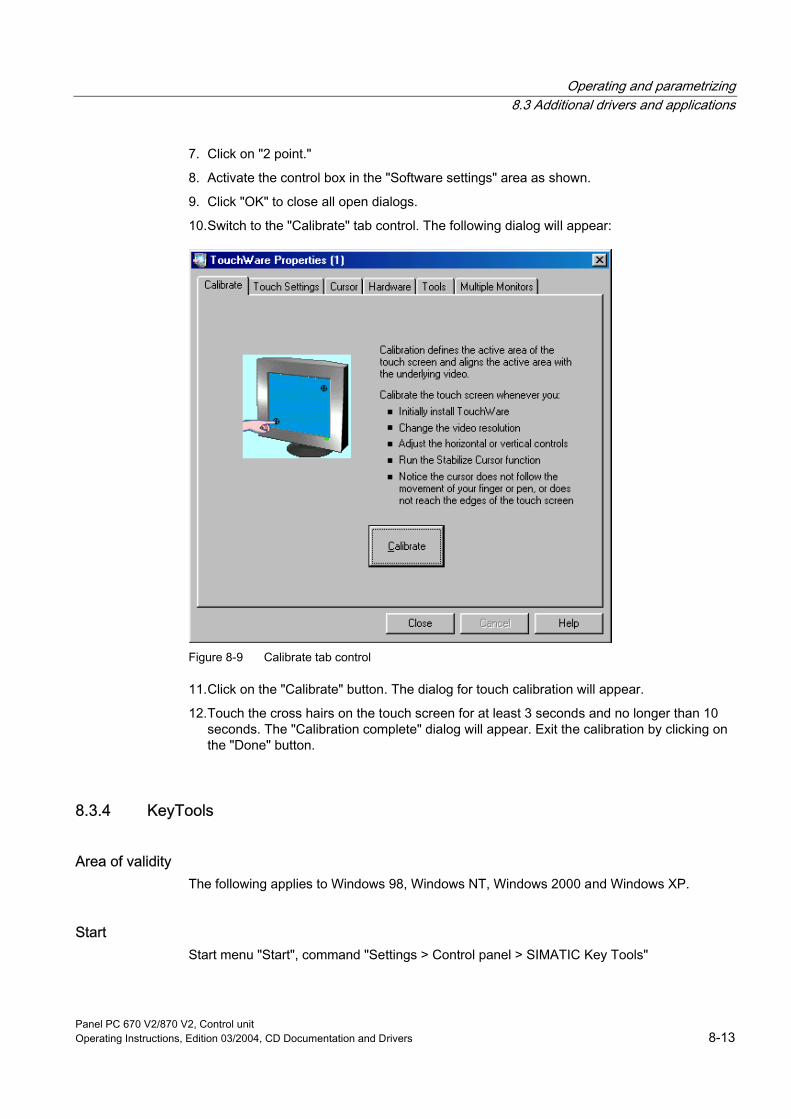
Operating and parametrizing 8.3 Additional drivers and applications
Panel PC 670 V2/870 V2, Control unit Operating Instructions, Edition 03/2004, CD Documentation and Drivers 8-13
7. Click on "2 point."
8. Activate the control box in the "Software settings" area as shown.
9. Click "OK" to close all open dialogs.
10. Switch to the "Calibrate" tab control. The following dialog will appear:
Figure 8-9 Calibrate tab control
11. Click on the "Calibrate" button. The dialog for touch calibration will appear.
12. Touch the cross hairs on the touch screen for at least 3 seconds and no longer than 10 seconds. The "Calibration complete" dialog will appear. Exit the calibration by clicking on the "Done" button.
8.3.4 KeyTools
Area of validity The following applies to Windows 98, Windows NT, Windows 2000 and Windows XP.
Start Start menu "Start", command "Settings > Control panel > SIMATIC Key Tools"

Operating and parametrizing 8.3 Additional drivers and applications
Panel PC 670 V2/870 V2, Control unit 8-14 Operating Instructions, Edition 03/2004, CD Documentation and Drivers
Function SIMATIC Key Tools is a selection of applications for the Panel PC for adapting the key codes sent from the key panel of the control unit. A description of the "KeyTools" is located in the "Help" menu, and more information is located in the menu "Info > About."
"KeyTools" consists of the following tools:
• "Keycode table", previously "KeyPad": Loading and editing of key code tables
• "WinCC hotkey function", previously "KeyHook": WinCC hotkey function activation und deactivation.
• "Security features": prevents two function keys from being activated simultaneously. This prevents incorrect operations and undefined states of the application program.
Warning
For security purposes, always implement "Security features" and never deactivate "Security features." If the user deactivates "Security features" nonetheless, make sure that no malfunctions are triggered in the application program.
Serious malfunctions of the application program cannot be ruled out in external input devices or combinations of external input devices and control devices with key panels. The "Security features" are ineffective in such cases.
8.3.5 KeyHook
Area of validity The following applies to devices which have a key panel and no "KeyTools" at their disposal.
Start
Warning Incorrect operation
Do not uninstall the "KeyHook" application!
Applies after the deinstallation of "KeyHook":
When the additional function keys F13 and S16 are used, or when using your own key code table, serious malfunctions of the user software can occur, because the key codes behind the function keys can also be activated by activating keys other than the configured ones.
Start menu "Start", command "Settings > Control panel > Keyboard," Tab control "KeyHook."

Operating and parametrizing 8.3 Additional drivers and applications
Panel PC 670 V2/870 V2, Control unit Operating Instructions, Edition 03/2004, CD Documentation and Drivers 8-15
Function • "KeyHook" prevents the improper activation of two function keys simultaneously. This
applies to the keyboard on control units with key panels:
• Applies to Windows NT, Windows 2000 and Windows XP:
The function keys <F13> to <F20> and <S1> to <S12> send key combinations. For example, pressing the key <F13> represents the key combination <Shift+F1> and releasing it the key combination <Shift+F1>. For certain software products, e.g. SIMATIC WinCC, another sequence of key combinations is required. Using the "KeyHook," the key combination <Shift+F1> is changed to <F1+Shift> by releasing.
Figure 8-10 KeyHook
8.3.6 Keypad
Area of validity The following applies to devices which have a key panel and no "KeyTools" at their disposal. The following section applies to Windows 98, Windows NT, Windows 2000 and Windows XP.
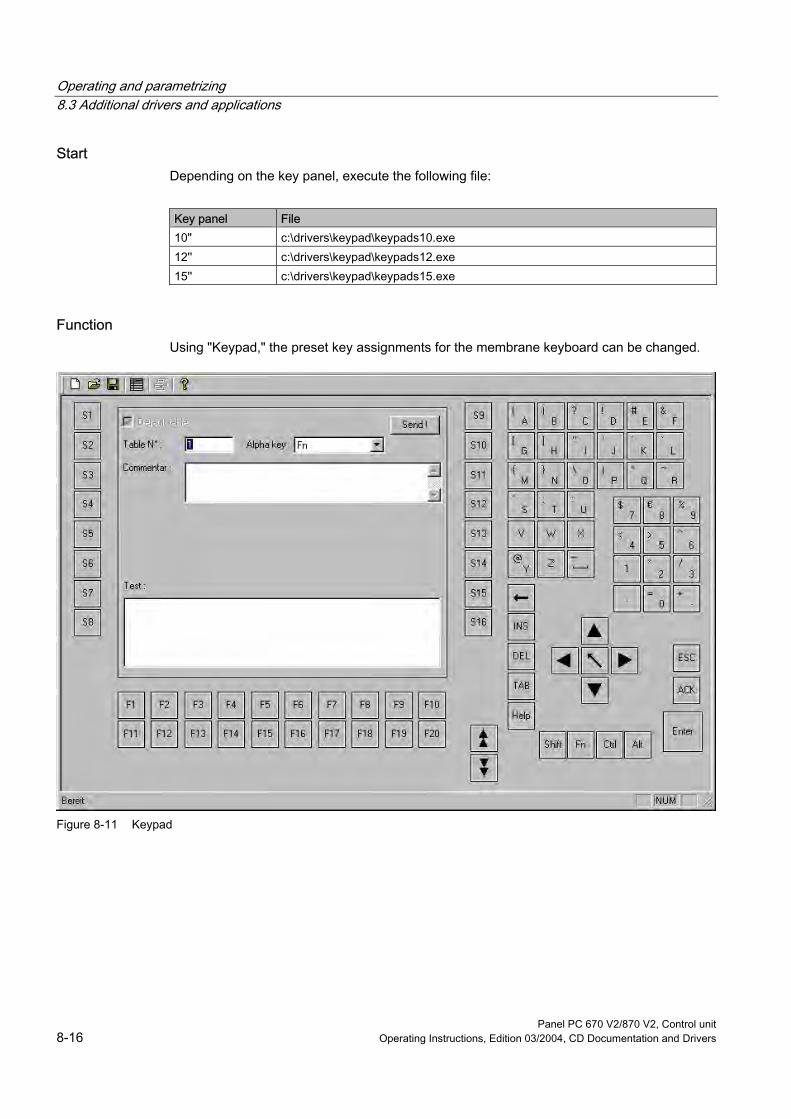
Operating and parametrizing 8.3 Additional drivers and applications
Panel PC 670 V2/870 V2, Control unit 8-16 Operating Instructions, Edition 03/2004, CD Documentation and Drivers
Start Depending on the key panel, execute the following file:
Key panel File 10" c:\drivers\keypad\keypads10.exe 12'' c:\drivers\keypad\keypads12.exe 15'' c:\drivers\keypad\keypads15.exe
Function Using "Keypad," the preset key assignments for the membrane keyboard can be changed.
Figure 8-11 Keypad
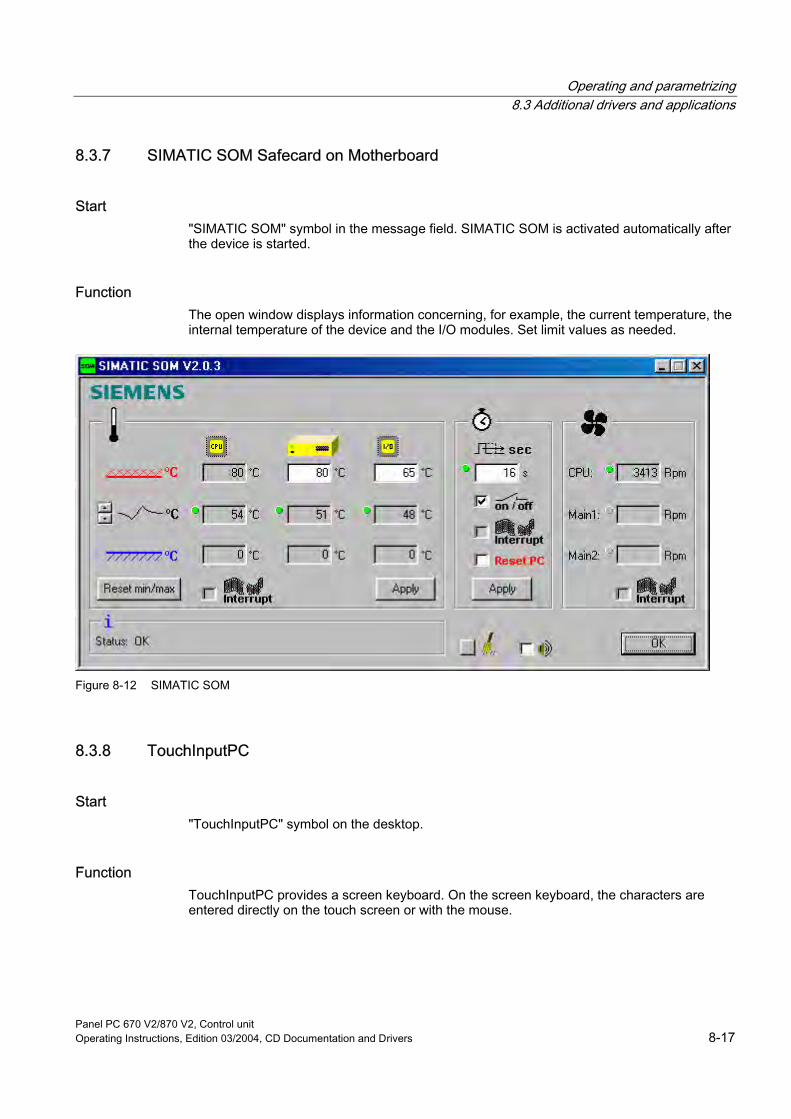
Operating and parametrizing 8.3 Additional drivers and applications
Panel PC 670 V2/870 V2, Control unit Operating Instructions, Edition 03/2004, CD Documentation and Drivers 8-17
8.3.7 SIMATIC SOM Safecard on Motherboard
Start "SIMATIC SOM" symbol in the message field. SIMATIC SOM is activated automatically after the device is started.
Function The open window displays information concerning, for example, the current temperature, the internal temperature of the device and the I/O modules. Set limit values as needed.
Figure 8-12 SIMATIC SOM
8.3.8 TouchInputPC
Start "TouchInputPC" symbol on the desktop.
Function TouchInputPC provides a screen keyboard. On the screen keyboard, the characters are entered directly on the touch screen or with the mouse.

Operating and parametrizing 8.3 Additional drivers and applications
Panel PC 670 V2/870 V2, Control unit 8-18 Operating Instructions, Edition 03/2004, CD Documentation and Drivers
Figure 8-13 TouchInputPC
8.3.9 Set brightness
Start "Set brightness" symbol on the desktop.
Function The intensity of the backlighting is adjusted using "Set brightness."
Figure 8-14 Set brightness
8.3.10 CheckLanguageID
Area of validity The following applies to Windows 2000 Multi-Language and Windows XP Multi-Language.
Start c:\drivers\checklang\checklangid.exe
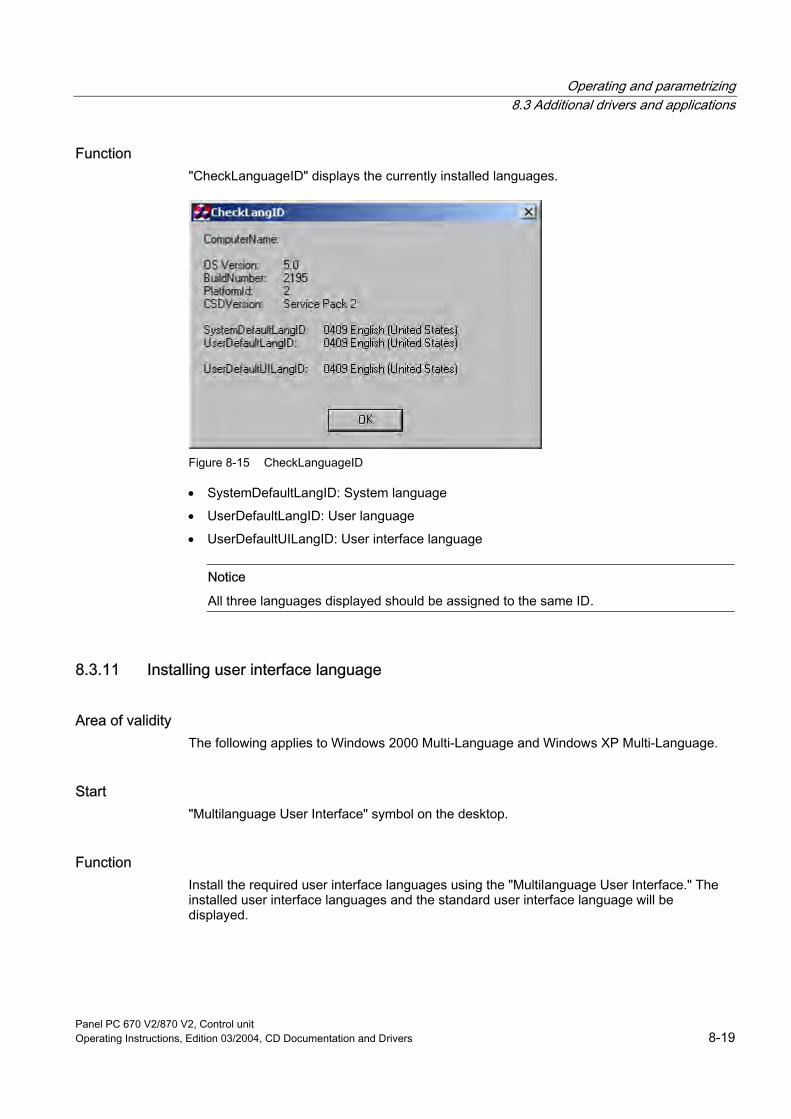
Operating and parametrizing 8.3 Additional drivers and applications
Panel PC 670 V2/870 V2, Control unit Operating Instructions, Edition 03/2004, CD Documentation and Drivers 8-19
Function "CheckLanguageID" displays the currently installed languages.
Figure 8-15 CheckLanguageID
• SystemDefaultLangID: System language
• UserDefaultLangID: User language
• UserDefaultUILangID: User interface language Notice
All three languages displayed should be assigned to the same ID.
8.3.11 Installing user interface language
Area of validity The following applies to Windows 2000 Multi-Language and Windows XP Multi-Language.
Start "Multilanguage User Interface" symbol on the desktop.
Function Install the required user interface languages using the "Multilanguage User Interface." The installed user interface languages and the standard user interface language will be displayed.

Operating and parametrizing 8.3 Additional drivers and applications
Panel PC 670 V2/870 V2, Control unit 8-20 Operating Instructions, Edition 03/2004, CD Documentation and Drivers
Figure 8-16 Multilanguage File Installation
Procedure 1. Start the "Multilanguage User Interface".
2. Activate the desired languages in the upper field.
3. Select the desired standard language from the lower field.
4. Close the dialog with the "OK" button. The changes become effective when the user logs off, logs back on, or initiates a restart.
8.3.12 Changing user language
Introduction The display of date, time, cash amount, and decimal point are language-specific. Using the relevant standard language, foreign text will be displayed in the respective native language if the application supports the standard language.
Applications have language-specific dialogs. Using the relevant system language, foreign text in dialogs will be displayed in the respective native language if the application supports the system language.

Operating and parametrizing 8.3 Additional drivers and applications
Panel PC 670 V2/870 V2, Control unit Operating Instructions, Edition 03/2004, CD Documentation and Drivers 8-21
Start • Start menu "Start", command "Settings > Control panel> Regional settings," Tab control
"Input."
• Context menu of the symbol "Change language" in the message field, command "Properties," Tab control "Input"
Function In the regional settings, tab control "General," set the standard language of applications, e.g. "MS Excel," in the upper field. Set the system language of applications, e.g. "Outlook," in the lower field.
Notice
When the standard language and the input language are not selected as described, Asian characters, for example, will not be displayed correctly on the screen.
Procedure 1. Open the "Regional settings" dialog box. The following dialog will appear:
Figure 8-17 Regional settings dialog
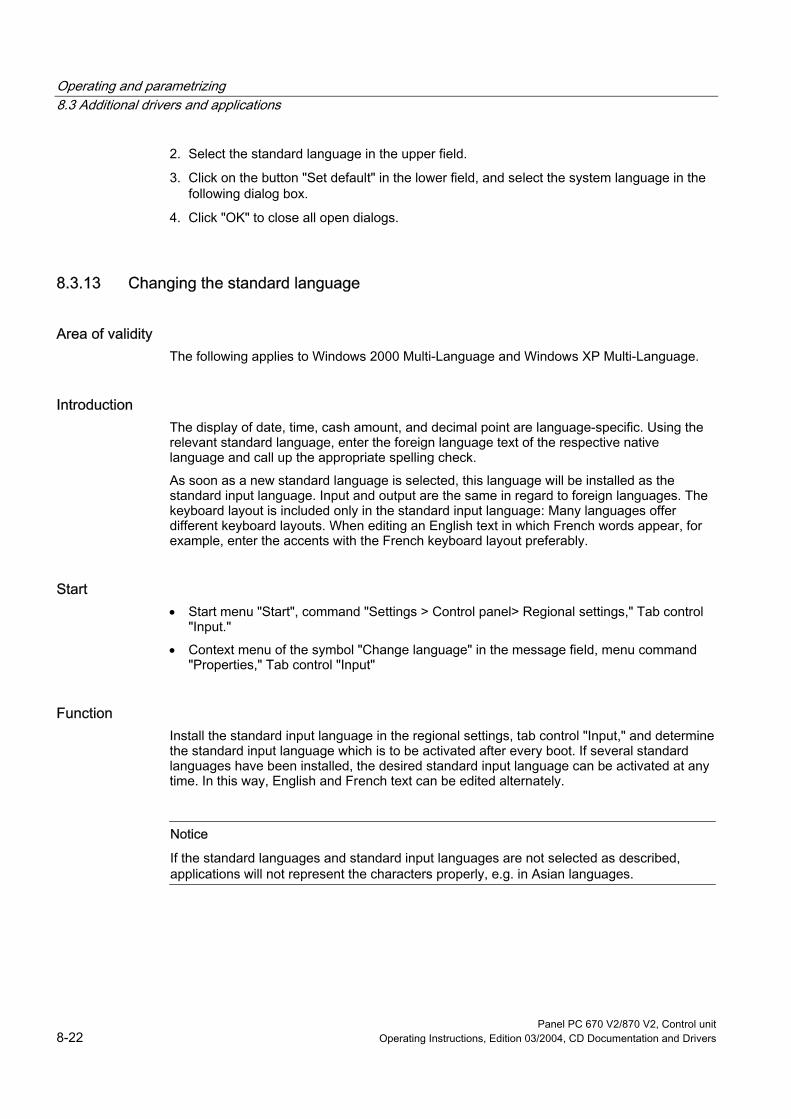
Operating and parametrizing 8.3 Additional drivers and applications
Panel PC 670 V2/870 V2, Control unit 8-22 Operating Instructions, Edition 03/2004, CD Documentation and Drivers
2. Select the standard language in the upper field.
3. Click on the button "Set default" in the lower field, and select the system language in the following dialog box.
4. Click "OK" to close all open dialogs.
8.3.13 Changing the standard language
Area of validity The following applies to Windows 2000 Multi-Language and Windows XP Multi-Language.
Introduction The display of date, time, cash amount, and decimal point are language-specific. Using the relevant standard language, enter the foreign language text of the respective native language and call up the appropriate spelling check.
As soon as a new standard language is selected, this language will be installed as the standard input language. Input and output are the same in regard to foreign languages. The keyboard layout is included only in the standard input language: Many languages offer different keyboard layouts. When editing an English text in which French words appear, for example, enter the accents with the French keyboard layout preferably.
Start • Start menu "Start", command "Settings > Control panel> Regional settings," Tab control
"Input."
• Context menu of the symbol "Change language" in the message field, menu command "Properties," Tab control "Input"
Function Install the standard input language in the regional settings, tab control "Input," and determine the standard input language which is to be activated after every boot. If several standard languages have been installed, the desired standard input language can be activated at any time. In this way, English and French text can be edited alternately.
Notice
If the standard languages and standard input languages are not selected as described, applications will not represent the characters properly, e.g. in Asian languages.
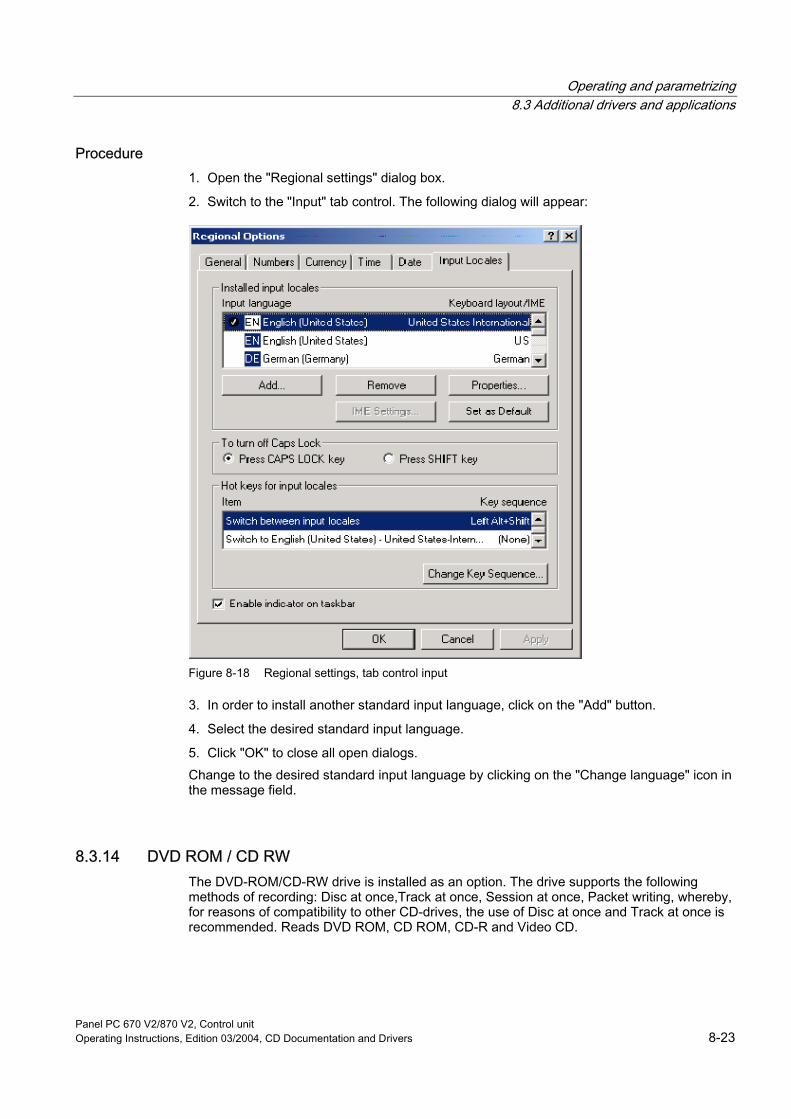
Operating and parametrizing 8.3 Additional drivers and applications
Panel PC 670 V2/870 V2, Control unit Operating Instructions, Edition 03/2004, CD Documentation and Drivers 8-23
Procedure 1. Open the "Regional settings" dialog box.
2. Switch to the "Input" tab control. The following dialog will appear:
Figure 8-18 Regional settings, tab control input
3. In order to install another standard input language, click on the "Add" button.
4. Select the desired standard input language.
5. Click "OK" to close all open dialogs. Change to the desired standard input language by clicking on the "Change language" icon in the message field.
8.3.14 DVD ROM / CD RW The DVD-ROM/CD-RW drive is installed as an option. The drive supports the following methods of recording: Disc at once,Track at once, Session at once, Packet writing, whereby, for reasons of compatibility to other CD-drives, the use of Disc at once and Track at once is recommended. Reads DVD ROM, CD ROM, CD-R and Video CD.
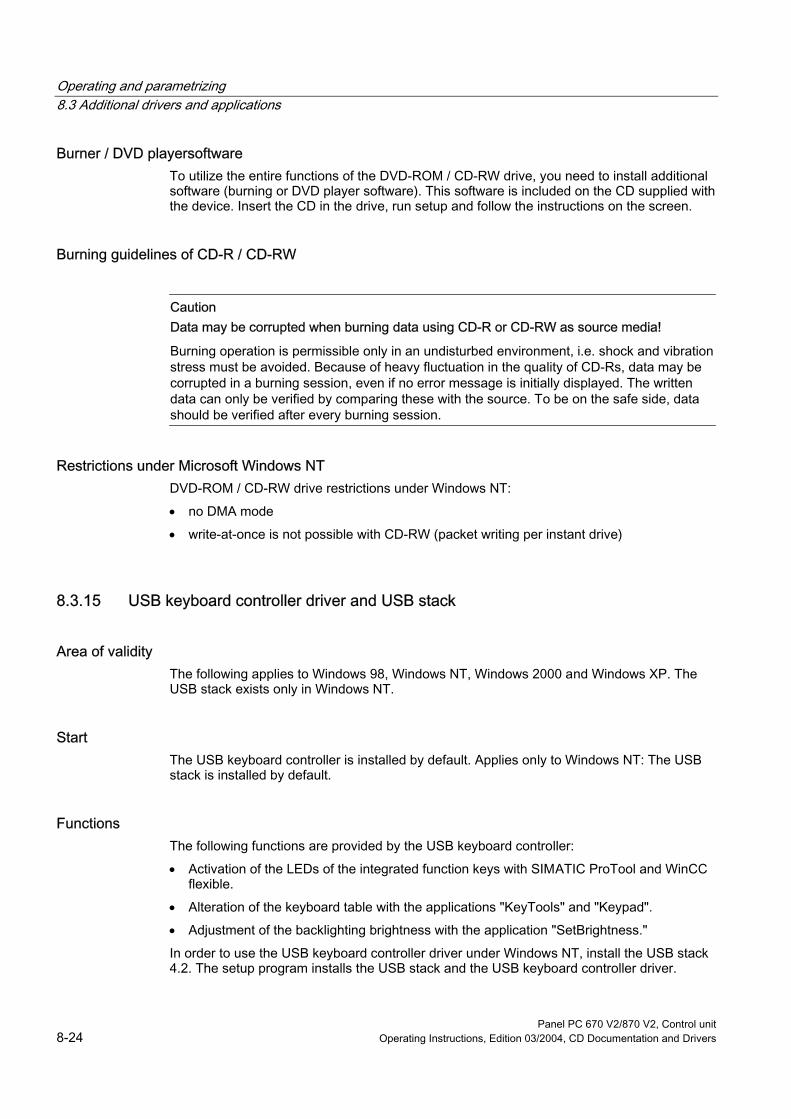
Operating and parametrizing 8.3 Additional drivers and applications
Panel PC 670 V2/870 V2, Control unit 8-24 Operating Instructions, Edition 03/2004, CD Documentation and Drivers
Burner / DVD playersoftware To utilize the entire functions of the DVD-ROM / CD-RW drive, you need to install additional software (burning or DVD player software). This software is included on the CD supplied with the device. Insert the CD in the drive, run setup and follow the instructions on the screen.
Burning guidelines of CD-R / CD-RW
Caution Data may be corrupted when burning data using CD-R or CD-RW as source media!
Burning operation is permissible only in an undisturbed environment, i.e. shock and vibration stress must be avoided. Because of heavy fluctuation in the quality of CD-Rs, data may be corrupted in a burning session, even if no error message is initially displayed. The written data can only be verified by comparing these with the source. To be on the safe side, data should be verified after every burning session.
Restrictions under Microsoft Windows NT DVD-ROM / CD-RW drive restrictions under Windows NT:
• no DMA mode
• write-at-once is not possible with CD-RW (packet writing per instant drive)
8.3.15 USB keyboard controller driver and USB stack
Area of validity The following applies to Windows 98, Windows NT, Windows 2000 and Windows XP. The USB stack exists only in Windows NT.
Start The USB keyboard controller is installed by default. Applies only to Windows NT: The USB stack is installed by default.
Functions The following functions are provided by the USB keyboard controller:
• Activation of the LEDs of the integrated function keys with SIMATIC ProTool and WinCC flexible.
• Alteration of the keyboard table with the applications "KeyTools" and "Keypad".
• Adjustment of the backlighting brightness with the application "SetBrightness."
In order to use the USB keyboard controller driver under Windows NT, install the USB stack 4.2. The setup program installs the USB stack and the USB keyboard controller driver.

Panel PC 670 V2/870 V2, Control unit Operating Instructions, Edition 03/2004, CD Documentation and Drivers 9-1
Maintenance and Service 99.1 Service
Scope of service The device is designed to require little service. Clean the keyboard membrane nevertheless.
Cleaning agent Use dish soap or foaming screen cleaner only as cleaning agents.
Caution
Do not clean the device with agressive solvents or scrubbing agents or with pressurized air or steam cleaner.
Procedure 1. Turn off the device. This prevents the accidental triggering of functions when the keys are
touched.
2. Dampen the cleaning cloth.
3. Spray the cleaning agent on the cloth and not directly on the device.
4. Clean the device with the cleaning cloth.

Maintenance and Service 9.2 Maintenance and replacement parts
Panel PC 670 V2/870 V2, Control unit 9-2 Operating Instructions, Edition 03/2004, CD Documentation and Drivers
9.2 Maintenance and replacement parts The following replacement parts are available for the device:
Replacement part Order number: The complete control unit A generally valid order number for the control unit
cannot be given because it is dependent on the control unit and computer unit configuration at hand and their order numbers. In this case, please contact your Siemens branch office.
The complete computer unit For additional information, please refer to computer unit operating instructions.
In addition for the decentralized design: the connecting cable 2 m, 5 m, 10 m, 20 m
For further information, please refer to options in the chapter "Description" 6XV1440-7AH20 6XV1440-7AH50 6XV1440-7AN10 6XV1440-7AN20
Set of clamps 6FC5248-0AF06-0AA0 Rubber cover for the USB port 6FC5248-0AF05-0AA0 Lithium battery W79084-E1003-B1
9.3 Separating the control unit and the computer unit in the central design
9.3.1 Separating Panel PC 670 V2
Area of validity The section applies to the central design.
Introduction The control unit is separated from the computer unit to carry out repairs or replace the control unit, for example.

Maintenance and Service 9.3 Separating the control unit and the computer unit in the central design
Panel PC 670 V2/870 V2, Control unit Operating Instructions, Edition 03/2004, CD Documentation and Drivers 9-3
Procedure 1. Isolate the device from power supply.
2. Open the switch cabinet.
3. In order to swing down the computer unit, loosen the knurl screws attaching the computer to the rear of the control unit.
4. Swing open the computer unit. The connectors on the rear of the control unit are now accessible.
5. In order to dismount the computer unit, remove the cable connectors K1 and K2 between the computer unit and the control unit.
6. Two mounting rails, whose ends are in the form of lugs, are screwed to the control unit. Lift the computer unit vertically out of these lugs.
7. Put the computer unit down carefully.
8. If necessary, also remove the control unit depending on its design: Secure the control unit against falling out and unscrew it. Or remove the clamps which secure the control unit to the installation wall, as shown in the mounting cut-out in the dimensions diagram.
Figure 9-1 Swinging the computer unit away from the control unit, as seen from above

Maintenance and Service 9.3 Separating the control unit and the computer unit in the central design
Panel PC 670 V2/870 V2, Control unit 9-4 Operating Instructions, Edition 03/2004, CD Documentation and Drivers
Figure 9-2 Rear of the control unit with the interface positions
Separating the device in an uinstalled state As an alternative, dismount the device completely and separate the control unit and computer unit from one another in an uninstalled state. Lay a pad under the computer unit as illustrated so that the computer does not fall out and bend the lugs.
Installing the device To reinstall the device, follow the reverse procedure.
9.3.2 Separating Panel PC 870 V2
Area of validity The section applies to the central design.
Introduction The control unit is separated from the computer unit to carry out repairs or to replace the control unit, for example.

Maintenance and Service 9.3 Separating the control unit and the computer unit in the central design
Panel PC 670 V2/870 V2, Control unit Operating Instructions, Edition 03/2004, CD Documentation and Drivers 9-5
Procedure 1. Isolate the device from the power supply.
2. Open the switch cabinet. The device is now accesible from the rear.
3. To swing away the computer unit: Loosen the four permanent knurl screws attaching the computer unit to the rear of the control unit, as shown in the mounting cut-out in the dimensions diagram.
4. Swing the computer unit away. The connectors on the rear of the control unit are now accessible.
5. In order to dismount the computer unit, remove the cable connectors K1 and K2 between the computer unit and the control unit.
6. Two mounting rails, whose ends are in the form of lugs, are screwed to the control unit. Lift the computer unit vertically out of these lugs.
7. Put the computer unit down carefully.
8. Where necessary, also remove the control unit depending on its design: Secure the control unit against falling out and unscrew it. Or remove the clamps which secure the control unit to the installation wall, as shown in the mounting cut-out in the dimensions diagram.
Figure 9-3 Swinging the computer unit down away the control unit, as seen from above
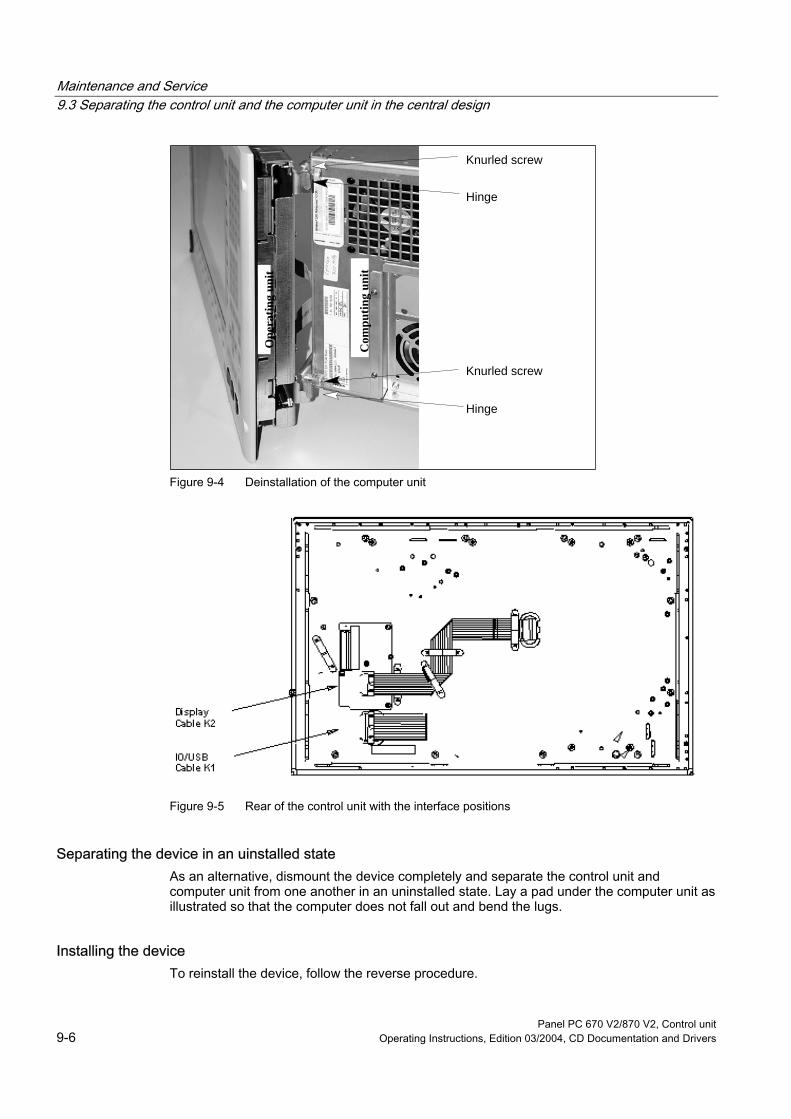
Maintenance and Service 9.3 Separating the control unit and the computer unit in the central design
Panel PC 670 V2/870 V2, Control unit 9-6 Operating Instructions, Edition 03/2004, CD Documentation and Drivers
Com
putin
g un
it
Ope
ratin
g un
it
Knurled screw
Knurled screw
Hinge
Hinge
Figure 9-4 Deinstallation of the computer unit
Figure 9-5 Rear of the control unit with the interface positions
Separating the device in an uinstalled state As an alternative, dismount the device completely and separate the control unit and computer unit from one another in an uninstalled state. Lay a pad under the computer unit as illustrated so that the computer does not fall out and bend the lugs.
Installing the device To reinstall the device, follow the reverse procedure.

Panel PC 670 V2/870 V2, Control unit Operating Instructions, Edition 03/2004, CD Documentation and Drivers 10-1
Technical specifications 1010.1 Technical data
10.1.1 EMC requirements The following data applies to the central design:
Standard EMC requirements EN 61000-6-4
EN 61000-6-2
RI suppression EN 55011 Class A, group 1. • Immunity level against very steep impulses: Bursts • Immunity in supply lines • Immunity in data/signal lines <30 m • Immunity in data/signal lines >30 m process data
lines
EN 61000-4-4 DC 24 V; 2,0 kV, interference criterion B 1.0 kV, interference criterion B 2.0 kV, interference criterion B
Immunity to surges: Surge EN 61000-4-5 on DC 24-500 V 1 kV symmetrical 2 kV unsymmetrical with intermediate unit Dehnrail 24 FML, order number: 901 104
Immunity to discharges of static electricity ESD EN 61000-4-2 8 kV at air discharge 6 kV at contact discharge, direct/indirect interference criterion B
Immunity to radiated, narrow band electromagnetic fields
EN 61000-4-3 EN 61000-4-3
80-1000 MHz: 10 V/m modulation: 80% AM with 1 kHz, interference criterion A 900 MHz, ±5 MHz, 10 V/m length of test 1 Minute Pulse modulation: 50% sensor proportion 50% with 200 Hz, interference criterion A
HF radiation in lines and shielded lines EN 61000-4-6 on DC 24 V on signal lines and data lines 150 kHz to 80 MHz: 10 V modulation: 80% AM with 1 kHz, interference criterion A
Immunity to magnetic fields IEC 61000-4-8 50/60 Hz, 30 A/m effective value The ESD immunity of PC cards 4 kV for contact discharge
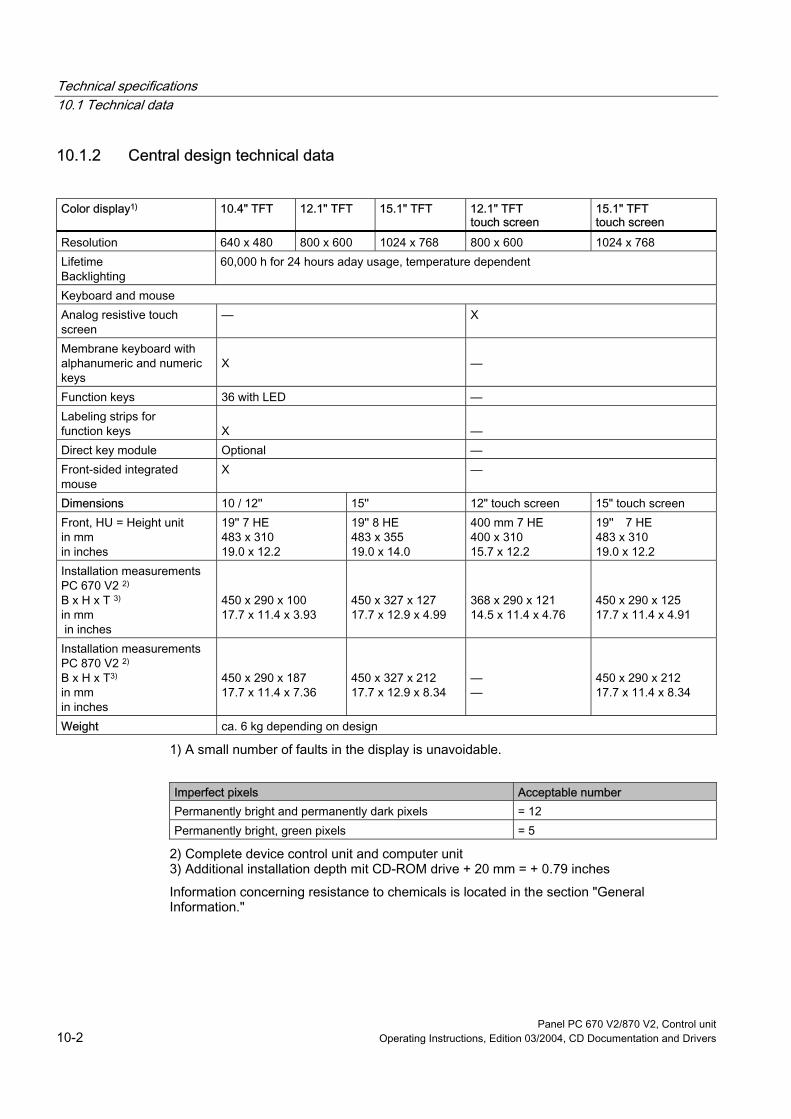
Technical specifications 10.1 Technical data
Panel PC 670 V2/870 V2, Control unit 10-2 Operating Instructions, Edition 03/2004, CD Documentation and Drivers
10.1.2 Central design technical data
Color display1) 10.4" TFT 12.1" TFT 15.1" TFT 12.1" TFT
touch screen 15.1" TFT touch screen
Resolution 640 x 480 800 x 600 1024 x 768 800 x 600 1024 x 768 Lifetime Backlighting
60,000 h for 24 hours aday usage, temperature dependent
Keyboard and mouse Analog resistive touch screen
— X
Membrane keyboard with alphanumeric and numeric keys
X
—
Function keys 36 with LED — Labeling strips for function keys
X
—
Direct key module Optional — Front-sided integrated mouse
X —
Dimensions 10 / 12'' 15'' 12" touch screen 15" touch screen Front, HU = Height unit in mm in inches
19'' 7 HE 483 x 310 19.0 x 12.2
19'' 8 HE 483 x 355 19.0 x 14.0
400 mm 7 HE 400 x 310 15.7 x 12.2
19'' 7 HE 483 x 310 19.0 x 12.2
Installation measurements PC 670 V2 2) B x H x T 3) in mm in inches
450 x 290 x 100 17.7 x 11.4 x 3.93
450 x 327 x 127 17.7 x 12.9 x 4.99
368 x 290 x 121 14.5 x 11.4 x 4.76
450 x 290 x 125 17.7 x 11.4 x 4.91
Installation measurements PC 870 V2 2) B x H x T3) in mm in inches
450 x 290 x 187 17.7 x 11.4 x 7.36
450 x 327 x 212 17.7 x 12.9 x 8.34
— —
450 x 290 x 212 17.7 x 11.4 x 8.34
Weight ca. 6 kg depending on design
1) A small number of faults in the display is unavoidable.
Imperfect pixels Acceptable number Permanently bright and permanently dark pixels = 12 Permanently bright, green pixels = 5
2) Complete device control unit and computer unit 3) Additional installation depth mit CD-ROM drive + 20 mm = + 0.79 inches
Information concerning resistance to chemicals is located in the section "General Information."

Technical specifications 10.1 Technical data
Panel PC 670 V2/870 V2, Control unit Operating Instructions, Edition 03/2004, CD Documentation and Drivers 10-3
Interfaces USB central design 1 x front-sided 1) USB decentralized design 1 x front 1), 1 x rear Safety Protection class In accordance with VDE 0106 T1: 1982 IEC 536 Degree of protection a. with clamp attachment, encircling seal and pressed on
rubber plug for USB port IP 65 2)
b. Touch screen variant with front-sided USB 1.1 port, with clamp attachment and encircling seal
NEMA 4 and IP 65 2)
c. with screw attachment IP 54 2) Safety specifications IEC in accordance with DIN VDE 0805/11.93 Electromagnetic compatibility (EMC)
EN 61000-6-4/EN 55022, EN 61000-6-2 / EN 61000-4-2, EN 61000-4-3, EN 61000-4-4, EN 61000-4-5, EN 61000-4-6
Approvals CE, cULUS 508 Power consumption typically 13 W, maximum 21 W Period of warranty 24 months
1) USB 1.1 standard. Not an order option of "Control unit without front-sided USB port": see degree of protection, variant b. 2) Operate only in closed spaces
10.1.3 Ambient and environmental conditions
Mechanical conditions Tested according to Vibration load during operation 10 to 58 Hz: 0.075 mm, 58 to 500 Hz: 1 g IEC 60068-2-6 Shock load during operation 50 m/s2, 30 ms, 3 shocks IEC 60068-2-29 Ambient environmental conditions Heat dissipation by means of natural convection Temperature limit values during operation with CD-RW/DVD drive during storage/transport
5 °C... 45 °C 5 °C... 40 °C -20 °C... 60 °C
Tested according to IEC 60068-2-1, IEC 60068-2-2:, IEC 60068-2-14 Rel. humidity limit values during operation during storage/transport
5 ... 85 % at 25 °C 5 ... 95 % at 25 °C (+77 °F)
Tested according to IEC 60068-2-3, IEC 60068-2-30, IEC 60068-2-56 Temperature change Maximum 10 K/h Condensation not permissible Supply air No corrosive gases

Technical specifications 10.1 Technical data
Panel PC 670 V2/870 V2, Control unit 10-4 Operating Instructions, Edition 03/2004, CD Documentation and Drivers
10.1.4 Decentralized design technical data This section describes the specifications that deviate from a central configuration.
Electrical specifications
Power consumption AC power supply DC power supply max. 0.67 A for 120 V
max. 0.48 A for 240 V max. 1.7 A for 24 V
Power consumption max. approx. 70 VA max. approx. 41 W Ambient requirements Safety AC: EN60950, DC: IEC 1131
Certifications: CE, cULus according to UL508
Dimensions/weight 12'' 15'' 12'' touchscreen 15'' touchscreen Mounting dimensions B x H x T in mm in inch
450 x 290 x 69 17.7 x11.4 x 2.71
450 x 327 x 91 17,7 x12.9 x 3.58
368 x 290 x 85 14.5 x11.4 x 3.34
450 x 290 x 91 17.7 x11.4 x 3.58
Weight approx. 8.4 kg depending on configuration Installation up to 70° vertical inclination
Variant SIMATIC HMI Cu-Link cable
Plug at both ends 15-pin Sub-D plug Diameter Bend radius Torsion Tensile stress 11 mm min. 66 mm max. 30° / m max. 50 N / mm2 Traversing speed Acceleration Number of plug-in
cycles Number of bend cycles
Insulation material
max. 3 m/s maximum 5 m/s2 maximum 100 10 000 000 No silicon, no CFC Sheathing material PU, flame-retarding to IEC 60 332.1
Oil-resistant to VDE 0472 Part 803, Test category B Order no. 2 m 5 m 10 m 20 m 6XV1440-7AH20 6XV1440-7AH50 6XV1440-7AN10 6XV1440-7AN20

Technical specifications 10.2 Dimensional drawings
Panel PC 670 V2/870 V2, Control unit Operating Instructions, Edition 03/2004, CD Documentation and Drivers 10-5
10.2 Dimensional drawings
10.2.1 Overview The following pages contain the dimensions for the central design.
The dimensions for the decentralized design are located in the "Dimensions" section of the chapter "Recessed mounting cut-out".
10.2.2 Panel PC 670 V2 dimensions for central design If a CD-ROM drive or a CD-RW-/DVD drive is installed in the computer unit, the installation depth must be enlarged by 21 mm.
Figure 10-1 Dimensions of the Panel PC 670 V2 in central design without CD-ROM drive

Technical specifications 10.2 Dimensional drawings
Panel PC 670 V2/870 V2, Control unit 10-6 Operating Instructions, Edition 03/2004, CD Documentation and Drivers
10.2.3 Panel PC 870 V2 dimensions for central design If a CD-ROM drive or a CD-RW-/DVD drive is installed in the computer unit, the installation depth must be enlarged by 21 mm.
Figure 10-2 Dimensions of the Panel PC 870 V2 in central design without CD-ROM drive

Technical specifications 10.3 Interfaces
Panel PC 670 V2/870 V2, Control unit Operating Instructions, Edition 03/2004, CD Documentation and Drivers 10-7
10.3 Interfaces
10.3.1 USB port Assignment of the front-sided USB 1.1 port.
Figure 10-3 USB pin assignment
Pin Name Signal type Comments 1 USB_P5V_fused Voltage
DC +5 V, secured, for external USB port; maximum 100 mA, connect external power supply for devices with higher power consumption!
2 USB_D0M Bidirectional Data, USB channel 0 3 USB_D0P Bidirectional Data+, USB channel 0 4 USB_GND Voltage Ground for external USB interface
10.4 Keyboard table
Key codes The following table applies only to control units with key panels. The table depicts the standard keyboard assignments and the allocated key codes. Change the key codes using the "KeyTools."
Key number Code Key label 1 43 F10 2 41/s F20 (Shift F8) 3 09 f 3a1 24/s & 4 08 e 4a1 20/s # 5 07 d 5a1 1e/s ! 6 06 c

Technical specifications 10.4 Keyboard table
Panel PC 670 V2/870 V2, Control unit 10-8 Operating Instructions, Edition 03/2004, CD Documentation and Drivers
6a1 38/s ? 7 05 b 7a1 27/s ) 8 04 a 8a1 26/s ( 9 42 F9 10 40/s F19 (Shift F7) 11 0f l 11a1 35 ‘ 12 0e k 12a1 34/A ’ 13 0d j 13a1 34 ’ 14 0c i 14a1 34/s ” 15 0b h 15a1 30 ] 16 0a g 16a1 2f [ 17 41 F8 18 3f/s F18 (Shift F6) 19 15 r 19a1 35/s ~ 20 14 q 20a1 33/AS ° 21 13 P 21a1 31/s ’ 22 12 o 22a1 31 \ 23 11 n 23a1 30/s } 24 10 m 24a1 2f/s { 25 40 F7 26 3e/s F17 (Shift F5) 27 26 9 27a1 22/s % 28 25 8 28a1 22/A (Euro) 29 24 7 29a1 21/s $ 30 18 u 30a1 33/s :

Technical specifications 10.4 Keyboard table
Panel PC 670 V2/870 V2, Control unit Operating Instructions, Edition 03/2004, CD Documentation and Drivers 10-9
31 17 t 31a1 33 ; 32 16 s 32a1 36 , 33 3f F6 34 3d/s F16 (Shift F4) 35 23 6 35a1 23/s ^ 36 22 5 36a1 37/s > 37 21 4 37a1 36/s < 38 1b x 39 1a W 40 19 v 41 3e F5 42 3c/s F15 (Shift F3) 43 20 3 43a1 38 / 44 1f 2 44a1 25/s * 45 1e 1 46 2c (BLANK) 46a1 2d/s _ 47 1d z 48 1c y 48a1 1f/s @ 49 3d F4 50 3b/s F14 (Shift F2) 51 56 – 51a1 57 + 52 27 0 52a1 2e = 53 37 . 56 2a (Backspace) 57 3c F3 58 3a/s F13 (Shift F1) 61 52 (CURSOR UP) 62 4b (PAGE UP) 63 4e (PAGE DOWN) 64 49 (INSERT) 65 3b F2 66 45 F12

Technical specifications 10.4 Keyboard table
Panel PC 670 V2/870 V2, Control unit 10-10 Operating Instructions, Edition 03/2004, CD Documentation and Drivers
67 29 (ESC) 68 4f (CURSOR RIGHT) 69 4a (HOME) 70 50 (CURSOR LEFT) 72 4c (DELETE) 73 3a F1 74 44 F11 75 3a/a (ACK - ALT F1) 76 28 (ENTER) 77 51 (CURSOR DOWN) 79 0b/a (HELP) 80 2b (TAB) 80A1 2b/s (SHIFT TAB) 81 00/c (CONTROL) 82 00/s (SHIFT) 82A1 39 (CAPS LOCK) 83 00/a (ALT) 89 42/s,1 S1 (Shift F9) 90 43/s,2 S2 (Shift F10) 91 44/s,3 S3 (Shift F11) 92 45/s,4 S4 (Shift F12) 93 3a/c,5 S5 (CONTROL F1) 94 3b/c,6 S6 (CONTROL F2) 95 3c/c,7 S7 (CONTROL F3) 96 3d/c,8 S8 (CONTROL F4) 97 3e/c,9 S9 (CONTROL F5) 98 3f/c,10 S10 (CONTROL F6) 99 40/c,11 S11 (CONTROL F7) 100 41/c,12 S12 (CONTROL F8) 101 42/c,13 S13 (CONTROL F9) 102 43/c,14 S14 (CONTROL F10) 103 44/c,15 S15 (CONTROL F11) 104 45/c,16 S16 (CONTROL F12)
Explanation of the values in the keyboard table
Term in table Meaning Example
<Key number>a1 Press FN key also 3a1 <Code value>/s SHIFT transmitted also 41/s <Code value>/a ALT transmitted also 34/a <Code value>/as ALT+SHIFT transmitted also 33/as <Code value>/c CTRL transmitted also 3a/c,5

Panel PC 670 V2/870 V2, Control unit Operating Instructions, Edition 03/2004, CD Documentation and Drivers 11-1
Appendix 1111.1 Certificates and guidelines
11.1.1 Approvals The various panels of the control units have the following approvals:
UL 1950 UL 508 CSA cUL FCC FM Approvals
for ships NEMA
Panel PC 670 V2
No Yes No Yes No Class1 Div2, for 12" and 15" NEMA touch screen panels only
No Yes, for 12" and 15" touch screen panels
Panel PC 870 V2
No Yes No Yes No No No Yes, for 15" touch screen panels
Note
The approval or approbation is located on the rating label. The rating label is described in the chapter "Planning use."
11.1.2 ESD guideline
What ESD means Almost all electronic modules are equipped with highly integrated components and elements in MOS technology. Due to their their technology, these electronic components are extremely sensitive to power surges and also to discharges of static electricity. These components are therefore marked as follows:
• ESD:components suceptible to ElectroStatic Discharge
• ESD: internationally recognized marking for components and modules susceptible to electrostatic discharge
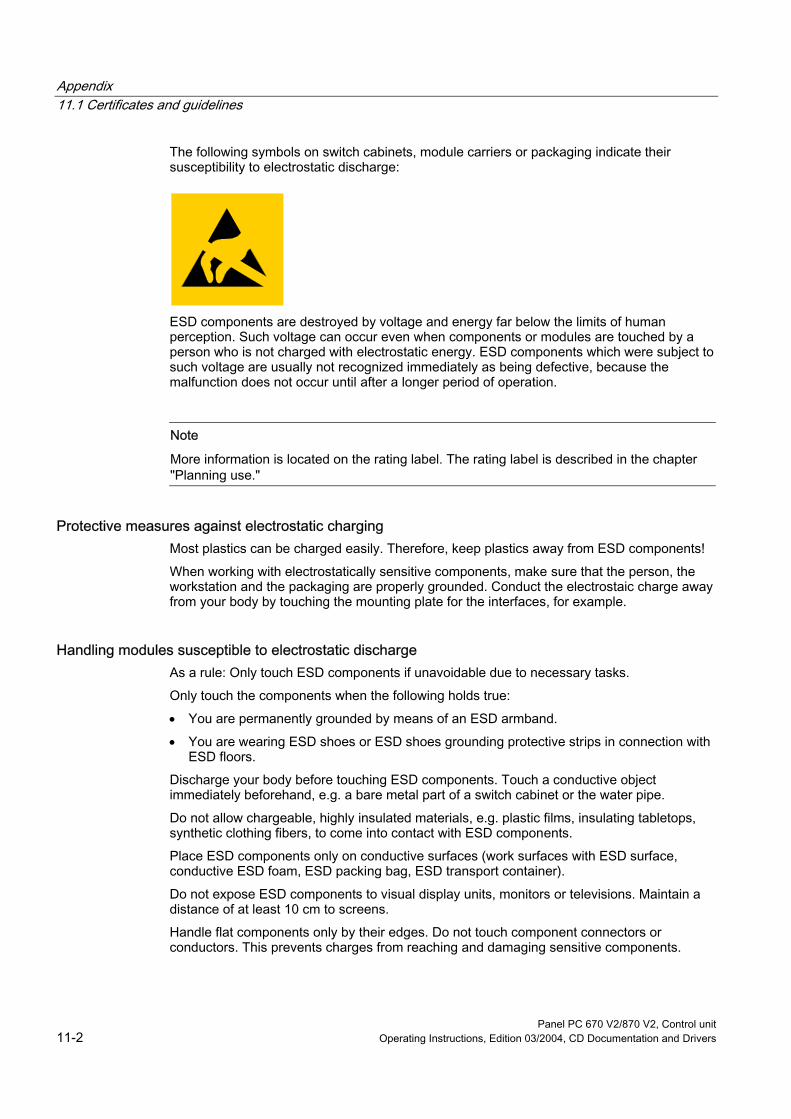
Appendix 11.1 Certificates and guidelines
Panel PC 670 V2/870 V2, Control unit 11-2 Operating Instructions, Edition 03/2004, CD Documentation and Drivers
The following symbols on switch cabinets, module carriers or packaging indicate their susceptibility to electrostatic discharge:
ESD components are destroyed by voltage and energy far below the limits of human perception. Such voltage can occur even when components or modules are touched by a person who is not charged with electrostatic energy. ESD components which were subject to such voltage are usually not recognized immediately as being defective, because the malfunction does not occur until after a longer period of operation.
Note
More information is located on the rating label. The rating label is described in the chapter "Planning use."
Protective measures against electrostatic charging Most plastics can be charged easily. Therefore, keep plastics away from ESD components!
When working with electrostatically sensitive components, make sure that the person, the workstation and the packaging are properly grounded. Conduct the electrostaic charge away from your body by touching the mounting plate for the interfaces, for example.
Handling modules susceptible to electrostatic discharge As a rule: Only touch ESD components if unavoidable due to necessary tasks.
Only touch the components when the following holds true:
• You are permanently grounded by means of an ESD armband.
• You are wearing ESD shoes or ESD shoes grounding protective strips in connection with ESD floors.
Discharge your body before touching ESD components. Touch a conductive object immediately beforehand, e.g. a bare metal part of a switch cabinet or the water pipe.
Do not allow chargeable, highly insulated materials, e.g. plastic films, insulating tabletops, synthetic clothing fibers, to come into contact with ESD components.
Place ESD components only on conductive surfaces (work surfaces with ESD surface, conductive ESD foam, ESD packing bag, ESD transport container).
Do not expose ESD components to visual display units, monitors or televisions. Maintain a distance of at least 10 cm to screens.
Handle flat components only by their edges. Do not touch component connectors or conductors. This prevents charges from reaching and damaging sensitive components.
Appendix 11.1 Certificates and guidelines
Panel PC 670 V2/870 V2, Control unit Operating Instructions, Edition 03/2004, CD Documentation and Drivers 11-3
Measuring and changing ESD modules Measure the ESD component under the following conditions only:
• The measuring device is grounded with a protective conductor, for example.
• The probe on the potential-free measuring device has been discharged, e.g. by touching the bare metal of a part of the switch cabinet.
• Your body is discharged. To do so, touch a grounded metallic component.
Solder only with grounded soldering irons.
Shipping modules susceptible to electrostatic discharge Always store or ship ESD components in conductive packaging, e.g. metallized plastic boxes or metal cans. Leave the components and parts in their packaging until installation.
If the packaging is not conductive, wrap the ESD component in a conductive material, e.g. rubber foam, ESD bag, household aluminum foil, or paper, before packing. Do not wrap the ESD component in plastic bags or plastic film.
In ESD components containing installed batteries, make sure that the conductive packaging does not touch the battery connectors or short circuit. Insulate the connectors with suitable material.

Appendix 11.2 Abbreviations
Panel PC 670 V2/870 V2, Control unit 11-4 Operating Instructions, Edition 03/2004, CD Documentation and Drivers
11.2 Abbreviations
ANSI American National Standards Institute ASCII American Standard Code for Information Interchange B Width BIOS Basic Input Output System CD-ROM Compact Disc – Read Only Memory CPU Central Processing Unit DC Direct Current DHCP Dynamic Host Configuration Protocol DNS Domain Name Service DP Distributed I/Os DSN Data Source Name ESD Modules susceptible to ElectroStatic Discharge EMC ElectroMagnetic Compatibility H Height HF High frequency HMI Human Machine Interface IF Interface: Interface LCD Liquid Crystal Display: Liquid crystal display LED Light Emitting Diode: Light emitting diode Mbps Megabits per second PC Personal Computer PG Programming device PPI Point to Point Interface SIMATIC S7 PS/2 Personal System 2 PC Programmable Logic Controller T Device depth TCP/IP Transmission Control Protocol/Internet Protocol USB Universal Serial Bus VGA Video Graphics Array

Appendix 11.3 Glossary
Panel PC 670 V2/870 V2, Control unit Operating Instructions, Edition 03/2004, CD Documentation and Drivers 11-5
11.3 Glossary
A Application An application is a program which is put directly on the operating system MS-DOS or windows. An application on the PC/PG, for example, is STEP 7.
Automation device (AD) The programmable automation devices (AD) of the SIMATIC S5 system consist of a central unit, one or several CPUs, and other modules, e.g. input modules and output modules.
Automation system (AS) A programmable logic controller (PLC), consisting of a central unit, a CPU, and various input and output modules.
B Baud Unit of measurement for the transmission speed. The unit of measurement, Baud, defines the number of transferred signal states per second. When only two states occur, one baud is equivalent to a transmission rate of 1 bps.
Module Modules are plug-in units for PLCs, programming devices, or PCs. Modules exist, for example, as central modules, power-ons, or as mass storage.
Boot diskette A boot disk is a bootstrap loader diskette, which has a boot sector which loads the operating system from the diskette.
Booting The starting or restarting of the computer. During the boot sequence, the operating system is loaded from the system data carrier into RAM.
C Cache High-speed access buffer often used for interim storage (buffering) of requested data. The computer has two cache levels, the 2 level.
Chipset Located on the motherboard, interconnects the processor with the RAM, the graphic controller, the PCI bus, and the external interfaces.
COM interface The COM interface is a serial V.24 modem interface. The port is suitable for asynchronous data transfer. As an alternative, connect printers with a serial interface.
Controller Installed hardware and software which control the functions of specific internal or external devices, e.g. the keyboard controller.

Appendix 11.3 Glossary
Panel PC 670 V2/870 V2, Control unit 11-6 Operating Instructions, Edition 03/2004, CD Documentation and Drivers
D Documentation & Drivers CD The "Documentation & Drivers" CD is included. The CD contains specific drivers and drivers and applications for the supported operating system.
Drop down menu Menu bar on the upper edge of the screen. The menu commands are pre-set or can be set as drop down menus or pull down menus. Drop down menus roll down as soon as the cursor is moved over the menu title. Pull down menus roll down after clicking on the title.
E EPROM, EEPROM Plug-in module with EPROM/EEPROM chips. The chips store S5/S7 application programs permanently. This programmed module is then inserted into the prepared slots of the automation systems.
Ethernet Local network with Bus structure for data communication with a transmission speed of 10/100 baud.
F Formatting Basic partitioning of memory space on a magnetic data carrier into tracks and segments. Formatting deletes all data on a data carrier. All data carriers must be formatted prior to their first use.
D Gender Changer The Gender Changer 25-pin male / 25-pin male is used to convert the COM1/V24/AG interface of the SIMATIC PC family into the common 25-pin male connector.
Motherboard The motherboard, as the central part of the computer, processes and stores data, controls and manages interfaces and peripheral devices.
H RAM The main memory represents the complete RAM area on a PC/PG.
Hub A term from network technology. A device which joins communication lines at a central location and provides a common connection to all devices on the network.
I Image An image is, for example, an image of hard disk partitions. Save the image in a file in order to restore it as needed.
Interface See Interface.
Appendix 11.3 Glossary
Panel PC 670 V2/870 V2, Control unit Operating Instructions, Edition 03/2004, CD Documentation and Drivers 11-7
K Cold start A start sequence which begins when the computer is turned on. During a cold start, the operating system carries out basic hardware checks and then boots.
L LPT interface The LPT interface is a parallel centronic interface to which a printer is connected, for example.
P Plug and play Through plug and play, the computer configures itself automatically to be able to communicate with peripheral devices, e.g. screens, modems and printers. User connects a peripheral device: plug. Afterwards, the peripheral device can be used immediately. play, without having to configure the operating system manually. The Plug and Play PC requires both a BIOS that supports Plug and Play and a corresponding expansion card.
R Recovery CD Contains the DOS tools for installing drivers in hard disks and Windows operating systems.
Restore CD The Restore CD is used to restore the system partition or the entire hard disk to factory state if the system has crashed. The bootable CD contains all the necessary image files. They create a start diskette which restores the factory state through the network drive.
ROM memory Read-Only Memory The ROM memory is a read only memory in which every memory location can be addressed individually. They contain factory set programs and data that are not lost in the event of a power failure.
Hibernation The screen and hard disk are shut off during hibernation. All data located in the RAM is stored on the hard disk and the PG is shut off.
S Interface The connection of individual hardware elements, e.g. automation device, PCs, programming device, printer, or screen, by means of physical plug connectors.
Connection between different programs in order to exchange data.
T Drivers Program parts of the operating system. They adapt user program data to the specific formats required by peripheral devices, such as hard disk, monitors, and printers.
V V.24 interface The V.24 interface is a standardized port for data transfer. Connect printers, modems, and other hardware components to the V.24 interfaces.

Panel PC 670 V2/870 V2, Control unitOperating Instructions, Edition 03/2004, CD Documentation and Drivers

Panel PC 670 V2/870 V2, Control unit Operating Instructions, Edition 03/2004, CD Documentation and Drivers Index-1
Index
< <Shift> key, 7-4
1 12" variant, 3-4, 3-5, 4-7, 7-1 15" variant, 6-3, 7-7
A Abbreviations, 11-4 Acceleration, 10-4 Ambient conditions, 10-3 Application, 11-5 Approbation, 11-1 Approval, 10-3, 11-1 Area of validity, 1-1 Arithmetic symbols, 7-5
Entering, 7-5 AS, 11-5 Automation device, 11-5 Automation System, 11-5
B backlighting, 10-2
Service life, 10-2 Backlighting, 3-2, 3-3, 3-4 Baud, 11-5 Block diagram, 6-7 Boot diskette, 11-5 Booting, 11-5 Burning, 8-24
C Cable, 6-2, 6-5, 6-7, 9-2
Connecting cable, 6-7, 9-2 Display cable, 6-2 Equipotential bonding cable, 6-5 I/O USB cable, 6-2
Cable connectors, 9-3, 9-5 Cables, 3-5, 3-6
Connecting cable, 3-5, 3-6 Cache, 11-5 Calibrating, 8-11
Repeating, 8-11 Caring, 9-1
Device, 9-1 CD-R / CD-RW
Operating guidelines, 8-23 Restrictions under Microsoft Windows NT, 8-24
CD-ROM drive, 10-2 CD-RW, 8-23 Certification, 10-4 Change, 11-3 Changing
ESD, 11-3 CheckLanguageID, 8-18 Checklist, 8-1 Chipset, 11-5 Clamps, 5-1 Cleaning agent, 9-1 Cold start, 11-7 COM interface, 11-5 Combination, 3-5
Available combination, 3-5 Commissioning, 2-2 Communications environment, 1-2 Components, 3-5 Components susceptible to ElectroStatic Discharge, 11-1 Computer unit, 3-1, 3-2, 9-2, 9-4
Separating from the control unit, 9-2, 9-4 Condensation, 2-2, 8-1 Configuration, 3-5, 10-4
Specifications for distributed configuration, 10-4 Connecting, 2-1, 6-3, 6-4, 6-6, 7-5, 8-2, 8-7
Connecting cable, 6-6 Connecting external keyboard, 7-5 Electrical connection, 2-1 Equipotential bonding, 6-4 I/O modules, 8-2, 8-7 in decentralized design, 6-3 Power supply, 6-6
Connecting cable, 3-5, 3-6, 6-6, 6-7, 9-2
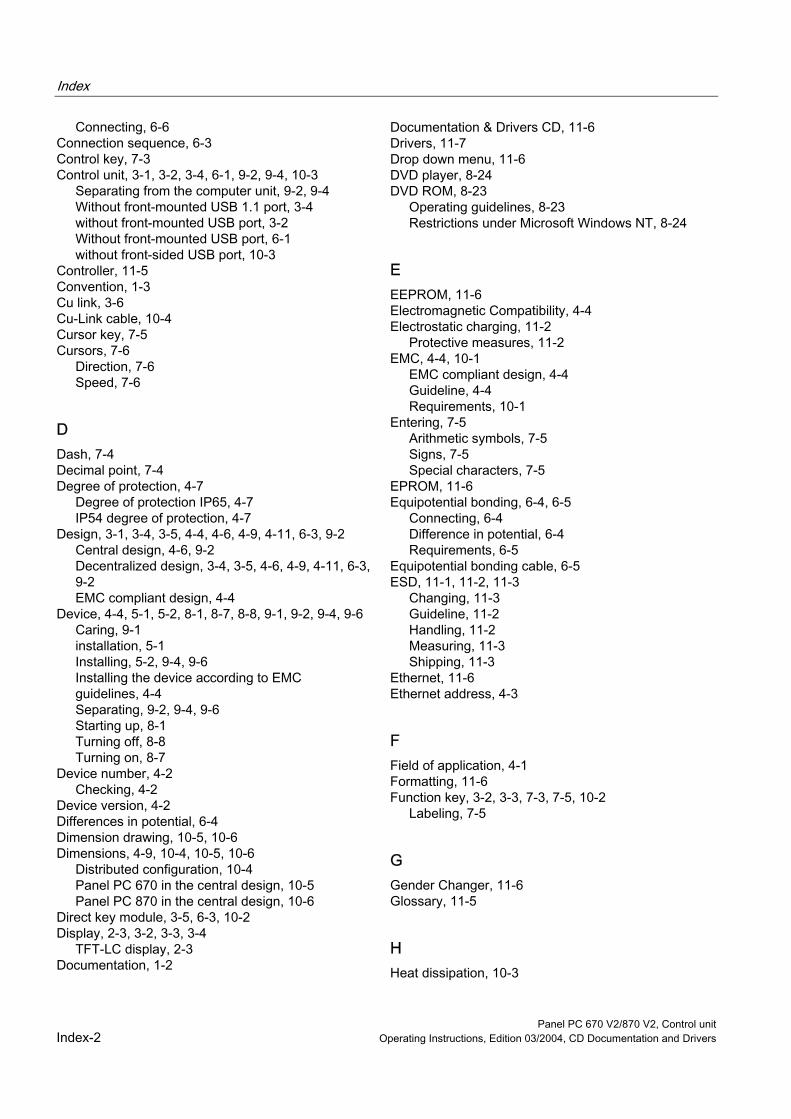
Index
Panel PC 670 V2/870 V2, Control unit Index-2 Operating Instructions, Edition 03/2004, CD Documentation and Drivers
Connecting, 6-6 Connection sequence, 6-3 Control key, 7-3 Control unit, 3-1, 3-2, 3-4, 6-1, 9-2, 9-4, 10-3
Separating from the computer unit, 9-2, 9-4 Without front-mounted USB 1.1 port, 3-4 without front-mounted USB port, 3-2 Without front-mounted USB port, 6-1 without front-sided USB port, 10-3
Controller, 11-5 Convention, 1-3 Cu link, 3-6 Cu-Link cable, 10-4 Cursor key, 7-5 Cursors, 7-6
Direction, 7-6 Speed, 7-6
D Dash, 7-4 Decimal point, 7-4 Degree of protection, 4-7
Degree of protection IP65, 4-7 IP54 degree of protection, 4-7
Design, 3-1, 3-4, 3-5, 4-4, 4-6, 4-9, 4-11, 6-3, 9-2 Central design, 4-6, 9-2 Decentralized design, 3-4, 3-5, 4-6, 4-9, 4-11, 6-3, 9-2 EMC compliant design, 4-4
Device, 4-4, 5-1, 5-2, 8-1, 8-7, 8-8, 9-1, 9-2, 9-4, 9-6 Caring, 9-1 installation, 5-1 Installing, 5-2, 9-4, 9-6 Installing the device according to EMC guidelines, 4-4 Separating, 9-2, 9-4, 9-6 Starting up, 8-1 Turning off, 8-8 Turning on, 8-7
Device number, 4-2 Checking, 4-2
Device version, 4-2 Differences in potential, 6-4 Dimension drawing, 10-5, 10-6 Dimensions, 4-9, 10-4, 10-5, 10-6
Distributed configuration, 10-4 Panel PC 670 in the central design, 10-5 Panel PC 870 in the central design, 10-6
Direct key module, 3-5, 6-3, 10-2 Display, 2-3, 3-2, 3-3, 3-4
TFT-LC display, 2-3 Documentation, 1-2
Documentation & Drivers CD, 11-6 Drivers, 11-7 Drop down menu, 11-6 DVD player, 8-24 DVD ROM, 8-23
Operating guidelines, 8-23 Restrictions under Microsoft Windows NT, 8-24
E EEPROM, 11-6 Electromagnetic Compatibility, 4-4 Electrostatic charging, 11-2
Protective measures, 11-2 EMC, 4-4, 10-1
EMC compliant design, 4-4 Guideline, 4-4 Requirements, 10-1
Entering, 7-5 Arithmetic symbols, 7-5 Signs, 7-5 Special characters, 7-5
EPROM, 11-6 Equipotential bonding, 6-4, 6-5
Connecting, 6-4 Difference in potential, 6-4 Requirements, 6-5
Equipotential bonding cable, 6-5 ESD, 11-1, 11-2, 11-3
Changing, 11-3 Guideline, 11-2 Handling, 11-2 Measuring, 11-3 Shipping, 11-3
Ethernet, 11-6 Ethernet address, 4-3
F Field of application, 4-1 Formatting, 11-6 Function key, 3-2, 3-3, 7-3, 7-5, 10-2
Labeling, 7-5
G Gender Changer, 11-6 Glossary, 11-5
H Heat dissipation, 10-3
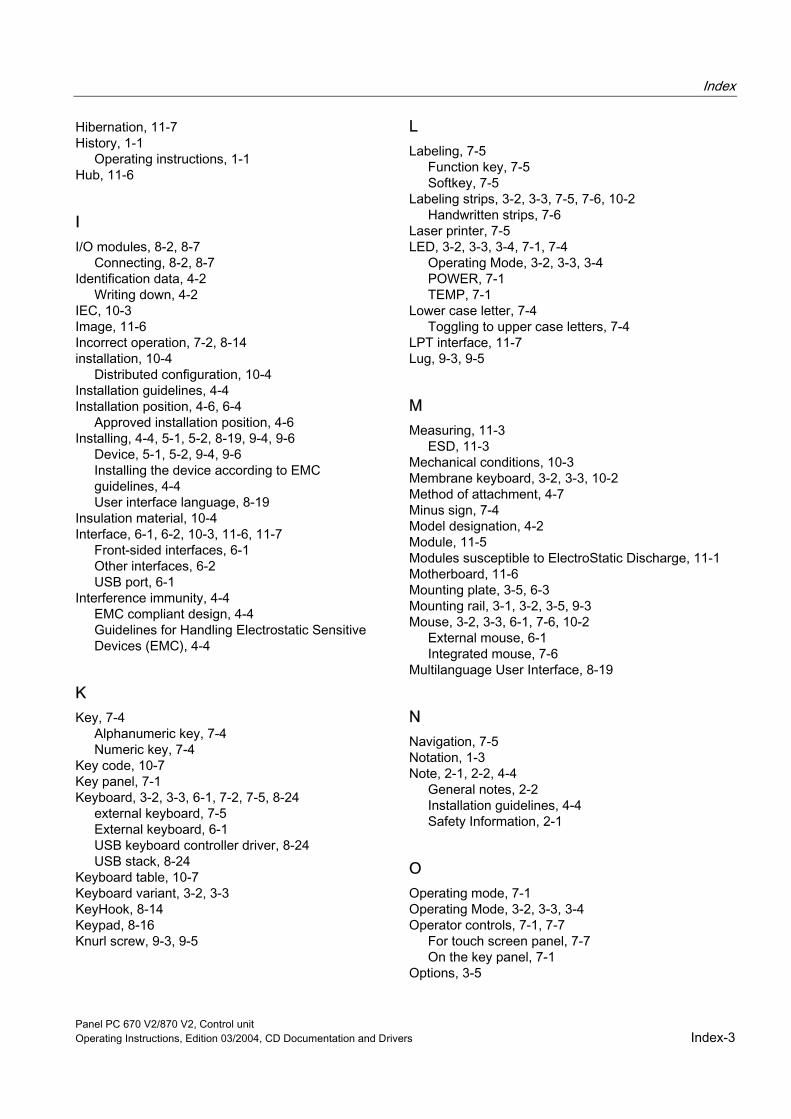
Index
Panel PC 670 V2/870 V2, Control unit Operating Instructions, Edition 03/2004, CD Documentation and Drivers Index-3
Hibernation, 11-7 History, 1-1
Operating instructions, 1-1 Hub, 11-6
I I/O modules, 8-2, 8-7
Connecting, 8-2, 8-7 Identification data, 4-2
Writing down, 4-2 IEC, 10-3 Image, 11-6 Incorrect operation, 7-2, 8-14 installation, 10-4
Distributed configuration, 10-4 Installation guidelines, 4-4 Installation position, 4-6, 6-4
Approved installation position, 4-6 Installing, 4-4, 5-1, 5-2, 8-19, 9-4, 9-6
Device, 5-1, 5-2, 9-4, 9-6 Installing the device according to EMC guidelines, 4-4 User interface language, 8-19
Insulation material, 10-4 Interface, 6-1, 6-2, 10-3, 11-6, 11-7
Front-sided interfaces, 6-1 Other interfaces, 6-2 USB port, 6-1
Interference immunity, 4-4 EMC compliant design, 4-4 Guidelines for Handling Electrostatic Sensitive Devices (EMC), 4-4
K Key, 7-4
Alphanumeric key, 7-4 Numeric key, 7-4
Key code, 10-7 Key panel, 7-1 Keyboard, 3-2, 3-3, 6-1, 7-2, 7-5, 8-24
external keyboard, 7-5 External keyboard, 6-1 USB keyboard controller driver, 8-24 USB stack, 8-24
Keyboard table, 10-7 Keyboard variant, 3-2, 3-3 KeyHook, 8-14 Keypad, 8-16 Knurl screw, 9-3, 9-5
L Labeling, 7-5
Function key, 7-5 Softkey, 7-5
Labeling strips, 3-2, 3-3, 7-5, 7-6, 10-2 Handwritten strips, 7-6
Laser printer, 7-5 LED, 3-2, 3-3, 3-4, 7-1, 7-4
Operating Mode, 3-2, 3-3, 3-4 POWER, 7-1 TEMP, 7-1
Lower case letter, 7-4 Toggling to upper case letters, 7-4
LPT interface, 11-7 Lug, 9-3, 9-5
M Measuring, 11-3
ESD, 11-3 Mechanical conditions, 10-3 Membrane keyboard, 3-2, 3-3, 10-2 Method of attachment, 4-7 Minus sign, 7-4 Model designation, 4-2 Module, 11-5 Modules susceptible to ElectroStatic Discharge, 11-1 Motherboard, 11-6 Mounting plate, 3-5, 6-3 Mounting rail, 3-1, 3-2, 3-5, 9-3 Mouse, 3-2, 3-3, 6-1, 7-6, 10-2
External mouse, 6-1 Integrated mouse, 7-6
Multilanguage User Interface, 8-19
N Navigation, 7-5 Notation, 1-3 Note, 2-1, 2-2, 4-4
General notes, 2-2 Installation guidelines, 4-4 Safety Information, 2-1
O Operating mode, 7-1 Operating Mode, 3-2, 3-3, 3-4 Operator controls, 7-1, 7-7
For touch screen panel, 7-7 On the key panel, 7-1
Options, 3-5
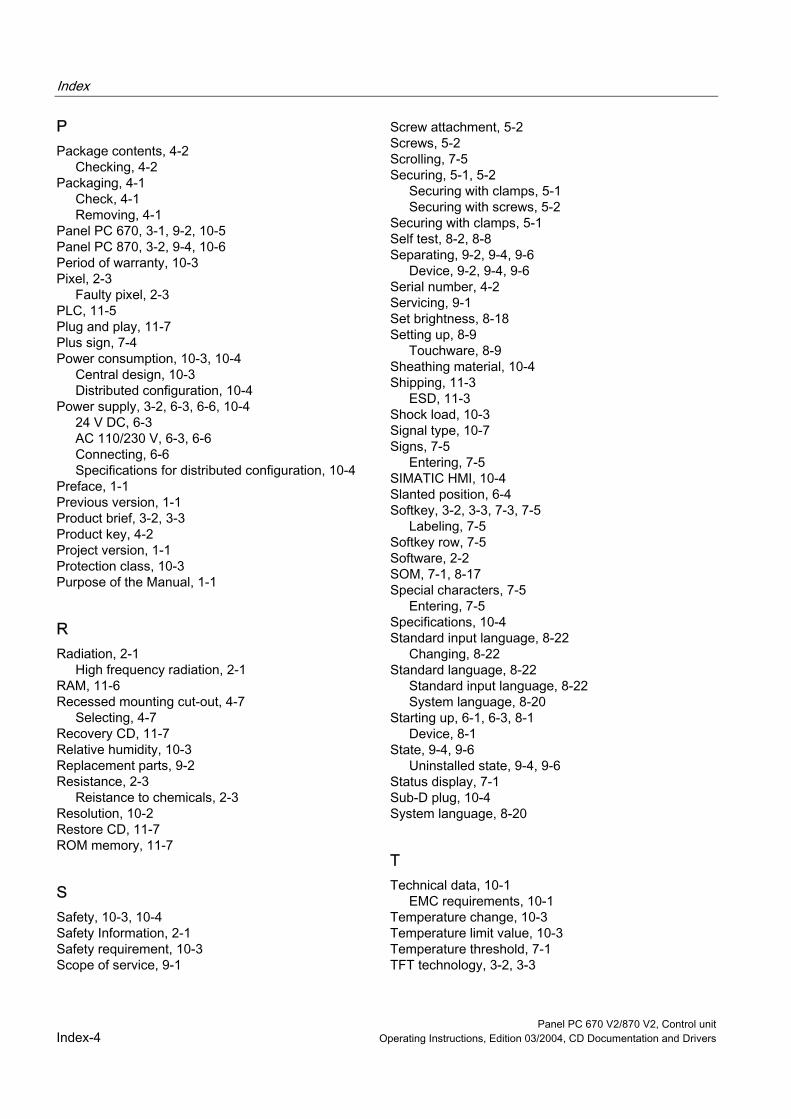
Index
Panel PC 670 V2/870 V2, Control unit Index-4 Operating Instructions, Edition 03/2004, CD Documentation and Drivers
P Package contents, 4-2
Checking, 4-2 Packaging, 4-1
Check, 4-1 Removing, 4-1
Panel PC 670, 3-1, 9-2, 10-5 Panel PC 870, 3-2, 9-4, 10-6 Period of warranty, 10-3 Pixel, 2-3
Faulty pixel, 2-3 PLC, 11-5 Plug and play, 11-7 Plus sign, 7-4 Power consumption, 10-3, 10-4
Central design, 10-3 Distributed configuration, 10-4
Power supply, 3-2, 6-3, 6-6, 10-4 24 V DC, 6-3 AC 110/230 V, 6-3, 6-6 Connecting, 6-6 Specifications for distributed configuration, 10-4
Preface, 1-1 Previous version, 1-1 Product brief, 3-2, 3-3 Product key, 4-2 Project version, 1-1 Protection class, 10-3 Purpose of the Manual, 1-1
R Radiation, 2-1
High frequency radiation, 2-1 RAM, 11-6 Recessed mounting cut-out, 4-7
Selecting, 4-7 Recovery CD, 11-7 Relative humidity, 10-3 Replacement parts, 9-2 Resistance, 2-3
Reistance to chemicals, 2-3 Resolution, 10-2 Restore CD, 11-7 ROM memory, 11-7
S Safety, 10-3, 10-4 Safety Information, 2-1 Safety requirement, 10-3 Scope of service, 9-1
Screw attachment, 5-2 Screws, 5-2 Scrolling, 7-5 Securing, 5-1, 5-2
Securing with clamps, 5-1 Securing with screws, 5-2
Securing with clamps, 5-1 Self test, 8-2, 8-8 Separating, 9-2, 9-4, 9-6
Device, 9-2, 9-4, 9-6 Serial number, 4-2 Servicing, 9-1 Set brightness, 8-18 Setting up, 8-9
Touchware, 8-9 Sheathing material, 10-4 Shipping, 11-3
ESD, 11-3 Shock load, 10-3 Signal type, 10-7 Signs, 7-5
Entering, 7-5 SIMATIC HMI, 10-4 Slanted position, 6-4 Softkey, 3-2, 3-3, 7-3, 7-5
Labeling, 7-5 Softkey row, 7-5 Software, 2-2 SOM, 7-1, 8-17 Special characters, 7-5
Entering, 7-5 Specifications, 10-4 Standard input language, 8-22
Changing, 8-22 Standard language, 8-22
Standard input language, 8-22 System language, 8-20
Starting up, 6-1, 6-3, 8-1 Device, 8-1
State, 9-4, 9-6 Uninstalled state, 9-4, 9-6
Status display, 7-1 Sub-D plug, 10-4 System language, 8-20
T Technical data, 10-1
EMC requirements, 10-1 Temperature change, 10-3 Temperature limit value, 10-3 Temperature threshold, 7-1 TFT technology, 3-2, 3-3
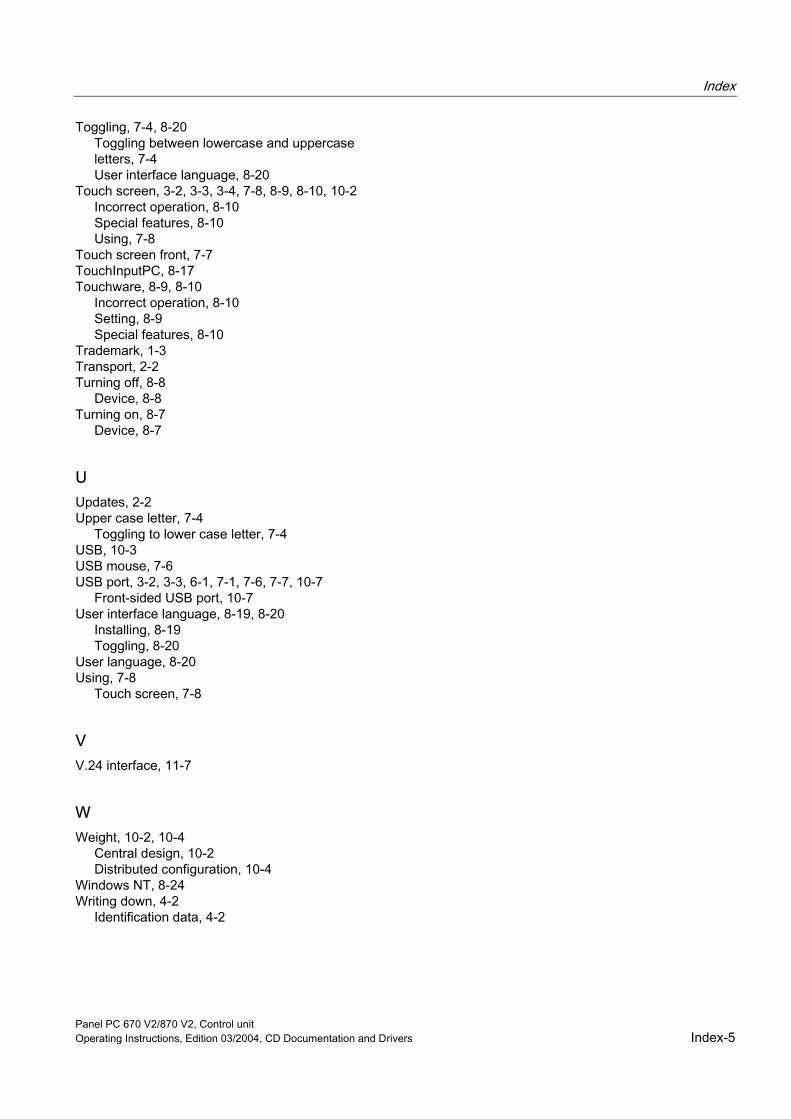
Index
Panel PC 670 V2/870 V2, Control unit Operating Instructions, Edition 03/2004, CD Documentation and Drivers Index-5
Toggling, 7-4, 8-20 Toggling between lowercase and uppercase letters, 7-4 User interface language, 8-20
Touch screen, 3-2, 3-3, 3-4, 7-8, 8-9, 8-10, 10-2 Incorrect operation, 8-10 Special features, 8-10 Using, 7-8
Touch screen front, 7-7 TouchInputPC, 8-17 Touchware, 8-9, 8-10
Incorrect operation, 8-10 Setting, 8-9 Special features, 8-10
Trademark, 1-3 Transport, 2-2 Turning off, 8-8
Device, 8-8 Turning on, 8-7
Device, 8-7
U Updates, 2-2 Upper case letter, 7-4
Toggling to lower case letter, 7-4 USB, 10-3 USB mouse, 7-6 USB port, 3-2, 3-3, 6-1, 7-1, 7-6, 7-7, 10-7
Front-sided USB port, 10-7 User interface language, 8-19, 8-20
Installing, 8-19 Toggling, 8-20
User language, 8-20 Using, 7-8
Touch screen, 7-8
V V.24 interface, 11-7
W Weight, 10-2, 10-4
Central design, 10-2 Distributed configuration, 10-4
Windows NT, 8-24 Writing down, 4-2
Identification data, 4-2

Index
Panel PC 670 V2/870 V2, Control unit Index-6 Operating Instructions, Edition 03/2004, CD Documentation and Drivers