submitting and managing entry of appearance and
TRANSCRIPT

ACCESS Administrative Protective Order and Entry of Appearance Forms (Release 4) External User Guide
Submitting and Managing Entry of Appearance and
Administrative Protective Order Applications
March 11, 2019

Page 1 of 33
Table of Contents 1. Submitting an EOA .................................................................................................................................................... 3
A. What is an Entry of Appearance (EOA)? ................................................................................................................ 3
B. Submitting an EOA in ACCESS ................................................................................................................................ 3
C. After Submitting the EOA ....................................................................................................................................... 6
2. Managing an EOA ...................................................................................................................................................... 8
A. Waiting for Approval .............................................................................................................................................. 8
B. EOA Needs Amendment ........................................................................................................................................ 8 C. Active EOA ............................................................................................................................................................ 11
3. Submitting a New APO Application ........................................................................................................................ 12
A. What is an Administrative Protective Order (APO)? ............................................................................................ 12
B. Submitting an APO Application in ACCESS ........................................................................................................... 12
C. After Submitting the APO Application ................................................................................................................. 19
4. Managing an APO Application ................................................................................................................................ 21
A. Waiting for Approval ............................................................................................................................................ 21
B. APO Application Needs Amendment ................................................................................................................... 21 C. Active APO Application ........................................................................................................................................ 25 D. Error Messages When Updating an APO Application .......................................................................................... 25
5. Features in Manage APO Application Page ............................................................................................................ 28
A. Components of Manage APO Application Page ................................................................................................... 28
B. Creating A Similar APO Application ...................................................................................................................... 29
6. Draft APO Application ............................................................................................................................................. 31
C. Purpose of a Draft APO Application ..................................................................................................................... 31
D. Creating and Saving Draft APO Application ......................................................................................................... 31
7. My Service Lists Page .............................................................................................................................................. 32
A. Components of My Service Lists .......................................................................................................................... 32 B. Open or Download a Service List ......................................................................................................................... 32

Page 2 of 33
Table of Figures Figure 1: Main Menu .................................................................................................................................................................................. 3 Figure 2: Manage Entry of Appearance ..................................................................................................................................................... 4 Figure 3: Create New Entry of Appearance ............................................................................................................................................... 4 Figure 4: Entry of Appearance ................................................................................................................................................................... 5 Figure 5: Confirmation of Entry of Appearance ......................................................................................................................................... 6 Figure 6: E-file or Manual Submission Document ...................................................................................................................................... 7 Figure 7: Add More Files After E-file .......................................................................................................................................................... 7 Figure 8: Manage Entry of Appearance ..................................................................................................................................................... 8 Figure 9: Update Entry of Appearance (In-Progress) ................................................................................................................................. 8 Figure 10: Manage Entry of Appearance with Status as Active or Needs Amendment ............................................................................. 8 Figure 11: Update Entry of Appearance (Active/Needs Amendment) ...................................................................................................... 9 Figure 12: Confirmation of Entry of Appearance ..................................................................................................................................... 10 Figure 13: E-file or Manual Submission Document .................................................................................................................................. 11 Figure 14: Add More Files After E-file ...................................................................................................................................................... 11 Figure 15: Main Menu .............................................................................................................................................................................. 12 Figure 16: Manage APO Application ........................................................................................................................................................ 12 Figure 17: Create New APO Application .................................................................................................................................................. 13 Figure 18: APO Application (TOP) ............................................................................................................................................................ 14 Figure 19: APO Application (Section 1 and 2) .......................................................................................................................................... 15 Figure 20: APO Application (Section 3) .................................................................................................................................................... 16 Figure 21: APO Application: (Section 3 – Choose Attorney Applicants, Part 1) ....................................................................................... 16 Figure 22: APO Application (Section 3 – Choose Attorney Applicants, Part 2) ........................................................................................ 16 Figure 23: APO Application (Section 4) .................................................................................................................................................... 17 Figure 24: APO Application (Section 4 – Choose Non-Attorney Applicants) ........................................................................................... 18 Figure 25: APO Application (Section 5 and 6) .......................................................................................................................................... 18 Figure 26: APO Application (Section 7) .................................................................................................................................................... 19 Figure 27: Confirmation of APO Application ............................................................................................................................................ 19 Figure 28: E-file or Manual Submission Document .................................................................................................................................. 20 Figure 29: Add More Files After E-file ...................................................................................................................................................... 20 Figure 30: Manage APO Application (In-Progress) ................................................................................................................................... 21 Figure 31: Update APO Application (In-Progress) .................................................................................................................................... 21 Figure 32: Manage APO Application (Active/Needs Amendment) .......................................................................................................... 22 Figure 33: Update APO Application (Top and Section 1) ......................................................................................................................... 22 Figure 34: Update APO Application (Section 7) ....................................................................................................................................... 23 Figure 35: Confirmation of Updated APO Application ............................................................................................................................. 23 Figure 36: E-file or Manual Submission Document .................................................................................................................................. 24 Figure 37: Add More Files After E-file ...................................................................................................................................................... 24 Figure 38: Manage APO Application (Active) ........................................................................................................................................... 25 Figure 39: APO Application Section 3 Error ............................................................................................................................................. 25 Figure 40: APO Application Section 4 Error ............................................................................................................................................. 26 Figure 41: APO Application (Section 3 – Choose Attorney Applicants) ................................................................................................... 27 Figure 42: APO Application (Section 4 – Choose Non-Attorney Applicants) ........................................................................................... 27 Figure 43: Manage APO Application ........................................................................................................................................................ 28 Figure 44: Other APO Applications for my firm ....................................................................................................................................... 28 Figure 45: Create Similar APO application button ................................................................................................................................... 29 Figure 46: Similar APO Application .......................................................................................................................................................... 29 Figure 47: Submittal Options ................................................................................................................................................................... 30 Figure 48: Draft in Manage APO Application Table ................................................................................................................................. 31 Figure 49: My Service Lists ....................................................................................................................................................................... 32 Figure 50: Downloading Service List ........................................................................................................................................................ 33

Page 3 of 33
1. Submitting an EOA
A. What is an Entry of Appearance (EOA)? An entry of appearance is a letter or document that states briefly how a party qualifies as an interested party in an antidumping (AD) or countervailing duty (CVD) proceeding. The entry of appearance provides the contact information of the person who will act as the point of contact for the party, and it indicates the intent of the party to participate in an AD/CVD proceeding. Acceptance of an entry of appearance is signified by the Secretary’s inclusion of the person on a document referred to as the public service list. Note: The ACCESS EOA form is intended to be submitted by the lead attorney, or lead organization/company point of contact, using that person’s login credentials.
B. Submitting an EOA in ACCESS 1. From Home page, click on “Manage Entry of Appearance” on the left-side Main Menu. (Figure 1)
Figure 1: Main Menu
2. On “Manage Entry of Appearance” page, a table will appear if there are any existing EOAs previously submitted by the user. These EOAs may be accessed by clicking on the case number. (Figure 2)

Page 4 of 33
Figure 2: Manage Entry of Appearance
3. Click on “Create New Entry of Appearance” to begin EOA creation. (Figure 3)
Figure 3: Create New Entry of Appearance
4. The “Manage Entry of Appearance” page will open. (Figure 4)
5. All fields with a red asterisk * must be filled out on the page. First, type in the Case Number. The Case
Title will auto-fill. Clicking “Case List” next to the Case Number field will open a window showing all possible case numbers in ACCESS and their corresponding Case Titles. The Case Segment is then selected using a drop-down menu that will show all available case segments.
6. Select “Yes” or “No” for “Is participant(s) represented by counsel?” using the drop-down box.
7. In “Participant Type(s), check up to 9 participant types that apply. At least one of the 9 is required to be
checked and filled. (Figure 4)
8. In the Interested Party boxes, type in the name of organization or company. Where members are requested, enter their names, separated by commas. If there is not enough space to provide all names, you may attach a PDF with a list of names to your Entry of Appearance. In the appropriate box, type “see attached” and, after submitting the EOA application, use “Add EOA Supporting Docs” to e-file the PDF. You will be taken to an E-File page, where you can upload your list of names as a PDF.
9. In the “Additional Information” field, if inputting more than one company per participant category, or if
more than one category is applicable per company, use this field to provide a narrative description of how each organization/company qualifies as an interested party.
10. For Name, Firm Name, Full Address, Firm/Organization Phone and Email Address, these fields are auto-populated from the submitter’s account. Only the address may be edited from within the EOA form. (Figure 4)

Page 5 of 33
11. Once the form is completed, you may submit by clicking the “Submit” button at the bottom of the page. If you decide against submitting, simply click the “Cancel” button to be taken back to the Home page.
Figure 4: Entry of Appearance
C. After Submitting the EOA
Page 6 of 33
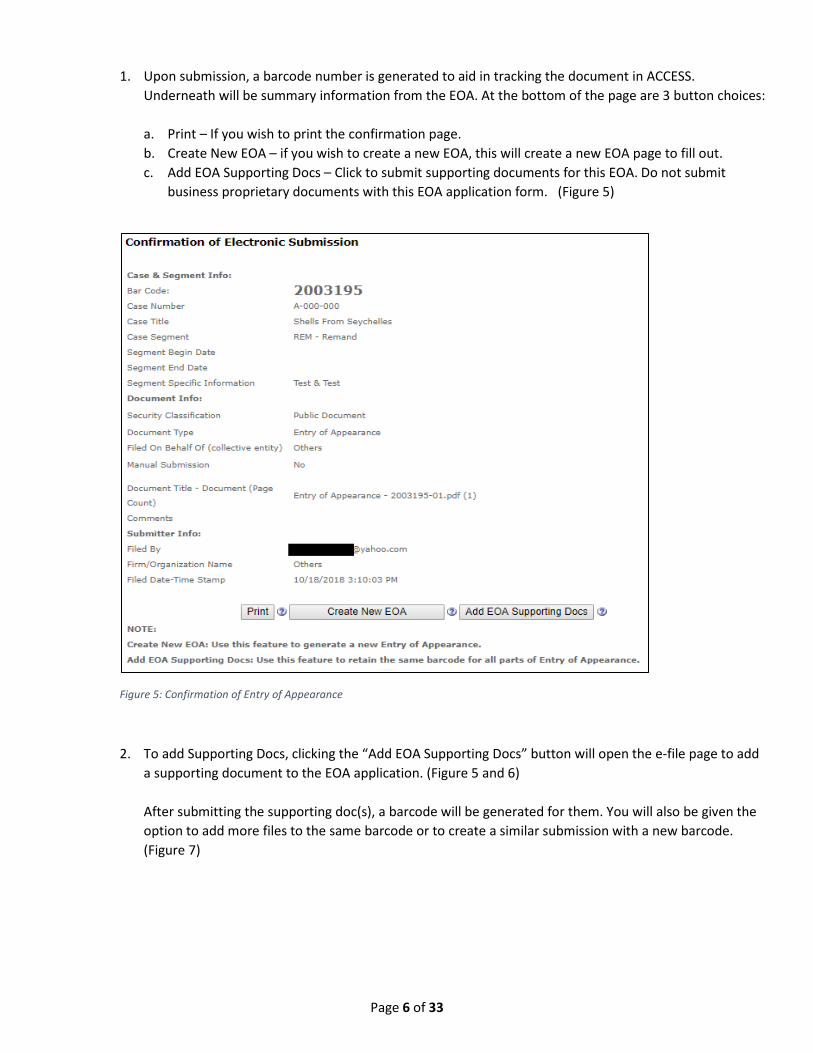
1. Upon submission, a barcode number is generated to aid in tracking the document in ACCESS.
Underneath will be summary information from the EOA. At the bottom of the page are 3 button choices: a. Print – If you wish to print the confirmation page. b. Create New EOA – if you wish to create a new EOA, this will create a new EOA page to fill out. c. Add EOA Supporting Docs – Click to submit supporting documents for this EOA. Do not submit
business proprietary documents with this EOA application form. (Figure 5)
Figure 5: Confirmation of Entry of Appearance
2. To add Supporting Docs, clicking the “Add EOA Supporting Docs” button will open the e-file page to add a supporting document to the EOA application. (Figure 5 and 6) After submitting the supporting doc(s), a barcode will be generated for them. You will also be given the option to add more files to the same barcode or to create a similar submission with a new barcode. (Figure 7)

Page 7 of 33
Figure 6: E-file or Manual Submission Document
Figure 7: Add More Files After E-file

Page 8 of 33
2. Managing an EOA A. Waiting for Approval
1. After an EOA is submitted, clicking on “Manage Entry of Appearance” from the main menu will show
that the EOA is now in “In Progress” status. (Figure 8) During the time that the EOA is “In Progress”, the form may be opened to the “Update Entry of Appearance” page, but it will be in read-only mode only. No data can be changed or edited. (Figure 9)
Figure 8: Manage Entry of Appearance
Figure 9: Update Entry of Appearance (In-Progress)
B. EOA Needs Amendment 1. Once the APO Unit approves the EOA, the status will change to either “Active” or “Needs Amendment”.
(Figure 10)
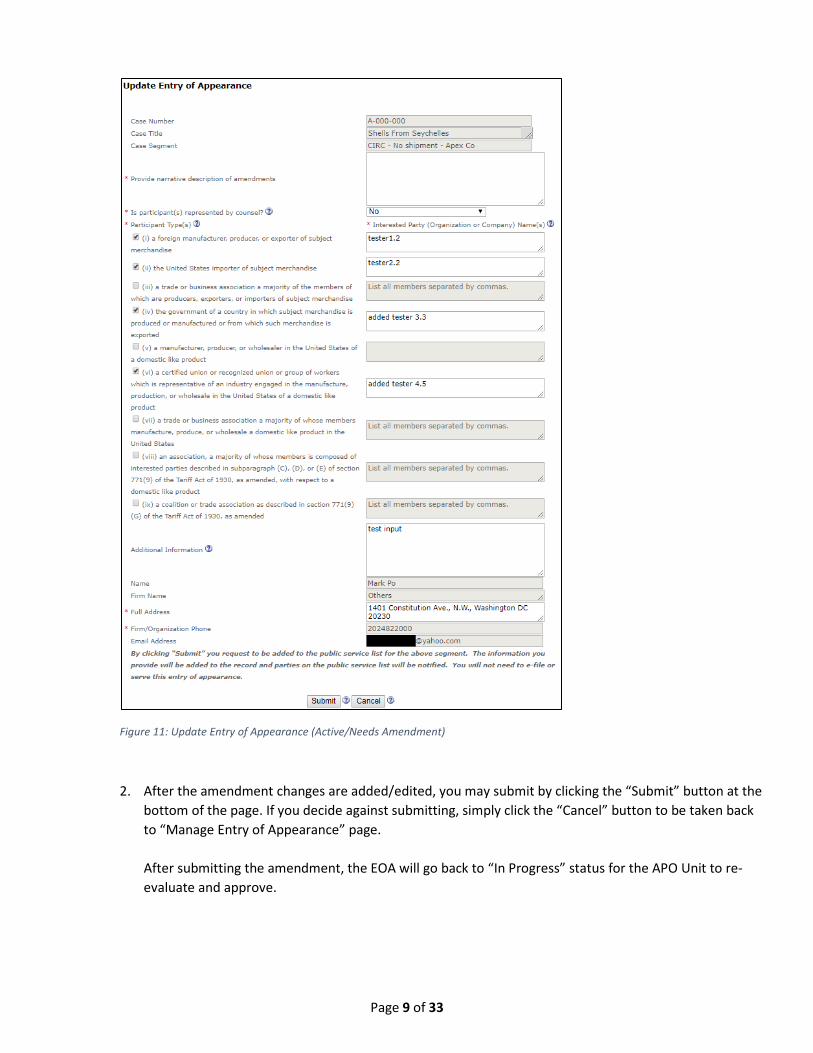
If the status is in “Needs Amendment”, then the application needs editing or additional information. Clicking on the Case Number will open the “Update Entry of Appearance” page to allow editing. Greyed-out fields cannot be edited, but the Participant Type(s) field can be toggled by checking the appropriate boxes to add or remove participants. (Figure 11)
Figure 10: Manage Entry of Appearance with Status as Active or Needs Amendment
Page 9 of 33
Figure 11: Update Entry of Appearance (Active/Needs Amendment)
2. After the amendment changes are added/edited, you may submit by clicking the “Submit” button at the bottom of the page. If you decide against submitting, simply click the “Cancel” button to be taken back to “Manage Entry of Appearance” page. After submitting the amendment, the EOA will go back to “In Progress” status for the APO Unit to re-evaluate and approve.

Page 10 of 33
3. Upon submission, a barcode number is generated to aid in tracking the amendment in ACCESS. The confirmation page will include summary information. At the bottom of the page are 3 button choices (Figure 12): a. Print – If you wish to print the document.
b. Create New EOA – This will take you back to EOA creation page.
c. Add EOA Supporting Docs – Click to submit public supporting documents for this EOA. Do not submit
business proprietary documents with this EOA application form.
Figure 12: Confirmation of Entry of Appearance
4. To add Supporting Docs, click the “Add EOA Supporting Docs” button to take you to the e-file page to add a public document to the EOA application. (Figure 12 and 13) After submitting the supporting doc(s), a barcode will be generated for them. You will also be given the option to add more files to the same barcode or to create a similar submission with a new barcode. (Figure 14)

Page 11 of 33
Figure 13: E-file or Manual Submission Document
Figure 14: Add More Files After E-file
C. Active EOA 1. Once the APO Unit approves the EOA, the status will change to “Active” in the “Manage Entry of
Appearance” Page. (Figure 2)
2. If the EOA needs to be updated after becoming active, click on the case number to open the “Update Entry of Appearance” page. (Figure 11) The steps to update will be the same steps as in Section 4B (EOA Needs Amendment) for amending/updating an active EOA.
Page 12 of 33
3. Submitting a New APO Application
A. What is an Administrative Protective Order (APO)? An APO is the legal mechanism by which the Department of Commerce’s Enforcement and Compliance can control the limited disclosure of BPI in AD/CVD proceedings to the legal representatives of interested parties. The release of BPI under APO is authorized when a representative files an application for APO access in which they agree to be bound by the APO terms and the approved applicant is added to the APO Service List. Note: The ACCESS APO application is intended to be submitted by the lead attorney, using the lead attorney’s login credentials.
B. Submitting an APO Application in ACCESS 1. From Home page, click on “Manage APO Application” on the left-side Main Menu. (Figure 15)
Figure 15: Main Menu
2. On “Manage APO Application” page, a table will appear if there are any existing APO applications previously submitted by the user. These APO applications may be accessed by clicking on the case number. (Figure 16)
Figure 16: Manage APO Application
Page 13 of 33
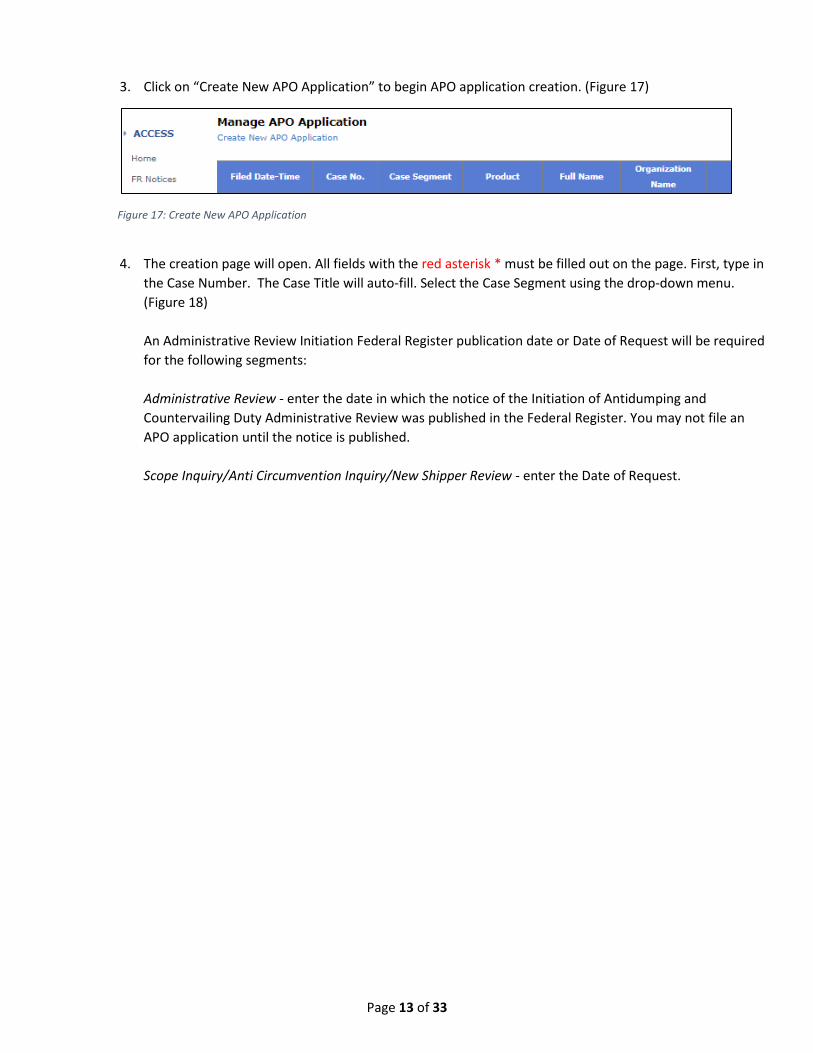
3. Click on “Create New APO Application” to begin APO application creation. (Figure 17)
Figure 17: Create New APO Application
4. The creation page will open. All fields with the red asterisk * must be filled out on the page. First, type in
the Case Number. The Case Title will auto-fill. Select the Case Segment using the drop-down menu. (Figure 18) An Administrative Review Initiation Federal Register publication date or Date of Request will be required for the following segments: Administrative Review - enter the date in which the notice of the Initiation of Antidumping and Countervailing Duty Administrative Review was published in the Federal Register. You may not file an APO application until the notice is published. Scope Inquiry/Anti Circumvention Inquiry/New Shipper Review - enter the Date of Request.

Page 14 of 33
Figure 18: APO Application (TOP)
5. In Section 1, check up to 9 participant types that apply. (Figure 19)
In the Interested Party boxes, list the name of the organization or company. For more than one company, enter the names separated by commas. If there is not enough space to provide all names, you may attach a PDF with a list of names to your APO application. In the appropriate box, type “see attached” and, after submitting the APO application, use “Add Public APO Supporting Docs” to e-file the PDF.
In Section 1, in the “Additional information” field, if inputting more than one company per participant category, or if more than one category is applicable per company, use this field to provide a narrative description of how each organization/company qualifies as an interested party.
In Section 2, enter the firm name if there is another authorized applicant or representative that also represents the interested parties listed in Section 1.

Page 15 of 33
Figure 19: APO Application (Section 1 and 2)
6. In Section 3, select answers to Parts A-D using the drop-down boxes. Use Part E to explain any affirmative responses for Parts A-D if needed. (Figure 20) In the 2nd half of Section 3, choose the attorneys to be included in the APO application. (Figure 21) This list only includes active e-filers from your firm who have included in their User Profile: 1) the jurisdictions and courts in which they are admitted to practice, and 2) a checked box indicating consent to have others from the same firm include the user in an APO application. If you do not see a particular attorney in this list, ask the attorney to check their User Profile to ensure the account is active and contains the foregoing information. Note: This list does not include the user who is logged in and filling out the form. This user will appear as the lead attorney, and the name and contact information will appear at the end of the APO application form.

Page 16 of 33
Under “Choose Attorney Applicants”, potential applicants appear on the left-hand box. Using the right arrow button, applicants can be moved to the right-hand box to add them to the APO application. (Figure 21 and 22)
Figure 20: APO Application (Section 3)
Figure 21: APO Application: (Section 3 – Choose Attorney Applicants, Part 1)
Figure 22: APO Application (Section 3 – Choose Attorney Applicants, Part 2)
7. In Section 4, the drop-down boxes answer Parts A, D, E, F and G. Use Part H to explain any affirmative responses for Parts D – G, if needed. (Figure 23) In response to Part B, if applicable, enter the name of the lawyer and law firm who retained the non-attorney applicants.

Page 17 of 33
Figure 23: APO Application (Section 4)
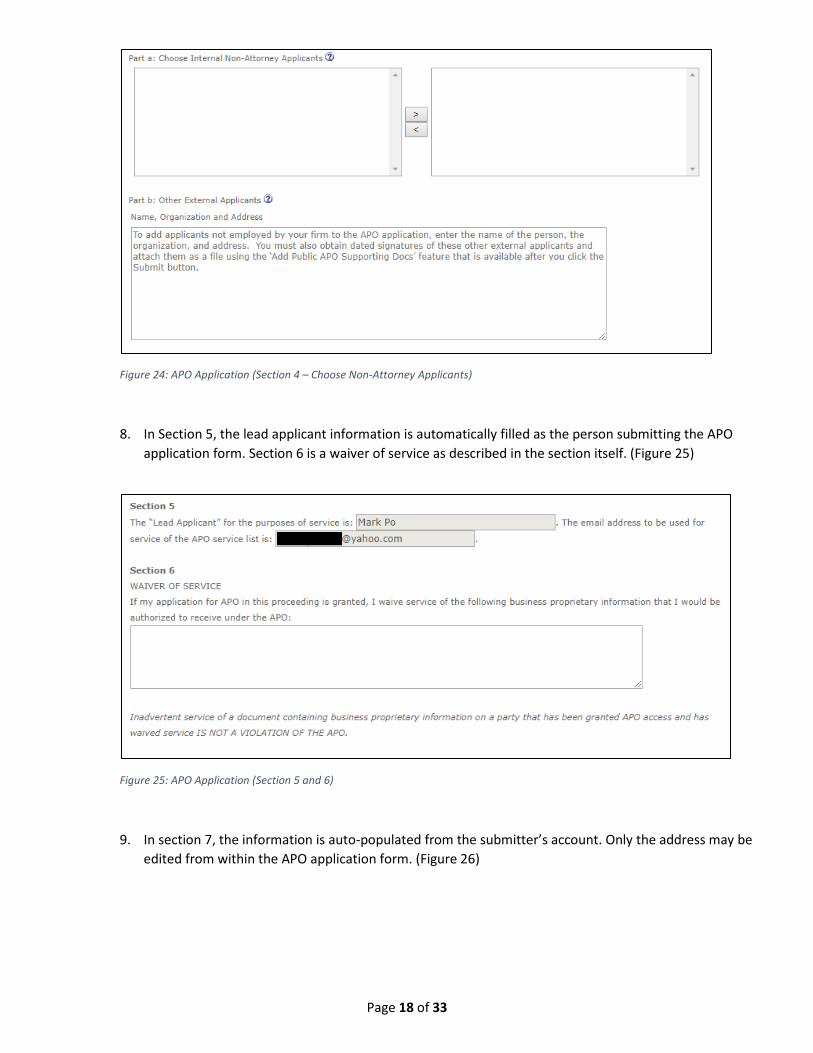
In Part a of Section 4, choose non-attorneys from your firm to be included in the APO application. This list only includes active e-filers from your firm who have checked the box in their User Profile indicating consent to have others from the same firm include the user in an APO application. Under “Choose Internal Non-Attorney Applicants”, potential applicants appear on the left-hand box. Using the right arrow button, applicants can be moved to the right-hand box to add them to the APO application. (Figure 24) In Part b of Section 4, if you wish to add applicants not employed by your firm to the APO application, enter the name of the person, the organization, and address. (Figure 24) You must also obtain dated signatures of these other external applicants and attach them as a file using the ‘Add Public APO Supporting Docs’ feature that is available after you click the Submit button.
Page 18 of 33
Figure 24: APO Application (Section 4 – Choose Non-Attorney Applicants)
8. In Section 5, the lead applicant information is automatically filled as the person submitting the APO application form. Section 6 is a waiver of service as described in the section itself. (Figure 25)
Figure 25: APO Application (Section 5 and 6)
9. In section 7, the information is auto-populated from the submitter’s account. Only the address may be edited from within the APO application form. (Figure 26)

Page 19 of 33
Figure 26: APO Application (Section 7)
10. Once the form is completed, you may submit by clicking the “Submit” button at the bottom of the page. If you decide against submitting, simply click the “Cancel” button to be taken back to “Manage APO Application” page. (Figure 26)
C. After Submitting the APO Application 1. Upon submission, a barcode number is generated to aid in tracking the document in ACCESS.
Underneath will be summary information from the APO application. At the bottom of the page are 3 button choices: a. Print – If you wish to print the confirmation page. b. Create New APO Application – This will take you back to the APO application creation page. c. Add Public APO Supporting Docs – Click to submit public supporting documents for this APO. Do not
submit business proprietary documents with this APO application form. (Figure 27)
Figure 27: Confirmation of APO Application

Page 20 of 33
2. To add Supporting Docs, clicking the “Add Public APO Supporting Docs” button will then take you to the e-file page to add a public document to the APO application. (Figure 27 and 28) After submitting the supporting doc(s), a barcode will be generated for them. You will also be given the option to add more files to the same barcode or to create a similar submission with a new barcode. (Figure 29)
Figure 28: E-file or Manual Submission Document
Figure 29: Add More Files After E-file

Page 21 of 33
4. Managing an APO Application A. Waiting for Approval
1. After an APO application is submitted, clicking on “Manage APO Application” from the main menu will
show that the APO application is now in “In Progress” status. (Figure 30) During the time that the APO is “In Progress”, the form may be opened to the “Update Administrative Protective Order Application” page, but it will be in read-only mode only. No data can be changed or edited. (Figure 31)
Figure 30: Manage APO Application (In-Progress)
Figure 31: Update APO Application (In-Progress)
B. APO Application Needs Amendment 1. Once the APO Unit approves the APO application, the status will change to either “Active” or “Needs
Amendment”. (Figure 32)
If the status is in “Needs Amendment”, then the application needs editing or additional information. Clicking on the Case Number will open the “Update Administrative Protective Order Application” page. The fields that cannot be changed will be greyed out. (Figure 33)
Under “This application is:”, the following check boxes can be chosen separately or together:
a. A request to amend the firm’s list of authorized applicants; or b. A request to amend the firm’s list of clients.

Page 22 of 33
Figure 32: Manage APO Application (Active/Needs Amendment)
Figure 33: Update APO Application (Top and Section 1)
2. Make the needed amendments to the APO application. Note: You will need to answer Section 3 Parts A-E and Section 4 Parts A-H each time you amend an APO application.
3. After the amendment changes are added/edited, you may submit by clicking the “Submit” button at the bottom of the page. (Figure 34) If you decide against submitting, simply click the “Cancel” button to be taken back to “Manage APO Application” page. After submitting the amendments, the APO application will go back to “In Progress” status for the APO Unit to re-evaluate and approve.

Page 23 of 33
Figure 34: Update APO Application (Section 7)
4. Upon submission, a barcode number is generated to aid in tracking the amendment in ACCESS. The confirmation page will include summary information. At the bottom of the page are 3 button choices (Figure 35): a. Print – If you wish to print the confirmation page.
b. Create New APO Application – this will take you back to APO creation page.
c. Add Public APO Supporting Docs – Click to submit public supporting documents for this APO. Do not
submit business proprietary documents with this APO application form.
Figure 35: Confirmation of Updated APO Application

Page 24 of 33
5. To add Supporting Docs, clicking the “Add Public APO Supporting Docs” button will take you to the e-file page to add a public document to the APO application. (Figure 35 and 36) After submitting the supporting doc(s), a barcode will be generated for them. You will also be given the option to add more files to the same barcode or to create a similar submission with a new barcode. (Figure 37)
Figure 36: E-file or Manual Submission Document
Figure 37: Add More Files After E-file

Page 25 of 33
C. Active APO Application 1. Once the APO Unit approves the APO application, the status will change to “Active” in the “Manage APO
Application” Page. (Figure 38)
Figure 38: Manage APO Application (Active)
2. If the APO application needs to be updated after becoming active, click on the case number to open the “Update Administrative Protective Order Application” page. (Figure 33) The steps to update will be the same steps as in Section 2B (APO Application Needs Amendment) for amending/updating an active APO application.
D. Error Messages When Updating an APO Application 1. When updating older APO Applications created before the Release 4 Update, some applications may
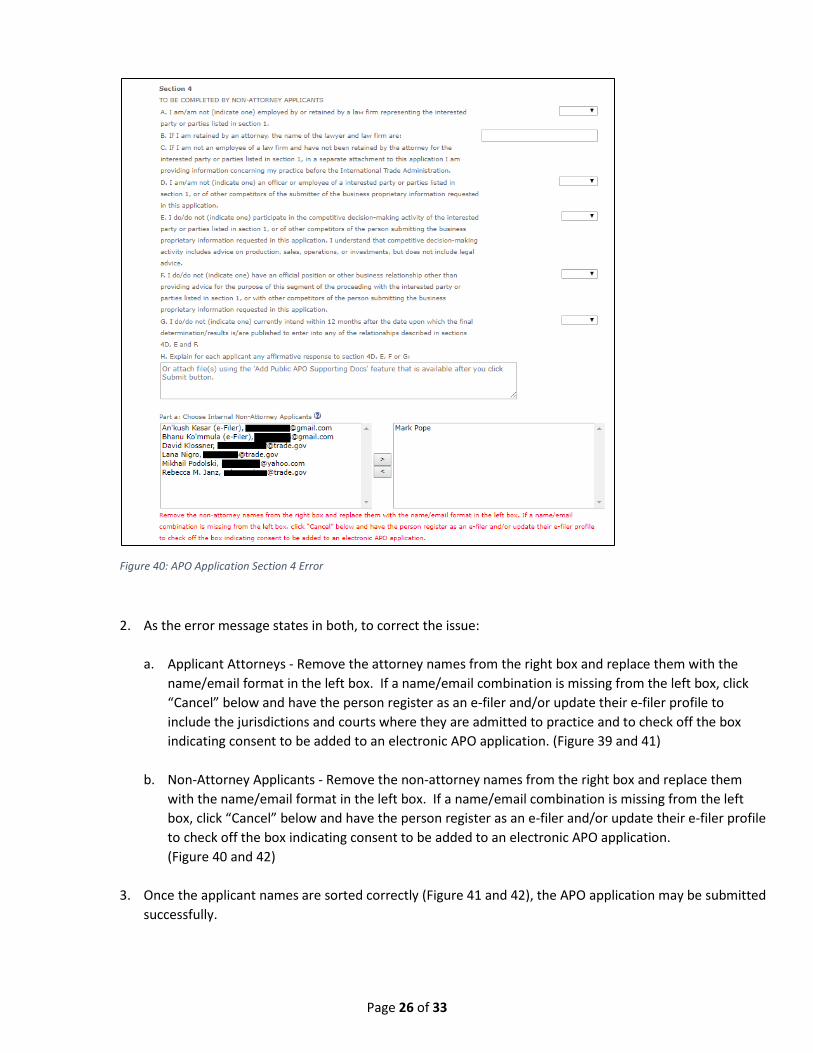
need some updating of Attorney Applicants and Non-Attorney Applicants. In Section 3 and Section 4a, if a name in the right box does not have an accompanying email address, the form cannot be submitted for an update and will show an error message. (Figure 39 and 40)
Figure 39: APO Application Section 3 Error
Page 26 of 33
Figure 40: APO Application Section 4 Error
2. As the error message states in both, to correct the issue: a. Applicant Attorneys - Remove the attorney names from the right box and replace them with the
name/email format in the left box. If a name/email combination is missing from the left box, click “Cancel” below and have the person register as an e-filer and/or update their e-filer profile to include the jurisdictions and courts where they are admitted to practice and to check off the box indicating consent to be added to an electronic APO application. (Figure 39 and 41)
b. Non-Attorney Applicants - Remove the non-attorney names from the right box and replace them with the name/email format in the left box. If a name/email combination is missing from the left box, click “Cancel” below and have the person register as an e-filer and/or update their e-filer profile to check off the box indicating consent to be added to an electronic APO application. (Figure 40 and 42)
3. Once the applicant names are sorted correctly (Figure 41 and 42), the APO application may be submitted
successfully.

Page 27 of 33
Figure 41: APO Application (Section 3 – Choose Attorney Applicants)
Figure 42: APO Application (Section 4 – Choose Non-Attorney Applicants)
Page 28 of 33
5. Features in Manage APO Application Page A. Components of Manage APO Application Page
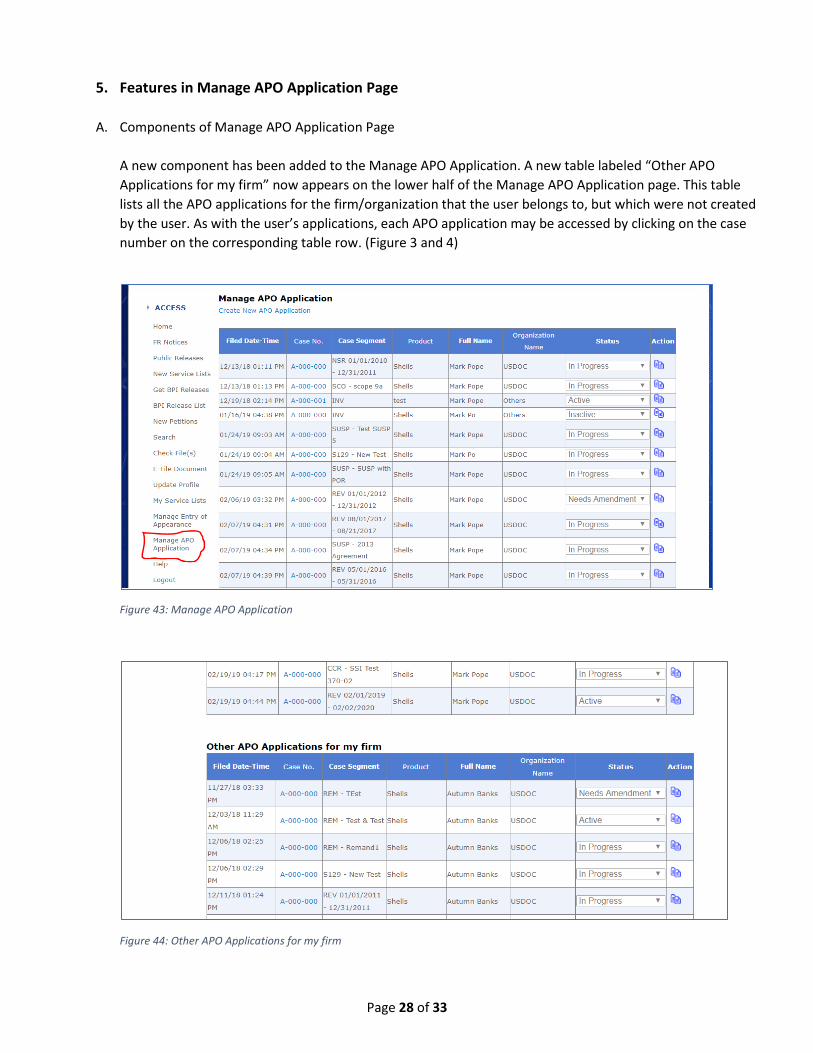
A new component has been added to the Manage APO Application. A new table labeled “Other APO Applications for my firm” now appears on the lower half of the Manage APO Application page. This table lists all the APO applications for the firm/organization that the user belongs to, but which were not created by the user. As with the user’s applications, each APO application may be accessed by clicking on the case number on the corresponding table row. (Figure 3 and 4)
Figure 43: Manage APO Application
Figure 44: Other APO Applications for my firm

Page 29 of 33
B. Creating A Similar APO Application You can now create a copy of an existing APO Application and modify it for use. A paper icon button has been added to the end of each application row. Clicking on this button will open an APO Application creation page. (Figure 5) The application information associated with A-000-000, Segment CCR, Segment Specific Information “SSI Test 370-02” is copied into a new application creation page for submittal. (Figure 6)
Figure 45: Create Similar APO application button
Figure 46: Similar APO Application
Page 30 of 33
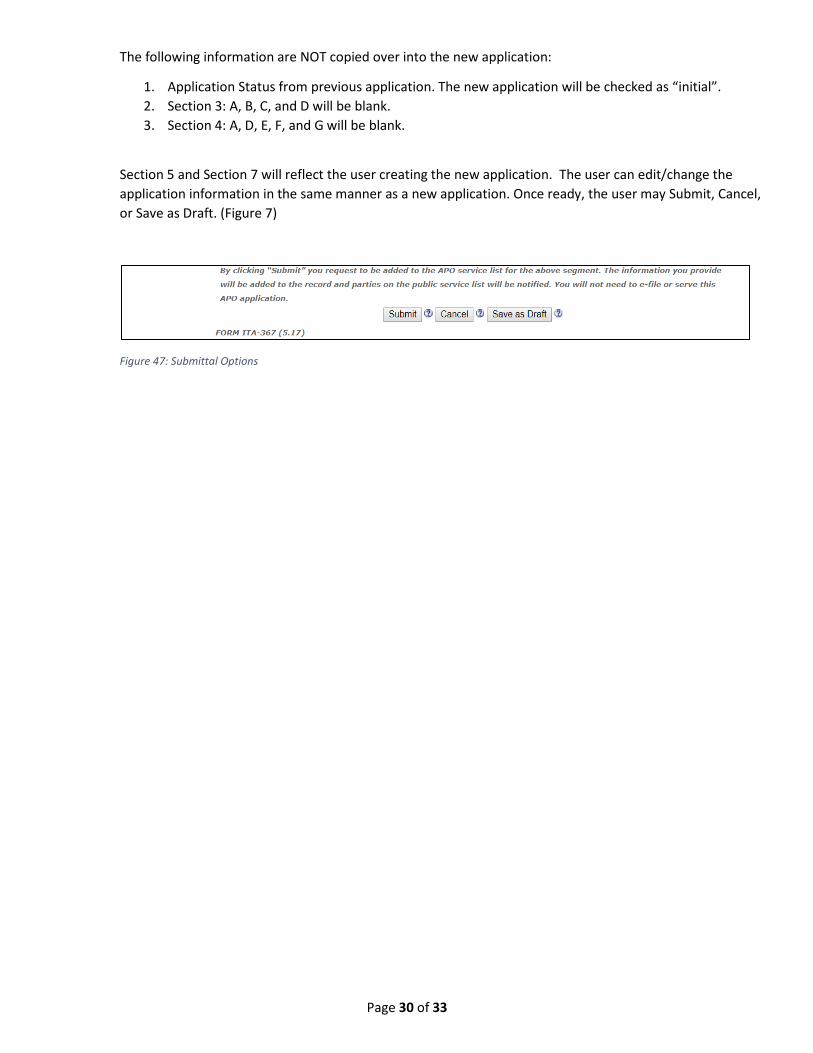
The following information are NOT copied over into the new application:
1. Application Status from previous application. The new application will be checked as “initial”. 2. Section 3: A, B, C, and D will be blank. 3. Section 4: A, D, E, F, and G will be blank.
Section 5 and Section 7 will reflect the user creating the new application. The user can edit/change the application information in the same manner as a new application. Once ready, the user may Submit, Cancel, or Save as Draft. (Figure 7)
Figure 47: Submittal Options

Page 31 of 33
6. Draft APO Application
A. Purpose of a Draft APO Application A Draft APO Application gives the user the ability to save an APO application without submitting it. Saving the draft lets the user make changes to the draft before official submission.
B. Creating and Saving Draft APO Application Creating a Draft APO application is no different than creating a regular application. The user may click on “Create New APO Application” at the top of the Manage APO Application page (Figure 3) or click the paper icon button used to create a similar APO Application (Figure 5). The creation page (Figure 6) remains the same. Clicking “Save as Draft” button will save the APO Application as a draft and the following confirmation message will appear:
“You have successfully saved the APO Application in Draft status. Select the Manage APO Application menu option to retrieve the saved draft to further edit and submit. Draft APO Applications are saved in the system for 30 days.”
The following information are NOT saved in the draft APO Application and will need to be answered each time:
1. Section 3, A, B, C, and D will be blank. 2. Section 4, A, D, E, F, and G will be blank.
Going back to Manage APO Application page, the Draft appears with a trash can icon on the row. (Figure 8) Clicking on the trash can icon will delete the draft entirely from ACCESS. To access the Draft again for further editing, click on the case number. If the draft is still not ready for submission, click “Save as Draft” to save the newest updates to the draft application. The draft can be saved as many times as needed, but the draft can only be saved up to 30 days.
Figure 48: Draft in Manage APO Application Table
Page 32 of 33
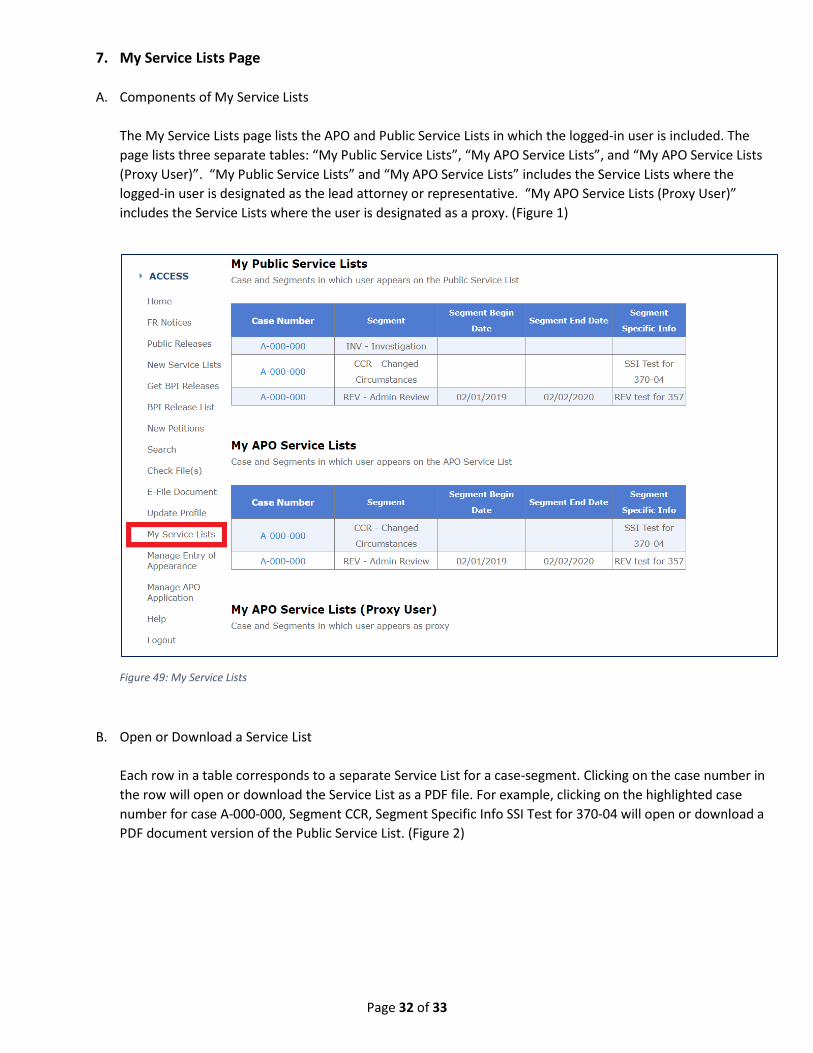
7. My Service Lists Page A. Components of My Service Lists
The My Service Lists page lists the APO and Public Service Lists in which the logged-in user is included. The page lists three separate tables: “My Public Service Lists”, “My APO Service Lists”, and “My APO Service Lists (Proxy User)”. “My Public Service Lists” and “My APO Service Lists” includes the Service Lists where the logged-in user is designated as the lead attorney or representative. “My APO Service Lists (Proxy User)” includes the Service Lists where the user is designated as a proxy. (Figure 1)
Figure 49: My Service Lists
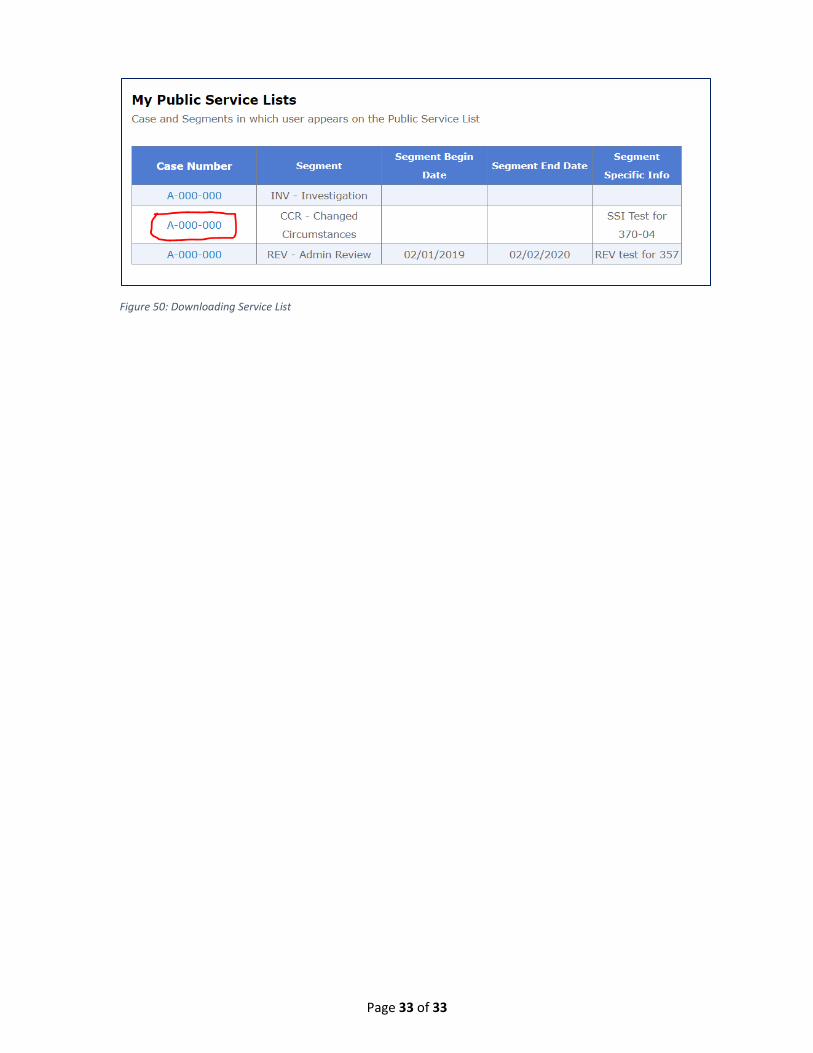
B. Open or Download a Service List Each row in a table corresponds to a separate Service List for a case-segment. Clicking on the case number in the row will open or download the Service List as a PDF file. For example, clicking on the highlighted case number for case A-000-000, Segment CCR, Segment Specific Info SSI Test for 370-04 will open or download a PDF document version of the Public Service List. (Figure 2)
Page 33 of 33
Figure 50: Downloading Service List