tekla struxml export -...
TRANSCRIPT

StruSoft AB www.strusoft.com Version: September 25th, 2017
Tekla StruXML Import User‟s Guide to FEM-Design - Tekla Structures Integration

2

3
Copyright
Copyright© 2017 by StruSoft. All rights reserved.
Content of this publication may not be reproduced or transmitted in any means without the written
permission of StruSoft AB.
Trademarks
FEM-Design® is a registered trademark of StruSoft.
Tekla® Structures is a registered trademark of Trimble Solutions Corporation.

4
Disclaimer
The Tekla StruXML Import is a tool that enables a link between FEM-Design and Tekla Structures.
Substantial amount of time and effort have gone into development and testing Tekla StruXML Import
tool. We did our best to ensure the reliability of the software and the accuracy of this document.
However, the user must accept that no warranty is given by the developers concerning accuracy of this
software or information found in this document.
Anyone that has doubts concerning the accuracy of the Tekla StruXML Import, or has suggestions
regarding development of the Tekla StruXML Import, is welcome to contact us at:
For support, please use: [email protected]. When sending support question, please
remember to always attach an original Tekla Structures model, FEM-Design model and a struxml file.
Current link versions
- Tekla StruXML Import 1.0.004
Compatibility
- Tekla Structures: version 18-21.1, 2016, 2016i, 2017, 2017i
Download
- FEM-Design Download Center
- StruSoft Installer
Additional materials
- Tekla – FEM-Design Integration
- Forum
- StruSoft Official YouTube Channel

5
Table of Contents
1. INTRODUCTION........................................................................................................................................... 7
1.1. MANUAL SCOPE .............................................................................................................................................. 7
1.2. INSTALLATION ................................................................................................................................................. 7
1.3. CONCEPT ....................................................................................................................................................... 7
1.4. FUNCTIONALITY............................................................................................................................................... 7
1.5. DESIGNED WORKFLOW ..................................................................................................................................... 9
1.6. TRANSFERRED DATA ......................................................................................................................................... 9
2. TEKLA STRUXML IMPORT ........................................................................................................................... 10
2.1. SAVING FEM-DESIGN MODEL .......................................................................................................................... 11
2.2. CREATING TEKLA MODEL ................................................................................................................................. 11
2.3. TEKLA STRUXML IMPORT TOOL ....................................................................................................................... 12
2.3.1. Import tab ......................................................................................................................................... 12
2.3.2. Materials tab .................................................................................................................................... 15
2.3.3. Sections tab ...................................................................................................................................... 17
2.3.4. Options tab ....................................................................................................................................... 19
2.3.5. Import (convert) ............................................................................................................................... 21
2.3.6. Update .............................................................................................................................................. 25
2.4. LIMITATIONS AND FUTURE DEVELOPMENT .......................................................................................................... 32
Tekla StruXML Import
6
NEW FEATURES AND CHANGES COMPARED TO TEKLA STRUXML IMPORT 1.0.003
ADDED:
1. Compatibility with Tekla Structures 2017i.
2. Possibility to convert axes and storeys
It is possible to convert struxml axes and storeys to Tekla grid system. Read more in Chapter
2.3.5 B.
FIXED:
3. It is now much faster to switch options on and off (e.g. check / uncheck Type and Status
options) at models containing large number of elements.
NEW FEATURES AND CHANGES COMPARED TO TEKLA STRUXML IMPORT 1.0.002
ADDED:
4. Compatibility with Tekla Structures 2017.
5. New user-defined input parameters are available in the Options tab.
It is possible to define Prefix input parameters for imported elements. More in Chapter 2.3.4.
6. Possibility to save the Options tab settings as Default.
It is possible to save the setting in Options tab as default, and load those settings for a new
project, More in Chapter 2.3.4.
CHANGED:
7. User-defined input parameters can be defined separately for concrete and steel objects. More in
Chapter 2.3.4.

Tekla StruXML Import
7
1. Introduction
1.1. Manual scope
This document describes the concept behind the link between FEM-Design and Tekla Structures, and
explains how to exchange data between those two programs using the Tekla StruXML Import tool.
1.2. Installation
Download the latest version of Tekla StruXML Import from StruSoft Installer or from FEM-Design
Download Center and run the installation file.
When the installation process is completed, Tekla StruXML Import tool will appear under StruSoft
folder in the Start menu, as shown in Figure 1-1.
Figure 1-1
1.3. Concept
Tekla StruXML Import Tool enables direct communication between FEM-Design and Tekla Structures.
The direct data transfer is based on conversion of FEM-Design analysis model transfer into Tekla
Structures native objects. FEM-Design analysis model is saved as struxml file type and converted to
Tekla native objects in the Tekla StruXML Import tool. The proper sections and materials are
assigned to Tekla native objects in the mapping process.
1.4. Functionality
The Tekla StruXML Import Tool has the following functionality (Figure 1-2):
- importing FEM-Design model to create a new Tekla Structures model,
- updating Tekla Structures model with changes made in FEM-Design model after the initial
import.
One can import / update:
- selected element(s),
- group of elements (e.g. all beams, columns, etc.),
- all elements.

Tekla StruXML Import
8
Figure 1-2
When updating the Tekla model, changes (in comparison to the initially imported objects) are
recognized on both FEM-Design (struxml) and Tekla side. Following changes can be recognized:
- new element (only in struxml),
- modification of an element (in struxml and in Tekla),
section / thickness
material
geometry
ID (only in struxml)
- deletion of element (in struxml and in Tekla).
If certain object is changed, it is assigned to one of the status categories: New, Modified, Deleted or
Conflicted. Also, a certain type of change is reflected in the object name (Figure 1-3):
- object type is bolded when geometry changed,
- section name is bolded when it changed,
- material name is bolded when it changed,
- ID is bolded when it changed,
- object name is strikethrough if it was deleted.
The same rule applies if an object is changed in Tekla. Certain part of the Tekla name is bolded or
strikethrough to reflect the change type.
Figure 1-3
One can accept a certain change (and update the Tekla object), or deny (ignore) it. Each object can
be treated individually.
Tekla StruXML Import
9
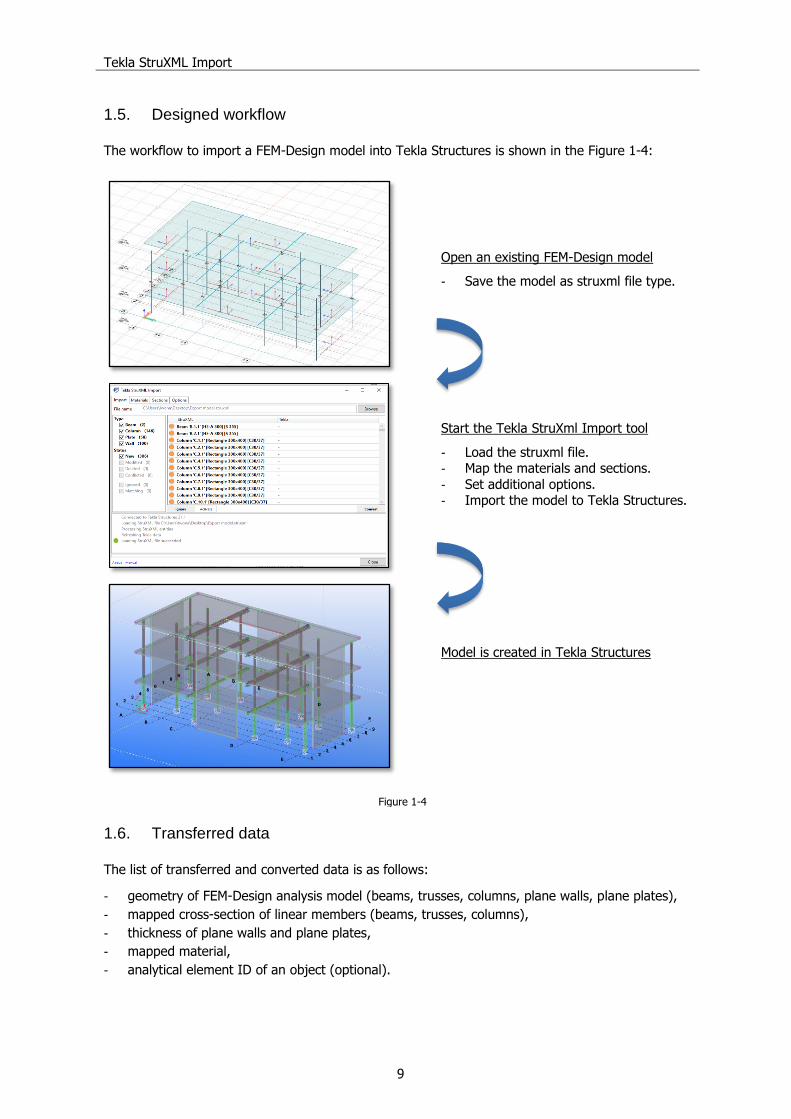
1.5. Designed workflow
The workflow to import a FEM-Design model into Tekla Structures is shown in the Figure 1-4:
Open an existing FEM-Design model
- Save the model as struxml file type.
Start the Tekla StruXml Import tool
- Load the struxml file. - Map the materials and sections.
- Set additional options. - Import the model to Tekla Structures.
Figure 1-4
Model is created in Tekla Structures
1.6. Transferred data
The list of transferred and converted data is as follows:
- geometry of FEM-Design analysis model (beams, trusses, columns, plane walls, plane plates),
- mapped cross-section of linear members (beams, trusses, columns),
- thickness of plane walls and plane plates,
- mapped material,
- analytical element ID of an object (optional).

Tekla StruXML Import
10
2. Tekla StruXML Import
This chapter explains the detailed workflow of the integration between FEM-Design and Tekla
Structures, as well as the functionality of the Tekla StruXML Import tool. In the table below, a
detailed workflow is described.
IMPO
RT F
EM
-DESIG
N M
OD
EL T
O T
EKLA
In FEM-Design: Save FEM-Design model as .struxml file type (Chapter 2.1).
In Tekla: Start Tekla Structures and open an existing model, or create a new model (Chapter 2.2).
In Tekla StruXML Import: Start Tekla StruXML Import tool (Chapter 2.3).
In the Import tab load the struxml file (Chapter 2.3.1).
Go to Materials tab and map all the materials used in the model (Chapter 2.3.2).
Go to Sections tab and map all the sections used in the model (Chapter 2.3.3).
Go to Options tab and decide upon the optional settings (Chapter 2.3.4).
Go back to Import tab, select an element / elements to convert to Tekla model and press Convert (Chapter Error! Reference source not found.).
Close the Tekla StruXML Import tool.
In Tekla: Continue working with the imported model and when finished, Save the model (with the original name).
- - - - - - - - - - - - - - - - - - - - - - - - - - - - - - - - - - - - - - - - - - - - - - - - - - - - - - - - - - - - - - - - - - -
UPD
ATE T
EKLA M
OD
EL
In FEM-Design: Save the new version of the earlier imported FEM-Design model as .struxml file type.
In Tekla: Open the previously imported model.
In Tekla StruXML Import: Start Tekla StruXML Import tool.
In the Import tab load the new struxml file (Chapter 2.3.1)..
If necessary, go to Materials tab and map all the new materials used in the model (Chapter 2.3.2).
If necessary, go to Sections tab and map all the new sections used in the model (Chapter 2.3.3).
If necessary, go to Options tab and decide upon the optional settings (Chapter 2.3.4).
Go back to Import tab, and verify the status of elements (Chapter 0).
- Select an element / elements and press Convert if you wish to update the Tekla element to the struxml version.
- Select an element / elements and press Ignore if you wish to ignore the element and do not update the Tekla element to the struxml version.
Close the Tekla StruXML Import tool.
In Tekla: Continue working with the imported model and when finished, Save the model (with the original name).

Tekla StruXML Import
11
2.1. Saving FEM-Design model
In FEM-Design go to File -> Save as and save your model as .struxml file type. Struxml file type is
an alternative FEM-Design format that among other things, is used as data exchange format
between FEM-Design and other programs such Tekla Structures and Revit.
Figure 2-1
2.2. Creating Tekla model
Start Tekla Structures and open an existing model, or create a new model.
Figure 2-2
If you consider updating your Tekla model later, you must keep the same name of the Tekla
model. If you save your initially imported model with a different name, all the identifiers will be
changed and there will not be possibility to update the model later.

Tekla StruXML Import
12
2.3. Tekla StruXML Import tool
Start the Tekla StruXML Import tool. Remember that Tekla Structures has to be opened in
the background. The tool will first establish connection to the Tekla Structures.
Figure 2-3
2.3.1. Import tab
Press Browse and locate the struxml file containing the FEM-Design model that you wish to import
to Tekla. Upon loading the file the dialogs in the Import tab become active just as shown in the
example in Figure 2-4.
There are four main dialogs in the Import tab:
- Filter window
- Objects list
- Actions window
- Log area
2.3.1.1. Filter window
Elements in the struxml file are filtered by two parameters: Type and Status.
Following Type of element is recognized:
Beam: Beams and truss members in struxml
Column: Columns in struxml
Plate: Plane plates in struxml
Wall: Plane walls in struxml
Following Status of an element is recognized:
New: New element in struxml (not existing in Tekla model before)
Modified: Element has been modified in struxml or in Tekla after the initial import
Deleted: Element has been deleted in struxml or in Tekla after the initial import
Conflicted: Element is modified both in struxml and in Tekla after the initial import
- - - - - - - - - - - - - - - - - - - - - - - - - - - - - - - - - - - - - - - - - - - - - - - - - - - - - - - - - - - - - - -
Ignored: User ignored the element and did not convert it to Tekla
Matching: Element has a matching status between struxml and Tekla

Tekla StruXML Import
13
Following rules apply:
- If an element of a specific type and status exist in the loaded struxml file, the corresponding
category will be bolded and selected by default.
- The value in parenthesis shows the total number of elements belonging to certain category.
- Elements belonging to selected categories in the Filter dialog are visible in the Object list.
Figure 2-4
2.3.1.2. Objects list
This dialog is divided into two parts: StruXML and Tekla (Figure 2-7):
- In StruXML column, one can see a list of all elements from the struxml file (according to selected
type or status filter).
- In Tekla column, one can see a list of corresponding objects that have been converted to Tekla
(before the elements are converted, the Tekla column will be empty - Figure 2-5).
The naming convention is following:
StruXML Tekla
Type „ID‟ [Sections or Thickness][Material] Type „Name‟ [Sections or Thickness][Material]
FILTER WINDOW
OBJECTS LIST
LOG AREA
ACTIONS WINDOW
Tekla StruXML Import
14
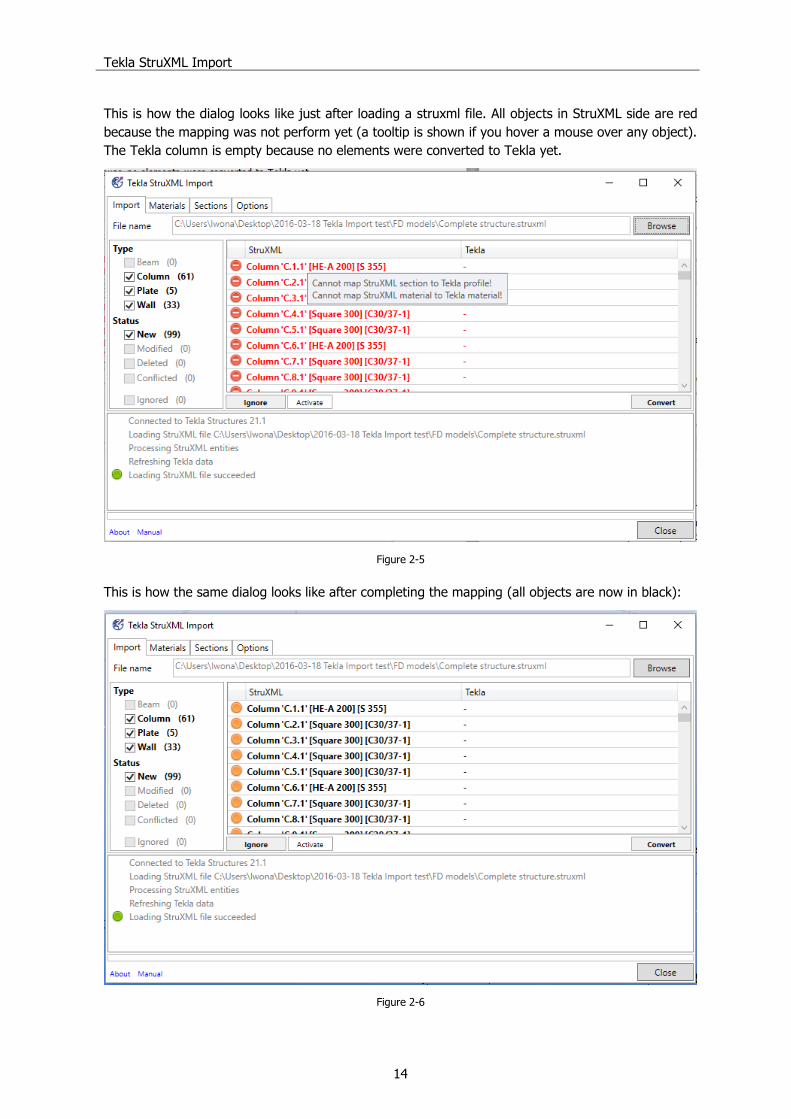
This is how the dialog looks like just after loading a struxml file. All objects in StruXML side are red
because the mapping was not perform yet (a tooltip is shown if you hover a mouse over any object).
The Tekla column is empty because no elements were converted to Tekla yet.
Figure 2-5
This is how the same dialog looks like after completing the mapping (all objects are now in black):
Figure 2-6

Tekla StruXML Import
15
And this is how the same dialog looks like after converting all objects to Tekla:
Figure 2-7
2.3.1.3. Actions window
Here is where the user decides what to do about a selected object(s). One can press Convert, in
order to convert (import or update) selected object(s) to Tekla.
One can press Ignore, in order not to convert (import or update) selected object(s) to Tekla. One
can press Activate, in order to activate back an ignored object.
2.3.1.4. Log area
Here is where the user can see all the log messages that the tool sends when processing the model.
When importing / updating the model, each action type is reflected in certain message (Figure 2-7),
e.g:
- Creating Beam/Column/Plate/Wall ID
- Modifying Beam/Column/Plate/Wall ID
- Deleting Beam/Column/Plate/Wall ID
In case of some recognized problem (e.g. unsupported contour of plate), a warning message will be
displayed below the processed object.
2.3.2. Materials tab
In the Materials tab one should map all the materials used in the FEM-Design model into
corresponding materials from Tekla Material Catalog.
In the left part of the dialog called StruXML, one can find list of all materials* used in the FEM-
Design model, just as shown in Figure 2-8.
*Some material names can be listed several times (if they have different application data properties in FEM-Design).
Tekla StruXML Import
16
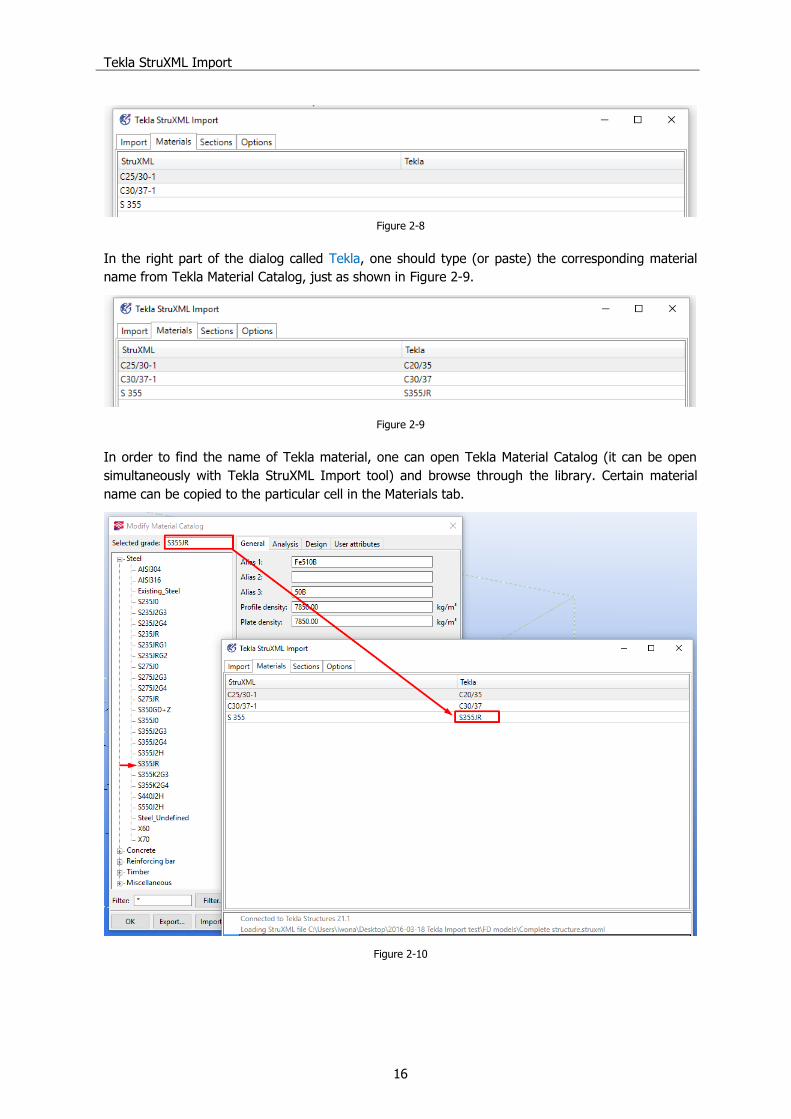
Figure 2-8
In the right part of the dialog called Tekla, one should type (or paste) the corresponding material
name from Tekla Material Catalog, just as shown in Figure 2-9.
Figure 2-9
In order to find the name of Tekla material, one can open Tekla Material Catalog (it can be open
simultaneously with Tekla StruXML Import tool) and browse through the library. Certain material
name can be copied to the particular cell in the Materials tab.
Figure 2-10

Tekla StruXML Import
17
2.3.3. Sections tab
In the Sections tab one should map all the sections used in the FEM-Design model into
corresponding sections from Tekla Profile Catalog.
In the left part of the dialog called StruXML, one can find list of all sections used in the FEM-Design
model, just as shown in Figure 2-11.
Figure 2-11
In the right part of the dialog called Tekla, one should type (or paste) the corresponding section
name from Tekla Profile Catalog, just as shown in Figure 2-12.
Figure 2-12
In order to find the name of Tekla section, one can open Tekla Profile Catalog (it can be open
simultaneously with Tekla StruXML Import tool) and browse through the library. Certain section
name can be copied to the particular cell in the Sections tab.
Figure 2-13

Tekla StruXML Import
18
Pay attention when mapping e.g. rectangular concrete sections. There is a different naming
convention of the concrete sections between FEM-Design and Tekla.
In FEM-Design, a naming convention for a default concrete rectangular section is following: bxh,
where b is the width of a section, and h is the height of the section e.g.: 150x300 (Figure 2-14).
In Tekla, naming convention for a default concrete rectangular section can be following: h*b, where
b is the width of a section, and h is the height of the section e.g.: 300*150 (Figure 2-15).
Figure 2-14
Figure 2-15
So a rectangular beam 150x300 in FEM-Design has to be mapped as shown in Figure 2-16, in order
to be imported correctly to Tekla.
Figure 2-16

Tekla StruXML Import
19
2.3.4. Options tab
In the Options tab, one can decide about optional settings regarding the imported data (Figure
2-17).
Figure 2-17
There are two options:
- Put StruXML identifier into “User Field 4” of the Tekla object
If this is option is checked, the analytical ID of FEM-Design object (Figure 2-18) will be imported
along with its geometry, and placed in the User-defined attributes of the Tekla object, in User
field 4 (Figure 2-19).
Figure 2-18
Figure 2-19

Tekla StruXML Import
20
- Put user-defined input parameter for model object default
If this option is checked, the fields below become active and one can define the Name, Class
and Prefix parameters for each type of imported objects, separately for concrete and steel
elements, as shown in Figure 2-20. If this option is not checked, all objects will receive default
parameters.
Figure 2-20
If this option is checked, the user-defined input parameters will replace the default parameters
for the particular element, as shown in Figure 2-21.
Figure 2-21
One can save the Options using „Save as default button‟. When starting new project, use „Load
as default‟ in order to import default options.

Tekla StruXML Import
21
2.3.5. Import (convert)
A. Convert structural elements
Follow this example to understand the simple import mechanism.
After loading a struxml file and completing sections and materials mapping (and choosing optional
setting) the Import dialog looks like on Figure 2-22.
Figure 2-22
In order to convert (import) object to Tekla:
- select a certain object (it will highlight in blue) or,
- select a group of objects (click on several objects with Ctrl button pressed) or,
- select one random object and press Ctrl+A in order to select all objects (Figure 2-23)
and press Convert*.
*Since version 1.1.004, the Convert button is called Convert objects.

Tekla StruXML Import
22
Figure 2-23
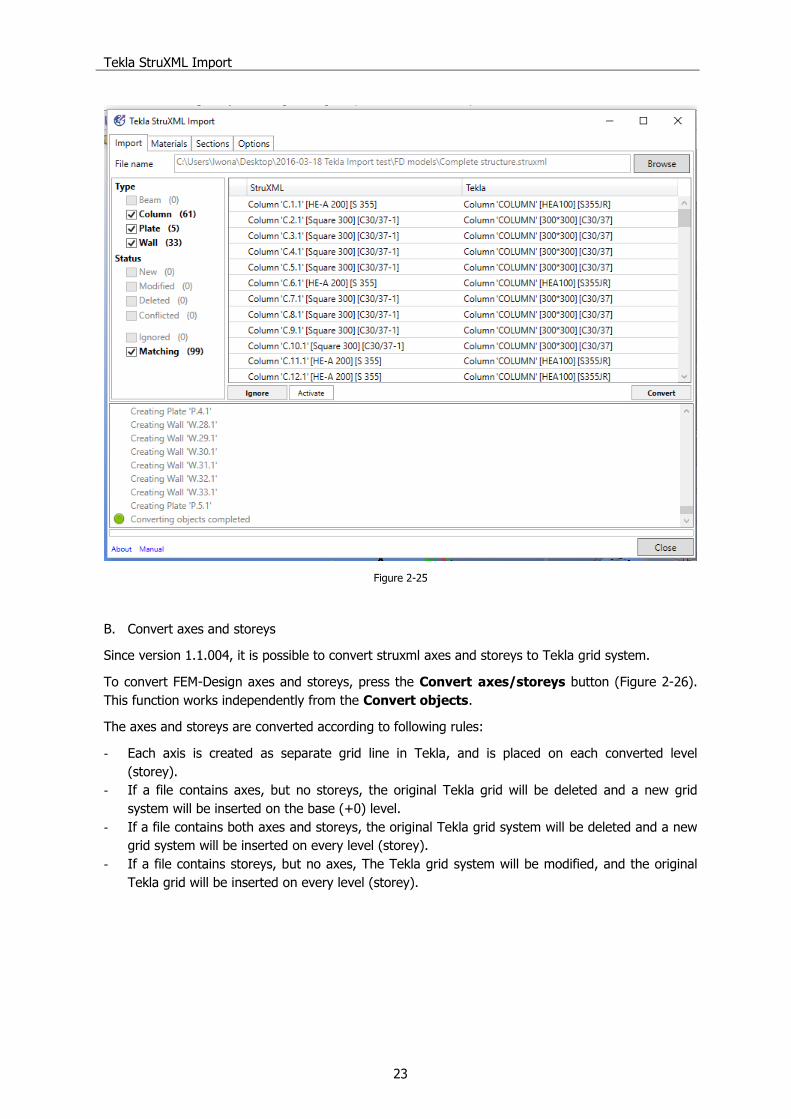
When selected objects are converted, they appear in the Tekla model (Figure 2-24) and their status
in the Tekla StruXML Import will change to Matching (Figure 2-25).
Figure 2-24
Tekla StruXML Import
23
Figure 2-25
B. Convert axes and storeys
Since version 1.1.004, it is possible to convert struxml axes and storeys to Tekla grid system.
To convert FEM-Design axes and storeys, press the Convert axes/storeys button (Figure 2-26).
This function works independently from the Convert objects.
The axes and storeys are converted according to following rules:
- Each axis is created as separate grid line in Tekla, and is placed on each converted level
(storey).
- If a file contains axes, but no storeys, the original Tekla grid will be deleted and a new grid
system will be inserted on the base (+0) level.
- If a file contains both axes and storeys, the original Tekla grid system will be deleted and a new
grid system will be inserted on every level (storey).
- If a file contains storeys, but no axes, The Tekla grid system will be modified, and the original
Tekla grid will be inserted on every level (storey).

Tekla StruXML Import
24
Figure 2-26
C. Press Close to close the Tekla StruXML Import Tool.
If you do not see your model in Tekla, or you see only part of it:
- double click in the drawing area and adjust the View depth
- right click in the drawing area and select Fit work area to Entire Model
Figure 2-27

Tekla StruXML Import
25
2.3.6. Update
If you continue working on the (previously imported to Tekla) model in FEM-Design, you can use the
new version of that model to update the current version of Tekla model. The current version of the
model can include some changes applied after the previous struxml model was imported. A brief
workflow is shown in Figure 2-28
Figure 2-28
When importing another version of the same FEM-Design model, changes are recognized in
comparison to the previously imported version and to the current version of Tekla model. Following
changes are recognized:
In StruXML model:
- New object
- Modified objects
Geometry
Section
Material
ID
- Deleted objects
In Tekla model:
- Modified objects
Geometry
Section
Material
- Deleted objects
When updating Tekla object to the FEM-Design version, the previous object in Tekla is deleted, and
a new object that matches FEM-Design properties, is created in its place. It is not possible to update
any Tekla object on parameter level.
Please follow the next example, to understand the idea of the update mechanism.
Tekla StruXML Import
26
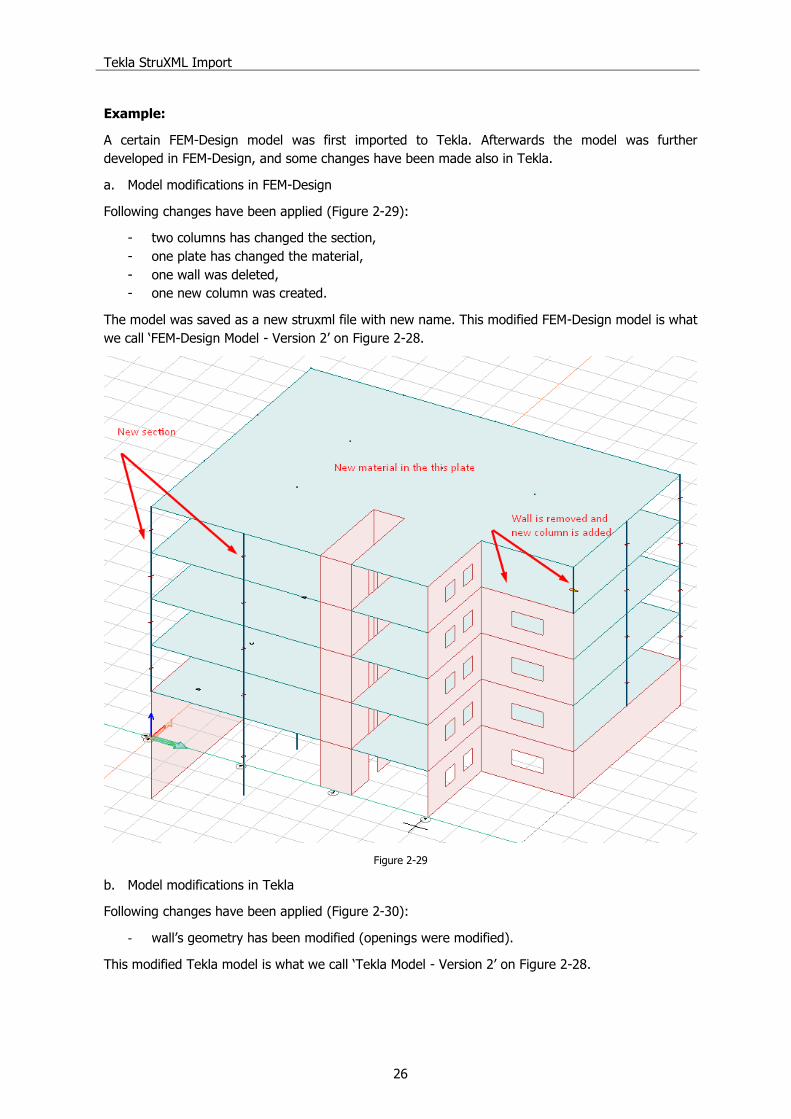
Example:
A certain FEM-Design model was first imported to Tekla. Afterwards the model was further
developed in FEM-Design, and some changes have been made also in Tekla.
a. Model modifications in FEM-Design
Following changes have been applied (Figure 2-29):
- two columns has changed the section,
- one plate has changed the material,
- one wall was deleted,
- one new column was created.
The model was saved as a new struxml file with new name. This modified FEM-Design model is what
we call „FEM-Design Model - Version 2‟ on Figure 2-28.
Figure 2-29
b. Model modifications in Tekla
Following changes have been applied (Figure 2-30):
- wall‟s geometry has been modified (openings were modified).
This modified Tekla model is what we call „Tekla Model - Version 2‟ on Figure 2-28.

Tekla StruXML Import
27
Figure 2-30
c. Update
In order to update the current version of the Tekla model, start the Tekla StruXML Import tool, and
browse for the new version of the FEM-Design model.
Upon loading the file, one can see a list of all changes (Figure 2-31). If some objects are marked in
red, it means that some additional mapping is required. In such case, perform the missing material
and sections mapping first.
Figure 2-31

Tekla StruXML Import
28
By default, only the changes are checked to be visible. In this example there is 1 new object, 4
objects are modified, and 1 object is deleted. The remaining 94 objects are matching (matching
objects are not displayed by default).
In order to have better overview of the model changes, one can decide to display only one type of
modification at a time, e.g. display only New, or only Modified, etc.
New objects
Display only new objects (Figure 2-32). There is one new column added in FEM-Design (struxml)
model. In order to add it to Tekla model, select the cell and press Convert.
Figure 2-32
New column is added into Tekla model, and its status will change to Matching.
Figure 2-33

Tekla StruXML Import
29
Modified objects
Now, let‟s look at modified objects (Figure 2-34).
- Two columns in FEM-Design (struxml) changed their sections from HEA200 to HEA180
(therefore the section name [HE-A 180] is bolded). When looking at the corresponding
object in Tekla, one can see what the original section was [HEA 200].
- One panel (wall) changed its geometry in Tekla model (therefore, the Panel word is
bolded).
- One slab changed its material in FEM-Design from C25/30 to C30/37 (therefore, the
material name [C30/37-1] s bolded).
Figure 2-34
In order to apply the three changes made in FEM-Design to the Tekla model, select the three
objects and press Convert (Figure 2-35).
Figure 2-35

Tekla StruXML Import
30
The two columns have a new profile in Tekla now, and the slab changed the material to C30/37. All
three objects changed their status to Matching.
Figure 2-36
Ignored objects
The last object that is left in Modified category is the wall W.28.1 that was modified in Tekla. Here, if
you want to bring the original version of the wall that exist in the FEM-Design (struxml) model,
select it and press Convert. The wall in Tekla will be modified to the previous version.
But if you want to keep the current modified version of the wall in Tekla, just select the object and
press Ignore.
Figure 2-37

Tekla StruXML Import
31
No modification will be done to Tekla wall, and its status will change to Ignored (Figure 2-37). In
Ignored, you will be able to see the list of all objects that were not automatically converted to Tekla
model.
If you want to activate an ignored object, select it and press Activate. This way, the object will be
move to its original category.
Ignore can also be used if, for some reason, you do not want to automatically update the Tekla
objects with FEM-Design change (maybe you prefer to do it manually).
To summarize: Ignore can be used in two situations:
- When an object was changed (modified / deleted) only in Tekla and you want to keep this
state, and do not update the object to the previous version from FEM-Design (struxml).
- When an object was changed (modified / deleted) only in FEM-Design and you do not want
to automatically update the Tekla model with this change.
Deleted objects
Display only deleted objects (Figure 2-38). There is one wall that was deleted in FEM-Design model
(struxml).
Figure 2-38
If you wish to update the Tekla model (delete that wall), just select the object and press Convert.
The wall will be deleted from Tekla and its status will change to Matching.
Figure 2-39
(If you do not want to delete that wall in Tekla, select the object and press Ignore).

Tekla StruXML Import
32
Conflict
In case any object was modified in both places, i.e. in FEM-Design and in Tekla, one has to decide
which version of the object to accept (it is not possible to keep the state of Tekla object and update
it only with the change from FEM-Design).
To demonstrate an example of a conflict, let‟s assume that in the next round, a slab was modified in
FEM-Design (opening was added), and the same slab was also modified in Tekla (slab boundaries
were extended).
Upon loading the struxml file containing another version of the FEM-Design model, a conflict is
recognized (Figure 2-40). Both changes were made to the slab‟s geometry therefore the name of the
objects are bolded in both sides.
In order to accept the version of the plate from FEM-Design (struxml), one should select the object
and press Convert. The slab in Tekla will be updated to the current version from FEM-Design (but
the change applied in Tekla to that slab will be lost).
In order to keep the version of the slab in Tekla, and do not automatically update it to FEM-Design
version, one should select the object and press Ignore. This way we can keep the Tekla
modification (and perhaps apply the other modification manually in Tekla).
Figure 2-40
2.4. Limitations and future development
Tekla StruXML Import 1.00.000 is the first release of the tool and has certain limitations.
Development of this tool will continue and one can expect many improvements in the next versions.
Recognized limitations:
- The original name of the Tekla model cannot be changed if one wants to update that
model later.
- Contour of the slab / wall including arc is not supported and such slab /wall will not be
imported to Tekla.
- Openings in the slab / wall including arc are not supported and such openings will not
be created in Tekla (slab / wall will be imported).
Future development:
- done in version 1.0.004 Import axes and storeys as grid system to Tekla
- Import profiled panels to Tekla.
- Improvements in mapping (saving mapping, introducing Tekla material and section
catalogs into the tool).
- Improvements in the user input (more categories for Name and Class) done in
version 1.0.003