telstra business mail · pdf file01 telstra business mail quick reference guide before you...
TRANSCRIPT

01
TELSTRA BUSINESS MAILQUICK REFERENCE GUIDE
BEFORE YOU START
1.1 INTRODUCTION
1.1.1 Who this Guide is For
1.1.2 What’s in this Guide
1.1.3 How to Use this Guide
1.1.4 Terms Used in this Guide
1.1.5 Syntax
1.1.6 On Line Help
1.1.1 Who this Guide is ForThis guide is for anyone who wishes to configure Email applications for use with Telstra Business Mail.
You will need a basic understanding of email.
1.1.2 What’s in this GuideThis User Guide includes configuration information for:
�Microsoft Outlook 2003® (“Outlook�2003”) or Microsoft Outlook.
�Microsoft Outlook Express® (“Outlook�Express”) and Microsoft Windows Mail® (“Windows�Mail”)
�Configuration information for Business Mail on Windows Pocket PC or BlackBerry® handheld devices is also included.
1.1.3 How to Use this GuideYou will need to perform a number of steps to complete the configuration of your Business Mail services.
You should use The�Checklist�in the next section to guide you through these steps.
1.1.4 Terms Used in this GuideAdministration of Business Mail is performed with a browser using Mission�Control.
Users can change their passwords with DeskControl. DeskControl also provides access to Business Mail and Business Online POP mail (web mail)
Outlook�Web�Access�is a means of accessing your Telstra Business Standard and Advanced Mail from the Internet using a standard browser.
The Global�Address�List�(GAL) is the address list of all users and groups in your organisation that are represented on Business Mail Standard and Advanced.
1. BEFORE YOU START 01
1.1 Introduction 01
1.2 The Checklist 02
1.3 Business Mail
Requirements 03
1.4 Downloading & Installing
Outlook 2003 04
2. MICROSOFT OUTLOOK
CONFIGURATION 06
3 OUTLOOK EXPRESS
OR WINDOWS MAIL 16
4. OTHER POP3 EMAIL CLIENTS 26
5. WINDOWS POCKET PC
& SMART PHONE 27

1. BEFORE YOU START 01
1.1 Introduction 01
1.2 The Checklist 02
1.3 Business Mail
Requirements 03
1.4 Downloading & Installing
Outlook 2003 04
2. MICROSOFT OUTLOOK
CONFIGURATION 06
3 OUTLOOK EXPRESS
OR WINDOWS MAIL 16
4. OTHER POP3 EMAIL CLIENTS 26
5. WINDOWS POCKET PC
& SMART PHONE 27
02
TELSTRA BUSINESS MAILQUICK REFERENCE GUIDE
BEFORE YOU START
This guide describes the configuration of:
Outlook�2003�using MAPI�(Messaging Application Programming Interface) implemented using RPC�over�HTTPS�to communicate with the Business Mail servers. (for Business Mail Advanced).
Windows�Mail�and Outlook�Express�using POP3�Post Office Protocol 3) and SMTP�(Simple Mail Transfer Protocol) for Business Mail Standard and Business Mail POP.
A POP3 mailbox is a mailbox which supports POP3 mail retrieval. All Business Mail mailboxes support POP3 mail retrieval.
1.1.5 SyntaxWithin the description of the procedures in this guide, the names of screens, windows, dialog boxes, and controls (menus, buttons, checkboxes etc) are in boldface�type. Boldface�type is also used to emphasize terms or headings where appropriate.
1.1.6 On Line HelpAfter logging into Mission control, documentation regarding the configuration and operation of Business Mail can be downloaded from the Help page.
1.2 THE CHECKLIST
The Checklist below briefly describes the steps required to setup your Business Mail mailboxes after your Business Mail Account and domain have been activated.
Step 1
Ensure your computer(s) & software meet the minimum requirements for Business Mail. Refer to Business�Mail�Requirements�in this User Guide.
Step 2
Create your user mailboxes. Refer to the Business�Mail�Administration�Guide.
Step 3
If you are using an Advanced Mailbox, you may wish to download and install Outlook 2003. Refer to Downloading�&�Installing�Outlook�2003�in this User Guide.
Step 4
Configure your email application to work with Telstra Business Mail as outlined in this User Guide. You may wish to install a different email application. See Appendix 1, Email Clients. You will now be able to access your mailbox.

1. BEFORE YOU START 01
1.1 Introduction 01
1.2 The Checklist 02
1.3 Business Mail
Requirements 03
1.4 Downloading & Installing
Outlook 2003 04
2. MICROSOFT OUTLOOK
CONFIGURATION 06
3 OUTLOOK EXPRESS
OR WINDOWS MAIL 16
4. OTHER POP3 EMAIL CLIENTS 26
5. WINDOWS POCKET PC
& SMART PHONE 27
03
TELSTRA BUSINESS MAILQUICK REFERENCE GUIDE
BEFORE YOU START
1.3 BUSINESS MAIL REQUIREMENTS
1.3.1 Operating System
1.3.2 Mission Control
1.3.3 Firewall Configuration
1.3.1 Operating SystemYou will require Windows XP with Service Pack 2 or better.
1.3.2 Mission ControlTo access Mission Control, you will need a browser with equivalent functionality to Internet Explorer 6. (Internet Explorer 6 or greater; or Firefox, any version) You must have cookies enabled on your browser.
1.3.3 Firewall Configuration
Business Mail Advanced with Outlook 2003
For normal operation, your firewall must only be configured to allow TCP traffic on port 443. In some cases you may need port 135 open during initial configuration.
Business Mail Advanced or Business Mail Standard with Outlook Web Access.
TCP traffic on port 443.
For Business Mail Advanced, Business Mail Standard or Business Mail POP using POP and SMTP
TCP traffic on ports 25 and 110.
1.3.4 Email Access
Business Mail Advanced Mailboxes
The full range of enhanced features of Business Mail such as shared calendars & appointments are only available using
�Outlook 2003 or
�Outlook 2007
as MAPI clients.
Business Mail Advanced mailboxes can also be accessed with POP3 or IMAP 4 clients if required.

1. BEFORE YOU START 01
1.1 Introduction 01
1.2 The Checklist 02
1.3 Business Mail
Requirements 03
1.4 Downloading & Installing
Outlook 2003 04
2. MICROSOFT OUTLOOK
CONFIGURATION 06
3 OUTLOOK EXPRESS
OR WINDOWS MAIL 16
4. OTHER POP3 EMAIL CLIENTS 26
5. WINDOWS POCKET PC
& SMART PHONE 27
04
TELSTRA BUSINESS MAILQUICK REFERENCE GUIDE
BEFORE YOU START
Business Mail Standard Mailboxes
Business Mail Standard Mailboxes provide similar functionality to Business Mail Advanced mailboxes when accessed online with Outlook Web Access. Outlook Web Access Premium requires Microsoft Internet Explorer 6 or greater. Other browsers support Outlook Web Access Basic
Business Mail Standard mailboxes can also be accessed with POP3 or IMAP 4 clients if required.
Business Mail POP and Business Online POP Mailboxes
The Business Mail POP Mailboxes and Business Online POP mailboxes can be accessed with any standard POP3 mail client. Examples are:
�Outlook Express, Windows Mail
�Entourage
Mozilla Thunderbird
The DeskControl webmail client can also be used to access any of the above mailboxes online.
Handheld Devices
Windows based Pocket PC’s can use Active�Sync�to synchronize mail, calendar, and tasks with both Standard and Advanced Mailboxes.
BlackBerry�handsets can be used to receive email from both Standard and Advanced Mailboxes.
1.4 DOWNLOADING & INSTALLING OUTLOOK 2003
1.4.1 IntroductionTo take full advantage of the features of Business Mail Advanced, you will need Outlook 2003 or Outlook 2007. Users of Business Mail Advanced may download Outlook 2003 from Mission Control.
If you already have Outlook 2007, you may use it instead of Outlook 2003.
1.4.2 Important �Outlook 2003 installed with the Telstra License Key must
only be used by users with Business Mail Advanced mailboxes.
�If a user wishes to continue using Outlook 2003 after ceasing to use their Advanced Mailbox, they must own a registered copy of this Outlook 2003.
�Users of Outlook 2003 installed with the Telstra License Key must follow the terms and conditions displayed on the Outlook 2003 download page.

1. BEFORE YOU START 01
1.1 Introduction 01
1.2 The Checklist 02
1.3 Business Mail
Requirements 03
1.4 Downloading & Installing
Outlook 2003 04
2. MICROSOFT OUTLOOK
CONFIGURATION 06
3 OUTLOOK EXPRESS
OR WINDOWS MAIL 16
4. OTHER POP3 EMAIL CLIENTS 26
5. WINDOWS POCKET PC
& SMART PHONE 27
05
TELSTRA BUSINESS MAILQUICK REFERENCE GUIDE
BEFORE YOU START
1.4.3 Downloading Outlook 2003To download Outlook 2003:
�Select Mail Server from the Main Menu in Mission Control
�From the displayed list of users, click on Edit in the Action�column (Figure 1)
Figure�1�Selecting�Edit
�Click on the Terms and Conditions Link next to the Users mailbox number.
Figure�2�The�Terms�and�Conditions�Link
�Click on the link under the displayed Terms and Conditions to download Outlook 2003
1.4.4 Installing Outlook 2003To start the installation of Outlook 2003, double click on the Outlook 2003 installation file you have downloaded. Installation files will be copied to your computer, and the Outlook 2003 Installation will be started.
Follow the screen prompts to install Outlook 2003. When prompted for the Product Key, enter the Key supplied.

1. BEFORE YOU START 01
2. MICROSOFT OUTLOOK
CONFIGURATION 06
2.1 Outlook Profiles 06
2.2 Configuring Outlook 2003 08
2.3 Troubleshooting Outlook
2003 or Outlook 2007
Configuration 14
3 OUTLOOK EXPRESS
OR WINDOWS MAIL 16
4. OTHER POP3 EMAIL CLIENTS 26
5. WINDOWS POCKET PC
& SMART PHONE 27
06
TELSTRA BUSINESS MAILQUICK REFERENCE GUIDE
MICROSOFT OUTLOOK CONFIGURATION
2.1 OUTLOOK PROFILES
2.1.1 What is a Profile?
2.1.2 Working with Profiles
2.1.3 Creating the First Profile
2.1.4 Creating Additional Profiles
2.1.5 Adding the Profile
2.1.6 Naming the Profile
2.1.7 Removing a Profile
2.1.1 What is a Profile?Profiles are the means by which Outlook stores a user’s configuration information. Using profiles, a single user can have multiple configurations in a single mail client or multiple users can each have their own account configured on a single machine.
Generally, a single user will have a single default Outlook profile.
This section describes the use of profiles with Outlook 2003. If you have Outlook 2007, some of the screens will be different.
2.1.2Working with ProfilesIf you wish to open, create, edit or delete a profile this is done from the Control Panel:
�From the Start�Menu, open the Control Panel
�Double click on the Mail icon
2.1.3 Creating the First Profile �If you have not yet created a profile, the Add Profile
Window will open when you double click on the Mail icon
�Select the Add…�button
�The Mail Setup Wizard will start.
Complete the profile configuration as described in the following sections.

07
TELSTRA BUSINESS MAILQUICK REFERENCE GUIDE
MICROSOFT OUTLOOK CONFIGURATION
2.1.4 Creating Additional Profiles �From the Control Panel double click on the Mail icon:
Figure�3�Mail�Setup
�Click on the Show�Profiles�button.
�The Add�Profile�window will open
2.1.5 Adding the Profile �From the Mail window, select Add…
Figure�4�Adding�A�New�Profile
1. BEFORE YOU START 01
2. MICROSOFT OUTLOOK
CONFIGURATION 06
2.1 Outlook Profiles 06
2.2 Configuring Outlook 2003 08
2.3 Troubleshooting Outlook
2003 or Outlook 2007
Configuration 14
3 OUTLOOK EXPRESS
OR WINDOWS MAIL 16
4. OTHER POP3 EMAIL CLIENTS 26
5. WINDOWS POCKET PC
& SMART PHONE 27
08
TELSTRA BUSINESS MAILQUICK REFERENCE GUIDE
MICROSOFT OUTLOOK CONFIGURATION
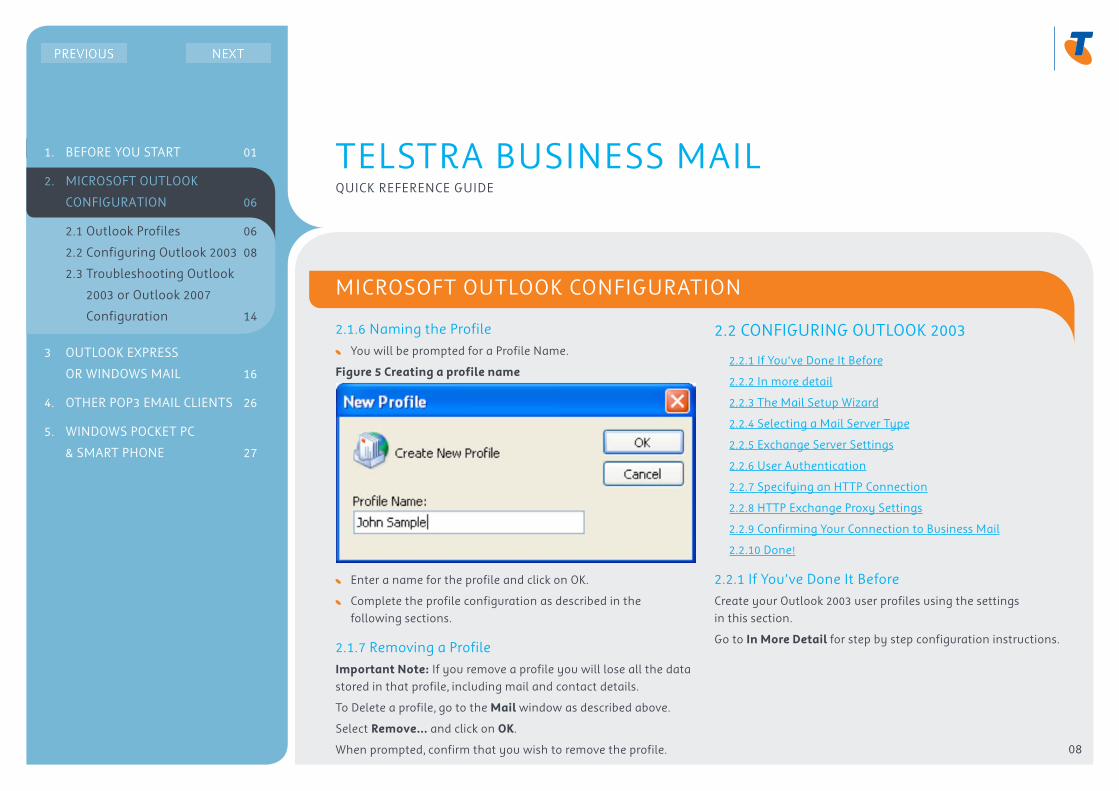
2.1.6 Naming the Profile �You will be prompted for a Profile Name.
Figure�5�Creating�a�profile�name
�Enter a name for the profile and click on OK.
�Complete the profile configuration as described in the following sections.
2.1.7 Removing a ProfileImportant�Note: If you remove a profile you will lose all the data stored in that profile, including mail and contact details.
To Delete a profile, go to the Mail�window as described above.
Select Remove…�and click on OK.
When prompted, confirm that you wish to remove the profile.
2.2 CONFIGURING OUTLOOK 2003
2.2.1 If You’ve Done It Before
2.2.2 In more detail
2.2.3 The Mail Setup Wizard
2.2.4 Selecting a Mail Server Type
2.2.5 Exchange Server Settings
2.2.6 User Authentication
2.2.7 Specifying an HTTP Connection
2.2.8 HTTP Exchange Proxy Settings
2.2.9 Confirming Your Connection to Business Mail
2.2.10 Done!
2.2.1 If You’ve Done It BeforeCreate your Outlook 2003 user profiles using the settings in this section.
Go to In�More�Detail�for step by step configuration instructions.
1. BEFORE YOU START 01
2. MICROSOFT OUTLOOK
CONFIGURATION 06
2.1 Outlook Profiles 06
2.2 Configuring Outlook 2003 08
2.3 Troubleshooting Outlook
2003 or Outlook 2007
Configuration 14
3 OUTLOOK EXPRESS
OR WINDOWS MAIL 16
4. OTHER POP3 EMAIL CLIENTS 26
5. WINDOWS POCKET PC
& SMART PHONE 27

09
TELSTRA BUSINESS MAILQUICK REFERENCE GUIDE
MICROSOFT OUTLOOK CONFIGURATION
Table�1�User�Profile�Settings�–�RPC�over�HTTP
User Name Use the Full Name as configured in Mission Control e.g. John Sample.
Login User Name Format Use the user’s primary email address e.g. [email protected]
Password As created by Administrator
USER SETTINGS
Authentication when connecting to proxy Server
Basic Authentication
Mutually authenticate the session when connecting with SSL
On
On slow networks connect using HTTP first, then connect using TCP/IP
On
On fast networks connect using HTTP first, then connect using TCP/IP
On
OTHER SETTINGS
Microsoft Exchange Server mail.pm.telstra.com
Exchange Proxy Server mail.pm.telstra.com
SERVER SETTINGS
2.2.2 In more detailCreate a user profile as described in Outlook�2003�Profiles. After creating a new profile, the Mail�Setup�Wizard�will start automatically.
2.2.3 The Mail Setup WizardIn the E-Mail�Accounts�dialog, select the Add�a�new�e-mail�account�radio button.
Figure�6�Outlook�2003�Email�Accounts�Wizard
Click on the Next button to continue.
1. BEFORE YOU START 01
2. MICROSOFT OUTLOOK
CONFIGURATION 06
2.1 Outlook Profiles 06
2.2 Configuring Outlook 2003 08
2.3 Troubleshooting Outlook
2003 or Outlook 2007
Configuration 14
3 OUTLOOK EXPRESS
OR WINDOWS MAIL 16
4. OTHER POP3 EMAIL CLIENTS 26
5. WINDOWS POCKET PC
& SMART PHONE 27
10
TELSTRA BUSINESS MAILQUICK REFERENCE GUIDE
MICROSOFT OUTLOOK CONFIGURATION
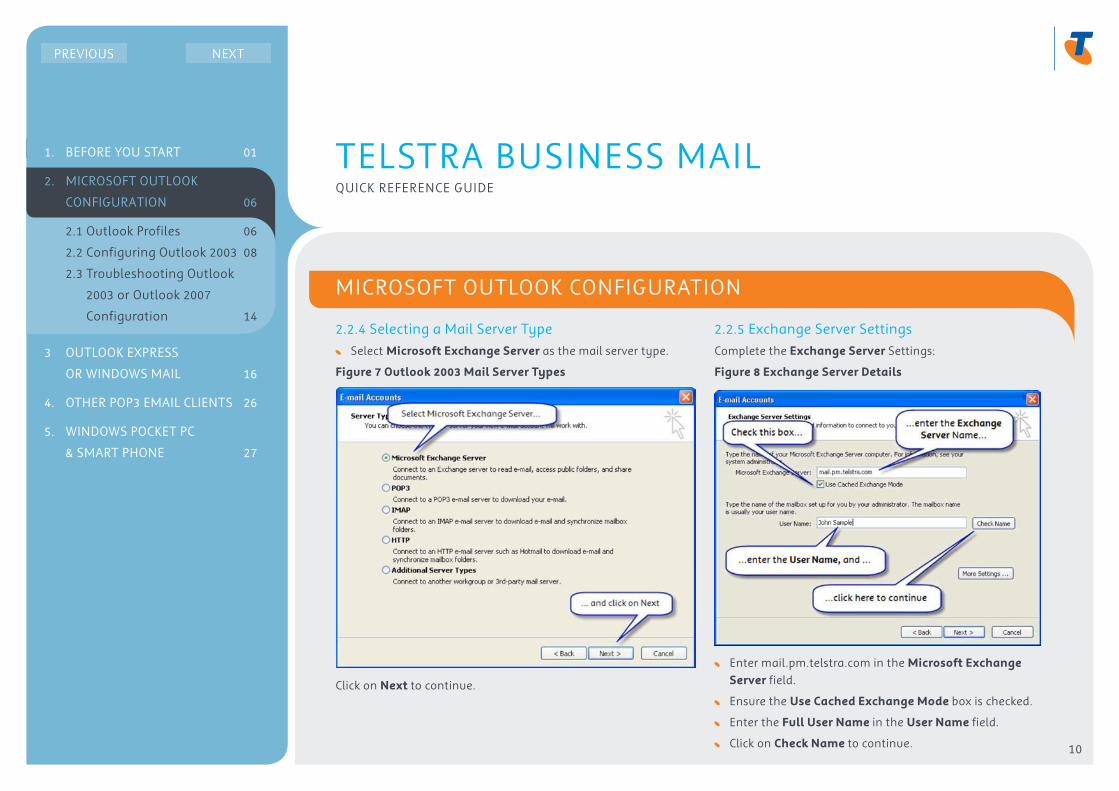
2.2.4 Selecting a Mail Server Type �Select Microsoft�Exchange�Server�as the mail server type.
Figure�7�Outlook�2003�Mail�Server�Types
Click on Next�to continue.
2.2.5 Exchange Server SettingsComplete the Exchange�Server�Settings:
Figure�8�Exchange�Server�Details
�Enter mail.pm.telstra.com in the Microsoft�Exchange�Server�field.
�Ensure the Use�Cached�Exchange�Mode�box is checked.
�Enter the Full�User�Name�in the User�Name�field.
�Click on Check�Name�to continue.
1. BEFORE YOU START 01
2. MICROSOFT OUTLOOK
CONFIGURATION 06
2.1 Outlook Profiles 06
2.2 Configuring Outlook 2003 08
2.3 Troubleshooting Outlook
2003 or Outlook 2007
Configuration 14
3 OUTLOOK EXPRESS
OR WINDOWS MAIL 16
4. OTHER POP3 EMAIL CLIENTS 26
5. WINDOWS POCKET PC
& SMART PHONE 27

11
TELSTRA BUSINESS MAILQUICK REFERENCE GUIDE
MICROSOFT OUTLOOK CONFIGURATION
2.2.6 User AuthenticationWhen prompted, enter your username and password:
Figure�9�User�Authentication
2.2.7 Specifying an HTTP ConnectionIn the Microsoft�Exchange�Server�dialogue box, select the Connection�tab, and:
�Check the Connect�to�my�Business�Mailbox�using�HTTP�box
�Click on the Exchange�Proxy�Settings… button to continue.
Figure�10�Specify�HTTP�Connection
1. BEFORE YOU START 01
2. MICROSOFT OUTLOOK
CONFIGURATION 06
2.1 Outlook Profiles 06
2.2 Configuring Outlook 2003 08
2.3 Troubleshooting Outlook
2003 or Outlook 2007
Configuration 14
3 OUTLOOK EXPRESS
OR WINDOWS MAIL 16
4. OTHER POP3 EMAIL CLIENTS 26
5. WINDOWS POCKET PC
& SMART PHONE 27

12
TELSTRA BUSINESS MAILQUICK REFERENCE GUIDE
MICROSOFT OUTLOOK CONFIGURATION
2.2.8 HTTP Exchange Proxy SettingsIn the Exchange�Proxy�Settings�dialog, make the following entries:
�In the Use�this�URL�to�connect�to�my�proxy�server�for�Exchange�field, enter mail.pm.telstra.com
�Check the Connect�using�SSL�only checkbox.
�Check the On�Fast�Networks, connect�using�HTTP�first,�then�Connect�using�TCP/IP�checkbox.
�In the Use�this�authentication�when�connecting�to�my�proxy�server�box, select Basic�Authentication.
Figure�11�RPC�over�HTTP�Exchange�Proxy�Settings
�Click OK to close the Exchange Proxy Settings dialog and Microsoft Exchange Server dialog boxes.
1. BEFORE YOU START 01
2. MICROSOFT OUTLOOK
CONFIGURATION 06
2.1 Outlook Profiles 06
2.2 Configuring Outlook 2003 08
2.3 Troubleshooting Outlook
2003 or Outlook 2007
Configuration 14
3 OUTLOOK EXPRESS
OR WINDOWS MAIL 16
4. OTHER POP3 EMAIL CLIENTS 26
5. WINDOWS POCKET PC
& SMART PHONE 27
13
TELSTRA BUSINESS MAILQUICK REFERENCE GUIDE
MICROSOFT OUTLOOK CONFIGURATION
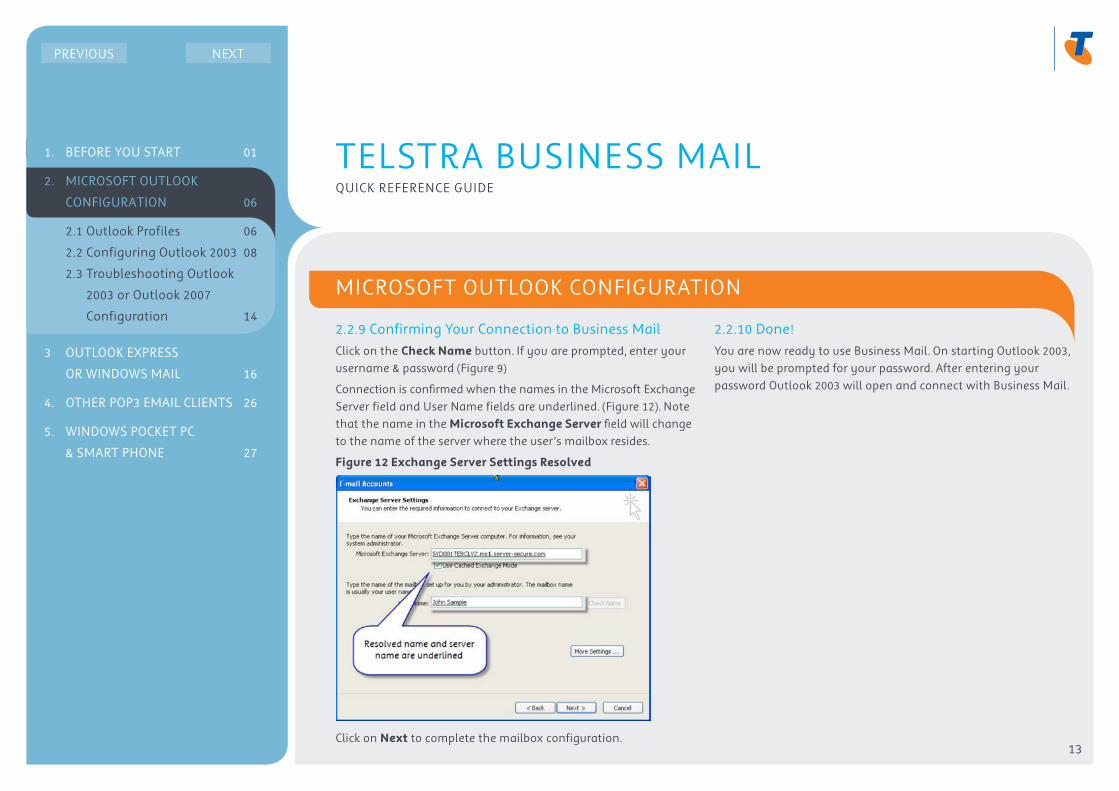
2.2.9 Confirming Your Connection to Business MailClick on the Check�Name�button. If you are prompted, enter your username & password (Figure 9)
Connection is confirmed when the names in the Microsoft Exchange Server field and User Name fields are underlined. (Figure 12). Note that the name in the Microsoft�Exchange�Server�field will change to the name of the server where the user’s mailbox resides.
Figure�12�Exchange�Server�Settings�Resolved
�
Click on Next to complete the mailbox configuration.
2.2.10 Done!You are now ready to use Business Mail. On starting Outlook 2003, you will be prompted for your password. After entering your password Outlook 2003 will open and connect with Business Mail.
1. BEFORE YOU START 01
2. MICROSOFT OUTLOOK
CONFIGURATION 06
2.1 Outlook Profiles 06
2.2 Configuring Outlook 2003 08
2.3 Troubleshooting Outlook
2003 or Outlook 2007
Configuration 14
3 OUTLOOK EXPRESS
OR WINDOWS MAIL 16
4. OTHER POP3 EMAIL CLIENTS 26
5. WINDOWS POCKET PC
& SMART PHONE 27

14
TELSTRA BUSINESS MAILQUICK REFERENCE GUIDE
MICROSOFT OUTLOOK CONFIGURATION
2.3 TROUBLESHOOTING OUTLOOK 2003 OR OUTLOOK 2007 CONFIGURATION
2.3.1 If the Connection is Not Confirmed
2.3.2 Verifying Connection to Business Mail
2.3.3 Verifying Port 135 Connection to Business Mail
2.3.4 Wrong Mailbox Type
2.3.1 If the Connection is Not ConfirmedIf the connection is not confirmed;
�Check the spelling of the user name
�Check the spelling of server names you have entered
Note: If you are using an incorrect username or password, you will receive the login prompt again.
�Ensure any host file entries you have made are correct
�Ensure that the user is configured as Business Mail Advanced in Mission Control
�Ensure that your network is not blocking the ports 135 or 443. (See also Verifying�Connection�to�Business�Mail�and Verifying�port�135�Connection�to�Business�Mail)
�Ensure that you do not have a personal firewall or virus scan application which blocks these ports.
2.3.2 Verifying Connection to Business MailTo ensure you have connection to Business Mail:
From the Start Menu select Run
Enter cmd�and click on OK
At the DOS prompt, enter:
telnet mail.pm.telstra.com 443
If your connection is successful, a telnet session will open with a blank screen and a prompt.
Type Control ] (hold down the Control key with the ] key) to close the connection
Type quit and enter to quit the telnet session.
An unsuccessful connection is indicated by the error:
Connecting To mail.pm.telstra.com...Could not open a connection to host on port 443 : Connect failed
If your connection to Business Mail is not successful, check that mail.pm.telstra.com can be resolved by your PC, and that there are no network issues (e.g. firewalls blocking access), please consult your IT Specialist if you do not know how to do this.
1. BEFORE YOU START 01
2. MICROSOFT OUTLOOK
CONFIGURATION 06
2.1 Outlook Profiles 06
2.2 Configuring Outlook 2003 08
2.3 Troubleshooting Outlook
2003 or Outlook 2007
Configuration 14
3 OUTLOOK EXPRESS
OR WINDOWS MAIL 16
4. OTHER POP3 EMAIL CLIENTS 26
5. WINDOWS POCKET PC
& SMART PHONE 27

15
TELSTRA BUSINESS MAILQUICK REFERENCE GUIDE
MICROSOFT OUTLOOK CONFIGURATION
2.3.3 Verifying Port 135 Connection to Business MailRepeat the above procedure, using the command
telnet mail.pm.telstra.com 135
to ensure port 135 is open to Business Mail
2.3.4 Wrong Mailbox TypeIf you receive this error, open Mission Control and check that the mailbox has been set up as an Advanced mailbox.
Figure�13�Check�that�the�mailbox�is�correctly�configured
Figure�14�Mailbox�configuration
1. BEFORE YOU START 01
2. MICROSOFT OUTLOOK
CONFIGURATION 06
2.1 Outlook Profiles 06
2.2 Configuring Outlook 2003 08
2.3 Troubleshooting Outlook
2003 or Outlook 2007
Configuration 14
3 OUTLOOK EXPRESS
OR WINDOWS MAIL 16
4. OTHER POP3 EMAIL CLIENTS 26
5. WINDOWS POCKET PC
& SMART PHONE 27

1. BEFORE YOU START 01
2. MICROSOFT OUTLOOK
CONFIGURATION 06
3 OUTLOOK EXPRESS
OR WINDOWS MAIL 16
3.1 Configuring Outlook Express
and Windows Mail 16
4. OTHER POP3 EMAIL CLIENTS 26
5. WINDOWS POCKET PC
& SMART PHONE 27
16
TELSTRA BUSINESS MAILQUICK REFERENCE GUIDE
OUTLOOK EXPRESS OR WINDOWS MAIL
3.1 CONFIGURING OUTLOOK EXPRESS AND WINDOWS MAIL
3.1.1 Overview
3.1.2 If You’ve Done It Before
3.1.3 Additional Settings
3.1.4 In More Detail
3.1.5 Starting the Wizard
3.1.6 Your Name
3.1.7 Your Email Address
3.1.8 Email Servers
3.1.9 Login Details
3.1.10 Closing the Wizard
3.1.11 SMTP Server Authentication
3.1.12 Changing the Account Name
3.1.13 Done!
3.1.1 OverviewThis section describes the configuration of Microsoft Outlook Express for use with POP3 mail retrieval from Business Mail. If you are using POP3, you will also be using SMTP as the mail delivery protocol.
Note: It is important that you use the correct SMTP settings.
If you are using Business Mail POP or Business Online POP you will have the option of:
�Telstra’s SMTP facility (smtp.telstrabusiness.com)
�SMTP Mass Email (smtp-au.server-mail.com)
�Business Mail Standard or Business Mail Advanced SMTP (mail.pm.telstra.com)
The Section If�You’ve�Done�It�Before�has the configuration details for configuring Business Mail POP, Business Mail Online, Business Mail Standard and Business Mail Advanced.
The detailed description (In�More�Detail) describes configuration for Business Mail POP. If you wish to use POP3 retrieval with Business Mail Advanced, Business Mail Standard, or Business Online POP you should refer to the tables in the If�You’ve�Done�It�Before�and Additional�Settings�sections.
If you are using Business Mail Advanced or Standard, POP3 can also be configured in a secure mode (POP3 S), in which case your mail retrieval sessions will be encrypted.

17
TELSTRA BUSINESS MAILQUICK REFERENCE GUIDE
OUTLOOK EXPRESS OR WINDOWS MAIL
3.1.2 If You’ve Done It BeforeThe configuration details required for Outlook Express and Windows Mail are:
Please use the following details if you received your “Welcome to your hosting service” email on and from 31st�July�2009.
USER SETTINGS BUSINESS MAIL POP & BUSINESS ONLINE POP
BUSINESS MAIL STANDARD OR ADVANCED
Name�&�Internet�Email�Address
Display Name This name appears as part of the “from” address of the emails sent by you.
Example: Bill Smith
Example: John Sample
Email Address. This name appears as part of the “from” address of email sent by you.
Example: bsmith@ bizmail.com
Example: jsample@ bizmail.com
USER SETTINGS BUSINESS MAIL POP & BUSINESS ONLINE POP
BUSINESS MAIL STANDARD OR ADVANCED
Email�Server�Names
Incoming Mail Server n/a mail.pm. telstra.com
Outgoing Mail (SMTP) Server n/a mail.pm. telstra.com
Incoming Mail Server pop. telstrabusiness.com
n/a
Outgoing Mail (SMTP) Server smtp.telstrabusiness.com
n/a
Outgoing Mail (SMTP) Server (Mass Email)
smtp-au.server-mail.com
n/a
Internet�Mail�Logon
Account Name Example: [email protected]
Example: jsample @bizmail.com
Password As created by Administrator
As created by Administrator
1. BEFORE YOU START 01
2. MICROSOFT OUTLOOK
CONFIGURATION 06
3 OUTLOOK EXPRESS
OR WINDOWS MAIL 16
3.1 Configuring Outlook Express
and Windows Mail 16
4. OTHER POP3 EMAIL CLIENTS 26
5. WINDOWS POCKET PC
& SMART PHONE 27

18
TELSTRA BUSINESS MAILQUICK REFERENCE GUIDE
OUTLOOK EXPRESS OR WINDOWS MAIL
Please use the following details if you received a “Welcome to your hosting service” email before�31st�July�2009.
USER SETTINGS BUSINESS MAIL POP & BUSINESS ONLINE POP
BUSINESS MAIL STANDARD OR ADVANCED
Name�&�Internet�Email�Address
Display Name This name appears as part of the “from” address of the emails sent by you.
Example: Bill Smith
Example: John Sample
Email Address. This name appears as part of the “from” address of email sent by you.
Example: bsmith@ bizmail.com
Example: jsample@ bizmail.com
USER SETTINGS BUSINESS MAIL POP & BUSINESS ONLINE POP
BUSINESS MAIL STANDARD OR ADVANCED
Email�Server�Names
Incoming Mail Server n/a mail.pm. telstra.com
Outgoing Mail (SMTP) Server n/a mail.pm. telstra.com
Incoming Mail Server Applies to Business Mail POP included in Telstra Business Broadband package
pop. telstrabusiness.com
n/a
Incoming Mail Server pop.pm.telstra.com n/a
Outgoing Mail (SMTP) Server smtp.telstrabusiness.com
n/a
Outgoing Mail (SMTP) Server (Mass Email)
smtp-au.server-mail.com
n/a
Internet�Mail�Logon
Account Name Example: [email protected]
Example: jsample @bizmail.com
Password As created by Administrator
As created by Administrator
1. BEFORE YOU START 01
2. MICROSOFT OUTLOOK
CONFIGURATION 06
3 OUTLOOK EXPRESS
OR WINDOWS MAIL 16
3.1 Configuring Outlook Express
and Windows Mail 16
4. OTHER POP3 EMAIL CLIENTS 26
5. WINDOWS POCKET PC
& SMART PHONE 27

19
TELSTRA BUSINESS MAILQUICK REFERENCE GUIDE
OUTLOOK EXPRESS OR WINDOWS MAIL
3.1.3 Additional SettingsThe information in this section is used to complete the properties settings of Outlook Express.
USER INFORMATION BUSINESS ONLINE POP & BUSINESS MAIL POP
BUSINESS MAIL STANDARD OR ADVANCED
Servers
Outgoing Mail Server authentication
Selected Selected
Advanced�–�Standard�Configuration
Outgoing mail (SMTP) Port 25 25
Outgoing mail server requires secure connection (SSL)
Not Selected Not Selected
For POP3, Incoming mail Port
110 110
Incoming mail server requires secure connection (SSL)
Not Selected Not Selected
USER INFORMATION BUSINESS ONLINE POP & BUSINESS MAIL POP
BUSINESS MAIL STANDARD OR ADVANCED
Advanced�–�Secure�Configuration�
Outgoing mail (SMTP) Port Not Applicable 25
Outgoing mail server requires secure connection (SSL)
Not Applicable Not Selected
For POP3, Incoming mail Port
Not Applicable 995
Incoming mail server requires secure connection (SSL)
Not Applicable Selected
3.1.4 In More DetailTo create a Business Mail POP account with Outlook Express the Internet�Connection�Wizard�is used.
�Start Outlook Express.
�If this the first account you are creating with Outlook Express, the Internet Connection Wizard Starts automatically. Otherwise, the Wizard must be started manually.
1. BEFORE YOU START 01
2. MICROSOFT OUTLOOK
CONFIGURATION 06
3 OUTLOOK EXPRESS
OR WINDOWS MAIL 16
3.1 Configuring Outlook Express
and Windows Mail 16
4. OTHER POP3 EMAIL CLIENTS 26
5. WINDOWS POCKET PC
& SMART PHONE 27

20
TELSTRA BUSINESS MAILQUICK REFERENCE GUIDE
OUTLOOK EXPRESS OR WINDOWS MAIL
3.1.5 Starting the Wizard �To start the Internet Connection Wizard manually, from the
Tools menu, select Accounts.
�From the Internet�Accounts�dialog, select Add, Mail
�Choose the Mail�tab.
Figure�15�Internet�Accounts�Dialog
The Internet�Connection�Wizard�will start.
3.1.6 Your Name �Enter your name in the Display�Name�field. This name
is in the From name of your outgoing emails. The name does not correspond to a particular Business Mail field.
�Click Next�to continue.
Figure�16�Enter�your�name
1. BEFORE YOU START 01
2. MICROSOFT OUTLOOK
CONFIGURATION 06
3 OUTLOOK EXPRESS
OR WINDOWS MAIL 16
3.1 Configuring Outlook Express
and Windows Mail 16
4. OTHER POP3 EMAIL CLIENTS 26
5. WINDOWS POCKET PC
& SMART PHONE 27

21
TELSTRA BUSINESS MAILQUICK REFERENCE GUIDE
OUTLOOK EXPRESS OR WINDOWS MAIL
3.1.7 Your Email Address �In the Email�address�field, enter your email address.
This address will be displayed as the originating email address on the messages you send. If a recipent of a message uses the automatic reply to your message, it will go to this address.
Figure�17�Email�Address�Field
�Click on Enter to continue.
3.1.8 Email ServersIn the Email�Sever�Names�window enter the server addressing information:
�Select POP3 from the My�incoming�mail�server�is�a�…..�server�drop-down box.
�Use the table below to complete the Incoming server and Outgoing server fields.
Please use the following details if you received your “Welcome to your hosting service” email on�and�after�31st�July�2009.
USER SETTINGS BUSINESS MAIL POP & BUSINESS ONLINE POP
BUSINESS MAIL STANDARD OR ADVANCED
Incoming Mail Server n/a mail.pm. telstra.com
Outgoing Mail (SMTP) Server n/a mail.pm. telstra.com
Incoming Mail Server pop. telstrabusiness.com
n/a
Outgoing Mail (SMTP) Server smtp.telstrabusiness.com
n/a
Outgoing Mail (SMTP) Server (Mass Email)
smtp-au.server-mail.com
n/a
1. BEFORE YOU START 01
2. MICROSOFT OUTLOOK
CONFIGURATION 06
3 OUTLOOK EXPRESS
OR WINDOWS MAIL 16
3.1 Configuring Outlook Express
and Windows Mail 16
4. OTHER POP3 EMAIL CLIENTS 26
5. WINDOWS POCKET PC
& SMART PHONE 27

22
TELSTRA BUSINESS MAILQUICK REFERENCE GUIDE
OUTLOOK EXPRESS OR WINDOWS MAIL
Please use the following details if you received your “Welcome to your hosting service” before�31st�July�2009. You should also refer to the following details if you signed up to Business Online and Business Mail before�30th�June�2009.
USER SETTINGS BUSINESS MAIL POP & BUSINESS ONLINE POP
BUSINESS MAIL STANDARD OR ADVANCED
Incoming Mail Server n/a mail.pm. telstra.com
Outgoing Mail (SMTP) Server n/a mail.pm. telstra.com
Incoming Mail Server pop.pm. telstra.com
n/a
Outgoing Mail (SMTP) Server smtp.telstrabusiness.com
n/a
Outgoing Mail (SMTP) Server (Mass Email)
smtp-au.server-mail.com
n/a
Figure�18�Outlook�Express�POP3�Server�Details
�Click on the Next button to continue.
1. BEFORE YOU START 01
2. MICROSOFT OUTLOOK
CONFIGURATION 06
3 OUTLOOK EXPRESS
OR WINDOWS MAIL 16
3.1 Configuring Outlook Express
and Windows Mail 16
4. OTHER POP3 EMAIL CLIENTS 26
5. WINDOWS POCKET PC
& SMART PHONE 27

23
TELSTRA BUSINESS MAILQUICK REFERENCE GUIDE
OUTLOOK EXPRESS OR WINDOWS MAIL
3.1.9 Login Details �In the Internet Mail Logon dialog (Figure 19), enter your
authentication details.
The Account�Name�is the user’s Email Address. The password is that created by the administrator.
Figure�19�Outlook�Express�Authentication�Details
�If you check the Remember�password�checkbox, you will not be prompted for a user name or password when logging on. If you do not check this box, you will be prompted for your password only.
�Do not check the Log�on�using�Secure�Password�Authentication�(SPA) box.
3.1.10 Closing the Wizard �Click on the Next button to continue.
�Click on the Finish button.
If you are not using SMTP, you will now need to select SMTP authentication, and optionally, rename the account and select secure connection.
1. BEFORE YOU START 01
2. MICROSOFT OUTLOOK
CONFIGURATION 06
3 OUTLOOK EXPRESS
OR WINDOWS MAIL 16
3.1 Configuring Outlook Express
and Windows Mail 16
4. OTHER POP3 EMAIL CLIENTS 26
5. WINDOWS POCKET PC
& SMART PHONE 27
24
TELSTRA BUSINESS MAILQUICK REFERENCE GUIDE
OUTLOOK EXPRESS OR WINDOWS MAIL
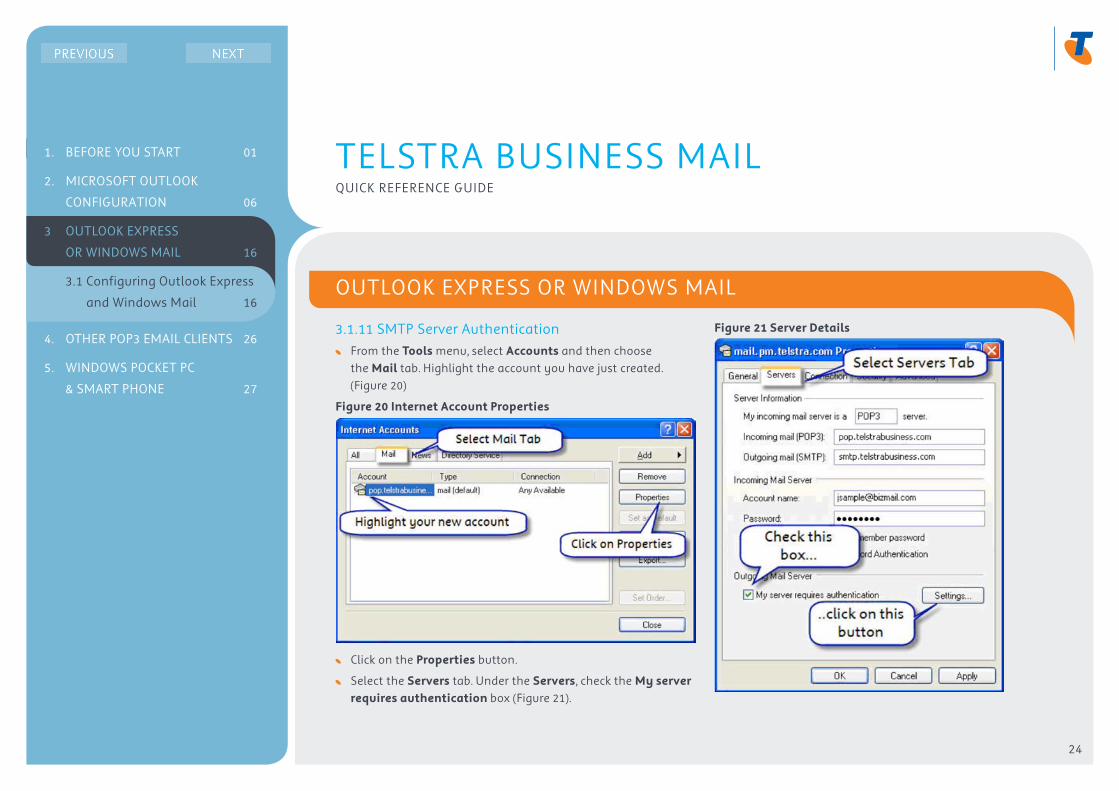
3.1.11 SMTP Server Authentication �From the Tools menu, select Accounts�and then choose
the Mail�tab. Highlight the account you have just created. (Figure 20)
Figure�20�Internet�Account�Properties
�Click on the Properties button.
�Select the Servers tab. Under the Servers, check the My�server�requires�authentication�box (Figure 21).
Figure�21�Server�Details
1. BEFORE YOU START 01
2. MICROSOFT OUTLOOK
CONFIGURATION 06
3 OUTLOOK EXPRESS
OR WINDOWS MAIL 16
3.1 Configuring Outlook Express
and Windows Mail 16
4. OTHER POP3 EMAIL CLIENTS 26
5. WINDOWS POCKET PC
& SMART PHONE 27

25
TELSTRA BUSINESS MAILQUICK REFERENCE GUIDE
OUTLOOK EXPRESS OR WINDOWS MAIL
�Click on the Settings button. In the Outgoing Mail Server dialog box, check that Use�the�same�settings�as�my�incoming�mail�server�is selected.
�Click on OK�to close the Outgoing�Mail�Server�dialog box.
�Click on the Apply�button to confirm the change.
3.1.12 Changing the Account Name �To change the name of the email account, select the
General tab. (Figure 22 & Figure 23). You may choose any name you wish.
Figure�22�Mail�Account�Name
Figure�23�Changing�the�Name�of�the�Mail�Account
�Click Apply�to confirm the change.
�Click OK�to close the dialog box.
3.1.13 Done!You are now ready to use Business Mail using Outlook Express.
1. BEFORE YOU START 01
2. MICROSOFT OUTLOOK
CONFIGURATION 06
3 OUTLOOK EXPRESS
OR WINDOWS MAIL 16
3.1 Configuring Outlook Express
and Windows Mail 16
4. OTHER POP3 EMAIL CLIENTS 26
5. WINDOWS POCKET PC
& SMART PHONE 27

26
TELSTRA BUSINESS MAILQUICK REFERENCE GUIDE
OTHER POP3 EMAIL CLIENTS
4.1 OTHER CLIENTS
You should be able to setup Business Mail to work with POP3 clients other than Outlook Express. These include clients such as Mozilla Thunderbird and Microsoft Entourage.
4.2 IMAP CONNECTION
If required, you can use IMAP for retrieval and management with Business Mail Advanced and Standard.
USER INFORMATION EXAMPLE
Name�&�Internet�Email�Address
Email Address. [email protected]
Internet�Mail�Logon
Account Name [email protected]
Password As created by Administrator
Email�Server�Names
Incoming Mail (IMAP 4) Server mail.pm.telstra.com
Outgoing Mail (SMTP) Server mail.pm.telstra.com
1. BEFORE YOU START 01
2. MICROSOFT OUTLOOK
CONFIGURATION 06
3 OUTLOOK EXPRESS
OR WINDOWS MAIL 16
4. OTHER POP3 EMAIL CLIENTS 26
4.1 Other Clients 26
4.2 IMAP Connection 26
5. WINDOWS POCKET PC
& SMART PHONE 27

27
TELSTRA BUSINESS MAILQUICK REFERENCE GUIDE
WINDOWS POCKET PC & SMART PHONE
5.1 BEFORE YOU START
5.1.1 Overview
5.1.2 What You Will Need
5.1.1 OverviewThis document describes the configuration of a Pocket PC or smartphone with ActiveSync.
The configuration described in this section is for an i-mate K-Jam. The configuration information applies to other Windows CE based PDA’s and smartphones although some screens may vary depending on the make & model.
5.1.2 What You Will NeedThe minimum requirements are:
�Pocket PC or smartphone with Windows Pocket PC 2003 or later operating system.
�A Business Mail mailbox. Business Mail Standard and Business Mail Advanced support Pocket PC & SmartPhone mail retrieval.
�Microsoft ActiveSync software for setup from a PC.
To configure your pocket device, you will also require:
�Your mailbox number. This is in the format mb123456xx
�Your Business Mail login password.
�The phone number of your device.
1. BEFORE YOU START 01
2. MICROSOFT OUTLOOK
CONFIGURATION 06
3 OUTLOOK EXPRESS
OR WINDOWS MAIL 16
4. OTHER POP3 EMAIL CLIENTS 26
5. WINDOWS POCKET PC
& SMART PHONE 27
5.1 Before You Start 27
5.2 Exchange Server Settings 28
5.3 Using Your BlackBerry
With Business Mail 32
5.4 Configuring your
BlackBerry from the Web 34

28
TELSTRA BUSINESS MAILQUICK REFERENCE GUIDE
WINDOWS POCKET PC & SMART PHONE
5.2 EXCHANGE SERVER SETTINGS
5.2.1 If You’ve Done It Before
5.2.2 In More Detail
5.2.3 Server Configuration
5.2.4 Server Settings
5.2.5 More Server Settings
5.2.6 Configure your Synchronizing Options
5.2.7 Scheduling the Synchronization
5.2.8 Choosing your Schedule Details
5.2.9 Done!
5.2.1 If You’ve Done It BeforeConfigure the ActiveSync server for Pocket PC using the following details:
USER INFORMATION EXAMPLE
Mail Server mail.pm.telstra.com
User Name User’s mailbox number. Eg: mb987612aa
Password Users login password
Domain The domain for Business Mail is ME1
5.2.2 In More Detail �From the Start�menu, select Programs.
�Locate and tap on the ActiveSync�icon.
This will open the ActiveSync�window
1. BEFORE YOU START 01
2. MICROSOFT OUTLOOK
CONFIGURATION 06
3 OUTLOOK EXPRESS
OR WINDOWS MAIL 16
4. OTHER POP3 EMAIL CLIENTS 26
5. WINDOWS POCKET PC
& SMART PHONE 27
5.1 Before You Start 27
5.2 Exchange Server Settings 28
5.3 Using Your BlackBerry
With Business Mail 32
5.4 Configuring your
BlackBerry from the Web 34

29
TELSTRA BUSINESS MAILQUICK REFERENCE GUIDE
WINDOWS POCKET PC & SMART PHONE
5.2.3 Server Configuration �In the ActiveSync�window, tap on the Menu.
�Select Add�Server�Source�from the menu. If you already have a server configured, select the Configure�Server�item.
5.2.4 Server Settings �Enter mail.pm.telstra.com�in the Server�Address�field
�Tick the This�Server�requires�an�encrypted�(SSL)�connection�box
�Select Next�to continue.
1. BEFORE YOU START 01
2. MICROSOFT OUTLOOK
CONFIGURATION 06
3 OUTLOOK EXPRESS
OR WINDOWS MAIL 16
4. OTHER POP3 EMAIL CLIENTS 26
5. WINDOWS POCKET PC
& SMART PHONE 27
5.1 Before You Start 27
5.2 Exchange Server Settings 28
5.3 Using Your BlackBerry
With Business Mail 32
5.4 Configuring your
BlackBerry from the Web 34

30
TELSTRA BUSINESS MAILQUICK REFERENCE GUIDE
WINDOWS POCKET PC & SMART PHONE
5.2.5 More Server Settings �Enter your Mailbox�Number�in the User�Name�field.
�Enter your Business Mail login password in the Password�field.
�Enter ME1�in the Domain�Name�field.
�Tap on Advanced�to select options in the event of conflicts during Server Synchronisation, otherwise tap on Next�to continue.
5.2.6 Configure your Synchronizing Options �Configure each option as required.
�Tap on Finish�to return to the ActiveSync screen.
Note: Take care to configure your settings so that you do not delete data unintentionally.
1. BEFORE YOU START 01
2. MICROSOFT OUTLOOK
CONFIGURATION 06
3 OUTLOOK EXPRESS
OR WINDOWS MAIL 16
4. OTHER POP3 EMAIL CLIENTS 26
5. WINDOWS POCKET PC
& SMART PHONE 27
5.1 Before You Start 27
5.2 Exchange Server Settings 28
5.3 Using Your BlackBerry
With Business Mail 32
5.4 Configuring your
BlackBerry from the Web 34

31
TELSTRA BUSINESS MAILQUICK REFERENCE GUIDE
WINDOWS POCKET PC & SMART PHONE
5.2.7 Scheduling the Synchronization �From the ActiveSync screen menu, select Schedule.
5.2.8 Choosing your Schedule DetailsFrom the Schedule screen, you can specify the schedule used by your Pocket PC to synchronise with the Business Mail server.
�Select your required settings and tap on OK to return to the ActiveSync screen.
1. BEFORE YOU START 01
2. MICROSOFT OUTLOOK
CONFIGURATION 06
3 OUTLOOK EXPRESS
OR WINDOWS MAIL 16
4. OTHER POP3 EMAIL CLIENTS 26
5. WINDOWS POCKET PC
& SMART PHONE 27
5.1 Before You Start 27
5.2 Exchange Server Settings 28
5.3 Using Your BlackBerry
With Business Mail 32
5.4 Configuring your
BlackBerry from the Web 34

32
TELSTRA BUSINESS MAILQUICK REFERENCE GUIDE
WINDOWS POCKET PC & SMART PHONE
5.2.9 Done!Your Pocket PC should now be configured for operation with Business Mail and is ready for use.
From the ActiveSync screen, you can manually synchronize your Pocket PC with the Exchange Mail server by tapping on Sync.
5.3 USING YOUR BLACKBERRY WITH BUSINESS MAIL
5.3.1 Overview
5.3.2 Prerequisites
5.3.3 Synchronizing Calendar items, tasks and notes
5.3.4 Account Validation
5.3.5 Limitations
5.3.1 OverviewThis section describes the configuration of your BlackBerry for use with Business Mail.
Once configured, you will be able to read, send and manage messages in your Business Mail mailbox.
5.3.2 PrerequisitesBefore integrating your BlackBerry with an Business Mail account, you should take note of the following points:
�If you are using Microsoft Outlook as your desktop client, you should not be using the Cached Exchange Mode option.
�Your account should not be configured to redirect incoming messages to .pst files or folder other than your Inbox.
1. BEFORE YOU START 01
2. MICROSOFT OUTLOOK
CONFIGURATION 06
3 OUTLOOK EXPRESS
OR WINDOWS MAIL 16
4. OTHER POP3 EMAIL CLIENTS 26
5. WINDOWS POCKET PC
& SMART PHONE 27
5.1 Before You Start 27
5.2 Exchange Server Settings 28
5.3 Using Your BlackBerry
With Business Mail 32
5.4 Configuring your
BlackBerry from the Web 34

33
TELSTRA BUSINESS MAILQUICK REFERENCE GUIDE
WINDOWS POCKET PC & SMART PHONE
5.3.3 Synchronizing Calendar items, tasks and notesCalender items, Contacts, Tasks and Notes in your Business Mail account are not synchronized wirelessly with your BlackBerry.
Likewise, Calender items, Contacts, Tasks and Notes created on your BlackBerry will not be synchronized wirelessly with you Business Mail Account.
If you wish to synchronize these items you may do so by connecting the handset and using the BlackBerry Desktop�Manager�software.
For further information on synchronization, see the User Guide on the BlackBerry�User�Tools�CD.
5.3.4 Account ValidationWhen you are using your BlackBerry with Business Mail, you will receive an email every 90 days requesting that you validate your account. To validate your account, log in to http://telstra.blackberry.com�and follow the instructions on the email.
5.3.5 LimitationsYou can only send and receive email with your BlackBerry. As described above, Calender items, Contacts, Tasks and Notes in your Business Mail are not synchronized wirelessly with your BlackBerry.
You may have difficulties receiving messages if you have more than 900 messages in your Business Mail Inbox, or you have messages with attachments of 8Mb or more in size.
1. BEFORE YOU START 01
2. MICROSOFT OUTLOOK
CONFIGURATION 06
3 OUTLOOK EXPRESS
OR WINDOWS MAIL 16
4. OTHER POP3 EMAIL CLIENTS 26
5. WINDOWS POCKET PC
& SMART PHONE 27
5.1 Before You Start 27
5.2 Exchange Server Settings 28
5.3 Using Your BlackBerry
With Business Mail 32
5.4 Configuring your
BlackBerry from the Web 34

34
TELSTRA BUSINESS MAILQUICK REFERENCE GUIDE
WINDOWS POCKET PC & SMART PHONE
5.4 CONFIGURING YOUR BLACKBERRY FROM THE WEB
5.4.1 Overview
5.4.2 Login
5.4.3 Set Up an Account
5.4.4 Enter Your Email Address
5.4.5 Select Additional Information
5.4.6 Select Your Mailbox Type
5.4.7 Web Browser Access
5.4.8 Enter your User Details
5.5.9 Done!
5.4.10 Clean Up your Old Account
5.4.1 OverviewYou can use BlackBerry’s BIS (BlackBerry Internet Service) to receive mail from your Business Mail account.
5.4.2 Login �Login in to http://www.telstra.blackberry.com/
�Enter your username, password and click on the Log�In�button.
�If this is an Initial BlackBerry setup please press “Create�New�Account” enter handset details and follows the prompts to create your account.
1. BEFORE YOU START 01
2. MICROSOFT OUTLOOK
CONFIGURATION 06
3 OUTLOOK EXPRESS
OR WINDOWS MAIL 16
4. OTHER POP3 EMAIL CLIENTS 26
5. WINDOWS POCKET PC
& SMART PHONE 27
5.1 Before You Start 27
5.2 Exchange Server Settings 28
5.3 Using Your BlackBerry
With Business Mail 32
5.4 Configuring your
BlackBerry from the Web 34

35
TELSTRA BUSINESS MAILQUICK REFERENCE GUIDE
WINDOWS POCKET PC & SMART PHONE
5.4.3 Set Up an Account �Click on the Setup�an�Account�button
5.4.4 Enter Your Email Address �Enter your email address in the Email�Address�field
�Leave the Password�fields blank
�Click on Next
1. BEFORE YOU START 01
2. MICROSOFT OUTLOOK
CONFIGURATION 06
3 OUTLOOK EXPRESS
OR WINDOWS MAIL 16
4. OTHER POP3 EMAIL CLIENTS 26
5. WINDOWS POCKET PC
& SMART PHONE 27
5.1 Before You Start 27
5.2 Exchange Server Settings 28
5.3 Using Your BlackBerry
With Business Mail 32
5.4 Configuring your
BlackBerry from the Web 34

36
TELSTRA BUSINESS MAILQUICK REFERENCE GUIDE
WINDOWS POCKET PC & SMART PHONE
5.4.5 Select Additional Information �In the Additional Information Required window, select the I�will�
provide�the�settings�to�add�this�email�account�radio button and click on Next
5.4.6 Select Your Mailbox Type �Select This�is�my�work�email�account�and click on Next.
5.4.7 Web Browser Access �Select I�can�access�my�email�account�using�a�web�browser
�Click on the Next�button
1. BEFORE YOU START 01
2. MICROSOFT OUTLOOK
CONFIGURATION 06
3 OUTLOOK EXPRESS
OR WINDOWS MAIL 16
4. OTHER POP3 EMAIL CLIENTS 26
5. WINDOWS POCKET PC
& SMART PHONE 27
5.1 Before You Start 27
5.2 Exchange Server Settings 28
5.3 Using Your BlackBerry
With Business Mail 32
5.4 Configuring your
BlackBerry from the Web 34

37
TELSTRA BUSINESS MAILQUICK REFERENCE GUIDE
WINDOWS POCKET PC & SMART PHONE
5.4.8 Enter your User Details �In the next window, complete the following details
Notes: Email server for Business Mail must be: https://me1-au.server-secure.com/exchange�Contact your administrator for your mailbox number
�Click the Next�button
5.5.9 Done! �Your Business Mail account will be confirmed:
�You will also receive an Email confirming the set up this account.
1. BEFORE YOU START 01
2. MICROSOFT OUTLOOK
CONFIGURATION 06
3 OUTLOOK EXPRESS
OR WINDOWS MAIL 16
4. OTHER POP3 EMAIL CLIENTS 26
5. WINDOWS POCKET PC
& SMART PHONE 27
5.1 Before You Start 27
5.2 Exchange Server Settings 28
5.3 Using Your BlackBerry
With Business Mail 32
5.4 Configuring your
BlackBerry from the Web 34

38
TELSTRA BUSINESS MAILQUICK REFERENCE GUIDE
WINDOWS POCKET PC & SMART PHONE
5.4.10 Clean Up your Old Account• When your old account is no longer receiving email, you can delete it.
1. BEFORE YOU START 01
2. MICROSOFT OUTLOOK
CONFIGURATION 06
3 OUTLOOK EXPRESS
OR WINDOWS MAIL 16
4. OTHER POP3 EMAIL CLIENTS 26
5. WINDOWS POCKET PC
& SMART PHONE 27
5.1 Before You Start 27
5.2 Exchange Server Settings 28
5.3 Using Your BlackBerry
With Business Mail 32
5.4 Configuring your
BlackBerry from the Web 34

TELSTRA BUSINESS MAILQUICK REFERENCE GUIDE
©Telstra Corporation Limited, Melbourne, 2010
All rights reserved. No part of this publication may be reprinted, reproduced, stored in a retrieval system or transmitted, in any form or by any means, without the prior permission in writing from the owners.
Unless otherwise expressly agreed in writing, the information contained in this manual is subject to change without notice and Telstra Corporation Limited assumes no responsibility for any alteration to, or any error or other deficiency in, this document.
Windows, Microsoft Exchange, Exchange 2000, Microsoft Outlook and Microsoft Outlook Express are trademarks of Microsoft Corporation Product or company names are trademarks or registered trademarks of their respective holders.
BlackBerry is trade mark of Research In Motion Limited.
Published by Telstra Messaging, Level 24, 242 Exhibition St, Melbourne, Australia
Telstra Corporation Limited, Melbourne, ACN 051 775 556, ABN 33 051 775 556
XXXXX
APR10
1. BEFORE YOU START 01
2. MICROSOFT OUTLOOK
CONFIGURATION 06
3 OUTLOOK EXPRESS
OR WINDOWS MAIL 16
4. OTHER POP3 EMAIL CLIENTS 26
5. WINDOWS POCKET PC
& SMART PHONE 27