telstra business sip installation guide · 2020-02-05 · telstra business sip® introduction...
TRANSCRIPT
TELSTRA
BUSINESS SIP®
INSTALLATION GUIDE

Intentionally blank

TELSTRA BUSINESS SIP®
Telstra Business SIP – Installation, Configuration and Number Migration Guide 3/69
Contents
Introduction ................................................................................................................................ 7
Document Scope .................................................................................................................... 7
How to use this guide ............................................................................................................. 7
Business SIP installation - document map .............................................................................. 8
1 Site Preparation .................................................................................................................. 9
2 Pre-Installation .................................................................................................................... 9
3 Quick Installation Guides .................................................................................................. 10
3.1. Network-side installation configuration of SIP NTU .............................................. 10
3.2. SIP NTU to PBX-side configuration (customer responsibility) .............................. 11
3.3. Number Migration/Activation (customer responsibility) ........................................ 12
4 SIP NTU Physical installation ............................................................................................ 13
4.1. SIP NTU ports ..................................................................................................... 13
4.1.1. SIP NTU port descriptions .................................................................................................. 15
5 SIP NTU Network-side configuration (Northbound) ........................................................... 16
5.1. SIP NTU login ...................................................................................................... 16
5.1.1. SIP NTU username and password..................................................................................... 16
5.1.2. SIP NTU password change ................................................................................................ 17
5.1.3. Static Ethernet IP & WAN discovery using the Provisioning Wizard ................................. 18
5.1.4. SIP NTU registration to the Business SIP Platform ........................................................... 20
5.1.5. Verification of the network-side (Northbound) configuration .............................................. 22
6 SIP NTU to PBX-side configuration (Southbound) ............................................................ 23
6.1. Pre-PBX-side configuration considerations .......................................................... 23
6.2. SIP NTU login ...................................................................................................... 23
6.3. Confirm SIP NTU network-side (Northbound) status ............................................ 24
6.4. Selecting the ‘PBX Type’ ..................................................................................... 25
6.5. SIP NTU to ISDN BRA/BRI PBX .......................................................................... 26
6.5.1. ISDN BRA/BRI configuration (Example One425) .............................................................. 26
6.5.2. BRA/BRI ‘Physical Port Settings’ ....................................................................................... 27
6.5.3. BRA/BRI ‘ISDN Settings’ .................................................................................................... 27
6.5.4. DID/Multi-number ............................................................................................................... 28
6.6. SIP NTU to ISDN PRA/PRI PBX .......................................................................... 29
6.6.1. ISDN PRA/PRI configuration .............................................................................................. 29
6.6.2. PRA/PRI ‘Physical Port Settings’ ....................................................................................... 30
6.6.3. PRA/PRI ‘ISDN Settings’ .................................................................................................... 30
6.6.4. PRA/PRI ‘Timeslot Allocation’ ............................................................................................ 31
6.6.5. ISDN PBX configuration completion .................................................................................. 31

TELSTRA BUSINESS SIP®
Telstra Business SIP – Installation, Configuration and Number Migration Guide 4/69
6.7. SIP NTU to IP PBX .............................................................................................. 32
6.7.1. SIP PBX Configuration ....................................................................................................... 33
6.7.2. PBX Profile ......................................................................................................................... 35
6.7.3. IP PBX Topology and configuration ................................................................................... 35
6.8. SIP NTU configuration status verifications ........................................................... 39
6.8.1. ISDN PBX status verifications ............................................................................................ 39
6.8.2. IP PBX status verification ................................................................................................... 41
6.9. Test Call from SIP NTU ....................................................................................... 42
6.9.1. Test call instructions ........................................................................................................... 42
6.9.2. Test Result ......................................................................................................................... 42
6.10. SIP NTU Administration ....................................................................................... 43
6.10.1. Provisioning Server ............................................................................................................ 43
6.10.2. User Management .............................................................................................................. 43
6.10.3. Device Reboot .................................................................................................................... 44
6.10.4. Factory Reset ..................................................................................................................... 44
7 Number migration ............................................................................................................. 45
7.1. Business SIP – Customer Management Portal Administrator login ...................... 45
7.2. Activations (number migration) ............................................................................ 46
7.2.1. Rolling back your migration ................................................................................................ 47
7.2.2. Number migration test calls ................................................................................................ 47
7.2.3. Activation (number migration) process............................................................................... 49
8 Appendices ....................................................................................................................... 59
8.1. SIP NTU Diagrams & Connections ...................................................................... 59
8.1.1. 2515 IP PBX only ............................................................................................................... 59
8.1.2. 270 IP & ISDN PBX ............................................................................................................ 60
8.1.3. 420 IP PBX only ................................................................................................................. 61
8.1.4. 425 IP PBX only ................................................................................................................. 62
8.1.5. 425 4B 4TE IP & ISDN PBX ............................................................................................... 63
8.1.6. 540 IP PBX only ................................................................................................................. 64
8.1.7. 700 IP & ISDN PBX ............................................................................................................ 65
8.2. Appendix - Retrieving NTU Device ID and password ........................................... 66
8.3. Appendix - Troubleshooting ................................................................................. 67
8.4. Appendix - SIP NTU LED functions/colour indicators ........................................... 68
8.5. Appendix – Faulty hardware ................................................................................ 68
9 Glossary ........................................................................................................................... 69
TELSTRA BUSINESS SIP®
Telstra Business SIP – Installation, Configuration and Number Migration Guide 5/69
Table of figures
Figure 1: Business SIP Solution Overview ........................................................................ 7
Figure 2: Document Map ................................................................................................ 8
Figure 3: SIP NTU Port Layout Example .......................................................................... 13
Figure 4: SIP NTU Interconnectivity Map ........................................................................ 14
Figure 5: SIP NTU login page ......................................................................................... 16
Figure 6: SIP NTU password change ............................................................................... 17
Figure 7: Starting the provisioning wizard ....................................................................... 18
Figure 8: Static Ethernet IP option ................................................................................. 18
Figure 9: Static Ethernet IP fields................................................................................... 18
Figure 10: Ethernet WAN detected ................................................................................. 19
Figure 11: Ethernet WAN confirmed ............................................................................... 19
Figure 12: Enter Business SIP Platform Device ID and Password ....................................... 20
Figure 13: Voice interface registered with the Business SIP Platform ................................. 21
Figure 14: Confirming SIP NTU network-side (Northbound) configuration ........................... 22
Figure 15: SIP NTU login page ....................................................................................... 23
Figure 16: Initial status screen confirming SIP NTU provisioning ....................................... 24
Figure 17: SIP PBX Selection ......................................................................................... 25
Figure 18: PBX status screen confirming PBX type selected .............................................. 25
Figure 19: BRA/BRI port selection .................................................................................. 26
Figure 20: Assigning numbers ....................................................................................... 28
Figure 21: PRA/PRI configuration groups ........................................................................ 29
Figure 22: Recommended PRA/PRI Timeslot Allocation settings ......................................... 31
Figure 23: ISDN PBX configuration confirmation .............................................................. 31
Figure 24: SIP PBX Selection ......................................................................................... 32
Figure 25: SIP PBX Configuration Page ........................................................................... 33
Figure 26: SIP PBX Advanced Settings Configuration Page ................................................ 34
Figure 27: SIP PBX Profile Selection ............................................................................... 35
Figure 28: IP PBX Attached to SIP NTU Topology ............................................................. 35
Figure 29: Steps to configure PBX Attached to SIP NTU Topology ...................................... 36
Figure 30: IP PBX - NTU Attached Settings ..................................................................... 36
Figure 31: IP PBX Attached to Gateway Topology ............................................................ 37
Figure 32: Steps to configure PBX Attached to Gateway Topology ..................................... 37
Figure 33: IP PBX - Gateway Attached Settings ............................................................... 38
Figure 34: Northbound and Southbound verifications ....................................................... 39
Figure 35: BRI ports verification .................................................................................... 40
Figure 36: PRA/PRI ports verification .............................................................................. 40
TELSTRA BUSINESS SIP®
Telstra Business SIP – Installation, Configuration and Number Migration Guide 6/69
Figure 37: SIP PBX Configuration ................................................................................... 41
Figure 38: SIP Test Call ................................................................................................ 42
Figure 39: Test Call Results ........................................................................................... 42
Figure 40: Provisioning Server Synchronisation ............................................................... 43
Figure 41: User Management fields ................................................................................ 43
Figure 42: Device Reboot option .................................................................................... 44
Figure 43: Restore Factory Settings ............................................................................... 44
Figure 44: Business SIP Portal Login Screen .................................................................... 45
Figure 45: Activations Tab............................................................................................. 46
Figure 46: Migration process flow and test points ............................................................ 47
Figure 47: Activations (number migration) tab ................................................................ 49
Figure 48: View Affected Numbers pop-up ...................................................................... 50
Figure 49: One2515 Series Front View ........................................................................... 59
Figure 50: One270 front view ........................................................................................ 60
Figure 51: One270 1P AV2 5T/a rear view ...................................................................... 60
Figure 52: One420 Series Front View ............................................................................. 61
Figure 53: One420 AV2 4TE Rear View ........................................................................... 61
Figure 54: One425 Series Front View ............................................................................. 62
Figure 55: One425 4TE rear view ................................................................................... 62
Figure 56: One425 Series Front View ............................................................................. 63
Figure 57: One425 4TE Rear View .................................................................................. 63
Figure 58: One540 Series Front View ............................................................................. 64
Figure 59: One540 AV2 5TE/a Rear View ........................................................................ 64
Figure 60: One700 front view ........................................................................................ 65
Figure 61: One700 2P AV2 5T/a rear view ...................................................................... 65
Figure 62: Get Credentials link in SIP NTU tab ................................................................. 66
Figure 63: ‘Get Credentials’ pop-up example ................................................................... 66
List of Tables
Table 1: Recommended BRA/BRI Physical Port Settings ................................................... 27
Table 2: Recommended BRA/BRI ISDN Settings .............................................................. 27
Table 3: Recommended PRA/PRI Physical Port settings .................................................... 30
Table 4: Recommended PRA/PRI ‘ISDN Settings’ ............................................................. 30

TELSTRA BUSINESS SIP®
Telstra Business SIP – Installation, Configuration and Number Migration Guide 7/69
Introduction
The Business SIP product is designed to be installed over any type of internet connection fixed or mobile broadband. It employs a SIP NTU (network termination unit) that connects to the internet and the PBX requiring a two stage configuration.
The SIP NTU internet configuration can be performed either by Telstra technicians, appropriately skilled customer technicians or Telstra nominated partners.
The SIP NTU PBX configuration can only be performed by PBX technicians.
Below is a simplified view of a Business SIP solution.
Figure 1: Business SIP Solution Overview
In the diagram above:
‘SIP Trunk’ refers to the IP connection which is provided over a fixed or mobile broadband service provided by the customer and identified above as ‘Broadband Access Network’.
‘Broadband Gateway/Router’ is a customer supplied device that connects the ‘SIP Trunk’ to the ‘SIP NTU’.
‘Customer fixed voice telephone system’ refers to the customers’ own voice equipment such as a Private Branch Exchange (PBX) or Key Telephony System (KTS).
DOCUMENT SCOPE This document covers the:
physical installation of the SIP NTU (referred to as the ‘device’)
configuration/registration of the SIP NTU to the Business SIP Platform (Calling Platform)
configuration of the SIP NTU to the PBX
number migration (where applicable for a given installation).
HOW TO USE THIS GUIDE The content in this guide will be relevant across a range of activities and should be available to
any person responsible for the following, as each section focusses on specific actions that
together enable the complete installation of a Business SIP service:
Site preparation
Pre-installation activities
Physical installation
Network side configuration
PBX side configuration
Number migration and testing.
The map below can help you navigate through the installation process outlined above:

TELSTRA BUSINESS SIP®
Telstra Business SIP – Installation, Configuration and Number Migration Guide 8/69
BUSINESS SIP INSTALLATION - DOCUMENT MAP This diagram maps out the stages of a Business SIP hardware installation, configuration and
number migration. Sections indicated refer to detail contained in this document.
Figure 2: Document Map
(Section 1)
(Section 2)
(Section 4)
(Section 5)
(Section 6)
(Section 6.5)
(Section 6.6)
(Section 6.7)
(Section 7)
(Section 8.1)
(Sections 7.1 & 8.3)

TELSTRA BUSINESS SIP®
Telstra Business SIP – Installation, Configuration and Number Migration Guide 9/69
1 Site Preparation
The following conditions should be observed when locating the equipment:
The device must be installed within two metres of a dedicated mains power outlet.
The device will need shelving or desk space of approximately 300mm x 300mm, ensuring that there is sufficient ventilation. Do not stack devices directly on top of each other.
Do not place the unit close to a heat source or in direct sunlight.
Avoid locations exposed to heavy soiling due to exhaust from machinery, airborne particles from industrial processes or excessive dust.
To ensure adequate airflow through the unit, please ensure that the ventilation holes are unobstructed at all times.
Label any existing PBX cable(s) with the correct port number(s).
Confirm that there will be a gateway device or internet access point that provides a working network connection, within 2 meters of the SIP NTU installation location.
2 Pre-Installation
Before commencing the installation:
Check the SIP NTU to ensure that all components have been included and that the device has no obvious physical damage.
Identify and reconfirm the gateway/internet access device that is providing a working network connection and that it is within 2 meters of the SIP NTU installation location.
Obtain the device ID and password from the Business SIP Portal1 using the login and password provided via email.
Confirm that the old ISDN cable(s) are labelled with the correct port number(s).
1 Access the Telstra Business SIP Customer Management Portal via the link (https://portal.mycalling.telstra.com/login). Once logged in, navigate to the ‘SIP trunk’ tab, then to ‘SIP NTU’ and select ‘Get credentials’. Further details are available in the Business SIP Portal Administration Guide.

TELSTRA BUSINESS SIP®
Telstra Business SIP – Installation, Configuration and Number Migration Guide 10/69
3 Quick Installation Guides
The following are quick guides that cover the three main aspects of installation, configuration
and number migration.
The network side installation/configuration can be performed by Customer, Telstra nominated
Partner or Telstra technicians.
3.1. Network-side installation configuration of SIP NTU
Step Description Section
1 Connect the SIP NTU to a power outlet. Leave switched off at the wall.
4 SIP NTU Physical
installation
2 Connect from the WAN port of the SIP NTU
(ETH 1/0) yellow cable, to a LAN port on the internet gateway.
Switch the SIP NTU power on at the wall socket.
3 Connect your laptop to the SIP NTU via a LAN port (use ports 0/2 or 0/3), open
a browser and enter the IP address 192.168.9.1.
4 Enter the ‘user’ and ‘password’ (these are case sensitive).
Use values ‘user’ and ‘password’; although the password may be the serial
number from the bottom of the device.
5.1.1 SIP NTU
username and
password
5 Follow the prompts. Change the password to one agreed with the customer.
5.1.2 SIP NTU
password change 6 Enter the password here:
You’ll be taken back to the login screen. Log in again and start the Provisioning
Wizard.
7 In the left menu, select ‘Provisioning Wizard’, then select ‘(-)Start’. Follow the
prompts and enter the device ID and password2. Click ‘OK’ as per the GUI
prompts to connect to the DMS, which auto-downloads the configuration data
and registers the device.
5.1.3 Static Ethernet
IP & WAN discovery
using the
Provisioning
Wizard
5.1.4 SIP NTU
registration to the
Business SIP
Platform
8 As a final check, in the left menu of the web GUI, select ‘Status’,
‘(-)Voice’ and the SIP NTU Registration State field will show Registered. The
AUX LED on the SIP NTU should be steady green.
5.1.4 SIP NTU
registration to the
Business SIP
Platform
2 The device ID and password (also known as DMS credentials) are located on the Telstra Business SIP portal (https://portal.mycalling.telstra.com/login). Once you log in, go to the ‘SIP trunk’ tab, then to ‘SIP NTU’ and select ‘Get credentials’.

TELSTRA BUSINESS SIP®
Telstra Business SIP – Installation, Configuration and Number Migration Guide 11/69
3.2. SIP NTU to PBX-side configuration (customer responsibility)
The PBX side configuration can only be performed by the Customer technician.
Step Description Section
9 Ensure that the existing ISDN PBX connections/cables are correctly labelled.
As per steps 3-6, connect your laptop to the SIP NTU using ports 0/2 or 0/3 and
login as per steps 4 to 6 but using the current password.
6.5 SIP NTU to ISDN
BRA/BRI PBX
6.6 SIP NTU to ISDN
PRA/PRI PBX
10 Select PBX Type and then either ISDN or Ethernet SIP on the web dropdown
menu.
6.4 Selecting the
‘PBX Type
11 Configure the BRA/BRI, PRA/PRI or IP ports using the recommended settings.
If the optional steps are not required go to step 14.
6.5 SIP NTU to ISDN
BRA/BRI PBX
6.6 SIP NTU to ISDN
PRA/PRI PBX
6.7 IP PBX
Optional steps if the service is multi-number or line hunt/multi-
number
Provisioning Wizard – DID/Multi Number screen
Section
12 Select from the range of Unassigned Numbers on the web user interface. 6.5.4 DID/Multi-
number
13 Drag and drop each number to the appropriate ports (the same ports as the
existing ISDN PBX). If you have a number that you wish to hunt across the ports,
assign it to the Line Hunt field.
6.5.4 DID/Multi-
number
Step NTU to PBX (Southbound) verification and prep for Number
migration
Section
14 Confirm the completion of the PBX configuration using the SIP NTU GUI.
Navigate to the ‘Status’ / ‘System Information’ / ‘System Status’ section and
look for ‘PBX Configured’ Yes (Type xxxx)’
6.8.1 ISDN PBX &
6.8.2 IP PBX
15 Prior to number migration prepare to disconnect the cables from the existing
NT1s and connect to the appropriate SIP NTU BRA/BRI / PRA/PRI or Ethernet
port/s.
n/a

TELSTRA BUSINESS SIP®
Telstra Business SIP – Installation, Configuration and Number Migration Guide 12/69
3.3. Number Migration/Activation (customer responsibility)
The following is a summary of the steps required to migrate and test voice services between the PBX and the Telstra Business SIP platform, activities of which are the responsibility of the customer.
Step Performing Number Migration/Activation Section
16 Before starting the number migration ensure that the SIP NTU has been configured
against the PBX. (See step 14 in the ‘PBX-side configuration Quick Guide’ section
3.2 above.)
3.2 Quick Guide
17 Using the Portal URL and login detail provided, access the Telstra Business SIP
Customer Management Portal and navigate to the ‘Activations’ tab.
7.2.3 Activation
(number
migration)
process
18 Check the ‘View Affected Numbers’ to confirm the numbers being migrated in the
current order.
19 If not done already, move the PBX cabling from the existing NT1 to the new SIP
NTU device, noting that your services will cease to operate from this point until
number migration is completed, or you move the cabling back to the NT1.
20 Follow the screen prompts to activate the outbound numbers.
21 Perform outbound test calls* from the PBX handset.
22 Follow the screen prompts to activate the inbound numbers.
23 Perform inbound test calls* to the PBX.
24 Activate finalisation.
25 It is advised to perform some load testing to ensure that your required concurrent
call numbers are possible on your broadband service and that uploads and
downloads are also unaffected.
If you find that call quality is impacted, roll back the activation using the Business
SIP Portal and address the issue before performing the Activation again.
26 Once Activated and finalised, continue to use the new services (for seven days)
taking note of and reporting any issues to Telstra. Both outbound and inbound
services can be rolled back (using the Portal) within this time if issues are identified.
*The test calls and the use of the Customer Management Portal user interface can be performed by a non-
technical person, however some experience may be useful to communicate with Telstra support groups,
should any issues arise.

TELSTRA BUSINESS SIP®
Telstra Business SIP – Installation, Configuration and Number Migration Guide 13/69
4 SIP NTU Physical installation
The basic steps for connecting the SIP NTU are:
1. Connect the power plug to the back of the SIP NTU (note whether the unit has an on/off switch and ensure that it is in the ‘OFF’ position).
2. With the mains wall switch in the OFF position, connect the other end to the power outlet in the wall. 3. Connect the Ethernet cable (running from the LAN port on the gateway or NTD) to the Ethernet port 1/0
of the SIP NTU (do not connect it to any of the ports in the four-port switch). 4. Connect the Ethernet cable from a PC/laptop to either LAN port 0/2 or 0/3 only.
Note: Ports 0/0 through 0/3 will only provide access during initial device provisioning. 5. Turn on the power at the wall and where applicable, switch on at the SIP NTU.
Note: The SIP NTU will be powered up and ready for provisioning when the STATUS and IP LEDs are steady green.
4.1. SIP NTU ports
There are different types of connections on each of the SIP NTUs and this section presents and
describes the differences between the connection types and their functions.
See Section 8.1 SIP NTU Diagrams & Connections for the connections and layouts for each
model applicable to the Business SIP product.
A typical SIP NTU port layout could look like this:
Figure 3: SIP NTU Port Layout Example
The port types found across the range of OneAccess SIP NTUs are described on page 15.
The image below shows the types of devices/systems that would be supported by each type of
port.

TELSTRA BUSINESS SIP®
Telstra Business SIP – Installation, Configuration and Number Migration Guide 14/69
Note: This is not intended to convey a typical installation configuration, but
provides graphical information about where devices connect to the SIP NTU
ports.
Figure 4: SIP NTU Interconnectivity Map

TELSTRA BUSINESS SIP®
Telstra Business SIP – Installation, Configuration and Number Migration Guide 15/69
4.1.1. SIP NTU port descriptions
Ethernet (LAN) Ports
Ethernet ports supporting IP PBXs, analogue IADs and laptop connection for SIP NTU configuration and troubleshooting.
Important: Ports 0/0 & 0/1 are for PBX’s using static IP
Ports 02/ & 0/3 are DHCP for IAD’s, PBX’s and PC’s that are ok with dynamic IP’s
Ports 0/0 & 0/1 are static IP
Ports 02/ & 0/3 are DHCP.
Fast Ethernet/UTP Port
This port is used to connect the carriage service to the SIP NTU.
This port can also be seen labelled as either ETH or UTP as shown here
BRA/BRI & PRA/PRI Ports
These ports support ISDN PBXs. There are three types of ISDN port configurations.
BRA/BRI (4 Ports)
and
2 PRA/PRI variants
(1 port 5/0 and 2 port 5/0 & 5/1)
DSL, SFP and Console Ports
The VDSL/ADSL port is not available on all models.
The SFP and console connections are not used on any Business SIP installation.
TELSTRA BUSINESS SIP®
Telstra Business SIP – Installation, Configuration and Number Migration Guide 16/69
5 SIP NTU Network-side configuration (Northbound)
This section covers four main activities to configure the SIP NTU and register it with the Business SIP Platform:
1. Logging in to the SIP NTU GUI via the web browser interface (requiring a username and password) 2. Changing the default password (forced) 3. Using the ‘Provisioning Wizard’ to detect the WAN 4. Register the SIP NTU with the Business SIP Platform (requiring the Business SIP Platform device ID
and password also referred to as the Business SIP Platform credentials or just ‘credentials’.)
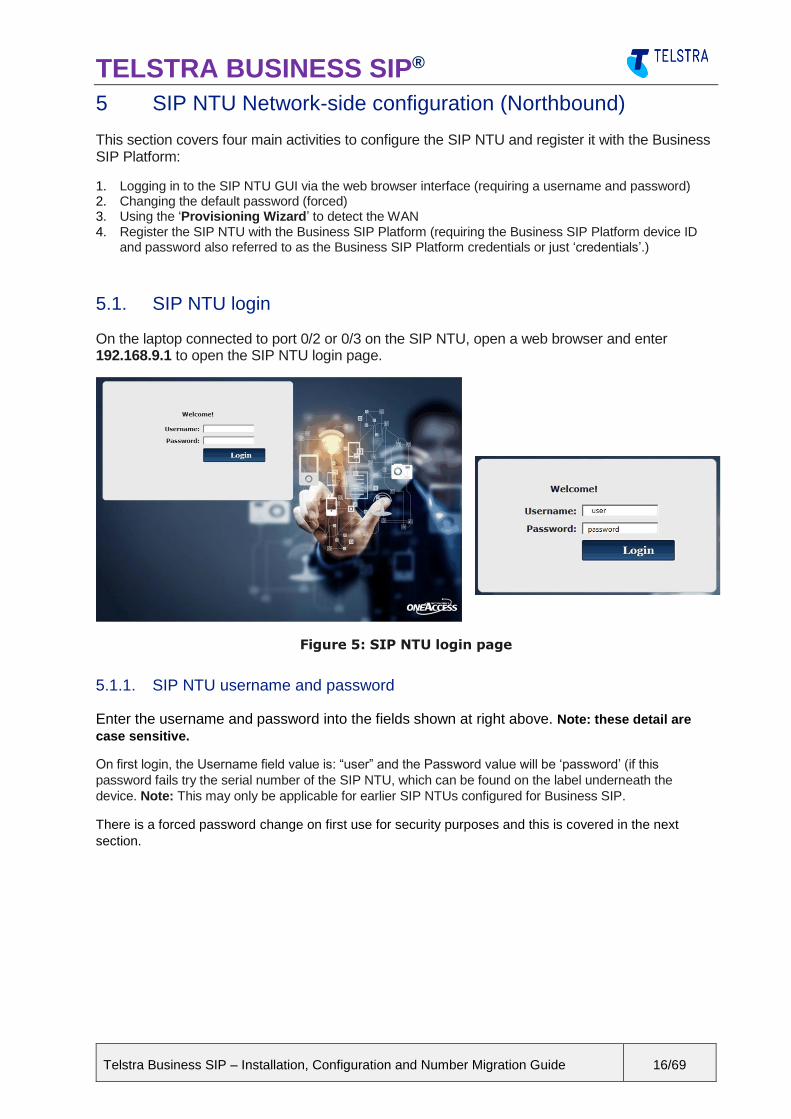
5.1. SIP NTU login
On the laptop connected to port 0/2 or 0/3 on the SIP NTU, open a web browser and enter 192.168.9.1 to open the SIP NTU login page.
Figure 5: SIP NTU login page
5.1.1. SIP NTU username and password
Enter the username and password into the fields shown at right above. Note: these detail are
case sensitive.
On first login, the Username field value is: “user” and the Password value will be ‘password’ (if this
password fails try the serial number of the SIP NTU, which can be found on the label underneath the
device. Note: This may only be applicable for earlier SIP NTUs configured for Business SIP.
There is a forced password change on first use for security purposes and this is covered in the next
section.
TELSTRA BUSINESS SIP®
Telstra Business SIP – Installation, Configuration and Number Migration Guide 17/69
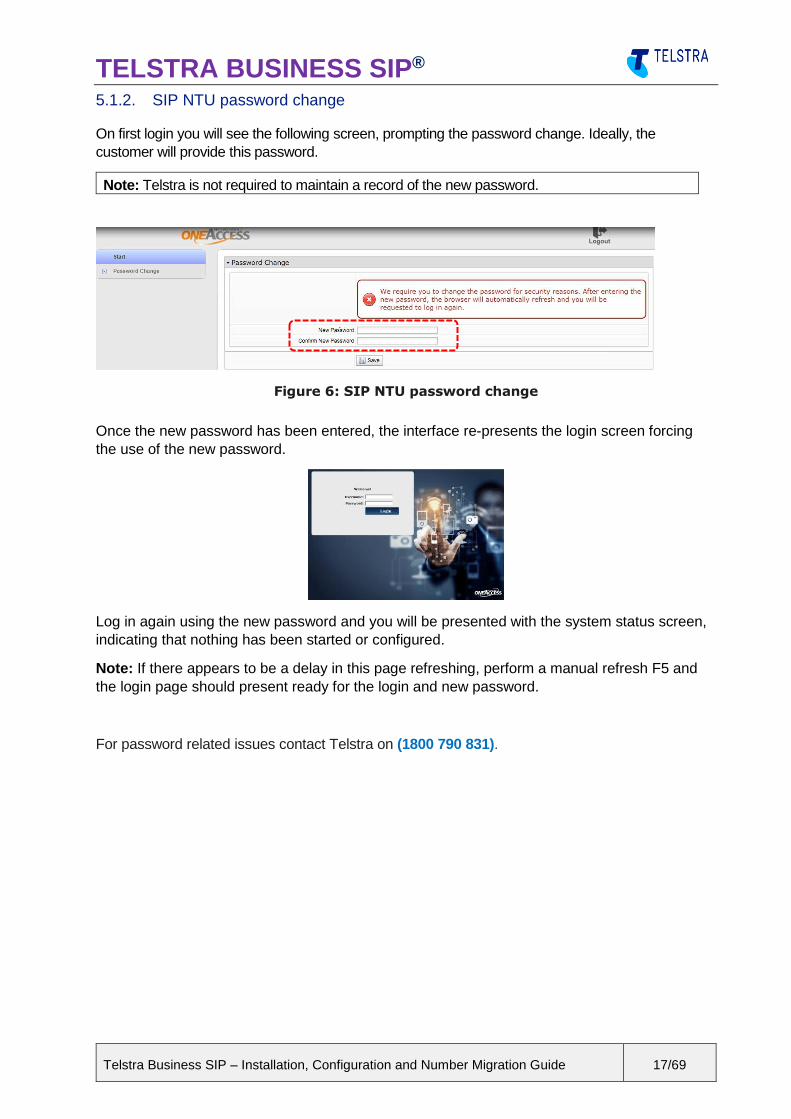
5.1.2. SIP NTU password change
On first login you will see the following screen, prompting the password change. Ideally, the
customer will provide this password.
Note: Telstra is not required to maintain a record of the new password.
Figure 6: SIP NTU password change
Once the new password has been entered, the interface re-presents the login screen forcing
the use of the new password.
Log in again using the new password and you will be presented with the system status screen,
indicating that nothing has been started or configured.
Note: If there appears to be a delay in this page refreshing, perform a manual refresh F5 and
the login page should present ready for the login and new password.
For password related issues contact Telstra on (1800 790 831).

TELSTRA BUSINESS SIP®
Telstra Business SIP – Installation, Configuration and Number Migration Guide 18/69
5.1.3. Static Ethernet IP & WAN discovery using the Provisioning Wizard
The ‘Provisioning Wizard’ allows you to set a static IP address if there is no DHCP server
available. It also detects the WAN type, which is a critical step before it is then used to log in to
the Business SIP Platform to download the configuration file for the device.
To begin, select ‘Provisioning Wizard’ from the left menu pane, then click on ‘Start’ as shown
below, then click ‘Next’.
Figure 7: Starting the provisioning wizard
The provisioning wizard presents a checkbox that, when checked, presents fields to enter a
static IP address if there is no DHCP server.
Figure 8: Static Ethernet IP option
Once the Static Ethernet IP checkbox is ticked, the fields will appear as shown in the example
below.
Figure 9: Static Ethernet IP fields
TELSTRA BUSINESS SIP®
Telstra Business SIP – Installation, Configuration and Number Migration Guide 19/69
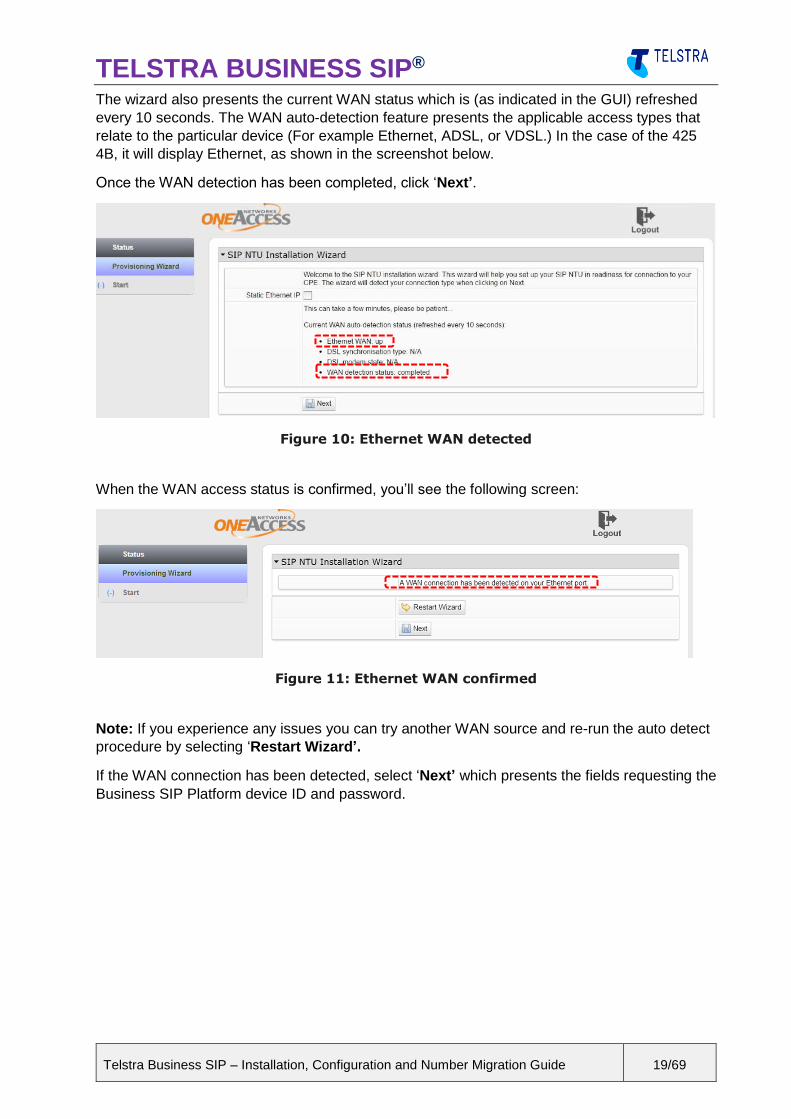
The wizard also presents the current WAN status which is (as indicated in the GUI) refreshed
every 10 seconds. The WAN auto-detection feature presents the applicable access types that
relate to the particular device (For example Ethernet, ADSL, or VDSL.) In the case of the 425
4B, it will display Ethernet, as shown in the screenshot below.
Once the WAN detection has been completed, click ‘Next’.
Figure 10: Ethernet WAN detected
When the WAN access status is confirmed, you’ll see the following screen:
Figure 11: Ethernet WAN confirmed
Note: If you experience any issues you can try another WAN source and re-run the auto detect
procedure by selecting ‘Restart Wizard’.
If the WAN connection has been detected, select ‘Next’ which presents the fields requesting the
Business SIP Platform device ID and password.
TELSTRA BUSINESS SIP®
Telstra Business SIP – Installation, Configuration and Number Migration Guide 20/69
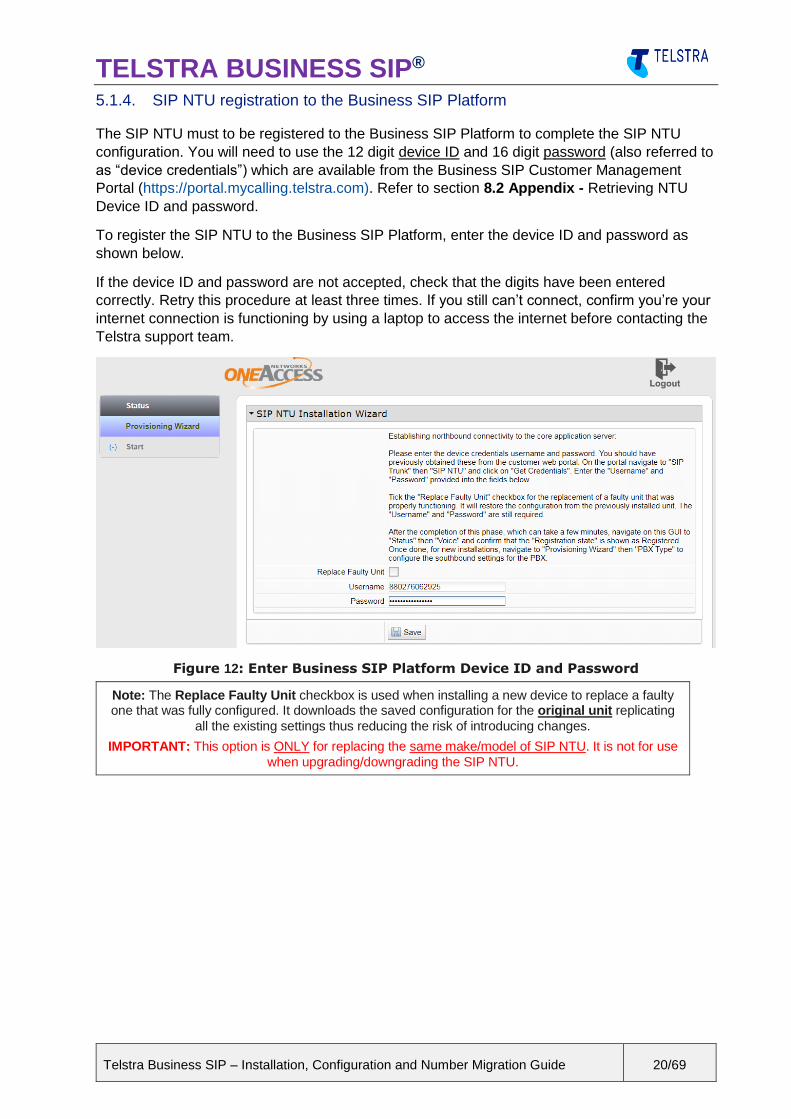
5.1.4. SIP NTU registration to the Business SIP Platform
The SIP NTU must to be registered to the Business SIP Platform to complete the SIP NTU
configuration. You will need to use the 12 digit device ID and 16 digit password (also referred to
as “device credentials”) which are available from the Business SIP Customer Management
Portal (https://portal.mycalling.telstra.com). Refer to section 8.2 Appendix - Retrieving NTU
Device ID and password.
To register the SIP NTU to the Business SIP Platform, enter the device ID and password as
shown below.
If the device ID and password are not accepted, check that the digits have been entered
correctly. Retry this procedure at least three times. If you still can’t connect, confirm you’re your
internet connection is functioning by using a laptop to access the internet before contacting the
Telstra support team.
Figure 12: Enter Business SIP Platform Device ID and Password
Note: The Replace Faulty Unit checkbox is used when installing a new device to replace a faulty one that was fully configured. It downloads the saved configuration for the original unit replicating
all the existing settings thus reducing the risk of introducing changes.
IMPORTANT: This option is ONLY for replacing the same make/model of SIP NTU. It is not for use
when upgrading/downgrading the SIP NTU.

TELSTRA BUSINESS SIP®
Telstra Business SIP – Installation, Configuration and Number Migration Guide 21/69
To confirm that the SIP NTU is registered, select ‘Voice’ and check for a value of ‘Registered’
as shown in Figure 13 below. The SIP NTU is now registered with the Business SIP Platform.
If the GUI screen does not show ‘Registered’, wait a few minutes and then refresh the status by
clicking on ‘Reload Statistics’.
Figure 13: Voice interface registered with the Business SIP Platform
The network-side (Northbound) installation of the SIP NTU and registration with the Telstra Business SIP platform is now complete.
Note: In the figure above, the ‘Southbound’ Interface’ section, refers to the PBX and shows
the ‘Configured’ field indicating ‘No’. This signifies the starting point for the SIP NTU
configuration to the PBX (Southbound).
On successful network-side (Northbound) configuration, the Provisioning Wizard will present the
‘PBX Type’ configuration page, shown in the next section.

TELSTRA BUSINESS SIP®
Telstra Business SIP – Installation, Configuration and Number Migration Guide 22/69
5.1.5. Verification of the network-side (Northbound) configuration
Before proceeding to the PBX-side (Southbound) configuration, refer to the ‘Status’ screen to
verify that the network-side (Northbound) configuration is complete and check the ‘PBX
Configured’ status as shown below:
Notice that the ‘PBX Configured’ field shows ‘No’.
Figure 14: Confirming SIP NTU network-side (Northbound) configuration
TELSTRA BUSINESS SIP®
Telstra Business SIP – Installation, Configuration and Number Migration Guide 23/69
6 SIP NTU to PBX-side configuration (Southbound)
This section covers the following activities to complete the SIP NTU to PBX (Southbound) configuration:
1. Pre configuration considerations 2. Logging in to the SIP NTU GUI via the web browser interface (requiring a username and password) 3. Verifying the Northbound configuration 4. Selecting the PBX Type 5. Configuring ISDN BRA/BRI PBX services 6. Configuring ISDN PRA/PRI PBX services 7. Configuring IP PBX services 8. SIP NTU configuration status verifications 9. Making test calls from the SIP NTU to the Business SIP Platform.
6.1. Pre-PBX-side configuration considerations
Before configuring the SIP NTU to the PBX the following is recommended reading to ensure an understanding of what may be involved in this stage:
Existing BRA/BRI port connections should be labelled so that the cables can be correctly
connected to the new SIP NTU.
Confirm if DID/Multi Number is applicable and familiarise yourself with section 6.5.4 DID/Multi-
number.
Verify that the network-side configuration of the SIP NTU has been completed by login into the SIP
NTU GUI and checking the Status page.
See Figure 16: Initial status screen confirming SIP NTU provisioning
Prepare your plan for moving any cabling from an existing PBX as there will be service disruption.
Where the Business SIP product is replacing existing ISDN services a Number Migration activity
will be required and this needs to be coordinated with cable moves between an existing NT1 device
and the new SIP NTU. To rollback both number migration and cabling may be required and these
should be performed with care. For more details about number migration see section 7 Number
migration.
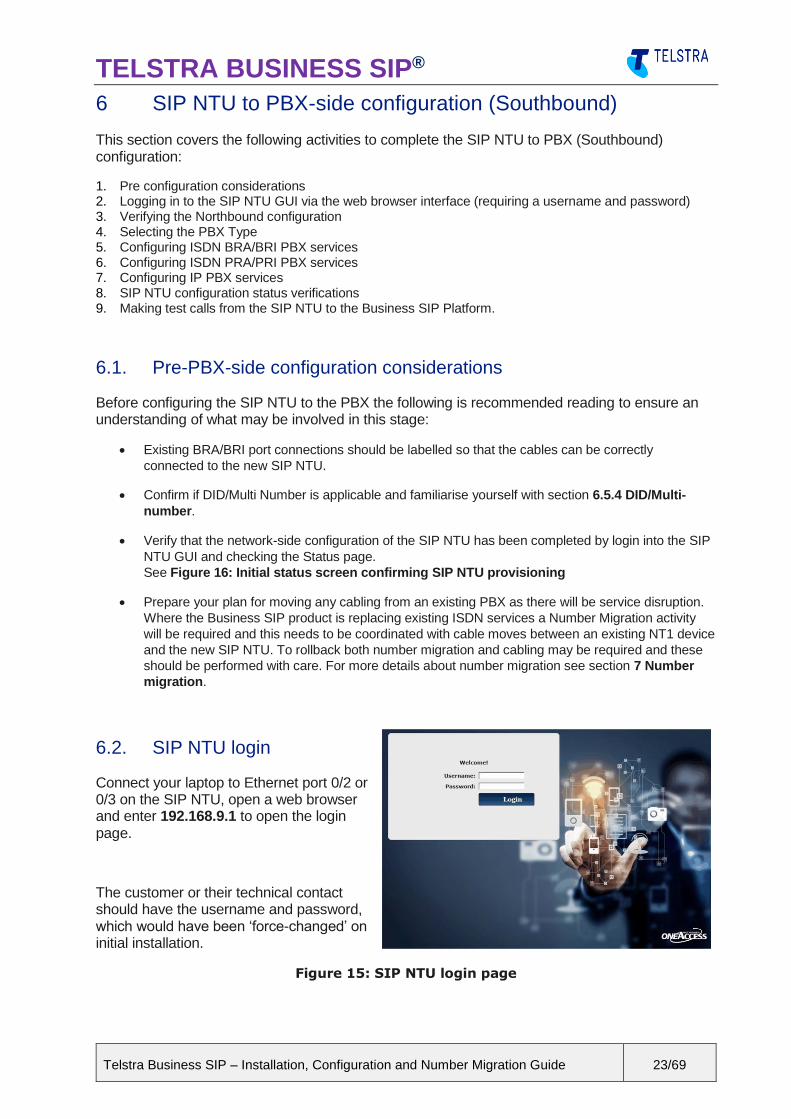
6.2. SIP NTU login
Connect your laptop to Ethernet port 0/2 or 0/3 on the SIP NTU, open a web browser and enter 192.168.9.1 to open the login page.
The customer or their technical contact should have the username and password, which would have been ‘force-changed’ on initial installation.
Figure 15: SIP NTU login page
TELSTRA BUSINESS SIP®
Telstra Business SIP – Installation, Configuration and Number Migration Guide 24/69
For password related issues contact Telstra on (1800 790 831).
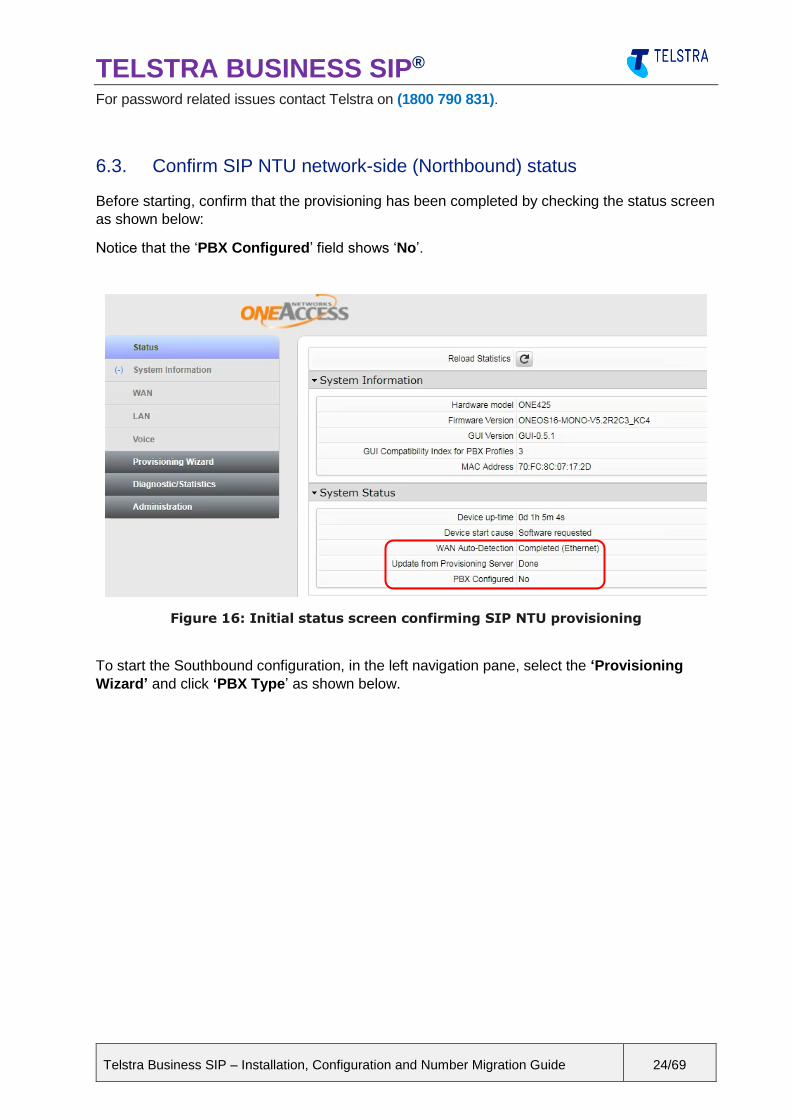
6.3. Confirm SIP NTU network-side (Northbound) status
Before starting, confirm that the provisioning has been completed by checking the status screen
as shown below:
Notice that the ‘PBX Configured’ field shows ‘No’.
Figure 16: Initial status screen confirming SIP NTU provisioning
To start the Southbound configuration, in the left navigation pane, select the ‘Provisioning
Wizard’ and click ‘PBX Type’ as shown below.
TELSTRA BUSINESS SIP®
Telstra Business SIP – Installation, Configuration and Number Migration Guide 25/69
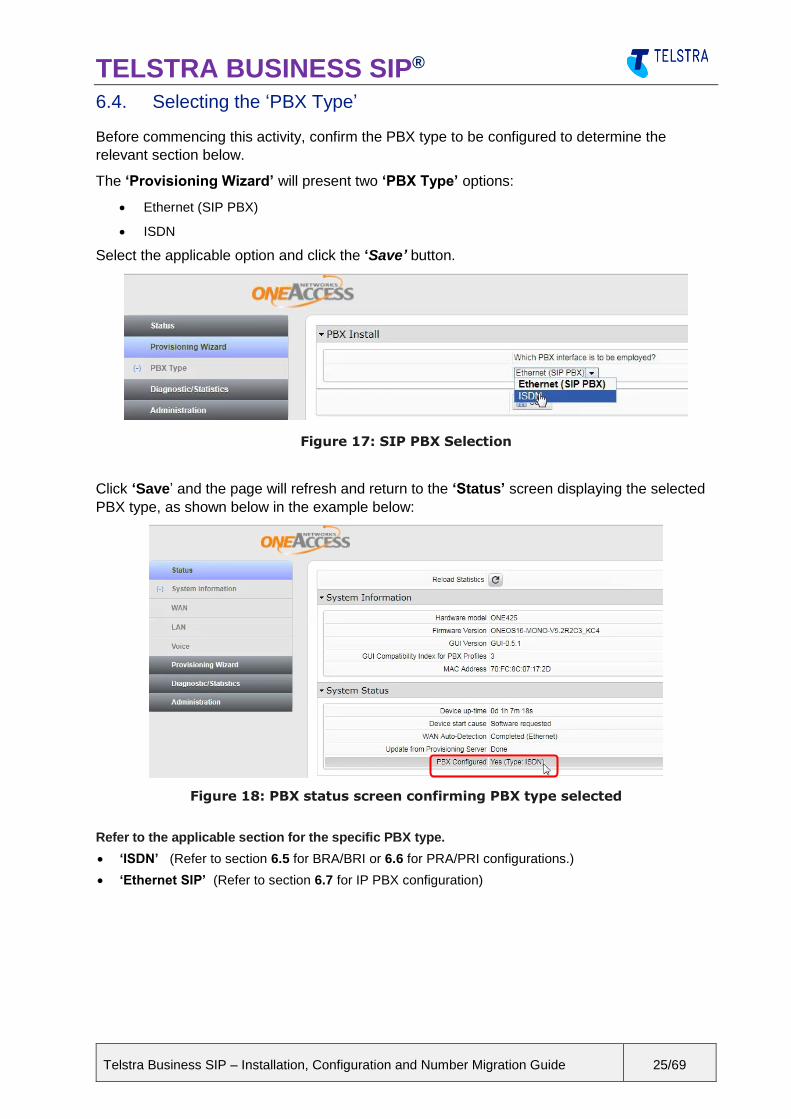
6.4. Selecting the ‘PBX Type’
Before commencing this activity, confirm the PBX type to be configured to determine the
relevant section below.
The ‘Provisioning Wizard’ will present two ‘PBX Type’ options:
Ethernet (SIP PBX)
ISDN
Select the applicable option and click the ‘Save’ button.
Figure 17: SIP PBX Selection
Click ‘Save’ and the page will refresh and return to the ‘Status’ screen displaying the selected
PBX type, as shown below in the example below:
Figure 18: PBX status screen confirming PBX type selected
Refer to the applicable section for the specific PBX type.
‘ISDN’ (Refer to section 6.5 for BRA/BRI or 6.6 for PRA/PRI configurations.)
‘Ethernet SIP’ (Refer to section 6.7 for IP PBX configuration)

TELSTRA BUSINESS SIP®
Telstra Business SIP – Installation, Configuration and Number Migration Guide 26/69
6.5. SIP NTU to ISDN BRA/BRI PBX
Once ISDN is selected, the wizard automatically detects the BRA/BRI interfaces and the GUI
presents the appropriate screen.
Important: To migrate to the new Telstra Business SIP service, disconnection and cutover is required (not applicable to brand new services, i.e. not migrating from an existing PBX) which creates a service interruption. This is required during the SIP NTU to PBX (Southbound) configuration.
6.5.1. ISDN BRA/BRI configuration (Example One425)
The GUI detects the ISDN ports on the SIP NTU and when the ‘Provisioning Wizard’ option is selected in the left navigation pane, the available BRI ports are presented. In the example below these are 5/0 to 5/3. As each BRA/BRI port is selected, it is flagged with a blue marker indicating that it is ready for configuration and the corresponding fields appear in the right window, as indicated by the red boxes in the image below.
Note: There is no preferred order to configure the ports but is strongly recommended that all ports be ‘Enabled’ by selecting each one in turn from the left menu (e.g. BRI 5/0 shown below, BRI 5/1, BRI 5/2, BRI 5/3) and ticking the ‘Enabled’ check box as shown below; even if not all are used/connected.
The recommended settings should be used unless other specific settings are required.
Select ‘Save’ to apply the port configuration to the SIP NTU. Configure each BRA/BRI port in the same way; using the recommended settings as shown in the table, further below, unless the customer PBX requires specific settings.
The two configuration groups presented are: Physical Port Settings and ISDN Settings; although another configuration for BRA/BRI is “DID/Multi-Number”, detailed further below.
Figure 19: BRA/BRI port selection
TELSTRA BUSINESS SIP®
Telstra Business SIP – Installation, Configuration and Number Migration Guide 27/69
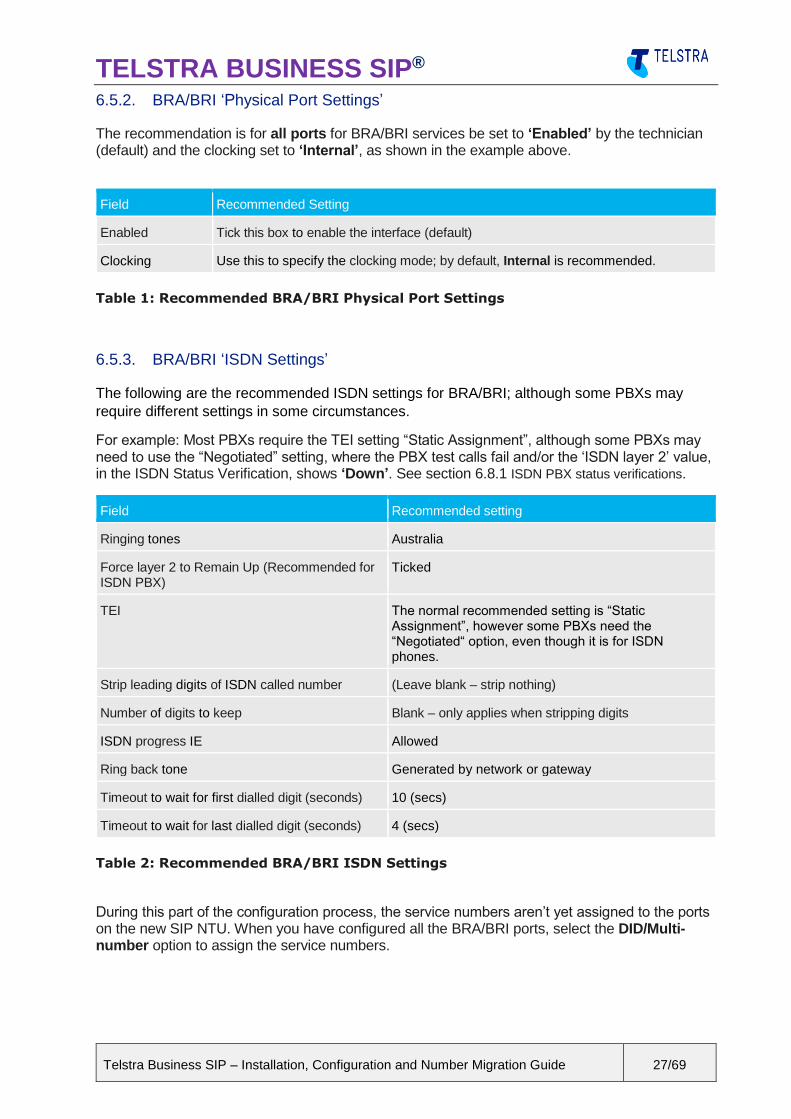
6.5.2. BRA/BRI ‘Physical Port Settings’
The recommendation is for all ports for BRA/BRI services be set to ‘Enabled’ by the technician (default) and the clocking set to ‘Internal’, as shown in the example above.
Field Recommended Setting
Enabled Tick this box to enable the interface (default)
Clocking Use this to specify the clocking mode; by default, Internal is recommended.
Table 1: Recommended BRA/BRI Physical Port Settings
6.5.3. BRA/BRI ‘ISDN Settings’
The following are the recommended ISDN settings for BRA/BRI; although some PBXs may
require different settings in some circumstances.
For example: Most PBXs require the TEI setting “Static Assignment”, although some PBXs may need to use the “Negotiated” setting, where the PBX test calls fail and/or the ‘ISDN layer 2’ value, in the ISDN Status Verification, shows ‘Down’. See section 6.8.1 ISDN PBX status verifications.
Field Recommended setting
Ringing tones Australia
Force layer 2 to Remain Up (Recommended for ISDN PBX)
Ticked
TEI The normal recommended setting is “Static Assignment”, however some PBXs need the “Negotiated“ option, even though it is for ISDN phones.
Strip leading digits of ISDN called number (Leave blank – strip nothing)
Number of digits to keep Blank – only applies when stripping digits
ISDN progress IE Allowed
Ring back tone Generated by network or gateway
Timeout to wait for first dialled digit (seconds) 10 (secs)
Timeout to wait for last dialled digit (seconds) 4 (secs)
Table 2: Recommended BRA/BRI ISDN Settings
During this part of the configuration process, the service numbers aren’t yet assigned to the ports on the new SIP NTU. When you have configured all the BRA/BRI ports, select the DID/Multi-number option to assign the service numbers.
TELSTRA BUSINESS SIP®
Telstra Business SIP – Installation, Configuration and Number Migration Guide 28/69
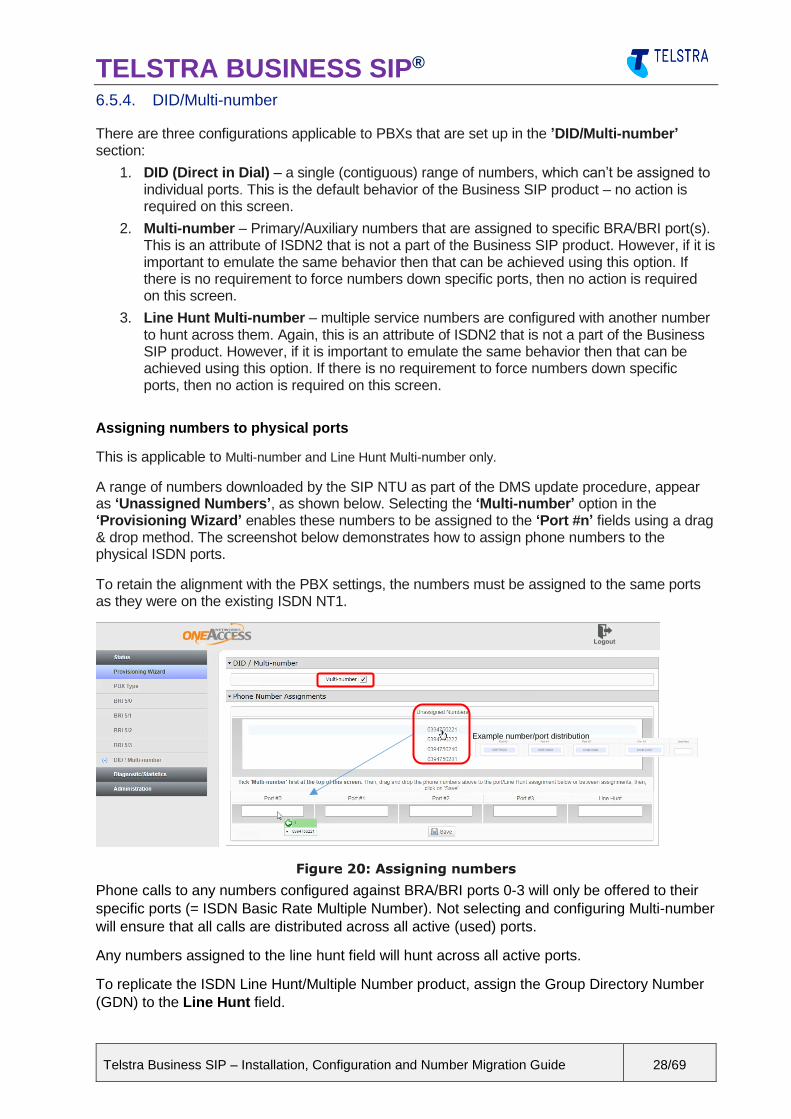
6.5.4. DID/Multi-number
There are three configurations applicable to PBXs that are set up in the ’DID/Multi-number’ section:
1. DID (Direct in Dial) – a single (contiguous) range of numbers, which can’t be assigned to individual ports. This is the default behavior of the Business SIP product – no action is required on this screen.
2. Multi-number – Primary/Auxiliary numbers that are assigned to specific BRA/BRI port(s). This is an attribute of ISDN2 that is not a part of the Business SIP product. However, if it is important to emulate the same behavior then that can be achieved using this option. If there is no requirement to force numbers down specific ports, then no action is required on this screen.
3. Line Hunt Multi-number – multiple service numbers are configured with another number to hunt across them. Again, this is an attribute of ISDN2 that is not a part of the Business SIP product. However, if it is important to emulate the same behavior then that can be achieved using this option. If there is no requirement to force numbers down specific ports, then no action is required on this screen.
Assigning numbers to physical ports
This is applicable to Multi-number and Line Hunt Multi-number only.
A range of numbers downloaded by the SIP NTU as part of the DMS update procedure, appear as ‘Unassigned Numbers’, as shown below. Selecting the ‘Multi-number’ option in the ‘Provisioning Wizard’ enables these numbers to be assigned to the ‘Port #n’ fields using a drag & drop method. The screenshot below demonstrates how to assign phone numbers to the physical ISDN ports.
To retain the alignment with the PBX settings, the numbers must be assigned to the same ports as they were on the existing ISDN NT1.
Figure 20: Assigning numbers
Phone calls to any numbers configured against BRA/BRI ports 0-3 will only be offered to their
specific ports (= ISDN Basic Rate Multiple Number). Not selecting and configuring Multi-number
will ensure that all calls are distributed across all active (used) ports.
Any numbers assigned to the line hunt field will hunt across all active ports.
To replicate the ISDN Line Hunt/Multiple Number product, assign the Group Directory Number
(GDN) to the Line Hunt field.
Example number/port distribution
TELSTRA BUSINESS SIP®
Telstra Business SIP – Installation, Configuration and Number Migration Guide 29/69
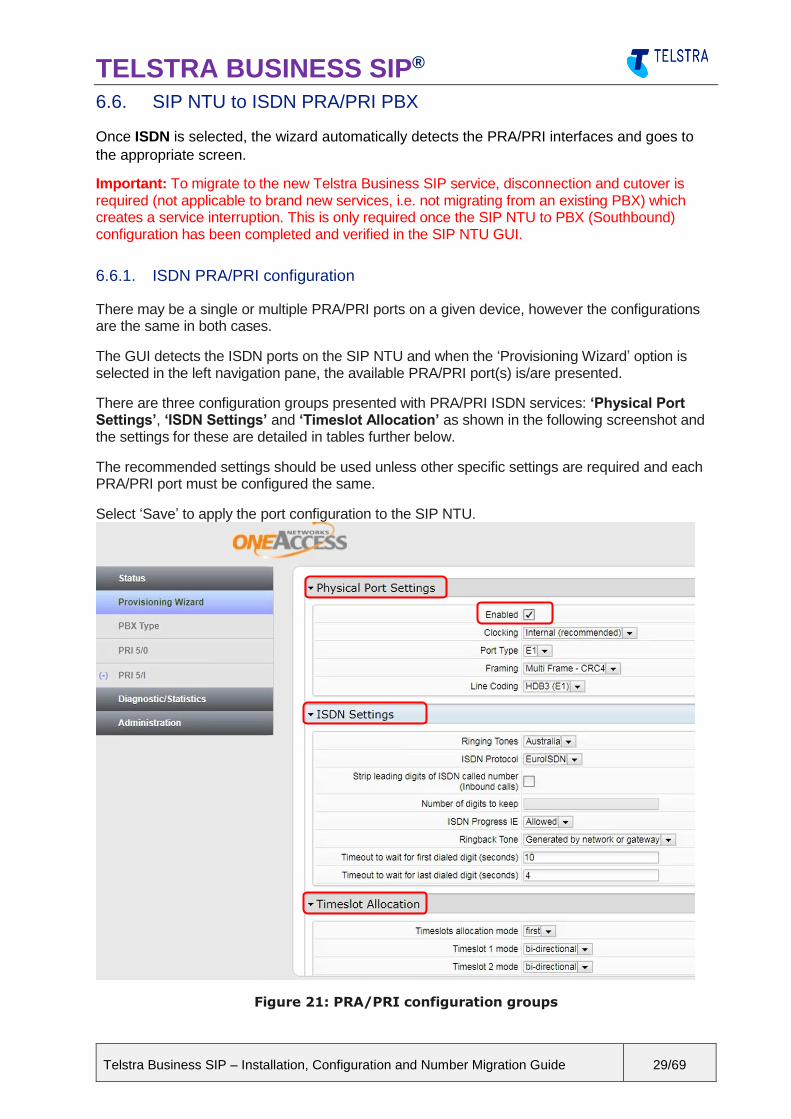
6.6. SIP NTU to ISDN PRA/PRI PBX
Once ISDN is selected, the wizard automatically detects the PRA/PRI interfaces and goes to
the appropriate screen.
Important: To migrate to the new Telstra Business SIP service, disconnection and cutover is required (not applicable to brand new services, i.e. not migrating from an existing PBX) which creates a service interruption. This is only required once the SIP NTU to PBX (Southbound) configuration has been completed and verified in the SIP NTU GUI.
6.6.1. ISDN PRA/PRI configuration
There may be a single or multiple PRA/PRI ports on a given device, however the configurations are the same in both cases.
The GUI detects the ISDN ports on the SIP NTU and when the ‘Provisioning Wizard’ option is selected in the left navigation pane, the available PRA/PRI port(s) is/are presented.
There are three configuration groups presented with PRA/PRI ISDN services: ‘Physical Port Settings’, ‘ISDN Settings’ and ‘Timeslot Allocation’ as shown in the following screenshot and the settings for these are detailed in tables further below.
The recommended settings should be used unless other specific settings are required and each PRA/PRI port must be configured the same.
Select ‘Save’ to apply the port configuration to the SIP NTU.
Figure 21: PRA/PRI configuration groups

TELSTRA BUSINESS SIP®
Telstra Business SIP – Installation, Configuration and Number Migration Guide 30/69
6.6.2. PRA/PRI ‘Physical Port Settings’
The recommendation is for all ports for PRA/PRI services be set to ‘Enabled’ by the technician (default) and the clocking set to ‘Internal’, as shown in the example above.
Note: Some SIP NTU models have the default set to Double Frame and so it is recommended to always check this setting.
Field Recommended Setting
Enabled Tick this box to enable the interface (default)
Clocking Use this to specify the clocking mode; by default, Internal is recommended.
Port Type E1
Framing Multi Frame – CRC4
Line Coding HDB3 (E1)
Table 3: Recommended PRA/PRI Physical Port settings
6.6.3. PRA/PRI ‘ISDN Settings’
The recommendation is for all ports for PRA/PRI services be set to ‘Enabled’ by the technician (default) and the clocking set to ‘Internal’, as shown in the example above.
The following are the recommended ISDN settings for PRA/PRI:
Field Recommended setting
Ringing tones Australia
ISDN Protocol EuroISDN
Strip leading digits of ISDN called number (Leave blank – strip nothing)
Number of digits to keep Blank – only applies when stripping digits
ISDN progress IE Allowed
Ring back tone Generated by network or gateway
Timeout to wait for first dialled digit (seconds) 10 (secs)
Timeout to wait for last dialled digit (seconds) 4 (secs)
Table 4: Recommended PRA/PRI ‘ISDN Settings’
TELSTRA BUSINESS SIP®
Telstra Business SIP – Installation, Configuration and Number Migration Guide 31/69
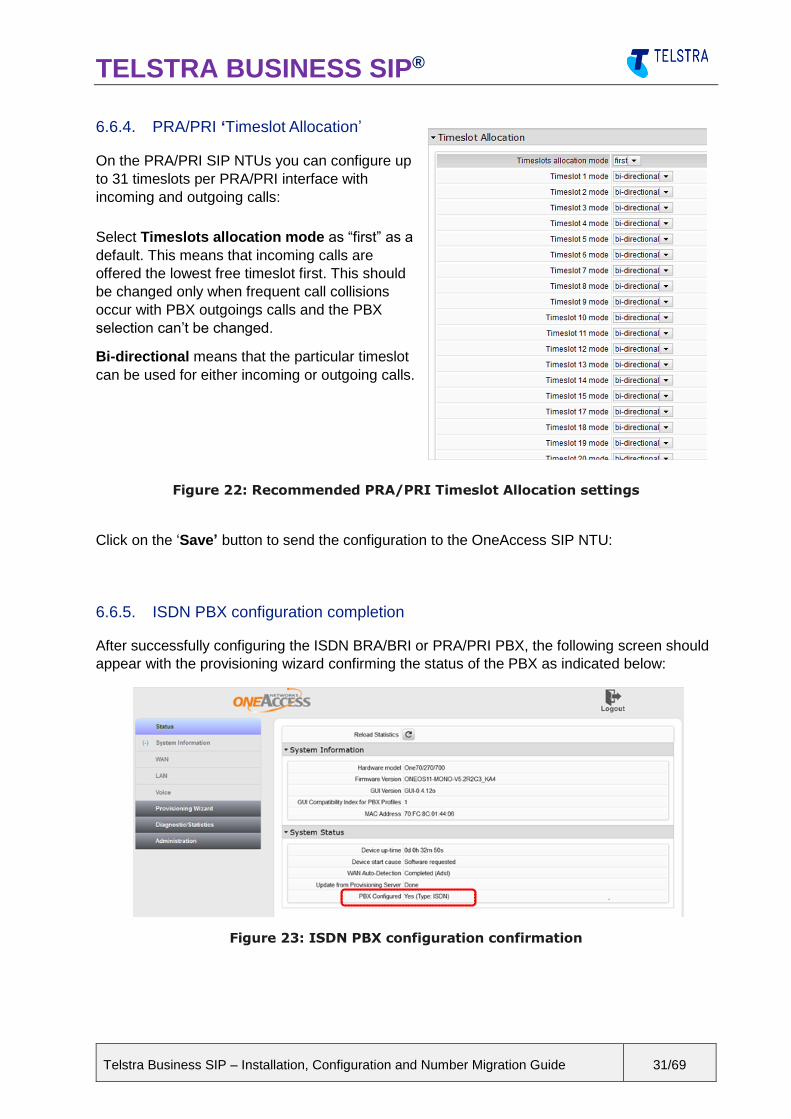
6.6.4. PRA/PRI ‘Timeslot Allocation’
On the PRA/PRI SIP NTUs you can configure up
to 31 timeslots per PRA/PRI interface with
incoming and outgoing calls:
Select Timeslots allocation mode as “first” as a
default. This means that incoming calls are
offered the lowest free timeslot first. This should
be changed only when frequent call collisions
occur with PBX outgoings calls and the PBX
selection can’t be changed.
Bi-directional means that the particular timeslot
can be used for either incoming or outgoing calls.
Figure 22: Recommended PRA/PRI Timeslot Allocation settings
Click on the ‘Save’ button to send the configuration to the OneAccess SIP NTU:
6.6.5. ISDN PBX configuration completion
After successfully configuring the ISDN BRA/BRI or PRA/PRI PBX, the following screen should
appear with the provisioning wizard confirming the status of the PBX as indicated below:
Figure 23: ISDN PBX configuration confirmation

TELSTRA BUSINESS SIP®
Telstra Business SIP – Installation, Configuration and Number Migration Guide 32/69
6.7. SIP NTU to IP PBX
On successful network-side (Northbound) configuration, the Provisioning Wizard will present the
‘PBX Type’ configuration page, shown below.
Before commencing this activity, confirm that the PBX type to be configured is a SIP PBX,
otherwise refer to section 6.5 for BRA/BRI or 6.6 for PRA/PRI configurations.
The dropdown highlighted below will present two options:
ISDN
Ethernet SIP
Select the applicable option (for IP PBX select ‘Ethernet (SIP PBX)’) and click the Save button.
Figure 24: SIP PBX Selection
TELSTRA BUSINESS SIP®
Telstra Business SIP – Installation, Configuration and Number Migration Guide 33/69
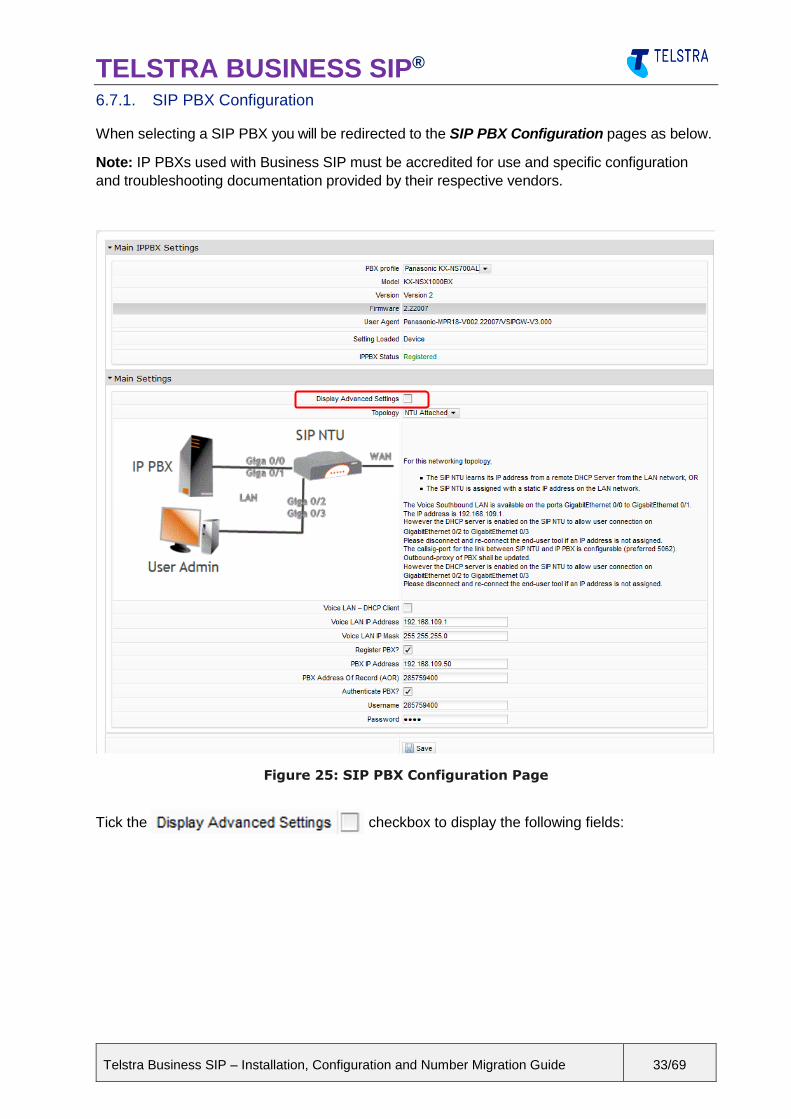
6.7.1. SIP PBX Configuration
When selecting a SIP PBX you will be redirected to the SIP PBX Configuration pages as below.
Note: IP PBXs used with Business SIP must be accredited for use and specific configuration
and troubleshooting documentation provided by their respective vendors.
Figure 25: SIP PBX Configuration Page
Tick the checkbox to display the following fields:
TELSTRA BUSINESS SIP®
Telstra Business SIP – Installation, Configuration and Number Migration Guide 34/69
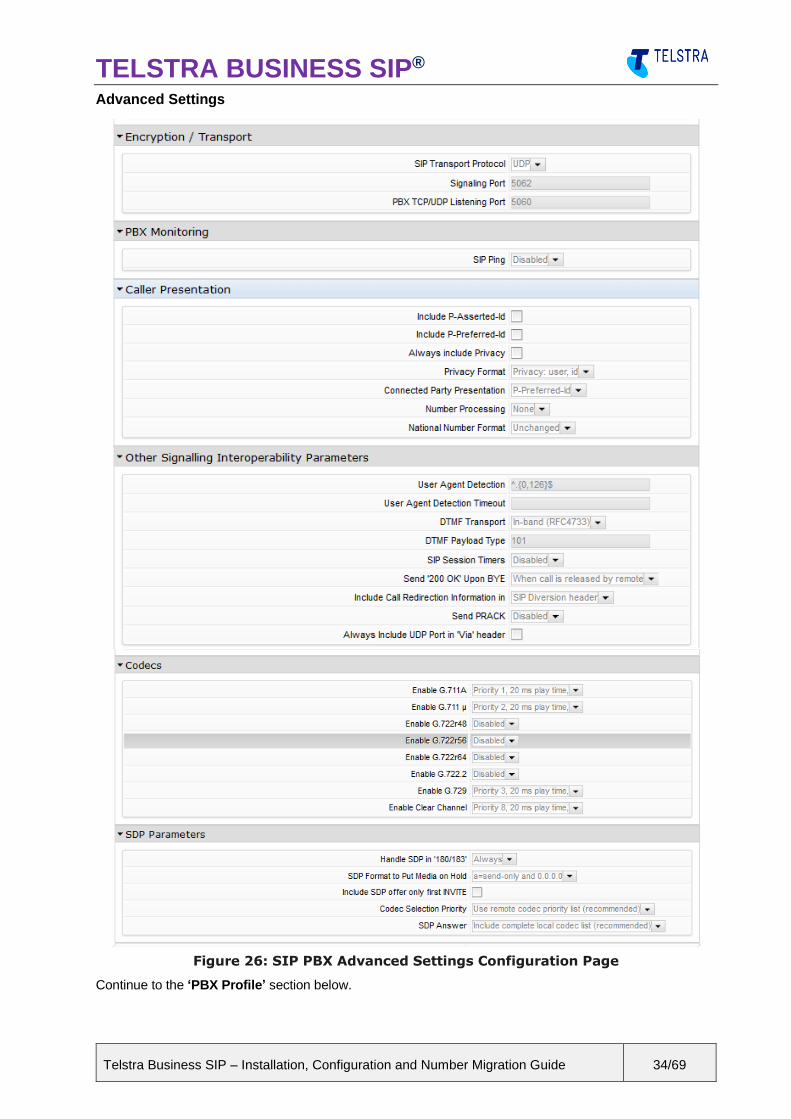
Advanced Settings
Figure 26: SIP PBX Advanced Settings Configuration Page
Continue to the ‘PBX Profile’ section below.
TELSTRA BUSINESS SIP®
Telstra Business SIP – Installation, Configuration and Number Migration Guide 35/69
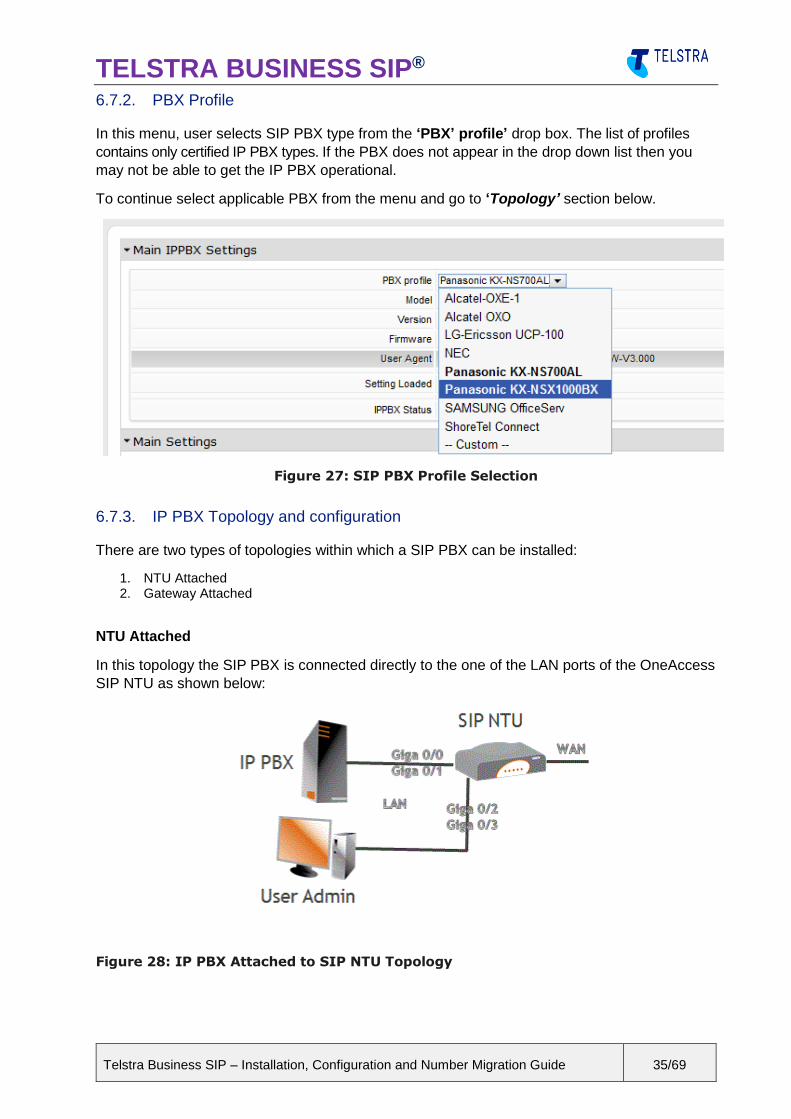
6.7.2. PBX Profile
In this menu, user selects SIP PBX type from the ‘PBX’ profile’ drop box. The list of profiles
contains only certified IP PBX types. If the PBX does not appear in the drop down list then you
may not be able to get the IP PBX operational.
To continue select applicable PBX from the menu and go to ‘Topology’ section below.
Figure 27: SIP PBX Profile Selection
6.7.3. IP PBX Topology and configuration
There are two types of topologies within which a SIP PBX can be installed:
1. NTU Attached 2. Gateway Attached
NTU Attached
In this topology the SIP PBX is connected directly to the one of the LAN ports of the OneAccess
SIP NTU as shown below:
Figure 28: IP PBX Attached to SIP NTU Topology
TELSTRA BUSINESS SIP®
Telstra Business SIP – Installation, Configuration and Number Migration Guide 36/69
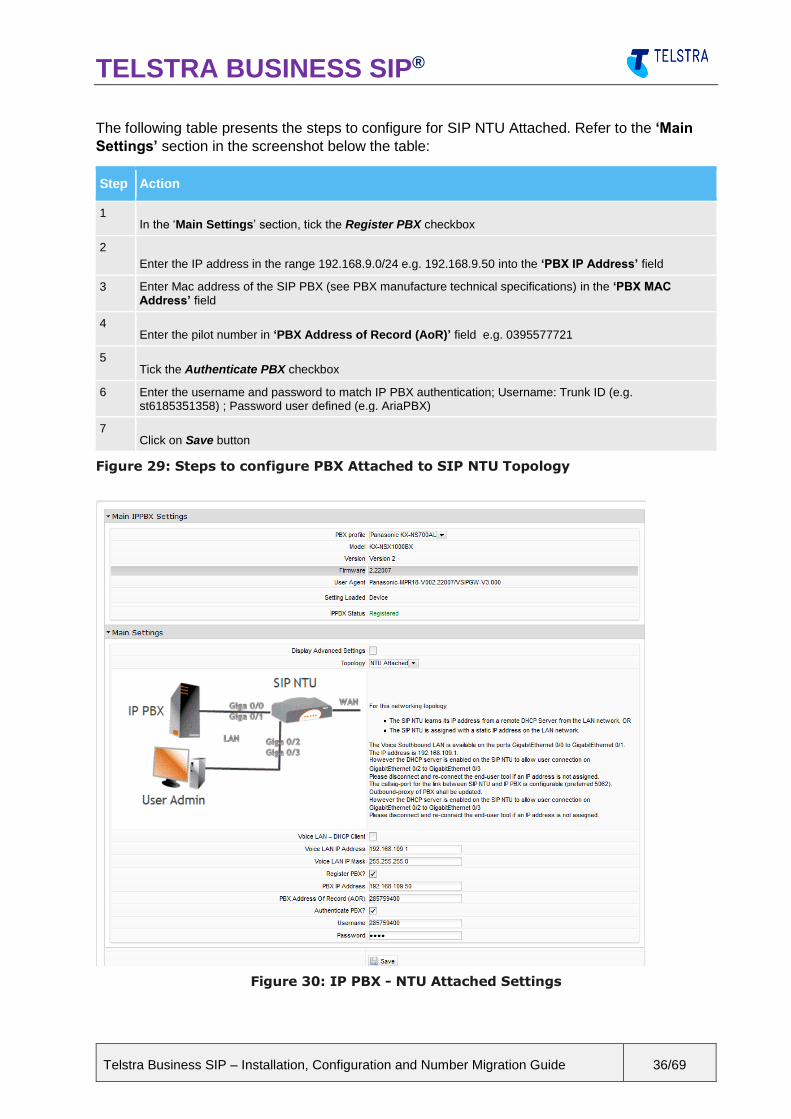
The following table presents the steps to configure for SIP NTU Attached. Refer to the ‘Main
Settings’ section in the screenshot below the table:
Step Action
1 In the ‘Main Settings’ section, tick the Register PBX checkbox
2
Enter the IP address in the range 192.168.9.0/24 e.g. 192.168.9.50 into the ‘PBX IP Address’ field
3 Enter Mac address of the SIP PBX (see PBX manufacture technical specifications) in the ‘PBX MAC Address’ field
4 Enter the pilot number in ‘PBX Address of Record (AoR)’ field e.g. 0395577721
5 Tick the Authenticate PBX checkbox
6 Enter the username and password to match IP PBX authentication; Username: Trunk ID (e.g. st6185351358) ; Password user defined (e.g. AriaPBX)
7 Click on Save button
Figure 29: Steps to configure PBX Attached to SIP NTU Topology
Figure 30: IP PBX - NTU Attached Settings

TELSTRA BUSINESS SIP®
Telstra Business SIP – Installation, Configuration and Number Migration Guide 37/69
Gateway Attached
In this topology the SIP PBX is connected to the gateway LAN port.
Figure 31: IP PBX Attached to Gateway Topology
The following table presents the steps to configure for Gateway Attached. Refer to the ‘Main
Settings’ section in the screenshot below the table:
Step Action
1 In the ‘Main Settings’ section, tick the ‘Register’ PBX checkbox
2 Enter the IP address in the range 192.168.9.0/24 e.g. 192.168.9.50 into the ‘PBX IP Address’ field
3 Enter the pilot number in the ‘PBX Address of record (AoR)’ field e.g. 0395577721
4 Tick the Authenticate PBX checkbox
5 Enter the username and password to match the IP PBX authentication: Username <Trunk ID> (e.g. st6185351358) ; Password <user defined> (e.g. AriaPBX123)
6 Click on the ‘Save’ button
Figure 32: Steps to configure PBX Attached to Gateway Topology

TELSTRA BUSINESS SIP®
Telstra Business SIP – Installation, Configuration and Number Migration Guide 38/69
Figure 33: IP PBX - Gateway Attached Settings
Click on the ‘Save’ button to send configuration to the OneAccess SIP NTU:

TELSTRA BUSINESS SIP®
Telstra Business SIP – Installation, Configuration and Number Migration Guide 39/69
6.8. SIP NTU configuration status verifications
This section describes how to obtain and identify the status of the:
SIP NTU registration both network-side (Northbound) and PBX-side (Southbound)
ISDN PBX ports (BRA/BRI or PRA/PRI).
IP PBX ports.
In all cases, log in to the SIP NTU GUI and select Reload Statistics .
When interpreting the Incoming and Outgoing calls counts you will need to consider on which
interface the stats are viewed.
The call stats are viewed from the perspective of the SIP NTU, which means that for an
“Outgoing” call (e.g. PBX to SIP NTU to Network) the calls will be viewed as “Incoming” on the
Southbound side (coming in to the SIP NTU) and as “Outgoing” on the Northbound side
(leaving the SIP NTU).
The Northbound Interface will present calls between the SIP NTU and the telco Network
whereas the Southbound interface will present the calls between the SIP NTU and the PBX.
6.8.1. ISDN PBX status verifications
The Voice status screen in the following images show the state of each configurable
component of the SIP NTU
This screenshot shows:
the SIP NTU is registered
the PBX (Southbound) interface is configured
Figure 34: Northbound and Southbound verifications
TELSTRA BUSINESS SIP®
Telstra Business SIP – Installation, Configuration and Number Migration Guide 40/69
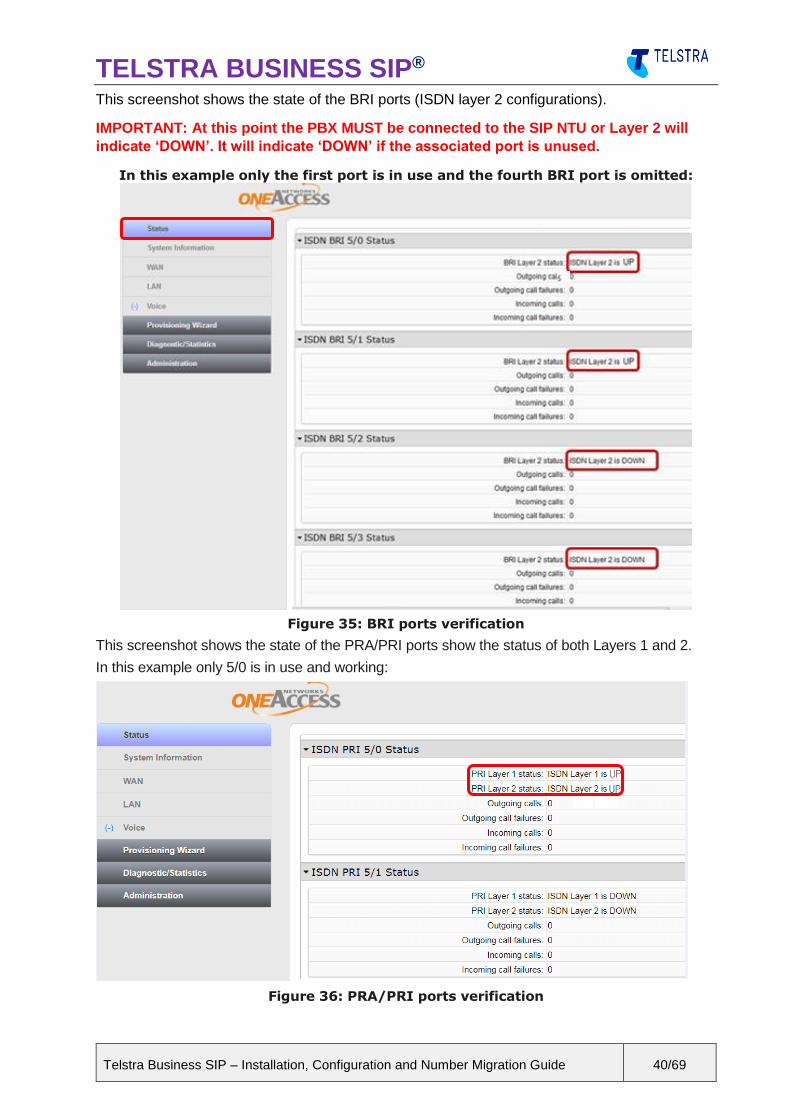
This screenshot shows the state of the BRI ports (ISDN layer 2 configurations).
IMPORTANT: At this point the PBX MUST be connected to the SIP NTU or Layer 2 will
indicate ‘DOWN’. It will indicate ‘DOWN’ if the associated port is unused.
In this example only the first port is in use and the fourth BRI port is omitted:
Figure 35: BRI ports verification
This screenshot shows the state of the PRA/PRI ports show the status of both Layers 1 and 2.
In this example only 5/0 is in use and working:
Figure 36: PRA/PRI ports verification
TELSTRA BUSINESS SIP®
Telstra Business SIP – Installation, Configuration and Number Migration Guide 41/69
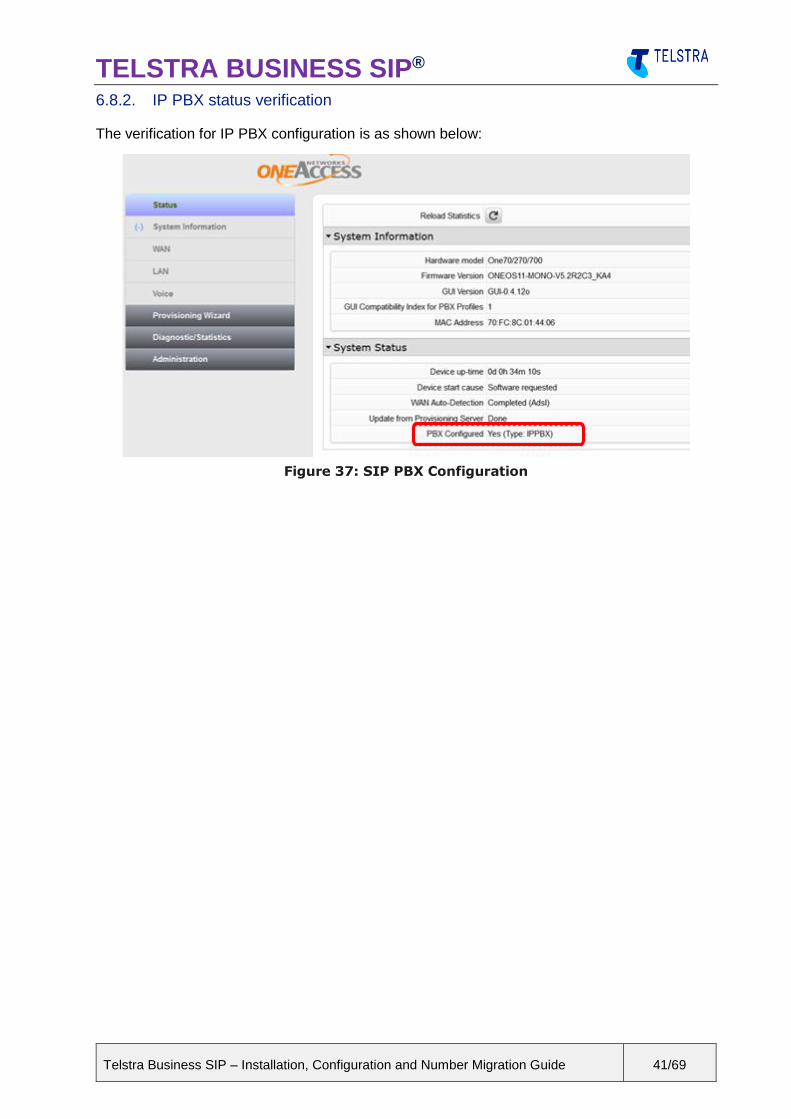
6.8.2. IP PBX status verification
The verification for IP PBX configuration is as shown below:
Figure 37: SIP PBX Configuration

TELSTRA BUSINESS SIP®
Telstra Business SIP – Installation, Configuration and Number Migration Guide 42/69
6.9. Test Call from SIP NTU
With this feature, a test call can be generated to ensure full operability of the SIP NTU with the
Telstra Business SIP Platform. With Call Direction, test calls can be made from the NTU and
these can either be toward the network (Northbound) or to the PBX or individual handsets
(Southbound). The calls can be set to play music or provide an audio loopback. Depending on
the direction of the call the appropriate called and/or calling number information will be required.
Figure 38: SIP Test Call
6.9.1. Test call instructions
To make a test call, select the Test Call option in the navigation menu. Select Call Direction to
nominate which direction you want the test call to go; to the SIP Provider (towards the
network), to the PBX, or to Directly Attached Phones.
The following is the sequence to performing a test call:
Select the Call Direction as shown above.
Set the Number of test calls (between 1 and 10).
Set Media Handling to ‘Play Music’ or ‘Loopback Audio’.
Enter the Calling Number (if the pilot number is not defined).
Enter the Called Number (this is the destination number).
Start the test by clicking the Start Test button.
6.9.2. Test Result
The following figure shows an example of test call results:
Figure 39: Test Call Results

TELSTRA BUSINESS SIP®
Telstra Business SIP – Installation, Configuration and Number Migration Guide 43/69
6.10. SIP NTU Administration
There are basic administration features available and these are described in the screenshots
below.
6.10.1. Provisioning Server
Although there is an automated process for updating the device in-line with the server, this can
be done manually through this page. Clicking ‘Save’ triggers the automated process that
locates and retrieves the file(s) saving them to the device. The update is performed as part of
this routine.
Figure 40: Provisioning Server Synchronisation
6.10.2. User Management
This page allows you to create and provide access to other end Users.
Figure 41: User Management fields

TELSTRA BUSINESS SIP®
Telstra Business SIP – Installation, Configuration and Number Migration Guide 44/69
6.10.3. Device Reboot
Figure 42: Device Reboot option
6.10.4. Factory Reset
OneAccess NTU’s do not have a factory reset button. Factory Reset functionality is available via the Web
GUI. The steps to perform the factory reset are:
1. If not already logged in, open a Web browser and enter 192.168.9.1 to open the Web GUI login page.
2. Enter the Web GUI user ID and password details. 3. From the left side menu, select ‘Administration’ then ‘Restore Factory Settings’ 4. Select the ‘Restore Now’ button, which will present the ‘Are you sure?’ banner.
By selecting ‘OK’, the default factory configuration will overwrite the current configuration and the device will reboot.
Note: This procedure will require the NTU to be re-registered with the northbound (network
side) interface.
Figure 43: Restore Factory Settings
TELSTRA BUSINESS SIP®
Telstra Business SIP – Installation, Configuration and Number Migration Guide 45/69
7 Number migration
Number migration is the final step in establishing a Business SIP service.
IMPORTANT: Only proceed with step if you have completed the SIP NTU to PBX (Southbound)
configuration. See step 14 in section 3.2 NTU to PBX-side configuration quick guide.
This section will help you log in to the Business SIP Customer Management Portal to migrate
your existing services to Telstra Business SIP. See the Business SIP – Customer Management
Portal Administrator login section below for the url and guidelines.
During this process, you will need to perform certain test calls to (using a mobile phone or a
remote landline) and from your service numbers (using your PBX handset) to prove that each
stage of the migration has completed successfully before proceeding with the next.
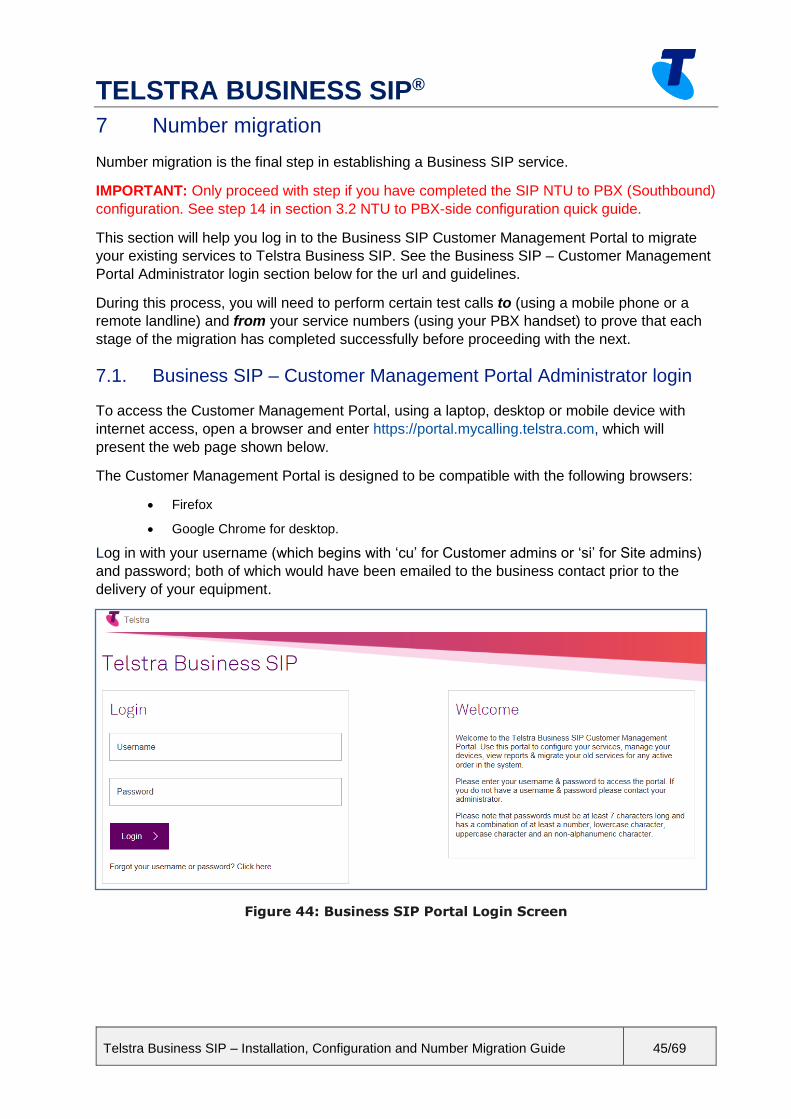
7.1. Business SIP – Customer Management Portal Administrator login
To access the Customer Management Portal, using a laptop, desktop or mobile device with
internet access, open a browser and enter https://portal.mycalling.telstra.com, which will
present the web page shown below.
The Customer Management Portal is designed to be compatible with the following browsers:
Firefox
Google Chrome for desktop.
Log in with your username (which begins with ‘cu’ for Customer admins or ‘si’ for Site admins)
and password; both of which would have been emailed to the business contact prior to the
delivery of your equipment.
Figure 44: Business SIP Portal Login Screen
TELSTRA BUSINESS SIP®
Telstra Business SIP – Installation, Configuration and Number Migration Guide 46/69
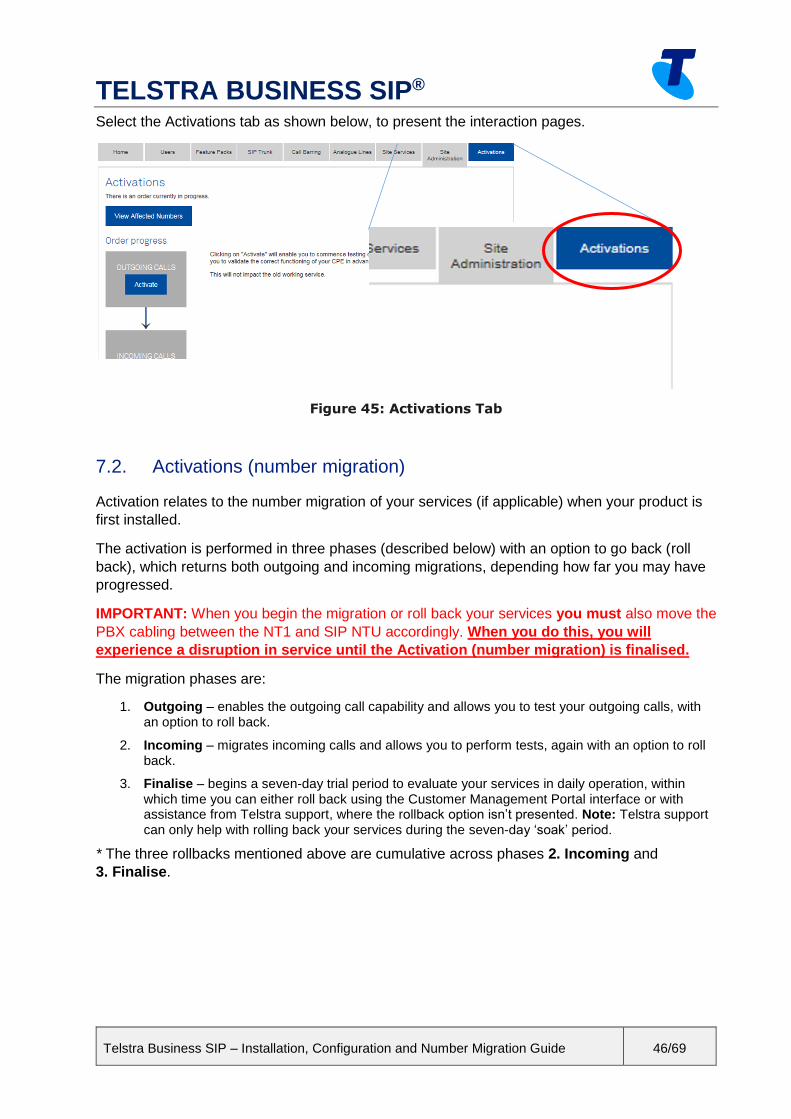
Select the Activations tab as shown below, to present the interaction pages.
Figure 45: Activations Tab
7.2. Activations (number migration)
Activation relates to the number migration of your services (if applicable) when your product is
first installed.
The activation is performed in three phases (described below) with an option to go back (roll
back), which returns both outgoing and incoming migrations, depending how far you may have
progressed.
IMPORTANT: When you begin the migration or roll back your services you must also move the
PBX cabling between the NT1 and SIP NTU accordingly. When you do this, you will
experience a disruption in service until the Activation (number migration) is finalised.
The migration phases are:
1. Outgoing – enables the outgoing call capability and allows you to test your outgoing calls, with an option to roll back.
2. Incoming – migrates incoming calls and allows you to perform tests, again with an option to roll back.
3. Finalise – begins a seven-day trial period to evaluate your services in daily operation, within which time you can either roll back using the Customer Management Portal interface or with assistance from Telstra support, where the rollback option isn’t presented. Note: Telstra support can only help with rolling back your services during the seven-day ‘soak’ period.
* The three rollbacks mentioned above are cumulative across phases 2. Incoming and
3. Finalise.

TELSTRA BUSINESS SIP®
Telstra Business SIP – Installation, Configuration and Number Migration Guide 47/69
7.2.1. Rolling back your migration
Once you’ve activated the Outgoing, Incoming and Finalise phases, the Rollback option on
the Finalise box remains available for up to seven days, depending on how many rollbacks are
performed during the migration. This seven-day period allows time to assess the operational
performance of your Telstra Business SIP services.
Between the Incoming and Finalise Activation steps there is a limit of three rollbacks*, after
which the rollback option is not presented.
7.2.2. Number migration test calls
During the number migration, test calls are required to evaluate whether to roll back or activate
the next phase.
Outgoing test calls must be made
from the handsets connected to the
PBX associated with your Telstra
Business SIP product. It is
recommended that calls be made to
different types of networks, including
but not limited to, mobile (on different
carriers), local standard numbers and
interstate numbers.
Incoming test calls – arrange calls from mobiles (on different
carriers), local standard numbers, interstate and (if relevant)
international numbers.
Figure 46: Migration process flow and test points
Check the Current
Calls in Progress
in the Business SIP
Portal – SIP NTU
tab.

TELSTRA BUSINESS SIP®
Telstra Business SIP – Installation, Configuration and Number Migration Guide 48/69
Below are the five status indicators you’ll see during the migration process.
Note 1: The second and third states are transitional and may only appear briefly.
Note 2: During the process the web GUI will take 5 minutes to update, however it is likely that
the initiated changes have taken place and so testing (in the case of Outgoing Call activation)
may be started even though the web page indications may not have changed.
Pending Phase
This indicates that the phase (outgoing, incoming or finalise) is ready to start migrating.
Click Activate to begin the migration phase.
Phase Initiated
This status appears momentarily while the migration is started.
Phase in Progress
This status appears during the setting up of services in the background.
Phase Completed – with option to undo
When this status is presented, you can start testing your calls for the given phase of the migration.
If successful, click Activate on the next phase or click Rollback to begin again.
Phase Completed – with no option to undo
These will be repeated for each of the three phases, noting that the second and third are
transitional.
TELSTRA BUSINESS SIP®
Telstra Business SIP – Installation, Configuration and Number Migration Guide 49/69
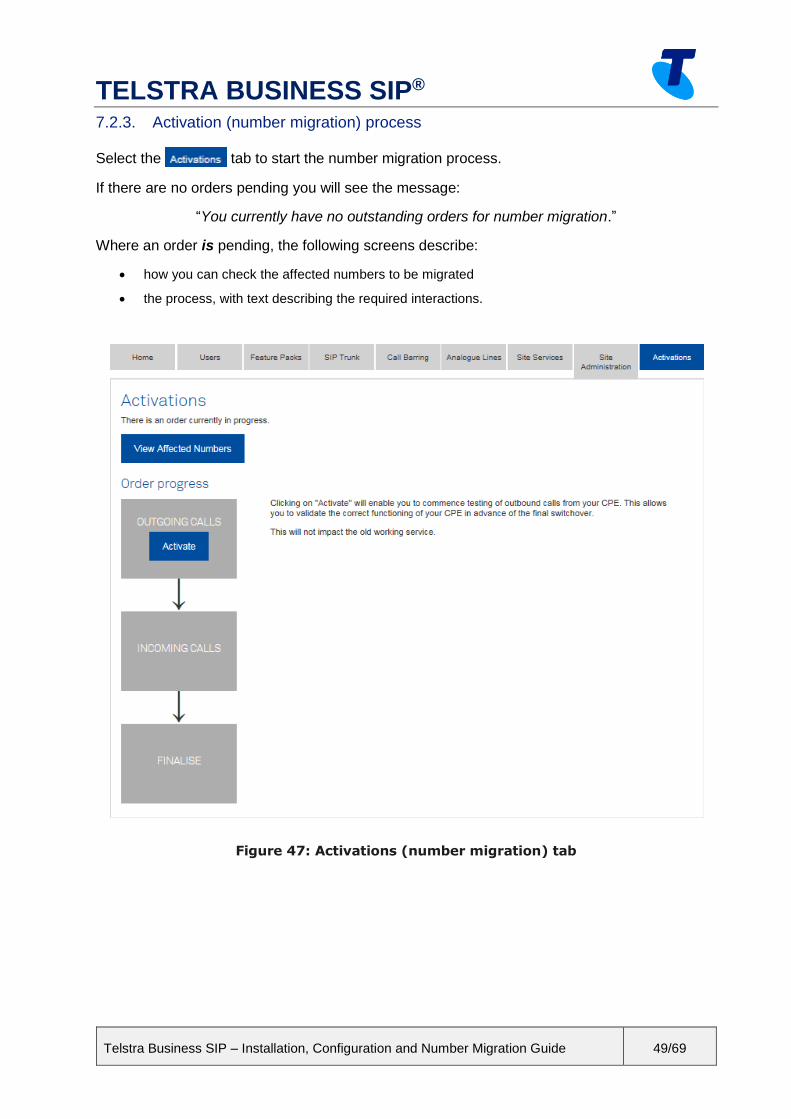
7.2.3. Activation (number migration) process
Select the tab to start the number migration process.
If there are no orders pending you will see the message:
“You currently have no outstanding orders for number migration.”
Where an order is pending, the following screens describe:
how you can check the affected numbers to be migrated
the process, with text describing the required interactions.
Figure 47: Activations (number migration) tab

TELSTRA BUSINESS SIP®
Telstra Business SIP – Installation, Configuration and Number Migration Guide 50/69
Before you begin the migration, you can view the numbers being migrated by selecting the
button as shown below:
Figure 48: View Affected Numbers pop-up
Once you’ve reviewed this information click .
TELSTRA BUSINESS SIP®
Telstra Business SIP – Installation, Configuration and Number Migration Guide 51/69
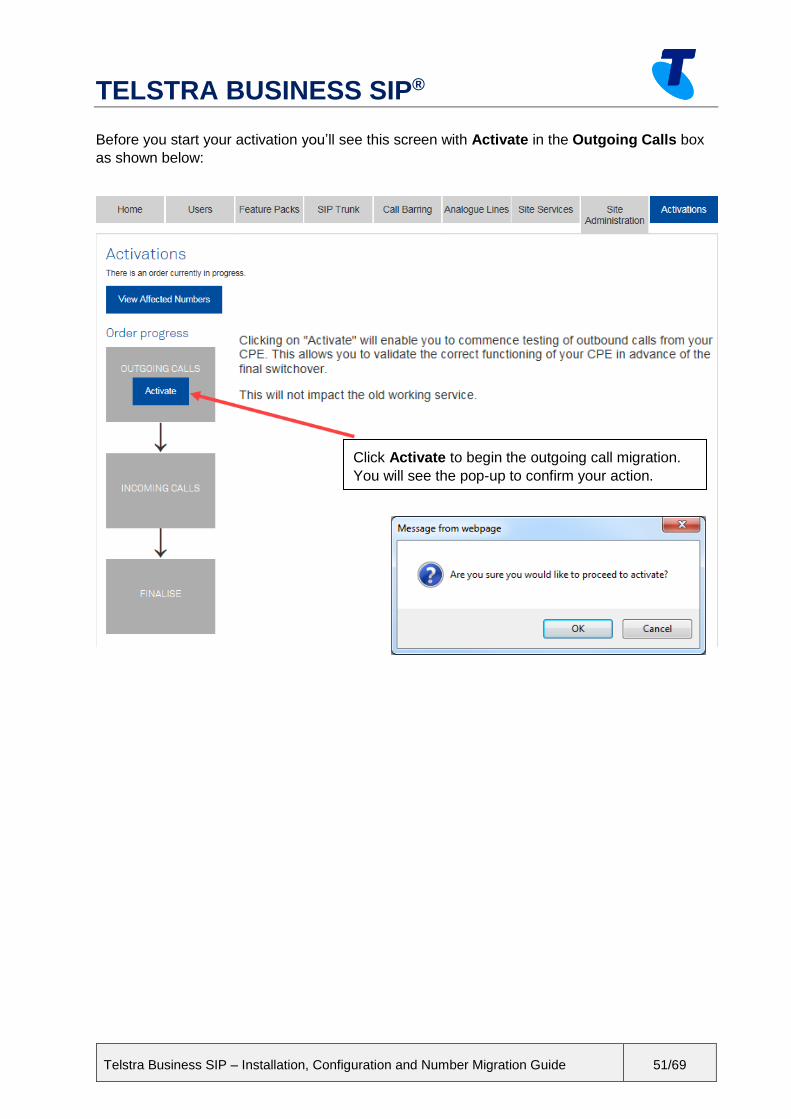
Before you start your activation you’ll see this screen with Activate in the Outgoing Calls box
as shown below:
Click Activate to begin the outgoing call migration.
You will see the pop-up to confirm your action.

TELSTRA BUSINESS SIP®
Telstra Business SIP – Installation, Configuration and Number Migration Guide 52/69
The outgoing calls box will appear yellow for a brief period as the changes are made in the
background.
Once the Outgoing calls have been
migrated the button will turn green with
Rollback in a blue box, as shown in the
next image.
TELSTRA BUSINESS SIP®
Telstra Business SIP – Installation, Configuration and Number Migration Guide 53/69
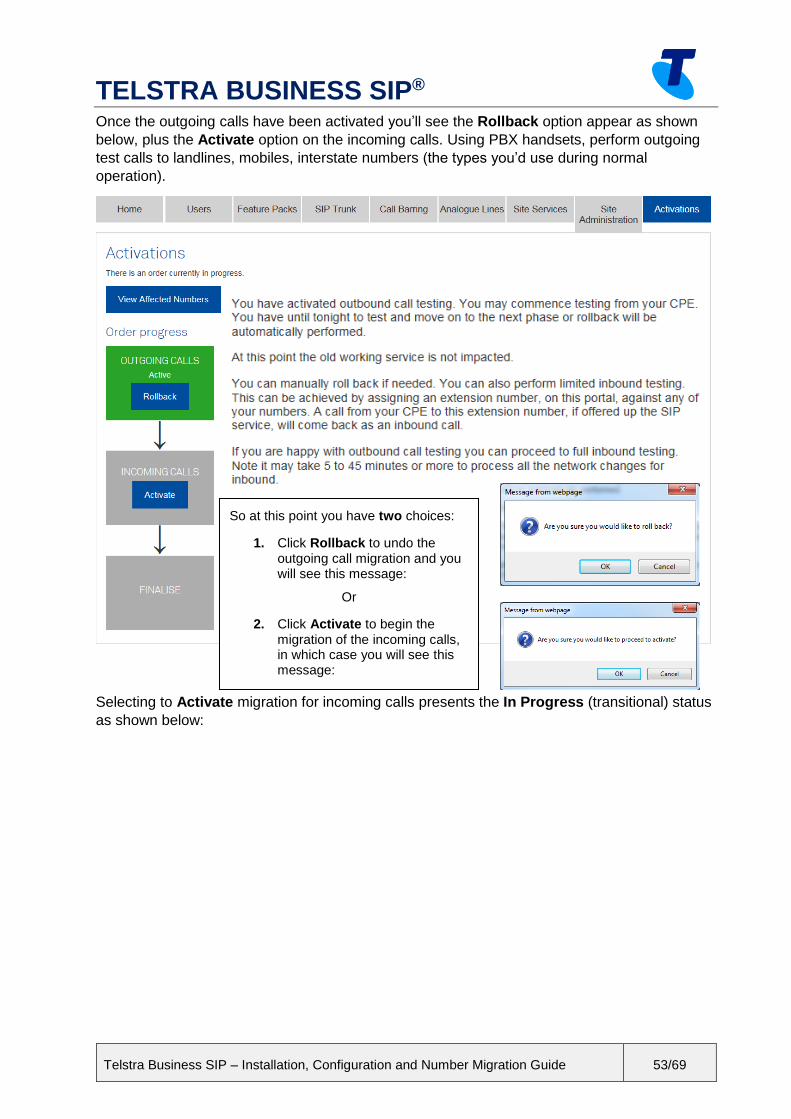
Once the outgoing calls have been activated you’ll see the Rollback option appear as shown
below, plus the Activate option on the incoming calls. Using PBX handsets, perform outgoing
test calls to landlines, mobiles, interstate numbers (the types you’d use during normal
operation).
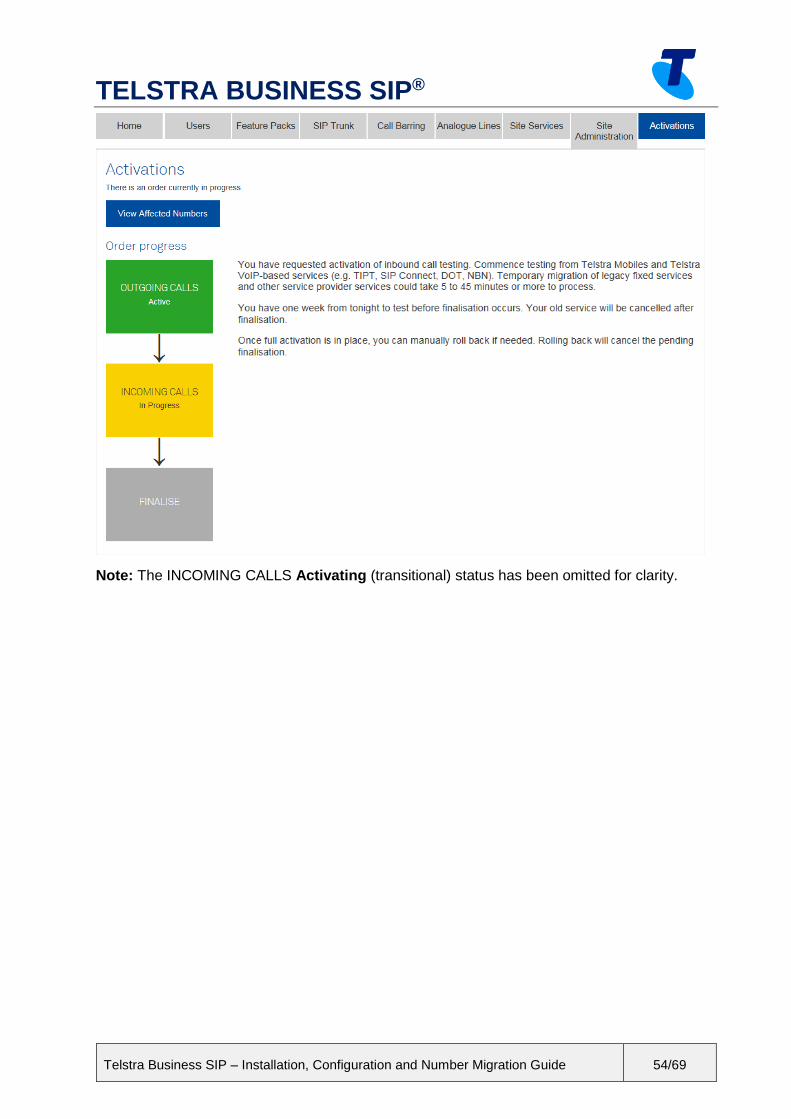
Selecting to Activate migration for incoming calls presents the In Progress (transitional) status
as shown below:
So at this point you have two choices:
1. Click Rollback to undo the outgoing call migration and you will see this message:
Or
2. Click Activate to begin the migration of the incoming calls, in which case you will see this message:
TELSTRA BUSINESS SIP®
Telstra Business SIP – Installation, Configuration and Number Migration Guide 54/69
Note: The INCOMING CALLS Activating (transitional) status has been omitted for clarity.

TELSTRA BUSINESS SIP®
Telstra Business SIP – Installation, Configuration and Number Migration Guide 55/69
Once the incoming calls have been activated you’ll see the Rollback option appear as shown
below, as well as the Activate option on the Finalise step. Using external services including
mobiles from various carriers, landlines, interstate landline residential and business numbers,
arrange calls into the PBX:
Selecting to Activate migration for Finalise presents the In Progress (transitional) status as
shown below:

TELSTRA BUSINESS SIP®
Telstra Business SIP – Installation, Configuration and Number Migration Guide 56/69
Note: The Activating (transitional) status has been omitted for clarity.

TELSTRA BUSINESS SIP®
Telstra Business SIP – Installation, Configuration and Number Migration Guide 57/69
Where assistance is required contact Telstra on (1800 790 831).
At this point your services are fully migrated; however once Finalise goes to
the Active state, the Rollback option is presented for seven days.
Note: If you’ve already used the rollback function three times during the
incoming and finalise phases, the rollback option will not be presented.
If you need to roll back your services during the seven-day period, contact us.

TELSTRA BUSINESS SIP®
Telstra Business SIP – Installation, Configuration and Number Migration Guide 58/69
At the end of the seven-day soak period your migration will be complete and you will be advised
as presented below:
When you see this screen, your old services will be decommissioned.
TELSTRA BUSINESS SIP®
Telstra Business SIP – Installation, Configuration and Number Migration Guide 59/69
8 Appendices
These appendices include supplementary information to assist in the management if your
Business SIP product during installation and operation.
8.1. SIP NTU Diagrams & Connections
The following diagrams present the various connections and visual indicators for the NTU
models accredited for use with Business SIP.
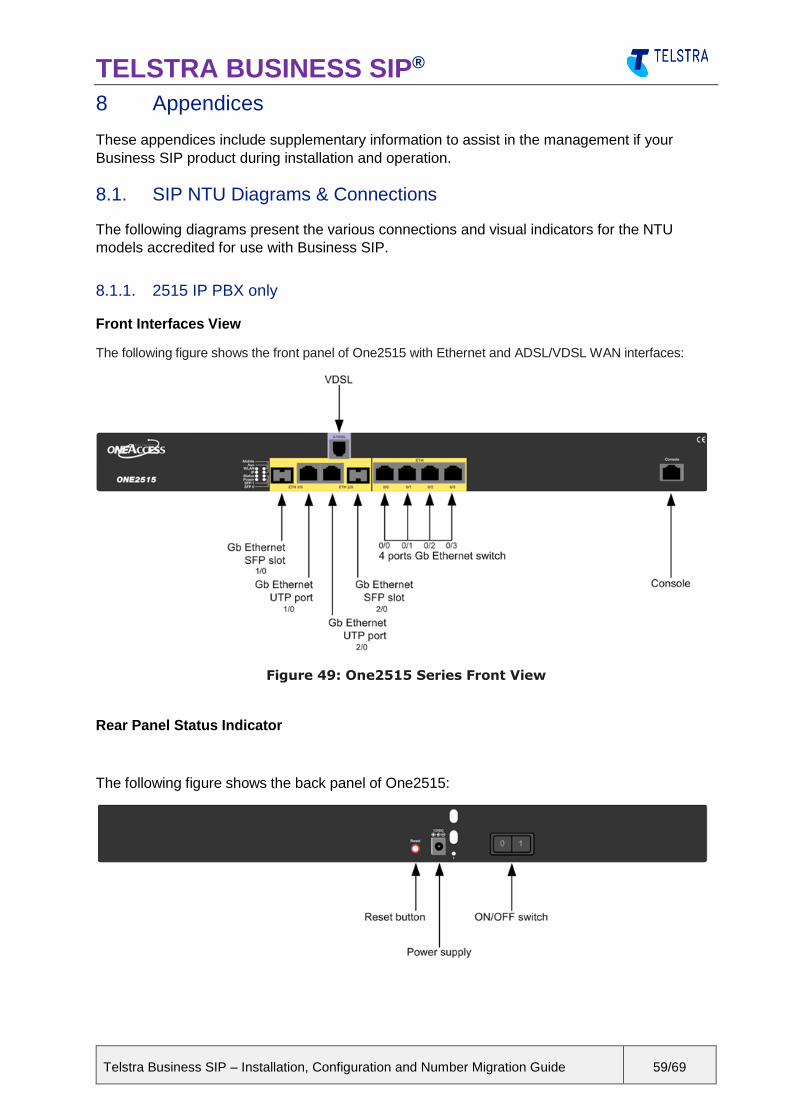
8.1.1. 2515 IP PBX only
Front Interfaces View
The following figure shows the front panel of One2515 with Ethernet and ADSL/VDSL WAN interfaces:
Figure 49: One2515 Series Front View
Rear Panel Status Indicator
The following figure shows the back panel of One2515:

TELSTRA BUSINESS SIP®
Telstra Business SIP – Installation, Configuration and Number Migration Guide 60/69
8.1.2. 270 IP & ISDN PBX
Front View
Figure 50: One270 front view
Rear View
Figure 51: One270 1P AV2 5T/a rear view
TELSTRA BUSINESS SIP®
Telstra Business SIP – Installation, Configuration and Number Migration Guide 61/69
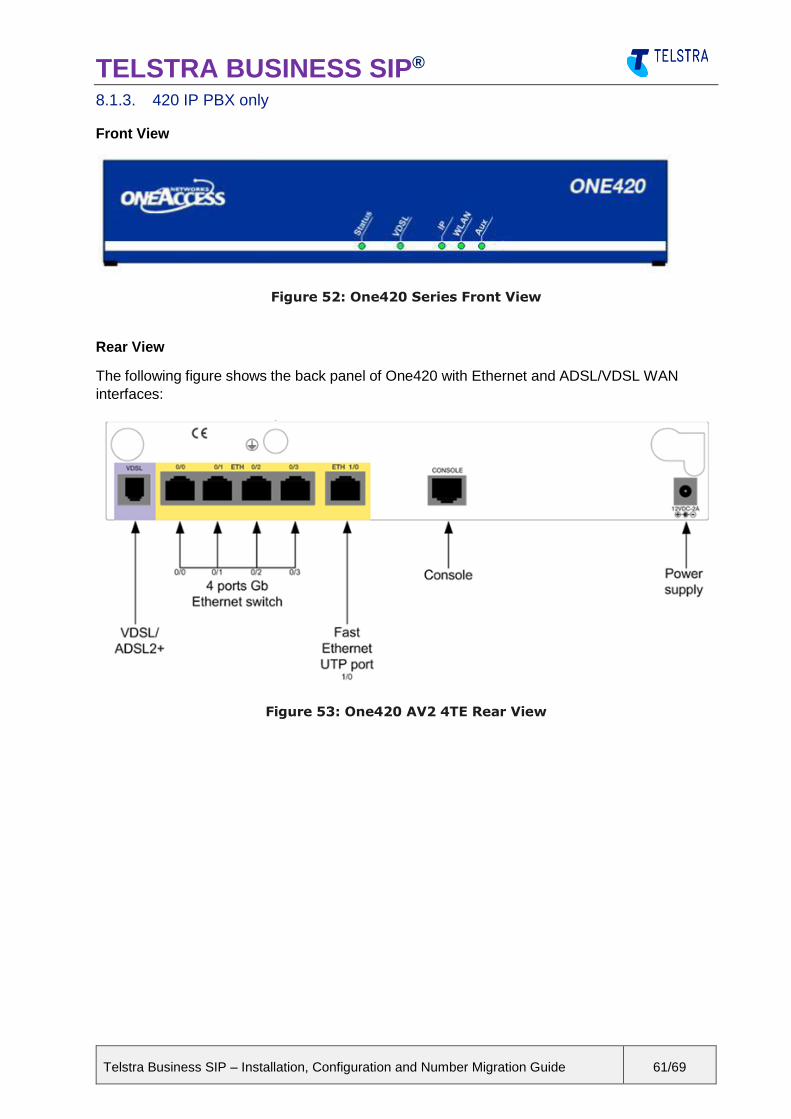
8.1.3. 420 IP PBX only
Front View
Figure 52: One420 Series Front View
Rear View
The following figure shows the back panel of One420 with Ethernet and ADSL/VDSL WAN
interfaces:
Figure 53: One420 AV2 4TE Rear View
TELSTRA BUSINESS SIP®
Telstra Business SIP – Installation, Configuration and Number Migration Guide 62/69
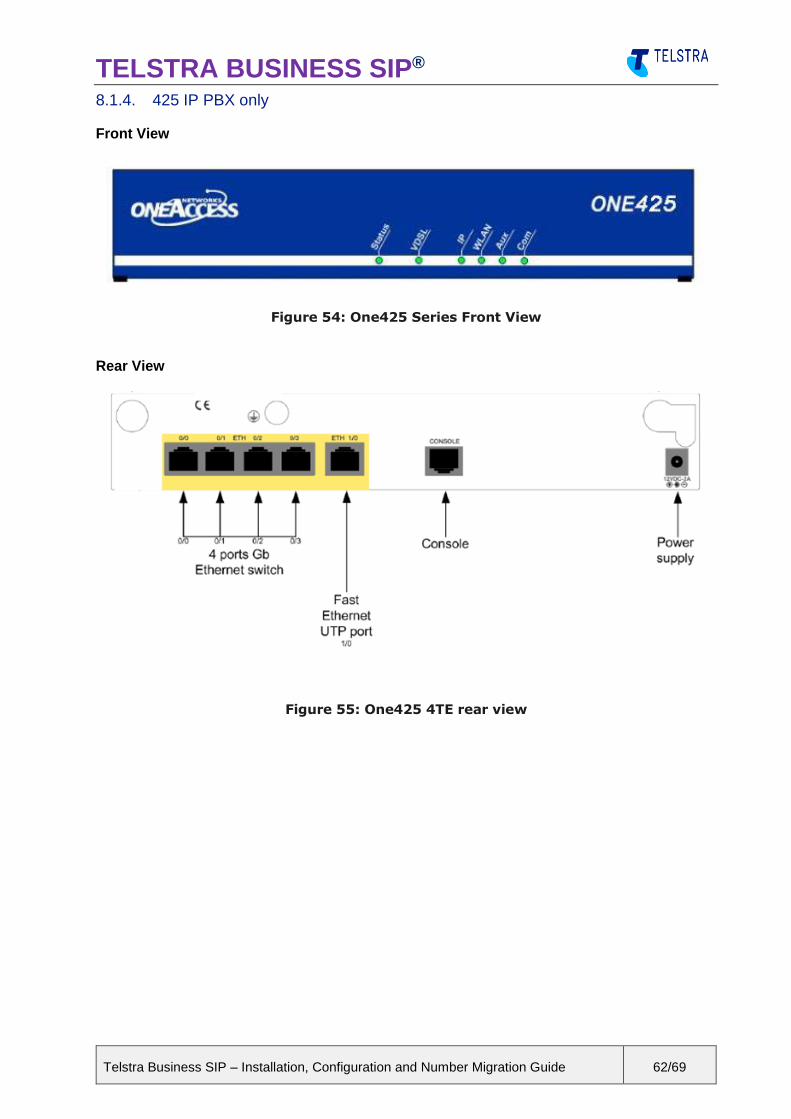
8.1.4. 425 IP PBX only
Front View
Figure 54: One425 Series Front View
Rear View
Figure 55: One425 4TE rear view

TELSTRA BUSINESS SIP®
Telstra Business SIP – Installation, Configuration and Number Migration Guide 63/69
8.1.5. 425 4B 4TE IP & ISDN PBX
Front View
Figure 56: One425 Series Front View
Rear View
The following figure shows the back panel of OE425 with Ethernet WAN interface:
Figure 57: One425 4TE Rear View

TELSTRA BUSINESS SIP®
Telstra Business SIP – Installation, Configuration and Number Migration Guide 64/69
8.1.6. 540 IP PBX only
Front View
Figure 58: One540 Series Front View
Rear View
Figure 59: One540 AV2 5TE/a Rear View
TELSTRA BUSINESS SIP®
Telstra Business SIP – Installation, Configuration and Number Migration Guide 65/69
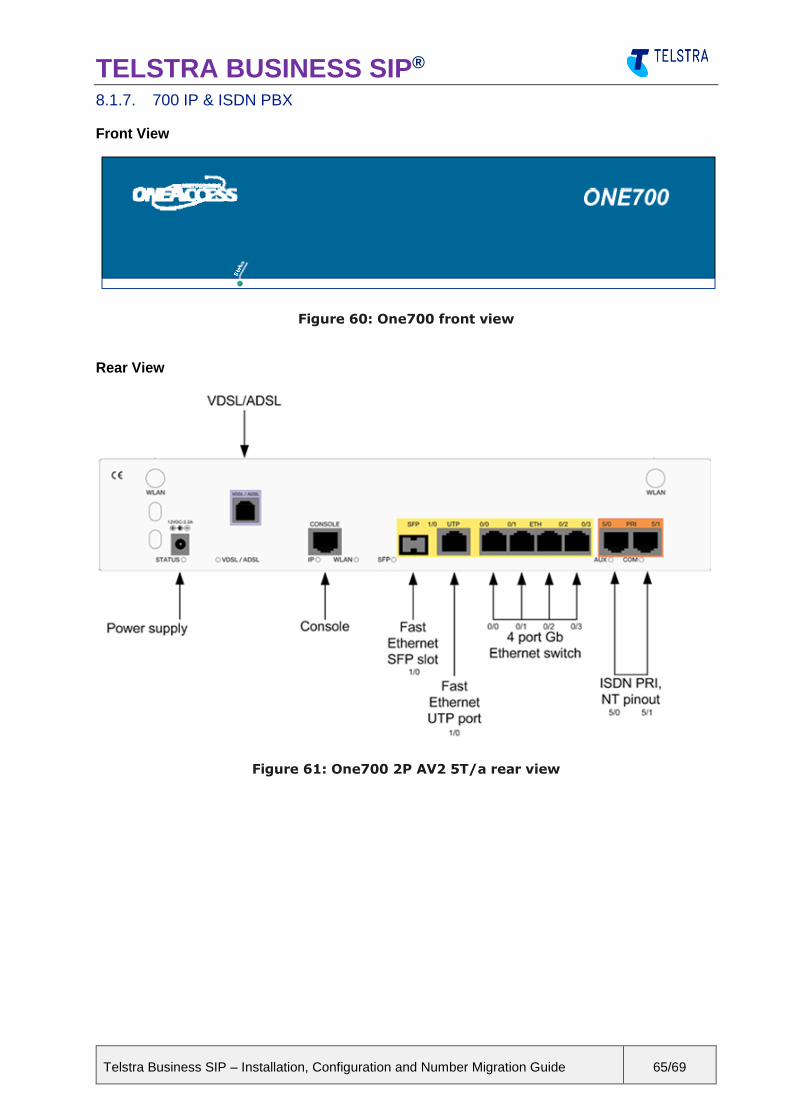
8.1.7. 700 IP & ISDN PBX
Front View
Figure 60: One700 front view
Rear View
Figure 61: One700 2P AV2 5T/a rear view

TELSTRA BUSINESS SIP®
Telstra Business SIP – Installation, Configuration and Number Migration Guide 66/69
8.2. Appendix - Retrieving NTU Device ID and password
To retrieve the Business SIP Platform device ID and password (also referred to as ‘device
credentials’, log in to the Business SIP Customer Management Portal
(https://portal.mycalling.telstra.com/login using your Administrator username and password) and
navigate to the tab then select SIP NTU as shown below.
The device ID and password can be accessed by clicking ‘Get Credentials’ as shown in the
screen below:
Figure 62: Get Credentials link in SIP NTU tab
Clicking ‘Get Credentials’ opens a pop-up window presenting the username and password.
Note: Keep these details strictly confidential as the integrity of your device and the security of
your service depends on this information.
Figure 63: ‘Get Credentials’ pop-up example
TELSTRA BUSINESS SIP®
Telstra Business SIP – Installation, Configuration and Number Migration Guide 67/69
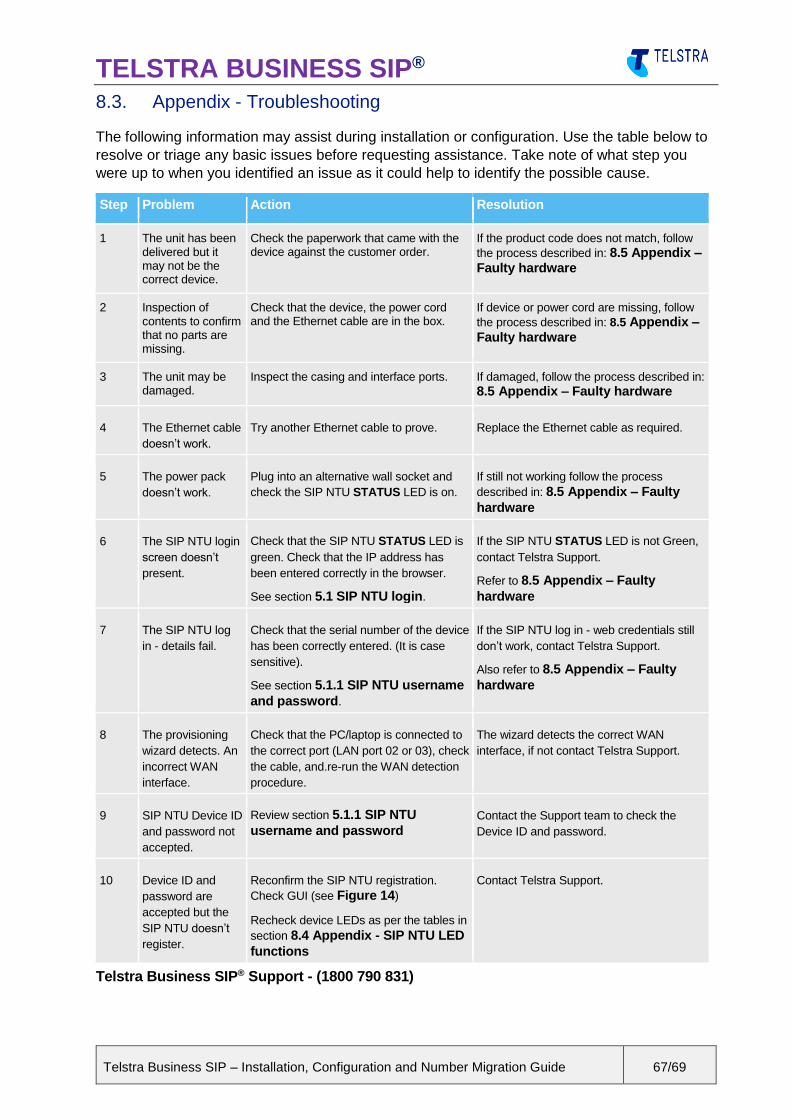
8.3. Appendix - Troubleshooting
The following information may assist during installation or configuration. Use the table below to
resolve or triage any basic issues before requesting assistance. Take note of what step you
were up to when you identified an issue as it could help to identify the possible cause.
Step Problem Action Resolution
1 The unit has been delivered but it may not be the correct device.
Check the paperwork that came with the device against the customer order.
If the product code does not match, follow
the process described in: 8.5 Appendix – Faulty hardware
2 Inspection of contents to confirm that no parts are missing.
Check that the device, the power cord and the Ethernet cable are in the box.
If device or power cord are missing, follow
the process described in: 8.5 Appendix – Faulty hardware
3 The unit may be damaged.
Inspect the casing and interface ports. If damaged, follow the process described in:
8.5 Appendix – Faulty hardware
4 The Ethernet cable
doesn’t work.
Try another Ethernet cable to prove. Replace the Ethernet cable as required.
5 The power pack
doesn’t work.
Plug into an alternative wall socket and
check the SIP NTU STATUS LED is on.
If still not working follow the process
described in: 8.5 Appendix – Faulty
hardware
6 The SIP NTU login
screen doesn’t
present.
Check that the SIP NTU STATUS LED is
green. Check that the IP address has
been entered correctly in the browser.
See section 5.1 SIP NTU login.
If the SIP NTU STATUS LED is not Green,
contact Telstra Support.
Refer to 8.5 Appendix – Faulty
hardware
7 The SIP NTU log
in - details fail.
Check that the serial number of the device
has been correctly entered. (It is case
sensitive).
See section 5.1.1 SIP NTU username
and password.
If the SIP NTU log in - web credentials still
don’t work, contact Telstra Support.
Also refer to 8.5 Appendix – Faulty
hardware
8 The provisioning
wizard detects. An
incorrect WAN
interface.
Check that the PC/laptop is connected to
the correct port (LAN port 02 or 03), check
the cable, and.re-run the WAN detection
procedure.
The wizard detects the correct WAN
interface, if not contact Telstra Support.
9 SIP NTU Device ID
and password not
accepted.
Review section 5.1.1 SIP NTU
username and password
Contact the Support team to check the
Device ID and password.
10 Device ID and
password are
accepted but the
SIP NTU doesn’t
register.
Reconfirm the SIP NTU registration.
Check GUI (see Figure 14)
Recheck device LEDs as per the tables in
section 8.4 Appendix - SIP NTU LED
functions
Contact Telstra Support.
Telstra Business SIP® Support - (1800 790 831)
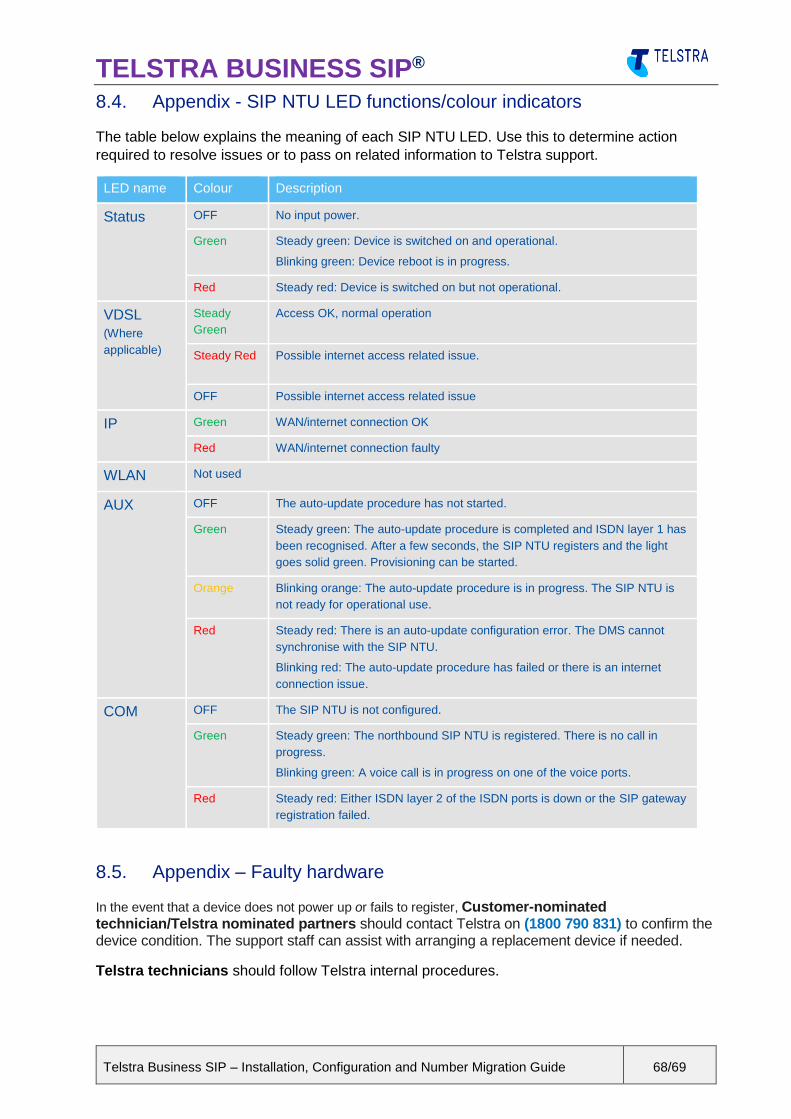
TELSTRA BUSINESS SIP®
Telstra Business SIP – Installation, Configuration and Number Migration Guide 68/69
8.4. Appendix - SIP NTU LED functions/colour indicators
The table below explains the meaning of each SIP NTU LED. Use this to determine action
required to resolve issues or to pass on related information to Telstra support.
LED name Colour Description
Status OFF No input power.
Green Steady green: Device is switched on and operational.
Blinking green: Device reboot is in progress.
Red Steady red: Device is switched on but not operational.
VDSL
(Where
applicable)
Steady
Green
Access OK, normal operation
Steady Red Possible internet access related issue.
OFF Possible internet access related issue
IP Green WAN/internet connection OK
Red WAN/internet connection faulty
WLAN Not used
AUX OFF The auto-update procedure has not started.
Green Steady green: The auto-update procedure is completed and ISDN layer 1 has
been recognised. After a few seconds, the SIP NTU registers and the light
goes solid green. Provisioning can be started.
Orange Blinking orange: The auto-update procedure is in progress. The SIP NTU is
not ready for operational use.
Red Steady red: There is an auto-update configuration error. The DMS cannot
synchronise with the SIP NTU.
Blinking red: The auto-update procedure has failed or there is an internet
connection issue.
COM OFF The SIP NTU is not configured.
Green Steady green: The northbound SIP NTU is registered. There is no call in
progress.
Blinking green: A voice call is in progress on one of the voice ports.
Red Steady red: Either ISDN layer 2 of the ISDN ports is down or the SIP gateway
registration failed.
s show different status modes by the way they light up and the colours they display.
8.5. Appendix – Faulty hardware
In the event that a device does not power up or fails to register, Customer-nominated technician/Telstra nominated partners should contact Telstra on (1800 790 831) to confirm the device condition. The support staff can assist with arranging a replacement device if needed.
Telstra technicians should follow Telstra internal procedures.
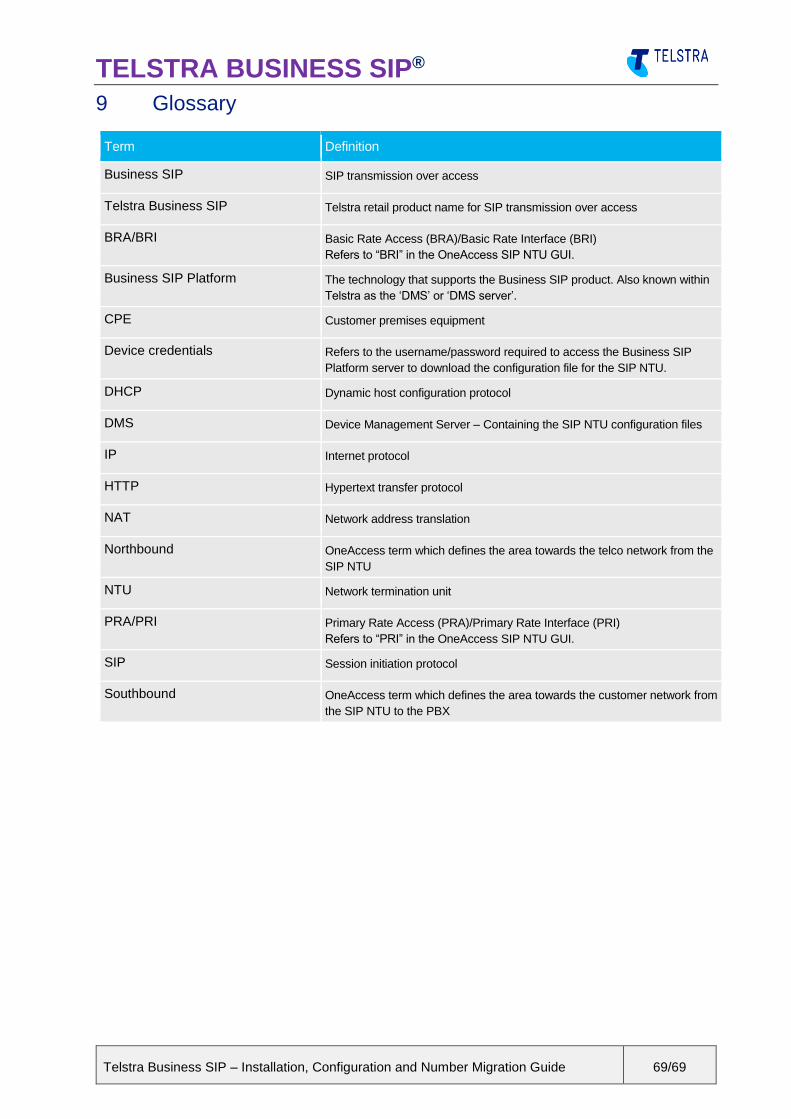
TELSTRA BUSINESS SIP®
Telstra Business SIP – Installation, Configuration and Number Migration Guide 69/69
9 Glossary
Term Definition
Business SIP SIP transmission over access
Telstra Business SIP Telstra retail product name for SIP transmission over access
BRA/BRI Basic Rate Access (BRA)/Basic Rate Interface (BRI)
Refers to “BRI” in the OneAccess SIP NTU GUI.
Business SIP Platform The technology that supports the Business SIP product. Also known within
Telstra as the ‘DMS’ or ‘DMS server’.
CPE Customer premises equipment
Device credentials Refers to the username/password required to access the Business SIP
Platform server to download the configuration file for the SIP NTU.
DHCP Dynamic host configuration protocol
DMS Device Management Server – Containing the SIP NTU configuration files
IP Internet protocol
HTTP Hypertext transfer protocol
NAT Network address translation
Northbound OneAccess term which defines the area towards the telco network from the
SIP NTU
NTU Network termination unit
PRA/PRI Primary Rate Access (PRA)/Primary Rate Interface (PRI)
Refers to “PRI” in the OneAccess SIP NTU GUI.
SIP Session initiation protocol
Southbound OneAccess term which defines the area towards the customer network from
the SIP NTU to the PBX