the beamer class for latex - a tutorial · motivationbasic...
TRANSCRIPT

Motivation Basic Code Themes Tips Environments Overlays Exercise 2 Graphics Structure Tables Final
The beamer class for LATEX– A Tutorial –
Kathrin Wunsch
Centre for Fusion, Space and AstrophysicsDepartment of PhysicsUniversity of Warwick
Workshop, University of Warwick, 23rd April 2012

Motivation Basic Code Themes Tips Environments Overlays Exercise 2 Graphics Structure Tables Final
Outline
1 Motivation
2 1st Example & Basic Code
3 Changing the Way Thinks look: Themes
4 Practical Tips & Exercise 1
5 Structuring a Presentation: Environments
6 Creating Overlays
7 Let’s have another break: Exercise 2
8 Including Graphics
9 Structuring a Presentation: Columns, Spaces & Alignments
10 Tips for Professional Tables
11 And, Finally ....

Motivation Basic Code Themes Tips Environments Overlays Exercise 2 Graphics Structure Tables Final
Why Beamer?
Advantages:
Standard LATEX commands work for Beamer: you can write basicLATEX, you can easily make a Beamer presentation
Final output is usually a pdf file:
→ compatible with all operating systems (MAC, Unix, Windows);
You can easily create overlays and dynamic effects;
Mathematical formula look neater and can be copied directly from awritten LATEX document;
Beamer comes with a wide range of predefined themes.
Disadvantages:
Not as “point-and-click” as PowerPoint;
Basic knowledge of LATEX is required.

Motivation Basic Code Themes Tips Environments Overlays Exercise 2 Graphics Structure Tables Final
Outline
1 Motivation
2 1st Example & Basic Code
3 Changing the Way Thinks look: Themes
4 Practical Tips & Exercise 1
5 Structuring a Presentation: Environments
6 Creating Overlays
7 Let’s have another break: Exercise 2
8 Including Graphics
9 Structuring a Presentation: Columns, Spaces & Alignments
10 Tips for Professional Tables
11 And, Finally ....

Motivation Basic Code Themes Tips Environments Overlays Exercise 2 Graphics Structure Tables Final
A first example
\documentclass{beamer}
\title {A first example}
\author{author}
\date{\ today}
\begin{document}
\frame{\ titlepage}
\begin{frame}
\frametitle{First Slide}
Contents of first slide
\end{frame}
\end{document}
Motivation Basic Code Themes Tips Environments Overlays Exercise 2 Graphics Structure Tables Final
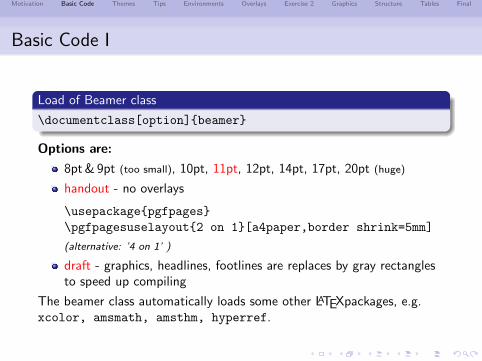
Basic Code I
Load of Beamer class
\documentclass[option]{beamer}
Options are:
8pt & 9pt (too small), 10pt, 11pt, 12pt, 14pt, 17pt, 20pt (huge)
handout - no overlays
\usepackage{pgfpages}
\pgfpagesuselayout{2 on 1}[a4paper,border shrink=5mm]
(alternative: ’4 on 1’ )
draft - graphics, headlines, footlines are replaces by gray rectanglesto speed up compiling
The beamer class automatically loads some other LATEXpackages, e.g.xcolor, amsmath, amsthm, hyperref.

Motivation Basic Code Themes Tips Environments Overlays Exercise 2 Graphics Structure Tables Final
Basic Code II - The FrameSubtitle
A frame defines one “page” (slide) of the presentation.
A Basic Frame
\begin{frame}[option]
\frametitle{Basic Code II - The Frame} % Bookmark info\framesubtitle{Subtitle} % Bookmark infoFrame content
\end{frame}
Options are:
plain - no headlines, footlines, sidebars
b, c or t - vertically align at bottom, center or top
fragile - require for verbatim environment
shrink=0..100 - shrink everything by n percent
. . .

Motivation Basic Code Themes Tips Environments Overlays Exercise 2 Graphics Structure Tables Final
Basic Code II - Sections & Subsections
You can structure the presentation using the usual LATEXcommands\section and \subsection before the frame environment\section[short title]{long title}
\subsection[short title]{long title}
\begin{frame}...
each call of them creates:1 a new entry into the Table of Contents2 insert a new entry into the navigation bars (in many themes)3 does not generate a frame heading or any text on the slide
the version \section*[]{} adds only an entry in the navigationbars, but not in the Table of Contents
Motivation Basic Code Themes Tips Environments Overlays Exercise 2 Graphics Structure Tables Final
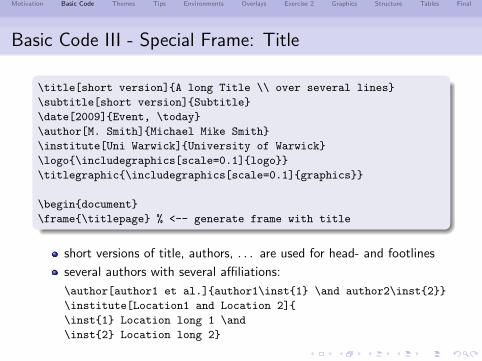
Basic Code III - Special Frame: Title
\title[short version]{A long Title \\ over several lines}
\subtitle[short version]{Subtitle}
\date[2009]{Event, \today}
\author[M. Smith]{Michael Mike Smith}
\institute[Uni Warwick]{University of Warwick}
\logo{\includegraphics[scale=0.1]{logo}}
\titlegraphic{\includegraphics[scale=0.1]{graphics}}
\begin{document}
\frame{\titlepage} % <-- generate frame with title
short versions of title, authors, . . . are used for head- and footlines
several authors with several affiliations:
\author[author1 et al.]{author1\inst{1} \and author2\inst{2}}
\institute[Location1 and Location 2]{
\inst{1} Location long 1 \and
\inst{2} Location long 2}

Motivation Basic Code Themes Tips Environments Overlays Exercise 2 Graphics Structure Tables Final
Basic Code III - Special Frame: Table of contents
Creating table of contents:
\frame{\frametitle{Outline}\tableofcontents[pausesections]}
[pausesections] is optional → create pause between the sections.
Note: You can automatically print the table of contents at the beginningof each section by adding the following code in the preamble:
\AtBeginSection[] {
\begin{frame}
\frametitle{Outline}
\tableofcontents[currentsection]
\end{frame}}

Motivation Basic Code Themes Tips Environments Overlays Exercise 2 Graphics Structure Tables Final
Outline
1 Motivation
2 1st Example & Basic Code
3 Changing the Way Thinks look: Themes
4 Practical Tips & Exercise 1
5 Structuring a Presentation: Environments
6 Creating Overlays
7 Let’s have another break: Exercise 2
8 Including Graphics
9 Structuring a Presentation: Columns, Spaces & Alignments
10 Tips for Professional Tables
11 And, Finally ....

Motivation Basic Code Themes Tips Environments Overlays Exercise 2 Graphics Structure Tables Final
Themes
For the appearance of the presentation you can select predefined themesof the Beamer class. Thereby, Beamer classifies five Categories:
Categories of Themes:
1 Presentation Themes: slide template
2 Color Themes*: color scheme of slide template
3 Font Themes*: defines the fonts
4 Inner Themes*:defines inside of slide like of bullets, boxes, ect.
5 Outer Themes*: defines outside of slide like head- and footlines
(* are optional if you don’t like the default settings of Presentation themes)

Motivation Basic Code Themes Tips Environments Overlays Exercise 2 Graphics Structure Tables Final
Themes - Presentation Themes
Specifies the slide template of the entire presentation:
\usetheme[...]{Berkeley}
Presentation Themes (many are named after cities):
AnnArbor Antibes Bergen Berkeley BerlinBoadilla boxes CambridgeUS Copenhagen Darmstadtdefault Dresden Frankfurt Goettingen HannoverIlmenau JuanLesPins Luebeck Madrid MalmoeMarburg Montpellier PaloAlto Pittsburgh Rochester
Singapore Szeged Warsaw

Motivation Basic Code Themes Tips Environments Overlays Exercise 2 Graphics Structure Tables Final
Themes - Color Themes
Specifies the color themes of the slide template either complete orjust for inner and outer elements:
\usecolortheme[...]{beaver}
Color Themes (many are named after animals):
complete: albatross, beetle, crane, dove, fly, seagull, wolverine,beaver
inner: lily, orchid, rose
outer: whale, seahorse, dolphin
Note: Theme-Matrix presents various theme and color combinations:http://www.hartwork.org/beamer-theme-matrix/

Motivation Basic Code Themes Tips Environments Overlays Exercise 2 Graphics Structure Tables Final
Themes - Inner Themes
Specifies the typesetting of elements within the frame such as:
title and part pages
itemize, enumeration & description environment
block, theorem & proof environment
figures and tables
footnotes
bibliography entries
\useinnertheme[...]{circles}
Inner Themes:
circles default inmargin rectangles rounded

Motivation Basic Code Themes Tips Environments Overlays Exercise 2 Graphics Structure Tables Final
Themes - Outer Themes
Specifies the the navigational elements such as:
head- and footline
sidebars
logo
frame title
\useouthertheme[...]{split}
Outer Themes:
default infolines miniframes sidebar smoothbarssmoothtree split tree

Motivation Basic Code Themes Tips Environments Overlays Exercise 2 Graphics Structure Tables Final
Themes - Font Themes
Specifies the the fonts used in a presentation:
\usefonttheme[...]{serif}
Font Themes:
default professionalfonts serifstructureitalicserif structuresmallcapsserif structurebold
⇒ All themes can be further customized by options [...] which can befound in the documentation included in the distribution of Beamer.
⇒ The color/inner/outer & font themes are optional which can beselected if you don’t like the default settings
⇒ More detailed adjustments are possible → check the documentation
Motivation Basic Code Themes Tips Environments Overlays Exercise 2 Graphics Structure Tables Final
Outline
1 Motivation
2 1st Example & Basic Code
3 Changing the Way Thinks look: Themes
4 Practical Tips & Exercise 1
5 Structuring a Presentation: Environments
6 Creating Overlays
7 Let’s have another break: Exercise 2
8 Including Graphics
9 Structuring a Presentation: Columns, Spaces & Alignments
10 Tips for Professional Tables
11 And, Finally ....

Motivation Basic Code Themes Tips Environments Overlays Exercise 2 Graphics Structure Tables Final
Practical Tips - WorkflowCreating your presentation pdf file
1 Create a main.tex which contains
settings (i.e. required packages, themes specifications)title specifications with title frametable of contents frame
2 create the various frames separately and include them into the maindocument main.tex via the \input{slide} command
3 Compiling you main.tex twice using either
pdflatex (recommended) for .png, .jpg, .jpeg & .pdf graphicslatex, followed by dvips and ps2pdf for .eps & .ps graphics
4 Open the .pdf file with Acrobat, xpdf, evince, skim, . . .
Hint:
pdflatex works NOT together with the package pstricks
Search for an editor supporting LATEX, such as texmaker

Motivation Basic Code Themes Tips Environments Overlays Exercise 2 Graphics Structure Tables Final
Practical Tipps - Workflow
main.tex
\documentclass[10pt]{beamer}
\usetheme[compress]{Ilmenau}
\usepackage{listings}...
\title[]{Title}...
\begin{document}
\frame{\titlepage}
\frame{\frametitle{Outline}
\tableofcontents[]}
% Start slides
\input{slide1.tex}
\input{slide2.tex}...
\end{document}
slide1.tex
\begin{frame}[]
\frametitle{Title of slide 1}
contents of slide 1
\end{frame}
slide2.tex
\begin{frame}[]
\frametitle{Title of slide 2}
contents of slide 2
\end{frame}...

Motivation Basic Code Themes Tips Environments Overlays Exercise 2 Graphics Structure Tables Final
Exercise 1
1 Create the first example as shown in the presentation (use for thecompiling pdflatex and have a look for the output).
2 Create a simple presentation with 3 frames/slides organised asshown in the Workflow. Thereby, the frames should be specifiedwith two different sections.
3 Create a title page with title, subtitle, date, location and threedifferent authors with two different affiliations.
4 Create a Table of Contents and let the Table of Contents re-appearin front of each new section.
5 Play a bit around with the different categories of the themes aspresented in this presentation.
Motivation Basic Code Themes Tips Environments Overlays Exercise 2 Graphics Structure Tables Final
Outline
1 Motivation
2 1st Example & Basic Code
3 Changing the Way Thinks look: Themes
4 Practical Tips & Exercise 1
5 Structuring a Presentation: Environments
6 Creating Overlays
7 Let’s have another break: Exercise 2
8 Including Graphics
9 Structuring a Presentation: Columns, Spaces & Alignments
10 Tips for Professional Tables
11 And, Finally ....

Motivation Basic Code Themes Tips Environments Overlays Exercise 2 Graphics Structure Tables Final
Environments I - Lists
⇒ Usual LATEX environments are available
Itemize - environment
\begin{itemize}
\item first item
\item second item
\end{itemize}
first item
second item
Enumerate - environment
\begin{enumerate}
\item first item
\item second item
\end{enumerate}
1 first item
2 second item
Description - environment
\begin{description}
\item[Item1] description
\item[Item2] description
\end{description}
Item1 description
Item2 description

Motivation Basic Code Themes Tips Environments Overlays Exercise 2 Graphics Structure Tables Final
Environments II - Mathematics Blocks
⇒ Usual math LATEX environments are available
Theorem
\begin{theorem}
...
\end{theorem}
Definition
\begin{definition}
...
\end{definition}
Lemma
\begin{lemma}
...
\end{lemma}
Corollary
\begin{corollary}
...
\end{corollary}
Proof.
\begin{proof}
...
\end{proof}
Example
\begin{example}
...
\end{example}

Motivation Basic Code Themes Tips Environments Overlays Exercise 2 Graphics Structure Tables Final
Environments II - Blocks
⇒ Beamer offers additional block environments
A Block
\begin{block}{A Block}
...
\end{block}
A Alertbox
\begin{alertblock}{A Alertblock}
...
\end{block}
A Exampleblock
\begin{exampleblock}{A Exampleblock}
...
\end{block}
Appearance of blocks, lists & environments is defined by template.
The Title is mandatory. Use \begin{block}{}... for empty block.

Motivation Basic Code Themes Tips Environments Overlays Exercise 2 Graphics Structure Tables Final
Outline
1 Motivation
2 1st Example & Basic Code
3 Changing the Way Thinks look: Themes
4 Practical Tips & Exercise 1
5 Structuring a Presentation: Environments
6 Creating Overlays
7 Let’s have another break: Exercise 2
8 Including Graphics
9 Structuring a Presentation: Columns, Spaces & Alignments
10 Tips for Professional Tables
11 And, Finally ....

Motivation Basic Code Themes Tips Environments Overlays Exercise 2 Graphics Structure Tables Final
Overlays
Overlays control the order in which parts of the frame appear.
+ Helpful to focus the attention of the audience to the informationthat is currently being discussed.
− Don’t overuse it: otherwise you’ll end up to continuously run backto the computer to click to uncover the next part of your talk.

Motivation Basic Code Themes Tips Environments Overlays Exercise 2 Graphics Structure Tables Final
Overlays - Pause
Pause command
An easy (but unflexible) way to create overlays is the \pause command.If you use this command somewhere in the frame, only the text on theframe up to the \pause command is shown on the first slide. On thesecond slide, everything up to the second \pausem, and so forth.
1 Shown from first slide on.
2 Shown from second slide on.
3 Shown from third slide on.
4 Shown from fourth slide on.
\begin{enumerate}
\item Shown from first slide on.
\pause
\item Shown from second slide on.
\pause
\item Shown from third slide on.
\pause
\item Shown from fourth slide on.
\end{enumerate}
⇒ Can be used inside environments, mathematical equation & texts.

Motivation Basic Code Themes Tips Environments Overlays Exercise 2 Graphics Structure Tables Final
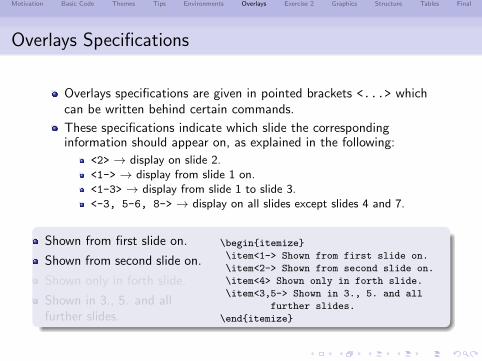
Overlays Specifications
Overlays specifications are given in pointed brackets <...> whichcan be written behind certain commands.
These specifications indicate which slide the correspondinginformation should appear on, as explained in the following:
<2> → display on slide 2.<1-> → display from slide 1 on.<1-3> → display from slide 1 to slide 3.<-3, 5-6, 8-> → display on all slides except slides 4 and 7.
Shown from first slide on.
Shown from second slide on.
Shown only in forth slide.
Shown in 3., 5. and allfurther slides.
\begin{itemize}
\item<1-> Shown from first slide on.
\item<2-> Shown from second slide on.
\item<4> Shown only in forth slide.
\item<3,5-> Shown in 3., 5. and all
further slides.
\end{itemize}
Motivation Basic Code Themes Tips Environments Overlays Exercise 2 Graphics Structure Tables Final
Overlays Specifications
Overlays specifications are given in pointed brackets <...> whichcan be written behind certain commands.
These specifications indicate which slide the correspondinginformation should appear on, as explained in the following:
<2> → display on slide 2.<1-> → display from slide 1 on.<1-3> → display from slide 1 to slide 3.<-3, 5-6, 8-> → display on all slides except slides 4 and 7.
Shown from first slide on.
Shown from second slide on.
Shown only in forth slide.
Shown in 3., 5. and allfurther slides.
\begin{itemize}
\item<1-> Shown from first slide on.
\item<2-> Shown from second slide on.
\item<4> Shown only in forth slide.
\item<3,5-> Shown in 3., 5. and all
further slides.
\end{itemize}

Motivation Basic Code Themes Tips Environments Overlays Exercise 2 Graphics Structure Tables Final
Overlays Specifications - Example
Example Code
\alert{Alert on all slides.}
\alert<2>{Alert on slide 2}
\alert<3>{Alert on slide 3}
\alert<1,3>{Alert on slides 1 and 3}
\alert<-2,4>{Alert on slides 1,2 and 4}
Result from Code
Alert on all slides.Alert on slide 2Alert on slide 3Alert on slides 1 and 3Alert on slides 1,2 and 4

Motivation Basic Code Themes Tips Environments Overlays Exercise 2 Graphics Structure Tables Final
Overlays Specifications - Commands
Overlay Specification can be used with these commands:
Commands for Overlay Specifications
\textbf<2>{Sample} Sample\textit<2>{Sample} Sample\textsl<2>{Sample} Sample\alert<2>{Sample} Sample\textrm<2>{Sample} Sample\textsf<2>{Sample} Sample\color<2>{green}{Sample} Sample\structure<2>{Sample} Sample
Note: Effect of each command will only appear on the second slide

Motivation Basic Code Themes Tips Environments Overlays Exercise 2 Graphics Structure Tables Final
Special commands with Overlay Specifications I
The following commands have special overlay specifications which affectthe text within the brackets {} or behind the command:
Special commands with Overlay Specifications I
\onslide<>{} Text will only be shown on the specified slides. Onnon-specified slides, text still occupies the space.
\only<>{} Text only appears on specified slides. On non-specified slides text will occupy no space.
\uncover<>{} Text will only be shown on specified slides. Onnon-specified slides, text still occupies the spaceand appears transparent if transparency effects areenabled.
\visible<>{} Text will be shown on specified slides. On theother slides, text is not shown but occupies stillthe space.
\invisible<>{} Opposite to \visible.

Motivation Basic Code Themes Tips Environments Overlays Exercise 2 Graphics Structure Tables Final
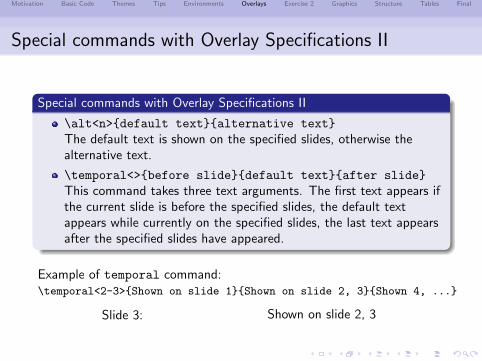
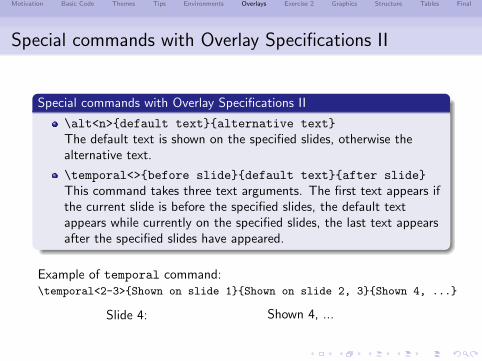
Special commands with Overlay Specifications II
Special commands with Overlay Specifications II
\alt<n>{default text}{alternative text}
The default text is shown on the specified slides, otherwise thealternative text.
\temporal<>{before slide}{default text}{after slide}
This command takes three text arguments. The first text appears ifthe current slide is before the specified slides, the default textappears while currently on the specified slides, the last text appearsafter the specified slides have appeared.
Example of temporal command:\temporal<2-3>{Shown on slide 1}{Shown on slide 2, 3}{Shown 4, ...}
Slide 1: Shown on slide 1

Motivation Basic Code Themes Tips Environments Overlays Exercise 2 Graphics Structure Tables Final
Special commands with Overlay Specifications II
Special commands with Overlay Specifications II
\alt<n>{default text}{alternative text}
The default text is shown on the specified slides, otherwise thealternative text.
\temporal<>{before slide}{default text}{after slide}
This command takes three text arguments. The first text appears ifthe current slide is before the specified slides, the default textappears while currently on the specified slides, the last text appearsafter the specified slides have appeared.
Example of temporal command:\temporal<2-3>{Shown on slide 1}{Shown on slide 2, 3}{Shown 4, ...}
Slide 2: Shown on slide 2, 3
Motivation Basic Code Themes Tips Environments Overlays Exercise 2 Graphics Structure Tables Final
Special commands with Overlay Specifications II
Special commands with Overlay Specifications II
\alt<n>{default text}{alternative text}
The default text is shown on the specified slides, otherwise thealternative text.
\temporal<>{before slide}{default text}{after slide}
This command takes three text arguments. The first text appears ifthe current slide is before the specified slides, the default textappears while currently on the specified slides, the last text appearsafter the specified slides have appeared.
Example of temporal command:\temporal<2-3>{Shown on slide 1}{Shown on slide 2, 3}{Shown 4, ...}
Slide 3: Shown on slide 2, 3
Motivation Basic Code Themes Tips Environments Overlays Exercise 2 Graphics Structure Tables Final
Special commands with Overlay Specifications II
Special commands with Overlay Specifications II
\alt<n>{default text}{alternative text}
The default text is shown on the specified slides, otherwise thealternative text.
\temporal<>{before slide}{default text}{after slide}
This command takes three text arguments. The first text appears ifthe current slide is before the specified slides, the default textappears while currently on the specified slides, the last text appearsafter the specified slides have appeared.
Example of temporal command:\temporal<2-3>{Shown on slide 1}{Shown on slide 2, 3}{Shown 4, ...}
Slide 4: Shown 4, ...

Motivation Basic Code Themes Tips Environments Overlays Exercise 2 Graphics Structure Tables Final
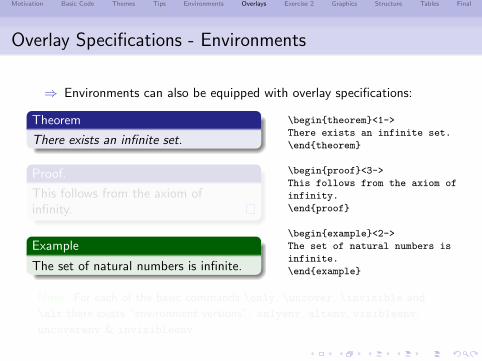
Overlay Specifications - Environments
⇒ Environments can also be equipped with overlay specifications:
Theorem
There exists an infinite set.
Proof.
This follows from the axiom ofinfinity.
Example
The set of natural numbers is infinite.
\begin{theorem}<1->
There exists an infinite set.
\end{theorem}
\begin{proof}<3->
This follows from the axiom of
infinity.
\end{proof}
\begin{example}<2->
The set of natural numbers is
infinite.
\end{example}
Note: For each of the basic commands \only, \uncover, \invisible and
\alt there exists “environment versions”: onlyenv, altenv, visibleenv,
uncoverenv & invisibleenv.
Motivation Basic Code Themes Tips Environments Overlays Exercise 2 Graphics Structure Tables Final
Overlay Specifications - Environments
⇒ Environments can also be equipped with overlay specifications:
Theorem
There exists an infinite set.
Proof.
This follows from the axiom ofinfinity.
Example
The set of natural numbers is infinite.
\begin{theorem}<1->
There exists an infinite set.
\end{theorem}
\begin{proof}<3->
This follows from the axiom of
infinity.
\end{proof}
\begin{example}<2->
The set of natural numbers is
infinite.
\end{example}
Note: For each of the basic commands \only, \uncover, \invisible and
\alt there exists “environment versions”: onlyenv, altenv, visibleenv,
uncoverenv & invisibleenv.

Motivation Basic Code Themes Tips Environments Overlays Exercise 2 Graphics Structure Tables Final
Overlay Specifications - Transparency Effects
⇒ By default, covered items are not shown during a presentation.
Transparency Effects
Transparency effects can be specified in a quite general way by using thecommand in the preamble: \setbeamercovered{options}
Options are:
invisible: default - covered text is completely transparent
transparent: covered text is typeset in a transparent way(opaqueness can be specified - check documentation)
dynamic: covered text is transparent in dynamic way, i.e. the longerit will take till the text is uncovered, the stronger the transparency.
highly dynamic: same effect as dynamic, but the effect is stronger.
. . .

Motivation Basic Code Themes Tips Environments Overlays Exercise 2 Graphics Structure Tables Final
Outline
1 Motivation
2 1st Example & Basic Code
3 Changing the Way Thinks look: Themes
4 Practical Tips & Exercise 1
5 Structuring a Presentation: Environments
6 Creating Overlays
7 Let’s have another break: Exercise 2
8 Including Graphics
9 Structuring a Presentation: Columns, Spaces & Alignments
10 Tips for Professional Tables
11 And, Finally ....

Motivation Basic Code Themes Tips Environments Overlays Exercise 2 Graphics Structure Tables Final
Let’s have another break: Exercise 2
1 Add a new frame to your already created presentation and create asimple block without a title, and an alertblock with a title.
2 Add another frame and generate overlays using itemize
environment with a) the pause command and b) overlayspecifications.
3 Write down in a new frame the following sentences:
This is the first sentence in the frame.This is the second sentence in the frame.This is the third sentence in the frame.End of overlays.
and use the various commands only, onslide, uncover, visibleand invisible to generate overlays. In particular observe thedifferences between only and visible. For a better understandingenable transparency effect by using the command\setbeamercovered{highly dynamic} in the preamble.
Motivation Basic Code Themes Tips Environments Overlays Exercise 2 Graphics Structure Tables Final
Outline
1 Motivation
2 1st Example & Basic Code
3 Changing the Way Thinks look: Themes
4 Practical Tips & Exercise 1
5 Structuring a Presentation: Environments
6 Creating Overlays
7 Let’s have another break: Exercise 2
8 Including Graphics
9 Structuring a Presentation: Columns, Spaces & Alignments
10 Tips for Professional Tables
11 And, Finally ....

Motivation Basic Code Themes Tips Environments Overlays Exercise 2 Graphics Structure Tables Final
Including Graphics
Standard LATEX figure environment can be used→\includegraphics[options]{filename}
Options are:
scale=<value>: scale the picture by <value>height=<len>: scale the picture so that the width is <len>width=<len>: scale the picture so that the width is <len>angle=<x>: rotate the picture by <x> degreesdraft: Don’t display image, print filename in a box of the same size.. . .
Beamer also supports the pgf package
→ \pgfdeclareimage[options]{image name}{filename}
→ \pgfuseimage{image name}
→ \pgfimage[options]{image name}
the commands \includegraphics, \pgfuseimage, and\pgfimage can be combined with overlay specification

Motivation Basic Code Themes Tips Environments Overlays Exercise 2 Graphics Structure Tables Final
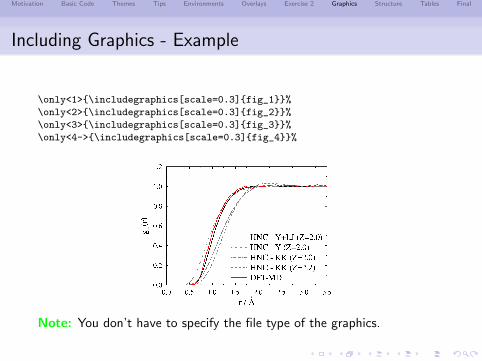
Including Graphics - Example
\only<1>{\includegraphics[scale=0.3]{fig_1}}%
\only<2>{\includegraphics[scale=0.3]{fig_2}}%
\only<3>{\includegraphics[scale=0.3]{fig_3}}%
\only<4->{\includegraphics[scale=0.3]{fig_4}}%
Note: You don’t have to specify the file type of the graphics.

Motivation Basic Code Themes Tips Environments Overlays Exercise 2 Graphics Structure Tables Final
Including Graphics - Example
\only<1>{\includegraphics[scale=0.3]{fig_1}}%
\only<2>{\includegraphics[scale=0.3]{fig_2}}%
\only<3>{\includegraphics[scale=0.3]{fig_3}}%
\only<4->{\includegraphics[scale=0.3]{fig_4}}%
Note: You don’t have to specify the file type of the graphics.
Motivation Basic Code Themes Tips Environments Overlays Exercise 2 Graphics Structure Tables Final
Outline
1 Motivation
2 1st Example & Basic Code
3 Changing the Way Thinks look: Themes
4 Practical Tips & Exercise 1
5 Structuring a Presentation: Environments
6 Creating Overlays
7 Let’s have another break: Exercise 2
8 Including Graphics
9 Structuring a Presentation: Columns, Spaces & Alignments
10 Tips for Professional Tables
11 And, Finally ....

Motivation Basic Code Themes Tips Environments Overlays Exercise 2 Graphics Structure Tables Final
Columns
To structure the frame you can use
LATEX minipage environments
Beamer columns environments
\begin{columns}
\begin{column}[]{.5\textwidth}
\begin{block}{Block 1} Contents of Block 1\end{block}
\end{column}
\begin{column}[]{.5\textwidth}
\begin{block}{Block 2} Contents of Block 2\end{block}
\end{column}
\end{columns}
Block 1
Contents of Block 1
Block 2
Contents of Block 2

Motivation Basic Code Themes Tips Environments Overlays Exercise 2 Graphics Structure Tables Final
Alignments & Spacings
A frame can be assigned a left, center, or right alignment with theflushleft, center and flushright environments\begin{center}
The center-aligned text goes here.
\end{center}
Cent aligned Example
The center-aligned text goes here.
A vertical or horizontal space can be indicated by using\vspace{0.5cm} and \hspace{0.5cm}, respectively.
Several units can be used, e.g, mm, cm, in, pt, . . . .
Also negative values can be used to squeeze text or graphicstogether: \vspace{-0.5cm}

Motivation Basic Code Themes Tips Environments Overlays Exercise 2 Graphics Structure Tables Final
Outline
1 Motivation
2 1st Example & Basic Code
3 Changing the Way Thinks look: Themes
4 Practical Tips & Exercise 1
5 Structuring a Presentation: Environments
6 Creating Overlays
7 Let’s have another break: Exercise 2
8 Including Graphics
9 Structuring a Presentation: Columns, Spaces & Alignments
10 Tips for Professional Tables
11 And, Finally ....

Motivation Basic Code Themes Tips Environments Overlays Exercise 2 Graphics Structure Tables Final
Tips for Professional Tables
Simple tables can be created in Beamer with the tabular environment:
\begin{tabular}[position]{table spec}...
\end{tabular}
The following symbols are available to describe the table columns:
l left-justified columnc centered columnr right-justified columnp{width} paragraph column with text vertically aligned at the top| vertical line|| double vertical line
Note: LATEX won’t wrap the text in a column if it is too wide for thepage. With p{width} you can define the width of the column and thetext will be wrap-around.

Motivation Basic Code Themes Tips Environments Overlays Exercise 2 Graphics Structure Tables Final
Tips for Professional Tables - Examples
label 1 label 2 label 3
cell 1 cell 2 cell 3cell 4 cell 5 cell 6
\begin{tabular}{c|c|c}
\hline
label 1 & label 2 & label 3 \\
\hline\hline
cell 1 & cell 2 & cell 3 \\
cell 4 & cell 5 & cell 6 \\
\hline
\end{tabular}
For more professional looking tables use the booktabs package:e.g. it provides the commands \toprule, \midrule & \bottomrule.
label 1 label 2 label 3
cell 1 cell 2 cell 3cell 4 cell 5 cell 6
\begin{tabular}{c|c|c}
\toprule
label 1 & label 2 & label 3 \\
\midrule
cell 1 & cell 2 & cell 3 \\
cell 4 & cell 5 & cell 6 \\
\bottomrule
\end{tabular}

Motivation Basic Code Themes Tips Environments Overlays Exercise 2 Graphics Structure Tables Final
Outline
1 Motivation
2 1st Example & Basic Code
3 Changing the Way Thinks look: Themes
4 Practical Tips & Exercise 1
5 Structuring a Presentation: Environments
6 Creating Overlays
7 Let’s have another break: Exercise 2
8 Including Graphics
9 Structuring a Presentation: Columns, Spaces & Alignments
10 Tips for Professional Tables
11 And, Finally ....

Motivation Basic Code Themes Tips Environments Overlays Exercise 2 Graphics Structure Tables Final
And, Finally ....
This presentation shows only a fraction of Beamer’s capability.
Other useful thinks:
Adding notes to the pdf → \documentclass[notes]{beamer}
Drawing figures using e.g.:
the LATEX picture environmentpstricks package: cannot use pdflatex with this
Animations, Sounds & Multimedia → \usepackage{multimedia}
Adding a Bibliography & Appendix
⇒ References:
Beamer User Guide:http://sourceforge.net/projects/latex-beamer/
Web: if you think Beamer should be able to do it, google it!