tutorial of photobucket
TRANSCRIPT

Tutorial of Photobucket
What is Photobucket?
Photobucket is an image- and video-sharing and hosting site that allows users to create profiles and portfolios to share. This website has nearly three billion users and is one of the safest photo websites on the Internet. On Photobucket you can upload, share, link and find photos, videos and graphics. Photobucket you can collaborate with friends, and share pictures without having any attachments involved! This also allows you to create slideshows and print pictures with the touch of a button, and many of the features they offer are free.
Do I have to pay for a Photobucket account?
The basic version of Photobucket is free and when you sign up for an account it is defaulted as giving you the free promotions it offers. The free account allows you to have up to 500MB of space for images and video clips; to create slideshows, collages and stamps to allow friends and family to see images; allows you to have albums of photos that can be set to either public, so that everyone can see them or private, so that only certain people can see photos with your permission. Photobucket also gives you the option to turn your images into prints, books, cards, shirts, and so much more!
What is included in a Pro Account and how much will it cost?
With a Pro Account, you are able to upload as many pictures as you want, and gives you the opportunity to work with more sets of software to be able to create even better looking photo albums. You also get everything that a free Photobucket account receives, plus the ability to have tech support in case something was to go wrong. This Pro Account costs $24.95 per year and may be something to think about as you look into using this wonderful website to upload photos.

To register for Photobucket follow these steps below:
1. Go to www.photobucket.com and in the top right hand corner of the page is a green button that says join now. Click on the link and wait for the next slide to load.
2. Click on this button here which will allow you to register and sign up for a Photobucket account.
3. After clicking on it, another screen will appear similar to the one below:

4. When this screen comes up, create a user name and password that will be easy for you to remember but hard for others to remember. Type in the user name and the password into the blanks as it tells you and then hit the next step button. A screen will then appear like the one below:
5. It will then prompt you to fill in the basic information needed. When you are finished, simply hit the Sign me Up button at the bottom of your screen and you will have an account with Photobucket.

Uploading Pictures
Follow these steps to change your uploading options
You can change your upload options at any time.
1. Log into your Photobucket account. 2. Click the more options link in the Upload panel.
The options available for your account type display with the current option selected.

3. Click the button next to your preferred maximum resize dimensions for your web-size images.
Notes:
If you select larger dimensions than your images, your images are not resized when you upload (faster uploads). This also applies to high resolution images.
Your photo must be 1 MB or less If an option is grayed out, it is not available for your account type.
4. Choose your video upload preferences.
Note: High definition videos take up more “space” so you will reach the 300MB/10 minute limit more quickly than with a standard definition video.
6. Select the Scramble filenames… option to scramble your files names when you upload so no one can guess your links. E.g., you select Scramble filenames… and then upload a file named “myfile.gif”. The display name of the file in your album may be d4ls30.gif.
7. Select the Add more tags… option to add tags immediately after upload. Deselect this option if you do not want to go to the tagging page immediately after uploading images.
Note: You can only add tags to images.
8. Click the Save button.

Follow these steps to upload your pictures or videos onto the website:
Requirements: You must be a Photobucket account holder. You must have Adobe Flash version 6.0.25 or higher installed.
Steps to Take:
1. Open the Photobucket site at http://www.photobucket.com
Enter your username and password at the top of the page, and then click the log in button to log into your Photobucket account.
2. Select albums & upload from the menu at the top of your album.
3. Navigate to the album into which you want to upload your images and videos,
and make sure the my computer option at the right is selected. 4. Click the more options link to:
o Change your upload size. All subsequent uploads will to adhere to the selected size.
o Scramble files names. o Add tags and descriptions to files after you upload.

5. Click the Upload images & videos button. You can upload both images and videos at the same time.
6. Browse to the location of your media, and choose the media you want to upload (up to 200 files).
Hold the CTRL or SHIFT key down, and click on image or video files to select multiple files. The CTRL key allows you to select content randomly from the list within a folder on your computer. The SHIFT key allows you to select a contiguous list of files. On a Mac, hold down Shift or the Apple/Command key to select multiple files.
7. Click the Open button with the files highlighted to upload your selected media.
Adding Titles
Steps to Take:
1. Open the Photobucket site at http://www.photobucket.com
Enter your username and password at the top of the page, and then click the log in button to log into your Photobucket account.
2. Select albums & upload from the menu at the top of your album.
3. Add a title to images in the Bulk uploader before you upload them.

3. If you do not have Adobe Flash, add a title to images, videos, and Web URLs directly from the upload panel in the Non-Flash uploader.
4. Add a title directly above the thumbnail image for a particular file, after you
upload content or create content within Photobucket.
5. Add a title below the media on the full-view page.

Editing Images
There are many ways you can edit your images including: rotating, resizing, red-eye removal, crop, and adding text.
Resizing Image
Steps to Take:
1. Open the Photobucket site at http://www.photobucket.com
Enter your username and password at the top of the page, and then click the log in button to log into your Photobucket account.
2. Select albums & upload from the menu at the top of your album.
Note: You can also click edit images to open the Image Editor.
3. Click the thumbnail or the edit link for the image that you want to resize.
When you click the image thumbnail, the full-size view displays.
4. Mouse over the image in full-size view, and do one of the following: o Select resize, and then choose an option (Tiny, Small, Medium, more
options).
Important! If you use resize on the full-view page, your resize is permanent. If you make your image smaller, there is no way to enlarge it again. Make sure you keep a back-up of the original file.
OR

o Click edit image to open the Image Editor.
5. Make sure you are in the Basic tab, then select a preset size from the drop-down-
menu, use the width/height slider bars, or type in the size of your choice. For best results, leave the Keep Proportions checkbox selected so your image is not distorted. Click the Apply button to see your changes.
6. Click save a copy at the bottom of the page to create a new image in your
account, with the modifications that you made. Photobucket recommends this option if you want to keep your original image unedited. Click Replace original to save the changes you made to the original file in your album, replacing your original.

Rotating Image
1. Open the Photobucket site at http://www.photobucket.com
Enter your username and password at the top of the page, and then click the log in button to log into your Photobucket account.
2. Select albums & upload from the menu at the top of your album.
Note: You can also click edit images to open the Image Editor.
3. Click the thumbnail or the edit link for the image that you want to rotate.
When you click the image thumbnail, the full-size view displays.
4. Mouse over the image in full-size view, and do one of the following: o Select rotate, and then select an option (Left, Right, Flip upside-down) to
do a basic rotation of the image.
OR
o Click edit image to open the Image Editor.
Make sure you are in the Basic tab of the Image Editor, and click the Rotate or
Flip buttons until you are happy.

5. Click save a copy at the bottom of the page to create a new image in your account, with the modifications that you made. Photobucket recommends this option if you want to keep your original image unedited. Click Replace original to save the changes you made to the original file in your album, replacing your original.
Cropping a photo
Steps to Take:
1. Open the Photobucket site at http://www.photobucket.com
Enter your username and password at the top of the page, and then click the log in button to log into your Photobucket account.
2. Select albums & upload from the menu at the top of your album.
Note: You can also click edit images to open the Image Editor.
3. Click the thumbnail or the edit link for the image that you want to crop.
When you click the image thumbnail, the full-size view displays.

4. Mouse over the image in full-size view, select edit image, and then click crop to open the Image Editor.
5. Make sure you are in the Basic tab. If you clicked the edit link on the thumbnail,
click Crop. The area at the top of the page displays instructions for cropping.
6. Select the area of the image that you wish to crop into by dragging the selection
box around it. After you select an area, click-and-drag the green squares to modify the area.
Note: Right-click (CTRL+click on Mac) after you make your selection to view
additional options.

7. Click the Crop Selected Area button at the top of the page.
8. Click save a copy at the bottom of the page to create a new image in your account, with the modifications that you made. Photobucket recommends this option if you want to keep your original image unedited. Click Replace original to save the changes you made to the original file in your album, replacing your original.
Other Cool Features
1. Open the Photobucket site at http://www.photobucket.com
Enter your username and password at the top of the page, and then click the log in button to log into your Photobucket account.
2. Select albums & upload from the menu at the top of your album.
Note: You can also click edit images to open the Image Editor.
3. Click the thumbnail or the edit link for the image that you want to add effects to.
When you click the image thumbnail, the full-size view displays.
4. Mouse over the image in full-size view, and click edit image to open the Image Editor.

5. Choose a tab at the top of Image Editor Application. Each tab provides different edit and manipulation options for the image.
6. Click an icon in the menu that displays horizontally below the tab you selected. For example, the Effects tab contains some fun ways to colorize and modify your
image.
Some tabs may have a more button to display additional options. Some features
may also provide an option for advanced settings, for an additional level of customization!
Within the Decorate tab, you can add stickers, text, and thought bubbles, as well as inserting your face onto a preset image!
7. Make a selection from the Decorate tab to see your available options.
Note: Use the undo button to cancel the last action you made. You should be able to undo at least several layers of modifications. Use the sizing slider to resize
your image for finer detailing!
8. Click save a copy to create a new image in your account, with the modifications that you made. This option is strongly recommended if you want to keep your original image unedited. Click Replace original to save your changes to the original file in your album, essentially replacing it with the new one.

Creating a Scrapbook
1. Log into your Photobucket account. 2. Click scrapbooks in the secondary menu. The Scrapbook Builder page opens
in a separate window, and a page where you can click a button to create a scrapbook displays in your current window.
Important! If you have a pop-up blocker, the Scrapbook Builder page may not open. Click the Click here button on the page that displays in your current window to display the Scrapbook Builder page, and make sure you set www.scrapblog.com as an allowed site in your pop-up blocker settings.
3. Choose a theme to preview all pages for that theme. 4. Click Select Theme to use that theme or Close to select a different theme.
The theme is applied, and photos in your album display at the left. 5. Choose a scrapbook page at the bottom of the window. It displays in the main
window. 6. Click-and-drag the photo(s) you want onto the scrapbook page. If you do not
see the photo(s) you want, click Get Photos at the left. 7. Click a photo on the scrapbook page, then click-and-drag to move or resize it. 8. Click save when you are done.
Editing a Scrapbook
After you create a scrapbook, you can edit the pictures; rearrange the order, and more.
1. Log into your Photobucket account. 2. Click the thumbnail for the scrapbook you want to edit. It displays in the full-
view page. 3. Mouse over the scrapbook and click edit original scrapbook. The original
scrapbook opens in the Scrapbook Builder. 4. Make the appropriate edits. 5. Click Save to save your changes.
Creating Your Own Slideshow
Overview: The following tutorial explains how to create a slideshow within your Photobucket account.
Important! You can have 100 images per slideshow.
Steps to Take:

1. Open the Photobucket site at http://www.photobucket.com
Enter your username and password at the top of the page, and then click the log in button to log into your Photobucket account.
2. Select the slideshow button from the menu at the top of your album.
Note: The slideshow will be saved in the album that you are in when you click slideshow.
3. Click the images that you want to add to your slideshow. If you want to add images from your sub albums, use the album drop-down menu. Note: Video files cannot be added to a slideshow, and animated gif/.swf files only display the first frame.
4. Choose a style from one of the icons on the right. 5. Choose a size (small, medium or large) from the drop down menu beneath the
styles.

A preview of your slideshow begins to display as images are added.
6. Click the view full size link to see the actual size of your slideshow. Due to
framing restrictions on the page, 'Medium' and 'Large' slideshows may not preview at 100%.
If the images in the slideshow have titles, in your album, the titles display in the slideshow as well. You can add a new title to an image or edit an existing one in
the Slideshows page. 7. Click the red button at the bottom right corner of the thumbnail to remove an
image from your slideshow.
Drag-and-drop the thumbnails to the left or right to rearrange the order of the images in your slideshow.

Click the clear all titles link to remove all titles from the images added to your slideshow. This does not affect the titles in your album.
8. Click the save slideshow button when you are done. Add a title to your slideshow and click the Save button. Your slideshow is now available in your Photobucket album for sharing and linking around the web!
Editing Slideshows
Steps to Take:
1. Open the Photobucket site at http://www.photobucket.com
Enter your username and password at the top of the page, and then click the log in button to log into your Photobucket account.
2. Select albums & upload from the menu at the top of your album.
3. Locate the slideshow that you want to edit.
Note: If you have a lot of content in your album and you have trouble locating the slideshow, click the slideshows content filter at the top of your album.
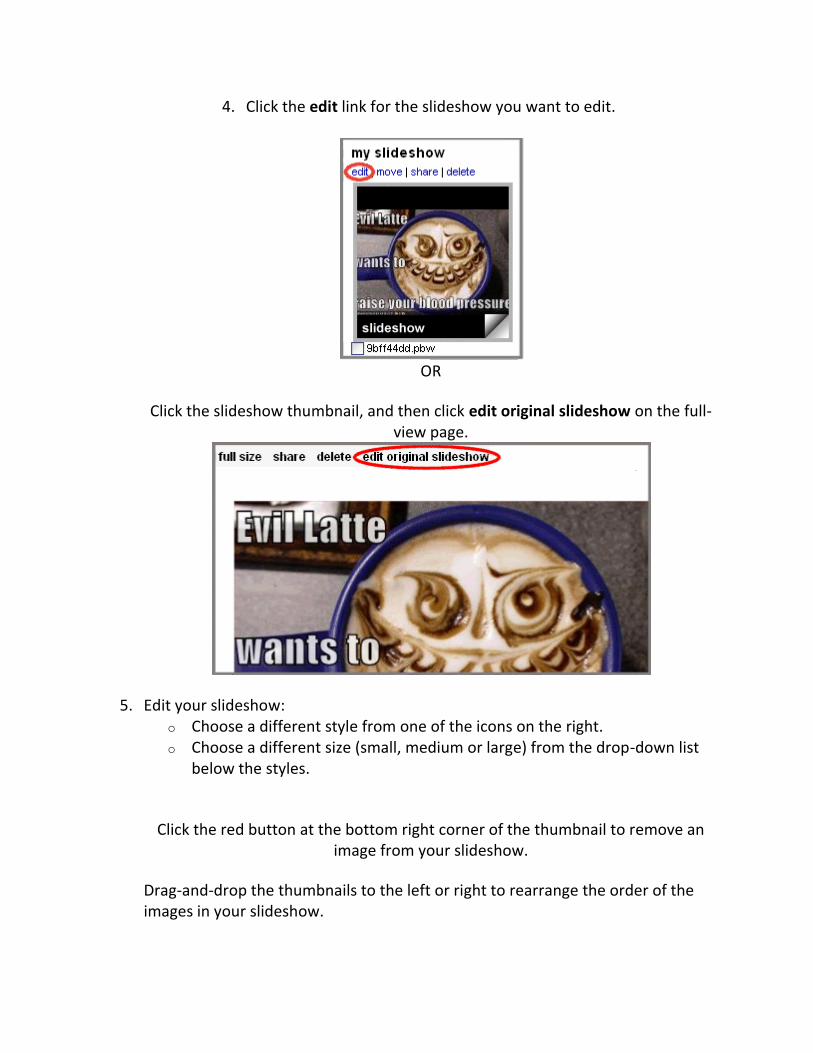
4. Click the edit link for the slideshow you want to edit.
OR
Click the slideshow thumbnail, and then click edit original slideshow on the full-view page.
5. Edit your slideshow: o Choose a different style from one of the icons on the right. o Choose a different size (small, medium or large) from the drop-down list
below the styles.
Click the red button at the bottom right corner of the thumbnail to remove an
image from your slideshow.
Drag-and-drop the thumbnails to the left or right to rearrange the order of the images in your slideshow.

Click the clear all titles link to remove all titles from the images added to your slideshow. This does not affect the titles in your album. Click Add a Title to add
titles.
6. Click the save slideshow button when you are done. Add a title to your slideshow and click the Save button. Your slideshow is now available in your Photobucket album for sharing and linking around the web!