user guide guía del usuario español ( 7 – 10...
TRANSCRIPT

User Guide English ( 3 – 6 )
Guía del usuario Español ( 7 – 10 )
Guide d’utilisation Français ( 11 – 14 )
Guida per l’uso Italiano ( 15 – 18 )
Benutzerhandbuch Deutsch ( 19 – 22 )
Appendix English ( 23 )

2

3
User Guide (English) Introduction
The Lectern Active is a portable lectern for multi-media presentations—perfect for hotels, places of worship, conference rooms and convention centers. This all-in-one solution is designed with professional features, such as a powerful 2-way speaker system, inputs for a microphone and playback device, an LED podium lamp and a separate output to feed an external sound system or remote zone. It also features a rigid laptop tray and AC convenience outlets.
Please see this guide’s Setup chapter to learn how to integrate Lectern Active with your audio system, and then refer to the Operation chapter to start using Lectern Active.
Box Contents
Lectern Active
Gooseneck XLR Microphone & Windscreen
4-Pin Gooseneck Podium Lamp
Power Cable
User Guide
Safety & Warranty Manual
Support
For the latest information about this product (documentation, technical specifications, system requirements, compatibility information, etc.) and product registration, visit denonpro.com.
For additional product support, visit denonpro.com/support.
4
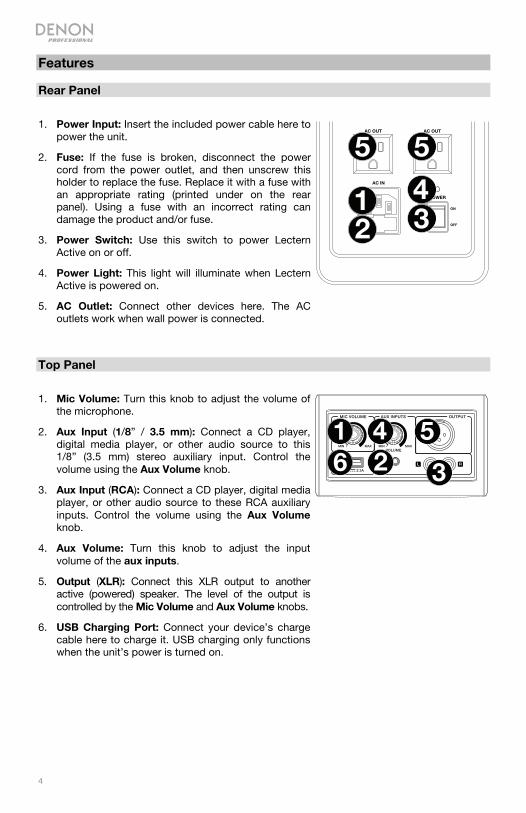
Features Rear Panel
1. Power Input: Insert the included power cable here to power the unit.
2. Fuse: If the fuse is broken, disconnect the power cord from the power outlet, and then unscrew this holder to replace the fuse. Replace it with a fuse with an appropriate rating (printed under on the rear panel). Using a fuse with an incorrect rating can damage the product and/or fuse.
3. Power Switch: Use this switch to power Lectern Active on or off.
4. Power Light: This light will illuminate when Lectern Active is powered on.
5. AC Outlet: Connect other devices here. The AC outlets work when wall power is connected.
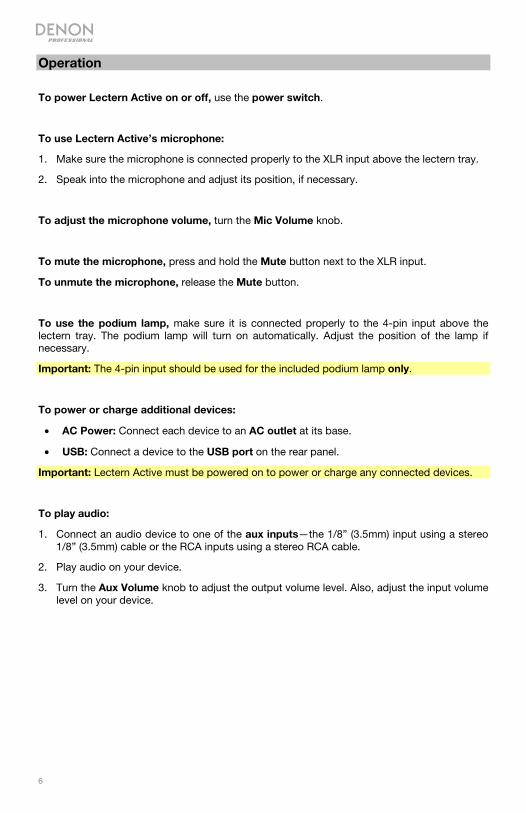
Top Panel
1. Mic Volume: Turn this knob to adjust the volume of the microphone.
2. Aux Input (1/8” / 3.5 mm): Connect a CD player, digital media player, or other audio source to this 1/8” (3.5 mm) stereo auxiliary input. Control the volume using the Aux Volume knob.
3. Aux Input (RCA): Connect a CD player, digital media player, or other audio source to these RCA auxiliary inputs. Control the volume using the Aux Volume knob.
4. Aux Volume: Turn this knob to adjust the input volume of the aux inputs.
5. Output (XLR): Connect this XLR output to another active (powered) speaker. The level of the output is controlled by the Mic Volume and Aux Volume knobs.
6. USB Charging Port: Connect your device’s charge cable here to charge it. USB charging only functions when the unit’s power is turned on.
12 3
4
5 5
12 3
46
5

5
Setup Items not listed under Introduction > Box Contents are sold separately.
4-pin Podium Lamp XLR Microphone
Smartphone (charging or audio playback)
Loudspeaker
Power Outlet
6
Operation
To power Lectern Active on or off, use the power switch.
To use Lectern Active’s microphone:
1. Make sure the microphone is connected properly to the XLR input above the lectern tray.
2. Speak into the microphone and adjust its position, if necessary.
To adjust the microphone volume, turn the Mic Volume knob.
To mute the microphone, press and hold the Mute button next to the XLR input.
To unmute the microphone, release the Mute button.
To use the podium lamp, make sure it is connected properly to the 4-pin input above the lectern tray. The podium lamp will turn on automatically. Adjust the position of the lamp if necessary.
Important: The 4-pin input should be used for the included podium lamp only.
To power or charge additional devices:
• AC Power: Connect each device to an AC outlet at its base.
• USB: Connect a device to the USB port on the rear panel.
Important: Lectern Active must be powered on to power or charge any connected devices.
To play audio:
1. Connect an audio device to one of the aux inputs—the 1/8” (3.5mm) input using a stereo 1/8” (3.5mm) cable or the RCA inputs using a stereo RCA cable.
2. Play audio on your device.
3. Turn the Aux Volume knob to adjust the output volume level. Also, adjust the input volume level on your device.
7
Guía del usuario (Español) Introducción
El Lectern Active es un atril portátil para presentaciones multimedia—perfecto para hoteles, templos, salas de conferencia y centros de convenciones. Esta solución todo en uno está diseñada con características profesionales, tales como un poderoso sistema de altavoces bidireccional, entradas para micrófono y dispositivo de reproducción, una LED lámpara para atril y una salida separada para alimentar un sistema de sonido externo o zona remota. También cuenta con una bandeja rígida para ordenadores portátiles y convenientes tomas de corriente alterna.
Consulte el capítulo Ajustes de esta guía para aprender a integrar el Lectern Active con su sistema de audio y luego consulte el capítulo Operación para comenzar a utilizar el Lectern Active.
Contenido de la caja
Lectern Active
Micrófono XLR y paraviento de brazo articulado
Lámpara de brazo articulado para atril de 4 patillas
Cable de corriente
Guía del usuario
Manual sobre la seguridad y garantía
Soporte
Para obtener la información más reciente acerca de este producto (documentación, especificaciones técnicas, requisitos de sistema, información de compatibilidad, etc.) y registrarlo, visite denonpro.com.
Para obtener soporte adicional del producto, visite denonpro.com/support.

8
Características Panel trasero
1. Entrada del cable de corriente: Inserte aquí el cable de corriente incluido para alimentar la unidad.
2. Fusible: Si el fusible está roto, desconecte el cable de alimentación de la toma de corriente y desatornille este soporte para reemplazar el fusible. Reemplácelo por un fusible de la especificación apropiada (impresa en o debajo del portafusibles). Si utiliza un fusible de especificación incorrecta, puede dañarse la unidad y/o el fusible.
3. Interruptor de encendido: Utilice este interruptor para encender y apagar el Lectern Active.
4. Luz de encendido: Esta luz se encenderá cuando el Lectern Active se encuentre encendido.
5. Tomacorriente de CA: Conecte aquí otros dispositivos. Los tomacorrientes de CA funcionan cuando el suministro eléctrico de la pared está conectado.
Panel superior
1. Volumen del micrófono: Gire esta perilla para ajustar el volumen del micrófono.
2. Entrada auxiliar (3,5 mm / 1/8 pulg.): Conecte a esta entrada auxiliar estéreo de 3,5 mm (1/8 pulg.) un reproductor de CD, un reproductor de medios digitales u otra fuente de audio. Controle el volumen de salida mediante la perilla de volumen auxiliar.
3. Entradas auxiliares (RCA): Conecte a estas entradas auxiliares de RCA un reproductor de CD, un reproductor de medios digitales u otra fuente de audio. Controle el volumen de salida mediante la perilla de volumen auxiliar.
4. Volumen auxiliar: Gire esta perilla para ajustar el volumen de las entradas auxiliares.
5. Salida (XLR): Conecte esta salida XLR a otro altavoz activo (alimentado). El nivel de esta salida se controla mediante el ajuste de volumen del micrófono y volumen auxiliar.
6. Puerto de carga USB: Conecte aquí el cable de carga de su dispositivo para cargarlo. La carga por USB funciona solamente cuando la unidad está encendida.
12 3
4
5 5
12 3
46
5
9
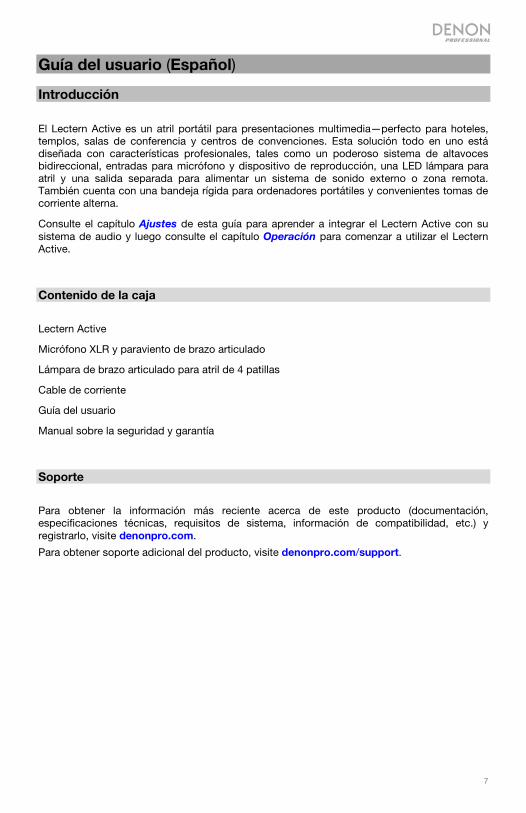
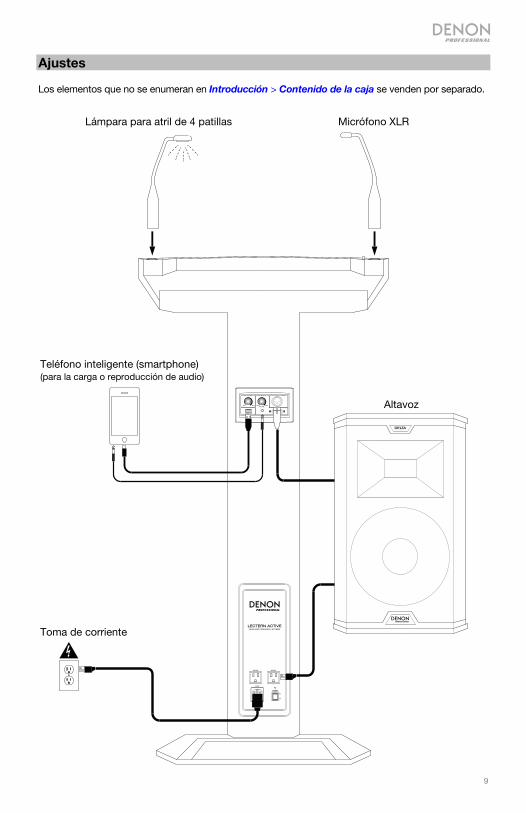
Ajustes Los elementos que no se enumeran en Introducción > Contenido de la caja se venden por separado.
Lámpara para atril de 4 patillas Micrófono XLR
Teléfono inteligente (smartphone) (para la carga o reproducción de audio)
Altavoz
Toma de corriente
10
Operación
Para encender o apagar el Lectern Active, utilice el interruptor de encendido.
Para utilizar el micrófono del Lectern Active:
1. Asegúrese de que el micrófono esté conectado correctamente a la entrada XLR encima de la bandeja del atril.
2. Hable al micrófono y ajuste su posición de ser necesario.
Para ajustar el volumen del micrófono, gire la perilla Mic Volume (volumen de micrófono).
Para silenciar el micrófono, mantenga pulsado el botón Mute (silenciar) junto a la entrada XLR.
Para anular el silenciamiento del micrófono, suelte el botón Mute.
Para usar la lámpara de brazo articulado, asegúrese de que éste conectada correctamente a la entrada de 4 patillas encima de la bandeja del atril. La lámpara para atril se encenderá automáticamente. Ajuste la posición de la lámpara de ser necesario.
Importante: La entrada de 4 patillas debe ser usada con la lámpara para atril solamente.
Para alimentar o cargar dispositivos adicionales:
• Corriente alterna: Conecte cada dispositivo a una toma de corriente alterna en su base.
• USB: Conecte un dispositivo al puerto USB del panel trasero.
Importante: El Lectern Active debe estar encendido para alimentar o cargar cualquier dispositivo conectado.
Para reproducir el audio:
1. Conecte un dispositivo de audio a una de las entradas auxiliares—la entrada de 3,5 mm (1/8 pulg.) mediante un cable estéreo de 3,5 mm (1/8 pulg.) o a las entradas RCA mediante un cable RCA estéreo.
2. Reproduzca audio en su dispositivo.
3. Gire la perilla Aux Volume (volumen auxiliar) para ajustar el nivel de volumen de salida. También, ajuste el nivel de volumen de entrada en su dispositivo.

11
Guide d’utilisation (Français) Introduction
Le Lectern Active est un lutrin portatif pour les présentations multimédia — idéal pour les hôtels, les endroits de culte, les salles de conférence et les centres de congrès. Cette solution tout-en-un est conçue avec des fonctionnalités professionnelles, telles qu’un puissant système d’enceintes deux voies, des entrées pour microphone et appareils de lecture, une lampe LED flexible et une sortie distincte pour alimenter un système audio externe ou une zone télécommandée. Il dispose également d’un plateau rigide pour ordinateur portable et des prises secteur.
Veuillez consulter la section Installation de ce guide pour apprendre comment intégrer le Lectern Active avec votre système audio, puis reportez-vous à la section Fonctionnement pour commencer à utiliser le Lectern Active.
Contenu de la boîte
Lectern Active
Microphone XLR flexible avec écran
Lampe flexible à 4 broches
Câble d’alimentation
Guide d’utilisation
Consignes de sécurité et informations concernant la garantie
Assistance
Pour les toutes dernières informations concernant la documentation, les spécifications techniques, la configuration requise, la compatibilité et l’enregistrement du produit, veuillez visiter denonpro.com.
Pour de l’assistance supplémentaire, veuillez visiter le site denonpro.com/support.

12
Caractéristiques Panneau arrière
1. Entrée câble d’alimentation : Branchez le câble d’alimentation inclus ici afin d’alimenter l’appareil.
2. Fusible : Si le fusible de l’appareil est endommagé, débranchez le câble d’alimentation de la prise secteur y dévissez le porte-fusible afin de le remplacer. Remplacez-le par un fusible avec un classement approprié (imprimé sur le panneau arrière). L’utilisation d’un fusible de calibre inapproprié pourrait endommager l’appareil et/ou le fusible.
3. Interrupteur d’alimentation : Cet interrupteur permet de mettre le Lectern Active sous et hors tension.
4. Indicateur d’alimentation : L’indicateur d’alimentation s’allume lorsque le Lectern Active est sous tension.
5. Prise de courant alternatif : Branchez les autres périphériques ici. Les prises de courant CA fonctionnent lorsque l’appareil est sous tension.
Panneau supérieur
1. Volume du microphone : Ce commande permet d’ajuster le volume du microphone.
2. Entrée auxiliaire (3,5 mm): Cette entrée stéréo 3,5 mm permet de brancher un lecteur de disques compacts, un lecteur multimédia ou autres sources audio. Le niveau de cette entrée est commandé par le bouton volume auxiliaire.
3. Entrées auxiliaires (RCA): Ces entrées RCA permettent de brancher un lecteur de disques compacts, un lecteur multimédia ou autres sources audio. Le niveau de ces entrées est commandé par le bouton volume auxiliaire.
4. Volume auxiliaire : Cette commande permet d’ajuster le volume des entrées auxiliaires.
5. Sortie (XLR) : Cette sortie XLR permet de brancher une autre enceinte amplifiée. Le volume est commandé par les réglages volume du microphone et volume auxiliaire.
6. Port de rechargement USB : Branchez le câble de rechargement de votre périphérique à cette prise pour le recharger. Le rechargement de la pile par la connexion USB fonctionne uniquement lorsque l’appareil est sous tension.
12 3
4
5 5
12 3
46
5
13
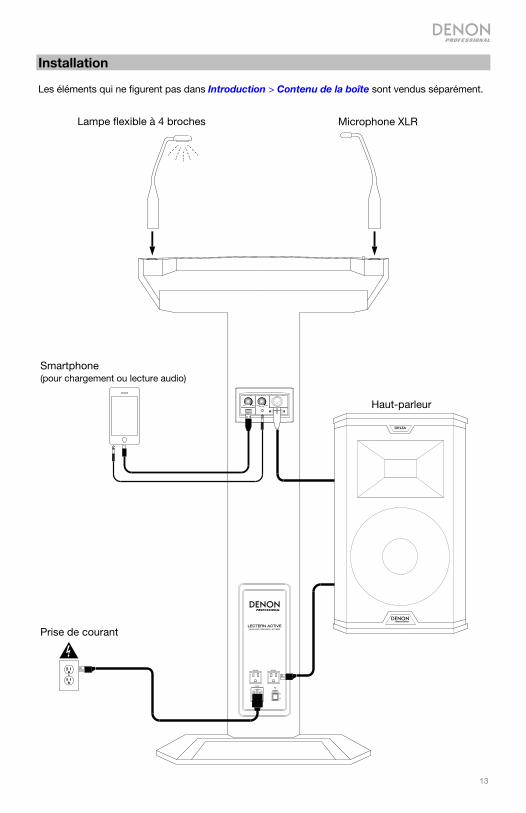
Installation Les éléments qui ne figurent pas dans Introduction > Contenu de la boîte sont vendus séparément.
Lampe flexible à 4 broches Microphone XLR
Smartphone (pour chargement ou lecture audio)
Haut-parleur
Prise de courant

14
Fonctionnement
Pour mettre le Lectern Active sous et hors tension, utilisez l’interrupteur d’alimentation.
Pour utiliser le microphone du Lectern Active :
1. Veuillez vous assurer que le microphone est branché correctement à l’entrée XLR au-dessus du plateau du lutrin.
2. Veuillez parler dans le microphone et ajuster sa position, si nécessaire.
Pour régler le volume du microphone, utilisez le bouton Mic Volume.
Pour activer la mise en sourdine du microphone, maintenez le bouton Mute à côté de l’entrée XLR enfoncé.
Pour désactiver la mise en sourdine du microphone, relâchez le bouton Mute.
Pour utiliser la lampe flexible, veillez à ce qu’elle soit correctement branchée à l’entrée à 4 broches au-dessus du plateau du lutrin. La lampe flexible s’allumera automatiquement. Ajustez la position de la lampe au besoin.
Important : L’entrée à 4 broches doit être utilisée uniquement avec la lampe flexible fournie.
Pour alimenter ou recharger des appareils supplémentaires :
• Alimentation secteur : Branchez chaque appareil à une prise secteur sur la base.
• USB : Branchez un appareil au port USB du panneau arrière.
Important : Le Lectern Active doit être sous tension pour alimenter ou recharger les appareils branchés.
Pour faire la lecture audio :
1. Branchez un appareil audio à l’une des entrées auxiliaires de 3,5 mm en utilisant un câble stéréo de 3,5 mm ou à l’une des entrées RCA en utilisant un câble stéréo RCA.
2. Lancez la lecture audio sur votre appareil.
3. Utilisez le bouton Aux Volume afin de régler le volume de sortie. Réglez également le volume d’entrée sur votre appareil.

15
Guida per l’uso (Italiano) Introduzione
Il Lectern Active è un leggio portatile per presentazioni multimediali. Perfetto per hotel, luoghi di culto, sale conferenze e centri congressi. Questa soluzione tutto in uno è stata concepita con funzioni professionali quali un potente impianto di altoparlanti a 2 vie, ingressi per un microfono e un dispositivo di riproduzione, una lampada LED da podio e un’uscita distinta per l’alimentazione di un impianto audio esterno o una zona a distanza. Presenta inoltre un vassoio rigido per laptop e uscite CA.
Si veda il capitolo Setup della presente guida per sapere come integrare il Lectern Active al proprio impianto audio, quindi fare riferimento al capitolo Operazione per iniziare a utilizzare il Lectern Active.
Contenuti della confezione
Lectern Active
Microfono XLR a collo d’oca e antivento
Lampada da podio a collo d'oca a 4 perni
Cavo di alimentazione
Guida per l’uso
Istruzioni di sicurezza e garanzia
Assistenza
Per le ultime informazioni in merito a questo prodotto (documentazione, specifiche tecniche, requisiti di sistema, informazioni sulla compatibilità, ecc.) e per effettuarne la registrazione, recarsi alla pagina denonpro.com.
Per ulteriore assistenza sul prodotto, recarsi alla pagina denonpro.com/support.

16
Caratteristiche Pannello posteriore
1. Ingresso cavo di alimentazione: per alimentare l’apparecchio, inserire a questo livello il cavo di alimentazione in dotazione.
2. Fusibile: se il fusibile dell’apparecchio è rotto, scollegare il cavo di alimentazione dalla presa di alimentazione e svitare questo supporto per sostituirlo. Sostituire il fusibile con uno dalla tensione nominale adeguata (stampata sotto il pannello posteriore). L’utilizzo di un fusibile dalla tensione nominale errata può danneggiare il prodotto e/o il fusibile.
3. Interruttore di alimentazione: servirsi di questo interruttore per accendere e spegnere il Lectern Active.
4. Spia di alimentazione: questa spia si illumina quando il Lectern Active viene acceso.
5. Presa di alimentazione CA: Collegare altri dispositivi qui. Le prese funzionano quando l’alimentazione a parete è collegata.
Pannello superiore
1. Volume del microfono: girare queste manopole per regolare il volume del microfono.
2. Ingresso ausiliario (3,5 mm / 1/8”): collegare un lettore CD, un lettore di media digitali o altre fonti audio a questo ingresso ausiliario stereo da 3,5 mm (1/8”). Regolare il volume di uscita servendosi della manopola volume ausiliario.
3. Ingressi ausiliari (RCA): collegare un lettore CD, un lettore di media digitali o altre fonti audio a questi ingressi ausiliari RCA. Regolare il volume di uscita servendosi della manopola volume ausiliario.
4. Volume ausiliario: girare queste manopole per regolare il volume degli ingressi Aux.
5. Uscita (XLR): collegare questa uscita XLR a un altro altoparlante attivo (alimentato). Il livello dell’uscita è controllato dall’impostazione di volume del microfono e volume ausiliario.
6. Porta di carica USB: collegare a questo livello il cavo di ricarica del dispositivo per ricaricarlo. La carica tramite USB funziona unicamente quando l’apparecchio è acceso.
12 3
46
5
12 3
4
5 5

17
Setup Elementi non elencati sotto Introduzione > Contenuti della confezione sono venduti separatamente.
Lampada da podio a 4 perni Microphono XLR
Smartphone (per la ricarica o riproduzione audio)
Altoparlante
Presa di corrente

18
Operazione
Per accendere o spegnere il Lectern Active, servirsi dell’interruttore di alimentazione (power).
Per utilizzare il microfono del Lectern Active:
1. Assicurarsi che il microfono sia adeguatamente collegato all’ingresso XLR sopra al vassoio del leggio.
2. Parlare nel microfono e regolarne la posizione, se necessario.
Per regolare il volume del microfono, girare la manopola Mic Volume.
Per silenziare il microfono, tenere premuto il tasto Mute accanto all’ingresso XLR.
Per annullare il silenziamento del microfono, rilasciare il tasto Mute.
Per utilizzare la lampada da podio, assicurarsi che sia collegata adeguatamente all'ingresso a 4 perni posto sopra il leggìo. La lampada si accenderà automaticamente. Regolare la posizione della lampada, se necessario.
Importante: l'ingresso a 4 perni va utilizzato unicamente per la lampada da podio in dotazione.
Per alimentare o caricare ulteriori dispositivi:
• Alimentazione CA: collegare ciascun dispositivo a una presa CA alla sua base.
• USB: collegare un dispositivo alla porta USB presente sul pannello posteriore.
Importante: per alimentare o caricare altri dispositivi collegati, il Lectern Active deve essere acceso.
Riproduzione di audio:
1. Collegare un dispositivo audio a uno degli ingressi aux — l’ingresso da 1/8” (3,5 mm) servendosi di un cavo stereo da 1/8” (3,5 mm) o gli ingressi RCA servendosi di un cavo stereo RCA.
2. Riprodurre l’audio sul dispositivo.
3. Servirsi della manopola Aux Volume per regolare il livello del volume in uscita. Regolare il livello del volume in ingresso sul proprio dispositivo.

19
Benutzerhandbuch (Deutsch) Einführung
Lectern Active ist ein tragbares Lesepult für Multimedia-Präsentationen - perfekt für Hotels, Kirchen, Konferenzräume und Kongresszentren. Eine Komplettlösung mit professionellen Features, wie zum Beispiel einem leistungsstarken 2-Wege-Lautsprechersystem, Eingänge für Mikrofon und Wiedergabegerät, einer LED-Podiumlampe und einem separaten Ausgang, um ein externes Soundsystem oder eine Remote-Zone zu beschicken. Darüber hinaus verfügt das Gerät über einen soliden Laptop-Stand und bequemen AC-Steckdosen.
Bitte lesen Sie das Setup-Kapitel in dieser Anleitung, um zu erfahren, wie Sie das Lectern Active in Ihr Audiosystem integrieren können. Lesen Sie anschließend das Kapitel Betrieb, um das Lectern Active in Betrieb zu nehmen.
Lieferumfang
Lectern Active
XLR-Schwanenhalsmikrofon- & Windschutz
Schwanenhalspodiumlampe mit 4-Pins
Netzkabel
Benutzerhandbuch
Sicherheitshinweise und Garantieinformationen
Kundendienst
Für die neuesten Informationen zu diesem Produkt (Dokumentation, technische Daten, Systemanforderungen, Informationen zur Kompatibilität etc.) und zur Produktregistrierung besuchen Sie bitte: denonpro.com.
Für zusätzlichen Produkt-Support besuchen Sie denonpro.com/support.

20
Funktionen Rückseite
1. Stromkabeleingang: Schließen Sie das mitgelieferte Stromkabel hier an, um das Gerät mit Strom zu versorgen.
2. Sicherung: Wenn die Sicherung defekt ist ziehen Sie zunächst den Netzstecker. Schrauben Sie diese Halterung ab, um die Sicherung zu ersetzen. Ersetzen Sie sie mit einer Sicherung mit entsprechendem Sicherungswert (auf der Rückseite angegeben). Die Verwendung einer Sicherung mit falschem Sicherungswert kann das Produkt und/oder die Sicherung beschädigen.
3. Netzschalter: Mit diesem Schalter schalten Sie das Lectern Active ein oder aus.
4. Power-LED: Die LED leuchtet auf, wenn das Lectern Active eingeschaltet ist.
5. Steckdose: Schließen Sie Ihre andere Geräte hier. Die Steckdosen funktionieren, wenn das Gerät an das Stromnetz angeschlossen ist.
Oberseite
1. Mikrofon-Lautstärke: Drehen Sie diesen Regler, um die Lautstärke des Mikrofons einzustellen.
2. Aux-Eingang (3,5 mm): Schließen Sie einen CD-Player, digitalen Medien-Player oder eine andere Audioquelle an diesem 3,5mm-Aux-Eingang an. Regeln Sie die Lautstärke mit dem Aux-Lautstärkeregler.
3. Aux-Eingang (Cinch): Schließen Sie einen CD-Player, digitalen Medien-Player oder eine andere Audioquelle an diesen Cinch-Aux-Eingängen an. Regeln Sie die Lautstärke mit dem Aux-Lautstärkeregler.
4. Aux-Lautstärkeregler: Drehen Sie diesen Regler, um die Lautstärke der Aux-Eingänge einzustellen.
5. Ausgang (XLR): Verbinden Sie diesen XLR-Ausgang mit einem anderen aktiven (mit Strom versorgten) Lautsprecher. Der Ausgangspegel wird durch die Lautstärkeeinstellungen jedes Kanals geregelt: Mikrofon-Lautstärke und Aux-Lautstärke.
6. USB-Anschluss: Schließen Sie das Ladekabel Ihres Geräts hier an, um es aufzuladen. Das Laden via USB funktioniert nur, wenn das Gerät eingeschaltet ist.
12 3
46
5
12 3
4
5 5

21
Setup Teile, die nicht unter Einführung > Lieferumfang angegeben sind, sind separat erhältlich.
Podiumlampe mit 4-Pins XLR-Mikrofon
Smartphone (für das Aufladen oder Audio-Wiedergabe)
Lautsprecher
Steckdose

22
Betrieb
Um Lectern Active ein- oder auszuschalten, verwenden Sie den Netzschalter.
So verwenden Sie das Lectern Active-Mikrofon:
1. Stellen Sie sicher, dass das Mikrofon richtig an den XLR-Eingang über dem Pult angeschlossen ist.
2. Sprechen Sie in das Mikrofon und passen Sie die Position bei Bedarf an.
Um die Lautstärke des Mikrofons einzustellen, drehen Sie den Mic-Lautstärkeregler.
Um das Mikrofon stummzuschalten, halten Sie die Taste Stummschalten neben dem XLR-Eingang gedrückt.
Um die Stummschaltung des Mikrofons aufzuheben, lassen Sie die Stummschalten-Taste los.
Um die Podiumlampe zu verwenden, stellen Sie sicher, dass sie korrekt an den 4-poligen Eingang über dem Pult angeschlossen ist. Die Podiumlampe schaltet sich automatisch ein. Bei Bedarf passen Sie die Position der Lampe an.
Wichtig: Der 4-polige Eingang sollte ausschließlich für die mitgelieferte Podiumlampe verwendet werden.
Um das Gerät oder zusätzliche Geräte aufzuladen:
• Stromnetz: Schließen Sie jedes Gerät an der Basis einer Steckdose an.
• USB: Schließen Sie ein Gerät an den rückseitigen USB-Anschluss.
Wichtig: Lectern Active muss eingeschaltet werden, um angeschlossene Geräte aufzuladen oder mit Strom zu versorgen.
Zum Abspielen von Audio:
1. Schließen Sie ein Audiogerät an einen der Aux-Eingänge an - für den 3,5 mm Eingang verwenden Sie ein 3,5 mm Stereo-Kabel, beim Cinch-Eingang verwenden Sie Stereo-Cinch-Kabel.
2. Spielen Sie Audio auf Ihrem Gerät ab.
3. Drehen Sie den Aux-Lautstärkeregler, um den Ausgangslautstärkepegel einzustellen. Stellen Sie darüber hinaus auch die Eingangslautstärke auf Ihrem Gerät ein.

23
Appendix (English) Technical Specifications
Output Power 200 W peak; 100 W RMS
Amplification Bi-amplified design with electronic crossover & limiter
(4) 5.25” (133 mm) full-range speakers
(1) horn-loaded high-frequency driver
Mixer Controls Microphone volume, mute button
Auxiliary volume for 1/8” (3.5 mm) and RCA aux inputs
Connections (1) XLR microphone input
(1) 1/8” (3.5 mm) stereo input
(1) RCA stereo input pair (line-level)
(1) XLR output
(1) 4-pin XLR input
(1) USB charging port
(2) AC outlets (or 1 AC outlet for international models)
(1) IEC power input
Power Connection IEC
Input Voltage 100–120/220–240 V, 50/60 Hz, 1080 W
Fuse 100–120 V: T12.5AL 250V
220–240 V: T6.3AL 250V
Dimensions(width x depth x height)
24.8” x 15.0” x 47.0”
63.1 x 38.1 x 119.4 cm
Weight 44.00 lbs.
19.96 kg
Specifications are subject to change without notice.
Trademarks & Licenses Denon is a trademark of D&M Holdings Inc., registered in the U.S. and other countries. Denon Professional products are producted by inMusic Brands, Inc., Cumberland, RI 02864, USA.
All other product names, company names, trademarks, or trade names are those of their respective owners.
