using oracle hrms - the fundamentals (us) · oracle hrms 8 – 2 ... example setups using generic...
TRANSCRIPT
Using Oracle� HRMS –The Fundamentals (US)RELEASE 11i
November 2001

Using Oracle HRMS – The Fundamentals (US) Release 11i
The part number for this book is A73315–02.
The part number for this set is A77153–02
Copyright � 2001, Oracle Corporation. All rights reserved.
Major Contributors: Mike Bailey, Alison Crabbe, Keith Ekiss, Juliette Fleming, Jeffrey Erickson,Michael Laverty, Julia Margetson, Janet McCandless, Kathie Patterson, Louise Raffo
Contributors: Martin Bocutt, Dinesh Arora, Mark Rowe, John Woodward, Kevin Kelley
The Programs (which include both the software and documentation) contain proprietary informationof Oracle Corporation; they are provided under a license agreement containing restrictions on use anddisclosure and are also protected by copyright, patent and other intellectual property law. Reverseengineering of the Programs is prohibited. No part of this document may be reproduced ortransmitted in any form or by any means, electronic or mechanical, for any purpose, without theexpress written permission of Oracle Corporation.
Program Documentation is licensed for use solely to support the deployment of the Programs andnot for any other purpose.
The information contained in this document is subject to change without notice. If you find anyproblems in the documentation, please report them to us in writing. Oracle Corporation does notwarrant that this document is error free. Except as may be expressly permitted in your licenseagreement for these Programs, no part of these Programs may be reproduced or transmitted in anyform or by any means, electronic or mechanical, for any purpose, without the express writtenpermission of Oracle Corporation.
If the Programs are delivered to the US Government or anyone licensing or using the Programs onbehalf of the US Government, the following notice is applicable:
RESTRICTED RIGHTS LEGEND Programs delivered subject to the DOD FAR Supplement are ’commercial computer software’ and use,duplication and disclosure of the Programs including documentation, shall be subject to the licensingrestrictions set forth in the applicable Oracle license agreement. Otherwise, Programs delivered subjectto the Federal Acquisition Regulations are ’restricted computer software’ and use, duplication anddisclosure of the Programs shall be subject to the restrictions in FAR 52.227–19, Commercial ComputerSoftware – Restricted Rights (June, 1987). Oracle Corporation, 500 Oracle Parkway, Redwood City, CA94065.” The Programs are not intended for use in any nuclear, aviation, mass transit, medical, or otherinherently dangerous applications. It shall be licensee’s responsibility to take all appropriate fail–safe,back up, redundancy and other measures to ensure the safe use of such applications if the Programsare used for such purposes, and Oracle disclaims liability for any damages caused by such use of thePrograms.
Oracle is a registered trademark, and Oracle Financials, Oracle Discoverer,OracleMetaLink, PL/SQL and SQL*Plus, are trademarks or registered trademarks ofOracle Corporation. Other names may be trademarks of their respective owners.

iContents
Contents
Preface Preface xi. . . . . . . . . . . . . . . . . . . . . . . . . . . . . . . . . . . . . . . . . . . . . . . . . Audience for This Guide xii. . . . . . . . . . . . . . . . . . . . . . . . . . . . . . How To Use This Guide xii. . . . . . . . . . . . . . . . . . . . . . . . . . . . . . . Do Not Use Database Tools to Modify Oracle Applications Data xxi. . . . . . . . . . . . . . . . . . . . . . . . . . . . . . . . . . About Oracle xxi. . . . . . . . . . . . . . . . . . . . . . . . . . . . . . . . . . . . . . . . Your Feedback xxii. . . . . . . . . . . . . . . . . . . . . . . . . . . . . . . . . . . . . . .
Chapter 1 Introduction to Oracle HRMS 1 – 1. . . . . . . . . . . . . . . . . . . . . . . . . . . . . Introduction Overview 1 – 2. . . . . . . . . . . . . . . . . . . . . . . . . . . . . . . . . . .
Introduction to Oracle HRMS 1 – 3. . . . . . . . . . . . . . . . . . . . . . . . . . Human Resource Model 1 – 8. . . . . . . . . . . . . . . . . . . . . . . . . . . . . . . Shared Information in Oracle HRMS 1 – 10. . . . . . . . . . . . . . . . . . . . Multilingual Oracle HRMS 1 – 12. . . . . . . . . . . . . . . . . . . . . . . . . . . . Managing Change Over Time 1 – 14. . . . . . . . . . . . . . . . . . . . . . . . . . Setting Your Effective Date 1 – 18. . . . . . . . . . . . . . . . . . . . . . . . . . . . Viewing the History of Datetracked Information 1 – 19. . . . . . . . . . Removing an End Date 1 – 19. . . . . . . . . . . . . . . . . . . . . . . . . . . . . . . .
Chapter 2 Organization Management 2 – 1. . . . . . . . . . . . . . . . . . . . . . . . . . . . . . . Organization Management Overview 2 – 2. . . . . . . . . . . . . . . . . . . . . . .
Organization Management 2 – 3. . . . . . . . . . . . . . . . . . . . . . . . . . . . Locations 2 – 4. . . . . . . . . . . . . . . . . . . . . . . . . . . . . . . . . . . . . . . . . . . . Location Extra Information Types 2 – 4. . . . . . . . . . . . . . . . . . . . . .

ii Using Oracle HRMS – The Fundamentals (US)
Representing Employers Using Business Groups 2 – 6. . . . . . . . . Single and Multiple Business Groups 2 – 7. . . . . . . . . . . . . . . . . . . Defaults for the Business Group 2 – 7. . . . . . . . . . . . . . . . . . . . . . . . Adapting and Creating a New Business Group 2 – 8. . . . . . . . . . . Setting Up Locations 2 – 9. . . . . . . . . . . . . . . . . . . . . . . . . . . . . . . . . . Representing Organizations 2 – 11. . . . . . . . . . . . . . . . . . . . . . . . . . . Government Reporting Entities (GREs) 2 – 12. . . . . . . . . . . . . . . . . . Organization Classifications 2 – 16. . . . . . . . . . . . . . . . . . . . . . . . . . . Levels of Internal Organizations 2 – 19. . . . . . . . . . . . . . . . . . . . . . . . Creating an Organization 2 – 21. . . . . . . . . . . . . . . . . . . . . . . . . . . . . . Entering Organization Classifications 2 – 23. . . . . . . . . . . . . . . . . . . Entering Additional Information 2 – 23. . . . . . . . . . . . . . . . . . . . . . . Entering Business Group Information 2 – 28. . . . . . . . . . . . . . . . . . . Entering Representative Body Information 2 – 29. . . . . . . . . . . . . . . Business Groups: Entering Budget Value Defaults 2 – 29. . . . . . . . Business Groups: Selecting a PTO Balance Type 2 – 30. . . . . . . . . . Business Groups and HR Organizations: Entering Work Day Defaults 2 – 30. . . . . . . . . . . . . . . . . . . . . . . . . . . . . . . . . . . . . . Defining a Default Monthly Payroll for a Business Group 2 – 31. . GREs: Entering the IRS Identification Number 2 – 32. . . . . . . . . . . HR Organizations: Entering Costing Information 2 – 32. . . . . . . . . HR Organizations: Entering Parent Organizations 2 – 33. . . . . . . . HR Organizations: Entering a Work Schedule 2 – 33. . . . . . . . . . . . Business Group: Entering EEO Reporting Information 2 – 34. . . . Entering Constituency Information for a Representative Body 2 – 34. . . . . . . . . . . . . . . . . . . . . . . . . . . . . . . Entering Location Information for Constituencies 2 – 35. . . . . . . . . Entering Organization Hierarchy Information for Constituencies 2 – 35. . . . . . . . . . . . . . . . . . . . . . . . . . . . . . . . . . Entering Organization Information for Constituencies 2 – 35. . . . . Entering Grade Information for Constituencies 2 – 36. . . . . . . . . . . Entering Bargaining Unit Information for Constituencies 2 – 36. . Entering Job Information for Constituencies 2 – 36. . . . . . . . . . . . . Entering Collective Agreement Grade Information for Constituencies 2 – 37. . . . . . . . . . . . . . . . . . . . . . . . . . . . . . . . . . Entering Trade Union Information for a Bargaining Association 2 – 37. . . . . . . . . . . . . . . . . . . . . . . . . . . . . Entering EEO–1 and VETS Establishment Data for Parent Entities 2 – 37. . . . . . . . . . . . . . . . . . . . . . . . . . . . . . . . . . . . . Entering EEO–1 Parent Entity Data 2 – 38. . . . . . . . . . . . . . . . . . . . . Entering Multiple Worksite Report Parent Entity Data 2 – 39. . . . . Entering VETS Parent Entity Data 2 – 39. . . . . . . . . . . . . . . . . . . . . . Finding an Organization 2 – 40. . . . . . . . . . . . . . . . . . . . . . . . . . . . . .

iiiContents
Removing and Deleting Organizations 2 – 41. . . . . . . . . . . . . . . . . . Organization Hierarchies 2 – 41. . . . . . . . . . . . . . . . . . . . . . . . . . . . . . Creating Organization Hierarchies 2 – 45. . . . . . . . . . . . . . . . . . . . . . Changing Organization Hierarchies 2 – 47. . . . . . . . . . . . . . . . . . . . . Deleting Organization Hierarchies 2 – 48. . . . . . . . . . . . . . . . . . . . . . Running the Organization Hierarchy Report 2 – 48. . . . . . . . . . . . .
Chapter 3 Hierarchy Diagrammers 3 – 1. . . . . . . . . . . . . . . . . . . . . . . . . . . . . . . . . . Hierarchy Diagrammers Overview 3 – 2. . . . . . . . . . . . . . . . . . . . . . . . .
Viewing and Editing Hierarchy Diagrams 3 – 2. . . . . . . . . . . . . . . Launching a Hierarchy Diagrammer 3 – 3. . . . . . . . . . . . . . . . . . . . Finding an Organization or Position in the Hierarchy Diagrammers 3 – 4. . . . . . . . . . . . . . . . . . . . . . . . . . . . Changing the Appearance of a Hierarchy Diagram 3 – 5. . . . . . . Displaying Information about Organizations or Positions 3 – 6. . Setting Up a New Hierarchy 3 – 7. . . . . . . . . . . . . . . . . . . . . . . . . . . Creating a New Version of an Existing Hierarchy 3 – 8. . . . . . . . . Copying an Existing Hierarchy 3 – 9. . . . . . . . . . . . . . . . . . . . . . . . . Adding Organizations or Positions to a Hierarchy 3 – 10. . . . . . . . Removing Organizations or Positions From a Hierarchy 3 – 10. . . Moving Organizations or Positions in a Hierarchy 3 – 11. . . . . . . . Menu and Toolbar Commands 3 – 12. . . . . . . . . . . . . . . . . . . . . . . . .
Chapter 4 Enterprise Modeling 4 – 1. . . . . . . . . . . . . . . . . . . . . . . . . . . . . . . . . . . . . Enterprise Modeling Overview 4 – 2. . . . . . . . . . . . . . . . . . . . . . . . . . . .
Enterprise Modeling 4 – 4. . . . . . . . . . . . . . . . . . . . . . . . . . . . . . . . . . Jobs and Positions 4 – 6. . . . . . . . . . . . . . . . . . . . . . . . . . . . . . . . . . . . Position Management 4 – 9. . . . . . . . . . . . . . . . . . . . . . . . . . . . . . . . . Position Management Decisions 4 – 13. . . . . . . . . . . . . . . . . . . . . . . . Position Hiring Status 4 – 14. . . . . . . . . . . . . . . . . . . . . . . . . . . . . . . . . Job and Position Names 4 – 16. . . . . . . . . . . . . . . . . . . . . . . . . . . . . . . Jobs and Position Evaluation 4 – 16. . . . . . . . . . . . . . . . . . . . . . . . . . . Position Extra Information Types 4 – 17. . . . . . . . . . . . . . . . . . . . . . . Project Based Enterprises Example 4 – 18. . . . . . . . . . . . . . . . . . . . . . Rule Based Enterprises Example 4 – 22. . . . . . . . . . . . . . . . . . . . . . . Hybrid Enterprise Structures Example 4 – 25. . . . . . . . . . . . . . . . . . Contract Staff and Other Non–Standard Assignments Example 4 – 27. . . . . . . . . . . . . . . . . . . . . . . . . . . . . . Creating a Job Group 4 – 27. . . . . . . . . . . . . . . . . . . . . . . . . . . . . . . . . Defining a Job 4 – 28. . . . . . . . . . . . . . . . . . . . . . . . . . . . . . . . . . . . . . . Defining a Position 4 – 30. . . . . . . . . . . . . . . . . . . . . . . . . . . . . . . . . . .

iv Using Oracle HRMS – The Fundamentals (US)
Defining a Position with a Position Transaction 4 – 36. . . . . . . . . . . Copying a Position 4 – 38. . . . . . . . . . . . . . . . . . . . . . . . . . . . . . . . . . . Updating Positions 4 – 43. . . . . . . . . . . . . . . . . . . . . . . . . . . . . . . . . . . Finding a Position 4 – 47. . . . . . . . . . . . . . . . . . . . . . . . . . . . . . . . . . . . Viewing Position Occupancy 4 – 49. . . . . . . . . . . . . . . . . . . . . . . . . . . Viewing Transaction History 4 – 49. . . . . . . . . . . . . . . . . . . . . . . . . . . Position Hierarchies 4 – 51. . . . . . . . . . . . . . . . . . . . . . . . . . . . . . . . . . Creating a Position Hierarchy 4 – 53. . . . . . . . . . . . . . . . . . . . . . . . . . Creating a New Version of a Position Hierarchy 4 – 54. . . . . . . . . . Copying an Existing Hierarchy 4 – 54. . . . . . . . . . . . . . . . . . . . . . . . . Deleting a Position Hierarchy 4 – 54. . . . . . . . . . . . . . . . . . . . . . . . . . Changing a Position Hierarchy 4 – 55. . . . . . . . . . . . . . . . . . . . . . . . . Running the Position Hierarchy Report 4 – 56. . . . . . . . . . . . . . . . . Business Group Reorganization 4 – 56. . . . . . . . . . . . . . . . . . . . . . . . Reorganize your Business Group 4 – 58. . . . . . . . . . . . . . . . . . . . . . . Describing Your Mass Move 4 – 58. . . . . . . . . . . . . . . . . . . . . . . . . . . Identifying Your Source Positions 4 – 59. . . . . . . . . . . . . . . . . . . . . . Identifying Your Target Positions 4 – 60. . . . . . . . . . . . . . . . . . . . . . . Verifying the Transfer of Assignments for Each Source Position 4 – 61. . . . . . . . . . . . . . . . . . . . . . . . . . . . . . . . . . . . Verifying or Adding Valid Grades for Each Target Position 4 – 62. . . . . . . . . . . . . . . . . . . . . . . . . . . . . . . . . . . . Executing the Mass Move 4 – 63. . . . . . . . . . . . . . . . . . . . . . . . . . . . . Reviewing the Mass Move 4 – 63. . . . . . . . . . . . . . . . . . . . . . . . . . . . . Re–executing a Mass Move 4 – 64. . . . . . . . . . . . . . . . . . . . . . . . . . . . Grades and Grade Structures 4 – 65. . . . . . . . . . . . . . . . . . . . . . . . . . Grade Relationships to Compensation and Benefits 4 – 67. . . . . . . Grade Rates to Relate Pay to Grades 4 – 68. . . . . . . . . . . . . . . . . . . . Pay Scales to Relate Pay to Grades 4 – 70. . . . . . . . . . . . . . . . . . . . . . Defining a Grade 4 – 72. . . . . . . . . . . . . . . . . . . . . . . . . . . . . . . . . . . . . Deleting Grades 4 – 72. . . . . . . . . . . . . . . . . . . . . . . . . . . . . . . . . . . . . . Defining a Grade Rate 4 – 73. . . . . . . . . . . . . . . . . . . . . . . . . . . . . . . . Viewing Grade Comparatios 4 – 73. . . . . . . . . . . . . . . . . . . . . . . . . . . Defining a Pay Scale 4 – 74. . . . . . . . . . . . . . . . . . . . . . . . . . . . . . . . . . Defining Scale Rates 4 – 75. . . . . . . . . . . . . . . . . . . . . . . . . . . . . . . . . . Relating Grades to Progression Points 4 – 76. . . . . . . . . . . . . . . . . . . Placing an Employee on a Grade Step 4 – 76. . . . . . . . . . . . . . . . . . . Incrementing Grade Step Placements 4 – 77. . . . . . . . . . . . . . . . . . . Running the Current and Projected Progression Point Values Report 4 – 78. . . . . . . . . . . . . . . . . . . . . . . . . . . . . . . . . . . . . Running the Employee Increment Results Report 4 – 78. . . . . . . . . Entering a Collective Agreement 4 – 79. . . . . . . . . . . . . . . . . . . . . . .

vContents
Setting up Collective Agreement Grades 4 – 80. . . . . . . . . . . . . . . . . Entering Collective Agreement Grades 4 – 80. . . . . . . . . . . . . . . . . .
Chapter 5 Payroll Definition 5 – 1. . . . . . . . . . . . . . . . . . . . . . . . . . . . . . . . . . . . . . . Payroll Definition Overview 5 – 2. . . . . . . . . . . . . . . . . . . . . . . . . . . . . . .
Payroll Definition 5 – 3. . . . . . . . . . . . . . . . . . . . . . . . . . . . . . . . . . . . Other Employee Groups 5 – 4. . . . . . . . . . . . . . . . . . . . . . . . . . . . . . Available Payment Methods 5 – 5. . . . . . . . . . . . . . . . . . . . . . . . . . . Database Triggers 5 – 5. . . . . . . . . . . . . . . . . . . . . . . . . . . . . . . . . . . . Process Parameters 5 – 7. . . . . . . . . . . . . . . . . . . . . . . . . . . . . . . . . . . Defining a Payment Method 5 – 8. . . . . . . . . . . . . . . . . . . . . . . . . . . Defining Consolidation Sets 5 – 8. . . . . . . . . . . . . . . . . . . . . . . . . . . Creating a Payroll 5 – 9. . . . . . . . . . . . . . . . . . . . . . . . . . . . . . . . . . . . Deleting Payrolls 5 – 11. . . . . . . . . . . . . . . . . . . . . . . . . . . . . . . . . . . . . Entering NACHA Tape Data for GREs 5 – 11. . . . . . . . . . . . . . . . . . Defining Dynamic Triggers 5 – 12. . . . . . . . . . . . . . . . . . . . . . . . . . . . Grouping Dynamic Triggers into Legislative Functional Areas 5 – 14. . . . . . . . . . . . . . . . . . . . . . . . . . . . . . . . . . . Setting up the TIAA-CREF Interface 5 – 15. . . . . . . . . . . . . . . . . . . . Maintaining Process Parameters 5 – 16. . . . . . . . . . . . . . . . . . . . . . . .
Chapter 6 Cost Analysis 6 – 1. . . . . . . . . . . . . . . . . . . . . . . . . . . . . . . . . . . . . . . . . . . Cost Analysis Overview 6 – 2. . . . . . . . . . . . . . . . . . . . . . . . . . . . . . . . . .
Cost Analysis 6 – 2. . . . . . . . . . . . . . . . . . . . . . . . . . . . . . . . . . . . . . . . Labor Costs in Oracle HRMS 6 – 3. . . . . . . . . . . . . . . . . . . . . . . . . . . Labor Cost Allocation Example 6 – 4. . . . . . . . . . . . . . . . . . . . . . . . Data Costed at the Payroll Level 6 – 5. . . . . . . . . . . . . . . . . . . . . . . . Data Costed at the Element Link Level 6 – 5. . . . . . . . . . . . . . . . . . Employer Charge Distribution Example 6 – 7. . . . . . . . . . . . . . . . . Data Costed at the Organization and Assignment Levels 6 – 9. . The Cost Allocation Key Flexfield 6 – 10. . . . . . . . . . . . . . . . . . . . . . Setup of the Cost Allocation Key Flexfield 6 – 11. . . . . . . . . . . . . . . The Oracle HRMS Cost Allocation Key Flexfield Example 6 – 13. Data Costed at the Element Entry Level 6 – 15. . . . . . . . . . . . . . . . . Costing for Taxes 6 – 15. . . . . . . . . . . . . . . . . . . . . . . . . . . . . . . . . . . . . Costing All Taxes by Tax Type 6 – 16. . . . . . . . . . . . . . . . . . . . . . . . . . Costing State and Local Taxes by Jurisdiction 6 – 17. . . . . . . . . . . . Running the Costing Process 6 – 19. . . . . . . . . . . . . . . . . . . . . . . . . . . Running the Cost Breakdown Report 6 – 20. . . . . . . . . . . . . . . . . . . Mapping Cost Allocation to the Accounting Flexfield 6 – 20. . . . .

vi Using Oracle HRMS – The Fundamentals (US)
Running the Transfer to GL Process 6 – 21. . . . . . . . . . . . . . . . . . . . . Entering Adjustments to Costed Employee Tax Balances 6 – 22. . .
Chapter 7 Workers’ Compensation 7 – 1. . . . . . . . . . . . . . . . . . . . . . . . . . . . . . . . . . Overview of Workers Compensation in Oracle HRMS 7 – 2. . . . . . . .
How are Workers Compensation Premiums Calculated in Oracle HRMS? 7 – 2. . . . . . . . . . . . . . . . . . . . . . . . . . . . . . . . . . . . . How are Workers Compensation Insurance Rates Calculated? 7 – 3. . . . . . . . . . . . . . . . . . . . . . . . . . . . . . . . . . How do Surcharges and Rebates Affect my Companies Insurance Rate? 7 – 4. . . . . . . . . . . . . . . . . . . . . . . . . How is Overtime Pay Affected by Workers Compensation? 7 – 5 Can I Change a Workers Compensation Code for an Employee? 7 – 5. . . . . . . . . . . . . . . . . . . . . . . . . . . . . . . . . . . . . Workers Compensation in Oracle Payroll 7 – 6. . . . . . . . . . . . . . . . Payroll Exposure 7 – 6. . . . . . . . . . . . . . . . . . . . . . . . . . . . . . . . . . . . . WC Code Overrides 7 – 7. . . . . . . . . . . . . . . . . . . . . . . . . . . . . . . . . . Default Workers’ Compensation Code Mapping 7 – 7. . . . . . . . . . WC Elements and Formulas in Oracle Payroll 7 – 7. . . . . . . . . . . . Calculating Employer and Employee Contributions 7 – 9. . . . . . . Creating Default Workers’ Compensation Code Mapping 7 – 10. . Setup Steps for Workers’ Compensation Calculations 7 – 11. . . . . Exempting Employees from Workers’ Compensation 7 – 12. . . . . Associating WC Codes with Rates 7 – 12. . . . . . . . . . . . . . . . . . . . . . Entering WC Codes, Payroll Exposure Rules and Surcharges 7 – 13. . . . . . . . . . . . . . . . . . . . . . . . . . . . . . . . . . . . Entering a WC Override Code 7 – 14. . . . . . . . . . . . . . . . . . . . . . . . .
Chapter 8 Government Mandated HR Reporting 8 – 1. . . . . . . . . . . . . . . . . . . . . Overview of Government Mandated Reporting in Oracle HRMS 8 – 2. . . . . . . . . . . . . . . . . . . . . . . . . . . . . . . . . . . . . . . . .
Introduction to US Government–Mandated Reporting in Oracle HRMS 8 – 2. . . . . . . . . . . . . . . . . . . . . . . . . . . . . . . . . . . . . Reporting Categories and Statuses 8 – 3. . . . . . . . . . . . . . . . . . . . . . Reporting Organizations 8 – 3. . . . . . . . . . . . . . . . . . . . . . . . . . . . . . Establishment Hierarchies 8 – 3. . . . . . . . . . . . . . . . . . . . . . . . . . . . . Varieties of Establishment Hierarchies 8 – 5. . . . . . . . . . . . . . . . . . . The Single–Establishment Hierarchy 8 – 5. . . . . . . . . . . . . . . . . . . . Multi–Establishment Hierarchies 8 – 6. . . . . . . . . . . . . . . . . . . . . . . Preparing for Government–Mandated HR Reporting 8 – 7. . . . . . Registration of Reporting Categories and Statuses 8 – 7. . . . . . . . Setting Up Reporting Organizations 8 – 8. . . . . . . . . . . . . . . . . . . .

viiContents
Example Multi–Establishment Hierarchies 8 – 8. . . . . . . . . . . . . . . Setup Steps for AAP Reporting 8 – 10. . . . . . . . . . . . . . . . . . . . . . . . . Setup Steps for ADA Reporting 8 – 11. . . . . . . . . . . . . . . . . . . . . . . . Setup Steps for OSHA Reporting 8 – 12. . . . . . . . . . . . . . . . . . . . . . . Registering Reporting Categories 8 – 12. . . . . . . . . . . . . . . . . . . . . . . Registering Reporting Statuses 8 – 13. . . . . . . . . . . . . . . . . . . . . . . . . Define Reporting Establishments to Represent Corporate Headquarters 8 – 13. . . . . . . . . . . . . . . . . . . . . . . . . . . Set Up Establishment Hierarchies 8 – 14. . . . . . . . . . . . . . . . . . . . . . Put Subordinate Reporting Organizations in Hierarchies 8 – 15. . Enter Establishment Overrides 8 – 16. . . . . . . . . . . . . . . . . . . . . . . . . Define Lines of Progression for Jobs 8 – 16. . . . . . . . . . . . . . . . . . . . . Establishments and Generic Hierarchies 8 – 17. . . . . . . . . . . . . . . . . Example Setups Using Generic Hierarchies 8 – 20. . . . . . . . . . . . . . Setup Steps for EEO–1 Reporting 8 – 21. . . . . . . . . . . . . . . . . . . . . . . Setup Steps for EEO4 and EEO5 Reporting 8 – 22. . . . . . . . . . . . . . Setup Steps for VETS–100 Reporting 8 – 23. . . . . . . . . . . . . . . . . . . . Creating an Establishment Hierarchy 8 – 24. . . . . . . . . . . . . . . . . . . Copying an Establishment Hierarchy 8 – 25. . . . . . . . . . . . . . . . . . . Associating Jobs with EEO Job Categories 8 – 26. . . . . . . . . . . . . . . Equal Employment Opportunity (EEO–1) Reporting 8 – 27. . . . . . Obtaining EEO Reports 8 – 28. . . . . . . . . . . . . . . . . . . . . . . . . . . . . . . Data for EEO Reporting 8 – 29. . . . . . . . . . . . . . . . . . . . . . . . . . . . . . . Submit EEO Standard Form 100 8 – 31. . . . . . . . . . . . . . . . . . . . . . . . Running the EEO4 Report 8 – 33. . . . . . . . . . . . . . . . . . . . . . . . . . . . . Running the EEO5 Report 8 – 33. . . . . . . . . . . . . . . . . . . . . . . . . . . . . AAP (Affirmative Action Plan) Reporting 8 – 34. . . . . . . . . . . . . . . AAP Organizations 8 – 35. . . . . . . . . . . . . . . . . . . . . . . . . . . . . . . . . . . AAP Hierarchies 8 – 36. . . . . . . . . . . . . . . . . . . . . . . . . . . . . . . . . . . . . Data for AAP Reporting 8 – 36. . . . . . . . . . . . . . . . . . . . . . . . . . . . . . . Example AAP Hierarchy 8 – 36. . . . . . . . . . . . . . . . . . . . . . . . . . . . . . Set Up AAP Organizations 8 – 38. . . . . . . . . . . . . . . . . . . . . . . . . . . . Create AAP Establishment Hierarchies 8 – 38. . . . . . . . . . . . . . . . . . Associate Jobs with AAP Reporting Information 8 – 39. . . . . . . . . . Obtain AAP Reports 8 – 39. . . . . . . . . . . . . . . . . . . . . . . . . . . . . . . . . . VETS–100 Reporting 8 – 40. . . . . . . . . . . . . . . . . . . . . . . . . . . . . . . . . . Data for VETS–100 Reports 8 – 41. . . . . . . . . . . . . . . . . . . . . . . . . . . . Obtain VETS–100 Reports 8 – 42. . . . . . . . . . . . . . . . . . . . . . . . . . . . . Registering Employees as Disabled 8 – 45. . . . . . . . . . . . . . . . . . . . . ADA (Americans with Disabilities Act) Reporting 8 – 45. . . . . . . . Enter Information about Disabilities 8 – 46. . . . . . . . . . . . . . . . . . . . Enter Requests for Disability Accommodation 8 – 47. . . . . . . . . . . .

viii Using Oracle HRMS – The Fundamentals (US)
Obtain ADA Reports 8 – 48. . . . . . . . . . . . . . . . . . . . . . . . . . . . . . . . . . OSHA (Occupational Safety and Health Act) Reporting 8 – 48. . . OSHA Data 8 – 49. . . . . . . . . . . . . . . . . . . . . . . . . . . . . . . . . . . . . . . . . . OSHA Categories of Illness 8 – 50. . . . . . . . . . . . . . . . . . . . . . . . . . . . Entering Information about Work–related Injury or Illness 8 – 50. Obtain OSHA Reports 8 – 52. . . . . . . . . . . . . . . . . . . . . . . . . . . . . . . .
Chapter 9 Windows and Reports A – 1. . . . . . . . . . . . . . . . . . . . . . . . . . . . . . . . . . . Windows and their Navigation Paths A – 2. . . . . . . . . . . . . . . . . . . . . . . Reports and Processes in Oracle HRMS A – 61. . . . . . . . . . . . . . . . . . . . .
Glossary
Index

Reader’s Comment Form
Using Oracle HRMS –– The Fundamentals (US) Release 11i
A73315–02
Oracle Corporation welcomes your comments and suggestions on the quality and usefulnessof this publication. Your input is an important part of the information we use for revision.
• Did you find any errors?
• Is the information clearly presented?
• Do you need more information? If so, where?
• Are the examples correct? Do you need more examples?
• What features did you like most about this manual? What did you like least about it?
If you find any errors or have any other suggestions for improvement, please indicate the topic, chapter,and page number below:
Please send your comments to:
Oracle Applications Documentation ManagerOracle Corporation500 Oracle ParkwayRedwood Shores, CA 94065Phone: (650) 506–7000 Fax: (650) 506–7200
If you would like a reply, please give your name, address, and telephone number below:
Thank you for helping us improve our documentation.


xiPreface
Preface

xii Using Oracle HRMS – The Fundamentals (US)
Audience for This Guide
Welcome to Release 11i of Using Oracle HRMS – The Fundamentals (US).
This guide assumes you have a working knowledge of the following:
• The principles and customary practices of your business area.
• Oracle Human Resources Management Systems
If you have never used Oracle Human Resources ManagementSystems, Oracle suggests you attend one or more of the OracleHuman Resources Management Systems training classesavailable through Oracle University.
• The Oracle Applications graphical user interface.
To learn more about the Oracle Applications graphical userinterface, read the Oracle Applications User’s Guide.
See Other Information Sources for more information about OracleApplications product information.
How To Use This Guide
This guide contains the information you need to understand and useOracle HRMS.
• Chapter 1 introduces the major features of Oracle HRMS. It alsodescribes the human resource model, how information is sharedin Oracle HRMS and how to manage Oracle HRMS in differentlanguages. It also describes how to use your documentation andonline help.
• Chapter 2 explains how you represent all the differentorganizations that make up your enterprise.
• Chapter 3 describes how to graphically view and createhierarchy diagrams for organizations and positions using OracleHRMS Hierarchy Diagrammers.
• Chapter 4 explains how you can customize Oracle HRMS so thatit accurately reflects the organizations of work and managementsof people with the enterprise. It explains how you can model thejobs, positions and grades to reflect the structures and cultureswithin your enterprise.
xiiiPreface
• Chapter 5 explains how you define payrolls. You define as manypayrolls as you require to meet the pay policies of yourenterprise.
• Chapter 6 explains how you can enter labor costs associated withyour employees. Using Oracle Payroll, you can automaticallyaccumulate these costs.
• Chapter 7 discusses mandatory government reporting.
• Chapter 8 discusses how Oracle HRMS handles WorkersCompensation (WC) programs. How you associate your jobswith state WC work classification codes, and how to furtherassociate these codes with state WC premium rates.
• Appendix A lists the default navigation paths for all thewindows and reports in Oracle HRMS for the US, as they aresupplied.
Note: HRMS Implementation Steps are included inImplementing Oracle HRMS, rather than in this User Guide.
Documentation Accessibility
Our goal is to make Oracle products, services, and supportingdocumentation accessible, with good usability, to the disabledcommunity. To that end, our documentation includes features thatmake information available to users of assistive technology. Thisdocumentation is available in HTML format, and contains markup tofacilitate access by the disabled community. Standards will continue toevolve over time, and Oracle Corporation is actively engaged withother market–leading technology vendors to address technicalobstacles so that our documentation can be accessible to all of ourcustomers. For additional information, visit the Oracle AccessibilityProgram web site at http://www.oracle.com/accessibility/.
Accessibility of Code Examples in Documentation
JAWS, a Windows screen reader, may not always correctly read thecode examples in this document. The conventions for writing coderequire that closing braces should appear on an otherwise empty line;however, JAWS may not always read a line of text that consists solelyof a bracket or brace.
Accessibility of Links to External Web Sites in Documentation
This documentation may contain links to web sites of other companiesor organizations that Oracle Corporation does not own or control.

xiv Using Oracle HRMS – The Fundamentals (US)
Oracle Corporation neither evaluates nor makes any representationsregarding the accessibility of these web sites.
Other Information Sources
You can choose from many sources of information, including onlinedocumentation, training, and support services, to increase yourknowledge and understanding of Using OracleR HRMS –The Fundamentals (US).
If this guide refers you to other Oracle Applications documentation,use only the Release 11i versions of those guides.
Online Documentation
All Oracle Applications documentation is available online (HTML andPDF).
• Online Help – The new features section in the HTML helpdescribes new features in 11i. This information is updated foreach new release of Oracle HRMS. The new features section alsoincludes information about any features that were not yetavailable when this guide was printed. For example, if youradministrator has installed software from a mini–pack as anupgrade, this document describes the new features. Online helppatches are available on Metalink.
• 11i Features Matrix – This document lists new features availableby patch and identifies any associated new documentation. Thenew features matrix document is available on Metalink.
• Readme File– Refer to the readme file for patches that you haveinstalled to learn about new documentation or documentationpatches that you can download.
Related User’s Guides
Using OracleR HRMS – The Fundamentals (US) shares business andsetup information with other Oracle Applications products. Therefore,you may want to refer to other user guides when you set up and useUsing OracleR HRMS – The Fundamentals (US).
You can read the guides online by choosing Library from theexpandable menu on your HTML help window, by reading from theOracle Applications Document Library CD included in your media

xvPreface
pack, or by using a Web browser with a URL that your systemadministrator provides.
If you require printed guides, you can purchase them from the Oraclestore at http://oraclestore.oracle.com.
Guides Related to All Products
Oracle Applications User’s Guide
This guide explains how to enter data, query, run reports, and navigateusing the graphical user interface (GUI) available with this release ofOracle HRMS (and any other Oracle Applications products). This guidealso includes information on setting user profiles, as well as runningand reviewing reports and concurrent processes.
You can access this user’s guide online by choosing ”Getting startedwith Oracle Applications” from any Oracle Applications help file.
Oracle Alert User’s Guide
This guide explains how to define periodic and event alerts to monitorthe status of your Oracle Applications data.
Oracle Applications Developer’s Guide
This guide contains the coding standards followed by the OracleApplications development staff. It describes the Oracle ApplicationObject Library components needed to implement the OracleApplications user interface described in the Oracle Applications UserInterface Standards for Forms–Based Products. It also provides informationto help you build your custom Oracle Forms Developer 6i forms so thatthey integrate with Oracle Applications.
Oracle Applications User Interface Standards for Forms–BasedProducts
This guide contains the user interface (UI) standards followed by theOracle Applications development staff. It describes the UI for theOracle Applications products and how to apply this UI to the design ofan application built by using Oracle Forms.

xvi Using Oracle HRMS – The Fundamentals (US)
Guides Related to This Product
Using Oracle HRMS – The Fundamentals
Use this guide to learn about representing your enterprise on yourapplication. This includes setting up your organization hierarchy,recording details about jobs and positions within your enterprise,defining a payroll, and also how to manage your costs.
Managing Your Workforce Using Oracle HRMS
Use this guide to learn about all aspects of managing your workforce.This includes how to represent your workforce on your application,recruiting new employees and developing their careers, and alsodefining and managing budgets.
Running Your Payroll Using Oracle HRMS
This user guide provides information about wage attachments, taxesand social insurance, the payroll run, and other processes.
Managing Total Compensation Using Oracle HRMS
Use this guide to learn about setting up the application to store andprocess information on your total compensation package, includingsalary administration, other earnings, deductions, benefits, absencemanagement and PTO accrual plans.
Configuring, Reporting and System Administration in Oracle HRMS
This guide provides information about extending and configuringOracle HRMS, managing security, auditing, information access, andletter generation.
Implementing Oracle HRMS
This guide explains the setup procedures you need to carry out in orderto successfully implement Oracle HRMS in your enterprise.
Implementing Oracle Self–Service Human Resources (SSHR)
This guide provides information about setting up the self–servicehuman resources management functions for managers and employees.Managers and employees can then use an intranet and Web browser to

xviiPreface
have easy and intuitive access to personal information and careermanagement functionality.
Using Oracle FastFormula
This guide provides information about writing, editing, and usingformulas to configure your system. Oracle FastFormula provides asimple way to write formulas using English words and basicmathematical functions. For example, Oracle FastFormula enables youto specify elements in payroll runs or create rules for PTO and accrualplans.
Using Oracle Training Administration (OTA)
This guide provides information about how to set up and use OracleTraining Administration to facilitate your training and certificationbusiness.
Using Oracle SSP/SMP
This guide provides information about setting up and using OracleSSP/SMP to meet your statutory sick pay and statutory maternity payobligations.
Using Application Data Exchange
This guide provides information about using Application DataExchange to view HRMS data with desktop tools, and upload reviseddata to your application.
Oracle Business Intelligence System Implementation Guide
This guide provides information about implementing Oracle BusinessIntelligence (BIS) in your environment.
BIS User Guide 11i
This guide is provided as online help only from the BIS application andincludes information about intelligence reports, Discoverer workbooks,and the Performance Management Framework.

xviii Using Oracle HRMS – The Fundamentals (US)
Using Oracle Time Management
This guide provides information about capturing work patterns such asshift hours so that this information can be used by other applicationssuch as General Ledger.
Installation and System Administration
Oracle Applications Concepts
This guide provides an introduction to the concepts, features,technology stack, architecture, and terminology for Oracle ApplicationsRelease 11i. It provides a useful first book to read before an installationof Oracle Applications. This guide also introduces the concepts behindApplications–wide features such as Business Intelligence (BIS),languages and character sets, and Self–Service Web Applications.
Installing Oracle Applications
This guide provides instructions for managing the installation of OracleApplications products. In Release 11i, much of the installation processis handled using Oracle Rapid Install, which minimizes the time toinstall Oracle Applications and the Oracle8 technology stack, and theOracle8i Server technology stack by automating many of the requiredsteps. This guide contains instructions for using Oracle Rapid Installand lists the tasks you need to perform to finish your installation. Youshould use this guide in conjunction with individual product user’sguides and implementation guides.
Upgrading Oracle Applications
Refer to this guide if you are upgrading your Oracle ApplicationsRelease 10.7 or Release 11.0 products to Release 11i. This guidedescribes the upgrade process and lists database and product–specificupgrade tasks. You must be either at Release 10.7 (NCA, SmartClient,or character mode) or Release 11.0, to upgrade to Release 11i. Youcannot upgrade to Release 11i directly from releases prior to 10.7.
Maintaining Oracle Applications
Use this guide to help you run the various AD utilities, such asAutoUpgrade, AutoPatch, AD Administration, AD Controller, ADRelink, License Manager, and others. It contains how–to steps,screenshots, and other information that you need to run the AD

xixPreface
utilities. This guide also provides information on maintaining theapplications file system and database.
Oracle Applications System Administrator’s Guide
This guide provides planning and reference information for the OracleApplications System Administrator. It contains information on how todefine security, customize menus and online help, and manageconcurrent processing.
Other Implementation Documentation
Oracle Applications Product Update Notes
Use this guide as a reference for upgrading an installation of OracleApplications. It provides a history of the changes to individual OracleApplications products between Release 11.0 and Release 11i. It includesnew features, enhancements, and changes made to database objects,profile options, and seed data for this interval.
Multiple Reporting Currencies in Oracle Applications
If you use the Multiple Reporting Currencies feature to recordtransactions in more than one currency, use this manual beforeimplementing Oracle HRMS. This manual details additional steps andsetup considerations for implementing Oracle HRMS with this feature.
Multiple Organizations in Oracle Applications
If you use the Oracle Applications Multiple Organization Supportfeature to use multiple sets of books for one Oracle HRMS installation,this guide describes all you need to know about setting up and usingOracle HRMS with this feature.
Oracle Workflow Guide
This guide explains how to define new workflow business processes aswell as customize existing Oracle Applications–embedded workflowprocesses. You also use this guide to complete the setup steps necessaryfor any Oracle Applications product that includes workflow–enabledprocesses.

xx Using Oracle HRMS – The Fundamentals (US)
Oracle Applications Flexfields Guide
This guide provides flexfields planning, setup, and referenceinformation for the Using OracleR HRMS – The Fundamentals (US)implementation team, as well as for users responsible for the ongoingmaintenance of Oracle Applications product data. This manual alsoprovides information on creating custom reports on flexfields data.
Oracle Technical Reference Manuals
The technical reference guides are now available in electronic formatonly. You can now access technical reference manuals for any OracleApplications product you have licensed.
Oracle Manufacturing and Distribution Open Interfaces Manual
This manual contains up–to–date information about integrating withother Oracle Manufacturing applications and with your other systems.This documentation includes open interfaces found in OracleManufacturing.
Oracle Applications Message Reference Manual
This manual describes all Oracle Applications messages. This manual isavailable in HTML format on the documentation CD–ROM for Release11i.
Training and Support
Training
Oracle offers a complete set of training courses to help you and yourstaff master Oracle HRMS and reach full productivity quickly. Thesecourses are organized into functional learning paths, so you take onlythose courses appropriate to your job or area of responsibility.
You have a choice of educational environments. You can attend coursesoffered by Oracle University at any one of our many EducationCenters, you can arrange for our trainers to teach at your facility, oryou can use Oracle Learning Network, Oracle University’s onlineeducation utility. In addition, Oracle Training professionals can tailorstandard courses or develop custom courses to meet your needs. Forexample, you may want to use your organization structure,terminology, and data as examples in a customized training sessiondelivered at your own facility.

xxiPreface
Support
From on–site support to central support, our team of experiencedprofessionals provides the help and information you need to keepUsing OracleR HRMS – The Fundamentals (US) working for you. Thisteam includes your Technical Representative, Account Manager, andOracle’s large staff of consultants and support specialists with expertisein your business area, managing an Oracle8i server, and your hardwareand software environment.
Do Not Use Database Tools to Modify Oracle Applications Data
Oracle STRONGLY RECOMMENDS that you never use SQL*Plus,Oracle Data Browser, database triggers, or any other tool to modifyOracle Applications data unless otherwise instructed.
Oracle provides powerful tools you can use to create, store, change,retrieve, and maintain information in an Oracle database. But if you useOracle tools such as SQL*Plus to modify Oracle Applications data, yourisk destroying the integrity of your data and you lose the ability toaudit changes to your data.
Because Oracle Applications tables are interrelated, any change youmake using an Oracle Applications form can update many tables atonce. But when you modify Oracle Applications data using anythingother than Oracle Applications, you may change a row in one tablewithout making corresponding changes in related tables. If your tablesget out of synchronization with each other, you risk retrievingerroneous information and you risk unpredictable results throughoutOracle Applications.
When you use Oracle Applications to modify your data, OracleApplications automatically checks that your changes are valid. OracleApplications also keeps track of who changes information. If you enterinformation into database tables using database tools, you may storeinvalid information. You also lose the ability to track who has changedyour information because SQL*Plus and other database tools do notkeep a record of changes.
About Oracle
Oracle Corporation develops and markets an integrated line ofsoftware products for database management, applications

xxii Using Oracle HRMS – The Fundamentals (US)
development, decision support and office automation, as well as OracleApplications, an integrated suite of more than 160 software modulesfor financial management, supply chain management, manufacturing,project systems, human resources and customer relationshipmanagement.
Oracle products are available for mainframes, minicomputers, personalcomputers, network computers and personal digital assistants,allowing organizations to integrate different computers, differentoperating systems, different networks, and even different databasemanagement systems, into a single, unified computing and informationresource.
Oracle is the world’s leading supplier of software for informationmanagement, and the world’s second largest software company. Oracleoffers its database, tools, and application products, along with relatedconsulting, education and support services, in over 145 countriesaround the world.
Your Feedback
Thank you for using Using OracleR HRMS – The Fundamentals (US)and this user’s guide.
Oracle values your comments and feedback. This guide contains aReader’s Comment Form you can use to explain what you like ordislike about Using OracleR HRMS – The Fundamentals (US) or thisuser’s guide. Mail your comments to the following address or call usdirectly at (650) 506–7000.
Oracle Applications Documentation ManagerOracle Corporation500 Oracle ParkwayRedwood Shores, CA 94065U.S.A.
Or, send electronic mail to [email protected].

C H A P T E R
1
1 – 1Introduction to Oracle HRMS
Introduction to OracleHRMS

1 – 2 Using Oracle HRMS – The Fundamentals (US)
Introduction Overview
All your Oracle HRMS applications have a single source of informationbecause they share the same tables within the Oracle database. Thiseliminates data redundancy, reduces the possibility of conflicting datain different databases and creates a consistent, complete and reliablepicture of every employee.
To help you understand how Oracle HRMS uses the Oracle database,you need to be familiar with the following key concepts:
• Human Resource Model: You can define your own humanresource model to reflect your enterprise’s structures andpolicies. This information model lets you record the personal,work, and pay information for all the people you want to holdand process.
• Shared Information in Oracle HRMS: Oracle Human Resourcesand Oracle Payroll are available for purchase together as thecomponents of a closely integrated human resourcesmanagement system. This system combines Oracle HumanResources and Oracle Payroll windows under a single menustructure, sharing windows and underlying tables whereverpossible to eliminate redundant data entry, maintenance andstorage.
• How To Use Your Documentation and Online Help: There aremany different activities which make up a successful strategic,value–added human resource management system. All theseactivities can be grouped into an interrelated cycle of events. Tohelp you set up and manage your system, each event in the cycleis explained in the volumes of your Oracle HRMS User’s Guideand the online help.
• Multilingual Oracle HRMS: Oracle HRMS enables you tomanage information in a wide variety of languages. To enableyou to do this Oracle HRMS provides you with:
– Multiple address styles
– National identifiers (such as social security numbers)validated against the format required in each country
– Legislation specific date formatting
– Translatable information
– Multilingual reports
• Managing Change Over Time: A key requirement for anyenterprise is the ability to manage change confidently and

1 – 3Introduction to Oracle HRMS
effectively. Typical enterprise changes include corporaterestructuring, departmental reorganization, mergers andde–mergers of companies, centralization or decentralization ofcontrol and decision making, employee development andturnover. In Oracle HRMS, you can change each of the majorparts of your enterprise model without having to redefine theother parts.
Introduction to Oracle HRMS
Oracle Human Resource Management Systems (HRMS) enables you toachieve a well managed human resource system, turning HRmanagement into a strategic advantage.
What is Human Resource Management?
Today, the most successful enterprises continuously review andimprove their business functions, searching for new ways to streamlineprocesses to make them more effective and to use them to gaincompetitive advantage. Human Resource Management is responsiblefor addressing the workforce aspect of this continuous improvement.
How has the role of Human Resource Management changed?
Human resource management was originally an administrative andwelfare role within an enterprise. This often included recruitment andrecord–keeping functions.
This role was primarily reactive in nature. Human Resources respondedto the needs of both managers and employees, but did not anticipatethem.
In the last few decades, human resource management has evolved andassumed a more proactive role, from automated processing, to theprovision of a new level of strategic value.
Why is Human Resource Management important?
The people within your enterprise produce the goods and provide theservices that fuel your enterprise. At the same time, the human cost isoften the biggest cost a company incurs. Well managed humanresources directly improve your enterprise and contribute to acompetitive advantage.

1 – 4 Using Oracle HRMS – The Fundamentals (US)
If your enterprise has strategic, value added human resourcemanagement you will hire, motivate and retain the most capableworkforce. You will have the ability to engage employees and linemanagers directly in managing their skills and careers to yourenterprise’s advantage. Furthermore, you will have accurate,up–to–date workforce information for managers and executives.
What applications comprise the Oracle HRMS family suite?
Oracle HRMS consists of the following applications. These are allseparate products powerfully integrated into one application family.
• Oracle Human Resources
• Oracle Payroll
• Oracle Advanced Benefits
• Oracle Self–Service Human Resources (SSHR)
When the term HRMS is used, it refers to this integrated set ofapplications.
Applications Related to the Oracle HRMS family suite
There are other applications related to the Oracle HRMS family suite:
• Oracle Training Administration
• Application Data Exchange and Hierarchy Diagrammers
• Statutory Sick Pay and Statutory Maternity Pay (UK only)
• Oracle Time Management
• Oracle Business Intelligence System
Individual user guides provide information on these other products.
What is Oracle Human Resources?
Oracle Human Resources (HR) is a proactive management solution thathelps control costs while developing and supporting an effectiveworkforce. Among the many features of Oracle HR is the ability to:
• Manage the entire recruitment cycle
• Design organizational models that match current and futurebusiness strategies and objectives
• Perform position management by defining and recordingrequired skills, competencies, experience and qualifications forpositions, jobs and organizations

1 – 5Introduction to Oracle HRMS
• Perform career management functions relating to the definitionof competencies, assessments, suitability matching, graphicalranking and succession planning
• Administer and maintain benefits plans, coverage levels andcontribution allocations
• Manage salary proposals and approve these by component
• Use spreadsheets to export compensation and benefit details forcomparison with external survey figures
Oracle Human Resources provides the shortest route to fast, smarthuman resource management.
What is Oracle Payroll?
Oracle Payroll is a high–performance, rule based payroll managementsystem designed to keep pace with changing enterprises and workforceneeds.
Payroll managers require a solution to address unique requirementsand offer complex calculations without losing the benefits of a standardsupported package. Oracle Payroll offers that capability via a unique,data driven approach that enables the definition and management ofdiverse payroll requirements.
Among its many capabilities, Oracle Payroll delivers the power to:
• Process many payrolls quickly and easily in a single day
• Define comprehensive personal payment methods
• Quickly create complex calculation rules such as union overtimewithout programming
• Efficiently check, double check and reconcile payrolls
• Make retroactive adjustments to past earnings or deductions
• Examine employee payment histories at any time
• Track and monitor employee costs via online access to payrolldata
• Disburse in multiple currencies
• Transfer payroll information to the general ledger and to otheraccounting systems, including project costing systems
• Report on payroll results to the tax office and companyexecutives
• Maintain full security and integrity of payroll information,including historical information

1 – 6 Using Oracle HRMS – The Fundamentals (US)
• Enable access to information when required for inquiries andresponses to pay queries
Oracle Payroll enables fast, flexible and accurate payroll processingfrom time capture to ledger costing.
What is meant by separate vs. integrated Oracle HRMS systems?
Traditionally, human resources and payroll departments have oftenheld and managed human resource information in separate, duplicatesystems.
Over time there has been a greater demand for more unifiedinformation management derived from both human resource andpayroll sources.
One solution to this has been to develop interface products, that enabletechnical specialists to transfer data between the two systems. OracleHRMS, however, provides an integrated system that both functions cangenuinely share with full security and control of access byresponsibility.
This system is flexible enough to be implemented for use in a humanresources only or a payroll only environment. In each case you haveaccess to the full range of functionality associated with humanresources or payroll.
What is Oracle Advanced Benefits?
In addition to the powerful compensation and benefit functionalityincluded in Oracle Human Resources, Oracle also offers OracleAdvanced Benefits. Oracle Advanced Benefits enables the setup andadministration of a complete benefits offering for enterprises managingtheir own benefits administration.
Oracle Advanced Benefits delivers the following key functions:
• Pre and post–enrollment communications
• Web and interactive voice response (IVR) enrollment for cafeteriaand exceptions
• Default and mass enrollments
• Enrollment process monitoring
• Life event management (for example, new hires, transfers,relocations or age changes)
• Web–based what–if eligibility analysis
• Flexibility spending account claims processing and reporting

1 – 7Introduction to Oracle HRMS
Oracle Advanced Benefits provides a total compensation framework,setting the stage for exciting and new compensation solutions.
What is Oracle Self–Service Human Resources (SSHR)
SSHR provides self–service human resource management for managersand employees. Using an intranet and a web browser employees andtheir managers now have easy to use and intuitive access to personaldata and career management functionality.
Oracle Workflow is used extensively in SSHR. SSHR uses Workflow tomanage the flow of information between employees and management.The workflow engine is used for business process transactions and canroute decision making through approval chains. For example, anemployee may apply for a job using the Apply for a Job function andthrough a management approvals process be informed and acceptedinto a job.
The workflow engine is also used to modify and configure much ofSSHR.
Using SSHR you can:
• Manage careers
This includes appraising employee’s competencies, matching aperson to a job or position by competence and planningsuccession.
• Perform web based recruitment using ’Candidate Offers’
Candidate offers enables you to perform web based recruitment.Managers can seek approval for an appointment then advise jobapplicants, by letter, that they have been successful. Thisfunction is offered with its own responsibilities.
See: Oracle Self–Service Human Resources, Implementing OracleSelf–Service Human Resources (SSHR).
Is Oracle HRMS a Multilingual, Global Application?
Yes. Oracle HRMS offers the best of both worlds in the sameinstallation. Oracle provides non–legislative information commonacross all countries, plus localized information specific to each country.
Oracle also enables you to run HRMS in more than one language on asingle database. This enables you to enter and report on informationusing more than one language. For example, your base, or sourcelanguage, could be French, but you could also install German and

1 – 8 Using Oracle HRMS – The Fundamentals (US)
English. You would then be able to enter and produce reports inFrench, German and English.
Human Resource Model
The human resource model is both flexible and adaptable. It is flexible,so that you can reflect the needs of different companies, or differentgroups within the same company. It is adaptable, so that you can easilychange the basic model as your enterprise changes.
Figure 1 – 1 Modeling Human Resource Information
People
In Oracle HRMS, you can hold information about current and formeremployees, applicants, external contacts such as contractors, andemployee contacts such as relatives and dependents.
1 – 9Introduction to Oracle HRMS
In addition to standard information such as addresses, nationality,interview records, qualifications, and absence information, you candefine any other special information you need to hold for people. Forexample, you can define what information to hold on medical history,previous employment, or outside interests.
You can also record employment information, such as hours of workand work choices.
Oracle HRMS holds one integrated set of employee–relatedinformation. Payroll users access the parts of this information theyrequire, while enterprise business rules determine who is responsiblefor entering and maintaining it.
Work StructuresWork structures represent the different ways in which employees canwork within your enterprise. They provide the framework for definingthe work assignments of your employees. They enable you to managethe information about your enterprise that is independent of youremployees. You can also think of work structures as representing theorganizational units of your enterprise. The Business Group is thelargest unit and represents your enterprise as a whole.
The work structures include your internal organizations (such asdepartments or divisions), payrolls, jobs or positions, gradingstructures, and any special employee groupings that you use in yourenterprise.
There is one integrated set of work structures for human resource andpayroll users.
Compensation and BenefitsIn Oracle HRMS you can define your own types of compensation andbenefits, and the business rules you want to apply to them. As youchange policies, move people within your enterprise, and adjust theirindividual remuneration packages, the system maintains theircompensation and benefit history.
For example, suppose you want to define a special type of paymentand make this available only to employees who work at a particularlocation. In Oracle HRMS you use a compensation element to representthe payment. You define the business rule as a link between theelement and the specific location. Then when you assign employees tothe location, they automatically become eligible for the payment.
AssignmentsIn Oracle HRMS, the assignment describes employees’ places withinthe enterprise: the organization for which they work, their role, grade,

1 – 10 Using Oracle HRMS – The Fundamentals (US)
location, and so on. As you change the assignment information for anemployee, you automatically build up their work history.
Your compensation eligibility rules link compensation and benefits towork structures, such as jobs or grades. The assignment placesemployees within the work structures of the enterprise. In this way, anemployee’s assignment determines their eligibility for compensationand benefits.
You can use assignments to identify major employee groups within theenterprise for management, for reporting and costing, and forcompensation and benefit planning and administration.
Shared Information in Oracle HRMS
For all Oracle HRMS applications, you enter and maintain the samefundamental information about your structure and operations, youremployees and their assignments and employee compensation andbenefits. You then add the specialized information you need specificallyfor human resources, or payroll management or benefitsadministration.
Common Information
The common core of fundamental information used for humanresources, payroll and benefits administration includes:
• Your operational basics:
– Payrolls with their calendars and pay periods
– Currencies and methods of payment you use
• Your organizational structure:
– Internal organizations, such as companies, divisions,departments, work groups, or production team
– External organizations of key importance to you, such asemployment agencies, tax authorities, or unionheadquarters
– Organization location information, including addresses andtelephone numbers
– Hierarchies showing the relationships between yourorganizations
– Any grade and grade scale structures you use

1 – 11Introduction to Oracle HRMS
• Your employees’ essential personal information, such as:
– Name and address
– Marital status
– Birth date
– Nationality
– Ethnic origin
• Your employees’ current work statuses, such as:
– Active assignment
– On maternity leave
– Terminated
• Your employees’ assignments to:
– Internal organizations
– Grades, or grades and grade steps
– Jobs, or jobs and positions
– Salary bases for quoting pay, such as hourly or annual
– Payrolls
• Elements of your employees’ pay and benefits:
– Earnings such as salary, wages, commissions, bonuses,allowances
– Employer charges such as employer contributions tolegislatively–mandated or private insurance or pensionplans
– Deductions such as contributions for union dues oremployee stock purchase plans
– Nonpayment benefits such as vacation time or a company car
Shared Windows in Oracle HRMS
While many of the windows in your system relate exclusively to thehuman resources, payroll or benefits functions, some includeinformation relevant to more than one function. These latter windowsare shared windows.
Shared windows can include some information fields relevant to bothhuman resources and payroll users, and other fields for informationspecific to either human resources or payroll users but not both.

1 – 12 Using Oracle HRMS – The Fundamentals (US)
Using Shared Windows
You can control the use of fields on shared windows by the value yoursystem administrator gives to each user or responsibility for theHR:User Type profile option. The three valid values are:
• HR with Payroll User
• HR User
• Payroll User
Users with an HR User profile
These are restricted in their use of fields on certain windows. Inparticular they:
• Do not see certain fields on the Element window, which are onlyrequired if you are processing elements
• Cannot assign employees to a payroll if both Oracle Payroll andOracle Human Resources are installed
Also, in all legislations, apart from the US, they:
• Do not see the Statutory Information field in the Payroll window
• Cannot adjust element entry Pay Values
Multilingual Oracle HRMS
Oracle HRMS enables you to manage information in a wide variety oflanguages. To help you enter and retrieve information in the languageof your choice, HRMS provides you with the following features.
Multiple Addresses Styles
Every country has its own address style, for example in Italy you canenter the province and in Malaysia you can enter the region. OracleHRMS enables you to select the correct country address style.
See: Address Styles, Configuring, Reporting and System Administration inOracle HRMS.
National Identifiers
Each country has its own method of identifying its citizens. Forexample, in the UK it is the National Insurance number, in the US it isthe Social Security number, and in Canada it is the Social Insurancenumber.

1 – 13Introduction to Oracle HRMS
For supported localizations you can select the correct national identifierfor your site and then check on entry that identifiers have the correctnational format. For example, in the UK the format is ’AADDDDDDA’,where A is a letter and D is a digit, while in Canada it is DDD DDDDDD.
If your localization is not supported, you can define your ownvalidation.
Dates and Numbers
Oracle HRMS enables you to enter dates and numbers in any formatand then translates this into the national format supported by yourlegislation. For example, you do not have to enter a date in a prescribedformat such as DD/MM/YYYY. You can enter the date how you want,and HRMS automatically configures it in the national format definedfor your site.
Similarly, you do not have to enter numerical information in aprescribed format. For example, US usage has previously required theformat 1,000.0 whereas German usage has required the format 1.000,00.You can now enter the number without explicit formatting, as thecorrect format for your site will be automatically configured.
Translating Information
Oracle HRMS enables you to install additional languages on top ofyour base or source language. You can then enter information in keyfields in your additional languages using the Translations window. Thisis accessed from the Translation icon. The translated information youenter is then used if you print reports or log on to Oracle HRMS in thislanguage.
The HRMS windows where the Translation icon is available are:
• Organization
• Location
• Person Types
• Assignment Statuses
• Element
• Input Values
• Balance
• Organizational Payment Method
• Element Classifications
See: Creating Translations for a Record, Oracle Applications User’s Guide
1 – 14 Using Oracle HRMS – The Fundamentals (US)
Multilingual Reports
Oracle HRMS enables you to print HRMS reports in the languages ofyour choice. Depending on the type of report, Oracle HRMS either:
• Enables you to select the language in which to print the report
• Prints the report in the language, or set of languages, dependingon the report parameters you select
See: Multilingual Reporting, Configuring, Reporting and SystemAdministration in Oracle HRMS
Managing Change Over Time
A key requirement for any enterprise is the ability to manage changeconfidently and effectively. Typical enterprise changes includecorporate restructuring, departmental reorganization, mergers andde–mergers of companies, centralization or decentralization of controland decision making, employee development and turnover.
In Oracle HRMS, you can change each of the major parts of yourenterprise model without having to redefine the other parts.
To manage the changes to your enterprise, information within yourenterprise is either dated or datetracked.
Dated Information
Work structures are an example of information that is dated. You canattach dates to your work structures to manage different versions overtime. You retain previous versions for historical information and youcan create future–dated versions to prepare for reorganization inadvance.
You can also set up in advance the business rules, includingcompensation and benefits, associated with the new structures. Thesebecome effective on the date you specify, avoiding a workload peak.
The information in Oracle HRMS about your locations, organizations,jobs, positions, grades, payrolls and other work structures is also datedinformation. All dated information has From and To dates, that is,dates from and to which it is in effect in your enterprise. For example,when defining a position, you enter a date from which it starts. Toclose it down, you give it a date to which it remains valid.
Oracle HRMS does not permit you to assign employees to structures ondates earlier than their Date From, or later than their Date To.

1 – 15Introduction to Oracle HRMS
Similarly, the system protects you from building eligibility rules forcompensation and benefits based on work structures that have not yetgone into effect, or are out of date.
Consider using a fixed date, such as 01–JAN–1901 as the start date forall your initial work structures. By choosing a date like this you canimmediately identify all of your implementation definitions. Youshould use accurate dates for all subsequent definitions.
Dated Versions of Hierarchies
You can structure the organizations and positions you enter in OracleHRMS into organization or position hierarchies that serve variouspurposes. Reporting hierarchies, for example, reflect reporting lineswithin your enterprise.
You maintain both dates and version numbers for these hierarchies, tokeep a history of your hierarchies as they change over time.
To build a new version of a hierarchy, you can copy an existing one andmake the necessary changes to it. When you save the new version thesystem automatically gives the previous version an end date.
DateTrack
In contrast to work structures, which are simply dated, other keydynamic information in Oracle HRMS is datetracked. This includesinformation on employees, assignments, and compensation andbenefits. DateTrack allows you to maintain a continuous history of theinformation over time.
You can enter datetracked information or make changes to it at anytime. When you set an effective date for your work, DateTrack ensuresthat only information effective on that day is used for any processing,validation, and reporting you carry out. When you make a change, youcan choose whether it is a correction to the last update or a new updateto be recorded in the history of the record. You can use DateTrackHistory to view a report of every update ever made to a record.
You can identify windows containing datetracked, rather than dated,information by the presence of a region labelled Effective Dates.
Effective Date Reminder
When you are new to DateTrack, you may find it useful to be remindedof your effective date whenever you open a window where you canenter or change datetracked information. The reminder appears in aDecision window and asks whether you want to change your effectivedate. If you choose Yes, the Alter Effective Date window displays.

1 – 16 Using Oracle HRMS – The Fundamentals (US)
There is a user profile option called DateTrack:Reminder thatdetermines when the Decision window appears. There are threepossible values for this profile option:
• Always
• Never
• Not Today
The Not Today value causes the reminder to appear when you navigateto a window where you can change datetracked information and youreffective date is not today’s date.
You can set the value of this profile option in the Personal ProfileValues window.
Datetracked Information and History
Oracle HRMS maintains a continuous record of changes made todatetracked information. When you view a record in a datetrackedwindow, it shows you a snapshot of the information on your effectivedate. The Effective Dates region on the datetracked window showsyou the dates between which the snapshot is valid.
Suppose you are viewing an assignment with an effective start date of01–JAN–1999 and no effective end date. This means that theassignment was created or last changed on 1 January 1999, and thesnapshot information you are viewing is still valid. There have been nochanges to the assignment since 1 January 1999, and there are no futuredated changes.
To find out whether the assignment existed before 1 January 1999, youshould use DateTrack History.
If there is an effective end date, you know that the record was eitherdeleted or changed on the next day. To find out whether the recordcontinues to exist, you can set your effective date to the day after thisend date, or use DateTrack History.
When you update datetracked information, you are prompted tochoose between Update and Correction.
If you choose Update, Oracle HRMS changes the record as from youreffective date, but preserves the previous information. If you chooseCorrection, Oracle HRMS overrides the previous information withyour new changes. The start and end dates of the snapshot you havecorrected remain the same.
Example of Correction Versus Update
Suppose you hire two new employees, Jack Lee and Julie Summers. Afew weeks later Julie gets married. At the same time you discover anerror in Jack’s record relating to his nationality.

1 – 17Introduction to Oracle HRMS
You update Julie’s information by setting your effective date to the dateof her wedding and entering her new married status, her change ofname, and new next of kin information. Her previous personalinformation, which was valid until her wedding, remains in her record.
You correct Jack’s wrong nationality by setting your effective date to hishire date and entering the correct nationality. By choosing Correction,you put the record right, from the beginning. You should checkwhether there is an end date in the Effective Dates region of Jack’srecord. If there is, you have only corrected the first snapshot of therecord. Set your effective date to the day after the end date, and makethe correction again. Continue in this way until the To field is blank,indicating that you have reached the last snapshot of this record.
New Records
You cannot create a record and then update it on the same day. If youtry to do this, Oracle HRMS warns you that the old record will beoverridden, and then changes Update to Correction. This is becauseDateTrack maintains records for a minimum of a day at a time.
Future Updates
Using DateTrack, you can make future updates. For example, supposeyou are relocating an employee, with six months notice. You decide toenter the relocation on the system straight away. So you set youreffective date to the first day when the employee will be at the newlocation, and change the location on the assignment.
Later that month you promote the employee to a new grade. So youset your effective date to today’s date and change the grade on theassignment. Oracle HRMS checks to see whether the record has afuture update scheduled. It finds that the location changes in thefuture and prompts you for the type of update you now want to make.You have two choices:
Insert: This simply inserts the change before the next scheduledchange. This is the correct choice for the example. The employeewould be promoted from today. The future–dated relocation still takesplace in six months time.
Replace: This change replaces all future–dated changes. In the example,the employee would be promoted from today. However, the record ofthe relocation would be completely removed from the system.
DateTrack Date Security
There is a DateTrack:Date Security user profile option, whichdetermines whether you can change your effective date. Your system

1 – 18 Using Oracle HRMS – The Fundamentals (US)
administrator sets this profile option. You can check its value on thePersonal Profile Values window. There are four possible values:
• All: You can change to any other effective date.
• Future: You can change between today’s date and any futuredates.
• Past: You can change between today’s date and any past dates.
• Present: You cannot change to a date other than today.
DateTrack Deleting Options
When you delete datetracked information, Oracle HRMS prompts youwith the following options:
End Date: This ends the record on your effective date. When youre–query the record, this end date displays in the To field.
Purge: This totally removes the record from your database.
If there are any future updates to the record after your effective date,Oracle HRMS may prompt you with another two options:
All: This removes all future updates to the record. The currentsnapshot is valid until you make another change.
Next: This removes the next future update to the record. It then resetsthe current snapshot’s end date to the end date of the deleted update.
You do not always see all of these options when you choose to delete.Some windows do not allow all four operations.
Setting Your Effective Date
When you log on to Oracle HRMS, your effective date is always today’sdate. To view information current at another date, or to makeretrospective or future–dated changes, you need to change youreffective date.
� To set your effective date:
1. Save any outstanding information you have entered or changed,then choose Alter Effective Date from the Tools menu.
The Alter Effective Date window opens.
2. Enter a new effective date and choose OK.
If your current window is a ”top–level” window (one calleddirectly from the Navigator), your new effective date remains in
1 – 19Introduction to Oracle HRMS
place until you reset it or exit Oracle HRMS. If your currentwindow is not a top–level window, your new effective date onlyapplies while you are working in the current window and anywindows subsidiary to it. When you return to a top–level window,your effective date is reset to its previous value.
Note: In certain special cases, when you change your effectivedate on a subsidiary window, Oracle HRMS returns you to theprevious window, and you may have to re–query the recordsyou want to view or update. This protects the integrity ofthese records.
So long as your effective date remains different from today’s date,it is displayed in the title bar of every window.
Viewing the History of Datetracked Information
To see all the changes made to a datetracked record over time, useDateTrack History.
� To view DateTrack History:
1. Choose the DateTrack History icon from the Toolbar.
The DateTrack History Change Field Summary window opens.Each row shows which fields were changed on the From date.
2. Choose the Full History button if you want to open a DateTrackHistory folder showing the value of each field between the effectivedates. The row for the current snapshot (corresponding to youreffective date) is highlighted.
You can use the Folder menu to select the fields to view in thefolder.
Note: It is possible to customize the information displayed inthe Folder by modifying the DateTrack History view for theunderlying table.
See: How To Create and Modify DateTrack History Views,(Oracle HRMS Implementation Guide)
See: Customizing the Presentation of Data in a Folder, (OracleApplications User’s Guide)
Removing an End Date
If you have mistakenly set an end date on a datetracked record, youcan remove it.
1 – 20 Using Oracle HRMS – The Fundamentals (US)
� To remove an end date:
1. Set your effective date to the day the record ends.
2. Choose Delete Record from the Edit menu.
3. Choose the DateTrack delete option Next. This removes the nextchange to the record, which is the end date. Save your work.

C H A P T E R
2
2 – 1Organization Management
OrganizationManagement

2 – 2 Using Oracle HRMS – The Fundamentals (US)
Organization Management Overview
You can represent your enterprise at the highest level by defining it asan employer, and then representing all the departments and sectionsbelow this.
To enable you to get the most out of the Organization Managementfunctionality, you need to understand the components provided torepresent your enterprise. These are:
• Locations: You can set up the physical locations of youremployees.
• Representing employers using Business Groups: You need torepresent your enterprise as an employer. HRMS enables you todo this by creating Business Groups. This is the largestorganizational unit you set up. You can set up:
– Single or multiple Business Groups: You can set up oneBusiness Group or many Business Groups, depending onthe needs of your enterprise.
– Defaults for Business Groups: To save you time, you canenter defaults for the Business Groups. This defines the typeof information that will generally apply to all employees inthe Business Group, such as, default working hours for allemployees, employment standards, and such. These can beoverridden.
– Government Reporting Entities (selected legislations only):You can set up one or more Government Reporting Entities(GREs) within each Business Group. The GRE is theorganization the federal, state, local or provincialgovernments recognize as the employer.
– Provincial Reporting Establishment (Canada only) You canalso set up Provincial Reporting Establishments (PREs) torepresent employees in the province of Quebec.
• Representing organizations: HRMS enables you to represent alllevels of your enterprise and those enterprises you work with.You can represent:
– Internal organizations: These are the groupings in whichemployees work, such as branches, departments or sections.
– External organizations: You can also include informationabout the external organizations you work with, such as,training vendors, tax offices, certification bodies or worker’scompensation boards.

2 – 3Organization Management
• Organization hierarchies: You can show reporting lines andother hierarchical relationships among organizations in yourenterprise. You can use:
– Multiple hierarchies: You can set up as many hierarchies asyou need, you might want to set up hierarchies for matrixmanagement, security hierarchies or hierarchies forreporting.
– Organization change and version control: Changing yourhierarchy to reflect simple changes in reporting lines is notdifficult.
Organization Management
Oracle HRMS can represent all the components of your enterprise. Youcan record the physical locations where your employees work and allthe different departments and sections that make up your enterprise.You can even record information about other organizations you workwith, such as recruitment agencies or tax authorities.
How do you represent your enterprise as an employer?
Oracle HRMS enables you to represent your enterprise as an employerby setting up a Business Group. This corresponds to a company orcorporation, or in large enterprises, to a holding or parent company orcorporation.
In North America, how do you manage government reporting?
Oracle HRMS enables you to set up one or more GovernmentReporting Entities (GREs) within each of your Business Groups. GREsrepresent an employer the government recognizes as being responsiblefor paying employees and for filing a variety of reports thatgovernment agencies require. If your enterprise has a single EmployerIdentification Number from the Internal Revenue Service, yourBusiness Group and GRE are the same organization.
For Canada, you also need to set up Provincial ReportingEstablishments (PREs). GREs and PREs represent an employer thegovernments recognise as being responsible for paying employees andfor filing a variety of reports. There must be a GRE for each BusinessNumber that the Canada Customs and Revenue Agency (CCRA)assigns to an employer. There must be a PRE for each QuebecIdentification Number that the Ministere du Revenu assigns to an

2 – 4 Using Oracle HRMS – The Fundamentals (US)
employer. If your enterprise has a single Business Number from theCCRA and a single Quebec Identification Number, your BusinessGroup, GRE and PRE are the same organization.
How do you represent the structure of an enterprise?
Oracle HRMS enables you to build a model of your enterprise showingall the reporting lines and other hierarchical relationships. You can setup reporting hierarchies reflecting all the reporting lines in yourenterprise, as established in organization charts.
Locations
In Oracle HRMS, you set up each physical site where your employeeswork as a separate location. You can set up:
• Global locations: These are available in all Business Groups.
• Business Group locations: These can only be used in oneBusiness Group.
Similarly, you enter the addresses of external organizations that youwant to maintain in your system, such as employment agencies, taxauthorities, and insurance or benefits carriers. When setting upinternal or external organizations, you select from a list of theselocations.
This approach has these advantages:
• You enter information about each location only once, therebysaving data entry time.
• Central maintenance of locations ensures consistency of addressstandards.
• Your work sites exist as separate structures identifiable forreporting purposes, and for use in the rules that determineemployee eligibility for various types of compensation andbenefits.
Location Extra Information Types
Define as many Extra Information Types (EITs) as you require to holdinformation about locations. There are also some predefinedassignment EITs supplied with the application to enable you to enterrequired information. These are:

2 – 5Organization Management
Establishment Extra Information
Enter information specific to individual establishments that you aregoing to include in an establishment hierarchy. Values you enter herewill override information you enter at the parent entity level. If youleave fields blank then the values you enter against the parent entity areused in the report.
Note: The reporting name, reporting unit, and the MWRspecific data do not default to values entered against the parententity if they are not entered here.
• EEO–1 Specific Data – the EEO–1 reporting name and unitnumber for the establishment, whether the establishmentemploys apprentices or is a government contractor, briefdescriptions of the of the establishments major businessactivities.
The unit number is the number the EEOC assigns toorganizations that function as EEO–1 establishments. For newestablishments of existing companies leave this blank.
An establishment is considered to be a government contractor ifit is one of the following:
– Prime government contractors or first tier subcontractors,who have a contract, subcontract, or purchase orderamounting to more than $50,000.
– A depository of government funds.
• EEO–1/VETS Generic Data – DUNS number, SIC number,NAICS number, GRE for statistical reporting, whether the reportshould treat the establishment as a headquarters establishment.
The VETS–100 report only uses the SIC number so ignores theNAICS number.
The EEO–1 report uses the SIC number if you enter one here. Ifnot then it uses the NAICS number, regardless of whether youenter a SIC number against the parent entity. If you do not entera value here then the report uses the SIC number you enteragainst the parent entity, or the NAICS number if a SIC numberis not present.
• MWR Specific Data – report unit number, trade name, work sitedescription, comment codes 1–3, comments
The report unit number is given to the worksite by the State andis the number to which the organization is associated.
The comment code 1 is a code to define the reason that theemployment data differs substantially from the previous reports.

2 – 6 Using Oracle HRMS – The Fundamentals (US)
Comment 2 and 3 can be used to enter further codes to accountfor any differences. The Comment field can be used to explainlarge changes in employment or wage data.
• VETS Specific Data – reporting name for the establishment, unitnumber
The unit number is obsolete for VETS–100 reporting purposesbut you can still use it for internal information.
Representing Employers Using Business Groups
The largest organizational unit you set up in Oracle HRMS to representyour enterprise as an employer is the Business Group. A BusinessGroup may correspond to a company or corporation, or in largeenterprises, to a holding or parent company or corporation.
By default, all employees you enter in Oracle HRMS receive anassignment to their Business Group. When you give them assignmentsto internal organizations such as divisions or departments, thesereplace the default assignment, but their records continue to existwithin the Business Group.
Key flexfields enable you to enter information about the BusinessGroup. As part of the implementation of Oracle HRMS, the keyflexfields for a Business Group are set up before the Business Groupitself. For further details about implementation, refer to the OracleHRMS Implementation Guide.
Within a Business Group, you set up one or more Government ReportingEntities (GREs). A GRE represents an employer the federal governmentrecognizes as being responsible for paying employees and for filing avariety of reports government agencies require. It is distinguished byhaving a unique IRS (Internal Revenue Service) identification number.
A Business Group with companies or divisions that have their own IRSidentification numbers includes a GRE for each one. However all theseGREs use the body of information on work structures and employees,and the single set of key flexfields, established for the entire BusinessGroup.
The Startup Business Group
Oracle HRMS comes with one Business Group supplied as startupdata. You can use this and its default definitions as the starting pointfor your own Business Group, or you can create a completely newBusiness Group.

2 – 7Organization Management
Note: If you create a new Business Group, you must create anew responsibility (or edit the default responsibility) to allowaccess to it, before beginning to create other work structures.
Single and Multiple Business Groups
Many enterprises decide to use a single Business Group to hold ’live’information, so they can display, report and manage information fromall parts of the enterprise at the same time.
Note: You cannot view information online for more than oneBusiness Group at a time.
However, there are reasons for setting up multiple Business Groups inthe same installation, such as the following:
• You want to have a copy of your live system with examplerecords for training or testing purposes.
• You are a holding company or a corporation with a number ofsubsidiary companies. Each subsidiary has its own structures,employees, and compensation and benefit policies. If yoursubsidiaries are in different countries you also have to deal withlocal legislative requirements.
• You are acquiring a company or merging with another company,and you want to maintain separate structures and compensationand benefits during the transition process.
Defaults for the Business Group
You can enter certain types of information for the Business Group toappear as defaults throughout your enterprise structures:
• You can select a default currency.
• You can enter a default for the value each assignment contributestowards each staffing budget that you define. For example, bydefault an assignment may count as one for a headcount budget.
• You can enter default working hours for all the employees in theBusiness Group. You can override these defaults at organization,position, and assignment levels.
If you are using HRMS in the US, you have additional defaults:
• For HR reporting purposes you can register Reporting Categoriesand Reporting Statuses for the Business Group. These include
2 – 8 Using Oracle HRMS – The Fundamentals (US)
employment categories such as Full Time or Part Time that coveremployees who are not temporary workers, and assignmentstatuses such as Active or Paid Leave that cover employees whohave not left your enterprise.
• You can register for the Business Group the names of thesegments of its Cost Allocation key flexfield that hold cost centerand labor distribution codes. This customizes the names thatappear as field prompts in your BEE Windows.
Employee and Applicant Identification Numbers
When defining a Business Group, you choose a method of creatingidentifying numbers for its employees and applicants. The choices are:
• Automatic number generation
• Manual entry
• For employees only, automatic use of a national identifier, suchas the US social security number, Canadian social insurancenumber or the UK National Insurance number
Note: Once you save an automatic number generation method,you can later change only to manual entry.
Adapting and Creating a New Business Group
The first organization you must set up is the Business Group, to whichall other organizations belong.
You can either adapt the startup Business Group provided with OracleHRMS, or create a new Business Group for your enterprise.
You must then create a responsibility that enables you to access theBusiness Group.
� To adapt the startup Business Group:
1. Select the default Oracle Human Resources responsibility with thesecurity group ’Standard’. This enables you to see all the recordsfor the startup Business Group.
2. Adapt the startup Business Group to your own Business Grouprequirements.
See: Creating an Organization: page 2 – 21
� To create a new Business Group:
1. Create a new Business Group.

2 – 9Organization Management
See: Creating an Organization: page 2 – 21
Note: Your system administrator must create a newresponsibility for the Business Group before you can use it.This gives access to all the records, as follows:
� To define a ’view–all’ responsibility:
1. Navigate to the Responsibilities window.
2. Enter a Name for the responsibility and select the application forwhich you are defining it (such as Oracle Human Resources) in theApplication field.
3. Select the global or localization Navigator you require in the Menufield.
4. Select one of the predefined report groups (such as US or CAHRMS Reports and Processes) in the Report Group field.
5. Save your work.
6. Set the HR User Profile options for the new responsibility using theSystem Profile Values window. You must set up the:
• HR: User Type
Use this profile option to limit field access on windows sharedbetween Oracle Human Resources and Oracle Payroll
• HR: Security Profile
Use this to link your new responsibility to the ’view all’ securityprofile. This gives you access to all the records in the BusinessGroup.
See: System Profile Value Window, Oracle Applications SystemAdministrator’s Guide
7. Save your work.
Setting Up Locations
You can enter addresses in the Location window.
Locations are shared across Business Groups in HRMS and with twoother Oracle applications: Inventory and Purchasing. HRMS does notuse some of the fields in the Location window. These fields aredisabled for HRMS users.
For information about Purchasing locations, see Defining Locations,Oracle Purchasing User’s Guide

2 – 10 Using Oracle HRMS – The Fundamentals (US)
� To enter a work location and its address:
1. Enter the name of the location, and a description if required.
2. Uncheck the Global check box if you want the location to only beavailable within the default Business Group of your currentresponsibility. Accept the default if you want the location to be aglobal location and therefore available to all Business Groups.
If you are setting up a global location, the location name must beunique across all Business Groups.
If you are setting up a location for one Business Group, the locationname must be unique within that Business Group and all globallocations, but does not have to be unique across all BusinessGroups.
Note: You cannot amend the Global check box once you haveset up your location.
3. Select a national address style from the list. If a local address styleexists for your country, it is displayed as the default. Otherwise, theinternational style is displayed.
North American users: The local style is only displayed if you haveVertex geocode data installed.
Note: You can change existing address styles or create newones if required. See: Changing Default National AddressStyles, Configuring, Reporting and System Administration inOracle HRMS.
4. Enter address information in this window.
Note: US Payroll users: If you change a location address, youneed to update the location in the State Tax Rules window foreach assignment at that location.
5. If the mailing address of the location differs from the payrolltaxation address, you need to enter an overriding address into thePayroll Tax fields.
6. Choose OK and then choose the Extra Information button to enterany additional information required by your enterprise.
See: Entering Extra Information, Configuring, Reporting and SystemAdministration in Oracle HRMS
7. Save your location.
Making Locations Inactive
Making a location inactive prevents users from selecting it.

2 – 11Organization Management
� To remove an address from the Location list:
� Enter an inactive date when the location is no longer in use in yourenterprise, and save your changes.
Deleting Locations
You can delete locations that have not been used.
Note: If a location is still in use, but you do not want it to beselected today or in the future, enter an inactive date.
� To delete a location:
1. Query the location you want to delete.
2. Delete the location.
3. Save the changes.
Representing Organizations
In Oracle HRMS, the organizations you set up to represent yourenterprise as an employer are the Business Group, and in NorthAmerica, one or more GREs within the Business Group.
Below this level, you represent the groupings in which employeeswork, such as branches, departments or sections, by means of internalorganizations. To enable the assignment of employees to an internalorganization, you classify it as an HR Organization.
You also maintain information in the system about various types ofexternal organizations relevant to human resources and payrollmanagement and administration. These can include training vendors,tax offices, benefits carriers, or certification bodies.
External organizations can appear in your organization hierarchiestogether with internal organizations and are defined in the same way.
Note: You can never assign employees to externalorganizations, even those classified as HR Organizations.
Organization Types
When setting up an organization you can give it an organization type toidentify the kind of unit it is, and the part it plays in your enterprise.Examples of organization types can be Administration or Service, or

2 – 12 Using Oracle HRMS – The Fundamentals (US)
the level of each organization in your enterprise, such as Division,Department or Cost Center.
You can use organization types to report on the different sorts oforganizations you set up. You create the organization types you requireby entering values for the Lookup Type ORG_TYPE.
You can use organization types to report on the different sorts oforganizations you set up.
Organization Classification
Whenever you create an organization you have to give it aclassification, such as Business Group or HR Organization. Theclassification you give to an organization defines its purpose andfunctionality within Oracle HRMS.
Selecting a classification, enables you to set up additional informationabout your organization. The classification you enter controls theadditional information you can set up.
Classification are predefined, and each Oracle Product group isinstalled with the classifications and information types relevant to theirapplication. For example, Oracle Financials has different classificationsfrom Oracle HRMS.
Note: Oracle HRMS enables you to install your own additionalinformation types for classifications.
Government Reporting Entities (GREs)
After defining one or more Business Groups for your enterprise, youset up one or more Government Reporting Entities (GREs) within eachBusiness Group. The GRE is the organization that federal, state andlocal governments recognize as the employer who:
• Issues pay to employees.
• Withholds taxes from employees’ pay and is liable for employertaxes and tax reporting.
• Provides other government–mandated reporting, such as EEO–1,OSHA, and New Hire reports.
Each GRE has a unique 9–digit number (sometimes called the employeridentification number or taxpayer identification number) issued by the IRS.Your enterprise may have just one such number, in which case yourBusiness Group and GRE are the same organization.

2 – 13Organization Management
Large enterprises may include a number of different divisions orcompanies each with its own identification number from the IRS, inwhich case you set up a GRE for each. You can associate several GREstogether as a Tax Group, for which one of the GREs can serve as thecommon paymaster.
Information for Taxes, NACHA and Reporting
Because of its pay, tax and reporting role, a GRE must contain thefollowing information entered by you:
• Basic rules affecting calculation of federal, state and local taxes,and information for tax reporting.
• Information required for labelling NACHA tapes used to payemployees by direct deposit into their bank accounts.
• Information for submission of government mandated reportingon matters such as employees’ work–related injuries, equalemployment opportunities, and obligations to pay child support.
Note: The GRE in the Oracle HRMS products is the sameorganization as the Legal Entity that appears in the OracleFinancials products, holding the taxpayer identificationnumber. For this reason, the GRE may appear as GRE/LegalEntity on pick lists.
Enterprises using Oracle HRMS and Oracle Financials productsshould define only one GRE/Legal Entity to represent eachemployer organization with a unique IRS identificationnumber.
Enterprises with One GRE
Enterprises with only one identification number from the IRS need onlyone GRE in which to place all employees. In Oracle HRMS, theBusiness Group and the GRE are the same organization. Appearingbelow is an example organization chart for a Business Group with oneGRE.
Figure 2 – 1Single Company Business Group/GRE

2 – 14 Using Oracle HRMS – The Fundamentals (US)
In a company like this, some employees can have assignments to theBusiness Group organization itself, if it also has the classification HROrganization. Most have an assignment to one of the various HROrganizations subordinate to the Business Group. All employeesbelong to the same GRE, which pays them, withholds their taxes, andprovides reports on various matters concerning them to governmentagencies.
Enterprises with Multiple GREs
For large enterprises that include several different employers with theirown IRS identification numbers, all the employees in each companymay be paid by that company, and hence all require an assignment to aGRE that coincides with their company. In this case you set up withinthe Business Group, a GRE for each separate employer.
In enterprises like this, all employees assigned to an HR Organizationwithin a company have an assignment to the same GRE, andconversely, all employees in a given GRE belong to the same company.
Figure 2 – 2GREs Coincident with Companies

2 – 15Organization Management
Alternative Structuring of Companies and GREsIn other large enterprises, the GREs responsible for paying groups ofemployees are not the same as the companies within the BusinessGroup, which may be organized, for example, according to theparticular types of work or projects they undertake. The figure abovestill reflects the structure of the companies in this type of enterprise.But the GREs representing the employing organizations that payemployees have a separate structure that is independent of thecompanies, as in the figure below.
Figure 2 – 3GREs Independent of Companies
In this type of enterprise, employees assigned to a particular GRE canhave a work assignment to any of the different companies constituting

2 – 16 Using Oracle HRMS – The Fundamentals (US)
the enterprise, and a particular company can include employeesassigned to several different GREs.
In enterprises like this, employees are clear about which company theyare working in, but may be unaware of their membership in a separateGRE. Because the functions of GREs relate to payroll administrationand governmental reporting, they have little direct impact onemployees’ daily lives at work.
Business Groups with multiple GREs often associate some GREstogether in a Tax Group with a common paymaster.
GREs and Tax Groups
Enterprises with multiple GREs can place certain GREs together in taxgroups. The tax group takes the name you give it.
Note: The Tax Group name must be consistent in spelling andcase for all GREs to be included. For example, “My TaxGroup” is not the same as “my tax group.”
When multiple GREs are included in a tax group, the taxable limits forFUTA and SS are maintained at a Tax Group Level.
Using tax groups allows employers to give employees moving withinGREs credit towards their Social Security, and Federal UnemploymentTax Act (FUTA) taxes.
At the same time that you enter federal tax rules for a GRE, you canplace the GRE in a Tax Group.
Organization Classifications
You can select the following classifications in the Organization window,depending on your legislation:
All Legislations
All legislations can use the following classifications:
• Business Group: Use this to define a Business Group.
• HR Organization: Use this for all organizations (includingBusiness Groups and if you are in the US, GREs) to which youwant to assign employees.
• Payee Organization: Use this when defining an externalorganization that is the recipient of a third party payment froman employee, for example a court–ordered payment. You can

2 – 17Organization Management
then select this organization on the Personal Payment Methodwindow when entering a third party payment method.
• Employer or Bargaining Association: Use these when definingan organization that is involved in negotiating a collectiveagreement. A bargaining association could be any organizationrepresenting the employees in negotiations, for example a tradeunion. The UK legislation also enables you to select a bargainingassociation in the Union Processing window to set up a unionelement.
• Representative Body: Use this when defining a representativebody. This may be a body defined in legislation, such as aEuropean Works Council, or may be defined by the employer,such as a Sports and Social Club.
• Disability Organization: Use this when defining an externalorganization with which employee disabilities are registered.
• Medical Service Provider: Use this when defining anorganization that provides any medical services, such as medicalassessments, to the people in your enterprise.
• Constituency: Use this to define a constituency to grouptogether workers eligible to vote for particular elections.
Selected Legislations
Selected legislations, including North America, can use the GRE/LegalEntity classification to define an organization that is recognized as aseparate employer by tax or other legal authorities.
Federal Legislation
The Federal legislation can use the Beneficiary Organizationclassification.
US Legislation
The US legislation can use the following classifications:
• Reporting Establishment, Corporate Headquarters or AAPOrganization: Use these when defining reporting organizations,that is, organizations required for the production of certainreports for government agencies.
• Parent Entity: Use this when defining an organization to beincluded at the top level of an establishment hierarchy. You canthen use the hierarchy when producing certain reports forgovernment agencies.
If you are assigning this classification to a Business Group, youmust assign it to your default Business Group, that is the one

2 – 18 Using Oracle HRMS – The Fundamentals (US)
defined in your security profile. If you do not, then your datawill not be visible when you attempt to create your hierarchy inthe Generic Hierarchy window.
• Benefits Carrier, Workers Compensation Carrier, or BeneficiaryOrganization: Use these when defining an external organizationbelonging in one of these classifications. You can then select theorganization when defining a benefit, entering information forWorkers Compensation calculations, or recording beneficiariesemployees have named for certain benefits.
Canadian Legislation
The Canadian legislation can use the following classifications:classification to
• Provincial Medical Carrier Use this to define a medical carrierfor a province.
• Provincial Reporting Establishment Use this to representemployees in the province of Quebec.
French Legislation
The French legislation can use the following classifications:
• Company: Use this to define a company.
• Establishment: Use this to define an establishment.
Note: It is not advisable to classify an organization as both acompany and an establishment. You should create two separateorganizations.
• URSSAF Center or ASSEDIC Center: Use this when defining anexternal organization that is a Social Security organization. Youcan select the organization when entering additionalorganization information for an establishment. URSSAForganizations may also be selected when entering additionalorganization information for a company.
• Insurance Provider or Pension Provider: Use this when definingan external organization that provides insurance or pensions.You can select the organization when entering additionalorganization information for a company or an establishment.
• OPACIF or OPCA: Use this when defining an externalorganization that collects the company’s yearly trainingcontribution.
• CPAM: Use this when defining an external organization that is aCPAM office. You can select the organization when enteringemployment information in the People window.

2 – 19Organization Management
Dutch Legislation
The Dutch legislation can use the following classifications:
• Dutch UWV Organization: Use this to hold information such asthe contract number for the Dutch UWV Organization.
• Dutch Organization: Use this to hold information such as theDutch region for the Law SAMEN.
Levels of Internal Organizations
You decide for yourself the level of organization detail your enterpriseneeds in Oracle HRMS.
At one extreme, a Business Group/GRE can be the only organizationdefined in the system. However this will severely limit your ability tomanage and report on employee assignment and payroll information,and to control access to HRMS records. At the other extreme, you candefine an organization for every grouping of employees, howeversmall. But the costs of maintaining organizations at this level willprobably outweigh the benefits.
When thinking about the internal organizations to set up for yourenterprise in Oracle HRMS, consider what your current managerialgroupings are. Then you can adjust up or down to determine the bestlevel or organizational detail for your enterprise to maintain.
Representing Companies in Multi–Company Business Groups
When the configuration of your enterprise warrants, you can use bothinternal organizations and the People Group key flexfield to representthe entities appearing on your organization chart. For example,suppose your enterprise includes two companies, each with its owninternal groupings and compensation and benefits policies:
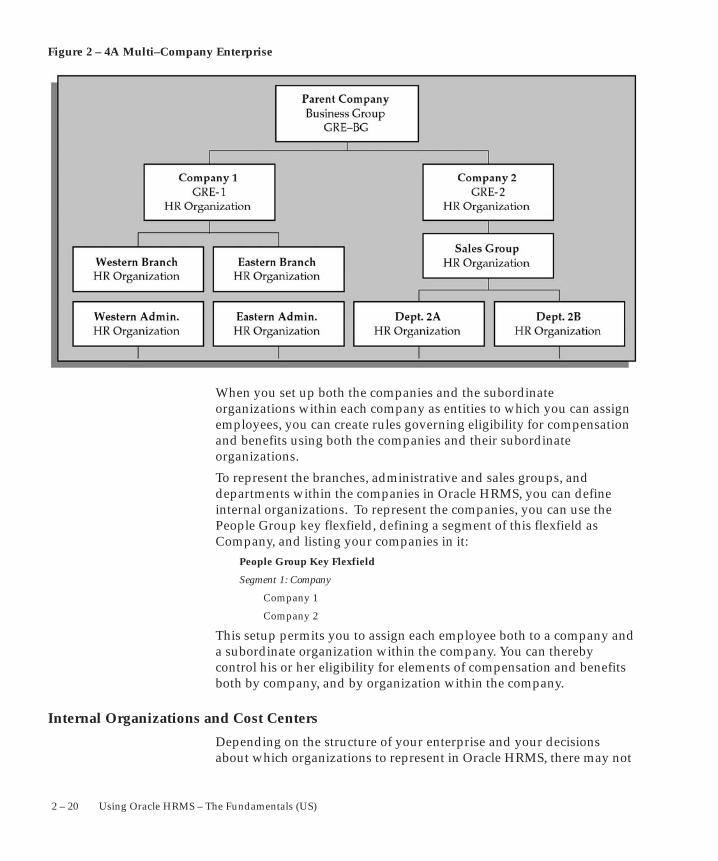
2 – 20 Using Oracle HRMS – The Fundamentals (US)
Figure 2 – 4A Multi–Company Enterprise
When you set up both the companies and the subordinateorganizations within each company as entities to which you can assignemployees, you can create rules governing eligibility for compensationand benefits using both the companies and their subordinateorganizations.
To represent the branches, administrative and sales groups, anddepartments within the companies in Oracle HRMS, you can defineinternal organizations. To represent the companies, you can use thePeople Group key flexfield, defining a segment of this flexfield asCompany, and listing your companies in it:
People Group Key Flexfield
Segment 1: Company
Company 1
Company 2
This setup permits you to assign each employee both to a company anda subordinate organization within the company. You can therebycontrol his or her eligibility for elements of compensation and benefitsboth by company, and by organization within the company.
Internal Organizations and Cost Centers
Depending on the structure of your enterprise and your decisionsabout which organizations to represent in Oracle HRMS, there may not

2 – 21Organization Management
be a one–to–one correspondence between your cost centers and theorganizations you enter.
When defining an internal organization, you can identify one costcenter against which the payroll costs of the employees assigned to theorganization should be collected. You simply select the cost centerfrom a list in a segment of the Cost Allocation key flexfield.
For example, suppose you are defining in Oracle HRMS theorganization Product Assembly, whose employee payroll costs go tothe cost center Production. When entering the organization ProductAssembly, you select Production from the list of cost centers in the CostAllocation flexfield:
Cost Allocation Key Flexfield
Segment 1: Cost Center
410–Accounting
425–Production
503–Public Relations
Note: If employees’ costs are charged to cost centers otherthan those of their organizations, or if they work in anorganization only part time, you can enter other cost centers,and the percentage of time to be charged to each, on theiremployee assignments. Costing information entered foremployee assignments overrides that entered for organizations.
For more information about the cost allocation key flexfield see SettingUp The Cost Allocation Key Flexfield: page 6 – 11.
Creating an Organization
Use the Organization window to create:
• Business Groups
• External organizations (for example, tax offices, insurancecarriers, disability organizations, benefit carriers, or recruitmentagencies)
• Internal organizations (for example, departments, sections orcost centers)
• GREs (selected legislations only)
To create an organization you must:
1. Create an Organization: page 2 – 21

2 – 22 Using Oracle HRMS – The Fundamentals (US)
2. Enter Organization Classifications: page 2 – 23
3. Enter Additional Information: page 2 – 23
� To create an organization:
1. Navigate to the Organization window and select the New button tocreate a new organization.
Note: For information about querying existing organizations, seeFinding an Organization: page 2 – 40.
2. Enter a name for your organization in the Name field.
Note: All Oracle applications you install share the informationentered in the Organization window. Therefore organizationnames must be unique within a Business Group, and BusinessGroup names must be unique across your applications network.
3. Optionally, select an organization type in the Type field.
Organization types do not classify your organization, you use themfor reporting purposes only. The type may identify the function anorganization performs, such as Administration or Service, or thelevel of each organization in your enterprise, such as Division,Department or Cost Center.
4. Enter a start date in the From field. This should be early enough toinclude any historical information you need to enter.
Note: You cannot assign an employee to an organization before thestart date of the organization.
5. Enter a location, if one exists. You can also enter an internal addressto add more details such as floor or office number.
If you are using Oracle Payroll in the US, every organization towhich employees can have assignments, including BusinessGroups, must have on record a location with a complete address.This is because the system uses the location of the organization ofthe employee’s primary assignment to determine employee worklocations for tax purposes. This does not apply to GREs, becausethe assignment to a GRE exists in addition to the assignment to anorganization.
Note: If you are an Oracle Inventory user, then you must notassign a location to more than one organization classified as anInventory Organization.
6. Enter internal or external in the Internal or External field. Youcannot assign people to an external organization.
Examples of external organizations that may require entry aredisability organizations, benefits carriers, insurance carriers,

2 – 23Organization Management
organizations that employees name as beneficiaries of certainemployee benefits, and organizations that are recipients of thirdparty payments from employees’ pay.
7. Save the basic organization details.
Entering Organization Classifications
To determine the purpose and use of each organization you create, yougive it one or more classifications. The setup information you enter foran organization depends in large part on its classification.
Note: Classifying an organization as a Business Group is notreversible. Employees, organizations, and other data arepartitioned by Business Group. You can only view the recordsof one Business Group at a time.
� To enter organization classifications:
1. Enter the classification for your organization in the Name field.
2. Enable the classification by checking the Enable box. This allowsyou to use and enter the essential additional information for yourorganization.
3. Save the classification details.
4. You can either enter additional information for the classificationtype or enter another classification.
Note: Save each classification after entering and enabling it.
Entering Additional Information
For each organization classification you select, you can enter additionalinformation. This information can be different for each classification.
• For Business Group see: Business Group: page 2 – 24
• For HR organization HR Organization: page 2 – 24
• For reporting establishment see: Reporting Establishment: page2 – 24
• For AAP organization see: AAP Organization: page 2 – 25
• For GRE see: GRE: page 2 – 25
• For parent entity see: Parent Entity: page 2 – 26

2 – 24 Using Oracle HRMS – The Fundamentals (US)
• For representative body see: Representative Body: page 2 – 26
• For constituency see: Constituency: page 2 – 26
• For bargaining association see: Bargaining Association: page2 – 27
� To enter Business Group additional information:
1. Click on the organization classification for which you want to enteradditional information. Choose the Others button to open theAdditional Organization Information window.
2. Select one of the following:
Business Group Information, see Entering Business GroupInformation: page 2 – 28
Business Group: EEO Reporting, see Business Group: Entering EEOReporting Information: page 2 – 34
Budget Values Defaults, see Business Groups: Entering BudgetValues Defaults: page 2 – 29
Work Day Information, see Defaults for Work Day (Start and EndTimes): page 2 – 30
Default Monthly Payroll, see: Business Groups: Defining a DefaultMonthly Payroll: page 2 – 31
PTO Balance Type, see Business Groups: Selecting a PTO BalanceType: page 2 – 30
3. Repeat these steps to enter further information.
� To enter HR organization additional information:
1. Click on the organization classification for which you want to enteradditional information. Choose the Others button to open theAdditional Organization Information window.
2. Select one of the following:
Costing Information, see HR Organizations: Entering CostingInformation: page 2 – 32
Work Day Information, see Business Groups and HROrganizations: Work Day Defaults: page 2 – 30
Work Schedule, see Entering a Work Schedule: page 2 – 33
3. Repeat these steps to enter further information.
� To enter reporting establishment additional information:
1. Click on the organization classification for which you want to enteradditional information. Choose the Others button to open theAdditional Organization Information window.
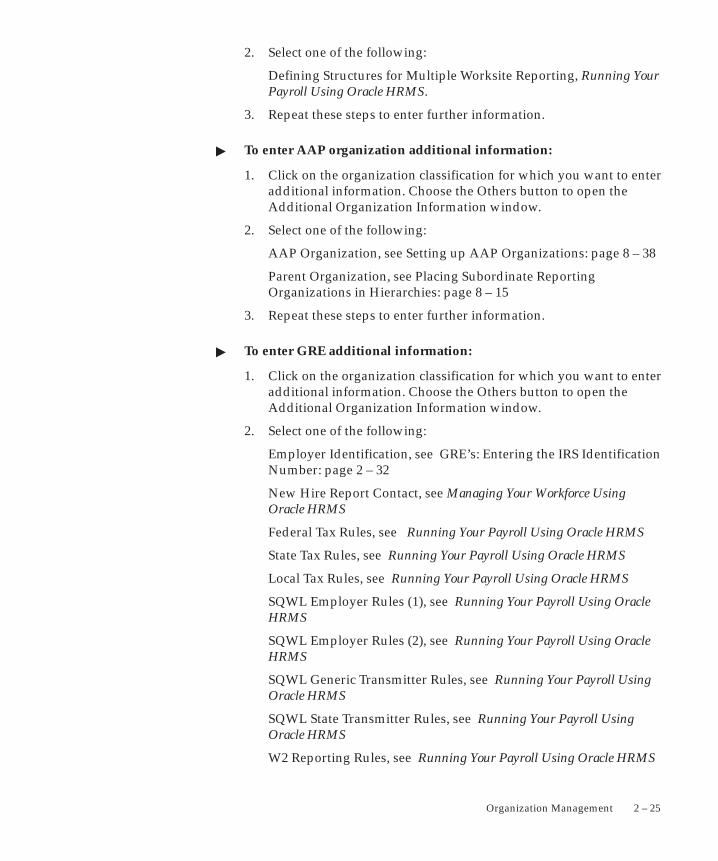
2 – 25Organization Management
2. Select one of the following:
Defining Structures for Multiple Worksite Reporting, Running YourPayroll Using Oracle HRMS.
3. Repeat these steps to enter further information.
� To enter AAP organization additional information:
1. Click on the organization classification for which you want to enteradditional information. Choose the Others button to open theAdditional Organization Information window.
2. Select one of the following:
AAP Organization, see Setting up AAP Organizations: page 8 – 38
Parent Organization, see Placing Subordinate ReportingOrganizations in Hierarchies: page 8 – 15
3. Repeat these steps to enter further information.
� To enter GRE additional information:
1. Click on the organization classification for which you want to enteradditional information. Choose the Others button to open theAdditional Organization Information window.
2. Select one of the following:
Employer Identification, see GRE’s: Entering the IRS IdentificationNumber: page 2 – 32
New Hire Report Contact, see Managing Your Workforce UsingOracle HRMS
Federal Tax Rules, see Running Your Payroll Using Oracle HRMS
State Tax Rules, see Running Your Payroll Using Oracle HRMS
Local Tax Rules, see Running Your Payroll Using Oracle HRMS
SQWL Employer Rules (1), see Running Your Payroll Using OracleHRMS
SQWL Employer Rules (2), see Running Your Payroll Using OracleHRMS
SQWL Generic Transmitter Rules, see Running Your Payroll UsingOracle HRMS
SQWL State Transmitter Rules, see Running Your Payroll UsingOracle HRMS
W2 Reporting Rules, see Running Your Payroll Using Oracle HRMS

2 – 26 Using Oracle HRMS – The Fundamentals (US)
NACHA Rules, see Entering NACHA Tape Data for GREs: page5 – 11
New Hire Reporting, see Entering a New Hire Report Contract fora GRE, Managing Your Workforce Using Oracle HRMS
1009R Magnetic Report RulesParent Organization, see PlacingSubordinate Reporting Organizations in Hierarchies: page 8 – 15
3. Repeat these steps to enter further information.
� To enter parent entity additional information:
1. Click on the organization classification for which you want to enteradditional information. Choose the Others button to open theAdditional Organization Information window.
2. Select one of the following:
EEO1 and VETs Establishment Data, see: Entering EEO1 and VETsEstablishment Data for Parent Entities: page 2 – 37
Multi Work Site Report Parent Entity Data, see: Entering MultiWork Site Report Parent Entity Data: page 2 – 39
VETS Parent Entity Data, see: Entering VETS Parent Entity Data:page 2 – 39
EEO1 Parent Entity Data, see: Entering EEO1 Parent Entity Data:page 2 – 38
3. Repeat these steps to enter further information.
� To enter representative body additional information:
1. Click on the organization classification for which you want to enteradditional information. Choose the Others button to open theAdditional Organization Information window.
2. Select one of the following:
Representative Body Information, see: Entering RepresentativeBody Information: page 2 – 29
Constituency Information: see: Entering Constituency Informationfor a Representative Body: page 2 – 34
3. Repeat these steps to enter further information.
� To enter constituency additional information:
1. Click on the organization classification for which you want to enteradditional information. Choose the Others button to open theAdditional Organization Information window.
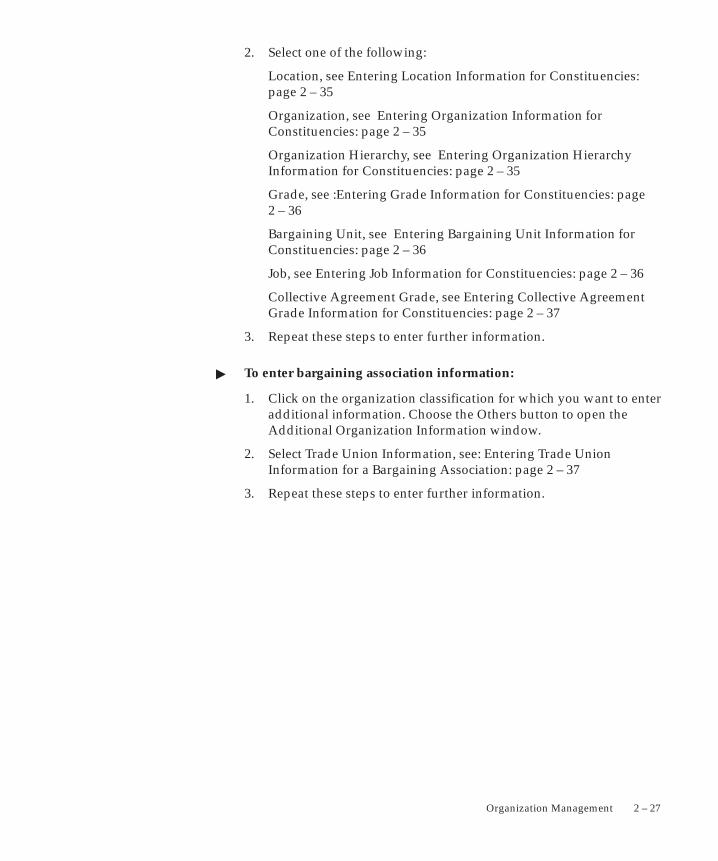
2 – 27Organization Management
2. Select one of the following:
Location, see Entering Location Information for Constituencies:page 2 – 35
Organization, see Entering Organization Information forConstituencies: page 2 – 35
Organization Hierarchy, see Entering Organization HierarchyInformation for Constituencies: page 2 – 35
Grade, see :Entering Grade Information for Constituencies: page2 – 36
Bargaining Unit, see Entering Bargaining Unit Information forConstituencies: page 2 – 36
Job, see Entering Job Information for Constituencies: page 2 – 36
Collective Agreement Grade, see Entering Collective AgreementGrade Information for Constituencies: page 2 – 37
3. Repeat these steps to enter further information.
� To enter bargaining association information:
1. Click on the organization classification for which you want to enteradditional information. Choose the Others button to open theAdditional Organization Information window.
2. Select Trade Union Information, see: Entering Trade UnionInformation for a Bargaining Association: page 2 – 37
3. Repeat these steps to enter further information.

☞
☞
2 – 28 Using Oracle HRMS – The Fundamentals (US)
Entering Business Group Information
� To enter Business Group information:
1. In the Organization window, query the Business Group if it doesnot already appear there. In the Organization Classificationsregion, select Business Group, choose the Others button, and selectBusiness Group Information.
2. Click in a field of the Additional Organization Information windowto open the Business Group Information window.
3. You can enter a short name for the Business Group. This name isno longer used in Oracle HRMS It is provided for compatibilitywith earlier releases, where it appeared in the header line of eachform.
4. Select the method of creating identifying numbers for employeesand applicants. The choices are:
• Automatic number generation
• Manual entry
• Automatic use of the national identifier (for example, the socialsecurity number in the US, and the NI number in the UK). Thisoption is available for employees only.
Attention: Once you save your method, you cannot later changeto either of the automatic options. You can only change to manualentry.
5. Select the names of the key flexfield structures you want to use inthis Business Group.
6. Select the appropriate Legislation Code and default currency. TheLegislation Code determines the startup data you can access andthe contents of some legislation–specific windows.
Attention: Selecting the correct legislation code is essential for thecorrect functioning of Oracle HRMS. You cannot change thelegislation code after entering employees against the BusinessGroup.
7. (US users) To maintain fiscal year balances in Oracle Payroll if yourfiscal year is different from the calendar year, enter the fiscal yearstart date.
8. You can enter a Minimum and Maximum Working Age for theBusiness Group. When you enter or hire employees, you receive awarning if the person’s age is outside this range.
9. Save your work.

2 – 29Organization Management
Entering Representative Body Information
You use the Representative Body Information window to record detailsabout organizations classified as a representative body; for example,jurisdiction and duration of mandate.
� Entering Representative Body Information:
1. Select the Job Group associated with the representative body.
Note: You cannot associate a representative body with the defaultHR Job Group.
2. Select the body’s jurisdiction; for example, fire wardens or healthand safety issues. This list is maintained using the JURISDICTIONlookup type
3. Enter the duration of the body’s mandate and select the units (forexample, years).
4. Select the body’s method of funding; for example, employerfunded, employee funded, or joint funded. This list is maintainedusing the FUNDING_METHOD lookup type.
5. Enter the maximum number of seats.
Note: The maximum number of seats for a representative bodymust not exceed the total number of seats allocated to aconstituency.
6. Save your work.
Warning: Once you have attached roles to a representativebody, you must not change the Job Group associated with therepresentative body, as this may lead to errors in the operatingof the system.
Business Groups: Entering Budget Value Defaults
You can set up budgets for non–monetary measures such as headcountor full–time equivalent. When you enter employee assignments todefine the work an employee does for your enterprise, you can specifythe value of the assignment towards these budgets. For example, allassignments typically count as one for headcount budgets, but maycount as less than one for full–time equivalent budgets.
To remove the requirement to enter these values for every assignment,you can enter defaults for the whole Business Group. You can overridethe defaults for individual assignments.

2 – 30 Using Oracle HRMS – The Fundamentals (US)
� To define budget value defaults:
1. In the Organization window, query the Business Group if it doesnot already appear there. In the Organization Classificationsregion, select Business Group, choose the Others button, and selectBudget Value Defaults.
2. Click in a field of the Additional Organization Information windowto open the Budget Value Defaults window.
3. In the Units field, select a measurement type, such as Full TimeEquivalent or Headcount.
4. Enter a default value in the Value field.
You can enter a default value for as many budgetary units as youplan to use for the Business Group.
To find out more about budgets see Budget Overview, Managing YourWorkforce Using Oracle HRMS.
Business Groups: Selecting a PTO Balance Type
If you use Oracle Payroll, you can choose to use a payroll balance tostore gross accruals for an accrual plan. The payroll balance ismaintained by the payroll run. It calculates accruals from the day aftereither the Date Earned or the Date Paid of the last payroll period inwhich the assignment was processed
To specify whether to use Date Earned or Date Paid for all your accrualplans, select a PTO Balance Type for your business group. The defaultis Date Paid.
� To select a PTO balance type:
1. In the Organization window, query the business group if it does notalready appear there. In the Organization Classifications region,select Business Group, choose Others, and select PTO Balance Type.
2. Click in the field on the Additional Organization Informationwindow to open the PTO Balance Type window.
3. Select Date Paid or Date Earned in the PTO Balance Type field.
4. Save your work.
Business Groups and HR Organizations: Entering Work Day Defaults
You can set up default working hours for all employees in the BusinessGroup or in an HR Organization, saving data entry at lower levels.
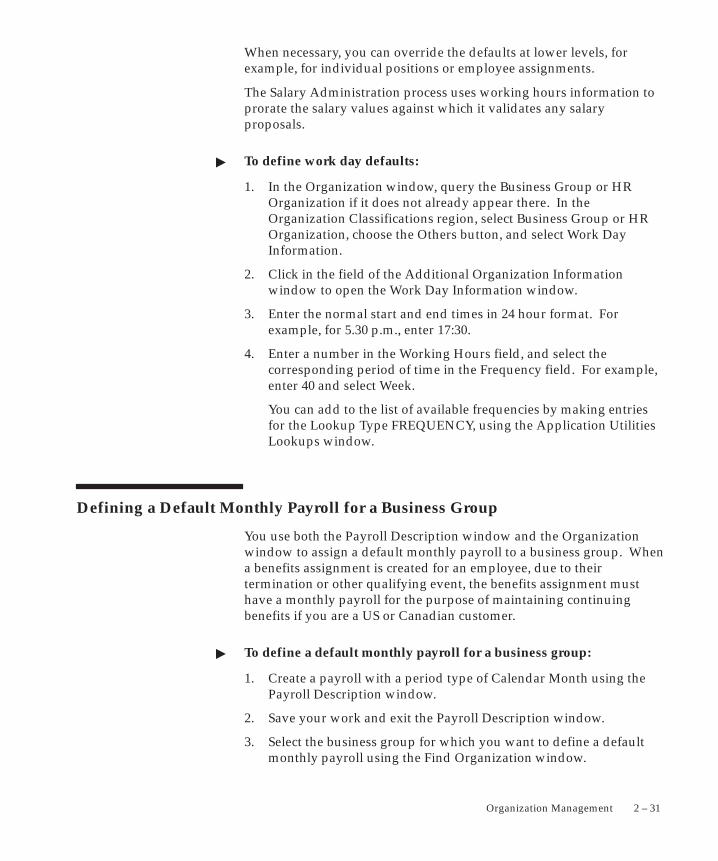
2 – 31Organization Management
When necessary, you can override the defaults at lower levels, forexample, for individual positions or employee assignments.
The Salary Administration process uses working hours information toprorate the salary values against which it validates any salaryproposals.
� To define work day defaults:
1. In the Organization window, query the Business Group or HROrganization if it does not already appear there. In theOrganization Classifications region, select Business Group or HROrganization, choose the Others button, and select Work DayInformation.
2. Click in the field of the Additional Organization Informationwindow to open the Work Day Information window.
3. Enter the normal start and end times in 24 hour format. Forexample, for 5.30 p.m., enter 17:30.
4. Enter a number in the Working Hours field, and select thecorresponding period of time in the Frequency field. For example,enter 40 and select Week.
You can add to the list of available frequencies by making entriesfor the Lookup Type FREQUENCY, using the Application UtilitiesLookups window.
Defining a Default Monthly Payroll for a Business Group
You use both the Payroll Description window and the Organizationwindow to assign a default monthly payroll to a business group. Whena benefits assignment is created for an employee, due to theirtermination or other qualifying event, the benefits assignment musthave a monthly payroll for the purpose of maintaining continuingbenefits if you are a US or Canadian customer.
� To define a default monthly payroll for a business group:
1. Create a payroll with a period type of Calendar Month using thePayroll Description window.
2. Save your work and exit the Payroll Description window.
3. Select the business group for which you want to define a defaultmonthly payroll using the Find Organization window.

2 – 32 Using Oracle HRMS – The Fundamentals (US)
4. Place the cursor in the Organization classifications block on theBusiness Group field and choose the Others button.
5. Select Benefits Defaults from the Additional OrganizationInformation lookups.
6. Choose the Next button to display the Benefits Defaults window.
7. Select a monthly payroll for this business group.
8. Save your work.
GREs: Entering the IRS Identification Number
� To enter the unique identification number for the GRE:
1. In the Organization window, query the GRE if it does not alreadyappear there. In the Organization Classifications region, selectGovernment Reporting Entity, choose the Others button, and selectEmployer Identification.
2. Click in a field of the Additional Organization Information windowto open the Employer Identification window.
3. Enter the identification number the IRS has issued for the GRE.
Note: If required, a Retirement Organization may have thesame Employer Identification Number as an existing GRE.
HR Organizations: Entering Costing Information
� To enter costing information:
1. In the Organization window, query the HR Organization if it doesnot already appear there. In the Organization Classificationsregion, select HR Organizations, choose Others, and select CostingInformation.
2. Click in the Additional Information window to display thesegments of the Cost Allocation flexfield set up with the qualifier ofOrganization.
3. Select the appropriate cost code in each segment.
For individual employees, you can override theseorganization–level codes by entering costing information on theirassignments.

2 – 33Organization Management
HR Organizations: Entering Parent Organizations
After you set up organization hierarchies, use the Parent Organizationwindow to place a subordinate organization in hierarchies by namingits immediate parent in each hierarchy.
� To enter a parent organization:
1. In the Organization window, query the HR Organization if it doesnot already appear there. In the Organization Classificationsregion, select HR Organization, choose Others, and select ParentOrganization to open the Parent Organization window.
2. Select the hierarchy name.
3. Select the name of the parent organization to which the HROrganization is subordinate in this hierarchy.
4. To enter the HR Organization in another hierarchy, repeat steps 2and 3.
HR Organizations: Entering a Work Schedule
Work schedules show the number of working hours scheduled each dayof the week for employees, starting with Monday. For example, for anemployee who works 7 hours and 45 minutes each day Sunday throughThursday, with Friday and Saturday off, the work schedule is:775–775–775–775–0–0–775.
Oracle Payroll uses work schedules to prorate pay for employees whodo not submit timecards. The startup data you receive with OraclePayroll includes several work schedules in common use, entered in thetable COMPANY WORK SCHEDULES.
� To select a work schedule for an HR Organization:
1. In the Organization window, query the organization if it does notalready appear there. In the Organization Classifications region,select HR Organization, choose the Others button, and select WorkSchedule.
2. Click in the field in the Additional Organization Informationwindow to open the Work Schedule window.
3. Select the default work schedule for the organization.
You can override this default for individual employees on theirassignments.

2 – 34 Using Oracle HRMS – The Fundamentals (US)
If the work schedule you need is not on the list, go to the TableStructure window, query the table COMPANY WORK SCHEDULES,and enter the new work schedule.
Business Group: Entering EEO Reporting Information
Within your Business Group you can enter information relevant forEEO reporting.
Enter information from the Organization window
� To enter EEO reporting information:
1. Query your Business Group.
2. Select EEO Report details from the others window.
3. Click in the EEO Report Details field.
4. Select the correct report.
Note: The type of report you select will determine which EEO jobcategories appear in the Job window.
5. If your report is EEO–5 complete the EEO–5 report type field.
6. Enter the control/OE number.
7. Enter the certifying officer information.
8. Enter contact person information.
9. Save your work.
Entering Constituency Information for a Representative Body
You can assign constituencies to a representative body in theConstituency window.
� To enter constituency information for a representative body:
1. Select a constituency.
2. Enter the number of seats.
Note: The number of seats allocated to a constituency mustnot exceed the maximum number of seats for its representativebody.

2 – 35Organization Management
3. Select a voting method.
4. Save your work.
Entering Location Information for Constituencies
Enter a location for the constituency from the Organization window.
� To enter a location:
1. Select Location from the Others window.
2. Select a valid location.
3. Include or exclude the location from the constituency in theselection field.
4. Save your work.
Entering Organization Hierarchy Information for Constituencies
Enter organization hierarchy information for the constituency in theOrganization window. You can control which people to include orexclude in the constituency by indicating a starting node.
� To enter organization hierarchy information:
1. Select organization hierarchy from the Others window.
2. Select the organization hierarchy.
3. Enter the hierarchy starting node.
4. Include or exclude the organization hierarchy from theconstituency in the selection field.
5. Save your work
Entering Organization Information for Constituencies
Enter an organization for the constituency from the Organizationwindow.
� To enter an organization:
1. Select organization from the Others window.

2 – 36 Using Oracle HRMS – The Fundamentals (US)
2. Select the organization.
3. Include or exclude the organization from the constituency in theselection field.
4. Save your work.
Entering Grade Information for Constituencies
Enter a grade for the constituency in the Organization window.
� To enter additional grade information:
1. Select grade from the Others window.
2. Select the grade.
3. Include or exclude the grade from the constituency in the selectionfield.
4. Save your work.
Entering Bargaining Unit Information for Constituencies
Enter a bargaining unit for the constituency from the Organizationwindow.
� To enter additional bargaining unit information:
1. Select bargaining unit from the Others window.
2. Select the bargaining unit.
3. Include or exclude the bargaining unit from the constituency in theselection field.
4. Save your work.
Entering Job Information for Constituencies
Enter job information for the constituency from the Organizationwindow.
� To enter additional job information:
1. Select job from the Others window.

2 – 37Organization Management
2. Select the job.
3. Include or exclude the job from the constituency in the selectionfield.
4. Save your work.
Entering Collective Agreement Grade Information for Constituencies
Enter a collective agreement grade for the constituency from theOrganization window.
� To enter additional collective agreement grade information:
1. Select collective agreement grades from the Others window.
2. Select the grade.
3. Include or exclude the grade from the constituency in the selectionfield.
4. Save your work.
Entering Trade Union Information for a Bargaining Association
Use the Trade Union Information window to record furtherinformation about your bargaining association if it is a trade union.
� To enter trade union information for a bargaining association:
1. Query the bargaining association in the organizations window if itdoes not already appear there. In the Organization Classificationsregion, select Bargaining Association, choose the Others button.
2. Click in a field of the Additional Organization Information windowto open the Trade Union Information window.
3. Enter an employer reference and a trade union reference. Thesecould be numbers to be used in an Electronic Data Interchange.
4. Save your work
Entering EEO–1 and VETS Establishment Data for Parent Entities
Use the organization information type to set up defaults forestablishments held beneath this parent entity in an establishment
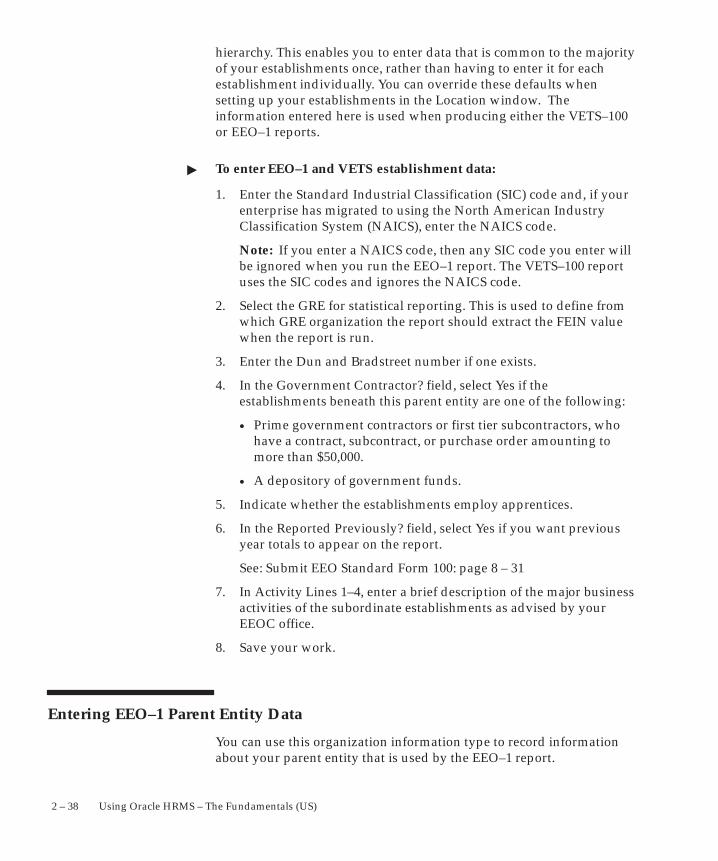
2 – 38 Using Oracle HRMS – The Fundamentals (US)
hierarchy. This enables you to enter data that is common to the majorityof your establishments once, rather than having to enter it for eachestablishment individually. You can override these defaults whensetting up your establishments in the Location window. Theinformation entered here is used when producing either the VETS–100or EEO–1 reports.
� To enter EEO–1 and VETS establishment data:
1. Enter the Standard Industrial Classification (SIC) code and, if yourenterprise has migrated to using the North American IndustryClassification System (NAICS), enter the NAICS code.
Note: If you enter a NAICS code, then any SIC code you enter willbe ignored when you run the EEO–1 report. The VETS–100 reportuses the SIC codes and ignores the NAICS code.
2. Select the GRE for statistical reporting. This is used to define fromwhich GRE organization the report should extract the FEIN valuewhen the report is run.
3. Enter the Dun and Bradstreet number if one exists.
4. In the Government Contractor? field, select Yes if theestablishments beneath this parent entity are one of the following:
• Prime government contractors or first tier subcontractors, whohave a contract, subcontract, or purchase order amounting tomore than $50,000.
• A depository of government funds.
5. Indicate whether the establishments employ apprentices.
6. In the Reported Previously? field, select Yes if you want previousyear totals to appear on the report.
See: Submit EEO Standard Form 100: page 8 – 31
7. In Activity Lines 1–4, enter a brief description of the major businessactivities of the subordinate establishments as advised by yourEEOC office.
8. Save your work.
Entering EEO–1 Parent Entity Data
You can use this organization information type to record informationabout your parent entity that is used by the EEO–1 report.

2 – 39Organization Management
� To enter EEO–1 parent entity data:
1. Enter the reporting name for the parent entity and the EEO–1company number, assigned by the EEO office to identify acompany or parent company.
2. Select Yes in the Affiliated field if the parent entity:
• Employs fewer than 100 employees, and
• Is affiliated with another company, or subject to centralizedownership or management, resulting in a single enterpriseemploying 100 or more employees
3. Save your work.
Entering Multiple Worksite Report Parent Entity Data
Use this organization information type to record information aboutyour parent entity that is used by the Multiple Worksite report.
� To enter Multiple Worksite report parent entity data:
1. Enter the legal name. This will be reported if it is different from thetrade name entered against the establishment in the Locationwindow.
For example, ABC Enterprises could have a subsidiary divisioncalled Bay Restaurant. ABC Enterprises would be considered as thelegal name and Bay Restaurant would be a trade name.
2. Save your work.
Entering VETS Parent Entity Data
Use this organization information type to record information aboutyour parent entity that is used by the VETS–100 report.
� To enter VETS parent entity data:
1. Enter the reporting name to be used for this parent entity.
2. Enter the company number that the US Department of Labor hasprovided to identify this parent entity.
3. Select the type of reporting organization appropriate for this parententity.
2 – 40 Using Oracle HRMS – The Fundamentals (US)
4. Save your work.
Finding an Organization
Use the Find Organization window to find the organizations you wantto review or amend. If you want to set up a new organization, ratherthan querying an existing organization, select the New button. Formore information about creating a new organization see Creating anOrganization: page 2 – 21.
Note: When you navigate to the Organization window, theFind Organization window automatically displays.
� To query an organization using the Find Organization window:
1. Do one, a selection, or all of the following:
• Enter a full or partial query on the organization’s name. If morethan one name matches the selection criteria, select one of thenames.
• Enter a full or partial query on the organization type and/orlocation. If more than one organization type or location matchesthe selection criteria, select the type and/or location to query.
• Enter a full or partial query on the classification name. If morethan one classification name matches the selection criteria, selectthe name to query.
For the classification you have selected indicate whether youwant to query on:
– Enabled classifications: This only returns thoseorganizations that match your selection criteria and haveyour selected classification enabled.
– Disabled classification: This only returns thoseorganizations that match your selection criteria and haveyour selected classification disabled.
– Both: This returns organizations that match your selectioncriteria and have your selected classification, regardless ofwhether the classification is enabled or disabled.
2. Choose the:
• Find button to run the query.
The organization or organizations found by the query display inthe Organization window. If the query finds more than one

2 – 41Organization Management
organization, you can use the [Down Arrow] key or choose NextRecord from the Go menu to display the next organization.
• Clear button to remove the existing selection criteria. You canthen enter new information on which to perform a query.
Removing and Deleting Organizations
Remove an organization if you want to prevent it being available foremployee assignments. This still leaves a history of the organization.Only delete an organization if you want to completely remove it fromyour system.
� To remove an organization
1. Select the organization you want to remove.
2. Enter an end date (Date To) on the organization record.
� To delete an organization
1. Remove any employee assignments to the organization.
2. Remove the organization from any hierarchies.
3. Disable its organization classifications in the Organization window.
4. Delete the organization in the Organization window.
Organization Hierarchies
Organization hierarchies show reporting lines and other hierarchicalrelationships between organizations in your enterprise.

2 – 42 Using Oracle HRMS – The Fundamentals (US)
You set up a primary reporting hierarchy reflecting the main reportinglines, as established in the organization chart of your enterprise. Belowis an example of an organization chart showing the reporting lines of asingle–company enterprise.
Figure 2 – 5 Chart Showing Primary Reporting Lines
Multiple Hierarchies
In addition to the primary reporting hierarchy, you can set up as manyother organization hierarchies as you need.
Hierarchies for Matrix Management
Your enterprise may have a matrix management structure in whichorganizations have more than one reporting line. For example, lookingat the organization chart for Global Industries, the HR organizationunder Production might have another reporting relationship to theorganization Company HR. You can set up additional hierarchies toreflect secondary reporting relationships within your enterprise.
Security Hierarchies
As well as constructing hierarchies to reflect reporting lines, you canalso use hierarchies to control access to information. For example, in adecentralized enterprise you might want to give each regional manageraccess to the records of the employees in the organizations in theirregion.

2 – 43Organization Management
Looking again at the organization chart for Global Industries, you wantmanagers in the Sales East office to have access to the records of allemployees in the eastern region sales groups. You can do this bybuilding a geographical hierarchy of your regions and the organizationsin each.
You can also give managers in the Sales East office access to records inother organizations by creating a global organization hierarchystructure.
Hierarchies for Reporting
When you run some of the Oracle HRMS standard reports, you canspecify an organization hierarchy to determine which organizationsand employees the report covers. You can also use this approach inyour own standard or ad hoc reports. You can create additionalorganization hierarchies just for analysis and inquiry purposes.
In the US, to produce reporting for government authorities, forexample EEO–1 and VETS–100 reports, you build special establishmenthierarchies to obtain the correct coverage of employees.
Organizational Change and Version Control
Changing your hierarchies to reflect simple changes in reporting lines iseasy. You create a new version of your existing hierarchy and modifyparts of its structure. Oracle HRMS retains earlier versions ofhierarchies for historical information.
However, when you experience a major restructuring, it is often best tocreate new work structures, including new organizations and reportinglines.
Suggestion: You can create future–dated versions of yourorganization structures and use these to prepare forreorganization in advance. You retain previous versions ofyour hierarchies for historical information.
If you want to read more information about dated information andhierarchy versions, see Dated Versions of Hierarchies: page 1 – 15
Global Organization Hierarchies
If you use an application other than Oracle HRMS, for example, OracleCRM, then you can use global organization hierarchies to set up globalsecurity profiles that enable you to work on organizations in multipleBusiness Groups.
2 – 44 Using Oracle HRMS – The Fundamentals (US)
A global hierarchy can contain organizations from any Business Groupon your database. By associating a global organization hierarchy with aglobal security profile you can create a security hierarchy that givesusers access to organizations across Business Groups.
If you want to read more information about security profiles, see:Security Profiles, Configuring, Reporting and System Administration inOracle HRMS.
If you use the Oracle HRMS ’professional’ forms interface, then youcannot access data across Business Groups using one responsibilty,even if you associate a global security profile to your responsibilty.Your access is limited to organizations in the Business Group defined inthe HR:Business Group profile option.

2 – 45Organization Management
Creating Organization Hierarchies
Create organization hierarchies to show reporting lines and otherhierarchical relationships. If you want to include organizations from asingle Business Group, use the Organization Hierarchy window,alternatively, use the Global Organization Hierarchy window to includeorganizations from any Business Group. Always define hierarchiesfrom the top organization down.
You must define the top organization in the hierarchy, and at least oneorganization subordinate to it.
Note: To access the Global Organizations Hierarchy window youmust have a global security profile associated with yourresponsibility and your System Administrator must add thewindow to the menu.
� To set up a new organization hierarchy:
1. Enter a unique name for the hierarchy, and check Primary if it isyour main reporting hierarchy.
2. Save your work.
3. Enter the version number and start date for the hierarchy.
You can copy an existing hierarchy. See: To copy an existinghierarchy: page 2 – 47, below.
4. Save your work.
5. Query the top organization name in the Organization block.
6. In the Subordinates block, select the immediate subordinates forthe top organization.
If you are using the Global Organization Hierarchy window, thelookup displays which Business Group each organization belongsto as organizations from different Business Groups can have thesame name.
7. To add organizations below one of these immediate subordinateschoose the Down Arrow button for the organization.
The Organization block now displays the organization youselected. You can add subordinates to this organization. To returnto the previous level, choose the Up Arrow button.
Note: The list of organizations from which you can select inthe Subordinates block includes organizations that are alreadyin the hierarchy. If you select such an organization, you willmove it and all its subordinates within the hierarchy.

2 – 46 Using Oracle HRMS – The Fundamentals (US)
See: Changing Organization Hierarchies: page 2 – 47
� To enable position control:
1. Query the organization hierarchy in the Name field.
2. Check the Position Control checkbox to select this hierarchy as theone that operates under the position control business rules.
You can designate only one hierarchy for position control. Anyversions you create of this hierarchy are also position controlled.
3. Determine the level at which the position control begins:
• To set the level at the highest organization so that positioncontrol includes it and all its subordiantes, click the Top NodeEnabled checkbox.
• To set the level so that position control begins at a subordinatelevel, choose the organization in the Subordinate block and selectYes from the LOV in the Position Control block.
4. To exclude an organization that shouldn’t operate under positioncontrol rules, choose the organization in the Subordinates blockand select No from the LOV in the Position Control block.
Excluding the organization automatically excludes its subordinates.
� To change the top node for position control:
1. Query the organization hierarchy version that’s position controlled.
2. Query the organization that will become the new top node in theOrganization block.
3. Query the organization that was the previous top node in theSubordinates block and click the select Yes from the LOV in thePosition Control block.
� To create a new version of an existing hierarchy:
1. Query the name of the hierarchy.
2. In the Version field, use the Down Arrow to move through existingversions of the hierarchy until you reach a version number forwhich no other data appears. Enter the start date for the newversion.
Note: Overlapping versions of a hierarchy cannot exist. Wheneveryou enter a new version of a hierarchy, the system automaticallygives an end date to the existing version. Oracle HRMS retains therecords of obsolete hierarchies, so you do not lose any historicalinformation.

2 – 47Organization Management
You can copy an existing hierarchy. See: To copy an existinghierarchy: page 2 – 47, below.
3. Query the top organization name in the Organization block.
4. In the Subordinates block, select the immediate subordinates forthe top organization.
5. To add organizations below one of these immediate subordinates,choose the Down Arrow button for the organization.
The Organization block now displays the organization youselected. You can add subordinates to this organization. To returnto the previous level, choose the Up Arrow button.
� To copy an existing hierarchy:
1. Enter or query the name and number of your new hierarchyversion and choose the Copy Hierarchy button.
2. Select the name and version number of the hierarchy you want tocopy.
Details of this hierarchy then appear in the Organization andSubordinates blocks. You can change these.
Changing Organization Hierarchies
� To add a new organization to an existing hierarchy:
1. Query the hierarchy and version you want to change.
2. Query the parent organization for the one you are adding.
3. Select the new organization in the Subordinates block.
Note: The list of organizations from which you can select inthe Subordinates block includes organizations that are alreadyin the hierarchy. If you select such an organization, you willmove it and all its subordinates within the hierarchy.
� To change the top organization of an existing hierarchy:
1. Query the hierarchy and version you want to change.
2. Query the new top organization.
3. Select the previous top organization in the Subordinates block.
� To move an organization and all its subordinates:
1. Query the hierarchy and version you want to change.

2 – 48 Using Oracle HRMS – The Fundamentals (US)
2. Query the new parent organization for the one you want to move.
3. Select the organization to move in the Subordinates block. All theorganization’s subordinates are moved.
Deleting Organization Hierarchies
You cannot delete an organization hierarchy if other versions exist, or asecurity profile uses it.
� To delete an organization hierarchy
1. Remove all the subordinate organizations from the hierarchy,starting at the lowest level.
2. Delete the organization hierarchy.
Running the Organization Hierarchy Report
Oracle HRMS includes a standard Organization Hierarchy Report todisplay the relationships between organizations in a hierarchy.You runreports from the Submit Requests window.
� To run the Organization Hierarchy Report:
1. In the Name field, select Organization Hierarchy.
2. Enter the Parameters field to open the Parameters window.
3. Enter the effective date for which you want to see the report.
4. In the Organization Structure field, select the hierarchy. If there aremultiple versions, select a version.
If the effective date lies between the version’s start and end dates,the report shows information for the effective date. If it lies outsidethese dates, the report shows information for the start date of theversion.
5. In the Parent Organization field, select the highest organization inthe hierarchy that you want to see on the report.
6. Enter Yes in the Managers Shown field to see managers’ names.
If there are more than ten managers, you see the number ofmanagers only.
7. Choose the Submit button.

C H A P T E R
3
3 – 1Hierarchy Diagrammers
HierarchyDiagrammers

3 – 2 Using Oracle HRMS – The Fundamentals (US)
Hierarchy Diagrammers OverviewYou can create organization and position hierarchies to reflect reportinglines and control access to information in your enterprise. See:
• Organization Hierarchies: page 2 – 41
• Position Hierarchies: page 4 – 2
You can use the hierarchy diagrammers to edit these hierarchies using agraphical interface.
The hierarchy diagrammers use the same security model as the otherwindows in Oracle HRMS and access to them is restricted by yourresponsibility.
You launch a hierarchy diagrammer from the Organization Hierarchywindow or the Position Hierarchy window. See Launching a HierarchyDiagrammer: page 3 – 3.
Note: Before you can access the hierarchy diagrammers, a TCFSocketServer must be running. Your system administrator canset this up for you.
Viewing and Editing Hierarchy Diagrams
You can view and edit hierarchy diagrams for organizations andpositions using:
• The Organization Hierarchy Diagrammer
• The Position Hierarchy Diagrammer
Do I need to run a separate program to create hierarchy diagrams?
No. The hierarchy diagrammers are standard Oracle HRMS windows,with the addition of a graphical area. They work together with theOrganization Hierarchy window and Position Hierarchy window soyou can create basic hierarchies using these windows and then makeintuitive drag–and–drop changes using the diagrammers.
Any changes made using the hierarchy diagrammers are reflected inthe hierarchy windows, and are saved in your database.
Can I create multiple versions of a hierarchy, and model different business scenarios?
Yes. You can use the diagrammers together with the organization andposition hierarchy windows to:
3 – 3Hierarchy Diagrammers
• Create new versions of existing hierarchies
• Create copies of existing hierarchies
• Create future–dated hierarchies to prepare for reorganizations inadvance
Can I print the graphical versions of the hierarchies?
Yes. You can print pictorial representations of organization and positionhierarchies.
Can I create hierarchies that contain organizations from multiple business groups?
Yes. If you have the appropriate security access to more than onebusiness group, you can include organizations from more than onebusiness group in your hierarchy.
Launching a Hierarchy Diagrammer
You edit organization or position hierarchies in the OrganizationHierarchy Diagrammer window or the Position Hierarchy Diagrammerwindow.
� To launch a hierarchy diagrammer:
1. Open the Organization or Position Hierarchy window using theDiagrammer menu option. This displays a cut–down version of theHierarchy window.
Note: To create hierarchies containing organizations from onlyone business group, choose the Diagrammer Local option. Toinclude hierarchies from more than one business group, choosethe Diagrammer Global option.
2. Query the hierarchy you want to edit. If it does not yet exist, youcan create a new hierarchy by:
• Setting Up a New Hierarchy: page 3 – 7
• Creating a New Version of an Existing Hierarchy: page 3 – 8
• Copying an Existing Hierarchy: page 3 – 9
3. Choose the Open Editor button to open the Hierarchy Diagrammerwindow. The selected organization or position hierarchy isdisplayed.

3 – 4 Using Oracle HRMS – The Fundamentals (US)
The hierarchy diagrammer is divided into three regions:
• The hierarchy diagram region. This displays a diagrammaticrepresentation of an organization or position hierarchy. You usethe hierarchy diagram region to graphically view, create ormodify an organization or position hierarchy.
• The node list region. This displays a Find block and a list oforganizations or positions that you have located using the Findfeature and have not yet attached to a hierarchy.
• The node properties region. This displays details of the selectedorganization or position. Use the buttons to display furtherposition and assignment details for the selected organization orposition.
Finding an Organization or Position in the Hierarchy Diagrammers
You can display a list of unattached organizations or positions so thatyou can view additional information about them or add them to yourhierarchy. You do this using the node list region of the HierarchyDiagrammer windows.
� To find an organization or position:
1. In the Name field, enter the name of the organization or position.
• To broaden the search, you can use the percent (%) symbol toreplace one or more letters; for example, enter Sales% to findSales North, Sales South, Sales Central and so on.
• To narrow the search, you can enter different criteria in the otherfields next to the Find button; for example, to find all Salesorganizations with Senior Sales Executive jobs, you could enter:
– Sales% in the Name field
– Senior Sales Executive in the Job field
– Active in the Hiring Status field
2. Choose the Find button.
All matches for the criteria you entered are listed below the Findarea.
3. To remove the search results and start a new query, choose theClear button.

3 – 5Hierarchy Diagrammers
Changing the Appearance of a Hierarchy Diagram
You can change the appearance of a hierarchy diagram including:
• The levels displayed in the hierarchy
• The style of the hierarchy diagram
• The text style, size and color, and the background and line colors
• The area of the screen used to display the diagram
The changes you make affect the appearance of the diagram both onscreen and when you print it out.
Expanding and Collapsing Diagrams
Organizations and positions with subordinate levels in a hierarchydiagram include a small button for expanding or collapsing diagrams:
Expandable parent organization or position with hiddensubordinate levels. Click the button to expand the parent anddisplay subordinate organizations or positions.
Collapsible parent organization or position with subordinate levelsdisplayed. Click the button to collapse subordinate organizations orpositions.
Changing the Style of a Diagram
You can choose from three styles of hierarchy diagram:
• Vertical style: displays the hierarchy diagram in a stackedhierarchical layout
• nterleaved style: displays the hierarchy diagram in an expandedstacked hierarchical layout
• Org chart style: displays the hierarchy diagram in anorganization chart style layout.
Choose a style from the View menu or choose the appropriate toolbarbutton to change the style.
Changing the Font and Colors in a Diagram
You can change the colors of the following elements of a hierarchydiagram:
• Background
• Lines and boxes
3 – 6 Using Oracle HRMS – The Fundamentals (US)
• Nodes (organizations or positions)
• Node text
� To change the font and colors in a diagram:
1. Launch a hierarchy diagrammer: page 3 – 3.
2. Choose Edit, Preferences from the menu to display the Preferenceswindow.
3. Choose the Choose Color... button for the diagram element youwant to change.
4. Select a color from the Color Picker dialog.
You can also change the style and size of the text by selecting from theFont Name and Font Size poplists in the Preferences window.
Changing the Display Area of a Diagram
You can increase the area of the screen available for the hierarchydiagram by hiding unwanted regions of the window using thefollowing options on the View menu:
• Node Properties
• Node List
• Toolbar
• Status Bar
Suggestion: If you still want to see the properties fororganizations or positions, you can display a floatingproperties sheet. Choose the button on the Node Propertiesregion before you hide the region, or choose Properties fromthe Edit menu.
Displaying Information about Organizations or Positions
You can display additional information about organizations orpositions in the hierarchy diagrammers, to assist you in creating orediting hierarchies.
� To display additional information for an organization or position:
1. Launch a hierarchy diagrammer: page 3 – 3.
2. Either:

3 – 7Hierarchy Diagrammers
• Select an organization or position in the hierarchy diagramregion of the window.
or:
• Use the Find feature to display an unattached organization orposition in the node list region of the window and then select it.
3. Choose one of the following buttons:
• Organizations or Positions
• Assignments
• Organization Holders or Position Holders
A floating window appears displaying additional details for theselected organization or position.
You can also resize the amount of space available to each region of thewindow, to make the best use of the display space, by dragging theedge of the region.
Setting Up a New Hierarchy
Use the hierarchy diagrammers to graphically set up a neworganization or position hierarchy. You must first use the Organizationor Position window to specify:
• The top organization or position in the hierarchy
• All the subordinate organizations or positions for the hierarchy.
See Creating an Organization: page 2 – 21 or see Defining a Position:page 4 – 30
� To set up a new organization or position hierarchy:
1. Open the Organization or Position Hierarchy window using theDiagrammer menu option. This displays a cut–down version of theHierarchy window.
Note: To create hierarchies containing organizations from onlyone business group, choose the Diagrammer Local option. Toinclude hierarchies from more than one business group, choosethe Diagrammer Global option. The availability of theseoptions depends on whether your system administrator hasgranted you access to the local or global versions of thewindows using function security. See Menu Structure inConfiguring, Reporting and System Administration in OracleHRMS.

3 – 8 Using Oracle HRMS – The Fundamentals (US)
2. Enter a unique name for your new hierarchy, and check Primary ifit is your main reporting hierarchy.
3. Enter the version number and start date for the hierarchy.
4. Save your work.
5. Choose the Open Editor button to open the hierarchy diagrammer.
6. In the node list region of the window, query the organization orposition that represents the top level in the hierarchy and drag it tothe hierarchy diagram region of the window.
7. Build the hierarchy by adding organizations or positions, workingfrom the top level down.
• To add an organization or position, drag it from the node listregion to the organization or position that will be its parent anddrop it on top to add it to the hierarchy. The cursor displays asmall rectangle when you are on top of the parent value.
• You can move and remove organizations or positions to modifythe hierarchy until you have the correct structure.
8. Save your hierarchy. The hierarchy diagrammer commits thechanges to your database to create the new hierarchy.
Creating a New Version of an Existing Hierarchy
Use the hierarchy diagrammers to create a new version of an existingorganization or position hierarchy.
� To create a new version of an existing hierarchy:
1. Open the Organization or Position Hierarchy window using theDiagrammer menu option. This displays a cut–down version of theHierarchy window.
Note: To create hierarchies containing organizations from onlyone business group, choose the Diagrammer Local option. Toinclude hierarchies from more than one business group, choosethe Diagrammer Global option. The availability of theseoptions depends on whether your system administrator hasgranted you access to the local or global versions of thewindows using function security
See Menu Structure in Configuring, Reporting and System Administrationin Oracle HRMS.
2. Query the name of the hierarchy.
3 – 9Hierarchy Diagrammers
3. In the Version field, use the Down Arrow to move through existingversions of the hierarchy until you reach a version number forwhich no other data appears. Enter the start date for the newversion.
Overlapping versions of a hierarchy cannot exist. When you createa new version of an existing hierarchy, the system automaticallygives an end date to the existing version. Oracle HRMS retains allprevious versions of hierarchies for historical information.
4. Save your work.
5. Choose the Open Editor button to open the Hierarchy Diagrammerwindow. The new version of the organization or position hierarchyis displayed.
6. Modify the hierarchy to add, move or remove organizations orpositions to create the new hierarchy.
7. Save your hierarchy. The hierarchy diagrammer commits thechanges to your database to create the new hierarchy.
You can also create a new hierarchy by copying an existing hierarchy:page 3 – 9 and modifying it.
Copying an Existing Hierarchy
Use the hierarchy diagrammers to create a new organization orposition hierarchy by copying an existing one.
� To copy an existing hierarchy:
1. Open the Organization or Position Hierarchy window using theDiagrammer menu option. This displays a cut–down version of theHierarchy window.
Note: To create hierarchies containing organizations from onlyone business group, choose the Diagrammer Local option. Toinclude hierarchies from more than one business group, choosethe Diagrammer Global option. The availability of theseoptions depends on whether your system administrator hasgranted you access to the local or global versions of thewindows using function security.
See Menu Structure in Configuring, Reporting and System Administrationin Oracle HRMS.
2. Choose New from the File menu, enter a name for your newhierarchy and save your work.

3 – 10 Using Oracle HRMS – The Fundamentals (US)
3. Enter a start date for your new hierarchy and choose the CopyHierarchy button (do not save first).
4. Select the name and version of the hierarchy you want to copy, andchoose Copy.
5. Choose the Open Editor button to open the Hierarchy Diagrammerwindow. The copied organization or position hierarchy isdisplayed.
6. Modify the hierarchy to add, move or remove organizations orpositions to create the new hierarchy.
7. Save your hierarchy. The hierarchy diagrammer commits thechanges to your database to create the new hierarchy.
Adding Organizations or Positions to a Hierarchy
Use the hierarchy diagrammers to add organizations or positions to anorganization or position hierarchy.
� To add organizations or positions to a hierarchy:
1. Launch a hierarchy diagrammer: page 3 – 3.
2. In the node list region of the window, query the organization orposition you want to add to your hierarchy.
3. Select the organization or position name in the node list, and dragit to the organization or position that will be its parent, then drop iton top to add it to the hierarchy.
The cursor displays a small rectangle when you are on top of theparent value.
4. Save your changes to the hierarchy. The hierarchy diagrammercommits the changes to your database.
Removing Organizations or Positions From a Hierarchy
Use the hierarchy diagrammers to remove organizations or positionsfrom an organization or position hierarchy.
� To remove organizations or positions from a hierarchy:
1. Launch a hierarchy diagrammer: page 3 – 3.

3 – 11Hierarchy Diagrammers
2. Select the organization or position you want to delete from yourhierarchy, and drag and drop it into the node list region of thewindow, or choose Cut to remove it and all its descendants.
You are not deleting the organization or position from yourdatabase; you are just removing it from the hierarchy.
3. Save your changes to the hierarchy. The hierarchy diagrammercommits the changes to your database.
Moving Organizations or Positions in a Hierarchy
Use the hierarchy diagrammers to move organizations or positions inan organization or position hierarchy.
� To move organizations or positions in a hierarchy (drag and drop):
1. Launch a hierarchy diagrammer: page 3 – 3.
2. Select the organization or position you want to move in yourhierarchy, drag it to the organization or position that will be itsparent and drop it on top to add it to the hierarchy.
The cursor displays a small rectangle when you are on top of theparent value.
3. Save your changes to the hierarchy. The hierarchy diagrammercommits the changes to your database.
� To move organizations or positions in a hierarchy (cut and paste):
1. Launch a hierarchy diagrammer: page 3 – 3.
2. Select the organization or position you want to move in yourhierarchy, and choose Cut from the Edit menu or choose the Cutbutton on the toolbar.
3. Move the cursor over an organization or position that you want tomove it beneath, or next to.
The cursor displays a small rectangle when you are on top of theparent value.
4. Choose:
• Paste, to move the organization or position to be a subordinate ofthe one selected
or:
• Paste Next to, to move the organization or position to the samelevel as the one selected.

3 – 12 Using Oracle HRMS – The Fundamentals (US)
5. Save your changes to the hierarchy. The hierarchy diagrammercommits the changes to your database.
Menu and Toolbar Commands
You can access the following commands from the hierarchydiagrammer menus. Use them to create, edit, save and print hierarchydiagrams and control the display of hierarchy diagrams on yourdesktop.
Some of these commands are also available from the toolbar, whichprovides quick access to commands you use often.
File Menu
Save
Saves changes made to the hierarchy to your database.
Refresh
Refreshes the screen to show the latest changes to the hierarchydiagram.
Prints the hierarchy diagram as it is displayed in the window.
Close Hierarchy Editor
Exits the hierarchy diagrammer and prompts you to save anychanges.
Edit Menu
Cut
Removes the selected organization or position and any subordinateorganizations or positions from the current hierarchy, and places iton the clipboard. Use with Paste or Paste next to, to move theorganization or position.
Copy
Copies the selected organization or position and any subordinateorganizations or positions in the current hierarchy to the clipboard.Use with Paste or Paste next to, to move the organization orposition. When you paste the copied organization or position, it isremoved from its original place in the hierarchy and replaced at thenew location, thus having the same effect as the Cut option.

3 – 13Hierarchy Diagrammers
Paste
Pastes an organization or position into the hierarchy at the levelbelow the selected organization or position.
Paste next to
Pastes an organization or position into the hierarchy at the samelevel as the selected organization or position.
Delete
Removes an organization or position from the hierarchy diagram.Unlike Cut and Copy, this option does not place the organization orposition on the clipboard. Only removes organizations andpositions from the hierarchy and does not delete them from yourdatabase.
Properties (on–screen button)
Displays a floating window showing the properties of the selectedorganization or position. You can use this instead of the nodeproperties region of the window.
Preferences
Displays the Preferences window, which you can use to change thetext style and size, and the colors of the text, lines, nodes andbackground of the hierarchy diagram.
View Menu
Vertical Style
Changes the view of the current hierarchy diagram to a stackedhierarchical layout.
Interleaved Style
Changes the view of the current hierarchy diagram to an expanded,stacked hierarchical layout.
Org Chart Style
Changes the view of the current hierarchy diagram to anorganization chart style layout.
Node Properties
Toggles on or off the region of the window containing theproperties of the selected organization or position, enabling you todisplay more of the hierarchy diagram.
Node List

3 – 14 Using Oracle HRMS – The Fundamentals (US)
Toggles on or off the region of the window containing the Findblock and the list of organizations or positions that are not part ofthe hierarchy, enabling you to display more of the hierarchydiagram.
Toolbar
Toggles the toolbar on and off.
Status Bar
Toggles the status bar at the bottom of the main hierarchydiagrammer window on and off.
Help Menu
About
Displays information about the hierarchy diagrammer.
Library
Displays help for using any Oracle applications you have installed.

C H A P T E R
4
4 – 1Enterprise Modeling
Enterprise Modeling
4 – 2 Using Oracle HRMS – The Fundamentals (US)
Enterprise Modeling Overview
In many enterprises the basic management units are roles, notindividuals. This is because organizations continue in unchangedexistence despite frequent changes in staff. However, the definition ofa ’role’ varies from one enterprise to another. Like organizationstructures, it reflects the culture of the enterprise.
Within Oracle HRMS the concept of a role is used in three differentways:
• A person’s primary role is set up using jobs and positions. Thisdefines the key tasks that the person is employed to fulfil.
• A person may also perform ancillary activities, such as firewarden or health and safety representative, that in someinstances can lead to enhanced employment rights orcompensation. These activities are known as supplementaryroles.
• A person may additionally have to authorize or approve certainactions within the enterprise, such as expenses or recruitment.This must be set up using workflow roles.
Role Definition (Jobs and Positions)
You define roles to represent the ways that different groups ofemployees work as:
• Jobs
• Jobs and Positions
You can also have a combination of both to define different rolesthroughout your enterprise.
You can also identify groups of employees (using the Job Name andPosition Name key flexfields), and you can hold standard information,such as job descriptions and standard working hours.
Part of your definition also includes the evaluation you want toperform between roles.
Role definitions can include descriptions of responsibilities,requirements and working conditions. There are a number of ways toadd information about a role, for example, you can attach documents(such as word processed documents, spreadsheets, or simple textcomments) to each job or position record. You can also add up totwenty additional fields to each window to hold extra information yourequire. To see the number of ways to add information, see: EnteringAdditional Information About Jobs and Positions: page 4 – 7.

4 – 3Enterprise Modeling
If you use positions to define roles, you can use Oracle’s position,budget, and workflow functionality to keep position and related costsin line with available funds. See: Position Management: page 4 – 9.
Supplementary Roles
As well as recording information about the roles that employees carryout as part of their employment contract, you can record informationabout supplementary roles that employees undertake. For example, anemployee may be a health and safety representative, or a member of arepresentative body such as a European Works Council.
Job Groups
Each job is held in a Job Group. The Job Group is used to store jobs of asimilar type together in one group. All standard jobs created in OracleHRMS, that is, those jobs that define the role the person is employed tofulfil, must be stored in the default HR Job Group.
Supplementary roles must not use the default HR Job Group.
Workflow Roles
Workflow roles typically correspond to the types of actions thatcharacterize each destination in a routing sequence, such as initiator,classifier, reviewer, approver, and are defined by the user. You canassociate several users to the same role, thus allowing anyoneoccupying that role to process the transaction.
Position Hierarchies
If you use positions to define roles, you can define position hierarchies toshow the detailed line management reporting in each organization orthroughout the enterprise. You can create and maintain your reportingstructures in one of two ways; using the Position Hierarchy window orthe Position Hierarchy Diagrammer.
Grade Structures
You can represent the grade structures used in your enterprise, andrelate compensation to grades. You can relate compensation to gradesdirectly, using grade rates, or indirectly, using grade scales.
Reorganize Business Groups
You can also represent the reporting lines and other relationships bybuilding hierarchies. Using Mass Move, you can transfer a group ofemployee assignments in one step, to another organization or to newpositions within the same organization.

4 – 4 Using Oracle HRMS – The Fundamentals (US)
Collective Agreements
You can record details of collective agreements that are recognized byorganizations within your Business Group. Collective agreements areagreements between a bargaining unit and an employer or employerfederation that determine minimum pay rates and conditions for theemployees covered by its terms.
Enterprise Modeling
Each enterprise has its own unique culture, which is reflected in theorganization of work and in the management of people within theenterprise. The enterprise culture also affects the reward systems inoperation and the control systems that are required.
The range of enterprise modeling is very wide. However, it is possibleto identify some common types of enterprise, and we suggest how youmight implement Oracle HRMS for three typical enterprise models.These are:
• Project based enterprises
• Rule based enterprises
• Hybrid enterprise structures
How closely should you follow one or other of these models?
These suggestions are not intended to provide a blueprint for your ownimplementation. They should help you to see the possibilities – howyou can implement and use different combinations of organizationsand jobs, or positions in your own situation.
What is the role of jobs, positions and grades in enterprise modeling?
Jobs, positions and grades play a key role in the modeling of workstructures in your enterprise. Jobs and positions can represent the rolesof your employees in different ways.
You can relate compensation to grades in two ways: directly, usinggrade rates, or indirectly, using grade scales. If you relate compensationto grades directly, salary information is held in the salary element. Ifyou relate compensation to indirectly, this salary information is notheld in the salary element, but in a grade step table. There may beseveral steps, and hence values, for each grade in its grade scale. Weexplain the factors you should take into account in choosing the moreappropriate of these two approaches for your enterprise.

4 – 5Enterprise Modeling
What is the role of position hierarchies?
Position hierarchies show the detailed line management reporting ineach organization throughout the enterprise. You can set up a primaryhierarchy and multiple secondary hierarchies to show reporting lines,including ”dotted line” reporting. You can also use position hierarchiesto control access to information.
Can I reorganize my Business Group?
Yes. By using Mass Move you can move a group of assignments todifferent positions either within an organization or betweenorganizations. You can move assignments to existing positions or createnew positions for them. You can also change the grade, location, andstandard conditions of an assignment.
How do you manage positions?
Position management is a flexible system that offers standard andadvanced levels of control. Standard controls allow organizations todefine positions, route and approve budgets. Advanced controls alloworganizations to route and approve position definitions and budgets,and to ensure that positions and related costs are kept in line withavailable funds in accordance with policy. Configurable business rulesperform validations, and interfaces from payroll, budgeting, andcommitments to General Ledger ensure accurate and currentinformation.
Management reports provide data and analysis necessary to staywithin budget and to adjust expenditures or budgets in response topermanent changes, such as reclassification of a position, authorizationof new positions, or temporary changes such as temporarily freezing aposition.
You can choose whether to apply position control to organizations, toan entire organizational hierarchy or selected organizations within it.
How do you ensure that actions are in keeping with policy?
Using Oracle Workflow, you can route position transactions and budgetworksheets to gather the necessary approvals and authorizations toensure that decisions are in keeping with current policy. You can routetransactions based on routing list, position hierarchy, or supervisoryhierarchy (the application extrapolates the hierarchy based on thesupervisor entered on the user’s primary assignment).
When you route a transaction, the application automatically identifiesthe next authorized user. You can send the transaction to that user orskip that person and send it to the next person.

4 – 6 Using Oracle HRMS – The Fundamentals (US)
You can easily view the routing history for current and pasttransactions, including details about the actions taken, and for eachaction, the prior and subsequent destinations.
The application maintains an historical record of information about aposition using date tracking. Date tracking allows the user to viewposition data and gather information that can be used to addresscomplaints or other actions brought by employees or bargaining units.
Is there a simple way to create new positions?
Yes, position copy allows you to duplicate position data and easilydefine new positions.
Jobs and Positions
You define roles to represent the ways that different groups ofemployees work. In Oracle HRMS you can use jobs or positions, or acombination, to define roles.
A job is a generic role within a Business Group,which is independent of any single organization.For example, the jobs Manager and Consultant canoccur in many organizations. You can also use jobsto set up supplementary roles that an employeemight hold, for example, fire warden, or health andsafety officer. You can distinguish thesesupplementary roles from other jobs by using JobGroups.
A position is a specific occurrence of one job, fixedwithin one organization. For example, the positionFinance Manager would be an instance of the job ofManager in the Finance organization. The positionbelongs to the organization. There may be one,many, or no holders of a position at any time.
Example
In a large structured organization, you may have a permanentestablishment of positions for most of your employees.
However, you may also have groups of employees hired to performspecific tasks. This can be on a temporary or a permanent basis. Staffin this category can include agency workers, consultants andcontractors. For these staff, you can define the role more flexibly as ajob.
Job
Position

4 – 7Enterprise Modeling
Model Your Organization and Roles
When you plan how to model your organizations and roles, considerthe following points:
• Positions are normally used in role–based enterprise structureswhere clearly defined rules largely determine the waysemployees work, and the compensation and benefits theyreceive.
• To manage fixed establishments of posts that exist independentlyof the employee assignment, it is best to use positions.
If you decide to use positions to represent your enterprise structuresyou need to consider carefully how to use organizations.
Positions provide you with a finer degree of structural definition andcontrol than organizations on their own. You can use bothorganizations and positions to represent your reporting structures.However, if you define both, you must also maintain both over time.This may lead you into duplication of effort and information.
Suggestion: If you decide to use positions to represent howpeople work in your enterprise, it is best to define most of thedetail at the level of the position. Do not duplicate this detailin organization structures.
Use organizations to show your highest level of departments ordivisions. Use positions and position hierarchies to show the reportinggroups existing in your enterprise.
If you use positions to define roles, you can use Oracle’s position andbudget functionality to stay within budget and adjust positionexpenditures or budgets in response to changes in organizations,personnel, and funding sources. You can also use Oracle Workflow forrouting position definitions and budgets for approval, and configurepredefined business rules that perform necessary validations. See:Position Management: page 4 – 9.
Additional Information About Roles
As you define roles in your enterprise you can describe theirresponsibilities, requirements, and working conditions. This can bedone in a number of ways:
• For positions you can enter the location, probation period andworking hours in the standard fields. Entering location andworking hours for an organization provides a default for allpositions within that organization.

4 – 8 Using Oracle HRMS – The Fundamentals (US)
• You can attach documents, for example, text describing theobjectives and tasks of the job or position, to each record.
• You can add up to twenty additional fields to each window in adescriptive flexfield. These fields can be global (they alwaysappear) or context–sensitive (they appear only when triggeredby another piece of information). For example, you could set upfields to record the health and safety requirements of a position,or its suitability for job share.
• You can add any number of Extra Information Types (EITs). Thiswould enable you to set up fields to hold information to whichonly users with certain responsibilities would have access. Forexample, you could set up fields only to be used by managers.
• You can enter competencies against both jobs and positions.Then, using the suitability matching tool, you can matchemployees’ competencies to those required by a job or position.This enables you to identify training needs or rank potentialsuccessors. You can also enter which position is the plannedsuccessor for each position in your enterprise.
Job Groups
Each job is held in a job group. The job group is used to store jobs of asimilar type together in one group. All standard jobs created in OracleHRMS, that is, those jobs that define the role the person is employed tofulfil, must be stored in the Default HR Job Group. This job group isautomatically created for your business group. Only jobs entered in theDefault HR Job Group will be available in other windows in OracleHRMS such as Position, Competencies, or Assignment. The onlywindows within Oracle HRMS that can access jobs outside of theDefault HR Job Group are the Supplementary Roles window and theElections window.
You can set up additional job groups to store supplementary roles thatyour employees might fulfil. These would be performed in addition tothe roles described above and could be as a result of company definedinitiatives like fire warden, or defined by legislation such as health andsafety representative.
See: Workers’ Representation and Supplementary Roles in ManagingYour Workforce Using Oracle HRMS.
You can also set up job groups to be used by Oracle Projects.
The way in which your enterprise uses job groups will depend on thesetting of the HR:Cross Business Group profile option. If this is set to Ythen you can create global job groups that can be accessed by all

4 – 9Enterprise Modeling
business groups on your system. If it is set to N then you can onlycreate job groups for use within your business group.
Note: The HR Default Job Group is business group specificand therefore all jobs held within it are only available withinyour business group. Global job groups only apply tosupplementary roles within Oracle HRMS, and Oracle Projects.
Position Management
Oracle’s position, budget, and workflow functionality supportsbusiness processes commonly required to manage positions. Forexample, using these business processes, you can:
• Define positions: page 4 – 10
• Prepare budgets and transfer that data to Payroll and GeneralLedger: page 6 – 21
• Prepare mass actions such as copying and updating positions orupdating mass assignments: page 4 – 10
• Control access to data: page 4 – 11
• Route and approve data: page 4 – 11
• Validate data against configurable business rules: page 4 – 12
• Capture historical data: page 4 – 12
• Plan based on management reports: page 4 – 12
Organizations require different levels of control when managingpositions. For example, a standard level of control might typicallyinvolve position definition, management planning and reportingagainst budgets, and cost tracking. Organizations fitting thisdescription generally base their budgets on positions, jobs, ororganizations. These organizations do not require rules placed onpositions and budgets to ensure that costs correspond to availablefunds in a fiscal period.
More advanced control typically might involve complex approvalprocesses, encumbrance accounting and commitment of funds, budgetreallocation, and reporting requirements based on external fundingauthorities. Organizations fitting this description base their budgets onpositions and use these budgets to keep positions and related costs inline with available funds in a fiscal period.
If your organization requires a standard level of control, you:
• define positions using the position description window

4 – 10 Using Oracle HRMS – The Fundamentals (US)
• prepare budgets using the budget detail window, if you do notrequire workflow or base your budgets on other criteria thanpositions, jobs, or organizations
• prepare budgets using the budget worksheet and review the status ofa transaction, if you require workflow
If your organization requires a more advanced level of control, you:
• define positions using routed position transactions
• prepare budgets using the budget worksheet to manage costsassociated with positions
• validate data using the configurable business rules to performnecessary validations
• control access using transaction templates
Regardless of the degree of position management you choose toimplement, you can plan based on management reports, perform massactions, control access to data using Oracle’s standard security, postcommitments to General Ledger for budgeted positions, and capturehistorical data using datetracking.
Define Positions
If you designate an organization as a position–control organization, youdefine and maintain positions for that organization using positiontransactions. If you don’t designate an organization as aposition–control organization, you continue to use the existing positiondefinition window.
Using Oracle Workflow, you can route and approve the data in thetransaction prior to updating that information to the database. Uponupdate to the database, you can enter supplementary position data.
Prepare Mass Actions
Position control simplifies position definition and maintenance byproviding:
• Position copy functionality that lets you create one or more positionsbased on existing positions
• Position update functionality that lets you update one or morepositions
• Mass assignment updates that enable you to change assignment dataon one or more assignments

4 – 11Enterprise Modeling
See: Mass Assignment Updates, Managing Your Workforce UsingOracle HRMS.
Control Access
In addition to standard security, you can control access to positiondefinition and budgeting by several mechanisms. You can:
• Specify which workflow roles and users or positions can approverouted transactions
• Define rules that prevent unauthorized users from receivingtransactions
• Use templates for positions transactions that define the data thatusers can access, edit, and approve
You can use the supplied task and workflow role templates or createnew ones to suit your requirements.
For mass actions, a Context form allows you to restrict transactions byresponsibility and by legislation.
Route and Approve Data
The process of establishing and maintaining positions and budgetsinvolves appropriate approvals and reviews. Using Oracle Workflow,you can route transactions and obtain necessary approvals.
You can base routing on user–defined routing lists, position hierarchies,or supervisory hierarchies. The approval mechanism gives you controlover who approves transactions and under what circumstances. Yourestrict which users process transactions by defining routing andapproval rules.
When routing a transaction, you can decide whom to notify when aspecific event occurs, such as the successful posting to the database.You can also expedite routing by skipping people in the routingsequence, or by sending the transaction directly to an overrideapprover.
After approving a transaction, the approver can apply the transactionto the database or route it to another user to have it applied (that userdoesn’t have to have approver status).
To ensure that transactions are processed in a timely manner, you canset a response time (in days) that returns a notification to the sender ifthere is no response when the interval elapses.

4 – 12 Using Oracle HRMS – The Fundamentals (US)
Validate Data
Configurable business rules provide the greatest degree of control inmanaging positions and budgets. They perform necessary validationsto assure that money is available to compensate incumbents.
The business rules automatically run checks against actions onbudgeted positions, such as hiring applicants, terminating employees,changing assignments, changing position definitions, and modifyingbudgets.
For example, the business rules:
• Prevent the incumbents’ annual salaries from exceeding theposition’s budgeted salary/wages amounts.
• Let you advertise a position and process applicants but not hireanyone into a position until the funding is approved.
• Prevent assignments to positions that have pending transactions.
You can configure the business rules and choose which of thepredefined business rules the application should ignore, block, or issuea warning.
Capture Historical Data
Datetracking of the position form generates historical data. Thedatetracking mechanism also allows you to prepare future–datedtransactions and to perform retroactive changes. A transaction statuswindow captures a complete routing history of pending and appliedtransactions. A history window captures position records that have astatus of applied or submitted.
Plan Based on Management Reports
Management reports provide data and analysis to stay within budgetand to adjust expenditures or budgets in response to permanent andtemporary changes in organizations, personnel, and funding sources.
Management reports and process logs inform you of potentialproblems and provide the data necessary to analyze and solve thoseproblems.
Another tool for solving problems is the process log. If there are anyerrors encountered in processing an action, such as applying changedcriteria to mass assignment records or updating the database, theapplication enters information about the error in the Process Log andchanges the status of the transaction to show the error.

4 – 13Enterprise Modeling
Position Management Decisions
You can determine the extent to which you manage positions andposition–related costs. The key question is do you base your budgetson positions and do you use business rules to manage and validateposition actions and their related costs?
If you choose to manage positions using business rules:
• Decide which organization hierarchy and organizations in thathierarchy should have position control.
• Decide which budget should establish position expenditures.
• Review the business rules and decide which business rules to ignoreor to enforce as errors.
• Make the necessary workflow decisions described below.
If you choose to manage positions without using these business rules:
• Decide if you want to route budgets for data entry and approval
If you choose to route budgets, make the necessary workflowdecisions described below.
For background information about position control, refer to PositionManagement: page 4 – 9, Transaction Templates, see Configuring,Reporting, and System Administration in Oracle HRMS, Workflow forPosition Management, see Configuring, Reporting, and SystemAdministration in Oracle HRMS.
For information about making budget decisions, refer to BudgetingOverview, see Managing Your Workforce Using Oracle HRMS.
Workflow
If you route transactions, make the following decisions.
Roles
• Identify the workflow roles that typify your enterprise and decidewhether to add further lookups for role types.
Routing and approvals
• Decide what type of routing to implement for each category oftransaction (position transaction and budget worksheets).
The three types of routing are routing lists, position hierarchy, orsupervisory hierarchy.
• Based on the selected routing type, decide which users or positionshave the authority to approve transactions.

4 – 14 Using Oracle HRMS – The Fundamentals (US)
• Decide whether to set up routing and approval rules to restrictaccess to transactions.
The application automatically selects a routing sequence andqualifies users based on the values entered in the transaction.
• Decide when to update current and retroactive transactions(immediately or later).
• Decide when to update future–dated transactions (immediately oron effective date).
Templates (position transaction)
• Decide whether to configure role and task templates.
Review the supplied Basic Role and Create and Update positiontransaction task templates. Base your decision to define newtemplates on the type of work users perform, and on the view andedit permissions they require.
Position Hiring Status
Every position must have a hiring status. The system statuses providedwith Oracle HRMS are as follows. You can provide user names forthese system statuses and map more than one user name onto eachsystem status, if required.
• Proposed – For modeling or planning.
• Active – Available for use.
• Frozen – Position can continue to be used with currentincumbents but no new incumbents can be placed in it.
• Eliminated – Position is no longer in use and will not be requiredin the future. A position cannot be reactivated when it has beeneliminated.
• Deleted – Position was set up by mistake, or never approved. Aposition can only be deleted before its Start Date (that is, the dateon which it was approved for use). A position cannot bereactivated when it has been deleted.
Note: Positions have a Valid/Invalid status as well as a hiringstatus. You cannot assign an employee to an Active position ifits status is Invalid (or a user defined status). You can onlyassign to a position with an Active hiring status and a Valid (orblank) main status.
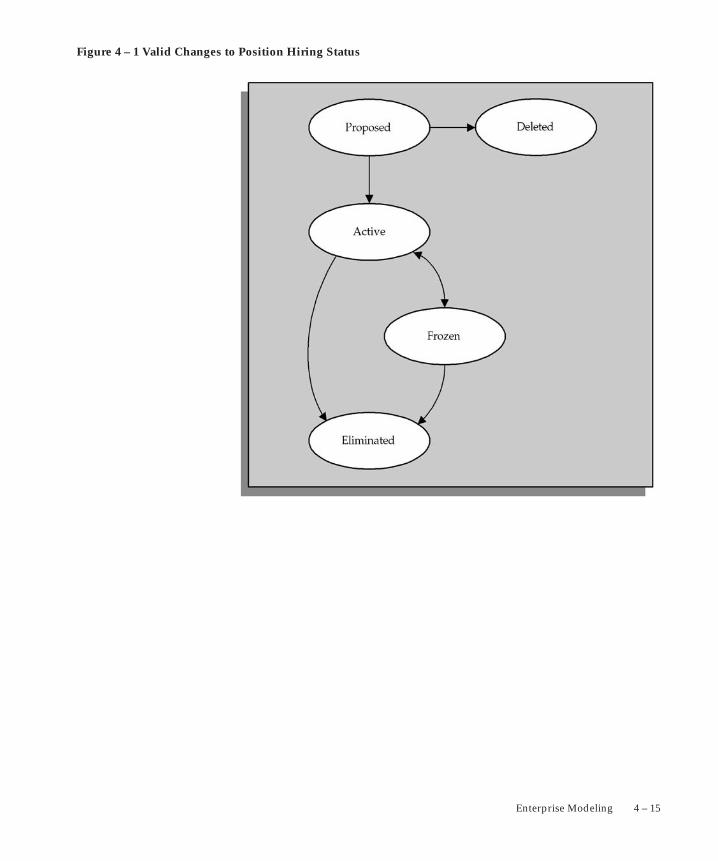
4 – 15Enterprise Modeling
Figure 4 – 1 Valid Changes to Position Hiring Status

4 – 16 Using Oracle HRMS – The Fundamentals (US)
Job and Position Names
Before you define your jobs and positions, decide whether you want touse simple names and codes, or multi–segment job and position namesto hold more information.
The name can be a title only, as for example:
• Director
• Analyst
• Training Manager
You can add another segment to categorize the jobs or positions. Inthis way, you can use segments to identify subgroups of employeeswithin your enterprise. For example, a job name can comprise a titleand a job type, such as:
• Director of Finance.Director
• Assistant Director of Finance.Director
• Finance Officer.Professional
Similarly, a position name can comprise a title, a position number, andan indicator showing whether the position is part–time. For example:
• Training Manager.020001.F/T
• Secretary to the Training Manager.020013.P/T
You define the segments of the job and position names and their validvalues by setting up the Job Name key flexfield and the Position Name keyflexfield. Normally your system administrator does this.
Jobs and Position Evaluation
Evaluation systems, which compare the responsibilities of roles to helpin the definition of grades, are common in large enterprises. The HayEvaluation System, which is used internationally, is an example.Directly or indirectly, the evaluation can also contribute to settingcompensation levels.
Evaluation systems normally use a set of formal and systematicprocedures to perform a comparison of roles. As such, evaluation isprimarily concerned with the definition of the relative status of a role,and not with a set of absolutes. The objective of all evaluation systemsis to place a role in a grading or salary structure.
There are two main types of evaluation system:

4 – 17Enterprise Modeling
Key roles are examined factor by factor and a rankcomparison order produced for each factor. Acomplex comparison of weighted factors thenfollows.
A wider range of factors is used. Each factor isweighted and has a numerical scoring system. Thetotal points scored determines the placement of therole in a grade or salary structure.
These systems might incorporate benchmarking, where a few key rolesdetermine the rank of all the others. Grades and compensation levelsare determined after the evaluation and ranking of the jobs.
In Oracle HRMS, you can set up one or more evaluation systems forjobs or positions. You use a descriptive flexfield to hold the evaluationinformation, which provides the flexibility for you to use the evaluationsystem of your choice.
Position Extra Information Types
You can define as many Extra Information Types as you require tohold additional information about positions. There are also somepredefined Extra Information Types. These are:
• Seasonal Information – the estimated start and end dates for theseason relevant to a seasonal position. You can enter a day andmonth without a year so that the information does not need to beupdated each year.
• Reservation Information – the reason for reserving a position (orpart of its FTE), the person it is reserved for, and the start andend dates of the reservation.
For example, the reservation status could be New Hire, in whichcase the start date would be the date the offer is made oraccepted.
You can add your own reservation statuses using the LookupType POSITION_RESERVED_STATUS. Two values are seeded:Management Discretion and New Hire.
• Overlap Information – the proposed start and end dates of theperiod of overlap between one incumbent leaving and a newincumbent starting work in the position.
• Position Family – one or more classifications for the position.
You create your own position families using the Lookup TypePOSITION_FAMILY.
Factor
Points Rating

4 – 18 Using Oracle HRMS – The Fundamentals (US)
Project Based Enterprises Example
Project based enterprises are often service based industries whereflexibility and organizational change are key features. Examples areconsultancy or construction companies, or small manufacturing orsoftware companies.
Single Projects
In these enterprises, employees are assigned to work on single projectsfor a given period of time. For example, an engineer working on alarge scale construction project might be assigned to the project for aperiod of six months. All their work and costs are associated with thisone project. When this is complete the employee moves on to performa similar role on another project. In this example you would expect theemployee to have a single assignment, with 100% of the assignmentcosts allocated to a single project. The employee assignment might alsocontain project specific information, such as location or groupinformation.
Multiple Projects
In a different situation, an employee might be assigned to a number ofprojects at the same time. For example, consider an ApplicationsConsultant working for Oracle Corporation. This person is employedas a consultant by a specific organization within Oracle but the projectwork is undertaken outside Oracle. The consultant performs similartasks in different implementation projects, and costs are allocated onthe basis of actual time spent working on each project. In this exampleyou would expect the consultant to have a single assignment in OracleHRMS and the project allocation and costs to be entered as timecardinformation.
In both of these examples, employees perform specific roles, but theywork on different tasks or projects at different times. Project basedenterprises normally have a fluid organization structure with regularlychanging reporting and management lines. This fluidity provides theflexibility required to compete in rapidly changing markets.
Organizations can be formed or transformed at short notice as differentprojects or management groups are formed. Employees can beassigned and reassigned to these organizations, also at short notice,although they normally retain their basic role, or job.
Representing Organizations and Jobs
To represent both single and multiple projects, you need the ability todefine and change organization structures quickly and easily. You must

4 – 19Enterprise Modeling
also be able to move employees between organizations while keepingthe same job. For both of these reasons, you would probably useorganizations and jobs to show how people are assigned and managed.
Jobs
Jobs are independent of organizations. In the Assignment window, youcan change the assignment organization or job independently.
Figure 4 – 2 Project Based Assignments
Typically, you would not define Positions to show this type of working.Positions require additional definition and maintenance, and do notreflect the sort of flexible working environment found in this type ofenterprise.
Organizations
Working with organizations and jobs as the basis of the employeeassignment, you can also consider how you would reflect theassignment of the employee to individual projects. There are a numberof possible options to consider.
• Use organizations to show actual projects, and assign employeesto projects.
– Useful for single projects. For multiple project assignmentsyou would need to use multiple assignments.
• Use a People Group flexfield segment to hold the project code.
– An alternative for single projects, where you want to use theorganization to show internal management structures.However, for multiple project assignments you would stillneed to use multiple assignments.
• Use a Cost Allocation flexfield segment to hold the project code.
– Useful for both single and multiple project assignments.You can collect project cost information at the workassignment or the timecard entry level.

4 – 20 Using Oracle HRMS – The Fundamentals (US)
Organization Structures
You should define organizations down to the level of individualmanagers, and use the manager flag on the Assignment window toidentify the manager of each organization. Also, define your primaryorganization hierarchy to show the detailed management reportinglines among organizations and managers. In this way you can showthat employees assigned to an organization are managed by theorganization’s manager.
Note: It is best not to use the Supervisor field of the assignmentwindow to identify managers for individual employees. Thisfield is used to identify a personal supervisor for an employeeand is not updated if the supervisor moves to another job ororganization.
Job Structures
In this type of environment, jobs show the specific roles employeesperform. Therefore, you are likely to have multi–segment job names todistinguish different types and different levels of jobs in the enterprise.For example, you might define a three segment job name withDepartment, Title, and Job Level. An actual job combination might thenbe ’Applications.Consultant.Senior’.
Project Allocation and Costing
With this type of implementation, you would probably use theassignment to identify management type reporting. You wouldidentify project–working using a segment of the Cost Allocationflexfield to show Project Code for each assignment.
If you set the qualifier Assignment to Yes for this segment, you couldenter percentage costs for the assignment to different project codes. Ifyou set the qualifier Element Entry to Yes, you could use a timecardelement to record and cost the actual hours worked on each project.
See: Data Costed at the Organization and Assignment Levels: page6 – 9
Other Management Issues
When you consider this environment there are other areas yourdecisions may affect:
Individual compensation and benefits are oftenbased on personal negotiation, or performance
RemunerationPolicies

4 – 21Enterprise Modeling
reviews. Therefore you will probably have fewerrules to determine policy and more considerationof the actual values entered for an employee.
Typically grades and jobs are very closely linked.For example, the name Senior Consultant mayidentify both the role of an employee and his or herrelative status and eligibility for compensation andbenefits.
You may decide to set up the same structures forboth the job and the grade. This will be true if youwant to set up rates of pay with minimum andmaximum values associated with your grades.
Headcount budgets are usually allocated at thelevel of the organization, or the combination oforganization and job.
You can calculate your salary budgets from thedefinition of organization and job headcountbudgets, combined with valid grades and graderate information.
Actual salary costs in an HR environment can becalculated from the actual salaries of assignedemployees.
Actual salary costs in an environment includingOracle Payroll can be calculated directly frompayroll results.
See: Budgeting, Managing Your Workforce UsingOracle HRMS.
Vacancies are not created by default whenever anemployee leaves. Managers often have thefreedom to decide if they want to replace anemployee, or to recruit to a different role.
The recruitment process is often informal andallows for recruitment by resume (or CV).Individual managers are usually responsible forinterviewing and selecting candidates. This maybe on a one–to–one basis.
The need for individual career planning anddevelopment is matched by the need to identifyskilled employees for specific projects, jobs, andpositions.
Grades and Jobs
Budgets
Vacancies andRecruitment
Career PlanningandDevelopment

4 – 22 Using Oracle HRMS – The Fundamentals (US)
Using a competence–based approach, you canidentify, and measure the competencies held byyour employees and match them to workopportunities. Depending on the structure of yourenterprise, you can model career and successionplans using either career paths or positionhierarchies. This enables you to both continue todevelop your employees, whilst ensuring that youhave potential successors for all your positions.
Rule Based Enterprises ExampleThe rule–based enterprise is often a highly structured environment inwhich all aspects of work and remuneration are well organized andregulated. Common examples of this type of enterprise are found ingovernment, education, health and other public sector industries. Akey feature of this type of enterprise is the concern with managingpositions, or posts. Positions exist, and are managed independently ofpeople in post.
You can picture the role type organization as a ’Greek temple’, whosestrength is in its pillars. These pillars are the specialist functions ordepartments that exist within the enterprise. They are strong andalmost independent organizations. For example, the Financedepartment would have very little involvement in the working of theHR department.
Coordination between the groups takes place at the top of the structureby a narrow band of senior management – the pediment. In thisenvironment it is assumed that this should be the only personalcoordination needed. If the separate pillars do their job, as laid downby the rules and procedures, the ultimate result will be predictable.
Roles are usually more important than individuals. People are selectedfor satisfactory performance of a role, which is described so that arange of individuals could fill it. Reward systems are likely to be roleor rule–based.
Often, clearly defined procedures exist for every task and processwithin the enterprise. For example, job descriptions and job evaluationprocedures define individual roles and positions of authority. Also, itis common to find that procedures exist to govern communications,such as colored and numbered forms, committee reports, and so forth.
Representing Positions
Positions are most appropriate for this type of enterprise and providethe finer detail on work structure and line management that is needed
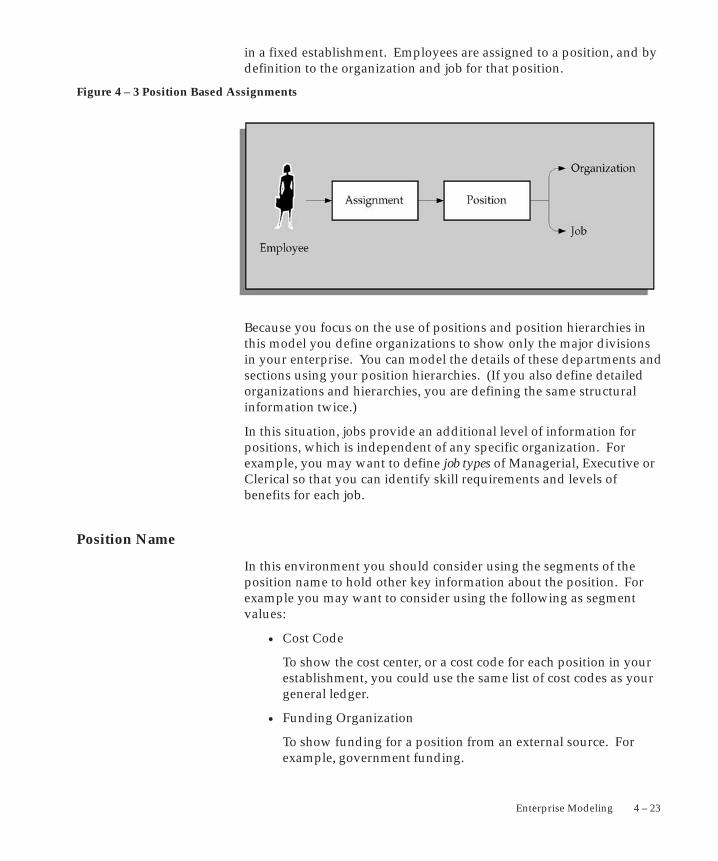
4 – 23Enterprise Modeling
in a fixed establishment. Employees are assigned to a position, and bydefinition to the organization and job for that position.
Figure 4 – 3 Position Based Assignments
Because you focus on the use of positions and position hierarchies inthis model you define organizations to show only the major divisionsin your enterprise. You can model the details of these departments andsections using your position hierarchies. (If you also define detailedorganizations and hierarchies, you are defining the same structuralinformation twice.)
In this situation, jobs provide an additional level of information forpositions, which is independent of any specific organization. Forexample, you may want to define job types of Managerial, Executive orClerical so that you can identify skill requirements and levels ofbenefits for each job.
Position Name
In this environment you should consider using the segments of theposition name to hold other key information about the position. Forexample you may want to consider using the following as segmentvalues:
• Cost Code
To show the cost center, or a cost code for each position in yourestablishment, you could use the same list of cost codes as yourgeneral ledger.
• Funding Organization
To show funding for a position from an external source. Forexample, government funding.

4 – 24 Using Oracle HRMS – The Fundamentals (US)
• Multiple assignments allowed – Y/N?
In Oracle HRMS a position can have any number of holders.You can set headcount budget values to track any variance onbudget, or you could use this type of segment to prompt users.
• Current status
As part of your position control procedures you may need tomark the status of a position for reporting or managementpurposes. For example, you can label a position as Frozen,Vacant or Active.
Note: You can use the Additional Position Details descriptiveflexfield to hold this type of information about positions if youdo not want the information to be visible to all users.
Management Reporting Lines
You can define a primary position hierarchy to show the managementreporting lines for all your positions. You should find that most ofyour security and reporting needs are based on this primary hierarchy.Groups are identified by selecting a manager and all the positions thatreport to that manager in this hierarchy.
Other Management Issues
When you consider this environment there are other areas yourdecisions may affect:
Individual compensation and benefits are oftenregulated, or based on union negotiatedagreements.
Reward systems are usually based on the roleperformed rather than on personal or performanceassessment. This may mean that you have todefine detailed eligibility rules for compensationand benefits.
Valid grades are defined for positions and it iscommon to use grade steps and progression points.
National or union pay scales establish actual ratesof pay for a grade and this is independent ofperformance. An employee is paid the rate for hisor her grade and step. Incrementing rules, whichdetermine progression to the next step, are usuallypart of the plan and are often time–based.
RemunerationPolicies
ComparativeGrades andPositions

4 – 25Enterprise Modeling
Job evaluation methods exist to compare rolesacross the industry with agreed grading structuresand rates of pay.
Headcount or full–time equivalent budgets areusually set for each position.
You can calculate your Salary budgets from theposition budgets, combined with valid grades andprogression point information.
In an HR environment you would calculate actualsalary costs, at any time, from the current salariesof assigned employees.
In an environment including Oracle Payroll, youwould calculate actual salary costs directly frompayroll run results.
There is an automatic vacancy when an employeeterminates employment. The position exists evenwhen there are no holders.
The stages of the recruitment process and theprocedures surrounding these are probably welldefined and regulated.
Standard letters for each stage of the process arealso likely to be well established.
In this environment people are recruited for theirability to perform a role. You would hold jobdescriptions and skill requirements for eachposition using attachments for text and the SpecialInformation Type for structured data.
Typically there is a well defined set of standardreports needed in this environment. Often theseare required by government.
Hybrid Enterprise Structures Example
Many enterprises combine different types of structure for differentgroups of employees. Typical of these hybrid types are largemanufacturing or corporate enterprises where management andadministrative roles are fixed into specific organizations, but other rolesare managed in a more flexible manner.
In Oracle HRMS you would set up this type of hybrid enterprise usingpositions for some groups of employees, and organization and jobs for
Budgeting
Vacancies andRecruitment
Standard Reports

4 – 26 Using Oracle HRMS – The Fundamentals (US)
others. For example, in one factory organization you might define aposition for the Production Manager, and one job for all production lineworkers.
Figure 4 – 4 Hybrid Enterprise Assignments
Employee Assignments
In this type of enterprise most of your workers would be assigned to anorganization and a job. However you would define managementpositions because they have the characteristics of fixed roles withinspecific organizations, including the idea of automatic vacancy ontermination of the assignment. In each organization you would haveonly one position. This would be the manager, and by default, anyother employee who works in the organization would report to themanager.
Other Management Issues
Other issues for managing groups of employees by position, or byorganization and job are the same as for Project Based Enterprises: page4 – 18 and Rule Based Enterprises: page 4 – 22.
Employees working in unionized jobs participate innegotiated rates of pay and conditions. You woulddefine grade rates or progression points to dealwith negotiated pay rates for workers in jobs.
RemunerationPolicy
4 – 27Enterprise Modeling
Employees in management positions are morelikely to have their salary administered personallyand be reviewed on their performance. You definegrade rates and salary bases to deal with salaryadministration for employees in positions.
Contract Staff and Other Non–Standard Assignments Example
It is common to find individuals working within an enterprise who donot fit into the general definition of work structures. For example, youmay have agency or contract staff working temporarily to cover avacancy, or you may have external contract staff working as part of aproject team.
The way in which you record information for these individualsdepends on how you manage them:
• You can treat the assignment for this type of employee in exactlythe same way as any regular employee.
• Alternatively, you could set up a different person type todistinguish this type of employee.
• You could define your own types of employment category todistinguish different ways of working at the assignment level.
• You could define and use your own assignment statuses toidentify different ways of working in a particular job or position.
However, you may decide that the person does not work in apredefined role, but is simply working in a particular organization for aset period of time. To do this you would assign the employee to anorganization only, and focus on the other assignment information forfurther information.
Note: A basic rule in Oracle HRMS is that an employee musthave an assignment. The minimum work structure requiredfor an assignment is the Business Group.
Creating a Job Group
You create job groups in the Job Groups window.
� To create a job group:
1. Enter a name for the job group. If the HR:Cross Business Groupprofile option is set to Y then this name must be unique across the
SalaryAdministration
4 – 28 Using Oracle HRMS – The Fundamentals (US)
system. If it is set to N then it must be unique within the businessgroup.
2. Select the required flexfield structure. This will determine the fieldsthat are displayed in the Job window when this job group ischosen.
3. Select a business group if required. If the HR:Cross Business Groupprofile option is set to N, then your business group will bedisplayed and you will not be able to amend it. If the profile optionis set to Y then you can either select your business group, or leavethe field blank to create a global job group.
Note: The HR Default Job Group that contains all the standardHRMS jobs is business group specific and therefore all jobs heldwithin it are only available within your business group. Global jobgroups only apply to supplementary roles within Oracle HRMS,and Oracle Projects.
4. Check the Master Job Group check box if this is to be the master jobgroup. The jobs within the master job group can have jobs fromother job groups mapped onto them using Oracle Projects.
If the HR:Cross Business Group profile option is set to Y then youmay only have one master job group across the system. If it is set toN then you can have one for each of your business groups.
5. Save your changes.
Defining a Job
You use the Job window to define jobs, the skills that jobholdersrequire, and the grades to which they can be assigned. You can alsoenter job evaluation scores, if you have set up a job evaluation system.
Check with your HR manager or system administrator whether this isthe right window for entering job requirements. You use the Jobwindow if requirements were defined using Special Information Types.You use the Competence Requirements window if you are followingthe competence approach.
Additionally, you can enter in the Further Information field of the Jobwindow:
• an FLSA (Fair Labor Standards Act) code indicating whether thejob is exempt from payment for overtime work
• an EEO job category, needed for production of EEO–1, AAP, andVETS–100 reports, and a job group, line of progression andsalary code, needed for AAP reports

4 – 29Enterprise Modeling
• information relating to the use of a job as a survey benchmark.
If you intend loading historic assignment details in Oracle HRMS,make sure you enter valid start dates. You cannot assign an employeeto a job before the start date of the job.
Suggestion: Consider using a fixed date as a default for yourinitial setup, such as 01–JAN–1901. This simplifies your dataentry.
� To define a job:
1. Enter a start date early enough to handle any historical informationyou want to enter.
2. Select the required job group. This defaults to the Default HR JobGroup for your Business Group and should not be changed unlessyou want to enter a job that describes a supplementary role to aperson’s normal employment, such as a fire warden or health andsafety representative, or. you are setting up a job to be used inOracle Projects.
Only jobs entered in the Default HR Job Group will be available inother windows in Oracle HRMS such as Position, Competencies, orAssignment. The only windows within Oracle HRMS that canaccess jobs outside of the Default HR Job Group are theSupplementary Roles window and the Elections window.
3. Enter a unique name for the job. If there is more than one segmentin the Job Name flexfield, a window opens when you enter theName field. You must enter a unique combination of segments inthis window.
Note: The flexfield that opens is dependent on the Job Groupyou have selected
4. Enter a numerical approval authority value to define an approvallevel for incumbents of this job.
5. Indicate whether the job carries any additional employment rightsor is a benchmark job. A benchmark job is one that can be used torepresent a number of jobs in reports such as salary surveys.
6. Select a benchmark job, if required.
7. Click in the Further Information field to open the Further JobInformation window. Here you can:
• mark the job for use as a survey benchmark
• select an FLSA code of Exempt or Nonexempt
• select an EEO code for the job

4 – 30 Using Oracle HRMS – The Fundamentals (US)
• select a job group, line of progression, and salary code for the job
8. Save the job.
9. Choose the Evaluation button to enter evaluation information andan overall evaluation score for the job.
See Managing Your Workforce Using Oracle HRMS.
10. Choose the Requirements button to enter job requirements, such asrequired qualifications or valid experience, to help you matchpeople to roles.
Note: You use the Competence Requirements window to entercompetencies if you are following the Competence approach.
See Managing Your Workforce Using Oracle HRMS.
11. Choose the Valid Grades button to enter the grades to whichjobholders can be assigned.
See Managing Your Workforce Using Oracle HRMS.
Note: For calculation of the Workers Compensation liability ofyour enterprise, you must associate this job with the workclassification code of one or more states.
12. Choose the Survey Mapping button to link salary survey lines toyour job.
Note: You use the Map Salary Survey window to map the jobdetails from market surveys, called salary survey lines, to jobswithin your enterprise.
13. Choose the Extra Information button to enter job categories for thejob. You can link as many categories as you need to a job, forexample, technical, managerial or administration.
There may also be other types of job Extra information defined foryour enterprise.
Note: You can only access job categories – your systemadministrator may have set up other Extra Information foryour responsibility.
Defining a Position
You use the Position window to define positions within yourorganizations and to add them to position hierarchies. You can alsoenter the skills that position holders require and the grades to whichthey can be assigned. You can enter position evaluation scores, if youhave set up a position evaluation system.

4 – 31Enterprise Modeling
Note: Use the datetracked Position window if you are usingany of the Oracle HRMS applications. If you do not use OracleHRMS at your site, use the non–datetracked version of thePosition window.
Use the Position Transaction window for positions that belongto organizations that you have selected for position control.
See: Creating Organization Hierarchies: page 2 – 45
Position Management Check Boxes
The check boxes at the top of the window are for information purposesonly. They are checked if the position belongs to an organizationselected for position control. The check boxes indicate whether theposition is:
• Open: unfilled
• Under Review: changes to the position definition are in processusing a position transaction
• Approved Future Actions: the position or changes to it are approvedfor a future effective date
See: Defining a Position Using Position Transactions: page 4 – 36,Setting up Transaction Templates in Configuring, Reporting and SystemAdministration in Oracle HRMS.
� To define a position:
1. Set your effective date early enough to handle any historicalinformation about the position that you want to enter.
Note: Consider using a fixed date as a default for your initialsetup, for example, 01–JAN–1901. This will simplify yourdata–entry.
2. If you are selecting the Active hiring status for the first time (seestep 9), enter a Start Date. This is the earliest date on which aperson can be hired into this position.
3. Enter a unique name for the position in the Date Effective Namefield in the Position Details tabbed region.
Note: The Name field at the top of the window displays thelatest name on record for the position, irrespective of youreffective date. This name is used on all other windows, such asassignment.
If there is more than one segment in the Position Name flexfield, awindow opens when you enter the Name field. You must enter aunique combination of segments in this window.

4 – 32 Using Oracle HRMS – The Fundamentals (US)
4. Select the position type. The choices are:
• Single Incumbent, meaning that only one employee is allowed tohold the position at any time
• Shared, meaning there can be several incumbents, up to thevalue of the FTE field
• Pooled (Public Sector only), meaning the position is looselydefined so rules about FTE and hours are not enforced by thesystem
• None, which you can select if you do not need to record positiontypes
5. If the position is permanent and budgeted every year, select thePermanent check box.
6. If the position is only used in one season each year (such as asummer teacher), select the Seasonal check box. You can enter theseason dates in the Seasonal Information extra information type.
7. Select the organization and job for this position. They must have astart date on or before the start date of this position.
Note: You cannot change the organization or job once you havesaved the definition.
You can set up several positions that have the same job in the sameorganization. Each position name must be unique.
8. If you know that the position will be transferred to anotherorganization or job in the future, enter the proposed end dates now,for information.
9. Select a hiring status. See: Position Hiring Status: page 4 – 14.
The Start Date field indicates when the current hiring status cameinto effect.
10. If the status is Frozen, you must enter a proposed end date for thestatus. Optionally, you can enter a proposed end date for Proposedor Active statuses, for information.
11. Select a location for the position, or leave the default, which is thelocation of the organization.
12. Optionally, select a status for the position.
Selecting Valid or leaving the Status field blank enables employeesto be assigned to the position, provided other conditions (such asan Active hiring status) are met. If the status is Invalid or any otherstatus defined at your site, employees cannot be assigned to theposition.

4 – 33Enterprise Modeling
Entering Hiring Information
13. Enter the number of Full Time Equivalents to be assigned to thisposition. If the Position Type is Single Incumbent, FTE must be 1.0or less.
14. You can enter the number of incumbents that are planned for theposition in the Headcount field.
15. If appropriate, select a bargaining unit code for the position. This isusually the legally recognized collective negotiating organization.
Note: You set up your different bargaining units as values for theLookup type BARGAINING_UNIT_CODE.
16. If required, enter the earliest date at which incumbents can be hiredinto this position. If you have created a requisition and vacancy forthis position, the earliest hire date must be within the vacancydates.
17. Enter the date by which the position should be filled. This datemust be on or after the Earliest Hire Date.
18. Select the Permit Recruiting check box if the position is not openbut you want to enable advertising, job posting and acceptance ofapplications.
For example, you might select this check box for a position that isfrozen but due to become active in the near future.
Proposed Entry Salary
19. Select the payroll to which the position’s incumbents are normallyassigned. This payroll’s calendar can be used for calculations ofbudgeted amounts and commitments.
20. Select the salary basis to which the position’s incumbents arenormally assigned.
21. Select the default grade to be used to determine the entry salary ofposition incumbents.
Note: If you maintain information about valid grades for theposition or the position’s job, this grade must be one of the validgrades.
See Managing Your Workforce Using Oracle HRMS.
22. Do one of the following, or leave these fields blank:
• If the position is paid from a pay scale, select the grade step andscale rate that represent the entry level salary for this position.The system displays the value of the step on the scale rate youselected.

4 – 34 Using Oracle HRMS – The Fundamentals (US)
• If you maintain a grade rate to hold entry salary for this position,select the appropriate grade rate. The value or range (minimum,maximum and midpoint values) for this grade rate aredisplayed.
Probation
23. If there is a probation period for this position, you can enter itslength in the Probation region.
Overlap
24. Select the length of time a new incumbent can overlap with aleaving incumbent for transfer of skills.
Note: You can enter proposed start and end dates for particularperiods of overlap using the Extra Information Types window.
Entering Work Terms
Note: The Working Hours and Normal Start and End Timesdefault from the organization, but you can override them.
25. Enter a number in the Working Hours field, and select thecorresponding period of time in the Frequency field. For example,enter 40 and select Week.
26. Enter the normal start and end times in 24 hour format. Forexample, for 5.30 p.m., enter 17:30.
Note: If this position operates within a shift system or has anunusual work schedule, you can record the shift pattern or daysworked in the Work Choices window.
See Managing Your Workforce Using Oracle HRMS.
27. Select the name of a person who supervises this position. See alsothe Supervisor field in the Related Positions region if the position issupervised by the holder of a specified position rather than anamed person.
28. Select the Replacement Required field if you want users to bewarned that they should enter the name of a replacement whenthey enter an absence for a holder of this position. You might dothis for positions where it is essential that a person is in charge atall times. See also step 31.
29. European users: Select the Works Council Approval check box ifthe position falls under the jurisdiction of a Works Council.
Related Positions
30. Select the position held by the supervisor or manager of thisposition.

4 – 35Enterprise Modeling
31. In the Relief field, you can select the position that should be held bypeople who cover this position when the incumbent is absent.
32. Select the position from which a successor will to move to fill thisposition.
Extended Pay Term
33. For academic positions, if salary can be paid over a longer periodthan the work term (such as a 9 month appointment paid over 12months), select the Extended Pay Permitted check box.
34. If extended pay is permitted, enter the start and end dates of thework and pay terms.
Entering Additional Details
35. If required, enter comments, a posting description for recruitmentpurposes, and any special confidentiality or security requirements,such as a clearance level.
36. Save your position.
37. If you want to add the position to one or more position hierarchies,choose the Reporting To button. Select a hierarchy and the name ofthe position to which this position reports.
38. Choose the Evaluation button to enter evaluation information andan overall evaluation score for the position.
See Managing Your Workforce Using Oracle HRMS.
39. Choose the Valid Grades button to enter the grades to whichposition holders can be assigned.
See Managing Your Workforce Using Oracle HRMS.
40. Choose the Others button to enter Requirements, Occupancy, ExtraInformation, Work Choices and Define Survey Mapping.
41. Choose Requirements to enter position requirements, such asrequired qualifications or valid experience, to help you matchpeople to roles.
See Managing Your Workforce Using Oracle HRMS.
Note: Check with your HR manager or system administratorwhether this is the right window for entering positionrequirements. You use this window if requirements were definedusing Special Information Types. Use the CompetenceRequirements window if you are following the competenceapproach.

4 – 36 Using Oracle HRMS – The Fundamentals (US)
42. Choose Occupancy to view all those people who have held aselected position or who are applying for it, and the dates of theiroccupancy. This information could be relevant for selecting peoplewith the necessary skills for similar positions.
See: Viewing Position Occupancy: page 4 – 49
43. Choose Work Choices to enter work choices that can affect anemployee’s, applicant’s, contractor’s, or ex–employee’s capacity tobe deployed within your enterprise (or a customer’s).
See Managing Your Workforce Using Oracle HRMS.
44. Choose Define Survey Mapping to link salary survey lines to yourposition.
See: Mapping Salary Survey Lines, Managing Total CompensationUsing Oracle HRMS.
45. Choose Extra Information to enter any additional informationrequired by your enterprise.
See: Position Extra Information Types: page 4 – 17
See: Entering Extra Information, Configuring, Reporting and SystemAdministration in Oracle HRMS.
Defining a Position with a Position Transaction
Use the Position Transaction window to define and maintain positiondefinitions for organizations that you have selected as position–controlorganizations.
For information about selecting organizations for position control, referto Organization Hierarchies: page 2 – 45
Use the Position Transaction window to create or change a positiondefinition. To view position history prior to updating, choose PositionTransaction History from the Tools menu.
� To create or change a position:
1. In the Apply Template dialog, select task template(s) from the listof values. Select the Enabled check box to use the template(s).
The Apply Template dialog is available only to the initiator. If youreceive a routed transaction and wish to apply an additional tasktemplate, choose Apply Template from the Tools menu.
The application automatically applies your role template to the tasktemplate(s).

4 – 37Enterprise Modeling
2. Enter a position name.
• To create a position definition, complete the fields in the PositionFlexfield dialog and choose OK.
• To update a position definition, select the position name from thelist of values.
Note: When entering data in the window, you must enter themandatory fields (shown in yellow) before saving or routingthe transaction. You must complete the required fields (shownin blue) prior to applying the transaction.
3. In the Action Date field, enter the position’s effective date.
The checkmarks in the Open, Under Review, and Approved FutureActions check boxes indicate the status of the transaction:
• Open: You can fill the position. The hiring status is active and theFTE is still available.
• Under Review: A pending transaction for the position has anUnder Review template applied. No one can process atransaction for that position until a user updates the currenttransaction.
• Approved Future Actions: There is at least one pending transactionwith a future effective date.
4. Complete the fields for the Position Details, Hiring Information,Work Terms, and Additional Details as covered in Defining aPosition. Begin with step 4 that describes selecting the positiontype.
5. Choose the Work Choices tab and select the relevant domesticdeployment boxes if the position requires the holder to:
• Work in all locations
• Relocate
• Travel
6. Select the relevant international deployment boxes if the positionrequires the holder to:
• Work in all countries
• Relocate
• Hold a passport
7. Choose the Extra Information tab to define additional informationabout positions such as:
• Overlap Information

4 – 38 Using Oracle HRMS – The Fundamentals (US)
• Seasonal Information
• Reserved Information
• Position Family Information
See: Position Extra Information Types: page 4 – 17
8. Click on the grey arrow to the right of the Extra Information tab.
9. Choose Requirements from the list to enter position requirementssuch as ADA Disability Accom’s and OSHA – reportable incident
10. Save your work. Route the transaction to gather the necessaryapprovals, and then apply and update the transaction when youhave completed it.
See Routing Budget Worksheets and Position Transaction,Configuring and Extending Oracle HRMS.
11. After you approve and update the data to the database, choosePosition Transaction History from the Tools menu.
You can view all changes made to the currently selected position.These include changes made using the Position window and thosethat have a transaction status of Submitted or Applied.
Copying a Position
Position Copy reduces the time and effort required to create positionsand ensures that position data is uniform and accurate across positions.You can use it when creating positions in anticipation of a change inorganization, budget, or workplans.
When you use Position Copy, you have the flexibility to:
• Specify criteria for finding and selection position(s)
• Use existing positions and create new ones making minor or majorchanges to the position definition
• Preview the results before creating the final copies
• Save the set of positions and continue working on it at another time,for example when you have received all the information required tocomplete the position definitions
The information that you can select and change when copying positionsdepends on your Responsibility defined in the User Profile. TheContexts window controls what information you can view and changebased on Responsibility, Application, and Legislation.

4 – 39Enterprise Modeling
Use the Position Copy window.
� To copy a position:
1. In the Name field, enter a name that to identify the set of positionsto be copied. (Enter a name even if you are going to copy only oneposition.)
2. In the Effective Date field, enter a date that corresponds to theposition data you want copied.
The Effective Date applies to all the positions that you query. Ifyou do not enter a date, the system uses the current date.
Entering Selection Criteria
3. Choose the Original tab and enter the Selection Criteria. You cancopy a specific position or retrieve all positions that correspond tothe criteria.
• To copy a specific position, enter the Position Name and enter theposition key flexfield information. Skip the Other Criteria field.
Note: If you don’t know the information to enter in eachposition key flexfield, choose the Combinations button and usethe Position find dialog.
• To retrieve all positions that correspond to a job, organization, orlocation, skip the Position Name field and enter Other Criteria.
When you click the Other Criteria field, the system displays adialog where you can choose a Job, Organization, and/orLocation from the supplied List of Values.
4. Enter the number of copies for each retrieved position.
5. Choose Query to display the positions that match the SelectionCriteria.
6. If necessary, change the number of default copies.
• To have the system enter the default number of copies, chooseAll from the Selection pop–up list.
• To have the system ignore positions you don’t want copied,choose None from the Selection pop–up list.
• To have the system copy a few positions from the list of retrievedpositions, locate the positions you want to copy. Enter a zero (0)in the Copies column next to each position. Choose Invert fromthe Selection pop–up list. The system changes the zeroes to theDefault Copies number and deselects the remaining positions.
4 – 40 Using Oracle HRMS – The Fundamentals (US)
• To enter a greater or lesser number of copies than the defaultamount, manually change the number of copies in the Copiescolumn.
Entering Changes for New Information
7. Choose the New tab.
8. Click the Change List field to display the Change List’s suppliedvalues. Enter information that you want applied to the newpositions.
The information you enter in the Change List applies to all thepositions; however, after you create your new positions, you canoverride the contents of individual fields.
Note: In the Change List items, the Start Date is the newposition’s Start Date at the top of the Position form, and theEffective date, the new “From” Effective Date. If you don’tenter dates in these fields, the system uses the existingposition’s dates.
9. In the Position Name field (optionally), enter a value for one of theposition key flexfield segments that you want to change on all thenewly created position names.
10. In the Column field, choose a Position key flexfield segment(denoted by an asterisk).
The system changes this segment in each new position name basedon the information you supply in the following steps.
Note: If you choose a different Column identifer, you mustmanually change the new position names to make each oneunique before submitting the positions for update.
11. Choose an Operation. Use this field to specify how you want theColumn item changed:
• Choose Replace to substitute the data with data you enter in theWith and/or Increment fields.
• Choose Suffix or Prefix to append the information in the Withand/or Increment fields.
• Choose None to skip the Operation field.
Choose this option when you want to change the data manuallyon the new positions rather than automatically apply anidentifier.
12. In the With field, enter alphabetical and/or numeric informationthat replaces the Column item, or serves as a suffix or prefix.

4 – 41Enterprise Modeling
13. In the Increment field, enter an amount by which to increase ordecrease the Column item.
The identifier for the first new position has an increment of zero.Subsequent positions increase or decrease this number based on theamount entered in the Increment field.
For example, if you create five positions for Manager and enter IIas a suffix in the With field, the new positions become ManagerII0,ManagerII1, ManagerII2, and so on. If you skip the With field andenter an increment of 1, the new positions become Manager0,Manager1, Manager2, and so on.
14. Choose the Other Info button for a list of additional position datato copy. Check the boxes that correspond to the data you wantcopied.
Note: Position Extra Information includes all the ExtraInformation types associated with this position.
15. Choose the Create New button.
When you choose the Create New button, the system creates a setof positions based on your selection and change criteria.
16. Deselect those positions that you don’t want to copy.
• To have the system skip positions you don’t want copied, chooseNone from the Selection pop–up list.
• To have the system copy a few positions from a longer list,deselect the positions you want to copy. Choose Invert from theSelection pop–up list. The application selects the formerlydeselected positions and visa versa.
17. Make any necessary changes to the position data, replacing thedisplayed data by entering new data or choosing the appropriatedata from the supplied List of Values.
For example, you might change the Status, to change an existingstatus from Frozen to Proposed.
18. Choose Other Info to select or deselect Position Extra Informationor Work Choices for a specific position.
After the system creates the new position(s), you can use thePosition form to change the data contained in Position ExtraInformation or Work Choices.
Making Further Changes to Selection Criteria
If you change the Selection Criteria after you create new positions,and then rechoose Create New, a dialog appears asking if you want

4 – 42 Using Oracle HRMS – The Fundamentals (US)
to replace the positions and overwrite any manual changes you’vemade. Choose No to keep your changes and Yes to replace thepositions.
Note: If you are changing the Selection Criteria to modeldifferent results, you might create two Position Copy sets,submit the set you want and delete the other.
Making the Final Copies
19. Choose the Submit button to create the new position(s) and toupdate the database.
When the set of positions is submitted, the system refreshes theposition data with the exception of the Change List items and anymanual changes you’ve made. It refreshes the data based on theEffective Date.
The system validates the position(s) using the same validationprocess it does when you create a position with the Position form.You can query the new position in the Position form and continuemaking further changes, for example, to Position ExtraInformation.
Correcting Errors
If you copied more than one position, the successfully updatedpositions display a Status of Complete. You can take no furtheraction on these positions.
If the system encounters an error when you submit the set, forexample, a duplicate position name, the Status changes to ErrorNew Record(s).
� To correct an Error:
1. Locate the position on the Original tab that has a status of ErrorNew Record(s).
2. Choose the New tab to view the corresponding positions. Locatethe positions that have a status of Error New Record(s).
If you have many positions, you can sort the New folder by theStatus column so that all Error New Record(s) are groupedtogether.
3. Review the change list items and make any necessary corrections.
You might have an error, for example, if information that’s requiredto complete a position is missing.

4 – 43Enterprise Modeling
4. After correcting the information, resubmit the set of positions.
� To correct a Dependent Error:
If the system encounters an error when validating the Other Info(Position Extra Information and Work Choices), it generates the newpositions and records a Error Dependent Record(s) status.
1. Locate the positions marked as Error Dependent Record(s) on theNew tabbed region.
2. Query these positions on the Position form.
3. Make any necessary corrections to the position information.
Submitting Copies at Different Times
When you’re copying many positions, you may not have theinformation on hand that you need to create and submit all thepositions. You can process the information at different times by:
• Setting up different sets of positions based on which ones requirefurther data entry
• Including all the positions in the same batch, but deselectingpositions on the New tab
You can deselect a position and submit the other positions. Thedeselected ones display a Pending New Record(s) status. Completethe information, select the positions, and choose the Submit button.
If you have many positions, you can sort the New folder by theStatus column so that all Pending New Record(s) positions aregrouped together.
Updating Positions
Mass Position Update reduces the time and effort required to updatepositions and ensures uniform and accurate data across positions. Youcan use it to modify positions in anticipation of a change inorganization, budget, or workplans.
When you use Mass Position Update, you can:
• Specify criteria for finding and selecting position(s)
• Change the position definition
• Preview the results before creating the final changes
4 – 44 Using Oracle HRMS – The Fundamentals (US)
• Save the set of positions and continue working on it at another time,such as when you have received all the information required tocomplete the position definitions
The information that you can select and change when updatingpositions depends on your Responsibility defined in the User Profile.The Contexts window controls what information you can view andchange based on Responsibility, Application, and Legislation.
� To update a position:
1. Open the Mass Position Update window.
2. In the Name field, enter a name to identify the set of positions to beupdated. (Enter a name even if you are going to modify only oneposition.)
3. In the Effective Date field, enter the date that you want thepositions to change.
The Effective Date applies to all the positions that you query. If youdo not enter a date, the system uses the current date.
Entering Selection Criteria
4. Choose the Original tab and enter the Selection Criteria. You canchange a specific position or retrieve all positions that correspondto the criteria.
• To update a specific position, enter the Position Name and enterthe position key flexfield information. Skip the Other Criteriafield.
Note: If you don’t know the information to enter in eachposition key flexfield, choose the Combinations button and usethe Position find dialog.
• To retrieve all positions that correspond to a job, organization, orlocation, skip the Position Name field and enter Other Criteria.
When you click the Other Criteria field, the system displays adialog where you can choose a Job, Organization, and/orLocation from the supplied Lists of Values.
5. Choose Query to display the positions that match the SelectionCriteria.
6. If necessary, deselect all the positions you do not want to update.You can manually deselect positions, or you can use the Selectionpop–up list to select None, then manually select the positions youwant to update. Alternatively, you can deselect the positions youwant to modify, then choose Invert. If you change your mind andwant to update all the queried positions, you can choose All.

4 – 45Enterprise Modeling
Entering Changes
7. Choose the New tab.
8. Click the Change List field to display the Change List’s suppliedvalues. Enter information that you want applied to the positions.
The information you enter in the Change List applies to all thepositions; however, after you modify your positions, you canoverride the contents of individual fields.
Note: In the Change List items, the Start Date is the updatedposition’s Start Date at the top of the Position form, and theEffective date, the new “From” Effective Date. If you don’tenter dates in these fields, the system uses the existing positiondates.
9. Choose the Create New button.
When you choose the Create New button, the system creates a setof positions based on your selection and change criteria.
10. Deselect those positions that you don’t want to change.
• To have the system skip positions you don’t want changed,choose None from the Selection pop–up list.
• To have the system change a few positions from a longer list,deselect the positions you want to update. Choose Invert fromthe Selection pop–up list. The application selects the formerlydeselected positions and visa versa.
11. Make any necessary changes to the position data, replacing thedisplayed data by entering new data or choosing the appropriatedata from the supplied List of Values. You can adjust data forindividual positions.
For example, you might change the Status, to change an existingstatus from Frozen to Proposed.
Making Further Changes to Selection Criteria
If you change the Selection Criteria after you update positions, andthen again choose Create New, a dialog appears asking if you wantto replace the positions and overwrite any manual changes you’vemade. Choose No to keep your changes and Yes to replace thepositions.
Note: If you are changing the Selection Criteria to modeldifferent results, you might create two Position Update sets,submit the set you want and delete the other.
Making the Final Changes
12. Before submitting your update, you must choose a DatetrackMode, which determines how the application records the update.

4 – 46 Using Oracle HRMS – The Fundamentals (US)
• Correction replaces all information for the position(s) you areupdating
• Update end–dates the original position record, creating a newrecord to hold your changes and thus preserving the history ofthe changes to the position
• Update–Insert creates a new record inbetween two existingrecords (for instance, a past version and a current or futureversion of the position), likewise preserving the position’s entirehistory
• Update–Override behaves like a Correction, but replaces only anupdate rather than the entire history of the position
13. Choose the Submit button to update the position(s) and to updatethe database.
When you submit the set of positions, the system refreshes theposition data with the exception of the Change List items and anymanual changes you’ve made. It refreshes the data based on theEffective Date.
The system validates the position(s) using the same validationprocess it does when you create a position with the Position form.You can query the new position in the Position form and continuemaking further changes, for example, to Position ExtraInformation.
Correcting Errors
If you updated more than one position, the successfully updatedpositions display a Status of Complete. You can take no furtheraction on these positions.
If the system encounters an error––such as a duplicate positionname––when you submit the set, the Status changes to Error NewRecord(s).
The Process Log lists the errors.
� To correct an Error:
1. Locate the position on the Original tab that has a status of ErrorNew Record(s).
2. Choose the New tab to view the corresponding positions. Locatethe positions that have a status of Error New Record(s).
If you have updated many positions, you can sort the New folderby the Status column so that all Error New Record(s) are groupedtogether.
4 – 47Enterprise Modeling
3. Review the change list items and make any necessary corrections.
You might see an error, for example, if information that’s requiredto complete a position is missing.
4. After correcting the information, resubmit the set of positions.
Submitting Updates at Different Times
When you’re updating many positions, you may not have theinformation on hand that you need to create and submit all thepositions. You can process the information at different times by:
• Setting up different sets of positions based on which ones requirefurther data entry
• Including all the positions in the same batch, but deselectingpositions on the New tab
You can deselect a position and submit the other positions. Thedeselected ones display a Pending New Record(s) status. Completethe information, select the positions, and choose the Submit button.
If your set includes many positions, you can sort the New folder bythe Status column so that all Pending New Record(s) positions aregrouped together.
Finding a Position
Use the Find window to display a single position or a set of positionsthat correspond to specific criteria.
� To query a position using the Find Position window:
1. Click the Name field, and enter the Position Name information.
The Position name is composed of the segments of the position keyflexfield. If you don’t know what the segments are, you can querythe information:
• Choose the Combinations button.
• In the Enter Reduction Criteria dialog, enter the query criteria,and choose the OK button.
If you recall part of the search word(s), use the percent (%)symbol as a wildcard to retrieve all matches that contain thesearch word(s) or to replace letters whose case you don’t know(the search is case sensitive).

4 – 48 Using Oracle HRMS – The Fundamentals (US)
If one position is found, it’s displayed immediately in thePosition window. If more than one Position is found, the resultsare displayed in a separate window. Choose the appropriatePosition Name.
2. In the Type field, choose the appropriate Position Type.
3. In the Job field, choose a Job.
4. In the Organization field, choose an Organization.
5. In the Location field, choose a Location.
6. In the Hiring Status field, choose a Hiring Status.
7. Choose the Find button to find a position that corresponds to thecriteria you’ve entered.
Note: If you choose Find without entering any search criteria, thesystem displays the first position record in the Position window.You can use the [Down Arrow] key to display the next position.

4 – 49Enterprise Modeling
Viewing Position Occupancy
The Position Occupancy folder lists all those people who have held aselected position or who are applying for it, and the dates of theiroccupancy. This information could be relevant for selecting peoplewith the necessary skills for similar positions.
Note: As supplied, this folder displays employees who haveheld the selected position or who are scheduled to hold it.Your system administrator can create a customized version ofthe form to display applicants who are currently applying forthe position.
The supplied folder also contains a button to open the Peoplewindow to see further details of an occupant. Your systemadministrator can change the buttons displayed on thiswindow.
� To view occupants of a position:
� In the Position window, query a position and choose theOccupancy button.
Occupants are listed in reverse date order. Where a person hasoccupied the same position at different times, a separate record iscreated for each occupancy.
Viewing Further Details of Occupants or Applicants
� To see further details of occupants or applicants:
� Select the person’s record in the Position Occupancy folder andchoose the Person button.
Note: There is no restriction on the assignments you can viewin the Position Occupancy folder. However, you cannot viewfurther details if you do not have clearance to view thatperson’s records.
Viewing Transaction History
You can refer to the Transaction Status window for information aboutthe status and ownership of a transaction, and to end or route atransaction.
The Transaction Status window can show you a transaction’s:

4 – 50 Using Oracle HRMS – The Fundamentals (US)
• Current status (pending, approved, applied to the database, rejected,terminated, or submitted to the database for future update)
• Name of the user who currently possesses the transaction
• Routing history, including the actions taken on the transaction, theuser who took the action, and the person to whom the transactionwas routed
• Attributes and transaction values that determine the routingcategory and routing destinations
Note: If you do not see a routing history, a user has initiatedbut not routed the transaction.
You can route transactions from the Transaction Status window, whichyou may need when, for instance, someone is on vacation. You can alsouse the window to take action on future–dated transactions that theapplication has received for posting but not yet applied.
Use the Transaction Status window to view the status and history of atransaction. The window is a folder, so you can choose the order of thetransactions and perform all other standard folder actions.
� To determine the status of a transaction:
1. Choose Transaction Status from the Navigator menu.
The Find Transactions dialog appears.
2. Choose a transaction category, specify your business group orGlobal and whether you want to include delegated transactions.
3. You can specify the owner of the transaction: a particular user, aparticular role, or a combination of the two; you can also look at alltransactions available to you, all belonging to any owner, or allbelonging to no owner.
You can also choose a range of statuses: transactions of a particularstatus, all open transactions, all completed transactions, or those ofany status.
Choose Find, and the Transaction Status window appears.
4. Select the transaction whose history you wish to view.
The Routing History for that transaction is displayed.
5. Choose the General tab to display the date, action taken (such asinitiated, rejected, or sent back), approval status, and commentsentered on the routing notification.
The approval column records who approved the transaction, anapprover or the override approver.

4 – 51Enterprise Modeling
6. Choose the Forwarded By tab to find out who took the action androuted the transaction, and Forwarded To, to determine its nextdestination.
7. Under Rule Attributes, choose the Current Approver tab to viewthe approver attribute, value or range of values, and thetransaction value that determined the basis for routing thetransaction to the current person.
8. Choose the Next Approver tab to view the approver attribute,value or range of values, and the transaction value that determinedthe basis for routing the transaction to the next person.
9. Choose the Routing tab to view the rule attribute, value or range ofvalues, and the transaction value that determined the routingcategory.
For example, if you route budget worksheets to one of two routinglists based on the budget amount, you can see the transaction valuethat determined the selection of the routing list.
10. To route the transaction, choose the Route button to bring up theRouting window.
Terminating a Transaction
During routing, you terminate transactions by rejecting the transactionin the Routing window. The application returns the transaction to theinitiator who can then reject and thus terminate it.
Use the Transaction Status window to terminate a transaction
• if the initiator is no longer a valid user and cannot reject thetransaction, or
• if you want to terminate an approved and submitted future–datedtransaction. Terminating a transaction removes it from the workflowprocess.
Use the Transaction Status window to terminate a transaction.
� To terminate a transaction:
1. In the Transactions block, select the transaction to terminate.
2. Choose the Terminate button.
3. Save your work.
Position HierarchiesIf you use positions to define roles, you can define position hierarchies toshow the detailed line management reporting in each organization orthroughout the enterprise.

4 – 52 Using Oracle HRMS – The Fundamentals (US)
You can create and maintain your reporting structures in two ways:
• Using the Position Hierarchy window
• Using the Position Hierarchy Diagrammer
The Hierarchy Diagrammer, included with Oracle HRMS, enables youto create your position hierarchies graphically, and make intuitivedrag–and–drop changes to them.
See: Introduction to Hierarchy Diagrams, Using Applications DataExchange and Hierarchy Diagrammers
Position hierarchies are very like organization hierarchies. You can setup a primary hierarchy and multiple secondary hierarchies to showreporting lines, including ’dotted line’ reporting, and to control accessto information.
Position hierarchies are dated, so you can create future–dated versionsto prepare for reorganization in advance, and can retain previousversions for historical information.
Figure 4 – 5 Position Hierarchies
Change and Delete Positions
You can add new positions to an existing hierarchy, or change positionsin a hierarchy. You can also delete a position hierarchy, but you mustcheck that it is not tied in to other working areas of the system.

4 – 53Enterprise Modeling
Creating a Position Hierarchy
Use the Position Hierarchy window to create position hierarchies.Always define hierarchies from the top position down.
Note: You can use the Hierarchy Diagrammer to create yourposition hierarchy graphically.
See: Introduction to Hierarchy Diagrams, Using ApplicationData Exchange and Hierarchy Diagrammers.
Each position can belong to any number of hierarchies at the sametime, but can only appear once in any hierarchy.
You should define the primary reporting hierarchy as part of yourimplementation of positions. The first version of your hierarchy shouldshow your reporting structures when you implement Oracle HR.
Suggestion: You may find it easier to define the Hierarchyusing the top position and one other. Then you can add otherpositions into the hierarchy when you make your definitions inthe Position window.
� To create a position hierarchy:
1. Enter a unique name, and check Primary if it is your mainreporting hierarchy.
2. Enter the version number and start date for the hierarchy.
You can copy an existing hierarchy. See: Copying an ExistingHierarchy: page 4 – 54
3. Query the top position name into the Position block.
The Holder field displays the name of the employee who holds thisposition. If there is more than one holder, this field displays thenumber of holders. You can choose the List icon from the toolbarto display the list of holders.
4. In the Subordinates block, select the immediate subordinates forthe top position.
5. To add organizations below one of these immediate subordinates,check the Down check box for the position.
The Position block now displays the position you selected. You canadd subordinates to this position. To return to the previous level,check the Up check box.
Note: The list of positions from which you can select in theSubordinates block includes positions that are already in thehierarchy. If you select such a position, you will move it and allits subordinates within the hierarchy.

4 – 54 Using Oracle HRMS – The Fundamentals (US)
Creating a New Version of a Position Hierarchy
� To create a new version of an existing hierarchy:
1. Query the name of the hierarchy.
2. In the Version field, use the Down Arrow to move through existingversions of the hierarchy until you reach a version number forwhich no other data appears. Enter the start date for the newversion.
Note: Overlapping versions of a hierarchy cannot exist. Wheneveryou enter a new version of a hierarchy, the system automaticallygives an end date to the existing version. Oracle HRMS retains therecords of obsolete hierarchies so you do not lose any historicalinformation.
You can copy an existing hierarchy. See: Copying an ExistingHierarchy: page 4 – 54
3. Query the top position name into the Position block.
4. In the Subordinates block, select the immediate subordinates forthe top position.
5. To add positions below one of these immediate subordinates, checkthe Down check box for the position.
The Position block now displays the position you selected. You canadd subordinates to this position. To return to the previous level,check the Up check box.
Copying an Existing HierarchyUse the Position Hierarchy window to copy an existing hierarchy.
� To copy an existing hierarchy:
1. Enter or query the name and number of your new hierarchyversion and choose the Copy Hierarchy button.
2. Select the name and version number of the hierarchy you want tocopy.
Details of this hierarchy then appear in the Position andSubordinates blocks. You can change these.
Deleting a Position HierarchyUse the Position Hierarchy window to delete a position hierarchy. Youmust check that the hierarchy is not tied in to other working areas ofthe system before you try to delete it.
4 – 55Enterprise Modeling
� To delete a position hierarchy:
1. Remove any subordinate positions from the hierarchy, starting atthe lowest level.
2. Check whether other versions of the hierarchy exist. If they do,you must delete these other versions first.
3. Check whether the position hierarchy is referenced by a securityprofile. If it is, you must first delete this link.
4. Query the position hierarchy in the Position Hierarchy window andchoose Delete.
Changing a Position Hierarchy
Use the Position Hierarchy window to change a hierarchy. You canchange position hierarchies in three different ways.
� To add new positions to an existing hierarchy:
1. Query the hierarchy and version you want to change.
2. Query the parent position for the one you want to add.
3. Select the new position in the Subordinates block.
Note: The list of positions from which you can select in theSubordinates block includes positions that are already in thehierarchy. If you select such a position, you will move it and allits subordinates within the hierarchy.
� To change the top position in an existing hierarchy:
1. Query the hierarchy and version you want to change.
2. Query the new top position.
3. Select the previous top position in the Subordinates block.
� To move a position and all its subordinates within a hierarchy:
1. Query the hierarchy and version you want to change.
2. Query the new parent position for the one you want to move.
3. Select the position to move in the Subordinates block.
4 – 56 Using Oracle HRMS – The Fundamentals (US)
Running the Position Hierarchy Report
Oracle HRMS includes a standard Position Hierarchy Report to displaythe relationship between the positions in a hierarchy. The report alsolists the current holders of each position in the hierarchy.
You run reports in the Submit Requests window.
� To run the Position Hierarchy Report:
1. In the Name field, select Position Hierarchy.
2. Enter the Parameters field to open the Parameters window.
3. Enter the effective date for which you want to see the report.
If the effective date lies between the version’s start and end dates,the report shows information for the effective date. If it lies outsidethese dates, the report shows information for the start date of theversion.
4. In the Position Structure field, select the hierarchy. If there aremultiple versions, select a version.
5. In the Parent Position field, select the highest position in thehierarchy that you want to see on the report.
6. Enter Yes in the Holders Shown field to see holders’ names.
If there are more than ten holders, you see the number of holdersonly.
7. Choose the Submit button.
Business Group Reorganization
Business Group reorganizations often entail changing many employeerecords in the same way. Because Mass Move allows you to modifymultiple employee records at once, you can make such changesconveniently.
You can move a group of assignments to different positions eitherwithin an organization or between organizations. You can moveassignments to existing positions or create new positions for them. Youcan also change the grade, location, and standard conditions of anassignment. North American users can also change the GRE/LegalEntity of an assignment.
Preparing for Your Reorganization
To prepare for your mass move, you must make certain decisions andensure that certain prerequisites are in place.

4 – 57Enterprise Modeling
The following checklist takes you through the main decision areas.
• What is my source organization? (The mass move transfersassignments from the source organization.)
• What is my target organization? (The mass move transfersassignments to the target organization. The target organizationcan differ from or be the same as the source organization.)
• What is the effective date for the mass move?
• What are the source position(s)? (The mass move transfersassignments from the source position(s) within the sourceorganization).
• Do I want to deactivate the source position?
• What are my target position(s)?
• If my target position(s) are new, will their location and standardconditions be copied from the source position, targetorganization, or Business Group?
• What grades are valid for the target position(s)?
• Which assignment(s) will transfer from my source position(s) tomy target position(s).
• Will the grade of any transferring assignment change during themass move?
• (North American users) Will the GRE/Legal Entity of anytransferring assignment change during the mass move?
• Will the location and standard conditions of any transferringassignment change during the mass move?
Historical Information
As you reorganize your Business Group over time, you will develop anhistorical archive of mass moves. This archive consists of:
• All executed mass moves for which Status=Complete
• Any executed mass moves for which Status=Complete withWarnings
• Any saved but unexecuted mass moves (Status=Unprocessed orStatus=In Error) that you have not deleted
Because it is important to maintain an historical record of BusinessGroup reorganizations, you cannot delete a mass move when its statusis Complete or Complete with Warnings. However, you can delete anyunexecuted mass moves you chose to save but which have a status ofUnprocessed or In Error.

4 – 58 Using Oracle HRMS – The Fundamentals (US)
Re–executing a mass move overwrites its original contents. Thus, onlythe latest re–execution of that mass move would appear in thehistorical archive.
Reorganize your Business Group
Use the Mass Moves feature to reorganize positions, and the peopleassigned to them. You can also identify source and target positions foryour mass move.
1. Ensure you have access to a responsibility linked to the BusinessGroup within which the mass move will take place. See: Adaptingand Creating a New Business Group: page 2 – 8
2. Check that the source and target organizations for your mass movealready exist in the HRMS database. See: Creating an Organization:page 2 – 21
3. Describe Your Mass Move: page 4 – 58
4. Identify Your Source Positions: page 4 – 59
5. Identify Your Target Positions: page 4 – 60
6. Verify the Transfer of Assignments for each Source Position: page4 – 61
7. Verify or Add Valid Grades for each Target Position: page 4 – 62
8. Execute the Mass Move: page 4 – 63
9. Review the Mass Move: page 4 – 63
10. Execute your Mass Move again: page 4 – 63
Describing Your Mass Move
To describe your mass move, enter a description, determining thesource and target organizations for the mass move, and specifying thedate on which the mass move will take effect.
� To describe your mass move:
1. Navigate to the Mass Move window.
2. Enter a description of the mass move you want to perform.
You can change this description at any time before the mass moveis processed.

☞
4 – 59Enterprise Modeling
3. Select the source and target organizations for the mass move.
The source and target organizations can differ or be the same. Thelists includes organizations that have been defined for the BusinessGroup.
Note: You cannot create a target organization ”on the fly.”
You can change the source and target organizations for this massmove at any time until you choose the Find button on the FindPositions window. These definitions then become part of thepermanent definition of the mass move and cannot be changed.
4. If necessary, adjust the effective date of the mass move.
You can adjust the effective date at any time before the mass moveis processed.
5. Save your work.
Identifying Your Source Positions
After describing your mass move, you must identify source positionsto be moved.
� To identify your source positions:
1. In the Mass Move window, choose the Positions button.
2. In the resulting Find Positions window, select source jobs and thesource positions associated with those jobs.
You can select from a list of existing jobs and positions in the sourceorganization, or you can use generic search criteria (wildcards) toidentify a pool of source jobs and source positions from which youwill select your source positions in Step 3.
3. Choose the Find button.
When the Mass Move – Positions window is populated withinformation, the source and target organizations you defined in theMass Move window appear in display fields.
4. If you used search criteria to identify a pool of source jobs andpositions, make sure that the list includes all of the source jobs andpositions you want to include in this mass move.
Attention: If you want to add source jobs or positions to this list,you must delete this mass move and define a new mass move;source jobs and positions cannot be added to this list.

4 – 60 Using Oracle HRMS – The Fundamentals (US)
5. In the Move check boxes, check each of the source positions youwant to move.
Assignments associated with unchecked source positions will notbe affected by the mass move in any way.
6. If you want to deactivate any source position on the effective datefor the mass move, check the Deactivate Old Position check boxwhen that position is selected.
Selected: Deactivating a source position does not delete it from theHRMS database, but enters the mass move effective date as the enddate for the position.
Unselected: Leaving this check box unchecked allows assignmentsto be assigned to this source position after the effective date of themass move, even though the source position may have noassignments immediately following the mass move.
Note: Unchecking the Move check box for a record restores theoriginal values for that record.
Identifying Your Target Positions
Now that you have identified the source positions for your mass move,you are ready to identify its target positions. For each of the targetpositions you will define, perform the following steps:
� To identify your target positions:
1. On the Mass Move – Positions window, select one source positionfor your mass move.
2. Select a target job to correspond with that source position.
The list includes existing jobs within the Business Group.
Note: You cannot create a target job ”on the fly.”
3. Choose Edit Field to enter a new target position, or select a targetposition.
The list includes existing positions in the target organization.
Note: Each source position can have only one target position.However you can use the same target position for multiple sourcepositions.
4. Select the location and standard conditions for this target position.
5. If this target position is a new position, you can enter location andstandard conditions as follows:

☞
4 – 61Enterprise Modeling
Source Position: Indicates that the location and standardconditions of the source position will be applied to the new targetposition when the mass move takes effect.
Target Organization: Indicates that the location and standardconditions of the target organization will be applied to the newtarget position when the mass move takes effect.
Business Group: Indicates that the location and standardconditions of the Business Group will be applied to the new targetposition when the mass move takes effect.
Attention: Unchecking the Move check box for a record restoresthe original values for that record.
6. When you have identified each of your source and target positions,choose the Assignments button.
Verifying the Transfer of Assignments for Each Source Position
The content of the Mass Move – Assignments window depends on thesource position you last selected in the Mass Move – Positions window.The Mass Move – Assignments window displays that selected sourceposition, and its corresponding source organization and source job. Italso displays the target position you have entered for this selectedsource position, and the target organization and job associated withthis target position.
All applicant and employee assignments associated with the sourceposition you selected in the Mass Move – Positions window are alsodisplayed.
As the Move check boxes show, by default all assignments associatedwith this source position are selected to move to the target position.The Mass Move – Assignments window allows you to verify theseassignments and to indicate which ones, if any, will not be moving tothe target position. It also enables you to change the grade, location andstandard conditions for any of the assignments to be moved. NorthAmerican users can also change GRE/Legal Entity conditions.
� To verify the transfer of assignments for each source position:
1. If you want to prevent any of these assignments from moving tothe target position, uncheck the appropriate Move check boxes.
2. If you want to change the grade for any transferring assignment,select the assignment, and then select another grade for thatassignment.

☞
4 – 62 Using Oracle HRMS – The Fundamentals (US)
3. (North American users only) If you want to change the GRE/LegalEntity for any transferring assignment, select the assignment, andthen select another GRE/Legal Entity for that assignment.
4. If you want to copy location and standard conditions for atransferring assignment from an entity other than the currentassignment (default), select the assignment, and then select the newlocation and standard conditions for that assignment. Options areas follows:
Current Assignment: Indicates that the transferring assignmentwill maintain its current location and standard conditions when themass move takes effect.
Source Position: Indicates that the location and standardconditions of the source position will be applied to the transferringassignment when the mass move takes effect.
Target Organization: Indicates that the location and standardconditions of the target organization will be applied to thetransferring assignment when the mass move takes effect.
Business Group: Indicates that the location and standardconditions of the Business Group will be applied to the transferringassignment when the mass move takes effect.
Attention: Unchecking the Move check box for a record restoresthe original values for that record.
5. To save your work and then return to the Mass Move – Positionswindow, close the Mass Move – Assignment window.
When the Mass Move – Positions window reappears, you canrepeat the above steps for any other source positions whosetransferring assignments you choose to verify. Otherwise, you areready to verify or add valid grades for any targets jobs and/orpositions.
Verifying or Adding Valid Grades for Each Target Position
Because it is possible for the grade of a transferring assignment to beoutside the bounds of the valid grades for the target job or targetposition, you can use Mass Move to add valid grades to the targetposition.
� To verify or add valid grades for each target position:
1. On the Mass Move – Positions window, choose the Valid Gradesbutton.

4 – 63Enterprise Modeling
The Valid Grades window displays the valid grades for the targetposition:
• A newly–created target position has the same valid grades as thesource position.
• An existing target position retains its existing valid grades, andMass Move adds any other grades that are valid for the sourceposition.
You cannot delete any of the valid grades.
2. Optionally, select additional valid grades for the target position.
3. Close the Mass Move – Valid Grade window to save your workand return to the Mass Move – Positions window.
When the Mass Move – Positions window reappears, you can selectany other records, to verify or add valid grades for that targetposition.
Executing the Mass Move
Use the Mass Move window to execute the mass move.
� To execute the mass move:
1. Close the Mass Move – Positions window.
2. Save your work when prompted to do so.
3. On the Mass Move window, choose the Execute button.
If the number of changes being made is large, executing the massmove may take some time.
Reviewing the Mass Move
After you have chosen the Execute button on the Mass Move window,you are ready to review the results.
� To review the mass move:
1. On the Mass Move window, review the contents of the Status field.
Unprocessed: Indicates that you have not yet executed the massmove.

☞
4 – 64 Using Oracle HRMS – The Fundamentals (US)
Complete: Indicates that the mass move completed successfullywithout errors. For historical purposes, completed mass moves areautomatically archived and cannot be modified.
Complete with Warnings: Indicates that the mass move completedsuccessfully. Nevertheless, you should still review any warningmessages the mass move generates. It is possible for a mass moveto execute with Status=Complete with Warnings, yet without allassignments moving as you intended.
In Error: Indicates that the mass move did not completesuccessfully and that no changes took effect. You must first resolvethe offending conditions before you can successfully re–execute themass move.
Attention: If the Status field shows In Error or Complete withWarnings, the Message button appears next to the Positions button.
2. If the Message button is displayed, review the messages.
The Message window that appears includes the following fields:
Type: This displays the type of message; Warning or Error.
Row Information: If this field displays a position name, themessage applies to a source position. If this field displays the nameof a person, this field applies to the assignment associated with thatperson.
Message: This displays the text of the message.
Note: The Explain button on the Message window is disabled if noadditional information is available.
3. If the Status field shows Complete or Complete with Warnings,navigate to the Mass Move – Assignments window and verify thatthe mass move changes you wanted to make did in fact take effect.Then navigate back to the Mass Move window.
Re–executing a Mass Move
If the Status field on the Mass Move window shows In Error, you needto resolve the problems and re–execute the mass move until the Statusfield shows Complete or Complete with Warnings. If the Status fieldshows Complete with Warnings, you should investigate thoseWarnings to determine whether you want to resolve the warningconditions and re–execute the mass move to eliminate the warnings.
The mass move feature displays warnings even when it has executedsuccessfully. Resolving problems may require that you exit Mass Move.
4 – 65Enterprise Modeling
For example, an applicant assignment associated with a vacancy willnot move during a mass move. To move that assignment to the targetposition, you would need to use the Assignment window todisassociate this applicant assignment from the source position, andthen assign this applicant to a target position.
� To re–execute a mass move:
1. Navigate to the Mass Move window. Query the mass move thatyou previously saved and want to re–execute.
2. After the Mass Move window is populated with data, makewhatever changes you need to make to correct the mass movedefinition.
Note: Since assignments are datetracked, you may only update agiven assignment once a day. To bypass this rule, you can alter themass move effective date.
If you query a previously saved mass move and then choose thePositions button, the Find Positions window is not displayed.Instead, the Mass Move – Assignments window immediatelyappears and is populated with data.
3. Choose the Re–execute button.Review your mass move in thestandard manner.
Grades and Grade Structures
Grades are normally used to record the relative status of employeeassignments and to determine compensation and benefits, such assalary, overtime rates, and company car.
Using Grades to Compare Roles
You can define one or more valid grades for each job or position. Youenter this information in the Valid Grades window, which opens fromthe Job window or the Position window.
When you enter a grade assignment, the list of grades shows whichones are valid for the job or position you select.
Grades can have different levels of complexity, which need to berepresented in the overall structure of the grade.
Figure 4 – 6 Grades

4 – 66 Using Oracle HRMS – The Fundamentals (US)
In its simplest form, a grade can be a single character, or number, in alogical sequence. For example:
• Grade A
• Grade B
• Grade C
By adding a second segment to the grade name, you can identifysub–grades, such as:
• Grades A.1, A.2, A.3, and A.4
• Grades B.1 and B.2
• Grades C.1, C.2, and C.3
A more complex structure could be used to distinguish grades fordifferent staff groups, such as:
• Manual.A.1, Manual.A.2, and Manual.G.1
• Clerical.C.1 and Clerical.C.2
In this example, there are three segments in the grade name. A grade isthe combination of segments you define. You set up the segments andtheir valid values using the Grade Name Key Flexfield. Normally thisis done by the system administrator.
See: User Definable Key Flexfields, Configuring, Reporting and SystemAdministration in Oracle HRMS.
4 – 67Enterprise Modeling
Grade Relationships to Compensation and Benefits
In many enterprises there are rule based reward structures based ongrade. These rules can relate grades and pay directly or indirectly. Youcan associate compensation and benefits with your grades. Forexample, you can record a minimum or maximum salary for a grade.
There are two approaches:
• Using grade rates, you can either enter a fixed value for eachgrade, or you can enter a minimum, maximum, and mid–pointvalues for each grade.
• Using grade scales, you can associate each grade with severalpoints on a pay scale, and enter compensation values for thesepoints.
Note: The compensation information can changeindependently of the grade. Therefore, you should not define itas part of the grade name. Instead you should relate it to thegrade, either directly or indirectly.
Direct Relationship
You may have a salary administration system in which the actual levelof pay normally falls between a minimum and a maximum value for agrade. Regular performance reviews and ratings can involvecomparison with the mid–point value of pay for your grade. In OracleHRMS, this is a grade rate.

4 – 68 Using Oracle HRMS – The Fundamentals (US)
Figure 4 – 7 Relating Grades and Pay Directly and Indirectly
Indirect Relationship
You may be using a step based system of progression points withingrades, in which each point has a fixed value in a pay schedule or table.In Oracle HRMS this is a pay scale.
Relating pay to grades indirectly is common in government, educationand health enterprises. It is also common in large commercialenterprises that negotiate pay levels with staff or union representatives.
Grade Rates to Relate Pay to Grades
In Oracle HRMS, you can set up a table of values related to each grade.These are called grade rates. You can enter a fixed value or a range ofvalid values for each grade.

4 – 69Enterprise Modeling
For example, you might define a salary rate and an overtime rate ofpay for every grade, with minimum, maximum, and midpoint values.Both rates would be in monetary units. However, you can also definerates with non–monetary units, such as days, hours, or numbers.
Figure 4 – 8 Grade Rates
Grade rates are datetracked and this means that you can keep thehistory of the actual values you use. You can also set up rate values ata future date and be sure that this information will automatically takeeffect on the date you set, and not before.
You can use your grade rate values:
• As part of a QuickPaint report or inquiry
• To validate salary proposals
• To validate other compensation entries you make for employees
The salary administration process validates salary proposalsautomatically against the appropriate grade rate. You can use formulavalidation to check other compensation entries.

4 – 70 Using Oracle HRMS – The Fundamentals (US)
Automatic Database Item Creation
When you save your definition, an automatic process createscorresponding database items that formulas can access.
See: Dynamic Database Items, Using Oracle FastFormula.
Pay Scales to Relate Pay to Grades
If you are involved in negotiating pay levels with staff or union groups,you may be using a system of grade steps or points with specific valuesof pay for each step, or point. For example, you may have negotiateddifferent pay scales with different union groups. Or, you may havenegotiated a single set of pay points for all of your employees.
Typically, employees are placed on a step within their grade. Theymove up the steps for the grade by a periodic incrementing process.This process might run automatically at a fixed time each year or itmight be based on a review process specific to the employee.
In Oracle HRMS you set up a pay scale to show the separate points andthe value negotiated for each point. You can set up any number of payscales, for example for negotiated pay scales with different unions.
Scale Rates
You create a rate and enter a fixed value for each progression point on apay scale. You can create as many rates as you require, such as one fora shift allowance, and another for overtime. Notice that, unlike graderates, you can only enter a fixed value for each point; you cannot entera range of valid values.
The values are datetracked so that you can keep the history of theactual values you use. You can also set up rate values at a future dateand be sure that this information will automatically take effect on thedate you set, and not before.
The rates can be defined in monetary units, or as integers, numbers,days, or hours, in various formats. For example, you could define arate in hours to specify the maximum number of overtime hours thatcan be worked per week.
Automatic Database Item Update
When you define rates, an automatic process creates correspondingdatabase items that formulas can access.

4 – 71Enterprise Modeling
See: Dynamic Database Items, Using Oracle FastFormula.
Relate Grades to Progression Points
A pay scale defines a complete set of progression points. You canassociate a subset of these points with each grade.
The group of points valid for a grade is called a grade scale. Each pointin the grade scale is called a step because it represents the steps forincrementing an employee’s pay. The steps must follow the sequenceof points on the pay scale but they can jump several points, ifappropriate to the specific grade.
Note: Grade scales are datetracked.
Figure 4 – 9 Grade Scales
Place the Employee on a Grade Step
If you include a grade as part of an employee’s assignment, you canplace the employee on a step on the associated grade scale.
Scale Rates and Salary Administration
If you are holding salary values as a scale rate, you should not alsoenter them in a salary element using Salary Administration. Insteadyou view an employee’s salary in the Grade Step Placement window,and change it by incrementing the grade step placement of the

4 – 72 Using Oracle HRMS – The Fundamentals (US)
assignment. Such increments, or changes to the scale rate, would notaffect salary element entries for employees. You would have to updatethese entries separately.
Use scale rates for employees whose salaries are determined by theirgrade step placement. Use Salary Administration for employees forwhom you determine salary on an individual basis.
Defining a Grade
If you intend loading historic assignment details into Oracle HRMS,make sure you enter valid start dates for your grades. You cannotassign an employee to a grade before the start date of the grade.
Suggestion: Consider using a fixed date as a default for yourinitial setup, for example, 01–JAN–1901. This will simplifyyour data–entry.
� To define a grade:
1. Enter your grades in sequence number order.
The sequence number can be any number from 1 upwards. Thenumber indicates the rank order of the grade; 1 indicates thehighest grade.
This is the sequence in which the grades appear to users in lists ofvalues.
Consider sequencing each grade at intervals of 10 or more, toaccommodate any future changes to grades.
2. Enter a unique name for the grade. If there is more than onesegment in the grade name structure, a window opens when youenter the Name field. You must enter a unique combination ofsegments.
3. Enter a start date early enough to handle any historical informationyou want to enter.
4. Save your work.
Deleting Grades
� To remove a grade from the list of grades to which employees can beassigned:
� In the Grades window, enter an end date against the grade.

4 – 73Enterprise Modeling
� To delete a grade entirely from the system:
1. Reassign anyone already assigned to the grade to another grade.
2. Highlight the grade in the Grades window and choose Row Delete.
If you have historical records using the grade, you cannot delete it.You can only enter an end date to prevent further assignments tothis grade.
Defining a Grade Rate
You define grade rates in the Grade Rate window.
Grade rate values are DateTracked and you must ensure you use thecorrect date to create your initial set of values.
If you intend loading historic grade rate details into Oracle HRMS,make sure you enter the correct start date for all your history.
� To define grade rates:
1. Set your effective date to a date early enough for any historicalinformation you want to enter.
2. Enter a name for the grade rate and select the units for measuringit. Save your new rate.
3. In the Grade Rate Values block, select the grades for which youwant to define rates. For each grade, enter a fixed value or aminimum, maximum and mid value.
To use this grade rate to validate salary proposals entered in theSalary Administration window, you must enter a minimum andmaximum value.
To view comparatio values using this grade rate, you must enter amid value.
Viewing Grade Comparatios
The View Employee Grade Comparatio window compares thecompensation values you enter for employees with the minimum,maximum, and mid values you define for their grades.
� To view employee grade comparatio values:
1. Select an element and input value.
The inquiry finds assignments that have an entry for this inputvalue.

4 – 74 Using Oracle HRMS – The Fundamentals (US)
2. Select a grade rate and grade for which you have defined a rangeof valid values.
The inquiry compares the minimum, maximum, and mid values foryour chosen grade with the element entries of the list ofassignments.
3. Choose the Find button to run the inquiry.
The folder in the lower part of the window lists the assignmentsthat match your selection criteria:
• The value is the element entry value for each assignment.
• The comparatio shows the assignment’s element entry as apercentage of the mid–value defined for the grade rate.
• The percent of range shows the position of the assignment’selement entry between the minimum value for the grade rate(0%) and the maximum value (100%).
Part Time Employees
Employee are part time if the hours on their assignment’s standardconditions are less than the work day hours entered for theirorganization. For part time employees, the system prorates theminimum, maximum, and mid grade rate values before calculating thecomparatio and percent of range.
Defining a Pay Scale
You define a pay scale, which is a set of progression points forcompensation, in the Pay Scale window.
Pay scales are used commonly in government and regulated orunionized enterprises where actual values of pay are defined as a ’payscale’, a ’schedule’, or a ’spine’. Characteristics of this functionality are:
• A single scale of points and values is used to establish the actualpay for a grade group.
• Each point in the pay scale has a single value.
• Grades can have a number of distinct steps, with each step givena single point in the pay scale.
• An employee assignment to a grade includes a point, or stepvalue, and the point value determines the actual pay of theemployee.
You can have any number of different pay scales in Oracle HRMS.Each scale has its own set of points which may be characters ornumbers.

4 – 75Enterprise Modeling
� To define a pay scale:
1. Enter a unique name for the pay scale.
2. Enter the Increment Frequency for this pay scale. For example, ifyou want to increment the placement of assignments on the payscale once each year, enter 1 in the Number field and select Year inthe Per Period field.
Note: These values provide information only. You can use theSubmit Requests window to set up automatic regular incrementingof grade step placements by the Increment Progression Pointsprocess.
See: Incrementing Grade Step Placements: page 4 – 77
The Automatic Increment field shows the date of the last automaticincrement.
3. Save the pay scale.
4. Enter the names of the points (or steps) of the scale. The Pointnames can be numeric or alphanumeric. Enter them in ascendingorder.
5. Enter a sequence number, in ascending order, for each point. Thesequence determines the progression order for the incrementingprocess. Then save the scale again.
Note: Enter sequence numbers in multiples of 5 or 10, forexample 5, 10, 15, 20. This makes it easier to enter new pointsafterwards between existing points in the sequence.
Defining Scale Rates
Use the Scale Rate window to define a scale rate.
Use the correct date to create your initial set of values. If you intendloading historic pay scale values into Oracle HRMS, you must usecorrect dates for all your history.
� To define a scale rate:
1. Set your effective date early enough to handle any historicalinformation you want to enter.
2. Enter a unique name for the rate.
3. Select the units for measuring the rate, such as hours, money, orinteger.

4 – 76 Using Oracle HRMS – The Fundamentals (US)
4. Select the pay scale for which you are defining the rate.
5. Save the rate.
6. In the Progression Point Values block, select the points for whichyou want to define rates. For each point, enter a fixed value.
7. Save the rate again.
Relating Grades to Progression Points
Use the Grade Scale window to relate grades to progression points.
A grade can have any number of steps. Steps do not always have thesame interval as the pay scale points. For example, you may have apay scale with points from 1 to 10, and a Grade which has 5 steps withpoints in the sequence 3, 5, 7, 8, and 9.
� To create a grade scale:
1. Set your effective date early enough to handle any historicalinformation you want to enter.
2. Select a grade, and select the pay scale from which you want tochoose progression points.
3. Select the highest point (or ceiling) to which employees on thisgrade can be automatically incremented by the IncrementProgression Points process. Save the grade scale.
You can override this ceiling for individual employee assignments.
The step in which the ceiling occurs is automatically displayed inthe Step field.
4. In the Grade Steps block, select the points you want to include onthis grade scale.
When you save, the system sorts the points into ascending order bytheir sequence numbers (defined in the Pay Scale window).
Placing an Employee on a Grade Step
Use the Grade Step Placement window to place an employee on agrade step. When you open this window, information about the gradeand scale appears automatically. By default, the ceiling point is the oneyou defined for the grade. However, you can enter a special ceilingpoint for individual employees in the Assignment window.

4 – 77Enterprise Modeling
Note: Placing an employee on a grade step does notautomatically update the salary element
� To place an employee on a grade step:
1. Set your effective date to the date when the placement should comeinto effect.
2. Select the point or step on which to place the employee assignment.
3. Check Auto–Increment to increment the employee’s placementautomatically when you run the Increment Progression PointsProcess.
4. Select a reason for manually entering a placement, if required.
You can add values to the list of valid reasons by defining valuesfor the Lookup Type PLACEMENT_REASON.
5. Save your work.
The Progression Point Values block displays the rates you havedefined for the pay scale, and the values corresponding to theselected progression point.
Incrementing Grade Step Placements
You can increment grade step placements manually, using the GradeStep Placement window, or automatically, by running the IncrementProgression Points process. In each case, the actual salary element isnot updated. You can use grade step placements to update salaryelements but you will need to write an Oracle Payroll formula to to dothis. However, you are advised not to use Salary Administration toconfirm a grade step change, because this will mean that subsequentchanges to the point values will require updates for all the salaryrecords to which they apply.
� To run the Increment Progression Points process:
1. Navigate to the Submit Requests window.
2. Select the Increment Progression Points in the Name field.
3. Enter the Parameters field to open the Parameters window.
4. Enter the name of the pay scale.
5. Enter the date on which the increment becomes effective.
6. Enter values for some or all of the segments of your People Groupflexfield, if required. This restricts the assignments incremented bythe process to those in the group matching the values you enter.

☞
4 – 78 Using Oracle HRMS – The Fundamentals (US)
Attention: An assignment’s grade step placement is incrementedautomatically only if all the following conditions are met:
• It is still below the ceiling point.
• The automatic increment check box on the Grade Step Placementwindow is checked for the assignment.
• There are no future changes or deletions to the assignment’sgrade step placement, or to the assignment itself, or to the gradescale for the assignment’s grade, or to the new grade step for theassignment.
Running the Current and Projected Progression Point Values Report
Run this report before running the Increment Progression Pointsprocess, to assess its effects. This report shows what changes would bemade by the Increment Progression Points process and how much itwould cost for a particular scale rate, such as salary, or for all rates.
You run reports in the Submit Requests window.
� To run the Points Values Report:
1. Select Current and Projected Progression Points Values Report inthe Name field.
2. Enter the Parameters field to open the Parameters window.
3. Select a Pay Scale and enter the date on which the increment wouldbecome effective.
4. Restrict the scope of the report, if required, by selecting anorganization, a group and/or a rate.
5. Choose the Submit button.
Running the Employee Increment Results Report
Run this report after running the Increment Progression Points process.This report shows the results of the process.
You run reports in the Submit Requests window.
� To run the Employee Increment Results Report:
1. Select Employee Increment Results Report in the Name field.

4 – 79Enterprise Modeling
2. Enter the Parameters field to open the Parameters window.
3. Select a pay scale and the increment process run for which youwant to see the results.
4. Restrict the scope of the report, if required, by selecting anorganization, a group and/or a rate.
5. Choose the Submit button.
Entering a Collective Agreement
Use the Collective Agreements window to enter information aboutcollective agreements used by your enterprise. Before doing this youmust:
• Define the bargaining unit in the Organization window using thebargaining unit classification.
• Define the employer in the Organization window using theemployer classification.
� To enter a collective agreement:
1. Enter the name of the collective agreement. This must be unique toallow a collective agreement to be referenced across your BusinessGroup.
2. Enter the number of the collective agreement.
3. Enter the start date of the collective agreement and enter itsjurisdiction.
Note: An end date should only be entered once the collectiveagreement is no longer applicable to your enterprise. After the enddate the collective agreement can no longer be attached to anassignment.
4. Select the employer and bargaining unit who have negotiated thecollective agreement and enter the name of the signatory for eachparty.
5. Enter the name of the authorizing body and the date on which thecollective agreement was authorized.
6. Save your changes.
You can attach an electronic copy of any collective agreement thataccompanies the record using the Attachments button.
See: Using Attachments, Configuring, Reporting and SystemAdministration in Oracle HRMS.

4 – 80 Using Oracle HRMS – The Fundamentals (US)
Setting up Collective Agreement Grades
Collective agreement grades enable you to define how an employee isgraded or ranked in a collective agreement. A collective agreementgrade is defined by a combination of values that you enter using gradefactors. A grade factor is a user–defined field that you set up as part ofthe grade structure in the Collective Agreement Grades (CAGR) keyflexfield. The grades that you predefine for a collective agreement areknown as reference grades. To set up collective agreement grades:
1. Set up the Collective Agreement Grades key flexfield to define agrade structure and grade factors.
See: User–Definable Key Flexfields, Configuring, Reporting andSystem Administration in Oracle HRMS
Note: If you are in Italy, do not set up this flexfield. You must usethe predefined IT_CAGR flexfield structure.
2. Enter a collective agreement: page 4 – 79.
3. Enter collective agreement grades: page 4 – 80. to link a gradestructure to a collective agreement, and to define a set of referencegrades.
What Next?
You can now define a collective agreement grade for an assignmentusing the Employment Terms tabbed region on the Assignment form.
See: Entering Additional Assignment Details, Managing Your WorkforceUsing Oracle HRMS
Entering Collective Agreement Grades
You enter collective agreement grades to link a collective agreement toa grade structure and to define a set of reference grades that can beused in that collective agreement.
You enter this information using the Agreement Grades window.
� To enter a collective agreement grade:
1. Query the collective agreement and select the grade structure. Thereference grades entered will be recorded against the combinationof collective agreement and grade structure selected.
2. Check the Override Allowed check box if you want to enable usersto enter any combination of values for the selected grade structure

4 – 81Enterprise Modeling
in the Assignment window. If you leave the check box uncheckedusers will be forced to select a predefined reference grade.
3. Insert a sequence number and click the Name field. Enter valuesfor the grade factors that are displayed. Each combination of valuesrepresents a reference grade.
4. Enter as many reference grades as required.
5. Save your changes.
You can now use the Assignment window to define the assignment’scollective agreement grade.
See: Entering Additional Assignment Details, Managing Your WorkforceUsing Oracle HRMS

4 – 82 Using Oracle HRMS – The Fundamentals (US)

C H A P T E R
5
5 – 1Payroll Definition
Payroll Definition
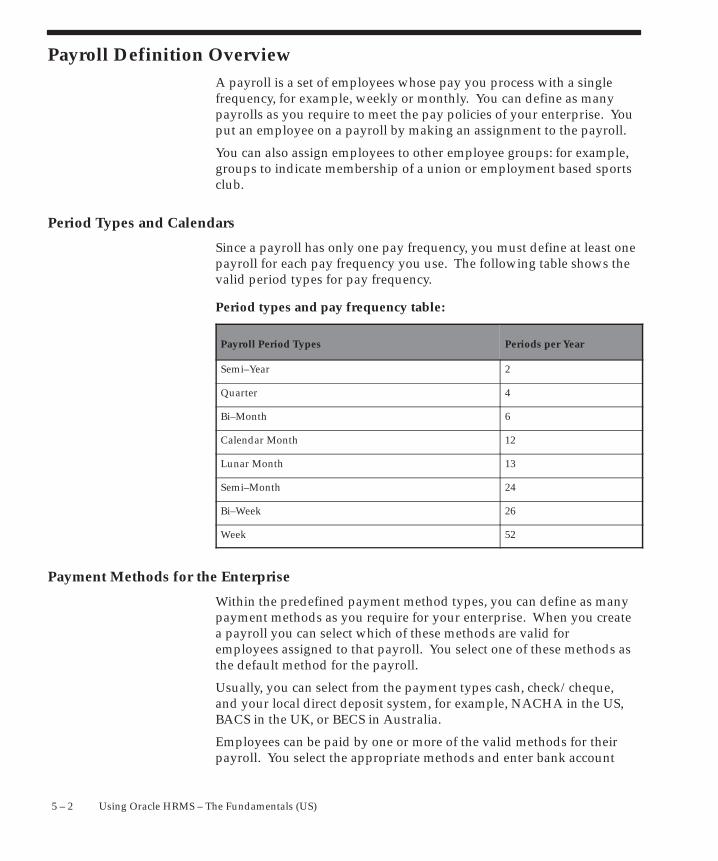
5 – 2 Using Oracle HRMS – The Fundamentals (US)
Payroll Definition OverviewA payroll is a set of employees whose pay you process with a singlefrequency, for example, weekly or monthly. You can define as manypayrolls as you require to meet the pay policies of your enterprise. Youput an employee on a payroll by making an assignment to the payroll.
You can also assign employees to other employee groups: for example,groups to indicate membership of a union or employment based sportsclub.
Period Types and Calendars
Since a payroll has only one pay frequency, you must define at least onepayroll for each pay frequency you use. The following table shows thevalid period types for pay frequency.
Period types and pay frequency table:
Payroll Period Types Periods per Year
Semi–Year 2
Quarter 4
Bi–Month 6
Calendar Month 12
Lunar Month 13
Semi–Month 24
Bi–Week 26
Week 52
Payment Methods for the Enterprise
Within the predefined payment method types, you can define as manypayment methods as you require for your enterprise. When you createa payroll you can select which of these methods are valid foremployees assigned to that payroll. You select one of these methods asthe default method for the payroll.
Usually, you can select from the payment types cash, check/cheque,and your local direct deposit system, for example, NACHA in the US,BACS in the UK, or BECS in Australia.
Employees can be paid by one or more of the valid methods for theirpayroll. You select the appropriate methods and enter bank account

5 – 3Payroll Definition
information, if required, in the Personal Payment Method window. Ifyou do not enter any personal payment methods, the employee is paidusing the default method for his or her payroll.
You can also define payment methods for third party payments, suchas court–ordered wage attachments. Third party payments are alwaysmade by cheque/check, so methods for these payments must have thetype Cheque (Check).
Payroll Definition
You can define your payroll to meet the needs of your enterprise.
Can Oracle Payroll handle different pay frequencies?
Yes––you can set up different pay frequencies, for example weekly ormonthly, so that you can pay different sets of employees at differentintervals. Each payroll can only have a single pay frequency and youmust set up at least one payroll for each pay frequency that you define.
Figure 5 – 1 Multiple payrolls in a Business Group
Do you have flexible control over payment methods?
You can define a payroll to include different types of payment method– for example, payment by bank transfer, payment by check/cheque,

5 – 4 Using Oracle HRMS – The Fundamentals (US)
and so on. When you process the payroll you can then pay the set ofemployees for that payroll in any of the following ways:
• All employees receive payment by a single default paymentmethod for their payroll.
• Employees receive payment by a combination of the paymentmethods that you have defined for their payroll.
• Individual employees receive payment that can be distributedbetween the defined payment methods in proportions differentfrom those applying to other employees belonging to the samepayroll.
Can you group employees according to payroll categories in your organization?
You can assign people to any work structure such as an employmentcategory or a particular location. You can also define a special groupingfor your organization. For example, you can create a group to indicatemembership of a union.
Other Employee GroupsAll the work structures provide ways of defining groups of employeesin your enterprise, such as groups working at a particular location, oron a certain grade, or in a department. You create the groups byassigning employees to the work structures in the Assignment window.
You can also assign people to:
• An employment category: full-time – regular, full-time –temporary, part time – regular, or part time – temporary
• A salary basis, such as weekly or annual, which defines theduration for which the employee’s salary is quoted
See: Components of the Assignment, Managing Workforce Using OracleHRMS.
Oracle HRMS provides a special structure you can use to define anyother special groupings of employees your enterprise requires. Thisstructure is called the people group. Just as with payrolls and otherwork structures, you can assign employees to people groups, and usethem to define employee eligibility for compensation and benefitselements.
The People Group Flexfield
People Group is a key flexfield, like Job Name, Position Name, andGrade Name. As with these other key flexfields, you can define up to30 segments to hold information you use to identify employee groupsin your enterprise.

5 – 5Payroll Definition
Using the People Group key flexfield to define your groups is apowerful mechanism because you can:
• Link elements to Group flexfield segments so that onlyemployees within the group are eligible for the elements
• Inquire and report on individual segments in Inquiry windowsand in reports
• Use DateTrack to build up a history of the group information
If your enterprise uses pay scales to relate compensation levels togrades indirectly, you can use a People Group segment to specify whichemployees are processed by the Increment Progression Points process.
Once you decide how to define the Group key flexfield structure andsegments, it is the responsibility of the system administrator to set theflexfield up. At least one segment of this flexfield must be set up beforeyou can begin entering employee assignments.
Making People Group Segments Required
If you make any of the People Group segments required, this will applyto both the Element Link window and the Assignment window. Thismeans that you may have to create multiple element links if you wantto use a People Group segment in the eligibility criteria for a link.
For example, suppose you have defined two segments: a Yes/Nosegment called Fast Track, which is required, and a segment calledPension Plan, which is not required. You want to make an elementavailable only to members of a certain pension plan. However, youmust create two element links: one for members of the pension planwho are on the Fast Track, and another for members who are not on theFast Track.
Note: If there are many possible values for the requiredsegment, the maintenance of multiple links can become aburden so be cautious in making segments of this flexfieldrequired.
Available Payment Methods
Each payment method has a type of either check, NACHA, or cash.
Database Triggers
Database administrators can modify the behavior of Oracle HRMS andcontrol the way in which standard payroll processes run by doing someor all of the following:

5 – 6 Using Oracle HRMS – The Fundamentals (US)
• Creating dynamic triggers.
• Enabling or disabling dynamic triggers.
• Grouping triggers into functional areas.
Database Triggers
Database triggers are created in the Oracle HRMS database whenOracle HRMS is installed. Oracle HRMS uses two types of databasetrigger:
• Static triggers
• Dynamic triggers
It is important that you understand the difference between these twotypes of trigger.
The Difference Between Static Triggers and Dynamic Triggers
Static triggers are an integral part of Oracle HRMS and should notnormally be disabled. They apply to the entire Oracle HRMS system.The most likely situation in which you would disable a static databasetrigger is when you are working with your support representative toidentify a technical issue with the way in which Oracle HRMS isbehaving on your site.
Dynamic triggers are designed to be selectively enabled and disabledby HRMS system administrators. They can be enabled for specificlegislations, business groups and payrolls. For example, if you areoutsourcing some of your payrolls to a third party, you can enablesome third party interface dynamic database triggers as part of yourOracle HRMS implementation.
How Database Triggers are Maintained
Your database administrator is responsible for:
• Defining dynamic triggers
• Specifying whether they should fire on update, insert or delete
Database administrators can use a forms interface to view existingtriggers and create new dynamic triggers. A database administrator orHRMS system administrator can enable a dynamic trigger to fire forspecific legislations, business groups, and payrolls, or a combination ofthese.
A database administrator can also group triggers into a functional areaso that multiple triggers can be manipulated in a single operation.

5 – 7Payroll Definition
Database Triggers and Third Party Payroll Interfaces
If you are interfacing Oracle HRMS to a third party payroll systemusing the Oracle HRMS Payroll Interface Toolkit, your databaseadministrator can enable or disable triggers for a particular legislation,business group or payroll.
A number of predefined dynamic triggers are delivered with OracleHRMS. These prevent certain information from being updated ordeleted in Oracle HRMS, and prevent data in Oracle HRMS fromgetting out of step with data in your third party payroll system.
These triggers are grouped into predefined functional areas. Individualtriggers can be enabled or disabled for specific legislations, businessgroups and payrolls using the Dynamic Triggers Functional AreaGrouping window.
The following predefined functional areas are supplied with OracleHRMS:
• Generic Payroll Interface Toolkit
• ADP Payroll Interface
• Ceridian 100 Payroll Interface
• Ceridian 500 Payroll Interface
• Duplicate Element Reporting Names
These correspond to the payroll interfaces that are supplied as standardwith Oracle HRMS. The triggers contained within these payrollinterface functional areas are not enabled for legislations, businessgroups or payrolls on delivery. You must enable them for specificlegislations, business groups and/or payrolls to make them active.
If you are not using a third party payroll interface you do not need toenable any of these triggers. Although they will appear as enabled onthe Define Dynamic Triggers window they will not fire because theyhave not been enabled for any legislations, business groups or payrolls.
Process Parameters
Database administrators can use a forms interface to select alternativevalues for process parameters. For example, they can select the numberof threads assigned to a process and make a selection of thecombination of levels for which logging is provided.
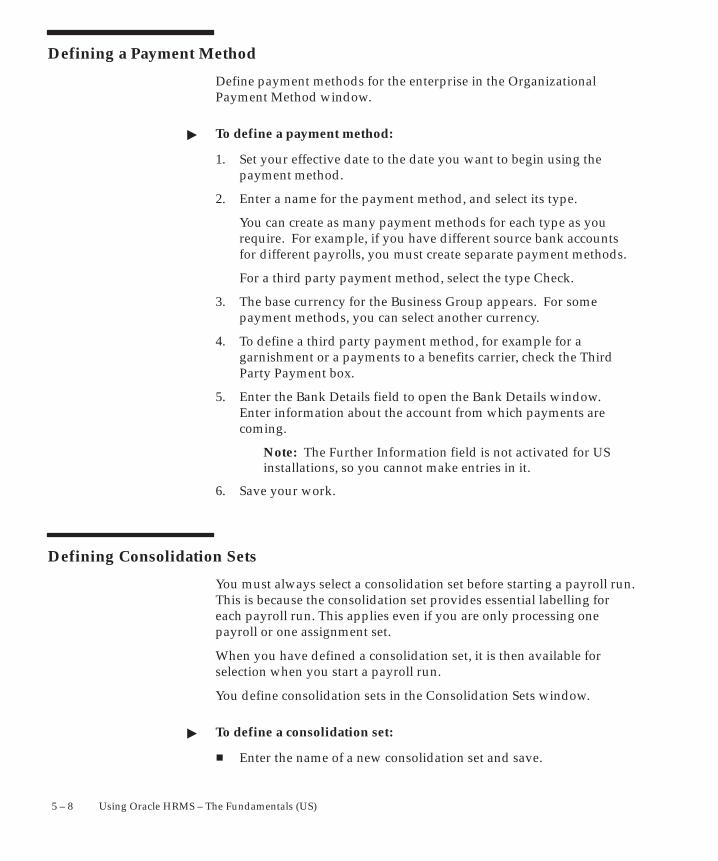
5 – 8 Using Oracle HRMS – The Fundamentals (US)
Defining a Payment Method
Define payment methods for the enterprise in the OrganizationalPayment Method window.
� To define a payment method:
1. Set your effective date to the date you want to begin using thepayment method.
2. Enter a name for the payment method, and select its type.
You can create as many payment methods for each type as yourequire. For example, if you have different source bank accountsfor different payrolls, you must create separate payment methods.
For a third party payment method, select the type Check.
3. The base currency for the Business Group appears. For somepayment methods, you can select another currency.
4. To define a third party payment method, for example for agarnishment or a payments to a benefits carrier, check the ThirdParty Payment box.
5. Enter the Bank Details field to open the Bank Details window.Enter information about the account from which payments arecoming.
Note: The Further Information field is not activated for USinstallations, so you cannot make entries in it.
6. Save your work.
Defining Consolidation Sets
You must always select a consolidation set before starting a payroll run.This is because the consolidation set provides essential labelling foreach payroll run. This applies even if you are only processing onepayroll or one assignment set.
When you have defined a consolidation set, it is then available forselection when you start a payroll run.
You define consolidation sets in the Consolidation Sets window.
� To define a consolidation set:
� Enter the name of a new consolidation set and save.

5 – 9Payroll Definition
� To delete a consolidation set:
1. Query the consolidation set.
2. Choose Edit, Delete Record.
You can only delete a consolidation set if it is not the default set fora payroll and if it is not associated with any payroll processes.
Creating a Payroll
Use the Payroll window to create a payroll, including its calendar andvalid payment methods.
� To create a new payroll:
1. Set your effective date to a date early enough to handle anyhistorical information you want to enter. Your effective date mustbe on or before the first period start date of the payroll calendar.
2. Enter the payroll’s name and select its period type from the list.
3. Enter the end date of the payroll’s first period, and the number ofyears for which the system should initially generate the payroll’scalendar. You can increase this number later to generate additionalyears.
When you enter the First Period End Date, make sure that thecorresponding start date of the first period is after the start date ofthe payroll.
4. Change the zero default to a negative or positive number of daysbefore or after the period end date in the Date Offset region.
For example, in the US, you can set the cutoff date for asemi–monthly payroll to three days before the period end date (–3),while the Scheduled Run and Check dates can be five and sevendays after this date, respectively. In Canada, you can set the cutoffdate to three days before the period end date (–3), while the Paydate can be five days after this date.
• The Check or Pay Date is the date of constructive receipt of pay,on which paychecks/paycheques become negotiable.
• The Cut Off date, included for your reference, is the final date forentering or changing payroll information before a run.
• US only: The Scheduled Run Date is the date scheduled for theRegular run of this payroll each period.

☞
5 – 10 Using Oracle HRMS – The Fundamentals (US)
These offsets are the defaults for the calendar. You can make datechanges manually in the calendar by choosing the Period Datesbutton, for example, when an offset date falls on a weekend orholiday.
5. Select a default payment method for employees who have no validpersonal payment method. You cannot select a method usingmagnetic tape because this requires information about employees’bank accounts.
6. Select a default consolidation set for this payroll. One consolidationset is created automatically when you define your Business Group.Oracle Payroll users can create other consolidation sets for payrollprocessing.
7. Enter information about the set of books and suspense accountholding costing information for this payroll in the Costing region, ifrequired.
The information you enter here depends on the setup of your CostAllocation key flexfield.
See: Setting Up the Cost Allocation Key Flexfield: page 6 – 11
8. Save your work.
9. Choose the Period Dates button to view the calendar generated foryour payroll. In the Period Dates window you can:
• View the default offset dates for every period, and manuallyoverride any of these dates in any record.
• Change the payroll’s default Open status in any period to Closedto prevent further element entries. You can also reopen theperiod if necessary.
Attention: Use this feature with caution. When you performcertain important tasks in Oracle HRMS, the system mayautomatically create or delete element entries. These tasks includehiring and terminating people, and updating assignments. Youcannot change any element entries that span a closed payrollperiod, and so you may be prevented from performing these tasks.
10. Choose the Valid Payment Methods button to add valid paymentmethods for this payroll.
In the Valid Payment Methods window, the default paymentmethod for the payroll appears automatically. You can add othermethods. First set your effective date to the date you want themethod to become valid.

5 – 11Payroll Definition
Note: An employee assigned to this payroll can have any numberof personal payment methods chosen from those you enter here forthe payroll.
Deleting Payrolls
You can delete a payroll if there are no active employee assignments orelement links to it. However, if you have run processing for a payroll itis not advisable to delete it. If necessary, define a new payroll andsimply discontinue use of the old payroll.
� To delete a payroll:
1. Remove any element links or employee assignments to the payroll.
2. Query the payroll in the Payroll window, choose Delete Record andSave.
Entering NACHA Tape Data for GREs
For GREs using payrolls with payment methods of the type NACHA,enter information for the NACHA tape batch headers in the NACHARules window.
� To enter NACHA rules for a GRE:
1. In the Organization window, query the GRE if it does not alreadyappear there. In the Organization Classifications region, place thecursor on Government Reporting Entity, choose the Others button,and select NACHA Rules to open the NACHA Rules window.
2. Enter the Company Name, which is the name of the GRE makingthis batch of direct deposit payments to employees.
3. Select Mixed Debit and Credit Entries, Debit Entries Only or CreditEntries Only in the Service Class Code field.
4. Enter the Company Identification number of the GRE making thisbatch of payments.
5. In the Company Discretionary Data field, you can enter codes ofsignificance to you, to enable special handling of all subsequententries in the batch. This field has no standard interpretation.
6. In the Message Authentication Code, you can enter an 8–charactercode you derive, whose purpose is to validate the authenticity of

5 – 12 Using Oracle HRMS – The Fundamentals (US)
Automated Clearing House (ACH) entries. This field has nostandard interpretation.
7. Optionally, you can enter the method of employee identification(SSN or Employee Identification number for the GRE) in theIndividual Identification field. This is for information purposesonly.
Defining Dynamic Triggers
Use the Dynamic Trigger Definition window to:
• Find a trigger that already exists. Existing triggers are referred toas static triggers.
• Create a new trigger. Any new triggers that you create arereferred to as dynamically generated triggers.
• Enable and disable triggers.
If you are using a third party payroll product you should not use thiswindow to enable and disable triggers. Use the Dynamic TriggerFunctional Area Grouping window instead.
� To find an existing trigger
1. Select either Dynamically Generated Triggers or Static DatabaseTriggers.
2. Select an Application to restrict the range of your search. Note thatthis does not refer to the application owning the trigger. It refers tothe application owning the table to which the trigger is applied.
3. Enter one of the following:
– A table name.
– A trigger name.
– A table name and a trigger name.
4. Select a Triggering Action or a combination of triggering actions.
5. Select the Trigger Type (static database triggers only).
• All – displays all existing triggers
• Before Each Row
• Before Each Event
• After Each Row

5 – 13Payroll Definition
• After Each Event
• Instead of Each Row
• Instead of Each Event
• Statement
Note: These criteria do not apply to triggers createddynamically. Dynamic triggers are always defined to run aftereach row.
� To enable and disable dynamic triggers
Warning: These instructions apply to dynamic databasetriggers only. You should never disable a static databasetrigger.
When you have found the database trigger corresponding to yoursearch criteria, you can see whether the trigger is enabled or disabled.The Enabled flag is checked if the trigger is enabled, and unchecked ifthe trigger is disabled.
You can change the status of the trigger by checking or unchecking theEnabled flag.
Changes become effective immediately.
� To create a dynamic trigger
1. Select Dynamic Database Triggers.
2. Enter a description for the trigger. This description will appear as acomment in the generated code
3. Select the table on which this trigger operates.
4. Select the action type for the trigger
• Insert – the trigger may be created after Insert.
• Update – the trigger may be created after Update.
• Delete – the trigger may be created after Delete.
Dynamic trigger creation does not support:
• The combination of insert, update and delete actions availablewhen creating static triggers.
• Triggers that are not of the after each row type.
5. Save the trigger definition
When you have saved the trigger definition you cannot change thetable on which a trigger is run, nor can you change the action that
5 – 14 Using Oracle HRMS – The Fundamentals (US)
the trigger performs. Instead, you must delete the trigger and thenrecreate it with the correct details.
Grouping Dynamic Triggers into Legislative Functional Areas
Use the Dynamic Trigger Functional Area Grouping window to includeall triggers for the functional area into a single group. You can thenenable or disable all triggers for the entire area in a single operationrather than enabling each trigger individually.
We deliver functional area groupings as predefined data for thosecustomers who are using Oracle HR with a third party payroll.However, third party payroll users can also define a subset of thisgrouping and use it in preference to the predefined grouping.
� To group dynamic triggers into functional areas
1. Enter a description for the new functional area, or query an existingfunctional area.
2. Select one of the following from the next block,:
– Legislation
– Business Group
– Payroll
3. Choose the name of the legislation, business group or payroll.
4. Select the description of each trigger to be assigned to thefunctional area.
5. Enable or disable this grouping for this legislation, business groupor payroll.
You can specify groupings for legislation only, business group onlyor payroll only, but you can also specify any combination of these,If you do not select any of these then the triggers operate on alloccasions.
� To enable selected triggers from a predefined grouping
If you only want to enable some of the triggers delivered in apredefined grouping, then you disable the predefined groupingand create a new grouping containing your selection of triggers.You then enable the new grouping.

5 – 15Payroll Definition
Setting up the TIAA-CREF Interface
To set up the TIAA-CREF interface:
1. Enter the PPG and Billing Code into the TIAA-CREF Setup Codeswindow by navigating to the Additonal Organization Informationwindow for the appropriate GRE/Legal Entity and selectingTIAA-CREF Setup Codes. Do this for each GRE that theTIAA-CREF Inteface will use.
The PPG Code and Billing Codes are assigned to your institutionby TIAA-CREF. The Billing code is attached to the PPG code.
2. Enter the PPG and Billing Code for each assignment in theAssignment window by selecting the Others button, and thenselecting TIAA-CREF Setup Codes to open a window where youcan enter the appropriate codes.
3. Enter the TIAA-CREF Mode of Payment Code in the PayrollWindow’s Further Payroll Information Flexfield. Do this for eachpayroll that the TIAA-CREF Interface will use.
All TIAA-CREF mode of payment codes are defined in the List ofValues for the TIAA-CREF Mode of Payment Code field.
4. Set up the appropriate elements and balance feeds for eachemployee who will be making TIAA-CREF contributions.
See: Total Compensation Elements Setup, Managing TotalCompensation Using Oracle HRMS.
Oracle Payroll provides you with the following balances for usewith the TIAA-CREF interface:
• RA/GRA PLAN BY-INST – For the employer plan contributions.
• RA/GRA PLAN REDUCT – For required employee pretax plancontributions
• RA-PLAN DEDUCT – For required employee after-tax plancontributions
• RA-ADDL REDUCT – For additional voluntary pretaxemployee contributions
• RA-ADDL DEDUCT – For additional voluntary after-taxemployee contributions
• SRA/GSRA REDUCT – For voluntary pretax employeecontributions to TIAA-CREF’s SRA or GSRA product.
Once you have set up Oracle Payroll to use the TIAA-CREF interface,you can run the TIAA-CREF Transmission Report.

5 – 16 Using Oracle HRMS – The Fundamentals (US)
See: Running the TIAA–CREF Transmission Report, ManagingYour Payroll Using Oracle HRMS.
See: Entering Dependents, Beneficiaries, and Other Contacts,Managing Your Workforce Using Oracle HRMS.
Maintaining Process Parameters
Use the Action Parameters window to modify the parameters for yourpayroll processes. For example, you can:
• Specify the number of threads to be allocated to your payrollprocesses.
• Enable or disable categories of logging for your payrollprocesses.
� To maintain process parameters:
1. From the parameters tab, select the name of the parameter that youwant to modify, or enter a parameter name.
For details of the parameters that you can enter, see the TechnicalEssay Payroll Action Parameters.
2. Enter a value for the parameter name. For example, Trace has avalue of either Y or N
Note: We recommend that Trace is set to N, because setting itto Y imposes an extra processing load on the payroll processes.
� To maintain logging parameters:
Logging parameters are identified by a combination of letters, and youuse the logging tab to enable logging categories. For example, if loggingis set to RGE this corresponds to the following combination of loggingcategories:
R – Routing
G – General
E – Element Entry
1. Select the logging tab.
2. Check each of the logging categories that you want to enable.
3. Uncheck any logging categories that you want to disable.

C H A P T E R
6
6 – 1Cost Analysis
Cost Analysis

6 – 2 Using Oracle HRMS – The Fundamentals (US)
Cost Analysis OverviewThe following topics explain how the costing process is implemented inOracle HRMS.
• Labor Costs in Oracle HRMS – the Oracle products installed inyour organization determine how you can use information aboutthe allocation of labor costs.
• The Cost Allocation Key Flexfield – entries made here determinehow you can distribute costs across your organization. Thedefault allocation of costs for your organization can beoverridden so that the costing process will incorporateexceptions and temporary costing arrangements.
• Data Costed at the Payroll Level – the costing level applicablewhen costs are always charged to the same company or the sameset of books within your organization.
• Data Costed at the Element Link Level – the costing level atwhich you define the costing type for earnings and deductions:costed, fixed costed, or distributed.
• Data Costed at the Organization and Assignment Level – thecosting level applicable when costs are entirely or mostlyallocated to the same cost center.
• Data Costed at the Element Entry Level – the costing levelapplicable when costs for an individual element entry, such as atimecard entry, should override costs entered at any other level.
Cost Analysis
In any human resource environment you must be able to enter the laborcosts associated with your employees. Oracle HRMS gives you thepower and flexibility to perform a cost analysis that best reflects thebusiness activities of your organization.
How can you use cost analysis to support your business activities?
You can use Oracle HRMS to:
• Estimate labor costs from current compensation definitions
• Project future labor costs by modelling organizational changeand salary reviews
You can also use Oracle Payroll to accumulate actual payroll costs fortransfer to Oracle General Ledger.
6 – 3Cost Analysis
How can you allocate labor costs across your organization?
You can allocate labor costs to particular departments, and to particularproducts or projects.
If you are using Oracle Payroll you can also allocate costs to an accountfor transfer to Oracle General Ledger.
How flexible is the costing process?
Although you can define a default cost center for your organization,you may need to run the costing process for employees who dividetheir time between two or more cost centers. Oracle HRMS enablesyou to specify the proportion in which costs should be allocatedbetween different cost centers within your organization.
Labor Costs in Oracle HRMS
At all installations of Oracle HR, you can allocate employee costs tocost centers, GL codes and labor distribution codes. You do this bysetting up segments of the Cost Allocation key flexfield to determinethe windows in which users can select cost codes.
If your installation does not include Oracle Payroll or Oracle GeneralLedger, you must consider how to relate information on labor costsentered in Oracle Human Resources to your payroll and financialsystems.
If your installation includes Oracle Payroll, you use a post–payroll runprocess to accumulate payroll costs by cost center, GL account code,and the labor distribution codes in use at your enterprise. Forinstallations that also include Oracle General Ledger you can map thesegments of the Cost Allocation key flexfield to the correspondingsegments of the General Ledger Accounting flexfield. Anotherpost-payroll run process is available to facilitate the transfer ofinformation on payroll transactions to Oracle General Ledger.

6 – 4 Using Oracle HRMS – The Fundamentals (US)
Labor Cost Allocation Example
The Sample Payroll Results table below is based on the flexfield setupdescribed in the previous topic. It displays payroll run results for fouremployees, using accounts and work structures identified using theCost Allocation key flexfield. The Example Costing Process Resultstable shows how the Costing process allocates these payroll results:
• to accounts and cost centers, for the general ledger
• to accounts for cost centers and product lines within cost centers,for labor distribution purposes.
Sample Payroll Results table:
Employee CostCenter
ProductLine
Salary Wages Overtime UnionDues
Employee 1 Production H201100%
1,000 400 20
Employee 2 Sales H305100%
1,500
Employee 3 Production H201 50% 2,000 600 30
H202 50%
Employee 4 Sales H305 20% 1,000
H310 40%

6 – 5Cost Analysis
The table below shows the allocation of costs from the sample runresults displayed above.
Example Costing Process Results
AccountCode
Cost Center Product LineCode
Production Sales H201 H202 H305 H307 H310
Salaries 2,500 1,700 400 400
Wages 3,000 2,000 1,000
Overtime 1,000 700 300
UnionDuesLiability
50
Clearing (Account contains balancing credits for earnings Salary, Wages and Over-time, and balancing debit for deduction Union Dues.)
Data Costed at the Payroll Level
Sometimes the labor costs from a payroll should all be charged to aparticular company within your enterprise, or all be entered in aparticular set of books. In this case, you select the code for thecompany or set of books from the appropriate segment of the CostAllocation flexfield when defining the payroll.
Also at the payroll level, you can select codes for suspense accounts. Asuspense account is one that collects costs from the payroll if segmententries at lower levels are missing. For example, if an employeereceives a Special Production Bonus but there is no GL code for thisearnings type to debit in the Cost Allocation flexfield, the cost of thebonus goes into the suspense account.
Entries of sums in a suspense account alert you to missing codes, andprovide a way to hold unallocated costs until you can make manualjournal entries to the correct accounts. Since codes entered in the CostAllocation flexfield at levels below the payroll level override anyentered at the payroll level, costs go to a suspense account only whenthe correct account codes are not entered at the element link level.
Data Costed at the Element Link Level
You enter the important costing information for an element on its links.This means that all elements for which you must maintain costing

6 – 6 Using Oracle HRMS – The Fundamentals (US)
information must have at least one link, even those that receive entriesduring the payroll run as indirect results of the processing of otherelements.
When defining a link for an element, you select a costable type thatdetermines whether the payroll run should collect the results of thislink for costing purposes. By default, a link’s costable type is NotCosted. For the results of elements that process in payroll runs to becollected for accumulation and transfer, you must change this defaultto a costable type of either Costed, Fixed Costed or Distributed.
Costable Type: Costed
When processing an element for an employee with a link markedCosted, the payroll run checks for Cost Allocation flexfield entriesaffecting the employee at every level – payroll, element link,organization, assignment, and element entry. Since earnings typesmay well receive override entries of information for labor distributionpurposes at the lower levels of assignment or element entry, thecostable type Costed is likely to be best for the links of elementsrepresenting earnings.
Costable Type: Fixed Costed
When processing elements marked for Fixed Costing, the system looksfor costing information at the payroll, element link and element entrylevels only, not the assignment or organization levels. You can, in fact,override the account code at element entry level. This is because theorder of priorities for Fixed Costing is Payroll (highest priority),Element Link and finally Element Entry (lowest priority).
Suggestion: Deduction amounts are usually irrelevant tolabor distribution analyses, so elements representingdeductions seldom receive lower level entries of costinginformation. The costable type Fixed Costing may be best forthese elements’ links. However, this is optional.
Costable Type: Distributed
For labor distribution analysis, you can distribute employer charges,such as employer payments for social security or employee benefits, asoverhead costs to be added to employees’ earnings. The links ofelements representing employer charges you want to distribute in thisway require the costing type Distributed.
For each employee, Oracle Payroll distributes the run results ofelements with this costable type proportionally over a set of earnings
6 – 7Cost Analysis
types you specify. This distribution set of earnings types could include,for example, Wages, Overtime and Shift Pay. When you selectDistributed as the costable type of a link, you must also enter the nameof the distribution set of earnings over which the run results of the linkare to be distributed.
See: Defining an Element or Distribution Set, Configuring, Reporting andSystem Administration in Oracle HRMS.
Costing and Balancing GL Accounts
For element links whose run results should go to the General Ledger,you enter in the Costing field of the link, the GL account to debit orcredit, and in the Balancing field, the account to correspondingly creditor debit.
For earnings types and non–payroll payments, the GL account to debit(for example, Salaries) goes in the Costing field, and the account tocredit (for example, Clearing) goes in the Balancing field. Fordeductions, the account to credit (for example, Union Dues Liabilities)goes in the Costing field, and the account to debit (for example,Clearing) goes in the Balancing field.
Employer Charge Distribution Example
When you give links for elements representing employer charges thecostable type Distributed, the Costing process distributes the employercharges as overhead for each employee, over a set of employees’earnings.
See: Data Costed at the Element Link Level: page 6 – 5
This example shows how employer payments totalling $100 aredistributed over a set of earnings including wages and overtime, forthe cost center Production and the product lines H201 and H202. Thetable below shows the distribution of overhead over costs and productline totals.
Overhead Distribution for the Production Cost Center
Total paid to Production Cost Center as Wages run result:
$3,000.00
Total paid to Production Cost Center as Overtime run result:
$1,000.00
Total for Earnings types specified for distribution: $4,000.00
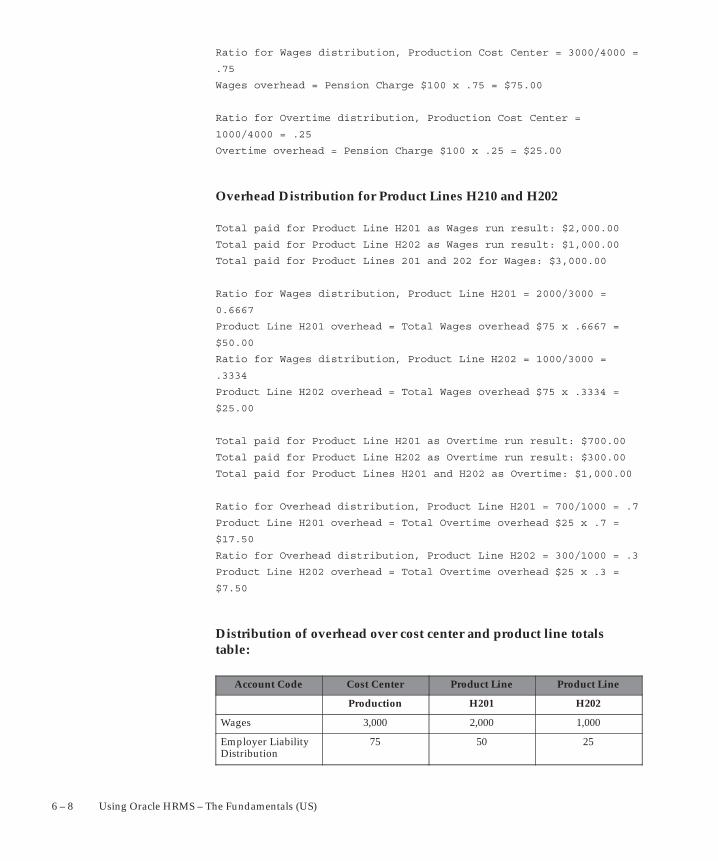
6 – 8 Using Oracle HRMS – The Fundamentals (US)
Ratio for Wages distribution, Production Cost Center = 3000/4000 =
.75
Wages overhead = Pension Charge $100 x .75 = $75.00
Ratio for Overtime distribution, Production Cost Center =
1000/4000 = .25
Overtime overhead = Pension Charge $100 x .25 = $25.00
Overhead Distribution for Product Lines H210 and H202
Total paid for Product Line H201 as Wages run result: $2,000.00
Total paid for Product Line H202 as Wages run result: $1,000.00
Total paid for Product Lines 201 and 202 for Wages: $3,000.00
Ratio for Wages distribution, Product Line H201 = 2000/3000 =
0.6667
Product Line H201 overhead = Total Wages overhead $75 x .6667 =
$50.00
Ratio for Wages distribution, Product Line H202 = 1000/3000 =
.3334
Product Line H202 overhead = Total Wages overhead $75 x .3334 =
$25.00
Total paid for Product Line H201 as Overtime run result: $700.00
Total paid for Product Line H202 as Overtime run result: $300.00
Total paid for Product Lines H201 and H202 as Overtime: $1,000.00
Ratio for Overhead distribution, Product Line H201 = 700/1000 = .7
Product Line H201 overhead = Total Overtime overhead $25 x .7 =
$17.50
Ratio for Overhead distribution, Product Line H202 = 300/1000 = .3
Product Line H202 overhead = Total Overtime overhead $25 x .3 =
$7.50
Distribution of overhead over cost center and product line totalstable:
Account Code Cost Center Product Line Product Line
Production H201 H202
Wages 3,000 2,000 1,000
Employer LiabilityDistribution
75 50 25

6 – 9Cost Analysis
Product LineProduct LineCost CenterAccount Code
Overtime 1,000 700 200
Employer LiabilityDistribution
25 17.50 7.50
Data Costed at the Organization and Assignment Levels
When setting up an internal organization for which most or all laborcosts go to the same cost center, select that cost center from theappropriate segment of the Cost Allocation flexfield when defining theorganization.
For example, if the labor costs of most of the employees in theCommercial Sales Group go against the cost center Sales, select Salesfrom the list of cost centers when defining the organization CommercialSales Group. This means that by default, the system accumulates laborcosts for each employee assigned to the Commercial Sales Group forthe cost center Sales.
Perhaps the costs of some employees assigned to this group shouldexceptionally be charged to a different cost center. For theseemployees, you can enter the correct costing information on theirassignments. Entries at the assignment level override entries at theorganization level.
There may also be employees regularly assigned to work in this grouponly part time, who work elsewhere the rest of the time. In cases likethese, it is not necessary to give employees two assignments. You canenter a number of cost centers for one assignment, specifying thepercentage of labor costs to charge to each:
Proportion Seg. 1 Cost Center
50% Sales
50% Public Relations
You can also enter other types of costing information at the assignmentlevel. For example, if a Production Department employee regularlyworks 80% of the time on one product line and 20% on another, youcan enter this on the assignment.
Proportion Seg. 3 Labor Dist. Code
80% H201
20% H202

6 – 10 Using Oracle HRMS – The Fundamentals (US)
Notice that assignment level entries are datetracked, so you can enterchanges ahead of time.
The Cost Allocation Key Flexfield
When implementing and using Oracle HRMS, you make selectionsfrom the lists in the Cost Allocation flexfield segments as follows:
• When defining a payroll, you can select a code for the company orset of books holding the labor costs from the payroll.
• When linking an element representing an earnings type such asRegular Salary, a deduction such as Union Dues, or an employercharge such as a benefit plan contribution, you select a GL codethat the element’s results should debit or credit, and a code forthe balancing GL account to credit or debit.
Note: As well as making entries to the Cost Allocationflexfield at the element link level, you also enter on each link,essential information about the type of costing the systemshould do for the link. Available types include Costed, FixedCosted, and Distributed.
See: Data Costed at the Element Link Level: page 6 – 5
• When defining an internal organization or entering an employeeassignment, you can select codes for the cost centers, productlines or other structures for which to collect the labor costs of theorganization or assignment.
• When entering timecard data in Oracle Payroll, you can selectcodes for accounts, cost centers, product lines and other itemslisted in the flexfield segments to show how to collect labor costsfor particular hours worked.
The different points at which you can make entries to segments of theCost Allocation flexfield exist as related entry levels. Ranging from topto bottom, the five entry levels are these:
Entry Level Windows Purpose of Entry
Payroll Payroll Identifies company or set of books to which all costsfrom this payroll should go.
Link Element Link Identifies a GL account to debit and a balancingaccount to credit, or for deductions, an account tocredit and a balancing account to debit. Other entriescan identify any other accounts into which run resultsof the element should go.

6 – 11Cost Analysis
Purpose of EntryWindowsEntry Level
Organization Organization Identifies structures such as cost centers against whichto charge the payroll costs of employees in theorganization.
Assignment AssignmentCosting
Identifies structures such as cost centers and productlines against which to regularly charge payroll costs ofthis assignment.
Element Entry ElementEntriesBatch Lines
Identifies structures such as cost centers and productlines against which to charge payroll costs of anemployee assignment for a period. Entries oftentaken from timecards.
Note: You enable a qualifier for each segment of your CostAllocation flexfield to control whether it appears at a givenentry level. For example, for the Cost Center segment of yourflexfield, which receives entries only at the organization,assignment and element entry levels, you enable theOrganization, Assignment and Element Entry qualifiers. Thissegment then appears only at these levels.
See: Setup of the Cost Allocation Key Flexfield: page 6 – 11
Overrides for the Cost Allocation Flexfield
A key feature of the Cost Allocation flexfield is that entries made to itssegments at lower levels override any entries at higher levels. Thus,entries from timecards made in a particular segment at the ElementEntry level override any entries to this segment made at the employeeassignment, organization, link and payroll levels.
This helps to keep your costing information accurate. For example, ifemployees temporarily work at cost centers or on product linesdifferent from those entered for their organizations or assignments,they can enter the cost center or product line codes together with theirtime worked on their timecards. On receipt of this costing informationat the element entry level, the system correctly charges their time forthe period, using this information rather than any entered at theorganization or assignment levels.
Setup of the Cost Allocation Key Flexfield
You must define at least one segment of the Cost Allocation keyflexfield; you may define as many as 30 segments. To set up thisflexfield, consult the explanations and procedures given in the OracleApplications Flexfields Manual.

6 – 12 Using Oracle HRMS – The Fundamentals (US)
You can control which segments of the Cost Allocation flexfield appearin each of the windows from which users can make entries to thisflexfield.
Display of Flexfield Segments
Oracle HRMS implementors and users make selections from the lists inthe Cost Allocation flexfield’s segments at different levels, that is, inseveral different Oracle HRMS windows. However, in a particularwindow, they usually need to access only certain segments of theflexfield.
For example, when defining a payroll you need only the segmentcontaining the companies or sets of books to which a payroll’s laborcosts should go. When defining a link for an earnings or deductionelement, you may need only the segment containing the list of thecosting and balancing GL codes. You are likely need the segmentcontaining the list of cost centers only when defining an organization oremployee assignment, or making an element entry.
You control the appearance of a Cost Allocation flexfield segment in aparticular window by enabling qualifiers for the segment. When youenable a particular qualifier for a segment, this causes the segment toappear and be available for entry in a particular window, as follows:
Qualifier Enables Segment’s Appearance in
Payroll Payroll window
Element Link Element Link window
Organization Organization window
Assignment Assignment Costing window
Element Entry Element Entries window
The following table lists the five levels, and the correct order ofprocessing priority.
LevelQualifiers for thisLevel Typical Segments Displayed at this Level
Payroll Payroll company code, set of books
Element Link Element, Balancing GL account codes for costing and balancing
Organization Organization cost centers
Assignment Assignment project or product codes, or cost centersthat do not map onto organizations
Element Entry Element Entry project or product codes (for employeeswho submit timesheets)

6 – 13Cost Analysis
A code entered at a lower level can override a code entered at a higherlevel. This means that if a segment is populated at element entry level,it overrides all other levels. You can enable as many qualifiers asnecessary for a particular segment.
The Oracle HRMS Cost Allocation Key Flexfield Example
To construct a simple example of a Cost Allocation flexfield, supposethat the departments of an enterprise each constitute a cost center.Suppose also that the general ledger accounts receiving labor costs areSalaries, Wages, Overtime, Bonuses, Union Dues Liability and Clearing.
The Clearing account in this example represents a single account set upfor entry of:
– Credits, in order to balance debits to accounts for earningstypes, for example Salaries, Wages, Overtime and Bonuses
– Debits, in order to balance credits to accounts fordeductions, for example Union Dues Liability.
After running the Payroll and Costing processes, you can make journalentries to credit or debit each individual balancing account, makingcorresponding debits or credits to the Clearing account.
Information to be transferred to the General Ledger includes:
• The totals of salaries and wages paid in departments and costcenters are entered as debits to the Salaries and Wages accounts,and as balancing credits to the Clearing account.
• The total of bonuses paid to employees is entered as a debit tothe account Bonuses, and as a balancing credit to the Clearingaccount.
• The total deducted from employees in Production and QualityControl to pay their union dues is entered as a credit to the DuesLiability account, and as a balancing debit to the Clearing account.
To collect information for transfer to the general ledger, this enterprisecan construct a Cost Allocation flexfield with two segments, one foridentifying cost centers and one for GL costing and balancing codes, asfollows:
Seg. 1 Cost Center Seg. 2 GL Code
Accounting Salaries
Production Wages
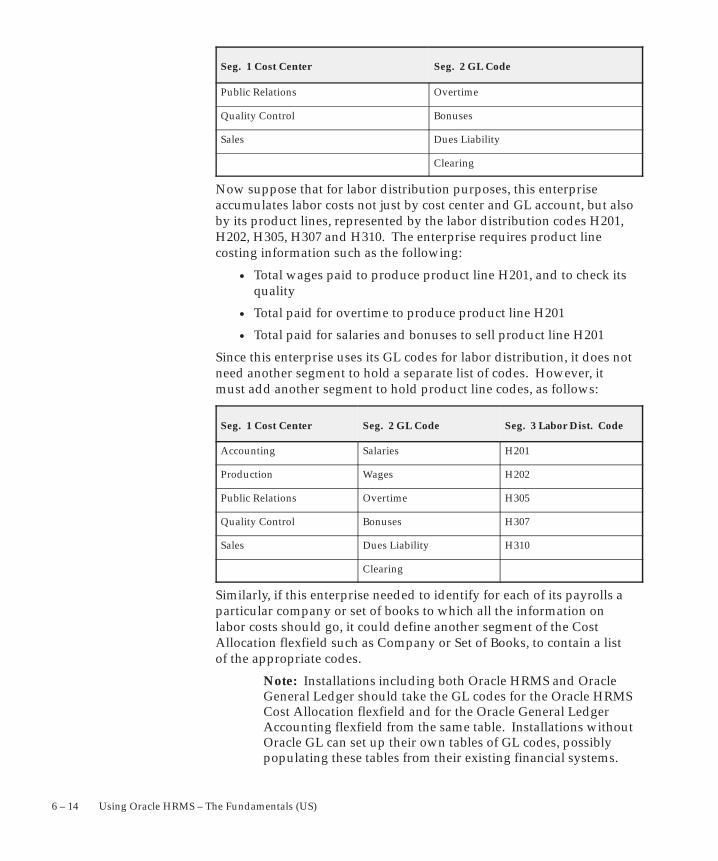
6 – 14 Using Oracle HRMS – The Fundamentals (US)
Seg. 2 GL CodeSeg. 1 Cost Center
Public Relations Overtime
Quality Control Bonuses
Sales Dues Liability
Clearing
Now suppose that for labor distribution purposes, this enterpriseaccumulates labor costs not just by cost center and GL account, but alsoby its product lines, represented by the labor distribution codes H201,H202, H305, H307 and H310. The enterprise requires product linecosting information such as the following:
• Total wages paid to produce product line H201, and to check itsquality
• Total paid for overtime to produce product line H201
• Total paid for salaries and bonuses to sell product line H201
Since this enterprise uses its GL codes for labor distribution, it does notneed another segment to hold a separate list of codes. However, itmust add another segment to hold product line codes, as follows:
Seg. 1 Cost Center Seg. 2 GL Code Seg. 3 Labor Dist. Code
Accounting Salaries H201
Production Wages H202
Public Relations Overtime H305
Quality Control Bonuses H307
Sales Dues Liability H310
Clearing
Similarly, if this enterprise needed to identify for each of its payrolls aparticular company or set of books to which all the information onlabor costs should go, it could define another segment of the CostAllocation flexfield such as Company or Set of Books, to contain a listof the appropriate codes.
Note: Installations including both Oracle HRMS and OracleGeneral Ledger should take the GL codes for the Oracle HRMSCost Allocation flexfield and for the Oracle General LedgerAccounting flexfield from the same table. Installations withoutOracle GL can set up their own tables of GL codes, possiblypopulating these tables from their existing financial systems.

6 – 15Cost Analysis
See: User–Defined Tables, Configuring, Reporting and SystemAdministration in Oracle HRMS.
Data Costed at the Element Entry Level
When you make entries to elements with links marked as Costed forindividual employees using the Element Entries window, or for manyemployees at once using the BEE windows, you can at the same timesupply costing information.
Information entered at this level overrides any information entered atother levels. For example, if an employee has costing information onrecord in a Cost Allocation flexfield segment at the organization orassignment level, an entry of timecard information in this segment atthe element entry level overrides the organization or assignment–levelinformation.
Costing for Taxes
The setup for maintaining costing information on employer andemployee federal tax liabilities is straightforward. However, the setupfor costing state and local taxes depends on the way your generalledger holds this information.
On the one hand, just as you enter a total into a GL account for afederal tax type, your enterprise may enter a total into a GL account forone or more state or local tax types, regardless of the states or localitieslevying the taxes. For example, you enter a single total for amountswithheld for employees’ federal income tax (FIT), and may similarlyenter a single total for amounts withheld for employees’ state incometax (SIT), regardless of the states in which these taxes are owed.
Alternatively, you may make entries for state and local taxes for eachstate, or state and locality, in which these taxes are owed. In this case,your setup for costing these taxes will differ from that used for federaltaxes.
Elements for Taxes
Oracle Payroll comes with the elements for the following taxes alreadydefined (EE = employee tax, ER = employer tax):
Federal taxes
• Federal Income Tax (FIT) – EE

6 – 16 Using Oracle HRMS – The Fundamentals (US)
• Federal Unemployment Tax Act (FUTA) – ER
• Social Security (SS) – EE and ER
• Medicare – EE and ER
• Earned Income Credit (EIC) – EE
State taxes
• State Income Tax (SIT) – EE
• State Unemployment Insurance (SUI) – ER, EE in some states
• State Disability Insurance (SDI) – EE, ER in some states
Local taxes
• City Tax – EE. Includes coverage of Head Tax – ER.
• County Tax – EE. Includes coverage of School District Tax – EE
Links to all payrolls for the elements for each of these taxes are usuallycreated during the implementation of Oracle HRMS for yourenterprise.
Costing All Taxes by Tax Type
You maintain costing for federal taxes by the tax type, and can similarlyhold costing information for state and local taxes by type only (not bythe state or locality to which they are payable). To do this you enter onthe link for the tax type’s element the code for the general ledgeraccount to which amounts of the tax should go.
For example, suppose that:
• the segment of the Cost Allocation key flexfield that holds GLcodes has the name GL Code
• all amounts withheld for FIT should go to the GL account code123fit, and all amounts for SIT, should go to 123sit.
To collect costing information for both these taxes, you do thefollowing:
• ensure that links to all payrolls exist for the elements FIT andSIT. These are usually created during implementation of OraclePayroll.
• if the possible entries to the GL Code segment exist in value setsvalidated by entries existing in a table or on a predefined list,ensure that the codes 123sit and 123fit appear in the table or list.

6 – 17Cost Analysis
See: Values and Value Sets (Oracle Applications Flexfields Guide)
• Query the FIT or SIT element in the Element Link window. Inthe Costing region, choose the tax type Fixed Costed. TheTransfer to GL box is automatically checked.
• For the FIT element, select in the Costing field, the account code123fit. For the SIT element, select the code 123sit.
With this setup, when the Costing process runs, it will collect allamounts withheld for FIT and SIT under the GL codes 123fit and123sit.
Costing State and Local Taxes by Jurisdiction
If your general ledger maintains tax totals by state, or by state andlocality, you follow a different setup procedure for costing these taxes.You still must ensure that links to all payrolls exist for the tax elements.Additionally, you must set up one or more special segments of the CostAllocation key flexfield to collect the required jurisdiction information.These special segments must be named as follows:
• State Code. If your requirement is to collect state and local taxcosts by state but not locality, set up only this segment.
• County Code, City Code, School District Code. Set up thesethree segments if you must collect tax amounts not only by state,but also by locality.
Note: In setting up these segments, do not mark them asrequired. Also, do not enable any qualifiers for them, as theyshould not appear in any Oracle HRMS windows.
See: Controlling the Display of Flexfield Segments: page 6 – 12
These segments are special in that you never make any entries in themat any of the entry levels (Payroll, Element Link, Organization,Assignment, or Element Entry). Instead, these segments receive entriesdirectly from the payroll run.
Payroll runs enter the appropriate jurisdiction code for each of the stateand local taxes they process:
• into the State Code segment, if the other segments are notdefined, or
• into the State Code, County Code, City Code, and School DistrictCode, if these are all defined.
When the Costing process runs, it collects the amounts for each stateand local tax under the jurisdiction code of the state or locality. For

6 – 18 Using Oracle HRMS – The Fundamentals (US)
example, the jurisdiction code of the state of Illinois is 14, for KaneCounty in this state the code is 089, and for the town of Geneva in thiscounty the code is 1110.
It is your responsibility to set up matches between your GL accountcodes and the jurisdiction codes the Costing process uses, and todevelop a process for transferring Costing process results to theappropriate accounts in your general ledger. A complete listing of USjurisdiction codes used in Oracle HRMS is available in the GeoCoderMaster List from Vertex Inc.

6 – 19Cost Analysis
Running the Costing Process
The Costing process generates journal entries for your ledgers andcosting information relating to labor costs. You can enter start and enddates of the period over which you want to cost payroll runs in orderto cost all your runs in one process. Alternatively, you may want toproduce a costing run for each payroll run.
You run the Costing process from the Submit Requests window. Youshould run Costing before the Transfer to GL process.
� To run the Costing process:
1. In the Name field, select Costing.
2. In the Parameters window, select the name of the payroll orconsolidation set to run the process for. When you select a payroll,its default consolidation set displays.
3. Enter the start and end dates of the time span for the Costingprocess to cover.
4. Choose the Submit button.

6 – 20 Using Oracle HRMS – The Fundamentals (US)
Running the Cost Breakdown Report
There are two versions of the Cost Breakdown report:
• The Cost Breakdown Report for Costing Run shows summarizedcosting totals for a specified costing process.
• The Cost Breakdown Report for Date Range shows summarizedcosting totals for a particular consolidation set or payroll over aspecified interval.
Both versions show the distribution of payroll calculation results pluscorresponding General Ledger and labor cost details.
You run both versions in the Submit Requests window.
� To run the Report for a Costing Run:
1. In the Name field, select the report name. Then enter theParameters field to open the Parameters window.
2. Enter the costing process for which you want to generate thereport. Additionally, if your legislation allows costing by reportingentities, you can specify whether this costing run should apply toall reporting entities, or to a single reporting entity that you selectin the reporting entity field.
3. Choose the Submit button.
� To run the Report for a Date Range:
1. In the Name field, select the report name. Then enter theParameters field to open the Parameters window.
2. Enter the start and end dates for which you want to generate thereport.
3. Select the name of either the payroll or the consolidation set forwhich you want to see information. Additionally, if yourlegislation allows costing by reporting entities, you can specifywhether this costing run should apply to all reporting entities, orto a single reporting entity that you select in the reporting entityfield.
4. Choose the Submit button
Mapping Cost Allocation to the Accounting Flexfield
If your installation includes Oracle Payroll and Oracle General Ledger,you can run the Transfer to GL process in each payroll period after you

6 – 21Cost Analysis
have run the Costing process. The Transfer to GL process transferscosting results to the GL Accounting flexfield. Before running thisprocess, you must map segments of the Cost Allocation flexfield to thecorresponding segment of the Accounting flexfield for each payroll. Todo this, use the GL Map window.
� To map Cost Allocation to Accounting flexfield segments:
1. Set your effective date to the date from which this mapping shouldtake effect.
2. Query the payroll for which you are performing the mapping. Itsperiod type appears in the Period field.
3. Select the set of books for whose Accounting flexfield you areperforming the mapping. Costing information from a payroll cango to only one set of books.
4. Select the name of a Cost Allocation flexfield segment in the PayrollCosting Segment field for which a corresponding segment exists inthe Accounting flexfield. Select the name of the correspondingsegment in the GL Chart of Accounts Segment field. Repeat thisprocess for all the Cost Allocation flexfield segments for whichthere is a corresponding segment in the Accounting flexfield.
5. Save your entries.
Running the Transfer to GL Process
If your installation includes Oracle General Ledger, you can run theTransfer to GL process. This transfers the results of the Costing processfor a payroll to the Accounting flexfield of Oracle General Ledger.
It is not necessary for your payroll to use the same currency as yourgeneral ledger.
You run the Transfer to GL process from the Submit Requests window.
� To run the Transfer to GL process:
1. In the Name field, select Transfer to GL.
2. In the Parameters window, select the payroll or consolidation setfor which you are running the process. When you select a payroll,its default consolidation set displays.
3. If you want to set the accounting date for the transfer to dateearned, then change the TGL_DATE_USED pay action parameter

6 – 22 Using Oracle HRMS – The Fundamentals (US)
to ”E”. If you do not do this then the accounting date of thetransfer defaults to the effective date of the originating payroll
4. Enter the start and end dates of the period for which you want totransfer Costing process results.
5. Choose the Submit button.
Entering Adjustments to Costed Employee Tax Balances
To make these entries for an employee assignment, use the Adjust TaxBalances window.
Prerequisite
❑ For each Business Group, there are certain elements needed to holdsome of the information entered in this window. These elementsare included in your Oracle Payroll startup data. Before your firstuse of the Adjust Tax Balances window, ensure links exist for thetax elements. If not you must create links for these elements thatinclude the costing information appropriate to your enterprise.
To ensure that these links are always in effect for the BusinessGroup, set your effective date to 01–JAN–0001 when creating them.
The elements requiring links are:
Federal State Local
FIT SIT_WK County_WK
SS_EE SUI_EE City_WK
Medicare_EE SDI_EE County_SUBJECT_WK
SIT_SUBJECT_WK City_SUBJECT_WK
SUI_SUBJECT_EE
SUI_SUBJECT_ER
SDI_SUBJECT_EE
SDI_SUBJECT_ER
FIT = Federal Income Tax, SS = Social Security
SIT = State Income Tax, SUI = State Unemployment Insurance, SDI= State Disability Insurance
WK = Work Location
Note: It may be convenient to link these elements to allpayrolls, so that all employees in the Business Group areeligible for them.

6 – 23Cost Analysis
� To adjust balances of subject wages and taxes withheld:
1. In the Assignment window, query the employee assignment forwhich you are entering adjustments to tax balances, and open theAdjust Tax Balances window.
The window displays the city, state, zip code and county of theemployee’s default work location, and the default consolidation setfor the payroll of the employee’s assignment. You can change thesedefaults if necessary.
2. To enter adjustments to the Gross Earnings Subject to Tax balancesfor the employee, select the name of the earnings type causing theadjustment in the Earnings Name field.
The list displays all the earnings types initiated in your system(classifications Earnings, Supplemental Earnings, and ImputedEarnings).
3. Enter the gross amount by which you are adjusting the GrossEarnings Subject to Tax balances. The amount can be positive ornegative.
If you are not also entering adjustments to balances of taxesactually withheld, go to step 4. If you are also entering adjustmentsto Employee Withheld tax balances, go to step 5.
4. If you are adjusting Gross Earnings Subject to Tax Balances only,save your work and exit this window. The system updates GrossEarnings Subject to Tax balances in accordance with the taxabilityrules for the earnings type (these appear in the Taxability Ruleswindow).
5. To also enter adjustments to the Employee Withheld tax balancesfor this earnings type, in order to record in Oracle Payrollinformation about a payment made and tax deductions taken forthe employee outside Oracle Payroll, enter the net amount of thepayment.
6. If you want to cost the balance adjustment, check the Costed checkbox. You enter costing details by using the Cost Allocation keyflexfield. You access this flexfield by clicking in the Costing filedon the Element Link window, or the Payroll window. Onlysegments enabled at the element entry level will be available forinput.
7. Enter for each tax appearing in the Taxes Withheld region, anyamount actually deducted for the tax from the gross amount of theearnings type. When you complete these entries, save your work.
8. To check the correctness of your entries of amounts withheld, thesystem adds each amount entered for a tax in the Taxes Withheld

6 – 24 Using Oracle HRMS – The Fundamentals (US)
region to the net amount entered for the earnings type. If the totaldoes not equal the gross amount entered, you receive an errormessage and must correct any typing errors.
9. When you save the entries in the Taxes Withheld region and receiveno error messages, the system:
• updates Gross Earnings Subject to Tax balances in accordancewith the taxability rules for the earnings type that appear in theTaxability Rules window
• updates Employee Withheld balances for the taxes with theamounts entered amounts in the Taxes Withheld region.
� To adjust employee withheld balances only:
1. In the Assignment window, query the employee assignment forwhich you are entering adjustments to Employee Withheldbalances. Open the Adjust Tax Balances window.
The window displays the city, state, zip code and county of theemployee’s default work location, and the default consolidation setfor the payroll of the employee’s assignment. You can change thesedefaults if necessary.
2. For each tax appearing in the Taxes Withheld region, enter theamount of the adjustment.
3. If you want to cost the balance adjustment, check the Costed checkbox. You enter costing details by using the Cost Allocation keyflexfield. You access this flexfield by clicking in the Costing fieldon the Element Link window, or the Payroll window. Onlysegments enabled at the element entry level will be available forinput. When you complete these entries, save your work.
The system then updates Employee Withheld balances for the taxeswith the amounts entered in the Taxes Withheld region.

C H A P T E R
7
7 – 1Workers’ Compensation
Workers’Compensation

7 – 2 Using Oracle HRMS – The Fundamentals (US)
Overview of Workers Compensation in Oracle HRMSEvery state has a Workers Compensation program to provideemployees with insurance coverage for work–related injuries.
All states legislate WC (Workers Compensation) programs to provideemployees with insurance coverage for work–related injuries. In everystate, employers are liable for the premiums for this insurance, and insome states the employee pays a portion as well.
Determination of the WC liability of your enterprise requiresmaintenance of some specialized information. You must associate yourjobs with state WC work classification codes, and further, associatethese codes with state WC premium rates. You also must maintainWC–related data for each GRE.
WC Insurance Carriers and Monopolistic or Competitive States
Some states are monopolistic with respect to the WC insurance carrier,which means that employers in these states can use only the state fundas their carrier.
Other states are competitive, which means they permit employers to useeither private insurers or the state agency to fund WC programs. Ifyour enterprise has GREs in different states, you likely have a differentcarrier in each state. If your enterprise has more than one GRE in acompetitive state, it is possible for each to have a different WC carrier.However, each GRE can have only one WC carrier per state, whosename you enter in the system.
How are Workers Compensation Premiums Calculated in Oracle HRMS?
Premiums paid for worker’s compensation insurance, whether it is amonopolistic or competitive state, are generally based on the type ofbusiness the employer does and the size of the payroll.
Employers are assigned classification codes based on the nature of thebusiness. A dollar value is then assigned to the code and a calculationmethod is used to determine the employer’s and employee’s worker’scompensation premium.
Calculation Methods
There are three calculation methods for determining both employeeand employer contributions to Workers Compensation Insurance.
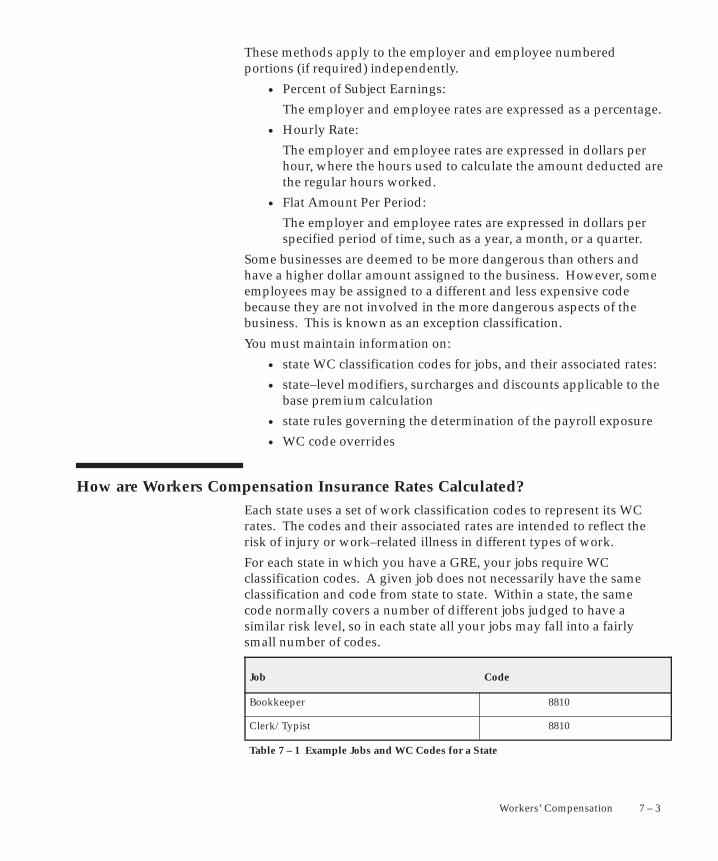
7 – 3Workers’ Compensation
These methods apply to the employer and employee numberedportions (if required) independently.
• Percent of Subject Earnings:
The employer and employee rates are expressed as a percentage.
• Hourly Rate:
The employer and employee rates are expressed in dollars perhour, where the hours used to calculate the amount deducted arethe regular hours worked.
• Flat Amount Per Period:
The employer and employee rates are expressed in dollars perspecified period of time, such as a year, a month, or a quarter.
Some businesses are deemed to be more dangerous than others andhave a higher dollar amount assigned to the business. However, someemployees may be assigned to a different and less expensive codebecause they are not involved in the more dangerous aspects of thebusiness. This is known as an exception classification.
You must maintain information on:
• state WC classification codes for jobs, and their associated rates:
• state–level modifiers, surcharges and discounts applicable to thebase premium calculation
• state rules governing the determination of the payroll exposure
• WC code overrides
How are Workers Compensation Insurance Rates Calculated?Each state uses a set of work classification codes to represent its WCrates. The codes and their associated rates are intended to reflect therisk of injury or work–related illness in different types of work.
For each state in which you have a GRE, your jobs require WCclassification codes. A given job does not necessarily have the sameclassification and code from state to state. Within a state, the samecode normally covers a number of different jobs judged to have asimilar risk level, so in each state all your jobs may fall into a fairlysmall number of codes.
Job Code
Bookkeeper 8810
Clerk/Typist 8810
Table 7 – 1 Example Jobs and WC Codes for a State
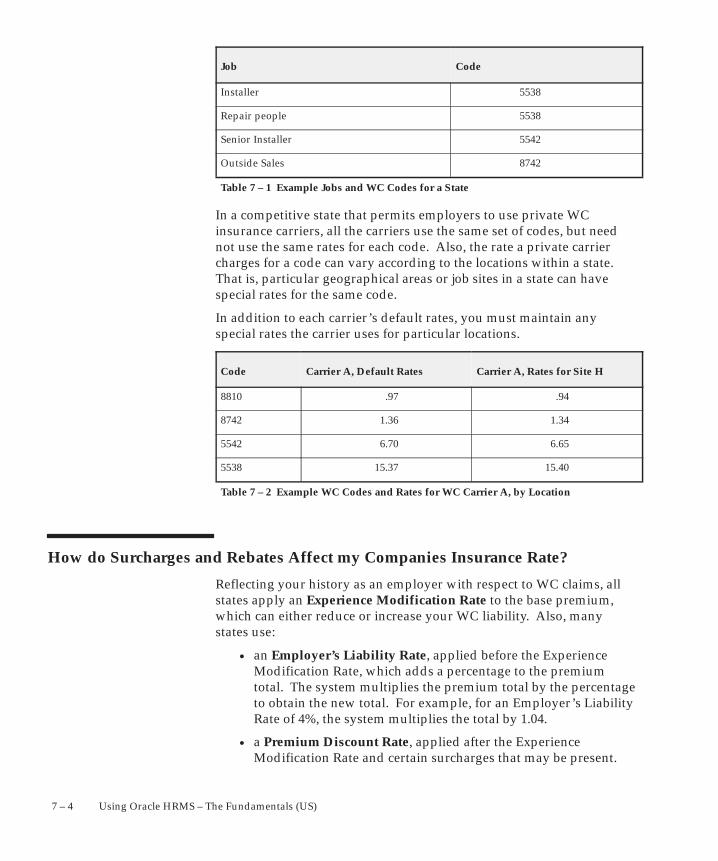
7 – 4 Using Oracle HRMS – The Fundamentals (US)
CodeJob
Installer 5538
Repair people 5538
Senior Installer 5542
Outside Sales 8742
Table 7 – 1 Example Jobs and WC Codes for a State
In a competitive state that permits employers to use private WCinsurance carriers, all the carriers use the same set of codes, but neednot use the same rates for each code. Also, the rate a private carriercharges for a code can vary according to the locations within a state.That is, particular geographical areas or job sites in a state can havespecial rates for the same code.
In addition to each carrier’s default rates, you must maintain anyspecial rates the carrier uses for particular locations.
Code Carrier A, Default Rates Carrier A, Rates for Site H
8810 .97 .94
8742 1.36 1.34
5542 6.70 6.65
5538 15.37 15.40
Table 7 – 2 Example WC Codes and Rates for WC Carrier A, by Location
How do Surcharges and Rebates Affect my Companies Insurance Rate?
Reflecting your history as an employer with respect to WC claims, allstates apply an Experience Modification Rate to the base premium,which can either reduce or increase your WC liability. Also, manystates use:
• an Employer’s Liability Rate, applied before the ExperienceModification Rate, which adds a percentage to the premiumtotal. The system multiplies the premium total by the percentageto obtain the new total. For example, for an Employer’s LiabilityRate of 4%, the system multiplies the total by 1.04.
• a Premium Discount Rate, applied after the ExperienceModification Rate and certain surcharges that may be present.

7 – 5Workers’ Compensation
This modifier always reduces the premium total. The systemmultiplies the premium total by the Premium Discount Rate todetermine the discount amount, and then subtracts this amountfrom the premium total.
Surcharges
In addition to the modifiers mentioned above, some states applysurcharges, which can be either additional charges or rebates, to the WCpremium calculation. One or two surcharges may be applied after theExperience Modification Rate but before the Premium Discount Rate.Another surcharge may be applied after the Premium Discount Rate.Some surcharges are added into the running total of the premium,while others are held separately and applied to the premiumcalculation at the end.
Unique State Provisions
In addition to the commonly occurring modifiers and surcharges, astate may use special modifiers, surcharges or rules not foundelsewhere.
How is Overtime Pay Affected by Workers Compensation?
Overtime Pay and Executive Weekly Maximum
States have different rules regarding the inclusion of overtime pay inemployees’ WC payroll exposure, depending on whether theseearnings are paid at straight time or premium rates. Further, somestates impose an Executive Weekly Maximum, which sets an upperlimit on the amount of an employee’s earnings available for inclusion inhis or her payroll exposure. Overtime hours can also be included,independent from subject wages.
Can I Change a Workers Compensation Code for an Employee?
Sometimes you must override the regular WC job classification codesfor certain employees. For example, when employees in a high risk jobclassification are working at a construction site, you may be required togive everyone at the site, including clerical personnel and similar lowerrisk workers, the higher risk code.

7 – 6 Using Oracle HRMS – The Fundamentals (US)
Workers Compensation in Oracle Payroll
For Oracle Payroll users, the payroll run calculates employer WCliability for each employee. At Oracle HRMS installations that do notinclude Oracle Payroll, it may still be necessary to maintain WC–relatedinformation in the HRMS database, for transfer to other systems.
Oracle HRMS allows you to maintain Workers Compensationinformation for each of your GREs, and for the jobs within them.
At installations including Oracle Payroll, the payroll run calculates theemployer/employee liability for Workers Compensation.
Special State Provisions
You can modify the standard functionality of Oracle HRMS toaccommodate special state provisions. Your WC insurance carriers caninform you about the rules currently in effect in particular states, andabout changes to these rules as they occur.
Payroll Exposure
Overtime Pay and Executive Weekly Maximum
You set a state’s rules concerning the inclusion of overtime in payrollexposure, and any limit on the inclusion of earnings in payrollexposure, using the Workers Compensation window.
Note: This category of payroll exposure only applies when atleast one of the calculation methods is Percentage of SubjectEarnings.
See: Entering WC Job Codes, Payroll Exposure Rules and Surcharges:page 7 – 13
Supplemental and Imputed Earnings Types
The inclusion in the payroll exposure of supplemental and imputedearnings also varies from state to state. You maintain information oncommonly–occurring state rules regarding the inclusion of variousearnings types in the Workers Compensation payroll exposure.
Unique State Rules
Individual states can, and do, have additional rules they apply to thedetermination of WC payroll exposure. If you have GREs in these

7 – 7Workers’ Compensation
states, you can make modifications to Oracle HRMS to account for suchrules. Your WC insurance carrier in a state can supply informationabout that state’s particular rules and regulations
See Also
Setup Steps for Workers Compensation Calculations: page 7 – 11
Associating WC Codes with Rates: page 7 – 12
WC Code Overrides
After your setup of WC–related information is complete, you can selectand remove WC override codes for individual employee assignments.
See Also
Entering a WC Override Code: page 7 – 14
Default Workers’ Compensation Code Mapping
Many states have only one Workers Compensation rate, and foremployers in those states with a large amount of job codes, this leads toexcessive manual data entry in the Workers Compensation Codesscreen. Oracle Payroll allows you to run a process to map all of theavailable jobs to a single Workers Compensation code.
Use the Default Workers Compensation Code Mapping when you haveemployees in a state with only one workers compensation code, or veryfew workers compensation codes. You can manually change thoseemployees who are not part of the default.
See Creating Default Workers Compensation Code Mapping: page7 – 10
WC Elements and Formulas in Oracle Payroll
Oracle Payroll includes several WC elements:
• Workers Compensation element (classification: Employer Taxes).
The Workers Compensation element stores the amount of eachemployer’s liability WC premium, calculated using the WCformula.

7 – 8 Using Oracle HRMS – The Fundamentals (US)
• Workers Compensation ER2 (classification: Employer Taxes).
The Workers Compensation element stores the amount of eachemployer’s secondary liability WC premium, calculated usingthe WC formula.
• Workers Compensation ER3 (classification: Employer Taxes).
The Workers Compensation element stores the amount of eachemployer’s tertiary liability WC premium, calculated using theWC formula.
• Workers Compensation EE (classification: Employee Taxes)
The Workers Compensation EE element maintains the employeewithheld balance.
• Workers Compensation EE2 (classification Employee Taxes).
The Workers Compensation EE element maintains the secondaryemployee withheld balance.
• The Workers Compensation Information element (classification:Information).
The Workers Compensation Information element’s input valuesMod 1 Surcharge, Post Exp Mod 2 Surcharge and Post Prem Disc1 Surcharge, hold the results of the three surcharges that mayapply to an employee’s WC premium calculation. Its input valueWCable Hours Pay holds the employee’s payroll exposure.
• The Workers Compensation (WC) formula.
You can review these elements and formula at any time using theElement window and the Formula window.
The Workers’ Compensation elements are created as open links duringthe installation of Oracle Payroll. For WC reporting, you can retrieveinformation from the WC elements and report on it in the ways thatbest suit your enterprise.
Suggestion: You must create Workers’ Compensation elementlinks as open links.
The WC Premium Calculation
The WC calculation included in Oracle Payroll does the following:
• Determines the employee’s SUI state and his or her assignmentlocation.
• Locates the WC code. (Uses the code for the employee’s job,unless it finds an entry of an override code.)

7 – 9Workers’ Compensation
• Finds the employee’s payroll exposure and applies the executivemaximum if one is entered and applied.
• Determines the WC rate, using the employee’s GRE, SUI state,work location if relevant, and the WC code.
• Calculates the employee and employer liabilities based on thecalculation method(s) specified.
• Applies the Experience Modification.
• Applies the first surcharge if one exists; adds it to running total ifsurcharge entry is marked for accumulation.
• Applies the second surcharge if one exists; adds it to runningtotal if surcharge entry is marked for accumulation.
• Applies the Premium Discount if one exists.
• Applies the third surcharge if one exists; adds it to running totalif surcharge entry is marked for accumulation.
• Calculates total WC payable for this employee. Total WCpayable = running total + any surcharges not accumulated.
See Also
Setup Steps for Workers Compensation Calculations: page 7 – 11
Calculating Employer and Employee Contributions
Oracle Payroll supports both employee and employer contributions toWorkers’ Compensation Insurance.
Calculation Methods control the navigation and titles on the lowerportion of the screen. Percent of Subject Earnings is the defaultcalculation method if none is chosen. Order of precedence forcalculation methods is:
1. If none is specified, the percent of Subject Earnings is default.
2. Employee and Employer portion one: Use calculation method one.If none is specified the method is defaulted to percent of subjectearnings.
3. Employee and Employer portion two: Use calculation method two.If none is specified, use the same as calculation method one.
4. Employee and Employer tertiary portion: Use calculation methodthree. If none is specified, use the same as calculation method two.

7 – 10 Using Oracle HRMS – The Fundamentals (US)
The details of each calculation method are:
• Percent of Subject Earnings:
The employer and employee rates are in percent , where 10.0000is calculated as 10%. If the Employer/Employee Rate fields areleft blank they are assumed to be zero. The Period field is notapplicable.
• Hourly Rate:
The employer and employee rates are in units of dollars perhour, where 10.0000 = $10/Hour. The hours used to calculate theamount deducted are the regular hours worked. Overtime canbe included in the calculation. The Period field is not applicable.
• Flat Amount Per Period:
The titles on the Employer/Employee rate fields switch toamount, and the amounts are in units of dollars per specifiedperiod, where 10.0000 = $10/Period.
For this calculation method a period must be specified. Thevalid choices for Period are Year, Month, and Quarter. Theamount specified will be deducted at the beginning of theperiod.
Example: If $10 per year is specified, then $10 will be deductedfrom the next pay period and then again in the first pay period ofthe following year.
Employer Rates/Employee Rates are fields where you can associate thestate’s WC codes with a carrier’s default rates or amounts for a givenstate. If the carrier applies special rates to one or more work locationswithin the state, enter these rates by carrier and location.
Period is the period of time used in the Flat Amount Per Periodcalculation method.
Surcharges, experience and liability modifications, and premiumdiscounts are supported for all methods. Surcharges only apply to theemployer portion, and not the employee’s portion.
Creating Default Workers’ Compensation Code Mapping
Oracle Payroll assumes that no jobs are currently mapped to any codesfor the state of interest; this prevents the accidental overriding ofpreviously entered job codes.
Suggestion: This is an implementation-level task. If you havealready implemented your system for all the states in which

7 – 11Workers’ Compensation
you have employees, do not run this process. If you do decideto run this process, you will need to remove this informationfrom the system first, then run the process.
The system also requires you to enter a code with its correspondingrate into the Workers’ Compensation Rates screen prior to running theprocess; this maintains the same validation as the corresponding form.
You request a default workers compensation code mapping from theSubmit Requests screen.
� To create a default worker’s compensation code mapping:
1. Select Set default workers compensation job code from the list inthe Name field.
2. Select the appropriate state in the State field.
3. Select the appropriate code number in the Workers’ CompensationJob Code field.
4. Select OK, then select Submit.
Setup Steps for Workers’ Compensation Calculations
� To set up WC data for a state in which GREs are located:
1. Set up each of your WC insurance carriers in the state as anexternal organization with the classification Workers’Compensation Carrier. For a monopolistic state, there is only onecarrier.
See: Creating an Organization: page 2 – 21
2. For each carrier in the state, associate the state work classificationcodes with the carrier’s default rates, and any special ratesapplicable at particular locations.
See: Associating WC Codes with Rates: page 7 – 12
3. For each GRE in the state, identify the WC carrier and enter theExperience Modification rate. If applicable, also enter theEmployer’s Liability and Premium Discount rates.
Enter all rates as positive numbers, never as negative numbers. Forexample, enter an Employer’s Liability surcharge of 20% as 120(120% of the base premium). Enter a 10% Premium Discount as 10.
Note: The Employer’s Liability rate always increases thepremium amount; the Premium Discount rate always decreases

7 – 12 Using Oracle HRMS – The Fundamentals (US)
it. The Experience Modification rate can either increase ordecrease the premium. To enter it correctly, check what it isintended to do for this GRE.
4. Define calculation methods, rates for each job code, and period ifapplicable.
See Calculating Employer and Employee Contributions: page 7 – 9
5. Ensure that you have set up each work location in the state forwhich a WC carrier uses rates other than its default rates.
See: Setting Up Site Locations: page 2 – 9
6. Associate your jobs with the state work classification codes. At thistime, also enter:
• the Executive Weekly Maximum if one exists for this state
• the state’s rules regarding inclusion of overtime earnings andovertime hours in the payroll exposure
• any standard surcharges in use in this state.
See: Entering WC Job Codes, Payroll Exposure Rules andSurcharges: page 7 – 13
7. If you are using Oracle Payroll to calculate WC liability, for eachstate in which you are liable for WC payments, check the categoriesin the classifications Supplemental Earnings and Imputed Earningsthat represent earnings included in employees’ payroll exposure.
Exempting Employees from Workers’ Compensation
� To exempt employees from workers compensation withholding at theassignment level:
1. Enter the employee tax information form.
2. Check the WC Exempt check box in the state area.
This exempts the assignment in the state currently displayed in thestate area.
Note: The workers compensation state is the same as the SUIstate; changing the workers compensation state changes theSUI state.
Associating WC Codes with Rates
For a given state and each Workers’ Compensation insurance carrieryou use in the state, associate the state’s WC codes with a carrier’s

7 – 13Workers’ Compensation
default rates. The default rates are those that apply when no location isspecified. If the carrier applies special rates to one or more worklocations within the state, enter these rates by carrier and location.
To associate codes with rates, use the WC Codes and Rates window.
Prerequisites
❑ All your WC carriers in this state must be set up as externalorganizations with the classification Workers’ CompensationCarrier.
See: Creating an Organization
❑ If there are carriers whose rates differ for particular work locations,those locations must be entered in the system.
See: Setting Up Site Locations
� To enter WC work classification codes and rates:
1. Query the state and carrier for which you are entering codes andrates. To enter rates for a particular location, also query thelocation. If you leave the Location field blank, the rates you enterare the default rates for this carrier and state.
2. Enter each code and its associated rate in the Code and Rate fields.When finished, save your work.
See Also
Setup Steps for Workers’ Compensation Calculations
Entering WC Job Codes, Payroll Exposure Rules and Surcharges
Entering WC Codes, Payroll Exposure Rules and Surcharges
Make these entries for a state using the Workers’ Compensationwindow.
Prerequisite
❑ Complete the entry of WC codes and rates for the carrier orcarriers in the state.
See: Entering WC Codes and Rates
� To enter WC codes, payroll exposure rules and surcharges:
1. Query the state in the Name window.
7 – 14 Using Oracle HRMS – The Fundamentals (US)
2. If an Executive Weekly Maximum exists for this state, enter it.
3. In the Codes for Jobs region, select your jobs and their codes.
4. In the Calculation Region, select this state’s rules for the inclusionof overtime earnings in employees’ payroll exposure. To includeearnings for overtime paid at premium rates check the PremiumTime box, and to include overtime paid at straight time rates, checkthe Straight Time box.
If your enterprise uses terms other than Premium Time andStraight Time to designate types of overtime pay, you can change toyour terms using the Lookup window. The Lookup type isUS_WC_OVERTIME_CATEGORY.
5. In the Surcharges region, enter any standard surcharges this stateapplies to the WC calculation. For each surcharge:
• enter its name, which must be unique for the state
• select its formula position, that is, the point at which it applies tothe WC premium calculation. Three possible selections exist:
– After Experience Modification – Charge 1 (appliedimmediately after the Experience Modification Rate)
– After Experience Modification – Charge 2 (appliedimmediately after Charge 1. This selection is available onlyafter entry of a surcharge with the formula position AfterExperience Modification – Charge 1).
– After Premium Discount – Charge 1 (applied immediatelyafter the Premium Discount Rate).
• enter the rate for the surcharge as a positive number for a rebate,or a negative number for an additional charge. For example,enter –10 to apply a rebate of 10% to the premium, or 10 to applyan additional charge of 10%.
• In the Accumulate field, select Yes or No. Select Yes for therebate or additional charge to be calculated and immediatelyapplied to the running total of the premium. Select No for therebate or additional charge to be calculated, held separately andonly added to the premium calculation when it is complete.
6. Save your work.
Entering a WC Override Code
You may be required to enter a WC code for an employee thatoverrides the default code associated with his or her job. This situation

7 – 15Workers’ Compensation
can arise when, for example, workers in a relatively high–risk jobclassification begin work at a job site, and the risk of injury for anyworker at the site is judged to increase.
Enter WC code overrides in the window GREs and Other Data.
Prerequisites
❑ The employee’s assignment must include a work location and a jobwith a WC code.
See:
Entering a New Assignment
Entering WC Job Codes, Payroll Exposure Rules and Surcharges
❑ The employee’s assignment must have a SUI state and a GRE onrecord. There must be a WC insurance carrier entered for the GRE.An association of the WC codes for the SUI state with the defaultrates of the GRE’s WC carrier must be in place.
See:
Tax Information for an Employee Assignment
GREs and Other Data Region
Entering Federal, State, and Local Tax Rules for GREs
Associating WC Codes with Rates
� To enter a WC override code:
� In the WC Override Code field, select the override code.
Note: If no list of codes is available, check that all theprerequisites for override code selection are in place.

7 – 16 Using Oracle HRMS – The Fundamentals (US)

C H A P T E R
8
8 – 1Government Mandated HR Reporting
Government MandatedHR Reporting

8 – 2 Using Oracle HRMS – The Fundamentals (US)
Overview of Government Mandated Reporting in Oracle HRMS
How does Oracle HRMS handle government mandated reporting?
To satisfy the requirements for these reports, Oracle HRMS gives youthe ability to maintain specialized information about employees andtheir jobs, and to group employees in different ways, for example, bytheir work location or establishment, or by their affirmative action plan.
Which government mandated reports does Oracle HRMS automate?
Oracle Human Resources provides the means to organize and maintainthe information needed for government–mandated HR reporting, andto produce EEO–1, AAP, VETS–100, ADA, and OSHA reports.
Note: Many states now require employers to submit New Hirereports, primarily to ensure that employees meet court–orderedchild support obligations by deductions from their pay. Newhire reporting is normally the responsibility of the payrolldepartment.
Introduction to US Government–Mandated Reporting in Oracle HRMS
Today employers must prepare a number of reports about theiremployees for submission to various government authorities, or forinternal use to ensure legislative compliance. The purpose of several ofthese reports is to measure the extent to which various identifiablegroups of people are obtaining and advancing in employment:
• Equal Employment Opportunity (EEO) and Affirmative ActionPlan (AAP) reporting focuses on the employment andadvancement of employees by their gender and ethnic origin
• Federal Contractor Veterans Employment (VETS–100) reportingis concerned with the employment and advancementopportunities of disabled and Vietnam era veterans
• Americans with Disabilities Act (ADA) reporting is concernedwith employment opportunities for people with various types ofdisabilities, and employers’ provision of reasonableaccommodations enabling these people to perform the essentialfunctions of jobs or positions.
Other federal–level reporting, mandated by the Occupational Safetyand Health Administration (OSHA), is concerned with the extent andseverity of work–related injuries and illnesses affecting employees.

8 – 3Government Mandated HR Reporting
Reporting Categories and StatusesSome reporting places no restrictions on the employment category orassignment status of the employees to be covered. However otherreporting, such as that for VETS–100 and ADA, must cover onlynon–temporary, full time or part time employees at a non–terminatedassignment status.
As a means to identify these employees, you register for the BusinessGroup as Reporting Categories, your employment categories that includenon–temporary, full time or part time employees. You register asReporting Statuses, your assignment statuses that includenon–terminated employees.
Reporting OrganizationsYou often must issue separate reporting for each GRE in your BusinessGroup. Sometimes you must further break down data for a GRE by theestablishments (hiring locations, units, or work sites) where itsemployees are based. A GRE can include employees working inseveral different establishments, and conversely, a given establishmentcan include employees in several different GREs.
For reporting purposes, an establishment may be a single physicallocation, a complex of work sites in a locality, or even all the sitesincluded in a relatively large geographic area. For OSHA reporting,there may be two or more separate establishments at one physical worklocation if distinctly different types of operations are carried out at thelocation. To represent establishments for reporting, you giveorganizations the classification Reporting Establishment.
A GRE whose employees all work at the same establishment issimultaneously a GRE and a Reporting Establishment. For GREs withemployees at different establishments you define a number of separateReporting Establishments. To identify the establishment serving as theheadquarters organization, you give a Reporting Establishment theadditional classification of Corporate Headquarters.
AAP reporting requires breakdowns of employees by the affirmativeaction plans covering them, instead of breakdowns by establishment.To meet this requirement, you give organizations the classification AAPOrganization, to represent individual affirmative action plans.
Establishment HierarchiesTo determine for reporting purposes which employees belong to aparticular GRE and reporting organization, you construct establishment

8 – 4 Using Oracle HRMS – The Fundamentals (US)
hierarchies, and supply them as parameters to the processes thatproduce particular reports.
A typical establishment hierarchy has a GRE at the top, ReportingEstablishments at the next level, and HR Organizations subordinate tothe Reporting Establishments. Report processes normally countemployees as belonging to the Reporting Establishment to which theirHR Organizations are subordinate in an establishment hierarchy.
Figure 8 – 1Example Establishment Hierarchy
Looking at the example establishment hierarchy above, a report processwith this hierarchy as a parameter counts the employees in the HROrganizations subordinate to the Thurbco Mfg. ReportingEstablishment as based at that establishment, and those in HROrganizations subordinate to Thurbco Denver as based at thatestablishment.
Establishment Overrides
Report processes using establishment hierarchies can take exceptionalcases into account. You can enter an override Reporting Establishmentfor any employee. When a process finds an override, it counts theemployee as part of the override Reporting Establishment.
For example, if reports should include an employee in the count forThurbco Denver, even though he is currently assigned to an

8 – 5Government Mandated HR Reporting
organization subordinate to Thurbco Mfg, you simply enter ThurbcoDenver as his override establishment.
Note: The establishment override functionality does not applyto AAP reporting. This is because the fundamental units ofAAP reporting are affirmative action plans, not ReportingEstablishments.
Varieties of Establishment HierarchiesFor most government–mandated HR reporting, you set up for a givenGRE either a single–establishment hierarchy, or multiple–establishmenthierarchies. If you have multiple establishments, you may also need aheadquarters hierarchy for the establishment representing your enterpriseheadquarters.
The same basic rule applies to all the establishment hierarchies youbuild (but not to the AAP hierarchies used for AAP reporting). Thisrule is:
In a non–AAP establishment hierarchy, an organization classified asa Reporting Establishment can never be subordinate to anotherorganization classified as a Reporting Establishment.
This means that in an establishment hierarchy, a GRE/ReportingEstablishment can be the top organization, or Reporting Establishmentscan be subordinate to a GRE (and optionally to HR Organizations). Buta Reporting Establishment cannot be subordinate to another ReportingEstablishment.
AAP Establishment Hierarchies
Establishment hierarchies constructed for AAP reporting areexceptional because this reporting is based on the affirmative actionplans existing within a GRE. This means that in AAP establishmenthierarchies:
• establishments appear as subordinates of AAP Organizationsrepresenting the affirmative action plans
• AAP Organizations (which may also be ReportingEstablishments) can appear at various levels in the hierarchy, andcan be subordinate to other AAP Organizations (which may alsobe Reporting Establishments).
The Single–Establishment HierarchyIn some cases, all the employees of a Business Group/GRE or a GREwork at, or from, a single establishment, and you use a

8 – 6 Using Oracle HRMS – The Fundamentals (US)
single–establishment hierarchy as a parameter for production of anestablishment report:
Figure 8 – 2Example Single Establishment Hierarchy
The top organization of this type of hierarchy can be either a BusinessGroup/GRE or a GRE, but must also be classified as a ReportingEstablishment.
Multi–Establishment Hierarchies
For complex enterprises with multiple GREs and ReportingEstablishments, you build multi–establishment hierarchies. For certaintypes of reporting you also require a special headquarters hierarchy, tocover the employees working in the Reporting Establishment thatconstitutes the enterprise headquarters. This section discussesmulti–establishment hierarchies; the one following discussesheadquarters hierarchies.
The top organization in a multi–establishment hierarchy can be either aBusiness Group/GRE or a GRE.
Note: For reporting that requires a separate report on yourheadquarters establishment, the top organization of amulti–establishment hierarchy must not be the headquarters

8 – 7Government Mandated HR Reporting
organization. A headquarters organization always belongs in aspecial headquarters hierarchy.
An already existing organization classed as a GRE may be suitable foruse as the top organization of a multi–establishment hierarchy.Alternatively, you can create a GRE for reporting purpose only, with aname similar to that of an operational GRE, and the same IRSidentification number as the operational GRE.
Counting Establishment Employees
A report process can count of the number of employees in a particularReporting Establishment, and alter its treatment of the establishmentdepending on the results of this count. For example, EEO–1 andVETS–100 reporting for establishments with fewer than 50 employees isdifferent from that for larger establishments.
Looking at the example hierarchy above for MS Distributors, reportprocesses with this hierarchy as a parameter are able to determine thatthe MS Distributors Detroit Reporting Establishment has fewer than 50employees, and to produce the appropriate reporting for thisestablishment.
Preparing for Government–Mandated HR Reporting
In preparation for running the VETS–100 and ADA reports, you mustregister Reporting Categories and Reporting Statuses for the BusinessGroup.
In preparation for all government–mandated HR reporting, you mustset up one or more types of reporting organizations. These include:
• Reporting Establishments
• Corporate Headquarters
• AAP Organizations
After setting up the reporting organizations you need, you can buildestablishment hierarchies and AAP establishment hierarchies thatinclude these reporting organizations.
Before running EEO–1, VETS–100, ADA, or OSHA reports, you enterestablishment overrides for individual employees as necessary.
Registration of Reporting Categories and Statuses
You must limit the coverage of VETS–100 and ADA reports toemployees who work either full or part time but are not temporary
8 – 8 Using Oracle HRMS – The Fundamentals (US)
workers, and who have a non–terminated employment status as of theend date of the reporting period.
To establish the employment categories and assignment statuses of theemployees that VETS–100 and ADA reporting must cover, you registerReporting Categories and Reporting Statuses for the Business Group:
• Reporting Categories are the employment categories includingemployees who work full or part time on a non–temporary basis.
• Reporting Statuses are the assignment statuses applicable toemployees at a non–terminated status.
Start the registration of Reporting Categories and Statuses from theOrganization window.
Setting Up Reporting Organizations
A reporting organization is an organization that has, in addition to anyother classifications, one or more of these classifications:
• Reporting Establishment
• Corporate Headquarters
• AAP Organization
Before defining reporting organizations, determine the establishmenthierarchies your enterprise needs for government–mandated HRreporting. This will in turn determine the particular reportingorganizations you must set up.
See: Varieties of Establishment Hierarchies: page 8 – 5
Reporting organizations that do not have the classification CorporateHeadquarters may be subordinate to other organizations inestablishment hierarchies. You can quickly place a subordinatereporting organization in a hierarchy by entering its parentorganization as additional information for its classification.
Note: When a reporting organization is the top organization inan establishment hierarchy, you always place it in the hierarchywhen creating the hierarchy in the Organization Hierarchywindow.
Example Multi–Establishment Hierarchies
For examples of multi–establishment hierarchies, we can look at thehypothetical corporation Swanson Inc. Its Business Group includes

8 – 9Government Mandated HR Reporting
two GREs, the parent company Swanson Inc. and a subsidiary, MSDistributors Detroit. The enterprise employs workers at four separateestablishments:
• company headquarters in Cleveland, Ohio
• one factory in a Cleveland suburb and another in Dayton, Ohio
• the MS Distributors warehouse and shipping center in Detroit,Michigan.
This table summarizes the distribution of the 4,000 employees ofSwanson Inc., by GRE and Reporting Establishment:
Table 8 – 1 Swanson Inc. Employee Distribution
Reporting Establishment Swanson Inc. GREMS DistributorsDetroit GRE
Swanson Inc. Headquarters 500
Swanson Mfg. 1,500
MS Distributors Detroit 955
Swanson Dayton 1,000 45
For reporting purposes, this enterprise needs two multi–establishmenthierarchies, and requires a headquarters hierarchy. Themulti–establishment hierarchies required are these:
When you run a report giving one of these hierarchies as a parameter,the report process includes as belonging in a particular ReportingEstablishment, any employees assigned to that establishment, plus allthe employees assigned to the HR Organizations subordinate to that

8 – 10 Using Oracle HRMS – The Fundamentals (US)
establishment. The only employees in these organizations that are notcovered are any that have establishment overrides entered for the otherReporting Establishment in the hierarchy.
Setup Steps for AAP Reporting
Because AAP reports cover individual affirmative action plans ratherthan establishments, the Reporting Establishment overridefunctionality available for EEO–1 and VETS–100 reporting does notapply to AAP reporting.
1. Ensure that each employee has an gender and ethnic origin onrecord, and has an assignment to a GRE and a job.
2. Determine salary codes for your jobs by selecting a grade torepresent each salary code. If necessary, define grades to use assalary codes.
See: Defining Grades: page 4 – 72
3. Define lines of progression for the jobs your affirmative actionplans cover.
See: Defining Lines of Progression for Jobs: page 8 – 16
4. Determine the job groups that the jobs in your affirmative actionplans belong to, and enter the job group names for the QuickCodetype US_JOB_GROUPS.
A job group consists of jobs with similar levels of responsibility,compensation, and opportunities for advancement.
See: Adding QuickCode Values in Configuring, Reporting, andSystem Administration in Oracle HRMS
5. Associate each job your affirmative action plans cover with an EEOcategory, if they are not already so associated. Also associate thesejobs with a salary code, line of progression, and job group.
See: Associating Jobs with EEO Job Categories: page 8 – 26
See: Associating Jobs with AAP Reporting Information: page 8 – 39
6. Define an AAP Organization to represent each of your affirmativeaction plans.
See: Setting Up AAP Organizations: page 8 – 38
7. Determine the AAP hierarchies you require, and build them.
See: AAP Hierarchies: page 8 – 36

8 – 11Government Mandated HR Reporting
See: Setting Up Establishment Hierarchies: page 8 – 14
8. Run the AAP report processes.
See: Obtaining AAP Reports: page 8 – 39
Setup Steps for ADA Reporting
1. Ensure that Reporting Categories and Statuses are registered foryour Business Group.
See: Registering Reporting Categories and Statuses: page 8 – 7
2. Ensure that registration of employees as disabled, and that entry ofinformation about disability types and requests for disabilityaccommodation, is complete. Registration of someone as disabledis accomplished by checking the Disabled box when you enterpersonal information about him or her.
See: Entering a New Person (step 9) in Managing Your WorkforceUsing Oracle HRMS
See: Entering Information about Disabilities: page 8 – 46
See: Entering Requests for Disability Accommodation: page 8 – 47
3. Ensure that each employee who is registered as disabled, who hasprovided information about a disability type, or who has requesteda disability accommodation has an assignment to a GRE, a job orposition, and an employment category.
See: Entering a New Assignment in Managing Your Workforce UsingOracle HRMS
4. Identify the establishments within each GRE that you need forADA reporting, and ensure that they are defined as ReportingEstablishments.
See: Setting Up Reporting Establishments: page 8 – 8
5. Determine and build, if necessary, the establishment hierarchiesyou need to obtain ADA reporting.
See: Setting Up Establishment Hierarchies: page 8 – 14
6. To include information about essential job or position requirementsin ADA reporting, ensure that you have entered these requirementsfor your jobs or positions.
See Entering Job and Position Skill Requirements, Managing YourWorkforce Using Oracle HRMS.

8 – 12 Using Oracle HRMS – The Fundamentals (US)
7. Manually enter any necessary establishment overrides foremployees.
See: Entering Establishment Overrides: page 8 – 16
8. Run the ADA report process.
Setup Steps for OSHA Reporting
1. Ensure that entry of information on each incident of work–relatedinjury or illness is complete.
See: Entering Information about Work–Related Injury or Illness:page 8 – 50
2. Identify the establishments within each GRE that you need forOSHA reporting, and ensure that they are defined as ReportingEstablishments.
See: OSHA Data and Reporting: page 8 – 49
See: Setting Up Reporting Establishments: page 8 – 8
3. Determine and build, if necessary, the establishment hierarchiesyou need to obtain OSHA reporting.
See: Setting Up Establishment Hierarchies: page 8 – 14
4. Manually enter any necessary establishment overrides foremployees.
See: Entering Establishment Overrides: page 8 – 16
5. Run the OSHA report processes.
See: Obtaining OSHA Reports: page 8 – 52
Registering Reporting Categories
Reporting Categories are employment categories that covernon–temporary, full–time, or part–time work. The categories youselect here control which employees appear in the EEO–1 and VETsreport.
� To register reporting categories for the Business Group:
1. In the Organization window, query the Business Group if it doesnot already appear there. With the cursor on Business Group in the

8 – 13Government Mandated HR Reporting
Organization Classification region, choose the Others button. SelectReporting Categories.
2. Click in the first blank field in the Additional Information windowto open the Reporting Categories window. Select an employmentcategory to register employees who are non–temporary, full time orpart time workers. Choose OK to transfer your selection to theAdditional Information window.
3. To register another employment category, repeat step one.
4. When you finish registering categories, save your work. ChooseOK to close the Reporting Categories window and the AdditionalInformation window.
Registering Reporting Statuses
Reporting Statuses are those assignment statuses that covernon–terminated statuses. The statuses you select here controlwhich employees appear in the EEO–1 and VETs reports.
� To register reporting statuses for the Business Group:
1. In the Organization window, query the Business Group if it doesnot already appear there. With the cursor on Business Group in theOrganization Classification region, choose the Others button. SelectReporting Statuses.
2. Click in the first blank field in the Additional Information windowto open the Reporting Statuses window. Register a status thatcovers employees at a non–terminated status. Choose OK totransfer your selection to the Additional Information window.
3. To register another assignment status, repeat step one.
4. When you finish registering statuses, save your work. Choose OKto close the Reporting Statuses window and the AdditionalInformation window.
Define Reporting Establishments to Represent Corporate Headquarters
When using multi–establishment hierarchies for reporting purposes,you may need to identify a particular Reporting Establishment as theheadquarters establishment of your enterprise. To do this you set up aCorporate Headquarters organization, for use as the top organizationin a headquarters hierarchy.

8 – 14 Using Oracle HRMS – The Fundamentals (US)
You normally classify only one reporting organization within aBusiness Group as the Corporate Headquarters organization.
Note: An organization classified as a Corporate Headquartersshould also have the classifications GRE and ReportingEstablishment. It can have other classifications as well.
See: The Headquarters Hierarchy: page 8 – 24
� To define a corporate headquarters:
1. Using the Organization window, query the organization to beclassified as a corporate headquarters, if it does not already appearthere.
Note: This organization always has other classifications as well, forwhich entry of additional information is necessary
See: Creating an Organization: page 2 – 21
2. In the Organization Classifications region, select the classificationCorporate Headquarters for the organization and enable it.
There is no additional information to add for the CorporateHeadquarters classification. The Corporate Headquartersorganization is always at the top of a headquarters hierarchy, soyou place it in this hierarchy when defining the hierarchy.
See: Setting Up Establishment Hierarchies: page 8 – 14
Set Up Establishment Hierarchies
Establishment hierarchies include:
• single–establishment hierarchies
• multi–establishment hierarchies
• headquarters hierarchies
• AAP establishment hierarchies.
Single–Establishment Hierarchies
� To create a single–establishment hierarchy:
1. Determine the top organization of the hierarchy. It must be a GREand a Reporting Establishment. It may be a Business Group/GRE.

8 – 15Government Mandated HR Reporting
2. Build the hierarchy by placing all the HR Organizations in theBusiness Group/GRE or GRE at the second and lower levels underthe top organization.
Multi–Establishment Hierarchies
� To create a multi–establishment hierarchy:
1. Determine the top organization of the hierarchy. It can be aBusiness Group/GRE or a GRE. It cannot be a ReportingEstablishment or an HR Organization, and should not have theclassification Corporate Headquarters.
2. Build the hierarchy by placing the appropriate establishments andthe HR Organizations subordinate to the establishments at lowerlevels.
Headquarters Hierarchies
� To create a headquarters hierarchy:
1. The top organization is that classified as Corporate Headquarters.It must also have the classifications GRE and ReportingEstablishment.
2. Build the hierarchy by placing all the HR Organizations in theheadquarters organization at the second and lower levels under thetop organization.
Put Subordinate Reporting Organizations in Hierarchies
Reporting organizations with the classification Reporting Establishmentand/or AAP Organization may exist in subordinate positions inestablishment hierarchies. There is a convenient way to place theseorganizations in hierarchies when you set them up. You can name thehierarchies and parent organizations of the reporting organization inthe Parent Organization window, accessible from the Organizationwindow.
See: Setting Up Establishment Hierarchies: page 8 – 14
� To put a reporting organization in a hierarchy:
1. In the Organization window, query the reporting organization if itdoes not already appear there. Select Reporting Establishment or

8 – 16 Using Oracle HRMS – The Fundamentals (US)
AAP Organization in the Organization Classifications region,choose the Others button, and select Parent Organization to openthe Parent Organization window.
2. Select the hierarchy name.
3. Select the name of the parent organization to which the reportingorganization is subordinate in this hierarchy.
4. To place the reporting organization in another hierarchy, repeatsteps 2 and 3.
5. Save your work.
Enter Establishment Overrides
Use establishment overrides when employees who would normally becounted in one Reporting Establishment, should actually be counted asbelonging to another in the same establishment hierarchy. Reportprocesses with establishment hierarchies as parameters check whetherReporting Establishment overrides exist for the employees thehierarchies cover. If it finds overrides, it counts the employees asbelonging to the override Reporting Establishments.
Note: Because the basic unit of AAP reporting within a GRE isits affirmative action plans (AAP Organizations), not itsReporting Establishments, you cannot enter establishmentoverrides for AAP reporting.
See: AAP Hierarchies: page 8 – 36
� To enter an establishment override for an employee:
� Select the override establishment in the Establishment field.
Define Lines of Progression for Jobs
To define a line of progression for a series of jobs, you build entitiescalled career paths in Oracle HRMS. Career paths are also useful forBuilding a line of progression, or career path, involves these two steps:
• entering the name of the line of progression into the system as acareer path name, using the Career Path Names window
• entering the jobs comprising the line of progression, startingfrom the job with highest status and remuneration and workingdown, using the Map Career Path window.

8 – 17Government Mandated HR Reporting
A job can appear only once in any line of progression.
� To define lines of progression:
1. In the Career Path Names window, enter and save the names of thelines of progression you have determined for your enterprise.
2. Open the Map Career Path window. In the Name field, select thetop job in a line of progression.
3. In the Career Path Name field, select the name of this line ofprogression.
4. In the Job Progression From block, select the job that is one leveldown from the job appearing in the Name field. Check the Downbox. The window redisplays with the selected job now appearingin the Name field.
5. Repeat Step 4 until you have entered all the jobs in the line ofprogression.
To move back up the line of jobs, check the Up box.
6. Save your work.
Establishments and Generic Hierarchies
Create establishment hierarchies to represent your enterprise andgroup your employees into the establishments required by the MultipleWorksite report.
By using the generic hierarchies functionality to set up yourestablishment hierarchies, you can use the same information on severalreports, rather than having to define it individually for each report.
Note: The generic hierarchy functionality will support theVETS–100 and EEO–1 reports in a future release. We havesupplied organization information types and location EITs toenable you to begin recording information needed by thesereports to support your future migration.
Single and Multi Establishment Hierarchies
If all the employees in your enterprise work in, or from, a singleestablishment, then set up a single establishment hierarchy to representthis.
Figure 8 – 3 Single Establishment Hierarchy

8 – 18 Using Oracle HRMS – The Fundamentals (US)
Alternatively, if the employees in your enterprise work in, or from,multiple establishments, then set up a multi establishment hierarchy torepresent this.
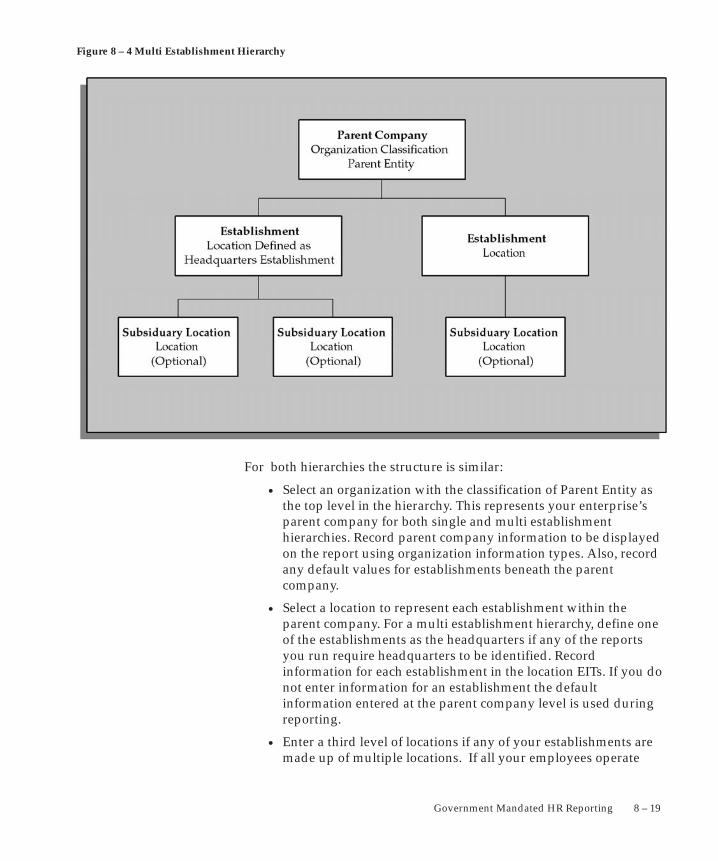
8 – 19Government Mandated HR Reporting
Figure 8 – 4 Multi Establishment Hierarchy
For both hierarchies the structure is similar:
• Select an organization with the classification of Parent Entity asthe top level in the hierarchy. This represents your enterprise’sparent company for both single and multi establishmenthierarchies. Record parent company information to be displayedon the report using organization information types. Also, recordany default values for establishments beneath the parentcompany.
• Select a location to represent each establishment within theparent company. For a multi establishment hierarchy, define oneof the establishments as the headquarters if any of the reportsyou run require headquarters to be identified. Recordinformation for each establishment in the location EITs. If you donot enter information for an establishment the defaultinformation entered at the parent company level is used duringreporting.
• Enter a third level of locations if any of your establishments aremade up of multiple locations. If all your employees operate

8 – 20 Using Oracle HRMS – The Fundamentals (US)
from the physical locations of the establishments, then you donot need to add any further levels to the hierarchy.
Example Setups Using Generic Hierarchies
Use the Generic Hierarchy window to set up hierarchies to representyour enterprise for reporting purposes. The following examples explainhow to use the generic hierarchy functionality to represent morecomplex organizational structures.
Establishment Hierarchies
Normally, an establishment has a one to one relationship with thelocation representing it. The following scenarios outline exampleswhere this might not be the case.
Scenario 1
You can set up an organization that straddles two or moreestablishments. This can happen where, for cost code reasons, you setup a department as one organization yet because it is spread over twophysical locations it is effectively two establishments. For example, youcould set up West Coast Sales department, based in San Francisco, asone organization but in reality covers both San Francisco and LosAngeles.
To represent this you must set up two locations and enter differentestablishment information against each location. Then associate therelevant location to a person’s assignment record. This does notinterfere with cost code as this is defined by the organization associatedto the assignment. You can then include establishments as separatenodes underneath the organization in the hierarchy and these can bereported on separately.
Scenario 2
You could have a single location that contains a number ofestablishments. This happens where groups of employees, all based atthe same location, work for different subsidiary companies. Forexample, the San Francisco office could contain sales, and maintenance,each being in a different company.
To represent this you must set up two locations, with identicaladdresses, for this example this would be the San Francisco address,but enter different establishment information against each location.Then associate the relevant location to the person’s assignment record.

8 – 21Government Mandated HR Reporting
Then include establishments as separate nodes underneath theorganization in the hierarchy and these can be reported on separately.
Scenario 3
You could have multiple physical locations that are in close proximityto each other and are therefore reported under a single establishment.To represent this you must set up each physical location and associate itto the appropriate assignments. Then include the establishment in thehierarchy at the secind level and include the locations beneath thisestablishment. When you run the report the locations data will thenappear in the results of the establishment.
Setup Steps for EEO–1 Reporting
1. Ensure that Reporting Categories and Statuses are registered foryour Business Group.
Reporting Categories are those employment categories that covernon–temporary, full time, or part time work. Reporting Statuses arethose assignment statuses that cover non–terminated statuses.
See Registering Reporting Categories: page 8 – 12
See Registering Reporting Statuses: page 8 – 13
2. Specify the report your Business Group has to run to define the jobcategories list.
See Business Group: Entering EEO Reporting Information: page2 – 34
3. Enter an EEO job category for each job in your enterprise.
See: Associating Jobs with EEO Job Categories: page 8 – 26
4. Ensure that each employee has a gender, ethnic origin on record, ajob linked to an EEO–1 job category, a location in the establishmenthierarchy, an assignment status that matches a reporting status, andan employment category that matches a reporting category.
See: Enter Data for EEO Reporting: page 8 – 29
5. Set up an organization with the classification of parent entity torepresent your parent company.
See Creating an Organization: page 2 – 21
6. Enter data into the EEO–1 Parent Entity Data additionalinformation type for the organization you have classified as aparent entity.

8 – 22 Using Oracle HRMS – The Fundamentals (US)
See Entering EEO–1 and VETS Establishment Data for ParentEntities: page 2 – 37
7. Enter the information you want to appear as the default in theEEO–1/VETS Establishment Data additional information typedata.
See Entering EEO–1 and VETS Establishment Data for ParentEntities: page 2 – 37
8. Define EEO–1 information in the EEO–1 Specific Data locationextra information type. Do this for each of the locations included asestablishments for the report.
See: Location Extra Information Types: page 2 – 4
9. Define one of the locations as headquarters if the headquartersreport is required.
10. Define your establishment hierarchy.
See Creating an Establishment Hierarchy: page 8 – 24
11. Run the EEO–1 report processes.
See Submit EEO Standard Form 100: page 8 – 31
Setup Steps for EEO4 and EEO5 Reporting
1. Determine which report you require for your enterprise. You mustenter the details of the report in your Business Group.
See: Business Group: Entering EEO Reporting Information: page2 – 34
2. If you are setting up the EEO5, create any annexes for your schooldistrict as locations. Details of these annexes will appear on theheader page of the reports.
Note: If your installation has multiple Business Groups set up thenyou must enter the annexes manually onto the report, as locationsare not Business Group specific.
See: Setting Up Locations: page 2 – 9
3. Ensure job categories are setup, and contain the correct list ofvalues for your type of organization.
See: Associating Jobs with EEO Job Categories: page 8 – 26
4. Ensure certain personal information is setup.
See: Data for EEO Reporting: page 8 – 29

8 – 23Government Mandated HR Reporting
5. Submit the report.
See: Running the Report EEO4: page 8 – 33, and Running theReport EEO5: page 8 – 33
Setup Steps for VETS–100 Reporting
1. Ensure that Reporting Categories and Statuses are registered foryour Business Group.
Reporting Categories are those employment categories that covernon–temporary, full time or part time work. Reporting Statuses arethose assignment statuses that cover non–terminated statuses.
See Registering Reporting Categories: page 8 – 12
See: Registering Reporting Statuses: page 8 – 13
2. Specify the EEO–1 job categories list required for your BusinessGroup.
See Business Group: Entering EEO Reporting Information: page2 – 34
3. Ensure that EEO job categories are on record for your jobs.
See: Associating Jobs with EEO Job Categories: page 8 – 26
4. Ensure that all employees qualifying as Special Disabled Veteransor Veterans of the Vietnam Era have a veteran status of VietnamVeteran, Disabled Vietnam Veteran, or Disabled Veteran, and havean assignment to a job and an employment category:
See: Entering a New Person, Managing Your Workforce Using OracleHRMS.
See: Entering an Assignment, Managing Your Workforce Using OracleHRMS.
5. Enter the information you want to appear as the default in theEEO–1/VETS Establishment Data additional information typedata.
See: Entering EEO–1 and VETS Establishment Data for ParentEntities: page 2 – 37.
6. Define one of the locations as the headquarters if a headquartersreport is required.
7. Run the VETS–100 report processes.
See: Obtaining VETS–100 Reports: page 8 – 42

8 – 24 Using Oracle HRMS – The Fundamentals (US)
Creating an Establishment Hierarchy
In order to extract the information required to complete certainstatutory reports, you must be able to represent your enterprise’sparent company and establishments in the application.
You do this by setting up establishment hierarchies using the GenericHierarchies window. You must set up establishment hierarchies usingthis method for EEO, VETS and Multiple Worksite Reports.
� To create an establishment hierarchy:
1. Enter a name for your hierarchy.
2. Select the type of hierarchy you are creating, for example Vets,EEO, AAP, Multi Work Site.
3. Save your work.
4. Enter the version number for the hierarchy you are creating.
Note: If you make changes to the hiearchy after you have used itfor reporting, you must save it with a new version number in orderto retain the previous version. This enables you to re–create oldreports as required by law.
5. Enter the date from which this hierarchy is to be effective.
Note: For the Multiple Work Site report, enter a date that is beforethe end of the quarter on which you are reporting.
6. Enter an end date for the hierarchy if you want it only to be validfor a certain period of time.
7. Select the status of the hierarchy.
Note: If you amend the hierarchy, you must ensure that thevalidate check is set to on. If the validate check is not set to on, youwill not be able to select a hierarchy version when you run thereport.
8. Save your work.
9. In the Parent block, enter a sequence number and select the type ofParent Entity.
10. Select the organization you want to be the parent company in thishierarchy. This list is limited to organizations with the classificationof Parent Entity.
11. Save your work.
12. In the Subordinates block, enter a sequence number and select thetype of Establishment.

8 – 25Government Mandated HR Reporting
13. Select the location you want to include as an establishment in thishierarchy. This list is limited to locations with report informationentered in a location EIT.
14. Repeat steps 10 and 11 until you have added all the establishmentsyou require.
15. Save your work.
16. Choose the Down button to move your establishments into theParent block. You can now enter locations that are subordinate tothe establishments you have entered.
17. Ensure that the establishment for which you want to create asubordinate location is selected in the Parent block.
18. In the Subordinates block, enter a sequence number and select thetype of Location.
19. Select the location you want to include as a subordinate to theestablishment.
Note: You can only include a location in the hierarchy once.
20. Repeat steps 18 and 19 until you have added all the locations yourequire. Save your work.
21. Check the Validation check box to validate your hierarchy againstthe criteria defined for the type of hierarchy you have selected. Thischeck box remains checked until you next save a change, afterwhich you should validate the hierarchy again.
22. Save your work.
Copying an Establishment Hierarchy
If you want to create a new hierarchy based on an existing one there aretwo ways you can achieve this. These are to create a copy of:
• A hierarchy and save it as a different name.
Use this to create a new hierarchy that is very similar to anexisting one.
• A version of an existing hierarchy.
Use this to update an existing hierarchy, but retain a record ofthe current version. For example, if you need to be able toproduce retrospective reports you need to keep versions of yourhierarchies to support this.
You create copies of hierarchies, and versions of hierarchies in theGeneric Hierarchy window.
8 – 26 Using Oracle HRMS – The Fundamentals (US)
� To copy an establishment hierarchy:
1. Query the hierarchy that you want to copy and choose the CopyHierarchy button.
2. Enter a name for the new hierarchy in the Copy Hierarchy windowand choose the Copy button.
3. Make any required changes to the new hierarchy and save yourwork.
� To create a copy of a version of an establishment hierarchy:
1. Query the hierarchy that you want to make a new version of andchoose the Copy Version button
Note: Ensure there is an end date for the previous version beforeyou create a new version.
2. Enter the version number, start date, and optionally the end datefor the new version in the Copy Hierarchy Version window.
3. Make any required changes to the new hierarchy version and saveyour work.
Note: Only the new version now appears in the Generic Hierarchywindow. Re–query the hierarchy to see all the other versions.
Associating Jobs with EEO Job Categories
For EEO, AAP, and VETS–100 reporting, you must associate each job inyour enterprise with an EEO job category.
To associate a job with an EEO category, start from the Job window.
� To associate a job with an EEO job category:
1. Query the job in the Name field if it does not already appear there.Click in the Further Information field to open the Further JobInformation window.
Note: The type of report you select in your Business Group willdetermine what categories will appear.
2. In the EEO Category field, select the category for this job.
3. If your report is EEO4, select the EEO Function for this job.
4. Save your work.

8 – 27Government Mandated HR Reporting
Equal Employment Opportunity (EEO–1) Reporting
Most private employers in the US must provide EEO–1 reports to theJoint Reporting Committee, in accordance with the Civil Rights Act of1964, as amended by the Equal Employment Opportunity Act of 1972.
Under Equal Employment Opportunity Commission (EEOC) rules, anestablishment for EEO reporting is an economic unit, such as an office,factory, store, or mine, that produces goods or services at a singlephysical location. Establishments are permanent locations from whichyou supervise employees or from where they operate.
You submit particular EEO–1 reports dependant on whether you are asingle–establishment or multi–establishment employer.
EEO Suite of Reports
You can run the whole suite of EEO reports at one time, or you can runindividual reports, as required. We recommend that you run the wholesuite of EEO reports because the application automatically creates thesingle–establishment or multi–establishment reports for you, from thehierarchy structure you previously identified.
For Single Establishment employers an Individual EstablishmentReport is produced.
Multi–Establishment employers must submit a Consolidated Reportentered on Standard Form 100, which summarizes EEO information forall employees in the enterprise. Multi–establishment employers cansubmit the other EEO–1 report types for which they are responsible ascomputer printouts, provided they exactly conform to EEOCformatting standards. These report types are the:
• Individual Establishment Report, required for eachestablishment having 50 or more employees
• Headquarters Report, required for the establishment identifiedas the headquarters of the enterprise
Note: When a multi establishment employer has only oneestablishment located in the U.S, and the parent company islocated outside the U.S, you must set up an additional dummyestablishment for a Headquarters report to be produced.
The Headquarters report is produced under the same header asthe Individual Establishment Report.
• Establishment Employment Listing, showing the name,address, total employment and major activity of eachestablishment with fewer than 50 employees. Required if suchsmall establishments exist.

8 – 28 Using Oracle HRMS – The Fundamentals (US)
The Exception Report
The Exception report provides the employer with extensive details ofwho has been omitted from the EEO report, listed by location.
The Exception report shows the employee name, employee number,gender, job, EEO category, ethnic origin and employment category ofall employees excluded from the EEO suite of reports. The Exceptionreport also gives details of why individuals were not included in theEEO suite of reports.
The Exception report is produced separately to the other EEO reportswith its own header and details.
Obtaining EEO Reports
You run the EEO reports from the Submit Requests window as a singlerequest.
Submitting Reports as Computer Printouts
The printouts are formatted in accordance with the formatting rules ofthe EEOC, you can submit the following reports as computer printouts:
• Headquarters Unit
• Individual Establishment
• Establishment Employment Listing
• EEO–4 Report – by functional areas
• EEO–5 Report – by district or system with locations specified
To ensure correct formatting, the EEOC requires submission of testprintouts for review and written verification of acceptability. Oracle HREEO reports are all designed to comply with current EEOC formattingstandards.
Direct questions on computerized reports for EEO–1, EEO–4, andEEO–5 to the appropriate coordinator:
The EEO–1 Coordinator
EEOC–Surveys
PRINTSRP
1801 L Street, NW – Suite 9604
Washington, DC 20507

8 – 29Government Mandated HR Reporting
Telephone: 202–663–4985
The EEO–4 Coordinator
Survey Management and Analysis Branch
Program Research and Surveys Division (OPO–ORPP)
FAX: 202–663–7130
Telephone: 202–663–4930
EEOC–Surveys
1801 L Street, N.W.
Washington, D.C. 20507
The EEO–5 Coordinator
Survey Management and Analysis Branch
Program Research and Surveys Division (OPO–ORPP)
FAX: 202–663–7130
Telephone: 202–663–4952
EEOC–Surveys
1801 L Street, N.W.
Washington, D.C. 20507
Data for EEO Reporting
For this reporting, you must maintain certain personal information foremployees, and EEO job categories for your jobs.
Employee Gender and Ethnic Origin
EEO reports show by gender and ethnic origin, the number ofemployees working in each job category in a specified payroll period.So for EEO reporting purposes, you must keep on record both thegender and the ethnic origin of your employees.
These are the relevant categories of ethnic origin:
• White (not of Hispanic origin)

8 – 30 Using Oracle HRMS – The Fundamentals (US)
• Black (not of Hispanic origin)
• Hispanic
• Asian or Pacific Islander
• American Indian or Alaskan Native
There are also five new categories supplied.
• Black or African American
• Hispanic or Latino (white race only)
• Hispanic or Latino (all other races)
• Asian
• Native Hawiian or Other Pacific Islander
These new categories will take effect from 2003 though you can beginusing them on your application now as each of the new categories ismapped to the relevant current one. For example if you record anemployee as Hispanic or Latino (white race only), when you run thereport this employee will be included in the total for Hispanic.
EEO Job Categories
Each of your jobs must be associated with an EEO job category and allyour employees have assignments to jobs, if they are to be included onthe reports.
Employment Categories and Assignment Statuses for EEO–1 and VETS
Each of the employees to be included in either the EEO–1 or VETSreport must have an employment category and assignment status thatmatch those set as reporting categories and statuses.
Additional Required Fields for EEO–4 and EEO–5
For employees to be included in reports EEO–4 and EEO–5 you mustalso ensure the following:
• The employee’s primary assignment must not be in terminateassignment status.
• An EEO function must be selected for EEO–4.
• A salary must be specified for EEO–4.
• For EEO–5, employees must have an employment category ofeither full–time regular or part–time regular.

8 – 31Government Mandated HR Reporting
Submit EEO Standard Form 100
You cannot submit the following reports as computer printouts:
• Consolidated
• EEO Single–establishment
Instead, you must print out the reports and copy the relevantinformation onto the Standard Form 100.
EEO Suite of Reports
You can run the whole suite of EEO reports at one time, or you can runindividual reports, as required. When you run the whole suite of EEOreports the application automatically creates the single–establishmentor multi–establishment reports for you, from the hierarchy structureyou previously identified.
See: Equal Employment Opportunity Reporting (EEO–1): page8 – 31.
� To run the EEO–1 Suite of Reports:
1. Select EEO–1 Suite of Reports in the Request Name field. If theparameters window does not open automatically, click in theParameters field.
2. Enter the start and end dates of the period this report covers.
3. Select the name of the establishment hierarchy to use for thisreport.
4. Enter the dates covered by the payroll period when you lastsubmitted this report in the Previous Audit Start and End Datefields if you want approximate totals to appear on the report.These totals will only appear if you select Yes, in the ReportedPreviously field when you enter establishment data for parententities.
See: Entering EEO1 and VETS Establishment Data for ParentEntities: page 2 – 37
Leave the Previous Audit Start and End Date fields blank if youwant the totals on the report to appear blank. You can then enterthe values from last years reports manually.
5. Choose OK, then Submit.
Individual EEO–1 Reports
You do not need to run the EEO–1 reports individually if you have runthe EEO–1 Suite of Reports.

8 – 32 Using Oracle HRMS – The Fundamentals (US)
� To run an Individual Establishment Report:
1. Select EEO Individual Establishment in the Request Name field. Ifthe Parameters window does not open automatically, click in theParameters field.
2. Enter the start and end dates of the period this report covers.
3. Select the name of the establishment hierarchy to use for thisreport.
4. Enter the dates covered by the payroll period when you lastsubmitted this report in the Previous Audit Start and End Datefields.
These dates are input for information only, the omission of entryinto these fields does not affect the reports output.
5. Choose OK, then Submit.
� To run a Consolidated Report:
1. Select EEO Consolidated Report in the Request Name field. If theParameters window does not open automatically, click in theParameters field.
2. Enter the start and end dates of the period this report covers.
3. Select the name of the establishment hierarchy to use for thisreport.
4. Enter the dates covered by the payroll period when you lastsubmitted this report in the Previous Audit Start and End Datefields.
These dates are input for information only, the omission of entryinto these fields does not affect the reports output.
5. Choose OK, then Submit.
� To run an Establishment Employment Listing Report:
1. Select EEO Establishment Employment Listing in the RequestName field. If the Parameters window does not openautomatically, click in the Parameters field.
2. Enter the start and end dates of the period this report covers.
3. Select the name of the establishment hierarchy to use for thisreport.
4. Choose OK, then Submit.

8 – 33Government Mandated HR Reporting
EEO Exception Report
� To run the EEO–1 Exception Report
1. Select EEO–1 Exception in the Request Name field. If theparameters window does not open automatically, click in theParameters field.
2. Enter the start and end dates of the period this report covers.
3. Select the name of the establishment hierarchy to use for thisreport.
4. Enter the dates covered by the payroll period when you lastsubmitted this report in the Previous Audit Start and End Datefields.
These dates are input for information only, the omission of entryinto these fields does not affect the reports output.
5. Choose OK, then Submit.
Running the EEO4 Report
This report is a requirement for state and local governments. Itprovides information on employees that satisfies federal agencies’ legalrequirements. EEO4 reports cover information on functional areas, EEOjob categories, race and ethnic category and gender.
Run reports from the Submit Requests window.
� To run the EEO4 Report:
1. In the name field select EEO4 Reporting.
2. Enter the reporting year in the Parameters window.
3. Using the fields provided enter any additional messages.
This information is optional and will appear in the top right cornerof the report.
4. Choose the Submit button.
Running the EEO5 Report
This report is a requirement for K –12 school systems or districts. It isan aggregate report for the entire school system or district. EEO5

8 – 34 Using Oracle HRMS – The Fundamentals (US)
covers EEO job category (assignment classification), race and ethniccategory and gender.
Run reports from the Submit Requests window
� To run the EEO5 Report:
1. In the name field select EEO5 Reporting.
2. Enter the reporting year in the Parameters window.
3. Enter the agency type.
4. Enter the enrollment as on reporting year.
This number indicates the total students in the reporting year.
5. Choose the Submit button.
AAP (Affirmative Action Plan) Reporting
The US Federal Executive Order 11246 requires enterprises who aregovernment contractors or subcontractors and have 50 or moreemployees, to establish affirmative action plans (AAPs) for women andethnic minorities. The Office of Federal Contract Compliance Programs(OFCCP) of the US Labor Department, responsible for enforcingaffirmative action laws, requires these enterprises to measure theeffectiveness of their affirmative action plans by implementation ofinternal reporting.
To assist you with affirmative action reporting, Oracle HR providestwo reports for your AAP plans:
• AAP–Workforce Analysis
• AAP–Job Group Analysis
These reports both display for each job an affirmative action plancovers, the EEO job category and a salary code indicating the job’srelative compensation level. Also the reports display for each job, thenumber and percentage of employees in the job by gender and byethnicity (White / Black / Asian / Native American / Hispanic).
Workforce Analysis Report
This report shows by their line of progression, the jobs in theorganizations an affirmative action plan covers. A line of progressionis a set of related jobs, ordered from the lowest to the highest paid.This is an example line of progression for jobs in Sales:

8 – 35Government Mandated HR Reporting
Sales Assistant –> Salesperson –> Sales Team Leader –> Sales DistrictManager –> Sales Regional Manager –> Vice–president of Sales
The Workforce Analysis report displays the current totals of allemployees and of ethnic minorities for each organization and for theentire affirmative action plan. It also shows the totals for eachorganization as a percentage of the plan totals.
Job Group Analysis Report
This report organizes the jobs an affirmative action plan covers by theirjob groups. A job group is a set of jobs related by virtue of similar levelsof responsibility, compensation and opportunities for advancement.For example, the Regional Manager Job Group could include these jobs:
Sales Regional Manager – Regional Director, Human Resources –Regional Head, Finance – Production Manager – MIS RegionalManager
For each job group, the report displays the current totals of allemployees and of ethnic minorities in its jobs. It also displays thesetotals for the entire affirmative action plan, and shows the jobs, andshows each job group’s totals as percentages of the plan totals.
AAP Organizations
AAP reporting differs from other types of government–mandated HRreporting in that the reports are issued for each affirmative action planwithin a GRE, instead of the establishments within a GRE. While it canhappen that an affirmative action plan covers all employees in one orseveral Reporting Establishments, plan coverage does not necessarilyfollow these boundaries.
For example, a plan may cover employees based in many differentReporting Establishments who all work in the same functional area,such as customer service or human resources. Another plan may covera variety of employees based at different sites who all have the samejob classification, such as Registered Nurse, Technician, or Machinist.
To represent the affirmative action plans in your enterprise, you set uporganizations classified as AAP Organizations, entering for each thename of its plan. An AAP Organization can also be (but is notnecessarily) a GRE, Reporting Establishment, and HR Organization.After defining AAP Organizations you place them in AAPestablishment hierarchies.

8 – 36 Using Oracle HRMS – The Fundamentals (US)
AAP Hierarchies
AAP hierarchies differ from other establishment hierarchies in oneimportant respect. Whereas in other establishment hierarchies oneReporting Establishment cannot be subordinate to another, in AAPhierarchies an AAP Organization, which can also be a ReportingEstablishment, can occur at any level.
In other words, AAP Organizations can appear below other AAPOrganizations in an AAP establishment hierarchy when this representsthe reality of your enterprise, even if both organizations are alsoReporting Establishments.
To obtain the AAP reporting for one of these plans, you supply thehierarchy name and the particular plan name as report parameters.
Data for AAP Reporting
For this reporting you maintain the same information as that requiredfor EEO–1 reports:
• employee gender and ethnic type
• EEO job categories for jobs
See: Data for EEO–1 Reporting: page 8 – 29
Additionally, for AAP reporting you jobs must have:
• salary codes, for which you use pay grades
• lines of progression. You determine and set up your lines ofprogression, and then associate the appropriate jobs with them.
• job groups. You determine your job group names, set them up,and then associate each job with its group.
Example AAP Hierarchy
The following diagram is an example AAP Hierarchy.

8 – 37Government Mandated HR Reporting
This example AAP hierarchy includes these affirmative action plans:
• the Swanson Dayton plan, covering all the employees who workin the Swanson Dayton factory
• the Management plan, covering the employees who work in MSDistributors, Warehouse Management, Shipping Management,and Shipping’s administration
• The Warehouse plan, covering the employees in warehouseorganizations below the management level
• The Dock Crews plan, covering the laborers that work on theloading docks.

8 – 38 Using Oracle HRMS – The Fundamentals (US)
Set Up AAP Organizations
The hierarchies you build for AAP reporting must include AAPOrganizations, to represent the affirmative action plans in effect in yourenterprise.
See: AAP Organizations: page 8 – 35
� To define an AAP organization:
1. Using the Organization window, either query an existing internalorganization or create an internal organization with the appropriatename and location for this AAP Organization.
See: Creating an Organization: page 2 – 21
2. In the Organization Classifications region, select the classificationAAP Organization for the organization and enable it. Save yourwork.
3. Select the classification AAP organization in the OrganizationClassifications region. Choose the Others button and select AAPOrganization. Click in the Additional Organization Informationfield to open the AAP Organization window. Enter the name of theaffirmative action plan this organization represents.
Note: The organization can have other classifications as well. If itdoes, add information for these classifications as necessary.
See: Creating an Organization: page 2 – 21
4. Save your work. If this AAP Organization occurs as a subordinateorganization in one or more AAP establishment hierarchies, place itin these hierarchies using the Parent Organization window.
Create AAP Establishment Hierarchies
� To create an AAP establishment hierarchy:
1. Determine how best to place in the hierarchy your affirmativeaction plans, represented by AAP Organizations, and theorganizations under each plan.
If the hierarchy is for one affirmative action plan only, the AAPOrganization representing this plan should be the top organization.If the hierarchy covers two or more plans, the AAP Organizationsfor these plans can appear at any level of the hierarchy.
2. Build the hierarchy by placing all the organizations with jobscovered by an affirmative action plan, below the AAP Organizationrepresenting that plan

8 – 39Government Mandated HR Reporting
See: Example AAP Hierarchy: page 8 – 36
Associate Jobs with AAP Reporting Information
To associate your jobs with salary codes, lines of progression, and jobgroups, define all the jobs covered by your affirmative action plans.
See: Defining Jobs: page 4 – 28
� To associate jobs with AAP reporting information:
1. In the Job window, query the job in the Name field if it does notalready appear there. Click in the Further Information field to openthe Further Job Information window.
2. Select for this job its job group name, line of progression, and gradeused for its salary code, in the Job Group, Line of Progression, andSalary Code fields, respectively.
Obtain AAP Reports
Run report requests from the Submit Requests window.
� To run the AAP–Workforce Analysis report:
1. Select AAP–Workforce Analysis Report in the Request Name field.Click in the Parameters field if the Parameters window does notautomatically open.
2. Enter the effective date of the report. This date defaults to yoursession date.
3. Select the name of the affirmative action plan on which to report,and the AAP hierarchy to use.
4. For the report to cover only one organization, select its name in theOrganization field.
5. For the report to cover only one line of progression, select its namein the Line of Progression field.
6. Choose Submit.
� To run the AAP–Job Group Analysis report:
1. Select AAP–Job Group Analysis Report in the Request Name field.Click in the Parameters field if the Parameters window does notopen automatically.
8 – 40 Using Oracle HRMS – The Fundamentals (US)
2. Enter the effective date of the report. This date defaults to yoursession date.
3. Select the name of the affirmative action plan on which to report,and the AAP hierarchy to use.
4. For the report to cover the jobs and employees in just one jobgroup, enter its name in the Job Group field.
5. Choose Submit.
VETS–100 Reporting
Employers who fall under certain legislative guidelines must each yearfile the Federal Contractor Veterans Employment Report,(VETS–100) tocover a one–year period. Its purpose is to help the US Department ofLabor determine whether Vietnam–era veterans and disabled veteransfrom the Vietnam era and other war veterans, are benefiting fromaffirmative action in obtaining and advancing in employment.
You submit particular VETS–100 reports dependant on whether you area single–establishment or multi–establishment employer.
You submit the VETS reports by hard copy.
Note: Currently, only the submission of VETS reports by hardcopy is supported. The electronic submission of VETS reportswill be supported in a future release.
VETS Suite of Reports
You can run the whole suite of VETS reports at one time, or you canrun individual reports as required. When you run the whole suite ofVETS reports the application automatically creates thesingle–establishment or multi–establishment reports for you, from thehierarchy structure you previously identified.
For single establishment employers a Veterans Employment Report isproduced.
If you have multiple hiring locations, the reports produced include:
• Veterans Employment Report required for each establishmentwith 50 or more employees
• Headquarters Report covering employees in the ParentCompany, or headquarters organization of your enterprise
Note: The Headquarters report is producedunder the sameheader as the VETS–100 Veterans Employment Report.

8 – 41Government Mandated HR Reporting
• Consolidated Veterans Employment Reports listing by state,information about its hiring locations with fewer than 50employees
• Establishment Employment Listing listing by establishments ineach state information about its hiring locations with fewer than50 employees
Report Contents
For the hiring locations in your enterprise, VETS–100 reporting shows:
• Numbers of Special Disabled and Vietnam Era Veterans youemploy separated into job categories. These are the EEO jobcategories also used for EEO–1 and AAP reporting.
• Total number of new hires in the reporting period in each jobcategory, together with the number of the new hires in eachcategory who qualify as Special Disabled Veterans, Vietnam EraVeterans and Other Eligible Veterans.
Data for VETS–100 Reports
VETS–100 reporting covers those veterans you employ at each hiringlocation in a GRE who meet these criteria:
• They qualify as Special Disabled Veterans or Vietnam EraVeterans, in accordance with the legal definitions of thesecategories.
• They work on a non–temporary, full time or part time basis.
• They have a non–terminated employment status as of the enddate of the report period.
To record the veteran status of your employees, you select a veteranstatus when entering other personal information for them. Todetermine which of your employment categories cover non–temporaryfull time or part time workers, and which assignment statuses count asnon–terminated, you register them as Reporting Categories andReporting Statuses.
Special Disabled and Vietnam Era Veterans
A Special Disabled Veteran is one who, under laws administrated bythe Department of Veteran Affairs:
8 – 42 Using Oracle HRMS – The Fundamentals (US)
• is entitled to compensation for a disability rated at 30% or more,or
• is entitled to compensation for a disability rated at 10% or 20%and has been determined to have a serious employmenthandicap, or
• has been discharged or released from active duty because of aservice–connected disability.
A Vietnam Era Veteran is one who served more than 180 days of activemilitary, naval, or air service, any part of which fell between 5 August,1964 and 7 May, 1975, and:
• who was discharged or released with other than an dishonorabledischarge, or
• was discharged or released from active duty because of aservice–connected disability.
Obtain VETS–100 Reports
You can submit electronic, or hard–copy VETS–100 reports, as required.
Note: Currently we only support the submission of VETSreprots by hard copy. The electronic submission of VETSreports will be supported in a future release.
Computer–generated reports are acceptable so long as they conformexactly to the formatting standards of the Office of Veterans’Employment and Training. The Oracle HR VETS–100 reports aredesigned to accord with current formatting standards. To ensure thecorrectness of the VETS–100 report formatting, mail or fax a samplecopy to this office in advance:
US Department of Labor, Office of Veterans’ Employment and Training
VETS–100 Reporting
649 Monroe St.
Montgomery, AL 36131–2446
Telephone: 1–800–535–2446, Fax: 205–242–0744
You produce reports even if no employees meet the criteria you enter..Run report requests from the Submit Requests window.
Warning: If you are submitting electronic VETS–100 reports,do not enter commas in the address fields for theorganizations, this corrupts the file conversion performed by

8 – 43Government Mandated HR Reporting
the Department of Labor. Amend the addresses of yourorganizations accordingly.
Vets–100 Suite of Reports
You can run the whole suite of VETS–100 reports at one time, or youcan run individual reports, as required. When you run the whole suiteof VETS–100 reports the application automatically creates thesingle–establishment or multi–establishment reports for you, from thehierarchy structure you previously identified.
See: VETS–100 Reporting: page 8 – 40.
� To run the VETS–100 Suite of reports:
1. Select VETS–100 Suite of Reports in the Request Name field. Clickin the Parameters field if the Parameters window does notautomatically open.
2. Enter the start and end dates for the period this report covers.
3. Select the name of the establishment hierarchy to use for thisreport.
4. Select the correct version number from the list for the chosenhierarchy.
If an error occurs, please check that validate or status is setcorrectly.
5. Select yes in the Show New Hires field if you want new hires to beindicated on the final reports.
6. Select yes in the show Totals field if you want totals to be shown onthe final reports.
7. Choose OK, then Submit.
Individual VETS Reports
You do not need to run the VETS reports individually if you have runthe VETS–100 Suite of Reports.
� To run Veterans Employment report:
1. Select VETS–100 Veterans Employment Report in the RequestName field. Click in the Parameters field if the Parameterswindow does not automatically open.
2. Enter the start and end dates for the period this report covers.

8 – 44 Using Oracle HRMS – The Fundamentals (US)
3. Select the name of the establishment hierarchy to use for thisreport.
4. Select the correct version number from the list for the chosenhierarchy.
If an error occurs, please check that validate or status is setcorrectly.
5. Select yes in the Display Totals field if you want totals to be shownon the final report.
6. Select yes in the Display New Hires field if you want new hires tobe indicated on the final report.
7. Choose OK, then Submit.
� To run the Consolidated Veterans Employment report:
1. Select VETS–100 Consolidated Veterans Employment Report in theRequest Name field. Click in the Parameters field if the Parameterswindow does not automatically open.
2. Enter the start and end dates for the period this report covers.
3. Select the name of the establishment hierarchy to use for thisreport.
4. Select the correct version number from the list for the chosenhierarchy.
If an error occurs, please check that validate or status is setcorrectly.
5. Select yes in the Display Totals field if you want totals to be shownon the final report.
6. Select yes in the Display New Hires field if you want new hires tobe indicated on the final report.
7. Choose OK, then Submit.
� To run the Establishment Employment Listing report:
1. Select VETS–100 Establishment Employment Listing in the RequestName field. Click in the Parameters field if the Parameterswindow does not automatically open.
2. Enter the start and end dates for the period this report covers.
3. Select the name of the establishment hierarchy to use for thisreport.
4. Select the correct version number from the list for the chosenhierarchy.

8 – 45Government Mandated HR Reporting
If an error occurs, please check that validate or status is setcorrectly.
5. Select yes in the show Totals field if you want totals to be shown onthe final report.
6. Select yes in the Show New Hires field if you want new hires to beindicated on the final report.
7. Choose OK, then Submit.
Registering Employees as Disabled
When employees request registration as disabled, effect thisregistration by checking the Disabled box in the Person window whenentering them in the system. They will then be listed on the ADAReport.
ADA (Americans with Disabilities Act) Reporting
The Americans with Disabilities Act (ADA) became law on 26 July1990. It prohibits employers from discriminating against employees orapplicants with disabilities who can perform the essential functions of ajob with reasonable accommodation. Under ADA, people withdisabilities are those:
• who have a physical or mental impairment that substantiallylimits one or more major life activities, or
• who have a record of such an impairment, or
• who are regarded as having such an impairment.
The ADA Report shows how your enterprise is responding to therequests of employees with disabilities for reasonable accommodationsto permit them to carry out the essential functions of their jobs, withoutundue hardship to you as their employer.
Report Coverage
The ADA report covers those employees in each of your establishmentswho work on a non–temporary, full or part time basis, have anon–terminated assignment status as of the report period end date, andhave taken one or more of the following actions:
• requested registration as a disabled person.

8 – 46 Using Oracle HRMS – The Fundamentals (US)
• provided information about a type of disability they have.
• requested accommodation for a disability.
To determine which of your employment categories covernon–temporary full time or part time workers, and which assignmentstatuses count as non–terminated, you use the Reporting Categoriesand Reporting Statuses registered for your BusinessGroup.Information for ADA ReportingThe report providesbasic information (name, number, organization and job) aboutemployees who have identified themselves as having a disability. Youcan register employees as disabled when entering other basic personalinformation about them. When employees submit information aboutparticular types of disabilities, you maintain this information using theADA Disabilities window. The report presents this information,including any information in the form of comments.Requests forAccommodationsBecause the Americans with Disabilities Actencourages employers to make reasonable accommodations permittingemployers with disabilities to work, Oracle HR provides theDisabilities Accommodations window for recording information aboutemployees’ requests for such accommodations.The ADA Report liststhese requests with their request dates, reviewers, review dates andstatus (requested, approved, or denied). It also lists the cost of eachapproved accommodation, and the total cost of approvedaccommodations for each establishment.Essential Functions of Jobsor PositionsThe report can optionally display for each employee witha disability, the essential requirements of his or her job or position,providing that you maintain these requirements in the database.
See Entering Job and Position Skill Requirements, Managing YourWorkforce Using Oracle HRMS.
Enter Information about Disabilities
When employees provide information about a type of disability theyhave, enter this information in the ADA Disabilities window. Start thisentry from the Person window.
� To enter information about a person’s disability type:
1. Query the person in the Person window if he or she does notalready appear there. Choose the Special Info button to open theSpecial Information window.
2. In the Name field, select Disabilities. In the Details block, click inthe Detail field to open the Disabilities window.

8 – 47Government Mandated HR Reporting
3. In the Type field, enter a brief description of the nature of thedisability.
4. Optionally, enter more detailed information, such as the expectedduration of the disability or the results of medical reviews, in theComments window. To open this window, click on the paper clipicon in the toolbar.
5. Choose the OK button when you complete the entry, and save yourwork.
On the ADA Report, the information entered for employeesappears under the heading Disability. Any comments entered alsoappear on the report.
Enter Requests for Disability Accommodation
When employees with disabilities request accommodations to helpthem perform the essential functions of their jobs, enter informationabout these requests in the Disability Accommodations window. Startthis entry from the Person window.
� To enter information about accommodation requests:
1. Query the person in the Person window if he or she does notalready appear there. Choose the Others button, and select SpecialInfo to open the Special Information window.
2. In the Name field, select ADA Disability Accommodations. In theDetails block, click in the Detail field to open the ADA DisabilityAccommodations window.
3. In the Description field, briefly enter the accommodationrequested, for example, Wheelchair ramp or Widened door. TheDate Requested field defaults to the effective date.
4. In the Status field, select Requested, Approved or Denied to trackthe request status.
5. Optionally, enter the name of the reviewer of the request, and thedate reviewed, in the Confirmed By and Date Confirmed fields.
6. For approved requests, enter the date of providing theaccommodation, and its cost.
7. Optionally, add comments regarding the request using theComments window. Click on the paper clip icon to open thiswindow.
8 – 48 Using Oracle HRMS – The Fundamentals (US)
8. Choose the OK button when you complete data entry, and saveyour work. The information entered for employees, including anycomments, appears on the ADA Report.
Obtain ADA Reports
As ADA reporting is for your own use, there are no requiredformatting standards.
� To run an ADA report:
1. Select ADA Report in the Request Name field. Click in theParameters field if the Parameters window does not openautomatically.
2. The effective date will be the date of the report.
3. For the Organization Hierarchy parameter, select the name of theestablishment hierarchy to use for this report.
4. To obtain the report for a particular employee, select his or hername or employee number.
5. To obtain the report for employees in a particular job and/orlocation, select the job or location name, or both.
6. Select Yes for the report to include a listing of the essentialrequirements for the jobs or positions of employees withdisabilities.
7. Select Yes for the View Registered Disabled Only parameter for thereport to include only those employees with disabilities whosepersonal information includes registration as disabled.
8. For the Sort By parameter, select Employee to sort by employee lastname. Select Assignment to sort by job name, location, grade,position and employee name, in that order.
9. Choose OK, then Submit.
OSHA (Occupational Safety and Health Act) Reporting
The Occupational Safety and Health Act of 1970 and Title 29 of the Codeof Federal Regulations, Part 1904 (29CFR Part 1904) require employers incertain industries to record and report on employees’ work–relatedinjuries and illnesses. The Bureau of Labor Statistics (BLS) administers

8 – 49Government Mandated HR Reporting
this record keeping and reporting, often in cooperation with stateagencies. Employers must consult with these agencies to determine ifthey are subject to additional state–level recording and reportingobligations.
Employers in relatively high–risk industries such as construction,manufacturing, and health services, must keep OSHA records for eachindividual establishment on an ongoing basis, if they have a combinedtotal of 11 or more employees working at one or more establishments.
Employers in other industries that normally are not required to keepOSHA records, must maintain these records when selected toparticipate in the Annual Survey of Occupational Injuries and Illnesses.The purpose of this survey is to produce national estimates ofoccupational injuries and illnesses for all employers.
For a full list of industries required to maintain and report on OSHAinformation, and detailed instructions about OHSA record keeping,consult the document A Brief Guide to Recordkeeping Requirements forOccupational Injuries and Illnesses. To obtain copies of this publication,contact your regional office of the Bureau of Labor Statistics or write to:
Bureau of Labor Statistics
Division of Management Systems (1220–0029)
Washington, DC 20212
OSHA Data
Information needed for OSHA reporting includes a description of eachwork–related injury or illness and the date, place and circumstances ofits occurrence or onset, as well as information on its physical effectsand its outcome. For a nonfatal incident, you also maintain datashowing its effects on the employee’s ability to work.
The OSHA Form 200 report, Log and Summary of OccupationalInjuries and Illnesses, is the vehicle for logging information aboutwork–related injuries and illnesses during the year, and for presentinga summary of these injuries and illnesses at year end. An additionalreport, OSHA Form 101, Supplementary Record of OccupationalInjuries and Illnesses, provides further information about the caseslogged.
OSHA Establishments
GREs with more than one establishment must maintain separate sets ofOSHA records and reporting for each establishment. To represent
8 – 50 Using Oracle HRMS – The Fundamentals (US)
these establishments and the employees within them, you useReporting Establishments and establishment hierarchies.
Notice that for OSHA record keeping and reporting, clearly separateactivities performed at the same physical location require treatment asseparate Reporting Establishments. For example, if an enterprise hasmanufacturing facilities and sales offices in the same building, eachactivity constitutes a distinct establishment.
OSHA Categories of IllnessOSHA recognizes these categories of occupational illness:
• Occupational skin diseases or disorders. Examples are eczema,oil acne, chrome ulcers, chemical burns, etc.
• Dust diseases of the lungs. Examples are silicosis, asbestosis andother asbestos–related diseases, varieties of pneumoconioses, etc.
• Respiratory conditions due to toxic agents. Examples arepneumonitis, pharyngitis, rhinitis, acute congestion due tochemicals, dusts, gases or fumes, etc.
• Poisoning (systemic effects of toxic materials). Examples arepoisoning by lead, mercury, cadmium, arsenic or other metals;by carbon monoxide, hydrogen sulfide or other gases; by benzol,carbon tetrachloride or other organic solvents; by insecticidesprays; by other chemicals such as formaldehyde, plastics, resins;etc.
• Disorders due to physical agents (other than toxic materials).Examples are heatstroke and other effects of environmental heat;frostbite and other effects of exposure to low temperatures;effects of ionizing radiation (isotopes, X–rays, radium); effects ofnonionizing radiation (welding flash, microwaves); etc.
• Disorders associated with repeated trauma. Examples arenoise–induced hearing loss; synovitis, tenosynovitis, bursitis;Raynaud’s phenomena; other conditions due to repeated motion,vibration or pressure.
• All other occupational illnesses. Examples are anthrax,brucellosis, infectious hepatitis, malignant and benign tumors,food poisoning, histoplasmosis, etc.
Entering Information about Work–related Injury or IllnessWhen employees suffer work–related injuries or illnesses, recordinformation about these incidents in the OSHA–Reportable Incidentwindow. Start this entry from the Person window.

8 – 51Government Mandated HR Reporting
� To enter data on an OSHA–reportable incident:
1. Query the employee suffering the injury or illness in the Personwindow, if he or she does not already appear here. Choose theOthers button, and select Special Info to open the SpecialInformation window.
2. In the Name field, select OSHA–Reportable Incident. In the Detailsblock, click in the Detail field to open the OSHA–ReportableIncident window.
3. For incidents of work–related injury, you must select the categoryInjury. Otherwise select the category appropriate for awork–related illness.
See: OSHA Categories of Illness: page 8 – 50
4. Enter a brief description of the injury or illness, for example:Amputation of 1st joint right forefinger; Strain of lower back;Electrocution––body.
5. Enter the incident date, and address including the number andstreet, city or town, state, zip code. Enter whether the incidentoccurred on the employer’s premises.
The employer’s premises include rest rooms, hallways andcafeterias, but not parking facilities or recreational facilities such asgyms, pools or ball fields, unless the employee was engaged inwork–related activity there.
6. In the Activity field, describe what the employee was doing wheninjured or taken ill. In the Objects/Substances Involved field, listany tools, equipment or materials being used or handled.
7. Use the Comments window to enter a description of how theaccident or exposure to illness occurred. To open this window,click on the paper clip icon.
8. In the Body Parts Affected field, enter the injury or illness and thebody part, for example, Fracture of ribs; Dermatitis of left hand;Lead poisoning.
9. Indicate if the incident caused the termination or permanenttransfer of the employee. If it caused missed work or restrictedactivity, enter the number of days missed or restricted.
Do not include the day of injury or onset of illness, or days theemployee would not have worked in any case. For employeeswithout regular work schedules, estimate the number of misseddays.
10. If the injury or illness caused the employee’s death, you must enterthe date of death. Entry of a date in the Date Deceased field signalsthat the injury or illness was fatal, and must be reported as such.
8 – 52 Using Oracle HRMS – The Fundamentals (US)
11. Enter the name and address of the physician attending theemployee, and if he or she was hospitalized, the name and addressof the hospital.
12. Choose the OK button when you complete data entry, and saveyour work. When you run the OSHA No. 200 and OSHA No. 101reports, information entered in this window appears on one or bothof these reports.
Obtain OSHA Reports
Computer–generated versions of the forms OSHA No. 200 and OSHANo. 101 are acceptable, so long as they contain the same informationand are as readable and comprehensible as the OSHA forms. The BLSadvises employers using computer–generated forms to submit asample report for review, to ensure compliance with BLS regulations.
Run report requests from the Submit Requests window.
See: Setup Steps for OSHA Reporting: page 8 – 12
� To run OSHA Form 200 or Form 101 Reports:
1. Select OSHA Form 200 Report or OSHA Form 101 Report in theRequest Name field. Click in the Parameters field if the Parameterswindow does not open automatically.
2. For the parameter GRE, select the name of the GRE for which youare running the report.
3. For the Organization Hierarchy parameter, select the name of theestablishment hierarchy to use for this report.
4. Enter the start and end dates of the period this report covers. Theperiod end date is the date that appears on the report.

A P P E N D I X
A
A – 1Windows and Reports
Windows and Reports

A – 2 Using Oracle HRMS – The Fundamentals (US)
Windows and their Navigation Paths
The following list shows the default navigation paths for all thewindows in Oracle HRMS for the US, as they are supplied. You canuse taskflow windows directly from the menu, or from the People andAssignment windows.
The responsibility that you use determines which of these windowsyou can use and how you access them. Your system administrator setsup navigation menus and task flows for your responsibility. They mayalso create customized versions of some of these windows usingdifferent window titles.
AAP Organization
1. Choose Work Structures –> Organization –> Description in theNavigator.
2. Enter or query an AAP Organization.
3. Choose the Others button and select AAP Organization.
Absence Detail
Do one of the following:
1. Choose People –> Enter and Maintain in the Navigator.
2. Choose the Others button and select Absence.
Or:
1. Choose Fastpath –> Absence in the Navigator.
2. In the resulting Find window, query the person.
Absence Attendance Type
� Choose Total Compensation –> Basic –> Absence Types in theNavigator.
Accrual Bands
1. Choose Processes and Reports –> Action Parameters in theNavigator.
1. Choose Total Compensation –> Basic –> Accrual Plans in theNavigator.
2. Enter or query an accrual plan name.
3. Choose the Accrual Bands button.

A – 3Windows and Reports
Accrual Plans
� Choose Total Compensation –> Basic –> Accrual Plans in theNavigator.
Accruals
Do one of the following:
1. Choose View –> Employee Accruals in the Navigator.
2. Run a query in the Assignments Folder window.
3. Select an employee assignment and choose the Accruals button.
Or:
1. Choose Fastpath –> Accruals in the Navigator.
2. In the resulting Find window, query the person.
Action Types
1. Choose Total Compensation –> Programs and Plans –> PlanEnrollment Requirements in the Navigator.
2. Query or enter a plan.
3. Choose the Actions button.
Actvity Rate
1. Choose Total Compensation –> Rates/Coverage Definitions –> FlexCredits in the Navigator.
2. Query a compensation object.
3. Choose the Activity Rate button.
Activity Variable Rates and Rules
1. Choose Total Compensation –> Rates/Coverage Definitions –> FlexCredits in the Navigator.
2. Query a compensation object.
3. Choose the Variable Rates button.
Actual Premiums
� Choose Total Compensation –> General Definitions –>Rate/Coverage Definitions –> Actual Premiums in the Navigator.

A – 4 Using Oracle HRMS – The Fundamentals (US)
Address
Do one of the following:
1. Choose People –> Enter and Maintain in the Navigator.
2. Enter or query a person.
3. Choose the Address button.
Or:
1. Choose Fastpath –> Address in the Navigator.
2. In the resulting Find window, query the person.
Adjust Balance (Payroll only)
Do one of the following:
1. Choose People –> Enter and Maintain in the Navigator.
2. Enter or query an employee.
3. Choose the Assignment button.
4. Choose the Others button and select Adjust Balance.
Or:
1. Choose Fastpath –> Adjust Balances in the Navigator.
2. In the resulting Find window, query the person.
Adjust Tax Balances (Payroll only)
1. Choose People –> Enter and Maintain in the Navigator.
2. Enter or query an employee.
3. Choose the Assignment button.
4. Choose the Others button and select Adjust Tax Balances.
Advanced Criteria
1. Choose Benefits Extract –> Criteria Definition in the Navigator.
2. Query or enter a criteria definition and choose the Advanced tab.
3. Select a Criteria Type and choose the Details button.
Alter Effective Date
� Choose Work Structures –> Collective Agreement and GradeStructures in the Navigator.
A – 5Windows and Reports
Alien Data Window
1. Choose People –> Enter and Maintain in the Navigator.
2. Enter or query an employee.
3. Choose the Assignment button.
4. Choose the Tax Information button.
5. Choose the Alien Data button.
� Choose Tools –> Alter Effective Date from the Tools menu.
Applicant Entry
� Choose Recruitment –> Applicant Quick Entry in the Navigator.
Applicant Interview
1. Choose People –> Enter and Maintain in the Navigator.
2. Enter or query an applicant.
3. Choose the Others button and select Application.
4. Choose the Interview button.
Application
Do one of the following:
1. Choose People –> Enter and Maintain in the Navigator.
2. Enter or query an applicant.
3. Choose the Others button and select Application.
Or:
1. Choose Fastpath –> Application in the Navigator.
2. In the resulting Find window, query the person.
Application Utilities Lookups
1. Choose Other Definitions –> Application Utilities Lookups in theNavigator.
2. Enter or query a user–defined Type.
Appraisal Template
� Choose Career Management –> Appraisal Template in theNavigator.

A – 6 Using Oracle HRMS – The Fundamentals (US)
Assessment Template
� Choose Career Management –> Assessment Template in theNavigator.
Assign Security Profiles
� Choose Security –> Assign Security Profiles in the Navigator.
Assignment
Do one of the following:
1. Choose People –> Enter and Maintain in the Navigator.
2. Enter or query an employee.
3. Choose the Assignment button.
Or:
1. Choose Fastpath –> Assignment in the Navigator.
2. In the resulting Find window, query the person.
Assignment Budget Values
Do one of the following:
1. Choose People –> Enter and Maintain in the Navigator.
2. Enter or query an applicant or an employee.
3. Do one of the following:
For an applicant:
• Choose the Others button and select Application.
• Choose the Budgets button.
For an employee:
• Choose the Assignment button.
• Choose the Others button and select Budget Values.
Or:
1. Choose Fastpath –> Assignment Budget in the Navigator.
2. In the resulting Find window, query the person.
Assignment Criteria
1. Choose Payroll –> Assignment Set in the Navigator.

A – 7Windows and Reports
2. Enter or query an assignment set.
3. Choose the Criteria button.
Assignment History
� Choose View –> Histories –> Employee Assignment in theNavigator.
Assignment Processes
1. Choose View –> Payroll Process Results in the Navigator.
2. Enter or query a payroll process.
3. Choose the Assignment Process button.
Assignment Set
� Choose Payroll –> Assignment Set in the Navigator.
Assignment Statuses
� Choose Work Structures –> Status in the Navigator.
Assignment Folder
� Choose View –> Lists –> Assignment Folder in the Navigator.
Authentication Activities (Advanced Benefits Only)
� Choose Total Compensation –> General Definitions –>Authentication Activities in the Navigator.
Balance (Payroll only)
� Choose Total Compensation –> Basic –> Balance in the Navigator.
Balance Classifications (Payroll only)
1. Choose Total Compensation –> Basic –> Balance in the Navigator.
2. Enter or query a balance.
3. Choose the Classifications button.
Balance Dimensions (Payroll only)
1. Choose Total Compensation –> Basic –> Balance in the Navigator.
2. Enter or query a balance.
3. Choose the Dimensions button.

A – 8 Using Oracle HRMS – The Fundamentals (US)
Balance Feed Control (Payroll only)
1. Choose Total Compensation –> Basic –> Element Description in theNavigator.
2. Enter or query an element.
3. Choose the Balance Feed Control button.
Balance Feeds (Payroll only)
Note: This instance of the Balance Feeds window lets you selectmore than one balance for the element to feed.
1. Choose Total Compensation –> Basic –> Element Description in theNavigator.
2. Enter or query an element.
3. Choose the Balance Feeds button.
Batch Header
� Choose Mass Information eXchange: MIX –> Batch Element Entryin the Navigator.
Batch Process Parameters (Advanced Benefits only)
� Choose Processes and Reports –> Batch Process Parameters in theNavigator.
Batch Summary
� Choose Mass Information eXchange: MIX –> BEE Summary in theNavigator.
Beneficiaries
1. Choose People –> Enter and Maintain in the Navigator.
2. Enter or query an employee or applicant.
3. Choose the Others button and select Contact.
4. Choose the Entries button.
5. Select the element representing the benefit for which you areentering a beneficiary.
6. Choose the Others button and select Beneficiary.

A – 9Windows and Reports
Beneficiary Certifications
1. Choose Total Compensation –> Programs and Plans –> PlanEnrollment Requirements in the Navigator.
2. Query a plan.
3. Choose the Designations tab.
4. Choose the Beneficiary tab.
5. Choose the Certifications button.
Benefits Authentication Form (Advanced Benefits only)
� Choose People –> Total Comp Contribution –> BenefitsAuthentication Form in the Navigator.
Benefits Balances
� Choose Total Compensation –> General Definitions –>Eligibility/Rate Factors –> Benefits Balances in the Navigator.
Benefit Contributions
� Choose Total Compensation –> Basic –> Benefit Contributions inthe Navigator.
Benefits Group
� Choose Total Compensation –> General Definitions –>Eligibility/Rate Factors –> Benefits Group in the Navigator.
Benefits Pools (Advanced Benefits only)
� Choose Total Compensation –> Rate/Coverage Definitions –>Benefits Pools in the Navigator.
Benefits Authentication Form (Advanced Benefits only)
� Choose People –> Total Comp Contribution –> BenefitsAuthentication Form in the Navigator.
Benefits Service Center (Advanced Benefits Only)
� Choose People –> Benefits Service Center in the Navigator.
Book Events
1. Choose People –> Enter and Maintain in the Navigator.
2. Enter or query an employee or applicant.

A – 10 Using Oracle HRMS – The Fundamentals (US)
3. Choose the Others button and select Bookings.
Budget
1. Choose Work Structures –> Budget –>Budget Details in theNavigator.
2. In the resulting Find window, query the budget.
3. Select a budget version.
4. Choose the Open button.
Budgets
1. Choose Work Structures –> Budget –>Budget Details in theNavigator.
2. In the resulting Find window, query the budget.
Budget Characteristics
� Choose Work Structures –> Budget –> Budget Characteristics in theNavigator.
Budget Details
Follow these steps if you are entering a budget that is not routed forapproval.
1. Choose Work Structures –> Budget –>Budget Details in theNavigator.
2. In the resulting Find window, query the budget.
3. Select a budget version.
4. Choose the Open button.
5. Select a line item in the budget and choose the Periods button.
Follow these steps if you are routing a budget for approval through ahierarchy of approvers.
1. Choose Work Structures –> Budget –>Worksheet in the Navigator.
2. Define the properties of the worksheet.
3. Choose the Create Worksheet button.
4. Edit the worksheet by entering values for budget line items.
5. Choose the Periods button.

A – 11Windows and Reports
Budget Reallocation
� Choose Work Structures –> Budget –>Budget Reallocation in theNavigator.
Budget Set
� Choose Work Structures –> Budget –>Budget Set in the Navigator.
Budget Value Defaults
1. Choose Work Structures –> Organization –> Description in theNavigator.
2. Enter or query a Business Group.
3. Choose the Others button and select Budget Value Defaults.
Budgetary Calendar
� Choose Work Structures –> Budget –> Budget Calendar in theNavigator.
Business Group Information
1. Choose Work Structures –> Organization –> Description in theNavigator.
2. Enter or query a Business Group.
3. Choose the Others button and select Business Group Information.
Career Path Names
� Choose Work Structures –> Job –> Path Name in the Navigator.
Certifications
1. Choose Total Compensation –> Programs and Plans –> PlanEnrollment Requirements in the Navigator.
2. Query or enter a plan.
3. Choose the General tab.
4. Choose the Plan or Option tab.
5. Choose the Certifications button.
Change Event Log
1. Choose Benefits Extract –> Change Event Log in the Navigator.

A – 12 Using Oracle HRMS – The Fundamentals (US)
Cities
� Choose Other Definitions –> Cities in the Navigator.
City Tax Rules <Employee>
1. Choose People –> Enter and Maintain in the Navigator.
2. Enter or query an employee or applicant.
3. Chose the Tax Information button.
4. Choose the Tax information button from the Federal Tax Rules<Employee> window.
5. Choose the Tax information button from the State Tax Rules<Employee> window.
6. Choose the Tax information button from the County Tax Rules<Employee> window.
COBRA Benefits (Basic Benefits)
1. Choose People –> Enter and Maintain in the Navigator.
2. Enter or query an employee.
3. Choose the Assignment button.
4. Choose the Others button and select COBRA.
5. Enter or query a qualifying event.
6. Choose the Benefits button.
COBRA Coverage (Basic Benefits)
1. Choose People –> Enter and Maintain in the Navigator.
2. Enter or query an employee.
3. Choose the Assignment button.
4. Choose the Others button and select COBRA.
COBRA Payments (Basic Benefits)
1. Choose People –> Enter and Maintain in the Navigator.
2. Enter or query an employee.
3. Choose the Assignment button.
4. Choose the Others button and select COBRA.
5. Enter or query a qualifying event.
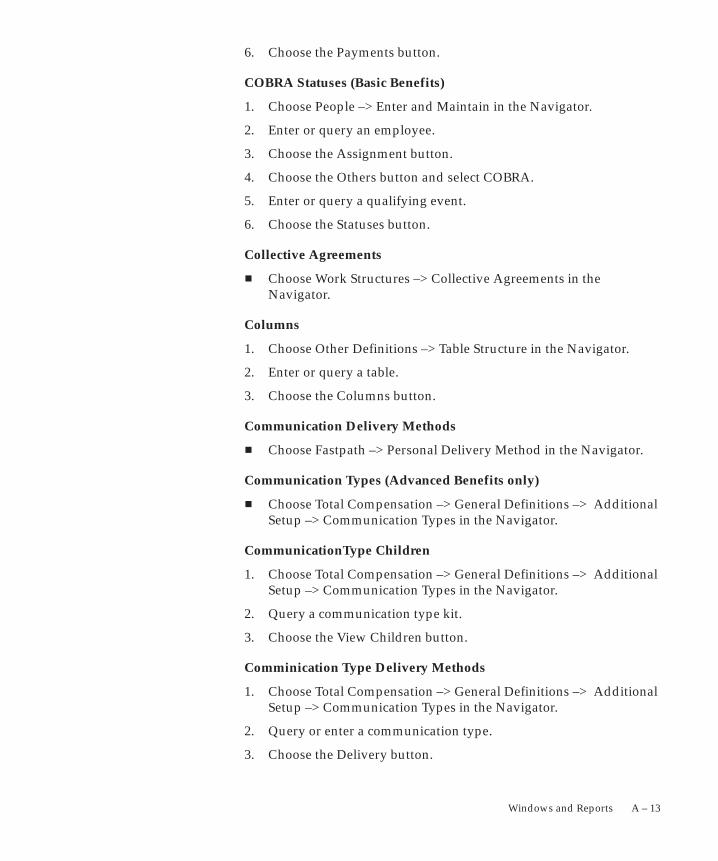
A – 13Windows and Reports
6. Choose the Payments button.
COBRA Statuses (Basic Benefits)
1. Choose People –> Enter and Maintain in the Navigator.
2. Enter or query an employee.
3. Choose the Assignment button.
4. Choose the Others button and select COBRA.
5. Enter or query a qualifying event.
6. Choose the Statuses button.
Collective Agreements
� Choose Work Structures –> Collective Agreements in theNavigator.
Columns
1. Choose Other Definitions –> Table Structure in the Navigator.
2. Enter or query a table.
3. Choose the Columns button.
Communication Delivery Methods
� Choose Fastpath –> Personal Delivery Method in the Navigator.
Communication Types (Advanced Benefits only)
� Choose Total Compensation –> General Definitions –> AdditionalSetup –> Communication Types in the Navigator.
CommunicationType Children
1. Choose Total Compensation –> General Definitions –> AdditionalSetup –> Communication Types in the Navigator.
2. Query a communication type kit.
3. Choose the View Children button.
Comminication Type Delivery Methods
1. Choose Total Compensation –> General Definitions –> AdditionalSetup –> Communication Types in the Navigator.
2. Query or enter a communication type.
3. Choose the Delivery button.

A – 14 Using Oracle HRMS – The Fundamentals (US)
Communication Type Triggers
1. Choose Total Compensation –> General Definitions –> AdditionalSetup –> Communication Types in the Navigator.
2. Query or enter a communication type.
3. Choose the Triggers button.
Communication Type Usages
1. Choose Total Compensation –> General Definitions –> AdditionalSetup –> Communication Types in the Navigator.
2. Query or enter a communication type.
3. Choose the Usages button.
Competence Profile
1. Choose People –> Enter and Maintain in the Navigator.
2. Enter or query a person.
3. Choose the Others button and select Competence Profile.
Competence Requirements
� Choose Career Management –> Competence Requirements in theNavigator.
Competence Types
� Choose Career Management –> Competence Types in theNavigator.
Competencies
� Choose Career Management –> Competencies in the Navigator.
Consolidation Sets (Payroll only)
Configurable Business Rules
� Choose Transaction Maintenance Forms –> Configurable BusinessRules in the Navigator.
� Choose Payroll –> Consolidation in the Navigator.
Contacts
Do one of the following:
1. Choose People –> Enter and Maintain in the Navigator.

A – 15Windows and Reports
2. Enter or query an employee or applicant.
3. Choose the Others button and select Contact.
Or:
1. Choose Fastpath –> Contact in the Navigator.
2. In the resulting Find window, query the person.
Contexts
� Choose Security –> Contexts in the Navigator
Contract
Do one of the following:
1. Choose People –> Enter and Maintain in the Navigator.
2. Enter or query an employee or applicant.
3. Choose the Others button.
4. Choose Contracts.
Or:
1. Choose Fastpath –> Contracts in the Navigator.
2. In the resulting Find window, query the person.
Contribution History (Def Comp 457)
� Choose View –> Histories –>Entries –>Contribution History
Control Totals
1. Choose Mass Information eXchange: MIX –> Batch Element Entryin the Navigator.
2. Choose the Totals button.
Conversion Rate Types
� Choose Payroll –> Currency Rate Types in the Navigator.
Costing
Do one of the following:
1. Choose People –> Enter and Maintain in the Navigator.
2. Enter or query an employee.
3. Choose the Assignment button.

A – 16 Using Oracle HRMS – The Fundamentals (US)
4. Choose the Others button and select Costing.
Or:
1. Choose Fastpath –> Costing in the Navigator.
2. In the resulting Find window, query the person.
Costing Information
1. Choose Work Structures –> Organization –> Description in theNavigator.
2. Enter or query an organization.
3. Choose the Others button and select Costing.
County Tax Rules <Employee>
1. Choose People –> Enter and Maintain in the Navigator.
2. Enter or query an employee or applicant.
3. Chose the Tax Information button.
4. Choose the Tax information button from the Federal Tax Rules<Employee> window.
5. Choose the Tax information button from the State Tax Rules<Employee> window.
Court Orders
� Choose People –> Total Comp Enrollment –> Court Orders in theNavigator.
Coverage Across Plan Types
� Choose Total Compensation –> Rates/Coverage Definitions –>Coverage Across Plan Types in the Navigator.
Coverage Calculations
� Choose Total Compensation –> Rate/Coverage Definitions –>Coverage Calculations in the Navigator.
Covered Dependents
1. Choose People –> Enter and Maintain in the Navigator.
2. Enter or query an employee or applicant.
3. Choose the Others button and select Contact.
4. Chose the Entries button.
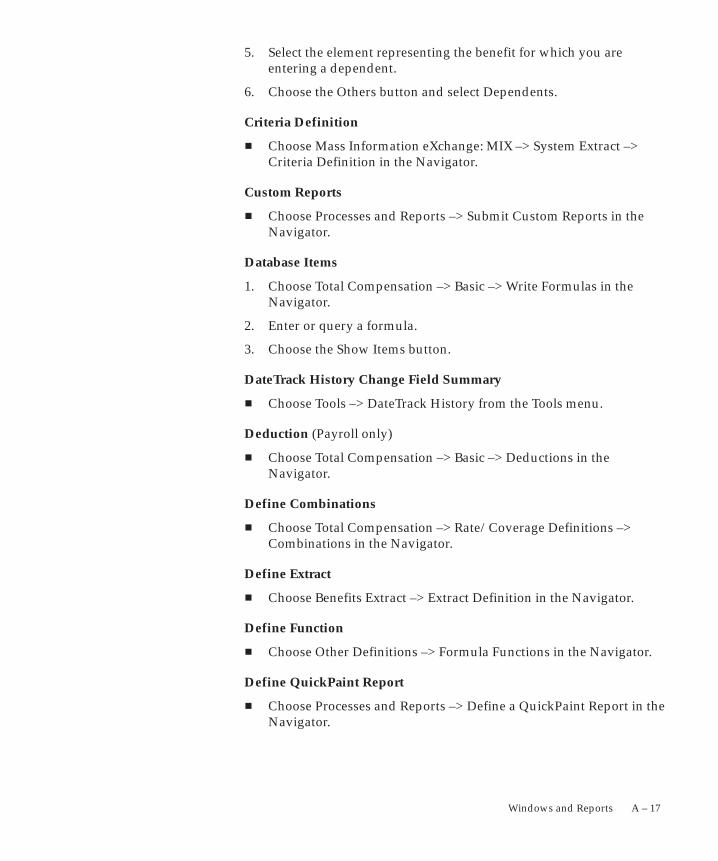
A – 17Windows and Reports
5. Select the element representing the benefit for which you areentering a dependent.
6. Choose the Others button and select Dependents.
Criteria Definition
� Choose Mass Information eXchange: MIX –> System Extract –>Criteria Definition in the Navigator.
Custom Reports
� Choose Processes and Reports –> Submit Custom Reports in theNavigator.
Database Items
1. Choose Total Compensation –> Basic –> Write Formulas in theNavigator.
2. Enter or query a formula.
3. Choose the Show Items button.
DateTrack History Change Field Summary
� Choose Tools –> DateTrack History from the Tools menu.
Deduction (Payroll only)
� Choose Total Compensation –> Basic –> Deductions in theNavigator.
Define Combinations
� Choose Total Compensation –> Rate/Coverage Definitions –>Combinations in the Navigator.
Define Extract
� Choose Benefits Extract –> Extract Definition in the Navigator.
Define Function
� Choose Other Definitions –> Formula Functions in the Navigator.
Define QuickPaint Report
� Choose Processes and Reports –> Define a QuickPaint Report in theNavigator.

A – 18 Using Oracle HRMS – The Fundamentals (US)
Define Task Flow
� Choose Security –> Task Flow Definitions in the Navigator.
Define Task Flow Nodes
� Choose Security –> Task Flow Nodes in the Navigator.
Delete Person
� Choose People –> Delete Personal Records in the Navigator.
Dependent/Beneficiary Designation (Advanced Benefits Only)
� Choose People –> Total Comp Enrollment –> Benefit Enrollment –>Dependent/Beneficiary Designation in the Navigator.
Or:
1. Choose People –> Total Comp Enrollment –> Benefits Enrollment–> Flex Program in the Navigator.
2. Query a person.
3. Choose the Designees button.
Dependent Certifications
Do one of the following:
1. Choose Total Compensation –> Programs and Plans –> ProgramEnrollment Requirements in the Navigator.
2. Query a program.
3. Choose the Dependent Coverage tabbed region
4. Choose the Certifications button.
Or:
1. Choose Total Compensation –> Programs and Plans –> PlanEnrollment Requirements in the Navigator.
2. Query a plan.
3. Choose the Designations tab.
4. Choose the Dependent tab.
5. Choose the Certifications button.
Dependent Change of Life Event
Do one of the following:

A – 19Windows and Reports
1. Choose Choose Total Compensation –> Programs and Plans –>Program Enrollment Requirements in the Navigator.
2. Query a program and choose the Dependent Coverage tabbedregion.
3. Choose the Dependent Change of Life Event button.
Or:
1. Choose Choose Total Compensation –> Programs and Plans –>Plan Enrollment Requirements in the Navigator.
2. Query a plan and choose the Designations tabbed region.
3. Choose the Dependent tab.
4. Choose the Dependent Change of Life Event button.
Dependent Change of Life Event Certification
Do one of the following:
1. Choose Choose Total Compensation –> Programs and Plans –>Program Enrollment Requirements in the Navigator.
2. Query a program and choose the Dependent Coverage tabbedregion.
3. Choose the Dependent Change of Life Event button.
4. Select a life event and choose the Dependent Change of Life EventCertifications button.
Or:
1. Choose Choose Total Compensation –> Programs and Plans –>Plan Enrollment Requirements in the Navigator.
2. Query a plan and choose the Designations tabbed region.
3. Choose the Dependent tab.
4. Choose the Dependent Change of Life Event button.
5. Select a life event and choose the Dependent Change of Life EventCertifications button.
Dependent Coverage Eligibility Profiles
� Choose Total Compensation –> General Definitions –> EligibilityProfiles –> Dependent Coverage in the Navigator.

A – 20 Using Oracle HRMS – The Fundamentals (US)
Derived Factors
� Choose Total Compensation –> General Definitions –>Eligibility/Rate Factors –> Derived Factors in the Navigator.
Designation Requirements
Do one of the following:
1. Choose Total Compensation –> Programs and Plans –> Options inthe Navigator.
2. Query or enter an option.
3. Choose the Designation Requirements button.
Or:
1. Choose Total Compensation –> Programs and Plans –> PlanEnrollment Requirements in the Navigator.
2. Query a plan.
3. Choose the General tab.
4. Choose the Plan or Option tab.
5. Choose the Designations button.
Dynamic Trigger Definition
� Choose Other Definitions –> Dynamic Trigger Definition in theNavigator.
Dynamic Trigger Functional Area Grouping
� Choose Other Definitions –> Dynamic Trigger Functional AreaGrouping in the Navigator.
Earnings (Payroll only)
� Choose Total Compensation –> Basic –> Earnings in the Navigator.
Edit Formula
1. Choose Total Compensation –> Basic –> Write Formulas in theNavigator.
2. Enter or query a formula.
3. Choose the Edit button.

A – 21Windows and Reports
EEO–1 Filing
1. Choose Work Structures –> Organization –> Description in theNavigator.
2. Enter or query a Government Reporting Entity (GRE).
3. Choose the Others button and select EEO–1 Filing.
Electable Choices
1. Choose People –> Total Comp Participation
2. Choose the Enrollment Opportunities button
3. Choose the Electable Choices button.
Element
� Choose Total Compensation –> Basic –> Element Description in theNavigator.
Element and Distribution Set
� Choose Payroll –> Element Set in the Navigator.
Element Classifications (Payroll only)
� Choose Total Compensation –> Basic –> Classification in theNavigator.
Element Entries
Do one of the following:
1. Choose People –> Enter and Maintain in the Navigator.
2. Enter or query an employee.
3. Choose the Assignment button.
4. Choose the Entries button.
Or:
1. Choose Fastpath –> Entries in the Navigator.
2. In the resulting Find window, query the person.
Element Link
� Choose Total Compensation –> Basic –> Link in the Navigator.

A – 22 Using Oracle HRMS – The Fundamentals (US)
Eligibility
Do one of the following:
1. Choose Total Compensation –> Programs and Plans –> Plans in theNavigator.
2. Query or enter a plan.
3. Choose the Plan Eligibility button.
4. Choose the Eligibility button.
Or:
1. Choose Total Compensation –> Programs and Plans –> Plans in theNavigator.
2. Query or enter a plan.
3. Choose the Options button.
4. Choose the Option Eligibility button.
5. Choose the Eligibility button.
Or:
1. Choose Total Compensation –> Programs and Plans –> Programs inthe Navigator.
2. Query or enter a program.
3. Choose the Plans and Plan Types button.
4. Choose the Plans tab or the Plan Types tab.
5. Choose the Participation Eligibility button.
6. Choose the Eligibility button.
Or:
1. Choose Total Compensation –> Programs and Plans –> Programsin the Navigator.
2. Query or enter a program.
3. Choose the Participation Eligibility button.
4. Choose the Eligibility button.
Employee Assignment Processes
� Choose View –> Assignment Process Results in the Navigator.

A – 23Windows and Reports
Employee Review
Do one of the following:
1. Choose People –> Enter and Maintain in the Navigator.
2. Enter or query an employee.
3. Choose the Assignment button.
4. Choose the Others button and select Reviews.
Or:
1. Choose Fastpath –> Employee Review in the Navigator.
2. In the resulting Find window, query the person.
Employee Run Result History (Payroll only)
� Choose View –> Histories –> Run Results in the Navigator.
Employer Identification
1. Choose Work Structures –> Organization –> Description in theNavigator.
2. Enter or query a Government Reporting Entity (GRE).
3. Choose the Others button and select Employer Identification
End Application
End Employment
Enrollment Action (Advanced Benefits only)
� Choose Total Compensation –> General Definitions –> AdditionalSetup –> Enrollment Action Types in the Navigator.
Enrollment Opportunities
1. Choose People –> Total Comp Participation
2. Choose the Enrollment Opportunities button.
Enrollment Override
� Choose People –> Total Comp Enrollment –> Enrollment Overridein the Navigator.

A – 24 Using Oracle HRMS – The Fundamentals (US)
Enrollment Rules
1. Choose Total Compensation –> Programs and Plans –> PlanEnrollment Requirements in the Navigator.
2. Query or enter a plan.
3. Choose the Timing tab.
4. Choose the Scheduled tab or the Life Event tab.
5. Choose the Enrollment Rules button.
Entry Values
1. Choose People –> Enter and Maintain in the Navigator.
2. Enter or query an employee.
3. Choose the Assignment button.
4. Choose the Entries button.
5. Select an entry and choose the Entry Values button.
Establishment EEO–1 Filing
1. Choose Work Structures –> Organization –> Description in theNavigator.
2. Enter or query a Reporting Establishment.
3. Choose the Others button and select Establishment EEO–1 Filing.
Establishment VETS–100 Filing
1. Choose Work Structures –> Organization –> Description in theNavigator.
2. Enter or query a Reporting Establishment.
3. Choose the Others button and select Establishment VETS–100Filing.
Event Bookings
Do one of the following:
� Choose People –> Events and Bookings in the Navigator.
Or:
1. Choose Fastpath –> Event in the Navigator.
2. In the resulting Find window, query the person.

A – 25Windows and Reports
Exemption Rules (Payroll only)
� Choose View –> Wage Attachments–> Exemption Rules
External/Manual Payments (Payroll only)
Do one of the following:
1. Choose People –> Enter and Maintain in the Navigator.
2. Enter or query an employee.
3. Choose the Assignment button.
4. Choose the Others button and select External Pay.
Or:
1. Choose Fastpath –> External/Manual Payments in the Navigator.
2. In the resulting Find window, query the person.
Extract Definition
Extra Person Information Window
1. Choose People –> Enter and Maintain in the Navigator.
2. Enter or query an employee.
3. Choose the Others button.
4. Choose Extra Information.
5. Choose a Type.
6. Choose Details.
� Choose Mass Information Exchange –> System Extract –> ExtractDefinition in the Navigator.
Extract Results
1. Choose Mass Information eXchange –> System Extract –> ExtractResults in the Navigator.
2. Query an extract run result and choose the Errors and Warningsbutton.
Extract Results Errors
1. Choose Benefits Extract –> Extract Results in the Navigator.
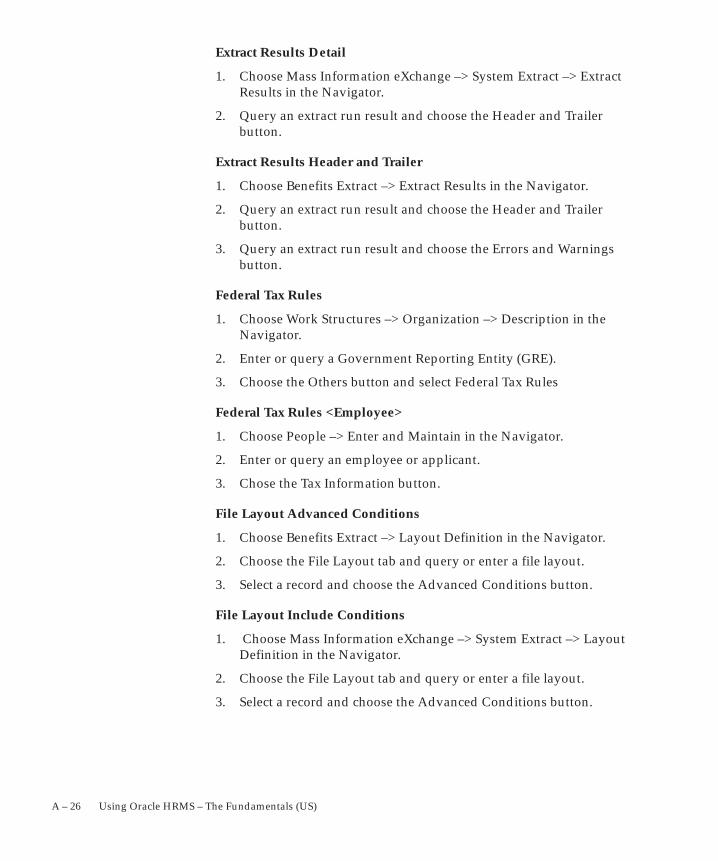
A – 26 Using Oracle HRMS – The Fundamentals (US)
Extract Results Detail
1. Choose Mass Information eXchange –> System Extract –> ExtractResults in the Navigator.
2. Query an extract run result and choose the Header and Trailerbutton.
Extract Results Header and Trailer
1. Choose Benefits Extract –> Extract Results in the Navigator.
2. Query an extract run result and choose the Header and Trailerbutton.
3. Query an extract run result and choose the Errors and Warningsbutton.
Federal Tax Rules
1. Choose Work Structures –> Organization –> Description in theNavigator.
2. Enter or query a Government Reporting Entity (GRE).
3. Choose the Others button and select Federal Tax Rules
Federal Tax Rules <Employee>
1. Choose People –> Enter and Maintain in the Navigator.
2. Enter or query an employee or applicant.
3. Chose the Tax Information button.
File Layout Advanced Conditions
1. Choose Benefits Extract –> Layout Definition in the Navigator.
2. Choose the File Layout tab and query or enter a file layout.
3. Select a record and choose the Advanced Conditions button.
File Layout Include Conditions
1. Choose Mass Information eXchange –> System Extract –> LayoutDefinition in the Navigator.
2. Choose the File Layout tab and query or enter a file layout.
3. Select a record and choose the Advanced Conditions button.

A – 27Windows and Reports
Flex Credits (Advanced Benefits only)
� Choose Total Compensation –> Rate/Coverage Definitions –> FlexCredits in the Navigator.
Flex Program (Advanced Benefits only)
� Choose People –> Total Comp Enrollment –> Flex Program in theNavigator.
Form 941 Information
� Choose View –> Tax Information –> Form 941 Information in theNavigator.
Forms Configurator
� Choose Security –> Forms Configurator in the Navigator.
Form Customization
� Choose Security –> Customform in the Navigator.
Formula
� Choose Total Compensation –> Basic –> Write Formulas in theNavigator.
Formula Result Rules (Payroll only)
� Choose Total Compensation –> Basic –> Formula Results in theNavigator.
Frequency Rules
1. Choose Total Compensation –> Basic –> Deductions in theNavigator.
2. Enter or query a deduction.
3. Choose the Frequency Rules button.
Funding Distribution
1. Choose Work Structures –> Budget –> Worksheet in the Navigator.
2. Choose the Periods button to open the Budget Details window.
3. Choose the Budget Sets tab.
4. Choose the Budget Set Distribution button.

A – 28 Using Oracle HRMS – The Fundamentals (US)
GL Daily Rates
� Choose Payroll –> GL Daily Rates in the Navigator.
GL Map (Payroll only)
� Choose Payroll –> GL Flexfield Map in the Navigator.
Globals
� Choose Total Compensation –> Basic –> Global Values in theNavigator.
GL Daily Rates
� Choose Total Compensation –> Basic –> Global Values in theNavigator.
Goods and Services
� Choose Total Compensation –> General Definitions –> AdditionalSetup –> Goods and Services in the Navigator.
Grade Rate
� Choose Work Structures –> Grade –> Grade Rate in the Navigator.
Grade Scale
� Choose Work Structures –> Grade –> Grade Steps and Points in theNavigator.
Grade Step Placement
Do one of the following:
1. Choose People –> Enter and Maintain in the Navigator.
2. Enter or query an employee.
3. Choose the Assignment button.
4. Choose the Others button and select Grade Step.
Or:
1. Choose Fastpath –> Grade Step in the Navigator.
2. In the resulting Find window, query the person.
Grades
� Choose Work Structures –> Grade –> Description in the Navigator.

A – 29Windows and Reports
Hiring Applicants
� Choose People –> Maintain Using Templates –> Hire Applicants inthe Navigator.
Imputed Income
� Choose Total Compensation –> Rate/Coverage Definitions –>Imputed Income in the Navigator.
Information Type Security
� Choose Security –> Information Types Security in the Navigator.
Input Values
1. Choose Total Compensation –> Basic –> Element Description in theNavigator.
2. Enter or query an element.
3. Choose the Input Values button.
Investment Options
1. Choose People –> Total Comp Enrollment –> Benefit Enrollment –>Savings Plan in the Navigator.
2. Query a person.
3. Choose the Investment Options button.
Job
� Choose Work Structures –> Job –> Description in the Navigator.
Job Evaluation
� Choose Work Structures –> Job –> Job Grade in the Navigator.
1. Choose Work Structures –> Job –> Description in the Navigator.
2. Enter or query a job.
3. Choose the Evaluation button.
Job Requirements
1. Choose Work Structures –> Job –> Description in the Navigator.
2. Enter or query a job.
3. Choose the Requirements button.

A – 30 Using Oracle HRMS – The Fundamentals (US)
Layout Definition
� Choose Benefits Extract –> Layout Definition in the Navigator.
Life Event
Do one of the following:
1. Choose Total Compensation –> Programs and Plans –> Programs inthe Navigator.
2. Query or enter a program.
3. Choose the Plan and Plan Types button.
4. Choose the Plans tab or the Plan Types tab.
5. Choose the Life Event button.
Or:
1. Choose Total Compensation –> Programs and Plans –> Programsin the Navigator.
2. Query or enter a program.
3. Choose the Life Event button.
Life Event Certifications
1. Choose Total Compensation –> Programs and Plans –> PlanEnrollment Requirements in the Navigator.
2. Query or enter a plan.
3. Choose the General tab.
4. Choose the Plan or Option tab.
5. Choose the Life Event Certifications button.
Life Event Reason Impact on Eligibility (Advanced Benefits)
1. Choose Total Compensation –> Programs and Plans –> Plans in theNavigator.
2. Query or enter a plan.
3. Choose the Options button.
4. Choose the Life Event Eligibility button.
Life Event Reasons (Advanced Benefits only)
� Choose Total Compensation –> General Definitions –> AdditionalSetup –> Life Event Reasons in the Navigator.

A – 31Windows and Reports
Limit Rules (Payroll only)
� Choose View –> Wage Attachments –> Limit Rules in theNavigator.
Link Input Values
1. Choose Total Compensation –> Basic –> Link in the Navigator.
2. Enter or query an element.
3. Choose the Input Values button.
List Assignments
� Choose View –> Lists –> Assignments in the Navigator.
List Employees by Absence Type
� Choose View –> Lists –> Employees by Absence Type in theNavigator.
List Employees by Element
� Choose View –> Lists –> Employees by Element in the Navigator.
List Employees by Organization
� Choose View –> Lists –> Employees by Organization in theNavigator.
List Employees by Position
� Choose View –> Lists –> Employees by Position in the Navigator.
List Employees by Position Hierarchy
� Choose View –> Lists –> Emps by Position Hierarchy in theNavigator.
List People by Assignment
� Choose View –> Lists –> People by Assignment in the Navigator.
List People by Special Information
� Choose View –> Lists –> People by Special Information in theNavigator.
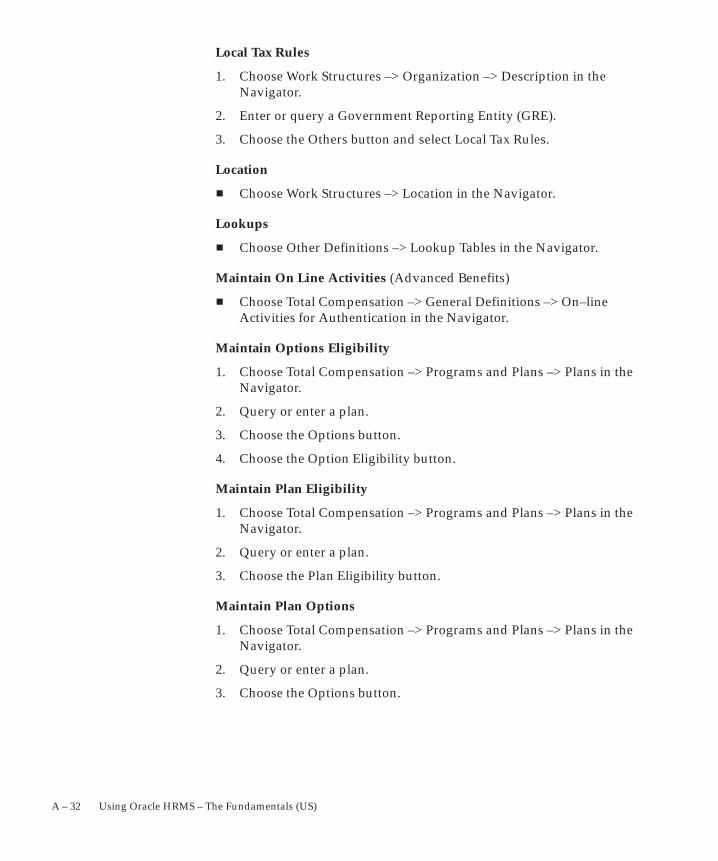
A – 32 Using Oracle HRMS – The Fundamentals (US)
Local Tax Rules
1. Choose Work Structures –> Organization –> Description in theNavigator.
2. Enter or query a Government Reporting Entity (GRE).
3. Choose the Others button and select Local Tax Rules.
Location
� Choose Work Structures –> Location in the Navigator.
Lookups
� Choose Other Definitions –> Lookup Tables in the Navigator.
Maintain On Line Activities (Advanced Benefits)
� Choose Total Compensation –> General Definitions –> On–lineActivities for Authentication in the Navigator.
Maintain Options Eligibility
1. Choose Total Compensation –> Programs and Plans –> Plans in theNavigator.
2. Query or enter a plan.
3. Choose the Options button.
4. Choose the Option Eligibility button.
Maintain Plan Eligibility
1. Choose Total Compensation –> Programs and Plans –> Plans in theNavigator.
2. Query or enter a plan.
3. Choose the Plan Eligibility button.
Maintain Plan Options
1. Choose Total Compensation –> Programs and Plans –> Plans in theNavigator.
2. Query or enter a plan.
3. Choose the Options button.

A – 33Windows and Reports
Maintain Plan Related Details
1. Choose Total Compensation –> Programs and Plans –> Plans in theNavigator.
2. Query or enter a plan.
3. Choose the Details button.
Maintain Pop Up Messages (Advanced Benefits only)
� Choose Total Compensation –> General Definitions –> DefineMessages in the Navigator.
Maintain Visa
Maintain Visa Window
1. Choose People –> Maintain Using Templates –>Maintain Visa inthe Navigator.
2. Choose an employee.
Map Career Path
� Choose Work Structures –> Job –> Career Path in the Navigator.
Map Salary Survey
1. Choose Work Structures –> Position –> Description in theNavigator.
2. Complete the Position window and save your work.
3. Choose the Define Survey Map button.
Or:
1. Choose Work Structures –> Job –> Description in the Navigator.
2. Complete the Job window and save your work.
3. Choose the Define Salary Map button.
Mass Move
� Choose Work Structures –> Position –> Mass Move in theNavigator.
Mass Move – Assignments
1. Choose Work Structures –> Position –> Mass Move in theNavigator.
A – 34 Using Oracle HRMS – The Fundamentals (US)
2. Complete the Mass Move window and save your work.
3. Choose the Positions button.
4. Complete the Find Positions window.
5. Choose the Find button.
6. Complete the Mass Move – Positions window.
7. Choose the Assignments button.
Mass Move – Messages
1. Choose Work Structures –> Position –> Mass Move in theNavigator.
2. Complete the Mass Move window and save your work.
3. Choose the Positions button.
4. Complete the Find Positions window and choose the Find button.
5. Complete the Mass Move – Positions window and choose theAssignments button.
6. Complete the Mass Move – Assignments window and close it.
7. From the Mass Move – Positions window, choose the Valid Gradesbutton.
8. Complete the Valid Grades window and close it.
9. Close the Mass Move – Positions window.
10. From the Mass Move window, choose the Execute button.
11. If the Status field shows In Error or Complete with Warnings, aMessage button appears.
12. If the Message button appears, choose it to view messages in theMass Move – Messages window.
Note: Alternatively, you can view messages for saved (but not yetsuccessfully executed) mass moves as follows:
1. Choose Work Structures –> Position –> Mass Move in theNavigator.
2. Enter the name of the saved mass move in the Description field.
3. When the Mass Move window is populated with data and theMessage button appears, choose the Message button .

A – 35Windows and Reports
Mass Move – Positions
1. Choose Work Structures –> Position –> Mass Move in theNavigator.
2. Complete the Mass Move window.
3. Save your work.
4. Choose the Positions button.
5. In the resulting Find Positions window, select or enter a Source Joband Source Position.
6. Choose the Find button.
Mass Move – Valid Grades
1. Choose Work Structures –> Position –> Mass Move in theNavigator.
2. Complete the Mass Move window and save your work.
3. Choose the Positions button.
4. Complete the Find Positions window.
5. Choose the Find button.
6. Complete the Mass Move – Positions window.
7. Choose the Valid Grades button.
Mass Position Update: page 4 – 43
� Choose Work Structures –> Position –> Mass Position Update
Mass Update of Applicants
� Choose Recruitment –> Mass Updates for Person –> Mass Updateof Applicant Assignments in the Navigator.
Mass Update of Employee Assignments
� Choose People –> Mass Updates for Person –> Mass Update ofEmployee Assignments in the Navigator.
Medical Assessments
Do one of the following:
1. Choose People –> Enter and Maintain in the Navigator.
2. Enter or query a person.
3. Choose the Others button and select Medical Assessments.

A – 36 Using Oracle HRMS – The Fundamentals (US)
Or:
1. Choose Fastpath –> Medical Assessments in the Navigator.
2. In the resulting Find window, query the person.
Messages
1. Choose Mass Information eXchange: MIX –> Batch Element Entryin the Navigator.
2. Choose the Messages button.
Message Configuration (Advanced Benefits only)
� Choose Total Compensation –> General Definitions –> MessageConfiguration in the Navigator.
Miscellaneous Plan
� Choose People –> Total Comp Enrollment –> Benefits Enrollment–> Miscellaneous Plan in the Navigator.
MIX Batch Header
� Choose Mass Information eXchange: MIX –> Batch Element Entryin the Navigator.
Monitor Batch Processes (Advanced Benefits only)
� Choose Processes and Reports –> Monitor Batch Processes in theNavigator.
Monthly Participant Premium
� Choose People –> Total Comp Contribution –> Monthly ParticipantPremium in the Navigator.
Monthly Plan or Option Premium
� Choose –> People –> Total Comp Contribution –> MonthlyPremium in the Navigator.
Multiple Worksite Reporting
1. Choose Work Structures –> Organization –> Description in theNavigator.
2. Enter or query a Government Reporting Entity (GRE).
3. Choose the Others button and select Multiple Worksite Reporting

A – 37Windows and Reports
NACHA Rules
1. Choose Work Structures –> Organization –> Description in theNavigator.
2. Enter or query a Government Reporting Entity (GRE).
3. Choose the Others button and select NACHA Rules
Net Calculation Rules
1. Choose Total Compensation –> Basic –> Accrual Plans in theNavigator.
2. Enter or query an accrual plan name.
3. Choose the Net Calculation Rules button.
New Hire Reporting
1. Choose Work Structures –> Organization –> Description in theNavigator.
2. Enter or query a GRE.
3. Choose the Others button.
4. Select New Hire Reporting
Non–Flex Program
� Choose People –> Total Comp Enrollment –> Non–Flex Program inthe Navigator.
5. Click in the Additional Organization Information field.
Options
� Choose Total Compensation –> General Definitions –> Programsand Plans –> Options in the Navigator.
Organization
� Choose Work Structures –> Organization –> Description in theNavigator.
Organization Hierarchy
� Choose Work Structures –> Organization –> Hierarchy in theNavigator.
A – 38 Using Oracle HRMS – The Fundamentals (US)
Organization Hierarchy Diagrammer
� Choose Work Structures –> Organization –> Diagrammer in theNavigator.
Organizational Payment Method
� Choose Payroll –> Payment Methods in the Navigator.
Other Rates
1. Choose People –> Total Comp Enrollment –> Non–Flex Program inthe Navigator.
2. Query a person.
3. Choose the Others button and select Other Rates.
Parent Organization
1. Choose Work Structures –> Organization –> Description in theNavigator.
2. Enter or query an organization.
3. Choose the Others button and select Parent Organization.
Participant
� Choose Total Compensation –> General Definitions –> EligibilityProfiles –> Participant in the Navigator.
Participation Eligibility Profiles
� Choose Total Compensation –> General Definitions –> EligibilityProfiles –> Participation Eligibility Profiles
Participation Overrides (Advanced Benefits only)
� Choose People –> Total Comp Participation –> ParticipationOverrides in the Navigator.
Payment Schedule
1. Choose Total Compensation –> Rates/Coverage Definitions –> FlexCredits in the Navigator.
2. Query or enter a flex credit definition and choose the Processingtabbed region.
3. Choose the Payment Schedule button.

A – 39Windows and Reports
Payments
1. Choose People –> Total Comp Contribution –> RecordContribution or Distribution
2. Choose the View Payments window.
Pay Scale
� Choose Work Structures –> Grade –> Pay Scale in the Navigator.
Payroll
� Choose Payroll –> Description in the Navigator.
Payroll Processes (Payroll only)
� Choose View –> Payroll Process Results in the Navigator.
People
� Choose People –> Enter and Maintain in the Navigator.
People Folder
� Choose View –> Lists –> People Folder in the Navigator.
1. Choose People –> Enter and Maintain in the Navigator.
2. Enter or query an employee, and choose the Assignment button.
3. Choose the Tax Information button.
4. Choose the Percentage button.
Performance
1. Choose People –> Enter and Maintain in the Navigator.
2. Enter or query an employee, and choose the Assignment button.
3. Choose the Salary button.
4. Choose the Performance button.
Or:
1. Choose People –> Enter and Maintain in the Navigator.
2. Enter or query an employee, and choose the Assignment button.
3. Choose the Others button and select Performance.
Period Dates
1. Choose Payroll –> Description in the Navigator.

A – 40 Using Oracle HRMS – The Fundamentals (US)
2. Enter or query a payroll.
3. Choose the Period Dates button.
Period–to–Date Limits
Do one of the following:
� Choose Total Compensation –> General Definitions –>Rate/Coverage Definitions –> Period–to–Date Limits in theNavigator.
Or:
1. Choose Total Compensation –> Rates/Coverage Definitions –> FlexCredits in the Navigator.
2. Query a compensation object.
3. Choose the Activity Rate button.
4. Choose the Period to Date Limit button.
Period Types
� Choose Other Definitions –> Time Periods in the Navigator.
Person Benefits Assignment
� Choose People –> Total Comp Participation –> Person BenefitsAssignment
Person Benefits Balances
� Choose People –> Total Comp Participation –> Person BenefitsBalances in the Navigator.
Person Changes (Advanced Benefits only)
1. Choose Total Compensation –> General Definitions –> AdditionalSetup –> Life Event Reasons in the Navigator.
2. Query or enter a life event.
3. Choose the Person Changes button.
4. Choose the Define Person Change button.
Person Changes Cause Life Events (Advanced Benefits only)
1. Choose Total Compensation –> General Definitions –> AdditionalSetup –> Life Event Reasons in the Navigator.
2. Query or enter a life event.

A – 41Windows and Reports
3. Choose the Person Changes button.
Person Communications (Advanced Benefits only)
� Choose People –> Enrollment Process –> Person Communicationsin the Navigator.
Person Enrollment Action Items (Advanced Benefits only)
Do one of the following:
� Choose People –> Total Comp Enrollment –> Enrollment Process–> Person Enrollment Action Items in the Navigator.
Or:
1. Choose People –> Total Comp Enrollment –> Benefits Enrollment–> Flex Program in the Navigator.
2. Query a person.
3. Choose the Action Items button.
Person Enrollment Certificates (Advanced Benefits only)
Do one of the following:
� Choose People –> Total Comp Enrollment –> Enrollment Process–> Person Enrollment Certifications in the Navigator.
Or:
1. Choose People –> Total Comp Enrollment –> Benefits Enrollment–> Flex Program in the Navigator.
2. Query a person.
3. Choose the Certifications button.
Person Primary Care Provider
� Choose People –> Total Comp Enrollment –> Benefits Enrollment–> Person Primary Care Provider in the Navigator.
Person Types
� Choose Other Definitions –> Person Types in the Navigator.
Person Type Usage
� Choose Fastpath –> Person Type Usage in the Navigator.

A – 42 Using Oracle HRMS – The Fundamentals (US)
Personal Payment Method
Do one of the following:
1. Choose People –> Enter and Maintain in the Navigator.
2. Enter or query an employee.
3. Choose the Assignment button.
4. Choose the Pay Method button, or choose the Others button andselect Pay Method.
Or:
1. Choose Fastpath –> Pay Method in the Navigator.
2. In the resulting Find window, query the person.
Phone Numbers
Do one of the following:
1. Choose People –> Enter and Maintain in the Navigator.
2. Enter or query an employee.
3. Choose the Others button.
4. Choose Phones.
Or:
1. Choose Fastpath –> Phones in the Navigator.
2. In the resulting Find window, query the person.
Picture
Do one of the following:
1. Choose People –> Enter and Maintain in the Navigator
2. Enter or query a person.
3. Choose the Picture button.
Or:
1. Choose Fastpath –> Picture in the Navigator.
2. In the resulting Find window, query the person.
Plan and Plan Type
1. Choose Total Compensation –> Programs and Plans –> Programs inthe Navigator.

A – 43Windows and Reports
Plan Enrollment Requirements
� Choose Total Compensation –> General Definitions –> Programsand Plans –> Plan Enrollment Requirements in the Navigator.
2. Query or enter a program.
3. Choose the Plan and Plan Types button.
Plan in Program Participation Eligibility
1. Choose Total Compensation –> Programs and Plans –> Programs inthe Navigator.
2. Query or enter a program.
3. Choose the Plan and Plan Types button.
4. Choose the Plans tab.
5. Choose the Participation Eligibility button.
Plan Reimbursement
� Choose Total Compensation –> General Definitions –> Programsand Plans –> Plan Reimbursement in the Navigator.
Plans
� Choose Total Compensation –> General Definitions –> Programsand Plans –> Plans in the Navigator.
Plan Type Participation Eligibility
1. Choose Total Compensation –> Programs and Plans –> Programs inthe Navigator.
2. Query or enter a program.
3. Choose the Plan and Plan Types button.
4. Choose the Plan Type tab.
5. Choose the Participation Eligibility button.
Plan Types
� Choose Total Compensation –> General Definitions –> Programsand Plans –> Plan Types in the Navigator.
Position
� Choose Work Structures –> Position –> Description in theNavigator.

A – 44 Using Oracle HRMS – The Fundamentals (US)
Position Copy
Choose Work Structures –> Position –> Position Copy in the Navigator.
Position Evaluation
1. Choose Work Structures –> Position –> Description in theNavigator.
2. Enter or query a position.
3. Choose the Evaluation button.
Position Hierarchy
� Choose Work Structures –> Position –> Hierarchy in the Navigator.
Position Hierarchy Diagrammer
� Choose Work Structures –> Position –> Diagrammer in theNavigator.
Position Occupancy Folder
1. Choose Work Structures –> Position –> Description in theNavigator.
2. Query a position.
3. Choose the Occupancy button.
Position Reporting To
1. Choose Work Structures –> Position –> Description in theNavigator.
2. Enter or query a position.
3. Choose the Reporting To button.
Position Requirements
1. Choose Work Structures –> Position –> Description in theNavigator.
2. Enter or query a position.
3. Choose the Requirements button.
Position Transaction
Choose Work Structures –> Position –> Position Transaction in theNavigator.

A – 45Windows and Reports
Possible Certifications
1. Choose People –> Total Comp Participation
2. Choose the Enrollment Opportunities button.
3. Choose the Electable Choices button
4. Choose the Possible Certifications button
Postal/Zip
� Choose Total Compensation –> General Definitions –>Eligibility/Rate Factors –> Postal/Zip in the Navigator.
Primary Care Providers
Do one of the following:
� Choose People –> Total Comp Enrollment –> Person Primary CareProvider
Or:
1. Choose People –> Total Comp Enrollment –> Flex Program in theNavigator.
2. Query a person.
3. Choose the Care Providers button.
Process Log
Choose Processes and Reports –> Process Log in the Navigator.
Program/Plan Years
� Choose Total Compensation –> General Definitions –> AdditionalSetup –> Program/Plan Years in the Navigator.
Programs
� Choose Total Compensation –> General Definitions –> Programsand Plans –> Programs in the Navigator.
Program Enrollment Requirements
� Choose Total Compensation –> General Definitions –> Programsand Plans –> Program Enrollment Requirements in the Navigator.
Program Participation Eligibility
1. Choose Total Compensation –> Programs and Plans –> Programsin the Navigator.

A – 46 Using Oracle HRMS – The Fundamentals (US)
2. Query or enter a program.
3. Choose the Participation Eligibility button.
Program Waive Certifications
1. Choose Total Compensation –> Programs and Plans –> Programsin the Navigator.
2. Query or enter a program.
3. Choose the Plan and Plan Types button.
4. Choose the Plan Types tab.
5. Choose the Waive button.
6. Choose the Waive Certification button.
Program Waive Reasons
1. Choose Total Compensation –> Programs and Plans –> Programs inthe Navigator.
2. Query or enter a program.
3. Choose the Plan and Plan Types button.
4. Choose the Plan Types tab.
5. Choose the Waive button.
Qualifications
1. Choose People –> Enter and Maintain in the Navigator.
2. Enter or query a person.
3. Choose the Others button and select Qualifications.
Qualification Types
� Choose Career Management –> Qualification Types in theNavigator.
QuickPaint Inquiry
1. Choose Processes and Reports –> Run a QuickPaint Report in theNavigator.
2. Query a report that has been run.
3. Choose the View Report button.
A – 47Windows and Reports
QuickPay (Payroll only)
Do one of the following:
1. Choose People –> Enter and Maintain in the Navigator.
2. Enter or query an employee.
3. Choose the Assignment button.
4. Choose the Others button and select QuickPay.
Or:
1. Choose Fastpath –> QuickPay in the Navigator.
2. In the resulting Find window, query the person.
Rating Scales
� Choose Career Management –> Rating Scales in the Navigator.
Record Continuing Benefits Payments
� Choose People –> Total Comp Contribution –> Record ContinuingBenefits Payments in the Navigator.
Record Layout Advanced Conditions
1. Choose Benefits Extract –> Layout Definition in the Navigator.
2. Choose the Record Layout tab and query or enter a record layout.
3. Select a Data Element and choose the Advanced Conditions button.
Record Layout Include Conditions
1. Choose Mass Information eXchange –> System Extract –> LayoutDefinition in the Navigator.
Recruiting For
1. Choose Recruitment –> Recruitment Activity in the Navigator.
2. Enter or query a recruitment activity.
3. Choose the Recruiting For button.
Recruitment Activity
� Choose Recruitment –> Recruitment Activity in the Navigator.

A – 48 Using Oracle HRMS – The Fundamentals (US)
Regulations
� Choose Total Compensation –> General Definitions –> AdditionalSetup –> Regulations in the Navigator.
Regulatory Bodies and Regulations
1. Choose Total Compensation –> General Definitions –> AdditionalSetup –> Reporting Groups in the Navigator.
2. Query or enter a reporting group.
3. Choose the Plan Regulatory Bodies and Regulations button.
Reimbursements Requests (Advanced Benefits only)
� Choose People –> Total Comp Distribution –> ReimbursementsRequests in the Navigator.
Related Person Changes (Advanced Benefits only)
1. Choose Total Compensation –> General Definitions –> AdditionalSetup –> Life Event Reasons in the Navigator.
2. Query or enter a life event.
3. Choose the Related Person Changes button.
4. Choose the Define Related Person Change button.
Related Person Changes Cause Life Events (Advanced Benefits only)
1. Choose Total Compensation –> General Definitions –> AdditionalSetup –> Life Event Reasons in the Navigator.
2. Query or enter a life event.
3. Choose the Related Person Changes button.
1. Choose Work Structures –> Organization –> Description in theNavigator.
2. Enter or query a Business Group.
3. Choose the Others button and select Reporting Categories.
Reporting Groups
� Choose Total Compensation –> General Definitions –> AdditionalSetup –> Reporting Groups in the Navigator.
A – 49Windows and Reports
Reporting Statuses
1. Choose Work Structures –> Organization –> Description in theNavigator.
2. Enter or query a Business Group.
3. Choose the Others button and select Reporting Statuses.
Request Letter
� Choose Recruitment –> Request Recruitment Letter in theNavigator.
Request Set
� Choose Security –> Report Sets in the Navigator.
Requisition and Vacancy
� Choose Recruitment –> Requisition and Vacancy in the Navigator.
RetroPay Set (Payroll only)
� Choose Payroll –> RetroPay Set in the Navigator.
Reverse Payroll Run (Payroll only)
Do one of the following:
1. Choose People –> Enter and Maintain in the Navigator.
2. Enter or query an employee.
3. Choose the Assignment button.
4. Choose the Others button and select Reverse Run.
Or:
1. Choose Fastpath –> Reverse Payroll Run in the Navigator.
2. In the resulting Find window, query the person.
Roles
� Choose Transaction Maintenance Forms –> Roles in the Navigator.
Routing
1. Choose Work Structures –> Position –> Position Transaction in theNavigator.
2. Choose Save from the File menu.

A – 50 Using Oracle HRMS – The Fundamentals (US)
Or:
1. Choose Work Structures –> Budget –> Budget Worksheet in theNavigator.
2. Choose Save from the File menu.
Routing Lists
� Choose Transaction Maintenance Forms –>Routing Lists in theNavigator.
Rows
1. Choose Other Definitions –> Table Structure in the Navigator.
2. Enter or query a table.
3. Choose the Rows button.
Run QuickPaint Report
� Choose Processes and Reports –> Run a QuickPaint Report in theNavigator.
Salary Administration
Do one of the following:
1. Choose People –> Enter and Maintain in the Navigator.
2. Enter or query an employee.
3. Choose the Assignment button.
4. Choose the Salary button.
Or:
1. Choose Fastpath –> Salary in the Navigator.
2. In the resulting Find window, query the person.
Salary Basis
� Choose Total Compensation –> Basic –> Salary Basis in theNavigator.
Salary History
Do one of the following:
1. Choose View –> Histories –> Salary in the Navigator.
2. Run a query in the Assignments Folder window.

A – 51Windows and Reports
3. Select an employee assignment and choose the Salary Historybutton.
Or:
1. Choose Fastpath –> Salary History in the Navigator.
2. In the resulting Find window, query the person.
Salary Management Folder
� Choose People –> Salary Management in the Navigator.
Salary Surveys
� Choose Total Compensation –> Basic –> Salary Survey in theNavigator.
Saving Plan
1. Choose People –> Total Comp Enrollment –> Benefits Enrollment–> Savings Plan in the Navigator.
2. Choose the Record Layout tab and query or enter a record layout.
3. Select a Data Element and choose the Include Conditions button.
Scale Rate
� Choose Work Structures –> Grade –> Point Values in the Navigator.
Schools and Colleges
� Choose Career Management –> Schools and Colleges in theNavigator.
Schools and Colleges Attended
1. Choose People –> Enter and Maintain in the Navigator.
2. Enter or query a person.
3. Choose the Others button and select Schools/Colleges.
Secondary Statuses
Do one of the following:
1. Choose People –> Enter and Maintain in the Navigator.
2. Enter or query an applicant or employee.
3. Do one of the following:
For an applicant:
A – 52 Using Oracle HRMS – The Fundamentals (US)
• Choose the Others button and select Application.
• Choose the Secondary Status button.
For an employee:
• Choose the Assignment button.
• Choose the Others button and select Secondary Status.
Or:
1. Choose Fastpath –> Secondary Status in the Navigator.
2. In the resulting Find window, query the person.
Security Profile
� Choose Security –> Profile in the Navigator.
Service Areas
� Choose Total Compensation –> General Definitions –>Eligibility/Rate Factors –> Service Areas in the Navigator.
Sort
1. Choose Mass Information eXchange –> System Extract –> LayoutDefinition in the Navigator.
2. Choose the File Layout tab and select a Record Name.
3. Choose the Sort button.
Special Information
Do one of the following:
1. Choose People –> Enter and Maintain in the Navigator.
2. Enter or query a person.
3. Choose the Special Info button.
Or:
1. Choose Fastpath –> Special Information in the Navigator.
2. In the resulting Find window, query the person.
Special Rates
1. Choose People –> Total Comp Enrollment –> Benefits Enrollment–> Flex Program in the Navigator.
2. Query a person.

A – 53Windows and Reports
3. Choose the Special Rates button.
Special Information Types
� Choose Other Definitions –> Special Information Types in theNavigator.
SQWL Employer Rules (1) (Payroll only)
1. Choose Work Structures –> Organization –> Description in theNavigator.
2. Enter or query a Government Reporting Entity (GRE).
3. Choose the Others button and select SQWL Employer Rules (1)
SQWL Employer Rules (2) (Payroll only)
1. Choose Work Structures –> Organization –> Description in theNavigator.
2. Enter or query a Government Reporting Entity (GRE).
3. Choose the Others button and select SQWL Employer Rules (2)
SQWL Generic Transmitter Rules (Payroll only)
1. Choose Work Structures –> Organization –> Description in theNavigator.
2. Enter or query a Government Reporting Entity (GRE).
3. Choose the Others button and select SQWL Generic TransmitterRules
Standard Distributions/Contributions
� Choose Total Compensation –> General Definitions –>Rate/Coverage Definitions –> StandardDistributions/Contributions in the Navigator.
SQWL State-Specific Transmitter Rules (Payroll only)
1. Choose Work Structures –> Organization –> Description in theNavigator.
2. Enter or query a Government Reporting Entity (GRE).
3. Choose the Others button and select SQWL State Transmitter Rules

A – 54 Using Oracle HRMS – The Fundamentals (US)
State Tax Rules
1. Choose Work Structures –> Organization –> Description in theNavigator.
2. Enter or query a Government Reporting Entity (GRE).
3. Choose the Others button and select State Tax Rules.
State Tax Rules <Employee>
1. Choose People –> Enter and Maintain in the Navigator.
2. Enter or query an employee or applicant.
3. Chose the Tax Information button.
4. Choose the Tax information button from the Federal Tax Rules<Employee> window.
Statement of Earnings (Payroll only)
Do one of the following:
1. Choose View –> Assignment Process Results
2. Choose the SOE Report button.
Or:
1. Choose People –> Enter and Maintain in the Navigator.
2. Enter or query an employee.
3. Choose the Assignment button.
4. Choose the Others button and select Statement of Earnings.
Or:
1. Choose Fastpath –> US Statement of Earnings in the Navigator.
2. In the resulting Find window, query the person.
Standard Rates
� Choose Total Compensation –> General Definitions –>Rate/Coverage Definitions –> Standard Rates in the Navigator.
Submit a New Request
1. Choose Processes and Reports –> Submit Processes and Reports inthe Navigator.
2. Select Single Request or a Request Set.

A – 55Windows and Reports
Supplementary Roles
1. Choose People –> Enter and Maintain in the Navigator.
2. Enter or query an employee.
3. Choose the Others button and select Supplementary Roles.
Table Structure
� Choose Other Definitions –> Table Structure in the Navigator.
Table Values
� Choose Other Definitions –> Table Values in the Navigator.
1. Choose People –> Enter and Maintain in the Navigator.
2. Enter or query an employee.
3. Choose the Others button and select End Application.
Or:
1. Choose Fastpath –> End Application in the Navigator.
2. In the resulting Find window, query the person.
Do one of the following:
1. Choose People –> Enter and Maintain in the Navigator.
2. Enter or query an employee.
3. Choose the Others button and select End Employment.
Or:
1. Choose Fastpath –> End Employment in the Navigator.
2. In the resulting Find window, query the person.
Transaction Categories
� Choose Transaction Maintenance Forms –> Transaction Categoriesin the Navigator.
Transaction Category Wizard
� Choose Maintenance Forms –> Transaction Category Wizard.
Transaction Status
� Choose Security –> Transaction Status in the Navigator

A – 56 Using Oracle HRMS – The Fundamentals (US)
Transaction Templates
� Choose Transaction Maintenance Forms –>Transaction Templatesin the Navigator.
Update Payroll Run (Payroll only)
� Choose Payroll –> Update Payroll Run in the Navigator.
User Types and Statuses
� Choose Other Definitions –>User Types and Statuses
Valid Grades (for jobs)
1. Choose Work Structures in the Navigator.
2. Choose either Job –> Description or Position –> Description.
3. Enter or query a job or position.
4. Choose the Valid Grades button.
Valid Payment Methods
1. Choose Payroll –> Description in the Navigator.
2. Enter or query a payroll.
3. Choose the Valid Payment Methods button.
Variable Rate Profiles
� Choose Total Compensation –> General Definitions –>Rate/Coverage Definitions –> Variable Rate Profiles in theNavigator.
VETS–100 Filing
1. Choose Work Structures –> Organization –> Description in theNavigator.
2. Enter or query a Government Reporting Entity (GRE).
3. Choose the Others button and select VETS–100 Filing.
View Absence History
� Choose View –> Histories –> Absence in the Navigator.
View Earnings and Deductions Balances
Do one of the following:
A – 57Windows and Reports
1. Choose View –> Employee Balances in the Navigator.
2. Select an employee assignment and choose the Balances button.
Or:
1. Choose Fastpath –> Employee Balances in the Navigator.
2. In the resulting Find window, query the person.
View Element Entry History for Employee
1. Choose View –> Histories –> Entries in the Navigator.
2. Run a query in the Assignments Folder window.
3. Select an employee assignment and choose the Entry Historybutton.
View Employee Dental, Medical and Vision Benefits
1. Choose View –> Employee Benefits in the Navigator.
2. Run a query in the Assignments Folder window.
3. Select an employee assignment and choose the View Benefitsbutton.
View Employee Grade Comparatio
� Choose View –> Grade Comparatio in the Navigator.
View Enrollment Results
� Choose People –> Total Comp Enrollment –> View EnrollmentResults in the Navigator.
View Participation Information (Advanced Benefits only)
� Choose People –> Total Comp Participation –> View ParticipationInfomation in the Navigator.
View Program Structure
� Choose Total Compensation –> Programs and Plans –> ViewProgram Structure in the Navigator.
View Run Messages (Payroll only
� Choose View –> System Messages in the Navigator.
View Tax Balances
Do one of the following:

A – 58 Using Oracle HRMS – The Fundamentals (US)
1. Choose View –> Tax Information –> Tax Balances in the Navigator.
2. Select an employee assignment and choose the Balances button.
Or:
1. Choose Fastpath –> Tax Balances in the Navigator.
2. In the resulting Find window, query the person.
View Vacancies
� Choose View –> Vacancies in the Navigator.
W2 Reporting Rules
1. Choose Work Structures –> Organization –> Description in theNavigator.
2. Enter or query a Government Reporting Entity (GRE).
3. Choose the Others button and select W2 Reporting Rules.
W941 (Payroll only)
� Choose View –> Tax Information–> Form 941 Information in theNavigator
WC Codes and Rates
� Choose Work Structures –> Job –> Workers Compensation Rates inthe Navigator
Wage Attachment Earnings Rules
� Choose Total Compensation –> Wage Attachment –> EarningsRules in the Navigator.
Wage Attachment Exemption Rules
� Choose Total Compensation –> Wage Attachment –> ExemptionRules in the Navigator.
Wage Attachment Limit Rules
� Choose Total Compensation –> Wage Attachment –> Limit Rules inthe Navigator.
Waive Participation (Advanced Benefits only)
� Choose People –> Total Comp Participation –> Waive Participationin the Navigator.
A – 59Windows and Reports
1. Choose Total Compensation –> Programs and Plans –> Plans in theNavigator.
2. Query or enter a plan.
3. Choose the Waiving button.
What–if Eligibility (Advanced Benefits only)
� Choose People –> Total Comp Participation –> What–if Eligibilityin the Navigator.
Work Choices (Job and Position)
1. Choose Work Structures –>Job or Position –> Description in theNavigator.
2. Enter or query a job or position.
3. Choose the Work Choices button.
Work Choices (Person)
1. Choose People –> Enter and Maintain in the Navigator.
2. Enter or query a person.
3. Choose the Others button and select Work Choices.
Work Day Information
1. Choose Work Structures –> Organization –> Description in theNavigator.
2. Enter or query an organization.
3. Choose the Others button and select Work Day Information.
Work Schedule
Worklist Window
1. Choose Processes and Reports –> Workflow Notification in theNavigator.
1. Choose Work Structures –> Organization –> Description in theNavigator.
2. Enter or query an organization.
3. Choose the Others button and select Work Schedule.

A – 60 Using Oracle HRMS – The Fundamentals (US)
Work Site Filing
1. Choose Work Structures –> Organization –> Description in theNavigator.
2. Enter or query a Reporting Establishment.
3. Choose the Others button and select Work Site Filing.
Worker’s Compensation
� Choose Work Structures –> Job –> Workers Compensation Codes inthe Navigator
Worksheet
1. Choose Work Structures –>Budget –>Worksheet in the Navigator.
2. Define the properties of the worksheet.
3. Choose the Create Worksheet button.
Worksheet Characteristics
� Choose Work Structures –>Budget –>Worksheet in the Navigator.
A – 61Windows and Reports
Reports and Processes in Oracle HRMS
AAP Reports
� Provides Job group analysis and workflow analysis reports.
See: Using Oracle HRMS – The Fundamentals.
Absences Report
� Absence details for an employee or organization, for some or allabsence types.
See: Managing Total Compensation Using Oracle HRMS.
ADA Reports
� Shows how your enterprise is responding to the requests ofemployees with disabilities.
Annual Unemployment Insurance (Form 940) Information (Payrollonly)
� Provides numbers for annual 940 filing.
Assignment Status Report
� All employees, applicants or both assigned to selected workstructures.
See: Managing Your Workforce Using Oracle HRMS.
Audit Report (Payroll only)
� Selects person, employee or applicant, assignment, element,recurring or non–recurring status. Shows Business Group, GRE,assignment details, person entering data (responsibility), inputdate, effective change date, details of person affected. Lists allfields changed, with input date and effective date, old value andnew value, responsibility, workstation address.
See: Configuring, Reporting and System Administration in Oracle HRMS.
Budget Position Detail Report
� Lists the status of all Positions that are part of a specific Budget.
See: Using Oracle HRMS – The Fundamentals.
COBRA Reports
� Coverage of payments report and publish standard COBRA letter.

A – 62 Using Oracle HRMS – The Fundamentals (US)
See: Managing Total Compensation Using Oracle HRMS.
Cost Breakdown Report (Payroll only)
� Summarized costing totals for a specified costing process andsummarized costing totals for a particular consolidation set orpayroll and payroll period.
See: Using Oracle HRMS – The Fundamentals.
Cost Breakdown Summary Report (Payroll only)
� Lists costing details by date range, payroll, consolidation set, GREand segment values.
See: Using Oracle HRMS – The Fundamentals.
Current and Projected Progression Point Values Report
� The expected results of running the Increment Progression Pointsprocess, that is the projected point and value changes for a group ofemployees.
Download HRMS Taskflows Process
� Run this process to export a task flow from your database to a flatfile that you can then import to another database.
See: Configuring, Reporting and System Administration in Oracle HRMS.
Earnings Audit (Payroll only)
See: Configuring, Reporting and System Administration in Oracle HRMS.
� Report detailing all employees with a particular element beingprocessed in a given pay period.
See: Running Your Payroll Using Oracle HRMS.
EEO–1 Reports
� EEO individual establishment and headquarters report and EEOconsolidated report.
See: Using Oracle HRMS – The Fundamentals.
EEO4 Reports
� Run this report for state and local governments.
See: Using Oracle HRMS – The Fundamentals.

A – 63Windows and Reports
EEO5 Reports
� Run this report for the school system or district.
See: Using Oracle HRMS – The Fundamentals.
Element Link Details Report
� The eligibility criteria for an element or group of elements.
See: Managing Total Compensation Using Oracle HRMS.
Element Result Listing
� Run results processed for a particular element over a definedperiod, and run results for selected input values of each employee’slast assignment process.
See: Running Your Payroll Using Oracle HRMS.
Employee Increment Results Report
� The actual results of running the Increment Progression Pointsprocess, that is progression point and value changes for a group ofemployees.
See: Using Oracle HRMS – The Fundamentals.
Employee Organization Movements Report
� New hires, terminations, transfers in and transfer out of a selectedorganization, or organization hierarchy.
See: Managing Your Workforce Using Oracle HRMS.
Employee Payroll Movements Report (Payroll only)
� New hires, terminations, transfers in and transfer out of a selectedpayroll.
See: Managing Your Workforce Using Oracle HRMS.
Employee Run Results (Payroll only)
� Users may select various elements for the various time frames,assignment of GREs. The report shows the run results for selectedinformation by pay period.
See: Running Your Payroll Using Oracle HRMS.

A – 64 Using Oracle HRMS – The Fundamentals (US)
Employee Summary Report
� Addresses, contacts, periods of service, assignments, specialinformation, personal payment methods and element entries for aselected employee.
See: Managing Your Workforce Using Oracle HRMS.
Federal W–2 (magnetic media) (Payroll only)
� Creation of Federal W–2 magnetic media and summary totals.
See: Running Your Payroll Using Oracle HRMS.
Federal W–2 Forms (Payroll only)
� Prints employee W–2s at an individual level, thus allowing W–2s tobe created as employees terminate, or for an entire GRE.
See: Running Your Payroll Using Oracle HRMS.
Federal 1099–R (magnetic media) (Payroll only)
� Creation of Federal 10999R magnetic media.
See: Running Your Payroll Using Oracle HRMS.
Federal 1099–R Forms (Payroll only)
� Provides for printing of retiree 1099–R at an individual level as wellas all employees in a GRE.
See: Running Your Payroll Using Oracle HRMS.
Full Personal Details Report Set
� Person details, applicant details, assignment details and workdetails for one employee.
See: Managing Your Workforce Using Oracle HRMS.
GRE Totals (Payroll only)
� Reconciliation report to be used to assist in period end processingbalancing purposes. This report shows Federal and State leveltaxable balances and withholdings.
See: Running Your Payroll Using Oracle HRMS.

A – 65Windows and Reports
Gross to Net Summary US (Payroll only)
� Details of total earnings and deductions summarized for aspecified payroll and payroll period.
See: Running Your Payroll Using Oracle HRMS.
Invalid Address Report (Payroll only)
� Lists any address information inconsistencies.
See: Running Your Payroll Using Oracle HRMS.
Job and Position Skills Matching Report
� Lists of employees, applicants or both that meet some or all skillrequirements of a job or position.
See: Managing Your Workforce Using Oracle HRMS.
Multiple Worksite Report
� Reports on wages and locations of employees in all the multiplelocations across all SUIs and other GREs.
See: Managing Your Workforce Using Oracle HRMS.
NACHA (magnetic media) (Payroll only)
� Provides for creation of employee NACHA information to besubmitted.
See: Running Your Payroll Using Oracle HRMS.
NACHA Report (Payroll only)
� Detail of employee NACHA information.
See: Running Your Payroll Using Oracle HRMS.
Negative Balance Reports (Payroll only)
� Report listing any negative balances found due to user adjustmentsor conversion issues..
See: Running Your Payroll Using Oracle HRMS.
New Hire Reports
� Report on newly hired or rehired employees.
See: Using Oracle HRMS – The Fundamentals.

A – 66 Using Oracle HRMS – The Fundamentals (US)
Organization Hierarchy Report
� The organizations and optionally their managers below a selectedposition in a particular hierarchy.
See: Using Oracle HRMS – The Fundamentals.
Organizational Position Summary Report
� Lists the budget status for all positions within a Position ControlOrganization.
See: Using Oracle HRMS – The Fundamentals.
OSHA Reports
� Report on work related injuries or illness.
See: Using Oracle HRMS – The Fundamentals.
Payments Register (Payroll only)
� Reports listing payments made to employees, listing paymentmethod, check number, and amount.
See: Running Your Payroll Using Oracle HRMS.
Payroll Message Report (Payroll only)
� Display messages for processes connected to specified payrolls.
See: Running Your Payroll Using Oracle HRMS.
Position Element Summary Report
� Lists the budget status for an element for all positions in theBusiness Group.
See: Using Oracle HRMS – The Fundamentals.
Position Element Detail Report
� Lists the budget status for all budgeted elements for a specificPosition and Organization.
See: Using Oracle HRMS – The Fundamentals.
Position Hierarchy Report
� The positions and optionally their holders below a selected positionin a particular hierarchy.
See: Using Oracle HRMS – The Fundamentals.

A – 67Windows and Reports
Position Summary Report
� Lists the budget status of all Positions in a specific Organization.
See: Using Oracle HRMS – The Fundamentals.
Report Under Budgeted Positions (Salary)
� Run this report if you administer position control budgets. Thereport lists the positions that are under budgeted for the selectedorganization and all subordinate organizations in the organizationhierarchy.
See: Using Oracle HRMS – The Fundamentals
Requisition Summary Report
� Applicants and their interview schedules for a selection ofvacancies.
See: Managing Your Workforce Using Oracle HRMS.
Salary Review Report
� Current, past and proposed salaries for a selected list of employees.
See: Managing Total Compensation Using Oracle HRMS.
Series EE Bond Purchase Report
� Compares actual staffing level with budgeted levels over a specificperiod.
Staffing Budget Details Report
� Actual staffing level with budgeted levels over a specified period.
See: Managing Your Workforce Using Oracle HRMS.
Statement of Earnings (Payroll only)
� Check writer process produces paychecks with statement ofearnings.
See: Running Your Payroll Using Oracle HRMS.
Terminations Report
� The number of employees from selected organizations leaving yourenterprise within a particular period, and the reason for leaving.
See: Managing Your Workforce Using Oracle HRMS.

A – 68 Using Oracle HRMS – The Fundamentals (US)
VETS–100 Reports
� Shows number of special disabled and Vietnam era veterans youemploy in each of nine job categories. Also, show total number ofnew hires in each job category and number of new hires in eachcategory who qualify as special disabled veterans and Vietnam eraveterans.
See: Using Oracle HRMS – The Fundamentals.
Void Payments (Payroll only)
� Details of cancelled check payments.
See: Running Your Payroll Using Oracle HRMS.
Processes
Audit Trail Update Tables Process
� This process is used to set up audit trail on selected windows.
See: Configuring, Reporting and System Administration in Oracle HRMS.
Audit Trail Update Datetracked Tables Process
� This process is used to set up audit trail on selected windows.
See: Configuring, Reporting and System Administration in Oracle HRMS.
BEE Batch Process (Purge)
� This process is used to delete a batch from the BEE tables oncompletion of the concurrent request.
See: Managing Total Compensation Using Oracle HRMS.
BEE Batch Process (Validate)
� This process is used to test each batch line against predefined rulesabout element entries, and against any additional validationprocedures that you have created.
See: Managing Total Compensation Using Oracle HRMS.
BEE Batch Process (Transfer)
� This process is used to create element entries in the Oracle HRMSEntries table from the existing entries in the BEE temporary tables.
See: Managing Total Compensation Using Oracle HRMS.

A – 69Windows and Reports
BEE Batch Process (Rollback)
� This process is used to completely remove a BEE transfer, providedyou have not purged the batch from the BEE tables
See: Managing Total Compensation Using Oracle HRMS.
Bulk Compile Formulas
� Run this process to compile all your formulas.
See: Using Oracle FastFormula.
Calculate Commitment
� Run this process to calculate the projected expenditures for abudget over a given period. You can calculate commitments for anentire budget or for a single position in a budget.
See: Using Oracle HRMS – The Fundamentals
Check Writer Process (Payroll only)
� This process is used to write sequences of checks for your payrollrun.
See: Running Your Payroll Using Oracle HRMS.
Close Action Items Process (Advanced Benefits Only)
� Run this process before the Close Enrollments Process to close anyopen action items that are required or optional for the persons youselect.
See: Managing Total Compensation Using Oracle HRMS.
Close Enrollments Process (Advanced Benefits Only)
� Run this process to close a person’s enrollment after elections havebeen made.
Commitment GL Posting
� You run the Commitment GL Posting batch process to transferbudget commitments from Oracle HRMS to Oracle General Ledger.
See: Managing Total Compensation Using Oracle HRMS.
Communications Triggers Process (Advanced Benefits Only)
� Use the communications triggers process to generatecommunications for persons who meet the selection criteria thatyou specify.

A – 70 Using Oracle HRMS – The Fundamentals (US)
See: Managing Total Compensation Using Oracle HRMS.
Costing Process
� Generates journal entries for your ledgers and costing informationrelating to labor costs.
See: Using Oracle HRMS – The Fundamentals.
Default Enrollment Process (Advanced Benefits Only)
� Run this process to enroll participants into the default benefit planwhen participants have not made an election.
See: Managing Total Compensation Using Oracle HRMS.
Dependent Eligibility Process (Advanced Benefits Only)
� Run this process for those benefit plans that include an age factor indetermining dependent eligibility.
See: Managing Total Compensation Using Oracle HRMS.
Extract Process (Advanced Benefits Only)
� Run the extract process to save the output of your system extract tothe directory and file that you specified in your extract definition.
See: Managing Total Compensation Using Oracle HRMS.
Enable Multiple Security Groups Process
� Run this process when you first set up single responsibility security.
See: Configuring, Reporting and System Administration in Oracle HRMS.
Grant Permissions to Roles Process (ROLEGEN)
� Dynamically grants select permissions on Oracle HRMS tables andviews to the HR_REPORTING_USER role.
See: Configuring, Reporting and System Administration in Oracle HRMS.
Generate Secure User Process (SECGEN)
� Run this process when you create a new security profile thatreferences a reporting user.
Maintain Participant Eligibility Process (Standard Benefits Only)
� Run this process if you license Standard Benefits and you want todetermine benefits eligibility for a segment of your employeepopulation. This process also de–enrolls currently enrolled

A – 71Windows and Reports
participants who lose benefits eligibility and ends their associatedbenefits coverage and activity rate.
See: Configuring, Reporting and System Administration in Oracle HRMS.
NACHA Process (Payroll only)
� Produces files that you load on magnetic tape and despatch tobanks for direct deposit payments.
See: Running Your Payroll Using Oracle HRMS.
Participation Batch Process: Life Event (Advanced Benefits Only)
� Run this process to determine eligibility and electable choices forbenefits participants based on a life event you select.
See: Managing Total Compensation Using Oracle HRMS.
Participation Batch Process: Scheduled (Advanced Benefits Only)
� Run this process to determine eligibility and electable choices forbenefits participants based on a scheduled enrollment event.
See: Managing Total Compensation Using Oracle HRMS.
Participation Batch Process: Selection (Advanced Benefits Only)
� Run this process to determine eligibility for benefits participants.This process does not create electable choices.
See: Managing Total Compensation Using Oracle HRMS.
PrePayments Process (Payroll only)
� Use this process to distribute employee pay over more than onepayment method using either a percentage or monetary split.
Relieve Commitments
� Run the Relieve Commitments request set to calculate budgetcommitments and post the results to Oracle General Ledger. Therequest set combines the Calculate Commitments process and theCommitment GL Posting process.
See: Using Oracle HRMS – The Fundamentals
Commitment GL Posting
See: Using Oracle HRMS – The Fundamentals
See: Running Your Payroll Using Oracle HRMS.

A – 72 Using Oracle HRMS – The Fundamentals (US)
Retry Payroll Process (Payroll only)
� Retry a payroll process again.
See: Running Your Payroll Using Oracle HRMS.
RetroPay Process (Payroll only)
� Enables you to make back pay adjustments.
The following reports are available to assist you with theadministration of Tenure tracking.
See: Running Your Payroll Using Oracle HRMS.
Security List Maintenance Process (LISTGEN)
� This process is usually run every night to maintain the lists oforganizations, positions, payrolls, employees, and applicants thatsecurity profile holders can access.
See: Configuring, Reporting and System Administration in Oracle HRMS.
Synchronize Positions Process
� This process updates the non–datetracked Positions table(PER_ALL_POSITIONS_F) with changes made to the datetrackedtable (HR_ALL_POSITIONS_F). When you run the process, anydatetracked changes with an effective date on or before today areapplied to the non–datetracked table.
Tenure Notifications
� These notification reports are available for you to send to facultymembers and their academic manager during the Tenure process
Tenure Reports:
� The following reports are available to assist you with theadministration of Tenure tracking.
� Run this process to import a task flow to your database from a flatfile exported from another database.
See: Configuring, Reporting and System Administration in Oracle HRMS.
Void Payments Process (Payroll only)
� Allows you to void checks that have been printed but need to becancelled.
A – 73Windows and Reports
Workforce Headcount Report
� The number and type of employees within an organization, as wellas employee attrition rate data.
See: Managing Your Workforce Using Oracle HRMS.

A – 74 Using Oracle HRMS – The Fundamentals (US)

Glossary – 1
Glossary
360 Degree Appraisal Part of the SSHRAppraisal function and also known as aGroup Appraisal. This is an employeeappraisal undertaken by managers withparticipation by reviewers.
360 Degree Self Appraisal Part of the SSHRAppraisal function and also known as aGroup Appraisal. This is a 360 Degreeappraisal initiated by an employee. Theemployee (initiator) can add managers andreviewers to the appraisal.
AAbsence Types Categories of absence, such as
medical leave or vacation leave, that youdefine for use in absence windows.
Accrual The recognized amount of leavecredited to an employee which isaccumulated for a particular period.
Accrual Band A range of values thatdetermines how much paid time off anemployee accrues. The values may be yearsof service, grades, hours worked, or anyother factor.
Accrual Plan See: PTO Accrual Plan
Accrual Period The unit of time, within anaccrual term, in which PTO is accrued. Inmany plans, the same amount of time isaccrued in each accrual period, such as twodays per month. In other plans, the amountaccrued varies from period to period, or theentitlement for the full accrual term is givenas an up front amount at the beginning ofthe accrual term.
Accrual Term The period, such as one year,for which accruals are calculated. In mostaccrual plans, unused PTO accruals mustbe carried over or lost at the end of theaccrual term. Other plans have a rollingaccrual term which is of a certain durationbut has no fixed start and end dates.
Activity Rate The monetary amount orpercentage associated with an activity, suchas $12.35 per pay period as an employeepayroll contribution for medical coverage.Activity rates can apply to participation,eligibility, coverages, contributions, anddistributions.
Actual Premium The per–participantpremium an insurance carrier charges theplan sponsor for a given benefit.

Glossary – 2 Using Oracle HRMS – The Fundamentals (US)
Administrative Enrollment A type ofscheduled enrollment caused by a changein plan terms or conditions and resulting ina re–enrollment.
Applicant A candidate for employment in aBusiness Group.
Appraisee A person being appraised by anappraiser..
Appraiser A person, usually a manager, whoappraises an employee.
Appraisal An appraisal is a process where anemployee’s work performance is rated andfuture objectives set. See also: Assessment.
Appraising Manager The person who initiatesand performs an Employee–Manager or 360Degree Appraisal. An appraising managercan create appraisal objectives.
Apply for a Job An SSHR function thatenables an employee to, apply, search andprepare applications for an internallyadvertised vacancy.
Arrestment Scottish court order made out forunpaid debts or maintenance payments.See also: Court Order
Assessment An information gatheringexercise, from one or many sources, toevaluate a person’s ability to do a job. Seealso: Appraisal.
Assignment An employee’s assignmentidentifies his or her role and payroll withina Business Group. The assignment is madeup of a number of assignment components.Of these, organization is mandatory, andpayroll is a required component forpayment purposes.
Assignment Number A number that uniquelyidentifies an employee’s assignment. Anemployee with multiple assignments hasmultiple assignment numbers.
Assignment Set A grouping of employeesand/or applicants that you define forrunning QuickPaint reports and processingpayrolls. See also: QuickPaint Report
Assignment Status For employees, used totrack their permanent or temporarydepartures from your enterprise, and tocontrol the remuneration they receive. Forapplicants, used to track the progress oftheir applications.
BBACS Banks Automated Clearing System.
This is the UK system for making directdeposit payments to employees.
Balances Positive or negative accumulationsof values over periods of time normallygenerated by payroll runs. A balance cansum pay values, time periods or numbers.See also: Predefined Components
Balance Adjustment A correction you maketo a balance. You can adjust user balancesand assignment level predefined balancesonly.
Balance Dimension The period for which abalance sums its balance feeds, or the set ofassignments/transactions for which it sumsthem. There are five time dimensions: Run,Period, Quarter, Year and User. You canchoose any reset point for user balances.
Balance Feeds These are the input values ofmatching units of measure of any elementsdefined to feed the balance.
Glossary – 3
Bargaining Unit A bargaining unit is a legallyorganized group of people which have theright to negotiate on all aspects of termsand conditions with employers or employerfederations. A bargaining unit is generally atrade union or a branch of a trade union.
Base Currency The currency in which OraclePayroll performs all payroll calculations foryour Business Group. If you payemployees in different currencies to this,Oracle Payroll calculates the amounts basedon exchange rates defined in the system.
Behavioral Indicators Characteristics thatidentify how a competence is exhibited inthe work context. See also: Proficiency Level
Benefit Any part of an employee’sremuneration package that is not pay.Vacation time, employer–paid medicalinsurance and stock options are allexamples of benefits. See also: Elements
Beneficiary A person or organizationdesignated to receive the benefits from abenefit plan upon the death of the insured.
Block The largest subordinate unit of awindow, containing information for aspecific business function or entity. Everywindow consists of at least one block.Blocks contain fields and, optionally,regions. They are delineated by a bevellededge. You must save your entries in oneblock before navigating to the next. Seealso: Region, Field
Budget Value In Oracle Human Resourcesyou can enter staffing budget values andactual values for each assignment tomeasure variances between actual andplanned staffing levels in an organization orhierarchy.
Business Group The highest levelorganization in the Oracle HRMS system.A Business Group may correspond to thewhole of your enterprise or to a majorgrouping such as a subsidiary or operatingdivision. Each Business Group mustcorrespond to a separate implementation ofOracle HRMS.
Business Number (BN) In Canada, this is theemployer’s account number with RevenueCanada. Consisting of 15 digits, the first 9identify the employer, the next 2 identifythe type of tax account involved (payroll vs.corporate tax), and the last 4 identify theparticular account for that tax.
CCafeteria Benefits Plan See: Flexible Benefits
ProgramCalendars In Oracle Human Resources you
define calendars that determine the startand end dates for budgetary years, quartersand periods. For each calendar you select abasic period type. In Oracle SSP/SMP youdefine calendars to determine the start dateand time for SSP qualifying patterns.
Calendar Exceptions In Oracle SSP/SMP youdefine calendar exceptions for an SSPqualifying pattern, to override the patternon given days. Each calendar exception isanother pattern which overrides the usualpattern.
Canada/Quebec Pension Plan (CPP/QPP)Contributions Contributions paid byemployers and employees to each of theseplans provide income benefits uponretirement.

Glossary – 4 Using Oracle HRMS – The Fundamentals (US)
Candidate Offers An SSHR function used by aline manager to offer a job to a candidate.This function is supplied with its ownresponsibility.
Career Path This shows a possible progressionfrom one job or position from any numberof other jobs or positions within theBusiness Group. A career path must bebased on either job progression or positionprogression; you cannot mix the two.
Carry Over The amount of unused paid timeoff entitlement an employee brings forwardfrom one accrual term to the next. It may besubject to an expiry date i.e. a date bywhich it must be used or lost. See also:Residual
Cash Analysis A specification of the differentcurrency denominations required forpaying your employees in cash. Unioncontracts may require you to follow certaincash analysis rules.
Certification Documentation required toenroll or change elections in a benefits planas the result of a life event, to waiveparticipation in a plan, to designatedependents for coverage, or to receivereimbursement for goods or services underan FSA.
Ceiling The maximum amount of unusedpaid time off an employee can have in anaccrual plan. When an employee reachesthis maximum, he or she must use someaccrued time before any more time willaccrue.
Child/Family Support payments In Canada,these are payments withheld from anemployee’s compensation to satisfy a childor family support order from a ProvincialCourt. The employer is responsible forwithholding and remitting the payments tothe court named in the order.
Collective Agreement A collective agreement isa form of contract between an employer oremployer representative, for example, anemployer federation, and a bargaining unitfor example, a union or a union branch.
Collective Agreement Grade Combination ofinformation that allows you to determinehow an employee is ranked or graded in acollective agreement.
Communications Benefits plan informationthat is presented in some form toparticipants. Examples include apre–enrollment package, an enrollmentconfirmation statement, or a notice ofdefault enrollment.
Compensation The pay you give toemployees, including wages or salary, andbonuses. See also: Elements
Compensation Object For Standard andAdvanced Benefits, compensation objectsdefine, categorize, and help to manage thebenefit plans that are offered to eligibleparticipants. Compensation objects includeprograms, plan types, plans, options, andcombinations of these entities.
Competence Any measurable behaviorrequired by an organization, job or positionthat a person may demonstrate in the workcontext. A competence can be a piece ofknowledge, a skill, an attitude or anattribute.
Competence Evaluation A method used tomeasure an employees ability to do adefined job.
Competence Profile Where you recordapplicant and employee accomplishments,for example, proficiency in a competence.
Competence Requirements Competenciesrequired by an organization, job or position.See also: Competence, Core Competencies

Glossary – 5
Competence Type A group of relatedcompetencies.
Configurable Forms Forms that your systemadministrator can modify for ease of use orsecurity purposes by means of CustomForm restrictions. The Form Customizationwindow lists the forms and their methodsof configuration.
Consolidation Set A grouping of payroll runswithin the same time period for which youcan schedule reporting, costing, andpost–run processing.
Contact A person who has a relationship to anemployee that you want to record.Contacts can be dependents, relatives,partners or persons to contact in anemergency.
Contract A contract of employment is anagreement between an employer andemployee or potential employee thatdefines the fundamental legal relationshipbetween an employing organization and aperson who offers his or her services forhire. The employment contract defines theterms and conditions to which both partiesagree and those that are covered by locallaws.
Contribution An employer’s or employee’smonetary or other contribution to a benefitsplan.
Core Competencies Also known as LeadershipCompetencies or Management Competencies.The competencies required by every personto enable the enterprise to meet its goals.See also: Competence
Costable Type A feature that determines theprocessing an element receives foraccounting and costing purposes. There arefour costable types in Oracle HRMS:costed, distributed costing, fixed costing,and not costed.
Costing Recording the costs of an assignmentfor accounting or reporting purposes.Using Oracle Payroll, you can calculate andtransfer costing information to your generalledger and into systems for projectmanagement or labor distribution.
Court Order A ruling from a court thatrequires an employer to make deductionsfrom an employee’s salary for maintenancepayments or debts, and to pay the sumsdeducted to a court or local authority. Seealso: Arrestment
DDatabase Item An item of information in
Oracle HRMS that has specialprogramming attached, enabling OracleFastFormula to locate and retrieve it for usein formulas.
Date To and Date From These fields are usedin windows not subject to DateTrack. Theperiod you enter in these fields remainsfixed until you change the values in eitherfield. See also: DateTrack, Effective Date
DateTrack When you change your effectivedate (either to past or future), DateTrackenables you to enter information that takeseffect on your new effective date, and toreview information as of the new date. Seealso: Effective Date
Dependent In a benefit plan, a person with aproven relationship to the primaryparticipant whom the participantdesignates to receive coverage based on theterms of the plan.
Deployment Factors See: Work Choices

Glossary – 6 Using Oracle HRMS – The Fundamentals (US)
Derived Factor A factor (such as age, percentof fulltime employment, length of service,compensation level, or the number of hoursworked per period) that is used incalculations to determine ParticipationEligibility or Activity Rates for one or morebenefits.
Descriptive Flexfield A field that yourorganization can configure to captureadditional information required by yourbusiness but not otherwise tracked byOracle Applications. See also: Key Flexfield
Developer Descriptive Flexfield A flexfielddefined by your localization team to meetthe specific legislative and reporting needsof your country. See also: Extra InformationTypes
Direct Deposit The electronic transfer of anemployee’s net pay directly into theaccount(s) designated by the employee.
Distribution Monetary payments made from,or hours off from work as allowed by, acompensation or benefits plan.
EEffective Date The date for which you are
entering and viewing information. You setyour effective date in the Alter EffectiveDate window. See also: DateTrack
EIT See: Extra Information TypeElectability The process which determines
whether a potential benefits participant,who has satisfied the eligibility rulesgoverning a program, plan, or option in aplan, is able to elect benefits. Participantswho are eligible for benefits do not alwayshave electable benefit choices based on therules established in a benefit plan design.
Elements Components in the calculation ofemployee pay. Each element represents acompensation or benefit type, such assalary, wages, stock purchase plans, andpension contributions.
Element Classifications These control theorder in which elements are processed andthe balances they feed. Primary elementclassifications and some secondaryclassifications are predefined by OraclePayroll. Other secondary classifications canbe created by users.
Element Entry The record controlling anemployee’s receipt of an element, includingthe period of time for which the employeereceives the element and its value. See also:Recurring Elements, Nonrecurring Elements
Element Link The association of an element toone or more components of an employeeassignment. The link establishes employeeeligibility for that element. Employeeswhose assignment components match thecomponents of the link are eligible for theelement. See also: Standard Link
Element Set A group of elements that youdefine to process in a payroll run, or tocontrol access to compensation informationfrom a configured form, or for distributingcosts.
Eligibility The process by which a potentialbenefits participant satisfies the rulesgoverning whether a person can ever enrollin a program, plan, or option in a plan. Aparticipant who is eligible for benefits mustalso satisfy electability requirements.

Glossary – 7
Employee Histories An SSHR function for anemployee to view their, Training History, Job Application History, EmploymentHistory, Absence History, or Salary History.A manager can also use this function toview information on their direct reports.
Employment Category A component of theemployee assignment. Four categories aredefined: Full Time – Regular, Full Time –Temporary, Part Time – Regular, and PartTime – Temporary.
Employment Insurance (EI) Benefit plan runby the federal government to which themajority of Canadian employers andemployees must contribute.
Employment Insurance Rate In Canada, this isthe rate at which the employer contributesto the EI fund. The rate is expressed as apercentage of the employee’s contribution.If the employer maintains an approvedwage loss replacement program, they canreduce their share of EI premiums byobtaining a reduced contribution rate.Employers would remit payroll deductionsunder a different employer account numberfor employees covered by the plan.
Employment Equity Occupational Groups(EEOG) In Canada, the Employment EquityOccupational Groups (EEOG) consist of 14classifications of work used in theEmployment Equity Report. The EEOGswere derived from the NationalOccupational Classification system.
Enroll in a Class An SSHR function whichenables an employee to search and enroll inan internally published class. An employeecan also use this function to maintain theircompetencies.
Enrollment Action Type Any action requiredto complete enrollment or de–enrollment ina benefit.
Entitlement In Australia, this is all unusedleave from the previous year that remainsto the credit of the employee.
ESS Employee Self Service. A predefinedSSHR responsibility.
Event An activity such as a training day,review, or meeting, for employees orapplicants.
Expected Week of Confinement (EWC) Inthe UK, this is the week in which anemployee’s baby is due. The Sunday of theexpected week of confinement is used inthe calculations for Statutory Maternity Pay(SMP).
Extra Information Type (EIT) A type ofdeveloper descriptive flexfield that enablesyou to create an unlimited number ofinformation types for six key areas inOracle HRMS. Localization teams may alsopredefine some EITs to meet the specificlegislative requirements of your country.See also: Developer Descriptive Flexfield
FField A view or entry area in a window where
you enter, view, update, or deleteinformation. See also: Block, Region
Flex Credit A unit of ”purchasing power” in aflexible benefits program. An employeeuses flex credits, typically expressed inmonetary terms, to ”purchase” benefitsplans and/or levels of coverage withinthese plans.

Glossary – 8 Using Oracle HRMS – The Fundamentals (US)
Flexible Benefits Program A benefitsprogram that offers employees choicesamong benefits plans and/or levels ofcoverage. Typically, employees are given acertain amount of flex credits or moneyswith which to ”purchase” these benefitsplans and/or coverage levels.
Flexible Spending Account (FSA) Under USInternal Revenue Code Section 125,employees can set aside money on a pretaxbasis to pay for eligible unreimbursedhealth and dependent care expenses.Annual monetary limits and use–it–or–loseit provisions exist. Accounts are subject toannual maximums and forfeiture rules.
Form A predefined grouping of functions,called from a menu and displayed, ifnecessary, on several windows. Formshave blocks, regions and fields as theircomponents. See also: Block, Region, Field
GGlobal Value A value you define for any
formula to use. Global values can be dates,numbers or text.
Goods or Service Type A list of goods orservices a benefit plan sponsor hasapproved for reimbursement.
Grade A component of an employee’sassignment that defines their level and canbe used to control the value of their salaryand other compensation elements.
Grade Comparatio A comparison of theamount of compensation an employeereceives with the mid–point of the validvalues defined for his or her grade.
Grade Rate A value or range of valuesdefined as valid for a given grade. Usedfor validating employee compensationentries.
Grade Scale A sequence of steps valid for agrade, where each step corresponds to onepoint on a pay scale. You can place eachemployee on a point of their grade scaleand automatically increment all placementseach year, or as required. See also: Pay Scale
Grade Step An increment on a grade scale.Each grade step corresponds to one pointon a pay scale. See also: Grade Scale
Grandfathered A term used in BenefitsAdministration. A person’s benefits aresaid to be grandfathered when a planchanges but they retain the benefitsaccrued.
Group A component that you define, usingthe People Group key flexfield, to assignemployees to special groups such aspension plans or unions. You can usegroups to determine employees’ eligibilityfor certain elements, and to regulate accessto payrolls.
Group Certificate In Australia, this is astatement from a legal employer showingemployment income of an employee for thefinancial year..
HHierarchy An organization or position
structure showing reporting lines or otherrelationships. You can use hierarchies forreporting and for controlling access toOracle HRMS information.

Glossary – 9
IImputed Income Certain forms of indirect
compensation that US Internal RevenueService Section 79 defines as fringe benefitsand taxes the recipient accordingly.Examples include employer payment ofgroup term life insurance premiums over acertain monetary amount, personal use of acompany car, and other non–cash awards.
Initiator In SSHR a person who starts a 360Degree appraisal (Employee or Self) on anindividual. An initiator and the appraiseeare the only people who can see allappraisal information.
Input Values Values you define to holdinformation about elements. In OraclePayroll, input values are processed byformulas to calculate the element’s runresult. You can define up to fifteen inputvalues for an element.
Instructions An SSHR user assistancecomponent displayed on a web page todescribe page functionality.
KKey Flexfield A flexible data field made up of
segments. Each segment has a name youdefine and a set of valid values you specify.Used as the key to uniquely identify anentity, such as jobs, positions, grades, costcodes, and employee groups. See also:Descriptive Flexfield
LLeave Loading In Australia, an additional
percentage amount of the annual leave paidthat is paid to the employee.
Leaver’s Statement In the UK, this Recordsdetails of Statutory Sick Pay (SSP) paidduring a previous employment (issued asform SSP1L) which is used to calculate anew employee’s entitlement to SSP. If anew employee falls sick, and the last datethat SSP was paid for under the previousemployment is less than eight calendarweeks before the first day of the PIW forthe current sickness, the maximum liabilityfor SSP is reduced by the number of weeksof SSP shown on the statement.
Legal Employer A business in Australia thatemploys people and has registered with theAustralian Tax Office as a Group Employer.
Life Event A significant change in a person’slife that results in a change in eligibility orineligibility for a benefit.
Life Event Collision A situation in which theimpacts from multiple life events onparticipation eligibility, enrollability, level ofcoverage or activity rates conflict with eachother.
Life Event Enrollment A benefits planenrollment that is prompted by a life eventoccurring at any time during the plan year.
Linking Interval In the UK, this is the numberof days that separate two periods ofincapacity for work. If a period ofincapacity for work (PIW) is separated froma previous PIW by less than the linkinginterval, they are treated as one PIWaccording to the legislation for entitlementto Statutory Sick Pay (SSP). An employeecan only receive SSP for the maximumnumber of weeks defined in the legislationfor one PIW.

Glossary – 10 Using Oracle HRMS – The Fundamentals (US)
Linked PIWs In the UK, these are linkedperiods of incapacity for work that aretreated as one to calculate an employee’sentitlement to Statutory Sick Pay (SSP). Aperiod of incapacity for work (PIW) links toan earlier PIW if it is separated by less thanthe linking interval. A linked PIW can beup to three years long.
LMSS Line Manager Self Service. Apredefined SSHR responsibility.
Long Service Leave Leave with pay grantedto employees of a particular employer aftera prescribed period of service oremployment with that employer.
Lookup Types Categories of information,such as nationality, address type and taxtype, that have a limited list of valid values.You can define your own Lookup Types,and you can add values to some predefinedLookup Types.
Lower Earnings Limit (LEL) In the UK, this isthe minimum average weekly amount anemployee must earn to pay NationalInsurance contributions. Employees whodo not earn enough to pay NationalInsurance cannot receive Statutory Sick Pay(SSP) or Statutory Maternity Pay (SMP).
MManager–Employee Appraisal Part of the
SSHR Appraisal function. A managerappraisal of an employee. However, anappraising manager does not have to be amanager.
Maternity Pay Period In the UK, this is theperiod for which Statutory Maternity Pay(SMP) is paid. It may start at any time fromthe start of the 11th week before theexpected week of confinement and cancontinue for up to 18 weeks. The start dateis usually agreed with the employee, butcan start at any time up to the birth. Anemployee is not eligible to SMP for anyweek in which she works or for any otherreason for ineligibility, defined by thelegislation for SMP.
Menus You set up your own navigationmenus, to suit the needs of different users.
Medicare Levy An amount payable by mosttaxpayers in Australia to cover some of thecost of the public health system.
NNACHA National Automated Clearing House
Association. This is the US system formaking direct deposit payments toemployees.
National Identifier This is the alphanumericcode that is used to uniquely identify aperson within their country. It is often usedfor taxation purposes. For example, in theUS it is the Social Security Number, in Italyit is the Fiscal Code, and in New Zealand itis the IRD Number.

Glossary – 11
National Occupational Classification (NOC)code In Canada, the National OccupationalClassification (NOC) System wasdeveloped to best reflect the type of workperformed by employees. Occupations aregrouped in terms of particular tasks, dutiesand responsibilities. The use of thisstandardized system ensures consistency ofdata from year to year within the samecompany as well as between companies.These codes are used in the EmploymentEquity Report.
Net Accrual Calculation The rule that defineswhich element entries add to or subtractfrom a plan’s accrual amount to give netentitlement.
Net Entitlement The amount of unused paidtime off an employee has available in anaccrual plan at any given point in time.
Nonrecurring Elements Elements that processfor one payroll period only unless youmake a new entry for an employee. Seealso: Recurring Elements
North American Industrial Classification(NAIC) code The North AmericanIndustrial Classification system (NAICs)was developed jointly by the US, Canadaand Mexico to provide comparability instatistics regarding business activity acrossNorth America. The NAIC replaces the USStandard Industrial Classification (SIC)system, and is used in the EmploymentEquity Report.
Not in Program Plan A benefit plan that youdefine outside of a program.
OOpen Enrollment A type of scheduled
enrollment in which participants can enrollin or alter elections in one or more benefitsplans.
Oracle FastFormula An Oracle tool thatallows you to write Oracle HRMS formulaswithout using a programming language.
Organization A required component ofemployee assignments. You can define asmany organizations as you want withinyour Business Group. Organizations can beinternal, such as departments, or external,such as recruitment agencies. You canstructure your organizations intoorganizational hierarchies for reportingpurposes and for system access control.
OSSWA Oracle Self Service Web Applications.OTM Oracle Training Management.
PPattern A pattern comprises a sequence of
time units that are repeated at a specifiedfrequency. Oracle SSP/SMP uses SSPqualifying patterns to determine employeesentitlement to Statutory Sick Pay (SSP).
Pattern Time Units A sequence of time unitsspecifies a repeating pattern. Each timeunit specifies a time period of hours, daysor weeks.
Pay Scale A set of progression points that canbe related to one or more rates of pay.Employee’s are placed on a particular pointon the scale according to their grade and,usually, work experience. See also: GradeScale
Payment Type There are three standardpayment types for paying employees:check, cash and direct deposit. You candefine your own payment methodscorresponding to these types.

Glossary – 12 Using Oracle HRMS – The Fundamentals (US)
Payroll A group of employees that OraclePayroll processes together with the sameprocessing frequency, for example, weekly,monthly or bimonthly. Within a BusinessGroup, you can set up as many payrolls asyou need.
People List An SSHR line manager utility usedto locate an employee.
Performance (within Assessment) Anexpectation of ”normal” performance of acompetence over a given period. Forexample, a person may exceed performanceexpectation in the communicationcompetence. See also: Proficiency (withinAssessment), Competence, Assessment
Period of Incapacity for Work (PIW) In theUK, this is a period of sickness that lastsfour or more days in a row, and is theminimum amount of sickness for whichStatutory Sick Pay can be paid. If a PIW isseparated by less then the linking interval, alinked PIW is formed and the two PIWs aretreated as one.
Period Type A time division in a budgetarycalendar, such as week, month, or quarter.
Person Search An SSHR function whichenables a manager to search for a person.There are two types of search, Simple andAdvanced.
Person Type There are eight system persontypes in Oracle HRMS. Seven of these arecombinations of employees, ex–employees,applicants, and ex–applicants. The eighthcategory is ’External’. You can create yourown user person types based on the eightsystem types.
Personal Public Service Number (PPS) TheIrish equivalent to National Insurancenumber in the UK, or the Social Securitynumber in the US.
Personal Tax Credits Return (TD1) A RevenueCanada form which each employee mustcomplete. Used by the employee to reducehis or her taxable income at source byclaiming eligible credits and also providespayroll with such important information ascurrent address, birth date, and SIN. Thesecredits determine the amount to withholdfrom the employee’s wages forfederal/provincial taxes.
Plan Design The functional area that allowsyou to set up your benefits programs andplans. This process involves defining therules which govern eligibility, availableoptions, pricing, plan years, third partyadministrators, tax impacts, plan assets,distribution options, required reporting,and communications.
Plan Sponsor The legal entity or businessresponsible for funding and administering abenefits plan. Generally synonymous withemployer.
Position A specific role within the BusinessGroup derived from an organization and ajob. For example, you may have a positionof Shipping Clerk associated with theorganization Shipping and the job Clerk.
Predefined Components Some elements andbalances, all primary element classificationsand some secondary classifications aredefined by Oracle Payroll to meetlegislative requirements, and are suppliedto users with the product. You cannotdelete these predefined components.
Professional Information An SSHR functionwhich allows an employee to maintain theirown professional details or a line managerto maintain their direct reports professionaldetails.

Glossary – 13
Proficiency (within Assessment) Theperceived level of expertise of a person in acompetence, in the opinion of the assessor,over a given period. For example, a personmay demonstrate the communicationcompetence at Expert level. See also:Performance (within Assessment), Competence,Assessment
Proficiency Level A system for expressing andmeasuring how a competence is exhibitedin the work context. See also: BehavioralIndicators.
Progression Point A pay scale is calibrated inprogression points, which form a sequencefor the progression of employees up the payscale. See also: Pay Scale
Provincial/Territorial Employment StandardsActs In Canada, these are laws coveringminimum wages, hours of work, overtime,child labour, maternity, vacation,public/general holidays, parental andadoption leave, etc., for employeesregulated by provincial/territoriallegislation.
Provincial Health Number In Canada, this isthe account number of the provinciallyadministered health care plan that theemployer would use to make remittances.There would be a unique number for eachof the provincially controlled plans i.e.EHT, Quebec HSF, etc.
PTO Accrual Plan A benefit in whichemployees enroll to entitle them to accrueand take paid time off. The purpose ofabsences allowed under the plan, who canenroll, how much time accrues, when thetime must be used, and other rules aredefined for the plan.
QQPP (See Canada/Quebec Pension Plan)Qualification Type An identified
qualification method of achievingproficiency in a competence, such as anaward, educational qualification, a licenseor a test. See also: Competence
Qualifying Days In the UK, these are days onwhich Statutory Sick Pay (SSP) can be paid,and the only days that count as waitingdays. Qualifying days are normally workdays, but other days may be agreed.
Qualifying Pattern See: SSP Qualifying PatternQualifying Week In the UK, this is the week
during pregnancy that is used as the basisfor the qualifying rules for StatutoryMaternity Pay (SMP). The date of thequalifying week is fifteen weeks before theexpected week of confinement and anemployee must have been continuouslyemployed for at least 26 weeks continuinginto the qualifying week to be entitled toSMP.
Quebec Business Number In Canada, this isthe employer’s account number with theMinistere du Revenu du Quebec, alsoknown as the Quebec Identificationnumber. It consists of 15 digits, the first 9identify the employer, the next 2 identifythe type of tax account involved (payroll vs.corporate tax), and the last 4 identify theparticular account for that tax.
Questionnaire An SSHR function whichrecords the results of an appraisal.

Glossary – 14 Using Oracle HRMS – The Fundamentals (US)
QuickPaint Report A method of reporting onemployee and applicant assignmentinformation. You can select items ofinformation, paint them on a report layout,add explanatory text, and save the reportdefinition to run whenever you want. Seealso: Assignment Set
RRates A set of values for employee grades or
progression points. For example, you candefine salary rates and overtime rates.
Rating Scale Used to describe an enterprise’scompetencies in a general way. You do nothold the proficiency level at the competencelevel. See also: Proficiency Level
Record of Employment (ROE) A HumanResources Development Canada form thatmust be completed by an employerwhenever an interruption of earningsoccurs for any employee. This form isnecessary to claim Employment Insurancebenefits.
Recruitment Activity An event or program toattract applications for employment.Newspaper advertisements, career fairsand recruitment evenings are all examplesof recruitment activities. You can groupseveral recruitment activities togetherwithin an overall activity.
Recurring Elements Elements that processregularly at a predefined frequency.Recurring element entries exist from thetime you create them until you delete them,or the employee ceases to be eligible for theelement. Recurring elements can havestandard links. See also: NonrecurringElements, Standard Link
Region A collection of logically related fieldsin a window, set apart from other fields bya rectangular box or a horizontal line acrossthe window. See also: Block, Field
Registered Pension Plan (RPP) This is apension plan that has been registered withRevenue Canada. It is a plan where fundsare set aside by an employer, an employee,or both to provide a pension to employeeswhen they retire. Employee contributionsare generally exempt from tax.
Registered Retirement Savings Plan (RRSP)This is an individual retirement savingsplan that has been registered with RevenueCanada. Usually, contributions to theRRSP, and any income earned within theRRSP, is exempt from tax.
Report Parameters Inputs you make whensubmitting a report to control the sorting,formatting, selection, and summarizing ofinformation in the report.
Report Set A group of reports and concurrentprocesses that you specify to run together.
Requisition The statement of a requirementfor a vacancy or group of vacancies.
Request Groups A list of reports andprocesses that can be submitted by holdersof a particular responsibility. See also:Responsibility
Residual The amount of unused paid time offentitlement an employee loses at the end ofan accrual term. Typically employees cancarry over unused time, up to a maximum,but they lose any residual time that exceedsthis limit. See also: Carry Over

Glossary – 15
Responsibility A level of authority in anapplication. Each responsibility lets youaccess a specific set of Oracle Applicationsforms, menus, reports, and data to fulfillyour business role. Several users can sharea responsibility, and a single user can havemultiple responsibilities. See also: SecurityProfile, User Profile Options, Request Groups,Security Groups
Retry Method of correcting a payroll run orother process before any post–runprocessing takes place. The original runresults are deleted and the process is runagain.
Revenue Canada Department of theGovernment of Canada which, amongstother responsibilities, administers,adjudicates, and receives remittances for alltaxation in Canada including income tax,Employment Insurance premiums, CanadaPension Plan contributions, and the Goodsand Services Tax (legislation is currentlyproposed to revise the name to the CanadaCustoms and Revenue Agency). In theprovince of Quebec the equivalent is theMinistere du Revenu du Quebec.
Reviewer (SSHR) A person invited by anappraising manager to add reviewcomments to an appraisal.
Reversal Method of correcting payroll runs orQuickPay runs after post–run processinghas taken place. The system replacespositive run result values with negativeones, and negative run result values withpositive ones. Both old and new valuesremain on the database.
Rollback Method of removing a payroll runor other process before any post–runprocessing takes place. All assignmentsand run results are deleted.
SSearch by Date An SSHR sub–function used
to search for a Person by Hire date,Application date, Job posting date or searchby a Training event date.
Salary Basis The period of time for which anemployee’s salary is quoted, such as hourlyor annually. Defines a group of employeesassigned to the same salary basis andreceiving the same salary element.
Scheduled Enrollment A benefits planenrollment that takes place during apredefined enrollment period, such as anopen enrollment. Scheduled enrollmentscan be administrative, open, orunrestricted.
Security Group Security groups enable HRMSusers to partition data by Business Group.Only used for Security Groups Enabledsecurity. See also: Responsibility, SecurityProfile, User Profile Options
Security Groups Enabled Formerly known asCross Business Group Responsibilitysecurity. This security model uses securitygroups and enables you to link oneresponsibility to many Business Groups.
Security Profile Security profiles controlaccess to organizations, positions andemployee and applicant records within theBusiness Group. System administrators usethem in defining users’ responsibilities. Seealso: Responsibility
Self Appraisal Part of the SSHR Appraisalfunction. This is an appraisal undertaken byan employee to rate their own performanceand competencies.
SMP See: Statutory Maternity Pay
Glossary – 16 Using Oracle HRMS – The Fundamentals (US)
Social Insurance Number (SIN) A uniquenumber provided by Human ResourcesDevelopment Canada (HRDC) to eachperson commencing employment inCanada. The number consists of 9 digits inthe following format (###–###–###).
Source Deductions Return (TP 1015.3) AMinistere du Revenu du Quebec formwhich each employee must complete. Thisform is used by the employee to reduce hisor her taxable income at source by claimingeligible credits and also provides payrollwith such important information as currentaddress, birth date, and SIN. These creditsdetermine the amount of provincial tax towithhold from the employee’s wages.
Special Information Types Categories ofpersonal information, such as skills, thatyou define in the Personal Analysis keyflexfield.
SSHR Oracle Self–Service Human Resources.An HR management system using anintranet and web browser to deliverfunctionality to employees and theirmanagers.
SSP See: Statutory Sick Pay SSP Qualifying Pattern In the UK, an SSP
qualifying pattern is a series of qualifyingdays that may be repeated weekly, monthlyor some other frequency. Each week in apattern must include at least one qualifyingday. Qualifying days are the only days forwhich Statutory Sick Pay (SSP) can be paid,and you define SSP qualifying patterns forall the employees in your organization sothat their entitlement to SSP can becalculated.
Standard Link Recurring elements withstandard links have their element entriesautomatically created for all employeeswhose assignment components match thelink. See also: Element Link, RecurringElements
Statement of Commissions and Expenses forSource Deduction Purposes (TP1015.R.13.1) A Ministere du Revenu duQuebec form which allows an employeewho is paid partly or entirely bycommissions to pay a constant percentageof income tax based on his or her estimatedcommissions for the year, less allowablebusiness expenses.
Statement of Remuneration and Expenses(TD1X) In Canada, the Statement ofRemuneration and Expenses allows anemployee who is paid partly or entirely bycommission to pay a constant percentage ofincome tax, based on his or her estimatedincome for the year, less business-relatedexpenses.
Statutory Maternity Pay In the UK, you payStatutory Maternity Pay (SMP) to femaleemployees who take time off work to havea baby, providing they meet the statutoryrequirements set out in the legislation forSMP.
Standard HRMS Security The standardsecurity model. Using this security modelyou must log on as a different user to see adifferent Business Group. See:

Glossary – 17
Statutory Sick Pay In the UK, you payStatutory Sick Pay (SSP) to employees whoare off work for four or more days becausethey are sick, providing they meet thestatutory requirements set out in thelegislation for SSP.
Succession Planning An SSHR function whichenables a manager to prepare a successionplan.
Suitability Matching An SSHR function whichenables a manager to compare and rank apersons competencies.
Superannuation Guarantee An Australiansystem whereby employers are required tocontribute a percentage of an eligibleemployee’s earnings to a superannuationfund to provide for their retirement.
TTabbed Regions Parts of a window that
appear in a stack so that only one is visibleat any time. You click on the tab of therequired region to bring it to the top of thestack.
Task Flows A sequence of windows linked bybuttons to take you through the stepsrequired to complete a task, such as hiring anew recruit. System administrators cancreate task flows to meet the needs ofgroups of users.
Terminating Employees You terminate anemployee when he or she leaves yourorganization. Information about theemployee remains on the system but allcurrent assignments are ended.
Termination Rule Specifies when entries of anelement should close down for an employeewho leaves your enterprise. You can definethat entries end on the employee’s actualtermination date or remain open until afinal processing date.
Tips An SSHR user assistance component thatprovides information about a field.
UUser Assistance Components SSHR online
help comprising tips and instructions.User Balances Users can create, update and
delete their own balances, includingdimensions and balance feeds. See also:Balances
User Profile Options Features that allowsystem administrators and users to tailorOracle HRMS to their exact requirements.See also: Responsibility, Security Profile
VViewer (SSHR) A person with view only
access to an appraisal. An appraisingmanager or an employee in a 360 DegreeSelf appraisal can appoint view only accessto an appraisal.
WWCB Account Number In Canada, this is the
account number of the provinciallyadministered Worker’s CompensationBoard that the employer would use to makeremittances. There would be a uniquenumber for each of the provinciallycontrolled boards i.e. Workplace Safety &Insurance Board of Ontario, CSST, etc.

Glossary – 18 Using Oracle HRMS – The Fundamentals (US)
Waiting Days In the UK, statutory Sick Pay isnot payable for the first three qualifyingdays in period of incapacity for work(PIW), which are called waiting days. Theyare not necessarily the same as the firstthree days of sickness, as waiting days canbe carried forward from a previous PIW ifthe linking interval between the two PIWsis less than 56 days.
Work Choices Also known as WorkPreferences, Deployment Factors, or WorkFactors. These can affect a person’s capacityto be deployed within an enterprise, suchwillingness to travel or relocate. You canhold work choices at both job and positionlevel, or at person level.
Worker’s Compensation Board In Canada,this is a provincially governed legislativebody which provides benefits to employeesupon injury, disability, or death whileperforming the duties of the employer.Worker’s Compensation Board premiumsare paid entirely by the employer.
Workflow An Oracle application which usescharts to manage approval processes and inaddition is used in SSHR to configuredisplay values of sections within a webpage and instructions.
Work Structures The fundamental definitionsof organizations, jobs, positions, grades,payrolls and other employee groups withinyour enterprise that provide the frameworkfor defining the work assignments of youremployees.

Index – 1
Index
AAAP Organization, organization classification,
2 – 17AAP Reporting, setting up, 8 – 10AAP reporting
data for, 8 – 36hierarchies for, 8 – 36organizations for, 8 – 35, 8 – 38overview of, 8 – 34 to 8 – 36setup steps for, 8 – 10
AAP Reporting Information, associate jobswith, 8 – 39
ADA reportinginformation for, 8 – 46overview of, 8 – 45setup steps for, 8 – 11
Additional Information, entering, 2 – 23Addresses, for work sites, 2 – 4 to 2 – 49Applicant numbers, ways of creating, 2 – 8ASSEDIC Center, organization classification, 2
– 18Assignments, verifying for mass move, 4 – 61Available Payment Methods, 5 – 5
BBalances, fiscal year, 2 – 28Bargaining association, entering trade union
information, 2 – 37Bargaining Unit, organization classification, 2 –
17BEE, customizing segment names for, 2 – 8Beneficiary Organization, organization
classification, 2 – 17, 2 – 18Benefits Carrier, organization classification, 2 –
18Budget
in project based enterprises, 4 – 21in rule based enterprises, 4 – 25transaction, viewing status, 4 – 49
Budget value defaults, defining for BusinessGroup, 2 – 29
Business Groupreporting categories, 8 – 12reporting statuses, 8 – 13
Business Groupsadapting and creating, 2 – 8additional information for, 2 – 23, 2 – 24

Index – 2 Using Oracle HRMS – The Fundamentals (US)
creating hierarchies using multiple businessgroups, 3 – 3
creating multi–business group hierarchies, 3– 3
defaults for, 2 – 7defining, 2 – 21 to 2 – 23, 2 – 28 to 2 – 30defining a default monthly payroll, 2 – 31defining budget value defaults, 2 – 29 to 2 –
30organization classification, 2 – 16reorganizing, 4 – 58reorganizing with Mass Move, 4 – 56 to 4 –
58representing companies in, 2 – 19 to 2 – 21representing employers by, 2 – 2selecting a pto balance, 2 – 30single and multiple, 2 – 7startup data, 2 – 6
CCalendars, for payrolls, 5 – 10Career Paths. See Lines of ProgressionCollective agreement grades
entering, 4 – 80setting up, 4 – 80
Collective agreements, 4 – 4entering, 4 – 79
Commands, for menus and toolbar, 3 – 12Company, organization classification, 2 – 18Comparatio values for grades, 4 – 73Compensation and benefits, relating grades to,
4 – 67Consolidation sets
defining, 5 – 8deleting, 5 – 8
Constituenciesentering organization hierarchy information,
2 – 35entering bargaining unit information, 2 – 36entering collective agreement grade
information, 2 – 37entering grade information, 2 – 36entering job information, 2 – 36entering location information, 2 – 35entering organization information, 2 – 35
Constituency, organization classification, 2 – 17Contract staff, 4 – 27Corporate Headquarters
organization classification, 2 – 17Reporting Establishment for, 8 – 13 to 8 – 15
Cost Allocation key flexfielddesigning segments to hold transfer
information, 6 – 13 to 6 – 15entry overrides, 6 – 11mapping to GL Accounting flexfield, 6 – 20role of qualifiers, 6 – 12 to 6 – 14setting up, 6 – 11 to 6 – 25use of, 6 – 10 to 6 – 11
Cost analysis, 6 – 2overview, 6 – 2
Cost centersallocating costs to, 6 – 4 to 6 – 5defining organizations as, 6 – 9for organizations, 2 – 20 to 2 – 21in the Cost Allocation flexfield, 6 – 13 to 6 –
15Costable types
costed, 6 – 6default for element link, 6 – 5distributed, 6 – 6fixed costed, 6 – 6
Costingfor payrolls, 5 – 10process, 6 – 19
Costing informationallocating payroll run results, 6 – 4 to 6 – 7for assignments, 6 – 9 to 6 – 10for element entries, 6 – 15 to 6 – 17for element links, 6 – 5 to 6 – 7for GL debits and credits, 6 – 7for organizations and assignments, 6 – 9 to 6
– 11for payrolls, 6 – 5for projects, 4 – 20for taxes, 6 – 15 to 6 – 25transfer to Oracle GL, 6 – 20 to 6 – 22
CPAM, organization classification, 2 – 18
DDatabase triggers, 5 – 5
Index – 3
DateTrackchanging datetracked information, 1 – 16 to 1
– 18date reminder user profile option, 1 – 15date security user profile option, 1 – 17dated and datetracked compared, 1 – 14 to 1
– 16deleting datetracked information, 1 – 18future updates, 1 – 17main functions, 1 – 15 to 1 – 17removing an end date, 1 – 19setting your effective date, 1 – 18viewing a record’s datetracked changes, 1 –
16, 1 – 19Defining a Payment Method, 5 – 8Disabilities
accommodation requests for, 8 – 47 to 8 – 48recording types of, 8 – 46registration of, 8 – 45
Disability Organization, organizationclassification, 2 – 17
Distributed costingdistributing employer charges, 6 – 6 to 6 – 8distribution set requirement, 6 – 6 to 6 – 7example of, 6 – 7 to 6 – 25
Dynamic triggersdefining, 5 – 12grouping into legislative functional areas, 5 –
14
EEEO Job Categories, 8 – 26EEO job categories, 8 – 30 to 8 – 32EEO–1 reporting
ethnic categories for, 8 – 29job categories for, 8 – 30overview of, 8 – 27 to 8 – 29setup steps for, 8 – 21
Element links, costing of, 6 – 5 to 6 – 7Elements, costing of, 6 – 5 to 6 – 7Employee, entering establishment overrides, 8
– 16Employee assignments
position based, 4 – 22project based, 4 – 18 to 4 – 22
Employee groups, defining through workstructure assignments, 5 – 4
Employee numbers, ways of creating, 2 – 8Employees, exempting from Worker’s
Compensation, 7 – 12Employer
charges, distribution of, 6 – 6organization classification, 2 – 17
Employees, placing on a grade step, 4 – 76End dates, removing, 1 – 19Enterprise modeling
hybrid enterprises, 4 – 25 to 4 – 27Oracle HRMS overview, 4 – 2project based enterprises, 4 – 18 to 4 – 22reorganizing with Mass Move, 4 – 56role of jobs, positions and grades in, 4 – 4rule based enterprises, 4 – 22 to 4 – 25three models to consider, 4 – 4
Establishment, organization classification, 2 –18
Establishment hierarchiesand Reporting Establishments, 8 – 3example of, 8 – 4, 8 – 5, 8 – 8for AAP reports, 8 – 5, 8 – 38for multi–establishment GREs, 8 – 6 to 8 – 9for single–establishment GREs, 8 – 5rule for, 8 – 5setup of, 8 – 14 to 8 – 15varieties of, 8 – 5
Establishmentsfor government reporting, 8 – 3for OSHA reports, 8 – 3, 8 – 49
Ethnic origin, categories for, 8 – 29External organizations, 2 – 11Extra information types, predefined, 4 – 17
FFiscal year, balances for, 2 – 28
GGL codes
for federal taxes, 6 – 16

Index – 4 Using Oracle HRMS – The Fundamentals (US)
for state and local taxes, 6 – 17 to 6 – 19in the Cost Allocation flexfield, 6 – 13 to 6 –
15Government–mandated HR reports
overview of, 8 – 2preparations for, 8 – 7Reporting Categories and Statuses for, 8 – 3reporting organizations for, 8 – 3
Grade rates, 4 – 68 to 4 – 70Grade scales, 4 – 70Grade steps, 4 – 71
incrementing placements, 4 – 77placing employees on, 4 – 71
Grade structures, 4 – 3Grades
comparatio values, 4 – 73defining, 4 – 72 to 4 – 74deleting, 4 – 72overview, 4 – 65 to 4 – 82relating to progression points, 4 – 71, 4 – 76
GRE/Legal Entity, organization classification,2 – 17
GREsadditional information for, 2 – 25and common paymasters, 2 – 12and Legal Entities, 2 – 13and tax groups, 2 – 16entering NACHA tape data, 5 – 11functions of, 2 – 12identification number for, 2 – 12, 2 – 32NACHA information for, 5 – 11setting up establishment hierarchies, 8 – 14setting up Worker’s Compensation, 7 – 11
HHierarchy Diagrammers
adding organizations, 3 – 10adding positions, 3 – 10collapsing diagrams, 3 – 5copying, 3 – 9creating a new version, 3 – 8creating hierarchies using multiple Business
Groups, 3 – 3creating multi–business group hierarchies, 3
– 3
displaying, 3 – 3displaying information, 3 – 6editing, 3 – 2expanding diagrams, 3 – 5finding an organization or position, 3 – 4launching, 3 – 3moving organizations or positions, 3 – 11organization, 3 – 2overview, 3 – 2position, 3 – 2removing organizations or positions, 3 – 10setting up a new hierarchy, 3 – 7
Hours of workentering defaults for, 2 – 7, 2 – 30 to 2 – 31work schedules for, 2 – 33 to 2 – 34
HR Organizationentering costing information, 2 – 32organization classification, 2 – 16
HR Organizations, entering work schedules, 2– 33
Human resource managementimportance of, 1 – 3in hybrid enterprises, 4 – 25 to 4 – 82in project based enterprises, 4 – 18 to 4 – 22in rule based enterprises, 4 – 22 to 4 – 25integration over time with payroll
management, 1 – 6Oracle’s preferred model, 1 – 8
IIndirect results, costing of, 6 – 5 to 6 – 7Insurance carriers, for Workers Compensation,
7 – 2Insurance Provider, organization classification,
2 – 18IRS Identification Number, entering, 2 – 32
JJob codes, for Workers Compensation, 7 – 3 to
7 – 4, 7 – 12 to 7 – 13Job groups, 4 – 3
creating, 4 – 27

Index – 5
Jobscontrasted with positions, 4 – 6creating names for, 4 – 16defining, 4 – 28evaluation systems for, 4 – 16in project based enterprises, 4 – 20lines of progression for, 8 – 16 to 8 – 17representing jobs and positions, 4 – 2 to 4 – 7Workers Compensation codes for, 7 – 3 to 7 –
5
KKey flexfields
Cost Allocation, 2 – 8, 6 – 10 to 6 – 25Grade Name, 4 – 66Job Name, 4 – 16People Group, 5 – 4Position Name, 4 – 16
LLabor costs
allocation choices with Oracle HR, 6 – 3example allocation of, 6 – 4 to 6 – 5
Legal Entity, organization classification, 2 – 17Legislation code, 2 – 28Lines of Progression, defining, 8 – 16Links, for Workers Compensation elements, 7 –
8Locations, 2 – 4 to 2 – 49
deleting, 2 – 11making inactive, 2 – 10setting up, 2 – 9
MManaging change over time, 1 – 14Mass Move process
defining, 4 – 58executing, 4 – 63identifying source positions, 4 – 59identifying target positions, 4 – 60maintaining historical archive of moves, 4 –
57
prerequisite decisions for, 4 – 56re–executing after error message, 4 – 64reviewing, 4 – 63using for Business Group reorganization, 4 –
56verifying transfer of assignments, 4 – 61 to 4
– 63verifying valid grades for target positions, 4
– 62Matrix management, hierarchies for, 2 – 42Medical Service Provider, organization
classification, 2 – 17Menus
Edit menu, 3 – 12File menu, 3 – 12Help menu, 3 – 14summary of commands, 3 – 12using, 3 – 12View menu, 3 – 13
Multilingual features in Oracle HRMS, 1 – 12to 1 – 14
Multiple Worksite reporting, filing informationfor, 2 – 25
NNACHA, 5 – 11National Identifiers, 1 – 12Node properties, for diagrams, 3 – 13
OOPACIF, organization classification, 2 – 18OPCA, organization classification, 2 – 18Oracle Advanced Benefits, key functions of, 1 –
6Oracle HRMS
details of application suite, 1 – 4 to 1 – 6key concepts for new users, 1 – 2multilingual features, 1 – 7, 1 – 12 to 1 – 14
Oracle Human Resourceskey features, 1 – 4self–service provision for managers and
employees, 1 – 7

Index – 6 Using Oracle HRMS – The Fundamentals (US)
shares common information with pay andbenefits, 1 – 10 to 1 – 13
Oracle Payrollkey features, 1 – 5shares common information with HR and
benefits, 1 – 10 to 1 – 13Organization, entering additional information,
2 – 23Organization Classification, entering
additional information, 2 – 23Organization classifications, 2 – 12, 2 – 16
AAP Organization, 2 – 17ASSEDIC Center, 2 – 18Bargaining Unit, 2 – 17Beneficiary Organization, 2 – 17Beneficiary Organization, 2 – 18Benefits Carrier, 2 – 18Business Group, 2 – 16Company, 2 – 18Constituency, 2 – 17Corporate Headquarters, 2 – 17CPAM, 2 – 18Disability Organization, 2 – 17Employer, 2 – 17Establishment, 2 – 18GRE/Legal Entity, 2 – 17HR Organization, 2 – 16Insurance Provider, 2 – 18Medical Service Provider, 2 – 17OPACIF, 2 – 18OPCA, 2 – 18Parent Entity, 2 – 17Payee Organization, 2 – 16Pensions Provider, 2 – 18Provincial Medical Carrier, 2 – 18Provincial Reporting Establishment (PRE), 2
– 18Reporting Establishment, 2 – 17Representative Body, 2 – 17URSSAF Center, 2 – 18Workers Compensation Carrier, 2 – 18
Organization hierarchies, 2 – 41 to 2 – 49adding further organizations, 2 – 33adding to, 8 – 15 to 8 – 16changing, 2 – 47creating, 2 – 45 to 2 – 49deleting, 2 – 48for matrix management, 2 – 42
versions of, 2 – 43Organization management, overview, 2 – 2 to 2
– 4Organization types, 2 – 11Organizational Payment Method, 5 – 8Organizations
adding to existing hierarchies, 2 – 33adding to hierarchies, 2 – 23, 2 – 25, 8 – 15 to
8 – 16classifications for, 2 – 23cost centers for, 2 – 20 to 2 – 21creating, 2 – 21 to 2 – 23deleting and removing, 2 – 41displaying information, 3 – 6entering classifications for, 2 – 23entering locations for, 2 – 9 to 2 – 11external, 2 – 11in project based enterprises, 4 – 20levels of internal, 2 – 19 to 2 – 21representing enterprise structures by, 2 – 11
to 2 – 13used with position control, 4 – 7
OSHAForm 101 Report, 8 – 52Form 200 Report, 8 – 52
OSHA reportingestablishments for, 8 – 49for fatalities, 8 – 51information for, 8 – 49 to 8 – 50overview of, 8 – 48setup steps for, 8 – 12
Overhead labor costs, distribution of, 6 – 7 to 6– 24
PParent Entity, organization classification, 2 – 17Parent organizations, 8 – 15 to 8 – 16Pay periods, selecting, 5 – 9Pay scales, 4 – 70
defining, 4 – 74defining rates for, 4 – 75
Payee Organization, organizationclassification, 2 – 16
Payment Method, defining, 5 – 8

Index – 7
Payment Methods, 5 – 5Payment methods
deciding enterprise options, 5 – 2, 5 – 3for a payroll, 5 – 10
Payrollcreating, 5 – 9overview, 5 – 2 to 5 – 4
Payroll calendars, table of frequencies, 5 – 2Payroll exposure
entering rules for, 7 – 13 to 7 – 14for Workers Compensation premiums, 7 – 2,
7 – 5, 7 – 6Payroll Exposure Rules and Surcharges, 7 – 13Payroll processes
costing, 6 – 19Transfer to GL, 6 – 20 to 6 – 22
Payrollscheck date, 5 – 9cut off date, 5 – 9deleting, 5 – 11scheduled run date, 5 – 9
Pensions Provider, organization classification,2 – 18
People Group key flexfieldimportant features, 5 – 4making segments required, 5 – 5to represent companies, 2 – 19 to 2 – 21
Positioncopying a, 4 – 38, 4 – 43decisions for managing, 4 – 13defining using transactions, 4 – 36position control, 4 – 9solutions for managing, 4 – 9transaction, using, 4 – 36transaction, viewing history, 4 – 49
Position control, decisions, 4 – 13Position hierarchies, 4 – 51
adding a new position, 4 – 35changing, 4 – 55copying, 4 – 54creating, 4 – 53 to 4 – 81creating new versions, 4 – 54deleting, 4 – 54role of, 4 – 5
Positionscontrasted with jobs, 4 – 6creating names, 4 – 16defining, 4 – 30displaying information, 3 – 6evaluation systems, 4 – 16extra information types, 4 – 17finding, 4 – 47hiring status, 4 – 14identifying source positions for mass move,
4 – 59identifying target positions for mass move, 4
– 60key role in rule based enterprises, 4 – 22 to 4
– 25managing, 4 – 5representing jobs and positions, 4 – 2 to 4 – 7viewing occupancy, 4 – 49
Primary reporting hierarchy, 2 – 42Process parameters, 5 – 7
maintaining, 5 – 16Progression points
defining, 4 – 74relating to grades, 4 – 71
Project based enterprises, 4 – 18 to 4 – 22Provincial Medical Carrier, organization
classification, 2 – 18Provincial Reporting Establishment (PRE),
organization classification, 2 – 18Public sector, implementation in, 4 – 22 to 4 –
25
QQualifiers, for Cost Allocation key flexfield, 6 –
12 to 6 – 14
RRates
for grades, 4 – 68for pay scales, 4 – 75
Regular runs, scheduled date of, 5 – 9
Index – 8 Using Oracle HRMS – The Fundamentals (US)
Reporting Categories, registering, 8 – 12Reporting Categories and Statuses, 8 – 3
registering, 2 – 7, 8 – 7 to 8 – 9Reporting Establishment, organization
classification, 2 – 17Reporting Establishments
additional information for, 2 – 25 to 2 – 42for corporate headquarters, 8 – 13 to 8 – 14for government reports, 8 – 3overrides for, 8 – 4, 8 – 16 to 8 – 18
Reporting lines, 2 – 42, 4 – 51, 4 – 53Reporting organizations
additional information for, 2 – 25 to 2 – 27overview of, 8 – 3 to 8 – 5setup of, 8 – 8
Reporting Statuses, registering, 8 – 13Reports
AAP Job Group Analysis, 8 – 39AAP Workforce Analysis, 8 – 39ADA, 8 – 48Costing Breakdown for Costing Run, 6 – 20Costing Breakdown for Date Range, 6 – 20Current and Projected Progression Point
Values, 4 – 78Employee Increment Results, 4 – 78Organization Hierarchy, 2 – 48OSHA No. 200 and No. 101, 8 – 52Position Hierarchy, 4 – 56VETS–100 Veterans Employment, 8 – 42 to 8
– 53Representative body
entering constituency information, 2 – 34entering information, 2 – 29organization classification, 2 – 17
Rule based enterprises, 4 – 22
SSalary, relating to grades, 4 – 67Salary basis, assignments to, 5 – 4Scale rates, 4 – 75Security, controlling use of shared windows, 1
– 12Source positions, identifying for mass move, 4
– 59
Special information typesfor disability information, 8 – 46for OSHA–reportable incidents, 8 – 50 to 8 –
52Subsidiaries, as Business Groups, 2 – 7Supplementary roles, 4 – 3Surcharges, for Workers Compensation, 7 – 5, 7
– 13 to 7 – 14Suspense account, 6 – 5
TTarget positions, identifying for mass move, 4
– 60 to 4 – 62Tax balances, entering adjustments to, 6 – 22 to
6 – 25Taxes
costing, by jurisdiction, 6 – 17costing, by tax type, 6 – 16maintaining information for, 2 – 13, 2 – 25
Toolbarsummary of commands, 3 – 12using, 3 – 12
Transaction, viewing history, 4 – 49Transfer to GL process, 6 – 21
UUnion pay scales, 4 – 70URSSAF Center, organization classification, 2 –
18User profile options
DateTrack:Date Security, 1 – 17DateTrack:Reminder, 1 – 15HR:User Type, 1 – 12
VValid Payment Methods, 5 – 9VETS–100 reporting
data for, 8 – 41 to 8 – 42overview of, 8 – 40setup steps for, 8 – 23

Index – 9
WWindow
Career Path Names, 8 – 16Map Career Path, 8 – 16Organization�������� ������� ��� ��������� � � ��������� ��������� � � ��������� ������� � � ��
Organizational Payment Method, 5 – 8Parent Organization, reporting hierarchies, 8
– 15Payroll, 5 – 9
WindowsADA Disabilities, 8 – 46Adjust Tax and Subject Wage Balances, 6 – 22Alter Effective Date, 1 – 18Business Group Information, 2 – 28Career Path Name, 8 – 16Consolidation Sets, 5 – 8DateTrack History Change Field Summary, 1
– 19default navigation paths, A – 2Disability Accommodations, 8 – 47Find Organization, 2 – 40Find Positions, 4 – 59Generic Hierarchy, 2 – 18, 8 – 20, 8 – 24, 8 –
25, 8 – 26Grade Rate, 4 – 73Grade Scale, 4 – 71Grade Step Placement, 4 – 71Grades, 4 – 72Hierarchy Diagram, 3 – 3Job, 4 – 28Job Group, 4 – 27Location, 2 – 10Map Career Path, 8 – 16Mass Move, 4 – 58, 4 – 59Mass Move – Assignments, 4 – 61Mass Move – Positions, 4 – 60Mass Move – Valid Grades, 4 – 62
Organization, 2 – 21Organization Hierarchy, 2 – 45Organizational Payment Method, 5 – 2OSHA–reportable Incident, 8 – 50Parent Organization, 2 – 33Pay Scale, 4 – 74Payroll, 5 – 9Period Dates, 5 – 10Position Hierarchy, 4 – 53Position Occupancy, 4 – 49Position transaction, 4 – 36Scale Rate, 4 – 75transaction status, viewing, 4 – 49Valid Payment Methods, 5 – 10View Employee Grade Comparatio, 4 – 73Work Day Information, 2 – 30Work Schedule, 2 – 33
Work day information, 2 – 30Work schedules, entering, 2 – 33Work structures
key features in Oracle HRMS, 1 – 9setup examples, 4 – 4 to 4 – 17
Workers Compensationelements and formula for, 7 – 7 to 7 – 9entering WC codes, 7 – 13exempting employees, 7 – 12insurance carriers for, 7 – 2job codes and rates for, 7 – 3 to 7 – 5, 7 – 12
to 7 – 16links for WC elements, 7 – 7override code for, 7 – 5, 7 – 7, 7 – 14premium calculation, 7 – 2, 7 – 8premium modifiers, 7 – 4 to 7 – 5setting up, 7 – 11 to 7 – 16
Workers Compensation Carrier, organizationclassification, 2 – 18
Workers Compensation Code Mapping,creating default, 7 – 10
Workflow roles, 4 – 3

Index – 10 Using Oracle HRMS – The Fundamentals (US)