web client installation procedure
TRANSCRIPT

Innovative Solutions
Installation Procedure for Omnicast Web
Client using IIS
January 2011

Genetec.com | Installation Procedure for Omnicast Web Client using IIS
2 2
© 2011 Genetec Inc. All rights reserved.
Genetec Inc. distributes this document with software that includes an end–user license agreement and is furnished under license and may be used only in accordance with the terms of the license agreement. The contents of this document are protected under copyright law.
The contents of this guide are furnished for informational use only and are subject to change without notice. Genetec Inc. assumes no responsibility or liability for any errors or inaccuracies
that may appear in the informational content contained in this guide.
This publication may not be copied, modified, or reproduced in any form or for any purpose, nor
can any derivative works be created there from without Genetec Inc.’s prior written consent.
Genetec Inc. reserves the right to revise and improve its products as it sees fit. This document describes the state of a product at the time of document’s last revision, and may not reflect the
product at all times in the future.
In no event shall Genetec Inc. be liable to any person or entity with respect to any loss or damage that is incidental to or consequential upon the instructions found in this document or the computer software and hardware products described herein. The use of this document is subject to the disclaimer of liability found in the end–user license agreement.
"Genetec", "Omnicast", "Synergis", "AutoVu", "Federation", the Genetec stylized "G" and the Omnicast, Synergis and AutoVu logos are trademarks of Genetec Inc., either registered or
pending registration in several jurisdictions.
"Security Center" and the Security Center logo are trademarks of Genetec Inc.
Other trade names used in this document may be trademarks or registered trademarks of the manufacturers or vendors of the respective products.
All specifications are subject to change without notice.
Document Title: Installation Procedure for Omnicast Web Client using IIS Documentation Number: Date: December 2, 2011

Genetec.com | Installation Procedure for Omnicast Web Client using IIS
3 3
Table of Contents
1 General Information ............................................................................... 5
1.1 Document Revision ......................................................................................... 5
1.2 Contacting Technical Assistance .................................................................... 5
2 Requirements for Web Client ................................................................. 7
3 IIS Installation in Windows Procedure ................................................... 8
3.1 IIS in Windows Server 2008 ............................................................................ 8
3.1.1 Validating IIS in Windows Server 2008 ........................................................... 8
3.1.2 Installing IIS 7.0 in Windows Server 2008 ..................................................... 10
3.1.3 64-bit Windows Server 2008 ......................................................................... 13
3.2 IIS in Windows Vista or Windows 7 ............................................................... 15
3.2.1 Validating IIS in Windows Vista or Windows 7 .............................................. 15
3.2.2 Installing IIS 6.0 in Windows Vista or Windows 7.......................................... 15
3.2.3 64-bit Windows Vista or Windows 7 .............................................................. 17
3.3 IIS in Windows XP ........................................................................................ 17
3.3.1 Validating IIS in Windows XP ........................................................................ 17
3.3.2 Installing IIS 5 in Windows XP ...................................................................... 17
3.4 IIS in Windows Server 2003 .......................................................................... 17
3.4.1 Validating IIS 6.0 in Windows Server 2003 ................................................... 17
3.4.2 Installing IIS 6.0 in Windows Server 2003 ..................................................... 18
3.4.3 64-bit Windows XP and Windows Server 2003 ............................................. 19
4 Installing the Omnicast Web Client on the Server ............................... 20
4.1 Optional – Manual Installation for Omnicast Web Client (IIS 6) .................... 21
4.2 Optional – Manual Installation for Omnicast Web Client (IIS 7) .................... 22
5 Installing the Omnicast Web Client on the Workstation ....................... 24
6 Configuration Considerations ............................................................... 30
6.1 Lower Video Bandwidth ................................................................................ 30
6.2 Network Ports ............................................................................................... 31
7 Troubleshooting ................................................................................... 32
7.1 Web client does not connect ......................................................................... 32
8 Appendix A ........................................................................................... 34

Genetec.com | Installation Procedure for Omnicast Web Client using IIS
4 4
8.1 Enabling 32-bit mode in IIS 7 using the command-line ................................. 34

Genetec.com | Installation Procedure for Omnicast Web Client using IIS
5 5
1 General Information
Omnicast Web Client uses the Microsoft Internet Information Services (IIS) as its web server. IIS must be installed first on the server before installing the web client. This document describes in detail the necessary steps to install the Omnicast Web Client and integrate it with Microsoft IIS. It must be executed in the order as outlined in this document:
1. Install IIS in Windows on the web server
2. Install the Omnicast Web Client option on the web server
3. On the workstation, connect to the web server and install the web client
1.1 Document Revision
Date Description
2009-07-01 First release (taken from KB00000099). Added Windows Server 2008 information.
2009-07-20 Added Windows Vista procedure.
2009-10-15 Added Windows Server 2008 64-bit procedure.
2009-11-19 Added Manual Installation for Omnicast Web Client (IIS 7).
2010-04-23 Modified procedure for enabling 32-bit in IIS 7 and added note for Omnicast 4.5 GA.
2010-06-02 Modified IIS role services in Windows 2008; Added Windows 7; Added Troubleshooting section.
2011-01-26 Added “Configuration Considerations” section; changed to new Genetec template
1.2 Contacting Technical Assistance
Customers can reach the Genetec Technical Assistance Center (GTAC) using any one of
the following methods:
» Via the Genetec Technical Assistance Portal (GTAP) website: https://gtap.genetec.com
» Via e-mail: [email protected]
» Via telephone: Phone: 1-514-856-7100 Toll Free: 1-866-338-2988 (Canada and US only) Toll Free: +800 01818200 (Europe*) Fax: 1-514-332-1692
From Monday to Friday, 8:00 AM to 8:00 PM (Eastern time, GMT -5h)

Genetec.com | Installation Procedure for Omnicast Web Client using IIS
6 6
Customers should be ready to provide all relevant information describing the
problem/question, including System ID and version information.
*Please visit https://gtap.genetec.com for a list of covered regions.

Genetec.com | Installation Procedure for Omnicast Web Client using IIS
7 7
2 Requirements for Web Client
Omnicast Web Client requires the Internet Explorer web browser running version IE6, IE7 and IE8. The supported operating systems for Omnicast Web Clients are:
Windows XP SP2/SP3 (Omnicast 4.0 and higher)
Windows Server 2003 (Omnicast 4.0 and higher)
Windows Vista (Omnicast 4.2 and higher)
Windows Server 2008 (Omnicast 4.4 and higher)
Windows Server 2008 R2 (Omnicast 4.5 SR1 and higher)
Windows 7 (Omnicast 4.5 SR1 and higher)
For more details, please refer to the Web Clients section in the Omnicast Server/Client Specifications document, which can be downloaded from our documents section of our GTAP website:
http://www.genetec.com/English/Support/Assistance/Pages/Documents.aspx
Web Client applications require the use of DirectX to render the video on a tile in the web page. As of the writing of this article, DirectX9 or DirectX10 is available from the Microsoft Update website. The application requires a minimum level of DirectX8 to operate. To download the latest version please visit:
www.microsoft.com/windows/directx/default.aspx
Java Runtime Environment 6 Update 30 or higher must be installed on the client computer. The latest versions of Java can be found at the Sun Microsystems website. To have the latest version installed please visit:
http://java.sun.com/webapps/getjava/BrowserRedirect?locale=en&host=www.java.com:80
Genetec.com | Installation Procedure for Omnicast Web Client using IIS
8 8
3 IIS Installation in Windows Procedure
The following sections describe the necessary steps to install the Microsoft IIS in different versions of the Windows operating system (OS). Please go to the section corresponding to your version of OS. The Windows installation CD might be required.
3.1 IIS in Windows Server 2008
3.1.1 Validating IIS in Windows Server 2008
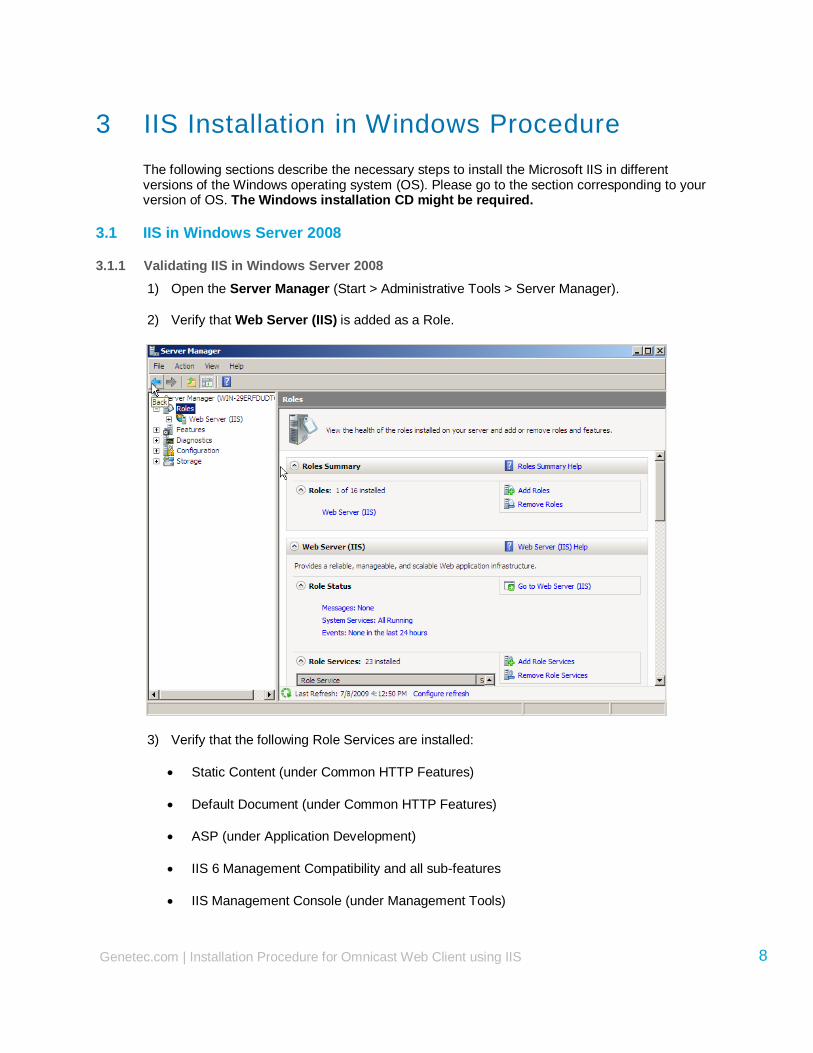
1) Open the Server Manager (Start > Administrative Tools > Server Manager).
2) Verify that Web Server (IIS) is added as a Role.
3) Verify that the following Role Services are installed:
Static Content (under Common HTTP Features)
Default Document (under Common HTTP Features)
ASP (under Application Development)
IIS 6 Management Compatibility and all sub-features
IIS Management Console (under Management Tools)

Genetec.com | Installation Procedure for Omnicast Web Client using IIS
9 9

Genetec.com | Installation Procedure for Omnicast Web Client using IIS
10 10
If Web Server (IIS) is not added as a Role, please follow the steps in the next section to install IIS in Windows Server 2008.
3.1.2 Installing IIS 7.0 in Windows Server 2008
If Web Server (IIS) has not been added as a Role in Windows Server 2008, please follow the procedure below to install IIS on the server.
1) Open the Server Manager (Start > Administrative Tools > Server Manager).
2) Select Add Roles.
3) Click Next to get the Select Server Roles options.
4) Select Web server (IIS) and click on Next.

Genetec.com | Installation Procedure for Omnicast Web Client using IIS
11 11
5) Click Next to go to Select Role Services. Select the following if not already selected:
Static Content (under Common HTTP Features)
Default Document (under Common HTTP Features)
ASP (under Application Development)
IIS 6 Management Compatibility and all sub-features
IIS Management Console (under Management Tools)
You may have other role services selected by default, but the role services in the above list MUST be selected.

Genetec.com | Installation Procedure for Omnicast Web Client using IIS
12 12

Genetec.com | Installation Procedure for Omnicast Web Client using IIS
13 13
6) When asked that additional roles services are required, select Add Required Role Services.
7) Click Next to proceed to the Confirm Installation Selections and click on Install.
8) Once the installation is complete, you should see Web Server (IIS) listed as a role.
3.1.3 64-bit Windows Server 2008
On 64-bit Windows, it is necessary to configure IIS 7 to run 32-bit web applications. The following steps must be performed on 64-bit Windows Server 2008 operating systems.
1) Open the IIS Manager (Start > Administrative Tools > Internet Information Services (IIS) Manager).
2) Expand the tree and select Application Pools.
3) Right-click on the DefaultAppPool and select Advanced Settings.

Genetec.com | Installation Procedure for Omnicast Web Client using IIS
14 14
4) In the field Enable 32-Bit Applications, change it to True and click OK.

Genetec.com | Installation Procedure for Omnicast Web Client using IIS
15 15
3.2 IIS in Windows Vista or Windows 7
3.2.1 Validating IIS in Windows Vista or Windows 7
To validate that IIS is installed on the server running Windows Vista or Windows 7, open Administrative Tools from the Control Panel and look for Internet Information Services (IIS) Manager. If the service cannot be located here, then it is probably not installed.
If IIS is not installed, please follow the steps in the next section to install IIS. If IIS is already installed, please verify that the necessary IIS options have been installed. To do so, please follow the same steps in the next section.
3.2.2 Installing IIS 6.0 in Windows Vista or Windows 7
1) Open the Control Panel and click on Programs and Features. Select Turn Windows features on or off. The Windows installation CD might be required.
2) Expand the choice Internet Information Services.
3) Select the following items:
Static Content (under World Wide Web Services/Common HTTP Features)
Default Document (under World Wide Web Services/Common HTTP Features)
ASP (under World Wide Web Services/Application Development Features)
Web Management Tools and all sub-features (under Web Management Tools)
You may have other role services selected by default which should not be a problem, but the role service in the above list MUST be selected.

Genetec.com | Installation Procedure for Omnicast Web Client using IIS
16 16
4) Check all items under Windows Process Activation Service:
5) Click OK and follow the instructions to complete the installation.

Genetec.com | Installation Procedure for Omnicast Web Client using IIS
17 17
3.2.3 64-bit Windows Vista or Windows 7
On 64-bit Windows, it is necessary to configure IIS 6 to run 32-bit web applications. Please perform the steps outlined in section 3.1.3 to enable 32-bit applications in IIS.
3.3 IIS in Windows XP
3.3.1 Validating IIS in Windows XP
To validate that IIS is installed on the server running Windows XP, open Administrative Tools from the Control Panel and look for Internet Information Services. If the service cannot be located here, then it is probably not installed. If IIS is not installed, please follow the steps in the next section to install IIS in Windows XP.
3.3.2 Installing IIS 5 in Windows XP
1) IIS can be installed by opening the Control Panel and clicking on Add Remove Programs.
2) Select Add/Remove Windows Components. The Windows installation CD might be
required. Make sure there is a checkmark beside IIS in the Components list then continue
with the Windows Components Wizard to complete the installation.
3) In the Windows Components Wizard, highlight the Internet Information Services (IIS) and
press the Details button.
4) Make sure World Wide Web Services is checked and press the Details button.
5) On the next screen, highlight World Wide Web Service and press the OK button to close
each window and Next to install the newly-selected components
3.4 IIS in Windows Server 2003
3.4.1 Validating IIS 6.0 in Windows Server 2003

Genetec.com | Installation Procedure for Omnicast Web Client using IIS
18 18
To validate that IIS is installed on the server, open Administrative Tools from the Control Panel and look for Internet Information Services (IIS) Manager. If the service cannot be located here then it is probably not installed. If IIS is not installed, please follow the steps in the next section to install IIS in Windows Server 2003.
3.4.2 Installing IIS 6.0 in Windows Server 2003
1) In the Windows Components Wizard, highlight the Application Server and press the
Details button.
2) First, check Application Server Console and ASP.NET, then highlight the Internet
Information Services (IIS) option and press Details.
3) On the next screen, highlight World Wide Web Services and press the Details button to
bring us onto the last screen.
4) We need to select the Active Server Pages option. Click OK to close each window and
Next to install the newly-selected components.
Note for Windows Server 2003: By default, ASP Pages are disabled. Procedure to enable dynamic content:
1) In IIS Manager, expand the local computer, and then click Web Service Extensions.
2) In the details pane, click the Web service extension that you want to enable (ASP).

Genetec.com | Installation Procedure for Omnicast Web Client using IIS
19 19
3) Click Allow to enable the Web service extension (ASP).
4) Click OK.
3.4.3 64-bit Windows XP and Windows Server 2003
The following steps must be performed on 64-bit Windows XP and Windows Server 2003 operating systems.
1) Configure IIS to run 32-bit web applications. In the cmd window, go to
C:\Inetpub\AdminScripts and execute the following command:
cscript.exe adsutil.vbs set W3SVC/AppPools/Enable32BitAppOnWin64 1
2) ASP.NET must run in 32-bit mode. To change ASP.NET to 32-bit mode, open a cmd
window, go to the .NET Framework folder, and execute the following command:
aspnet_regiis.exe –i

Genetec.com | Installation Procedure for Omnicast Web Client using IIS
20 20
4 Installing the Omnicast Web Client on the Server
The Web Client installer must be installed on the server. This will setup the web folder in IIS and put the web client installer on the server, thus making it a web server. Here are the steps to follow to install the Web Client on the server:
1) Select the setup type as Custom during the Omnicast Server installation and make sure there
is a checkmark beside Web Applications then continue the installation.
2) A dialog window will prompt you to create the virtual directory. The virtual directories that are
going to be installed will be shown in the following dialog. Check the option Create virtual
directories and click Next.
Note: If IIS is not yet installed on your machine (as seen above), leave this option unchecked and click Next. The Web server files will be copied to your local disk to the subfolder \WebClient, but you will have to create the virtual directories manually after installing IIS.
In Omnicast 4.5 GA, the virtual directory is not created. This is a known issue and is described in
article KB 340 in our Knowledge Base on the GTAP (gtap.genetec.com). Therefore, if you have
installed Omnicast 4.5 GA, it is necessary to execute the steps described in section 4.1 for IIS 6 or
section 4.2 for IIS 7 to manually create the virtual directory.

Genetec.com | Installation Procedure for Omnicast Web Client using IIS
21 21
4.1 Optional – Manual Installation for Omnicast Web Client (IIS 6)
When IIS is not set before the Web clients were installed, you must do these steps to configure the virtual directory.
1) Once IIS is installed, go to the Internet Information Services manager from the
Administrative Tools section in the Control Panel.
2) From the IIS manager select Default Web Site in the tree view of the left pane (under:
ComputerName(local computer)/Web Sites/).
3) If it is not already started, start this item from the Action menu drop down list, or by clicking
on the triangle icon on the toolbar.
4) The last step of the setup is to add the Omnicast Web as a new Virtual Directory. Do this by
right clicking on Default Web Site and select “New/Virtual Directory …” to launch the
Creation Wizard.
5) The Wizard will ask for an Alias to give the new website. As an example we can use “Client”
for the alias.
6) Next the Wizard will ask for the path to the Omnicast Web Clients directory.
7) For Omnicast 4.0 and 4.1: Browse to “C:/Program Files/Genetec Omnicast Server/” and
select the “WebClient” directory.
For Omnicast 4.2 and higher: Browse to “C:/Program Files/Common Files/DVR Software 4.2/” and select the “WebClients” directory.
8) The last step is to set the Access Permissions to “Read” and “Run Scripts”. After this step
the Creation Wizard will present a window indicating “You have successfully completed the
Virtual Directory Creation Wizard”.

Genetec.com | Installation Procedure for Omnicast Web Client using IIS
22 22
4.2 Optional – Manual Installation for Omnicast Web Client (IIS 7)
1) Once IIS is installed, go to the Internet Information Services (IIS) Manager from the
Administrative Tools section.
2) From the IIS manager select Default Web Site in the tree view of the left pane (under:
ComputerName(local computer)/Sites/).
3) If it is not already started, start this item from the Actions section on the right pane, or by
double clicking on the machine icon.
4) The last step of the setup is to add the Omnicast Web as a new Application. Do this by right
clicking on Default Web Site and select “Add Application …”
5) Enter the Alias (Client) and the physical path in where web client folder is located:
a. C:\Program Files\Common Files\DVR Software 4.x\WebClients (32-bit default path)
b. C:\Program Files (x86)\Common Files\DVR Software 4.x\WebClients (64-bit default path)

Genetec.com | Installation Procedure for Omnicast Web Client using IIS
23 23
6) The application should be listed in IIS as showed below.

Genetec.com | Installation Procedure for Omnicast Web Client using IIS
24 24
5 Installing the Omnicast Web Client on the Workstation
When the client workstations connect to the web server for the first time, it will download the Omnicast Web Client installer from the web server and prompt the user to install it on the workstation. Follow these steps to install the web client:
1) In Internet Explorer, for the URL type in the following:
http://<IP address of the server hosting the web client>/Client
If the server is reachable, you should see the following status while it downloads the Omnicast Web Client installer from the server. Depending on the bandwidth available, it could take some time.
2) Once the download is complete, you will be prompted to run the installer. Click on Install.

Genetec.com | Installation Procedure for Omnicast Web Client using IIS
25 25
3) Select the setup language for the InstallShield.
4) The InstallShield will extract the installer.

Genetec.com | Installation Procedure for Omnicast Web Client using IIS
26 26
5) Click Next to continue.
6) Accept the license agreement and click on Next.

Genetec.com | Installation Procedure for Omnicast Web Client using IIS
27 27
7) Click on Install the being the installation.

Genetec.com | Installation Procedure for Omnicast Web Client using IIS
28 28
8) Once the installation is complete, click Finish to exit the InstallShield.
9) On the client workstation, add the Gateway server to the list of Trusted Sites in Internet
Explorer (Tools > Internet Options > Security). On some clients where the security settings
may be high, this step may be necessary.
If for some reason you do not want to add the Gateway server to the list of Trusted Sites, the Internet Security Settings in Internet Explorer will have to be configured to allow the use of ActiveX controls, download ActiveX files to be run on the local computer and the execution of scripts. The following are the Security Settings that must be enabled (found under Tools/Internet Options…/Security, select Internet then Custom Settings):
Download signed ActiveX controls – Enable
Download unsigned ActiveX controls - Enable
Initialize and script ActiveX controls not marked as safe - Enable
Run AcriveX controls and plug-ins – Enable
Script ActiveX controls marked safe for scripting – Enable
Downloads – File download – Enable

Genetec.com | Installation Procedure for Omnicast Web Client using IIS
29 29
Downloads – Font download – Enable
Scripting – Scripting of Java applets – Enable
Save the changes and return to the main web browser.
10) In IE, you should now see the login page.
11) Fill in the fields and click on Connect. The Gateway is the Omnicast Gateway’s IP address or
server name that you will be connecting to.
Genetec.com | Installation Procedure for Omnicast Web Client using IIS
30 30
6 Configuration Considerations
6.1 Lower Video Bandwidth
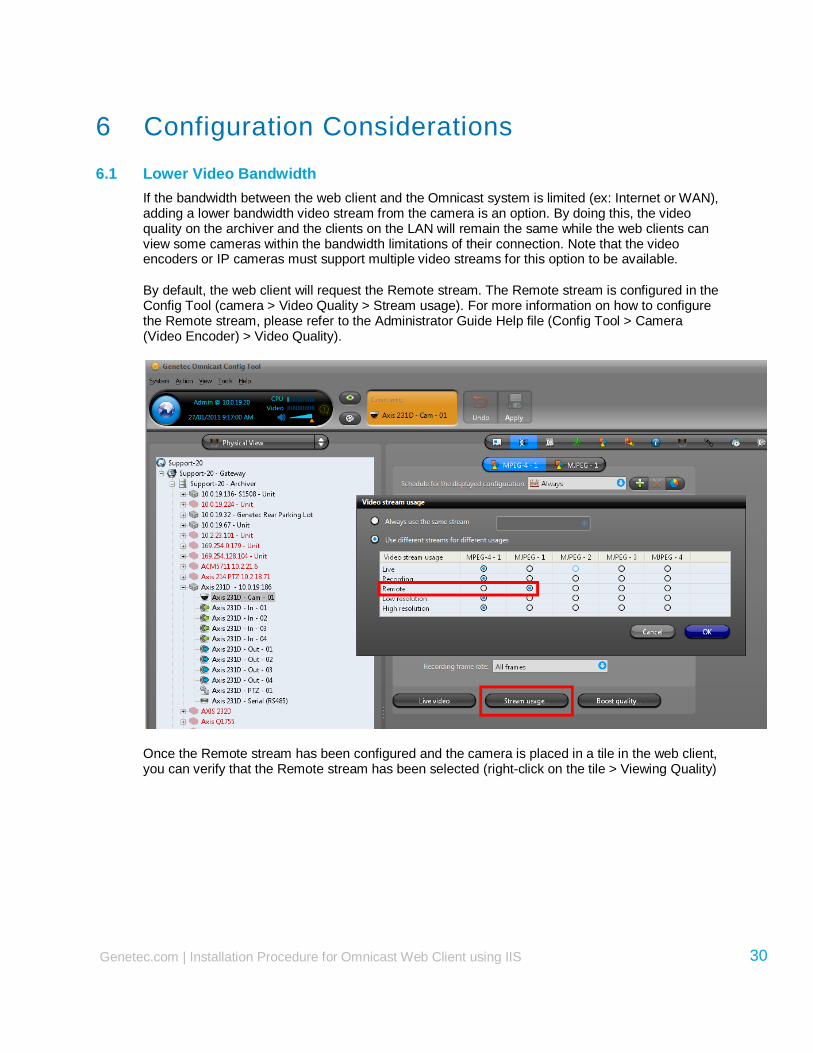
If the bandwidth between the web client and the Omnicast system is limited (ex: Internet or WAN), adding a lower bandwidth video stream from the camera is an option. By doing this, the video quality on the archiver and the clients on the LAN will remain the same while the web clients can view some cameras within the bandwidth limitations of their connection. Note that the video encoders or IP cameras must support multiple video streams for this option to be available.
By default, the web client will request the Remote stream. The Remote stream is configured in the Config Tool (camera > Video Quality > Stream usage). For more information on how to configure the Remote stream, please refer to the Administrator Guide Help file (Config Tool > Camera (Video Encoder) > Video Quality).
Once the Remote stream has been configured and the camera is placed in a tile in the web client, you can verify that the Remote stream has been selected (right-click on the tile > Viewing Quality)

Genetec.com | Installation Procedure for Omnicast Web Client using IIS
31 31
6.2 Network Ports
The login page is accessed via the web server through IIS. Therefore, only TCP port 80 is required. After this point, the ports used by the web client are the same as the Live Viewer (i.e. Full Client). Ex: TCP port 5001 is required to log into the Omnicast Directory from the web client. For the complete list of ports needed to be open for proper Omnicast functionality, please refer to KB 170:
https://gtap.genetec.com/Library/KnowledgeBaseArticle.aspx?kbid=170
If the web client is across the Internet or a WAN, ensure that the proper ports are open and routed correctly.
6.3 Active Directory
The web client works with Active Directory. However, the user must enter the windows credentials manually.

Genetec.com | Installation Procedure for Omnicast Web Client using IIS
32 32
7 Troubleshooting
7.1 Web client does not connect
You can reach the black “User logon” page. After filling in the user credentials fields and Gateway and you click on “Connect”, the Live Viewer appears but you are not connected.
Please check the following:
1) Ensure you can connect to the Omnicast system by using one of the full Omnicast client
applications (i.e. Config Tool, Live Viewer, or Archive Player), on the same or different
workstation.
2) Close all Internet Explorer windows and ensure there are no other IE instances running. This
could have prevented the installation of the web client to complete successfully.
a) Right-click on the taskbar and select Start Task Manager.
b) Select the Processes tab

Genetec.com | Installation Procedure for Omnicast Web Client using IIS
33 33
c) In the Image Name, there should not be any iexplorer.exe processes listed. If there are, select them and click on End Process.
3) If the full client is already installed on the workstation, you may need to install Java manually.
Please refer to section 2 to download and install Java.
4) If the web server is on Windows 2008/Windows 7/Vista, ensure that all the IIS role services
detailed in section 3.1.1 have been installed.
5) If the web client is connected to the Omnicast system via a WAN or Internet, ensure that the
Omnicast networks ports are open and routed properly (see section 6.2)

Genetec.com | Installation Procedure for Omnicast Web Client using IIS
34 34
8 Appendix A
8.1 Enabling 32-bit mode in IIS 7 using the command-line
In the cmd window, go to C:\Inetpub\AdminScripts and execute the following command:
cscript.exe adsutil.vbs set W3SVC/AppPools/Enable32BitAppOnWin64 1