xm-g6 - minidisc community portalminidisc.org/manuals/jvc/ib_xmg6.pdf · mportant for laser...
TRANSCRIPT

For Customer Use:Enter below the Model No. and Serial No. which are located either on the rear, bottom or side of the cabinet. Retain this information for future reference.
Model No.
Serial No.
LVT0378-002A[B]
INSTRUCTIONS
XM-G6
MINIDISC RECORDER
REC
REC PAUSE
SAMPLING RATE CONVERTER
M I N I D I S C R E C O R D E R X M - G 6
XM_cover[B] 99.11.22, 11:081

CAUTIONTo reduce the risk of electrical shocks, fire, etc.:
1. Do not remove screws, covers or cabinet.2. Do not expose this appliance to rain or moisture.
G-1
Warnings, Cautions and Others
Front view Side view
1 cm15 cm
15 cm 15 cm
10 cm
1 cm15 cm 15 cm
AX-UXG6
TD-UXG6
XT-UXG6R
XM-G6
AX-UXG6
TD-UXG6
XT-UXG6R
XM-G6
Caution: Proper VentilationTo avoid risk of electric shock and fire, and to prevent damage,locate the apparatus as follows:1 Front:
No obstructions and open spacing.2 Sides/ Top/ Back:
No obstructions should be placed in the areas shown by thedimensions below.
3 Bottom:Place on the level surface. Maintain an adequate air path forventilation by placing on a stand with a height of 10 cm ormore.
XM_safety[B] 99.11.26, 13:351

MPORTANT FOR LASER PRODUCTS
2 WARNING LABEL, PLACED INSIDE THE UNIT
REPRODUCTION OF LABELS
1 CLASSIFICATION LABEL, PLACED ON REARENCLOSURE
CLASS 1LASER PRODUCT
1. CLASS 1 LASER PRODUCT2. DANGER: Invisible laser radiation when open and interlock failed or defeated. Avoid direct exposure to beam.3. CAUTION: Do not open the top cover. There are no user serviceable parts inside the Unit; leave all servicing to qualified
service personnel.
G-2
DANGER: Invisible laser radiation when open and interlock failed or defeated.AVOID DIRECT EXPOSURE TO BEAM. (e)
ADVARSEL: Usynlig laser-stråling ved åbning, når sikkerhedsafbrydere er ude af funktion. Undgå udsæt-telse for stråling (d)
VARNING: Osynlig laser- strålning när denna del är öppnad och spärren är urkopplad. Betrakta ej strålen. (s)
VARO: Avattaessa ja suo-jalukitus ohitettaessa olet alttiina näkymättömälle lasersäteilylle. Älä katso säteeseen. (f)
XM_safety[B] 99.11.26, 13:352

1
Precautions
Installation• Install in a place which is level, dry and neither too hot
nor too cold — between 5˚C (41˚F) and 35˚C (95˚F).• Install the unit in a location with adequate ventilation to
prevent internal heat built-up in the units.• Leave sufficient distance between the unit and a TV.
DO NOT install the units in a location near heatsources, or in a place subject to direct sunlight,excessive dust or vibration.
Power sources• The power source of this unit is controlled by UX-G6R’s
system operation. Refer to its Instructions.• When connecting the unit to the UX-G6R, make sure to
unplug the AC power cord of the UX-G6R from the walloutlet.
Moisture condensationMoisture may condense inside the unit in the followingcases:• After starting heating in the room• In a damp room• If the unit is brought directly from a cold to a warm placeShould this occur, the system may malfunction. In this case,leave the unit turned on for a few hours until the moistureevaporates, unplug the AC power cord, and then plug it inagain.
DO NOT disassemble the unit since there areno user serviceable parts inside.
If anything goes wrong, unplug the AC power cord andconsult your dealer.
Welcome to XM-G6
XM-G6 is MiniDisc Recorder exclusively designed for UX-G6R micro component system. Although you cannot operatethis MD recorder without UX-G6R, this integration offersenhanced features to simple and easy operationssystematized on UX-G6R.Since the basic settings and common operations are almostidentical to those of UX-G6R, this manual mainly explainsMD related operations. Concerning UX-G6R’s settings andoperations, refer to its Instructions for details.
• The following marks are used in this manual:
Gives you warnings and cautions to preventfrom a damage or risk of fire/electric shock.Also gives you information which is not goodfor obtaining the best possible performancefrom the unit.
Gives you information and hints you hadbetter know.
We would like to thank you for purchasing one of our JVC products.Before operating this unit, read this manual carefully and thoroughly
to obtain the best possible performance from your unit,and retain this manual for future reference.
Introduction
EN01-10.XM-G6[B]/F 99.12.06, 14:401

2
Introduction .......................................................... 1Welcome to XM-G6 ............................................................. 1Precautions ........................................................................... 1
Contents ................................................................. 2
Location of the Buttons and Controls ................. 3Front Panels .......................................................................... 4Remote Control (belongs to UX-G6R) ................................ 4
Getting Started...................................................... 5Unpacking ............................................................................ 5Connecting the System Control Cable and the External
Wire .................................................................................. 5Connecting Another Digital Audio Equipment .................... 6
Playing Back an MD ............................................. 7Playing Back the Entire MD — Normal Play ...................... 7Searching and Skipping Tracks ............................................ 8Programing the Playing Order of the Tracks
— Program Play ............................................................... 9Playing at Random — Random Play .................................. 10Repeating Tracks — Repeat Play ....................................... 10
Recording onto an MD ....................................... 11Things to Know Before You Start Recording .................... 11Recording FM/AM (MW/LW) Broadcasts ........................ 12Recording a CD .................................................................. 14Recording a Tape ................................................................ 15Recording onto a Tape ........................................................ 16Recording the External Equipment .................................... 17
Editing an MD..................................................... 19Introducing MD Editing Functions .................................... 19DIVIDE Function ............................................................... 20JOIN Function .................................................................... 21MOVE Function ................................................................. 22ERASE Function ................................................................ 22ALL ERASE Function ....................................................... 23Erasing a Portion of a Track ............................................... 23
Assigning Titles to an MD .................................. 24Assigning a Title ................................................................. 24Changing the Title .............................................................. 26
Contents
Handling MDs ..................................................... 27MD Handling Precautions .................................................. 27
Additional Information ...................................... 28MD Disc Types ................................................................... 28ATRAC (Adaptive TRansform Acoustic Coding) .............. 28UTOC (User Table Of Contents) ........................................ 28Serial Copy Management System (SCMS) ........................ 29Sound Skip Guard Memory ................................................ 29MD Messages ..................................................................... 30MD Restrictions ................................................................. 31
Troubleshooting .................................................. 32
Specifications....................................................... 32
EN01-10.XM-G6[B]/F 99.12.06, 14:402
3
REC PAUSE
SAMPLING RATE CONVERTER
1
4
5
6
7
2
3REC
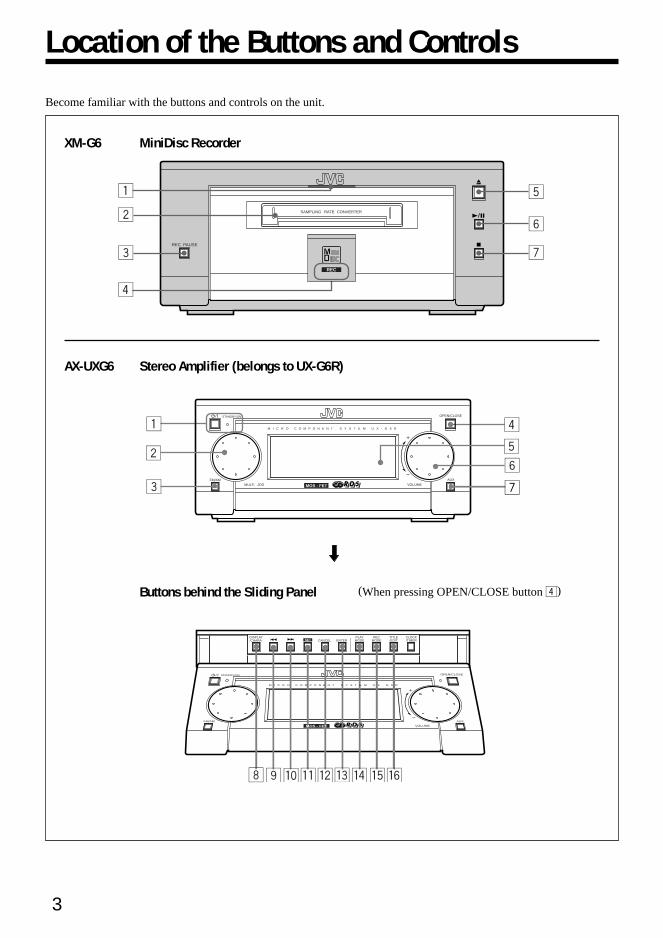
Location of the Buttons and Controls
XM-G6 MiniDisc Recorder
Buttons behind the Sliding Panel
Become familiar with the buttons and controls on the unit.
DISPLAY/CHARA.
PLAYMODE
RECMODE
TITLE/EDIT
CLOCK/TIMERCANCEL ENTERSET
8 9 pqwe r ty
MOS - FET
STANDBY/ON
FM/AM AUX
OPEN/CLOSE
VOLUME
M I C R O C O M P O N E N T S Y S T E M U X - G 6 R
4 ¢
AX-UXG6 Stereo Amplifier (belongs to UX-G6R)
M I C R O C O M P O N E N T S Y S T E M U X - G 6 R
MOS - FET
OPEN/CLOSE
AUXVOLUMEMULTI
FM/AM
STANDBY/ON
JOG
1 4
52
3
6
7
(When pressing OPEN/CLOSE button 4)
EN01-10.XM-G6[B]/F 99.12.06, 14:403

4
• You can also use the buttons on the remote control if theyhave the same or similar names (or marks) as those onthe units.If operation using the remote control is different fromthat using each unit, it is then explained.
Concerning with the remote controlRefer to the Instructions supplied with UX-G6R.
Remote Control (belongs to UX-G6R)Front Panels
MiniDisc Recorder XM-G61 MD IN lamp (7)2 MD loading slot (7)3 REC PAUSE button (12)4 REC indicator (12)5 0 (eject) button (8)6 6 (play/pause) button (8)7 7 (stop) button (8)
Stereo Amplifier AX-UXG61 button and STANDBY/ON lamp2 MULTI JOG dial3 FM/AM button (12)4 OPEN/CLOSE button (7)5 Display window6 VOLUME dial7 AUX button (17)
Buttons behind the Sliding Panel8 DISPLAY/CHARA. button (13, 25)9 4 button (8, 9, 25)p ¢ button (8, 9, 25)q SET button (9, 13, 20, 25)w CANCEL button (9, 21, 25)e ENTER button (21, 25)r PLAY MODE button (9)t REC MODE button (13)y TITLE/EDIT button (20, 24)
* MD related operations are mainly assigned tothe hollow buttons as illustrated bellow.
ACTIVEBASS EX.
VOLUME
MD
ENTERPTY/EON
AUTO PRESETPLAY MODE
FM MODE
CANCELDISPLAY/CHARA.
BASS
SLEEP
PANELOPEN/CLOSE
REMOTE CONTROL RM-SUXG6R
TAPE FM/AM
DOWN
UP
AUX
TITTLE/EDIT
REPEAT
TREBLE
DIMMER
CLOCK/TIMER
CD
>< SET
EN01-10.XM-G6[B]/F 99.12.06, 14:404

5
When connecting the XM-G6 MD recorderMake sure to turn off UX-G6R and unplug the ACpower cord. Leave it until all the connectionscomplete.
DO NOT place XM-G6 unit or any otherequipment onto AX-UXG6 stereo amplifier unit.Damage or malfunction may result from heatgenerating portion of AX-UXG6.
1 Turn off UX-G6R system and unplug the AC powercord from the wall outlet.
2 Place the UX-G6R’s units onto the XM-G6 unit.For example as follows, from top to bottom: AX-UXG6,XT-UXG6R, TD-UXG6, finally XM-G6.
3 Using the system control cable-C, connect XM-G6unit to XT-UXG6R unit.
When connecting the system control cable to theconnecterMake sure to connect the cable to the terminal havingthe same name as “FROM CONNECTOR-C” and“TO CONNECTOR-C. ”
• To connect the system control cable, press the middleof the connector body until it clicks into the terminalon the rear panel.
• To disconnect, pull the connector out pushing bothsides of the connector body. Never pull out the cablesthemselves.
4 Using the Optical digital cable, connect betweenXM-G6 unit and XT-UXG6R unit.
Now you have finished installation of XM-G6 unit toUX-G6R system.
Getting Started
Unpacking
After unpacking, check to be sure that you have thefollowing items.
• Optical digital cable (1)• External wire (1)
The number in the parentheses indicates the quantity of thepieces supplied. If any is missing, consult your dealerimmediately.
Connecting the System Control Cable andthe External Wire
Since XM-G6 Mini Disc Recorder is exclusively designedfor UX-G6R micro component system, you can easilyconnect this unit using the system control cable andconnector equipped on the rear panel of each unit asillustrated.• To prevent malfunction, connect the external wire as
illustrated.
To connect To disconnect
Optical digital cable (supplied)
Protective Plug
Before connecting the unit, removethe protective plug from the terminal.
FROM CONNECTOR-C
TO CONNECTOR-C
DIGITAL OUT
AUXXT-UXG6RSystem control cable-C
External wire (supplied)
XT-UXG6R
AX-UXG6
XM-G6
EN01-10.XM-G6[B]/F 99.12.06, 14:405

6
Connecting Another Digital Audio Equipment
For digital audio recording onto an MD, XM-G6 unitconnected to UX-G6R system has one more optical digitalterminal (OPTICAL DIGITAL IN for AUX), prepared foran external digital audio output equipment.
When connecting another digital equipmentMake sure to turn off UX-G6R system with XM-G6unit and unplug the AC power cord. Leave it until allthe connection completes.
DO NOT place an external equipment onto (orunder) UX-G6R system and XM-G6 unit.Damage or malfunction may result from heatgenerating portion of units.
1 Turn off UX-G6R system and unplug the AC powercord from the wall outlet.
2 Using the Optical digital cable (not supplied), connectbetween XT-UXG6R unit and another digitalequipment.
Now you have finished installation to UX-G6R system.
XT-UXG6RDIGITAL OUTfor XM-G6
DIGITAL INfor XT-UXG6R
DIGITAL INfor AUX
Protective Plug
Before connecting the other equipment, remove the protective plug from the terminal.
XM-G6
EN01-10.XM-G6[B]/F 99.12.06, 14:406

7
• Make sure to insert an MD in the direction of arrowmark on the MD cartridge.
If you cannot insert an MDYou have inserted an MD incorrectly and taken it offby force.MD loading slot rejects MD insertion. If this occurs,wait for one minute at most with the MD recorderturned on until a mechanical sound comes out of theMD mechanism.
The following information appears in the displaywindow of UX-G6R as follows:
Total track numberTotal playback time
Playing Back an MD
M I C R O C O M P O N E N T S Y S T E M U X - G 6 R
MOS - FET
OPEN/CLOSE
AUXVOLUMEMULTI
FM/AM
STANDBY/ON
JOG
MULTI JOG
OPEN/CLOSE
Play mode indicators
VOLUME
MD
ENTERPTY/EON
AUTO PRESETPLAY MODE
FM MODE
CANCELDISPLAY/CHARA.
BASS
SLEEP
PANELOPEN/CLOSE
REMOTE CONTROL RM-SUXG6R
TAPE FM/AM
SET
AUX
TITTLE/EDIT
REPEAT
TREBLE
DIMMER
CLOCK/TIMER
CD
ACTIVEBASS EX.
UP/DOWN
PLAY MODE
REPEAT
UP
DOWN
SETCANCEL
MD 6(play/pause)
4 / ¢
7 (stop)
><
< / >
REC
REC PAUSE
SAMPLING RATE CONVERTER
MD IN lamp
MD loading slot
0 (eject)
6 (play/pause) 7 (stop)
You can use Normal, Program, Random, or Repeat Play.• When using the buttons behind the sliding panel, press
OPEN/CLOSE button on AX-UXG6 unit to open thesliding panel first.
• When using the remote control, press MD 6 (play/pause) button first and 7 (stop) button successively.
Playing Back the Entire MD — Normal Play
1 Insert an MD into the MD loading slot.The MD is pulled in automatically to light on the MDIN lamp orange.
DISPLAY/CHARA.
PLAYMODE
RECMODE
TITLE/EDIT
CLOCK/TIMERCANCEL ENTERSET
4 ¢SET
CANCELPLAY MODEDISPLAY
/CHARA.
4 ¢
EN01-10.XM-G6[B]/F 99.12.06, 14:407

8
If the MD or each track has a titleThe disc title and track titles will be shown at thelower portion of the display window (Title longer than11 characters scrolls to show the entire title).
• DO NOT insert any foreign matters.
2 Press 6 (play/pause) button on the MD recorderor MD 6 (play/pause) button on the remotecontrol.Each track of the MD starts playing back, and playbackinformation appears in the display window as follows:
Current track numberElapsed playing time
• To stop playing back for a moment, press 6(play/pause) button on the MD recorder.The playback time starts blinking in the displaywindow.
• To resume playback, press 6 (play/pause)button again.Playback continues from the point where it wasstopped for a while.
3 Press 7 (stop) button to stop playing back the MD.
4 Press 0 (eject) button on the MD recorder to removethe MD.• Pressing 0 (eject) button during playback directly,
the MD recorder stops playback and ejects the MD.
«
Searching and Skipping Tracks
While playing back an MD, you can do the followingoperations.
To search and skip to a particular point in a trackDuring playback, press and hold 4 / ¢ button to meetthe desired passages in a track:
Press and hold ¢ button:Fast forwards in the track.
Press and hold 4 button:Fast reverses in the track.
UP/DOWN button on the remote control is alsoavailable to search and skip operations.
To go to another trackBefore or during playback, press 4 / ¢ buttonrepeatedly:
Press ¢ button:Skips to the beginning of the next and succeedingtracks.
Press 4 button:Goes back to the beginning of the current andprevious tracks.
Rotating MULTI JOG dial clockwise also changesthe tracks forwards quickly, while rotating itcounterclockwise the tracks reverse quickly (< / >button on the remote control also available).
Continued
EN01-10.XM-G6[B]/F 99.12.06, 14:408

9
• If you try to program a 33rd step“MEMORY FULL” will appear in the displaywindow, and your entry is ignored.
• The total playback time of programed tracksexceeds 99’59”“– – : – –” will appear in the display window.
6 Press 6 (play/pause) button on the MD recorder.The programed tracks are played back in the order youhave set.
7 Press 7 (stop) button to quit Program play.• When Program play finished, MD recorder auto-
matically stops.
To check the program contentsBefore playing back the MD, you can check the programcontents by using 4 / ¢ button.
Press ¢ button:Shows the programed tracks in the programedorder.
Press 4 button:Shows them in the reverse order.
To modify the programBefore playing back the MD, you can erase the lastprogramed track by pressing CANCEL button. Each timeyou press the button, the last programed track is erased fromthe end of program.• To add new tracks to the program before you start
playing-back, simply select a track number again youwant to add (repeat steps 3 to 4).
To erase all the programed dataAfter playing back the MD, you can erase all the programedtrack data by pressing 7 (stop) button. New program canbe entered again.
To exit from Program play modeBefore or during playback, you can exit from Program playmode as follows:• Before playback, press PLAY MODE button twice.• During playback, press 7 (stop) button then PLAY MODE
button twice.
Playback mode indicator goes off and the system resumesNormal play mode.
Pressing 00000 (eject) button to eject the MD also quitsProgram play mode.
Continued
PROGRAMCanceled
(Normal play)
RANDOM
Programing the Playing Order of the Tracks— Program Play
You can arrange the order in which the tracks play beforeyou start playing. You can program up to 32 tracks.
1 Insert an MD.• If the current playing source is not the MD, press
6 (play/pause) button on the MD recorder, then7 (stop) button before going to the next step.
2 Press PLAY MODE button repeatedly until “MDPROGRAM” appears in the display window.
• Each time you press the button, playback modeindicators also change as follows:
3 Rotate MULTI JOG dial to select a track number tobe programed (< / > button also available).
Track number Program number
4 Press SET button to enter selected track number tobe program-played.
Track number Program number
Here the track number 2 of the MD is stored into aprogram number 1, and shortly after that the totalplayback time of programed tracks appears in the displaywindow as follows:
Total playback time
5 Repeat steps 3 to 4 to program other tracks youwant up to 32 tracks.
EN01-10.XM-G6[B]/F 99.12.06, 14:409

10
Repeating Tracks — Repeat Play
You can have the entire disc, the programed tracks, or theindividual track repeat as many times as you like.
1 Insert an MD.If the current playing source is not the MD, press 6(play/pause) button on the MD recorder, then 7 (stop)button before going to the next step.
2 Press REPEAT button on the remote controlrepeatedly to set the repeat play mode.• Each time you press the button, repeat mode indicators
light in the display window, and repeat playback modechanges as follows:
: Repeats one track on the MD or in aprogram.
: Repeats all the tracks on the MD or aprogram.
3 Press 7 (stop) button to quit Repeat play.
To exit from Repeat play modePressing REPEAT button repeatedly until repeat modeindicators ( and ) goes off in the display window.
Combining play modes:• When combining Program play and Repeat play,
you can repeat whole the programed tracks orone track among them ( and ).
• When combining Random play and Repeat play,you can just repeat whole the shuffled tracks(only ).
Playing at Random — Random Play
The tracks of the loaded MD will play in no special order(at random) when you select this mode.
1 Insert an MD.If the current playing source is not the MD, press 6(play/pause) button on the MD recorder, then 7 (stop)button before going to the next step.
2 Press PLAY MODE button repeatedly until “MDRANDOM” appears in the display window.
• Each time you press the button, playback modeindicator also changes as follows:
3 Press 6 (play/pause) button on the MD recorder.
The track numbers are shuffled in the display windowfor a few seconds, and start playing back at random.Random play ends when all the tracks are played backonce.• Other MD operations are the same as Normal play.
4 Press 7 (stop) button to quit Random play.
To exit from Random play modeDuring playing back the MD, you can exit from Randomplay mode as follows:
• Before playback, press PLAY MODE button once.• During playback, press 7 (stop) button then press PLAY
MODE button once.
Play mode indicator goes off and the system resumesNormal play mode.
Pressing 00000 (eject) button to eject the MD also quitsRandom play mode.
Canceled(Normal play)PROGRAM
Canceled(Normal play)
RANDOM
EN01-10.XM-G6[B]/F 99.12.06, 14:4010

11
Things to Know Before You Start Recording
• It should be noted that it may be unlawful to pre-recorded tapes, records, or discs without the consent ofthe owner of copy right in the sound or video recording, broadcast or cable program and in any literary,dramatic, or artistic embodied therein.
• The sampling frequency rate converter built in the MD recorder allows you to record a digital source if itssampling frequency is 32 kHz, 44.1 kHz, or 48 kHz. If no source equipment is connected to the AUX terminalor if the sampling frequency of the connected equipment is not 32 kHz, 44.1 kHz, or 48 kHz, “DIGITALUNLOCK” appears in the display window (no recording is possible).
• When you record onto partially recorded MD, its contents are not erased or overwritten. The recording startsfrom the point following the last recorded track of the MD.If you want to record on such an MD from the beginning, you have to erase its contents first (see “ALL ERASEFunction” on page 23).
• The recording level is automatically set correctly, so it is not affected by the VOLUME dial. Thus, duringrecording you can adjust the sound you are actually listening to without affecting the recording level.
Recording/Editingpossible
Disc protected:Recording/Editing
not possible
An erasure protect tab
closed open
Recording onto an MD
To avoid erasing important recordingsRecordable MDs have an erasure protect tab so thatimportant recordings are not accidentally erased. When youfinish recording or editing, slide open the erasure protecttab on the cartridge side surface. New recording or editingis now no longer possible.To do re-recording or editing, return the tab to the closedposition.
About the track marksWhen playing an MD, you can move among the tracksusing MULTI JOG dial or < / > button quickly, and4 / ¢ or UP/DOWN button step by step.You can do this because there is a mark recorded atthe beginning of each track enabling you to locate thetrack. This mark is called a “track mark ” and theportion between two adjacent track marks is called a“ track .”
• When recording from a digital source such as aCD player, a track mark is recorded automaticallyat the beginning of each track.
• When recording from an analog source such asFM/AM broadcasts, no track mark is recorded onthe MD. This means that, when playing this MD,the MD recorder will regard the entire recording asone track (track 1). You will not be able to selectdirectly a certain portion or navigate through them.However, if there is a blank of three seconds or more,the MD recorder will consider it as a blank separating2 tracks and consequently put a track mark.
To put a track mark manually while recording ananalog source, press SET button where you want toput a track mark.
To add a track mark after recording is over, youcan use the DIVIDE function (see page 20).
EN11-18.XM-G6[B]/F 99.12.06, 14:4111

12
2 Press FM/AM button.
3 Tune into a desired station using MULTI JOG dialor 4 / ¢ button.Refer to UX-G6R’s Instructions for details (pages 14– 15).
4 Press REC PAUSE button on the MD recorder.The REC indicator on the MD recorder lights red.Information in the display window changes as follows:
Remaining time for recording
VOLUME
MD
ENTERPTY/EON
AUTO PRESETPLAY MODE
FM MODE
CANCELDISPLAY/CHARA.
BASS
SLEEP
PANELOPEN/CLOSE
REMOTE CONTROL RM-SUXG6R
><
TAPE FM/AM
SET
AUX
TITTLE/EDIT
REPEAT
TREBLE
DIMMER
CLOCK/TIMER
CD
ACTIVEBASS EX.
FM/AM
TAPE ` (playback)
AUX
UP
DOWN
SET
MD 6 (play/pause)
7 (stop)
CD 6 (play/pause)
DISPLAY/CHARA.
CANCEL
REC
REC PAUSE
SAMPLING RATE CONVERTER
MD IN lamp
REC indicator
0 (eject)
6 (play/pause) 7 (stop)
REC PAUSE
MD loading slot
M I C R O C O M P O N E N T S Y S T E M U X - G 6 R
MOS - FET
OPEN/CLOSE
AUXVOLUMEMULTI
FM/AM
STANDBY/ON
JOG
OPEN/CLOSE
FM/AM
AUX
DISPLAY/CHARA.
PLAYMODE
RECMODE
TITLE/EDIT
CLOCK/TIMERCANCEL ENTERSET
SET REC MODE
4 ¢
Continued
XM-G6 allows you to record a variety of audio sources ontoan MD using either manual recording or synchronizedrecording.• When using the buttons behind the sliding panel, press
OPEN/CLOSE button on AX-UXG6 to open the slidingpanel first.
• When using the remote control, press MD 6 (play/pause) button first and 7 (stop) button successively.
Recording FM/AM (MW/LW) Broadcasts
1 Insert a recordable MD with the arrow sign facingtoward the MD loading slot.The MD IN lamp lights orange and MD informationappears in the display window — total track numberand total playback time.• If you insert a blank MD, “BLANK DISC” appears.
EN11-18.XM-G6[B]/F 99.12.06, 14:4112

13
5 Press 6 (play/pause) button on the MD recorderto start recording.The REC indicator remains lit, and recording starts.
• To stop recording temporarily, press REC PAUSEbutton or 6 (play/pause) button on the MD recorderor MD 6 (play/pause) button on the remote control.
• To resume recording, press 6 (play/pause) buttonon the MD recorder or MD 6 (play/pause) buttonon the remote control again.
6 Press 7 (stop) button to stop recording as required.Information in the display window changes as follows:
You can remove the MD by pressing 0 (eject) button.
Using DISPLAY/CHARA. button while recordingEach time you press the button, the display windowswitches between the remaining time and the elapsedtime with the current track number alternately.Recording FM broadcasts, RDS information alsoappears (refer to the UX-G6R’s Instructions, page 16).
Monophonic Long RecordingUsing the REC MODE settings, you can record FM/AMbroadcasts for twice as long as given recording time of theMD in monaural reception.
1 Repeat the steps 1, 2 and 3 in previous page.
2 Press REC MODE button to select a recording modeas follows:
3 Press SET button to start recording.You can double the recording time length, andinformation appears in the display window as follows:
Remaining time for recording
• To stop recording temporarily, press REC PAUSEbutton or 6 (play/pause) button on the MD recorderor MD 6 (play/pause) button on the remote control.
• To resume recording, press 6 (play/pause) buttonon the MD recorder or MD 6 (play/pause) buttonon the remote control again.
Track marking in Long RecordingPutting track marks manually while recording, youcan easily identify and edit desired portions of thebroadcast program.To put a track mark, press SET button as requiredwhile recording and you can find out the current tracknumber using DISPLAY/CHARA. button.
4 Press 7 (stop) button to stop recording as required.“WRITING” appears in the display window, and youcan remove the MD by pressing 0 (eject) button.
Continued
EN11-18.XM-G6[B]/F 99.12.06, 14:4113

14
Recording a CD — Synchronized RecordingThis is the easiest way of CD recording. Setting the recordingmode, you can start playing back an entire CD and recordingit onto an MD simultaneously.
1 Repeat the steps 1 and 2 in previous section.
2 Press REC MODE button behind the sliding panelto select “SYNC REC >MD.”Each time you press the button, the recording modechanges as follows:
3 Press SET button to start recording.Recording starts automatically, and information changein the display window as follows:
Each time you press DISPLAY/CHARA. button,information switches between the remaining time andelapsed time with the current track number alternately.
While synchronized recordingYou cannot use pause function until the recordingfinishes.
4 Press 7 (stop) button (on either the CD player orthe MD recorder) to quit recording as required.“WRITING” appears in the display window, and youcan remove the MD by pressing 0 (eject) button.• When all the tracks finished recording, CD player
and MD recorder will automatically stop.
To record a single track during playbackPress REC MODE button to set “SYNC REC>MD”mode, you can record a current track during playback.The playback of the current track is stopped, and thesame track starts playing back from the beginningagain. At the same time, the MD recorder startsrecording the current track.• When the current track is recorded, both CD player
and MD recorder automatically stop.
Recording a CD
When recording a CD onto an MD, you can record the entireCD or the particular tracks manually and using thesynchronized recording.
Recording a CD ManuallyYou can start recording an entire CD or any tracks of a CDwhile listening.
1 Insert a recordable MD into the MD loading slot.The MD IN lamp lights orange.
2 Prepare a CD.• Place a CD on the disc tray, press 6 (play/pause)
button on the CD player or CD 6 (play/pause) onthe remote control, then press 7 (stop) button beforegoing to the next step.
• You can also record programed tracks if you want(refer to UX-G6R’s Instructions, pages 21 to 22).
3 Press REC PAUSE button on the MD recorder.The REC indicator on the MD recorder lights red.
4 Press 6 (play/pause) button on the CD player orCD 6 (play/pause) button on the remote control.Recording starts automatically, and information changesin the display window as follows:
• To stop recording temporarily, press REC PAUSEbutton or 6 (play/pause) button on the MD recorderor MD 6 (play/pause) button on the remote control.
• To resume recording, press 6 (play/pause) buttonon the MD recorder or MD 6 (play/pause) buttonon the remote control again.
5 Press 7 (stop) button to stop recording as required.“WRITING” appears in the display window, and youcan remove the MD by pressing 0 (eject) button.
Continued
Remaining time for recording
Remaining time of each trackCD Track number
SYNC REC> MD
(canceled)
SYNC REC> TAPE
Remaining time for recording
Remaining time of each trackCD Track number
EN11-18.XM-G6[B]/F 99.12.06, 14:4114

15
• To stop recording temporarily, press REC PAUSEbutton or 6 (play/pause) button on the MD recorderor MD 6 (play/pause) button on the remote control.
• To resume recording, press 6 (play/pause) buttonon the MD recorder or MD 6 (play/pause) buttonon the remote control again.
Each time you press DISPLAY/CHARA. button,information switches between the remaining time forthe recording and the elapsed time with the tracknumber of the MD alternately.
6 Press 7 (stop) buttons both on the MD recorder andthe cassette deck to quit recording as required.“WRITING” appears in the display window, and youcan remove the MD and the tape by pressing 0 (eject)buttons.
Using 77777 (stop) button on the remote control, youcannot stop both the MD recorder and thecassette deck. Make sure to press each button onboth units.
Recording a Tape — Sound Synchronized RecordingSetting the recording mode, you can start playing back atape and recording it onto an MD simultaneously.
1 Repeat the steps 1 and 2 in the previous section onthis page.
2 Press REC MODE button behind the sliding panelto select a recording mode as follows:
3 Press SET button.REC indicator on the MD recorder lights red, andinformation appears in the display window as follows:
Recording a Tape
When recording from TD-UXG6 cassette deck, you canselect one of the two recording methods — ManualRecording (stereo) and Sound Synchronized Recording.
• Manual Recording — Sound is recorded in stereo (bothon the left and right audio channels). You have to operatethe MD recorder and the cassette deck respectively.
• Sound Synchronized Recording — With this method, youcan start recording when the sound signals come into theMD recorder (sound is recorded in stereo).Sound Synchronized Recording will stop automaticallyif no sound comes in for more than 30 seconds.
If Sound Synchronized Recording will not workcorrectlyUse the Manual Recording. Sound SynchronizedRecording starts automatically when the MD recorderdetects sound signals come in. If sound signal is tooweak for this unit to detect, Sound SynchronizedRecording will not start (or will stop even while thesource is being played).
Recording a Tape Manually
1 Insert a recordable MD into the MD loading slot.The MD IN lamp lights orange.
2 Prepare a tape playback.• Place a tape on the tape tray, press ` (playback)
button on the cassette deck or TAPE ` (playback)button on the remote control, then press 7 (stop)button before going to the next step.
3 Press REC PAUSE button on the MD recorder.The REC indicator on the MD recorder lights red, andthe MD recorder switches to the recording-pause mode.
4 Press 6 (play/pause) button on the MD recorderor MD 6 (play/pause) button on the remotecontrol.The MD recorder starts recording, and informationchanges in the display window and the remaining timefor recording appears as follows:
5 Press ̀ (playback) button on the cassette deck orTAPE ` (playback) button on the remote controlin succession.
Continued
EN11-18.XM-G6[B]/F 99.12.06, 14:4115

16
4 Press ̀ (playback) button on the cassette deck orTAPE ` (playback) button on the remote control.Once the cassette deck starts playback, the MD recorderdetects the audio signals and starts recording.
Each time you press DISPLAY/CHARA. button,information switches between the remaining time forthe MD and the elapsed time for the MD alternately.
• If no sound comes in for more than 30 seconds, SoundSynchronized Recording will stop. “WRITING”appears in the display window, and you can remove theMD by pressing 0 (eject) button.
Recording onto a Tape
You can record an MD onto a tape manually and using therecording mode feature.• For details on recording operation of TD-UXG6 cassette
deck, refer to UX-G6R’s Instructions (pages 26 – 28).
Recording an MD onto a tape manually
1 Insert an MD to be played-back into the loading slot,and load a recordable tape.The MD IN lamp lights orange.
2 Press 6 (play/pause) button on the MD recorderor MD 6 (play/pause) button on the remotecontrol, then press 7 (stop) button immediately toprepare playing back the MD.
3 Press REC PAUSE button on TD-UXG6 cassettedeck to prepare for recording.
4 Press 6 (play/pause) button on the MD recorderor MD 6 (play/pause) button on the remotecontrol.The cassette deck automatically starts recording, andthe information changes as follows:
Track number Elapsed playback time
5 Press 7 (stop) button (on either the MD recorder orthe cassette deck) to quit recording as required.• When all the tracks finished recording, MD recorder
and the cassette deck will automatically stop.
Continued
Synchronized recording an MD onto a tape
1 Insert an MD to be played-back into the loading slot,and load a recordable tape.The MD IN lamp lights orange.
2 Press 6 (play/pause) button on the MD recorderor MD 6 (play/pause) button on the remotecontrol, then press 7 (stop) button immediately toprepare playing back the MD.
3 Press REC MODE button behind the sliding panelto select “SYNC REC>TAPE.”
4 Press SET button to start recording.Recording the MD onto the tape starts, and informationappears in the display window as follows:
Track number Elapsed playback time
5 Press 7 (stop) button (on either the MD recorder orthe cassette deck) to quit recording as required.• When all the tracks finished recording, MD recorder
and the cassette deck will automatically stop.
EN11-18.XM-G6[B]/F 99.12.06, 14:4116

17
Recording the External Equipment
When recording from the external equipment, you can selectone of the two recording methods — Manual Recordingand Sound Synchronized Recording.
• Manual Recording — Sound is recorded in stereo (bothon the left and right audio channels). You have to operatethe MD recorder and the external equipment respectively.
• Sound Synchronized Recording — With this method, youcan start recording when the sound signals come into theMD recorder (sound is recorded in stereo).Sound Synchronized Recording will stop automaticallyif no sound comes in for more than 30 seconds.
If Sound Synchronized Recording will not workcorrectlyUse the Manual Recording. Sound SynchronizedRecording starts automatically when the MD recorderdetects sound signals come in. If sound signal is tooweak for this unit to detect, Sound SynchronizedRecording will not start (or will stop even while thesource is being played).
Recording the External Equipment ManuallyFirst of all, make sure the proper cable connections betweenXM-G6 MD recorder and external equipment (see also page6 in this manual, and refer to UX-G6R’s Instructions pages9).
1 Insert a recordable MD.The MD IN lamp lights orange.
2 Press AUX button to select either analog source ordigital source according to the external equipment.Each time you press AUX button, AUX mode changesbetween “AUX” and “AUX DIGITAL” alternately.
3 Press REC PAUSE button on the MD recorder.The REC indicator on the MD recorder lights red, andthe MD recorder switches to the recording-pause mode.
4 Press 6 (play/pause) button on the MD recorderor MD 6 (play/pause) button on the remotecontrol.Selected source and remaining time for recording appearin the display window as follows:
or
5 Make the external equipment start playback insuccession.• To stop recording temporarily, press REC PAUSE
button or 6 (play/pause) button on the MD recorderor MD 6 (play/pause) button on the remote control.
• To resume recording, press 6 (play/pause) buttonon the MD recorder or MD 6 (play/pause) buttonon the remote control again.
Each time you press DISPLAY/CHARA. button,information switches between the remaining time forthe MD and the elapsed time for the MD alternately.
6 Press 7 (stop) button on the MD recorder to stoprecording as required.“WRITING” appears in the display window, and youcan remove the MD by pressing 0 (eject) button.
AUX AUX DIGITAL
Continued
EN11-18.XM-G6[B]/F 99.12.06, 14:4117

18
Recording the External Equipment — Sound Synchro-nized RecordingSetting the recording mode, you can start playing back theexternal equipment and recording from it onto an MDsimultaneously.First of all, make sure the proper cable connections betweenXM-G6 MD recorder and external equipment (see also page6 in this manual, and refer to UX-G6R’s Instructions page9).
1 Insert a recordable MD.The MD IN lamp lights orange.
2 Press AUX button to select either analog source ordigital source according to the external equipment.Each time you press AUX button, AUX mode changesbetween “AUX” and “AUX DIGITAL” alternately.
3 Press REC MODE button to select recording modeas follows:
4 Press SET button to start recording from the externalequipment.Selected source and remaining time for recording appearin the display window as follows:
or
• To stop recording temporarily, press REC PAUSEbutton or 6 (play/pause) button on the MD recorderor MD 6 (play/pause) button on the remote control.
• To resume recording, press 6 (play/pause) buttonon the MD recorder or MD 6 (play/pause) buttonon the remote control again.
Each time you press DISPLAY/CHARA. button,information switches between the remaining time forthe MD and the elapsed time for the MD alternately.
• If no sound comes in for more than 30 seconds, SoundSynchronized Recording will stop. “WRITING”appears in the display window, and you can remove theMD by pressing 0 (eject) button.
AUX AUX DIGITAL
EN11-18.XM-G6[B]/F 99.12.06, 14:4118

19
Introducing MD Editing Functions
A recorded MD can be edited in many ways. The MD editingfunctions include dividing, joining, moving, erasing singletracks, erasing the entire disc, and more than one of themcan be combined as required.
Dividing a track (DIVIDE) : Page 20This function divides a track by adding a track marking(s)in the desired point(s) in the middle or where you want tosearch later.
Joining a track (JOIN) : Page 21This function joins two adjacent tracks into a single trackby deleting a track marking.
Moving a track (MOVE) : Page 22This function moves a track by reordering the track numbers.
Erasing a track (ERASE) : Page 22This function erases specified tracks. After the erasure, thesubsequent tracks are justified and their track numbers aredecremented automatically.
Erasing all tracks (ALL ERASE) : Page 23This function erases data in a disc entirely.
Erasing a Portion of a TrackBy combining “DIVIDE,” “ERASE,” and “JOIN,” forexample, it is possible to erase only a part of an existingtrack.
You can also assign titles to MDs and/or tracks(See page 24).You can also assign titles to MDs and tracks (seepage 24). A title can be assigned to a track or disc.Once a title is assigned, it is displayed in laterplayback for confirmation.Each title can be composed of up to 64 characters(digits), and can be input using alphabeticcharacters (uppercase and lowercase), symbols andnumerals.
If “PLAYBACK DISC” or “DISC PROTECTED”appears when you try to edit an MDYou cannot edit such MDs. See page 30.
Editing an MD
C DA
1st
B
2nd 3rd 4th
E
5th
1st 2nd 3rd 4th
B C DA E
After track Bdivision
Track No.
C D E
C D E
BA
A B
After track Bjoining
Track No.
1st 2nd 3rd 4th 5th
1st 2nd 3rd 4th
C D EA B
C D EA B
After track Bmovement
Track No.
1st 2nd 3rd 4th 5th
1st 2nd 3rd 4th 5th
C D EA B
C EA
After track B and D erasure
Track No.
1st 2nd 3rd 4th 5th
1st 2nd 3rd
C D EA B
After All Erase
Track No.
1st 2nd 3rd 4th 5th
BLANK DISC
B CA
AB
A ACa b c
AB C
A
a c
AB C
A
a c
b
a c
Dividing track A into 3 tracks
Part to be erased
Erasing track
Joining
tracks and
Track No.
Track No.
Track No.
1st
1st
1st
1st
2nd
2nd
2nd
3rd
2nd 3rd
3rd
3rd
4th
4th
5th
EN19-26.XM-G6[B]/F 99.12.06, 14:4219

20
REC
REC PAUSE
SAMPLING RATE CONVERTER
MD IN lamp
MD loading slot
0 (eject)
M I C R O C O M P O N E N T S Y S T E M U X - G 6 R
MOS - FET
OPEN/CLOSE
AUXVOLUMEMULTI
FM/AM
STANDBY/ON
JOG
OPEN/CLOSE
MULTI JOG
DISPLAY/CHARA.
PLAYMODE
RECMODE
TITLE/EDIT
CLOCK/TIMERCANCEL ENTERSET
SET TITLE/EDITCANCEL
ENTER
4 ¢
VOLUME
MD
ENTERPTY/EON
AUTO PRESETPLAY MODE
FM MODE
CANCELDISPLAY/CHARA.
BASS
SLEEP
PANELOPEN/CLOSE
REMOTE CONTROL RM-SUXG6R
TAPE FM/AM
SET
AUX
TITTLE/EDIT
REPEAT
TREBLE
DIMMER
CLOCK/TIMER
CD
ACTIVEBASS EX.
TITLE/EDIT
SETCANCEL
ENTER
UP
DOWN
><< / >
• To operate with the buttons behind the sliding panel,press OPEN/CLOSE button on AX-UXG6 to open thesliding panel first.
• To operate with the remote control, press MD 6(play/pause) button first and 7 (stop) button successively.
• To quit operations any time during editing process,press TITLE/EDIT button repeatedly to resume normaloperation mode.
DIVIDE Function
This function allows you to divide one track into twoseparate tracks. It is useful, for example, when you want toadd track marks at a certain point within a track or if youwant to separate a recording.
1 Insert an MD you want to edit into the MD loadingslot.The MD IN lamp lights orange.
2 Press TITLE/EDIT button until “DIVIDE?” appearsin the display window.
3 Press SET button.The information of the first track of the MD appears inthe display window, and playback starts.
4 Rotate MULTI JOG dial or < / > button on theremote control to select the track you want to divide.
Continued
EN19-26.XM-G6[B]/F 99.12.06, 14:4220

21
• If “TRACK PROTECTED” appears, the selectedtrack has been write-protected by another component.You cannot edit such a protected track. To cancel theediting, press TITLE/EDIT button.
5 Press SET button when you find the point where youwant to divide the track.The MD recorder repeats the selected point — a portionof three seconds length following the dividing point.
• If you have selected a wrong track number, pressCANCEL button then select the correct track.
6 Rotate MULTI JOG dial ( < / > button also available)to precisely adjust the dividing point.• You can shift the dividing point up to ±128. This range
(±128) corresponds to approximately ±8 seconds fromthe original point (Position 0).
When you stop rotating MULTI JOG dial, the systemrepeats the newly selected dividing point.
7 When you find the right position, press SET button.“PUSH ENTER” appears in the display window.
8 Press ENTER button to finish the editing procedures.• If you want to cancel the editing, press CANCEL
button.
9 Press 0 (eject) button to eject the MD.“WRITING” appears while the editing you have madeis being recorded onto the MD.
To join the divided tracks again, see the JOIN function.
JOIN Function
This function allows you to join two adjacent tracks intoone track.• To quit any time during editing process, press TITLE/
EDIT button.
1 Insert an MD you want to edit into the MD loadingslot.The MD IN lamp lights orange.
2 Press TITLE/EDIT button until “JOIN?” appearsin the display window.
3 Press SET button.
4 Rotate MULTI JOG dial to select the two adjacenttracks you want to join (< / > button also available ).
5 Press SET button.
• If you have selected wrong tracks, press CANCELbutton, then select the correct tracks by rotatingMULTI JOG dial (< / > button also available).
• If you want to cancel the editing, press TITLE/EDITbutton.
• If “TRACK PROTECTED” appears, the selectedtrack has been write-protected by another component.You cannot edit such a protected track. To cancel theediting, press TITLE/EDIT button.
6 Press ENTER button to finish the editingprocedures.
7 Press 0 (eject) button to eject the MD.“WRITING” appears while the editing you have madeis being recorded on the MD.
To divide the joined tracks, see the DIVIDE function.
Continued
EN19-26.XM-G6[B]/F 99.12.06, 14:4221

22
MOVE Function
This function allows you to move a track to the positionyou prefer. It is useful to change the order of the tracks asyou like.• To quit any time during editing process, press TITLE/
EDIT button.
1 Insert an MD you want to edit into the MD loadingslot.The MD IN lamp lights orange.
2 Press TITLE/EDIT button until “MOVE?” appearsin the display window.
3 Press SET button.
4 Rotate MULTI JOG dial to select the track you wantto move (< / > button also available).
5 Press SET button.
• If you have selected a wrong track number, pressCANCEL button, then select the correct tracknumber again.
6 Rotate MULTI JOG dial to select the position whereyou want to move the track (< / > button alsoavailable).
7 Press SET button.
• If you have selected wrong tracks, press CANCELbutton, then select the correct tracks by rotatingMULTI JOG dial (< / > button also available).
• If you want to cancel the editing, press TITLE/EDITbutton.
8 Press ENTER button to finish the editing procedures.
9 Press 0 (eject) button to eject the MD.“WRITING” appears while the editing you have madeis being recorded on the MD.
ERASE Function
This function allows you to erase an unwanted track.• To stop any time during editing process, press TITLE/
EDIT button.
1 Insert an MD you want to edit into the MD loadingslot.The MD IN lamp lights orange.
2 Press TITLE/EDIT button until “ERASE?” appearsin the display windows.
3 Press SET button.
4 Rotate MULTI JOG dial to select the track you wantto erase (< / > button also available).
5 Press SET button.
• If you have selected a wrong track number, pressCANCEL button, then select the correct track number.
• If “TRACK PROTECTED” appears, the selectedtrack has been write-protected by another component.You cannot edit such a protected track. To cancel theediting, press TITLE/EDIT button.
6 Repeat steps 4 and 5 if you want to erase more tracks(three tracks erasable at a time).
Continued
EN19-26.XM-G6[B]/F 99.12.06, 14:4222

23
7 Press ENTER button to finish your selection of tracksto erase.
• If you want to cancel the editing, press CANCELbutton.
8 Press ENTER button again.
9 Press 0 (eject) button to eject the MD.“WRITING” appears while the editing you have madeis being recorded on the MD.
ALL ERASE Function
This function allows you to erase all the tracks on an MD.• To stop any time during editing process, press TITLE/
EDIT button.
1 Insert an MD you want to edit into the MD loadingslot.The MD IN lamp lights orange.
2 Press TITLE/EDIT button until “ALL ERASE?”appears in the display window.
3 Press SET button.
• If you want to cancel the editing, press CANCELbutton.
• If “TRACK PROTECTED” appears, the selectedtrack has been write-protected by another component.You cannot edit such a protected track. To cancel theediting, press TITLE/EDIT button.
4 Press ENTER button to erase all the tracks.
«
5 Press 0 (eject) button to eject the MD.“WRITING” appears while the editing you have madeis being recorded on the MD.
Erasing a Portion of a Track
You can erase just a portion of one track by using theDIVIDE, ERASE and JOIN functions.• To stop any time during editing process, press TITLE/
EDIT button.
1 Insert an MD you want to edit into the MD loadingslot.The MD IN lamp lights orange.
2 Press TITLE/EDIT button repeatedly to selectDIVIDE function.
3 Divide a track into 3 portions to isolate the portionto erase.• Use the DIVIDE function by referring to page 20.
4 Erase the middle portion.• Use the ERASE function by referring to page 22.
5 Join the two remaining portions.• Use the JOIN function by referring to page 21.
Continued
EN19-26.XM-G6[B]/F 99.12.06, 14:4223

24
You can assign a name to each MD and to each track.Once a title is assigned, it is displayed in later playback forconfirmation.Each title can be composed of up to 64 characters, and canbe input using alphabetic characters (uppercase andlowercase), symbols and numerals.
• To operate with the buttons behind the sliding panel,press OPEN/CLOSE button on AX-UXG6 to open thesliding panel first.
• To operate with the remote control, press MD 6(play/pause) button first and 7 (stop) button successively.
• To quit operations any time during editing process,press TITLE/EDIT button repeatedly to resume normaloperation mode.
Assigning a Title
1 Insert an MD you want to edit into the MD loadingslot.The MD IN lamp lights orange.
2 Press TITLE/EDIT button to enter title entry modeas follows:a) Pressing once makes track title entry available.
b) Pressing twice makes disc title entry available,and go to step 4.
Assigning Titles to an MD
VOLUME
MD
ENTERPTY/EON
AUTO PRESETPLAY MODE
FM MODE
CANCELDISPLAY/CHARA.
BASS
SLEEP
PANELOPEN/CLOSE
REMOTE CONTROL RM-SUXG6R
><
TAPE FM/AM
SET
AUX
TITTLE/EDIT
REPEAT
TREBLE
DIMMER
CLOCK/TIMER
CD
ACTIVEBASS EX.
TITLE/EDIT
UP
DOWN
SETCANCEL
ENTER
DISPLAY/CHARA.
< / >
4 / ¢
REC
REC PAUSE
SAMPLING RATE CONVERTER
MD IN lamp
MD loading slot
0 (eject)
M I C R O C O M P O N E N T S Y S T E M U X - G 6 R
MOS - FET
OPEN/CLOSE
AUXVOLUMEMULTI
FM/AM
STANDBY/ON
JOG
OPEN/CLOSE
MULTI JOG
DISPLAY/CHARA.
PLAYMODE
RECMODE
TITLE/EDIT
CLOCK/TIMERCANCEL ENTERSET
SET TITLE/EDITCANCEL
ENTERDISPLAY/CHARA.
4 / ¢
4 ¢
EN19-26.XM-G6[B]/F 99.12.06, 14:4224

25
3 Press SET button to select the track number.
Rotate MULTI JOG dial to select desired track number(or press < / > button on the remote control).
4 Press SET button again to enter the character entrymode.The character sets present 11 characters alphabeticallyat a time in the upper portion of the display window.
You can select a character from character sets in theupper portion of the display window, and enter it intothe character entry box in the lower portion.
5 Press DISPLAY/CHARA. button repeatedly to selectthe character sets as follows:
• See the character sets table on page 26 to knowwhat characters, symbols, and numerals you canuse.
6 Enter a character — an example to enter “F.”a) Rotate MULTI JOG dial (or press < / > button) to
move the blinking box where a character you wantexists.
b) For example, select the character “F” from“ABCDEFGHIJK” on the upper portion then pressSET button.Selected character is entered into an entry box onthe lower portion of the display window.
Track Number
• To move the characters on the upper portion, rotateMULTI JOG dial or press < / > button on the remotecontrol.
• To move the character entry box on the lowerportion, press 4 / ¢ button.
Each time you press SET button, the character entrybox moves character by character. The display windowcan show just 11 characters at a time.• If you enter the 12th character, the first character
scrolls out to the left end.• You can also scroll back to select and insert a new
character using MULTI JOG dial and the similarcontrolling buttons.
• If you have entered an incorrect character, pressCANCEL button to delete the last entry.
• To enter a blank, select a “(blank)” in the upperportion in the display window, then press SET button.
7 Repeat steps 5 and 6 to enter and edit othercharacters.
8 Press ENTER button to exit from title entry.“PUSH ENTER” appears in the display window.• If you want to cancel the editing, press TITLE/EDIT
button after pressing ENTER button here.
9 Press ENTER button to fix desired characters.• Pressing 0 (eject) button, “WRITING” appears and
the editing you have made is being recorded onto theMD.
You can assign titles during play or recording• During play:
Entering a track titleThe MD recorder repeats playback of the current trackuntil you press ENTER button in step 8 above. Whenyou press ENTER button, the next track will be played.Entering a disc titleThe MD recorder repeats playback of all tracks of theMD until you press ENTER button in step 8 above. Whenyou press ENTER button, the MD recorder enters the tracktitle entry mode.
• During recording:Entering a track titleThe MD recorder continues recording even after you pressENTER button in step 8 above. When you press ENTERbutton, a track title is assigned to the track where youhave started the title entry.
Continued
Blinks rhythmically
Character entry box
} MULTI JOG (< / >) ] Move upper portion
} 4 / ¢ ] Move lower portion
Uppercaseand symbols
Lowercaseand symbols
Numerals
EN19-26.XM-G6[B]/F 99.12.06, 14:4225

26
Available Characters
Uppercase and Symbols
(blank)
Lowercase and Symbols
(blank)
Numerals
• During Synchronized Recording:You can assign the disc title, and 15 track titles one afteranother as recording goes on. The track titles you haveentered are automatically assigned to the tracks recordedon the MD in sequential order. If you enter 16th tracktitle or more, they are ignored.
Changing the Title
You can make a correction or change the title.
1 Follow steps 1 to 4 of pages 24 to 25.
2 Rotate MULTI JOG dial or press < / > button toselect the character you want to correct.• Make sure that the character you want to change is
blinking.
3 Press CANCEL button to delete the character youhave selected in the step 2.
4 Enter the correct character.a) Press DISPLAY/CHARA. button to select the
character set you want.b) Rotate MULTI JOG dial (or press < / > button) to
select the correct character, then press SET button.
5 Repeat steps 2 to 4 to correct another characters.
6 Press ENTER button twice to finish correcting thetitle.• If you want to cancel the correction, press CANCEL
button after pressing ENTER button once in this step.
7 Press 0 (eject) button to eject the MD.“WRITING” appears while the editing you have madeis being recorded on the MD.
To erase all the charactersPress CANCEL button repeatedly in step 3 aboveto erase all the characters, then go to step 6.
EN19-26.XM-G6[B]/F 99.12.06, 14:4226

27
Handling MDs
MD Handling Precautions
To maintain high quality audio for a long periodSince the disc is accommodated inside a cartridge, itcan be handled easily without caring about dust anddirt. However, to maintain the high audio quality foran extended period, use care in the following points.
Installation locationDo not install the MD in following places.• In a place subject to direct sunlight or where the
temperature rises, for example in a closed automobile.The disc may be warped and unusable in these places.
• In a bathroom or where the humidity is high. The discmay be rusted in these places.
• On a beach or sandbox. The disc surface may be scratchedor damaged if grit penetrates through an opening on thecartridge.
Periodical maintenanceWhen the cartridge gets dusty or dirty, wipe with a soft,dry cloth.
Do not open the shutter.The shutter is usually locked to prevent opening. Donot force it open or the disc may be destroyed.
EN27-32.XM-G6[B]/F 99.12.06, 14:4227

28
Additional Information
MD Disc Types
There are two types of MDs: Premastered (prerecorded) and Recordable (blank).
Premastered MDsPremastered MDs, which have been recorded at music studio, can be played back like regular CDs. On an MD of thistype, data is recorded as the presence or absence of tiny pits. A laser beam focuses on the pits on the surface of the MD andreflects the detection back to the lens in the MD recorder. The MD recorder then decodes the signals and plays them backas music. This type of MD is called an “optical disc.”
Recordable MDsRecordable MDs, which use magneto-optical technology, can be recorded and played back repeatedly. The laser insidethe MD recorder applies heat to the MD, demagnetizing the magnetic layer of the MD for recording and playback. Thistype of MD is called “magnetic-optical disc.”
ATRAC (Adaptive TRansform Acoustic Coding)
The MD provides 80 (max.) minutes recording and playback time, more than that of an audio CD, but in a diameter ofonly 64 mm. This ability to store such a large amount of data is the result of ATRAC, an audio compression techniquedeveloped for MD. This technology cuts out faint sounds that would not be heard by the human beings. This technology,based on human sensitivity to sounds, reduces recorded data volume up to about one-fifth of that of the original data.
UTOC (User Table Of Contents)
Found only on recordable MDs, this area contains sub-data (track number, recording data, etc.) which can be rewritten bythe user.UTOC enables us to search tracks quickly and edit tracks on the MD.
3:124:156:05
Sound Cruise
Premastered MD Recordable MD
EN27-32.XM-G6[B]/F 99.12.06, 14:4228

29
Sound Skip Guard Memory
The biggest weakness of discs is their susceptibility to vibration. The “Sound Skip Guard Memory” has been developedto cope with this weakness.With this function, a few seconds of signals read by the optical read head from the disc are first stored in memory beforebeing reproduced as audio signals. Thus, even when vibration or shock interrupts signals being read, these stored signalscan continue to reproduce sounds for the few seconds. Thus, the user will enjoy uninterrupted music.
DIGITAL
ABCDEFG
DIGITAL
OK NO
Serial Copy Management System (SCMS)
The MD recorder integrated to this unit uses the Serial Copy Management System which allows only first-generationdigital copies to be made of premastered software (like CDs or prerecorded MDs).
Normally.... When “vibrated”....
Continued
EN27-32.XM-G6[B]/F 99.12.06, 14:4229

30
MD Messages
Message
BLANK DISC
CANNOT JOIN
DIGITAL INUNLOCK
DISC ERROR
DISC FULL
DISCPROTECTED
EMERGENCYSTOP
LOAD ERROR
MD NO DISC
NON-AUDIOCANNOT COPY
PLAYBACKDISC
SCMSCANNOT COPY
TRACKPROTECTED
Signification
The disc is blank.
You are trying to join tracks whichcannot be joined.
There is no digital device connected tothe DIGITAL IN terminals.
There is a problem with this MD.
There is no more space on the MD orthere are over 254 tracks.
The MD is write-protected.
A malfunction has occurred during therecording.
MD is not inserted correctly.
There is no MD.
You are trying to copy a non-audiodisc like a CD-ROM or a Video CD.
You are trying to edit or record on aplayback-only MD.
Digital copy of the 2nd generation isprohibited.
A track has been protected againstaccidental erasure by other componentthan the MD recorder in use.
Solution
Change the MD with another if youwant to enjoy playback.
This is not a malfunction (see MDRestrictions on page 31).
Connect digital device using opticaldigital cable properly.
Change the MD.
Use another recordable MD or erasesome tracks.
Unprotect the MD or use another (seepage 11).
Eject the MD and re-insert it.
Insert the MD cotrectly.
Put an MD.
Stop recording.
Use a recordable MD.
Use an analog recording method.
This protection cannot be released bythis MD recorder. To stop editing,press TITLE/EDIT button.
Continued
EN27-32.XM-G6[B]/F 99.12.06, 14:4230

31
MD Restrictions
The MD records data in an original format that differs from that of conventional cassette tapes or DATs. Since thereare some limitations with this recording format, the following types of symptoms may occur. These symptoms arenot malfunctions.
Symptoms
“DISC FULL” appears, even though there is stillenough remaining time on an MD.
“DISC FULL” appears even though the number oftracks and recording time do not reach the limit.
The JOIN function sometimes does not work.
The remaining time on the MD does not increase evenwhen tracks are erased.
The sound drops out during fast forward or fast rewind.
The amount of recorded time on the MD added to theamount of remaining time is shorter than the MD’stotal possible recording time.
Cause
There is a maximum number of tracks which can berecorded, regardless of recording time. More than 254tracks cannot be recorded on an MD.
• Repeating erasure and recording on the same MDcreates many blank portions sparsely on the MD.When recording on such an MD, a track is recordedon these blank portions sparsely. If a track is dividedand recorded into so many portions, “DISC FULL”appears.
• If a divided portion of less than 8 seconds is madewhile a track is recorded on the MD, that track cannotbe joined to another track using the JOIN function.Furthermore, if that track is erased, the remainingtime of the MD may not increase exactly by theerased amount.
• If a track has been divided into many portions whilebeing recorded on the MD, sounds will drop out whilefast forwarding or reversing such an MD.
You cannot record on a blank portion of less than 2seconds in the MD. For this reason, the actual recordingtime of discs may become shorter.
Continued
EN27-32.XM-G6[B]/F 99.12.06, 14:4231

32
TroubleshootingIf you are having a problem with your unit, check this list for a possible solution before calling for service.If you cannot solve the problem from the hints given here, or the unit has been physically damaged, call a qualifiedperson, such as your dealer, for service.
Symptom
No sound is heard.
Unable to record on an MD.
Unable to operate the remote control.
Loaded MD cannot be ejected.
Operations are disabled.
Possible Cause
• Connections are incorrect, orloose.
• You are using a prerecorded MD.
• The MD is write-protected.
• The path between the remotecontrol and the remote sensor onthe unit is blocked.
• The batteries have lost theircharge.
• The main AC power cord is notplugged in.
• The built-in microprocessor hasmalfunctioned due to externalelectrical interference.
Action
• Check all connections and makecorrections (see pages 5 – 6).
• Change it with a recordable MD.
• Unprotect the MD (see page 11).
• Remove the obstruction.
• Replace the batteries.
• Plug in the AC power plug.
• Unplug the unit then plug it backin.
SpecificationsMD recorderAudio Playing System: MiniDisc digital audio system
Recording System: Magneto-optical overwritesystem
Reading System: Non-contact, semiconductor laserpickup (λ=780 nm)
Error Correction System:CIRC (Cross Interleave Reed-Solomon Code)
Sampling Frequency: 44.1 kHz (With sampling rateconverter for recording — 32kHz/44.1 kHz/48 kHz)
Audio Compression System:ATRAC (Adaptive TRansformAcoustic Coding)
Wow and Flutter: ImmeasurableDimensions (approx.): 181 mm x 81 mm x 310 mm
(W/H/D)(7 3/16 in. x 3 1/4 in. x 12 1/4 in.)
Mass (approx.): 1.7 kg (3.5 lbs)
Supplied AccessoriesSee page 5.
Design and specifications are subject to change withoutnotice.
US and foreign patents licensed from DolbyLaboratories Licensing Corporation.
EN27-32.XM-G6[B]/F 99.12.06, 14:4232

JVC 1299JTMMDWJSCEN
VICTOR COMPANY OF JAPAN, LIMITED
XM_cover[B] 99.11.22, 11:082