3d printing technology - unipv · pdf file3d printing - origin 1981 – first article...
TRANSCRIPT

3D Printing Technology
- Friday Meeting-
June 7th, 2013 – DICAr, Aula MS1 Stefania Marconi
University of PaviaDept. Of Clinical and Surgical Sciences

Outline
� 3D printing technology overview
� Objet 30 Pro 3D printer
� Purposes
� Possibilities

Outline
� 3D printing technology overview
� Objet 30 Pro 3D printer
� Purposes
� Possibilities

3D Printing - Origin
� 1981 – First article about 3D printingtechnology(Hideo Kodama of Nagoya Municipal Industrial Research Institute)
� 1984 – First functioning 3D printer(Charles Hull, inventor of stereolitography, 3D System co-funder)
� 1990s– Introduction of new printingtechnologies, like Fused DepositionModeling and Selective Laser Sintering
� 2000s – Introduction of new printingmaterials (biocompatible materials, metals, wax and even cells)
� Last 3 years –great diffusion of 3D printing technology

3D Printing – General Principles
Creates objects through a sequential layering process
Additive manufacturing
Step 3- Printing
Step 1– From CAD modelto .STL file)
Step 2- Virtual slicing

Printing technologiesdiffer in the way layers are depositedor cured
3D Printing – General Principles
Printing: 3 steps
1) Printing head deploy a layer ofmaterial
2) Layer is cured
3) The printer traymoves down

3D Printing – Technologies 1
� SLA – StereoLitography Apparatus
� Material : liquid material
� Building : UV laser beam that traces each slice of the object on the surfaceof this liquid, causing a very thin layer of photopolymer toharden
� Material Extrusion: FDM – Fused Deposition Modeling
� Material : semi-liquid material (usually thermoplastic)
� Building : material is deposited from a computer-controlled printhead
� SLS - Selective Laser Sintering
� Material : fine layer of powder (wax, polystyrene, nylon, glass, ceramics, stainless steel, titanium, aluminium)
� Building : a laser selectively fuse a layer of granules together

� Material Jetting� Material : photo-polimeric material � Building : object layers are created by emitting liquid
photopolymer from a print head (like inkjet printers). The layer iscured using UV light.
3D Printing – Technologies 2
� Polijet technology (Objet Connex printers)
� More than onephoto-polimeric material at a time� Digital materials:
• Set resulting object mechanical properties• Print two different materials at a time

Outline
� 3D printing technology overview
� Objet 30 Pro 3D printer
� Purposes
� Possibilities

Objet 30 Pro 3D printer – General Information
-Build size: 294 x 192 x 148.6 mm
- Layer thickness: 28 microns (16 microns fortransparent material)
- Building technology:
� material jetting
� printingone material at a time
- The model grows within a support material: gel-likematerial, easily removable with water-jet cleaning machine
-The 3D printer software selects the best slicing and building orientation
� ensures the best model quality
� allows the saving of support material

Objet 30 Pro 3D printer – Printing process
7 printing materials
- Rigid opaque materials:• White (VeroWhitePlus)• Black (VeroBlackPlus)• Blue (VeroBlue)• Gray (VeroGray)
- Transparent material (VeroClear): a nearly colorlessmaterial (visual simulation of transparent thermoplasticsuch as PMMA)
- High Temperature material (RGD525): foradvanced functional testing, hot air/water flow, staticapplications
- Polypropylene-like material (DurusWhite): for snapfit applications
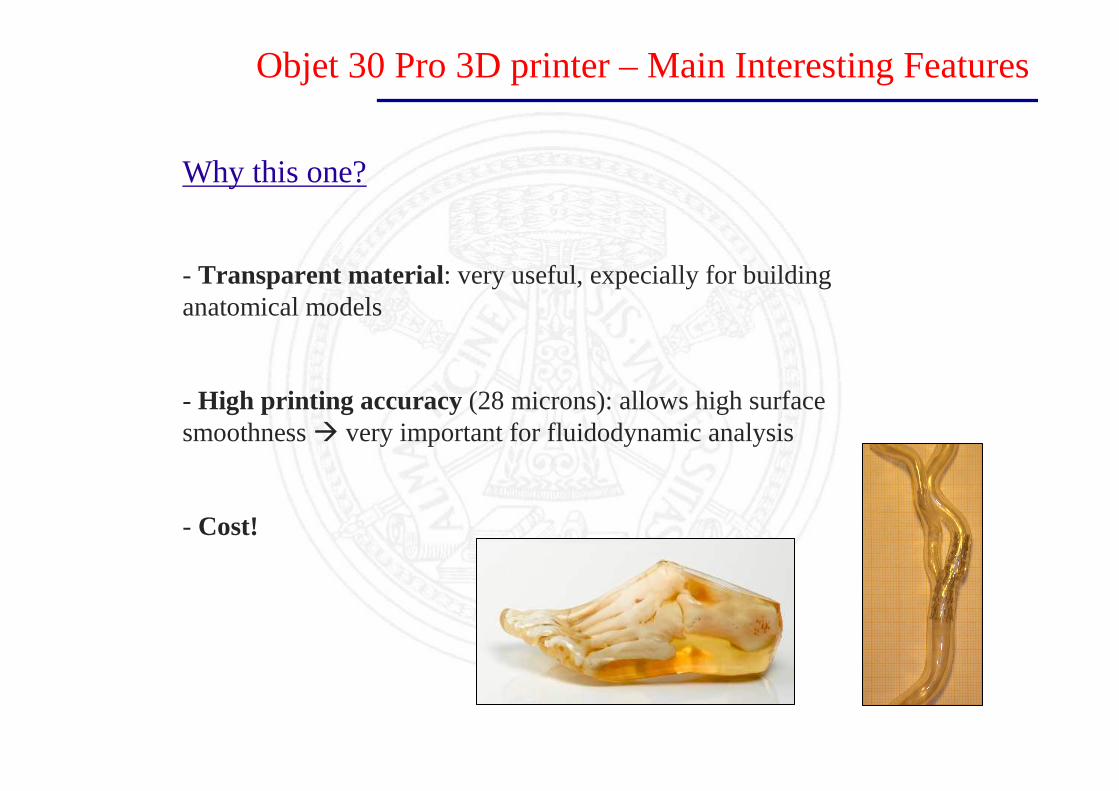
Objet 30 Pro 3D printer – Main Interesting Features
Why this one?
- Transparent material: very useful, expecially for building anatomical models
- High printing accuracy (28 microns): allows high surfacesmoothness� very important for fluidodynamic analysis
- Cost!

Outline
� 3D printing technology overview
� Objet 30 Pro 3D printer
� Purposes
� Possibilities

Purposes
What we have already planned to do?
1) Vascular models,for in vitro simulation purposes
2) Models of the pancreas,for pre-operatory planning purposes
3) Biomedical devices models, for new devices development and pre-
production studies

Purposes – Vascular Models
Purpose: get a physycal model of the patient specific aortic arch or other vasculardistricts and perform in-vitro simulation using the hydraulic circuit.
1) Start from angio-CT, CT or MRI images and get the patient specific vascularanatomy
2) Get a .STL model of the wallof the vascular structure
3) Print the model
• Print a rigid model using transparent material
• Get a deformable modelin silicon
• Get a virtualnegative modelof the anatomy (.STL)
• Print it in rigid plastic material
• Strain silicon in the negative model (vacuumchamber to get off air bubbles)
• Remove the plastic negative model

Purposes – Pancreas Models
Purpose: get a physical model of the pancreas, peri-pancreatic vessels and tumormass.
1) Start from CT images and get the patient specific anatomy
2) Get the .STL model of the 3 structures: pancreas, vessels and tumor
3) Create a cut plane in the pancreas head and insert pins to get an assemblablemodel→ to allow inserction of the tumor mass model
4) Print the structure
• Pancreas in transparent material
• Vessels and tumor in rigid plastic material

Purposes – Biomedical Devices
Purpose: get a physical model of the design device, for testing or just visualization purposes
1) Start fromCAD model
2) Get the .STL model
3) Just print the model
Physicalobject can beused in:
Pre-production� Rapid prototyping
Full-scale production � Rapid manufacturing

Outline
� 3D printing technology overview
� Objet 30 Pro 3D printer
� Purposes
� Possibilities

Purposes – Biomedical Devices
What we can do with the 3D printer?
- Print each CAD model that meetsmaximum building traydimensions
- Realize models even of high complexity
• 28 microns resolution allow the printing of functioningmechanisms
Possible employments: rapid-prototyping services, smallarchitectural plastics, and....

Thanks for yourattention