a guide to deconstruction - lccmr...human health in renovation and demolition processes. ... guide...
TRANSCRIPT
Some Facts
• US EPA has estimated that U.S. companies generate 136 million tons of building-related construction and demolition (C&D) waste per year.
• 92% of building-related C&D waste is from renovation and demolition. • C&D waste is approximately 30% of all solid waste produced in this country
excluding road and bridge debris. • US EPA has estimated that only 20-30% of C&D waste is presently recycled. • Excluding food and fuel, construction activities consume 60% of the total
materials used in the U.S. economy. • About 245,000 residential structures and 44,000 commercial structures are
demolished each year in the US. • Many older buildings contain asbestos and lead-based paint both hazardous to
human health in renovation and demolition processes. • Heavily leaded paint was used in about 1/3 of homes constructed before 1940,
about 1/2 of homes constructed between 1940 and 1960, and then to a lesser extent until it was limited to 0.06% in any product in 1978.
• Landfills and incinerators are increasingly more expensive and problematic to open, operate and close.
• In order to sustain human society into the next century, resource efficiency will have to increase by a factor of 10.
Log on to www.deconstructioninstitute.com for an interactive benefits calculator with more facts.
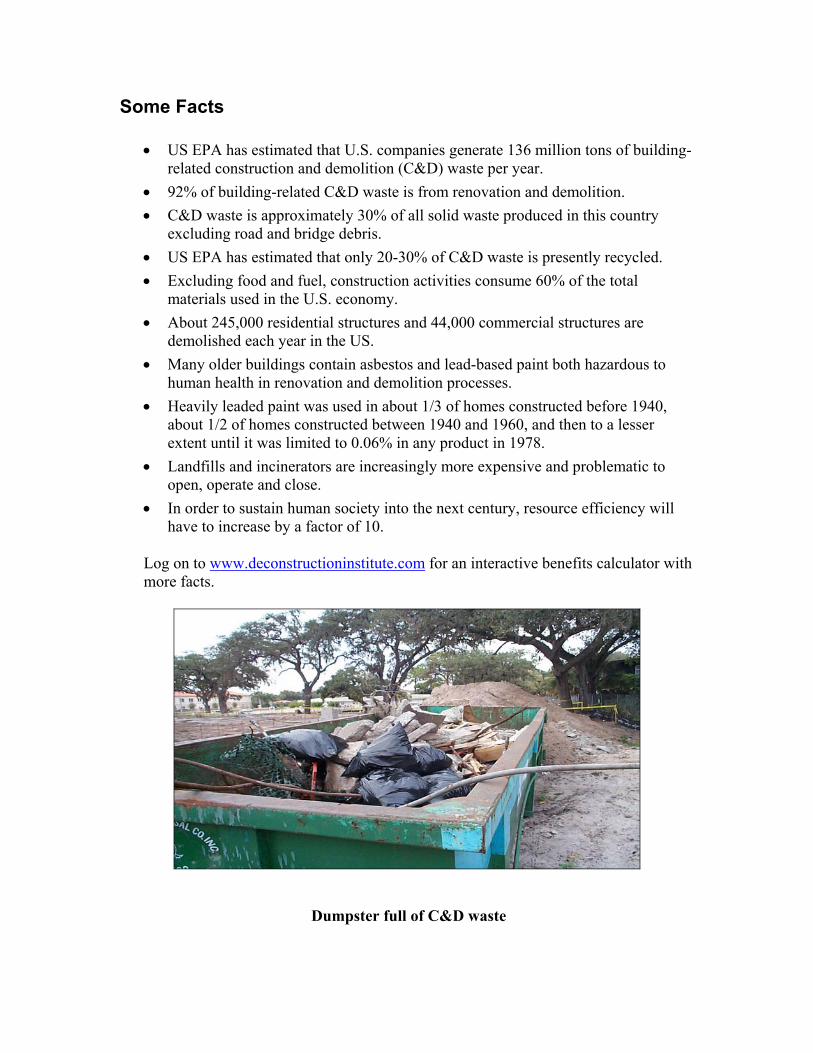
Dumpster full of C&D waste
Guide to Deconstruction Deconstruction Overview
Deconstruction Overview
Below is an overview for preparing and carrying-out a deconstruction project. This checklist provides a quick overview of the basic steps. This is a general list only. Please refer to each section for more details. Safety First You will see the word safety throughout this deconstruction guide. Important safety points are noted with an orange bar. Before considering a deconstruction program, the person who will manage the program must create a Deconstruction Safety Plan. For each new project, a Project Safety Plan will be created to handle any additional requirements to maintain safety at that specific project site. Elements of the Safety Plan will include worker orientation, hazard identification and training, guidelines for the use of tools, respiratory protection, fall protection, etc. The Safety Plan will contain procedures to handle emergencies, the proper OSHA forms, a job-site daily log, Personal Protective Equipment (PPE) use, and procedures for correcting unsafe behavior.
The Safety Plan is an accident prevention plan. Safety is a daily activity, and should be incorporated through DAILY safety talks at the beginning of the workday.
Survey The first step in a potential deconstruction is a site visit to examine the building. This consists of visually surveying the building (inside and out) to estimate the basic material types and the overall condition of the structure. The next step is a building materials estimate that is comprised of inventorying the building material types and quantities, by number of items and by measuring the building. It is also helpful to note basic conditions such as fire damage, water damage, rot, obvious leaks, and possible biological hazards such as bird or rat droppings. Environmental Health and Compliance Environmental surveys for lead and asbestos must be completed for any building built before 1978. The US EPA, OSHA and HUD all have regulations for dealing with asbestos containing materials (ACM) and lead-based paint materials (LBP). Although the EPA NESHAPS regulations exempt demolitions from the removal of non-friable ACM, deconstruction and salvage necessitate the removal of ALL asbestos before work begins. The deconstruction costs and processes will be heavily influenced by the presence of ACM and LBP materials. (Refer to www.epa.gov or www.osha.gov for detailed information on regulations or contact your local agency representative)
Page 9
Guide to Deconstruction Deconstruction Overview
Workers should receive asbestos awareness training in order to be able to recognize “suspect” ACM both before and during the deconstruction. The presence of LBP will require worker protection and care in the handling of these materials.
Asbestos Abatement Follow the law! All asbestos containing materials (ACM) must be removed before work begins. Be aware of all health and safety regulations for asbestos handling and disposal and handling of lead-based materials if they are in the building. Be sure that the abatement contractor makes proper notifications and permit applications to the state environmental protection department and that the abatement receives a proper clearance certifying that the building is safe to work in before starting the deconstruction. It is important to coordinate with the abatement contractor if their activities might damage salvageable materials. Plan for the time required for notification and abatement within the overall project schedule. (Refer to www.epa.gov/region4/air/asbestos for local regulations and contacts) Contracts and Specifications Estimating costs and finalizing a contract are the final pre-planning steps before agreeing to the deconstruction. There are many considerations in figuring out the project costs - starting with who is responsible for which costs. For example, if the Owner pays directly for necessary lead and asbestos surveys and asbestos abatement, then this does not need to be figured into the deconstruction costs. If the deconstruction is done by a non-profit, and the recovered materials are going to be a tax-deductible donation by the building Owner, this is also a major determining factor in how to price the deconstruction. The contract also determines the scope of work for the deconstructor. It should be determined who is responsible for the complete removal of all building-related debris such as foundations, septic tanks, site cleaning, etc. as well as who will get any recovered materials. The costs of the deconstruction itself will be determined by the answers to these questions. Historic Preservation If a building is in an older part of the town or looks older than 50 years it may have historic preservation oversight by the local municipality. After determining the address, the municipal planning department or historic preservation organization should be contacted to research any historic building or district designations and the local demolition or deconstruction permits processes associated with historic buildings.
Page 10

Guide to Deconstruction Deconstruction Overview
Permitting and Utilities Disconnection of all utilities must take place before any work can begin. This includes - electricity, natural gas, water, wastewater, telephone and cable. Check with local utilities to determine the requirements and to have the work completed. Often the completion of the disconnection of the utilities is included in the demolition permit approval process. If activities such as on-site sales of materials are planned, there may be a required permit to carry out this activity as well. Engineering Survey According to OSHA, a demolition must have a building engineering survey and dismantling plan completed before work starts. The engineering survey and plan is completed and signed off on by a competent person who will oversee the deconstruction itself. This plan indicates known hazards at the time of the inspection, the structural make-up of the building and the general schedule, tasks, techniques and tools to be used to conduct the deconstruction.
The most critical aspect of the engineering plan is the identification of anything that is part of the building’s structure and how these structural elements will be removed so as to not cause any unplanned collapses. The survey and plan are updated as the project progresses.
Organizational Plan The organizational plan is the plan for dealing with all the management and worker issues and the specifics of how the deconstruction will take place. Taking the time to plan ahead can prevent many hardships later on. This plan is divided into several components that are described in the detailed section. Specific topics include Schedule, Labor and Responsibilities, Tools and Equipment, Sub-Contractors, Training, and Safety. Site Plan The Site Plan will determine the locations of everything that will happen on the site. The Site Plan can begin when the Building Survey is completed. The Site Plan has to work within the physical constraints of the project site and should be sensitive to neighboring properties and roads. The location of the site in the community will determine a lot about the site plan as well. For example, a highly visible site can facilitate on-site sales but increases opportunities for pilferage. It is not a bad idea to sketch out the site ahead of time and label it in order to communicate the site plan to others involved in the project. Site Security Planning for the site is the time to consider Site Security. Site Security includes preventing the theft of equipment and tools, as well as the safety of anyone trespassing onto the site. A partially dismantled house can be a temptation to vandals. Before any deconstruction begins, the decision about whether salvaged materials will remain
Page 11

Guide to Deconstruction Deconstruction Overview
overnight will determine the needs for fencing, and lockable containers for storage or the time that it will take each day to remove materials from the site. Signage and warning tape should be used as due diligence to protect the public from the hazards of a deconstruction site.
Posting Signs
Warning tape for hazardous area
Materials Management Plan Recovered materials have three places to go: Reuse, Recycle or Disposal. The steps in the detailed section describe ways to efficiently manage the materials, allocation of persons responsible for managing the materials, and the methods for planning and communicating efficient materials “flow” on the site. The materials management is the key to a successful and safe project. Remember that deconstruction is creating materials for reuse in the most cost-effective manner. Removing materials without damaging them and keeping them in good condition when handling them will insure that your effort is not wasted. Always ask before any deconstruction: how will materials be distributed for reuse? Plan ahead so that materials are not handled any more than three times !!
• First time: take it off the building. • Second time: de-nail, trim and clean at the same time, and/or put it on the trailer,
or stack on the site sale for reuse. • Third time: take it off the transport for reuse or for storing at the reuse store. This
type of efficiency will happen only by planning ahead.
Removal De-nailing Transport for reuse
Page 12

Guide to Deconstruction Deconstruction Overview
Deconstruction Process Once all of the planning has been completed, the actual deconstruction can begin. Each deconstruction project is different. For resources, case studies, links and online tools to help in the deconstruction process, log onto www.deconstructioninstitute.com.
Page 13

Guide to Deconstruction Deconstruction Overview
Pete Hendrick’s Seven Samurai Principles of Deconstruction 1. Accumulation technique - As you take down the building you will get different types of materials. Store materials according to dimension and from each project or part of the same project, keep adding that type of material until you have a critical mass large enough to use or sell as a large unit, i.e. pallet, forklift, square of roofing, room’s worth. A critical mass is equivalent to what is found in a retail store, 1,000 BF for example. 2. Personality phenomenon - Apply your labor to the job that suits them. There are two parts; people who have to be pulling stuff off of the building are Type A. Those who can do the more mundane task like de-nailing are Type B. Third type carries the materials, cleans up, always moving from task to task and that is Type C. 3. Excitement code - Clean up as you go. Don’t become so involved in doing the whole roof for example that you end up with large backlog of dangerous, and dirty and in the way stuff. Do not allow materials to be piled up between the Type A and the Type B people/ tasks. 4. Monday morning conceptual and organizational lecture - Periodically stop and talk about the next phase of the deconstruction; why it’s next, so everybody understands not to go off on their own. How the crews are organized for each phase of the materials is very important and should be communicated so that everyone understands. 5. Fatigue factor - There are certain things you do not do when you are tired: Such as working on a roof or a ladder. Pace the hard stuff by switching off between jobs. For instance if you have three Type A’s, instead of them all doing the hard tasks together, switch them around so that they can relieve each other over time and one is always fresher. Be aware of the heat factor get out of the sun whenever possible, put the de-nailing station in the shade or on the porch if you have one. 6. Daily briefing of theories - Every morning check out everyone for general health, sore body parts, and coordinate what is coming off the building and how much space is left for that phase. Decide the materials flow, when and where de-nailing stations are needed. Arrange how the crew is arranged between areas of the buildings. Everybody needs to know what everybody else is doing for that day. If one person or group gets caught up, they will know how to go to the next phase or help somebody else. 7. Doing the right one - Walk around and get a general view of the building you are considering deconstructing to determine age, species of wood and types. Look at the whole building. Look at the practicality of taking the building apart. Figure out the number of people and how long it will take. If two houses are the same size and both made of pine for instance, look at the amount of time they have been exposed, the older the house is, the better it is, it will have higher quality materials so if you get less, it will be worth more of your time if considering two similar buildings in size and type of construction.
Page 14

Guide to Deconstruction Section 1: Safety
Section 1: Safety
When dismantling a building element, it is helpful to know how it was put together and what tools were used. This means that in general the deconstruction will follow the rule of “last on - first off” (LOFO) sometimes including the additions to the building.
Remember - It rains in Florida! The roof should be left in place as long as possible during the process, and all salvageable interior finishes should be removed before the roof is taken off.
Pre-Planning
Deconstruction is considered demolition and is covered by the OSHA Code of Federal Regulations (CFR) 29 Part 1926 for Labor. See OSHA for more details. http://www.osha.gov/
Safety starts with planning for the worst and taking every measure to prevent even the most minor incidents. It is reasonable to expect small minor cuts, scrapes, bruises, etc. but it is not reasonable to expect falls, electrical shocks, any major cuts or impact injuries. One aspect of deconstruction that differentiates it from more traditional and mechanized demolition is the use of predominantly hand labor. In the case of an integrated hand labor and mechanical labor process, the greatest care must be taken to insure the separation of people activities from the operation of mechanical equipment. A competent person must always be on site to assess any potential safety hazard and have the authority to take corrective action. A competent person “means one who is capable of identifying existing and predictable hazards in the surroundings or working conditions which are unsanitary, hazardous, or dangerous to employees, and who has authorization to take prompt corrective measures to eliminate them.” (OSHA29 CFR 1926.32) The location of the nearest medical emergency treatment and telephone numbers for emergency services should be known by all workers, or if one is not available, a person who has a valid certificate in first aid training must be on the site. The deconstruction process begins with protecting worker health in the removal and handling of lead-based painted materials (buildings built before 1978), exposure to possible biological hazards, and any asbestos containing materials that were missed by the asbestos survey.
Page 15
Guide to Deconstruction Section 1: Safety
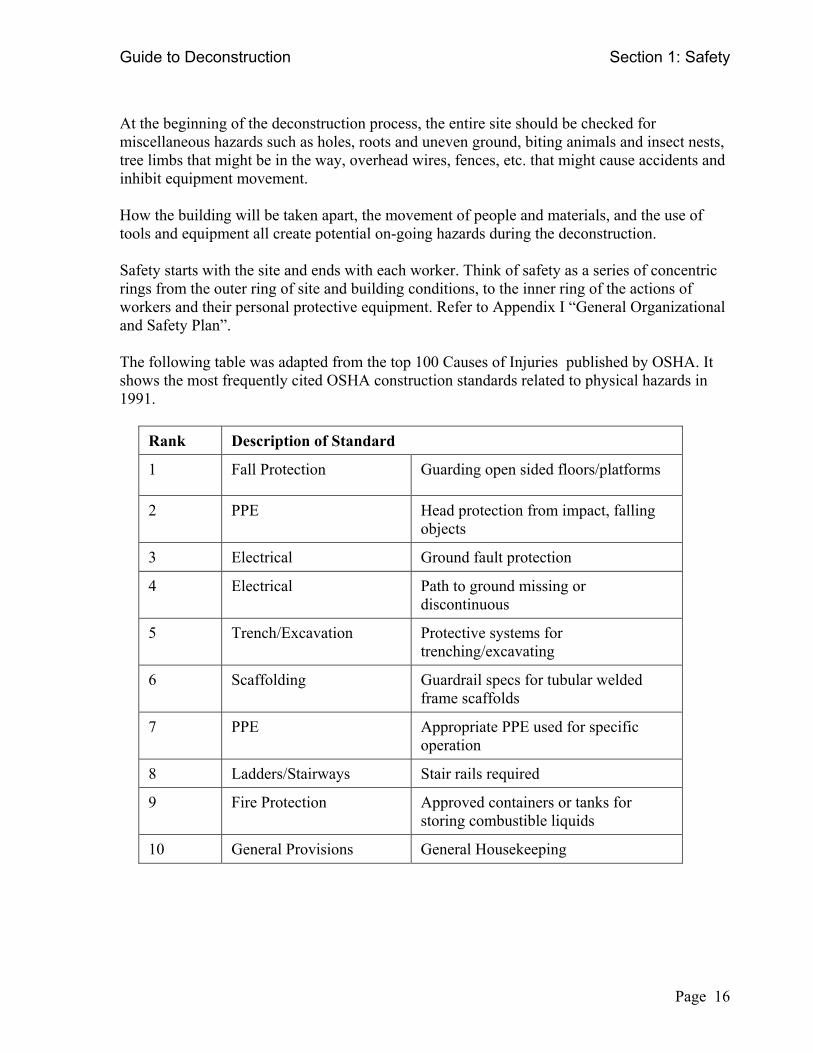
At the beginning of the deconstruction process, the entire site should be checked for miscellaneous hazards such as holes, roots and uneven ground, biting animals and insect nests, tree limbs that might be in the way, overhead wires, fences, etc. that might cause accidents and inhibit equipment movement. How the building will be taken apart, the movement of people and materials, and the use of tools and equipment all create potential on-going hazards during the deconstruction. Safety starts with the site and ends with each worker. Think of safety as a series of concentric rings from the outer ring of site and building conditions, to the inner ring of the actions of workers and their personal protective equipment. Refer to Appendix I “General Organizational and Safety Plan”. The following table was adapted from the top 100 Causes of Injuries published by OSHA. It shows the most frequently cited OSHA construction standards related to physical hazards in 1991.
Rank Description of Standard
1 Fall Protection Guarding open sided floors/platforms
2 PPE Head protection from impact, falling objects
3 Electrical Ground fault protection
4 Electrical Path to ground missing or discontinuous
5 Trench/Excavation Protective systems for trenching/excavating
6 Scaffolding Guardrail specs for tubular welded frame scaffolds
7 PPE Appropriate PPE used for specific operation
8 Ladders/Stairways Stair rails required
9 Fire Protection Approved containers or tanks for storing combustible liquids
10 General Provisions General Housekeeping
Page 16

Guide to Deconstruction Section 1: Safety
Safety - First Line of Defense The Building The first aspect of preventative safety is that the building has been abated of all asbestos (see photo) and that any possible and accessible biological hazards have been dealt with. The building elements should be physically sound and able to support the weight of workers, and not present a danger of collapse wherever workers might be present. Any shoring or stabilizing should be completed prior to the deconstruction and as needed during the process. No worker should contribute to the instability of the building by (for example) removing load-bearing walls when they are still supporting a floor or roof above. Do not remove vertical or horizontal structural elements “before their time.” The Environment Rain and wet conditions pose immediate hazards and work should not take place in the rain or in excessively wet conditions. Wet conditions can cause slips and electrical shocks. Extremely hot and or humid conditions and lack of ventilation are sources of heat exhaustion and stroke, and care should always be taken to insure adequate water consumption, as much shade as possible, and not overtaxing workers to the point that they might make serious mistakes. Tools The tools to be used should be adequate to the tasks, in proper working condition and used properly. Power tools must have proper insulation and grounding. The proper tools also include safety systems such as grounding for electrical generators, harnesses for fall protection, lock-out tags, warning tape, medical first aid kit, and fire extinguishers. (See Appendix II for “Basic Tools Necessary”). Supervision and Training The persons supervising the work (competent person) must know how to spot hazards and what to do about them, the proper order and techniques for the deconstruction, and how to communicate tasks to the workers. Training should always be given and acknowledged for any new worker and then again for each new task and piece of equipment. Safety is the result of communicating to workers how to do things in a safe manner. Safety is also the result of communication between workers. Everyone on a deconstruction site needs a constant “heads up” attitude about what and where people are in relation to the building, the ground, the materials, pieces of equipment, and to each other.
Page 17

Guide to Deconstruction Section 1: Safety
Clean Site A clean job site is a safe one. The simplest cause of nail punctures and tripping is when salvaged wood members with nails still in them are allowed to pile up or are allowed to sit in areas where people are walking. Tripping and slipping comes from allowing debris to pile up in the work areas. Always remove nails from wood at the earliest opportunity and stack materials for denailing away from where people are working or walking.
Ready to work
Clean up salvage and debris as you go!!
Safety - Last Line of Defense When all else is considered, from the weather to the building itself, Personal Protective Equipment (PPE) is the last line of defense. Lumber with nails sticking up in a pathway or a piece of flying debris should not be present in the first place, BUT if an accident happens, PPE will help prevent injuries. Basic PPE for every worker are:
• Hardhat - for any work where objects are overhead, debris might fall, or even someone might be carrying a piece of lumber nearby for example. Hardhats should be put on whenever entering the work zone and kept on!!
• Gloves - leather palm gloves provide some impact resistant; help
prevent blisters and splinters, and cuts from sharp objects.
• Safety Glasses - safety glasses prevent impacts to the eyes from small flying objects, and dust, debris, and fibers that might fall from above, and sparks or splinters from cutting or chiseling metals or masonry. It is extremely important to use safety glasses whenever using power tools that might cause debris to fly about or in case of a broken blade.
• Steel-Toed Boots - steel-toed boots and preferably also steel soles provide protection from objects that might impact the foot from above and from the side, and provide protection from stepping on nails. Boots with steel soles are the only real protection from stepping on nails. Boots also provide ankle support for uneven footing.
• Long Pants - long pants may be hotter than short pants, but provide an invaluable layer
of protection from sharp edges or nails.
Page 18

Guide to Deconstruction Section 1: Safety
• Ear Plugs - ear-plugs are used when power tools and generators are creating a lot of noise. OSHA provides a guideline for the levels of noise when ear-plugs should be used.
• Particle Filter Masks and Half Mask Respirators - respiratory protection is an
important aspect of worker health and safety whenever there is potential for respiratory hazards such as dust, fibers, and lead-based paint. A particle filter mask is only good for dust and is not sufficient for protection against lead-based paint. A properly fitted-tested half mask respirator with proper filter is required for working in an environment containing lead-based paint.
Hard Hat with Ear protection Particle filter mask and ear plugs
Safety - Bottom Line
Two of the most dangerous aspects of deconstruction are being caught or struck by - materials, tools, and especially by nails, and falls - from ladders, by tripping, slipping, and from positions on roofs or the roof structure
Being hit by materials often comes from lack of communication between workers so that one worker hits another with a piece of material. Another cause of being caught or struck by is from hitting materials or trying to muscle something apart and having it suddenly give. When a tool involved, this also often results in workers hitting themselves with a tool such as a crowbar. “Sorry” doesn’t count after someone is hurt!
Refer to “Job Site Daily Checklist” in Section 6.
Page 19

Guide to Deconstruction Section 1: Safety
Fall Prevention
It is not the fall that hurts - it’s what you land on at the end of the fall!!
Do not leave dangerous things for yourself or others to be tripped by, or to fall on!!
OSHA requires fall protection for heights starting at 6 feet above the surface below.
Many people are uncomfortable with heights. No workers should be asked to work at heights, unless they are comfortable doing so. Care should be taken when workers are tired, or exposed to high heat and humidity, which can reduce alertness and balance. The best fall protection strategy to begin with is a healthy and alert worker. Fall protection comes in several forms - from personal body harnesses to railings, to controlled access zones and monitoring. Personal body harnesses must be properly anchored to be effective.
Fall protection gear Side view on Back view on
Deconstruction is unique in that it involves removing the building elements from around the worker. This means creating a “leading edge” - reducing the places to secure a body harness or place a railing and to stand safely - all at the same time!! In the case of removing a roof structure or second floor, the worker is actually creating more openings through which to fall!! At some point during the removal of roofs and upper floors, it will be necessary to start working from below on scaffold or ladders, thereby reducing the fall hazard.
Page 20
Guide to Deconstruction Section 1: Safety
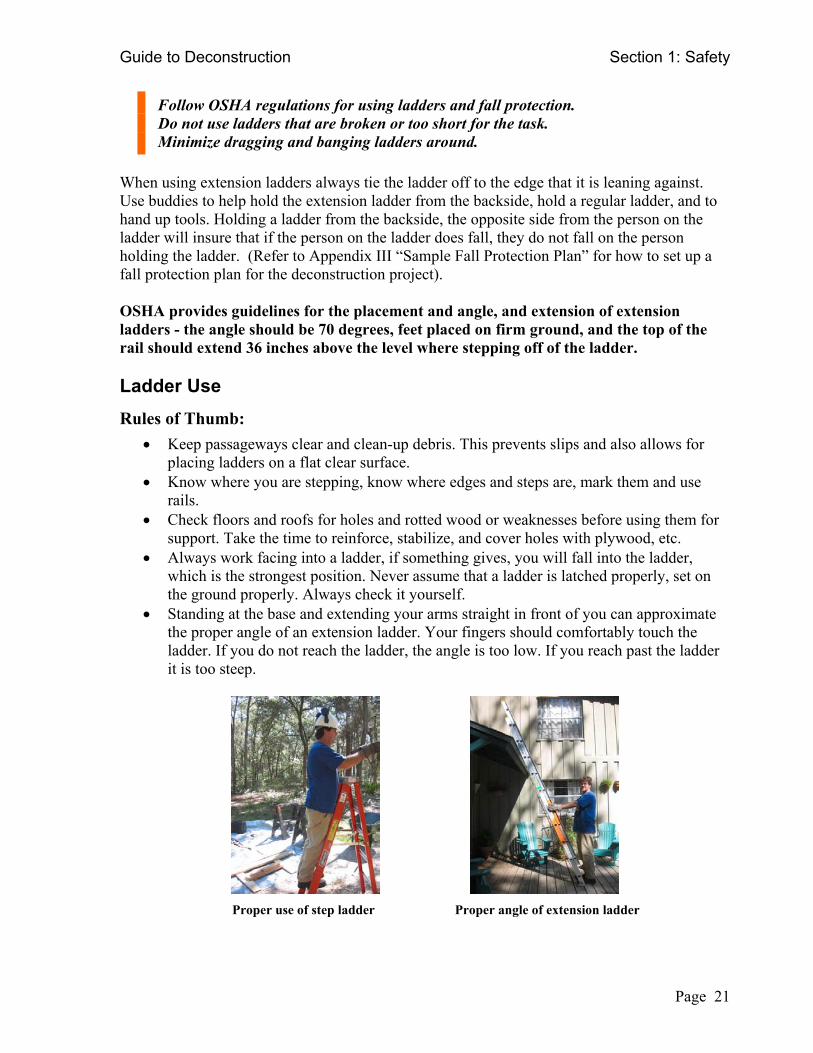
Follow OSHA regulations for using ladders and fall protection. Do not use ladders that are broken or too short for the task. Minimize dragging and banging ladders around.
When using extension ladders always tie the ladder off to the edge that it is leaning against. Use buddies to help hold the extension ladder from the backside, hold a regular ladder, and to hand up tools. Holding a ladder from the backside, the opposite side from the person on the ladder will insure that if the person on the ladder does fall, they do not fall on the person holding the ladder. (Refer to Appendix III “Sample Fall Protection Plan” for how to set up a fall protection plan for the deconstruction project). OSHA provides guidelines for the placement and angle, and extension of extension ladders - the angle should be 70 degrees, feet placed on firm ground, and the top of the rail should extend 36 inches above the level where stepping off of the ladder. Ladder Use Rules of Thumb:
• Keep passageways clear and clean-up debris. This prevents slips and also allows for placing ladders on a flat clear surface.
• Know where you are stepping, know where edges and steps are, mark them and use rails.
• Check floors and roofs for holes and rotted wood or weaknesses before using them for support. Take the time to reinforce, stabilize, and cover holes with plywood, etc.
• Always work facing into a ladder, if something gives, you will fall into the ladder, which is the strongest position. Never assume that a ladder is latched properly, set on the ground properly. Always check it yourself.
• Standing at the base and extending your arms straight in front of you can approximate the proper angle of an extension ladder. Your fingers should comfortably touch the ladder. If you do not reach the ladder, the angle is too low. If you reach past the ladder it is too steep.
Proper use of step ladder Proper angle of extension ladder
Page 21
Guide to Deconstruction Section 1: Safety
Safety Training A safe deconstruction project requires that all those present on the site know the Safety Plan and know how to accomplish the work. It is also necessary to assign clear roles and responsibilities so that each worker knows who is responsible for specific tasks such as Supervision, Safety, Medical and First Aid, Tools, Materials Management, Deconstruction - and knows where information is and what to do in special circumstances. This deconstruction guide is part of the training process.
Specialized training may be required for such things as Fall Protection and Respiratory Protection.
Do not allow untrained persons to work at the site, even for a moment. If an untrained person is hurt the deconstruction contractor is responsible for not properly preparing the worker. Train all workers and make sure that they acknowledge this training in writing. Job site safety includes not only the actual process of being safe but also the formalities of training and record keeping that serve for legal requirements. These formal structures serve an invaluable purpose of giving structure to job site safety training and consequently the process of the deconstruction itself. Emergency Planning The American National Standards Institute (ANSI) in its ANSI A10.6-1983 - Safety Requirements For Demolition Operations states: "No employee shall be permitted in any area that can be adversely affected when demolition operations are being performed. Only those employees necessary for the performance of the operations shall be permitted in these areas." Medical Services and First Aid Prior to starting work, provisions should be made for prompt medical attention in case of serious injury.
• The nearest hospital, infirmary, clinic, or physician • Instructions for the most direct route to these facilities. • Proper equipment for prompt transportation of an injured
worker, as well as a communication system to contact any necessary ambulance service, must be available at the job site.
• Post the telephone numbers of the hospitals, physicians, or ambulances in a conspicuous spot.
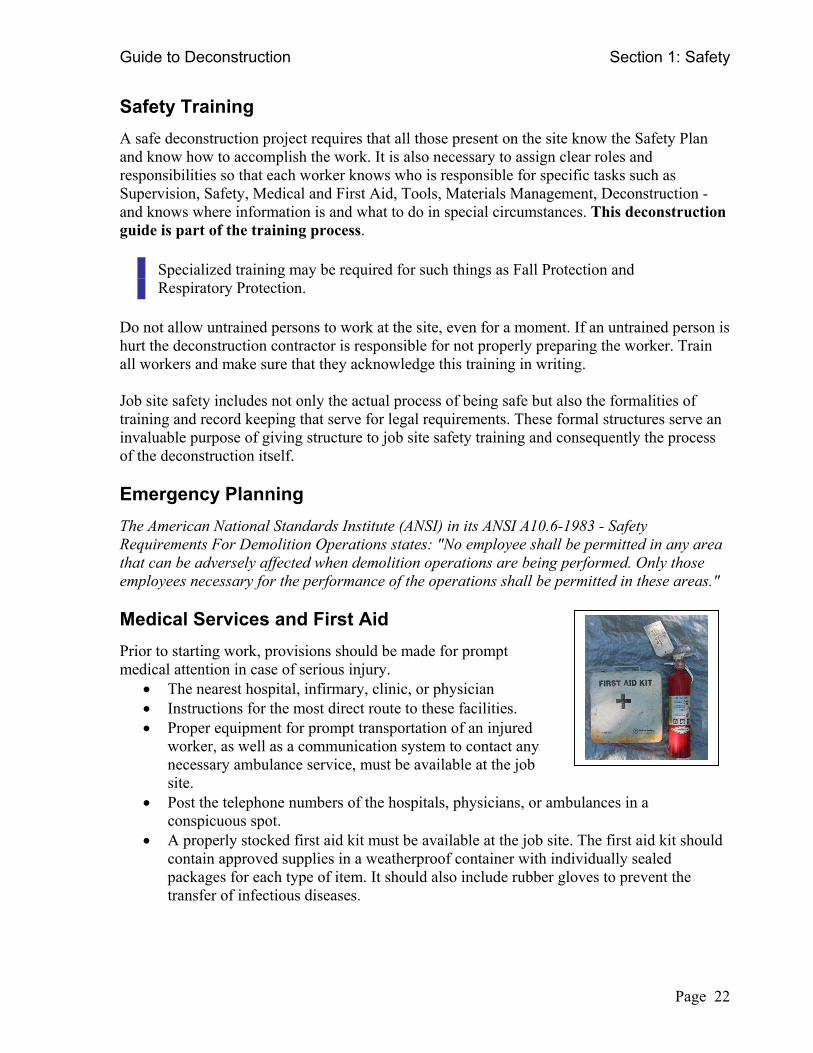
• A properly stocked first aid kit must be available at the job site. The first aid kit should contain approved supplies in a weatherproof container with individually sealed packages for each type of item. It should also include rubber gloves to prevent the transfer of infectious diseases.
Page 22

Guide to Deconstruction Section 1: Safety
• Provisions should be made to provide for quick drenching or flushing of the eyes should any person be working around corrosive materials. Eye flushing must be done with water containing no additives.
Check the contents of the first aid kit on each job and at least weekly to ensure that expended items are replaced.
Police and Fire
• The telephone numbers of the local police, ambulance, and fire departments should be available at each job site.
• Notify police in the event of any traffic problems, such as the movement of equipment to the job, uncontrolled fires, or other police/fire matters.
• Notify police to report any vandalism, unlawful entry to the job site, or accidents requiring police assistance.
Fire Prevention and Protection A "fire plan" should be set up prior to beginning a deconstruction job. This plan should outline the assignments of key personnel in the event of a fire and provide an evacuation plan for workers on the site. Common sense should be the general rule in all fire prevention planning.
• All potential sources of ignition should be evaluated and the necessary corrective measures taken.
• Electrical wiring and equipment for providing light, heat, or power should be installed by a competent person and inspected regularly.
• Equipment powered by an internal combustion engine should be located so that the exhausts discharge well away from combustible materials and away from workers.
• All internal combustion equipment should be shut down prior to refueling. • Fuel for this equipment should be stored in a safe location. • Sufficient firefighting equipment should be located near any flammable or combustible
liquid storage area. • Only approved containers and portable tanks should be used for the storage and
handling of flammable and combustible liquids. • Heating devices should be situated so that they are not likely to overturn and shall be
installed in accordance with their listing, including clearance to combustible material or equipment.
• Competent personnel should maintain temporary heating equipment, when utilized. • Smoking should be prohibited at or in the vicinity of hazardous operations or materials. • Roadways between and around combustible storage piles should be at least 15 feet wide
and maintained free from accumulation of rubbish, equipment, or other materials. • When storing debris or combustible material inside a structure, such storage shall not
obstruct or adversely affect the means of exit. • A suitable location at the job site should be designated and provided with plans,
emergency information, and equipment, as needed.
Page 23
Guide to Deconstruction Section 1: Safety
• Access for heavy fire-fighting equipment should be provided on the immediate job site at the start of the job and maintained until the job is completed.
• An ample number of fully charged portable fire extinguishers should be provided throughout the operation.
• All motor-driven mobile equipment should be equipped with an approved fire extinguisher.
OSHA Coverage One very important consideration for a non-profit organization is the use of the term “employee” for the requirement to follow OSHA regulations. If the deconstruction is carried out by an organization with at least one employed person and/or one or more employed persons are supervising or working at the deconstruction project, OSHA regulations apply to the deconstruction project, no matter how many volunteers may be engaged in the work, and regardless of whether the organization is a non-profit or a for-profit. Safety Rules of Thumb:
COMMUNICATION Knowing where you are in relation to others, walls, roof edges, steps, or changes in level, overhangs, any building element on the ground, OTHER workers and their activities, is probably the most important concept of all.
• Workers must be alert and invested in the work they are performing. • Cleanup of debris on all work surfaces will occur after each phase of deconstruction. • Piles of debris will not be allowed to accumulate in work areas where they could
generate a hazard or impediment to the workers. • One person will be appointed Job Safety Officer and will have overall responsibility for
job safety. • Every person on the site must act responsibly. • Understanding of the Deconstruction process and Goals. • Stabilizing weakened sections of buildings, and working in such as way as to keep the
structures as stable as possible via the order of the deconstruction. • Taking care in handling windows (glass), long items, heavy items, and objects with the
nails still in them. • Understanding how components are connected and the best method and tool to use in
removing it to minimize force that in turn can result in sudden movements, creating projectiles, slipping, etc.
• Importance of cleaning debris and removing materials from areas where they can be hazards either off or on the ground.
• Understanding load bearing components and stresses produced by gravity, including awareness of damaged components and weak points caused by termite, water damage, etc.
• Use of safety harnesses, scaffolding, ladders, guardrails, and 2x4s nailed horizontally for footholds when working on roofs.
Page 24
Guide to Deconstruction Section 1: Safety
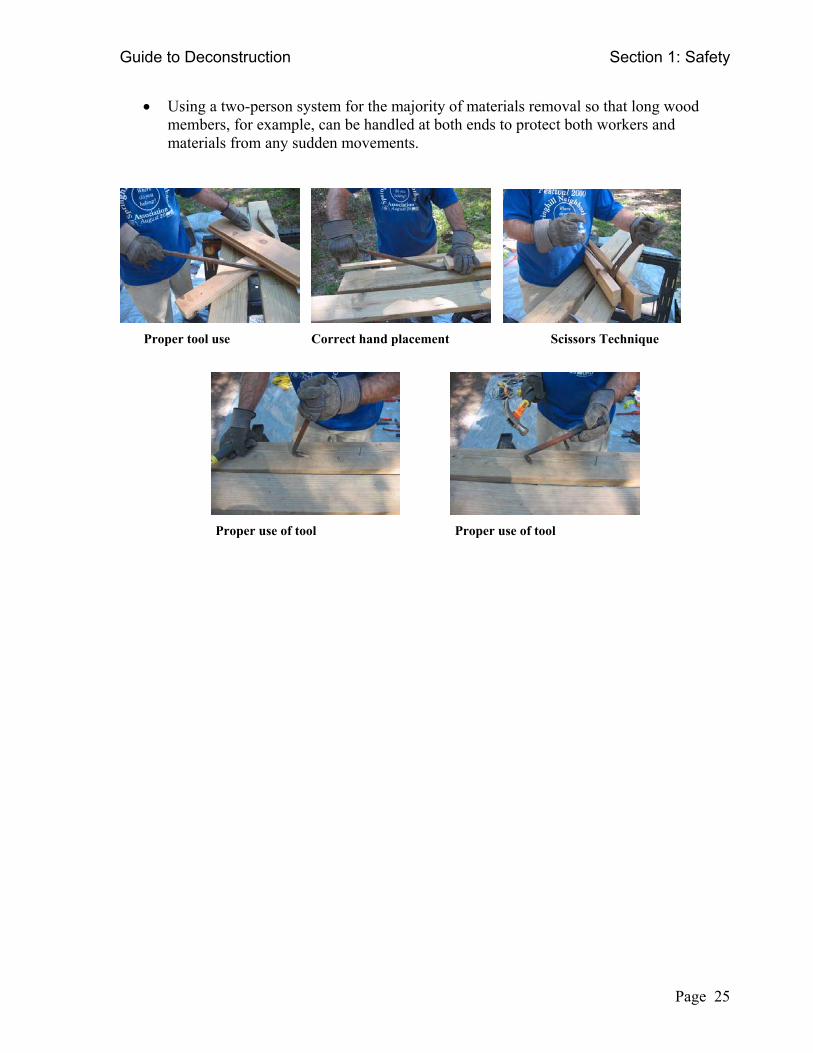
• Using a two-person system for the majority of materials removal so that long wood members, for example, can be handled at both ends to protect both workers and materials from any sudden movements.
Proper tool use Correct hand placement Scissors Technique
Proper use of tool Proper use of tool
Page 25