a solar wax melter solar wax melter is basically a box made out of 3/4" ply-wood (figure 1 and...
TRANSCRIPT

Most beginning beekeepers get into the hobby dreaming of producing a little honey; enough for their own use plus a little extra for gifts and perhaps for sale. We soon learn that there is another product of the hive - bees wax - which looks just too good to throw away. What to do with it?
In fact, wax is way too valuable to simply toss. It is a handy product to have around the home and shop. Wax makes a great lubricant for door hinges, sliding glass door roll-ers and other annoying squeaks and scrapes. Wax will not leave an oily stain and because it does not evaporate like oil, it will last a long, long time.
Of course in the arts and crafts department, bees wax has a history stretching back to ancient times. Who has not heard of bees wax candles? Did you know that bees wax tapers will not smoke like paraffin candles and will substantially outlast paraffin candles?
There is also a very good market for bees wax. In fact, pound for pound bees wax will bring just as high - or higher - price than honey. You will find no problem selling any surplus bees wax.
Most of your bees wax will come from the capping which you cut from the frames while harvesting honey. However, I always carry a bucket to the bee yard to save the burr and bridge comb that I gather when working with the hives. You will be surprised at the amount of wax you can collect while in the bee yard. Never throw away bees wax.
Rendering Bees Wax Raw bees wax, either from the decapping tank or the bee yard, needs to be cleaned and rendered since it will be soaked with honey, bug parts and other hive debris. To clean, rinse raw wax two or three times with clean, cool water. I simply put the raw wax in a 5-gallon honey bucket, fill it full of water and let is stand overnight. I then drain the bucket out of the honey gate, fill it again with fresh water and repeat the process. After the final rinse, let the wax thoroughly dry. Spreading it out on several layers of newspaper will help.
Now it is time to render the wax and this is where a solar wax melter will prove its worth. When raw wax is melted most of the debris will float to the top where it can be skimmed off. However, wax is highly flammable, and beekeepers who try to melt wax over an open flame (such as on your stove top) run the real risk of depilating themselves from the shoulders on up when the wax ignites in a big blue flash. (Note: I wrote “when” not “if”.) Even if melted in a double boiler, I get nervous with melted wax around an open flame or high heat source.
The answer is a solar wax melter. With this gadget, you can load it up with your rinsed, raw wax, put it in the sun and then go attend to your other business. You don’t have to worry about anything catching fire and the job will be done at the end of the day. As an added benefit, your wax will come out in near pristine condition since virtually all of the bug parts and other debris will be caught in the wax melter’s wire basket.
“In the Beekeeper’s Work Shop” Building a Solar Wax Melter
©by Stephen E. Tilmann
A Solar Wax Melter
You will be left with pure bees wax in the collecting pan. It will have a nice light color, that intoxicating bee wax smell and “bee” market ready. Now you can’t beat that!
Hint: Although I usually collect the wax in old bread pans or cake pans, having wax in smaller blocks and other shapes can be useful. For molds, I keep vacuum sealed clear plastic coverings that are used for packaging many household prod-ucts. These shapes are often just what is needed. Simply use the covering as a mold for the melted wax. See the Photo Gallery at the end of this article for examples.
Basic Construction The solar wax melter is basically a box made out of 3/4" ply-wood (Figure 1 and photo). The top is slanted so that the hinged top lid has a more favorable presentation toward the sun. The lid has a double pane of glass with a 3/4" separation (dead air space) that greatly increases the efficiency of the device. The sides, back and bottom of the box are insulated with 3/4" foil faced foam board and painted black.
Inside there is an large aluminum drip pan that rests on angled supports so that melted wax will run down and out through an opening cut at the lower end of the pan. Inside this pan, a #8 wire mesh basket holds the wax while melting. There are a couple of small wooden spacer bars stapled to the bottom of the wire basket to create a gap that permits the melted wax a flow space. The wire basket will catch and strain out almost all of the debris found in the wax. The melted wax you collect will be very clean.
An old metal cake pan or bread pan is just right for collect-ing the melted wax as it runs out the very bottom of the drip pan. Because the front door is hinged, you can easily check on the collection pans and replace them if they get full.
This project has a little of everything for the shop-bound beekeeper: woodworking (of course!), basic metal fabrication and even window glazing. Once completed and in use, you will wonder how you ever got by without your solar wax melter.
“In the Beekeeper’s Work Shop” Building a Solar Wax Melter
©by Stephen E. Tilmann
Construction Details
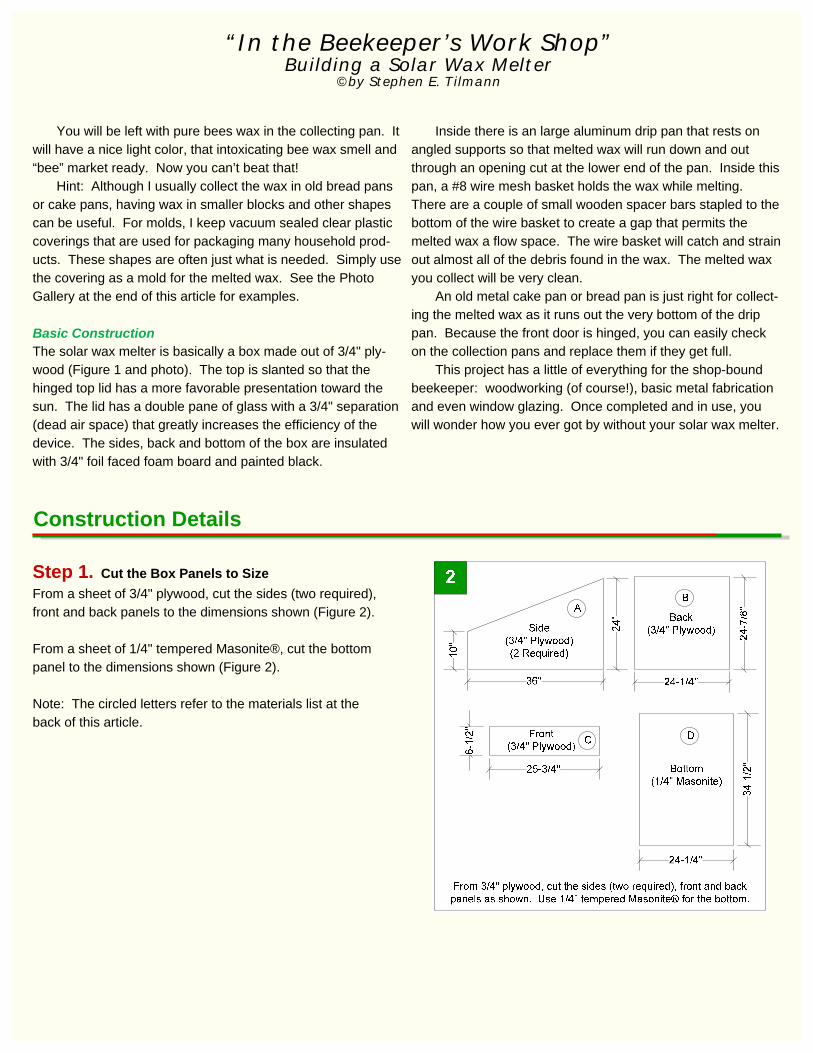
Step 1. Cut the Box Panels to Size
From a sheet of 3/4" plywood, cut the sides (two required), front and back panels to the dimensions shown (Figure 2). From a sheet of 1/4" tempered Masonite®, cut the bottom panel to the dimensions shown (Figure 2). Note: The circled letters refer to the materials list at the back of this article.
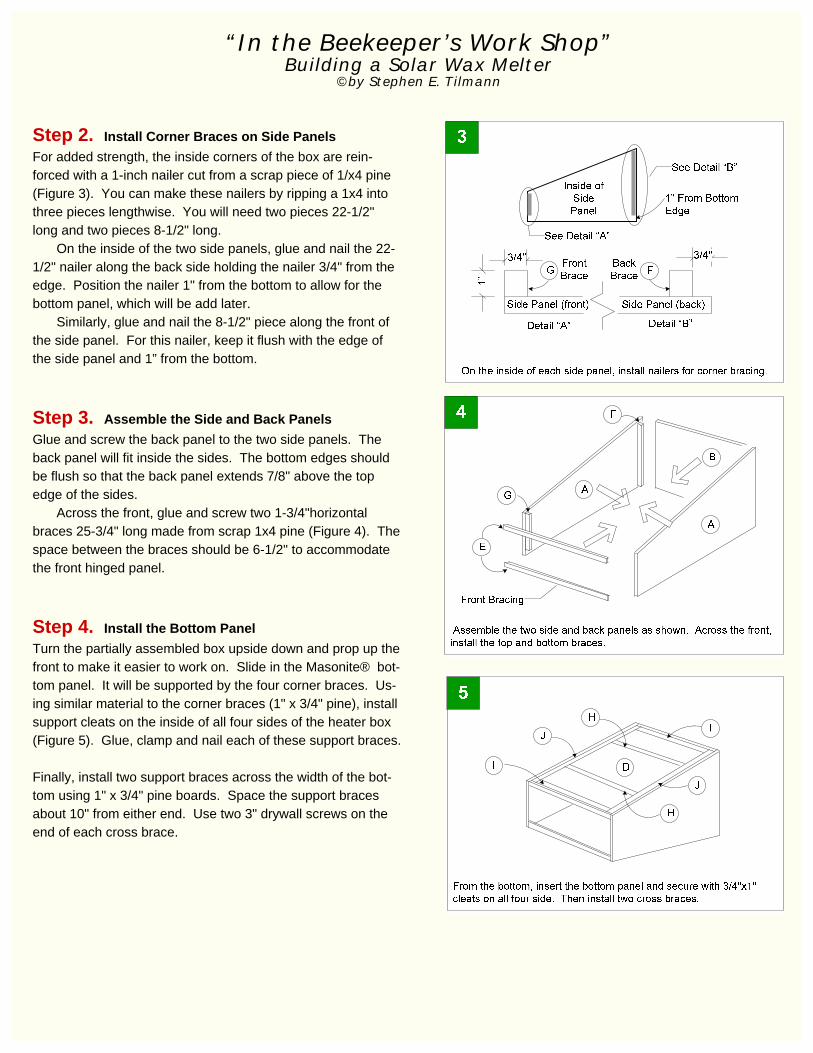
Step 2. Install Corner Braces on Side Panels
For added strength, the inside corners of the box are rein-forced with a 1-inch nailer cut from a scrap piece of 1/x4 pine (Figure 3). You can make these nailers by ripping a 1x4 into three pieces lengthwise. You will need two pieces 22-1/2" long and two pieces 8-1/2" long.
On the inside of the two side panels, glue and nail the 22-1/2" nailer along the back side holding the nailer 3/4" from the edge. Position the nailer 1" from the bottom to allow for the bottom panel, which will be add later.
Similarly, glue and nail the 8-1/2" piece along the front of the side panel. For this nailer, keep it flush with the edge of the side panel and 1” from the bottom.
Step 3. Assemble the Side and Back Panels
Glue and screw the back panel to the two side panels. The back panel will fit inside the sides. The bottom edges should be flush so that the back panel extends 7/8" above the top edge of the sides.
Across the front, glue and screw two 1-3/4"horizontal braces 25-3/4" long made from scrap 1x4 pine (Figure 4). The space between the braces should be 6-1/2" to accommodate the front hinged panel.
Step 4. Install the Bottom Panel
Turn the partially assembled box upside down and prop up the front to make it easier to work on. Slide in the Masonite® bot-tom panel. It will be supported by the four corner braces. Us-ing similar material to the corner braces (1" x 3/4" pine), install support cleats on the inside of all four sides of the heater box (Figure 5). Glue, clamp and nail each of these support braces. Finally, install two support braces across the width of the bot-tom using 1" x 3/4" pine boards. Space the support braces about 10" from either end. Use two 3" drywall screws on the end of each cross brace.
“In the Beekeeper’s Work Shop” Building a Solar Wax Melter
©by Stephen E. Tilmann

“In the Beekeeper’s Work Shop” Building a Solar Wax Melter
©by Stephen E. Tilmann
Step 5. Install the Drip Pan Supports
Inside the wax melter, the drip pan and wire basket are sup-port by three 24-1/4" 1x4s spanning the width of the melter (Figure 6). The supports are 6" below the top of the side pan-els and spaced 2-3/4", 14" and 25" from the inside of the back panel.
The flat side of the 1x4s should be slanted so that they are parallel to the top of the side panels. Use two 2" drywall screws screwed in from the outside of the side panels on each end of the supports.
Before installing the lowest support, glue and nail two 1/2" x 1-3/4" x 8" stops on the front edge (Figure 7). Leave a 6" gap between the stops.
Step 6. Make the Top Lid Frame
The frame for the hinged glass top is made from 2x4s cut into strips 1-3/4" x 1-1/4". You will need two pieces 37-3/4" long and two pieces 25-3/4" long (Figure 8).
On the same side of each piece, cut a 1/2" x 1/2" notch on the top and bottom edge (Figure 9). The glass panes will rest on the resulting ledge with a 3/4" space between the panes.
Two assemble, miter each end (45 degrees), glue and use two 2" drywall screws (predrill) to secure. Double check to make sure the frame is square.
The glass will be installed in a later step. 6"
2-3/
4"14
"25
"

Step 7. Install Filler Strip For Hinged Lid
A narrow filler strip needs to be installed across the top of the wax melter, adjacent to the back panel (Figure 10). The filler is made for 3/4" stock 25-3/4" wide. This filler will also be used for the lid hinges in a later step.
The filler will be about 1-3/4" wide. We recommend that you test fit the lid to determine the exact size needed. Lay the lid on top of the wax melter with the lower edge flush with the front of the box. The measure the width of the filler at the top.
Note that for a tight fit, the top edge of the filler is cut at an angle of 68 degrees. Again, determine your angle by striking a vertical line from the top corner of the filler when test fitting the lid.
Step 8. Paint the Inside and Outside of the Wax Melter
The assembly of all of the wood components for the wax melter is complete. Now is the time to completely paint the wax melter. The inside should be painted black. We suggest a primer coat and two top coats of good grade latex.
Hint: The door panel will be installed between the two rails in the front of the wax melter. Make sure there is adequate space by test fitting the door panel. If necessary, you may need to trim a slight amount from the door panel. Remember, the door panel will be painted which will make a tight fit even tighter.
Step 9. Line Inside of Wax Melter with Foam Board
Using 3/4" foil faced foam board, line the two sides, bottom and back of the wax melter (Figure 11). Glue the foam board into place using an adhesive rated for foam. Put the foil faced side toward the inside of the wax melter and then paint black.
Lumber yards also carry nails with plastic washers specifi-cally designed to nail foam boards. These work quite well. However, the nail length may be too long for this application, so you might have to cut the nail to be no longer than 1-1/4".
“In the Beekeeper’s Work Shop” Building a Solar Wax Melter
©by Stephen E. Tilmann
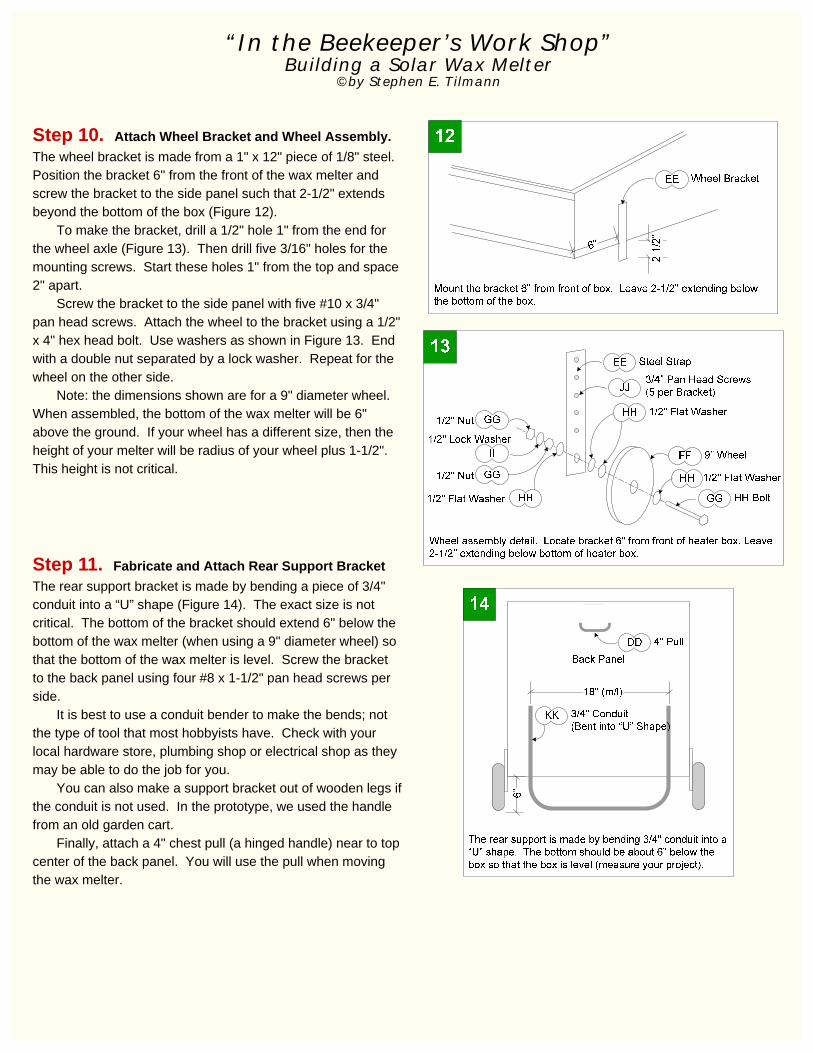
Step 10. Attach Wheel Bracket and Wheel Assembly.
The wheel bracket is made from a 1" x 12" piece of 1/8" steel. Position the bracket 6" from the front of the wax melter and screw the bracket to the side panel such that 2-1/2" extends beyond the bottom of the box (Figure 12).
To make the bracket, drill a 1/2" hole 1" from the end for the wheel axle (Figure 13). Then drill five 3/16" holes for the mounting screws. Start these holes 1" from the top and space 2" apart.
Screw the bracket to the side panel with five #10 x 3/4" pan head screws. Attach the wheel to the bracket using a 1/2" x 4" hex head bolt. Use washers as shown in Figure 13. End with a double nut separated by a lock washer. Repeat for the wheel on the other side.
Note: the dimensions shown are for a 9" diameter wheel. When assembled, the bottom of the wax melter will be 6" above the ground. If your wheel has a different size, then the height of your melter will be radius of your wheel plus 1-1/2". This height is not critical.
Step 11. Fabricate and Attach Rear Support Bracket
The rear support bracket is made by bending a piece of 3/4" conduit into a “U” shape (Figure 14). The exact size is not critical. The bottom of the bracket should extend 6" below the bottom of the wax melter (when using a 9" diameter wheel) so that the bottom of the wax melter is level. Screw the bracket to the back panel using four #8 x 1-1/2" pan head screws per side.
It is best to use a conduit bender to make the bends; not the type of tool that most hobbyists have. Check with your local hardware store, plumbing shop or electrical shop as they may be able to do the job for you.
You can also make a support bracket out of wooden legs if the conduit is not used. In the prototype, we used the handle from an old garden cart.
Finally, attach a 4" chest pull (a hinged handle) near to top center of the back panel. You will use the pull when moving the wax melter.
“In the Beekeeper’s Work Shop” Building a Solar Wax Melter
©by Stephen E. Tilmann

Step 12. Install the Front Door Panel
Install the front door panel using two 1" hinges on the bottom (Figure 15). On the top, use two half turn buttons to keep the door closed. Finally, finish off the door with a 4" drawer pull.
Step 13. Install Glass Panes
You will need two 24" x 36" panes of tempered glass. Starting on one side of the frame, put a thin layer of glazing compound on the top of the ledge and the lay in the glass pane. Use push-in glazier points to secure the pane. Then nail the retain-ing strips on top of the glass using 7/8” x 18 brads (refer back to Figure 9).
Turn the frame over and install the second pane of glass in a similar manner.
After the glass is installed, place the cover on top of the wax melter and attach the lid to the filler strip using two 2-inch hinges. Then attach a drawer pull to the front of the lid frame.
Step 14. Fabricate the Drip Pan
The wax drip pan is made from aluminum (trim coil stock). It sits on the cross supports inside the wax melter. The drip pan is 19-1/2" x 26-1/2" in size and 4" deep (Figure 16). All four sides of the drip pan are bent up along the dotted lines as shown. The tabs along the sides are bent along the outside of the back and front (Figure 17). Fasten the tabs with several pop rivets.
The bends are best made with a tool called a break. You can also use the sharp edge of your work bench to make the bends. Sheet metal shops will make this pan for you if you prefer to go that route.
Note the front has a 6" wide spout. The two edges of the spout are bent upwards (as shown) to guide the melted wax into a wax pan.
If there are any holes in the corners, particularly the bot-tom corners, these can be plugged with epoxy. Paint the in-side and outside of the drip pan black,
“In the Beekeeper’s Work Shop” Building a Solar Wax Melter
©by Stephen E. Tilmann

Step 15. Fabricate the Wire Wax Basket
The wire wax basket sits inside the drip pan. The basket is slightly smaller than the drip pan (17-1/2" x 25" x 3") and is made from #8 screen mesh (Figure 19), Along the bottom of the basket, there are three 3/4" spacers which hold the basket off the bottom of the drip pan and allows melted wax to flow.
The basket is fabricated using the same basic steps as the drip pan. Use short pieces of wire to hold the basket together where the flaps fold over the back and front sides.
Cut three 3/4" x 3/4" x 24" strips from scrap 1x4s. Staple these spacer strips to the bottom of the basket.
Extra Credit. As an additional step, you may also want
to add pivoting arm(s) (3/4” x 1” - to length) to hold up the lid. These can be attached to either the outside or the inside of the wax melter. Two arms (one on either side) may work best be-cause there will be less twisting of the frame (and possible glass breakage) than with only one support arm.
“In the Beekeeper’s Work Shop” Building a Solar Wax Melter
©by Stephen E. Tilmann
“In the Beekeeper’s Work Shop” Building a Solar Wax Melter
©by Stephen E. Tilmann
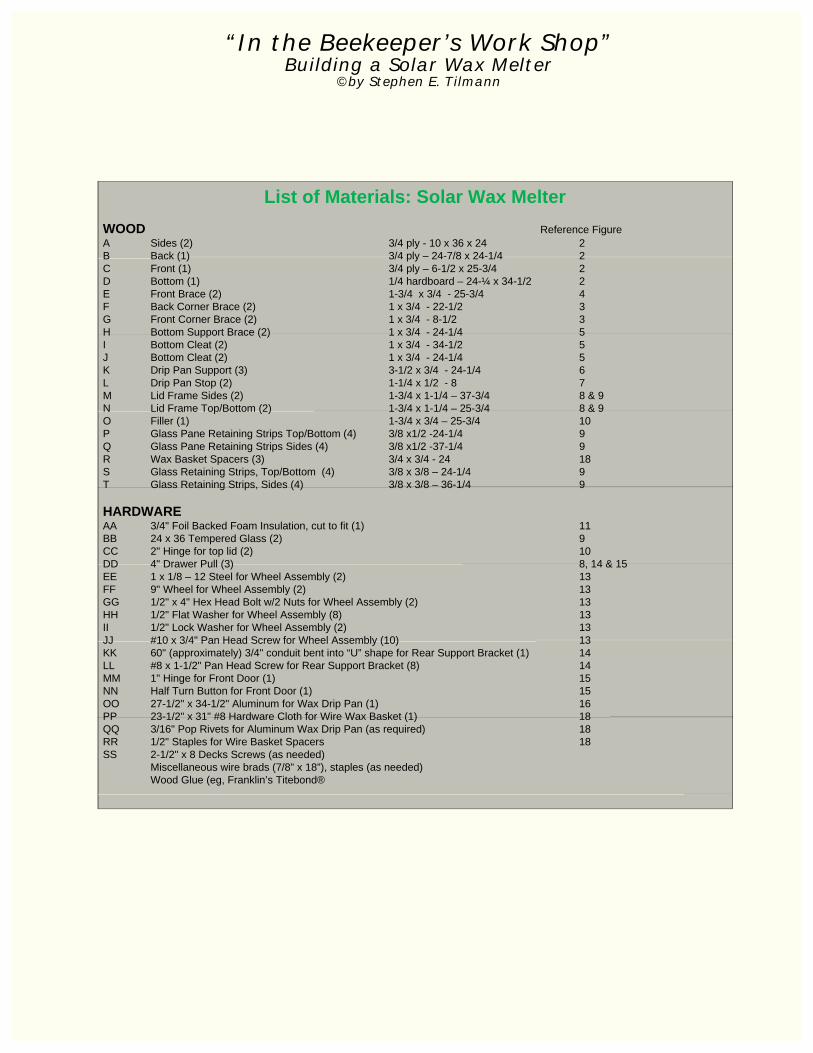
List of Materials: Solar Wax Melter
WOOD Reference FigureA Sides (2) 3/4 ply - 10 x 36 x 24 2B Back (1) 3/4 ply – 24-7/8 x 24-1/4 2C Front (1) 3/4 ply – 6-1/2 x 25-3/4 2D Bottom (1) 1/4 hardboard – 24-¼ x 34-1/2 2E Front Brace (2) 1-3/4 x 3/4 - 25-3/4 4F Back Corner Brace (2) 1 x 3/4 - 22-1/2 3G Front Corner Brace (2) 1 x 3/4 - 8-1/2 3H Bottom Support Brace (2) 1 x 3/4 - 24-1/4 5I Bottom Cleat (2) 1 x 3/4 - 34-1/2 5J Bottom Cleat (2) 1 x 3/4 - 24-1/4 5K Drip Pan Support (3) 3-1/2 x 3/4 - 24-1/4 6L Drip Pan Stop (2) 1-1/4 x 1/2 - 8 7M Lid Frame Sides (2) 1-3/4 x 1-1/4 – 37-3/4 8 & 9N Lid Frame Top/Bottom (2) 1-3/4 x 1-1/4 – 25-3/4 8 & 9O Filler (1) 1-3/4 x 3/4 – 25-3/4 10P Glass Pane Retaining Strips Top/Bottom (4) 3/8 x1/2 -24-1/4 9Q Glass Pane Retaining Strips Sides (4) 3/8 x1/2 -37-1/4 9R Wax Basket Spacers (3) 3/4 x 3/4 - 24 18S Glass Retaining Strips, Top/Bottom (4) 3/8 x 3/8 – 24-1/4 9T Glass Retaining Strips, Sides (4) 3/8 x 3/8 – 36-1/4 9
HARDWAREAA 3/4" Foil Backed Foam Insulation, cut to fit (1) 11BB 24 x 36 Tempered Glass (2) 9CC 2" Hinge for top lid (2) 10DD 4" Drawer Pull (3) 8, 14 & 15EE 1 x 1/8 – 12 Steel for Wheel Assembly (2) 13FF 9" Wheel for Wheel Assembly (2) 13GG 1/2" x 4" Hex Head Bolt w/2 Nuts for Wheel Assembly (2) 13HH 1/2" Flat Washer for Wheel Assembly (8) 13II 1/2" Lock Washer for Wheel Assembly (2) 13JJ #10 x 3/4" Pan Head Screw for Wheel Assembly (10) 13KK 60" (approximately) 3/4" conduit bent into “U” shape for Rear Support Bracket (1) 14LL #8 x 1-1/2" Pan Head Screw for Rear Support Bracket (8) 14MM 1" Hinge for Front Door (1) 15NN Half Turn Button for Front Door (1) 15OO 27-1/2" x 34-1/2" Aluminum for Wax Drip Pan (1) 16PP 23-1/2" x 31" #8 Hardware Cloth for Wire Wax Basket (1) 18QQ 3/16" Pop Rivets for Aluminum Wax Drip Pan (as required) 18RR 1/2" Staples for Wire Basket Spacers 18SS 2-1/2" x 8 Decks Screws (as needed)
Miscellaneous wire brads (7/8” x 18”), staples (as needed)Wood Glue (eg, Franklin’s Titebond®

“In the Beekeeper’s Work Shop” Building a Solar Wax Melter
©by Stephen E. Tilmann

“In the Beekeeper’s Work Shop” Building a Solar Wax Melter
©by Stephen E. Tilmann
Photo Gallery...
Photo Captions: 1. Completed solar wax melter ready for use. 2. Rendered wax in convenient shapes. 3. Detail of front corner showing insulating board. 4. Detail of wheel assembly. 5. Detail of bottom supports. 6. Detail of rear stand and pulling handle. 7. Interior shown was pan and hardware cloth basket.
3
2
1
4
5
6
7