chairman’s message - otherpeoplespixelss3.otherpeoplespixels.com/sites/8313/resume.pdf ·...
TRANSCRIPT

1

2
Chairman’s Message Recently I reviewed our website and was very impressed with the presentation. If you haven't seen it lately, you should take a look www.Decoupage.org. After much struggle we have made the decision not to hold a convention this year. Our organization has been an entity since 1971. This is thirty-seven years of marvelous creativity. I tried to come up with the right words to express our decision to postpone Convention for another year and looking at the website gave me the feeling of our strength as a group. I know that we will all be better for holding off for a year as this feeling of unease about our finances in this country and worldwide becomes more secure. I would like to hear from you about the decoupage topics you want to learn or brush up on for Convention 2010. We will have more time to prepare a tailor-made meeting for you-but we need your feedback. In the meantime you will have the email addresses and in most cases, physical addresses of members nearest to you. Perhaps we can organize smaller get-togethers to learn and share. Suzy B Suzy Barbor [email protected] Executive Director’s Message You may wonder about our cover lesson: The Importance of Sharing! It’s a very simple yet vital message-especially for our future. This issue of the Dialogue showcases the beautiful work of new member Kathleen Joyce. But if a friend hadn’t shared her love of decoupage with Kathy ten years ago, we wouldn’t be seeing this extraordinary talent today. You will be awestruck by her creativity, striking use of color and ability to paint magical pictures with paper whether the subject is the Beatles, beautiful ladies or bears in a forest. I would also like to honor Durwin Rice, Kathy’s mentor, who with his book, New Decoupage, greatly impacted our world of decoupage. His stunning use of architectural decoupage to show us how to transform our environment was a revolution to me. Durwin was our honored guest and spokesperson at Stowe Convention 1999. I’ll never forget the stampede to buy his autographed book after his beautiful slide show presentation. As Suzy stated above, the decision has been made to forgo Convention this year and plan ahead for next year. Please-we need your help: Volunteers to teach and to organize Convention 2010. Where you would like to hold it? What classes would you most like to attend? Send an E-mail to Suzy or to me with your thoughts and wishes. Also how about gathering in regional parts of the country for small group teaching and learning sessions? If you are interested in possibly hosting such an event whether for a day or a few days, please contact me. I’ll let others know in Marion Peer your area and we’ll go from there to set them up. There are lots of lessons included in this issue of the Dialogue. Some even have step-by-step photos and Photo Shop notes. But none are more important than the greatest gift of all: sharing your talent and generous spirit with others so they may carry on our decoupage art into the future. After all, our mission statement is to preserve the art of decoupage. Marion: [email protected] / Tel: 802-253-3903

3
New Sources and Resources
1. Lefranc and Bourgeois, the makers of fine art materials, has a new craquelure product called Deco Matt Crackling Medium. Visit their website www.lefrancandbourgeois.com for more information.
2. New member Roby Marone, (You will view her gorgeous decoupage art in our next issue.) sent in these two web sites for our viewing: www.hobbyandshop.it and www.laravella.com. The sites belong to Lara Vella, a very talented decoupage artist in Italy. She sells découpage papers and products on line and in the coming weeks she will show new products accompanied by suggested projects. 3. www.millecentouno.com has beautiful Italian papers. The contact is Maria Cristina Ilari. She gives workshops using the papers plus she does sell them. 4. www.Italianpaperonline.com and www.calambour.com are two new paper sources with distributors in the US. Thank you, Roy Larking, for sharing all of these paper sources with us! 5. For those of you seeking modern forms to decoupage, check out www.Wallies.com to view their new Mio Paper
Forms. These 3D modular paper tiles made from 100% recycled materials come in two patterns, Flow and Ripple, and can be painted and pasted.
New Member: Kathleen Joyce Kathy Joyce grew up in the sixties’ lifestyle of bold colors and flowing lines and this era inspires her beautiful and very exciting decoupage works of art to this day. A close friend introduced Kathy to decoupage a decade ago and she immediately dove in and decided to make her first piece a Beatles trunk to store all of her treasured Beatle memorabilia. "I used some of my original bubble gum cards for a collage on the top. I used an original set of paper dolls from Yellow Submarine for the back. I also used a one-step decoupage solution (decoupage in a jar), which distorted all of the original artwork. The trunk was huge and to this day, I love the compositions but the technique definitely needed much help.” Kathy then discovered Durwin Rice’s book New Decoupage, which expanded her world of decoupage and changed her life. She joined Durwin’s group and eventually entered one of her pieces in a decoupage contest and won. By then, she decided to try another Beatles trunk using her newfound skills and enthusiasm and proceeded to enter the Beatle Fest Art show in Boston. Once again, Kathy won an award for the trunk and the journey had begun. Durwin Rice became Kathy's mentor. His support and encouragement enabled Kathy to explore the limitless possibilities of decoupage collage. She knows no boundaries in decoupage and combines images to design collages and decoupage items from glass to wicker, from exquisite crystal paperweights to large glass pop art tables, wicker trunks, and mannequins! Last Spring Kathy was invited to teach a class in wicker decoupage at the Durwin Rice Decoupage Convention. “ My proudest accomplishments with decoupage are my Beatle collage pieces. It gives me the greatest pleasure to be able to combine my passions-Beatles and decoupage-and make so many people happy. All of the proceeds of my Beatles decoupage art have been donated to charity. It is an honor to be able to give back to the universe through my love of the Beatles. It thrills me to help keep their message of love and peace flowing. Ringo Starr, Louise Harrison (George's Sister) and all of her family, Joe Brown and Mark Hudson, all own pieces of my Beatles decoupage. Yoko has featured one of my works on her Imagine Peace web site. It has been an amazing journey! I am eternally grateful that I have been able to share this gift and to make people smile." Kathy lives on the South Shore of Boston with her loving and supportive family-a husband who is an amazing cartoonist, a daughter who just graduated with a degree in textile design plus two spoiled dogs and two spoiled cats. She hopes to some day raise and spoil a few alpacas.

4
Mucha Three Panel Screen (On cover) By Kathleen Joyce (USA) Materials: Beautiful old oak screen frame-flea market find- $10
Elmer’s Glue All used alone or Elmer’s mixed with wallpaper paste-I use Romans Pro 888-mixed 50/50. Sponges Brayer Minwax oil based poly Poly brushes Fine sandpaper Mucha art posters* Panel fronts:
Art Nouveau paper for backgrounds 6 particle boards cut to fit inside frames (Home Depot cut the 3 fronts and 3 backs for me-51”x18” each.) Primer paint Art Nouveau wallpaper (for backs) Razor blades COPIES!!! All sizes of copies from designs on original posters and florals on original posters enlarged
1. Cut and prime particle boards. 2. Apply Art Nouveau background papers with glue and brayer. Allow to dry. 3. Play around with cutout papers to decide on a design for each panel. (I chose the stained glass trims and the
floral strips to create frames for the top and bottom of each panel. 4. Apply each poster to center of each panel with glue and brayer. Allow posters to dry. 5. Play with papers to create a floral "border" using repeat images. Apply flower cut outs and butterflies to
complete design. Allow to dry. Trim all edges with razor. 6. After panels are entirely dry, apply many coats of oil-based poly varnish, allowing to thoroughly dry between
coats. Lightly sand between coats as you see fit. Usually it’s every third coat or if you see pet hair or specks-sand, sand, and more sand!
7. When satisfied that panel images are buried to your liking, attach each panel to the folding frame. Panel backs:
8. Paper three back panels with Art Nouveau wallpaper and allow to dry. 9. Trim edges and attach backs.
* Alphonse Mucha (1860-1939) was a world-acclaimed Czech Art Nouveau artist. The world’s first Mucha Museum, dedicated to his life and work, is housed in the Baroque Kaunický Palace in the very heart of Prague.

5
More Decoupage Art, Tips and Techniques from Kathy Joyce Technique tips: 1. I use a vast amount of glue on all of my pieces.
I get very, very messy when I decoupage. No matter what aprons or whatever I wear, it becomes saturated so I have an entire wardrobe of GLUE clothes.
2. I am not afraid to decoupage ANYTHING:
any surface, any size and any theme.
3. I learn multitudes by my mistakes.
4. I believe that there is no one pair of scissors, or one type of glue, or one type of finish that is best to use.
5. Some people love decoupage scissors and razor
knives, but I just use a regular standard size pair of scissors. I seem to be able to get a better grip on my images with large scissors as I turn the images into the scissors.
6. I have found my "tools" by experimenting until
I find just what suits me best. Design tips: 1. Experimentation is the key to design. 2. Play around with totally different styles and
mix them up.
3. Sometimes in the middle of a project, I will come across another paper like when I happen to set a plate down on a pile of papers to go and look at other papers. Then I realize that the paper I sat it on is just what it needed!
4. Designs are everywhere: If I see a beautiful scarf or dress, it can become a paper with a quick trip to the copy store! I also like to minimize and
and carry it into the theme of the project. Tiffany Clock Under Varnish 14”x 8” (The wooden clock underneath was a $10 flea market find!)

6
Tiffany Angel Plate Under Glass 15”x10”
Cross 3" x 8" I used paper napkins to do the textured parts of the cross and copied the napkins to printer paper to use for the flat sides.
7
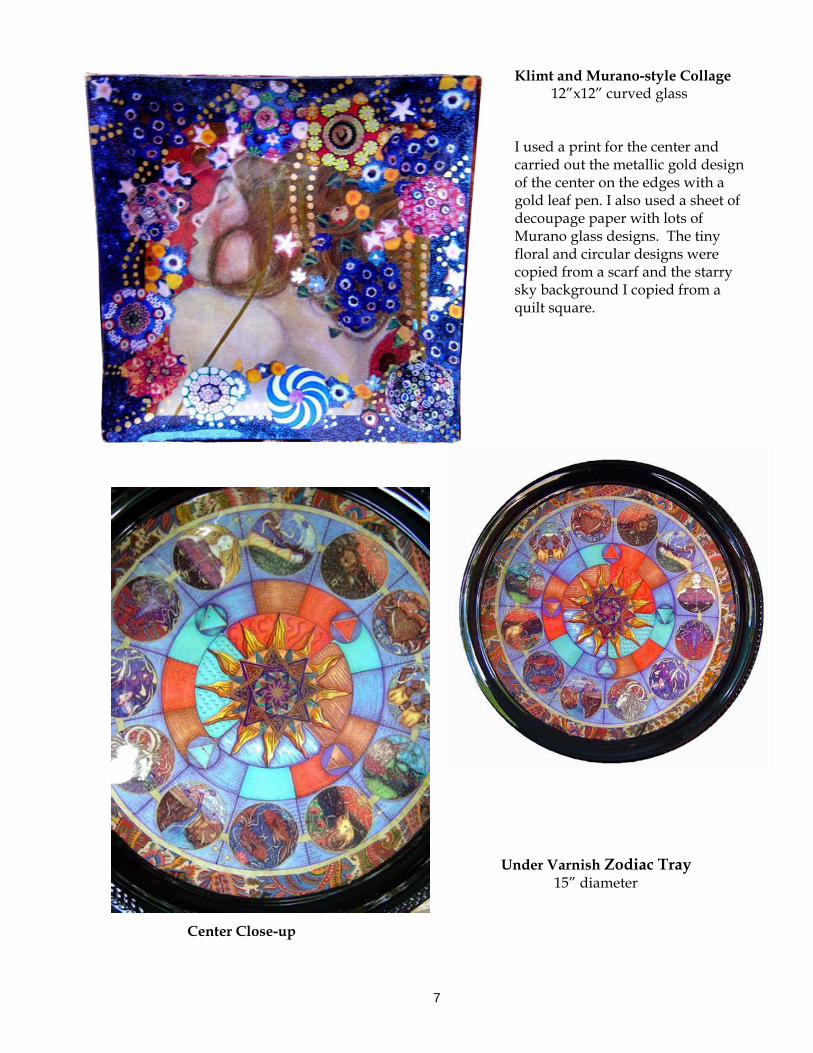
Klimt and Murano-style Collage 12”x12” curved glass I used a print for the center and carried out the metallic gold design of the center on the edges with a gold leaf pen. I also used a sheet of decoupage paper with lots of Murano glass designs. The tiny floral and circular designs were copied from a scarf and the starry sky background I copied from a quilt square.
Under Varnish Zodiac Tray 15” diameter
Center Close-up

8
Purple Mandala* Under Glass Bowl
14” in diameter and 3” deep
(*Mandala is a Sanskrit word, which means “Circle”. This hallowed diagram or meditation symbol is normally round and is a symbolic representation of the cosmos and its energy. It is utilized in Eastern and Native American medicine for curing body, soul, and spirit.)
In this bowl I combined many Mandala images in different sizes and I resized some so that the circles got larger as I added them. The background color is purple nail polish. (Only apply outdoors due to fumes!) Once that was thoroughly dry, I painted over it with solid black paint. This combination creates a luminous effect-it really pops! I then coated the back with poly and outlined it with a gold-leaf pen.

9
Under Sea Bowl Under Glass 17”x 4”

10
Decoupage Under Varnish on a Wicker Trunk 32” x 17” x 11”
Materials: Glue Foam brush Close-up of Trunk Top Sponge Tissue paper prints Polyurethane Wicker is easy to decoupage. Just paint on the glue and VERY, VERY, VERY ever so gently press the tissue into the weave. Finish with a coat of polyurethane.

11
Tiffany Under Varnish Tray 20” x 14” Designed prints pre-gluing
The Taming of the Shrew Kitty Privacy Screen Under Varnish (48” x 18”)

12
Some of Kathy’s Beatle Decoupage Her Beatle Kitchen: When we moved into this small bungalow, I did not have a room for my collectables. We needed a new kitchen, but I opted for heating our second floor instead. I realized that I had tons of Yellow Submarine pieces so I used cards for the border, and decoupaged the cornice boards, the breadbox and whatever else I saw. It is a very happy kitchen and if we ever move or do renovate the kitchen, the colors and theme will no doubt on with us.
Yellow Submarine Under Glass Vase 18” x 24” at widest circumference
Sgt. Pepper Under Varnish Tray 18”x11”3”

13
Sgt. Pepper Glass Top Table Glass tabletop 22” x 16” Frame and legs 27” x 21”
When I mention repeating designs in my Design Tips, this table is an example. I took the design on the center of the drum, (see table top photo below), enlarged it and made many copies in many sizes. I then carried this design onto the legs and frame.
Frame and Legs
Table Top
Corner Detail

14
Beatles Hard Day’s Night Box By Kathleen Joyce (USA) Materials: Round wood box with lid (10" round x 5" tall) Glue of choice Brushes and sponges Water-based poly (brush preferred for poly application) Brayer Photoshop & Point Shop Pro to re-invent original Beatle image Primer Decorative papers to blend with design and colors Sticky felt for inside box 1. Prime round box and lid inside and out. Allow to dry. 2. Use Photoshop and Point Pro Shop to redesign and color original image of Beatles Hard Days Night cover. 3. Cut round design papers to fit top, bottom and inside of lid. 4. Cut decorative papers to add to sides of box. 5. Glue sides of box and sides of lid, using brayer to smooth. Allow to dry. 6. Trim edges of glued papers. 7. Glue one round to top, one to bottom and one to inside of lid. Use brayer to smooth. 8. Decorate with complimentary cuts of paper. Allow to dry and trim. 9. Apply as many coats if water based poly to reach desired finish, lightly sanding between when needed. 10. Cut and apply sticky felt to inside of box
Beatles cover
Beatles cover re-colored
Unfinished box

15
Continued…
Paper design created for cover and inside lid (Can you see all the Beatle heads making up the design?) New papers ready for design process
Inside of box lid

16
Just released…new DVD and video!
Decoupage Under Glass
Presented by M.J. Toole
Join M.J. Toole, Master Decoupeur and long time teacher of decoupage, as she takes you through each step to create a beautiful plate with a design under glass.
Her presentation, Decoupage Under Glass, is a wonderful learning tool, guiding the beginner
through the process with ease. It is clear and concise as she explains and demonstrates each step.
This is an excellent instruction for beginners, and a good review for all decoupeurs.
Filmed by Thomas J. Kuhar Run time: Approximately two hours
Price: $40 plus shipping $6 USA or $10 overseas
Please send your order and check to: Sharon Lamonakis, Treasurer NGD One Keith Street
Turner’s Falls, MA 01376