eastern bank treasuryconnect money transfer user manual · eastern bank treasuryconnect money...
TRANSCRIPT

1
Eastern Bank TreasuryConnect Money Transfer User Manual
This user manual provides instructions for setting up new users and accessing services found within the Money Trans Admin group and the Money Transfer group.
Within Money Trans. Admin the services are: Template Permissions (bank defined only) Approval Requirements (free form and customer defined
templates)
Within Money Transfer those services are: Wire Approval Wire Input Multiple Entry Wire Report (Outgoing and Incoming) Wire Templates (bank and customer defined) Template Groups
December 2015

2
Table of Contents
TABLE OF CONTENTS .............................................................................................................................. 2
I. MONEY TRANSFER................................................................................................................................ 3
A. WIRE SERVICE ................................................................................................................................. 3
i. Permitting Money Transfer to Users .............................................................................................. 3
ii. Permitting MT Accounts to Users .................................................................................................. 4
iii. Setting Approval Limits for MT Accounts ................................................................................... 4
B. TEMPLATE PERMISSIONS SERVICE .......................................................................................... 5
i. Permitting Bank Defined Wire Templates to Users....................................................................... 5
ii. Setting Entry and Approval Limits for Templates Assigned to Users ........................................ 6
C. APPROVAL REQUIREMENTS ....................................................................................................... 6
i. Setting up approval requirements at the account level ................................................................. 7
ii. Account Approval Requirements Report ...................................................................................... 8
II. MONEY TRANSFER SERVICE ........................................................................................................... 9
A. WIRE INPUT SERVICE .................................................................................................................... 9
i. Inputting Wires ................................................................................................................................. 9
ii. Inputting a Free Form Wire ......................................................................................................... 11
B. WIRE TEMPLATE SERVICE ........................................................................................................ 13
i. Adding a Customer Defined Template ......................................................................................... 13
C. WIRE APPROVAL SERVICE ........................................................................................................ 15
i. Approving Pending Wire Transfers .............................................................................................. 15
ii. Deleting Pending Wire Transfers ................................................................................................. 17
iii. Editing Pending Wire Transfers ................................................................................................. 18
D. WIRE REPORT SERVICE .............................................................................................................. 19
i. Outgoing Wire Transfer Report .................................................................................................... 19
ii. Incoming Wire Transfer Report .................................................................................................. 22
E. MANAGING TEMPLATE GROUPS ............................................................................................. 23
i. Adding Template Groups .............................................................................................................. 23
ii. Deleting Template groups ............................................................................................................. 24
F. MULTIPLE ENTRY ......................................................................................................................... 24
I. Multiple Entry Input ..................................................................................................................... 25

3
I. MONEY TRANSFER
Overview
The Money Transfer system enables Corporate Customers to request money to be transferred between two accounts at different financial institutions or affiliate banks.
A. WIRE SERVICE
The Corporate Administrator will set up and maintain Wire Accounts and transaction
limits per transaction/per day using the User Admin function.
i. Permitting Money Transfer to Users The Corporate Administrator will permit the money transfer permissions and accounts to other users. To grant User Permissions and Accounts, go to the User Administration option and click on the User Admin tab:
1. Select a user from the list
2. Click on Services link to view the User Service Permissions. Click on Money Transfer to enable all services or click on the individual services to assign to the user.
3. Click submit.

4
ii. Permitting MT Accounts to Users
If still on the User Admin page, click the Permissions link otherwise:
1. Select User Administration from the drop down list.
2. Click on User Admin and select the User.
3. Click the Permissions link to assign the accounts to the user.
iii. Setting Approval Limits for MT Accounts
If still on the User Admin page, click Limits link otherwise:
1. Select User Administration from drop down list
2. Click on User Admin and select the User.
3. Click the Limits link to assign limits to users.
4. Choose to keep the default amounts as they are or enter the dollar amount the user is limited to for each transaction entry in the Max Entry field (Entry/Txn)
5. Enter the dollar amount the user is limited to for all transactions for the total day in the Max Entry per Day field (Entry/Day)
6. Enter the dollar amount for which the user is limited for each transaction approval in the Max Approval field (Approval/Txn)
7. Enter the dollar amount the user is limited to for all transaction approvals for the day in the Max Approval per Day field (Approval/Day)
8. Click in the Template Only checkbox if you want the user to only use the account in a template, otherwise leave the box unchecked to allow free form wires. If template only is selected, the user will not be permitted to create free-form wires.
9. Click the Submit button.
Note: If the wire limit has been set at the Customer level, the Admin can not give a User a higher limit then what has been defined. If the User is given a higher limit they will not be able to enter more than what the Customer Level wire limit has been set at. (If the customer level has been set there will be a line under Wire Limits displaying what the limits have been set at.)

5
B. TEMPLATE PERMISSIONS SERVICE
The Administrator uses the Template Permissions service to set up and maintain user permissions to the Bank defined Money Transfer Templates. Transaction limits and approval limits are also established and maintained on a per transaction/per day limit basis. The Administrator has access to bank defined templates that have been created and permitted by the bank, as well as templates that are created from an account for which the user has permission.
i. Permitting Bank Defined Wire Templates to Users
To grant users permission to wire templates:
1. Select Money Trans Admin then click on the Template Permissions tab.
2. Select a user in the User list box
3. The Inactive and Active templates for the selected user only are displayed in the Inactive and Active Templates list boxes
4. Select the template(s) in the Inactive list box and use the right arrow button [>] to move them to the Active list box
5. Select the template(s) in the Active list box and use the left arrow button [<] to move them to the Inactive list box

6
ii. Setting Entry and Approval Limits for Templates Assigned to Users
1. Perform steps 1 to 4 above for Permitting Wire Templates to Users
2. Select a single template or multiple templates in the Assigned Templates list box and click the Change Entry/Approval Limits button
3. Enter the total dollar amount per transaction for which the user can use this template in the Max Entry field
4. Enter the total dollar amount per day for which the user can use this template in the Max Entry per Day field
5. Enter the total dollar amount per transaction for which the user can approve this template in the Max Approval field
6. Enter the total dollar amount per day for which the user can approve this template in the Max Approval per Day field.
C. APPROVAL REQUIREMENTS
The Administrator uses the Approval Requirements service to add and manage approval settings at the account level instead of the user level. These approval requirements control the number of approvers or approval level by dollar tier also referred to as “dynamic” for free form money transfer requests and customer defined templates.
To select this service click on the Approval Reqs tab.
Note: Approvals set for Bank defined templates using the wire templates service override the approval requirements set for the account on the Approval requirements service.

7
i. Setting up approval requirements at the account level
To set up money transfer approval settings, the Administrator must indicate the setting for each Money Transfer type. The money transfer types that are utilized are repetitive and free form. The approval settings you can choose for each money transfer type are:
1. 0 – no one other then the user entering will need to approve the wire
2. 1 – one person must approve money transfers on this account
3. 2 – two people must approve money transfers on this account
4. Dynamic – set up the dollar amount range and approver level based on amount
5. Not available – users cannot add money transfers using this account
To set the limit for the account in the approval reqs tab following the steps below:
1. In the Repetitive wire section, click the select arrow and choose an option from the drop down list. If you choose dynamic, a popup box will be presented to enter the dollar limits. Dollar amounts should be entered without commas, decimals are required and need to increment up by $.01

8
2. The Free-form wire section follows the same steps outlined in #1.
3. Template approval determines if additional approval is needed when creating a customer maintained template.
4. Once completed click the Submit button to save the approval requirements.
The limits that you set up in the Approval Reqs service will apply to all users set up for the wire account. The limits do not apply to Bank defined templates.
ii. Account Approval Requirements Report
To view what the current approval requirements setting for all accounts are set up for the wire service follow the steps below:
1. Click on the Approval Reqs tab in MT Admin
2. Click the Display all button or highlight which account to view.
3. The accounts will display the current setting and the last modified information.

9
II. MONEY TRANSFER SERVICE
The Money Transfer service allows the corporate user to set up customer defined templates, create template groups, input wires, input multiple wires, approve wires, approve customer templates (if required) and view reports of any transactions initiated through the TreasuryConnect system.
A. WIRE INPUT SERVICE
Corporate users use the Wire Input service to initiate a free form or repetitive money transfer. User permissions will determine whether or not a user has access to a repetitive template or a free-form template to enter money transfer information.
i. Inputting Wires
Click on the Wire Input Tab.
1. When you select the Wire Input tab you must enter a One Time Passcode. Choose your notification method and enter the code to access the wire input selection page.
2. Select the desired Bank or Customer template to use for the wire.
***If you are not permitted to initiate free form wires you will not see the Account Selection section.

10
1. Enter the dollar amount in the open field next to the Amount.
2. Enter the date on which the money transfer will be released to the bank for payment in the Send Date field. Note: You can enter a wire up to 4 business day greater that the current day on the system.
3. Enter the date the money transfer payment is to be received in the Value Date field.
4. Click the Submit button. The Wire Transfer Review page displays
5. Review the detail for the money transfer. If the information on the Wire Review page is not correct, click the Clear button to delete the money transfer without initiating it
6. If no further approvals are required, the system displays an Approve button

11
7. Click the Approve button, if the details for the transfer are correct and the wire is complete.
8. If additional approvals are required, the system displays an Enter button
9. Click the Enter button, if the details for the transfer are correct. Note: the wire will stay in a pending status until another user approves the wire.
10. The Wire Confirmation page displays.
ii. Inputting a Free Form Wire
To input a free form wire, select to the Wire Input tab. If you have been granted permission in the wire accounts service to perform free form transfers, the accounts you are permitted to will be displayed on the right side of the screen under the Available Accounts section.
To input a free form wire transfer, follow the steps below:
1. Select the account to be debited from the available account listing.
2. Fill in the Beneficiary account information lines. All of the fields in red are required to process the wire transfer.
12
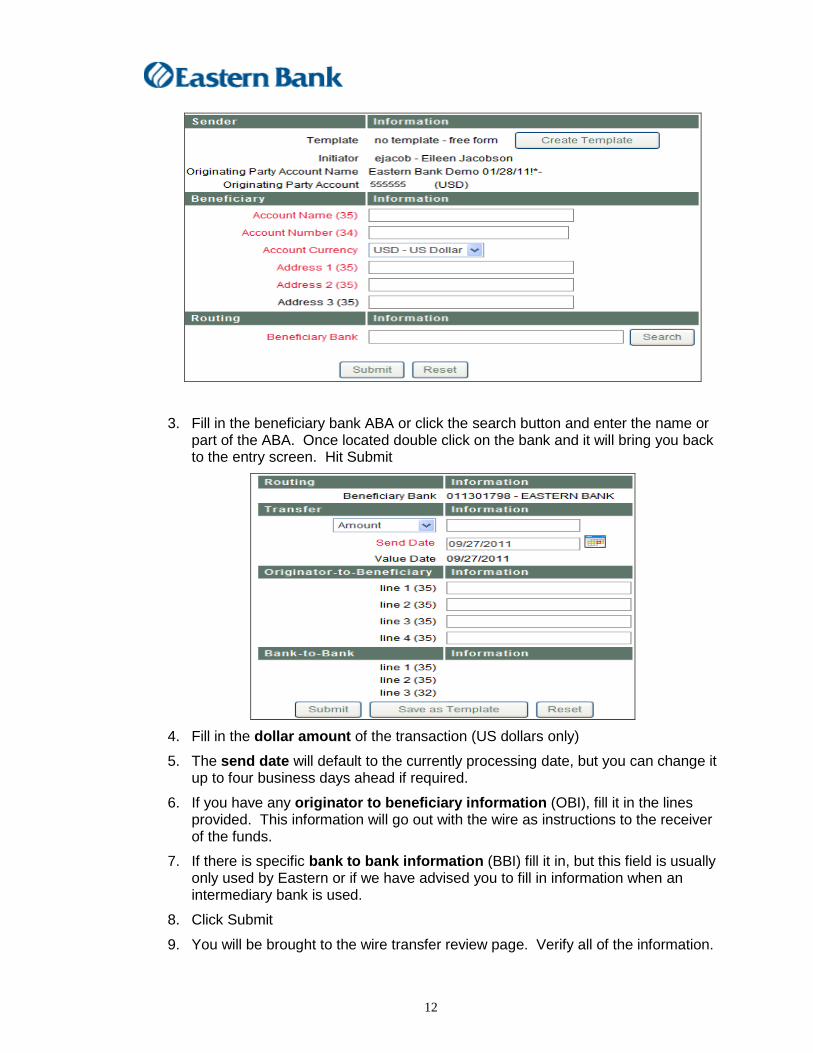
3. Fill in the beneficiary bank ABA or click the search button and enter the name or part of the ABA. Once located double click on the bank and it will bring you back to the entry screen. Hit Submit
4. Fill in the dollar amount of the transaction (US dollars only)
5. The send date will default to the currently processing date, but you can change it up to four business days ahead if required.
6. If you have any originator to beneficiary information (OBI), fill it in the lines provided. This information will go out with the wire as instructions to the receiver of the funds.
7. If there is specific bank to bank information (BBI) fill it in, but this field is usually only used by Eastern or if we have advised you to fill in information when an intermediary bank is used.
8. Click Submit
9. You will be brought to the wire transfer review page. Verify all of the information.

13
10. If any of the information is incorrect press CLEAR and the wire will not be processed. Otherwise, press the approve or enter button. If the wire requires a second approval you will see an enter button otherwise the approve button will appear.
You will be brought to the wire transfer review page. Verify all of the information
The confirmation page will appear as it does with the repetitive wire. To verify the status of your wire you can go to the Wire Report.
B. Wire Template Service
The Wire Template service allows any user, given the MTCustTemp permission in User Administration permissions, the ability to manage customer defined (not bank defined) templates. It allows the user to
View the list all customer defined templates
Add and delete templates
View detailed template information
Make changes to templates
Determine if the template is available to all users or this user only
This service gives the customer the ability to define templates and create their own dollar or approval limits at the user level using the wire account service or the Approval Reqs service for limits at the account level in MT Admin.
i. Adding a Customer Defined Template
To add a customer defined template, follow the steps below:
1. On the template screen enter a template code.
2. Enter a template name
3. Click the Add button. The Select an account page will appear.
4. Click on one of the accounts from the drop down list

14
5. The template data entry screen will appear
6. .Select whether the template is for all users or only for you
7. Enter the Beneficiary Information
8. Fill in the beneficiary bank ABA or choose the search option
9. Fill in the optional originator to beneficiary information
10. Fill in the optional Bank to Bank information
11. Click Submit
Result: The system saves the new repetitive template

15
C. WIRE APPROVAL SERVICE
Corporate Users use the Wire Approval service to review and work with pending Money Transfer requests. You can perform any of the following actions for a pending transfer:
Approve it Delete it Edit it
i. Approving Pending Wire Transfers
To approve all pending wire transfers:
1. Select the Wire Approval tab to access the Pending Transfers List page
Screen Image of Wire Approval - Pending Transfers Page
2. Enter your One Time Passcode when prompted
3. Click the Approve All button
4. Use the Cancel button if you want to end the approval process
5. Click the Submit button to approve the transfers
6. After the approval, the Pending Transfers Confirmation page displays
To approve individually selected transfers:
1. Follow steps 1 and 2 above
2. Click the red arrow in the Approve column next to a specific transfer to access the Review Pending Transfer Detail page, OR
3. Click the checkbox in the Approve column next to each transfer that you want to approve and click the Submit Selections button
4. Click the checkbox again to remove the check mark or use the Cancel button to clear all settings to checkboxes.
Screen Image of Wire Approval - Pending Transfers Page

16
5. When you use the Submit Selections button, you will access the Batch Approvals Review page
6. Review the action selected for each transfer
7. If the action is not correct, click the Clear button to return to the Pending Transfers List page
8. If the action is correct, click the Submit button to continue the approval process
9. After the approval, the Pending Transfers Confirmation page displays
10. When you use the red arrow to access the Review Pending Transfer Detail page and if additional approval is required, click the Enter button to continue the approval process for the selected pending transfer(s)
11. If the transfer(s) do not require any additional approval, click the Approve button to approve
Screen Image of Wire Approval – Pending Transfer Page
12. After the approval, the Pending Transfers Confirmation page displays
17
ii. Deleting Pending Wire Transfers
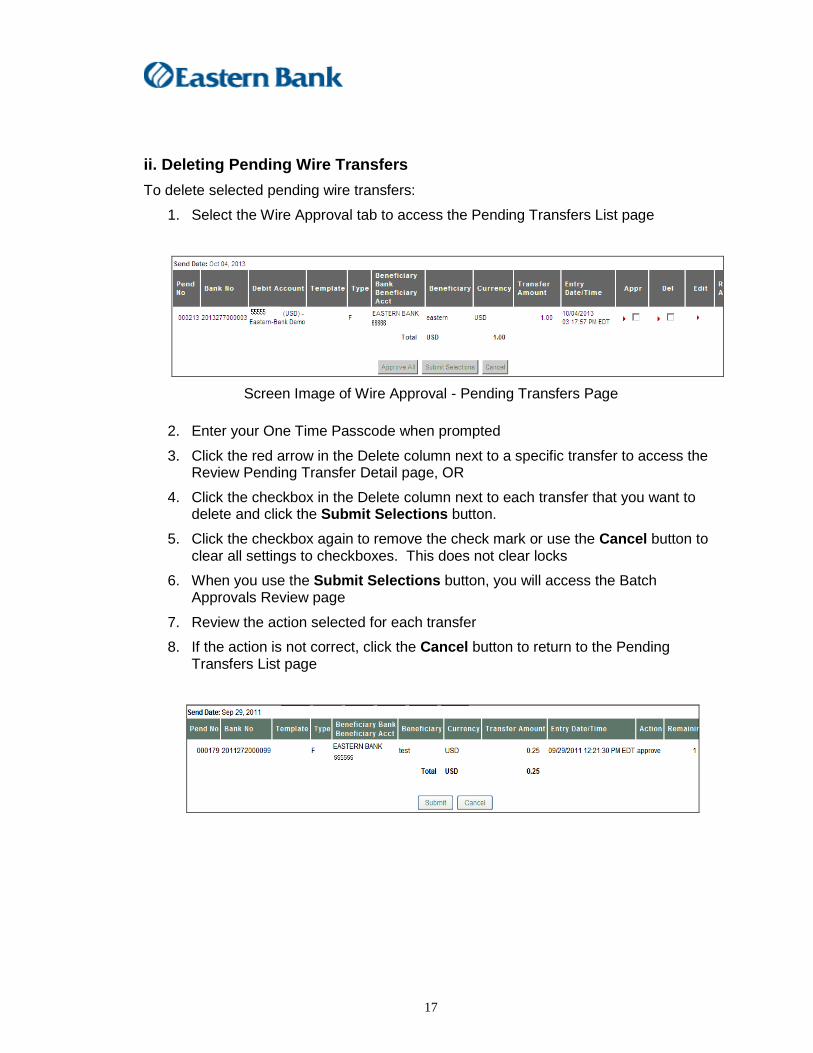
To delete selected pending wire transfers:
1. Select the Wire Approval tab to access the Pending Transfers List page
Screen Image of Wire Approval - Pending Transfers Page
2. Enter your One Time Passcode when prompted
3. Click the red arrow in the Delete column next to a specific transfer to access the Review Pending Transfer Detail page, OR
4. Click the checkbox in the Delete column next to each transfer that you want to delete and click the Submit Selections button.
5. Click the checkbox again to remove the check mark or use the Cancel button to clear all settings to checkboxes. This does not clear locks
6. When you use the Submit Selections button, you will access the Batch Approvals Review page
7. Review the action selected for each transfer
8. If the action is not correct, click the Cancel button to return to the Pending Transfers List page

18
9. If the action is correct click the Submit button to continue the deletion process
10. The Pending Transfers Confirmation page displays
11. When you use the red arrow to access the Review Pending Transfer Detail page, click the Delete button to continue the deletion process for the selected pending transfer(s)
12. The Pending Transfers Confirmation page displays
iii. Editing Pending Wire Transfers
To edit pending wire transfers:
1. Select the Wire Approval tab to access the Pending Transfers List page
Screen Image of Wire Approval - Pending Transfers Page
2. Enter your One Time Passcode when prompted
3. To edit a specified transfer from the Review Pending Transfers List page, click the red arrow in the Edit column next to a specific transfer to access the first Revise Pending Transfer Detail page
4. Make changes to editable fields as necessary
5. Click the Submit button. The system processes the transfer as a newly created transfer with validations handled as a new wire and user limits reset
OR Click the Save as Template button to access the Template Maintenance page
6. Finish defining the template and save your changes. The system returns you to the second Revise Pending Transfer Detail page

19
D. WIRE REPORT SERVICE
Corporate Users use the Wire Report service to either create a report of Outgoing Wire Transfer activity or Incoming Wire Transfer activity in TreasuryConnect.
i. Outgoing Wire Transfer Report
To generate a report of outgoing wire transfers in TreasuryConnect:
1. Select the Wire Report tab to access the Wire Report Selection Page. Select report type Wire Report for outgoing wires.
2. Select whether the wires you would like to view are for the send date or value date. If you initiate a wire today effective dated tomorrow the value date is the effective date of the wire.
3. Enter in the date range fields the starting and ending date to display
4. Enter in the amount range fields the minimum and maximum amounts to display
5. Enter in the bank trace range fields the lowest and highest bank trace numbers to display
6. Enter in the customer trace range fields the lowest and highest customer trace numbers to display
7. Select from the sort drop-down list field the method by which the system should sort the money transfers on this report
8. Click the Submit button to create the report and display the Outgoing Money Transfer Report

20
9. The following are the options that may appear in the status field:
a. Pending – wire pending approval
b. Approved – Wire approved by not received or sent to the wire system
c. Confirmed – Wire received by the wire system
d. Rejected – Wire transfer was not processed by the bank
e. Acknowledged – the wire was sent to the FED and a confirmation # received
10. Click the magnifying glass icon in the detail column to access the Processed Wire Report Detail page. Once the wire has been sent to the FED your confirmation number will appear on the bottom of the detail report.
21
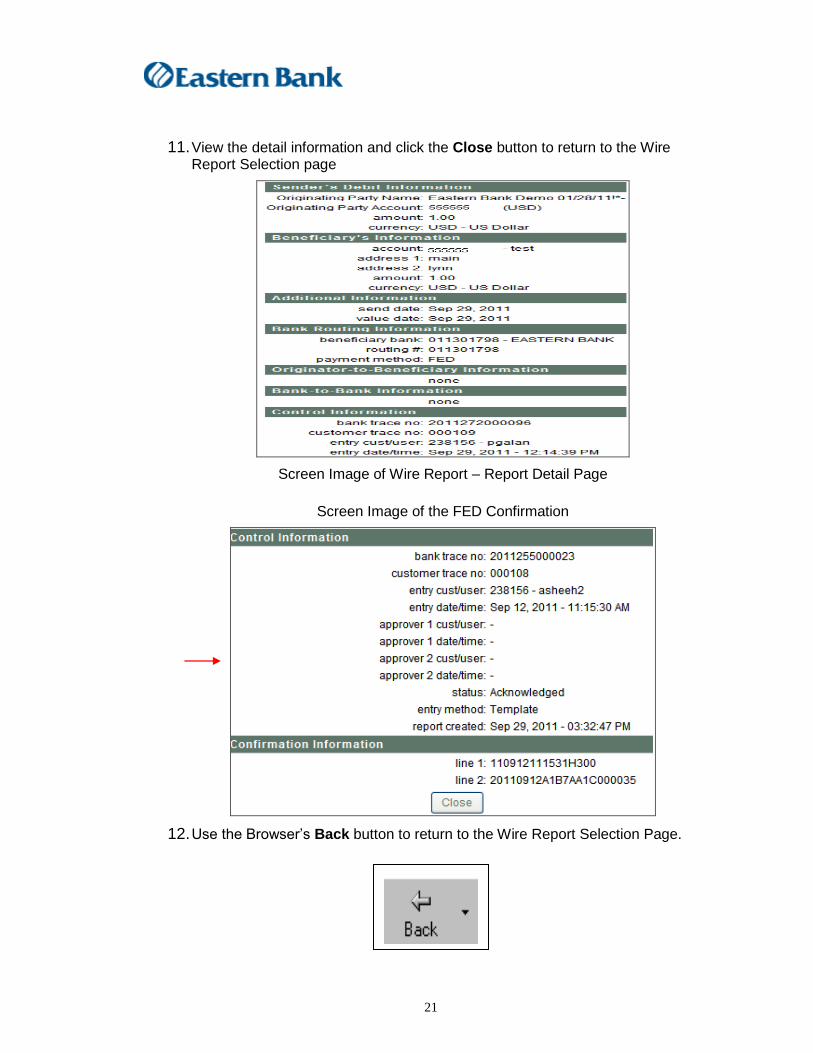
11. View the detail information and click the Close button to return to the Wire Report Selection page
Screen Image of Wire Report – Report Detail Page
Screen Image of the FED Confirmation
12. Use the Browser’s Back button to return to the Wire Report Selection Page.

22
ii. Incoming Wire Transfer Report
Use the Incoming Wire Report to view detail on incoming wires for 90 days. To generate a report of Incoming wire transfers in TreasuryConnect:
1. Select the Wire Report tab to access the Wire Report Selection Page. The report type is Incoming Wire Report for incoming wires.
2. Enter in the date range fields the starting and ending date to display
3. Enter in the amount range fields the minimum and maximum amounts to display
4. Click the Submit button to create the report and display the Incoming Money Transfer Report
5. Click on the magnifying glass to view the details.

23
6. View the detail information for the incoming wire and click close.
E. MANAGING TEMPLATE GROUPS
Administrators and assigned users can use the Template Groups service to create and manage groups of templates that you can use in the Multiple Entry service.
The permission associated with this service is TemplateGrp that the Administrator has
access to under User Administration permissions
Any user with permission to the Template Group service has permission to add, change,
and delete a template group. Please use caution when working with template groups
that you did not define.
i. Adding Template Groups
You can add both domestic and international repetitive templates. There is no limit to the
number of templates in a group, and templates can be members of multiple groups.
However, you can submit only a maximum of 150 wires in a multiple entry transfer. It is
recommended that you do not select more than 150 templates when adding templates to
any one group.
To add a new template group, follow the steps below:
1. Click the Template Groups tab
2. The template group selection page will appear

24
3. Type the name of your template group in the NAME field and click the Add
button.
4. The template group option screen will appear.
5. Select the save for option of either all users or this user.
6. Select the templates from the Available templates by clicking on them and
moving them to the selected template section using the arrow key.
7. Once all the templates are selected, click the add button, and you will get a
message box that confirms the template was saved, then click OK to clear the
screen.
ii. Deleting Template groups
You can also delete a template group using this page. To delete one or more groups, highlight the groups then click Delete. When the confirmation popup displays, click OK to complete the deletion.
F. MULTIPLE ENTRY
Use the Multiple Entry service to enter multiple money transfer requests from a single
page. The repetitive template is the only template type available in this service. The
templates that display in the list are those to which the user has permission, and also
permission to the debit account used in the template.
Note: When you enter money transfer data, the system does not accept a dash (-) or
colon (:) as the first character of any field, which ensures that each wire is SWIFT
compatible.

25
The permission associated with this service is MultiEntry in the User Administration permission listing.
I. Multiple Entry Input
Use this page to enter the wire transfer date and amount for each template or template
group selected, and submit the transfer for validation. If you select a template group,
only the templates that are approved for use display in the template list. The header
information contains the number of permitted templates and templates that are pending
approval. You will be prompted to enter a One Time Passcode before proceeding with
the wire entry.
1. Select the templates or groups from the listing
2. Click the INPUT WIRES button. The multi input screen will appear

26
3. Select the wires and input the dollar amount.
4. Then you can click the Submit selected or Delete selected button
5. The recap page will appear
6. Then you can either approve, correct or cancel the entries
7. The confirmation page will appear. If the wire requires additional approvals, this information will be indicated in the Remaining Approver field. 8. Click the Close button