emc cx-series server support products for hp-ux installation … · 2019-11-03 · emc cx-series...
TRANSCRIPT

1
This guide describes how to install and remove the EMC® Navisphere® Storage System Initialization Utility, Host Agent, Navisphere Server Utility, CLI (Command Line Interface), and admsnap software on a server running the Hewlett Packard HP-UX® operating system. It also explains how to edit the Host Agent configuration file to include specific information.
This document uses the term "Pre-FC4700" to refer to FC4500, FC5300, FC5500, FC5700, or C-Series storage system.
Topics include
◆ About EMC Navisphere Software ......................................................2◆ Finding Current Information...............................................................6◆ Installing and Removing the Navisphere Storage System
Initialization Utility...............................................................................7◆ Determining Whether to Install the Navisphere Host Agent or the
Server Utility ........................................................................................12◆ Requirements for the Host Agent, CLI, and Server Utility ...........13◆ Preparing to Install Host Agent, CLI, or Server Utility .................14◆ Installing and Removing the Host Agent and CLI.........................17◆ Installing and Removing the Navisphere Server Utility ...............20◆ Installing and Removing the Admsnap Utility...............................23◆ Modifying User Login Scripts ...........................................................27◆ Configuring the Host Agent ..............................................................28◆ Using the Event Monitor Configuration File...................................33◆ Starting and Stopping the Host Agent .............................................33◆ Agent Status Log Files on the Host...................................................34◆ Manually Editing the Host Agent Configuration File ...................35
EMC CX-SeriesServer Support Products for HP-UX
Installation GuideP/N 300-002-043
REV A02
March 5, 2005
2 EMC CX-Series Server Support Products for HP-UX Installation Guide
About EMC Navisphere Software
About EMC Navisphere SoftwareThe following EMC server-based software is available on the CX-Series Server Support Products CD:
◆ Navisphere Storage System Initialization Utility
◆ Navisphere Host Agent
◆ Navisphere Server Utility
◆ Admsnap Utility
◆ Navisphere CLI
Navisphere Storage System Initialization Utility
For CX-Series storage systems, use the Navisphere Storage System Initialization Utility to set network parameters. The Initialization Utility wizard guides you through the steps required to initialize your storage system. An authorized service provider will install and run the Initialization Utility.
The Navisphere Initialization Utility is supported only on the CX300, CX500, and CX700 storage systems. The CX-Series systems must be running FLARE OE 02.16.xxx.5.yyy or higher.

EMC CX-Series Server Support Products for HP-UX Installation Guide 3
About EMC Navisphere Software
Navisphere Host AgentThe Host Agent registers the server’s HBA (host bus adapter) with the attached CX-Series or FC-Series storage system when the Agent service starts. This action sends the initiator records for each HBA to the storage system. Initiator records are used to control access to storage system data. For pre-FC4700 storage systems, the Agent will only send the initiator records if Access Logix is installed.
The Agent can then retrieve information from the storage system automatically at startup or when requested by Manager or CLI.
The Host Agent can also
◆ Send drive mapping information to the attached CLARiiON® storage systems.
◆ Monitor storage-system events and can notify personnel by e-mail, page, or modem when any designated event occurs.
◆ Retrieve LUN WWN (world wide name) and capacity information from Symmetrix® storage systems.
Important The Host Agent is supported on CX-Series and FC-Series storage systems. You cannot install the Host Agent and the Navisphere Server Utility on the same server. However, you can install them on different servers that are connected to the same storage system.

4 EMC CX-Series Server Support Products for HP-UX Installation Guide
About EMC Navisphere Software
Navisphere Server Utility
Similar to the Host Agent, the Navisphere Server Utility registers the server’s HBA (host bus adapter) with the attached CX-Series or FC4700 storage system; however, unlike the Host Agent, the Server Utility does not:
◆ Send LUN mapping information back to the storage system. This information will not display in the Manager UI or CLI. To see LUN mapping information in the Manager UI or CLI, you must use the Host Agent instead of the Server Utility.
◆ Automatically retrieve information from storage systems, and forward it to Manager. With the Server Utility, you must manually update the information by starting the utility or you can create a script to run the utility.
◆ Require network connectivity to the storage system.
◆ Require that you install the utility; you can run it from the CD. However, we recommend that you install it on the server.
Important You cannot install the Host Agent and the Navisphere Server Utility on the same server. However, you can install them on different servers that are connected to the same storage system.
The Server Utility is supported on the FC4700 and CX-Series storage systems.The CX-Series systems must be running FLARE OE 02.16.xxx.5.yyy or higher. The FC4700 system must be running FLARE OE 08.51.xx.

EMC CX-Series Server Support Products for HP-UX Installation Guide 5
About EMC Navisphere Software
Admsnap Utility The Admsnap Utility is an executable program that you can run interactively or via a script to manage SnapView clones and snapshots. The Admsnap Utility resides on the servers connected to the storage system with the SnapView driver installed.
Use admsnap commands to:
◆ Scan for new storage devices
◆ Make storage devices inaccessible to the server operating system
◆ Flush cache data to disk
◆ List current snapshot devices
◆ Map and unmap to a SnapView session
◆ Start and stop a SnapView session
Navisphere CLI The CLI complements or can be used as an alternative to Manager. It provides a command line interface for storage-system management, including storage provisioning, status and configuration information retrieval, and control. You can use the CLI to automate management functions through shell scripts and batch files. CLI commands for many functions are server-based and are provided with the Host Agent. The remaining CLI commands are web-based and are provided with software that runs in the storage-system SPs. Since the web-based commands are created in Java, you must install a Java runtime environment (JRE). For more information, refer to the EMC Navisphere Command Line Interface (CLI) Reference Guide.
The Navisphere CLI is supported on CX-Series and FC-Series storage systems.

6 EMC CX-Series Server Support Products for HP-UX Installation Guide
Finding Current Information
Finding Current Information
The most up-to-date information about the CX-Series server software for HP-UX is posted on the EMC Powerlink™ website. We recommend that you download the latest information before you install the EMC Host Agent and CLI.
To access EMC Powerlink, use the following link:
http://powerlink.emc.com
After you log in, select Support > Document Library and find the following:
◆ Navisphere Host Agent/CLI and Utilities Release Notes(P/N 085090643)
◆ EMC Navisphere Manager Administrator’s Guide(P/N 069001125)
◆ EMC Navisphere Command Line Interface (CLI) Reference (P/N 069001038)
◆ EMC SnapView Command Line Interfaces Reference (P/N 069001181)
◆ The latest version of this guide that is applicable to your software revision
◆ EMC Installation Roadmap for CX-Series and FC-Series Storage Systems, which provides a checklist of the tasks that you must complete to install your storage system in a storage area network (SAN) or direct attach configuration.

EMC CX-Series Server Support Products for HP-UX Installation Guide 7
Installing and Removing the Navisphere Storage System Initialization Utility
Installing and Removing the Navisphere Storage System Initialization Utility
EMC recommends that you install the Navisphere Storage System Initialization Utility on the host; however, you can run the Utility from the CX-Series Server Support Products CD, as described in To Run the Utility from the CD on page 10.
PrerequisitesTo use the Storage System Initialization Utility on an HP-UX host to initialize a storage system, the client or host must meet the following requirements:
◆ Run a supported version of the HP-UX operating system.
◆ Be connected to the same subnet as the 10/100 management ports of the storage system that you want to initialize. This host may also be a server with Fibre Channel connections to the storage system.
To Install the Storage System Initialization Utility1. At the HP-UX server, log in as superuser (root).
2. If the CD-ROM or DVD-ROM drive is currently mounted on the host that you will use to initialize the storage system, unmount the drive before proceeding:
The host must be on the same subnet as the storage system.
At the command prompt, execute the appropriate command for the drive you want to unmount:
• For a CD-ROMcdumount /cdrom
• For a DVD-ROMdvdumount /dvdrom
3. Insert the CX-Series Server Support Products CD into the CD-ROM or DVD-ROM drive on the host.

8 EMC CX-Series Server Support Products for HP-UX Installation Guide
Installing and Removing the Navisphere Storage System Initialization Utility
4. Create the directory for the CD-ROM or DVD-ROM drive:
a. At the command prompt (#) in the hpterm or xterm window, execute
sam
The system administration utility (SAM) top-level menu opens.
b. Select the Peripheral Devices option.
The Peripheral Devices menu opens.
c. Select the Device List option.
The Device List dialog box opens.
d. Select the line in the list that contains descriptions of "CD-ROM SCSI drives" or "DVD-ROM SCSI drives." (A manufacturer’s name may precede this phase.)
e. At the top of the Device List dialog box, open the Action pull-down menu and select Show Device Files.
A list of device names appears.
The device name for the CD-ROM or DVD-ROM; for example, /dev/dsk/c2t2d0 and click OK.
f. Exit the SAM utility.
g. At the command prompt in an hpterm or xterm window, enter the root directory and make sure the /cdrom or /dvdrom directory exists.
cdls
If the /cdrom or /dvdrom directory does not appear in the resulting list, create it:
mkdir /cdrom ormkdir /dvdrom

EMC CX-Series Server Support Products for HP-UX Installation Guide 9
Installing and Removing the Navisphere Storage System Initialization Utility
5. Mount the CD-ROM or DVD-ROM:
mount devicename /cdromormount devicename /dvdrom
where devicename is the name you previously noted in step 4e above.
6. At the command prompt (#) in an hpterm or xterm window, change to the /cdrom or /dvdrom directory:
cd /cdromorcd /dvdrom
7. Specify the CD-ROM or DVD-ROM as the source depot:
/usr/sbin/swinstall -s /cdrom/hpux/INITTOOL.DEP\;1 -x mount_all_filesystems=false
or
/usr/sbin/swinstall -s /dvdrom/hpux/INITTOOL.DEP\;1 -x mount_all_filesystems=false
The SD-Install Software Selection dialog box opens.
8. In the software selection area of the SD-Install Software Selection dialog, select INITTOOL to install the Navisphere Server Utility.
9. From the taskbar in the SD-Install Software Selection dialog box, select
Actions > Install
The Install Analysis dialog box opens and the installation begins.
10. When the installation completes, click Done.
11. From the taskbar in the SD-Install Software Selection dialog box, select
12. File > Exit.
13. Unmount the CD-ROM or DVD-ROM as described in step 1.
14. Remove the CD from the CD-ROM or DVD-ROM drive.

10 EMC CX-Series Server Support Products for HP-UX Installation Guide
Installing and Removing the Navisphere Storage System Initialization Utility
To Run the Storage System Initialization Utility
You can run the Storage System Initialization Utility from the host on which you installed it or from the CX-Series Server Support Products CD.
To Run the Utility from the HostOpen an hpterm window and enter
cd /opt/Navisphere/bin/naviinittool
To Run the Utility from the CD1. Insert the CX-Series Server Support Products CD in the server's
drive.
2. At the command prompt (#) in an hpterm window, enter the following command to create a CD-ROM directory:
mkdir /cdrom
3. Identify the device file by executing the following command:
ioscan -funC disk
This command lists all recognized drives and their associated device files. The filename will be similar to /dev/dsk/c1t2d0.
4. Mount the CD drive:
mount /dev/dsk/device_filename /cdrom
where device_filename is the device filename from step 3. For example, mount /dev/dsk/c1t2d0 /cdrom.
5. Navigate to the HP-UX directory:
cd /cdrom/hpux
6. Run the Storage System Initialization Utility:
./naviinittool

EMC CX-Series Server Support Products for HP-UX Installation Guide 11
Installing and Removing the Navisphere Storage System Initialization Utility
To Remove the Storage System Initialization Utility
1. At the HP-UX server, log in as superuser (root).
2. Execute the following command to remove the Storage System Initialization Utility:
/usr/sbin/swremove -x mount_all_filesystems=false INITTOOL.DEP
The removal process begins. When the following message is displayed, the removal process is complete.
END swremove SESSION

12 EMC CX-Series Server Support Products for HP-UX Installation Guide
Determining Whether to Install the Navisphere Host Agent or the Server Utility
Determining Whether to Install the Navisphere Host Agent or the Server Utility
Depending on your application needs, you can install either the Host Agent or Navisphere Server Utility on an attached HP-UX server. You cannot install both applications on the same server; however, you can install them on different servers attached to the same storage system.
Table 1 describes the differences between the Host Agent and the Navisphere Server Utility.
Table 1 Differences Between the Host Agent and the Navisphere Server Utility
Function Host Agent Server Utility
Pushes LUN mapping and OS information to the storage system.
Yes – LUN mapping information displays in the Manager UI, next to the LUN icon, or with the CLI using the -lunmapinfo command.
No – The text Manually Registered appears next to the host name icon in the Manager UI indicating that the Host Agent is not installed on this server.
Runs automatically to send information to the storage system.
Yes – No user interaction is required.
Noa – You must manually update the information by starting the utility or you can create a script to run the utility.
Requires network connectivity to the storage system.
Yes – Network connectivity allows LUN mapping information to be available to the storage system.
No – LUN mapping information is not available through a network connection to the storage system.
Requires installation. Yes – You must install the Host Agent on the server.
No – You can run the Server Utility from the CD. However, we recommend that you install it on the server.
a. Since you run the Server Utility on demand, you have more control as to how often or when theutility is executed.

EMC CX-Series Server Support Products for HP-UX Installation Guide 13
Requirements for the Host Agent, CLI, and Server Utility
Requirements for the Host Agent, CLI, and Server UtilityTo run the HP-UX Host Agent, Navisphere Server Utility, or CLI, your server must meet the following requirements:
◆ Run a supported version of the HP-UX operating system.
◆ Have the EMC CLARiiON supported HBA hardware and driver installed.
◆ Be connected to each SP in each storage system either directly or through a switch or hub. Each SP must have an IP connection.
◆ For the Host Agent and CLI only – Be on a TCP/IP network connected to each SP in the storage system. The TCP/IP network connection allows the server to send LUN mapping information to the storage system and it allows Manager or CLI to communicate with the storage system over the network.
If you want to use the CLI on the server to manage storage systems on a remote server, the server must be on a TCP/IP network connected to both the remote server and each SP in the remote server’s storage system. The remote server can be running AIX, HP-UX, IRIX, Linux, NetWare, Solaris, or the Windows operating system.
For information about the specific revisions of the server operating system and the storage-system FLARE™ or Access Logix software that are required for your revision of the Host Agent, see the Release Notes for the Host Agent on the EMC Powerlink website. To access this website, see Finding Current Information on page 6.

14 EMC CX-Series Server Support Products for HP-UX Installation Guide
Preparing to Install Host Agent, CLI, or Server Utility
Preparing to Install Host Agent, CLI, or Server UtilityThe following tasks must be performed when you are installing the Host Agent, CLI, or Server Utility:
1. Determine whether a previous version of the software is installed (see below)
2. Install the Host Agent and/or CLI files (see page 17) or the Server Utility (see page 20).
Important If you will install the Navisphere Server Utility, you cannot install the Host Agent on the same server.
3. Unmount the CD-ROM (refer to page 19)
Before proceeding, ensure that the disk-array storage system(s) is connected to the HP-UX server where you are installing Agent.
To Check for Previous Versions of the Host Agent, CLI, or Server UtilityTo check for a previous version of Host Agent, CLI, or the Server Utility, do the following:
1. At the HP-UX server, log in as superuser (root).
2. On the tool bar at the bottom of the screen, click the terminal icon.An hpterm window opens.
3. At the command prompt (#) in the hpterm window, execute the following command:
/usr/sbin/swlist
4. When the list of currently installed software is displayed, examine the list to determine if any previous revision of Host Agent, CLI, or Server Utility is present.
See the following sample lists of installed software.
Sample List for a Server with the Initialization Utility, Host Agent, and CLI Installed
# Product(s) not contained in a Bundle:#
INITTOOL 6.17.0.0.91 Navisphere Initialization Tool (INITTOOL)NAVIAGENT 6.17.0.0.91 Navisphere Disk Array Management Tool (AGENT)NAVICLI 6.17.0.0.91 Navisphere Disk Array Management Tool (CLI)

EMC CX-Series Server Support Products for HP-UX Installation Guide 15
Preparing to Install Host Agent, CLI, or Server Utility
Sample List for a Server with the Initialization and Server Utilities Installed
# Product(s) not contained in a Bundle:#
HOSTUTIL 6.17.0.0.91 Navisphere Server Utility (HOSTUTIL)INITTOOL 6.17.0.0.91 Navisphere Initialization Tool (INITTOOL)
5. If a previous revision of the software you want to install is already installed, remove it before installing the Host Agent, CLI, or the Server Utility as described in either To Remove the Host Agent or CLI on page 19 or To Remove the Admsnap Utility on page 26.
To Mount the CD-ROM or DVD-ROM
If the CD-ROM or DVD-ROM drive is currently mounted, unmount the drive (see page 19) before proceeding.
1. Insert the CX-Series Server Support Products CD into the server’s CD-ROM or DVD-ROM drive.
2. At the command prompt (#) in the hpterm or xterm window, execute the following command:
sam
The system administration utility (SAM) top-level menu opens.
3. Select the Peripheral Devices option. The Peripheral Devices menu opens.
4. Select the Device List option. The Device List dialog box opens with several menu choices at the top of the dialog box.
5. Select the line in the list that contains descriptions of "CD-ROM SCSI drives" or "DVD-ROM SCSI drives." (Note this phrase may be preceded by a manufacturer’s name.)
6. At the top of the Device List dialog box, open the Action pull-down menu and select Show Device Files. A list of device names appears. Note the device name for the CD-ROM or DVD-ROM; for example, /dev/dsk/c2t2d0. Click OK.

16 EMC CX-Series Server Support Products for HP-UX Installation Guide
Preparing to Install Host Agent, CLI, or Server Utility
7. Exit the SAM utility.
At the command prompt (#) in an hpterm or xterm window, use the following command from the root directory to make sure the /cdrom or /dvdrom directory exists:
ls
If the /cdrom or /dvdrom directory exists, it will appear in the resulting list. If the /cdrom or /dvdrom directory does not exist, create it with the following command:
mkdir /cdrom
or
mkdir /dvdrom
8. Execute the following command to mount the CD-ROM or DVD-ROM:
mount devicename /cdrom
or
mount devicename /dvdrom
where devicename is the name you previously noted in step 6 above.
What Next? Install the Host Agent and/or CLI files (see below) or the Server Utility (see page 20).

EMC CX-Series Server Support Products for HP-UX Installation Guide 17
Installing and Removing the Host Agent and CLI
Installing and Removing the Host Agent and CLI You can install the Host Agent, the CLI, or both the Host Agent and CLI. If you will install both, install the Host Agent first. However, if you plan on installing the Navisphere Server Utility, you cannot install the Host Agent on the same server.
To Install the Host Agent and/or CLI1. At the HP-UX server, log in as superuser (root).
2. Insert the CX-Series Server Support Products CD in the server’s drive.
3. Mount the CD-ROM or DVD-ROM (refer to page 15).
4. At the command prompt (#) in an hpterm window, execute the following command to change to the /cdrom or /dvdrom directory:
cd /cdrom
or
cd /dvdrom
5. Execute the following command to specify the CD-ROM or DVD-ROM as the source depot:
/usr/sbin/swinstall -s /cdrom/hpux/NAVIAGNT.DEP\;1 -x mount_all_filesystems=false
or
/usr/sbin/swinstall -s /dvdrom/hpux/NAVIAGNT.DEP\;1 -x mount_all_filesystems=false
6. The SD-Install Software Selection dialog box opens. In the software selection area of the SD-Install Software Selection dialog, select (highlight) one of the following:
NAVICLI (to install just the CLI)orNAVIAGENT (to install just the Host Agent)
Important If you will install the Navisphere Server Utility, do not install the Host Agent. For information on how to install the Server Utility, refer to Installing and Removing the Navisphere Server Utility on page 20.

18 EMC CX-Series Server Support Products for HP-UX Installation Guide
Installing and Removing the Host Agent and CLI
7. From the taskbar in the SD-Install Software Selection dialog box, follow this path:
Actions > Install
The Install Analysis dialog box opens.
8. When the installation analysis completes, click OK.
A confirmation dialog opens.
9. In the confirmation dialog box, click Yes.
The confirmation dialog box and the Install Analysis dialog box close, the Install dialog box opens, and the installation begins.
10. When the installation completes, click Done.
11. In the SD-Install Software Selection dialog box, perform one of the following two tasks:
a. If you just installed the Host Agent and also want to install the CLI:
– In the software selection area of the SD-Install Software Selection dialog box, select (highlight) NAVICLI.
– Return to step 6 of this procedure.b. If you do not want to install the CLI, from the taskbar in the
SD-Install Software Selection dialog box taskbar, follow this path: File >Exit.

EMC CX-Series Server Support Products for HP-UX Installation Guide 19
Installing and Removing the Host Agent and CLI
Unmounting the CD-ROM or DVD-ROM
1. At the command prompt (#), execute the appropriate command for the drive you want to unmount.
To unmount a CD-ROM, enter the following commands:
cdumount /cdrom
To unmount a DVD-ROM, enter the following commands:
cdumount /dvdrom
2. Remove the CX-Series Server Support Products CD from the server’s CD-ROM or DVD-ROM drive.
What Next? Before you can use the Navisphere Host Agent or CLI, you must modify the user login scripts and configure the Host Agent configuration file. Refer to the Modifying User Login Scripts on page 27 and Configuring the Host Agent on page 28 sections.
To Remove the Host Agent or CLI
1. At the HP-UX server, log in as superuser (root).
2. At the command prompt (#) in an hpterm window, execute the one of the following commands:
To remove the Host Agent enter:
/usr/sbin/swremove -x mount_all_filesystems=false NAVIAGENT
To remove the CLI enter:
/usr/sbin/swremove -x mount_all_filesystems=false NAVICLI
The removal process begins.
When the following message is displayed, the removal process is complete:
END swremove SESSION

20 EMC CX-Series Server Support Products for HP-UX Installation Guide
Installing and Removing the Navisphere Server Utility
Installing and Removing the Navisphere Server UtilityEMC recommends that you install the Navisphere Server Utility the server; however, you can run the Server Utility from the CX-Series Server Support Products CD, as described in To Run the Server Utility from the CD on page 22.
Important You cannot install the Host Agent and the Server Utility on the same server. However, you can install them on different servers that are connected to the same storage system.
To Install the Navisphere Server Utility
1. At the HP-UX server, log in as superuser (root).
2. Insert the CX-Series Server Support Products CD in the server’s drive.
3. Mount the CD-ROM or DVD-ROM (refer to page 15).4. At the command prompt (#) in an hpterm window, execute the
following command to change to the /cdrom or /dvdrom directory:
cd /cdrom
or
cd /dvdrom
5. Execute the following command to specify the CD-ROM or DVD-ROM as the source depot:
/usr/sbin/swinstall -s /cdrom/hpux/HOSTUTIL.DEP\;1 -x mount_all_filesystems=false
or
/usr/sbin/swinstall -s /dvdrom/hpux/HOSTUTIL.DEP\;1 -x mount_all_filesystems=false
6. The SD-Install Software Selection dialog box opens. In the software selection area of the SD-Install Software Selection dialog, select HOSTUTIL to install the Navisphere Server Utility.

EMC CX-Series Server Support Products for HP-UX Installation Guide 21
Installing and Removing the Navisphere Server Utility
7. From the taskbar in the SD-Install Software Selection dialog box, follow this path:
Actions > Install
The Install Analysis dialog box opens and the installation begins.
8. When the installation completes, click Done.
9. From the taskbar in the SD-Install Software Selection dialog box, select File >Exit.
To Unmount the CD-ROM or DVD-ROM
1. At the command prompt (#), execute the appropriate command for the drive you want to unmount.
To unmount a CD-ROM, enter the following commands:
cdumount /cdrom
To unmount a DVD-ROM, enter the following commands:
cdumount /dvdrom
2. Remove the CX-Series Server Support Products CD from the server’s CD-ROM or DVD-ROM drive.
To Run the Server UtilityYou can run the Server Utility from the server or the CX-Series Server Support Products CD.
To Run the Server Utility from the ServerOpen an hpterm window and enter
/opt/Navisphere/bin/naviserverutil

22 EMC CX-Series Server Support Products for HP-UX Installation Guide
Installing and Removing the Navisphere Server Utility
To Run the Server Utility from the CDTo run the Navisphere Server Utility from the CD
1. Insert the CX-Series Server Support Products CD in the server's drive.
2. At the command prompt (#) in an hpterm window, enter the following command to create a CD-ROM directory
mkdir /cdrom
3. Identify the device file by executing the following command:
ioscan -funC disk
This command lists all recognized CD drives and their associated device files. The filename will be similar to /dev/dsk/c1t2d0.
4. Mount the CD drive:
mount /dev/dsk/device_filename /cdrom
where device_filename is the device filename from step 3. For example, mount /dev/dsk/c1t2d0 /cdrom.
5. Navigate to the HP-UX directory:
cd /cdrom/hpux
6. Run the Server Utility:
./naviserverutil
To Remove the Navisphere Server Utility
1. At the HP-UX server, log in as superuser (root).
2. Execute the following command to remove the Server Utility:
/usr/sbin/swremove -x mount_all_filesystems=false HOSTUTIL.DEP
The removal process begins. When the following message is displayed, the removal process is complete.
END swremove SESSION

EMC CX-Series Server Support Products for HP-UX Installation Guide 23
Installing and Removing the Admsnap Utility
Installing and Removing the Admsnap UtilityWe strongly recommend that you install admsnap on all HP-UX servers connected to a storage system that has the SnapView driver installed.
For the supported versions of these operating systems, see the Admsnap Release Notes.
Installation Prerequisites
Before you can install and use the Admsnap Utility, you must install:
◆ SnapView on a supported CLARiiON storage system. For a list of supported storage systems, refer to the release notes for SnapView and admsnap.
◆ Access Logix™ on the same CLARiiON storage system.
To Install the Admsnap Utility
1. On the toolbar at the bottom of the screen, click the terminal icon.An hpterm window opens.
2. At the command prompt (#) in the hpterm window, enter
/usr/sbin/swlist
3. When the list of currently installed software is displayed, examine the list to determine if any previous revision of admsnap is present.
See the following sample lists of installed software.
Sample List for a Server with the Initialization Utility, Host Agent, CL, and admsnap Installed
# Product(s) not contained in a Bundle:#
INITTOOL 6.17.0.0.91 Navisphere Initialization Tool (INITTOOL)NAVIAGENT 6.17.0.0.91 Navisphere Disk Array Management Tool (AGENT)NAVICLI 6.17.0.0.91 Navisphere Disk Array Management Tool (CLI)admsnap v2.7.0.0.0 admsnap

24 EMC CX-Series Server Support Products for HP-UX Installation Guide
Installing and Removing the Admsnap Utility
Sample List for a Server with the Initialization Utility, Server Utility, and admsnap Installed
# Product(s) not contained in a Bundle:#
HOSTUTIL 6.17.0.0.91 Navisphere Server Utility (HOSTUTIL)INITTOOL 6.17.0.0.91 Navisphere Initialization Tool (INITTOOL)admsnap v2.7.0.0.0 admsnap
4. If a previous revision is installed, remove it as described in To Remove the Admsnap Utility on page 26. If not, go to step 5.
5. If the CD-ROM drive is currently mounted, unmount it by entering
umount /cdrom
and remove the CD-ROM from it.
6. Insert the CX-Series Server Support Products CD into the server’s CD-ROM drive.
7. At the command prompt (#) in the hpterm window, enter
sam
The system administration utility (SAM) top-level menu opens.
8. Select the Peripheral Devices option.
The Peripheral Devices menu opens.
9. Select the Device List option.
The Device List dialog box opens with several menu choices at the top of the dialog box.
10. Select the line in the list that contains descriptions of “CD-ROM SCSI drives” or “DVD-ROM drives.” (Note that a manufacturer’s name may precede the phrase “CD-ROM SCSI drives” or “DVD-ROM drives.")
11. At the top of the Device List dialog box, open the Action pull-down menu and select Show Device Files.
A list of device names appears.
12. Note the device name for the CD-ROM; for example, /dev/dsk/c2t2d0 and click OK.

EMC CX-Series Server Support Products for HP-UX Installation Guide 25
Installing and Removing the Admsnap Utility
13. Exit the SAM utility.
At the command prompt (#) in an hpterm window, use the following command from the root directory to make sure the /cdrom directory exists:
ls
If the cdrom directory exists, its name appears in the resulting list. If the directory cdrom does not exist, create it with the following command:
mkdir /cdrom
14. Type the following command to mount the CD-ROM:
mount devicename /cdrom
where devicename is the name you previously noted in step 12 above.
15. At the command prompt (#) in an hpterm window, execute the following command to change to the cdrom directory:
cd /cdrom/hpux
16. At the command prompt (#) in an hpterm window, type the following command to specify the CD-ROM as the source depot:
/usr/sbin/swinstall -s /cdrom/hpux/admsnap.dep -x mount_all_filesystems=false
17. The SD-Install Software Selection dialog box opens. In the software selection area of the SD-Install Software Selection dialog, select admsnap.
18. From the SD-Install Software Selection menu bar, follow this path:
Actions > Install (analysis)
The Install Analysis dialog box opens.
19. When the installation analysis completes, click OK.
The Install Analysis dialog box closes, and a confirmation dialog box opens.
20. In the confirmation dialog box, click Yes.
The confirmation dialog box closes, the Install dialog box opens, and the installation begins.

26 EMC CX-Series Server Support Products for HP-UX Installation Guide
Installing and Removing the Admsnap Utility
21. When the installation completes, click Done.
22. From the SD-Install Software Selection menu bar, follow this path:
File > Exit
23. At the command prompt (#), execute the following commands to unmount the CD-ROM:
cd / umount /cdrom
You have installed admsnap on your HP-UX server. The software is installed in the directory /usr/admsnap.
What Next? Refer to the EMC SnapView Command Line Interfaces Reference for information on using the Admsnap Utility.
To Remove the Admsnap Utility
1. At the HP-UX server, log in as superuser (root).
2. Execute the following command to remove admsnap:
/usr/sbin/swremove -x mount_all_filesystems=false admsnap
The removal process begins. When the following message is displayed, the removal process is complete.
END swremove SESSION

EMC CX-Series Server Support Products for HP-UX Installation Guide 27
Modifying User Login Scripts
Modifying User Login ScriptsUse a text editor to modify your login scripts as described below:
◆ If you are running Common Desktop Environment, remove the pound sign (#) from the beginning of the last line (uncomment the last line) in $HOME/.dtprofile. The line should read:
DTSOURCEPROFILE=true
◆ Make the following additions to the specified paths in $HOME/.profile or in $HOME/.cshrc, and export each path:
• add /opt/Navisphere/bin to PATH
• add /opt/Navisphere/man to MANPATH
• add /usr/lib:/usr/lib/X11R5:/opt/Navisphere/lib to SHLIB_PATH
You must export each path after you have modified it.
What Next? For Pre-FC4700 storage systems- Go to the next section, Configuring the Host Agent.
For CX-Series and FC4700-Series storage systems - If you are setting up a new server, go to Starting and Stopping the Host Agent on page 33. If you are just upgrading the Host Agent or CLI on an existing system, you are finished with the upgrade.
28 EMC CX-Series Server Support Products for HP-UX Installation Guide
Configuring the Host Agent
Configuring the Host Agent Before you can use Navisphere Manager to manage or Navisphere CLI to configure legacy storage systems connected to a Host Agent, you must make sure the Host Agent configuration includes the information listed below.
A legacy system is a pre-FC4700 storage system or an FC4700 without the Navisphere Storage Management Server software.
Before you can use the Navisphere CLI navicli register command to configure an FC4700-Series or a CX-Series storage system connected to a Host Agent, you must make sure the Host Agent configuration file includes a privileged user.
The pathname of the Agent configuration file is /etc/Navisphere/agent.config
What Next? Go to the appropriate selection below for the information you need to add to the Host Agent configuration file.
◆ Specifying a Communication Channel for Legacy Storage Systems on page 29
◆ Adding IP Addresses for a Portal System on page 29
◆ Adding Privileged Users on page 31
Information to Add to Host Agent Configuration File for Legacy Storage Systems
Required for
Manager CLI
Communication path for the Host Agent to the storage system
Yes Yes
IP addresses of the portal system Yes No
Privileged user No Yes

EMC CX-Series Server Support Products for HP-UX Installation Guide 29
Configuring the Host Agent
Specifying a Communication Channel for Legacy Storage Systems
Do not add a communication channel for an SP in a CX-Series or FC4700-Series storage system. Doing so will cause Navisphere Manager to display an unnecessary unmanaged storage-system icon for the SP.
Each SP in a storage system is connected to the server by a Fibre Channel arbitrated loop (FC-AL) or fabric connection to a Fibre Channel adapter, sometimes called a host bus adapter (HBA). The path from the adapter through the SP to one LUN in the storage system is a communication channel to the storage system for the Host Agent. The device entries in the agent configuration file define the communication channels. The fibre controllers use SCSI mapping.
To use automatic device scanning, which updates device entries each time the Host Agent starts, make sure the Host Agent configuration file has a device entry with the following format:
device auto auto
This entry eliminates the need to enter specific devices in the configuration file and it is an entry in the default Host Agent configuration file.
What Next? To add IP addresses for a portal system - Go to Adding IP Addresses for a Portal System below.
To add a privilege user - Continue to the next section, Adding Privileged Users on page 31.
Adding IP Addresses for a Portal System
If you will use Navisphere Manager 6.X to configure the Host Agent and manage legacy storage systems, you will use a portal system. A portal system is a CX-Series or FC4700-Series storage system (storage-system portal), or a Windows Server 2003, or Windows 2000 server (server portal) running Storage Management Server software. When Navisphere 6.X requests information from a Host Agent, the request gets routed through the storage management server on the storage-system portal or the server portal to the Host Agent. For this reason, when using servers to monitor or perform management operations, you must enter the IP address for both SPs of the storage-system portal and the IP address for the server portal to the privileged user’s list in the Host Agent configuration file.

30 EMC CX-Series Server Support Products for HP-UX Installation Guide
Configuring the Host Agent
If you know the IP addresses for the portal system, you can add them to the Host Agent configuration file now.
When using Navisphere Manager 6.X, failure to enter the correct IP addresses, results in a "Caller not privileged" error when attempting an operation to those Host Agents.
To enter an IP address into the Host Agent configuration file, you can either edit the Host Agent configuration file manually or use Navisphere CLI.
Using a Text Editor to Edit the Host Agent Configuration File
To enter an IP address into the Host Agent configuration file, do one of the following:
◆ If you are using a storage-system portal, add the IP address for each SP in the portal to the /etc/Navisphere/agent.config file using the following format:
user system@IPaddress
where
For example, once you have configured a CX-Series or FC4700-Series storage system as the storage system portal, you must add the IP address for each SP in the portal to the Host Agent configuration file as follows:
user [email protected] [email protected]
◆ If you are using a server portal, add the IP address for the server to the /etc/Navisphere/agent.config file using the following format:
user system@IPaddress
where
IPaddress is the IP address for SP in the portal storage system
IPaddress is the IP address for the server portal

EMC CX-Series Server Support Products for HP-UX Installation Guide 31
Configuring the Host Agent
For example, once you have configured a Windows Server 2003, or Windows 2000 server as the server portal, you must add the IP address for the server to the Host Agent configuration file as follows.
user [email protected]. 227
Using CLI to Edit the Host Agent Configuration File
Add the IP address for each SP in the storage system portal, or the IP address for the server portal to the Host Agent configuration file using the following CLI command:
navicli remoteconfig -setconfig -adduser system@IPaddress
where
For example, for a storage-system portal, you might enter the following IP addresses:
navicli remoteconfig -setconfig -adduser [email protected] remoteconfig -setconfig -adduser [email protected]
For a server portal, you might enter the following IP address:
navicli remoteconfig -setconfig -adduser [email protected]
What Next? To add a privileged user, continue to the next section, Adding Privileged Users. If you are done editing the Host Agent configuration file, go to Saving the Host Agent Configuration File on page 32.
Adding Privileged UsersIf you will use Navisphere CLI to configure any storage system, the Host Agent configuration file must include an entry that defines the person who will issue the CLI commands as a privileged user.
To define a privileged user:
Add a local or remote privileged user by adding the appropriate entry below:
For a local useruser name
IPaddress is the IP address for each SP in the storage system portal, or the IP address for the server portal.

32 EMC CX-Series Server Support Products for HP-UX Installation Guide
Configuring the Host Agent
For a remote useruser name@hostname
where
name is the person’s account name.hostname is the name of the remote server the person will be
using.
The default Host Agent configuration file includes a user root entry.
What Next? Continue to the next section, Saving the Host Agent Configuration File on page 32.
Saving the Host Agent Configuration File
1. Save the Host Agent configuration file.
2. If you are done adding information to the Host Agent configuration file, stop and restart the Host Agent by entering the following commands:
# /sbin/init.d/agent stop# /sbin/init.d/agent start
What Next? For CX-Series and FC4700-Series storage systems - You are done editing the Host Agent configuration file.
For pre-FC4700 storage systems - You can now use Manager, CLI, or a text editor to edit the information for each managed storage system, such as the following:
◆ Agent description and contact◆ Polling frequency◆ SP event log entries to transfer
Using Navisphere Manager - Use the remote agent configuration feature as described in the Navisphere Manager Administrator’s Guide.
Using Navisphere CLI - Use the navicli remoteconfig command as described in the Navisphere Command Line Interface (CLI) Reference.
Using a text editor (textedit, vi, or emacs) - Refer to Manually Editing the Host Agent Configuration File on page 35.

EMC CX-Series Server Support Products for HP-UX Installation Guide 33
Using the Event Monitor Configuration File
Using the Event Monitor Configuration FileThe Navisphere Agents can monitor storage-system events and take such action as sending e-mail or paging you if specified events occur. Navisphere Manager provides an interactive way to define these events and actions. If you do not have Navisphere Manager, you can still define such events and actions by editing the Event Monitor configuration file:
/etc/Navisphere/Navimon.cfg
The file is documented internally; that is, text in it describes how to define events and the actions you want taken if the events occur. You can test the file after editing it using the Navisphere CLI command responsetest, as explained in the Navisphere Command Line Interface (CLI) Reference.
Starting and Stopping the Host AgentOn an HP-UX server, the Host Agent starts automatically when you bring the server up to init level 2 or higher. When you first start the Host Agent, look at the system log for the server’s operating system to make sure the Host Agent started and no device errors occurred.
When a storage system experiences heavy input/output traffic (that is, applications are using the storage system), information may not be reported to the Host Agent in a timely manner, resulting in the Host Agent taking several minutes to execute a storage-system management task. This behavior is most evident when one Host Agent is managing multiple storage systems. Also, if the SP event log is large and the Host Agent configuration file is set up to read all the events, it may take a few minutes for the Host Agent to start.
Starting the Host Agent
Log in as root and enter this command:
/sbin/init.d/agent start
Stopping the Host Agent
Log in as root and enter this command:
/sbin/init.d/agent stop

34 EMC CX-Series Server Support Products for HP-UX Installation Guide
Agent Status Log Files on the Host
Agent Status Log Files on the HostThe operating system logs messages about Host Agent events and serious Host Agent errors into its system log (/var/adm/syslog/syslog.log). It logs messages about such Host Agent events as startup and shutdown, and errors such as the Host Agent’s inability to access a device in its configuration file. If you need information about the Host Agent’s status, look for system log messages about the Host Agent.
Host Agent events are also recorded in the /etc/log/agent.log file.

EMC CX-Series Server Support Products for HP-UX Installation Guide 35
Manually Editing the Host Agent Configuration File
Manually Editing the Host Agent Configuration File
You need to edit the Host Agent configuration file only if you have pre-FC4700 storage systems connected to the server.
Before the Host Agent can communicate with the storage system, you must edit the Agent’s configuration file to include specific information. The pathname to the Agent configuration file is:
/opt/Navisphere/bin/agent.configor/etc/Navisphere/agent.config <link>
The configuration file contains the following information for each storage system to be managed:
◆ Agent description and contact
◆ Communication channel(s) to the storage system(s)
◆ Alternate communication channels
◆ Users
◆ Polling frequency
◆ SP event log entries to transfer

36 EMC CX-Series Server Support Products for HP-UX Installation Guide
Manually Editing the Host Agent Configuration File
Sample Agent Configuration File (agent.config)
############################ This file is used by Navisphere Agent to configure site # specific values.All entries in this file have this form:# object value-list# where "object" tells what sort of information is to be # configured, and "value-list" is a whitespace-separated # list of values to be configured.Samples, which should # be edited, appear below for all permissible types of # object.# White space (tabs, space, line-feeds, carriage-returns)# and blank lines are ignored; # To continue a line onto multiple lines use "\" as# the last character of that line.The "\" is dropped when # the next line is concatenated to the continued line.######################################################### Description specification# The "clarDescr" object takes arbitrary text values # intended to describe the agent and its location.#clarDescr Navisphere Agent## The "clarContact" object takes arbitrary text values # intended to describe who is responsible for the # configured agent, and how to reach them.#clarContact John Smith, 800-555-1212## Device specification# The format of "device" objects for CLARiiON devices is:# device device-spec name "description"# where the device-spec is the device name to open to # access the CLARiiON device. It can be a SCSI-2 file # name. If this is "auto", all attached arrays with bound# LUNs will be automatically configured.(Currently, dummy # arguments are required for name and description, when # using auto-configuration.) This can NOT be defaulted.## The name is the per-CLARiiON name that can be used to # identify each CLARiiON to the manager application. The # name is REQUIRED and cannot contain spaces (even if # surrounded by quotes). This can NOT be defaulted.## The description is a quoted string that contains a # brief description of the CLARiiON chassis being # managed. It defaults to "" if not specified, and to the # device name for auto-configuration.## SAMPLES:# device c0t0d0 NAVISPHERE-1 "NAVISPHERE-1"# automatically detect manageable devices
EMC CX-Series Server Support Products for HP-UX Installation Guide 37
Manually Editing the Host Agent Configuration File
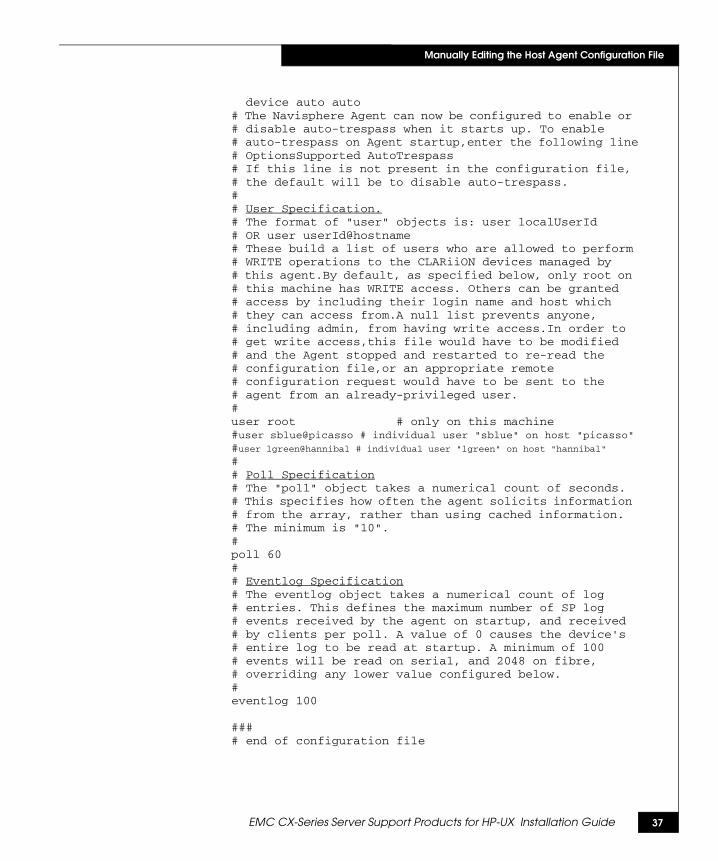
device auto auto# The Navisphere Agent can now be configured to enable or # disable auto-trespass when it starts up. To enable # auto-trespass on Agent startup,enter the following line# OptionsSupported AutoTrespass# If this line is not present in the configuration file, # the default will be to disable auto-trespass.## User Specification.# The format of "user" objects is: user localUserId# OR user userId@hostname# These build a list of users who are allowed to perform# WRITE operations to the CLARiiON devices managed by # this agent.By default, as specified below, only root on # this machine has WRITE access. Others can be granted # access by including their login name and host which # they can access from.A null list prevents anyone,# including admin, from having write access.In order to # get write access,this file would have to be modified # and the Agent stopped and restarted to re-read the # configuration file,or an appropriate remote # configuration request would have to be sent to the # agent from an already-privileged user.#user root # only on this machine#user sblue@picasso # individual user "sblue" on host "picasso"#user lgreen@hannibal # individual user "lgreen" on host "hannibal"## Poll Specification# The "poll" object takes a numerical count of seconds.# This specifies how often the agent solicits information # from the array, rather than using cached information. # The minimum is "10".#poll 60## Eventlog Specification# The eventlog object takes a numerical count of log # entries. This defines the maximum number of SP log # events received by the agent on startup, and received # by clients per poll. A value of 0 causes the device's # entire log to be read at startup. A minimum of 100 # events will be read on serial, and 2048 on fibre, # overriding any lower value configured below.#eventlog 100
#### end of configuration file

38 EMC CX-Series Server Support Products for HP-UX Installation Guide
Manually Editing the Host Agent Configuration File
Specifying the Agent Description and Contact
The agent description (clarDescr) and contact (clarContact) entries are optional informational text strings that Manager does not use. You can use the clarDescr entry to include information about the Agent, such as its revision, and the clarContact entry to include information about the person to contact concerning any Agent questions or problems that might occur.
Specifying the AgentDescription
Either modify the clarDescr entry or add a new clarDescr entry.
A clarDescr entry has this format:
clarDescr [description]
where:
Specifying theContact Description
Either modify the clarContact entry or add a new clarContact entry.
The clarContact entry has this format:
clarContact [contact_info]
where:
description is an optional description of the Agent, such as the name of the Agent and its revision. For example, Disk-Array Agent, revision x, where x is the revision of the Agent you are running.
contact_info is any optional information you want to include about whom to contact should any questions or problems with the Agent arise. You could include the name of a person to contact and the person’s e-mail address and phone number.

EMC CX-Series Server Support Products for HP-UX Installation Guide 39
Manually Editing the Host Agent Configuration File
Enabling Auto-trespass
Auto-trespassing is disabled by default, and it must remain disabled for PowerPath or HP-UX without PV Links. If you are using HP-UX with PV Links, you must enable it.
To enable auto-trespassing, add the following line to the Agent configuration file:
OptionsSupported Autotrespass
To disable auto-trespassing either remove the above line from the Agent configuration file or make sure it is commented out (has a # before it).
The sample agent configuration file contains OptionsSupported Autotrespass line as a comment, which means that the auto-trespassing is disabled. To enable auto-trespassing, you can either add the line or just uncomment it (delete the # from the beginning of the line).
Specifying Communication Channels to the SPs
Each SP in a storage system is connected to the server by a Fibre Channel arbitrated loop (FC-AL) connection to a Fibre Channel adapter, sometimes called a host bus adapter (HBA). The path from the adapter through the SP to one LUN in the storage system is a communication channel to the storage system for the Agent. The device entries in the Agent’s configuration file define the communication channels.
If a storage system has two SPs that are both connected to a host bus adapter in the same server, the server’s Agent configuration file must have a device entry (device) for the communication channel through each SP. If the SPs are connected to host bus adapters in different servers, then the Agent configuration file in each server must have a device entry for the communication channel through the SP connected to that server.
If you add a storage system to the server in the future, you must make sure that the Agent configuration file has a device entry for the communication channel through each SP in the new storage system.

40 EMC CX-Series Server Support Products for HP-UX Installation Guide
Manually Editing the Host Agent Configuration File
For FC4700-Series and pre-FC4700-Series storage systems, you need to know the FC-AL address IDs or SCSI target IDs of the storage system’s SP(s) and of the server’s HBAs to which the SP(s) are connected. The FC-AL address ID or the SCSI target ID of an SP is set by switches on the back of the storage system, as described in the storage-system installation and maintenance manual. In addition, you need to know the number for the LUN owned by each SP in the storage system.
To Specify aCommunication
Channel
Either modify the device entry, or add a new device entry.
The device entry uses the syntax:
device channel name ["description"]
where:
channel is a required field for the communication channel (device path, device name, or disk name) that the Agent uses to communicate with the storage system. The format is cDtSdL where:
For SCSI disks:
D is the number of the SCSI bus on the SCSI-2 adapter to which the storage system is connected.
S is the SCSI ID of the storage system’s SP that is connected to SCSI bus cD. If the adapter identified by cD provides a narrow SCSI bus, this SCSI ID can range from 0 through 7; and if the adapter provides a wide SCSI bus, this SCSI ID can range from 0 through 15.
L is the ID of a LUN owned by the SP identified by tS.
For Fibre Channel disks:
D, S, and L depend on the number of LUNs in the storage system and the setting of the FC-AL ID rotary switches on the SPs. You must use the ioscan utility and the CLI command systemtype to discover the device name, as explained in the following section.

EMC CX-Series Server Support Products for HP-UX Installation Guide 41
Manually Editing the Host Agent Configuration File
Discovering theDevice Names ofCommunication
Channel LUNs
To find out the device names of the LUNs that HP-UX sees, use the ioscan program and complete the following steps.
1. Enter the following commands to create special device files:
ioscan -fnC disk
insf -e
2. Enter the ioscan -fnC disk > orig.scan command:
This tells HP-UX to scan for disks and send the disk device names to a file, here orig.scan.
3. Print the orig.scan file to see device names similar to the following:
Class IH/W Path Driver S/W State H/W Type Description==============================================================================disk0 0/0/0.6.0 sdisk CLAIMED DEVICE SEAGATE ST34572WC
/dev/dsk/c0t6d0 /dev/rdsk/c0t6d0disk11 2/2/0.8.0.255.0.2.0 sdiskCLAIMED DEVICE DGC
/dev/dsk/c6t2d0 /dev/rdsk/c6t2d0disk4 4/2/0.0.0 sdisk CLAIMED DEVICE TOSHIBA CD-ROM...
/dev/dsk/c5t0d0 /dev/rdsk/c5t0d0disk14 6/0/0.8.0.255.0.1.0 sdiskCLAIMED DEVICE DGC
/dev/dsk/c7t1d0 /dev/rdsk/c7t1d0_____________________________________________________________________________
name is a required description for identifying the communication channel. We recommend that this name include a name for the storage system, the SP, and the LUN. For example, if the name of the storage system is cpc220, the SP is SP A, and the LUN is 0, you could use the name cpc220_spa_lun0. The Navisphere Manager does not use this information, but the Navisphere CLI does.
{"description"] is an optional description of the connection to the chassis. Be sure to enclose the description in quotation marks; for example, “Path from host img01 to cps220 SP A". The Navisphere Manager does not use this information, but the Navisphere CLI does. The information you specify here may be critically useful to anyone who maintains the storage systems connected to this server.
42 EMC CX-Series Server Support Products for HP-UX Installation Guide
Manually Editing the Host Agent Configuration File
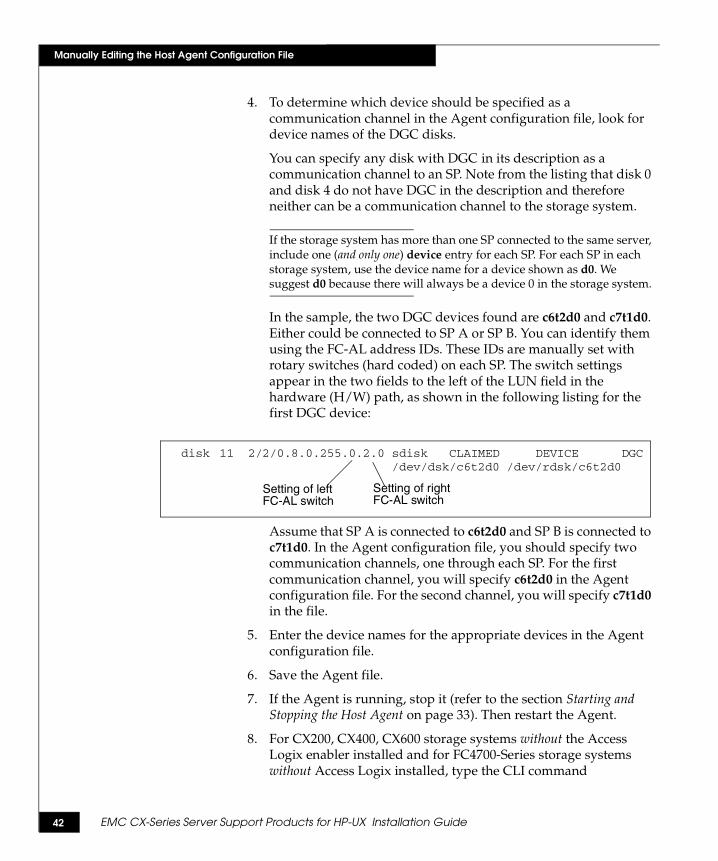
4. To determine which device should be specified as a communication channel in the Agent configuration file, look for device names of the DGC disks.
You can specify any disk with DGC in its description as a communication channel to an SP. Note from the listing that disk 0 and disk 4 do not have DGC in the description and therefore neither can be a communication channel to the storage system.
If the storage system has more than one SP connected to the same server, include one (and only one) device entry for each SP. For each SP in each storage system, use the device name for a device shown as d0. We suggest d0 because there will always be a device 0 in the storage system.
In the sample, the two DGC devices found are c6t2d0 and c7t1d0. Either could be connected to SP A or SP B. You can identify them using the FC-AL address IDs. These IDs are manually set with rotary switches (hard coded) on each SP. The switch settings appear in the two fields to the left of the LUN field in the hardware (H/W) path, as shown in the following listing for the first DGC device:
Assume that SP A is connected to c6t2d0 and SP B is connected to c7t1d0. In the Agent configuration file, you should specify two communication channels, one through each SP. For the first communication channel, you will specify c6t2d0 in the Agent configuration file. For the second channel, you will specify c7t1d0 in the file.
5. Enter the device names for the appropriate devices in the Agent configuration file.
6. Save the Agent file.
7. If the Agent is running, stop it (refer to the section Starting and Stopping the Host Agent on page 33). Then restart the Agent.
8. For CX200, CX400, CX600 storage systems without the Access Logix enabler installed and for FC4700-Series storage systems without Access Logix installed, type the CLI command
disk 11 2/2/0.8.0.255.0.2.0 sdisk CLAIMED DEVICE DGC/dev/dsk/c6t2d0 /dev/rdsk/c6t2d0
Setting of leftFC-AL switch
Setting of rightFC-AL switch

EMC CX-Series Server Support Products for HP-UX Installation Guide 43
Manually Editing the Host Agent Configuration File
systemtype to specify an HP-UX system type. As an argument to the command, if you are using the HP-UX PVLINKS feature, specify -config 2; if you are not using PVLINKS, specify -config a. As a device name, use one of the d0 device names you noted in the ioscan listing above. For example,
navicli -d c6t2d0 -h server1 systemtype -config 2
9. Wait for the SPs to restart, as indicated when the disk status lights on the front of each disk stop flashing.
If you do not have a Model 5600/5700 or Model 4400/4500 storage system, you have finished the communication channel identifying procedure; skip to the next section.
For a Model 5600/5700 or Model 4400/4500 storage system, there are several additional steps, as follows.
10. Run the ioscan program again, specifying a different name for the output file; for example:
ioscan -fnC disk
insf -e
ioscan -fnC disk > second.scan
11. Print the new scan file.
12. In the new ioscan listing, use the hardware (H/W) paths to compare communication channel device names to those in the original listing. It is very likely that the communications channel device names will be different. For example, compared to the listing earlier:
Class IH/W Path Driver S/W State H/W Type Description==============================================================================disk0 0/0/0.6.0 sdisk CLAIMED DEVICE SEAGATE ST34572WC
/dev/dsk/c0t6d0 /dev/rdsk/c0t6d0disk15 2/2/0.8.0.2.0.0.0 sdiskCLAIMED DEVICE DGC C5600WDUNB
/dev/dsk/c9t0d0 /dev/rdsk/c9t0d0disk4 4/2/0.0.0 sdisk CLAIMED DEVICE TOSHIBA CD-ROM...
/dev/dsk/c5t0d0 /dev/rdsk/c5t0d0disk11 6/0/0.8.0.1.0.0.0 sdiskCLAIMED DEVICE DGC C5600WDUNB
/dev/dsk/c10t0d0 /dev/rdsk/c10t0d0_____________________________________________________________________________

44 EMC CX-Series Server Support Products for HP-UX Installation Guide
Manually Editing the Host Agent Configuration File
Notice that the listing for the communication channel devices has changed as follows:
Hardware path 2/2/0.8.0.255.0.2.0 DGC changed to 2/2/0.8.0.2.0.0.0 DGC C5400WDUNB, and device /dev/dsk/c6t2d0 changed to /dev/dsk/c9t0d0.
Hardware path 6/0/0.8.0.255.0.1.0 DGC changed to 6/0/0.8.0.1.0.0.0 DGC C5400WDUNB and device /dev/dsk/c7t1d0 changed to /dev/dsk/c10t0d0.
13. Edit the Agent configuration file again and change the original communication channel device names to those that appeared after you entered the systemtype command.
14. Restart the Agent.
Continue to the next section and resume editing the Agent configuration file.
Enabling an AlternateCommunication
Channel
You can configure the Host Agent to take advantage of the HP-UX Logical Volume Manager (LVM) alternate links (PVLINKS), allowing all configured LUNs in the storage system to be available to both SPs. Enable alternate path access by uncommenting the following line in the configuration file:
OptionsSupported AutoTrespass
Adding Users to the Agent Configuration FileAny user who can log in to a server that is a Navisphere management station can monitor the status of its managed storage systems. However, a user must be a privileged user in the Host Agent configuration file to change a managed storage system’s configuration.
If you will be using Navisphere Manager 6.X to configure the Host Agent and manage your storage systems, you will be using a portal system for legacy storage systems. To add privileged users for a portal configuration, see Adding IP Addresses for a Portal System on page 29. To add other privileged users, see Adding Privileged Users on page 31.

EMC CX-Series Server Support Products for HP-UX Installation Guide 45
Manually Editing the Host Agent Configuration File
Specifying a Polling Frequency for the Agent
Polling frequency sets the time interval for the Agent to execute an automatic hardware poll to the storage system and update the Agent’s image of the storage system. Polling frequency determines how often the storage system is polled. The default polling interval is 60 seconds.
This background polling is automatic and occurs whether or not a client is communicating with the storage system. Since polling uses storage-system resources, setting the polling frequency value too low may affect performance.
Add the following line to the Agent configuration file:
poll n
where
n is 0 or an integer specifying the number of seconds between each poll of the Agent’s SP. The minimum value, other than 0, is 10. We recommend that n be equal to or greater than 60 (the default value). If n is omitted, Agent polling is disabled and the SP is inaccessible. If n equals 0, the Agent will poll every time it gets a request.

46 EMC CX-Series Server Support Products for HP-UX Installation Guide
Manually Editing the Host Agent Configuration File
Specifying the Number of SP Events to Read
The Agent reads event entries from the SP unsolicited event log at startup. You specify the number of the most current events to read. Since the complete log can contain as many as 16,800 entries, you may not want to burden the Agent with reading all of them.
If you enter a small value, Navisphere Manager and Navisphere CLI users will not be able to view the entire contents of the log without first stopping all applications, changing the value in the configuration file, saving the configuration file, restarting the Agent, and restarting the applications.
To specify the number of SP event log entries to transfer, add the following line to the Agent configuration file:
eventlog n
where:
Copyright © 2004-2005 EMC Corporation. All Rights Reserved.
EMC believes the information in this publication is accurate as of its publication date. The information is subject to change without notice.
THE INFORMATION IN THIS PUBLICATION IS PROVIDED "AS IS." EMC CORPORATION MAKES NO REPRESENTATIONS OR WARRANTIES OF ANY KIND WITH RESPECT TO THE INFORMATION IN THIS PUBLICATION, AND SPECIFICALLY DISCLAIMS IMPLIED WARRANTIES OF MERCHANTABILITY OR FITNESS FOR A PARTICULAR PURPOSE.
Use, copying, and distribution of any EMC software described in this publication requires an applicable software license.Trademark Information
EMC2, EMC, CLARiiON, Navisphere, and PowerPath are registered trademarks and Access Logix, FLARE, Powerlink, SAN Copy, SnapView and MirrorView are trademarks of EMC Corporation.All other trademarks mentioned herein are the property of their respective owners.
n is the number of log entries to transfer. For a serial connection, 100 < n < 16,800. For a fibre connection, 2048 < n < 16,800. If n is 0, the entire log is read. If n is a positive integer in the specified range, the specified number of entries are read.